D Link DWL7200APA1 2.4/5 GHz Wireless Access Point with PoE User Manual DWL 7000ap 033103
D Link Corporation 2.4/5 GHz Wireless Access Point with PoE DWL 7000ap 033103
D Link >
Contents
- 1. Users Manual Part 1
- 2. Users Manual Part 2
Users Manual Part 1

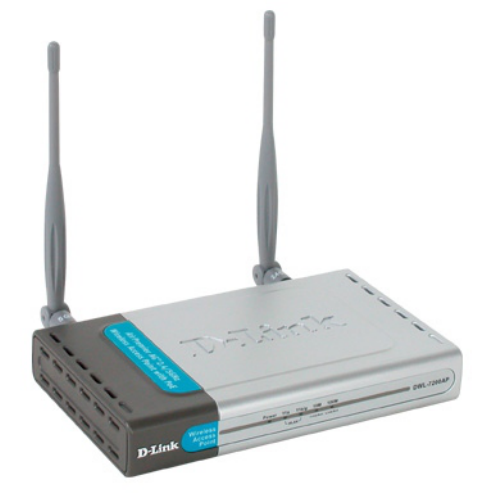
DWL-7200AP
802.11a/802.11g (2.4/5GHz)
Manual
Building Networks for People
D-Link
AirPremier AG
Wireless Access Point with PoE
TM
2
Contents
Package Contents ................................................................................3
Introduction............................................................................................4
Wireless Basics ....................................................................................6
Installation Considerations ....................................................................8
Getting Started ......................................................................................9
Using the Configuration Menu.............................................................. 11
Networking Basics ..............................................................................27
Troubleshooting...................................................................................40
Technical Specifications ......................................................................46
3
Contents of Package:
D-Link AirPremierTM AG DWL-7200AP
802.11a/802.11g (2.4GHz/5GHz) Wireless Access Point with PoE
Power Adapter – 48V, 0.4A
Manual on CD
Quick Installation Guide
Ethernet Cable
Note: Using a power supply with a different voltage than the one included with the
DWL-7200AP will cause damage and void the warranty for this product.
If any of the above items are missing, please contact your reseller.
System Requirements For Configuration:
Package Contents
At least 128MB of memory and a 500MHz processor
Computer with Windows, Macintosh, or Linux-based operating
system with an installed Ethernet adapter
Internet Explorer or Netscape Navigator version 6.0 or above,
with JavaScript enabled

4
Introduction
The DWL-7200AP has the newest, strongest and most advanced security features
available today. When used with other 802.11 WPA (Wi-Fi Protected Access) compatible
products in a network with a RADIUS server, the security features include:
WPA: Wi-Fi Protected Access which authorizes and identifies users based on a secret
key that changes automatically at regular intervals. WPA uses TKIP (Temporal
Key Integrity Protocol) to change the temporal key every 10,000 packets (a
packet is a kind of message transmitted over a network.) This ensures much
greater security than the standard WEP security. (By contrast, the previous
WEP encryption implementations required the keys to be changed manually.)
For home users that will not incorporate a RADIUS server in their network, the security
for the DWL-7200AP, used in conjunction with other WPA-compatible 802.11 products,
will still be much stronger than ever before. Utilizing the Pre-Shared Key mode of
WPA, the DWL-7200AP will obtain a new security key every time it connects to the
802.11 network. You only need to input your encryption information once in the
configuration menu. No longer will you have to manually input a new WEP key frequently
to ensure security. With the DWL-7200AP, you will automatically receive a new key
every time you connect, vastly increasing the safety of your communication.
At up to fifteen times the speed of previous wireless devices (up to 108Mbps in Super
AG mode), you can work faster and more efficiently, increasing productivity. With the
DWL-7200AP, bandwidth-intensive applications like graphics or multimedia will benefit
significantly because large files are able to move across the network quickly.
Inclusion of all three standards (802.11g; 802.11a; 802.11b) means that the DWL-7200AP
is versatile enough to allow connection to almost any 802.11 network or device.
5
Better security with WPA- The DWL-7200AP can securely connect to wire-
less clients on the network using WPA (Wi-Fi Protected Access) providing a
much higher level of security for your data and communications than has previ-
ously been available.
Compatible with the 802.11b standard to provide a wireless data rate of up to
11Mbps with 802.11b devices.
Features
Faster Wireless Networking with speeds up to 108Mbps in Super AG mode
Compatible with 802.11a, 802.11b and 802.11g Devices - Fully compatible
with the IEEE 802.11a, 802.11b and 802.11g standards, the DWL-7200AP can
connect with existing 802.11b-, 802.11g- or 802.11a- compliant wireless network
adapter cards.
LEDs
LED stands for Light-Emitting Diode. The DWL-7200AP Wireless Access Point has
5 Green LEDs as shown below:
Power
LAN (10/100)
WLAN
(802.11a and
802.11b or
802.11g)
A steady light indicates a connection to a power
source
A steady light indicates a connection to the Ethernet
port; a blinking light indicates activity
LED LED Activity
A blinking light indicates activity in the respective
wireless mode: 802.11a and/or 802.11b/802.11g
6
Wireless Basics
D-Link AirPremierTM AG wireless products are based on industry standards to provide
easy-to-use and compatible high-speed wireless connectivity within your home, business
or public access wireless networks. Strictly adhering to the IEEE standard, the D-Link
AirPremierTM AG wireless family of products will allow you to securely access the data
you want, when and where you want it. You will be able to enjoy the freedom that
wireless networking delivers.
A wireless local area network (WLAN) is a cellular computer network that transmits and
receives data with radio signals instead of wires. Wireless LANs are used increasingly
in both home and office environments, and public areas such as airports, coffee shops
and universities. Innovative ways to utilize WLAN technology are helping people to work
and communicate more efficiently. Increased mobility and the absence of cabling and
other fixed infrastructure have proven to be beneficial for many users.
Wireless users can use the same applications they use on a wired network. Wireless
adapter cards used on laptop and desktop systems support the same protocols as
Ethernet adapter cards.
People use wireless LAN technology for many different purposes:
Mobility - Productivity increases when people have access to data in any location
within the operating range of the WLAN. Management decisions based on real-time
information can significantly improve worker efficiency.
Low Implementation Costs - WLANs are easy to set up, manage, change and relocate.
Networks that frequently change can benefit from WLANs ease of implementation. WLANs
can operate in locations where installation of wiring may be impractical.
Installation and Network Expansion - Installing a WLAN system can be fast and
easy and can eliminate the need to pull cable through walls and ceilings. Wireless
technology allows the network to go where wires cannot go - even outside the home or
office.
Inexpensive Solution - Wireless network devices are as competitively priced as
conventional Ethernet network devices.
Scalability - WLANs can be configured in a variety of ways to meet the needs of
specific applications and installations. Configurations are easily changed and range
from Peer-to-Peer networks suitable for a small number of users to larger infrastructure
networks to accommodate hundreds or thousands of users, depending on the number of
wireless devices deployed.
7
Wireless Basics (continued)
Standards-Based Technology
The DWL-7200AP Wireless Access Point utilizes the 802.11a, 802.11b and draft 802.11g
standard.
The IEEE 802.11g standard is an extension of the 802.11b standard. It increases the
data rate up to 54Mbps (108Mbps in Super G mode) within the 2.4GHz band. The
802.11a standard also increases the data rate up to 54Mbps, but within the 5GHz band.
Both 802.11a and 802.11g utilize OFDM technology.
This means that in most environments, within the specified range of this device, you will
be able to transfer large files quickly or even watch a movie in MPEG format over your
network without noticeable delays. This technology works by transmitting high-speed
digital data over a radio wave utilizing OFDM (Orthogonal Frequency Division Multiplexing)
technology. OFDM works by splitting the radio signal into multiple smaller sub-signals
that are then transmitted simultaneously at different frequencies to the receiver. OFDM
reduces the amount of crosstalk (interference) in signal transmissions.
The DWL-7200AP offers the most advanced network security features available today,
including WPA.
In addition to its compatibility with 802.11g and 802.11a devices, the DWL-7200AP is
compatible with 802.11b devices. This means that if you have an existing 802.11b network,
or a network with a mixture of 802.11g, 802.11a and 802.11b, the devices in that network
will be compatible with the DWL-7200AP.
8
Wireless Basics (continued)
Installation Considerations
Desktop and laptop computers with wireless network adapters installed can access the
D-Link AirPremierTM AG DWL-7200AP from virtually anywhere within its operating range.
Keep in mind, however, that the number, thickness and location of walls, ceilings, or
other objects that the wireless signals must pass through, may limit the range. Typical
ranges vary depending on the types of materials and background RF (radio frequency)
noise in your home or business. The key to maximizing wireless range is to follow these
basic guidelines:
Be aware of the direct line between network devices. A wall that is 1.5
feet thick (.5 meters), at a 45-degree angle appears to be almost 3 feet
(1 meter) thick. At a 2-degree angle it looks over 42 feet (14 meters)
thick! Position devices so that the signal will travel straight through a
wall or ceiling (instead of at an angle) for better reception.
Building materials can impede the wireless signal - a solid metal door or
aluminum studs may have a negative effect on range. Try to position
wireless devices and computers with wireless adapters so that the signal
passes through drywall or open doorways and not other materials.
Keep your product away (at least 3-6 feet or 1-2 meters) from
electrical devices or appliances that may generate extreme RF noise.
Keep the number of walls and ceilings between the DWL-7200AP and
other network devices to a minimum - each wall or ceiling can reduce
your D-Link wireless product’s range from 3-90 feet (1-30 meters.) Position
your devices so that the number of walls or ceilings is minimized.
1
2
3
4
9
Getting Started
An Infrastructure wireless network contains an access point or router. The
Infrastructure Network example, shown on the following page, contains the following
D-Link network devices:
A wireless Access Point - D-Link AirPremierTM AG DWL-7200AP
An Ethernet Router - D-Link DI-604
A laptop computer with a wireless adapter - D-Link AirPremierTM AG DWL-AG660
A desktop computer with a wireless adapter - D-Link AirPremierTMAG DWL-AG530
A Cable modem - D-Link DCM-201
If you need to assign IP addresses to the computers on the network, please
remember that the IP address for each computer must be in the same IP
address range as all the computers in the network, and the subnet mask
must be exactly the same for all the computers in the network.
For example: If the first computer is assigned an IP address of 192.168.0.2 with a
subnet mask of 255.255.255.0, then the second computer can be assigned an IP
address of 192.168.0.3 with a subnet mask of 255.255.255.0, etc.
IMPORTANT: If computers or other devices are assigned the same IP
address, one or more of the devices may not be visible on the network.
IP ADDRESS
Note: If you are using a DHCP-capable router in your network you will not need
to assign a static IP address.
Right out of the box, with its default settings, the DWL-7200AP will automati-
cally connect with other D-Link AirPremierTM AG products.
Note: D-Link DWL-7200AP provide following wireless operation
modes to the EEC countries: (i) IEEE 802.11a: AP Mode,
(ii) IEEE 802.11g: AP Mode, WDS(Wireless Distribution System) bridge
mode Point to Point, Point to Multi-Point, Repeater and AP Client.
10
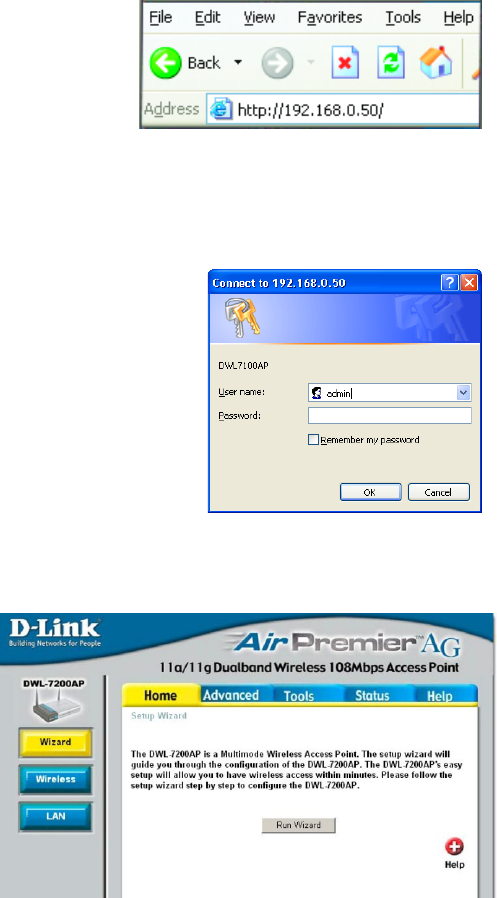
Whenever you want to configure your network or the DWL-7200AP, you can access
the Configuration Menu by opening the web-browser and typing in the IP address of
the DWL-7200AP. The DWL-7200AP default IP address is shown below:
Open the web browser
Type in the IP address of
the access point
Note: if you have changed the default IP address assigned to the DWL-7200AP,
make sure to enter the correct IP address.
Home > Wizard
The Home>Wizard screen
will appear. Please refer to
the Quick Installation Guide
for more information regard-
ing the Setup Wizard.
Using the Configuration Menu
Type admin in the User Name field
Leave the Password blank
Click Next
11
Using the Configuration Menu (continued)
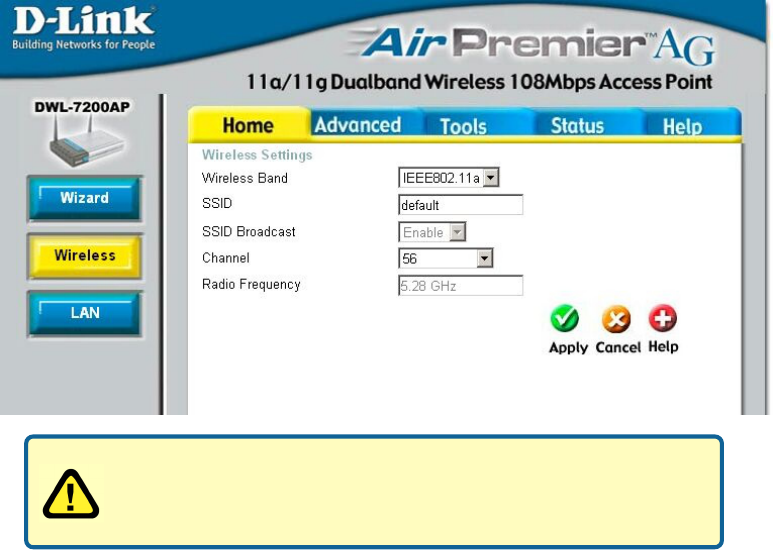
Home > Wireless
Apply- Click Apply to save the changes.
Radio
Frequency- The radio frequency will remain at 2.437GHz* .
Channel- 6 is the default channel. All wireless devices on the network must share
the same channel*.
SSID
Broadcast- Enable or Disable SSID Broadcast. Enabling this feature broadcasts the
SSID across the network.
SSID- Service Set Identifier (SSID) is the name designated for a specific wire-
less local area network (WLAN). The SSID’s factory default setting is
default. The SSID can be easily changed to connect to an existing
wireless network or to establish a new wireless network.
Wireless
Band- Select 802.11g or 802.11a from the pulldown menu.
Note: In the Configuration screens that follow, you will be able to
configure settings for 802.11a and 802.11g devices in your network.
Settings that you input for 802.11g devices will also apply to
802.11b devices in your network.
* default settings vary for 802.11a
* default settings vary for 802.11a
Due to DFS(Dynamic Frequency Selection),802.11a SSID Broadcast is always enabled.(EEC countries)
12
Using the Configuration Menu (continued)
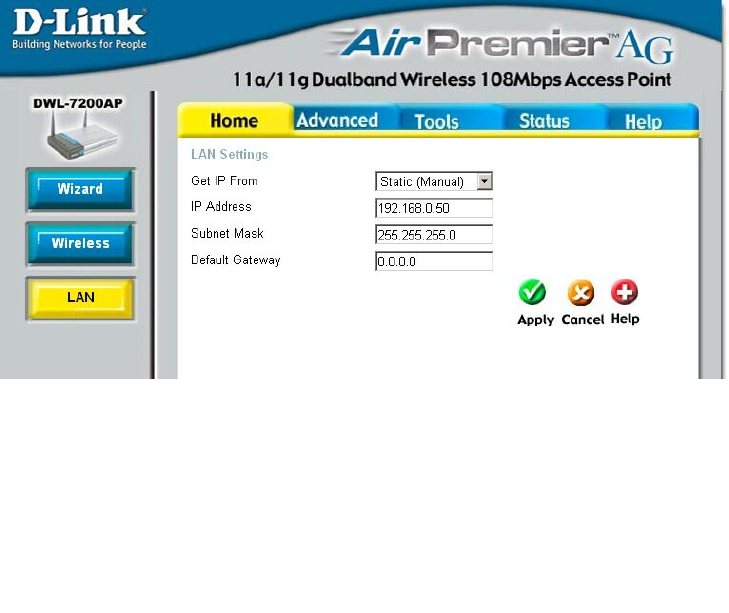
Home > LAN
LAN is short for Local Area Network. This is considered your internal network. These are
the IP settings of the LAN interface for the DWL-7200AP. These settings may be referred
to as private settings. You may change the LAN IP address if needed. The LAN IP
address is private to your internal network and cannot be seen on the Internet.
Get IP From- Select Static (Manual) or Dynamic (DHCP) as the method you
will use to assign an IP address to the DWL-7200AP.
Apply-
Default Gateway- This field is optional. Enter in the lP address of the router on your
network.
IP Address- The IP address of the LAN interface. The default IP address is:
192.168.0.50 (Note: You will need to use the AP Manager to
determine the IP address dynamically assigned to the access
point.)
Subnet Mask- The default subnet mask is 255.255.255.0
Click Apply if you have made any changes.
Using the Configuration Menu (continued)
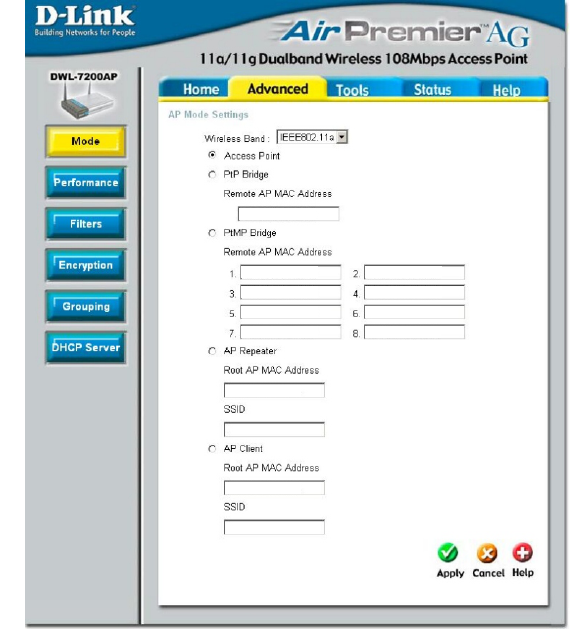
Advanced > Mode
Choose 802.11a or
802.11g wireless
band; then select
from the following
options*:
Access Point:
Select this mode to
create a WLAN
(wireless local area
network).
PtP Bridge (Point
to Point Bridge):
This mode enables
you to connect two
WLANS.
Remote AP M AC
Address: Input the
remote AP M AC
address of the AP
with which the
DWL-7200AP will
Associate.
PtMP Bridge (Point to Multi-Point Bridge): This mode enables you to connect multiple
WLANs
Remote AP MAC Address: Input the remote AP MAC Address of the APs with which
the DWL-7200AP will associate
AP Repeater: To extend the ange of the wireless network select this option and enter
the MAC address ofthe remote AP within your network that will have its range extended.
Remote AP MAC Address: Enter the MAC address of the remote AP within your network
AP Clinet: To transform any IEEE 802.3 Ethernet device (e.g., A computer, print, etc.)
Into an 802.11b wireless client when it communicates with another DWL-7200AP that is
acting as an AP.
Remote AP MA C Address: Enter the MAC address of the remote AP within your network
Apply: Click Apply if you have made any changes.
13
* WDS (Wireless Distribution System) features for PtP/PtMP Bridging and Repeating are only available in 2.4GHz. (EEC countries)
14
Using the Configuration Menu (continued)
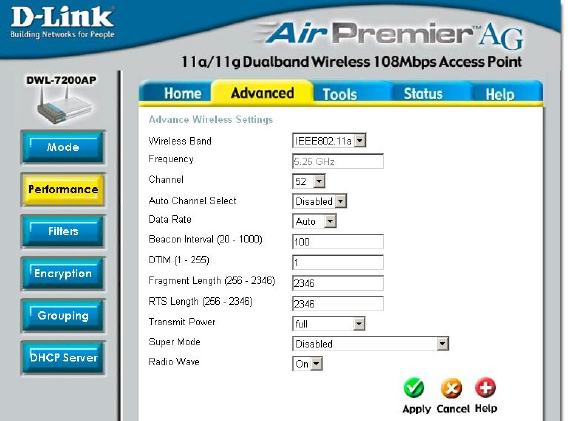
Advanced > Performance
Transmit Power: Adjust the transmission range here. This tool can be helpful for security
purposes if you wish to limit the transmission range.
Super Mode: Select Enabled or Disabled.
Radio Wave: Select ON or OFF.
Apply: Click Apply if you have made any changes.
Frequency: The
frequency range
will be displayed.
Channel: The
default channel
for 802.11g is 6.
Data Rate: Select the transmission rate for the network
Beacon Interval: Beacons are packets sent by an access point to synchronize a
wireless network. Specify a Beacon interval value (20-1000.) Default (100) is
recommended.
DTIM: (Delivery Traffic Indication Message) Enter a value between 1 and 255 for the
Delivery Traffic Indication Message (DTIM.) A DTIM is a countdown informing clients of
the next window for listening to broadcast and multicast messages.
Fragment Length: This value should remain at its default setting of 2346. If you
experience a high packet error rate, you may slightly increase your Fragmentation
Threshold within the value range of 256 to 2346. Setting the Fragmentation Threshold
too low may result in poor performance.
RTS Length: This value should remain at its default setting of 2346. If you encounter
inconsistent data flow, only minor modifications to the value range between 256 and
2346 are recommended.
Wireless Band:
Select 802.11a
(up to 54Mbps
speed in the
Xtreme GTM
5GHz range) or
802.11g (up to
108Mbps speed
with AirPlus
adapters.)
15
Using the Configuration Menu (continued)
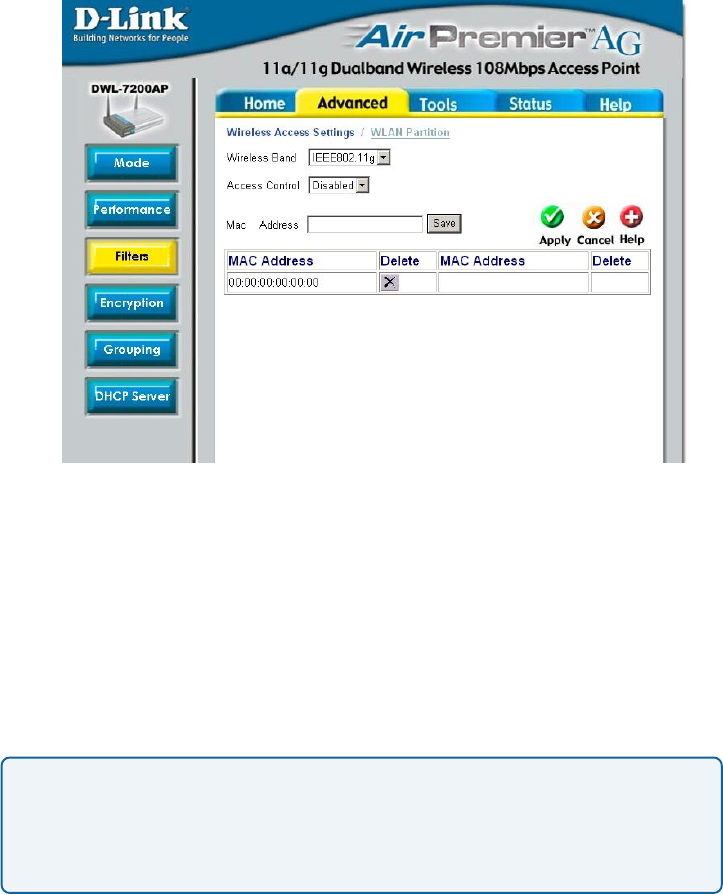
Advanced > Filters
Access Control:
Disabled - Disable the Access Control feature
Accept - Accept the MAC addresses in the list into the network
Reject - Reject the MAC addresses in the list from participating
in the network
Access Control List: Input the MAC addresses into the list
MAC Address (Media Access Control Address)
A unique hardware address that identifies a device on a network. It is assigned
at the factory and cannot be changed. Usually you will find this address on a
sticker on the device or on the packaging. (Please use the following format
when entering the MAC address- xx:xx:xx:xx:xx:xx)
16
Using the Configuration Menu (continued)
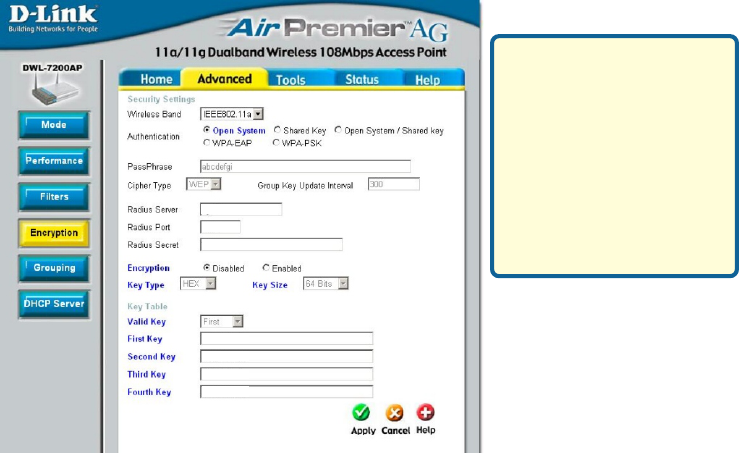
Advanced > Encryption
Encryption:
Select Enabled or Disabled (the default setting is Disabled)
Authentication:
Select from one of the following:
Key Type:
Select HEX (Hexadecimal) or ASCII
Key Size: Select 64, 128 or 256 bit for 802.11b; 64, 128, 152 bit for 802.11a
Valid Key: Select the key that you will use from one of the four keys in the Key Table.
Key Table: Input up to 4 keys using the format that you have selected in Wep Key
Type.
WPA: click here to select WPA security features
Shared Key/Open System: click here to select both options
Shared Key: in order to access the DWL-7200AP on the
network, the device must be listed in the Access Control List
Open System: the DWL-7200AP will be visible to all devices
on the network. Open System is the default setting.
Hexadecimal digits con-
sist of the numbers 0-9
and the letters A-F
ASCII (American Stan-
dard Code for Informa-
tion Interchange) is a
code for representing
English letters as num-
bers from 0-127
Apply: Click Apply if you have made any changes.
Wireless Band: Select 802.11a or 802.11g.
17
Using the Configuration Menu (continued)
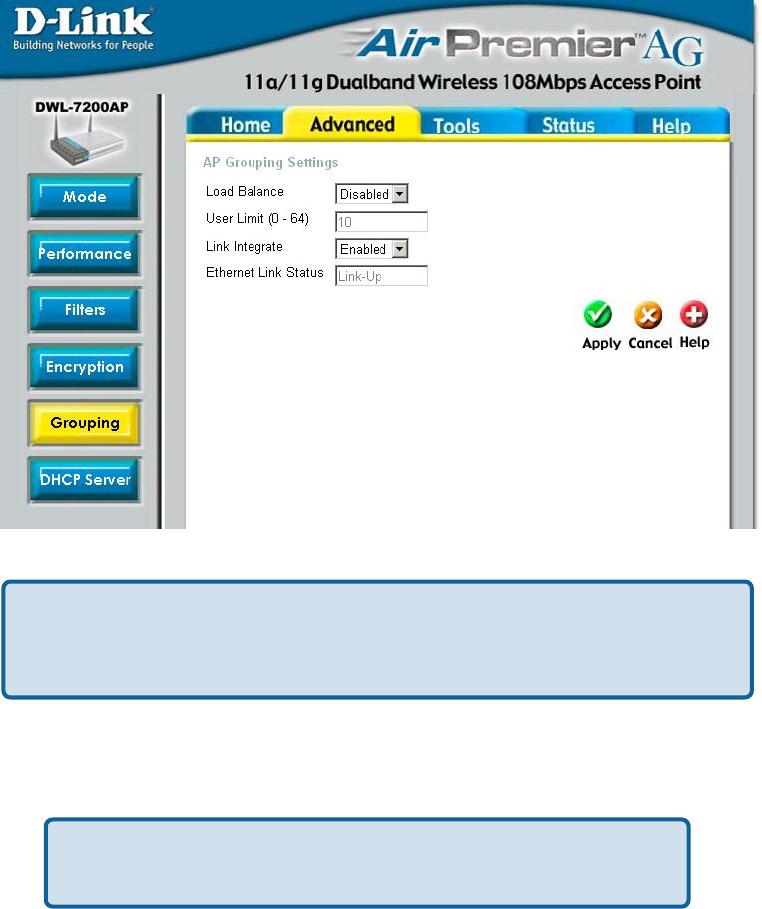
Advanced > Grouping
Load Balance: Select Enabled or Disabled.
Link Integrity: Select Enabled or Disabled.
User Limit: Set the User Limit in this field (0-64).
When you Enable Load Balance you allow several DWL-7200APs to balance
wireless network traffic and wireless clients among the DWL-7200APs in the
network. Assign each access point a different non-overlapping channel (e.g., 1,
6, 11).
Ethernet Link Status: This field displays the Ethernet Link Status. Link Up indicates
that there is an Ethernet LAN connection to the AP.
When Link Integrity is Enabled, whenever the Ethernet connection
between the LAN and the AP is disconnected - then the wireless
segment associated with the AP will also be disconnected from the AP.
Apply: Click Apply if you have made any changes.
18
Using the Configuration Menu (continued)
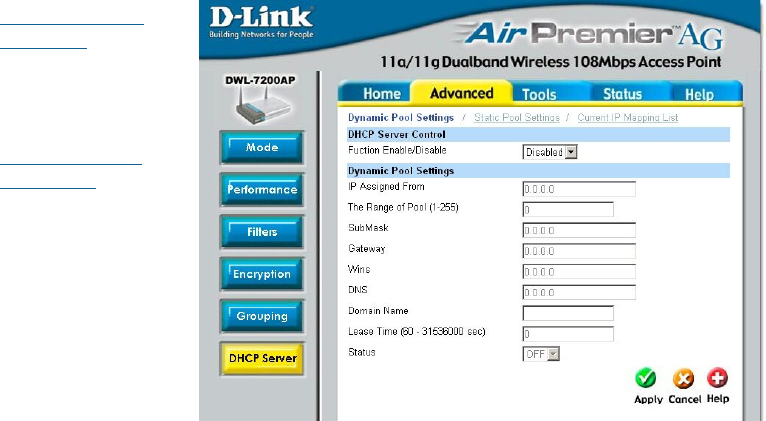
Advanced > DHCP Server > Dynamic Pool Settings
DHCP Server
Control-
Dynamic Pool
Settings-
Enable or Disable
the DHCP function
here.
Enter the starting IP
address in the
range.
IP Assigned From -
Enter the number
(the quantity) of IP
address in the
range.
The Range of
Pool (1-255)-
Enter the subnet mask here.
SubMask-
Enter the IP address of the router on the network.
Gateway-
Wins-
Status-
Windows Internet Naming Service is a system that deter-
mines the IP address of a network computer that has a dynami-
cally assigned IP address.
DNS- Enter the IP address of the DNS server. The DNS server trans-
lates domain names such as www.dlink.com into IP addresses.
Domain Name-
Enter the Domain Name of the DWL-7200AP.
Turn the Dynamic Pool Settings ON or OFF here.
Lease Time- Select the Lease Time here The Lease Time is the period of time
before the DHCP server will assign new IP addresses.
19
Using the Configuration Menu (continued)
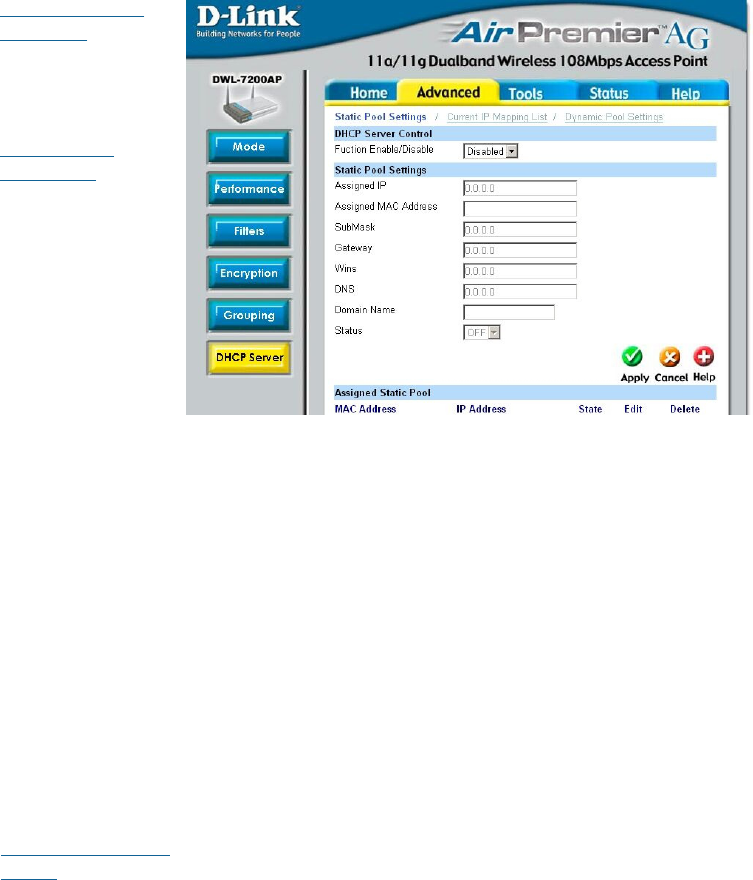
Advanced > DHCP Server > Static Pool Settings
DHCP Server
Control-
Static Pool
Settings-
Enable or Disable
the DHCP function
here.
Enter the static IP
address of the de-
vice here.
Assigned IP-
Enter the MAC ad-
dress of the device
here.
Assigned MAC
Address-
Enter the subnet mask here.
SubMask-
Enter the IP address of the router on the network.
Gateway-
Wins-
Status-
Windows Internet Naming Service is a system that determines
the IP address of a network computer that has a dynamically as-
signed IP address.
DNS-
Assigned Static
Pool-
Enter the IP address of the DNS server. The DNS server translates
domain names such as www.dlink.com into IP addresses.
Domain Name-
Enter the Domain Name of the DWL-7200AP.
Turn the Static Pool Settings ON or OFF here.
After you have input the Static Pool Settings for each device, click
Apply and the profile will appear in this list at the bottom of the
window.
Apply- Click Apply to save the changes.
20
Using the Configuration Menu (continued)
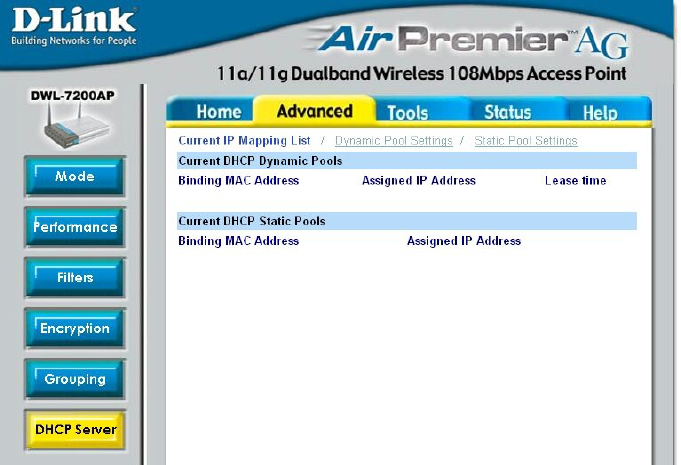
Advanced > DHCP Server > Current IP Mapping List
Current DHCP Dynamic Pools-These are IP address pools to which the DHCP
server function has assigned dynamic IP addresses.
Binding MAC address-
Assigned IP address-
Lease Time-
Current DHCP Static Pools-These are IP address pools to which the DHCP server
function has assigned static IP addresses.
Binding MAC address-
Assigned IP address-
This screen displays information about the current DHCP dynamic and static IP address
pools. This information is available when you enable the DHCP function of the DWL-
7200AP and assign dynamic and static IP address pools.
The MAC address of a device on the network
that is within the DHCP dynamic IP address
pool.
The current corresponding DHCP-assigned
dynamic IP address of the device.
The length of time that the dynamic IP address
will be valid.
The MAC address of a device on the network
that is within the DHCP static IP address pool.
The current corresponding DHCP-assigned
static IP address of the device.
21
Using the Configuration Menu (continued)
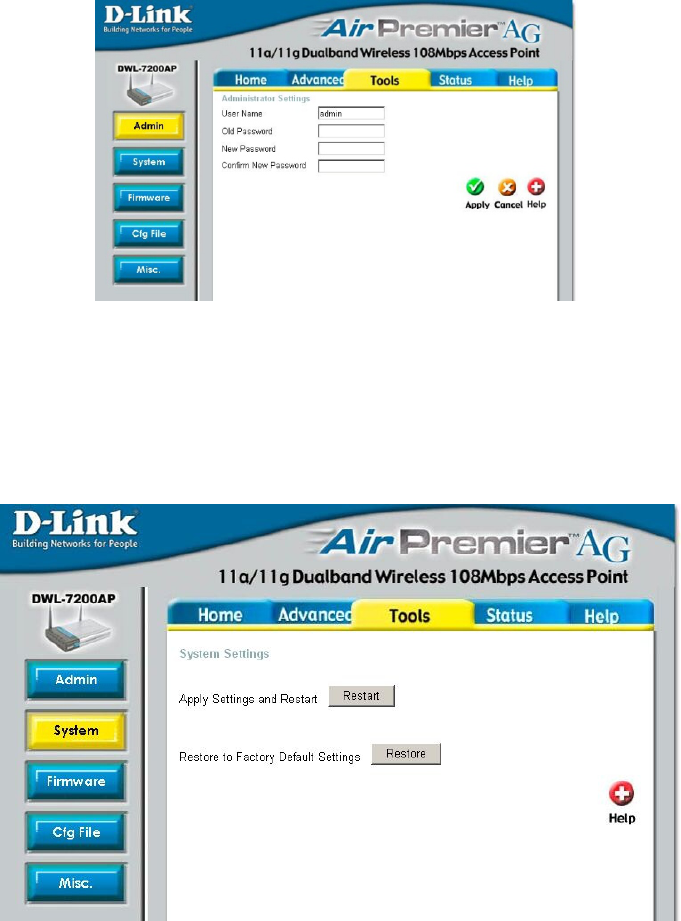
Tools > Admin
Tools > System
User Name: The default User Name is admin.
Old Password: To change your password, first enter the old password.
New Password: Enter the new password.
Confirm New Password: Re-enter the new password.
Apply: To save changes, click Apply.
Apply Settings and Restart: If you have made any changes to the configuration
settings, click Restart to apply the changes.
Restore to Factory Default Settings: To return the DWL-7200AP to the factory
default settings, click Restore.
22
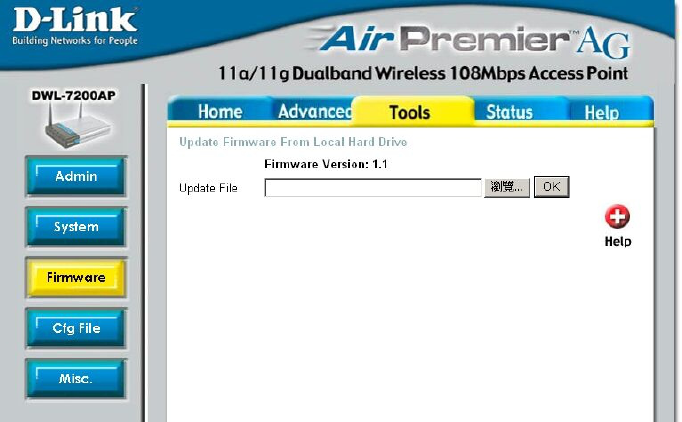
Using the Configuration Menu (continued)
Update File: Click on Browse to find the updated firmware file on your hard drive.
(Before you browse your hard drive you will need to download the updated firmware
from the D-Link Support website:
After you find the updated firmware file on your hard drive, click OK.
Tools> Firmware
http://www.dlink.co.uk/pages/tech_support/tech_support_overview.asp
23
Using the Configuration Menu (continued)
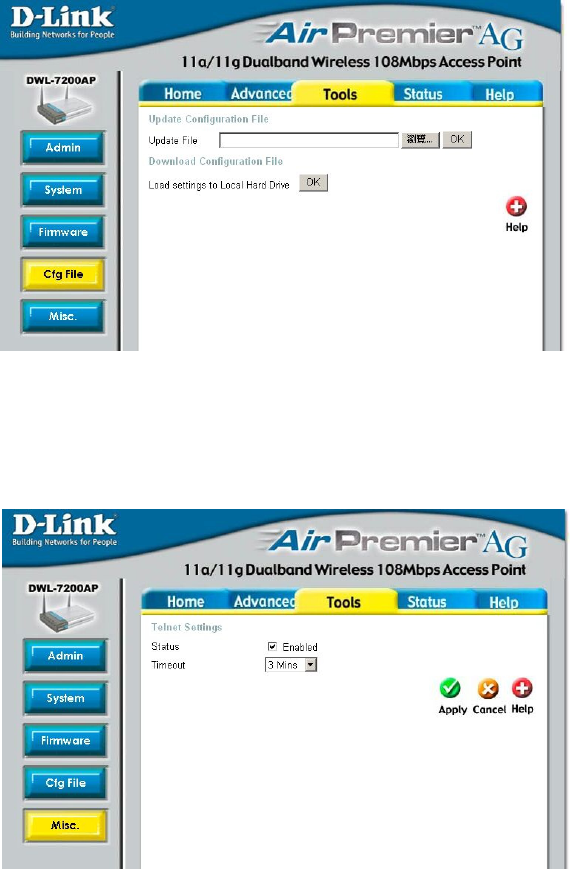
Tools > Cfg File
Browse for the con-
figuration settings
that you have saved
to your hard drive.
Click OK when you
made your selection.
Update File-
Click OK to load the
selected settings.
Load Settings to
the Local Hard
Drive-
Status-
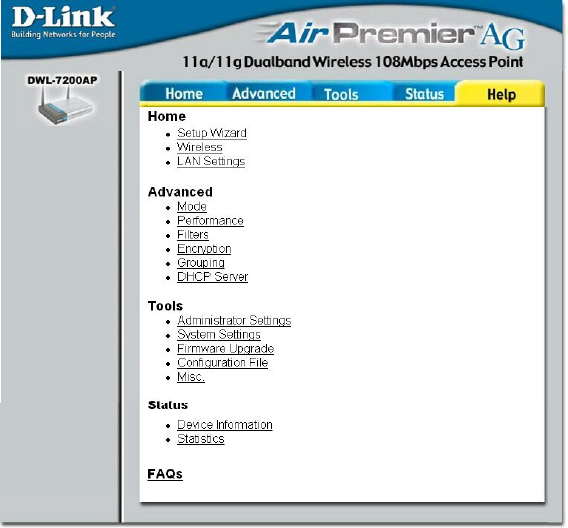
Telnet Settings
Select a time period
after which a ses-
sion timeout will
occur.
Timeout-
Click to Enable a
Telnet session.
Tools > Misc.
24
The Help menu
is displayed
here. You can
also click on
Help in any
window for
additional
information.
Help
Using the Configuration Menu (continued)
25
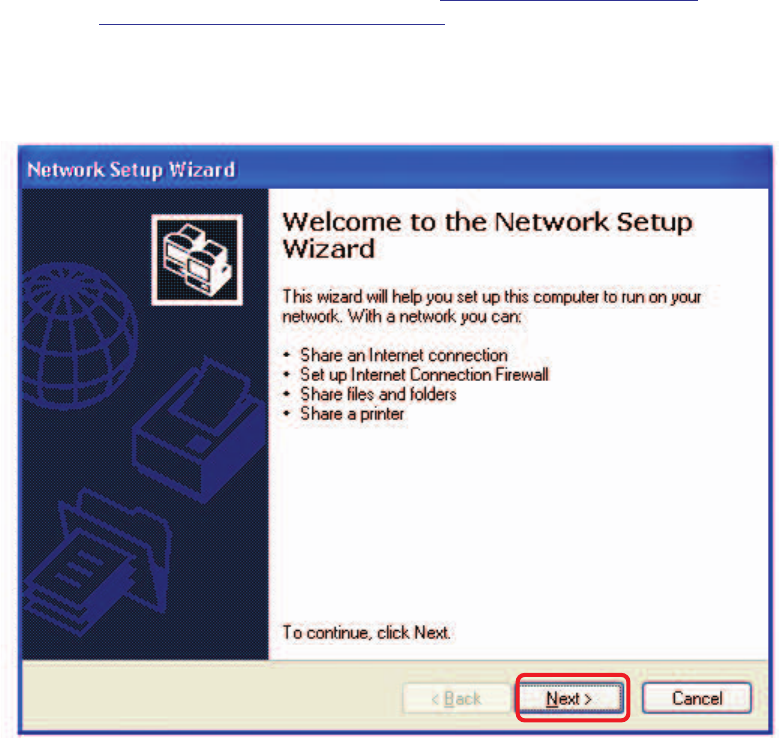
Using the Network Setup Wizard in Windows XP
In this section you will learn how to establish a network at home or work, using
Microsoft Windows XP.
Note: Please refer to websites such as http://www.homenethelp.com
and http://www.microsoft.com/windows2000 for information about networking
computers using Windows 2000, Me or 98.
Go to Start>Control Panel>Network Connections
Select Set up a home or small office network
Networking Basics
When this screen appears, click Next.