D Link DWLG120C1 IEEE802.11g WLAN USB Adapter User Manual dwl120v F manual 102103
D Link Corporation IEEE802.11g WLAN USB Adapter dwl120v F manual 102103
D Link >
Contents
- 1. Users manual part 1
- 2. Users manual part 2
- 3. Users manual part 3
Users manual part 1

Manual
Building Networks for People
802.11g (2.4GHz)
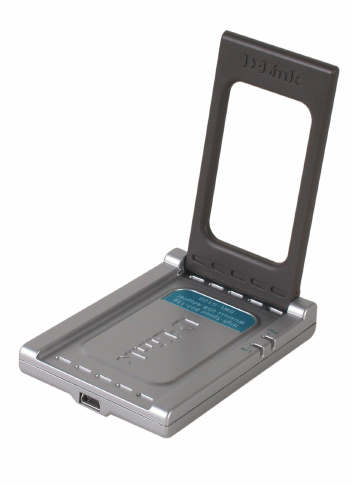
Wireless USB 2.0 Adapter
DWL-G120
D-Link AirPlus G
TM
2
Contents
Package Contents ................................................................................3
Introduction............................................................................................4
Features and Benefits ...........................................................................6
Wireless Basics ....................................................................................7
Installation Considerations ....................................................................8
Getting Started ......................................................................................9
Using the Configuration Utility ..............................................................11
Using the Configuration Utility with Macintosh OS ...............................20
Networking Basics ..............................................................................24
Troubleshooting...................................................................................37
Technical Specifications ......................................................................40
Contacting Technical Support ..............................................................42
Warranty and Registration ...................................................................43
3
D-Link AirPlusTM G DWL-G120
2.4 GHz Wireless USB 2.0 Adapter
At least 32MB of memory and a 300MHz processor
Properly installed and working USB Controller
Windows XP/2000/Me/98SE
A computer or laptop with an available USB port
Manual on CD-ROM
Quick Installation Guide
USB Extension Cable
Contents of Package:
Package Contents
If any of the above items are missing, please contact your reseller.
System Requirements:
Mac OS X (v10.2x or later)

4
Introduction
The D-Link AirPlus G DWL-G120 Wireless USB Adapter is a convenient Plug
& Play USB 2.0 solution that brings wireless networking to your laptop or desktop PC.
With transfer rates up to 54Mbps you can connect to a wireless network at
home, at the office or at any wireless hotspot. Now you can stay connected
wherever you are and wherever you go.
The DWL-G120 is Wi-Fi compliant, meaning that it can connect and interoperate
with other 802.11b or 802.11g Wi-Fi-compliant wireless routers, access points
and adapters. The DWL-G120 connects to any available USB port on a laptop
or desktop Windows and Macintosh-based computer and also includes a
standard USB extension cable. With the optional USB extension cable, the
DWL-G120 can be positioned virtually anywhere at a workstation to achieve
the best available wireless signal reception - whether that workstation is in your
office, on your deck or patio, by the pool, at the local coffee shop, or in an
airport terminal while waiting to board your next flight.
The adapter works with Apple Mac OS X (v10.2x or later) Jaguar, Microsoft
Windows XP, Windows 2000 and other Windows operating systems to ensure
that you’ll be up and running on a wireless network in just a matter of seconds.
Using its default settings, the DWL-G120 automatically connects to other D-
Link Air or AirPlus wireless products as soon as it’s active.
In addition to featuring 64- or 128-bit WEP encryption, the DWL-G120 offers
the added security of WPA (Wi-Fi Protected Access) when used with other
WPA devices in a network with a RADIUS server.
For home users that will not incorporate a RADIUS server in their network, the
security for the DWL-G120, used in conjunction with other WPA-compatible
802.11 products, will still be much stronger than ever before. Utilizing the Pre-
Shared Key mode of WPA, the DWL-G120 will obtain a new security key every
time it connects to the 802.11 network. You only need to input your encryption
information once in the configuration menu. No longer will you have to manually
input a new WEP key frequently to ensure security. With the DWL-G120, you
will automatically receive a new key every time you connect, vastly increasing
the safety of your communication.
TM
5
Features and Benefits
Provides high-speed wireless connection at up to 54Mbps
**
2 Environmental factors may adversely affect range
1 WPA will be available soon as a download for Mac users
Better Security with WPA1 - In addition to 64-,128-bit WEP encryption,
you can also securely connect to a wireless network using WPA (Wi-Fi
Protected Access) providing you a much higher level of security for your
data and communication than has previously been available.
Convenience of Plug & Play installation
Compact size for placement anywhere
Fully 802.11b/802.11g compatible
USB 2.0 standard
Powered by the USB port; no external power source is required
User-friendly configuration and diagnostic utilities
Supports Infrastructure networks via an access point and
Peer-to-Peer communication in Ad-Hoc mode
Connects at up to 328 feet indoors2
One year warranty
Optimal wireless reception using its USB cable (included). Position
the DWL-G120 almost anywhere in your workspace to achieve the
best reception possible.
6
Wireless Basics
Wireless users can use the same applications they use on a wired network.
Wireless adapter cards used on laptop and desktop systems support the same
protocols as Ethernet adapter cards.
D-Link wireless products are based on industry standards to provide easy-to-
use and compatible high-speed wireless connectivity within your home, business
or public access wireless networks. D-Link wireless products will allow you
access to the data you want, when and where you want it. You will be able to
enjoy the freedom that wireless networking brings.
A wireless local area network (WLAN) is a computer network that transmits
and receives data with radio signals instead of wires. WLANs are used
increasingly in both home and office environments, and public areas such as
airports, coffee shops and universities. Innovative ways to utilize WLAN
technology are helping people to work and communicate more efficiently.
Increased mobility and the absence of cabling and other fixed infrastructure
have proven to be beneficial to many users.
People use WLAN technology for many different purposes:
Mobility - Productivity increases when people have access to data in any
location within the operating range of the WLAN. Management decisions based
on real-time information can significantly improve worker efficiency.
Low Implementation Costs - WLANs are easy to set up, manage, change
and relocate. Networks that frequently change can benefit from WLANs ease
of implementation. WLANs can operate in locations where installation of wiring
may be impractical.
Installation and Network Expansion - Installing a WLAN system can be fast
and easy and can eliminate the need to pull cable through walls and ceilings.
Wireless technology allows the network to go where wires cannot go - even
outside the home or office.
Inexpensive Solution - Wireless network devices are as competitively priced
as conventional Ethernet network devices.
Scalability - WLANs can be configured in a variety of ways to meet the needs
of specific applications and installations. Configurations are easily changed
and range from Peer-to-Peer networks suitable for a small number of users to
larger Infrastructure networks to accommodate hundreds or thousands of
users, depending on the number of wireless devices deployed.
7
Installation Considerations
The DWL-G120 lets you access your network using a wireless connection
from virtually anywhere within its operating range. Keep in mind, however, that
the number, thickness and location of walls, ceilings, or other objects that the
wireless signals must pass through, may limit the range. Typical ranges vary
depending on the types of materials and background RF (radio frequency) noise
in your home or business. The key to maximizing wireless range is to follow
these basic guidelines:
Keep your product away (at least 3-6 feet or 1-2 meters) from electrical
devices or appliances that generate RF noise.
4
Keep the number of walls and ceilings between the DWL-G120 and
other network devices to a minimum - each wall or ceiling can reduce
your DWL-G120’s range from 3-90 feet (1-30 meters.) Position your
devices so that the number of walls or ceilings is minimized.
1
Be aware of the direct line between network devices. A wall that is 1.5
feet thick (.5 meters), at a 45-degree angle appears to be almost 3 feet
(1 meter) thick. At a 2-degree angle it looks over 42 feet (14 meters)
thick! Position devices so that the signal will travel straight through a
wall or ceiling (instead of at an angle) for better reception.
2
Building materials can impede the wireless signal - a solid metal door
or aluminum studs may have a negative effect on range. Try to position
wireless devices and computers with wireless adapters so that the
signal passes through drywall or open doorways and not other materials.
3
Wireless Basics (continued)

8
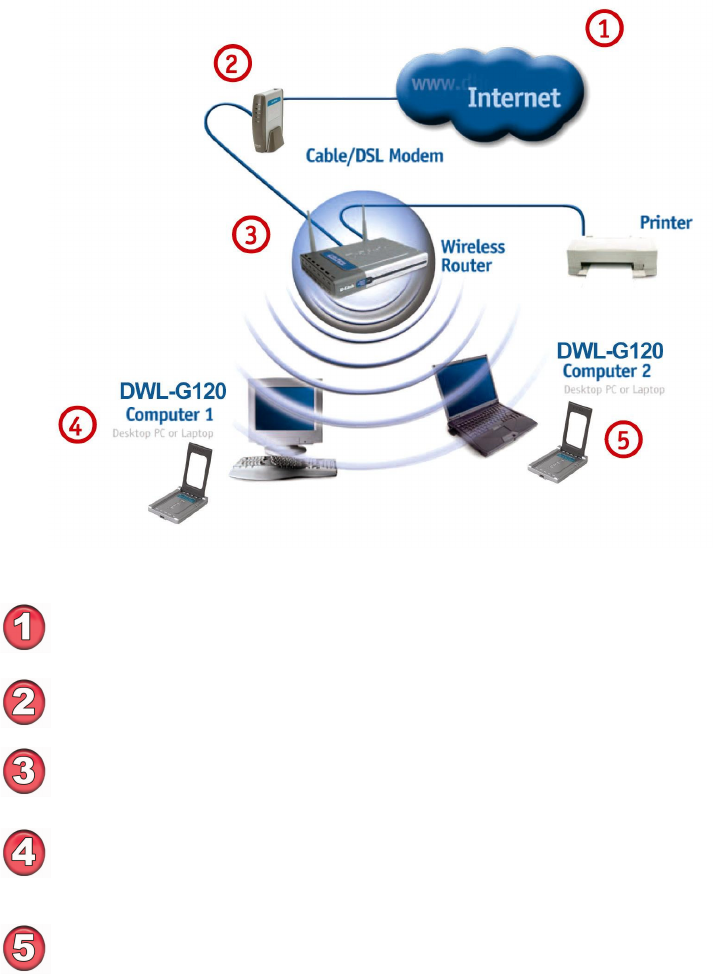
Getting Started
With its default settings, the DWL-G120 will connect with other
D-Link AirPlus G products, right out of the box.
A wireless router - D-Link AirPlusTM G DI-524
A laptop computer with a D-Link AirPlus G DWL-G122
A desktop computer with a D-Link AirPlus G DWL-G120
A cable modem - D-Link DCM-201
There are basically two modes of networking:
Infrastructure – using an access point or router, such as the DI-624.
Ad-Hoc – directly connecting to another computer, for Peer-to-Peer
communication, using wireless network adapters on each computer, such
as two or more DWL-G120 Wireless Network USB adapters.
On the following pages we will show you an example of an Infrastructure
Network and an Ad-Hoc Network.
An Infrastructure network contains an access point or router. The
Infrastructure network example shown on the following page contains the
following D-Link network devices (your existing network may be comprised of
other devices):
TM
TM
TM
9
You will need broadband Internet access (a cable or DSL-subscriber
line into your home or office).
Consult with your cable or DSL provider for proper installation of the
modem.
Connect the cable or DSL modem to your broadband router. (See the
Quick Installation Guide included with your router.)
Install the D-Link AirPlus G DWL-G120 Wireless USB adapter into an
available USB port on your desktop computer. (See the Quick Installa-
tion Guide included with the DWL-G120.)
Getting Started (continued)
For a typical wireless setup at home (as shown above), please do the following:
55
55
5
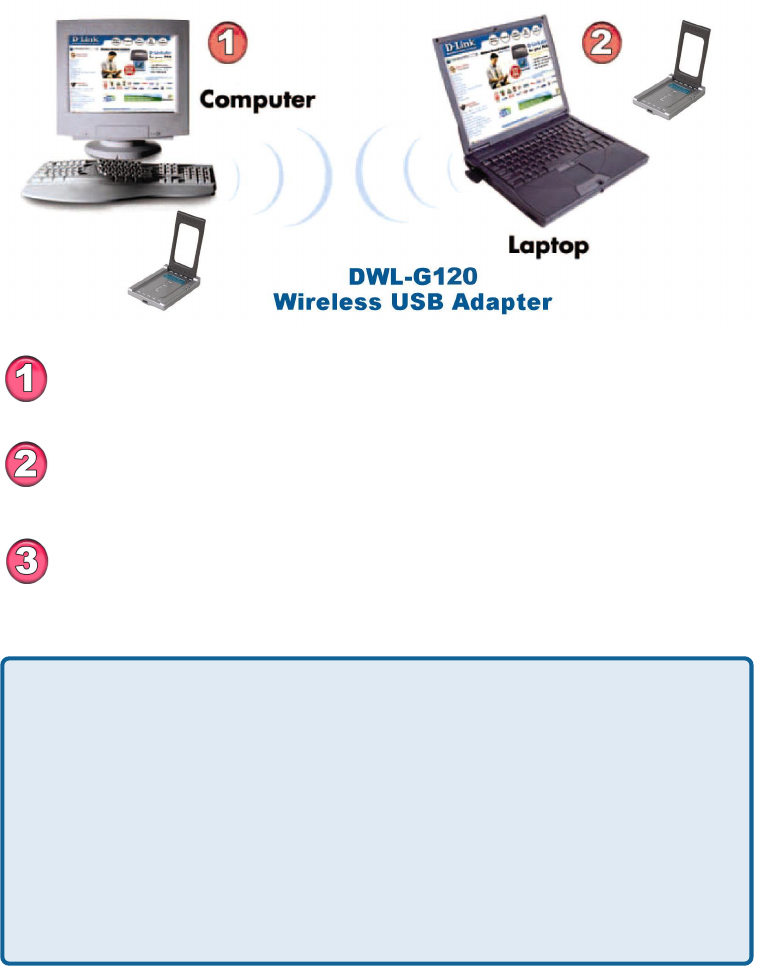
Setting up a Wireless Infrastructure Network
Install the D-Link AirPlus G DWL-G120 wireless USB adapter into an
available USB port on your laptop computer. (See the Quick Installa-
tion Guide included with the DWL-G120.)
TM
10
Getting Started (continued)
Setting up a Wireless Ad-Hoc Network
When assigning IP addresses to the computers on the network, please
remember that the IP address for each computer must be in the same
IP address range as all the computers in the network, and the subnet
mask must be exactly the same for all the computers in the network.
For example: If the first computer is assigned an IP address of 192.168.0.2
with a subnet mask of 255.255.255.0, then the second computer can be
assigned an IP address of 192.168.0.3 with a subnet mask of 255.255.255.0,
etc.
IMPORTANT: If computers or other devices are assigned the same IP
address, one or more of the devices may not be visible on the network.
IP Address
Install the D-Link AirPlus G DWL-G120 Wireless USB adapter into
the desktop computer. (See the Quick Installation Guide included with
the product.)
Set the wireless configuration for the adapters to Ad-Hoc mode, set
the adapters to the same channel, and assign an IP address to each
computer on the Ad-Hoc network.
Install the D-Link AirPlus G DWL-G120 Wireless USB adapter into
the laptop computer. (See the Quick Installation Guide included with
the product.)
DWL-G122
Wireless USB Adapter
TM
11
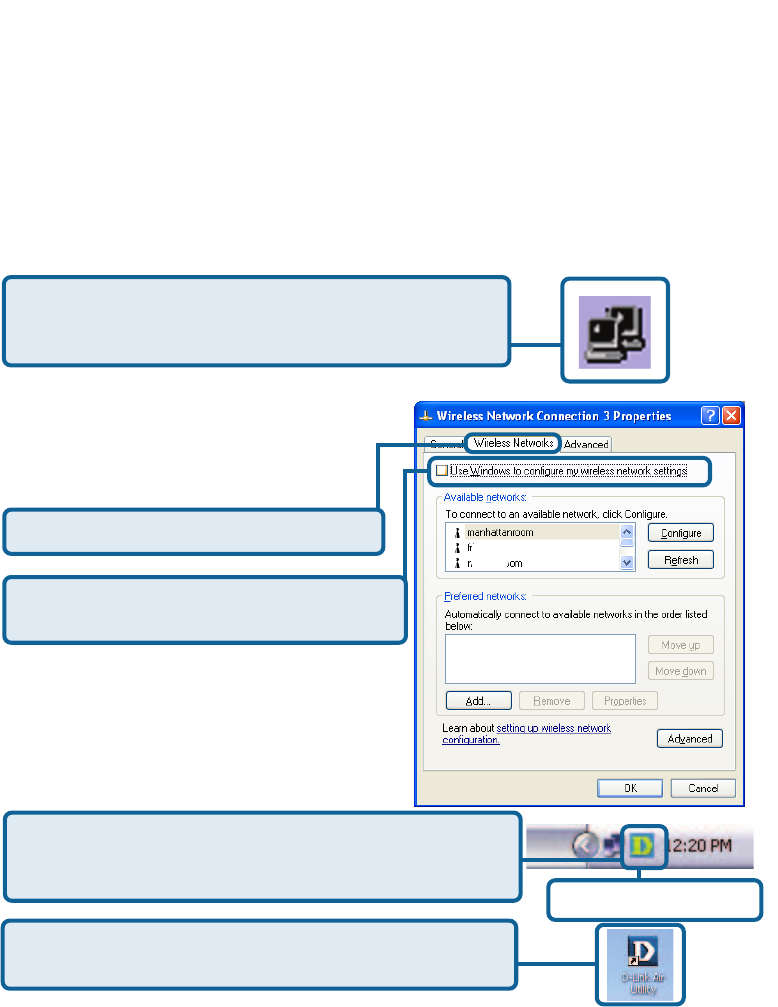
Select the Wireless Networks tab.
Uncheck the box in the properties window
that enables windows configuration.
D-Link AirPlus G DWL-G120 uses the Configuration Utility as the
management software. The utility provides the user an easy interface to change
any settings related to the wireless adapter. After you have completed the
installation of the DWL-G120 (refer to the Quick Installation Guide that came
with your purchase) whenever you start the computer, the Configuration Utility
starts automatically and the system tray icon is loaded in the toolbar (see
illustration below.*) Clicking on the utility icon will start the Configuration Utility.
Another way to start the Configuration Utility is to click on
Start>Programs>D-Link AirPlus G >D-Link AirPlus G Utility.
Using the Configuration Utility
If you are using Windows XP, you can use either the Zero Configuration Utility
or the D-Link Configuration Utility.
If the icon does not display in the taskbar, then click on
this icon on your desktop to open.
To use the D-Link Configuration Utility with XP, right-click
on the wireless network icon in the taskbar in the lower
right-hand corner of your computer screen.
In the window that appears, select
View Available Wireless Networks
and click the Advanced button. The
screen at right will appear.
After you have done this, you can then use the D-Link
Configuration Utility with XP by clicking on the D-Link
Configuration Utility icon. *Configuration Utility icon
in the system tray
TM

12
Using the Configuration Utility (continued)
Link Info
SSID:
The Service Set Identifier is
the name assigned to the
wireless network. The fac-
tory SSID setting is de-
fault.
Tx Rate:
The default setting is Auto; Tx Rate settings are automatically determined for
an optimal speed up to a maximum of 54Mbps.
Status:
Displays the MAC address
of the access point or
router to which the DWL-
G120 is associated
Channel:
The default setting is Auto. The channel selection is automatically determined
by the DWL-G120.
Signal Strength:
Displays the signal strength of the DWL-G120’s wireless connection to the
access point or router.
Packet Count:
Displays the statistics of the data packets that are transmitted and received.
Frequency:
802.11b indicates that the
DWL-G120 is communi-
cating in the 2.4GHz band.
Encryption:
You can see if WEP (Wired Equivalent Privacy) is Enabled or Disabled here.
Wireless Mode:
Either Infrastructure or Ad-Hoc will be displayed here. (Please see the Getting
Started section in this manual for an explanation of these two modes.)
Rescan Button:
Rescans for the strongest signal with the current SSID and associates with
that access point or router.
13
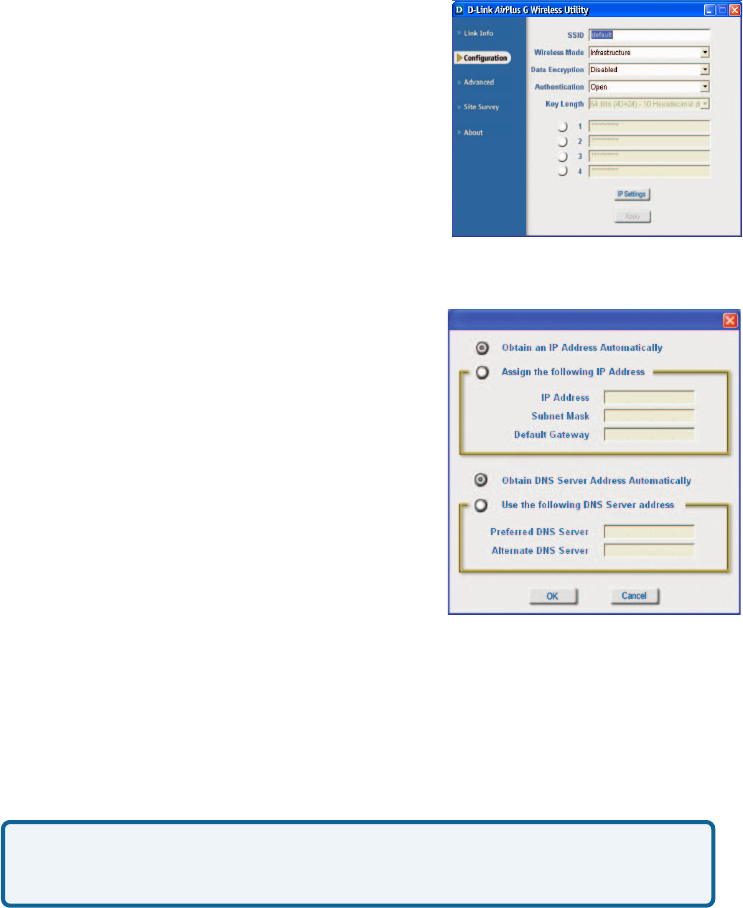
Configuration
Using the Configuration Utility (continued)
Wireless Mode:
SSID:
Authentication:
Keys 1-4:
Select the default key.
Key Length:
Data Encryption:
IP Settings:
Service Set Identifier is a name that identifies
a wireless network. Access points and
wireless devices attempting to connect to a
specific WLAN (Wireless Local Area Network)
must use the same SSID. The default setting
is default.
Click on the pull-down menu; select from the
following options:
Infrastructure - connecting to the WLAN
using an access point. (This is the
default setting).
Ad-Hoc – wireless mode used when
connecting directly to a computer
equipped with a wireless adapter in a
Peer-to-Peer environment.
Select Enabled or Disabled.
IP Settings
Choose one of the following modes:
Open Authentication – the DWL-G120
is visible to all devices on the network.
Shared Authentication – allows
communication only with other devices
with identical WEP settings.
Auto – will automatically adjust to the Authentication mode of the
wireless access point or router.
Select the key length and either ASCII (e.g., a word) or hexadecimal format.
Click Apply to save changes.
When you click IP Settings in the Configuration window, the pop-up screen
above will appear. Configure the IP Settings in this window.
Hexadecimal digits consist of the numbers 0-9 and the letters A-F.
ASCII (American Standard Code for Information Interchange) is a code for
representing English letters as numbers from 0-127.

14
Using the Configuration Utility (continued)
Advanced
Ad-Hoc Channel:
All devices in the Ad-Hoc
network must be set to the
same channel.
Click Apply if you have made any changes.
Data Packet Parameter:
Select the parameters here.
Profile IP Settings:
You can Enable or
Disable the IP Settings
portion of your profile here.
If you select Disable you
will need to configure the IP
address information each
time you connect to a
network. If you select
Enable you will maintain
the same IP address
information each time you
connect to a network.
Select Enable or Disable.
Launch Utility on Startup:
Power Mode:
Disable -This default setting consumes the most power.
Enable - This setting consumes the least power.
Fragmentation Threshold:
This value should remain at its default setting of 2432. If you experience a
high packet error rate, you may slightly increase your Fragmentation
Threshold within the value range of 256 to 2432. Setting the Fragmentation
Threshold too low may result in poor performance.
This value should remain at its default setting of 2432. If inconsistent data
flow is a problem, only a minor modification should be made.
RTS Threshold:
15
Refresh:
Click on Refresh to get the
most updated list of avail-
able networks.
Using the Configuration Utility (continued)
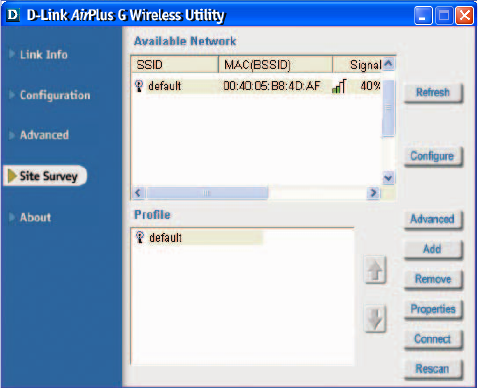
Site Survey
Available Network:
The top section of the window displays the Available Networks. Scroll up and
down the list and highlight the network to which you wish to connect. Click on
the Connect button.
Profile:
In the lower half of the screen, you can manage the profiles that you have cre-
ated for the wireless network at home, at the office and in public places. Scroll
up and down and highlight the profile that you wish to configure. You can Add or
Remove a profile, or configure the Properties of the profile in order to connect
with an available network.
Connect:
Highlight a network profile; click Connect to connect to that network.
Rescan:
Click Rescan to rescan and connect to the strongest signal with the current
SSID.
Configure:
Highlight an existing net-
work and click Configure;
the configuration window on
the next page will appear.
Advanced:
Highlight a network; click
Advanced and the screen
on the next page will ap-
pear.
Add:
Click Add and the screen on the next page will appear.
Remove:
Highlight a network profile; click Remove to remove a network from the profile
list.
Properties:
Highlight a network profile; click Properties and the screen on the next page
will appear.