D Link HP1320A1 Wireless N Powerline Router User Manual Part 2
D Link Corporation Wireless N Powerline Router Part 2
D Link >
Contents
- 1. User Manual Part 1
- 2. User Manual Part 2
- 3. User Manual Part 3
User Manual Part 2
81D-Link DHP-1320 User Manual
Section 3 - Conguration
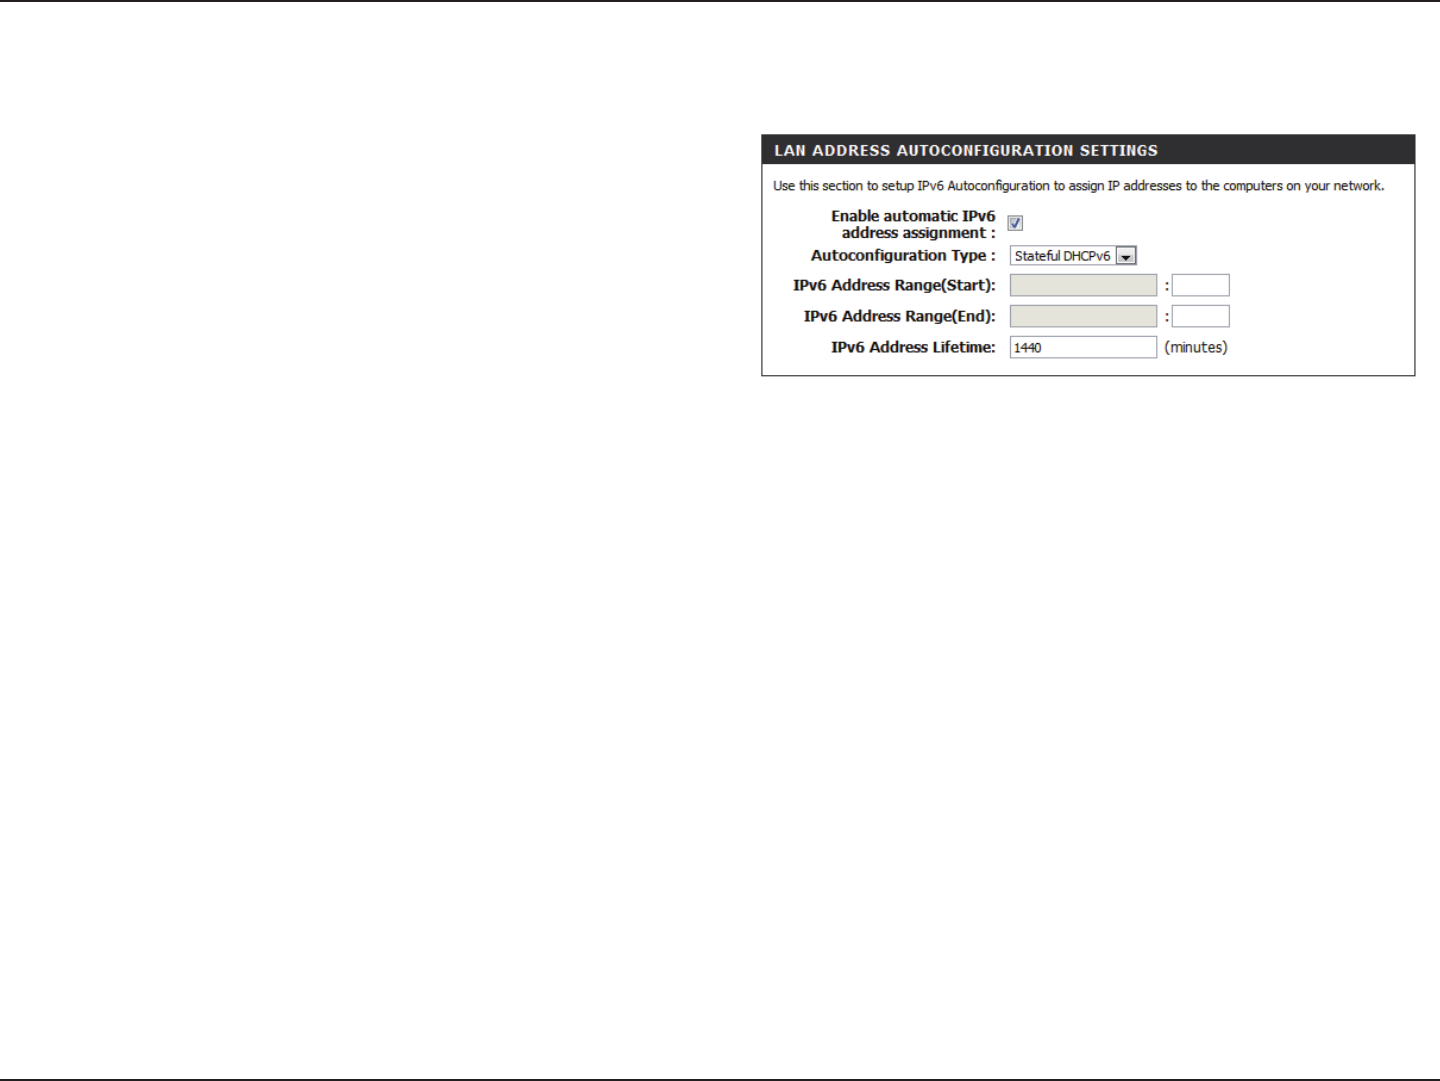
IPv6 over IPv4 Tunnel - Stateful
Enable automatic
IPv6 address
assignment:
Autoconguration
Type:
IPv6 Address
Range Start:
IPv6 Address
Range End:
IPv6 Address
Lifetime:
Check to enable the automatic IPv6 address assignment
feature.
Select Stateful (DHCPv6). Refer to the next page for
Stateless.
Enter the start IPv6 Address for the DHCPv6 range for your
local computers.
Enter the end IPv6 Address for the DHCPv6 range for your
local computers.
Enter the IPv6 Address Lifetime (in minutes).
IPv6

82D-Link DHP-1320 User Manual
Section 3 - Conguration
Displays the LAN IPv6 Link-Local address of the router.
LAN IPv6
Address
Settings:
IPv6
Link-local Only
Select Link-local Only from the My IPv6 Connection is drop-down menu if your Router will use the IPv6 link local method
to connect to the Internet.
Click the Save Settings button to save any changes made.
83D-Link DHP-1320 User Manual
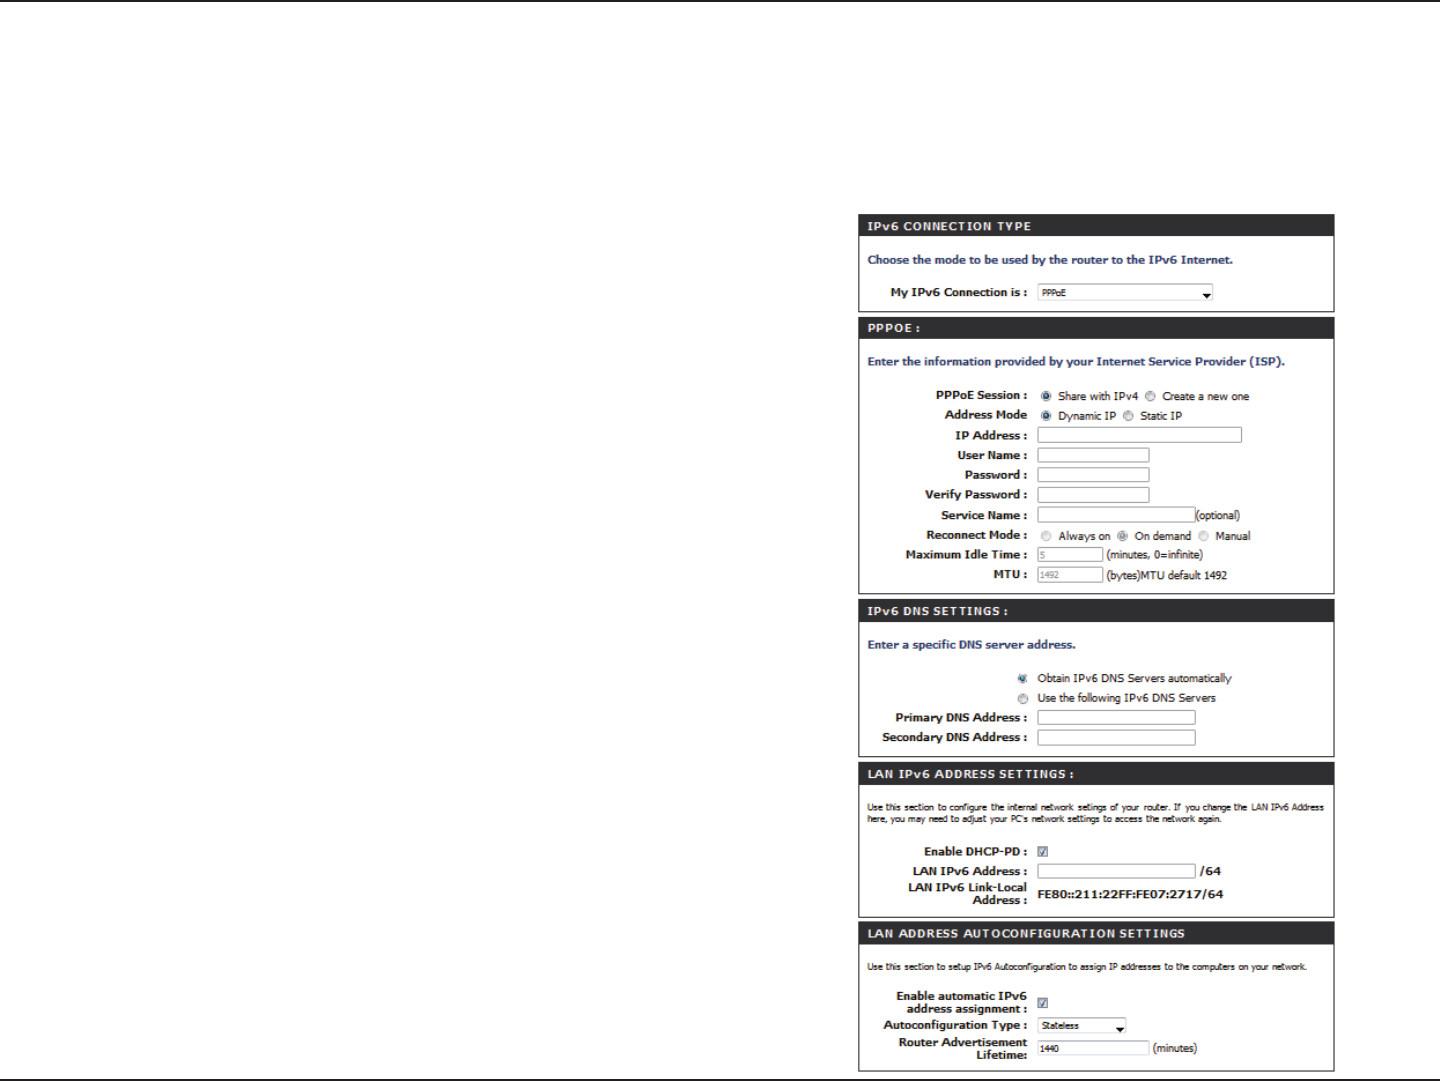
Section 3 - Conguration
PPPoE
The DHP-1320’s IPv6 Firewall feature allows you to congure which kind of IPv6 trac is allowed to pass through the device. The DHP-1320’s IPv6
Firewall functions in a similar way to the IP Filters feature.
Select PPPoE from the drop-down menu.
Enter the PPPoE account settings supplied by your Internet
provider (ISP).
Select Static if your ISP assigned you the IP address, subnet
mask, gateway, and DNS server addresses. In most cases, select
Dynamic.
Enter the IP address (Static PPPoE only).
Enter your PPPoE user name.
Enter your PPPoE password and then retype the password in
the next box.
Enter the ISP Service Name (optional).
Select either Always-on, On-Demand, or Manual.
Maximum Transmission Unit - you may need to change the
MTU for optimal performance with your specic ISP. 1500 is
the default MTU.
Enter a maximum idle time during which the Internet connection
is maintained during inactivity. To disable this feature, enable
Auto-reconnect.
My IPv6
Connection:
PPPoE:
Address Mode:
IP Address:
User Name:
Password:
Service Name:
Reconnection
Mode:
MTU:
Maximum Idle
Time:
IPv6

84D-Link DHP-1320 User Manual
Section 3 - Conguration
IPv6 DNS Settings:
Primary/Secondary
DNS Address:
LAN IPv6 Address:
LAN Link-Local
Address:
Enable
Autoconguration:
Autoconguration
Type:
IPv6 Address Range
Start:
IPv6 Address Range
End:
IPv6 Address Lifetime:
Select either Obtain DNS server address automatically or Use the following DNS Address.
Enter the primary and secondary DNS server addresses.
Enter the LAN (local) IPv6 address for the router.
Displays the Router’s LAN Link-Local Address.
Check to enable the Autoconguration feature.
Select Stateful (DHCPv6) or Stateless. Refer to the next page for Stateless.
Enter the start IPv6 Address for the DHCPv6 range for your local computers.
Enter the end IPv6 Address for the DHCPv6 range for your local computers.
Enter the IPv6 Address Lifetime (in minutes).
85D-Link DHP-1320 User Manual
Section 3 - Conguration
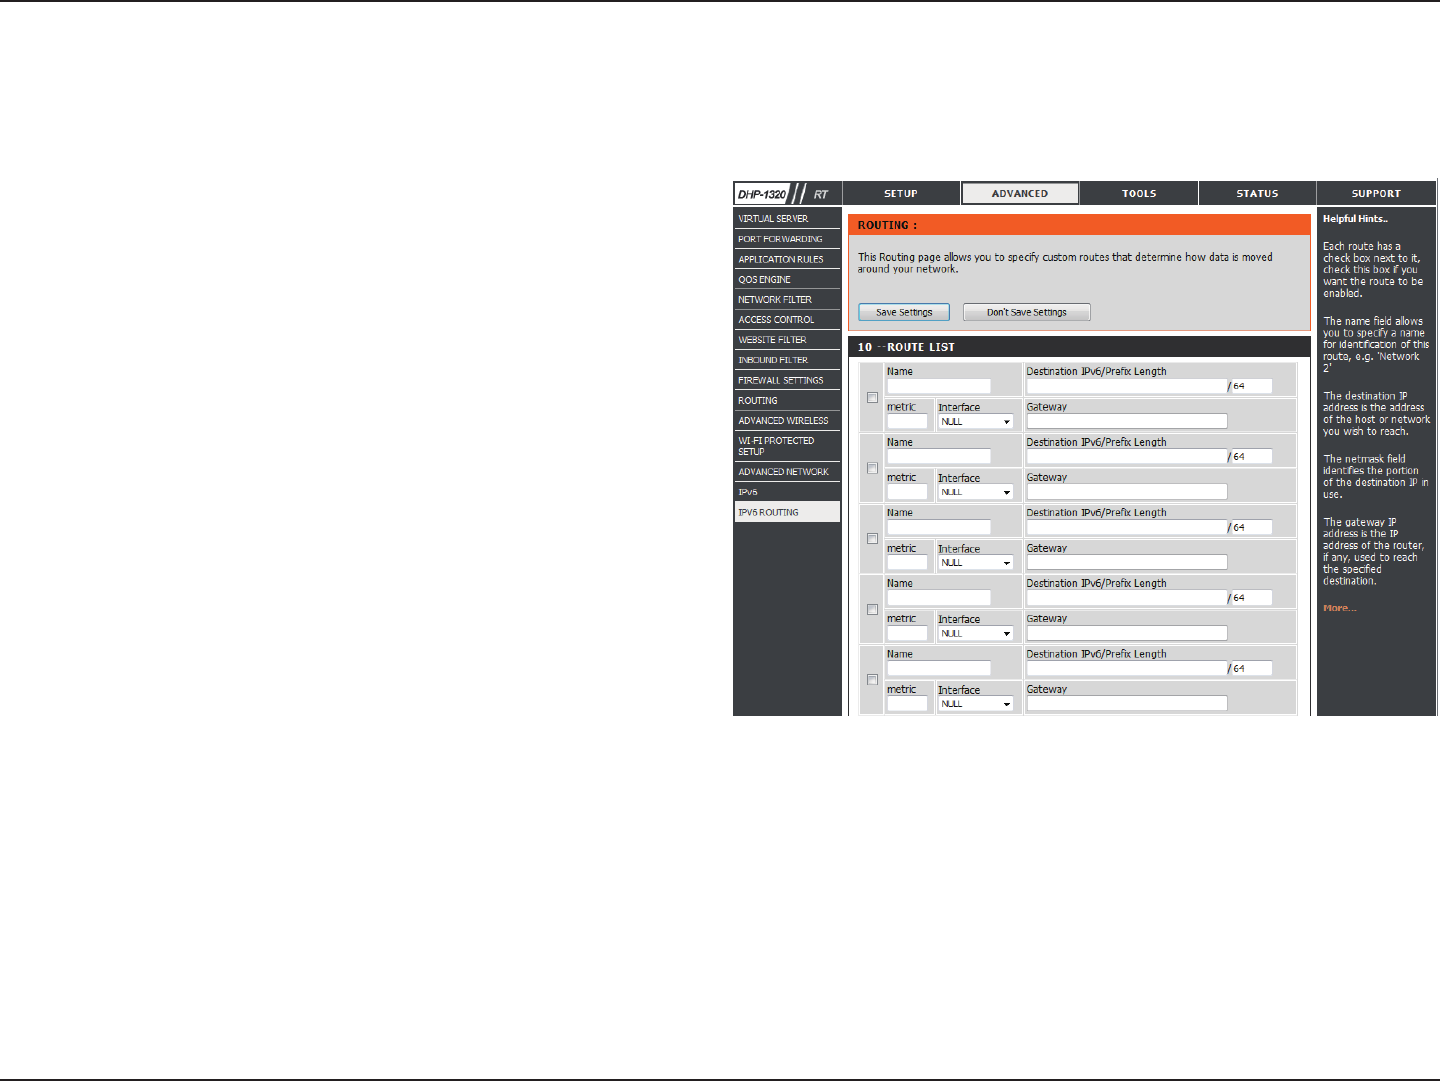
IPv6 Routing
This page allows you to specify custom routes that determine how data is moved around your network.
Routing List:
Name:
Destination IP:
Metric:
Interface:
Gateway:
Each Route has a checkbox next to it, check the box
of the route you wish to enable.
Specify a name for identication of this route.
This eld identies the portion of the destination IP
in use.
The route metric is a value from 1 to 16 that indicates
the cost of using this route. A value 1 is the lowest
cost and 15 is the highest cost.
Select the interface which the IP packet must use to
transit out of the router when this route is used.
The IP address of the router will be displayed here.
86D-Link DHP-1320 User Manual
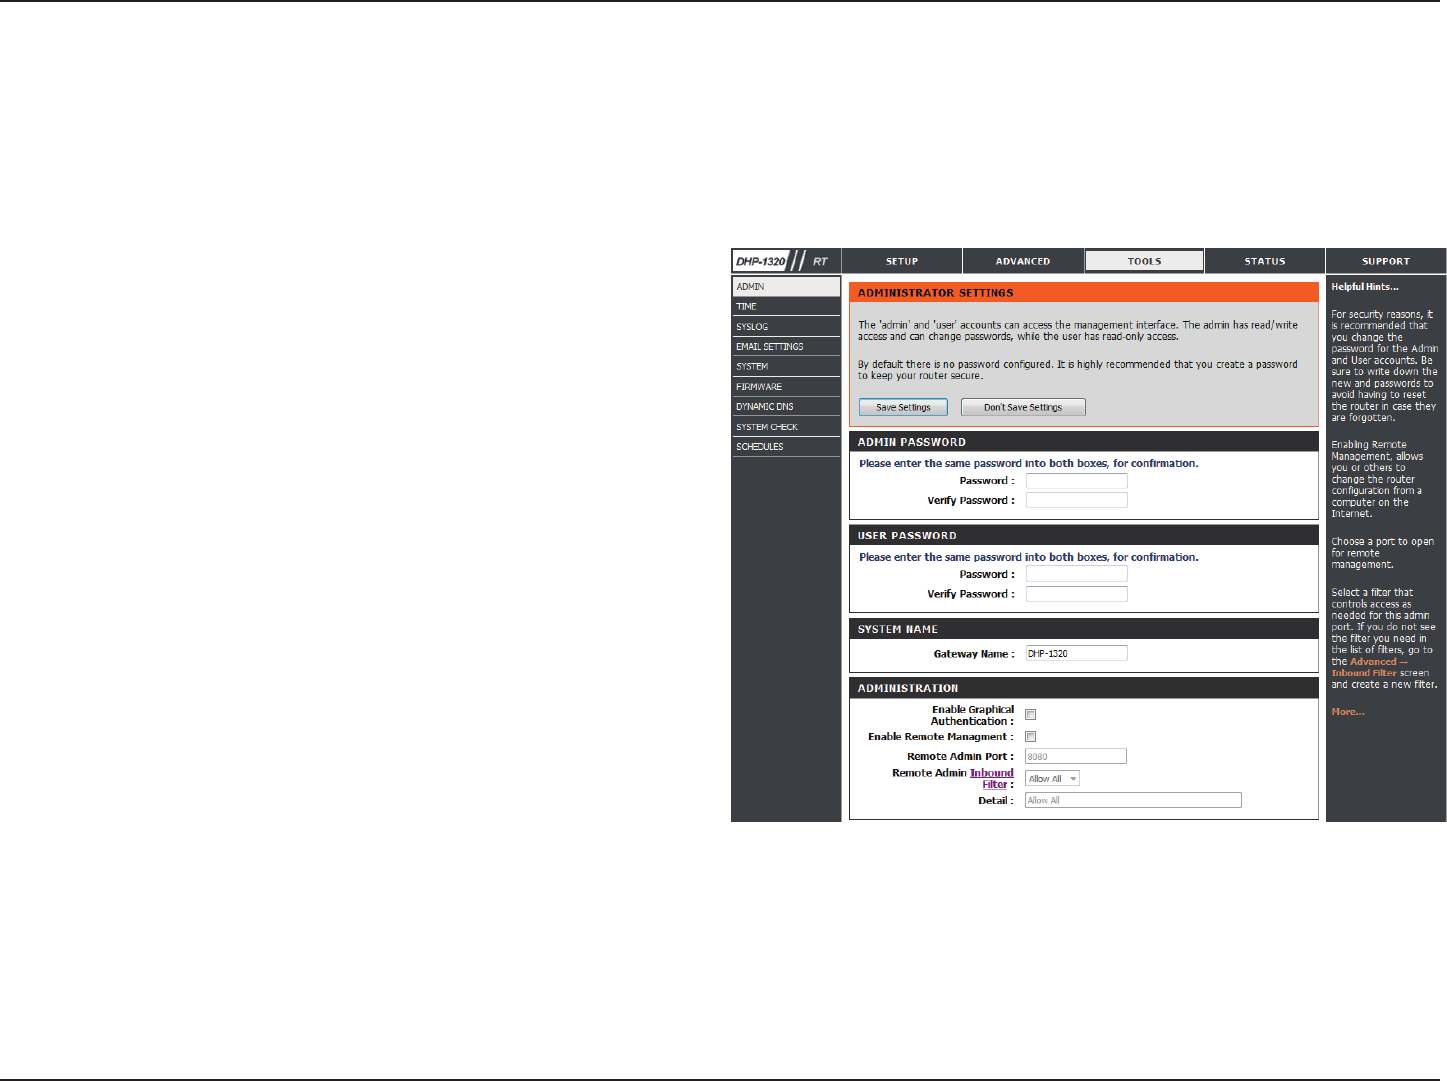
Section 3 - Conguration
Enter a new password for the Administrator Login Name.
The administrator can make changes to the settings.
Enter the new password for the User login. If you login as
the User, you can only see the settings, but cannot change
them.
Enter a name for your DHP-1320 Router.
Enables a challenge-response test to require users to type
letters or numbers from a distorted image displayed on
the screen to prevent online hackers and unauthorized
users from gaining access to your router’s network settings.
Remote management allows the DHP-1320 to be
configured from the Internet by a web browser. A
username and password is still required to access the Web-
Management interface. In general, only a member of your
network can browse the built-in web pages to perform
Administrator tasks. This feature enables you to perform
Administrator tasks from the remote (Internet) host.
Enter the port number that will be used to access the
DHP-1320.
Admin
Password:
Admin
This page will allow you to change the Administrator password and congure the authentication settings. This window also allows you to enable
Remote Management, via the Internet.
Tools
Enable
Graphical
Authentication:
Enable Remote
Management:
Remote
Admin Port:
Click the Save Settings button to save any changes made.
User Password:
Gateway Name:
87D-Link DHP-1320 User Manual
Section 3 - Conguration
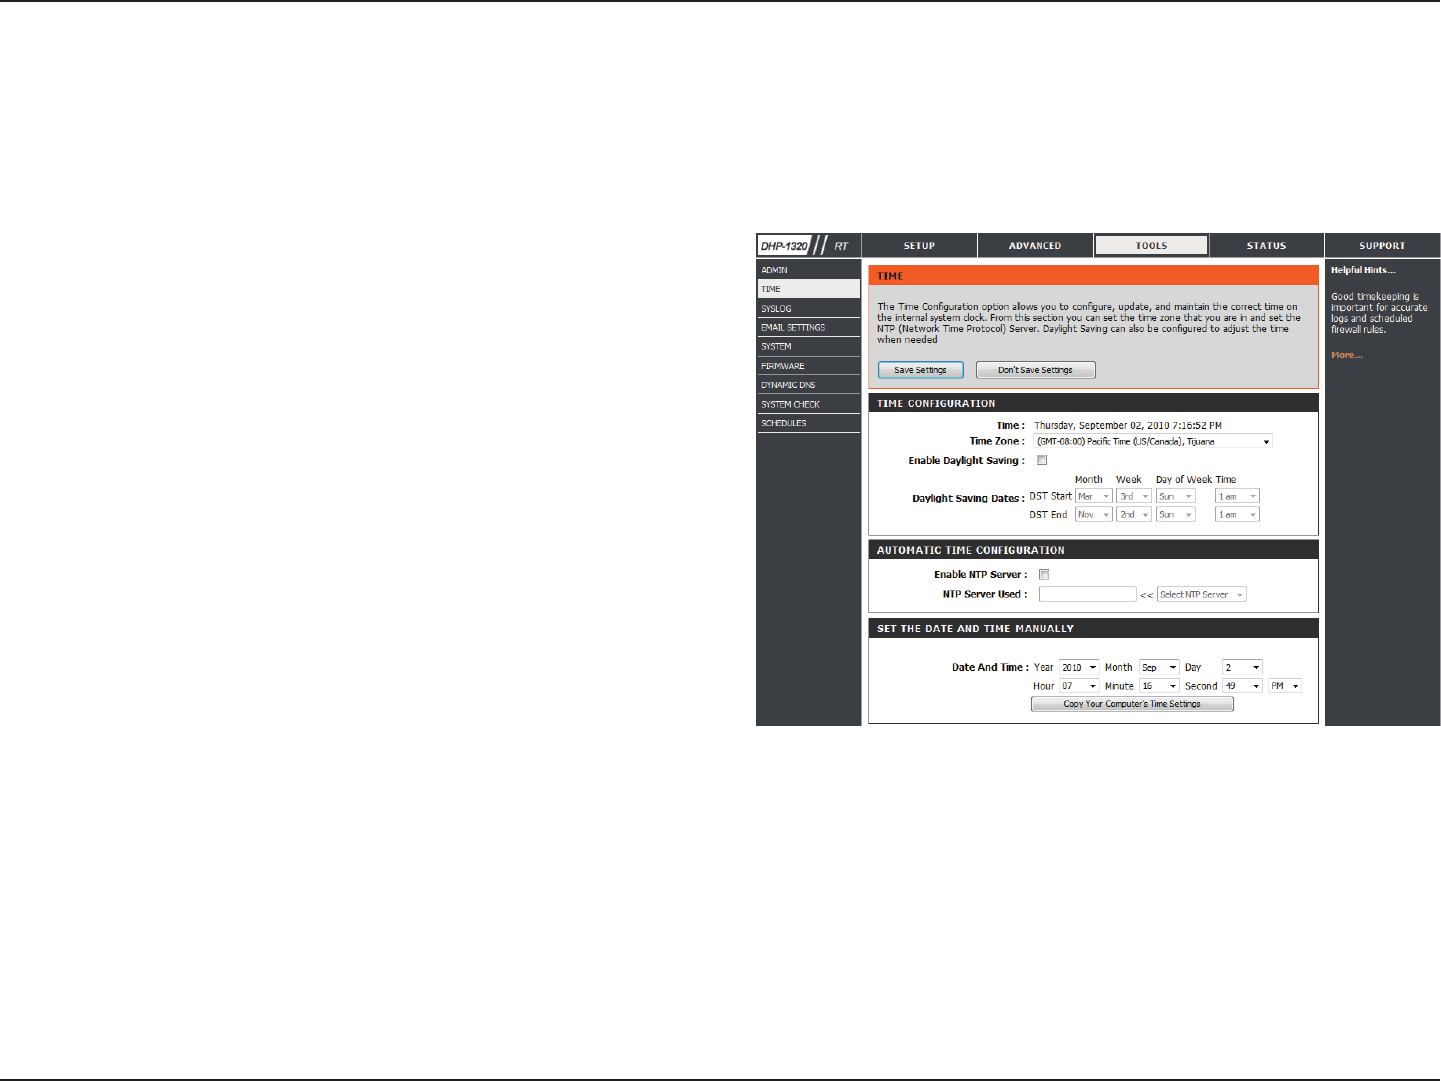
Time
Select the Time Zone from the drop-down menu.
Check this box if the country your are located in uses
Daylight Saving time. Enter a start date and an end date
for daylight saving time.
Check this box to enable the NTP Server.
NTP is short for Network Time Protocol. NTP synchronizes
computer clock times in a network of computers. To enable
NTP carry out the following:
1. Check the Automatically synchronize with D-Link’s
Internet Time Server box.
2. Choose the D-Link NTP server that you would like to
synchronize with from the NTP Server Used drop-down
menu.
Use this section to configure the time manually. To
congure the time manually, use the drop-down menus
to select the appropriate Year, Month, Day, Hour, Minute,
and Second.
Time Zone:
Enable Daylight
Saving:
Enable NTP Server:
NTP Server Used:
Set the Time and
Date Manually:
The Time window allows you to congure, update, and maintain the correct time on the internal system clock. From this section you can set the
time zone that you are in and set the Time Server. Daylight Saving can also be congured to automatically adjust the time when needed.
Click the Save Settings button to save any changes made.
88D-Link DHP-1320 User Manual
Section 3 - Conguration
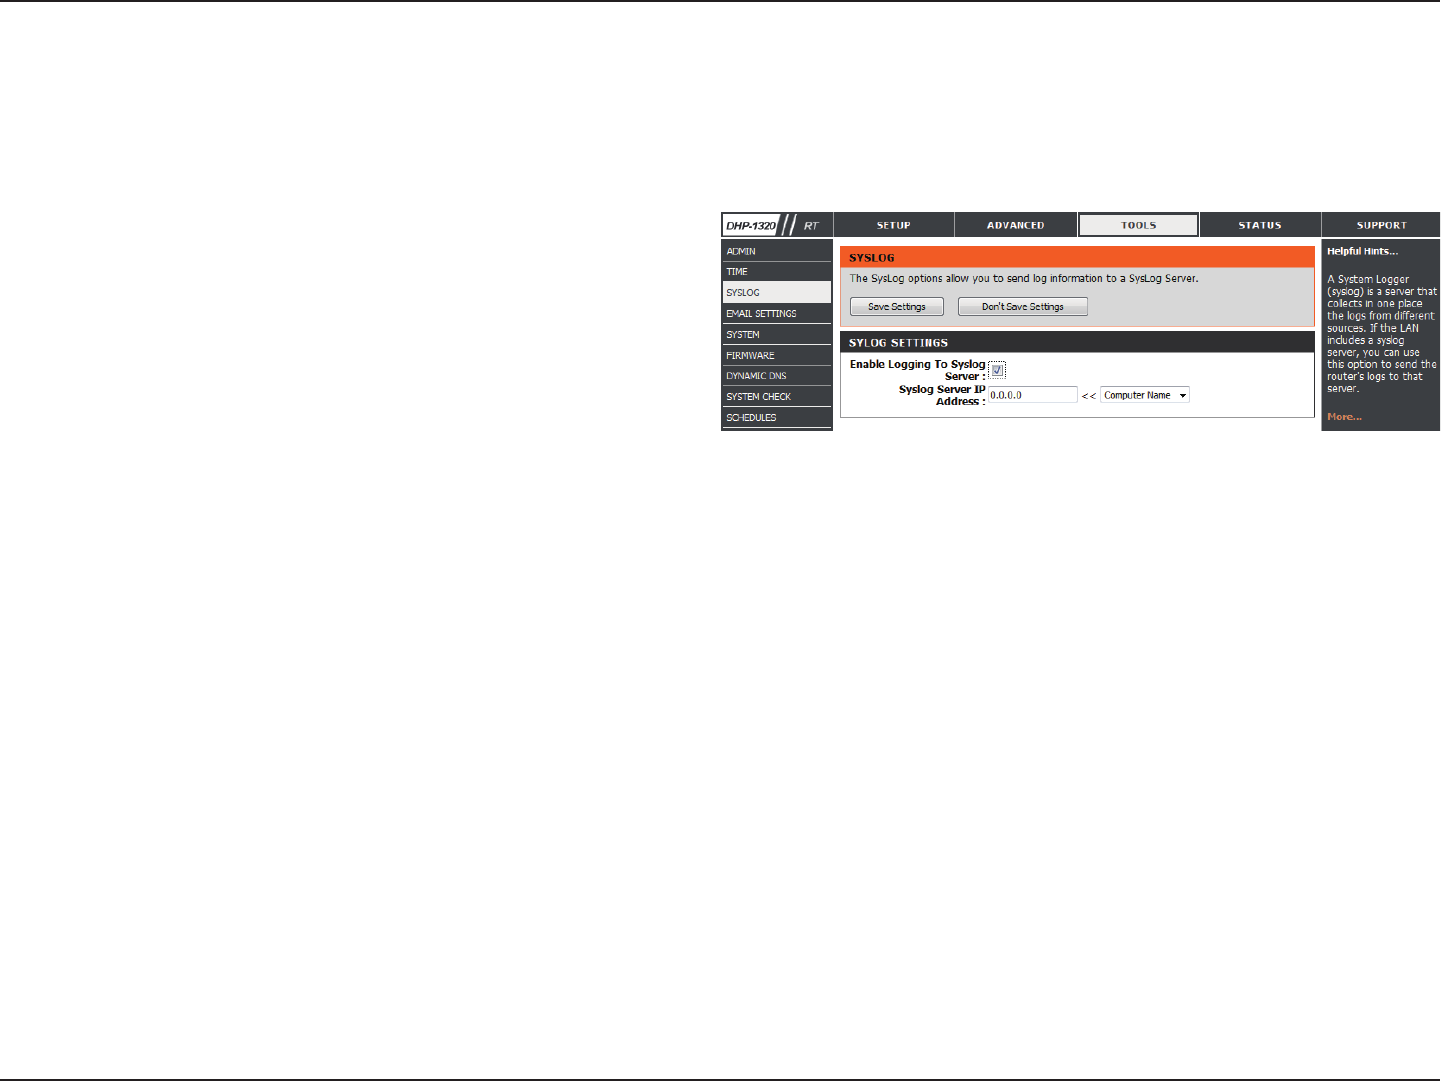
The Broadband Router keeps a running log of events and activities occurring on the Router. You may send these logs to a SysLog server on your
network.
Enable Logging
to SysLog
Server:
SysLog Server
IP Address:
Check this box to send the router logs to a SysLog Server.
The address of the SysLog server that will be used to
send the logs. You may also select your computer from
the drop-down menu (only if receiving an IP address
from the router via DHCP).
SysLog
89D-Link DHP-1320 User Manual
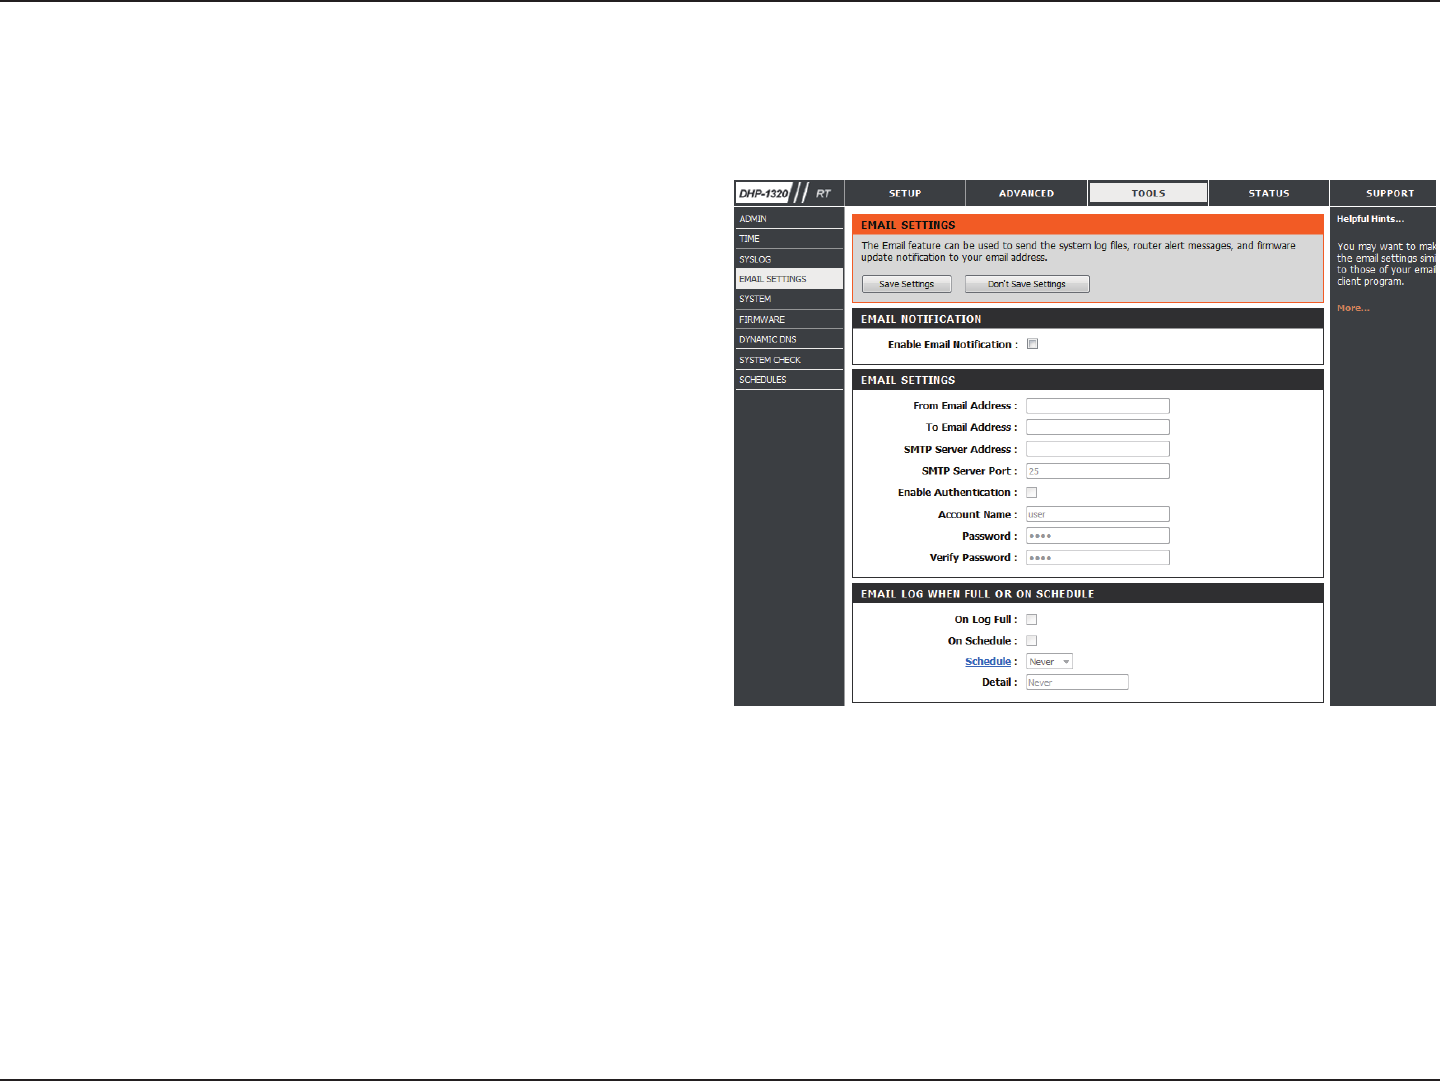
Section 3 - Conguration
Email Settings
The Email feature can be used to send the system log les and router alert messages to your email address.
Enable Email
Notications:
From Email
Address:
To Email Address:
SMTP Server
Address:
Enable
Authentication:
Account Name:
Password:
Send Mail Now:
On Log Full:
On Schedule:
Schedule:
When this option is enabled, router activity logs are
e-mailed to a designated e-mail address.
This email address will appear as the sender when you
receive a log le or rmware upgrade notication via
email.
Enter the email address where you want the email sent.
Enter the SMTP server address for sending email. If your
SMTP server requires authentication, select this option.
Check this box if your SMTP server requires authentication.
Enter your account for sending email.
Enter the password associated with the account. Re-type
the password associated with the account.
Click this button to send a test email from the Router to verify that the email settings have been congured correctly.
When this option is selected, logs will be sent via e-mail when the log is full.
Selecting this option will send the logs via e-mail according to schedule.
This option is enabled when On Schedule is selected. You can select a schedule from the list of dened schedules. To create
a schedule, go to Tools > Schedules.
Click the Save Settings button to save any changes made.
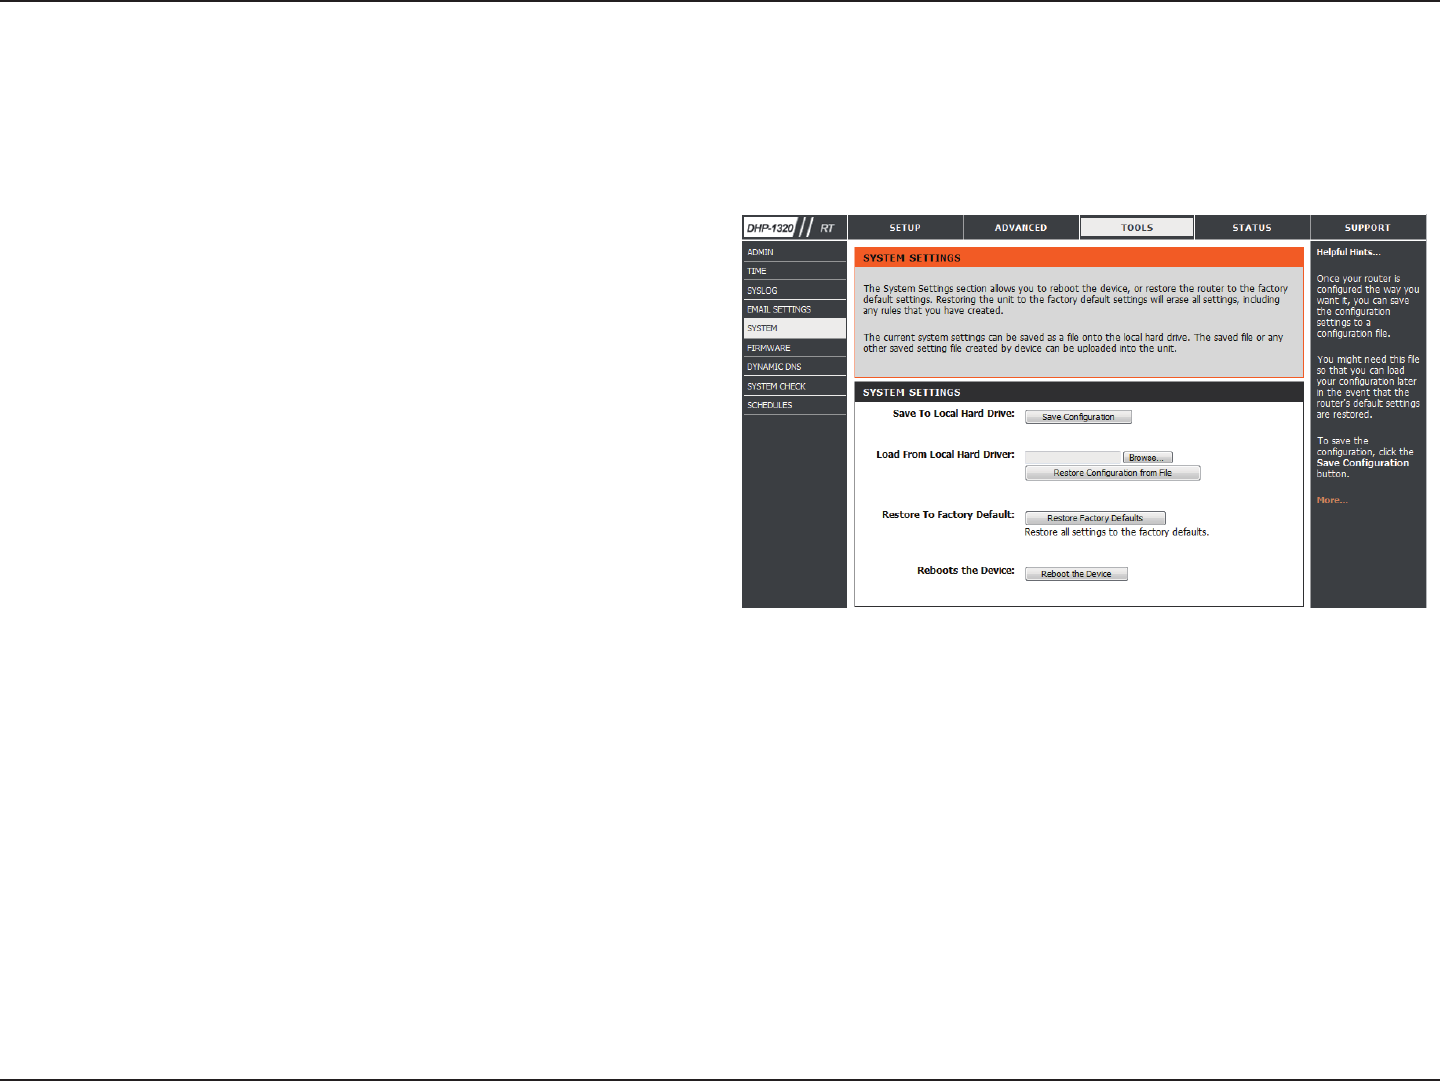
90D-Link DHP-1320 User Manual
Section 3 - Conguration
Use this option to save the current router conguration
settings to a le on the hard disk of the computer you
are using. First, click the Save button. A le dialog will
appear, allowing you to select a location and le name
for the settings.
Use this option to load previously saved router conguration
settings. First, use the Browse option to nd a previously
saved le of conguration settings. Then, click the Upload
Settings button below to transfer those settings to the
router.
This option will restore all conguration settings back
to the settings that were in eect at the time the router
was shipped from the factory. Any settings that have
not been saved will be lost, including any rules that
you have created. If you want to save the current router
conguration settings, use the Save button above.
Click to reboot the router.
Save Settings to
Local Hard Drive:
Load Settings from
Local Hard Drive:
Restore to Factory
Default Settings:
Reboot Device:
System
This section allows you to manage the router’s conguration settings, reboot the router, and restore the router to the factory default settings.
Restoring the unit to the factory default settings will erase all settings, including any rules that you’ve created.
91D-Link DHP-1320 User Manual
Section 3 - Conguration
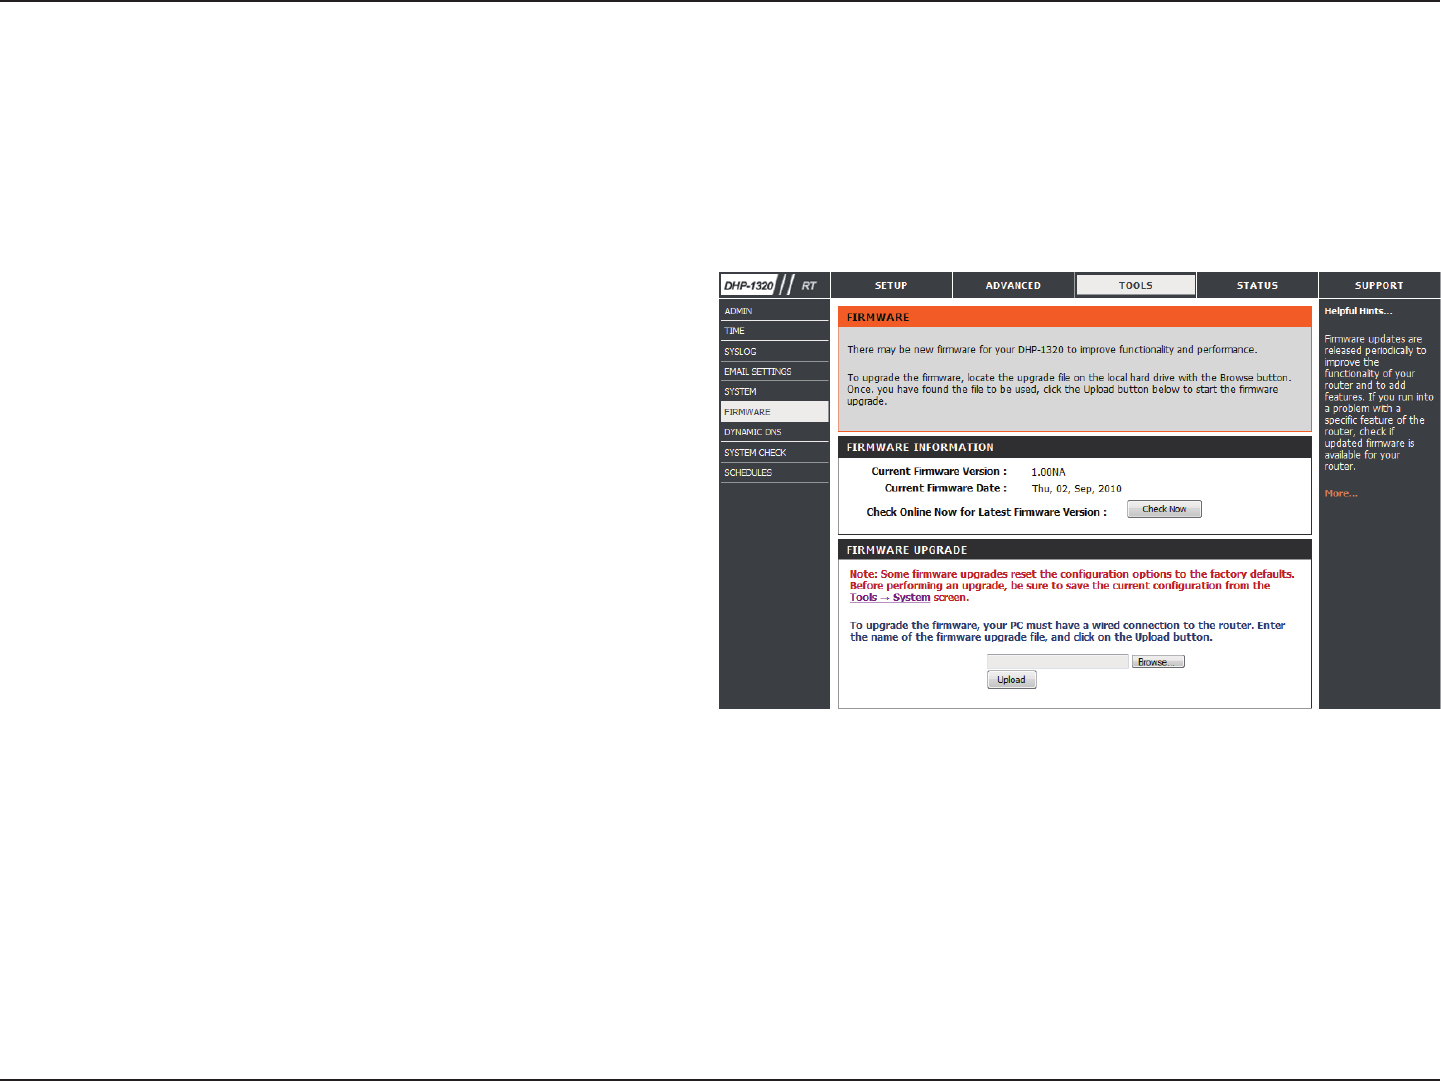
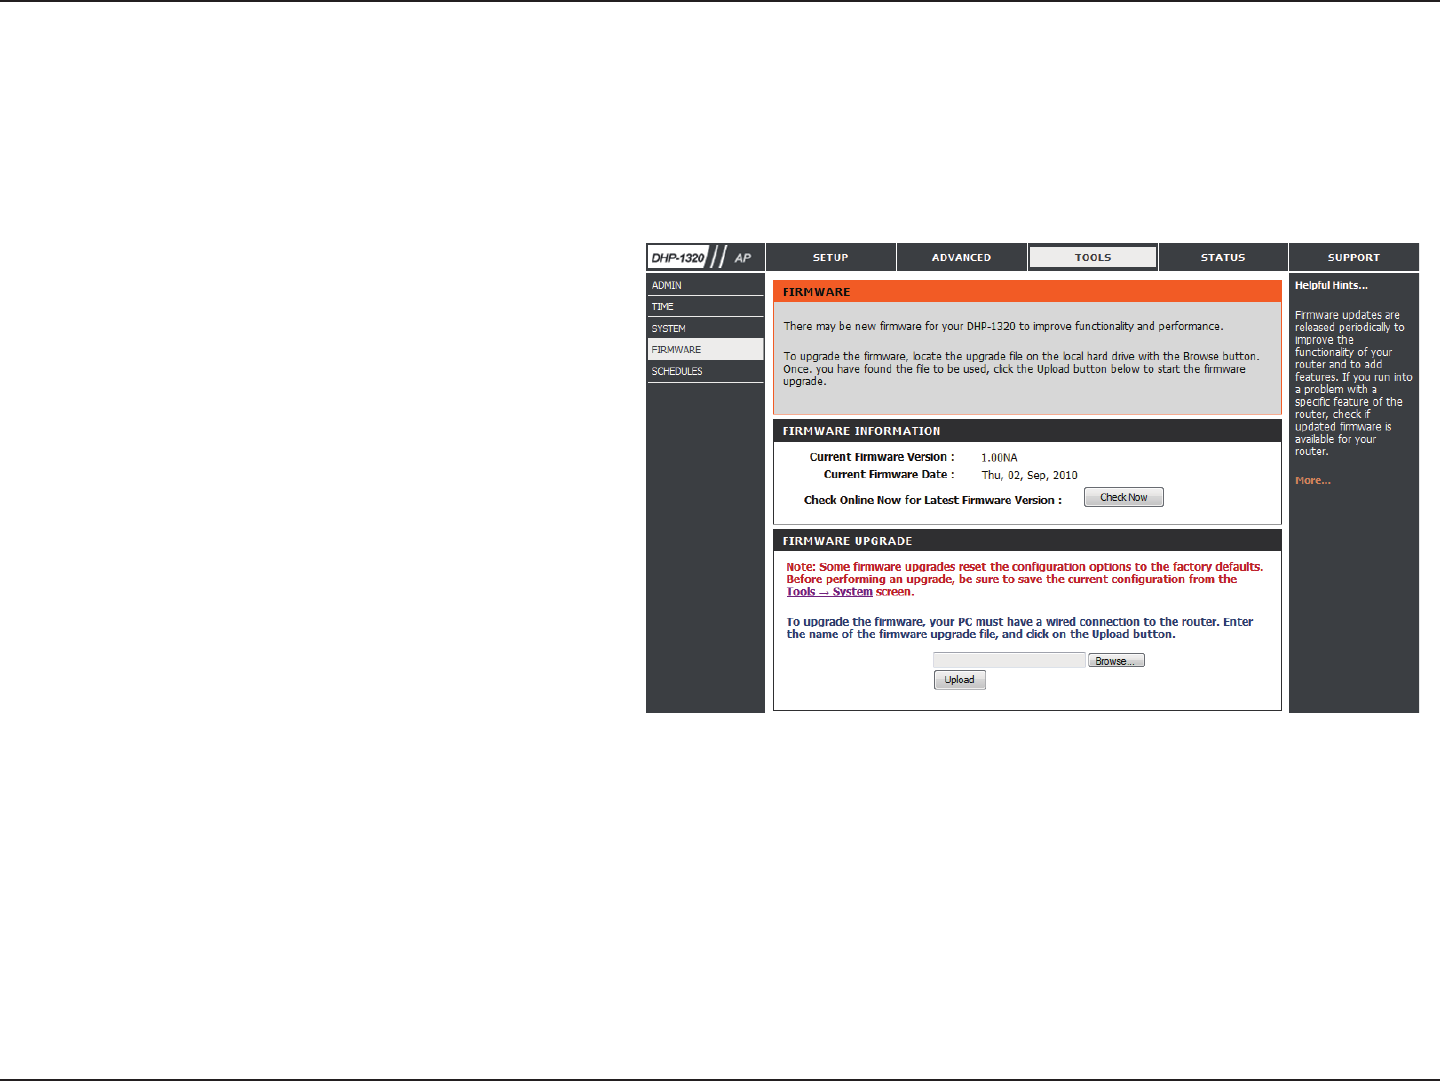
This section displays information about the rmware
that is loaded on the Router. Click the Check Now
button to nd out if there is an updated rmware; if so,
download the new rmware to your hard drive.
After you have downloaded the new rmware, click
Browse to locate the rmware update on your hard
drive. Click Upload to complete the rmware upgrade.
Firmware
Information:
Firmware
Upgrade:
Firmware
Use the Firmware window to upgrade the rmware of the Router and install language packs. If you plan to install new rmware, make sure the
rmware you want to use is on the local hard drive of the computer. If you want to install a new language pack, make sure that you have the language
pack available. Please check the D-Link support site for rmware updates at http://support.dlink.com. You can download rmware upgrades to your
hard drive from the D-Link support site.
92D-Link DHP-1320 User Manual
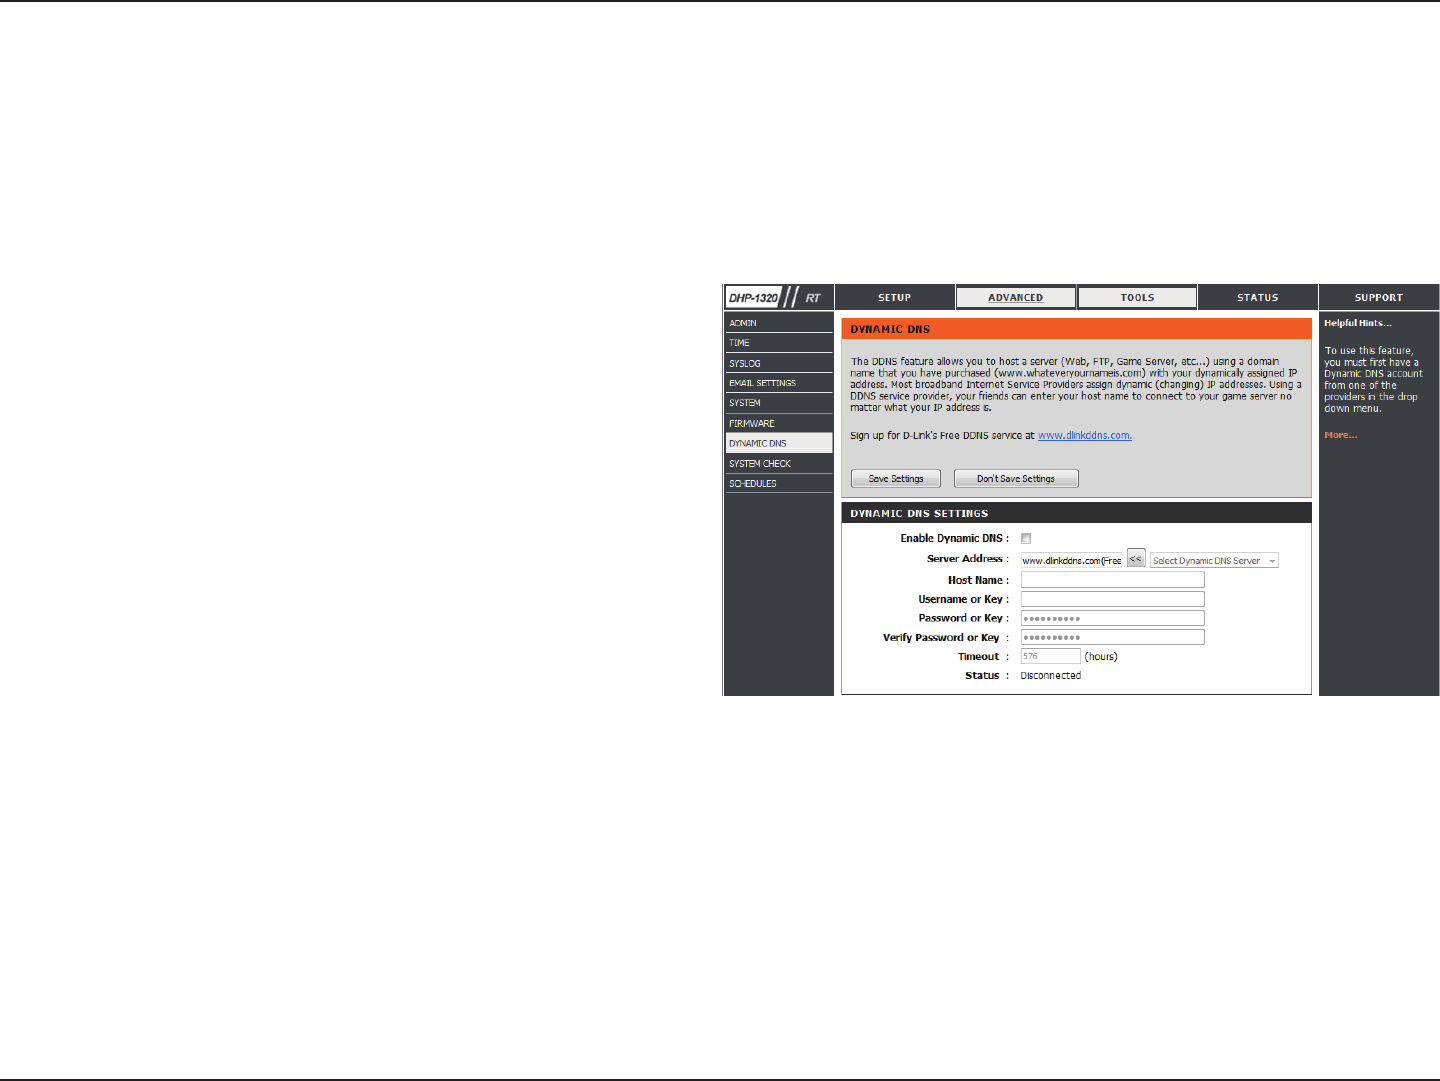
Section 3 - Conguration
Dynamic Domain Name System is a method of
keeping a domain name linked to a changing IP
Address. Check the box to enable DDNS.
Choose your DDNS provider from the drop down
menu.
Enter the Host Name that you registered with
your DDNS service provider.
Enter the Username for your DDNS account.
Enter a time in (hours).
Displays the current connection status to your
DDNS server.
Enable DDNS:
Server Address:
Host Name:
Username or Key:
Timeout:
Status:
Dynamic DNS
The DDNS feature allows you to host a server (Web, FTP, Game Server, etc…) using a domain name that you have purchased (www.whateveryournameis.
com) with your dynamically assigned IP address. Most broadband Internet Service Providers assign dynamic (changing) IP addresses. Using a DDNS
service provider, your friends can enter in your domain name to connect to your server no matter what your IP address is.
Click the Save Settings button to save any changes made.
93D-Link DHP-1320 User Manual
Section 3 - Conguration
The Ping Test is used to send Ping packets to test if a
computer is on the Internet. Enter the IP Address that you
wish to Ping, and click Ping. Click Stop to stop sending
Ping packets
The IPv6 Ping Test is used to send IPv6 Ping packets to test
if a computer is on the Internet. Enter the IPv6 Address
that you wish to Ping, and click Ping. Click Stop to stop
sending IPv6 Ping packets
The results of your Ping/IPv6 Ping attempts will be
displayed here.
System Check
Ping Test:
IPv6 Ping
Test:
Ping Results:
94D-Link DHP-1320 User Manual
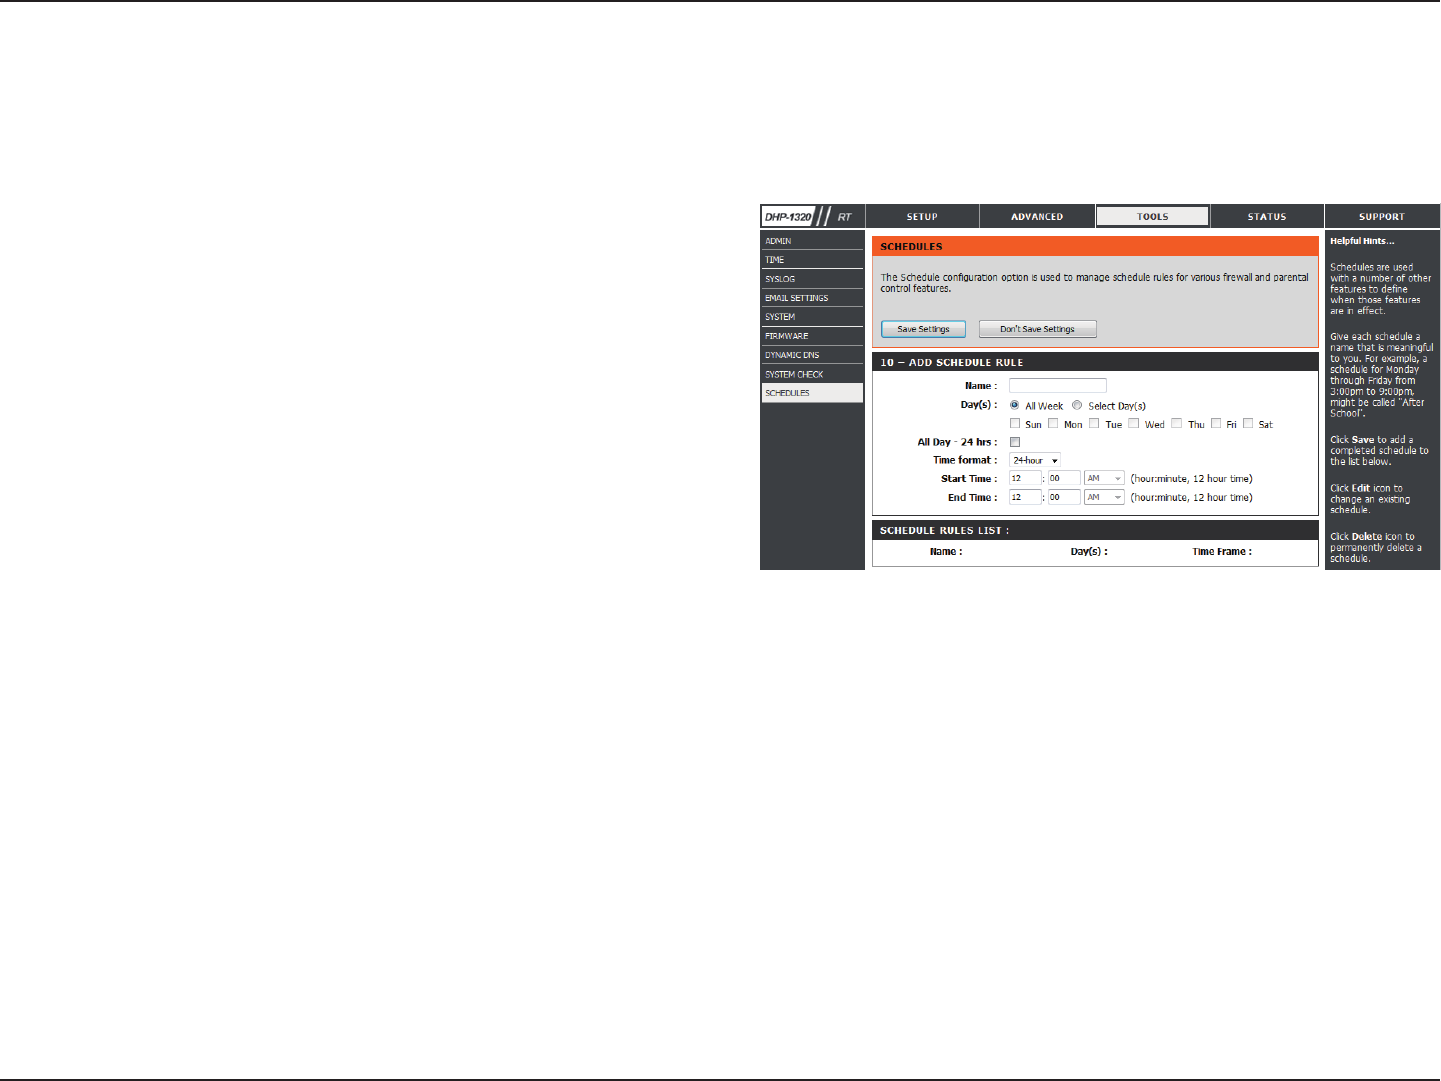
Section 3 - Conguration
Enter a name for your new schedule.
Select a day, a range of days, or All Week to include every
day.
Check All Day - 24hrs or enter a Start Time and End Time
for your schedule.
Click Save to save your schedule. You must click the Save
button for your schedules to go into eect.
The list of schedules will be listed here. Click the Edit icon
to make changes or click the Delete icon to remove the
schedule.
Name:
Days:
Time:
Save:
Schedule Rules
List:
Schedules
Schedules can be created for use with enforcing rules. For example, if you want to restrict web access to Mon-Fri from 3pm to 8pm, you could create
a schedule selecting Mon, Tue, Wed, Thu, and Fri and enter a Start Time of 3pm and End Time of 8pm.
95D-Link DHP-1320 User Manual
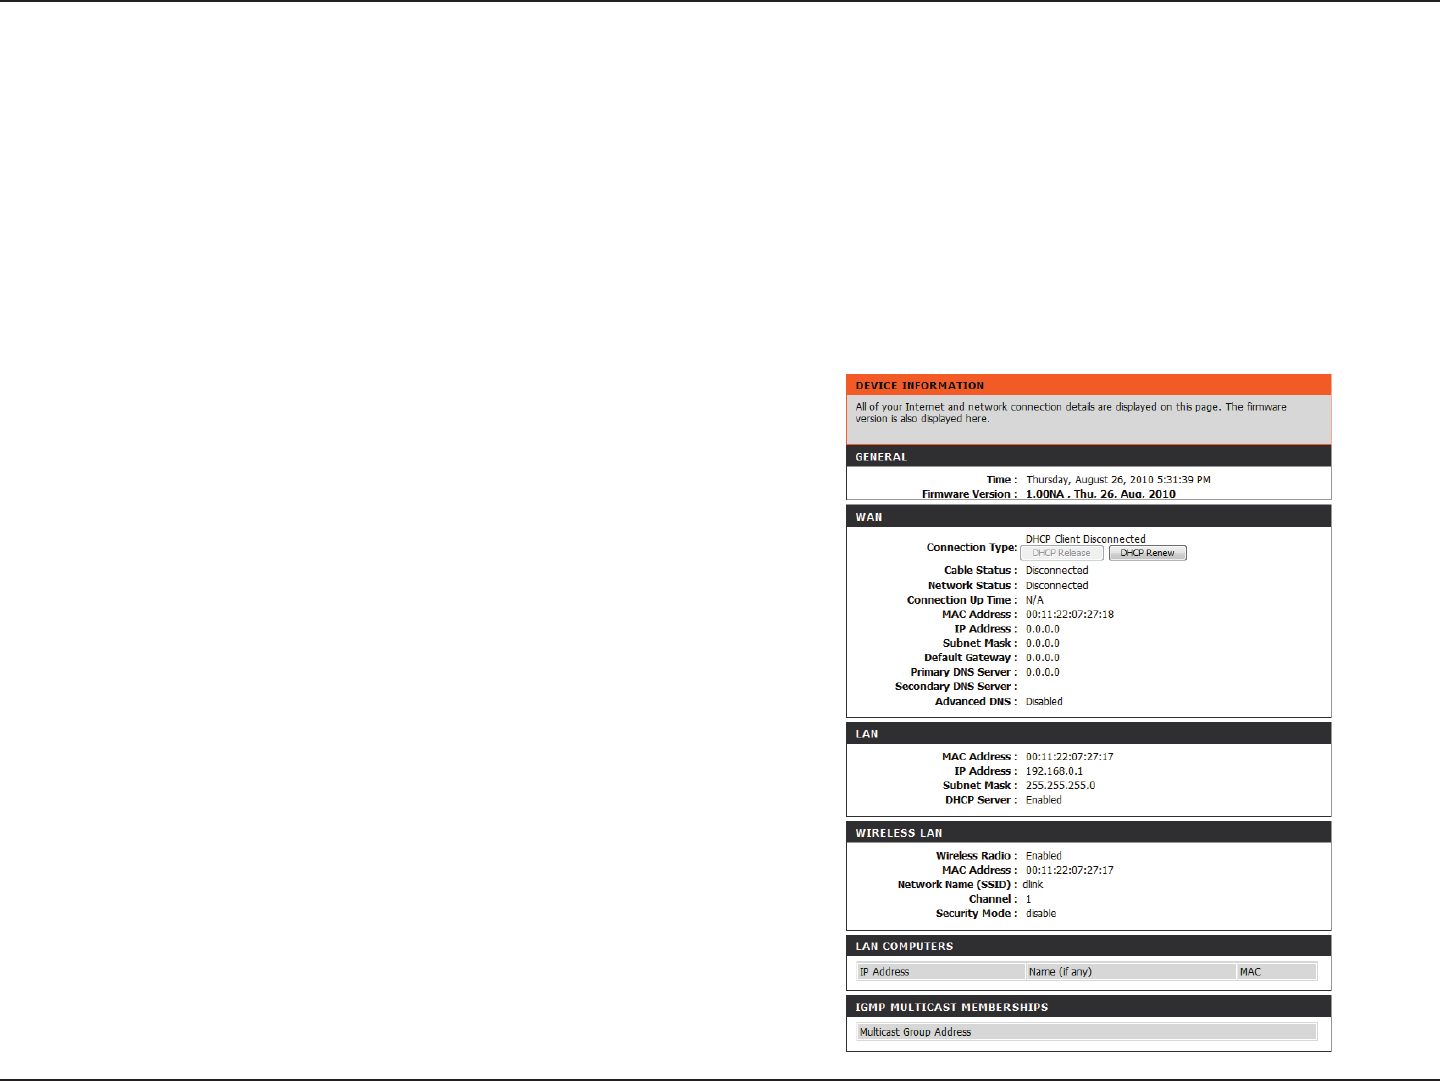
Section 3 - Conguration
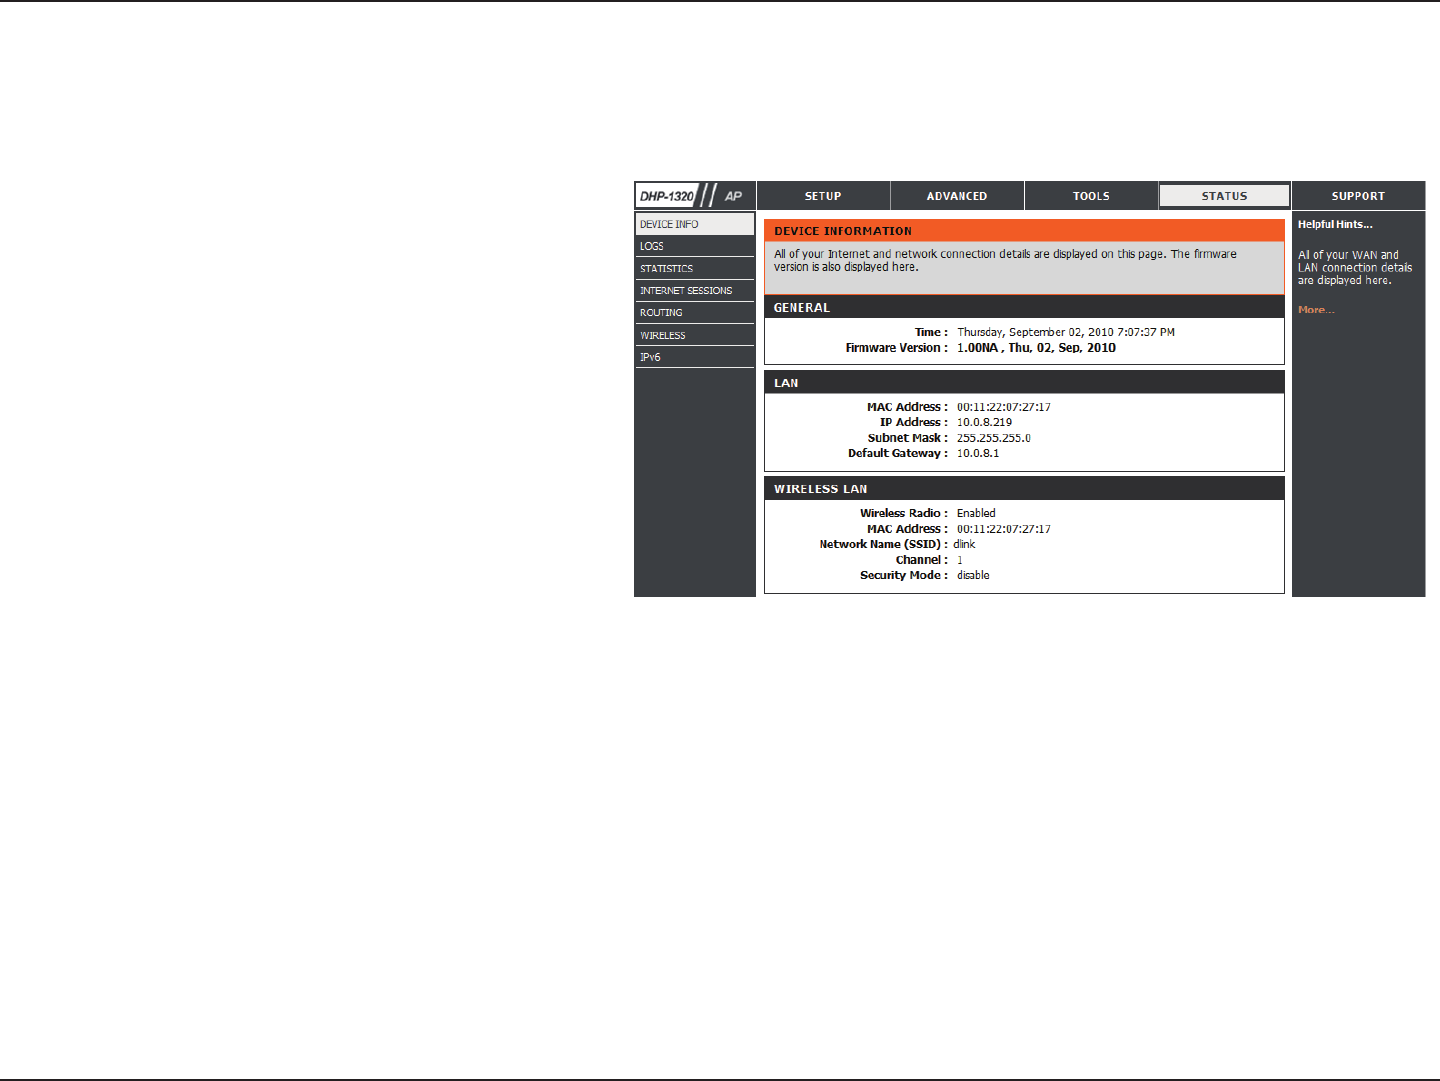
This page displays the current information for the DHP-1320. It will display the LAN, WAN (Internet), and Wireless information. If your Internet
connection is set up for a Dynamic IP address then a Release button and a Renew button will be displayed. Use Release to disconnect from your
ISP and use Renew to connect to your ISP.
If your Internet connection is set up for PPPoE, a Connect button and a Disconnect button will be displayed. Use Disconnect to drop the PPPoE
connection and use Connect to establish the PPPoE connection.
Displays the router’s time and rmware version.
Displays the MAC address and the public IP settings for
the router.
Displays the MAC address and the private (local) IP settings
for the router.
Displays the wireless MAC address and your wireless
settings such as SSID and Channel.
Displays computers and other devices which are connected
to the router via Ethernet, and that are receiving an IP
address assigned by the router CDHCP).
Displays the Multicast Group IP address.
General:
WAN:
LAN:
Wireless LAN:
LAN Computer:
IGMP Multicast
Memberships:
Device Info
Status
96D-Link DHP-1320 User Manual
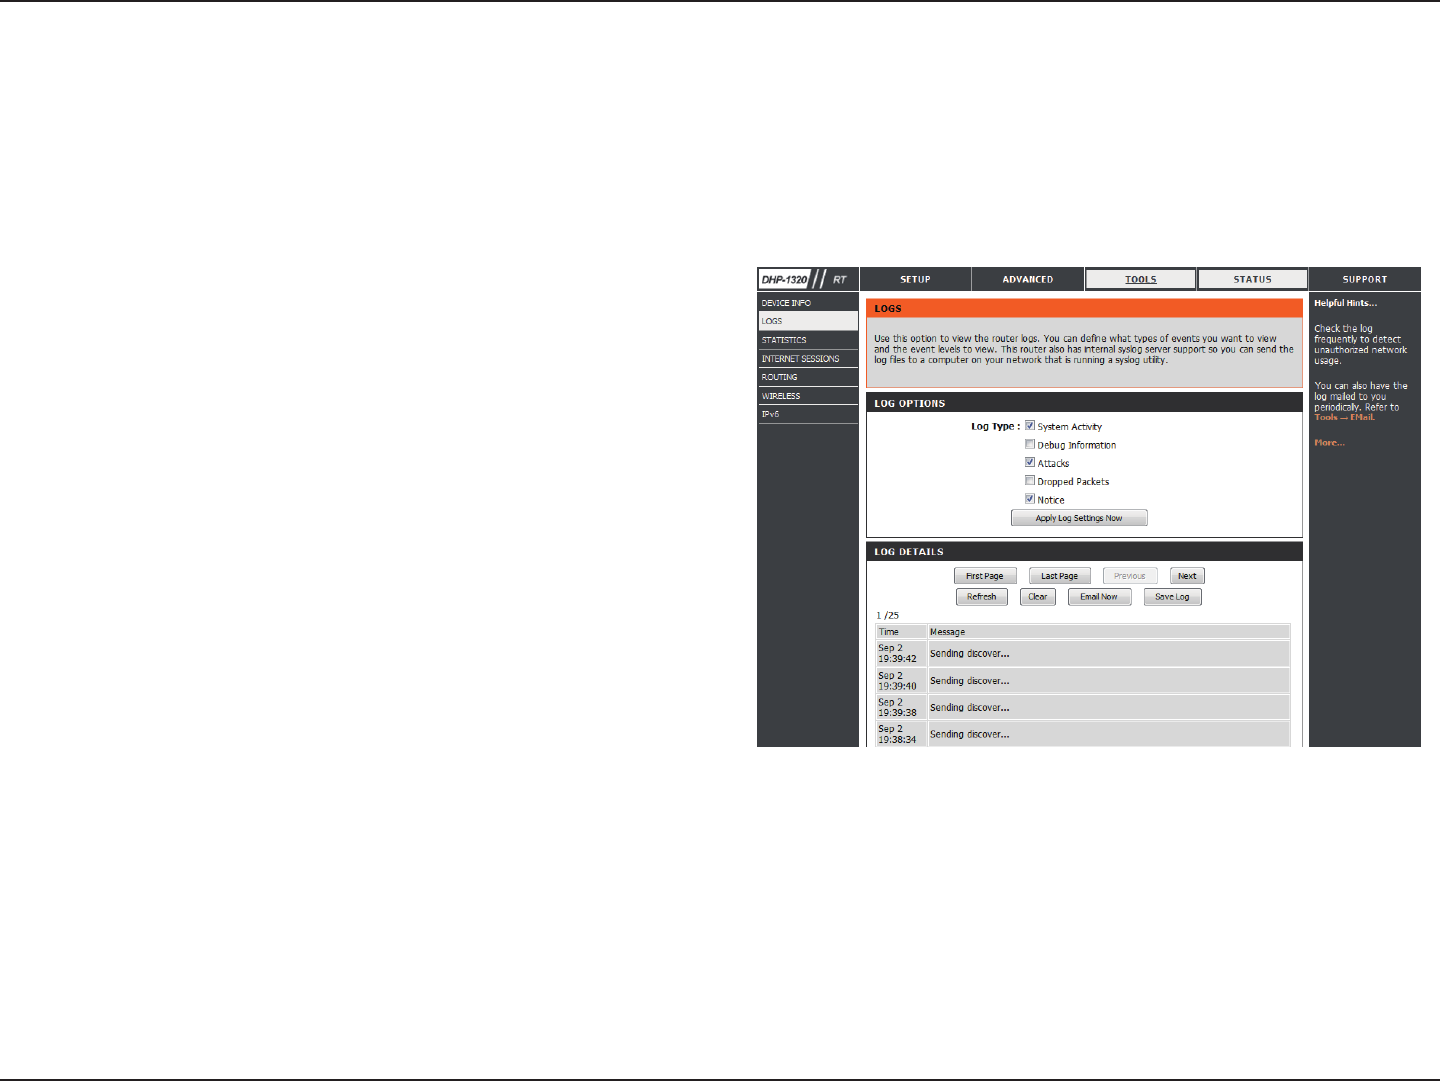
Section 3 - Conguration
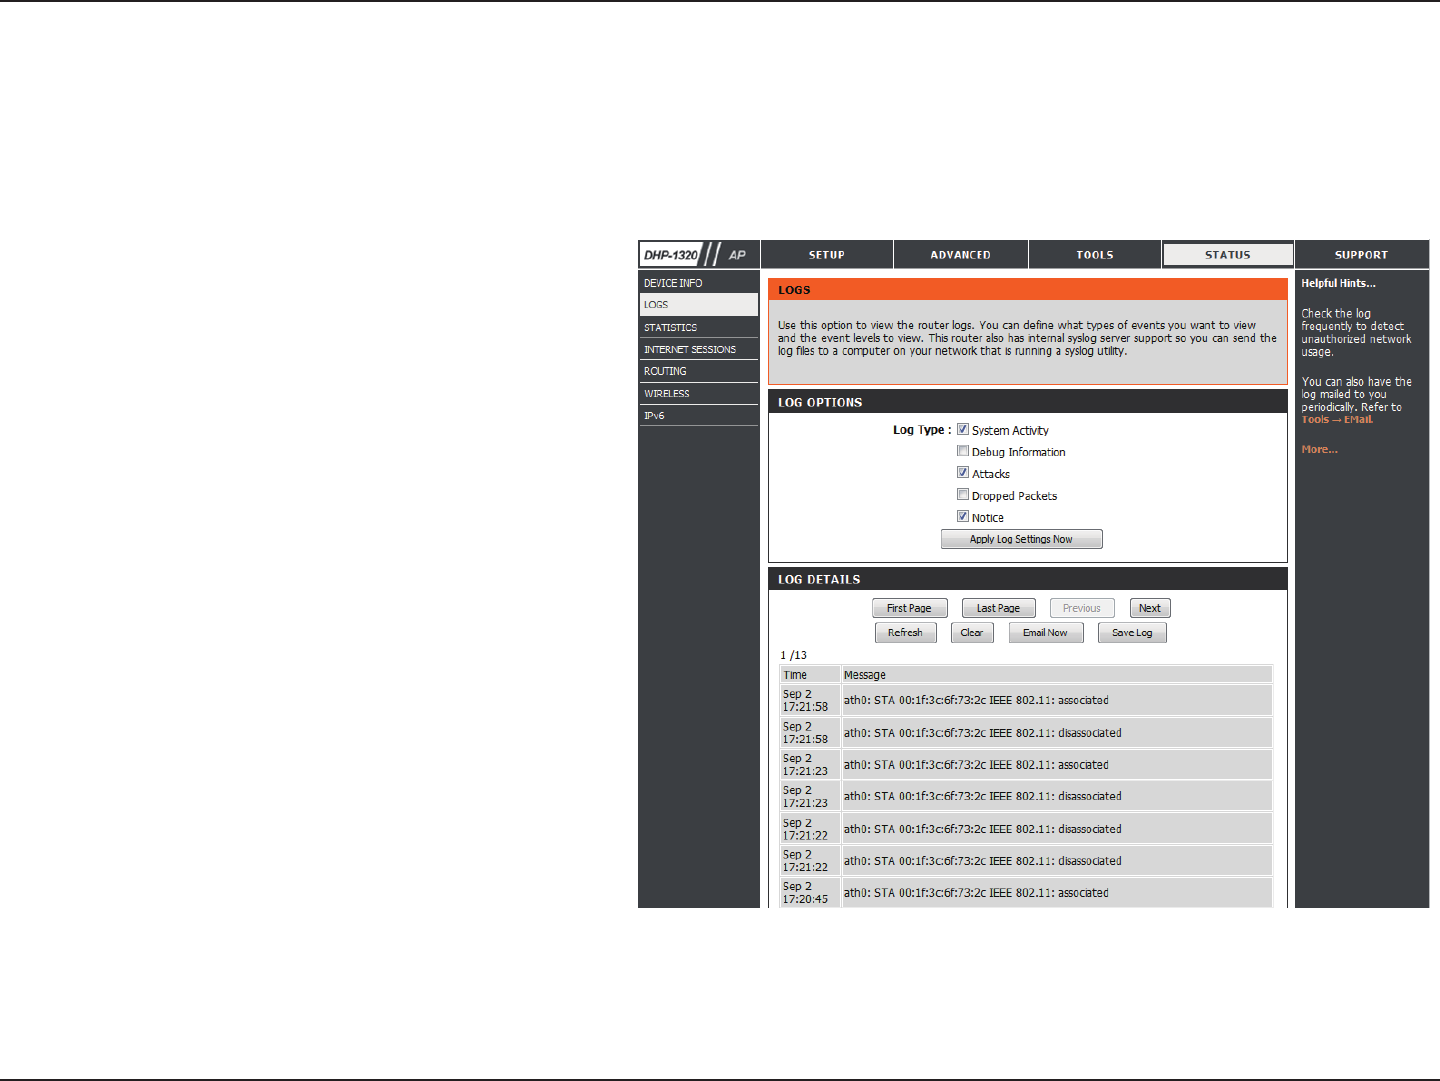
Logs
Save Log File:
Log Type:
First Page:
Last Page:
Previous:
Next:
Clear:
Email Now:
Click the Apply Log Settings Now button save the Router’s
log entries to a log le on your computer.
Use the radio buttons to select the types of messages
that you want to display from the log. System, Firewall
& Security, and Router Status messages can be selected.
Click this button to view the rst page of the Router logs.
Click this button to view the last page of the Router logs.
Click this button to view the previous page of the Router
logs.
Click this button to view the next page of the Router logs.
Clears all of the log contents.
Click this button to open the Tools > Email Settings
screen so that you can change the Email conguration
for sending logs.
The router automatically logs (records) events of possible interest in it’s internal memory. If there isn’t enough internal memory for all events, logs
of older events are deleted but logs of the latest events are retained. The Logs option allows you to view the router logs. You can dene what types
of events you want to view and the level of the events to view. This router also has external Syslog Server support so you can send the log les to
a computer on your network that is running a Syslog utility.
97D-Link DHP-1320 User Manual
Section 3 - Conguration
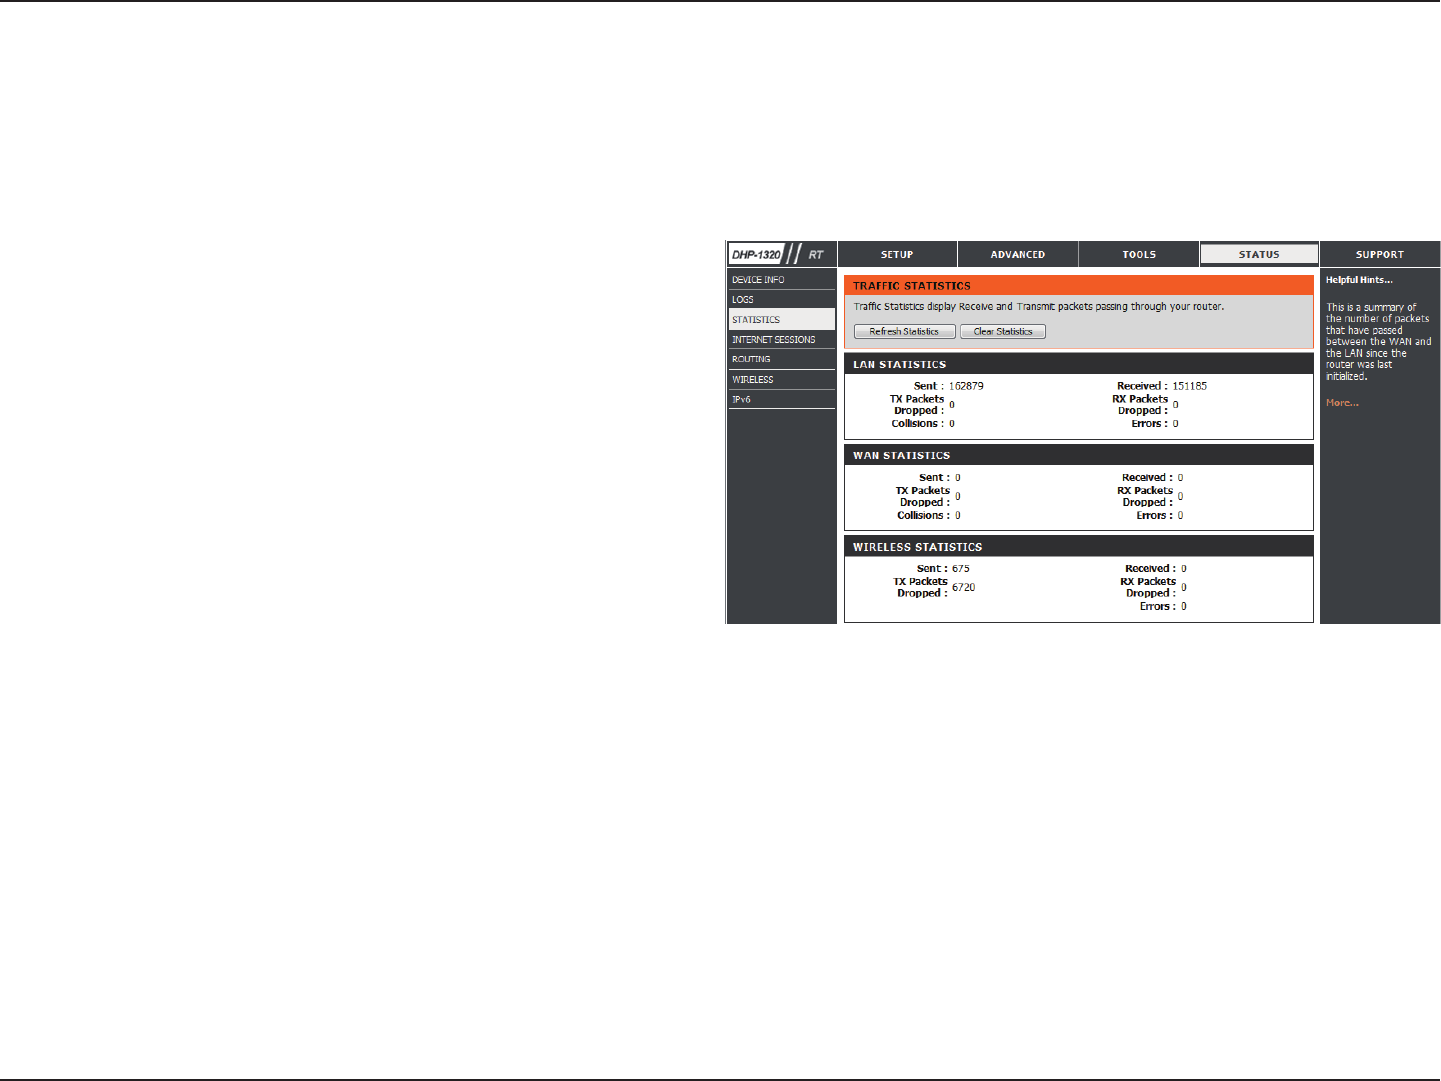
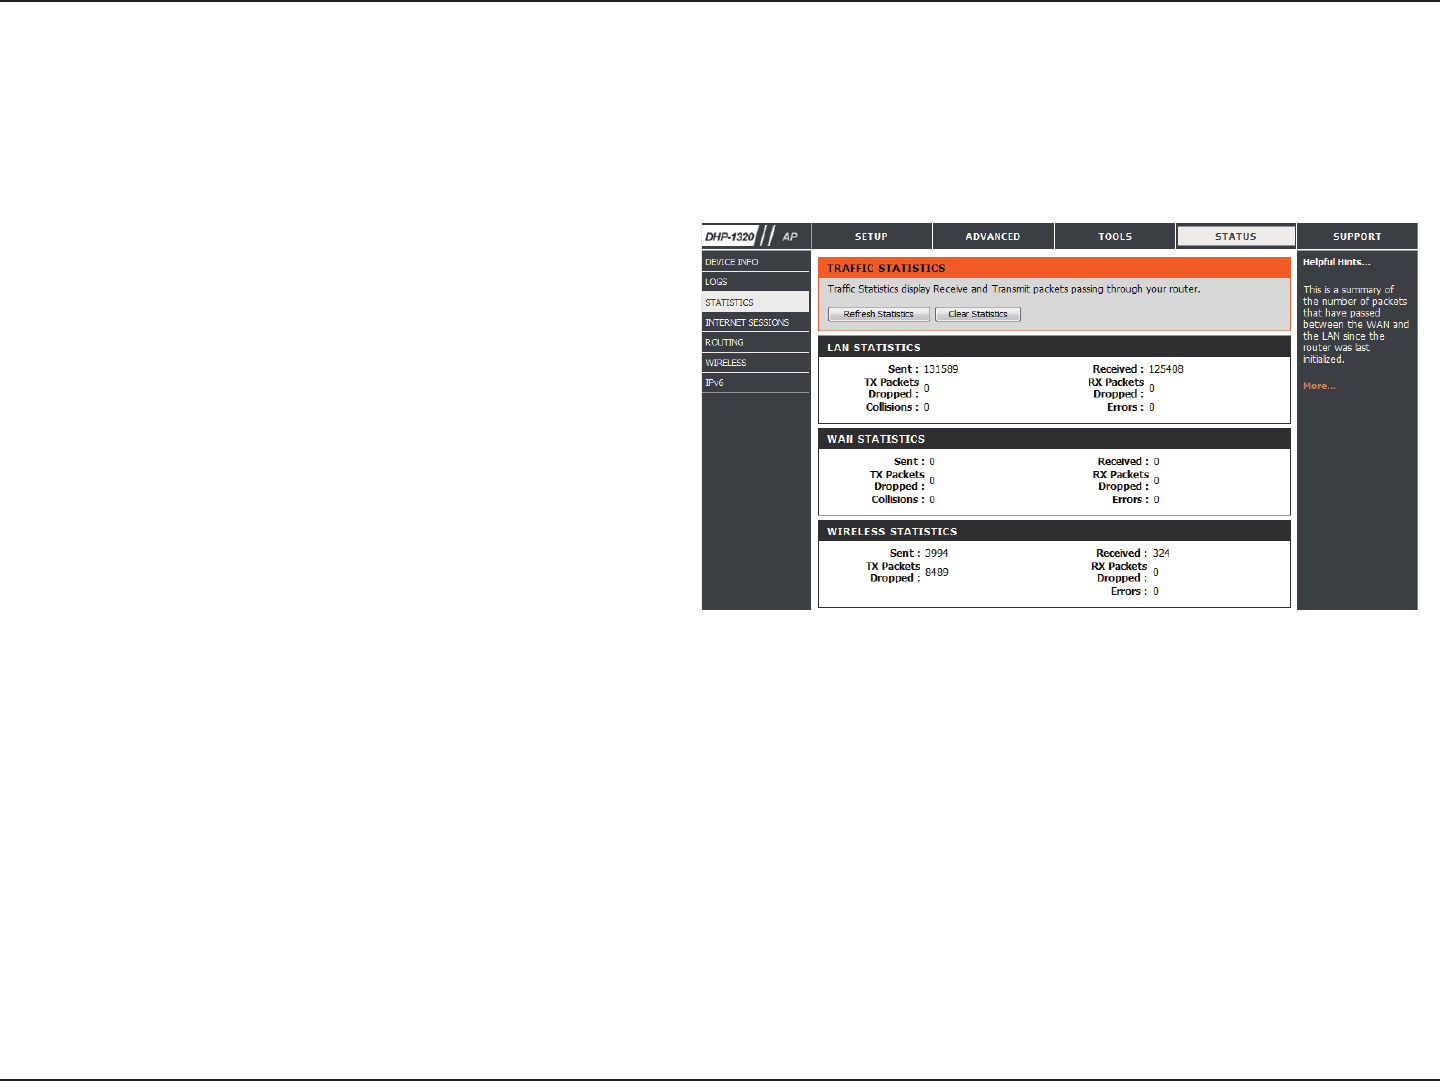
Statistics
The screen below displays the Trac Statistics. Here you can view the amount of packets that pass through the DHP-1320 on both the WAN, LAN ports
and the 802.11n/g (2.4GHz) wireless band. The trac counter will reset if the device is rebooted.
Refresh:
Reset:
Click the Refresh button to refresh the Router’s trac
statistics.
Click the Reset button to reset the Router’s trac
statistics.
98D-Link DHP-1320 User Manual
Section 3 - Conguration
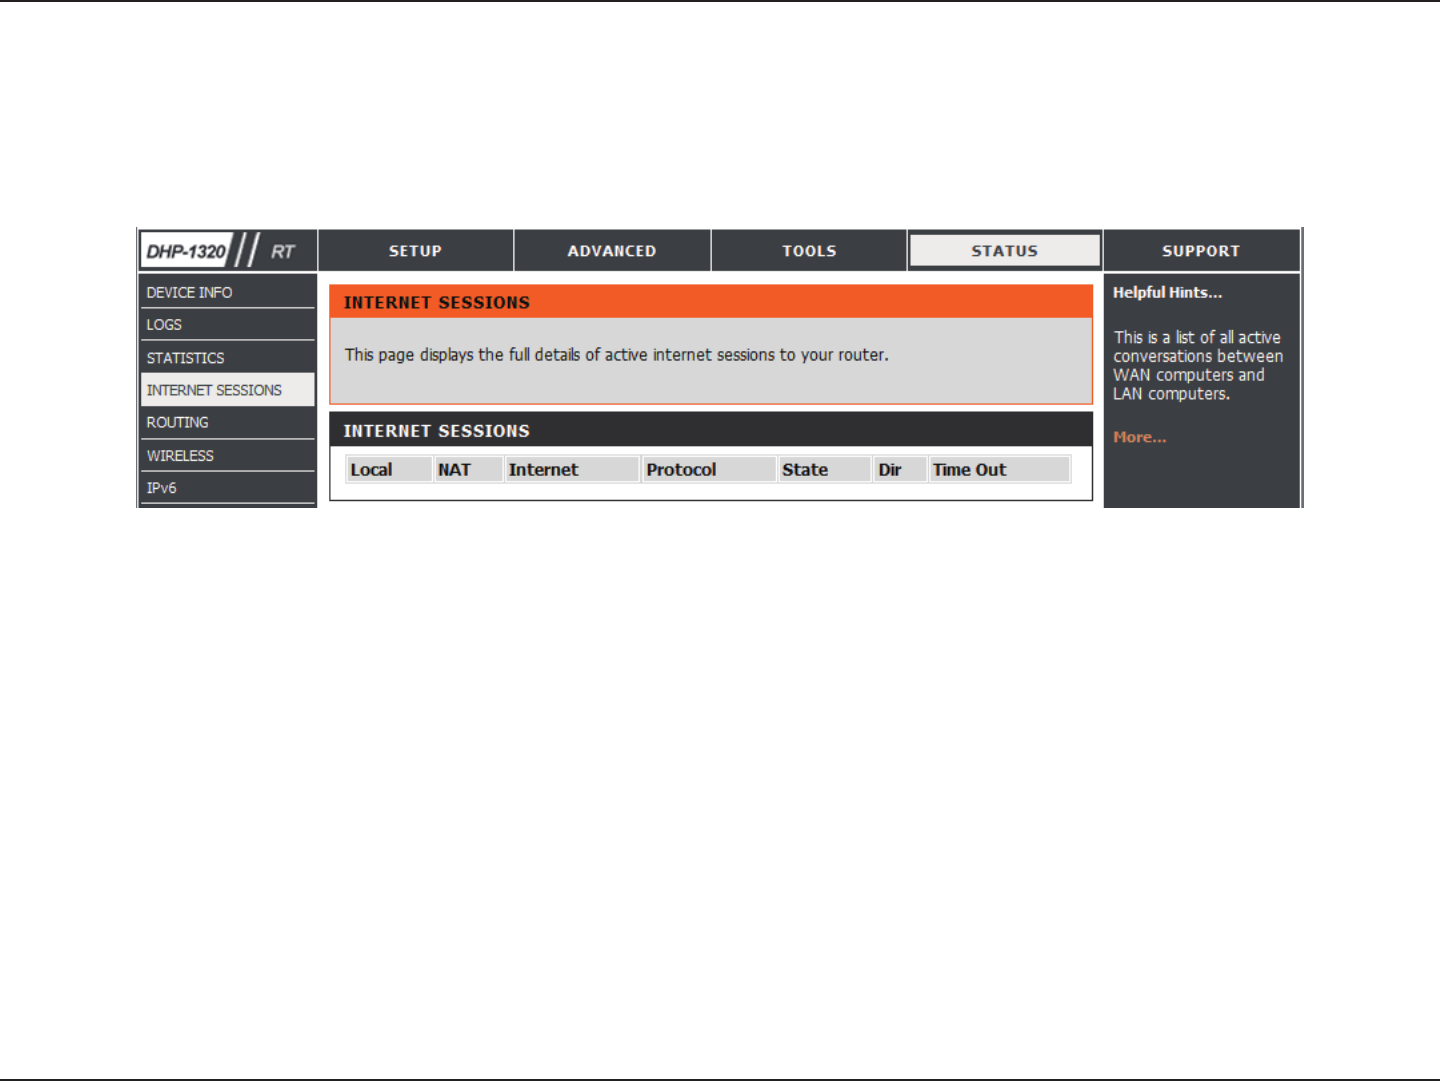
Internet Sessions
The Internet Sessions page displays full details of active Internet sessions through your router. An Internet session is a conversation between a
program or application on a LAN-side computer and a program or application on a WAN-side computer.
99D-Link DHP-1320 User Manual
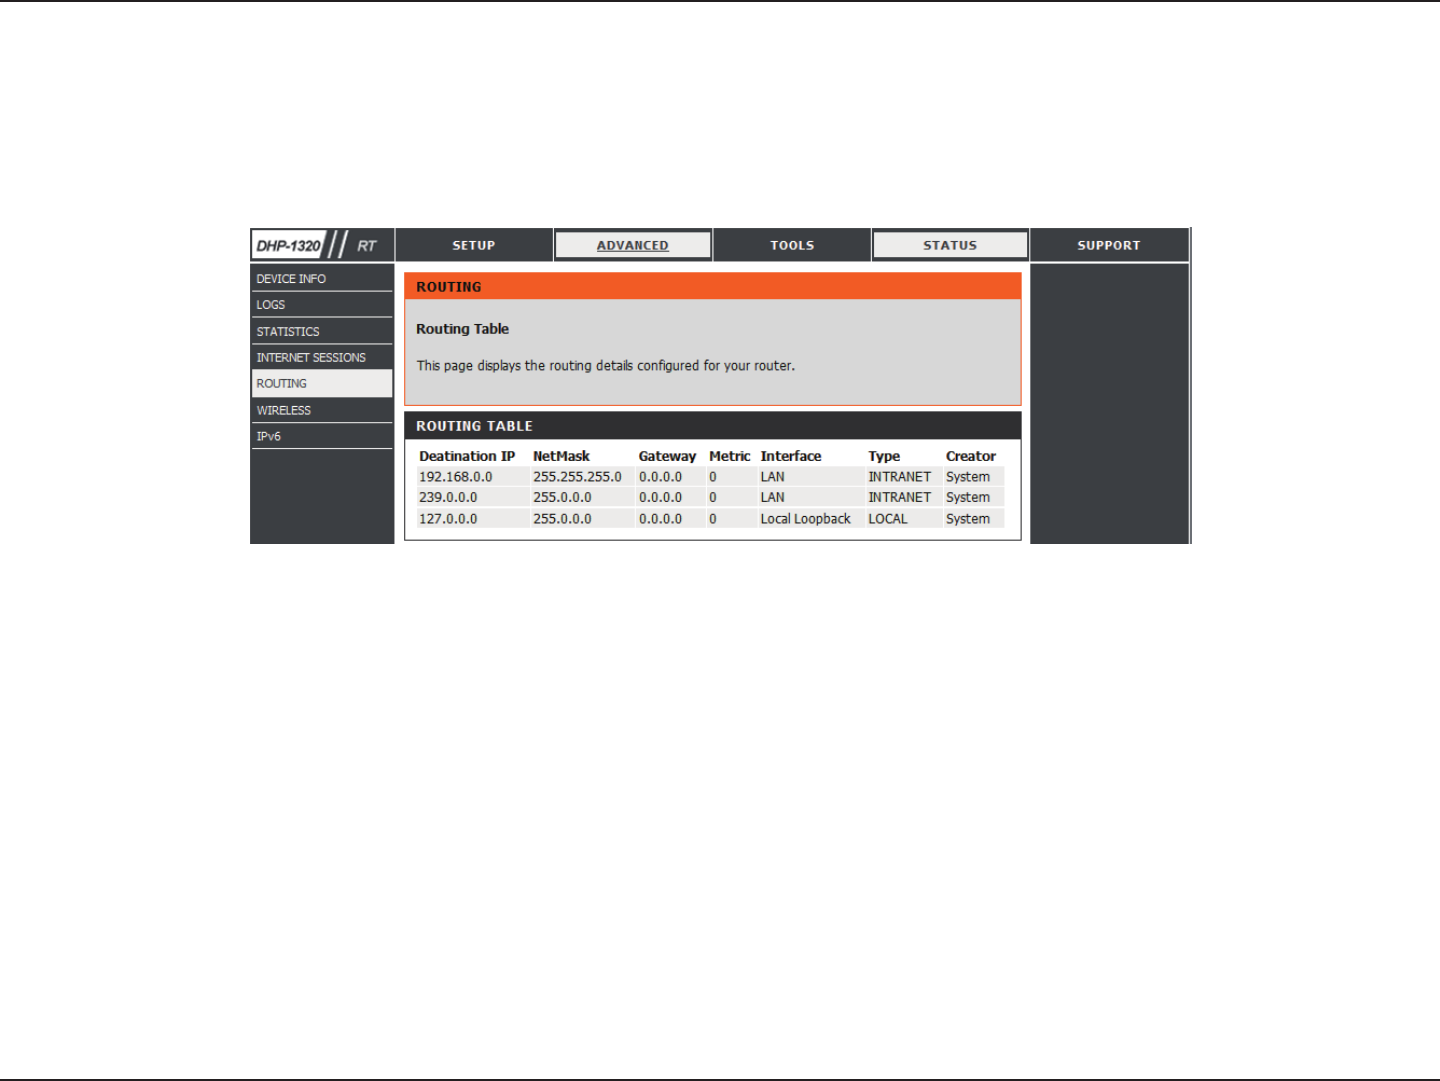
Section 3 - Conguration
Routing Table
This page displays the routing details congured for your router.
100D-Link DHP-1320 User Manual
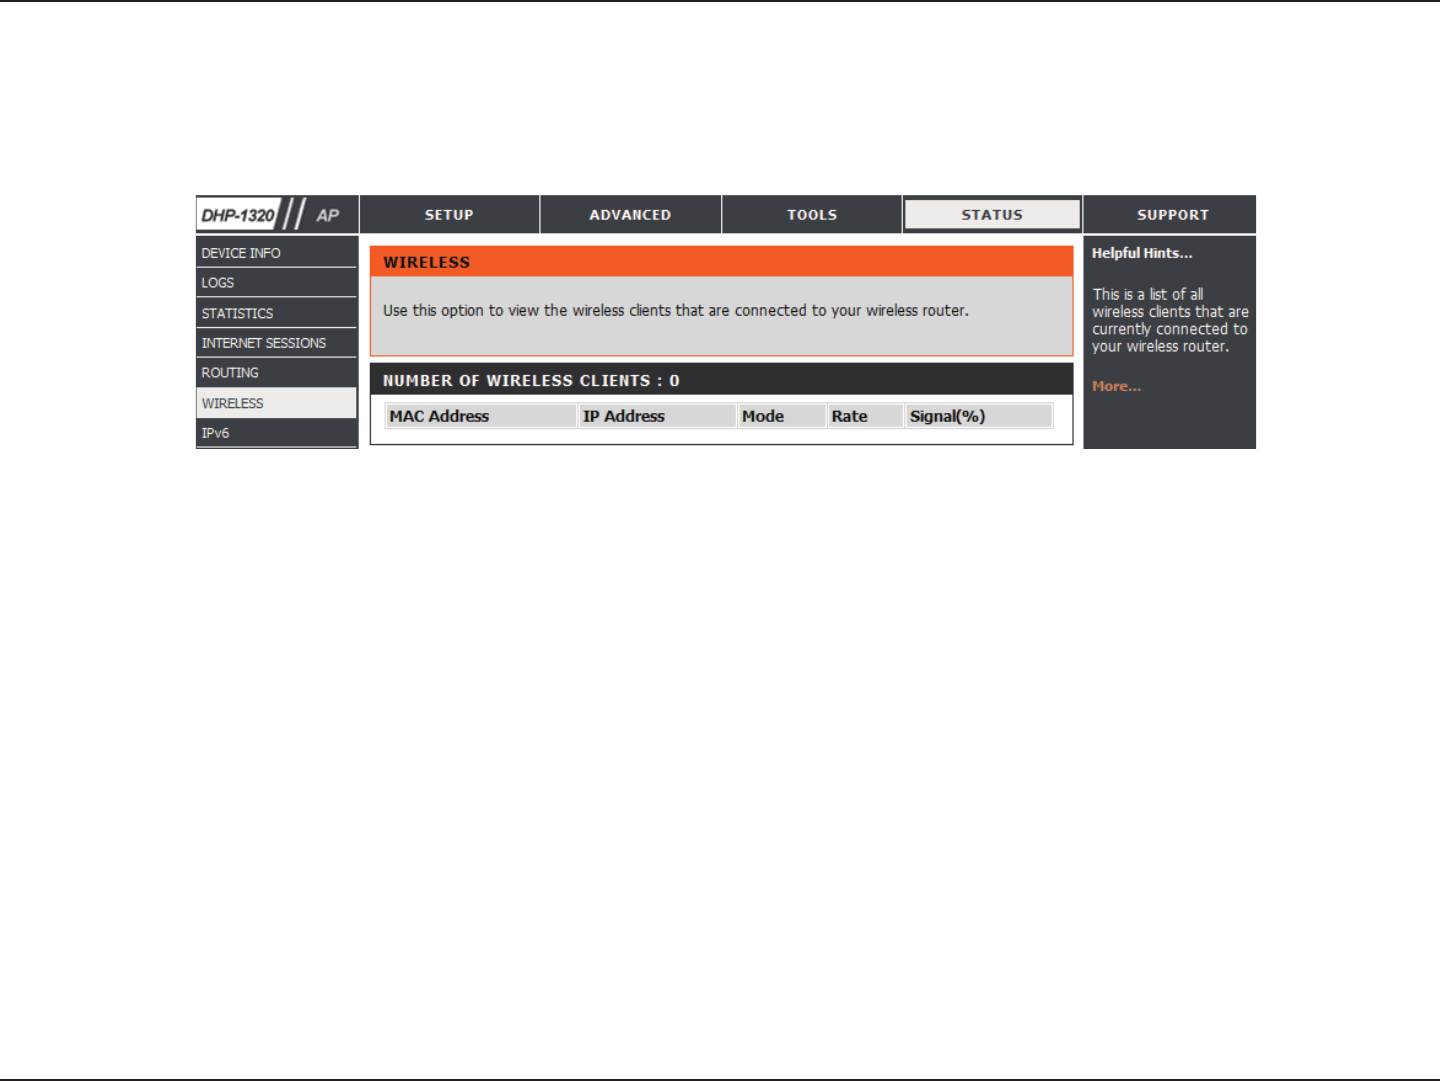
Section 3 - Conguration
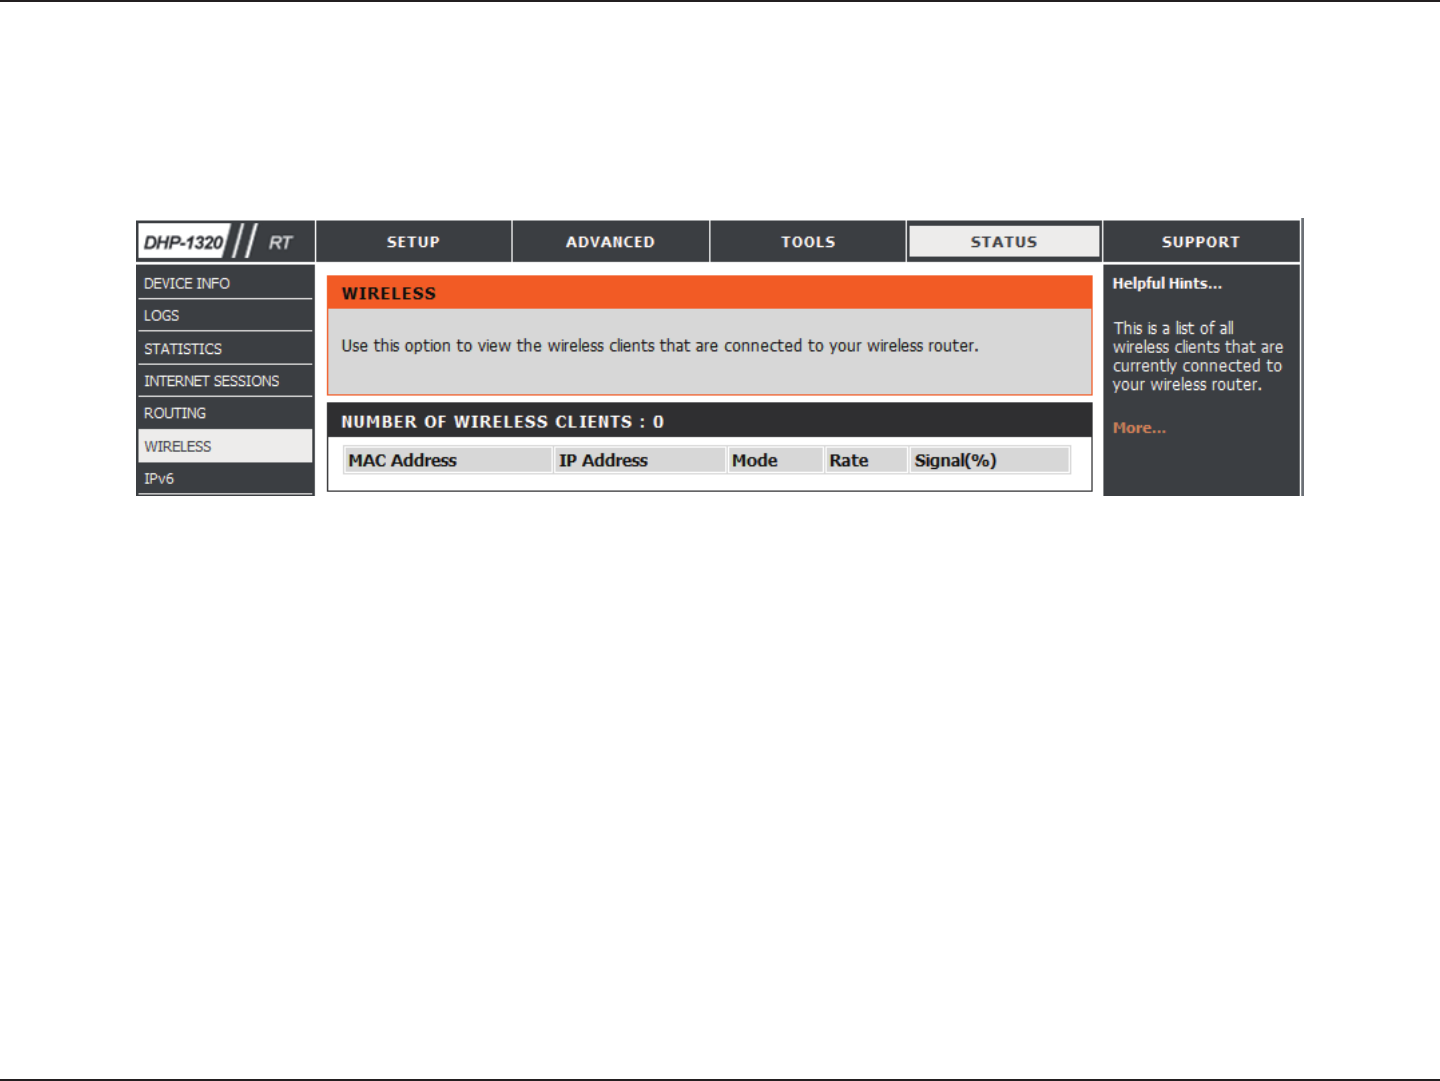
The wireless client table displays a list of current connected wireless clients. This table also displays the connection time and MAC address of the
connected wireless clients.
Wireless
101D-Link DHP-1320 User Manual
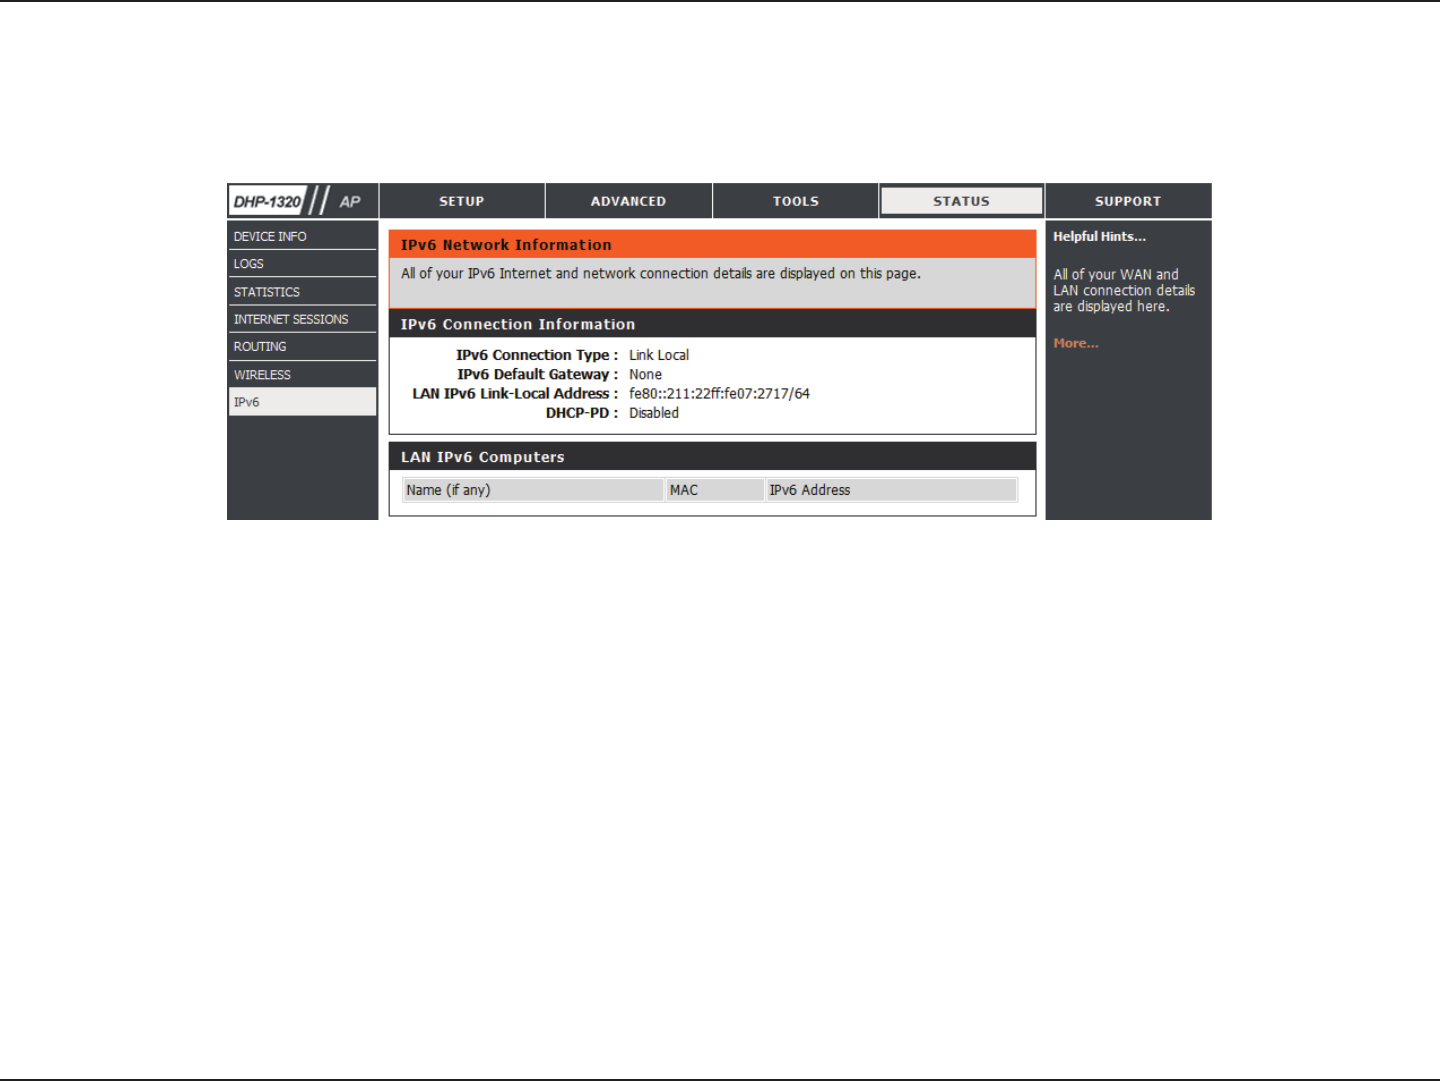
Section 3 - Conguration
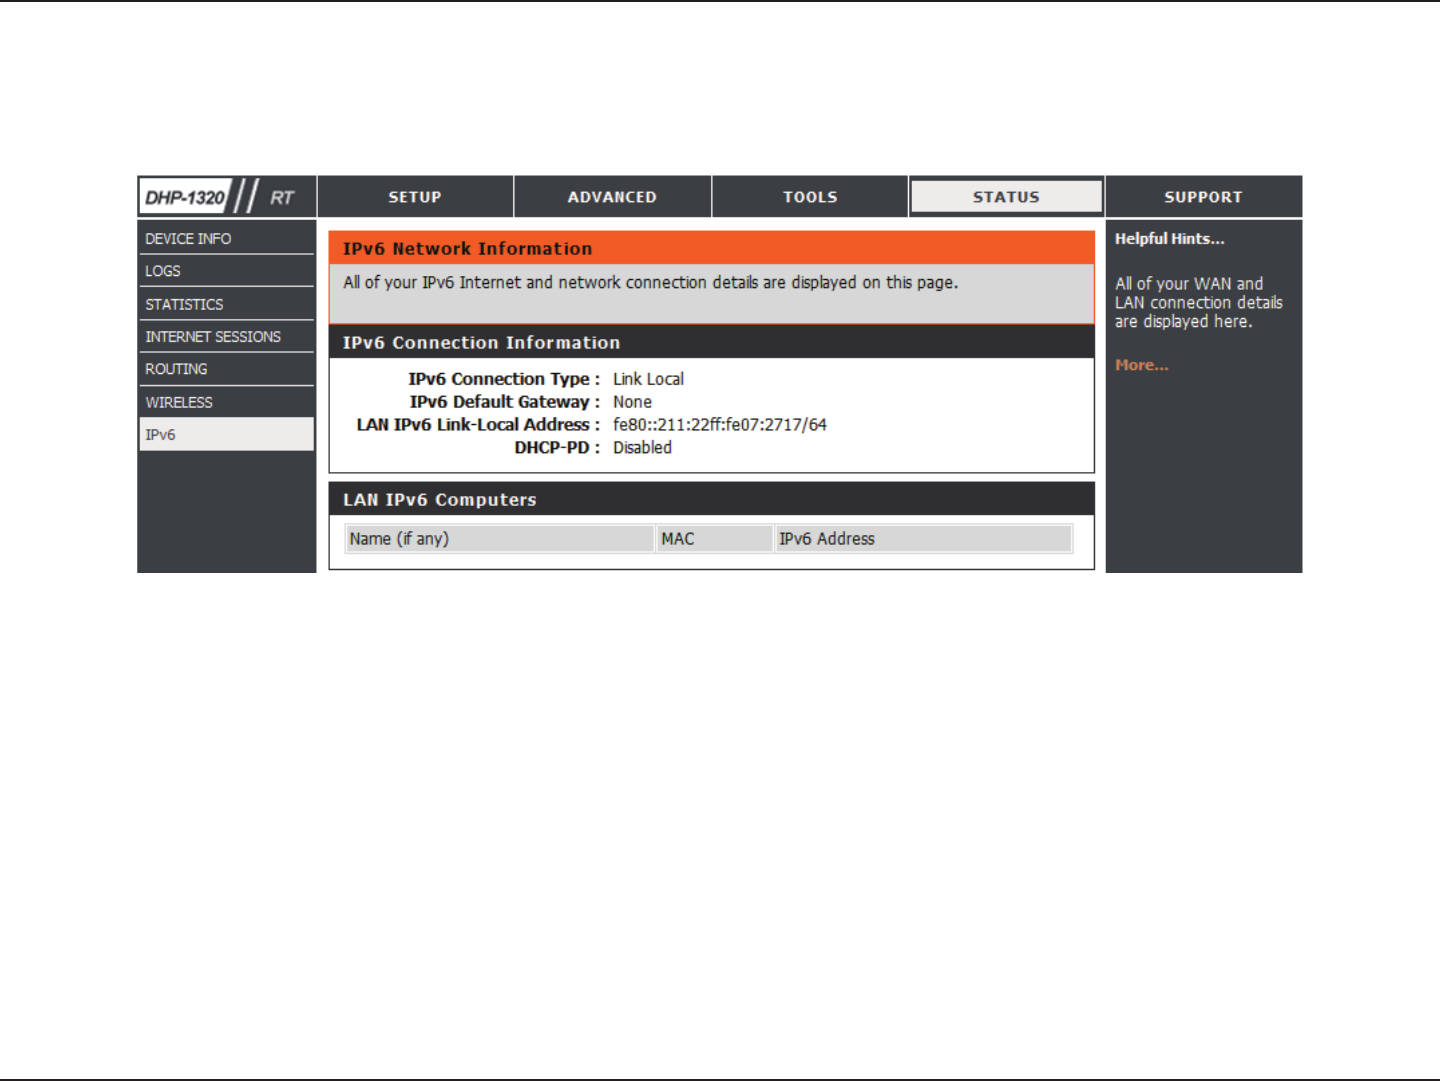
IPv6
The IPv6 page displays a summary of the Router’s IPv6 settings and lists the IPv6 address and host name of any IPv6 clients.
102D-Link DHP-1320 User Manual
Section 3 - Conguration
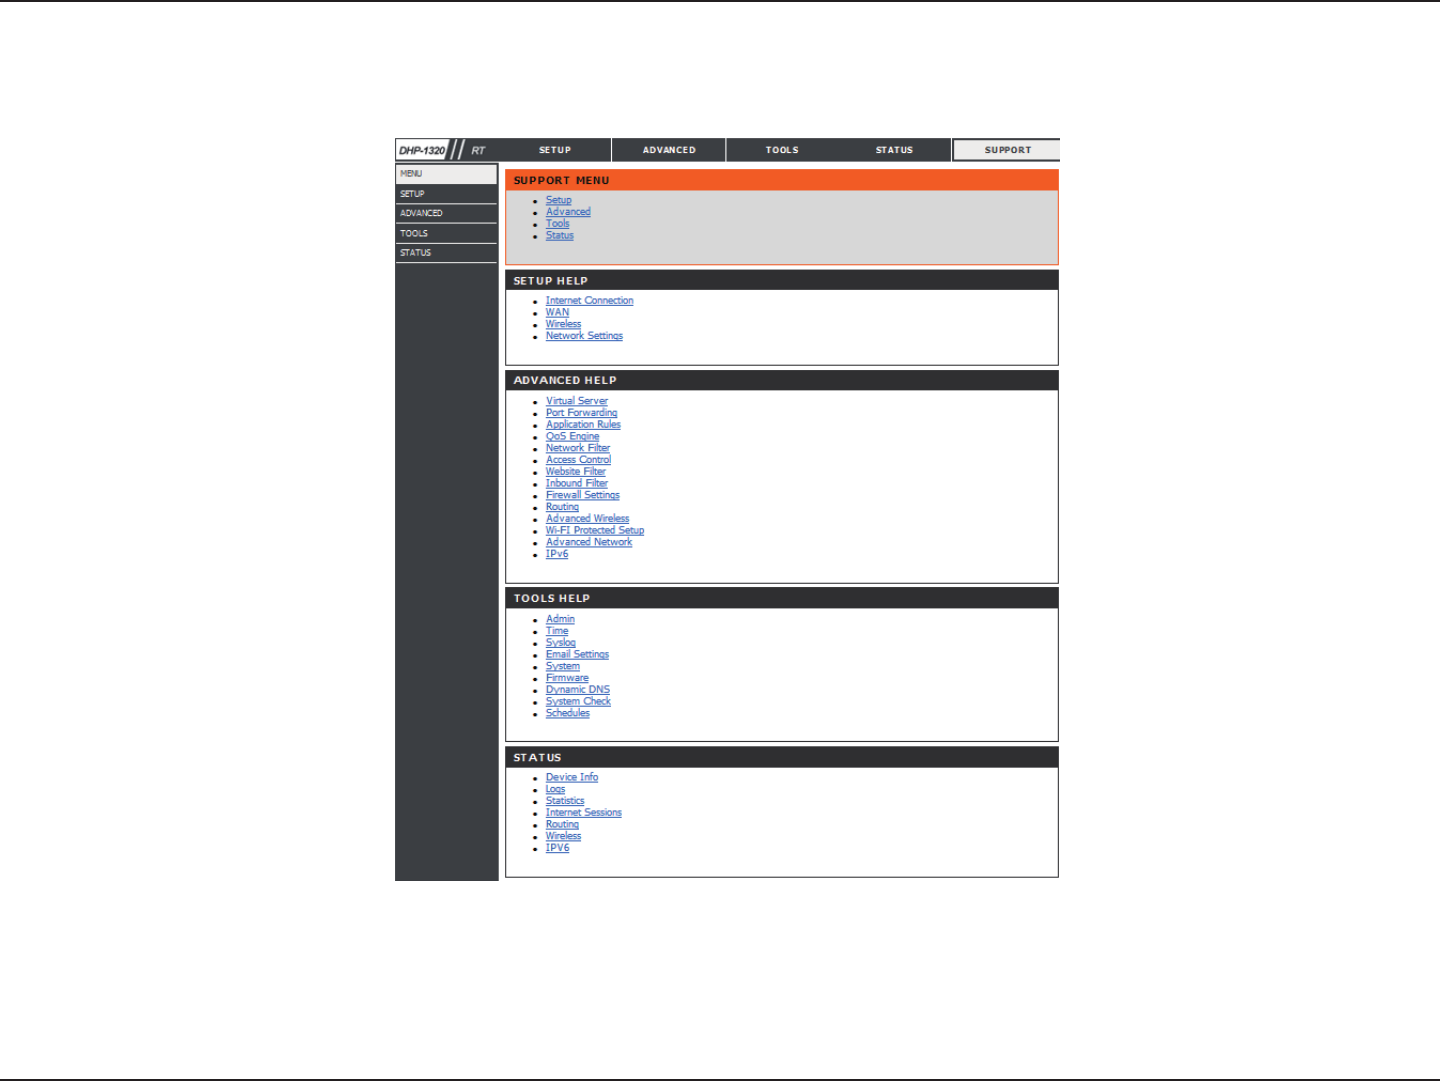
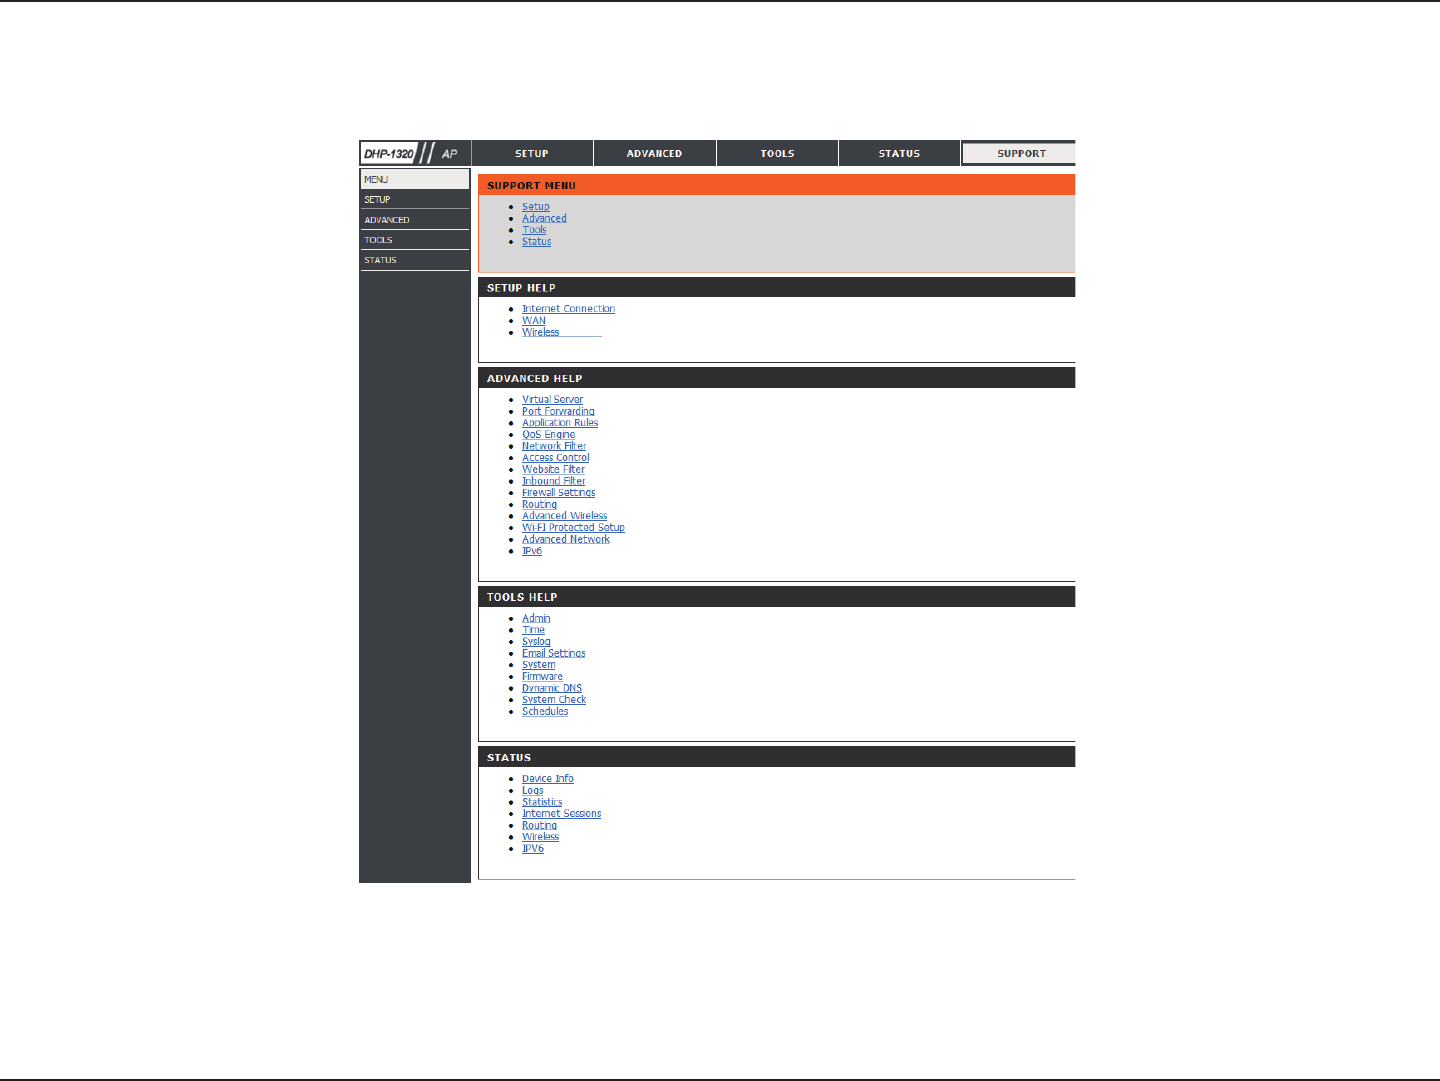
Support
103D-Link DHP-1320 User Manual
Section 4 - Security
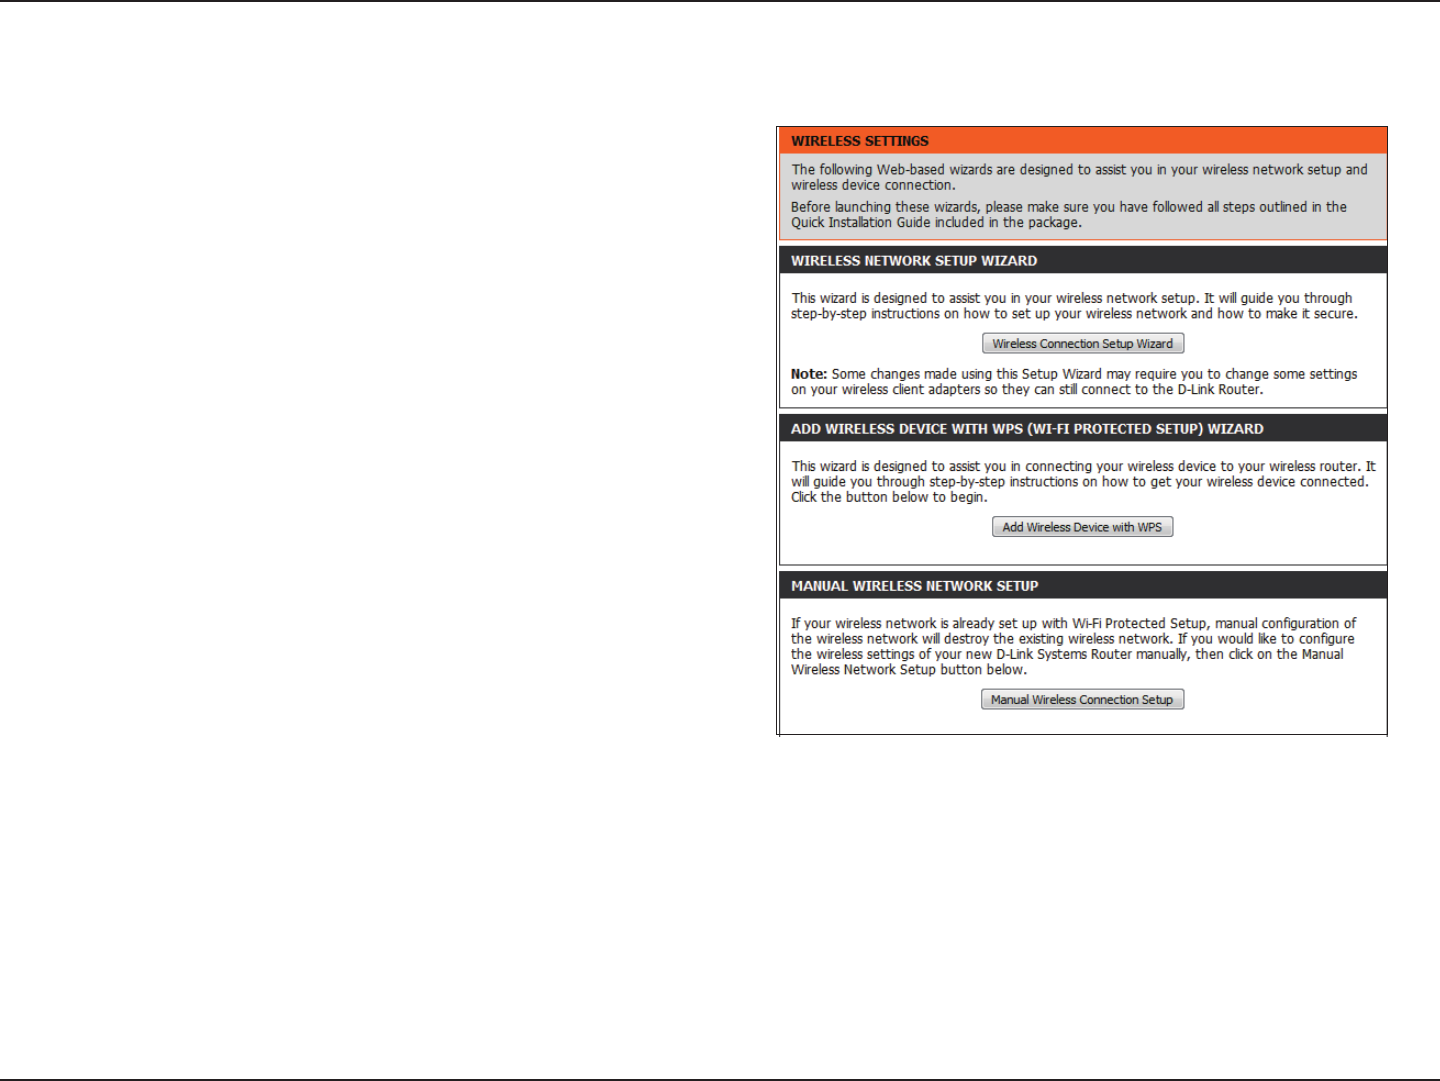
Wireless Connection Setup Wizard
To run the Wireless Connection Setup Wizard, click the Wireless Connection
Setup Wizard button in the Setup>Wireless Settings window.
104D-Link DHP-1320 User Manual
Section 4 - Security
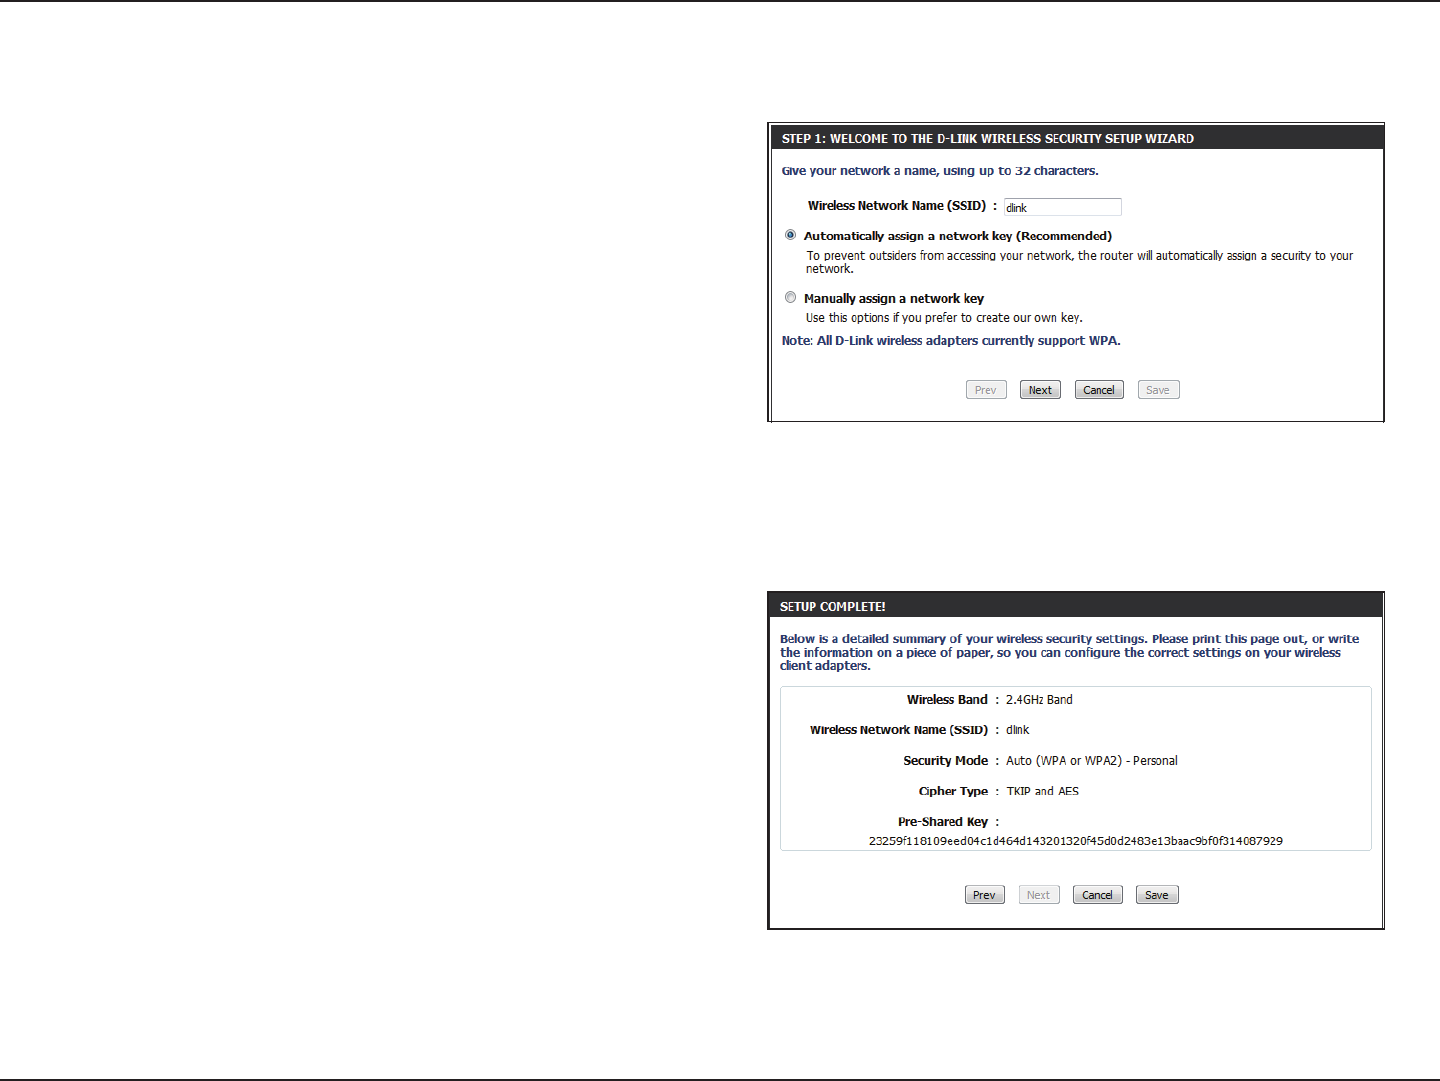
Wireless Security Setup Wizard
Check the Manually set 5GHz band Network Name... box to manually set
your desired wireless network name for the 5GHz band.
Type your desired wireless network name (SSID).
Automatically: Select this option to automatically generate the
router’s network key and click Next.
Manually: Select this option to manually enter your network key
and click Next.
If you selected Automatically, the summary window will display your
settings. Write down the security key and enter this on your wireless clients.
Click Save to save your settings.
105D-Link DHP-1320 User Manual
Section 4 - Security
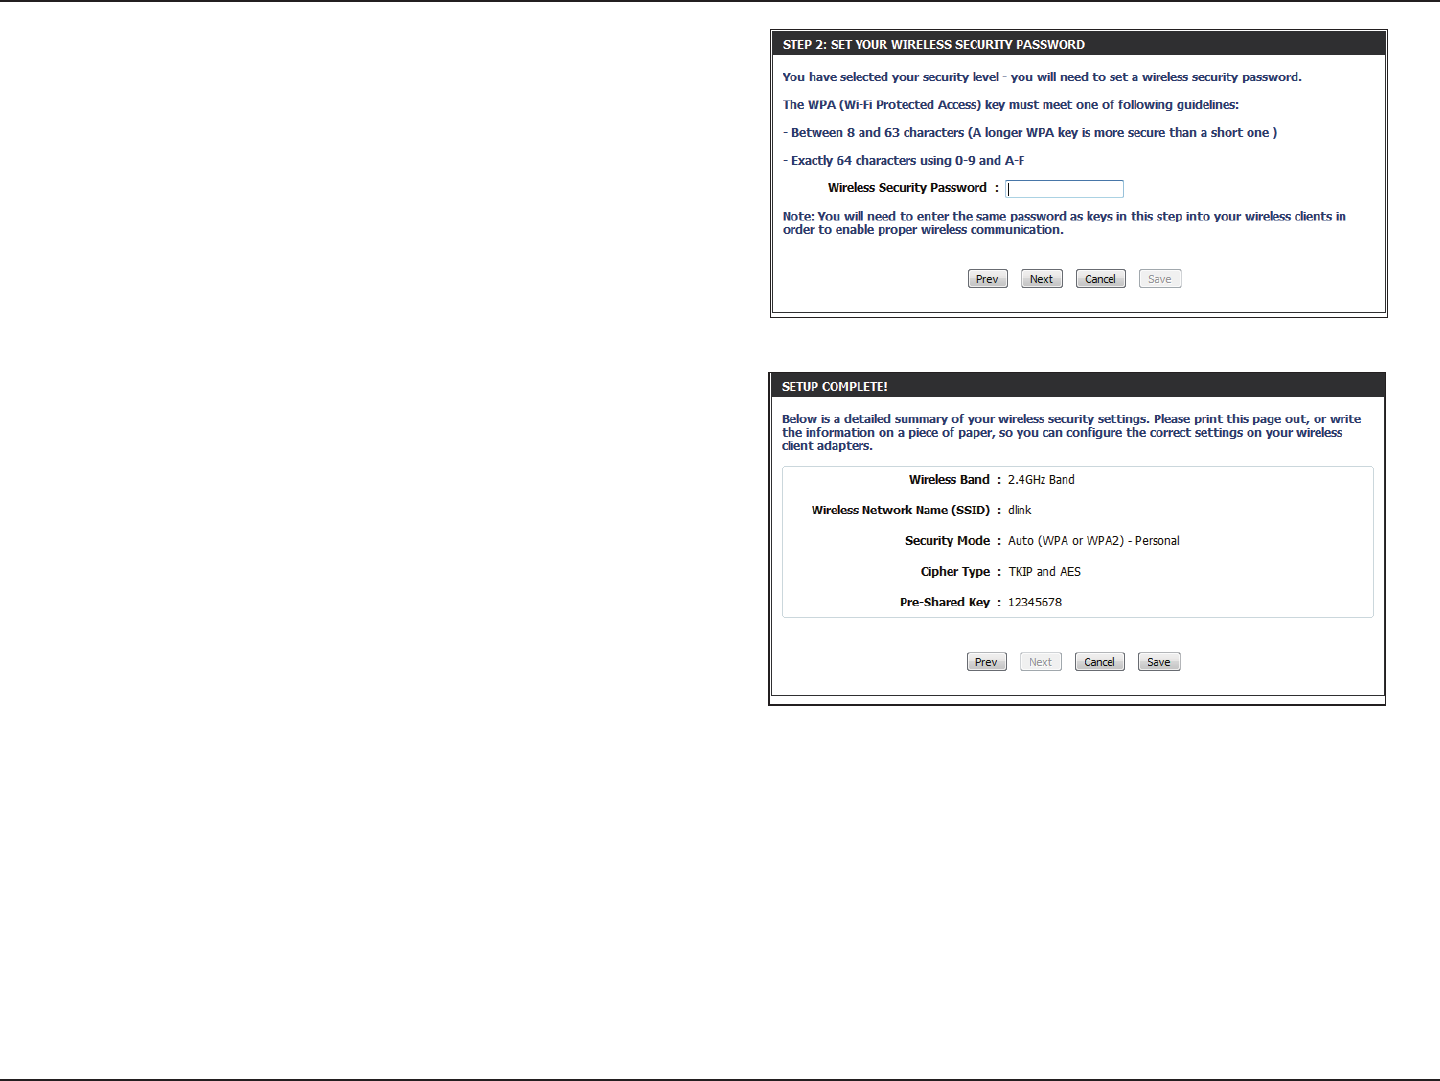
If you selected Manually, the following screen will appear.
Enter the Wireless Security Password you would like to use for your wireless
network and click Next to proceed to the next window.
The summary window will display your settings. Write down the security
key and enter this on your wireless clients. Click Save to save your settings.
106D-Link DHP-1320 User Manual
Section 4 - Security
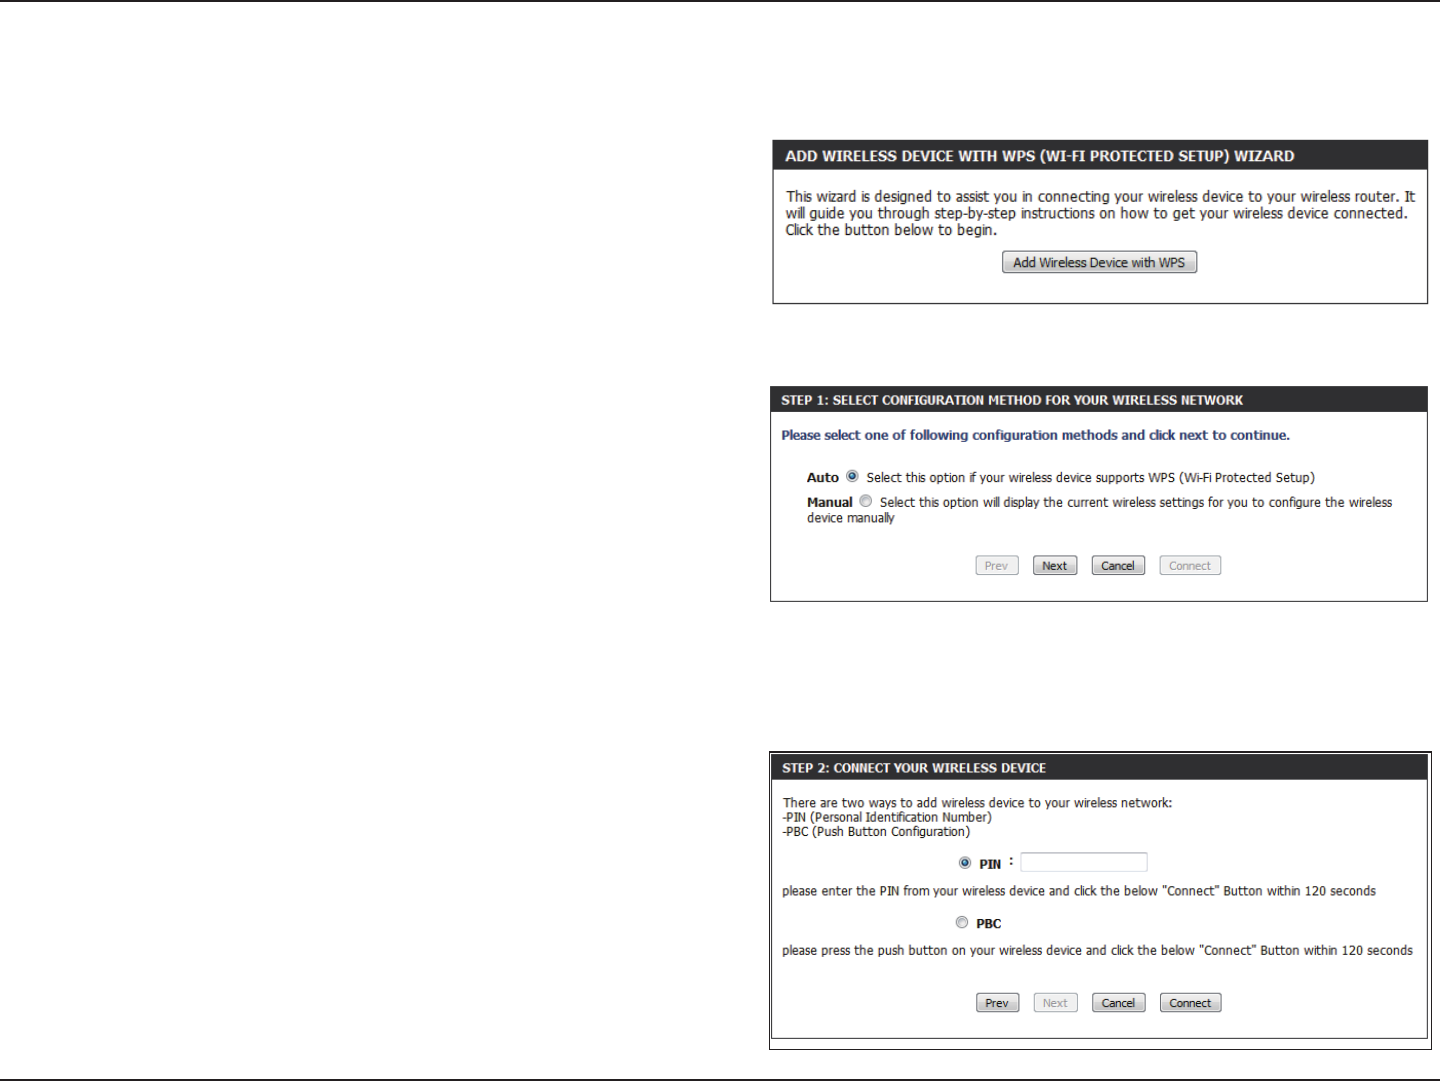
From the Setup > Wireless Settings screen, click Add Wireless Device
with WPS.
Add Wireless Device with WPS Wizard
PIN: Select this option to use PIN method. In order to use this method you
must know the wireless client’s 8 digit PIN and click Connect.
PBC: Select this option to use PBC (Push Button) method to add a wireless
client. Click Connect.
Select Auto to add a wireless client using WPS (Wi-Fi Protected Setup). Once
you select Auto and click Connect, you will have a 120 second time limit
to apply the settings to your wireless client(s) and successfully establish
a connection.
If you select Manual, a settings summary screen will appear. Write down
the security key and enter this on your wireless clients.
107D-Link DHP-1320 User Manual
Section 3 - Conguration
Conguration (AP Mode)
This section will show you how to congure your new D-Link wireless router using the web-based conguration utility.
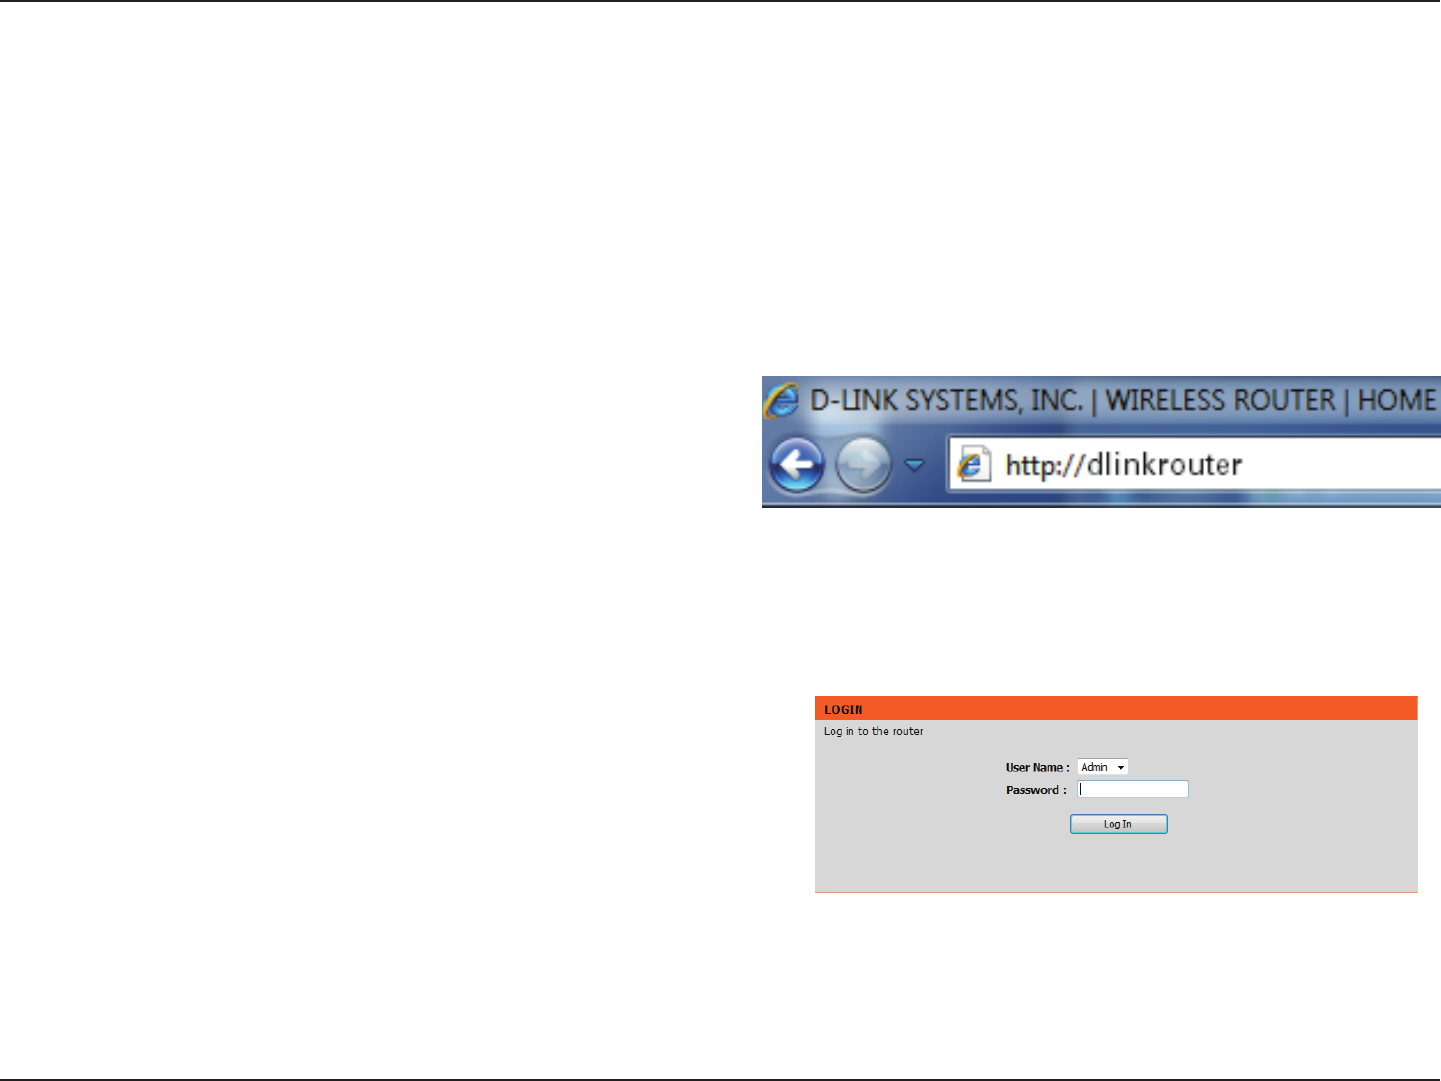
Web-based Conguration Utility
To access the conguration utility, open a web-browser such as Internet
Explorer and enter http://dlinkrouter or the IP address of the router
(192.168.0.1).
Select Admin in the User Name eld. Leave the password blank by default.
If you get a Page Cannot be Displayed error, please refer to the
Troubleshooting section for assistance.
108D-Link DHP-1320 User Manual
Section 3 - Conguration
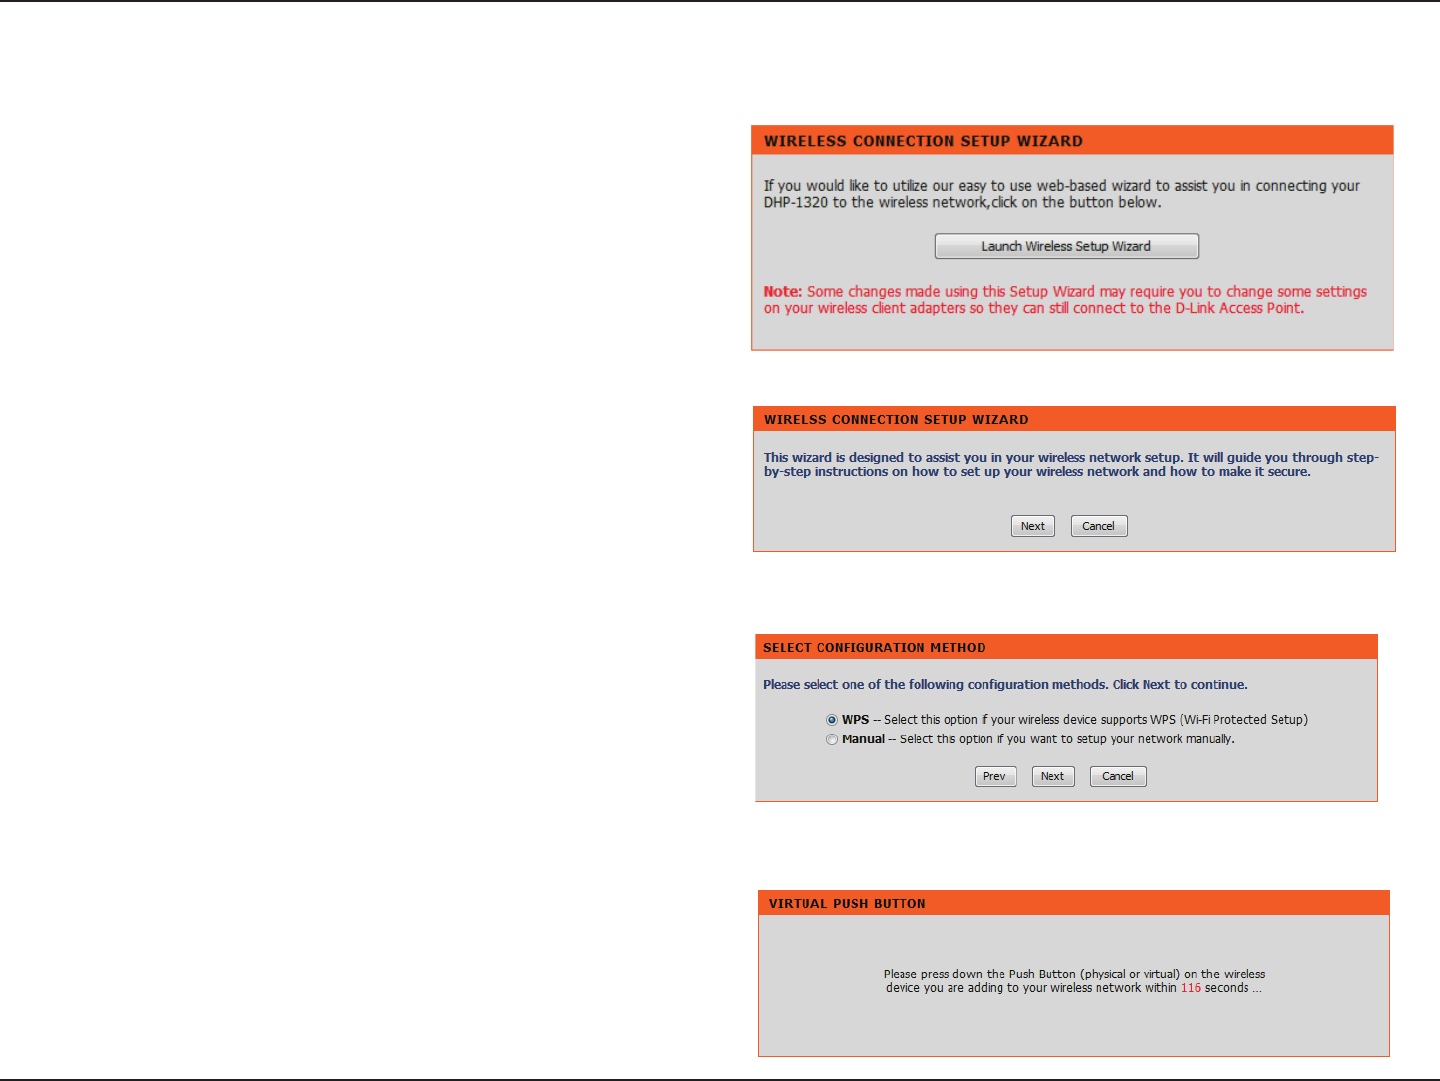
Wireless Setup Wizard
To use our web-based wizard to assit you in connecting your DHP-1320,
click Launch Wireless Setup Wizard to begin.
Click Next to continue your wireless network setup.
Select one of the two conguration methods. Select WPS if your wireless
device support WPS and click Next to continue to the next step.
Press down the Push Button on the wireless device within 116 seconds.
109D-Link DHP-1320 User Manual
Section 3 - Conguration
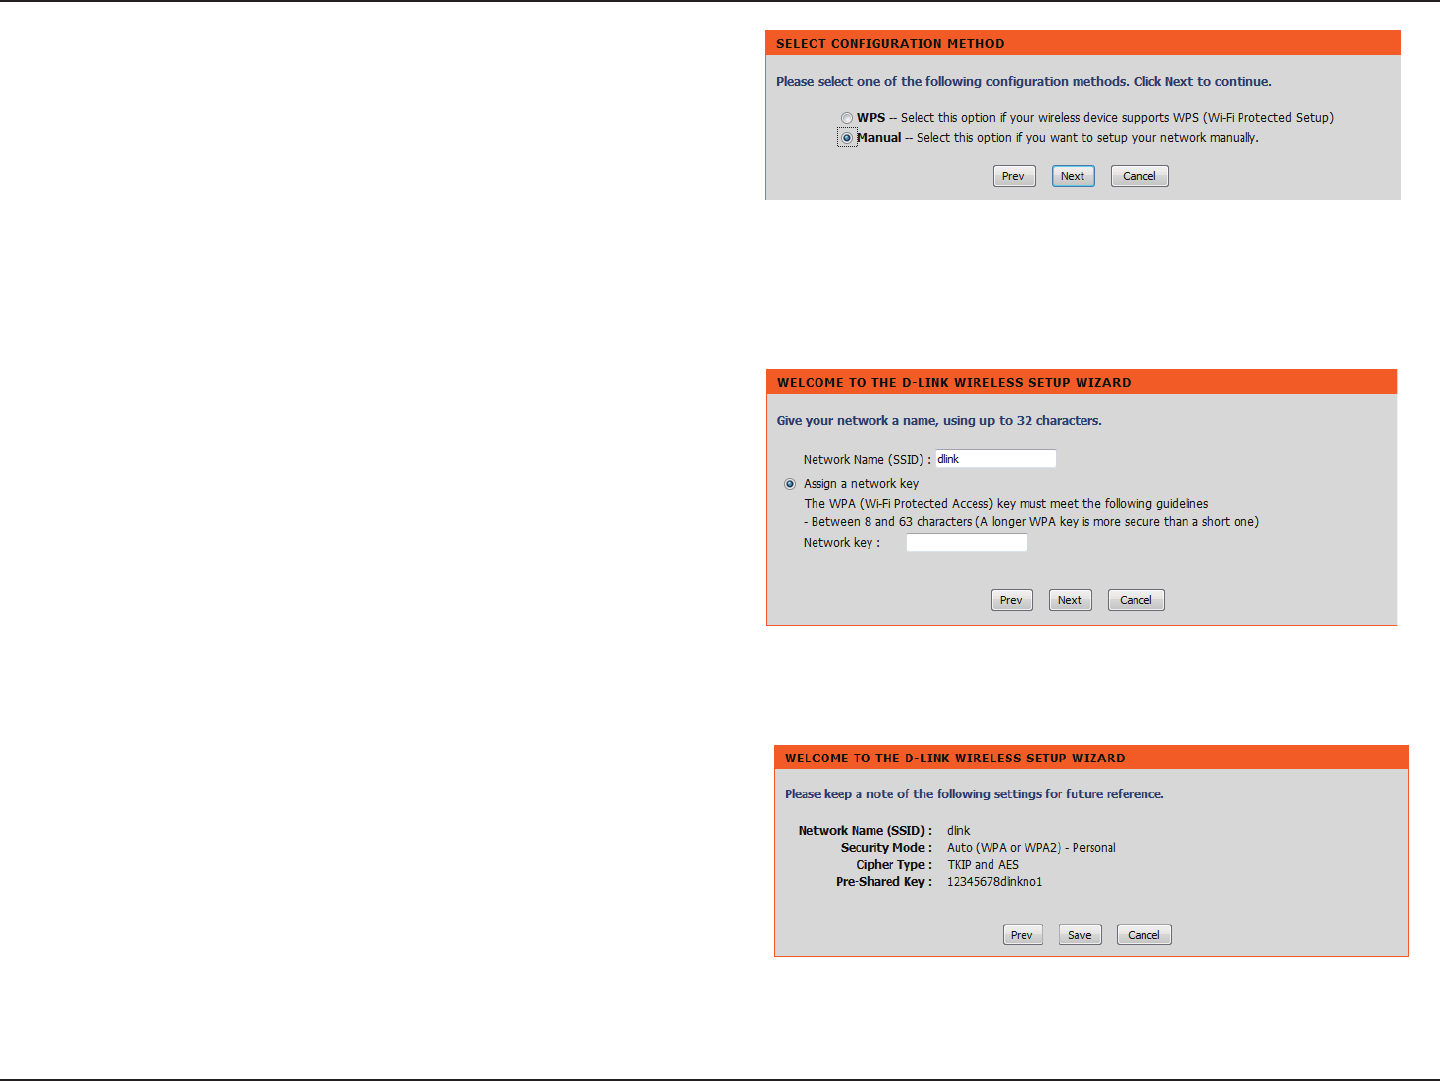
If you would like to setup your network manually, select Manual and click
Next to continue.
Enter the SSID (Service Set Identier). The SSID is the name of your wireless
network. Create a name using up to 32 characters. The SSID is case-
sensitive. Select Assign a network key and click Next.
Once this screen appears, the setup is complete. You will be given a detailed
summary of your wireless security settings.
Click Save to continue.
110D-Link DHP-1320 User Manual
Section 3 - Conguration
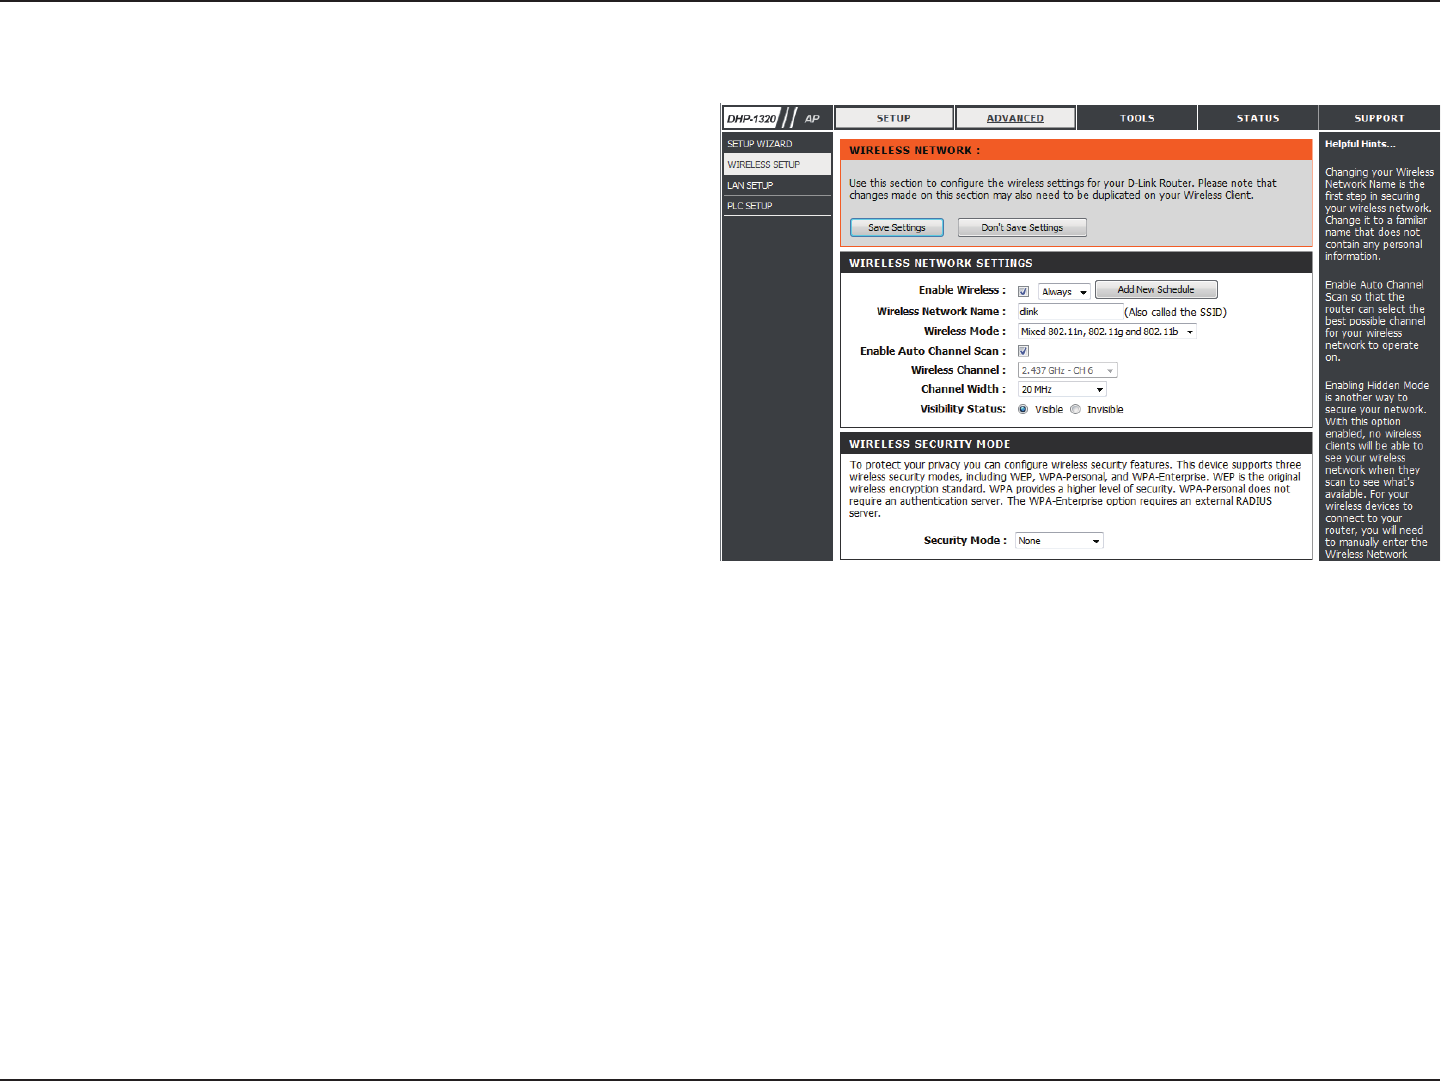
Wireless Setup
Check this box to enable the wireless function. If you
would prefer not to use wireless, uncheck the box to
disable all the wireless functions. You may also set up a
specic time range (schedule). Select a schedule from
the drop-down menu or click Add New Schedule to
create a new schedule.
When you are browsing for available wireless
networks, this is the name that will appear in the list
(unless Visibility Status is set to Invisible, see below).
This name is also referred to as the SSID. For security
purposes, changing the default network name is
highly recommended.
Select one of the following:
802.11n Only - Select if you are only using 802.11n
wireless clients.
Mixed 802.11n, 802.11g and 802.11b - Select if you are
using a mix of 802.11n, 11g, and 11b wireless clients.
Mixed 802.11n, 802.11g - Select if you are only using
802.11n, 11g wireless clients.
The Auto Channel Scan setting can be selected to
allow the DHP-1320 to select the channel with the least
amount of interference (during boot-up). Indicates the
channel setting for the DHP-1320.
The channel can be changed to t the channel setting
for an existing wireless network or to customize the
wireless network. If you enable Auto Channel Scan,
this option will be grayed out.
Enable
Wireless:
Wireless
Network
Name:
802.11
Mode:
Enable Auto
Channel
Scan :
Wireless
Channel

111D-Link DHP-1320 User Manual
Section 3 - Conguration
Channel Width:
Wireless Security
Settings:
Save Settings:
Select the Channel Width:
Auto 20/40 - Select if you are using both 802.11n and non-802.11n wireless devices.
20MHz - Select if you are not using any 802.11n wireless clients.
Locking the wireless security settings prevents the settings from being changed by any new external user using its PIN. Devices
can still be added to the wireless network using Wi-Fi Protected Setup. It is still possible to change wireless network
settings with Manual Wireless Network Setup, Wireless Network Setup Wizard, or an existing external WLAN Manager
user. Please refer to page 121.
Click Save Settings to save and activate the new changes.
112D-Link DHP-1320 User Manual
Section 3 - Conguration
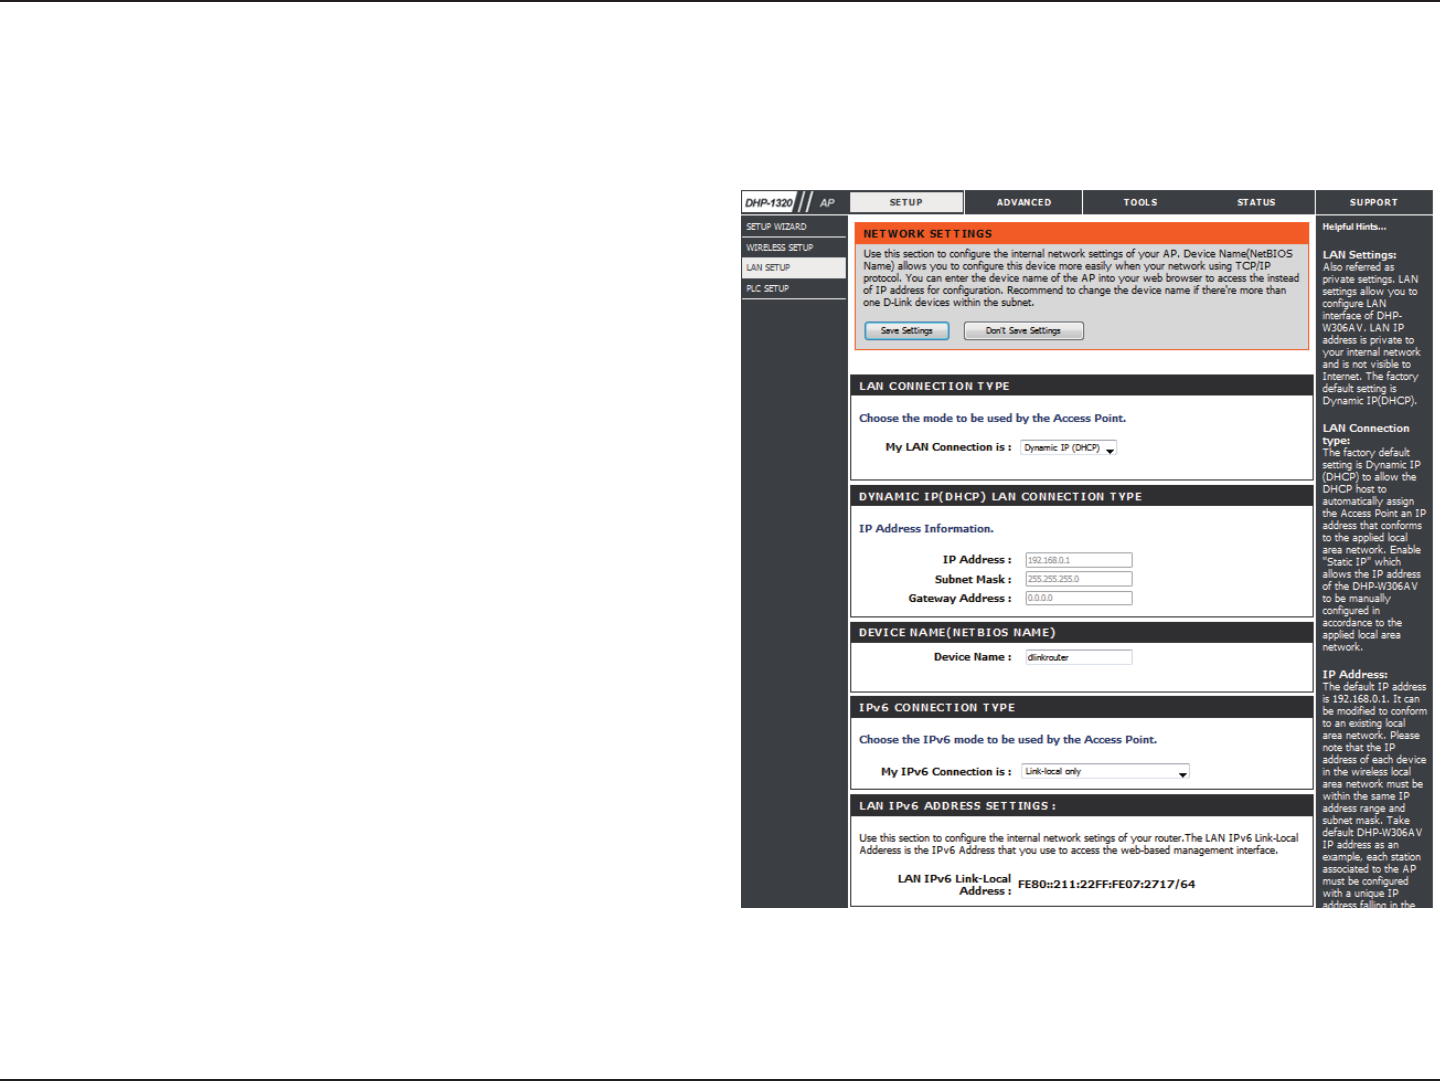
Network Settings - DHCP
This section will allow you to change the local network settings of the access point and to congure the DHCP settings.
LAN Connection
Type:
Device Name:
Save Settings:
Use the drop-down menu to select Dynamic IP (DHCP)
to automatically obtain an IP address on the LAN/private
network.
Enter the Device Name of the AP. Changing the Device
Name is recommended if there is more than one D-Link
device within the subnet.
Click Save Settings to save and activate the
new changes.
113D-Link DHP-1320 User Manual
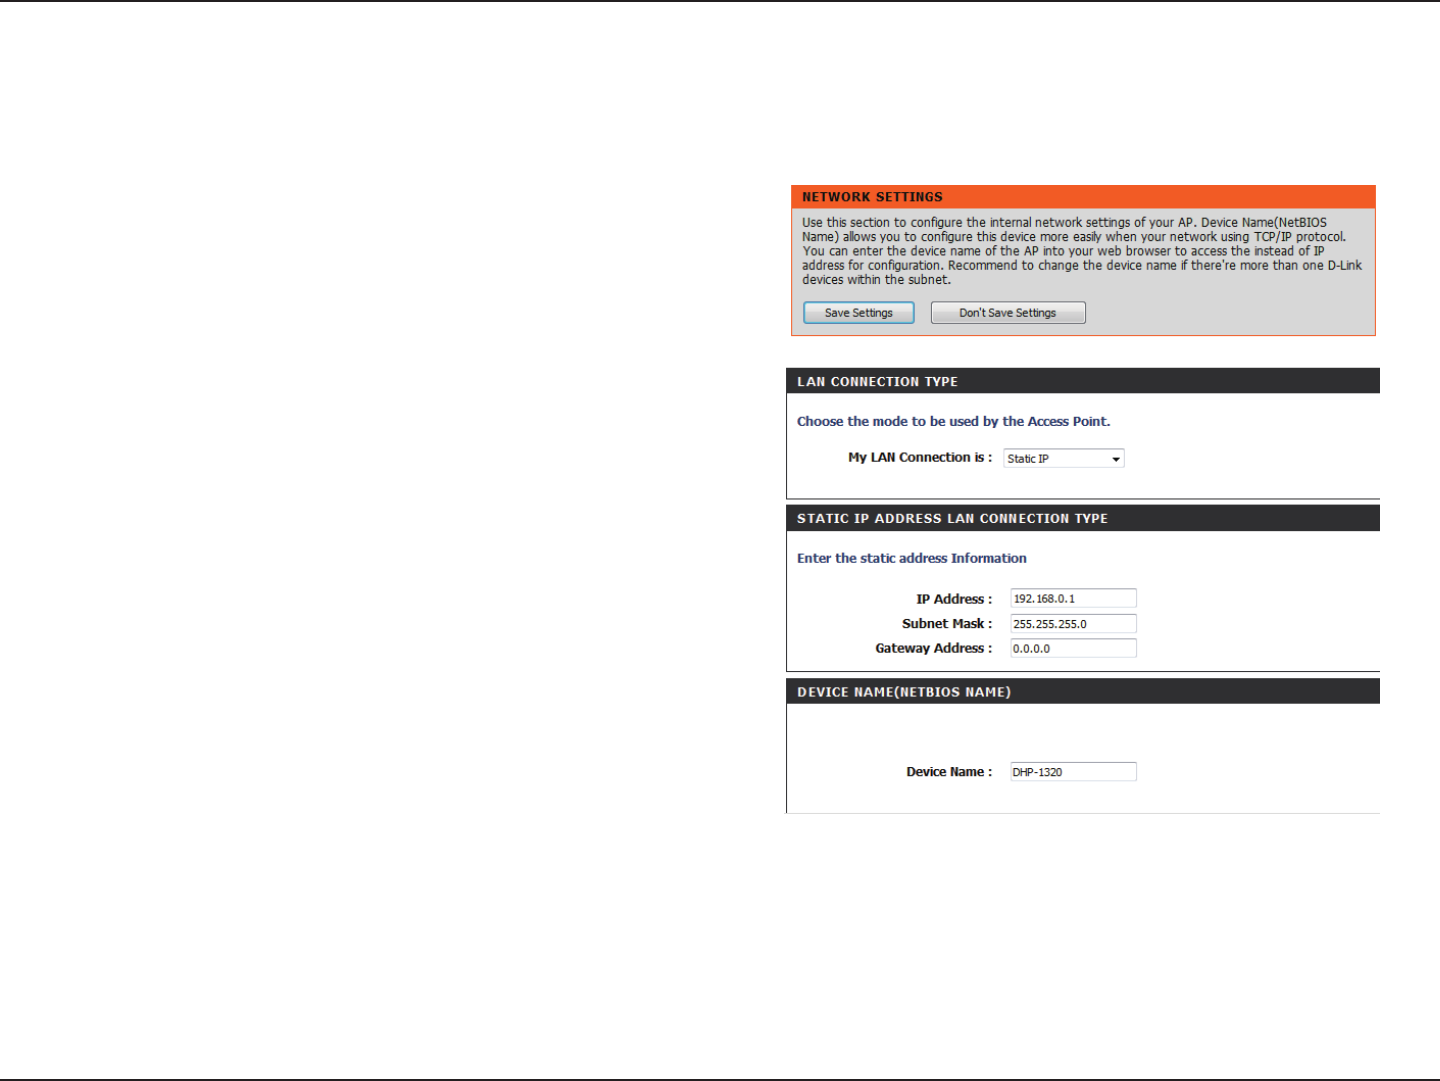
Section 3 - Conguration
Select Static IP to manually enter the IP address, subnet mask, and default gateway addresses.
LAN Connection
Type:
IP Address:
Subnet Mask:
Default Gateway:
Device Name:
Save Settings:
Select Static IP from the drop-down menu.
Enter the IP address of the access point. The default IP
address is 192.168.0.1. If you change the IP address, once
you click Apply, you will need to enter the new IP address
in your browser to return to the conguration
utility.
Enter the Subnet Mask.
Enter the Gateway. This is usually the LAN or internal IP
address of your router.
Enter the Device Name of the AP. It is recommended that
you change the Device Name if there is more than one
D-Link device within the subnet. You can enter the device
name of the AP into your web browser to access it instead
of IP address for conguration. If you are using the device
name to connect, make sure that your PC and your DHP-
1320 are on the same network.
Click Save Settings to save and activate the new changes.
Network Setup - Static IP
114D-Link DHP-1320 User Manual
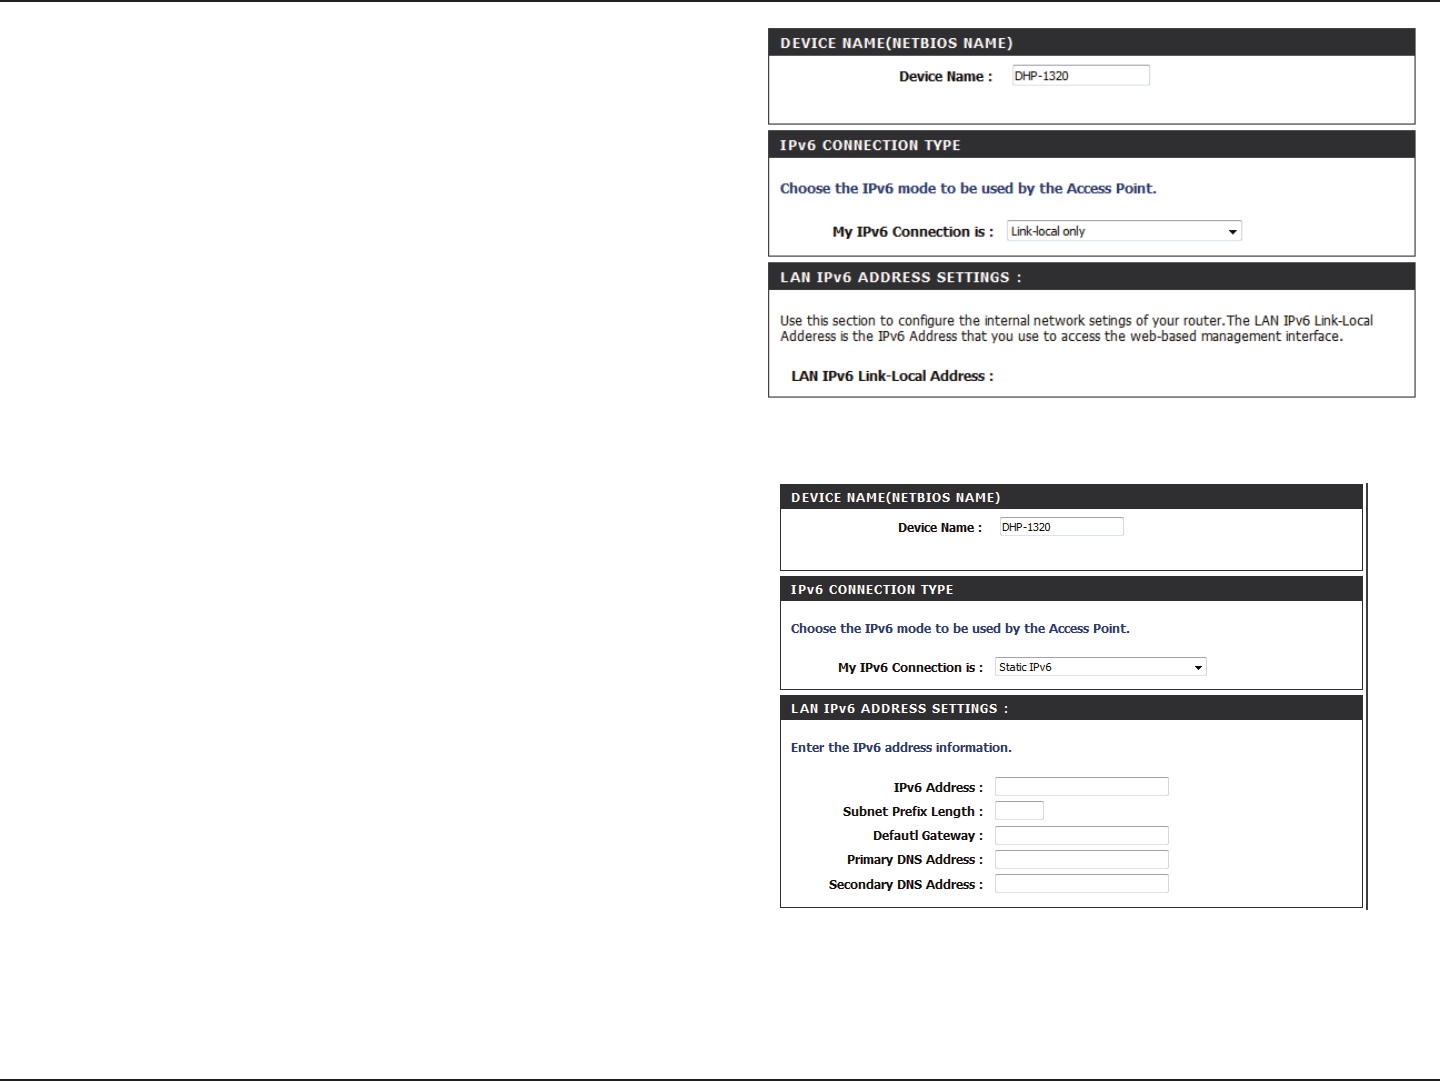
Section 3 - Conguration
My IPv6
Connection is:
LAN IPv6 Address
settings:
Select Link-local only from the drop-down menu.
This section displays the IPv6 address of the router.
My IPv6
Connection is:
LAN IPv6
Address:
Select static IPv6 from the drop-down menu.
Enter the LAN (local) IPv6 address for the router.
115D-Link DHP-1320 User Manual
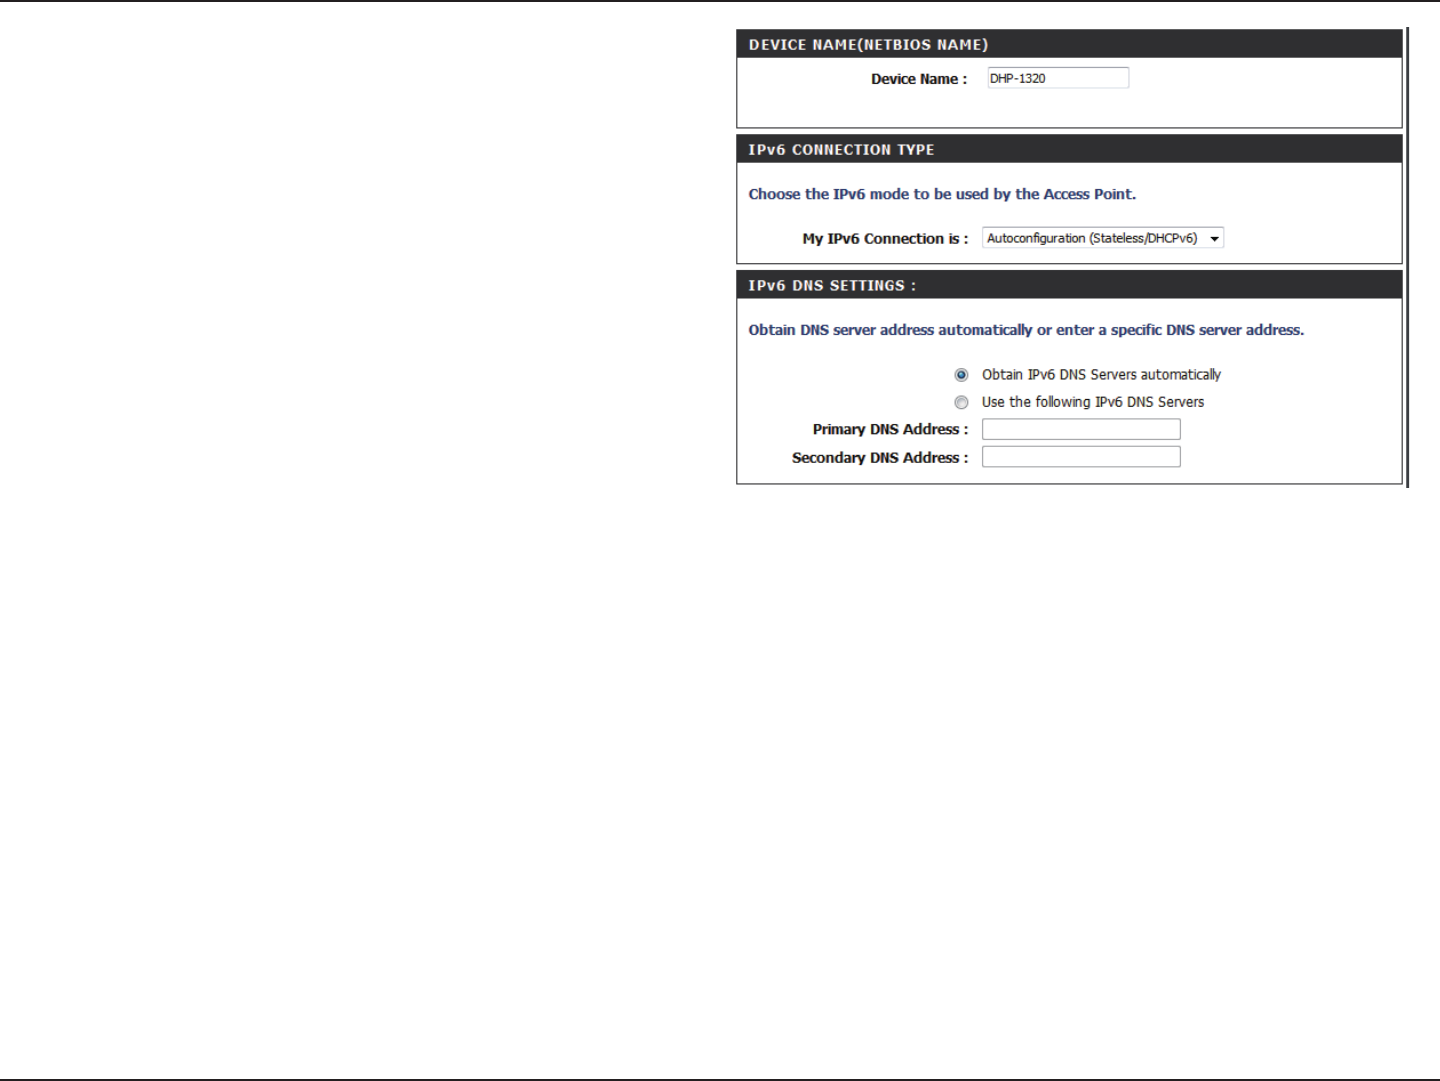
Section 3 - Conguration
My IPv6
Connection:
IPv6 DNS
Settings:
Select Autoconguration (Stateless/DHCPv6) from the
drop down menu.
Select Obtain IPv6 DNS Server automatically or enter a
specic DNS Server address.
116D-Link DHP-1320 User Manual
Section 3 - Conguration
Conguration
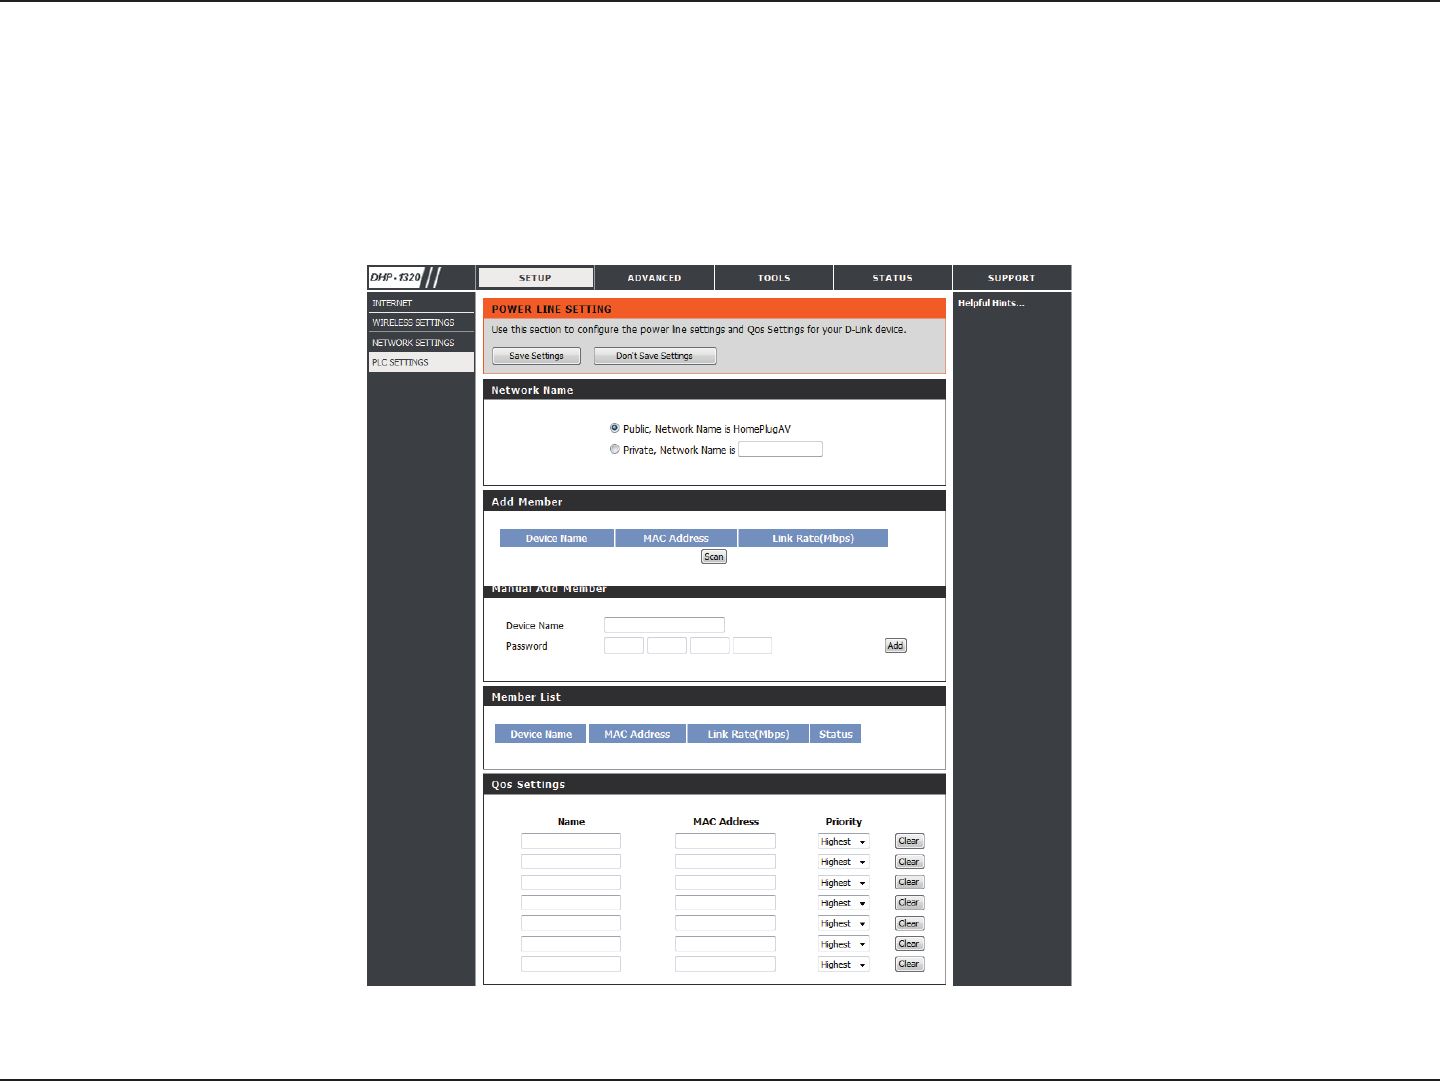
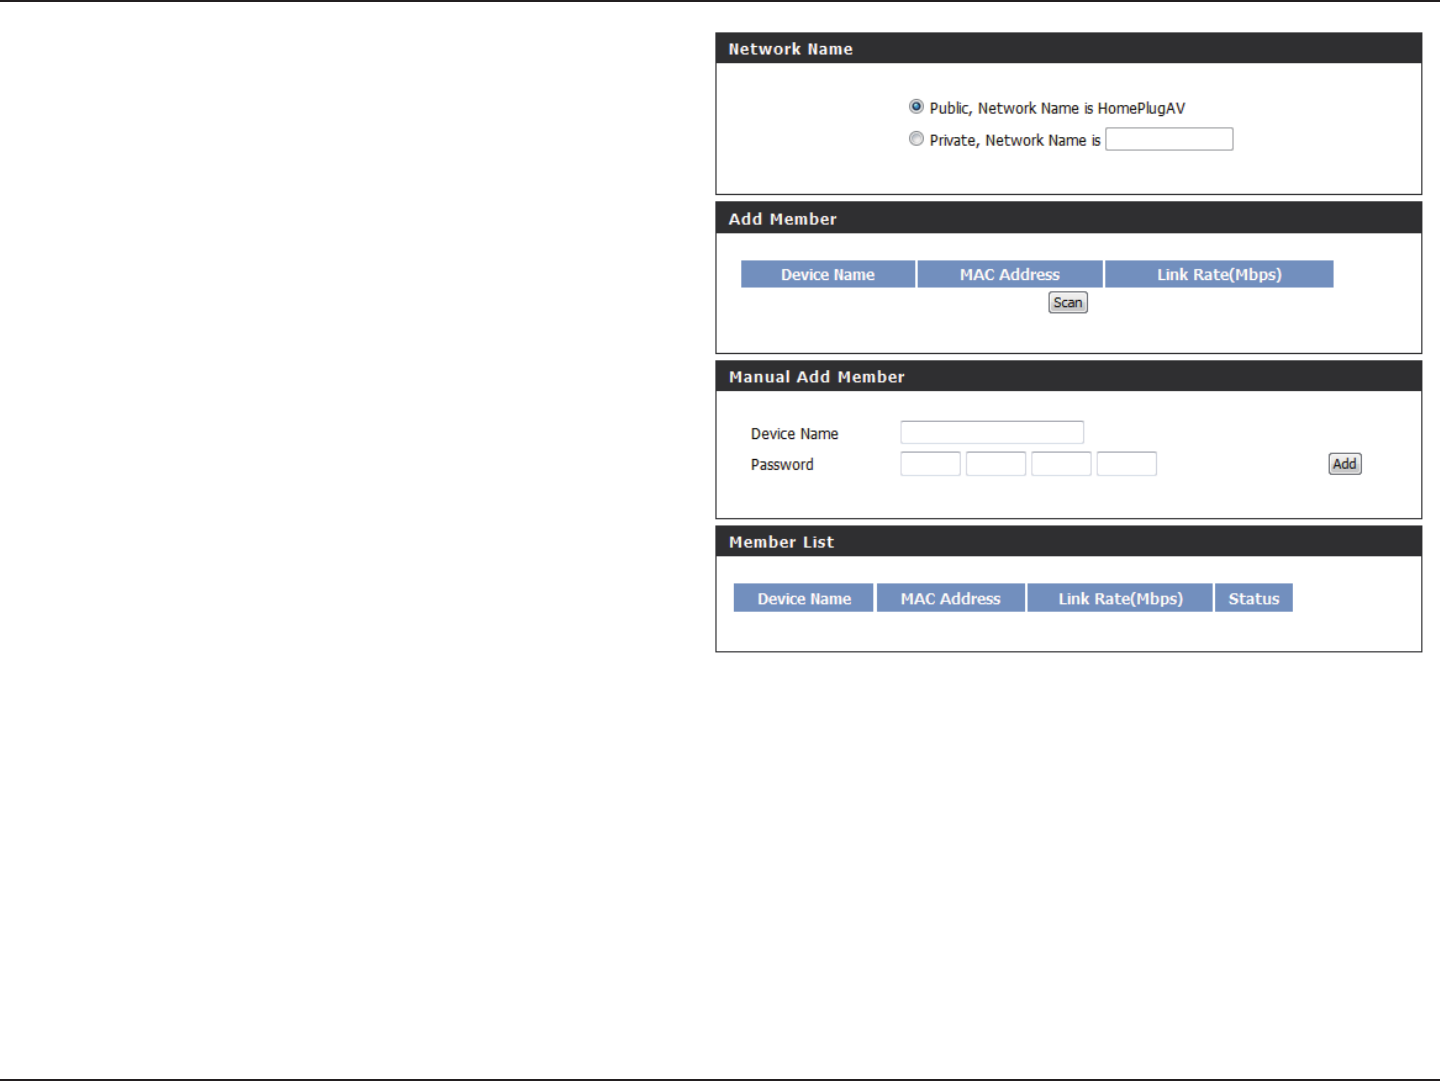
This section will show you how to congure your new D-Link PowerLine AV using the web-based conguration utility.
PLC Settings - AP Mode
117D-Link DHP-1320 User Manual
Section 3 - Conguration
Network
Name:
Public
Network
Name:
Private
Network
Name:
Scan:
Add Memeber:
Device Name:
Password:
Member List:
Link Rate:
You can set the name of your network and to make it
either public or private. Make sure the Network Name
of all of the devices within your PowerLine network is
the same.
Select this option if you would like to make your
powerline network public with the default Network
Name of “HomePlugAV”. Since this is a commonly used
Network Name, it is less secure than a private Network
Name.
Select this option if you wish to make your powerline
network more secure by using a private Network Name.
Type the name of your private PowerLine network in
the eld.
Scan for new PowerLine devices.
This section lets you add new PowerLine AV devices to
your PowerLine network. To add a new device, give it
a Device Name and enter its Password, then click Add.
When you add a device it is given the current Network
Name.
Type a name you wish to use to identify a specic PowerLine AV device. For example, “Jack’s room”.
The Password is used to verify that you are authorized to perform changes on a device. You can
nd the Password printed on the back of your device.
This section provides information on the PowerLine AV devices in your PowerLine network, or any devices that were previously
connected but it are currently disconnected.
Displays the device’s current data rate in Mbps.
118D-Link DHP-1320 User Manual
Section 3 - Conguration
Status:
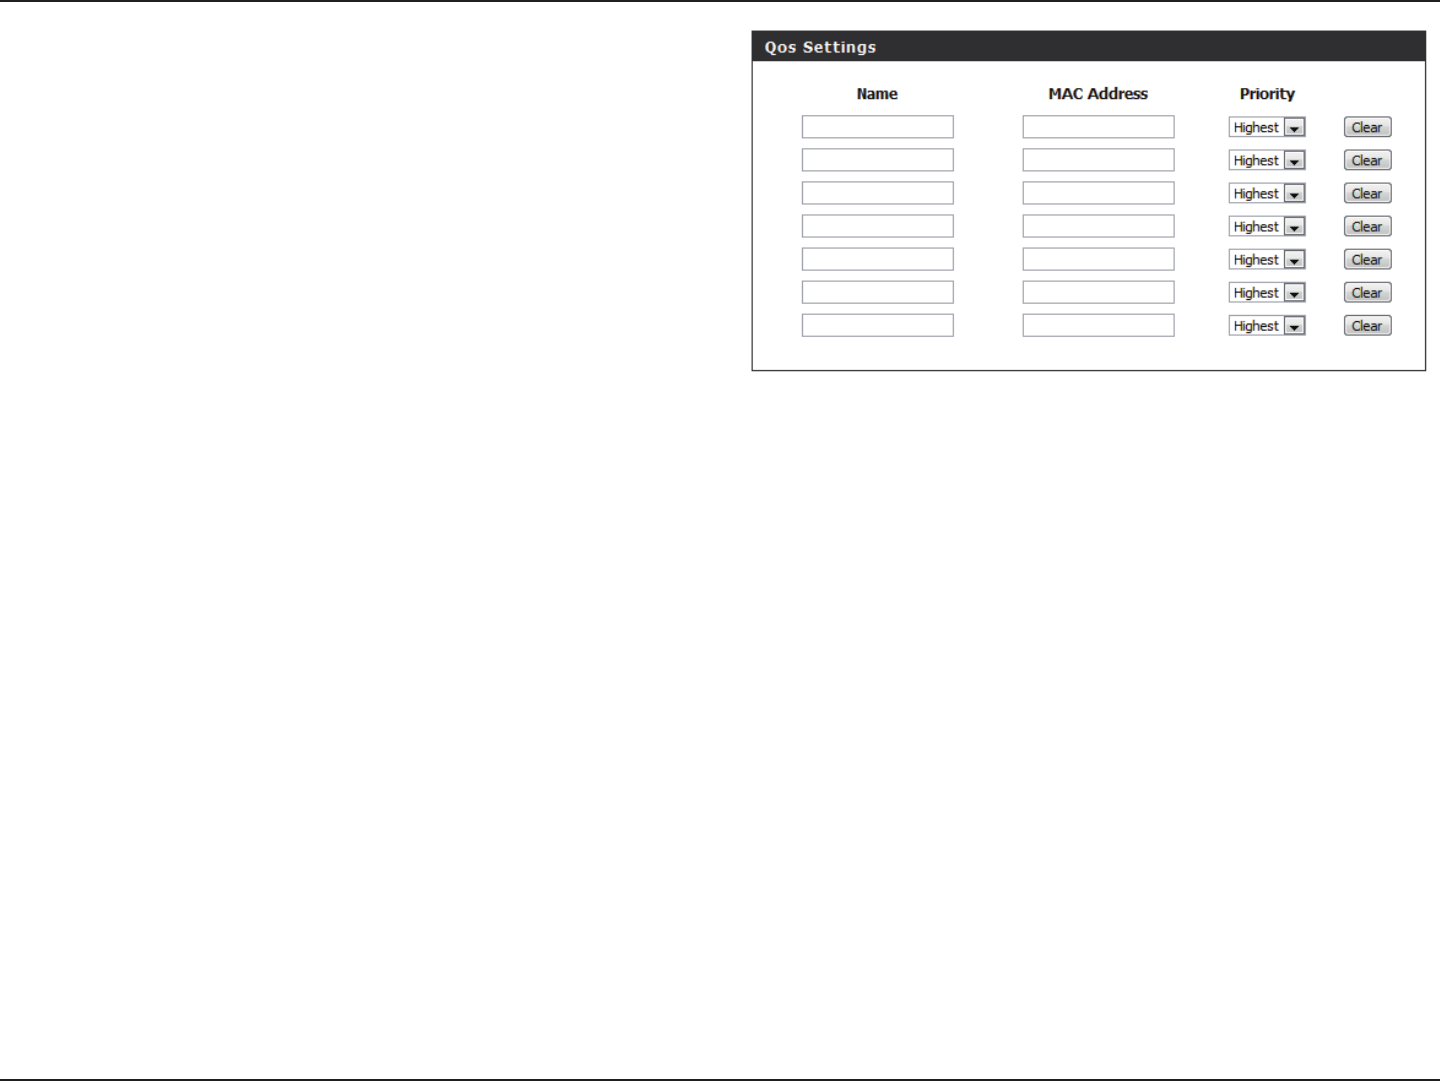
QoS Setting:
Mac Address:
This field shows the status of the device. If the field
displays the word Connect, then the device is connected
to your PowerLine network. If the eld displays the word
Disconnect, then the device has been added to the
network but it is not ready. Please check its password and
make sure the device is
powered on.
You can congure your PowerLine AV devices to give
priority to powerline network trac accordingly. Enter the
name, MAC Address, and priority level.
You can nd the MAC address printed on the back of your
device.
119D-Link DHP-1320 User Manual
Section 3 - Conguration
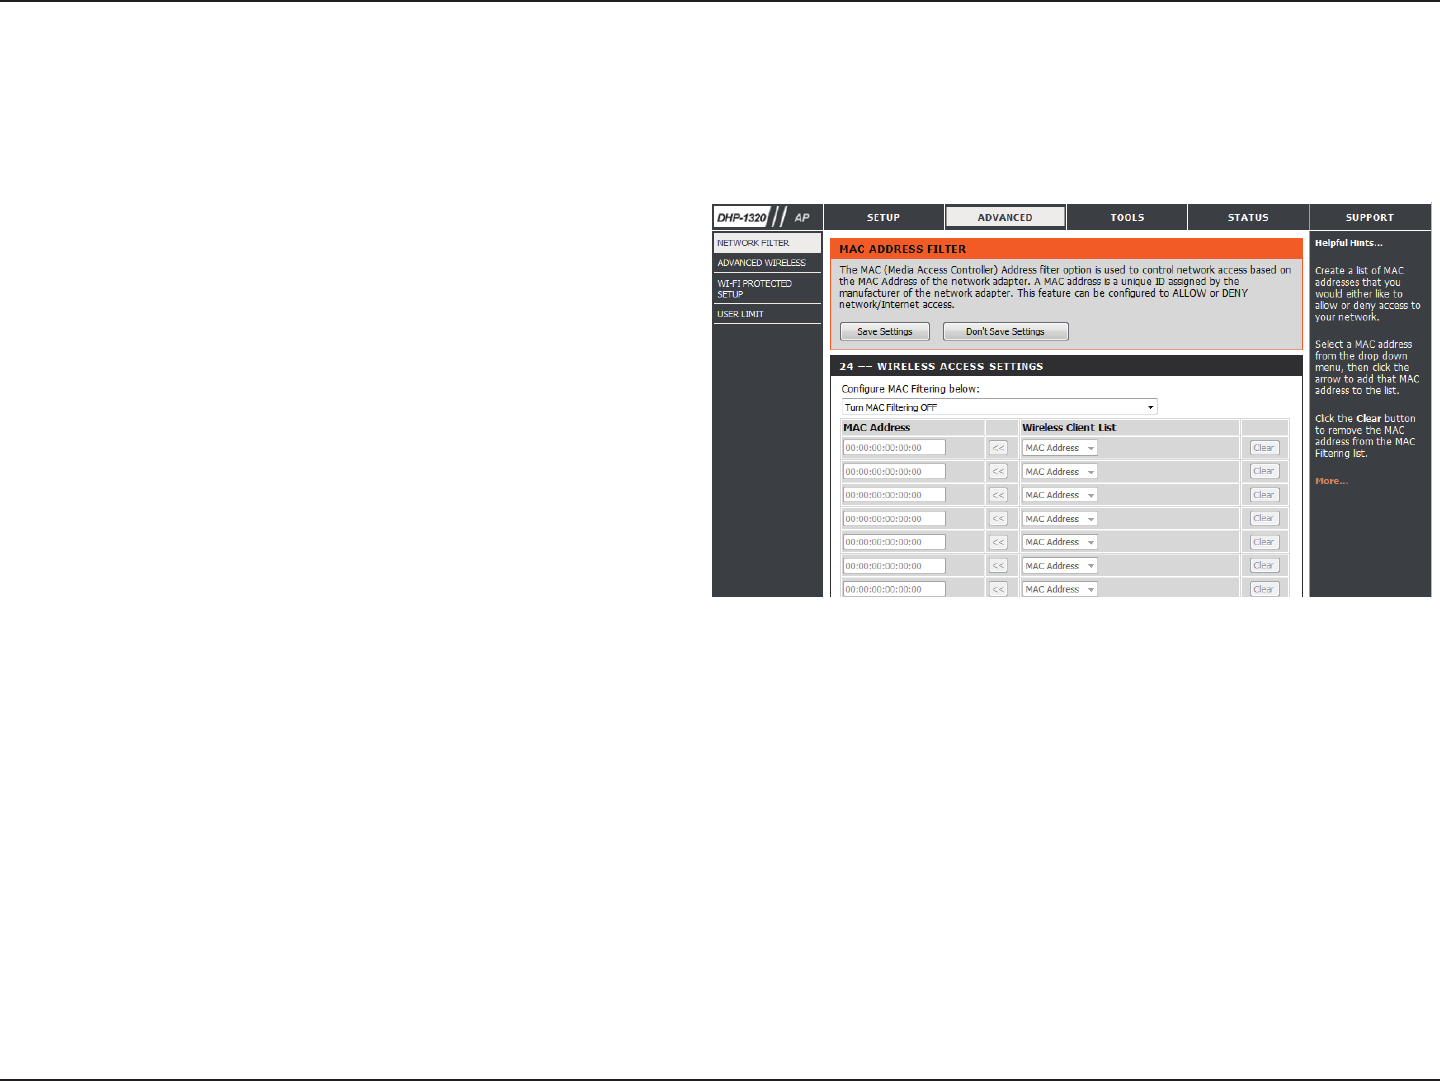
Use MAC (Media Access Control) Filters to authorize wireless clients to access your network by their MAC addresses. When enabled, any client not
on the MAC lter list will not be able to access your network.
MAC Address
Filter:
MAC Address:
Wireless Client List:
Save Settings:
Select Enable or Disable from the drop-down
menu.
Enter the MAC address you would like to lter.
To nd the MAC address on a computer, please refer
to the Networking Basics section in this manual. Click
Save Settings to activate and save.
Note: Make sure to enter the computer you are
currently using to congure the access point rst or
you will not be able to access the conguration utility
once you click Save Settings.
Select a DHCP client from the drop-down menu and
click to copy the MAC Address.
Click Save Settings to save and activate the
new changes.
Network Filter
120D-Link DHP-1320 User Manual
Section 3 - Conguration
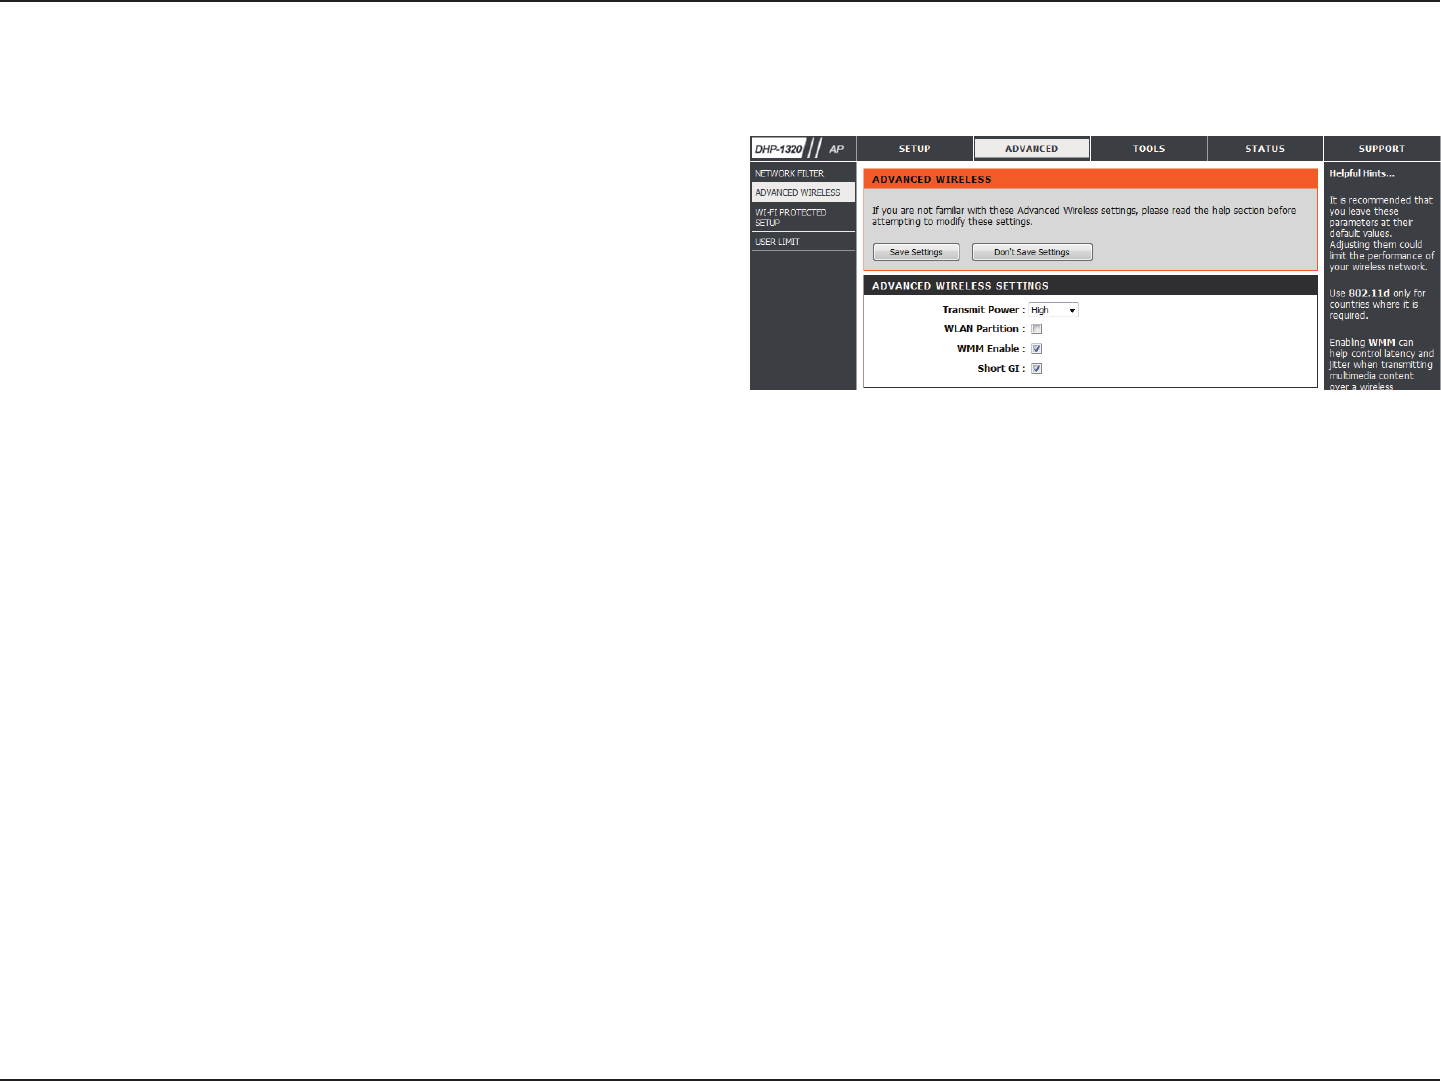
Advanced Wireless
Transmit
Power:
WLAN
Partition:
WMM Enable:
Short GI:
Sets the transmit power of the antennas.
Note: Transmit power is regulated by international
standard. Users are forbidden to change its maximum limit.
Select this checkbox to enable WLAN partition. If this
feature is enabled, then there is no barrier between
communication among wireless stations connecting to
the Access Point. If this is disabled, wireless clients are not
allowed to exchange data through the Access Point.
WMM is a Quality of Service (QoS) system for your wireless network. Enabling this feature will improve the quality of video and ice
applications for your wireless clients.
Check this box to reduce the guard interval time therefore increasing the data capacity. However, this setting less reliable and may
create higher data loss.
121D-Link DHP-1320 User Manual
Section 3 - Conguration
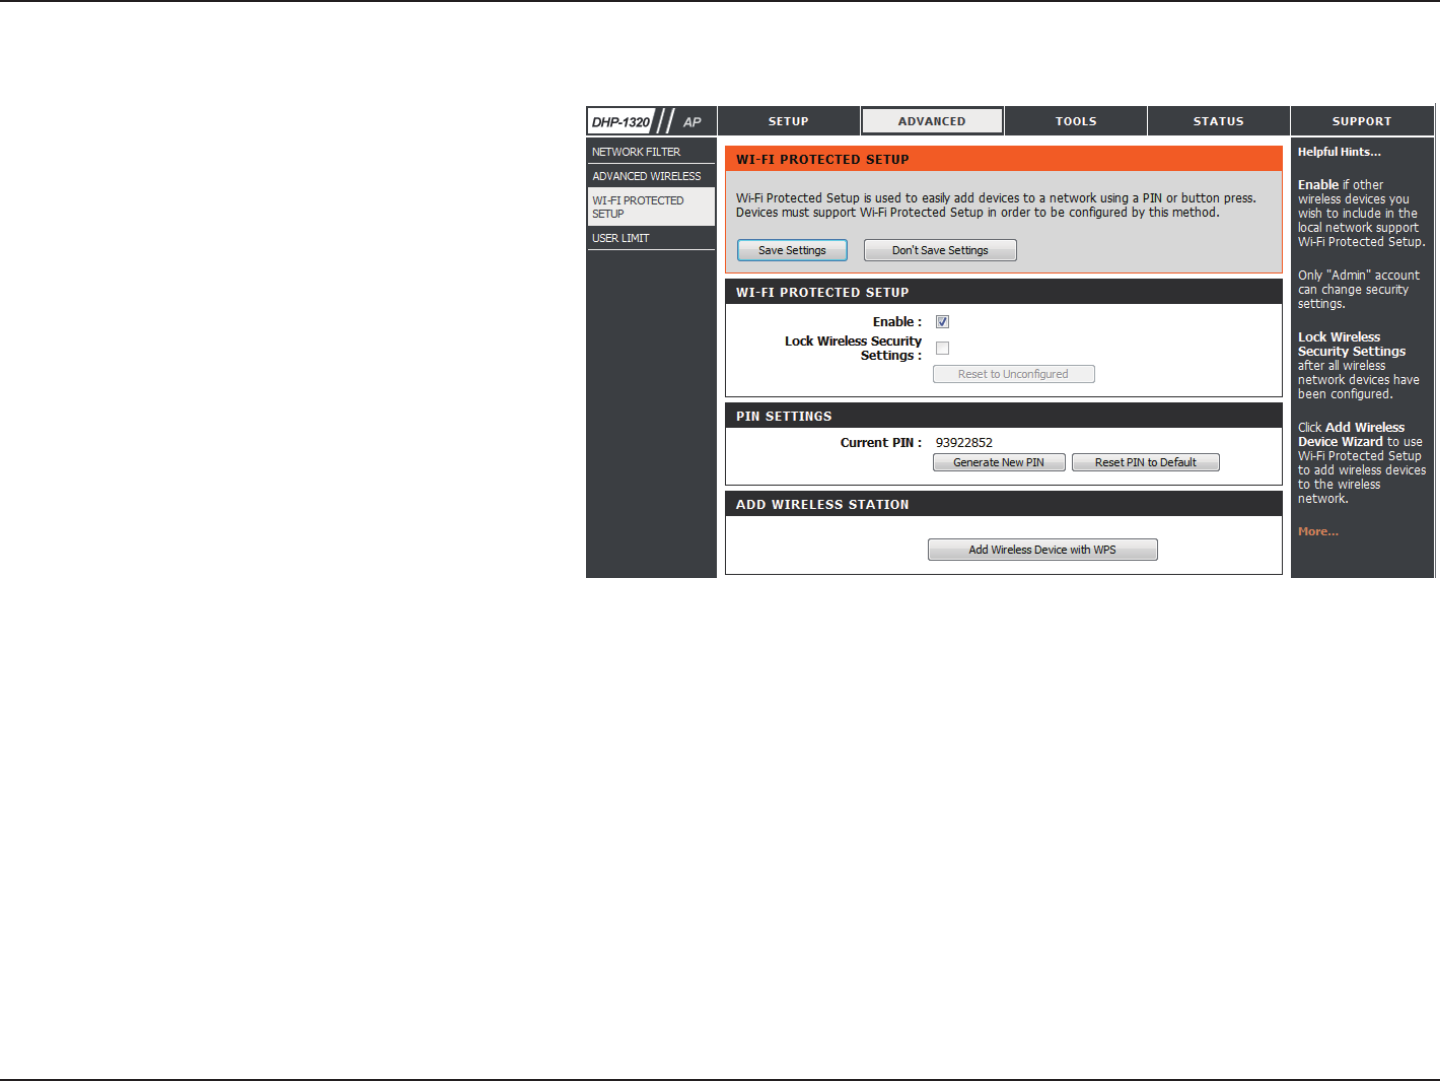
Wi-Fi Protect
Setup:
Reset to
Uncongure:
Current PIN:
Generate New
PIN:
Reset PIN to
Default:
Enables the Wi-Fi Protected Setup feature.
Restores the default Wi-Fi setup.
Shows the current value of the access
point’s PIN.
Create a random number that is a valid
PIN. This becomes the access point’s PIN.
You can then copy this PIN to the user
interface of the user.
Restores the default PIN of the access
point.
Wi-Fi Protect Setup
122D-Link DHP-1320 User Manual
Section 3 - Conguration
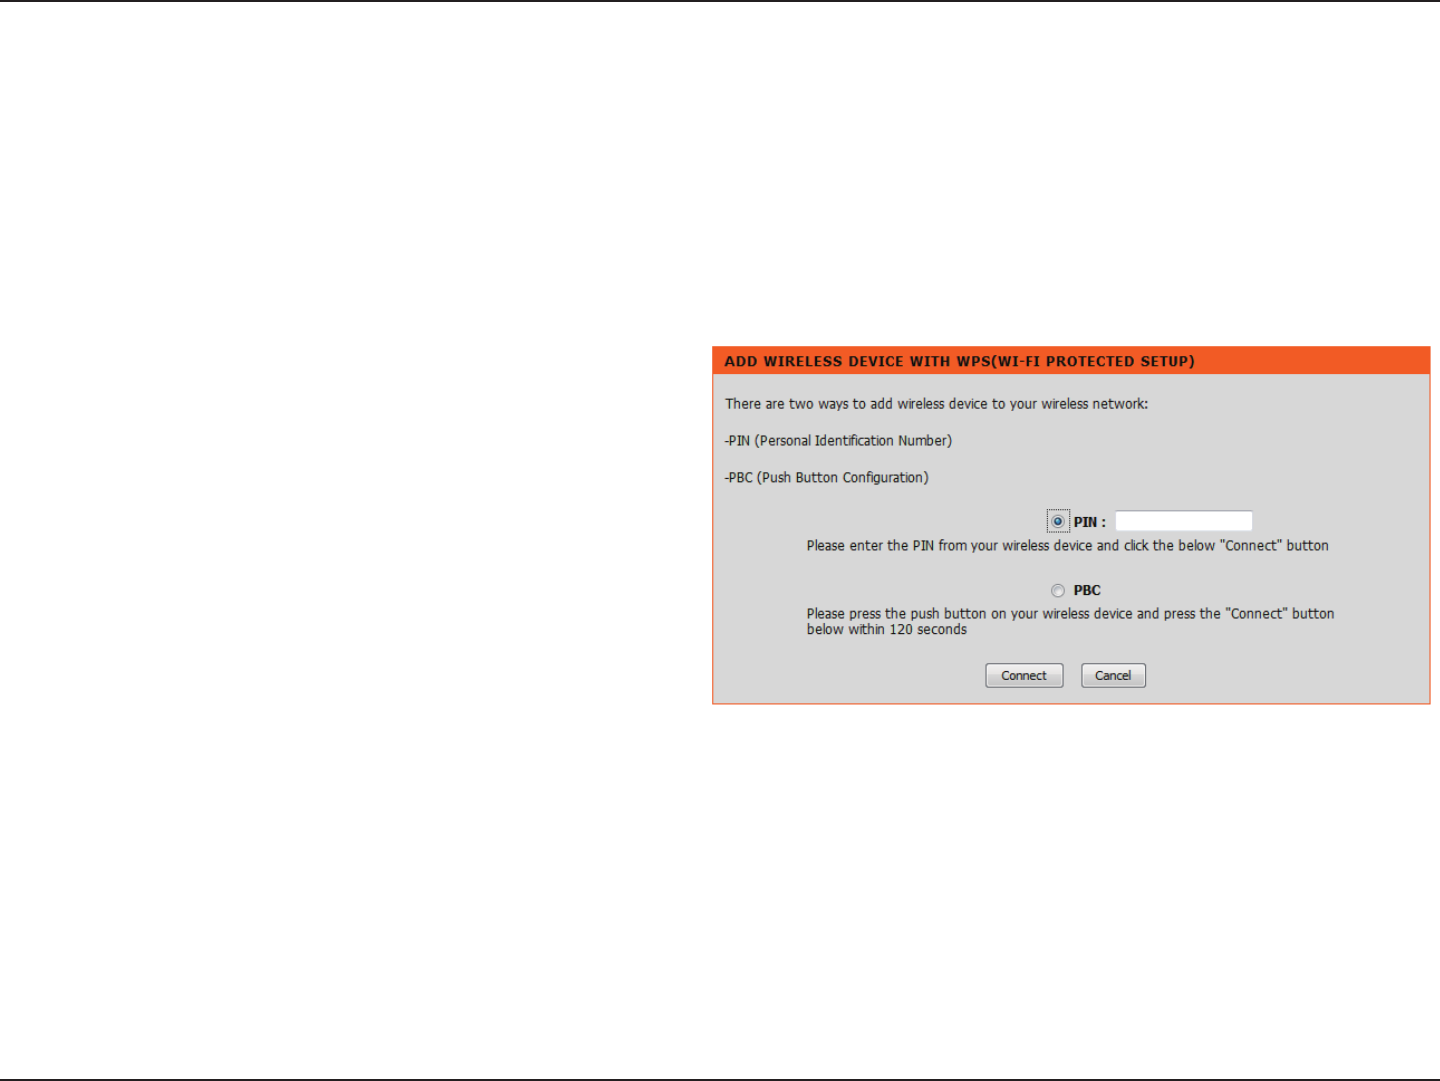
Add Wireless Device with WPS
Adding a Wireless Device Using the PIN Method
Please select one of the following conguration methods and click
Next to continue.
123D-Link DHP-1320 User Manual
Section 3 - Conguration
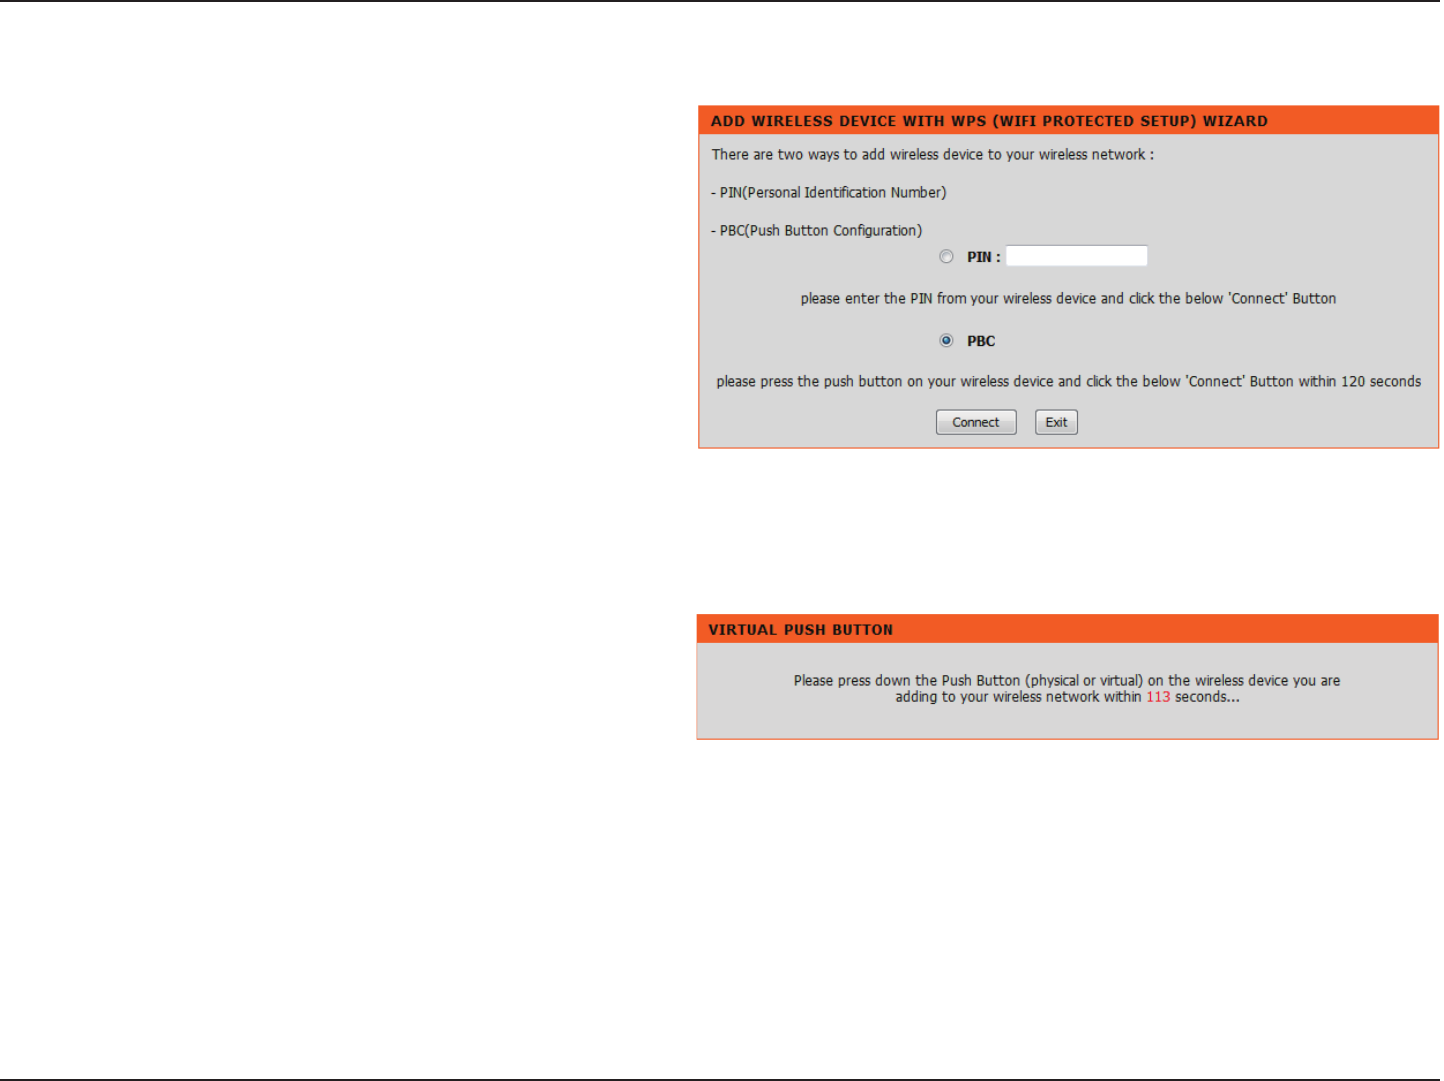
Adding a Wireless Device Using the PBC Method
Select PBC to use Push Button Conguration in order to connect to
your network.
Click Connect to continue.
Press the WPS Button on the wireless device that you are adding to
your network to complete the setup.
124D-Link DHP-1320 User Manual
Section 3 - Conguration
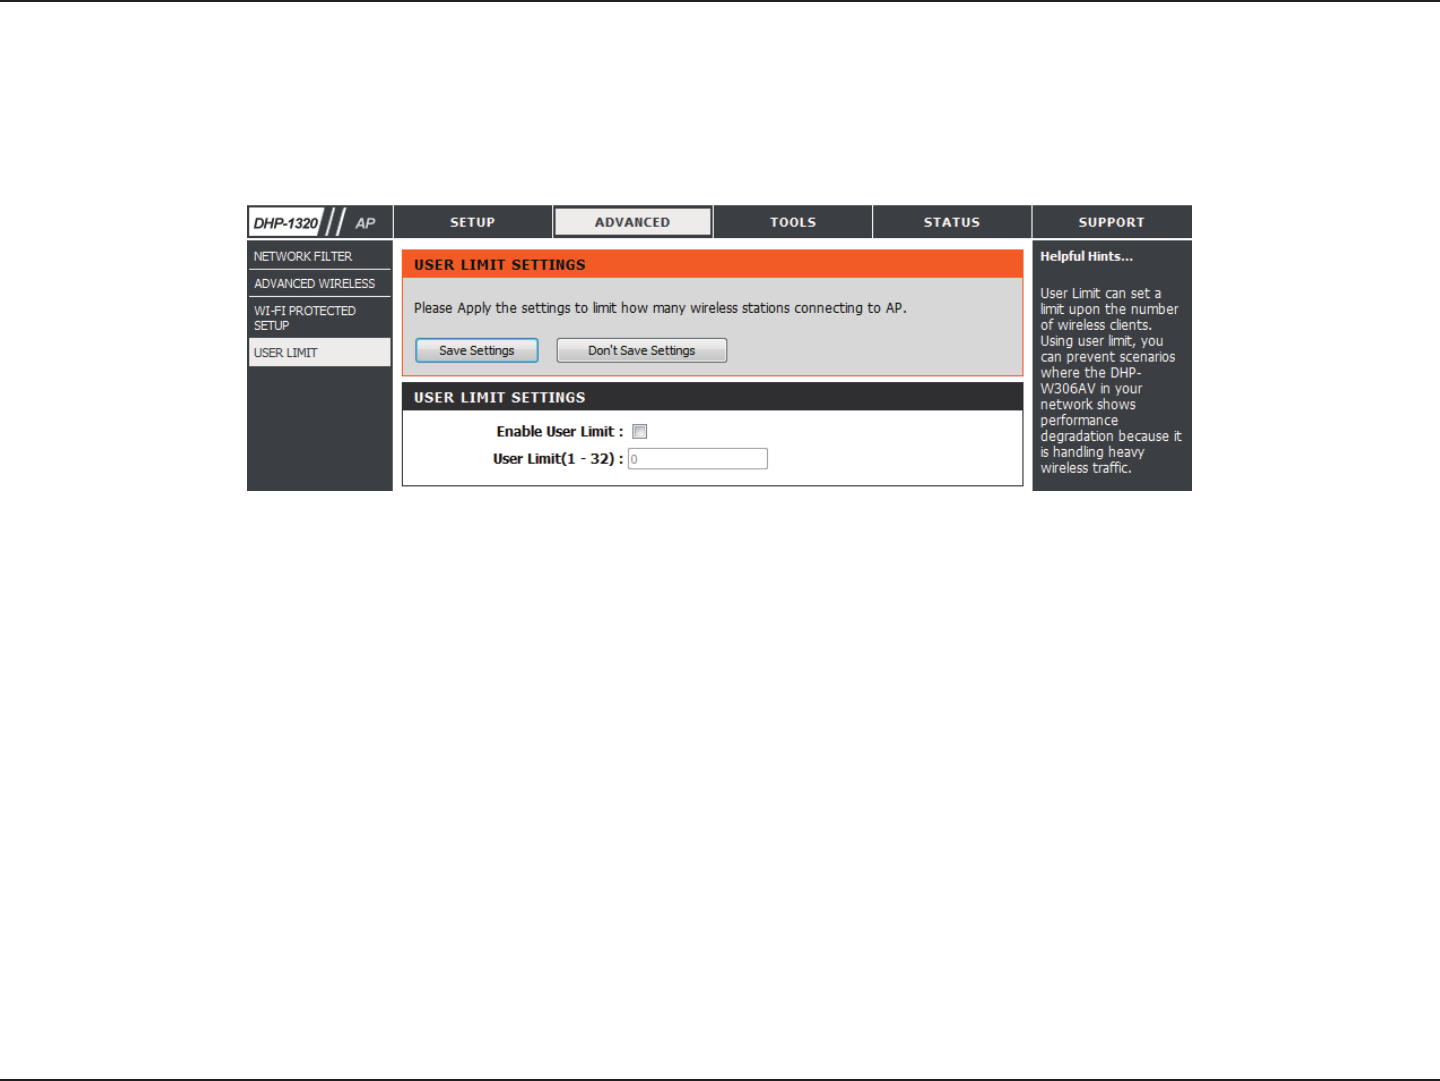
User Limit Settings
In this section, you may set a limit to the number of wireless clients to prevent heavy wireless trac.
125D-Link DHP-1320 User Manual
Section 3 - Conguration
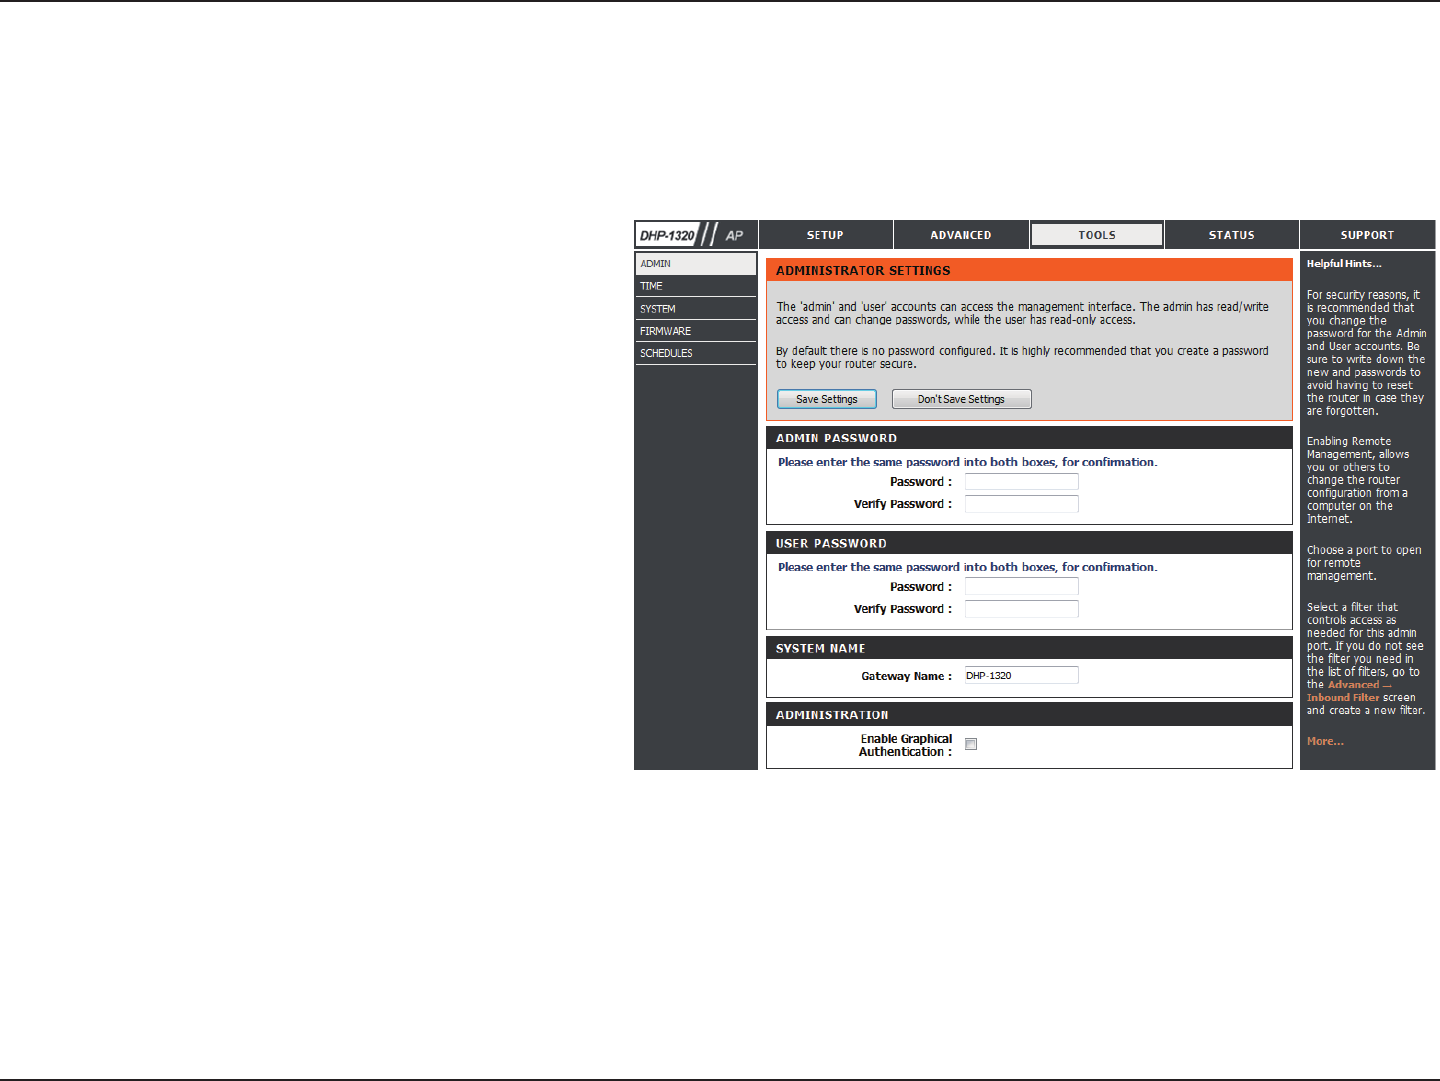
Admin
This page will allow you to change the Administrator password. The administrator password has read/write access.
Enter a new password for the Admin User
Name. The administrator account can change
the conguration of the device.
Enter the same password that you entered in
the previous textbox in order to conrm its
accuracy.
Enter DHP-1320.
Enables a challenge-response test which will
require users to type letters or numbers from
a distorted image displayed on the screen
to prevent online hackers and unauthorized
users from gaining access to your device’s
configuration. This feature is disabled by
default.
Click Save Settings to save and activate the
new changes.
Password:
Verify
Password:
System Name:
Enable
Graphical:
Save Settings:
126D-Link DHP-1320 User Manual
Section 3 - Conguration
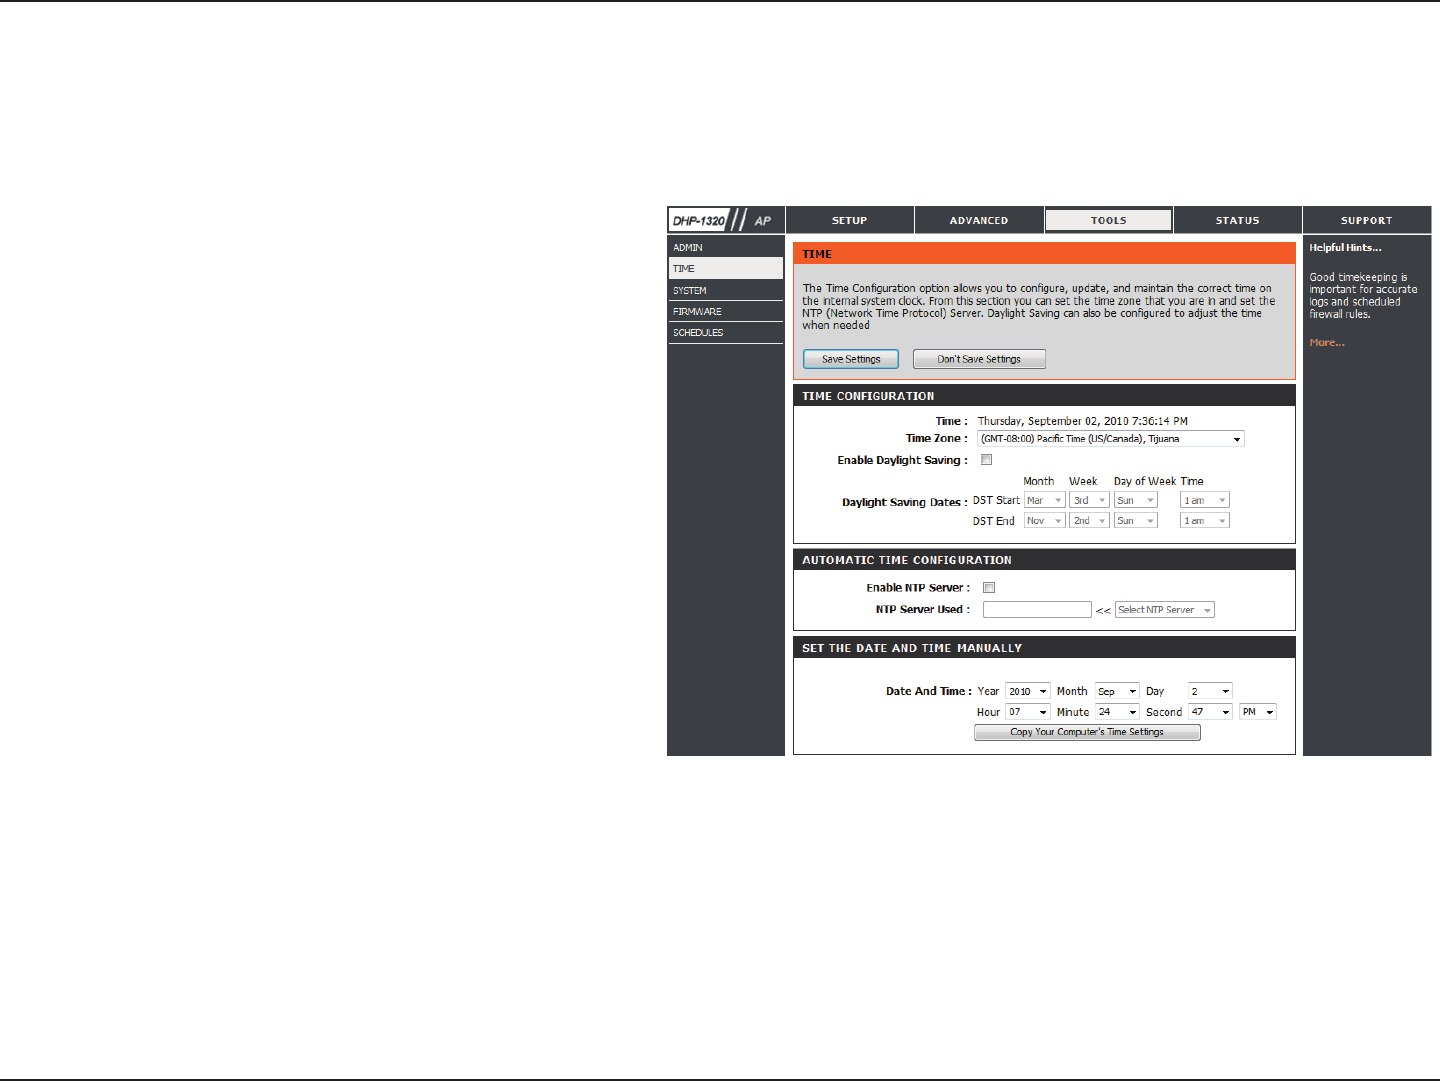
Time
This page will allow you to change the Administrator password. The administrator password has read/write access.
Select the Time Zone from the drop-down menu.
To select Daylight Saving time manually, select
enabled or disabled, and enter a start date and an
end date for daylight saving time.
NTP is short for Network Time Protocol. NTP
synchronizes computer clock times in a network
of computers. Check this box to use a NTP server.
This will only connect to a server on the Internet,
not a local server.
Enter the NTP server or select one from the drop
down menu.
To manually input the time, enter the values in
these elds for the Year, Month, Day, Hour, Minute,
and Second and then click Set Time. You can also
click Copy Your Computer’s Time Settings.
Time Zone:
Daylight
Saving:
Enable NTP
Server:
NTP Server
Used:
Manual:
127D-Link DHP-1320 User Manual
Section 3 - Conguration
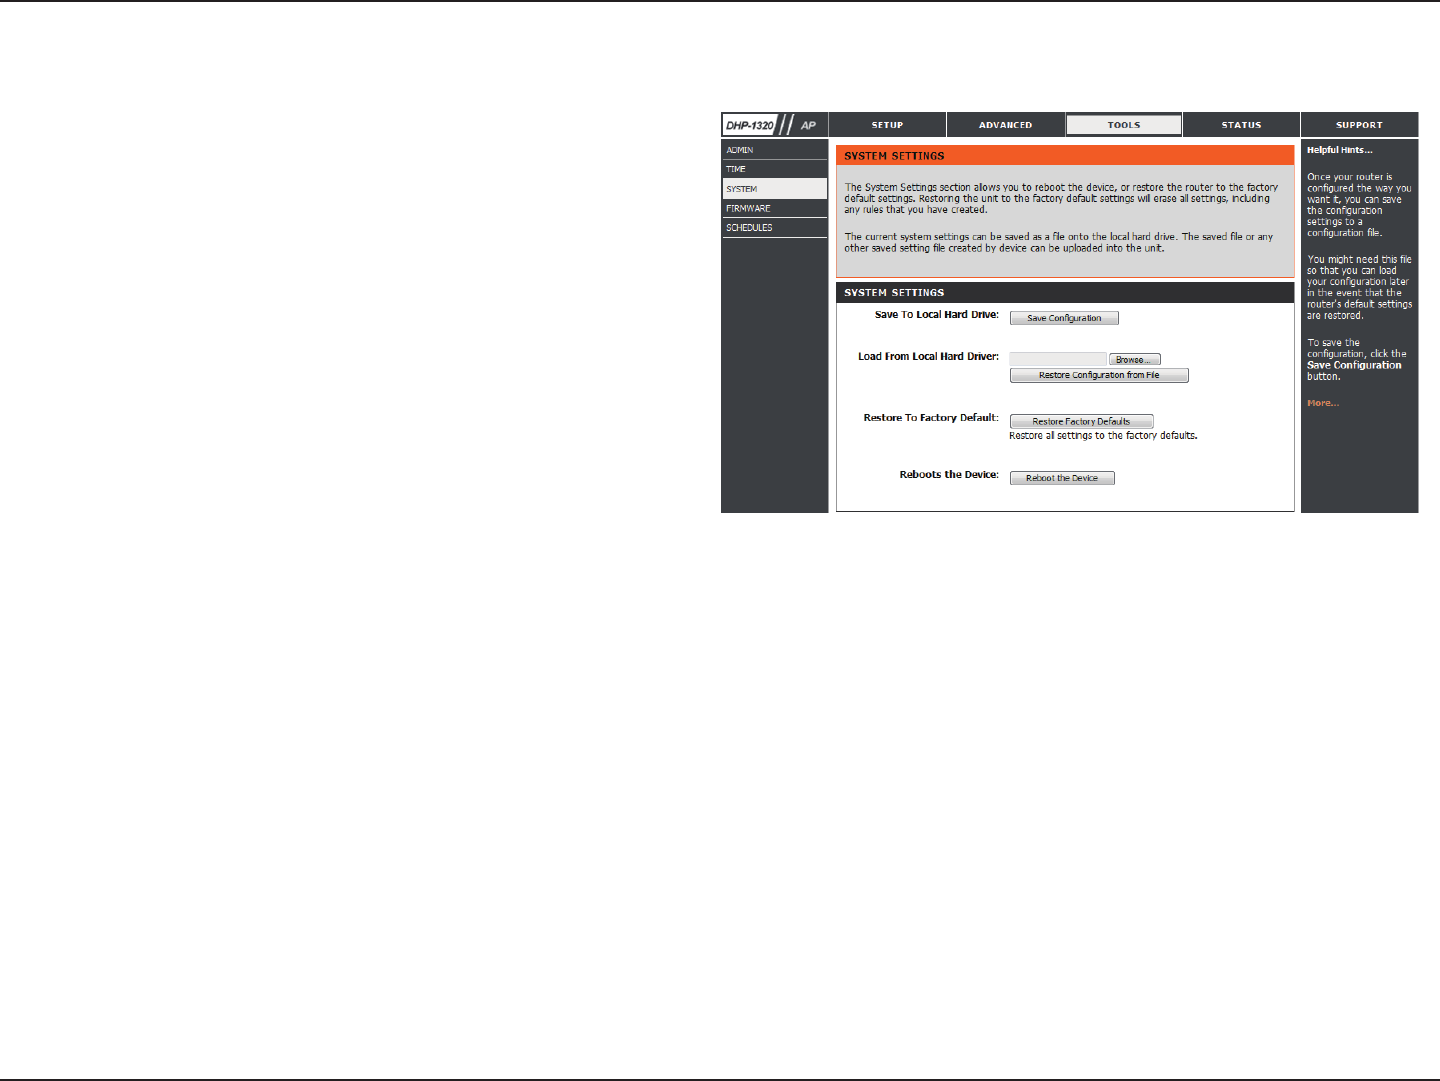
System Settings
Use this option to save the current router conguration
settings to a le on the hard disk of the computer you
are using. First, click the Save button. You will then
see a le dialog, where you can select a location and
le name for the settings.
Use this option to load previously saved router
conguration settings. First, use the Browse control
to nd a previously save le of conguration settings.
Then, click the Load button to transfer those settings
to the router.
This option will restore all conguration settings
back to the settings that were in eect at the time
the router was shipped from the factory. Any settings
that have not been saved will be lost, including any
rules that you have created. If you want to save the
current router conguration settings, use the Save
button above.
Click to reboot the router.
Save Settings to
Local Hard Drive:
Load Settings
from Local Hard
Drive:
Restore to
Factory Default
Settings:
Reboot Device:
128D-Link DHP-1320 User Manual
Section 3 - Conguration
Firmware
You can upgrade the rmware of the access point from this page. Make sure the rmware you would like to use is on the local hard drive of your
computer. Click Browse... to locate the rmware le to be used for the update. Please check the D-Link support site for rmware updates at
http://support.dlink.com. You can download rmware upgrades to your hard drive from the D-Link support site.
Click on the Check Now button to nd out if
there is an updated rmware or language pack
version. If a new version exists, download the
new rmware to your hard drive.
After you have downloaded the new rmware,
click Browse to locate the rmware update on
your hard drive. Click Upload to complete the
rmware upgrade.
Check Online for the latest rmware version in
oder to have your router check automatically
for new rmware upgrades.
Firmware
Information:
Firmware
Upgrade:
Notication
Options:
129D-Link DHP-1320 User Manual
Section 3 - Conguration
Schedules
Name:
Days:
Time:
Add:
Schedule
Rules
List:
Schedules can be created for use with enforcing rules. For example, if you would like to restrict web access to Mon-Fri from 3:00 p.m. to 8:00 p.m.,
you could create a schedule selecting Mon, Tue, Wed, Thu, and Fri and enter a StartTime of 3:00 p.m. and End Time of 8:00 p.m.
Enter a name for your new schedule.
Select a day, a range of days, or All Week to include
every day.
Check All Days or enter a start and end time for your
schedule.
After making your changes, click Save to save
the schedule rule.
The list of schedules will be listed here. Click the
Edit icon to make changes or click the Delete icon
to remove the schedule.
130D-Link DHP-1320 User Manual
Section 3 - Conguration
Device Info
This page displays the current information for the DHP-W306AV. It will display the LAN and wireless LAN information.
General:
LAN:
Wireless LAN:
Displays the access point’s time and rmware
version.
Displays the MAC address and the private
(local) IP settings for the access point.
Displays the wireless MAC address and your
wireless settings such as SSID and Channel.
131D-Link DHP-1320 User Manual
Section 3 - Conguration
Logs
The DHP-W306AV keeps a running log of events and activities occurring on the AP. If the AP is rebooted, the logs are automatically cleared. You can
save the log les under Log Settings.
Log Options:
First Page:
Last Page:
Previous:
Next:
Clear:
Log Settings:
Refresh:
You can select the types of messages that you
would like to display from the log: System
Activity, Debug Information, Attacks, Dropped
Packets, and Notice. Select the types you want
to view and click Apply Log Settings Now.
This button directs you to the rst page of the
log.
This button directs you to the last page of the
log.
This button directs you to the previous page
of the log.
This button directs you to the next page of the
log.
This button clears all current log content.
This button opens a new menu where you can
congure the log settings.
This button refreshes the log.
132D-Link DHP-1320 User Manual
Section 3 - Conguration
Statistics
The DHP-1360 keeps statistics of the trac that passes through it. You can view the amount of packets that pass through the LAN and wireless
portions of the network. The trac counter will reset if the access point is rebooted.
Refresh Statistics: Click the Refresh button to refresh the Access Point’s
trac statistics.
133D-Link DHP-1320 User Manual
Section 3 - Conguration
Wireless
This section allows you to view the wireless clients that are connected to your wireless access point.
134D-Link DHP-1320 User Manual
Section 3 - Conguration
IPv6
This section will display all of your IPv6 Internet and network connection details.
135D-Link DHP-1320 User Manual
Section 3 - Conguration
Support

136D-Link DHP-1320 User Manual
Section 4 - Security
Wireless Security
This section will show you the dierent levels of security you can use to protect your data from intruders. The
DHP-1320 oers the following types of security:
• WPA2 (Wi-Fi Protected Access 2) • WPA2-PSK (Pre-Shared Key)
• WPA (Wi-Fi Protected Access) • WPA-PSK (Pre-Shared Key)
What is WPA?
WPA (Wi-Fi Protected Access), is a Wi-Fi standard that was designed to improve the security features of WEP (Wired Equivalent Privacy).
The 2 major improvements over WEP:
• Improved data encryption through the Temporal Key Integrity Protocol (TKIP). TKIP scrambles the keys using a hashing algorithm
and, by adding an integrity-checking feature, ensures that the keys haven’t been tampered with. WPA2 is based on 802.11i and
uses Advanced Encryption Standard (AES) instead of TKIP.
• User authentication, which is generally missing in WEP, through the extensible authentication protocol (EAP). WEP regulates access
to a wireless network based on a computer’s hardware-specic MAC address, which is relatively simple to be snied out and stolen.
EAP is built on a more secure public-key encryption system to ensure that only authorized network users can access the network.
WPA-PSK/WPA2-PSK uses a passphrase or key to authenticate your wireless connection. The key is an alpha-numeric password between 8 and 63
characters long. The password can include symbols (!?*&_) and spaces. This key must be the exact same key entered on your wireless router or
access point.
WPA/WPA2 incorporates user authentication through the Extensible Authentication Protocol (EAP). EAP is built on a more secure public key encryption
system to ensure that only authorized network users can access the network.
137D-Link DHP-1320 User Manual
Section 4 - Security
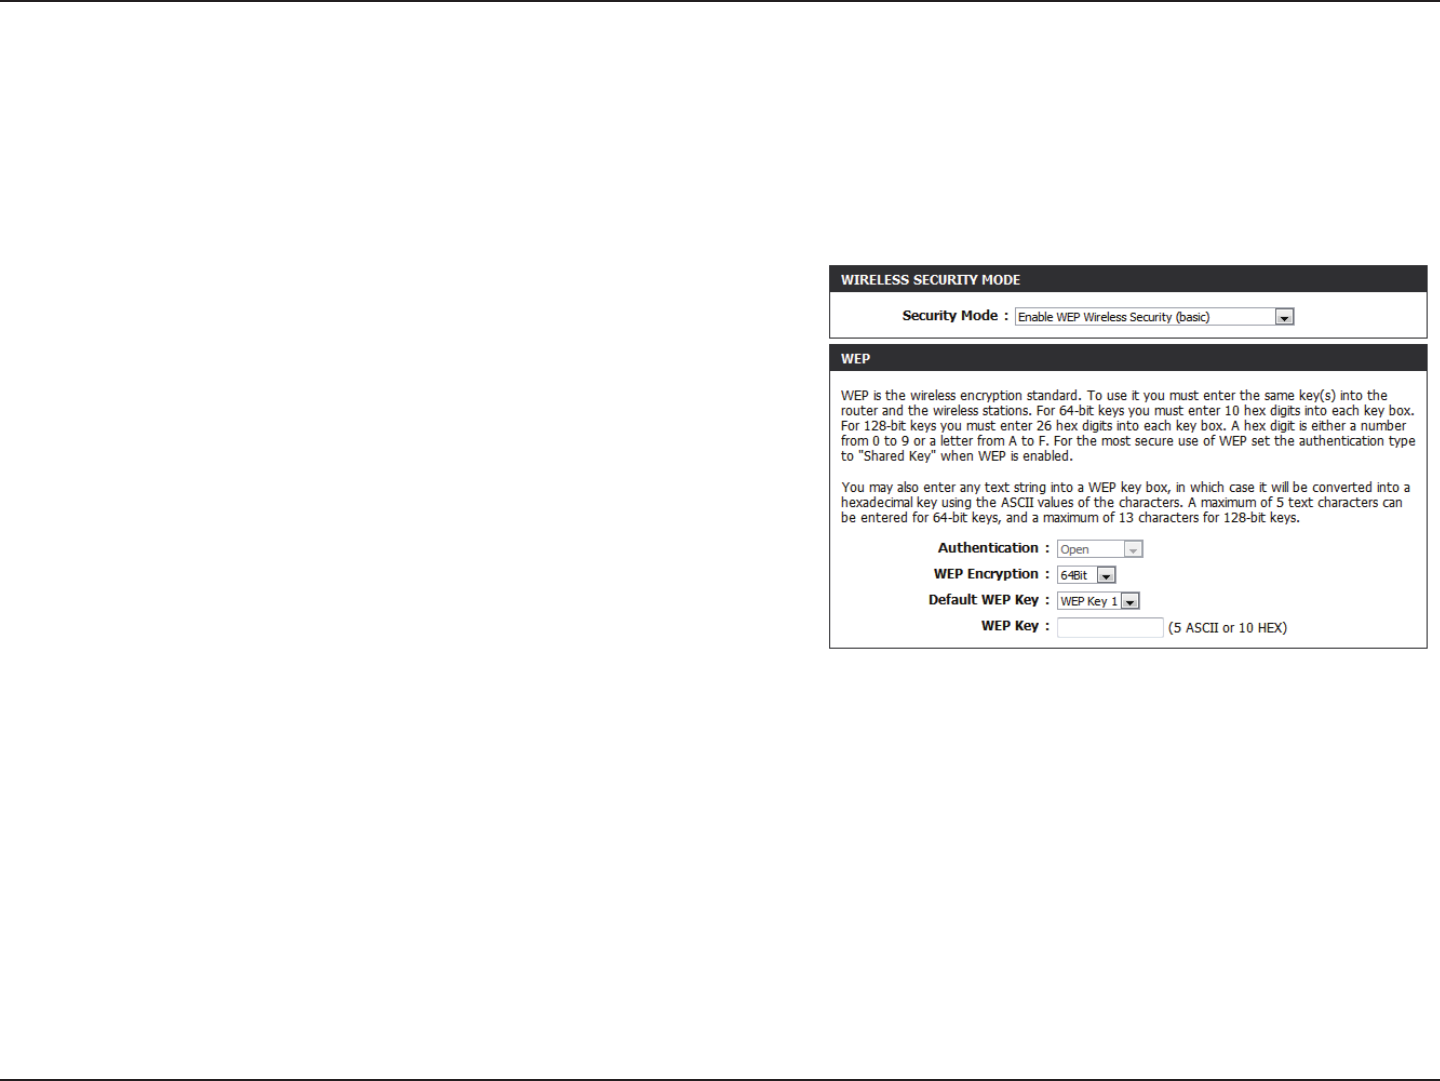
Congure WEP
It is recommended to enable encryption on your wireless router before your wireless network adapters. Please establish wireless connectivity before
enabling encryption. Your wireless signal may degrade when enabling encryption due to the added overhead.
1. Log into the web-based conguration by opening a web browser and entering the IP address of the router (192.168.0.1).
2. Click on Setup and then click Wireless Settings on the left side.
3. Click the Manual Wireless Connection Setup button.
4. Next to Security Mode, select Enable WEP Wireless Security (basic).
5. Next to WEP Encryption, select 64bit or 128bit.
6. Next to Default WEP Key, select the WEP key you would like to use as the default
WEP key. The available options are WEP Key 1, WEP Key 2, WEP Key 3, or WEP
Key 4.
7. Enter the WEP key you would like to use in the WEP Key eld.
8. Click Save Settings to save your settings. If you are conguring the router with
a wireless adapter, you will lose connectivity until you enable WEP on your adapter and enter the same WEP key as you did on the router.
138D-Link DHP-1320 User Manual
Section 4 - Security
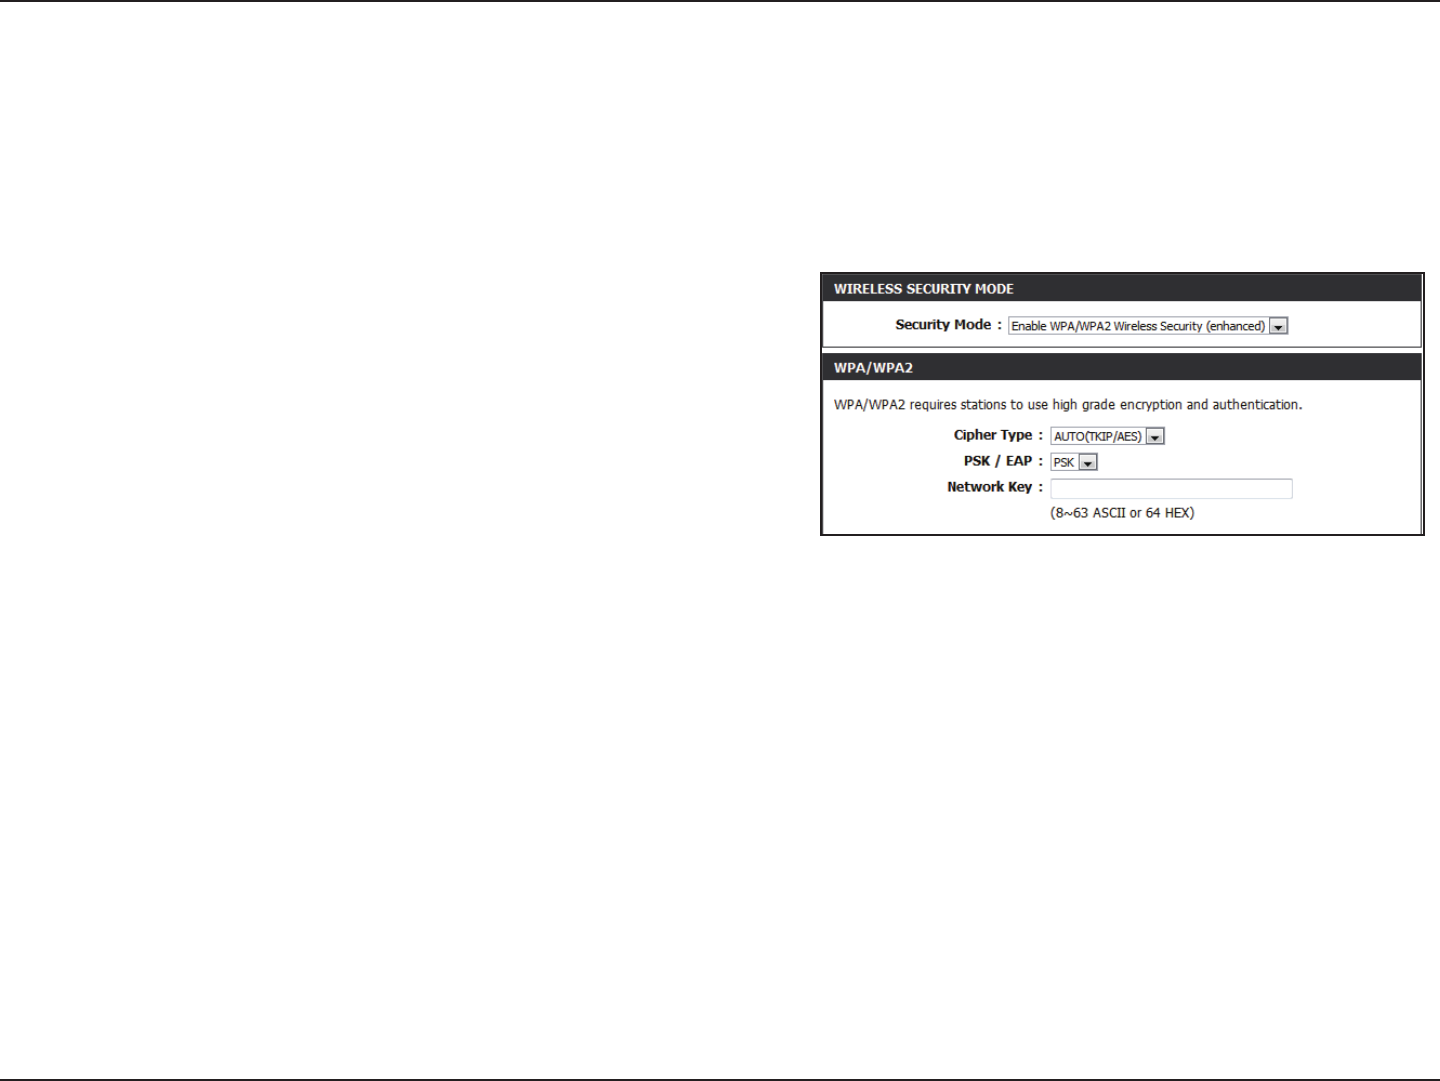
Congure WPA/WPA2-Personal (PSK)
It is recommended to enable encryption on your wireless router before your wireless network adapters. Please establish wireless connectivity before
enabling encryption. Your wireless signal may degrade when enabling encryption due to the added overhead.
1. Log into the web-based conguration by opening a web browser and entering the IP address of the router (192.168.0.1).
2. Click on Setup and then click Wireless Settings on the left side.
3. Click the Manual Wireless Connection Setup button.
4. Next to Security Mode, select Enable WPA/WPA2 Wireless Security (enhanced).
5. Next to Cipher Type, select Auto (TKIP/AES), TKIP, or AES.
6. Next to PSK/EAP, select PSK.
7. Enter the WPA network key you would like to use in the Network Key eld.
8. Click Save Settings to save your settings. If you are conguring the router with a wireless adapter, you will lose connectivity until you enable
WPA-PSK on your adapter and enter the same passphrase as you did on the router.
139D-Link DHP-1320 User Manual
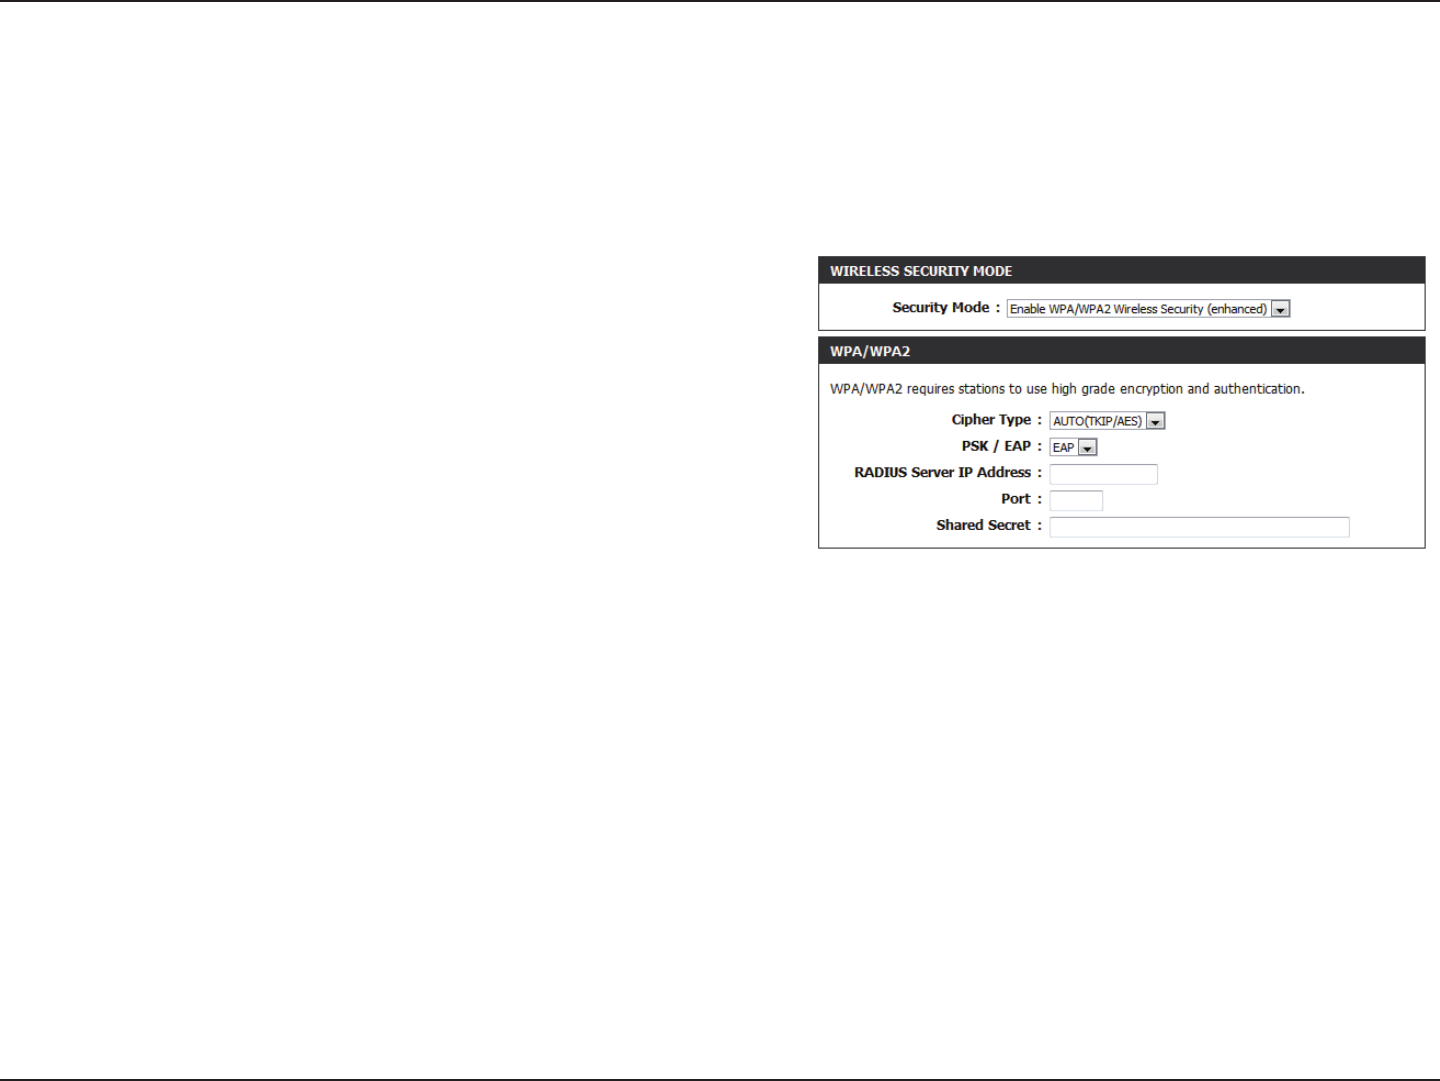
Section 4 - Security
It is recommended to enable encryption on your wireless router before your wireless network adapters. Please establish wireless connectivity before
enabling encryption. Your wireless signal may degrade when enabling encryption due to the added overhead.
1. Log into the web-based conguration by opening a web browser and entering the IP address of the router (192.168.0.1).
2. Click on Setup and then click Wireless Settings on the left side.
3. Click the Manual Wireless Connection Setup button.
4. Next to Security Mode, select Enable WPA/WPA2 Wireless Security (enhanced).
5. Next to Cipher Type, select Auto (TKIP/AES), TKIP, or AES.
6. Next to PSK/EAP, select EAP.
7. Next to RADIUS Server IP Address enter the IP Address of your RADIUS server.
8. Next to Port, enter the port you are using with your RADIUS server. 1812 is the default port.
9. Next to Shared Secret, enter the security key.
10. Click Save Settings to save your settings.
Congure WPA/WPA2-Enterprise (RADIUS)
140D-Link DHP-1320 User Manual
Section 5 - Connecting to a Wireless Network
Using Windows® 7
It is recommended to enable wireless security (WPA/WPA2) on your wireless router or access point before conguring your wireless adapter. If you
are joining an existing network, you will need to know the security key or passphrase being used.
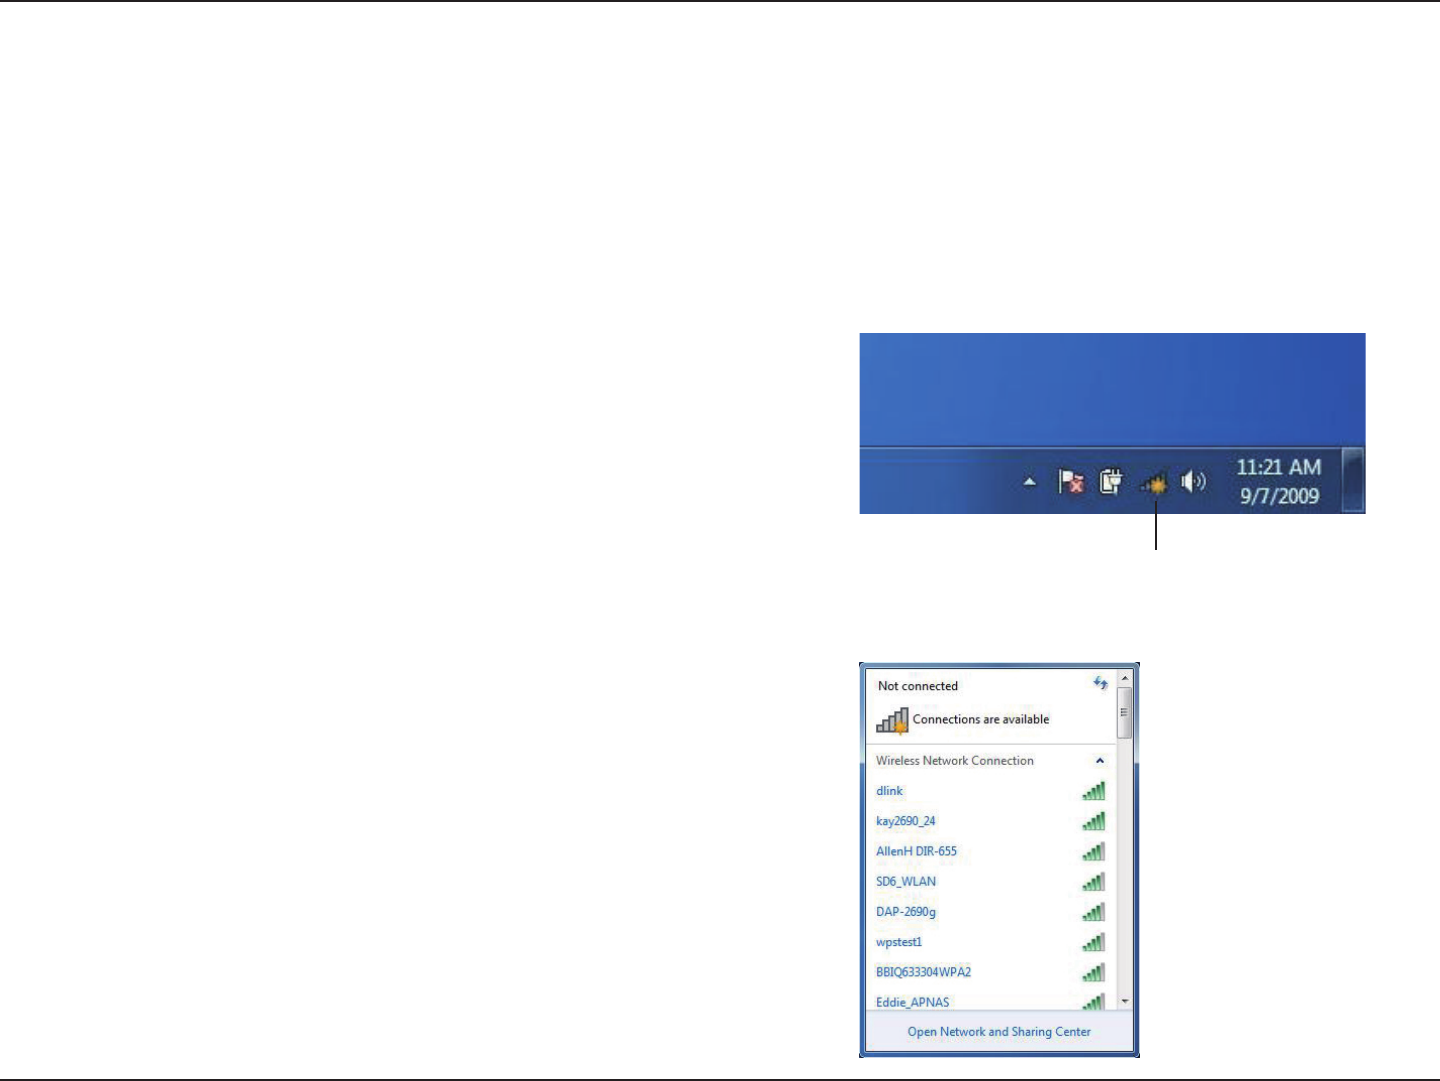
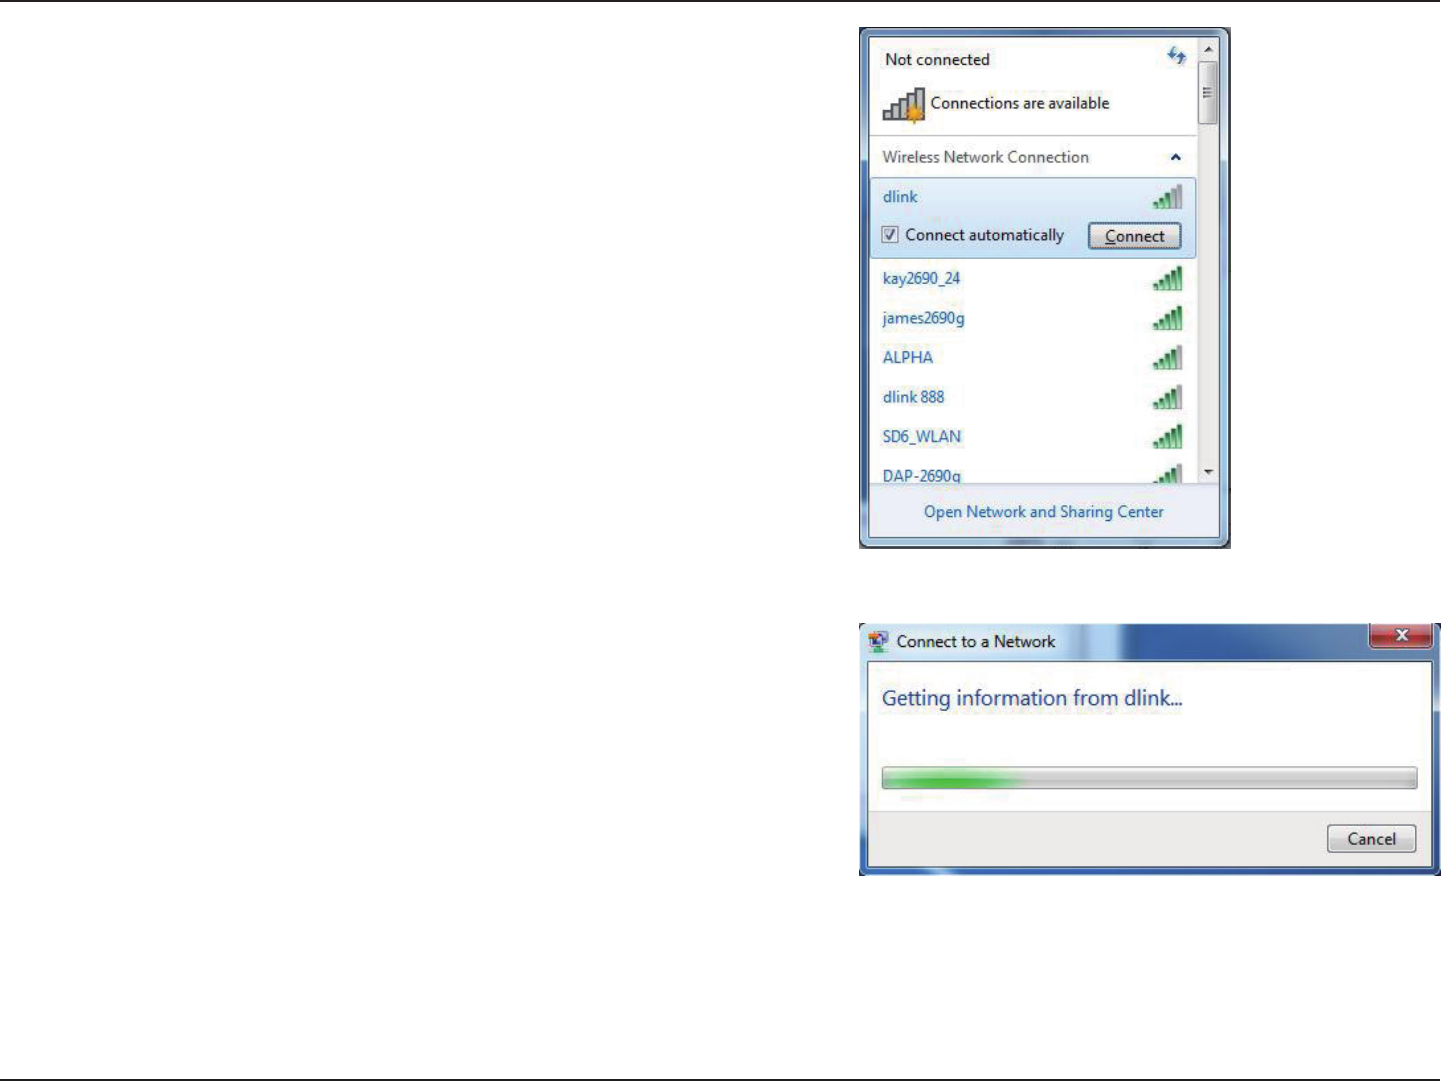
1. Click on the wireless icon in your system tray (lower-right corner).
2. The utility will display any available wireless networks in your area.
Connect to a Wireless Network
Wireless Icon
141D-Link DHP-1320 User Manual
Section 5 - Connecting to a Wireless Network
3. Highlight the wireless network (SSID) you would like to connect to and click
the Connect button.
If you get a good signal but cannot access the Internet, check your TCP/IP
settings for your wireless adapter. Refer to the Networking Basics section in
this manual for more information.
4. The following window appears while your computer tries to connect to the
router.
142D-Link DHP-1320 User Manual
Section 5 - Connecting to a Wireless Network
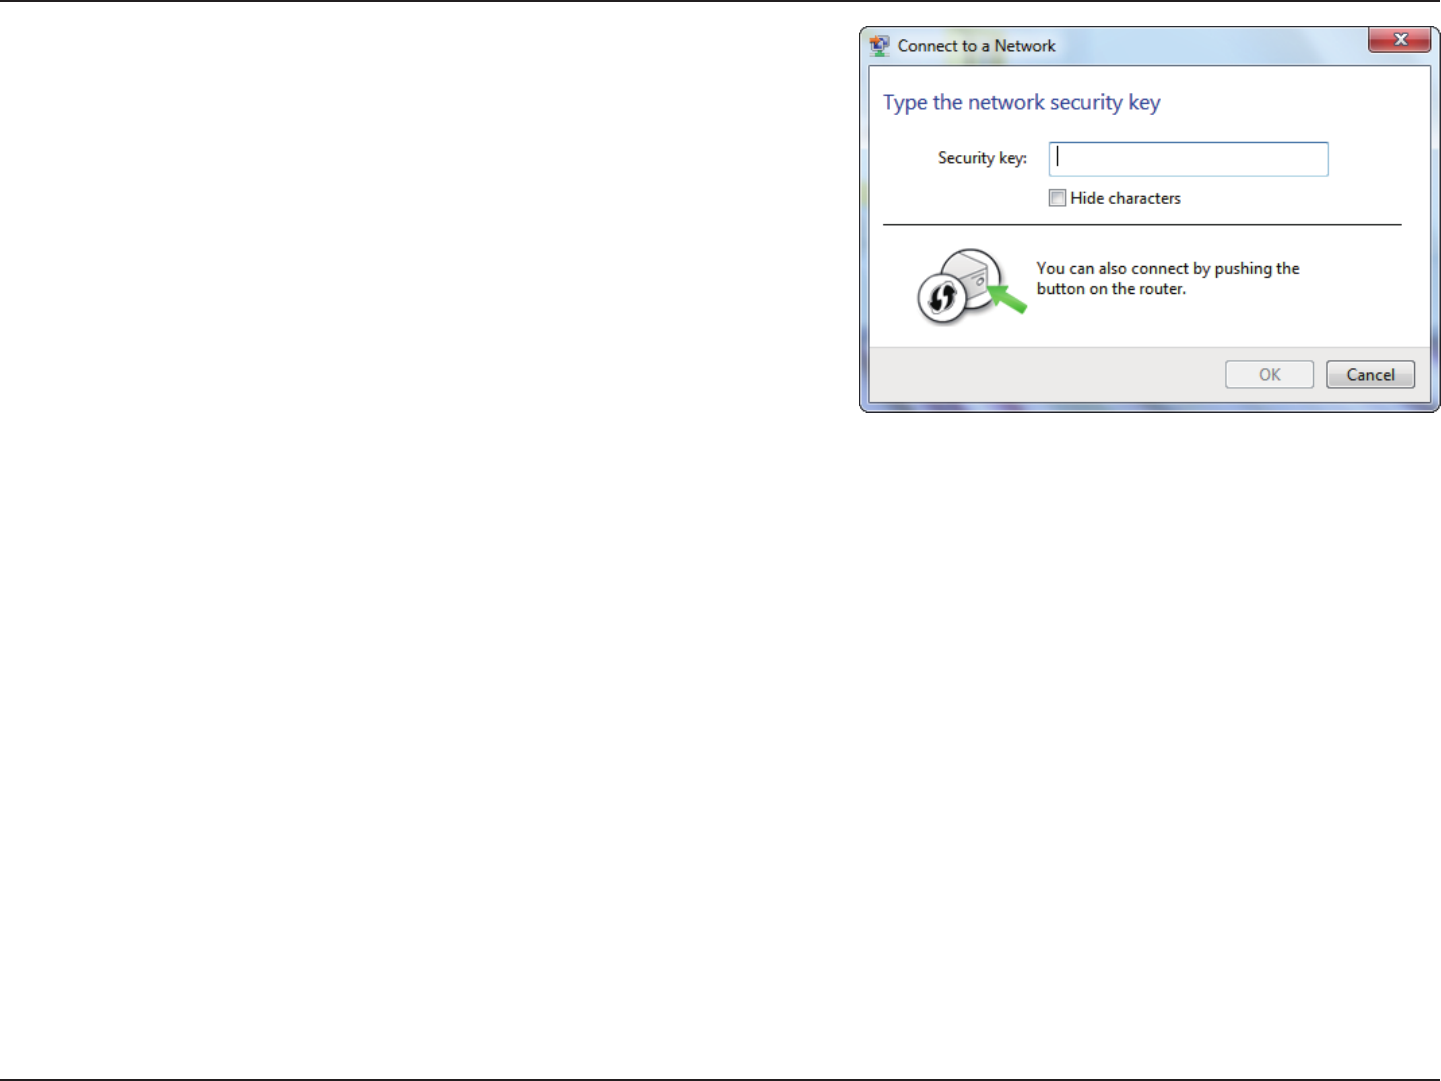
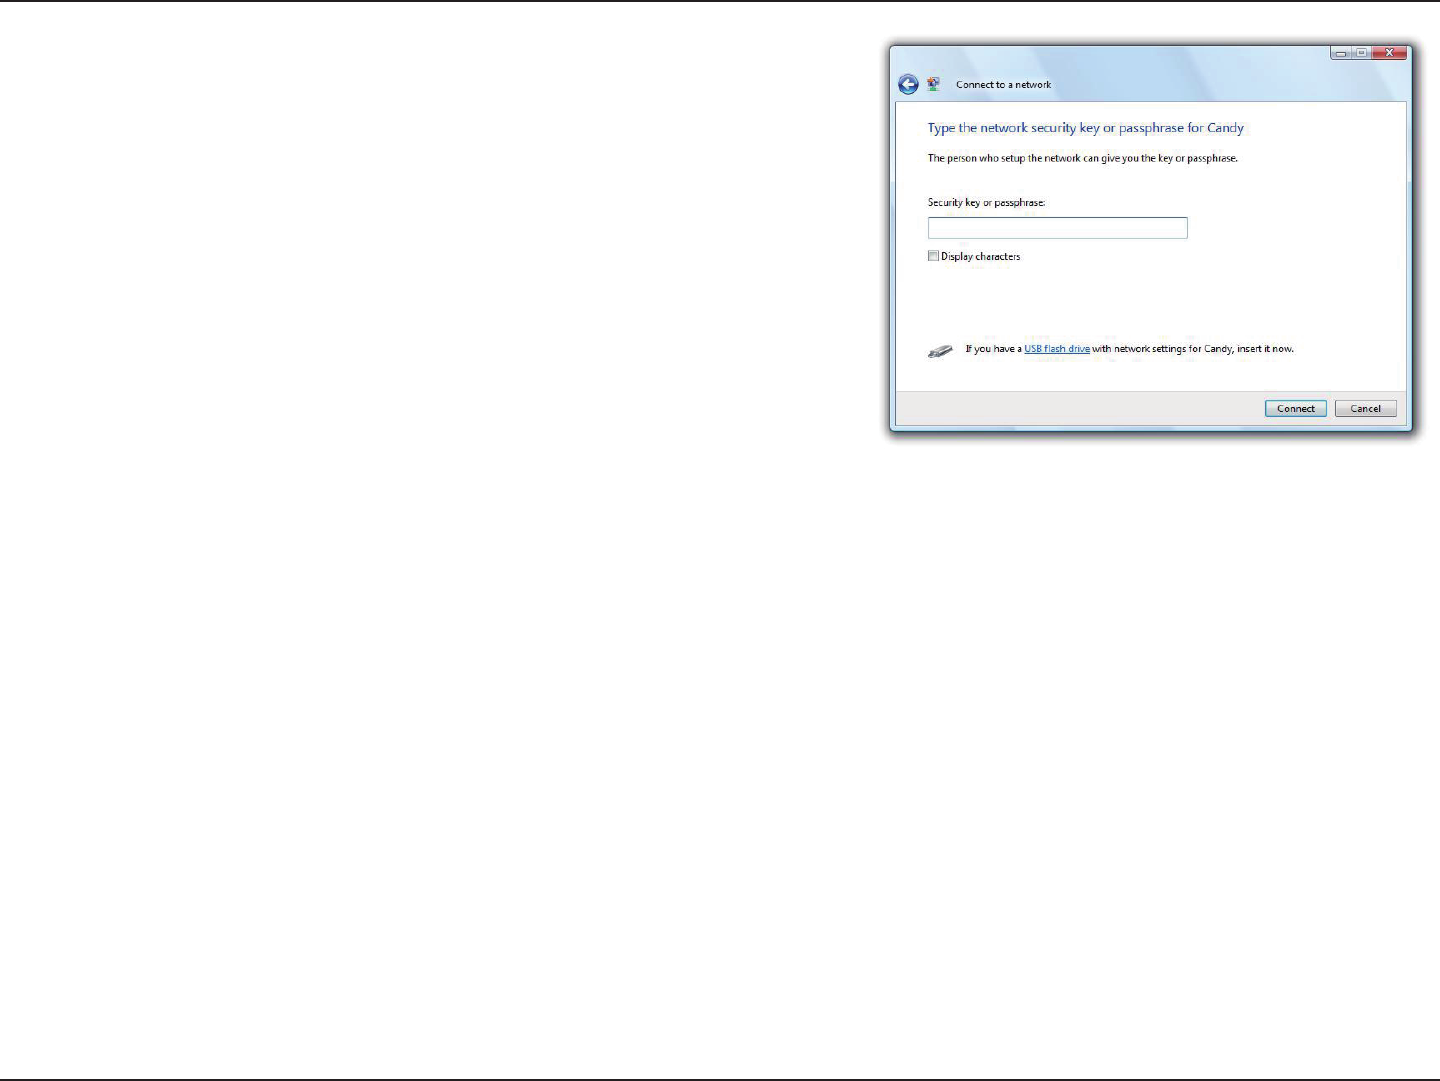
5. Enter the same security key or passphrase that is on your router and click
Connect. You can also connect by pushing the WPS button on the router.
It may take 20-30 seconds to connect to the wireless network. If the connection
fails, please verify that the security settings are correct. The key or passphrase
must be exactly the same as on the wireless router.
143D-Link DHP-1320 User Manual
Section 5 - Connecting to a Wireless Network
Congure WPS
The WPS feature of the router can be congured using Windows® 7. Carry out the following steps to use Windows® 7 to congure the WPS feature
of the router:
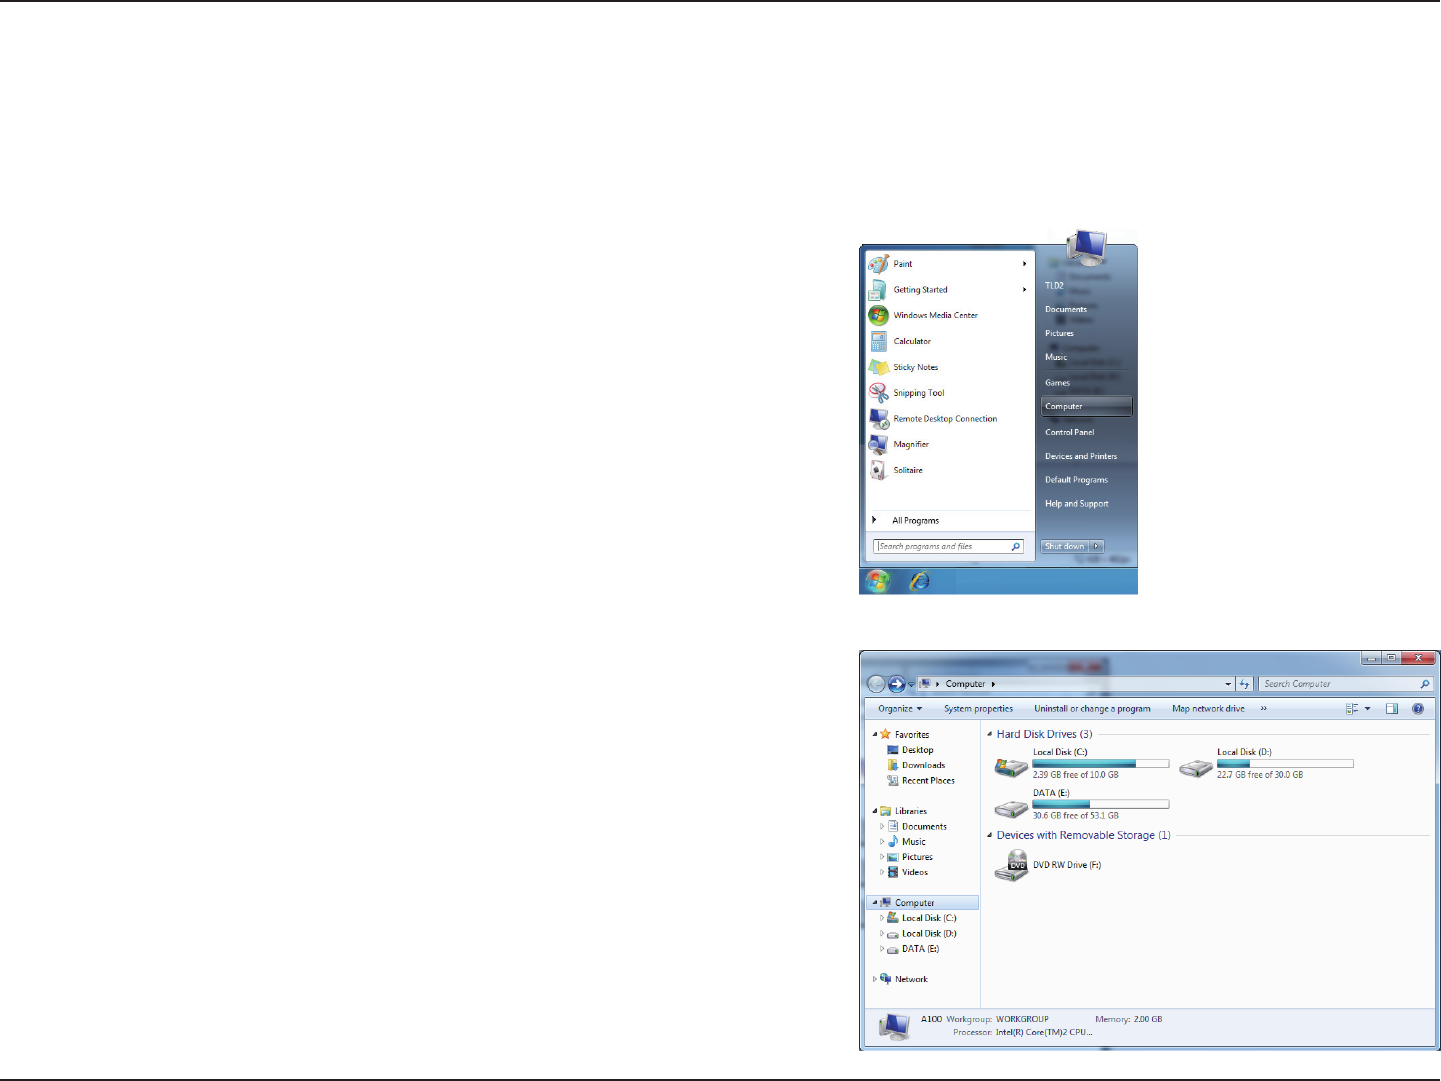
1. Click the Start button and select Computer from the Start menu.
2. Click the Network option.
144D-Link DHP-1320 User Manual
Section 5 - Connecting to a Wireless Network
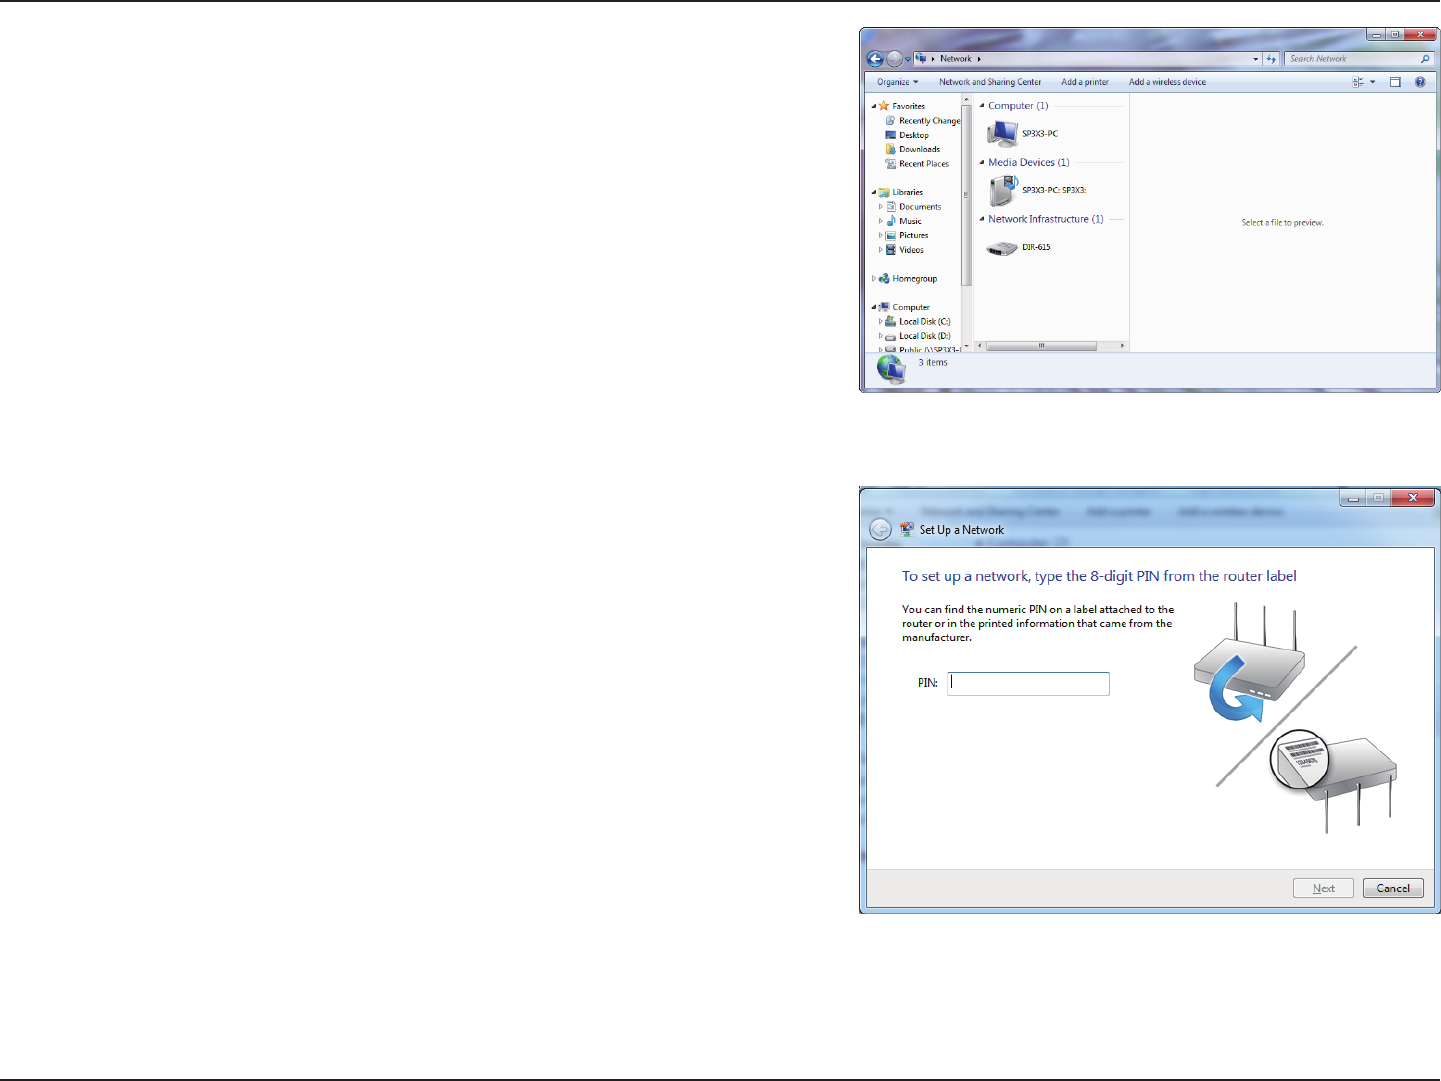
3. Double-click the DHP-1320.
4. Input the WPS PIN number (displayed in the WPS window on the Router’s
LCD screen or in the Setup > Wireless Setup menu in the Router’s Web UI)
and click Next.
145D-Link DHP-1320 User Manual
Section 5 - Connecting to a Wireless Network
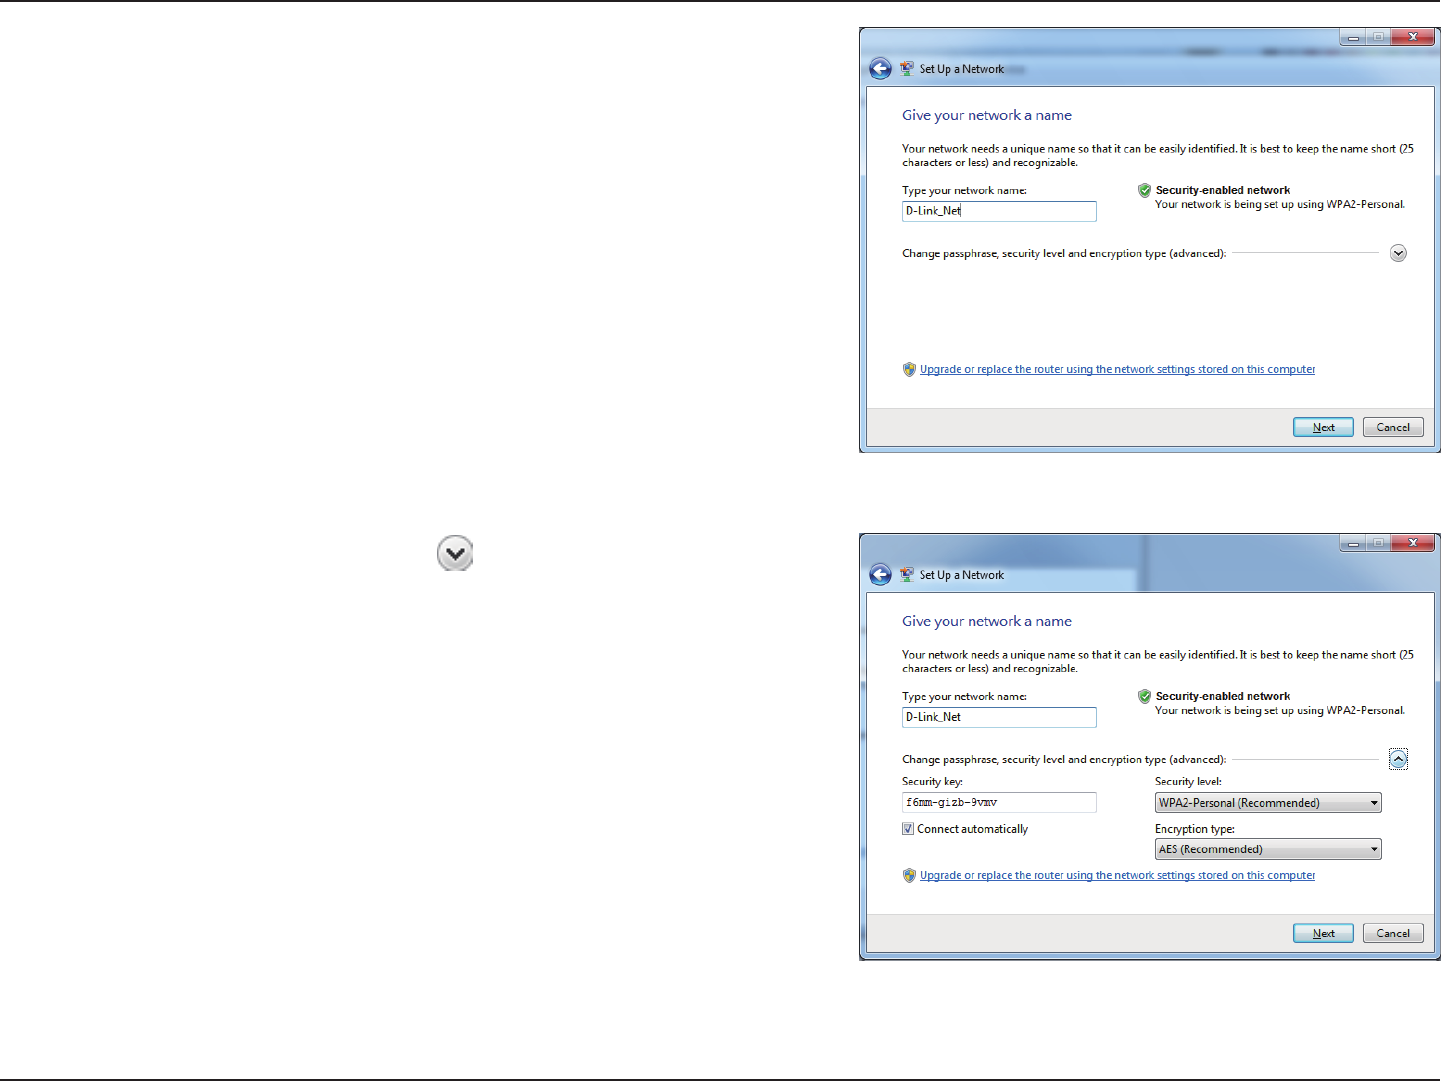
5. Type a name to identify the network.
6. To congure advanced settings, click the icon.
Click Next to continue.
146D-Link DHP-1320 User Manual
Section 5 - Connecting to a Wireless Network
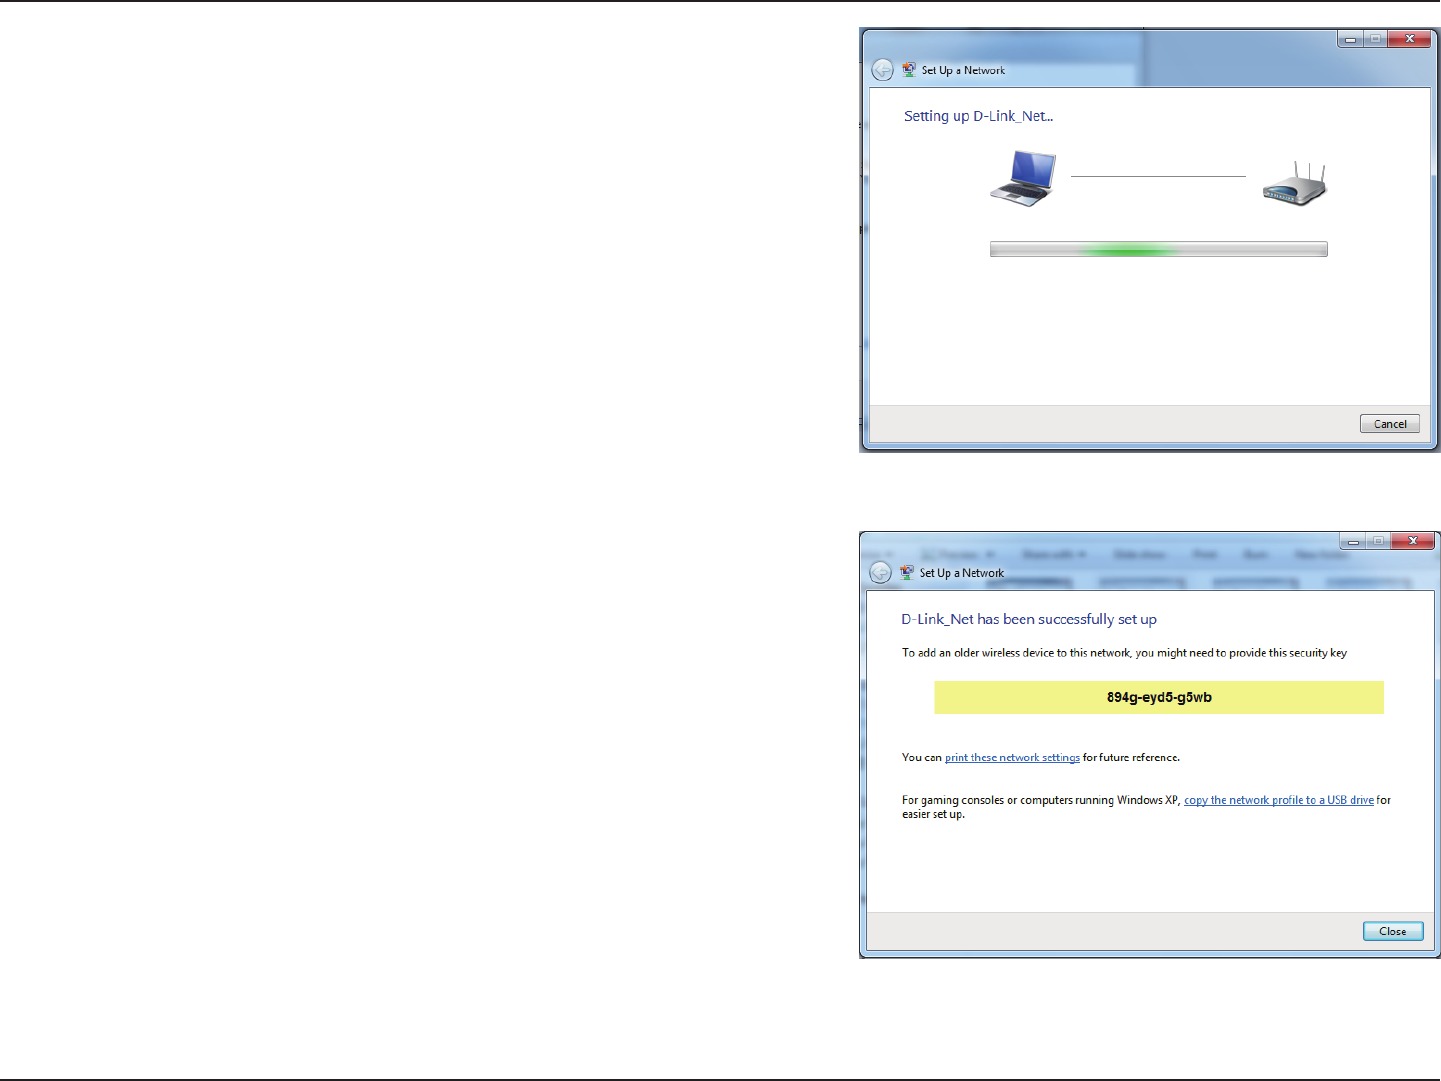
7. The following window appears while the Router is being congured.
Wait for the conguration to complete.
8. The following window informs you that WPS on the DHP-1320 has been setup
successfully.
Make a note of the security key as you may need to provide this security key
if adding an older wireless device to the network in the future.
9. Click Close to complete WPS setup.
147D-Link DHP-1320 User Manual
Section 5 - Connecting to a Wireless Network
Using Windows Vista®
Windows Vista® users may use the built-in wireless utility. If you are using another company’s utility or Windows® 2000, please refer to the user
manual of your wireless adapter for help with connecting to a wireless network. Most utilities will have a “site survey” option similar to the Windows
Vista® utility as seen below.
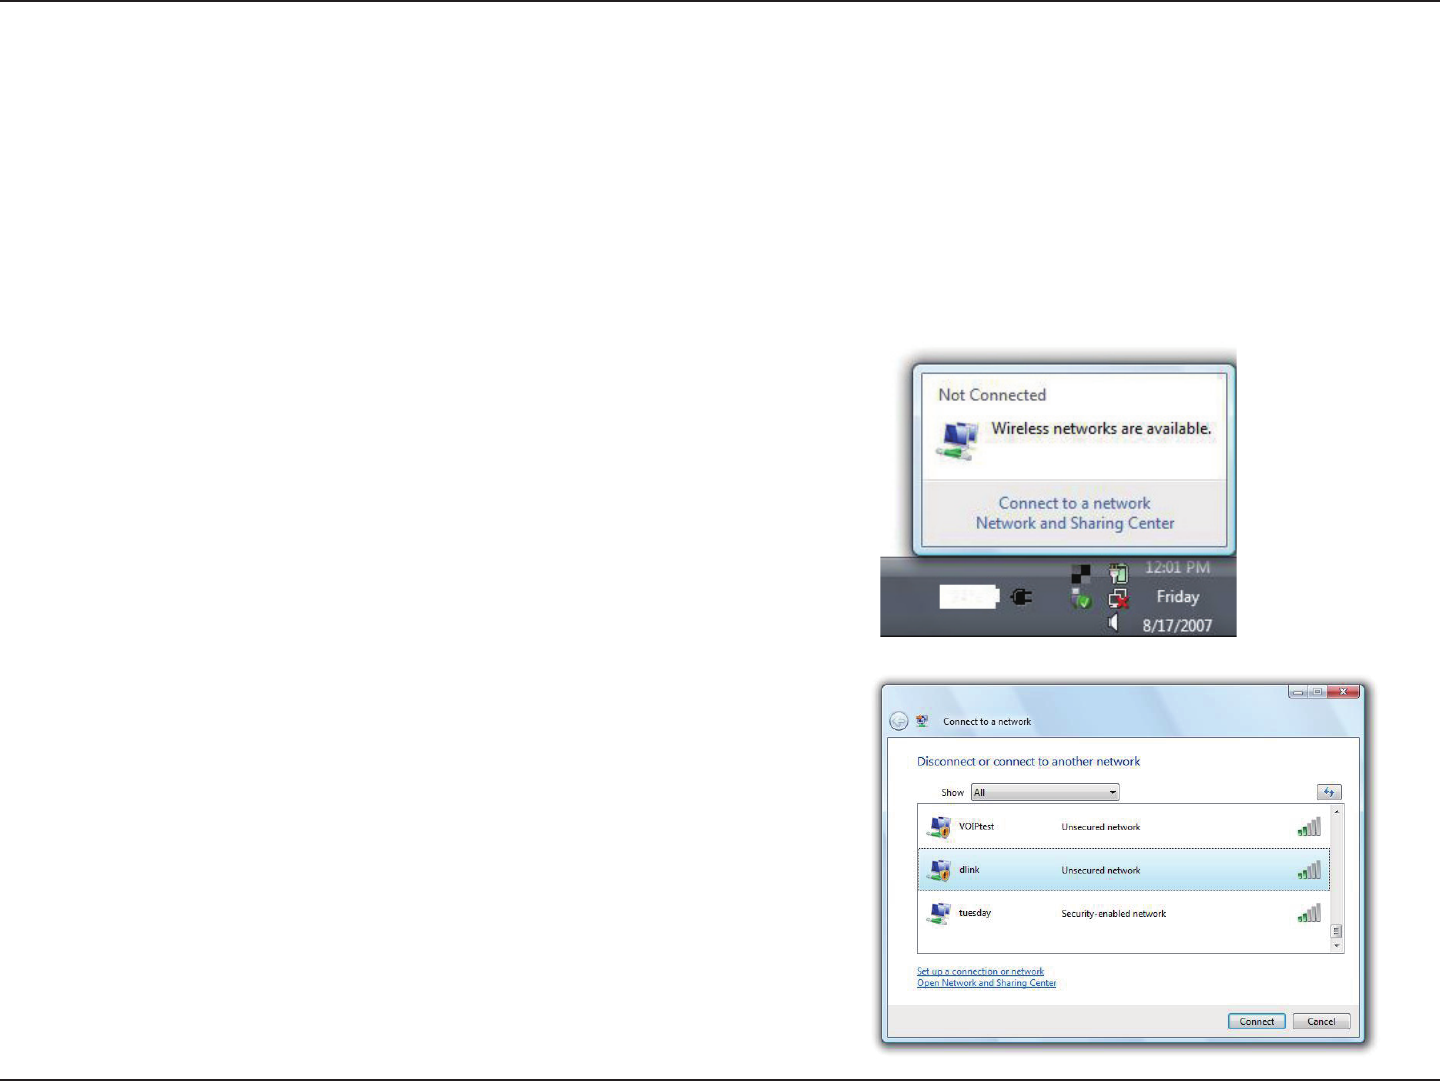
Right-click on the wireless computer icon in your system tray (lower-right corner
next to the time). Select Connect to a network.
If you receive the Wireless Networks Detected bubble, click on the center of
the bubble to access the utility.
or
The utility will display any available wireless networks in your area. Click on a
network (displayed using the SSID) and click the Connect button.
If you get a good signal but cannot access the Internet, check you TCP/IP settings
for your wireless adapter. Refer to the Networking Basics section in this manual
for more information.
148D-Link DHP-1320 User Manual
Section 5 - Connecting to a Wireless Network
Congure Wireless Security
It is recommended to enable wireless security (WPA/WPA2) on your wireless router or access point before conguring your wireless adapter. If you
are joining an existing network, you will need to know the security key or passphrase being used.
2. Highlight the wireless network (SSID) you would like to connect to and click
Connect.
1. Open the Windows Vista® Wireless Utility by right-clicking on the wireless
computer icon in your system tray (lower right corner of screen). Select
Connect to a network.
149D-Link DHP-1320 User Manual
Section 5 - Connecting to a Wireless Network
3. Enter the same security key or passphrase that is on your router and click Connect.
It may take 20-30 seconds to connect to the wireless network. If the connection fails,
please verify that the security settings are correct. The key or passphrase must be
exactly the same as on the wireless router.

150D-Link DHP-1320 User Manual
Section 5 - Connecting to a Wireless Network
Using Windows® XP
Windows® XP users may use the built-in wireless utility (Zero Conguration Utility). The following instructions are for Service Pack 2 users. If you are
using another company’s utility or Windows® 2000, please refer to the user manual of your wireless adapter for help with connecting to a wireless
network. Most utilities will have a “site survey” option similar to the Windows® XP utility as seen below.
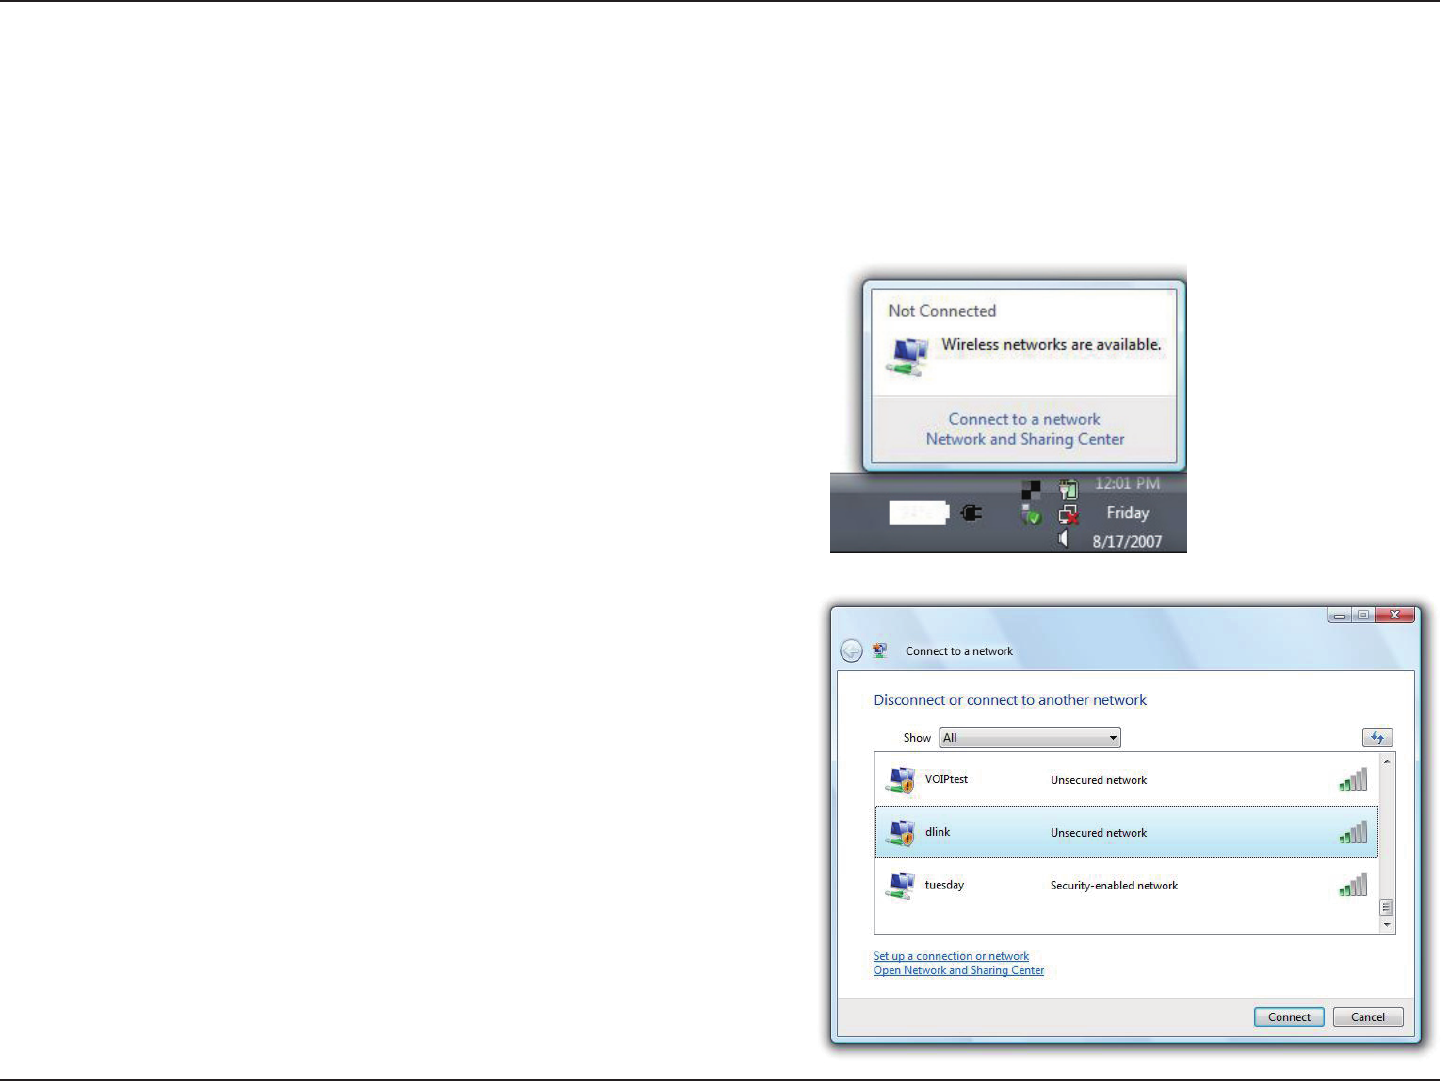
Right-click on the wireless computer icon in your system tray (lower-right corner
next to the time). Select View Available Wireless Networks.
If you receive the Wireless Networks Detected bubble, click on the center of the
bubble to access the utility.
or
The utility will display any available wireless networks in your area. Click on a
network (displayed using the SSID) and click the Connect button.
If you get a good signal but cannot access the Internet, check you TCP/IP settings
for your wireless adapter. Refer to the Networking Basics section in this manual
for more information.