D Link IR400A1 RangeBooster G Router User Manual Manual Part 1

D Link Corporation RangeBooster G Router Manual Part 1
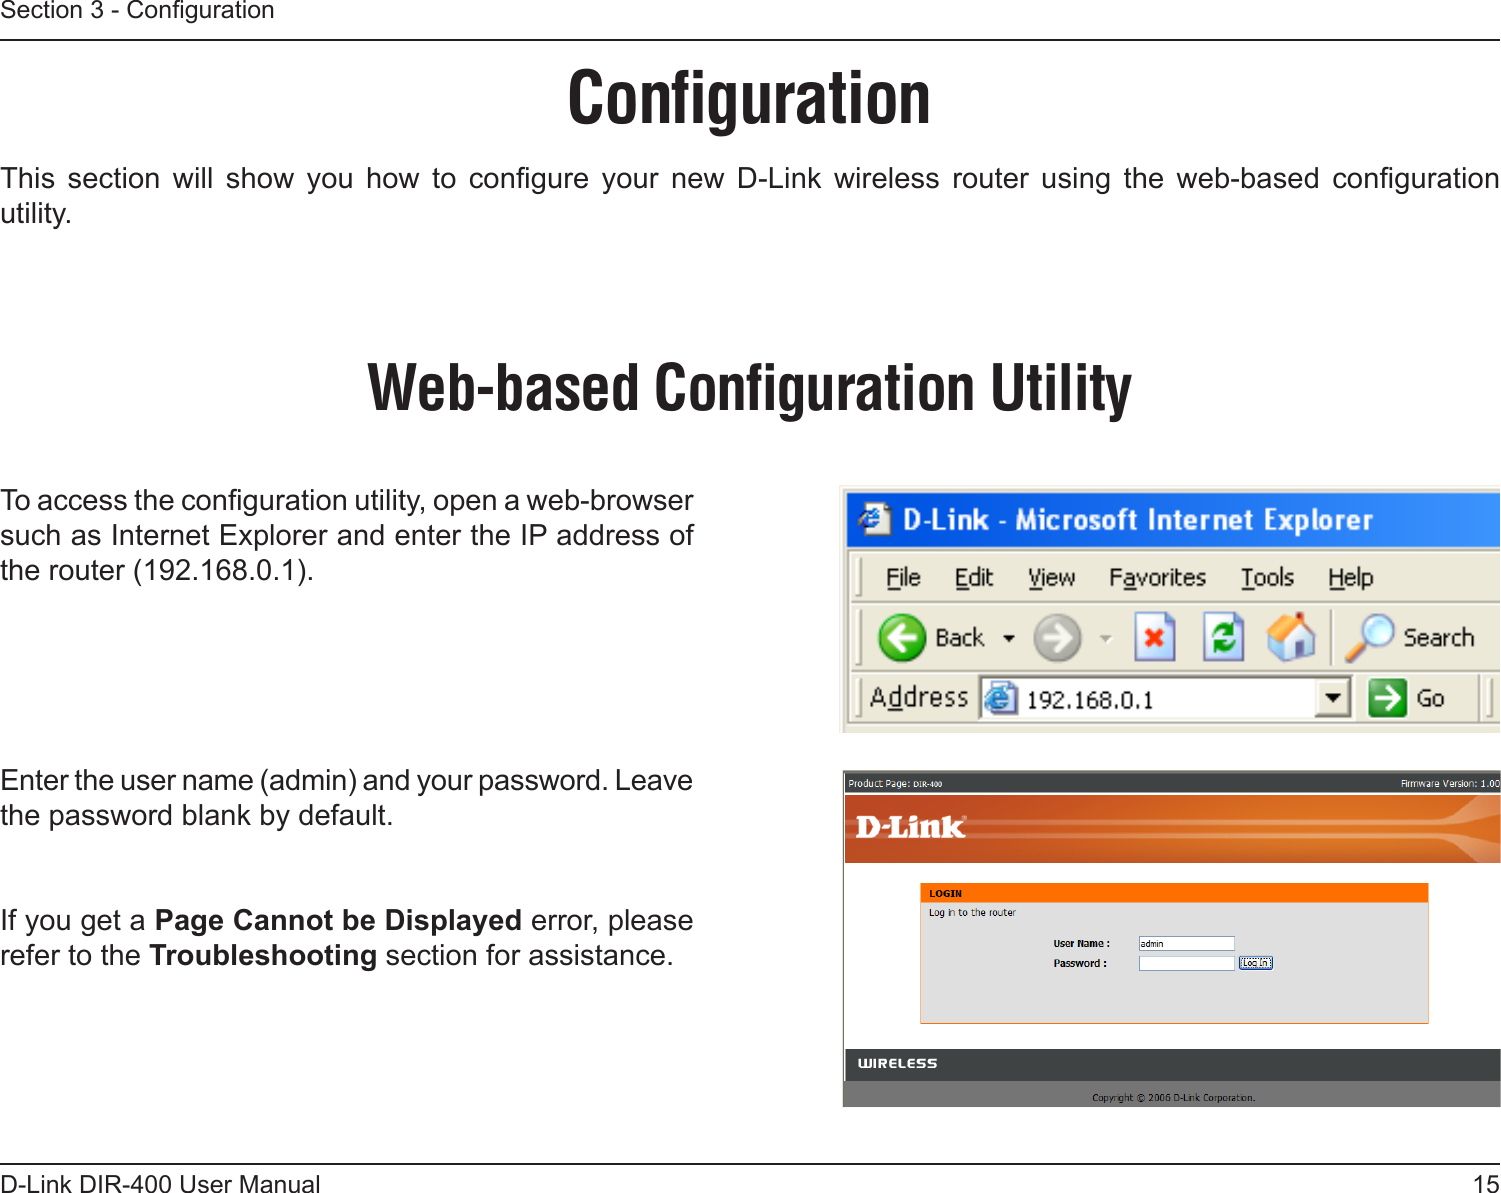
Manual Part 1

2D-Link DIR-400 User ManualTable of ContentsPackage Contents ..............................................................4System Requirements ....................................................4Introduction ....................................................................5Features .........................................................................6Hardware Overview ........................................................7Connections .............................................................7Buttons .....................................................................8LEDs ........................................................................9Installation .........................................................................10Before you Begin ..........................................................10Wireless Installation Considerations ............................ 11Connecting to a Cable/DSL/Satellite Modem ...............12Connecting to Another Router ......................................13Conguration ....................................................................15Web-based Conguration Utility ...................................15Setup Wizard .........................................................16Internet Setup ........................................................22Dynamic (Cable) ................................................22PPPoE (DSL) .....................................................23PPTP ..................................................................24L2TP...................................................................25Big Pond ............................................................26Static (assigned by ISP) .....................................27Russia PPTP ......................................................28Russia PPPoE (DSL) .........................................29Wireless Setup .......................................................30Enabling WEP Wireless Security ...........................34Enabling WPA, WPA2, WPA/WPA2 Wireless Security ..................................................................35Enabling WPA, WPA2, WPA/WPA2 Wireless Security for a RADIUS Server ..............................................36Adding a Wireless Device through WPS ................37Adding a Wireless Device through WPS (Wi-Fi Protected Setup) ....................................................38Adding a Wireless Device through WPS (PIN) ......39Adding a Wireless Device through WPS (PBC) .....40LAN Setup ..............................................................41DHCP Server Settings ...........................................42DHCP Reservation .................................................43Time and Date .......................................................44Parental Control .....................................................45Port Forwarding .....................................................46Application Rules ...................................................47Access Control .......................................................48Firewall & DMZ - DMZ Host ...................................49Firewall & DMZ - Firewall Rules .............................50Advanced Wireless ................................................51Advanced Network .................................................52Routing ...................................................................53Device Administration ............................................54Save and Restore ..................................................55Table of Contents
3D-Link DIR-400 User ManualTable of ContentsFirmware Update ...................................................56DDNS Settings .......................................................57System Check ........................................................58Schedules ..............................................................59Log Settings ...........................................................60Log Settings - Email Notication ............................61Device Information .................................................62Log .........................................................................63Statistics .................................................................64Active Session  ......................................................64Wireless .................................................................65Help ........................................................................66Wireless Security ..............................................................67What is WEP? ..............................................................67Conguring WEP ..........................................................68What is WPA? ..............................................................69Conguring WPA-PSK and WPA2-PSK .......................70Conguring WPA/WPA2-PSK .......................................71Conguring WPA, WPA2, & WPA/WPA2 (RADIUS) .....72Connecting to a Wireless Network .................................73Using Windows® XP .....................................................73Congure WEP.............................................................74Conguring WPA-PSK..................................................76Setting Up Wi-Fi Protection .............................................78(WCN 2.0 in Windows Vista) ............................................78Initial Router Conguration for Wi-Fi Protection ...........78Setting Up a Congured Router ...................................79Changing the Computer Name and Joining a  Workgroup ........................................................................80Conguring the IP Address in Vista ...............................82Connecting to a Secured Wireless Network (WEP,  WPA-PSK & WPA2-PSK) ..................................................85Connecting to an Unsecured Wireless Network ............89Troubleshooting ...............................................................93Wireless Basics ................................................................97What is Wireless? ........................................................98Wireless Setup Tips ...................................................100Wireless Modes ..........................................................101Networking Basics .........................................................102Checking your IP address ..........................................102Assigning a static IP address .....................................103Technical Specications ................................................104Contacting Technical Support .......................................106Warranty ..........................................................................107Registration ..................................................................... 112
4D-Link DIR-400 User ManualSection 1 - Product Overview• D-Link DIR-400 Wireless Router• Power Adapter• Ethernet Cable• Manual and Warranty on CDSystem Requirements• Ethernet-based Cable or DSL Modem• Computers with Windows®, Macintosh®, or Linux-based  operating systems with an installed Ethernet adapter• Internet Explorer Version 6.0 or Mozilla Firefox 1.5  above (for conguration)Package ContentsNote: Using a power supply with a different voltage rating than the one included with the DIR-400 will cause damage and void the warranty for this product.Note: Always attach the power cord plug to the power supply, before inserting the power cord and connected power supply to the wall outlet.
5D-Link DIR-400 User ManualSection 1 - Product OverviewIntroductionD-Link,  the  industry  leader  in  wireless  networking,  introduces  another  breakthrough  in  wireless  connectivity.  The  D-Link DIR-400 Wireless 108 G Router is capable of transferring data with a maximum wireless signal rate of up toDIR-400 Wireless 108 G Router is capable of transferring data with a maximum wireless signal rate of up toWireless 108 G Router is capable of transferring data with a maximum wireless signal rate of up to 108Mbps* through its 108Mbps Turbo mode*, and is also compatible with 802.11b/g.  The D-Link DIR-400 Wireless Router also offers four Ethernet ports to support multiple computers.The advanced wireless technology built into the DIR-400 Wireless Router offers data transfer speeds with a maximum wireless signal rate of up to 108Mbps* through its wireless channels, allowing streaming videos and other high bandwidth applications such as online gaming to operate without the hassle of Ethernet cables. The ability to use high bandwidth applications also makes streaming real-time programs more enjoyable and more efcient.   With the DIR-400 Wireless Router’s built-in advanced rewall, threats of hackers penetrating your network are minimized. Some rewall features include functions that allow or disallow certain ports to be open for certain applications. Time scheduling can be established as a rewall rule so that specic ports will be open at certain times and closed at other times. Features like content ltering, MAC ltering, URL blocking, and domain blocking are useful tools to prevent other unwanted intruders from connecting to your network or browsing restricted sites.The easy-to-use conguration wizard takes only minutes to set up and guides users step-by-step through conguring the DIR-400. With its versatile features and a user-friendly interface, the DIR-400 Wireless 108 G Router provides an enhanced networking experience.* 108Mbps Turbo mode operates only with other D-Link 108 G products. Maximum wireless signal rate derived from IEEE Standard 802.11g specications.Maximum wireless signal rate derived from IEEE Standard 802.11g specications. Actual data throughput will vary. Network conditions and environmental factors, including volume of network trafc, building materials and construction, and network overhead, lower actual data throughput rate. Environmental conditions will adversely affect wireless signal range.
6D-Link DIR-400 User ManualSection 1 - Product Overview• Faster Wireless Networking - The DIR-400 provides an up to 108Mbps* wireless connection with other D-Link 108 G devices. This capability allows users to participate in real-time activities online, such as video streaming, online gaming, and real-time audio. The performance of this 108 G wireless router gives you the freedom of wireless networking at speeds 2x faster than 802.11g and 10x faster than 802.11b.• Compatible with 802.11b and 802.11g Devices - The DIR-400 is still fully compatible with the IEEE 802.11g and 802.11b standards, so it can connect with existing 802.11g and 802.11b PCI, USB and Cardbus adapters.• Advanced Firewall Features - The Web-based user interface displays a number of advanced network management features including: • Content  Filtering -  Easily applied  content ltering  based on  MAC Address, URL,  and/or Domain Name.• Filter  Scheduling  - These  lters can  be  scheduled to  be  active on  certain days or  for a duration of hours or minutes.• Secure Multiple/Concurrent Sessions - The DIR-400 can pass through VPN sessions. It supports multiple and concurrent IPSec and PPTP sessions, so users behind the DIR-400 can securely access corporate networks.• User-friendly Setup Wizard - Through its easy-to-use Web-based user interface, the DIR-400 lets you control what information is accessible to those on the wireless network, whether from the Internet or from your company’s server. Congure your router to your specic settings within minutes.* 108Mbps Turbo mode operates only with other D-Link 108 G products. Maximum wireless signal rate derived from IEEE Standard 802.11g specications.108Mbps Turbo mode operates only with other D-Link 108 G products. Maximum wireless signal rate derived from IEEE Standard 802.11g specications. Actual data throughput will vary. Network conditions and environmental factors, including volume of network trafc, building materials and construction, and network overhead, lower actual data throughput rate. Environmental conditions will adversely affect wireless signal range.Features
7D-Link DIR-400 User ManualSection 1 - Product OverviewHardware OverviewConnectionsConnector for the Power Adapter.The Auto  MDI/MDIX  WAN port  is  the  connection  for the  Ethernet  cable  to  the Cable or DSL modem.LAN PortsConnects to Ethernet devices such as computers, switches, and hubs.
8D-Link DIR-400 User ManualSection 1 - Product OverviewHardware OverviewButtonsThe Wi-Fi Protected Setup (WPS) button is used to connect the router to other devices that support Push Button Conguration (PBC).Pressing the Reset Button restores the  router  to  its  original  factory default settings.
9D-Link DIR-400 User ManualSection 1 - Product OverviewHardware OverviewLEDsWAN LED A  solid  light  indicates  connection on  the  WAN  port.  This  LED  blinks during data transmission.WLAN LED A  solid  light  indicates  that  the  wireless segment is ready. This LED blinks during wireless data transmission.Local Network LEDs A  solid  light  indicates  a  connection  to  an Ethernet-enabled  computer  on  ports  1-4. This LED blinks during  data transmission.Status LEDA blinking light indicates that the        DIR-400 is ready.Power LED A  solid  light  indicates  a  proper connection to the power supply.
10D-Link DIR-400 User ManualSection 2 - InstallationBefore you BeginInstallationThis section will walk you through the installation process. Placement of the router is very important. Do not place the router in an enclosed area such as a closet, cabinet, or in the attic or garage. Please congure the router with the computer that was last connected directly to your modem. Also, you can only use the Ethernet port on your modem when connecting the modem to the router. If you were using the modem’s USB connection before using the router, then you must turn off your modem, disconnect the USB cable and connect an Ethernet cable to the WAN port on the router, and then turn the modem back on. In some cases, you may need to call your ISP to change connection types (USB to Ethernet). If you have DSL and are connecting via PPPoE, make sure you disable or uninstall any PPPoE software such as WinPoet, Broadjump, or Ethernet 300 from your computer or you will not be able to connect to the Internet.
11D-Link DIR-400 User ManualSection 2 - InstallationWireless Installation ConsiderationsThe D-Link wireless router lets you access your network using a wireless connection from virtually anywhere within the operating range of your wireless network. Keep in mind, however, that the number, thickness and location of walls, ceilings, or other objects that the wireless signals must pass through may limit the range. Typical ranges vary depending on the types of materials and background RF (radio frequency) noise in your home or business. The key to maximizing wireless range is to follow these basic guidelines:1. Keep the number of walls and ceilings between the D-Link router and other network devices to a minimum - each wall or ceiling can reduce your adapter’s range from 3-90 feet (1-30 meters.) Position your devices so that the number of walls or ceilings is minimized.2. Be aware of the direct line between network devices. A wall that is 1.5 feet thick (.5 meters), at a  45-degree angle appears to be almost 3 feet (1 meter) thick. At a 2-degree angle it looks over 42 feet (14 meters) thick! Position devices so that the signal will travel straight through a wall or ceiling (instead of at an angle) for better reception.3. Building materials make a difference. A solid metal door or aluminum studs may have a negative effect on range. Try to position access points, wireless routers, and computers so that the signal passes through drywall or open doorways. Materials and objects such as glass, steel, metal, walls with insulation, water (sh tanks), mirrors, le cabinets, brick, and concrete will degrade your wireless signal.4. Keep your product away (at least 3-6 feet or 1-2 meters) from electrical devices or appliances that generate RF noise.5. If you are using 2.4GHz cordless phones or X-10 devices (wireless products that control devices such as ceiling fans,  lights, and home security systems), your wireless connection may  degrade dramatically or drop completely. Make sure your 2.4GHz phone base is as far away from your wireless devices as possible. The base transmits a signal even if the phone in not in use.
12D-Link DIR-400 User ManualSection 2 - InstallationIf you are connecting the router to a cable/DSL/satellite modem, please follow the steps below:1. Place the router in an open and central location. Do not plug the power adapter into the router. 2. Turn the power off on your modem. If there is no on/off switch, then unplug the modem’s power adapter. Shut down your computer.3. Unplug the Ethernet cable (that connects your computer to your modem) from your computer and place it into the WAN port on the router.  4. Plug the included Ethernet cable into one of the four LAN ports on the router. Plug the other end into the Ethernet port on your computer.5. Turn on or plug in your modem.  Wait for the modem to boot (about 30 seconds). 6. Plug the power adapter to the router and then plug it into an outlet or power strip. Wait about 30 seconds for the router to boot. 7. Turn on your computer. 8. Verify the link lights on the router. The power light, WAN light, and the LAN light (the port that your computer is plugged into) should be lit. If not, make sure your computer, modem, and router are powered on and verify that the cable connections are correct. 9. Skip to page 15 to congure your router. Connecting to a Cable/DSL/Satellite Modem
13D-Link DIR-400 User ManualSection 2 - InstallationIf you are connecting the D-Link router to another router for use as a wireless access point and/or switch, you will have to do the following before connecting the router to your network:• Disable UPnP™• Disable DHCP• Change the LAN IP address to an available address on your network. The LAN ports on the router cannot accept a DHCP address from your other router.To connect to another router, please follow the steps below:1. Plug the power adapter into the router. Connect one of your computers to the router (LAN port) using an Ethernet cable. Make sure your IP address on the computer is 192.168.0.xxx (where xxx is between 2 and 254). Please see the  Networking  Basics section  for  more information.  If  you need to  change the settings,  write  down your existing settings before making any changes. In most cases, your computer should be set to receive an IP address automatically in which case you will not have to do anything to your computer.2. Open a web browser and enter http://192.168.0.1 and press Enter. When the login window appears, set the user name to admin and leave the password box empty. Click OK to continue.3. Click on Advanced and then click Advanced Network. Uncheck the Enable UPnP checkbox. Click Save Settings to continue. 4. Click Setup and then click Network Settings. Uncheck the Enable DHCP Server checkbox. Click Save Settings to continue.5. Under Router Settings, enter an available IP address and the subnet mask of your network. Click Save Settings to save your settings. Use this new IP address to access the conguration utility of the router in the future. Close the browser and change your computer’s IP settings back to the original values as in Step 1.Connecting to Another Router
14D-Link DIR-400 User ManualSection 2 - Installation6. Disconnect the Ethernet cable from the router and reconnect your computer to your network. 7. Connect an Ethernet cable to one of the LAN ports of the router and connect it to your other router. Do not plug anything into the WAN port of the D-Link router. 8. You may now use the other three LAN ports to connect other Ethernet devices and computers. To congure your wireless network, open a web browser and enter the IP address you assigned to the router. Refer to the Conguration and Wireless Security sections for more information on setting up your wireless network.
15D-Link DIR-400 User ManualSection 3 - CongurationConfigurationThis  section  will  show  you  how  to  congure  your  new  D-Link  wireless  router  using  the  web-based  conguration utility.Web-based Configuration UtilityTo access the conguration utility, open a web-browser such as Internet Explorer and enter the IP address of the router (192.168.0.1).Enter the user name (admin) and your password. Leave the password blank by default.If you get a Page Cannot be Displayed error, please refer to the Troubleshooting section for assistance.

Navigation menu