D Link IR605LA1 Wireless N 300 Cloud Router User Manual Q3 DIR 605L 3 1001221
D Link Corporation Wireless N 300 Cloud Router Q3 DIR 605L 3 1001221
D Link >
Contents
- 1. User manual 1 of 5
- 2. User manual 2 of 5
- 3. User manual 3 of 5
- 4. User manual 4 of 5
- 5. User manual 5 of 5
User manual 3 of 5

41D-Link DIR-605L User Manual
Section 3 - Conguration
Schedules
Enter a name for the new schedule rule.
Choose the desired day(s), either All Week or Select
Days. If the latter is selected, please use the checkboxes
directly below to specify the individual days.
Tick this check box if the new schedule rule applies to
the full 24-hour period.
If the new schedule rule does not apply to the full 24-
hour period, untick the previous checkbox and then
enter a specic beginning and ending time.
Name:
Day(s):
All Day - 24 hrs:
Start Time/
End Time:
The Router allows the user the ability to manage schedule rules for various rewall and parental control features on this window.
Once you have nished conguring the new schedule rule, click the Save Settings button at the top of the window.
',5/
42D-Link DIR-605L User Manual
Section 3 - Conguration
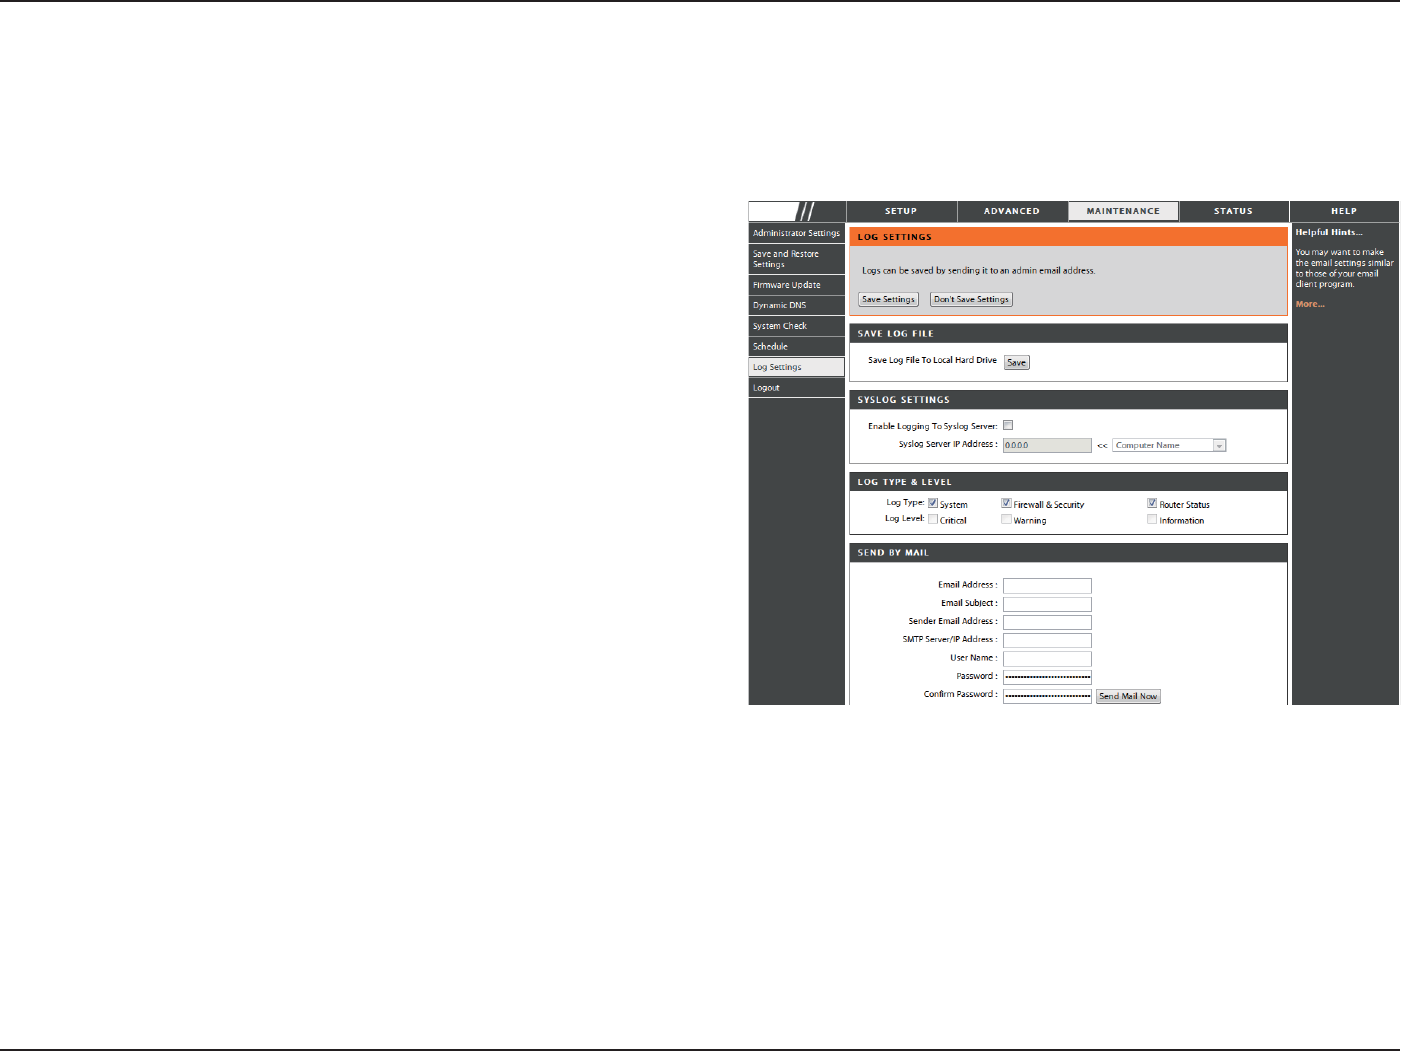
Log Settings
Click on the Save button link on this window to save
the log le to your local hard drive.
click the checkbox to save the log in the log server in
the LAN side.
Click the checkbox(es) of the type of log information
requested: “System, Firewall & Security, Router
Status, Critical, Warning and Information”
Enter the your SNTP server name(or IP address) and
enter your mail address before sending your system
log by mail.
Save Log File:
Syslog Server:
Log Type & Level:
Send by Mail:
The system log displays chronological event log data specied by the router user. You may also save a simple text le containing
the log to your computer. Click the Save button and follow the prompts to save the le.
',5/
43D-Link DIR-605L User Manual
Section 3 - Conguration
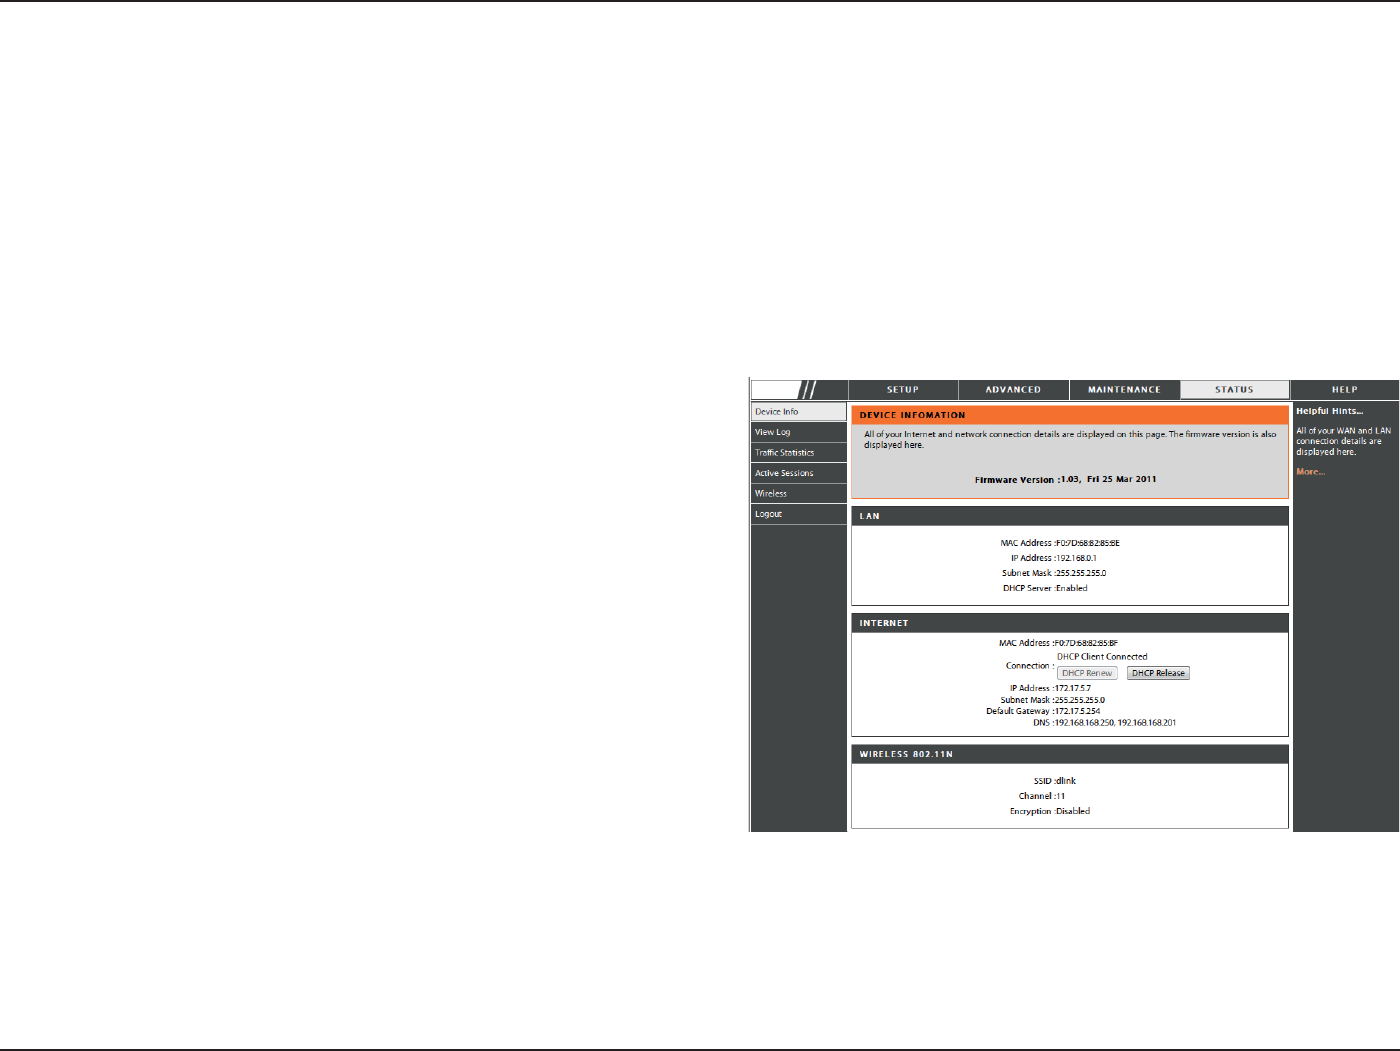
Device Info
This window displays the current information for the DIR-605L. It will display the LAN, WAN, and Wireless information.
If your WAN connection is set up for a Dynamic IP address then a DHCP Release button and a DHCP Renew button will be
displayed. Use DHCP Release to disconnect from your ISP and use DHCP Renew to connect to your ISP.
If your WAN connection is set up for PPPoE, a Connect button and a Disconnect button will be displayed. Use Disconnect to
drop the PPPoE connection and use Connect to establish the PPPoE connection.
Displays the MAC address and the private (local) IP
settings for the router.
Displays the MAC address and the public IP settings
for the router.
Displays the wireless MAC address and your wireless
settings such as SSID, Channel, and Encryption status.
LAN:
WAN:
Wireless
802.11N:
',5/
44D-Link DIR-605L User Manual
Section 3 - Conguration
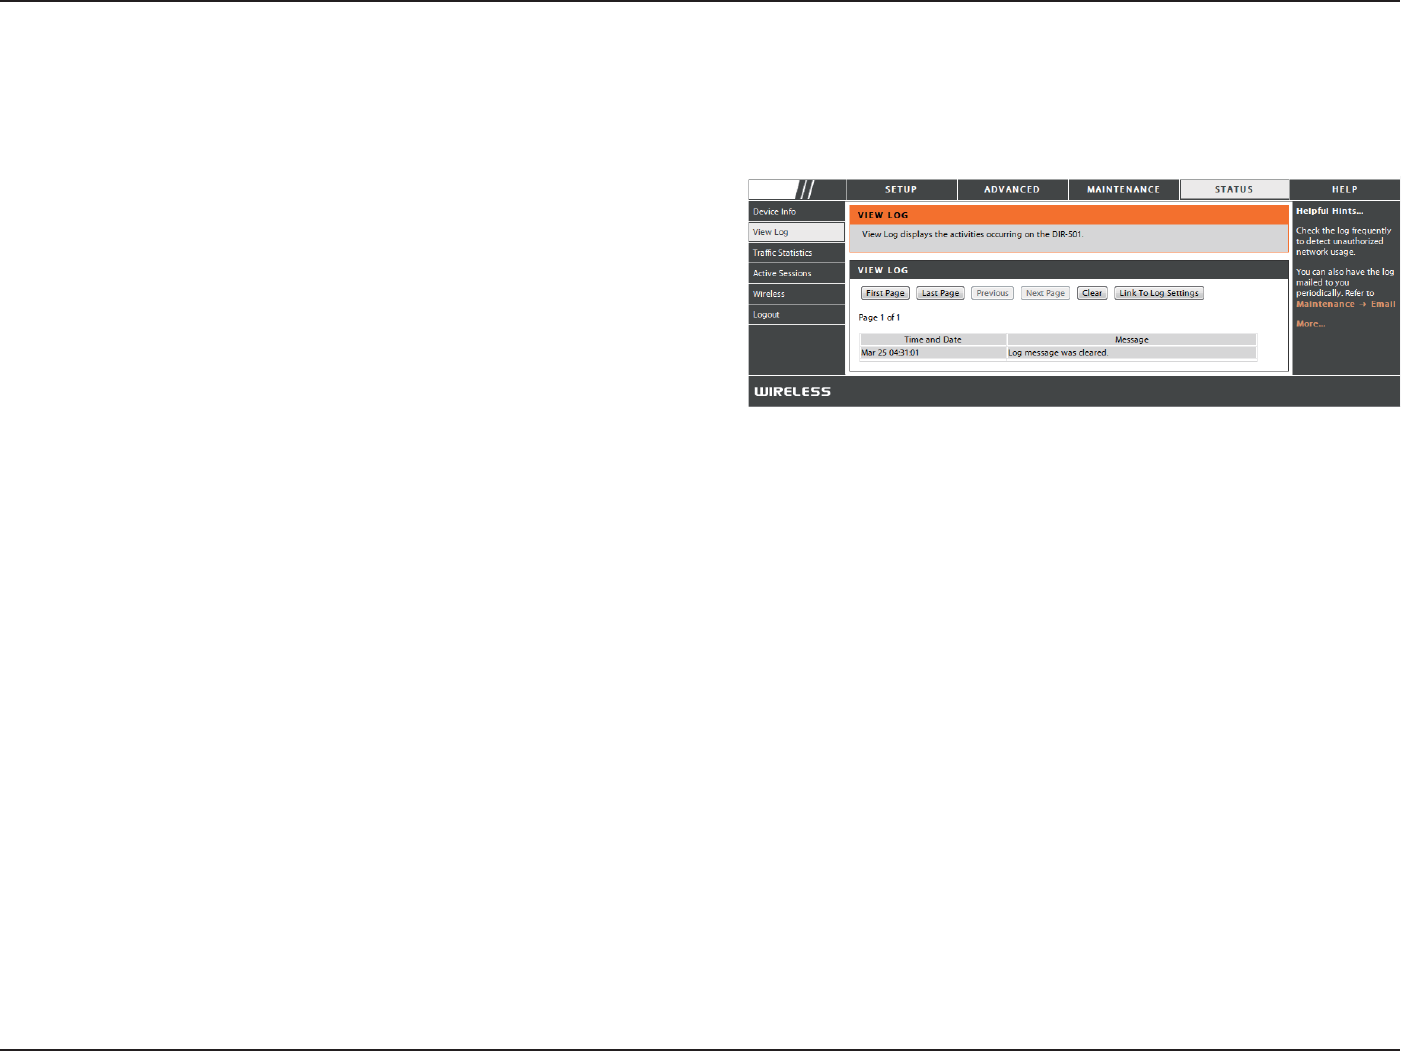
Log
First Page:
Last Page:
Previous:
Next:
Clear:
Link to Log
Settings:
View the rst page of the log.
View the last page of the log.
View the previous page.
View the next page.
Clear the log.
Click this button to go directly to the Log Settings
window (Maintenance > Log Settings).
This window allows you to view a log of activities on the Router. This is especially helpful detecting unauthorized network usage.
',5/
45D-Link DIR-605L User Manual
Section 3 - Conguration
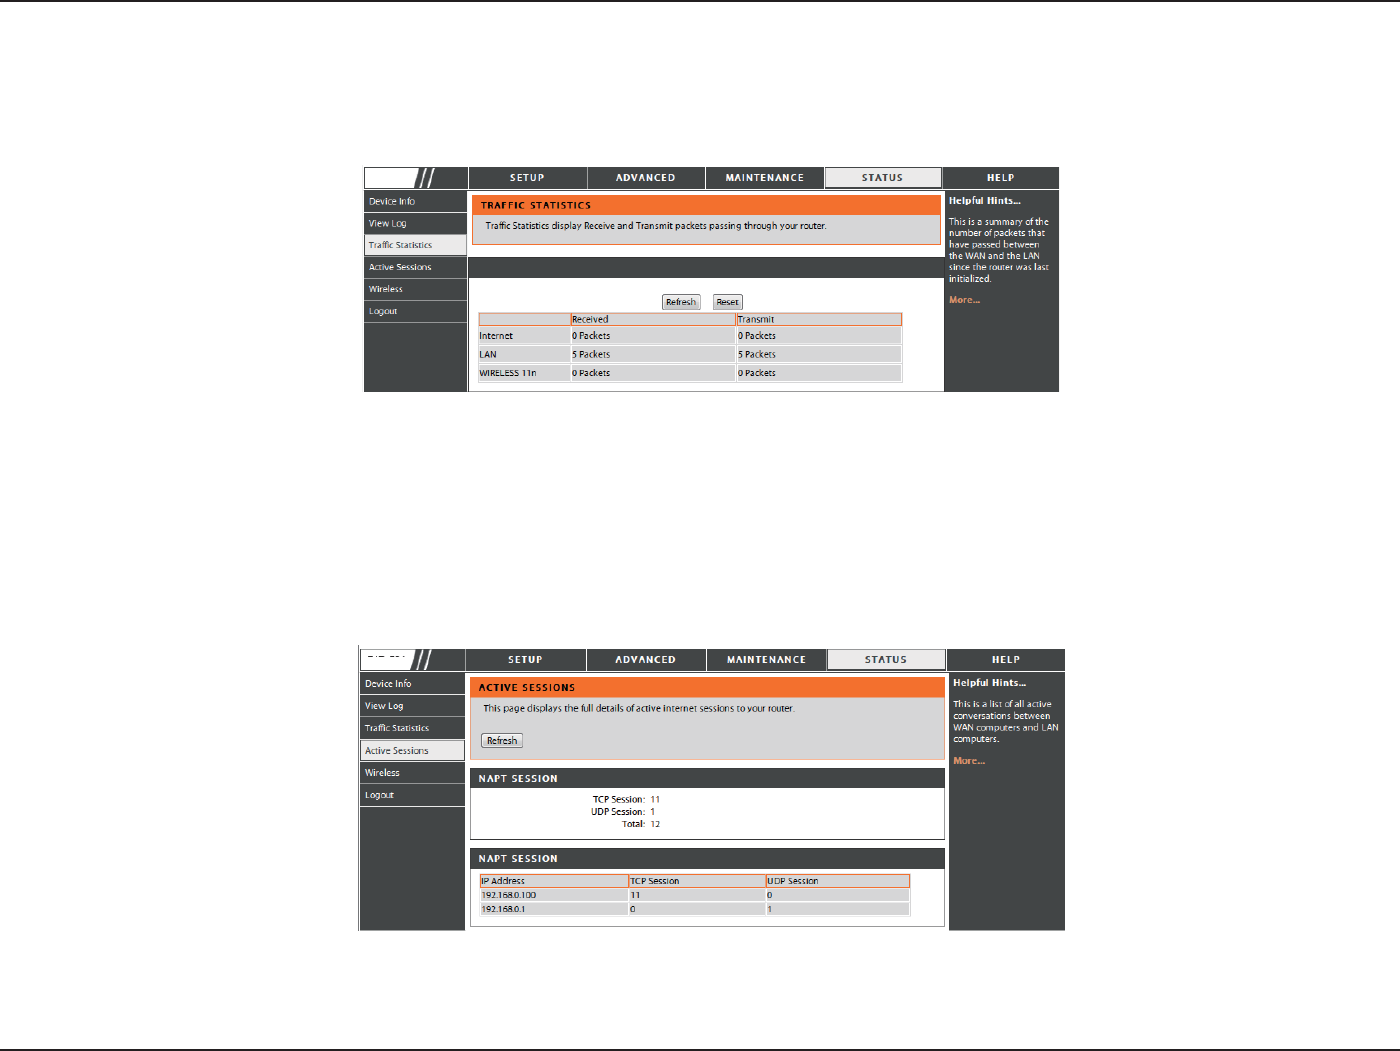
Trac Statistics
Active Session
The window below displays the Trac Statistics. Here you can view the amount of packets that pass through the DIR-605L on both
the WAN and the LAN ports. The trac counter will reset if the device is rebooted.
The NAPT Active Session table displays a list of all active conversations between WAN computers and LAN computers.
',5/
',5/
46D-Link DIR-605L User Manual
Section 3 - Conguration
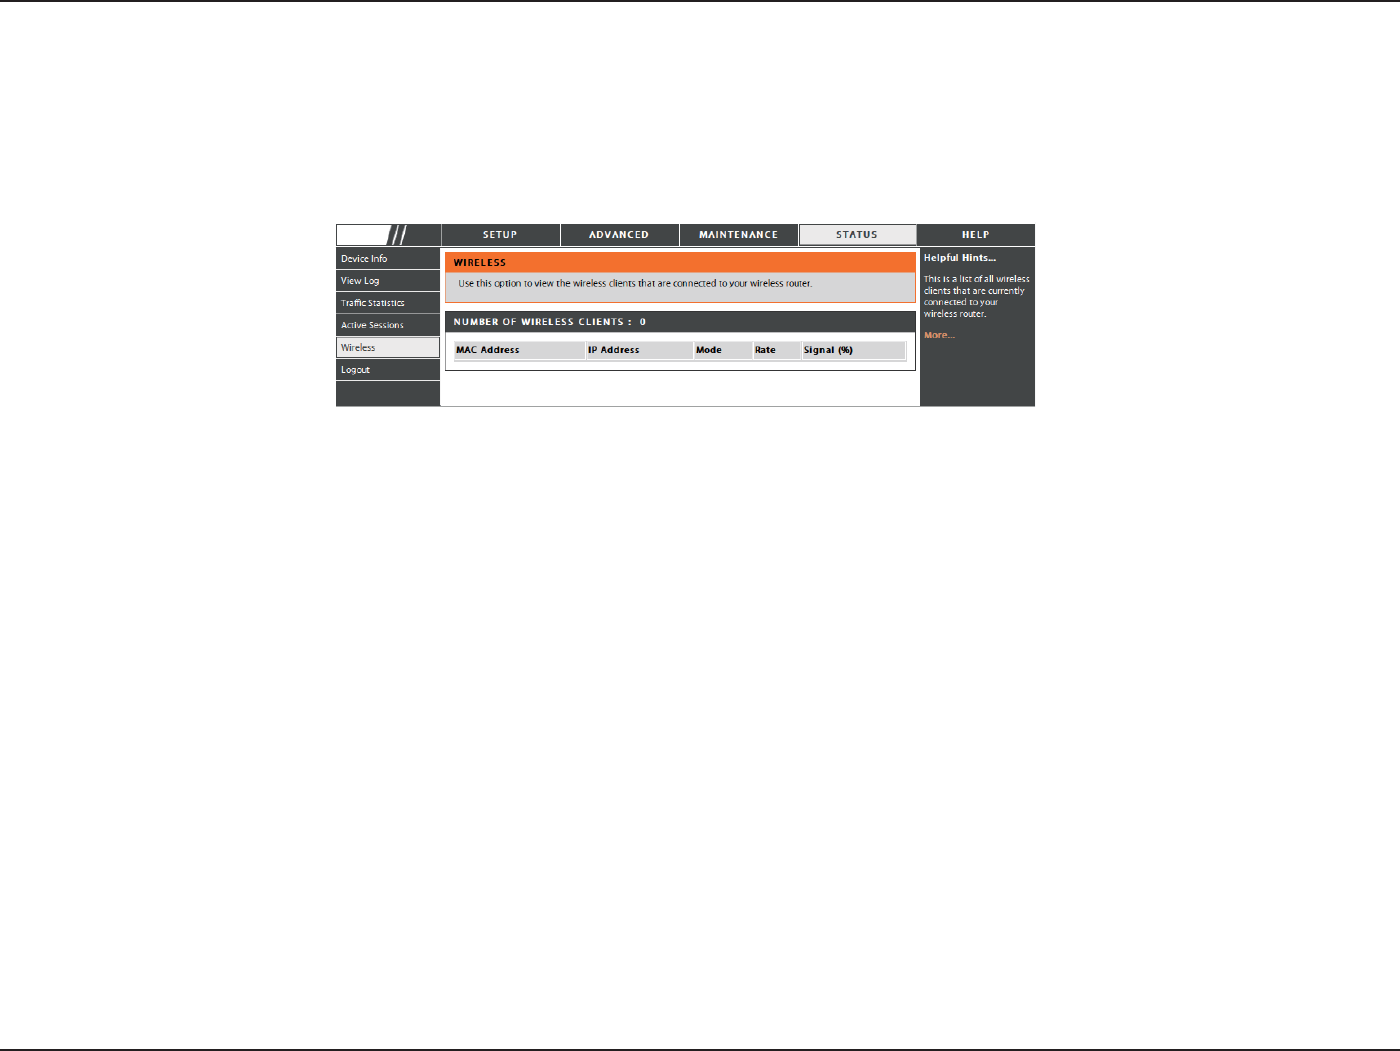
Wireless
The wireless client table displays a list of current connected wireless clients. This table also displays the connection time and
MAC address of the connected wireless client.
',5/
47D-Link DIR-605L User Manual
Section 3 - Conguration
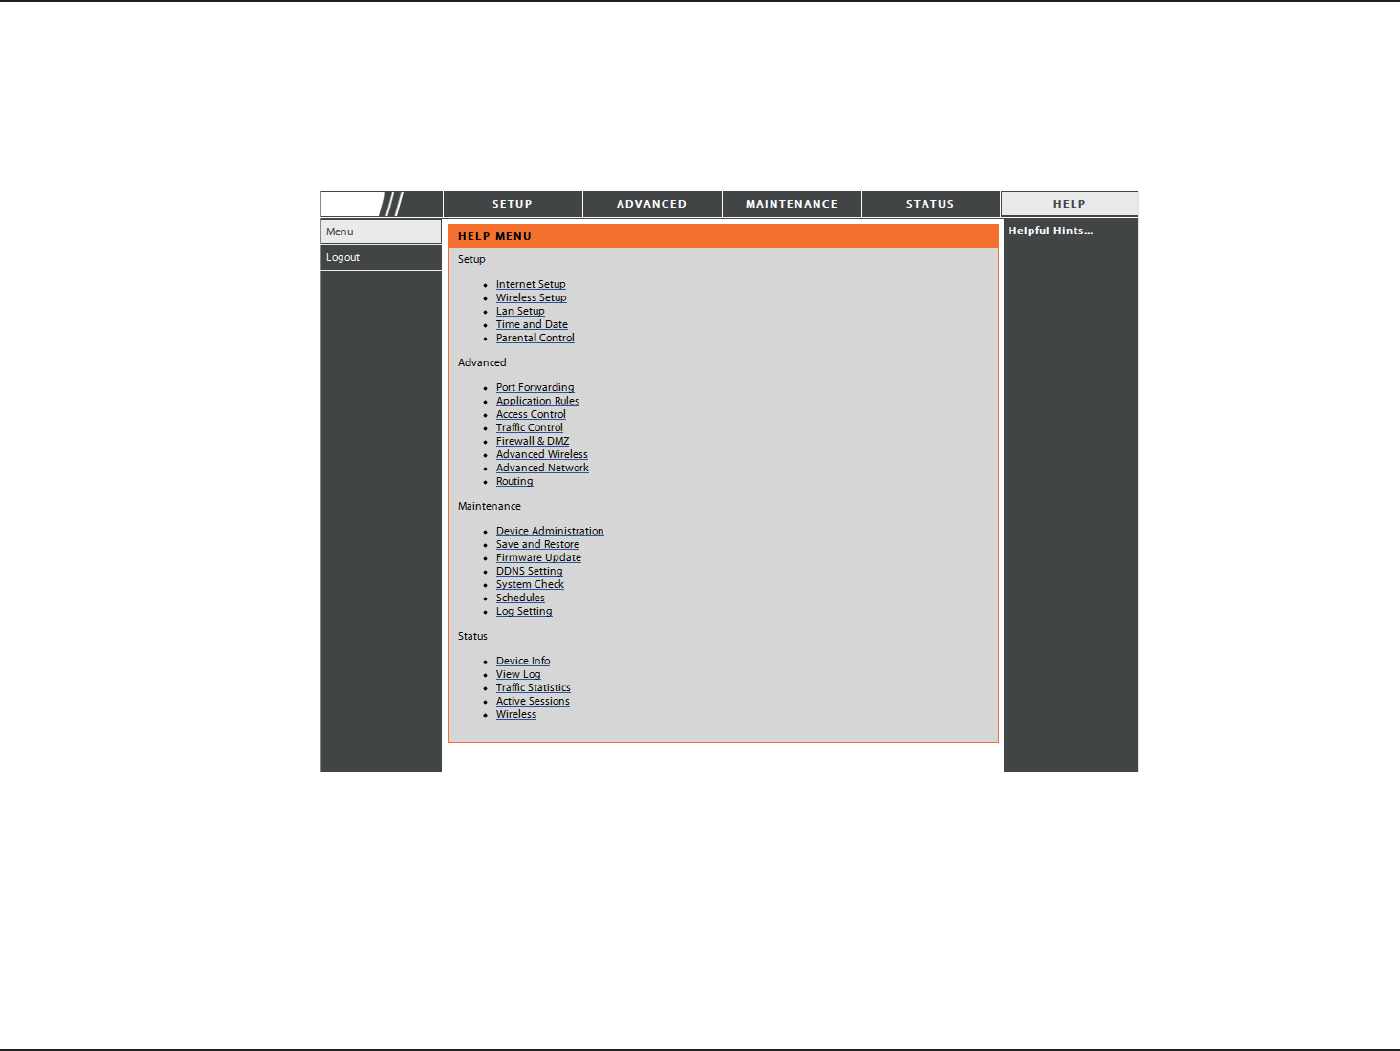
Help
Click the desired hyperlink to get more information about how to use the Router.
',5/

48D-Link DIR-605L User Manual
Section 4 - Security
Wireless Security
This section will show you the dierent levels of security you can use to protect your data from intruders. The
DIR-605L oers the following types of security:
• WPA2 (Wi-Fi Protected Access 2) • WPA2-PSK (Pre-Shared Key)
• WPA (Wi-Fi Protected Access) • WPA-PSK (Pre-Shared Key)
• WEP (Wired Equivalent Privacy)
What is WEP?
WEP stands for Wired Equivalent Privacy. It is based on the IEEE 802.11 standard and uses the RC4 encryption algorithm. WEP
provides security by encrypting data over your wireless network so that it is protected as it is transmitted from one wireless
device to another.
To gain access to a WEP network, you must know the key. The key is a string of characters that you create. When using WEP,
you must determine the level of encryption. The type of encryption determines the key length. 128-bit encryption requires a
longer key than 64-bit encryption. Keys are dened by entering in a string in HEX (hexadecimal - using characters 0-9, A-F) or
ASCII (American Standard Code for Information Interchange – alphanumeric characters) format. ASCII format is provided so
you can enter a string that is easier to remember. The ASCII string is converted to HEX for use over the network. Four keys can
be dened so that you can change keys easily.

49D-Link DIR-605L User Manual
Section 4 - Security
Congure WEP
It is recommended to enable encryption on your wireless router before your wireless network adapters. Please establish
wireless connectivity before enabling encryption. Your wireless signal may degrade when enabling encryption due to the
added overhead.
1. Log into the web-based conguration by opening a web browser and entering the IP address of the router (192.168.0.1).
Click on Wireless Setup on the left side.
2. Next to Security Mode, select Enable WEP Wireless Security (basic).
3. Next to Authentication, select either Shared Key or Open. Shared Key
is recommended as it provides greater security when WEP is enabled.
4. Select either 64Bit or 128Bit encryption from the drop-down menu
next to WEP Encryption.
5. Next to Default Key Type, select WEP Key 1 and enter a WEP key that
you create. Make sure you enter this key exactly on all your wireless
devices. You may enter up to four dierent keys either using Hex or
ASCII. Hex is recommended (letters A-F and numbers 0-9 are valid). In
ASCII all numbers and letters are valid.
6. Click Save Settings to save your settings. If you are conguring the
router with a wireless adapter, you will lose connectivity until you
enable WEP on your adapter and enter the same WEP key as you did on the router.

50D-Link DIR-605L User Manual
Section 4 - Security
What is WPA?
WPA, or Wi-Fi Protected Access, is a Wi-Fi standard that was designed to improve the security features of WEP (Wired Equivalent
Privacy).
The two major improvements over WEP:
• Improved data encryption through the Temporal Key Integrity Protocol (TKIP). TKIP scrambles the keys using a
hashing algorithm and, by adding an integrity-checking feature, ensures that the keys haven’t been tampered
with. WPA2 is based on 802.11i and uses Advanced Encryption Standard (AES) instead of TKIP.
• User authentication, which is generally missing in WEP, through the extensible authentication protocol (EAP).
WEP regulates access to a wireless network based on a computer’s hardware-specic MAC address, which is
relatively simple to be snied out and stolen. EAP is built on a more secure public-key encryption system to
ensure that only authorized network users can access the network.
WPA-PSK/WPA2-PSK uses a passphrase or key to authenticate your wireless connection. The key is an alpha-numeric password
between 8 and 63 characters long. The password can include symbols (!?*&_) and spaces. This key must be the exact same key
entered on your wireless router or access point.
WPA/WPA2 incorporates user authentication through the Extensible Authentication Protocol (EAP). EAP is built on a more
secure public key encryption system to ensure that only authorized network users can access the network.
51D-Link DIR-605L User Manual
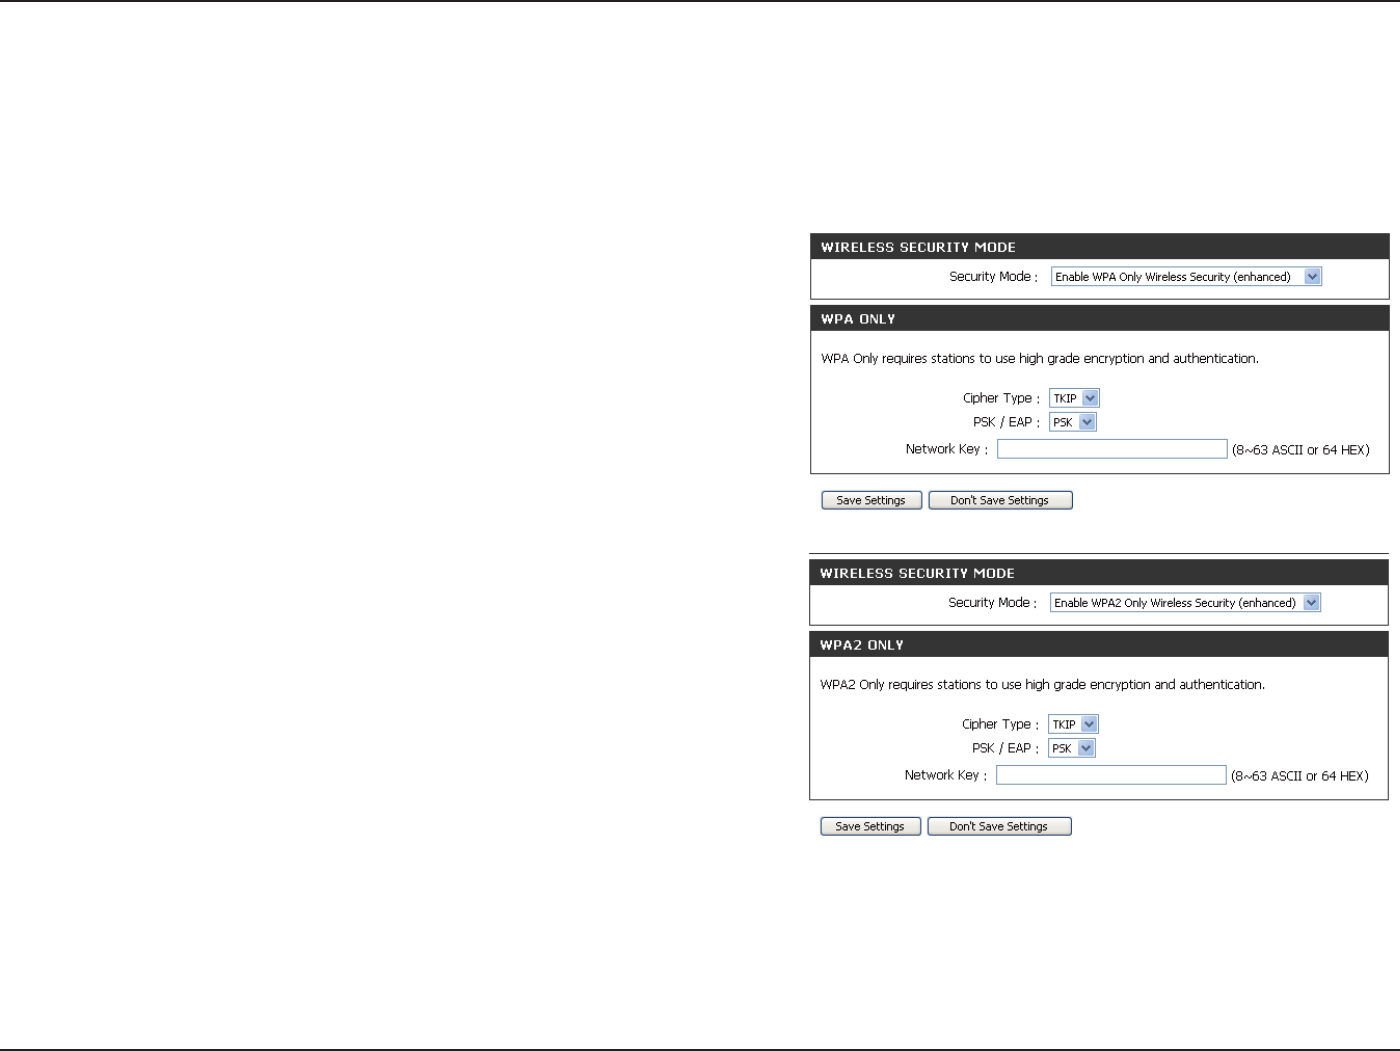
Section 4 - Security
Congure WPA-PSK and WPA2-PSK
It is recommended to enable encryption on your wireless Router before your wireless network adapters. Please establish
wireless connectivity before enabling encryption. Your wireless signal may degrade when enabling encryption due to the
added overhead.
1. Log into the web-based conguration by opening a web browser and
entering the IP address of the router (192.168.0.1). Click on Wireless
Setup on the left side.
2. Next to Security Mode, select Enable WPA Only Wireless Security
(enhanced) or Enable WPA2 Only Wireless Security (enhanced).
3. Next to Cipher Mode, select TKIP, AES, or Both.
4. Next to PSK/EAP, select PSK.
5. Next to Network Key, enter a key (passphrase). The key is an alpha-
numeric password
between 8 and 63 characters long. The password can
include symbols (!?*&_) and spaces. Make sure you enter
this key exactly the same on all other wireless clients.
6. Click Save Settings to save your settings. If you are conguring the
Router with a wireless adapter, you will lose connectivity until you
enable WPA-PSK or WPA2-PSK on your adapter and enter the same passphrase as you did on the Router.
52D-Link DIR-605L User Manual
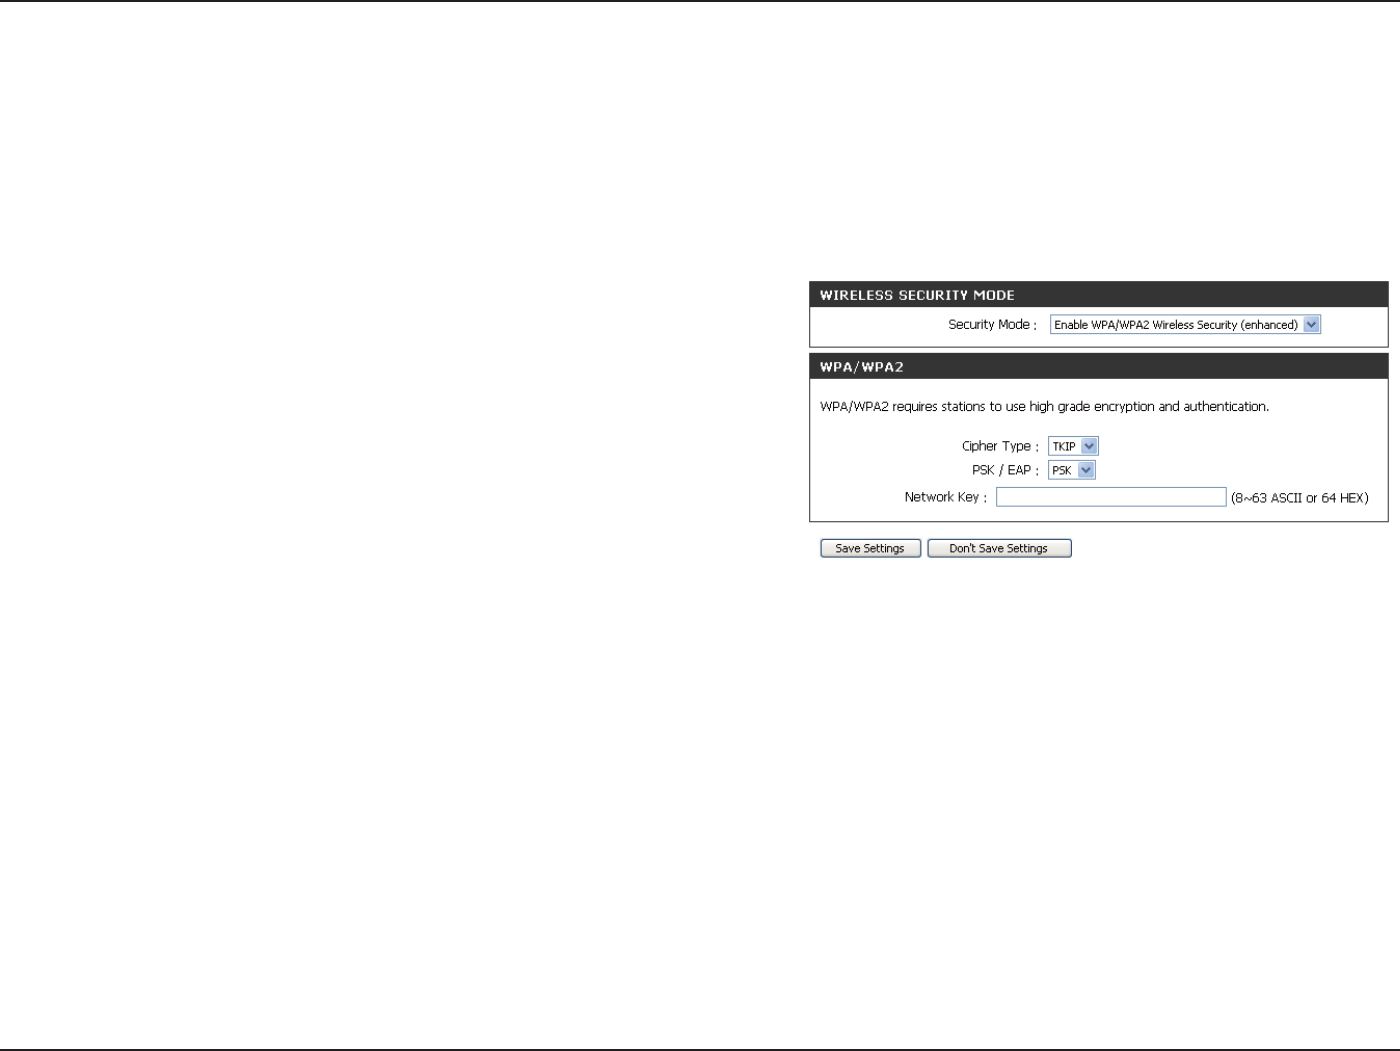
Section 4 - Security
Congure WPA/WPA2-PSK
It is recommended to enable encryption on your wireless Router before your wireless network adapters. Please establish
wireless connectivity before enabling encryption. Your wireless signal may degrade when enabling encryption due to the
added overhead.
1. Log into the web-based conguration by opening a web browser and
entering the IP address of the router (192.168.0.1). Click on Wireless
Setup on the left side.
2. Next to Security Mode, select Enable WPA/WPA2 Wireless Security
(enhanced).
3. Next to Cipher Mode, select TKIP, AES, or Both.
4. Next to PSK/EAP, select PSK.
5. Next to Network Key, enter a key (passphrase). The key is an alpha-numeric password
between 8 and 63 characters long. The password can include symbols (!?*&_) and spaces.
Make sure you enter this key exactly the same on all other wireless clients.
6. Click Save Settings to save your settings. If you are conguring the Router with a wireless adapter, you will lose connectivity
until you enable WPA/WPA2-PSK on your adapter and enter the same passphrase as you did on the Router.
53D-Link DIR-605L User Manual
Section 4 - Security
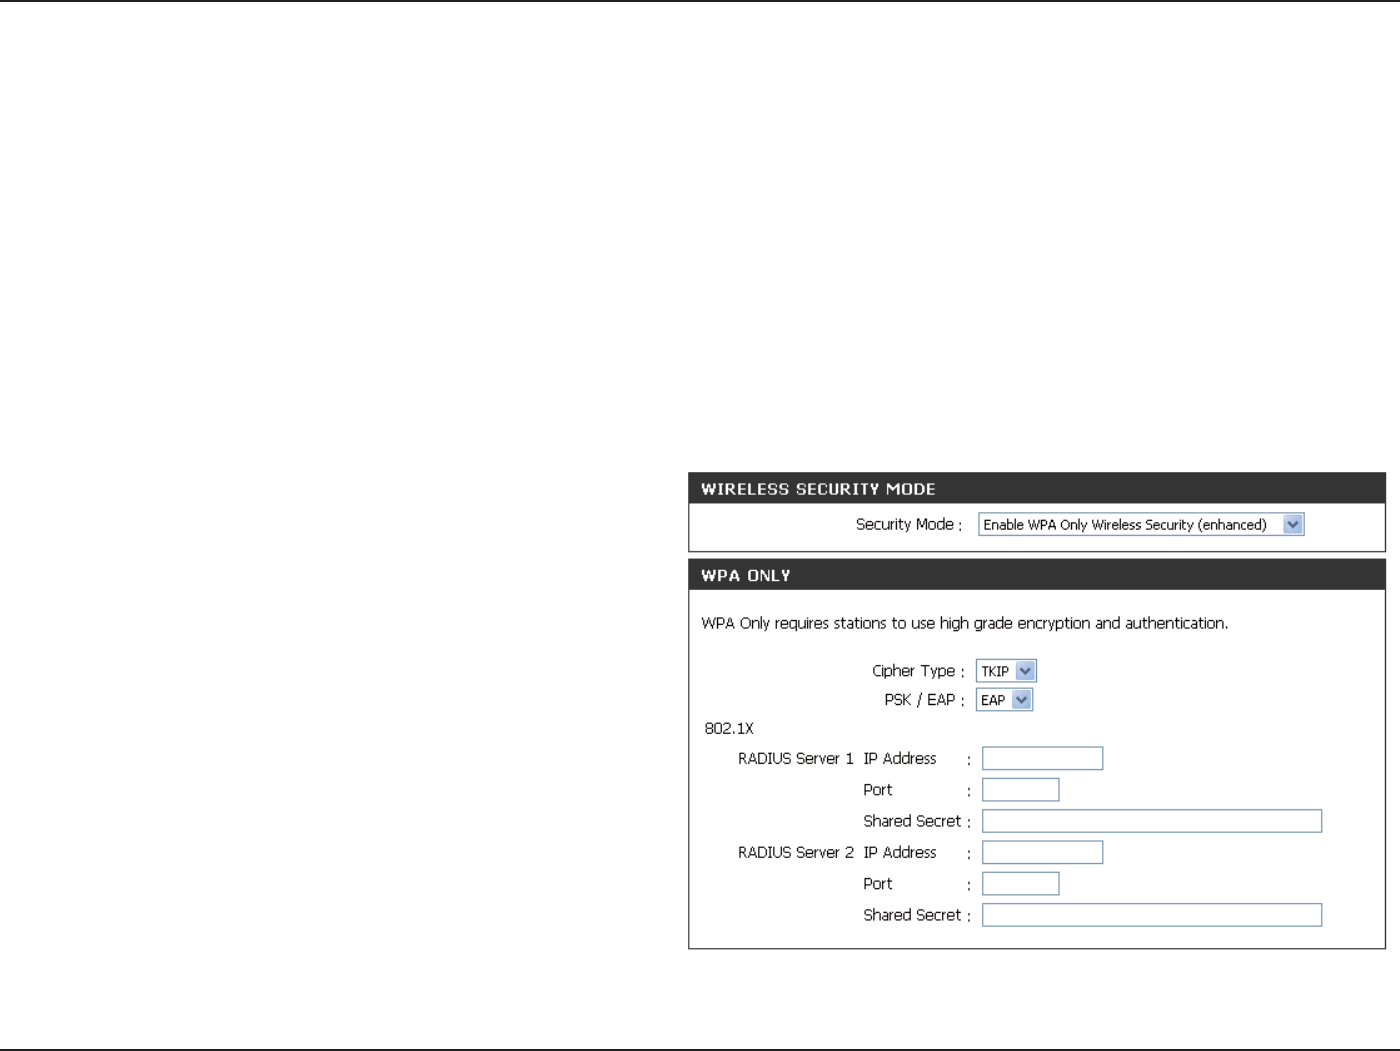
Congure WPA, WPA2, and WPA/WPA2 (RADIUS)
It is recommended to enable encryption on your wireless router before your wireless network adapters. Please establish
wireless connectivity before enabling encryption. Your wireless signal may degrade when enabling encryption due to the
added overhead.
1. Log into the web-based conguration by opening a web browser and entering the IP address of the router (192.168.0.1).
Click on Wireless Settings on the left side.
2. Next to Security Mode, select Enable WPA Only Wireless Security (enhanced), Enable WPA2 Only Wireless Security (enhanced),
or Enable WPA/WPA2 Wireless Security (enhanced).
3. Next to Cipher Type, select TKIP, AES, or Auto.
4. Next to PSK/EAP, select EAP.
5. Next to RADIUS Server 1 enter the IP Address of your
RADIUS server.
6. Next to Port, enter the port you are using with your
RADIUS server. 1812 is the default port.
7. Next to Shared Secret, enter the security key.
8. If you have a secondary RADIUS server, enter its IP address,
port, and secret key.
9. Click Save Settings to save your settings.

54D-Link DIR-605L User Manual
Section 5 - Connecting to a Wireless Network
Connect to a Wireless Network
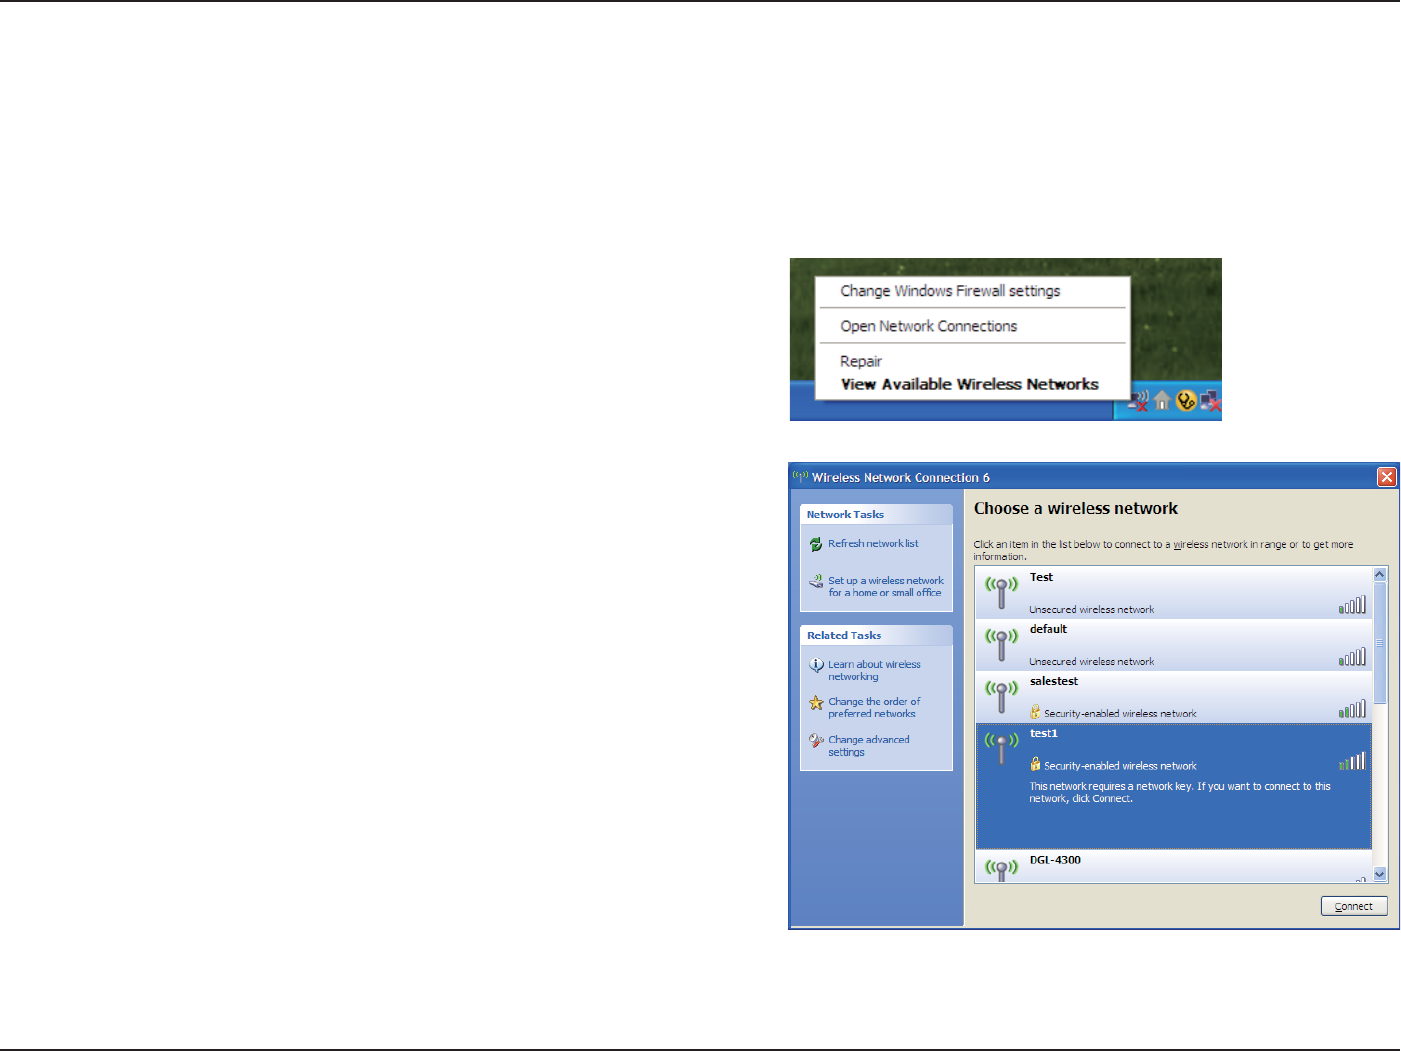
Using Windows® XP
Windows® XP users may use the built-in wireless utility (Zero Conguration Utility). The following instructions are for Service
Pack 2 users. If you are using another company’s utility or Windows® 2000, please refer to the user manual of your wireless
adapter for help with connecting to a wireless network. Most utilities will have a “site survey” option similar to the Windows®
XP utility as seen below.
Right-click on the wireless computer icon in your system tray
(lower-right corner next to the time). Select View Available
Wireless Networks.
If you receive the Wireless Networks Detected bubble, click on
the center of the bubble to access the utility.
or
The utility will display any available wireless networks in your area.
Click on a network (displayed using the SSID) and click the Connect
button.
If you get a good signal but cannot access the Internet, check you
TCP/IP settings for your wireless adapter. Refer to the Networking
Basics section in this manual for more information.
55D-Link DIR-605L User Manual
Section 5 - Connecting to a Wireless Network
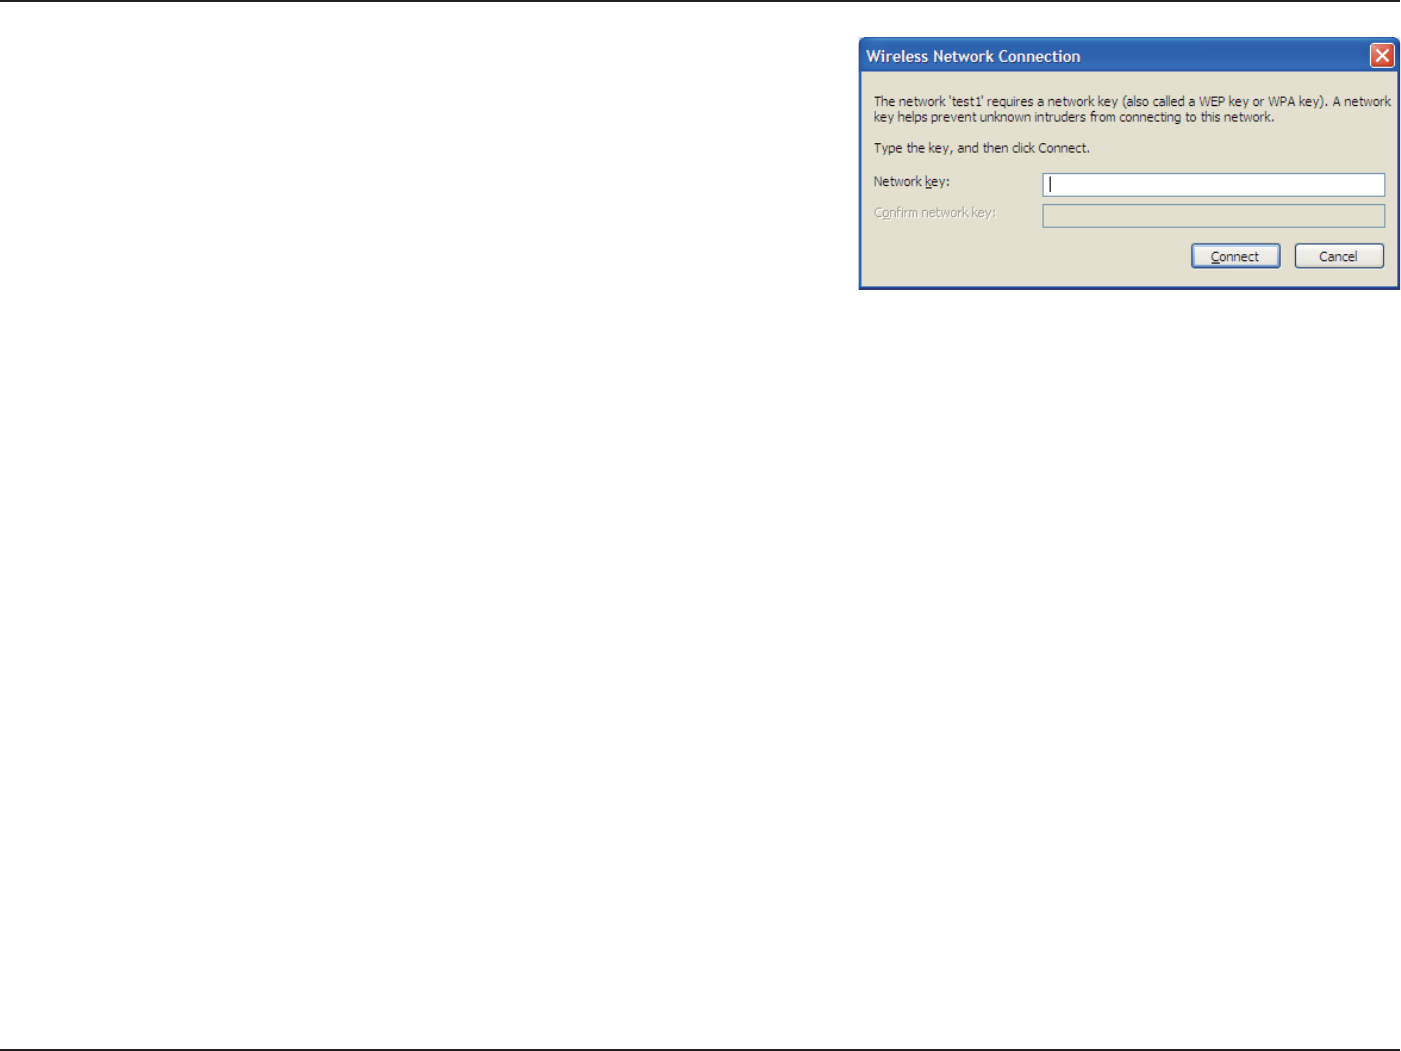
Congure WEP
It is recommended to enable WEP on your wireless router or access point before conguring your wireless adapter. If you are
joining an existing network, you will need to know the WEP key being used.
2. Highlight the wireless network (SSID) you would like to
connect to and click Connect.
1. Open the Windows® XP Wireless Utility by right-clicking
on the wireless computer icon in your system tray
(lower-right corner of screen). Select View Available Wireless
Networks.
56D-Link DIR-605L User Manual
Section 5 - Connecting to a Wireless Network
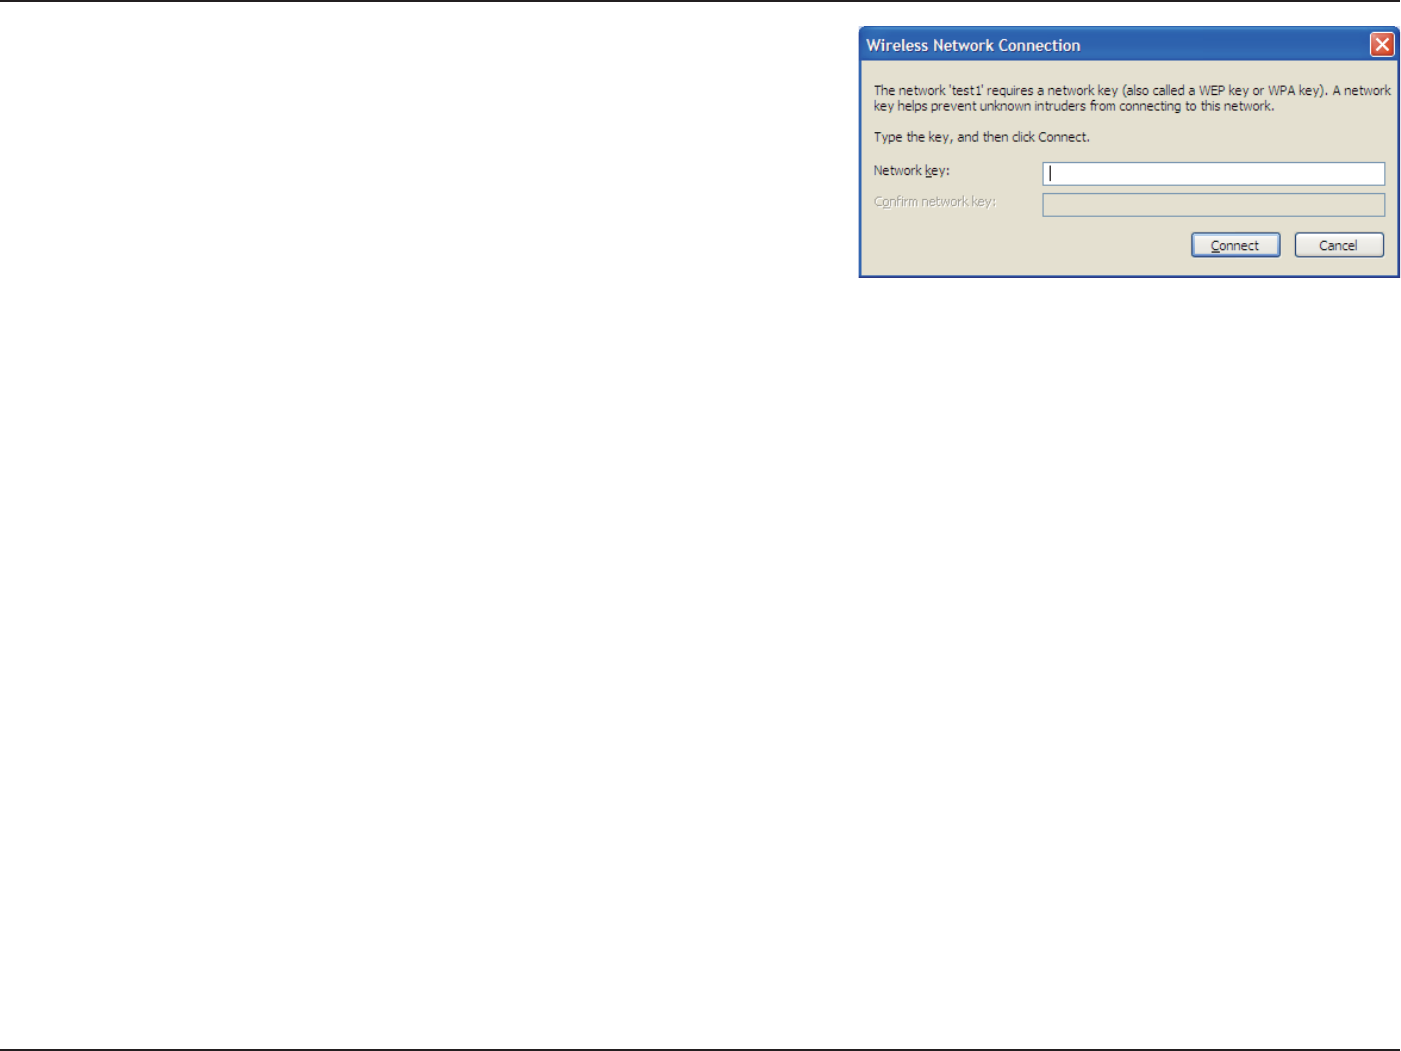
3. The Wireless Network Connection box will appear. Enter the same WEP
key that is on your router and click Connect.
It may take 20-30 seconds to connect to the wireless network. If the
connection fails, please verify that the WEP settings are correct. The WEP
key must be exactly the same as on the wireless router.
57D-Link DIR-605L User Manual
Section 5 - Connecting to a Wireless Network
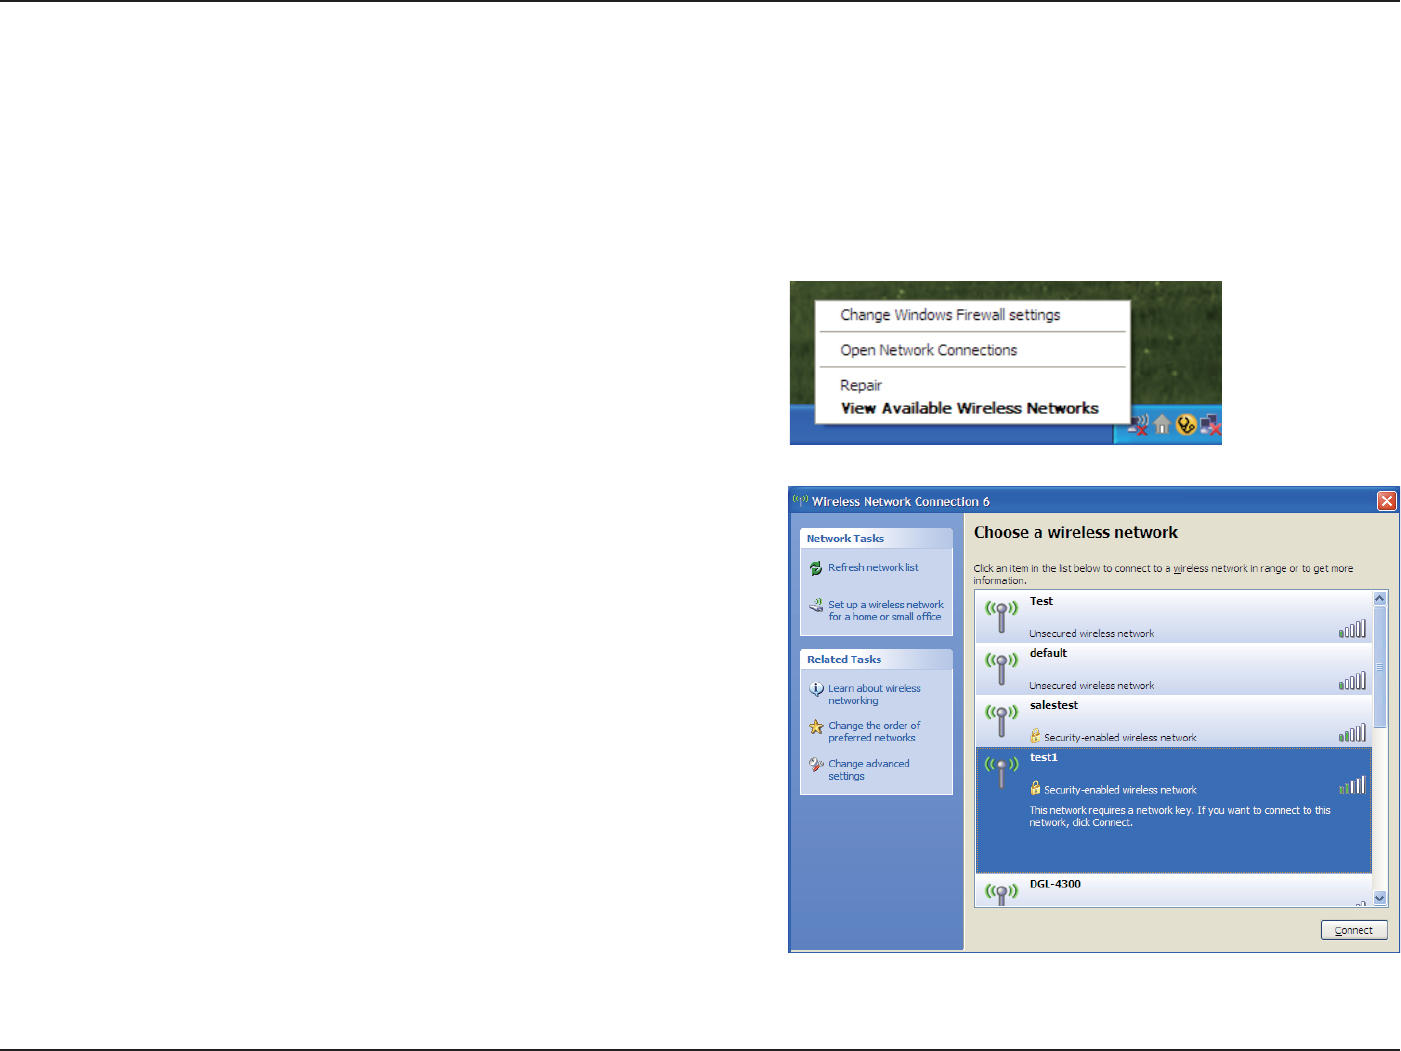
Congure WPA-PSK
It is recommended to enable WEP on your wireless router or access point before conguring your wireless adapter. If you are
joining an existing network, you will need to know the WEP key being used.
2. Highlight the wireless network (SSID) you would like to
connect to and click Connect.
1. Open the Windows® XP Wireless Utility by right-clicking
on the wireless computer icon in your system tray
(lower-right corner of screen). Select View Available Wireless
Networks.
58D-Link DIR-605L User Manual
Section 5 - Connecting to a Wireless Network
3. The Wireless Network Connection box will appear. Enter the WPA-PSK
passphrase and click Connect.
It may take 20-30 seconds to connect to the wireless network. If the
connection fails, please verify that the WPA-PSK settings are correct. The
WPA-PSK passphrase must be exactly the same as on the wireless router.
59D-Link DIR-605L User Manual
Section 6 - Setting Up Wi-Fi Protection (WCN 2.0 in Windows Vista)
Setting Up Wi-Fi Protection
(WCN 2.0 in Windows Vista)
The DIR-605L supports Wi-Fi protection, referred to as WCN 2.0 in Windows Vista. The instructions for setting this up depend
on whether you are using Windows Vista to congure the Router or third party software.
Initial Router Conguration for Wi-Fi Protection
When you rst set up the Router, Wi-Fi protection is disabled and uncongured. To enjoy the benets of Wi-Fi protection, the
Router must be both enabled and congured. There are three basic methods to accomplish this: use Windows Vista’s built-in
support for WCN 2.0, use software provided by a third party, or use the traditional Ethernet approach.
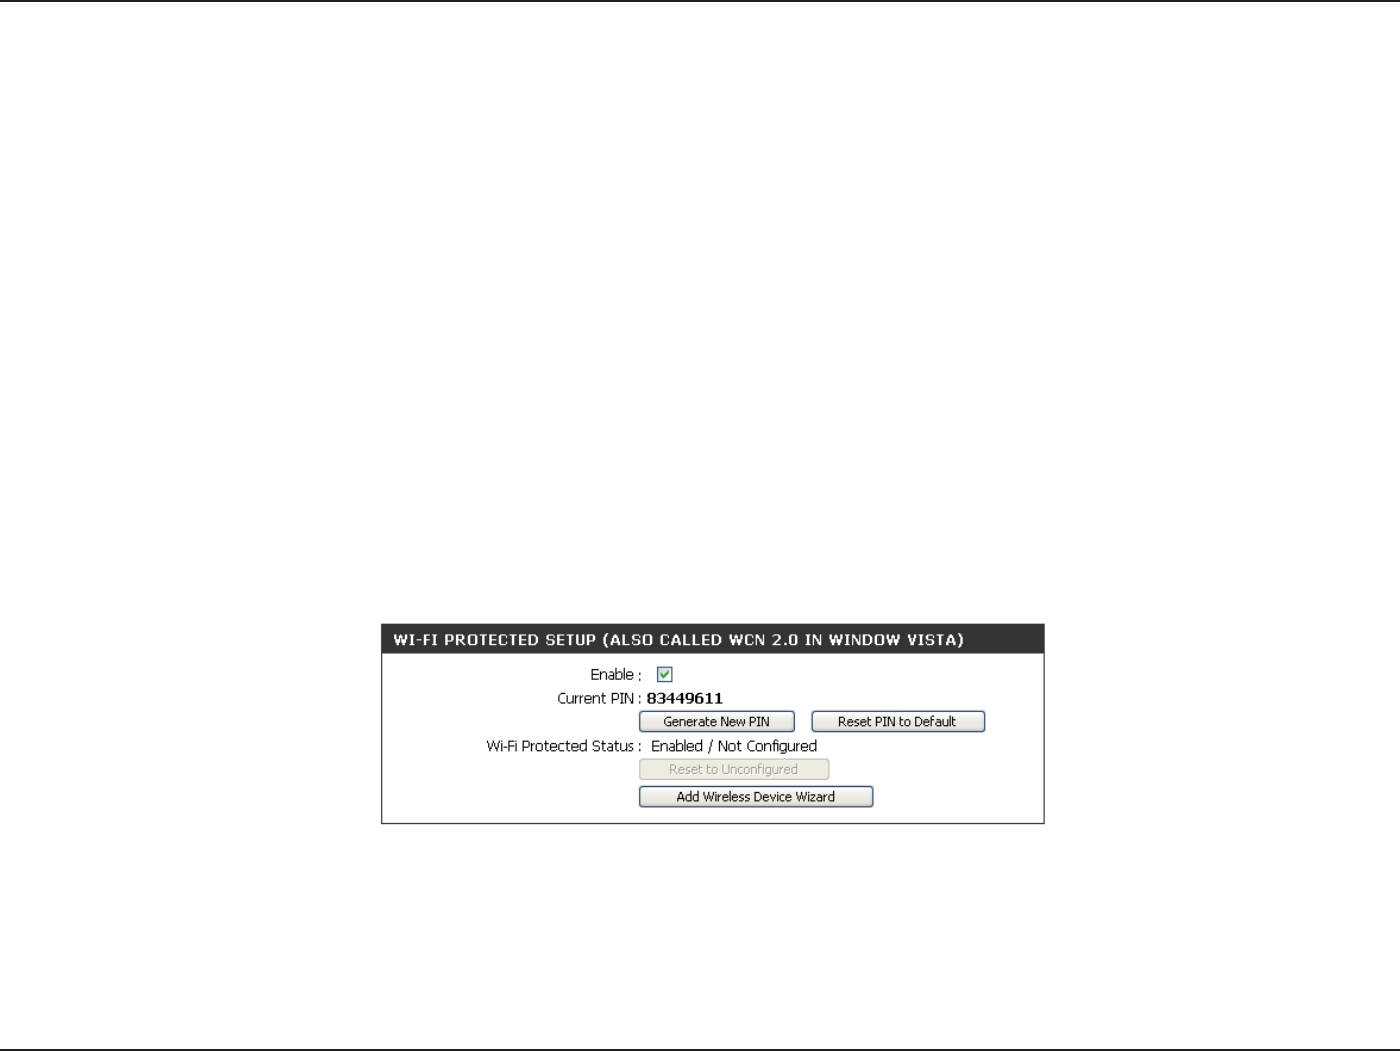
If you are running Windows Vista, tick the Enable checkbox on the Wireless Network window. Use the Current PIN that is
displayed on the Wireless Network window or choose to click the Generate New PIN button or Reset PIN to Default button.
If you are using third party software to set up Wi-Fi Protection, carefully follow the directions. When you are nished, proceed
to the next section to set up the newly-congured Router.

60D-Link DIR-605L User Manual
Section 6 - Setting Up Wi-Fi Protection (WCN 2.0 in Windows Vista)
Setting Up a Congured Router
Once the Router has been congured, you can use the push button on the Router or third party software to invite a newcomer
to join your Wi-Fi protected network. For maximum security, the software method is recommended. However, the push button
method is ideal if there is no access to a GUI.
If you are using the Router’s Wi-Fi Security push button option, simultaneously depress the push button located on the side of
the Router and the button on the client (or virtual button on the client’s GUI). Next click Finish. The Client’s software will then
allow a newcomer to join your secure, Wi-Fi protected network.
If you are using third party software, run the appropriate Wi-Fi Protected System utility. You will be asked to either use the push
button method or to manually enter the PIN. Follow the on-screen instructions.
61D-Link DIR-605L User Manual
Section 7 - Changing the Computer Name and Joining a Workgroup
Changing the Computer Name and Joining a
Workgroup
The following are step-by-step directions to change the computer name and join a workgroup.
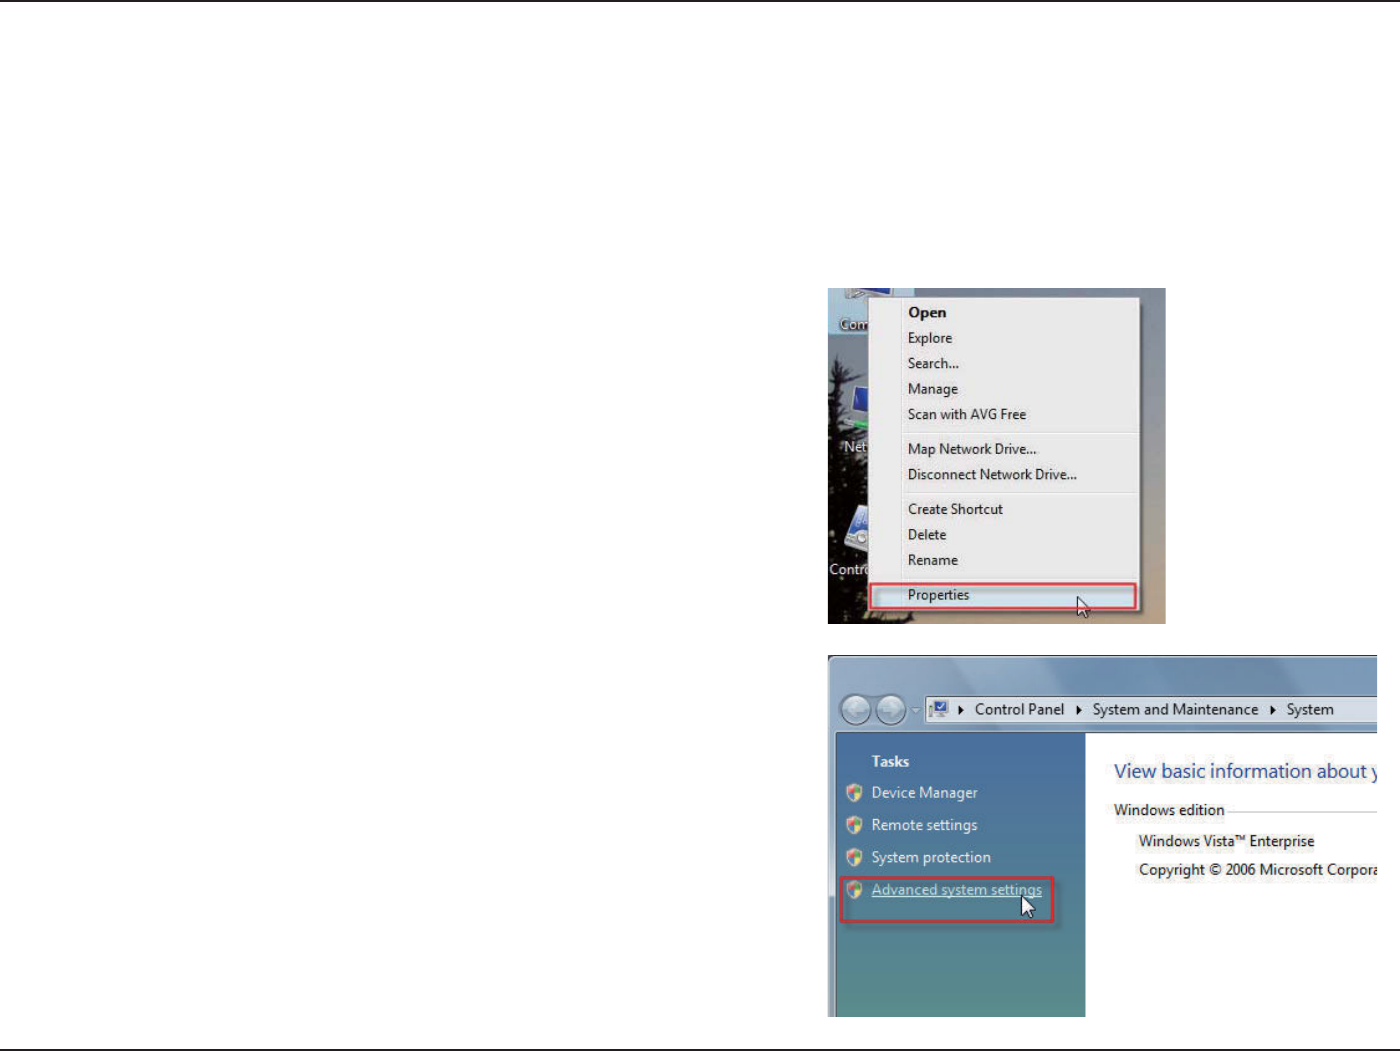
2. Click on the Advanced system settings link.
1. Click on Properties.
62D-Link DIR-605L User Manual
Section 7 - Changing the Computer Name and Joining a Workgroup
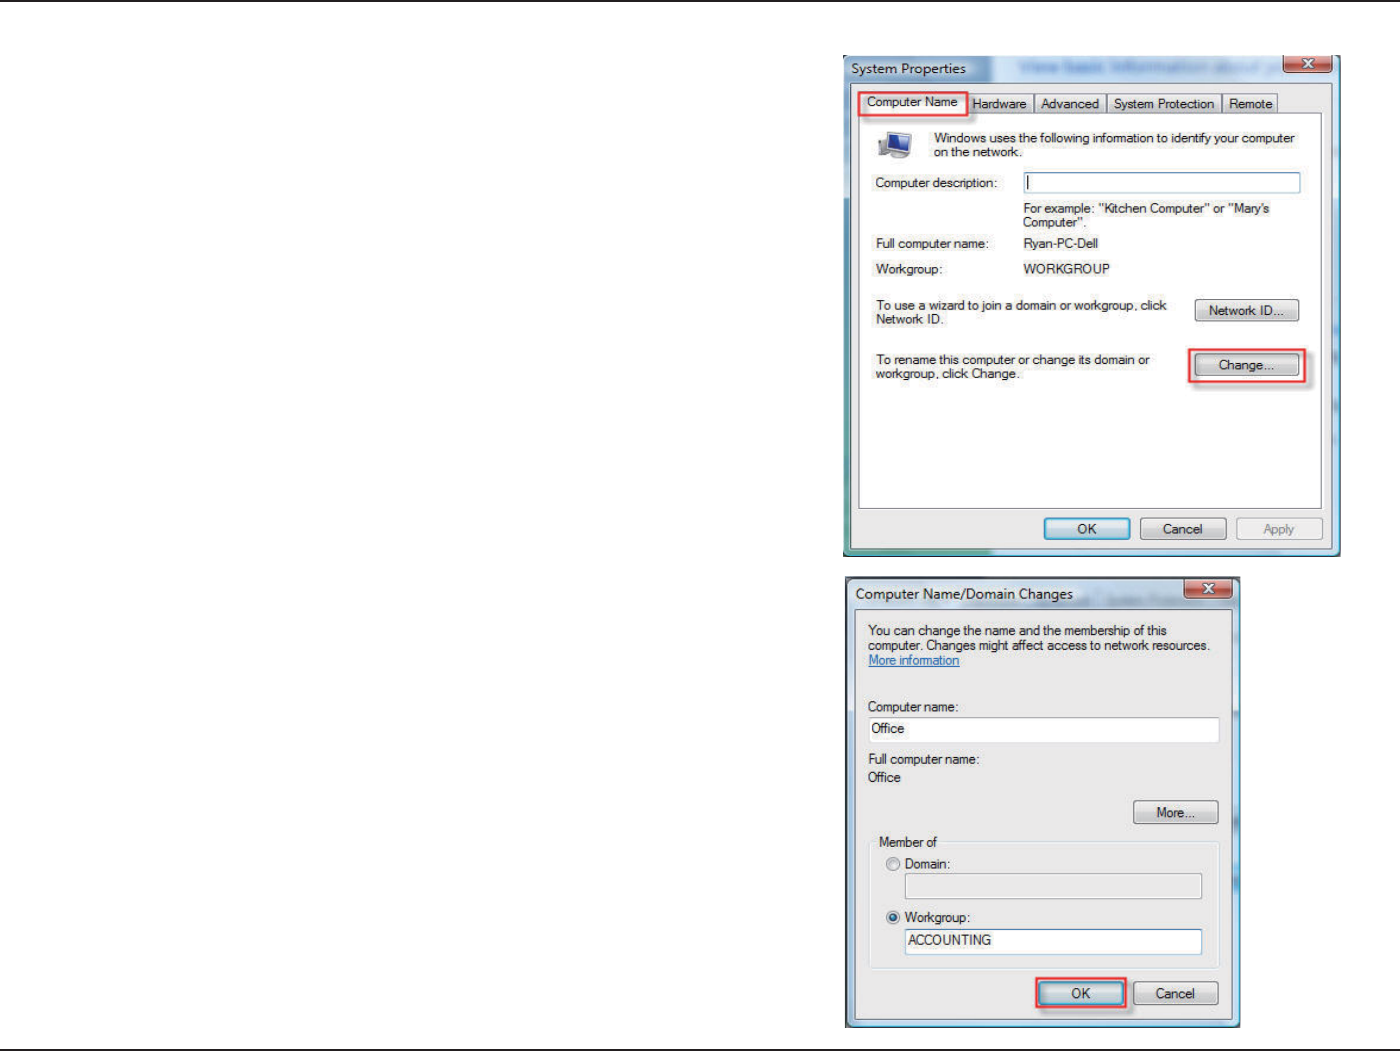
3. Click the Computer Name tab in the System Properties window and
enter a description of your computer in the textbox. When you are
nished, click the Change button.
4. Go to the Computer Name/Domain Changes window and
click the radio button next to the Workgroup you want to join.
When you are nished, click the OK button.
63D-Link DIR-605L User Manual
Section 8 - Conguring the IP Address in Vista
Conguring the IP Address in Vista
The following are step-by-step directions to congure the IP address in Windows Vista.
2. Go to the Network and Internet window and click the
appropriate Local Area Connection icon.
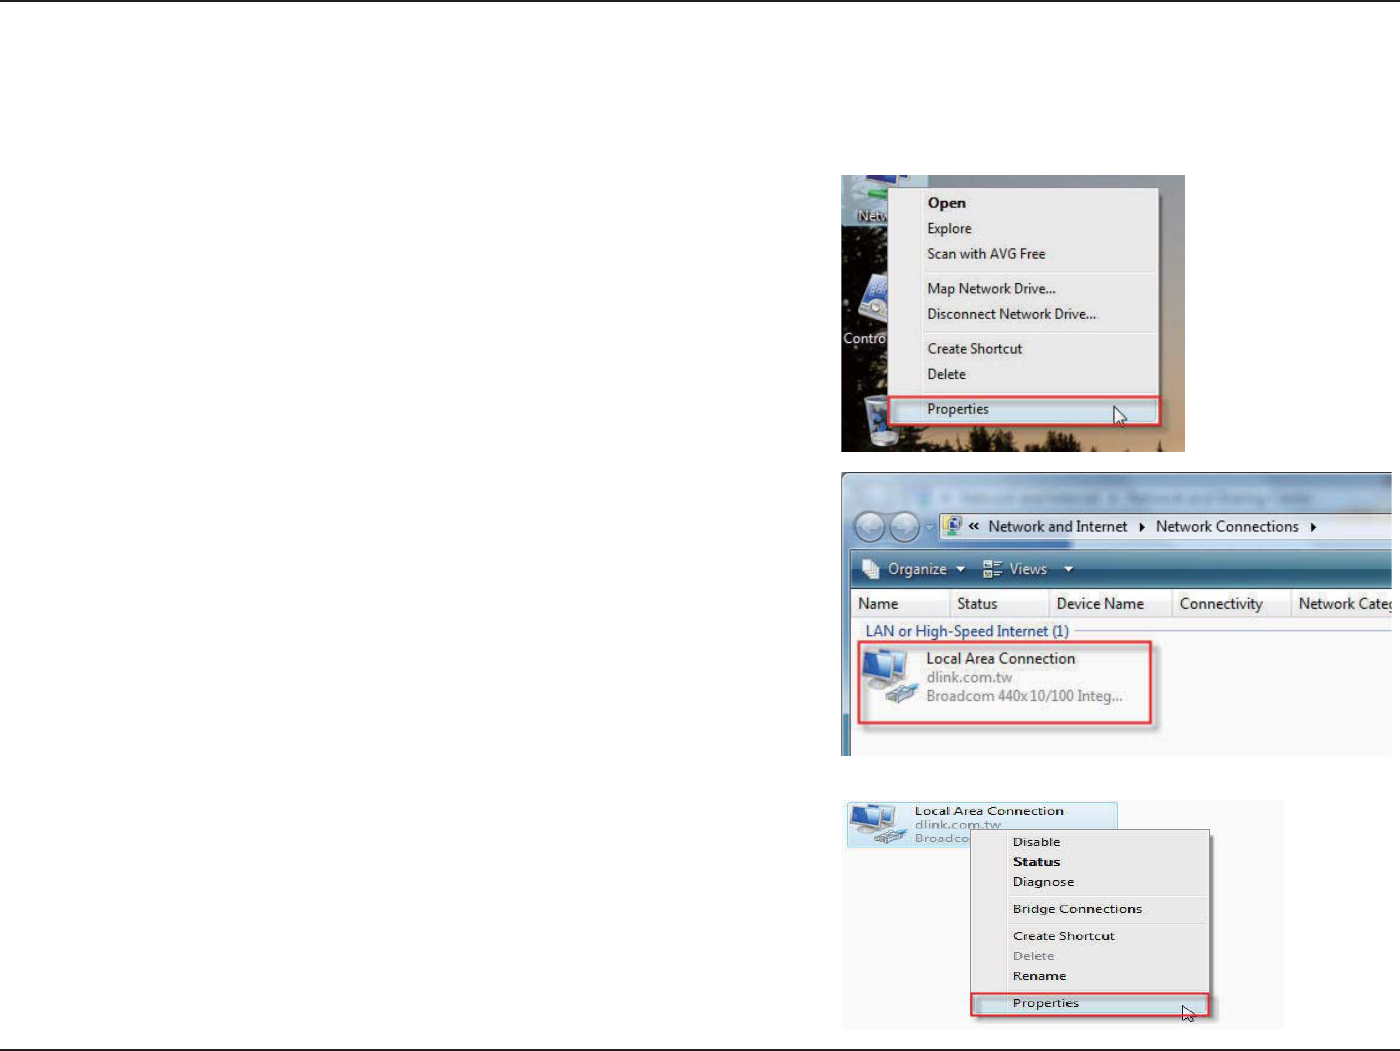
1. Click on Properties.
3. Right-click the Local Area Connection icon and then select
Properties from the drop-down menu.
64D-Link DIR-605L User Manual
Section 8 - Conguring the IP Address in Vista
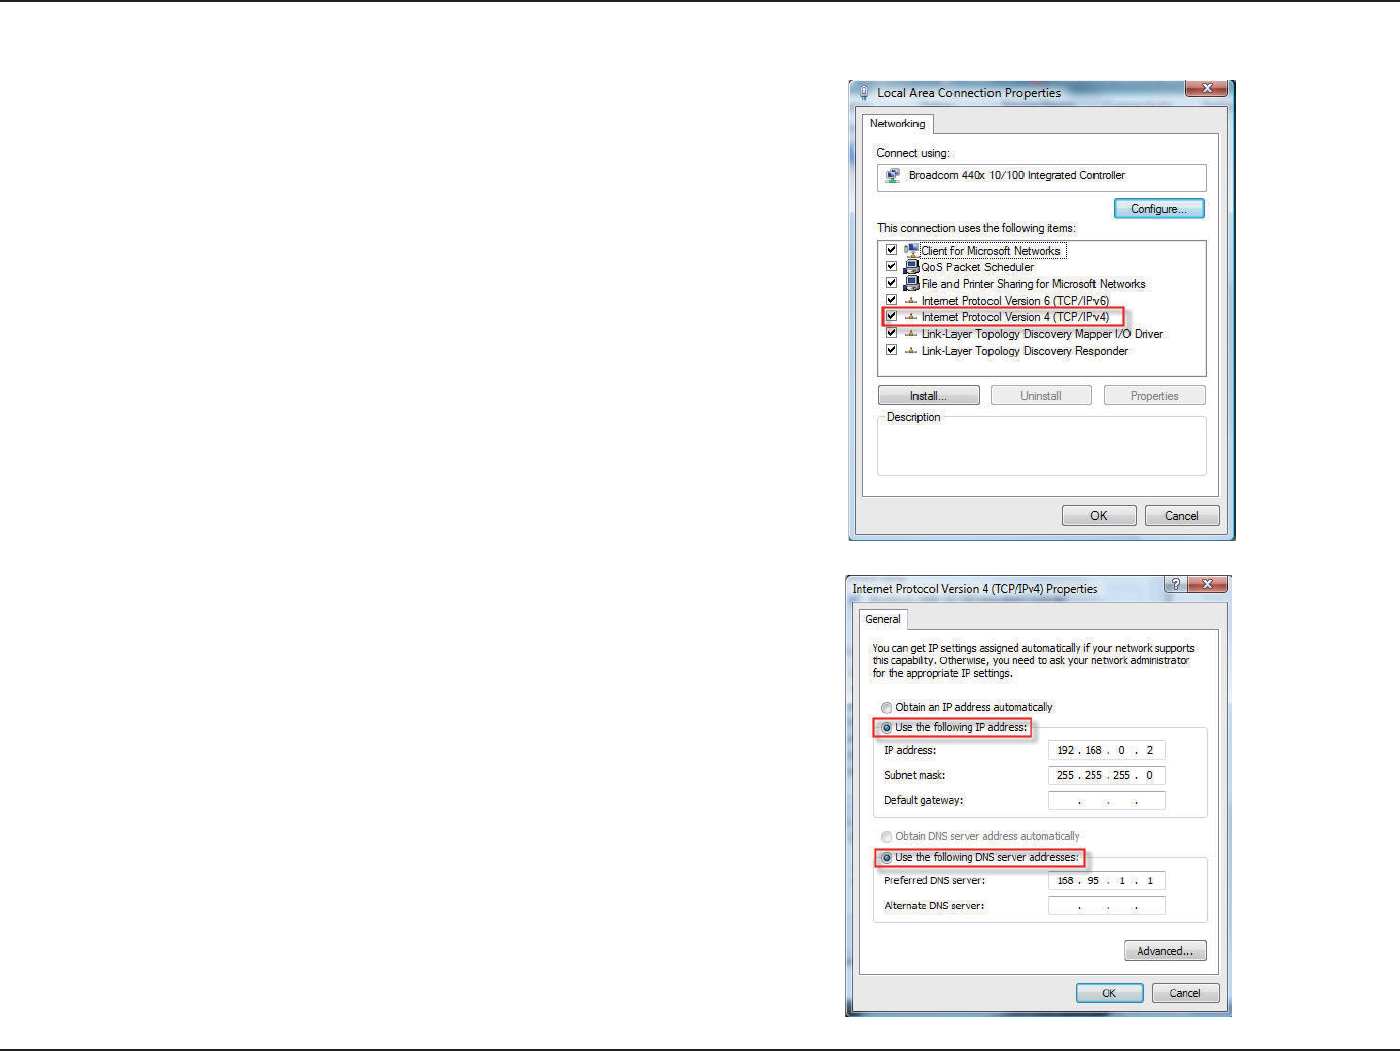
4. Tick the Internet Protocol Version 4 (TCP/IPv4) checkbox in the
Networking tab in the Local Area Connection Properties window.
5. Click the “Use the following IP address” option in the General
tab in the Local Area Connections Properties window and
enter the desired IP address in the space oered. Then click the
“Use the following DNS server addresses” option on the same
tab and enter the desired DNS server information.
65D-Link DIR-605L User Manual
Section 8 - Conguring the IP Address in Vista
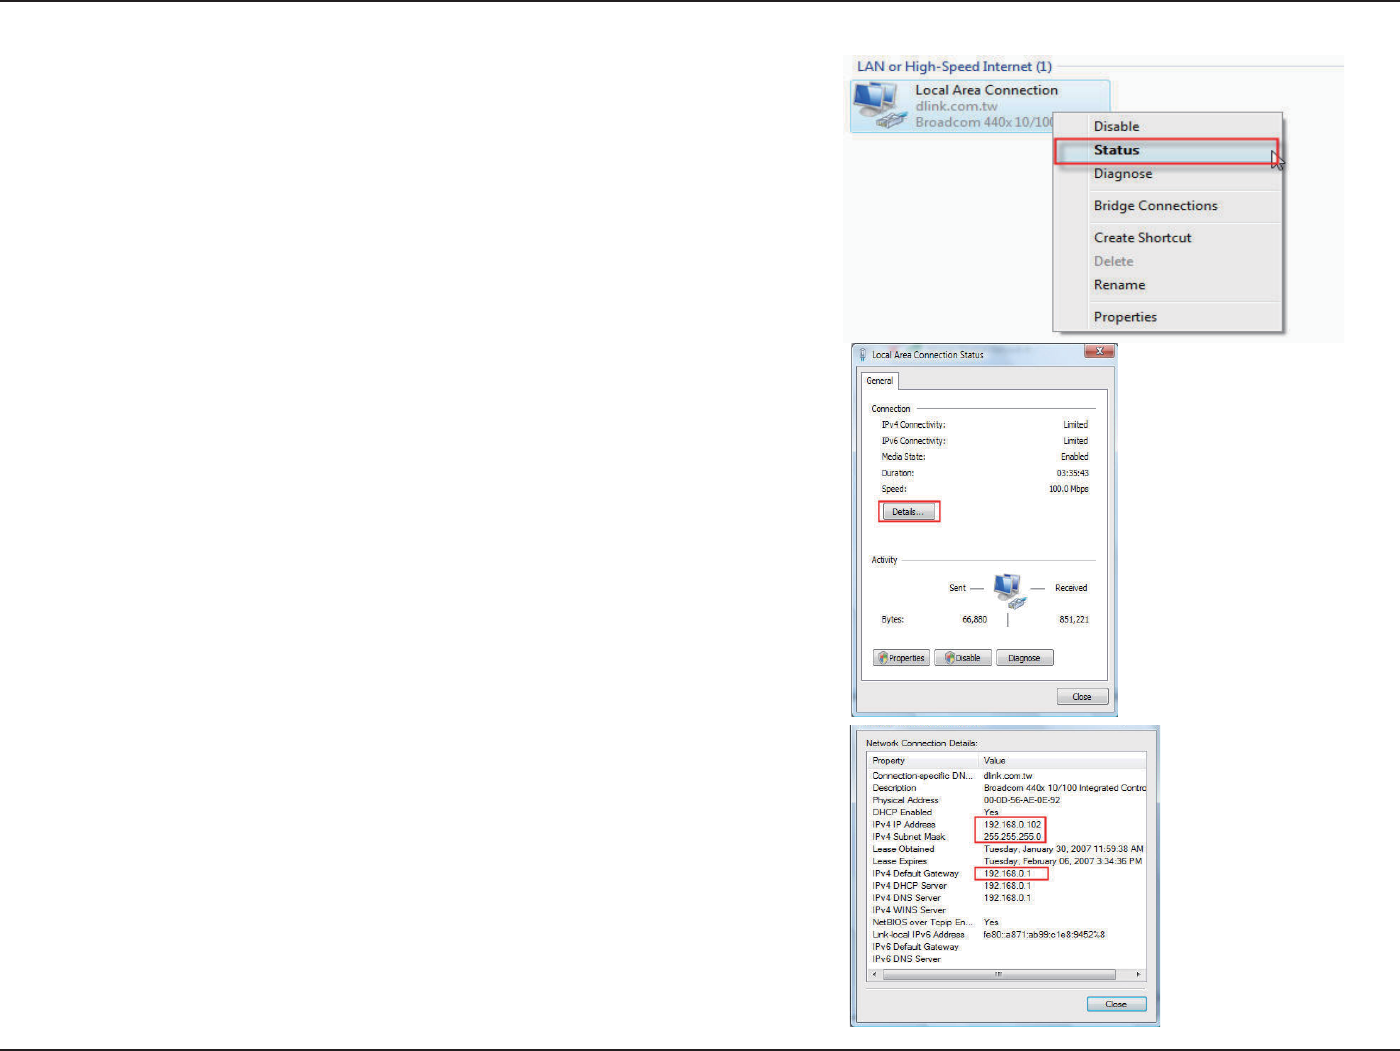
6. Right-click the Local Area Connection icon and then select Status from
the drop-down menu.
7. Go to the Local Area Connection Status window and click the
Details button.
8. Conrm your new settings on the Network Connection Status window.
When you are nished, click the Done button.
66D-Link DIR-605L User Manual
Section 9 - Setting Up a Connection Wirelessly
Setting Up a Connection or Network Wirelessly
The following are step-by-step directions to set up a wireless connection.
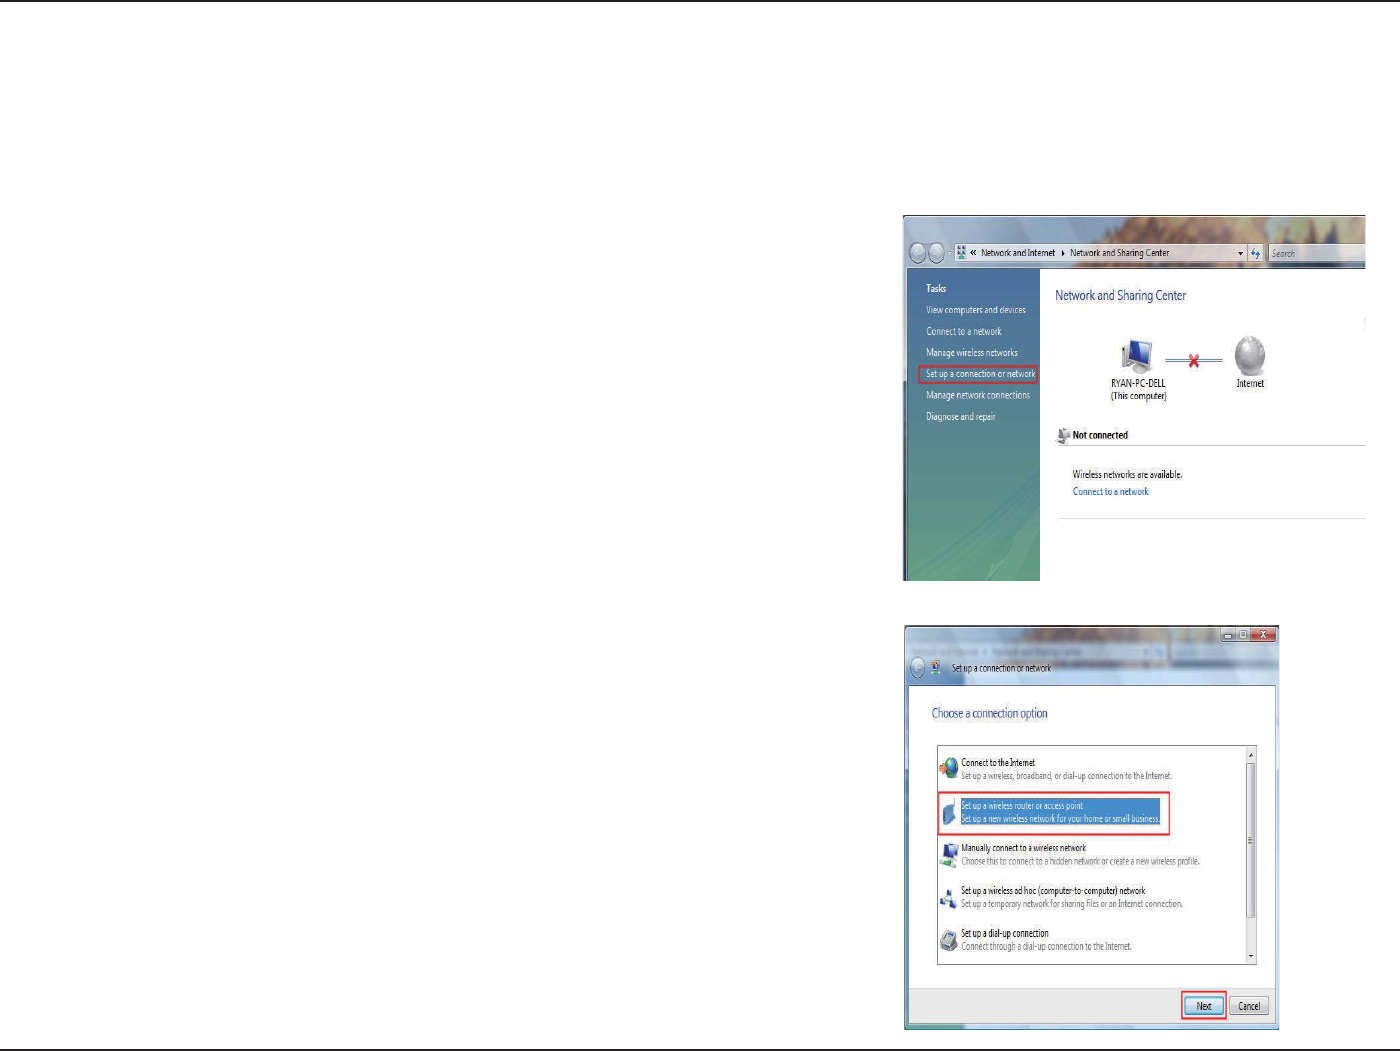
2. Go to the Set up a connection or network window and choose the Set up a
wireless router or access point Set up a new wireless network for your home
or business option. Click the Next button.
1. Click on Set up a connection or network in the Network and Sharing
Center section.
67D-Link DIR-605L User Manual
Section 9 - Setting Up a Connection Wirelessly
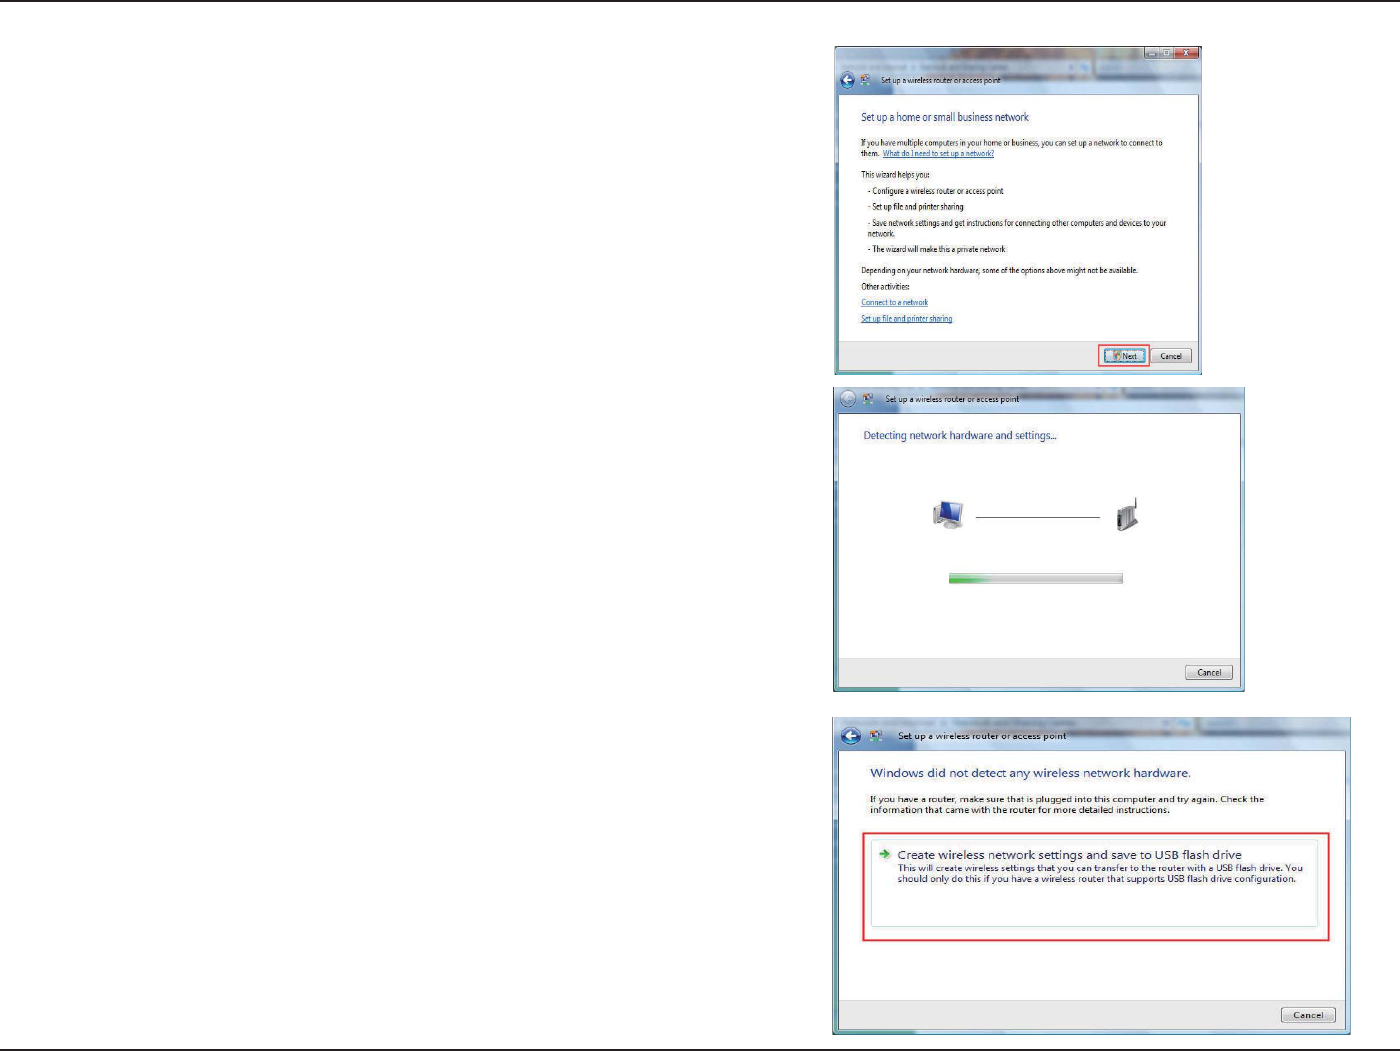
3. Click the Next button on the Set up a wireless router or access point
window.
4. The following window displays the system progress.
5. This window conrms that you want to create wireless network settings
that are savable to a USB ash drive.
68D-Link DIR-605L User Manual
Section 9 - Setting Up a Connection Wirelessly
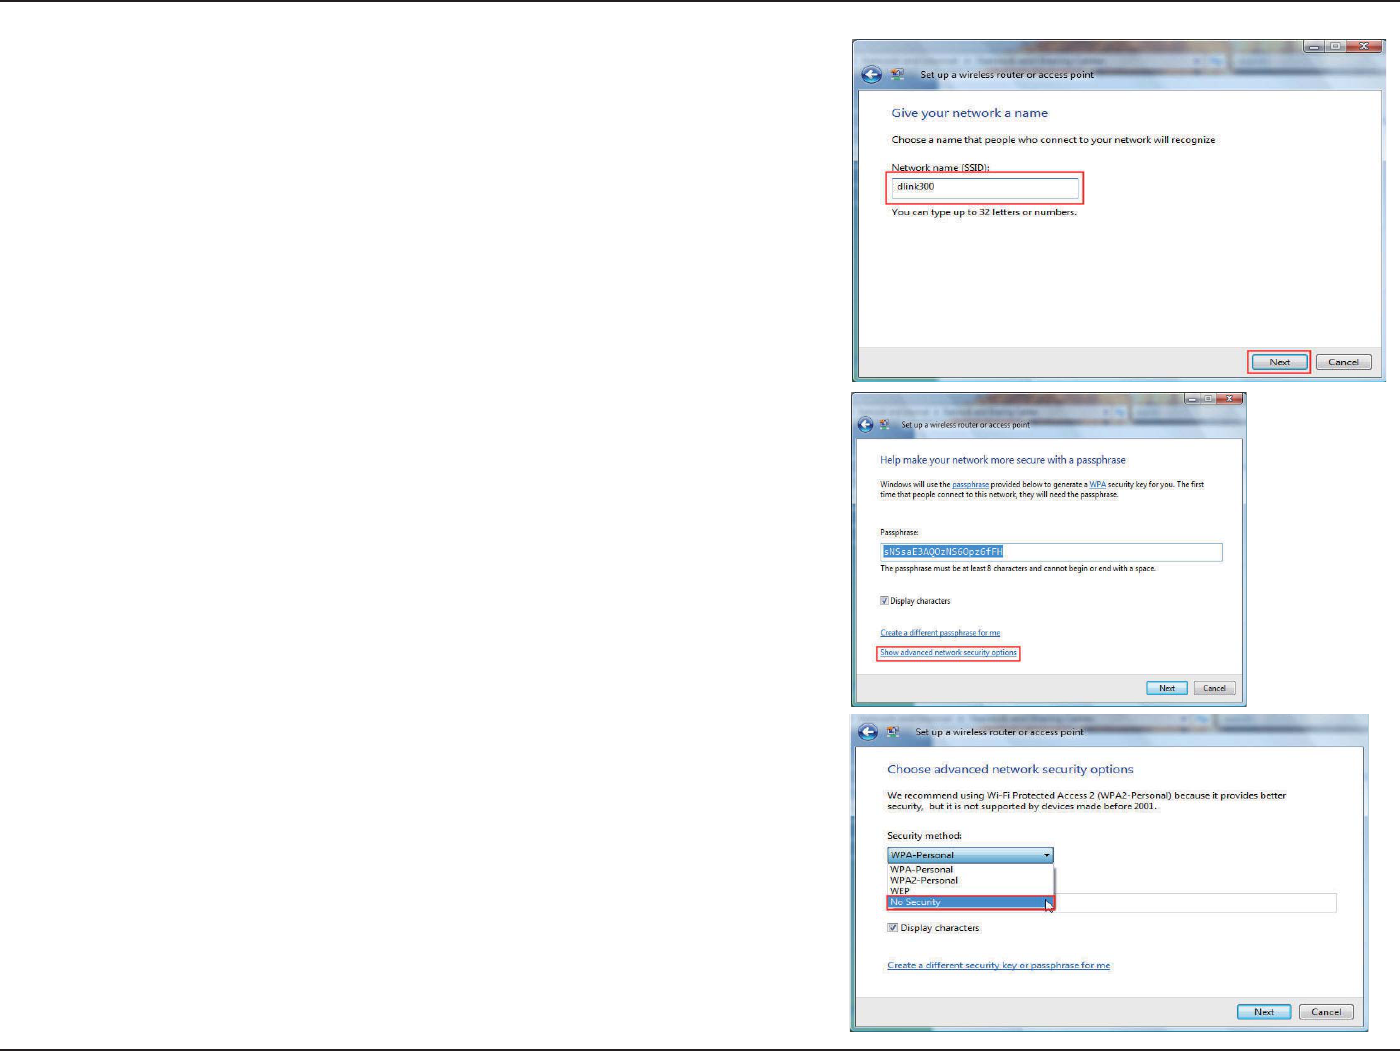
6. Enter a network name on the Give your network a name window in the
Set up a wireless router or access point wizard. Click the Next button.
7. Enter a passphrase on the Help make your network more secure with
a passphrase window in the Set up a wireless router or access point
wizard. Click the Show advanced network security options link.
8. Select security method on the Choose advanced network security
options window in the Set up a wireless router or access point wizard.
Click the Next button.