D Link IR615E1 D-Link DIR-615 Wireless N Router User Manual Manual Part 2
D Link Corporation D-Link DIR-615 Wireless N Router Manual Part 2
D Link >
Contents
- 1. Manual Part 1
- 2. Manual Part 2
- 3. Manual Part 3
Manual Part 2
21D-Link DIR-615 User Manual
Section 3 - Configuration
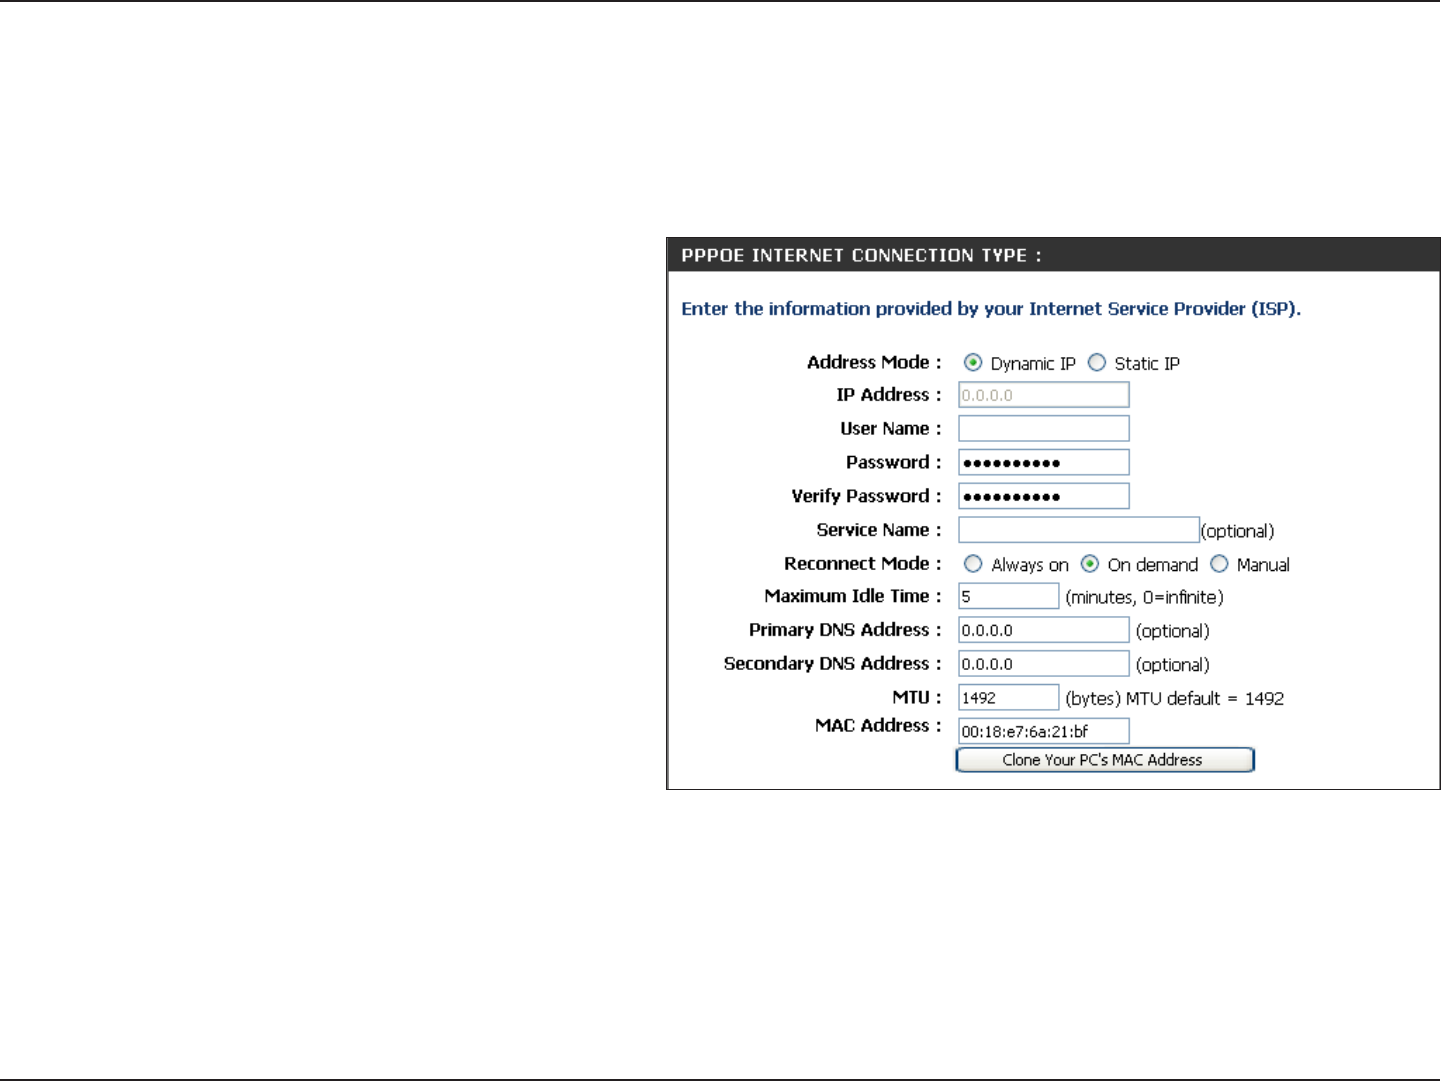
Select PPPoE (Username/Password) from
the drop-down menu.
Select Static if your ISP assigned you the IP
address, subnet mask, gateway, and DNS
server addresses. In most cases, select
Dynamic.
Enter the IP address (Static PPPoE only).
Enter your PPPoE user name.
Enter your PPPoE password and then retype
the password in the next box.
Enter the ISP Service Name (optional).
Select either Always-on, On-Demand, or
Manual.
Enter a maximum idle time during which the Internet connection is maintained during inactivity. To disable this feature,
enable Auto-reconnect.
Enter the Primary and Secondary DNS Server Addresses (Static PPPoE only).
My Internet
Connection:
Address Mode:
IP Address:
User Name:
Password:
Service Name:
Reconnection Mode:
Maximum Idle Time:
DNS Addresses:
PPPoE (DSL)
Choose PPPoE (Point to Point Protocol over Ethernet) if your ISP uses a PPPoE connection. Your ISP will provide
you with a username and password. This option is typically used for DSL services. Make sure to remove your PPPoE
software from your computer. The software is no longer needed and will not work through a router.

22D-Link DIR-615 User Manual
Section 3 - Configuration
MTU:
MAC Address:
Maximum Transmission Unit - you may need to change the MTU for optimal performance with your specific ISP. 1492 is
the default MTU.
The default MAC Address is set to the Internet port’s physical interface MAC address on the Broadband Router. It is not
recommended that you change the default MAC address unless required by your ISP. You can use the Clone Your PC’s
MAC Address button to replace the Internet port’s MAC address with the MAC address of your Ethernet card.
23D-Link DIR-615 User Manual
Section 3 - Configuration
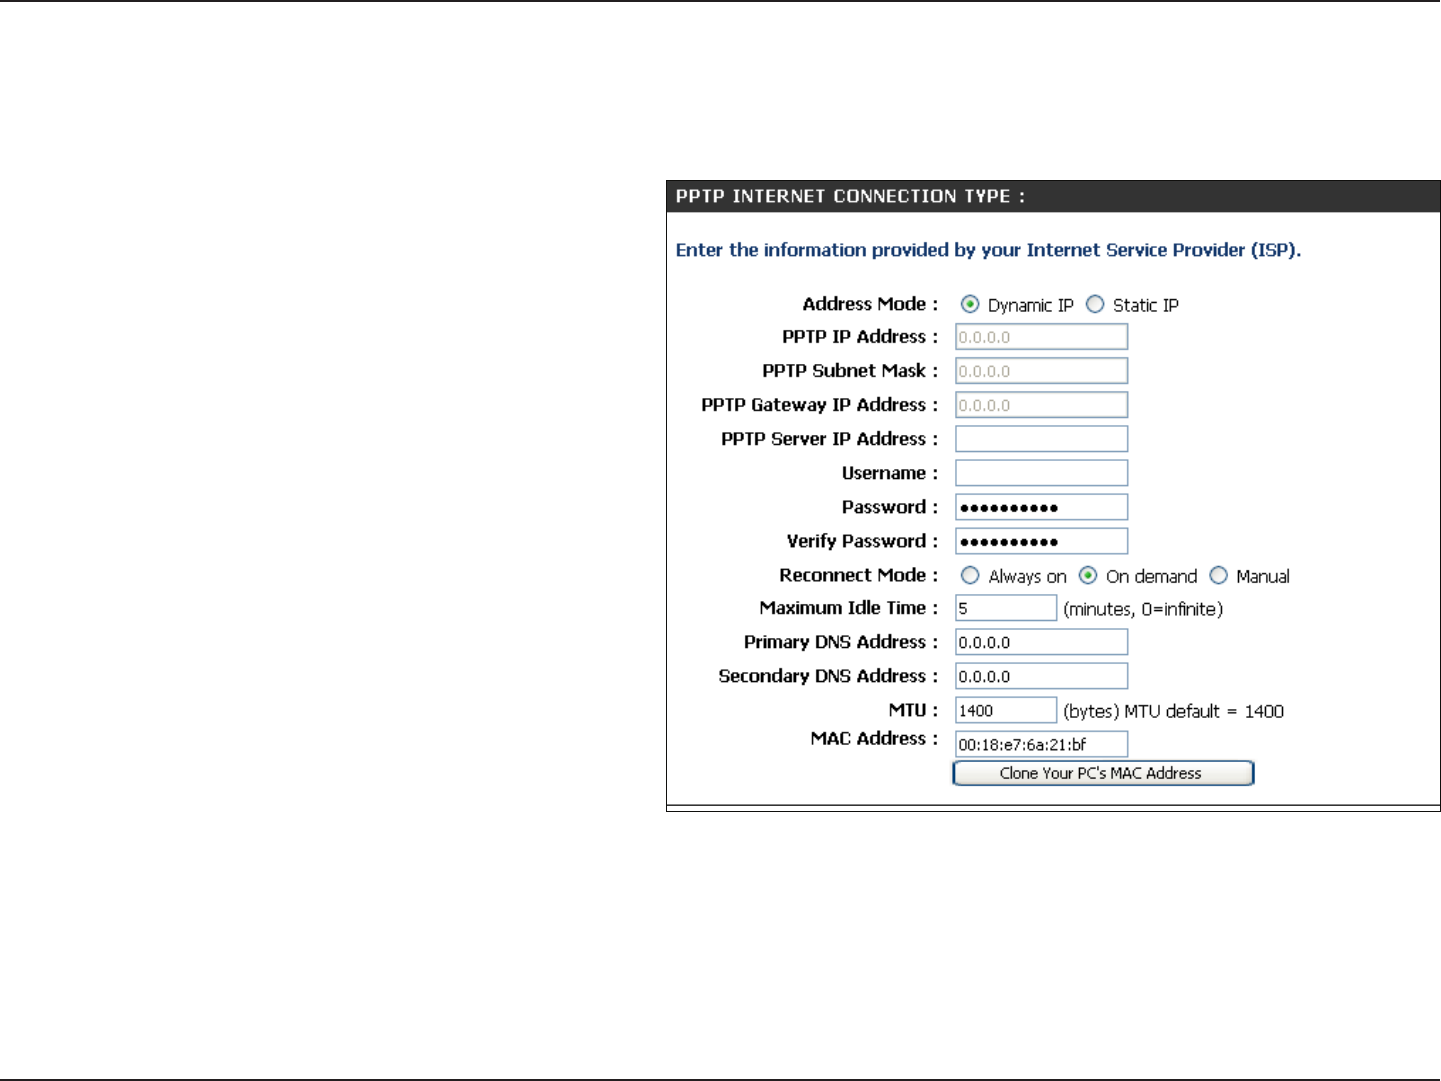
Select Static if your ISP assigned you the IP
address, subnet mask, gateway, and DNS server
addresses. In most cases, select Dynamic.
Enter the IP address (Static PPTP only).
Enter the Primary and Secondary DNS Server
Addresses (Static PPTP only).
Enter the Gateway IP Address provided by your
ISP.
Enter the Server IP provided by your ISP
(optional).
Enter your PPTP username.
Enter your PPTP password and then retype the
password in the next box.
Select either Always-on, On-Demand, or
Manual.
Enter a maximum idle time during which the Internet connection is maintained during inactivity. To disable this feature, enable
Auto-reconnect.
The DNS server information will be supplied by your ISP (Internet Service Provider.)
Maximum Transmission Unit - you may need to change the MTU for optimal performance with your specific ISP. 1400 is the
default MTU.
Address Mode:
PPTP IP Address:
PPTP Subnet
Mask:
PPTP Gateway:
PPTP Server IP:
PPTP
Choose PPTP (Point-to-Point-Tunneling Protocol ) if your ISP uses a PPTP connection. Your ISP will provide you with
a username and password. This option is typically used for DSL services.
Username:
Password:
Reconnect Mode:
Maximum Idle
Time:
DNS Servers:
MTU:

24D-Link DIR-615 User Manual
Section 3 - Configuration
The default MAC Address is set to the Internet port’s physical interface MAC address on the Broadband Router. It is not
recommended that you change the default MAC address unless required by your ISP. You can use the Clone Your PC’s
MAC Address button to replace the Internet port’s MAC address with the MAC address of your Ethernet card.
MAC Address:
25D-Link DIR-615 User Manual
Section 3 - Configuration
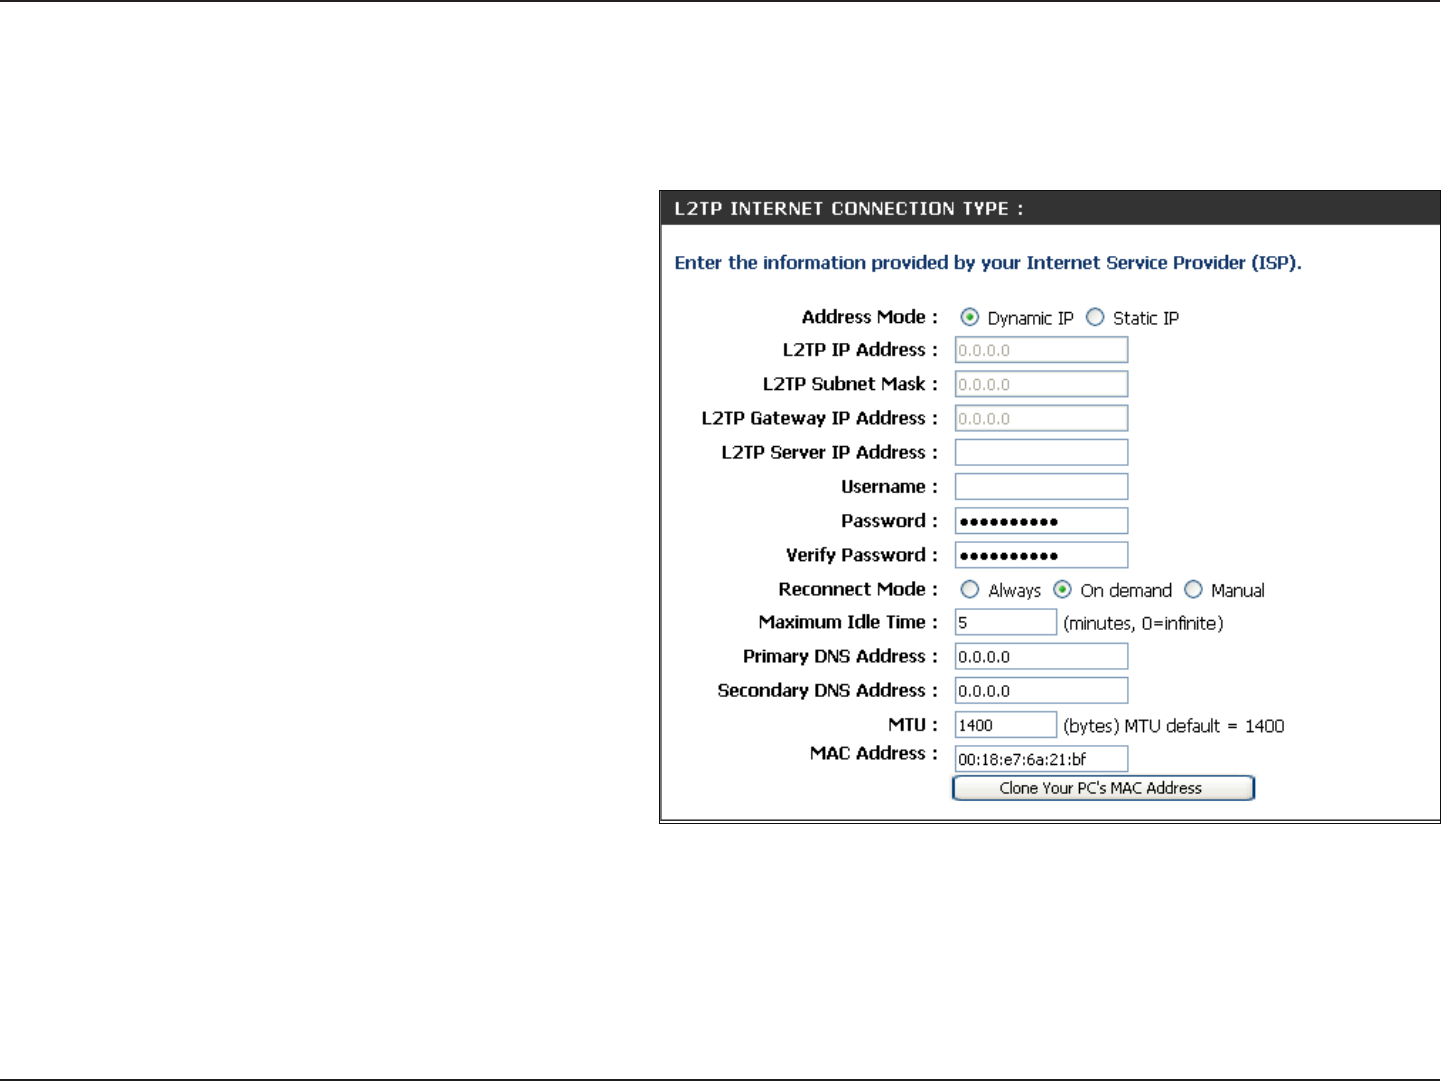
Select Static if your ISP assigned you the IP
address, subnet mask, gateway, and DNS
server addresses. In most cases, select
Dynamic.
Enter the L2TP IP address supplied by your
ISP (Static only).
Enter the Subnet Mask supplied by your ISP
(Static only).
Enter the Gateway IP Address provided by
your ISP.
Enter the Server IP provided by your ISP
(optional).
Enter your L2TP username.
Enter your L2TP password and then retype
the password in the next box.
Select either Always-on, On-Demand, or
Manual.
Enter a maximum idle time during which the Internet connection is maintained during inactivity. To disable this feature,
enable Auto-reconnect.
Enter the Primary and Secondary DNS Server Addresses (Static L2TP only).
Address Mode:
L2TP IP Address:
L2TP Subnet Mask:
L2TP Gateway:
L2TP Server IP:
Username:
Password:
Reconnect Mode:
Maximum Idle Time:
DNS Servers:
L2TP
Choose L2TP (Layer 2 Tunneling Protocol) if your ISP uses a L2TP connection. Your ISP will provide you with a username
and password. This option is typically used for DSL services.

26D-Link DIR-615 User Manual
Section 3 - Configuration
MTU:
Clone MAC
Address:
Maximum Transmission Unit - you may need to change the MTU for optimal performance with your specific ISP. 1400 is the
default MTU.
The default MAC Address is set to the Internet port’s physical interface MAC address on the Broadband Router. It is not
recommended that you change the default MAC address unless required by your ISP. You can use the Clone Your PC’s
MAC Address button to replace the Internet port’s MAC address with the MAC address of your Ethernet card.
27D-Link DIR-615 User Manual
Section 3 - Configuration
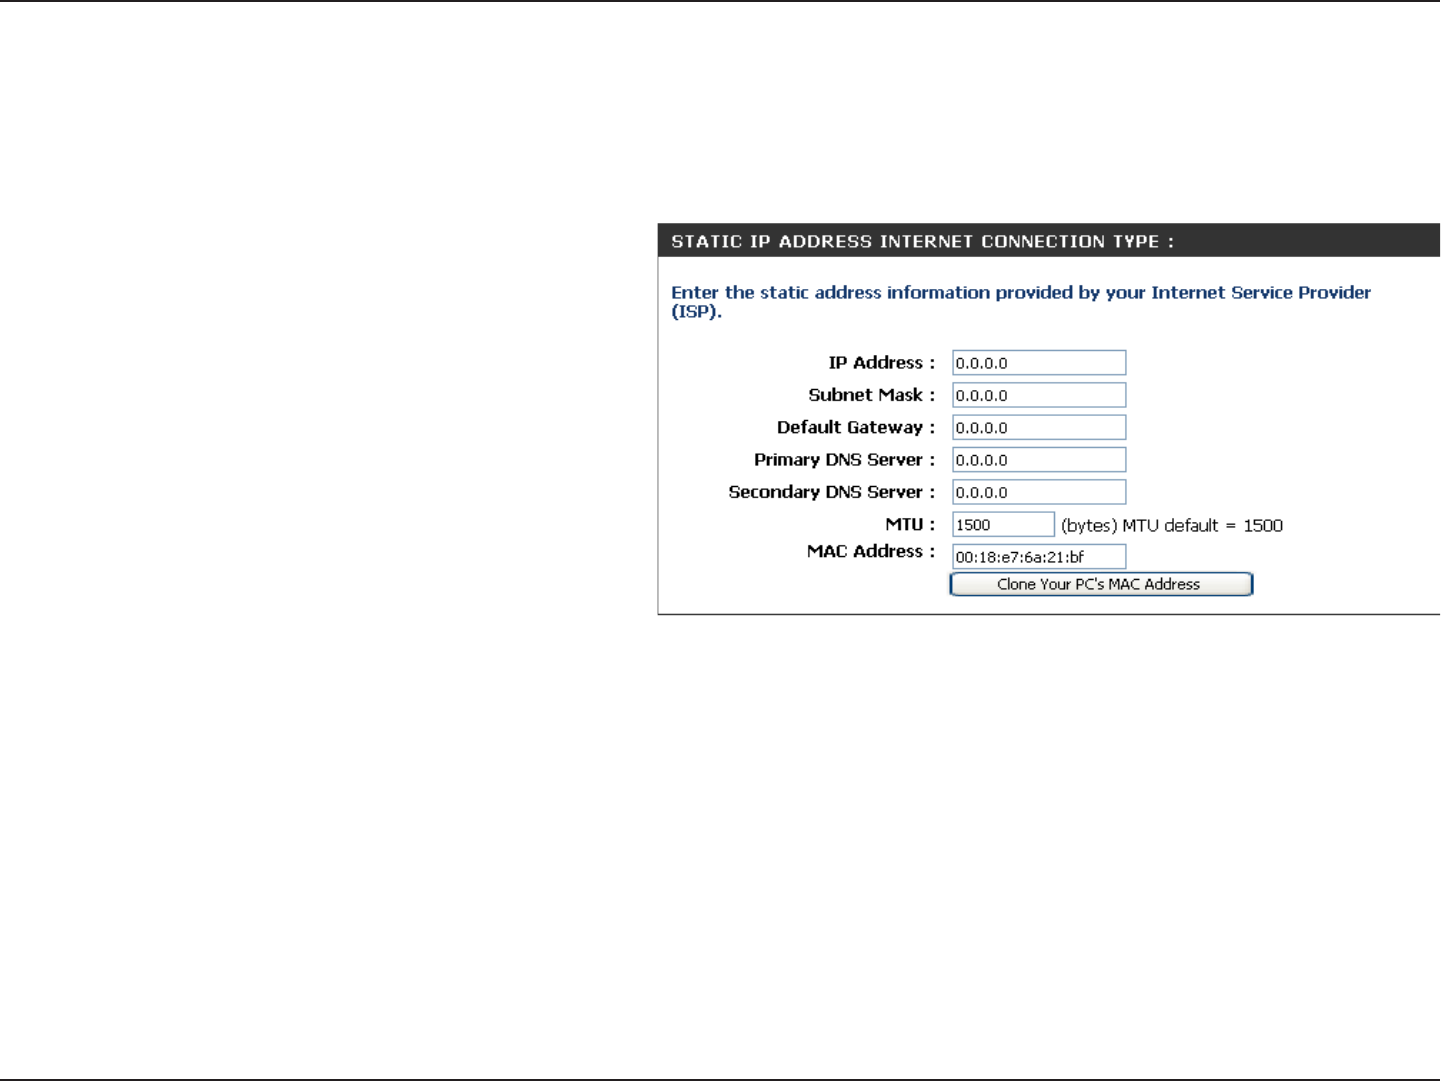
Enter the IP address assigned by your ISP.
Enter the Subnet Mask assigned by your ISP.
Enter the Gateway assigned by your ISP.
The DNS server information will be supplied by
your ISP (Internet Service Provider.)
Maximum Transmission Unit - you may need to
change the MTU for optimal performance with
your specific ISP. 1500 is the default MTU.
The default MAC Address is set to the Internet
port’s physical interface MAC address on the
Broadband Router. It is not recommended that
you change the default MAC address unless
required by your ISP. You can use the Clone
Your PC’s MAC Address button to replace
the Internet port’s MAC address with the MAC
address of your Ethernet card.
IP Address:
Subnet Mask:
Default Gateway:
DNS Servers:
MTU:
MAC Address:
Static IP Address
Select Static IP Address if all the Internet port’s IP information is provided to you by your ISP. You will need to enter in the IP address,
subnet mask, gateway address, and DNS address(es) provided to you by your ISP. Each IP address entered in the fields must be in the
appropriate IP form, which are four octets separated by a dot (x.x.x.x). The Router will not accept the IP address if it is not in this format.
28D-Link DIR-615 User Manual
Section 3 - Configuration
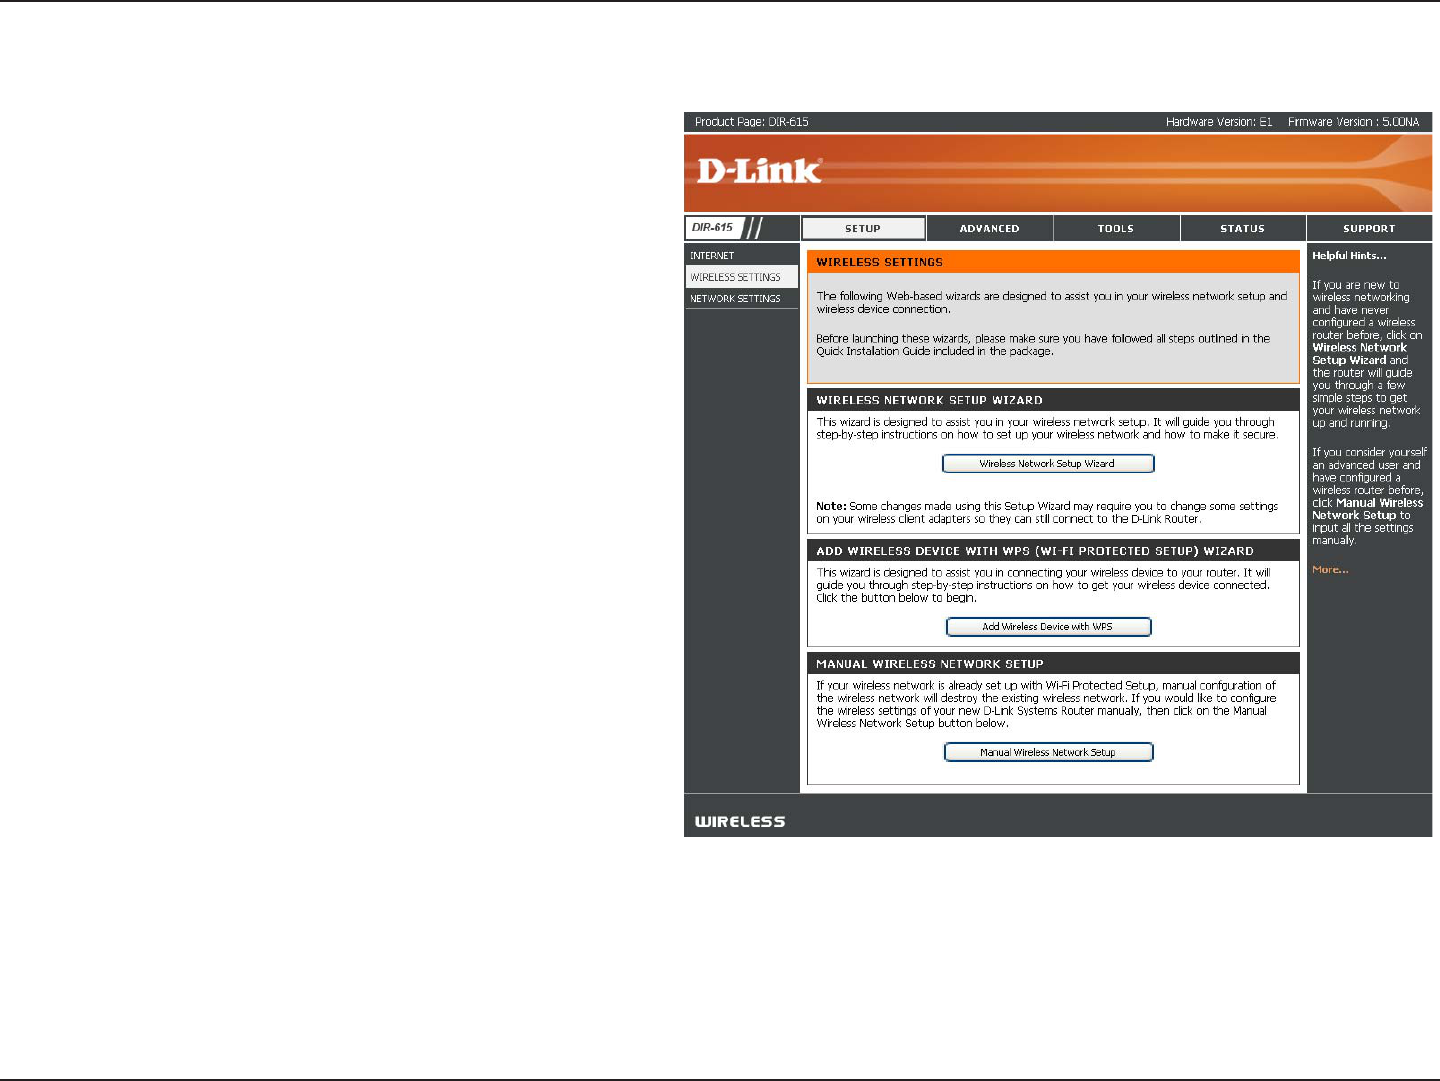
Wireless Settings
If you want to configure the wireless settings on your
router using the wizard, click Wireless Network Setup
Wizard and refer to page 79.
Click Add Wireless Device with WPS if you want to add
a wireless device using Wi-Fi Protected Setup (WPS)
and refer to page 82.
If you want to manually configure the wireless settings
on your router click Manual Wireless Network Setup
and refer to the next page.
29D-Link DIR-615 User Manual
Section 3 - Configuration
Manual Wireless Network Setup
Check the box to enable the wireless function. If
you do not want to use wireless, uncheck the box
to disable all the wireless functions. Click Add New
to create your own time schedule to enable the
wireless function.
Service Set Identifier (SSID) is the name of your
wireless network. Create a name using up to 32
characters. The SSID is case-sensitive.
Select one of the following:
802.11g Only - Select if all of your wireless clients
are 802.11g.
Mixed 802.11g and 802.11b - Select if you
are using both 802.11b and 802.11g wireless
clients.
802.11b Only - Select if all of your wireless clients
are 802.11b.
802.11n Only - Select only if all of your wireless
clients are 802.11n.
Mixed 802.11n, 802.11b, and 802.11g - Select
if you are using a mix of 802.11n, 11g, and 11b
wireless clients.
Mixed 802.11n and 802.11g - Select if you are
using a mix of 802.11n and 802.11g wireless
clients.
The Auto Channel Scan setting can be selected to
allow the DIR-615 to choose the channel with the least amount of interference.
Indicates the channel setting for the DIR-615. By default the channel is set to 6. The Channel can be changed to fit the
channel setting for an existing wireless network or to customize the wireless network. If you enable Auto Channel Scan,
this option will be greyed out.
Enable Wireless:
Wireless Network
Name:
802.11 Mode:
Enable Auto
Channel Scan:
Wireless Channel:

30D-Link DIR-615 User Manual
Section 3 - Configuration
Select the transmit rate. It is strongly suggested to select Best (Auto) for best performance.
Select the Channel Width:
Auto 20/40 - Select if you are using both 802.11n and non-802.11n wireless devices.
20MHz - Select if you are not using any 802.11n wireless clients. This is the default setting.
Select Invisible if you do not want the SSID of your wireless network to be broadcasted by the DIR-615. If Invisible is selected,
the SSID of the DIR-615 will not be seen by Site Survey utilities so your wireless clients will have to know the SSID of your
DIR-615 in order to connect to it.
Refer to page 79 for more information regarding wireless security.
Visibility Status:
Wireless Security:
Channel Width:
Transmission Rate:
31D-Link DIR-615 User Manual
Section 3 - Configuration
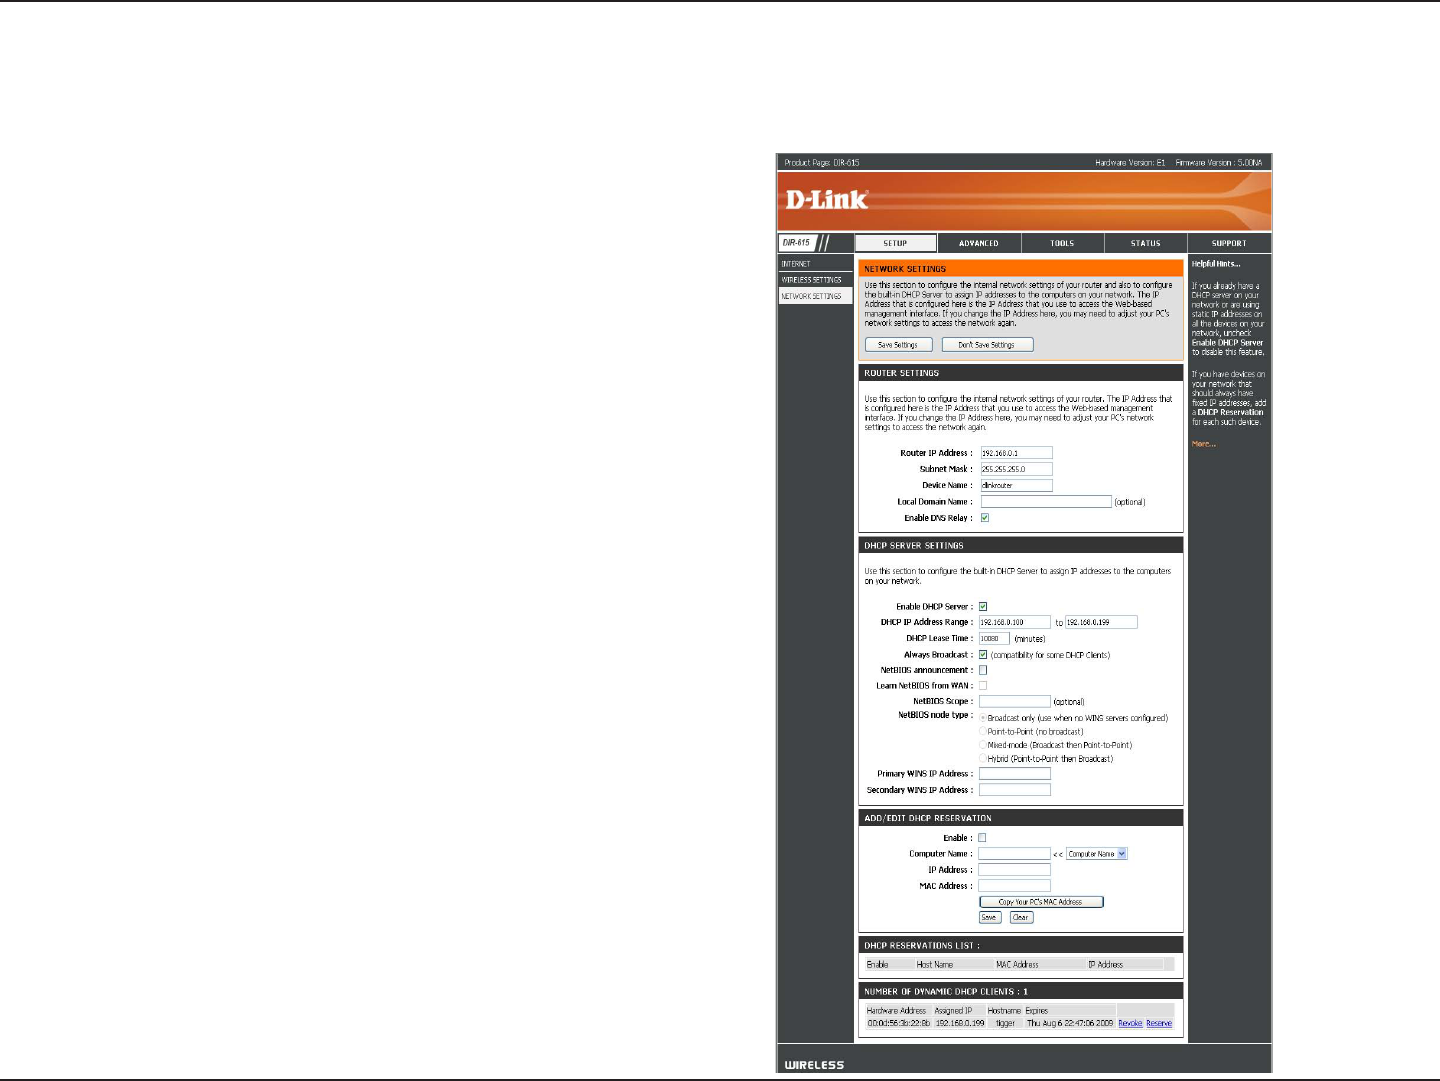
This section will allow you to change the local network settings of the router and to configure the DHCP settings.
Network Settings
Enter the IP address of the router. The default IP
address is 192.168.0.1.
If you change the IP address, once you click Apply, you
will need to enter the new IP address in your browser
to get back into the configuration utility.
Enter the Subnet Mask. The default subnet mask is
255.255.255.0.
Enter the Domain name (Optional).
Uncheck the box to transfer the DNS server information
from your ISP to your computers. If checked, your
computers will use the router for a DNS server.
IP Address:
Subnet Mask:
Local Domain:
Enable DNS Relay:
32D-Link DIR-615 User Manual
Section 3 - Configuration
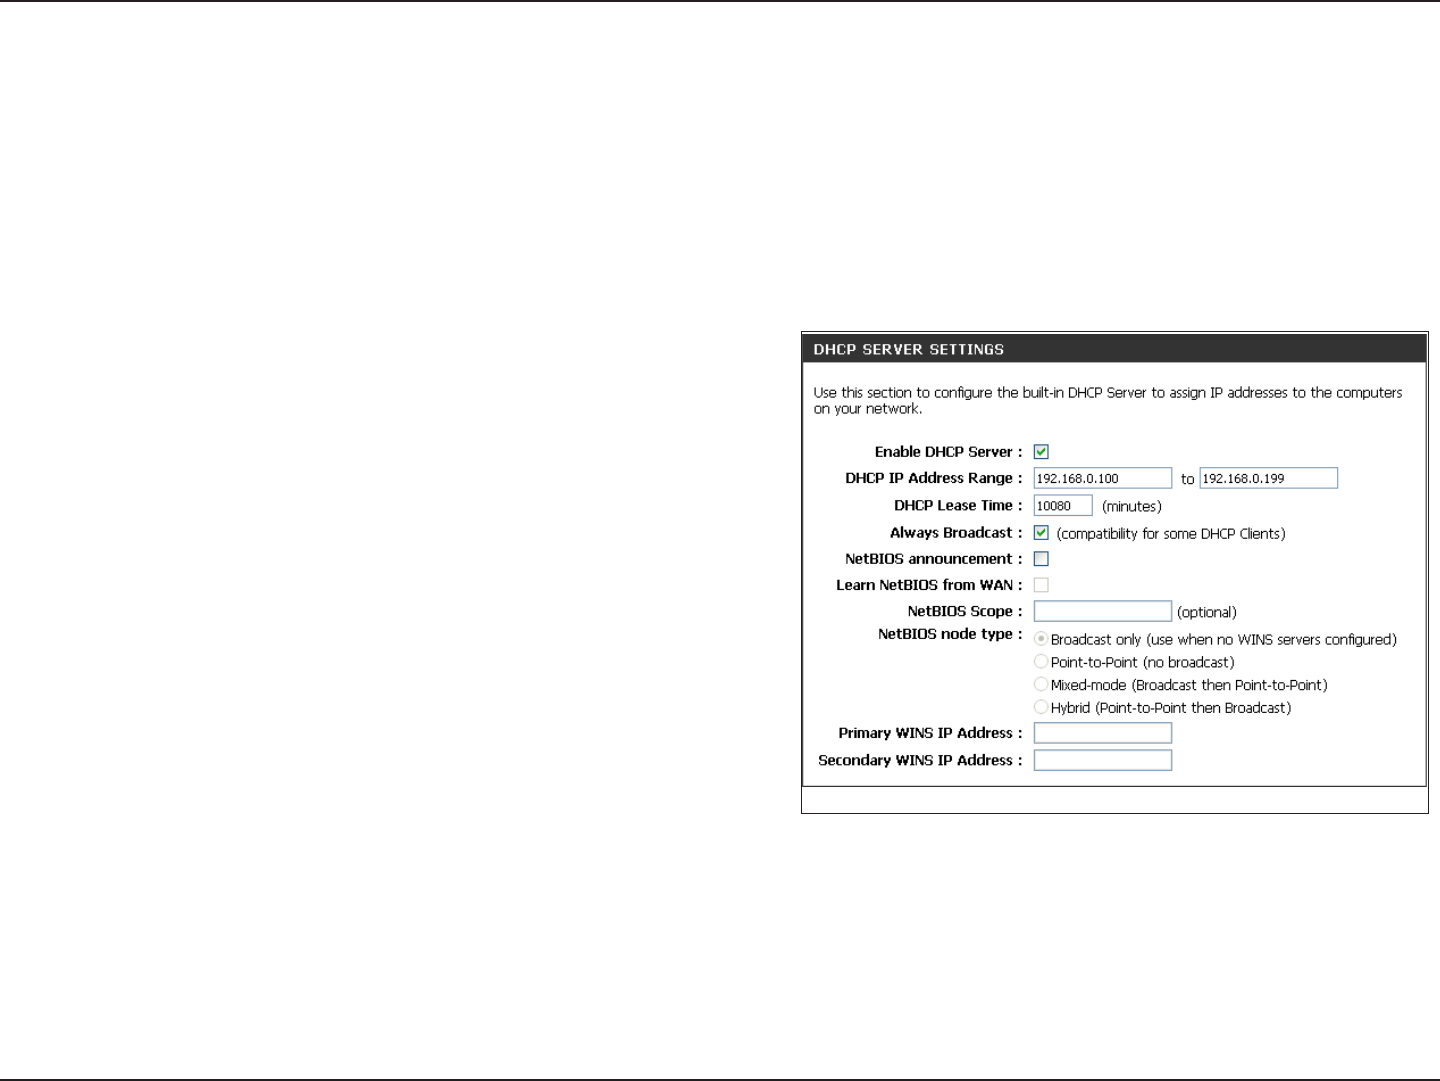
Check this box to enable the DHCP server on your router.
Uncheck to disable this function.
Enter the starting and ending IP addresses for the DHCP
server’s IP assignment.
Note: If you statically (manually) assign IP addresses to your
computers or devices, make sure the IP addresses are outside
of this range or you may have an IP conflict.
The length of time for the IP address lease. Enter the Lease
time in minutes.
Enable this function to ensure compatibility with some DHCP
clients.
If NetBIOS advertisement is switched on, switching this setting
on causes WINS information to be learned from the WAN side, if available. Turn this setting off to configure manually.
This is an advance setting and is normally left blank. This allows the configuration of NetBIOS domain name under which
network hosts operate. This setting has no effect if the “ Learn NetBIOS information form WAN is activated.
Enable DHCP
Server:
DHCP IP Address
Range:
Lease Time:
Always
Broadcast:
Learn NetBIOS
WAN:
Net BIOS scope:
DHCP Server Settings
DHCP stands for Dynamic Host Control Protocol. The DIR-615 has a built-in DHCP server. The DHCP Server will
automatically assign an IP address to the computers on the LAN/private network. Be sure to set your computers to be
DHCP clients by setting their TCP/IP settings to “Obtain an IP Address Automatically.” When you turn your computers
on, they will automatically load the proper TCP/IP settings provided by the DIR-615. The DHCP Server will automatically
allocate an unused IP address from the IP address pool to the requesting computer. You must specify the starting and
ending address of the IP address pool.
33D-Link DIR-615 User Manual
Section 3 - Configuration
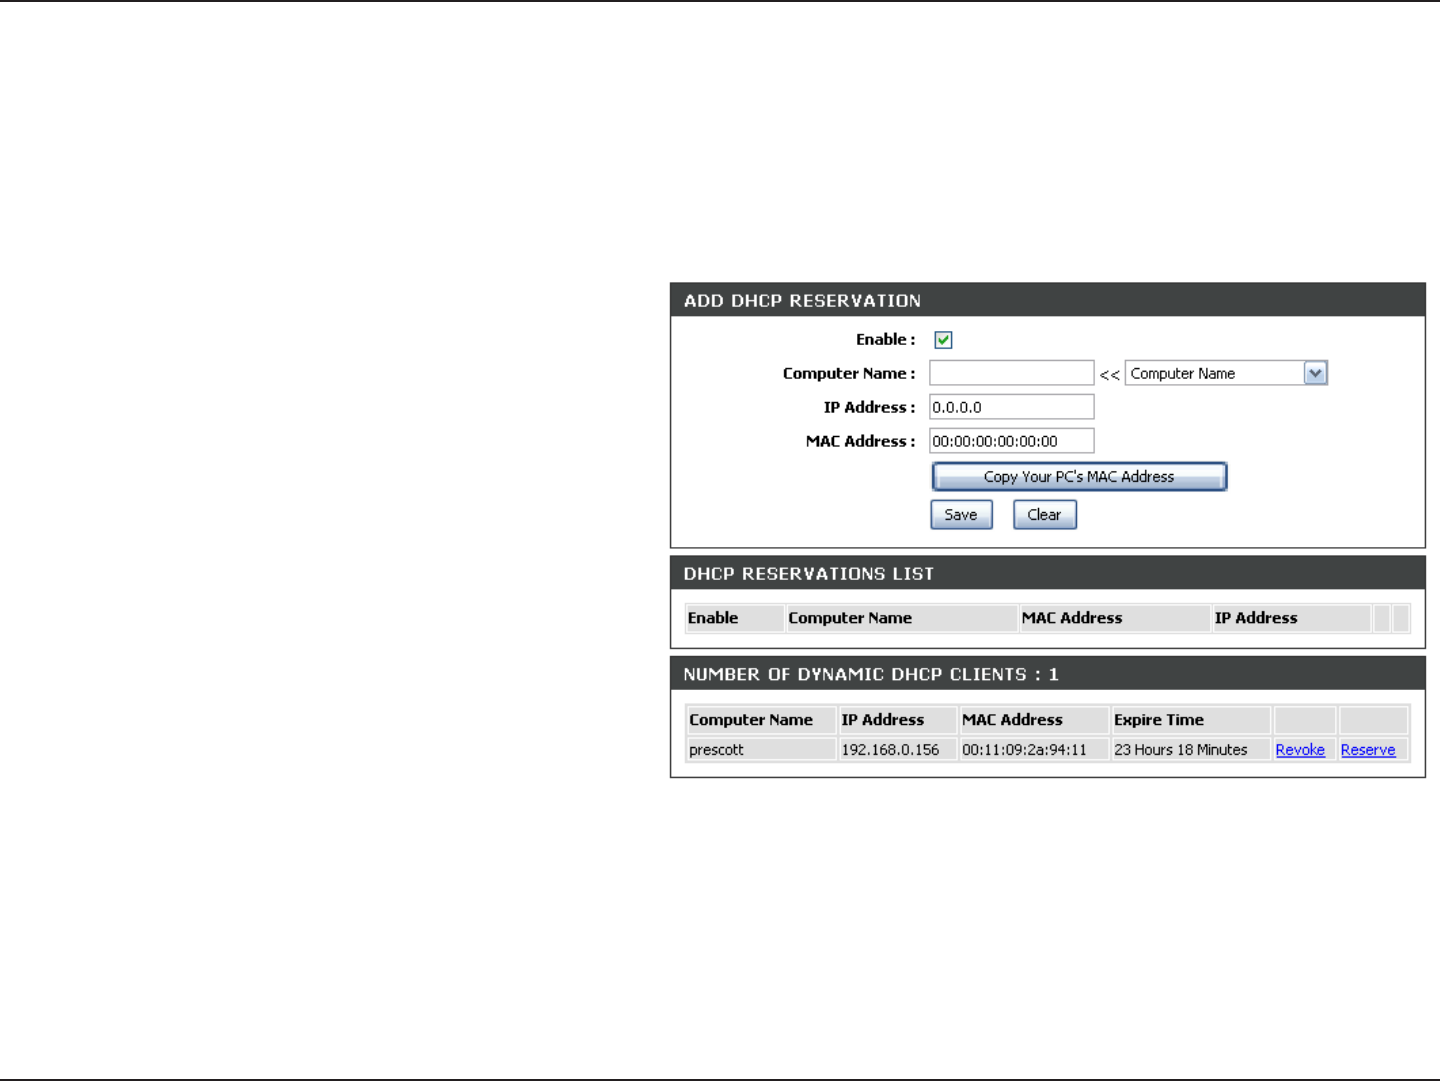
DHCP Reservation
If you want a computer or device to always have the same IP address assigned, you can create a DHCP reservation.
The router will assign the IP address only to that computer or device.
Note: This IP address must be within the DHCP IP Address Range.
Check this box to enable the reservation.
Enter the computer name or select from the drop-
down menu and click <<.
Enter the IP address you want to assign to the
computer or device. This IP Address must be
within the DHCP IP Address Range.
Enter the MAC address of the computer or
device.
If you want to assign an IP address to the
computer you are currently on, click this button
to populate the fields.
Click Save to save your entry. You must click
Save Settings at the top to activate your
reservations.
In this section you can see what LAN devices are currently leasing IP addresses.
Click Revoke to cancel the lease for a specific LAN device and free an entry in the lease table. Do this only if the device no
longer needs the leased IP address, because, for example, it has been removed from the network.
Enable:
Computer Name:
IP Address:
MAC Address:
Copy Your PC’s
MAC Address:
Save:
Number of
Dynamic DHCP
Clients:
Revoke:

34D-Link DIR-615 User Manual
Section 3 - Configuration
Reserve:
Note: The Revoke option will not disconnect a PC with a current network session from the network; you would need to use
MAC Address Filter to do that. Revoke will only free up a DHCP Address for the very next requester. If the previous
owner is still available, those two devices may both receive an IP Address Conflict error, or the second device may
still not receive an IP Address; in that case, you may still need to extend the “DHCP IP Address Range” to address
the issue, it is located in the DHCP Server section.
The Reserve option converts this dynamic IP allocation into a DHCP Reservation and adds the corresponding entry to the
DHCP Reservations List.
35D-Link DIR-615 User Manual
Section 3 - Configuration
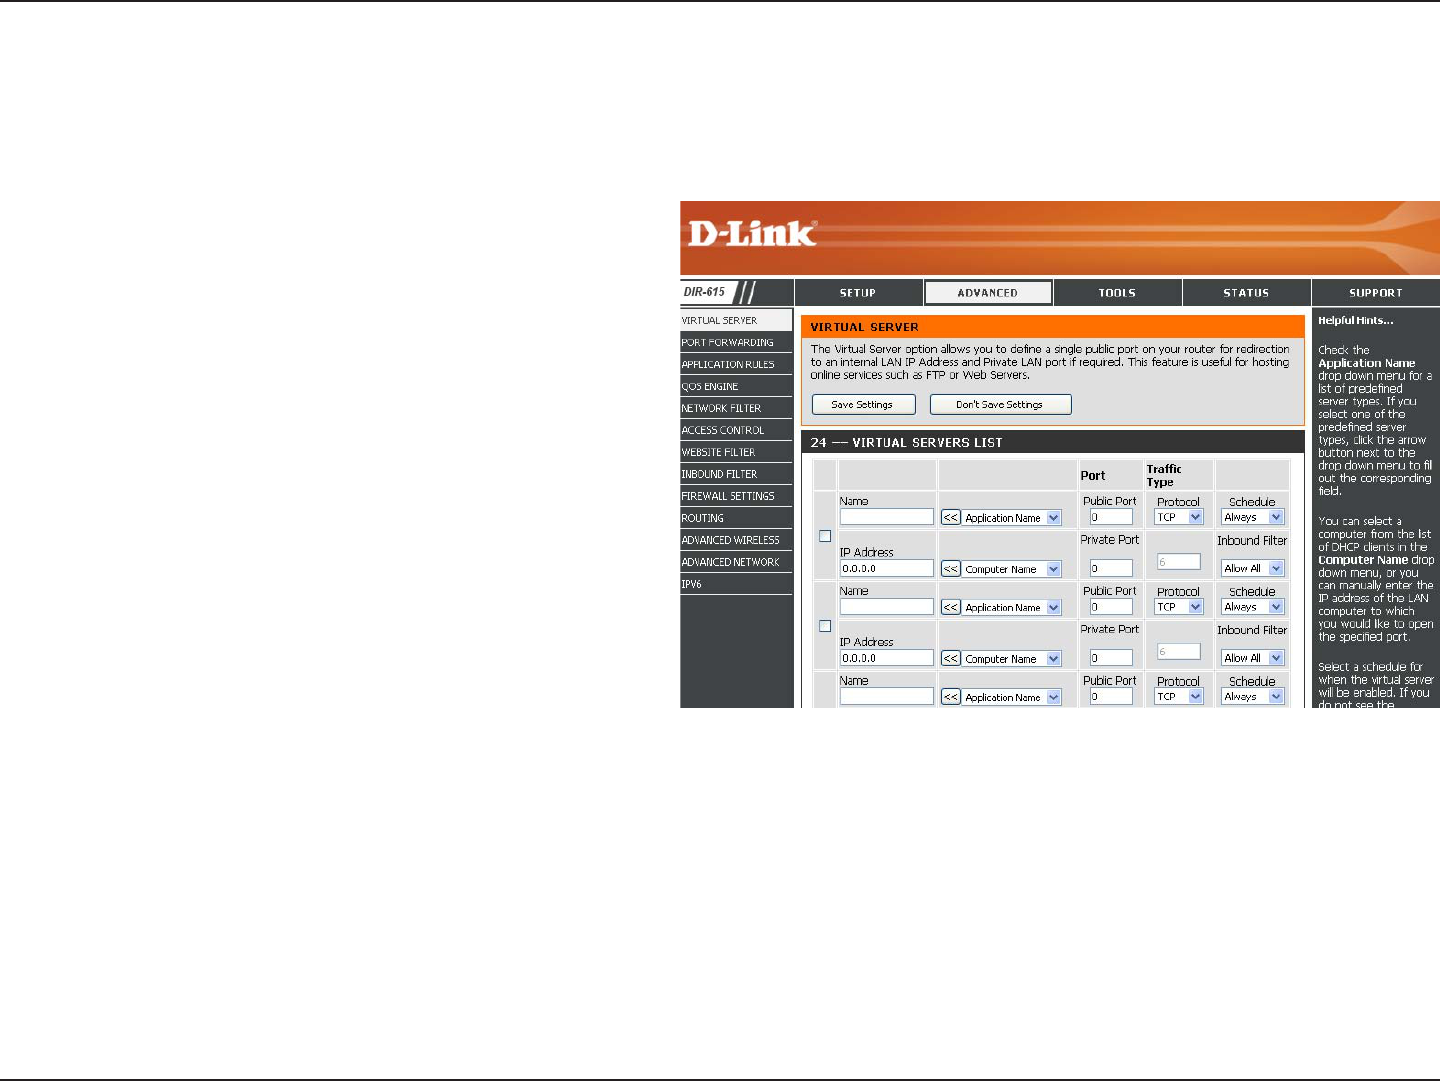
The DIR-615 can be configured as a virtual server so that remote users accessing Web or FTP services via the public
IP address can be automatically redirected to local servers in the LAN (Local Area Network).
The DIR-615 firewall feature filters out unrecognized
packets to protect your LAN network so all computers
networked with the DIR-615 are invisible to the outside
world. If you wish, you can make some of the LAN
computers accessible from the Internet by enabling
Virtual Server. Depending on the requested service,
the DIR-615 redirects the external service request to
the appropriate server within the LAN network.
The DIR-615 is also capable of port-redirection
meaning incoming traffic to a particular port may be
redirected to a different port on the server computer.
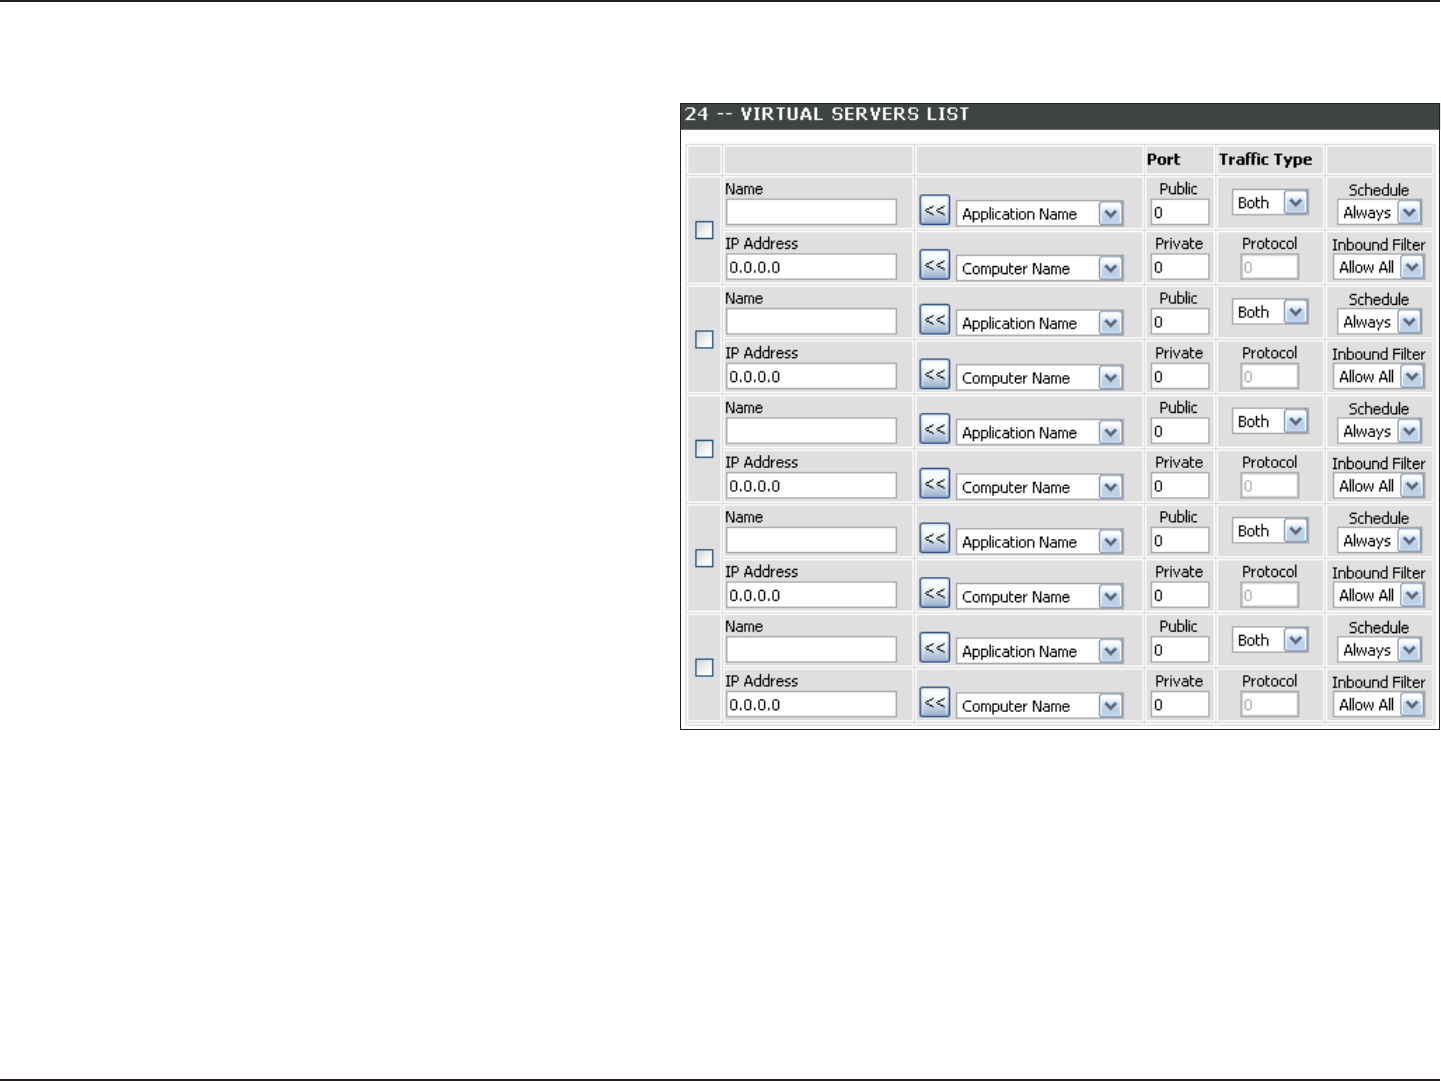
Each virtual service that is created will be listed at the
bottom of the screen in the Virtual Servers List. There are
pre-defined virtual services already in the table. You
may use them by enabling them and assigning the server IP to use that particular virtual service.
For a list of ports for common applications, please visit http://support.dlink.com/faq/view.asp?prod_id=1191.
Virtual Server
36D-Link DIR-615 User Manual
Section 3 - Configuration
This will allow you to open a single port. If you would like to open a range of ports, refer to the next page.
Enter a name for the rule or select an application
from the drop-down menu. Select an application
and click << to populate the fields.
Enter the IP address of the computer on your
local network that you want to allow the incoming
service to. If your computer is receiving an IP
address automatically from the router (DHCP),
you computer will be listed in the “Computer
Name” drop-down menu. Select your computer
and click <<.
Enter the port that you want to open next to Private
Port and Public Port. The private and public ports
are usually the same. The public port is the port
seen from the Internet side, and the private port
is the port being used by the application on the
computer within your local network.
Select TCP, UDP, or Both from the drop-down
menu.
Select Allow All (most common) or a created
Inbound filter. You may create your own inbound filters in the Advanced > Inbound Filter page.
The schedule of time when the Virtual Server Rule will be enabled. The schedule may be set to Always, which will allow the
particular service to always be enabled. You can create your own times in the Tools > Schedules section.
Name:
IP Address:
Private Port/
Public Port:
Protocol Type:
Inbound Filter:
Schedule:
37D-Link DIR-615 User Manual
Section 3 - Configuration
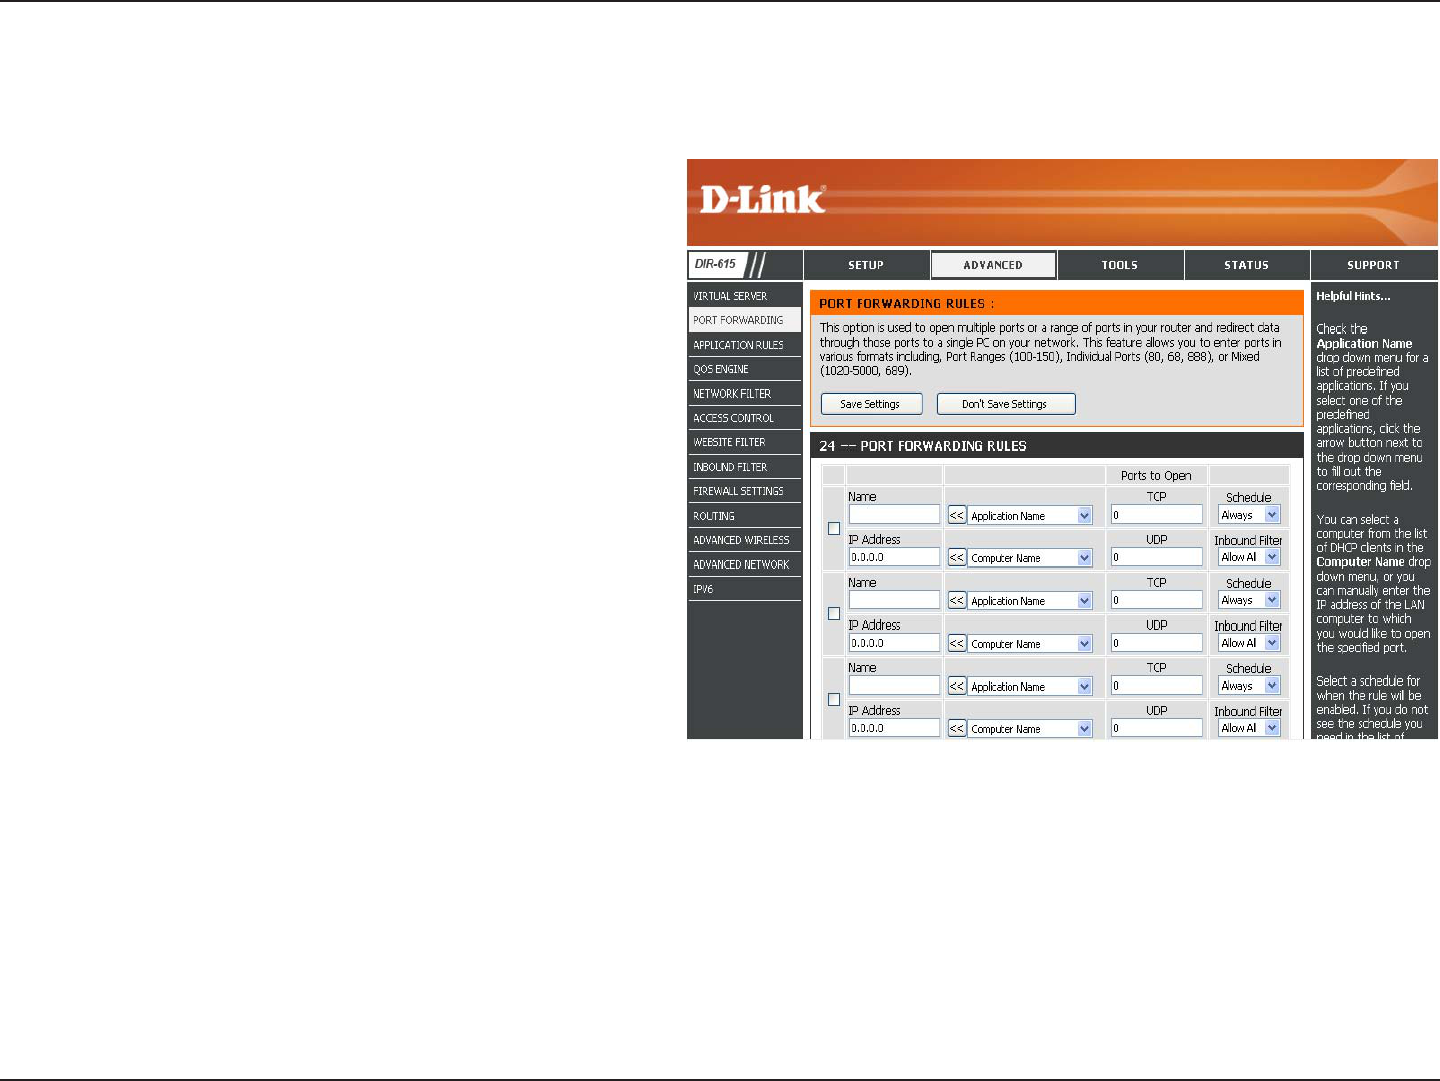
This will allow you to open a single port or a range of ports.
Port Forwarding
Enter a name for the rule or select an application
from the drop-down menu. Select an application
and click << to populate the fields.
Enter the IP address of the computer on your local
network that you want to allow the incoming service
to. If your computer is receiving an IP address
automatically from the router (DHCP), you computer
will be listed in the “Computer Name” drop-down
menu. Select your computer and click <<.
Enter the TCP and/or UDP port or ports that you
want to open. You can enter a single port or a range
of ports. Separate ports with a common.
Example: 24,1009,3000-4000
Select Allow All (most common) or a created
Inbound filter. You may create your own inbound
filters in the Advanced > Inbound Filter page.
The schedule of time when the Virtual Server Rule
will be enabled. The schedule may be set to Always,
which will allow the particular service to always
be enabled. You can create your own times in the
Tools > Schedules section.
Name:
IP Address:
TCP/UDP:
Inbound Filter:
Schedule:
38D-Link DIR-615 User Manual
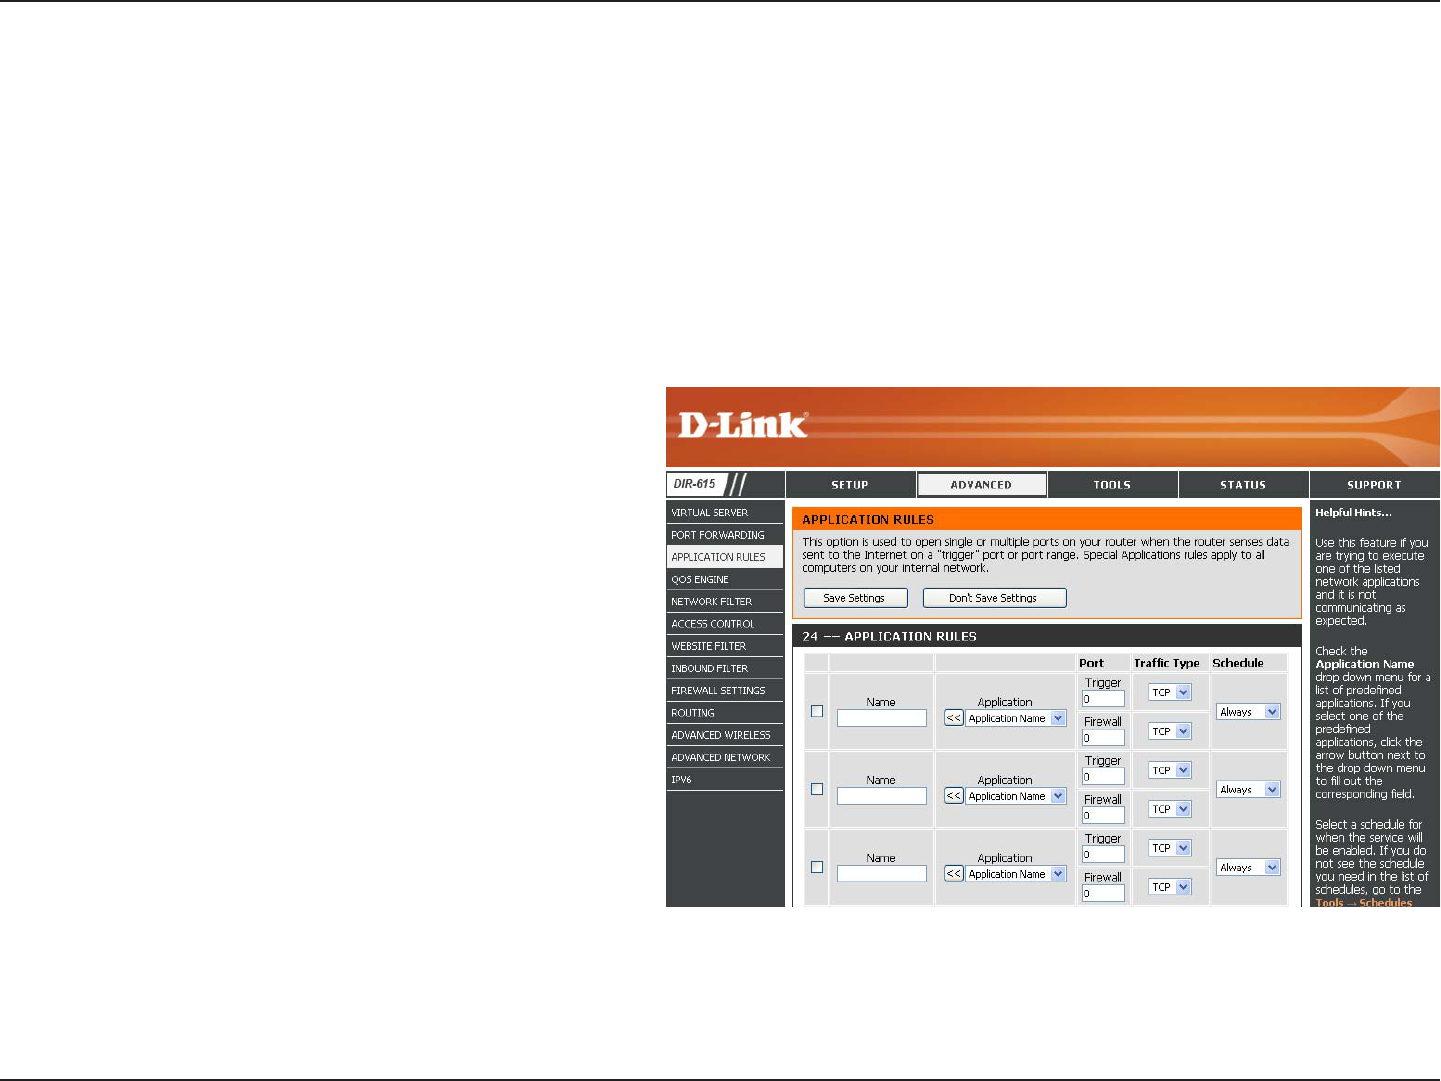
Section 3 - Configuration
Enter a name for the rule. You may select a
pre-defined application from the drop-down
menu and click <<.
This is the port used to trigger the application. It
can be either a single port or a range of ports.
Select the protocol of the trigger port (TCP,
UDP, or Both).
This is the port number on the Internet side
that will be used to access the application. You
may define a single port or a range of ports.
You can use a comma to add multiple ports or
port ranges.
Select the protocol of the firewall port (TCP,
UDP, or Both).
The schedule of time when the Application Rule
will be enabled. The schedule may be set to
Always, which will allow the particular service
to always be enabled. You can create your own
times in the Tools > Schedules section.
Name:
Trigger:
Traffic Type:
Firewall:
Traffic Type:
Schedule:
Application Rules
Some applications require multiple connections, such as Internet gaming, video conferencing, Internet telephony and
others. These applications have difficulties working through NAT (Network Address Translation). Special Applications
makes some of these applications work with the DIR-615. If you need to run applications that require multiple connections,
specify the port normally associated with an application in the “Trigger Port” field, select the protocol type as TCP or
UDP, then enter the firewall (public) ports associated with the trigger port to open them for inbound traffic.
The DIR-615 provides some predefined applications in the table on the bottom of the web page. Select the application
you want to use and enable it.
39D-Link DIR-615 User Manual
Section 3 - Configuration
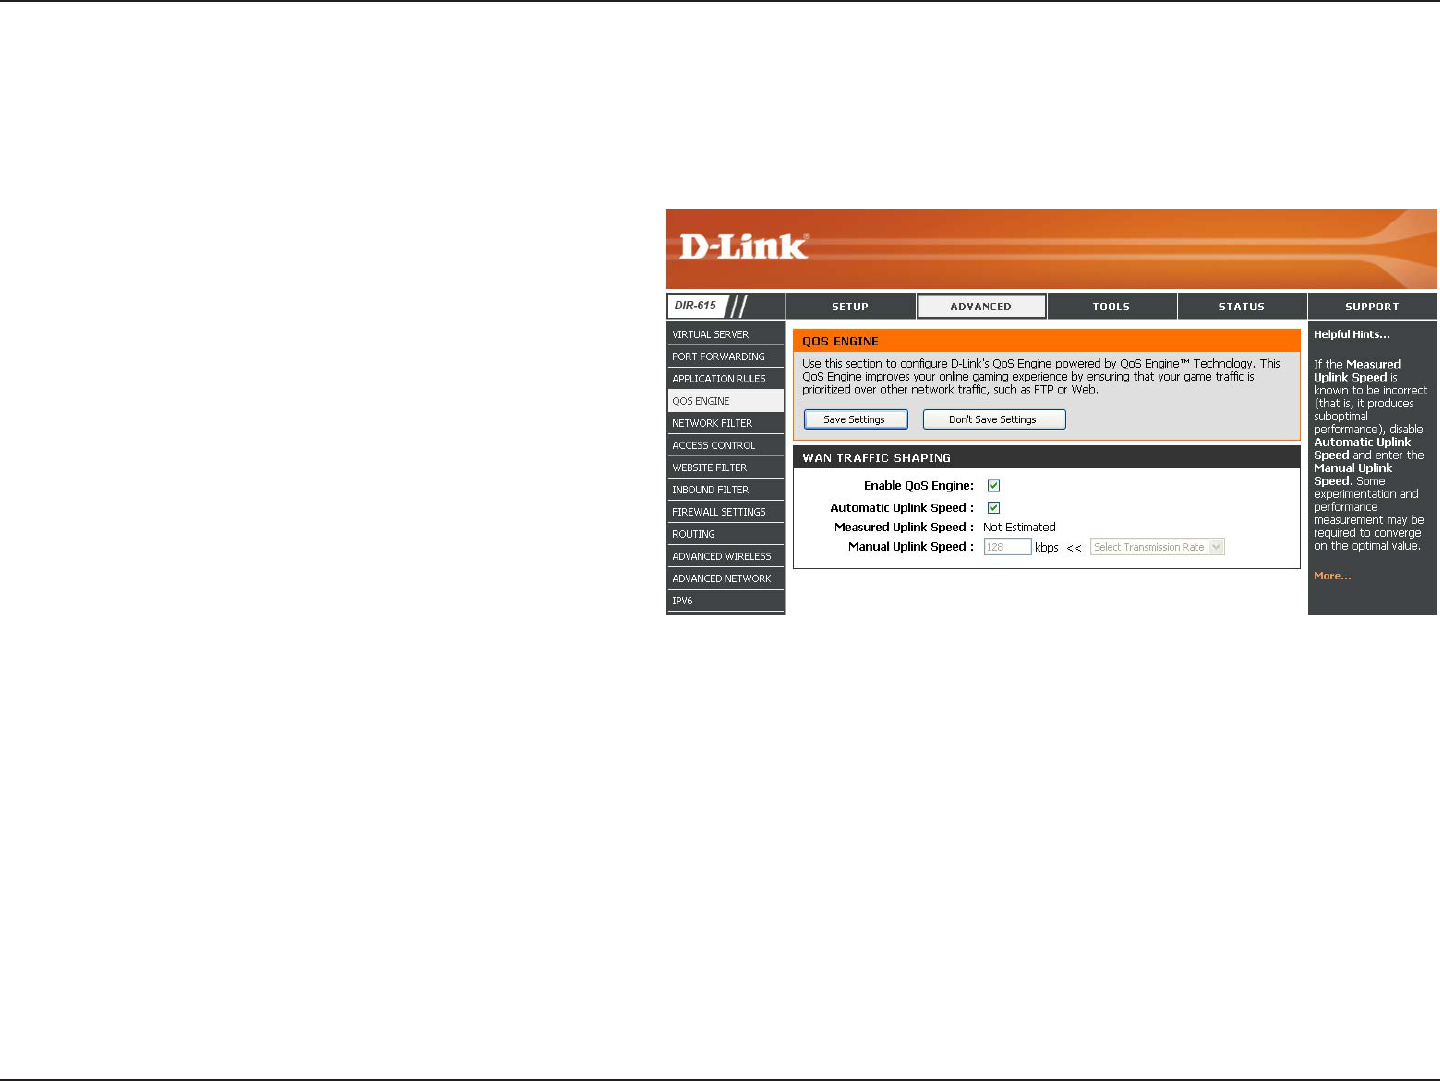
QoS Engine
This option is disabled by default. Enable this
option for better performance and experience
with online games and other interactive
applications, such as VoIP.
This option is enabled by default when the
QoS Engine option is enabled. This option will
allow your router to automatically determine the
uplink speed of your Internet connection.
This displays the detected uplink speed.
The speed at which data can be transferred
from the router to your ISP. This is determined
by your ISP. ISP’s offer speed as a download/
upload pair. For example, 1.5Mbits/284Kbits. Using this example, you would enter 284. Alternatively you can test your uplink
speed with a service such as www.dslreports.com.
Enable QoS Engine:
Automatic Uplink
Speed:
Measured Uplink
Speed:
Manual Uplink
Speed:
The QoS Engine option helps improve your network gaming performance by prioritizing applications. By default the
QoS Engine settings are disabled and application priority is not classified automatically.
40D-Link DIR-615 User Manual
Section 3 - Configuration
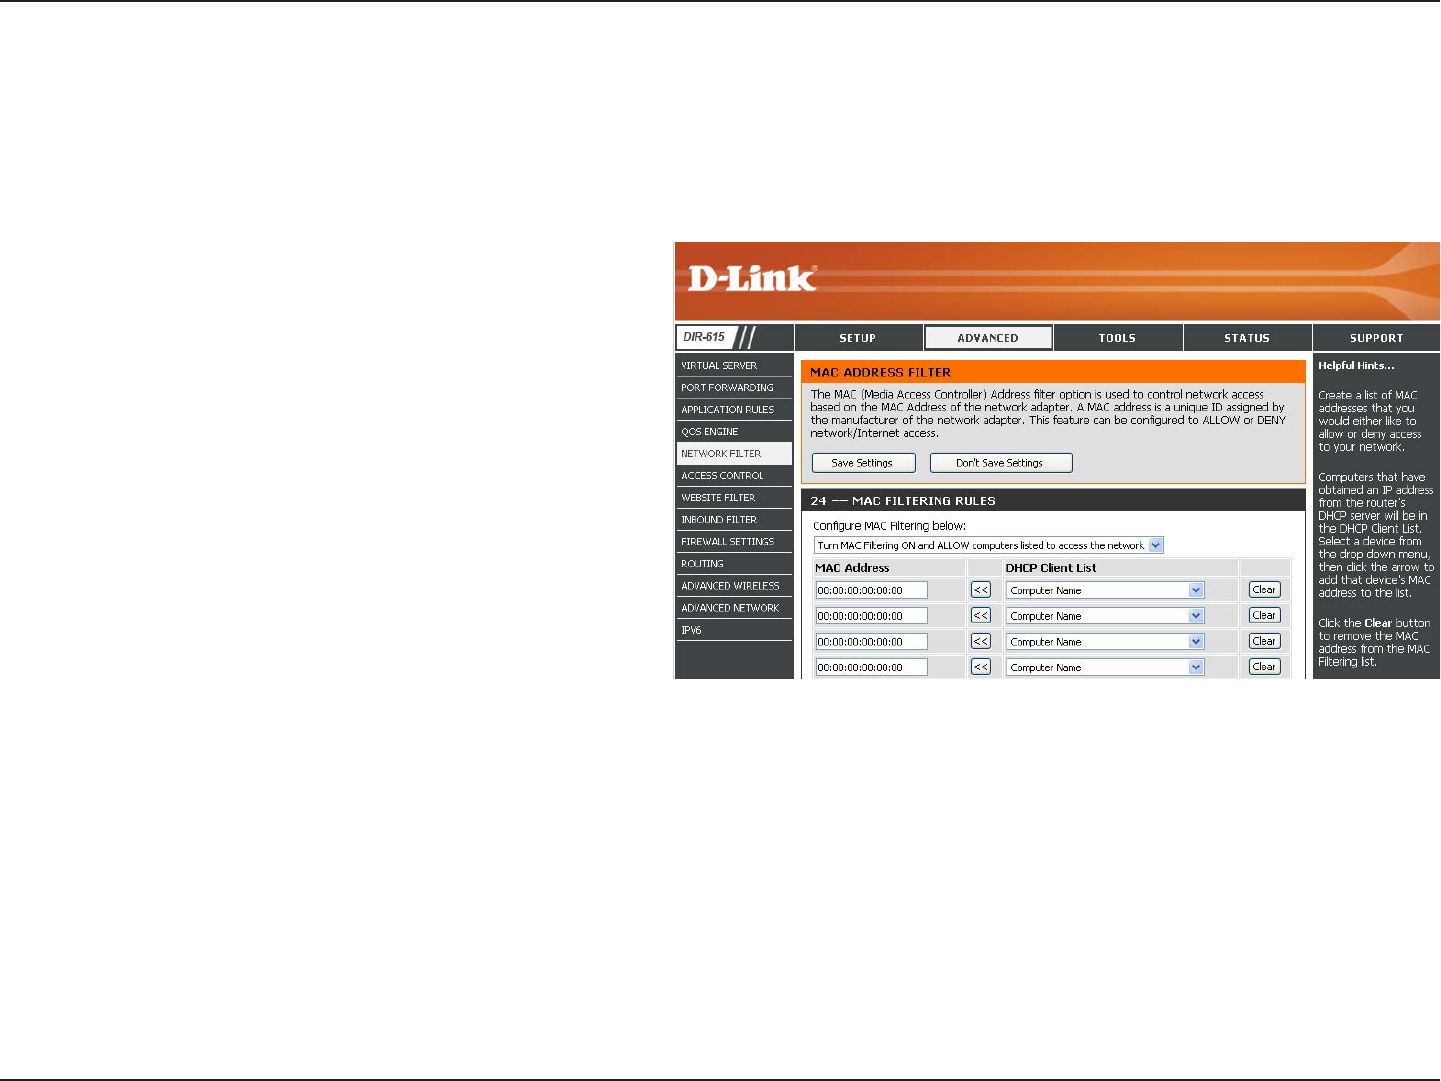
Network Filters
Select Turn MAC Filtering Off, allow MAC
addresses listed below, or deny MAC addresses
listed below from the drop-down menu.
Enter the MAC address you would like to filter.
To find the MAC address on a computer, please
refer to the Networking Basics section in this
manual.
Select a DHCP client from the drop-down menu
and click << to copy that MAC Address.
Configure MAC
Filtering:
MAC Address:
DHCP Client:
Use MAC (Media Access Control) Filters to allow or deny LAN (Local Area Network) computers by their MAC addresses
from accessing the Network. You can either manually add a MAC address or select the MAC address from the list of
clients that are currently connected to the Broadband Router.
41D-Link DIR-615 User Manual
Section 3 - Configuration
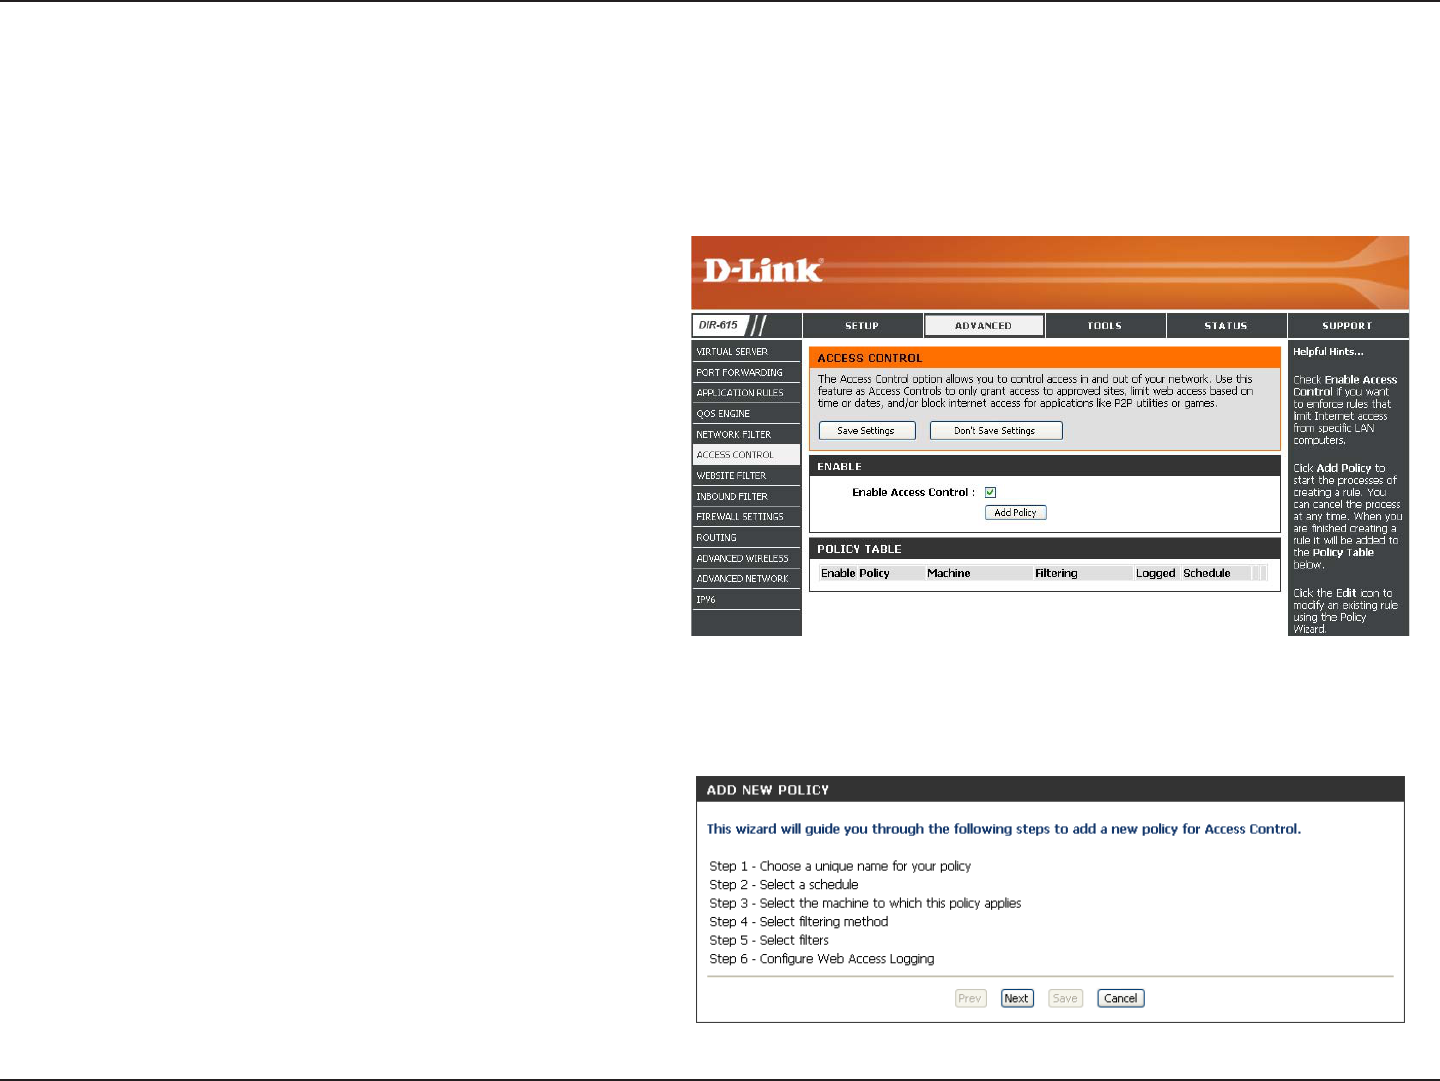
Access Control
Check the Enable Access Control check box
and click the Add Policy button to start the
Access Control Wizard.
Add Policy:
The Access Control section allows you to control access in and out of your network. Use this feature as Parental Controls
to only grant access to approved sites, limit web access based on time or dates, and/or block access from applications
like P2P utilities or games.
Click Next to continue with the wizard.
Access Control Wizard
42D-Link DIR-615 User Manual
Section 3 - Configuration
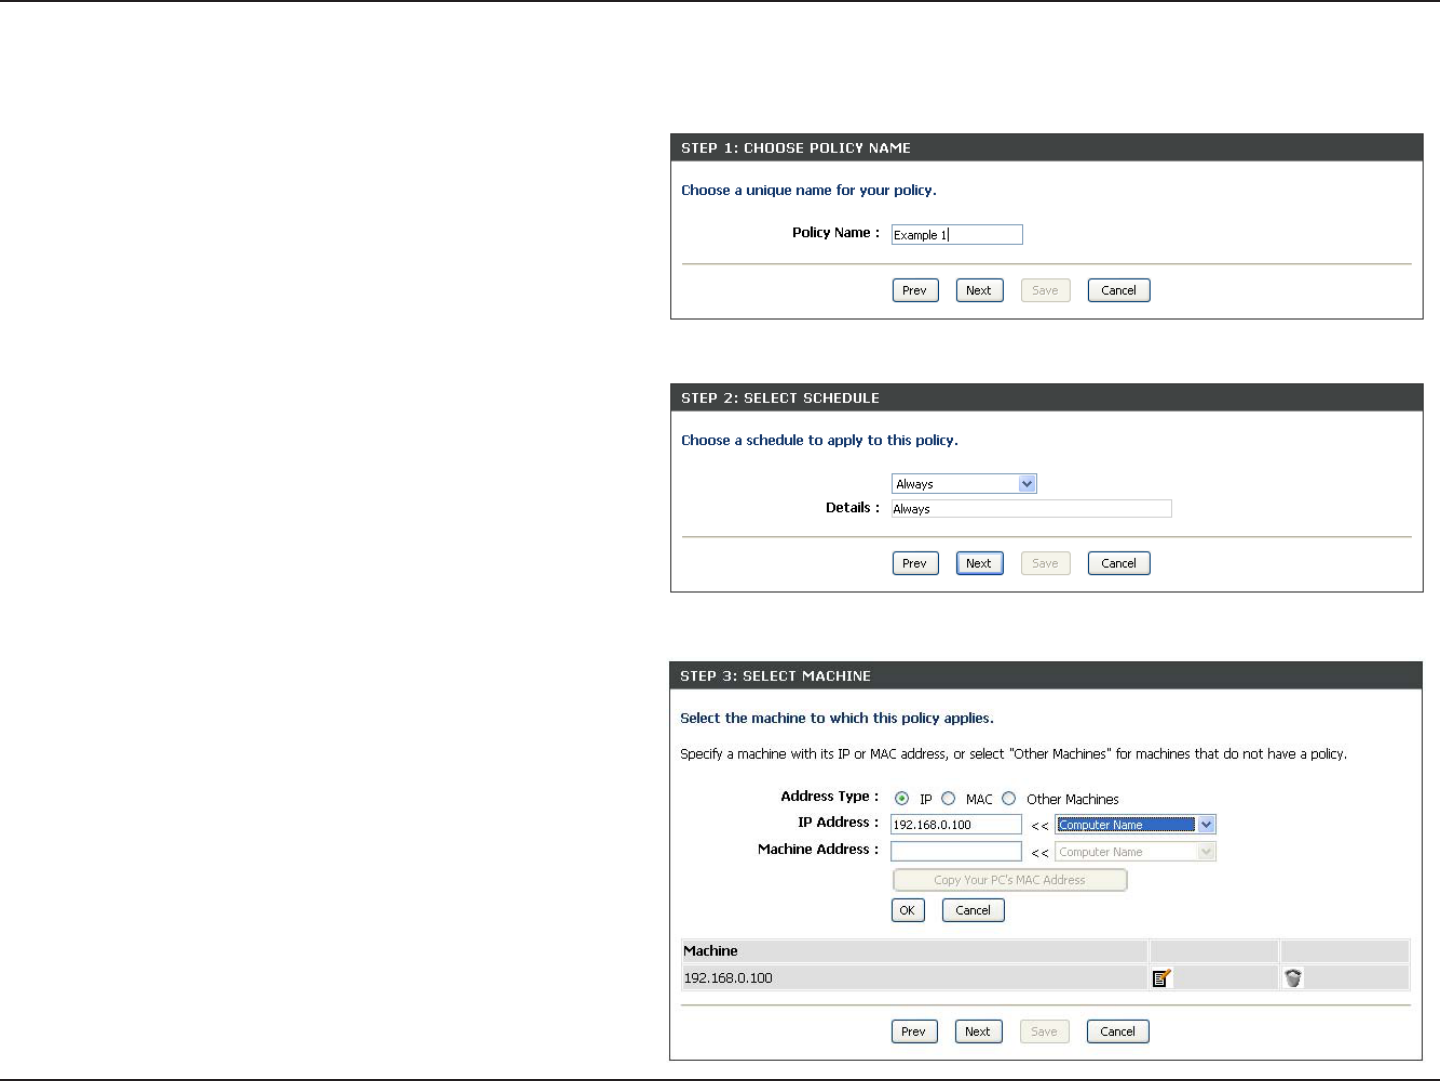
Enter a name for the policy and then click Next to continue.
Access Control Wizard (continued)
Select a schedule (I.E. Always) from the drop-down menu
and then click Next to continue.
Enter the following information and then click Next to
continue.
• Address Type - Select IP address, MAC address, or
Other Machines.
• IP Address - Enter the IP address of the computer
you want to apply the rule to.

43D-Link DIR-615 User Manual
Section 3 - Configuration
Select the filtering method and then click Next to continue.
Access Control Wizard (continued)
Enter the rule:
Enable - Check to enable the rule.
Name - Enter a name for your rule.
Dest IP Start - Enter the starting IP address.
Dest IP End - Enter the ending IP address.
Protocol - Select the protocol.
Dest Port Start - Enter the starting port number.
Dest Port End - Enter the ending port number.
To enable web logging, click Enable.
Click Save to save the access control rule.
44D-Link DIR-615 User Manual
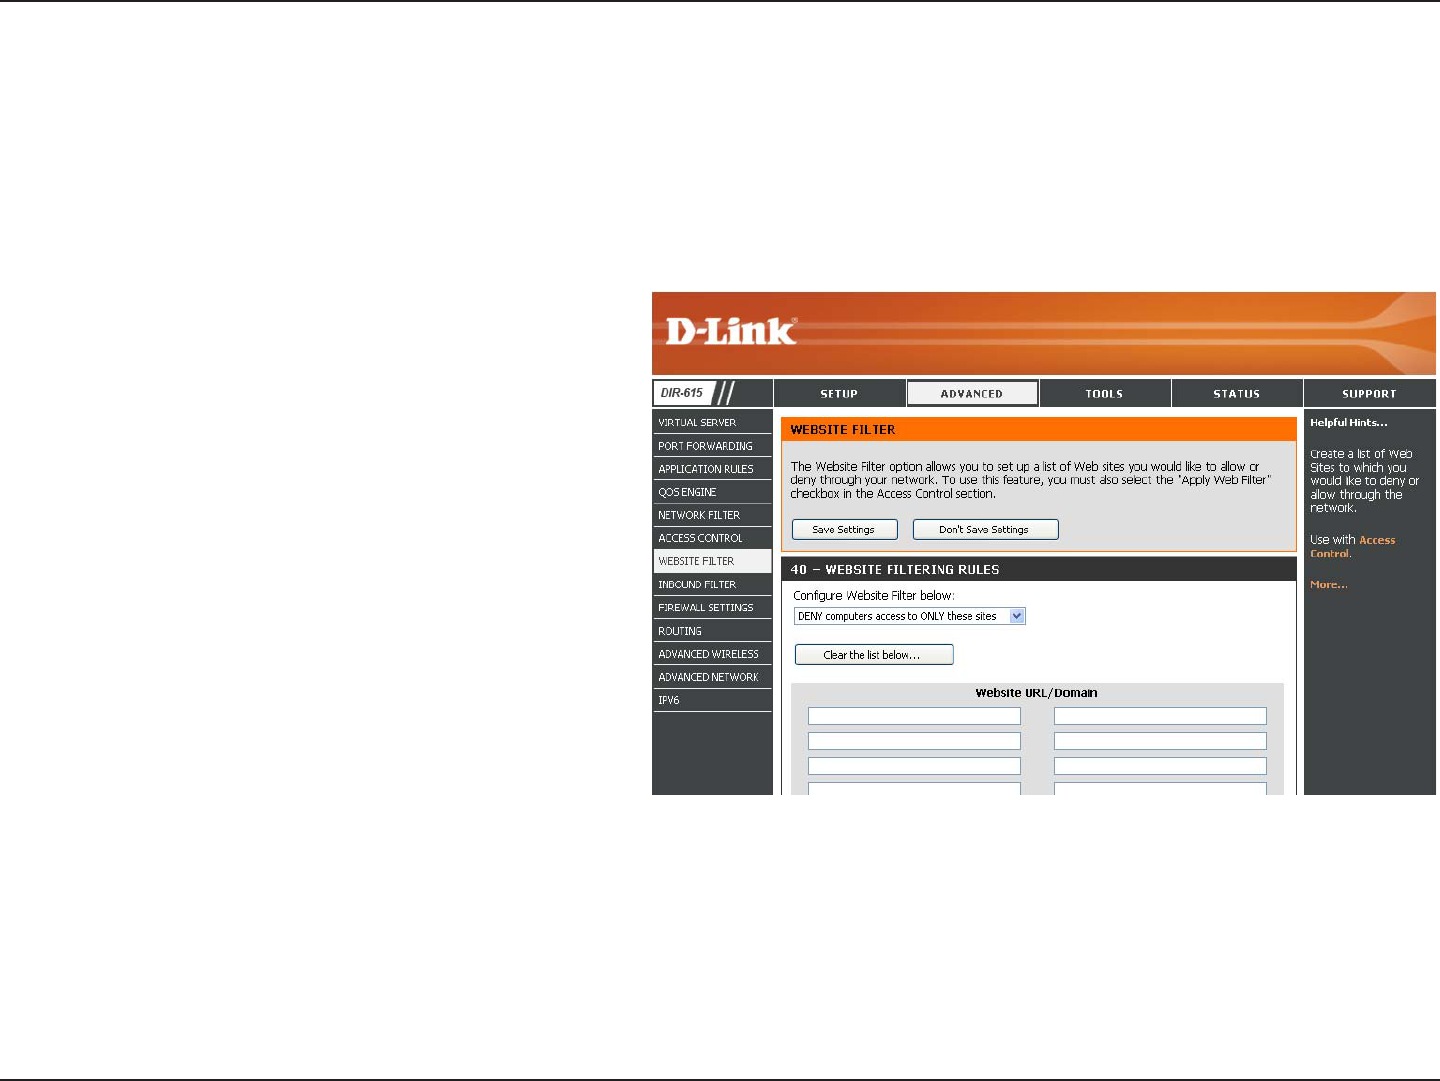
Section 3 - Configuration
Select Deny or Allow computers access to
only these sites.
Click to delete all entries in the list.
Enter the keywords or URLs that you want to
allow or deny.
Configure Website
Filter Below:
Clear the list
below:
Website URL/
Domain:
Website Filters
Website Filters are used to allow you to set up a list of allowed Web sites that can be used by multiple users through
the network. To use this feature select to Allow or Deny, enter the domain or website and click Add, and then click
Save Settings. You must also select Apply Web Filter under the Access Control section (page 40).
45D-Link DIR-615 User Manual
Section 3 - Configuration
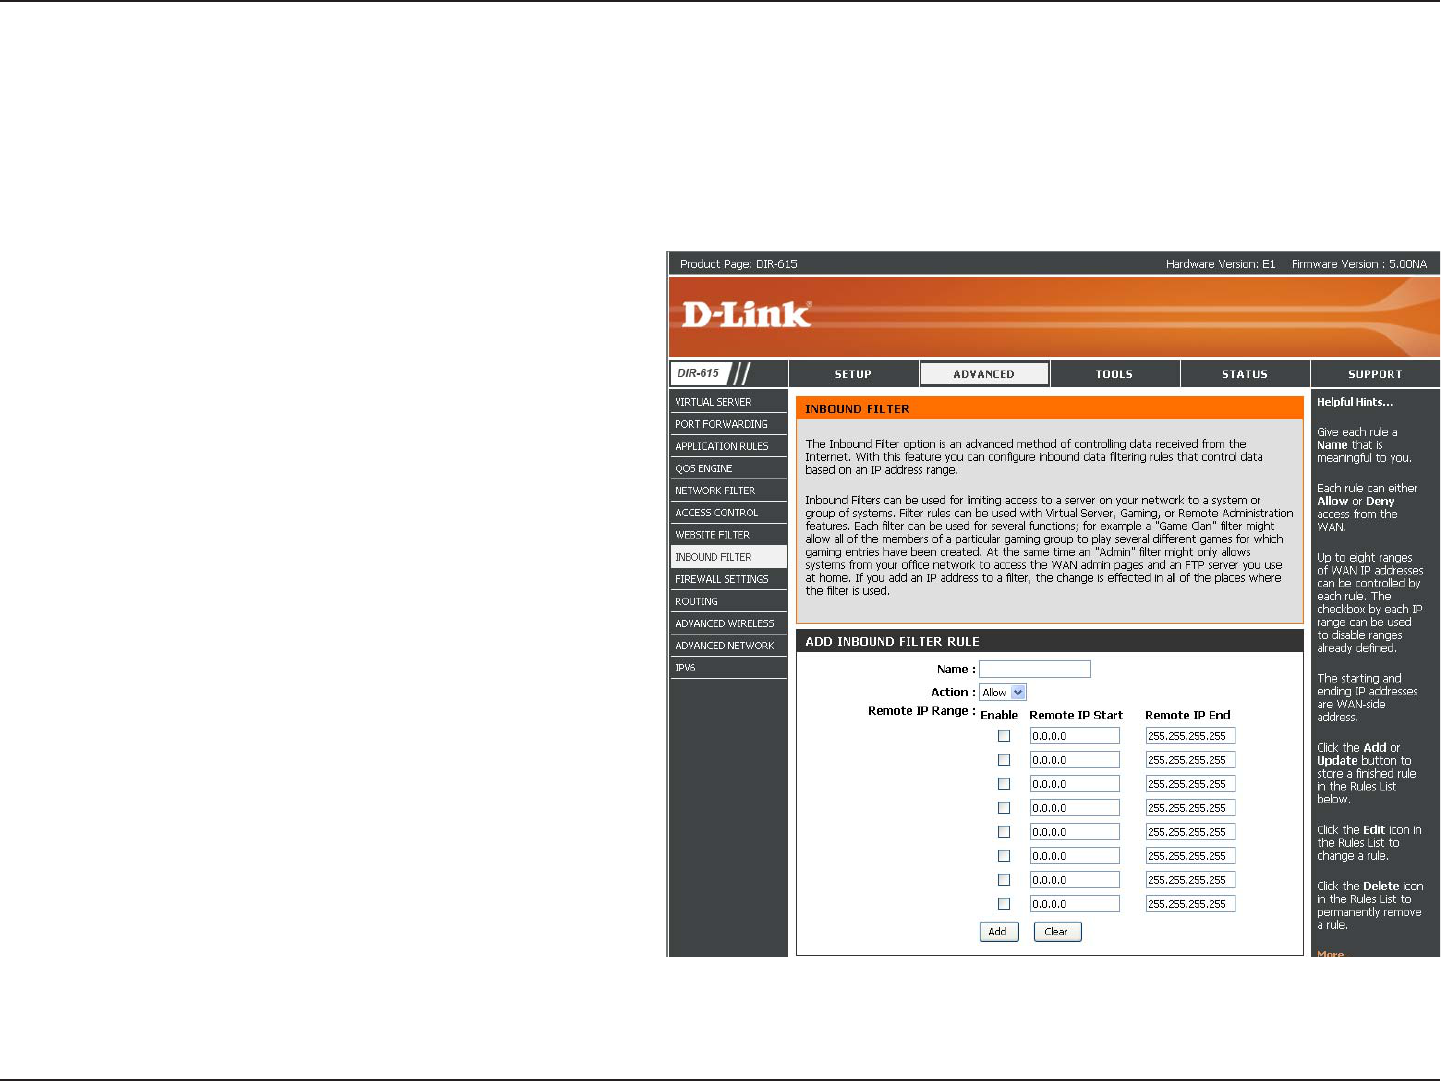
Enter a name for the inbound filter rule.
Select Allow or Deny.
Check to enable rule.
Enter the starting IP address. Enter 0.0.0.0 if
you do not want to specify an IP range.
Enter the ending IP address. Enter
255.255.255.255 if you do not want to specify
and IP range.
Click the Save button to apply your settings.
You must click Save Settings at the top to save
the settings.
This section will list any rules that are created.
You may click the Edit icon to change the
settings or enable/disable the rule, or click the
Delete icon to remove the rule.
Name:
Action:
Enable:
Source IP Start:
Source IP End:
Save:
Inbound Filter
Rules List:
The Inbound Filter option is an advanced method of controlling data received from the Internet. With this feature you
can configure inbound data filtering rules that control data based on an IP address range. Inbound Filters can be used
with Virtual Server, Port Forwarding, or Remote Administration features.
Inbound Filters
46D-Link DIR-615 User Manual
Section 3 - Configuration
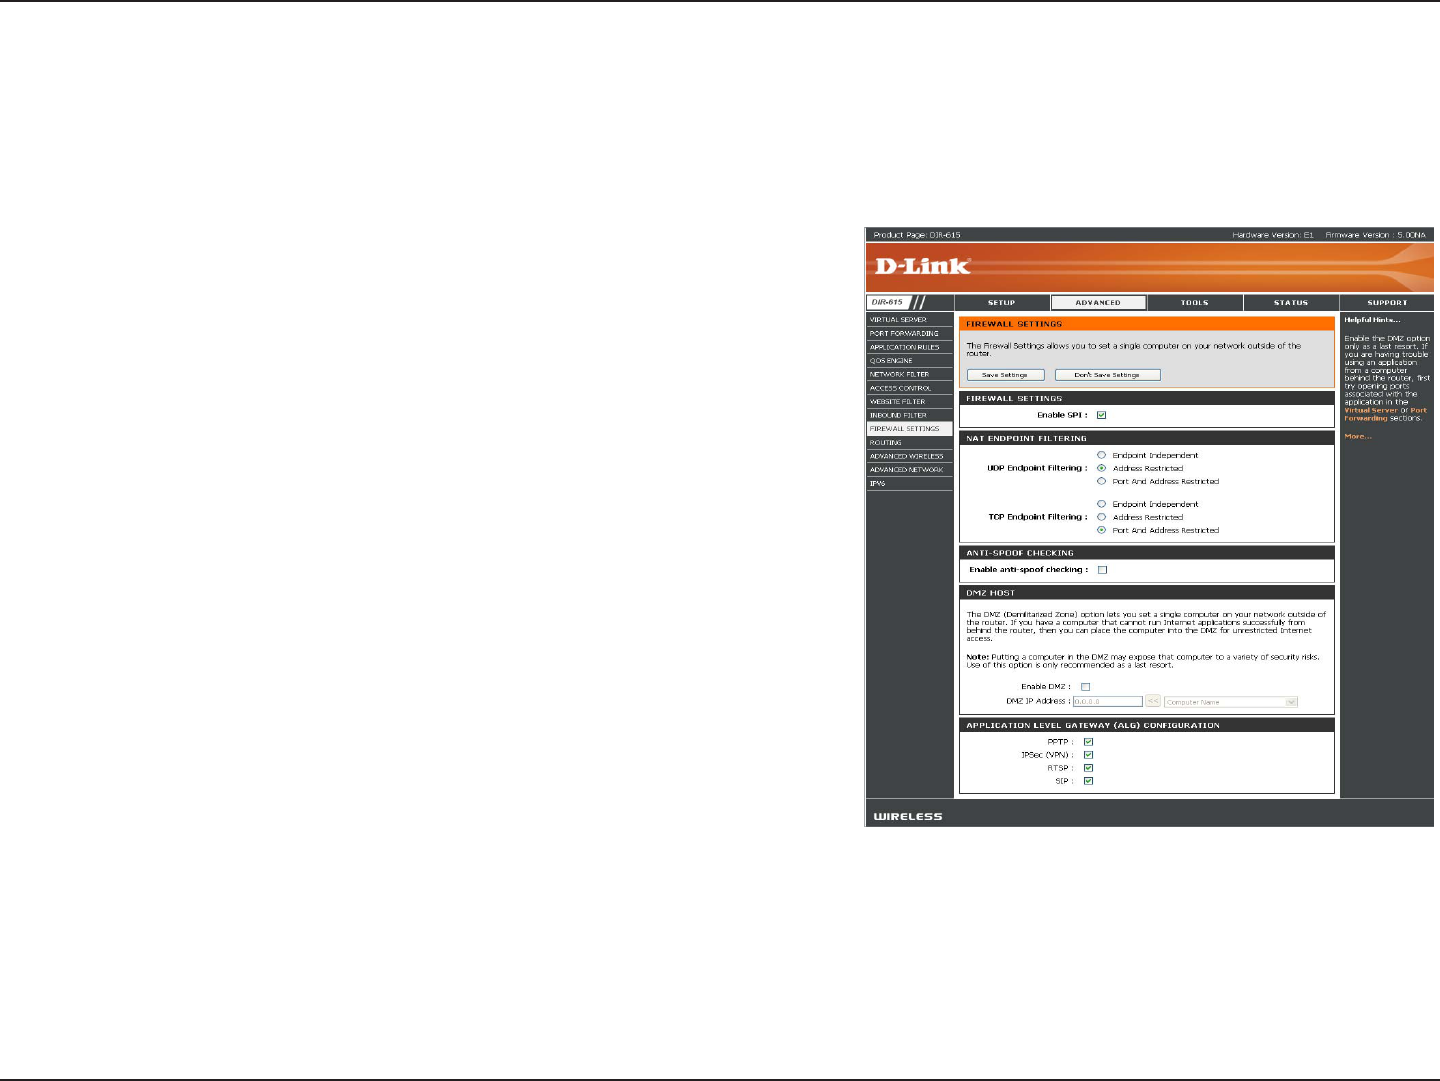
SPI (Stateful Packet Inspection, also known as dynamic packet
filtering) helps to prevent cyber attacks by tracking more state per
session. It validates that the traffic passing through the session
conforms to the protocol.
Select one of the following for TCP and UDP ports:
Endpoint Independent - Any incoming traffic sent to an open port
will be forwarded to the application that opened the port. The port
will close if idle for 5 minutes.
Address Restricted - Incoming traffic must match the IP address
of the outgoing connection.
Address + Port Restriction - Incoming traffic must match the IP
address and port of the outgoing connection.
Enable this option to provide protection from certain kinds of
“spoofing” attacks.
If an application has trouble working from behind the router, you
can expose one computer to the Internet and run the application
on that computer.
Note: Placing a computer in the DMZ may expose that computer to a variety of security risks. Use of this option is only
recommended as a last resort.
Specify the IP address of the computer on the LAN that you want to have unrestricted Internet communication. If this
computer obtains its IP address automatically using DHCP, be sure to make a static reservation on the System > Network
Settings page so that the IP address of the DMZ machine does not change.
Enable SPI:
NAT Endpoint
Filtering:
Enable Anti-Spoof
Checking:
Enable DMZ Host:
IP Address:
Firewall Settings
A firewall protects your network from the outside world. The D-Link DIR-615 offers a firewall type functionality. The SPI feature helps
prevent cyber attacks. Sometimes you may want a computer exposed to the outside world for certain types of applications. If you choose
to expose a computer, you can enable DMZ. DMZ is short for Demilitarized Zone. This option will expose the chosen computer completely
to the outside world.

47D-Link DIR-615 User Manual
Section 3 - Configuration
Routing
This page allows you to specify custom routes that determine how data is moved around your network.
Routing List:
Name:
Destination
IP:
Netmask:
Gateway:
Each Route has a checkbox next to it,
check the box of the route you wish to
enable.
Specify a name for identification of this
route.
Enter the address of the host or network
you wish to access.
This field identifies the portion of the
destination IP in use.
The IP address of the router will be
displayed here.
48D-Link DIR-615 User Manual
Section 3 - Configuration
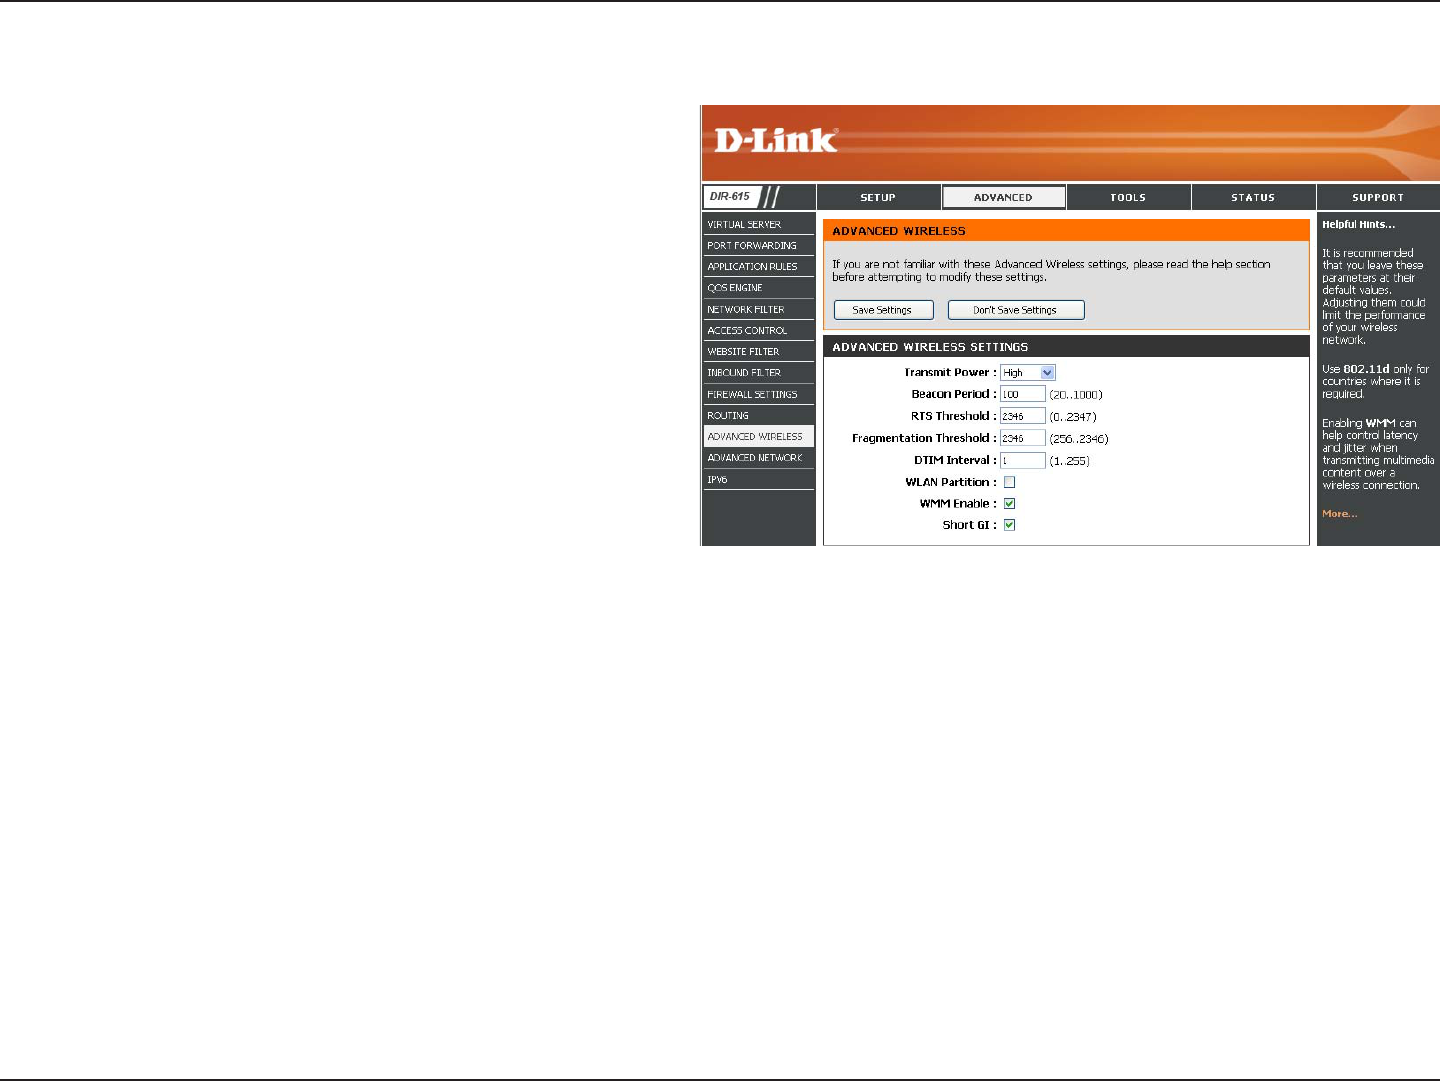
Set the transmit power of the antennas.
Beacons are packets sent by an Access Point to
synchronize a wireless network. Specify a value.
100 is the default setting and is recommended.
This value should remain at its default setting of
2432. If inconsistent data flow is a problem, only a
minor modification should be made.
The fragmentation threshold, which is specified
in bytes, determines whether packets will be
fragmented. Packets exceeding the 2346 byte
setting will be fragmented before transmission. 2346
is the default setting.
(Delivery Traffic Indication Message) 3 is the default
setting. A DTIM is a countdown informing clients of
the next window for listening to broadcast and multicast messages.
This enables 802.11d operation. 802.11d is a wireless specification developed to allow implementation of wireless networks in
countries that cannot use the 802.11 standard. This feature should only be enabled if you are in a country that requires it.
WMM is QoS for your wireless network. This will improve the quality of video and voice applications for your wireless
clients.
Check this box to reduce the guard interval time therefore increasing the data capacity. However, it’s less reliable and may
create higher data loss.
Transmit Power:
Beacon Period:
RTS Threshold:
Fragmentation
Threshold:
DTIM Interval:
WLAN Partition:
WMM Enable:
Short GI:
Advanced Wireless Settings
49D-Link DIR-615 User Manual
Section 3 - Configuration
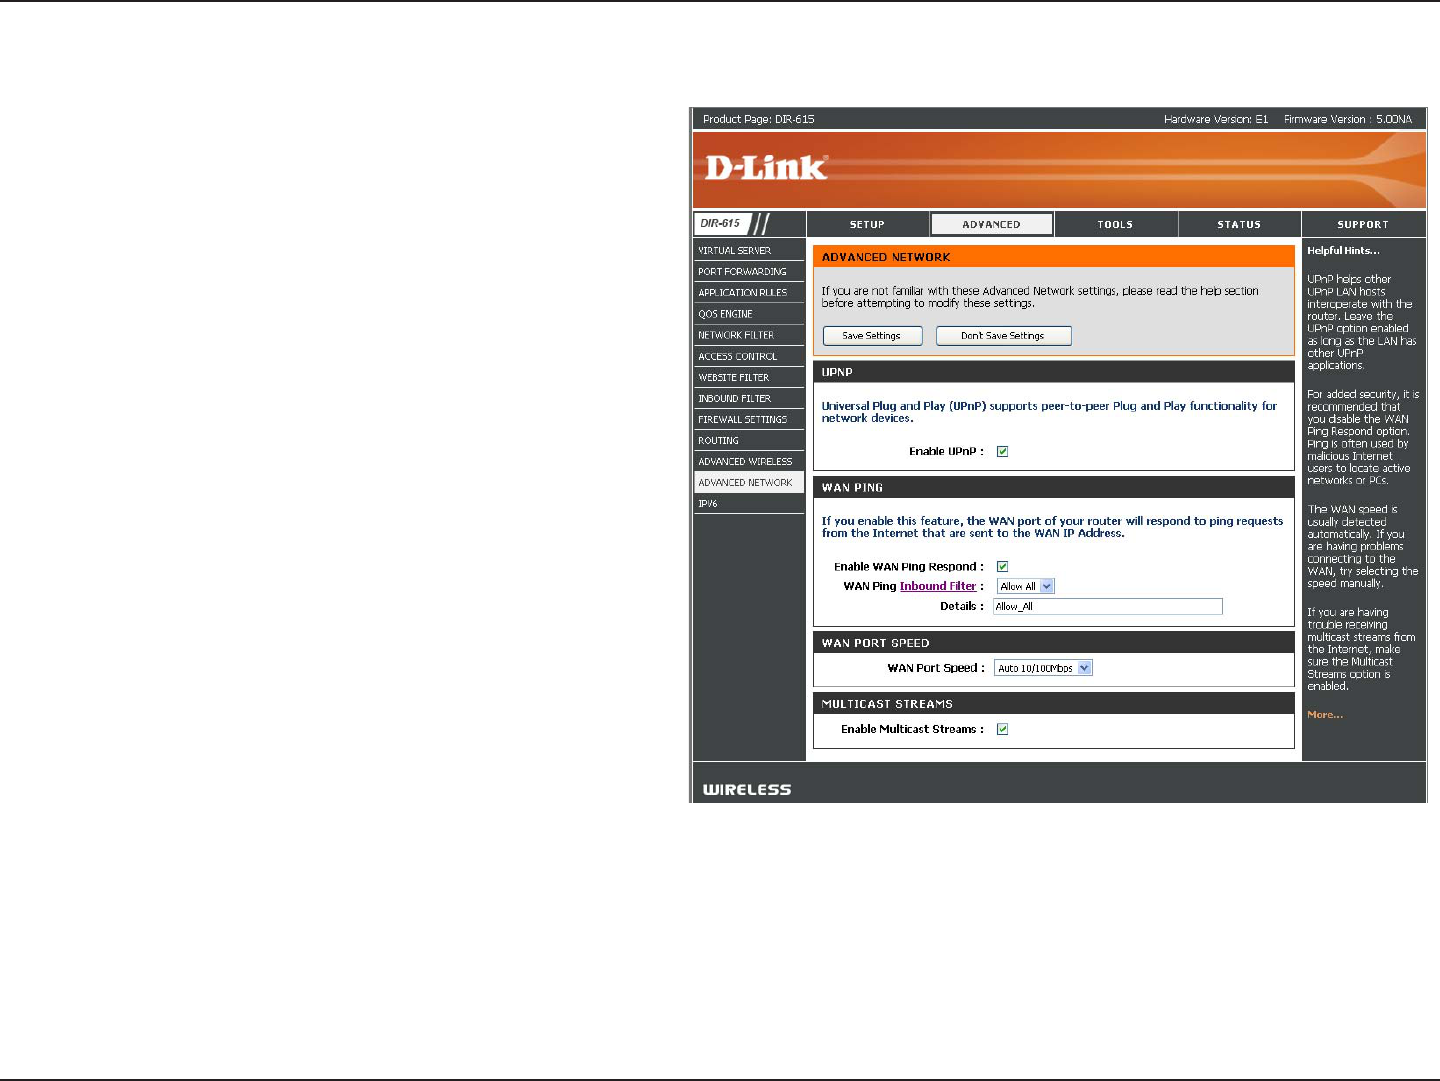
UPnP
Internet Ping Block
Internet Port Speed
Multicast Streams
To use the Universal Plug and Play (UPnP™)
feature click on Enabled. UPNP provides
compatibility with networking equipment, software
and peripherals.
Unchecking the box will not allow the DIR-615 to
respond to pings. Blocking the Ping may provide
some extra security from hackers. Check the box
to allow the Internet port to be “pinged”.
You may set the port speed of the Internet port
to 10Mbps, 100Mbps, or auto. Some older cable
or DSL modems may require you to set the port
speed to 10Mbps.
Check the box to allow multicast traffic to pass
through the router from the Internet.
UPnP Settings:
WAN Ping:
WAN Port Speed:
Multicast
Streams:
Advanced Network Settings
50D-Link DIR-615 User Manual
Section 3 - Configuration
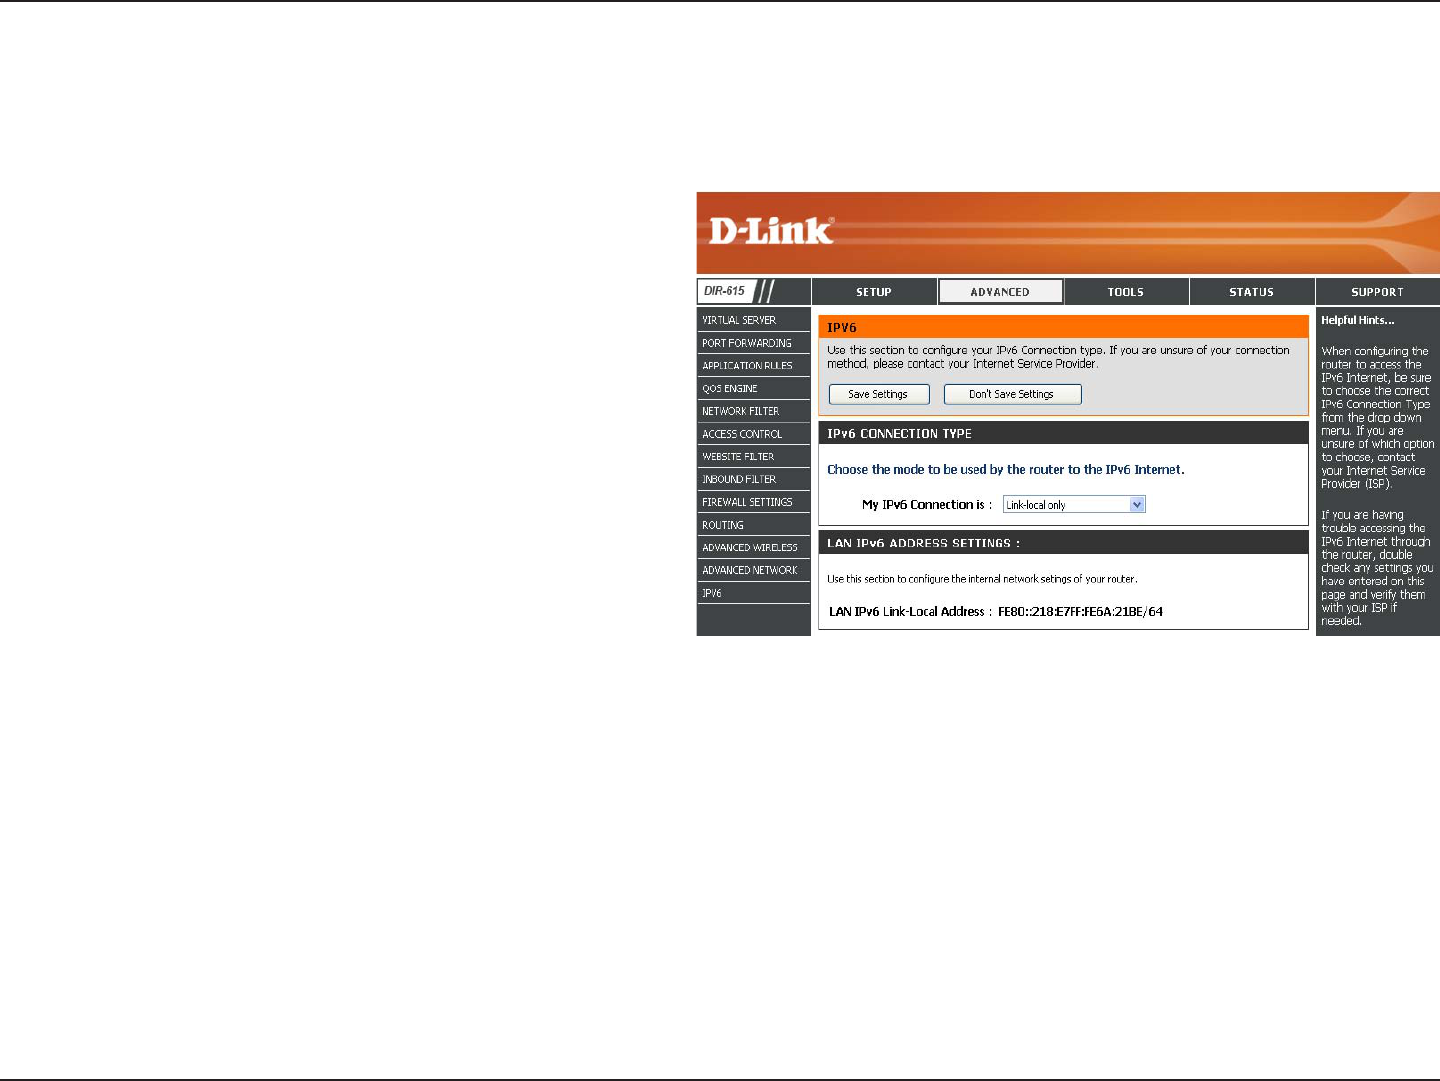
IPv6
Select Link-Local Only from the drop-down
menu.
Displays the IPv6 address of the router.
My IPv6 Connection:
LAN IPv6 Address
Settings:
Link-Local Connectivity
51D-Link DIR-615 User Manual
Section 3 - Configuration
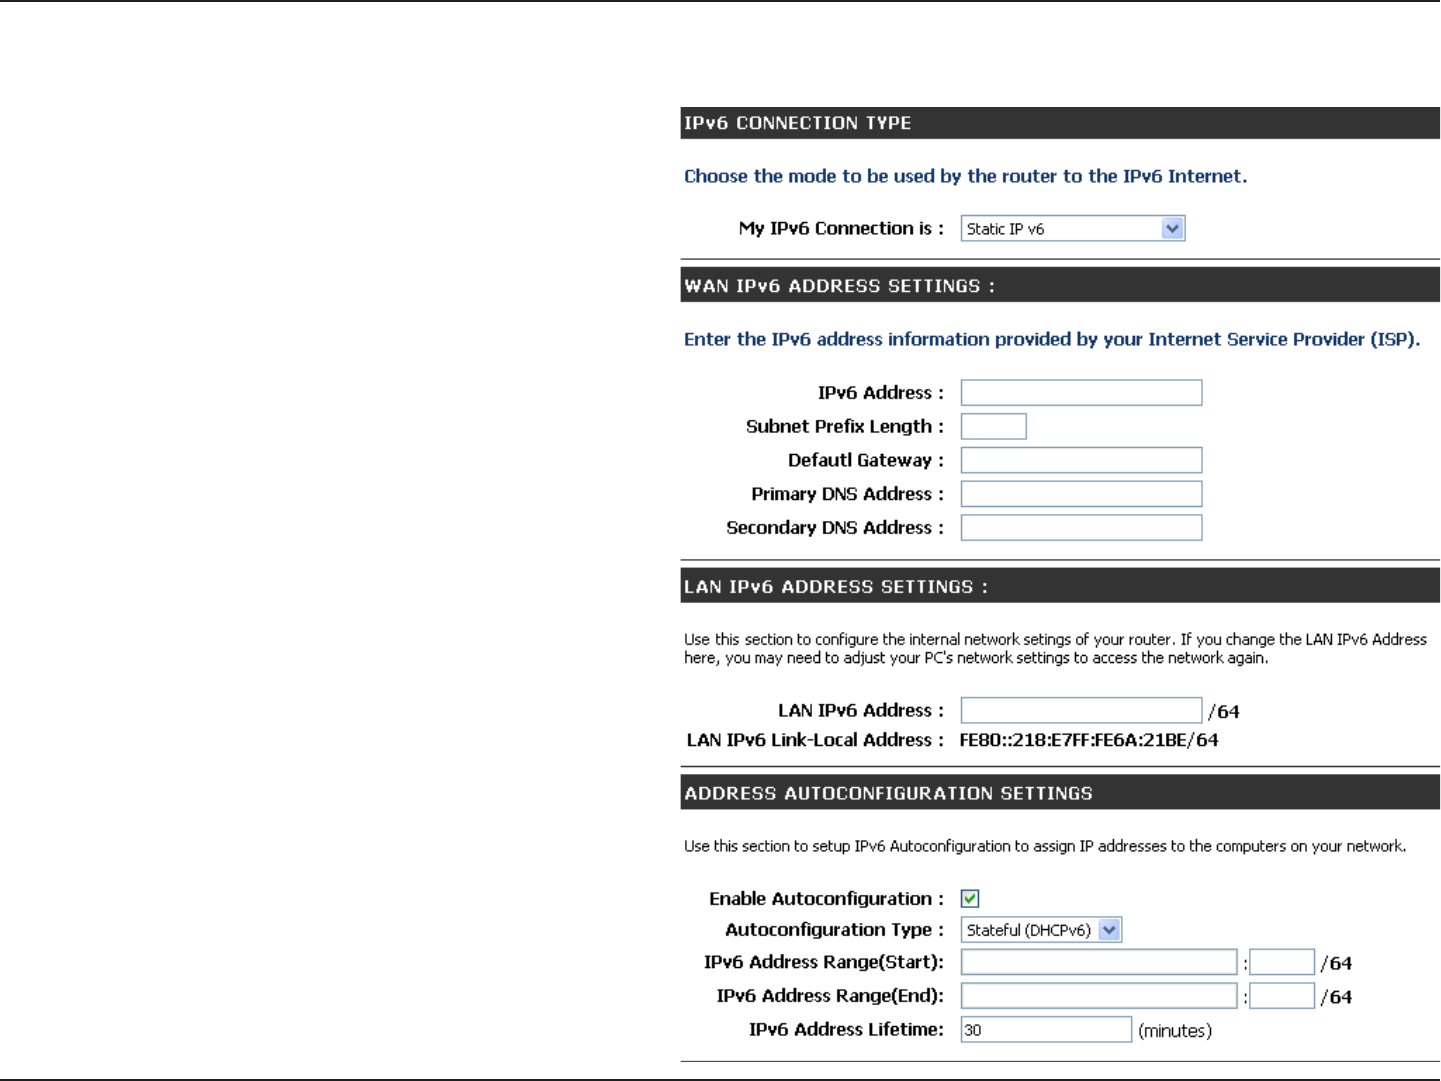
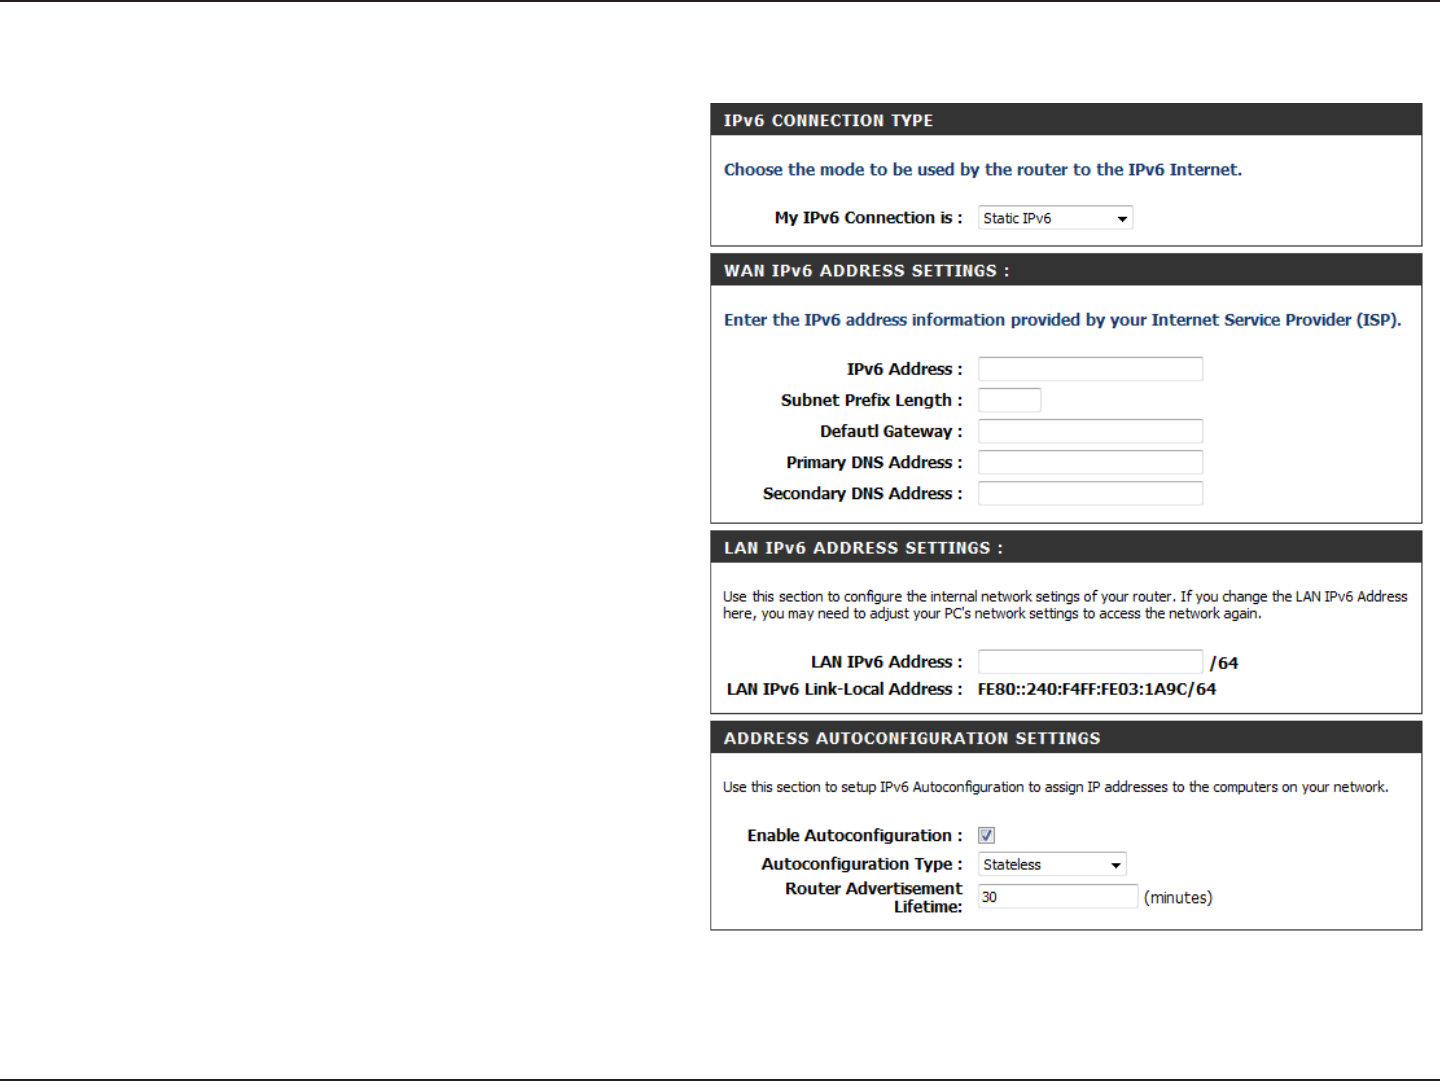
Static IPv6 (Stateful)
Select Static IPv6 from the drop-down
menu.
Enter the address settings supplied by your
Internet provider (ISP).
Enter the LAN (local) IPv6 address for the
router.
Displays the Router’s LAN Link-Local
Address.
Check to enable the Autoconfiguration
feature.
Select Stateful (DHCPv6) or Stateless.
Refer to the next page for Stateless.
Enter the start IPv6 Address for the DHCPv6
range for your local computers.
Enter the end IPv6 Address for the DHCPv6
range for your local computers.
Enter the IPv6 Address Lifetime (in
minutes).
My IPv6 Connection:
WAN IPv6 Address
Settings:
LAN IPv6 Address:
LAN Link-Local
Address:
Enable
Autoconfiguration:
Autoconfiguration
Type:
IPv6 Address Range
Start:
IPv6 Address Range
End:
IPv6 Address Lifetime:
52D-Link DIR-615 User Manual
Section 3 - Configuration
Static IPv6 (Stateless)
Select Static IPv6 from the drop-down
menu.
Enter the address settings supplied by your
Internet provider (ISP).
Enter the LAN (local) IPv6 address for the
router.
Displays the Router’s LAN Link-Local
Address.
Check to enable the Autoconfiguration
feature.
Select Stateless. Refer to the previous page
for Stateful.
Enter the Router Advertisement Lifetime (in
minutes).
My IPv6 Connection:
WAN IPv6 Address
Settings:
LAN IPv6 Address:
LAN Link-Local
Address:
Enable
Autoconfiguration:
Autoconfiguration Type:
Router Advertisement
Lifetime:
53D-Link DIR-615 User Manual
Section 3 - Configuration
DHCPv6 (Stateful)
Select DHCPv6 from the drop-down
menu.
Select either Obtain DNS server address
automatically or Use the following DNS
Address.
Enter the primary and secondary DNS
server addresses.
Enter the LAN (local) IPv6 address for the
router.
Displays the Router’s LAN Link-Local
Address.
Check to enable the Autoconfiguration
feature.
Select Stateful (DHCPv6) or Stateless.
Refer to the next page for Stateless.
Enter the start IPv6 Address for the DHCPv6
range for your local computers.
Enter the end IPv6 Address for the DHCPv6
range for your local computers.
Enter the IPv6 Address Lifetime (in
minutes).
My IPv6 Connection:
IPv6 DNS Settings:
Primary/Secondary
DNS Address:
LAN IPv6 Address:
LAN Link-Local
Address:
Enable
Autoconfiguration:
Autoconfiguration
Type:
IPv6 Address Range
Start:
IPv6 Address Range
End:
IPv6 Address Lifetime:

54D-Link DIR-615 User Manual
Section 3 - Configuration
DHCPv6 (Stateless)
Select DHCPv6 from the drop-down
menu.
Select either Obtain DNS server address
automatically or Use the following DNS
Address.
Enter the primary and secondary DNS
server addresses.
Enter the LAN (local) IPv6 address for the
router.
Displays the Router’s LAN Link-Local
Address.
Check to enable the Autoconfiguration
feature.
Select Stateless. Refer to the previous page
for Stateful.
Enter the Router Advertisement Lifetime (in
minutes).
My IPv6 Connection:
IPv6 DNS Settings:
Primary/Secondary
DNS Address:
LAN IPv6 Address:
LAN Link-Local
Address:
Enable
Autoconfiguration:
Autoconfiguration
Type:
Router Advertisement
Lifetime:
55D-Link DIR-615 User Manual
Section 3 - Configuration
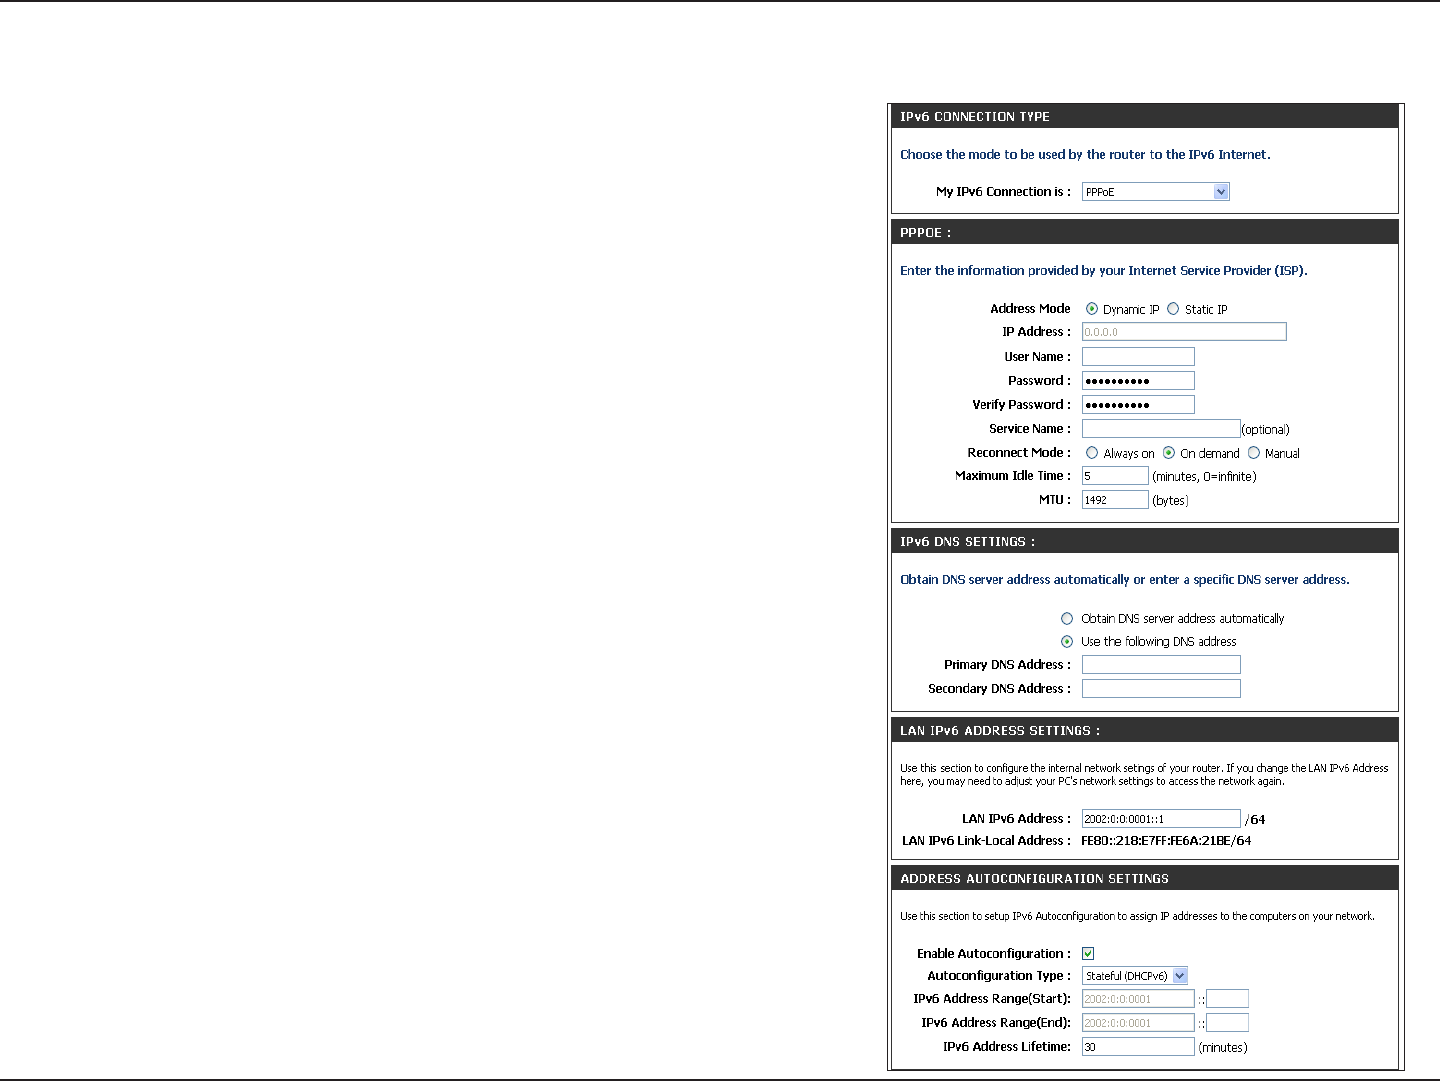
IPv6 over PPPoE (Stateful)
Select PPPoE from the drop-down menu.
Enter the PPPoE account settings supplied by your Internet
provider (ISP).
Select Static if your ISP assigned you the IP address, subnet
mask, gateway, and DNS server addresses. In most cases,
select Dynamic.
Enter the IP address (Static PPPoE only).
Enter your PPPoE user name.
Enter your PPPoE password and then retype the password
in the next box.
Enter the ISP Service Name (optional).
Select either Always-on, On-Demand, or Manual.
Enter a maximum idle time during which the Internet
connection is maintained during inactivity. To disable this
feature, enable Auto-reconnect.
Select either Obtain DNS server address automatically
or Use the following DNS Address.
Enter the primary and secondary DNS server addresses.
Enter the LAN (local) IPv6 address for the router.
Displays the Router’s LAN Link-Local Address.
My IPv6 Connection:
PPPoE:
Address Mode:
IP Address:
User Name:
Password:
Service Name:
Reconnection Mode:
Maximum Idle Time:
IPv6 DNS Settings:
Primary/Secondary DNS
Address:
LAN IPv6 Address:
LAN Link-Local Address:

56D-Link DIR-615 User Manual
Section 3 - Configuration
Enable Autoconfiguration:
Autoconfiguration Type:
IPv6 Address Range Start:
IPv6 Address Range End:
IPv6 Address Lifetime:
Check to enable the Autoconfiguration feature.
Select Stateful (DHCPv6) or Stateless. Refer to the next page for Stateless.
Enter the start IPv6 Address for the DHCPv6 range for your local computers.
Enter the end IPv6 Address for the DHCPv6 range for your local computers.
Enter the IPv6 Address Lifetime (in minutes).
57D-Link DIR-615 User Manual
Section 3 - Configuration
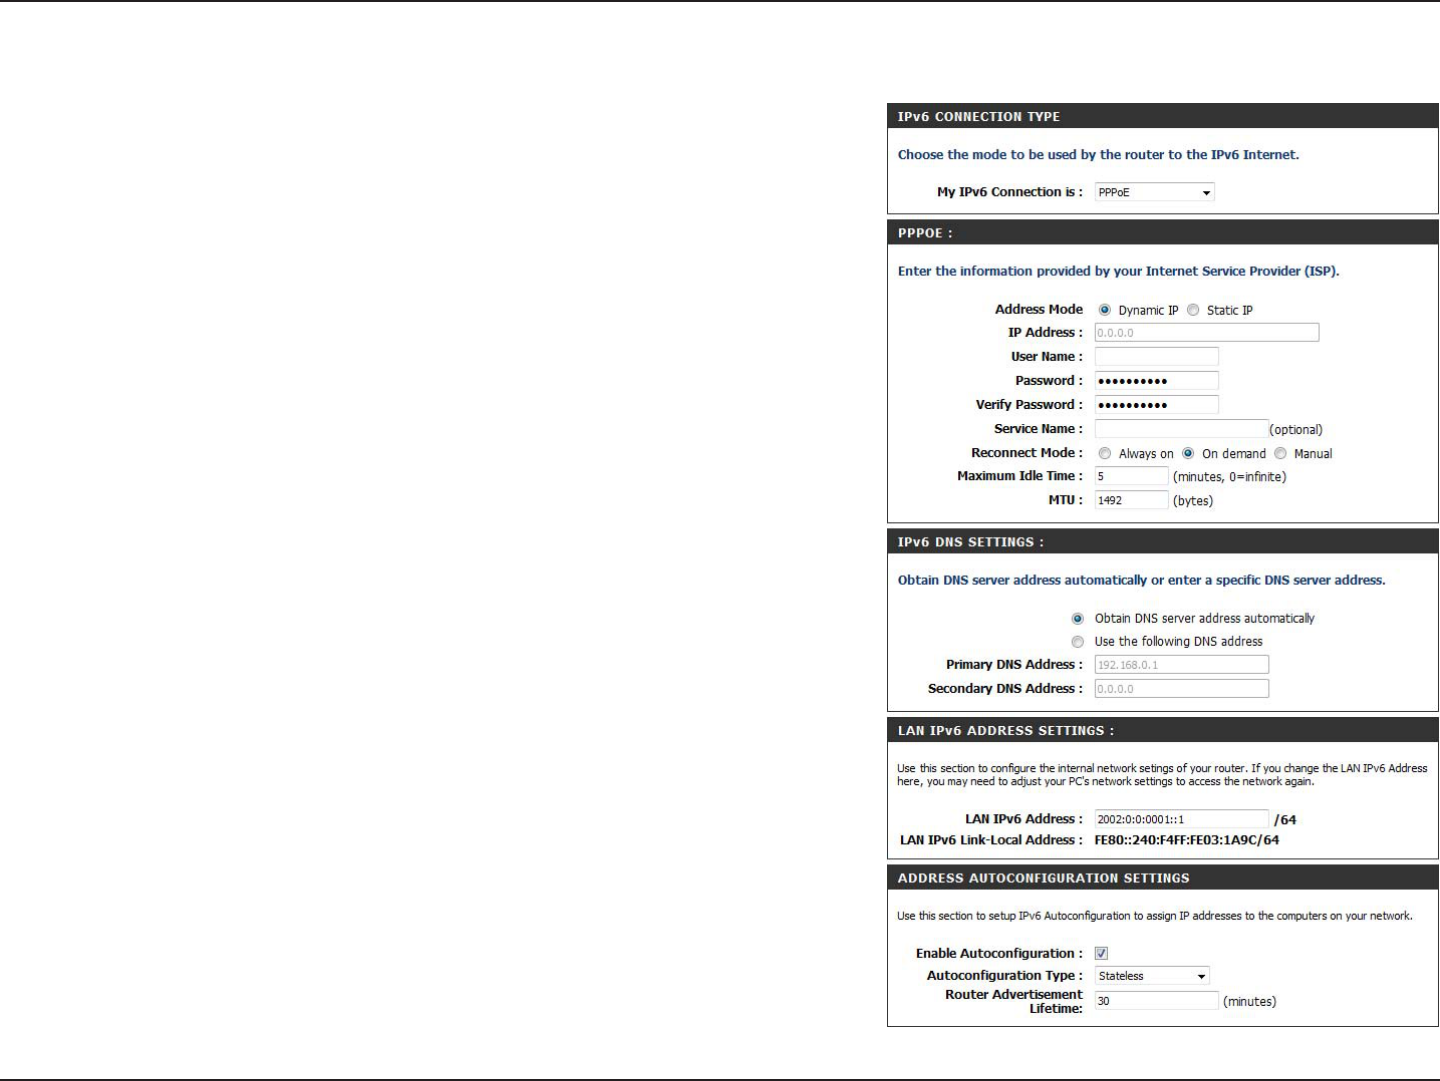
IPv6 over PPPoE (Stateless)
Select PPPoE from the drop-down menu.
Enter the PPPoE account settings supplied by your Internet
provider (ISP).
Select Static if your ISP assigned you the IP address, subnet
mask, gateway, and DNS server addresses. In most cases,
select Dynamic.
Enter the IP address (Static PPPoE only).
Enter your PPPoE user name.
Enter your PPPoE password and then retype the password
in the next box.
Enter the ISP Service Name (optional).
Select either Always-on, On-Demand, or Manual.
Enter a maximum idle time during which the Internet
connection is maintained during inactivity. To disable this
feature, enable Auto-reconnect.
Select either Obtain DNS server address automatically
or Use the following DNS Address.
Enter the primary and secondary DNS server addresses.
Enter the LAN (local) IPv6 address for the router.
Displays the Router’s LAN Link-Local Address.
My IPv6 Connection:
PPPoE:
Address Mode:
IP Address:
User Name:
Password:
Service Name:
Reconnection Mode:
Maximum Idle Time:
IPv6 DNS Settings:
Primary/Secondary DNS
Address:
LAN IPv6 Address:
LAN Link-Local Address:

58D-Link DIR-615 User Manual
Section 3 - Configuration
Enable Autoconfiguration:
Autoconfiguration Type:
Router Advertisement
Lifetime:
Check to enable the Autoconfiguration feature.
Select Stateful (DHCPv6) or Stateless.
Enter the Router Advertisement Lifetime (in minutes).
59D-Link DIR-615 User Manual
Section 3 - Configuration
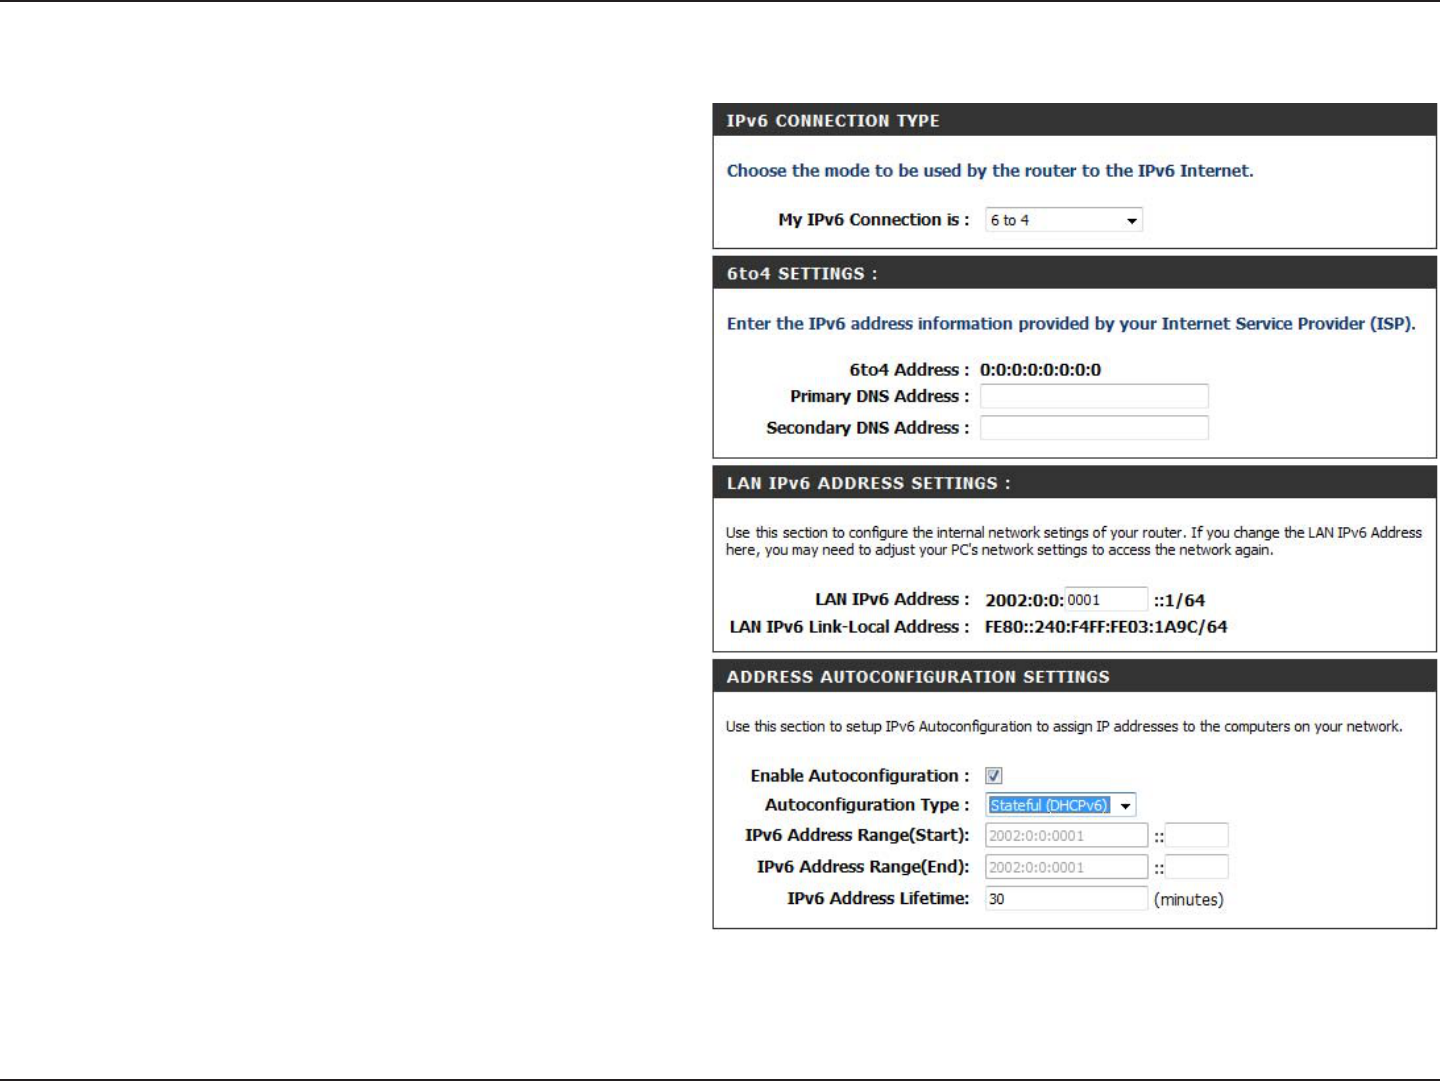
6 to 4 Tunneling (Stateful)
Select 6 to 4 from the drop-down menu.
Enter the IPv6 settings supplied by your Internet
provider (ISP).
Enter the primary and secondary DNS server
addresses.
Enter the LAN (local) IPv6 address for the
router.
Displays the Router’s LAN Link-Local Address.
Check to enable the Autoconfiguration feature.
Select Stateful (DHCPv6) or Stateless. Refer to
the next page for Stateless.
Enter the start IPv6 Address for the DHCPv6
range for your local computers.
Enter the end IPv6 Address for the DHCPv6
range for your local computers.
Enter the IPv6 Address Lifetime (in minutes).
My IPv6 Connection:
6 to 4 Settings:
Primary/Secondary
DNS Address:
LAN IPv6 Address:
LAN Link-Local
Address:
Enable
Autoconfiguration:
Autoconfiguration
Type:
IPv6 Address Range
Start:
IPv6 Address Range
End:
IPv6 Address
Lifetime:

60D-Link DIR-615 User Manual
Section 3 - Configuration
6 to 4 Tunneling (Stateless)
Select 6 to 4 from the drop-down menu.
Enter the IPv6 settings supplied by your
Internet provider (ISP).
Enter the primary and secondary DNS server
addresses.
Enter the LAN (local) IPv6 address for the
router.
Displays the Router’s LAN Link-Local
Address.
Check to enable the Autoconfiguration
feature.
Select Stateless. Refer to the previous page
for Stateful.
Enter the Router Advertisement Lifetime (in
minutes).
My IPv6 Connection:
6 to 4 Settings:
Primary/Secondary DNS
Address:
LAN IPv6 Address:
LAN Link-Local
Address:
Enable
Autoconfiguration:
Autoconfiguration Type:
Router Advertisement
Lifetime: