D Link IR842A1 AC1200 Wi-Fi Gigabit Router User Manual
D Link Corporation AC1200 Wi-Fi Gigabit Router
D Link >
User manual
Version 1.0 | 23/06/2015
AC1200 Wi-Fi Gigabit Router
User Manual
DIR-842

iD-Link DIR-842 User Manual
D-Link reserves the right to revise this publication and to make changes in the content hereof without obligation to notify any
person or organization of such revisions or changes.
Manual Revisions
Trademarks
D-Link and the D-Link logo are trademarks or registered trademarks of D-Link Corporation or its subsidiaries in the United States
or other countries. iPhone, iPad, and iPod touch are registered trademarks of Apple Inc. Android is a trademark of Google, Inc.
All other company or product names mentioned herein are trademarks or registered trademarks of their respective companies.
Copyright © 2015 by D-Link Corporation.
All rights reserved. This publication may not be reproduced, in whole or in part, without prior expressed written permission
from D-Link Corporation.
Revision Date Description
1.0 June 23, 2015 t*OJUJBMSFMFBTF
Preface

iiD-Link DIR-842 User Manual
Table of Contents
Preface ................................................................................. i
Manual Revisions ........................................................................... i
Trademarks ...................................................................................... i
Package Contents ......................................................................... 1
System Requirements ................................................................. 2
Introduction ................................................................................... 3
Features ............................................................................................4
Hardware Overview ..................................................................... 5
Connections ........................................................................... 5
LEDs ........................................................................................... 6
Installation ......................................................................... 7
Before you Begin ........................................................................... 7
Wireless Installation Considerations ......................................8
Manual Setup ................................................................................. 9
Conguration ...................................................................10
Setup Wizard ................................................................................11
QRS Mobile App ..........................................................................14
Conguration ...................................................................18
Home ..............................................................................................19
Internet ................................................................................... 19
DIR-842 ...................................................................................20
Connected Clients ..............................................................21
Settings ..........................................................................................22
Wizard .....................................................................................22
Internet ................................................................................... 22
IPv6 .....................................................................................31
Wireless ..................................................................................46
Guest Zone .......................................................................48
Network .................................................................................. 49
Features ..........................................................................................51
QoS Engine............................................................................51
Firewall Settings ..................................................................52
IPv4/IPv6 Rules ...............................................................54
Port Forwarding ..................................................................55
Virtual Server ...................................................................56
Website Filter ........................................................................57
Static Routes .........................................................................58
IPv6 .....................................................................................59
Dynamic DNS .......................................................................60
IPv6 Host ...........................................................................61
Management ................................................................................ 62
Time & Schedule .................................................................62
Time ....................................................................................62
Schedule ...........................................................................63
System Log ............................................................................64
Admin .....................................................................................65
System ...............................................................................66
Upgrade .................................................................................67
Statistics .................................................................................68
Table of Contents

iiiD-Link DIR-842 User Manual
Table of Contents
Connect a Wireless Client to your Router ......................69
WPS Button ...................................................................................69
Windows® 8 ...................................................................................70
WPA/WPA2 ............................................................................70
Windows® 7 ...................................................................................72
WPA/WPA2 ............................................................................72
WPS ..........................................................................................75
Windows Vista® ............................................................................79
WPA/WPA2 ............................................................................80
WPS/WCN 2.0 .......................................................................82
Windows® XP ................................................................................83
WPA/WPA2 ............................................................................84
Troubleshooting ..............................................................86
Wireless Basics .................................................................90
What is Wireless? .........................................................................91
Tips ...................................................................................................93
Wireless Modes ............................................................................94
Networking Basics ...........................................................95
Check your IP address ...............................................................95
Statically Assign an IP address ...............................................96
Technical Specications ..................................................97
Regulatory Information ..................................................98

1D-Link DIR-842 User Manual
Section 1 - Product Overview
Package Contents
Note: Using a power supply with a dierent voltage rating than the one included with the DIR-842 will cause damage and void the warranty
for this product.
If any of the above items are missing, please contact your reseller.
DIR-842 AC1200 Wi-Fi Gigabit Router
Ethernet Cable
Power Adapter
WI-FI Conguration Note
:L)L&RQ¿JXUDWLRQ1RWH

2D-Link DIR-842 User Manual
Section 1 - Product Overview
Network Requirements
t"O&UIFSOFUCBTFEDBCMFPS%4-NPEFN
t*&&&BDOHCBXJSFMFTTDMJFOUT
t&UIFSOFU
Web-based Conguration
Utility Requirements
Computer with the following:
t8JOEPXT¥.BDJOUPTIPS-JOVYCBTFEPQFSBUJOHTZTUFN
t"OJOTUBMMFE&UIFSOFUBEBQUFS
Browser Requirements:
t*OUFSOFU&YQMPSFSPSIJHIFS
t'JSFGPYPSIJHIFS
t4BGBSJPSIJHIFS
t$ISPNFPSIJHIFS
Windows® Users: Make sure you have the latest version of Java
installed. Visit www.java.com to download the latest version.
QRS Mobile Requirements tJ1IPOF¥J1BE¥J1PE5PVDI¥J04PSIJHIFS
t"OESPJEEFWJDFPSIJHIFS
System Requirements

3D-Link DIR-842 User Manual
Section 1 - Product Overview
Introduction
The D-Link DIR-842 is a IEEE 802.11ac compliant device that delivers up to 3x faster speeds than 802.11n while staying backward
compatible with 802.11n/g/b/a devices. Connect the DIR-842 to a cable or DSL modem and provide high-speed Internet access
to multiple computers, game consoles, and media players. Create a secure wireless network to share photos, les, music, videos,
printers, and network storage. Powered by the 802.11ac technology and equipped with four external antennas, this router
provides superior wireless coverage for larger homes and oces, or for users running bandwidth-intensive applications. The
DIR-842 also includes a 4-port 10/100/1000 Gigabit Ethernet switch that connects to wired devices for uninterrupted video
calling and faster le transfers.
D-Link Intelligent QoS Technology helps to increase network eciency by analyzing wired and wireless network trac and
prioritizing it in order of importance. This way, important network trac such as VoIP and video streaming, take priority over
background network trac such as a le downloads and print tasks, ensuring you have optimal network performance.
The DIR-842 supports the latest wireless security features to help prevent unauthorized access, be it from over a wireless network
PSUIF*OUFSOFU4VQQPSUGPS81"BOE81"TUBOEBSETFOTVSFUIBUZPVXJMMCFBCMFUPVTFUIFCFTUQPTTJCMFFODSZQUJPO
SFHBSEMFTTPGZPVSDMJFOUEFWJDFT*OBEEJUJPOUIJTSPVUFSJTFRVJQQFEXJUIBEVBMBDUJWFöSFXBMM41*BOE/"5UPQSFWFOUQPUFOUJBM
attacks over the Internet.

4D-Link DIR-842 User Manual
Section 1 - Product Overview
t6MUJNBUF(JHBCJU8JSFMFTT/FUXPSLJOH - The DIR-842 provides up to 300 Mbps wireless connection in 2.4 GHz
band, and up to 867 Mbps wireless connection in 5 GHz with other 802.11ac and 802.11n wireless clients. This
capability allows users to participate in real-time activities online, such as video streaming, online gaming, and
real-time audio. The performance of this 802.11ac wireless router gives you the freedom of wireless networking
at speeds 3x faster than 802.11n.
t$PNQBUJCMFXJUIOHCB%FWJDFT - The DIR-842 is still fully compatible with the IEEE 802.11a, IEEE
802.11b, 802.11g and 802.11n, so it can connect with existing 802.11a, IEEE 802.11b, 802.11g and 802.11n PCI,
USB, and CardBus adapters.
t"EWBODFE'JSFXBMM'FBUVSFT - The web-based user interface displays a number of advanced network
management features including:
t$POUFOU'JMUFSJOH - Easily applied content ltering based on MAC address, URL, and/or domain
name.
t'JMUFS4DIFEVMJOH - These lters can be scheduled to be active on certain days or for a duration of
hours or minutes.
t4FDVSF.VMUJQMF$PODVSSFOU4FTTJPOT - The DIR-842 can pass through VPN sessions. It supports
multiple and concurrent IPSec and PPTP sessions, so users behind the DIR-842 can securely access
corporate networks.
t6TFSGSJFOEMZ4FUVQ8J[BSE - Through its easy-to-use web-based user interface, the DIR-842 lets you control what
information is accessible to those on the wireless network, whether from the Internet or from your company’s
server. Congure your router to your specic settings within minutes.
* Maximum wireless signal rate derived from IEEE Standard 802.11a, 802.11g, 802.11n and 802.11ac specications. Actual data throughput will vary. Network conditions and
environmental factors, including volume of network trac, building materials and construction, and network overhead, lower actual data throughput rate. Environmental
conditions will adversely aect wireless signal range.
Features
5D-Link DIR-842 User Manual
Section 1 - Product Overview
Hardware Overview
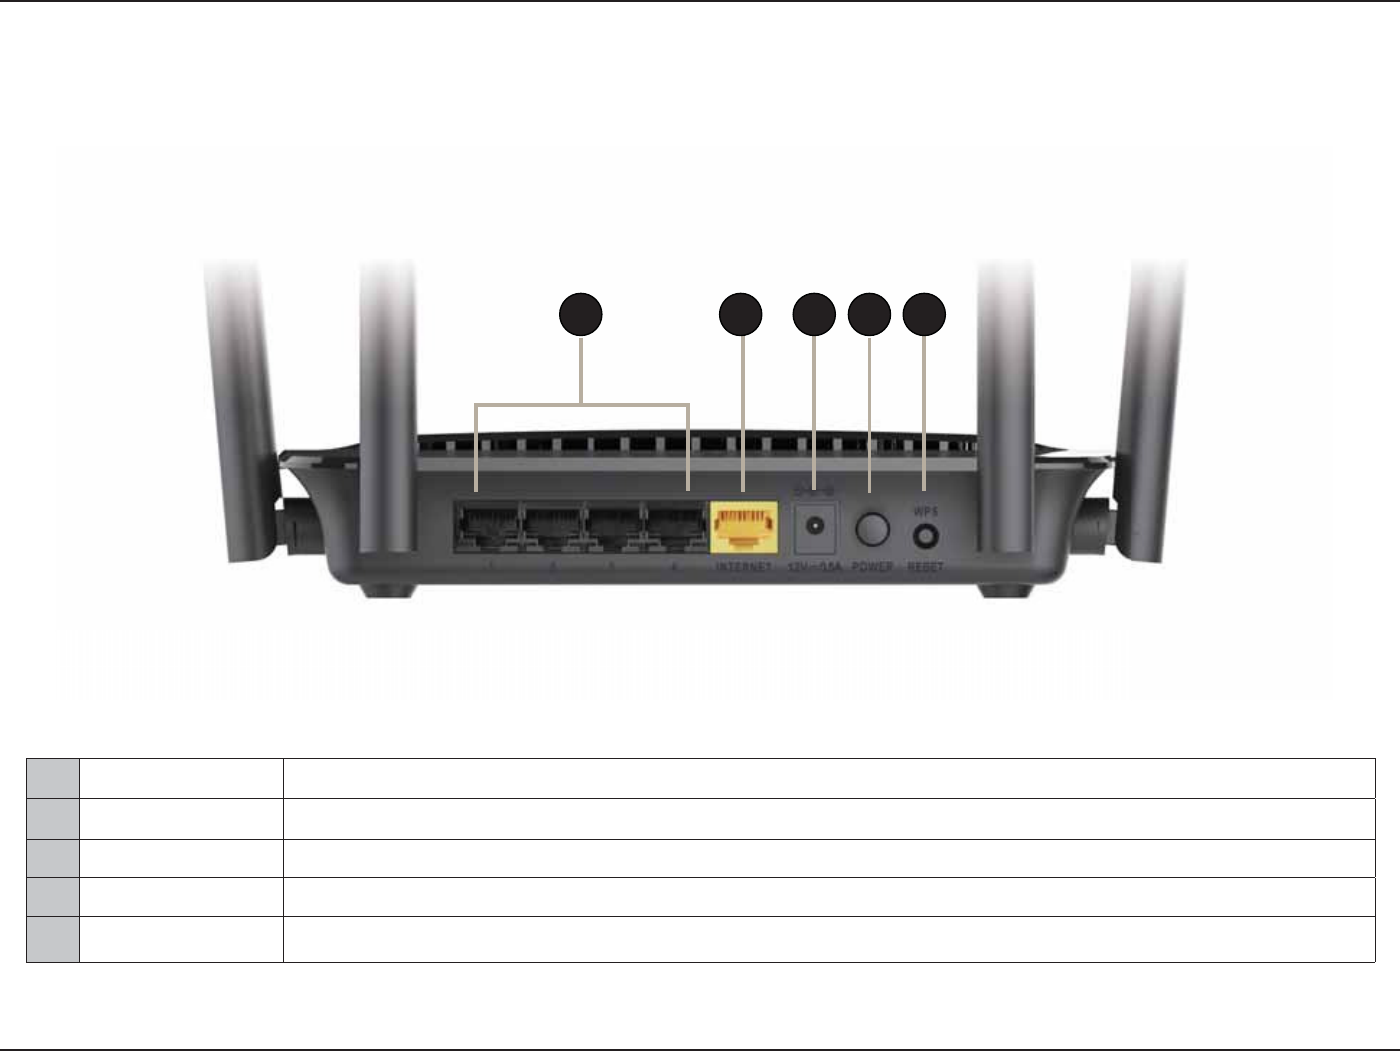
Connections
1-"/1PSUT $POOFDU&UIFSOFUEFWJDFTTVDIBTDPNQVUFSTTXJUDIFTTUPSBHF/"4EFWJDFTBOEHBNFDPOTPMFT
Internet Port Using an Ethernet cable, connect your broadband modem to this port.
3Power Receptor Receptor for the supplied power adapter.
4Power Button Press the power button to power the DIR-842 on and o.
5WPS / Reset Button Short press to start the WPS process. Long press for 10 seconds to reset the router to default settings.
1 42 53
6D-Link DIR-842 User Manual
Section 1 - Product Overview
Hardware Overview
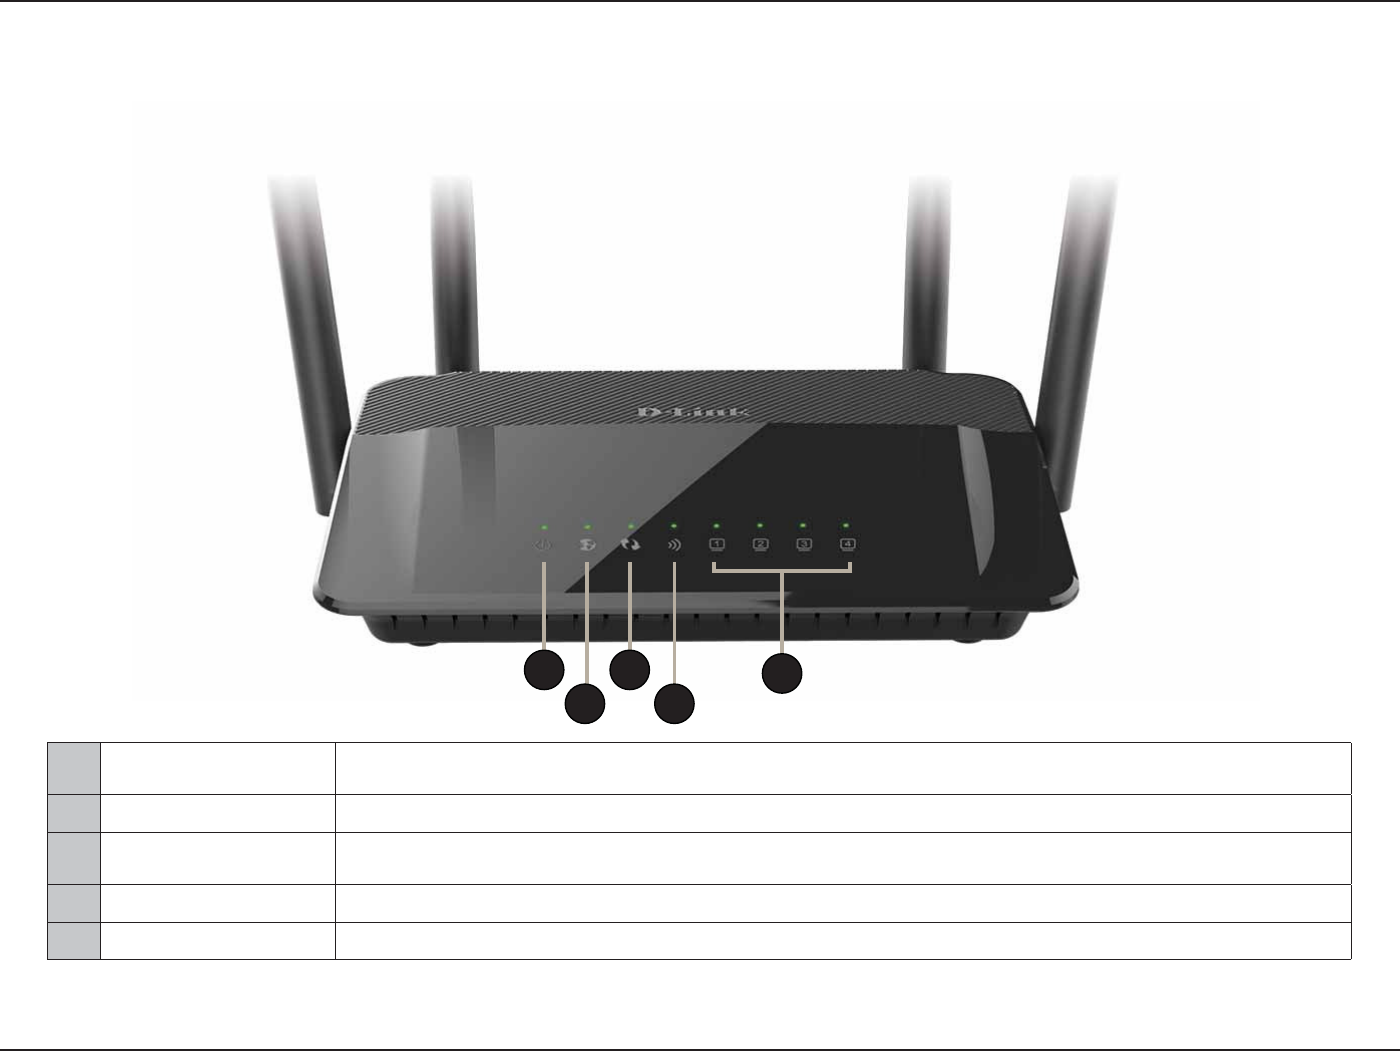
LEDs
1Power LED A solid light indicates that the device is powered on. The light will blink while the device is in recovery
mode.
Internet LED A solid light indicates that an Internet link is established.
3WPS LED A solid light indicates that the WPS handshake has been completed. The light will blink while the WPS
handshake is processing.
4WLAN LED A solid light indicates that the wireless is operating.
5LAN LEDs 1-4 A solid light indicates a connection to an Ethernet-enabled computer on ports 1-4 respectively.
1 3
2 4 5

7D-Link DIR-842 User Manual
Section 2 - Installation
Before you Begin
Installation
This section will walk you through the installation process. Placement of the router is very important. Do not place the router
in an enclosed area such as a closet, cabinet, or in the attic or garage.
t 1MFBTFDPOöHVSFUIFSPVUFSXJUIUIFDPNQVUFSUIBUXBTMBTUDPOOFDUFEEJSFDUMZUPZPVSNPEFN
t :PVDBOPOMZVTFUIF&UIFSOFUQPSUPOZPVSNPEFN*GZPVXFSFVTJOHUIF64#DPOOFDUJPOCFGPSFVTJOHUIFSPVUFS
then you must turn o your modem, disconnect the USB cable and connect an Ethernet cable to the Internet port
on the router, and then turn the modem back on. In some cases, you may need to call your ISP to change connection
UZQFT64#UP&UIFSOFU
t *GZPVIBWF%4-BOEBSFDPOOFDUJOHWJB111P&NBLFTVSFZPVEJTBCMFPSVOJOTUBMMBOZ111P&TPGUXBSFTVDIBT8JO1P&5
BroadJump, or EnterNet 300 from your computer or you will not be able to connect to the Internet.

8D-Link DIR-842 User Manual
Section 2 - Installation
Wireless Installation Considerations
The D-Link wireless router lets you access your network using a wireless connection from virtually anywhere within the
operating range of your wireless network. Keep in mind, however, that the number, thickness and location of walls, ceilings,
or other objects that the wireless signals must pass through, may limit the range. Typical ranges vary depending on the types
PGNBUFSJBMTBOECBDLHSPVOE3'SBEJPGSFRVFODZOPJTFJOZPVSIPNFPSCVTJOFTT5IFLFZUPNBYJNJ[JOHXJSFMFTTSBOHFJTUP
follow these basic guidelines:
1. Keep the number of walls and ceilings between the D-Link router and other network devices to a minimum -
FBDIXBMMPSDFJMJOHDBOSFEVDFZPVSBEBQUFSTSBOHFGSPNGFFUNFUFST1PTJUJPOZPVSEFWJDFTTPUIBU
the number of walls or ceilings is minimized.
#FBXBSFPGUIFEJSFDUMJOFCFUXFFOOFUXPSLEFWJDFT"XBMMUIBUJTGFFUUIJDLNFUFSTBUBEFHSFFBOHMF
BQQFBSTUPCFBMNPTUGFFUNFUFSUIJDL"UBEFHSFFBOHMFJUMPPLTPWFSGFFUNFUFSTUIJDL1PTJUJPO
EFWJDFTTPUIBUUIFTJHOBMXJMMUSBWFMTUSBJHIUUISPVHIBXBMMPSDFJMJOHJOTUFBEPGBUBOBOHMFGPSCFUUFSSFDFQUJPO
3. Building materials make a dierence. A solid metal door or aluminum studs may have a negative eect on range.
Try to position access points, wireless routers, and computers so that the signal passes through drywall or open
EPPSXBZT.BUFSJBMTBOEPCKFDUTTVDIBTHMBTTTUFFMNFUBMXBMMTXJUIJOTVMBUJPOXBUFSöTIUBOLTNJSSPSTöMF
cabinets, brick, and concrete will degrade your wireless signal.
,FFQZPVSQSPEVDUBXBZBUMFBTUGFFUPSNFUFSTGSPNFMFDUSJDBMEFWJDFTPSBQQMJBODFTUIBUHFOFSBUF3'
noise.
*GZPVBSFVTJOH()[DPSEMFTTQIPOFTPS9XJSFMFTTQSPEVDUTTVDIBTDFJMJOHGBOTMJHIUTBOEIPNFTFDVSJUZ
TZTUFNTZPVSXJSFMFTTDPOOFDUJPONBZEFHSBEFESBNBUJDBMMZPSESPQDPNQMFUFMZ.BLFTVSFZPVS()[QIPOF
base is as far away from your wireless devices as possible. The base transmits a signal even if the phone in not
in use.
9D-Link DIR-842 User Manual
Section 2 - Installation
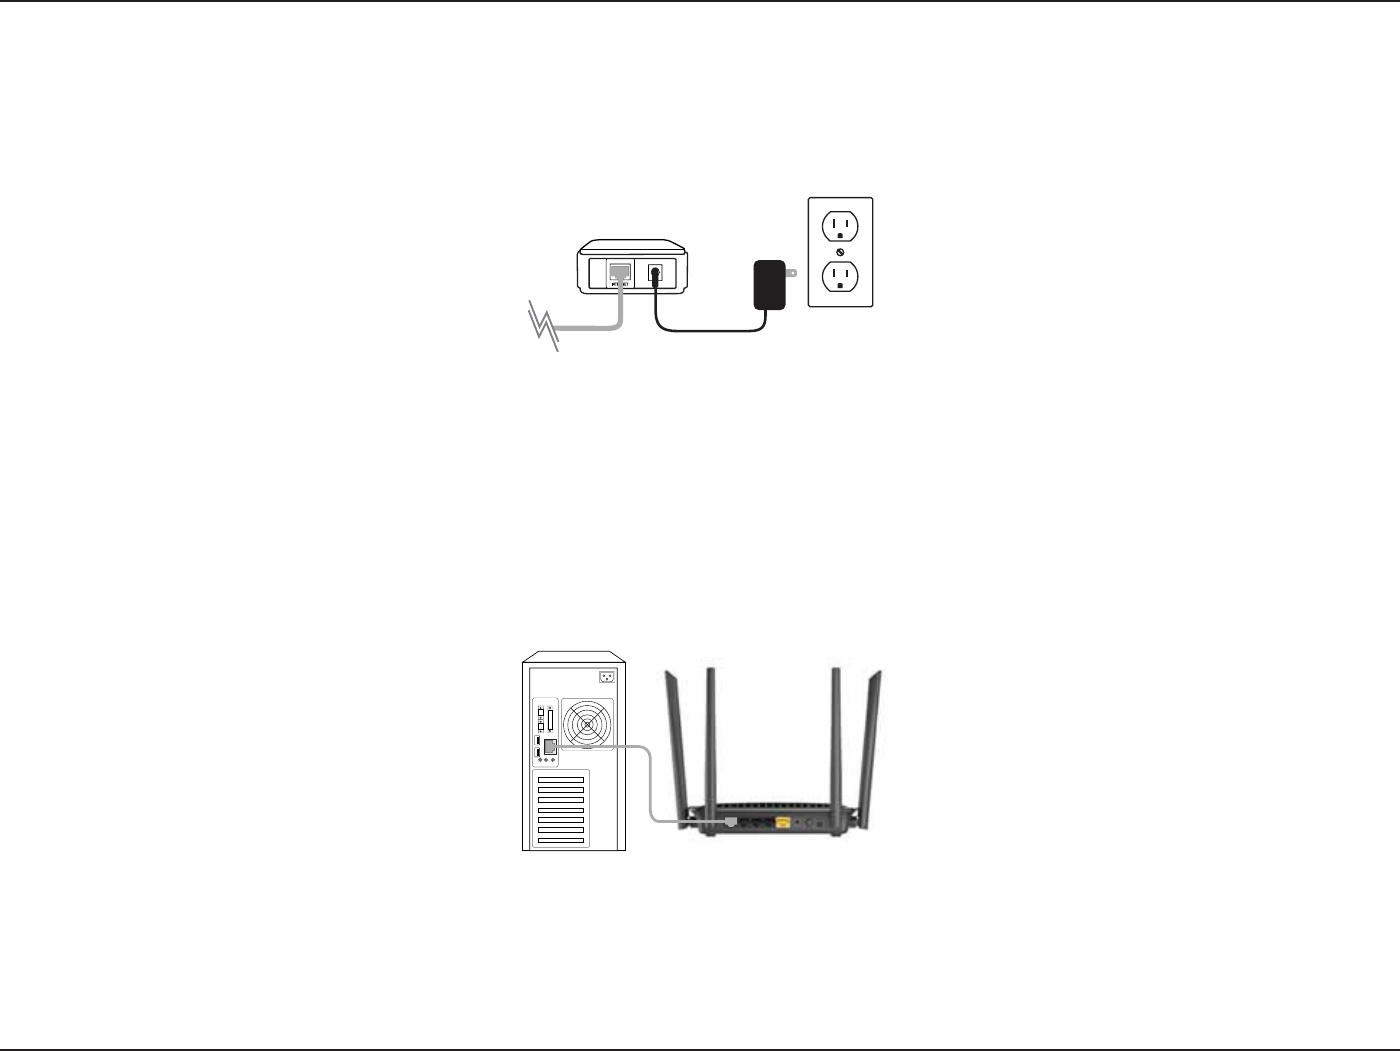
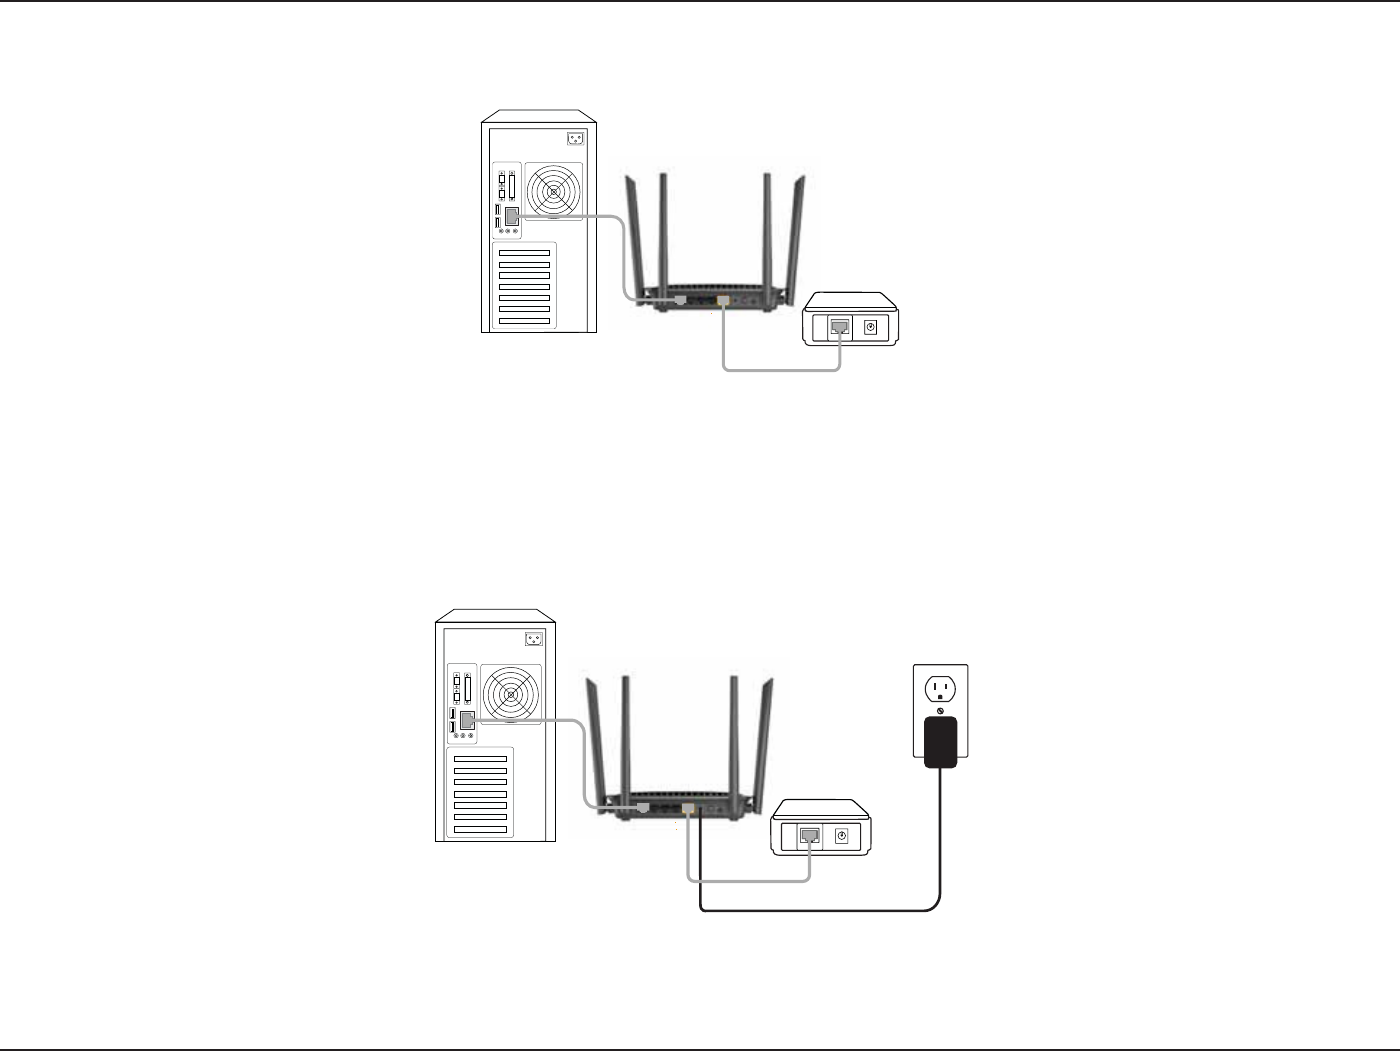
1. Turn o and unplug your cable or DSL broadband modem. This is required.
2. Position your router close to your modem and a computer. Place the router in an open area of your intended
work area for better wireless coverage.
6OQMVHUIF&UIFSOFUDBCMFGSPNZPVSNPEFNPSFYJTUJOHSPVUFSJGVQHSBEJOHUIBUJTDPOOFDUFEUPZPVSDPNQVUFS
Plug it into the LAN port labeled 1 on the back of your router. The router is now connected to your computer.
Manual Setup
4
Computer DIR-842
10D-Link DIR-842 User Manual
Section 2 - Installation
4. Plug one end of the included blue Ethernet cable that came with your router into the yellow port labeled
INTERNET on the back of the router. Plug the other end of this cable into the Ethernet port on your modem.
5. Reconnect the power adapter to your cable or DSL broadband modem and wait for two minutes.
6. Connect the supplied power adapter into the power port on the back of the router and then plug it into a power
outlet or surge protector. Press the power button and verify that the power LED is lit. Allow 1 minute for the
router to boot up.
7. If you are connecting to a broadband service, you may be online already and further conguration will be optional.
4
INTERNET
4
INTERNET
modem
Power Outlet

11D-Link DIR-842 User Manual
Section 3 - Conguration
There are several dierent ways you can congure your router to connect to the Internet and connect to your clients:
t %-JOL4FUVQ8J[BSE - This wizard will launch when you log into the router for the rst time. Refer to page 11.
t 234.PCJMF"QQ- Use your smart device to congure your router. Refer to page”QRS Mobile App” on page 15.
t Manual Setup-PHJOUPUIFSPVUFSBOENBOVBMMZDPOöHVSFZPVSSPVUFSBEWBODFEVTFSTPOMZ3FGFSUPQBHF
Conguration
12D-Link DIR-842 User Manual
Section 3 - Getting Started
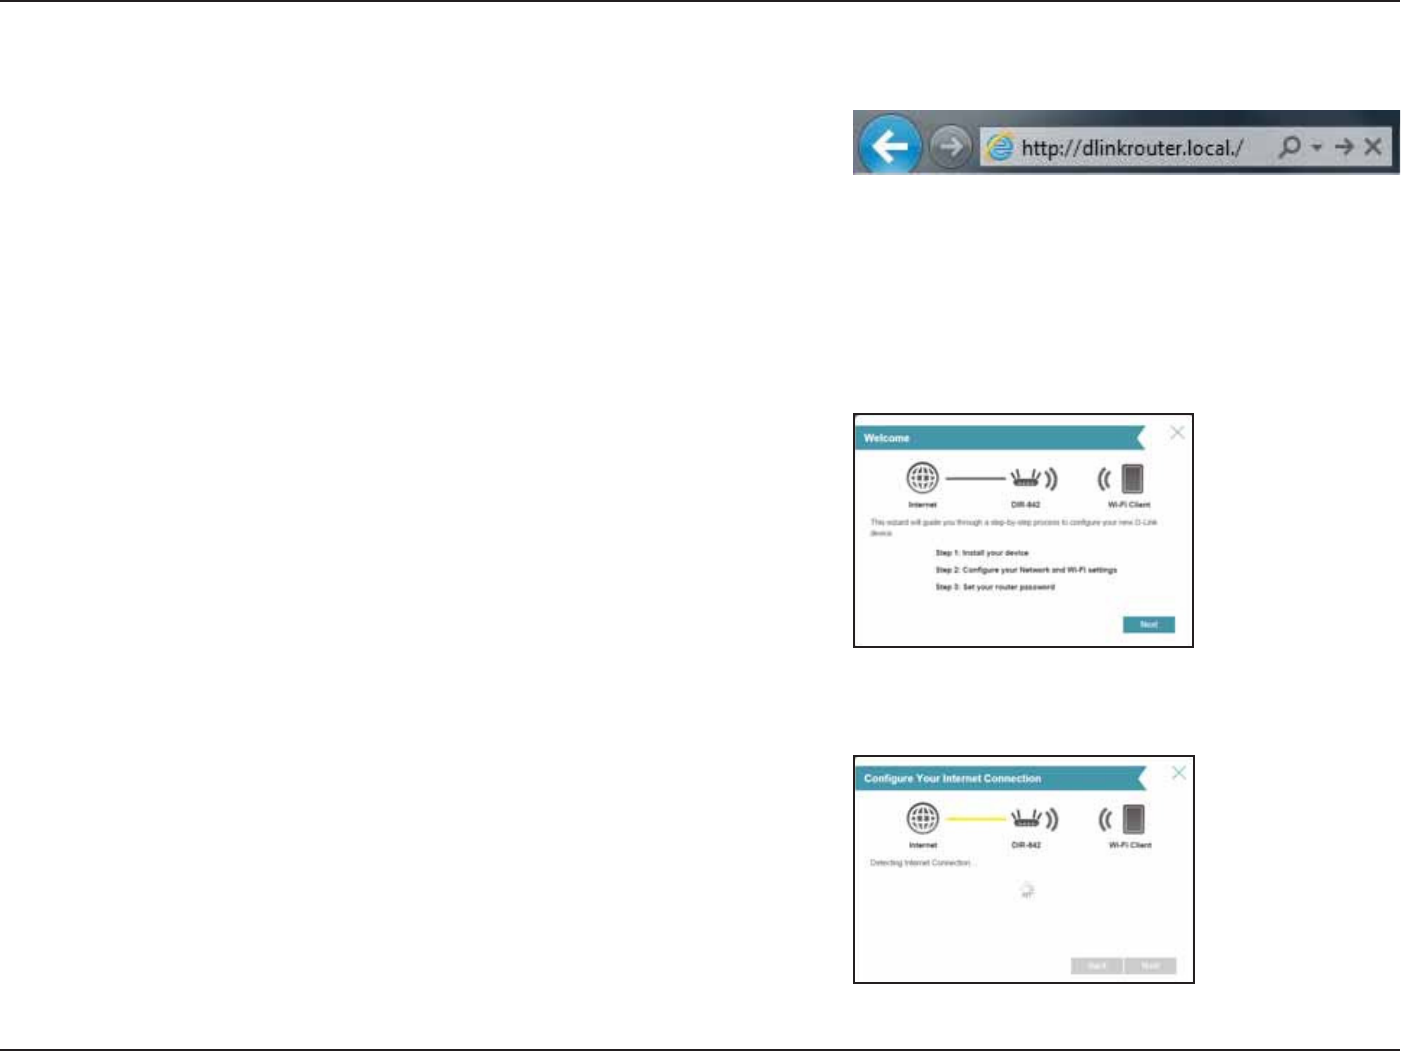
The wizard is designed to guide you through a step-by-step process to
congure your new D-Link router and connect to the Internet.
Click Next to continue.
Setup Wizard
If this is your rst time installing the router, open your web browser and
enter IUUQEMJOLSPVUFSMPDBMin the address bar. Alternatively, enter
UIF*1BEESFTTPGUIFSPVUFSEFGBVMUIUUQ Please refer to
Conguration on page 19.
Please wait while your router detects your Internet connection type. After
the router detects your Internet connection, you may need to enter your
ISP information such as your username and password.
13D-Link DIR-842 User Manual
Section 3 - Getting Started
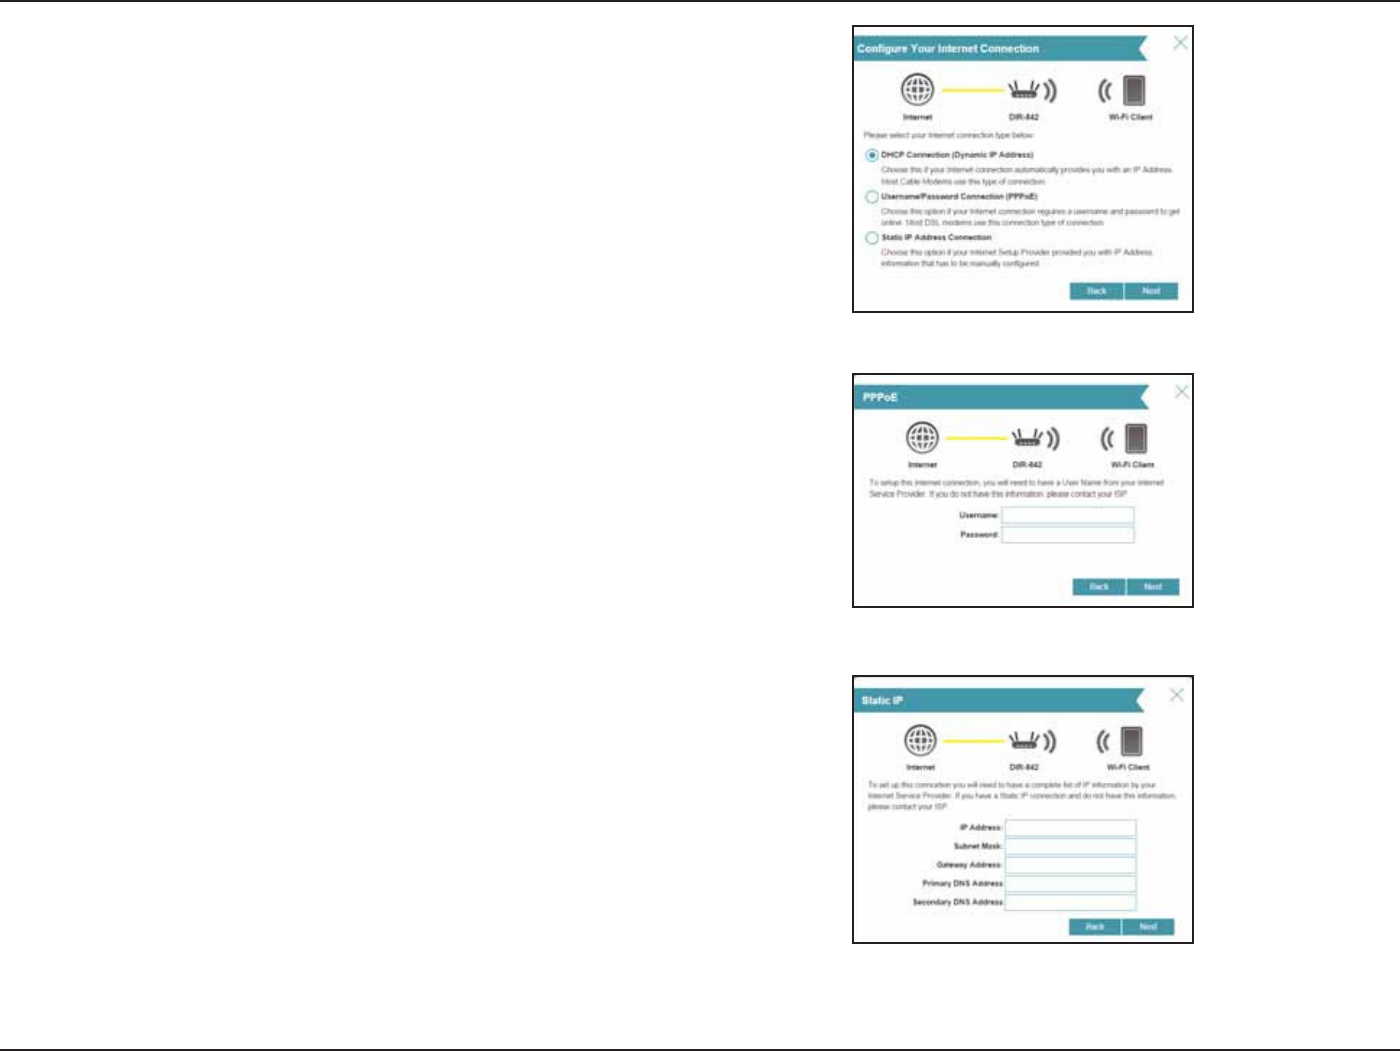
If the router does not detect a valid Internet connection, a list of
connection types to choose from will be displayed.
4FMFDUZPVS*OUFSOFUDPOOFDUJPOUZQFUIJTJOGPSNBUJPODBOCFPCUBJOFE
GSPNZPVS*OUFSOFUTFSWJDFQSPWJEFSBOEDMJDLNext to continue.
If the router detected or you selected PPPoE, enter your PPPoE username
and password and click Next to continue.
Note: If your computer has PPPoE software, make sure to remove it from
your computer. The software is no longer needed and will not work through
a router.
If the router detected or you selected Static, enter the IP and DNS settings
supplied by your ISP. Click Next to continue.
14D-Link DIR-842 User Manual
Section 3 - Getting Started
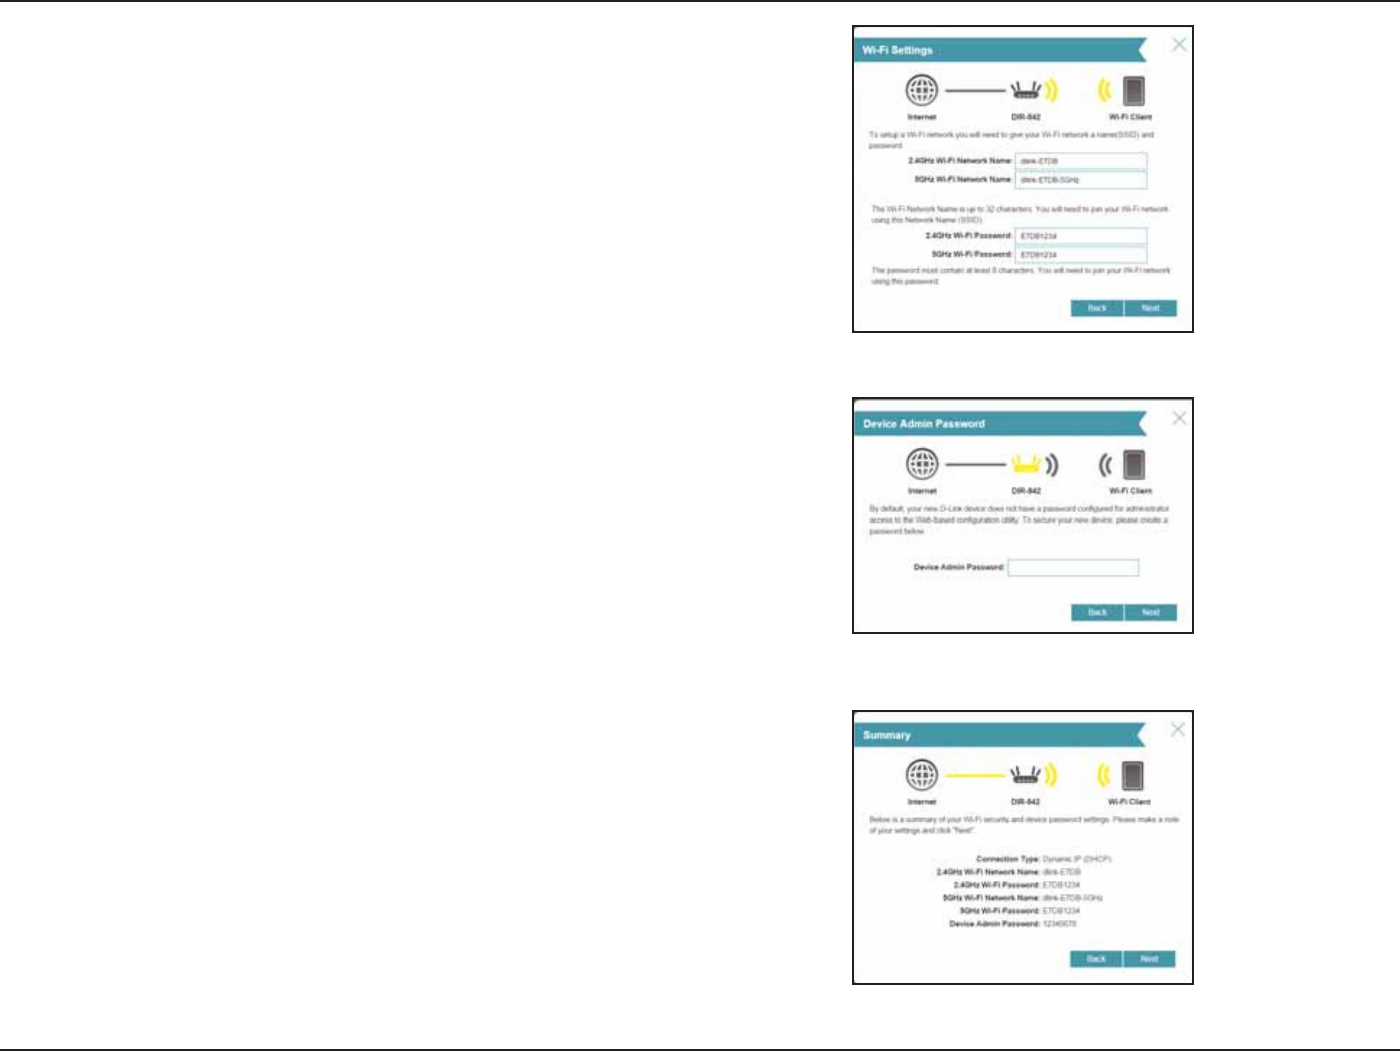
For both the 2.4 GHz and 5 GHz segments, create a Wi-Fi network name
44*%VTJOHVQUPDIBSBDUFST
$SFBUFB8J'JQBTTXPSECFUXFFODIBSBDUFST:PVSXJSFMFTTDMJFOUT
will need to have this passphrase or key entered to be able to connect
to your wireless network.
Click Next to continue.
*OPSEFSUPTFDVSFUIFSPVUFSQMFBTFFOUFSBOFXQBTTXPSE:PVXJMMCF
prompted for this password every time you want to use the router’s web
conguration utility. Click Next to continue.
The Summary window will display your settings. Click Next if you are
satised, or click Back to make changes to them.
15D-Link DIR-842 User Manual
Section 3 - Getting Started
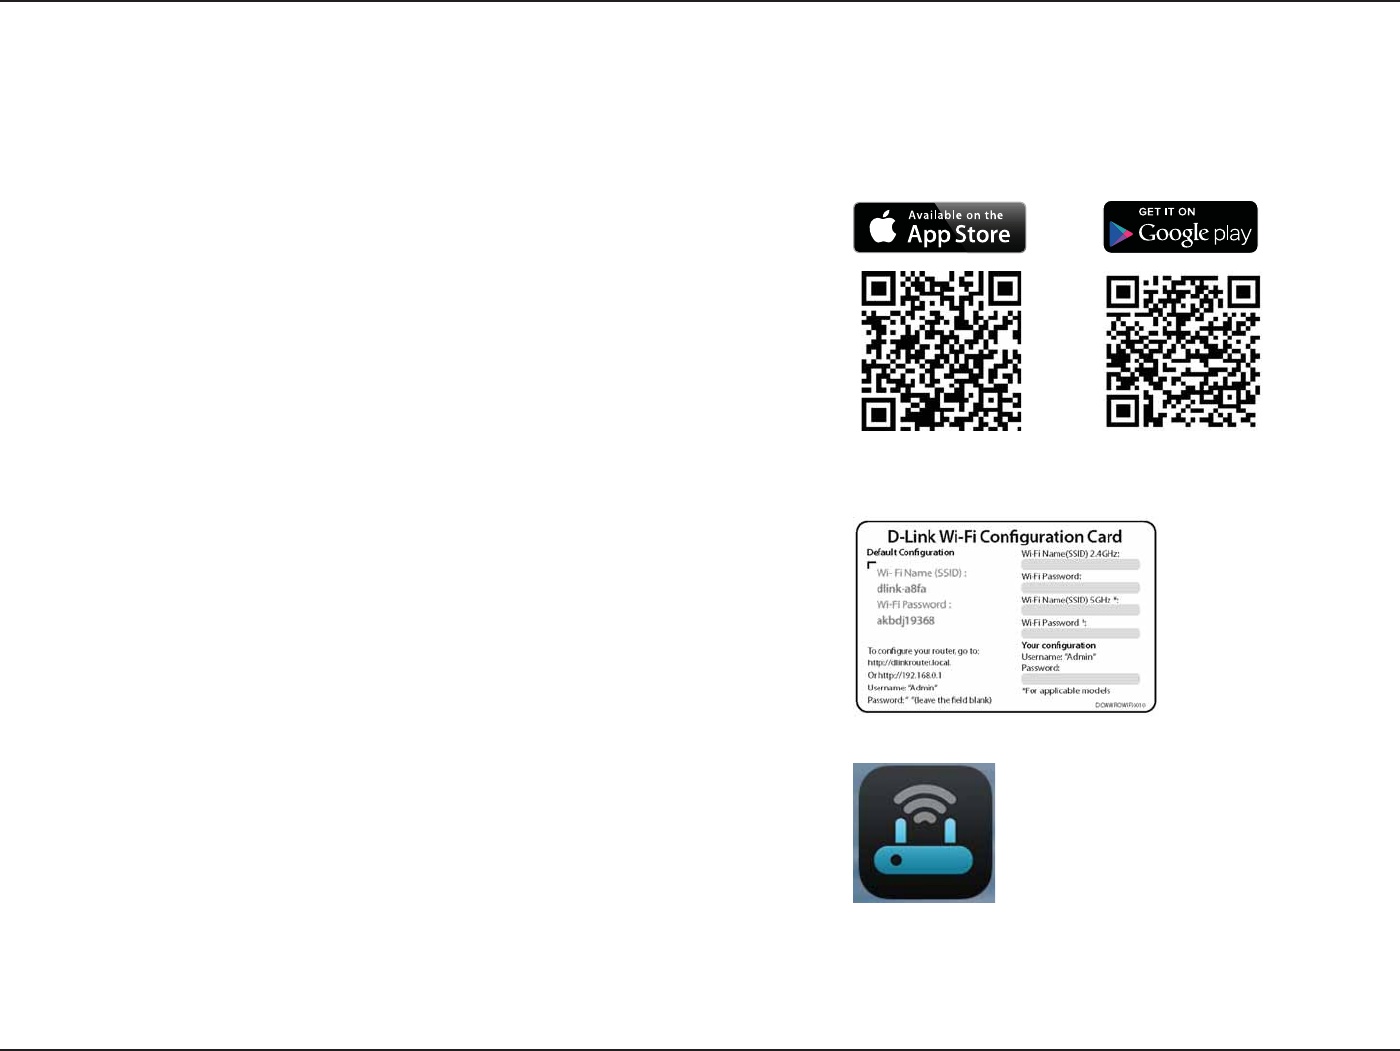
QRS Mobile App
QRS Mobile app allows you to install and congure your router from your mobile device.
Step 1
Search for the free QRS Mobile App on the iTunes Store or Google Play.
4UFQ
Once your app is installed, you may now congure your router. Connect
to the router wirelessly by going to your wireless utility on your device.
4DBOGPSUIF8J'JOBNF44*%BTMJTUFEPOUIFTVQQMJFEJOGPDBSE4FMFDU
and then enter your Wi-Fi password.
Step 3
Once you connect to the router, launch the QRS Mobile app from the
Home screen of your device.
Note: The following steps show the Android interface of the QRS Mobile
app. If you are using an iPhone, iPad, or iPod touch, the appearance may be
dierent to that of the screenshots, but the process is the same.
Note: The screenshots may be dierent depending on your mobile device’s OS version.
16D-Link DIR-842 User Manual
Section 3 - Getting Started
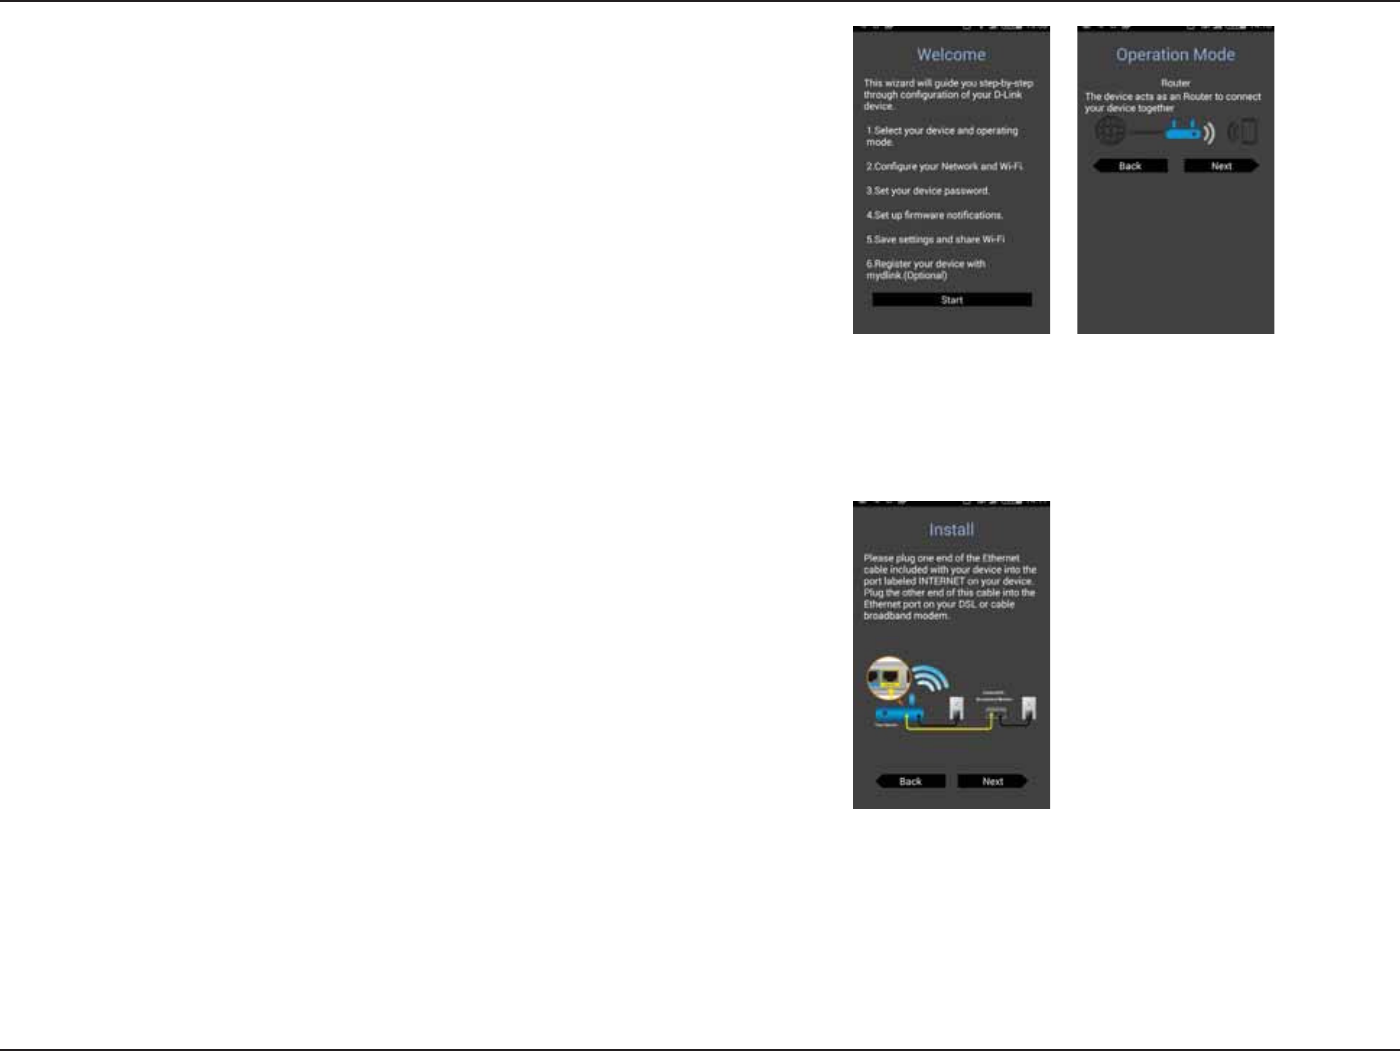
Step 4
:PVXJMMTFFUIFXFMDPNFTDSFFO5BQStart to proceed, then enter your
device password and tap Log In. Tap Next once the Operation Mode
screen appears.
Step 5
At this point, please ensure that your the router is connected to a modem.
Plug one end of the provided Ethernet cable into your DSL or cable
modem, and plug the other end into the port marked INTERNET on the
DIR-842. Tap Next to automatically detect your Internet connection and
proceed to the next step.
17D-Link DIR-842 User Manual
Section 3 - Getting Started
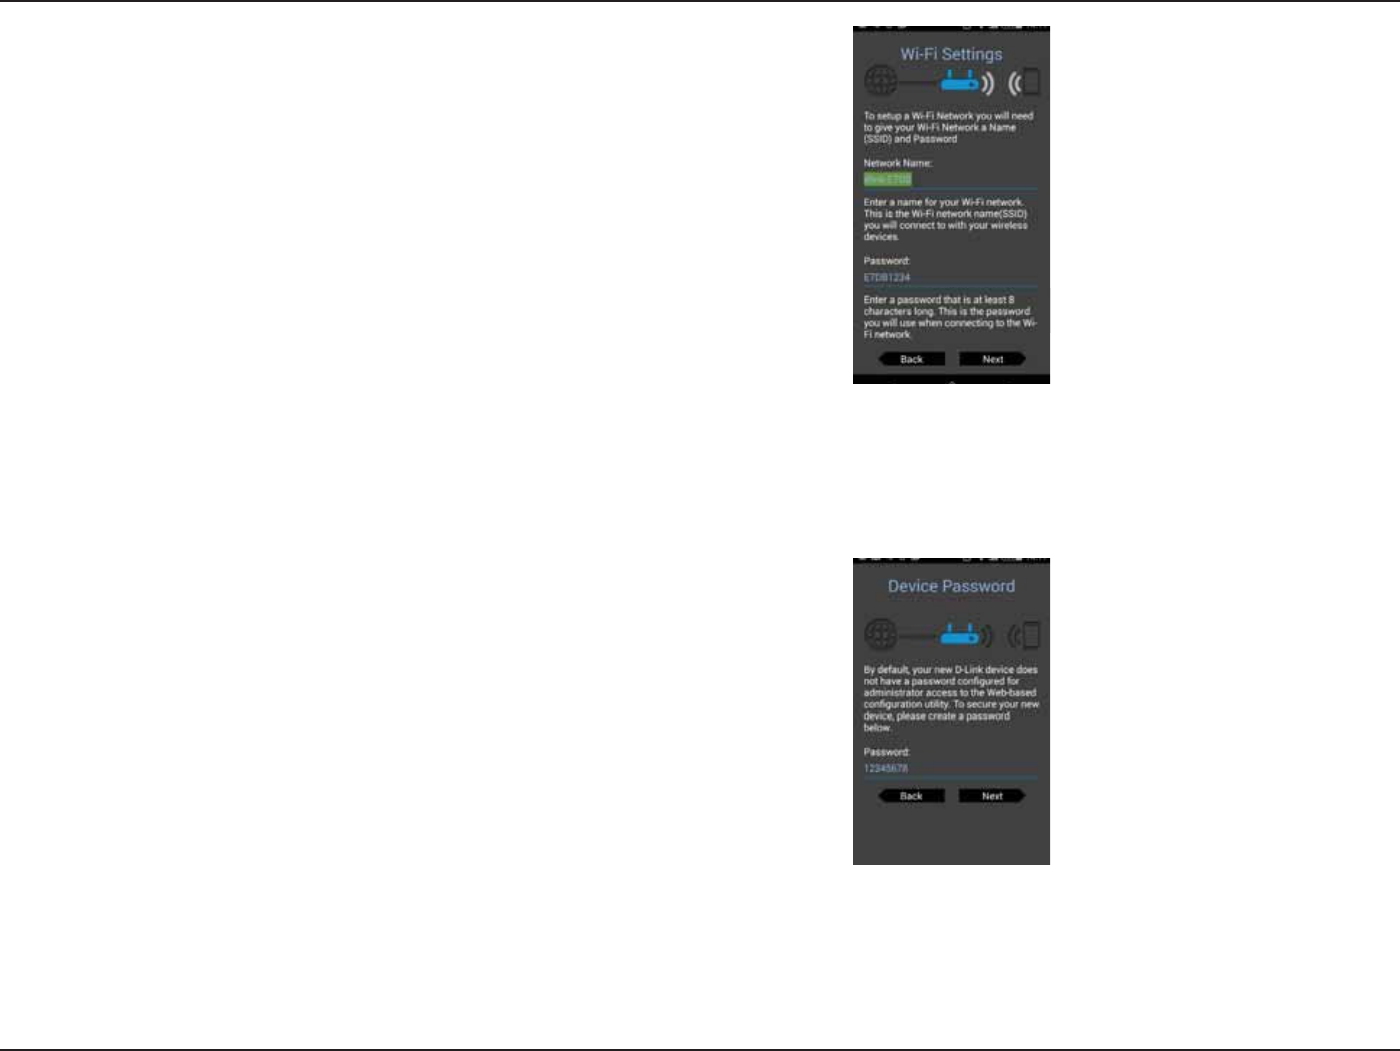
Step 6
'JSTUMZFOUFSBOFUXPSLOBNF44*%PGZPVSDIPJDFPSMFBWFJUVODIBOHFE
to accept the default SSID.
Secondly, choose a Wi-Fi password of at least 8 characters. Any device
trying to connect to the router wirelessly will need to enter this password
the rst time it connects.
Finally, tap Next to proceed.
:PVXJMMCFBTLFEUPFOUFSB44*%BOEQBTTXPSEGPSZPVS()[OFUXPSL
Repeat step 6 and tap Next to proceed.
Step 7
Enter the administrator password of your choice. Unlike the Wi-Fi
password, this password is only required when you need to congure
the router. See i8FCCBTFE $POöHVSBUJPO6UJMJUZwPOQBHF for
details of when this password is used. Tap Next to proceed.
18D-Link DIR-842 User Manual
Section 3 - Getting Started
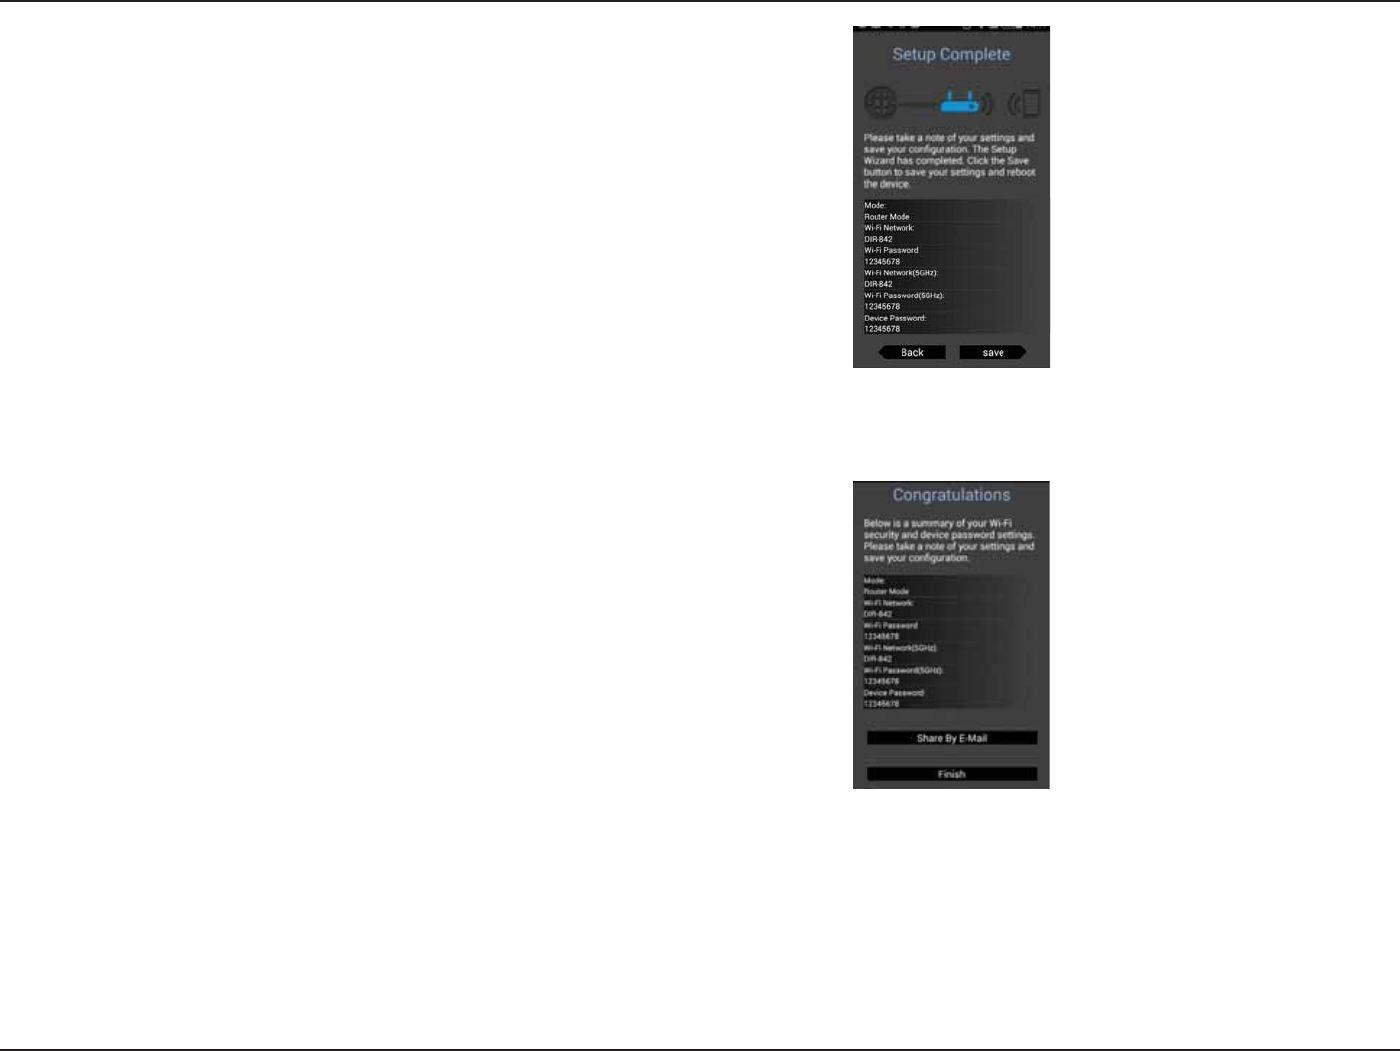
Step 8
:PVXJMMCFQSFTFOUFEXJUIBTVNNBSZPGZPVSDIPTFOTFUUJOHT
Tap Save to complete the setup and wait for your device to reboot.
$POHSBUVMBUJPOTZPVSEFWJDFIBTCFFOTVDDFTTGVMMZDPOöHVSFE:PVDBO
share this information by tapping Share By E-mail, or tap 'JOJTI to exit
the app.
19D-Link DIR-842 User Manual
Section 4 - Conguration
Conguration
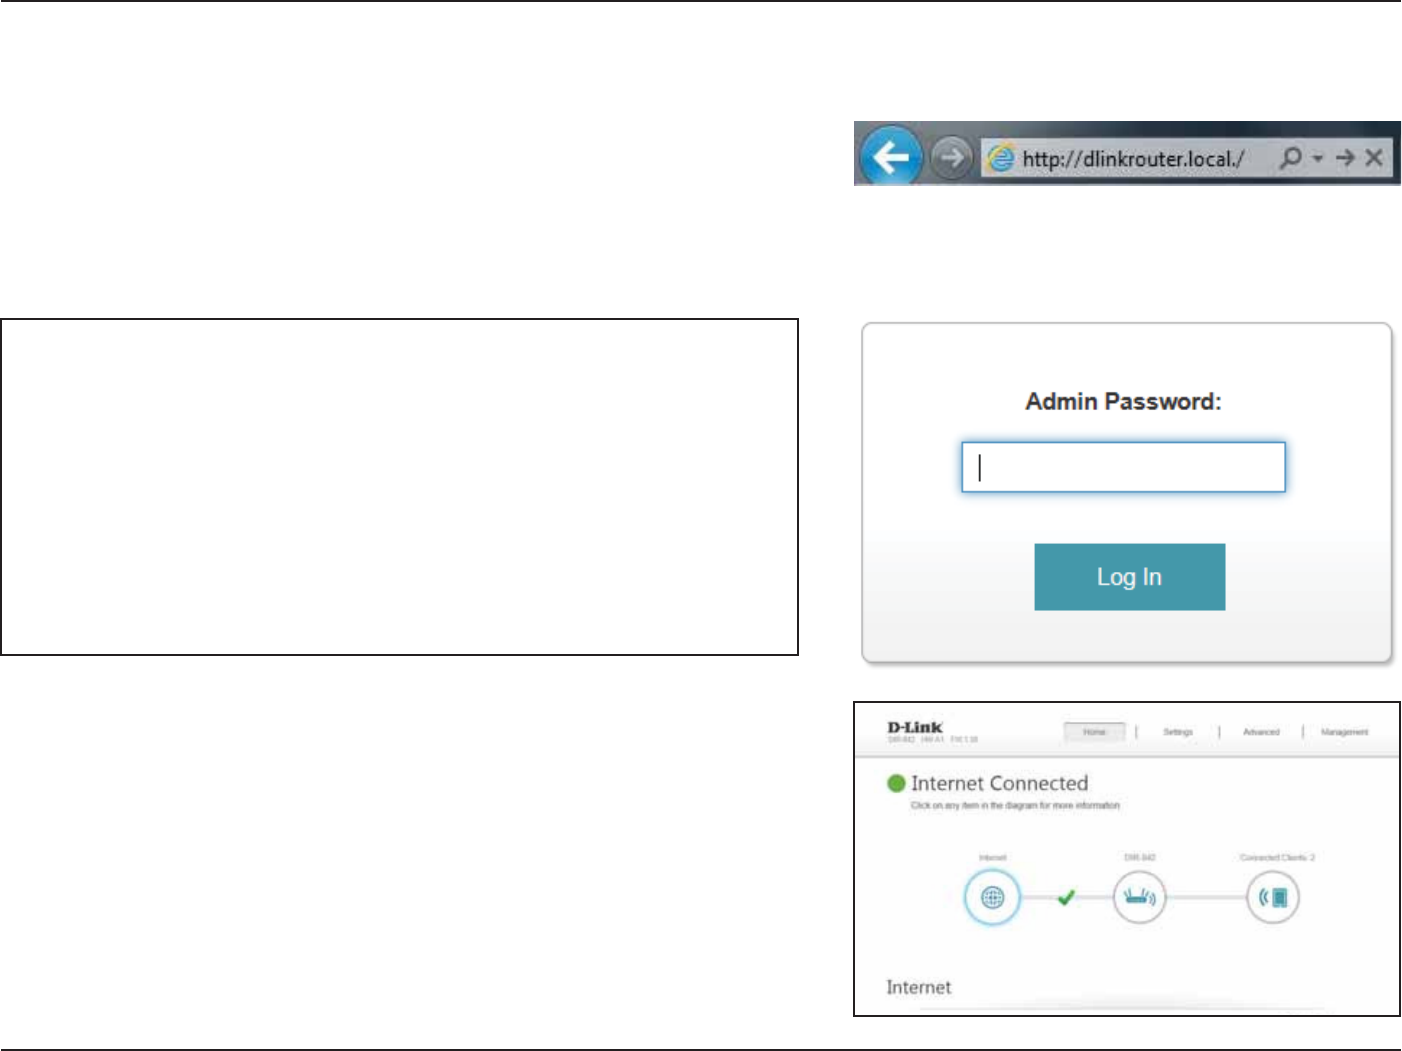
&OUFSZPVSQBTTXPSE*GZPVQSFWJPVTMZGPMMPXFEUIFTFUVQXJ[BSETFF
4FUVQ8J[BSEon page 12, please use the admin password you entered
during the wizard. Otherwise, leave the password blank. Click Log In to
proceed.
Note: If you cannot remember your password and cannot log in, press and
hold the reset button for 10 seconds (see Connections on page 5) to
restore the router to its default settings.
To access the conguration utility, open a web-browser such as Internet
Explorer and enter IUUQEMJOLSPVUFSMPDBM
Windows and Mac users may also connect by typing the IP address of
UIFSPVUFSCZEFGBVMUUIJTJTIUUQJOUIFBEESFTTCBS
The router’s home page will open displaying its current connection status.
The bar at the top of the page has quick access to Settings and
.BOBHFNFOUGVODUJPOT:PVNBZRVJDLMZKVNQCBDL)PNFBUBOZUJNF
Note: The system will automatically log out after a period of inactivity.
20D-Link DIR-842 User Manual
Section 4 - Conguration
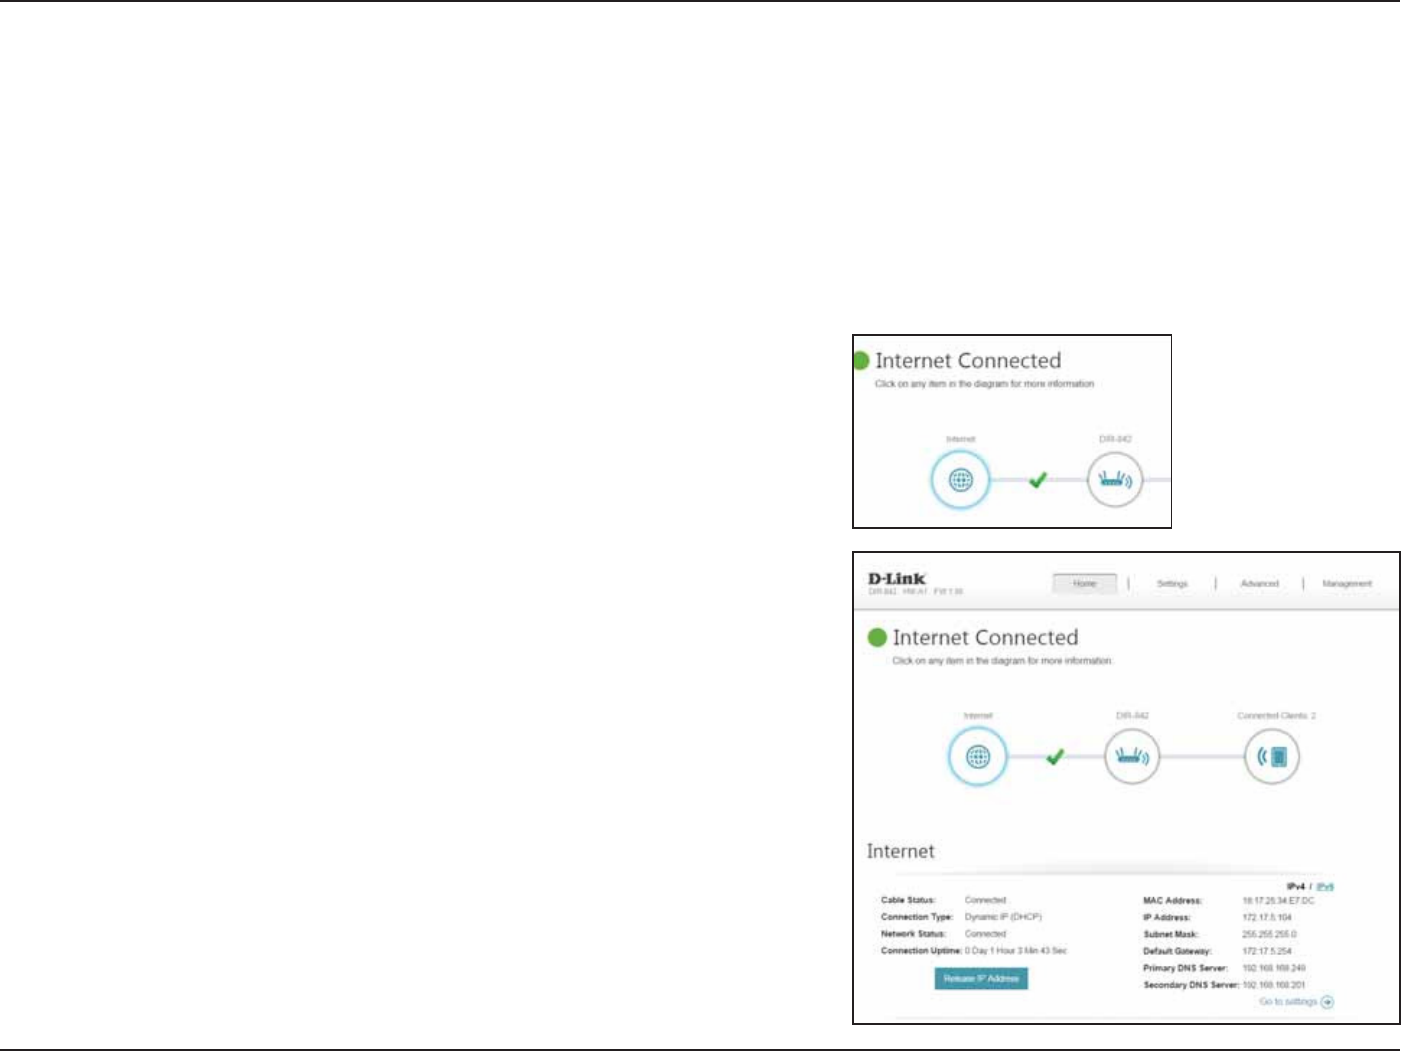
Home
5IF)PNFQBHFEJTQMBZTUIFDVSSFOUTUBUVTPGUIFSPVUFSJOUIFGPSNPGBOJOUFSBDUJWFEJBHSBN:PVDBODMJDLFBDIJDPOUPEJTQMBZ
information about each part of the network at the bottom of the screen. The menu bar at the top of the page will allow you
to quickly navigate to other pages.
The Home page displays whether or not the router is currently connected
to the Internet. If it is disconnected, click Click to repair to bring up the
TFUVQXJ[BSETFF4FUVQ8J[BSEPOQBHF
To bring up more details about your Internet connection, click on the
Internet icon. Click IPv4 or IPv6 to see details of the IPv4 connection
and IPv6 connection respectively.
Click Release to disconnect from the Internet. If you do this and wish to
reconnect, click Renew.
To recongure the Internet settings, refer to Internet on page 23.
Internet
21D-Link DIR-842 User Manual
Section 4 - Conguration
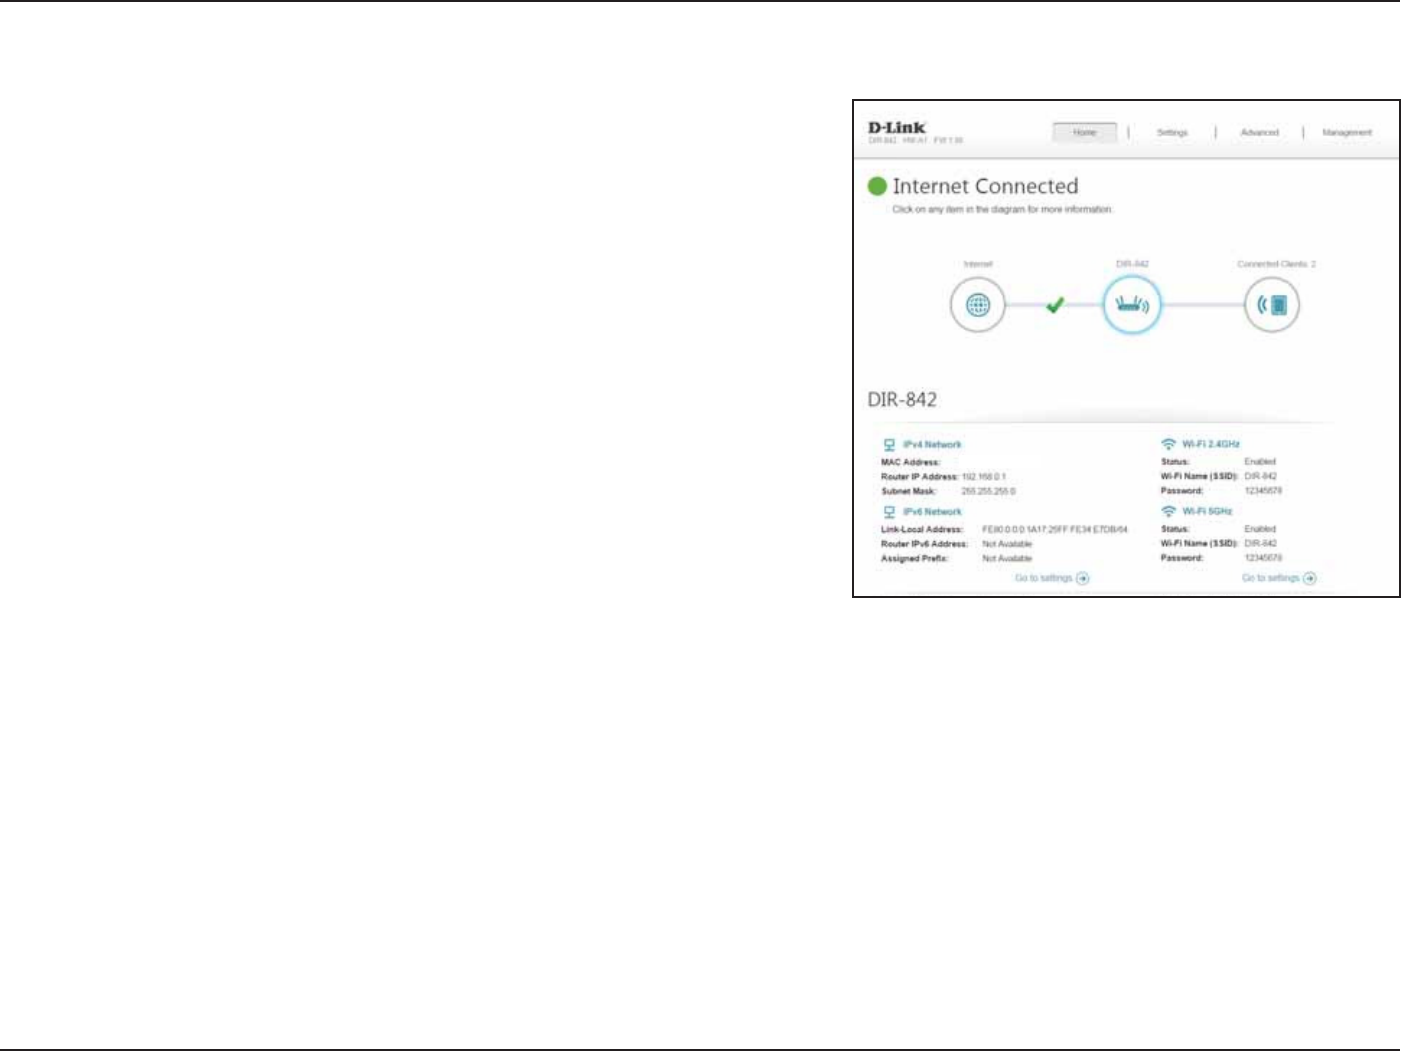
DIR-842
Click on the %*3icon to view details about the router and its wireless
settings.
Here you can see the router’s current wireless settings, as well as its MAC
address and IPv4/IPv6 addresses.
To recongure the network settings, either click (PUPTFUUJOHT on the
lower left, or click SettingsBUUIFUPQPGUIFQBHFBOEUIFONetwork
on the menu that appears. Refer to Network on page 50.
To recongure the wireless settings, either click (PUPTFUUJOHT, on the
lower right, or click SettingsBUUIFUPQPGUIFQBHFBOEUIFOWireless
on the menu that appears. Refer to Wireless on page 47.
22D-Link DIR-842 User Manual
Section 4 - Conguration
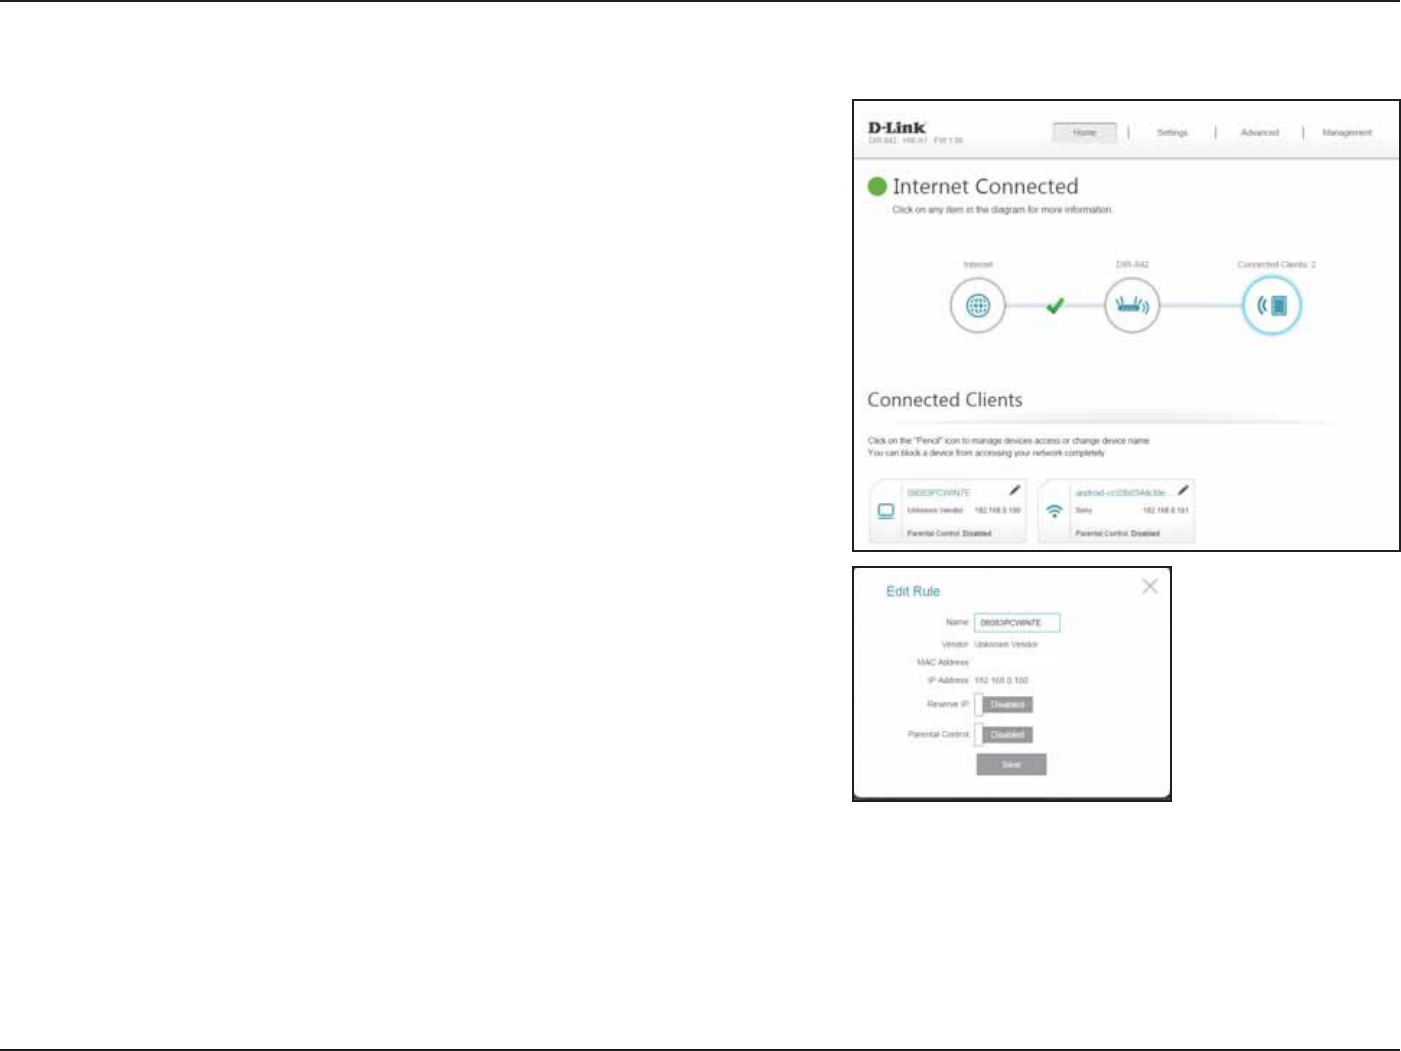
Connected Clients
Click on the Connected Clients icon to view details about the router and its wireless
settings.
On this page you can see all the clients currently connected to the router, and their
IP addresses.
To edit each client’s settings, click the pencil icon on the client you want to edit.
Enter a custom name for this client.
Displays the vendor of the device.
Enter a specic IP address for this client.
Enable to reserve this IP address for this client.
If enabled, parental control will completely disable all network
activity on the client according to a custom schedule. A drop-down
menu will appear; select the time schedule during which parental
control will take eect. The schedule may be set to "MXBZT0''to
indenitely deny network access to the client, or you can create your
own schedules in the SchedulesTFDUJPOSFGFSUPTime & Schedule
POQBHF
Click Save when you are done.
Name:
Vendor:
*1"EESFTT
Reserve IP:
Parental
Control:
23D-Link DIR-842 User Manual
Section 4 - Conguration
Settings
Wizard
Internet
In the Settings menu on the bar on the top of the page, click 8J[BSE to open the setup wizard. This is the same wizard that appears when you start
the router for the rst time. Refer to 4FUVQ8J[BSEon page 12for details.
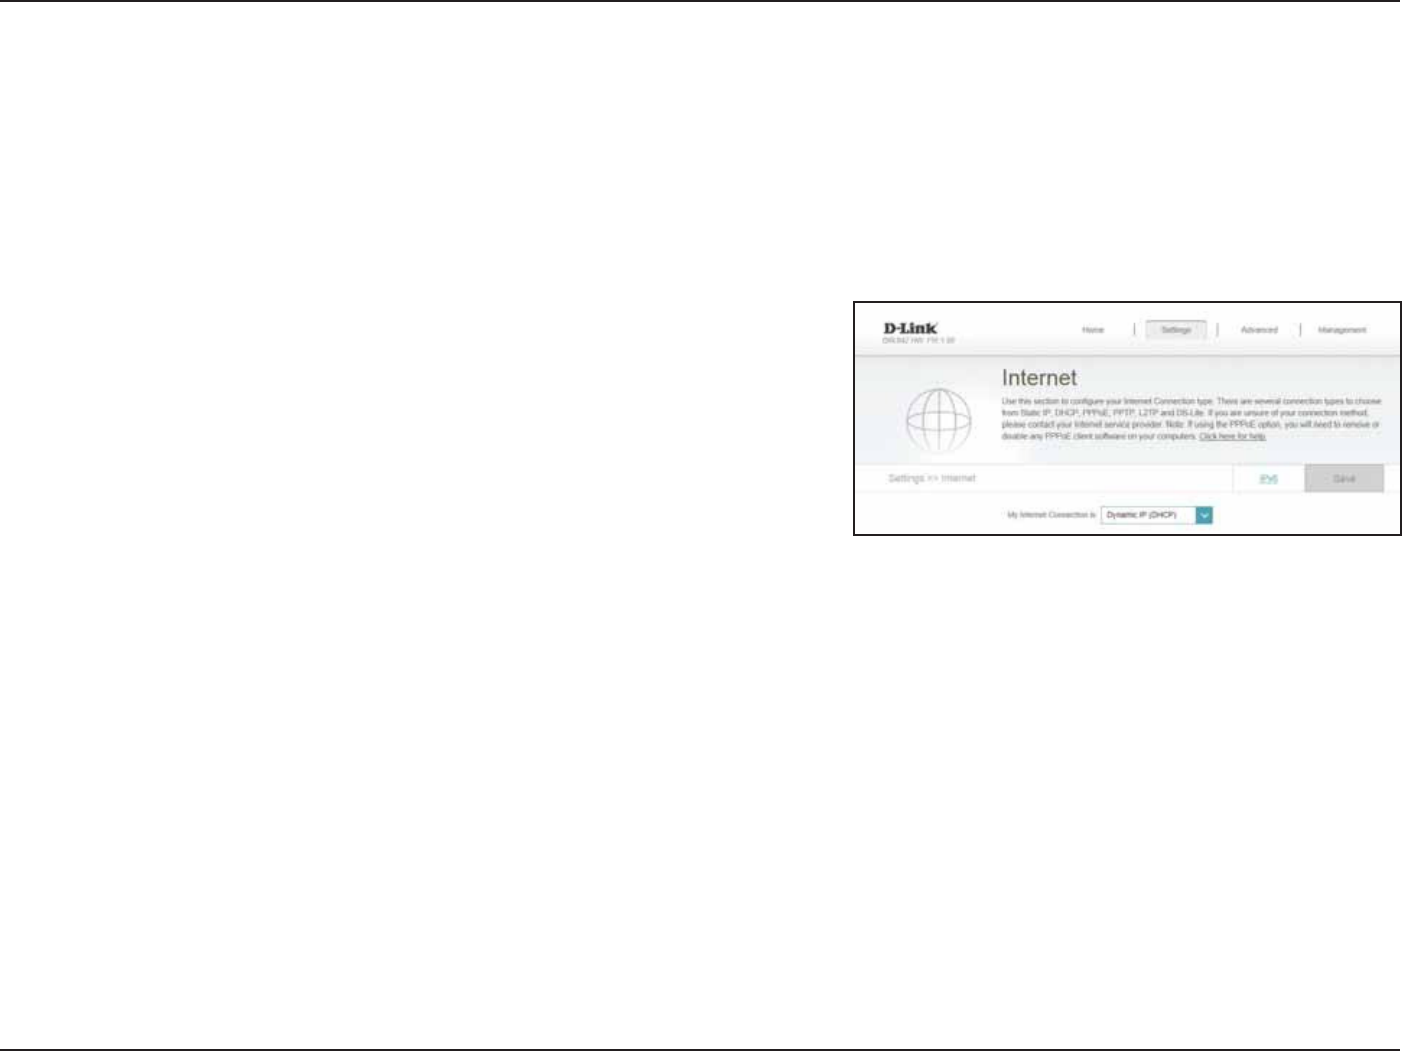
In the Settings menu on the bar on the top of the page, click Internet to see the
Internet conguration options.
Choose your Internet connection type from the drop-down menu.
:PVXJMM CFQSFTFOUFEXJUIUIFBQQSPQSJBUFPQUJPOTGPSZPVS
connection type. Click "EWBODFE4FUUJOHT to expand the list and
see all of the options.
My Internet
Connection Is:
'PS%ZOBNJD*1%)$1SFGFSUPDynamic IP (DCHP) on page 24
For Static IP refer to Static IP on page 25
For PPPoE refer to PPPoE on page 26
For PPTP refer to PPTP on page 27
For L2TP refer to -51on page 29
For DS-Lite refer to DS-Lite on page 31
To congure an IPv6 connection, click the IPv6 link. Refer to IPv6 on page 60.
24D-Link DIR-842 User Manual
Section 4 - Conguration
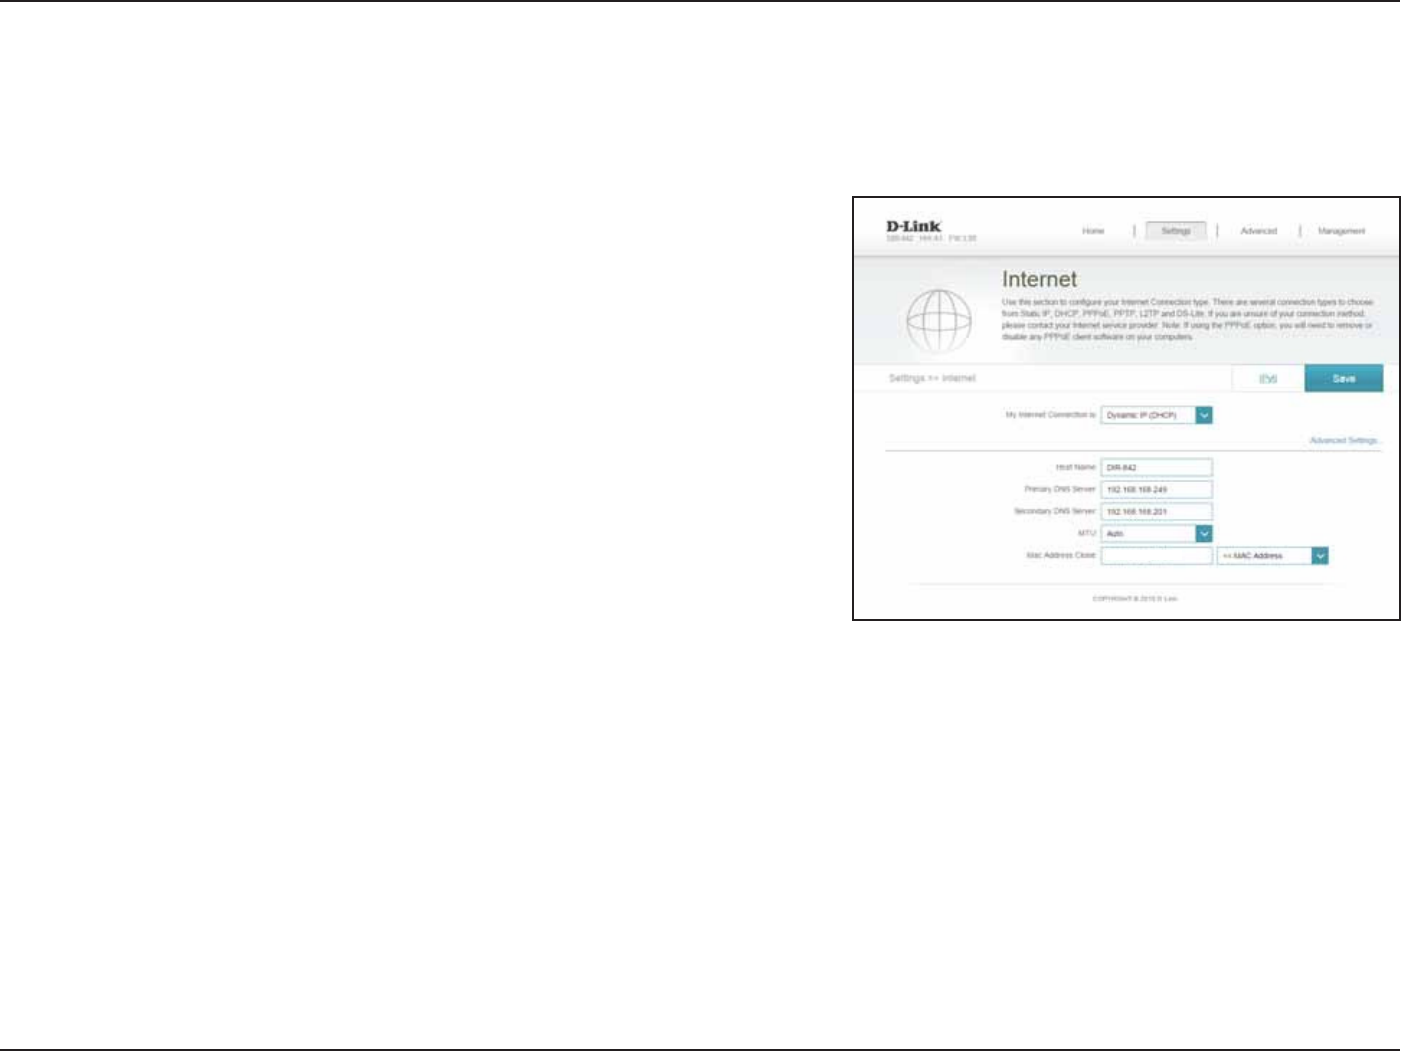
The host name is optional but may be required by some ISPs. Leave
it blank if you are not sure.
Enter the primary DNS server IP address assigned by your ISP. This
address is usually obtained automatically from your ISP.
Enter the secondary DNS server IP address assigned by your ISP. This
address is usually obtained automatically from your ISP.
Maximum Transmission Unit - you may need to change the MTU for
optimal performance with your ISP.
The default MAC address is set to the physical MAC address of the
SPVUFS:PVDBO VTFUIFESPQEPXONFOVUPSFQMBDFUIF *OUFSOFU
port’s MAC address with the MAC address of a connected client.
Click Save when you are done.
Host Name:
Primary DNS
Server:
Secondary DNS
Server:
MTU:
."$"EESFTT
Clone:
Dynamic IP (DCHP)
Select Dynamic IP (DHCP)UPPCUBJO*1BEESFTTJOGPSNBUJPOBVUPNBUJDBMMZGSPNZPVS*OUFSOFU4FSWJDF1SPWJEFS*414FMFDUUIJTPQUJPOJGZPVS*41
does not give you an IP address to use.
25D-Link DIR-842 User Manual
Section 4 - Conguration
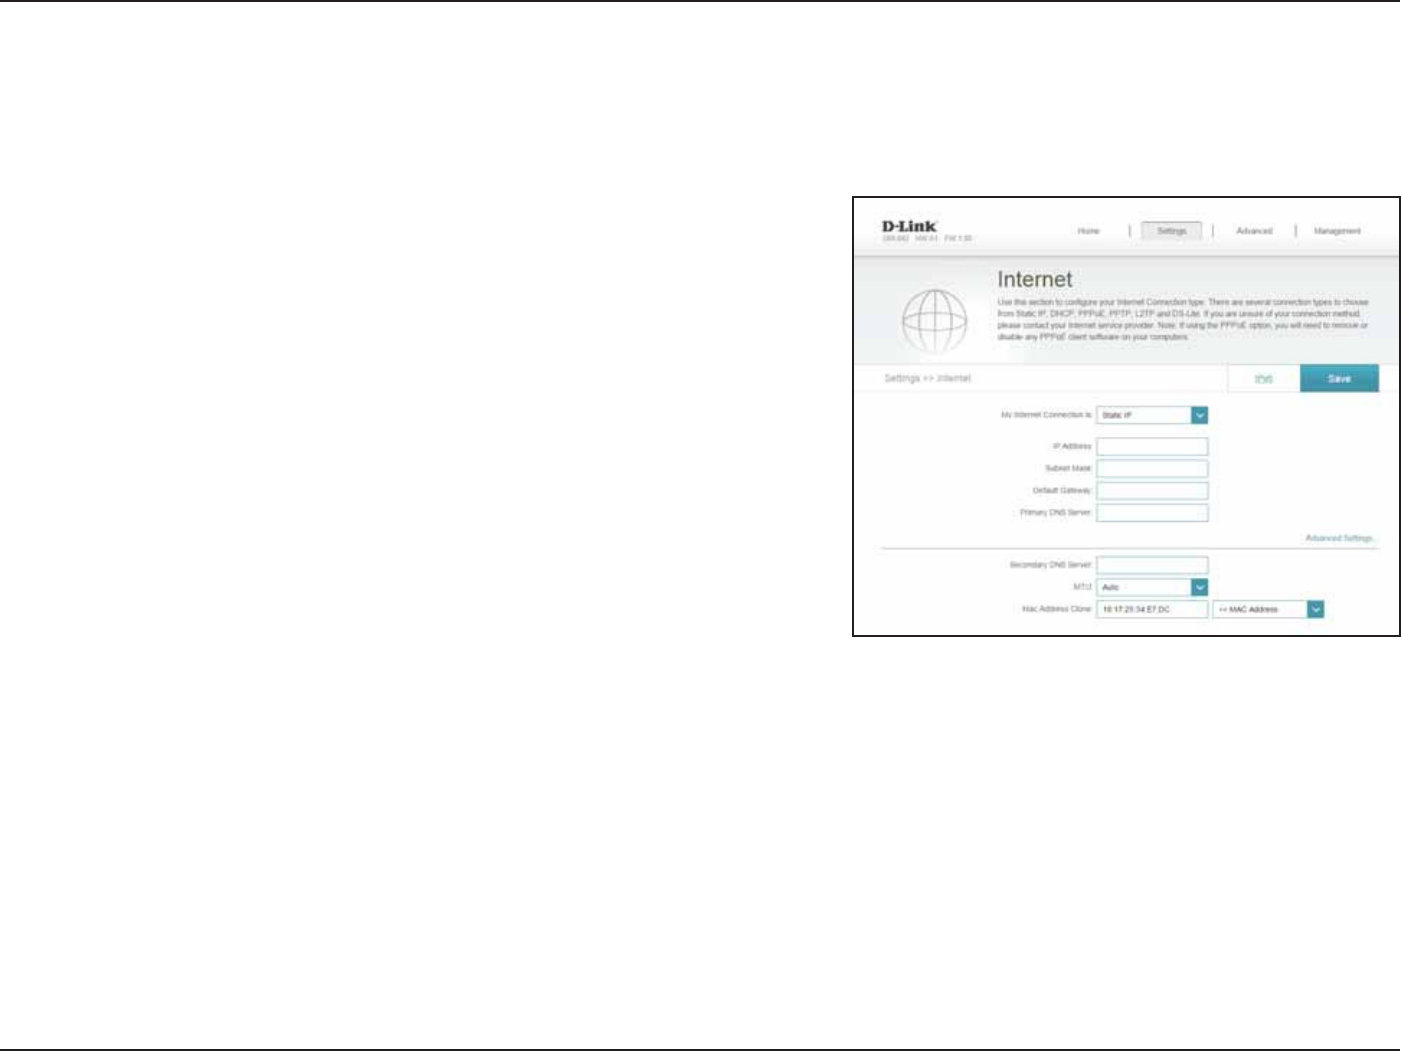
Enter the IP address provided by your ISP.
Enter the subnet mask provided by your ISP.
Enter the default gateway address provided by your ISP.
Enter the primary DNS server IP address assigned by your ISP.
Enter the secondary DNS server IP address assigned by your ISP.
Maximum Transmission Unit - you may need to change the MTU for
optimal performance with your ISP.
The default MAC address is set to the physical MAC address of the
SPVUFS:PVDBOVTFESPQEPXONFOVUPSFQMBDFUIF*OUFSOFUQPSUT
MAC address with the MAC address of a connected client.
Click Save when you are done.
*1"EESFTT
Subnet Mask:
Default
(BUFXBZ
Primary DNS
Server:
Secondary DNS
Server:
MTU:
Static IP
4FMFDU4UBUJD*1JGZPVS*1JOGPSNBUJPOJTQSPWJEFECZZPVS*OUFSOFUTFSWJDFQSPWJEFS*41
26D-Link DIR-842 User Manual
Section 4 - Conguration
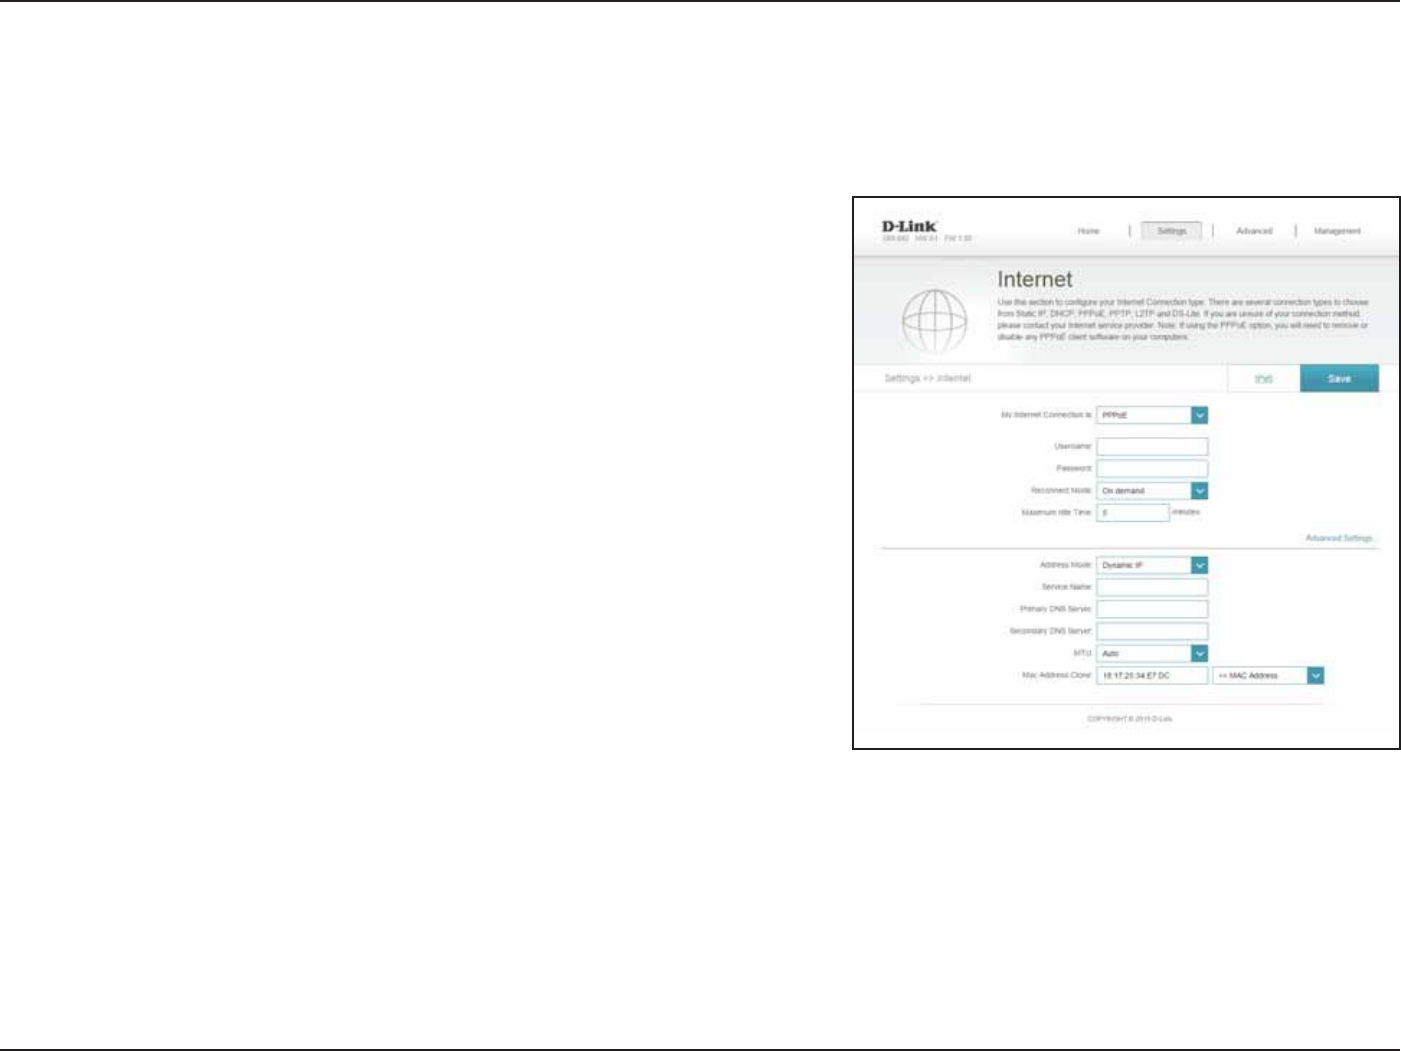
Enter the username provided by your ISP.
Enter the password provided by your ISP.
Select either "MXBZTPO, 0O%FNBOE, or Manual.
Enter a maximum idle time during which the Internet connection is
maintained during inactivity. To disable this feature, enable "VUP
reconnect.
Select Static IP if your ISP assigned you the IP address, subnet mask,
gateway, and DNS server addresses. In most cases, select Dynamic IP.
&OUFSUIF*1BEESFTTQSPWJEFECZZPVS*414UBUJD*1POMZ
&OUFSUIF*41TFSWJDFOBNFPQUJPOBM
Enter the primary DNS server IP address assigned by your ISP.
Enter the secondary DNS server IP address assigned by your ISP.
Maximum Transmission Unit - you may need to change the MTU for
optimal performance with your ISP.
Click Save when you are done.
Username:
Password:
Reconnect
Mode:
Maximum Idle
Time:
"EESFTT.PEF
*1"EESFTT
Service Name:
Primary DNS
Server:
Secondary DNS
Server:
MTU:
Select PPPoE if your Internet connection requires you to enter a username and password. This information is provided by your Internet Service
1SPWJEFS*41
PPPoE

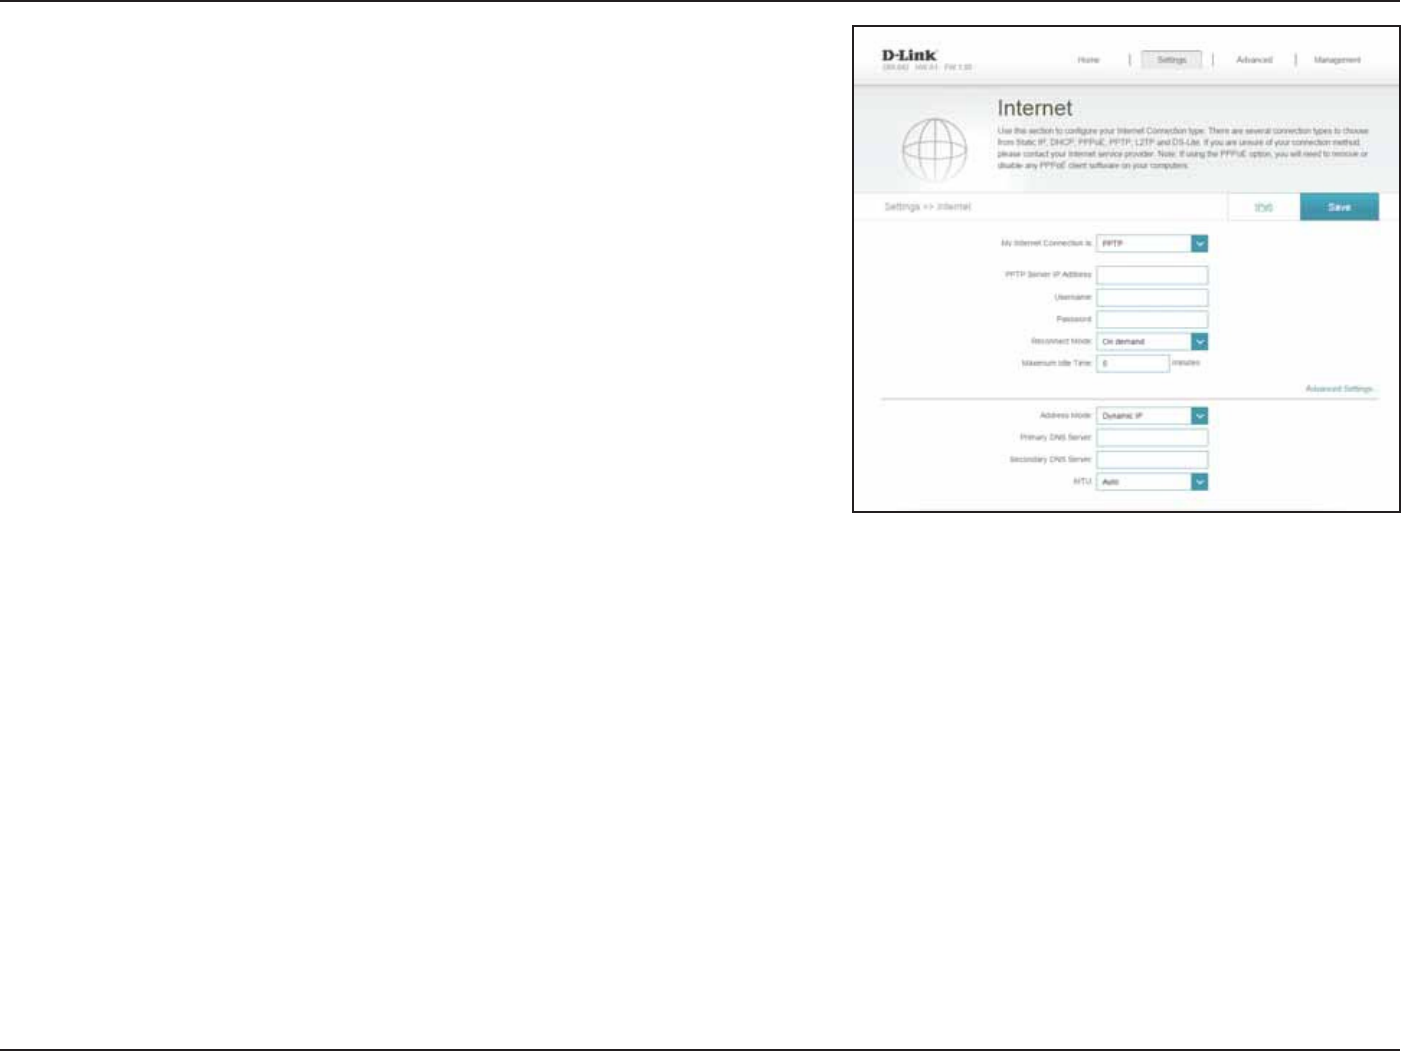
27D-Link DIR-842 User Manual
Section 4 - Conguration
Enter the PPTP server IP address provided by your ISP.
Enter the username provided by your ISP.
Enter the password provided by your ISP.
Select either "MXBZTPO, 0O%FNBOE, or Manual.
Enter a maximum idle time during which the Internet connection
is maintained during inactivity. To disable this feature, enable Auto-
reconnect.
Select Static IP if your ISP assigned you the IP address, subnet mask,
gateway, and DNS server addresses. In most cases, select Dynamic IP.
&OUFSUIF*1BEESFTTQSPWJEFECZZPVS*414UBUJD*1POMZ
&OUFSUIFTVCOFUNBTLQSPWJEFECZZPVS*414UBUJD*1POMZ
&OUFSUIFHBUFXBZ*1BEESFTTQSPWJEFECZZPVS*414UBUJD*1POMZ
Enter the primary DNS server IP address assigned by your ISP.
PPTP Server IP
"EESFTT
Username:
Password:
Reconnect
Mode:
Maximum Idle
Time:
"EESFTT.PEF
PPTP IP
"EESFTT
PPTP Subnet
Mask:
1151(BUFXBZ
*1"EESFTT
Primary DNS
Server:
Choose PPTP1PJOUUP1PJOU5VOOFMJOH1SPUPDPMJGZPVS*OUFSOFU4FSWJDF1SPWJEFS*41VTFTB1151DPOOFDUJPO:PVS*41XJMMQSPWJEFZPVXJUIB
username and password.
PPTP
28D-Link DIR-842 User Manual
Section 4 - Conguration
Enter the secondary DNS server IP address assigned by your ISP.
Maximum Transmission Unit - you may need to change the MTU for
optimal performance with your ISP.
Click Save when you are done.
Secondary DNS
Server:
MTU:
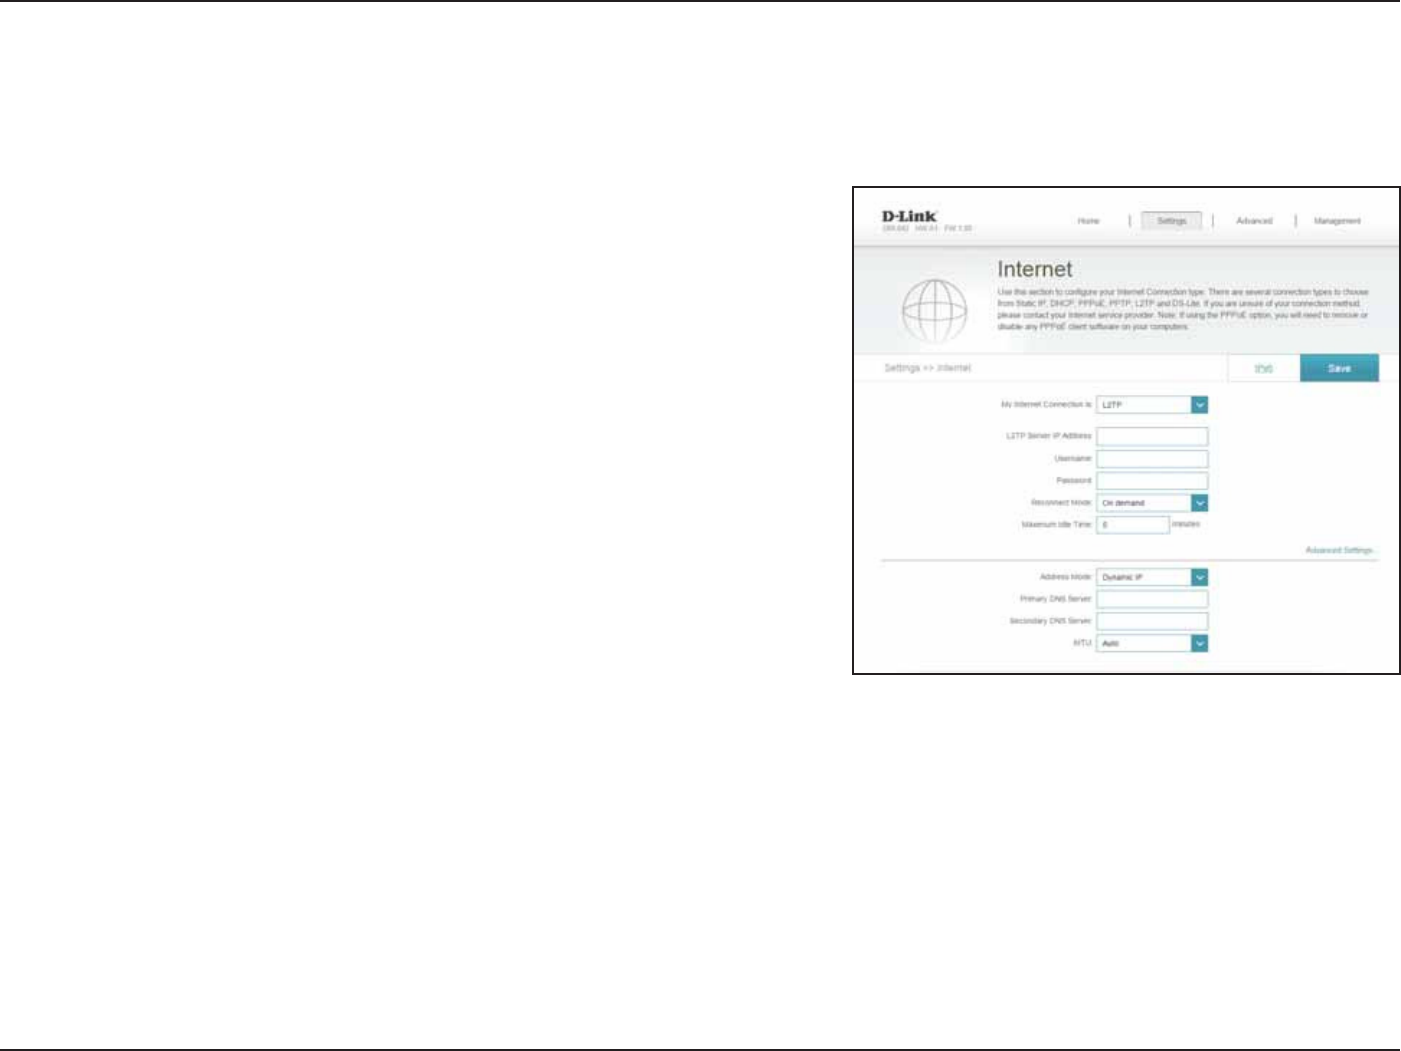
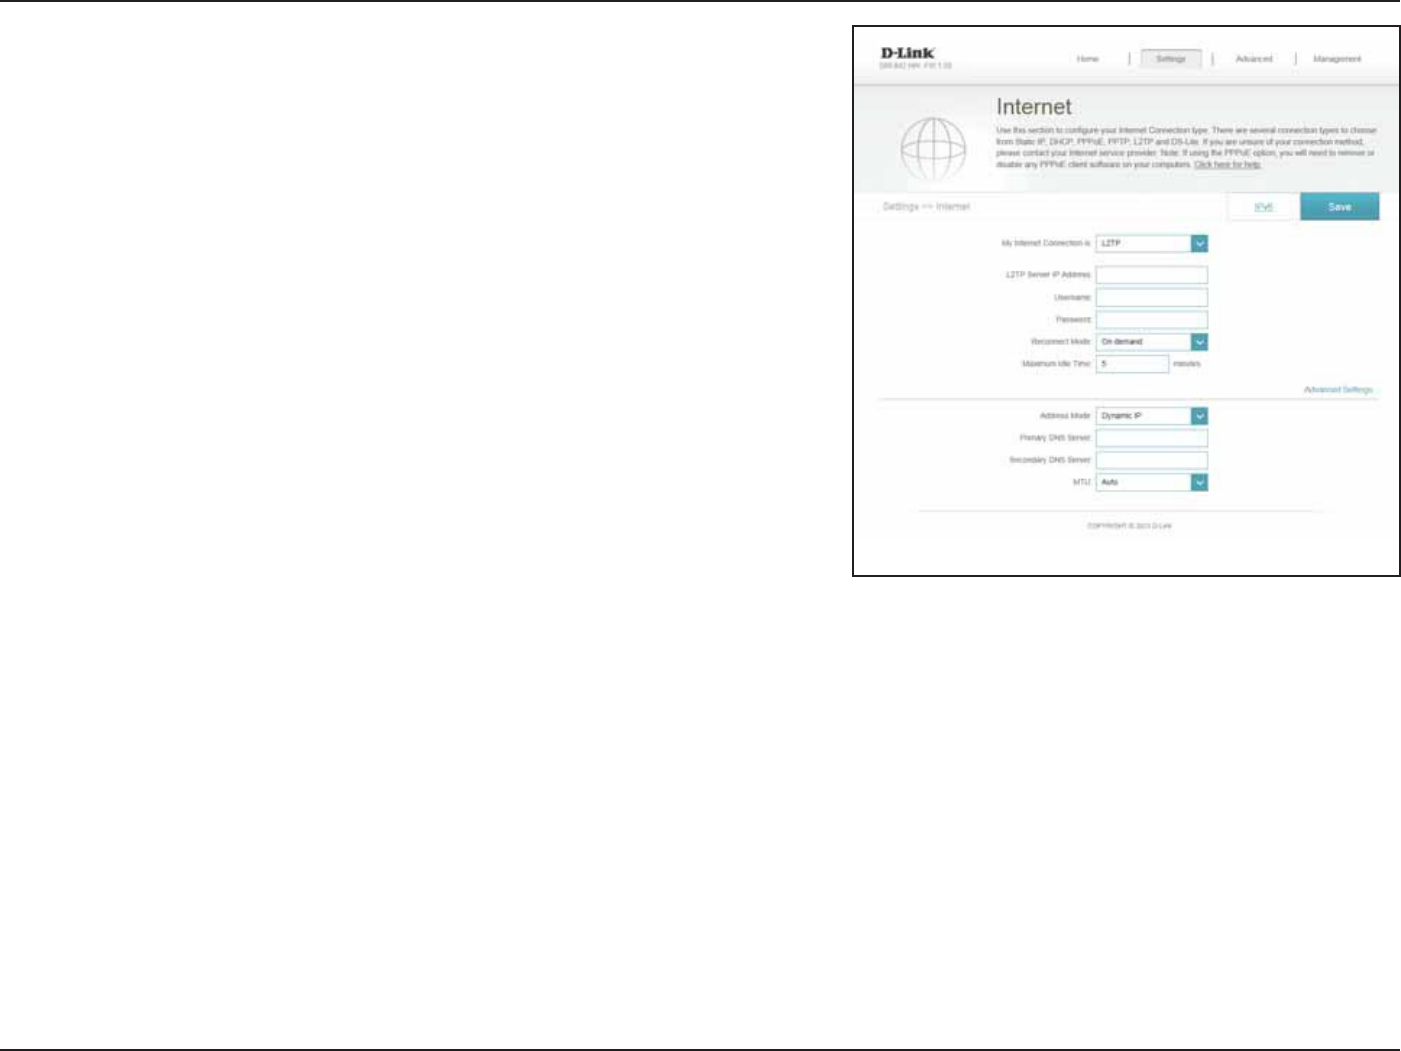
29D-Link DIR-842 User Manual
Section 4 - Conguration
L2TP
Enter the L2TP server IP address provided by your ISP.
Enter the username provided by your ISP.
Enter the password provided by your ISP.
Select either "MXBZTPO, 0O%FNBOE, or Manual.
Enter a maximum idle time during which the Internet connection
is maintained during inactivity. To disable this feature, enable Auto-
reconnect.
Select Static IP if your ISP assigned you the IP address, subnet mask,
gateway, and DNS server addresses. In most cases, select Dynamic IP.
&OUFSUIF*1BEESFTTQSPWJEFECZZPVS*414UBUJD*1POMZ
&OUFSUIFTVCOFUNBTLQSPWJEFECZZPVS*414UBUJD*1POMZ
&OUFSUIFHBUFXBZ*1BEESFTTQSPWJEFECZZPVS*414UBUJD*1POMZ
Enter the primary DNS server IP address assigned by your ISP.
-514FSWFS*1
"EESFTT
Username:
Password:
Reconnect
Mode:
Maximum Idle
Time:
"EESFTT.PEF
-51*1
"EESFTT
-514VCOFU
Mask:
-51(BUFXBZ
*1"EESFTT
Primary DNS
Server:
Choose -51-BZFS5VOOFMJOH1SPUPDPMJGZPVS*OUFSOFU4FSWJDF1SPWJEFS*41VTFTB-51DPOOFDUJPO:PVS*41XJMMQSPWJEFZPVXJUIBVTFSOBNF
and password.
30D-Link DIR-842 User Manual
Section 4 - Conguration
Enter the secondary DNS server IP address assigned by your ISP.
Maximum Transmission Unit - you may need to change the MTU for
optimal performance with your ISP.
Click Save when you are done.
Secondary DNS
Server:
MTU:
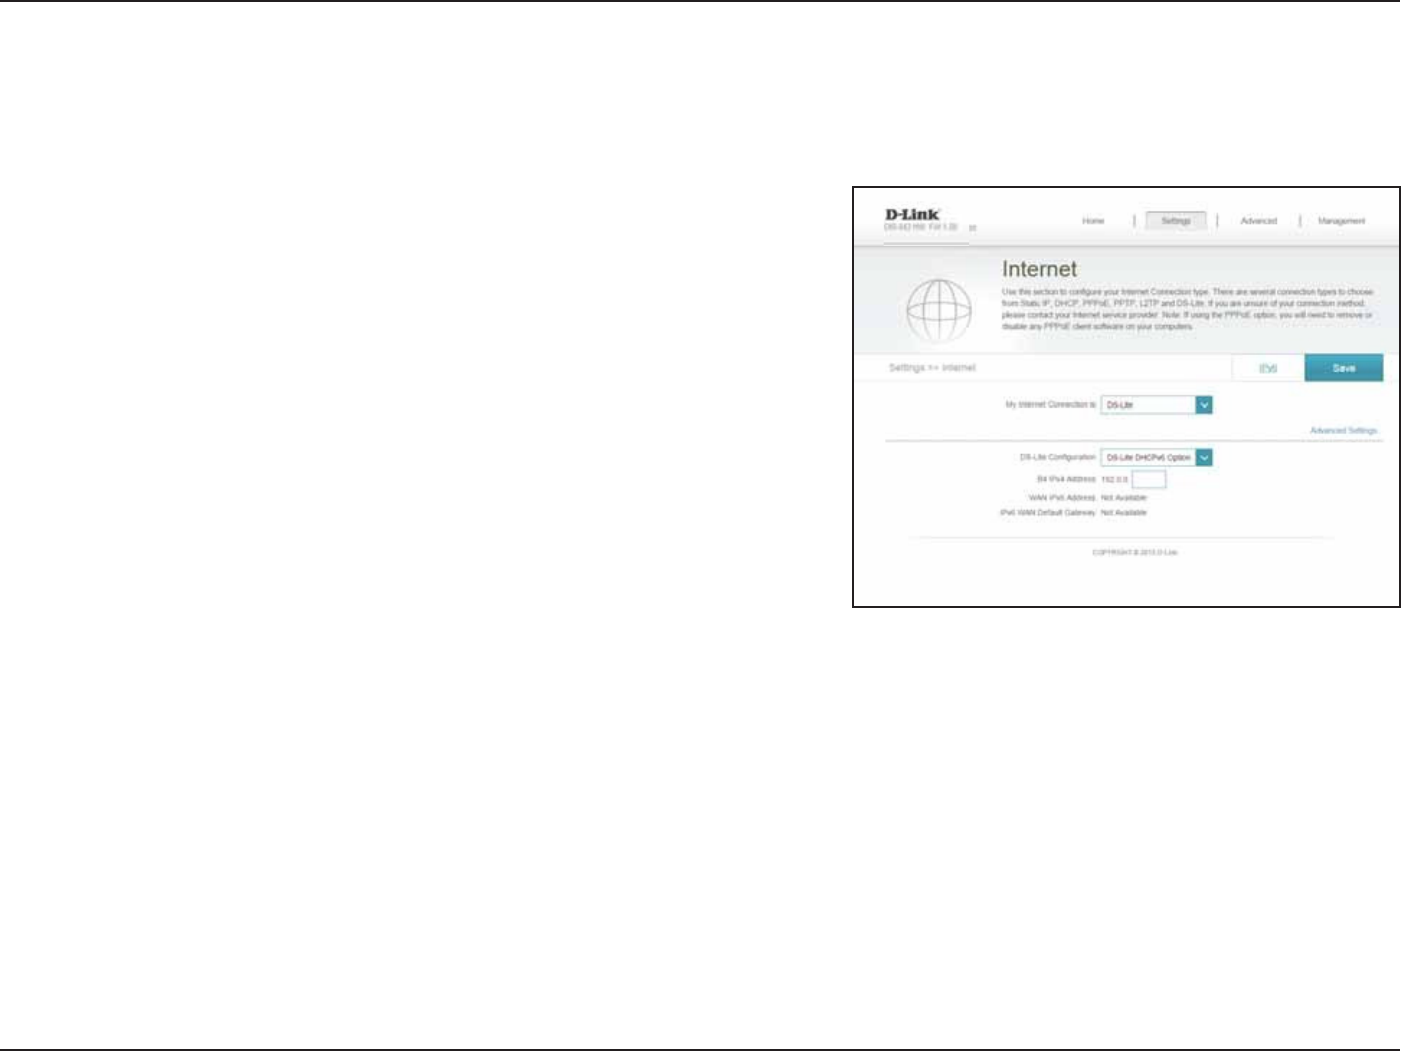
31D-Link DIR-842 User Manual
Section 4 - Conguration
DS-Lite
Select DS-Lite DHCPv6 to let the router allocate the AFTR IPv6
address automatically. Select Manual Conguration to enter the
AFTR IPv6 address manually.
If you selected Manual Conguration above, enter the AFTR IPv6
address here.
Enter the B4 IPv4 address value here.
Once connected, the WAN IPv6 address will be displayed here.
Once connected, the IPv6 WAN default gateway address will be
displayed here.
Click Save when you are done.
DS-Lite
Conguration:
"'53*1W
"EESFTT
B4 IPv6
"EESFTT
8"/*1W
"EESFTT
*1W8"/
Default
(BUFXBZ
DS-Lite is an IPv6 connection type. After selecting DS-Lite, the following parameters will be available for conguration:
32D-Link DIR-842 User Manual
Section 4 - Conguration
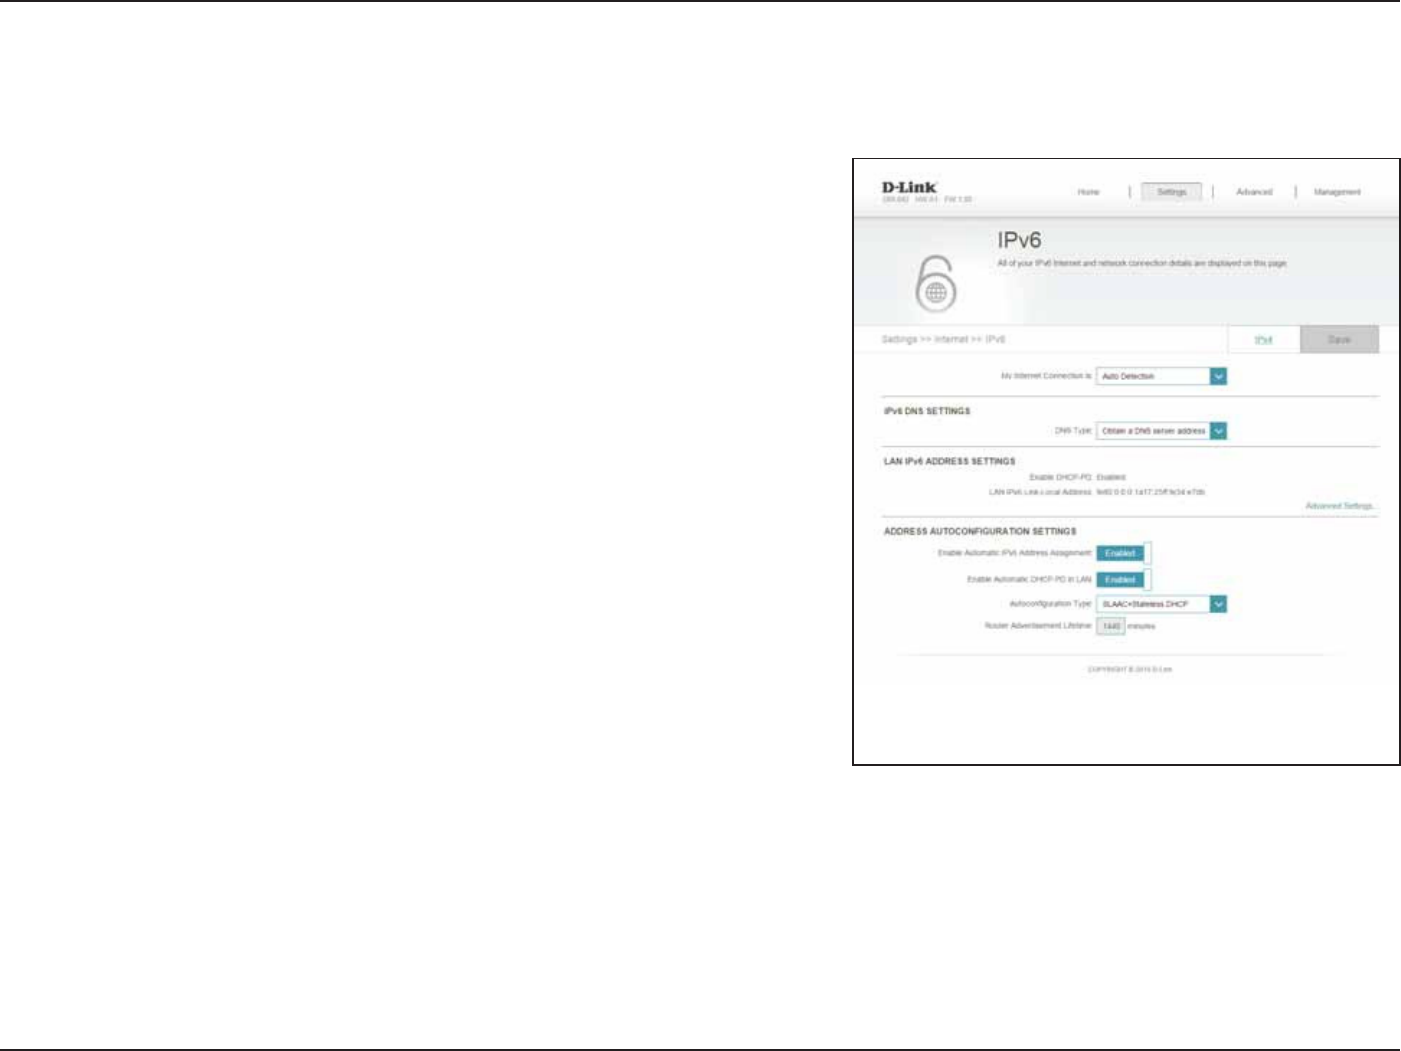
IPv6
To congure an IPv6 connection, click the IPv6 link. To return to the IPv4 settings, click IPv4.
$IPPTFZPVS*1WDPOOFDUJPOUZQFGSPNUIFESPQEPXONFOV:PV
will be presented with the appropriate options for your connection
type. $MJDL"EWBODFE4FUUJOHT. to expand the list and see all of
the options.
My Internet
Connection Is:
For "VUP%FUFDUJPO refer to "VUP%FUFDUJPOon page 33.
For Static IPv6 refer to Static IPv6 on page 35.
For "VUP$POöHVSBUJPO4-""$%)$1W refer to "VUP$POöHVSBUJPO4-""$
DHCPv6) on page 37.
For PPPoE refer to PPPoE on page 39.
For IPv6 in IPv4 Tunnel refer to IPv6 in IPv4 Tunnel on page 41.
For 6 to 4 refer to 6 to 4 on page 43.
For 6rd refer to 6rd “6rd” on page 44
For -PDBM$POOFDUJWJUZ0OMZ refer to -PDBM$POOFDUJWJUZ0OMZ on “Local Connec-
tivity Only” on page 46.
33D-Link DIR-842 User Manual
Section 4 - Conguration
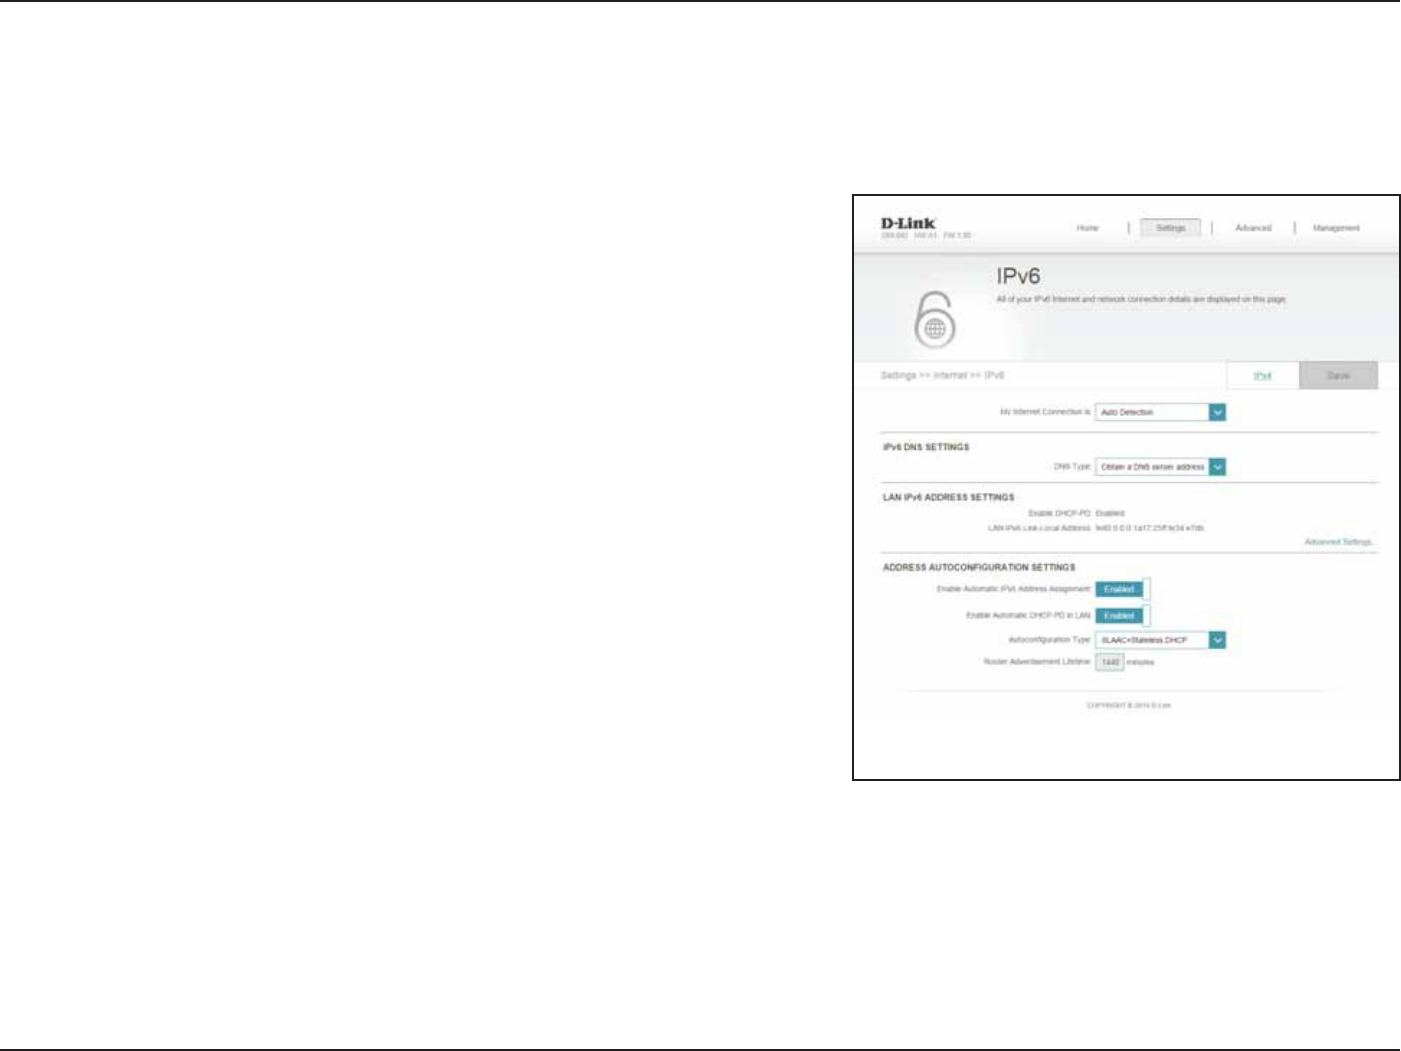
Auto Detection
Select either Obtain DNS server address automatically or Use the
following DNS address.
If you selected Use the following DNS address above, enter the
primary DNS server address.
If you selected Use the following DNS address above, enter the
secondary DNS server address.
Enable or disable prex delegation services.
*GZPVEJTBCMFE%)$11%FOUFSUIF-"/MPDBM*1WBEESFTTGPSUIF
router.
Displays the router’s LAN link-local address.
Enable or disable the Automatic IPv6 Address Assignment feature.
Enable or disable DHCP-PD for other IPv6 routers connected to the
LAN interface.
/PUF5IJTGFBUVSFSFRVJSFTBTNBMMFS TVCOFUQSFöYUIBO JF
BMMPXJOHGPSBMBSHFSBEESFTTBMMPDBUJPOTVDIBT$POUBDUZPVS
ISP for more information.
DNS Type:
Primary DNS
Server:
Secondary DNS
Server:
Enable DHCP-
PD:
LAN IPv6
Address:
LAN IPv6 Link-
Local Address:
Enable
Automatic
IPv6 Address
Assignment:
Enable
Automatic
DHCP-PD in
LAN:
"VUP%FUFDUJPONPEFOPU"VUP$POöHVSBUJPONPEFBVUPNBUJDBMMZEFUFDUT*1WUIFDPOOFDUJPONFUIPEVTFECZZPVS*OUFSOFU4FSWJDF1SPWJEFS
*41*GZPVS*41QSPWJEFTBO*1WTFSWJDFBOE"VUP%FUFDUJPOGBJMFEUPEFUFDUJUUIFVTFSNVTUNBOVBMMZTFMFDUBOPUIFS*1WDPOOFDUJPOUZQFTVDI
BT111P&"VUP$POöHVSBUJPOSE%4-JUFFUD
34D-Link DIR-842 User Manual
Section 4 - Conguration
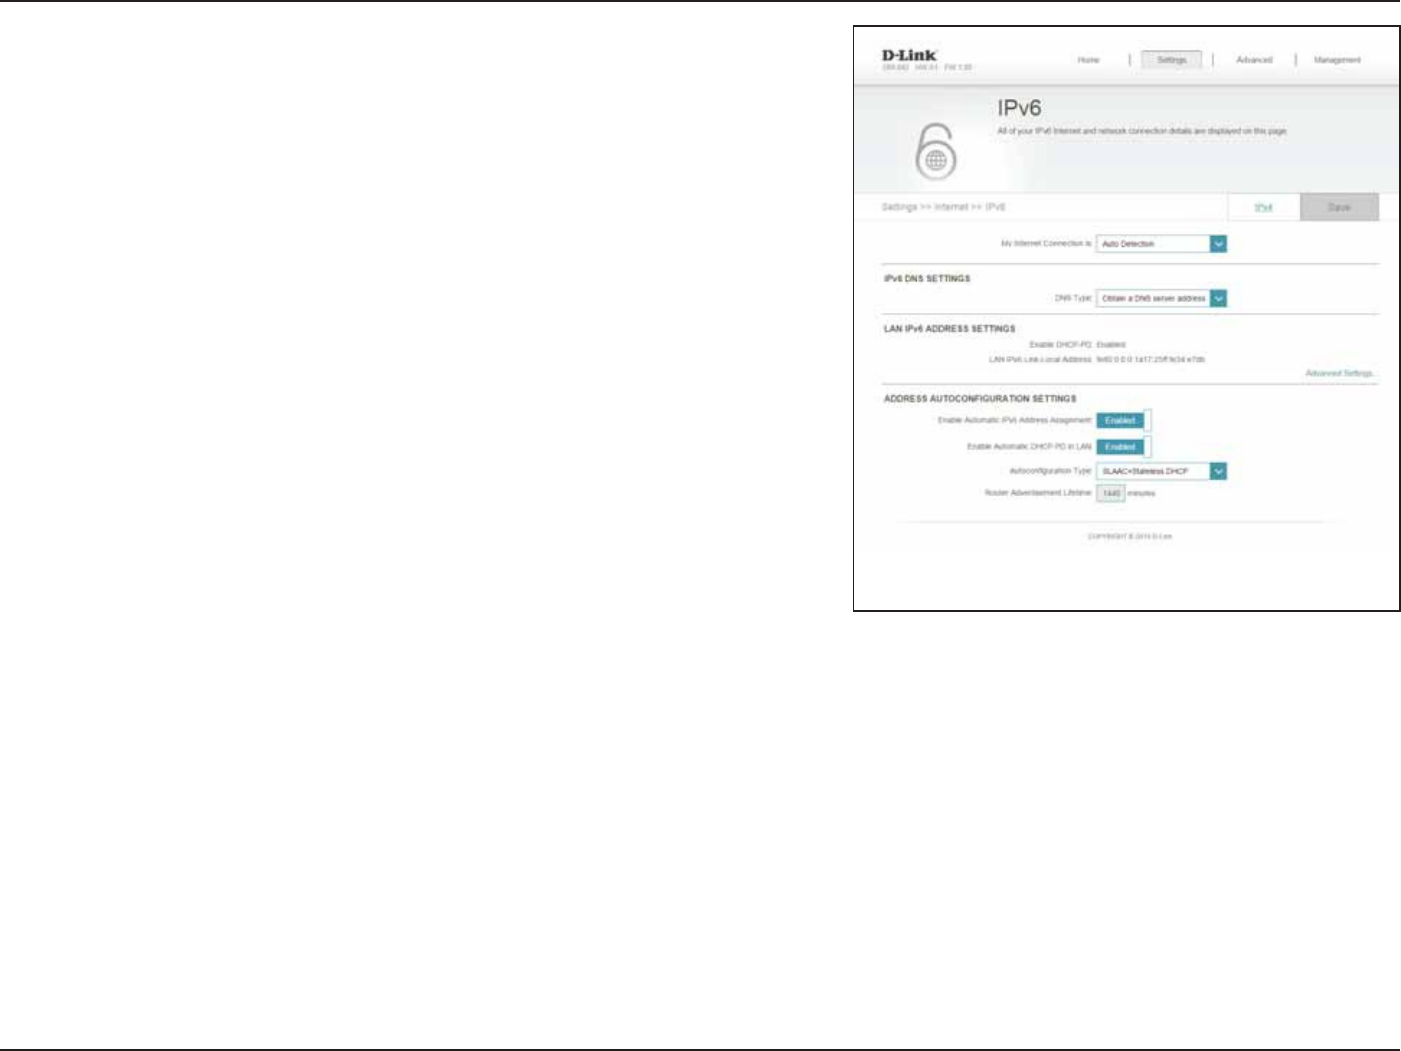
4FMFDU 4UBUFGVM%)$1W4-""$ 3%/44PS 4-""$4UBUFMFTT
DHCPv6.
&OUFSUIF*1WBEESFTTMJGFUJNFJONJOVUFT
Click Save when you are done.
Autoconguration
Type:
Router
Advertisement
Lifetime:
35D-Link DIR-842 User Manual
Section 4 - Conguration
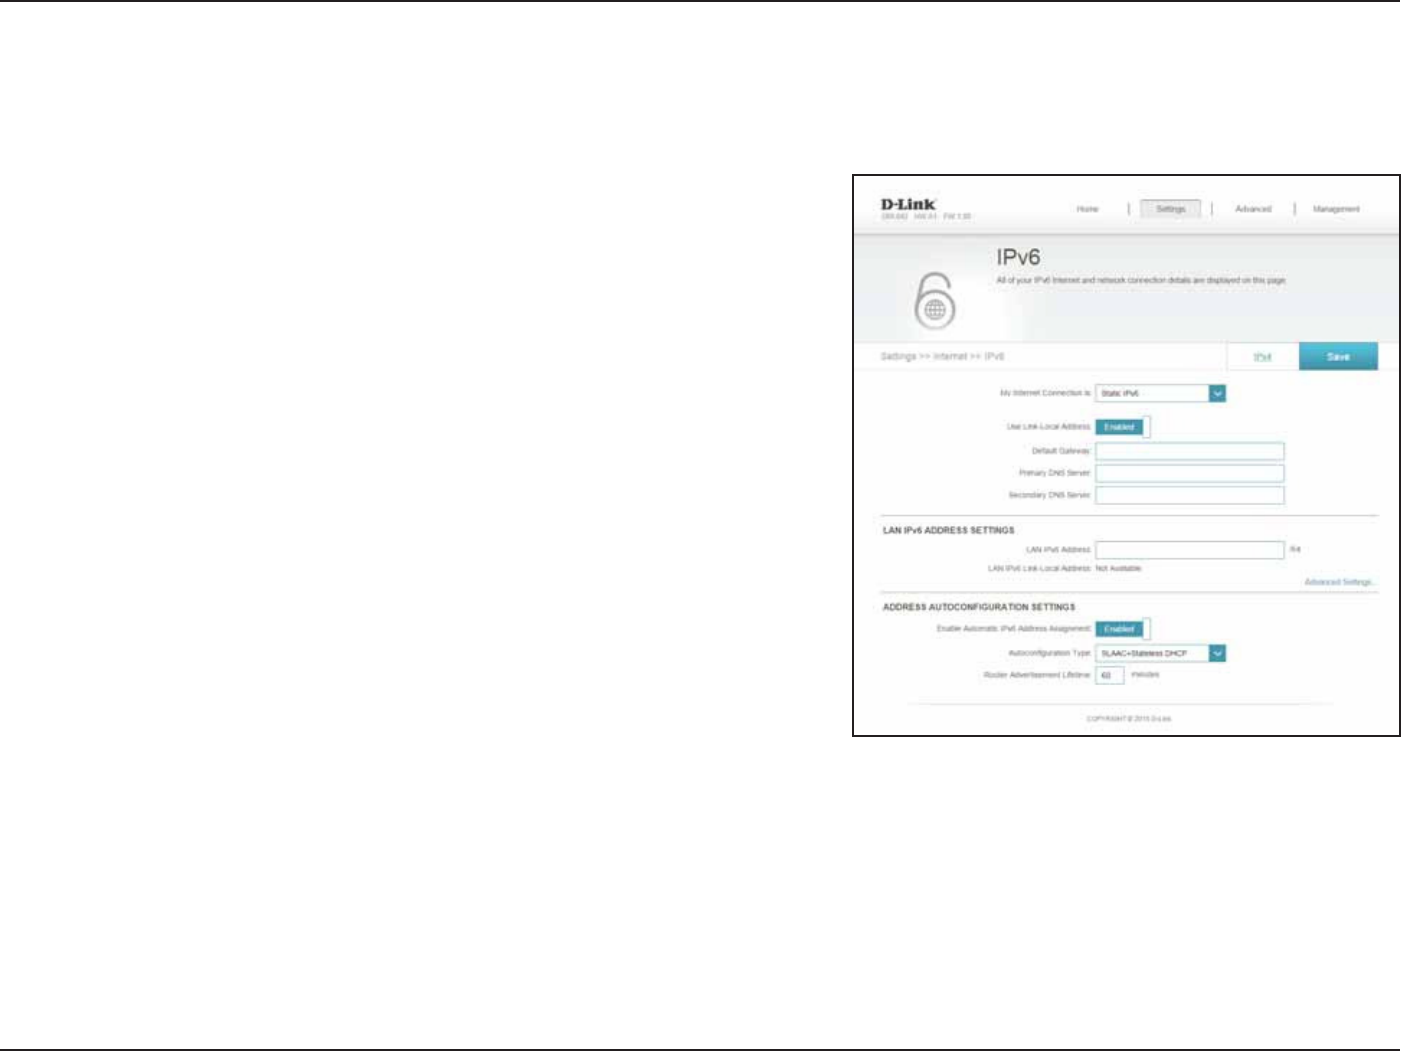
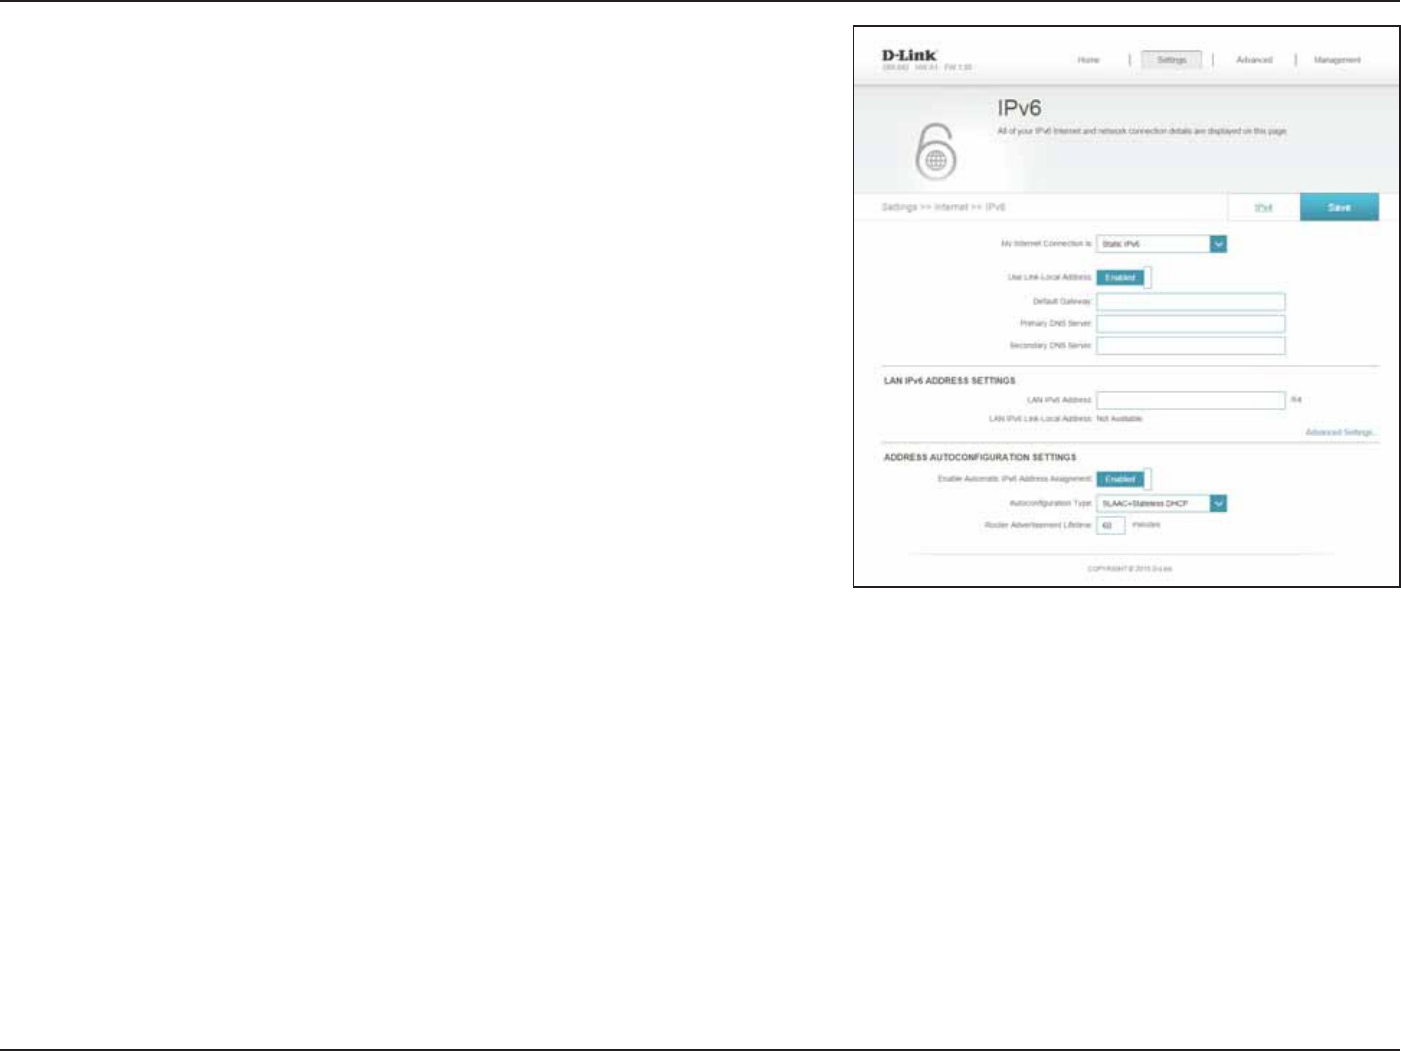
Static IPv6
Enable or disable a link-local address.
If you disabled Use Link-Local Address, enter the address supplied
by your ISP.
If you disabled Use Link-Local Address, enter the subnet prex length
supplied by your ISP.
Enter the default gateway for your IPv6 connection.
Enter the primary DNS server address.
Enter the secondary DNS server address.
&OUFSUIF-"/MPDBM*1WBEESFTTGPSUIFSPVUFS
Displays the router’s LAN link-local address.
Check to enable the Automatic IPv6 Address Assignment feature.
Use Link-Local
Address:
IPv6 Address:
Subnet Prex
Length:
Default
Gateway:
Primary DNS
Server:
Secondary DNS
Server:
LAN IPv6
Address:
LAN IPv6 Link-
Local Address:
Enable
Automatic
IPv6 Address
Assignment:
Select Static IPJGZPVS*1WJOGPSNBUJPOJTQSPWJEFECZZPVS*OUFSOFUTFSWJDFQSPWJEFS*41BOEUIFZSFRVFTUUIBUZPVVTFBTUBUJD*1
36D-Link DIR-842 User Manual
Section 4 - Conguration
4FMFDU 4UBUFGVM%)$1W4-""$ 3%/44PS 4-""$4UBUFMFTT
DHCPv6.
&OUFSUIF*1WBEESFTTMJGFUJNFJONJOVUFT
Click Save when you are done.
Autoconguration
Type:
Router
Advertisement
Lifetime:
37D-Link DIR-842 User Manual
Section 4 - Conguration
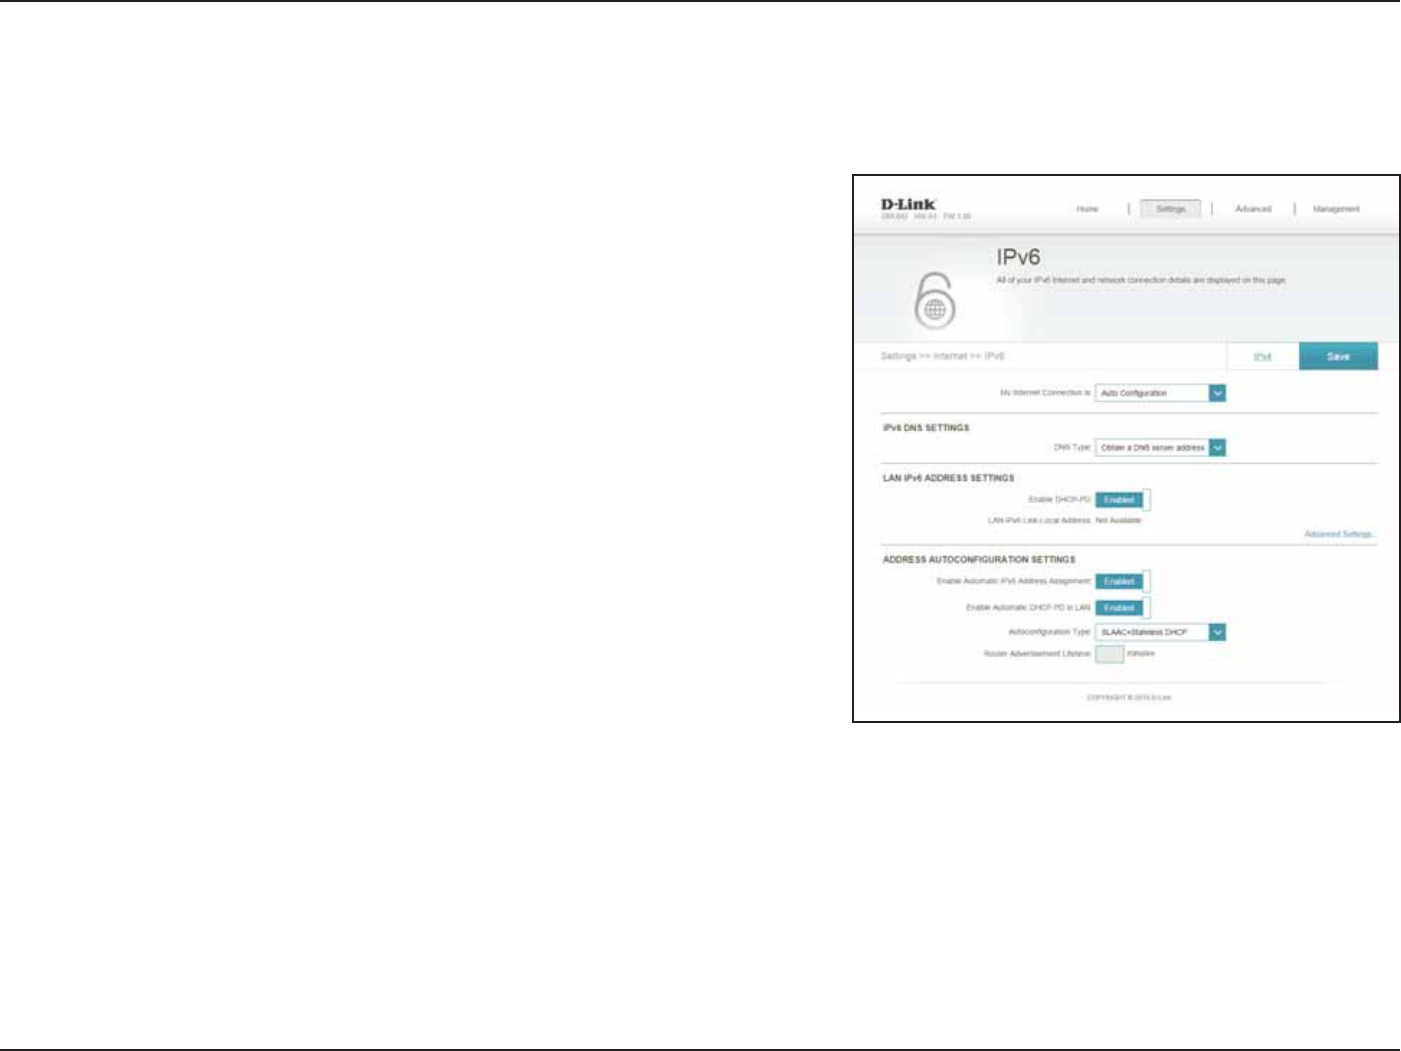
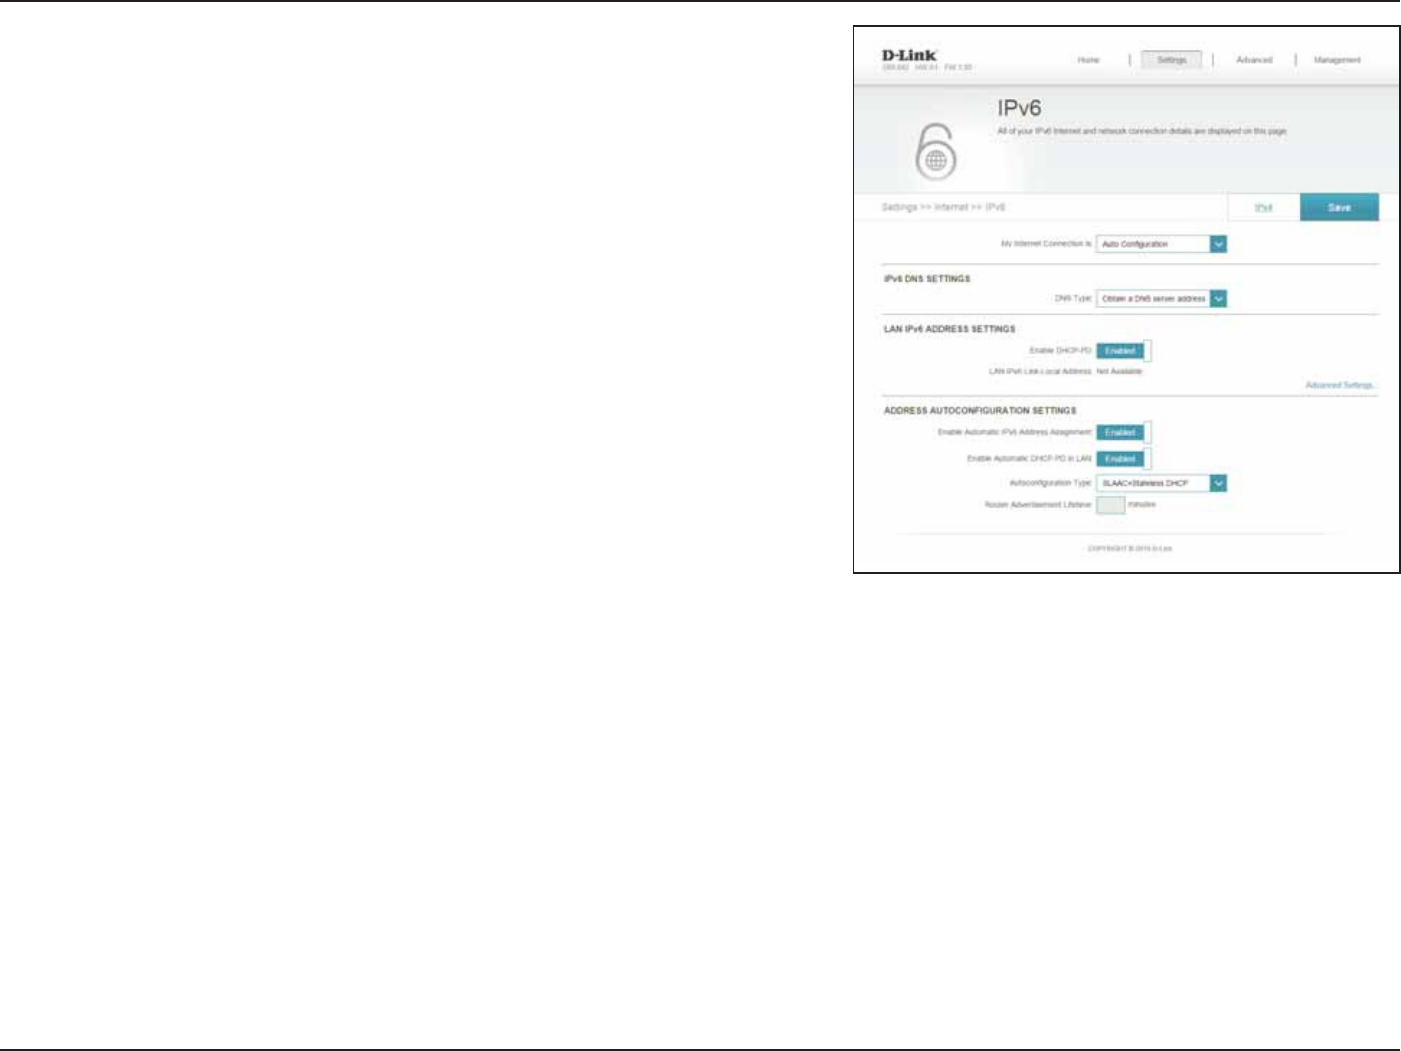
Auto Conguration (SLAAC/DHCPv6)
Select either Obtain DNS server address automatically or Use the
following DNS address.
If you selected Use the following DNS address above, enter the
primary DNS server address.
If you selected Use the following DNS address above, enter the
secondary DNS server address.
Enable or disable prex delegation services.
*GZPVEJTBCMFE%)$11%FOUFSUIF-"/MPDBM*1WBEESFTTGPSUIF
router.
Displays the router’s LAN link-local address.
Enable or disable the Automatic IPv6 Address Assignment feature.
Enable or disable DHCP-PD for other IPv6 routers connected to the
LAN interface.
/PUF5IJTGFBUVSFSFRVJSFTBTNBMMFS TVCOFUQSFöYUIBO JF
BMMPXJOHGPSBMBSHFSBEESFTTBMMPDBUJPOTVDIBT$POUBDUZPVS
ISP for more information.
DNS Type:
Primary DNS
Server:
Secondary DNS
Server:
Enable DHCP-
PD:
LAN IPv6
Address:
LAN IPv6 Link-
Local Address:
Enable
Automatic
IPv6 Address
Assignment:
Enable
Automatic
DHCP-PD in
LAN:
This is a connection method where the ISP assigns your IPv6 address when your router requests one from the ISP’s server. Some ISPs require you
to make some settings on your side before your router can connect to the IPv6 Internet.
38D-Link DIR-842 User Manual
Section 4 - Conguration
4FMFDU 4UBUFGVM%)$1W4-""$ 3%/44PS 4-""$4UBUFMFTT
DHCPv6.
&OUFSUIF*1WBEESFTTMJGFUJNFJONJOVUFT
Click Save when you are done.
Autoconguration
Type:
Router
Advertisement
Lifetime:
39D-Link DIR-842 User Manual
Section 4 - Conguration
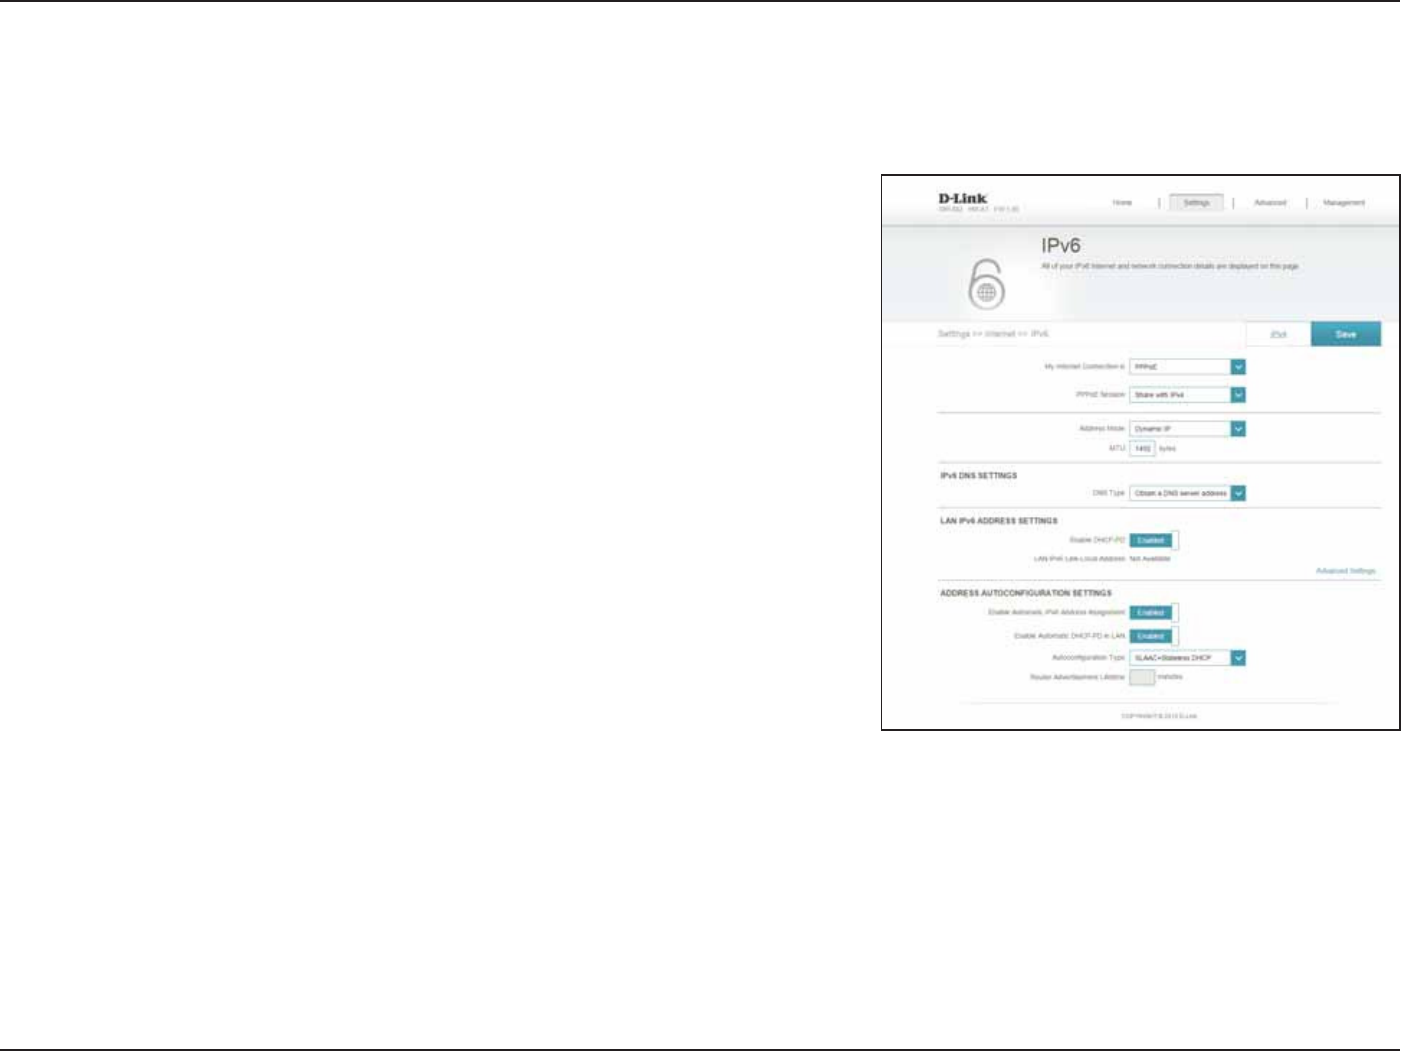
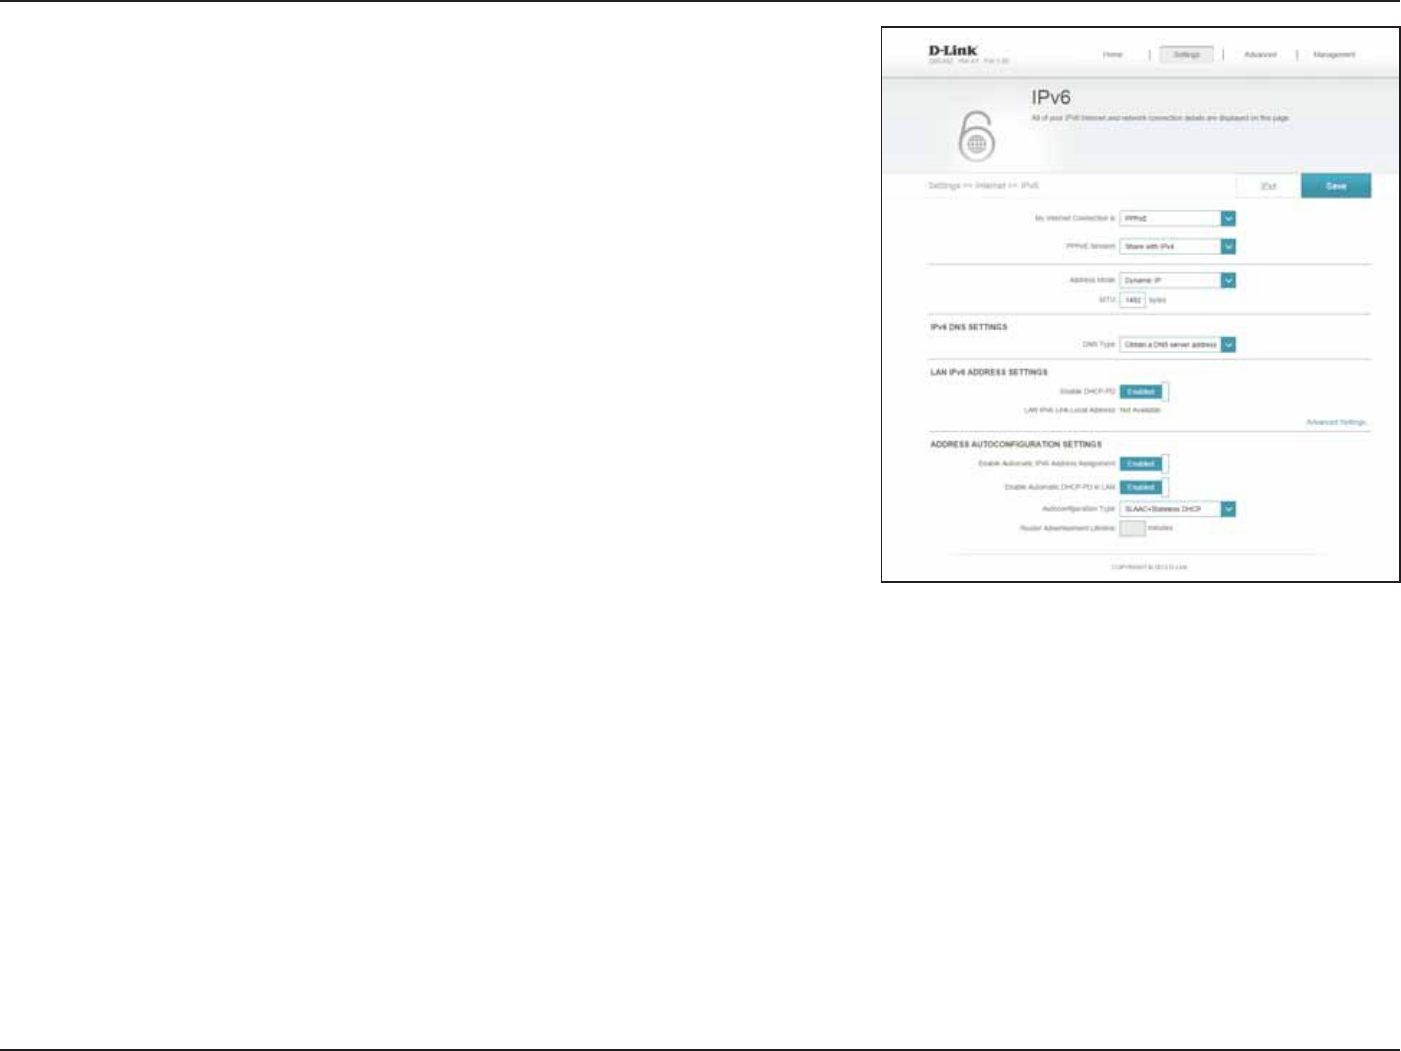
PPPoE
Choose Share with IPv4 to re-use your IPv4 PPPoE username and
password, or Create a new session.
If you selected Create a new session above, enter the PPPoE
username provided by your ISP here.
If you selected Create a new session above, enter the PPPoE
password provided by your ISP here.
Select Static IP if your ISP assigned you the IP address, subnet mask,
gateway, and DNS server addresses. In most cases, select Dynamic IP.
Maximum Transmission Unit - you may need to change the MTU for
optimal performance with your ISP.
Select either 0CUBJO%/4TFSWFSBEESFTTBVUPNBUJDBMMZ or Use the
following DNS address.
PPPoE Session:
Username:
Password:
Address Mode:
MTU:
DNS Type:
Select PPPoE if your Internet connection requires you to enter a username and password. This information is provided by your Internet service
QSPWJEFS*41
40D-Link DIR-842 User Manual
Section 4 - Conguration
Enable DHCP-PD for LAN IPv6.
Displays the router’s LAN link-local address.
Enable automatic IPv6 address assignment.
Enable or disable DHCP-PD for other IPv6 routers connected to the
LAN interface.
Note: This feature requires a smaller subnet prex than /64 (i.e. allowing
for a larger address allocation), such as /63. Contact your ISP for more
information.
Select 4-""$3%/44 or 4-""$4UBUFMFTT%)$14UBUFGVM
(DHCPv6).
&OUFSUIF*1WBEESFTTMJGFUJNFJONJOVUFT
Click Save when you are done.
Enable DHCP-
PD:
LAN IPv6 Link-
Local Address:
Enable
Automatic
IPv6 Address
Assignment:
Enable
Automatic
DHCP-PD in
LAN:
Auto
Conguration
Type:
Router
Advertisement
Lifetime:
41D-Link DIR-842 User Manual
Section 4 - Conguration
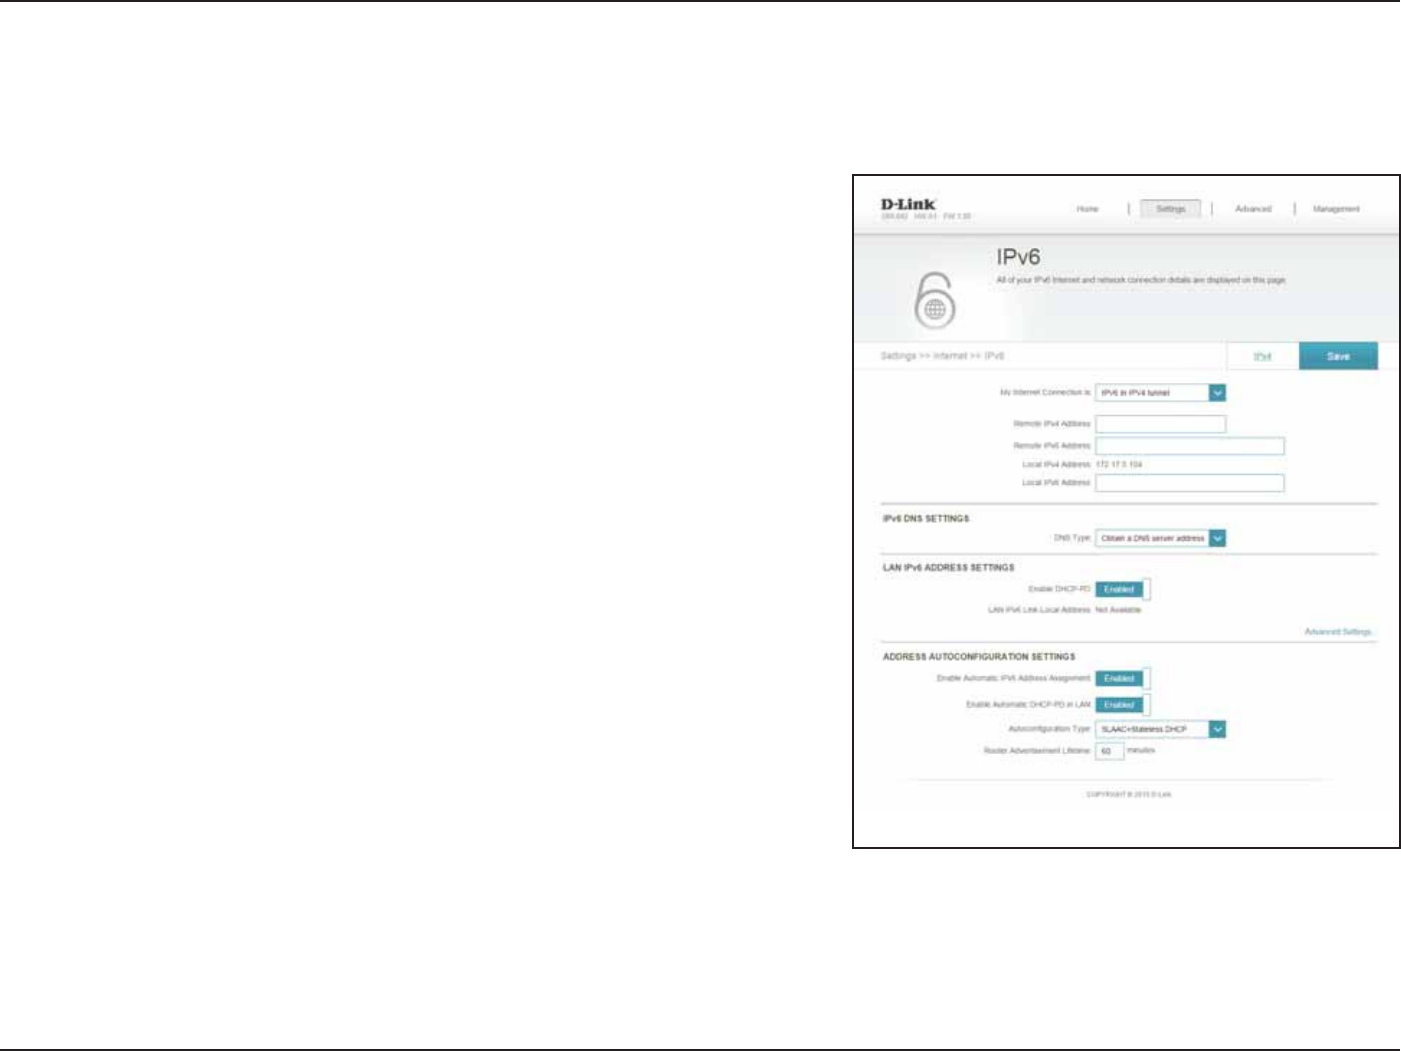
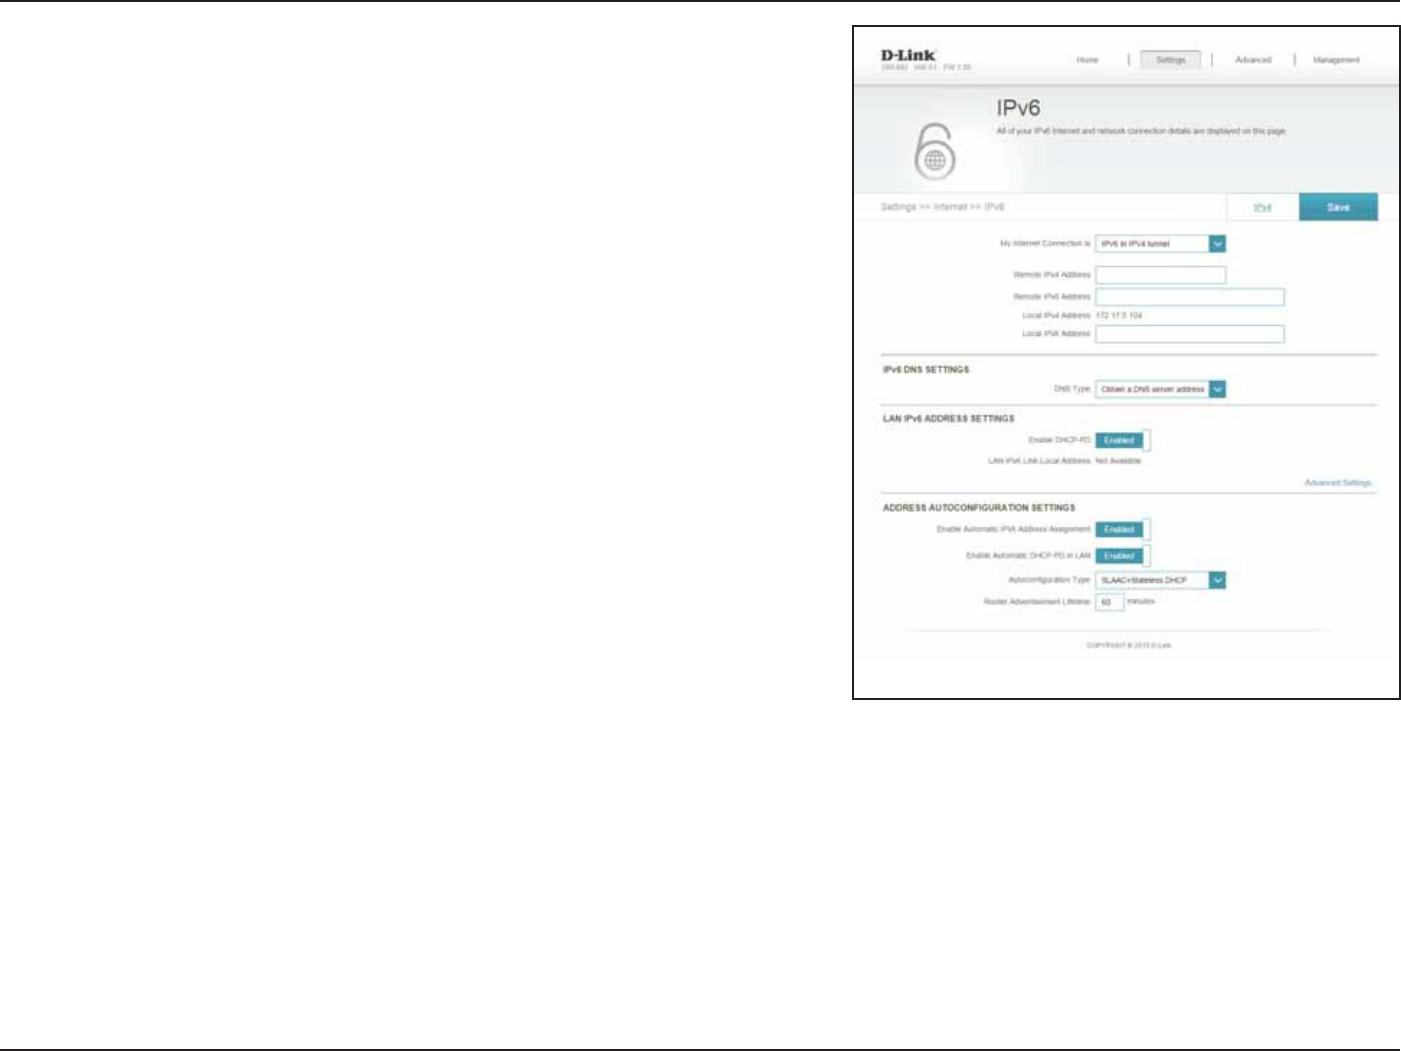
IPv6 in IPv4 Tunnel
Enter the IPv4 remote address you will use.
Enter the IPv6 remote address you will use.
Enter the IPv4 local address you will use.
Enter the IPv6 local address you will use.
Enter the subnet prex length supplied by your ISP.
Select either 0CUBJO%/4TFSWFSBEESFTTBVUPNBUJDBMMZ or Use the
following DNS address.
If you selected Use the following DNS address above, enter the
primary DNS server address.
If you selected Use the following DNS address above, enter the
secondary DNS server address.
Enable or disable prex delegation services.
*GZPVEJTBCMFE%)$11%FOUFSUIF-"/MPDBM*1WBEESFTTGPSUIF
router.
Remote IPv4
Address:
Remote IPv6
Address:
Local IPv4
Address:
Local IPv6
Address:
Subnet Prex
Length:
DNS Type:
Primary DNS
Server:
Secondary DNS
Server:
Enable DHCP-
PD:
LAN IPv6
Address:
The user can congure the IPv6 connection to run in IPv4 Tunnel mode. IPv6 over IPv4 tunneling encapsulates IPv6 packets in IPv4 packets so
that IPv6 packets can be sent over an IPv4 infrastructure.
42D-Link DIR-842 User Manual
Section 4 - Conguration
Displays the router’s LAN link-local address.
Enable or disable the Automatic IPv6 Address Assignment feature.
Enable or disable DHCP-PD for other IPv6 routers connected to the
LAN interface.
Note: This feature requires a smaller subnet prex than /64 (i.e. allowing
for a larger address allocation), such as /63. Contact your ISP for more
information.
Select Stateful (DHCPv6), 4-""$3%/44 or 4-""$4UBUFMFTT
DHCPv6.
&OUFSUIF*1WBEESFTTMJGFUJNFJONJOVUFT
Click Save when you are done.
LAN IPv6 Link-
Local Address:
Enable
Automatic
IPv6 Address
Assignment:
Enable
Automatic
DHCP-PD in
LAN:
Auto
Conguration
Type:
Router
Advertisement
Lifetime:
43D-Link DIR-842 User Manual
Section 4 - Conguration
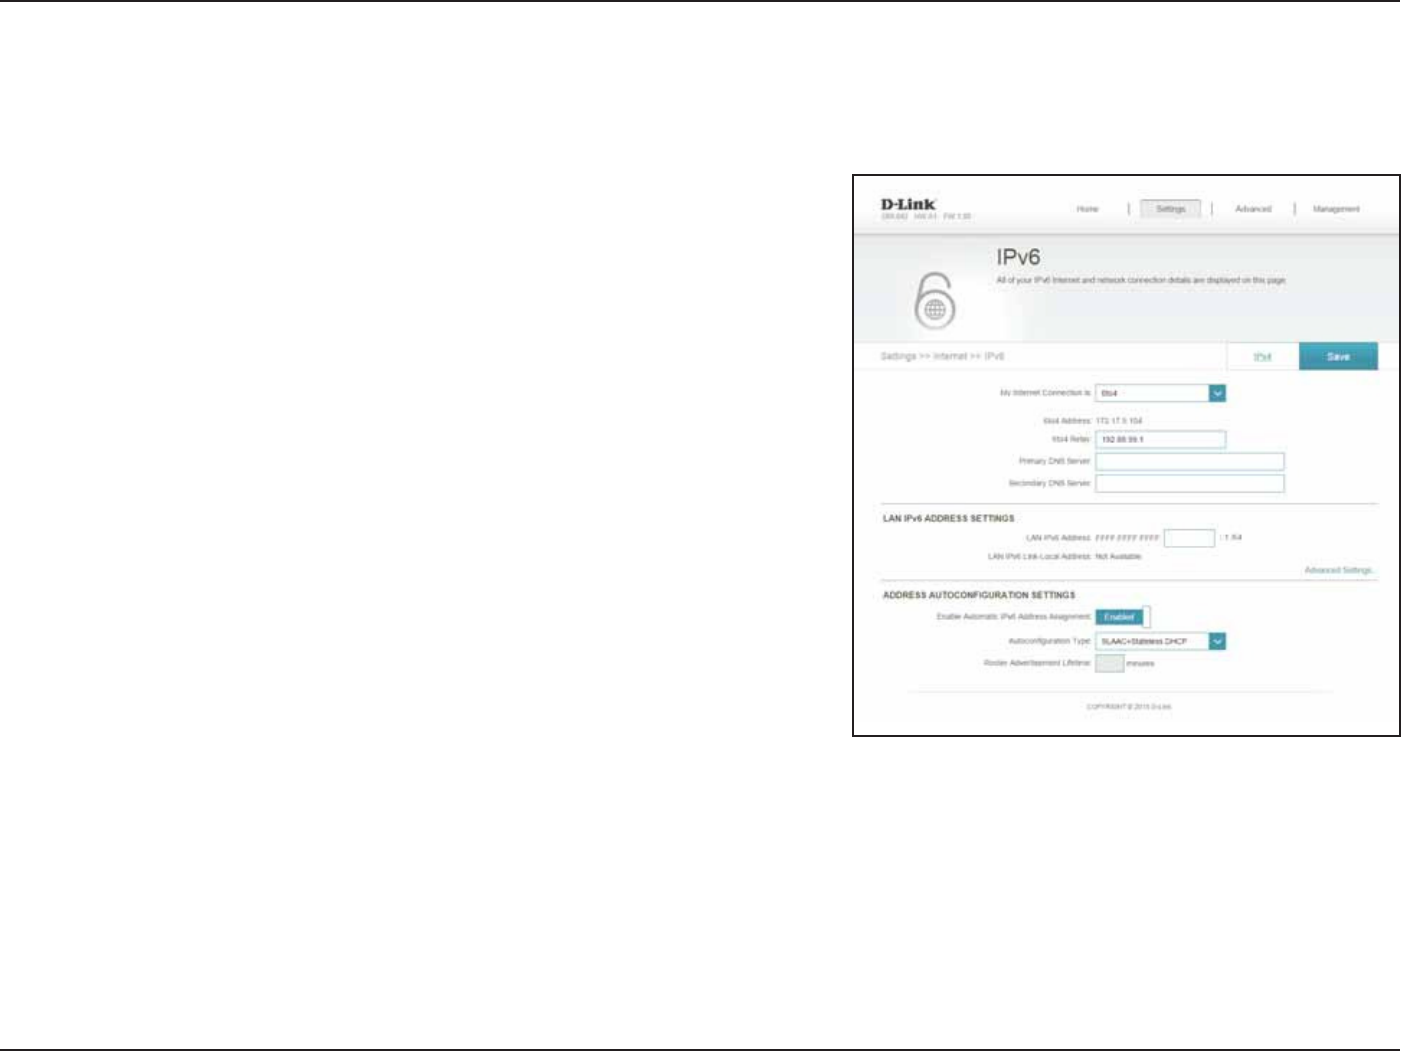
6 to 4
Displays the 6 to 4 address.
Enter the 6 to 4 relay supplied by your ISP.
Enter the primary DNS server address.
Enter the secondary DNS server address.
&OUFSUIF-"/MPDBM*1WBEESFTTGPSUIFSPVUFS
Displays the router’s LAN link-local address.
Check to enable the Automatic IPv6 Address Assignment feature.
Select Stateful (DHCPv6), 4-""$3%/44 or 4-""$4UBUFMFTT
DHCPv6.
&OUFSUIF*1WBEESFTTMJGFUJNFJONJOVUFT
Click Save when you are done.
6 to 4 Address:
6 to 4 Relay:
Primary DNS
Server:
Secondary DNS
Server:
LAN IPv6 Address:
LAN IPv6 Link-
Local Address:
Enable Automatic
IPv6 Address
Assignment:
Autoconguration
Type:
Router
Advertisement
Lifetime:
In this section the user can congure the IPv6 6 to 4 connection settings. 6to4 is an IPv6 address assignment and automatic tunneling
technology that is used to provide unicast IPv6 connectivity between IPv6 sites and hosts across the IPv4 Internet.
44D-Link DIR-842 User Manual
Section 4 - Conguration
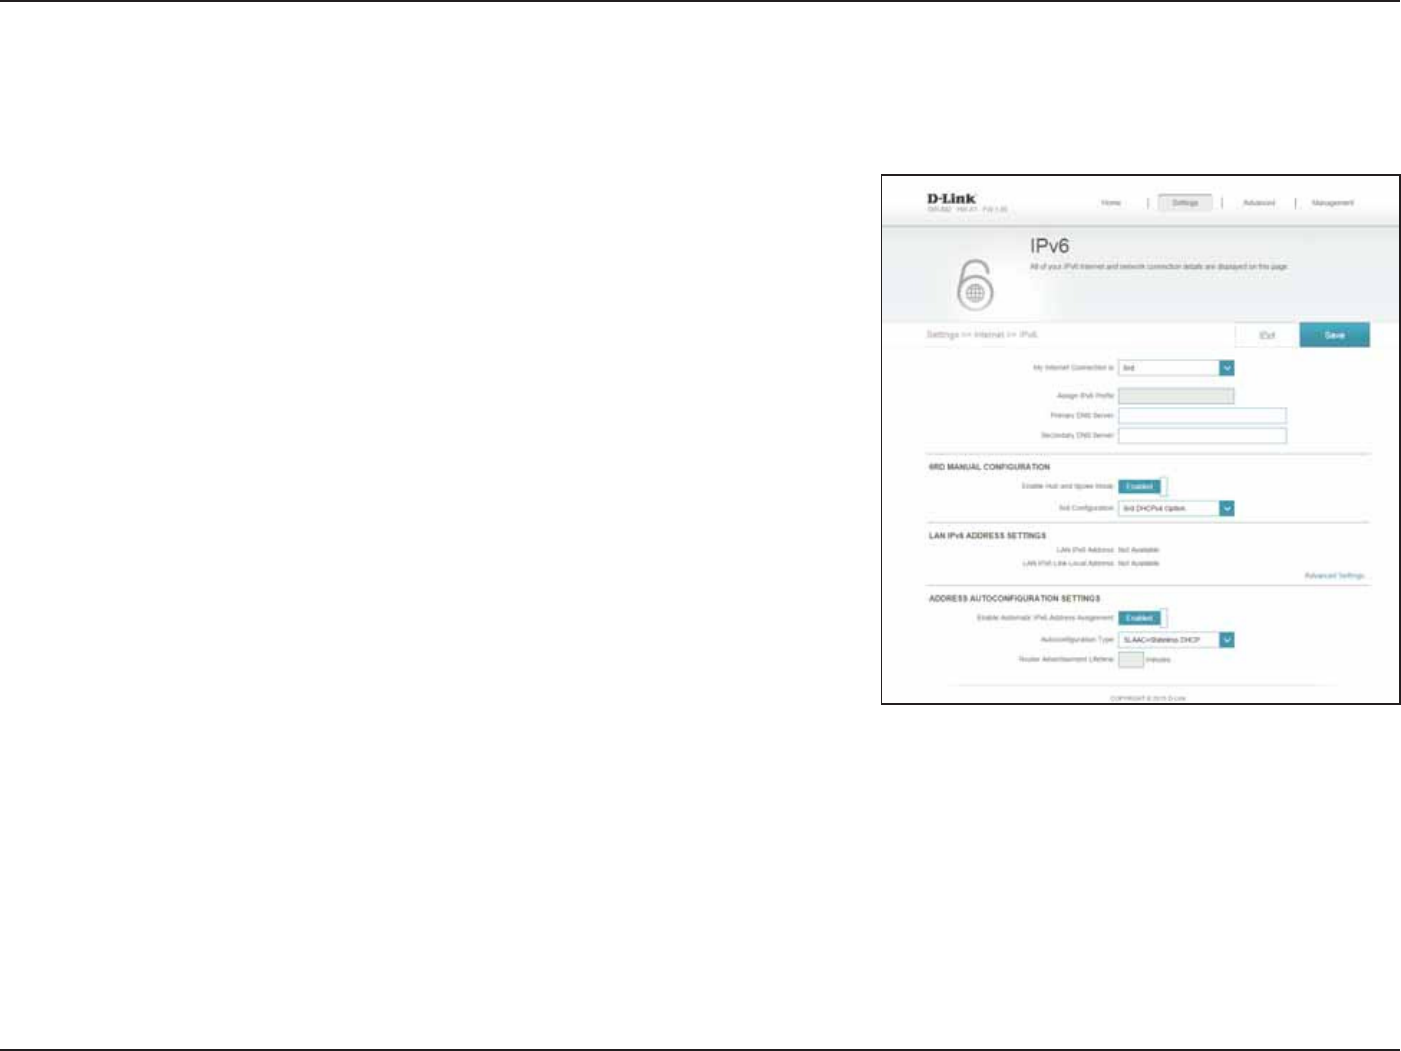
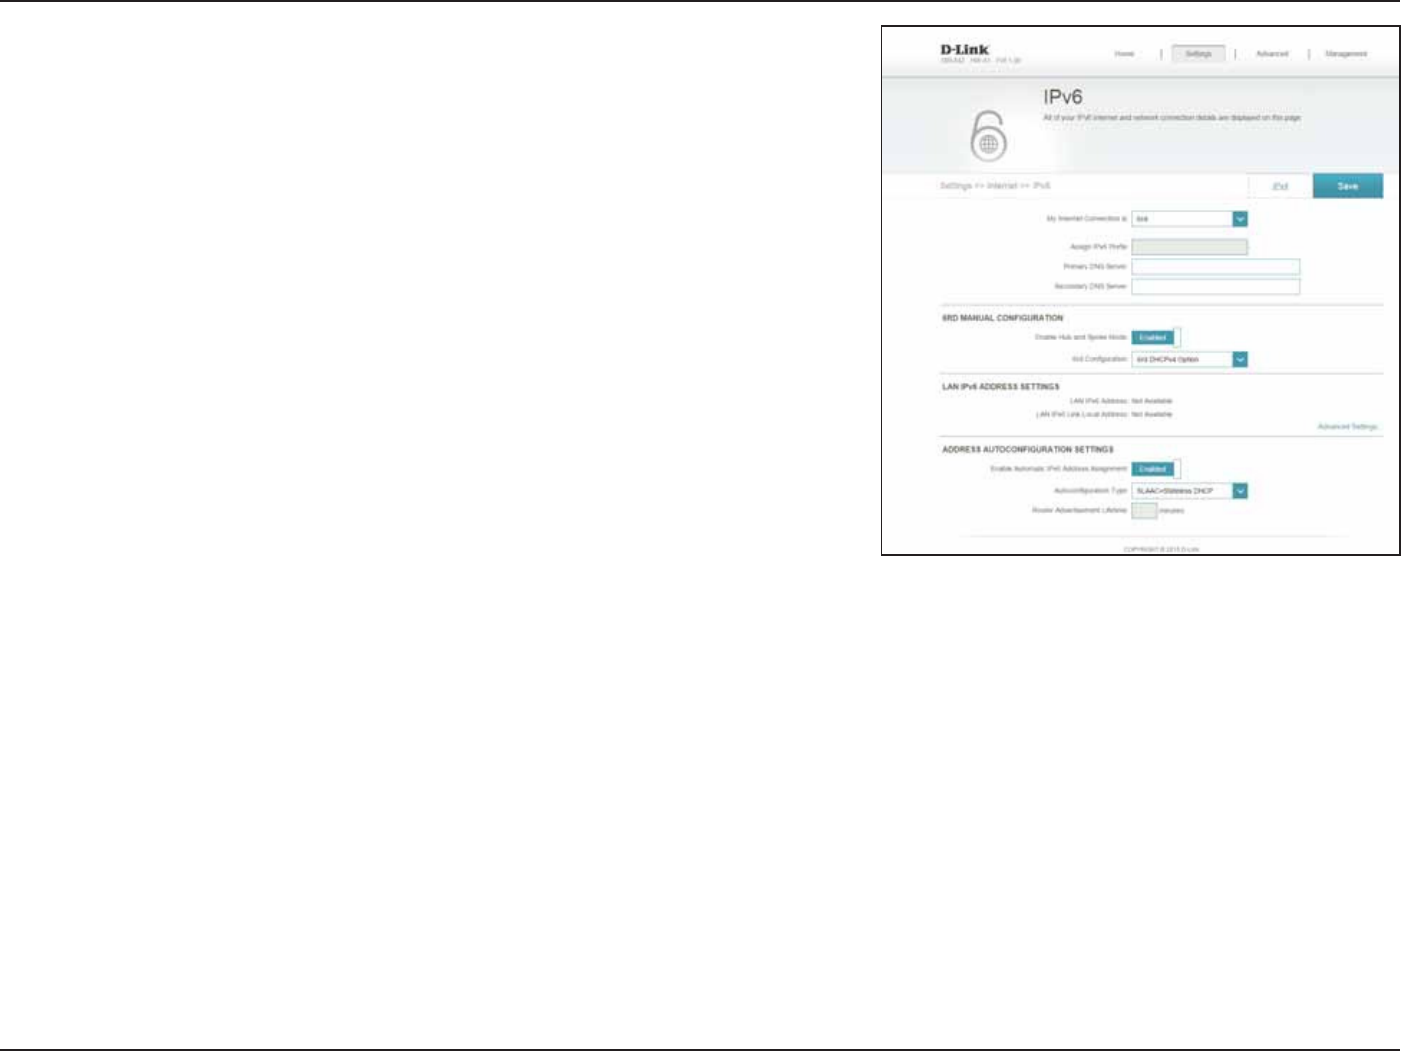
6rd
Currently unsupported.
Enter the primary DNS server address.
Enter the secondary DNS server address.
Enable if you want to minimize the number of routes to the
destination by using a hub and spoke method of networking.
Choose the SE%)$1W0QUJPO to automatically discover and
populate the data values, or Manual Conguration to enter the
settings yourself.
Displays the router’s LAN link-local address.
Assign IPv6
Prex:
Primary DNS
Server:
Secondary DNS
Server:
Enable Hub and
Spoke Mode:
6rd
Conguration:
LAN IPv6 Link-
Local Address:
In this section the user can congure the IPv6 6rd connection settings.
45D-Link DIR-842 User Manual
Section 4 - Conguration
Check to enable the Automatic IPv6 Address Assignment feature.
Select Stateful (DHCPv6), 4-""$3%/44 or 4-""$4UBUFMFTT
DHCPv6.
&OUFSUIF*1WBEESFTTMJGFUJNFJONJOVUFT
Click Save when you are done.
Enable
Automatic
IPv6 Address
Assignment:
Auto
Conguration
Type:
Router
Advertisement
Lifetime:
46D-Link DIR-842 User Manual
Section 4 - Conguration
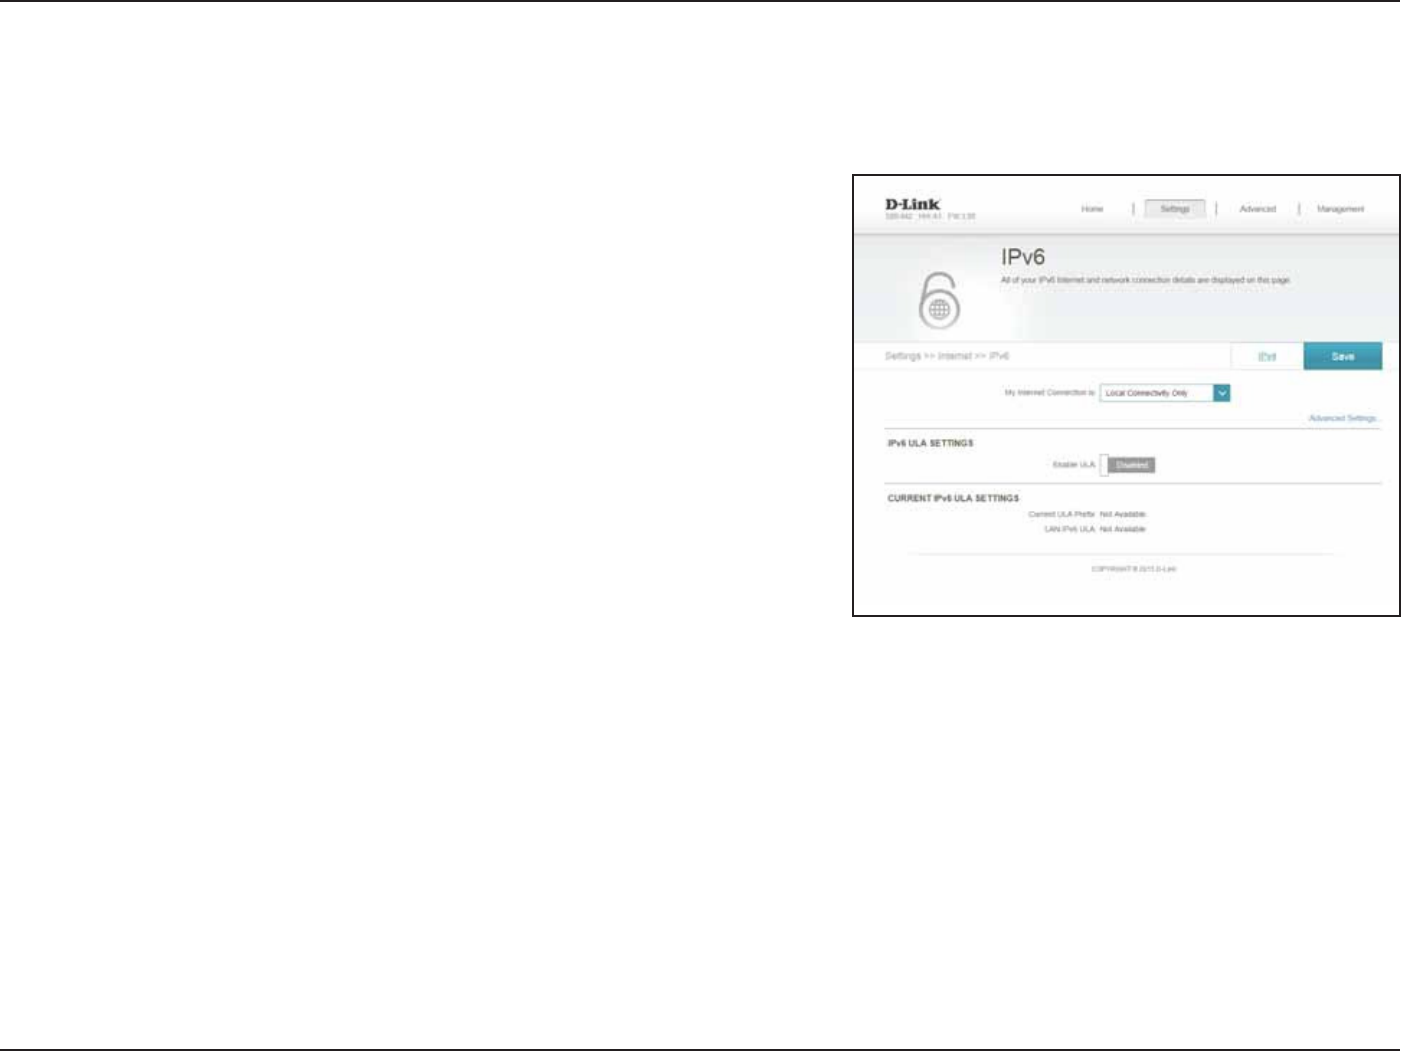
Local Connectivity Only
Click here to enable Unique Local IPv6 Unicast Addresses settings.
Checking this box will automatically congure the ULA prex for
the default setting.
This section will display the current settings for your IPv6 ULA.
This section will display the current settings for your LAN IPv6 ULA.
Click Save when you are done.
Enable ULA:
Use Default
ULA Prex:
Current IPv6
ULA Settings:
LAN IPv6
ULA:
-PDBM$POOFDUJWJUZ0OMZ allows you to set up an IPv6 connection that will not connect to the Internet.
47D-Link DIR-842 User Manual
Section 4 - Conguration
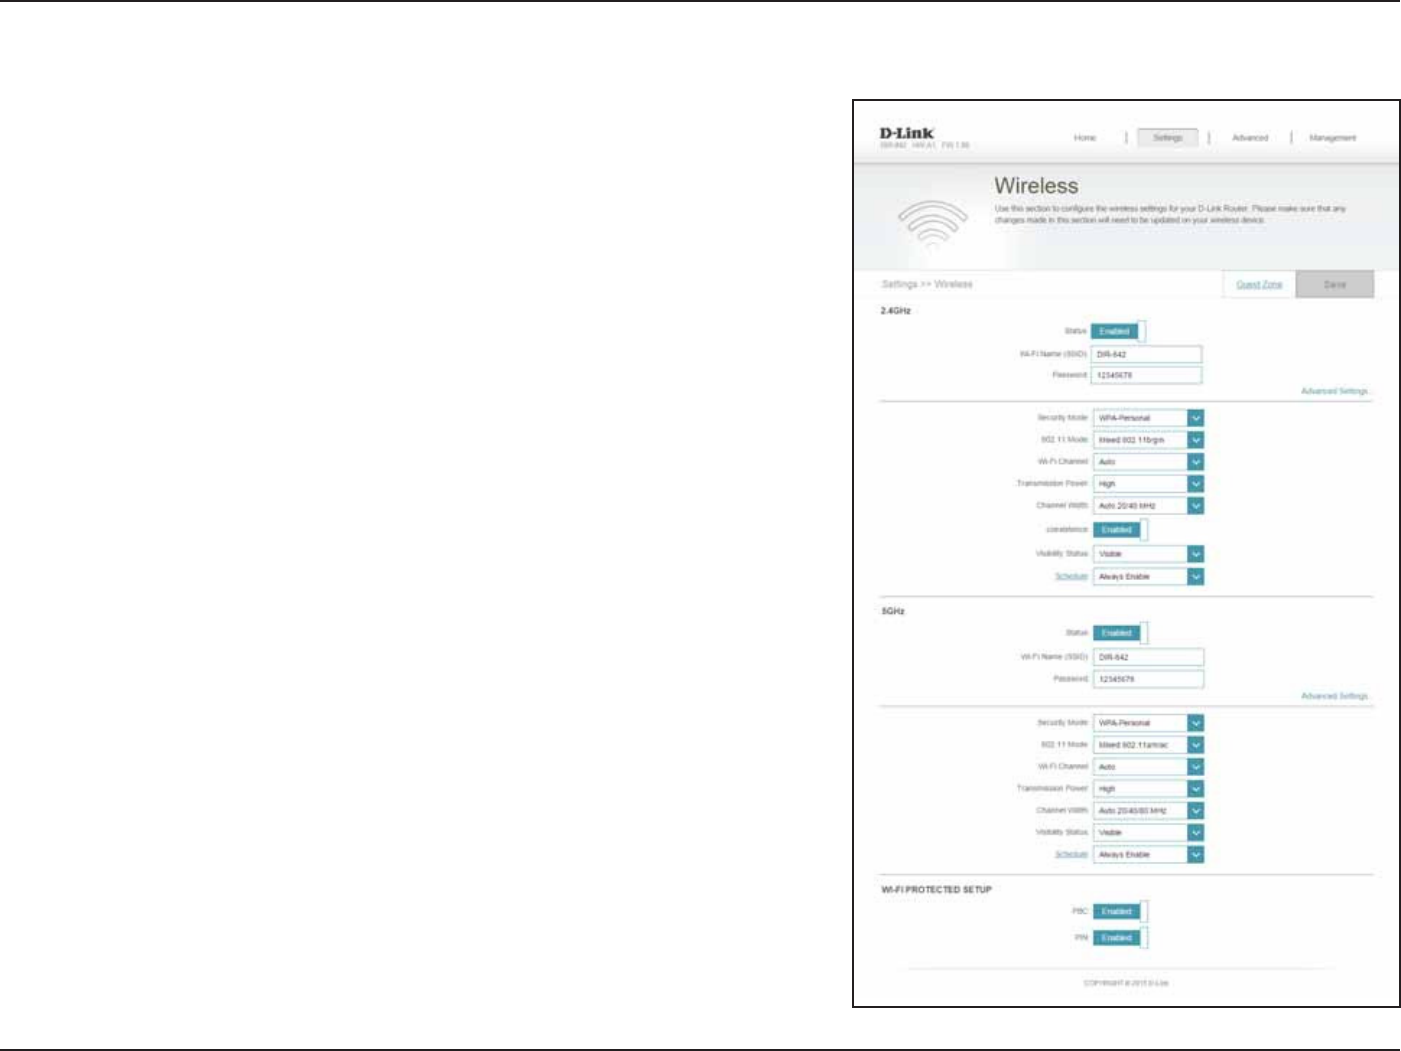
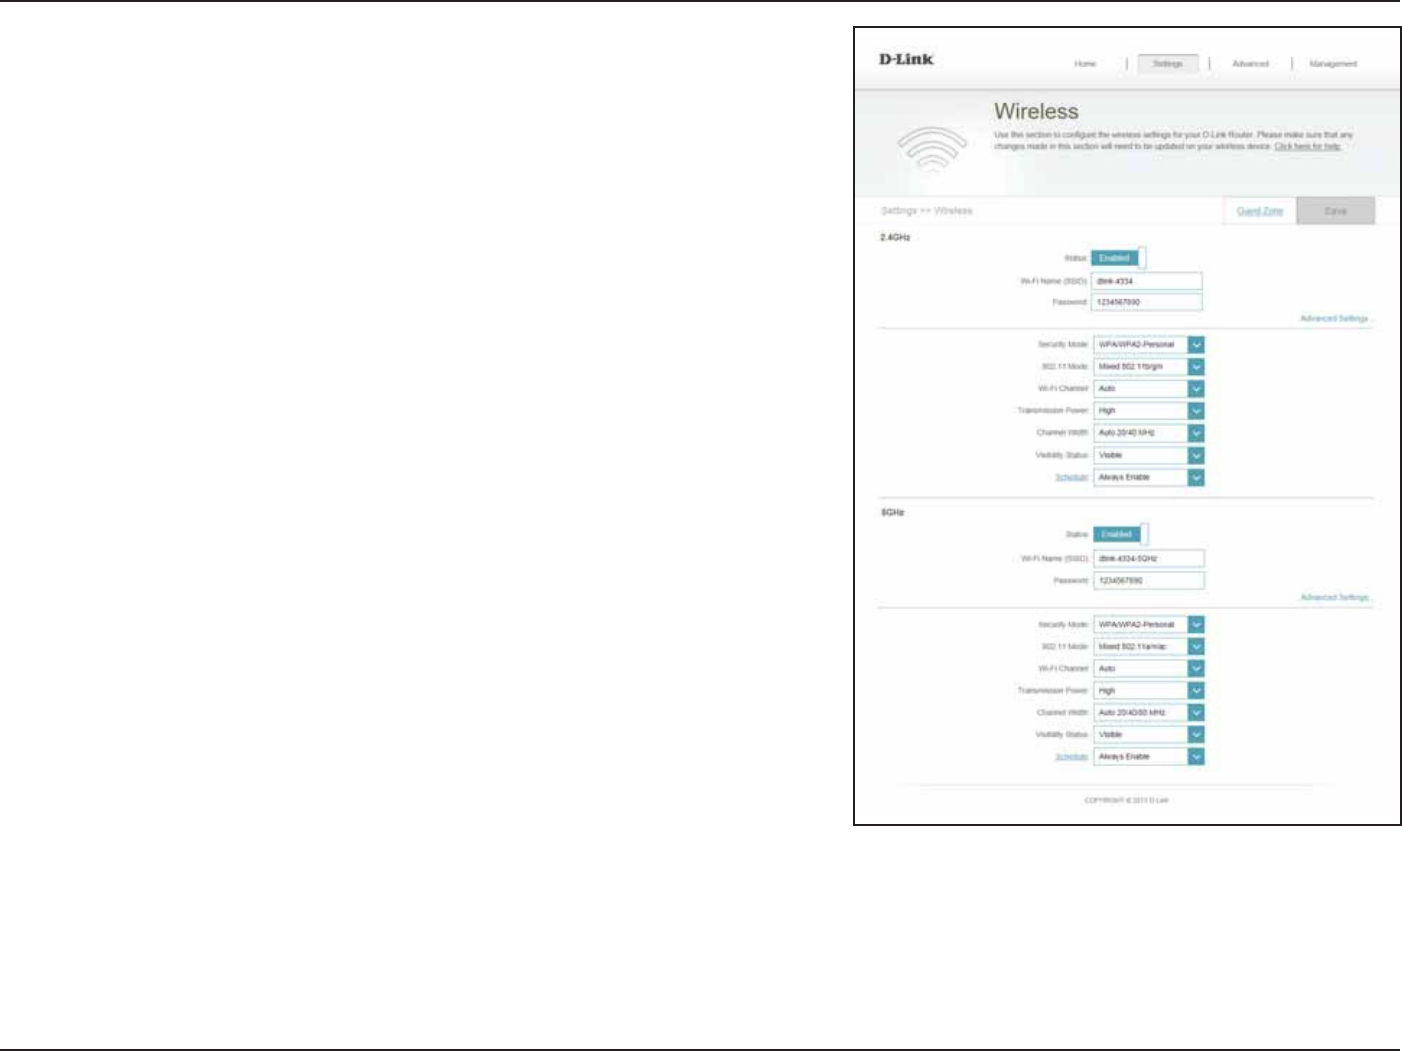
Wireless
Enable or disable the wireless frequency band.
Create a name for your wireless network using up to 32 characters.
Create a password to use for wireless security. Wireless clients will
need to enter this password to successfully connect to the network.
Choose None, WEP, or 81"81"1FSTPOBMSFDPNNFOEFE
Select the desired wireless networking standards to use. The available
options will depend on the wireless frequency band, as well as the
currently selected security mode.
Select the desired channel. The default is "VUPSFDPNNFOEFE
Select the desired wireless transmission power.
A higher channel width allows for faster data transmission, at the
possible expense of wireless coverage and compatibility with older
wireless clients. Select the optimum channel width for your wireless
network from the drop-down menu.
The default setting is Visible. Select Invisible if you do not want to
broadcast the SSID of your wireless network.
Status:
Wi-Fi Name
(SSID):
Password:
Security Mode:
802.11 Mode:
Wi-Fi Channel:
Transmission
Power:
Channel Width:
Visibility Status:
In the Settings menu on the bar on the top of the page, click Wireless to see the
wireless conguration options. To congure the router’s guest zone, click the (VFTU
Zone link. Refer to (VFTU;POF on page 11 for details. Click "EWBODFE4FUUJOHT
to expand the list and see all of the options. The following options apply to both the
2.4 GHz and the 5 GHz wireless frequency bands:
48D-Link DIR-842 User Manual
Section 4 - Conguration
Use the drop-down menu to select the time schedule that the Wi-Fi
network will be active during. The schedule may be set to "MXBZT
Enable, or you can create your own schedules in the Schedules
TFDUJPOSFGFSUPSchedulePOQBHFw4DIFEVMFwPOQBHF
Click Save when you are done.
Schedule:
49D-Link DIR-842 User Manual
Section 4 - Conguration
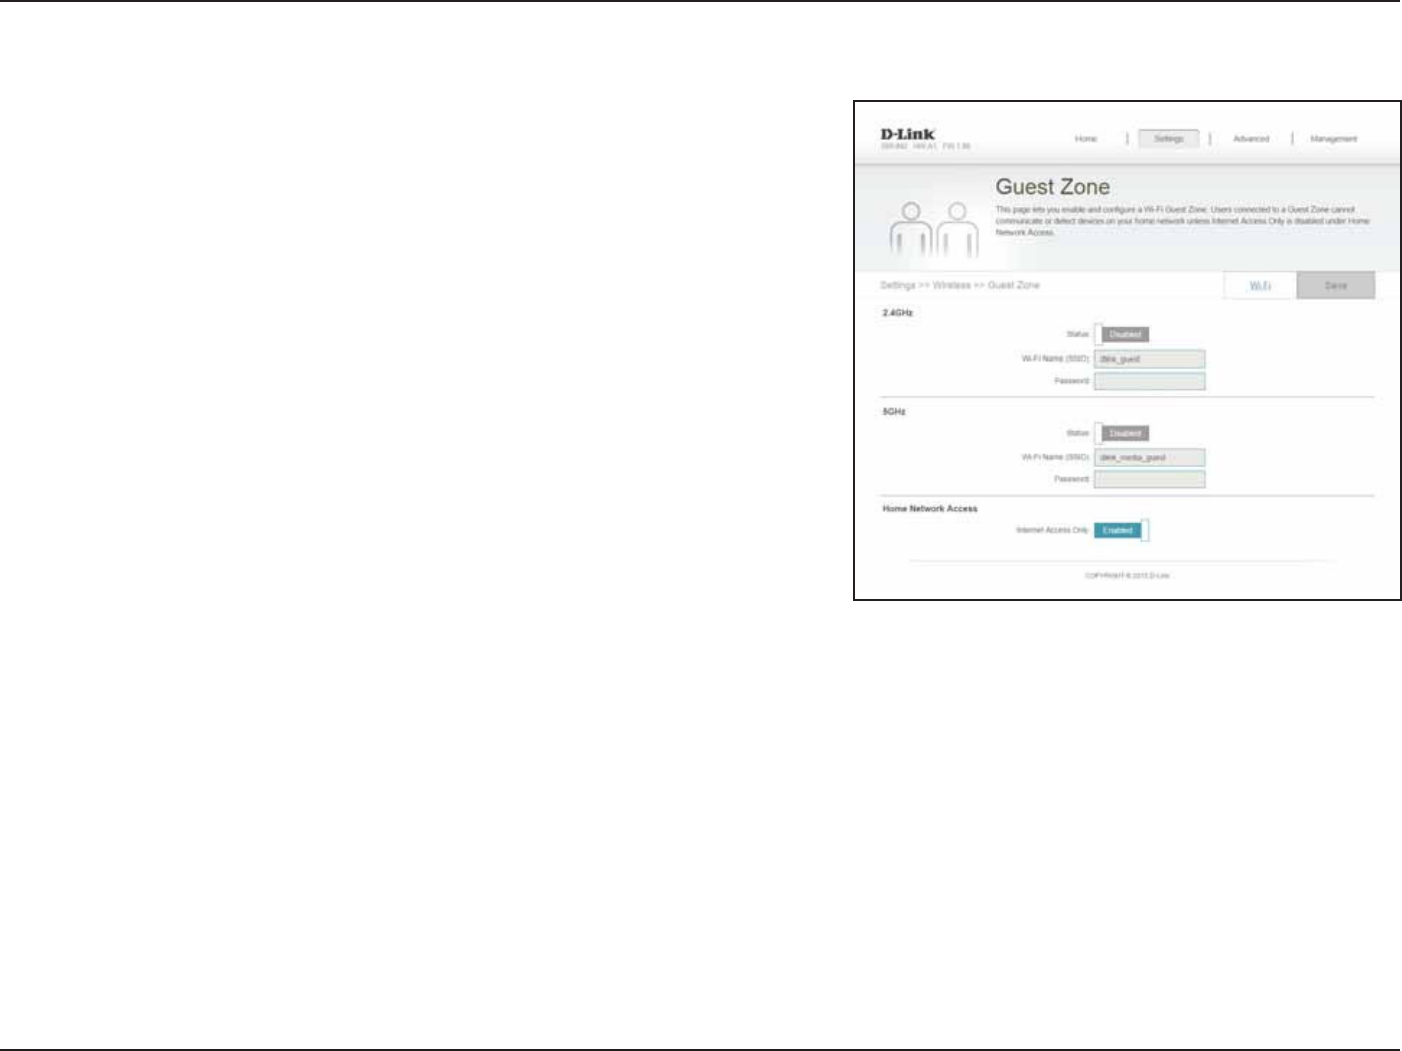
Guest Zone
Enable or disable the guest zone for each wireless frequency band.
&OUFSBXJSFMFTTOFUXPSLOBNF44*%UIBUJTEJòFSFOUGSPNZPVSNBJO
wireless network.
Create a password to use for wireless security. Wireless clients will
need to enter this password to successfully connect to the guest zone.
Enabling this option will confine connectivity to the Internet,
disallowing guests from accessing other local network devices and
any other service provided by the router itself.
Click Save when you are done.
Status:
Wi-Fi Name
(SSID):
Password:
Internet Access
Only:
In the Settings menu on the bar on the top of the page, click Wireless, then click
the (VFTU;POF link. Click "EWBODFE4FUUJOHT to expand the list and see all of
the options. The following options apply to both the 2.4 GHz and the 5 GHz wireless
frequency bands:
The guest zone feature will allow you to create temporary zones that can be used by
guests to access the Internet. These zones will be separate from your main wireless
OFUXPSL:PVNBZDPOöHVSFEJòFSFOU[POFTGPSUIF()[BOE()[XJSFMFTTCBOET
50D-Link DIR-842 User Manual
Section 4 - Conguration
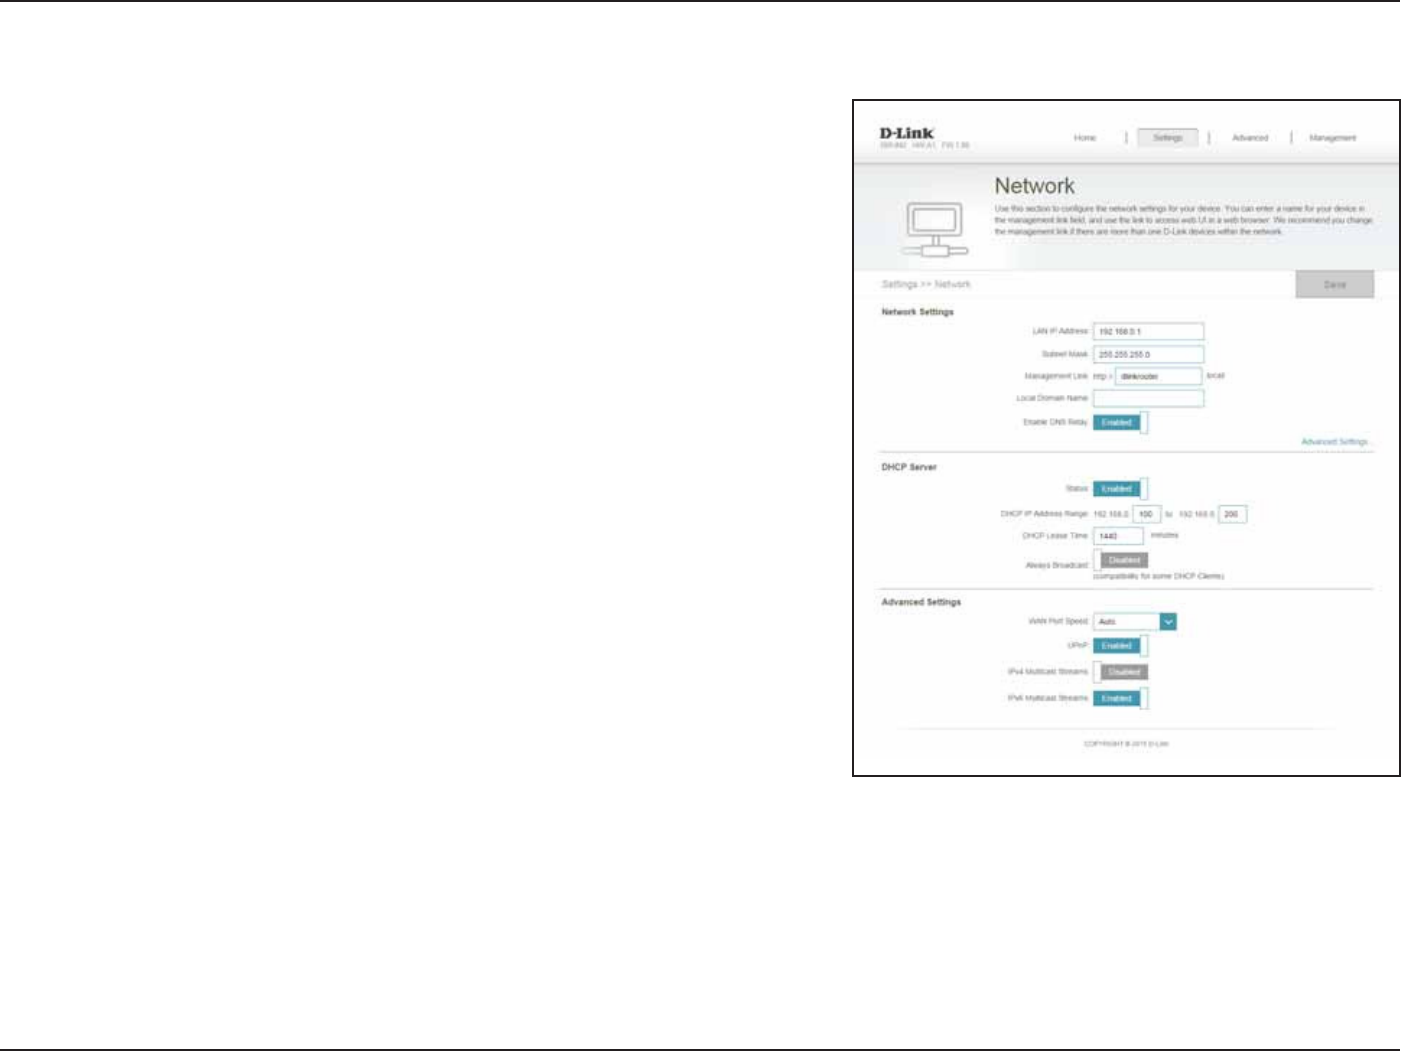
Network
Enter the IP address of the router. The default IP address is
.
If you change the IP address, once you click Save, you will need
to enter the new IP address in your browser to get back into the
conguration utility.
Enter the subnet mask of the router. The default subnet mask is
.
The default address to access the router’s configuration is
IUUQEMJOLSPVUFSMPDBM Here, you can replace dlinkrouter with
a name of your choice.
&OUFSUIFEPNBJOOBNFPQUJPOBM
Disable to transfer the DNS server information from your ISP to your
computers. If enabled, your computers will use the router for a DNS
server.
Enable or disable the DHCP server.
Enter the starting and ending IP addresses for the DHCP server’s IP
assignment.
Note: If you statically (manually) assign IP addresses to your computers
or devices, make sure the IP addresses are outside of this range or you
may have an IP conict.
LAN IP Address:
Subnet Mask:
Management
Link:
Local Domain
Name:
Enable DNS
Relay:
Status:
DHCP IP
Address Range:
This section will allow you to change the local network settings of the router and to
congure the DHCP settings. In the Settings menu on the bar on the top of the page,
click Network. Click "EWBODFE4FUUJOHT to expand the list and see all of the options.
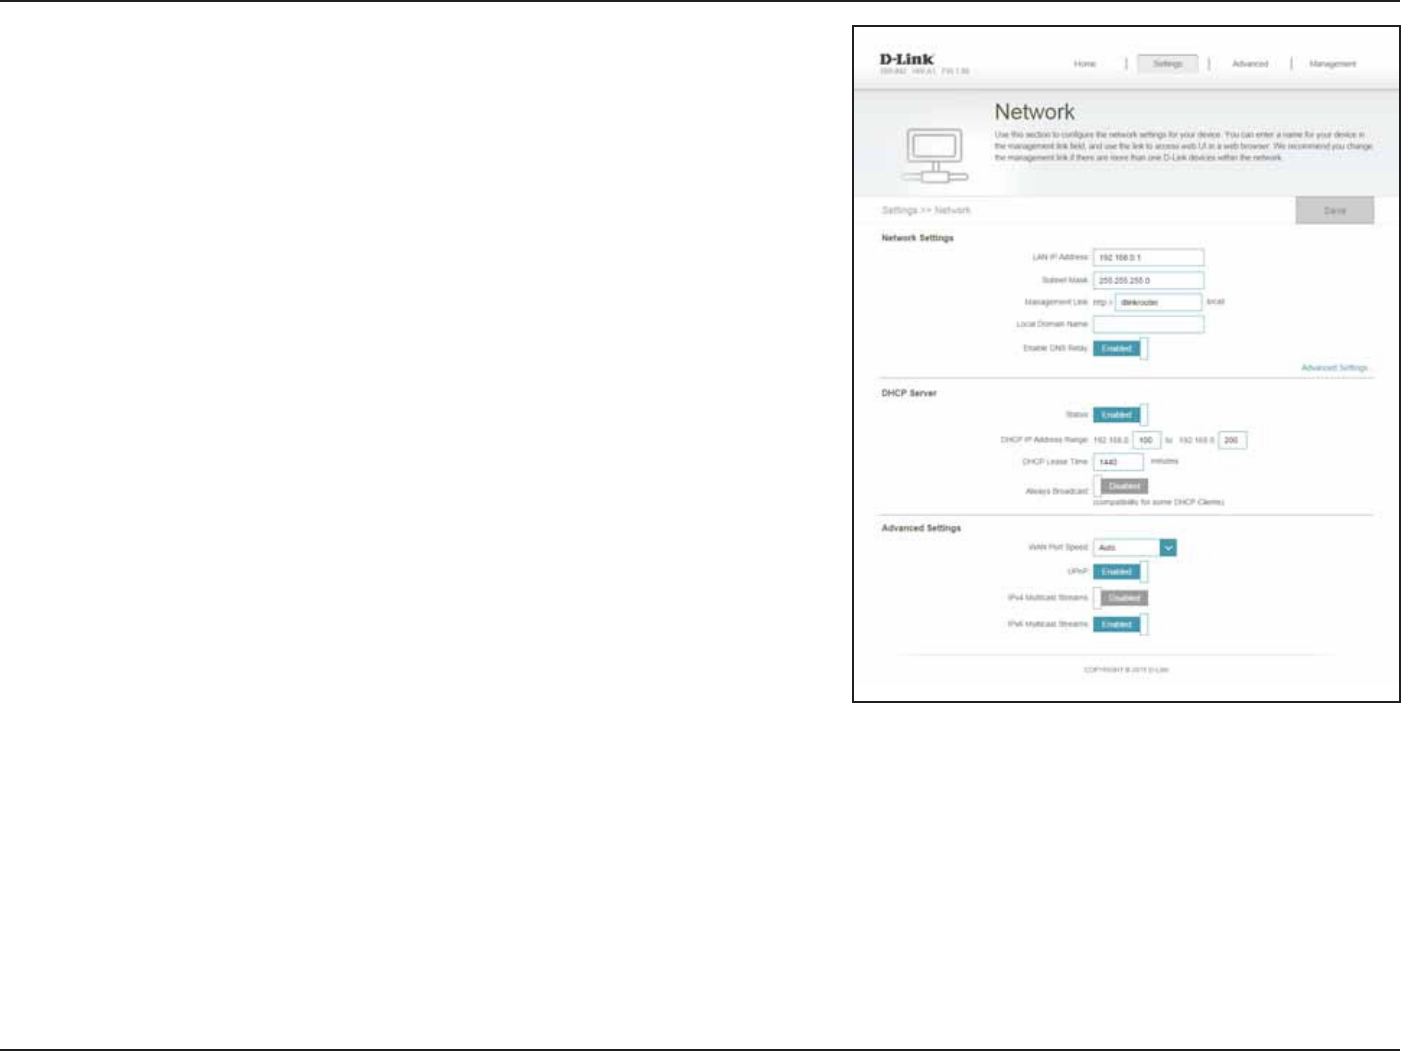
51D-Link DIR-842 User Manual
Section 4 - Conguration
DHCP Lease
Time:
Always
Broadcast:
WAN Port
Speed:
UPnP:
IPv4 Multicast
Stream:
IPv6 Multicast
Stream:
Enter the length of time for the IP address lease in minutes.
Enable this feature to broadcast your networks DHCP server to LAN/
WLAN clients.
:PVNBZTFUUIFQPSUTQFFE PGUIF*OUFSOFUQPSUUP10 Mbps,
100 Mbps or "VUPSFDPNNFOEFE
&OBCMFPS EJTBCMF6OJWFSTBM1MVH BOE1MBZ61O161O1QSPWJEFT
compatibility with networking equipment, software and peripherals.
Enable to allow IPv4 multicast trac to pass through the router from
the Internet.
Enable to allow IPv6 multicast trac to pass through the router from
the Internet.
Click Save when you are done.
52D-Link DIR-842 User Manual
Section 4 - Conguration
Features
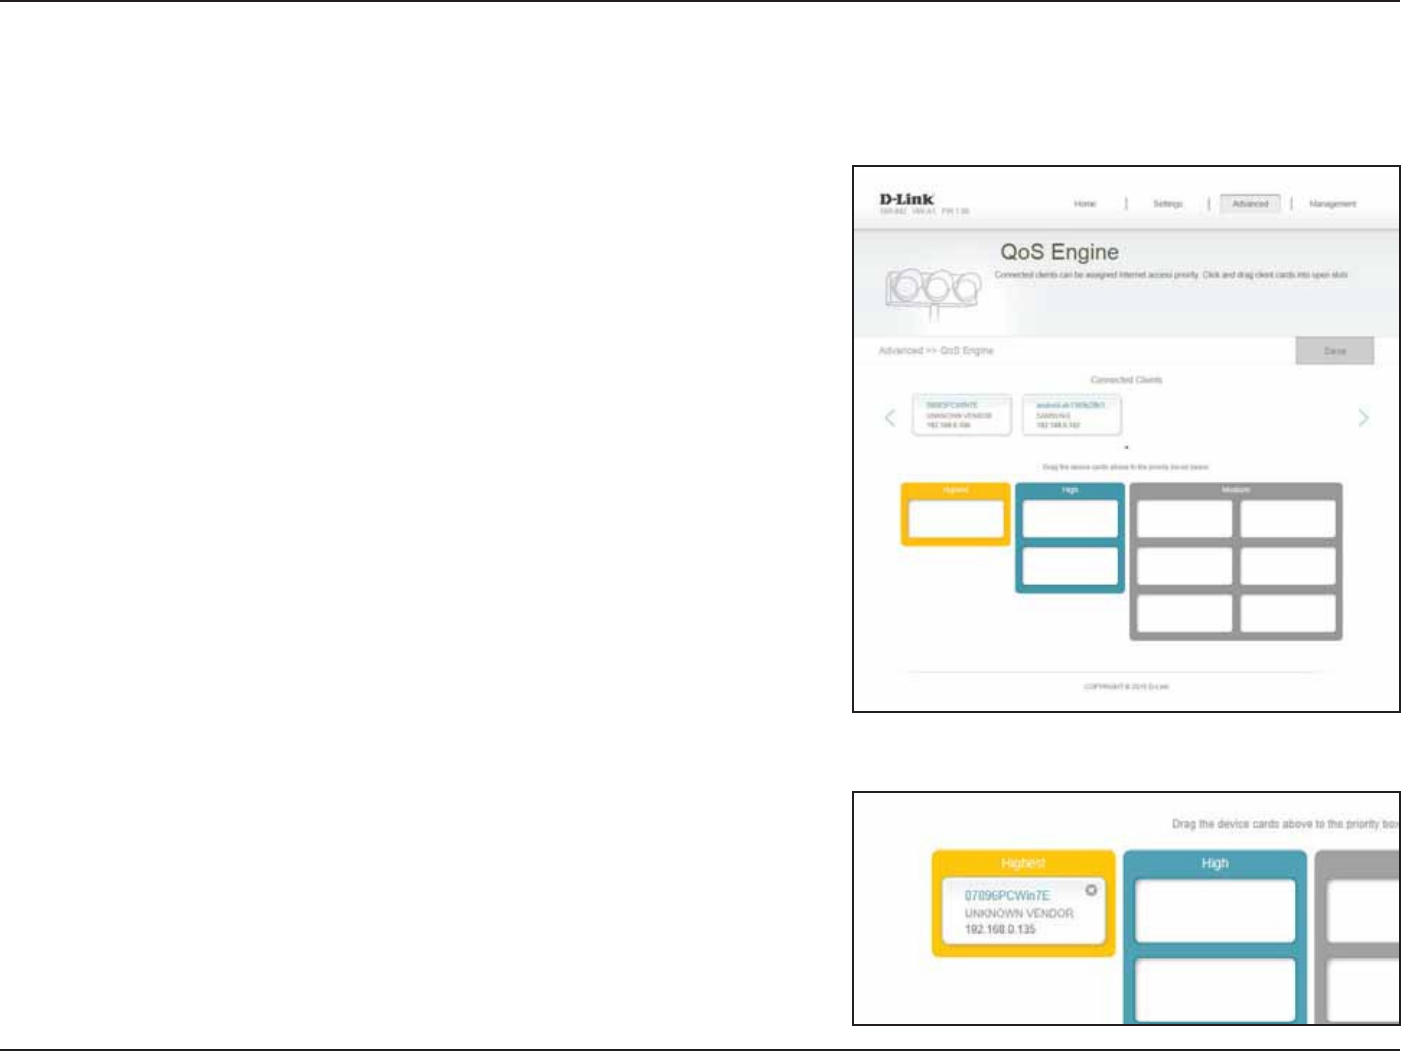
QoS Engine
This section will allow you to prioritize particular clients over others, so that those
clients receive higher bandwidth. For example, if one client is streaming a movie
and another is downloading a non-urgent le, you might wish to assign the former
device a higher priority than the latter so that the movie streaming is not disrupted
by the trac of the other devices on the network.
In the Features menu on the bar on the top of the page, click QoS Engine.
Under All Devices, you will see device cards representing each connected client. If
some are o-screen, you can use the < and > buttons to scroll through the cards.
A maximum of one device can be assigned Highest priority.
A maximum of two devices can be assigned High priority.
A maximum of eight devices can be assigned Medium priority.
If no devices are explicitly assigned a priority, they will all be treated with equal
priority. If some devices are not assigned a priority and others are, the unassigned
devices will be treated with the lowest priority.
To assign a priority level to a device, drag the device card from the All Devices list
over an empty slot and release the mouse button. The card will remain in the slot.
If you want to remove a priority assignment from a device and return it to the All
Devices list, click the cross icon in the top right of the device card.
Click Save when you are done.
53D-Link DIR-842 User Manual
Section 4 - Conguration
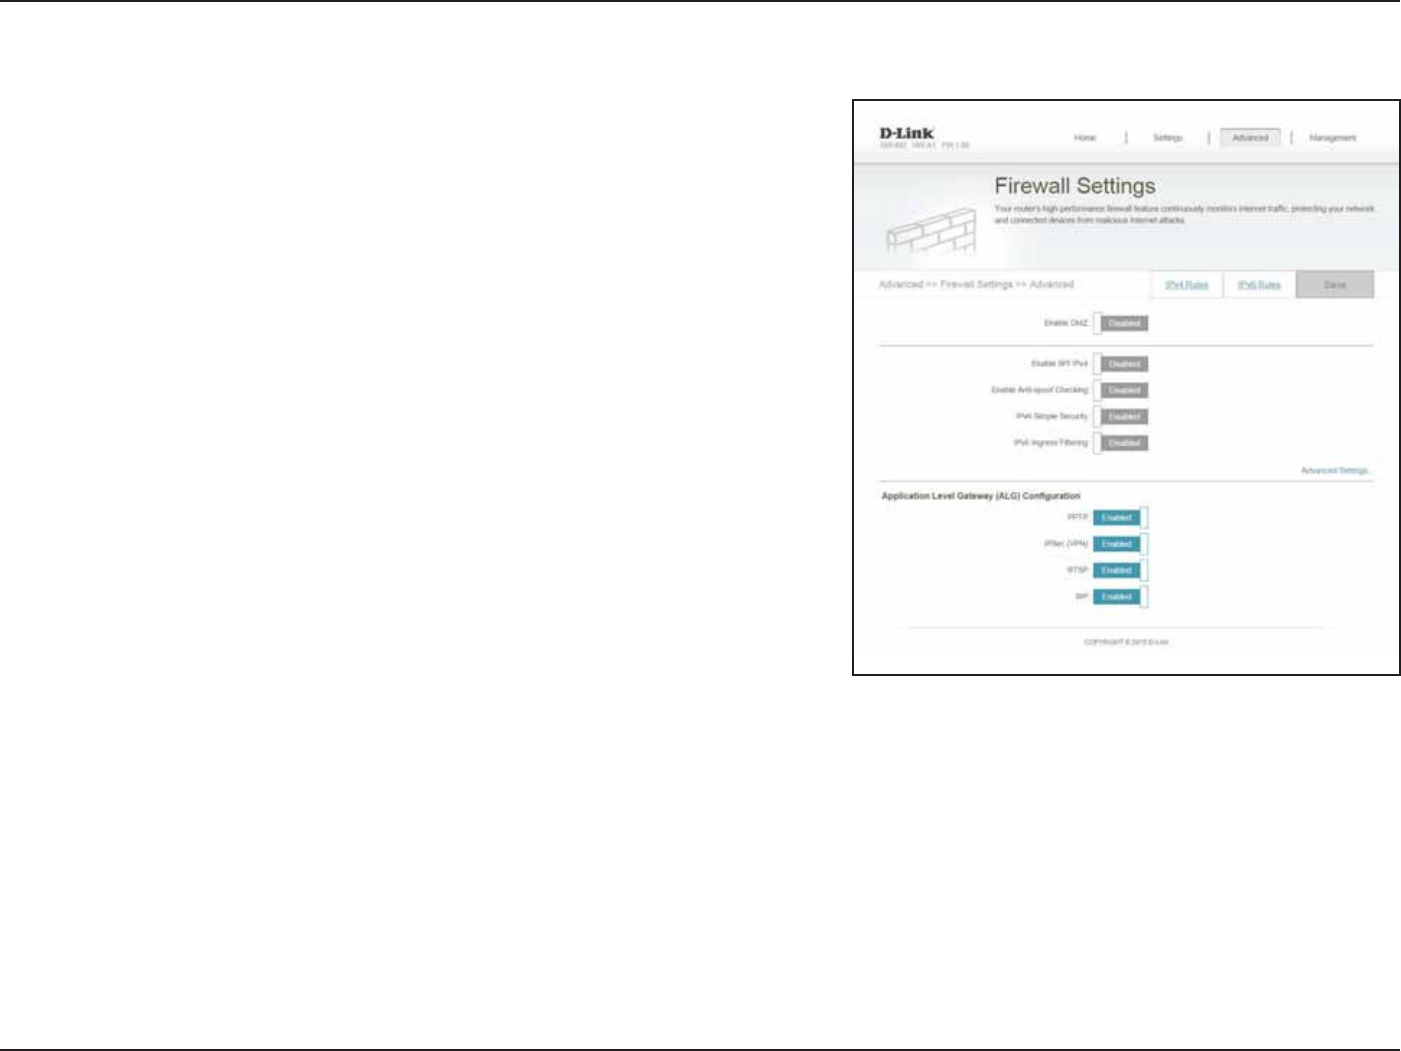
Firewall Settings
&OBCMFPSEJTBCMF%FNJMJUBSJ[FE;POF%.;5IJTDPNQMFUFMZFYQPTFT
the client to threats over the Internet, and is not recommended in
ordinary situations.
If you enabled DMZ, enter the IP address of the client you wish to
expose, or use the drop-down menu to quickly select it.
&OBCMJOH4UBUFGVM 1BDLFU*OTQFDUJPO41* IFMQTUPQSFWFOUDZCFS
attacks by validating that the trac passing through the session
conforms to the protocol.
Enable this feature to protect your network from certain kinds of
“spoong” attacks.
Enable or disable IPv6 simple security.
Enable or disable IPv6 ingress ltering.
Enable DMZ:
DMZ IP
Address:
Enable SPI IPv4:
Enable
Anti-Spoof
Checking:
IPv6 Simple
Security:
IPv6 Ingress
Filtering:
The router’s rewall protects your network from malicious attacks over the Internet.
In the Features menu on the bar on the top of the page, click 'JSFXBMM4FUUJOHT. Click
"EWBODFE4FUUJOHT to expand the list and see all of the options.
54D-Link DIR-842 User Manual
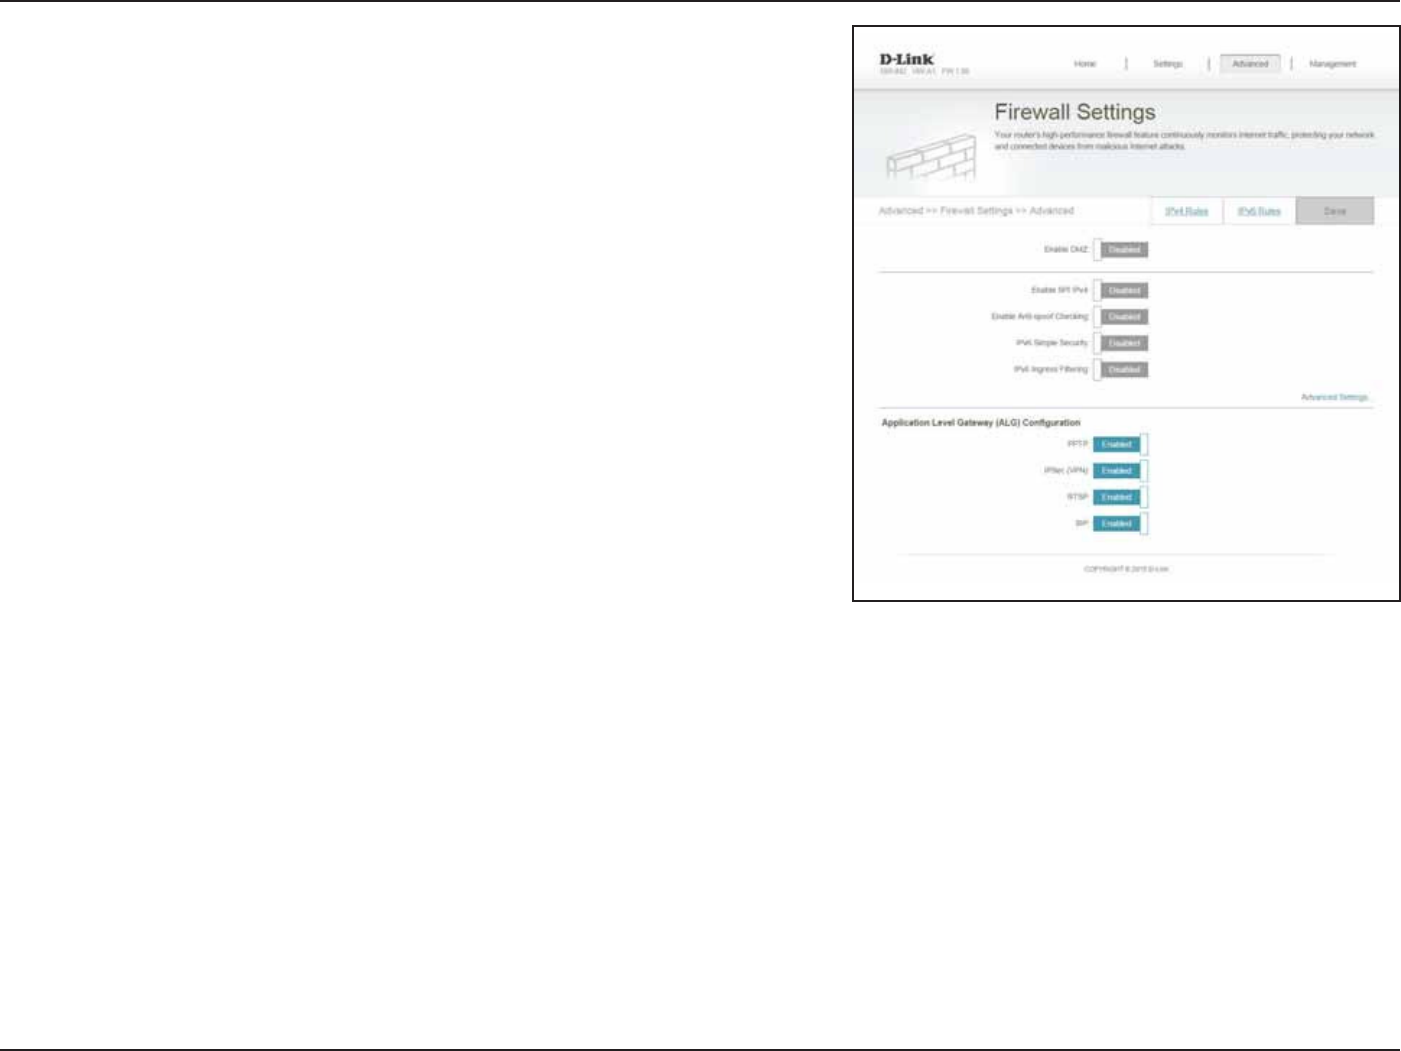
Section 4 - Conguration
Allows multiple machines on the LAN to connect to their corporate
network using the PPTP protocol.
Allows multiple VPN clients to connect to their corporate network
using IPSec. Some VPN clients support traversal of IPSec through
/"55IJT"QQMJDBUJPO-FWFM(BUFXBZ"-(NBZJOUFSGFSFXJUIUIF
operation of such VPN clients. If you are having trouble connecting
with your corporate network, try turning this ALG o. Please check
with the system administrator of your corporate network whether
your VPN client supports NAT traversal.
"MMPXTBQQMJDBUJPOTUIBUVTFT3FBM5JNF4USFBNJOH1SPUPDPM3541
to receive streaming media from the Internet.
"MMPXTEFWJDFTBOE BQQMJDBUJPOTVTJOH7P*17PJDFPWFS*1UP
communicate across NAT. Some VoIP applications and devices have
the ability to discover NAT devices and work around them. This ALG
may interfere with the operation of such devices. If you are having
trouble making VoIP calls, try turning this ALG o.
Click Save when you are done.
PPTP:
IPSec (VPN):
RTSP:
SIP:
55D-Link DIR-842 User Manual
Section 4 - Conguration
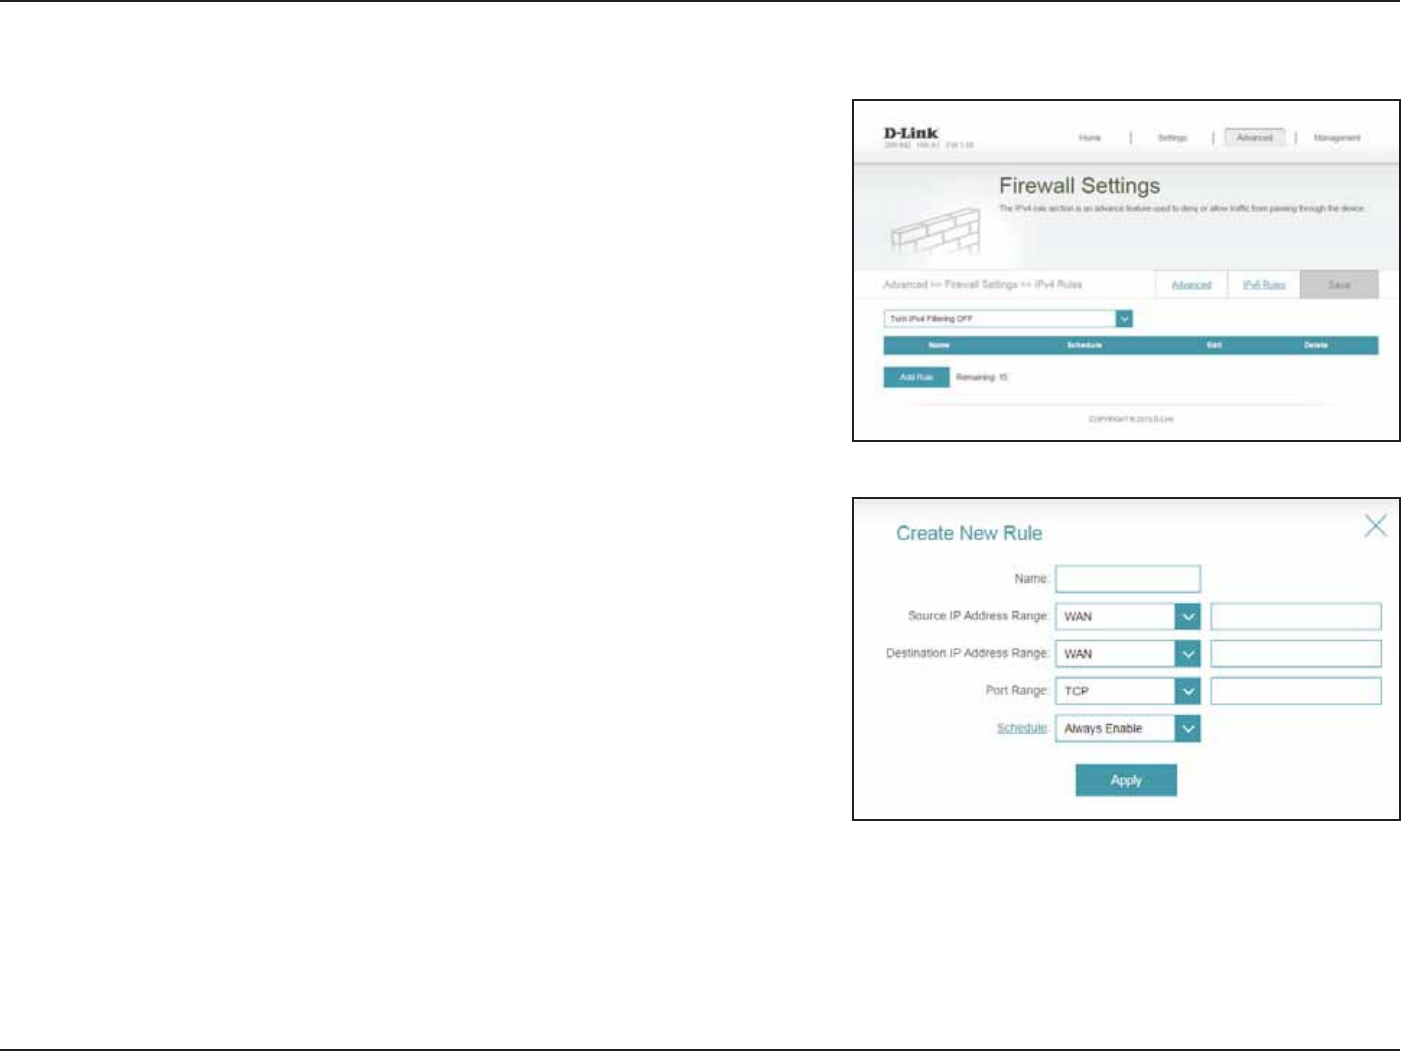
IPv4/IPv6 Rules
Enter a name for the rule.
Enter the source IP address range that the rule will apply to, and using
the drop-down menu, specify whether it is a 8"/ or -"/ IP address.
Enter the destination IP address range that the rule will apply to, and
using the drop-down menu, specify whether it is a 8"/ or -"/ IP
address.
4FMFDUUIFQSPUPDPMPGUIFUSBóDUPBMMPXPSEFOZ"OZ, TCP, or UDP
and then enter the range of ports that the rule will apply to.
Use the drop-down menu to select the time schedule that the rule
will be enabled on. The schedule may be set to "MXBZT&OBCMF, or
you can create your own schedules in the SchedulesTFDUJPOSFGFS
to Schedulei4DIFEVMFwPOQBHF
Click "QQMZ when you are done.
The IPv4/IPv6 Rules section is an advanced option that lets you congure what kind
of trac is allowed to pass through the network. To congure the IPv4 rules, from
the Firewall Settings page click IPv4 Rules. To congure IPv6 rules, from the Firewall
Settings page click IPv6 Rules. To return to the main Firewall Settings page, click
"EWBODFE.
To begin, use the drop-down menu to select whether you want to "--08 or DENY
UIFSVMFTZPVDSFBUF:PVDBOBMTPDIPPTFUPUVSOöMUFSJOH0''.
If you wish to remove a rule, click on its trash can icon in the Delete column. If you
wish to edit a rule, click on its pencil icon in the Edit column. If you wish to create a
new rule, click the "EE3VMFTbutton. Click Save when you are done. If you edit or
create a rule, the following options will appear:
Name:
Source IP
Address Range:
Destination IP
Address Range:
Port Range:
Schedule:
56D-Link DIR-842 User Manual
Section 4 - Conguration
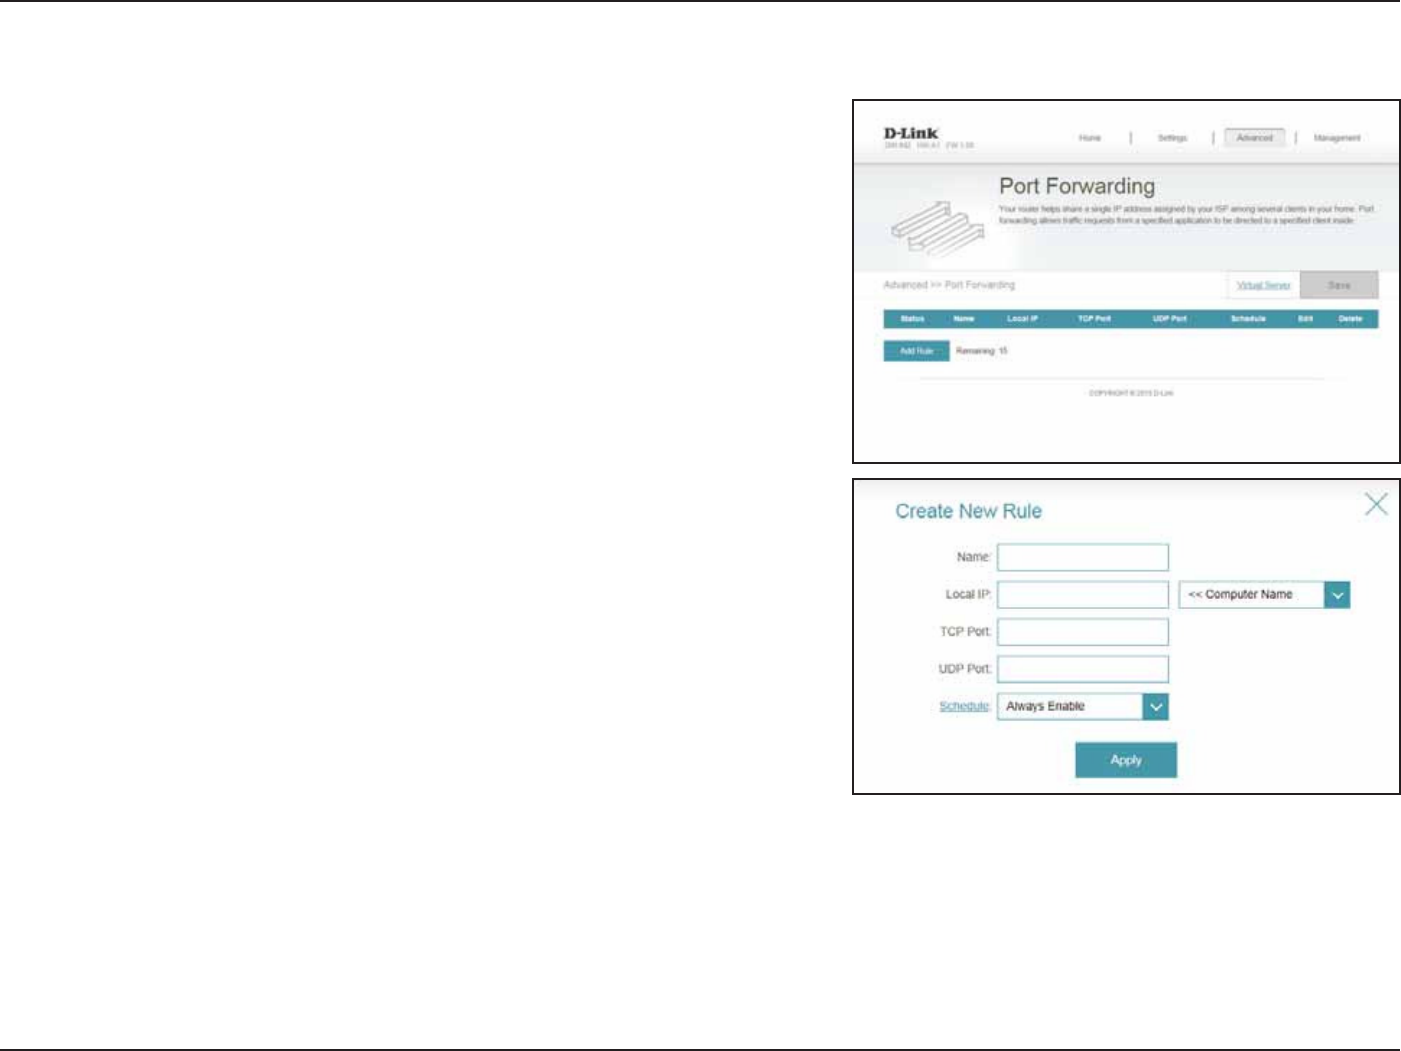
Port Forwarding
Enter a name for the rule.
Enter the IP address of the computer on your local network that you
want to allow the incoming service to. Alternatively, select the device
from the drop-down menu.
&OUFSUIF5$1QPSUTUIBUZPVXBOUUPPQFO:PVDBOFOUFSBTJOHMF
QPSUPSBSBOHFPGQPSUT4FQBSBUFQPSUTXJUIBDPNNBGPSFYBNQMF
&OUFSUIF6%1QPSUTUIBUZPVXBOUUPPQFO:PVDBOFOUFSBTJOHMF
QPSUPSBSBOHFPGQPSUT4FQBSBUFQPSUTXJUIBDPNNBGPSFYBNQMF
Use the drop-down menu to select the time schedule that the rule
will be enabled on. The schedule may be set to "MXBZT&OBCMF, or
you can create your own schedules in the SchedulesTFDUJPOSFGFS
to Schedulei4DIFEVMFwPOQBHF
Click "QQMZ when you are done.
Name:
Local IP:
TCP Port:
UDP Port:
Schedule:
Port forwarding allows you to specify a port or range of ports to open for specic
devices on the network. This might be necessary for certain applications to connect
through the router. In the Features menu on the bar on the top of the page, click
1PSU'PSXBSEJOH.
If you wish to remove a rule, click on its trash can icon in the Delete column. If you
wish to edit a rule, click on its pencil icon in the Edit column. If you wish to create a
new rule, click the "EE3VMFTbutton. Click Save when you are done. If you edit or
create a rule, the following options will appear:
57D-Link DIR-842 User Manual
Section 4 - Conguration
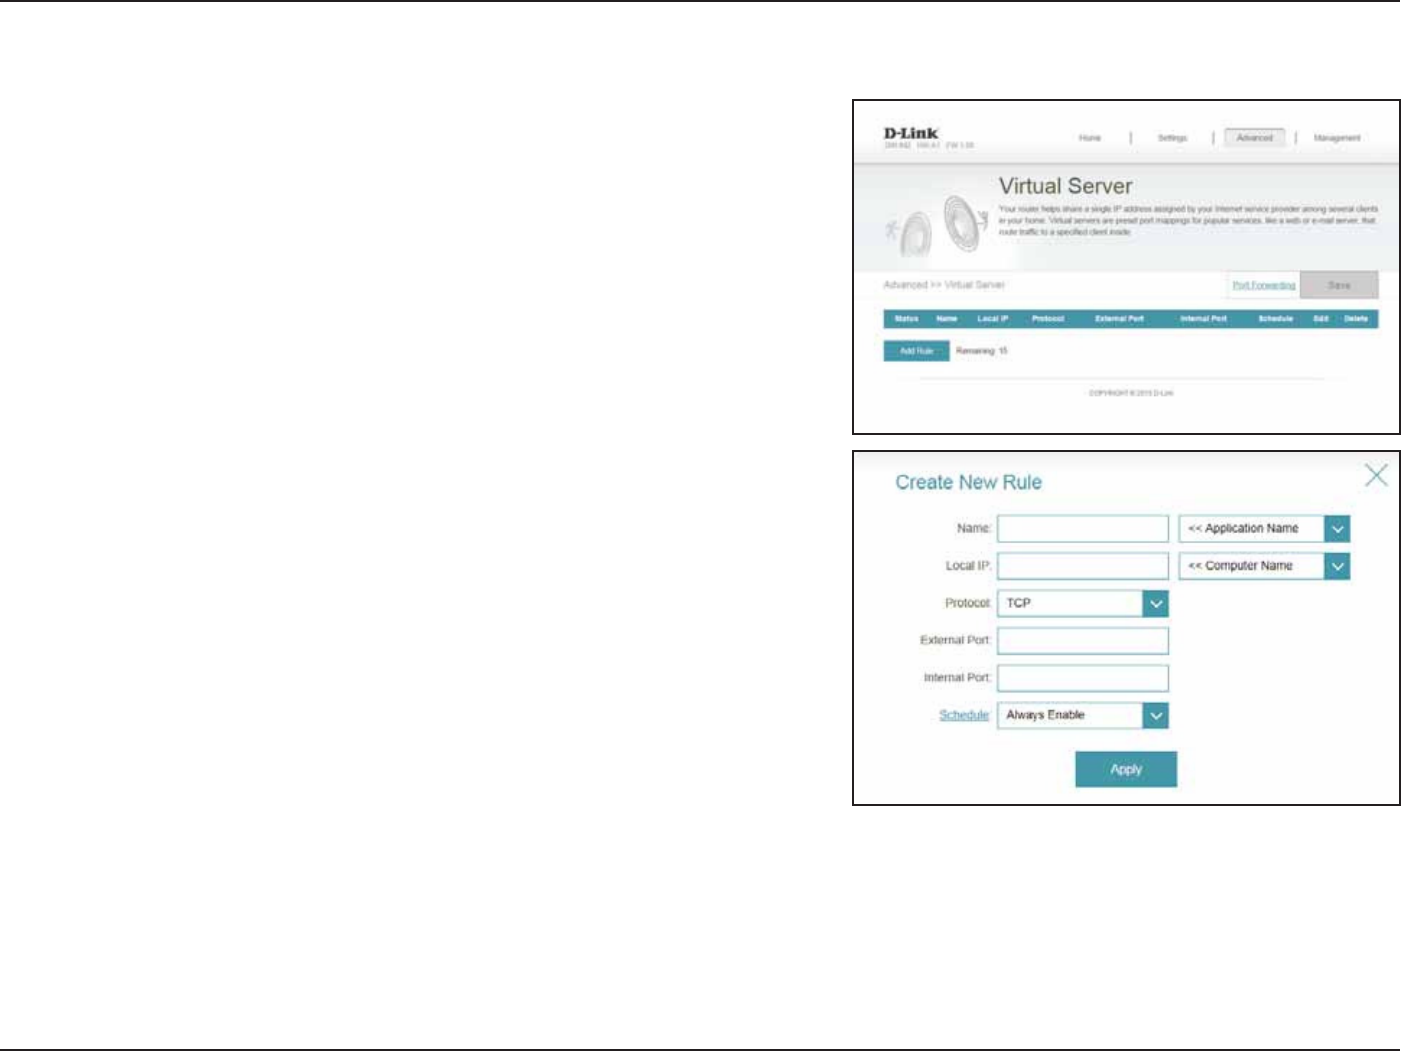
Virtual Server
Enter a name for the rule.
Enter the IP address of the computer on your local network that you
want to allow the incoming service to. Alternatively, select the device
from the drop-down menu.
4FMFDUUIFQSPUPDPMPGUIFUSBóDUPBMMPXPSEFOZTCP, UDP, Both,
or0UIFS
If you entered 0UIFS above, enter the protocol number.
Enter the public port you want to open.
Enter the private port you want to open.
Use the drop-down menu to select the time schedule that the rule
will be enabled on. The schedule may be set to "MXBZT&OBCMF, or
you can create your own schedules in the SchedulesTFDUJPOSFGFS
to SchedulePOQBHF
Click "QQMZ when you are done.
The virtual server allows you to specify a single public port on your router for
redirection to an internal LAN IP Address and Private LAN port. To congure the
virtual server, from the Port Forwarding page click Virtual Server. To return to the
main Port Forwarding page, click 1PSU'PSXBSEJOH.
If you wish to remove a rule, click on its trash can icon in the Delete column. If you
wish to edit a rule, click on its pencil icon in the Edit column. If you wish to create a
new rule, click the "EE3VMFTbutton. Click Save when you are done. If you edit or
create a rule, the following options will appear:
Name:
Local IP:
Protocol:
Protocol
Number:
External Port:
Internal Port:
Schedule:
58D-Link DIR-842 User Manual
Section 4 - Conguration
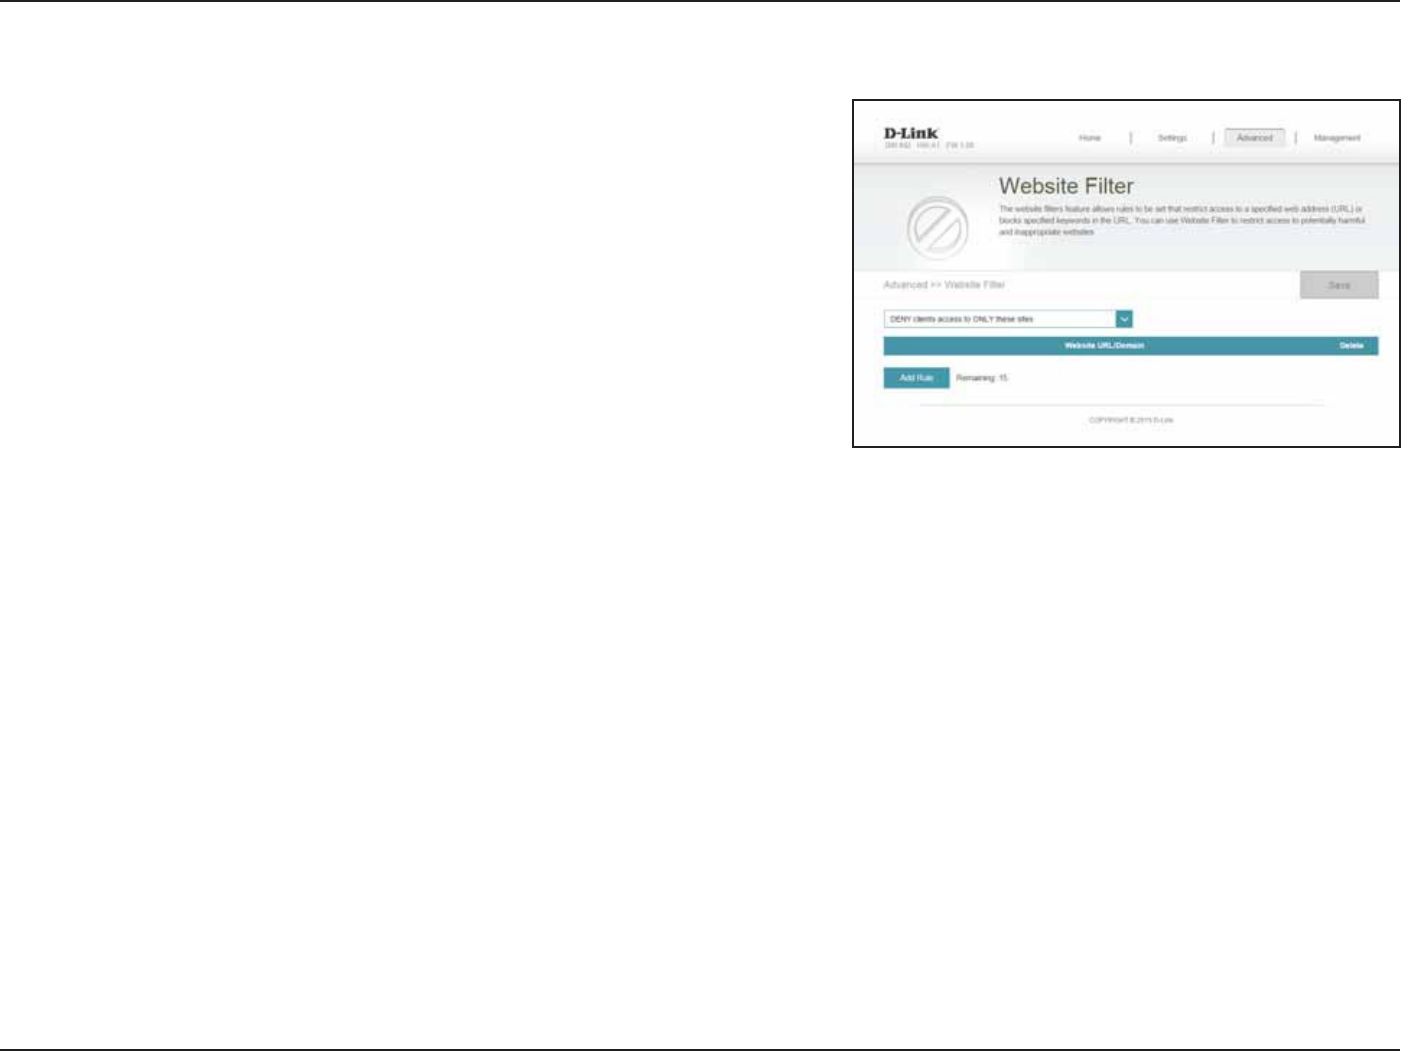
Website Filter
5IFXFCTJUFöMUFSTFUUJOHTBMMPXZPVUPCMPDLBDDFTTUPDFSUBJOXFCTJUFT:PVDBO
FJUIFSDSFBUFBMJTUPGTJUFTUPCMPDLPSDSFBUFBMJTUPGTJUFTUPBMMPXXJUIBMMPUIFSTJUFT
CFJOHCMPDLFE
In the Features menu on the bar on the top of the page, click 8FCTJUF'JMUFS.
If you want to create a list of sites to block, select %&/:DPNQVUFSTBDDFTTUP0/-:
these sites from the drop-down menu. All other sites will be accessible. If you want
to specify a list of sites to allow, select "--08DPNQVUFSTBDDFTTUP0/-:UIFTF
sites from the drop-down menu. All other sites will be blocked.
:PVNBZTQFDJGZBNBYJNVNPGöGUFFOXFCTJUFT5PBEEBOFXTJUFUPUIFMJTUDMJDL
Create New Rule. Next, under Website URL/Domain enter the URL or domain. If you
wish to remove a rule, click on its trash can icon in the Delete column. If you wish to
edit a rule, simply replace the URL or domain.
Click Save when you are done.
59D-Link DIR-842 User Manual
Section 4 - Conguration
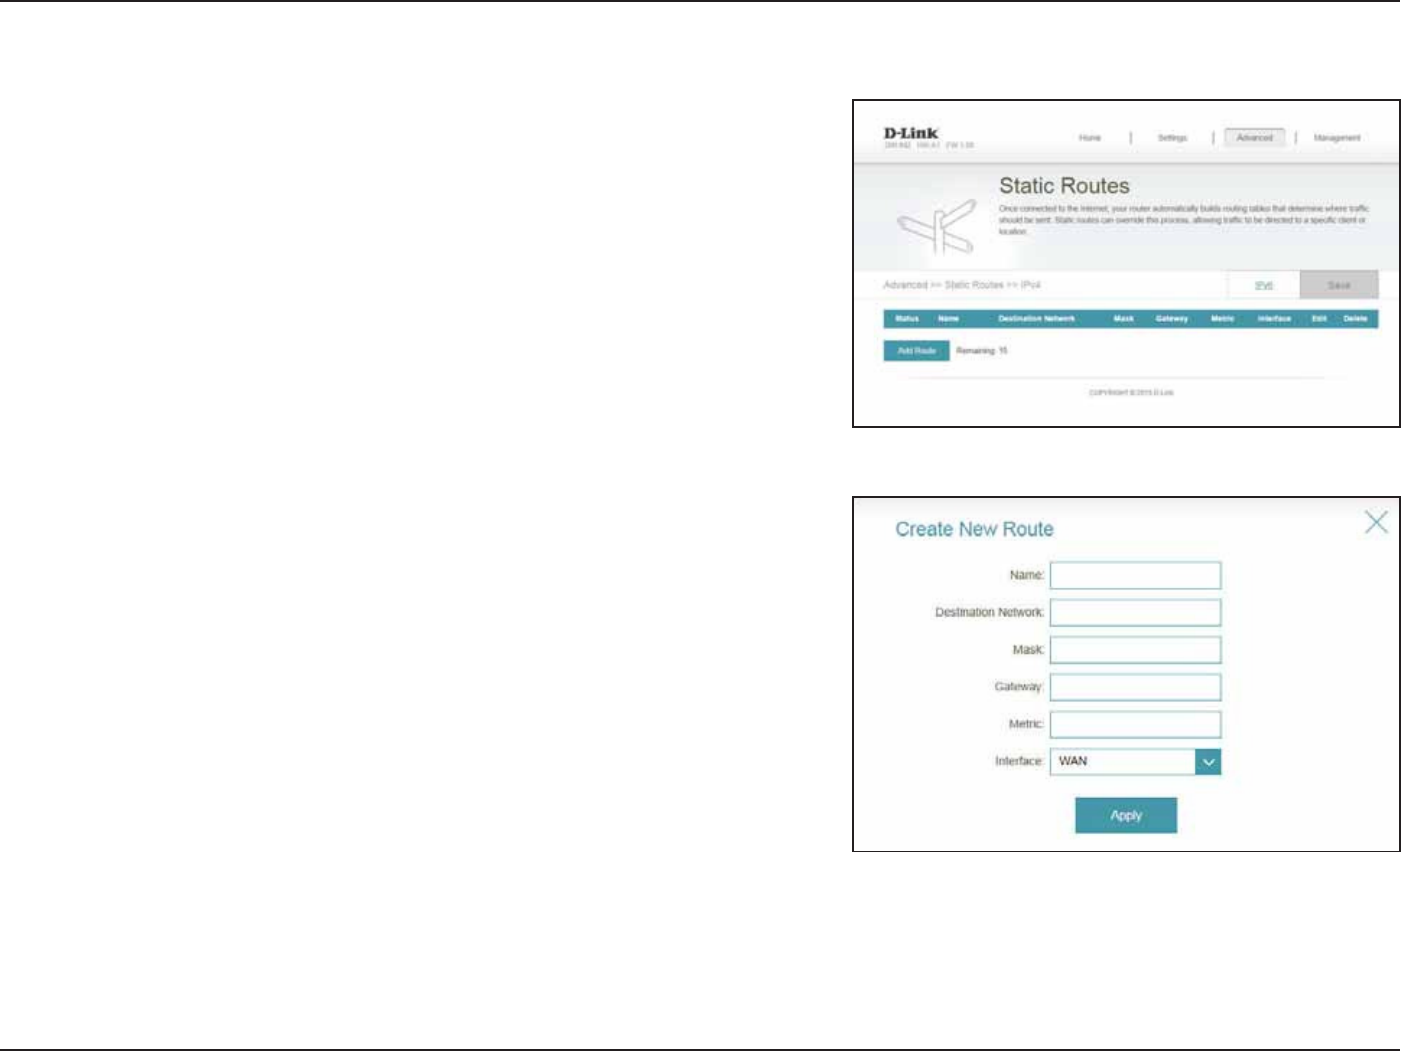
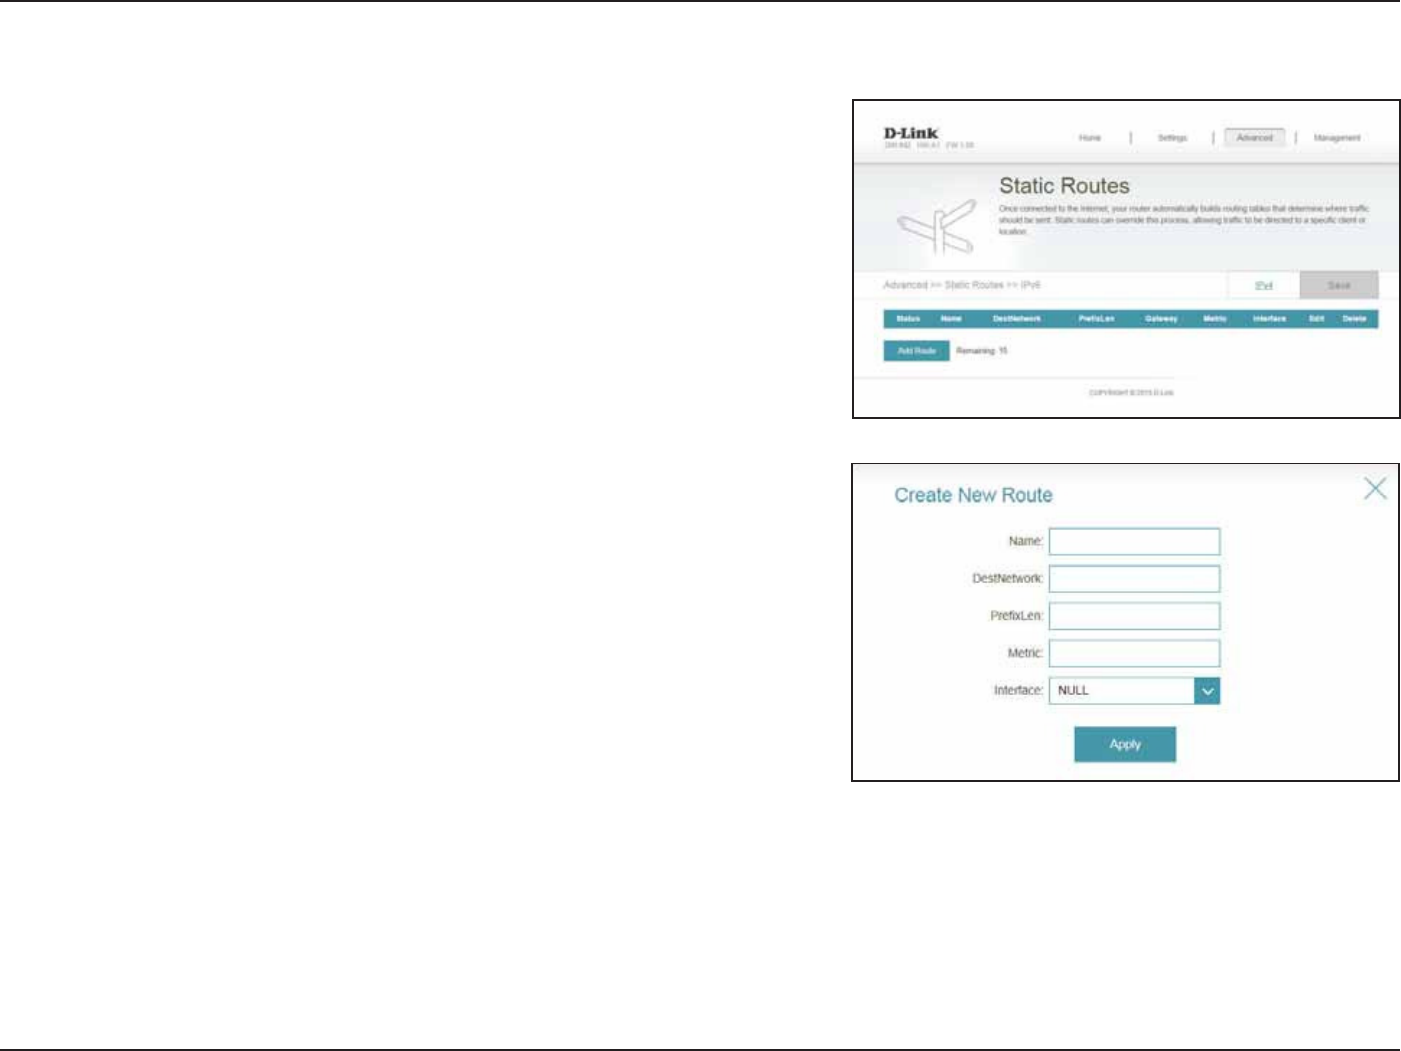
Static Routes
Enter a name for the rule.
Enter the IP address of packets that will take this route.
Enter the netmask of the route.
Enter your next hop gateway to be taken if this route is used.
The route metric is a value from 1 to 16 that indicates the cost of
using this route. A value 1 is the lowest cost and 15 is the highest cost.
Select the interface that the IP packet must use to transit out of the
router when this route is used.
Click "QQMZ when you are done.
The Static Routes section allows you to dene custom routes to control how data
trac is moved around your network.
In the Features menu on the bar on the top of the page, click Static Routes.
To congure IPv6 rules, click IPv6 and refer to IPv6 on page 60. To return to the
main IPv4 static routes page, click IPv4.
If you wish to remove a rule, click on its trash can icon in the Delete column. If you
wish to edit a rule, click on its pencil icon in the Edit column. If you wish to create a
new rule, click the "EE3VMFTbutton. Click Save when you are done. If you edit or
create a rule, the following options will appear:
Name:
Destination
Network:
Mask:
Gateway:
Metric:
Interface:
60D-Link DIR-842 User Manual
Section 4 - Conguration
Enter a name for the rule.
This is the IP address of the router used to reach the specied
destination.
Enter the IPv6 address prex length of the packets that will take this
route.
Enter the metric value for this rule here.
Select the interface that the IP packet must use to transit out of the
router when this route is used.
Click "QQMZ when you are done.
Name:
DestNetwork:
PrexLen:
Metric:
Interface:
IPv6
To congure IPv6 rules, on the Static Routes page click IPv6. To return to the main
IPv4 static routes page, click IPv4.
If you wish to remove a rule, click on its trash can icon in the Delete column. If you
wish to edit a rule, click on its pencil icon in the Edit column. If you wish to create a
new rule, click the "EE3VMFTbutton. Click Save when you are done. If you edit or
create a rule, the following options will appear:
61D-Link DIR-842 User Manual
Section 4 - Conguration
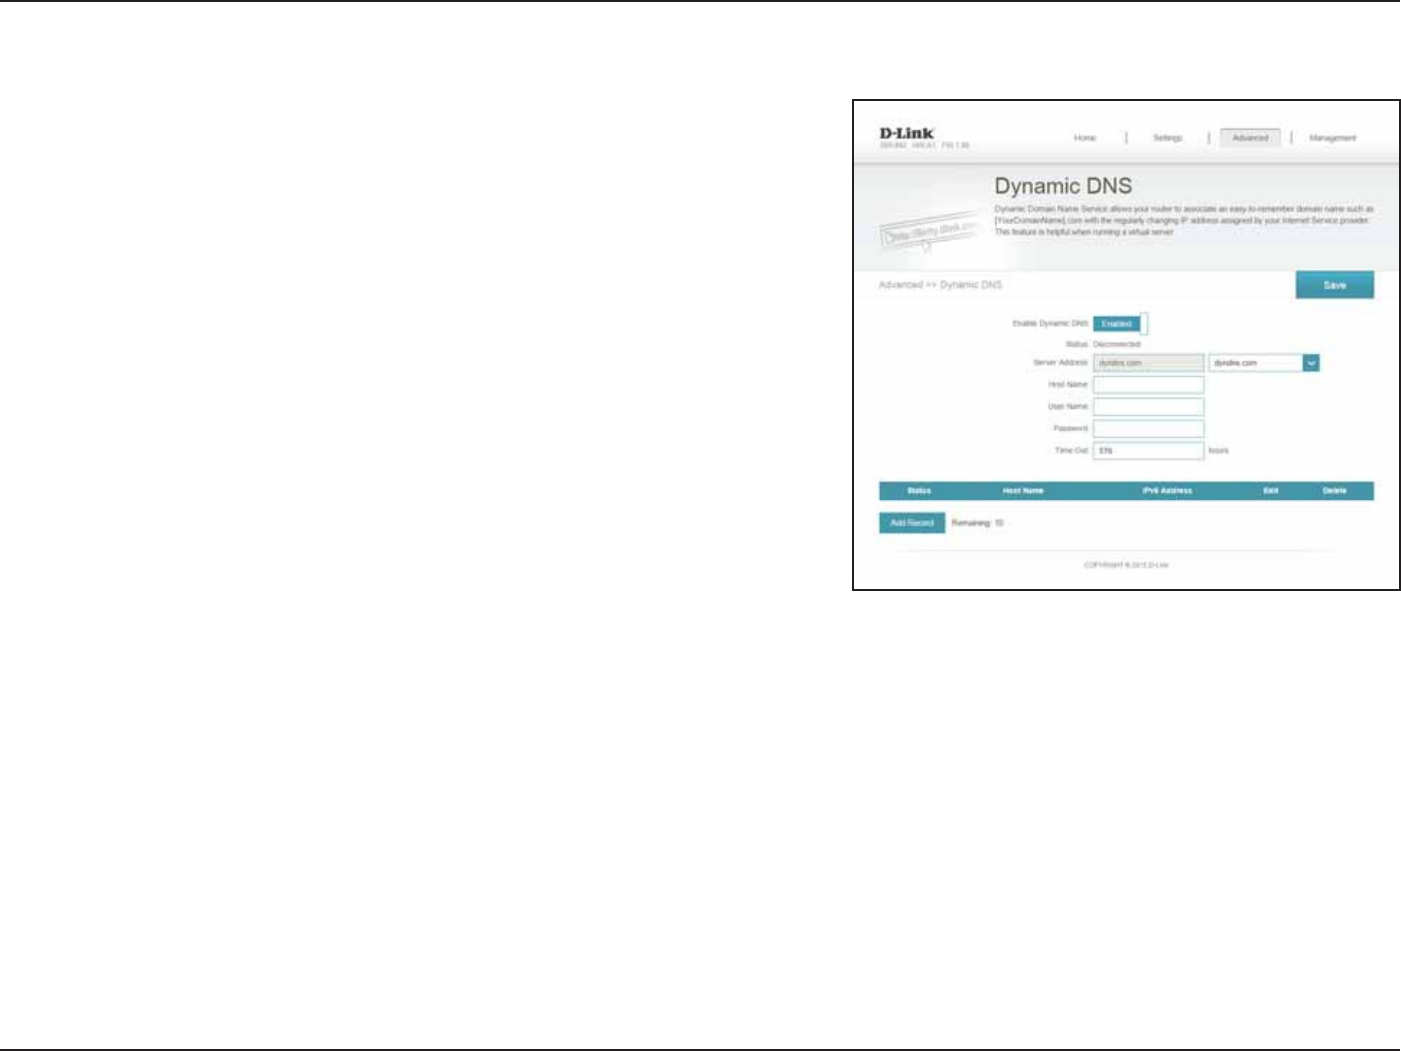
Dynamic DNS
.PTU*OUFSOFU4FSWJDF1SPWJEFST*41TBTTJHOEZOBNJDDIBOHJOH*1BEESFTTFT6TJOH
a dynamic DNS service provider, people can enter your domain name in their web
browser to connect to your server no matter what your IP address is.
In the Features menu on the bar on the top of the page, click Dynamic DNS.
Enabling dynamic DNS will reveal further conguration options.
Displays the current dynamic DNS connection status.
Enter the address of your dynamic DNS server, or select one from
the drop-down menu.
Enter the host name that you registered with your dynamic DNS
service provider.
Enter your dynamic DNS username.
Enter your dynamic DNS password.
&OUFSBUJNFPVUUJNFJOIPVST
Click Save when you are done.
Enable
Dynamic DNS:
Status:
Server Address:
Host Name:
User Name:
Password:
Time Out:
At the bottom of the page are the IPv6 host settings. To congure an IPv6 dynamic
DNS host, refer to IPv6 Host on page 62.
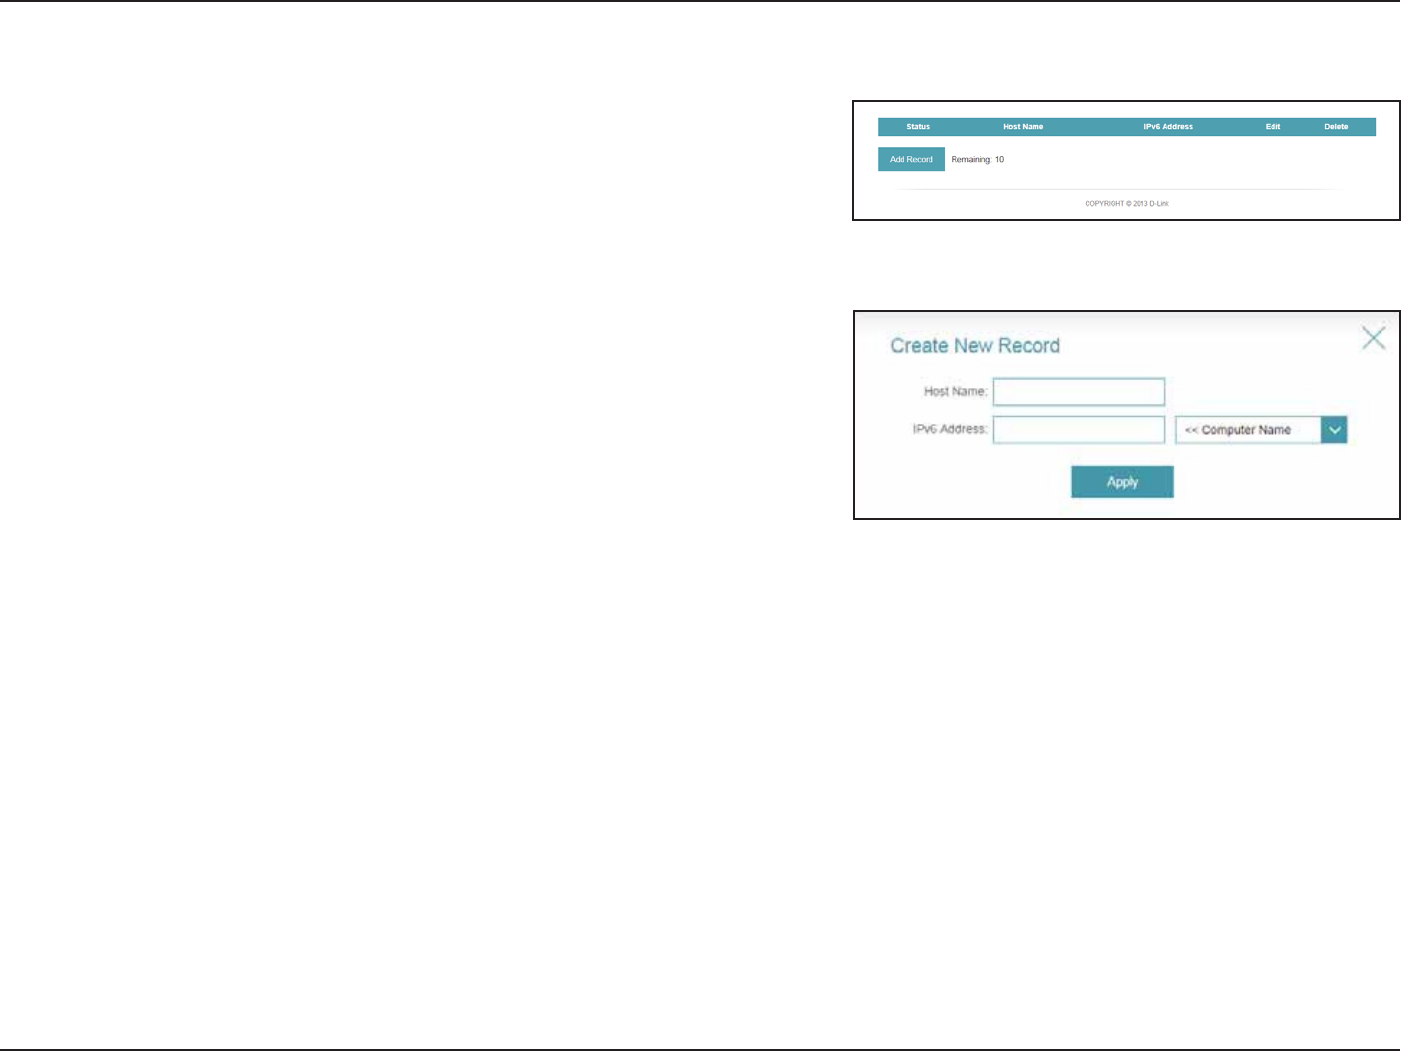
62D-Link DIR-842 User Manual
Section 4 - Conguration
Enter the host name that you registered with your dynamic DNS
service provider.
Enter the IPv6 address of the dynamic DNS server. Alternatively, select
the server device in the drop-down menu.
Click "QQMZ when you are done.
Host Name:
IPv6 Address:
The IPv6 host settings are found at the bottom of the Dynamic DNS page.
If you wish to remove a rule, click on its trash can icon in the Delete column. If you
wish to edit a rule, click on its pencil icon in the Edit column. If you wish to create a
new rule, click the "EE3FDPSEbutton. Click Save when you are done. If you edit or
create a rule, the following options will appear:
IPv6 Host
63D-Link DIR-842 User Manual
Section 4 - Conguration
Management
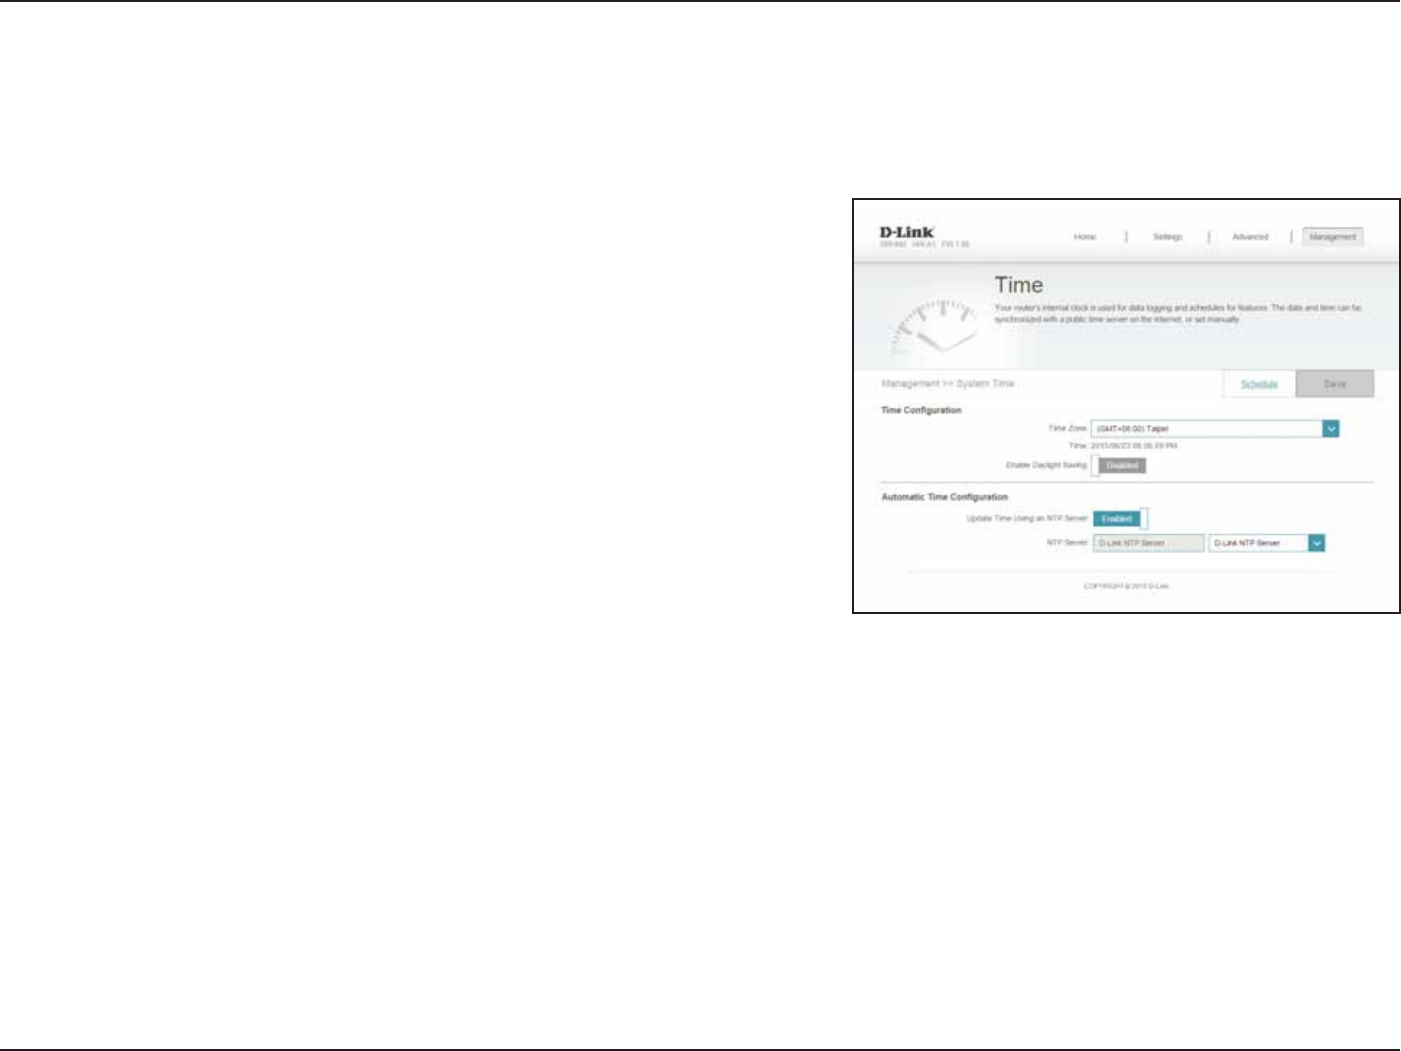
Time & Schedule
Time
The Time page allows you to congure, update, and maintain the correct time on
the internal system clock. From here you can set the time zone, the Network Time
1SPUPDPM/51TFSWFSBOEFOBCMFPSEJTBCMFEBZMJHIUTBWJOHUJNF
In the Management menu on the bar on the top of the page, click Time & Schedule.
Select your time zone from the drop-down menu.
Displays the current date and time of the router.
Enable or disable daylight saving time.
Enable or disable to allow an NTP server on the Internet to synchronize
the time and date with your router. If you enable this option, select
an NTP server from the drop-down menu. To congure the router’s
time and date manually, disable this option and use the drop-down
menus that appear to input the time and date.
Click Save when you are done.
Time Zone:
Time:
Daylight
Saving:
Update Time
Using an NTP
Server:
To congure and manage your schedules, click Schedule and refer to Schedule on
page <?>.
64D-Link DIR-842 User Manual
Section 4 - Conguration
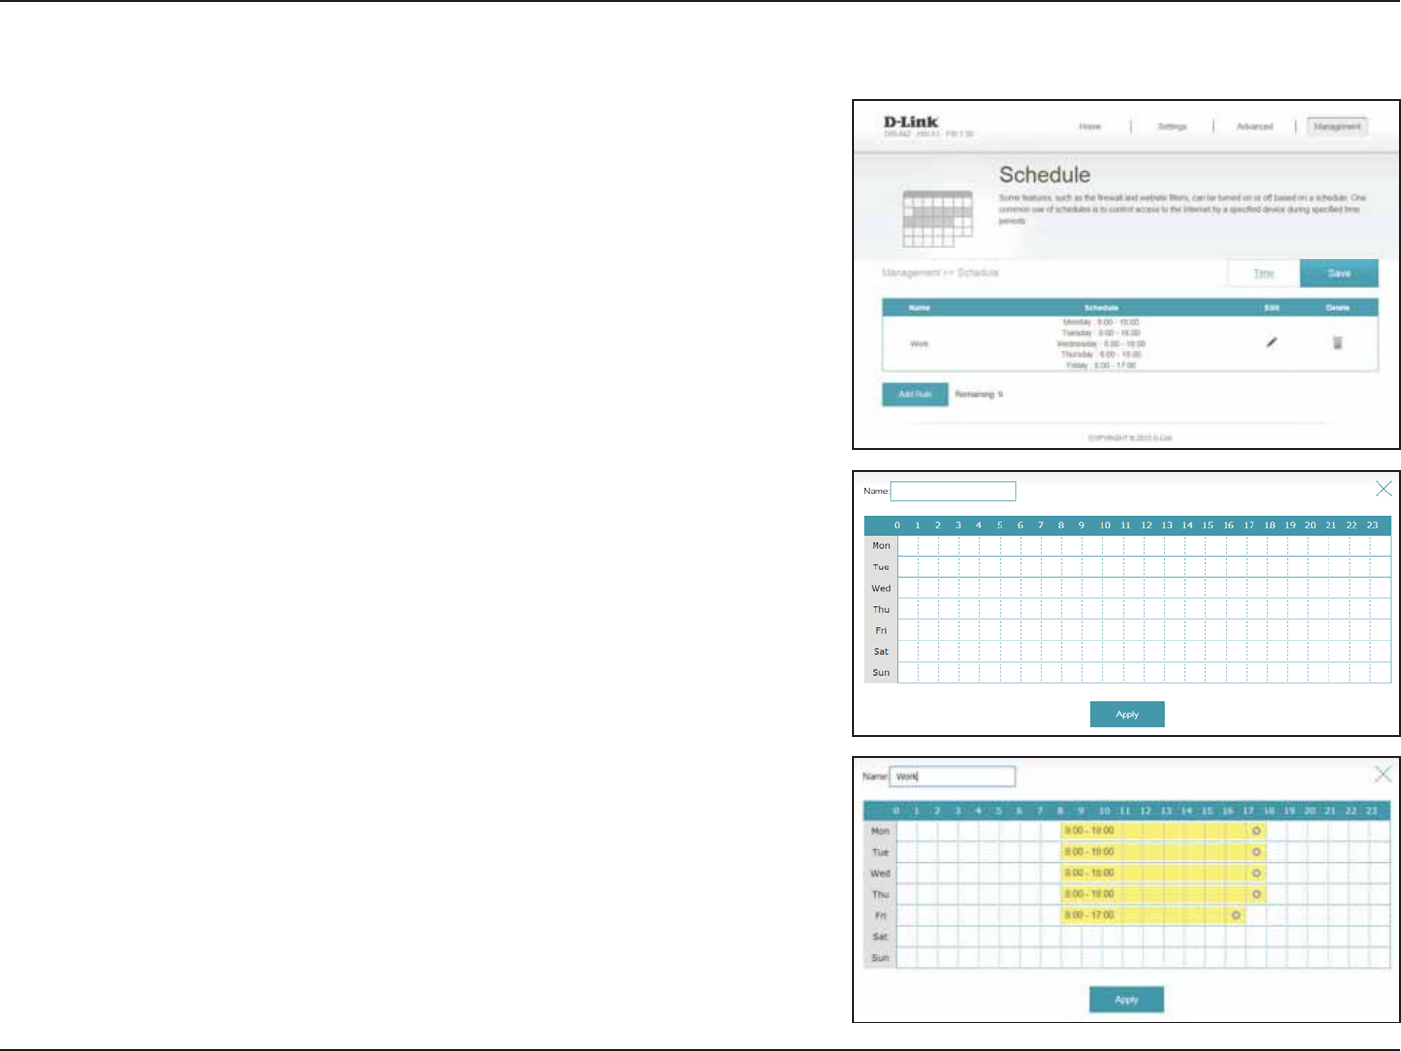
Schedule
Some conguration rules can be set according to a pre-congured schedule. To
create, edit, or delete schedules, from the Time page click Schedule. To return to
the Time page, click Time.
If you wish to remove a rule, click on its trash can icon in the Delete column. If you
wish to edit a rule, click on its pencil icon in the Edit column. If you wish to create a
new rule, click the "EE3VMFTbutton. Click Save when you are done. If you edit or
create a rule, the following screen will appear:
First, enter the name of your schedule in the Name eld.
Each box represents one hour, with the time at the top of each column. To add a time
QFSJPEUPUIFTDIFEVMFTJNQMZDMJDLPOUIFTUBSUIPVSBOEESBHUPUIFFOEIPVS:PV
can add multiple days to the schedule, but only one period per day.
To remove a time period from the schedule, click on the cross icon.
Click "QQMZ when you are done.
65D-Link DIR-842 User Manual
Section 4 - Conguration
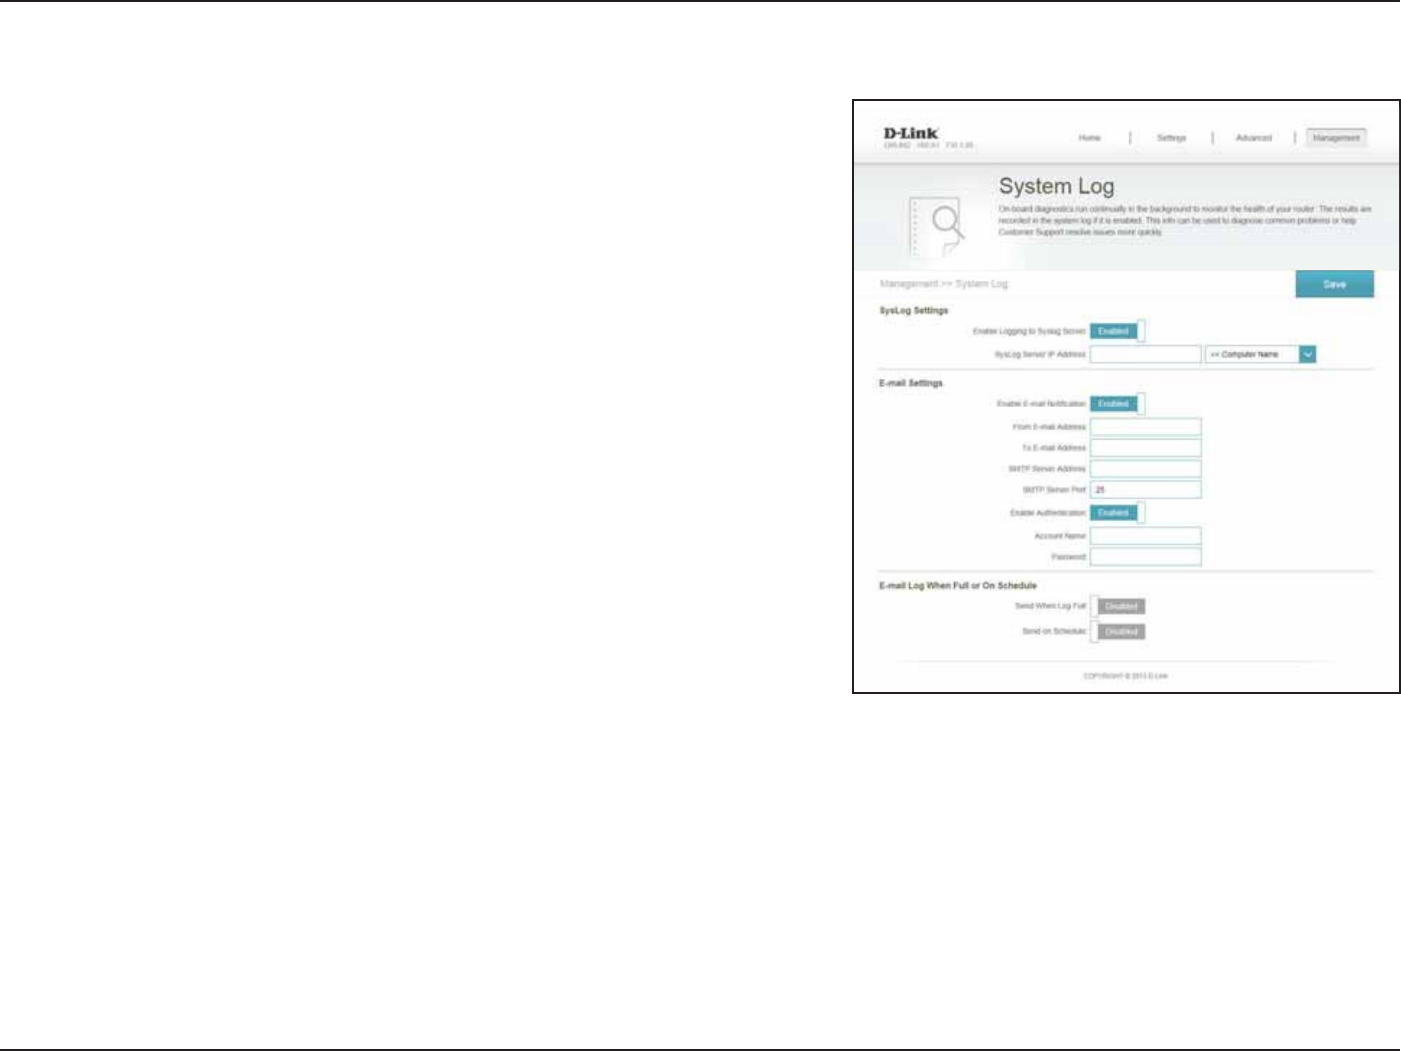
System Log
Check this box to send the router logs to a SysLog Server. If this is
disabled, there will be no other options on this page.
Enter the IP address for the Syslog server. If the Syslog server is
directly connected to the router, select it from the drop-down menu
to automatically populate the eld.
If you want the logs to be automatically sent to an email address,
enable this option.
Enter the settings for your email account. These are obtained from
your email service provider.
If email notication is enabled, this option will set the router to send
the log by email when the log is full.
This option can be enabled to send an email according to a pre-
congured schedule. See below.
If you enable Send on Schedule, use the drop-down menu to select
the time schedule that the rule will be enabled on. The schedule may
be set to "MXBZT&OBCMF, or you can create your own schedules in
the SchedulesTFDUJPOSFGFSUPSchedule on page 64
Click Save when you are done.
Enable Logging
to Syslog
Server:
Syslog Server IP
Address:
Enable Email
Notication:
Send when Log
Full:
Send on
Schedule:
Schedule:
The router keeps a running log of events. This log can be sent to a Syslog server, and
sent to your email address. In the Management menu on the bar on the top of the
page, click System Log.
66D-Link DIR-842 User Manual
Section 4 - Conguration
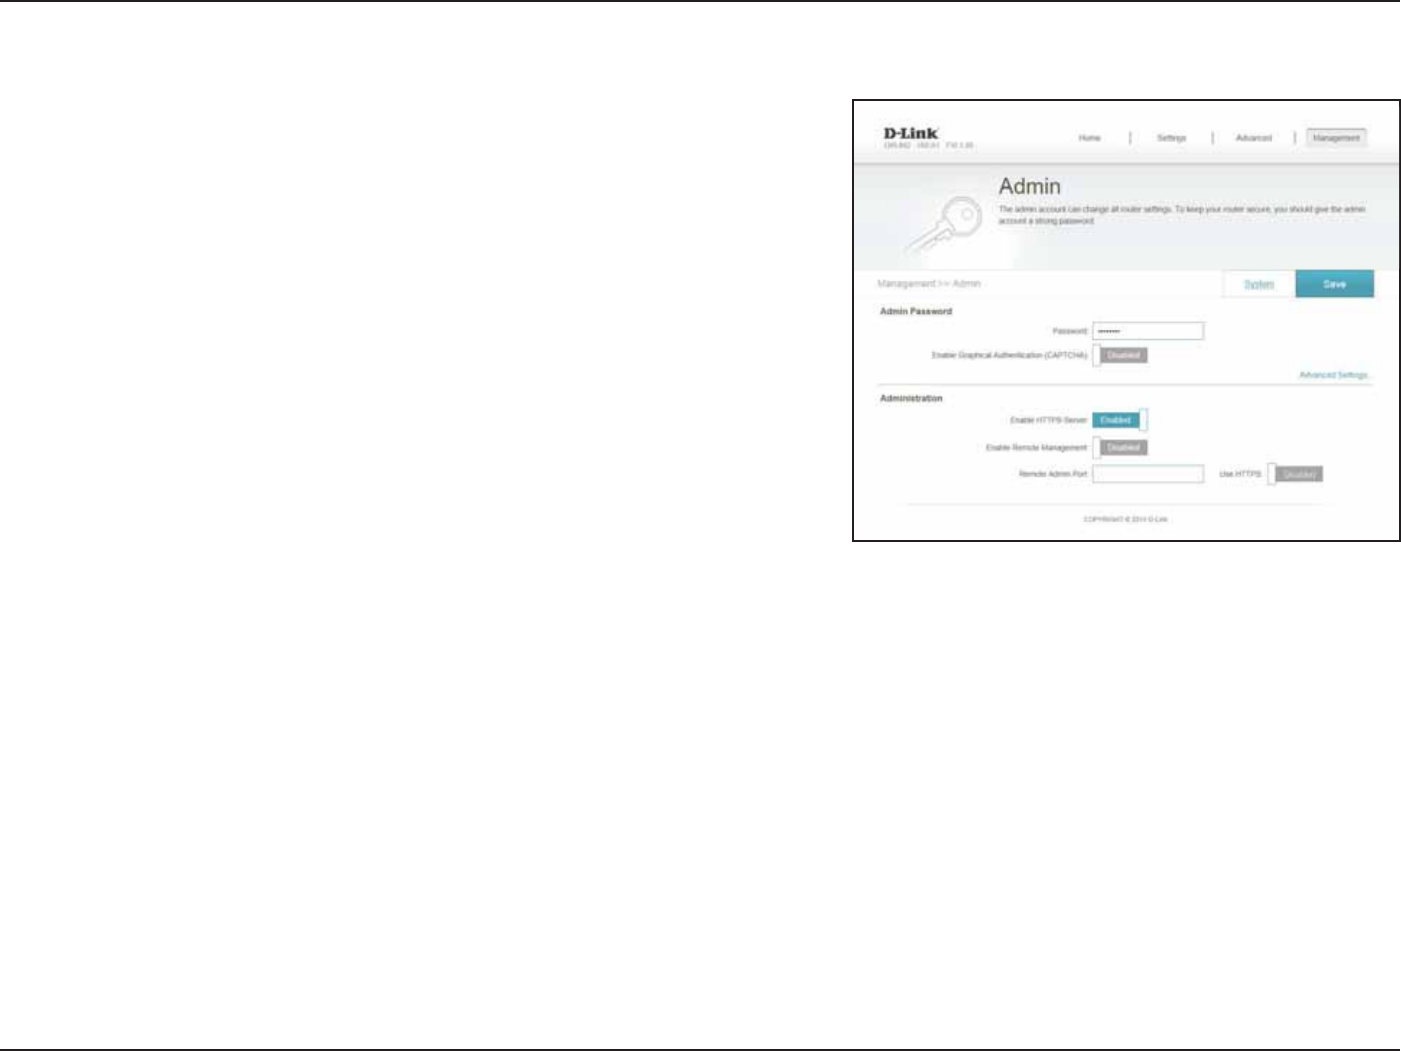
Admin
5IJTQBHFXJMMBMMPXZPVUPDIBOHFUIFBENJOJTUSBUPS"ENJOQBTTXPSEBOEFOBCMF
remote management.
In the Management menu on the bar on the top of the page, click "ENJO.
&OUFSBOFXQBTTXPSEGPSUIFBENJOJTUSBUPSBDDPVOU:PVXJMMOFFEUP
enter this password whenever you congure the router using a web
browser.
Enables a challenge-response test to require users to type letters or
numbers from a distorted image displayed on the screen to prevent
online hackers and unauthorized users from gaining access to your
router’s network settings.
Check to enable HTTPS to connect to the router securely. This means
to connect to the router, you must enter IUUQTEMJOLSPVUFSMPDBM
instead of IUUQEMJOLSPVUFSMPDBM
Remote management allows the DIR-842 to be congured from the
Internet by a web browser. A password is still required to access the
web management interface.
The port number used to access the DIR-842 is used in the URL. Example:
IUUQYYYY where x.x.x.x is the Internet IP address of the DIR-842
and 8080 is the port used for the web management interface.
Note: If you enabled HTTPS Server and wish to access the router remotely
and securely, you must enter https:// at the beginning of the address.
Click Save when you are done.
Password:
Enable
Graphical
Authentication
(CAPTCHA):
Enable HTTPS
Server:
Enable Remote
Management:
Remote Admin
Port:
To load, save, or reset settings, or reboot the router, click System and refer to System
on page 67.

67D-Link DIR-842 User Manual
Section 4 - Conguration
System
This option will save the current router conguration settings to a le
on your computer.
This option will load previously saved router conguration le. This will
overwrite the router’s current conguration.
This option will restore all conguration settings back to the settings that
were in eect at the time the router was shipped from the factory. Any
settings that have not been saved will be lost, including any rules that
you have created. If you want to save the current router conguration
settings, use the Save Settings To Local Hard Drive button above.
Click to reboot the router.
Save Settings
To Local Hard
Drive:
Load Settings
From Local
Hard Drive:
Restore To
Factory Default
Settings:
Reboot The
Device:
This page allows you to save the router’s current conguration, load a previously saved
conguration, reset the router to its factory default settings, or reboot the router.
From the Admin page click System. To return to the Admin page, click "ENJO.
68D-Link DIR-842 User Manual
Section 4 - Conguration
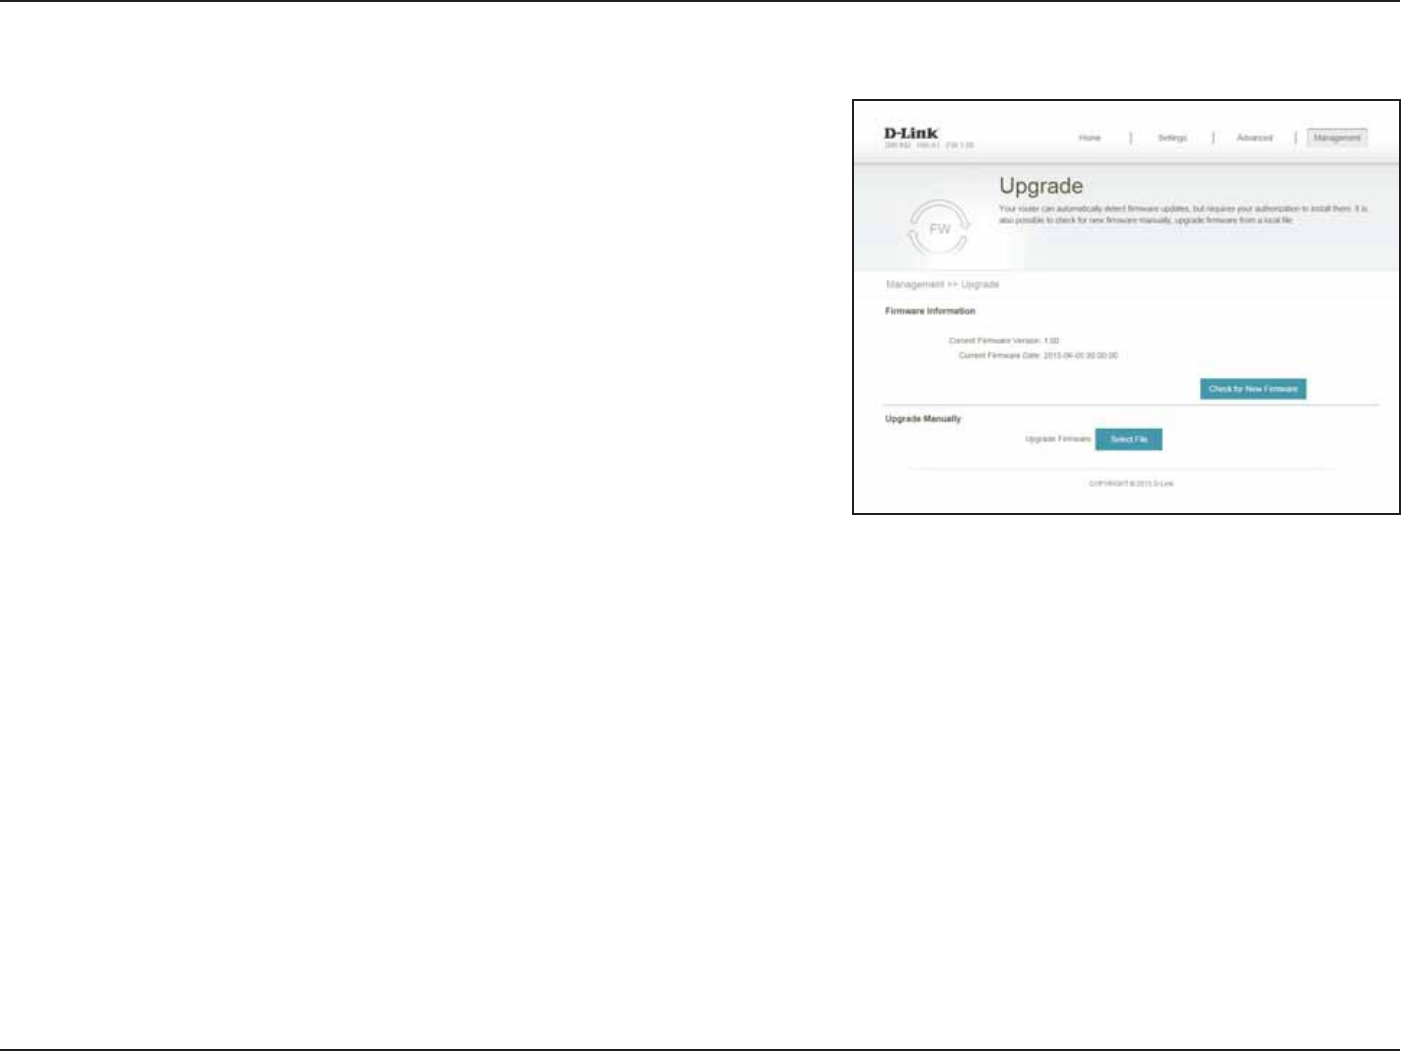
Upgrade
This page will allow you to upgrade the router’s rmware or language pack, either
automatically or manually. To manually upgrade the rmware or language pack, you
must rst download the relevant le from IUUQTVQQPSUEMJOLDPN.
In the Management menu on the bar on the top of the page, click Upgrade.
The current rmware’s version and date will be displayed.
Click this button to prompt the router to automatically check for a new
rmware version. If a newer version is found, it will prompt you to install
it.
If you wish to upgrade manually, rst download the rmware le you
wish to upgrade to. Next, click the 4FMFDU'JMF button and browse to the
öMFUPJOTUBMMUIFOFXöSNXBSF:PVDBOBMTPCSPXTFUPBMBOHVBHFQBDL
le to install a new language pack.
Firmware
Information:
Check for New
Firmware:
Upgrade
Firmware:

69D-Link DIR-842 User Manual
Section 4 - Conguration
Statistics
On the Statistics page you can view the amount of packets that pass through the router
on the WAN, LAN, and wireless segments.
In the Management menu on the bar on the top of the page, click Statistics.
:PVDBOWJFXUIFInternet, -"/, 8J'J()[, or 8J'J()[ by clicking on the
respective tabs at the top. The graph will update in real time. To clear the information
on the graph, click Clear.
The trac counter will reset if the device is rebooted.

70D-Link DIR-842 User Manual
Section 4 - Connecting to a Wireless Network
Connect a Wireless Client to your Router
WPS Button
4UFQ 8JUIJONJOVUFTQSFTTUIF814CVUUPOPOZPVSXJSFMFTTDMJFOUPSMBVODIUIFTPGUXBSFVUJMJUZBOE TUBSUUIF814
QSPDFTT
5IFFBTJFTUBOENPTUTFDVSFXBZUPDPOOFDUZPVSXJSFMFTTEFWJDFTUPUIFSPVUFSJT8148J'J1SPUFDUFE4FUVQ.PTUXJSFMFTT
devices such as wireless adapters, media players, Blu-ray DVD players, wireless printers and cameras will have a WPS button
PSBTPGUXBSFVUJMJUZXJUI814UIBUZPVDBOQSFTTUPDPOOFDUUPUIF%*3SPVUFS1MFBTFSFGFSUPZPVSVTFSNBOVBMGPSUIF
wireless device you want to connect to make sure you understand how to enable WPS. Once you know, follow the steps below:
Step 1 - Press the WPS button on the DIR-842 for about 1 second. The Internet LED on the front will start to blink.
Step 3 - Allow up to 1 minute to congure. Once the Internet light stops blinking, you will be connected and your wireless
connection will be secure with WPA2.
WPS Button
71D-Link DIR-842 User Manual
Section 4 - Connecting to a Wireless Network
Windows® 8
WPA/WPA2
*UJTSFDPNNFOEFEUPFOBCMFXJSFMFTTTFDVSJUZ81"81"POZPVSXJSFMFTTSPVUFSPSBDDFTTQPJOUCFGPSFDPOöHVSJOHZPVS
XJSFMFTTBEBQUFS*GZPVBSFKPJOJOHBOFYJTUJOHOFUXPSLZPVXJMMOFFEUPLOPXUIFTFDVSJUZLFZ8J'JQBTTXPSECFJOHVTFE
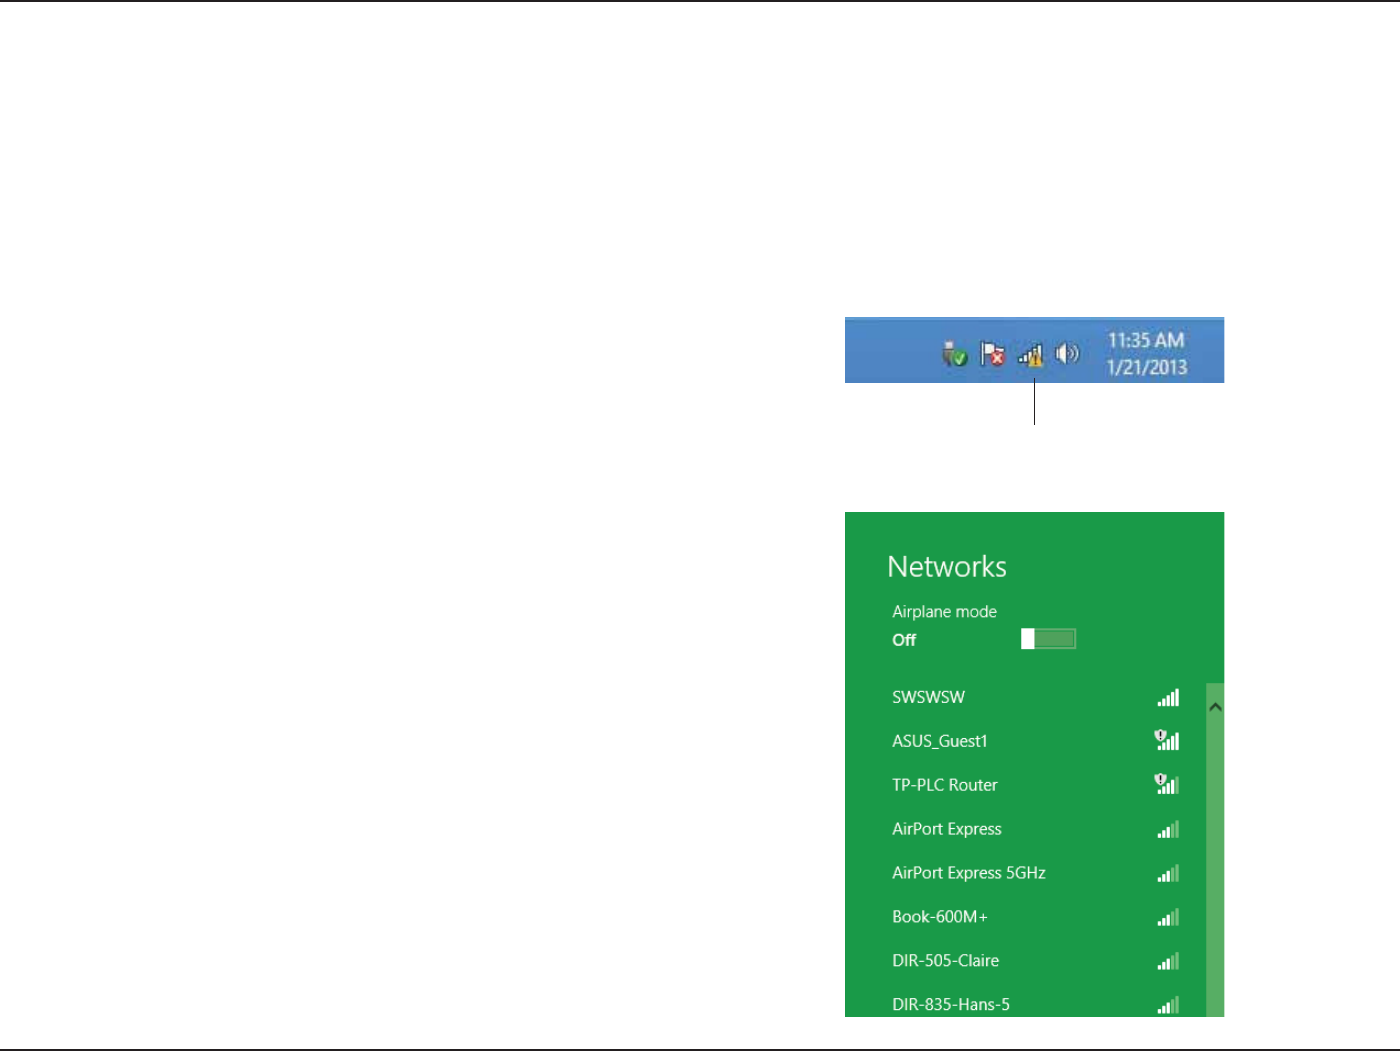
To join an existing network, locate the wireless network icon in the
taskbar, next to the time display.
Wireless Icon
Clicking on this icon will display a list of wireless networks which are
within connecting proximity of your computer. Select the desired
network by clicking on the network name.
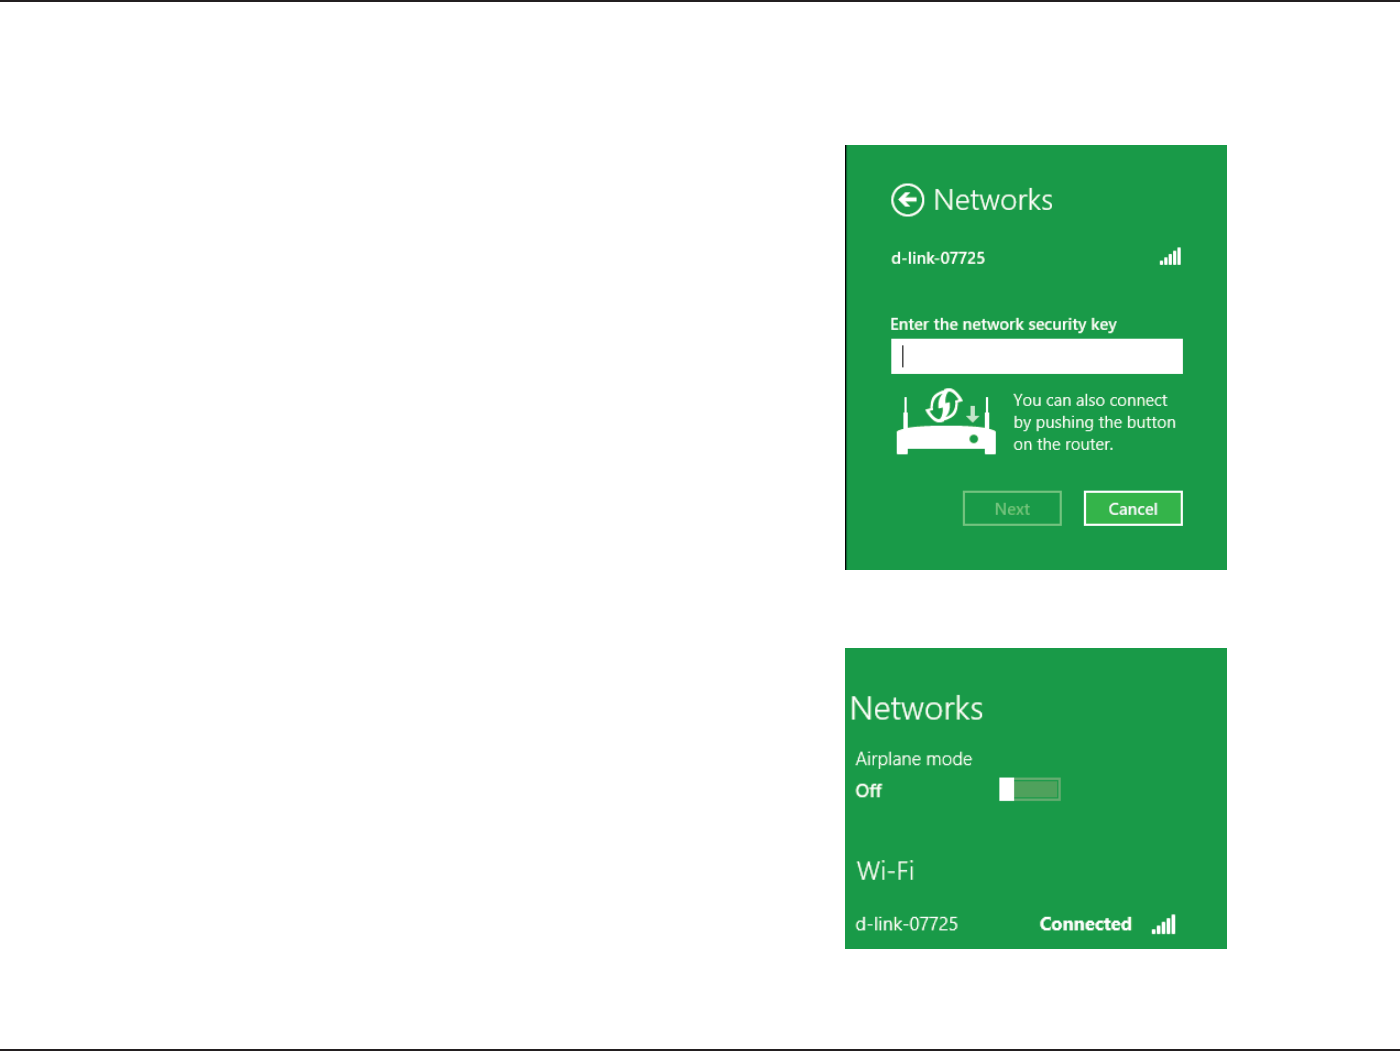
72D-Link DIR-842 User Manual
Section 4 - Connecting to a Wireless Network
:PVXJMMUIFOCFQSPNQUFEUPFOUFSUIFOFUXPSLTFDVSJUZLFZ8J
'JQBTTXPSEGPSUIFXJSFMFTTOFUXPSL&OUFSUIFQBTTXPSEJOUPUIF
box and click Next.
*GZPVXJTIUPVTF8J'J1SPUFDUFE4FUVQ814UPDPOOFDUUPUIF
router, you can also press the WPS button on your router at the
point to enable the WPS function.
When you have established a successful connection a wireless
network, the word Connected will appear next to the name of the
network to which you are connected.
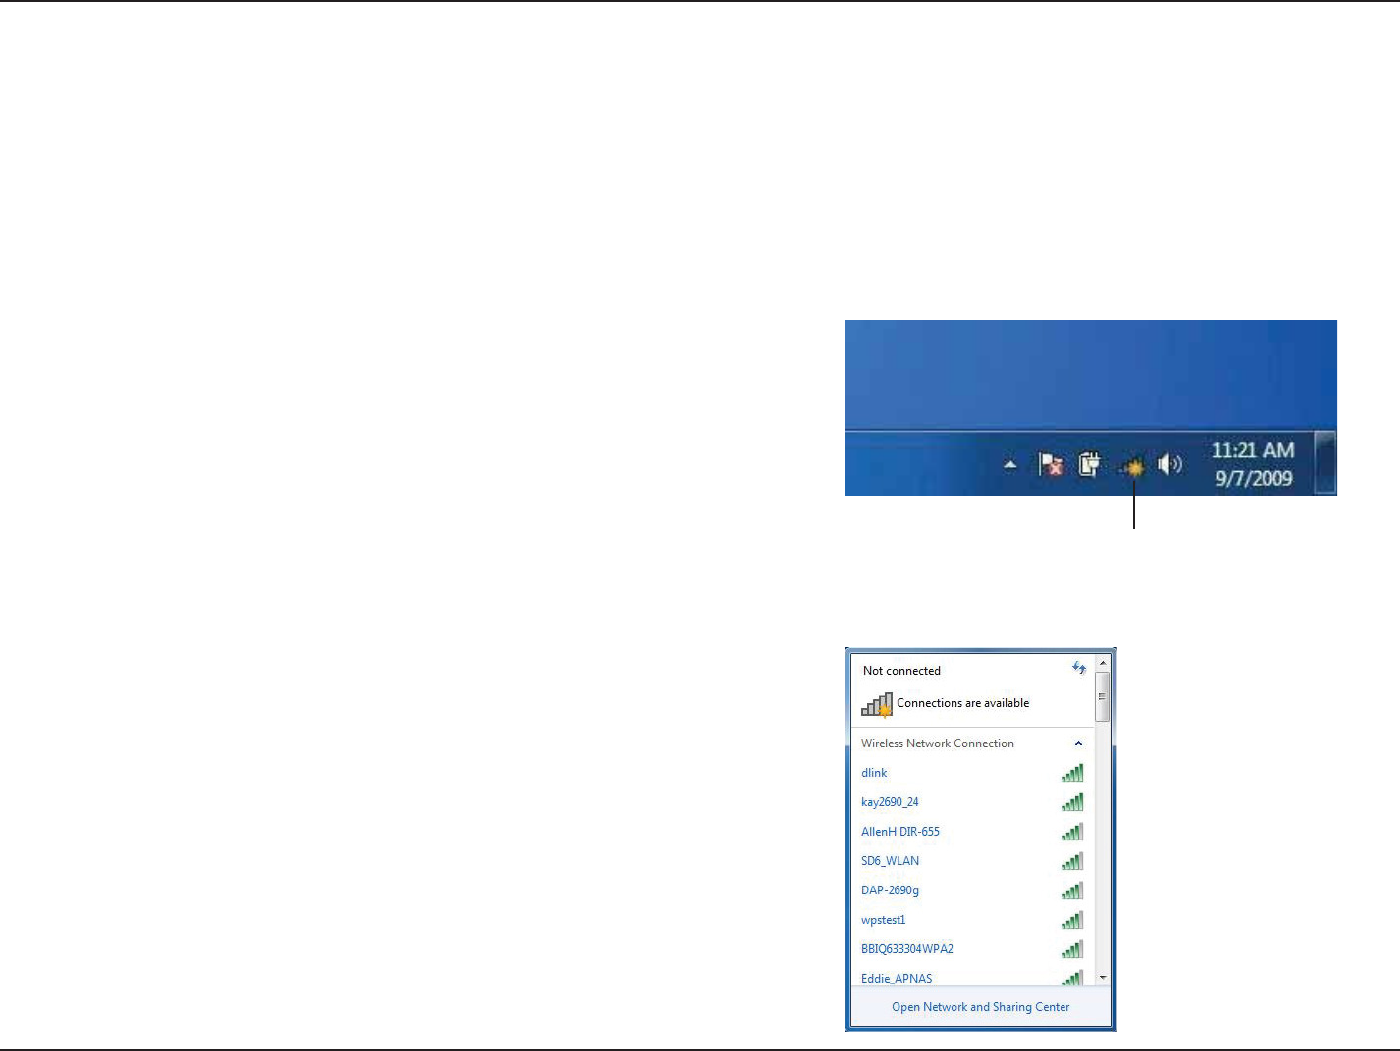
73D-Link DIR-842 User Manual
Section 4 - Connecting to a Wireless Network
Windows® 7
*UJTSFDPNNFOEFEUPFOBCMFXJSFMFTTTFDVSJUZ81"81"POZPVSXJSFMFTTSPVUFSPSBDDFTTQPJOUCFGPSFDPOöHVSJOHZPVS
wireless adapter. If you are joining an existing network, you will need to know the security key or passphrase being used.
$MJDLPOUIFXJSFMFTTJDPOJOZPVSTZTUFNUSBZMPXFSSJHIUDPSOFS
2. The utility will display any available wireless networks in your
area.
Wireless Icon
WPA/WPA2
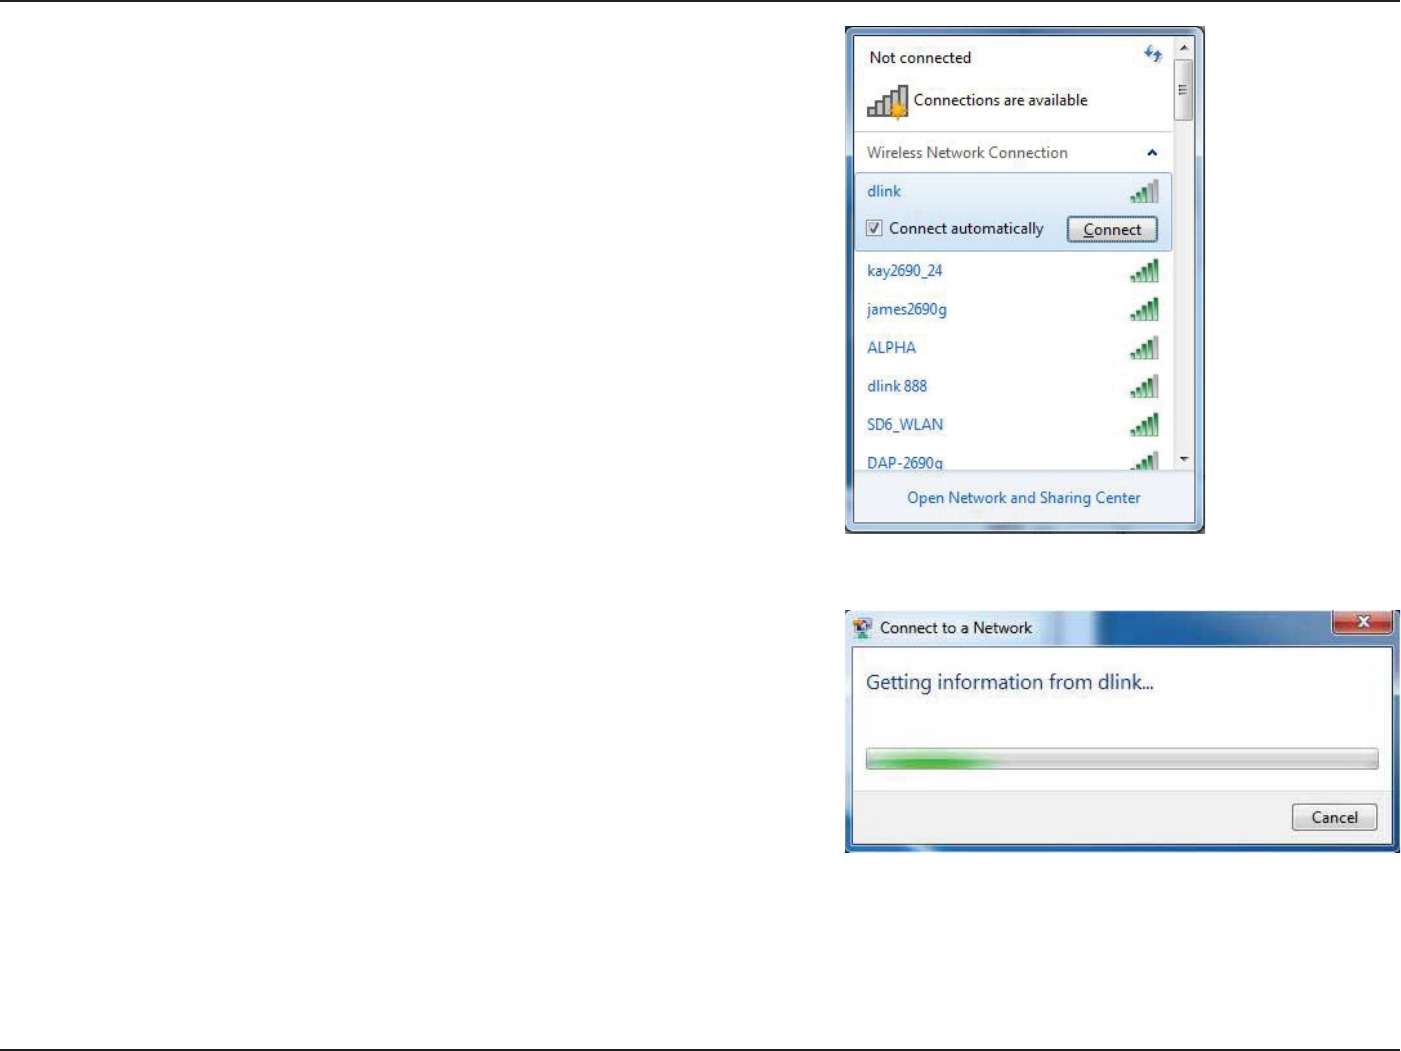
74D-Link DIR-842 User Manual
Section 4 - Connecting to a Wireless Network
)JHIMJHIU UIFXJSFMFTTDPOOFDUJPO XJUI8J'JOBNF44*%ZPV
would like to connect to and click the Connect button.
If you get a good signal but cannot access the Internet, check your
TCP/IP settings for your wireless adapter. Refer to the Networking
Basics section in this manual for more information.
4. The following window appears while your computer tries to
connect to the router.
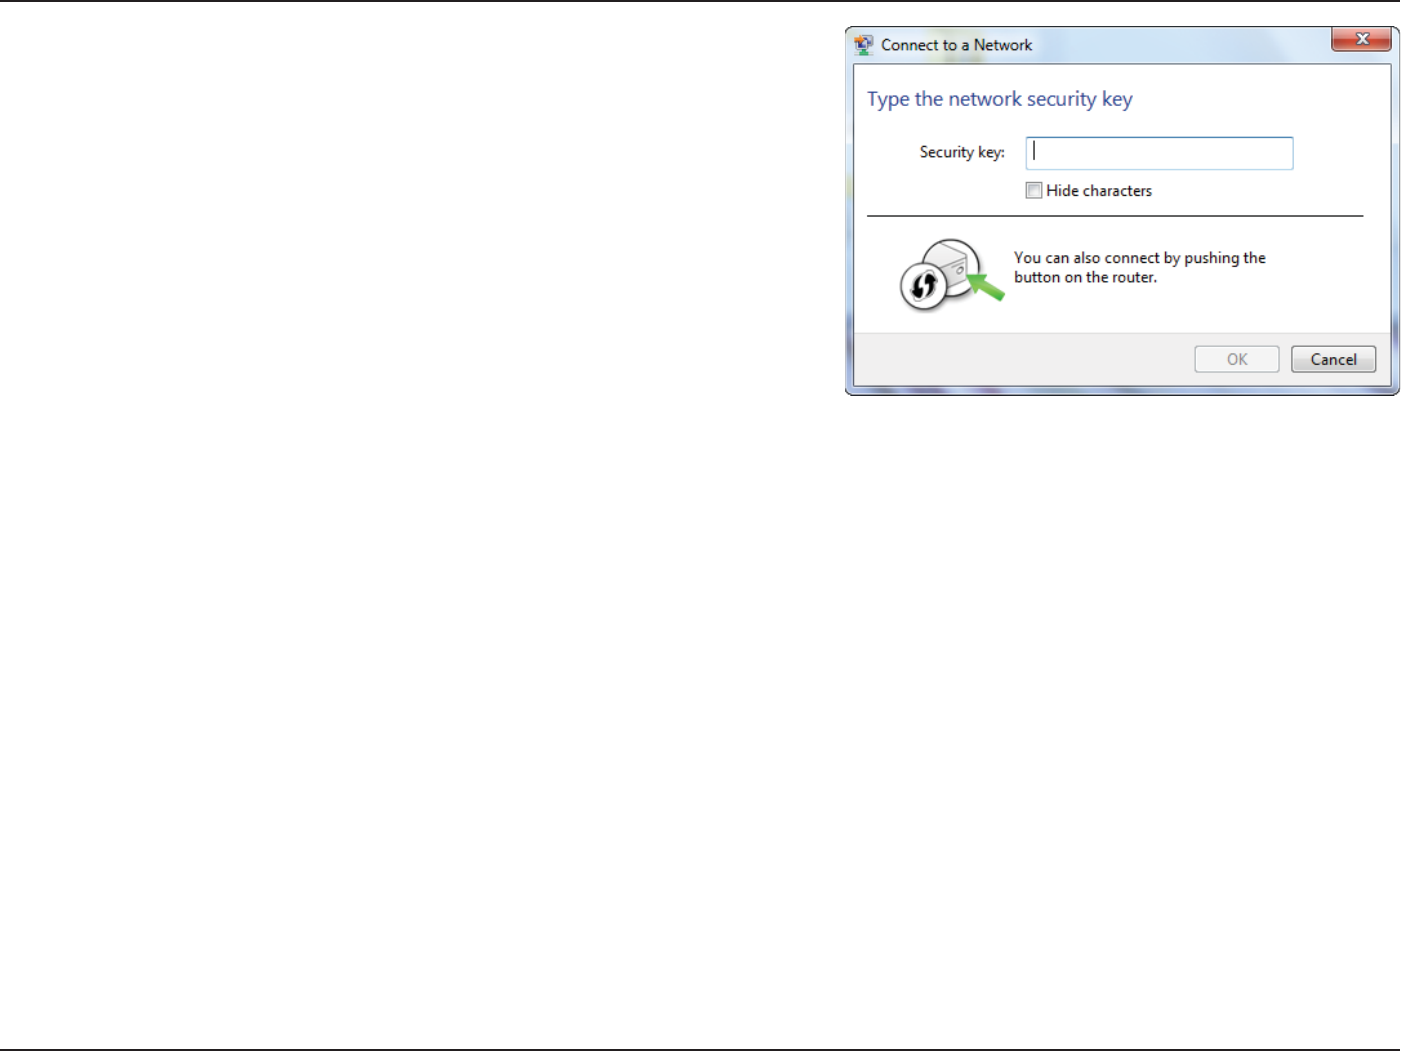
75D-Link DIR-842 User Manual
Section 4 - Connecting to a Wireless Network
&OUFSUIFTBNFTFDVSJUZLFZPSQBTTQISBTF8J'JQBTTXPSEUIBU
is on your router and click Connect:PV DBOBMTPDPOOFDUCZ
pushing the WPS button on the router.
It may take 20-30 seconds to connect to the wireless network. If the
connection fails, please verify that the security settings are correct.
The key or passphrase must be exactly the same as on the wireless
router.
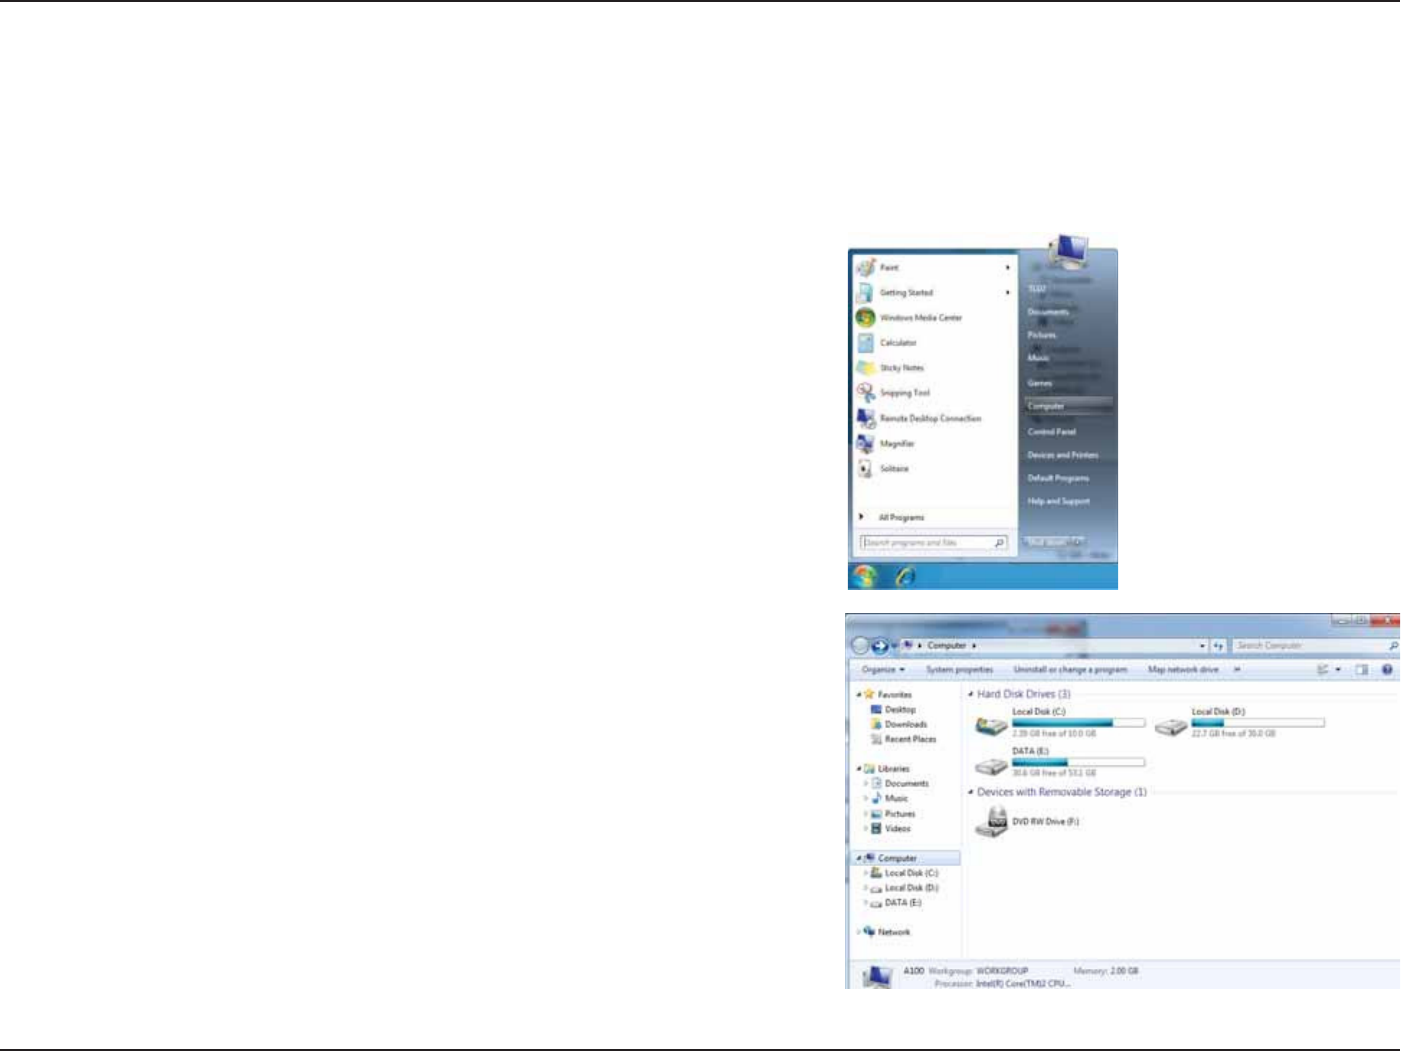
76D-Link DIR-842 User Manual
Section 4 - Connecting to a Wireless Network
WPS
The WPS feature of the DIR-842 can be congured using Windows® 7. Carry out the following steps to use Windows® 7 to
congure the WPS feature:
1. Click the Start button and select Computer from the Start menu.
2. Click Network on the left side.

77D-Link DIR-842 User Manual
Section 4 - Connecting to a Wireless Network
3. Double-click the DIR-842.
*OQVUUIF8141*/OVNCFSPOUIFSPVUFSMBCFMJOUIFSetup >
Wireless SetupNFOVJOUIFSPVUFSTXFC6*BOEDMJDLNext.
DIR-842
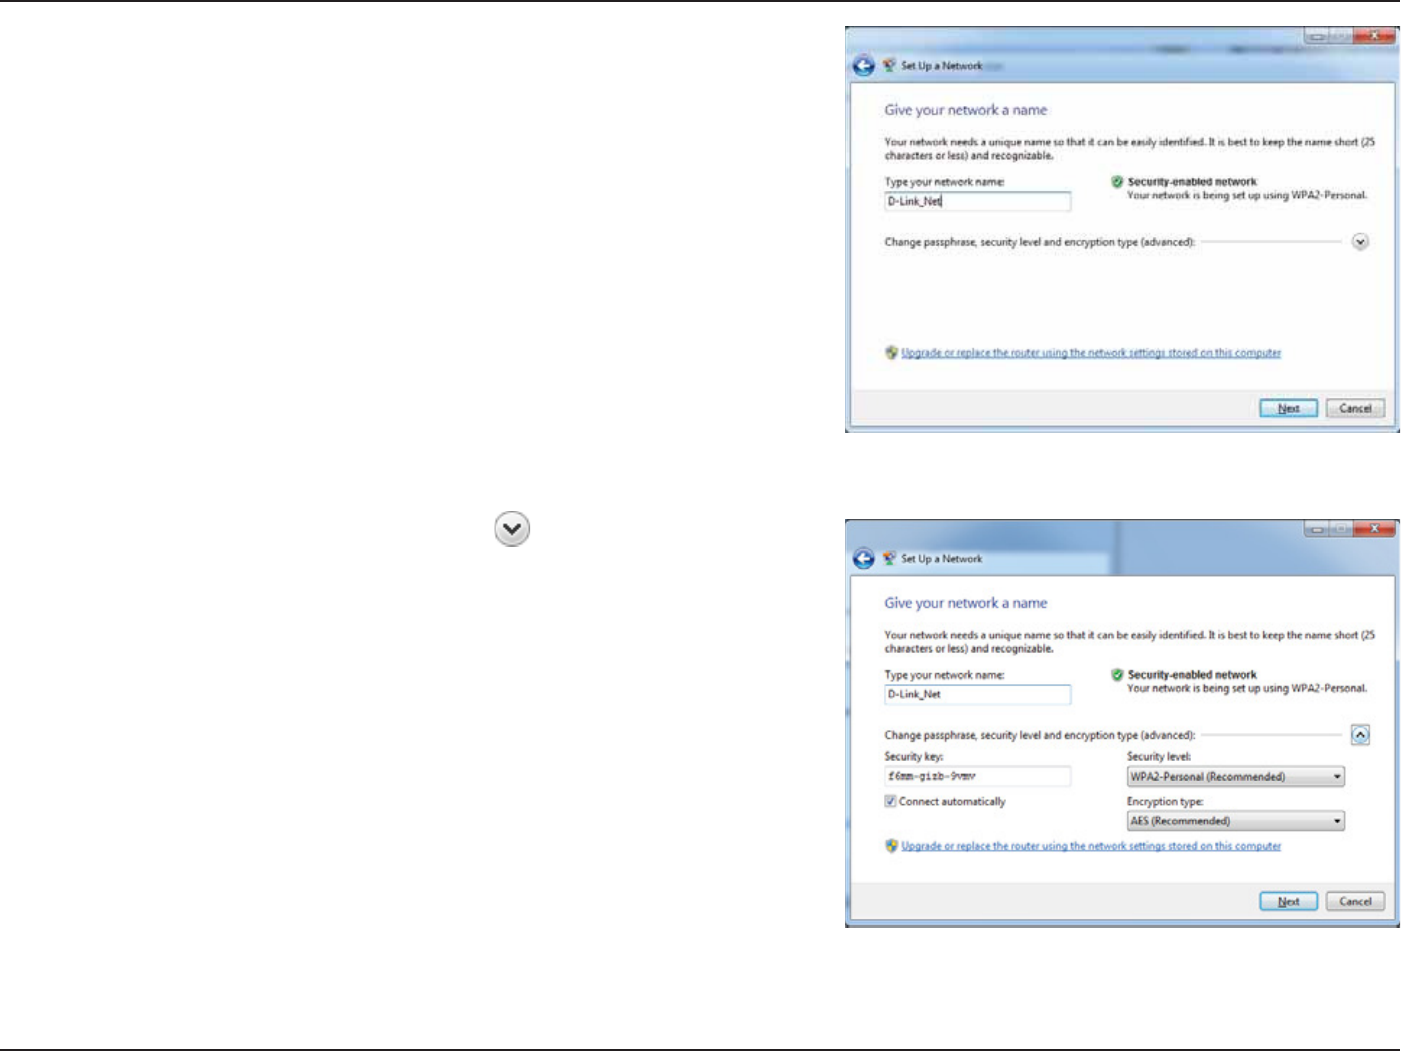
78D-Link DIR-842 User Manual
Section 4 - Connecting to a Wireless Network
5. Type a name to identify the network.
6. To congure advanced settings, click the icon.
Click Next to continue.
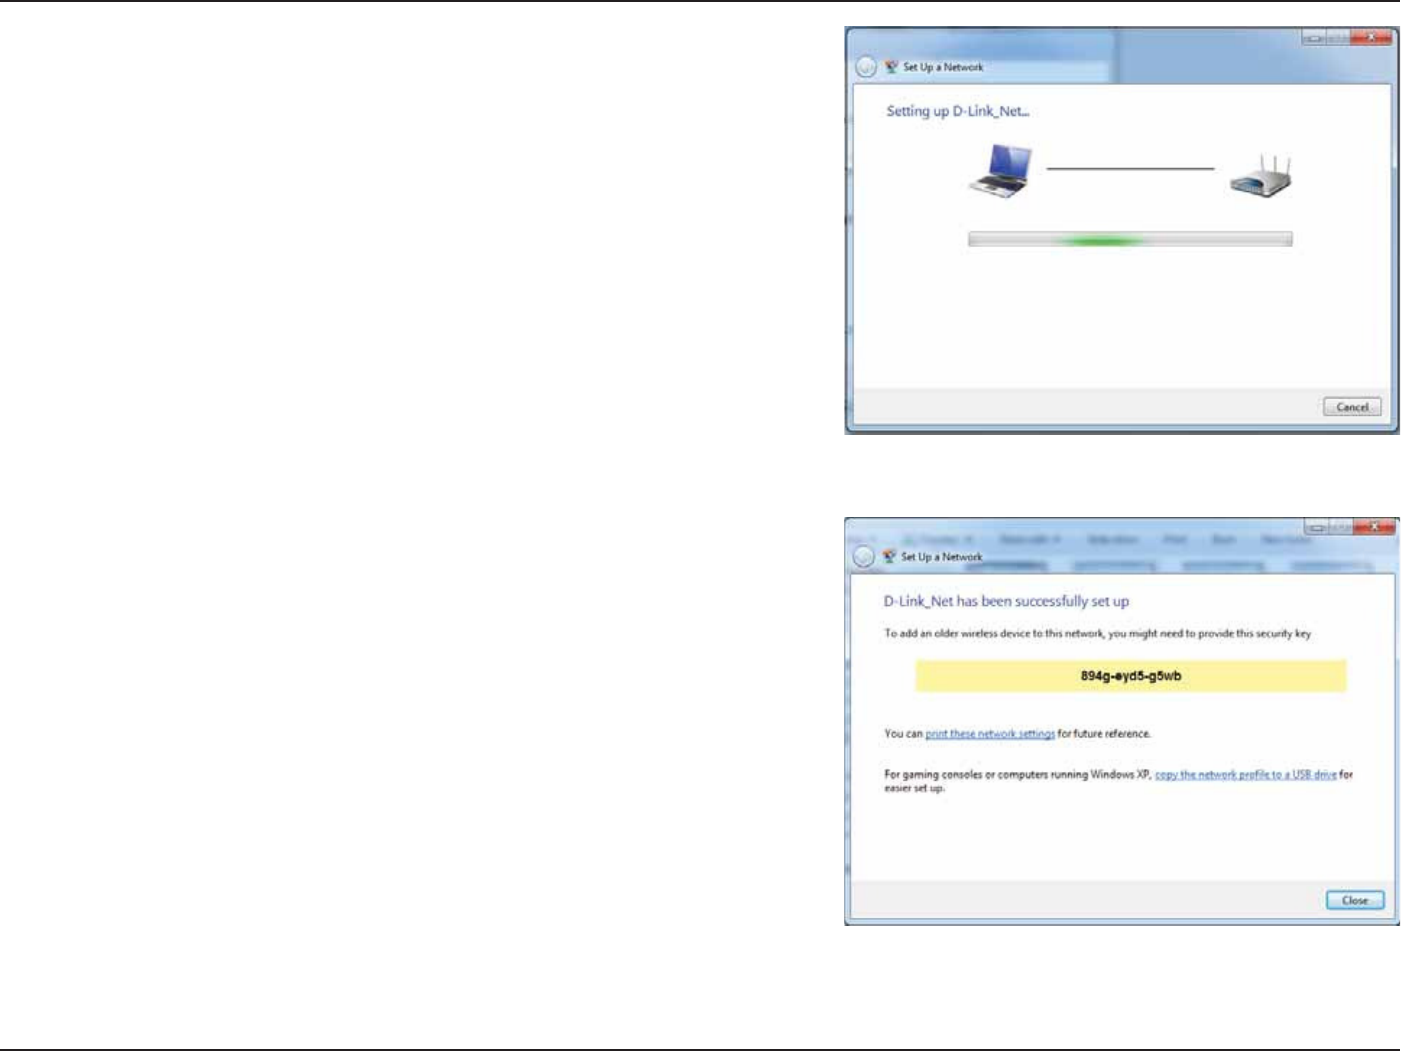
79D-Link DIR-842 User Manual
Section 4 - Connecting to a Wireless Network
7. The following window appears while the router is being
congured.
Wait for the conguration to complete.
8. The following window informs you that WPS on the router has
been setup successfully.
Make a note of the security key as you may need to provide this
security key if adding an older wireless device to the network in
the future.
9. Click Close to complete WPS setup.
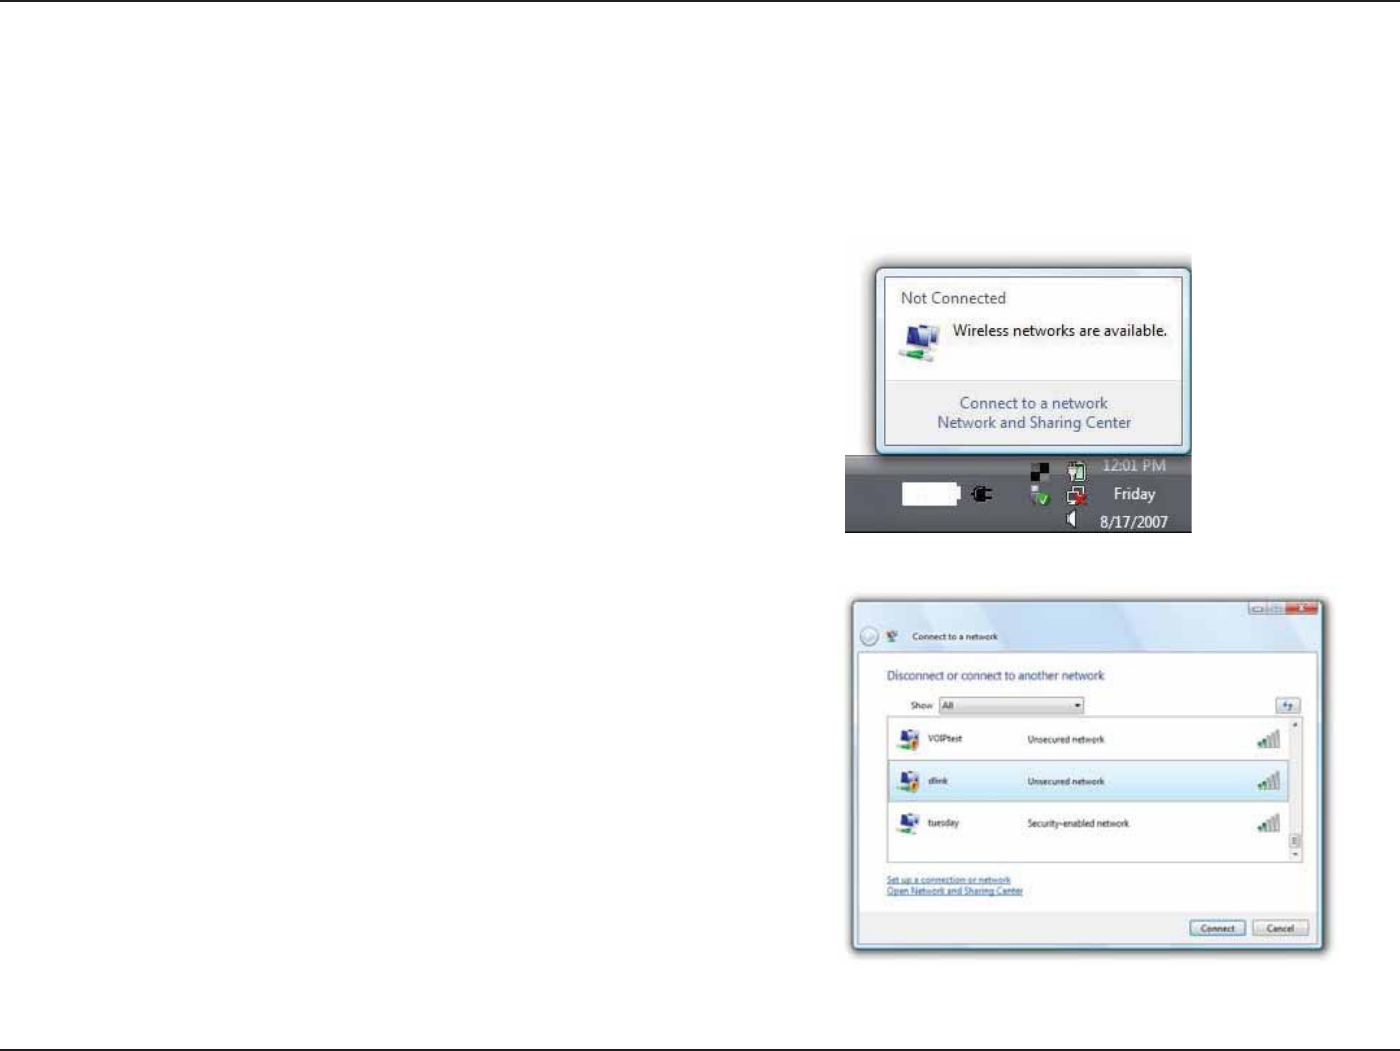
80D-Link DIR-842 User Manual
Section 4 - Connecting to a Wireless Network
Windows Vista®
Windows Vista® users may use the built-in wireless utility. If you are using another company’s utility, please refer to the user
manual of your wireless adapter for help with connecting to a wireless network. Most utilities will have a “site survey” option
similar to the Windows Vista® utility as seen below.
3JHIUDMJDLPOUIFXJSFMFTTDPNQVUFSJDPOJOZPVSTZTUFNUSBZMPXFS
SJHIUDPSOFSOFYUUPUIFUJNF4FMFDUConnect to a network.
If you receive the Wireless Networks Detected bubble, click on
the center of the bubble to access the utility.
or
The utility will display any available wireless networks in your area.
$MJDLPOBOFUXPSLEJTQMBZFEVTJOHUIF44*%BOEDMJDLUIFConnect
button.
If you get a good signal but cannot access the Internet, check you
TCP/IP settings for your wireless adapter. Refer to the Networking
Basics section in this manual for more information.
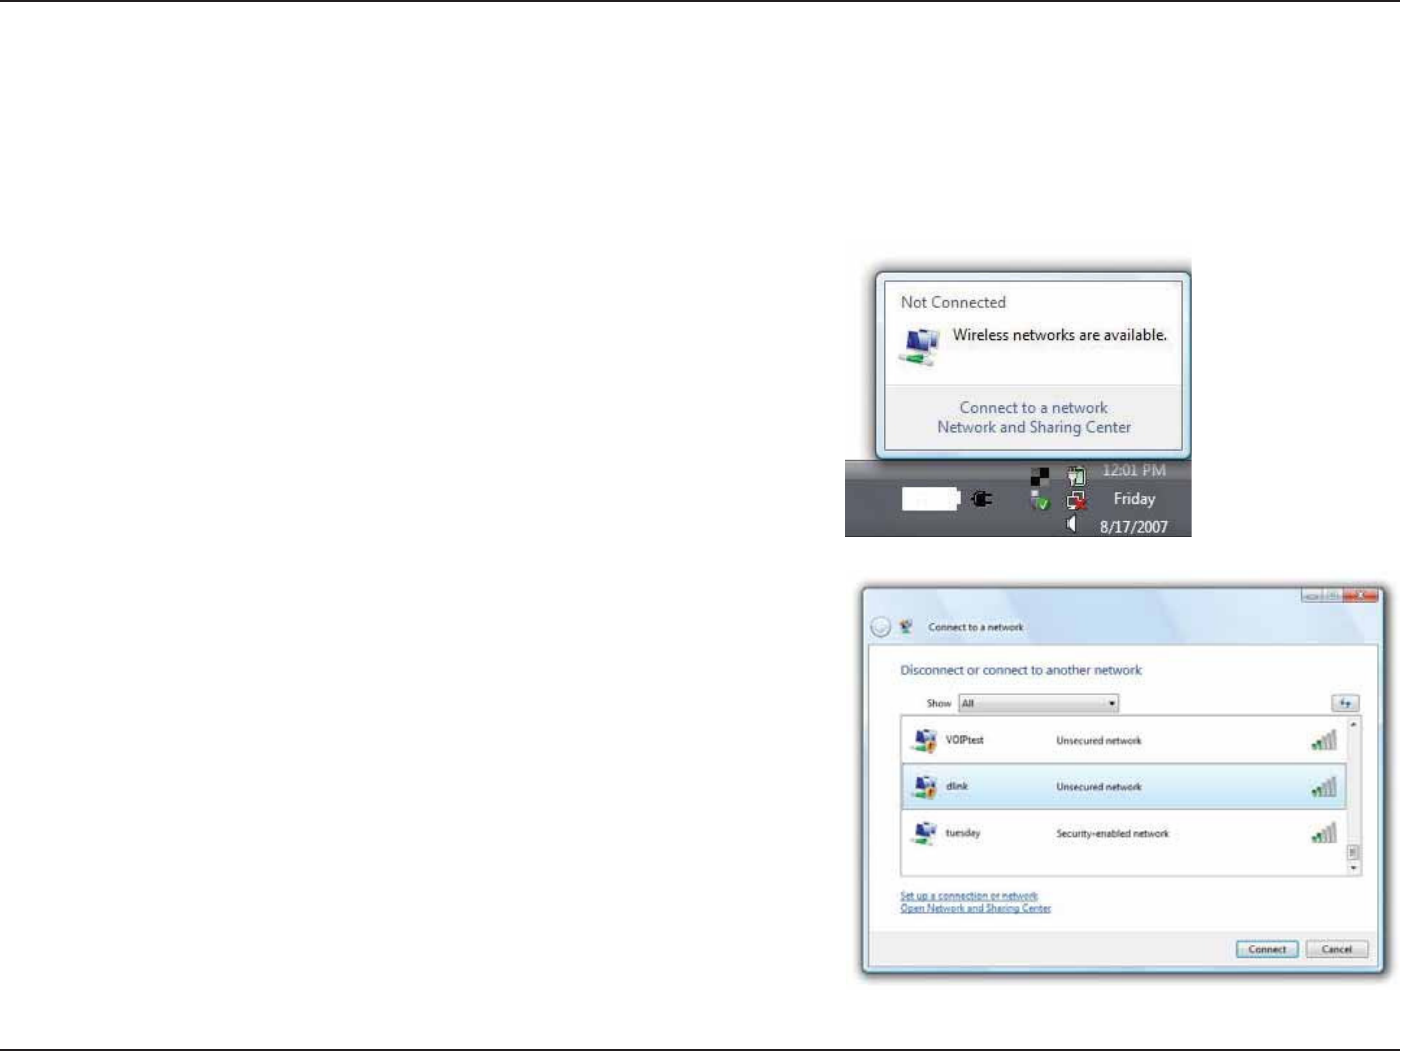
81D-Link DIR-842 User Manual
Section 4 - Connecting to a Wireless Network
WPA/WPA2
*UJTSFDPNNFOEFEUPFOBCMFXJSFMFTTTFDVSJUZ81"81"POZPVSXJSFMFTTSPVUFSPSBDDFTTQPJOUCFGPSFDPOöHVSJOHZPVS
wireless adapter. If you are joining an existing network, you will need to know the security key or passphrase being used.
2. )JHIMJHIUUIF8J'JOBNF44*%ZPVXPVMEMJLFUPDPOOFDUUP
and click Connect.
1. Open the Windows Vista® Wireless Utility by right-clicking on the
XJSFMFTTDPNQVUFSJDPOJOZPVSTZTUFNUSBZMPXFSSJHIUDPSOFS
PGTDSFFO4FMFDUConnect to a network.
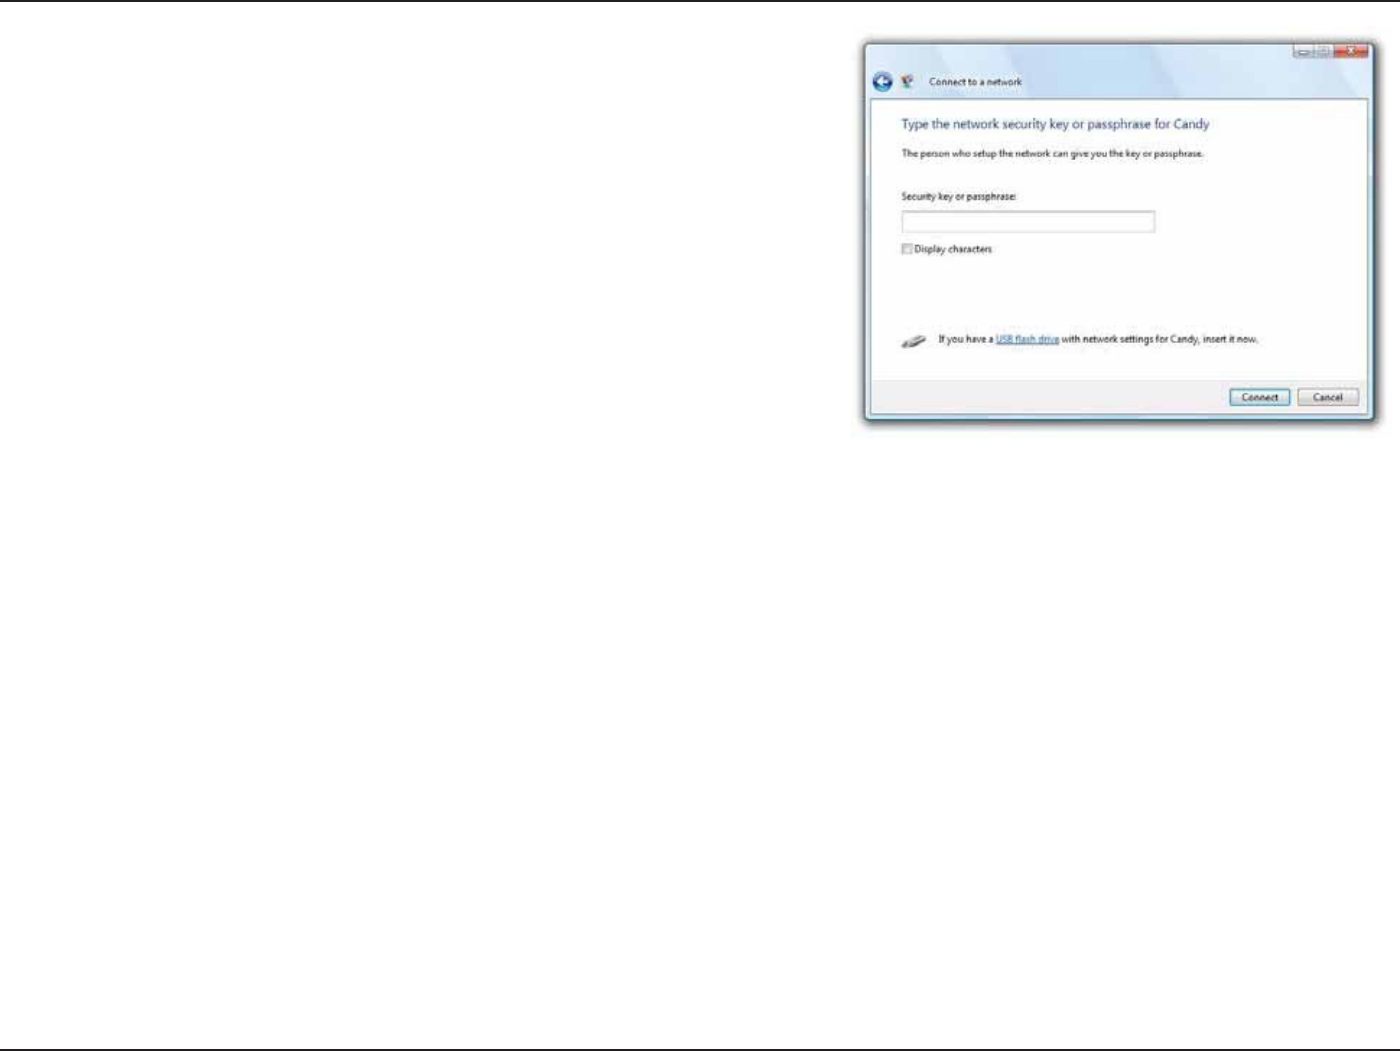
82D-Link DIR-842 User Manual
Section 4 - Connecting to a Wireless Network
&OUFSUIFTBNFTFDVSJUZLFZPSQBTTQISBTF8J'JQBTTXPSEUIBU
is on your router and click Connect.
It may take 20-30 seconds to connect to the wireless network. If the
connection fails, please verify that the security settings are correct.
The key or passphrase must be exactly the same as on the wireless
router.
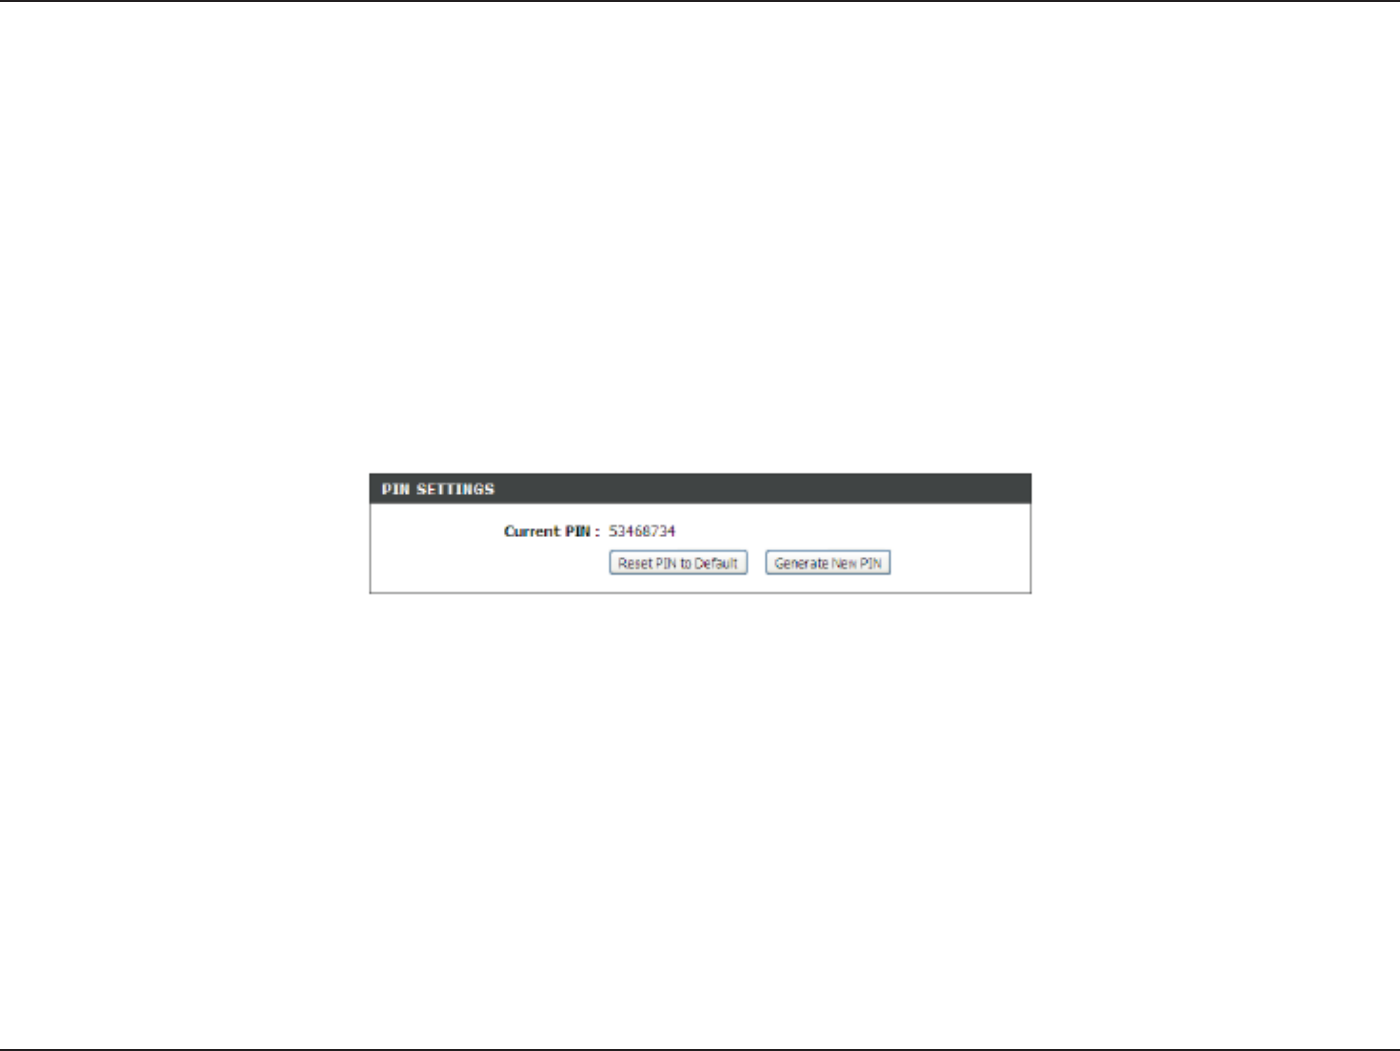
83D-Link DIR-842 User Manual
Section 4 - Connecting to a Wireless Network
WPS/WCN 2.0
The router supports Wi-Fi protection, referred to as WCN 2.0 in Windows Vista®. The following instructions for setting this up
depends on whether you are using Windows Vista® to congure the router or third party software.
When you rst set up the router, Wi-Fi protection is disabled and uncongured. To enjoy the benets of Wi-Fi protection, the
router must be both enabled and congured. There are three basic methods to accomplish this: use Windows Vista’s built-in
support for WCN 2.0, use software provided by a third party, or manually congure.
If you are running Windows Vista®, log into the router and click the Enable checkbox in the Basic > Wireless section. Use the
Current PIN that is displayed on the "EWBODFE > 8J'J1SPUFDUFE4FUVQ section or choose to click the (FOFSBUF/FX1*/
button or Reset PIN to Default button.
If you are using third party software to set up Wi-Fi Protection, carefully follow the directions. When you are nished, proceed
to the next section to set up the newly-congured router.
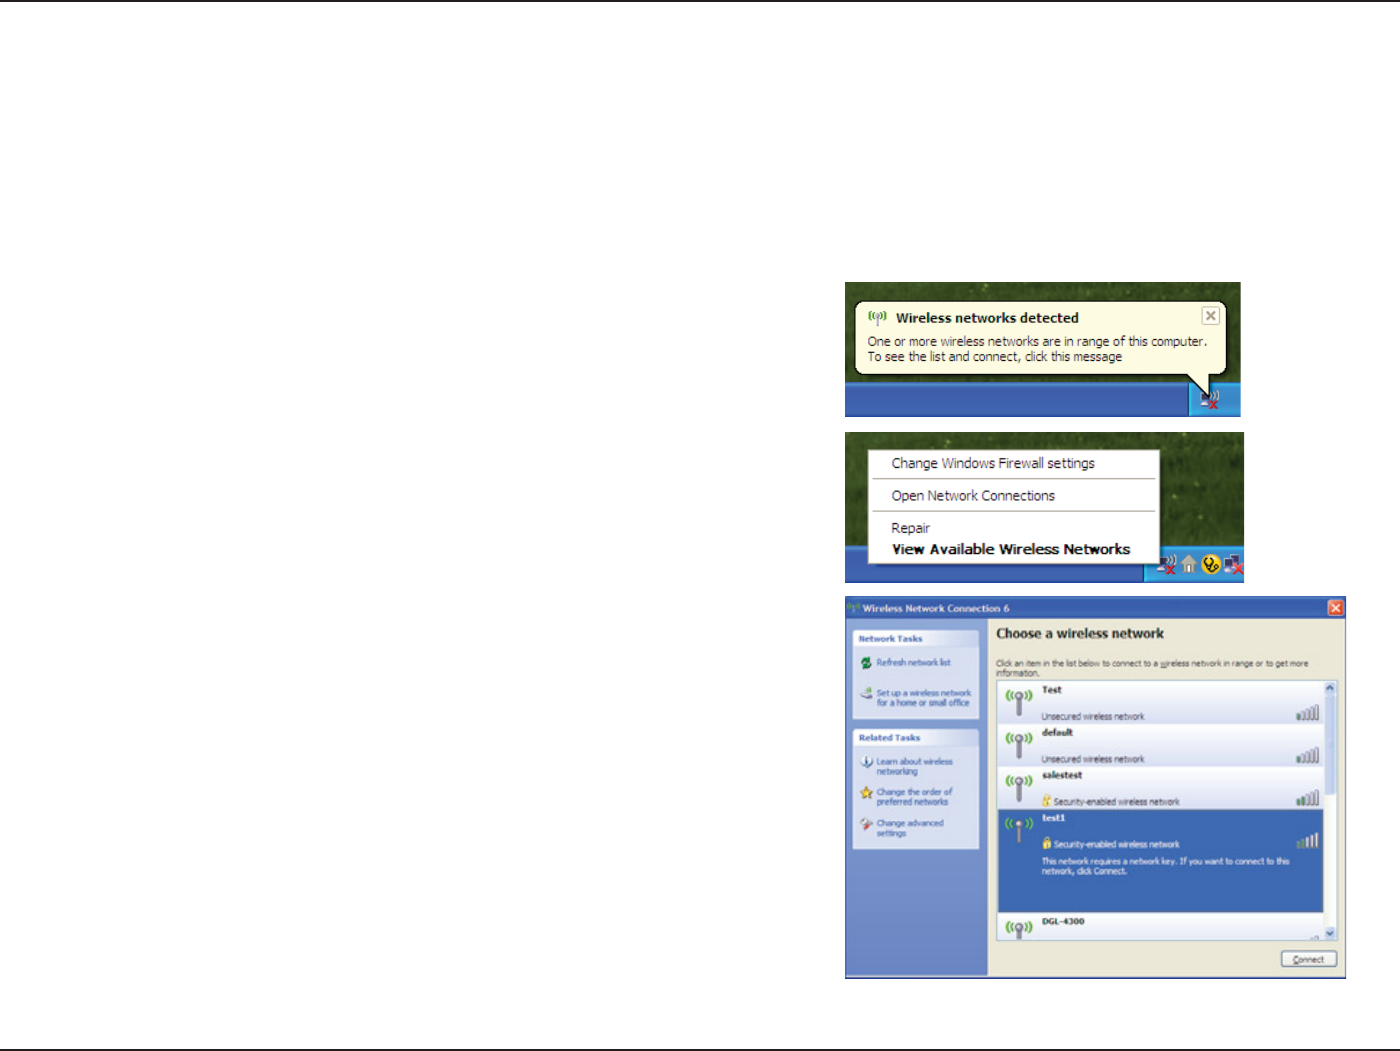
84D-Link DIR-842 User Manual
Section 4 - Connecting to a Wireless Network
Windows® XP
8JOEPXT¥91VTFSTNBZVTFUIFCVJMUJOXJSFMFTTVUJMJUZ;FSP$POöHVSBUJPO6UJMJUZ5IFGPMMPXJOHJOTUSVDUJPOTBSFGPS4FSWJDF
Pack 2 users. If you are using another company’s utility, please refer to the user manual of your wireless adapter for help with
connecting to a wireless network. Most utilities will have a “site survey” option similar to the Windows® XP utility as seen below.
3JHIUDMJDLPOUIFXJSFMFTTDPNQVUFSJDPOJOZPVSTZTUFNUSBZMPXFS
SJHIUDPSOFSOFYUUPUIFUJNF 4FMFDU7JFX"WBJMBCMF8JSFMFTT
Networks.
If you receive the Wireless Networks Detected bubble, click on
the center of the bubble to access the utility.
or
The utility will display any available wireless networks in your area.
$MJDLPOB8J'JOFUXPSLEJTQMBZFEVTJOHUIF44*%BOEDMJDLUIF
Connect button.
If you get a good signal but cannot access the Internet, check you
TCP/IP settings for your wireless adapter. Refer to the Networking
Basics section in this manual for more information.
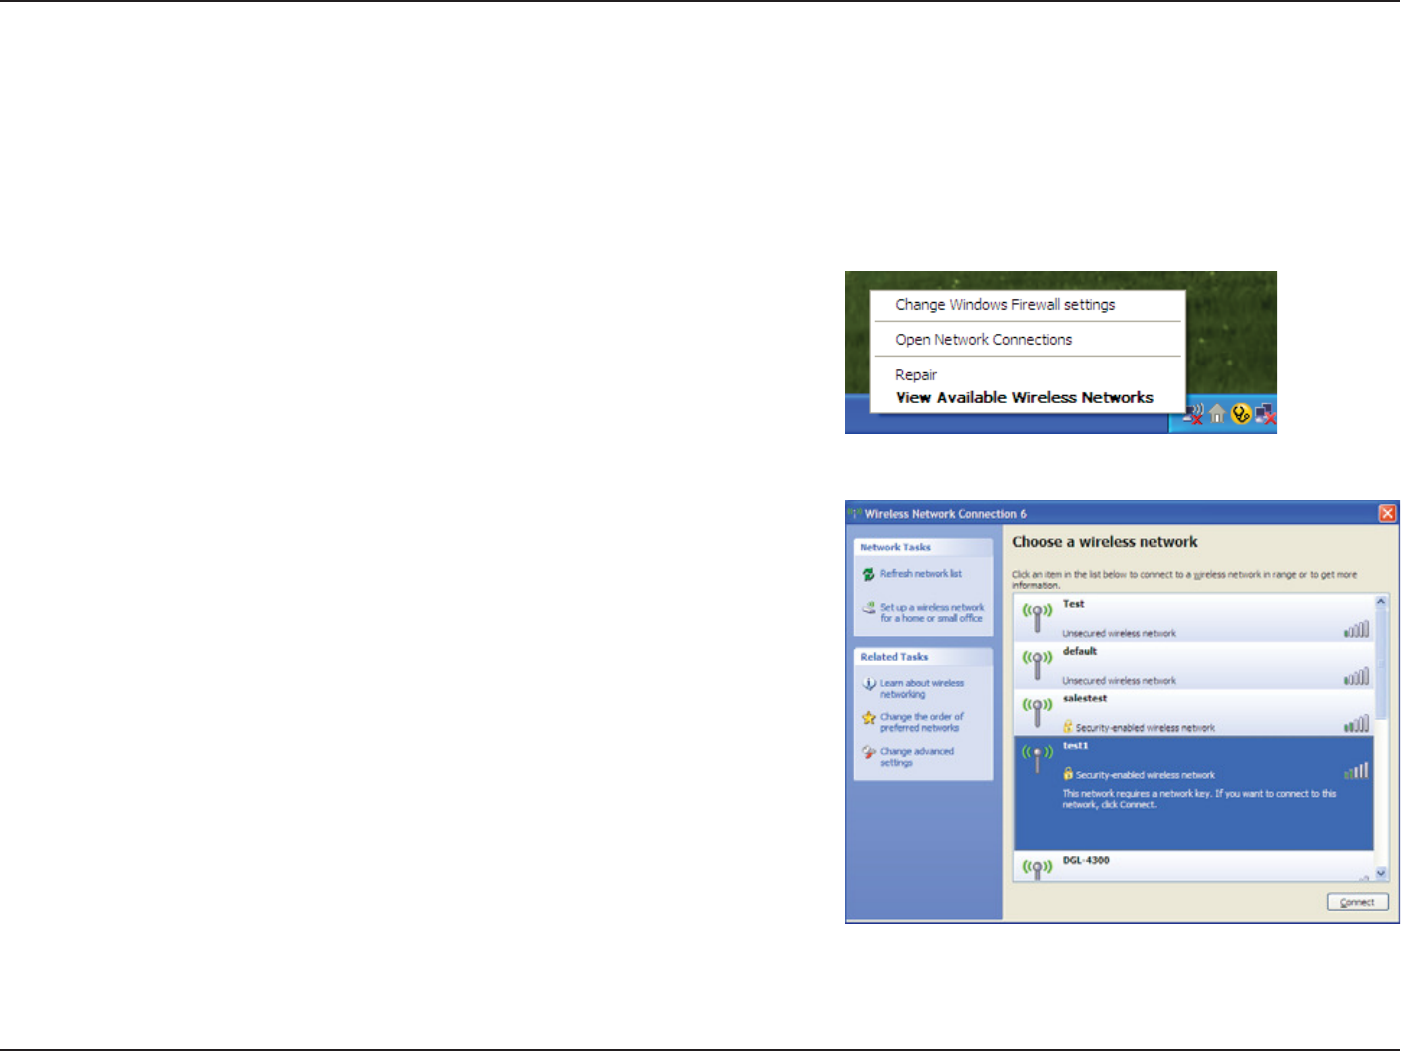
85D-Link DIR-842 User Manual
Section 4 - Connecting to a Wireless Network
It is recommended to enable WPA on your wireless router or access point before conguring your wireless adapter. If you are
joining an existing network, you will need to know the WPA key being used.
)JHIMJHIUUIF8J'JOFUXPSL44*%ZPVXPVMEMJLFUPDPOOFDUUP
and click Connect.
1. Open the Windows® XP Wireless Utility by right-clicking on the
XJSFMFTTDPNQVUFSJDPOJOZPVSTZTUFNUSBZMPXFSSJHIUDPSOFSPG
TDSFFO4FMFDU7JFX"WBJMBCMF8JSFMFTT/FUXPSLT.
WPA/WPA2
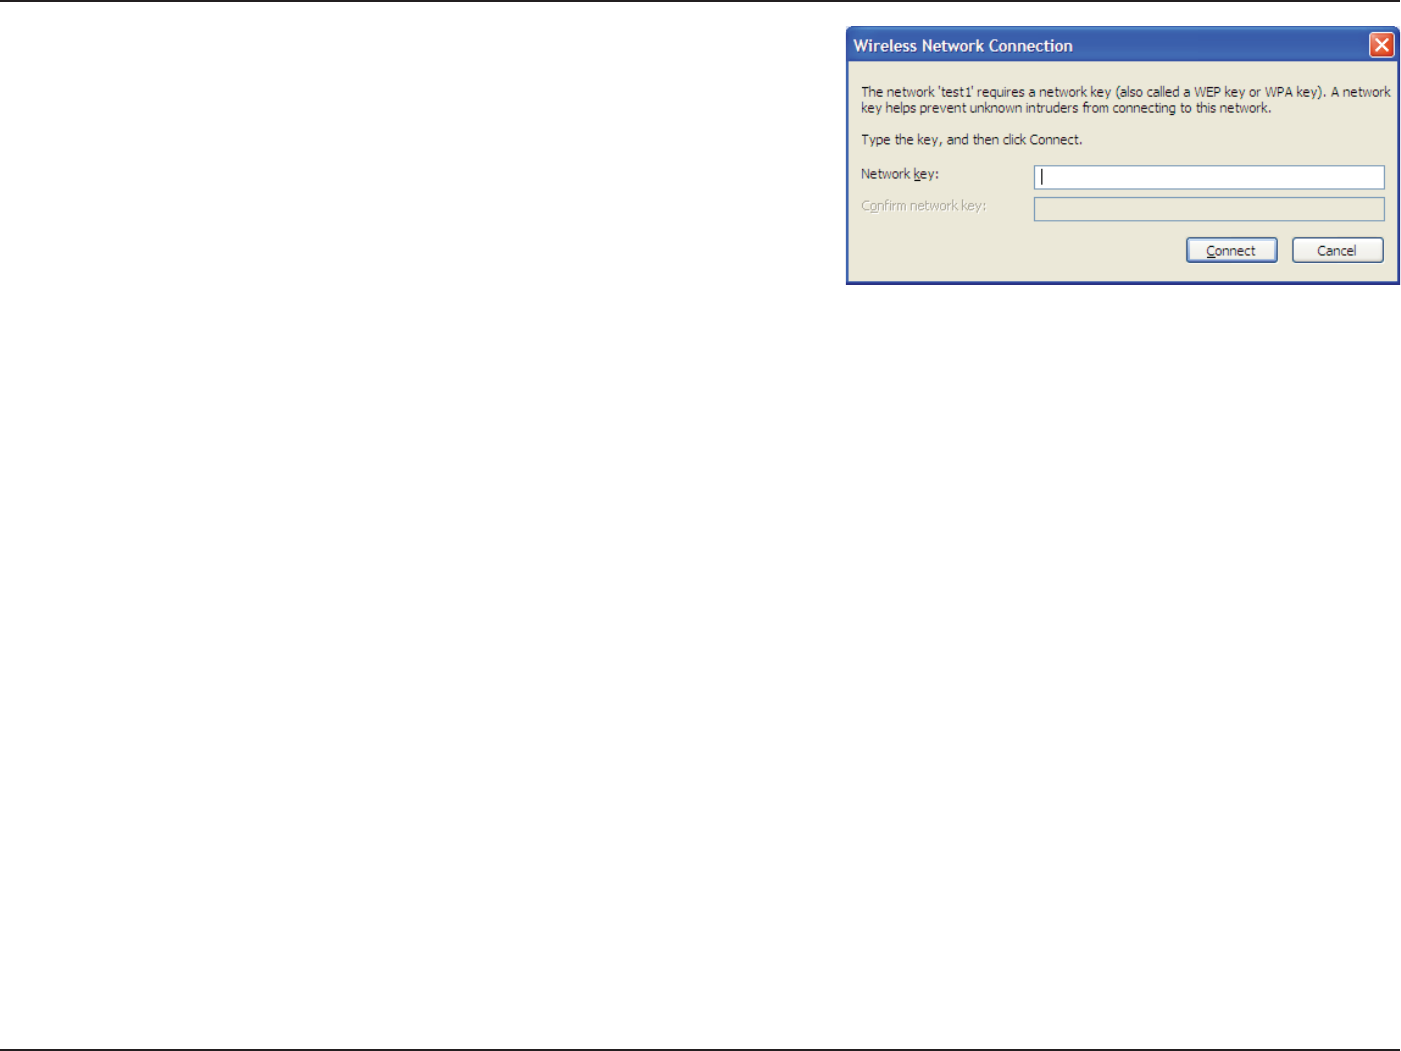
86D-Link DIR-842 User Manual
Section 4 - Connecting to a Wireless Network
3. The Wireless Network Connection box will appear. Enter the
WPA-PSK Wi-Fi password and click Connect.
It may take 20-30 seconds to connect to the wireless network. If
the connection fails, please verify that the WPA-PSK settings are
correct. The Wi-Fi password must be exactly the same as on the
wireless router.

87D-Link DIR-842 User Manual
Section 5 - Troubleshooting
Troubleshooting
This chapter provides solutions to problems that can occur during the installation and operation of the DIR-842. Read the
following descriptions if you are having problems. The examples below are illustrated in Windows® XP. If you have a dierent
operating system, the screenshots on your computer will look similar to the following examples.
1. Why can’t I access the web-based conguration utility?
8IFOFOUFSJOHUIF*1BEESFTTPGUIF%-JOLSPVUFSGPSFYBNQMFZPVBSFOPUDPOOFDUJOHUPBXFCTJUFOPSEPZPV
IBWFUPCFDPOOFDUFEUPUIF*OUFSOFU5IFEFWJDFIBTUIFVUJMJUZCVJMUJOUPB30.DIJQJOUIFEFWJDFJUTFMG:PVSDPNQVUFSNVTU
be on the same IP subnet to connect to the web-based utility.
t .BLFTVSFZPVIBWFBOVQEBUFE+BWBFOBCMFEXFCCSPXTFS8FSFDPNNFOEUIFGPMMPXJOH
- Microsoft Internet Explorer® 9 and higher
- Mozilla Firefox 20 and higher
(PPHMF$ISPNFBOEIJHIFS
- Apple Safari 5.1 and higher
t 7FSJGZQIZTJDBMDPOOFDUJWJUZCZDIFDLJOHGPSTPMJEMJOLMJHIUTPOUIFEFWJDF*GZPVEPOPUHFUBTPMJEMJOLMJHIUUSZVTJOHB
dierent cable or connect to a dierent port on the device if possible. If the computer is turned o, the link light may not be
on.
t %JTBCMFBOZ*OUFSOFUTFDVSJUZTPGUXBSFSVOOJOHPOUIFDPNQVUFS4PGUXBSFöSFXBMMTTVDIBT;POF"MBSN#MBDL*$&4ZHBUF
Norton Personal Firewall, and Windows® XP rewall may block access to the conguration pages. Check the help les included
with your rewall software for more information on disabling or conguring it.

88D-Link DIR-842 User Manual
Section 5 - Troubleshooting
t $POöHVSFZPVS*OUFSOFUTFUUJOHT
t (PUPStart > Settings > Control Panel. Double-click the *OUFSOFU0QUJPOT Icon. From the Security tab, click
the button to restore the settings to their defaults.
t $MJDLUIFConnection tab and set the dial-up option to Never Dial a Connection. Click the LAN Settings button.
Make sure nothing is checked. Click 0,.
t (PUPUIF"EWBODFE tab and click the button to restore these settings to their defaults. Click 0, three times.
t $MPTFZPVSXFCCSPXTFSJGPQFOBOEPQFOJU
t "DDFTTUIFXFCNBOBHFNFOU0QFOZPVSXFCCSPXTFSBOEFOUFSUIF*1BEESFTTPGZPVS%-JOLSPVUFSJOUIFBEESFTTCBS5IJT
should open the login page for your web management.
t *GZPVTUJMMDBOOPUBDDFTTUIFDPOöHVSBUJPOVOQMVHUIFQPXFSUPUIFSPVUFSGPSTFDPOETBOEQMVHCBDLJO8BJUBCPVU
seconds and try accessing the conguration. If you have multiple computers, try connecting using a dierent computer.
8IBUDBO*EPJG*GPSHPUNZQBTTXPSE
If you forgot your password, you must reset your router. Unfortunately this process will change all your settings back to the
factory defaults.
5PSFTFUUIFSPVUFSMPDBUFUIFSFTFUCVUUPOIPMFPOUIFSFBSQBOFMPGUIFVOJU8JUIUIFSPVUFSQPXFSFEPOVTFBQBQFSDMJQ
to hold the button down for 10 seconds. Release the button and the router will go through its reboot process. Wait about 30
seconds to access the router. The default IP address is 192.168.0.1. When logging in, the username is admin and leave the
password box empty.
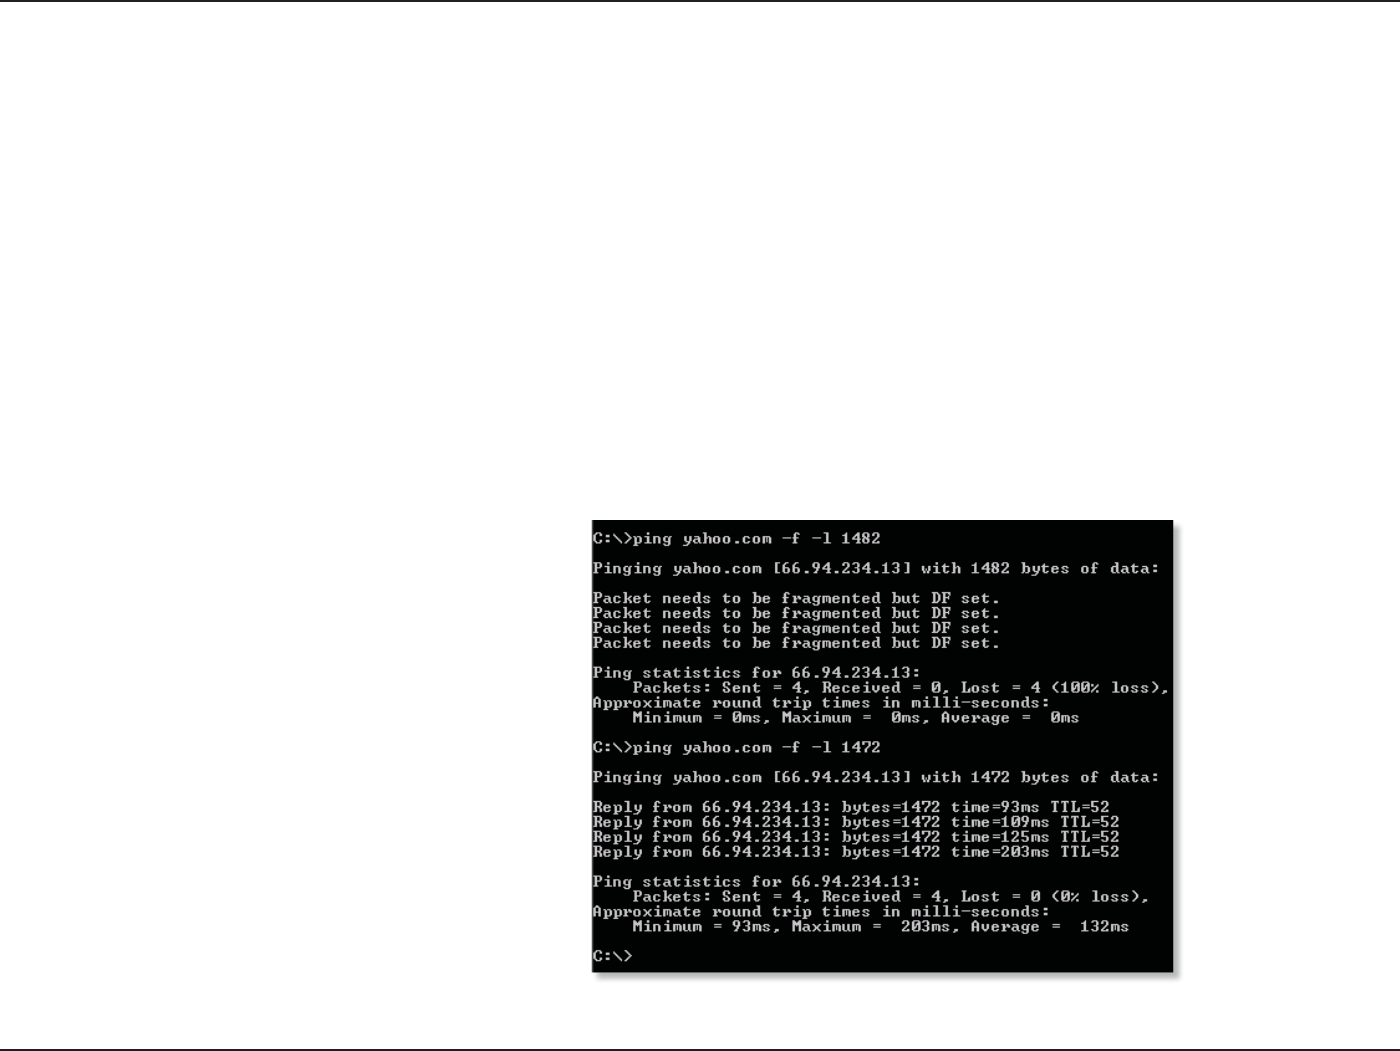
89D-Link DIR-842 User Manual
Section 5 - Troubleshooting
3. Why can’t I connect to certain sites or send and receive emails when connecting through my router?
If you are having a problem sending or receiving email, or connecting to secure sites such as eBay, banking sites, and Hotmail,
XFTVHHFTUMPXFSJOHUIF.56JOJODSFNFOUTPGUFO&YFUD
To nd the proper MTU Size, you’ll have to do a special ping of the destination you’re trying to go to. A destination could be
another computer, or a URL.
t$MJDLPOStart and then click Run.
t8JOEPXT¥BOE.FVTFSTUZQFJOcommand8JOEPXT¥/5917JTUB¥BOEVTFSTUZQFJOcmdBOE
press Enter PSDMJDL0,
t0ODFUIFXJOEPXPQFOTZPVMMOFFEUPEPBTQFDJBMQJOH6TFUIFGPMMPXJOHTZOUBY
ping [url] [-f] [-l] [MTU value]
Example: QJOHZBIPPDPNGM

90D-Link DIR-842 User Manual
Section 5 - Troubleshooting
:PVTIPVMETUBSUBUBOEXPSLZPVSXBZEPXOCZFBDIUJNF0ODFZPVHFUBSFQMZHPVQCZVOUJMZPVHFUBGSBHNFOUFE
packet. Take that value and add 28 to the value to account for the various TCP/IP headers. For example, lets say that 1452 was the
QSPQFSWBMVFUIFBDUVBM.56TJ[FXPVMECFXIJDIJTUIFPQUJNVNGPSUIFOFUXPSLXFSFXPSLJOHXJUI
Once you nd your MTU, you can now congure your router with the proper MTU size.
To change the MTU rate on your router follow the steps below:
t0QFOZPVSCSPXTFSFOUFSUIF*1BEESFTTPGZPVSSPVUFSBOEDMJDL0,.
t&OUFSZPVSVTFSOBNFBENJOBOEQBTTXPSECMBOLCZEFGBVMU$MJDL0, to enter the web conguration page
for the device.
t$MJDLPOSetup and then click Manual Congure.
t5PDIBOHFUIF.56FOUFSUIFOVNCFSJOUIF.56öFMEBOEDMJDLSave Settings to save your settings.
t5FTUZPVSFNBJM*GDIBOHJOHUIF.56EPFTOPUSFTPMWFUIFQSPCMFNDPOUJOVFDIBOHJOHUIF.56JOJODSFNFOUT
of ten.

91D-Link DIR-842 User Manual
Appendix A - Wireless Basics
D-Link wireless products are based on industry standards to provide easy-to-use and compatible high-speed wireless
connectivity within your home, business or public access wireless networks. Strictly adhering to the IEEE standard, the D-Link
XJSFMFTTGBNJMZPGQSPEVDUTXJMMBMMPXZPVUPTFDVSFMZBDDFTTUIFEBUBZPVXBOUXIFOBOEXIFSFZPVXBOUJU:PVXJMMCFBCMF
to enjoy the freedom that wireless networking delivers.
"XJSFMFTTMPDBMBSFBOFUXPSL8-"/JTBDFMMVMBSDPNQVUFSOFUXPSLUIBUUSBOTNJUTBOESFDFJWFTEBUBXJUISBEJPTJHOBMTJOTUFBEPG
wires. Wireless LANs are used increasingly in both home and oce environments, and public areas such as airports, coee shops
and universities. Innovative ways to utilize WLAN technology are helping people to work and communicate more eciently.
Increased mobility and the absence of cabling and other xed infrastructure have proven to be benecial for many users.
Wireless users can use the same applications they use on a wired network. Wireless adapter cards used on laptop and desktop
systems support the same protocols as Ethernet adapter cards.
Under many circumstances, it may be desirable for mobile network devices to link to a conventional Ethernet LAN in order to
use servers, printers or an Internet connection supplied through the wired LAN. A wireless router is a device used to provide
this link.
Wireless Basics

92D-Link DIR-842 User Manual
Appendix A - Wireless Basics
What is Wireless?
Wireless or Wi-Fi technology is another way of connecting your computer to the network without using wires. Wi-Fi uses radio
frequency to connect wirelessly, so you have the freedom to connect computers anywhere in your home or oce network.
Why D-Link Wireless?
D-Link is the worldwide leader and award winning designer, developer, and manufacturer of networking products. D-Link
delivers the performance you need at a price you can aord. D-Link has all the products you need to build your network.
How does wireless work?
Wireless works similar to how cordless phone work, through radio signals to transmit data from one point A to point B. But
XJSFMFTTUFDIOPMPHZIBTSFTUSJDUJPOTBTUPIPXZPVDBOBDDFTTUIFOFUXPSL:PVNVTUCFXJUIJOUIFXJSFMFTTOFUXPSLSBOHFBSFB
UPCFBCMFUPDPOOFDUZPVSDPNQVUFS5IFSFBSFUXPEJòFSFOUUZQFTPGXJSFMFTTOFUXPSLT8JSFMFTT-PDBM"SFB/FUXPSL8-"/
BOE8JSFMFTT1FSTPOBM"SFB/FUXPSL81"/
8JSFMFTT-PDBM"SFB/FUXPSL8-"/
*OBXJSFMFTTMPDBMBSFBOFUXPSLBEFWJDFDBMMFEBO"DDFTT1PJOU"1DPOOFDUTDPNQVUFSTUPUIFOFUXPSL5IFBDDFTTQPJOUIBT
a small antenna attached to it, which allows it to transmit data back and forth over radio signals. With an indoor access point
as seen in the picture, the signal can travel up to 300 feet. With an outdoor access point the signal can reach out up to 30 miles
to serve places like manufacturing plants, industrial locations, college and high school campuses, airports, golf courses, and
many other outdoor venues.

93D-Link DIR-842 User Manual
Appendix A - Wireless Basics
8JSFMFTT1FSTPOBM"SFB/FUXPSL81"/
Bluetooth is the industry standard wireless technology used for WPAN. Bluetooth devices in WPAN operate in a range up to
30 feet away.
Compared to WLAN the speed and wireless operation range are both less than WLAN, but in return it doesn’t use nearly as
much power which makes it ideal for personal devices, such as mobile phones, PDAs, headphones, laptops, speakers, and other
devices that operate on batteries.
Who uses wireless?
Wireless technology as become so popular in recent years that almost everyone is using it, whether it’s for home, oce, business,
D-Link has a wireless solution for it.
Home
t(JWFTFWFSZPOFBUIPNFCSPBECBOEBDDFTT
t4VSGUIFXFCDIFDLFNBJMJOTUBOUNFTTBHFFUD
t(FUTSJEPGUIFDBCMFTBSPVOEUIFIPVTF
t4JNQMFBOEFBTZUPVTF
4NBMM0óDFBOE)PNF0óDF
t4UBZPOUPQPGFWFSZUIJOHBUIPNFBTZPVXPVMEBUPóDF
t3FNPUFMZBDDFTTZPVSPóDFOFUXPSLGSPNIPNF
t4IBSF*OUFSOFUDPOOFDUJPOBOEQSJOUFSXJUINVMUJQMFDPNQVUFST
t/POFFEUPEFEJDBUFPóDFTQBDF

94D-Link DIR-842 User Manual
Appendix A - Wireless Basics
Where is wireless used?
Wireless technology is expanding everywhere not just at home or oce. People like the freedom of mobility and it’s becoming
so popular that more and more public facilities now provide wireless access to attract people. The wireless connection in public
places is usually called “hotspots”.
Using a D-Link CardBus Adapter with your laptop, you can access the hotspot to connect to Internet from remote locations
like: airports, hotels, coee shops, libraries, restaurants, and convention centers.
Wireless network is easy to setup, but if you’re installing it for the rst time it could be quite a task not knowing where to start.
That’s why we’ve put together a few setup steps and tips to help you through the process of setting up a wireless network.
Tips
Here are a few things to keep in mind, when you install a wireless network.
$FOUSBMJ[FZPVSSPVUFSPSBDDFTTQPJOU
Make sure you place the router/access point in a centralized location within your network for the best performance. Try to
place the router/access point as high as possible in the room, so the signal gets dispersed throughout your home. If you have
a two-story home, you may need a repeater to boost the signal to extend the range.
Eliminate Interference
Place home appliances such as cordless telephones, microwaves, and televisions as far away as possible from the router/access
point. This would signicantly reduce any interference that the appliances might cause since they operate on same frequency.

95D-Link DIR-842 User Manual
Appendix A - Wireless Basics
Security
Don’t let you next-door neighbors or intruders connect to your wireless network. Secure your wireless network by turning on
the WPA or WEP security feature on the router. Refer to product manual for detail information on how to set it up.
There are basically two modes of networking:
t Infrastructure – All wireless clients will connect to an access point or wireless router.
t "E)PD – Directly connecting to another computer, for peer-to-peer communication, using wireless network
adapters on each computer, such as two or more wireless network CardBus adapters.
An Infrastructure network contains an access point or wireless router. All the wireless devices, or clients, will connect to the
wireless router or access point.
An ad-hoc network contains only clients, such as laptops with wireless CardBus adapters. All the adapters must be in ad-hoc
mode to communicate.
Wireless Modes
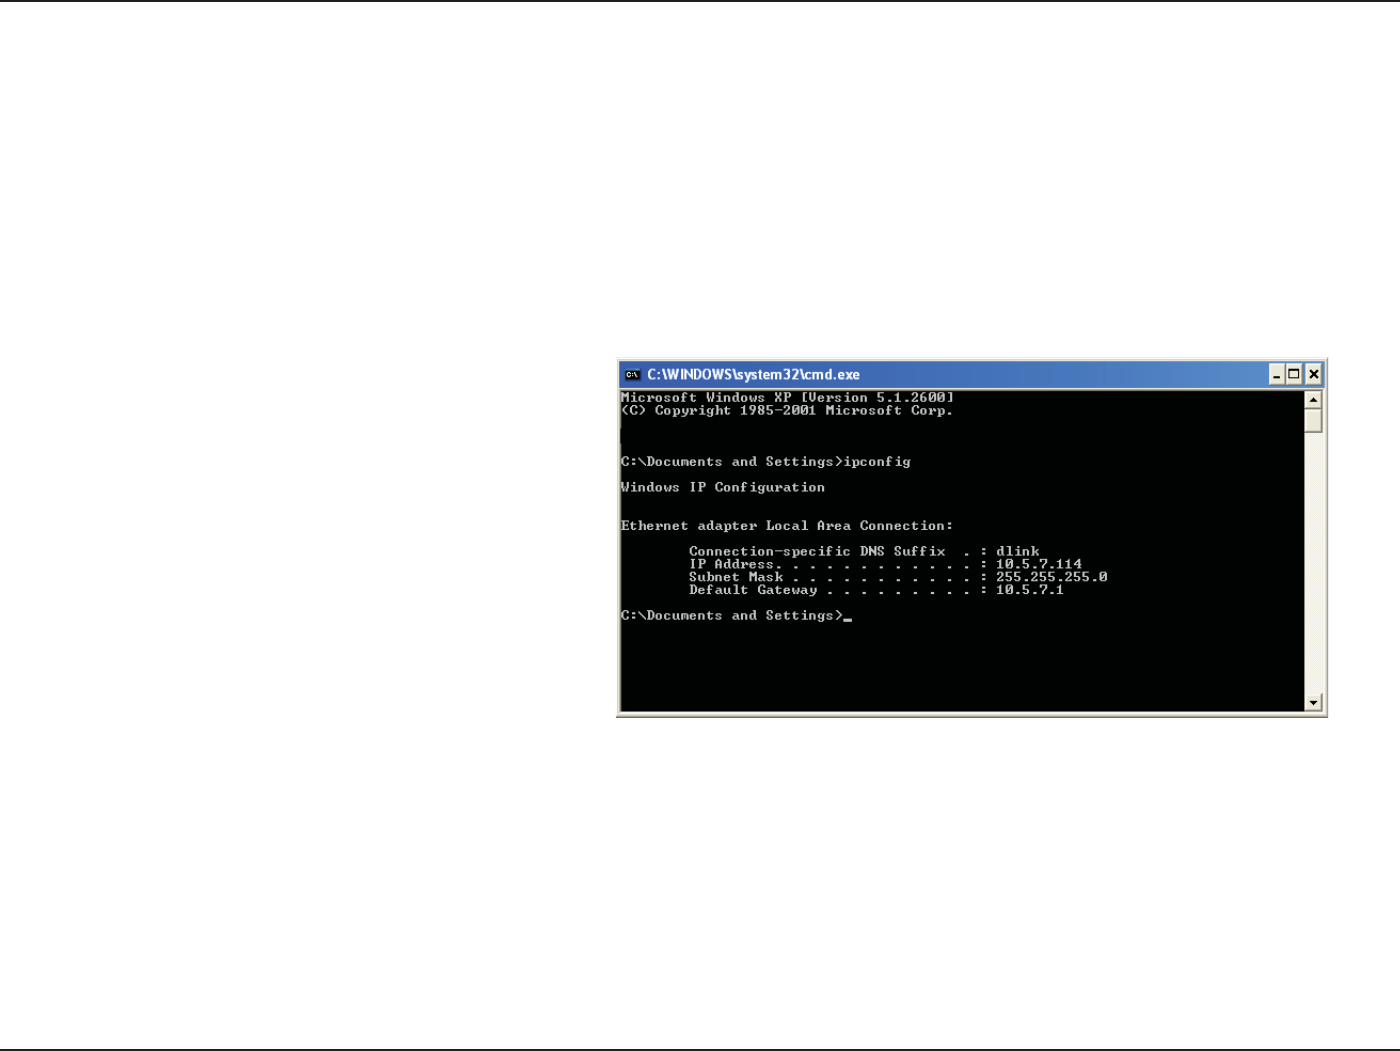
96D-Link DIR-842 User Manual
Appendix B - Networking Basics
Networking Basics
Check your IP address
After you install your new D-Link adapter, by default, the TCP/IP settings should be set to obtain an IP address from a DHCP
TFSWFSJFXJSFMFTTSPVUFSBVUPNBUJDBMMZ5PWFSJGZZPVS*1BEESFTTQMFBTFGPMMPXUIFTUFQTCFMPX
Click on Start > Run. In the run box type cmd and click 0,8JOEPXT¥7JTUB¥VTFSTUZQFcmd in the Start SearchCPY
At the prompt, type ipcong and press Enter.
This will display the IP address, subnet mask, and the
default gateway of your adapter.
If the address is 0.0.0.0, check your adapter installation,
security settings, and the settings on your router.
Some rewall software programs may block a DHCP
request on newly installed adapters.
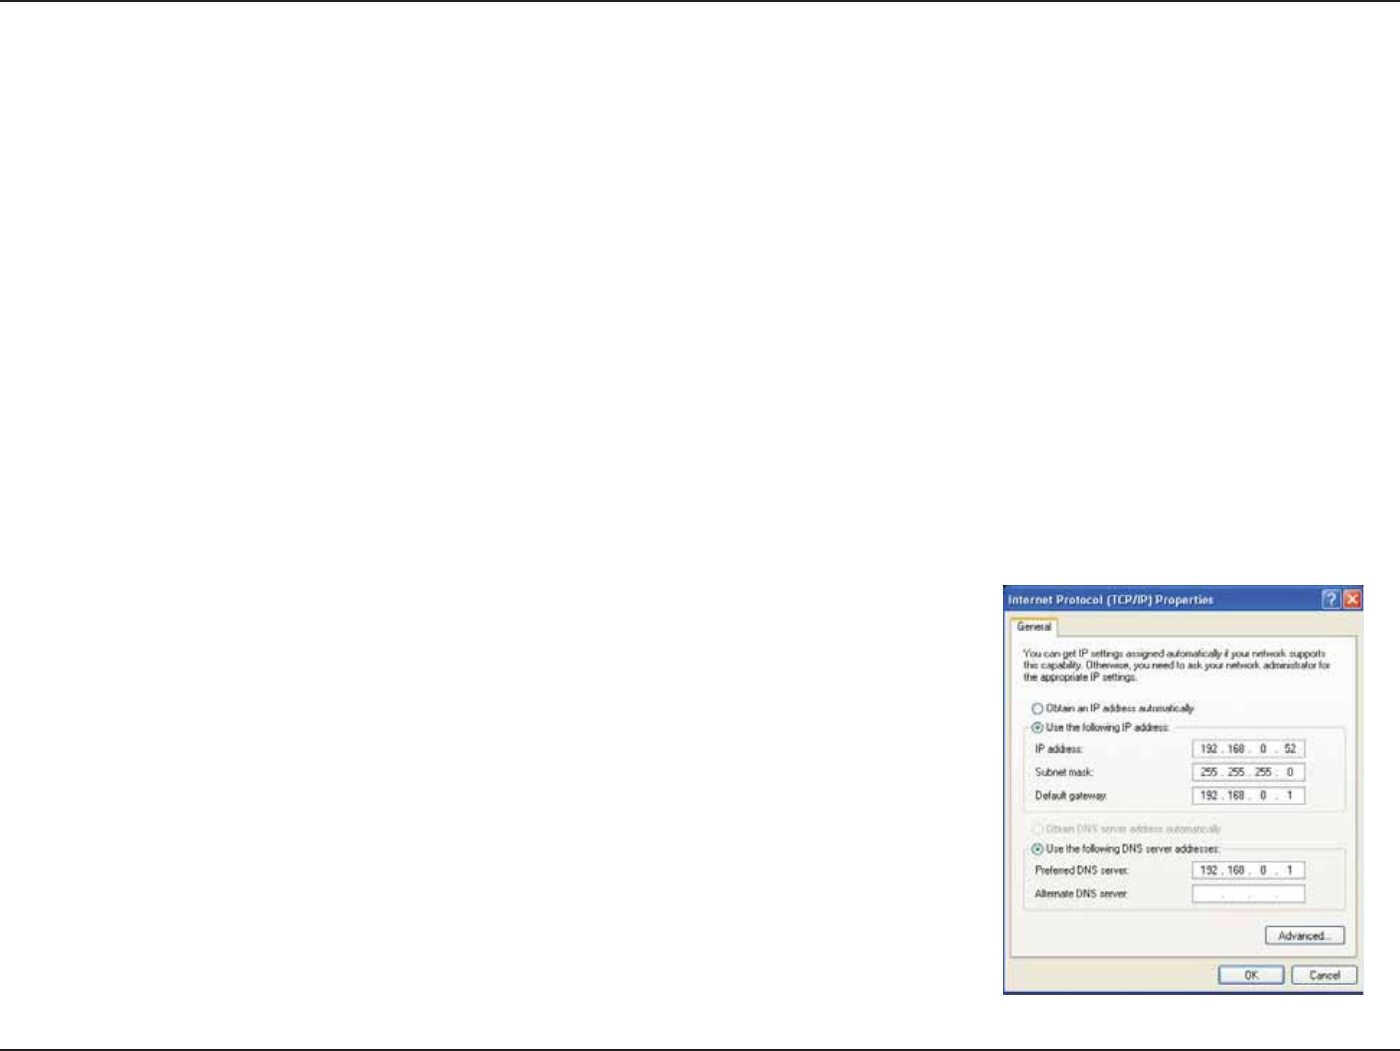
97D-Link DIR-842 User Manual
Appendix B - Networking Basics
Statically Assign an IP address
If you are not using a DHCP capable gateway/router, or you need to assign a static IP address, please follow the steps below:
Step 1
Windows® 7 - Click on Start > Control Panel > Network and Internet > Network and Sharing Center.
Windows Vista® - Click on Start > Control Panel > Network and Internet > Network and Sharing Center > Manage Network
Connections.
Windows® XP - Click on Start > Control Panel > Network Connections.
Windows® 2000 - From the desktop, right-click My Network Places > Properties.
4UFQ
Right-click on the -PDBM"SFB$POOFDUJPO which represents your network adapter and select Properties.
Step 3
Highlight *OUFSOFU1SPUPDPM5$1*1 and click Properties.
Step 4
Click Use the following IP address and enter an IP address that is on the same subnet
as your network or the LAN IP address on your router.
Example: If the router´s LAN IP address is 192.168.0.1, make your IP address 192.168.0.X
where X is a number between 2 and 99. Make sure that the number you choose is not
in use on the network. Set the Default Gateway the same as the LAN IP address of your
SPVUFS*&
4FU1SJNBSZ %/4UIFTBNFBTUIF -"/*1BEESFTTPG ZPVSSPVUFS5IF
Secondary DNS is not needed or you may enter a DNS server from your ISP.
Step 5
Click 0, twice to save your settings.

98D-Link DIR-842 User Manual
Appendix C - Technical Specications
Technical Specications
Hardware Specications
t LAN Interface: Four 10/100/1000 Mbps Gigabit Ethernet LAN ports
t WAN Interface: One 10/100/100 Mbps Gigabit Ethernet WAN port
t 8JSFMFTT*OUFSGBDF()[*&&&CHO
t 8JSFMFTT*OUFSGBDF()[*&&&BOBD
Operating Voltage
t Input: 100~240 V AC, 50~60 Hz
t Output: 12 V DC, 1 A
Temperature
t Operating: 32 ~ 104 o'_o$
t Non-Operating: -4 ~ 149 o'_o$
Humidity
t Operating: 10% - 90% non-condensing
t Non-Operating: 5% - 95% non-condensing
Wireless Frequency Range
t IEEE 802.11a: 5180 MHz~5240 MHz, 5745 MHz~5825 MHz
t IEEE 802.11b: 2400 MHz~2483 MHz
t IEEE 802.11g: 2400 MHz~2484 MHz
t IEEE 802.11n: 2400 MHz~2484 MHz, 5180 MHz~5240 MHz, 5745
MHz~5825 MHz
t IEEE 802.11ac: 5180 MHz~5240 MHz, 5745 MHz~5825 MHz
Wireless Bandwidth Rate
t IEEE 802.11a: 54, 48, 36, 24, 18, 12, 9, and 6 Mbps
t IEEE 802.11b: 11, 5.5, 2, and 1 Mbps
t IEEE 802.11g: 54, 48, 36, 24, 18, 12, 9, and 6 Mbps
t IEEE 802.11n: 6.5 to 300 Mbps
t IEEE 802.11ac: 6.5 to 867 Mbps
Antenna Type
t Four external antennas
Wireless Security
t 64/128bit WEP, WPA/WPA2-Personal, WPA/WPA2-Enterprise, WPS
1*/1#$
Certications
t CE
t FCC
t RoHS
t BSMI
t CCC
t NCC
t LVD
t cUL
Dimensions & Weight
t YYNNYYJODIFT
t HP[

99D-Link DIR-842 User Manual
Appendix D - Regulatory Information
'FEFSBM$PNNVOJDBUJPO$PNNJTTJPO*OUFSGFSFODF4UBUFNFOU
This equipment has been tested and found to comply with the limits for a Class B digital device, pursuant to Part 15 of the FCC Rules. These limits are
designed to provide reasonable protection against harmful interference in a residential installation. This equipment generates, uses and can radiate
radio frequency energy and, if not installed and used in accordance with the instructions, may cause harmful interference to radio communications.
However, there is no guarantee that interference will not occur in a particular installation. If this equipment does cause harmful interference to radio
or television reception, which can be determined by turning the equipment o and on, the user is encouraged to try to correct the interference by
one of the following measures:
- Reorient or relocate the receiving antenna.
- Increase the separation between the equipment and receiver.
- Connect the equipment into an outlet on a circuit dierent from that to which the receiver is connected.
- Consult the dealer or an experienced radio/TV technician for help.
FCC Caution: Any changes or modications not expressly approved by the party responsible for compliance could void the user’s authority to
operate this equipment.
5IJTEFWJDFDPNQMJFTXJUI1BSUPGUIF'$$3VMFT0QFSBUJPOJTTVCKFDUUPUIFGPMMPXJOHUXPDPOEJUJPOT5IJTEFWJDFNBZOPUDBVTFIBSNGVM
JOUFSGFSFODFBOEUIJTEFWJDFNVTUBDDFQUBOZJOUFSGFSFODFSFDFJWFEJODMVEJOHJOUFSGFSFODFUIBUNBZDBVTFVOEFTJSFEPQFSBUJPO
Operation of this device is restricted to indoor use only
*.1035"/5/05&
Radiation Exposure Statement:
This equipment complies with FCC radiation exposure limits set forth for an uncontrolled environment. This equipment should be installed and
operated with minimum distance 20cm between the radiator & your body.
This transmitter must not be co-located or operating in conjunction with any other antenna or transmitter.
Country Code selection feature to be disabled for products marketed to the US/CANADA
Industry Canada statement:
This device complies with Industry Canada’s licence-exempt RSSs. Operation is subject to the following two conditions:
Regulatory Information

100D-Link DIR-842 User Manual
Appendix D - Regulatory Information
5IJTEFWJDFNBZOPUDBVTFJOUFSGFSFODFBOE5IJTEFWJDFNVTUBDDFQUBOZJOUFSGFSFODFJODMVEJOHJOUFSGFSFODFUIBUNBZDBVTFVOEFTJSFE
operation of the device.
Cet appareil est conforme aux CNR exemptes de licence d’Industrie Canada. Son fonctionnement est soumis aux deux conditions suivantes:
$FEJTQPTJUJGOFQFVUDBVTFSEJOUFSGÏSFODFTFU$FEJTQPTJUJGEPJUBDDFQUFSUPVUFJOUFSGÏSFODFZDPNQSJTMFTJOUFSGÏSFODFTRVJQFVWFOUDBVTFS
un mauvais fonctionnement de l’appareil.
Caution:
JUIFEFWJDFGPSPQFSBUJPOJOUIFCBOE.)[JTPOMZGPSJOEPPSVTFUPSFEVDFUIFQPUFOUJBMGPSIBSNGVMJOUFSGFSFODFUPDPDIBOOFMNPCJMF
satellite systems;
"WFSUJTTFNFOU
JMFTEJTQPTJUJGTGPODUJPOOBOUEBOTMBCBOEF.)[TPOUSÏTFSWÏTVOJRVFNFOUQPVSVOFVUJMJTBUJPOËMJOUÏSJFVSBöOEFSÏEVJSFMFTSJTRVFT
EFCSPVJMMBHFQSÏKVEJDJBCMFBVYTZTUÒNFTEFTBUFMMJUFTNPCJMFTVUJMJTBOUMFTNÐNFTDBOBVY
Radiation Exposure Statement:
This equipment complies with IC radiation exposure limits set forth for an uncontrolled environment. This equipment should be installed and
operated with minimum distance 20cm between the radiator & your body.
Déclaration d’exposition aux radiations:
$FUÏRVJQFNFOUFTUDPOGPSNFBVYMJNJUFTEFYQPTJUJPOBVYSBZPOOFNFOUT*$ÏUBCMJFTQPVSVOFOWJSPOOFNFOUOPODPOUSÙMÏ$FUÏRVJQFNFOUEPJU
ÐUSFJOTUBMMÏFUVUJMJTÏBWFDVONJOJNVNEFDNEFEJTUBODFFOUSFMBTPVSDFEFSBZPOOFNFOUFUWPUSFDPSQT
ODD⌴ᶕද