D Link SHG300A1 ZigBee to Ethernet Gateway User Manual
D-Link Corporation ZigBee to Ethernet Gateway Users Manual
D Link >
Users Manual

DSH-G300 D-Link Corporation
Page 1
DSH-G300
Smart Hub
Manual
Version 1.0
Dec 7th, 2017

DSH-G300 D-Link Corporation
Page 2
Table of Contents
1. PRODUCT DESCRIPTION .................................................................................. 3
2. APPEARANCE ..................................................................................................... 3
3. INSTALLATIONS & CONFIGURATIONS ....................................................... 4
DSH-G300 D-Link Corporation
Page 3
1. PRODUCT DESCRIPTION
The DSH-G300 is a ZigBee to Ethernet gateway device that uses a generic
hardware design and can be deployed as different versions to fulfil different
applications.
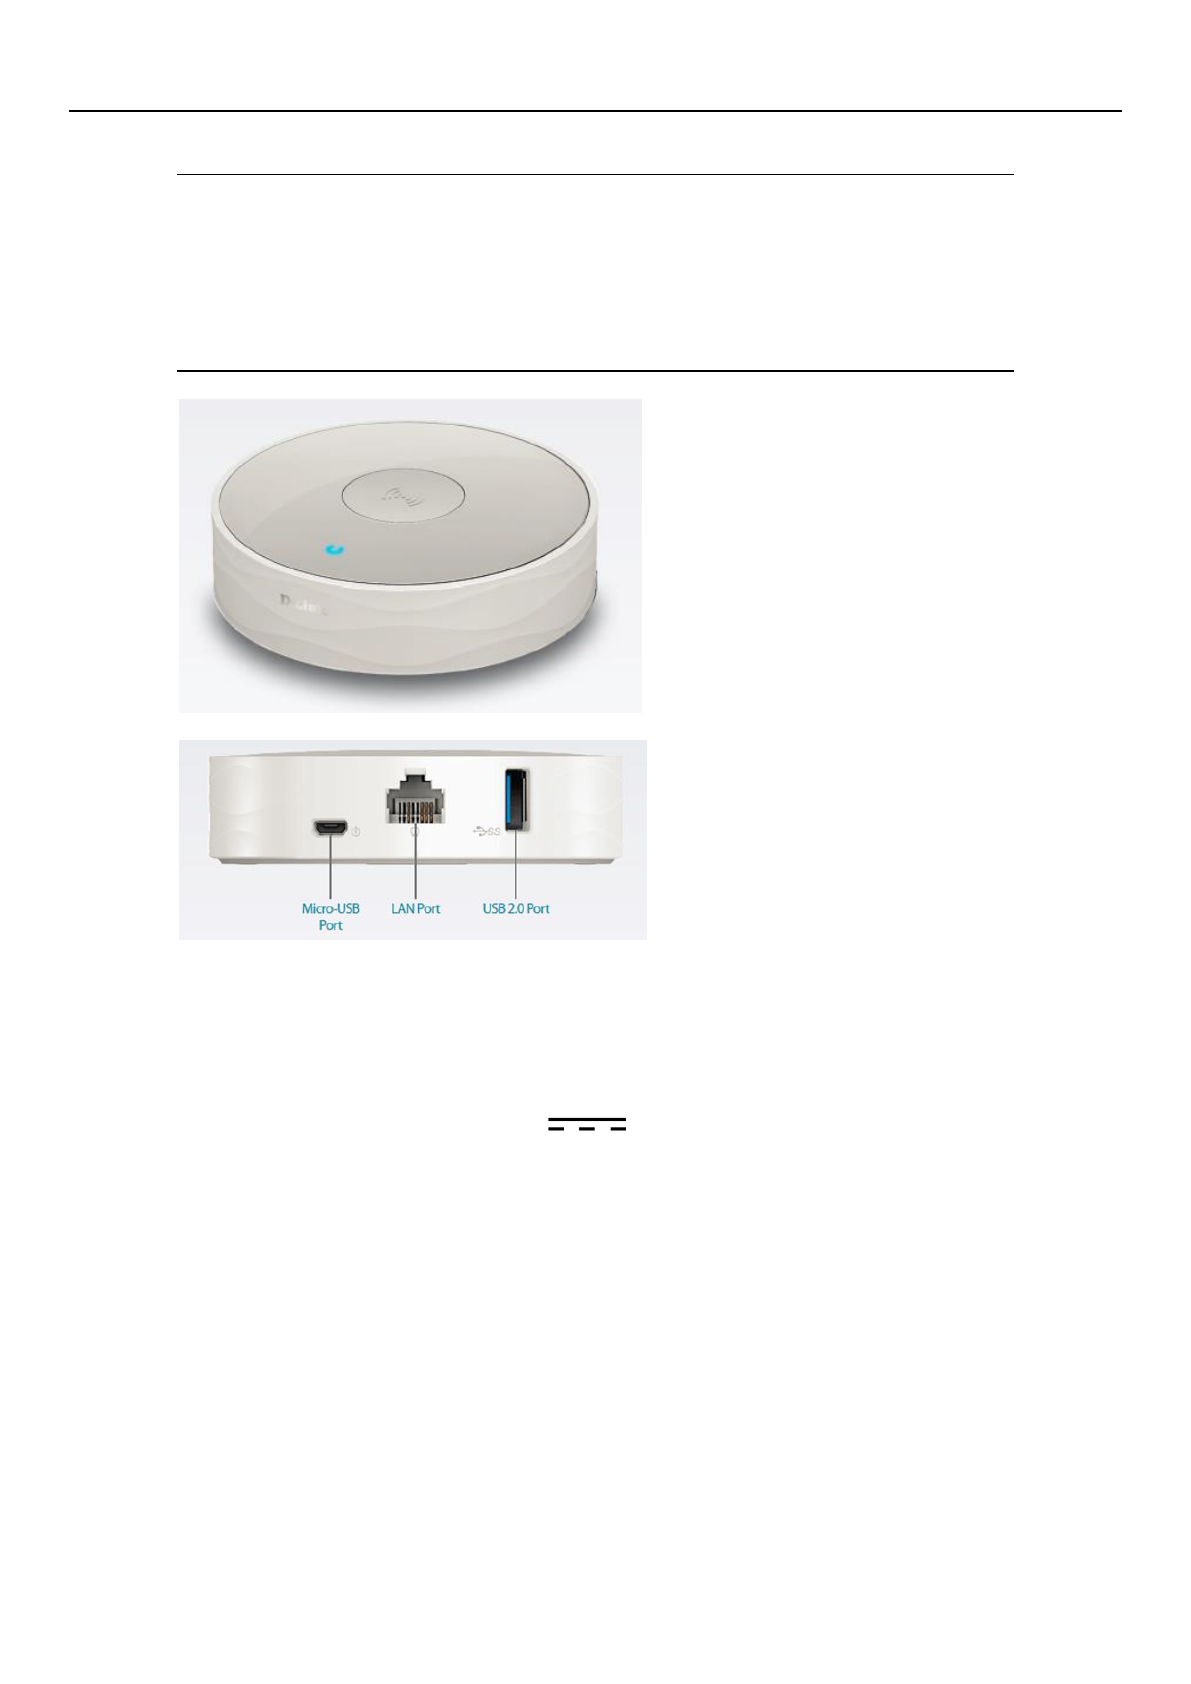
2. APPEARANCE
Top
LED: Status indicator
Wireless button: pairing/un-pairing
Rear
LAN port
Micro USB: Power jack, Vdc : 5V/2.A
USB port
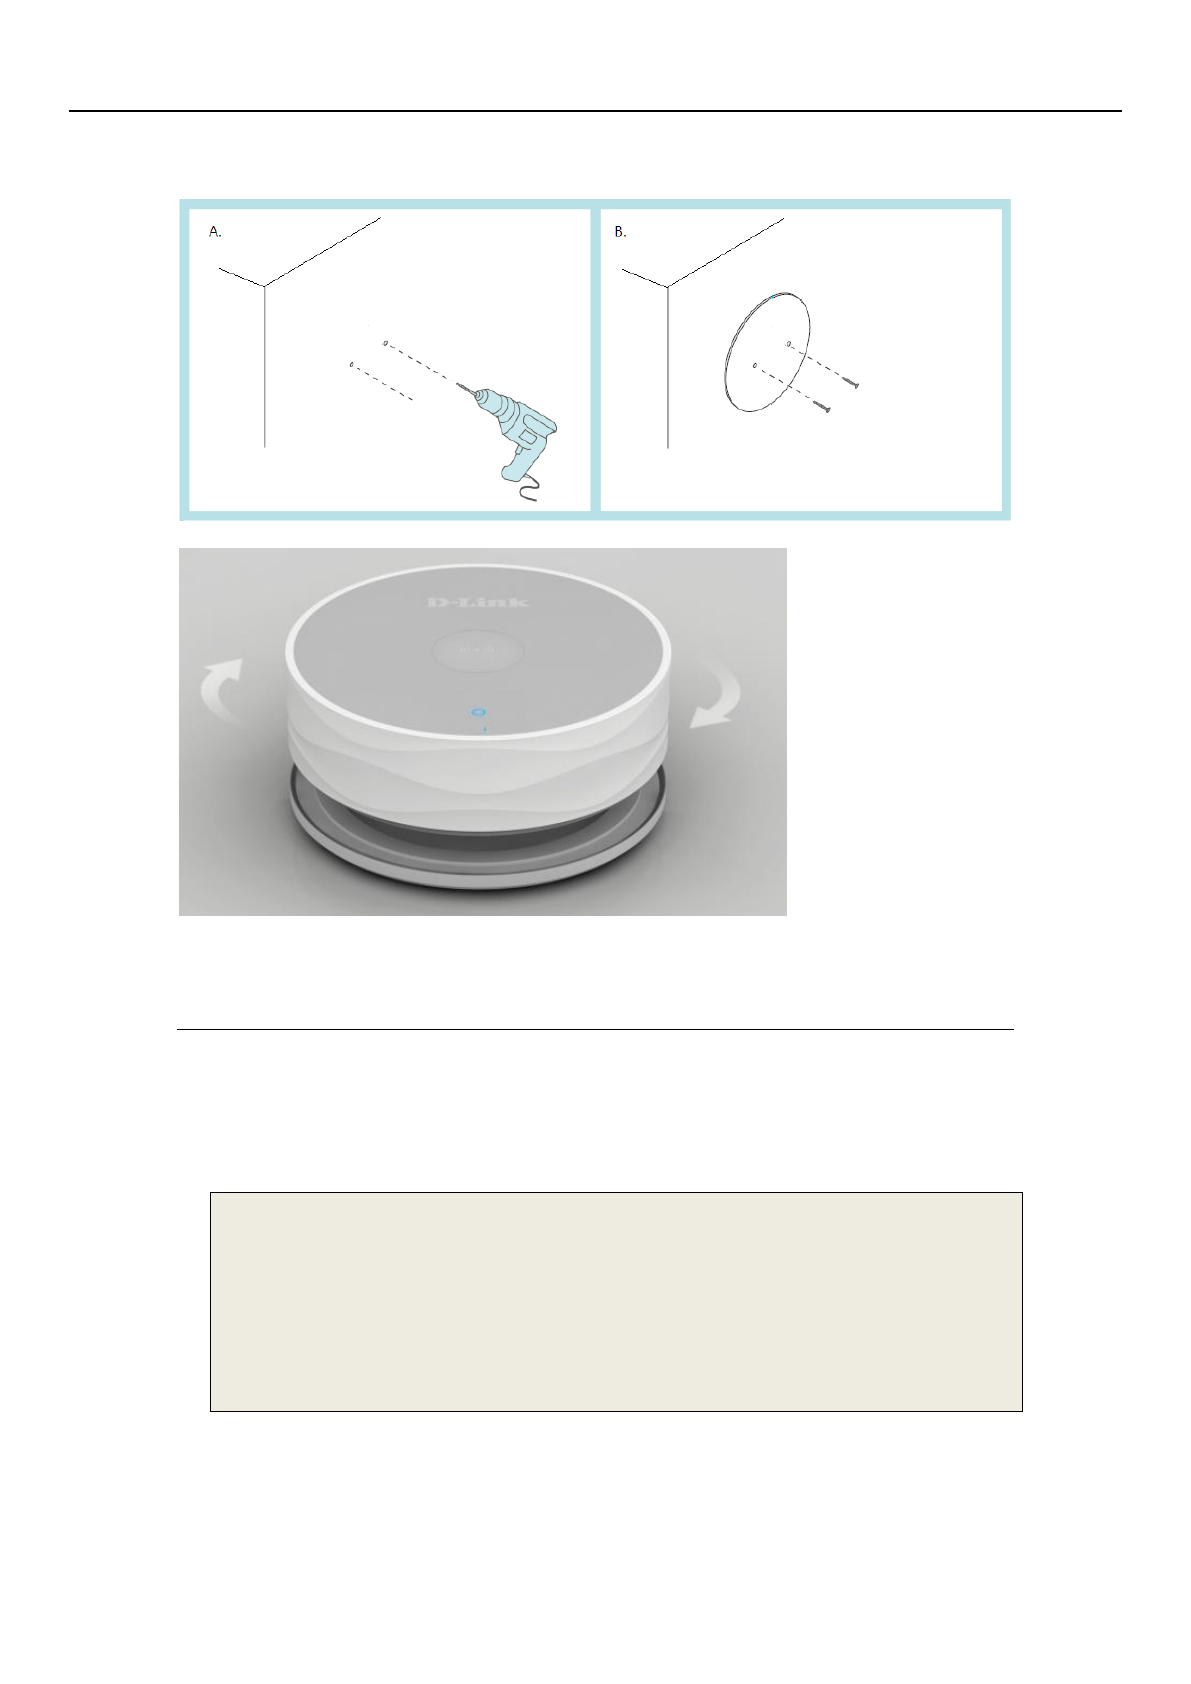
Bottom
Reset button
DSH-G300 D-Link Corporation
Page 4
Mounting installation
3. INSTALLATIONS & CONFIGURATIONS
how to build firmware by GPL
Install tools
Install fedora linux 22, and make sure you can connect to
internet.
Run command as below (ps : switch to root permission):
#yum -y update
#yum -y install gcc
#yum -y install zlib-devel openssl-devel
#yum -y install gcc-c++
#yum -y install bison
#yum -y install flex
#yum -y install ncurses-devel
#yum -y install fakeroot
#yum -y install patch
The workstation we used to build the image is:
OS Version: Fedora 22 (32-bit version on AMD or Intel system)
OS Kernel Version: 4.1.6-200.fc22.i686
GCC Version: 5.3.1 20160406 (Red Hat 5.3.1-6)
(You may use other Linux distribution as your workstation but
DSH-G300 D-Link Corporation
Page 5
no guarantee of a successful build.)
Setup Build Enviornment($means command)
1) please login as a normal user such as john, and copy the
gpl file to normal user folder, such as the folder /home/john
2) $cd /home/john
3) $tar zxvf DSHG300_A1_GPLv100b01.tar.gz
4) $cd DSHG300_A1_GPLv100b01
5) $su (ps : switch to root permission)
6) #mkdir /opt (if "/opt" is already exist, skip this step)
7) #cp -rf buildroot-gcc463 /opt
8) #exit (ps : switch back to normal user permission)
9) $source ./setupenv
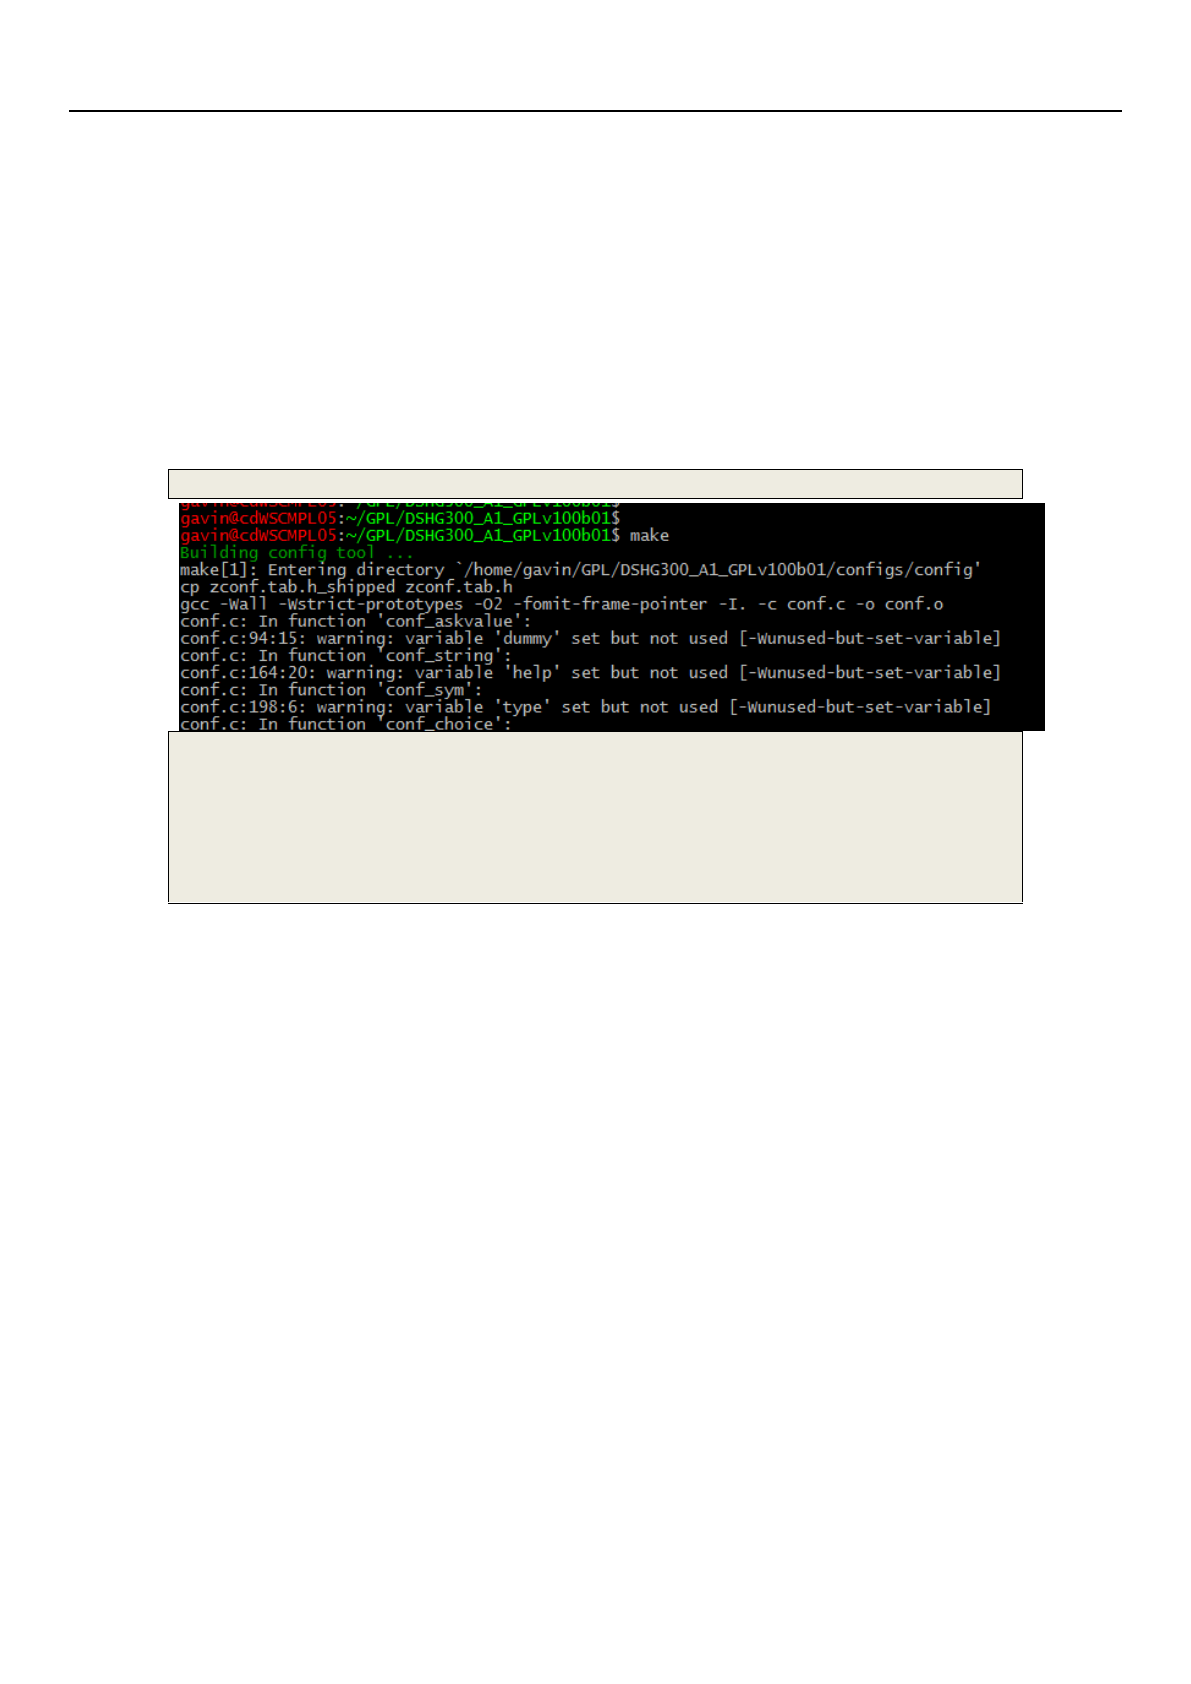
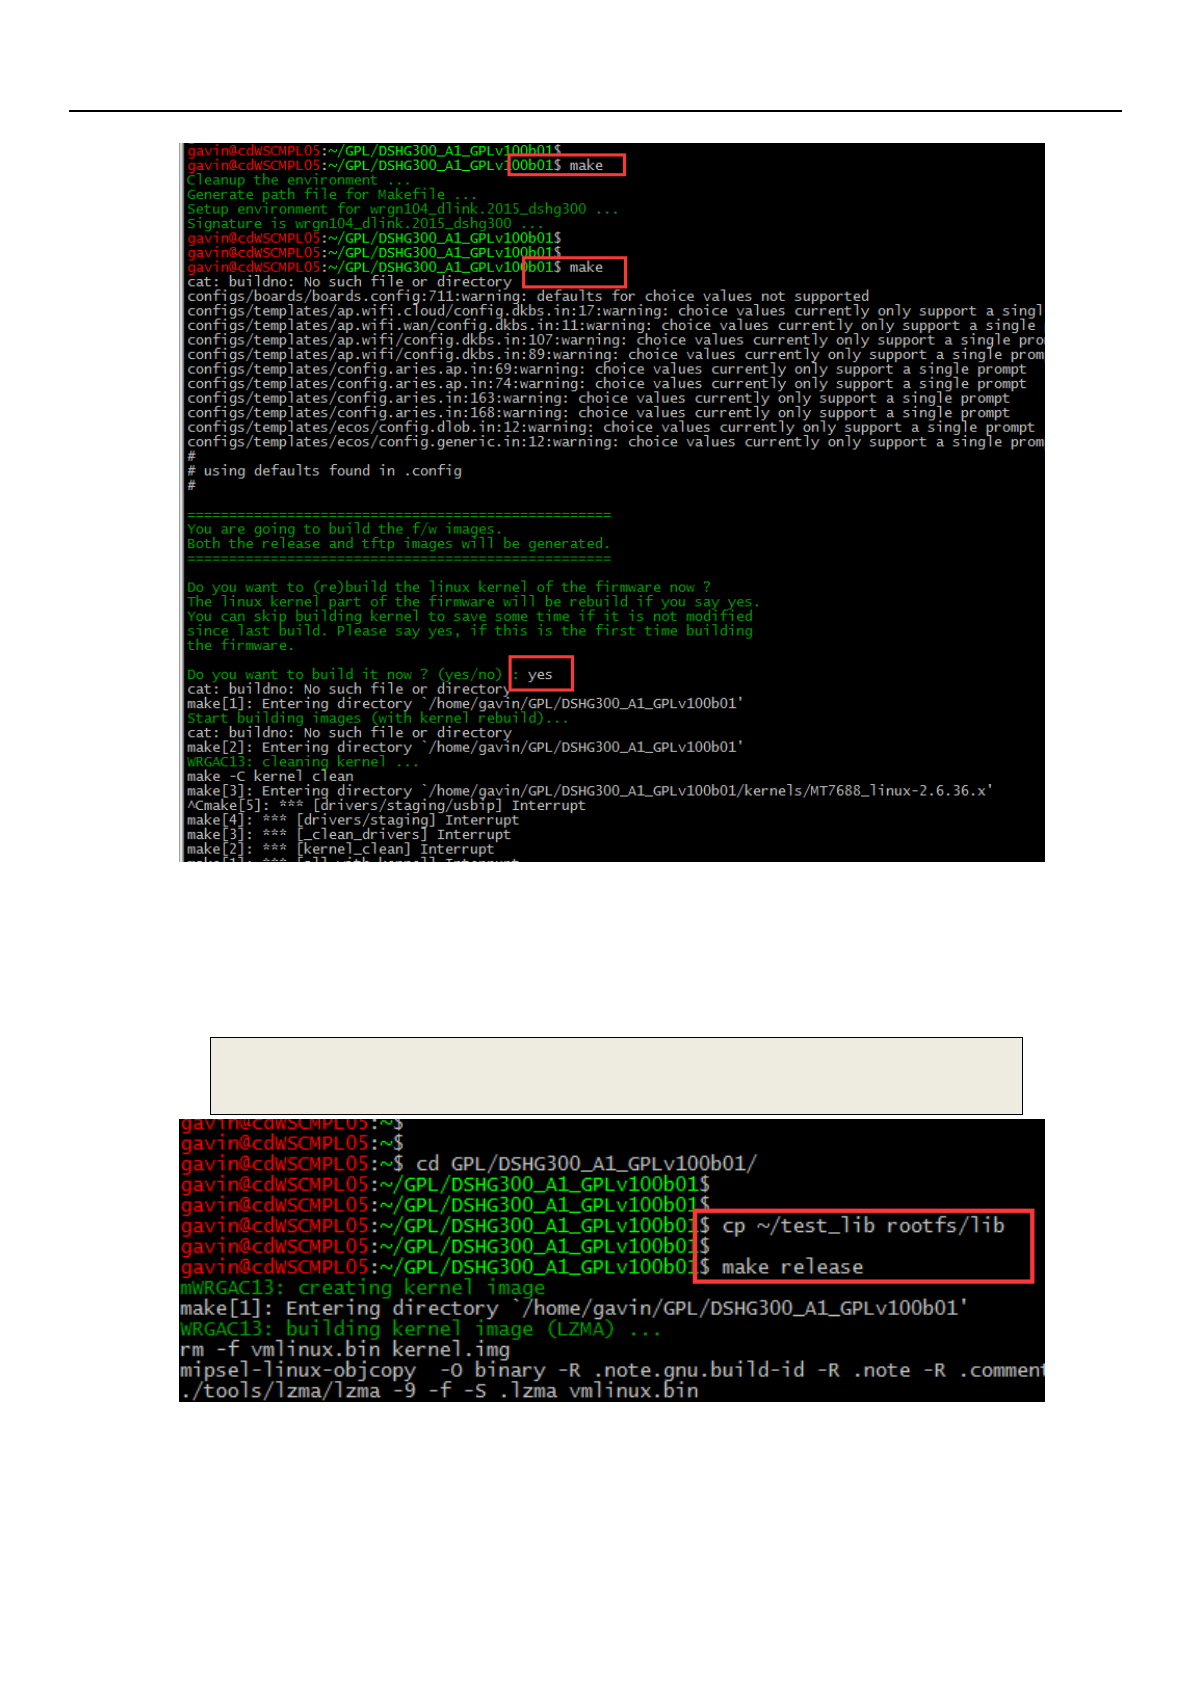
Building the image
$make
$make
$make
===================================================
You are going to build the f/w images.
Both the release and tftp images will be generated.
===================================================
Do you want to build it now ? (yes/no) : yes
DSH-G300 D-Link Corporation
Page 6
4) After make successfully, you will find the image file
in ./images/.
Tips: If there are some options need to be selected,
please input "enter" key to execute the default action.
How to install file into firmware
Copy file into rootfs then rebuild gpl firmware by “make
release”.
$cd DSHG300_A1_GPLv100b01
$cp ~/test_lib rootfs/lib
$make release
Tips: If there is not rootfs, please using full steps
to build firmware firstly.
How to add a mtd partition
enable jffs2 support in kernel config
Before this step, please using full steps to build firmware
DSH-G300 D-Link Corporation
Page 7
firstly.
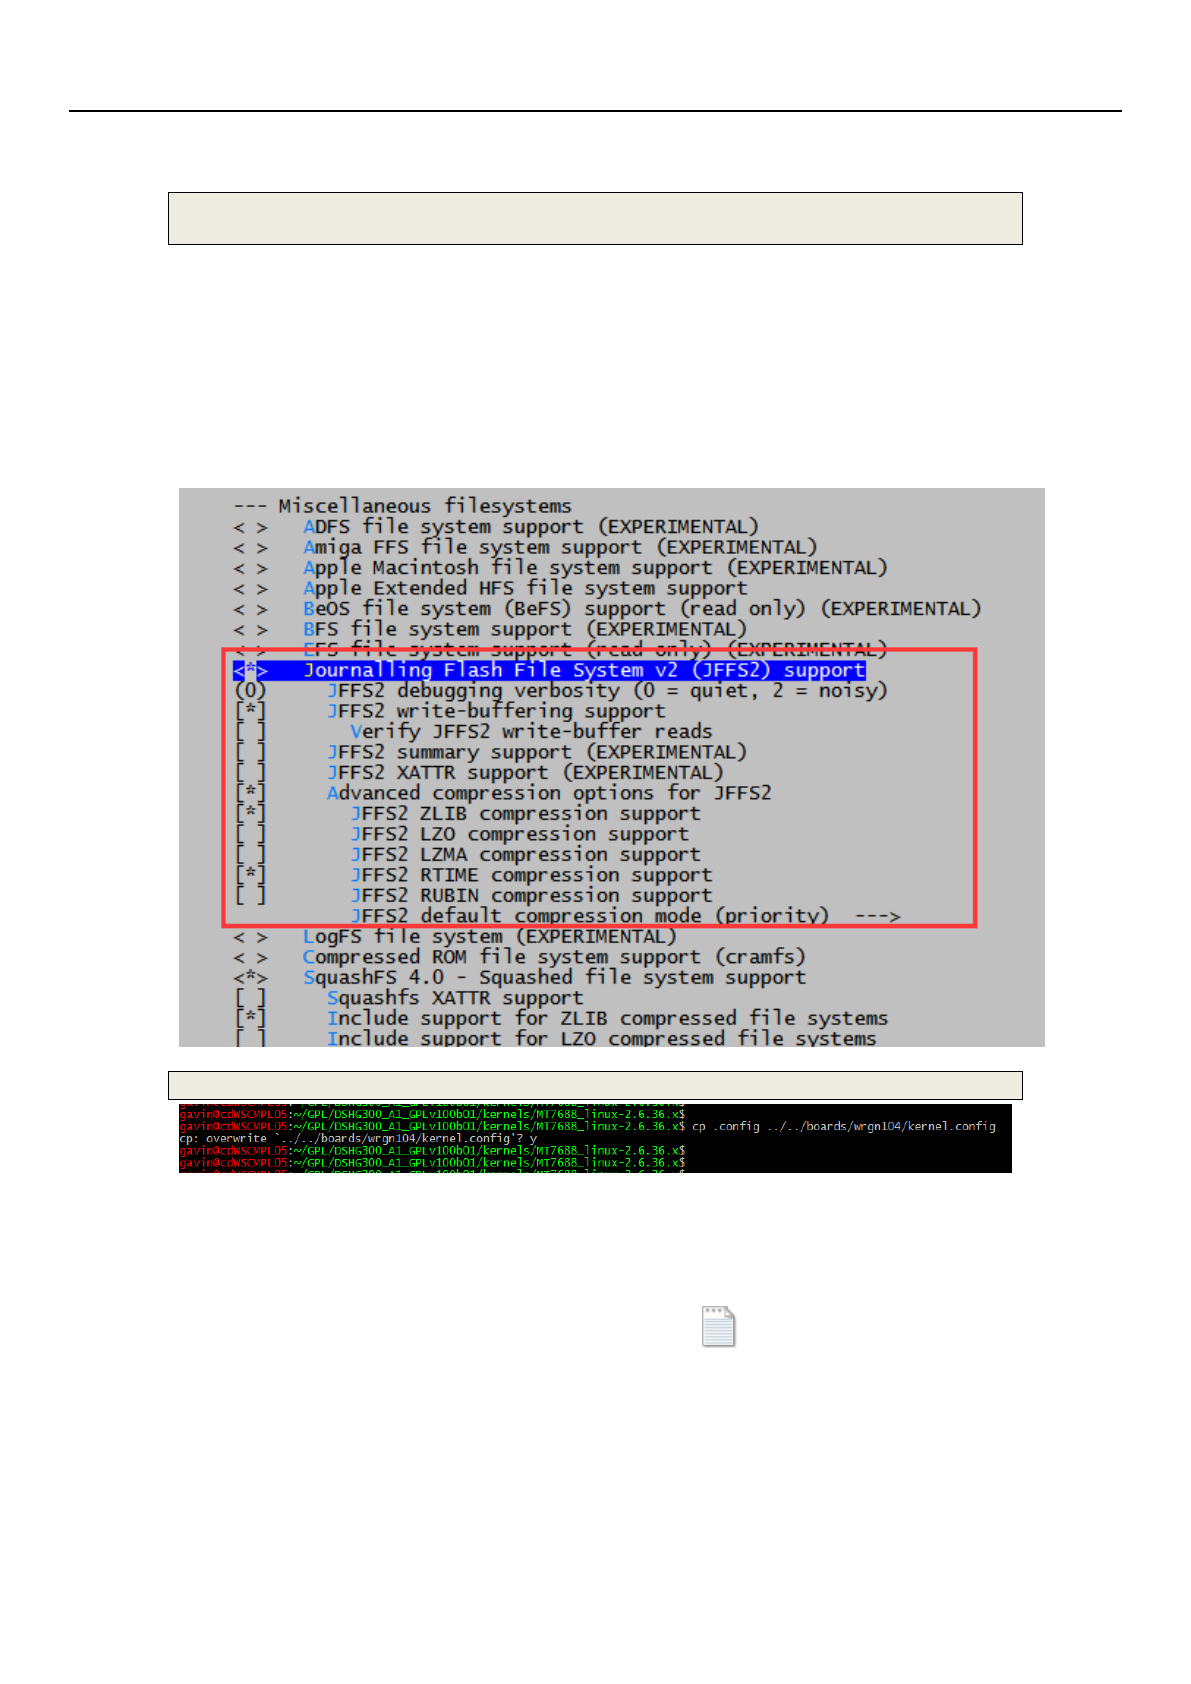
Run kernel menuconfig and select jffs2 option, then save it.
$ cd DSHG300_A1_GPLv100b01/kernels/MT7688_linux-2.6.36.x
$ make menuconfig
File systems --->
Miscellaneous filesystems --->
<*> Journalling Flash File System v2 (JFFS2) support
(0) JFFS2 debugging verbosity (0 = quiet, 2 = noisy)
[*] JFFS2 write-buffering support
[ ] JFFS2 summary support (EXPERIMENTAL)
[ ] JFFS2 XATTR support (EXPERIMENTAL)
[ ] Advanced compression options for JFFS2
<*> Compressed ROM file system support (cramfs)
Copy kernel config into boards folder.
$ cp .config ../../boards/wrgn104/kernel.config
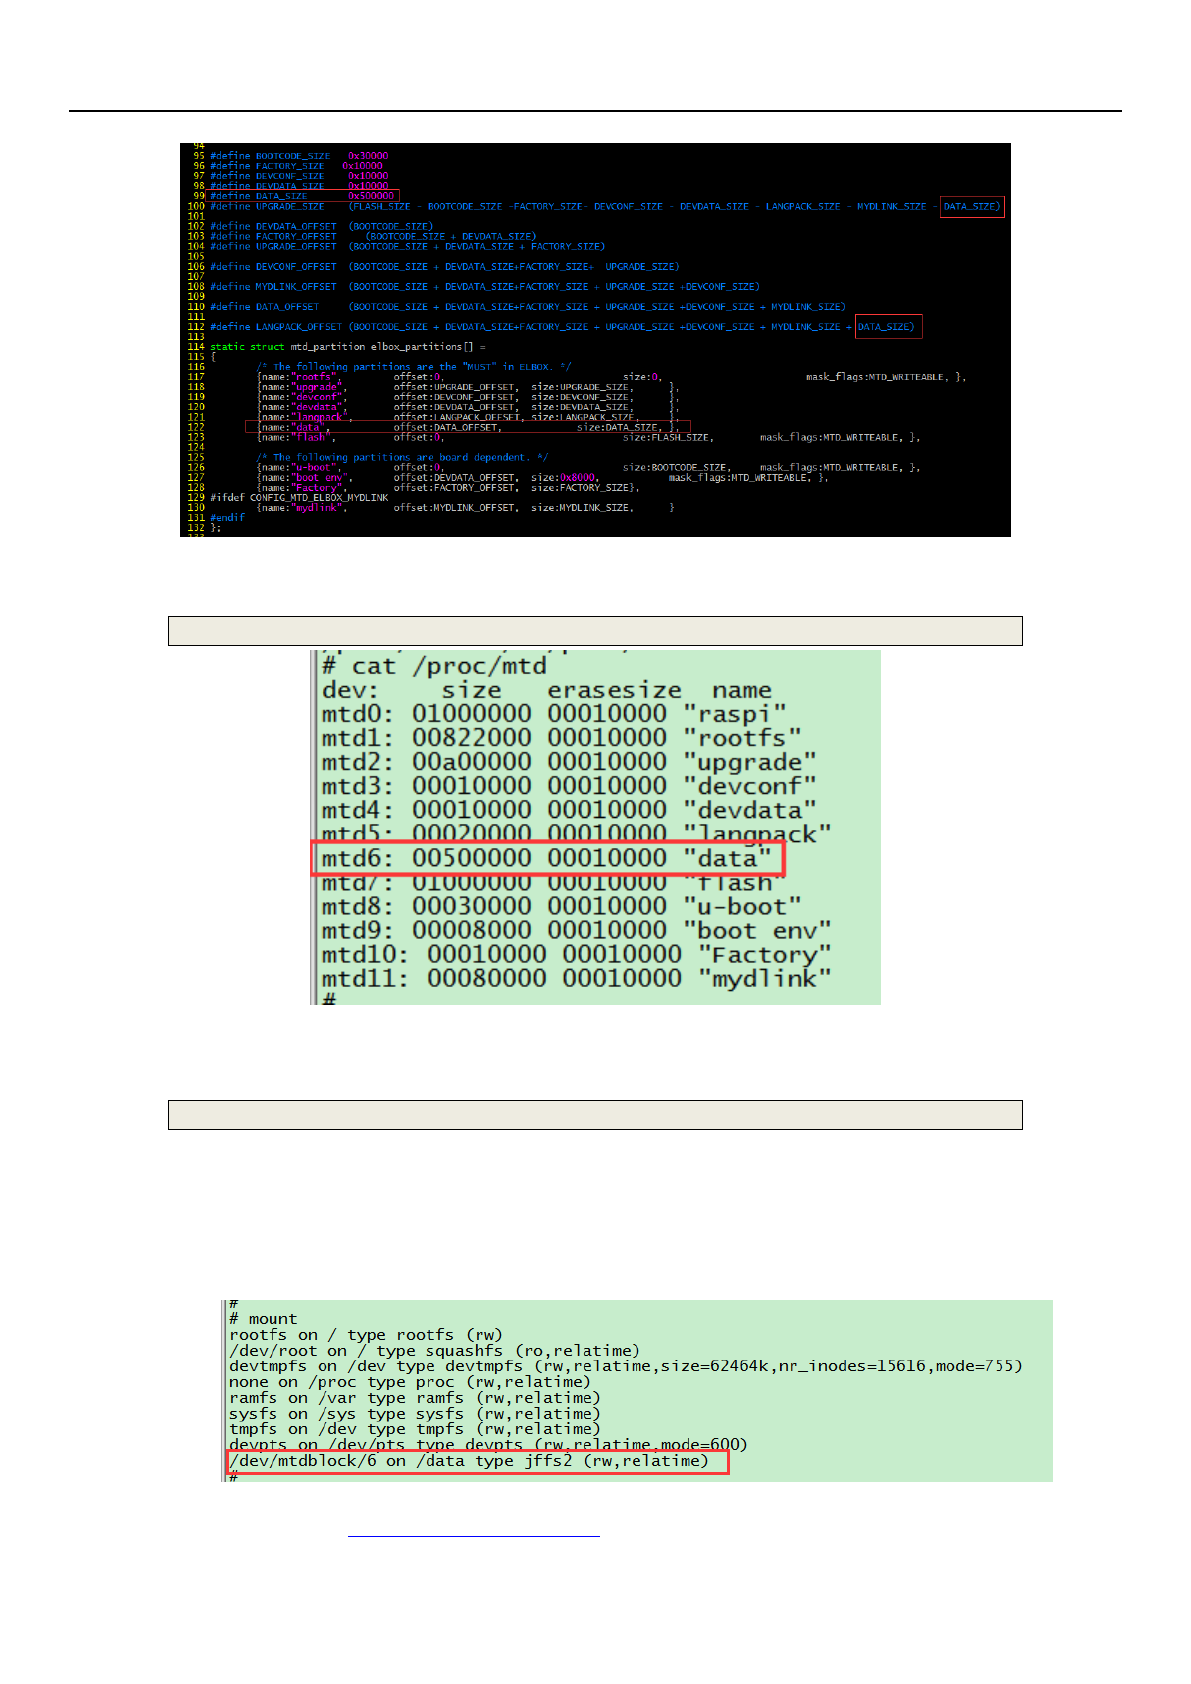
add mtd partition
Modify mtd partition map in file:
DSHG300_A1_GPLv100b01/kernels/MT7688_linux-
2.6.36.x/drivers/mtd/ralink/ralink_bbu_spi.c
This is a sample which add a mtd partition named by “test”,
and size of this partition is 320k:
ralink_bbu_spi.c
Re-bulid gpl firmware and upgrade gpl firmware into device.
DSH-G300 D-Link Corporation
Page 8
mount mtd partition
After firmware upgrade, show all mtd partitions by below
command:
$ cat proc/mtd
For this example, “data” mtd partition is mtd6 , it’s means
that dev path of “data” mtd partition is /dev/mtdblock/6.
Use below command to mount mtd partition “test” with jffs2
type.
$ mount -t jffs2 /dev/mtdblock/6 /data
Tips1: mtd partition must larger than 320k.
Tips2: we can add mtd partition by reduce “upgrade”
mtd partition size, but upgrade is used to upgrade firmware.
So we must make sure size of “upgrade” mtd partition always
larger than firmware size.
Tips3: in gpl v100b04, we auto mount the ”data” mtd
partition to /data while device boot up.
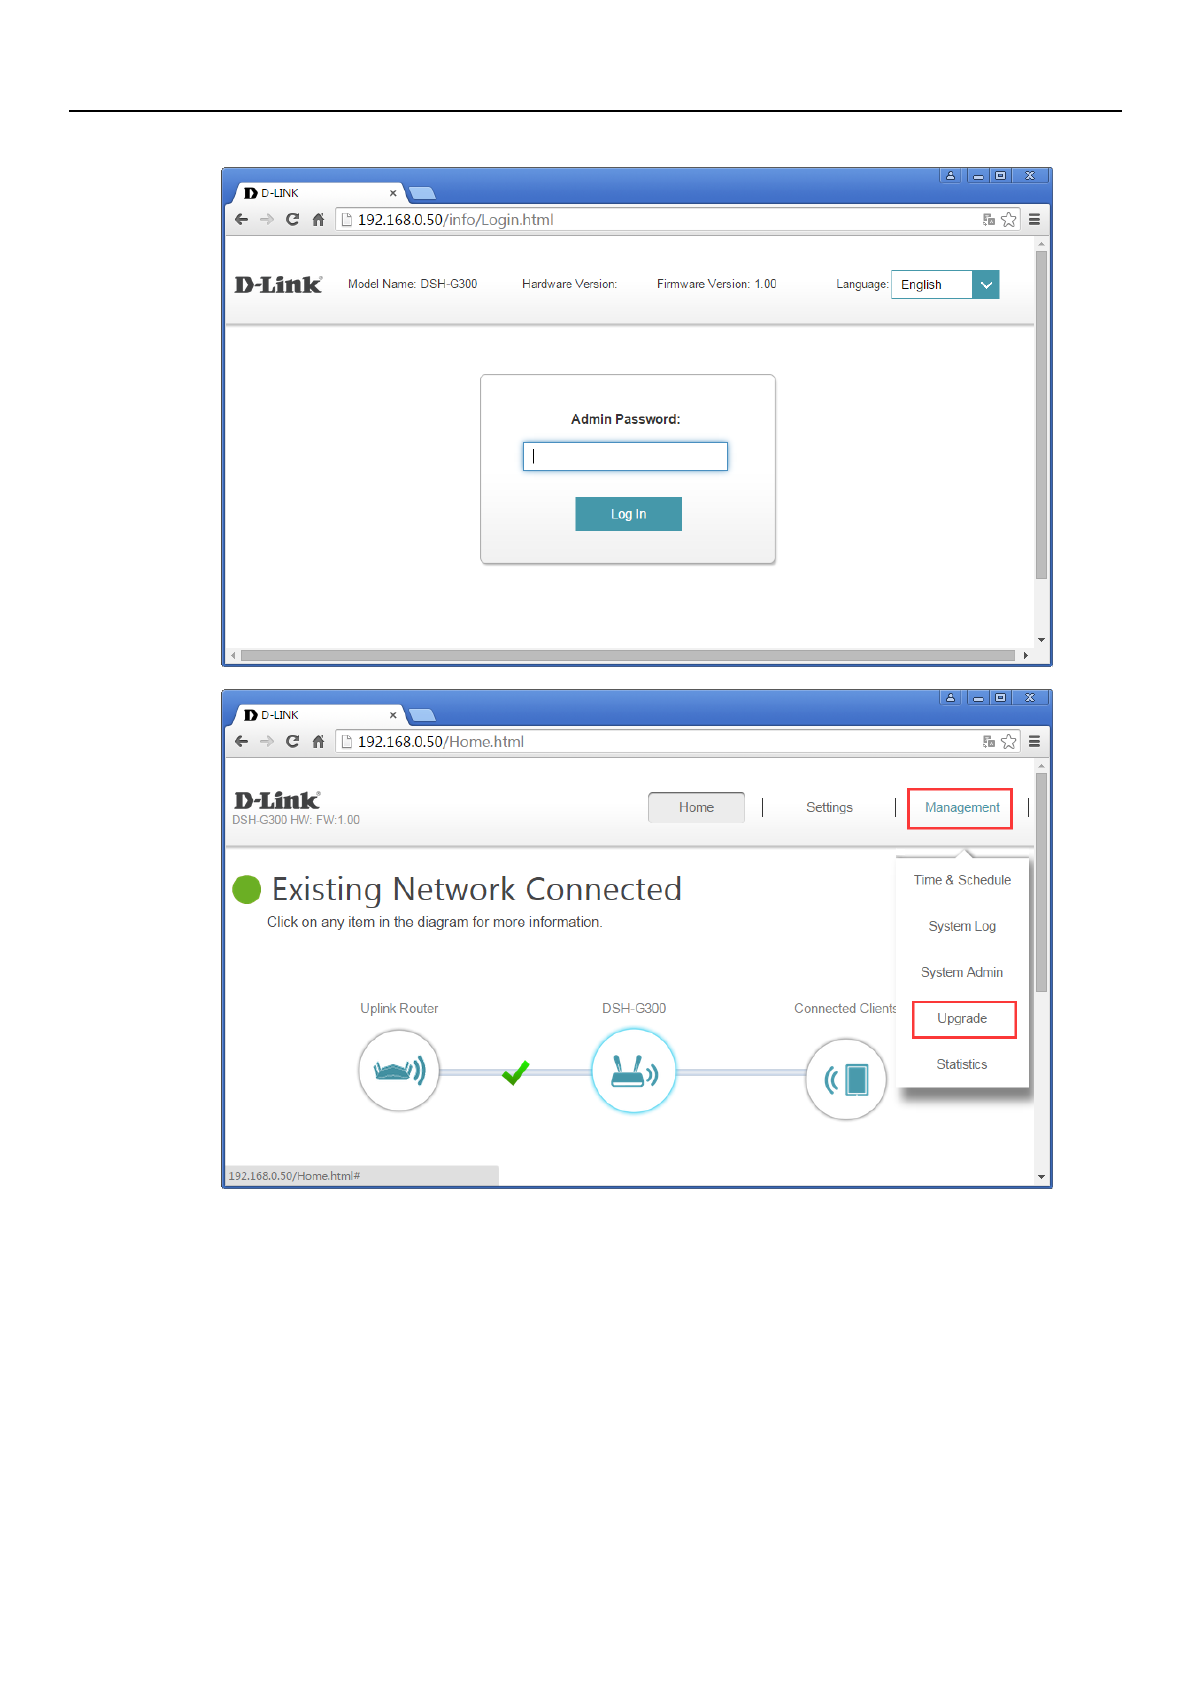
How to upgrade firmware by web
Enter URL http://192.168.0.50/ and login it.
DSH-G300 D-Link Corporation
Page 9
Default password is null(“”).
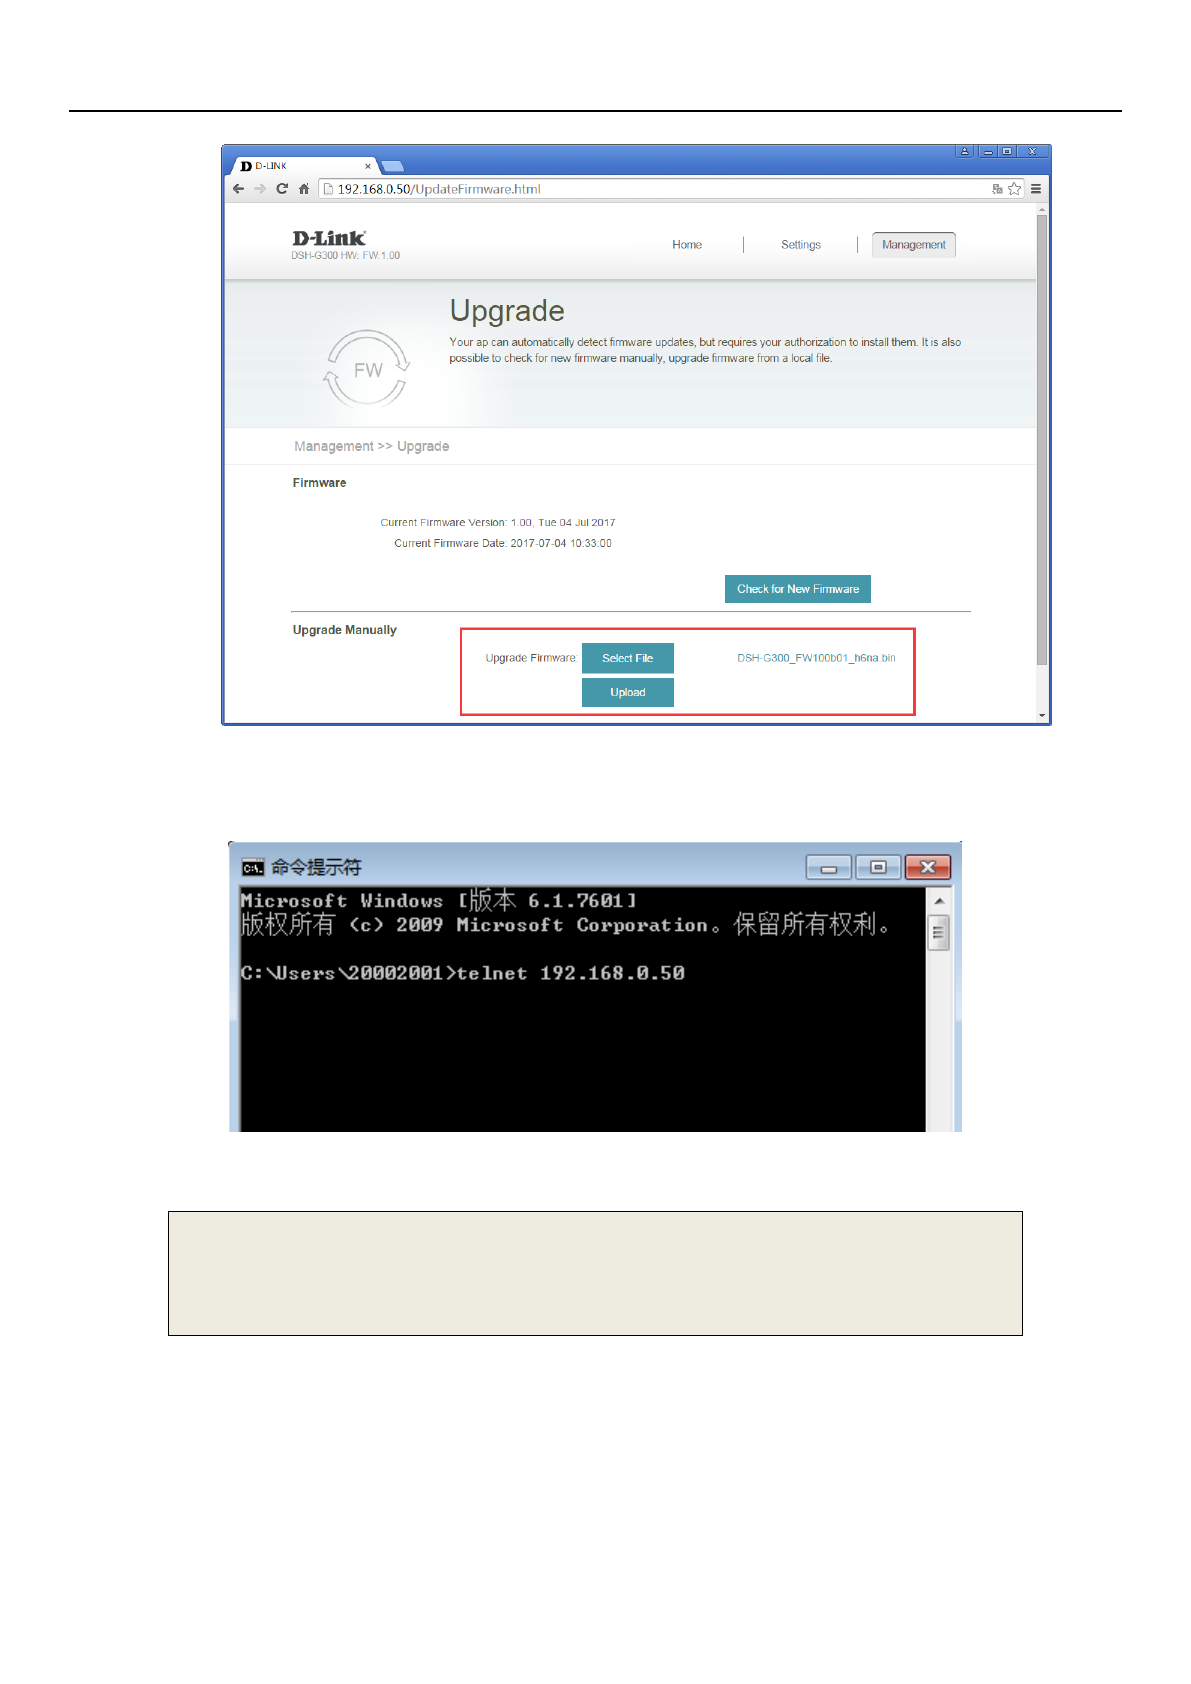
Enter firmware upgrade page.
Select firmware file and press Upload button.
DSH-G300 D-Link Corporation
Page 10
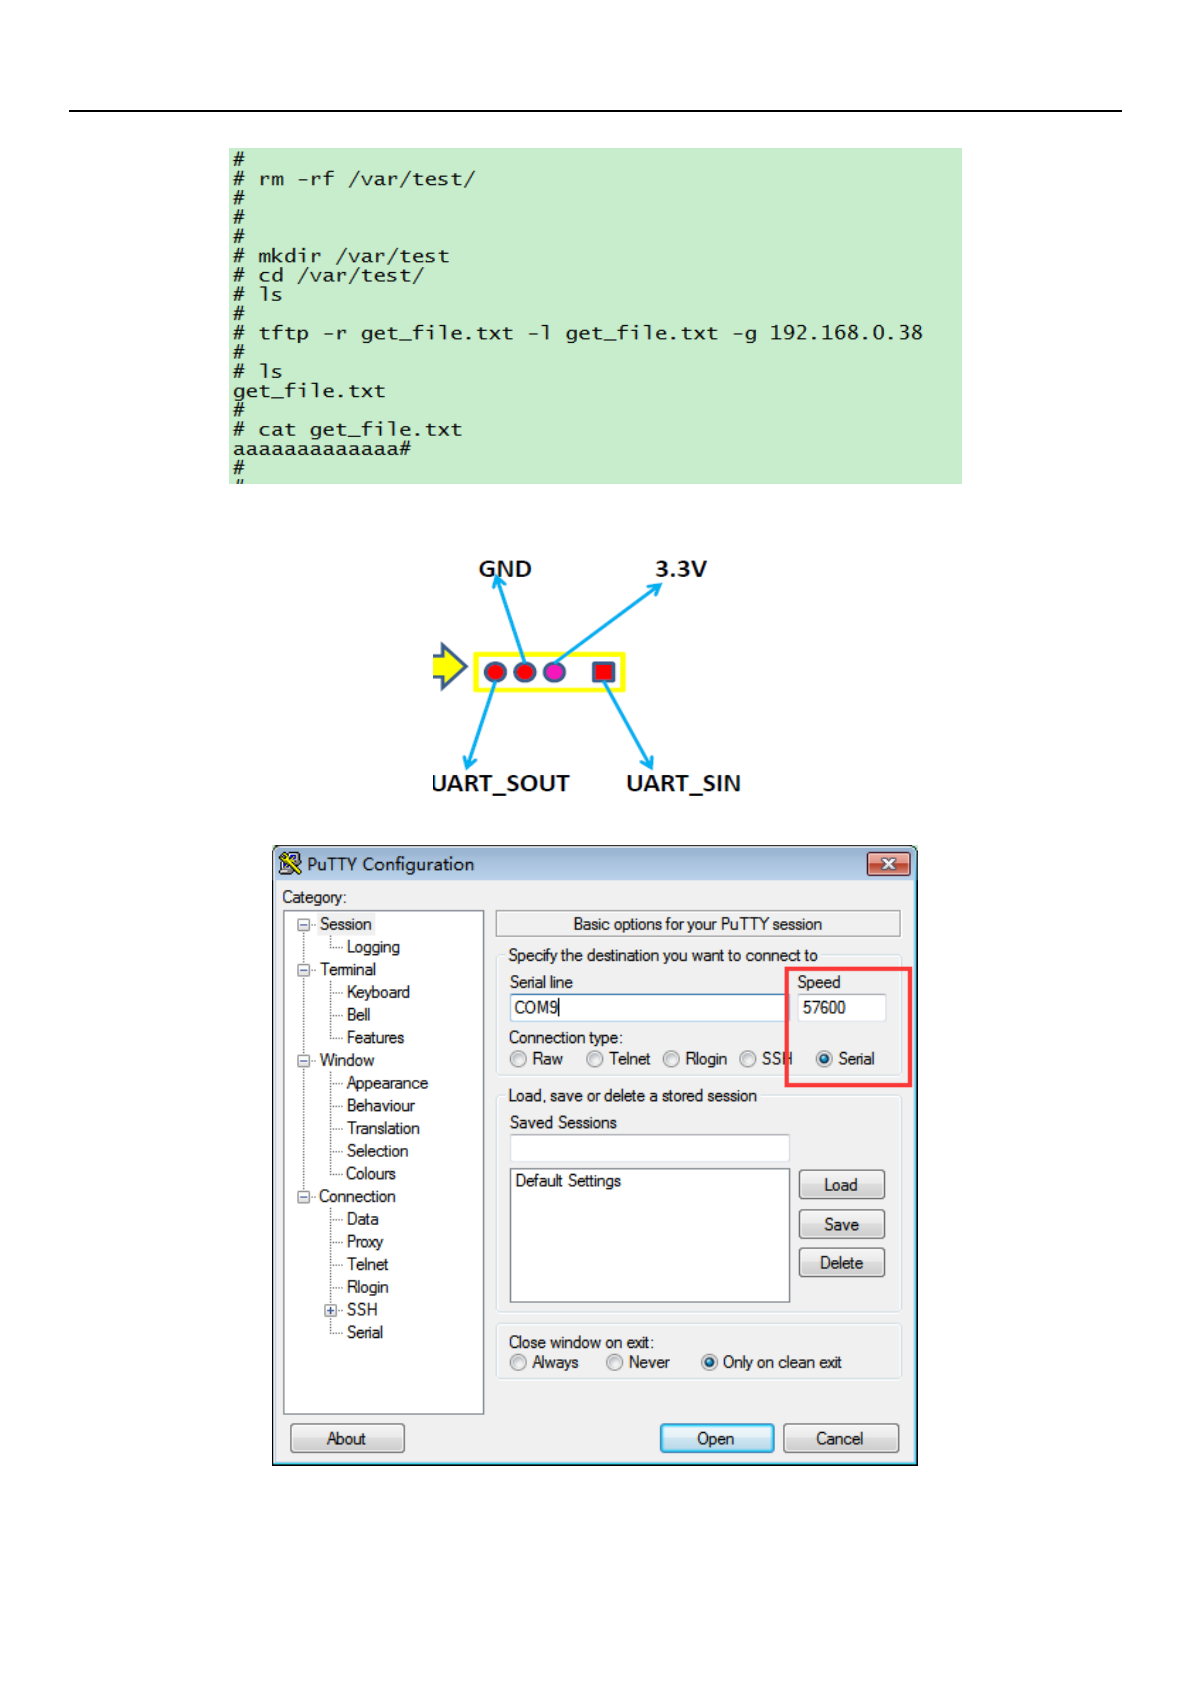
How to use telnet and tftp
How to use telnet
Telnet is enable as default,use tool to access it. Example is
Microsoft cmd tool. Device default ip is 192.168.0.50.
How to use tftp
Tftp can transfer a file from/to tftp server.
This is an exanple(tftp server ip is 192.168.0.38).
$ #get file from tftp server
$ tftp -r get_file.txt -l get_file.txt -g 192.168.0.38
$ #put file from tftp server
$ tftp -r put_file.txt -l put _file.txt -g 192.168.0.38
DSH-G300 D-Link Corporation
Page 11
Console define
Console connection type is Serial and speed is 57600

DSH-G300 D-Link Corporation
Page 12
FCC Statement:
This equipment has been tested and found to comply with the limits for a Class B
digital device, pursuant to part 15 of the FCC Rules. These limits are designed to
provide reasonable protection against harmful interference in a residential installation.
This equipment generates, uses, and can radiate radio frequency energy and, if not
installed and used in accordance with the instructions, may cause harmful interference
to radio communication. However, there is no guarantee that interference will not
occur in a particular installation. If this equipment does cause harmful interference to
radio or television reception, which can be determined by turning the equipment off
and on, the user is encouraged to try to correct the interference by one or more of the
following measures:
• Reorient or relocate the receiving antenna.
• Increase the separation between the equipment and receiver.
• Connect the equipment into an outlet on a circuit different from that to which
the receiver is connected.
• Consult the dealer or an experienced radio/TV technician for help.
FCC Caution:
Any changes or modifications not expressly approved by the party responsible
for compliance could void the user’s authority to operate this equipment.
This device complies with Part 15 of the FCC Rules. Operation is subject to
the following two conditions:
(1) This device may not cause harmful interference, and
(2) this device must accept any interference received, including
interference that may cause undesired operation.
If this device is going to be operated in 5.15 ~ 5.25GHz frequency range, then
it is restricted in indoor environment only.
IMPORTANT NOTICE:
FCC Radiation Exposure Statement:
This equipment complies with FCC radiation exposure limits set forth for an
uncontrolled environment. This equipment should be installed and operated
with minimum distance 20cm between the radiator & your body. This
transmitter must not be co-located or operating in conjunction with any other
antenna or transmitter.
The availability of some specific channels and/or operational frequency bands
are country dependent and are firmware programmed at the factory to match
the intended destination. The firmware setting is not accessible by the end
user.