D Link SL2750ET1 Wireless N 300 ADSL2+ Modem Router User Manual
D Link Corporation Wireless N 300 ADSL2+ Modem Router
D Link >
User Manual

USER MANUAL
Router: D-Link DSL-2750E
1
Table of Contents
Overview 3
Packing List 4
D-Link DSL-2750E Overview 4
Start with D-Link DSL-2750E 7
Connecting D-Link DSL-2750E 8
configuring Wireless Security Using WPS 16
Troubleshooting 17
Safety Concerns 26
FAQs 28
Tachnical Specification 31
2
Router: D-Link DSL-2750E
Quick Start
Thank you for purchasing Router: D-Link DSL-2750E
With the D-Link DSL-2750E, you can access the Internet at a high speed while
making a phone call.
If there is a need to configure the device in your application, please
ask for necessary information and guidance from your ISP
Overview
The following summarizes useful information to install D-Link DSL-2750E.
z Packing List
z D-Link DSL-2750E Overview
z Preparation
z Connecting D-Link DSL-2750E
z Quick Troubleshooting
z Safety Concerns
z FAQs (Frequently Ask Questions)
z Tachnical Specifications
3

Packing List
Open the packet delivered to you with care. Make sure that you have the following
items.
z One D-Link DSL-2750E
z One Splitter
z Two Micro Fillter
z One Power Adapter
z Two Telephone Cable
z One ETHERNET Cale
z Quick Guide
D-Link DSL-2750E
D-Link DSL-2750E gives full consideration to the household arrangements,
enabling horizontal or hanging on the wall. Picture below shows how it stands on
your table.
4
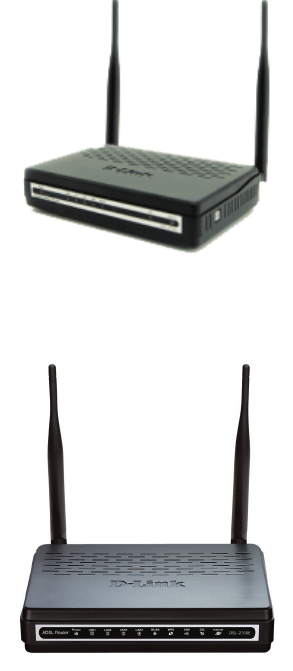
Figure 1-1 D-Link DSL-2750E Router Profile
Figure 1-2 D-Link DSL-2750E Router Front panel
5
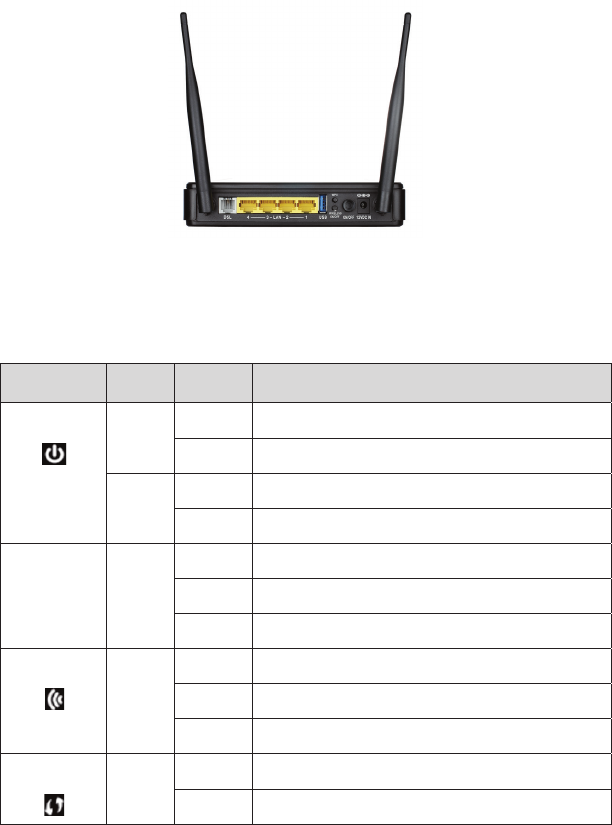
Figure 1-3 D-Link DSL-2750E Router Real panel
The LED Indicators as below;
Table 1-1 LED Indicators
Indicator Color Status Description
POWER
Green Off The power is off.
On The power is on and the initialization is normal.
Red On The device is initialing.
Blinks The firmware is upgrading.
ETHERNET
1-4
Green
Off No LAN link.
Blinks Data is being transmitted through the LAN interface
On The connection of LAN interface is normal.
WLAN
Green
On The Connection of WLAN interface is normal.
Blinks Data is transmitted through the WLAN interface.
Off The WLAN connection is not established.
WPS
Blue Blinks WPS negotiation and enabled on the device.
Off WPS negotiation is not enabled on the device.
6
Indicator Color Status Description
USB
Green
On The connection of USB flash disk has been
established.
Blinking Data is being transmitted.
Off The connection of USB flash disk is not established.
DSL
Green On On Initial self-test of the unit has passed and is ready
Blinks The device is detecting itself.
Off Initial self-test is failed.
Internet
Green Off The device is under the Bridge mode, DSL connection
is not present.
Blinks Internet data is being transmitted in the routing mode.
On The IP is connected.
Red On The device is attempted to become IP connected, but
failed.
Start With D-LINK DSL-2750E
Splitter
Using Splitter can reduce disturbance signals in the telephone line. D-Link DSL-
2750E needs to use a separate splitter. The External has three ports.
z LINE: Connecting to the phone jack.
z PHONE: Connecting to the telephone sets.
z DSL: Connecting to the D-Link DSL-2750E.
Remark: Figure 1-4 Computer to D-Link DSL-2750E Page 9
7
ETHERNET Card
Computer is connected to D-Link DSL-2750E through the ETHERNET port on D-Link
DSL-2750E. Ensure your computer is configured with ETHERNET Adapter as well as
ETHERNET port. Besides, make sure you enabled the TCP/IP for your operating
system.
Connecting D-Link DSL-2750E
(1) Place D-Link DSL-2750E in a safe and accessible location Keep the device away
from heat source, power line or highly powered electronic equipment where you
can easily view the LED indicator on the front panel of the device.
If you want to connect one or more telephones, Micro Filter is
needed; It will work between telephones and the line from phone
jack. For more details about connecting multiple telephones, please
refer to the FAQs
You are now ready to connect D-Link DSL-2750E. Follow these steps;
1. Connect the ADSL Line – Plug one end of the telephone cable into the Line
port of splitter and insert the other end into the phone jack. Use another
phone cable to connect the DSL port of the splitter and the DSL port on the
rear panel of Router. Use Telephone set connect to PHONE port of the
splitter
2. Connect the power adapter – Connect the power adapter to D-Link DSL-
2750E and the mail supply. Power on the switch. The Power LED indicator
will turn on.
3. Connect D-Link DSL-2750E to your computer – Use the ETHERNET cable to
connect D-Link DSL-2750E and your computer
8
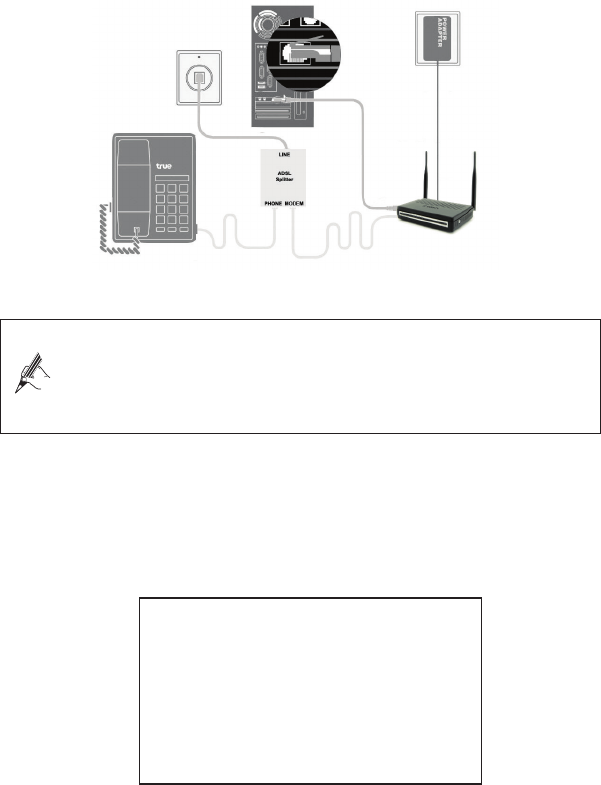
When the ETHERNET LED of D-Link DSL-2750E is ON, it indicates the connection
between D-Link DSL-2750E and your PC.
Figure 1-4 Computer to D-Link DSL-2750E
Ensure that the LAN cable connecting the LAN to D-Link DSL-2750E
must not exceed 100 meters or less
*** Depend on quality of telephone cable and noise
řşŞIf you want to connect PC via Wireless LAN. You can use default SSID
and WiFi key can get from Label Sticker on your D-Link DSL-2750E as follow. Exam:
SSID : true_homewifi_6JU and key is “0081Z225”. Both of SSID and WiFi key is a
unique value associated with D-Link DSL-2750E
SSID (Name of WiFi) : true_homewifi_6JU
Key (Password for use WiFi): 0081Z225
Router Username/Password
(User/Password for device’s login)
: admin/password
9
You can configure to Internet Connection by 2 ways are Web Browser and hi-
speed assistant program. Please do as follows.
Config by Web Configuration (Wizard)
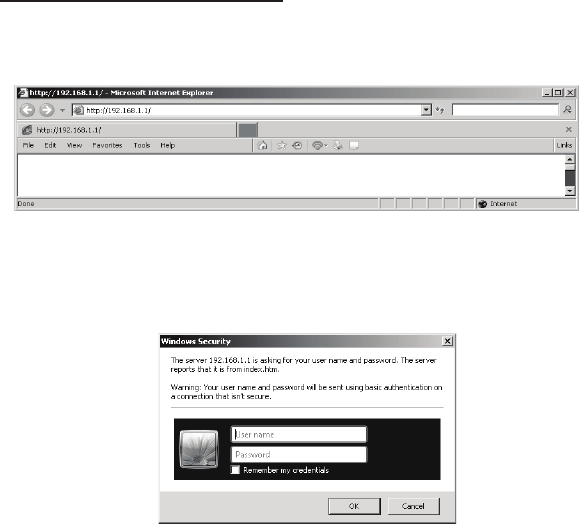
1. Open your web browser or Internet Explorer. Type “řšŚřŞŠřř” click
‘Enter’. See at Figure ř-ŝ
Figure 1-5 Browser
2. Web page will pop up Password insert. See at Figure 1-6
User : “admin” Password : “password” Click “Login”
Figure 1-6 Username / Password Login
10
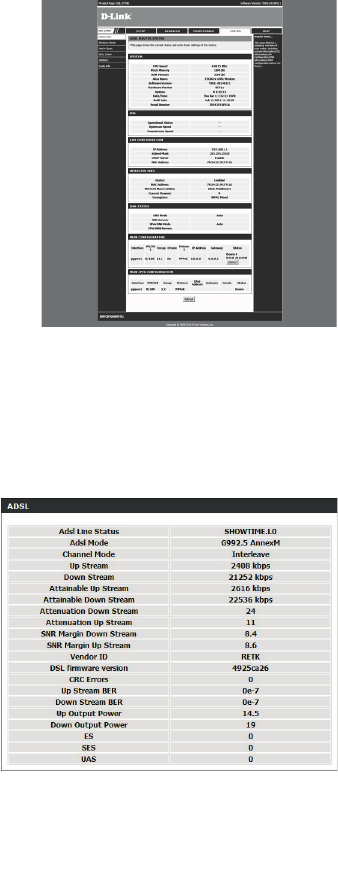
Web page will show the status of device. See at Figure ř-ş
Figure 1-7 Device Status
3. Click “Status” > “ADSL Driver” for check on internet description, If
internet synchronization that can done, Device will show sync description
like on Figure ř-Š
Figure ř-Š WAN Description
11
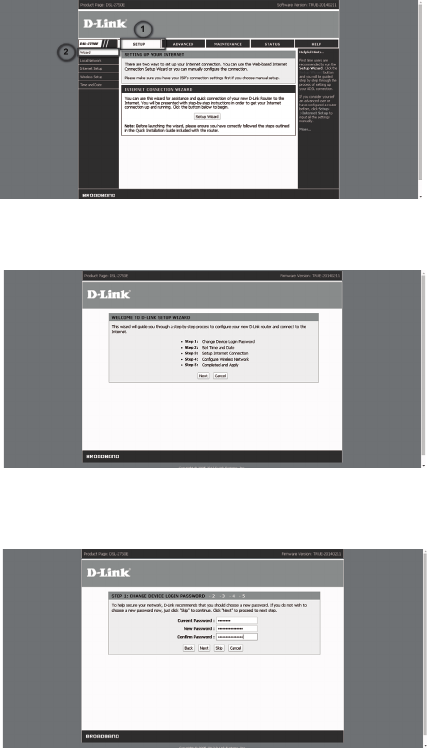
4. Start device configuration by wizard, Click “Setup” > “Wizard” as figure
1-9
Figure 1-9 Wizard Configuration
Figure 1-10 Wizard Configuration (Cont.)
Figure 1-11 User / Password Login Configuration
12
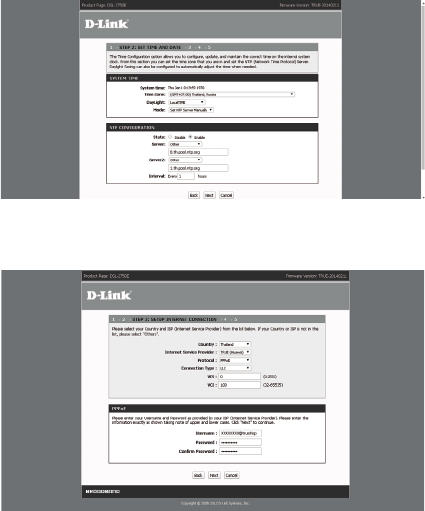
Figure 1-12 Date –Time Configuration
Figure 1-13 Internet Configuration
13
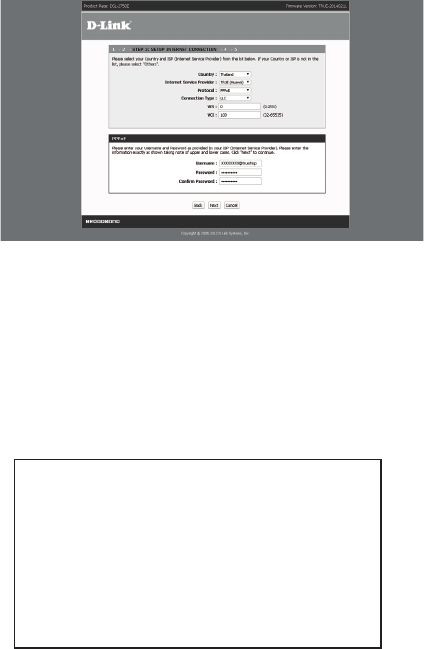
5. Under Page “Internet Configuration”, use the default factory setting and click
‘Next’.
Figure 1-14 Internet Configuration
6. The default SSID and WiFi Key are on the top of router.
You can change the default wireless SSID and wireless security to your
preferred value.
SSID (ºÉ°´µWiFi) : true_homewifi_6JU
Key (¦®´nµÎµ®¦´µ¦ÄoµWiFi): 0081Z225
Router Username/Password
(¦®´nµÎµ®¦´Áoµ´Ênµ°»¦r)
: admin/password
14
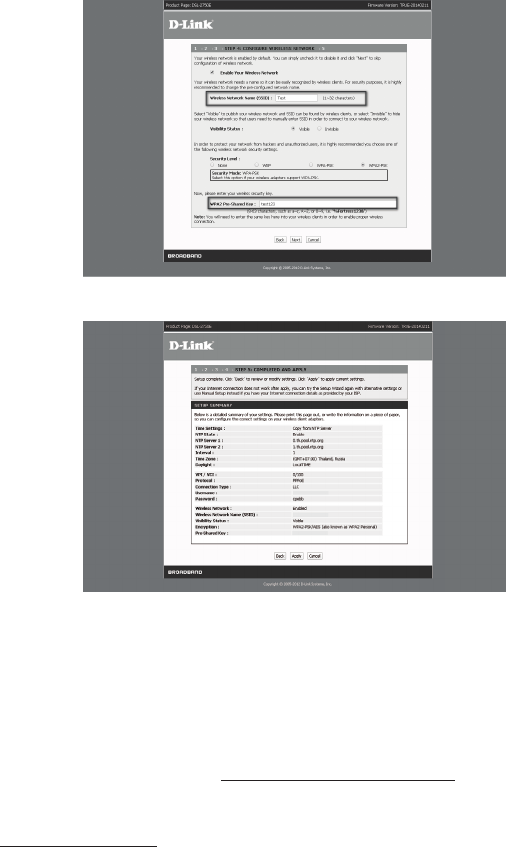
Figure 1-15 Wireless Configuration
Figure 1-16 Summarize of Configuration
Remark :
• You may get more information on how to connect TRUE Hi-Speed
Internet from this link: http://support.trueinternet.co.th/cpe
In case of installation or connection problem, contact us at 1686 or e-mail
support@truecorp.co.th
15

Configuring Wireless Security Using WPS
There are two WPS methods for creating a secure connection.
- Push Button Configuration (PBC) : create a secure wireless network
simply by pressing a button
- PIN Configuration : create a secure wireless network simply by entering a
wireless client’s PIN(Personal Identification Number)
Push button Configuration(PBC)
1. Make sure that your DSL-2750E is turned on and that it is within range of
your computer and Wireless LAN Security Mode is No Security or WPA-
PSK or WPA2-PSK.
2. Make sure that you have installed the wireless clients driver and utility in
your notebook.
3. In the wireless client utility, find the WPS setting. Enable WPS and press
the WPS button.
4. Go to WPS Station Page and press the Push Button or Press WPS/WLAN
button 5-10 sec.
5. Press WPS button on your Wireless client within 2 minutes.
PIN Configuration
When you use the PIN configuration method, you need to use both DSL-2750E
configuration interface and the client’s utilities.
16
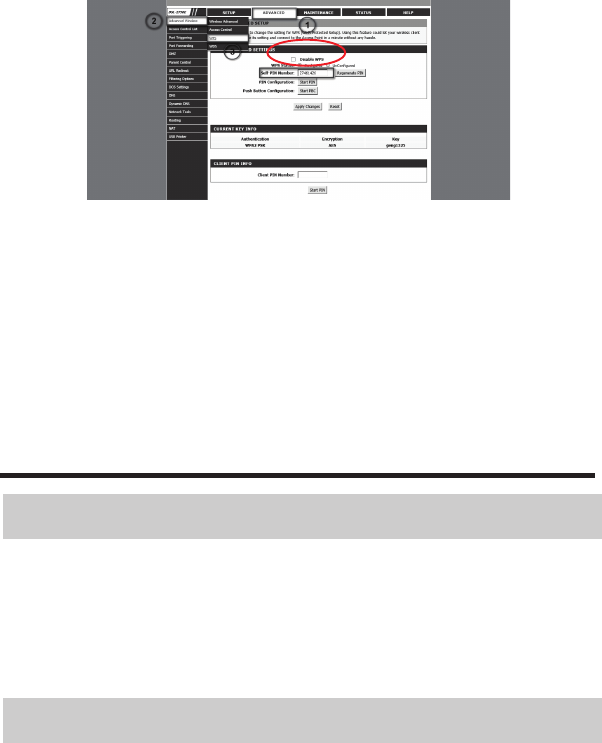
1. Login in to DSL-2750E then go to Menu Advance > Advance Wireless >
WPS to get PIN a Number.
Figure 1-17 ®oµnµ¦´ÂnWPS
2. Launch your wireless client’s configuration utility. Go to the WPS setting
and Enter the PIN number.
Troubleshooting
1. The Power indicator is off, what can I do?
You’d better check as follows.
(1) Whether the power adapter is suitable for the D-Link DSL-2750E.
(2) Whether the D-Link DSL-2750E is connected to the power supply correctly.
(3) Whether the ON/OFF button is clicked down.
2. The ETHERNET link indicator is off, what can I do?
17
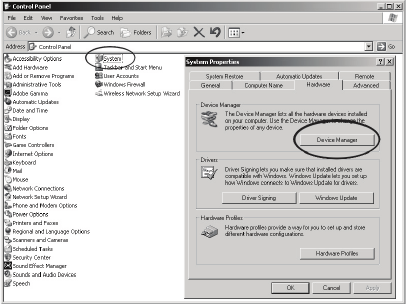
For Windows XP, You’d better check as follows.
(1) Whether the provided ETHERNET cable between the D-Link DSL-2750E
and the computer is in the correct type.
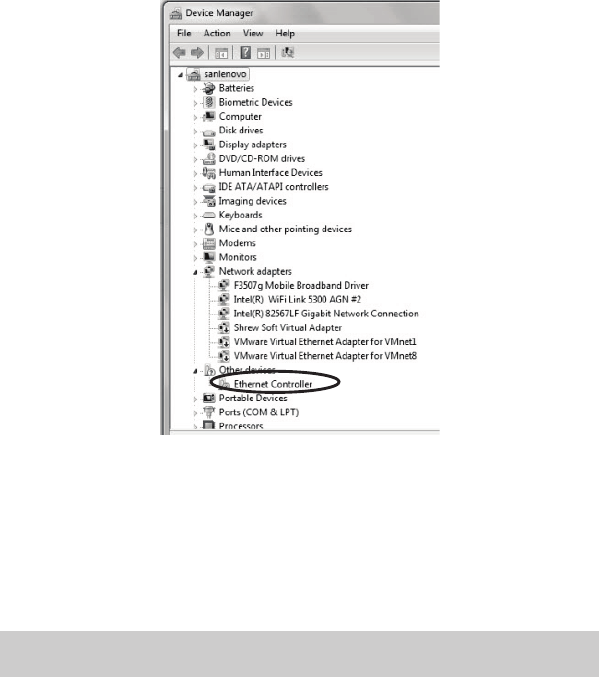
(2) Whether the ETHERNET card works normally. For Windows XP, Select
Start > Setting > Control Panel > System > Hardware > Device Manager. For
Windows 7, Select Start > Control Panel > System & Security > Device
manager Check whether there are devices that have the “?” Or “!” Mark
under Network adapters. If such devices exist, uninstall and then re-install
them. See at Figure 1-18
18
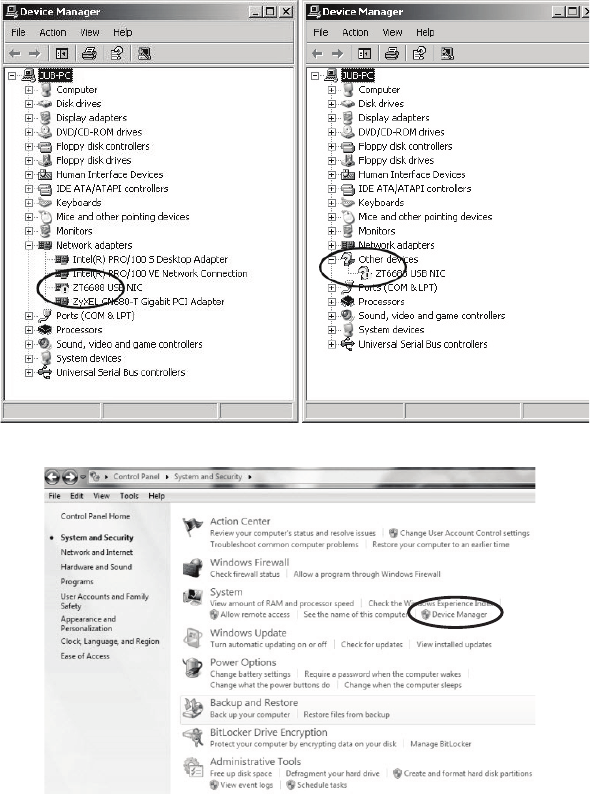
Windows XP
19
Windows 7
Figure 1-18 ETHERNET Card Status of Windows XP and Windows 7
- If the problem remains, change the slot for the network card.
*** It should be performed by specialist.
- Change another ETHERNET cable
3. The WLAN indicator is off, what can I do?
You’d better check as follows.
(1) Check whether there is D-Link DSL-2750E activates Wireless LAN. You can
check at Menu Setup > Wireless Setup > Wireless Basics on GUI of D-Link
DSL-2750E. See at Figure 1-19
20
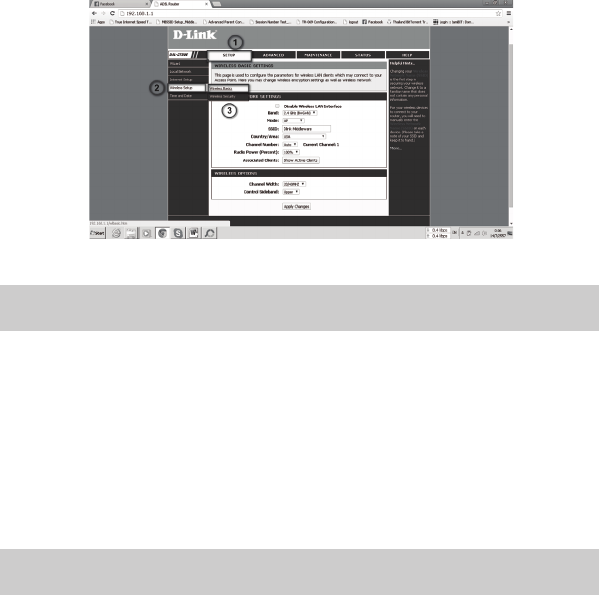
Figure 1-19 Enable Wireless LAN
4. The DSL link indicator is off. What can I do?
You’d better check as follows.
(1) Whether that the telephone line is correctly connected with the splitter.
(Figure 1-4, page 9)
(2) Whether the telephone line works normally by using a telephone to make a
test.
(3) Whether the telephone line is reliable
5. The Internet link indicator is off, what can I do?
You’d better check as follows.
(1) Whether that the telephone line is correctly connected with the splitter.
(2) Whether the DSL link indicator is On.
21
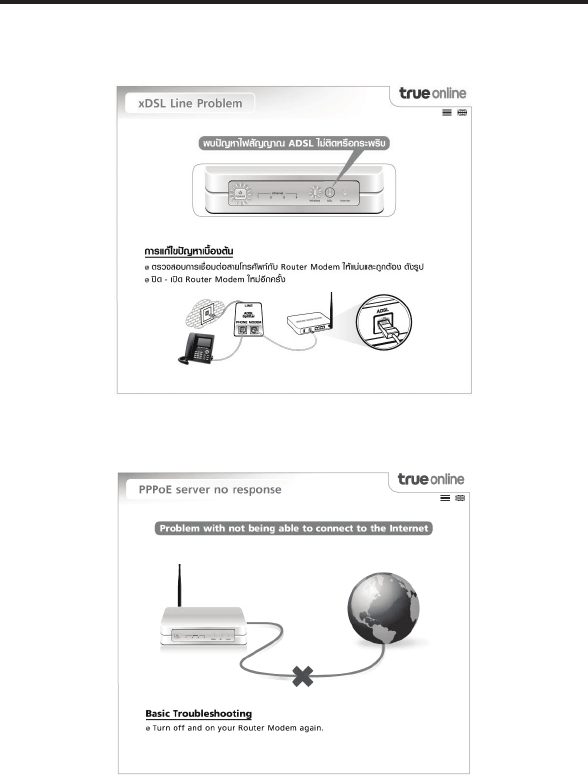
Warning Page
Warning page will show when router find some problem that may affect the
usage. This will help user to understand the problem and how to fix it.
Figure 1-20 Warning page show when ADSL light turn off or blinking.
Figure 1-21 Warning page show when can’t connect to internet.
22
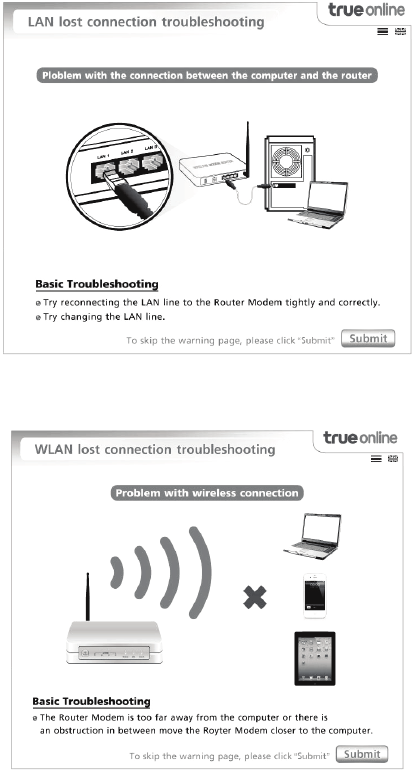
Figure 1-22 Warning page show the connection problem between computer and
router modem.
Figure 1-23 Warning page show when wireless disconnect many times.
23
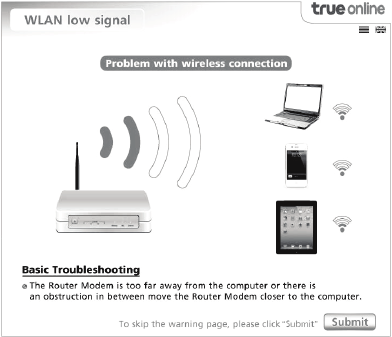
Figure 1-24 Warning page show when wireless signal is weak
If you wish to enable/disable warning page function, you may access to menu
Advance > Network Tools > Self Trouble shooting
• Enable = Enable Self Trouble Shooting page
• Disable = Disable Self Trouble Shooting page
24
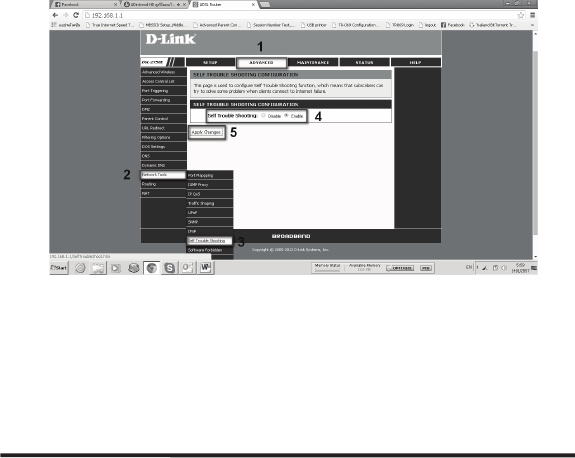
Figure ř-25 The page to enable/disable Self Trouble Shooting page
Helping tools when your computer has wrong configuration
(Self-Heal).
This feature use for help user for any wrong network configuration on computer that
after config, router can allow user to surf internet such as wrong IP Address, wrong
DNS that include wrong proxy configuration.
If you want enable/disable this feature can access follow menu Advanced > Network
Tools > IPnP
25
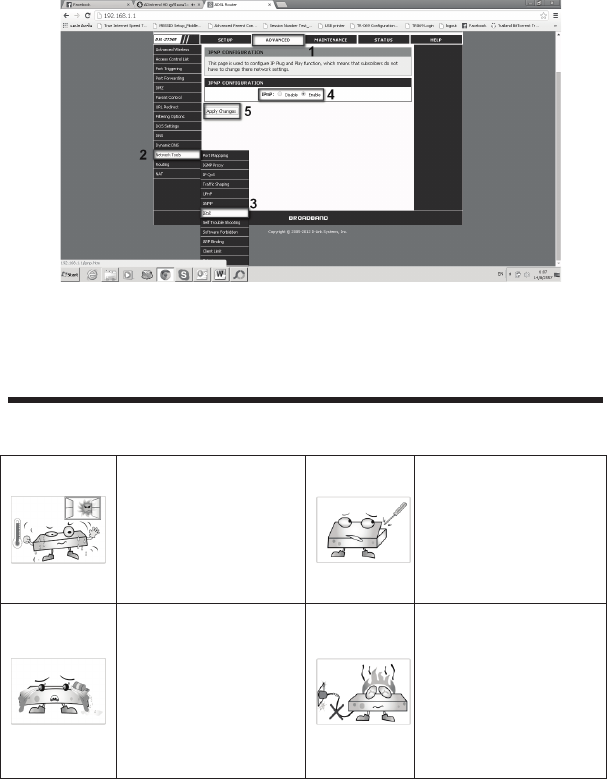
Figure ř-26 The page to access Self Heal page
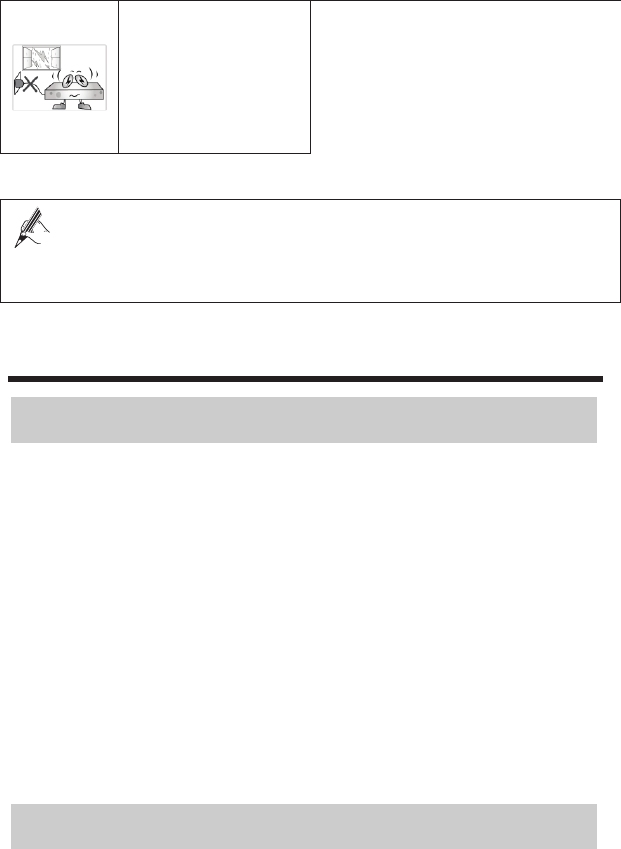
Safety Concerns
Pay attention to the following when installing and using the D-Link DSL-2750E
Place the device at a well-
ventilated place. Do not
dispose the device to
direct sunlight.
Never attempt to dismantle
the device by yourself. In
case of any fault, contact
the appointed maintenance
center for repair.
During storage,
transportation and
operation of the device,
keep the device dry.
Keep the power plug clean
and dry. Using a dirty or
wet power plug may lead
to electric shock or other
perils. Do not use an old or
a damaged power cable.
26
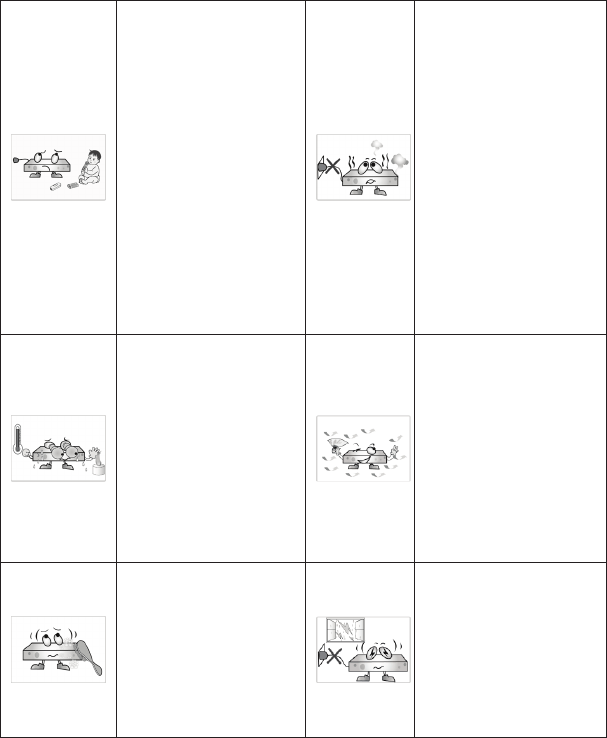
Do not let a child operate
the device without
guidance. Do not let a
child play with the device
or any accessory.
Swallowing the
accessories may lead to
peril.
In any of the following
cases, stop using the
device, disconnect it from
the power supply and
unplug the power plug
immediately: there is
smoke emitted from the
device, or there is some
abnormal noise or smell.
Contact the specified
maintenance center for
repair.
Keep at least 10 cm.
between the device and
the closest object for heat
dissipation. Keep the
device for away from any
heat source or bare fire,
such as a candle or an
electric heater.
Do not place any object on
top of the device.
Otherwise, the device may
be too hot during
operation. It can even be
deformed or damaged by
the heavy load.
Before cleaning the
device, stop using it and
disconnect it from the
power supply. Use a piece
of soft cloth to clean the
device.
Before plugging or
unplugging any cable, shut
down the device and
disconnect it from power
supply.
27
Unplug your router
during thunder storm.
This will protect your
router from damage due
to power surges.
Note: What D-Link DSL-2750E is used for a long time, temperature of the
shell will rise slightly. This is normal and does not affect the performance of
the device.
FAQs
1. Why does the ADSL CPE fall off line so often?
There are many factors concerned, such as telephone or fax machine is
connected directly to the ADSL subscriber line without splitter, faults in your ISP
access server or ADSL CPE (Compatibility or quality problem), ETHERNET
card (Low processing speed, invalid driver), line disconnection, line disturbance,
etc. You are suggested to check the following items in your applicable range.
(1) Ensure no telephone or fax machine is connected directly to the ADSL
subscriber line without splitter.
(2) Ensure the ADSL connector is valid.
(3) Keep the device away from heat source, power line or highly powered
electronic equipment.
(4) Telephone Line NOT have any Noise
2. How to connect multiple telephones?
28
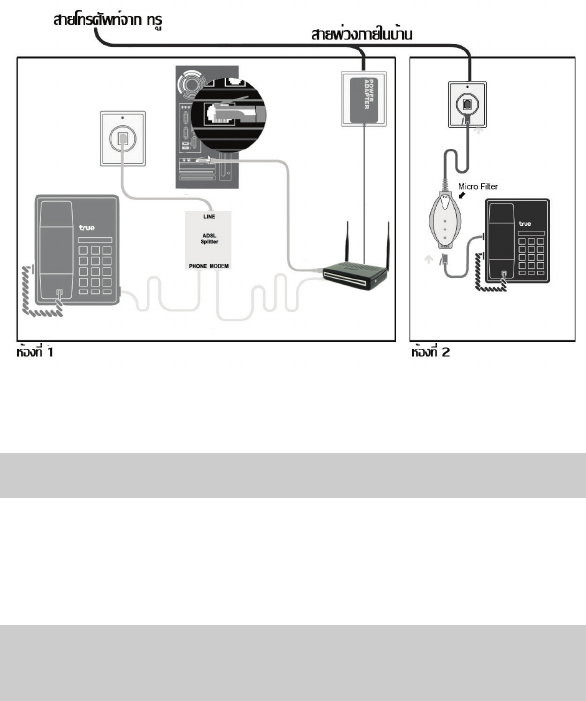
In case you need to connect telephone more than one set. You must install
Micro Filter for every branch of Telephone. Micro filter is available at True
Shops.
Figure 1-20 Multiple Telephones connection
3. What are the advantages compared with ordinary dial-up equipment?
z High data rate.
z Through Voice and data traffic are carried through a single line, the circuit
switch does not process data traffic. That is, you don’t need to pay extra
telephone fee for accessing the Internet.
4. Is there any possibility of losing voice quality by using ADSL CEP or
threatening data rate by calling simultaneously?
FDM technology is used here to separate the voice and data traffic, which are
29

totally independent to each other with standard frequency design. Even you
make phone call while accessing the Internet, it will not cause the losing of
voice quality or data rate.
5. Why can not I access the Internet?
(1) Ensure that you have entered the correct username and password.
(2) If you still cannot access the Internet, check whether the Proxy server on
your IE is correctly configured. The Proxy server must be disabled.
(3) Try different Websites, in case some Website fails.
Try to Power Off and Power On D-Link DSL-2750E then access Internet again.
6. I cannot get online for I changed the parameters of the D-Link DSL-2750E,
What can I do?
Try to restore the default factory setting of the D-Link DSL-2750E as follows.
(1) Find the Reset button on the bottom of the D-Link DSL-2750E.
Use a needle-like object to click and hold the Reset button 10 second, and then
release it.
(2) Default Configure and entered the correct username and password again
30
Technical Specification
General Specification
Standard ADSL Standard ITU-T G.992.1 G.dmt
ITU G.992.2 G.lite
ANSI T1.413 Issue 2
ADSL2 Standard ITU G.992.3 G.dmt.bis
ITU G.992.4 G.lite.bis
ADSL2+ Standard ITU G.992.5 ADSL2+
Data transfer
rate
G.dmt z The maximum downstream rate is 8 Mbit/s
z The maximum upstream rate is 896 Kbit/s
G.lite z The maximum downstream rate is 1.5 Mbit/s
z The maximum upstream rate is 512 Kbit/s
T1.413 z The maximum downstream rate is 8 Mbit/s
z The maximum upstream rate is Kbit/s
ADSL2+
Annex M
z The maximum downstream rate is 24 Mbit/s
z The maximum upstream rate is 896 Kbit/s
z The maximum upstream rate is 3 Mbit/s
ADSL2 z The maximum downstream rate is 12 Mbit/s
z The maximum upstream rate is 896 Kbit/s
z The maximum upstream rate is 3 Mbit/s
31
Physical and Environmental Specification
Power consumption 10 W
Power Adapter Output: 12 VDC 1 A
Environment Temperature 0ɗ ȸ 40ɗ (32ə ȸ 104ə)
Environment Humidity 10% – 95%
Dimensions 240 x 160 x 68 mm
Weight 290 g
32