D Link WL3140APA1 Wireless 108G Web Smart Thin AP with PoE User Manual Manual Part 1
D Link Corporation Wireless 108G Web Smart Thin AP with PoE Manual Part 1
D Link >
Contents
- 1. Manual Part 1
- 2. Manual Part 2
Manual Part 1
Smart W
LAN
Manager
May 2007
Version 1.00

Table of Contents
Table of Contents ....................................................................................................................................................................2
Introduction.............................................................................................................................................................................4
System Requirement ...........................................................................................................................................................4
Getting Started....................................................................................................................................................................4
Installing the Smart WLAN Manager.....................................................................................................................................5
Discovering the Switch and AP ............................................................................................................................................7
Using the Smart WLAN Manager ...........................................................................................................................................10
Understanding the Screen Layout ......................................................................................................................................10
Discovering Devices..........................................................................................................................................................11
Polling Information ............................................................................................................................................................11
Save to Database .............................................................................................................................................................11
Clear Database.................................................................................................................................................................12
Modify the Preference .......................................................................................................................................................12
Global Setting ............................................................................................................................................................12
Default Parameters.....................................................................................................................................................13
Mail Alert ...................................................................................................................................................................13
Syslog .......................................................................................................................................................................14
Modifying the Device Password .........................................................................................................................................15
Modifying the Device System Key ......................................................................................................................................16
Backup the Database ........................................................................................................................................................16
Restore the Database........................................................................................................................................................16
Searching the Switch.........................................................................................................................................................17
Configure the Wireless System..............................................................................................................................................18
Configure the Wireless Switch ...........................................................................................................................................18
System Configuration .................................................................................................................................................18
Anti-Rogue Configuration............................................................................................................................................19
Port Mapping Configuration.........................................................................................................................................19
Configure the Access Point individually...............................................................................................................................20
Basic Configuration ....................................................................................................................................................20
Wireless Configuration................................................................................................................................................21
Advanced Configuration..............................................................................................................................................23
Mac Filter Configuration..............................................................................................................................................24
D-Link Smart WLAN Manager User Manual
D-Link Corporation 3
Configure the Access Point by Group .................................................................................................................................25
Create a Group Template ...........................................................................................................................................25
Edit a Group Template................................................................................................................................................27
Management ..........................................................................................................................................................................29
Monitoring ........................................................................................................................................................................29
Monitoring AP and Wireless Switch by List...................................................................................................................29
Monitoring AP and Wireless Switch by Tree .................................................................................................................31
Monitoring AP and Wireless Switch by Topology ..........................................................................................................32
Monitoring Clients.......................................................................................................................................................34
Monitoring Summary...................................................................................................................................................34
TROBULESHOOTING.................................................................................................................. 錯誤! 尚未定義書籤。
Utilization .........................................................................................................................................................................36
Utilization>AP Users...................................................................................................................................................37
Utilization>AP Traffic ..................................................................................................................................................38
Utilization>Client Info..................................................................................................................................................39
Utilization>Load Balance ............................................................................................................................................40
Firmware Upgrade ............................................................................................................................................................41
Log ..................................................................................................................................................................................42
Cold Start:..................................................................................................................................................................43
Factory reset..............................................................................................................................................................44
D-Link Smart WLAN Manager User Manual
D-Link Corporation 4
Introduction
The Smart WLAN Manager is a convenient tool to manage the configuration of your network from a central computer. With Smart
WLAN Manager there is no need to configure D-Link DWL-3140AP Wireless Access Points individually.
System Requirement
Suggested Specifications for Smart WLAN Manager installation:
• A PC, Notebook with installed network adapter
• Supported OS: Windows 2000 or XP
Note: The performance of wired link is better than wireless link for each computer running AP Manager. Use the wired link to manage
the Access Point is recommended.
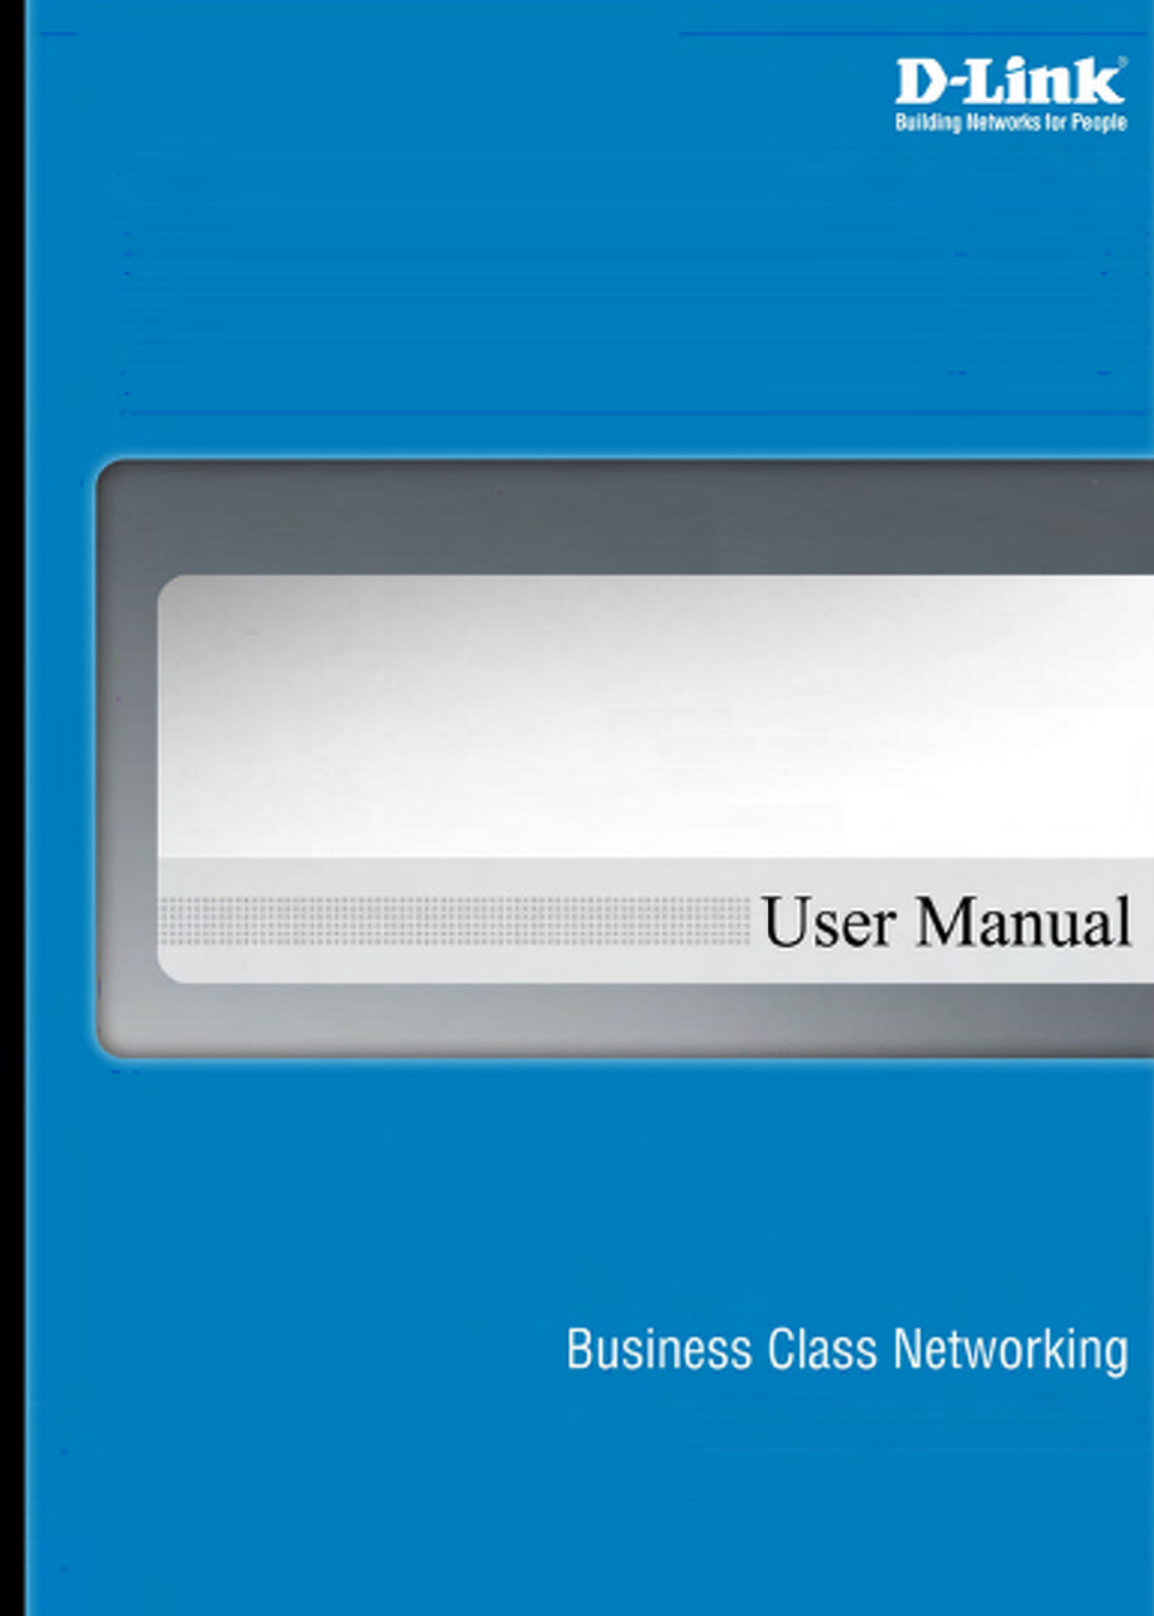
Getting Started
Please prepare your network environment as the
topology below. Switch (DES-1228P), Access Point
(DWL-3140AP), and the DHCP server need to be in the
same IP domain; the PC for Smart WLAN Manager
installation can connect the switch directly or via
Internet.
DES-1228P with Wireless
Awareness Function enabled
DWL-3140AP
Computer with
802.11b/g Adapter
DHCP Server
Smart WLAN Manager
DWL-3140AP

D-Link Smart WLAN Manager User Manual
D-Link Corporation 5
Installing the Smart WLAN Manager
Please do following steps to install the Smart WLAN Manager:
Step 1. Insert the CD and execute the “setup.exe” program. The
InstallShield Wizard will pop out as below:
Step 2. Choose the destination folder you want to install the program and
click “Next”.
D-Link Smart WLAN Manager User Manual
D-Link Corporation 6
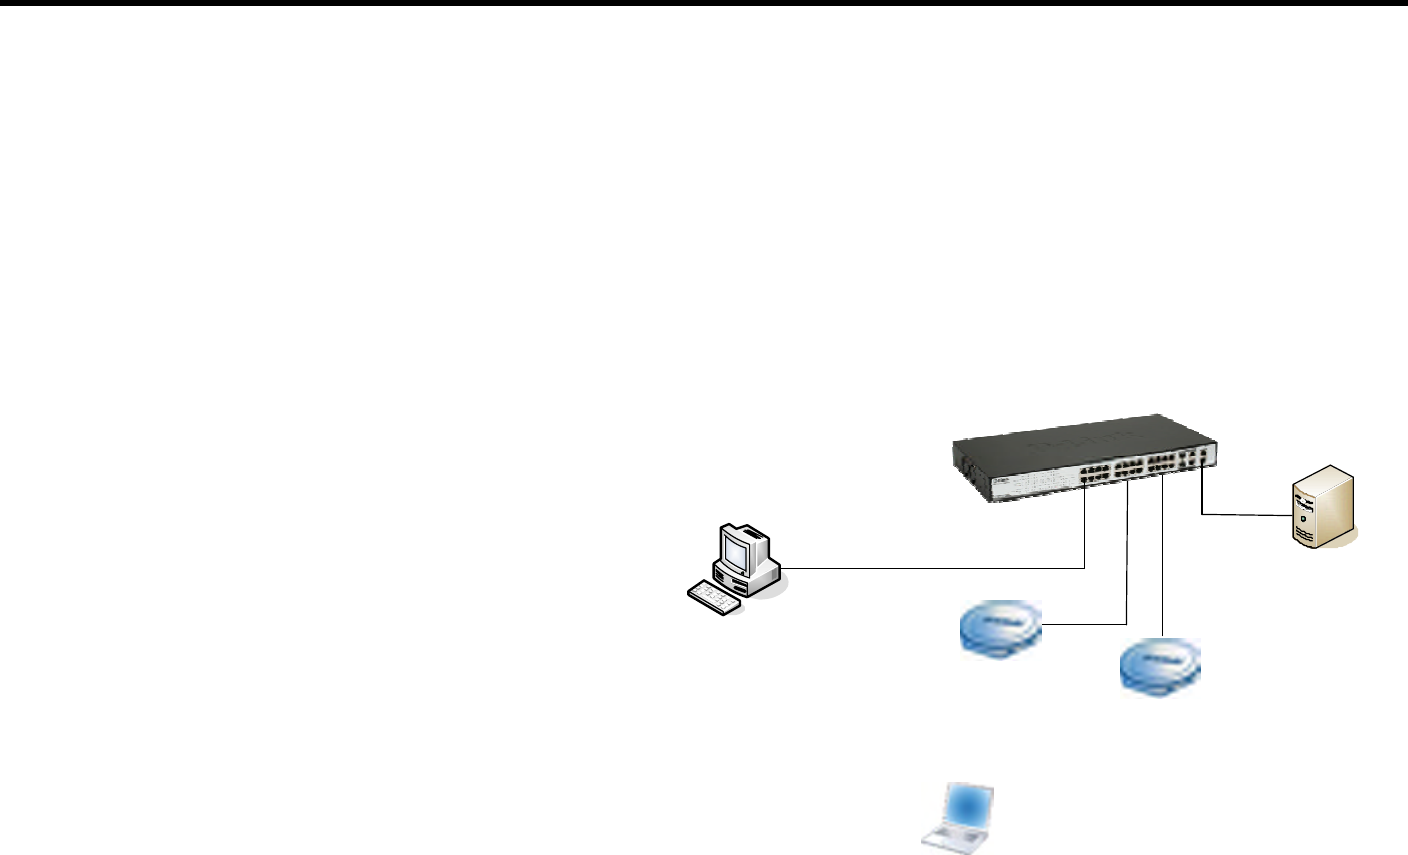
Step 3. The program will perform the installation automatically.
Step 4. Click “Finish” to complete the installation.
D-Link Smart WLAN Manager User Manual
D-Link Corporation 7
Discovering the Switch and AP
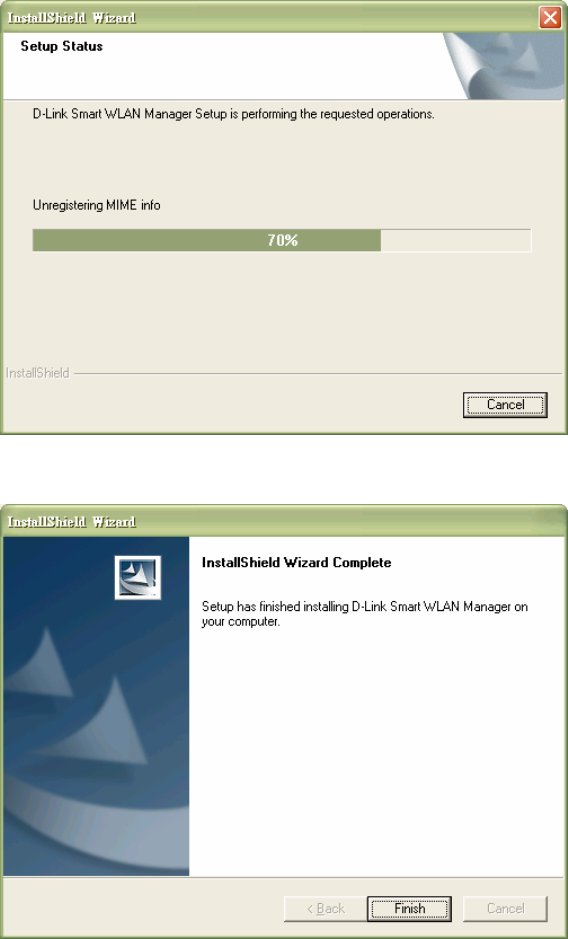
To launch the Smart WLAN Manager:
• Go to the Start Menu
• Select Programs
• Select D-Link Smart WLAN Manager
Click “OK” (There’s no default password).
Choose Tools>Switch Discover Utility or directly press the icon “ ”, the
Discovery List window will pop up:
D-Link Smart WLAN Manager User Manual
D-Link Corporation 8
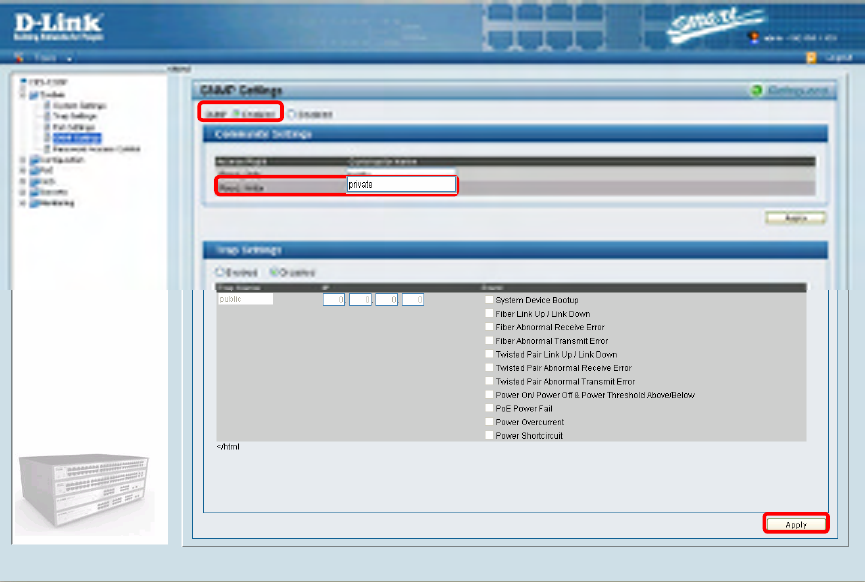
Launch the web browser on PC, and connect to switch by the IP address found (default password: admin). Make sure the firmware
version of DES-1228P is at least 1.20.03.
Make sure the SNMP read_write community is
“private” (default value) and enable the function.
D-Link Smart WLAN Manager User Manual
D-Link Corporation 9
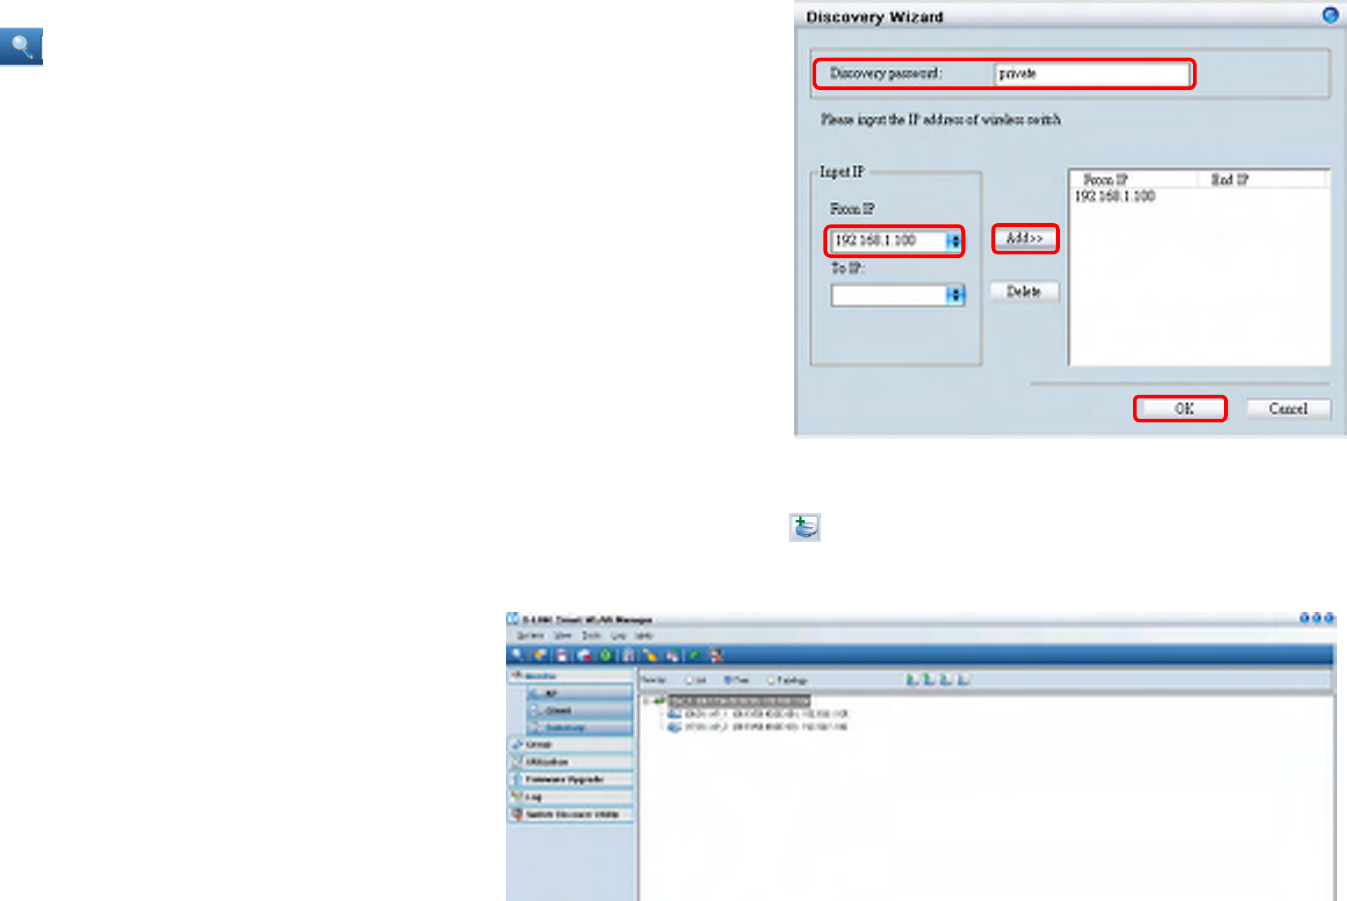
On the Smart WLAN Manager, choose ToolsàDiscovery Wizard or click the
icon “ ”; fill in the Discovery password with the SNMP read_write
Community Name “private”, and the IP of switch, then click “OK”
In Monitor>Tree, right click the newly found AP and choose “Save to Database ( )” to add the AP into database. The Status of AP
will change from “New” to “Online” after added into the database.
Note: For detailed connection configuration, please
also refer to the Configuration Guide.
D-Link Smart WLAN Manager User Manual
D-Link Corporation 10
Using the Smart WLAN Manager
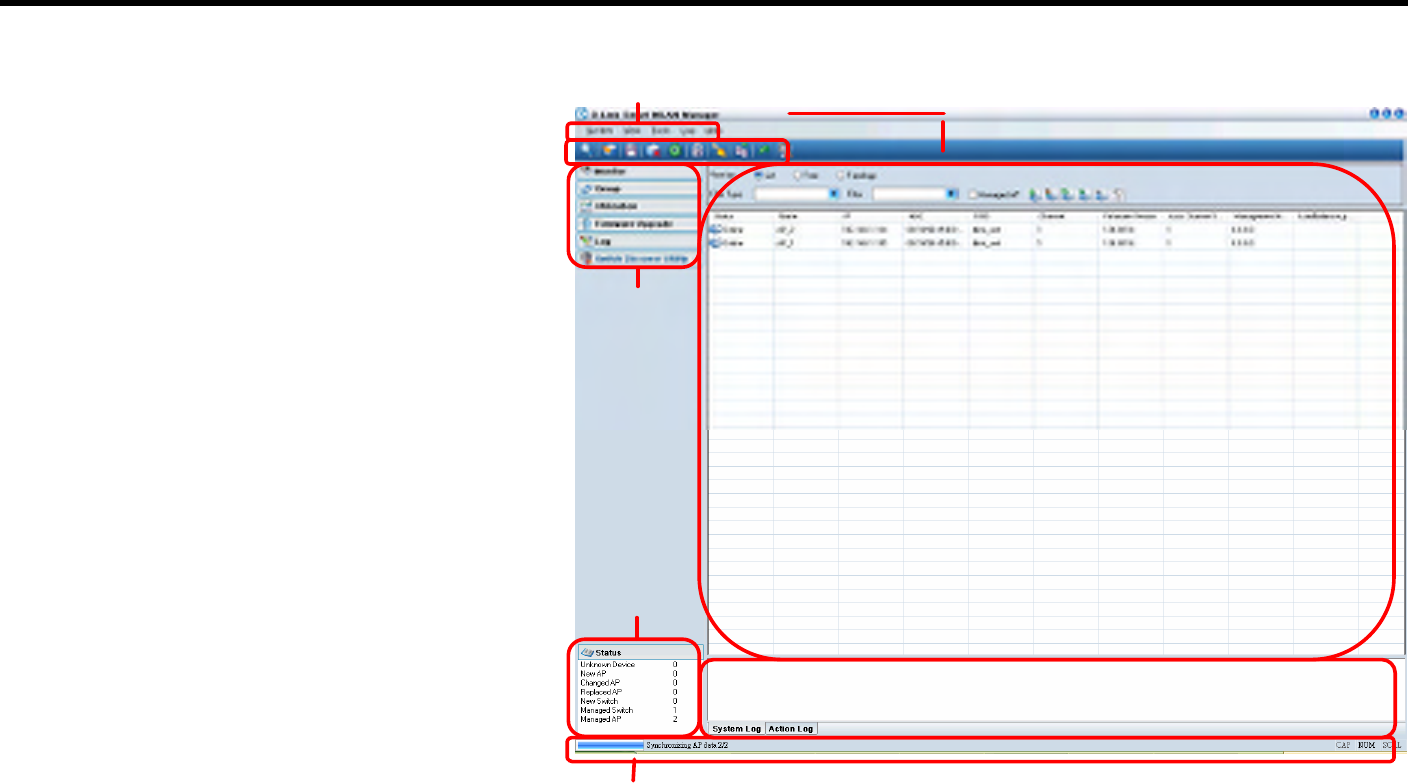
Understanding the Screen Layout
1. Menu Bar
2. Standard Bar
3. Function Tree
4. Database Columns
5. Status Columns
6. Output Bar
7. Status Bar
For maximum window view, user can disable the
standard bar, output bar, and status bar by selecting
the options of View in the menu bar.
○
1 Menu Bar ○
2 Standard Bar
○
3 Function Tree
○
6 Output Bar
○
5 Status Columns
‡ Status Bar
D-Link Smart WLAN Manager User Manual
D-Link Corporation 11
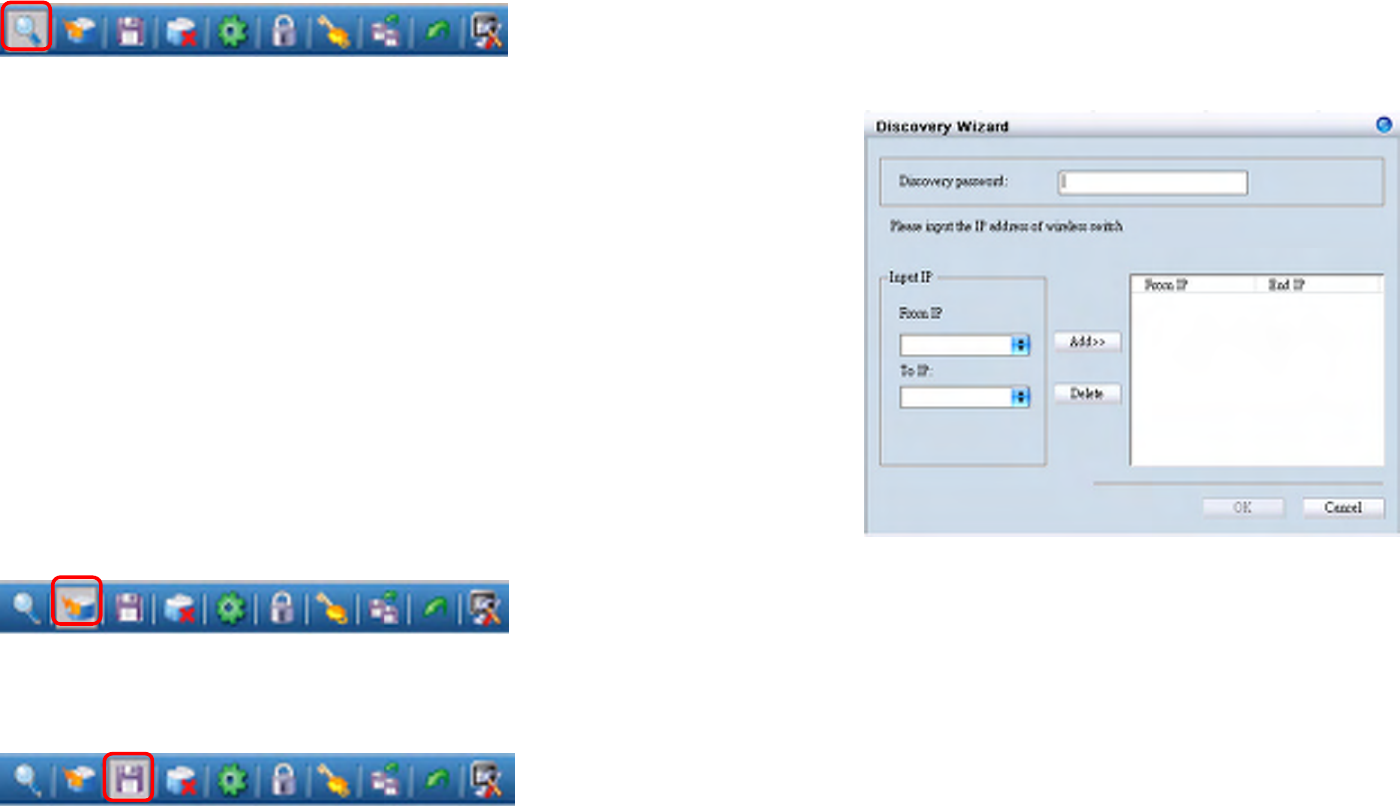
Discovering Devices
Click the Discovery Wizard icon or choose Tools>Discovery Wizard to discover the devices available on the network.
Discovery password - The discovery password needs to be consistent with the
SNMP read_write community name
Input IP - Enter the IP address of the switch. User can either input a specific IP
address (fill in “From IP”), or a range of IP addresses (fill in both “From IP” and
“To IP”)
Polling Information
By default the Smart WLAN Manager will scan the network every 15 seconds. Click the Start Polling icon to scan the network
immediately.
Save to Database
Click the Save to Database icon or choose System>Save all to database to save all the devices found out. You can all use the
hotkey (Ctrl +S) to achieve the same results.
D-Link Smart WLAN Manager User Manual
D-Link Corporation 12
Clear Database
Click the Clear Database icon or choose SystemàClear all from database to clear all the records saved.
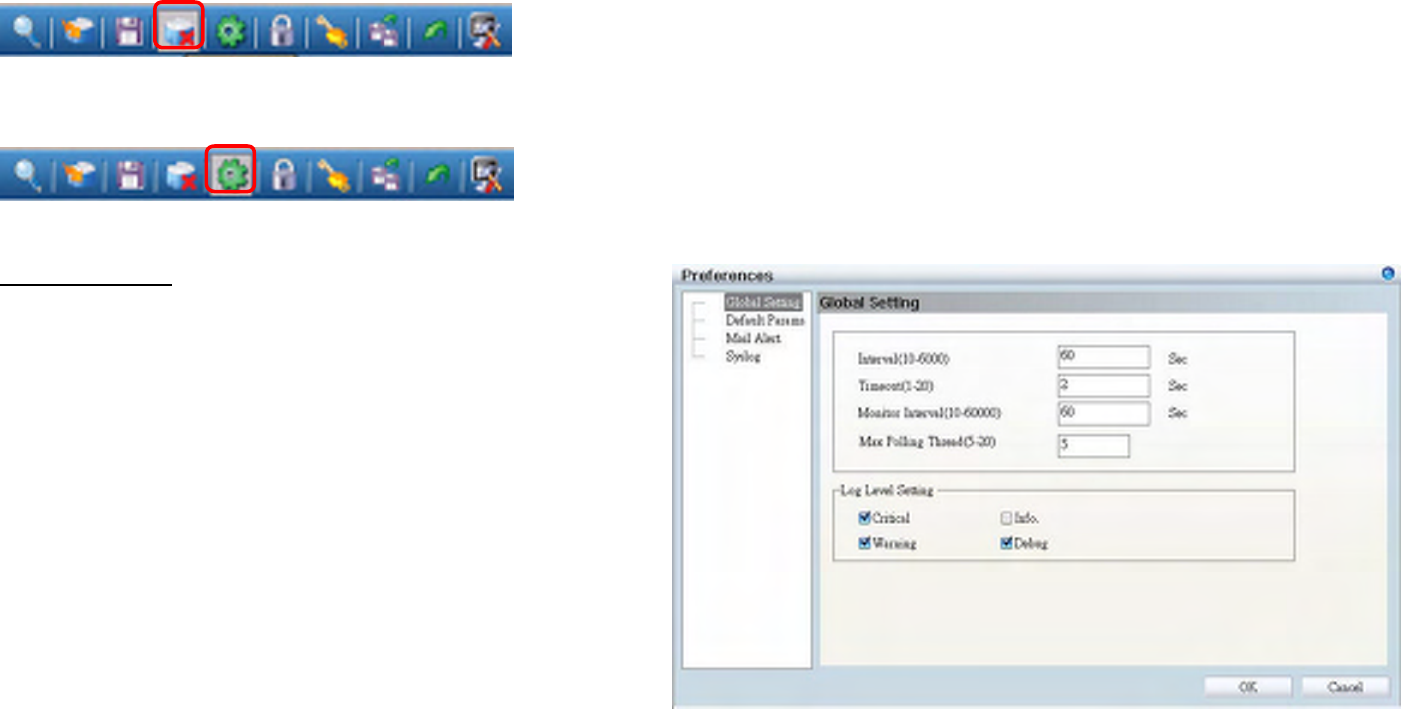
Modify the Preference
Click the Preference icon or choose Tools>Preference to modify the preference.
Global Setting
The Global Setting allows you to change the monitoring
parameters and the log levels.
Interval - The time needs to wait for the next polling. The
range is from 10 to 6000 seconds, and default value is 60.
TimeOut - The waiting time for the device to respond, fail to
response in time will be determined to be in offline status.
The range is from 1 to 20 seconds, and default value is 2.
Monitor interval - The period to scan for devices. The
range is from 10 to 60000 seconds, and default value is 60.
Max. Polling thread – The maximum devices polled at one
time. The default value is 5.
In Log Level Setting users can define what levels of events he wants to log. The default levels are Critical, Warning, and Debug.
D-Link Smart WLAN Manager User Manual
D-Link Corporation 13
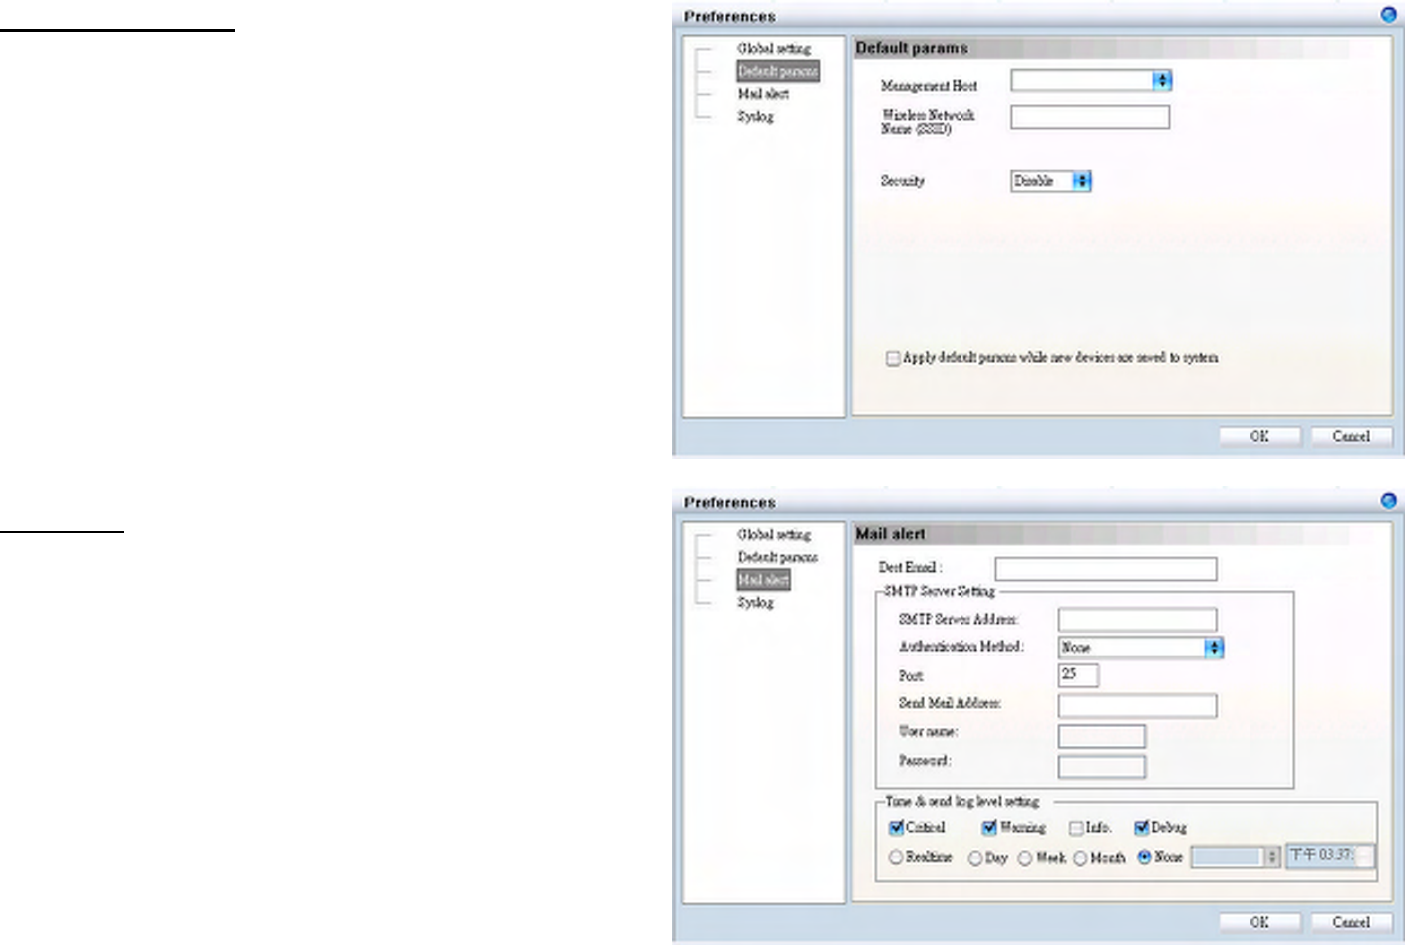
Default Parameters
In Default Params users can configure the SSID and security
to specific managed AP, or to create a default profile for all
new devices by checking the option.
Mail Alert
In Mail alert user can configure when an event happens, the
log message will be sent from certain SMTP (mail) server to
specific email address. You can also specify if you want to
send the email in real time, or to accumulate the messages
and send them out by daily, weekly, or monthly.
The default message types to be sent are critical, warning,
and debug.
D-Link Smart WLAN Manager User Manual
D-Link Corporation 14
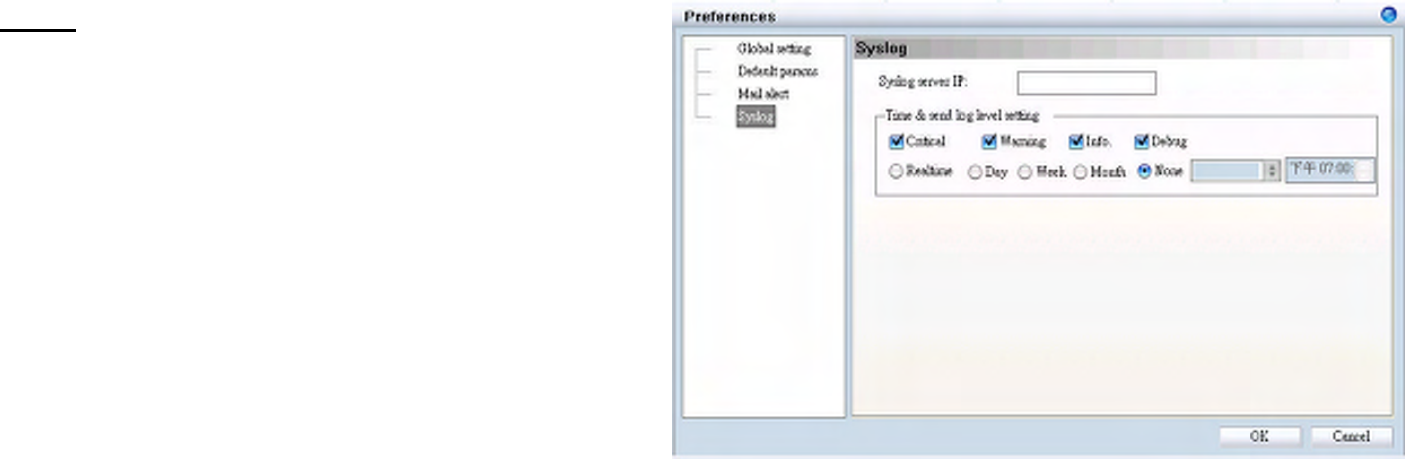
Syslog
In Syslog user is allowed to set the IP address of syslog
server, the level of events to be sent to the syslog server, and
when to send out the message
The default setting for logs to be recorded are all types
(critical, warning, info, and debug).
D-Link Smart WLAN Manager User Manual
D-Link Corporation 15
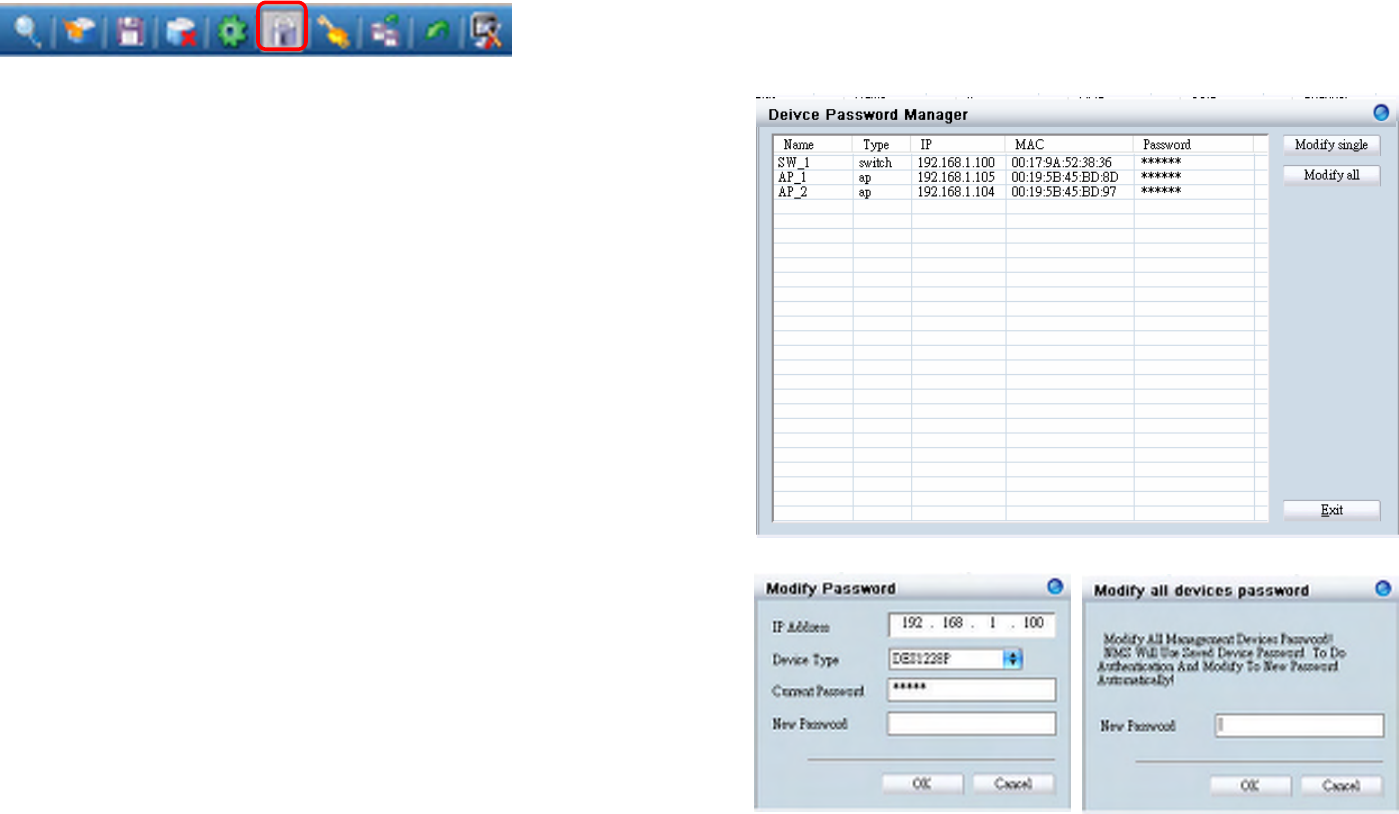
Modifying the Device Password
Click the Device Password Manager icon or to choose ToolsàPassword Manager to modify the device password.
User can either change the password individually by selecting the
device and click “Modify single”.
Or to change all devices at once by clicking “Modify all”.
D-Link Smart WLAN Manager User Manual
D-Link Corporation 16
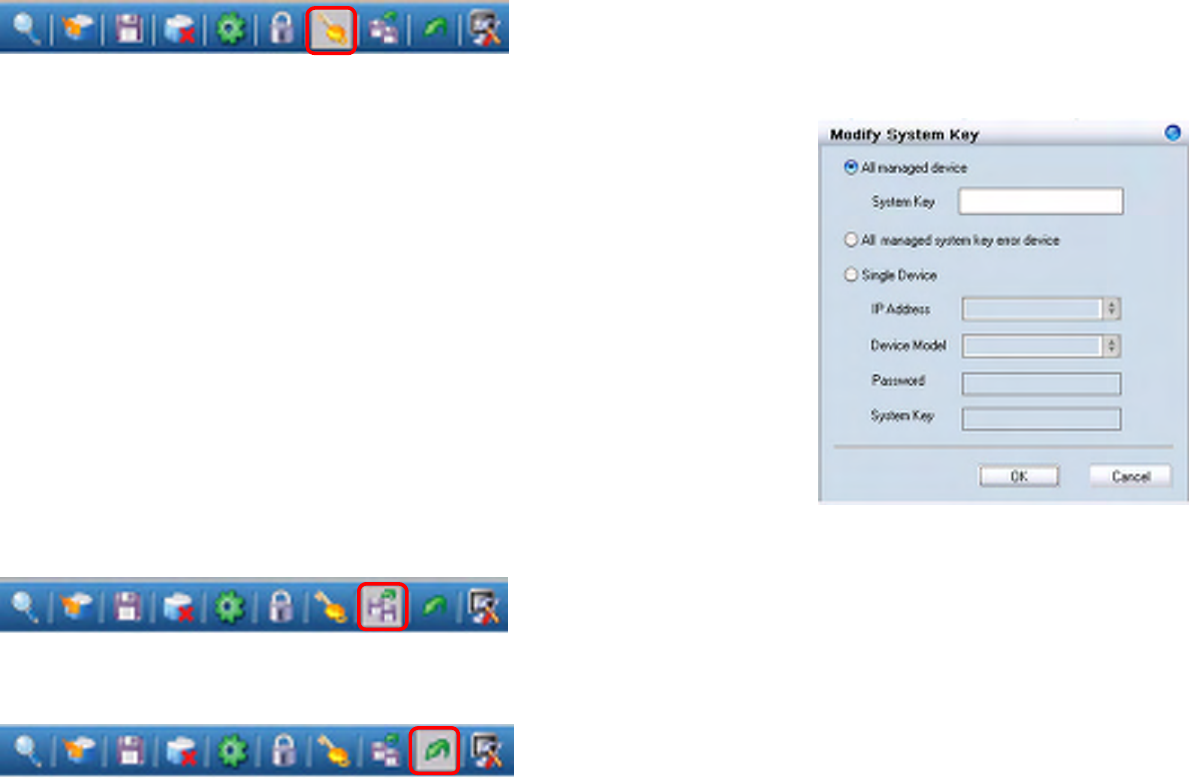
Modifying the Device System Key
Click the Modify All Device System Key icon or to choose ToolsàSystem Key Manager to modify the device system key.
User can assign the system key is to examine the validity of the access
point. Once the key is configured, it needs to be identical on both access
point and wireless switch for normal operation.
Backup the Database
Click the Backup Database icon or choose SystemàBackup database to save the current database to the PC.
Restore the Database
Click the Restore Database icon or choose SystemàRestore database to open the saved database from the PC.
D-Link Smart WLAN Manager User Manual
D-Link Corporation 17
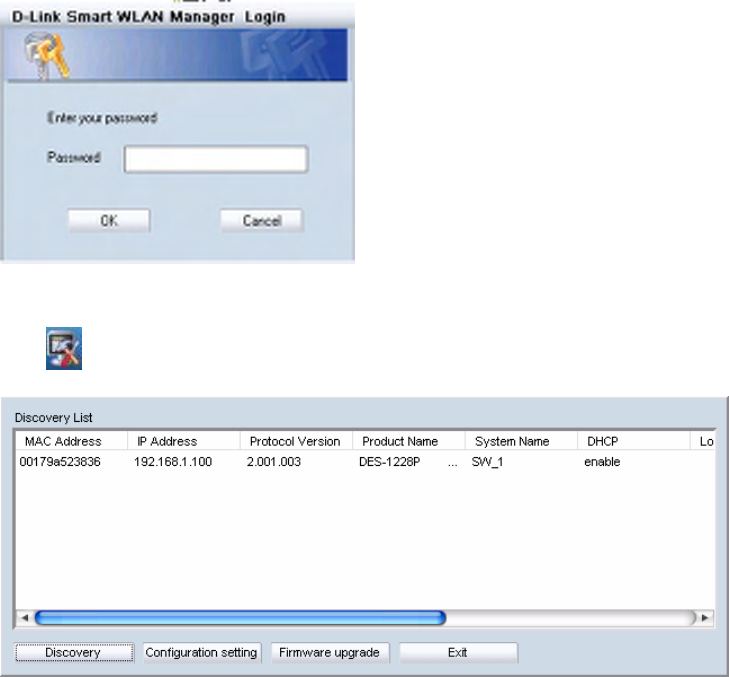
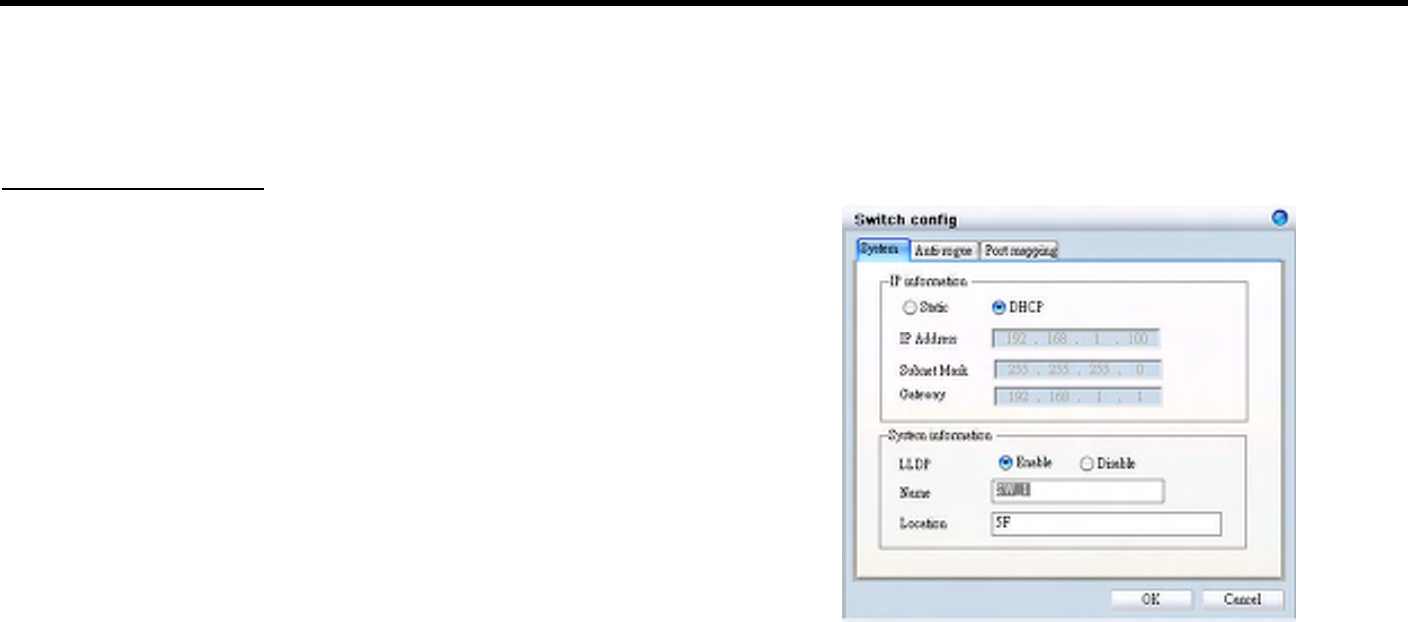
Searching the Switch
Click the Switch Discovery Utility icon or choose ToolsàSwitch Discovery Wizard to search the available switch.
The Discovery List window shows following information of the switch available:
MAC Address - The MAC address of switch
IP Address - The IP address of switch
Product Name - The model name
System Name - The name identifies the switch in the
network.
DHCP - The status of DHCP client of switch
Location - The location of the switch
Trap IP - The IP address of sWerver which receives the
SNMP Trap message
Subnet Mask - The subnet mask of switch IP address.
Gateway - The IP address of the gateway for switch
Selecting the switch and click “Configuration setting”, you can
modify some of attributes. Click “Set” when done.
D-Link Smart WLAN Manager User Manual
D-Link Corporation 18
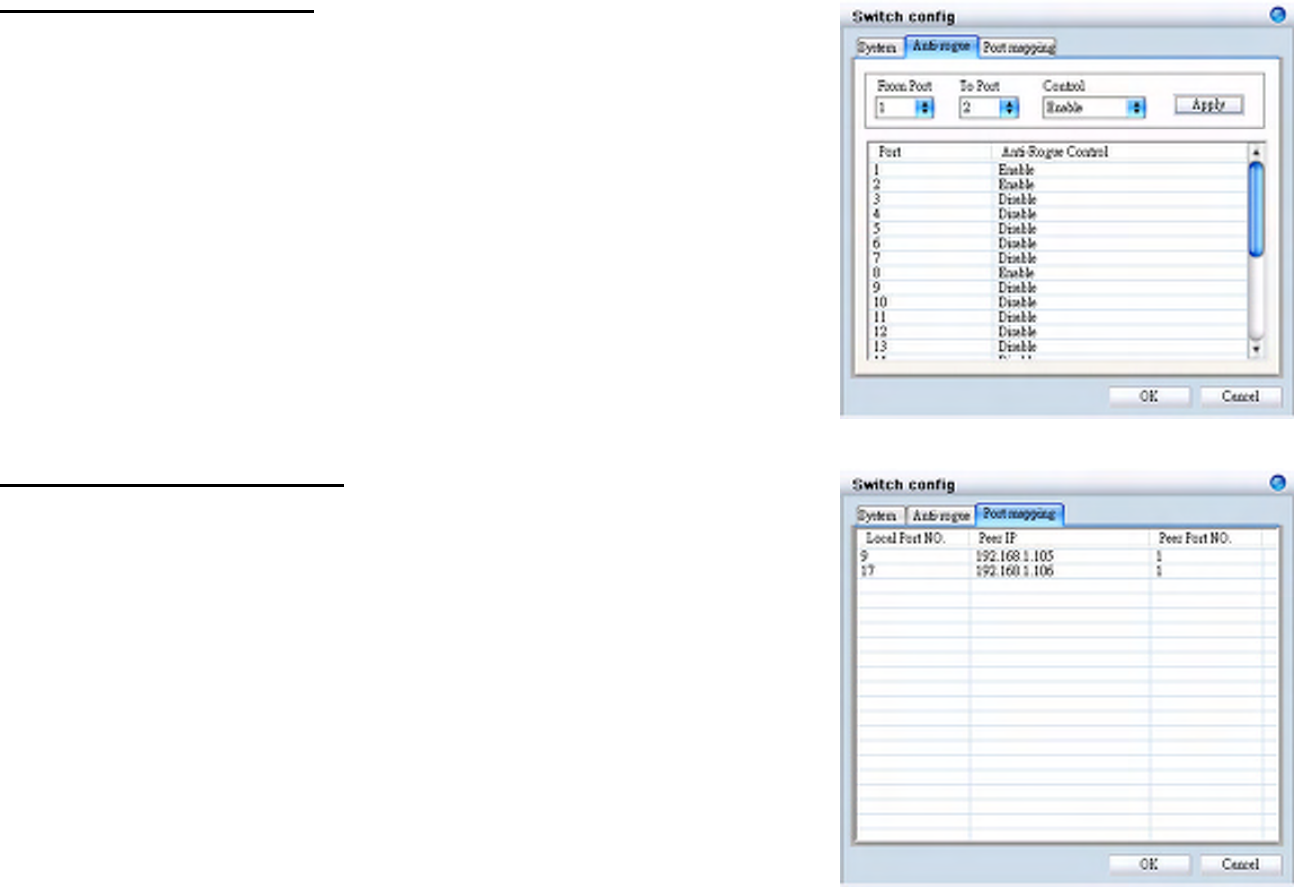
Configure the Wireless System
Configure the Wireless Switch
In Monitor>AP, choose the view by Tree or topology, and double click the wireless switch you want to change the setting, and the
configuration windows will pop up.
System Configuration
IP Address - Can choose static of dynamic (DHCP) IP address for the
wireless switch. When static IP was selected, please manual input IP Address,
Subnet Mask and Gateway IP.
LLDP - Select Enable or Disable the LLDP function. It is needed to enable
LLDP for finding the access points.
Name - Enter the system name for the wireless switch.
Location - Enter the location of the wireless switch.
D-Link Smart WLAN Manager User Manual
D-Link Corporation 19
Anti-Rogue Configuration
Configure the ports you want to enable the anti-rogue function. Once it is
enabled on a port, switch will check AP with the system key to determine if the
it will be authenticated or denied.
Port Mapping Configuration
It shows the ports which access points connect to, and their IP addresses.
D-Link Smart WLAN Manager User Manual
D-Link Corporation 20
Configure the Access Point individually
In MonitoràAP, double click the AP you want to change the setting, and the configuration windows will pop up.
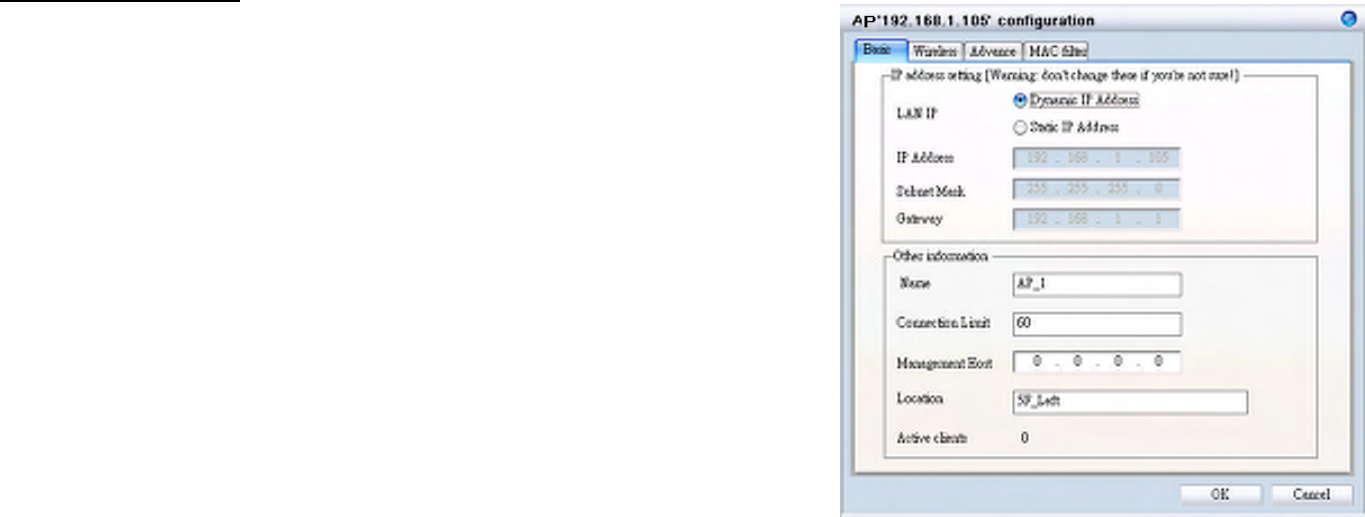
Basic Configuration
IP Address - Can choose static of dynamic (DHCP) IP address for the
wireless switch. When static IP was selected, please manual input IP Address,
Subnet Mask and Gateway IP.
Name - User can input the system name for the access point
Connection Limit - Maximum number of clients can be connected. Default
value is 60.
Management Host - Configure the IP address of the Smart WLAN Manager.
Default is none.
Location - User can input the location of the AP