User Manual

Accessories 4
Features 5
High quality 5
High performance 6
Part names and functions 7
Front panel 7
Display 9
Rear panel 10
Remote control unit 11
Connections
Installing this unit 15
Installing horizontally 15
Installing vertically 16
Before using the remote control unit 18
Operating range of the remote control unit 19
Connecting speakers 20
Speaker connection 21
Connecting a PC or Mac 22
Connecting to a device with digital audio output connectors 23
Connecting to a device with analog audio output connectors 24
Connecting the power cord 25
Contents Connections Playback Settings Tips Appendix
2
Front panel Display Rear panel Remote Index
Playback
Basic operation 27
Turning the power on 27
Switching the power to standby 27
Selecting the input source 28
Adjusting the volume 29
Turning off the sound temporarily (Muting) 29
Switching the display’s brightness 29
Playing a device 30
Connecting and playing back from a computer (USB-DAC) 30
Listening to music via a digital connection (COAXIAL/OPTICAL-1/
OPTICAL-2) 39
Listening to music via a analog connection (AUX) 40
Listening to music on a Bluetooth device 41
Settings
Menu map 49
Source Direct 51
Bass 51
Treble 51
Balance 51
H/P AMP Gain 51
Bluetooth 52
Auto Standby 52
Tips
Tips 54
Troubleshooting 55
Resetting to factory settings 62
Appendix
Specifications of supported audio formats 63
D/A Converter 63
Playing back Bluetooth devices 63
Bluetooth communications 63
Explanation of terms 64
Trademark information 65
Specifications 66
Index 69
Contents Connections Playback Settings Tips Appendix
3
Front panel Display Rear panel Remote Index
Thank you for purchasing this Denon product. To ensure proper operation, please read this owner’s manual carefully before using the product.
After reading this manual, be sure to keep it for future reference.
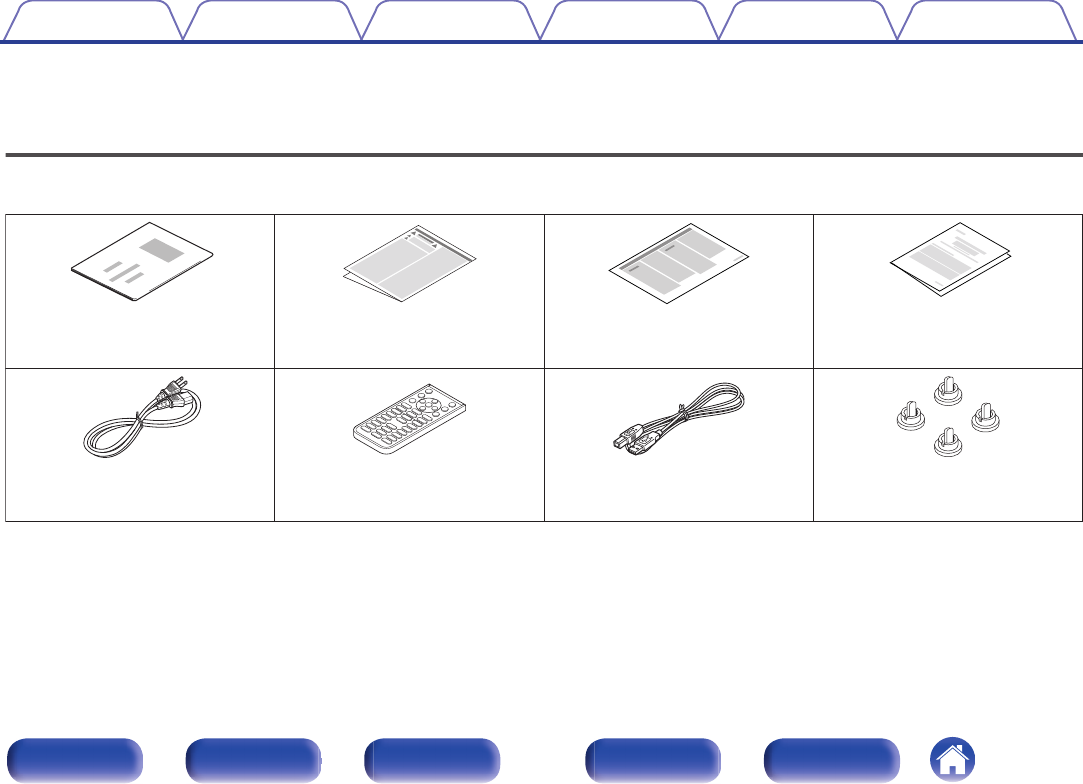
Accessories
Check that the following parts are supplied with the product.
.
Caps (silver) (x4)
USB cable
Remote control unit
(RC-1220) (built-in battery)
Power cord
Quick Start Guide Safety Instructions Notes on radio Warranty
(for North America model only)
Contents Connections Playback Settings Tips Appendix
4
Front panel Display Rear panel Remote Index
Features
High quality
0Equipped with a high-quality class D amplifier
The amplifier section incorporates Qualcomm® DDFATM technology
from Qualcomm. The output stage circuit has a discrete construction
which realizes higher S/N and lower distortion compared to
conventional class D amplifiers. Additionally, the high 50 W+50 W (4 Ω/
ohms) output which exceeds the size of the housing lets you enjoy
Denon’s ideal audio playback environment that delivers “delicate yet
powerful sound”.
.
Qualcomm DDFA is a product of Qualcomm Technologies International, Ltd. Qualcomm is
a trademark of Qualcomm Incorporated, registered in the United States and other countries,
used with permission. DDFA is a trademark of Qualcomm Technologies International, Ltd.,
registered in the United States and other countries, used with permission.
0High Bitrate and High Sampling with Advanced AL32 Processing
Plus
A high bitrate and high sampling has been achieved with Denon's
unique data interpolation algorithm. 16 bit audio signals are converted
to a high bitrate of 32 bit and 44.1 kHz sampling signals are up-sampled
by 16x to achieve smoother recreation of sound waves. Data
interpolation is also used, predicting interpolation points from a large
number of surrounding points to provide audio as close as possible to
the original sound. This elaborate restoration of data lost during digital
recording achieves fine, distortion-free rendering, accurate sound
localizing, rich bass and recreation that is faithful to the original sound.
Contents Connections Playback Settings Tips Appendix
5
Front panel Display Rear panel Remote Index
High performance
0Equipped with a USB-DAC function to support playback of high-
resolution sound sources
This unit supports the playback of high resolution audio formats such as
DSD (2.8/5.6/11.2 MHz) and PCM signals up to 384 kHz/32 bits.
It provides high quality playback of high resolution files into this unit from
a computer via USB-B connection.
0Compatible with a wide range of digital input equipment
This device is installed with two optical digital input interfaces and one
coaxial digital input interface to enable connection to a variety of TVs
and other digital input devices.
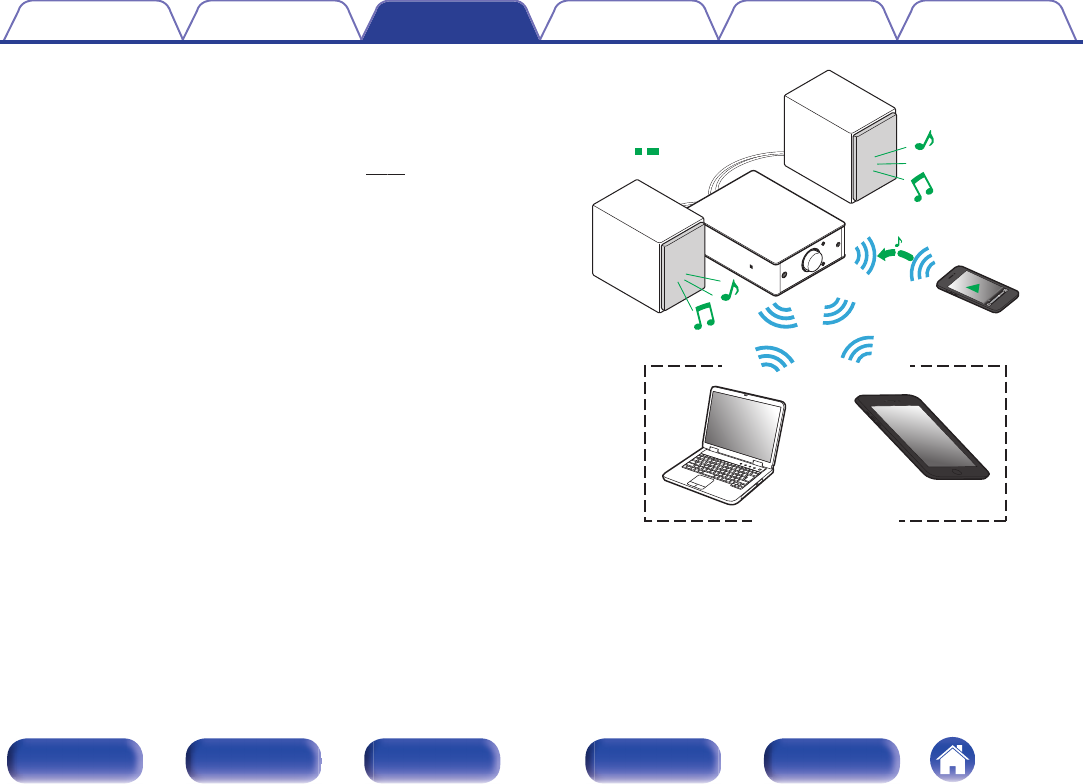
0Wireless connection with Bluetooth enabled devices (v p. 41)
You can connect Bluetooth enabled devices such as smartphones and
tablets with this unit to listen to music while browsing email and Web
sites in the Internet away from this unit. In addition, this unit supports
high quality audio codecs, aptX Low Latency and AAC, to enjoy music
and games with a powerful sound.
0NFC function included that enables one touch
connection (v p. 46)
You can just touch this unit with an NFC enabled smartphone or tablet
to turn on power to this unit and establish the Bluetooth connection.
0Supports vertical installation
This unit can be installed vertically or horizontally. The display
automatically rotates to match the installation orientation.
0System remote control
This unit comes with a system remote control that can also operate the
Denon's CD Player DCD-50.
Contents Connections Playback Settings Tips Appendix
6
Front panel Display Rear panel Remote Index
Part names and functions
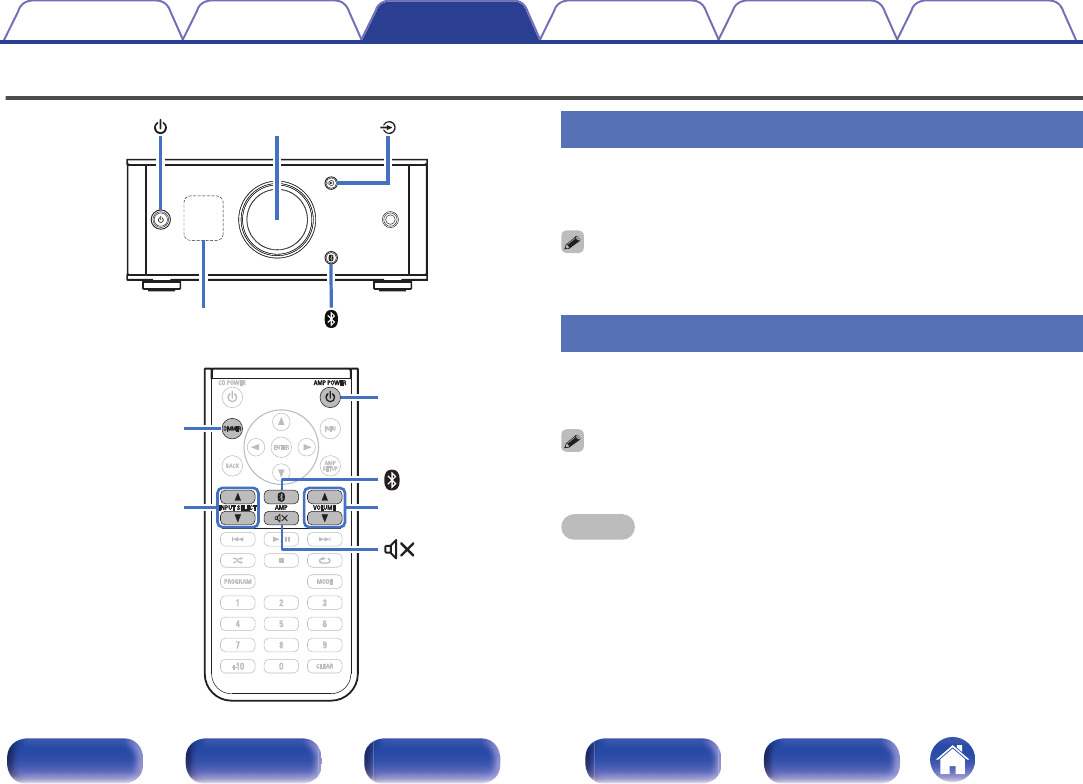
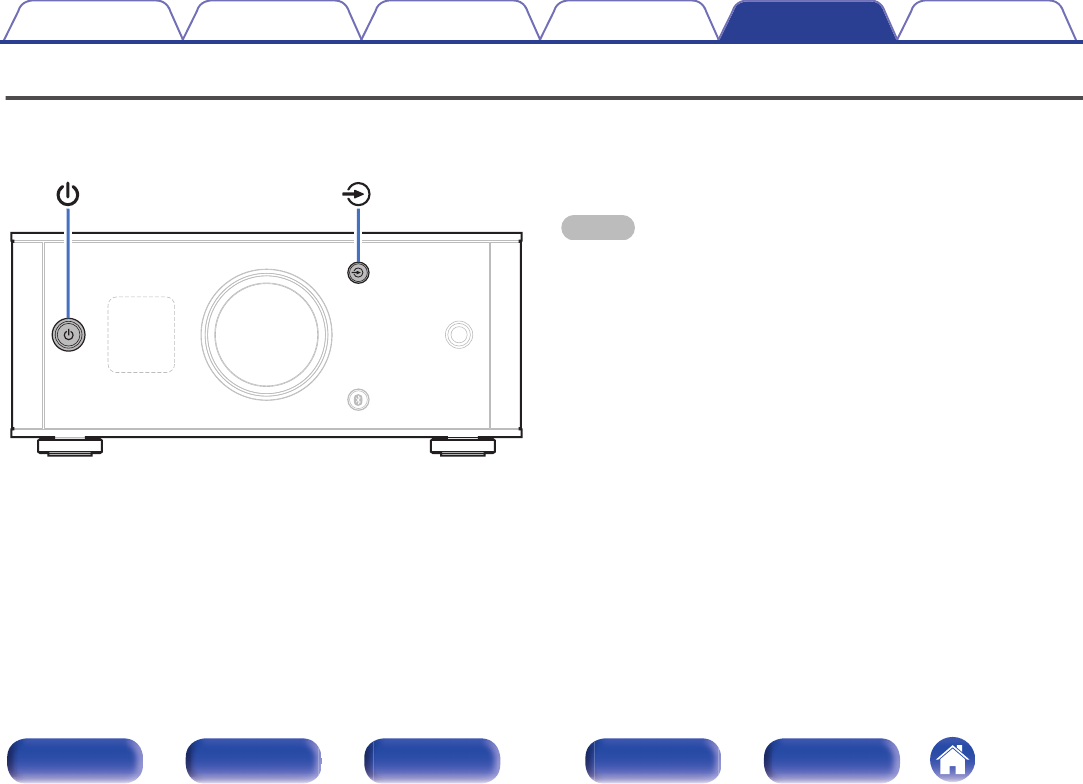
Front panel
.
w e t y
q r
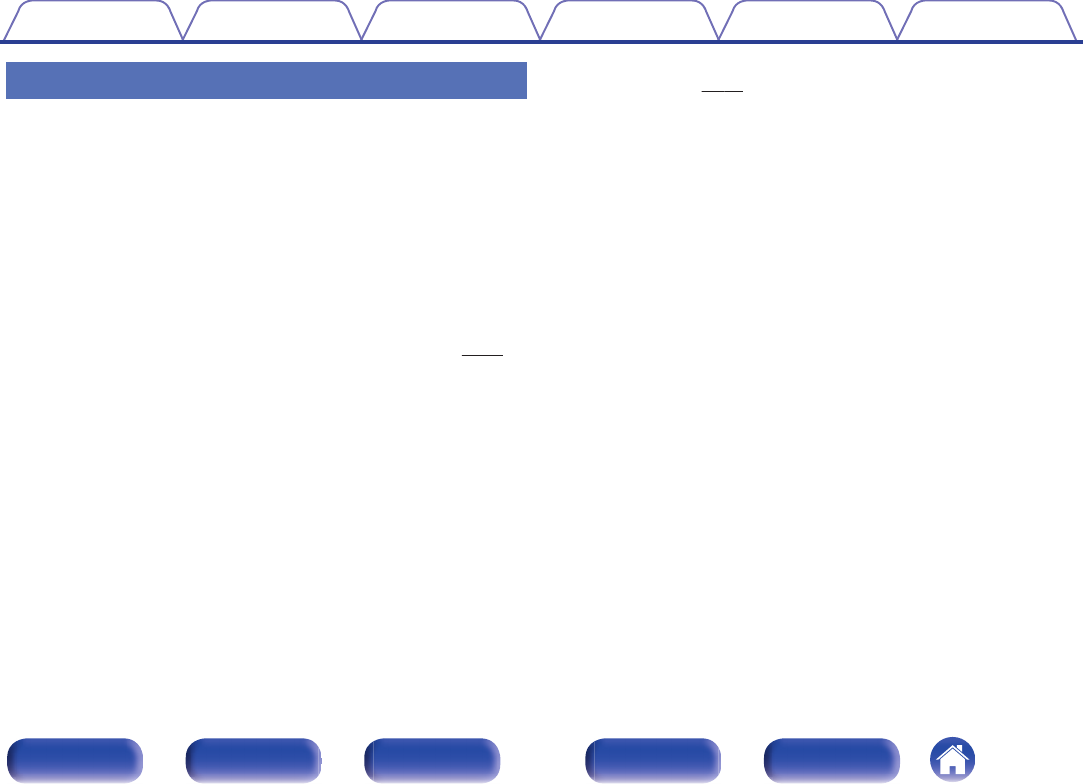
APower operation button (X)
This turns the power on/to standby. (v p. 27)
The power status is indicated as follows.
0Power on: Display lit
0Standby: Display off
BProtection circuit indicator
This blinks when the protection circuit has operated.
0“Power does not turn on/Power is turned off” (v p. 56)
0“Protection circuit” (v p. 64)
CDisplay
This displays various pieces of information. (v p. 9)
DRemote control sensor
This receives signals from the remote control unit. (v p. 19)
EVolume control knob
This adjusts the volume level. (v p. 29)
FInput source switching button (q)
This switches input sources. (v p. 28)
Contents Connections Playback Settings Tips Appendix
7
Front panel Display Rear panel Remote Index
.
i
u
.
Q0
o
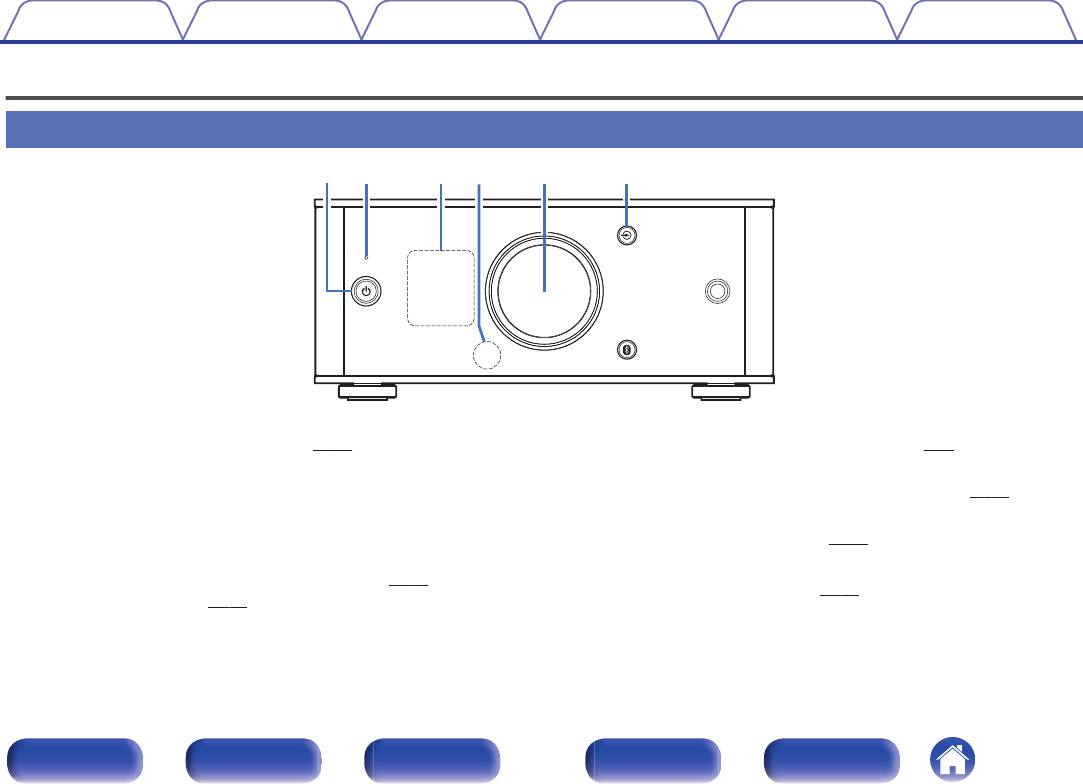
GHeadphones jack
Used to connect headphones.
When the headphones are plugged into this jack, audio will no longer
be output from the speaker terminals.
NOTE
0To prevent hearing loss, do not raise the volume level excessively when using
headphones.
HBluetooth button (V)
This switches the input to Bluetooth. This is also pressed during the
pairing operation. (v p. 42)
IN-Mark (Q)
Touch this mark with a Bluetooth device that includes the NFC function
when pairing (registering) with it. (v p. 46)
JInstallation holes for vertical installation feet
These are used when the unit is installed vertically. (v p. 16)
Contents Connections Playback Settings Tips Appendix
8
Front panel Display Rear panel Remote Index
Display
.
q w
㻝㻝㻚㻌㻞
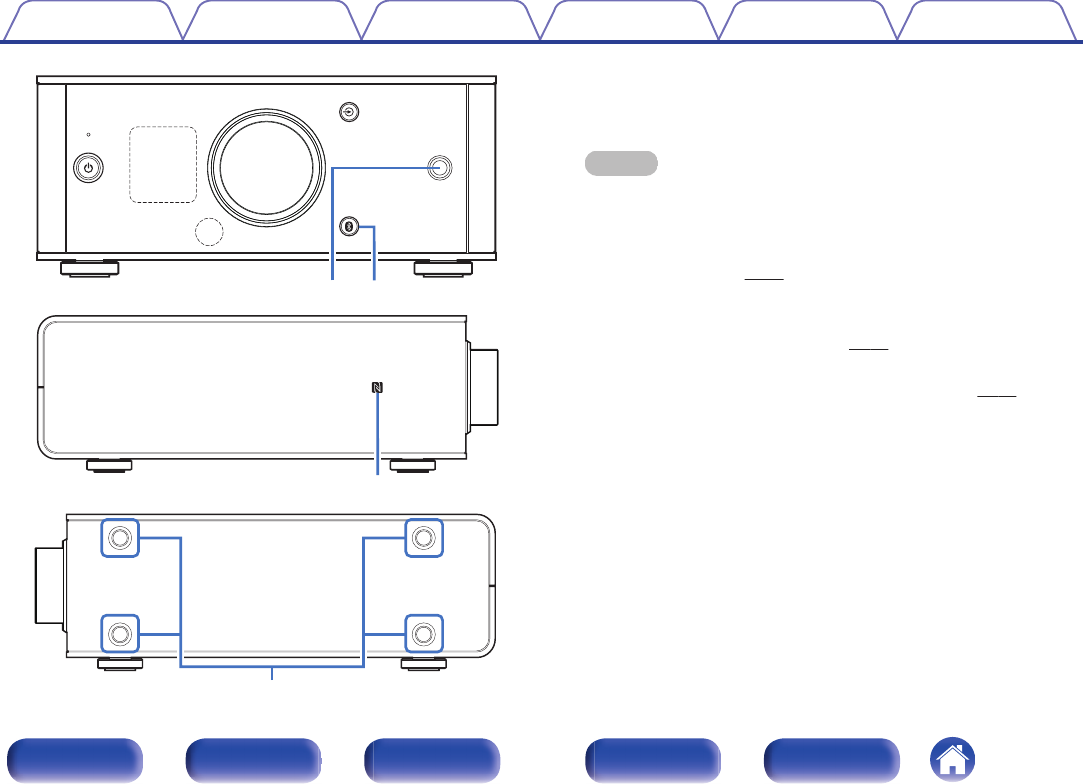
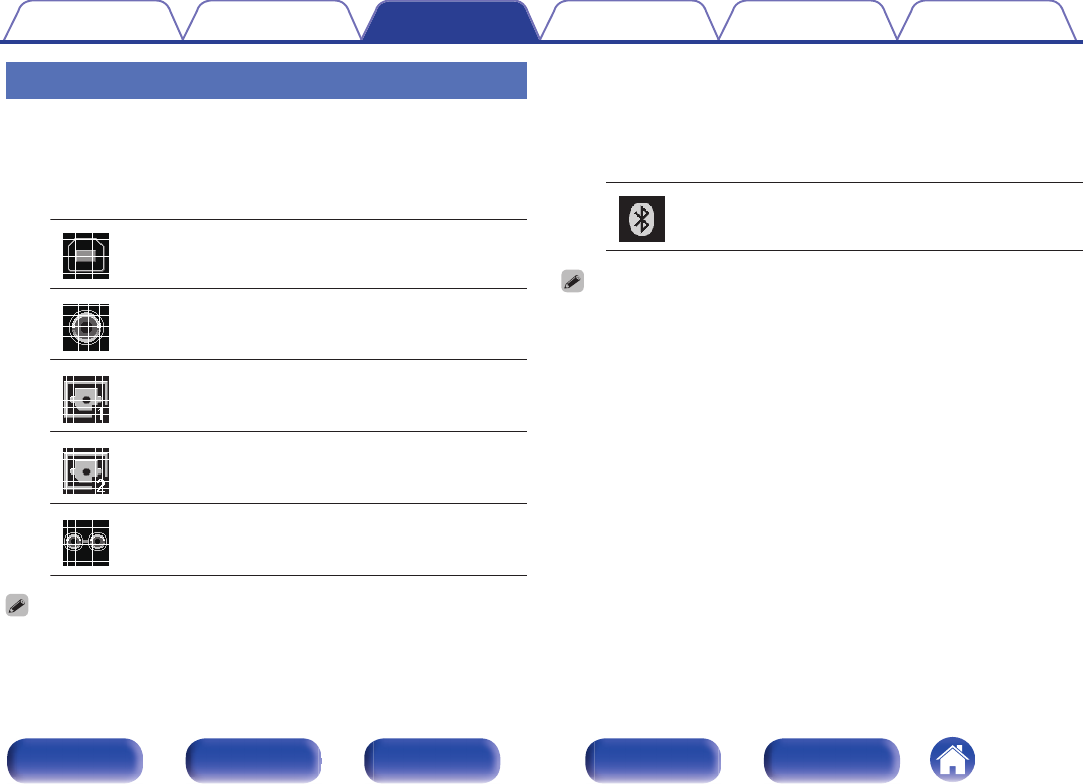
AInput source indicator
The following is displayed depending on the selected input source.
USB-DAC
COAXIAL
OPTICAL-1 OPTICAL-2
AUX
Bluetooth
. .
.
.
.
.
BInformation display
Displays items such as information on the audio signal being input or
the name of a Bluetooth device.
Contents Connections Playback Settings Tips Appendix
9
Front panel Display Rear panel Remote Index
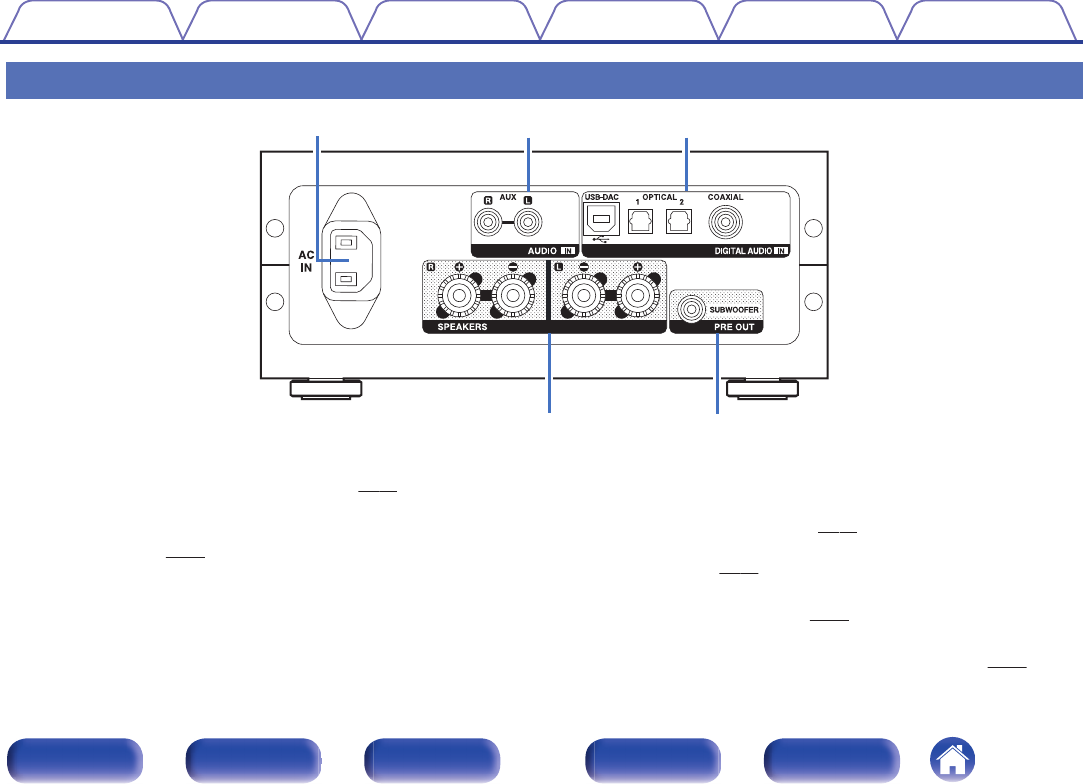
Rear panel
.
q
r t
we
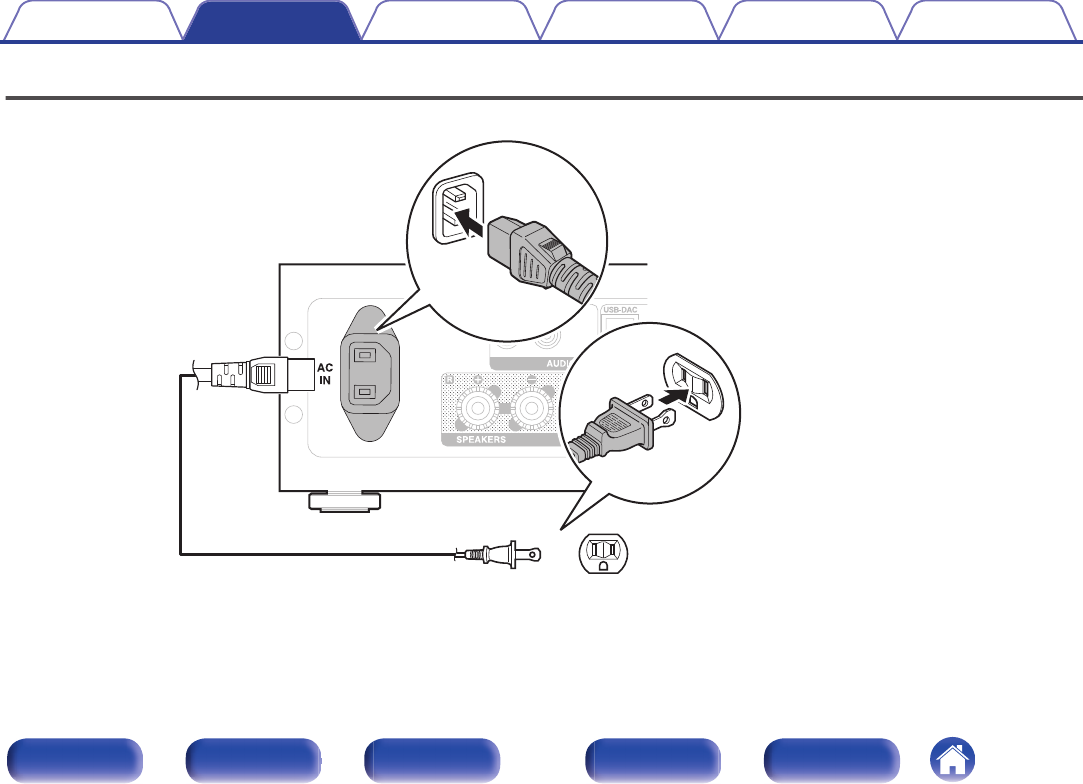
AAC inlet (AC IN)
Used to connect the supplied power cord. (v p. 25)
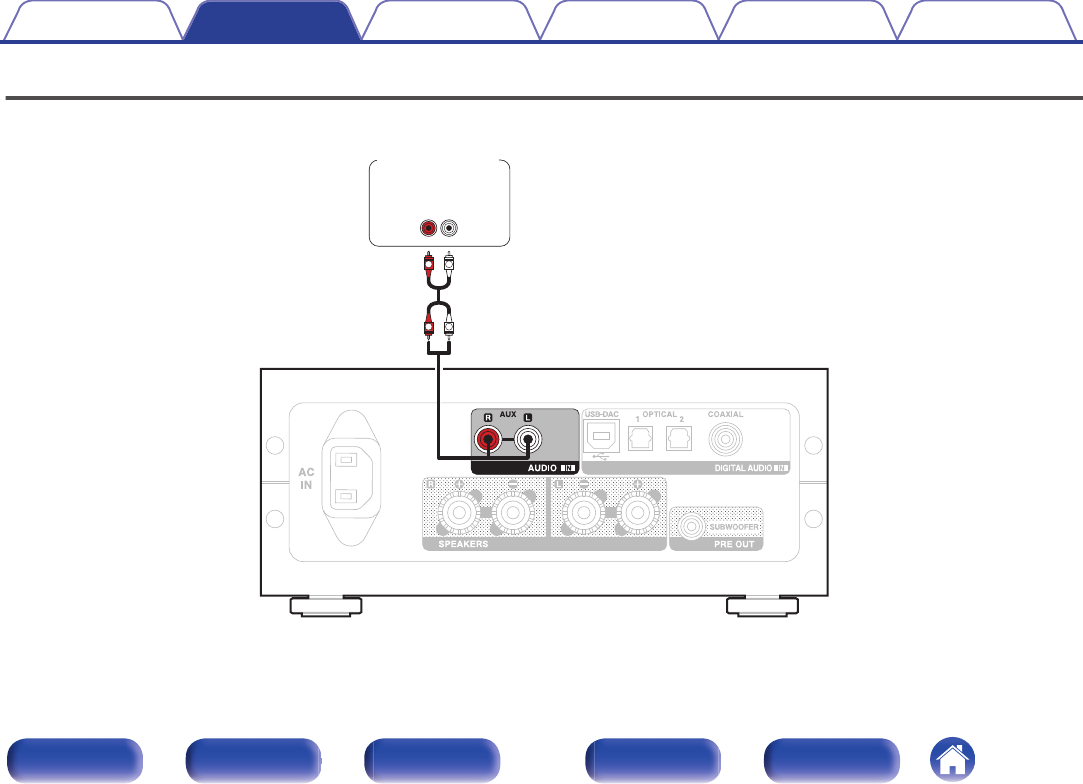
BAUX input connectors (AUDIO IN)
Used to connect devices equipped with analog audio connectors such
as CD players. (v p. 24)
CDIGITAL AUDIO IN connectors
Used to connect devices equipped with PC and digital audio output
connectors.
0“Connecting a PC or Mac” (v p. 22)
0“Connecting to a device with digital audio output
connectors” (v p. 23)
DSpeaker terminals (SPEAKERS)
Used to connect speakers. (v p. 21)
ESubwoofer terminal (PRE OUT)
Used to connect a subwoofer with a built-in amplifier. (v p. 21)
Contents Connections Playback Settings Tips Appendix
10
Front panel Display Rear panel Remote Index
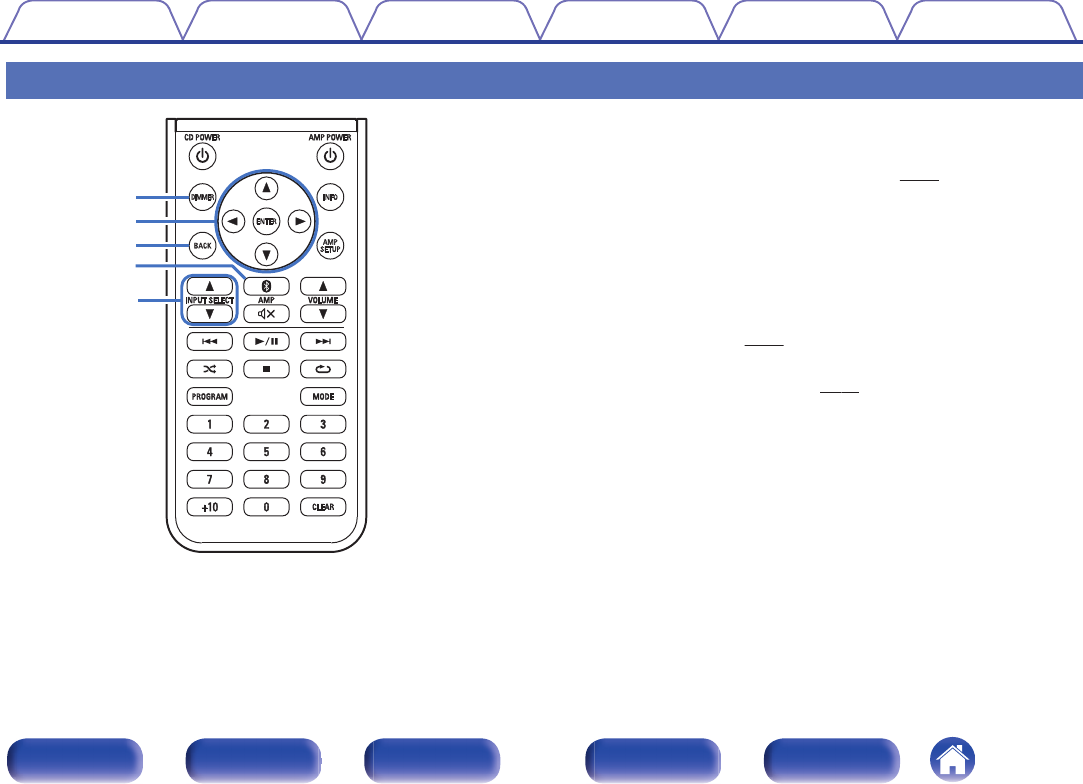
Remote control unit
.
q
e
r
t
w
oOperating this unit
ADIMMER button
Adjust the display brightness of this unit. (v p. 29)
BCursor buttons (uio p)
These select menu items.
CBACK button
Returns to the previous item.
DBluetooth button (V)
This switches the input to Bluetooth. This is also pressed during the
pairing operation. (v p. 42)
EINPUT SELECT buttons (df)
This switches input sources. (v p. 28)
Contents Connections Playback Settings Tips Appendix
11
Front panel Display Rear panel Remote Index
.
u
y
o
Q0
i
Q1
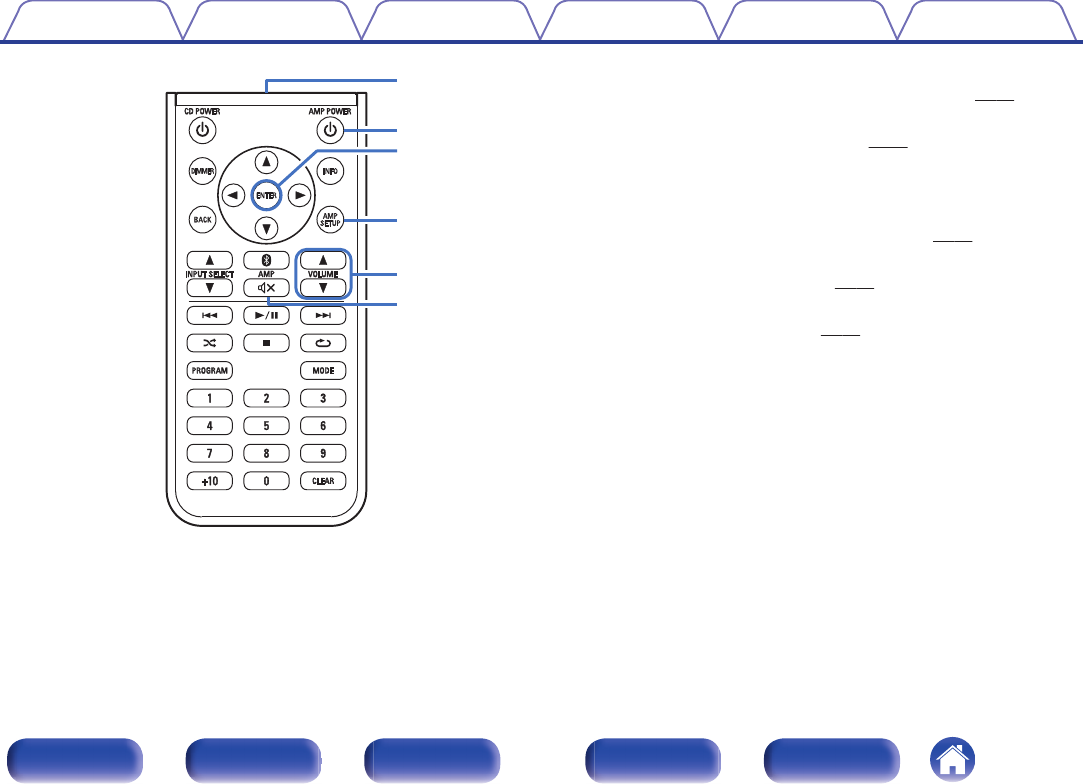
FSignal transmitter
This transmits signals from the remote control unit. (v p. 19)
GPower operation button (AMP POWER X)
This turns the power on/to standby. (v p. 27)
HENTER button
This determines the selection.
IAMP SETUP button
The setting menu is displayed on the display. (v p. 50)
JVOLUME buttons (df)
These adjust the volume level. (v p. 29)
KMute button (:)
This mutes the output audio. (v p. 29)
Contents Connections Playback Settings Tips Appendix
12
Front panel Display Rear panel Remote Index
.
q
w
e
r
t
y
i
o
Q0
Q1
Q2
u
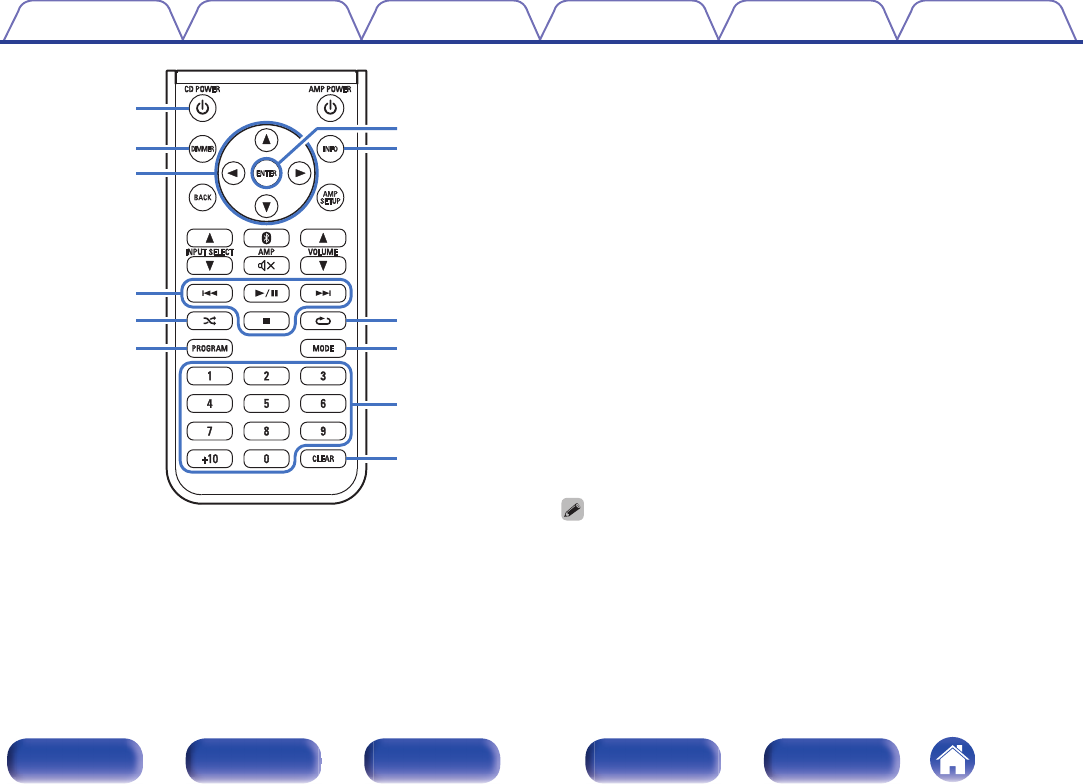
oCD player operations
A Denon CD player can be operated.
APower operation button (CD POWER X)
BDIMMER button
CCursor buttons (uio p)
DSystem buttons
0Skip buttons (8 / 9)
0Play/pause button (1 / 3)
0Stop button (2)
ERandom button (P)
FPROGRAM button
GENTER button
HInformation button (INFO)
IRepeat button (L)
JMODE button
KNumber buttons (0 – 9, +10)
LCLEAR button
0The remote control may not operate some products.
Contents Connections Playback Settings Tips Appendix
13
Front panel Display Rear panel Remote Index

oContents
Installing this unit 15
Installing horizontally 15
Installing vertically 16
Before using the remote control unit 18
Connecting speakers 20
Connecting a PC or Mac 22
Connecting to a device with digital audio output connectors 23
Connecting to a device with analog audio output connectors 24
Connecting the power cord 25
NOTE
0Do not plug in the power cord until all connections have been completed.
0Do not bundle power cords together with connection cables. Doing so can result in
humming or noise.
oCables used for connections
Provide necessary cables according to the devices you want to
connect.
Speaker cable
.
Audio cable
.
R
L
R
L
Optical cable
.
Coaxial digital cable
.
USB cable
(supplied) .
Contents Connections Playback Settings Tips Appendix
14
Front panel Display Rear panel Remote Index
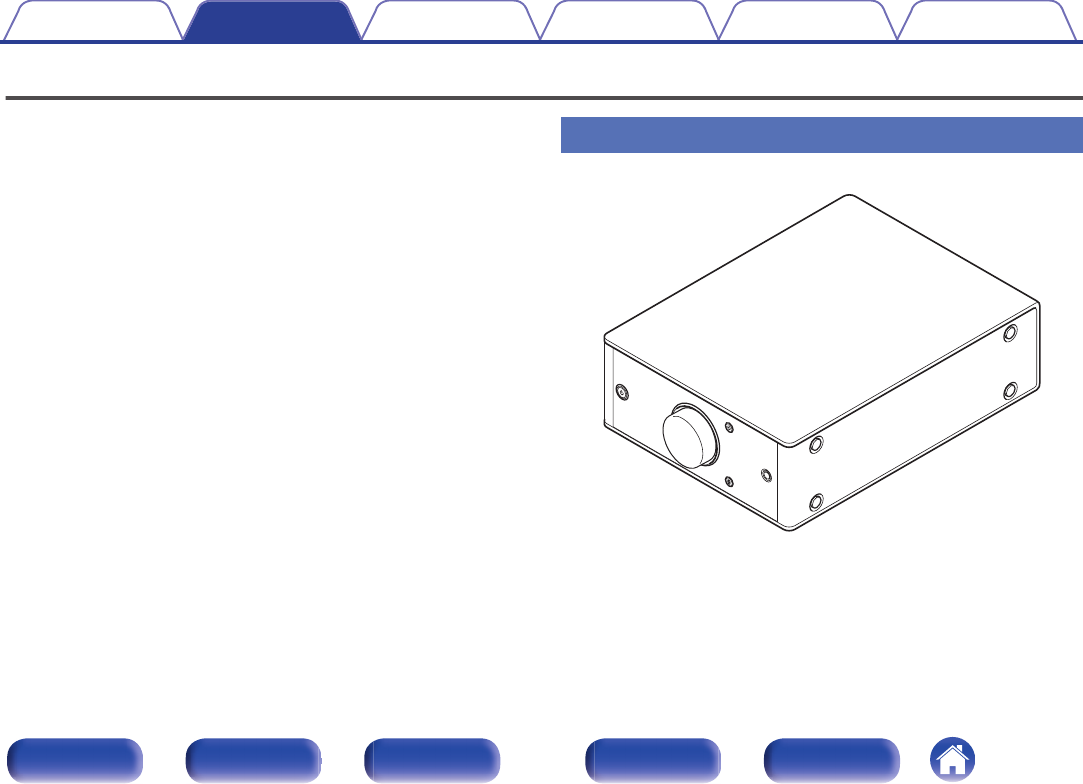
Installing this unit
This unit can be installed in two ways - horizontally or vertically. You can
select how to install this unit according to the installation place and your
preference. Installing horizontally
The feet are initially attached to the unit for horizontal installation.
.
Contents Connections Playback Settings Tips Appendix
15
Front panel Display Rear panel Remote Index
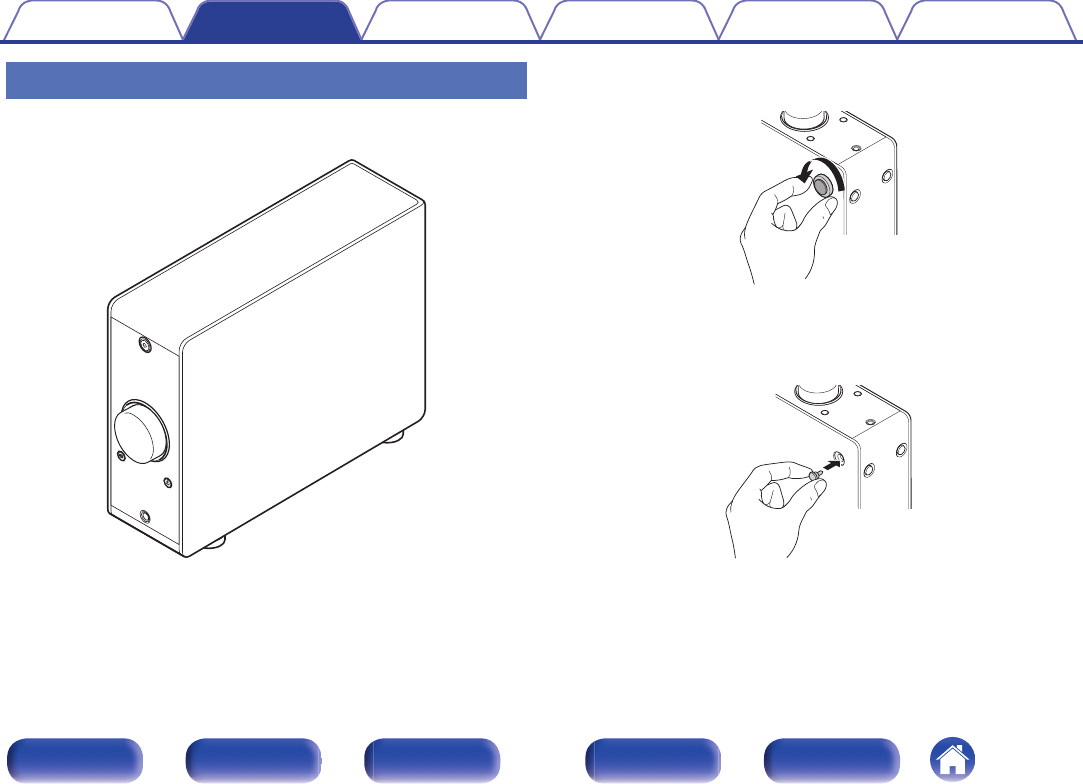
Installing vertically
This orientation is suitable for placing a narrow place such as a place next
to a laptop computer.
.
1Remove the feet.
.
0Rotate each of the 4 feet counter-clockwise to remove.
2Insert the supplied caps (silver) into the holes from
which the feet were removed.
.
Contents Connections Playback Settings Tips Appendix
16
Front panel Display Rear panel Remote Index
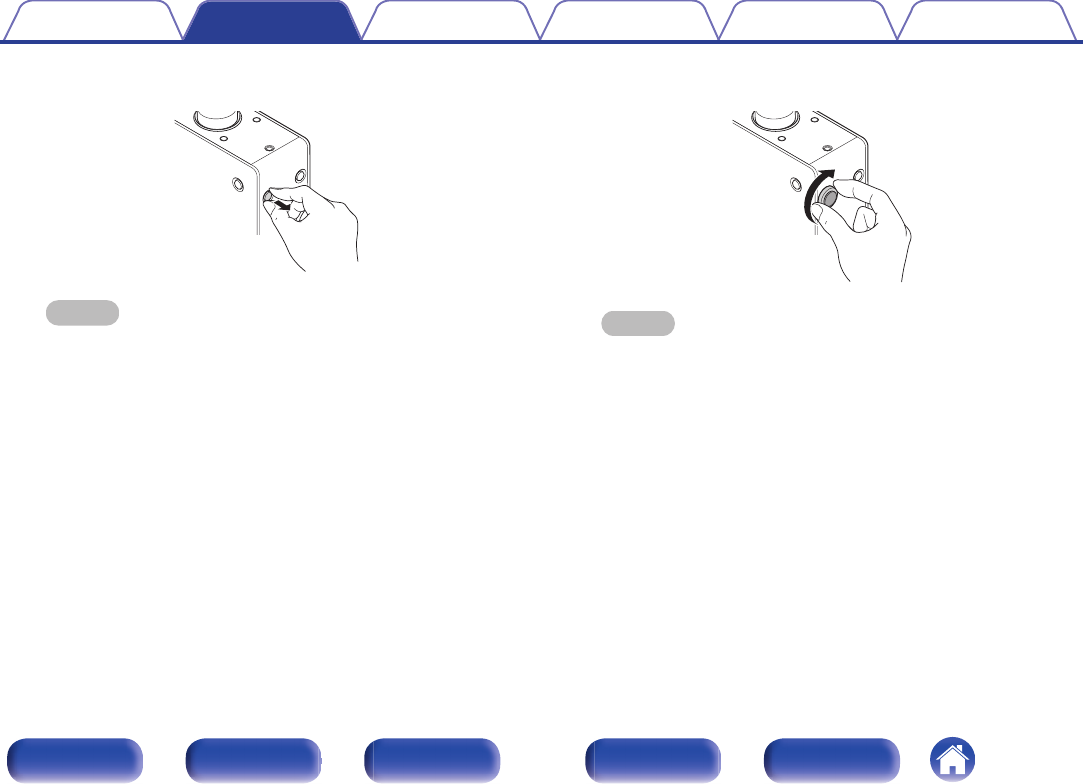
3Remove the cap (black).
.
NOTE
0Be careful not to damage your nails when removing the caps.
If necessary, use a thin-tipped tool to remove the caps. However, be careful
not to damage the unit when using tools.
4Rotate the removed feet clockwise to attach them.
.
NOTE
0After attaching the feet, adjust the height of the feet as necessary so that the
set is stable when installed.
Contents Connections Playback Settings Tips Appendix
17
Front panel Display Rear panel Remote Index
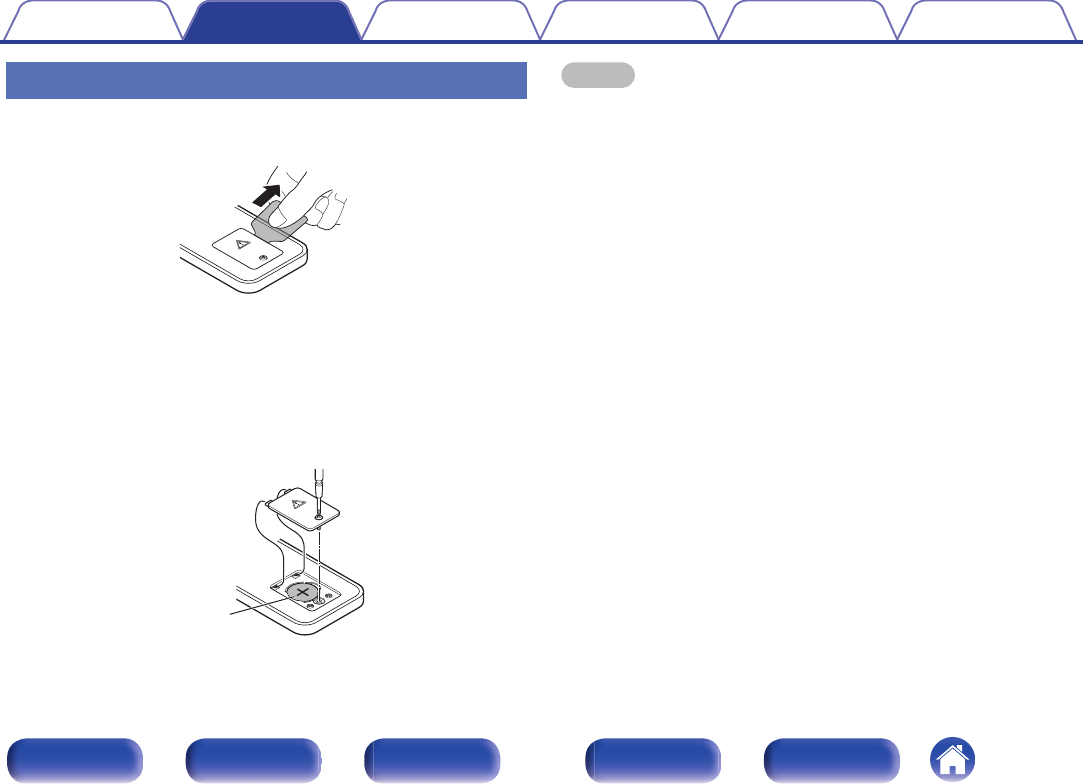
Before using the remote control unit
The remote control unit has a built-in lithium battery.
Pull out the insulation sheet before use.
.
oReplacing the battery
1. Loosen the screws of the back cover with a fine crosshead screwdriver
(purchased separately) and remove the back cover.
2. Remove the old battery, then insert a new coin-shaped lithium battery
(CR2025) so that the + symbol engraved on the battery faces upwards.
3. Put the back cover back on and tighten the screws.
.
CR2025
NOTE
0If the battery should have a leakage, immediately replace and dispose of the
battery. In this case, there is a risk of burn when the liquid comes in contact with
skins or clothes, so a great care should be taken. If the liquid accidentally comes in
contact, wash with tap water and consult a doctor.
0Remove the battery from the remote control unit if it will not be in use for long
periods.
Contents Connections Playback Settings Tips Appendix
18
Front panel Display Rear panel Remote Index
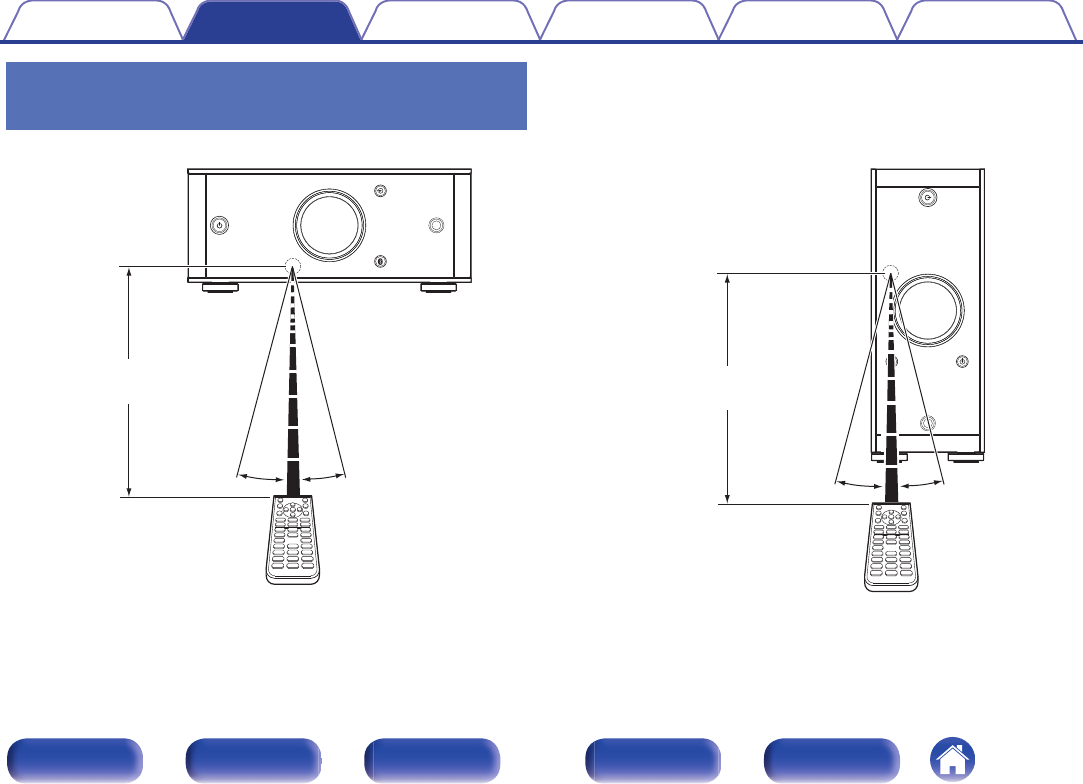
Operating range of the remote control
unit
Point the remote control unit at the remote sensor when operating it.
.
Approx. 23 ft/7 m
30° 30°
[Horizontal installation]
.
30° 30°
Approx. 23 ft/7 m
[Vertical installation]
Contents Connections Playback Settings Tips Appendix
19
Front panel Display Rear panel Remote Index
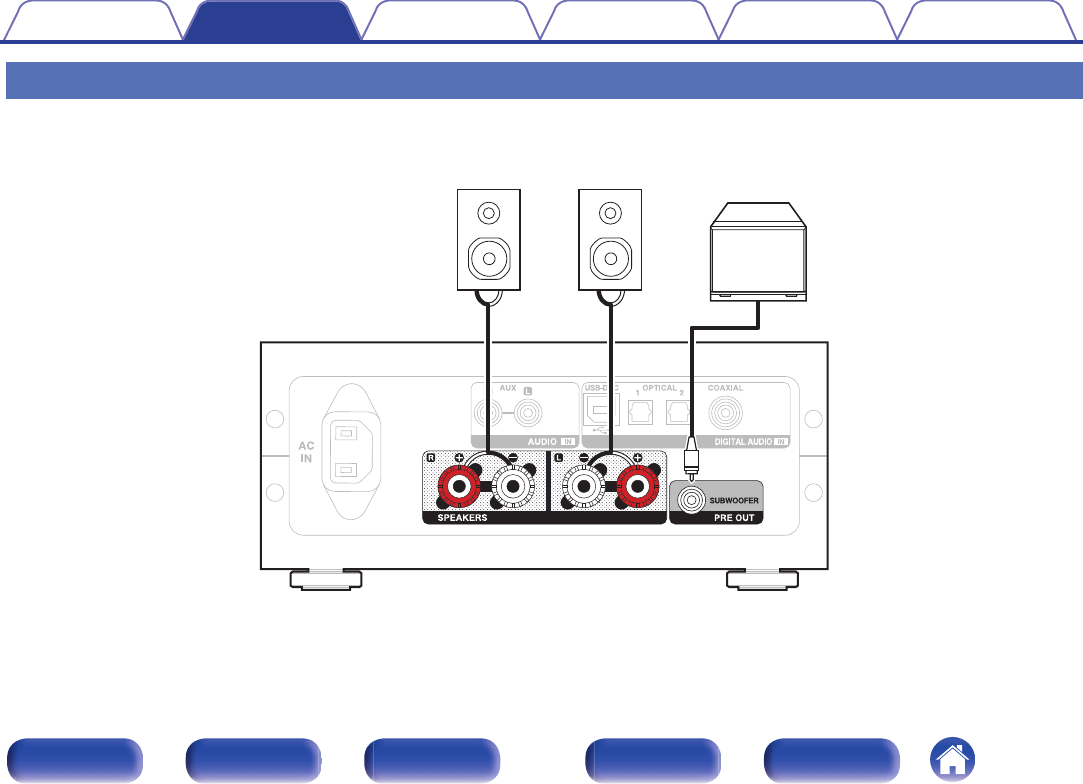
Connecting speakers
NOTE
0Disconnect this unit’s power plug from the power outlet before connecting the
speakers. Also, turn off the subwoofer.
0Connect so that the speaker cable core wires do not protrude from the speaker
terminal. The protection circuit may be activated if the core wires touch the rear
panel or if the + and - sides touch each other. (“Protection circuit” (v p. 64))
0Never touch the speaker terminals while the power cord is connected. Doing so
could result in electric shock.
0Use speakers with impedance of 4 - 16 Ω/ohms.
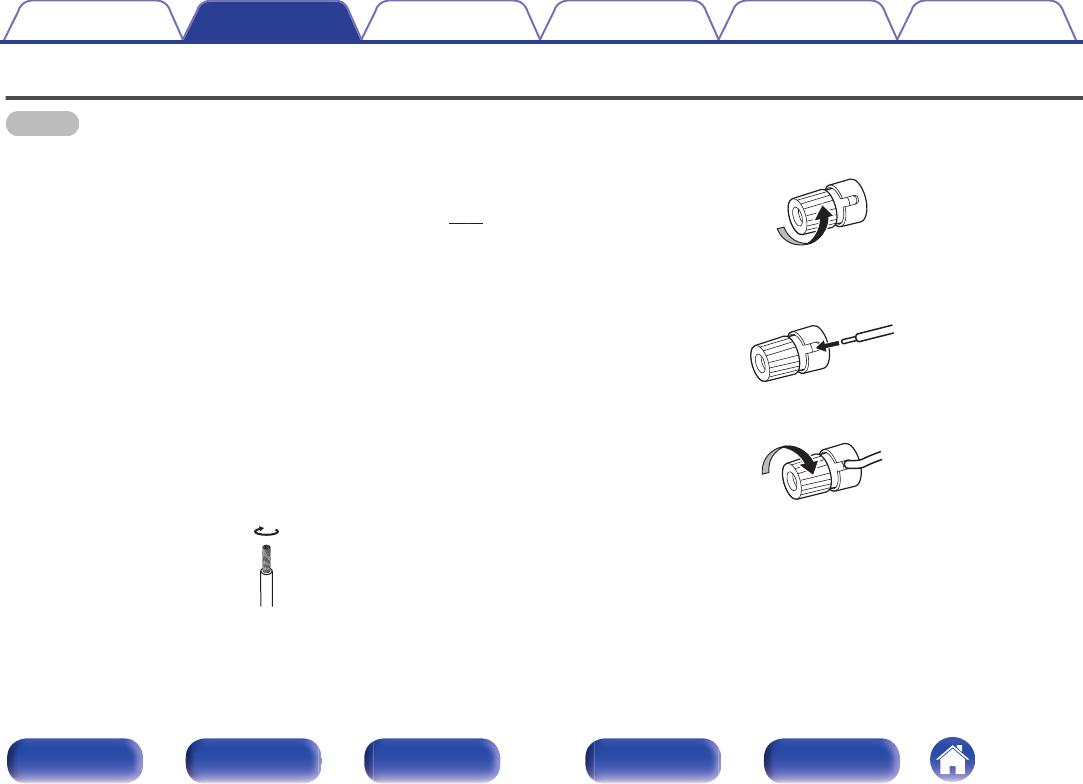
oConnecting the speaker cables
Carefully check the left (L) and right (R) channels on the speakers
being connected to this unit, and be sure to connect the polarities
correctly.
1Peel off about 3/8 inch (10 mm) of sheathing from the
tip of the speaker cable, then either twist the core wire
tightly or terminate it.
.
2Turn the speaker terminal counterclockwise to loosen
it.
.
3Insert the speaker cable’s core wire to the hilt into the
speaker terminal.
.
4Turn the speaker terminal clockwise to tighten it.
.
Contents Connections Playback Settings Tips Appendix
20
Front panel Display Rear panel Remote Index
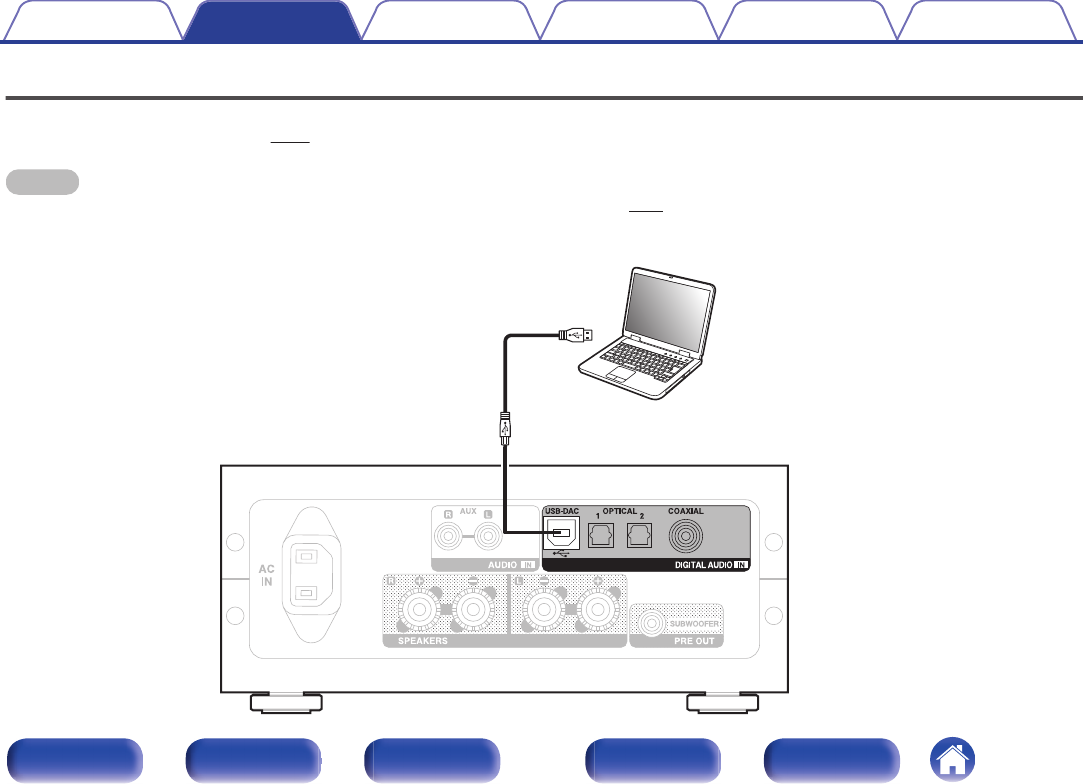
Connecting a PC or Mac
By connecting a computer to the USB-DAC port on the rear panel of this unit using a commercially available USB connecting cable (supplied), this unit
can be used as a D/A converter. (v p. 30)
NOTE
0Before USB connecting this unit to your computer, install the driver software in your computer. (v p. 31)
0Download the driver software from the PMA-60 page of the Denon website.
0Use a cable that is 10 ft (3 m) or less to connect to the computer.
.
Type A
Type B Computer on which the driver software and audio
player software are installed
USB 2.0 cable
(supplied)
Contents Connections Playback Settings Tips Appendix
22
Front panel Display Rear panel Remote Index
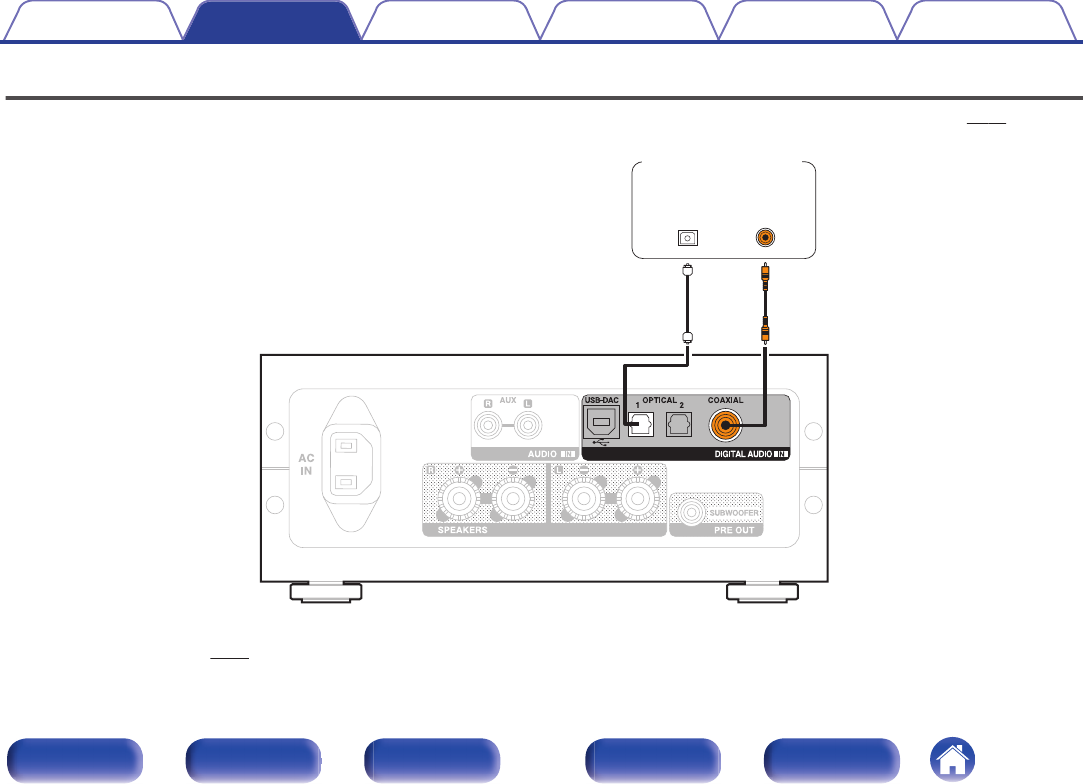
Connecting to a device with digital audio output connectors
Use this connection to input digital audio signals to this unit, and convert the signals for playback using the D/A converter of this unit. (v p. 39)
.
OPTICAL
OUT
COAXIAL
OUT
CD player/
Digital device
oAudio signals that can be played back
See “D/A Converter” (v p. 63).
Contents Connections Playback Settings Tips Appendix
23
Front panel Display Rear panel Remote Index
oContents
Basic operation
Turning the power on 27
Switching the power to standby 27
Selecting the input source 28
Adjusting the volume 29
Turning off the sound temporarily (Muting) 29
Switching the display’s brightness 29
Playing a device
Connecting and playing back from a computer (USB-DAC) 30
Listening to music via a digital connection (COAXIAL/OPTICAL-1/
OPTICAL-2) 39
Listening to music via a analog connection (AUX) 40
Listening to music on a Bluetooth device 41
Contents Connections Playback Settings Tips Appendix
26
Front panel Display Rear panel Remote Index
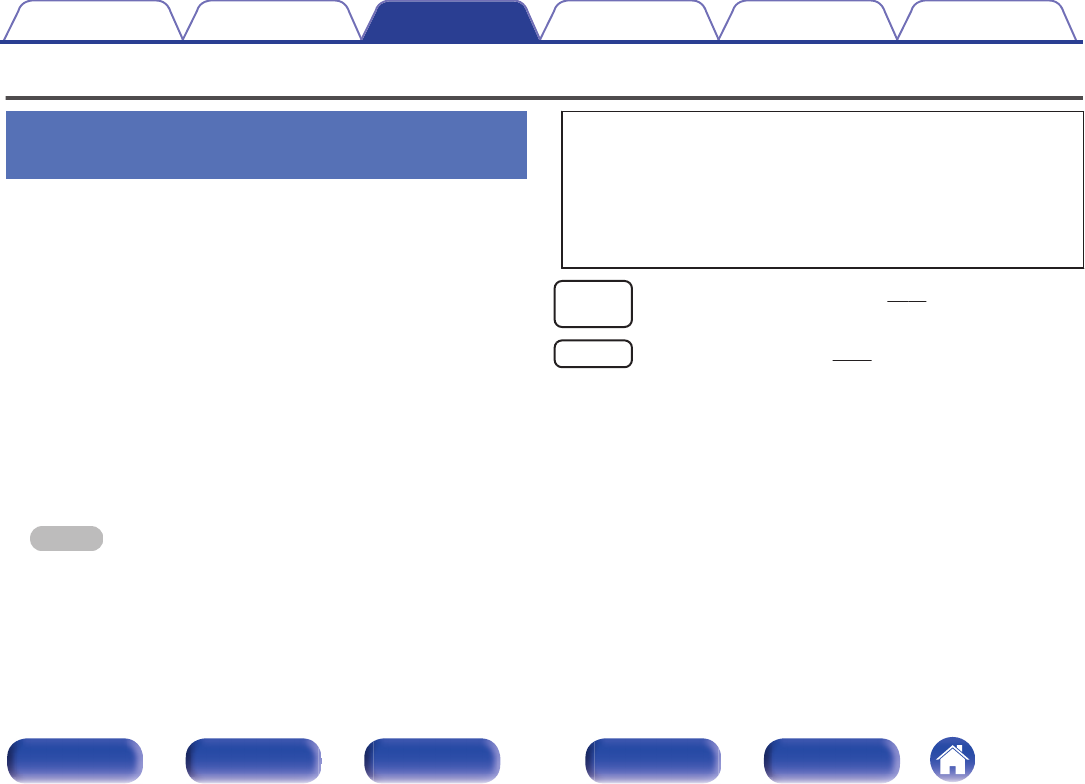
Basic operation
.
Display
Volume control knob
.
X
VOLUME df
INPUT SELECT df
AMP POWER
DIMMER
Turning the power on
1Press X to turn on power to this unit.
Turns the display on.
0You can also press AMP POWER X on the remote control unit to turn on power
from standby mode.
Switching the power to standby
1Press X.
Turns the display off.
0You can also switch the power to standby by pressing AMP POWER X on the
remote control unit.
NOTE
0When the power is in the standby mode, some circuits are electrified. Before you
go out or travel for a long period of time, disconnect the power cord from the power
outlet.
Contents Connections Playback Settings Tips Appendix
27
Front panel Display Rear panel Remote Index
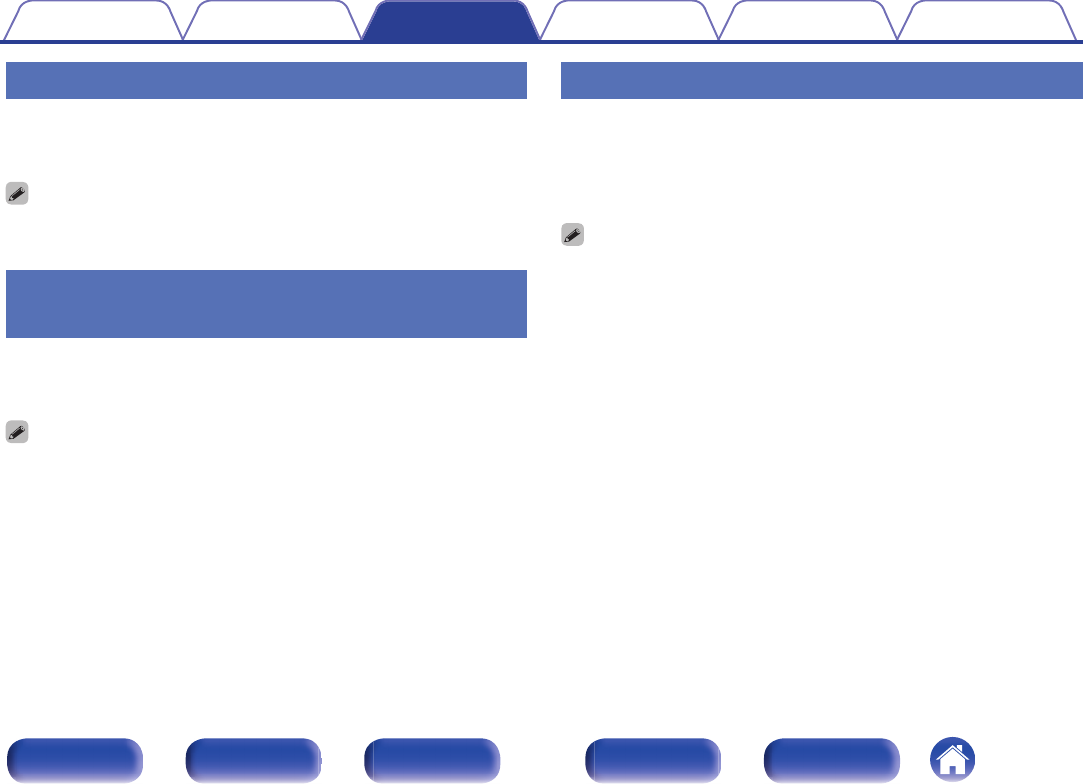
Selecting the input source
oSelecting USB-DAC, DIGITAL IN or ANALOG IN
1Press q to select the input source to be played.
The following icon appears on the display.
.
USB-DAC: Plays back audio on the computer.
.
COAXIAL: Plays back the device connected to the
COAXIAL connector.
.
OPTICAL-1: Plays back the device connected to the
OPTICAL 1 connector.
.
OPTICAL-2: Plays back the device connected to the
OPTICAL 2 connector.
.
AUX: Plays back the device connected to the
AUX connector.
0You can also use INPUT SELECT df on the remote control unit for this operation.
oSelecting Bluetooth
1Press V.
The following icon appears on the display.
.
Bluetooth: Connects and plays back a Bluetooth
device.
0You can also press V on the remote control unit for this operation.
Contents Connections Playback Settings Tips Appendix
28
Front panel Display Rear panel Remote Index
Adjusting the volume
1Turn the volume control knob to adjust the volume.
The volume level appears on the display.
0You can also use VOLUME df on the remote control unit for this operation.
0You can adjust the volume level to --- dB (mute) and between -90 dB and 0 dB.
Turning off the sound temporarily
(Muting)
1Press : on the remote control unit.
“MUTING” appears on the display.
0Press : again to cancel the muting.
Switching the display’s brightness
The display brightness can be adjusted between three levels.
1Press DIMMER on the remote control unit.
0The brightness of the display switches each time the button is
pressed.
0The DIMMER button also controls the Denon's CD Player DCD-50, so the DCD-50
can be operated simultaneously with this unit. When the two units have different
settings, press and hold in the button for lease 2 seconds to reset them both to the
default setting, then make the desired setting.
0The display brightness is set to most brightly by default.
Contents Connections Playback Settings Tips Appendix
29
Front panel Display Rear panel Remote Index
Playing a device
Connecting and playing back from a
computer (USB-DAC)
You can enjoy high-quality audio playback from the D/A converter built in
to this unit by inputting music files into this unit from a computer via USB
connection.
0Before USB connecting this unit to your computer, install the driver
software in your computer.
0Drivers do not need to be installed for Mac OS.
0Also, you can use whichever commercially available or downloadable
player software you like to playback files on your computer.
oComputer (System Requirements)
OS
0Windows 7, Windows 8, Windows 8.1 or Windows 10
0Mac OS X 10.10, 10.11 or macOS 10.12
USB
0USB 2.0: USB High speed/USB Audio Class Ver.2.0
NOTE
0This unit was checked the operation using the system requirements by us, but
it does not guarantee the operation of all systems.
0DSD is a registered trademark.
0Microsoft, Windows 7, Windows 8, Windows 8.1 and Windows
10 are either registered trademarks or trademarks of Microsoft
Corporation in the United States and/or other countries.
0ASIO is a trademark of Steinberg Media Technologies GmbH.
0Apple, Macintosh and Mac OS are trademarks of Apple Inc.,
registered in the U.S. and other countries.
Windows
OS
Installing the dedicated driver (v p. 31)
Mac OS Audio Device Settings (v p. 37)
Contents Connections Playback Settings Tips Appendix
30
Front panel Display Rear panel Remote Index
oInstalling the dedicated driver
(Windows OS only)
nInstalling the driver software
1Disconnect the USB cable between your PC and the
unit.
0The driver software cannot be installed correctly if your PC is
connected to the unit by a USB cable.
0If the unit and your computer are connected by a USB cable and
the computer is switched on before installation, disconnect the
USB and restart the computer.
2Download the dedicated driver from the “Download”
section of the PMA-60 page of the Denon website onto
your PC.
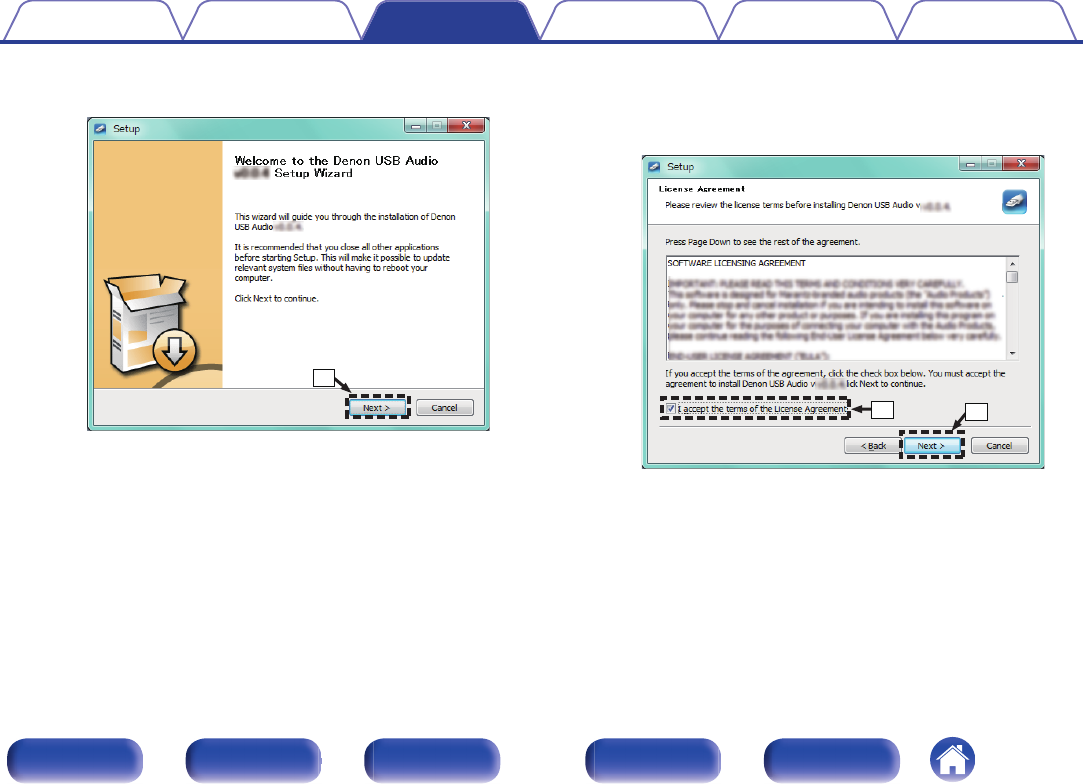
3Unzip the downloaded file, and double-click the exe
file.
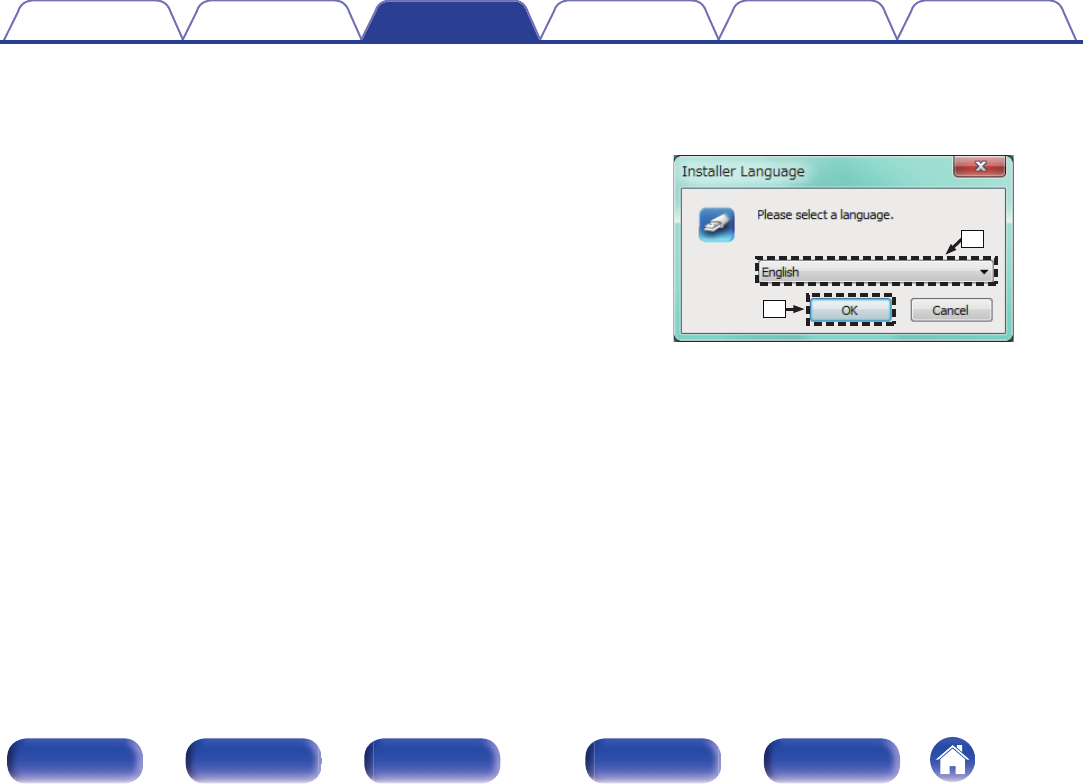
4Install the driver.
ASelect the language to use for the installation.
BClick “OK”.
.
q
w
Contents Connections Playback Settings Tips Appendix
31
Front panel Display Rear panel Remote Index
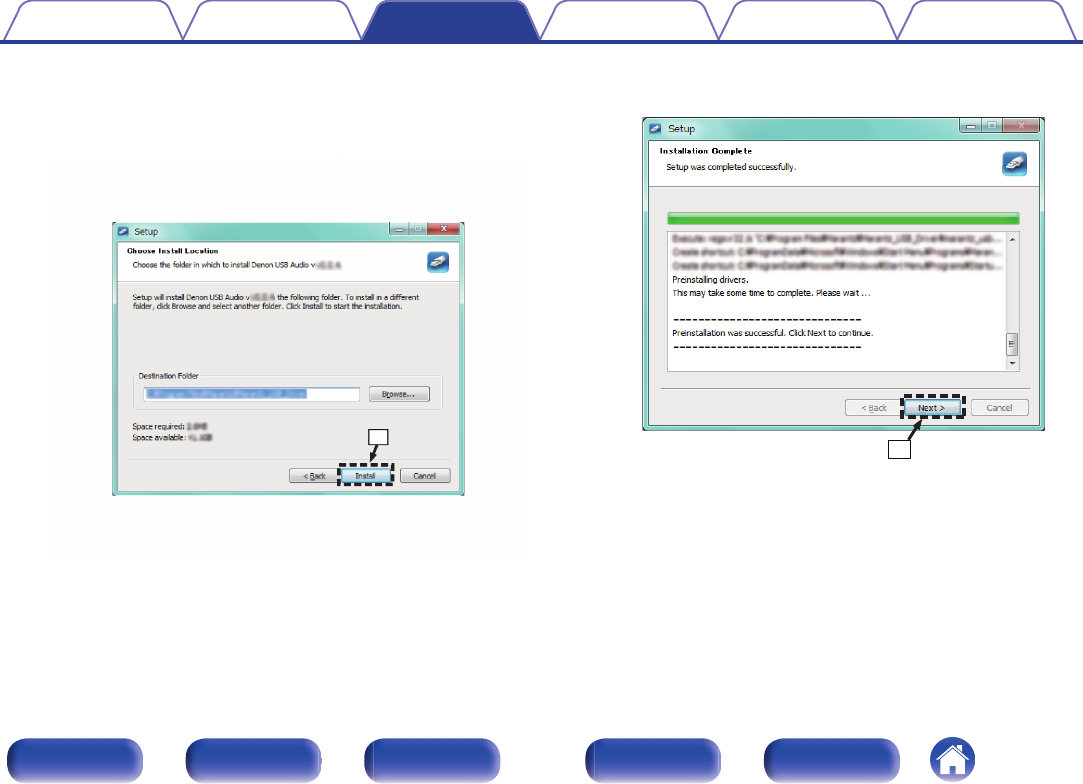
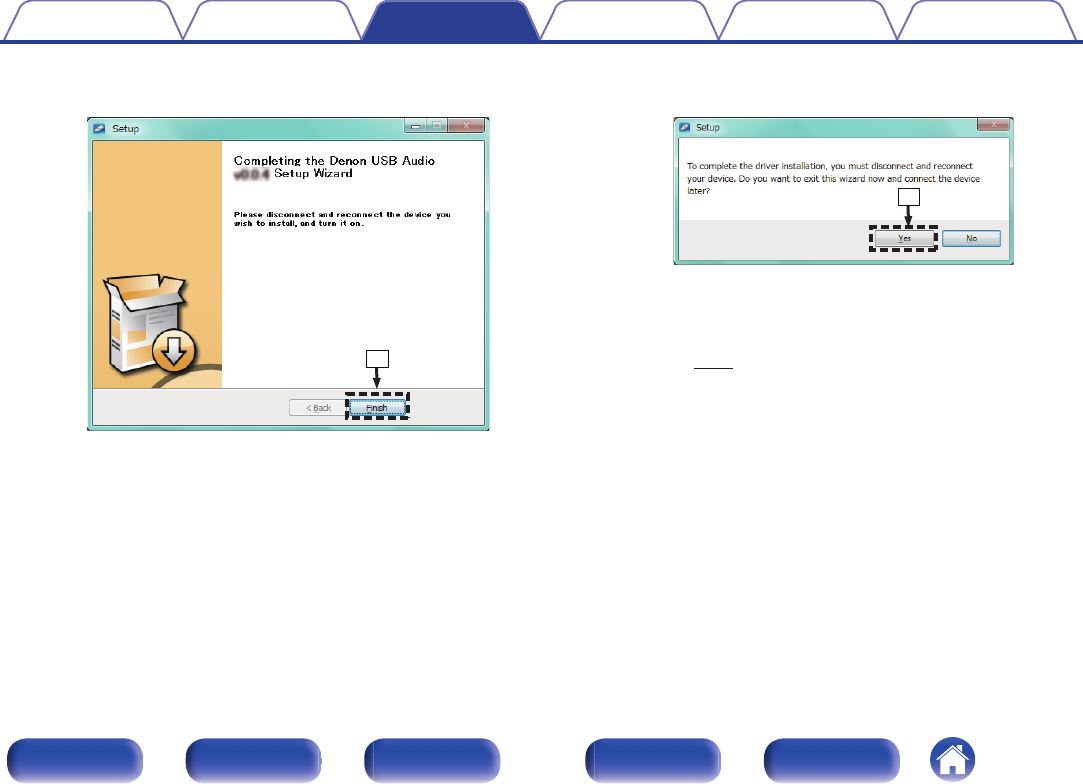
HWhen the installation is completed, click “Finish”.
.
i
IClick “Yes”.
.
o
5With the unit power off, connect the unit and PC using
a USB cable (supplied).
0For details on connections, see “Connecting a PC or
Mac” (v p. 22).
Contents Connections Playback Settings Tips Appendix
34
Front panel Display Rear panel Remote Index
6Press X.
0When the unit power is turned on, the PC automatically finds and
connects to the unit.
7Press q to switch the input source to “USB-DAC”.
8Checking the installed driver.
AClick the “Start” button and click “Control Panel” on the PC.
0The control panel setting list is displayed.
BClick the “Sound” icon.
0The sound menu window is displayed.
CCheck that there is a checkmark next to “Default Device” under in
“PMA-60” of the “Playback” tab.
0When there is a checkmark for a different device, click
“PMA-60” and “Set Default”.
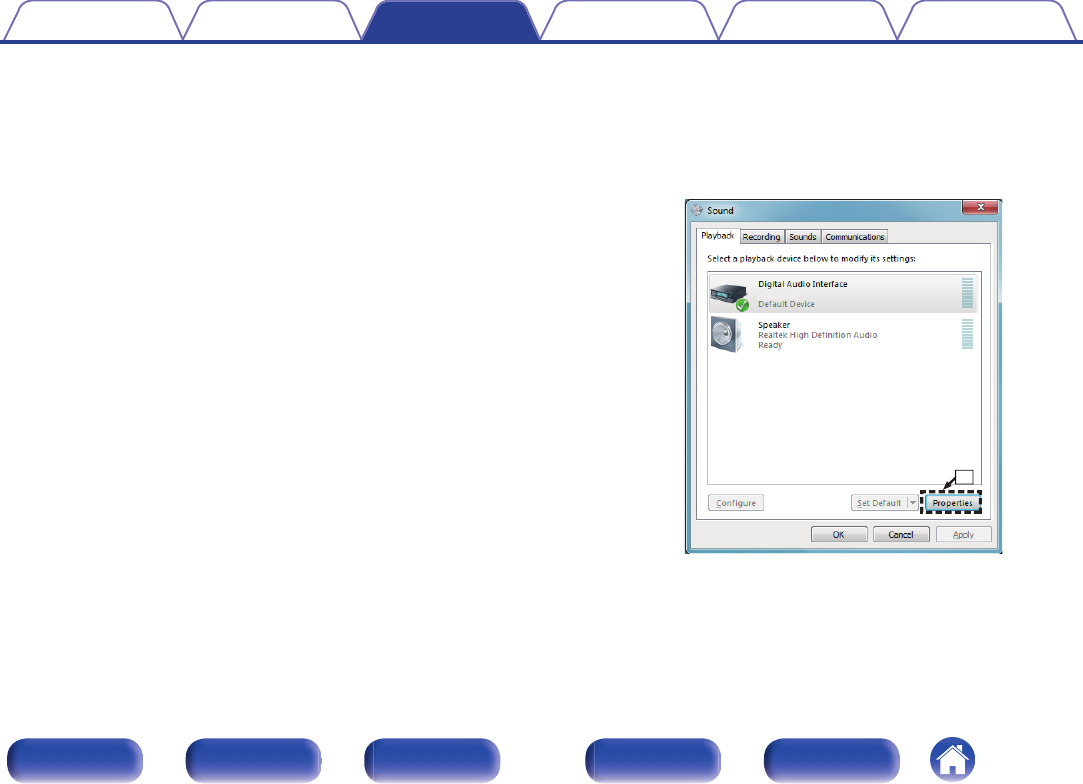
9Checking audio output.
Outputs a TEST signal from the PC and checks the audio output
from the USB-DAC function.
ASelect “PMA-60” and click “Properties”.
0The PMA-60 Properties window is displayed.
.
PMA-60
q
Contents Connections Playback Settings Tips Appendix
35
Front panel Display Rear panel Remote Index
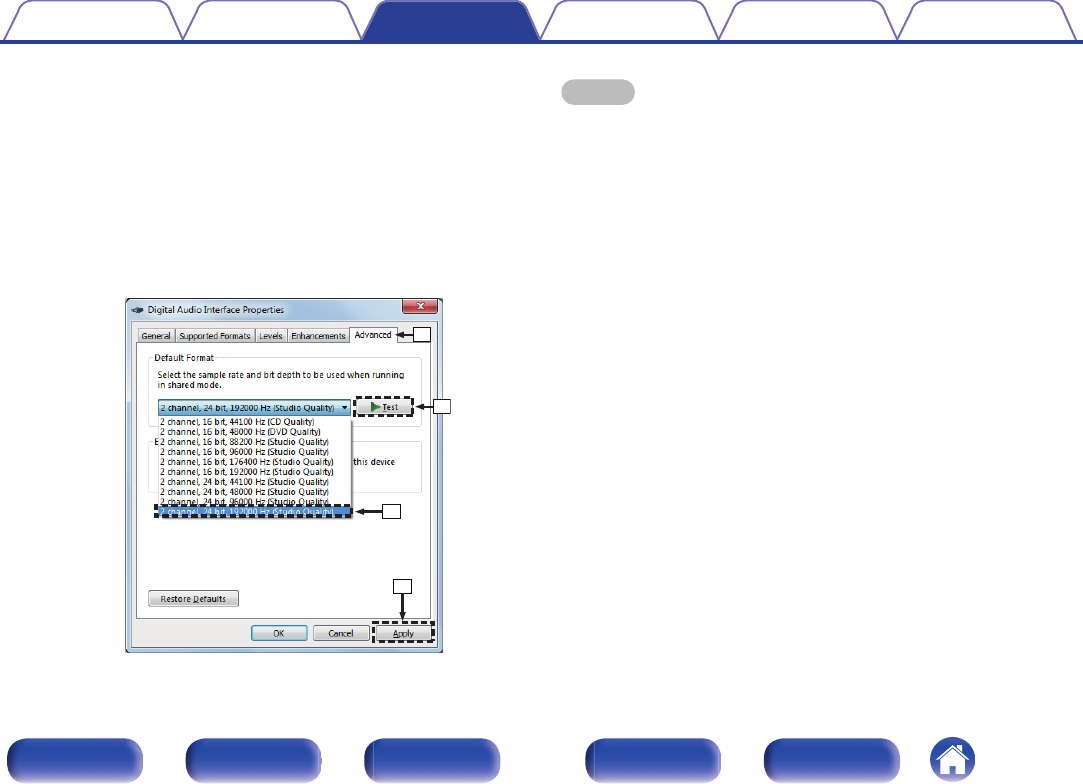
BClick the “Advanced” tab.
CSelect the sampling rate and bit rate to be applied to the D/A
converter.
0It is recommended that “2 channel, 24 bit, 192000 Hz (Studio
Quality)” is selected (Windows 7).
0It is recommended that “2 channel, 32 bit, 192000 Hz (Studio
Quality)” is selected (Windows 8/Windows 8.1/Windows 10).
DClick “Apply”.
EClick “Test”.
0Check that audio from this unit is output from the PC.
.
w
e
r
t
NOTE
0The dedicated driver must be installed in the PC before this unit is connected to a
PC. Operation will not occur correctly if connected to the PC before the dedicated
driver has been installed.
0Operation may fail in some PC hardware and software configurations.
0Player software supporting the Audio Stream Input Output (ASIO) driver is
required to play files with a sampling frequency of 352.8 kHz/384 kHz without
downsampling. Check your player software before playing files with the ASIO
driver.
0Please see the FAQ at www.denon.com if you experience any issues getting audio
to play from your computer through the this unit. You may also want to check the
support pages for your audio player application.
Contents Connections Playback Settings Tips Appendix
36
Front panel Display Rear panel Remote Index
oAudio Device Settings (Mac OS only)
AWith the unit power off, connect the unit and Mac using a USB cable
(supplied).
0For the connection procedure, refer to the “Connecting a PC or Mac”
section. (v p. 22)
BPress X.
CPress q to switch the input source to “USB-DAC”.
DMove the cursor to “Go” on the computer screen, and then click
“Utilities”.
0The utility list is displayed.
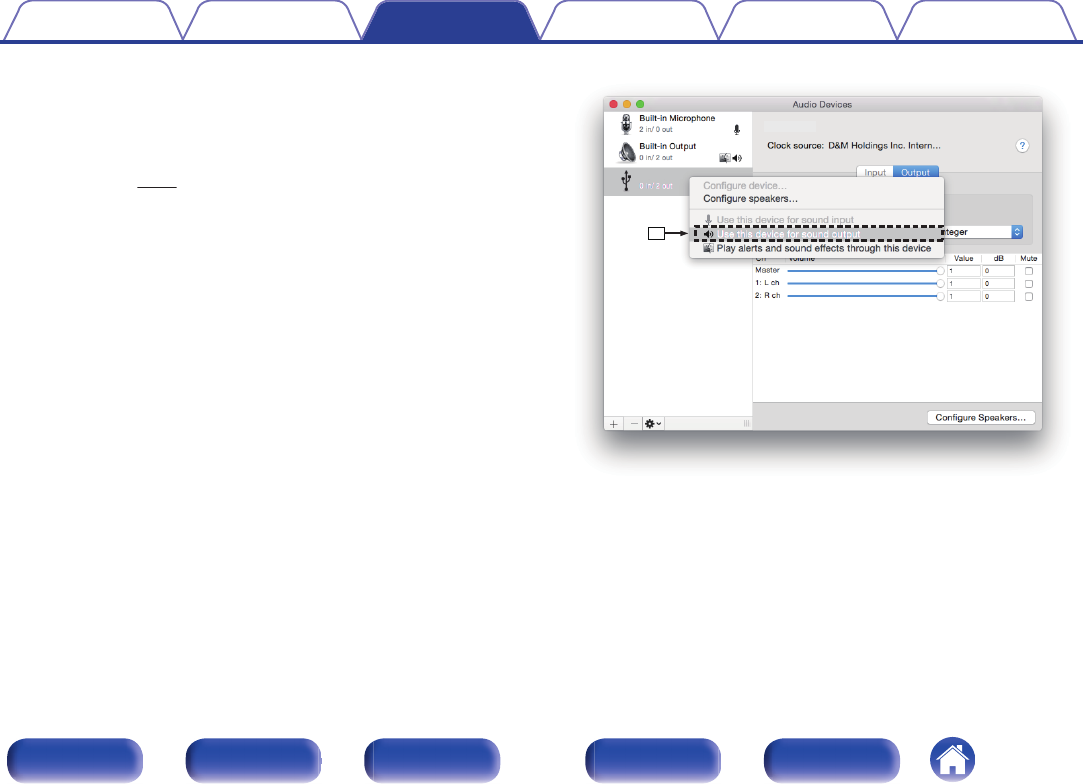
EDouble-click “Audio MIDI Setup”.
0The “Audio Devices” window is displayed.
FCheck that “Use this device for sound output” is checked in “PMA-60”.
0If a different device is checked, select and “Secondary click” on
“PMA-60”, and then select “Use this device for sound output”.
.
y
PMA-60
PMA-60
Contents Connections Playback Settings Tips Appendix
37
Front panel Display Rear panel Remote Index
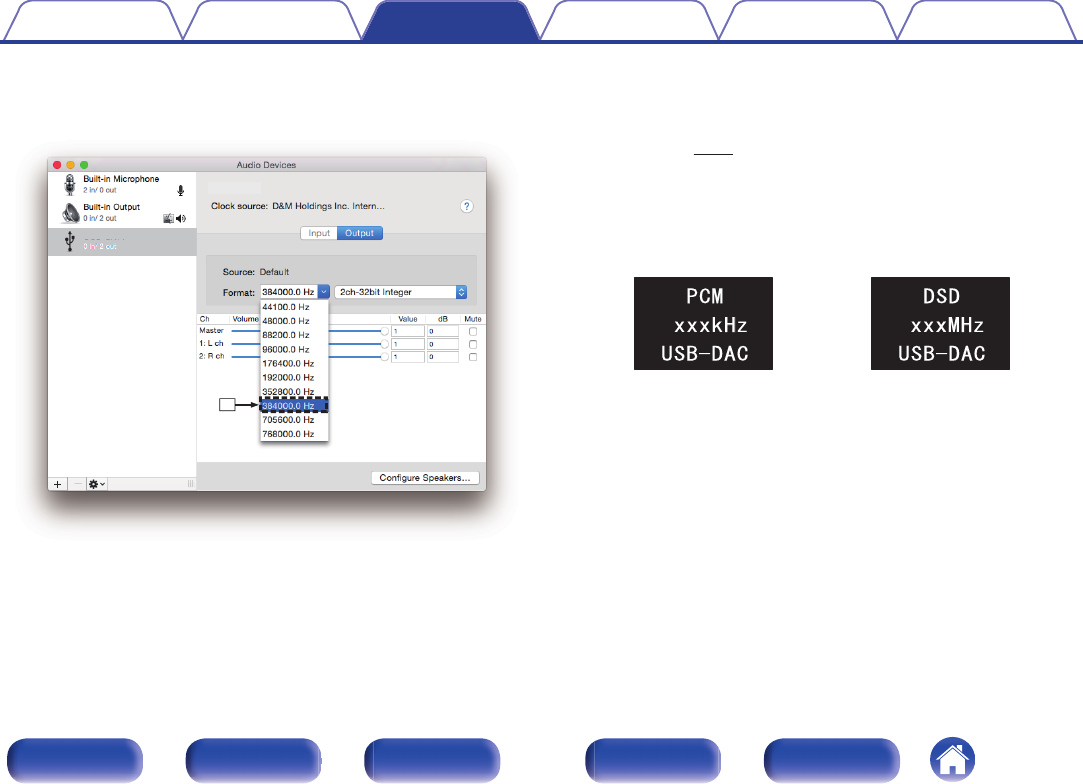
GSelect the “PMA-60” format.
0It is normally recommended to set the format to “384000.0 Hz” and
“2ch-32 bit Interger”.
.
u
PMA-60
PMA-60
HQuit Audio MIDI Setup.
oPlayback
Install the desired player software on your computer beforehand.
Use the rear panel USB-DAC port to connect this unit to a
computer. (v p. 22)
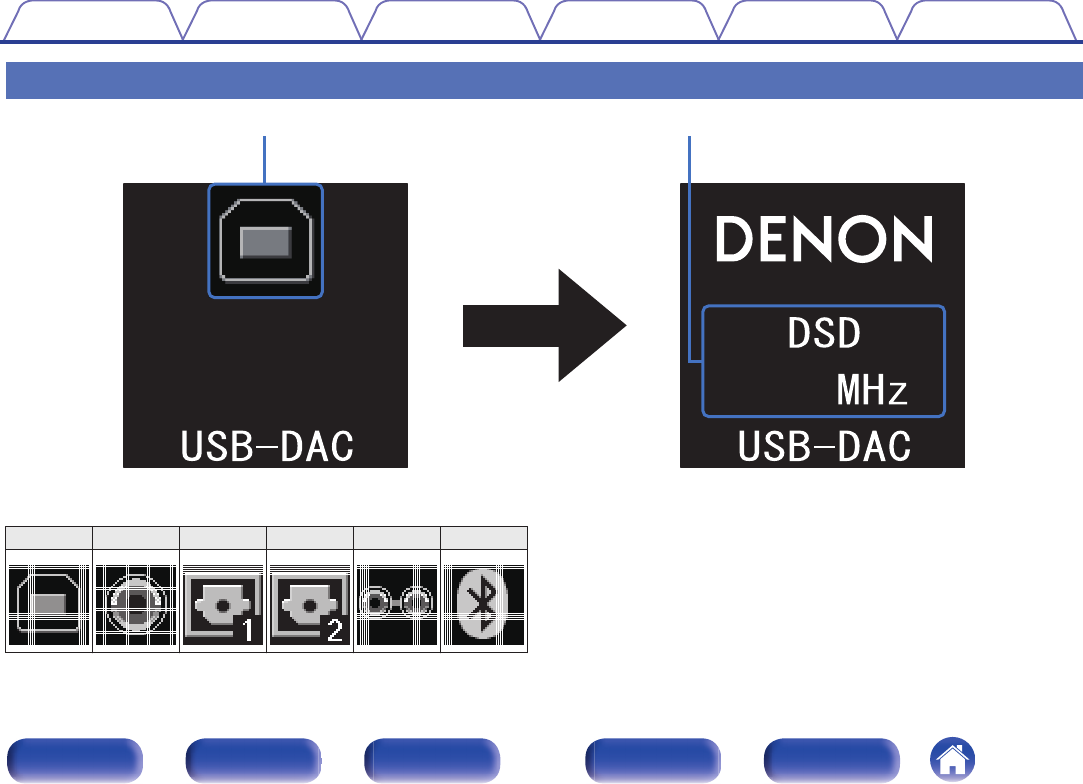
1Press q to switch the input source to “USB-DAC”.
Start playback on the computer’s player software.
The digital audio signal that is being input is shown as follows in the
display.
.
or
(xxx is the sampling frequency.)
0If the sampling frequency cannot be detected, “Unlocked” will be
displayed.
0“Unsupported” is displayed when audio signals that are not
supported by this unit are input.
Contents Connections Playback Settings Tips Appendix
38
Front panel Display Rear panel Remote Index
oAudio signals that can be played back
See “D/A Converter” (v p. 63).
NOTE
0Perform operations such as playback and pause on the computer. At this time, you
cannot perform operations with buttons on this unit or the remote control.
0You can also control the volume and equalizer on the computer. Enjoy playing
music at the desired volume.
0When this unit is functioning as a D/A converter, sound is not output from the
computer’s speakers.
0If the computer is disconnected from this unit while the computer music playback
software is running, the playback software may freeze. Always exit the playback
software before disconnecting the computer.
0When an error occurs on the computer, disconnect the USB cable and restart the
computer.
0The sampling frequency of the music playback software and sampling frequency
displayed on this unit may differ.
0Use a cable that is 10 ft (3 m) or less to connect to the computer.
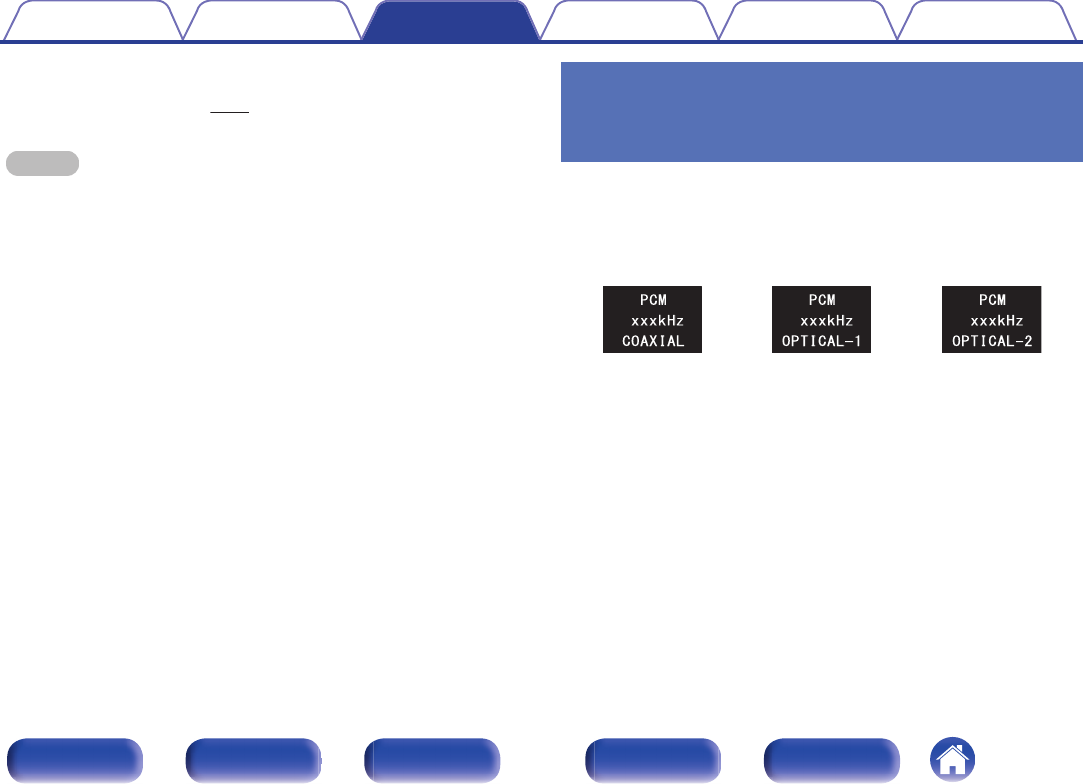
Listening to music via a digital
connection (COAXIAL/OPTICAL-1/
OPTICAL-2)
1Press q to switch the input source to “COAXIAL”,
“OPTICAL-1” or “OPTICAL-2”.
The digital audio signal that is being input is shown as follows in the
display.
.
or
or
(xxxx is the sampling frequency.)
0If the sampling frequency cannot be detected, “Unlocked” will be
displayed.
0“Unsupported” is displayed when audio signals that are not
supported by this unit are input.
2Play back music on the connected device.
The speakers output music from the connected device.
Contents Connections Playback Settings Tips Appendix
39
Front panel Display Rear panel Remote Index
oAudio signals that can be played back
See “D/A Converter” (v p. 63).
NOTE
0Do not input non-PCM signals, such as Dolby Digital and DTS. This causes noise
and could damage the speakers.
Listening to music via a analog
connection (AUX)
1Press q to switch the input source to “AUX”.
2Play back music on the connected device.
The speakers output music from the connected device.
Contents Connections Playback Settings Tips Appendix
40
Front panel Display Rear panel Remote Index
Listening to music on a Bluetooth
device
You can listen to music wirelessly by connecting this unit to a Bluetooth
device via Bluetooth.
oPairing
Pairing (registration) is an operation that is required in order to connect
a Bluetooth device to this unit using Bluetooth. When paired, the
devices authenticate each other and can connect without mistaken
connections occurring.
When using Bluetooth connection for the first time, you need to pair
this unit and the Bluetooth device to be connected. This unit can store
pairing information for a maximum of 8 devices.
NOTE
0You cannot simultaneously output music from multiple Bluetooth devices.
oHow to establish a Bluetooth connection
There are three types of Bluetooth connection methods. Use an
appropriate type depending on your environment.
Case 1 Pairing with this unit for the first time
(v p. 42)
Case 2 Connecting a Bluetooth device that this unit performed
pairing for before
(v p. 45)
Case 3 Connecting a Bluetooth device with the NFC function via
NFC
(v p. 46)
Contents Connections Playback Settings Tips Appendix
41
Front panel Display Rear panel Remote Index
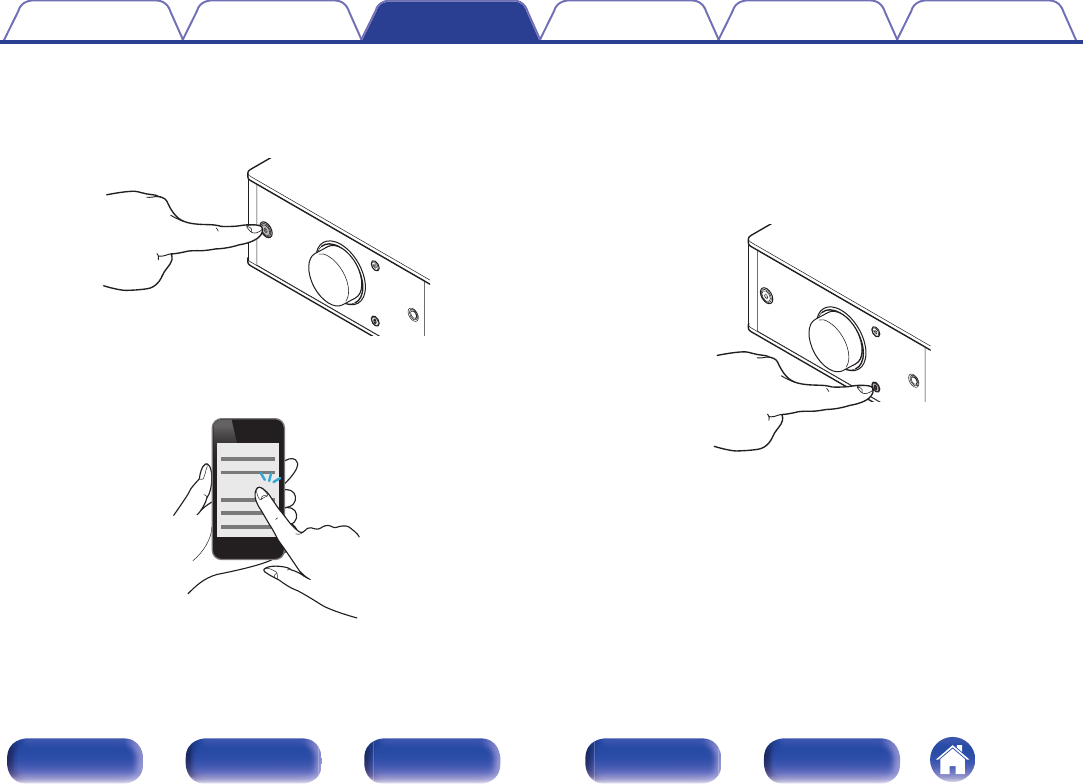
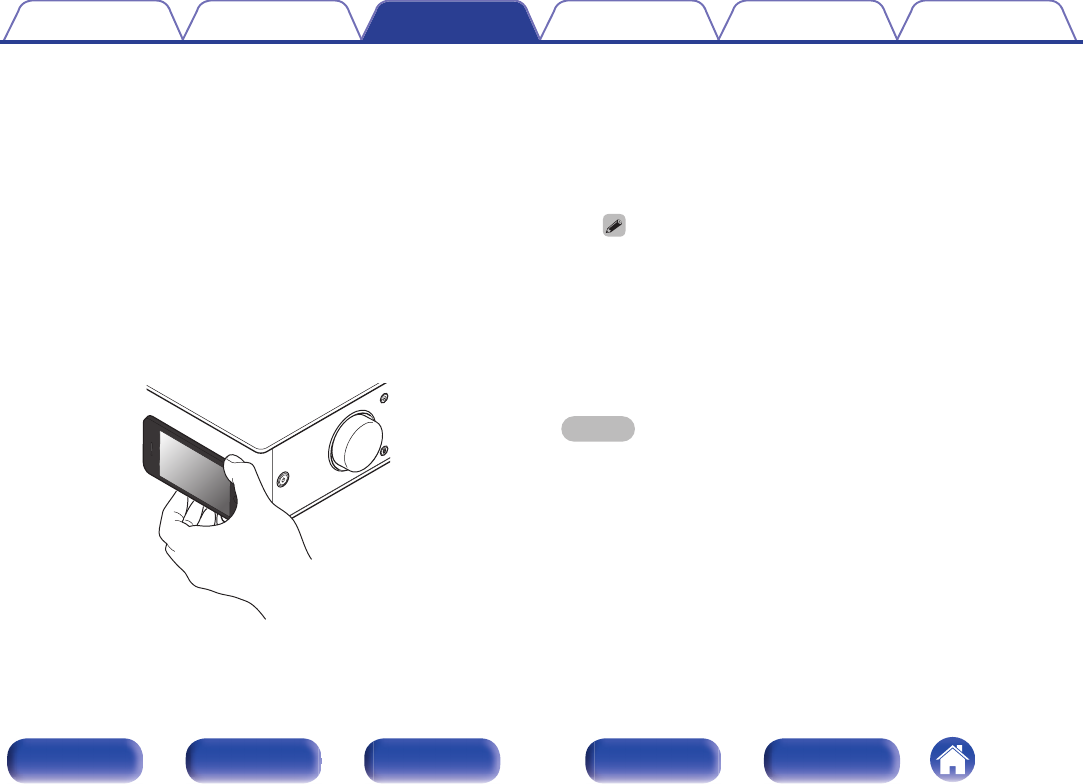
oCase 1: Pairing with this unit for the first time
1Press X to turn on power to this unit.
Turns the display on.
.
2Turn on the Bluetooth function on the Bluetooth device.
0For details, see the owner’s manual for your Bluetooth device.
.
Bluetooth ON
3Press V for 3 seconds or longer.
“Pairing” appears on the display, and the unit enters the pairing
mode.
0When you press V for the first time after purchase, this unit
automatically enters the pairing mode.
.
Contents Connections Playback Settings Tips Appendix
42
Front panel Display Rear panel Remote Index
4Select “Denon PMA-60” from the list of devices
displayed in the screen on the Bluetooth device.
When pairing is complete and the device is connected via Bluetooth,
the device name appears on the display of this unit.
.
Denon PMA-60
0When “Denon PMA-60” is not displayed in the screen on the Bluetooth
device, search for devices on the Bluetooth device.
0When you are prompted for a pass key in the screen on the Bluetooth
device, enter “0000”.
0English letters, numbers and certain symbols are displayed. Incompatible
characters are displayed as “.” (period).
Contents Connections Playback Settings Tips Appendix
43
Front panel Display Rear panel Remote Index
5Play back music on the Bluetooth device.
The speakers output music that the Bluetooth device is playing
back.
0Adjust to the appropriate volume level.
0When the pairing fails, retry from step 3.
0To perform pairing for another Bluetooth device, repeat steps 2 to 5 for each
device you want to perform pairing for.
0When no Bluetooth device is connected, “No Connection” appears on the display.
NOTE
0The pairing mode on this unit lasts for approx. 5 minutes. When the pairing mode
on this unit is canceled before the pairing is completed, retry from step 3.
0This unit cannot perform pairing against a Bluetooth device with a pass key other
than “0000”.
Contents Connections Playback Settings Tips Appendix
44
Front panel Display Rear panel Remote Index
oCase 2: Connecting a Bluetooth device that this unit performed pairing for before
1Turn on the Bluetooth function on the Bluetooth device.
0For details, see the owner’s manual for your Bluetooth device.
.
Bluetooth ON
2Select “Denon PMA-60” from the list of devices
displayed in the screen on the Bluetooth device.
Power to this unit is automatically turned on and this unit attempts to
establish the Bluetooth connection. When the device is connected
via Bluetooth, the device name appears on the display of this unit.
.
Denon PMA-60
3Play back music on the Bluetooth device.
The speakers output music from the Bluetooth device.
Contents Connections Playback Settings Tips Appendix
45
Front panel Display Rear panel Remote Index
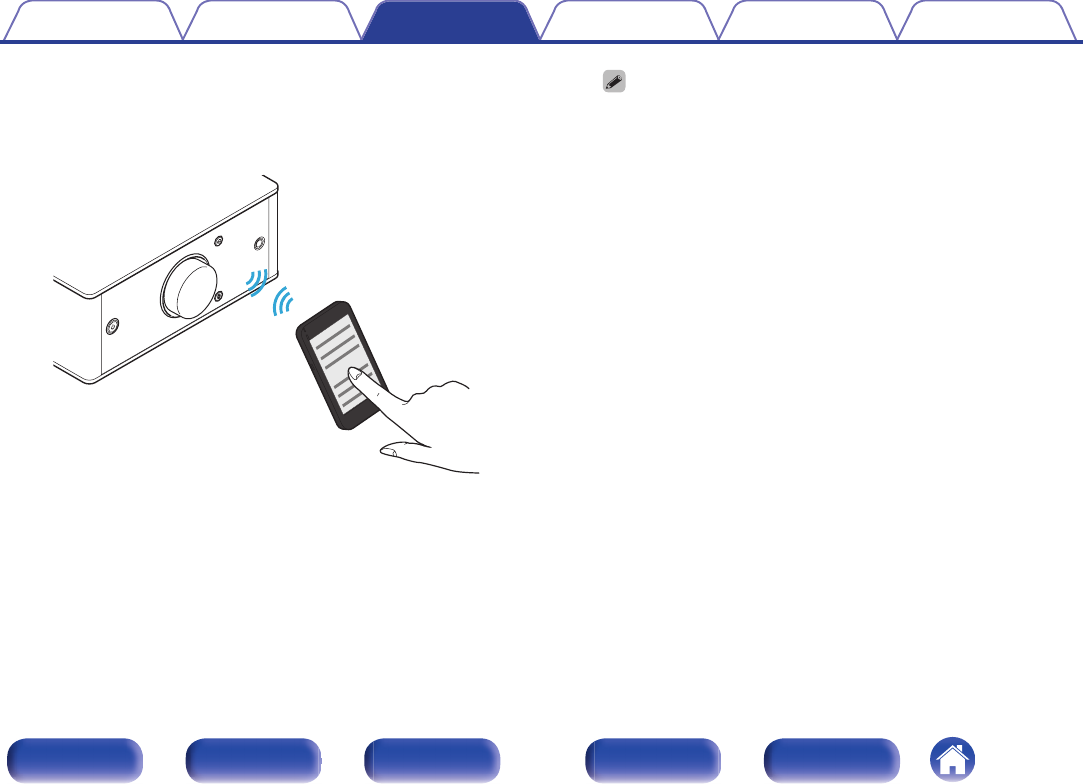
oCase 3: Connecting a Bluetooth device with the NFC function via NFC
You can just touch this unit with a Bluetooth device to turn on power to this unit and perform pairing or establish a connection between this unit and the
Bluetooth device.
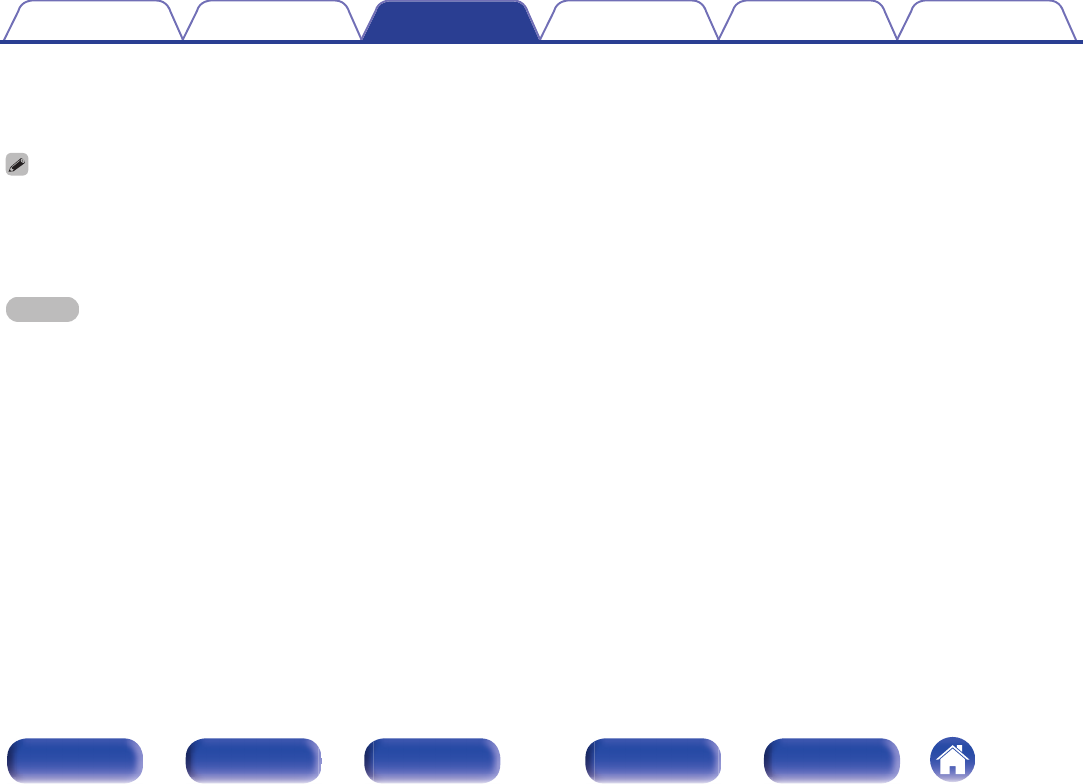
1Turn on the NFC function on the Bluetooth device.
0For details, see the owner’s manual for your Bluetooth device.
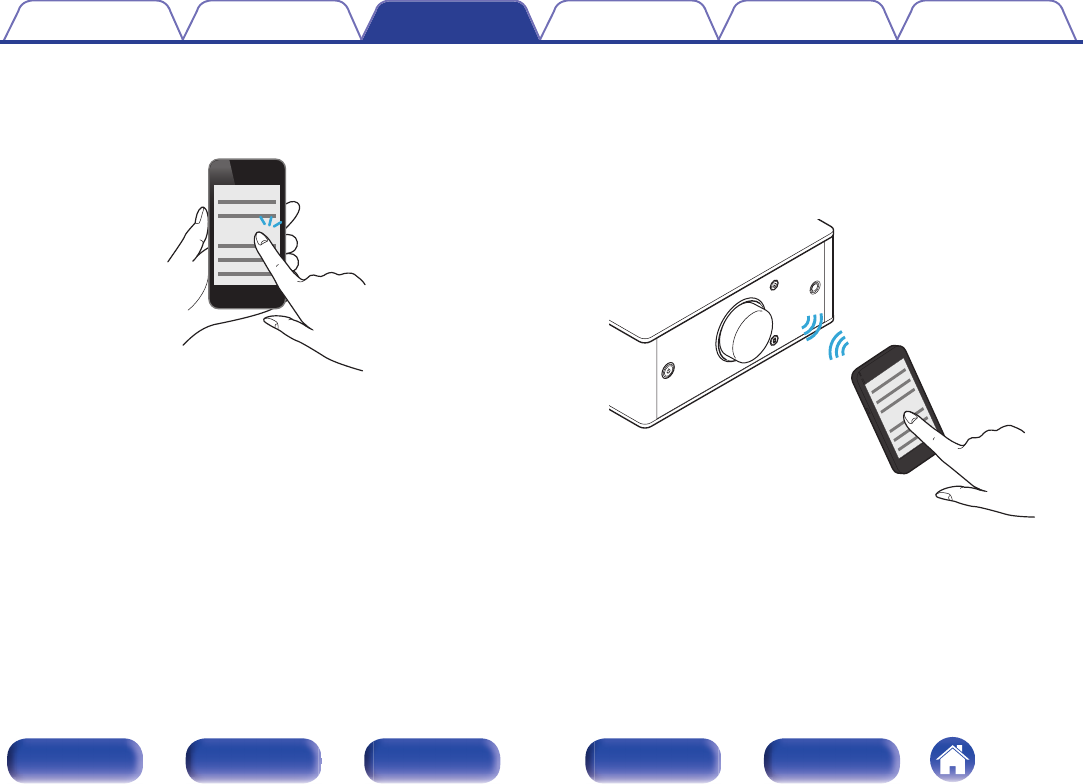
2Touch Q on this unit with the NFC antenna part on the
Bluetooth device.
Power to this unit is turned on and this unit attempts to establish the
Bluetooth connection.
When the device is connected via Bluetooth, the device name
appears on the display of this unit.
0Complete operations as instructed by the Bluetooth device.
.
3Play back music on the Bluetooth device.
This unit outputs music from the Bluetooth device.
0When you touch the N-Mark (Q) on this unit with the Bluetooth device that
is playing back music, this unit outputs that music.
0Touch the N-Mark (Q) again during the Bluetooth connection to disconnect
the connection.
0When you touch the N-Mark (Q) with a different Bluetooth device during
the Bluetooth connection, this unit stops playing back for the currently
connected Bluetooth device and connects to the newly touched Bluetooth
device.
NOTE
0Before establishing a NFC connection, cancel the lock function on the Bluetooth
device.
0When you touch this unit with a Bluetooth device, do so softly.
Contents Connections Playback Settings Tips Appendix
46
Front panel Display Rear panel Remote Index
oSimultaneously connecting multiple Bluetooth
devices (multi point function)
This unit can only output music from one connected Bluetooth device,
but up to 3 Bluetooth devices can simultaneously be connected.
(“Listening to music on a Bluetooth device” (v p. 41))
If frequently used devices are connected, it is useful for switching the
playback device because you do not have to reconnect them.
Perform pairing for devices you want to connect to beforehand.
.
Audio signals
Playing back
Connected via Bluetooth
Contents Connections Playback Settings Tips Appendix
47
Front panel Display Rear panel Remote Index
oSwitching the playback device
1Stop or pause the device that is currently played back.
2Play back the device that you want to output music
from.
0Turn the power of this unit to standby before turning the Bluetooth function of the
Bluetooth device off.
Contents Connections Playback Settings Tips Appendix
48
Front panel Display Rear panel Remote Index
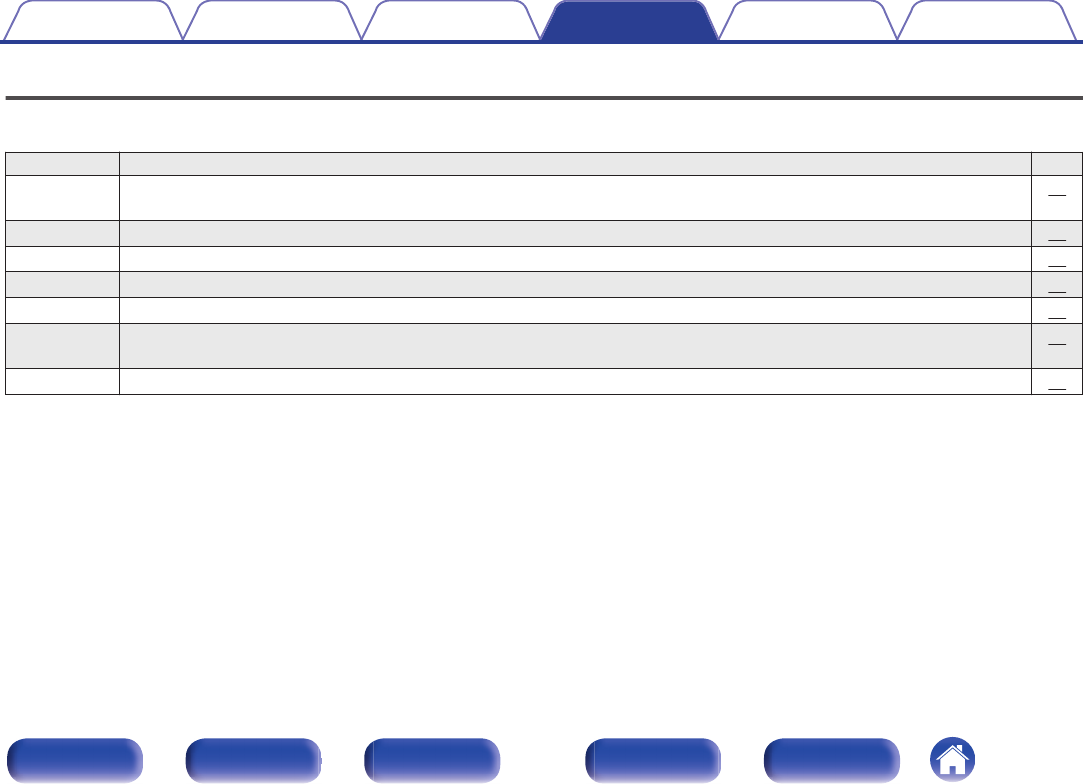
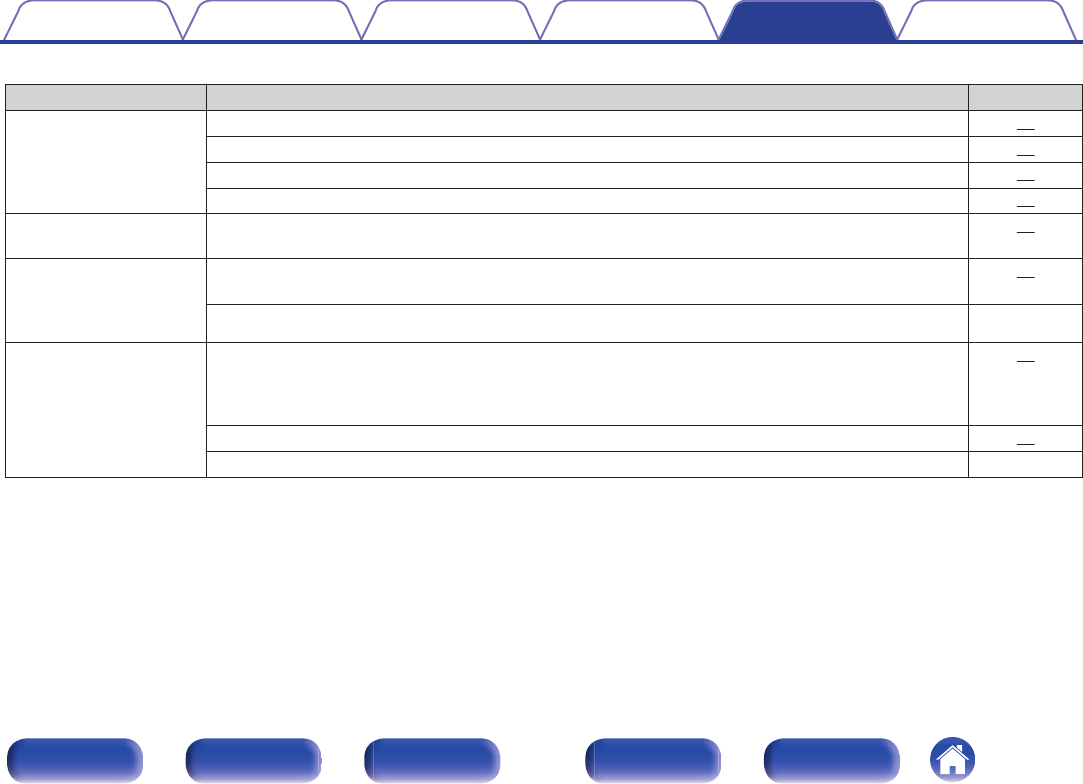
Menu map
For menu operations, see the following page.
By default, this unit has recommended settings defined. You can customize this unit based on your existing system and your preferences.
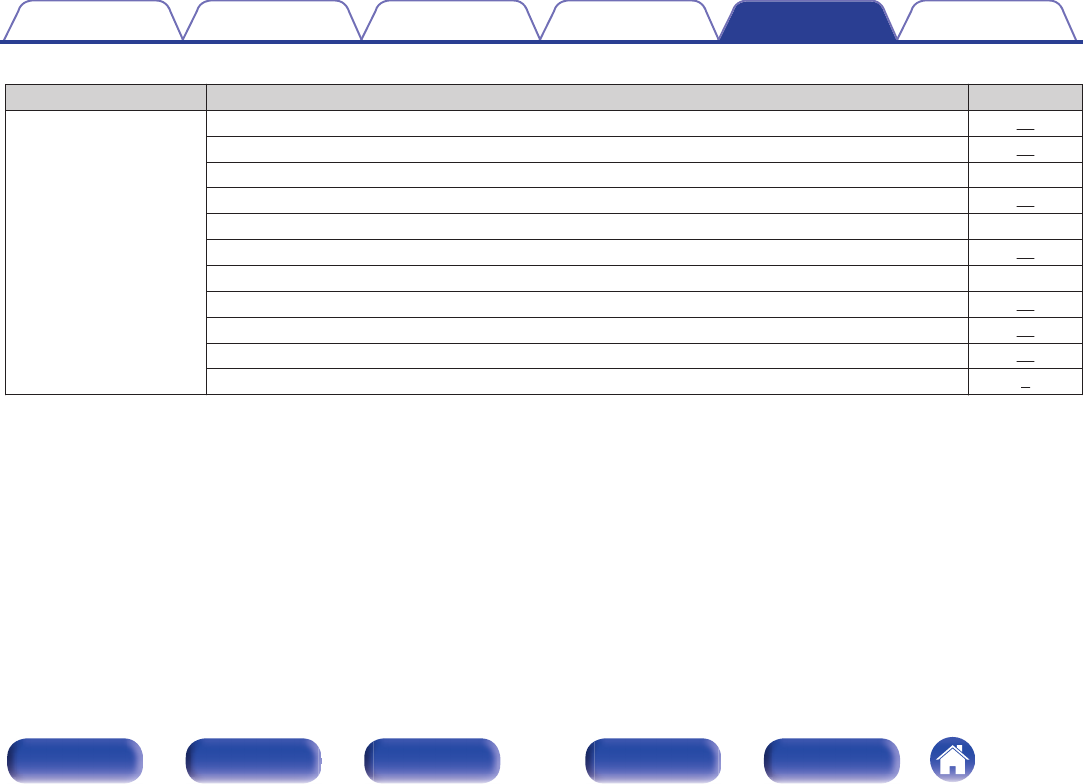
Setting items Description Page
Source Direct Sets Source Direct Mode. The audio signal is not passed through the sound quality adjustment circuits (Bass, Treble, Balance).
This provides playback that is more faithful to the original sound, but disables sound quality adjustment.
51
Bass Adjusts the bass sound. 51
Treble Adjusts the treble sound. 51
Balance Adjust the left/right volume balance. 51
H/P AMP Gain Set the gain of the headphone amplifier. Set this according to the impedance of the connected headphones. 51
Bluetooth Switches the Bluetooth function on/off. Stopping Bluetooth function reduces a source of noise that affects sound quality, enabling
higher sound quality playback.
52
Auto Standby Sets whether to automatically switch the unit to the standby mode when there is no input signal and operation for 30 minutes. 52
Contents Connections Playback Settings Tips Appendix
49
Front panel Display Rear panel Remote Index

.
AMP SETUP
uio p
ENTER
BACK
oMenu operation
1Press AMP SETUP.
The menu is displayed on the display.
2Use ui to select the menu to be set or operated, then
press ENTER.
3Use uio p to change to desired setting.
4Press ENTER to enter the setting.
0To return to the previous item, press BACK or o.
0Exiting the Menu, press AMP SETUP while the menu is
displayed.
The menu display disappears.
Contents Connections Playback Settings Tips Appendix
50
Front panel Display Rear panel Remote Index
Source Direct
Sets Source Direct Mode. The audio signal is not passed through the
sound quality adjustment circuits (Bass, Treble, Balance). This provides
playback that is more faithful to the original sound, but disables sound
quality adjustment.
Off
(Default):Disable source direct function.
On:
Playback sound is closer to the source
sound. Tone adjustments (Bass, Treble,
Balance) are disabled.
Bass
Adjusts the bass sound.
–8dB – +8dB (Default : 0dB)
Treble
Adjusts the treble sound.
–8dB – +8dB (Default : 0dB)
Balance
Use o p to adjust the left/right volume balance.
H/P AMP Gain
Set the gain of the headphone amplifier. Set this according to the
impedance of the connected headphones. It is recommended that this is
set on the “Low” side if the headphones have low impedance and on the
“High” side if they have high impedance.
Low:
Set the gain of the headphone amplifier to
“Low”. Set if the volume is too high when
the gain setting is “Mid”.
Mid
(Default):
Set the gain of the headphone amplifier to
“Mid”.
High:
Set the gain of the headphone amplifier to
“High”.Set when there is insufficient
volume, even when the gain setting is
“Mid”.
NOTE
0The headphone volume varies depending on the “H/P AMP Gain” setting.
Decrease the volume or mute the audio first if changing this setting while listening
to audio.
Contents Connections Playback Settings Tips Appendix
51
Front panel Display Rear panel Remote Index
Bluetooth
Stopping Bluetooth function reduces a source of noise that affects sound
quality, enabling higher sound quality playback.
On
(Default):Enables the Bluetooth function.
Off: Disables the Bluetooth function.
0When Bluetooth is “Off”, the input source cannot be switched to Bluetooth.
Auto Standby
When there is no input signal and operation for 30 minutes, this unit
automatically enters the standby mode.
On: The unit goes into standby after 30 minutes.
Off:
(Default):
The unit does not go into standby
automatically.
Contents Connections Playback Settings Tips Appendix
52
Front panel Display Rear panel Remote Index
oContents
Tips
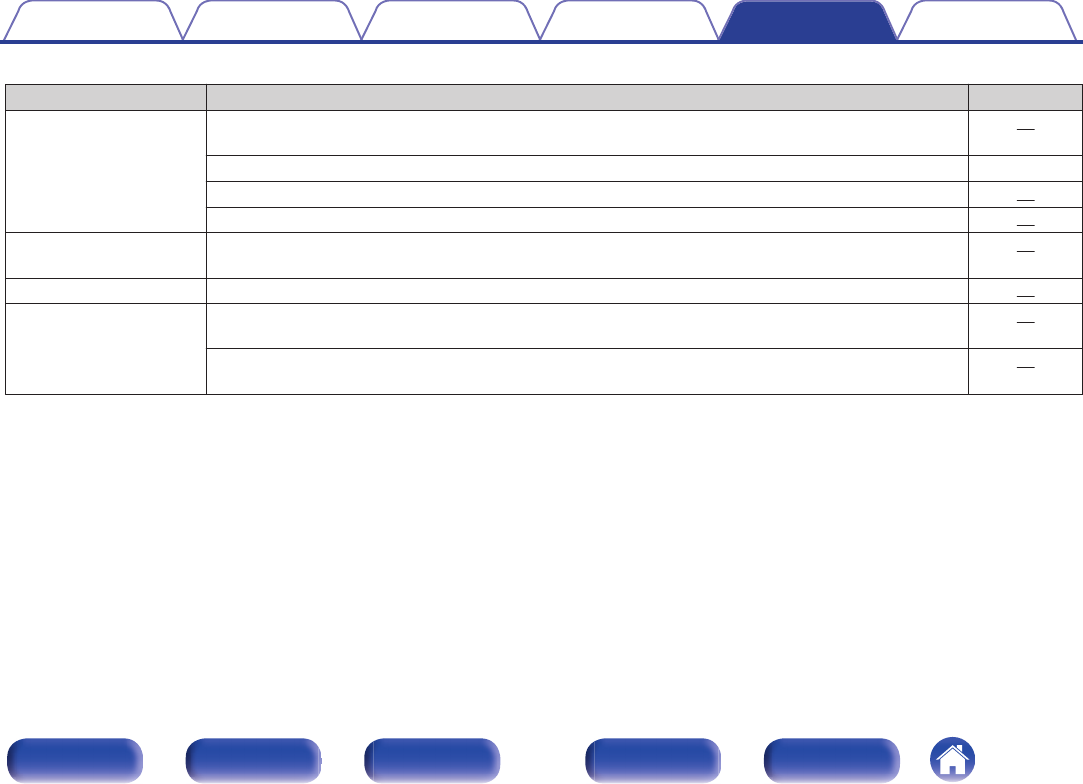
I want to turn on power to this unit from a Bluetooth device 54
I want to switch the connection to a different Bluetooth device 54
I want to connect to an NFC enabled device via NFC 54
I want to adjust the tone myself 54
I want sound playback that is faithful to the original sound 54
Troubleshooting
Power does not turn on/Power is turned off 56
No sound comes out 57
Sound is distorted or interrupted, or noise occurs 58
Desired sound does not come out 58
Files on a computer cannot be played back 59
Audio from digital devices cannot be played back (Coaxial/Optical) 60
Operations cannot be performed through the remote control unit 60
Bluetooth cannot be played back 61
NFC connection fails 61
Contents Connections Playback Settings Tips Appendix
53
Front panel Display Rear panel Remote Index
Tips
I want to turn on power to this unit from a Bluetooth device
0Once you perform pairing between this unit and a Bluetooth device, you can turn on power to this unit by operating the Bluetooth device. Select
“PMA-60” from the list of Bluetooth devices to turn on power to this unit.
I want to switch the connection to a different Bluetooth device
0This unit can only output music from one connected Bluetooth device, but up to 3 Bluetooth devices can simultaneously be connected. To switch the
connection easily, always have the frequently used Bluetooth devices connected. When multiple Bluetooth devices are connected and you want to
switch to a different Bluetooth device, stop playback on the device that is currently played back and play back the Bluetooth device that you want to
output music from. (v p. 48)
I want to connect to an NFC enabled device via NFC
0Enable the NFC function on an NFC enabled device, and touch the N-Mark (Q) on this unit with the NFC device. (v p. 46)
I want to adjust the tone myself
0Adjust the “Bass”, “Treble” and “Balance” in the setup menu to the desired levels. (v p. 51)
I want sound playback that is faithful to the original sound
0Set “Source Direct” in the setup menu to “On”. (v p. 51)
Contents Connections Playback Settings Tips Appendix
54
Front panel Display Rear panel Remote Index

Troubleshooting
1. Are the connections correct?
2. Is the set being operated as described in the owner’s manual?
3. Are the other devices operating properly?
If this unit does not operate properly, check the corresponding symptoms in this section.
If the symptoms do not match any of those described here, consult your dealer as it could be due to a fault in this unit. In this case, disconnect the power
immediately and contact the store where you purchased this unit.
Contents Connections Playback Settings Tips Appendix
55
Front panel Display Rear panel Remote Index
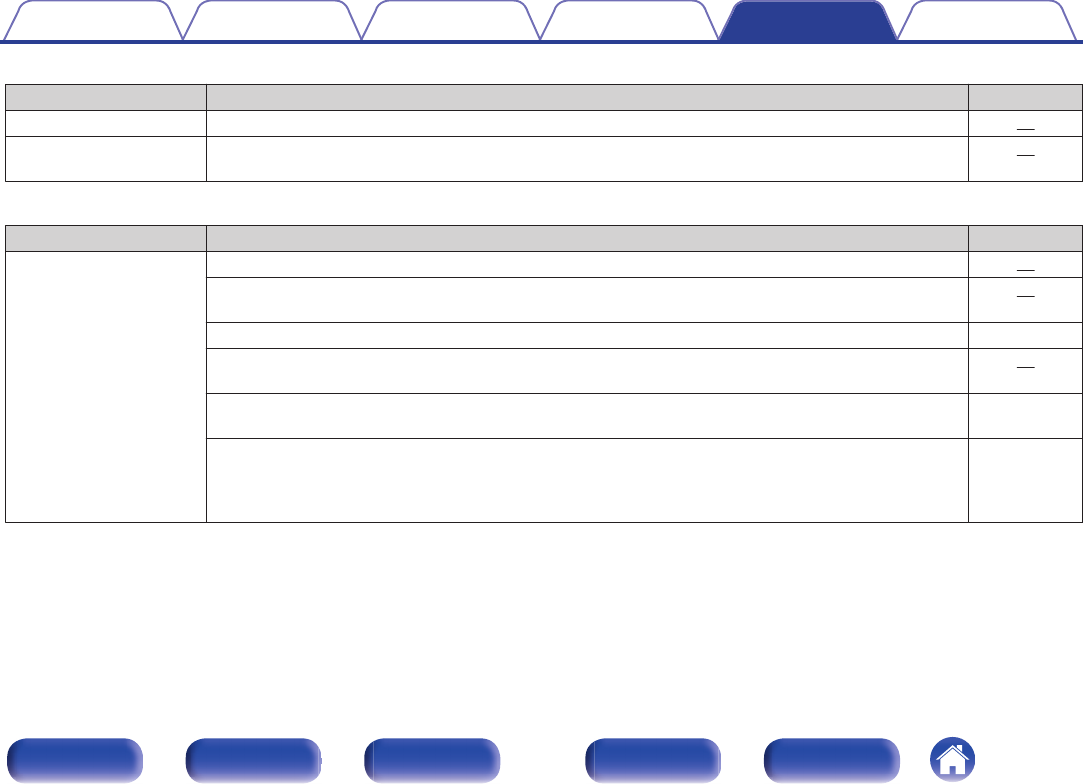
oPower does not turn on/Power is turned off
Symptom Cause / Solution Page
Power does not turn on. 0Check whether the power cord is correctly inserted into the power outlet. 25
0Check the connection between this unit and the power cord. 25
0This unit is in the standby mode. Press the power button (X). 27
0Use the power cord that is supplied with this unit. 25
Power automatically turns
off.
0The auto standby mode is on. When approx. 30 minutes pass with no audio input, this unit automatically
enters the standby mode. To turn Auto Standby mode off, set “Auto Standby” on the setup menu to “Off”.
52
Power turns off and the
protection circuit indicator
flashes in red approx.
every 2 seconds.
0The protection circuit has been activated due to a rise in temperature within this unit. Turn the power off,
wait about an hour until this unit cools down sufficiently, and then turn the power on again.
27
0Please re-install this unit in a place having good ventilation. -
Power turns off and the
protection circuit indicator
flashes in red approx.
every 0.5 seconds.
0Check the speaker connections. The protection circuit may have been activated because speaker cable
core wires came in contact with each other or a core wire was disconnected from the connector and
came in contact with the rear panel of this unit. After unplugging the power cord, firmly re-twist the core
wire, and then reconnect the wire.
20
0Turn down the volume and turn on the power again. 27
0This unit’s amplifier circuit has failed. Unplug the power cord and contact our customer service center. -
Contents Connections Playback Settings Tips Appendix
56
Front panel Display Rear panel Remote Index
oNo sound comes out
Symptom Cause / Solution Page
Audio is not output. 0Check the connections for all devices. 14
0Check the sound settings on the computer. 30
0Insert connection cables all the way in. -
0Check that the covered part of the speaker cable is not inserted into the speaker terminal. 20
0Check cables for damage. -
0Check that a proper input source is selected. 28
0Check that power to this unit and the connected devices is on. -
0Adjust to an appropriate volume level on this unit and the connected devices. 29
0To playback via a Bluetooth connection, perform pairing between this unit and the Bluetooth device. 41
0When the muting mode is enabled, cancel the muting. 29
0No sound is output from the speakers when headphones are connected. 8
Contents Connections Playback Settings Tips Appendix
57
Front panel Display Rear panel Remote Index

oSound is distorted or interrupted, or noise occurs
Symptom Cause / Solution Page
Sound is distorted or
interrupted, or noise
occurs.
0Adjust to an appropriate volume level on this unit and the connected devices. 29
0Place the device connected via Bluetooth closer to this unit. -
0Place this unit away from microwaves, wireless LAN devices, etc. -
0Turn off and on power to Bluetooth devices. -
0Turn down the volume of the playback device connected to the AUX connector. -
0Switch “H/P AMP Gain” to “High” if using headphones with high impedance or low sensitivity. 51
Sound is interrupted during
playback of music from a
computer.
0During playback of music from the computer, do not run any applications other than the player software. -
oDesired sound does not come out
Symptom Cause / Solution Page
No sound comes out of a
specific speaker.
0Check that speaker cables are properly connected. 20
0Set the left/right volume balance using “Balance” in the setup menu. 51
The left and right of stereo
sound is reversed.
0Check whether the left and right speakers are connected to the correct speaker terminals. 21
Set values are not reflected
in “Bass”, “Treble” and
“Balance”.
0Set “Off” to the “Source Direct”. 51
Headphone volume is low. 0Switch “H/P AMP Gain” to “High” if using headphones with high impedance or low sensitivity. 51
Contents Connections Playback Settings Tips Appendix
58
Front panel Display Rear panel Remote Index
oFiles on a computer cannot be played back
Symptom Cause / Solution Page
This unit is not recognized
on the computer.
0Reconnect the USB cable to the USB port on your computer. When this unit is still not recognized after
reconnection, connect to a different USB port.
22
0Restart your computer. -
0Check the OS of your computer. 30
0When your computer is running on Windows, a dedicated driver software should be installed. 31
This unit is not selected as
the playback device.
0Select this unit as the playback device in the sound settings on the computer. 30
“Unlocked” is displayed. 0When digital audio signals cannot be detected properly, “Unlocked” is displayed. 38
“Unsupported” is
displayed.
0“Unsupported” is displayed when audio signals that are not supported by this unit are input. Check the
settings on your computer or player software.
38
0If the computer you use is “Mac OS”, please check if the “PMA-60” format is set below “384000.0 Hz”
using the “Audio MIDI Setup”.
37
Contents Connections Playback Settings Tips Appendix
59
Front panel Display Rear panel Remote Index
oAudio from digital devices cannot be played back (Coaxial/Optical)
Symptom Cause / Solution Page
“Unlocked” is displayed. 0When digital audio signals cannot be detected properly, “Unlocked” is displayed. 39
“Unsupported” is
displayed.
0“Unsupported” is displayed when audio signals that are not supported by this unit are input. Check the
audio output signal format from your digital device.
39
oOperations cannot be performed through the remote control unit
Symptom Cause / Solution Page
Operations cannot be
performed through the
remote control unit.
0Batteries are worn out. Replace with new batteries. 18
0Operate the remote control unit within a distance of about 23 ft/7 m from this unit and at an angle of within
30°.
19
0Remove any obstacle between this unit and the remote control unit. -
0The coin-shaped lithium battery (CR2025) is not positioned correctly. Correct the positioning so that the +
symbol engraved on the battery faces upwards.
18
0The set’s remote control sensor is exposed to strong light (direct sunlight, inverter type fluorescent bulb
light, etc.). Move the set to a place in which the remote control sensor will not be exposed to strong light.
-
0When using a 3D video device, the remote control unit of this unit may not function due to effects of
wireless communications between units (such as TV and glasses for 3D viewing). In this case, adjust the
direction of units with the 3D communications function and their distance to ensure they do not affect
operations from the remote control unit of this unit.
-
Contents Connections Playback Settings Tips Appendix
60
Front panel Display Rear panel Remote Index

oBluetooth cannot be played back
Symptom Cause / Solution Page
Bluetooth devices cannot
be connected to this unit.
0The Bluetooth function in the Bluetooth device has not been enabled. See the Owner’s Manual of the
Bluetooth device to enable the Bluetooth function.
-
0Bring the Bluetooth device near to this unit. -
0The Bluetooth device cannot connect with this unit if it is not compatible with the A2DP profile. -
0Turn the power of the Bluetooth device off and on again, and then try again. -
0The Bluetooth function is off. Press Bluetooth button, activate the Bluetooth function and connect again. 52
The sound is cut off. 0Bring the Bluetooth device near to this unit. -
0Remove obstructions between the Bluetooth device and this unit. -
0To prevent electromagnetic interference, locate this unit away from microwave ovens, wireless LAN
devices and other Bluetooth devices.
-
0Reconnect the Bluetooth device. -
oNFC connection fails
Symptom Cause / Solution Page
NFC connection fails. 0Check that the Bluetooth device has the NFC function. -
0Touch the N-Mark (Q) on this unit, checking the location of the NFC antenna on the Bluetooth device.
Touch surely until the Bluetooth device responds.
46
Contents Connections Playback Settings Tips Appendix
61
Front panel Display Rear panel Remote Index
Resetting to factory settings
Perform this when this unit does not operate properly.
Various settings are reset to the factory default values. Make settings
again.
.
1When this unit is in the standby mode, press X while
holding q.
“INITIALIZE” appears on the display and this unit restarts.
NOTE
0Pairing information stored on this unit is also initialized. Perform pairing again.
Contents Connections Playback Settings Tips Appendix
62
Front panel Display Rear panel Remote Index
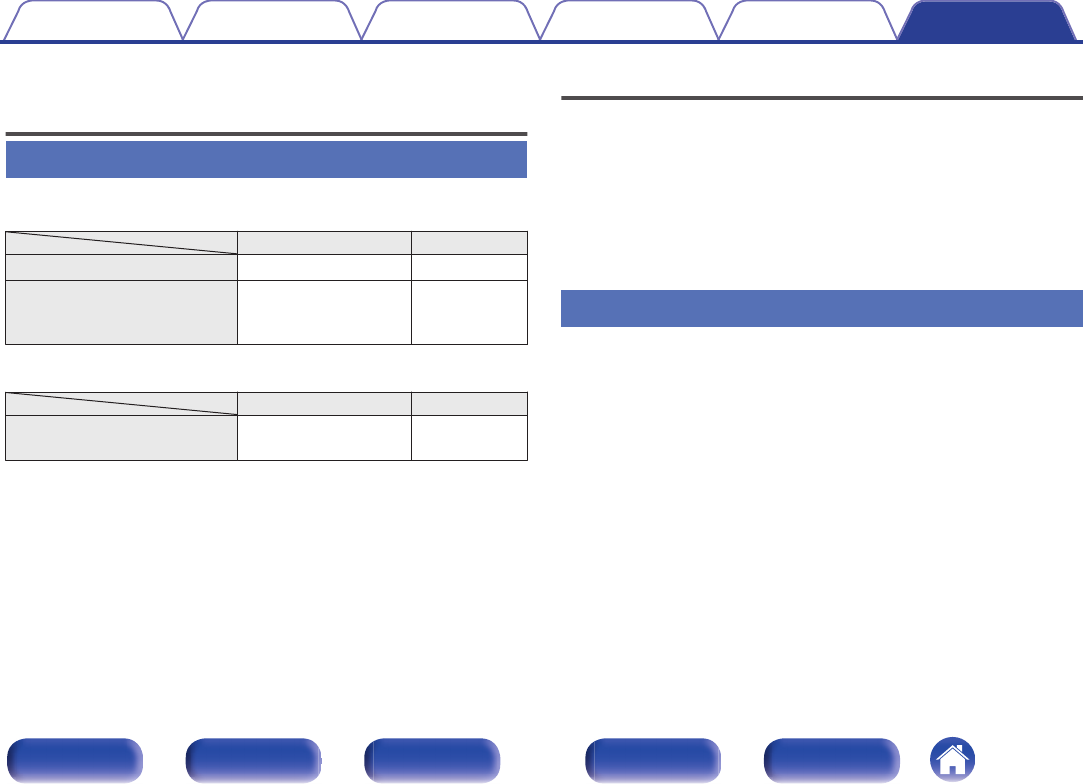
Specifications of supported audio
formats
D/A Converter
nUSB-DAC
Sampling frequency Bit length
DSD (2-channel) 2.8/5.6/11.2 MHz 1 bit
Linear PCM (2-channel)
44.1/48/88.2/96/
176.4/192/352.8/
384 kHz
16/24/32 bit
nCoaxial/Optical
Sampling frequency Bit length
Linear PCM (2-channel) 32/44.1/48/88.2/96/
176.4/192 kHz 16/24 bit
Playing back Bluetooth devices
This unit supports the following Bluetooth profiles.
0A2DP (Advanced Audio Distribution Profile) :
When a Bluetooth device that supports this specification is connected, you
can perform high quality streaming distribution of monaural and stereo
audio data.
0AVRCP (Audio/Video Remote Control Profile) :
When a Bluetooth device that supports this specification is connected, you
can operate the Bluetooth device from this unit.
Bluetooth communications
The radio waves broadcast from this unit may interfere with operations on
medical equipment. The radio wave interference may cause a malfunction.
Therefore, make sure to turn off power to this unit and Bluetooth devices in
the following places.
0Hospitals, trains, airplanes, gas stands, and other places where
flammable gas may occur.
0Places near automatic doors and fire alarms.
Contents Connections Playback Settings Tips Appendix
63
Front panel Display Rear panel Remote Index
Explanation of terms
Bluetooth
Technology for near field wireless communications. This unit can connect
to Bluetooth devices wirelessly. To establish a Bluetooth connection, you
must perform pairing (registering) beforehand.
DSD (Direct-Stream Digital)
One of the audio data recording methods, it is the signal aspect used to
store audio signals on a super audio CD, and is Δ-Σ modulated digital
audio.
NFC (Near Field Communication)
Technology for near field wireless communications. You can just touch
this unit with a device with the NFC function to establish a connection
between this unit and the device.
Sampling frequency
Sampling involves taking a reading of a sound wave (analog signal) at
regular intervals and expressing the height of the wave at each reading in
digitized format (producing a digital signal).
The number of readings taken in one second is called the “sampling
frequency”. The larger the value, the closer the reproduced sound is to the
original.
Pairing
Pairing (registration) is an operation that is required in order to connect a
Bluetooth device to this unit using Bluetooth. When paired, the devices
authenticate each other and can connect without mistaken connections
occurring.
When using Bluetooth connection for the first time, you need to pair this
unit and the Bluetooth device to be connected.
This unit can store pairing information for a maximum of 8 devices.
Protection circuit
This is a function to prevent damage to devices within the power supply
when an abnormality such as an overload, excess voltage occurs or over
temperature for any reason.
Linear PCM
Uncompressed PCM (Pulse Code Modulation) signals. Unlike lossy
compression audio sources such as MP3, no audio quality or dynamic
range deteriorates.
Contents Connections Playback Settings Tips Appendix
64
Front panel Display Rear panel Remote Index
Trademark information
.
The Bluetooth® word mark and logos are registered trademarks owned
by Bluetooth SIG,Inc. and any use of such marks by D&M Holdings Inc. is
under license. Other trademarks and trade names are those of their
respective owners.
.
Qualcomm aptX is a product of Qualcomm Technologies International,
Ltd.Qualcomm is a trademark of Qualcomm Incorporated, registered in
the United States and other countries, used with permission. aptX is a
trademark of Qualcomm Technologies International, Ltd., registered in
the United States and other countries, used with permission.
.
The N-Mark is a trademark or registered trademark of NFC Forum, Inc. in
the United States and in other countries.
Contents Connections Playback Settings Tips Appendix
65
Front panel Display Rear panel Remote Index

Specifications
oAudio section
0Output performance
Rated output: both channels driven
25 W+25 W (8 Ω/ohms, 1 kHz, T.H.D. 0.1 %)
50 W+50 W (4 Ω/ohms, 1 kHz, T.H.D. 1.0 %)
Output connectors: Speaker: 4-16 Ω/ohms
Headphones: Φ6.3 mm jack
Total harmonic distortion: 0.004 % (Digital in, Rated output -3 dB, 8 Ω/ohms, 1 kHz)
S/N ratio: 110 dB (Digital in, 25 W, 8 Ω/ohms, 1 kHz, IHF-A)
0Digital input signal
Audio formats: Digital audio interface (Linear PCM)
Coaxial input: 0.5 Vp-p/50 Ω/ohms
Optical input: More than – 27 dBm
Wavelength: 660 nm
0Input performance
Input sensitivity/impedance: AUX: 0.13 V / 22 kΩ/kohms
Contents Connections Playback Settings Tips Appendix
66
Front panel Display Rear panel Remote Index

oBluetooth section
Communication system: Bluetooth version 3.0
Transmission power: Maximum 2.5 mW (Class2)
Maximum communication range: Approx. 32.8 ft/10 m in line of sight *
Frequency band: 2.4 GHz band
Modulation method: FHSS (Frequency-Hopping Spread Spectrum)
Supported profiles: A2DP 1.3/AVRCP 1.5
Supported codecs: aptX Low Latency/AAC/SBC
zThe actual communication range varies depending on the influence of such factors as obstructions between devices, electromagnetic waves from microwave ovens, static
electricity, cordless phones, reception sensitivity, antenna performance, operating system, application software etc.
oGeneral
Power supply: AC120 V, 60 Hz
Power consumption: 35 W
Power consumption in standby mode: 0.2 W
For purposes of improvement, specifications and design are subject to change without notice.
Contents Connections Playback Settings Tips Appendix
67
Front panel Display Rear panel Remote Index

Index
v A
Auto Standby ................................................. 52
v B
Bluetooth device ............................................ 41
v C
CD player ................................................. 23, 24
v D
Display ............................................................. 9
v F
Front panel ....................................................... 7
v I
Installing horizontally ...................................... 15
Installing vertically .......................................... 16
v M
Multi point function ......................................... 47
Muting ............................................................ 29
v N
NFC function ............................................ 46, 64
v P
PC .................................................................. 22
Protection circuit ............................................ 64
v R
Rear panel ...................................................... 10
Remote control unit ........................................ 11
Resetting factory settings ............................... 62
v S
Source direct .................................................. 51
Speakers ........................................................ 20
v T
Tips ................................................................ 54
Troubleshooting ............................................. 53
v U
USB-DAC ....................................................... 30
v V
Volume ........................................................... 29
Contents Connections Playback Settings Tips Appendix
69
Front panel Display Rear panel Remote Index

.
www.denon.com 3520 10553 00AD
Copyright ©2017 D&M Holdings Inc.All Rights Reserved.
70
For customers in the USA
FCC Notice
Warning
This device complies with Part 15 of the FCC Rules.
Operation is subject to the following two conditions: (1)
This device may not cause harmful interference, and (2) this
device must accept any interference received, including
interference that may cause undesired operation.
Caution
You are cautioned that any changes or modifications not
expressly approved in this manual could void your authority
to operate this equipment.
Note: This equipment has been tested and found to comply
with the limits for a Class B digital device, pursuant to part
15 of the FCC Rules. These limits are designed to provide
reasonable protection against harmful interference in a
residential installation. This equipment generates, uses and
can radiate radio frequency energy and, if not installed and
used in accordance with the instructions, may cause
harmful interference to radio communications. However,
there is no guarantee that interference will not occur in a
particular installation. If this equipment does cause harmful
interference to radio or television reception, which can be
determined by turning the equipment off and on, the user is
encouraged to try to correct the interference by one or more
of the following measures:
– Reorient or relocate the receiving antenna.
–
Increase the separation between the equipment and receiver.
– Connect the equipment to an outlet on a circuit different
from that to which the receiver is connected.
– Consult the dealer or an experienced radio/TV technician for
help.
RF Exposure Statement
This transmitter must not be co-located or operated in
conjunction with any other antenna or transmitter used in
other systems. This device complies with FCC radiation
exposure limits set forth for an uncontrolled environment
and meets the FCC radio frequency (RF) Exposure
Guidelines. This equipment has very low levels of RF energy
that is deemed to comply without testing of specific
absorption rate (SAR).
For customers in Canada
IC statement
CAN ICES-3 (B)/NMB-3(B)
This device complies with INDUSTRY CANADA R.S.S. 247.
Operation is subject to the following conditions: (1) This
device may not cause harmful interference, and (2) this
device must accept any interference received, including
interference which may cause undesired operation.
Under Industry Canada regulations, this radio transmitter
may only operate using an antenna of a type and maximum
(or lesser) gain approved for the transmitter by Industry
Canada. To reduce potential radio interference to other
users, the antenna type and its gain should be so chosen
that the equivalent isotropically radiated power (e.i.r.p.) is
not more than that necessary for successful
communication.
This device complies with RSS-102 radiation exposure limits
set forth for an uncontrolled environment.
English:
This device complies with Industry Canada’s license-exempt RSSs. Operation is subject to the following two conditions:
(1) This device may not cause interference; and
(2) This device must accept any interference, including interference that may cause undesired operation of the device.
French:
Le pr sent appareil est conforme aux CNR d'Industrie Canada applicables aux appareils radio exempts de licence. L'exploitation est autoris e aux
deux conditions suivantes : (1) l'appareil ne doit pas produire de brouillage, et (2) l'utilisateur de l'appareil doit accepter tout brouillage
radio lectrique subi, m me si le brouillage est susceptible d'en compromettre le fonctionnement.