D and M RC7000 Remote Controller User Manual
D&M; Holdings Inc. Remote Controller Users Manual
UserManual.wiki
>
D and M
>
RC7000 User Manual
Users Manual
Navigation menu
Upload a User Manual
Namespaces
Wiki Guide
HTML
PDF
Info
Views
User Manual
Discussion / Help
Navigation
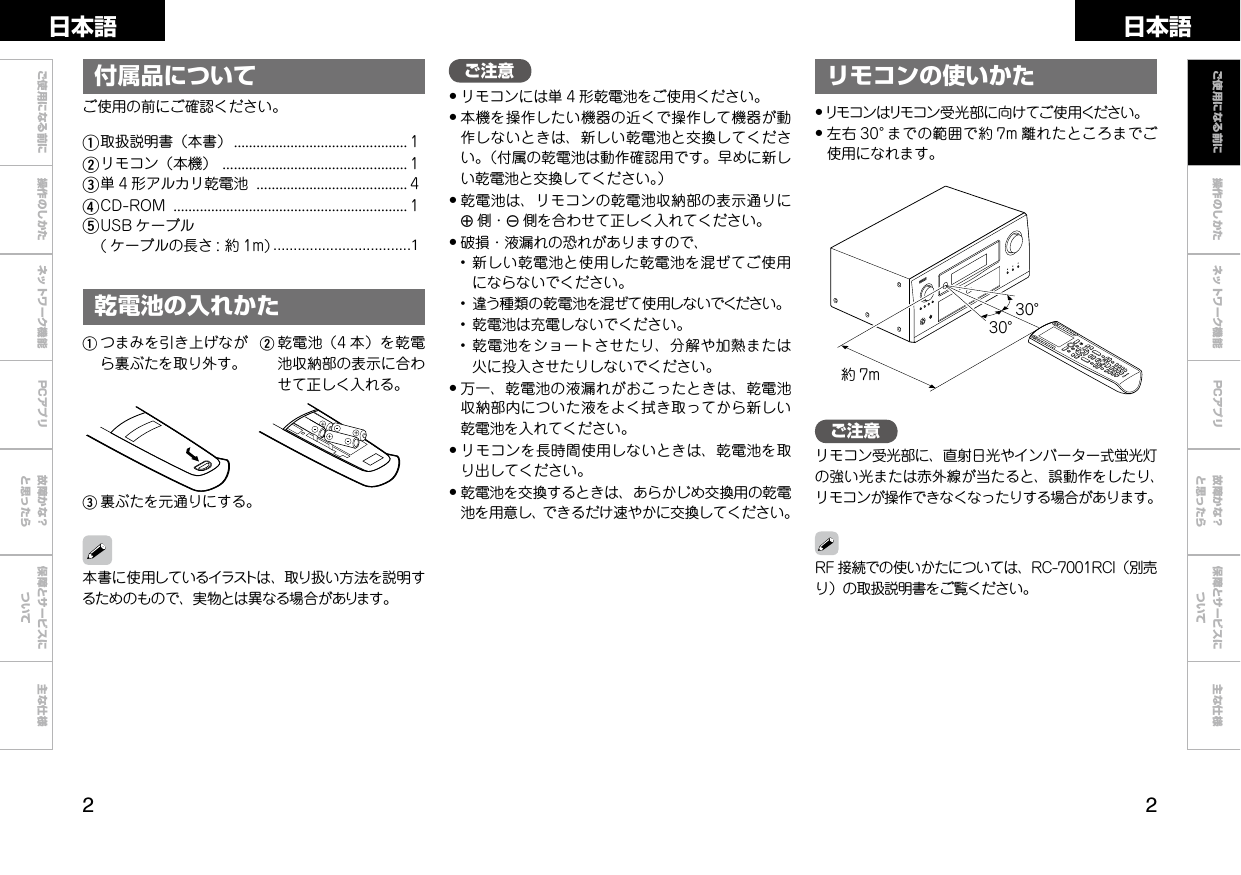
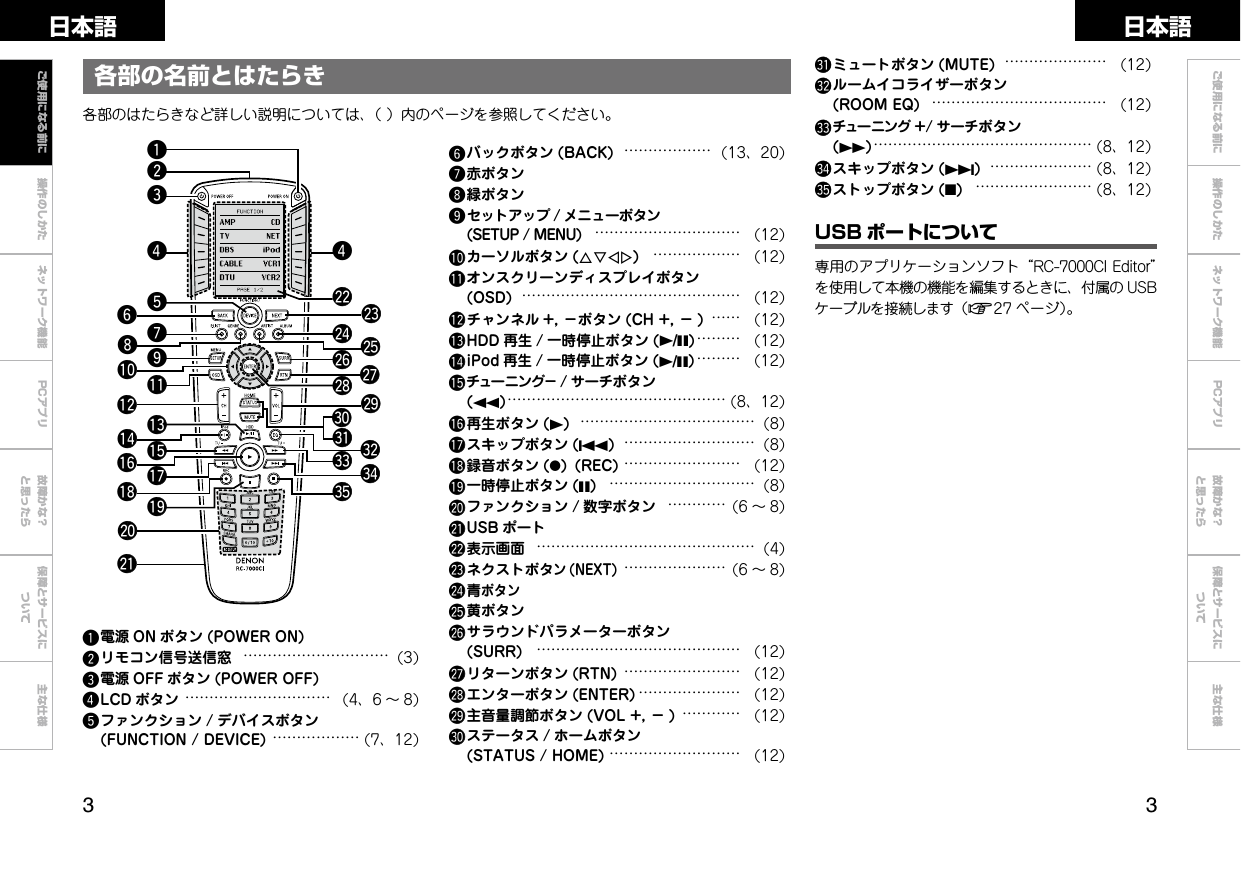
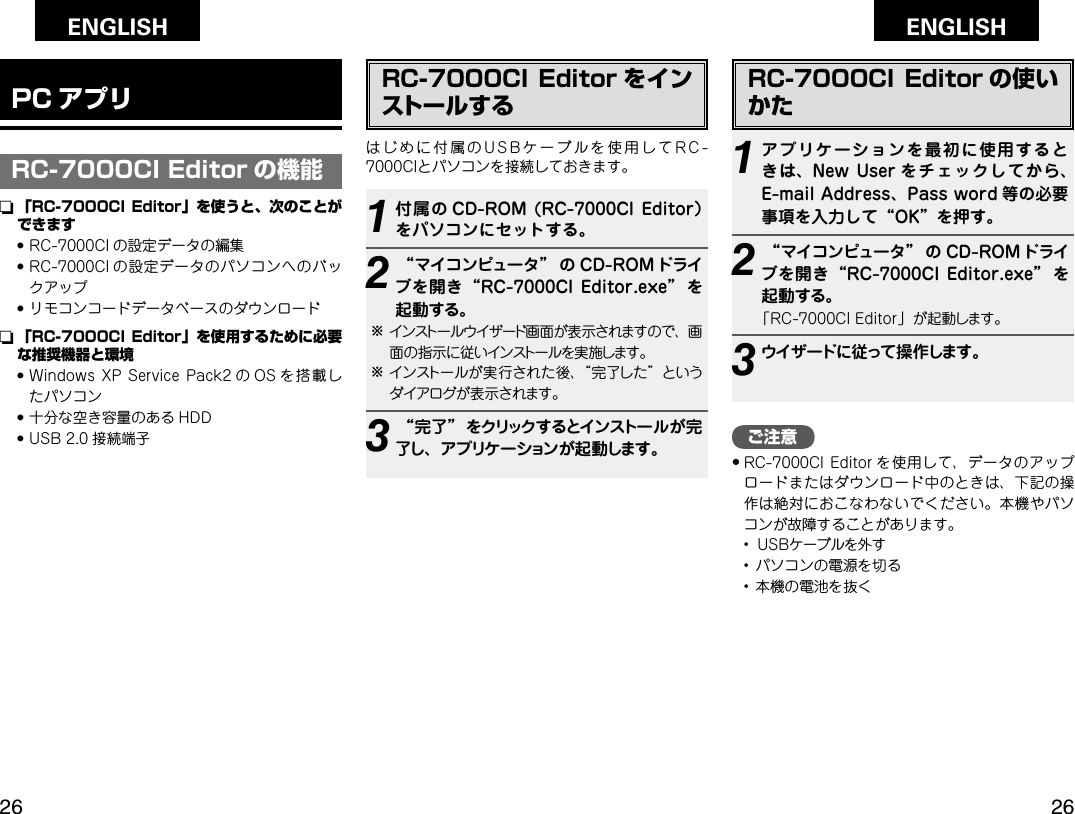
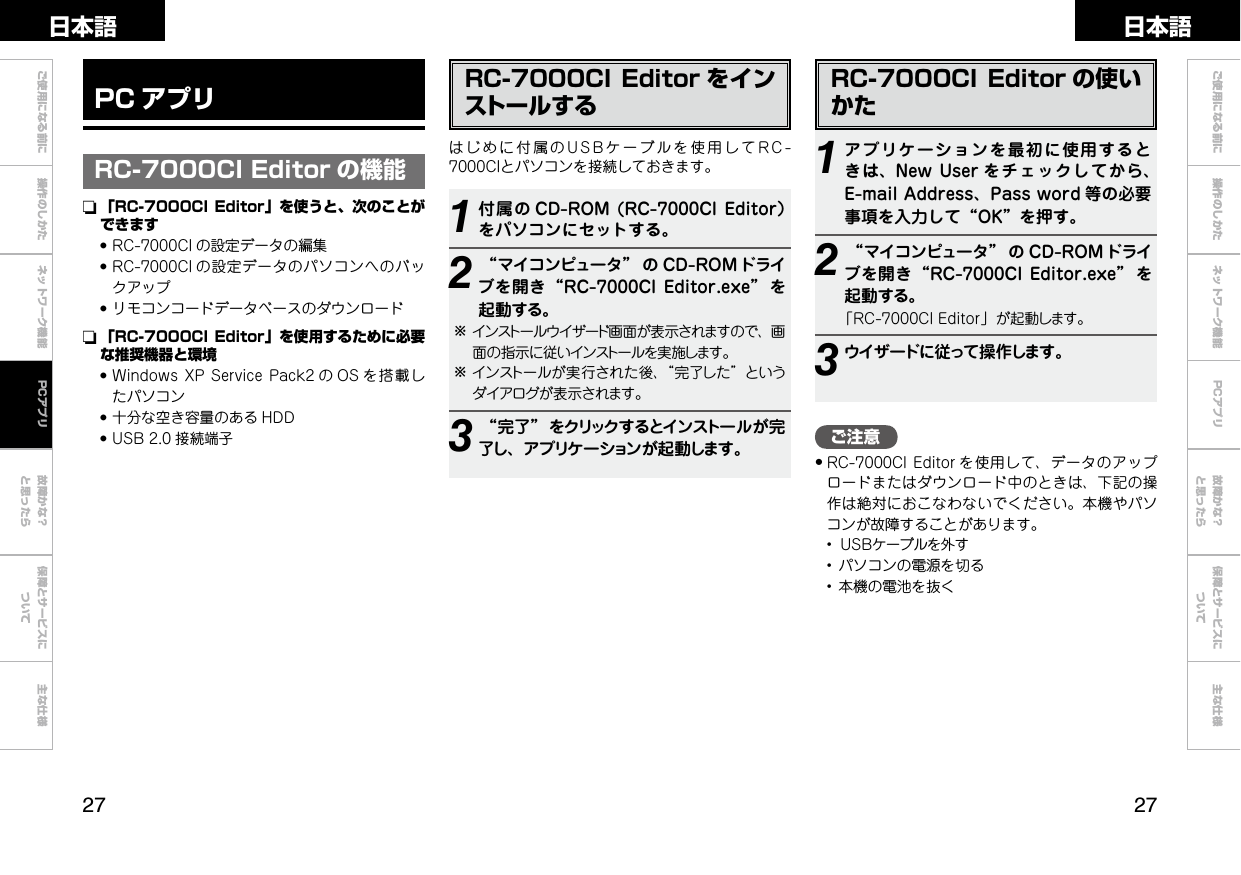
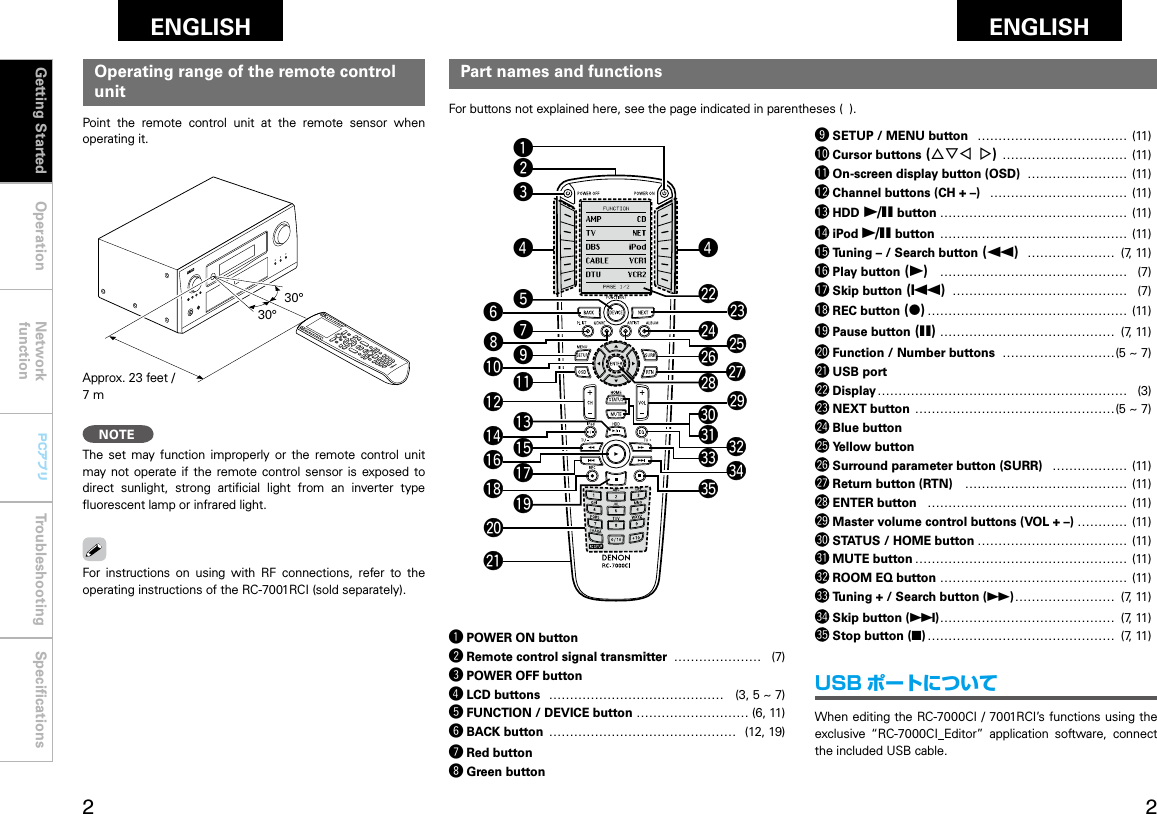
![ ご使用になる前に 操作のしかた ネットワーク機能 故障かな?と思ったら保障とサービスについて主な仕様ご使用になる前に ネットワーク機能 故障かな?と思ったら保障とサービスについて主な仕様日本語 日本語PCアプリPCアプリ操作のしかたはじめに初めて電池をセットしたとき下記の設定をおこなってください。LCD ボタン初期表示画面初期表示内容は下記の画面になります。 GScreen1H GScreen2HDEVICE SELECTAMP ZONE2ZONE3 ZONE4TUNER CDDVD TVSAT CABLEPage 1/2 DEVICE SELECTVCR 1 iPodVCR 2 NetAudDTU Page 2/21AV アンプ(AV レシーバー)の操作に使用するときは [Denon1] を押す。b[Denon2] は将来の拡張用機能です。 通常は [Denon1] を選択してください。2[YES] を押す。3NEXT を押す。デフォルトデバイスが [Denon1] に設定されます。4DEVICE を押す。初期設定画面になります。You have selected Denon 1 receiver.All devices used to control this receiver will be set up. Are yousure your receiver is of type Denon1?NO YES Please select which type of Denon receiver you are using below.Denon 1 Denon 212Success! Your remote has beensetup to workwith the Denon1 receiver.Press NEXT to continue with more setup choices or DEVICE to begin using your remote.3LCD ボタンn 選択の操作●表示している項目名の右または左の LCD ボタンを押して項目を選びます。●画面は5秒間表示します。表示中に操作をしてください。(「画面表示時間を設定する」(v6ページ))●画面の下に“PAGE”表示がある場合は表示している画面の他にも画面があります。NEXT ボタンまたは BACK ボタンで表示画面を切り替えてください。LCD ボタンの操作についてリモコンのボタンを押すと、LCD 画面に各種設定や操作の項目が表示されます。 RF 双方向通信機能を使用するときは「リモコンコード送信モードの設定」(v15 ページ)にて AMP を RF 設定に変更してご使用ください。n 取扱説明書の項目名表示この取扱説明書では画面に表示される項目名を[ ] で表示します。(例 :[Denon1])BACK ボタン操作のしかたNEXT ボタンDEVICE ボタンご注意この機能を使用するには RC-7001RCI(別売り)と対応する DENON 製品が必要です。1の画面を表示中に LCD 画面が消灯したときは、RC SETUP ボタンを3秒間押すと、もとの画面に戻ります。](https://usermanual.wiki/D-and-M/RC7000/User-Guide-807012-Page-9.png)
![ ご使用になる前に 操作のしかた ネットワーク機能 故障かな?と思ったら保障とサービスについて主な仕様ご使用になる前に ネットワーク機能 故障かな?と思ったら保障とサービスについて主な仕様日本語 日本語PCアプリPCアプリ設定画面表示時間を設定する画面表示して消えるまでの時間を設定します。初期設定:5 秒NEXTBACKDEVICERC SETUPLCDボタン LCDボタン操作説明のボタン名について[ ]: 選択項目の LCD ボタンボタン名のみ:リモコンのボタンを表します。1RC SETUPを3秒間押す。“PROGRAMDEVICE”メニューを表示します。2NEXTを2回押し、[USER PREF] を押す。3[DISPLAY T/O] を押す。4NEXTを押す。5[–DISPLAY T/O+] を押し、消灯するまでの時間を設定する。●右側の LCD ボタン···································+●左側の LCD ボタン···································–b1(MIN)~30(MAX) 秒の範囲内で設定できます。6[SAVE] を押す。7NEXT を押す。1DEVICEを押す。“DEVICESELECT”メニューを表示します。2操作したいデバイス(機器) の LCD ボタンを押す。b複数 の画 面がある時には、NEXT ボタンまたはBACK ボタンで画面を切り替えてください。3操作したい項目の LCD ボタンを押す。b複数 の画 面がある時には、NEXT ボタンまたはBACK ボタンで画面を切り替えてください。LCD ボタンの操作操作のしかた](https://usermanual.wiki/D-and-M/RC7000/User-Guide-807012-Page-11.png)
![ ご使用になる前に ネットワーク機能 故障かな?と思ったら保障とサービスについて主な仕様ご使用になる前に 操作のしかた ネットワーク機能 故障かな?と思ったら保障とサービスについて主な仕様日本語 日本語PCアプリPCアプリコントラストを調整をする画面の文字が見にくいときに設定します。初期設定:Level51RC SETUPを3秒間押す。“PROGRAMDEVICE”メニューを表示します。2NEXTを2回押し、[USER PREF] を押す。3[CONTRAST] を押す。4NEXTを押す。5[–CONTRAST+] を押し、コントラストを設定する。●右側の LCD ボタン···································+●左側の LCD ボタン····································–bLevel0(MIN) ~Level12(MAX) の範囲内で設定できます。6[SAVE] を押す。7NEXTを押す。NEXTVOL+ –7192BACKRC SETUP68DEVICELCDボタン LCDボタン3操作説明のボタン名について[ ]: 選択項目の LCD ボタンボタン名のみ:リモコンのボタンを表します。バックライト点灯時間を設定するバックライトが消灯するまでの時間を設定します。初期設定:5 秒1RC SETUPを3秒間押す。“PROGRAMDEVICE”メニューを表示します。2NEXTを2回押し、[USER PREF] を押す。3[LIGHT T/O] を押す。4NEXTを押す。5[–DISPLAY T/O+] を押し、消灯するまでの時間を設定する。●右側の LCD ボタン···································+●左側の LCD ボタン····································–bLIGHTOFF~30(MAX) 秒の範囲内で設定できます。6[SAVE] を押す。7NEXTを押す。設定を終了する“DEVICESELECT” 画面 を 表示 する ま でDEVICE を押す。操作のしかた](https://usermanual.wiki/D-and-M/RC7000/User-Guide-807012-Page-12.png)
![ ご使用になる前に 操作のしかた ネットワーク機能 故障かな?と思ったら保障とサービスについて主な仕様ご使用になる前に ネットワーク機能 故障かな?と思ったら保障とサービスについて主な仕様日本語 日本語PCアプリPCアプリ学習機能を使う登録したいデバイスのリモコン信号を受信させて登録することができます。ご注意製品の年式、モデルの機能の違いにより動作しないボタンまたは誤動作をする場合があります。81、2、3、6、7、8、9、VOL+ –を押して追加するデバイス(機器)が動作するか確認する。動作する········[YES] を押す。●IR/RF 選択画面に移行します。動作しない····[NO] を押す。●次のコードに切り替わりますので、動作するコードを探して [YES] で設定してください。9[IR]または [RF] を押して、リモコン信号を選ぶ。[IR]:赤外線信号を送信します。[RF]:リモコンレシーバー RC-7001RCI(別売り)に RF信号を送信します。bRC-7001RCI(別売り)については「ネットワーク機能」(v23 ページ)をご覧ください。10“SelectPosition”画面にて、プリセットしたデバイスを追加したい位置の LCDボタンを押す。設定が確定します。b終了するときは [NO]、続けるときは [YES] を押します。1RC SETUPを3秒間押す。“PROGRAMDEVICE”メニューを表示します。2[LEARNING] を押す。3[LEARN KEY] を押す。4NEXTを2回押す。5“SelectDevice”画面にて、リモコン信号を登録したいデバイスの LCD ボタンを押す。6“LearnKey”画面にて、登録したい操作ボタンを押す。bNEXT、BACK、DEVICE 以外のボタンに学習できます。いろいろな設定をするプリセットメモリー機能を使うリモコンにプリセットメモリーすると、各社のデバイス(機器)の操作ができるようになります。1RC SETUPを3秒間押す。“PROGRAMDEVICE”メニューを表示します。2[BASIC SETUP]を押す。3[BRAND SET] を押す。4NEXTを押す。5“PressDeviceType”画面にて、プリセットメモリーしたいデバイスの LCD ボタンを押す。6NEXTを押す。7“SelectBrand”画面にて、デバイスのブランド名の LCD ボタンを押す。複数のコードがある場合には 1ofzを表示します。(zはコード数)b選択したいブランドが表示されていないときには、NEXT を押してブランドの表示を切り替えます。操作のしかた](https://usermanual.wiki/D-and-M/RC7000/User-Guide-807012-Page-13.png)
![ ご使用になる前に ネットワーク機能 故障かな?と思ったら保障とサービスについて主な仕様ご使用になる前に 操作のしかた ネットワーク機能 故障かな?と思ったら保障とサービスについて主な仕様日本語 日本語PCアプリPCアプリマクロ機能を使う連続した操作を 1 つのボタンに登録させることができます。この機能により、1 回のボタン操作でアンプの電源 ON、入力ソースの選択、テレビの電源ON、ソースデバイス(機器)の電源 ON、再生などの一連の操作ができます。1RC SETUPを3秒間押す。“PROGRAMDEVICE”メニューを表示します。2[MACROS]を押す。3[ADD/REDO] を押す。4NEXTを2回押す。5“AssignMacro”画面にて、マクロを登録したいデバイス(機器)の LCD ボタンを押す。6マクロを登録したいボタンを押す。bNEXT、BACK、DEVICE 以外のボタンにマクロを登録できます。7NEXT を押して次の登録を続けます。bDEVICE を押してデバイス(機器)を選びます。b操作 5と6を繰り返してください。NEXTBACKDEVICERC SETUPLCDボタン LCDボタン操作説明のボタン名について[ ]: 選択項目の LCD ボタンボタン名のみ:リモコンのボタンを表します。7お互いのリモコン信号送信部を向き合わせ、NEXTを押してすぐに登録したいリモコンのボタンを押す。学 習 できると“Success!”を表示します。8続けて他のボタンを登録するときはNEXT を押す。b操作 6~8を繰り返してください。9学習を終了するときは [EXIT] を押す。bボタン名を変えたいときは [EDIT] を押します。「ボタン名の変更」(v19 ページ)操作 7からおこなってください。ご注意リモコンによっては学習できない場合や、学習してもデバイスが正常に動作しない場合があります。この場合は、デバイスの専用リモコンをご使用ください。操作のしかた](https://usermanual.wiki/D-and-M/RC7000/User-Guide-807012-Page-14.png)
![0 0ご使用になる前に 操作のしかた ネットワーク機能 故障かな?と思ったら保障とサービスについて主な仕様ご使用になる前に ネットワーク機能 故障かな?と思ったら保障とサービスについて主な仕様日本語 日本語PCアプリPCアプリコードサーチ機能を使う新しいデバイス(機器)をリモコンに追加するとき、プリセットするコードを探して追加できます。1RC SETUPを3秒間押す。“PROGRAMDEVICE”メニューを表示します。2[BASIC SETUP]を押す。3[CODE SEARCH] を押す。4NEXTを押す。5“PressDeviceType” 画面にて、コードを探したいデバイス(機器)の LCD ボタンを押す。6NEXTを 2 回押す。7リモコンのボタンを押してデバイス(機器)が動作したら、[YES] を押す。b[NO] を押すとコードを切り替えます。再度リモコンボタンを押して動作を確認してください。[BACK]で前のコードに戻ります。8“SelectPosition”画面にて、プリセットしたデバイス(機器)を追加したい位置の LCD ボタンを押す。b終了するときは [NO]、続けるときは [YES] を押します。ディレイタイム機能を使うマクロに登録された、リモコン信号の送信間隔(ディレイタイム)の設定ができます。8RC SETUPを押す。登録メニューを表示します。9設定したマクロを登録するときは [SAVE]を押す。[TEST]:登録したマクロを送信して確認します。[DELAY – +]:送信間隔を設定します。0.05(MIN)~ 60(MAX)秒の間で設定可能です。(初期値:0.25 秒)[CANCEL ENTRY]:最後に登録したコードを削除して、登録モードに戻ります。[START OVER]:最初からやり直します。10設定を終了するときは [EXIT]を押す。bボタン名(マクロ名)を変えたいときは [EDIT] を押します。「ボタン名の変更」(v19 ページ)操作 7からおこなってください。1RC SETUPを3秒間押す。“PROGRAMDEVICE”メニューを表示します。2[MACROS]を押す。3[EDIT DELAY] を押す。4NEXTを2回押す。5“EditMacro”画面から登録したマクロを選択します。6NEXTを押す。7[DELAY– +] でディレイタイムを変 更し、[SAVE]を押す。[TEST]:登録したマクロを送信して確認します。[DELAY – +]:送信間隔を設定します。[CREATE AGAIN]:新しいマクロを登録します。8設定を終了するときは [EXIT] を押す。操作のしかたご注意マクロを設定するボタンは、マクロに登録できません。](https://usermanual.wiki/D-and-M/RC7000/User-Guide-807012-Page-15.png)
![ ご使用になる前に ネットワーク機能 故障かな?と思ったら保障とサービスについて主な仕様ご使用になる前に 操作のしかた ネットワーク機能 故障かな?と思ったら保障とサービスについて主な仕様日本語 日本語PCアプリPCアプリNEXTENTERRC SETUPLCDボタン LCDボタン操作説明のボタン名について[ ]: 選択項目の LCD ボタンボタン名のみ:リモコンのボタンを表します。お気に入りの設定お気に入りのチャンネル番号を一つのボタンに登録して操作します。お気に入りの登録1RC SETUPを3秒間押す。“PROGRAMDEVICE”メニューを表示します。2[FAVORITES]を押す。3[ADD/REDO] を押す。4NEXTを押す。5[KEY] を押す。bここで、頁を追加することができます。[PAGE] を選択したときは、[MAIN] または [DEVICE] を押します。[MAIN] を選択したときは、[YES] で設定します。DEVICE] を選択したときは頁を追加するデバイス(機器)を選択します。6NEXTを押す。7“AssignFavorite”画面にて、お気に入りを登録したい場所のボタンを選ぶお気に入りの設定1RC SETUPを3秒間押す。“PROGRAMDEVICE”メニューを表示します。2[FAVORITES]を押す。3[CONFIGURE]を押す。4NEXTを 2 回押す。5“CONFIGUREFAV” 画面にて、設定したい項目の LCD ボタンを押す。[FAV DEVICE]:お気に入りで登録するデバイスを選択します。初期設定は“SAT”になっています。[FV IR DELAY]:登録したお気に入りボタンを押したときのリモコンコードの送信間隔を設定します。[TOTAL DIGIT]:お気に入りに登録するチャンネルの桁数を設定します。[CHANNEL KEY]:登録したお気に入りチャンネルの最後に ENTER を追加する場合に設定します。(数字ボタンで選択した後に、ENTER を押してチャンネルを設定するタイプのデバイスを使用する場合に設定します。)操作のしかたチャンネルの最後に ENTER を追加するときには ENTERを押します。ENTER を追加しない場合には NEXT を押します。b[EXIT] を押すと設定を終了します。 続けるときは[CONFIG] を押します。](https://usermanual.wiki/D-and-M/RC7000/User-Guide-807012-Page-16.png)
![ ご使用になる前に 操作のしかた ネットワーク機能 故障かな?と思ったら保障とサービスについて主な仕様ご使用になる前に ネットワーク機能 故障かな?と思ったら保障とサービスについて主な仕様日本語 日本語PCアプリPCアプリページの編集をするデバイスセレクトメニューまたは個々のデバイス(機器)にページを挿入して、デバイス(機器)またはボタンを追加できます。ページの挿入1RC SETUPを3秒間押す。“PROGRAMDEVICE”メニューを表示します。2NEXTを押し、[EDIT PAGE] を押す。3[ADD PAGE] を押す。4NEXTを押す。5デバイスセレクトメニューにページを追加するときは [MAIN] を、デバイス(機器)にページを追加するときは [DEVICE] を押す。b[DEVICE] を選んだときのみ、ページを追加したいデバイスの LCD ボタンを押す。6[YES] を押す。ページを追加します。bNEXT を押すと設定メニューに戻ります。4NEXTを押す。5“PunchThru” 画面にて、設定したいグループの LCD ボタンを押す。パンチスルーをグループ単位で割り当てることのできるファンクションは下表のとおりです。Groups FunctionsCHANNEL TUNE CH+, CH–, STATUS, 1~9, 0/10, +10TRANSPORTS iPod 1/3, HDD 1/3, EQ, 6, 7, 8, 9, REC, 3, STOP,VOLUME CONTROLVOL+, VOL–, MUTEMENU NAVIGATIONSETUP, SURR, OSD, RTN, uiop, ENTER6NEXTを押す。7“SourceDevice” 画面にて、設定したいグループのあるデバイスの LCD ボタンを押す。8NEXTを押す。9“TargetDevice” 画面にて、操作 7で選択したグループを送信したいデバイスのLCD ボタンを押す。8登録したい番号を入力する。9NEXTを押す。10[SAVE]を押してお気に入りに登録する。bボタン名を変更するときは [EDIT] を押します。11終了するときは [EXIT]を押す。続けるときは [ADD]を押す。パンチスルー機能を使う他のデバイスモードを選択した場合でも、以下のボタンをグループ単位で別のデバイスに割りあてることができます。例えば操作モードがアンプでも DVD のプレイ操作ができます。1RC SETUPを3秒間押す。“PROGRAMDEVICE”メニューを表示します。2[PUNCH THRU]を押す。3[ADD] を押す。操作のしかた10[YES] を押す。bNEXT を押すと設定メニューに戻ります。](https://usermanual.wiki/D-and-M/RC7000/User-Guide-807012-Page-17.png)
![ ご使用になる前に ネットワーク機能 故障かな?と思ったら保障とサービスについて主な仕様ご使用になる前に 操作のしかた ネットワーク機能 故障かな?と思ったら保障とサービスについて主な仕様日本語 日本語PCアプリPCアプリNEXTBACKRC SETUPLCDボタン LCDボタンデバイスの編集をするリモコンに登録されているデバイス(機器)を移動、コピー、挿入ができます。デバイスの移動または入れ替え1RC SETUPを3秒間押す。“PROGRAMDEVICE”メニューを表示します。2NEXTを押し、[EDIT DEVICE] を押す。3[MOVE/SWAP] を押す。4NEXTを押す。5“SourceDevice” 画面にて、移動したいデバイス(機器)の LCD ボタンを押す。6NEXTを押す。7移動先または入れ替えたいデバイス(機器)のLCD ボタンを押す。8 [YES]を押す。デバイス(機器)が移動します。b[NO] を押すと設定メニューに戻ります。続けるときは[YES] を押します。操作説明のボタン名について[ ]: 選択項目の LCD ボタンボタン名のみ:リモコンのボタンを表します。ページの削除1RC SETUPを3秒間押す。“PROGRAMDEVICE”メニューを表示します。2NEXTを押し、[EDIT PAGE] を押す。3[DELETE PAGE] を押す。4NEXTを押す。5[MAIN] または [DEVICE] を押す。6デバイスセレクトメニューのページを削除するときは [MAIN] を、デバイス(機器)のページを削除するときは [DEVICE] を押す。7[SELECT PAGE] を押す。8削除したいページを NEXT または BACK で選択してから、[SELECT PAGE] を押す。9[YES] を押す。ページを削除します。bNEXT を押すと設定メニューに戻ります。操作のしかた](https://usermanual.wiki/D-and-M/RC7000/User-Guide-807012-Page-18.png)
![ ご使用になる前に 操作のしかた ネットワーク機能 故障かな?と思ったら保障とサービスについて主な仕様ご使用になる前に ネットワーク機能 故障かな?と思ったら保障とサービスについて主な仕様日本語 日本語PCアプリPCアプリデバイスの削除1RC SETUPを3秒間押す。“PROGRAMDEVICE”メニューを表示します。2NEXTを押し、[EDIT DEVICE] を押す。3[ERASE] を押す。4NEXTを押す。5“SelectDevice” 画面にて、削除したいデバイスの LCD ボタンを押す。b以下のどちらかを押します。[LEAVE EMPTY]:デバイス(機器)を削除します。[SHIFT ALL UP]:デバイスが削除され、空いた場所をつめてデバイスの並び替えを行います。6[YES] を押す。デバイスを削除します。b[NO] を押すと設定メニューに戻ります。続けるときは[YES] を押します。デバイスのコピー1RC SETUPを3秒間押す。“PROGRAMDEVICE”メニューを表示します。2NEXTを押し、[EDIT DEVICE] を押す。3[COPY] を押す。4NEXTを押す。5“SourceDevice” 画面にて、コピーしたいデバイス(機器)の LCD ボタンを押す。6NEXTを押す。7“TargetDevice” 画面にて、コピーしたい場所の LCD ボタンを押す。コピー先にあるデバイスは消去され、コピーされます。8[YES] を押す。デバイスが移動します。b[NO] を押すと設定メニューに戻ります。続けるときは[YES] を押します。デバイスの挿入1RC SETUPを3秒間押す。“PROGRAMDEVICE”メニューを表示します。2NEXTを押し、[EDIT DEVICE] を押す。3[MOVE/INSERT] を押す。4NEXTを押す。5“SourceDevice” 画面にて、移動したいデバイスの LCD ボタンを押す。6NEXTを押す。7“TargetDevice” 画面にて、挿入したい場所の LCD ボタンを押す。8[YES] を押す。デバイスが移動します。b[NO] を押すと設定メニューに戻ります。続けるときは[YES] を押します。操作のしかた](https://usermanual.wiki/D-and-M/RC7000/User-Guide-807012-Page-19.png)
![ ご使用になる前に ネットワーク機能 故障かな?と思ったら保障とサービスについて主な仕様ご使用になる前に 操作のしかた ネットワーク機能 故障かな?と思ったら保障とサービスについて主な仕様日本語 日本語PCアプリPCアプリ1RC SETUPを3秒間押す。“PROGRAMDEVICE”メニューを表示します。2NEXTを押し、[EDIT DEVICE] を押す。3NEXTを押す。4[IR/RF] を押す。5NEXTを押す。6“SelectDevice” 画面にて、送信モードを変更したいデバイスの LCD ボタンを押す。7[IR] または [RF] を押し、[YES] を押す。[IR]:赤外線でコードを送信します。[RF]:電波でコードを送信します。b[RF] を選択したときは RC-7001RCI(別売り)のノード番号が表示されますので、選択し [YES] を押します。b[RF] を追加するときは、「ノードの追加」(v24ページ)の設定が必要です。8[YES] を押す。送信モードを確定します。b[NO] を押すと設定メニューに戻ります。続けるときは[YES] を押します。NEXTRC SETUPLCDボタン LCDボタン操作説明のボタン名について[ ]: 選択項目の LCD ボタンボタン名のみ:リモコンのボタンを表します。リモコンコード送信モードの設定デバイスのディスプレーモードの設定デバイス(機器)の表示の並びを選択できます。1RC SETUPを3秒間押す。“PROGRAMDEVICE”メニューを表示します。2NEXTを押し、[EDIT DEVICE] を押す。3[DISPLAY MODE] を押す。4NEXTを押す。5“SelectDevice”画面にて、ディスプレーモードを変更したいデバイスの LCD ボタンを押す。6[COLUMN MODE] または [ROW MODE] を押す。[COLUMN MODE]:1行に2つのデバイスを表示します。[ROW MODE]:デバイスを1行全体で表示します。7[YES] を押す。ディスプレーモードを確定します。b[NO] を押すと設定メニューに戻ります。続けるときは[YES] を押します。操作のしかたご注意ディスプレーモードはデバイス(機器)には設定されません。LCD ボタンの位置に対して設定されます。](https://usermanual.wiki/D-and-M/RC7000/User-Guide-807012-Page-20.png)
![ ご使用になる前に 操作のしかた ネットワーク機能 故障かな?と思ったら保障とサービスについて主な仕様ご使用になる前に ネットワーク機能 故障かな?と思ったら保障とサービスについて主な仕様日本語 日本語PCアプリPCアプリボタンの編集ボタンの移動、コピー、挿入ができます。ボタンの移動または入れ替え1RC SETUPを3秒間押す。“PROGRAMDEVICE”メニューを表示します。2NEXTを押し、[EDIT FUNC] を押す。3[MOVE/SWAP] を押す。4NEXTを押す。5“SourceDevice” 画面にて、移動したいボタンのデバイスの LCD ボタンを押す。6“SelectKey” 画面にて、移動したいボタンの LCD ボタンを押す。7NEXTを押す。8“TargetDevice” 画面にて、移動先または入れ替えたいボタンのデバイスの LCDボタンを押す。9“Selectkey” 画面にて、移動先、または入れ替えたいボタンの LCD ボタンを押す。10[YES]を押す。ボタンが移動、または入れ替えされます。b[NO] を押すと設定メニューに戻ります。続けるときは[YES] を押します。1RC SETUPを3秒間押す。“PROGRAMDEVICE”メニューを表示します。2NEXTを押し、[EDIT TEXT] を押す。3[DEVICE NAME] を押す。4“SelectDevice” 画面にて、名前を変更したいデバイス(機器) の LCD ボタンを押す。5NEXTを押す。6“EditText” 画 面にて、1段目の LCDボタンで編集したい文字の位置を選ぶ。72 段目の LCD ボタンで入力したい文字を選び、[SELECT] を押す。b[CAPS] を表示中は小文字、[lower] を表示中は大文字の入力になります。8[SAVE] を押す。b [NO] を押すと、設定メニューに戻ります。続けるときは [YES] を押します。デバイス名の変更操作のしかた](https://usermanual.wiki/D-and-M/RC7000/User-Guide-807012-Page-21.png)
![ ご使用になる前に ネットワーク機能 故障かな?と思ったら保障とサービスについて主な仕様ご使用になる前に 操作のしかた ネットワーク機能 故障かな?と思ったら保障とサービスについて主な仕様日本語 日本語PCアプリPCアプリボタンのコピー1RC SETUPを3秒間押す。“PROGRAMDEVICE”メニューを表示します。2NEXTを押し、[EDIT FUNC] を押す。3[COPY] を押す。4NEXTを押す。5“SourceDevice” 画面にて、コピーしたいボタンのデバイス(機器) の LCD ボタンを押す。6“Selectkey” 画面にて、コピーしたいボタンの LCD ボタンを押す。7NEXTを押す。8“TargetDevice” 画面にて、コピー先のデバイスの LCD ボタンを押す。9“Selectkey” 画面にて、コピー先の場所の LCD ボタンを押す。10[YES]を押す。ボタンをコピーします。b[NO] を押すと設定メニューに戻ります。続けるときは[YES] を押します。NEXTRC SETUPLCDボタン LCDボタン操作説明のボタン名について[ ]: 選択項目の LCD ボタンボタン名のみ:リモコンのボタンを表します。ボタンの挿入1RC SETUPを3秒間押す。“PROGRAMDEVICE”メニューを表示します。2NEXTを押し、[EDIT FUNC] を押す。3[MOVE/INSERT] を押す。4NEXTを押す。5“SourceDevice” 画面にて、移動したいボタンのデバイスの LCD ボタンを押す。6“Selectkey” 画面にて、移動したいボタンの LCD ボタンを押す。7NEXTを押す。8“TargetDevice” 画面にて、挿入先のボタンのデバイスの LCD ボタンを押す。9“Selectkey” 画面にて、挿入先の場所のLCD ボタンを押す。10[YES]を押す。ボタンを挿入します。b[NO] を押すと設定メニューに戻ります。続けるときは[YES] を押します。操作のしかた](https://usermanual.wiki/D-and-M/RC7000/User-Guide-807012-Page-22.png)
![ ご使用になる前に 操作のしかた ネットワーク機能 故障かな?と思ったら保障とサービスについて主な仕様ご使用になる前に ネットワーク機能 故障かな?と思ったら保障とサービスについて主な仕様日本語 日本語PCアプリPCアプリ1RC SETUPを3秒間押す。“PROGRAMDEVICE”メニューを表示します。2NEXTを押し、[EDIT FUNC] を押す。3[DISPLAY MODE] を押す。4NEXTを押す。5“SelectDevice” 画 面にて、ディスプレーモードを変更したいボタンのデバイスのLCD ボタンを押す。6“Selectkey” 画面にて、ディスプレーモードを変更したいボタンの LCD ボタンを押す。7[COLUMN MODE] または [ROW MODE] を押す。[COLUMN MODE]:1行に2つのボタンを表示します。[ROW MODE]:1行全体にボタンを表示します。8[YES] を押す。ディスプレーモードを確定します。b[NO] を押すと設定メニューに戻ります。続けるときは[YES] を押します。ボタンのディスプレーモードの設定ボタンの表示の並びを選択できます。1RC SETUPを3秒間押す。“PROGRAMDEVICE”メニューを表示します。2NEXTを押し、[EDIT FUNC] を押す。3NEXTを押し、[ADD IR] を押す。4NEXTを押す。5“SourceDevice” 画面にて、追加したいデバイス(機器)の LCD ボタンを押す。6NEXTを押す。7“ADDIR” 画面にて、追加したいボタンの機能の LCD ボタンを押す。8NEXTを押す。9“Selectkey” 画面にて、追加したいボタンの位置の LCD ボタンを押す。10[TEST KEY] を押し、動作した場合は [YES]を押す。bさらにボタンを追加するときは [YES] を押します。ボタンの追加新しいボタンを追加するとき、機能を選択して追加することができます。ボタンの削除1RC SETUPを3秒間押す。“PROGRAMDEVICE”メニューを表示します。2NEXTを押し、[EDIT FUNC] を押す。3[ERASE] を押す。4NEXTを押す。5“SourceDevice” 画面にて、削除したいボタンのデバイスの LCD ボタンを押す。6“Selectkey” 画面にて、削除したいボタンの LCD ボタンを押す。[LEAVE EMPTY]:ボタンを削除します。[SHIFT ALL UP]:ボタンが削除されて空いた場所をつめてボタンの並び替えを行います。7[YES]を押す。ボタンを削除します。b[NO] を押すと設定メニューに戻ります。続けるときは[YES] を押します。操作のしかた](https://usermanual.wiki/D-and-M/RC7000/User-Guide-807012-Page-23.png)
![ ご使用になる前に ネットワーク機能 故障かな?と思ったら保障とサービスについて主な仕様ご使用になる前に 操作のしかた ネットワーク機能 故障かな?と思ったら保障とサービスについて主な仕様日本語 日本語PCアプリPCアプリ学習機能を初期化する1RC SETUPを3秒間押す。“PROGRAMDEVICE”メニューを表示します。2[LEARNING]を押す。3[ERASE LEARN] を押す。4NEXTを2回押す。5“SourceDevice”画面にて、削除したいデバイスの LCD ボタンを押す。6“EraseLearn”画面にて、削除したい学習機能の LCD ボタンを押す。7削除するときは [YES] を押す。削除しないときは [NO] を押す。b終了するときは [NO]、続けるときは [YES] を押します。NEXTRC SETUPLCDボタン LCDボタン操作説明のボタン名について[ ]: 選択項目の LCD ボタンボタン名のみ:リモコンのボタンを表します。ボタン名の変更1RC SETUPを3秒間押す。“PROGRAMDEVICE”メニューを表示します。2NEXT を押し、[EDIT TEXT] を押す。3[KEY NAME]を押す。4“SelectDevice” 画面にて、ボタン名を変更したいデバイス(機器) の LCD ボタンを押す。5“Selectkey” 画面にて、ボタン名を変更したいボタンの LCD ボタンを押す。6NEXTを押す。7“EditText” 画 面にて、1段目の LCDボタンで編集したい文字の位置を選ぶ。82 段目の LCD ボタンで入力したい文字を選び、[SELECT] を押す。b[CAPS] を表示中は小文字、[lower] を表示中は大文字の入力になります。9[SAVE]を押す。b[NO] を押すと設定メニューに戻ります。続けるときは[YES] を押します。シンセボタンの追加この機能は将来の拡張用機能です。操作のしかた](https://usermanual.wiki/D-and-M/RC7000/User-Guide-807012-Page-24.png)
![0 0ご使用になる前に 操作のしかた ネットワーク機能 故障かな?と思ったら保障とサービスについて主な仕様ご使用になる前に ネットワーク機能 故障かな?と思ったら保障とサービスについて主な仕様日本語 日本語PCアプリPCアプリお気に入りを削除する1RC SETUPを3秒間押す。“PROGRAMDEVICE”メニューを表示します。2[FAVORITES]を押す。3[DELETE] を押す。4NEXTを2回押す。5“SourceDevice”画面にて、削除したいデバイス(機器)の LCD ボタンを押す。6“SelectKey”画面にて、削除したいボタンの LCD ボタンを押す。7削除するときは [YES] を押す。削除しないときは [NO] を押す。b終了するときは [NO]、続けるときは [YES] を押します。パンチスルー機能を初期化する1RC SETUPを3秒間押す。“PROGRAMDEVICE”メニューを表示します。2[PUNCH THRU]を押す。3[CLEAR] を押す。4NEXTを押す。5“PunchThru”画面にて、削除したいグループの LCD ボタンを押す。6NEXTを押す。7“SelectDevice”画面にて、パンチスルーを削除したいデバイス(機器)のLCD ボタンを押す。8[YES]を押す。bNEXT を押すと設定メニューに戻ります。マクロ機能を初期化する1RC SETUPを3秒間押す。“PROGRAMDEVICE”メニューを表示します。2[MACROS]を押す。3[DELETE] を押す。4NEXTを2回押す。5“SourceDevice”画面にて、削除したいマクロのデバイス(機器)の LCD ボタンを押す。6“SelectKey”画面にて、削除したいマクロの LCD ボタンを押す。7削除するときは [YES] を押す。削除しないときは [NO] を押す。b終了するときは [NO]、続けるときは [YES] を押します。操作のしかた](https://usermanual.wiki/D-and-M/RC7000/User-Guide-807012-Page-25.png)
![ ご使用になる前に ネットワーク機能 故障かな?と思ったら保障とサービスについて主な仕様ご使用になる前に 操作のしかた ネットワーク機能 故障かな?と思ったら保障とサービスについて主な仕様日本語 日本語PCアプリPCアプリユーザーリセットユーザーが追加したマクロや学習させたリモコンコードが消去されます。ただし、追加したデバイスは削除されません。1RC SETUPを3秒間押す。“PROGRAMDEVICE”メニューを表示します。2NEXTを押し、[RESET/LOCK] を押す。3[USER RESET] を押す。4NEXTを押す。5[YES]を押す。6NEXTを2回押す。リセットされます。NEXTRC SETUPLCDボタン LCDボタン操作説明のボタン名について[ ]: 選択項目の LCD ボタンボタン名のみ:リモコンのボタンを表します。オペレーショナルリセットお買い上げ時の状態にもどります。1RC SETUPを3秒間押す。“PROGRAMDEVICE”メニューを表示します。2NEXTを押し、[RESET/LOCK] を押す。3[OP RESET] を押す。4NEXTを押す。5[YES]を押す。6NEXTを2回押す。お買い上げ時の状態にもどります。操作のしかた](https://usermanual.wiki/D-and-M/RC7000/User-Guide-807012-Page-26.png)
![ ご使用になる前に 操作のしかた ネットワーク機能 故障かな?と思ったら保障とサービスについて主な仕様ご使用になる前に ネットワーク機能 故障かな?と思ったら保障とサービスについて主な仕様日本語 日本語PCアプリPCアプリ1RC SETUPを3秒間押す。“PROGRAMDEVICE”メニューを表示します。2NEXTを押し、[RESET/LOCK] を押す。3[LOCK] を押す。4NEXTを 2 回押す。5“SelectDevice” 画面にて、ロックしたいデバイス(機器)の LCD ボタンを押す。6[YES]を押す。b[NO] を押すと設定メニューに戻ります。続けるときは[YES] を押します。1RC SETUPを3秒間押す。“PROGRAMDEVICE”メニューを表示します。2NEXTを押し、[RESET/LOCK] を押す。3[UNLOCK] を押す。4NEXTを 2 回押す。5“Select Device” 画面にて、ロックを解除したいデバイス(機器) の LCD ボタンを押す。6[YES] を押す。b[NO] を押すと設定メニューに戻ります。続けるときは[YES] を押します。操作のしかたロック機能ロックすることでデバイス(機器) の編集ができなくなります。アンロック機能ロックしたデバイス(機器)のロックを解除します。](https://usermanual.wiki/D-and-M/RC7000/User-Guide-807012-Page-27.png)
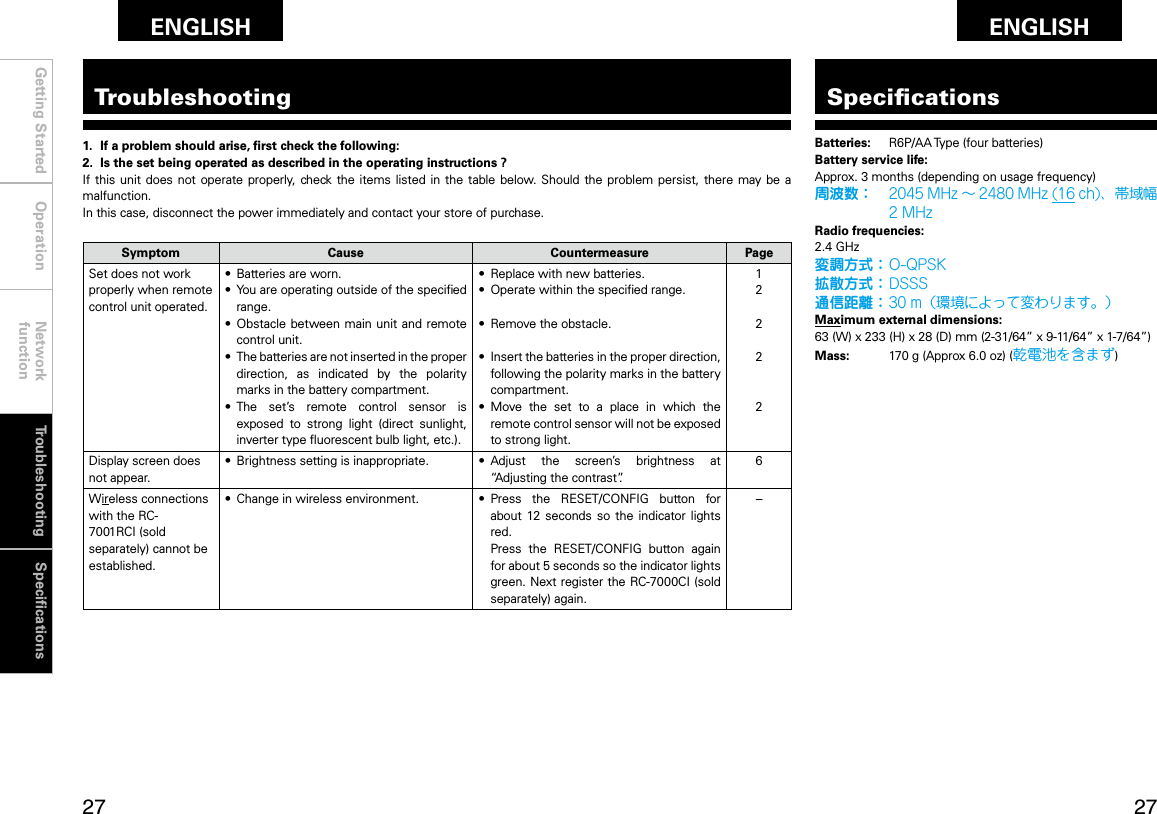
![ ご使用になる前に 操作のしかた ネットワーク機能 故障かな?と思ったら保障とサービスについて主な仕様ご使用になる前に 操作のしかた 故障かな?と思ったら保障とサービスについて主な仕様日本語 日本語PCアプリPCアプリNEXTRC SETUPLCDボタン LCDボタンノードを使った操作ノードの追加ノード番号を登録して RC-7001RCI(別売り)をネットワークに追加します。ノードの削除現在のネットワークからノード番号を指定して RC-7001RCI(別売り)を削除します。1RC SETUPを3秒間押す。“PROGRAMDEVICE”メニューを表示します。2NEXT を2回押し、[NETWORK] を押す。3[DELETE NODES] を押す。4NEXTを2回押す。RC-7001RCI(別売り) のノード番号を表示します。5削除したいノード番号を選択し、[YES]を押す。6NEXTを押す。b終了するときは [NO]、削除を続けるときは [YES] を押します。1RC SETUPを3秒間押す。“PROGRAMDEVICE”メニューを表示します。2NEXT を2回押し、[NETWORK] を押す。3[ADD NODES] を押す。4NEXTを押す。5リモコンをネットワークに追加するときは[REMOTE] を押す。bRC-7001RCI(別売り)を追加するときは [OTHER]を押します。6RC-7001RCI( 別 売 り ) の PESET/CONFIG を約 1 秒間押します。緑色のインジケーターが点滅します。7NEXTを2回押す。追加されると“Success!”を表示します。bNEXT を押すと設定メニューに戻ります。操作説明のボタン名について[ ]: 選択項目の LCD ボタンボタン名のみ:リモコンのボタンを表します。ネットワーク機能](https://usermanual.wiki/D-and-M/RC7000/User-Guide-807012-Page-29.png)
![ ご使用になる前に 操作のしかた 故障かな?と思ったら保障とサービスについて主な仕様ご使用になる前に 操作のしかた ネットワーク機能 故障かな?と思ったら保障とサービスについて主な仕様日本語 日本語PCアプリPCアプリノードの参照ネットワークに登録されている RC-7001RCI (別売り)を検索して一覧表示します。1RC SETUPを3秒間押す。“PROGRAMDEVICE”メニューを表示します。2NEXTを2回押し、[NETWORK] を押す。3[VIEW NODES] を押す。4NEXTを2回押す。ネットワークに登録されている RC-7001RCI(別売り)のノード番号は末尾に zマークを表示します。bNEXT を2回押すと設定メニューに戻ります。ノードラベルの変更RC-7001RCI(別売り) にラベルを追加してわかりやすくします。1RC SETUPを3秒間押す。“PROGRAMDEVICE”メニューを表示します。2NEXT を2回押し、[NETWORK] を押す。3[EDIT LABEL] を押す。4NEXTを2回押す。RC-7001RCI のノード番号を表示します。5変更したいノード番号を選択してから、NEXT を押します。選択したノードの編集画面になります。6“EditText”画面にて、1段目の LCDボタンで編集したい文字を選ぶ。72 段目の LCD ボタンで入力したい文字を選び、[SELECT] を押す。b[CAPS] を表示中は小文字、[lower] を表示中は大文字の入力になります。8 [SAVE] を押す。9NEXT を押す。b[NO] を押すと設定メニューに戻ります。続けるときは[YES] を押します。NEXTRC SETUPLCDボタン LCDボタン操作説明のボタン名について[ ]: 選択項目の LCD ボタンボタン名のみ:リモコンのボタンを表します。ネットワーク機能](https://usermanual.wiki/D-and-M/RC7000/User-Guide-807012-Page-30.png)
![ ご使用になる前に 操作のしかた ネットワーク機能 故障かな?と思ったら保障とサービスについて主な仕様ご使用になる前に 操作のしかた 故障かな?と思ったら保障とサービスについて主な仕様日本語 日本語PCアプリPCアプリレシーバーディスプレイモード(RDM)の設定RC-7001RCI( 別 売り) と対 応する DENON製品を使用して双方向通信をする場合に設定します。対応する DENON 製品のステータス情報などが本機の画面にて、確認できます。RDM用の頁の挿入位置を設定します。1RC SETUPを3秒間押す。“PROGRAMDEVICE”メニューを表示します。2NEXTを2回押し、[USER PREF] を押す。3[RDM] を押す。4NEXT を押す。5[YES] を押す。6[FIRST] または [LAST] で追加したい位置を設定する。[FIRST]:通常ボタン画面の先頭に RDM 用ページが追加されます。[LAST]:最後に RDM 用ページが追加されます。bNEXT を押すと設定メニューに戻ります。リモコンのバージョンの確認1RC SETUPを3秒間押す。“PROGRAMDEVICE”メニューを表示します。2NEXTを2回押し、[USER PREF] を押す。3[VERSION INFO] を押す。LCD ボタンのバージョン情報を表示します。bNEXT を押すと設定メニューに戻ります。ネットワーク機能](https://usermanual.wiki/D-and-M/RC7000/User-Guide-807012-Page-31.png)
![Getting Started Network functionTroubleshooting SpecificationsGetting Started Operation Network functionTroubleshooting SpecificationsENGLISH ENGLISH PCアプリPCアプリOperationLCD button1 To use to operate an AV amplier (AV receiver), press [Denon1]. b [Denon2] is a function for system expansion in the future. Normally select [Denon1].2 Press [YES].3 Press NEXT.By default, the device is set to [Denon1].4 Press DEVICE.The initial settings screen appears.IntroductionOperation of the LCD buttonsWhen buttons on the remote control unit are pressed, various settings and operation items appear on the LCD screen.LCD buttonWhen batteries are loaded for the first timeMake the setting described below.Initial display screenThe initial display settings are shown on the display below.When using the RF two-way communication functionChange the amplifier setting to “RF” at “Setting the remote control code transmission mode“ (vpage 14).n Operation for selecting• Press the LCD button to the left or right of the displayed item name to select it.• The screen is displayed for 5 seconds. Operate while the screen is displayed. (“Setting the screen display time” (vpage 5))• When “PAGE” is displayed at the bottom of the screen, there are one or more other pages in addition to the one currently displayed. Use the NEXT and BACK button to switch screens.BACK buttonn Indication of item names in this manualIn this manual, the names of items displayed on the screen are indicated [ ]. (Example: [Denon1]) GScreen 1H GScreen 2HDEVICE SELECTAMP ZONE2ZONE3 ZONE4TUNER CDDVD TVSAT CABLEPage 1/2 DEVICE SELECTVCR 1 iPodVCR 2 NetAudDTU Page 2/2OperationNEXT buttonDEVICE buttonPlease select which type of Denon receiver you are using below.Denon 1 Denon 2You have selected Denon 1 receiver.All devices used to control this receiver will be set up. Are yousure your receiver is of type Denon1?NO YES Success! Your remote has beensetup to workwith the Denon1 receiver.Press NEXT to continue with more setup choices or DEVICE to begin using your remote.321NOTEA DENON product compatible with the RC-7001RCI (sold separately) is required to use this function.1の画面を表示中に LCD 画面が消灯したときは、RC SETUP ボタンを3秒間押すと、もとの画面に戻ります。](https://usermanual.wiki/D-and-M/RC7000/User-Guide-807012-Page-37.png)
![Getting Started Network functionTroubleshooting SpecificationsGetting Started Operation Network functionTroubleshooting SpecificationsENGLISH ENGLISH PCアプリPCアプリNEXTBACKDEVICERC SETUPLCDボタン LCDボタンAbout the button names in these explanations [ ] : LCD buttons for selection items Button name only:Indicates a button on the remote control unitSettingsSetting the screen display timeUse this procedure to set the time until the screen display turns off.Initial setting: 5 seconds1 Press RC SETUP for 3 seconds.The “PROGRAM DEVICE” menu is displayed.2 Press NEXT twice, then press [USER PREF].3 Press [DISPLAY T/O].4 Press NEXT.5 Press [–DISPLAY T/O+] to set the time until the light turns off.• LCD button on right side ...................................... +• LCD button on right side ...................................... –b The time can be set between 1 (MIN) and 30 (MAX).6 Press [SAVE].7 Press NEXT.Operation the LCD button1 Press DEVICE.The “PROGRAM DEVICE” menu is displayed.2 Press the LCD button for the device you want to operate.b If there are multiple pages, use the NEXT and BACK button to switch screens.3 Press the LCD button for the item you want to operate.b If there are multiple pages, use the NEXT and BACK button to switch screens.OperationLCD buttonLCD button](https://usermanual.wiki/D-and-M/RC7000/User-Guide-807012-Page-39.png)
![Getting Started Operation Network functionTroubleshooting SpecificationsGetting Started Network functionTroubleshooting SpecificationsENGLISH ENGLISH PCアプリPCアプリNEXTVOL+ –7192BACKRC SETUP68DEVICELCDボタン LCDボタン3Adjusting the contrastSet this if the characters on the screen are hard to see.Initial setting: Level 51 Press RC SETUP for 3 seconds.The “PROGRAM DEVICE” menu is displayed.2 Press NEXT twice, then press [USER PREF].3 Press [CONTRAST].4 Press NEXT.5 [–CONTRAST+] を押し、コントラストを設定する。• LCD button on right side .......................................+• LCD button on right side .......................................–b The contrast can be set within the range of “Level 0 (MIN)” to “Level 12 (MAX)”.6 Press [SAVE].7 Press NEXT.Setting the backlight on timeUse this procedure to set the time until the backlight turns off.Initial setting: 5 seconds1 Press RC SETUP for 3 seconds.The “PROGRAM DEVICE” menu is displayed.2 Press NEXT twice, then press [USER PREF].3 Press [LIGHT T/O].4 Press NEXT.5 Press [–DISPLAY T/O+] to set the time until the light turns off.• LCD button on right side .......................................+• LCD button on right side .......................................–b The time can be set between LIGHT OFF and 30 (MAX).6 Press [SAVE].7 Press NEXT.Completing the settingPress DEVICE until the “DEVICE SELECT” screen appears.OperationLCD buttonLCD buttonAbout the button names in these explanations [ ] : LCD buttons for selection items Button name only:Indicates a button on the remote control unit](https://usermanual.wiki/D-and-M/RC7000/User-Guide-807012-Page-40.png)
![Getting Started Network functionTroubleshooting SpecificationsGetting Started Operation Network functionTroubleshooting SpecificationsENGLISH ENGLISH PCアプリPCアプリ8 Use 1, 2, 3, 6, 7, 8, 9, VOL+ – to check whether the device to be added operates.Operates ........................................ [YES]• The IR/RF selection screen appears.Does not operate ........................... [NO]• The screen switches to the next code.Find the code that operates and set it by pressing [YES].9 Press [IR] or [RF] to select the remote control signal.[IR] : Infrared signals are transmitted.[RF] : Send RF signals to the RC-7001RCI remote control receiver (sold separately).b For details on the RC-7001RCI (sold separately), see “Network function” (vpage 22).10 At the “Select Position” screen, press the LCD button for the device you want to add.The setting is entered.b Press [NO] to end, [YES] to continue.NOTEDepending on the product’s year of manufacture and differences in functions from model to model, there may be some buttons that do not operate or buttons that operate erroneously.Using the learning functionThis function lets you register the desired remote signals of devices by sending them to the remote control unit.1 Press RC SETUP for 3 seconds.The “PROGRAM DEVICE” menu is displayed.2 Press [LEARNING].3 Press [LEARN KEY].4 Press NEXT twice.5 At the “Select Device” screen, press the LCD button for the device whose remote control signals you want to register.6 At the “Learn Key” screen, press the LCD button for the operation button name you want to register.b Signals can be “learned” at buttons other than NEXT, BACK and DEVICE.Various settingsUsing the preset memory functionThe remote control unit can be preset to operate devices of various brands.1 Press RC SETUP for 3 seconds.The “PROGRAM DEVICE” menu is displayed.2 Press [BASIC SETUP].3 Press [BRAND SET].4 Press NEXT.5 At the “Press Device Type” screen, press the LCD button for the device you want to set in the preset memory.6 Press NEXT.7 At the “Select Brand” screen, press the LCD button for the device’s brand name.If there are multiple codes, “1 ofz” is displayed.(z is the number of codes)b If the brand you want to choose is not displayed, press NEXT to switch the brand display.Operation](https://usermanual.wiki/D-and-M/RC7000/User-Guide-807012-Page-41.png)
![Getting Started Operation Network functionTroubleshooting SpecificationsGetting Started Network functionTroubleshooting SpecificationsENGLISH ENGLISH PCアプリPCアプリNEXTBACKDEVICERC SETUPLCDボタン LCDボタンUsing the Macro functionThis function allows you to register a series of operations at a single button.With this function you can for example turn on the amplifier, select the input source, turn on the TV’s power, turn on the source device's power and set the play mode all by pressing a single button.1 Press RC SETUP for 3 seconds.The “PROGRAM DEVICE” menu is displayed.2 Press [MACROS].3 Press [ADD/REDO].4 Press NEXT twice.5 At the “Assign Macro” screen, press the LCD button for the device for which you want to register the macro.6 Press the button at which you want to register the macro.b Macros can be registered at buttons other than NEXT, BACK and DEVICE.7 Press NEXT to register the next signal.b Press DEVICE to select the device.b Repeat steps 5 to 6.7 Place the remote control units with their signal transmitters facing each other, press NEXT, then immediately press the button on the remote control unit you want to register. ”Success!” is displayed if the code was learned successfully.8 To register other buttons, press NEXT.b Repeat steps 6 to 8.9 Press [EXIT] to exit the learning mode.b Press [EDIT] if you want to change the button name. Perform the procedure at “Changing the button name” (v page 18) starting from step 7.NOTEThe learning function may not work for some remote control units, and sometimes a device may not operate properly even if its remote control signals have been learned. In this case, use the remote control unit included with the device.OperationLCD buttonLCD buttonAbout the button names in these explanations [ ] : LCD buttons for selection items Button name only:Indicates a button on the remote control unit](https://usermanual.wiki/D-and-M/RC7000/User-Guide-807012-Page-42.png)
![Getting Started Network functionTroubleshooting SpecificationsGetting Started Operation Network functionTroubleshooting SpecificationsENGLISH ENGLISH PCアプリPCアプリUsing the code search functionThis function lets you search for preset codes when adding new devices to the remote control unit.1 Press RC SETUP for 3 seconds.The “PROGRAM DEVICE” menu is displayed.2 Press [BASIC SETUP].3 Press [CODE SEARCH].4 Press NEXT.5 At the “Press Device Type” screen, press the LCD button for the device whose code you want to search for.6 Press NEXT twice.7 If the device operates when the remote control unit’s buttons are pressed, press [YES].b If [NO] is pressed, the code switches. Press a remote control unit button again to check. Press [BACK] to return to the previous code.8 At the “Select Position” screen, press the LCD button for the position at which you want to add the preset device.b Press [NO] to end, [YES] to continue.8 Press RC SETUP.The registration menu is displayed.9 Press [SAVE] to register the set macro.[TEST] : Press this to send the registered macro to check it.[DELAY – +] : Use these to set the transmission interval. This can be set to between “0.05(MIN)” and “60(MAX)”. (Initial setting: 0.25 seconds)[CANCEL ENTRY] : Press this to cancel the last code registered and return to the registration mode.[START OVER] : Press this to start over from the beginning.10 Press [EXIT] to end the setting.b Press [EDIT] if you want to change the button name (macro name). Perform the procedure at “Changing the button name” (vpage 18) starting from step 7.Using the delay time functionThe interval at which the remote control signals registered with the system call function are sent (the “delay time”) can be set.1 Press RC SETUP for 3 seconds.The “PROGRAM DEVICE” menu is displayed.2 Press [MACROS].3 Press [EDIT DELAY].4 Press NEXT twice.5 The “Edit Macro” screen is displayed. Select a macro that has been registered.6 Press NEXT.7 Use [DELAY – +] to change the delay time, then press [SAVE].[TEST] :Press this to send the registered macro to check it.[DELAY – +] :Use these to set the transmission interval.[CREATE AGAIN] :Use this to register a new macro.8 Press NEXT to end the setting.Operationご注意マクロを設定するボタンは、マクロに登録できません。](https://usermanual.wiki/D-and-M/RC7000/User-Guide-807012-Page-43.png)
![Getting Started Operation Network functionTroubleshooting SpecificationsGetting Started Network functionTroubleshooting SpecificationsENGLISH ENGLISH0 0PCアプリPCアプリNEXTENTERRC SETUPLCDボタン LCDボタンRegistering favorites1 Press RC SETUP for 3 seconds.The “PROGRAM DEVICE” menu is displayed.2 Press [FAVORITES].3 Press [ADD/REDO].4 Press NEXT.5 Press [KEY].b Pages can be added here.When [PAGE] is selected, press [MAIN] or [DEVICE].When [MAIN] is selected, press [YES] to set.When [DEVICE] is selected, select the device for which a page is to be added.6 Press NEXT.7 At the “Assign Favorite” screen, select the button for the place to be stored in the favorites.Favorites settingsFavorites settingsUse this function to register your favorite channel numbers so they can be operated with a single button.1 Press RC SETUP for 3 seconds.The “PROGRAM DEVICE” menu is displayed.2 Press [FAVORITES].3 Press [CONFIGURE].4 Press NEXT twice.5 At the “CONFIGURE FAV” screen, press the LCD button for the item you want to set.[FAV DEVICE] :Press this to select the device to be stored in the favorites.This is initially set to “SAT”.[FV IR DELAY] : Press this to set the interval at which the remote control signals are sent when buttons at which favorites have been registered are pressed.[TOTAL DIGIT] : Use this to set the number of digits of channels registered in the favorites.[CHANNEL KEY] : Set this to add ENTER after registered favorites (Set this for types of devices for which ENTER is pressed to set the channel after selecting it with the number buttons.)To add ENTER at the end of the channel, press ENTER. If you do not want to add ENTER, press NEXT.b When [EXIT] is pressed, the setting is completed. Press [CONFIG] to continue registering.OperationLCD buttonLCD buttonAbout the button names in these explanations [ ] : LCD buttons for selection items Button name only:Indicates a button on the remote control unit](https://usermanual.wiki/D-and-M/RC7000/User-Guide-807012-Page-44.png)
![Getting Started Network functionTroubleshooting SpecificationsGetting Started Operation Network functionTroubleshooting SpecificationsENGLISH ENGLISH PCアプリPCアプリInserting pagesEditing pagesPages can be inserted and devices or buttons can be added in the device select menu or in the individual devices.1 Press RC SETUP for 3 seconds.The “PROGRAM DEVICE” menu is displayed.2 Press NEXT, then press [EDIT PAGE].3 Press [ADD PAGE].4 Press NEXT.5 Press [MAIN] to add a page to the device select menu, [DEVICE] to add a page in the device.b When and only when [DEVICE] is selected, press the LCD button for the device to which you want to add a page.6 Press [YES].The page is added.b Press NEXT to return to the setting menu.8 Input the number of to be registered.9 Press NEXT.10 Press [SAVE] to register the favorite.b Press [EDIT] if you want to change the button name.11 Press [EXIT] to end the registration. Press [ADD] to continue registering.Using the punch through functionEven when a different device mode is selected, it is possible to assign the buttons below to a different device in units of groups.For example, the DVD play operation can be performed even if the operating mode is set to the amplifier.1 Press RC SETUP for 3 seconds.The“PROGRAM DEVICE” menu is displayed.2 Press [PUNCH THRU].3 Press [ADD].4 Press NEXT.5 At the “Punch Thru” screen, press the LCD button for the group you want to set.The functions for which punch thru can be assigned in units of groups are as shown on the table below.Groups FunctionsCHANNEL TUNE CH+, CH–, STATUS, 1~9, 0/10, +10TRANSPORTS iPod 1/3, HDD 1/3, EQ, 6, 7, 8, 9, REC, 3, STOP,VOLUME CONTROLVOL+, VOL–, MUTEMENU NAVIGATIONSETUP, SURR, OSD, RTN, uiop, ENTER6 Press NEXT.7 At the “Source Device” screen, press the LCD button for the device of the group you want to set.8 Press NEXT.9 At the “Target Device” screen, press the LCD button or the device whose group selected at step 7 you want to send.10 Press [YES].b Press NEXT to return to the setting menu.Operation](https://usermanual.wiki/D-and-M/RC7000/User-Guide-807012-Page-45.png)
![Getting Started Operation Network functionTroubleshooting SpecificationsGetting Started Network functionTroubleshooting SpecificationsENGLISH ENGLISH PCアプリPCアプリNEXTBACKRC SETUPLCDボタン LCDボタンMoving or swapping devicesEditing devicesDevices registered in the remote control unit can be moved, copied and inserted.1 Press RC SETUP for 3 seconds.The “PROGRAM DEVICE” menu is displayed.2 Press NEXT, then press [EDIT DEVICE].3 Press [MOVE/SWAP].4 Press NEXT.5 At the “Source Device” screen, press the LCD button for the device you want to move.6 Press NEXT.7 Press the LCD button for the target destination or the device to be substituted.8 Press [YES].The device is moved.b When [NO] is pressed, the setting menu reappears. To continue, press [YES].1 Press RC SETUP for 3 seconds.The “PROGRAM DEVICE” menu is displayed.2 Press NEXT, then press [EDIT PAGE].3 Press [DELETE PAGE].4 Press NEXT.5 Press [MAIN] or [DEVICE].6 Press [MAIN] to delete a page from the device select menu, [DEVICE] to delete a device page.7 Press [SELECT PAGE].8 Select the page to be deleted using NEXT and BACK, then press [SELECT PAGE].7 Press [YES].The page is delete.b Press NEXT to return to the setting menu.Deleting pagesOperationLCD buttonLCD buttonAbout the button names in these explanations [ ] : LCD buttons for selection items Button name only:Indicates a button on the remote control unit](https://usermanual.wiki/D-and-M/RC7000/User-Guide-807012-Page-46.png)
![Getting Started Network functionTroubleshooting SpecificationsGetting Started Operation Network functionTroubleshooting SpecificationsENGLISH ENGLISH PCアプリPCアプリCopying devices1 Press RC SETUP for 3 seconds.The “PROGRAM DEVICE” menu is displayed.2 Press NEXT, then press [EDIT DEVICE].3 Press [COPY].4 Press NEXT.5 At the “Source Device” screen, press the LCD button for the device you want to copy.6 Press NEXT.7 At the “Target Device” screen, press the LCD button for the place you want to copy.The device at the copy destination is cleared and the device is copied.8 Press [YES].The device is moved.b When [NO] is pressed, the setting menu reappears. To continue, press [YES].Deleting devices1 Press RC SETUP for 3 seconds.The “PROGRAM DEVICE” menu is displayed.2 Press NEXT, then press [EDIT DEVICE].3 Press [ERASE].4 Press NEXT.5 At the “Select Device” screen, press the LCD button for the device you want to insert.b Press one of the following:[LEAVE EMPTY] :The device is deleted.[SHIFT ALL UP] :The device is deleted and the other devices are all shifted up, filling in the space of the deleted device.6 Press [YES].The device is deleted.b When [NO] is pressed, the setting menu reappears. To continue, press [YES].Inserting devices1 Press RC SETUP for 3 seconds.The “PROGRAM DEVICE” menu is displayed.2 Press NEXT, then press [EDIT DEVICE].3 Press [MOVE/INSERT].4 Press NEXT.5 At the “Source Device” screen, press the LCD button for the device you want to move.6 Press NEXT.7 “Target Device”画面にて、挿入したい場所のLCDボタンを押す。8 Press [YES].The device is moved.b When [NO] is pressed, the setting menu reappears. To continue, press [YES].Operation](https://usermanual.wiki/D-and-M/RC7000/User-Guide-807012-Page-47.png)
![Getting Started Operation Network functionTroubleshooting SpecificationsGetting Started Network functionTroubleshooting SpecificationsENGLISH ENGLISH PCアプリPCアプリNEXTRC SETUPLCDボタン LCDボタン1 Press RC SETUP for 3 seconds.The “PROGRAM DEVICE” menu is displayed.2 Press NEXT, then press [EDIT DEVICE].3 Press NEXT.4 Press [IR/RF].5 Press NEXT.6 At the “Select Device” screen, press the LCD button for the device whose transmission mode you want to change.7 Press [IR] or [RF], then press [YES].[IR] :The codes are sent as infrared signals.[RF] :The codes are sent as radio waves.b When [RF] is selected, the RC-7001RCI (sold separately) node number is displayed. Select and press [YES].b The setting at “Adding nodes” (vpage 23) must be made in order to add [RF].8 Press [YES].The transmission mode is set.b When [NO] is pressed, the setting menu reappears. To continue, press [YES].1 Press RC SETUP for 3 seconds.The “PROGRAM DEVICE” menu is displayed.2 Press NEXT, then press [EDIT DEVICE].3 Press [DISPLAY MODE].4 Press NEXT.5 At the “Select Device” screen, press the LCD button for the device whose display mode you want to change.6 Press [COLUMN MODE] or [ROW MODE].[COLUMN MODE] :The devices are displayed two per row.[ROW MODE] :The devices are displayed one per row.7 Press [YES].The display mode is set.b When [NO] is pressed, the setting menu reappears. To continue, press [YES].Setting the device display modeUse this procedure to select the way in which the devices are displayed.Setting the remote control code transmission modeOperationLCD buttonLCD buttonAbout the button names in these explanations [ ] : LCD buttons for selection items Button name only:Indicates a button on the remote control unitご注意ディスプレーモードはデバイス(機器)には設定されません。LCD ボタンの位置に対して設定されます。](https://usermanual.wiki/D-and-M/RC7000/User-Guide-807012-Page-48.png)
![Getting Started Network functionTroubleshooting SpecificationsGetting Started Operation Network functionTroubleshooting SpecificationsENGLISH ENGLISH PCアプリPCアプリ1 Press RC SETUP for 3 seconds.The “PROGRAM DEVICE” menu is displayed.2 Press NEXT, then press [EDIT FUNC].3 Press [MOVE/SWAP].4 Press NEXT.5 At the “Source Device” screen, press the LCD button for the device you want to move.6 “SelectKey”画面にて、移動したいボタンのLCDボタンを押す。7 Press NEXT.8 At the “Target Device” screen, press the LCD button to where you want to move the device or which you want to swap.9 At the “Select key” screen, press the LCD button for the move destination or which you want to swap.10 Press [YES].The button moves or is replaced.b When [NO] is pressed, the setting menu reappears. To continue, press [YES].Editing buttonsUse this procedure to move, copy and insert buttons.Moving or swapping buttons1 Press RC SETUP for 3 seconds.The “PROGRAM DEVICE” menu is displayed.2 Press NEXT, then press [EDIT TEXT].3 Press [DEVICE NAME].4 At the “Select Device” screen, press the LCD button for the device whose name you want to change.5 Press NEXT.6 At the “Edit Text” screen, use the rst column of LCD buttons to select the position of the character to be edited.7 Select the character to be input with the second column of LCD buttons, then press [SELECT].b Lower case letters are input when [CAPS] is displayed, capital letters when [lower] is displayed.8Press [SAVE].b When [NO] is pressed, the setting menu reappears. To continue, press [YES].Changing the device nameOperation](https://usermanual.wiki/D-and-M/RC7000/User-Guide-807012-Page-49.png)
![Getting Started Operation Network functionTroubleshooting SpecificationsGetting Started Network functionTroubleshooting SpecificationsENGLISH ENGLISH PCアプリPCアプリNEXTRC SETUPLCDボタン LCDボタン1 Press RC SETUP for 3 seconds.The “PROGRAM DEVICE” menu is displayed.2 Press NEXT, then press [EDIT FUNC].3 Press [COPY].4 Press NEXT.5 At the “Source Device” screen, press the LCD button for the device of the button you want to copy.6 At the “Select key” screen, press the LCD button for the button you want to copy.7 Press NEXT.8 “Target Device”画面にて、コピー先のデバイスのLCDボタンを押す。9 “Select key”画面にて、コピー先の場所のLCDボタンを押す。10 Press [YES].The button is copied.b When [NO] is pressed, the setting menu reappears. To continue, press [YES].Copying buttons1 Press RC SETUP for 3 seconds.The “PROGRAM DEVICE” menu is displayed.2 Press NEXT, then press [EDIT FUNC].3 Press [MOVE/INSERT].4 Press NEXT.5 At the “Source Device” screen, press the LCD button for the device you want to move.6 At the “Select key” screen, press the LCD button for the device you want to move.7 Press NEXT.8 At the “Target Device” screen, press the LCD button for the device of the button for the place to be inserted.9 “Select key”画面にて、挿入先の場所のLCDボタンを押す。10 Press [YES].The button is inserted.b When [NO] is pressed, the setting menu reappears. To continue, press [YES].Inserting buttonsOperationLCD buttonLCD buttonAbout the button names in these explanations [ ] : LCD buttons for selection items Button name only:Indicates a button on the remote control unit](https://usermanual.wiki/D-and-M/RC7000/User-Guide-807012-Page-50.png)
![Getting Started Network functionTroubleshooting SpecificationsGetting Started Operation Network functionTroubleshooting SpecificationsENGLISH ENGLISH PCアプリPCアプリ1 Press RC SETUP for 3 seconds.The “PROGRAM DEVICE” menu is displayed.2 Press NEXT, then press [EDIT FUNC].3 Press NEXT, then press [ADD IR].4 Press NEXT.5 At the “Source Device” screen, press the LCD button for the device you want to add.6 Press NEXT.7 At the “ADD IR” screen, press the LCD button for the function of the button you want to add.8 Press NEXT.9 At the “Select key” screen, press the LCD button for the position of the button you want to add.10 Press [TEST KEY], and if the operation has been performed press [YES].b Press [YES] to add more buttons.Adding buttonsWhen new buttons are added, it is possible to select and add new functions.1 Press RC SETUP for 3 seconds.The “PROGRAM DEVICE” menu is displayed.2 Press NEXT, then press [EDIT FUNC].3 Press [DISPLAY MODE].4 Press NEXT.5 At the “Select Device” screen, press the LCD button for the device of the button whose display mode you want to change. 6 At the “Select key” screen, press the LCD button for the button whose display mode you want to change.7 Press [COLUMN MODE] or [ROW MODE].[COLUMN MODE] :The buttons are displayed two per row.[ROW MODE] :The buttons are displayed one per row.8 Press NEXT.The display mode is set.b When [NO] is pressed, the setting menu reappears. To continue, press [YES].Setting the button display modeUse this procedure to select the way in which the buttons are displayed.1 Press RC SETUP for 3 seconds.The “PROGRAM DEVICE” menu is displayed.2 Press NEXT, then press [EDIT FUNC].3 Press [ERASE].4 Press NEXT.5 At the “Source Device” screen, press the LCD button for the device you want to delete.6 At the “Select key” screen, press the LCD button for the device you want to delete.[LEAVE EMPTY] :The button is deleted.[SHIFT ALL UP] :The button is deleted and the other buttons are all shifted up, filling in the space of the deleted button.7 Press [YES].The button is deleted.b When [NO] is pressed, the setting menu reappears. To continue, press [YES].Deleting buttonsOperation](https://usermanual.wiki/D-and-M/RC7000/User-Guide-807012-Page-51.png)
![Getting Started Operation Network functionTroubleshooting SpecificationsGetting Started Network functionTroubleshooting SpecificationsENGLISH ENGLISH PCアプリPCアプリNEXTRC SETUPLCDボタン LCDボタンResetting the learning function1 Press RC SETUP for 3 seconds.The “PROGRAM DEVICE” menu is displayed.2 Press [LEARNING].3 Press [ERASE LEARN].4 Press NEXT twice.5 At the “Source Device” screen, press the LCD button for the device you want to delete.6 At the “Erase Learn” screen, press the LCD button for the learning function you want to erase.7 To delete, press [YES]. If you do not want to delete, press [NO].b Press [NO] to end, [YES] to continue.Changing the button name1 Press RC SETUP for 3 seconds.The “PROGRAM DEVICE” menu is displayed.2 Press NEXT, then press [EDIT TEXT].3 Press [KEY NAME].4 At the “Select Device” screen, press the LCD button for the device whose button name you want to change.5 At the “Select key” screen, select the LCD button for the button whose button name you want to change.6 Press NEXT.7 At the “Edit Text” screen, use the rst column of LCD buttons to select the position of the character to be edited.8 Select the character to be input with the second column of LCD buttons, then press [SELECT].b Lower case letters are input when [CAPS] is displayed, capital letters when [lower] is displayed.9 Press [SAVE].b When [NO] is pressed, the setting menu reappears. To continue, press [YES].Adding a synthesizer buttonThis is a function for system expansion in the future.OperationLCD buttonLCD buttonAbout the button names in these explanations [ ] : LCD buttons for selection items Button name only:Indicates a button on the remote control unit](https://usermanual.wiki/D-and-M/RC7000/User-Guide-807012-Page-52.png)
![Getting Started Network functionTroubleshooting SpecificationsGetting Started Operation Network functionTroubleshooting SpecificationsENGLISH ENGLISH PCアプリPCアプリDeleting favorites1 Press RC SETUP for 3 seconds.The “PROGRAM DEVICE” menu is displayed.2 Press [FAVORITES].3 Press [DELETE].4 Press NEXT twice.5 At the “Source Device” screen, press the LCD button for the device you want to delete.6 At the “Select key” screen, press the LCD button for the device you want to delete.7 To delete, press [YES]. If you do not want to delete, press [NO].b Press [NO] to end, [YES] to continue.Resetting the punch through function1 Press RC SETUP for 3 seconds.The “PROGRAM DEVICE” menu is displayed.2 Press [PUNCH THRU].3 Press [CLEAR].4 Press NEXT.5 At the “Punch Thru” screen, press the LCD button for the group you want to delete.6 Press NEXT.7 At the “Select Device” screen, press the LCD button for the device whose punch through setting you want to delete.8 Press NEXT.b Press NEXT to return to the settings menu.Resetting the macro function1 Press RC SETUP for 3 seconds.The “PROGRAM DEVICE” menu is displayed.2 Press [MACROS].3 Press [DELETE].4 Press NEXT twice.5 At the “Source Device” screen, press the LCD button for the device whose macro you want to delete.6 At the “Select Key” screen, press the LCD button for the macro you want to delete.7 To delete, press [YES]. If you do not want to delete, press [NO].b Press [NO] to end, [YES] to continue.Operation](https://usermanual.wiki/D-and-M/RC7000/User-Guide-807012-Page-53.png)
![Getting Started Operation Network functionTroubleshooting SpecificationsGetting Started Network functionTroubleshooting SpecificationsENGLISH ENGLISH0 0PCアプリPCアプリNEXTRC SETUPLCDボタン LCDボタン1 Press RC SETUP for 3 seconds.The “PROGRAM DEVICE” menu is displayed.2 Press NEXT, then press [RESET/LOCK].3 Press [USER RESET].4 Press NEXT.5 Press [YES].6 Press NEXT twice.The settings are reset.User resetThis procedure deletes the macro settings added by the user and the remote control codes that have been learned. It does not delete added devices.1 Press RC SETUP for 3 seconds.The “PROGRAM DEVICE” menu is displayed.2 Press NEXT, then press [RESET/LOCK].3 Press [OP RESET].4 Press NEXT.5 Press [YES].6 Press NEXT twice.The settings are returned to as they were upon purchase.Operational resetThe settings are returned to as they were upon purchase.OperationLCD buttonLCD buttonAbout the button names in these explanations [ ] : LCD buttons for selection items Button name only:Indicates a button on the remote control unit](https://usermanual.wiki/D-and-M/RC7000/User-Guide-807012-Page-54.png)
![Getting Started Network functionTroubleshooting SpecificationsGetting Started Operation Network functionTroubleshooting SpecificationsENGLISH ENGLISH PCアプリPCアプリ1 Press RC SETUP for 3 seconds.The “PROGRAM DEVICE” menu is displayed.2 Press NEXT twice, then press [RESET/LOCK].3 Press [LOCK].4 Press NEXT twice.5 At the “Select Device” screen, press the LCD button for the device you want to lock.6 Press [YES].b When [NO] is pressed, the setting menu reappears. To continue, press [YES].1 Press RC SETUP for 3 seconds.The “PROGRAM DEVICE” menu is displayed.2 Press NEXT twice, then press [RESET/LOCK].3 Press [UNLOCK].4 Press NEXT twice.5 At the “Select Device” screen, press the LCD button for the device you want to unlock 6 Press [YES].b When [NO] is pressed, the setting menu reappears. To continue, press [YES].OperationLock functionWhen locked, device editing is not possible.Unlock functionThis procedure unlocks devices that have been locked.](https://usermanual.wiki/D-and-M/RC7000/User-Guide-807012-Page-55.png)
![Getting Started Operation Troubleshooting SpecificationsGetting Started Operation Network functionTroubleshooting SpecificationsENGLISH ENGLISH PCアプリPCアプリNEXTRC SETUPLCDボタン LCDボタンOperations using nodesAdding nodesUse this procedure to register a node number and add an RC-7001RCI (sold separately) to the network.1 Press RC SETUP for 3 seconds.The “PROGRAM DEVICE” menu is displayed.2 Press NEXT twice, then press [NETWORK].3 Press [ADD NODES].4 Press NEXT.5 To add the remote control unit to the network, press [REMOTE].b To add an RC-7001RCI (sold separately), press [OTHER].6 Press RESET/CONFIG on the RC-7001RCI (sold separately) for about 1 second.The green indicator flashes.7 Press NEXT twice.“Success!” is displayed when the device has been added successfully.b Press NEXT to return to the settings menu.1 Press RC SETUP for 3 seconds.The “PROGRAM DEVICE” menu is displayed.2 Press NEXT twice, then press [NETWORK].3 Press [DELETE NODES].4 Press NEXT twice.The RC-7001RCI’s (sold separately) node number is displayed.5 Select the node number to be deleted, then press [YES].4 Press NEXT.b Press [NO] to end, [YES] to continue.Deleting nodesUse this procedure to delete RC-7001RCI (sold separately) units by specifying the node number from the current network.Network functionLCD buttonLCD buttonAbout the button names in these explanations [ ] : LCD buttons for selection items Button name only:Indicates a button on the remote control unit](https://usermanual.wiki/D-and-M/RC7000/User-Guide-807012-Page-57.png)
![Getting Started Operation Network functionTroubleshooting SpecificationsGetting Started Operation Troubleshooting SpecificationsENGLISH ENGLISH PCアプリPCアプリ1 Press RC SETUP for 3 seconds.The “PROGRAM DEVICE” menu is displayed.2 Press NEXT twice, then press [NETWORK].3 Press [EDIT LABEL].4 Press NEXT twice.The RC-7001RCI’s (sold separately) node number is displayed.5 Select the node number to be changed, then press NEXT.The edit screen for the selected node appears.6 At the “Edit Text” screen, use the rst column of LCD buttons to select the position of the character to be edited.7 Select the character to be input with the second column of LCD buttons, then press [SELECT].b Lower case letters are input when [CAPS] is displayed, capital letters when [lower] is displayed.8 Press [SAVE].9 Press NEXT.b When [NO] is pressed, the setting menu reappears. To continue, press [YES].Changing node labelsUse this procedure to add labels to RC-7001RCIs (sold separately) for easier distinction.1 Press RC SETUP for 3 seconds.The “PROGRAM DEVICE” menu is displayed.2 Press NEXT twice, then press [NETWORK].3 Press [VIEW NODES].4 Press NEXT twice.The node numbers of the RC-7001RCIs (sold separately) registered on the network are indicated with an z mark after them.b Press NEXT twice to return to the settings menu.Viewing nodesUse this procedure to search for and display a list of RC-7001RCIs (sold separately) registered in the network.NEXTRC SETUPLCDボタン LCDボタンAbout the button names in these explanations [ ] : LCD buttons for selection items Button name only:Indicates a button on the remote control unitNetwork functionLCD buttonLCD button](https://usermanual.wiki/D-and-M/RC7000/User-Guide-807012-Page-58.png)
![Getting Started Operation Troubleshooting SpecificationsGetting Started Operation Network functionTroubleshooting SpecificationsENGLISH ENGLISH PCアプリPCアプリSetting the receiver display mode (RDM)This setting is made for conducting two-way communications between the RC-7001RCI (sold separately) and compatible DENON products. The status information of the compatible DENON product can be displayed on the set's screen. Set the position for insertion of the RDM page.1 Press RC SETUP for 3 seconds.The “PROGRAM DEVICE” menu is displayed.2 Press NEXT twice, then press [USER PREF].3 Press [RDM].4 Press NEXT.5 Press [YES].6 Use [FIRST] and [LAST] to set the position to which the RDM page is to be added.[FIRST] :The RDM page is added at the top of the normal button screen.[ROW MODE] :The RDM page is added at the end.b Press NEXT to return to the settings menu.1 Press RC SETUP for 3 seconds.The “PROGRAM DEVICE” menu is displayed.2 Press NEXT twice, then press [USER PREF].3 Press [VERSION INFO].The LCD button version information is displayed.b Press NEXT to return to the settings menu.Checking the remote control unit versionNetwork function](https://usermanual.wiki/D-and-M/RC7000/User-Guide-807012-Page-59.png)