D and M RC7000 Remote Controller User Manual
D&M; Holdings Inc. Remote Controller Users Manual
D and M >
Users Manual
REMOTE CONTROL UNIT
RC-7000CI
取扱説明書
OWNER’S MANUAL
● お買い上げいただき、ありがとうございます。
● ご使用の前にこの取扱説明書をよくお読みのうえ、正しくご使用ください。
● お読みになった後は後日お役に立つこともありますので、必ず保存してください。
安全にお使いいただくためにー必ずお守りください。
n SAFETY PRECAUTIONS
CAUTION
RISK OF ELECTRIC SHOCK
DO NOT OPEN
CAUTION:
TO REDUCE THE RISK OF ELECTRIC SHOCK, DO NOT REMOVE
COVER (OR BACK). NO USER-SERVICEABLE PARTS INSIDE.
REFER SERVICING TO QUALIFIED SERVICE PERSONNEL.
The lightning flash with arrowhead symbol, within an equilateral
triangle, is intended to alert the user to the presence of
uninsulated “dangerous voltage” within the product’s enclosure
that may be of sufficient magnitude to constitute a risk of electric
shock to persons.
The exclamation point within an equilateral triangle is intended
to alert the user to the presence of important operating
and maintenance (servicing) instructions in the literature
accompanying the appliance.
WARNING:
TO REDUCE THE RISK OF FIRE OR ELECTRIC SHOCK, DO NOT
EXPOSE THIS APPLIANCE TO RAIN OR MOISTURE.
IC Information (For Canadian customers)
1. PRODUCT
RC-7000CI IC: 6963A-RC7000
This product complies with RSS-210 of Industry Canada.
Operation is subject to the following two conditions: (1) this product may not
cause harmful interference, and (2) this product must accept any interference
received, including interference that may cause undesired operation.
APPAREIL
RC-7000CI IC: 6963A-RC7000
Cet appareil est conforme à la norme CNR-210 du Canada.
L’utilisation de ce dispositif est autorisée seulement aux deux conditions
suivantes : (1) il ne doit pas produire de brouillage, et (2) l’utilisateur du
dispositif doit être prêt à accepter tout brouillage radioélectrique reçu, même
si ce brouillage est susceptible de compromettre le fonctionnement du
dispositif
I I
FCC Information (For US customers)
1. PRODUCT
RC-7000CI FCC ID: BV2-RC7000
This product complies with Part 15 of the FCC Rules. Operation is subject
to the following two conditions: (1) this product may not cause harmful
interference, and (2) this product must accept any interference received,
including interference that may cause undesired operation.
2. IMPORTANT NOTICE: DO NOT MODIFY THIS PRODUCT
This product, when installed as indicated in the instructions contained in this
manual, meets FCC requirements. Modification not expressly approved by
DENON may void your authority, granted by the FCC, to use the product.
3. NOTE
This product has been tested and found to comply with the limits for a Class B
digital device, pursuant to Part 15 of the FCC Rules. These limits are designed
to provide reasonable protection against harmful interference in a residential
installation.
This product generates, uses and can radiate radio frequency energy and, if
not installed and used in accordance with the instructions, may cause harmful
interference to radio communications. However, there is no guarantee that
interference will not occur in a particular installation. If this product does cause
harmful interference to radio or television reception, which can be determined
by turning the product OFF and ON, the user is encouraged to try to correct
the interference by one or more of the following measures:
• Reorient or relocate the receiving antenna.
• Increase the separation between the equipment and receiver.
• Connect the product into an outlet on a circuit different from that to which
the receiver is connected.
• Consult the local retailer authorized to distribute this type of product or an
experienced radio/TV technician for help.
CAUTION
• To comply with FCC RF exposure compliance requirement, separation
distance of at least 20cm must be maintained between the antenna of this
product and all persons.
• This product and its antenna must not be co-located or operating in
conjunction with any other antenna or transmitter.
IMPOTANT SAFETY
INSTRUCTIONS
1. Read these instructions.
2. Keep these instructions.
3. Heed all warnings.
4. Follow all instructions.
5. Do not use this apparatus near water.
6. Clean only with dry cloth.
7. Do not block any ventilation openings.
Install in accordance with the manufacturer's instructions.
8. Do not install near any heat sources such as radiators, heat registers, stoves,
or other apparatus (including amplifiers) that produce heat.
9. Do not defeat the safety purpose of the polarized or grounding-type plug. A
polarized plug has two blades with one wider than the other. A grounding type
plug has two blades and a third grounding prong. The wide blade or the third
prong are provided for your safety. If the provided plug does not fit into your
outlet, consult an electrician for replacement of the obsolete outlet.
10. Protect the power cord from being walked on or pinched particularly at plugs,
convenience receptacles, and the point where they exit from the apparatus.
11. Only use attachments/accessories specified by the manufacturer.
12. Use only with the cart, stand, tripod, bracket, or table
specified by the manufacturer, or sold with the apparatus.
When a cart is used, use caution when moving the cart/
apparatus combination to avoid injury from tip-over.
13. Unplug this apparatus during lightning storms or when
unused for long periods of time.
14. Refer all servicing to qualified service personnel. Servicing
is required when the apparatus has been damaged in any
way, such as power-supply cord or plug is damaged, liquid
has been spilled or objects have fallen into the apparatus,
the apparatus has been exposed to rain or moisture, does
not operate normally, or has been dropped.
15. For heat dispersal, do not install this unit in a confined space such as a
bookcase or similar enclosure.
16. Batteries shall not be exposed to excessive heat such as sunshine, fire or the
like.
II II

操作のしかた ネットワーク機能 故障かな?
と思ったら
保障とサービスに
ついて
主な仕様
日本語 日本語
PCアプリ
乾電池は充電しない
電
池の破裂・液漏れにより、火災・
けがの原因となります。
禁止
禁止
必ず実施
電池を交換するときは
●極性表示に注意し、表示通りに
正しく入れる
●指定以外の電池は使用しない
●新しい電池と古い電池を混ぜて
使用しない
間違えると電池の破裂・液漏れに
より、火災・けがや周囲を汚損す
る原因となることがあります。
正しく安全にお使いいただくため、ご
使用の前に必ずよくお読みください。
この取扱説明書および製品への表示では、製品を
安全に正しくお使いいただき、あなたや他の人々
への危害や財産への損害を未然に防止するために、
いろいろな絵表示をしています。その絵表示と意
味は次のようになっています。
内容をよく理解してから本文をお読みください。
安全上のご注意 警告 この表示を無視して、誤った取り扱いをすると、人が死亡また
は重傷を負う危険が差し迫って生じることが想定される内容
を示しています。
ご使用になる前に
IIIIII
ご使用になる前に 操作のしかた ネットワーク機能 PCアプリ 故障かな?
と思ったら
保障とサービスに
ついて
主な仕様
絵表示の例
図の中や近傍に具体的な禁止内容が
描かれています。
記号は注意(危険・警告を含む)を
促す内容があることを告げるものです。
感電注意
分解禁止
電源プラグを
コンセントから抜け
記号は禁止の行為であることを
告げるものです。
記号は行為を強制したり指示する内容
を告げるものです。
ステレオ音のエチケット
●隣り近所への配慮(おもいやり)を十分にいたしましょう。
●特に静かな夜間は、小さな音でも通りやすいものです。夜間の音
楽鑑賞には、特に気を配りましょう。
ご使用になる前に 操作のしかた ネットワーク機能 故障かな?
と思ったら
保障とサービスに
ついて
主な仕様
操作のしかた ネットワーク機能 故障かな?
と思ったら
保障とサービスに
ついて
主な仕様
日本語 日本語
PCアプリ
PCアプリ
2.4 DS 4
電波に関するご注意
●
本機は電波法に基づく工事設計認証を取得
した小電力データ通信システムの無線局設
備です。
●
本機を使用するときに無線局の免許は必
要ありません。
●本機は日本国内でのみ使用できます。
b
以下のことをおこなうと法律で罰せられる
ことがあります。
●本機を分解 / 改造すること
●本機に貼ってある証明ラベルをはがすこと
2.4:
2.4GHz 帯を使用する無線設備を表します。
DS:
変調方式を表します。
4:
移動体識別装置の構内無線局に対して想定さ
れる与干渉距離を表します(約 40m)。
:
2.4GHz 帯の全帯域を使用し、かつ移動体識
別装置の帯域を回避可能であることを意味し
ます。
●現品表示について
IVIV
この機器の使用周波数帯(2.4GHz)では、
電子レンジ等の産業・科学・医療用機器の
ほか、工場の製造ライン等で使用されてい
る移動体識別用の構内無線局(免許を要す
る無線局)、特定小電力無線局(免許を要
しない無線局)、およびアマチュア無線局
(免許を要する無線局)が運用されていま
す。
1.この機器を使用する前に、近くで移動体
識別用の構内無線局、特定小電力無線局
およびアマチュア無線局が運用されてい
ないことを確認してください。
2.万が一、この機器から移動体識別用の構
内無線局に対して有害な電波干渉の事例
が発生した場合には、速やかに使用周波
数を変更するか、または電波の発射を停
止した上、下記連絡先にご連絡いただき、
混信回避のための処置等についてご相談
してください。
3.その他、この機器から移動体識別用の特
定小電力無線局またはアマチュア無線局
に対して有害な電波干渉の事例が発生し
た場合など、何かお困りのことが起きた
ときには、次の連絡先へお問い合わせく
ださい。
連絡先:
株式会社
デノンコンシューマーマーケティング
お客様相談センターTEL:045-670-5555
http://denon.jp/info/info02.html
ご使用になる前に

操作のしかた ネットワーク機能 故障かな?
と思ったら
保障とサービスに
ついて
主な仕様
ご使用になる前に 操作のしかた ネットワーク機能 故障かな?
と思ったら
保障とサービスに
ついて
主な仕様
日本語 日本語
PCアプリ
PCアプリ
ご使用になる前に
総目次
付属品について························································· 2
乾電池の入れかた····················································· 2
リモコンの使いかた················································· 3
各部の名前とはたらき············································· 3
ご使用になる前に
はじめに····································································· 4
設定メニューマップ················································· 5
LCD ボタンの操作···················································· 6
設定
画面表示時間を設定する······································ 6
バックライト点灯時間を設定する······················· 7
コントラストを調整をする··································· 7
設定を終了する······················································ 7
いろいろな設定をする
プリセットメモリー機能を使う··························· 8
学習機能を使う················································8、9
マクロ機能を使う··········································9、10
ディレイタイム機能を使う·································10
コードサーチ機能を使う····································10
お気に入りの設定······································· 11、12
パンチスルー機能を使う····································12
ページの編集をする··································· 12、13
デバイスの編集をする····························· 13 ~ 16
ボタンの編集············································· 16 ~ 19
学習機能を初期化する········································19
操作のしかた
●
本機では、2.4GHz の周波数帯の電波を
利用している関係で、下記機器と干渉する
と正しく操作できなくなる可能性がありま
す。
【2.4GHzの周波数帯を使用している主な機器】
● 電子レンジ
●
無線 LAN を利用した機器(ノートパソコ
ン、無線ルーター、無線 LAN 対応 AV 機
器等)
● コードレスフォン
● Bluetooth 対応機器
● ワイヤレス対応 AV 機器
● ワイヤレスコントローラー
b正しく操作できない場合には、下記の方
法で改善する可能性があります。
1.干渉している機器との距離を離す。
2.干渉している機器の電源を切る。
●
ペースメーカ−等の医療用電気機器をご使
用の場合には、各医療用電気機器メーカ−
または販売店に電波による影響をご確認の
上ご使用ください。
●
設置の距離や障害物がない場合でも、電波
の反射等により受信がうまくいかない場合
があります。その場合にはレシーバーの向
きや位置を変えると改善することがありま
す。
● ラジオやテレビ、BS/CS チューナーなど
の電波を利用した機器のそばで使用する
と、ノイズを発生することがあります。そ
の場合には機器から遠ざけて使用してくだ
さい。
ノードを使った操作
ノードの追加························································24
ノードの削除························································24
ノードの参照························································25
ノードラベルの変更············································25
レシーバーディスプレイモード
(RDM)の設定················································26
リモコンのバージョンの確認·····························26
ネットワーク機能
故障かな?と思ったら..................... 27
保証とサービスについて............... 27
マクロ機能を初期化する····································20
お気に入りを削除する········································20
パンチスルー機能を初期化する·························20
オペレーショナルリセット·································21
ユーザーリセット················································21
ロック機能····························································22
アンロック機能····················································22
主な仕様......................................................... 27
ご使用になる前に
RC-7000CIEditor の機能···································27
RC-7000CIEditor をインストールする·········27
RC-7000CIEditor の使いかた·························27
PCアプリ
ご使用になる前に 操作のしかた ネットワーク機能 故障かな?
と思ったら
保障とサービスに
ついて
主な仕様
操作のしかた ネットワーク機能 故障かな?
と思ったら
保障とサービスに
ついて
主な仕様
日本語 日本語
PCアプリ
PCアプリ
本書に使用しているイラストは、取り扱い方法を説明す
るためのもので、実物とは異なる場合があります。
付属品について
ご使用の前にご確認ください。
q
取扱説明書(本書).............................................. 1
w
リモコン(本機)................................................. 1
e
単 4 形アルカリ乾電池........................................ 4
r
CD-ROM.............................................................. 1
t
USB ケーブル
( ケーブルの長さ :約 1m) ..................................1
乾電池の入れかた
q つまみを引き上げなが
ら裏ぶたを取り外す。
w 乾電池(4 本)を乾電
池収納部の表示に合わ
せて正しく入れる。
e 裏ぶたを元通りにする。
ご注意
•リモコンには単 4 形乾電池をご使用ください。
•本機を操作したい機器の近くで操作して機器が動
作しないときは、新しい乾電池と交換してくださ
い。(付属の乾電池は動作確認用です。早めに新し
い乾電池と交換してください。)
•乾電池は、リモコンの乾電池収納部の表示通りに
q側・w側を合わせて正しく入れてください。
•破損・液漏れの恐れがありますので、
•新しい乾電池と使用した乾電池を混ぜてご使用
にならないでください。
• 違う種類の乾電池を混ぜて使用しないでください。
• 乾電池は充電しないでください。
•乾電池をショートさせたり、分解や加熱または
火に投入させたりしないでください。
•万一、乾電池の液漏れがおこったときは、乾電池
収納部内についた液をよく拭き取ってから新しい
乾電池を入れてください。
•リモコンを長時間使用しないときは、乾電池を取
り出してください。
•乾電池を交換するときは、あらかじめ交換用の乾電
池を用意し、できるだけ速やかに交換してください。
ご使用になる前に
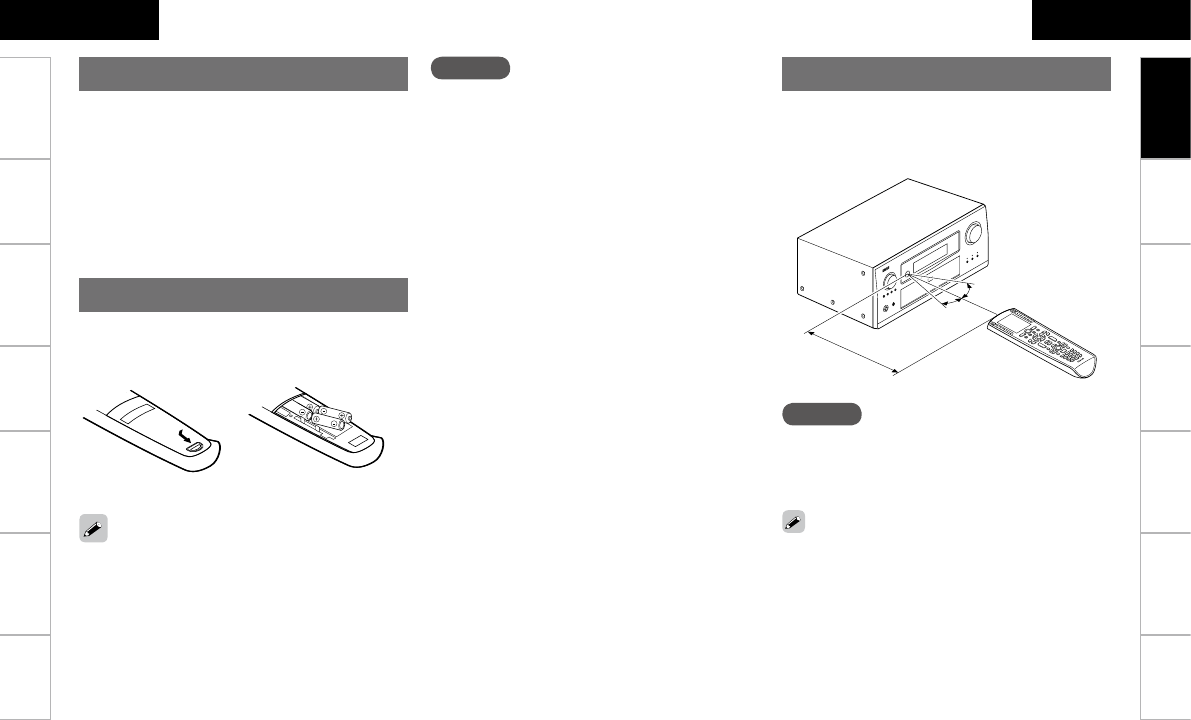
•
リモコンはリモコン受光部に向けてご使用ください。
• 左右 30°までの範囲で約 7m 離れたところまでご
使用になれます。
30°
30°
約 7m
リモコンの使いかた
ご注意
リモコン受光部に、直射日光やインバーター式蛍光灯
の強い光または赤外線が当たると、誤動作をしたり、
リモコンが操作できなくなったりする場合があります。
RF 接続での使いかたについては、RC-7001RCI(別売
り)の取扱説明書をご覧ください。
操作のしかた ネットワーク機能 故障かな?
と思ったら
保障とサービスに
ついて
主な仕様
ご使用になる前に 操作のしかた ネットワーク機能 故障かな?
と思ったら
保障とサービスに
ついて
主な仕様
日本語 日本語
PCアプリ
PCアプリ
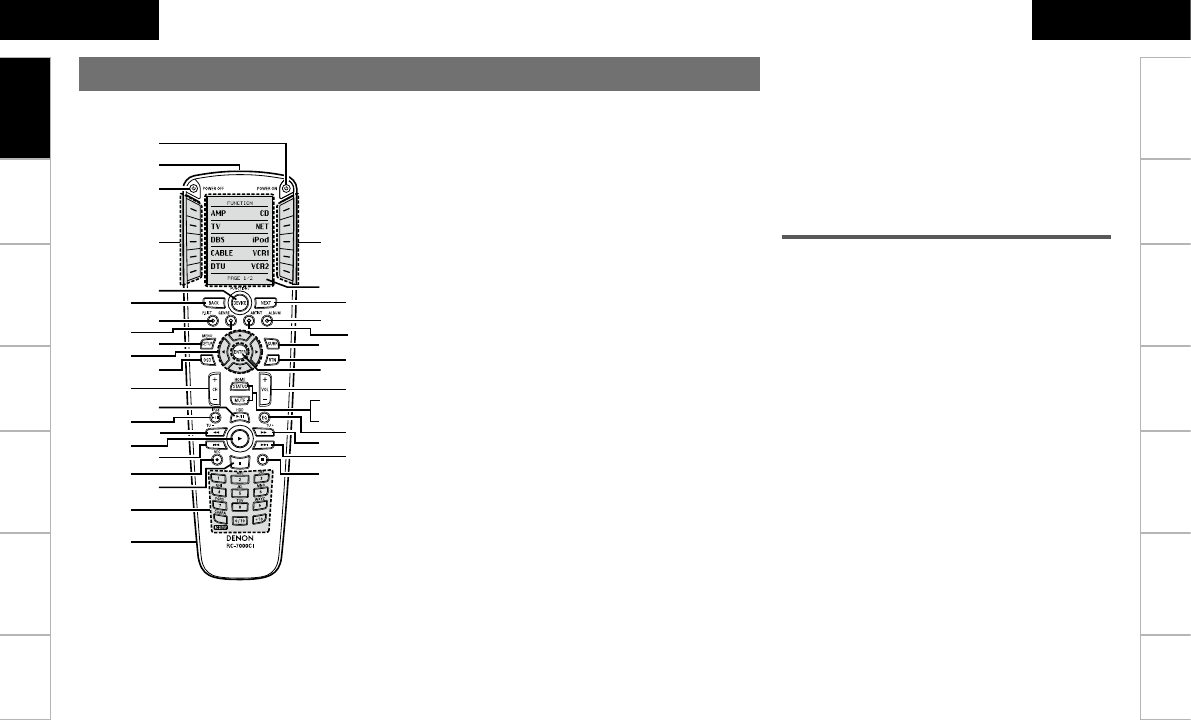
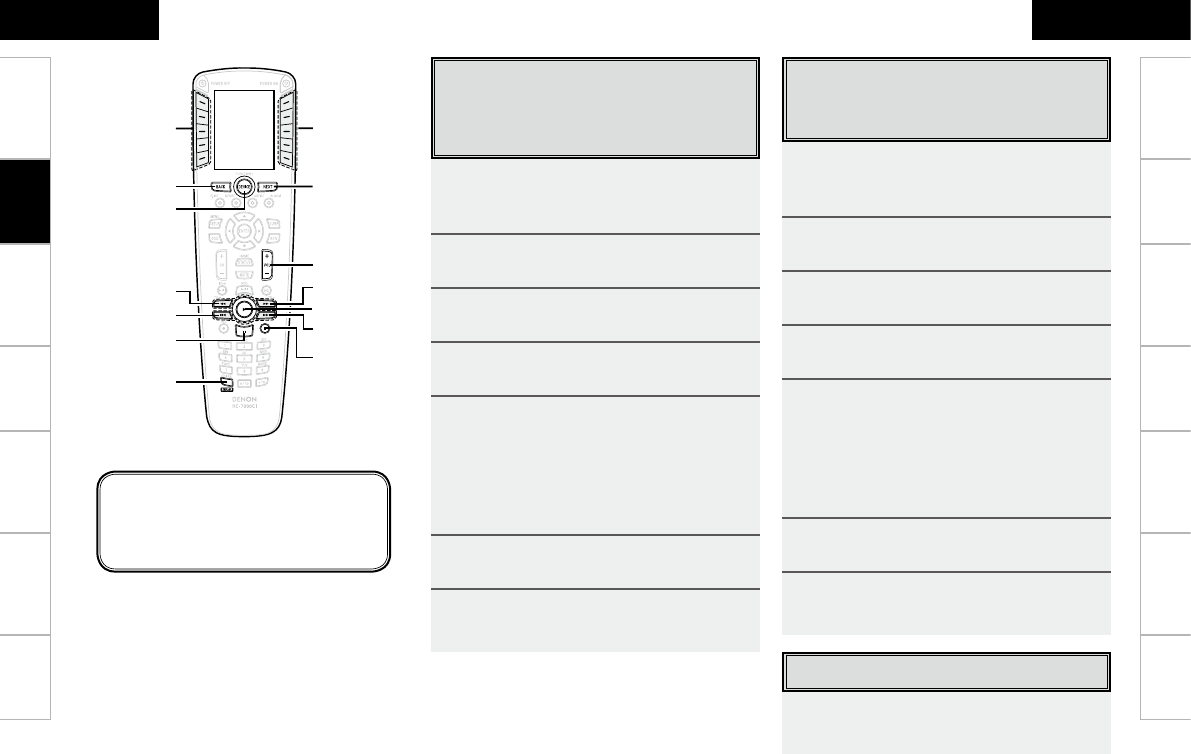
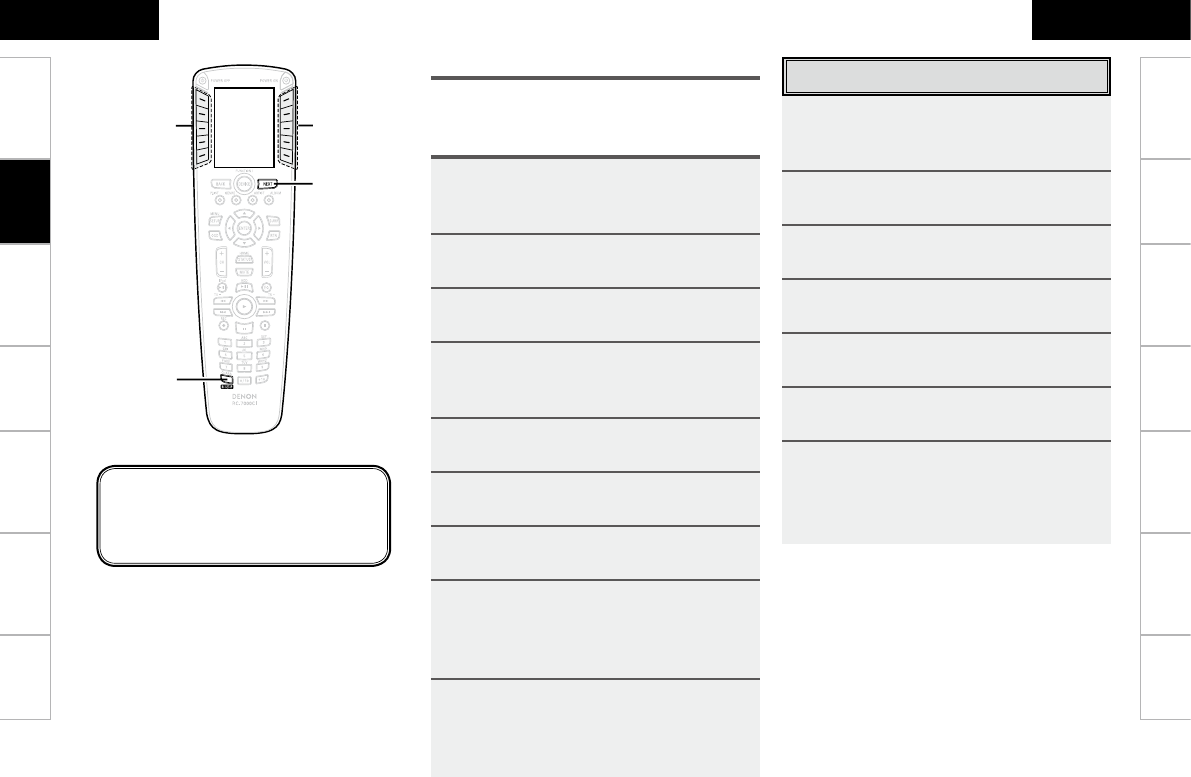
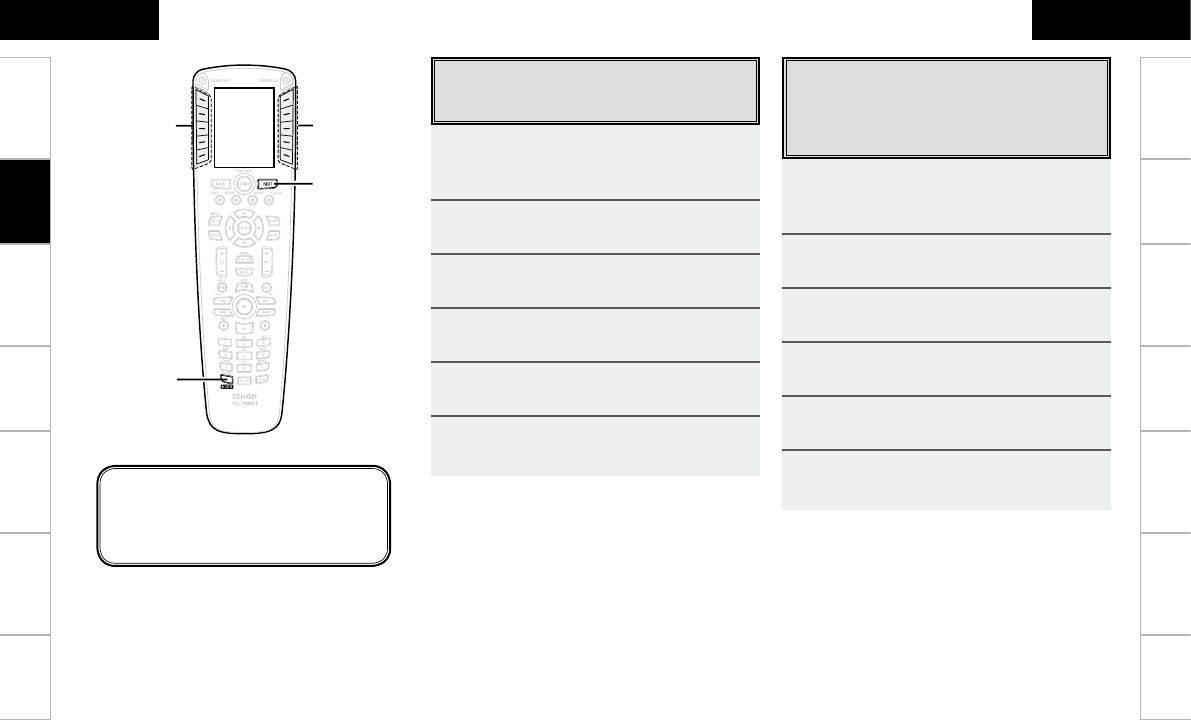
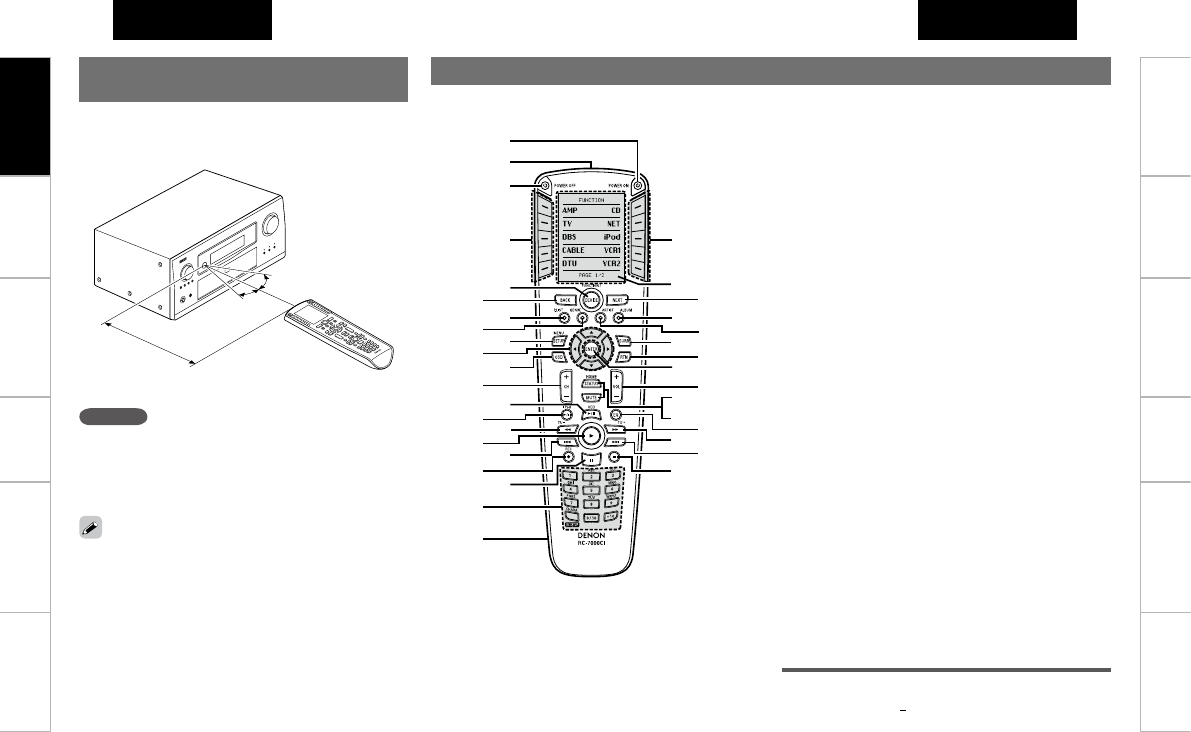
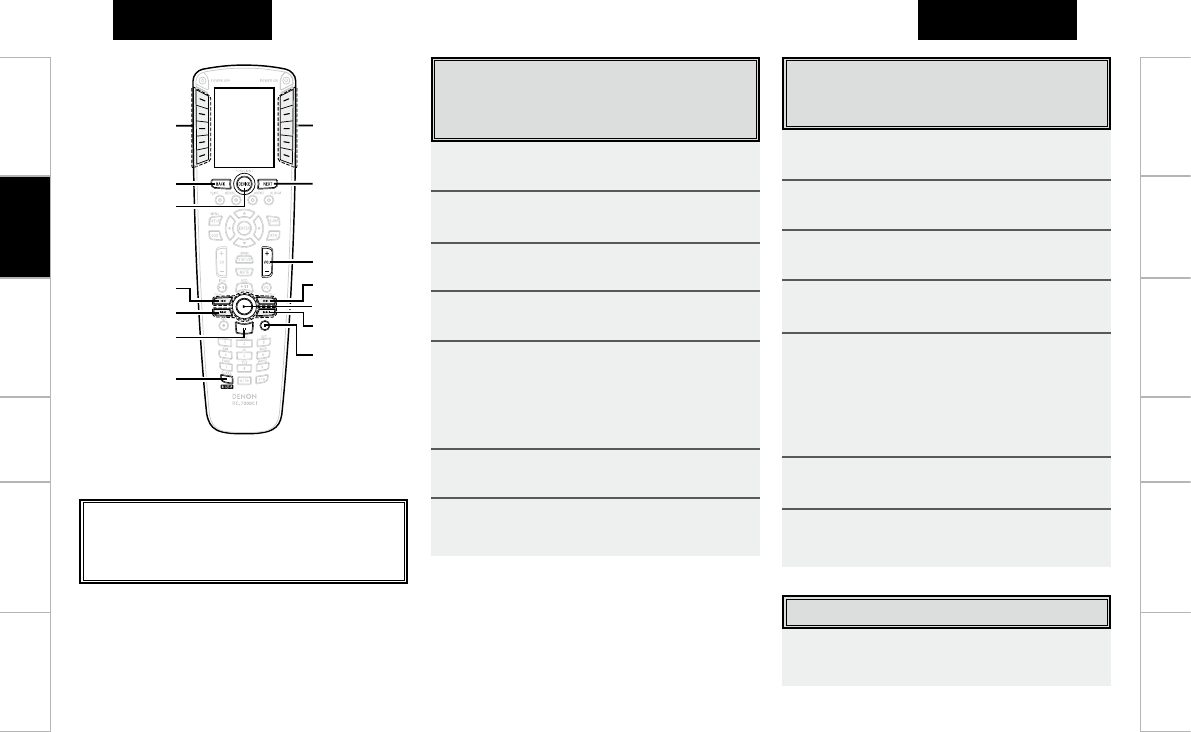
各部のはたらきなど詳しい説明については、()内のページを参照してください。
q
w
e
r r
W3
W2
W4 W5
W6 W7
W8 W9
E0
E1
E3
E5
E2
E4
yu
io
Q0 Q1
Q2
Q4 Q3
Q5
Q7
Q6
Q8 Q9
W0
W1
t
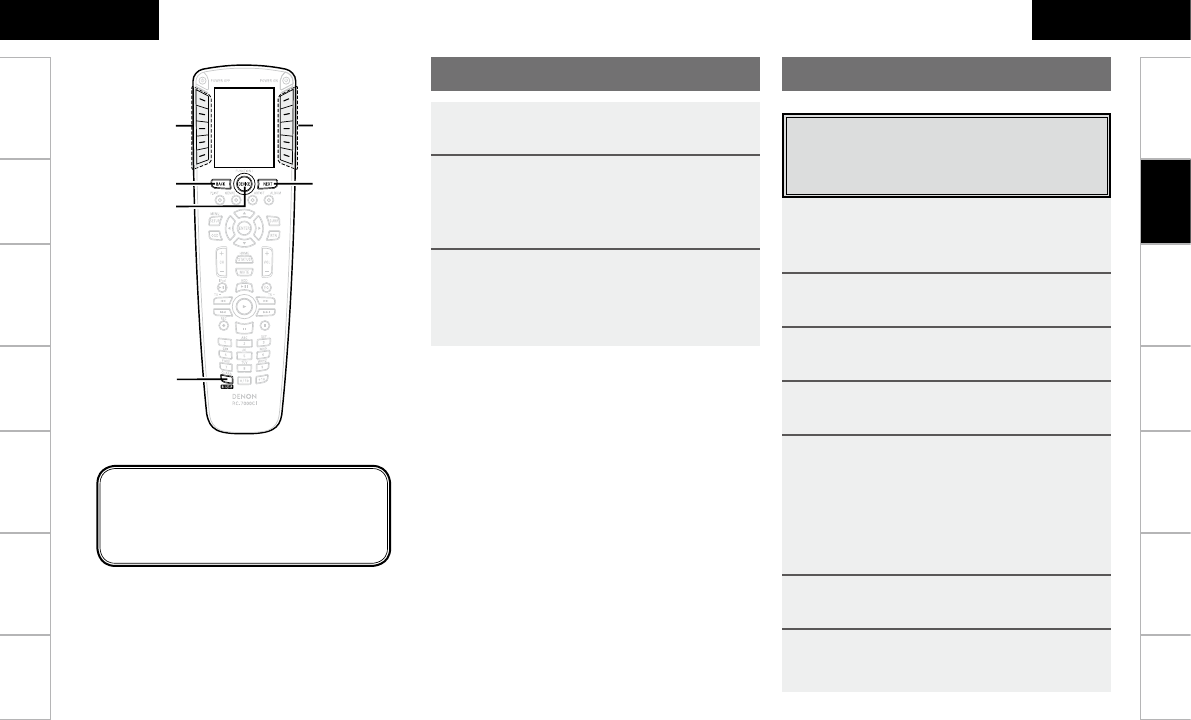
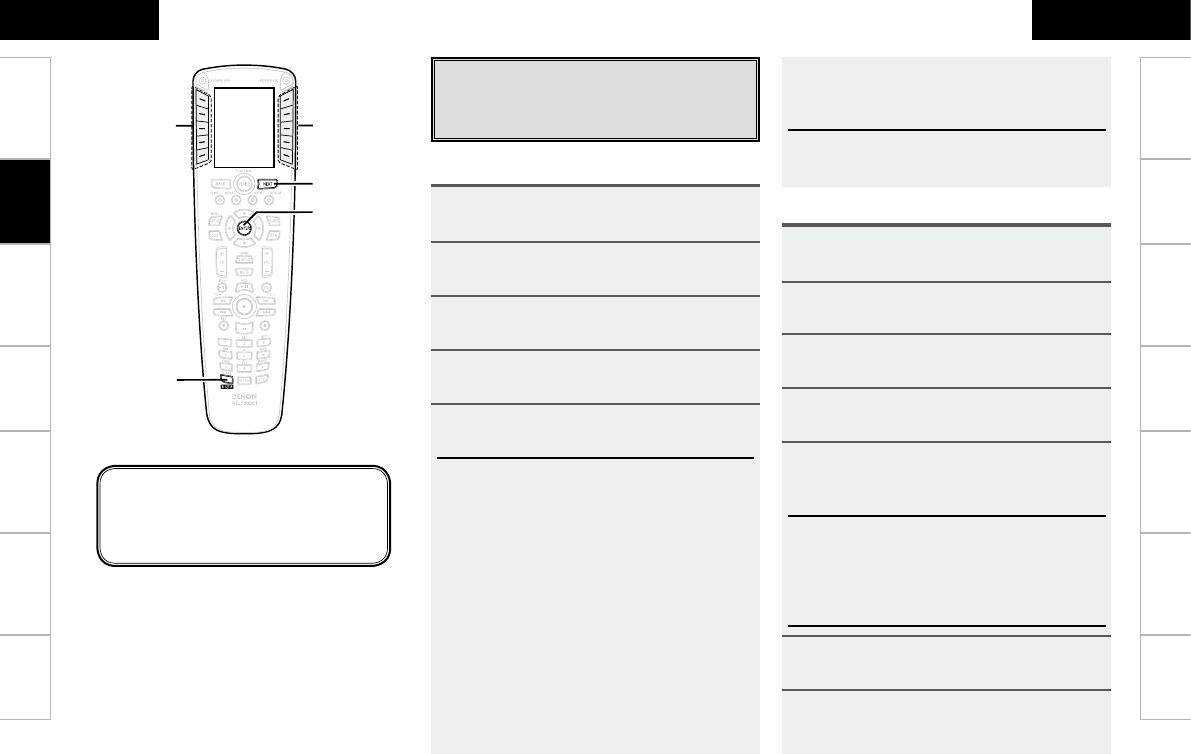
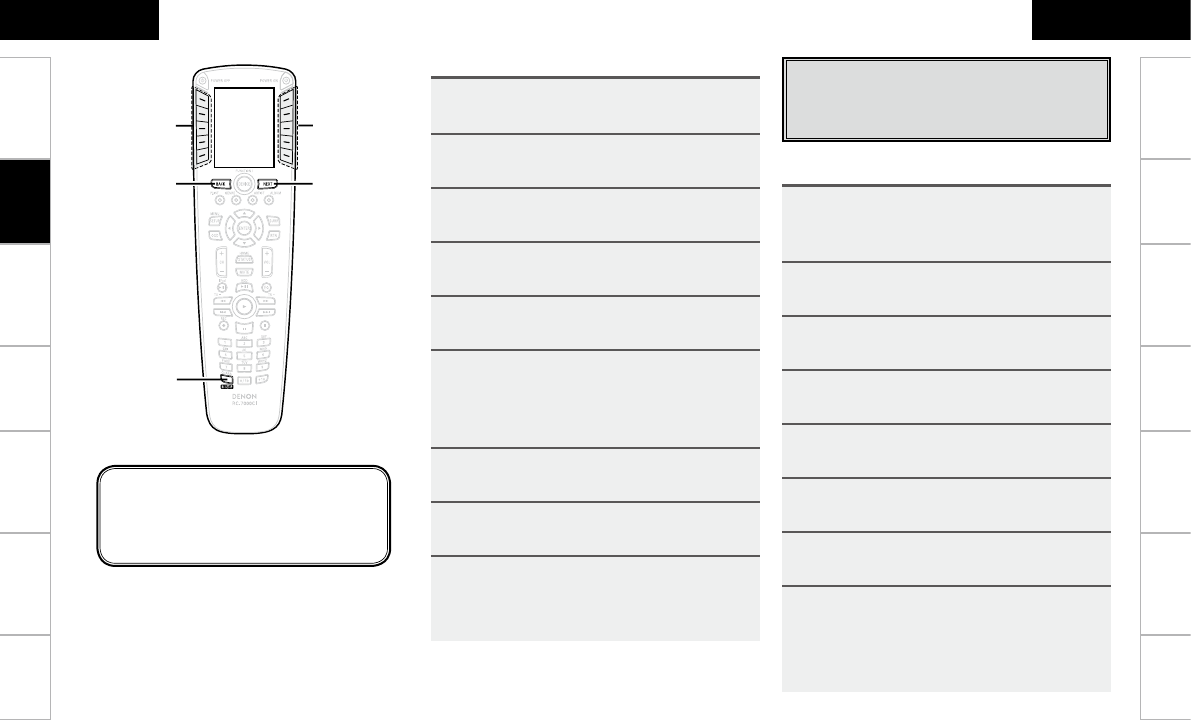
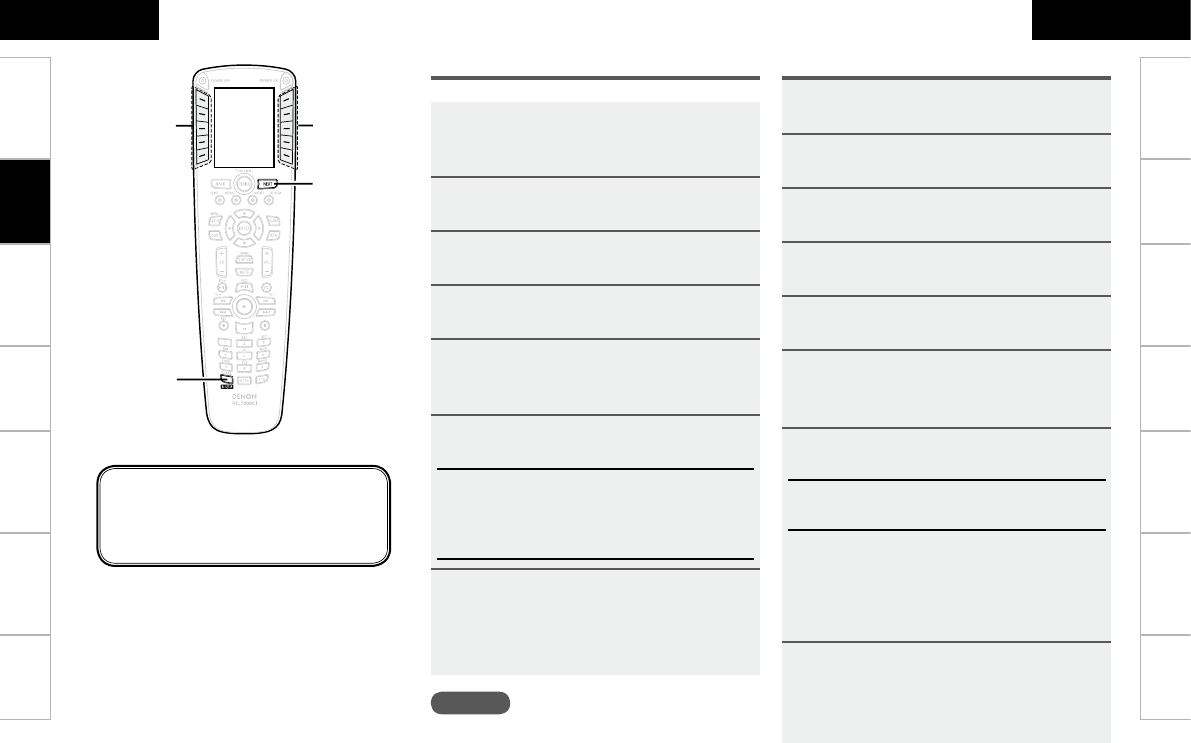
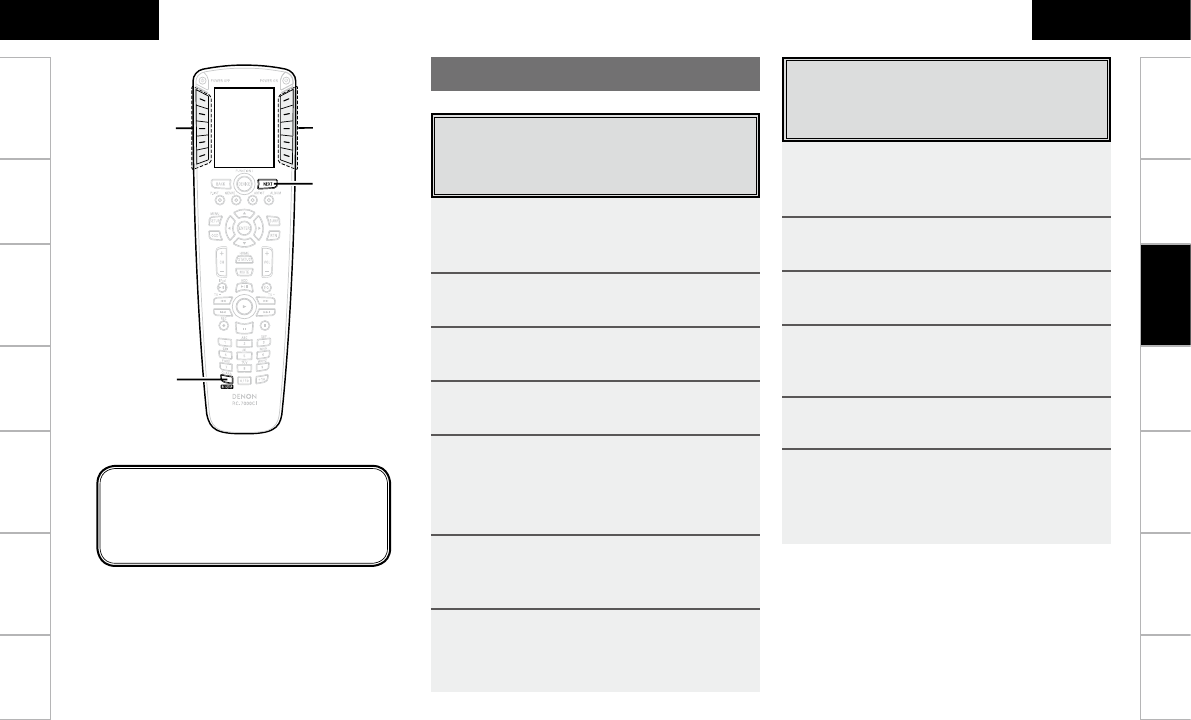
各部の名前とはたらき
yバックボタン (BACK) ……………… (13、20)
u赤ボタン
i緑ボタン
oセットアップ / メニューボタン
(SETUP/MENU) ………………………… (12)
Q0カーソルボタン (uiop) ……………… (12)
Q1オンスクリーンディスプレイボタン
(OSD) ……………………………………… (12)
Q2チャンネル +,-ボタン (CH+,- ) …… (12)
Q3HDD 再生 / 一時停止ボタン (1/3)……… (12)
Q4iPod 再生 / 一時停止ボタン (1/3)……… (12)
Q5チューニング- / サーチボタン
(6)……………………………………… (8、12)
Q6再生ボタン (1) ……………………………… (8)
Q7スキップボタン (8) ……………………… (8)
Q8録音ボタン (4) (REC)…………………… (12)
Q9
一時停止ボタン (3) ………………………… (8)
W0ファンクション / 数字ボタン ………… (6 ~ 8)
W1USB ポート
W2表示画面 ……………………………………… (4)
W3ネクストボタ
ン (NEXT)
………………… (6 ~ 8)
W4青
ボタン
W5黄ボタン
W6サラウンドパラメーターボタン
(SURR) …………………………………… (12)
W7リターンボタン (RTN) …………………… (12)
W8エンターボタン (ENTER)………………… (12)
W9主音量調節ボタン (VOL+,- ) ………… (12)
E0ステータス / ホームボタン
(STATUS/HOME)……………………… (12)
q電源 ON ボタン (POWERON)
wリモコン信号送信窓 ………………………… (3)
e電源 OFF ボタン (POWEROFF)
rLCD ボタン………………………… (4、6 ~ 8)
tファンクション / デバイスボタン
(FUNCTION/DEVICE)……………… (7、12)
ご使用になる前に
E1ミュートボタン (MUTE) ………………… (12)
E2ルームイコライザーボタン
(ROOMEQ) ……………………………… (12)
E3チューニング +/ サーチボタン
(7)……………………………………… (8、12)
E4スキップボタン (9) ………………… (8、12)
E5ストップボタン (2) …………………… (8、12)
USB ポートについて
専用のアプリケーションソフト“RC-7000CIEditor”
を使用して本機の機能を編集するときに、付属の USB
ケーブルを接続します(v27 ページ)。
ご使用になる前に 操作のしかた ネットワーク機能 故障かな?
と思ったら
保障とサービスに
ついて
主な仕様
ご使用になる前に ネットワーク機能 故障かな?
と思ったら
保障とサービスに
ついて
主な仕様
日本語 日本語
PCアプリ
PCアプリ
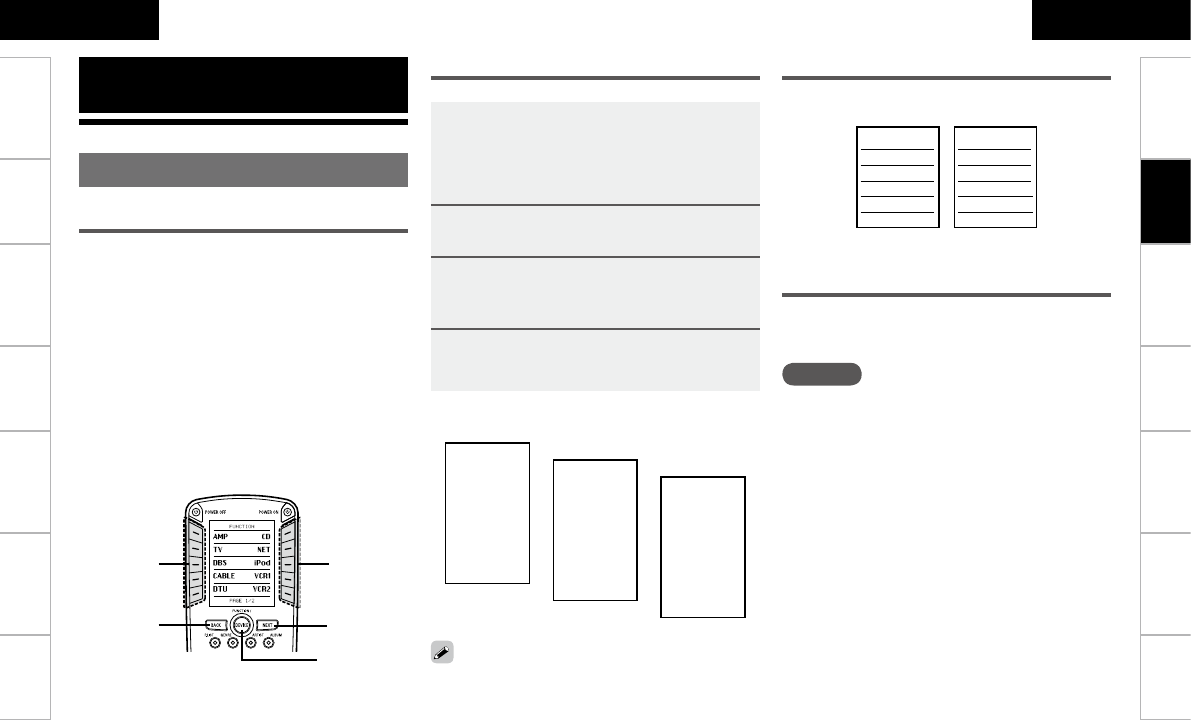
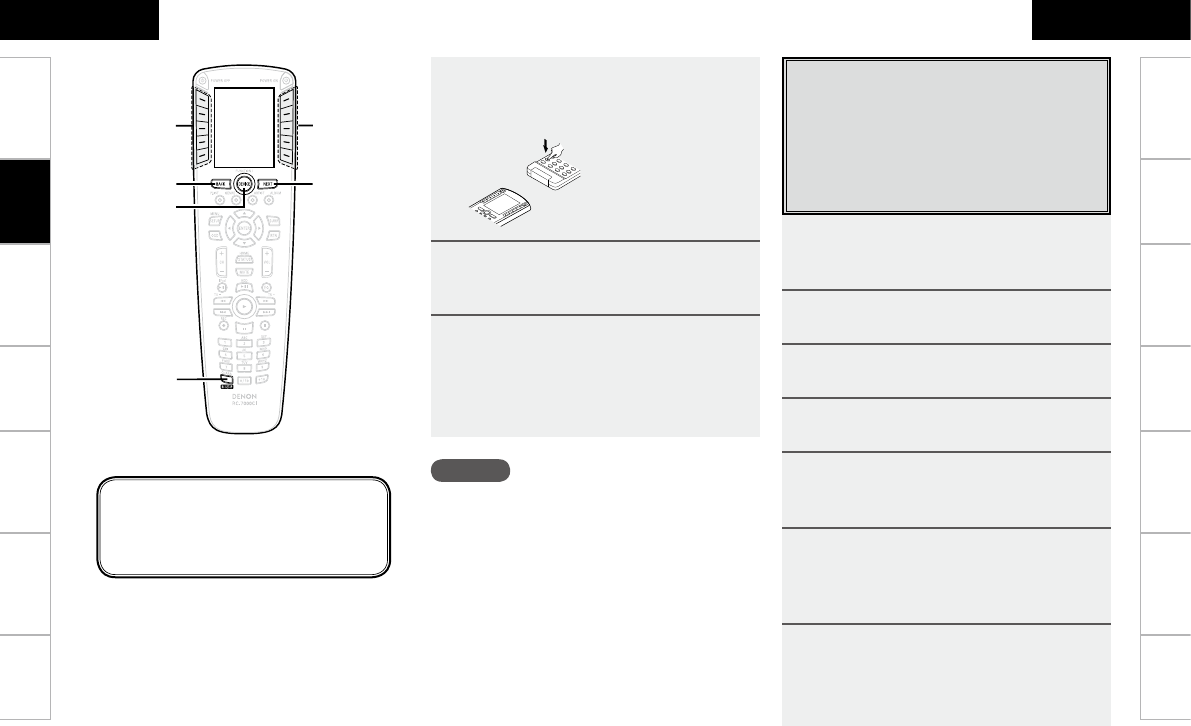
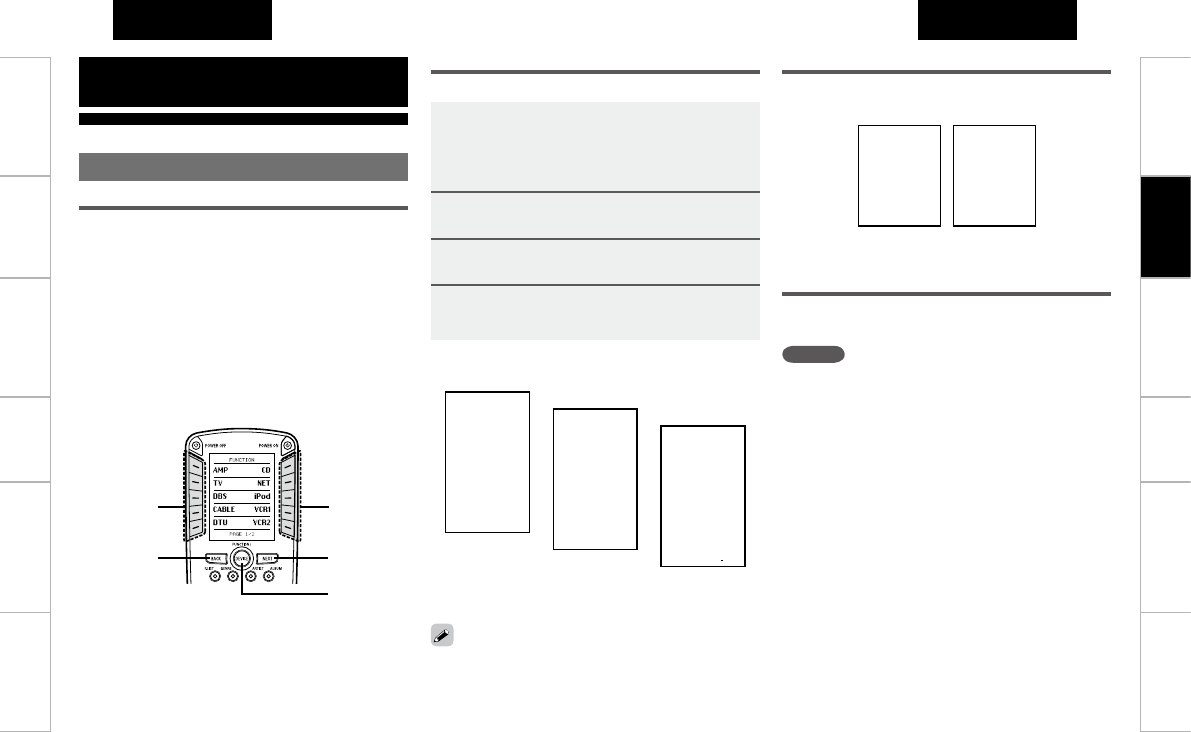
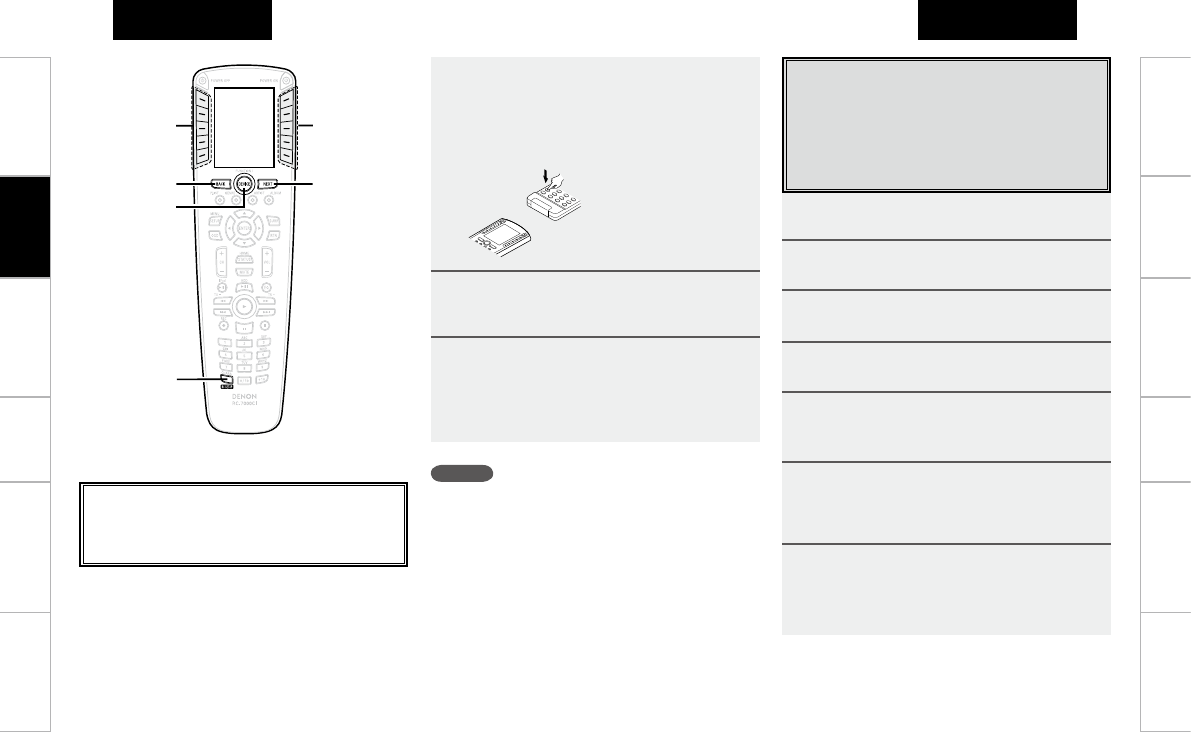
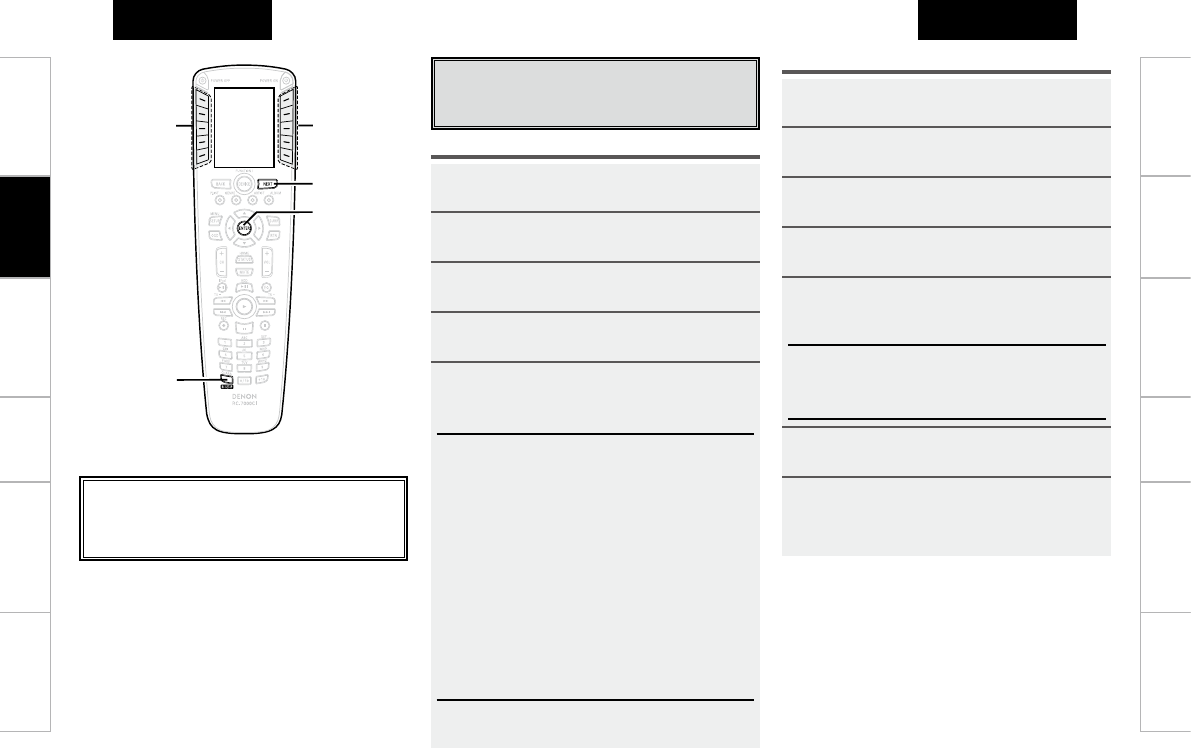
操作のしかた
はじめに
初めて電池をセットしたとき
下記の設定をおこなってください。
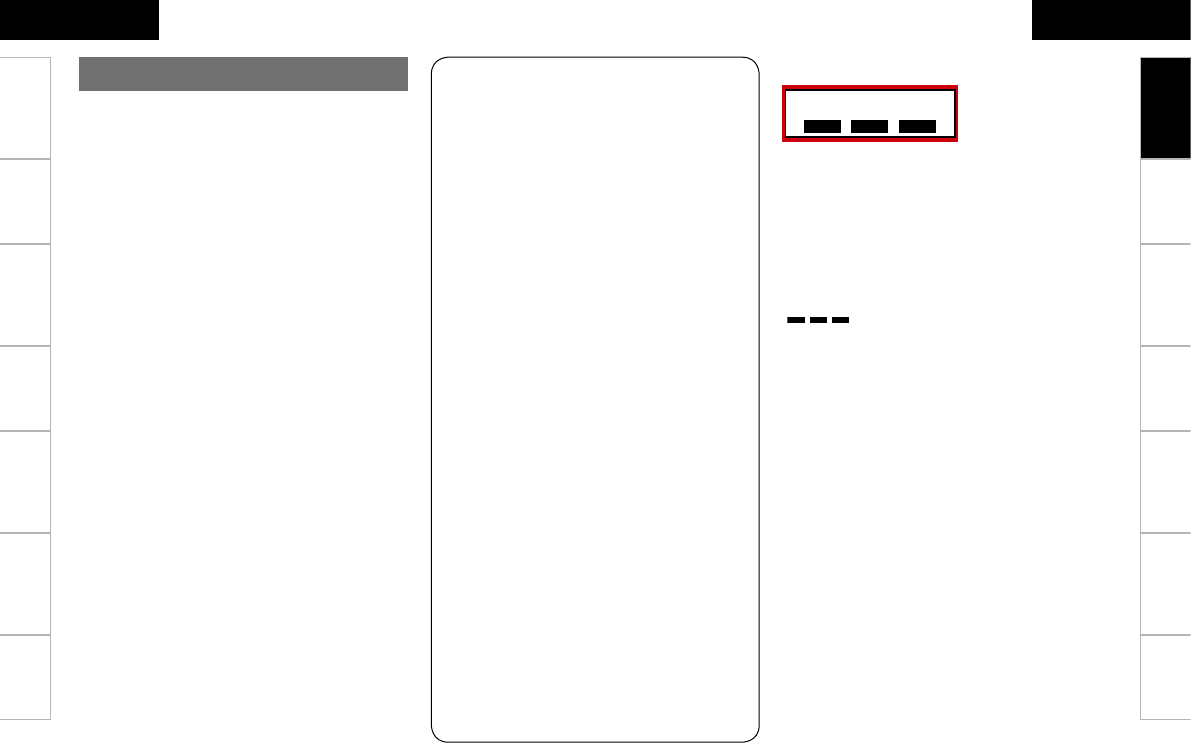
LCD ボタン
初期表示画面
初期表示内容は下記の画面になります。
GScreen1H GScreen2H
DEVICE SELECT
AMP ZONE2
ZONE3 ZONE4
TUNER CD
DVD TV
SAT CABLE
Page 1/2
DEVICE SELECT
VCR 1 iPod
VCR 2 NetAud
DTU
Page 2/2
1AV アンプ(AV レシーバー)の操作に使
用するときは [Denon1] を押す。
b[Denon2] は将来の拡張用機能です。
通常は [Denon1] を選択してください。
2[YES] を押す。
3NEXT を押す。
デフォルトデバイスが [Denon1] に設定されま
す。
4DEVICE を押す。
初期設定画面になります。
You have selected
Denon 1 receiver.
All devices used
to control this
receiver will be
set up. Are you
sure your
receiver is
of type Denon1?
NO YES
Please select
which type of
Denon receiver
you are using
below.
Denon 1 Denon 2
12
Success! Your
remote has been
setup to work
with the Denon1
receiver.
Press NEXT to
continue with
more setup
choices or DEVICE
to begin using
your remote.
3
LCD ボタン
n
選択の操作
●表示している項目名の右または左の LCD ボタン
を押して項目を選びます。
●画面は5秒間表示します。表示中に操作をして
ください。(「画面表示時間を設定する」(v6
ページ))
●画面の下に“PAGE”表示がある場合は表示し
ている画面の他にも画面があります。NEXT ボタ
ンまたは BACK ボタンで表示画面を切り替えて
ください。
LCD ボタンの操作について
リモコンのボタンを押すと、LCD 画面に各種設定や
操作の項目が表示されます。 RF 双方向通信機能を使用するときは
「リモコンコード送信モードの設定」(v15 ページ)
にて AMP を RF 設定に変更してご使用ください。
n
取扱説明書の項目名表示
この取扱説明書では画面に表示される項目名を
[ ] で表示します。(例 :[Denon1])
BACK ボタン
操作のしかた
NEXT ボタン
DEVICE ボタン
ご注意
この機能を使用するには RC-7001RCI(別売り)と対
応する DENON 製品が必要です。
1の画面を表示中に LCD 画面が消灯したときは、RC
SETUP ボタンを3秒間押すと、もとの画面に戻ります。
ご使用になる前に ネットワーク機能 故障かな?
と思ったら
保障とサービスに
ついて
主な仕様
ご使用になる前に 操作のしかた ネットワーク機能 故障かな?
と思ったら
保障とサービスに
ついて
主な仕様
日本語 日本語
PCアプリ
PCアプリ
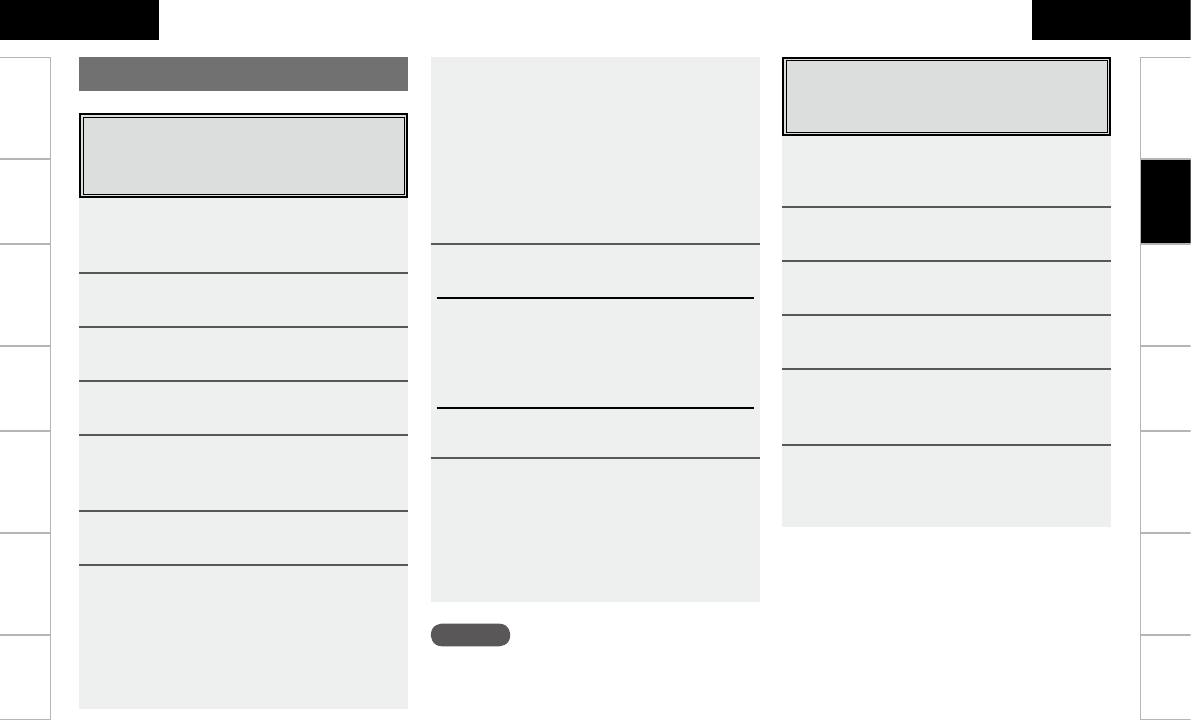
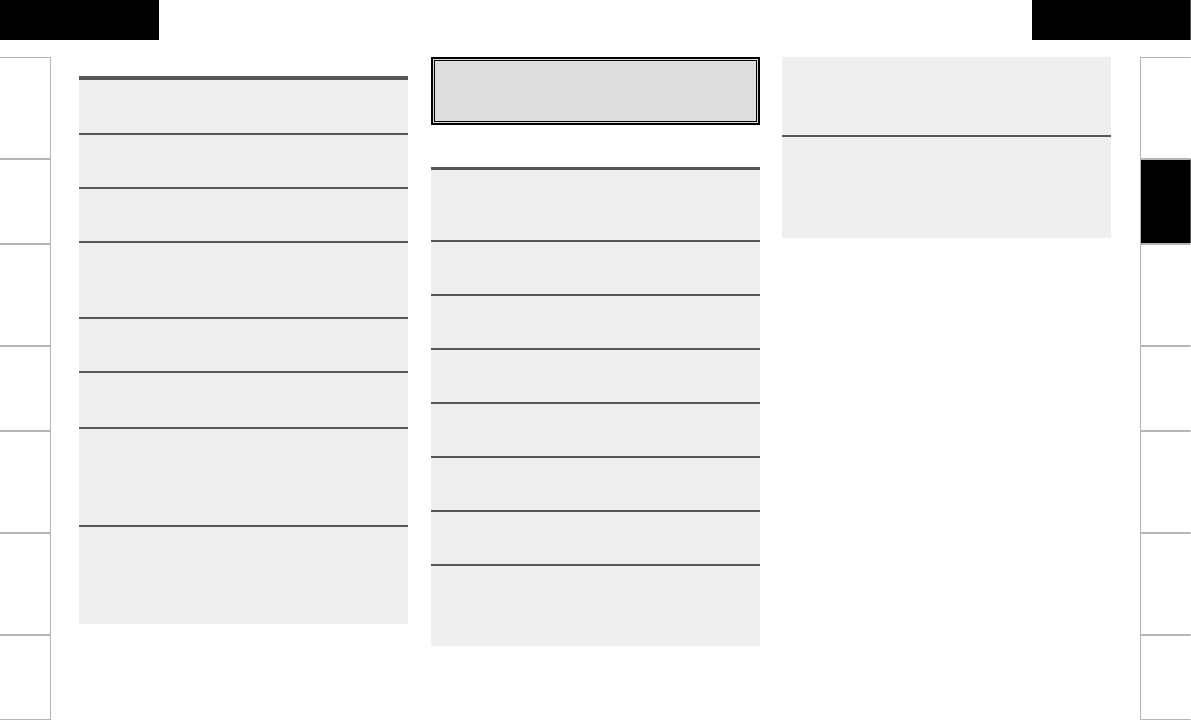
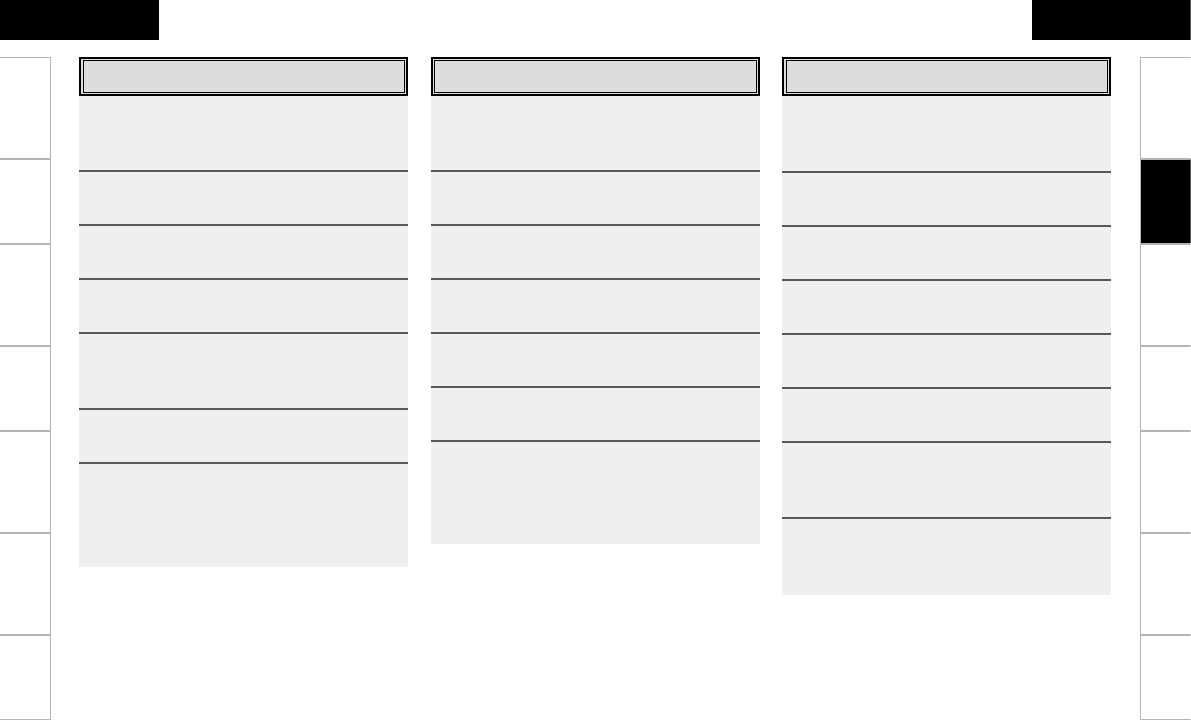
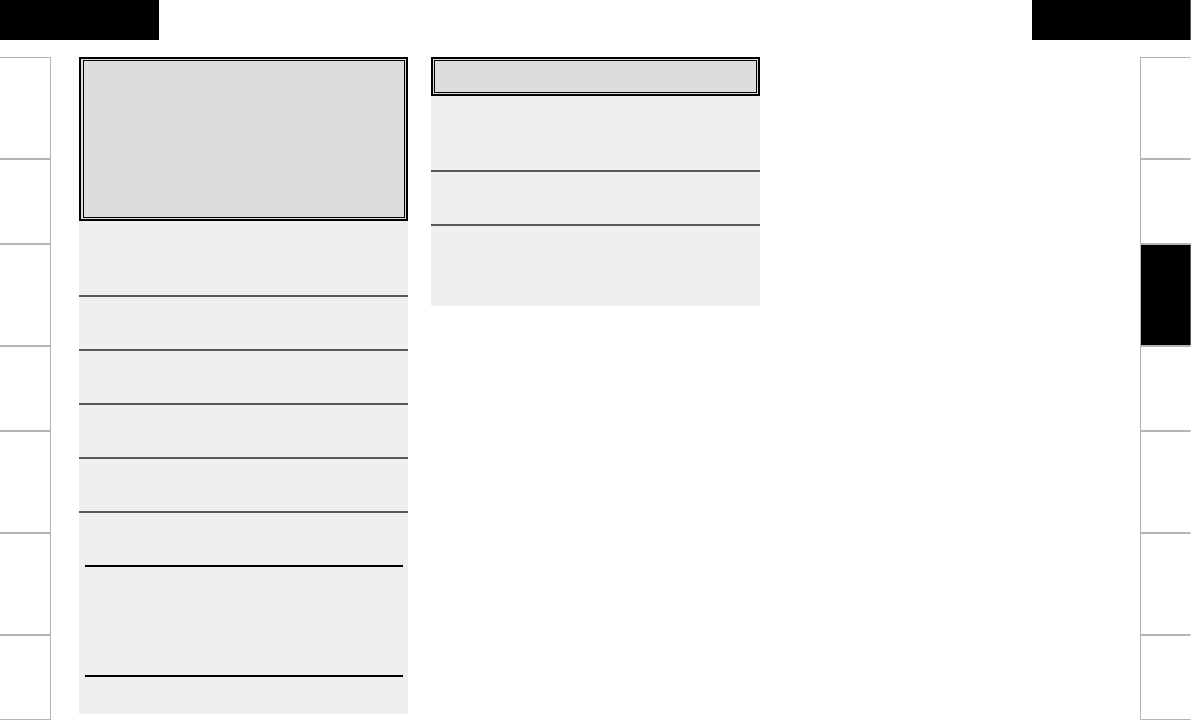
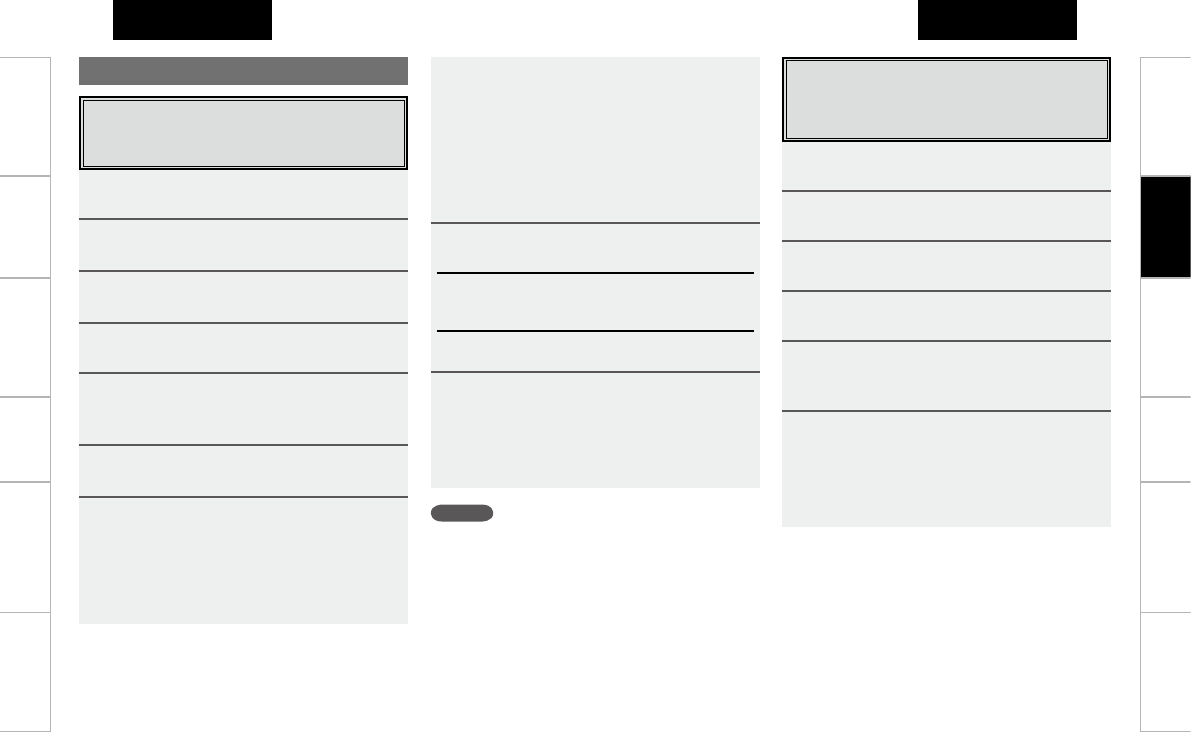
設定メニューマップ
n BASIC SETUP (v8, 10 page)
• BRAND SET
• CODE SEARCH
n FAVORITES (v11, 20 page)
• ADD / REDO
• DELETE
• CONFIGURE
· FAV DEVICE
· FAV IR DELAY
· TOTAL DIGITS
· CHANNEL KEY
n MACROS (v9, 10, 20 page)
• ADD / REDO
• DELETE
• EDIT DELAY
n PUNCH THRU (v12, 20 page)
• ADD
· CHANNEL TUNE
· TRANSPORTS
· VOLUME CONT
· MENU NAVIG.
• CLEAR
· CHANNEL TUNE
· TRANSPORTS
· VOLUME CONT.
· MENU NAVIG.
n LEARNING (v8, 19 page)
• LEARN KEY
• ERASE LEARN
n EDIT PAGE (v12, 13 page)
• ADD PAGE
• DELETE PAGE
n EDIT DEVICE (v13, 14 page)
• MOVE/SWAP
• MOVE/INSERT
• COPY
• ERASE
• DISPLAY MODE
• IR/RF
n EDIT TEXT (v16, 19 page)
• DEVICE NAME
• KEY NAME
n EDIT FUNC (v16, 17, 18 page)
• MOVE/SWAP
• MOVE/INSERT
• COPY
• ERASE
• DISPLAY MODE
• ADD IR
• ADD Synth
n RESET/LOCK (v21, 22 page)
• OP RESET
• USER RESET
• LOCK
• UNLOCK
n NETWORK (v24, 25 page)
• ADD NODES
• DELETE NODES
• VIEW NODES
• EDIT LABEL
n USER PREF (v6, 7, 26 page)
• VERSION INFO
• CONTRAST
• DISPLAY T/O
• LIGHT T/O
• RDM
操作のしかた
ご使用になる前に 操作のしかた ネットワーク機能 故障かな?
と思ったら
保障とサービスに
ついて
主な仕様
ご使用になる前に ネットワーク機能 故障かな?
と思ったら
保障とサービスに
ついて
主な仕様
日本語 日本語
PCアプリ
PCアプリ
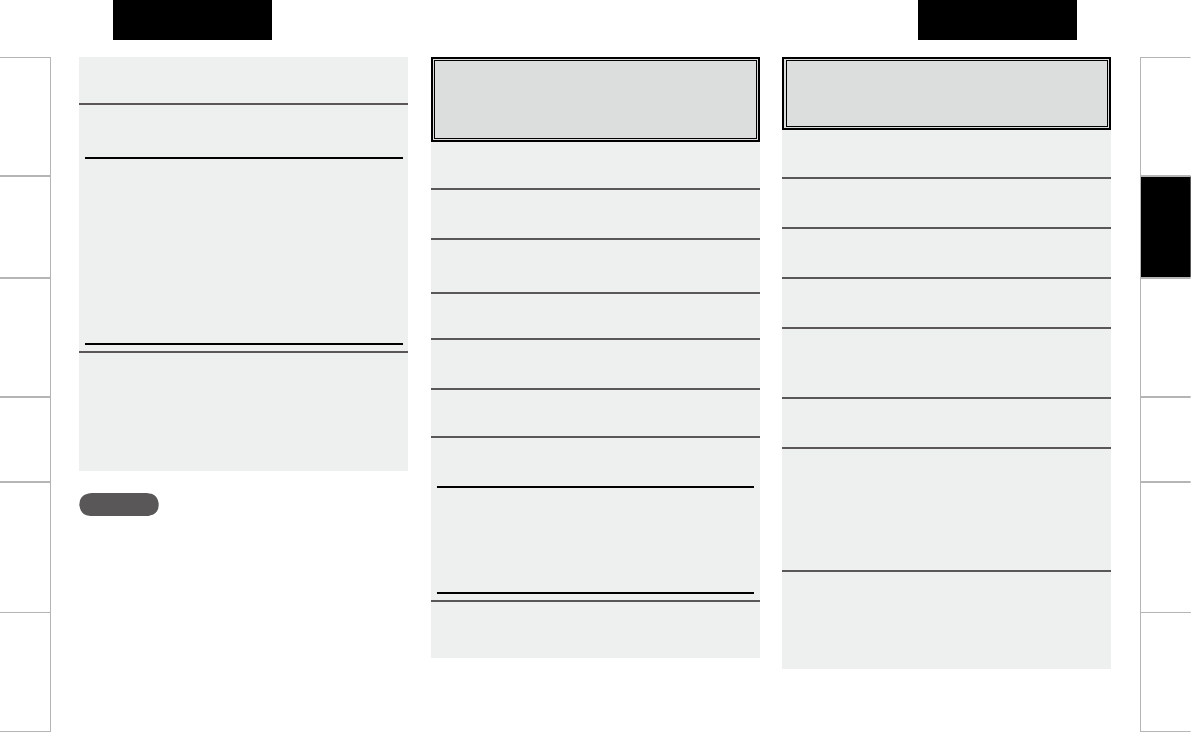
設定
画面表示時間を設定する
画面表示して消えるまでの時間を設定します。
初期設定:5 秒
NEXT
BACK
DEVICE
RC SETUP
LCDボタン LCDボタン
操作説明のボタン名について
[ ]: 選択項目の LCD ボタン
ボタン名のみ:
リモコンのボタンを表します。
1RC SETUPを3秒間押す。
“PROGRAMDEVICE”メニューを表示しま
す。
2NEXTを2回押し、[USER PREF] を押す。
3[DISPLAY T/O] を押す。
4NEXTを押す。
5[–DISPLAY T/O+] を押し、消灯するまでの
時間を設定する。
●右側の LCD ボタン···································+
●左側の LCD ボタン···································–
b1(MIN)~30(MAX) 秒の範囲内で設定できま
す。
6[SAVE] を押す。
7NEXT を押す。
1DEVICEを押す。
“DEVICESELECT”メニューを表示します。
2操作したいデバイス(機器) の LCD ボタ
ンを押す。
b複数 の画 面がある時には、NEXT ボタンまたは
BACK ボタンで画面を切り替えてください。
3操作したい項目の LCD ボタンを押す。
b複数 の画 面がある時には、NEXT ボタンまたは
BACK ボタンで画面を切り替えてください。
LCD ボタンの操作
操作のしかた
ご使用になる前に ネットワーク機能 故障かな?
と思ったら
保障とサービスに
ついて
主な仕様
ご使用になる前に 操作のしかた ネットワーク機能 故障かな?
と思ったら
保障とサービスに
ついて
主な仕様
日本語 日本語
PCアプリ
PCアプリ
コントラストを調整をする
画面の文字が見にくいときに設定します。
初期設定:Level5
1RC SETUPを3秒間押す。
“PROGRAMDEVICE”メニューを表示しま
す。
2NEXTを2回押し、[USER PREF] を押す。
3[CONTRAST] を押す。
4NEXTを押す。
5[–CONTRAST+] を押し、コントラストを設
定する。
●右側の LCD ボタン···································+
●左側の LCD ボタン····································–
bLevel0(MIN) ~Level12(MAX) の範囲内で
設定できます。
6[SAVE] を押す。
7NEXTを押す。
NEXT
VOL+ –
7
1
9
2
BACK
RC SETUP
6
8
DEVICE
LCDボタン LCDボタン
3
操作説明のボタン名について
[ ]: 選択項目の LCD ボタン
ボタン名のみ:
リモコンのボタンを表します。
バックライト点灯時間を設定
する
バックライトが消灯するまでの時間を設定します。
初期設定:5 秒
1RC SETUPを3秒間押す。
“PROGRAMDEVICE”メニューを表示しま
す。
2NEXTを2回押し、[USER PREF] を押す。
3[LIGHT T/O] を押す。
4NEXTを押す。
5[–DISPLAY T/O+] を押し、消灯するまでの
時間を設定する。
●右側の LCD ボタン···································+
●左側の LCD ボタン····································–
bLIGHTOFF~30(MAX) 秒の範囲内で設定で
きます。
6[SAVE] を押す。
7NEXTを押す。
設定を終了する
“DEVICESELECT” 画面 を 表示 する ま で
DEVICE を押す。
操作のしかた
ご使用になる前に 操作のしかた ネットワーク機能 故障かな?
と思ったら
保障とサービスに
ついて
主な仕様
ご使用になる前に ネットワーク機能 故障かな?
と思ったら
保障とサービスに
ついて
主な仕様
日本語 日本語
PCアプリ
PCアプリ
学習機能を使う
登録したいデバイスのリモコン信号を受信させ
て登録することができます。
ご注意
製品の年式、モデルの機能の違いにより動作しない
ボタンまたは誤動作をする場合があります。
81、2、3、6、7、8、9、
VOL+ –を押して追加するデバイス(機器)
が動作するか確認する。
動作する········[YES] を押す。
●IR/RF 選択画面に移行します。
動作しない····[NO] を押す。
●次のコードに切り替わりますので、動作するコード
を探して [YES] で設定してください。
9[IR]または [RF] を押して、リモコン信号
を選ぶ。
[IR]:
赤外線信号を送信します。
[RF]:
リモコンレシーバー RC-7001RCI(別売り)に RF
信号を送信します。
b
RC-7001RCI(別売り)については「ネットワー
ク機能」(v23 ページ)をご覧ください。
10
“SelectPosition”画面にて、プリセッ
トしたデバイスを追加したい位置の LCD
ボタンを押す。
設定が確定します。
b終了するときは [NO]、続けるときは [YES] を押しま
す。
1RC SETUPを3秒間押す。
“PROGRAMDEVICE”メニューを表示しま
す。
2[LEARNING] を押す。
3[LEARN KEY] を押す。
4NEXTを2回押す。
5“SelectDevice”画面にて、リモコン
信号を登録したいデバイスの LCD ボタン
を押す。
6“LearnKey”画面にて、登録したい操
作ボタンを押す。
bNEXT、
BACK、
DEVICE 以外のボタンに学習できます。
いろいろな設定をする
プリセットメモリー機能を使う
リモコンにプリセットメモリーすると、各社のデバイ
ス(機器)の操作ができるようになります。
1RC SETUPを3秒間押す。
“PROGRAMDEVICE”メニューを表示しま
す。
2[BASIC SETUP]を押す。
3[BRAND SET] を押す。
4NEXTを押す。
5“PressDeviceType”画面にて、プリ
セットメモリーしたいデバイスの LCD ボ
タンを押す。
6NEXTを押す。
7“SelectBrand”画面にて、デバイス
のブランド名の LCD ボタンを押す。
複数のコードがある場合には 1ofzを表示しま
す。(zはコード数)
b選択したいブランドが表示されていないときには、
NEXT を押してブランドの表示を切り替えます。
操作のしかた
ご使用になる前に ネットワーク機能 故障かな?
と思ったら
保障とサービスに
ついて
主な仕様
ご使用になる前に 操作のしかた ネットワーク機能 故障かな?
と思ったら
保障とサービスに
ついて
主な仕様
日本語 日本語
PCアプリ
PCアプリ
マクロ機能を使う
連続した操作を 1 つのボタンに登録させること
ができます。
この機能により、1 回のボタン操作でアンプ
の電源 ON、入力ソースの選択、テレビの電源
ON、ソースデバイス(機器)の電源 ON、再
生などの一連の操作ができます。
1RC SETUPを3秒間押す。
“PROGRAMDEVICE”メニューを表示しま
す。
2[MACROS]を押す。
3[ADD/REDO] を押す。
4NEXTを2回押す。
5“AssignMacro”画面にて、マクロを
登録したいデバイス(機器)の LCD ボタ
ンを押す。
6マクロを登録したいボタンを押す。
bNEXT、BACK、DEVICE 以外のボタンにマクロを登
録できます。
7NEXT を押して次の登録を続けます。
bDEVICE を押してデバイス(機器)を選びます。
b操作 5と6を繰り返してください。
NEXTBACK
DEVICE
RC SETUP
LCDボタン LCDボタン
操作説明のボタン名について
[ ]: 選択項目の LCD ボタン
ボタン名のみ:
リモコンのボタンを表します。
7お互いのリモコン信号送信部を向き合わ
せ、NEXTを押してすぐに登録したいリモコ
ンのボタンを押す。
学 習 できると“Success!”
を表示します。
8続けて他のボタンを登録するときは
NEXT を押す。
b
操作 6~8を繰り返してください。
9学習を終了するときは [EXIT] を押す。
b
ボタン名を変えたいときは [EDIT] を押します。
「ボタン名の変更」(v19 ページ)操作 7から
おこなってください。
ご注意
リモコンによっては学習できない場合や、学習して
もデバイスが正常に動作しない場合があります。こ
の場合は、デバイスの専用リモコンをご使用くださ
い。
操作のしかた
0 0
ご使用になる前に 操作のしかた ネットワーク機能 故障かな?
と思ったら
保障とサービスに
ついて
主な仕様
ご使用になる前に ネットワーク機能 故障かな?
と思ったら
保障とサービスに
ついて
主な仕様
日本語 日本語
PCアプリ
PCアプリ
コードサーチ機能を使う
新しいデバイス(機器)をリモコンに追加すると
き、プリセットするコードを探して追加できます。
1RC SETUPを3秒間押す。
“PROGRAMDEVICE”メニューを表示します。
2[BASIC SETUP]を押す。
3[CODE SEARCH] を押す。
4NEXTを押す。
5“PressDeviceType” 画面にて、コー
ドを探したいデバイス(機器)の LCD ボタ
ンを押す。
6NEXTを 2 回押す。
7リモコンのボタンを押してデバイス(機
器)が動作したら、[YES] を押す。
b[NO] を押すとコードを切り替えます。再度リモコン
ボタンを押して動作を確認してください。[BACK]
で前のコードに戻ります。
8“SelectPosition”画面にて、プリセッ
トしたデバイス(機器)を追加したい位
置の LCD ボタンを押す。
b終了するときは [NO]、続けるときは [YES] を押しま
す。
ディレイタイム機能を使う
マクロに登録された、リモコン信号の送信間隔
(ディレイタイム)の設定ができます。
8RC SETUPを押す。
登録メニューを表示します。
9設定したマクロを登録するときは [SAVE]
を押す。
[TEST]:
登録したマクロを送信して確認します。
[DELAY – +]:
送信間隔を設定します。0.05(MIN)~ 60(MAX)
秒の間で設定可能です。(初期値:0.25 秒)
[CANCEL ENTRY]:
最後に登録したコードを削除して、登録モードに戻り
ます。
[START OVER]:
最初からやり直します。
10
設定を終了するときは [EXIT]を押す。
b
ボタン名(マクロ名)を変えたいときは [EDIT] を
押します。
「ボタン名の変更」(v19 ページ)操作 7から
おこなってください。
1RC SETUPを3秒間押す。
“PROGRAMDEVICE”メニューを表示しま
す。
2[MACROS]を押す。
3[EDIT DELAY] を押す。
4NEXTを2回押す。
5“EditMacro”画面から登録したマク
ロを選択します。
6NEXTを押す。
7[DELAY– +] でディレイタイムを変 更し、
[SAVE]を押す。
[TEST]:
登録したマクロを送信して確認します。
[DELAY – +]:
送信間隔を設定します。
[CREATE AGAIN]:
新しいマクロを登録します。
8設定を終了するときは [EXIT] を押す。
操作のしかた
ご注意
マクロを設定するボタンは、マクロに登録できませ
ん。
ご使用になる前に ネットワーク機能 故障かな?
と思ったら
保障とサービスに
ついて
主な仕様
ご使用になる前に 操作のしかた ネットワーク機能 故障かな?
と思ったら
保障とサービスに
ついて
主な仕様
日本語 日本語
PCアプリ
PCアプリ
NEXT
ENTER
RC SETUP
LCDボタン LCDボタン
操作説明のボタン名について
[ ]: 選択項目の LCD ボタン
ボタン名のみ:
リモコンのボタンを表します。
お気に入りの設定
お気に入りのチャンネル番号を一つのボタンに
登録して操作します。
お気に入りの登録
1RC SETUPを3秒間押す。
“PROGRAMDEVICE”メニューを表示します。
2[FAVORITES]を押す。
3[ADD/REDO] を押す。
4NEXTを押す。
5[KEY] を押す。
bここで、頁を追加することができます。
[PAGE] を選択したときは、[MAIN] または [DEVICE] を
押します。
[MAIN] を選択したときは、[YES] で設定します。
DEVICE] を選択したときは頁を追加するデバイス(機
器)を選択します。
6NEXTを押す。
7“AssignFavorite”画面にて、お気に
入りを登録したい場所のボタンを選ぶ
お気に入りの設定
1RC SETUPを3秒間押す。
“PROGRAMDEVICE”メニューを表示します。
2[FAVORITES]を押す。
3[CONFIGURE]を押す。
4NEXTを 2 回押す。
5“CONFIGUREFAV” 画面にて、設定
したい項目の LCD ボタンを押す。
[FAV DEVICE]:
お気に入りで登録するデバイスを選択します。
初期設定は“SAT”になっています。
[FV IR DELAY]:
登録したお気に入りボタンを押したときのリモコ
ンコードの送信間隔を設定します。
[TOTAL DIGIT]:
お気に入りに登録するチャンネルの桁数を設定し
ます。
[CHANNEL KEY]:
登録したお気に入りチャンネルの最後に ENTER を追
加する場合に設定します。(数字ボタンで選択した
後に、ENTER を押してチャンネルを設定するタイプ
のデバイスを使用する場合に設定します。)
操作のしかた
チャンネルの最後に ENTER を追加するときには ENTER
を押します。ENTER を追加しない場合には NEXT を押
します。
b
[EXIT] を押すと設定を終了します。 続けるときは
[CONFIG] を押します。
ご使用になる前に 操作のしかた ネットワーク機能 故障かな?
と思ったら
保障とサービスに
ついて
主な仕様
ご使用になる前に ネットワーク機能 故障かな?
と思ったら
保障とサービスに
ついて
主な仕様
日本語 日本語
PCアプリ
PCアプリ
ページの編集をする
デバイスセレクトメニューまたは個々のデバイ
ス(機器)にページを挿入して、デバイス(機器)
またはボタンを追加できます。
ページの挿入
1RC SETUPを3秒間押す。
“PROGRAMDEVICE”メニューを表示します。
2NEXTを押し、[EDIT PAGE] を押す。
3[ADD PAGE] を押す。
4NEXTを押す。
5デバイスセレクトメニューにページを追加す
るときは [MAIN] を、デバイス(機器)にペー
ジを追加するときは [DEVICE] を押す。
b
[DEVICE] を選んだときのみ、ページを追加した
いデバイスの LCD ボタンを押す。
6[YES] を押す。
ページを追加します。
bNEXT を押すと設定メニューに戻ります。
4NEXTを押す。
5“PunchThru” 画面にて、設定したい
グループの LCD ボタンを押す。
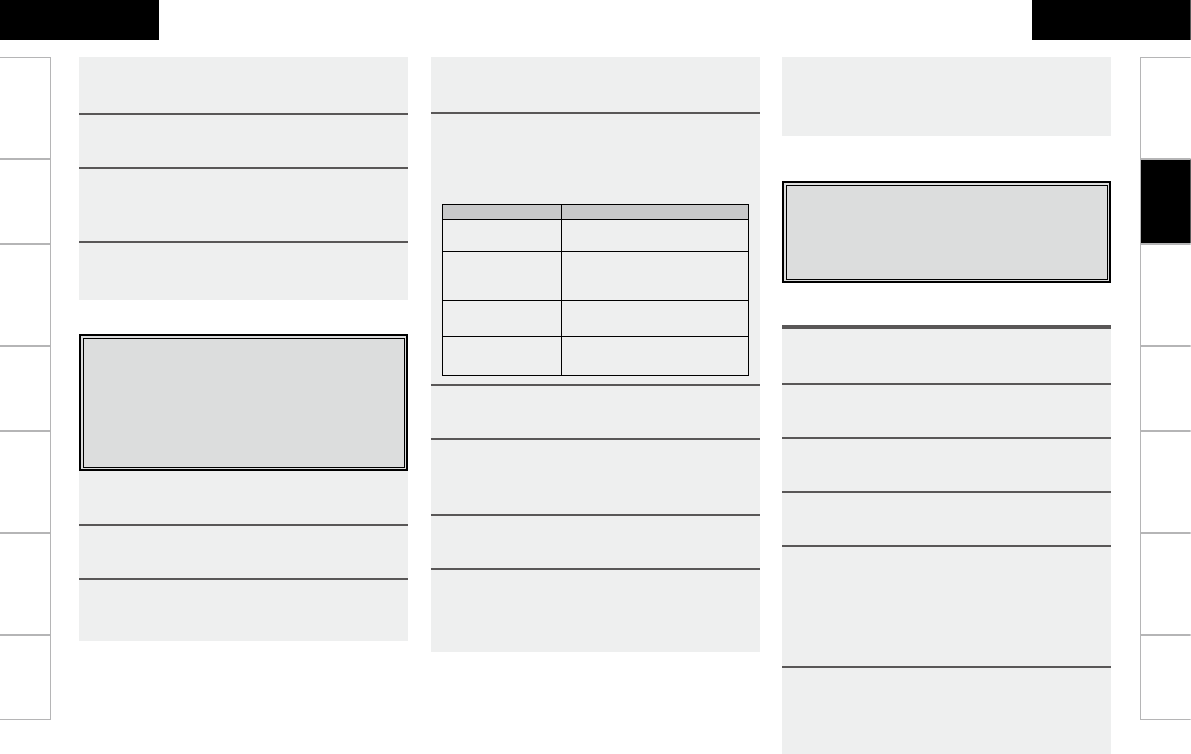
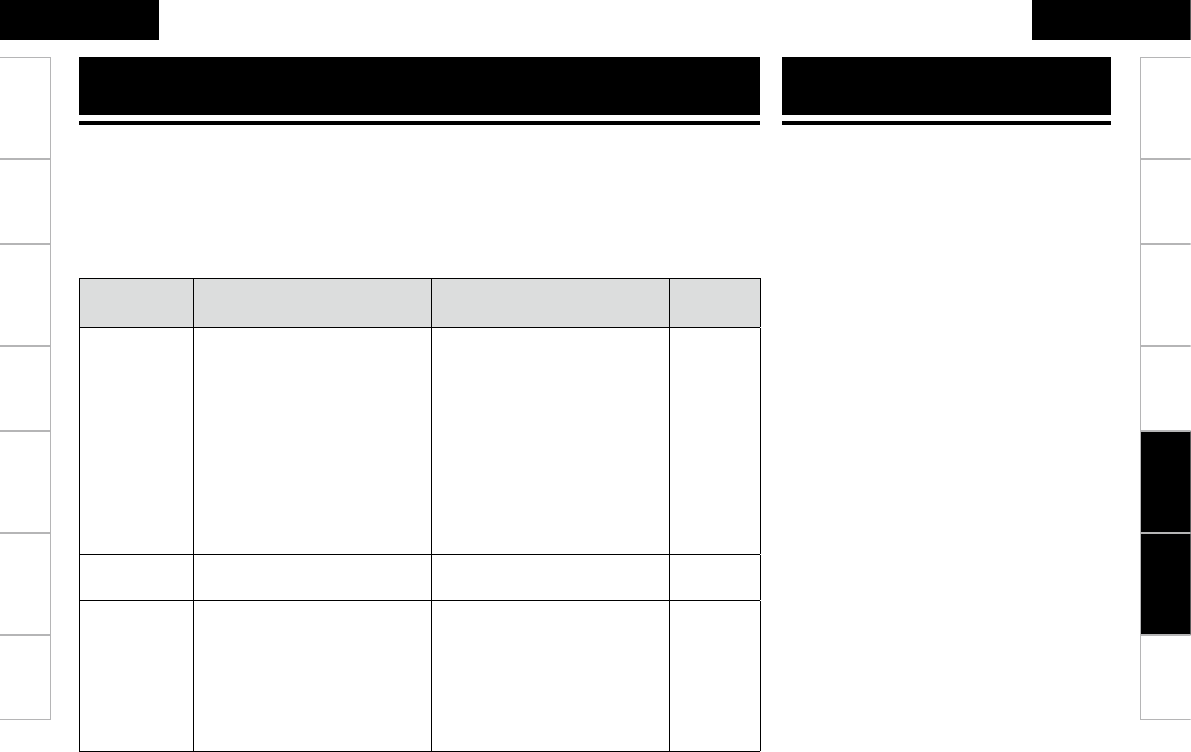
パンチスルーをグループ単位で割り当てることの
できるファンクションは下表のとおりです。
Groups Functions
CHANNEL TUNE CH+, CH–, STATUS, 1~9,
0/10, +10
TRANSPORTS iPod 1/3,
HDD 1/3, EQ, 6, 7,
8, 9, REC, 3, STOP,
VOLUME
CONTROL
VOL+, VOL–, MUTE
MENU
NAVIGATION
SETUP, SURR, OSD, RTN,
uiop, ENTER
6NEXTを押す。
7“SourceDevice” 画面にて、設定した
いグループのあるデバイスの LCD ボタンを
押す。
8NEXTを押す。
9“TargetDevice” 画面にて、操作 7で
選択したグループを送信したいデバイスの
LCD ボタンを押す。
8登録したい番号を入力する。
9NEXTを押す。
10
[SAVE]を押してお気に入りに登録する。
b
ボタン名を変更するときは [EDIT] を押します。
11
終了するときは [EXIT]を押す。
続けるときは [ADD]を押す。
パンチスルー機能を使う
他のデバイスモードを選択した場合でも、以下
のボタンをグループ単位で別のデバイスに割り
あてることができます。
例えば操作モードがアンプでも DVD のプレイ
操作ができます。
1RC SETUPを3秒間押す。
“PROGRAMDEVICE”メニューを表示します。
2[PUNCH THRU]を押す。
3[ADD] を押す。
操作のしかた
10
[YES] を押す。
bNEXT を押すと設定メニューに戻ります。
ご使用になる前に ネットワーク機能 故障かな?
と思ったら
保障とサービスに
ついて
主な仕様
ご使用になる前に 操作のしかた ネットワーク機能 故障かな?
と思ったら
保障とサービスに
ついて
主な仕様
日本語 日本語
PCアプリ
PCアプリ
NEXTBACK
RC SETUP
LCDボタン LCDボタン
デバイスの編集をする
リモコンに登録されているデバイス(機器)を
移動、コピー、挿入ができます。
デバイスの移動または入れ替え
1RC SETUPを3秒間押す。
“PROGRAMDEVICE”メニューを表示しま
す。
2NEXTを押し、[EDIT DEVICE] を押す。
3[MOVE/SWAP] を押す。
4NEXTを押す。
5“SourceDevice” 画面にて、移動した
いデバイス(機器)の LCD ボタンを押す。
6NEXTを押す。
7移動先または入れ替えたいデバイス(機器)
のLCD ボタンを押す。
8 [YES]を押す。
デバイス(機器)が移動します。
b[NO] を押すと設定メニューに戻ります。続けるとき
は[YES] を押します。
操作説明のボタン名について
[ ]: 選択項目の LCD ボタン
ボタン名のみ:
リモコンのボタンを表します。
ページの削除
1RC SETUPを3秒間押す。
“PROGRAMDEVICE”メニューを表示します。
2NEXTを押し、[EDIT PAGE] を押す。
3[DELETE PAGE] を押す。
4NEXTを押す。
5[MAIN] または [DEVICE] を押す。
6デバイスセレクトメニューのページを削
除するときは [MAIN] を、デバイス(機器)
のページを削除するときは [DEVICE] を押
す。
7[SELECT PAGE] を押す。
8削除したいページを NEXT または BACK で
選択してから、[SELECT PAGE] を押す。
9[YES] を押す。
ページを削除します。
bNEXT を押すと設定メニューに戻ります。
操作のしかた
ご使用になる前に 操作のしかた ネットワーク機能 故障かな?
と思ったら
保障とサービスに
ついて
主な仕様
ご使用になる前に ネットワーク機能 故障かな?
と思ったら
保障とサービスに
ついて
主な仕様
日本語 日本語
PCアプリ
PCアプリ
デバイスの削除
1RC SETUPを3秒間押す。
“PROGRAMDEVICE”メニューを表示しま
す。
2NEXTを押し、[EDIT DEVICE] を押す。
3[ERASE] を押す。
4NEXTを押す。
5“SelectDevice” 画面にて、削除した
いデバイスの LCD ボタンを押す。
b
以下のどちらかを押します。
[LEAVE EMPTY]:
デバイス(機器)を削除します。
[SHIFT ALL UP]:
デバイスが削除され、空いた場所をつめてデバイスの
並び替えを行います。
6[YES] を押す。
デバイスを削除します。
b[NO] を押すと設定メニューに戻ります。続けるとき
は[YES] を押します。
デバイスのコピー
1RC SETUPを3秒間押す。
“PROGRAMDEVICE”メニューを表示しま
す。
2NEXTを押し、[EDIT DEVICE] を押す。
3[COPY] を押す。
4NEXTを押す。
5“SourceDevice” 画面にて、コピーし
たいデバイス(機器)の LCD ボタンを押す。
6NEXTを押す。
7“TargetDevice” 画面にて、コピーし
たい場所の LCD ボタンを押す。
コピー先にあるデバイスは消去され、コピーされ
ます。
8[YES] を押す。
デバイスが移動します。
b
[NO] を押すと設定メニューに戻ります。続けるとき
は[YES] を押します。
デバイスの挿入
1RC SETUPを3秒間押す。
“PROGRAMDEVICE”メニューを表示しま
す。
2NEXTを押し、[EDIT DEVICE] を押す。
3[MOVE/INSERT] を押す。
4NEXTを押す。
5“SourceDevice” 画面にて、移動した
いデバイスの LCD ボタンを押す。
6NEXTを押す。
7“TargetDevice” 画面にて、挿入した
い場所の LCD ボタンを押す。
8[YES] を押す。
デバイスが移動します。
b[NO] を押すと設定メニューに戻ります。続けるとき
は[YES] を押します。
操作のしかた
ご使用になる前に ネットワーク機能 故障かな?
と思ったら
保障とサービスに
ついて
主な仕様
ご使用になる前に 操作のしかた ネットワーク機能 故障かな?
と思ったら
保障とサービスに
ついて
主な仕様
日本語 日本語
PCアプリ
PCアプリ
1RC SETUPを3秒間押す。
“PROGRAMDEVICE”メニューを表示します。
2NEXTを押し、[EDIT DEVICE] を押す。
3NEXTを押す。
4[IR/RF] を押す。
5NEXTを押す。
6“SelectDevice” 画面にて、送信モー
ドを変更したいデバイスの LCD ボタンを押
す。
7[IR] または [RF] を押し、[YES] を押す。
[IR]:赤外線でコードを送信します。
[RF]:電波でコードを送信します。
b[RF] を選択したときは RC-7001RCI(別売り)
のノード番号が表示されますので、選択し [YES] を
押します。
b[RF] を追加するときは、「ノードの追加」(v24
ページ)の設定が必要です。
8[YES] を押す。
送信モードを確定します。
b[NO] を押すと設定メニューに戻ります。続けるとき
は[YES] を押します。
NEXT
RC SETUP
LCDボタン LCDボタン
操作説明のボタン名について
[ ]: 選択項目の LCD ボタン
ボタン名のみ:
リモコンのボタンを表します。
リモコンコード送信モードの設定デバイスのディスプレーモードの設定
デバイス(機器)の表示の並びを選択できます。
1RC SETUPを3秒間押す。
“PROGRAMDEVICE”メニューを表示しま
す。
2NEXTを押し、[EDIT DEVICE] を押す。
3[DISPLAY MODE] を押す。
4NEXTを押す。
5“SelectDevice”画面にて、ディスプレー
モードを変更したいデバイスの LCD ボタン
を押す。
6[COLUMN MODE] または [ROW MODE] を
押す。
[COLUMN MODE]:
1行に2つのデバイスを表示します。
[ROW MODE]:
デバイスを1行全体で表示します。
7[YES] を押す。
ディスプレーモードを確定します。
b[NO] を押すと設定メニューに戻ります。続けるとき
は[YES] を押します。
操作のしかた
ご注意
ディスプレーモードはデバイス(機器)には設定さ
れません。LCD ボタンの位置に対して設定されます。
ご使用になる前に 操作のしかた ネットワーク機能 故障かな?
と思ったら
保障とサービスに
ついて
主な仕様
ご使用になる前に ネットワーク機能 故障かな?
と思ったら
保障とサービスに
ついて
主な仕様
日本語 日本語
PCアプリ
PCアプリ
ボタンの編集
ボタンの移動、コピー、挿入ができます。
ボタンの移動または入れ替え
1RC SETUPを3秒間押す。
“PROGRAMDEVICE”メニューを表示しま
す。
2NEXTを押し、[EDIT FUNC] を押す。
3[MOVE/SWAP] を押す。
4NEXTを押す。
5“SourceDevice” 画面にて、移動した
いボタンのデバイスの LCD ボタンを押す。
6“SelectKey” 画面にて、移動したいボ
タンの LCD ボタンを押す。
7NEXTを押す。
8“TargetDevice” 画面にて、移動先ま
たは入れ替えたいボタンのデバイスの LCD
ボタンを押す。
9“Selectkey” 画面にて、移動先、また
は入れ替えたいボタンの LCD ボタンを押
す。
10
[YES]を押す。
ボタンが移動、または入れ替えされます。
b[NO] を押すと設定メニューに戻ります。続けるとき
は[YES] を押します。
1RC SETUPを3秒間押す。
“PROGRAMDEVICE”メニューを表示します。
2NEXTを押し、[EDIT TEXT] を押す。
3[DEVICE NAME] を押す。
4“SelectDevice” 画面にて、名前を変
更したいデバイス(機器) の LCD ボタン
を押す。
5NEXTを押す。
6“EditText” 画 面にて、1段目の LCD
ボタンで編集したい文字の位置を選ぶ。
72 段目の LCD ボタンで入力したい文字を選
び、[SELECT] を押す。
b[CAPS] を表示中は小文字、[lower] を表示中は大
文字の入力になります。
8[SAVE] を押す。
b [NO] を押すと、設定メニューに戻ります。続けると
きは [YES] を押します。
デバイス名の変更
操作のしかた
ご使用になる前に ネットワーク機能 故障かな?
と思ったら
保障とサービスに
ついて
主な仕様
ご使用になる前に 操作のしかた ネットワーク機能 故障かな?
と思ったら
保障とサービスに
ついて
主な仕様
日本語 日本語
PCアプリ
PCアプリ
ボタンのコピー
1RC SETUPを3秒間押す。
“PROGRAMDEVICE”メニューを表示しま
す。
2NEXTを押し、[EDIT FUNC] を押す。
3[COPY] を押す。
4NEXTを押す。
5“SourceDevice” 画面にて、コピーし
たいボタンのデバイス(機器) の LCD ボ
タンを押す。
6“Selectkey” 画面にて、コピーしたい
ボタンの LCD ボタンを押す。
7NEXTを押す。
8“TargetDevice” 画面にて、コピー先
のデバイスの LCD ボタンを押す。
9“Selectkey” 画面にて、コピー先の場
所の LCD ボタンを押す。
10
[YES]を押す。
ボタンをコピーします。
b[NO] を押すと設定メニューに戻ります。続けるとき
は[YES] を押します。
NEXT
RC SETUP
LCDボタン LCDボタン
操作説明のボタン名について
[ ]: 選択項目の LCD ボタン
ボタン名のみ:
リモコンのボタンを表します。
ボタンの挿入
1RC SETUPを3秒間押す。
“PROGRAMDEVICE”メニューを表示しま
す。
2NEXTを押し、[EDIT FUNC] を押す。
3[MOVE/INSERT] を押す。
4NEXTを押す。
5“SourceDevice” 画面にて、移動した
いボタンのデバイスの LCD ボタンを押す。
6“Selectkey” 画面にて、移動したいボ
タンの LCD ボタンを押す。
7NEXTを押す。
8“TargetDevice” 画面にて、挿入先の
ボタンのデバイスの LCD ボタンを押す。
9“Selectkey” 画面にて、挿入先の場所
のLCD ボタンを押す。
10
[YES]を押す。
ボタンを挿入します。
b[NO] を押すと設定メニューに戻ります。続けるとき
は[YES] を押します。
操作のしかた
ご使用になる前に 操作のしかた ネットワーク機能 故障かな?
と思ったら
保障とサービスに
ついて
主な仕様
ご使用になる前に ネットワーク機能 故障かな?
と思ったら
保障とサービスに
ついて
主な仕様
日本語 日本語
PCアプリ
PCアプリ
1RC SETUPを3秒間押す。
“PROGRAMDEVICE”メニューを表示しま
す。
2NEXTを押し、[EDIT FUNC] を押す。
3[DISPLAY MODE] を押す。
4NEXTを押す。
5“SelectDevice” 画 面にて、ディスプ
レーモードを変更したいボタンのデバイスの
LCD ボタンを押す。
6“Selectkey” 画面にて、ディスプレー
モードを変更したいボタンの LCD ボタンを
押す。
7[COLUMN MODE] または [ROW MODE] を
押す。
[COLUMN MODE]:
1行に2つのボタンを表示します。
[ROW MODE]:
1行全体にボタンを表示します。
8[YES] を押す。
ディスプレーモードを確定します。
b[NO] を押すと設定メニューに戻ります。続けるとき
は[YES] を押します。
ボタンのディスプレーモードの設定
ボタンの表示の並びを選択できます。
1RC SETUPを3秒間押す。
“PROGRAMDEVICE”メニューを表示しま
す。
2NEXTを押し、[EDIT FUNC] を押す。
3NEXTを押し、[ADD IR] を押す。
4NEXTを押す。
5“SourceDevice” 画面にて、追加した
いデバイス(機器)の LCD ボタンを押す。
6NEXTを押す。
7“ADDIR” 画面にて、追加したいボタン
の機能の LCD ボタンを押す。
8NEXTを押す。
9“Selectkey” 画面にて、追加したいボ
タンの位置の LCD ボタンを押す。
10
[TEST KEY] を押し、動作した場合は [YES]
を押す。
b
さらにボタンを追加するときは [YES] を押します。
ボタンの追加
新しいボタンを追加するとき、機能を選択して追加
することができます。
ボタンの削除
1RC SETUPを3秒間押す。
“PROGRAMDEVICE”メニューを表示しま
す。
2NEXTを押し、[EDIT FUNC] を押す。
3[ERASE] を押す。
4NEXTを押す。
5“SourceDevice” 画面にて、削除した
いボタンのデバイスの LCD ボタンを押す。
6“Selectkey” 画面にて、削除したいボ
タンの LCD ボタンを押す。
[LEAVE EMPTY]:
ボタンを削除します。
[SHIFT ALL UP]:
ボタンが削除されて空いた場所をつめてボタンの
並び替えを行います。
7[YES]を押す。
ボタンを削除します。
b[NO] を押すと設定メニューに戻ります。続けるとき
は[YES] を押します。
操作のしかた
ご使用になる前に ネットワーク機能 故障かな?
と思ったら
保障とサービスに
ついて
主な仕様
ご使用になる前に 操作のしかた ネットワーク機能 故障かな?
と思ったら
保障とサービスに
ついて
主な仕様
日本語 日本語
PCアプリ
PCアプリ
学習機能を初期化する
1RC SETUPを3秒間押す。
“PROGRAMDEVICE”メニューを表示しま
す。
2[LEARNING]を押す。
3[ERASE LEARN] を押す。
4NEXTを2回押す。
5“SourceDevice”画面にて、削除した
いデバイスの LCD ボタンを押す。
6“EraseLearn”画面にて、削除したい
学習機能の LCD ボタンを押す。
7削除するときは [YES] を押す。
削除しないときは [NO] を押す。
b終了するときは [NO]、続けるときは [YES] を押しま
す。
NEXT
RC SETUP
LCDボタン LCDボタン
操作説明のボタン名について
[ ]: 選択項目の LCD ボタン
ボタン名のみ:
リモコンのボタンを表します。
ボタン名の変更
1RC SETUPを3秒間押す。
“PROGRAMDEVICE”メニューを表示しま
す。
2NEXT を押し、[EDIT TEXT] を押す。
3[KEY NAME]を押す。
4“SelectDevice” 画面にて、ボタン名
を変更したいデバイス(機器) の LCD ボ
タンを押す。
5“Selectkey” 画面にて、ボタン名を変
更したいボタンの LCD ボタンを押す。
6NEXTを押す。
7“EditText” 画 面にて、1段目の LCD
ボタンで編集したい文字の位置を選ぶ。
82 段目の LCD ボタンで入力したい文字を選
び、[SELECT] を押す。
b[CAPS] を表示中は小文字、[lower] を表示中は大
文字の入力になります。
9[SAVE]を押す。
b[NO] を押すと設定メニューに戻ります。続けるとき
は[YES] を押します。
シンセボタンの追加
この機能は将来の拡張用機能です。
操作のしかた
0 0
ご使用になる前に 操作のしかた ネットワーク機能 故障かな?
と思ったら
保障とサービスに
ついて
主な仕様
ご使用になる前に ネットワーク機能 故障かな?
と思ったら
保障とサービスに
ついて
主な仕様
日本語 日本語
PCアプリ
PCアプリ
お気に入りを削除する
1RC SETUPを3秒間押す。
“PROGRAMDEVICE”メニューを表示しま
す。
2[FAVORITES]を押す。
3[DELETE] を押す。
4NEXTを2回押す。
5“SourceDevice”画面にて、削除した
いデバイス(機器)の LCD ボタンを押す。
6“SelectKey”画面にて、削除したいボ
タンの LCD ボタンを押す。
7削除するときは [YES] を押す。
削除しないときは [NO] を押す。
b終了するときは [NO]、続けるときは [YES] を押しま
す。
パンチスルー機能を初期化する
1
RC SETUPを3秒間押す。
“PROGRAMDEVICE”メニューを表示しま
す。
2
[PUNCH THRU]を押す。
3
[CLEAR] を押す。
4
NEXTを押す。
5“PunchThru”画面にて、削除したい
グループの LCD ボタンを押す。
6
NEXTを押す。
7“SelectDevice”画面にて、パンチス
ルーを削除したいデバイス(機器)の
LCD ボタンを押す。
8
[YES]を押す。
bNEXT を押すと設定メニューに戻ります。
マクロ機能を初期化する
1RC SETUPを3秒間押す。
“PROGRAMDEVICE”メニューを表示しま
す。
2[MACROS]を押す。
3[DELETE] を押す。
4NEXTを2回押す。
5“SourceDevice”画面にて、削除した
いマクロのデバイス(機器)の LCD ボタ
ンを押す。
6“SelectKey”画面にて、削除したいマ
クロの LCD ボタンを押す。
7削除するときは [YES] を押す。
削除しないときは [NO] を押す。
b終了するときは [NO]、続けるときは [YES] を押しま
す。
操作のしかた
ご使用になる前に ネットワーク機能 故障かな?
と思ったら
保障とサービスに
ついて
主な仕様
ご使用になる前に 操作のしかた ネットワーク機能 故障かな?
と思ったら
保障とサービスに
ついて
主な仕様
日本語 日本語
PCアプリ
PCアプリ
ユーザーリセット
ユーザーが追加したマクロや学習させたリモコン
コードが消去されます。ただし、追加したデバイ
スは削除されません。
1RC SETUPを3秒間押す。
“PROGRAMDEVICE”メニューを表示しま
す。
2NEXTを押し、[RESET/LOCK] を押す。
3[USER RESET] を押す。
4NEXTを押す。
5[YES]を押す。
6NEXTを2回押す。
リセットされます。
NEXT
RC SETUP
LCDボタン LCDボタン
操作説明のボタン名について
[ ]: 選択項目の LCD ボタン
ボタン名のみ:
リモコンのボタンを表します。
オペレーショナルリセット
お買い上げ時の状態にもどります。
1RC SETUPを3秒間押す。
“PROGRAMDEVICE”メニューを表示しま
す。
2
NEXTを押し、[RESET/LOCK] を押す。
3
[OP RESET] を押す。
4
NEXTを押す。
5
[YES]を押す。
6
NEXTを2回押す。
お買い上げ時の状態にもどります。
操作のしかた
ご使用になる前に 操作のしかた ネットワーク機能 故障かな?
と思ったら
保障とサービスに
ついて
主な仕様
ご使用になる前に ネットワーク機能 故障かな?
と思ったら
保障とサービスに
ついて
主な仕様
日本語 日本語
PCアプリ
PCアプリ
1RC SETUPを3秒間押す。
“PROGRAMDEVICE”メニューを表示しま
す。
2NEXTを押し、[RESET/LOCK] を押す。
3[LOCK] を押す。
4NEXTを 2 回押す。
5“SelectDevice” 画面にて、ロックした
いデバイス(機器)の LCD ボタンを押す。
6[YES]を押す。
b[NO] を押すと設定メニューに戻ります。続けるとき
は[YES] を押します。
1RC SETUPを3秒間押す。
“PROGRAMDEVICE”メニューを表示しま
す。
2NEXTを押し、[RESET/LOCK] を押す。
3[UNLOCK] を押す。
4NEXTを 2 回押す。
5“Select Device” 画面にて、ロックを解
除したいデバイス(機器) の LCD ボタン
を押す。
6[YES] を押す。
b[NO] を押すと設定メニューに戻ります。続けるとき
は[YES] を押します。
操作のしかた
ロック機能
ロックすることでデバイス(機器) の編集ができ
なくなります。
アンロック機能
ロックしたデバイス(機器)のロックを解除します。
ご使用になる前に 操作のしかた 故障かな?
と思ったら
保障とサービスに
ついて
主な仕様
ご使用になる前に 操作のしかた ネットワーク機能 故障かな?
と思ったら
保障とサービスに
ついて
主な仕様
日本語 日本語
PCアプリ
PCアプリ
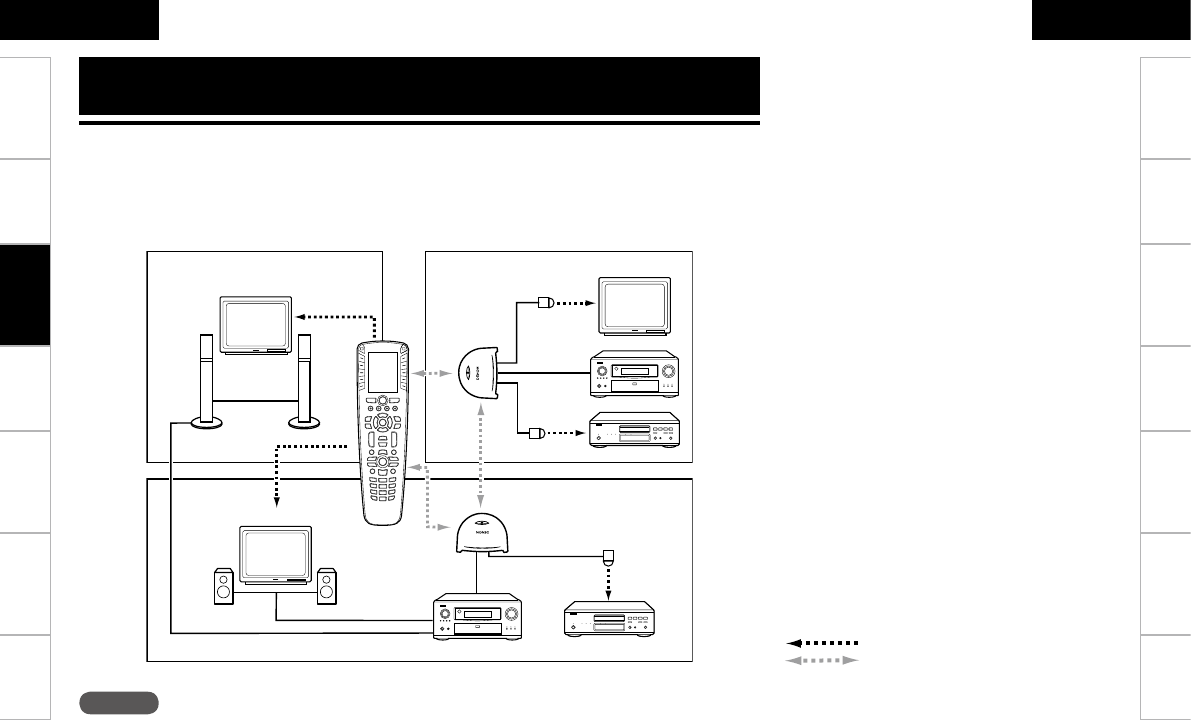
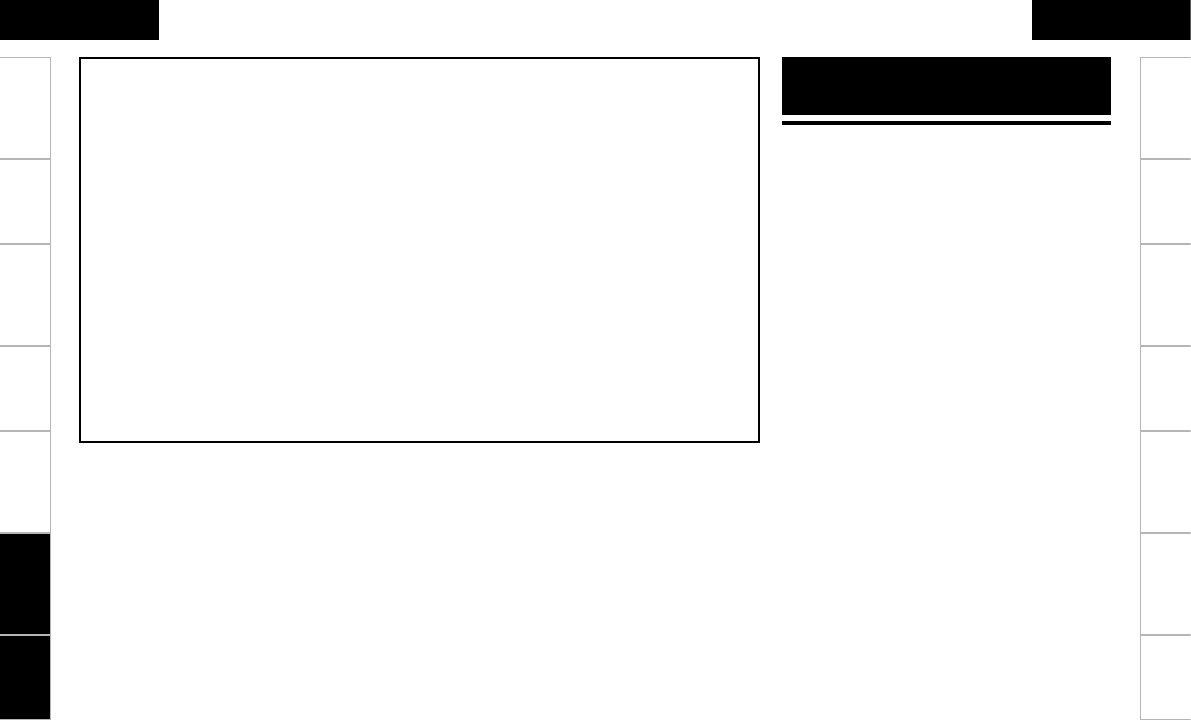
ネットワーク機能
RC-7001RCI(別売り)を使用した機能です。
RC-7001RCI(別売り)を使用して無線(RF)ネットワークを構築したとき、RC-7001RCIをノードと呼び
ます。RC-7001RCIごとに、個別のノード番号が登録されています。RC-7000CIでデバイス(機器)を登
録する際に、RF送信設定を行い、ノード番号を設定したデバイス(機器)のボタンを押すと、リモコン信号
は無線送信されて送信先のノード番号に該当するRC-7001RCIにて受信されます。
ご注意
電子レンジの近くで、無線を使用すると通信パフォーマンスが悪くなることがあります。その場合は、5 m
程度離してください。
モニター
モニター
モニター
AVアンプ
DVDプレーヤー
AVアンプ DVDプレーヤー
FLFR
FL
FR
リモコン(本機)
リピーター2
(RC-7001RCI
別売り)
:IR(赤外線通信)
:RF(双方向通信)
ネットワーク機能
リピーター1
(RC-7001RCI
別売り)
ご使用になる前に 操作のしかた ネットワーク機能 故障かな?
と思ったら
保障とサービスに
ついて
主な仕様
ご使用になる前に 操作のしかた 故障かな?
と思ったら
保障とサービスに
ついて
主な仕様
日本語 日本語
PCアプリ
PCアプリ
NEXT
RC SETUP
LCDボタン LCDボタン
ノードを使った操作
ノードの追加
ノード番号を登録して RC-7001RCI(別売り)
をネットワークに追加します。
ノードの削除
現在のネットワークからノード番号を指定して RC-
7001RCI(別売り)を削除します。
1RC SETUPを3秒間押す。
“PROGRAMDEVICE”メニューを表示しま
す。
2NEXT を2回押し、[NETWORK] を押す。
3[DELETE NODES] を押す。
4NEXTを2回押す。
RC-7001RCI(別売り) のノード番号を表示しま
す。
5削除したいノード番号を選択し、[YES]
を押す。
6NEXTを押す。
b終了するときは [NO]、削除を続けるときは [YES] を
押します。
1RC SETUPを3秒間押す。
“PROGRAMDEVICE”メニューを表示しま
す。
2NEXT を2回押し、[NETWORK] を押す。
3[ADD NODES] を押す。
4NEXTを押す。
5
リモコンをネットワークに追加するときは
[REMOTE] を押す。
bRC-7001RCI(別売り)を追加するときは [OTHER]
を押します。
6RC-7001RCI( 別 売 り ) の PESET/
CONFIG を約 1 秒間押します。
緑色のインジケーターが点滅します。
7NEXTを2回押す。
追加されると“Success!”を表示します。
bNEXT を押すと設定メニューに戻ります。
操作説明のボタン名について
[ ]: 選択項目の LCD ボタン
ボタン名のみ:
リモコンのボタンを表します。
ネットワーク機能

ご使用になる前に 操作のしかた 故障かな?
と思ったら
保障とサービスに
ついて
主な仕様
ご使用になる前に 操作のしかた ネットワーク機能 故障かな?
と思ったら
保障とサービスに
ついて
主な仕様
日本語 日本語
PCアプリ
PCアプリ
ノードの参照
ネットワークに登録されている RC-7001RCI (別
売り)を検索して一覧表示します。
1RC SETUPを3秒間押す。
“PROGRAMDEVICE”メニューを表示しま
す。
2NEXTを2回押し、[NETWORK] を押す。
3[VIEW NODES] を押す。
4NEXTを2回押す。
ネットワークに登録されている RC-7001RCI(別
売り)のノード番号は末尾に zマークを表示しま
す。
bNEXT を2回押すと設定メニューに戻ります。
ノードラベルの変更
RC-7001RCI(別売り) にラベルを追加してわ
かりやすくします。
1RC SETUPを3秒間押す。
“PROGRAMDEVICE”メニューを表示しま
す。
2NEXT を2回押し、[NETWORK] を押す。
3[EDIT LABEL] を押す。
4NEXTを2回押す。
RC-7001RCI のノード番号を表示します。
5変更したいノード番号を選択してから、
NEXT を押します。
選択したノードの編集画面になります。
6“EditText”画面にて、1段目の LCD
ボタンで編集したい文字を選ぶ。
72 段目の LCD ボタンで入力したい文字を選
び、[SELECT] を押す。
b[CAPS] を表示中は小文字、[lower] を表示中は大
文字の入力になります。
8 [SAVE] を押す。
9NEXT を押す。
b[NO] を押すと設定メニューに戻ります。続けるとき
は[YES] を押します。
NEXT
RC SETUP
LCDボタン LCDボタン
操作説明のボタン名について
[ ]: 選択項目の LCD ボタン
ボタン名のみ:
リモコンのボタンを表します。
ネットワーク機能
ご使用になる前に 操作のしかた ネットワーク機能 故障かな?
と思ったら
保障とサービスに
ついて
主な仕様
ご使用になる前に 操作のしかた 故障かな?
と思ったら
保障とサービスに
ついて
主な仕様
日本語 日本語
PCアプリ
PCアプリ
レシーバーディスプレイモード
(RDM)の設定
RC-7001RCI( 別 売り) と対 応する DENON
製品を使用して双方向通信をする場合に設定しま
す。対応する DENON 製品のステータス情報な
どが本機の画面にて、確認できます。RDM用の
頁の挿入位置を設定します。
1RC SETUPを3秒間押す。
“PROGRAMDEVICE”メニューを表示しま
す。
2NEXTを2回押し、[USER PREF] を押す。
3[RDM] を押す。
4NEXT を押す。
5[YES] を押す。
6[FIRST] または [LAST] で追加したい位置を
設定する。
[FIRST]:
通常ボタン画面の先頭に RDM 用ページが追加さ
れます。
[LAST]:
最後に RDM 用ページが追加されます。
bNEXT を押すと設定メニューに戻ります。
リモコンのバージョンの確認
1RC SETUPを3秒間押す。
“PROGRAMDEVICE”メニューを表示しま
す。
2NEXTを2回押し、[USER PREF] を押す。
3[VERSION INFO] を押す。
LCD ボタンのバージョン情報を表示します。
bNEXT を押すと設定メニューに戻ります。
ネットワーク機能
ご使用になる前に 操作のしかた ネットワーク機能 故障かな?
と思ったら
保障とサービスに
ついて
主な仕様
ご使用になる前に 操作のしかた ネットワーク機能 故障かな?
と思ったら
保障とサービスに
ついて
主な仕様
日本語 日本語
PCアプリ
ご注意
•RC-7000CI Editor を使用して、データのアップ
ロードまたはダウンロード中のときは、下記の操
作は絶対におこなわないでください。本機やパソ
コンが故障することがあります。
• USBケーブルを外す
• パソコンの電源を切る
• 本機の電池を抜く
RC-7000CI Editor をイン
ストールする
はじめに付属のUSBケーブルを使用してRC-
7000CIとパソコンを接続しておきます。
1付属の CD-ROM (RC-7000CIEditor)
をパソコンにセットする。
2“マイコンピュータ” の CD-ROM ドライ
ブを開き“RC-7000CIEditor.exe” を
起動する。
b
インストールウイザード画面が表示されますので、画
面の指示に従いインストールを実施します。
b
インストールが実行された後、“完了した”という
ダイアログが表示されます。
3“完了”をクリックするとインストールが完
了し、アプリケーションが起動します。
RC-7000CI Editor の使い
かた
1アプリケーションを最初に使用すると
きは、NewUser をチェックしてから、
E-mailAddress、Password 等の必要
事項を入力して“OK”を押す。
2“マイコンピュータ” の CD-ROM ドライ
ブを開き“RC-7000CIEditor.exe” を
起動する。
「RC-7000CIEditor」が起動します。
3
ウイザードに従って操作します。
PC アプリ
RC-7000CI Editor の機能
n
「RC-7000CI Editor」を使うと、次のことが
できます
●RC-7000CI の設定データの編集
●RC-7000CI の設定データのパソコンへのバッ
クアップ
●リモコンコードデータベースのダウンロード
n
「RC-7000CI Editor」を使用するために必要
な推奨機器と環境
●WindowsXPServicePack2 の OS を搭載し
たパソコン
●十分な空き容量のある HDD
●USB2.0 接続端子
PCアプリ
ご使用になる前に 操作のしかた ネットワーク機能 故障かな?
と思ったら
保障とサービスに
ついて
主な仕様
ご使用になる前に 操作のしかた ネットワーク機能 主な仕様
日本語 日本語
PCアプリ
PCアプリ
故障かな?と思ったら
n
取扱説明書に従って正しく操作していますか
n スピーカーやプレーヤーは正しく動作していますか
本機が正常に動作しないときは、次の表に従ってチェックしてみてください。
なお、この表の各項にも該当しない場合は本機の故障とも考えられますので、お買い上げの販売店にご相談
ください。
もしお買い上げの販売店でお分かりにならない場合は、当社のお客様相談窓口またはお近くの修理相談窓口
にご連絡ください。
症状 原因 対策 関連
ページ
リモコンを操作
しても、正常に
動作しない。
●電池が消耗している。
●本体から離れすぎているか、角度
が良くない。
●本機とリモコンの間に障害物があ
る。
●乾電池の qとwが正しくセット
されていない。
●本機のリモコン受光部に強い光
(直射日光、インバータ式蛍光灯
の光など)が当たっている。
●新しい乾電池と交換してくださ
い。
●リモコンは、本機から約 7 メート
ルおよび 30°以内の範囲内で操作
してください。
●障害物を取り除いてください。
●正しい極性でセットしてくださ
い。
●受光部に強い光が当たらない場所
に設置してください。
2
3
3
2
3
表示画面がでない
●明るさの設定が適切でない。 ●「コントラスト調整をする」で、画
面の明るさを調整してください。
7
RC-7001RCI(別
売り)とワイヤレ
スで接続できな
い。
●無線環境の変化。 ●RC-7001RCI
(別売り)
を初期化する。
RESET/CONFIG ボタンを 12 秒程
押して、インジケーターを赤点灯にし
ます。
再度 RESET/CONFIG ボタンを 5 秒
程押して、インジケーターを緑点灯に
します。この後 RC-7000CI
(別売り)
の登録を再度おこなってください。
–
保証とサービスについて
1.この商品には保証書を添付しております。
この商品には保証書を添付しております。
保証書は所定事項をお買い上げの販売店で記入して
お渡し致しますので、記載内容をご確認のうえ大切
に保存してください。
2.保証期間は、お買い上げ日より1年間です。
万一故障した場合には、保証書の記載内容により、
お買い上げの販売店またはお近くの修理相談窓口に
ご相談ください。但し、保証期間内でも保証書を添
付されない場合は、有料修理となりますので、ご注
意ください。
この商品に添付されている保証書によって、保証書
を発行している者(保証責任者)およびそれ以外の
事業者に対するお客様の法律上の権利を制限するも
のではありません。
保証および修理についてご不明の場合は、お買い上
げの販売店またはお近くの修理相談窓口にご相談く
ださい。
保障とサービスに
ついて
故障かな?
と思ったら
ご使用になる前に 操作のしかた ネットワーク機能 故障かな?
と思ったら
ご使用になる前に 操作のしかた ネットワーク機能 故障かな?
と思ったら
保障とサービスに
ついて
主な仕様
日本語 日本語
PCアプリ
PCアプリ
主な仕様
電源: 単4形アルカリ乾電池4本使用
電池の寿命: 約3ヶ月(使う頻度によります)
周波数: 2045MHz~2480MHz(16ch)、
帯域幅2MHz
無線周波数: 2.4GHz
変調方式: O-QPSK
拡散方式: DSSS
通信距離: 30m(環境によって変わります。)
最大外形寸法: 63(幅)x233(高さ)x28(奥行き)
mm
質量: 170g(乾電池を含まず)
保証書
保障とサービスに
ついて
主な仕様
Operation Network
function
Troubleshooting Specifications
Getting Started Operation Network
function
Troubleshooting Specifications
ENGLISH
PCアプリ
PCアプリ
Thank you for purchasing this DENON product. To ensure
proper operation, please read these owner’s manual carefully
before using the product.
After reading them, be sure to keep them for future
reference.
Getting Started
Accessories
Check that the following parts are supplied with the product.
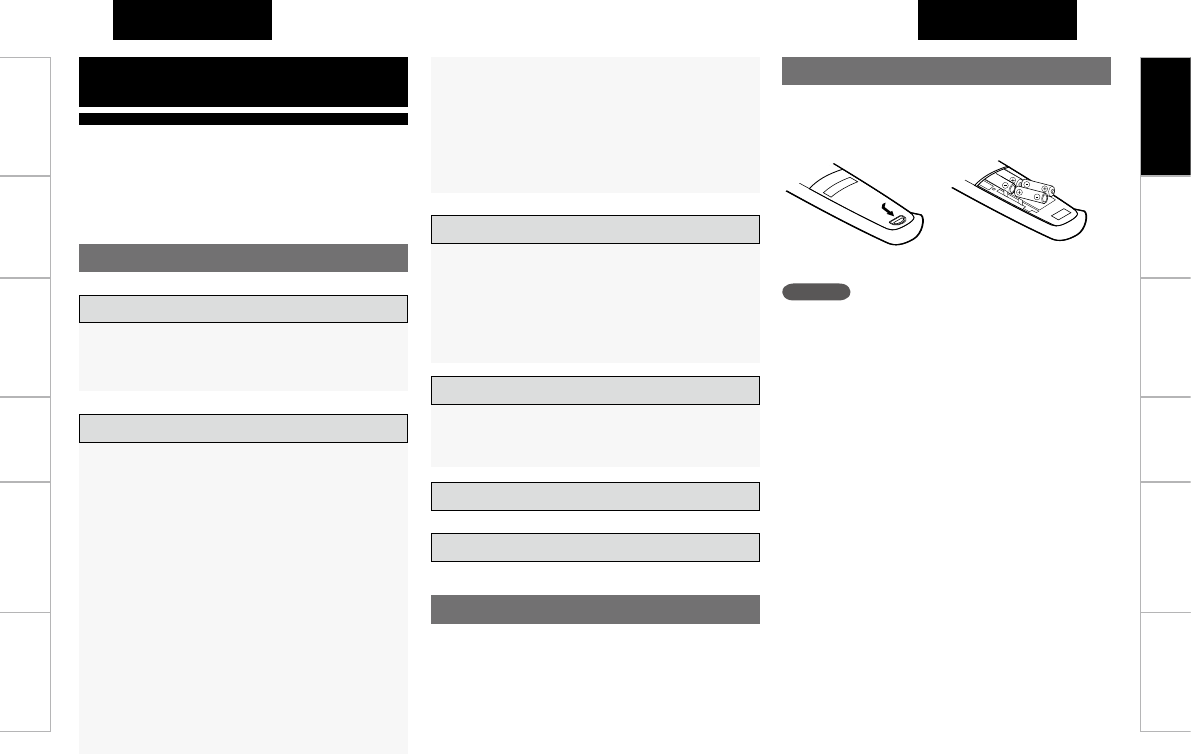
Inserting the batteries
q Lift the clasp and remove
the rear lid.
w Load the four batteries
properly as indicated by
the marks in the battery
compartment.
e Put the rear cover back on.
NOTE
• If you try to operate the RC-7000CI / 7001RCI near the
device you want to operate but the device does not operate,
replace the batteries with new ones. (The included batteries
are only meant for verifying operation. Replace them with
new batteries soon.)
• The supplied batteries are only for verifying operation.
• When inserting the batteries, be sure to do so in the proper
direction, following the “q” and “w” marks in the battery
compartment.
• To prevent damage or leakage of battery fluid:
• Do not use a new battery together with an old one.
• Do not use two different types of batteries.
• Do not attempt to charge dry batteries.
• Do not short-circuit, disassemble, heat or dispose of
batteries in flames.
• If the battery fluid should leak, carefully wipe the fluid off the
inside of the battery compartment and insert new batteries.
• Remove the batteries from the remote control unit if it will
not be in use for long periods.
• When replacing the batteries, have the new batteries ready
and insert them as quickly as possible.
q Owner’s Manual .............................................................. 1
w Remote control ................................................................ 1
e R6P/AA batteries ............................................................. 4
r CD-ROM .......................................................................... 1
t USB cable
(Cord length: Approx. 3.3 ft / 1 m) ................................... 1
Accessories ········································································ 1
Inserting the batteries ······················································ 1
Operating range of the remote control unit ··················· 2
Part names and functions ················································ 2
Getting Started
Contents
Introduction ······································································· 3
Settings menu map ·························································· 4
Operation the LCD button ················································ 5
Settings
Setting the screen display time ······································· 5
Setting the backlight on time ··········································· 6
Adjusting the contrast ····················································· 6
Completing the setting ···················································· 6
Various settings
Using the preset memory function ································· 7
Using the learning function ·········································· 7, 8
Using the Macro function ············································ 8, 9
Using the delay time function·········································· 9
Using the code search function ······································· 9
Favorites settings ····················································· 10, 11
Using the punch through function ··································11
Editing pages ···························································· 11, 12
Editing devices ······················································ 12 ~ 15
Editing buttons ······················································ 15 ~ 18
Operation
Resetting the learning function·······································18
Resetting the macro function ·········································19
Deleting favorites ···························································19
Resetting the punch through function ····························19
Operational reset ··························································· 20
User reset ······································································ 20
Lock function ································································· 21
Unlock function ······························································ 21
Network function
Operations using nodes
Adding nodes································································· 23
Deleting nodes ······························································ 23
Viewing nodes ······························································· 24
Changing node labels ···················································· 24
Setting the receiver display mode (RDM) ······················ 25
Checking the remote control unit version······················ 25
Troubleshooting ....................................................26
Specifications .........................................................26
Getting Started
ENGLISH
RC-7000CIEditor の機能···································27
RC-7000CI Editor をインストールする ·········27
RC-7000CI Editor の使いかた ·························27
PCアプリ
Operation Network
function
Troubleshooting Specifications
ENGLISH ENGLISH
PCアプリ
PCアプリ
Operating range of the remote control
unit
Point the remote control unit at the remote sensor when
operating it.
30°
30°
Approx. 23 feet /
7 m
NOTE
The set may function improperly or the remote control unit
may not operate if the remote control sensor is exposed to
direct sunlight, strong artificial light from an inverter type
fluorescent lamp or infrared light.
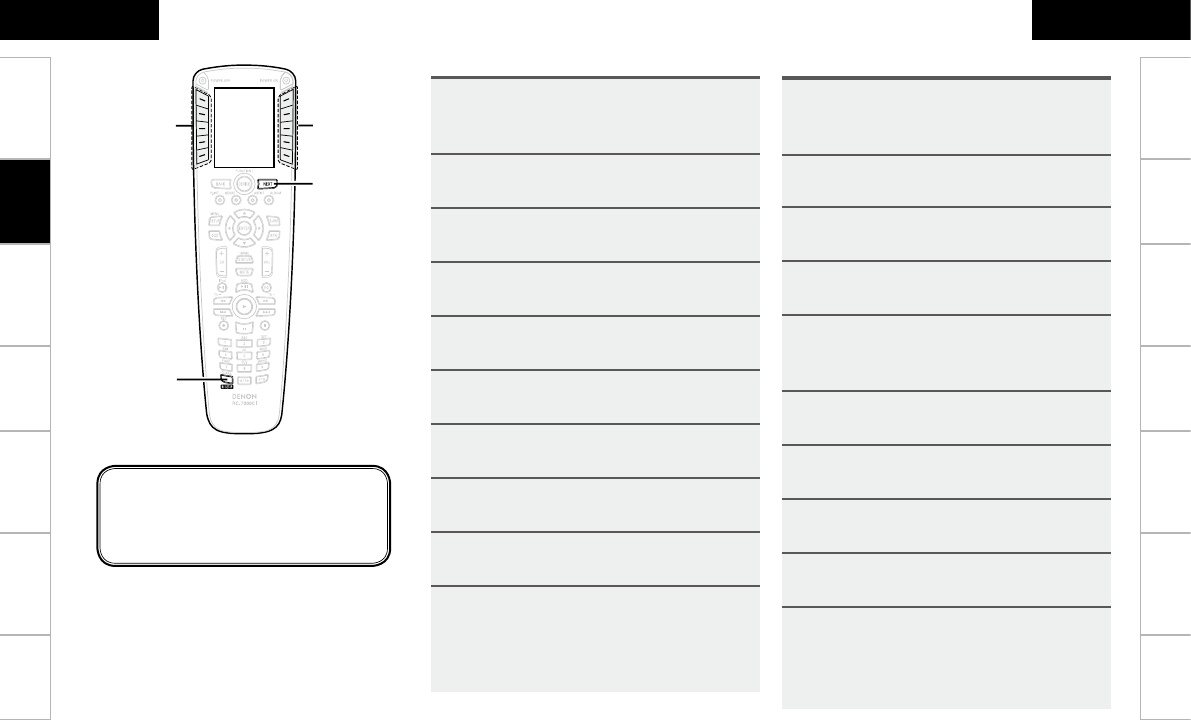
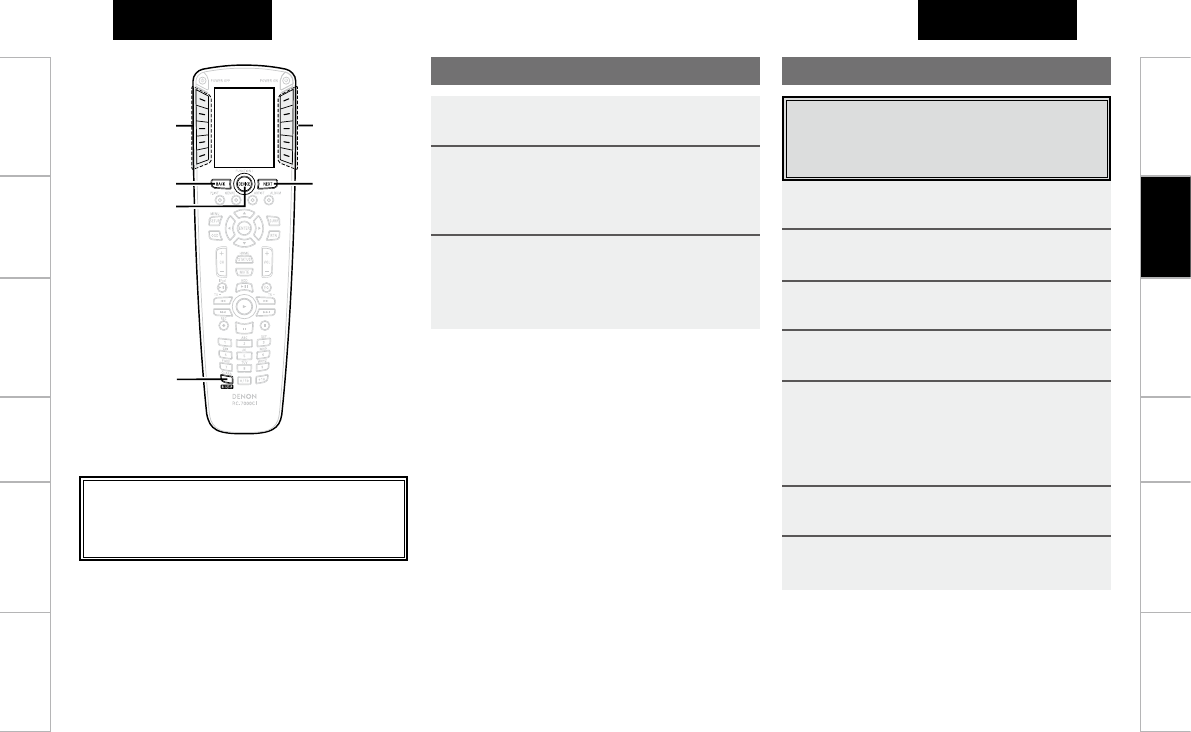
For buttons not explained here, see the page indicated in parentheses ( ).
Part names and functions
o SETUP / MENU button ……………………………… (11)
Q0 Cursor buttons (uio p) ………………………… (11)
Q1 On-screen display button (OSD) …………………… (11)
Q2 Channel buttons (CH + –) …………………………… (11)
Q3 HDD 1/3 button ……………………………………… (11)
Q4 iPod 1/3 button ……………………………………… (11)
Q5 Tuning – / Search button (6) ………………… (7, 11)
Q6 Play button (1) ……………………………………… (7)
Q7 Skip button (8) …………………………………… (7)
Q8 REC button (4) ………………………………………… (11)
Q9 Pause button (3) …………………………………… (7, 11)
W0 Function / Number buttons ………………………(5 ~ 7)
W1 USB port
W2 Display …………………………………………………… (3)
W3 NEXT button …………………………………………(5 ~ 7)
W4 Blue button
W5 Yellow button
W6 Surround parameter button (SURR) ……………… (11)
W7 Return button (RTN) ………………………………… (11)
W8 ENTER button ………………………………………… (11)
W9 Master volume control buttons (VOL + –) ………… (11)
E0 STATUS / HOME button ……………………………… (11)
E1 MUTE button …………………………………………… (11)
E2 ROOM EQ button ……………………………………… (11)
E3 Tuning + / Search button (7) …………………… (7, 11)
E4 Skip button (9) …………………………………… (7, 11)
E5 Stop button (2) ……………………………………… (7, 11)
q POWER ON button
w Remote control signal transmitter ………………… (7)
e POWER OFF button
r LCD buttons …………………………………… (3, 5 ~ 7)
t FUNCTION / DEVICE button ……………………… (6, 11)
y BACK button ……………………………………… (12, 19)
u Red button
i Green button
Getting Started
Getting Started
Operation Network
function
Troubleshooting Specifications
q
w
e
r r
W3
W2
W4 W5
W6 W7
W8 W9
E0
E1
E3
E5
E2
E4
yu
io
Q0 Q1
Q2
Q4 Q3
Q5
Q7
Q6
Q8 Q9
W0
W1
t
For instructions on using with RF connections, refer to the
operating instructions of the RC-7001RCI (sold separately).
USB ポートについて
When editing the RC-7000CI / 7001RCI’s functions using the
exclusive “RC-7000CI Editor” application software, connect
the included USB cable.
Getting Started Network
function
Troubleshooting Specifications
Getting Started Operation Network
function
Troubleshooting Specifications
ENGLISH ENGLISH
PCアプリ
PCアプリ
Operation
LCD button
1 To use to operate an AV amplier (AV
receiver), press [Denon1].
b [Denon2] is a function for system expansion in the future.
Normally select [Denon1].
2 Press [YES].
3 Press NEXT.
By default, the device is set to [Denon1].
4 Press DEVICE.
The initial settings screen appears.
Introduction
Operation of the LCD buttons
When buttons on the remote control unit are pressed, various
settings and operation items appear on the LCD screen.
LCD button
When batteries are loaded for the first time
Make the setting described below.
Initial display screen
The initial display settings are shown on the display below.
When using the RF two-way communication
function
Change the amplifier setting to “RF” at “Setting the remote
control code transmission mode“ (vpage 14).
n Operation for selecting
• Press the LCD button to the left or right of the displayed
item name to select it.
• The screen is displayed for 5 seconds. Operate while the
screen is displayed. (“Setting the screen display time”
(vpage 5))
• When “PAGE” is displayed at the bottom of the screen,
there are one or more other pages in addition to the one
currently displayed. Use the NEXT and BACK button to
switch screens.
BACK button
n Indication of item names in this manual
In this manual, the names of items displayed on the screen
are indicated [ ]. (Example: [Denon1])
GScreen 1H GScreen 2H
DEVICE SELECT
AMP ZONE2
ZONE3 ZONE4
TUNER CD
DVD TV
SAT CABLE
Page 1/2
DEVICE SELECT
VCR 1 iPod
VCR 2 NetAud
DTU
Page 2/2
Operation
NEXT button
DEVICE button
Please select
which type of
Denon receiver
you are using
below.
Denon 1 Denon 2
You have selected
Denon 1 receiver.
All devices used
to control this
receiver will be
set up. Are you
sure your
receiver is
of type Denon1?
NO YES
Success! Your
remote has been
setup to work
with the Denon1
receiver.
Press NEXT to
continue with
more setup
choices or DEVICE
to begin using
your remote.
3
2
1
NOTE
A DENON product compatible with the RC-7001RCI (sold
separately) is required to use this function.
1の画面を表示中に LCD 画面が消灯したときは、RC
SETUP ボタンを3秒間押すと、もとの画面に戻ります。
Getting Started Operation Network
function
Troubleshooting Specifications
Getting Started Network
function
Troubleshooting Specifications
ENGLISH ENGLISH
PCアプリ
PCアプリ
Settings menu map
Operation
n BASIC SETUP (v8, 10 page)
• BRAND SET
• CODE SEARCH
n FAVORITES (v11, 20 page)
• ADD / REDO
• DELETE
• CONFIGURE
· FAV DEVICE
· FAV IR DELAY
· TOTAL DIGITS
· CHANNEL KEY
n MACROS (v9, 10, 20 page)
• ADD / REDO
• DELETE
• EDIT DELAY
n PUNCH THRU (v12, 20 page)
• ADD
· CHANNEL TUNE
· TRANSPORTS
· VOLUME CONT
· MENU NAVIG.
• CLEAR
· CHANNEL TUNE
· TRANSPORTS
· VOLUME CONT.
· MENU NAVIG.
n LEARNING (v8, 19 page)
• LEARN KEY
• ERASE LEARN
n EDIT PAGE (v12, 13 page)
• ADD PAGE
• DELETE PAGE
n EDIT DEVICE (v13, 14 page)
• MOVE/SWAP
• MOVE/INSERT
• COPY
• ERASE
• DISPLAY MODE
• IR/RF
n EDIT TEXT (v16, 19 page)
• DEVICE NAME
• KEY NAME
n EDIT FUNC (v16, 17, 18 page)
• MOVE/SWAP
• MOVE/INSERT
• COPY
• ERASE
• DISPLAY MODE
• ADD IR
• ADD Synth
n RESET/LOCK (v21, 22 page)
• OP RESET
• USER RESET
• LOCK
• UNLOCK
n NETWORK (v24, 25 page)
• ADD NODES
• DELETE NODES
• VIEW NODES
• EDIT LABEL
n USER PREF (v6, 7, 26 page)
• VERSION INFO
• CONTRAST
• DISPLAY T/O
• LIGHT T/O
• RDM
Getting Started Network
function
Troubleshooting Specifications
Getting Started Operation Network
function
Troubleshooting Specifications
ENGLISH ENGLISH
PCアプリ
PCアプリ
NEXT
BACK
DEVICE
RC SETUP
LCDボタン LCDボタン
About the button names in these explanations
[ ] : LCD buttons for selection items
Button name only:
Indicates a button on the remote control unit
Settings
Setting the screen display time
Use this procedure to set the time until the screen
display turns off.
Initial setting: 5 seconds
1 Press RC SETUP for 3 seconds.
The “PROGRAM DEVICE” menu is displayed.
2 Press NEXT twice, then press [USER
PREF].
3 Press [DISPLAY T/O].
4 Press NEXT.
5 Press [–DISPLAY T/O+] to set the time until
the light turns off.
• LCD button on right side ...................................... +
• LCD button on right side ...................................... –
b The time can be set between 1 (MIN) and 30 (MAX).
6 Press [SAVE].
7 Press NEXT.
Operation the LCD button
1 Press DEVICE.
The “PROGRAM DEVICE” menu is displayed.
2 Press the LCD button for the device you
want to operate.
b If there are multiple pages, use the NEXT and BACK
button to switch screens.
3 Press the LCD button for the item you want
to operate.
b If there are multiple pages, use the NEXT and BACK
button to switch screens.
Operation
LCD buttonLCD button
Getting Started Operation Network
function
Troubleshooting Specifications
Getting Started Network
function
Troubleshooting Specifications
ENGLISH ENGLISH
PCアプリ
PCアプリ
NEXT
VOL+ –
7
1
9
2
BACK
RC SETUP
6
8
DEVICE
LCDボタン LCDボタン
3
Adjusting the contrast
Set this if the characters on the screen are hard to see.
Initial setting: Level 5
1 Press RC SETUP for 3 seconds.
The “PROGRAM DEVICE” menu is displayed.
2 Press NEXT twice, then press [USER
PREF].
3 Press [CONTRAST].
4 Press NEXT.
5 [–CONTRAST+] を押し、コントラストを
設定する。
• LCD button on right side .......................................+
• LCD button on right side .......................................–
b The contrast can be set within the range of “Level 0
(MIN)” to “Level 12 (MAX)”.
6 Press [SAVE].
7 Press NEXT.
Setting the backlight on time
Use this procedure to set the time until the backlight
turns off.
Initial setting: 5 seconds
1 Press RC SETUP for 3 seconds.
The “PROGRAM DEVICE” menu is displayed.
2 Press NEXT twice, then press [USER
PREF].
3 Press [LIGHT T/O].
4 Press NEXT.
5 Press [–DISPLAY T/O+] to set the time until
the light turns off.
• LCD button on right side .......................................+
• LCD button on right side .......................................–
b The time can be set between LIGHT OFF and 30 (MAX).
6 Press [SAVE].
7 Press NEXT.
Completing the setting
Press DEVICE until the “DEVICE SELECT”
screen appears.
Operation
LCD buttonLCD button
About the button names in these explanations
[ ] : LCD buttons for selection items
Button name only:
Indicates a button on the remote control unit
Getting Started Network
function
Troubleshooting Specifications
Getting Started Operation Network
function
Troubleshooting Specifications
ENGLISH ENGLISH
PCアプリ
PCアプリ
8 Use 1, 2, 3, 6, 7, 8, 9,
VOL+ – to check whether the device to be
added operates.
Operates ........................................ [YES]
• The IR/RF selection screen appears.
Does not operate ........................... [NO]
• The screen switches to the next code.Find the code
that operates and set it by pressing [YES].
9 Press [IR] or [RF] to select the remote control
signal.
[IR] : Infrared signals are transmitted.
[RF] : Send RF signals to the RC-7001RCI remote control
receiver (sold separately).
b For details on the RC-7001RCI (sold separately), see
“Network function” (vpage 22).
10
At the “Select Position” screen, press the
LCD button for the device you want to
add.
The setting is entered.
b Press [NO] to end, [YES] to continue.
NOTE
Depending on the product’s year of manufacture and
differences in functions from model to model, there may be
some buttons that do not operate or buttons that operate
erroneously.
Using the learning function
This function lets you register the desired remote
signals of devices by sending them to the remote
control unit.
1 Press RC SETUP for 3 seconds.
The “PROGRAM DEVICE” menu is displayed.
2 Press [LEARNING].
3 Press [LEARN KEY].
4 Press NEXT twice.
5 At the “Select Device” screen, press the LCD
button for the device whose remote control
signals you want to register.
6 At the “Learn Key” screen, press the LCD
button for the operation button name you
want to register.
b Signals can be “learned” at buttons other than NEXT, BACK
and DEVICE.
Various settings
Using the preset memory function
The remote control unit can be preset to operate devices
of various brands.
1 Press RC SETUP for 3 seconds.
The “PROGRAM DEVICE” menu is displayed.
2 Press [BASIC SETUP].
3 Press [BRAND SET].
4 Press NEXT.
5 At the “Press Device Type” screen, press
the LCD button for the device you want to
set in the preset memory.
6 Press NEXT.
7 At the “Select Brand” screen, press the LCD
button for the device’s brand name.
If there are multiple codes, “1 ofz” is displayed.
(z is the number of codes)
b If the brand you want to choose is not displayed, press
NEXT to switch the brand display.
Operation
Getting Started Operation Network
function
Troubleshooting Specifications
Getting Started Network
function
Troubleshooting Specifications
ENGLISH ENGLISH
PCアプリ
PCアプリ
NEXTBACK
DEVICE
RC SETUP
LCDボタン LCDボタン
Using the Macro function
This function allows you to register a series of
operations at a single button.
With this function you can for example turn on the
amplifier, select the input source, turn on the TV’s
power, turn on the source device's power and set the
play mode all by pressing a single button.
1 Press RC SETUP for 3 seconds.
The “PROGRAM DEVICE” menu is displayed.
2 Press [MACROS].
3 Press [ADD/REDO].
4 Press NEXT twice.
5 At the “Assign Macro” screen, press the
LCD button for the device for which you
want to register the macro.
6 Press the button at which you want to
register the macro.
b Macros can be registered at buttons other than NEXT,
BACK and DEVICE.
7 Press NEXT to register the next signal.
b Press DEVICE to select the device.
b Repeat steps 5 to 6.
7 Place the remote control units with their
signal transmitters facing each other, press
NEXT, then immediately press the button
on the remote control unit you want to
register.
”Success!” is displayed if the
code was learned successfully.
8 To register other buttons, press NEXT.
b Repeat steps 6 to 8.
9 Press [EXIT] to exit the learning mode.
b Press [EDIT] if you want to change the button name.
Perform the procedure at “Changing the button name”
(v page 18) starting from step 7.
NOTE
The learning function may not work for some remote control
units, and sometimes a device may not operate properly even
if its remote control signals have been learned. In this case,
use the remote control unit included with the device.
Operation
LCD buttonLCD button
About the button names in these explanations
[ ] : LCD buttons for selection items
Button name only:
Indicates a button on the remote control unit
Getting Started Network
function
Troubleshooting Specifications
Getting Started Operation Network
function
Troubleshooting Specifications
ENGLISH ENGLISH
PCアプリ
PCアプリ
Using the code search function
This function lets you search for preset codes when
adding new devices to the remote control unit.
1 Press RC SETUP for 3 seconds.
The “PROGRAM DEVICE” menu is displayed.
2 Press [BASIC SETUP].
3 Press [CODE SEARCH].
4 Press NEXT.
5 At the “Press Device Type” screen, press
the LCD button for the device whose code
you want to search for.
6 Press NEXT twice.
7 If the device operates when the remote
control unit’s buttons are pressed, press
[YES].
b If [NO] is pressed, the code switches. Press a remote
control unit button again to check. Press [BACK] to return
to the previous code.
8 At the “Select Position” screen, press the
LCD button for the position at which you
want to add the preset device.
b Press [NO] to end, [YES] to continue.
8 Press RC SETUP.
The registration menu is displayed.
9 Press [SAVE] to register the set macro.
[TEST] :
Press this to send the registered macro to check it.
[DELAY – +] :
Use these to set the transmission interval. This can be set
to between “0.05(MIN)” and “60(MAX)”. (Initial setting: 0.25
seconds)
[CANCEL ENTRY] :
Press this to cancel the last code registered and return to
the registration mode.
[START OVER] :
Press this to start over from the beginning.
10
Press [EXIT] to end the setting.
b Press [EDIT] if you want to change the button name
(macro name).
Perform the procedure at “Changing the button name”
(vpage 18) starting from step 7.
Using the delay time function
The interval at which the remote control signals
registered with the system call function are sent (the
“delay time”) can be set.
1 Press RC SETUP for 3 seconds.
The “PROGRAM DEVICE” menu is displayed.
2 Press [MACROS].
3 Press [EDIT DELAY].
4 Press NEXT twice.
5 The “Edit Macro” screen is displayed.
Select a macro that has been registered.
6 Press NEXT.
7 Use [DELAY – +] to change the delay time,
then press [SAVE].
[TEST] :
Press this to send the registered macro to check it.
[DELAY – +] :
Use these to set the transmission interval.
[CREATE AGAIN] :
Use this to register a new macro.
8 Press NEXT to end the setting.
Operation
ご注意
マクロを設定するボタンは、マクロに登録できませ
ん。
Getting Started Operation Network
function
Troubleshooting Specifications
Getting Started Network
function
Troubleshooting Specifications
ENGLISH ENGLISH
0 0
PCアプリ
PCアプリ
NEXT
ENTER
RC SETUP
LCDボタン LCDボタン
Registering favorites
1 Press RC SETUP for 3 seconds.
The “PROGRAM DEVICE” menu is displayed.
2 Press [FAVORITES].
3 Press [ADD/REDO].
4 Press NEXT.
5 Press [KEY].
b Pages can be added here.
When [PAGE] is selected, press [MAIN] or [DEVICE].
When [MAIN] is selected, press [YES] to set.
When [DEVICE] is selected, select the device for which a
page is to be added.
6 Press NEXT.
7 At the “Assign Favorite” screen, select the
button for the place to be stored in the
favorites.
Favorites settings
Favorites settings
Use this function to register your favorite channel
numbers so they can be operated with a single button.
1 Press RC SETUP for 3 seconds.
The “PROGRAM DEVICE” menu is displayed.
2 Press [FAVORITES].
3 Press [CONFIGURE].
4 Press NEXT twice.
5 At the “CONFIGURE FAV” screen, press
the LCD button for the item you want to
set.
[FAV DEVICE] :
Press this to select the device to be stored in the favorites.
This is initially set to “SAT”.
[FV IR DELAY] :
Press this to set the interval at which the remote control
signals are sent when buttons at which favorites have been
registered are pressed.
[TOTAL DIGIT] :
Use this to set the number of digits of channels registered
in the favorites.
[CHANNEL KEY] :
Set this to add ENTER after registered favorites
(Set this for types of devices for which ENTER is pressed to
set the channel after selecting it with the number buttons.)
To add ENTER at the end of the channel, press ENTER. If you
do not want to add ENTER, press NEXT.
b When [EXIT] is pressed, the setting is completed. Press
[CONFIG] to continue registering.
Operation
LCD buttonLCD button
About the button names in these explanations
[ ] : LCD buttons for selection items
Button name only:
Indicates a button on the remote control unit
Getting Started Network
function
Troubleshooting Specifications
Getting Started Operation Network
function
Troubleshooting Specifications
ENGLISH ENGLISH
PCアプリ
PCアプリ
Inserting pages
Editing pages
Pages can be inserted and devices or buttons can be
added in the device select menu or in the individual
devices.
1 Press RC SETUP for 3 seconds.
The “PROGRAM DEVICE” menu is displayed.
2 Press NEXT, then press [EDIT PAGE].
3 Press [ADD PAGE].
4 Press NEXT.
5 Press [MAIN] to add a page to the device
select menu, [DEVICE] to add a page in the
device.
b When and only when [DEVICE] is selected, press the LCD
button for the device to which you want to add a page.
6 Press [YES].
The page is added.
b Press NEXT to return to the setting menu.
8 Input the number of to be registered.
9 Press NEXT.
10
Press [SAVE] to register the favorite.
b Press [EDIT] if you want to change the button name.
11
Press [EXIT] to end the registration.
Press [ADD] to continue registering.
Using the punch through function
Even when a different device mode is selected, it is
possible to assign the buttons below to a different device
in units of groups.
For example, the DVD play operation can be performed
even if the operating mode is set to the amplifier.
1 Press RC SETUP for 3 seconds.
The“PROGRAM DEVICE” menu is displayed.
2 Press [PUNCH THRU].
3 Press [ADD].
4 Press NEXT.
5 At the “Punch Thru” screen, press the LCD
button for the group you want to set.
The functions for which punch thru can be assigned in
units of groups are as shown on the table below.
Groups Functions
CHANNEL TUNE CH+, CH–, STATUS, 1~9,
0/10, +10
TRANSPORTS iPod 1/3,
HDD 1/3, EQ, 6, 7,
8, 9, REC, 3, STOP,
VOLUME
CONTROL
VOL+, VOL–, MUTE
MENU
NAVIGATION
SETUP, SURR, OSD, RTN,
uiop, ENTER
6 Press NEXT.
7 At the “Source Device” screen, press the
LCD button for the device of the group you
want to set.
8 Press NEXT.
9 At the “Target Device” screen, press the
LCD button or the device whose group
selected at step 7 you want to send.
10
Press [YES].
b Press NEXT to return to the setting menu.
Operation
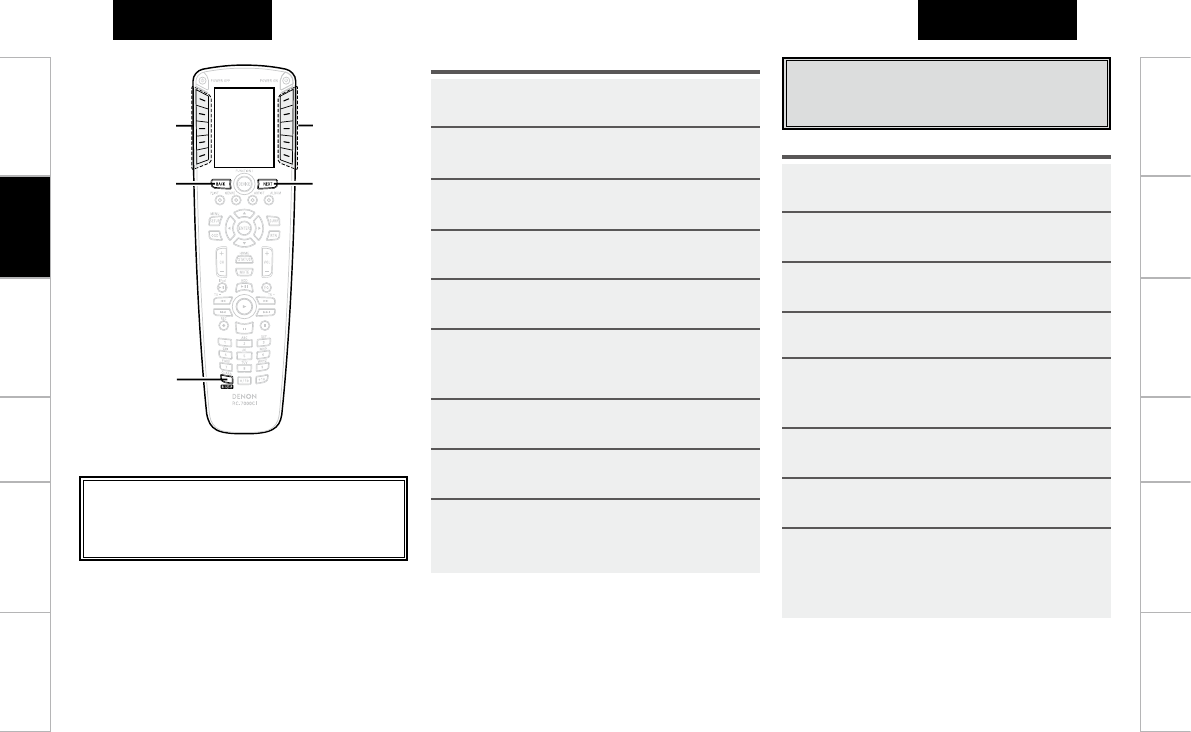
Getting Started Operation Network
function
Troubleshooting Specifications
Getting Started Network
function
Troubleshooting Specifications
ENGLISH ENGLISH
PCアプリ
PCアプリ
NEXTBACK
RC SETUP
LCDボタン LCDボタン
Moving or swapping devices
Editing devices
Devices registered in the remote control unit can be
moved, copied and inserted.
1 Press RC SETUP for 3 seconds.
The “PROGRAM DEVICE” menu is displayed.
2 Press NEXT, then press [EDIT DEVICE].
3 Press [MOVE/SWAP].
4 Press NEXT.
5 At the “Source Device” screen, press the
LCD button for the device you want to
move.
6 Press NEXT.
7 Press the LCD button for the target
destination or the device to be substituted.
8 Press [YES].
The device is moved.
b When [NO] is pressed, the setting menu reappears. To
continue, press [YES].
1 Press RC SETUP for 3 seconds.
The “PROGRAM DEVICE” menu is displayed.
2 Press NEXT, then press [EDIT PAGE].
3 Press [DELETE PAGE].
4 Press NEXT.
5 Press [MAIN] or [DEVICE].
6 Press [MAIN] to delete a page from the
device select menu, [DEVICE] to delete a
device page.
7 Press [SELECT PAGE].
8 Select the page to be deleted using NEXT
and BACK, then press [SELECT PAGE].
7 Press [YES].
The page is delete.
b Press NEXT to return to the setting menu.
Deleting pages
Operation
LCD buttonLCD button
About the button names in these explanations
[ ] : LCD buttons for selection items
Button name only:
Indicates a button on the remote control unit
Getting Started Network
function
Troubleshooting Specifications
Getting Started Operation Network
function
Troubleshooting Specifications
ENGLISH ENGLISH
PCアプリ
PCアプリ
Copying devices
1 Press RC SETUP for 3 seconds.
The “PROGRAM DEVICE” menu is displayed.
2 Press NEXT, then press [EDIT DEVICE].
3 Press [COPY].
4 Press NEXT.
5 At the “Source Device” screen, press the
LCD button for the device you want to
copy.
6 Press NEXT.
7 At the “Target Device” screen, press the
LCD button for the place you want to copy.
The device at the copy destination is cleared and the
device is copied.
8 Press [YES].
The device is moved.
b When [NO] is pressed, the setting menu reappears. To
continue, press [YES].
Deleting devices
1 Press RC SETUP for 3 seconds.
The “PROGRAM DEVICE” menu is displayed.
2 Press NEXT, then press [EDIT DEVICE].
3 Press [ERASE].
4 Press NEXT.
5 At the “Select Device” screen, press the LCD
button for the device you want to insert.
b Press one of the following:
[LEAVE EMPTY] :
The device is deleted.
[SHIFT ALL UP] :
The device is deleted and the other devices are all shifted
up, filling in the space of the deleted device.
6 Press [YES].
The device is deleted.
b When [NO] is pressed, the setting menu reappears. To
continue, press [YES].
Inserting devices
1 Press RC SETUP for 3 seconds.
The “PROGRAM DEVICE” menu is displayed.
2 Press NEXT, then press [EDIT DEVICE].
3 Press [MOVE/INSERT].
4 Press NEXT.
5 At the “Source Device” screen, press the
LCD button for the device you want to
move.
6 Press NEXT.
7 “Target Device”画面にて、挿入した
い場所のLCDボタンを押す。
8 Press [YES].
The device is moved.
b When [NO] is pressed, the setting menu reappears. To
continue, press [YES].
Operation
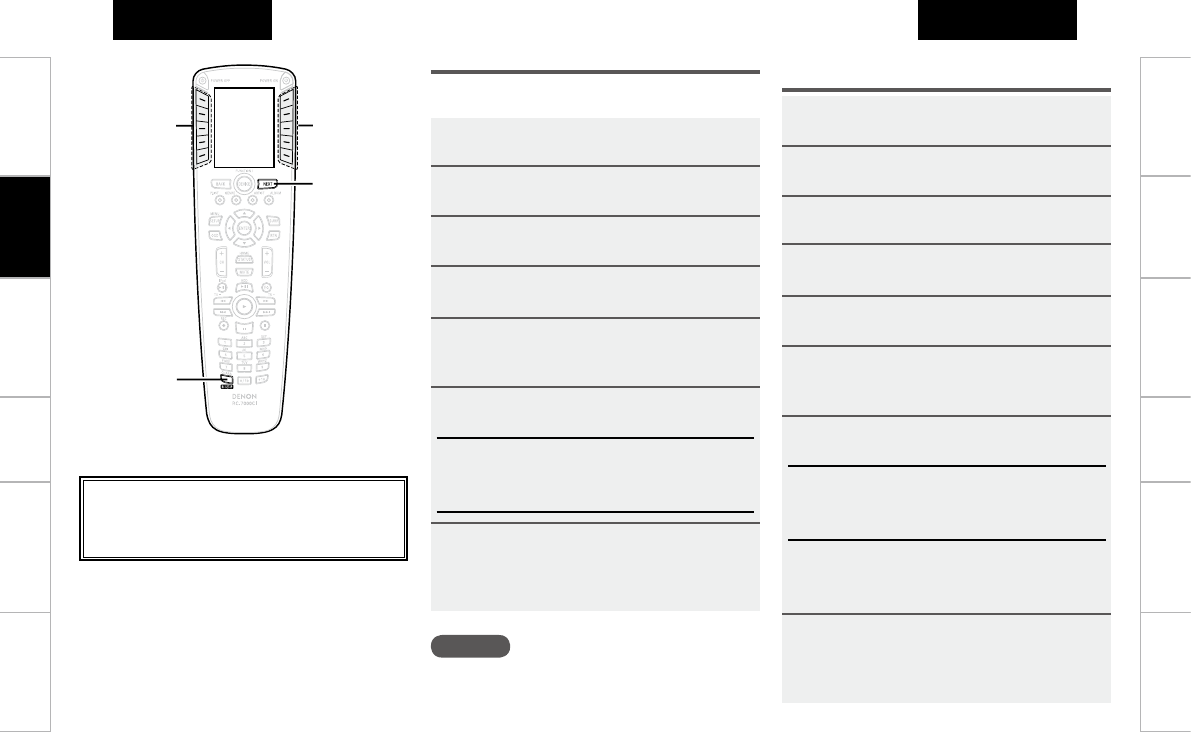
Getting Started Operation Network
function
Troubleshooting Specifications
Getting Started Network
function
Troubleshooting Specifications
ENGLISH ENGLISH
PCアプリ
PCアプリ
NEXT
RC SETUP
LCDボタン LCDボタン
1 Press RC SETUP for 3 seconds.
The “PROGRAM DEVICE” menu is displayed.
2 Press NEXT, then press [EDIT DEVICE].
3 Press NEXT.
4 Press [IR/RF].
5 Press NEXT.
6 At the “Select Device” screen, press the LCD
button for the device whose transmission
mode you want to change.
7 Press [IR] or [RF], then press [YES].
[IR] :
The codes are sent as infrared signals.
[RF] :
The codes are sent as radio waves.
b When [RF] is selected, the RC-7001RCI (sold separately)
node number is displayed. Select and press [YES].
b The setting at “Adding nodes” (vpage 23) must be
made in order to add [RF].
8 Press [YES].
The transmission mode is set.
b When [NO] is pressed, the setting menu reappears. To
continue, press [YES].
1 Press RC SETUP for 3 seconds.
The “PROGRAM DEVICE” menu is displayed.
2 Press NEXT, then press [EDIT DEVICE].
3 Press [DISPLAY MODE].
4 Press NEXT.
5 At the “Select Device” screen, press the LCD
button for the device whose display mode
you want to change.
6 Press [COLUMN MODE] or [ROW MODE].
[COLUMN MODE] :
The devices are displayed two per row.
[ROW MODE] :
The devices are displayed one per row.
7 Press [YES].
The display mode is set.
b When [NO] is pressed, the setting menu reappears. To
continue, press [YES].
Setting the device display mode
Use this procedure to select the way in which the devices are
displayed.
Setting the remote control code transmission
mode
Operation
LCD buttonLCD button
About the button names in these explanations
[ ] : LCD buttons for selection items
Button name only:
Indicates a button on the remote control unit
ご注意
ディスプレーモードはデバイス(機器)には設定さ
れません。LCD ボタンの位置に対して設定されます。
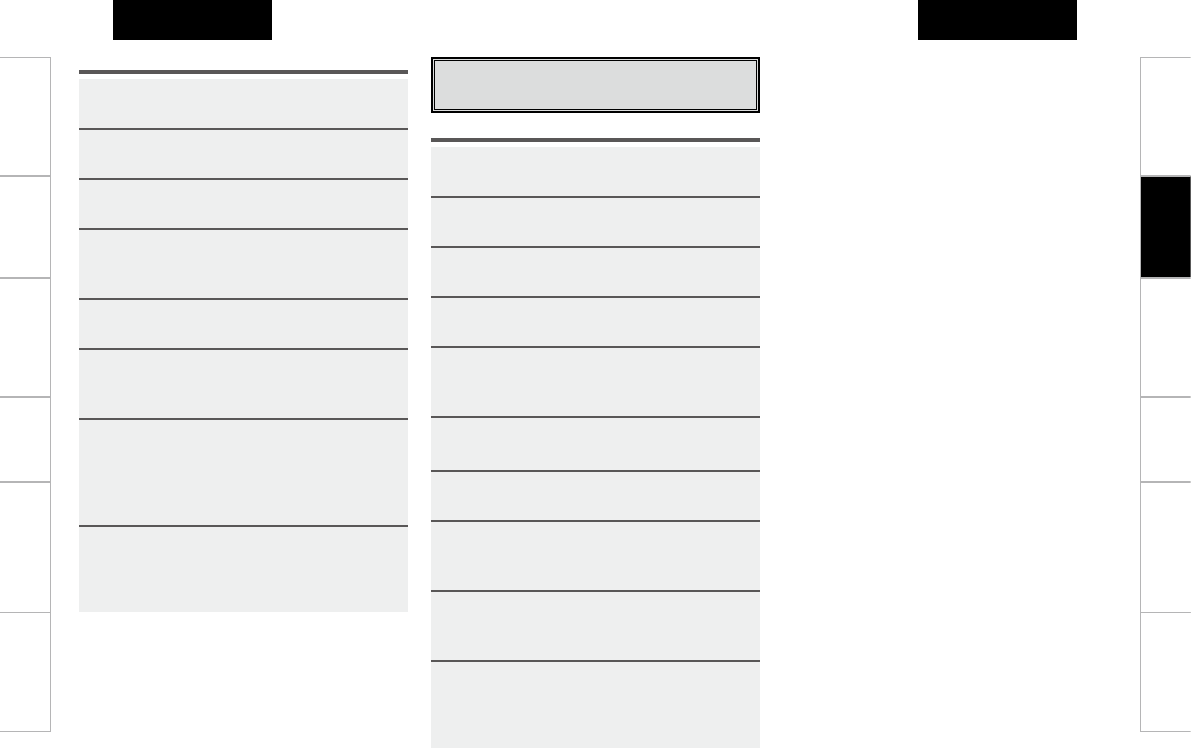
Getting Started Network
function
Troubleshooting Specifications
Getting Started Operation Network
function
Troubleshooting Specifications
ENGLISH ENGLISH
PCアプリ
PCアプリ
1 Press RC SETUP for 3 seconds.
The “PROGRAM DEVICE” menu is displayed.
2 Press NEXT, then press [EDIT FUNC].
3 Press [MOVE/SWAP].
4 Press NEXT.
5 At the “Source Device” screen, press the
LCD button for the device you want to
move.
6 “SelectKey”画面にて、移動したいボ
タンのLCDボタンを押す。
7 Press NEXT.
8 At the “Target Device” screen, press the
LCD button to where you want to move the
device or which you want to swap.
9 At the “Select key” screen, press the LCD
button for the move destination or which
you want to swap.
10
Press [YES].
The button moves or is replaced.
b When [NO] is pressed, the setting menu reappears. To
continue, press [YES].
Editing buttons
Use this procedure to move, copy and insert buttons.
Moving or swapping buttons
1 Press RC SETUP for 3 seconds.
The “PROGRAM DEVICE” menu is displayed.
2 Press NEXT, then press [EDIT TEXT].
3 Press [DEVICE NAME].
4 At the “Select Device” screen, press the LCD
button for the device whose name you want
to change.
5 Press NEXT.
6 At the “Edit Text” screen, use the rst
column of LCD buttons to select the position
of the character to be edited.
7 Select the character to be input with the
second column of LCD buttons, then press
[SELECT].
b Lower case letters are input when [CAPS] is displayed,
capital letters when [lower] is displayed.
8Press [SAVE].
b When [NO] is pressed, the setting menu reappears. To
continue, press [YES].
Changing the device name
Operation
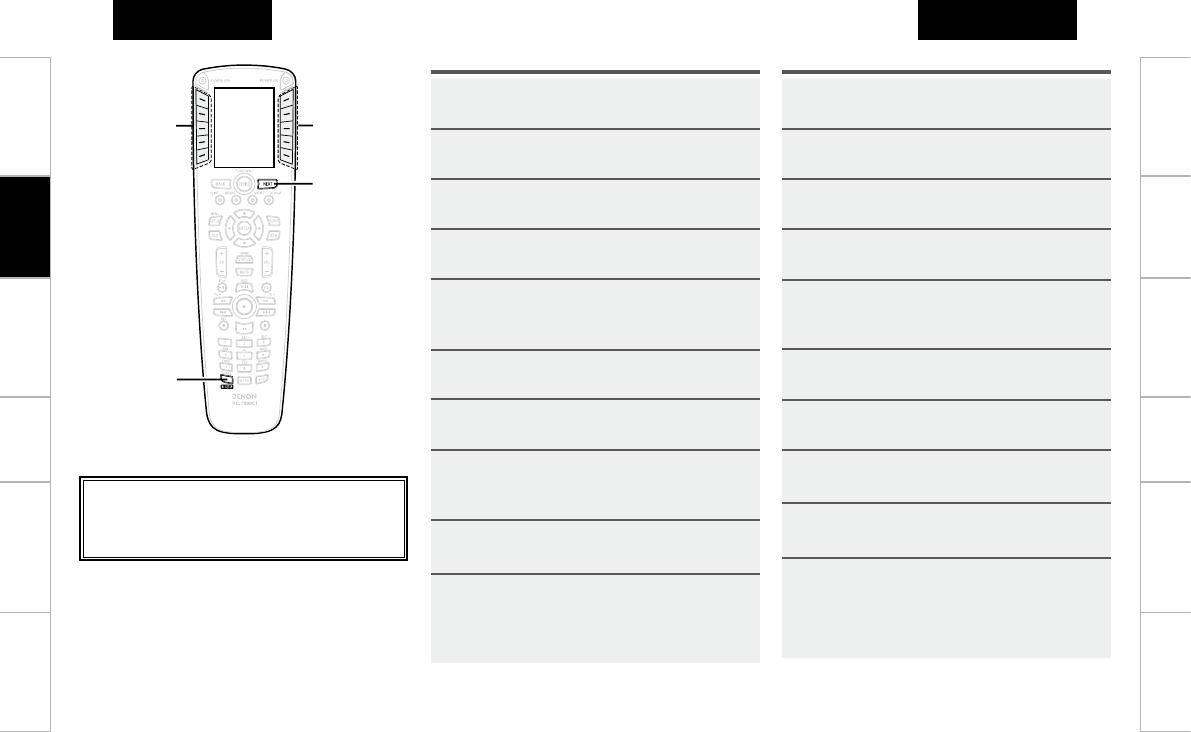
Getting Started Operation Network
function
Troubleshooting Specifications
Getting Started Network
function
Troubleshooting Specifications
ENGLISH ENGLISH
PCアプリ
PCアプリ
NEXT
RC SETUP
LCDボタン LCDボタン
1 Press RC SETUP for 3 seconds.
The “PROGRAM DEVICE” menu is displayed.
2 Press NEXT, then press [EDIT FUNC].
3 Press [COPY].
4 Press NEXT.
5 At the “Source Device” screen, press the
LCD button for the device of the button you
want to copy.
6 At the “Select key” screen, press the LCD
button for the button you want to copy.
7 Press NEXT.
8 “Target Device”画面にて、コピー先
のデバイスのLCDボタンを押す。
9 “Select key”画面にて、コピー先の場
所のLCDボタンを押す。
10
Press [YES].
The button is copied.
b When [NO] is pressed, the setting menu reappears. To
continue, press [YES].
Copying buttons
1 Press RC SETUP for 3 seconds.
The “PROGRAM DEVICE” menu is displayed.
2 Press NEXT, then press [EDIT FUNC].
3 Press [MOVE/INSERT].
4 Press NEXT.
5 At the “Source Device” screen, press the
LCD button for the device you want to
move.
6 At the “Select key” screen, press the LCD
button for the device you want to move.
7 Press NEXT.
8 At the “Target Device” screen, press the
LCD button for the device of the button for
the place to be inserted.
9 “Select key”画面にて、挿入先の場所
のLCDボタンを押す。
10
Press [YES].
The button is inserted.
b When [NO] is pressed, the setting menu reappears. To
continue, press [YES].
Inserting buttons
Operation
LCD buttonLCD button
About the button names in these explanations
[ ] : LCD buttons for selection items
Button name only:
Indicates a button on the remote control unit
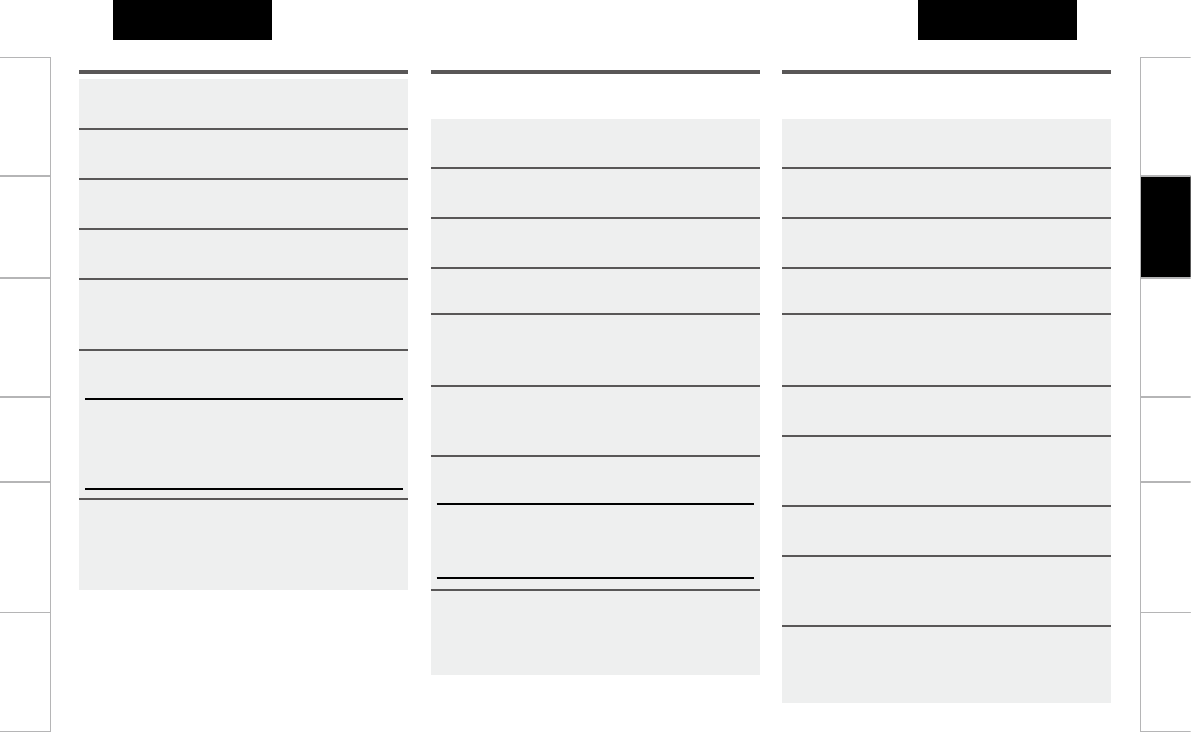
Getting Started Network
function
Troubleshooting Specifications
Getting Started Operation Network
function
Troubleshooting Specifications
ENGLISH ENGLISH
PCアプリ
PCアプリ
1 Press RC SETUP for 3 seconds.
The “PROGRAM DEVICE” menu is displayed.
2 Press NEXT, then press [EDIT FUNC].
3 Press NEXT, then press [ADD IR].
4 Press NEXT.
5 At the “Source Device” screen, press the
LCD button for the device you want to
add.
6 Press NEXT.
7 At the “ADD IR” screen, press the LCD
button for the function of the button you
want to add.
8 Press NEXT.
9 At the “Select key” screen, press the LCD
button for the position of the button you
want to add.
10
Press [TEST KEY], and if the operation has
been performed press [YES].
b Press [YES] to add more buttons.
Adding buttons
When new buttons are added, it is possible to select and add
new functions.
1 Press RC SETUP for 3 seconds.
The “PROGRAM DEVICE” menu is displayed.
2 Press NEXT, then press [EDIT FUNC].
3 Press [DISPLAY MODE].
4 Press NEXT.
5 At the “Select Device” screen, press the LCD
button for the device of the button whose
display mode you want to change.
6 At the “Select key” screen, press the LCD
button for the button whose display mode
you want to change.
7 Press [COLUMN MODE] or [ROW MODE].
[COLUMN MODE] :
The buttons are displayed two per row.
[ROW MODE] :
The buttons are displayed one per row.
8 Press NEXT.
The display mode is set.
b When [NO] is pressed, the setting menu reappears. To
continue, press [YES].
Setting the button display mode
Use this procedure to select the way in which the buttons are
displayed.
1 Press RC SETUP for 3 seconds.
The “PROGRAM DEVICE” menu is displayed.
2 Press NEXT, then press [EDIT FUNC].
3 Press [ERASE].
4 Press NEXT.
5 At the “Source Device” screen, press the
LCD button for the device you want to
delete.
6 At the “Select key” screen, press the LCD
button for the device you want to delete.
[LEAVE EMPTY] :
The button is deleted.
[SHIFT ALL UP] :
The button is deleted and the other buttons are all shifted up,
filling in the space of the deleted button.
7 Press [YES].
The button is deleted.
b When [NO] is pressed, the setting menu reappears. To
continue, press [YES].
Deleting buttons
Operation
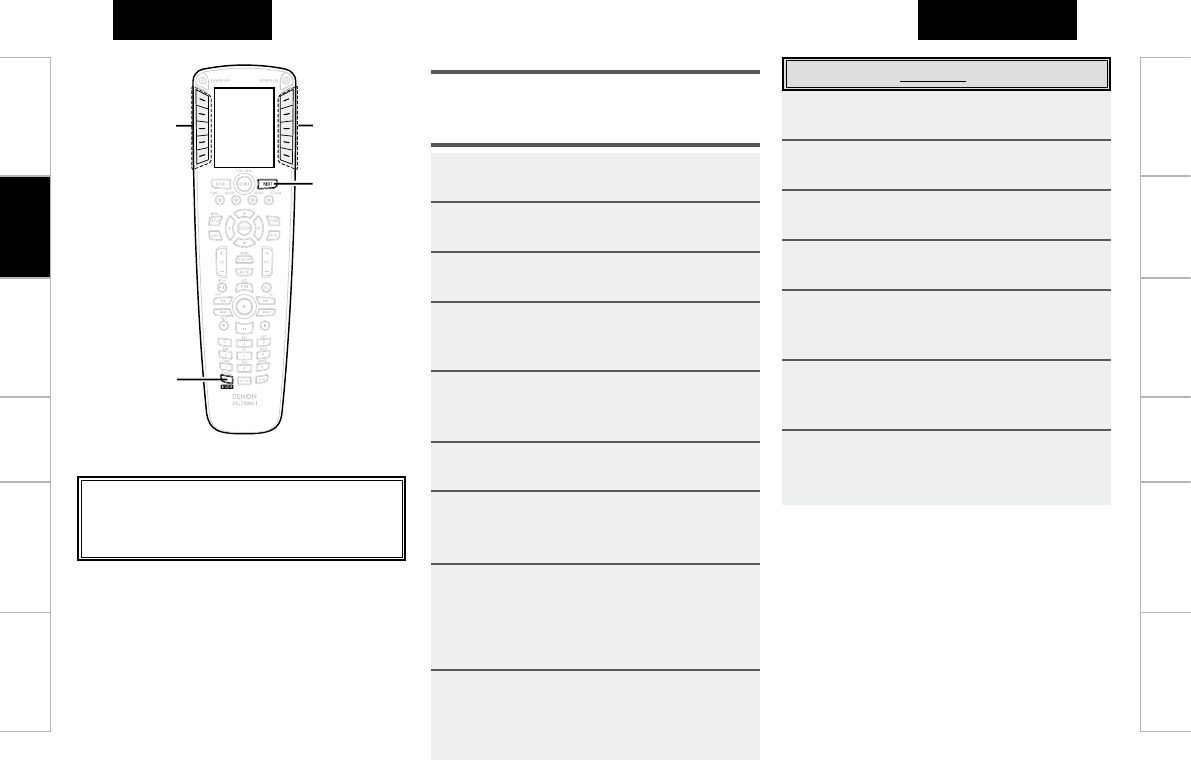
Getting Started Operation Network
function
Troubleshooting Specifications
Getting Started Network
function
Troubleshooting Specifications
ENGLISH ENGLISH
PCアプリ
PCアプリ
NEXT
RC SETUP
LCDボタン LCDボタン
Resetting the learning function
1 Press RC SETUP for 3 seconds.
The “PROGRAM DEVICE” menu is displayed.
2 Press [LEARNING].
3 Press [ERASE LEARN].
4 Press NEXT twice.
5 At the “Source Device” screen, press the
LCD button for the device you want to
delete.
6 At the “Erase Learn” screen, press the LCD
button for the learning function you want
to erase.
7 To delete, press [YES].
If you do not want to delete, press [NO].
b Press [NO] to end, [YES] to continue.
Changing the button name
1 Press RC SETUP for 3 seconds.
The “PROGRAM DEVICE” menu is displayed.
2 Press NEXT, then press [EDIT TEXT].
3 Press [KEY NAME].
4 At the “Select Device” screen, press the LCD
button for the device whose button name
you want to change.
5 At the “Select key” screen, select the LCD
button for the button whose button name
you want to change.
6 Press NEXT.
7 At the “Edit Text” screen, use the rst
column of LCD buttons to select the position
of the character to be edited.
8 Select the character to be input with the
second column of LCD buttons, then press
[SELECT].
b Lower case letters are input when [CAPS] is displayed,
capital letters when [lower] is displayed.
9 Press [SAVE].
b When [NO] is pressed, the setting menu reappears. To
continue, press [YES].
Adding a synthesizer button
This is a function for system expansion in the future.
Operation
LCD buttonLCD button
About the button names in these explanations
[ ] : LCD buttons for selection items
Button name only:
Indicates a button on the remote control unit
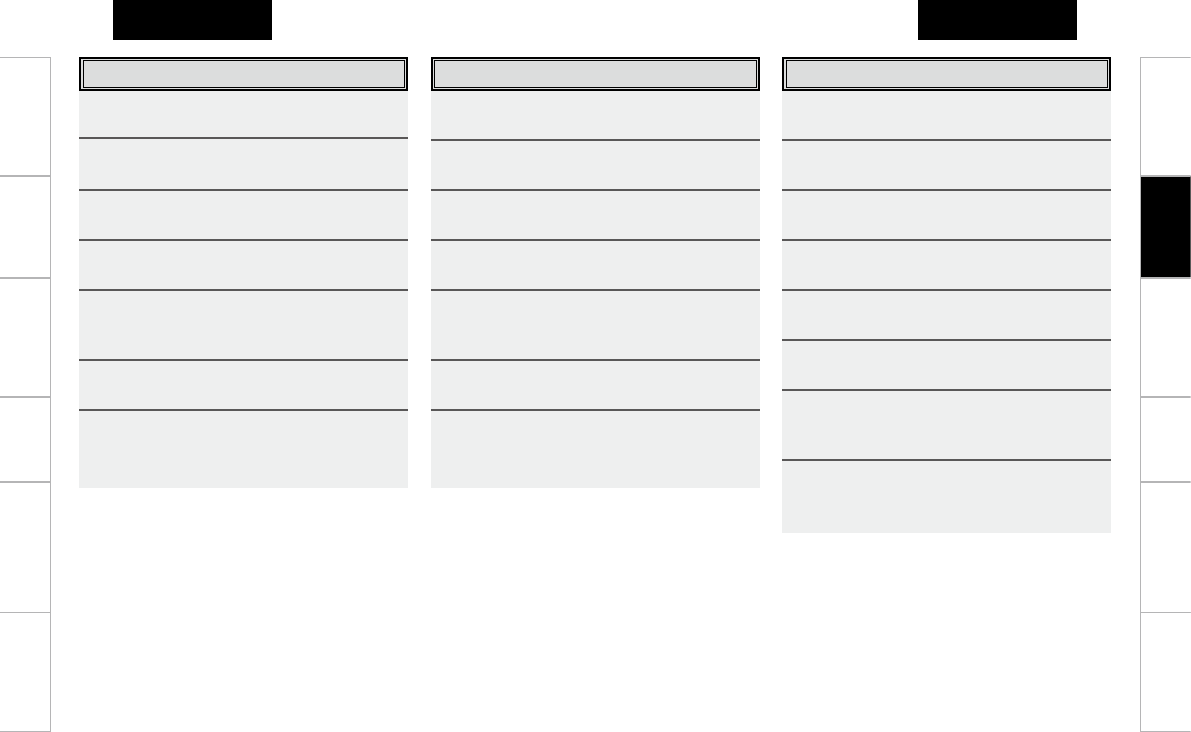
Getting Started Network
function
Troubleshooting Specifications
Getting Started Operation Network
function
Troubleshooting Specifications
ENGLISH ENGLISH
PCアプリ
PCアプリ
Deleting favorites
1 Press RC SETUP for 3 seconds.
The “PROGRAM DEVICE” menu is displayed.
2 Press [FAVORITES].
3 Press [DELETE].
4 Press NEXT twice.
5 At the “Source Device” screen, press the
LCD button for the device you want to
delete.
6 At the “Select key” screen, press the LCD
button for the device you want to delete.
7 To delete, press [YES].
If you do not want to delete, press [NO].
b Press [NO] to end, [YES] to continue.
Resetting the punch through function
1 Press RC SETUP for 3 seconds.
The “PROGRAM DEVICE” menu is displayed.
2 Press [PUNCH THRU].
3 Press [CLEAR].
4 Press NEXT.
5 At the “Punch Thru” screen, press the LCD
button for the group you want to delete.
6 Press NEXT.
7 At the “Select Device” screen, press the LCD
button for the device whose punch through
setting you want to delete.
8 Press NEXT.
b Press NEXT to return to the settings menu.
Resetting the macro function
1 Press RC SETUP for 3 seconds.
The “PROGRAM DEVICE” menu is displayed.
2 Press [MACROS].
3 Press [DELETE].
4 Press NEXT twice.
5 At the “Source Device” screen, press the
LCD button for the device whose macro you
want to delete.
6 At the “Select Key” screen, press the LCD
button for the macro you want to delete.
7 To delete, press [YES].
If you do not want to delete, press [NO].
b Press [NO] to end, [YES] to continue.
Operation
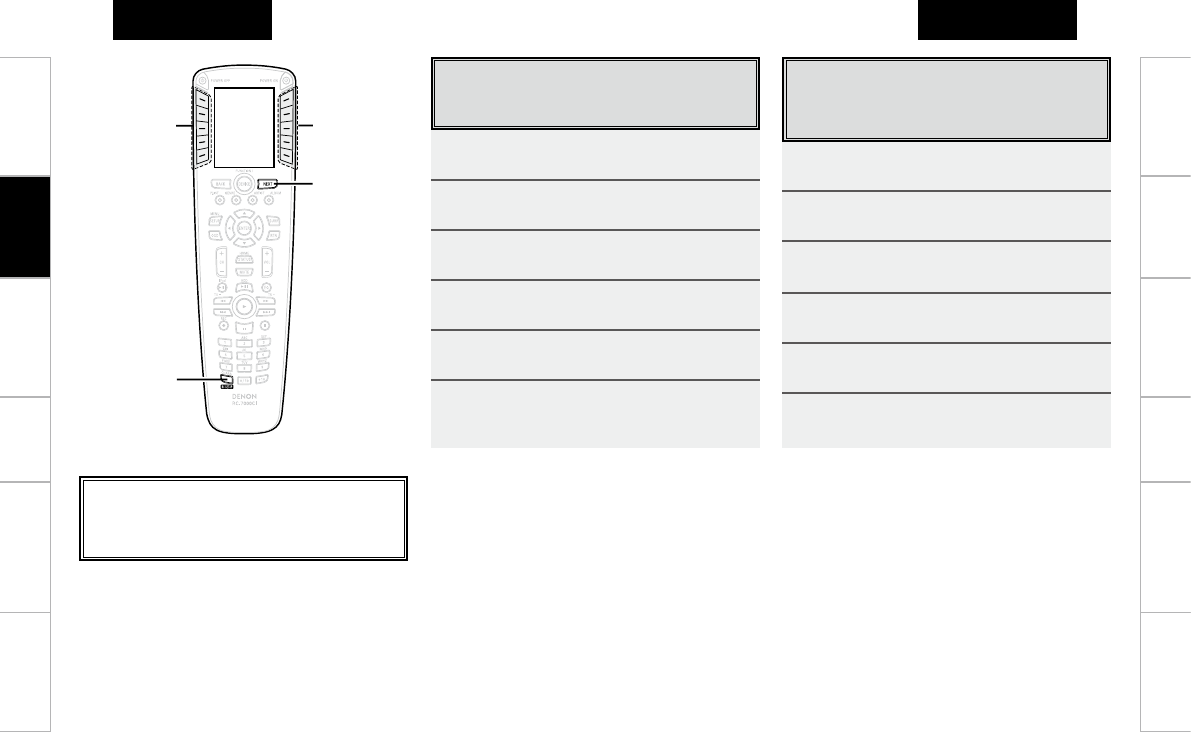
Getting Started Operation Network
function
Troubleshooting Specifications
Getting Started Network
function
Troubleshooting Specifications
ENGLISH ENGLISH
0 0
PCアプリ
PCアプリ
NEXT
RC SETUP
LCDボタン LCDボタン
1 Press RC SETUP for 3 seconds.
The “PROGRAM DEVICE” menu is displayed.
2 Press NEXT, then press [RESET/LOCK].
3 Press [USER RESET].
4 Press NEXT.
5 Press [YES].
6 Press NEXT twice.
The settings are reset.
User reset
This procedure deletes the macro settings added by
the user and the remote control codes that have been
learned. It does not delete added devices.
1 Press RC SETUP for 3 seconds.
The “PROGRAM DEVICE” menu is displayed.
2 Press NEXT, then press [RESET/LOCK].
3 Press [OP RESET].
4 Press NEXT.
5 Press [YES].
6 Press NEXT twice.
The settings are returned to as they were upon
purchase.
Operational reset
The settings are returned to as they were upon
purchase.
Operation
LCD buttonLCD button
About the button names in these explanations
[ ] : LCD buttons for selection items
Button name only:
Indicates a button on the remote control unit

Getting Started Network
function
Troubleshooting Specifications
Getting Started Operation Network
function
Troubleshooting Specifications
ENGLISH ENGLISH
PCアプリ
PCアプリ
1 Press RC SETUP for 3 seconds.
The “PROGRAM DEVICE” menu is displayed.
2 Press NEXT twice, then press [RESET/
LOCK].
3 Press [LOCK].
4 Press NEXT twice.
5 At the “Select Device” screen, press the LCD
button for the device you want to lock.
6 Press [YES].
b When [NO] is pressed, the setting menu reappears. To
continue, press [YES].
1 Press RC SETUP for 3 seconds.
The “PROGRAM DEVICE” menu is displayed.
2 Press NEXT twice, then press [RESET/
LOCK].
3 Press [UNLOCK].
4 Press NEXT twice.
5 At the “Select Device” screen, press the LCD
button for the device you want to unlock
6 Press [YES].
b When [NO] is pressed, the setting menu reappears. To
continue, press [YES].
Operation
Lock function
When locked, device editing is not possible.
Unlock function
This procedure unlocks devices that have been locked.
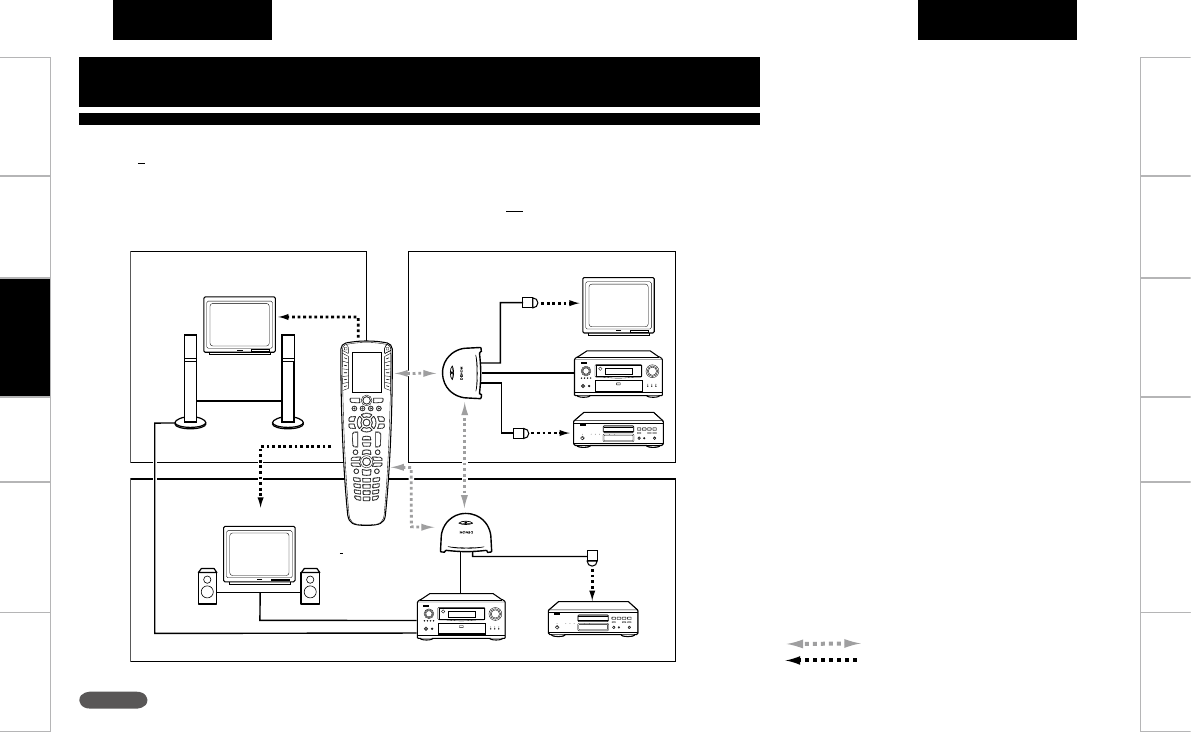
Getting Started Operation Network
function
Troubleshooting Specifications
Getting Started Operation Troubleshooting Specifications
ENGLISH ENGLISH
PCアプリ
PCアプリ
This functions uses the RC-7001RCI (sold separately).
When a wireless (RF) network is established using the RC-7001RCI (sold separately), the RC-7001RCI is called a node. An
individual node number is registered for each RC-7001RCI unit. When registering devices with the RC-7001RCI, once the RF
transmission settings are made, when a button on a device for which the node number is set is pressed, the remote control
signals are sent (wireless) and received by the RC-7001RCI corresponding to the node number of the transmission target.
Monitor
Monitor
Monitor
AV amplifier
DVD player
AV amplifier DVD player
FLFR
FLFR
Repeater 1
(RC-7001RCI, sold
separately)
Repeater 2
(RC-7001RCI,
sold separately)
Remote control
(RC-7000CI)
: RF (Two-way communications)
: IR (Infrared communications)
Network function
NOTE
If used near a microwave oven, wireless transmission performance may be adversely affected. If so, move about 5 meters
away.
Network
function
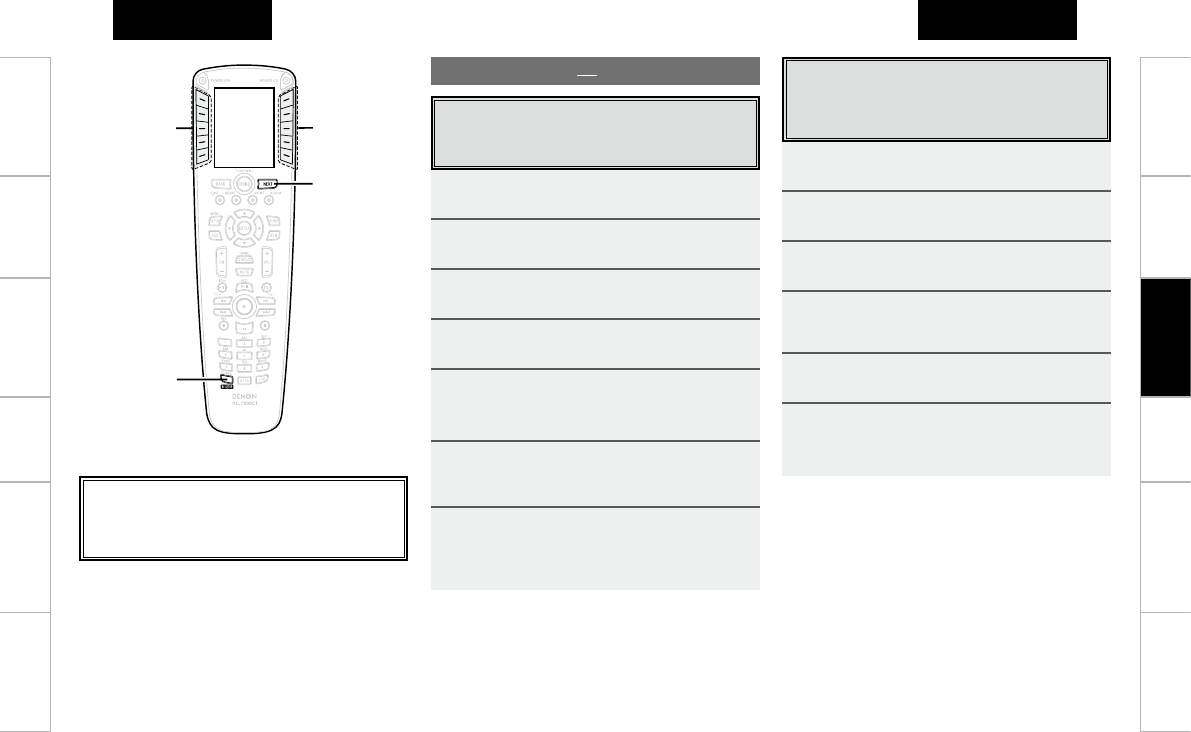
Getting Started Operation Troubleshooting Specifications
Getting Started Operation Network
function
Troubleshooting Specifications
ENGLISH ENGLISH
PCアプリ
PCアプリ
NEXT
RC SETUP
LCDボタン LCDボタン
Operations using nodes
Adding nodes
Use this procedure to register a node number and add an
RC-7001RCI (sold separately) to the network.
1 Press RC SETUP for 3 seconds.
The “PROGRAM DEVICE” menu is displayed.
2 Press NEXT twice, then press [NETWORK].
3 Press [ADD NODES].
4 Press NEXT.
5 To add the remote control unit to the
network, press [REMOTE].
b To add an RC-7001RCI (sold separately), press [OTHER].
6 Press RESET/CONFIG on the RC-7001RCI
(sold separately) for about 1 second.
The green indicator flashes.
7 Press NEXT twice.
“Success!” is displayed when the device has been
added successfully.
b Press NEXT to return to the settings menu.
1 Press RC SETUP for 3 seconds.
The “PROGRAM DEVICE” menu is displayed.
2 Press NEXT twice, then press [NETWORK].
3 Press [DELETE NODES].
4 Press NEXT twice.
The RC-7001RCI’s (sold separately) node number is
displayed.
5 Select the node number to be deleted, then
press [YES].
4 Press NEXT.
b Press [NO] to end, [YES] to continue.
Deleting nodes
Use this procedure to delete RC-7001RCI (sold
separately) units by specifying the node number from
the current network.
Network
function
LCD buttonLCD button
About the button names in these explanations
[ ] : LCD buttons for selection items
Button name only:
Indicates a button on the remote control unit
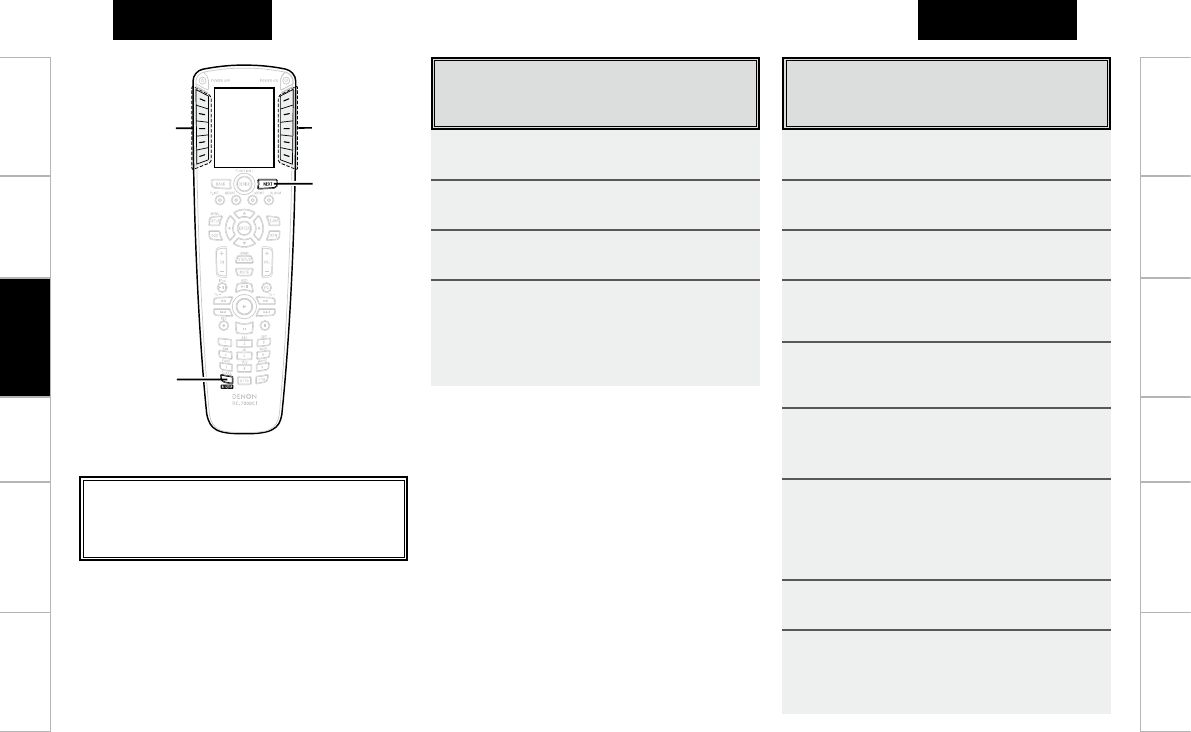
Getting Started Operation Network
function
Troubleshooting Specifications
Getting Started Operation Troubleshooting Specifications
ENGLISH ENGLISH
PCアプリ
PCアプリ
1 Press RC SETUP for 3 seconds.
The “PROGRAM DEVICE” menu is displayed.
2 Press NEXT twice, then press [NETWORK].
3 Press [EDIT LABEL].
4 Press NEXT twice.
The RC-7001RCI’s (sold separately) node number is
displayed.
5 Select the node number to be changed, then
press NEXT.
The edit screen for the selected node appears.
6 At the “Edit Text” screen, use the rst
column of LCD buttons to select the position
of the character to be edited.
7 Select the character to be input with the
second column of LCD buttons, then press
[SELECT].
b Lower case letters are input when [CAPS] is displayed,
capital letters when [lower] is displayed.
8 Press [SAVE].
9 Press NEXT.
b When [NO] is pressed, the setting menu reappears. To
continue, press [YES].
Changing node labels
Use this procedure to add labels to RC-7001RCIs (sold
separately) for easier distinction.
1 Press RC SETUP for 3 seconds.
The “PROGRAM DEVICE” menu is displayed.
2 Press NEXT twice, then press [NETWORK].
3 Press [VIEW NODES].
4 Press NEXT twice.
The node numbers of the RC-7001RCIs (sold separately)
registered on the network are indicated with an z mark
after them.
b Press NEXT twice to return to the settings menu.
Viewing nodes
Use this procedure to search for and display a list of RC-
7001RCIs (sold separately) registered in the network.
NEXT
RC SETUP
LCDボタン LCDボタン
About the button names in these explanations
[ ] : LCD buttons for selection items
Button name only:
Indicates a button on the remote control unit
Network
function
LCD buttonLCD button
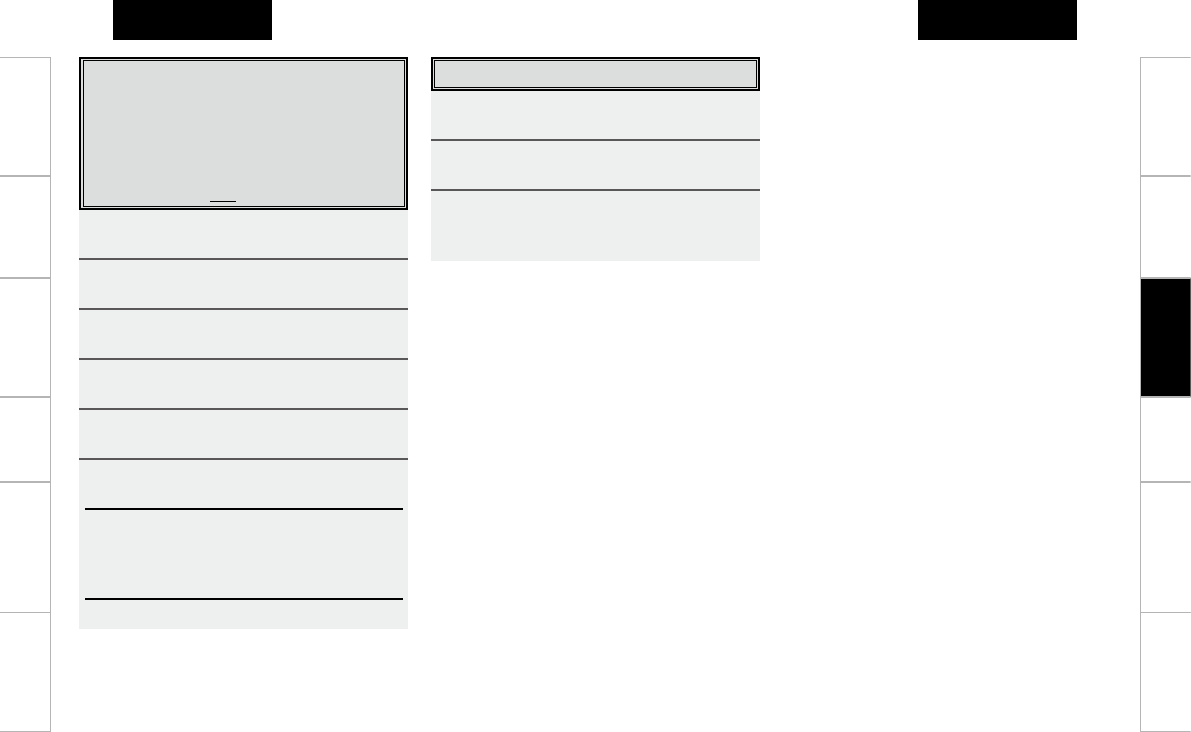
Getting Started Operation Troubleshooting Specifications
Getting Started Operation Network
function
Troubleshooting Specifications
ENGLISH ENGLISH
PCアプリ
PCアプリ
Setting the receiver display mode
(RDM)
This setting is made for conducting two-way
communications between the RC-7001RCI (sold
separately) and compatible DENON products. The status
information of the compatible DENON product can
be displayed on the set's screen. Set the position for
insertion of the RDM page.
1 Press RC SETUP for 3 seconds.
The “PROGRAM DEVICE” menu is displayed.
2 Press NEXT twice, then press [USER
PREF].
3 Press [RDM].
4 Press NEXT.
5 Press [YES].
6 Use [FIRST] and [LAST] to set the position
to which the RDM page is to be added.
[FIRST] :
The RDM page is added at the top of the normal button
screen.
[ROW MODE] :
The RDM page is added at the end.
b Press NEXT to return to the settings menu.
1 Press RC SETUP for 3 seconds.
The “PROGRAM DEVICE” menu is displayed.
2 Press NEXT twice, then press [USER
PREF].
3 Press [VERSION INFO].
The LCD button version information is displayed.
b Press NEXT to return to the settings menu.
Checking the remote control unit version
Network
function
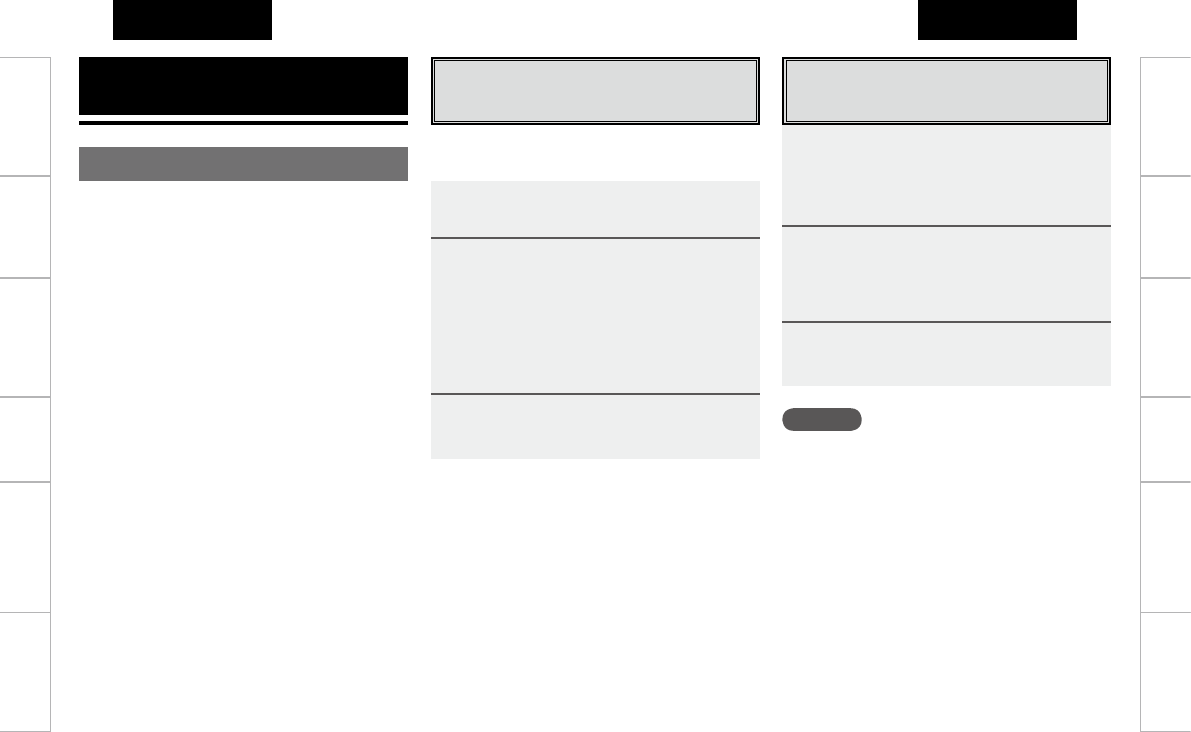
Getting Started Operation Network
function
Troubleshooting Specifications
Getting Started Operation Network
function
Troubleshooting Specifications
ENGLISH ENGLISH
PCアプリ
PCアプリ
ご注意
• RC-7000CI Editor を使用して、データのアップ
ロードまたはダウンロード中のときは、下記の操
作は絶対におこなわないでください。本機やパソ
コンが故障することがあります。
• USBケーブルを外す
• パソコンの電源を切る
• 本機の電池を抜く
RC-7000CI Editor をイン
ストールする
はじめに付属のUSBケーブルを使用してRC-
7000CIとパソコンを接続しておきます。
1付属の CD-ROM (RC-7000CIEditor)
をパソコンにセットする。
2“マイコンピュータ” の CD-ROM ドライ
ブを開き“RC-7000CIEditor.exe” を
起動する。
b
インストールウイザード画面が表示されますので、画
面の指示に従いインストールを実施します。
b
インストールが実行された後、“完了した”という
ダイアログが表示されます。
3“完了”をクリックするとインストールが完
了し、アプリケーションが起動します。
RC-7000CI Editor の使い
かた
1アプリケーションを最初に使用すると
きは、NewUser をチェックしてから、
E-mailAddress、Password 等の必要
事項を入力して“OK”を押す。
2“マイコンピュータ” の CD-ROM ドライ
ブを開き“RC-7000CIEditor.exe” を
起動する。
「RC-7000CI Editor」が起動します。
3
ウイザードに従って操作します。
PC アプリ
RC-7000CI Editor の機能
n
「RC-7000CI Editor」を使うと、次のことが
できます
● RC-7000CI の設定データの編集
● RC-7000CI の設定データのパソコンへのバッ
クアップ
● リモコンコードデータベースのダウンロード
n
「RC-7000CI Editor」を使用するために必要
な推奨機器と環境
● Windows XP Service Pack2 の OS を搭載し
たパソコン
● 十分な空き容量のある HDD
● USB 2.0 接続端子
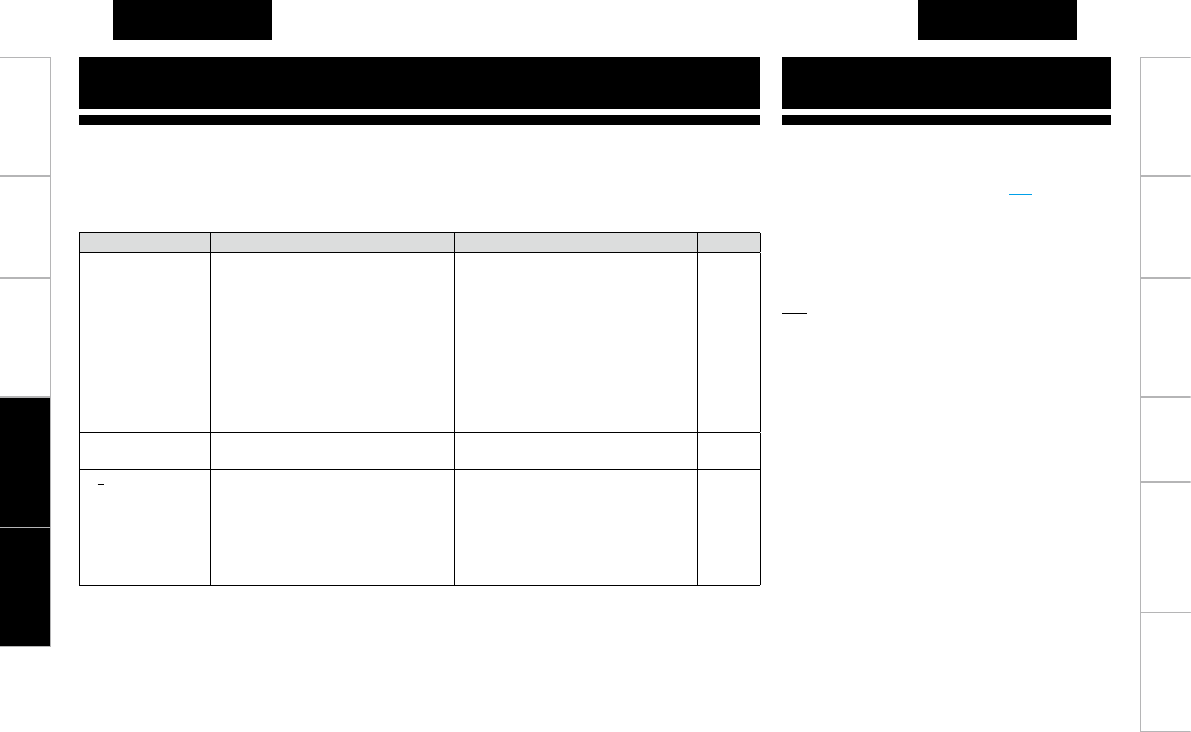
Getting Started Operation Network
function
Troubleshooting Specifications
Getting Started Operation Network
function
ENGLISH ENGLISH
PCアプリ
PCアプリ
Troubleshooting
1. If a problem should arise, first check the following:
2. Is the set being operated as described in the operating instructions ?
If this unit does not operate properly, check the items listed in the table below. Should the problem persist, there may be a
malfunction.
In this case, disconnect the power immediately and contact your store of purchase.
Symptom Cause Countermeasure Page
Set does not work
properly when remote
control unit operated.
• Batteries are worn.
• You are operating outside of the specified
range.
• Obstacle between main unit and remote
control unit.
• The batteries are not inserted in the proper
direction, as indicated by the polarity
marks in the battery compartment.
• The set’s remote control sensor is
exposed to strong light (direct sunlight,
inverter type fluorescent bulb light, etc.).
• Replace with new batteries.
• Operate within the specified range.
• Remove the obstacle.
• Insert the batteries in the proper direction,
following the polarity marks in the battery
compartment.
• Move the set to a place in which the
remote control sensor will not be exposed
to strong light.
1
2
2
2
2
Display screen does
not appear.
• Brightness setting is inappropriate. • Adjust the screen’s brightness at
“Adjusting the contrast”.
6
Wireless connections
with the RC-
7001RCI (sold
separately) cannot be
established.
• Change in wireless environment. • Press the RESET/CONFIG button for
about 12 seconds so the indicator lights
red.
Press the RESET/CONFIG button again
for about 5 seconds so the indicator lights
green. Next register the RC-7000CI (sold
separately) again.
–
Specifications
Batteries: R6P/AA Type (four batteries)
Battery service life:
Approx. 3 months (depending on usage frequency)
周波数: 2045 MHz ~ 2480 MHz (16 ch)、帯域幅
2 MHz
Radio frequencies:
2.4 GHz
変調方式: O-QPSK
拡散方式: DSSS
通信距離: 30 m(環境によって変わります。)
Maximum external dimensions:
63 (W) x 233 (H) x 28 (D) mm (2-31/64” x 9-11/64” x 1-7/64”)
Mass: 170 g (Approx 6.0 oz) (乾電池を含まず)
Troubleshooting Specifications

本 社 〒 104-0033東京都中央区新川 1-21-2
茅場町タワー14F
お客様相談センター TEL:045-670-5555
【電話番号はお間違えのないようにおかけください。】
受付時間 9:30 〜 12:00、12:45 〜 17:30
(弊社休日および祝日を除く、月〜金曜日)
故障・修理・サービス部品についてのお問い合わせ先(サービスセン
ター)については、次の URL でもご確認できます。
http://denon.jp/info/info02.html
Denon Brand Company, D&M Holdings Inc.
Printed in China 00D 511 4681 006
TOKYO, JAPAN
www.denon.com
購入店名: 電話( - - )
ご購入年月日: 年 月 日
後日のために記入しておいてください。