DATECS DATECSBTIOS Bluetooth Module User Manual DPP 250 UM EN Datecs
DATECS LTD. Bluetooth Module DPP 250 UM EN Datecs
UserManual.wiki
>
DATECS
>
DATECSBTIOS User Manual
>
User manual 1 of 2
Contents
1.
User manual 1 of 2
2.
User manual 2 of 2
User manual 1 of 2
Navigation menu
Upload a User Manual
Namespaces
Wiki Guide
HTML
PDF
Info
Views
User Manual
Discussion / Help
Navigation


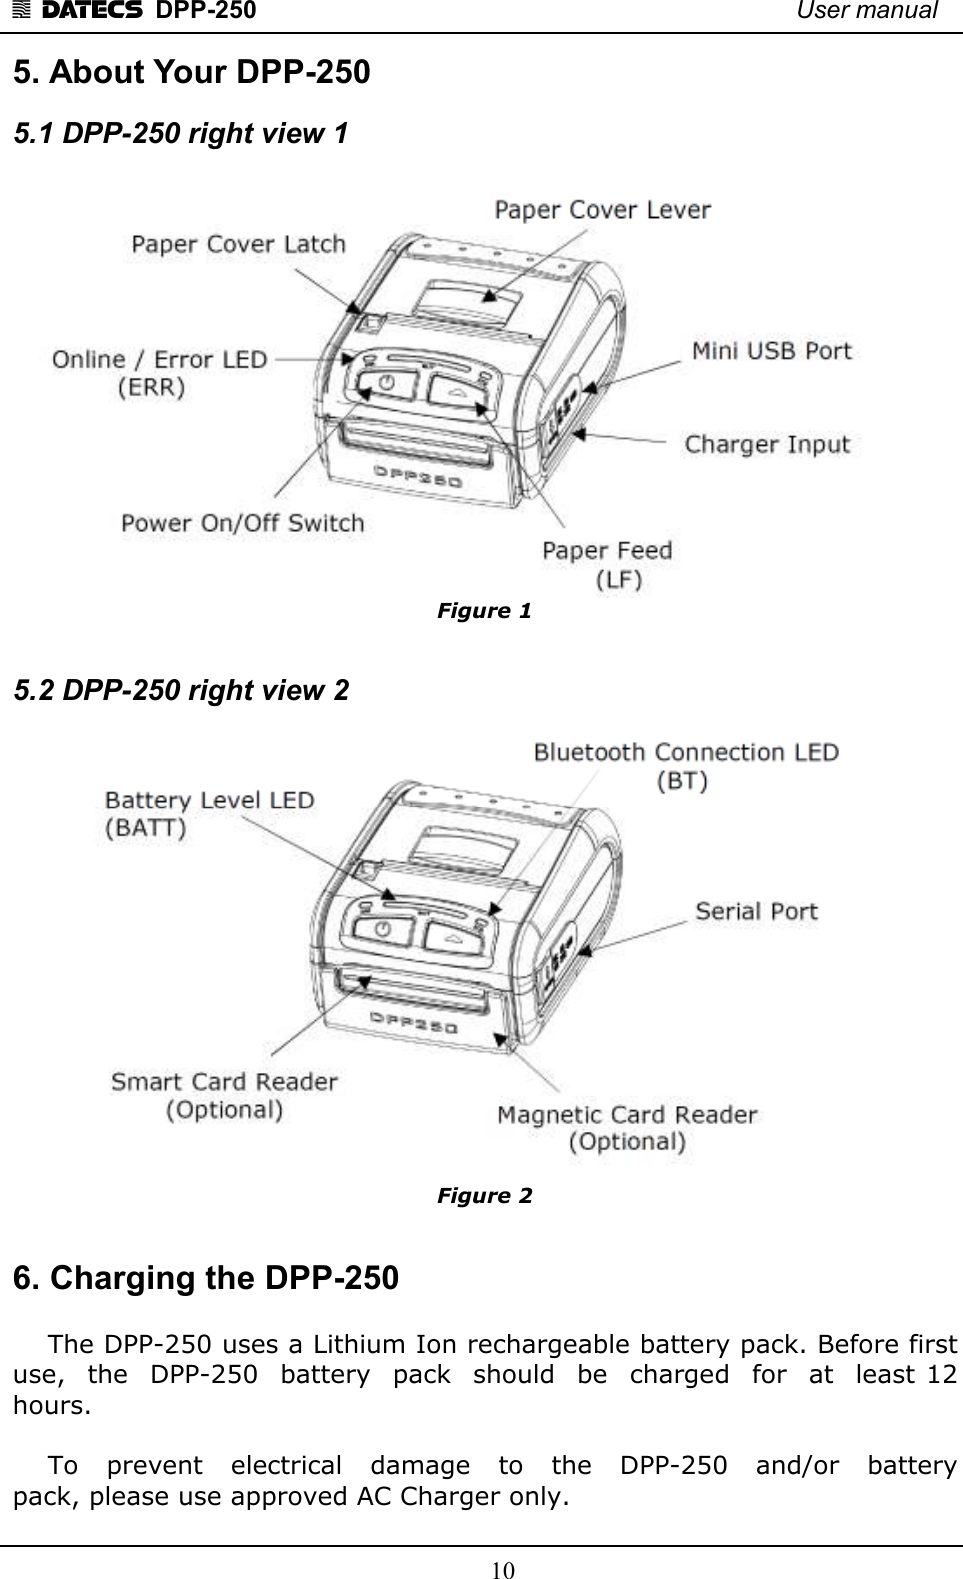
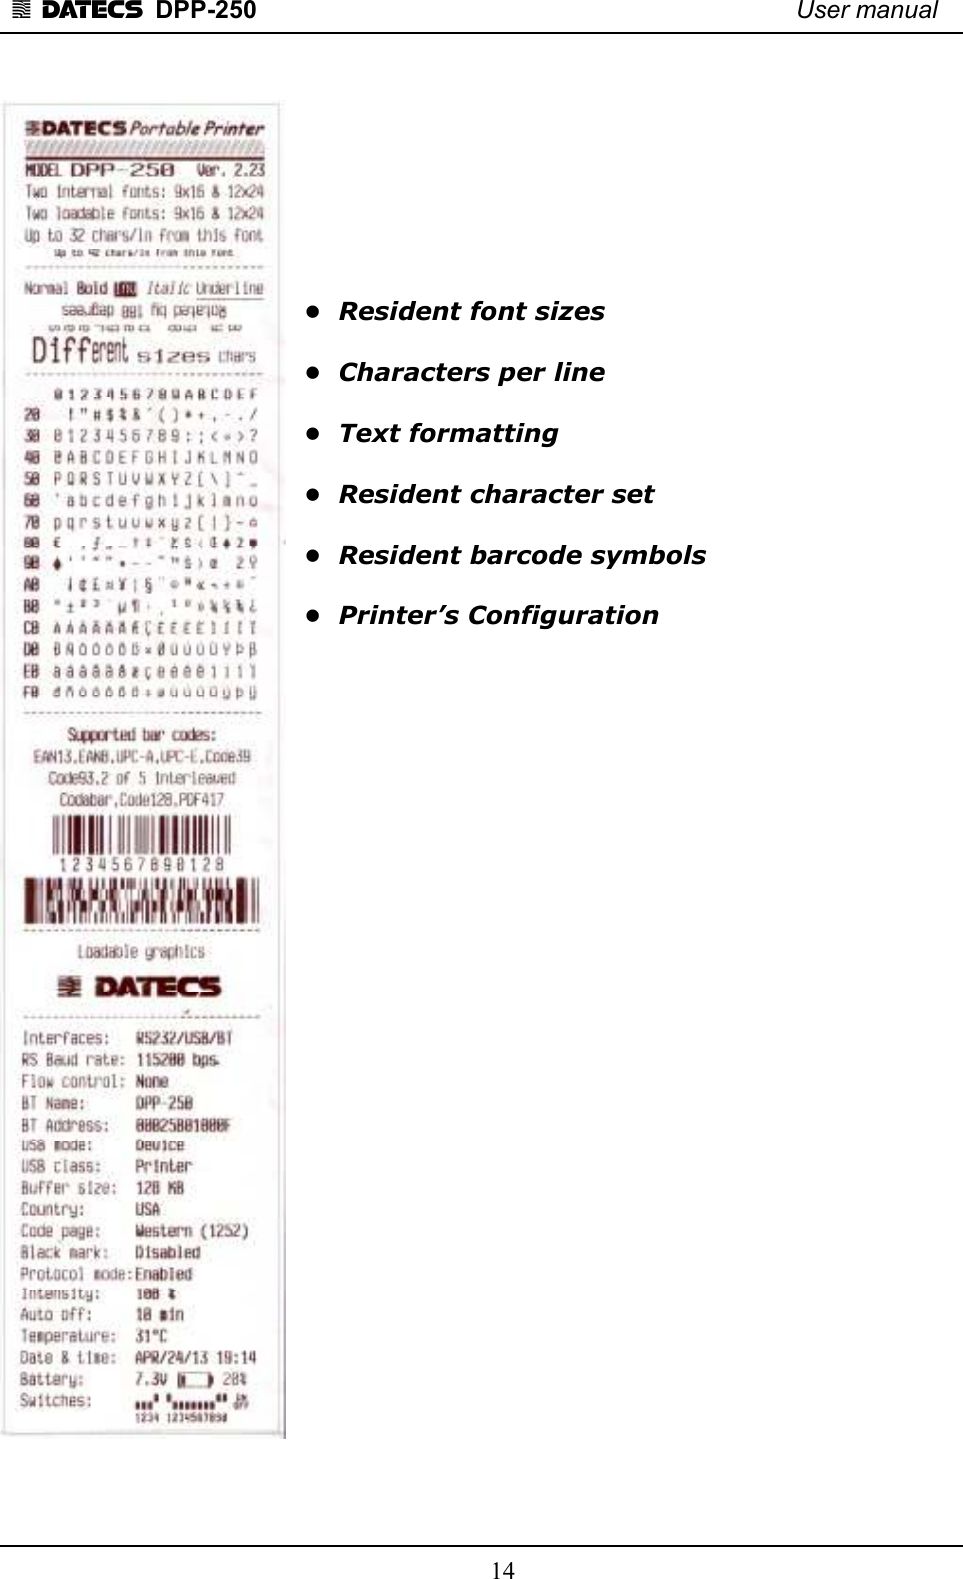
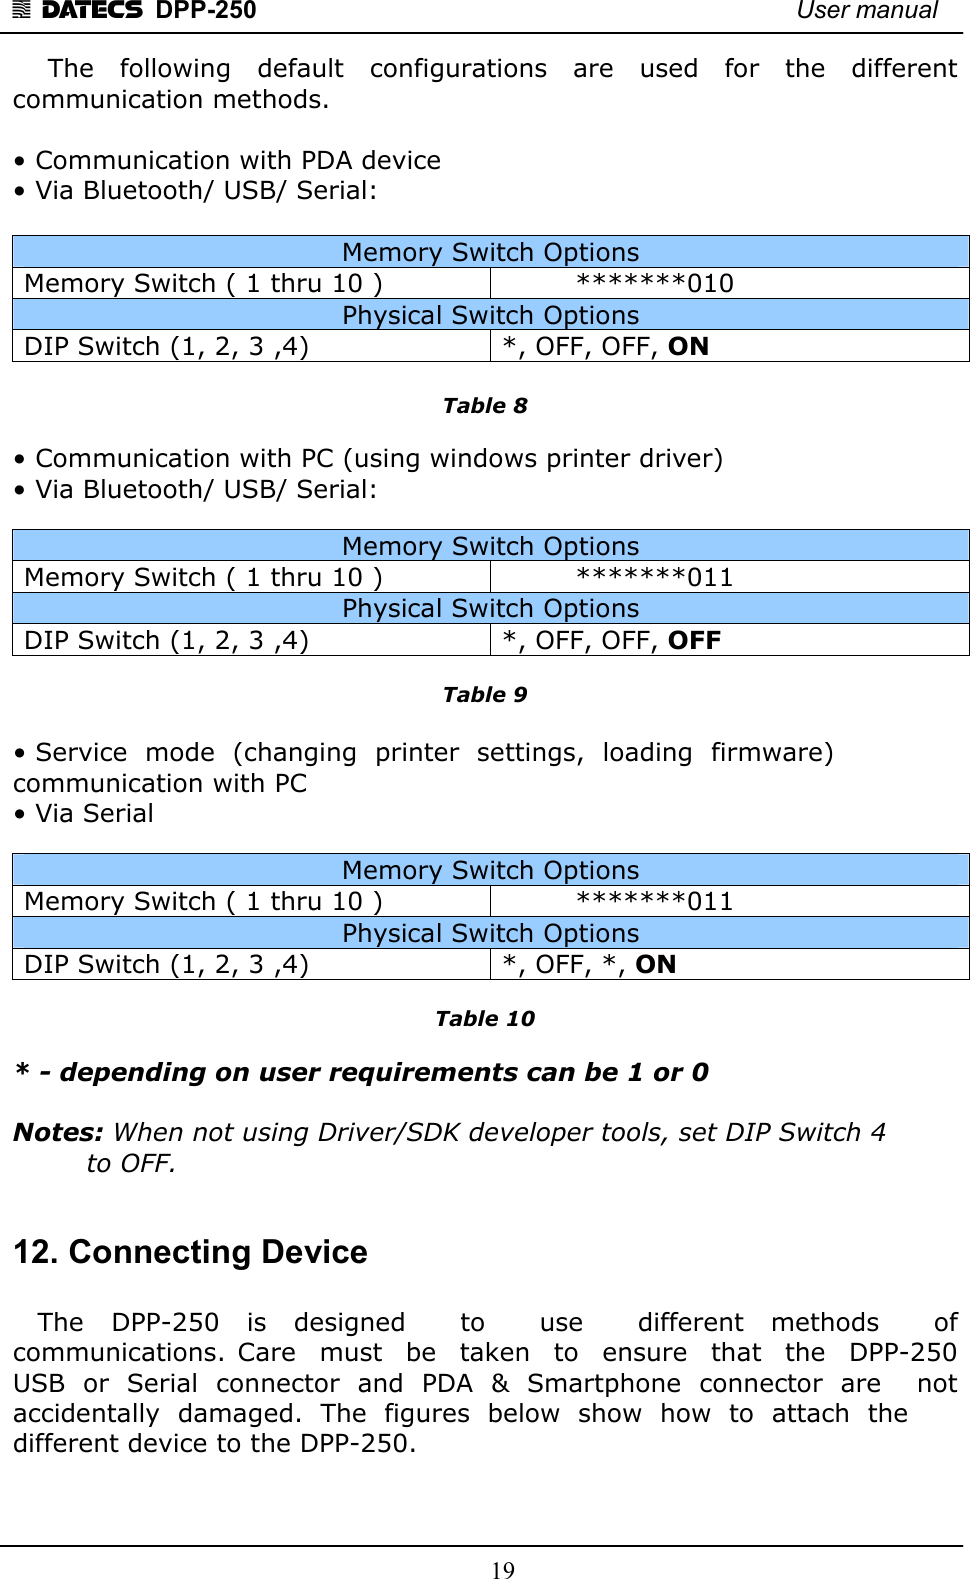
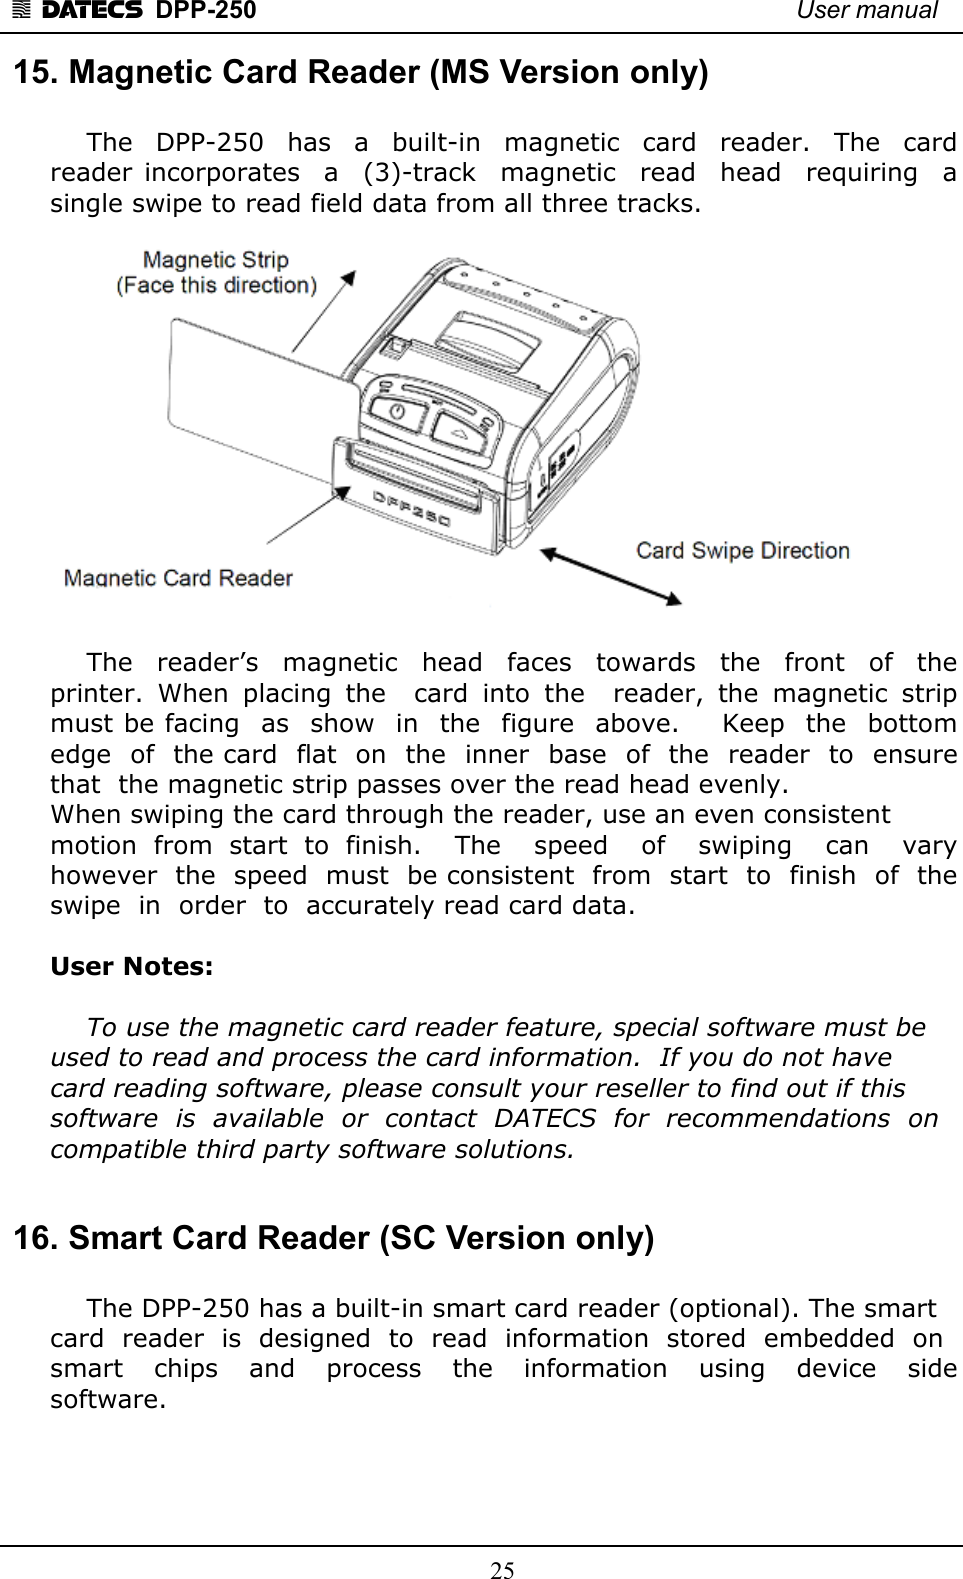
![1 DATECS DPP-250 User manual 18 •SW2: Disable CR / CR is executed as LF •SW3: Enable/Disable LF •SW4: LF immediately after CR/ Disable LF immediately after CR •SW5: Font A (12x24)/ Font B (9x16) •SW6-7: Reserved for future features. •SW8: Prevents others from discovering printer when set to ENABLE. Must be set after pairing is completed. •SW9: Disable/Enable USB. Allow the use of USB port for communications. •SW10: (OFF) set USB as the host mode. Host/Device 11. Pairing Info Details BAUD RATE: Default is 115200 AUTO OFF TIME: Default is 5 minutes PRINT DENSITY: Default is 100% CHARACTER TABLE: Default is WESTERN (1252) PAIRING INFO: Default is (SAVE=No) Notes: When saving pairing information, the printer remembers Bluetooth information of the last device connected (paired) to the printer. Saving pairing info prevents the printer from asking for passkey upon initialization. The process for using this option is described below. "To speed this programming process, you may bypass the memory switch settings by indicating "NO" via pressing of the <ON/OFF> button when the printer prints "CHANGE MEMORY SWITCHES" as shown on page 17. This will advance you to the next level of setting where pairing can be found". 1. Following instruction on page-13, change the Pairing Info option to [Save = Yes]. 2. Turn the printer on and pair the printer to your Bluetooth device. 3. The printer will now remember the pairing information and not prompt user for a passkey on every printer initialization. Clearing Pairing Info: 1. Following instruction on page-13, change the Pairing Info option to [Save = No]. 2. Turn on the printer and pair the new Bluetooth device to the printer. 3. The printer will prompt user for a passkey on every printer initialization. 11. Communications Configuration](https://usermanual.wiki/DATECS/DATECSBTIOS.User-manual-1-of-2/User-Guide-2335288-Page-18.png)
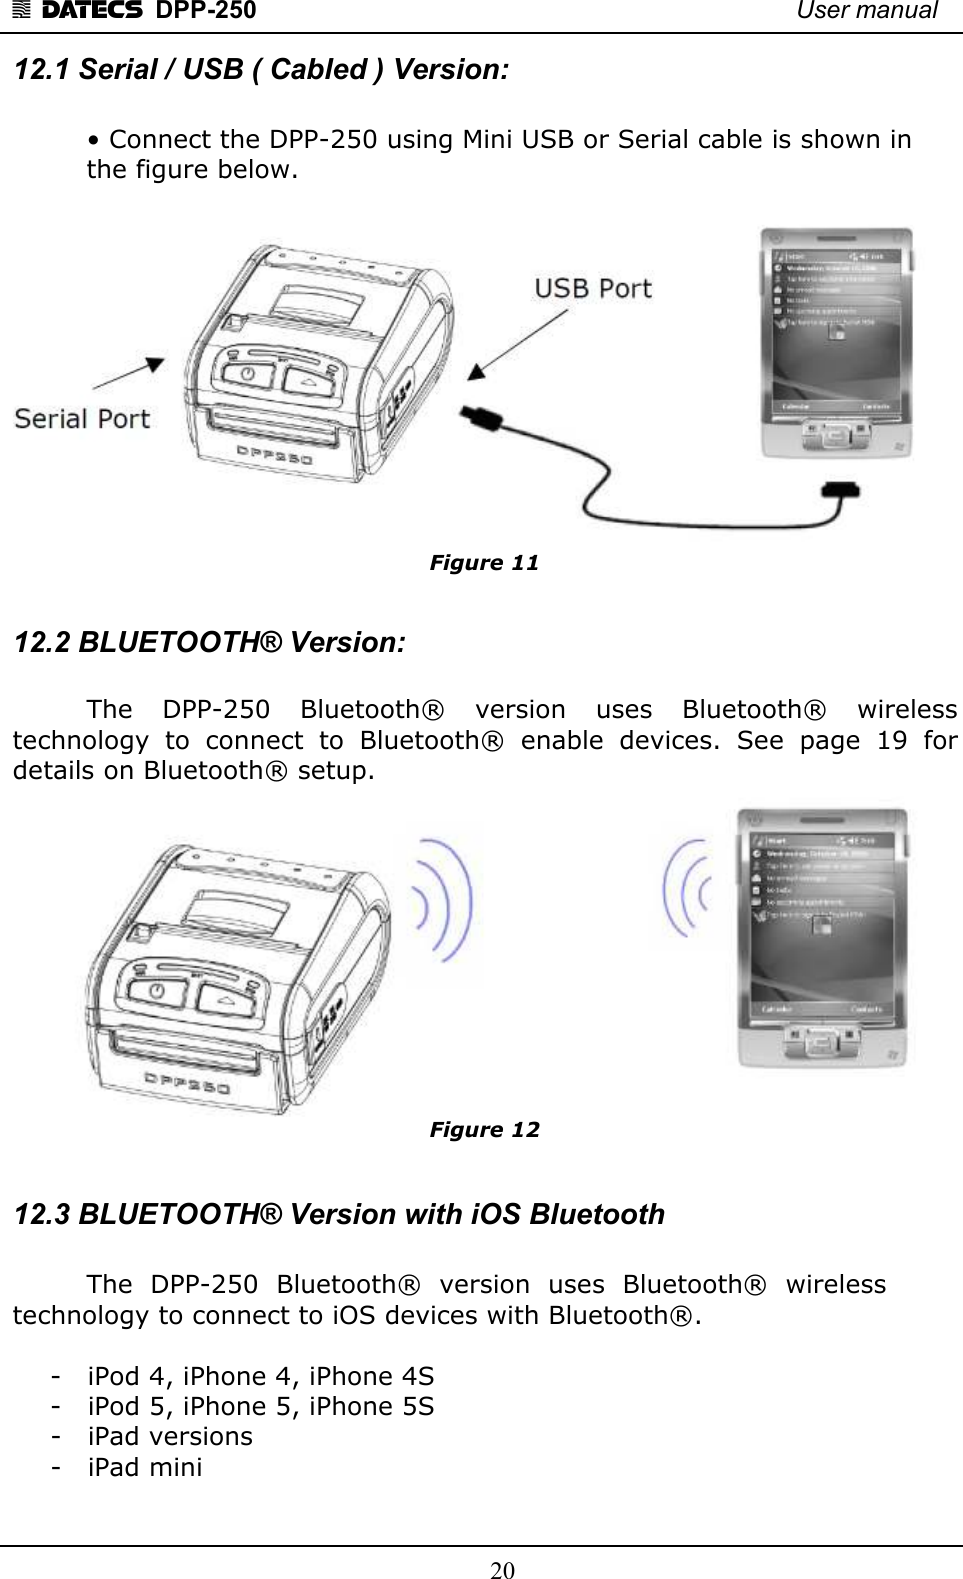
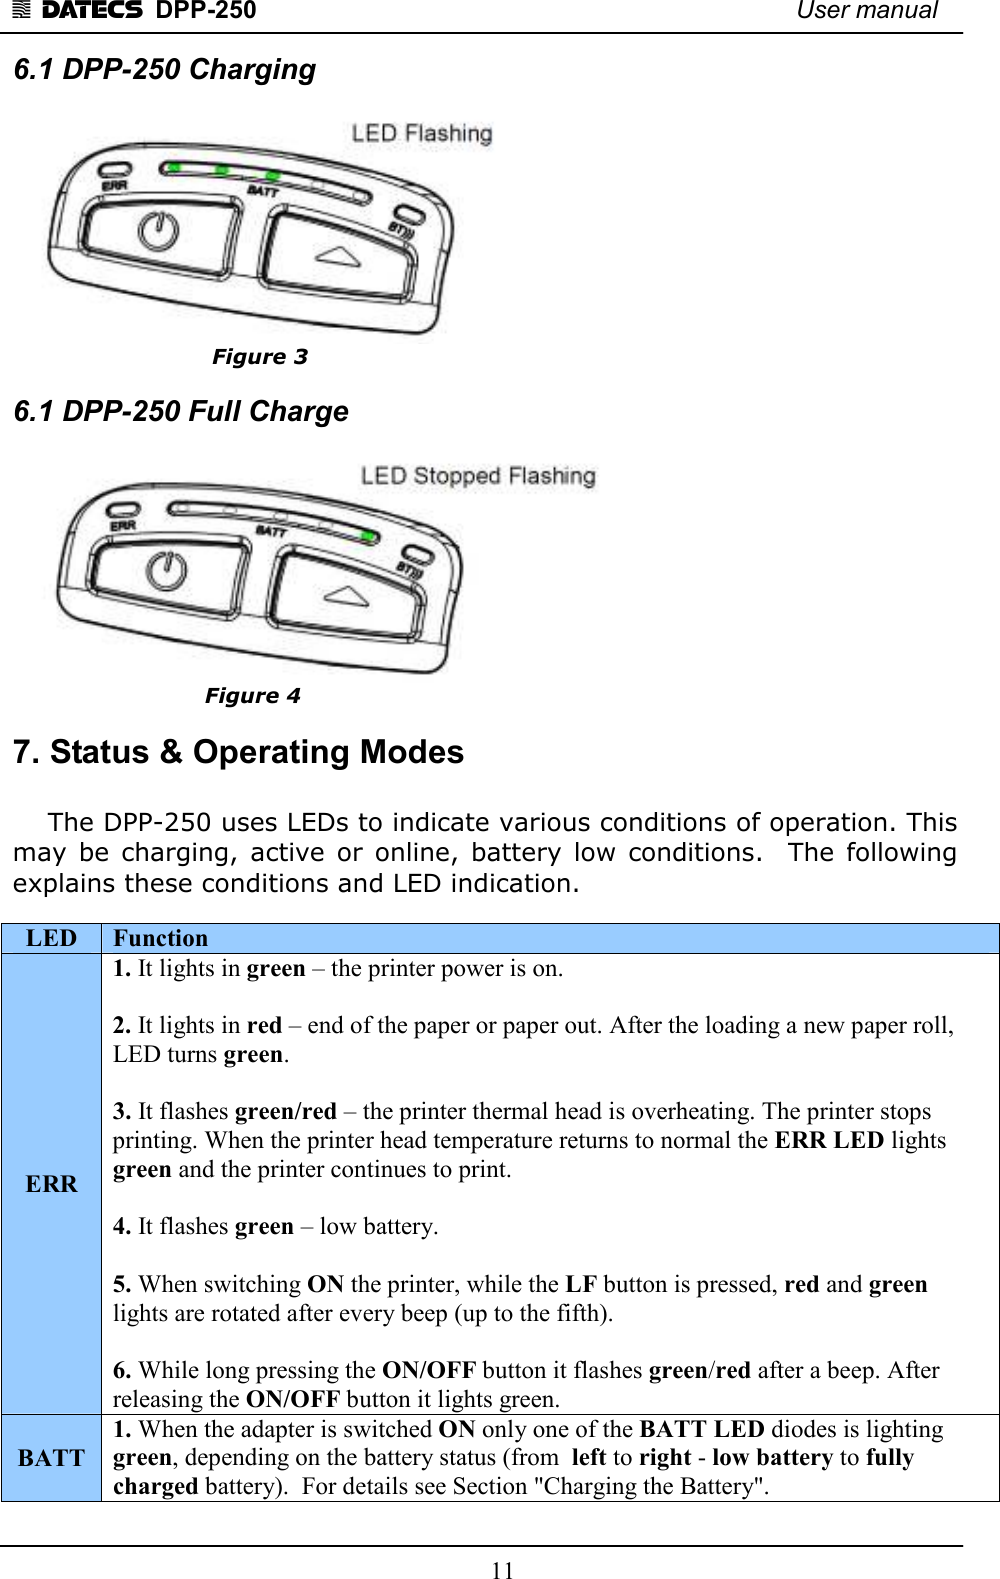
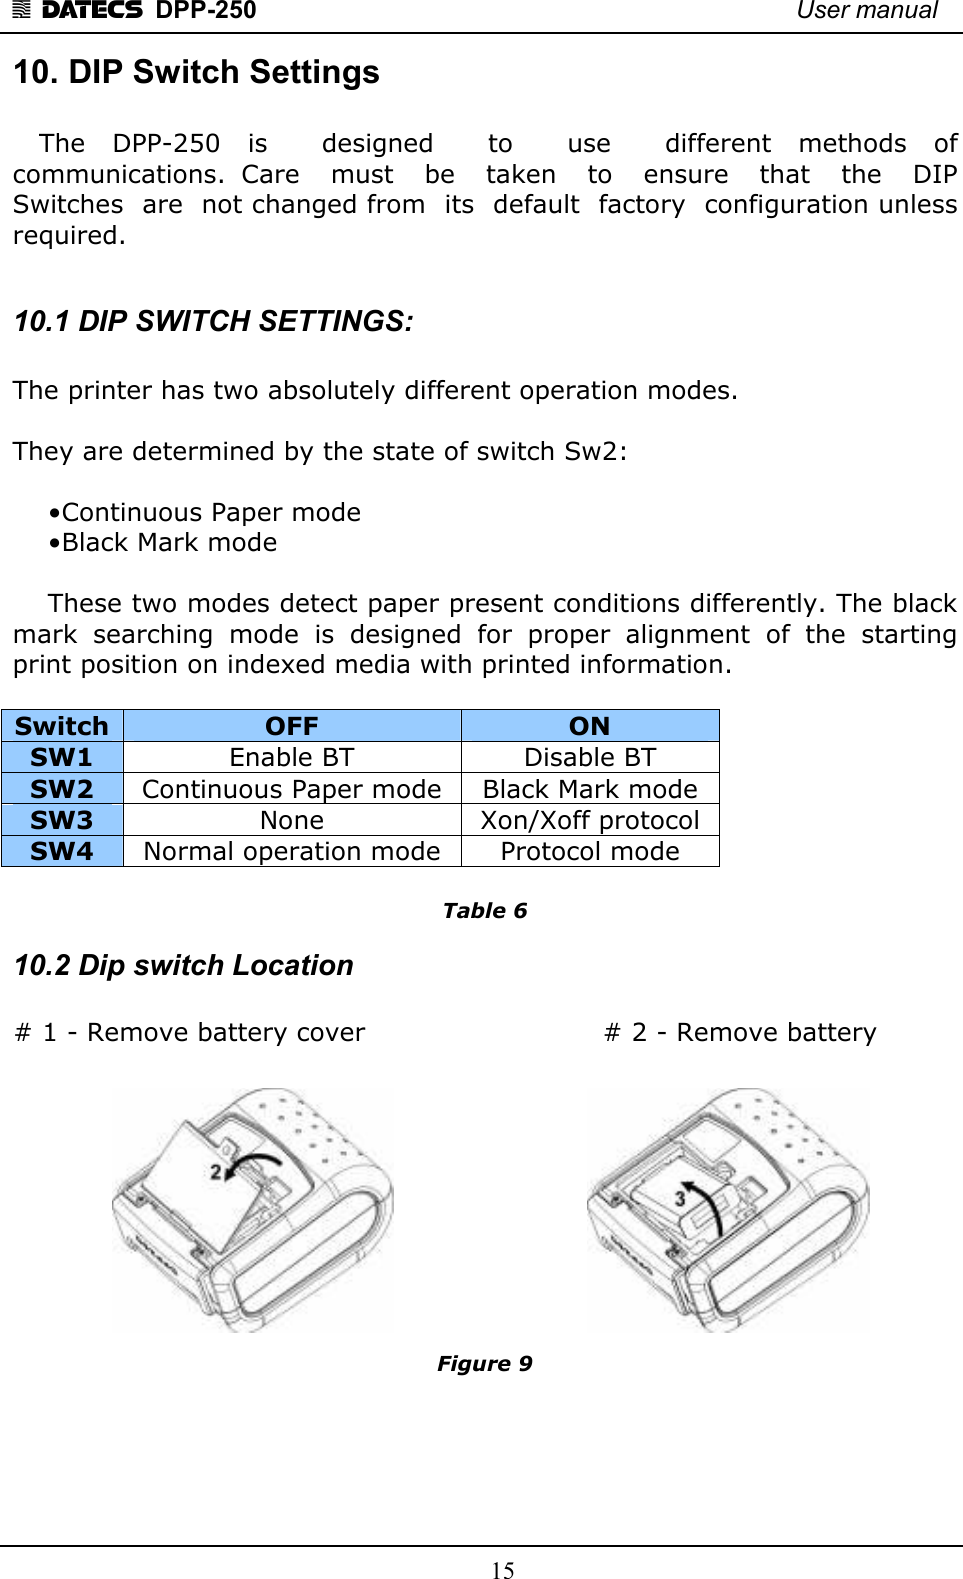
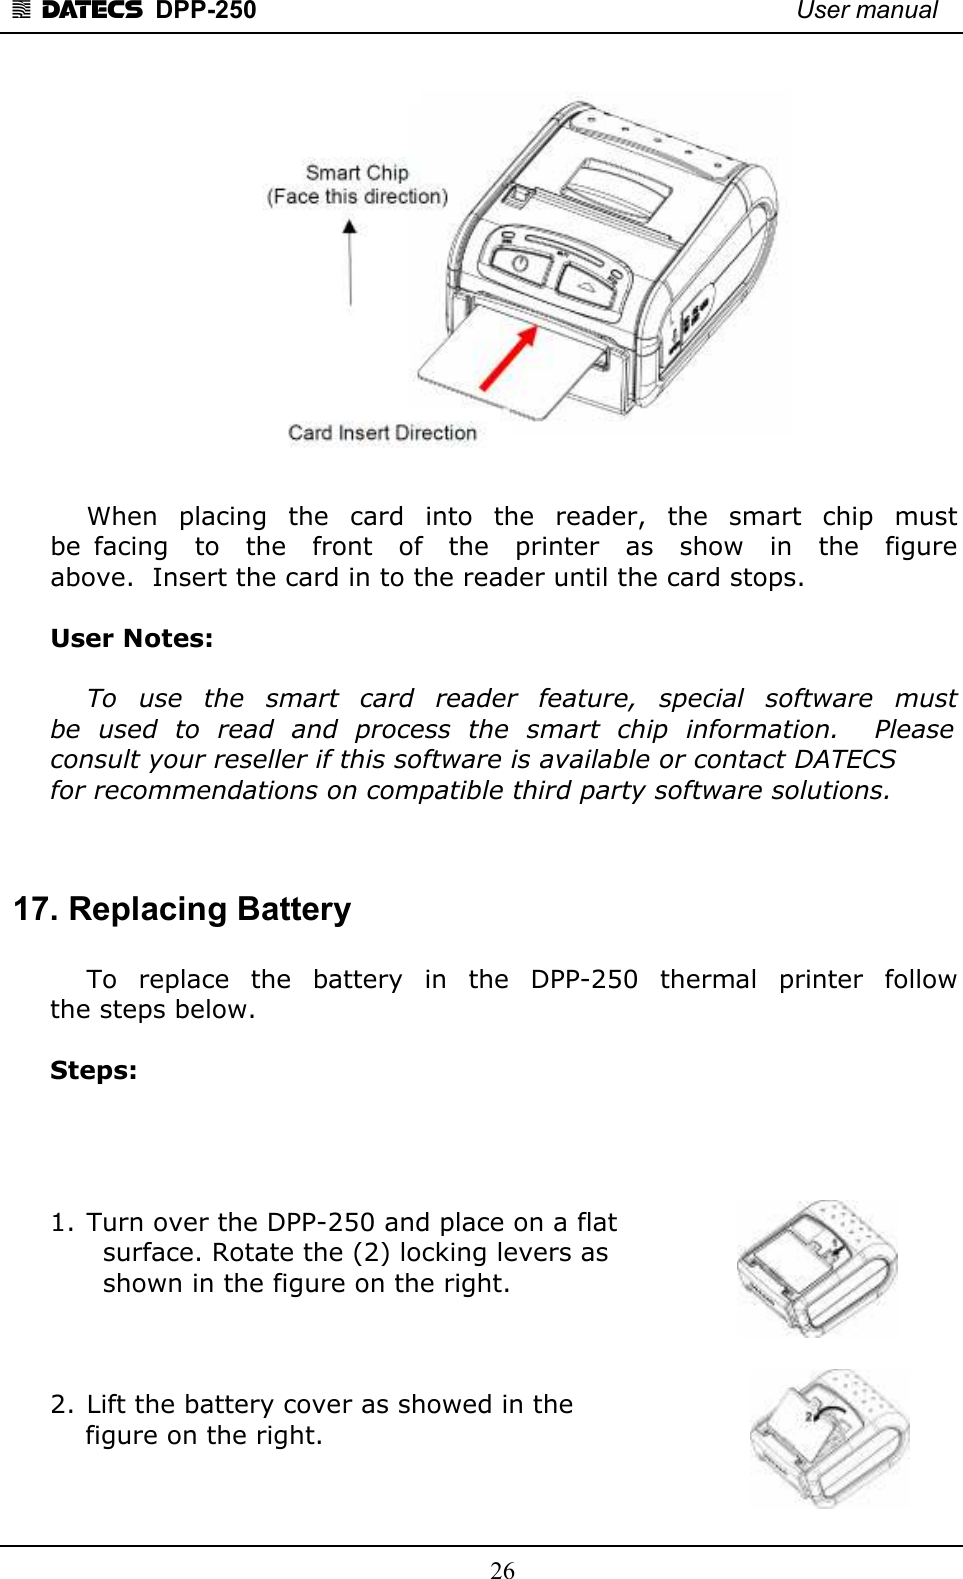
![1 DATECS DPP-250 User manual 21 More information on page 20. Figure 13 13. Bluetooth® Setup Adding New Bluetooth® Device to PDA or Smartphones The following is a brief explanation on how to [Pair] your Bluetooth® DPP-250 to PDA, Smartphones and iOS device. BlackBerry Devices: Add Device or Pairing Bluetooth® peripherals to BlackBerry devices require the use of the device Bluetooth® manager. Image on the right shows a typical Blackberry Bluetooth® manager. When adding / pairing the DPP-250, use the [0000] pairing key when prompted. Windows Mobile Devices: Creating a New Partnership or Pairing Bluetooth® peripherals to your Windows Mobile devices require the use of the device Bluetooth® manager. Image on the right shows a typical Windows Mobile Bluetooth® manager. When adding/pairing the DPP-250, use the [0000] pairing key when prompted. Palm Devices: Add Device or Pairing Bluetooth®](https://usermanual.wiki/DATECS/DATECSBTIOS.User-manual-1-of-2/User-Guide-2335288-Page-21.png)
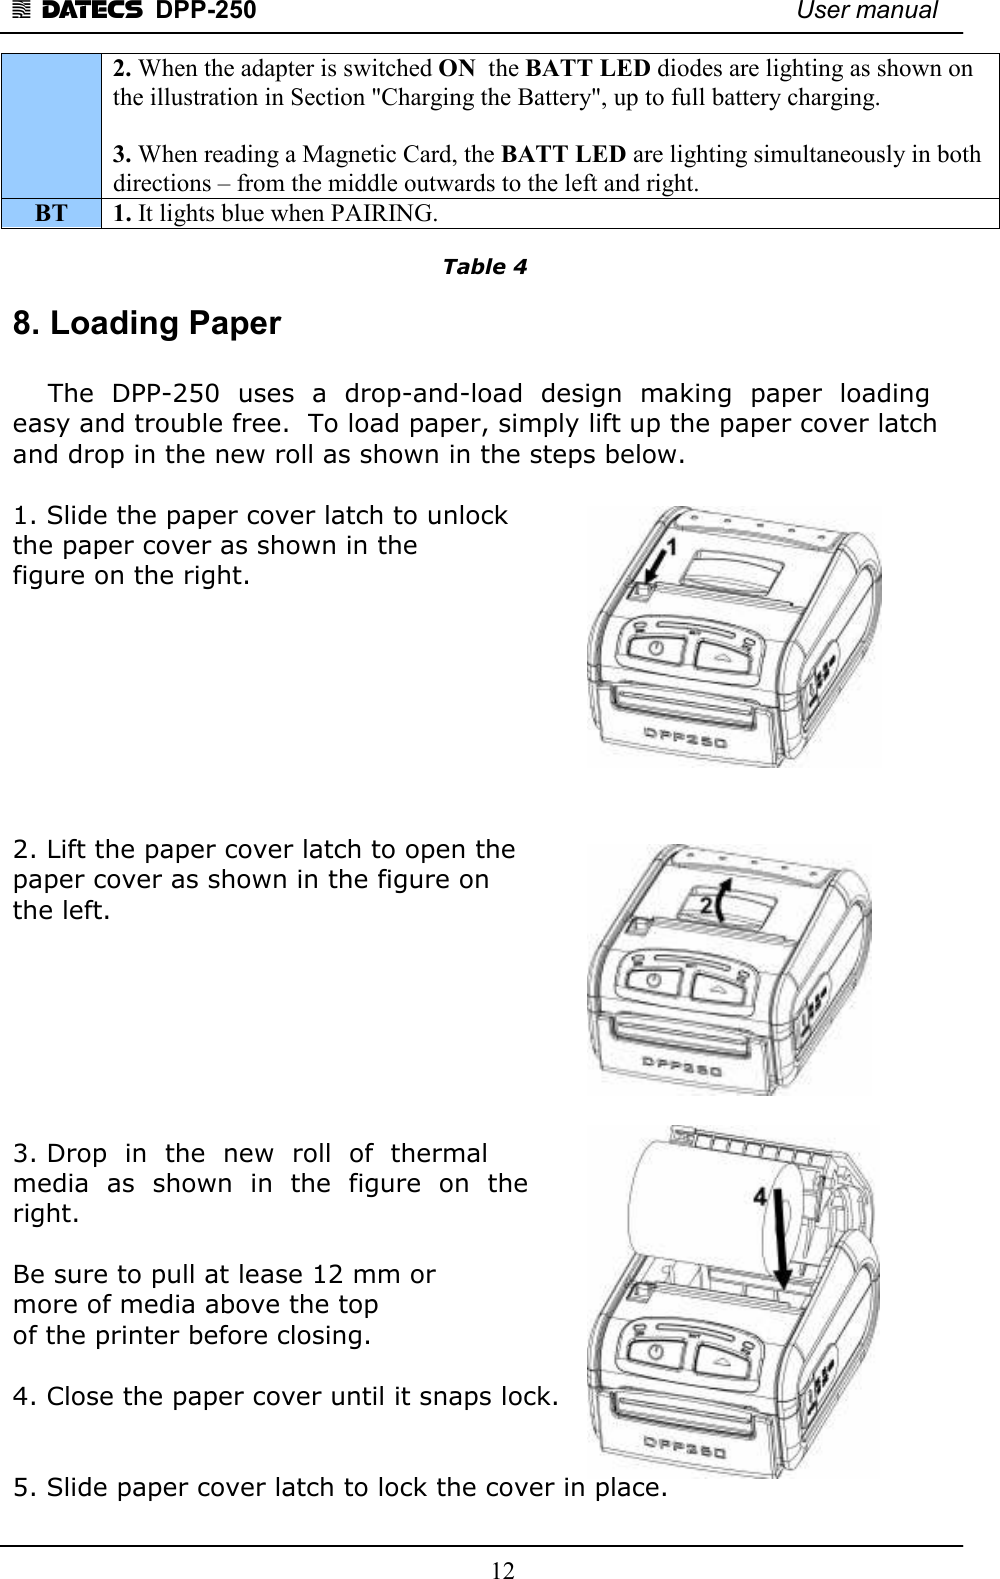
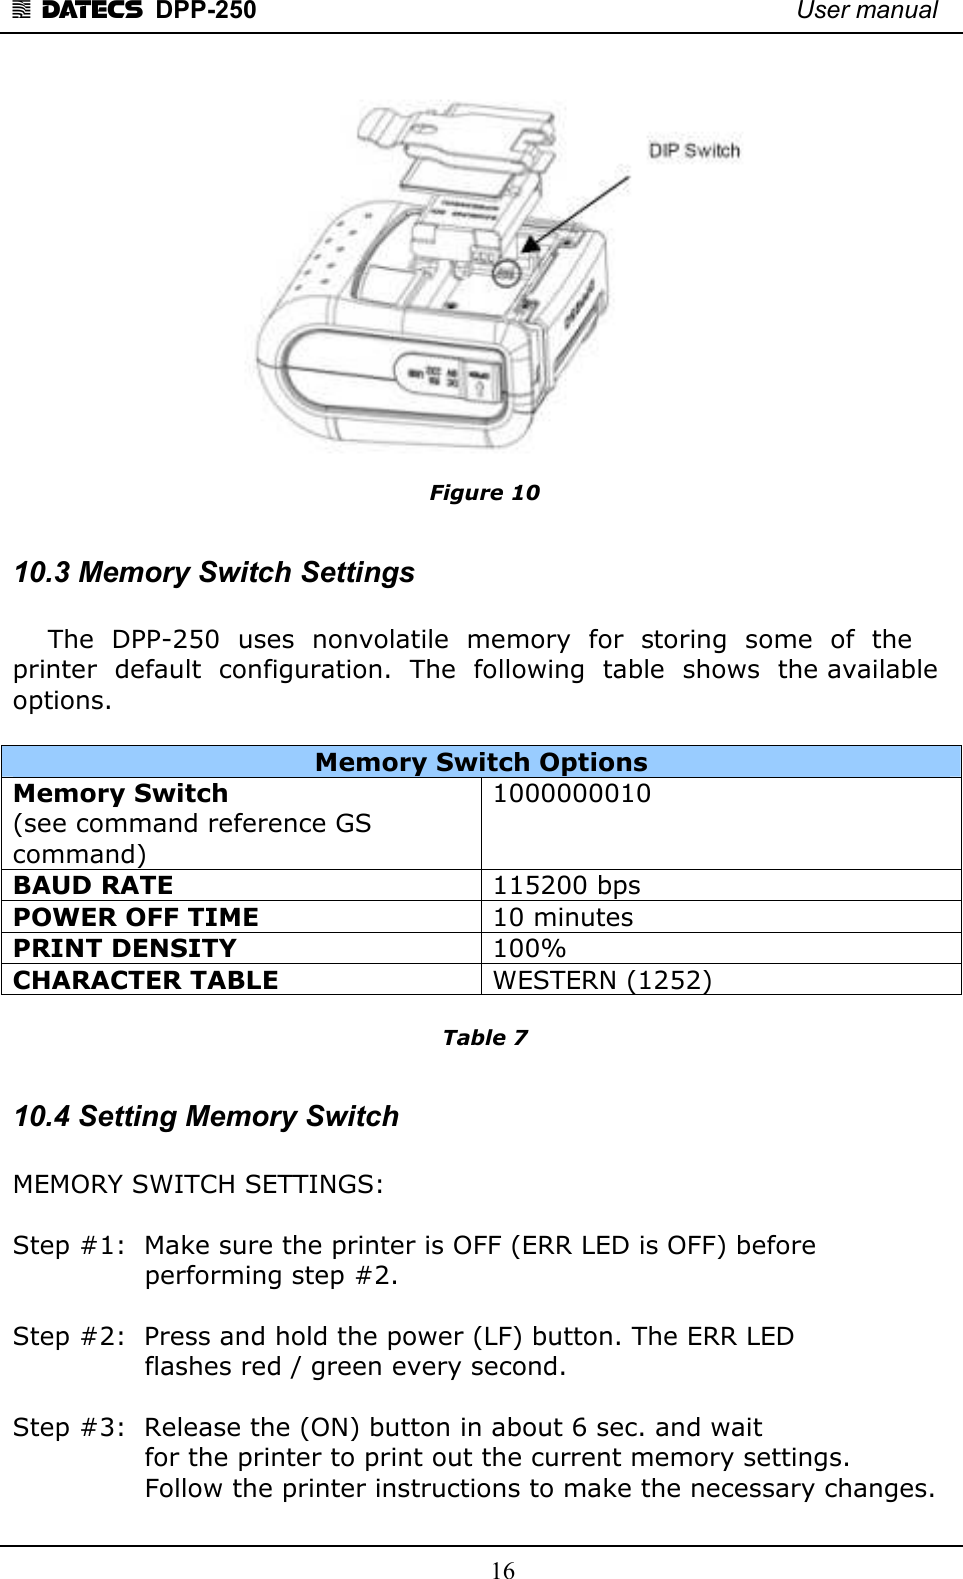
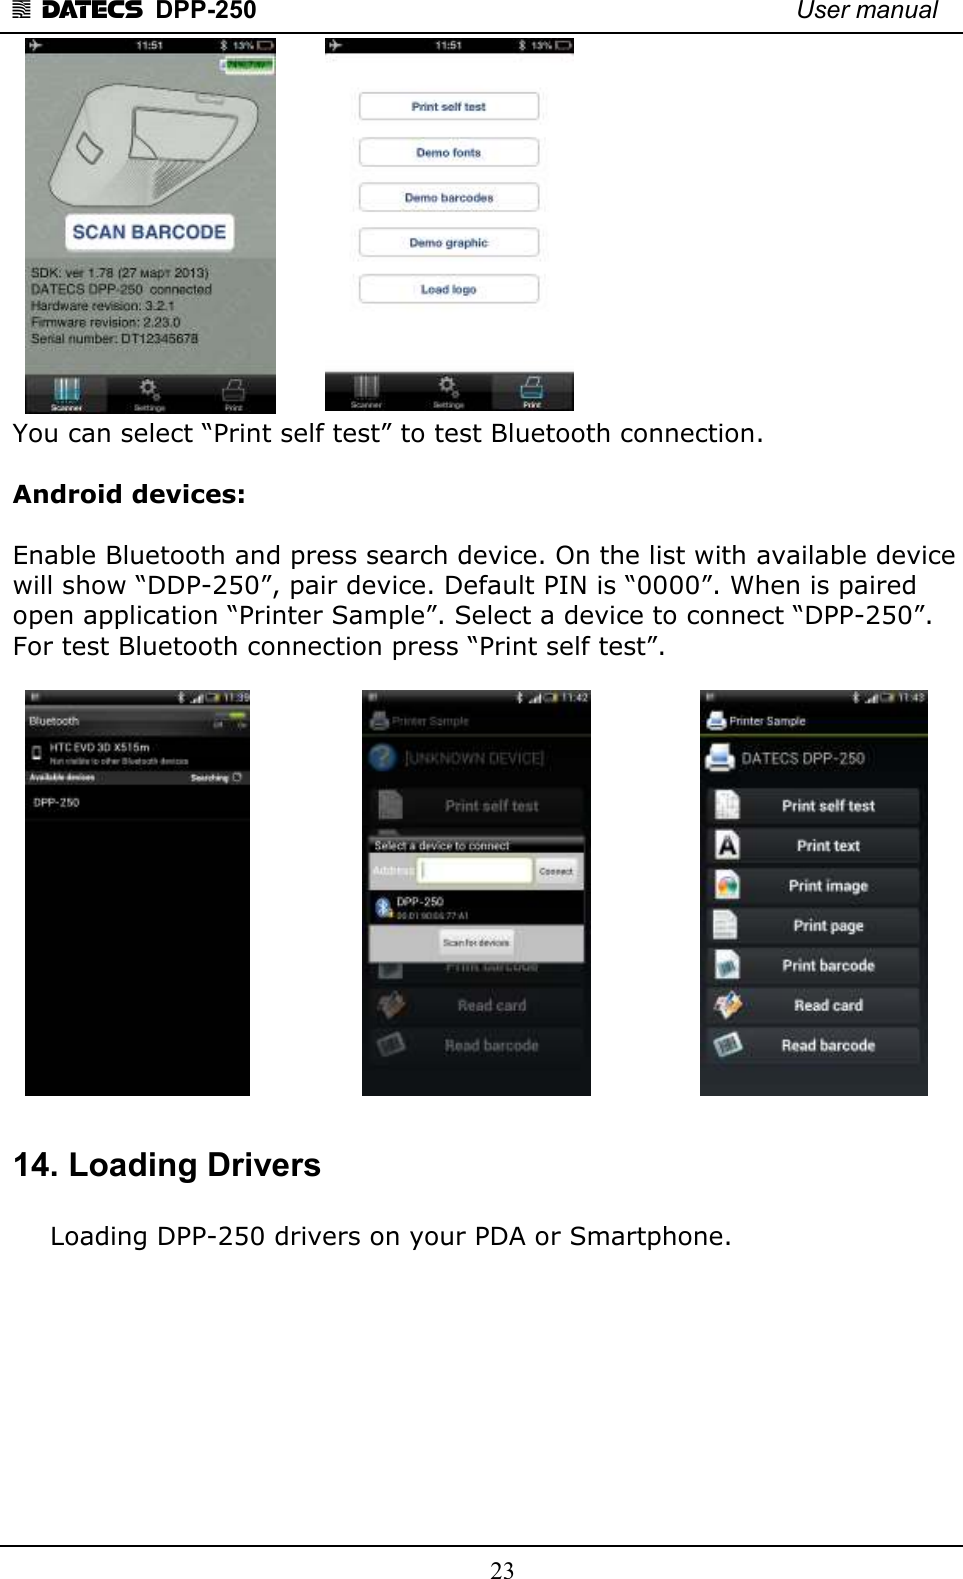
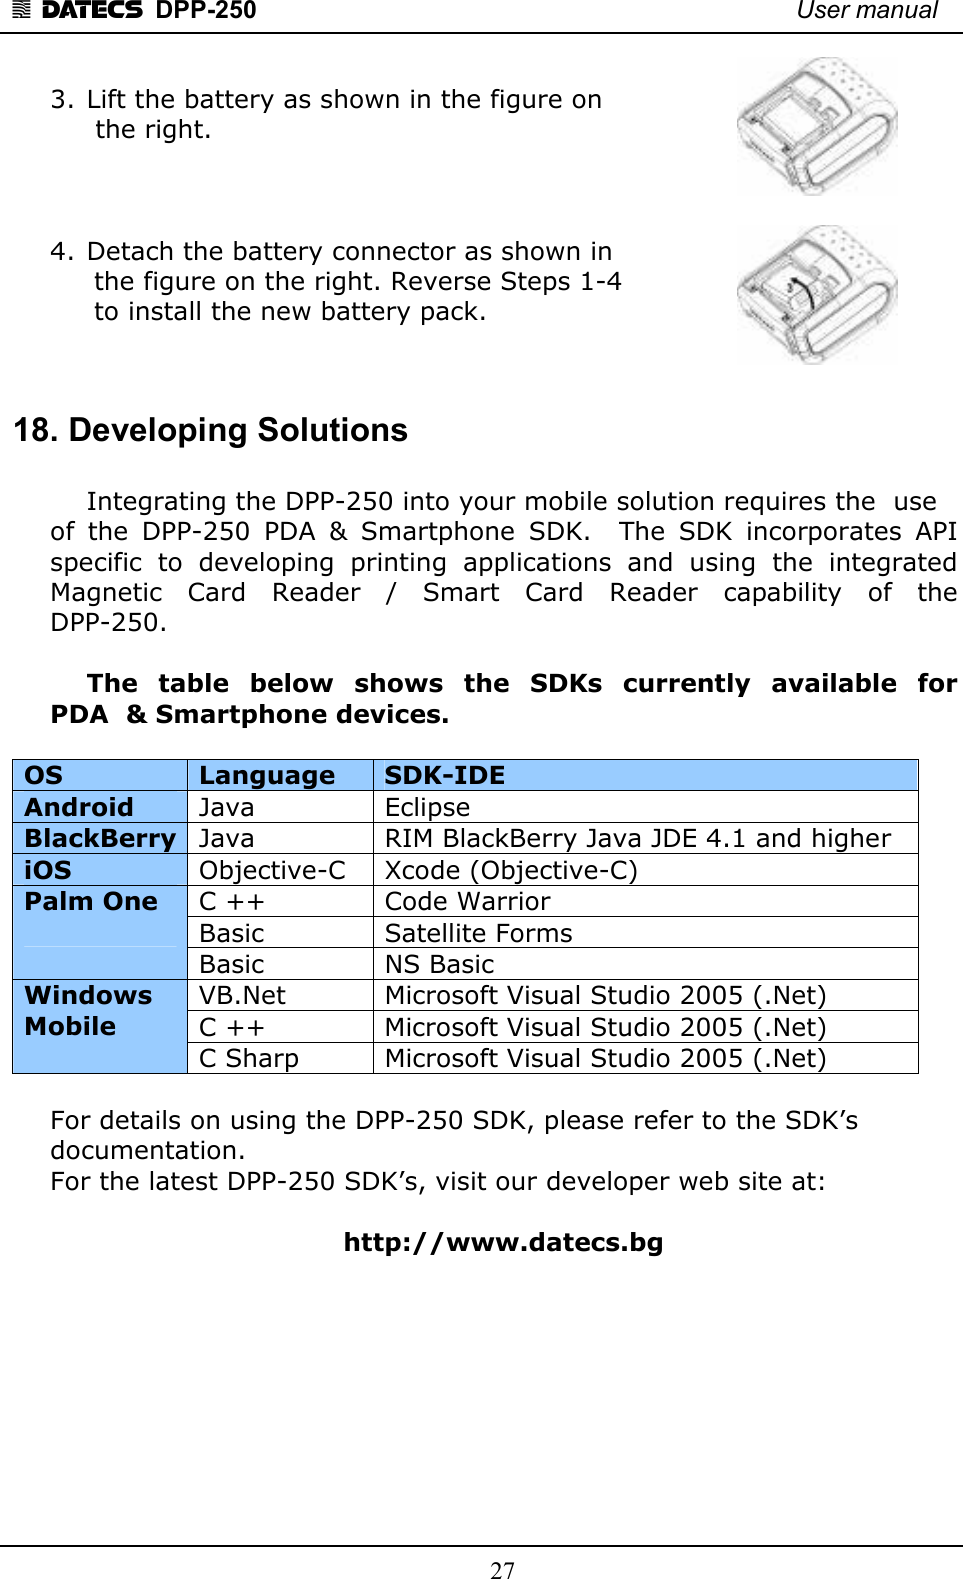
![1 DATECS DPP-250 User manual 22 peripherals to your Palm devices require the use of the device Bluetooth® manager. Image on the right shows a typical Palm Bluetooth® manager. When adding/pairing the DPP-250, use the [0000] pairing key when prompted. iOS Devices: Enable Bluetooth on iOS device. Select Bluetooth device, after this Pair to DPP-250. When is connected DPP-250 to iOS device, blue LED on DPP-250 will start blinking. Start app “Library Demo” and select “Print”.](https://usermanual.wiki/DATECS/DATECSBTIOS.User-manual-1-of-2/User-Guide-2335288-Page-22.png)
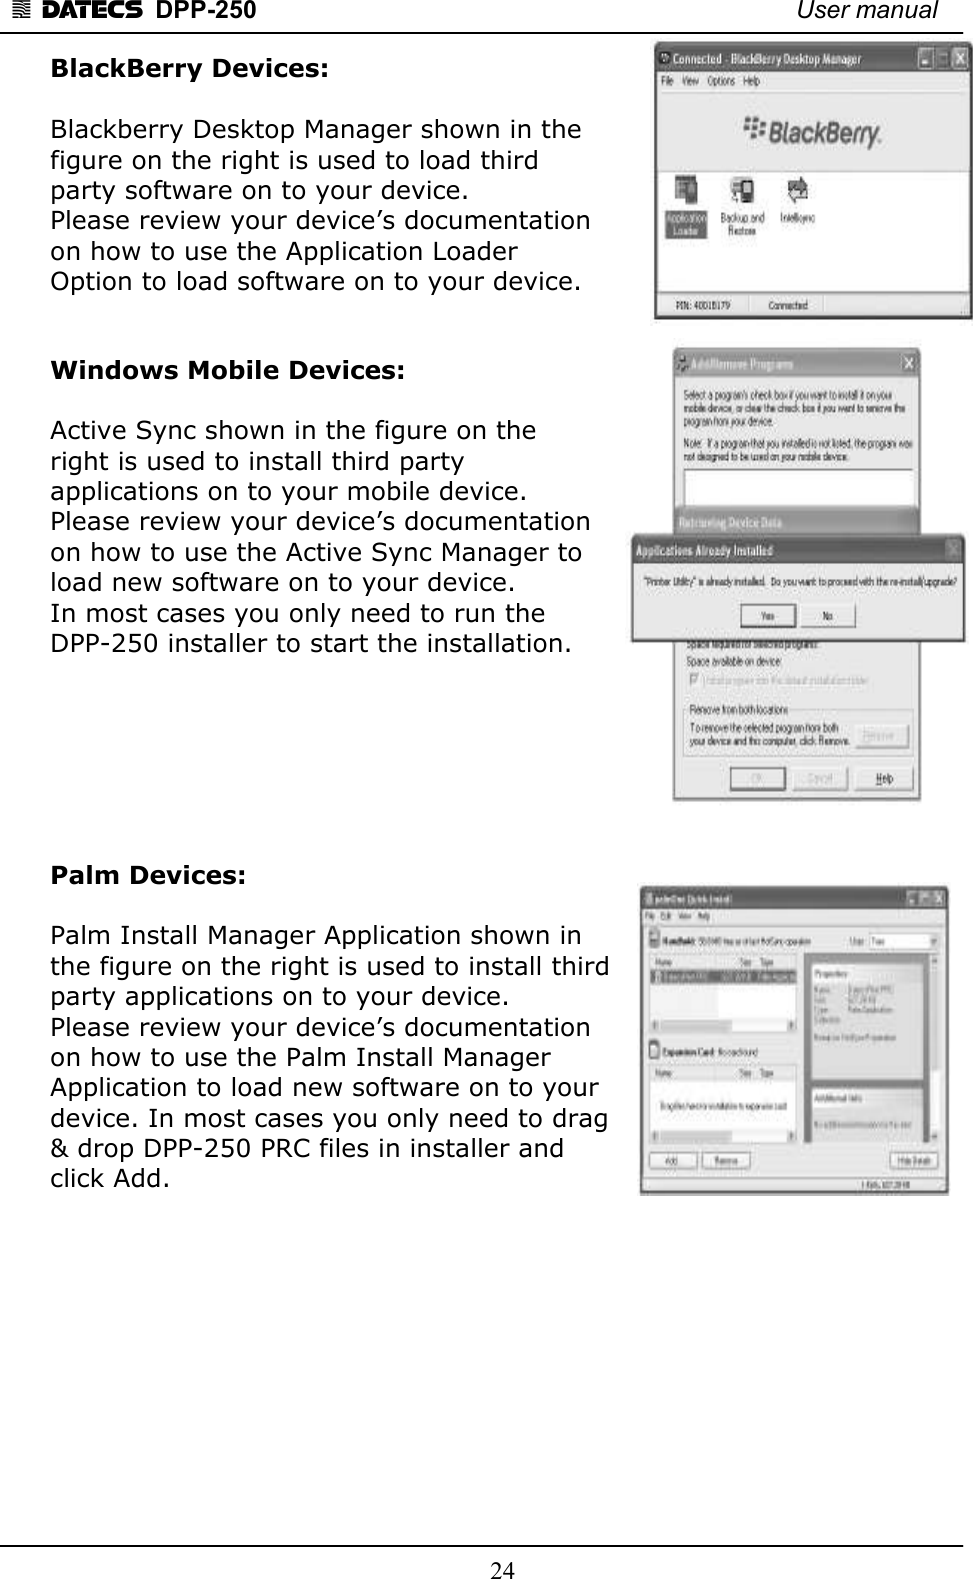
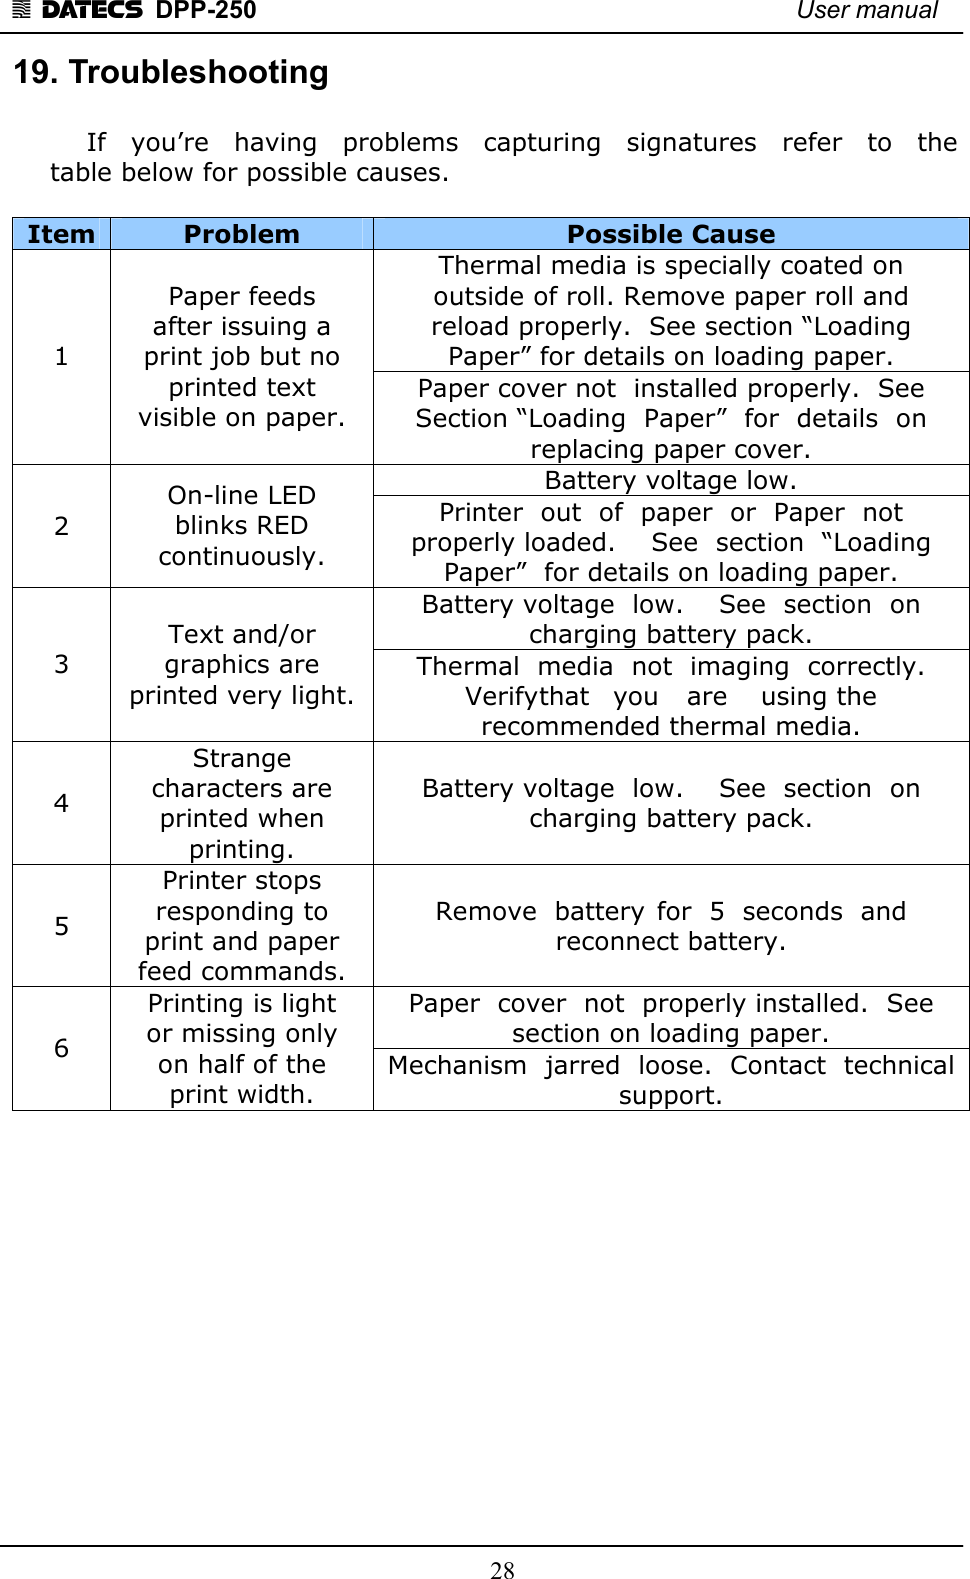
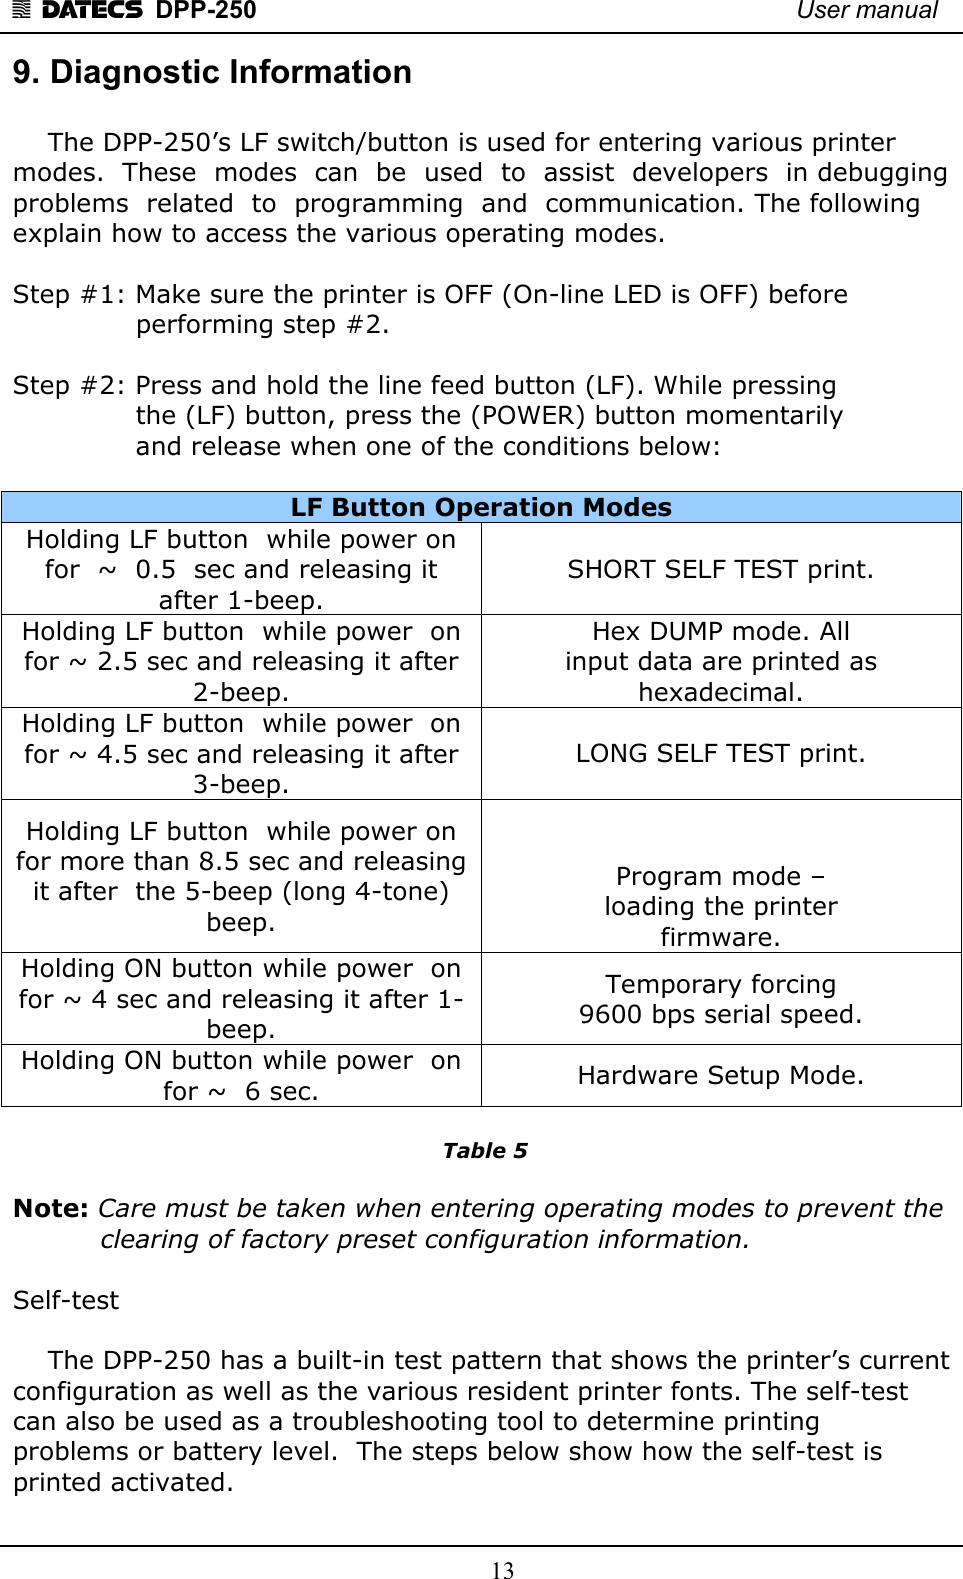
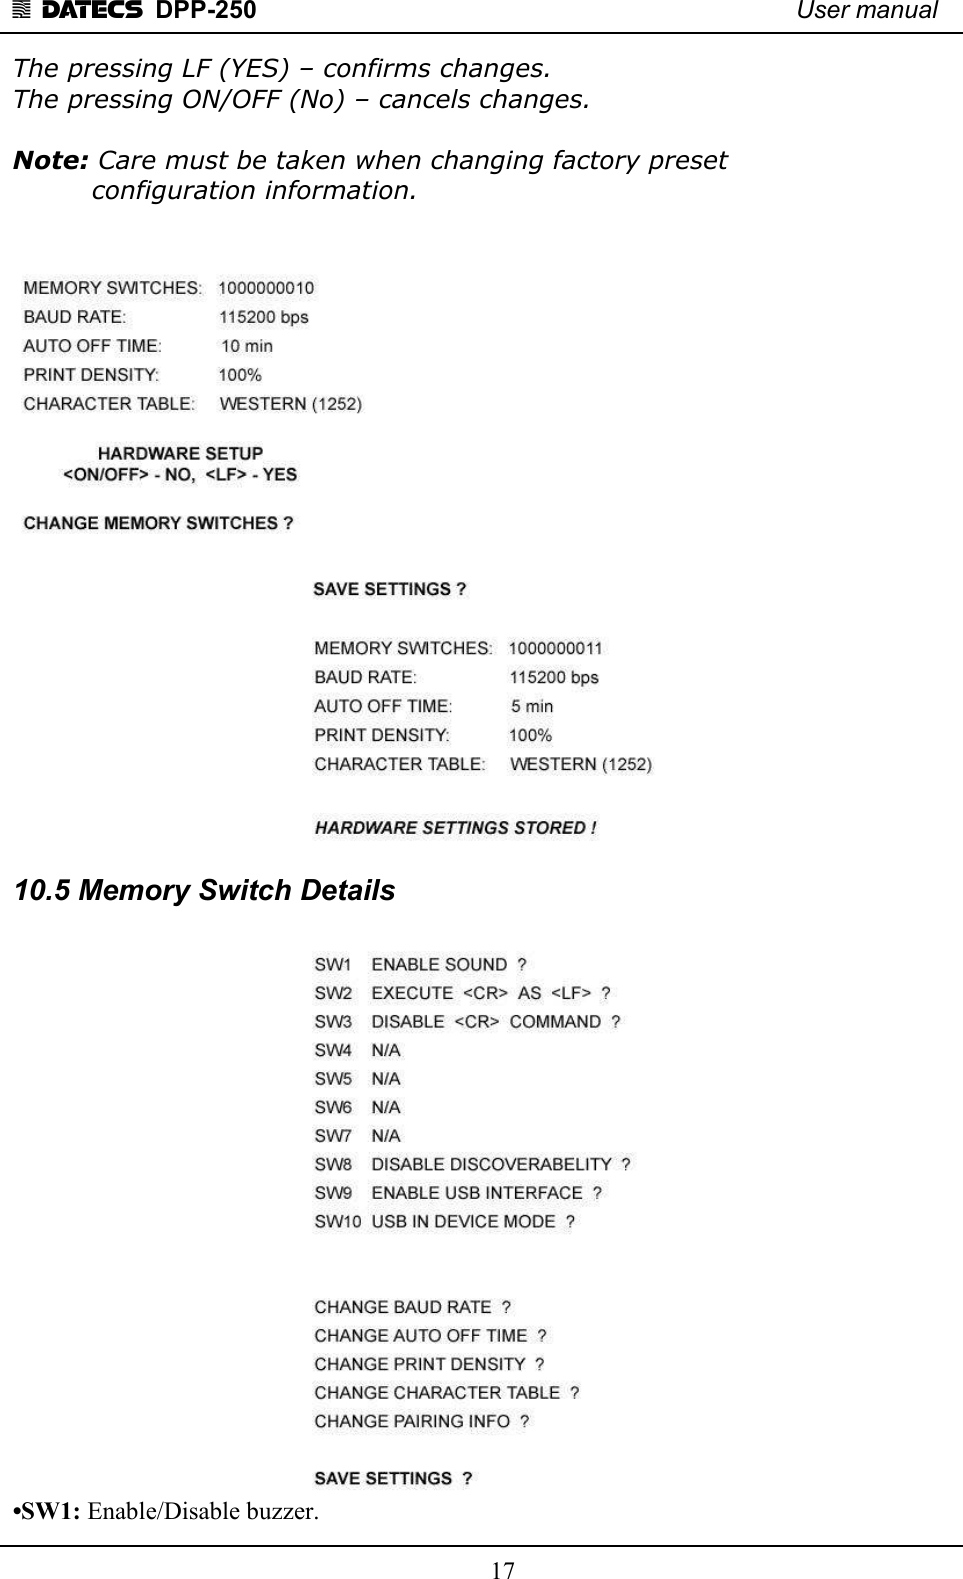
![1 DATECS DPP-250 User manual 30 41 ESC D Setting horizontal tab position 42 ESC E Specifying/Canceling highlighting 43 ESC F Filling or inverting the page area in page mode 44 ESC G Specifying/Canceling highlighting 45 ESC I Specifying/Canceling Italic print 46 ESC J Printing and Paper feed n/203 inches 47 ESC L Selecting page mode 48 ESC N Reading programmed serial number 49 ESC R Selecting country 50 ESC S Specifying speed (bps) of the serial port 51 ESC T Printing short self test 52 ESC U Selecting/Canceling underlined printing 53 ESC V Selecting/Canceling printing 90°- right turned characters 54 ESC W Defining the print area in page mode 55 ESC X Specifying max printing speed 56 ESC Y Selecting intensity level 57 ESC Z Returning diagnostic information 58 ESC \ Specifying relative horizontal position 59 ESC ] Loading the default settings stored in Flash memory 60 ESC ^ Saving current settings in Flash memory 61 ESC _ Loading factory settings 62 ESC ` Reading the Battery Voltage and Thermal head temperature 63 ESC a Aligning the characters 64 ESC b Increasing text line height 65 ESC c5 Enabling/Disabling the functioning of the button LF 66 ESC d Printing and feeding paper by n- lines 67 ESC i Feeding paper backwards 68 ESC o Temporarily feeding paper forward 69 ESC pair= Enabling/Disabling PAIRING info saving in Bluetooth mode 70 ESC pwd= Programming a new Bluetooth password (PIN) 71 ESC r Full command for sounding buzzer 72 ESC s Reading printer settings 73 ESC u Selecting code table 74 ESC v Transmitting the printer status 75 ESC x Setting the time interval for automatically switching Off the printer 76 ESC y Setting USB response strings 77 ESC { Enabling/Canceling printing of 180° turned characters 78 GS FF Printing in page mode and returning to standard mode 79 GS $ Specifying the absolute vertical position in page mode 80 GS ) Setting printer flags (memory switches)](https://usermanual.wiki/DATECS/DATECSBTIOS.User-manual-1-of-2/User-Guide-2335288-Page-30.png)