DDM P112MINU 2G Mobile Phone User Manual
DDM Brands LLC 2G Mobile Phone Users Manual
UserManual.wiki
>
DDM
>
P112MINU User Manual
Users Manual
Navigation menu
Upload a User Manual
Namespaces
Wiki Guide
HTML
PDF
Info
Views
User Manual
Discussion / Help
Navigation

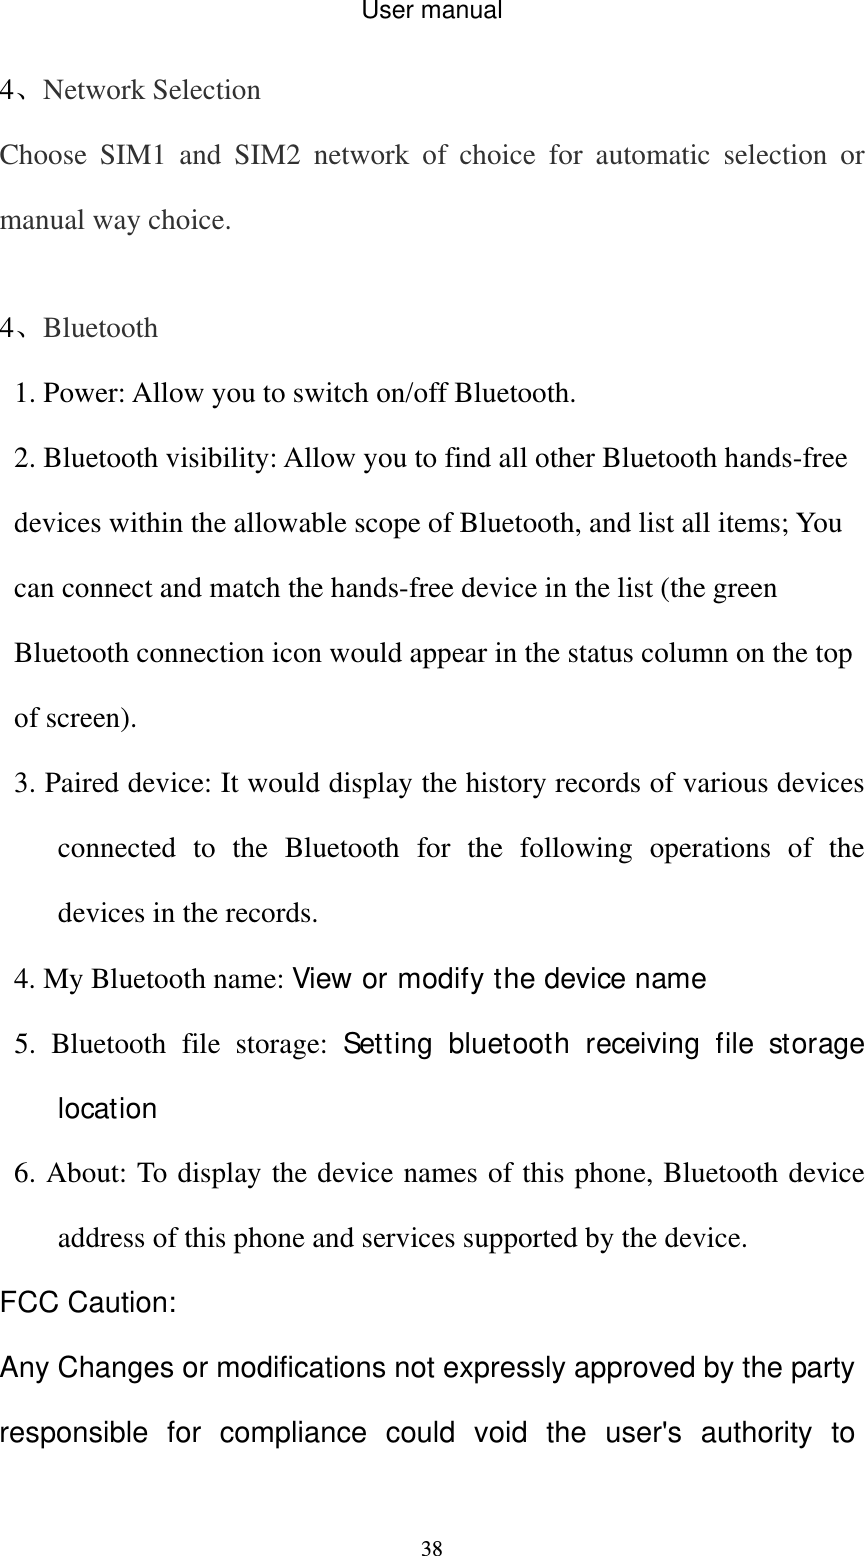
![User manual 3312.2 Phone Settings 12.2.1 Time and date Set time:Set your time. Set data: Set the current date Time format: Format for the time. Date display type: Set on display type Update time setting: Update date and time automatically from network 10.2.2. Select language Select the language for your handset. There are a variety of languages for you to choose: [English] and [Espanol] Input method settings:Set input method for text entry. 12.2.3 Shortcut settings Set all shortcut keys 12.2.4. Auto power on/off Set time to power on/off the phone automatically. 12.2.5. Restore factory settings Reset the phone to default values (factory settings). The phone password is required, which is "1234" by default.](https://usermanual.wiki/DDM/P112MINU/User-Guide-2142425-Page-33.png)
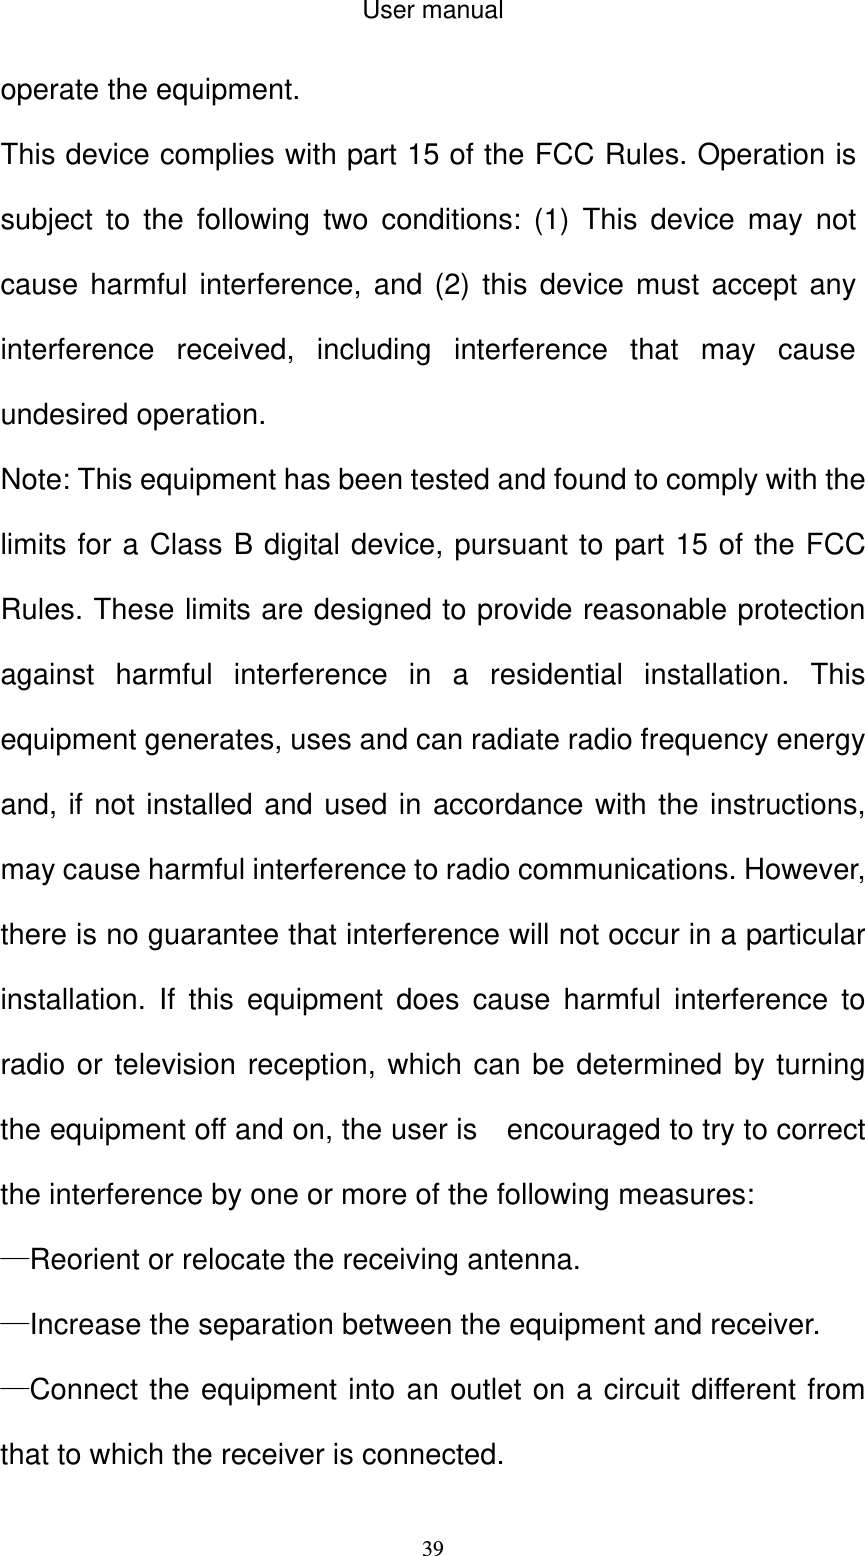
![User manual 35PIN2 (PersonalIdentificationNumber2) code is in some special function into (such as in setting fixed number, setting calls billing, etc) will enter personal identification number. Warning: please careful use this function, if continuous 10 times PUK2 yards input errors, SIM card will be scrapped. 3. Phone lock If the phone lock is activated, the phone lock password is requested after the phone switched on. The default password is "1234". If the phone is locked, only emergency calls can be made. 4. Modify the cell phone password The password of mobile phones can be reset 5. Privacy To through the unit password protection phone specific functions, in order to prevent others see stealing. When [call records], [message] functions enable password protection, in the corresponding main menu or child function, must be to enter the correct password to just can be used, default "0000". 5. Lock screen by end-key Set a key lock according to hang up key screen 6. Guard lock Open: Before enabling this function, you must first set password, if not](https://usermanual.wiki/DDM/P112MINU/User-Guide-2142425-Page-35.png)
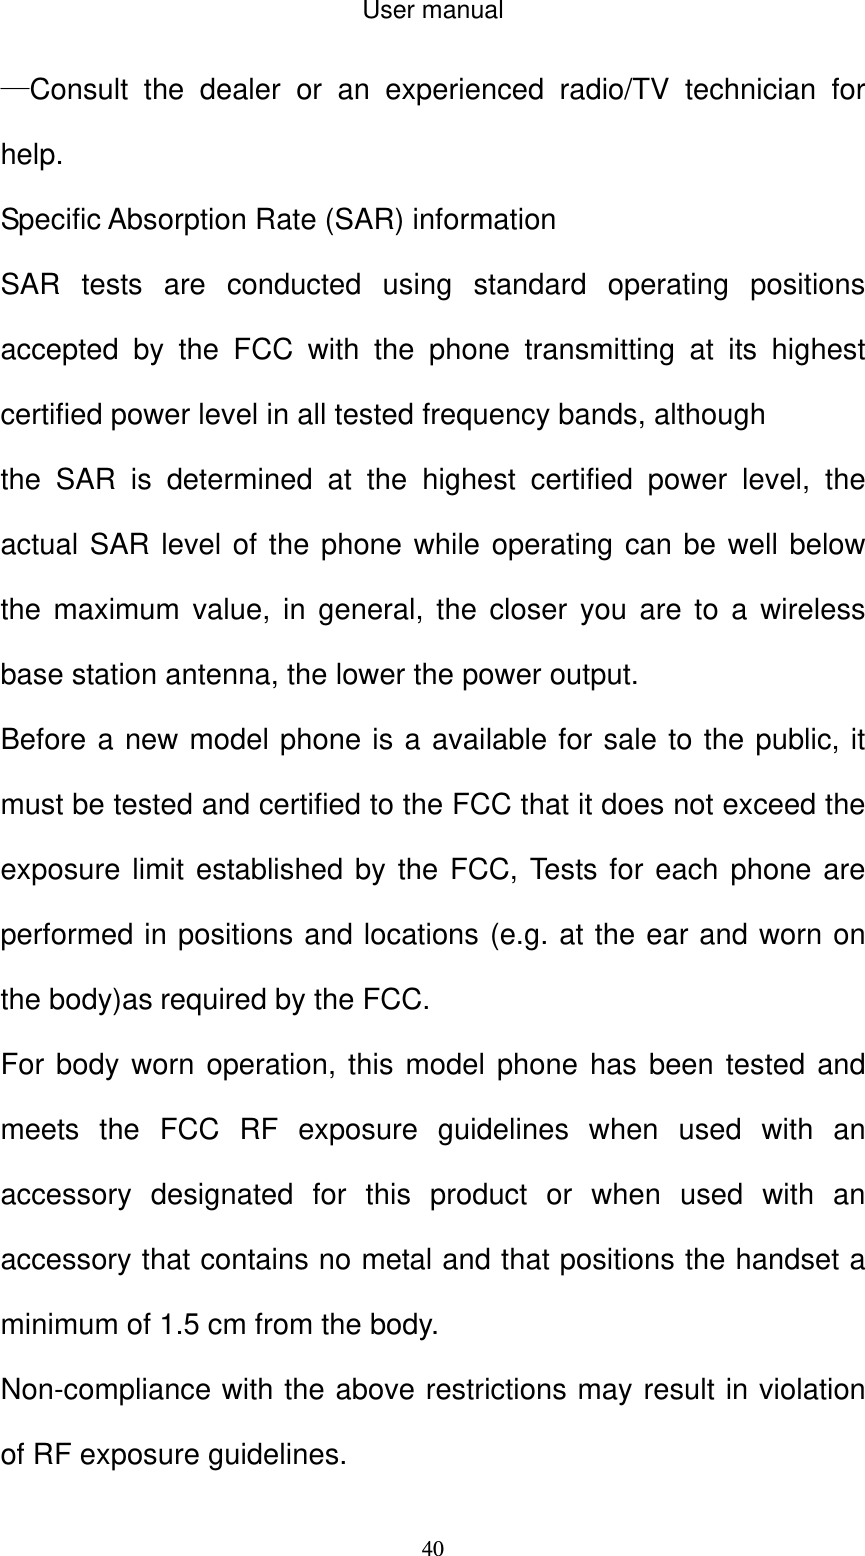
![User manual 36set password, cell phone tip "please first change password", to [modified password] menu set the security password again open, open the requirement in the input password and security notice mobile phone number (receiving the illegal use of the mobile phone SIM card to send about the illegal SIM card information), has been set up correctly, anti-theft functions start. Close: close security function. Close security function must first input security password. Change the password: modify security password 7. Fixed dial number Open the fixed dial-up function. If not you should find an operator for help. 8. Blacklist The phone cannot receive the call from this number if this number was added to the black list of the phone. 12.5 Connections Network settings 1、Data account Customize the Internet account Such As China Mobile GPRS、China Unicom WAP. To add to the Internet account, In the Internet inte](https://usermanual.wiki/DDM/P112MINU/User-Guide-2142425-Page-36.png)
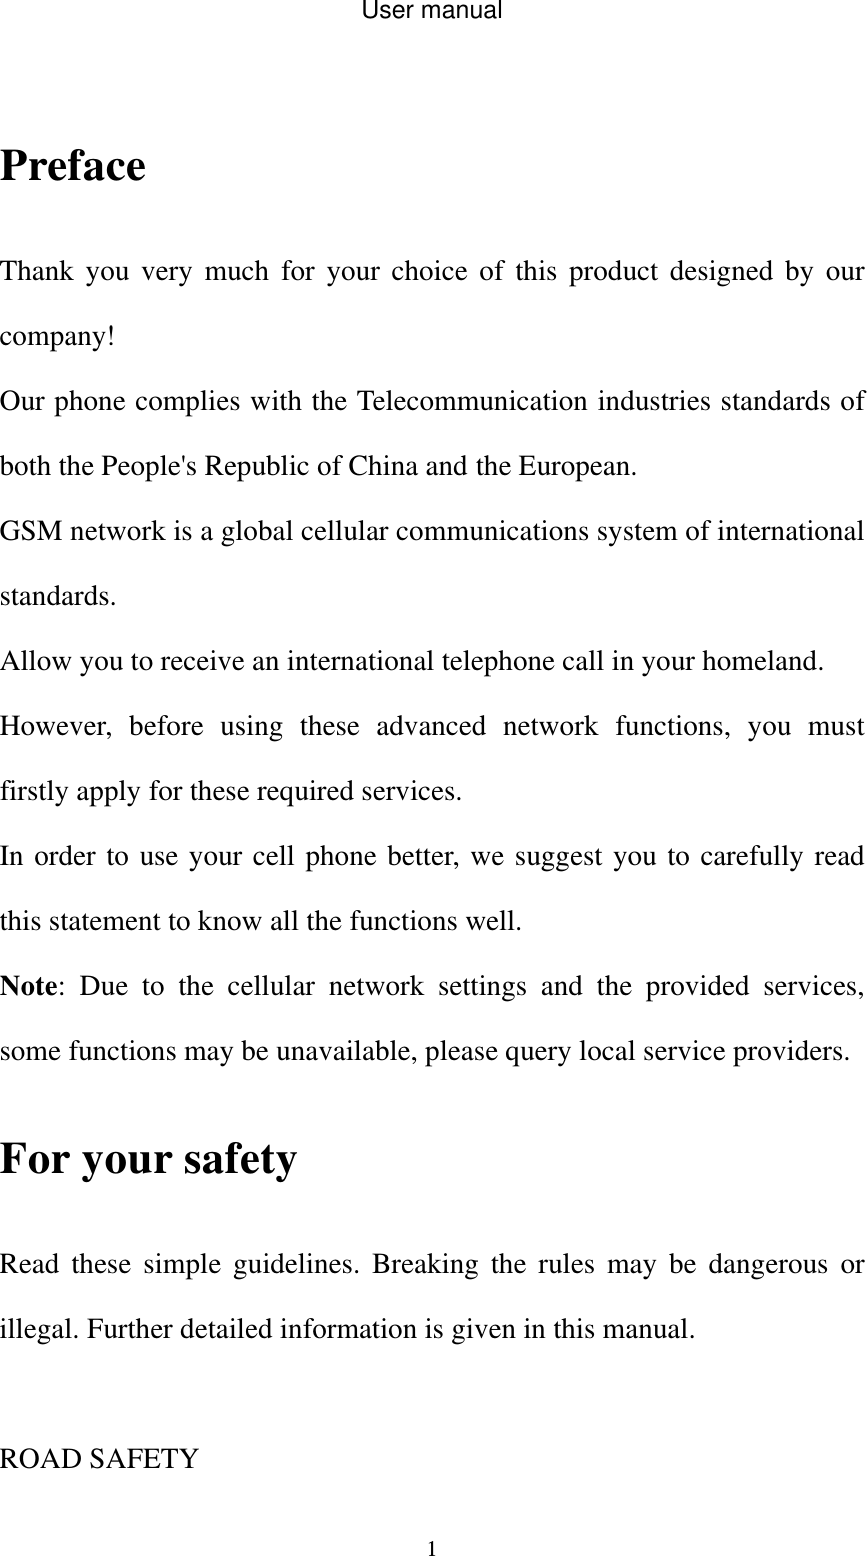
![User manual 37rface, press the [option], the following actions: New connection: Through the editing "connection Settings" new Internet account Auth type: set on confidential function. User name: make the edit network user name Password: setting inelastic password Access point: set name network access points Gateway IP: set up network IP address Gateway IP: set network port Rename: may make the edit the Internet account name Set home page: home page set up network address Advanced Settings: set the DNS address and network type New connection: choose to add multiple defaults Internet account Search: search area nearby on the registration network configuration, after searching use directly Delete, delete selected Internet account Edit: editing the selected Internet account 2、GPRS Service You can choose to open or closed 3、Data connection settings Mobile phones can accord to your SIM card default network configuration.](https://usermanual.wiki/DDM/P112MINU/User-Guide-2142425-Page-37.png)