Users Manual

1
CONTENTS
1. Preparation
Product Details
Package Contents
Name of parts
LCD Display
Loading the Battery
2. Windows98/SE Driver
Install
Windows98/SE Driver Install
3. Computer Connection
Connecting to a PC
Downloading Files
Disconnecting from a PC
4. Basic Operation
Turning Power On/Off
Playing the Track
File Navigation
Main Menu
Voice-Recording
Playing the FM Radio
Playback the voice-recorded files
Button List
5. Settings
DISPLAY
REPEAT MODE
FILE
MEMORY INFO
USER EQ
TEMPO
RESUME
SLEEP TIME
Menu Chart
6. Remarks
Precautions
Product Specifications
Trouble Shooting
Note) Contents of product manual are subject to change due to improvement of the product
without previous notice.
2
1. Preparation
P
P
Pr
r
ro
o
od
d
du
u
uc
c
ct
t
t
D
D
De
e
et
t
ta
a
ai
i
il
l
ls
s
s
● Playing MP3, WMA files, FM Radio, Voice Recording
● Built-in Memory(128MB/256MB/512MB)
● GUI(Graphic User Interface) Menu Support
- Easy to use multi-functions using graphic display like icon
● 6 Equalizers
- Normal/Jazz/Classic/Pop/Rock/User-defined
● Navigation
- Easy to search for files.
● Repeat Section“A<->B"
- Repeating any section you want to listen again for studying foreign language
● PC USB Power
- Using the PC’s USB Power when connected to a PC (no battery required for data
transfer)
● NO software Required (device seen as new drive letter)
- (Note: driver needed in Windows 98/SE)
● Long Battery Life
- 10 hours with AAA type battery
3
P
P
Pa
a
ac
c
ck
k
ka
a
ag
g
ge
e
e
C
C
Co
o
on
n
nt
t
te
e
en
n
nt
t
ts
s
s
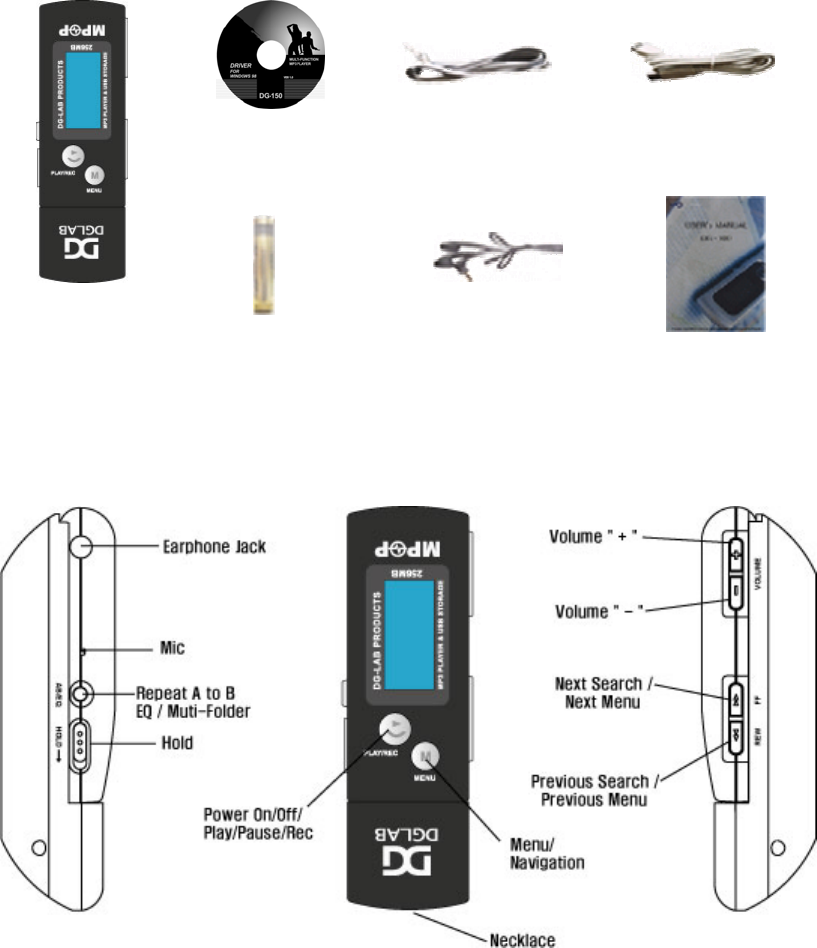
CD Necklace cable
DG-150
Battery (AAA X 1EA) Earphones User Guide
N
N
Na
a
am
m
me
e
e
o
o
of
f
f
p
p
pa
a
ar
r
rt
t
ts
s
s
Note) Plastic protect-cover is on LCD display at shipment
4
L
L
LC
C
CD
D
D
D
D
Di
i
is
s
sp
p
pl
l
la
a
ay
y
y
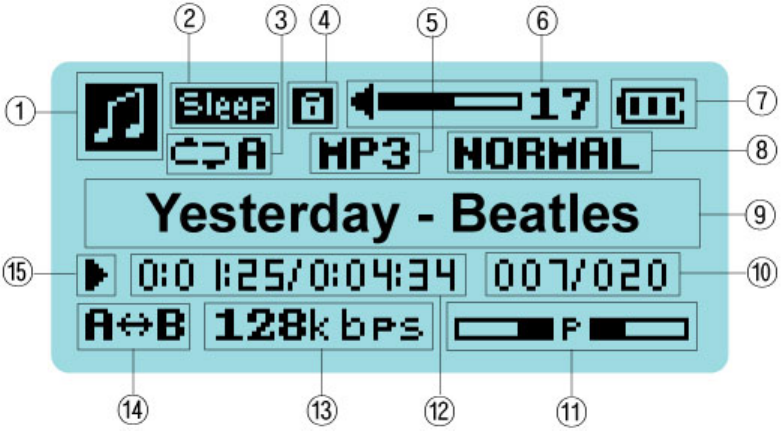
① Displays operations (Playback, Voice-recording, FM radio)
② Appears when sleep time is set up
③ Displays playback type (repeat type)
④ Displays when the Hold Switch is on
⑤ MP3 / WMA (File type)
⑥ Volume Level Icon
⑦ Displays the battery’s power level
⑧ Equalizer(EQ) Icon
⑨ Present file’s name or ID3 tag
⑩ Present file number / Total file numbers
⑪ Displays the volume output as the visualization of audio signal
⑫ Elapsed time of a present file / Total playing time of a present file
⑬ BIT RATE
⑭ Repeat Section Icon
⑮ Playing/Stop Icon
5
L
L
Lo
o
oa
a
ad
d
di
i
in
n
ng
g
g
t
t
th
h
he
e
e
B
B
Ba
a
at
t
tt
t
te
e
er
r
ry
y
y
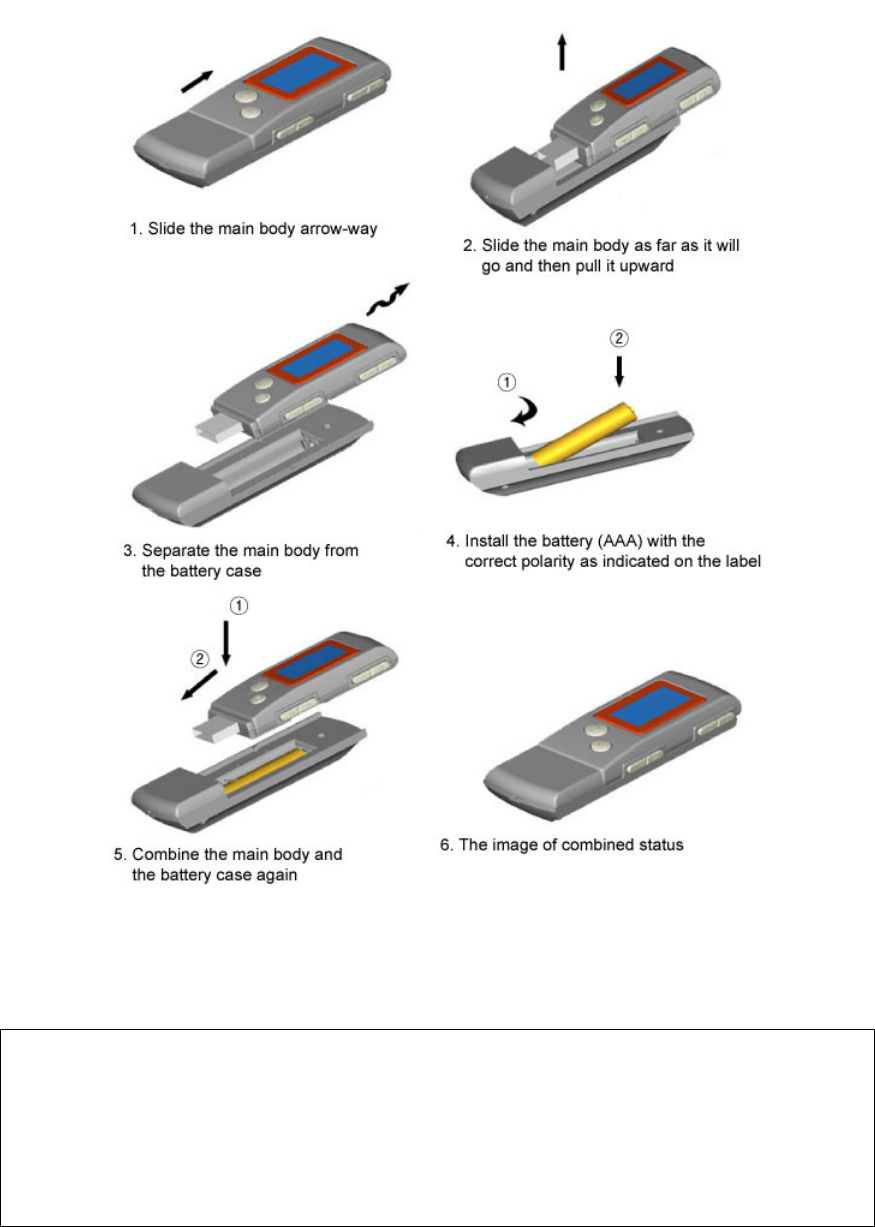
Cautions)
If you do not intend to use the battery for a long period of time, remove the battery from the
product.
If the battery is leaking, remove it from the product.
If the battery is leaking, wipe the battery terminal clean and then loading the new battery.
6
2. Windows98/SE Driver Install
W
W
Wi
i
in
n
nd
d
do
o
ow
w
ws
s
s9
9
98
8
8/
/
/S
S
SE
E
E
D
D
Dr
r
ri
i
iv
v
ve
e
er
r
r
I
I
In
n
ns
s
st
t
ta
a
al
l
ll
l
l
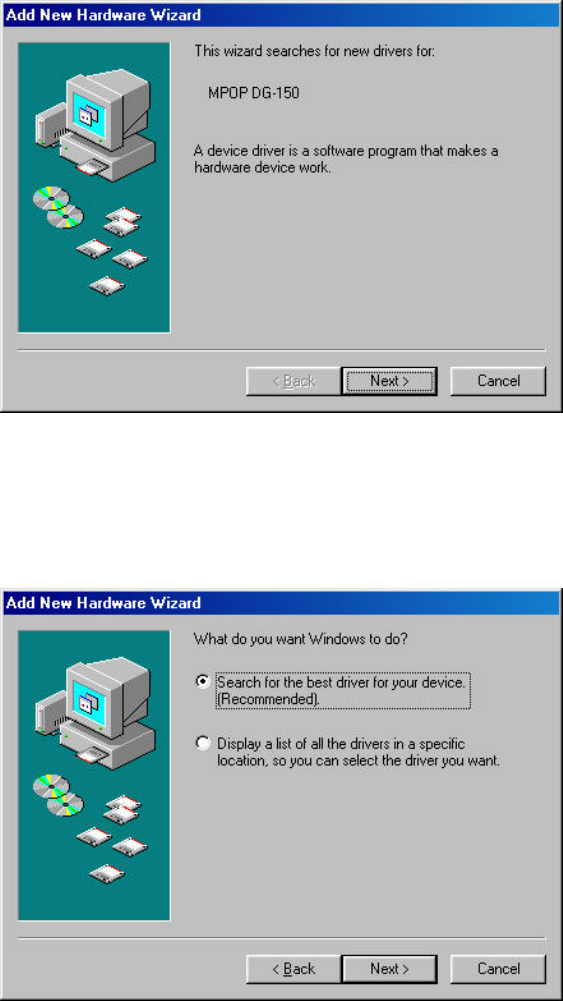
Note) Install this on a PC that uses Windows98/SE OS, only first installation is necessary.
(1) Insert the enclosed CD into the CD-Rom Drive and then plug DG-150 into a USB port
on a PC.
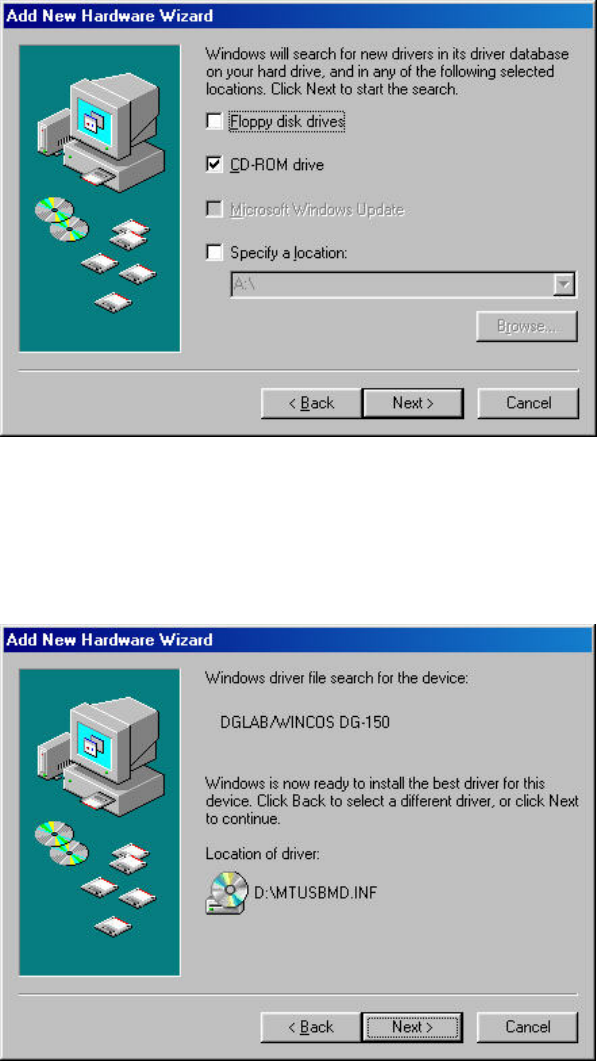
You may see following window (“Add New Hardware Wizard”). Click “Next” button.
(2) The following window will appear.
Select the first option (“Search for the best driver for your device”) and click
“Next” button
7
(3) Select “CD-ROM drive” and click “Next” button
(4) The following window will appear. Click “Next” button.
8
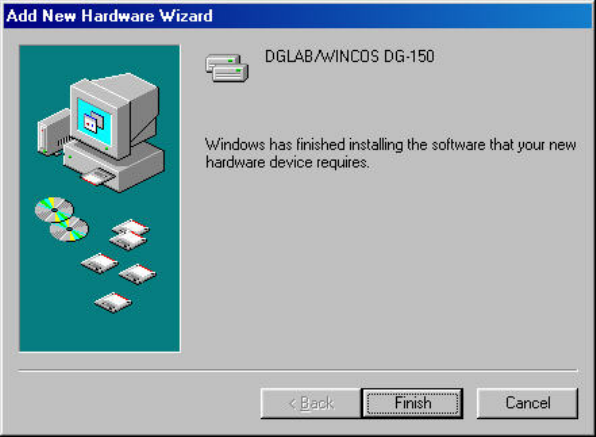
(5) Click “Finish” button.
Driver Installation is completed.
“Removable Disk” will shown in “My Computer” folder. When it is removed from
your computer, the “Removable Disk” will disappear from “My Computer”.
9
3. Computer Connection
C
C
Co
o
on
n
nn
n
ne
e
ec
c
ct
t
ti
i
in
n
ng
g
g
t
t
to
o
o
a
a
a
P
P
PC
C
C
(1) Remove the main body from the battery case
(2) Plug the main body into a USB port on your computer
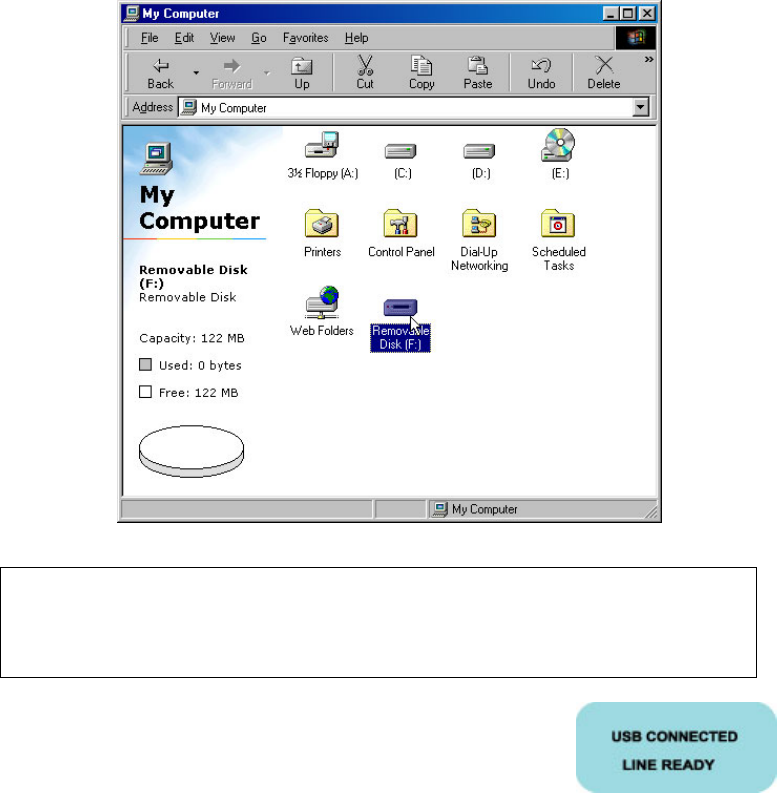
(3) “Removable Disk” will shown in “My Computer” folder
The main body of DG-150 can be used like a floppy diskette or removable HDD. When
it is removed from your computer, the “Removable Disk” will disappear from “My
Computer”.
"USB CONNECTED” message as shown will be displayed on
the main body’s LCD screen when the main body is plugged
into your computer.

10
D
D
Do
o
ow
w
wn
n
nl
l
lo
o
oa
a
ad
d
di
i
in
n
ng
g
g
F
F
Fi
i
il
l
le
e
es
s
s
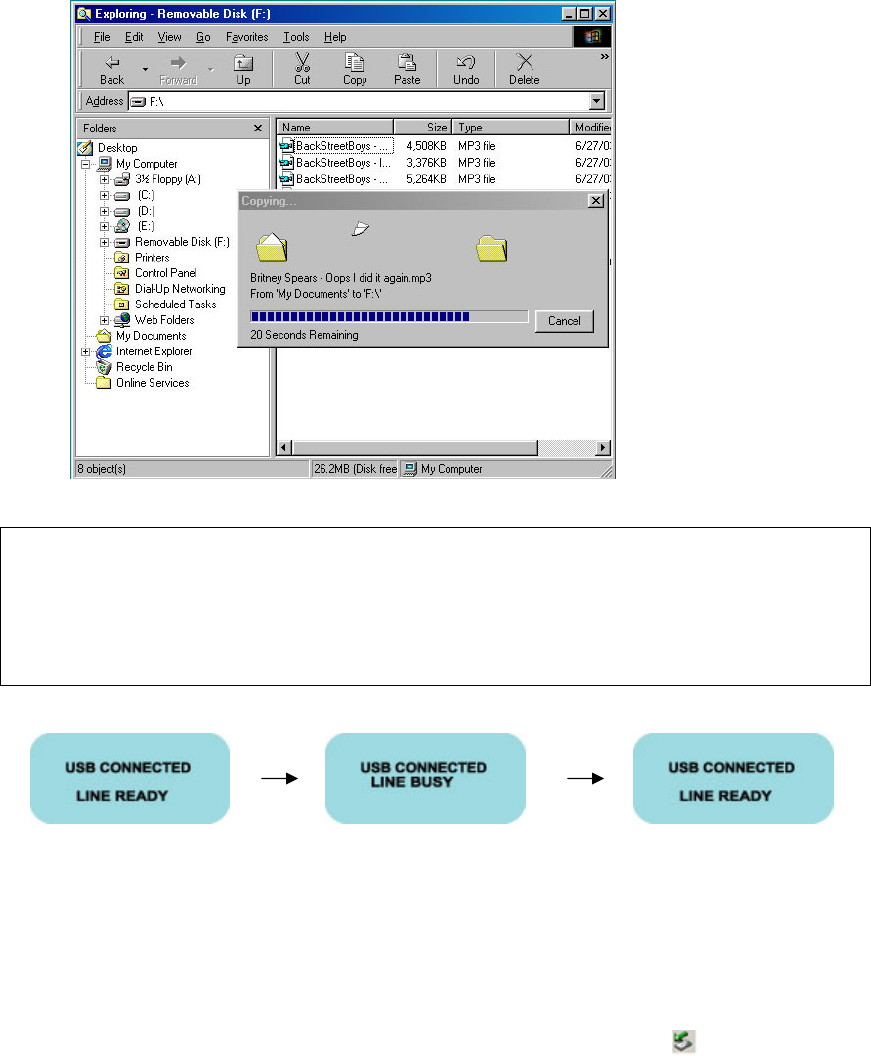
(1) Select the music files from your PC and then Press right button on you mouse and
Select “copy”
(2) Paste the selected files in the “Removable Disk” in “My Computer”
11
(3) Copying the files to “Removable Disk” will be shown.
Note)
Make sure that you see “Line Ready” on the LCD screen at DG-150 BEFORE removing DG-150 from
you PC because files are copying even if download looks like completed on the monitor of your
PC.
<Connection into PC> <files are being transferred> <transfer is completed>
D
D
Di
i
is
s
sc
c
co
o
on
n
nn
n
ne
e
ec
c
ct
t
ti
i
in
n
ng
g
g
f
f
fr
r
ro
o
om
m
m
a
a
a
P
P
PC
C
C
In Windows 2000/ME/XP, click the “Safely Remove Hardware” icon () in your system
tray and Stop the device you want to unplug or eject.
In Windows 98/SE, select the “Removable Disk” and right click your mouse and select
the “Eject” command before pulling DG-150 from your PC.
12
4. Basic Operation
T
T
Tu
u
ur
r
rn
n
ni
i
in
n
ng
g
g
P
P
Po
o
ow
w
we
e
er
r
r
O
O
On
n
n/
/
/O
O
Of
f
ff
f
f
● To Power On, press and hold the (PLAY) button about 1 second.
● To Power Off, press and hold the (PLAY) button about 2 seconds in playback or
stop mode.
● If no button is pressed in stop mode, power will be cut off automatically within 1
minute to preserve the battery.
Note) “KEY HOLD!!”Message will be blinking if you press (PLAY) button when Hold switch
(HOLD) is on. If Hold Switch (HOLD) is not Off within 5 seconds, power will be
cut off automatically.
P
P
Pl
l
la
a
ay
y
yi
i
in
n
ng
g
g
t
t
th
h
he
e
e
T
T
Tr
r
ra
a
ac
c
ck
k
k
● If you turn power on, a track will be playing right away. If there is no file,
“NO TRACK” message will be displayed.
<No file> <file>
● If you are in other MODE (i.e. VOICE RECORD, FM RADIO, VOICE PLAY, SETTINGS),
select “MUSIC PLAY”(Playing Mode) in Main Menu.
● Press (PLAY) button to play a track while pause or stop. Press (PLAY)
button to pause it while playing a track.
13
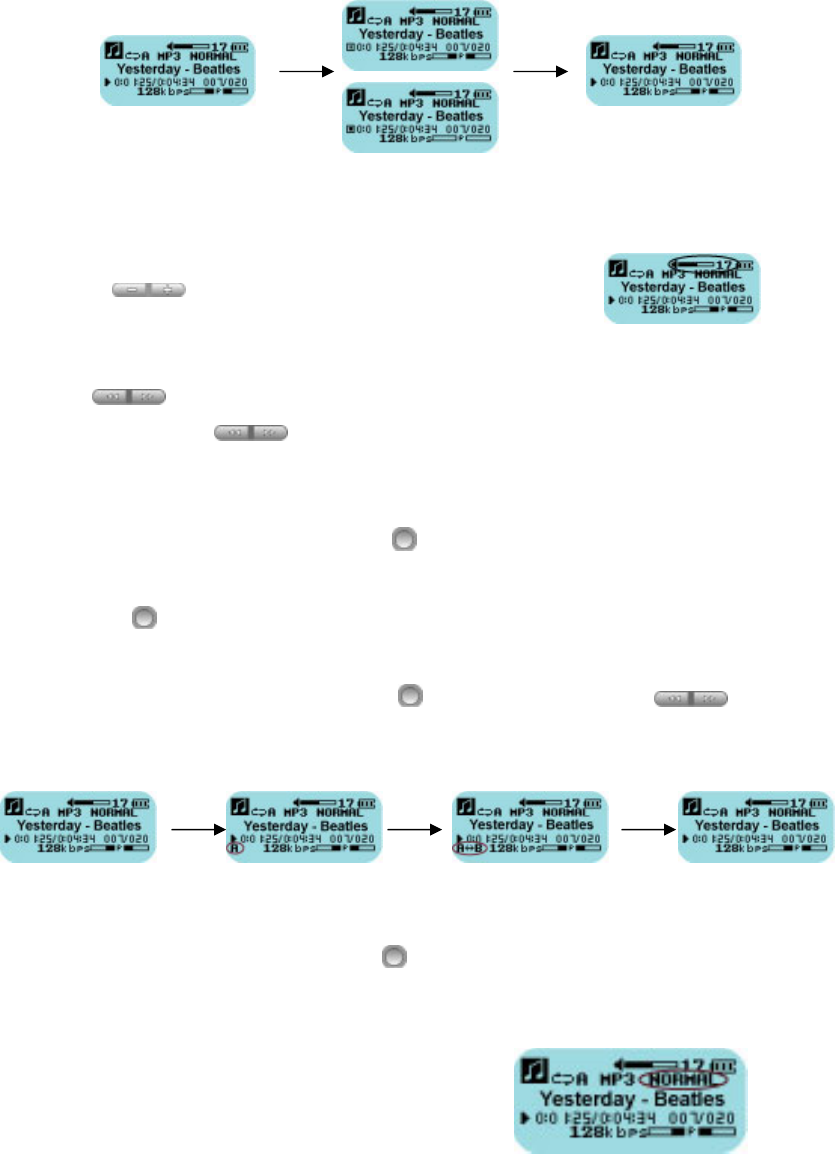
● Volume Control
Press the (VOLUME) button to adjust the volume.
● Select & Search track
- Press (REW, FF) button to select and play the next or previous track.
- Press and hold the (REW, FF) button about 2 seconds to search a track.
● Repeat Section
(1) While a track is playing, press the (A<->B) button to set the repeat section
(starting point “A”) of a desired track.
(2) Press the (A<->B) button again to set the ending point (“B”) of the desired
section of the track and playing repeatedly.
(3) To cancel a set A<->B repeat, Press (A<->B) button again or (REW, FF)
button.
● Equalizer
To select the EQ level, press and hold (A<->B) button more than 1 second.
- NORMAL : Standard EQ good for all genres of music
- JAZZ : EQ levels adjusted for Jazz music
- CLASSIC : EQ levels adjusted for Classical music
- POP : EQ levels adjusted for Pop music
- ROCK : EQ levels adjusted for Rock music
- USER : EQ levels a user can adjust
14
F
F
Fi
i
il
l
le
e
e
N
N
Na
a
av
v
vi
i
ig
g
ga
a
at
t
ti
i
io
o
on
n
n
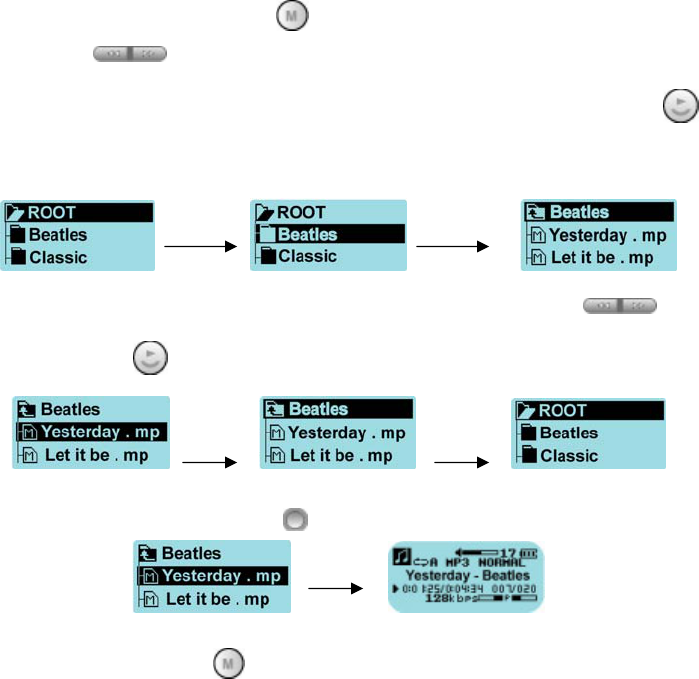
(1) To search files, press and hold (MENU) button about 1 second and then search
files by pressing (REW, FF) button.
(2) If you want to look at files in a folder, select the folder and press (PLAY)
button.
(3) To move to upper folder, select the desired folder by pressing (REW,FF)
button and then press (PLAY) button.
(4) To play the desired track, press (A<->B) button
(5) To exit navigation, press (MENU) button or select EXIT.
15
M
M
Ma
a
ai
i
in
n
n
M
M
Me
e
en
n
nu
u
u
There are 5 modes in Main Menu. i.e. MUSIC PLAY, FM RADIO, VOICE
RECORD, VOICE PLAY, SETTING Mode.
● To enter the Main Menu, press the (MENU) button.
● To move to the desired menu, use the (REW, FF) button.
● To move to sub-menu or select the option, press the (PLAY) button.
● If you press the (MENU) button again or no button is pressed for 10 seconds, it
will automatically exit from the Main Menu and return to the previous mode.
V
V
Vo
o
oi
i
ic
c
ce
e
e-
-
-R
R
Re
e
ec
c
co
o
or
r
rd
d
di
i
in
n
ng
g
g
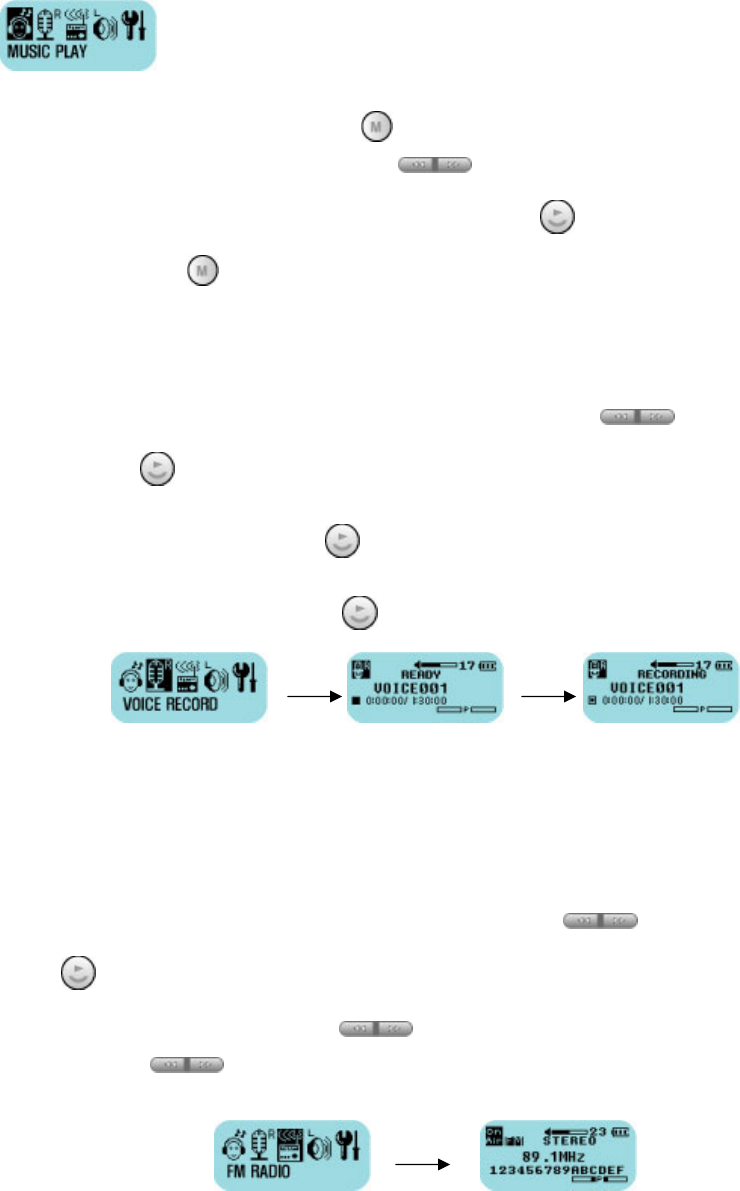
● When in Main Menu, select “VOICE RECORD” icon by using (REW, FF) button
and press (PLAY) button.
● To start a recording, press the (PLAY) button.
● To stop the recording, press the (PLAY) button again.
Note) A voice-recorded file is saved in VOICE Folder like VOICE000.VRF etc.
Voice-Recording is available only if there is space in memory.
P
P
Pl
l
la
a
ay
y
yi
i
in
n
ng
g
g
t
t
th
h
he
e
e
F
F
FM
M
M
R
R
Ra
a
ad
d
di
i
io
o
o
● To play the FM Radio, select “FM RADIO” icon by using (REW, FF) button and
press (PLAY) button in Main Menu.
● To change the frequency, press (REW, FF) button.
● If you press (REW, FF) button about more than 1 seconds, it will move to
previous or next the broadcast frequency. (AUTO SCAN)
16
[Preset Tuning]
● Hold down the (A<->B) button more than 1 second.
● Tune in to a station you wish to preset using the (REW, FF) button.
● Press the (A<->B) button again more than 1 second and select the preset number
using the (REW,FF) button.
● Press the (A<->B) button again more than 1 second to preset the station number.
* Some stations may not be preset in place where transmitting sensitivity is bad.
[Tuning in to a Preset Station]
To play the preset station, press the (A<->B) button to enter the
[MEMORY] Mode
Press the (REW, FF) button to select the desired preset
station number
P
P
Pl
l
la
a
ay
y
yb
b
ba
a
ac
c
ck
k
k
t
t
th
h
he
e
e
V
V
Vo
o
oi
i
ic
c
ce
e
e-
-
-r
r
re
e
ec
c
co
o
or
r
rd
d
de
e
ed
d
d
F
F
Fi
i
il
l
le
e
es
s
s
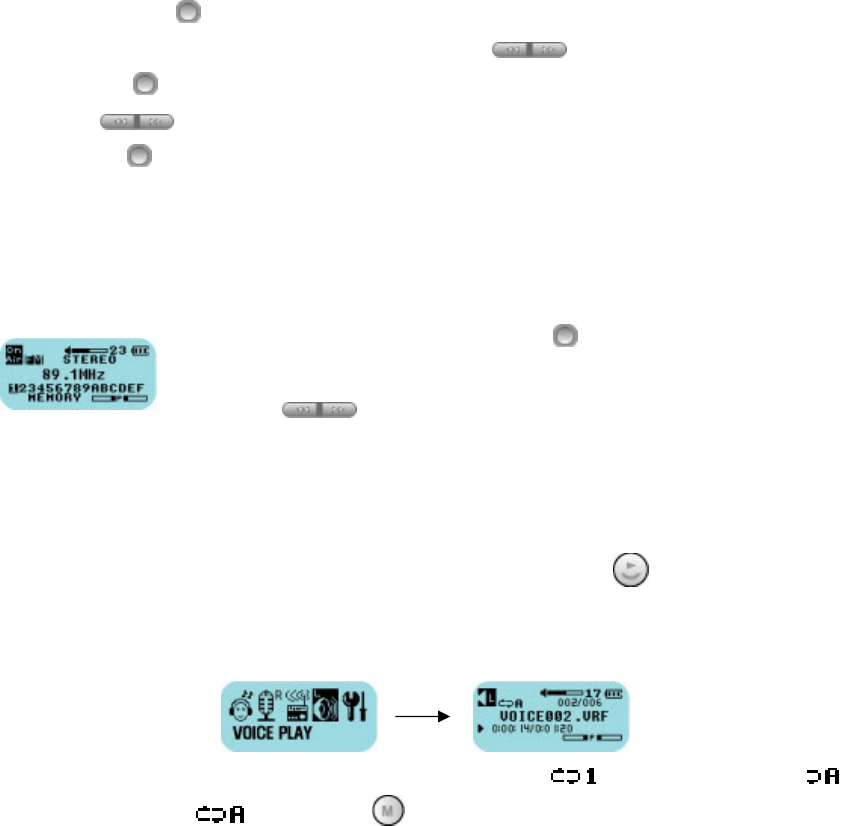
When in Main Menu, select “VOICE PLAY” icon and press the (PLAY) button.
You can operate the functions - such as playing the files, volume control and move
between tracks - the same way as in Playing the Track.
Note) To change different repeat modes (one file repeatedly (), all files one time (),
all files repeatedly ( )), press the (MENU) button more than 1 second.
17
B
B
Bu
u
ut
t
tt
t
to
o
on
n
n
L
L
Li
i
is
s
st
t
t
Button Previous State Press Length Operation
Power Off Long Turn power on and playing
Playing the track Short Stop
Playing/Playback
/Voice-Recording
FM / Menu
Navigation
Long Turn power off
Stop in
Playing/Playback
Short Play the track/Playback the voice-
recorded file
Stop in Voice-
Recording
Short Start Voice-Recording
Recording the Voice Short Stop
Menu Short Select the (sub)mode/option
PLAY/STOP
Navigation Short Move to upper(sub) directory
Playing/Playback Short Playing the next track/file
Playing/Playback Long FF and play within the track/file
FM Short Change the frequency, Moving channels
FM Long Auto scan
FF
MENU Short Moving MENU
Playing/Playback Short Playing the previous track/file
Playing/Playback Long REW and play within the track/file
FM Short Change the frequency, Moving channels
FM Long Auto scan
REW
MENU Short Moving MENU

18
Button Previous State Press Length Operation
Playing/Playback/FM/
Voice-Recording
Short Increase the volume along with volume
level
Playing/Playback/FM/
Voice-Recording
Long Increase the volume continuously
VOL +
MENU Short/Long adjust the level in the setting
Playing/Playback/FM/
Voice-Recording
Short Decrease the volume along with volume
level
Playing/Playback/FM/
Voice-Recording
Long Decrease the volume continuously
VOL -
MENU Short/Long adjust the level in the setting
Playing/Playback Short Turn Repeat Mode On/Off
Playing Long Change the EQ level
FM Short Turn MEMORY Mode On/Off
FM Long Preset the station(channel)
Navigation Short Select the file
REPEAT(A-B)
Settings(FILE DELETE) Short Delete the file
Playing/Playback/FM/
Voice-Recording
Short Enter the MENU
Playing/Stop a track Long Navigation
MENU
MENU Short Exit from the MENU
19
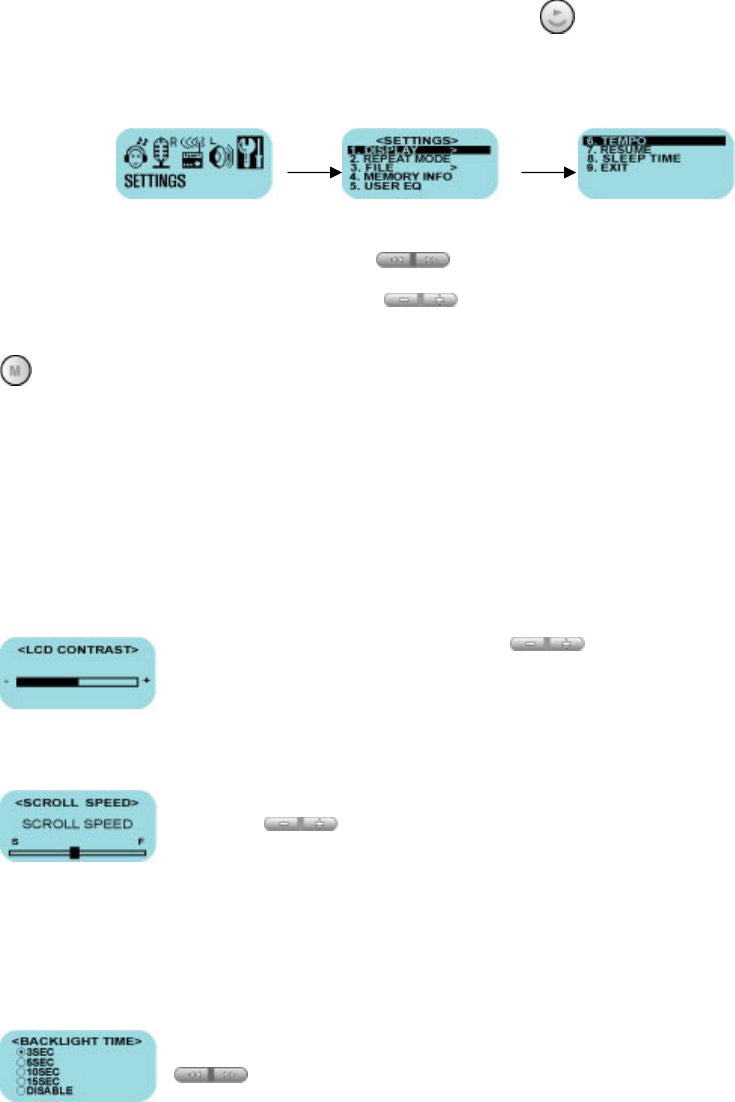
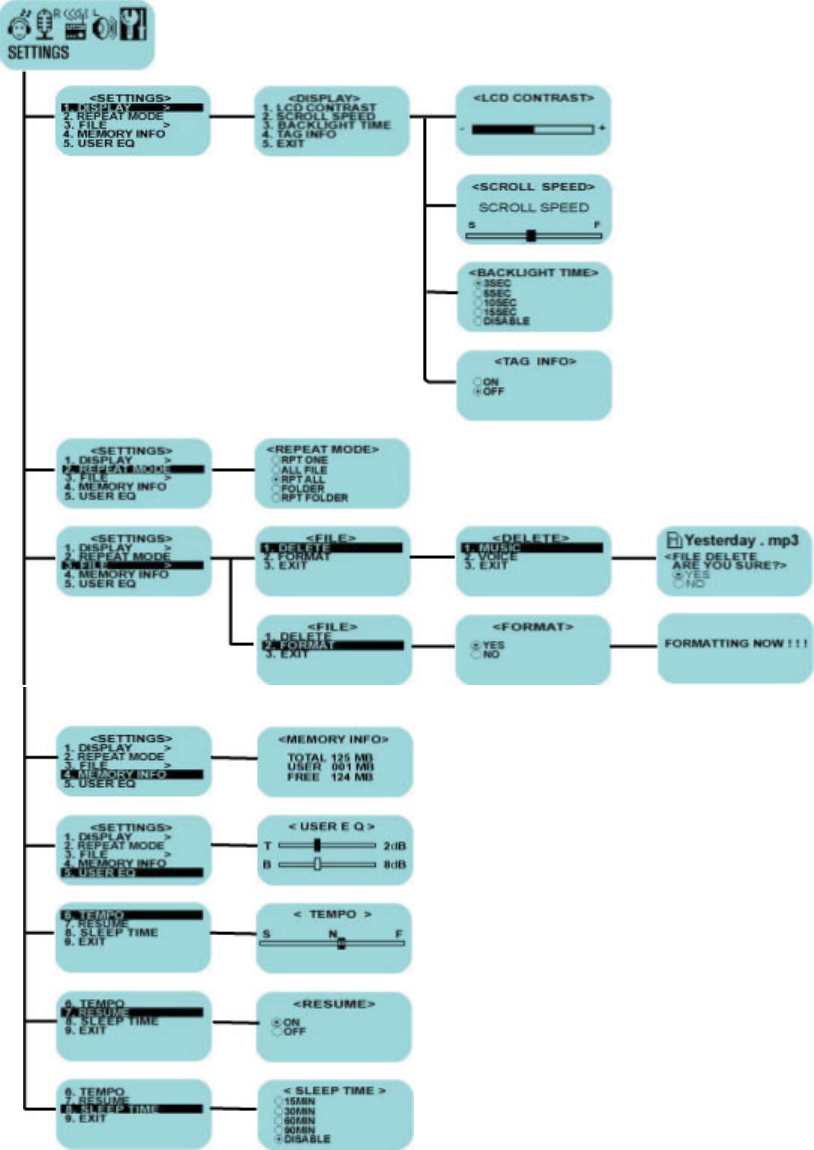
5. Settings
To enter Settings, select “Settings” icon and press (PLAY) button in Main Menu.
There are DISPLAY, REPEAT MODE, FILE, MEMORY INFO, USER EQ, TEMPO, RESUME, and SLEEP
TIME Menu and their Sub-Menu in settings.
● To move between the Menu, use the (REW, FF) button.
● To adjust the level, use the (VOLUME) button.
● To exit for sub-menu, select “EXIT” and To exit for Menu Mode, press the
(MENU) button.
Note) The values adjusted in settings are saved only in RESUME ON. When in RESUME OFF, return
to default value.
D
D
DI
I
IS
S
SP
P
PL
L
LA
A
AY
Y
Y
● LCD CONTRAST
Contrast can be adjusted by using the (VOLUME) button.
● SCROLL SPEED
Scroll speed of Tag Information/File Name on the LCD can be adjusted by
using the (VOLUME) button. (VOL- : slow, VOL+: fast)
File name will be displayed and scrolled while you are adjusting the Scroll
Speed so that you can confirm your setting. (If no file is saved, “SCROLL SPEED” text will
be displayed)
● BACKLIGHT TIME
Backlight time can be adjusted by OFF or /3/5/10/15 sec. using the
(REW, FF) button.
20
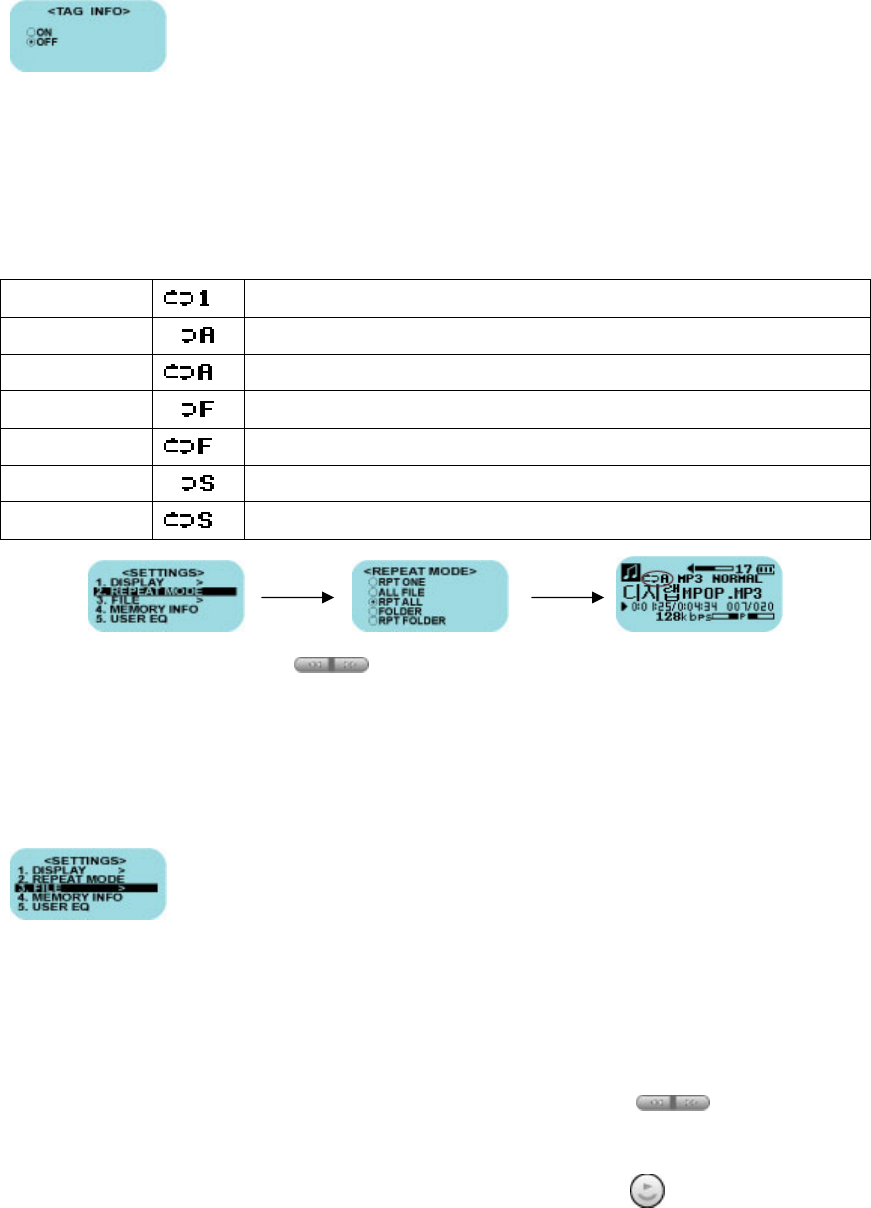
● TAG INFO
ON: Display track with Tag Information.
OFF: Display track with file name.
R
R
RE
E
EP
P
PE
E
EA
A
AT
T
T
M
M
MO
O
OD
D
DE
E
E
You can select and set 7 Repeat and Shuffle options in playing as follows.
RPT ONE Play a track you are listening to repeatedly.
ALL FILE Play all tracks in memory once and stop.
RPT ALL Play all tracks in memory repeatedly.
FOLDER Play all tracks in the folder and stop.
RPT FOLDER Play all tracks in the folder repeatedly.
SHUFFLE Randomly play all tracks in memory once and stop.
RPT SHUFFLE Randomly play all tracks in memory repeatedly.
To change the options, use the (REW, FF) button.
F
F
FI
I
IL
L
LE
E
E
When in File Menu, the player will stop automatically.
There are DELETE and FORMAT options in File Menu. Files are divided
into Music files and Voice-Recorded Files so that each file is deleted
separately.
● Deleting Files
(1) Select DELETE in FILE Menu and then select MUSIC or VOICE.
(2) Select the file you wish to delete in Navigation using the (REW,FF)
button.
To display files in a folder, select the folder and press (PLAY) button.
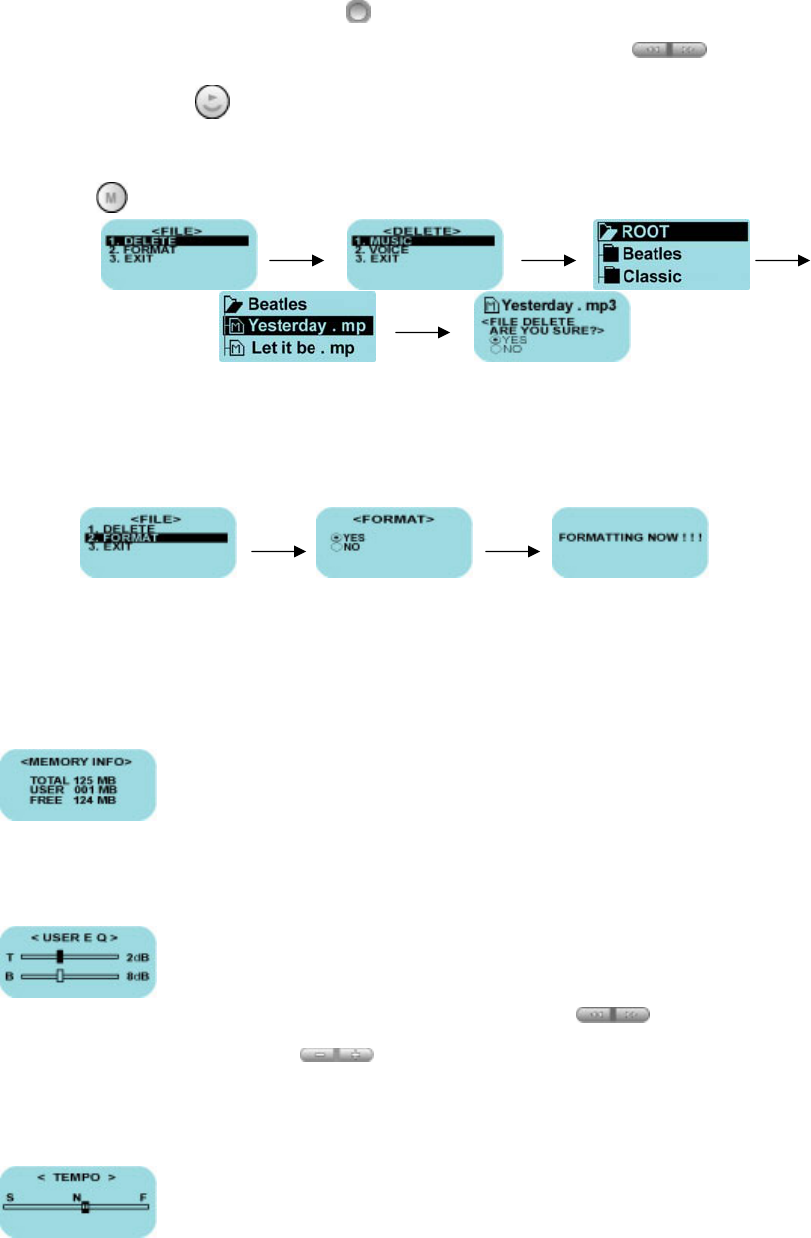
21
(3) To delete the file, press the (A<->B) button. Message “FILE DELETE ARE YOU
SURE?” is displayed on the LCD. Select “YES” using the (REW,FF)
button and press (PLAY) button.
(4) To escape from DELETE Menu, select EXIT option and to escape from Main Menu,
press (MENU) button.
● Formatting
It is possible to format system/memory of a player. (All the files will be deleted)
Select FORMAT and then select “YES” in File menu and the formatting is started.
* After formatting, VOICE folder will be created automatically.
M
M
ME
E
EM
M
MO
O
OR
R
RY
Y
Y
I
I
IN
N
NF
F
FO
O
O
TOTAL : Displays the total memory size.
USED : Displays the used memory size.
FREE : Displays the available memory size.
U
U
US
S
SE
E
ER
R
R
E
E
EQ
Q
Q
In addition to 5-preset EQs, a user can adjust EQ level.
(Adjusting Bass/Treble values)
To Switch over between T and B, use the (REW,FF) button and
to change the level, use the (VOLUME) button.
T
T
TE
E
EM
M
MP
P
PO
O
O
You can adjust playing file’s tempo.
Moving to S is getting playing tempo slower and moving to F is
getting to faster. (N is normal tempo). (VOL- : moving to S ,
VOL+ : moving to F)

22
R
R
RE
E
ES
S
SU
U
UM
M
ME
E
E
When ON, the player resumes to previous place in song after Power
Off.
The values adjusted in Settings mode are saved. (Only in the case
normally power is turned off.)
Note) After deleting files, formatting or connecting into a PC, RESUME is set to OFF automatically,
S
S
SL
L
LE
E
EE
E
EP
P
P
T
T
TI
I
IM
M
ME
E
E
Default value is set to DISABLE.
15, 30, 60 or 90 minutes can be set.
Automatically turns power off after a fixed time even though
playing music or listening to the Radio.
23
M
M
Me
e
en
n
nu
u
u
C
C
Ch
h
ha
a
ar
r
rt
t
t
24
6. Remarks
P
P
Pr
r
re
e
ec
c
ca
a
au
u
ut
t
ti
i
io
o
on
n
n
● Do not drop the player or apply any sudden/severe impact (Shock is a major
cause of breakdown).
● Be sure to take out the battery if the player will not be used for a long time.
● Avoid exposure to dust, moisture, magnetic fields, direct sunlight or heat.
● Please avoid static Electricity. If this happens, turn the player off and on
again.
● Do not disassemble the player.
● Do not listen to the player with a high volume level for a long period of time.
It may damage your hearing.
● Do not listen to the player when driving a car, motorcycle, or bicycle.
● Do not listen to the player with a high level volume at a crosswalk.
● When separating the player from your PC, be sure to follow the instructions in
section “Disconnecting from a PC”; especially in a Windows environment.
25
P
P
Pr
r
ro
o
od
d
du
u
uc
c
ct
t
t
S
S
Sp
p
pe
e
ec
c
ci
i
if
f
fi
i
ic
c
ca
a
at
t
ti
i
io
o
on
n
n
Model DG-150
Size 28.4 * 94.2 * 26.6mm (W X L X H)
Weight 38g (without battery)
Memory (128MB/256MB/512MB) built in Memory
Battery AAA type battery * 1EA
Earphones 6.0 mW / 16Ω
S/N Ratio 90 dB
Audio
Output
Output Frequency 20 Hz ~ 20 KHz
Earphones 6.0 mW / 16Ω
S/N Ratio 50 dB
FM
Output Frequency 88 MHz ~ 108 MHz
Voice-Recording Approx. 17 hrs – (256MB ,ADPCM)
LCD Graphic 3 Line with Backlight
Language Multi-Languages (Korean, English, Chinese, Japanese)
Download Speed 4 Mbps (Depending on PC)
Max. Playing Time Approx. 10 hrs (128 kbps, MP3, 20 Volume, Normal EQ)
Operating Temperature 0 ~ 40 ℃
USB Supporting USB 1.1 (Plug & Play)
OS Wind98/SE(with driver) , WindME/2000/XP , Mac 9.0 or above
26
T
T
Tr
r
ro
o
ou
u
ub
b
bl
l
le
e
e
S
S
Sh
h
ho
o
oo
o
ot
t
ti
i
in
n
ng
g
g
If you have any problem in the player, please check the following instructions
first.
● Can not turn power on
- Check whether the battery is exhausted.
- Check whether the battery is installed correctly by matching polarity to the
player.
● Dose not work when pressing the button
- Check whether the Hold switch is set (Hold->)..
● Screen on LCD stops
- Turn Power On/Off.
If this problem persists, disassemble the battery case from main body and
than combine two parts after several minutes.
● No Sound or Noise
- Check whether plug connected firmly or is dirty.
- Corrupted MP3 or WMA files may make a static noise and the sound may cut off.
Check the sound with other files.
● Failed download MP3 files from a PC
- Check the connection between a PC and main body of the player.
- Disconnect and connect USB port again.
- In Windows98/SE, Check whether the correct driver for Windows98/SE is installed.
-In Windows ME/2000/XP, Check Windows Update and re-booting a PC and connect
again.
CAUTION: Changes or modifications not expressly approved by the manufacturer
responsible for compliance could void the user’s authority to operate the equipment
WAR NI NG
This device complies with part 15 of the FCC Rules. Operation is subject to the
following two conditions: (1) This device may not cause harmful interference, and (2)
this device must accept any interference received, including interference that may cause
undesired operation.
INFORMATION TO USER:
This equipment has been tested and found to comply with the limit of a Class B digital
device, pursuant to Part 15 of the FCC Rules. These limits are designed to provide
reasonable protection against harmful interference in a residential installation. This
equipment generates, uses and can radiate radio frequency energy and, if not installed
and used in accordance with the instructions, may cause harmful interference to radio
communications. However, there is no guarantee that interference will not occur in a
particular installation; if this equipment does cause harmful interference to radio or
television reception, which can be determined by turning the equipment off and on, the
user is encouraged to try to correct the interference by one or more of the following
measures:
1. Reorient / Relocate the receiving antenna.
2. Increase the separation between the equipment and receiver.
3. Connect the equipment into an outlet on a circuit difference from that to which
the receiver is connected.
4. Consult the dealer or an experienced radio/TV technician for help