DH Technology 000000 UHF Band RFID Tag User Manual DVDPlayer ManualEN GB
DH Technology, Inc. UHF Band RFID Tag DVDPlayer ManualEN GB
Manual
Audi Entertainment mobile
Operating instructions G
2
CONTENTS
GENERAL INFORMATION................................ 3
Safety information .......................................... 3
Precautions to be taken when using the
portable DVD player........................................ 4
Advice on handling the discs .......................... 4
SCOPE OF SUPPLY........................................... 4
CONTROLS ON THE PLAYER............................ 5
Front face with control panel.......................... 5
Left and right sides ......................................... 6
Reverse side (without battery) ........................ 6
THE REMOTE CONTROL .................................. 7
Remote control buttons .................................. 7
Notes on using the remote control.................. 8
Inserting or replacing the battery.................... 8
TYPICAL PLAYER INSTALLATIONS................... 9
Installing in the car ......................................... 9
Demounting the portable DVD player ............. 9
Playback with two DVD players in the car. ... 10
Free-standing position .................................. 10
Day - night brightness adjustment ................ 10
INITIAL OPERATION ...................................... 11
Connecting to the power supply ................... 11
Switching the player On/Off.......................... 11
Standby mode ............................................... 11
DISC PLAYBACK............................................ 12
Inserting disc and playing back..................... 12
Interrupting /resuming playback ................... 12
Fast forwarding /rewinding........................... 13
Jumping to previous /next section................. 13
Calling up the DVD menu and navigation..... 13
Changing the sound playback language ....... 13
Calling up information on the disc................ 14
Ejecting the disc............................................ 14
PLAYING BACK AUDIO TITLES, IMAGES
AND VIDEOS FROM DATA CDS ..................... 15
Displaying the contents................................. 15
Switching selection ....................................... 15
Playing back content..................................... 16
Characteristics of individual file types........... 16
PLAYING BACK USBS AND
MEMORY CARDS...........................................17
Inserting the memory medium
and playing back files....................................17
Switching between several memory media....17
USING BLUETOOTH HEADPHONES................18
Establishing a headphone connection ...........18
Severing the bluetooth connection ................18
OTHER SETTINGS IN THE PLAYER MENU.......19
Navigating through the player menu.............19
Screen settings ..............................................19
Settings with connection to an external TV. ..19
Resetting to factory settings..........................20
Selecting the language ..................................20
CONNECTING TO EXTERNAL EQUIPMENT.....21
Connecting external equipment
for playback...................................................21
Playback from external equipment
(e.g. games consoles) ....................................21
Connecting headphones ................................21
USING THE BATTERY .....................................22
The battery ....................................................22
Battery operation of the portable
DVD player.....................................................22
Charging the battery......................................23
Notes on using the battery ............................23
PLAYER MENU - OVERVIEW ..........................24
FAULT CORRECTION......................................25
TECHNICAL DATA..........................................26
LICENCES AND COPYRIGHT...........................27

3
GENERAL INFORMATION
Please familiarise yourself with these installation and operating instructions prior to using
the portable DVD player for the first time. Read and adhere closely to following safety
information. Non-compliance with the safety information can cause personal injury and/or
damage to the player and will nullify any guarantee claims!
Keep these operating instructions in a safe place for later reference.
Safety information
DANGER! There are dangerous electrical voltages present within the player! Do
not open the casing under any circumstances! Contact a
qualified specialist workshop for any necessary repairs!
The player is to be safeguarded from moisture! Use a soft,
dry cloth for cleaning the casing surfaces!
When setting up the player, make sure there is enough space is
available for air to circulate around it! The player should not be
operated directly adjacent to heat sources!
ATTENTION! Connect the player to the power supply using only the
connecting cable supplied! Make sure that the cable is not
damaged and that the plugs are seated firmly!
Ensure that the supply voltage corresponds to the
operating voltage of the player. The operating voltage is stated
on the mains voltage adapter.
Isolate the player from the power supply during thunderstorms
or longer periods of absence!
Replace the batteries only with identical or equivalent items!
CLASS 1
LASER PRODUCT This equipment contains a laser unit in the DVD drive. The laser unit is
designed in such a way that no health hazards arise when used
correctly.
Do not open the laser unit under any circumstances!
Laser radiation can cause permanent damage to the eyesight!

4
Precautions to be taken when using the portable DVD player
DANGER! Only use the player in the car on the mount provided. The player
may only be installed and operated in vehicles in such a way that the
driver is not distracted.
Should smoke or odour possibly accompanied by unusual operating noises
develop, switch the player off immediately and isolate it from the voltage supply. Do not
continue using the player!
Avoid abrupt, jerky movements to the player during disc playback. The discs
could otherwise become damaged.
Advice on handling the discs
The player will play single or double-sided DVD video discs as well as standard compact
discs (12 cm diameter discs). Discs with special formats or 8 cm diameter CDs are not
suitable for playback.
Clean soiled discs carefully using first a damp, then a dry cloth. Changes in ambient
temperature can cause condensation to form on the disc. Dry the disc before use with a
soft cloth.
Avoid touching, writing on or damaging the reverse side of a disc or both sides in the case
of double-sided discs. Do not expose the discs to direct sunlight, dust or strong heat.
Defective discs can damage the DVD player and may therefore not be used!
SCOPE OF SUPPLY
The following components are included:
Check the contents upon receipt. Should a component be missing or damaged, contact
your dealer for replacement.
- Portable DVD player
- Remote control incl. battery
- Mains adapter for power supply
- 4 adapters for power supply
(UK, EU, AU and US)
- Picture stand
- Lithium-polymer rechargeable battery
- Operating instructions (10 languages)
-Travel bag
5
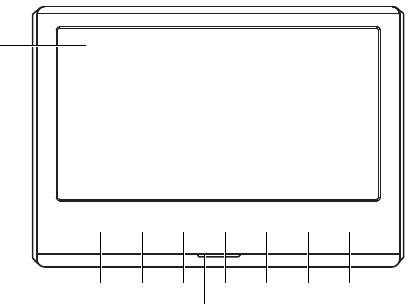
CONTROLS ON THE PLAYER
Front face with control panel
Note
The buttons on the front control panel are lit up after switching on.
They react to a single touch.
1 Display
2MENU
Calls up the player menu.
3STOP
Pre-stops /stops the playback.
4PREVIOUS CLIP
Switches to previous section /music title /
image. Holding down slows the play-
back. Also serves to navigate down the
menu.
5Day /night sensor as well as
sensor for remote control
6PLAY / PAUSE
Starts / interrupts the playback of a
medium. Also serves to confirm the
current selection in the menu display.
Holding down switches to or out of
standby mode.
7NEXT CLIP
Switches to next section /music title /
image. Holding down speeds up the
playback Also serves to navigate up the
menu.
8,9 VOLUME CONTROL
Controls the playback volume.
1
MENU
234
5
6789
6
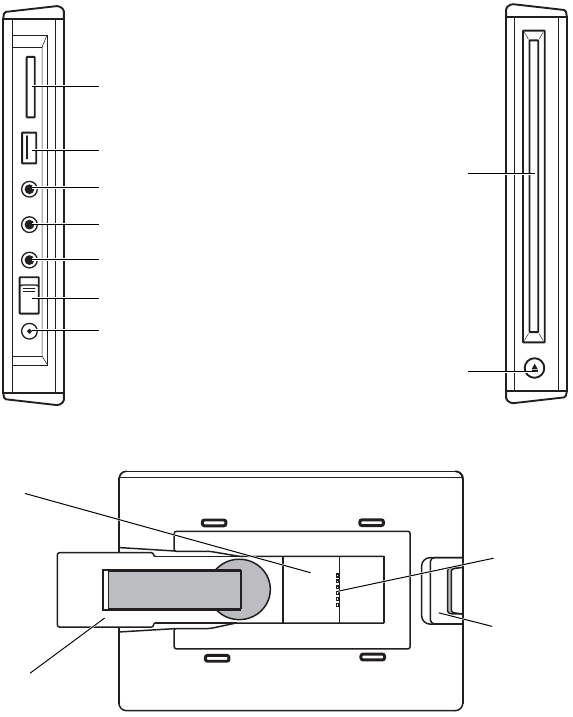
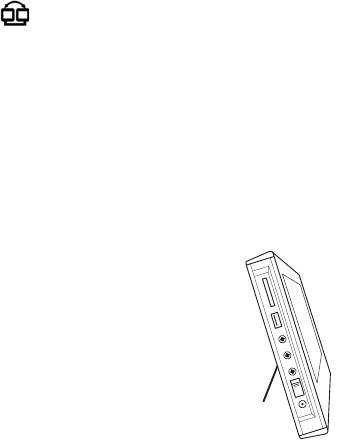
Left and right sides
Reverse side (without battery)
1 Slot for SD memory cards.
2USB socket
3VIDEO
Analogue video input / output.
4AUDIO
Analogue audio input / output.
5Headphone jack
6ON / OFF switch
7Mains connection socket
8DVD drive insert
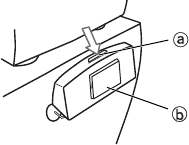
9Eject disc
1 Slot for mounting onto the carrier
bracket in the car and for inserting
the battery.
2 Picture stand (removable).
3 Connection contacts for installation in
car.
4 Release tab.
1
2
3
4
5
6
7
8
9
2
3
4
1
7
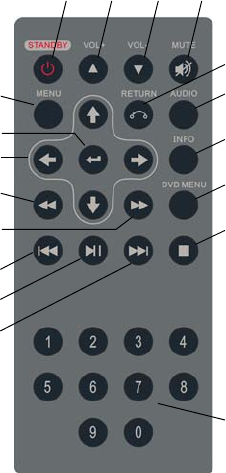
THE REMOTE CONTROL
Remote control buttons
1STANDBY
Switches the player On/Off.
2,3 VOL+ / VOL-
Increases /decreases the volume.
4MUTE
Switches the speakers On/Off.
5RETURN
Back to previous menu item.
6AUDIO
Language selection for DVD playback.
7INFO
Calls up disc information.
8DVD MENU
Calls up a DVD menu.
9STOP
Pre-stops /stops the playback.
10 Numerical entry 0-9.
11 NEXT CLIP
Switches to next section /
music title /image etc.
12 PLAY / PAUSE
Starts /interrupts the playback of a
medium
13 PREVIOUS CLIP
Switches to previous
section /music title /image etc.
14 FORWARD
Fast forward playback.
15 REWIND
Fast reverse playback.
16 Cursor buttons.
Moves the selection to the left, right, up
or down.
17 ENTER
Confirms entries.
18 MENU
Calls up the player menu.
1 2 3 4
5
6
7
8
9
10
11
12
13
14
15
16
17
18
8
Notes on using the remote control
Safeguard the remote control from moisture and mechanical stress such as impacts,
twisting etc. which can lead to damage and loss of functionality.
Avoid placing the remote control in bright light. This can likewise lead to functional defects.
Functional limitations can arise if there are obstacles between the remote control and the
sensor on the portable DVD player.
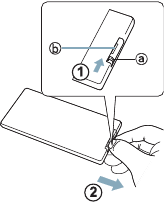
Inserting or replacing the battery
1 Push a fingernail into each of the slots in the
battery cover.
2 Press the battery compartment cover at slot (a)
lightly to the side () and pull the battery holder
at slot (b) out ().
3 Remove the old battery and place a new lithium
battery (Cr2025) into the holder.
The side of the battery marked + must point
upwards.
4 Push the battery holder back into the remote control until the holder clicks lightly into
place.
9
TYPICAL PLAYER INSTALLATIONS
Installing in the car
Note
For car installation, the front seat must be prepared accordingly and the carrier bracket for
mobile terminal devices installed. Should that not be the case, contact your dealer or
authorised Audi garage and enquire about Audi rear seat entertainment.
To install the player in the car, proceed as follows:
1 Press the button at the top of the carrier (a) so that
the counterpart (b) flips forward (arrow).
2 Attach the player from the left and push it to the
right until it clicks into place.
3 Check that the player is firmly seated.
Note
The player is switched on automatically when the car ignition is switched on if the ON/OFF
switch is ON.
Demounting the portable DVD player
To demount the player, proceed as follows:
1 Grasp the player with both hands. Push the release tab, left at the back, towards the
middle of the player and hold it in.
2 Push the player to the left, out of the carrier.
3 Push the counterpart on the carrier in, so that is closes up flush.
10
Playback with two DVD players in the car.
Where two players are installed in one car, is possible to transfer image and sound
contained on a disc from the one player to the second. To do this, proceed as follows:
1 Switch both players on.
2 Insert a disc /data carrier into one player and start the playback.
3 Select Mode - AV IN SEAT from the menu on the other player.
Note
In this mode, headphones are controlled independently from each other via the respective
player.
Free-standing position
For use outside the car, the portable DVD player can be set upright with the picture stand
on the reverse side.
1 Fit the picture stand into the slot on the reverse side.
2 Swing the tongue out until it clicks into place.
3 Turn the tongue round by 90° and stand the player up.
4 Check that the player is firmly seated.
Folding back the picture stand is done in reverse order.
Day - night brightness adjustment
A day - night sensor is built into the front face of the player. This provides automatic
adjustment of the screen brightness to the ambient brightness with a delay of around
5 seconds.
11
INITIAL OPERATION
Connecting to the power supply
When the portable DVD player is mounted in the car, power is supplied via the contacts on
the carrier.
If you are using the DVD player in a free-standing position, plug the mains adapter into a
socket and the DC plug into the mains connecting socket on the left side of the player. You
can also use the battery as an alternative.
Switching the player On/Off.
The portable DVD player is switched on as follows:
1 Push up the ON/OFF switch on the left side of the player.
2 The "Welcome" screen appears. The controls on the front face light up.
The player is ready for use.
Note
When switching on for the first time or after resetting the player settings, the language
selector appears (see "Selecting the language" on page 20).
To switch the player off, push down the ON/OFF switch on the left side of the player.
Standby mode
The portable DVD player automatically switches to the standby mode after a few minutes
when there is no playback or operator action. The screen becomes dark and only the PLAY
/ PAUSE button remains lit up on the front face.
1 Press STANDBY on the remote control or PLAY / PAUSE for a few seconds on the
player to end the standby mode.
2 Similarly, the player switches to standby mode if you press STANDBY on the remote
control when the screen is lit up or PLAY / PAUSE on the player for a few seconds.
12
DISC PLAYBACK
Inserting disc and playing back
Note
Check the condition of each disc before inserting! Do not use any deformed or otherwise
damaged data carriers!
Insert single-sided discs with the printed side to the front. Check both sides of a double-
sided disc then insert it correctly into the drive.
1 Check that the portable DVD player is ready for operation or in standby mode. If not,
switch the player on.
2 When you push the disc into the opening in the DVD drive it will be drawn in
automatically. The player reads the information on the disc. On the screen will appear
DVD, VCD or CD, depending on disc type.
3 Playback normally starts automatically, the disc menu (where available) appears in the
display. If not, press PLAY / PAUSE at the control panel or on the remote control.
Note
When an audio disc is playing back, the screen display ends automatically if no buttons are
pressed for about 1 minute. Pressing any random button reactivates the display.
Interrupting /resuming playback
1 To interrupt the playback with freeze-frame, press PLAY / PAUSE once.
2 To interrupt the playback without freeze-frame, press STOP once (pre-stop).
3 To resume the playback press PLAY / PAUSE again.
With most DVDs and video CDs the playback will restart at the point at which it was
stopped. By ejecting the disc or pressing STOP again, this resume function is
deactivated.
13
Fast forwarding /rewinding
1 During playback, press one of the FORWARD or REWIND buttons on the
remote control or press and hold one of the or buttons on the player.
2 The speed of the playback alters with each press of the button to 2x, 4x, 8x, 20x and
again to 1x.
3 Pressing PLAY / PAUSE also leads to playback at normal speed.
Jumping to previous /next section
1 During playback press one of the or buttons to jump to the previous / next
section.
Calling up the DVD menu and navigation
Most DVDs as well as video CDs with playback control (PBC) have a menu for selecting
individual video sequences. This menu can be activated during playback by pressing DVD
MENU on the remote control or by selecting the menu item DVD Option - Disc Menu.
1 Navigate DVDs by using the buttons and or and to get to the desired item
and start the playback with PLAY / PAUSE .
2 For video CDs with PBC, use the numerical buttons on the remote control to select an
item.
Note
Video CD playback can also be effected without calling up the disc menu. By pressing the
number 1 on the remote control while the playback is stopped, track 1 on the disc will be
played.
Changing the sound playback language
1 By pressing the AUDIO button on the remote control or by calling up the menu item
DVD Option - Audio during the playback, you can choose between the different
sound tracks offered – depending on the facilities on the
DVD/CD.
14
Calling up information on the disc
This function enables you to display general information on the disc such as playing time,
number of sections or title.
1 Press the INFO button on the remote control during playback or select the menu item
DVD Option - Information. The information is shown in the upper part of the
display.
2 Repeated pressing of the INFO button scrolls through the available information and
ultimately fades this out.
Ejecting the disc
1 Press the Disc eject button on the right side of the player. Any playback still running
is stopped, the disc is ejected about half way.
2 Remove the disc completely from the drive.
15
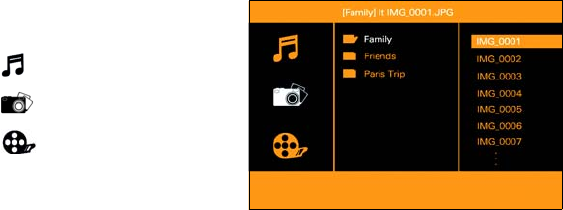
PLAYING BACK AUDIO TITLES, IMAGES AND VIDEOS
FROM DATA CDS
Displaying the contents
After inserting a disc which contains audio, image and/or video files, the player reads the
information on the media content and displays this on the screen in three columns.
The left column displays icons for the
respective mode:
Music
Photos
Videos
Recognised folders and files are listed
in the middle and right hand columns.
The currently selected mode, the current folder or the current file is highlighted white. The
current selection is symbolised by an orange bar.
Switching selection
1 Move the bar up or down within a column by pressing the or button.
2 To open a folder, press a PLAY / PAUSE button. The button switches to the right
hand column.
3 To return to the next highest folder level, press a STOP button.

16
Playing back content
1 If the bar is on an audio, image or video file, start the playback by pressing the PLAY
/ PAUSE button.
2 If there are several media files located within the current folder, these will be played
back sequentially.
3 During playback you can:
- switch to the previous or next file with or ,
- pause or resume the playback with PLAY / PAUSE .
4 To end the playback, press STOP . The folder structure returns to the display.
Characteristics of individual file types
The display on the screen can change depending on media type:
- With image files, you will see a thumbnail of the file in the middle column.
- With music files, you will see additional information in the lower part of the screen
(where available).
You will find a list of playable file formats in section "Technical data" on page 26.
File no./total File name Played

17
PLAYING BACK USBS AND MEMORY CARDS
Inserting the memory medium and playing back files
1 Insert the USB memory stick or memory card into the corresponding connection socket
on the left side of the player (see section "Left and right sides" on page 6).
2 The contents of the memory media are read and displayed as described in section
"Playing back audio titles, images and videos from data CDs" on page 15.
3 To play back the contents, proceed as described in section "Playing back content" on
page 16.
Note
Connection via a USB cable or using memory cards of inferior quality can have a negative
effect on the application.
Switching between several memory media
If several data carriers are inserted or connected into the player, the playback can be
switched between them as follows:
1 Press MENU on the player or remote control. The player menu is shown.
2 Confirm the current selection mode by pressing PLAY /
PAUSE on the player or RETURN on the remote control.
3 The sub-menu appears for selecting the data source.
The symbol for the current data source is highlighted white.
4 Move the selection to the desired item by pressing the and
buttons on the player or and on the remote control.
5 Confirm the selection by pressing PLAY / PAUSE on the
player or ENTER on the remote control.
The information on the selected data carrier is read by the player and
displayed or the playback starts automatically.

18
USING BLUETOOTH HEADPHONES
Establishing a headphone connection
Sound from the player can also be transmitted to a bluetooth headphone via a bluetooth
connection. It is necessary to proceed as follows when connecting for the first time:
1 Switch the headphones on by pressing and holding the symbol on the phone
designated "R". The green LED on the phone starts to flash.
Note
If the LED doesn't flash, replace the batteries or charge them up via the USB connection.
More detailed information can be found on this in the headphone' user information.
2 In the player menu, select Bluetooth - New connection. In the left upper corner
of the display a white flashing bluetooth symbol appears.
3 The player and headphones are creating a connection. This can take a few seconds.
After successful connection, the colour of the bluetooth symbol changes to blue.
4 Close the player menu. The bluetooth symbol will also be faded out.
Note
If the headphones have previously been connected with the portable DVD player then they
will recognise the player and connect automatically every time the DVD player and
headphones are switched on.
Severing the bluetooth connection
Should you wish to severe the connection, there are the following options:
1 Switch off the headphones by pressing and holding on the symbol on the side
designated "L". The green LED on the phone goes out and the sound is played back
via the player.
2 In the player menu, select Bluetooth - Bluetooth off.

19
OTHER SETTINGS IN THE PLAYER MENU
Navigating through the player menu
You can use the following buttons for calling up and navigating through the player menu.
Screen settings
The following monitor parameters can be set in the menu item Display:
-Brightness: automatic or manual, on a scale from 0 to 8.
With "Automatic" the screen brightness adapts itself automatically to the ambient
brightness (see "Day - night brightness adjustment" on page 10).
-Color: manual, on a scale from 0 to 8.
-Proportion: switch between width-to-height ratios 16:9 and 4:3.
Settings with connection to an external TV.
When you connect the portable DVD player to an external TV, you can make the
appropriate settings in the menu item Setup depending on its data:
-TV System: automatic – for multi-standard TVs, e.g. NTSC or PAL
Specification is automatic.
-TV Type: setting the width-to-height ratio – 16:9, 4:3 letterbox (films are played back
in the original width-to-height ratio, black bars may appear above and below), 4:3 pan
& scan (films fill the entire TV screen, may be partially cut off at the sides), 2.35:1.
Action Button on the player Button on the remote control
Calling up the menu MENU MENU
Up in menu level
Down in menu level
Confirm selection ENTER
Back to previous menu RETURN
Quit menu MENU MENU
20
Resetting to factory settings
By selecting the menu item Setup - Default, all manual configuration changes to the
portable DVD player are erased and returned to the factory settings.
Note
Thereafter, the language selection list appears on the screen.
Selecting the language
The player menu is available in the following languages:
English, German, Spanish, French, Italian, Russian, Swedish, Dutch, Japanese and Chinese.
The language can be selected in the menu item Language (see "Player menu - overview"
on page 24).

21
CONNECTING TO EXTERNAL EQUIPMENT
Attention
Before connecting, switch off the power supply to the portable DVD player and the external
equipment!
Connecting external equipment for playback
You can transmit the sound or image and sound signal from the portable DVD player to
external equipment such as a TV or amplifier. To do this, proceed as follows:
1 Connect the socket(s) AUDIO or VIDEO on the portable DVD player (see "Left and
right sides" on page 6) via the appropriate audio or video cable with the input socket(s)
on the external equipment.
2 Switch both the player and the external equipment on. Select the required input or
channel on the external equipment.
3 Start the media playback on the portable DVD player.
Playback from external equipment (e.g. games consoles)
You can transmit sound or image and sound signal from external playback equipment to
the portable DVD player. To do this, proceed as follows:
1 Connect the socket(s) AUDIO or VIDEO on the portable DVD player (see "Left and
right sides" on page 6) via the appropriate audio or video cable with the output
socket(s) on the external equipment.
2 Switch both the player and the external equipment on. In the portable DVD player
menu, select Mode - AV IN SIDE .
3 Start the media playback on the external equipment.
Connecting headphones
1 Turn the volume on the portable DVD player down to minimum.
2 Plug the headphones into the 'phone jack on the portable DVD player (see "Left and
right sides" on page 6).
3 Put the headphones on and turn the volume up to a comfortable level.
22
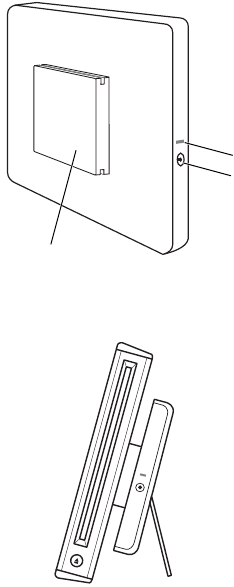
USING THE BATTERY
The battery
Located on the battery are:
1 Counterpart
2 Status LED
3 Mains connection socket.
Located on the reverse side (not illustrated) is a
slot similar to that on the portable DVD player for
inserting the picture stand.
Battery operation of the portable DVD player
You can use the portable DVD player running on
the battery for around 2.5 hours, independent of
mains power. To do so, proceed as follows:
1 Push the battery counterpart into the slot on
the reverse side of the portable DVD player
until it clicks into place.
2 Use the picture stand to stand the player up.
3 Switch the player on.
To remove the battery, proceed as follows:
1 Switch the player off.
2 Push the release tab, left at the back of the player, towards the middle of the player
and hold it in.
3 Push the battery out of the slot.
1
2
3

23
Charging the battery
To charge the battery, plug the mains adapter into a socket and the DC plug into the mains
connection socket on the battery. When the charging process starts, the status LED on the
battery lights up red. The LED goes out when the charging process has ended.
The battery can be charged while mounted on the player as well as separately.
Note
If the battery is mounted on the portable DVD player and the latter is connected to the
mains via the mains connection socket on the player, no charging of the battery takes
place.
Notes on using the battery
DANGER! Do not use the battery if it is damaged, deformed or swollen in any
way! This presents a fire and explosion hazard!
Batteries do not belong in the household rubbish! Spent, defective or
damaged batteries must be disposed of properly.
Charge the battery fully before using it for the first time.
The battery becomes warm during the charging process. This is normal.
If the battery becomes too warm or the ambient temperature is more than 30 °C, the
charging time can lengthen or even become impossible. In this case, let the battery cool off
or move to a cooler location before starting the charging process.
Do not recharge a battery which is already fully charged. This can permanently worsen the
battery's performance.
24
PLAYER MENU - OVERVIEW
Portable DVD player overview of menu:
Mode ------------- DVD
USB
SD
AV IN SEAT
AV IN SIDE
Bluetooth --------- Bluetooth On
Bluetooth Off
Pairing /
New connection
Display ------------- Brightness ---------
Color
Proportion --------
Auto
Manual ------------
0...8
16:9
4:3
0...8
Setup -------------- TV System ---------
TV Type ------------
Default
Auto
PAL
NTSC
16:9
4:3 LB
4:3 PS
2.35:1
Language --------- English
German
Spanish
French
Italian
Russian
Swedish
Dutch
Chinese
Japanese
DVD Option ------- Disc Menu
Information
Audio
Subtitle
Repeat

25
FAULT CORRECTION
Not every fault means the player is defective. The following table lists some faults, possible
causes and steps to remedy these.
DANGER!
Never attempt to repair the portable DVD player yourself.
Always contact a qualified repair shop in the following cases:
- The player has come into contact with water.
- The player no longer functions as normal.
- The playback performance and quality are significantly lower than usual.
Symptom Possible cause Remedy
Player won't switch on Player is unplugged from po-
wer supply
Check connection to player
and that mains plug is seated
properly
Remote control not wor-
king
Remote control batteries flat
Line of influence barred
Replace batteries
Test in another location
No sound output Volume at 0 Turn up volume
Playback has been interrupted Resume playback
Headphones are connected or
plugged in
Unplug headphones
Screen is blue, text: "No
signal"
Mode AV IN SEAT is activated
without external signal
Select another mode from the
player menu
No disc playback Disc incorrectly inserted Insert disc correctly
The disc is dirty or damaged Clean disc carefully
The disc contains no playable
content
No image and/or sound
on the external equip-
ment
Wrong channel or audio input
selected at the external
equipment
Check setting of the external
equipment
Cable connection loose Check cable seating
26
TECHNICAL DATA
Performance characteristics
- DVD player, code-free, for DVD, VCD, SVCD, CD, DVD+R, DVD-R, DVD+RW, DVD-RW
- Image and video formats: JPEG, MPEG2, DIVX, DAT
- Audio formats: MP2, MP3, DAT
- TV systems: NTSC, PAL
- Integrated stereo loudspeakers, 2 x 1 W
- integrated bluetooth module
Screen
- Diagonal: 9“ (22.8 cm), 800 x 480 pixels, width-to-height ration 16:9
- Brightness: 250 cd/m²
- Contrast: 400:1
Connections
- Headphones, input and output sockets: cinch 3.5 mm plug
- Card reader (SD) and USB port
Power supply
- Mains adapter: input 100-240 V AC, output 12 V 1.5 A DC
- Battery run time on playback: max. 2.5 hours
Dimensions
- Width /height /depth: 240 x 173 x 36.5 mm
- Weight: approx. 920 g
Battery
- Width /height /depth: 152 × 112 × 15mm
- Weight: approx. 240 g
- Capacity: 3000 mAh
- Output voltage: 7.4 V DC
- Charging time: approx. 4 hours (during simultaneous playback approx. 10 hours), up
to 500 charging cycles.
Temperature range
- Operating: -10 ... +50 °C
- Storage: -30 ... +70 °C
Environmental protection
The screen is mercury-free with arsenic-free screen glass and contains no BFRs (brominated
flame retardants) or PVC or heavy metals such as Cd, Cr, Hg or Pb, the casing consists of
recyclable aluminium.
The player complies with the harmonised European Standards in the versions current at the
time of manufacture:
Low voltage 2006/95/EC
Electromagnetic compatibility 2004/108/EC
27
LICENCES AND COPYRIGHT
MACROVISION:
This product contains a technology for safeguarding copyrights which are protected by US
patents and other intellectual property rights. The use of this copyright safeguarding
technology must be authorised by Macrovision and is provided for personal use and other
limited presentations unless otherwise stated by Macrovision. Reverse engineering or
disassembly are not permitted.
DOLBY:
Manufactured under licence from Dolby Laboratories. "Dolby" and the double-D symbol
are trademarks of Dolby Laboratories.
DivX:
This equipment contains a copyright safeguarding technology which is protected by DivX,
Inc. DivX, DivX Certified and related logos are trademarks of DivX, Inc. and are used within
the scope of a licence.
All other brand and product names referred to in these operating instructions are
trademarks and/or registered trademarks of the respective owner.
We reserve the right to make alterations for reasons of technical advancement.
The illustrations and screen displays used in this handbook may deviate from the actual
design of the equipment.
© Made by Nextbase for Audi Original Accessories, issued January 2011
AUDI-DVD-EN-GB-11-1
FCC STATEMENT:
FCC Caution: Any changes or modifications not expressly approved by the party
responsible for compliance could void the user's authority to operate this
equipment.
This device complies with Part 15 of the FCC Rules. Operation is subject to the
following two conditions: (1) This device may not cause harmful interference, and (2)
this device must accept any interference received, including interference that may
cause undesired operation.
IC STATEMENT:
Any changes or modifications not expressly approved by the party responsible for
compliance could void the user's authority to operate this equipment。
This device complies with RSS 210 of Industry Canada.
"Operation is subject to the following two conditions: (1) this device may not cause
interference, and (2) this device must accept any interference, including
interference that may cause undesired operation of the device."
Le présent appareil est conforme aux CNR d'Industrie Canada applicables aux
appareils radio exempts de licence. L'exploitation est autorisée aux deux conditions
suivantes : (1) l'appareil nedoit pas produire de brouillage, et (2) l'utilisateur de
l'appareil doit accepter tout brouillage radioélectrique subi, même si le brouillage est
susceptible d'en compromettre le fonctionnement.
"This Class B digital apparatus complies with Canadian ICES-003."
Cet appareil numérique de la classe B est conforme à la norme NMB-003 du
Canada.
This device and its antenna(s) must not be co-located or operating in conjunction
with any other antenna or transmitter.
Cet appareil et son antenne (s) ne doit pas être co-localisés ou fonctionnant en
conjonction avec une autre antenne ou transmetteur.
FCC STATEMENT
This device complies with Part 15 of the FCC Rules. Operation is subject to the following two
conditions:
1. This device may not cause harmful interference, and 2. This device must accept any
interference received, including interference that may cause undesired operation.
Note: This equipment has been tested and found to comply with the limits for a Class B digital
device, pursuant to part 15 of the FCC Rules. These limits are designed to provide reasonable
protection against harmful interference in a residential installation. This equipment generates,
uses and can radiate radio frequency energy and, if not installed and used in accordance with
the instructions, may cause harmful interference to radio communications. However, there is
no guarantee that interference will not occur in a particular installation. If this equipment does
cause harmful interference to radio or television reception, which can be determined by turning
the equipment off and on, the user is encouraged to try to correct the interference by one or
more of the following measures:
--Reorient or relocate the receiving antenna.
--Increase the separation between the equipment and receiver.
--Connect the equipment into an outlet on a circuit different from that to which the receiver is
connected.
--Consult the dealer or an experienced radio/TV technician for help.
Caution: Any changes or modifications not expressly approved by the party responsible for
compliance could void the user's authority to operate this equipment.