DIGI SINGAPORE IB3100 Base Station User Manual Manual
Teraoka Weigh-System Pte Ltd. Base Station Manual
Manual
Trademark: DIGI
Model Name: IB-3100
Product Name: Base Station
2006/8/16 v1.0
Federal Communication Commission Interference Statement
This equipment has been tested and found to comply with the limits for a Class B digital
device, pursuant to Part 15 of the FCC Rules. These limits are designed to provide
reasonable protection against harmful interference in a residential installation. This
equipment generates, uses and can radiate radio frequency energy and, if not installed
and used in accordance with the instructions, may cause harmful interference to radio
communications. However, there is no guarantee that interference will not occur in a
particular installation. If this equipment does cause harmful interference to radio or
television reception, which can be determined by turning the equipment off and on, the
user is encouraged to try to correct the interference by one of the following measures:
- Reorient or relocate the receiving antenna.
- Increase the separation between the equipment and receiver.
- Connect the equipment into an outlet on a circuit different from that
to which the receiver is connected.
- Consult the dealer or an experienced radio/TV technician for help.
FCC Caution: Any changes or modifications not expressly approved by the party
responsible for compliance could void the user's authority to operate this equipment.
This device complies with Part 15 of the FCC Rules. Operation is subject to the following
two conditions: (1) This device may not cause harmful interference, and (2) this device
must accept any interference received, including interference that may cause undesired
operation.
IMPORTANT NOTE:
FCC Radiation Exposure Statement:
This equipment complies with FCC radiation exposure limits set forth for an uncontrolled
environment. This equipment should be installed and operated with minimum distance
20cm between the radiator & your body.
This transmitter must not be co-located or operating in conjunction with any other
antenna or transmitter.

Index
[GENERAL INFORMATION] [PRODUCT INFORMATION]
[TYPICAL OPERATION]
[INFO SERVER ADMINISTRATOR MENU]
[INFO PAD ADMINISTRATOR MENU] [CONTENTS]
USER MANUAL
Digi Info ESL Tentative 04
Ver. 0.18.080122.1 (Updated on 15/03/08)

INFO SERVER ADMINISTRATOR MENU
[Home]
Info Server Administrator Menu is used by store people to do daily maintenance e.g. retrieves tag data, send
display, sticker printing and etc. To use these operations (e.g. send display, sticker printing and etc), it is
required for the user to program/design setting/format in the Info Server Serviceman Menu Screen in
advance.
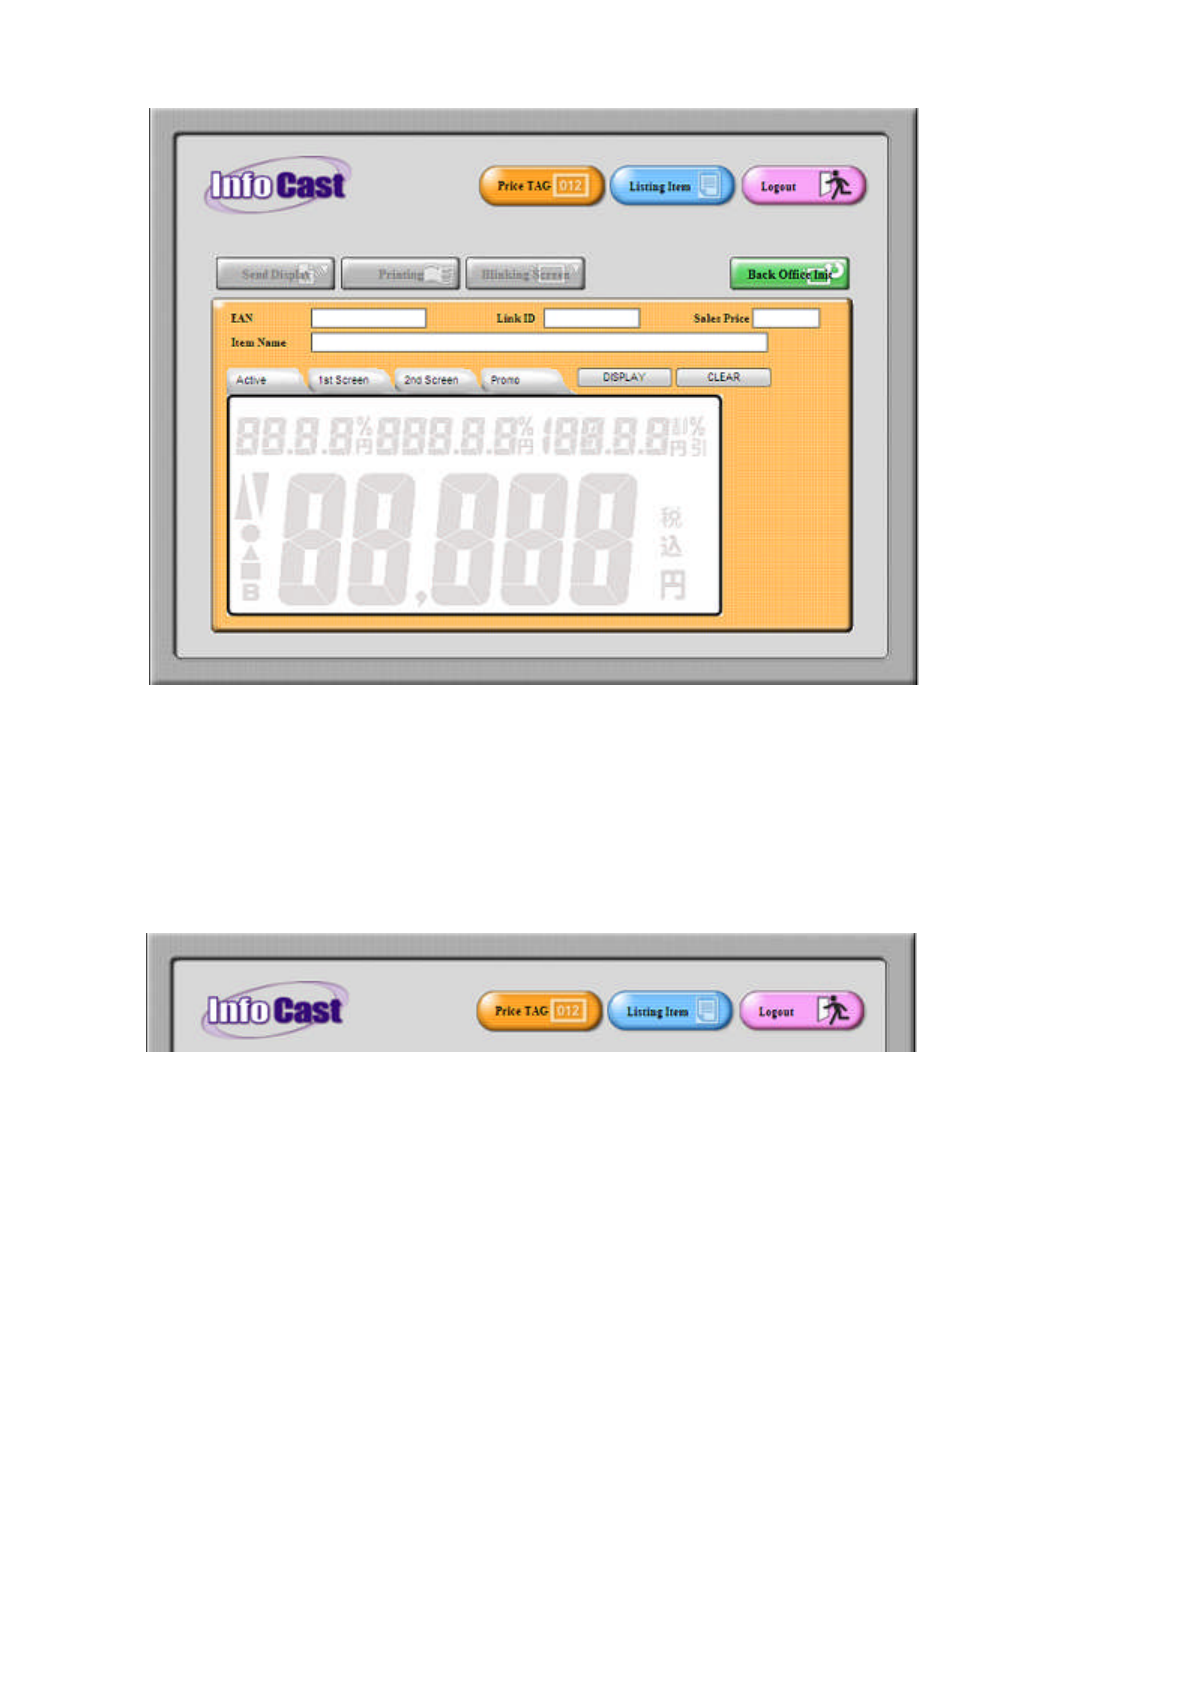
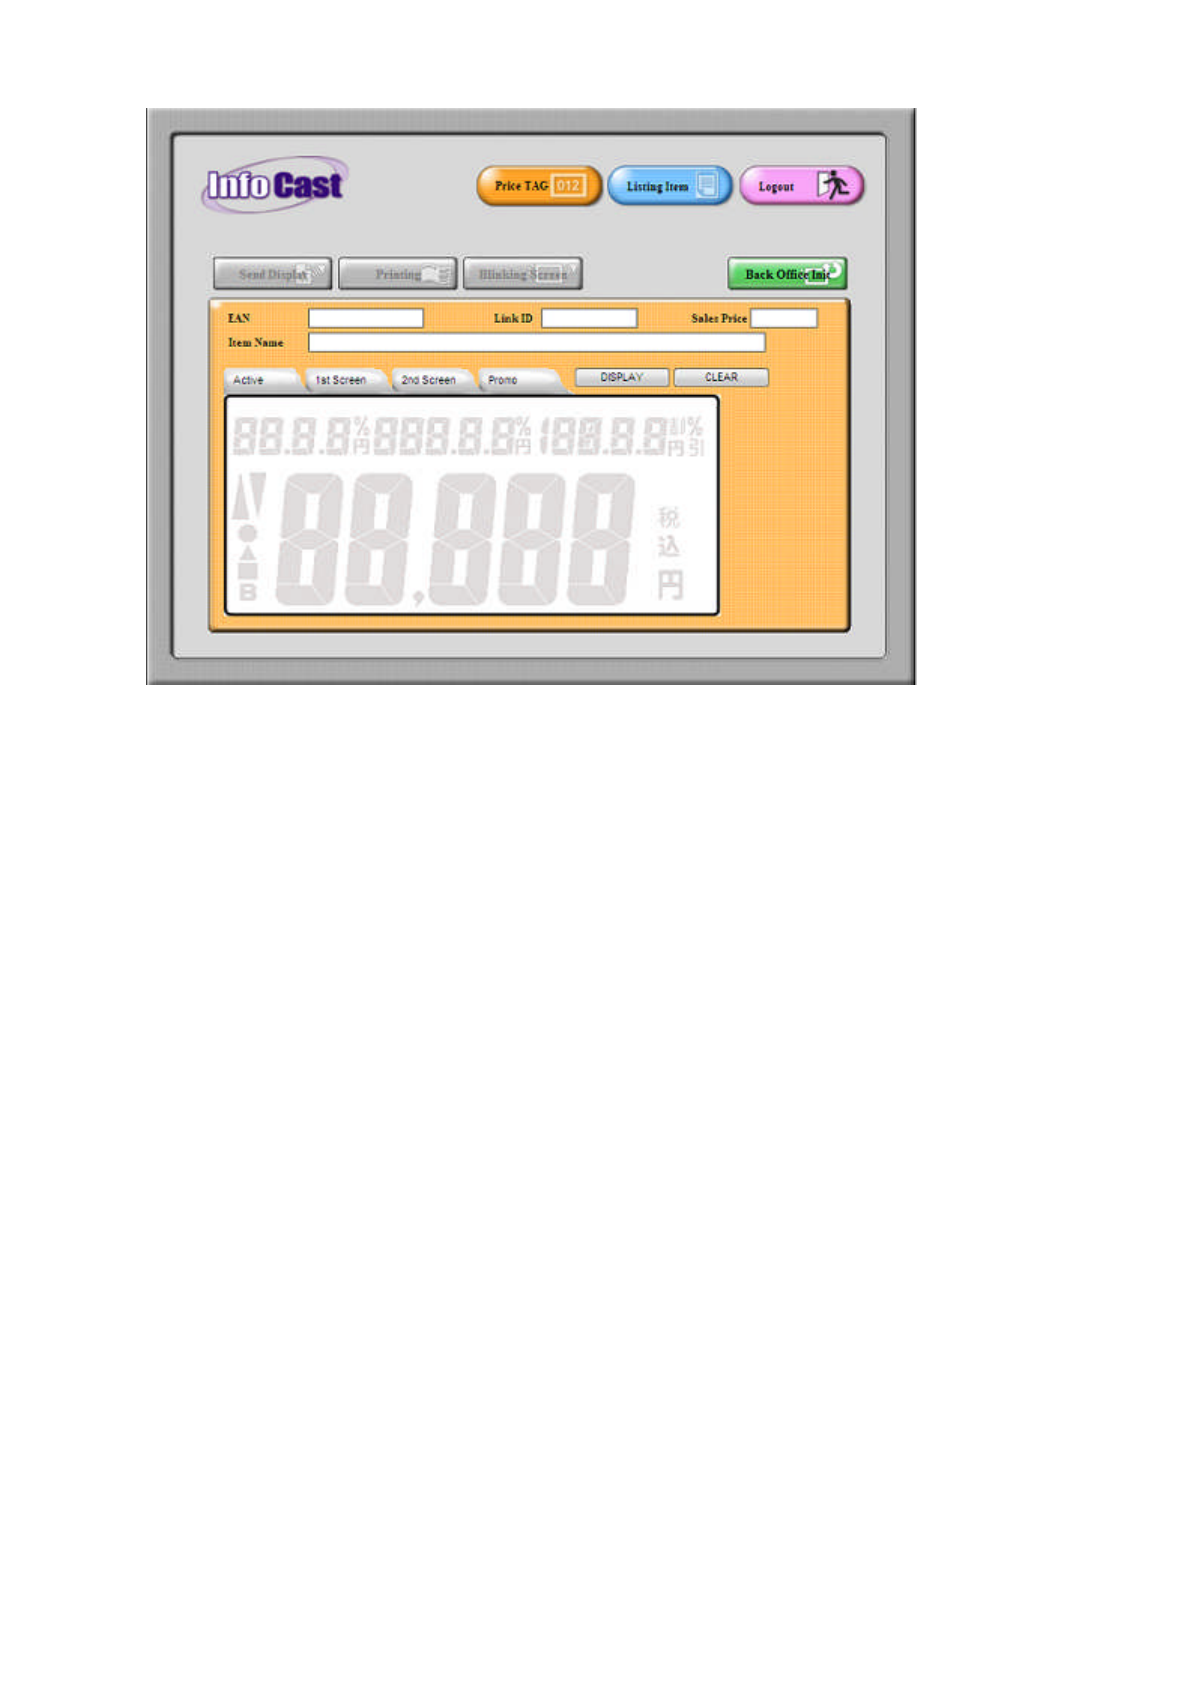
PRICE TAG
LISTING ITEM
MANUAL KEY IN BARCODE DATA

PRICE TAG
[Home] [Up]
Price Tag is used to view data/values that displayed on tag for each item, to print sticker and update data to
single tag each time.
ENTRY TO PRICE TAG
OVERVIEW OF PRICE TAG

ENTRY TO PRICE TAG
[Home] [Up]
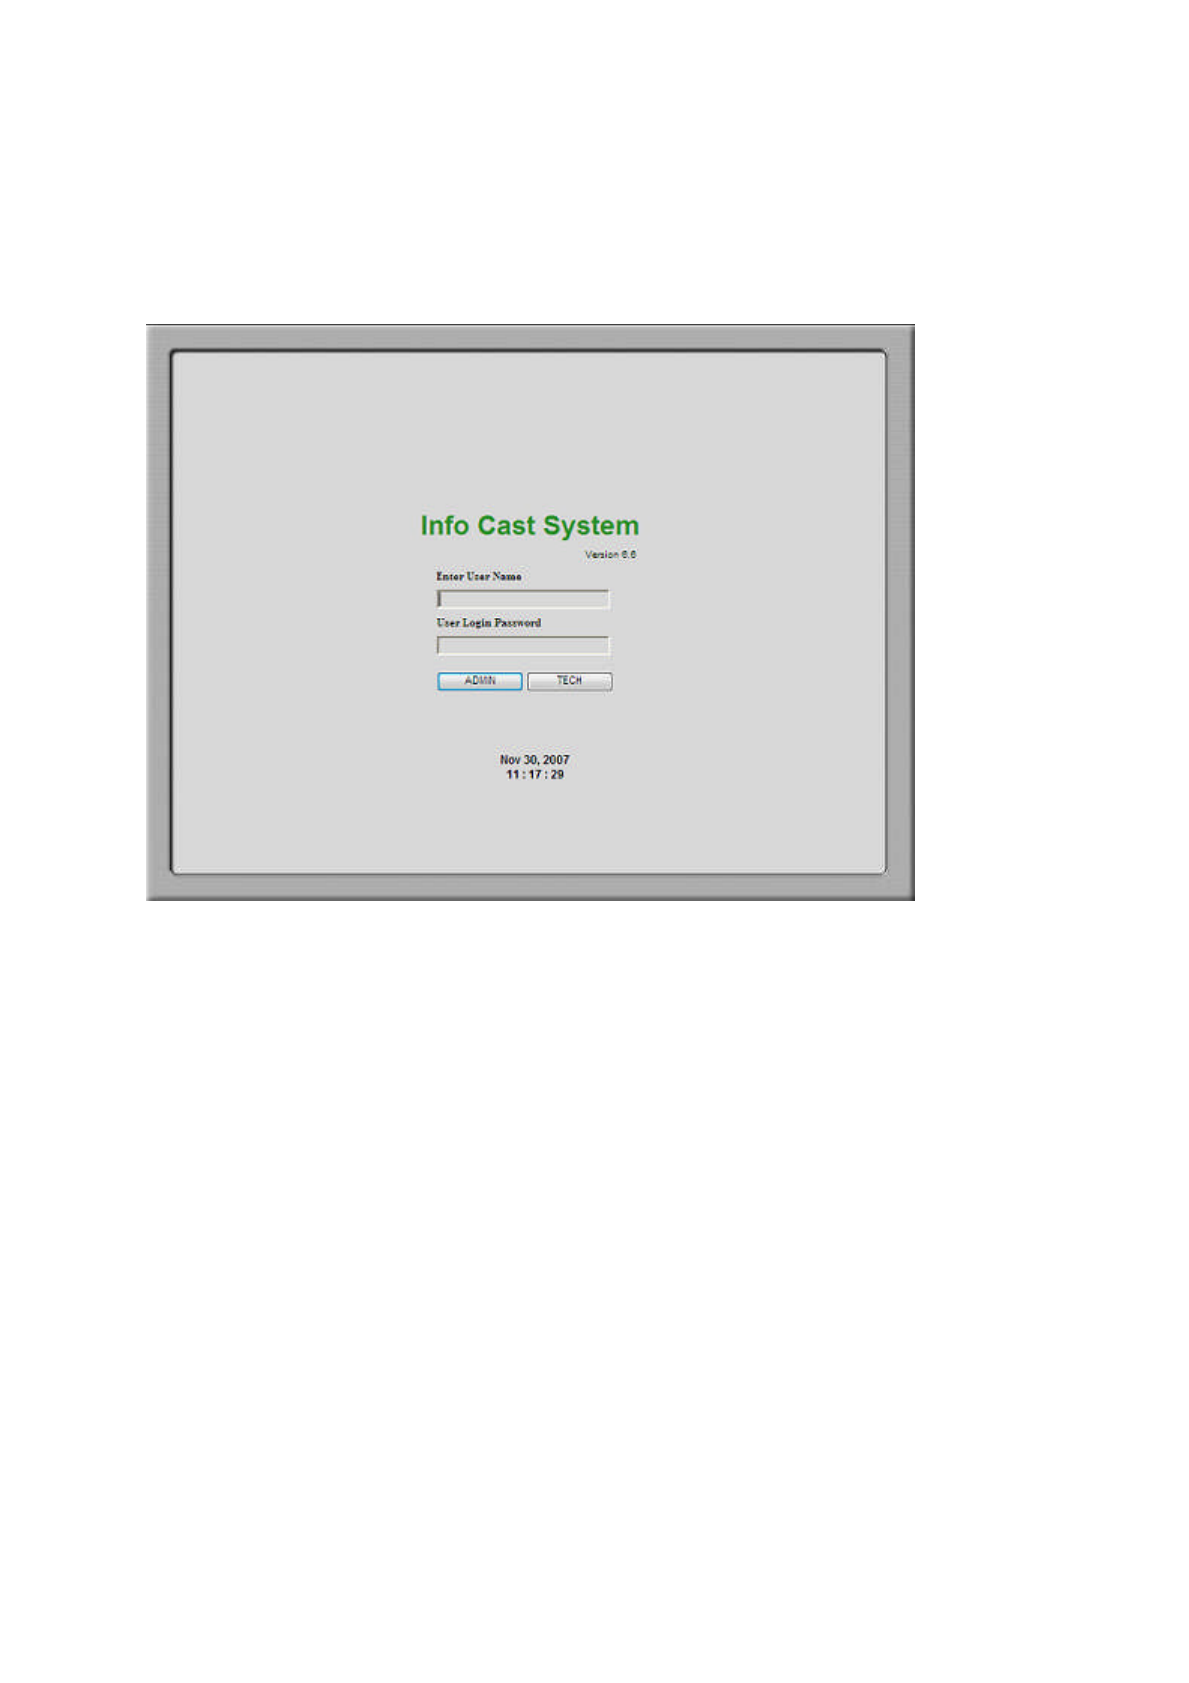
1. At the Info Cast Main Screen
2. Press [ADMIN] button to enter to Administrator Menu and enter to Price Tag screen
Note:
No
"User Name"
or
"Password"
required using this mode.
~ OR ~
1. During in other screen
2. Press
[PRICE TAG]
button to go to
Price Tag screen
3. Do operations as desired
OVERVIEW OF PRICE TAG
[Home] [Up]
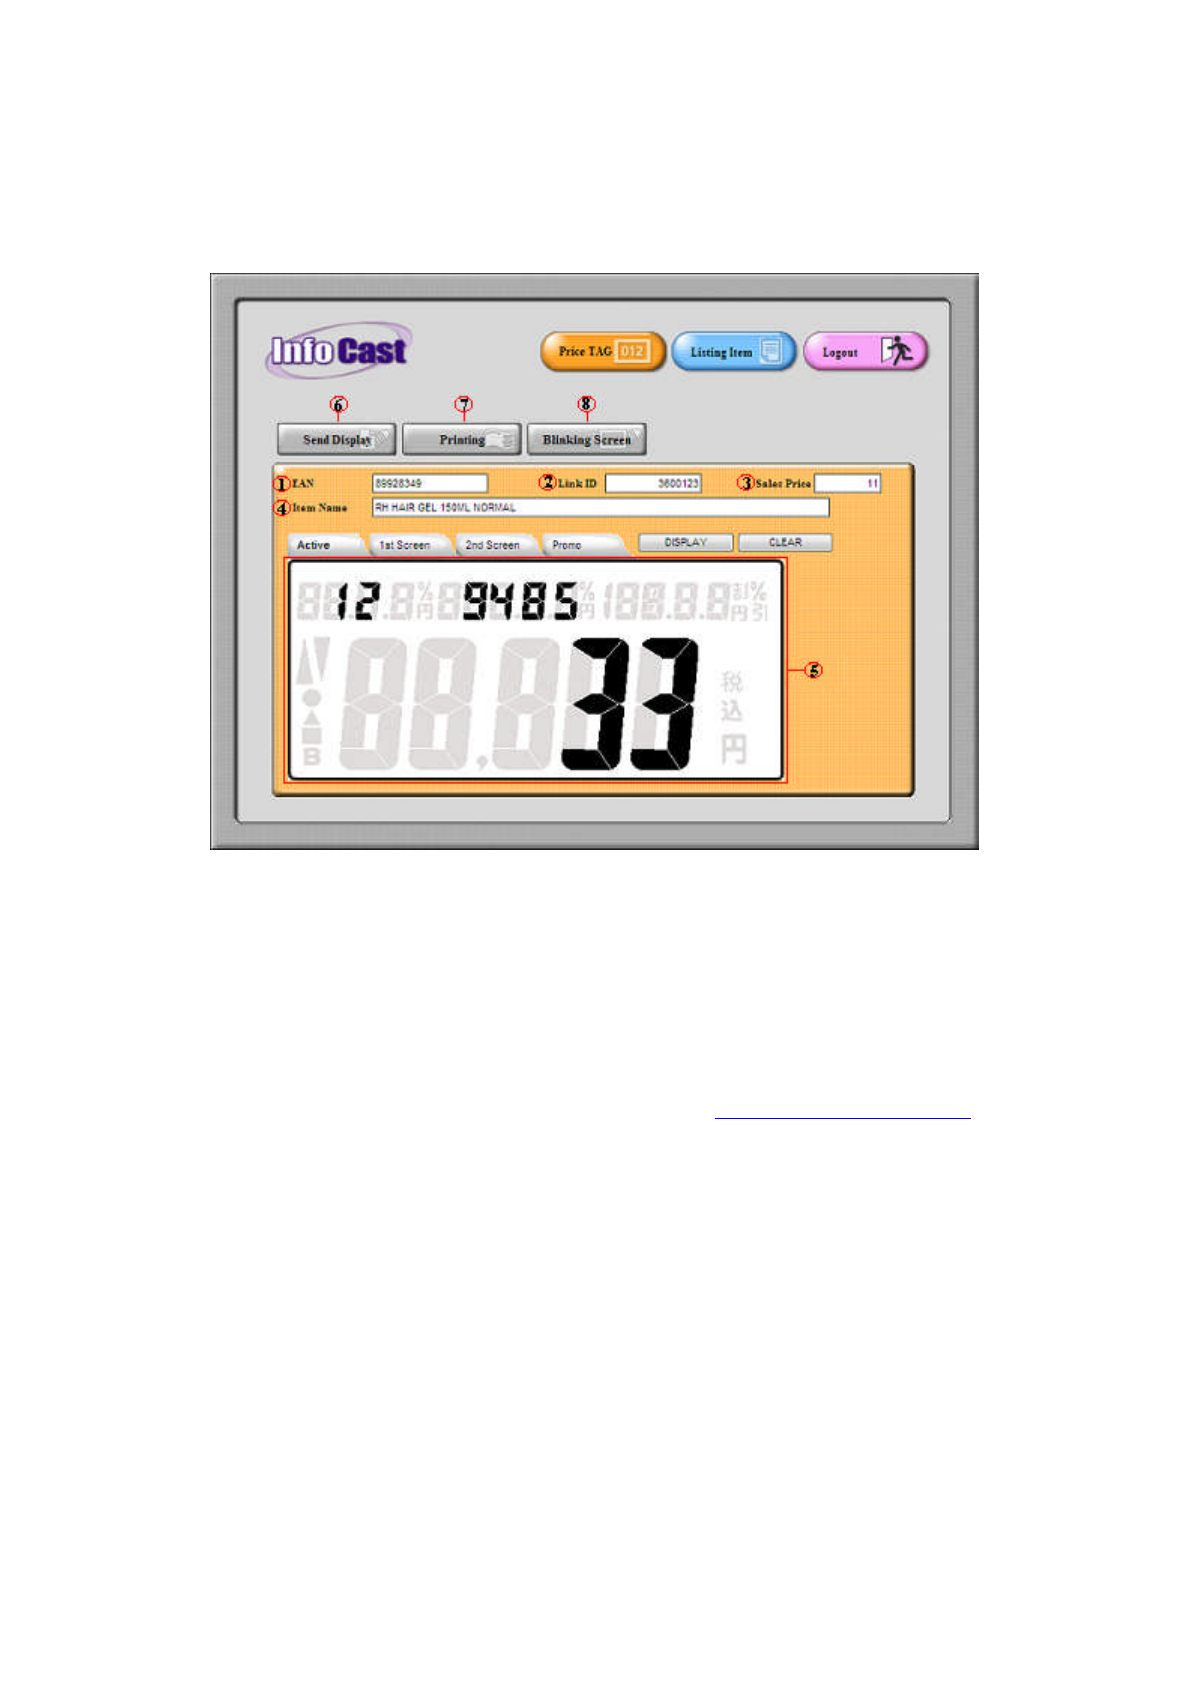
1. EAN
To search item by a EAN code (European article number)
Scan barcode or enter value by keyboard and press [DISPLAY] button to search entered item data
Note: To enter value by keyboard, user are required to follow Manual Key-in Barcode Data table
2. Link ID
To search item by a Link ID code
Press [SEARCH] button to search entered item data
3. Sales Price
Display Sales Price of the searched item
4.
Item Name
Display item name of the searched item
5. Tag Display Screen
Display searched item data on the Tag Display (depend on the tag format)
Able to view 3 screen of tag for each item
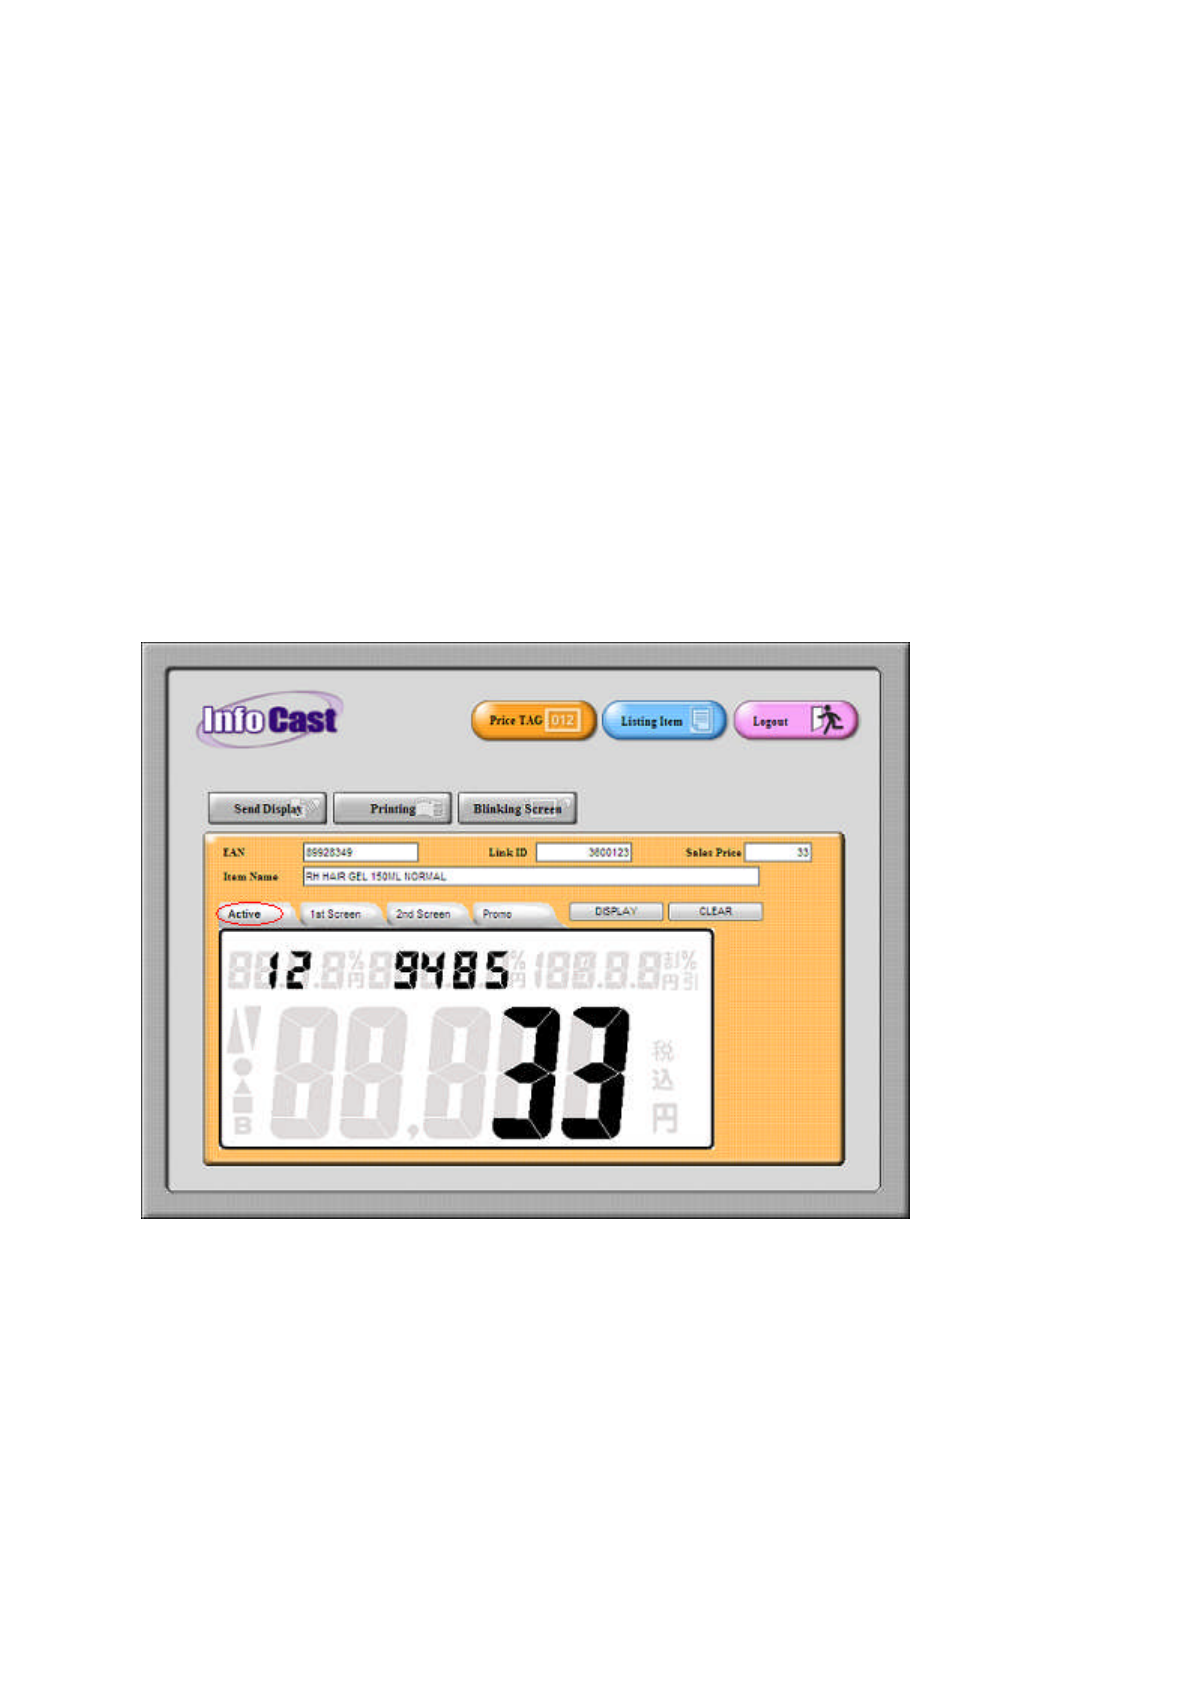
a) Active
To view the data and value displayed in active screen
Press [Active] Tab/button to view the active screen
b) 1st Screen
To view the data and value displayed in 1st screen
Press [1ST SCREEN] Tab/button to view the 1st screen
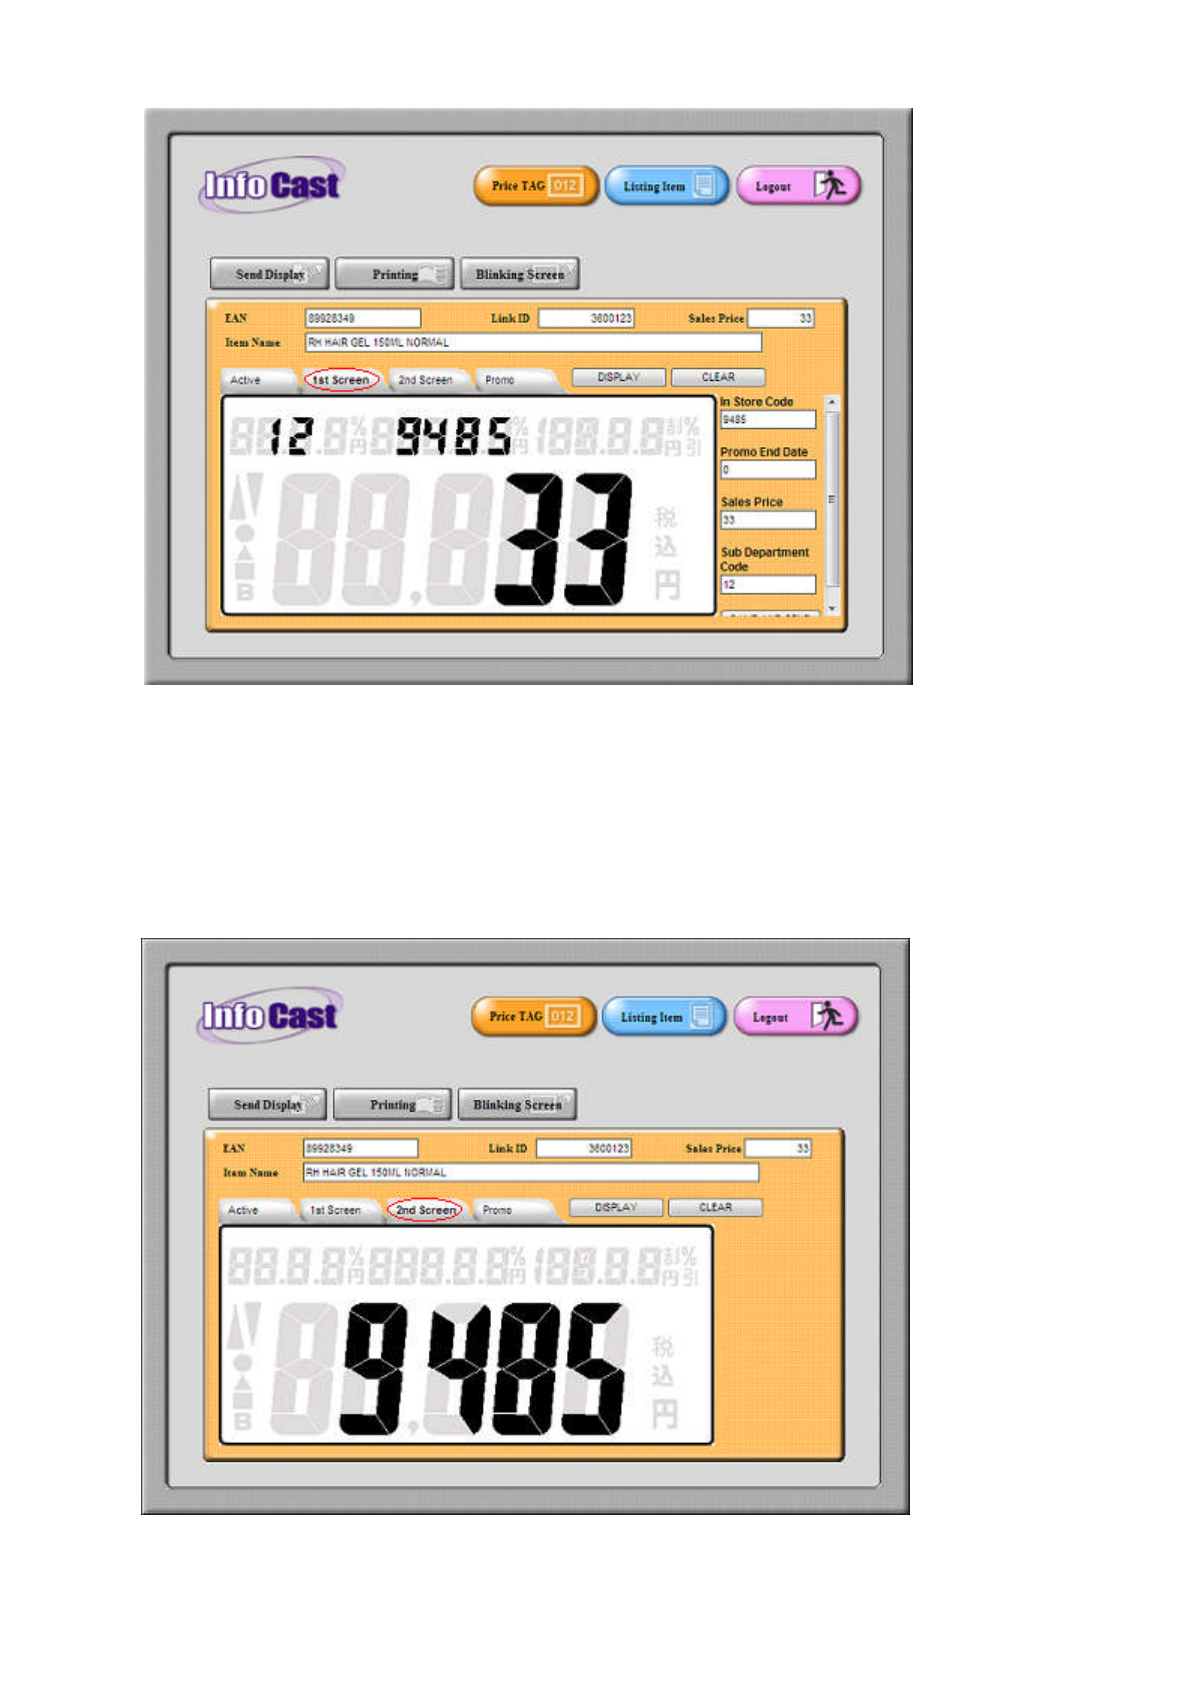
c) 2nd Screen
To view the data and value displayed in 2nd screen
Press [2ND SCREEN] Tab/button to view the 2nd screen
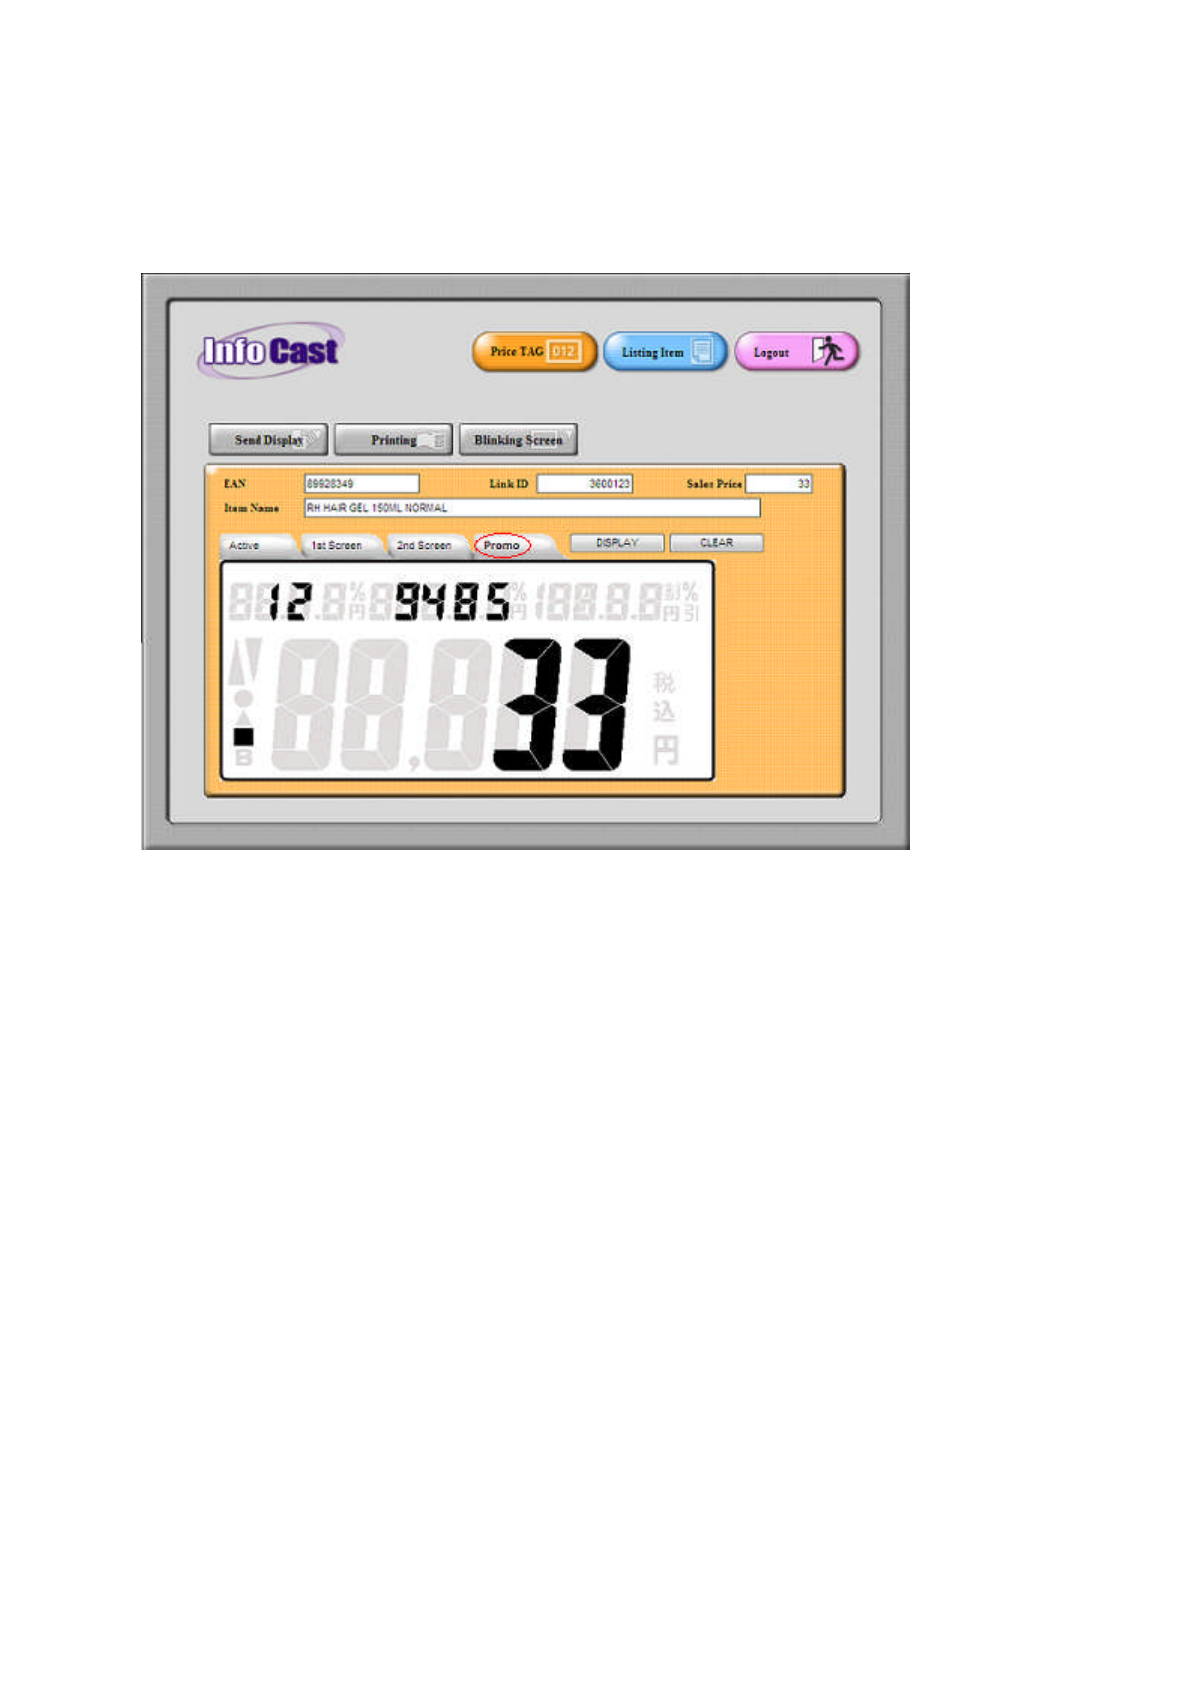
d) Promo Screen
To view the data and value displayed in promotion screen
Press [PROMO SCREEN] Tab/button to view the promo screen
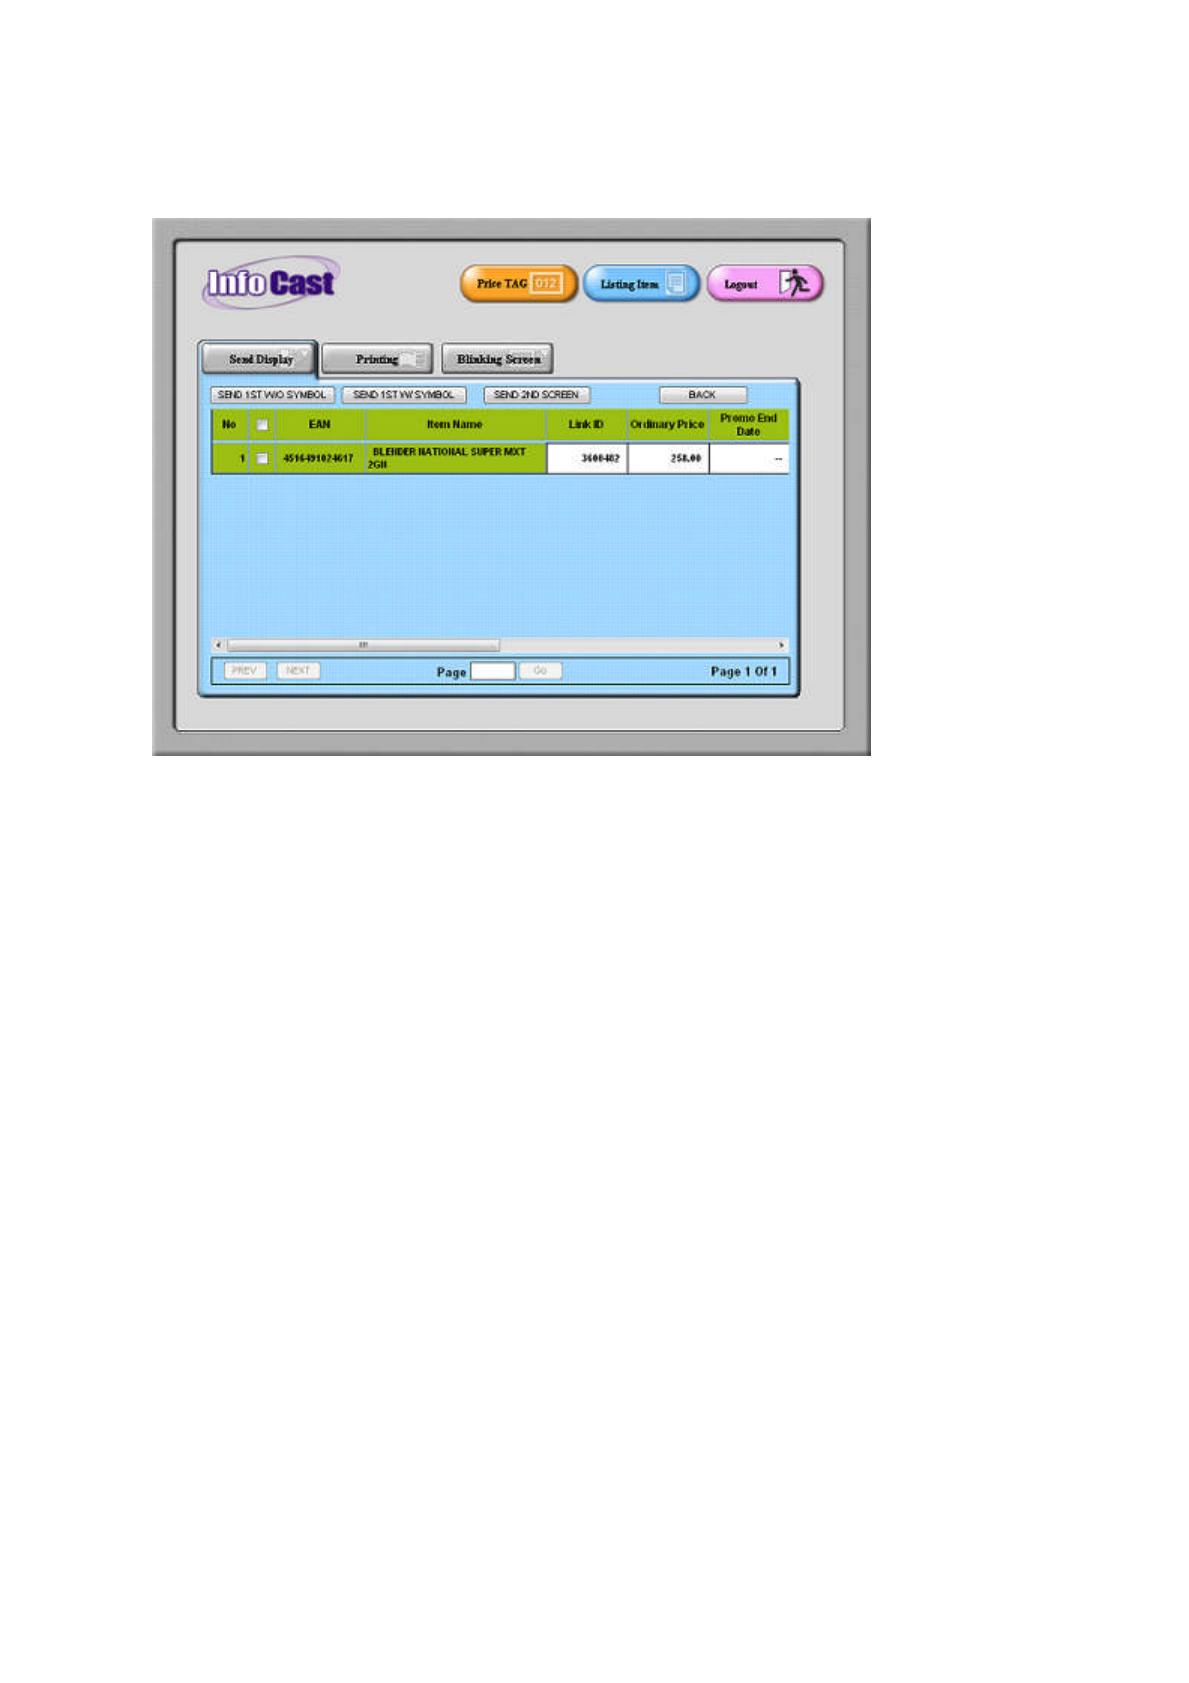
6. Send Display
Press [SEND DISPLAY] button to enter Send Display screen
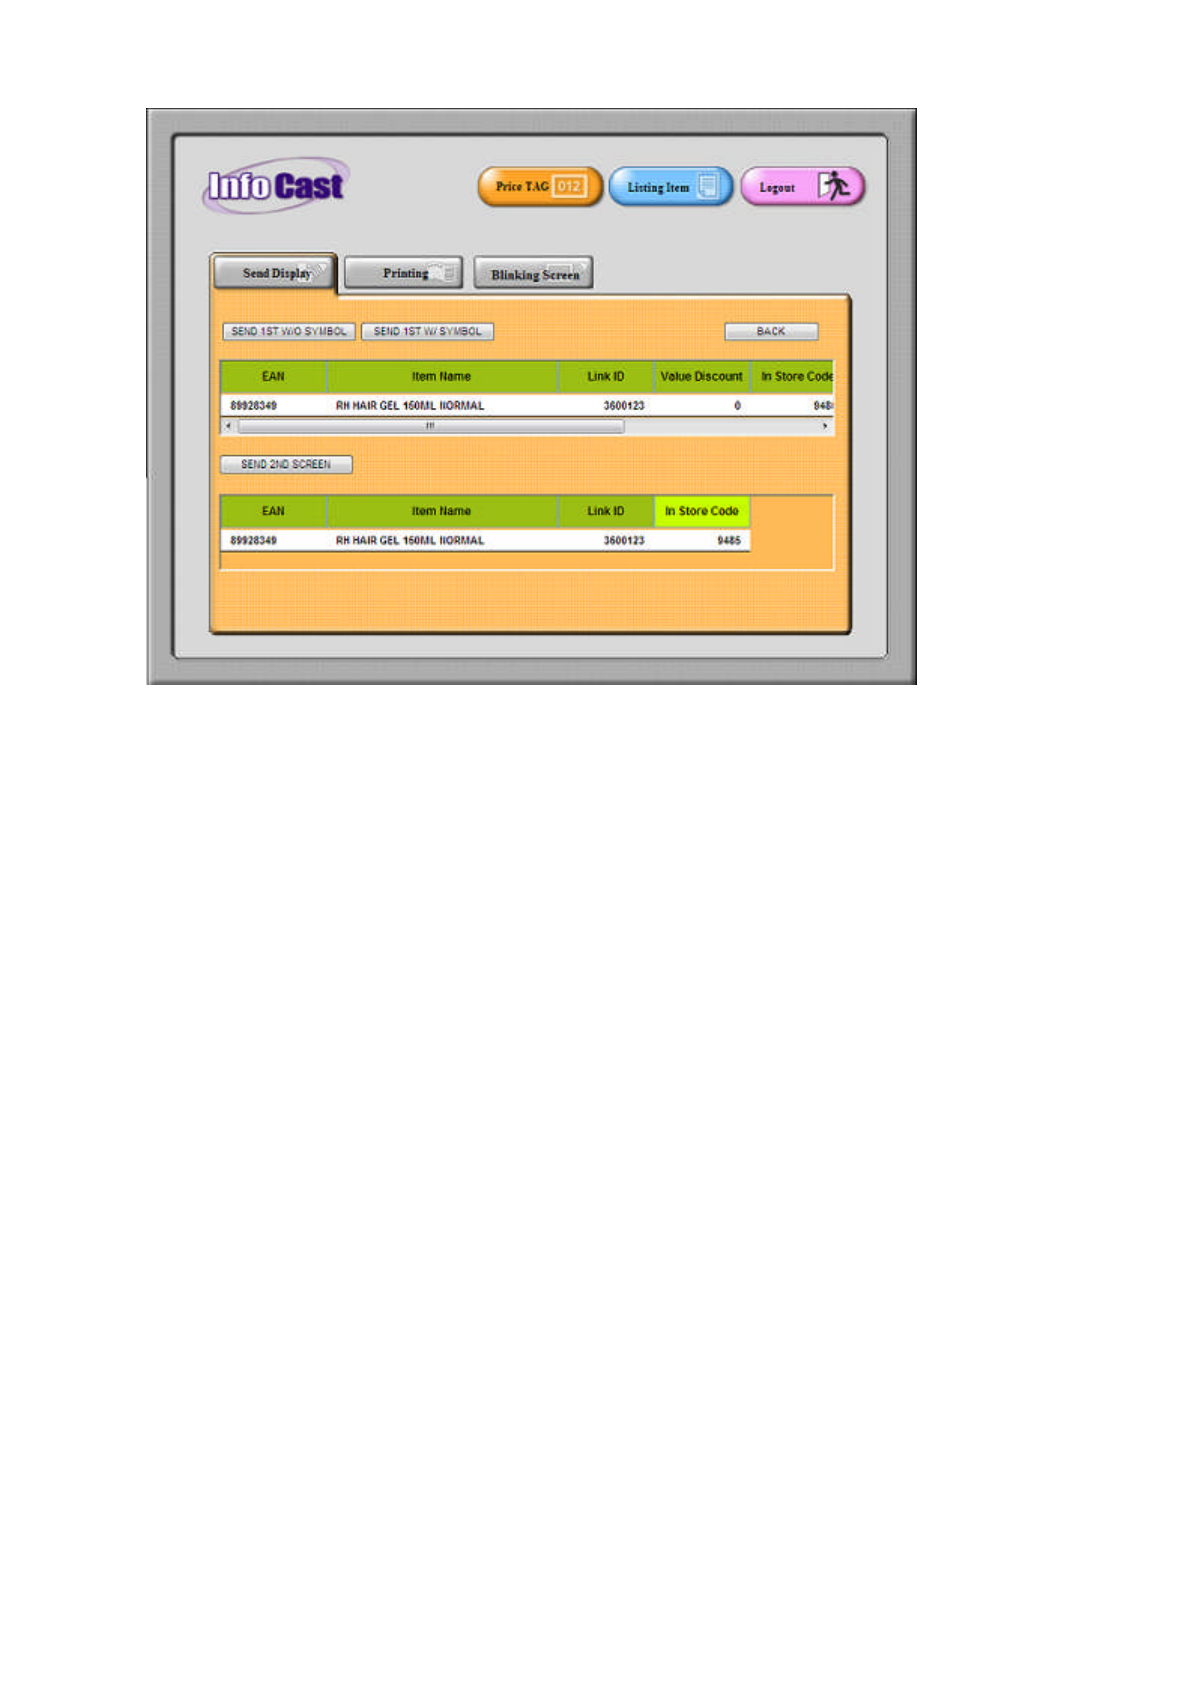
To resend item data to tag, this function is useful when the tag is hang or display incomplete data
Press [BACK] button to exit Send Display screen and return to price tag main screen
a) [SEND 1ST W/O SYMBOL] button - to send the 1st
screen numeric/digits data, without symbol e.g.
decimal point, Sales message and etc to selected tag
b) [SEND 1ST W/ SYMBOL] button - to send the 1st
screen numeric/digits data, with symbol e.g. decimal
point, Sales message and etc to selected tag
c) [SEND 2ND SCREEN] button - to send the 2nd screen to selected tag
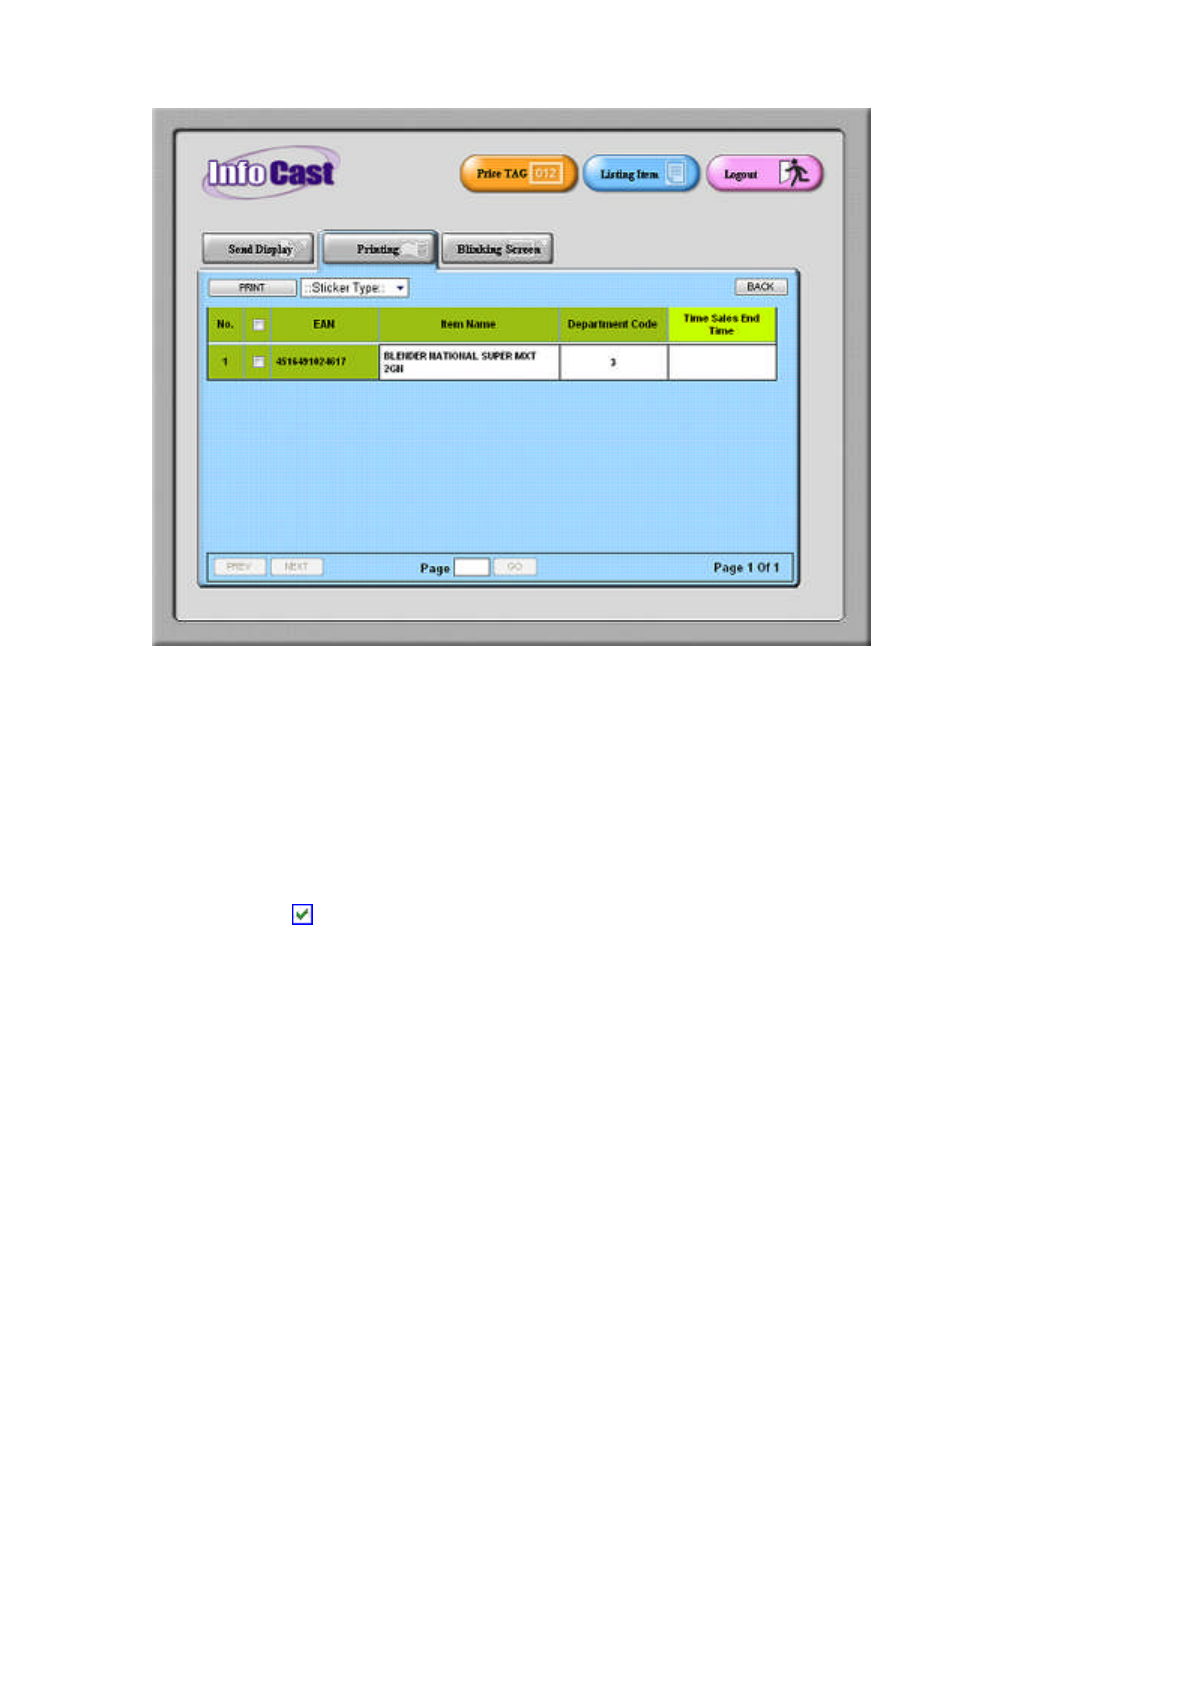
7. Printing
To print sticker or paper tag for the selected item
Press [PRINTING] button to enter Sticker & Paper Tag Printing screen
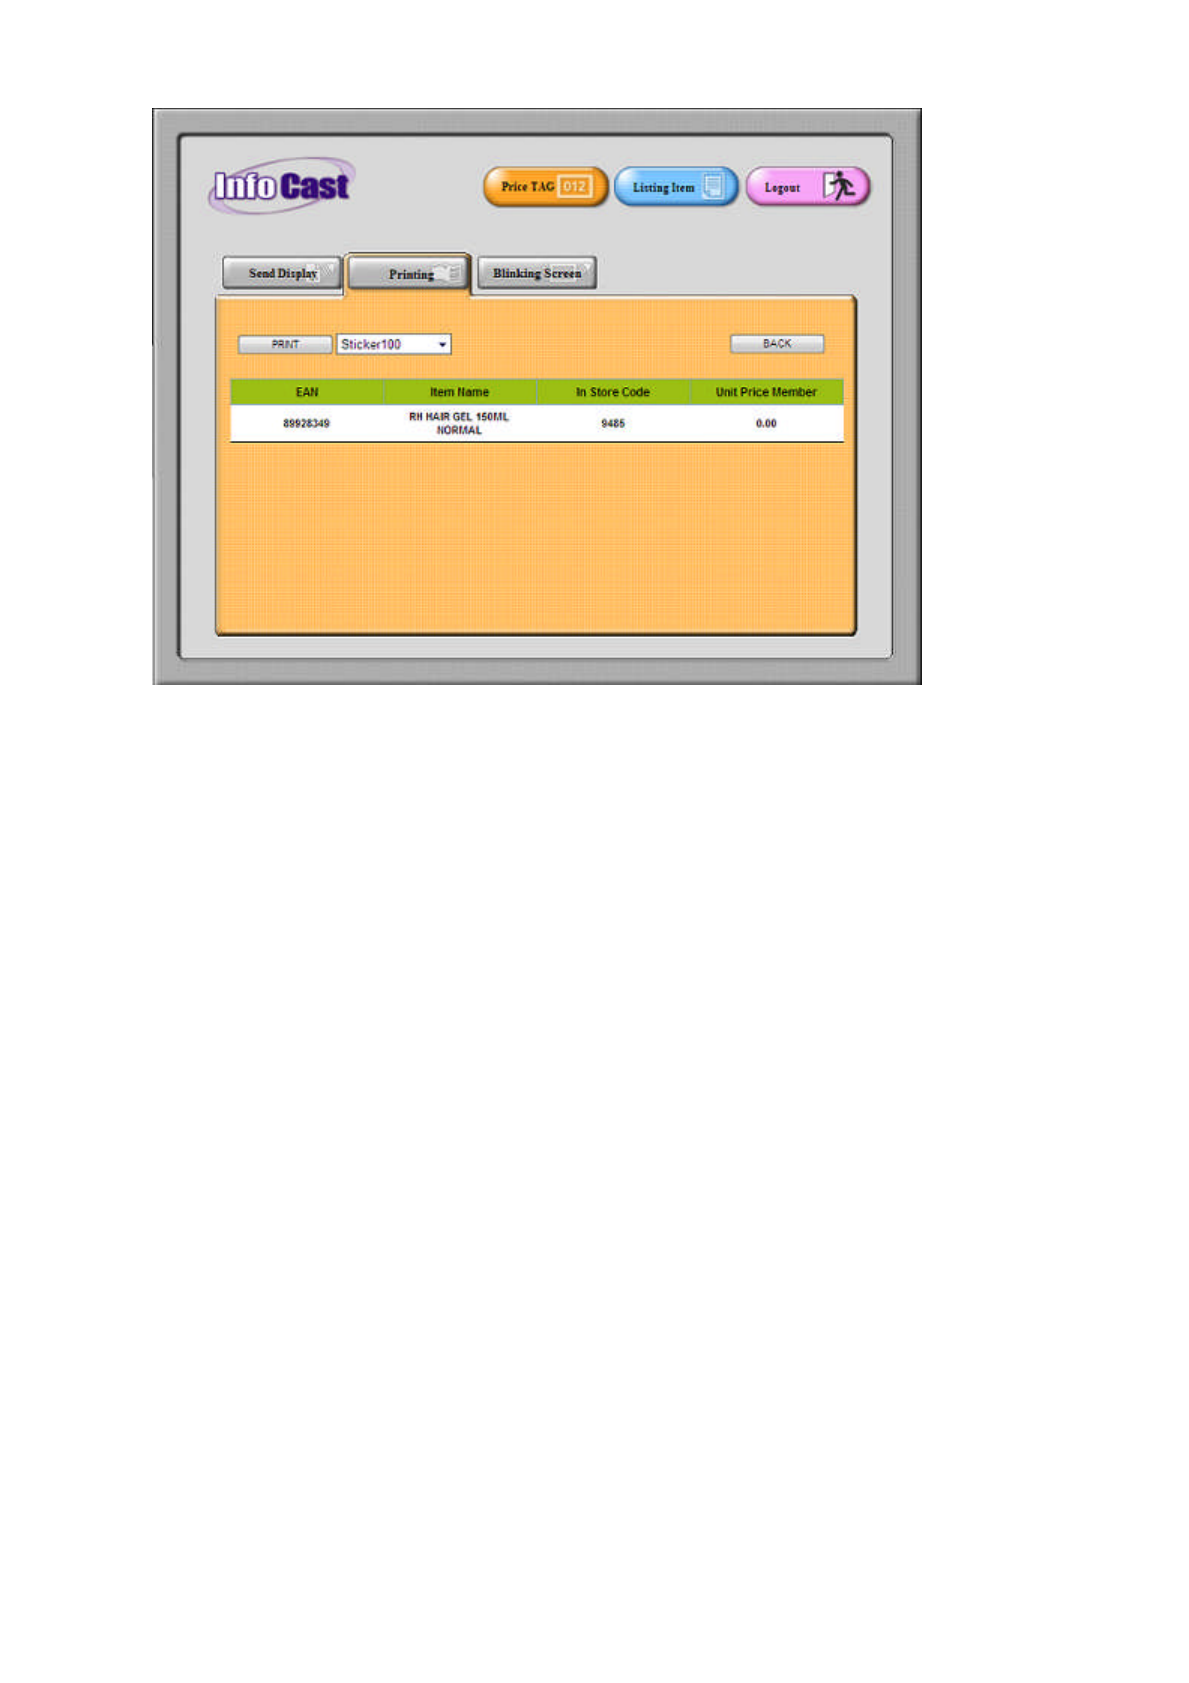
Press [BACK] button to exit Sticker & Paper Tag Printing screen and return to price tag main screen
a) [PRINT] button - to print sticker or paper tag for selected item
b) [STICKER TYPE] selection - to select available sticker type for printing
Note: Sticker type is required to be programmed in Sticker/Paper Tag Format Design in
advance
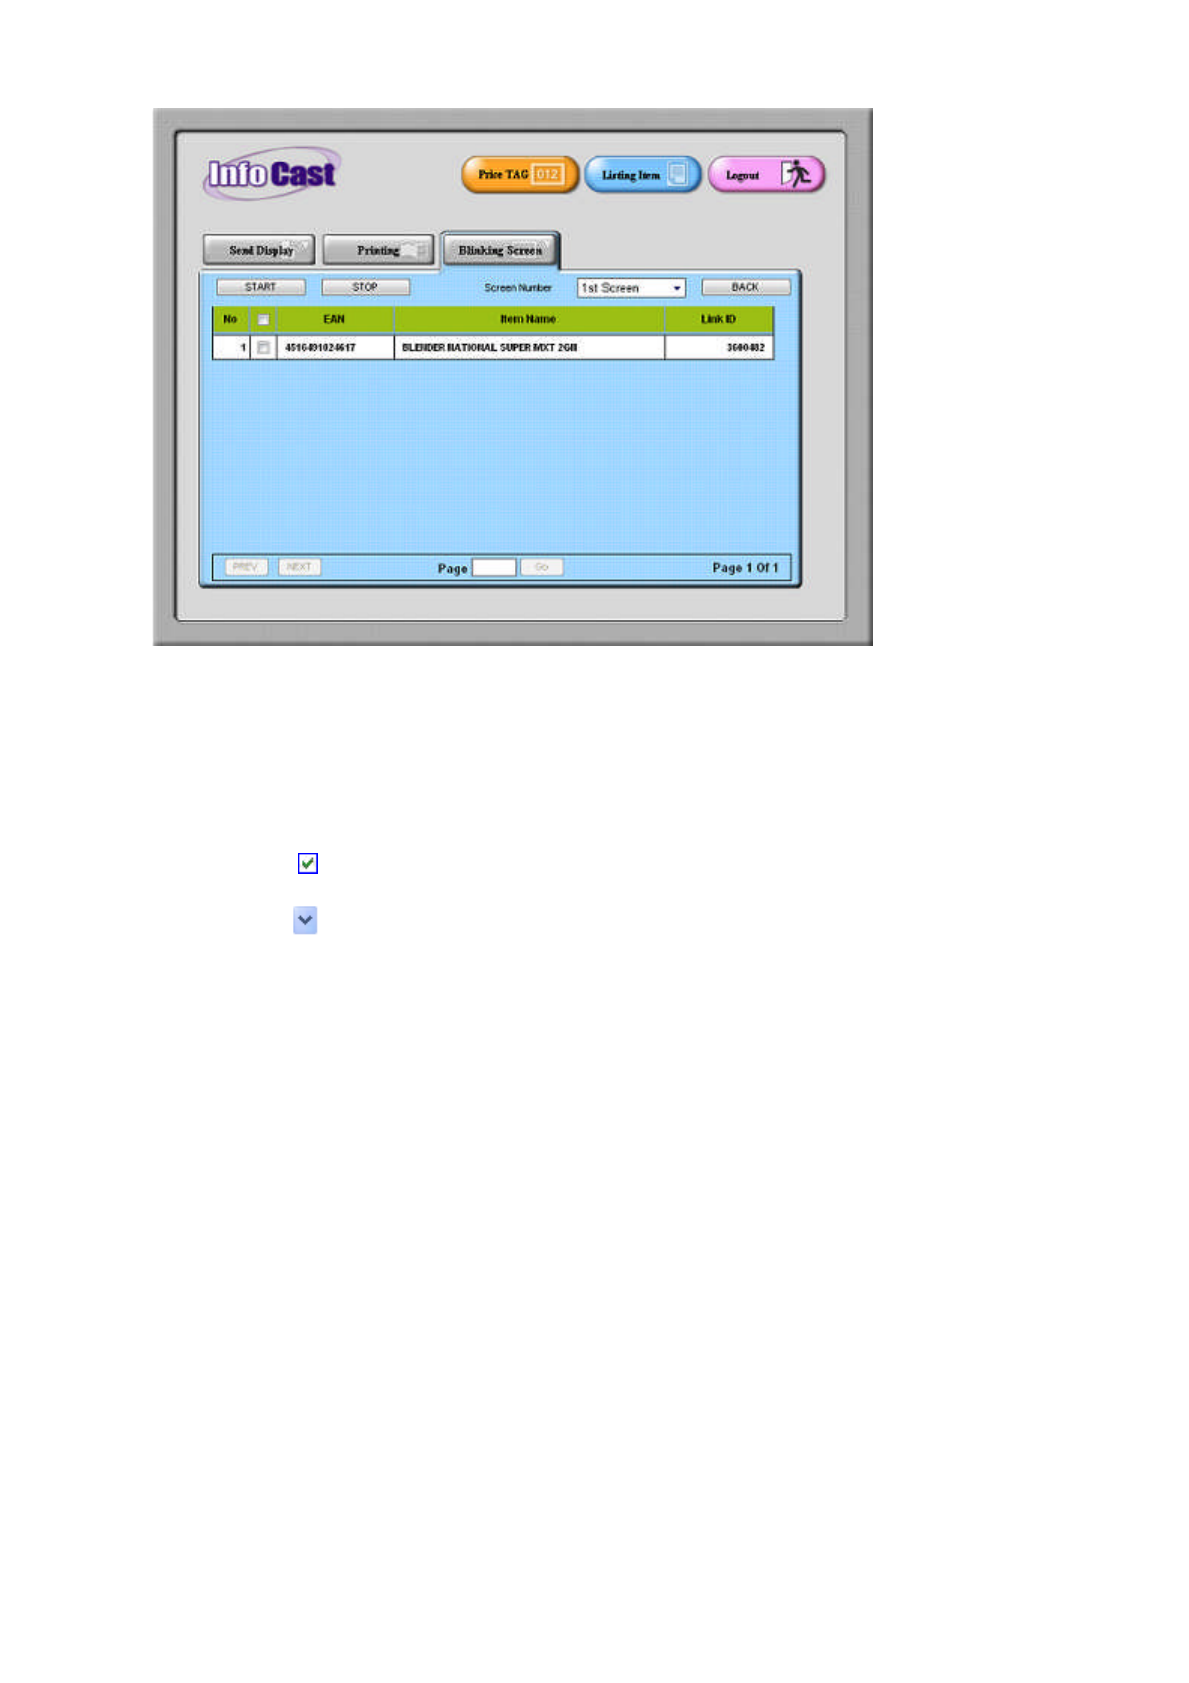
8. Blinking Screen
To set selected tag to blink tag displayed data
Press [BLINKING SCREEN] button to enter Blinking Screen mode screen
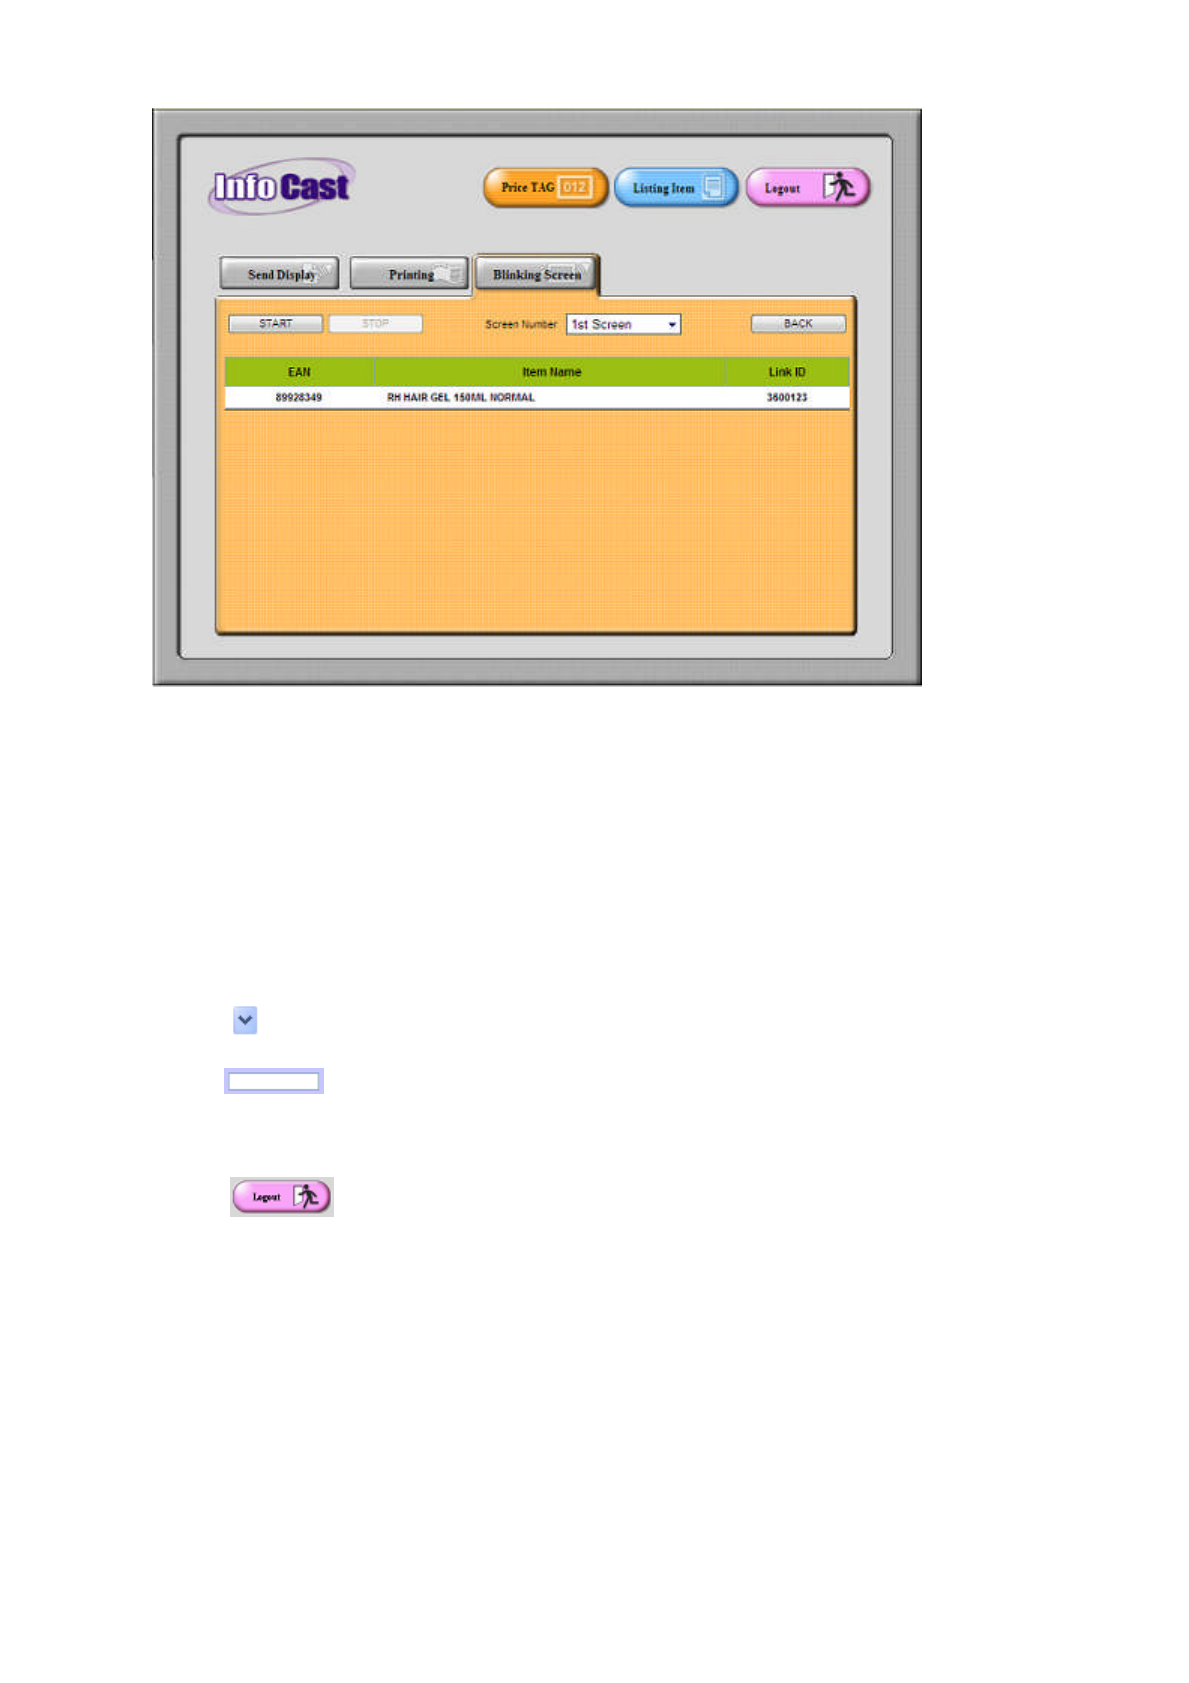
Press [BACK] button to exit Blinking Screen mode screen and return to price tag main screen
a) [START] button - to start blinking tag display
b) [STOP] button - to stop blinking tag display
c) [SCREEN NUMBER] selection - to select page of tag to be displayed after stop blinking
operation
Note1: Press button, to select data from available list
Note2: Click box to enter desired data
Note3: Press [CLEAR] button to clear data retrieved or entered
Note3:
press button, to exit from Maintenance screen, Price/Transaction Maintenance screen.

LISTING ITEM
[Home] [Up]
Listing Item is used to search data, to check error log, to print sticker and update data to multiple price tag.
ENTRY TO LISTING ITEM
OVERVIEW OF LISTING ITEM
ENTRY TO LISTING ITEM
[Home] [Up]
1. At the Info Cast Main Screen
Note: No "User Name" or "Password" required using this mode
2. Press
[ADMIN]
button to enter to
Administrator Menu
and enter to
Price Tag
screen
3. Then press [LISTING ITEM] button to go to Listing Item screen
4. Do operations as desired
OVERVIEW OF LISTING ITEM
[Home] [Up]
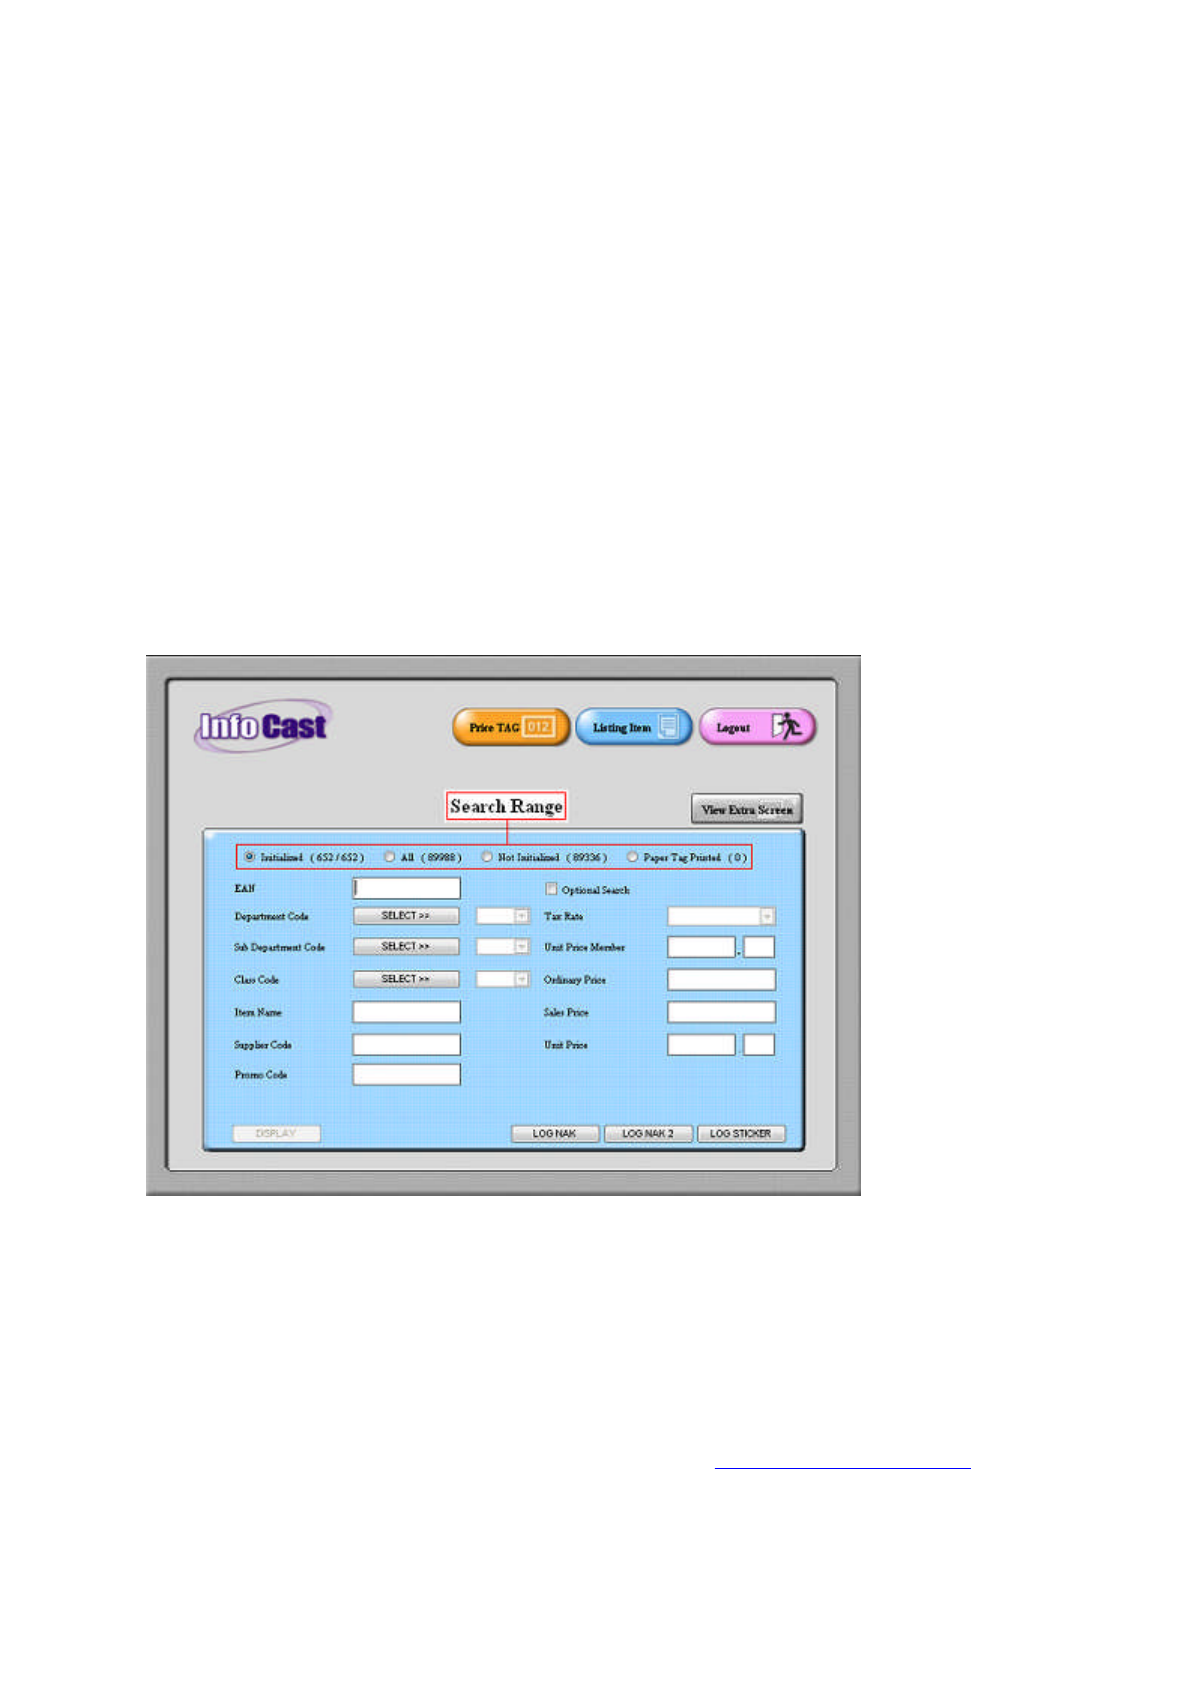
1. Search Range
To select search range for searching item
Initialized - To search items within initialized tag
Not Initialized - To search items within items that not been initialized with tag
All - To search all range of item (initialized and not initialized)
Paper Tag Printed - To search item within item that has printed paper tag
Note: The number in "(xx)", indicate number of items available for each search option type
2. EAN
To search item by a EAN code (European article number)
Scan barcode or enter value by keyboard and press [DISPLAY] button to search entered item data
Note: To enter value by keyboard, user are required to follow Manual Key-in Barcode Data table
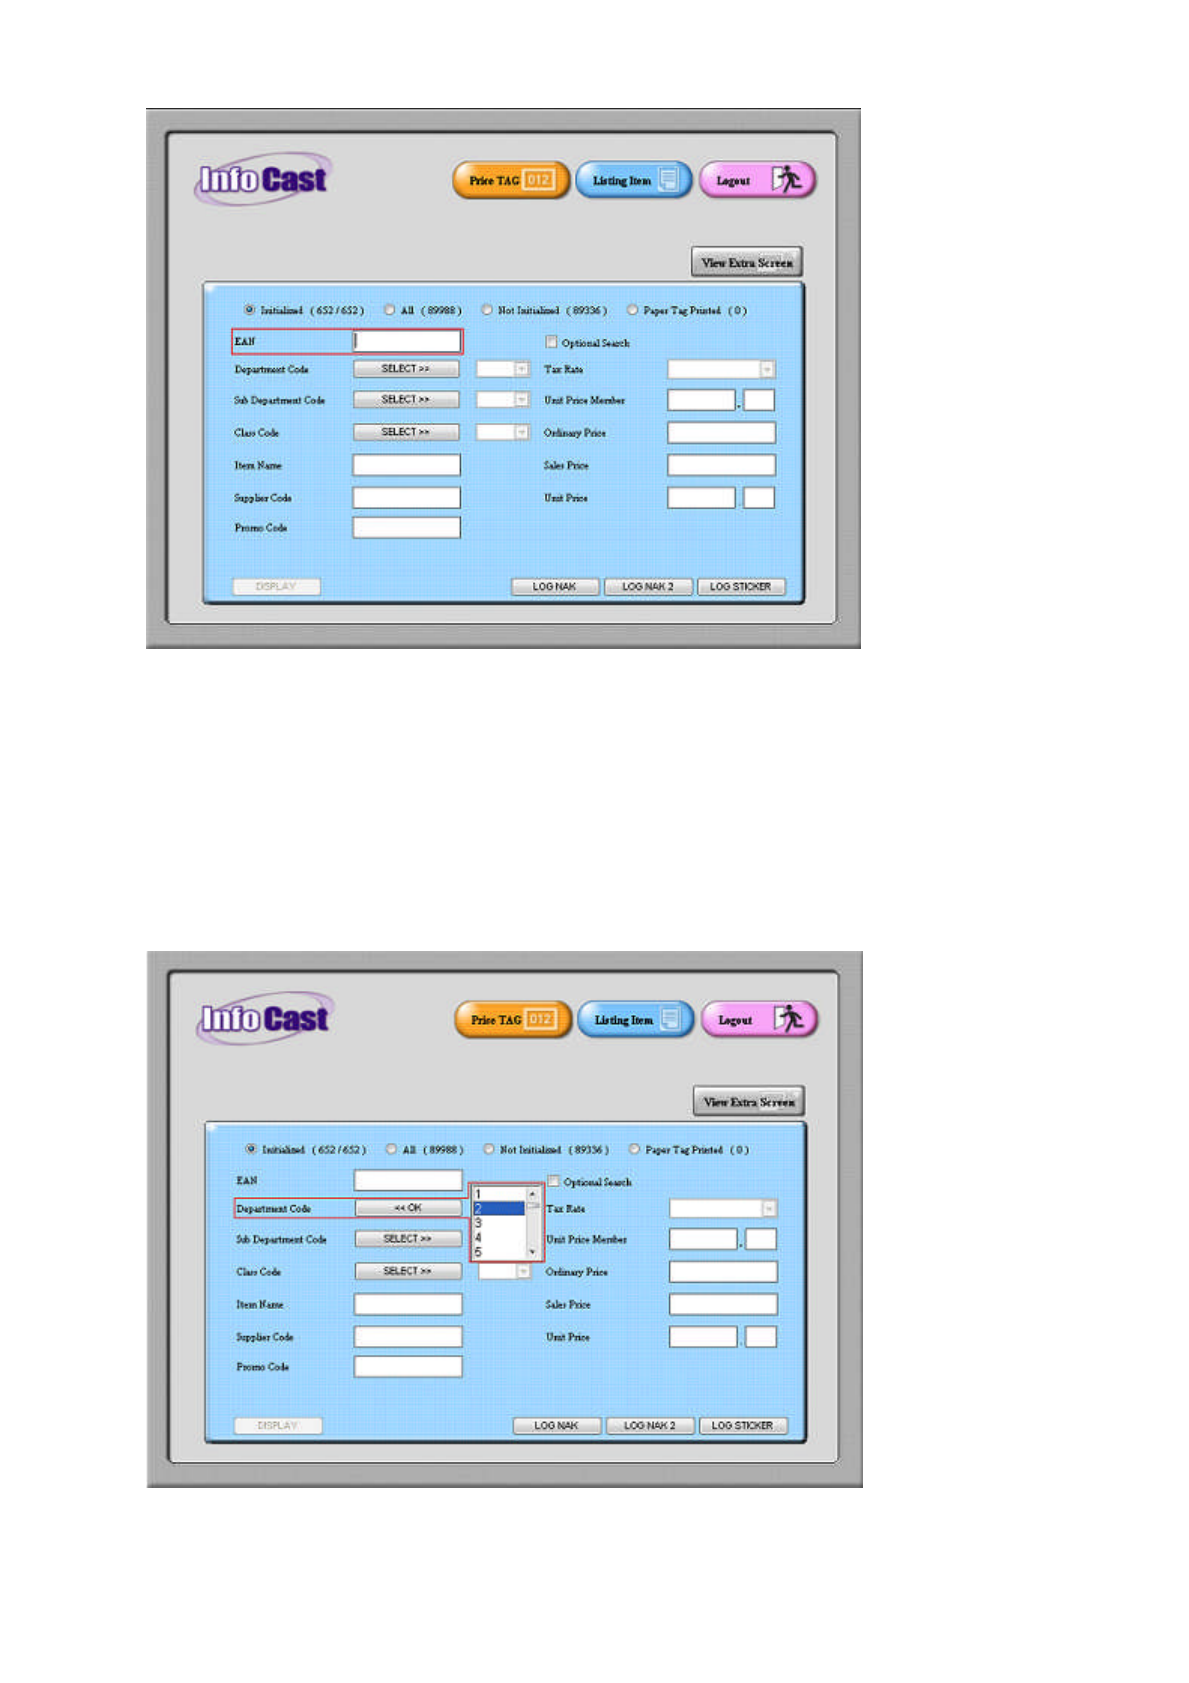
3. Department Code
To search item by department code
Press [SELECT] button to view available department code
Select department code and press [OK] button
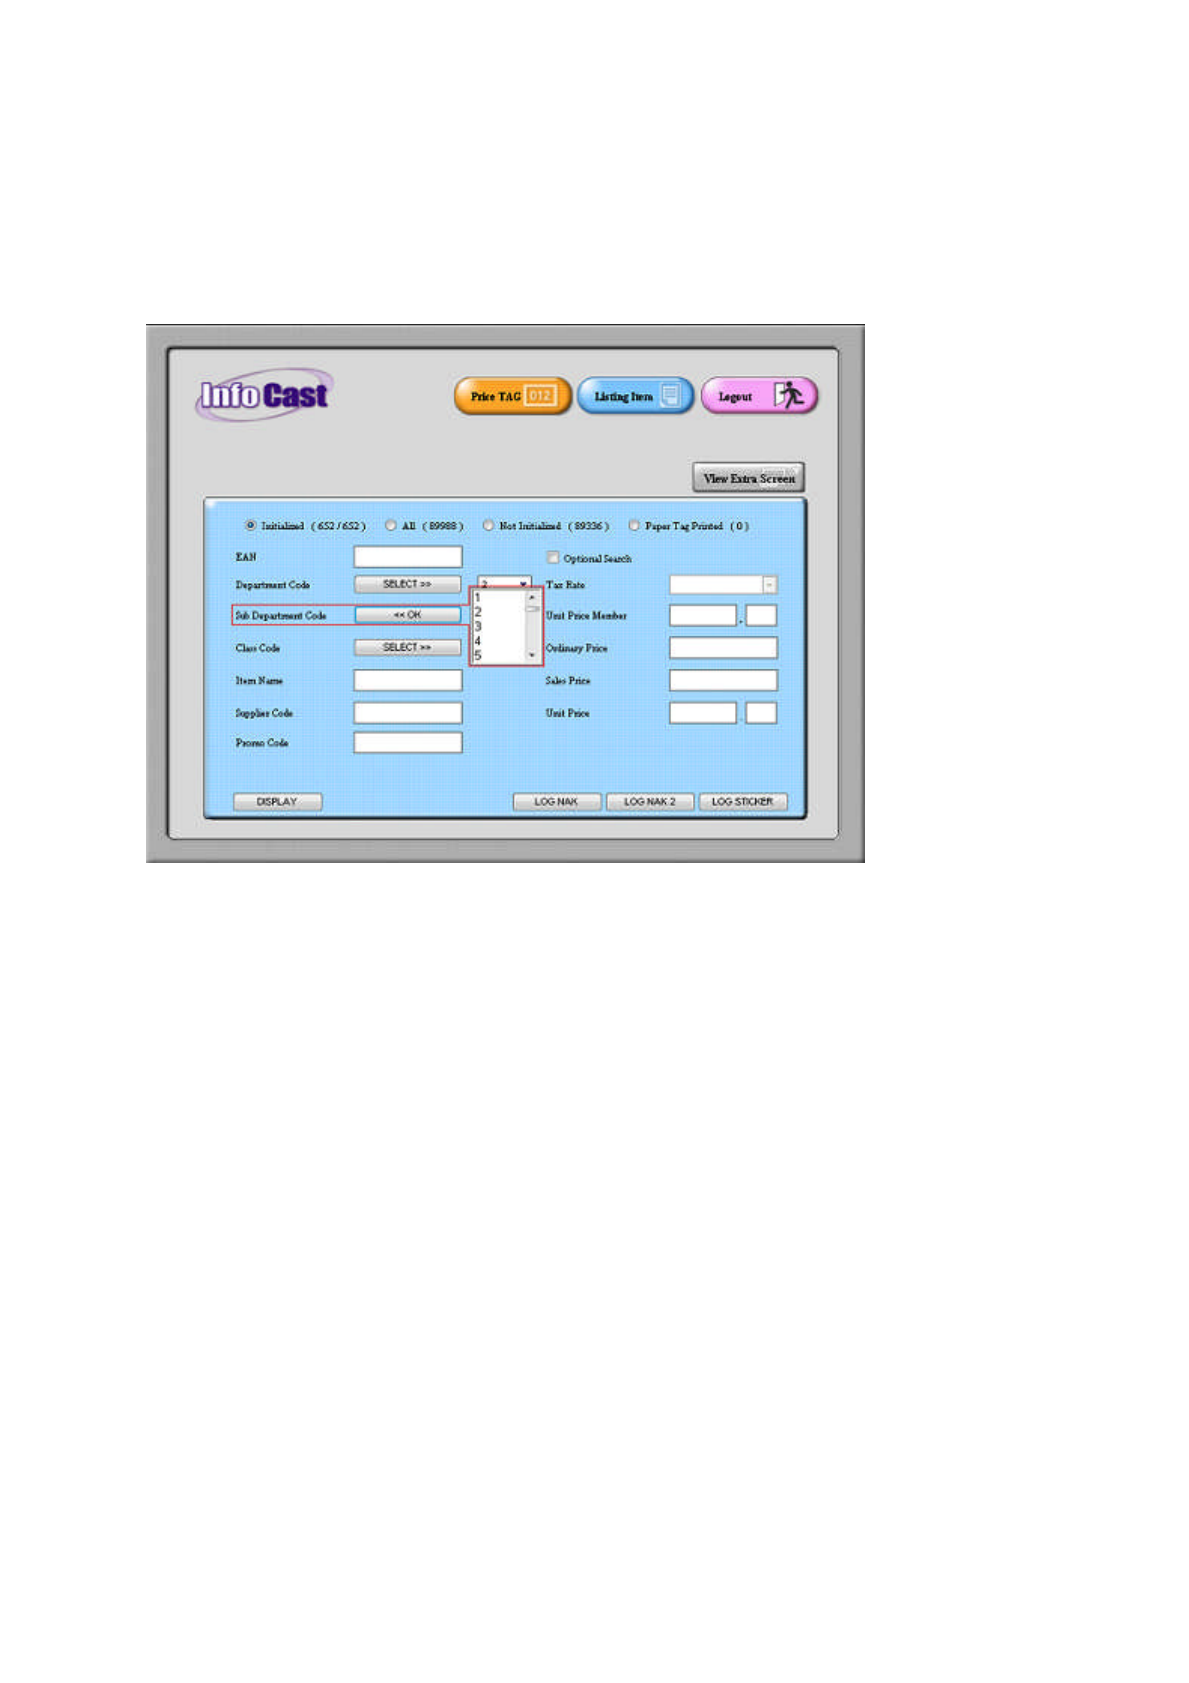
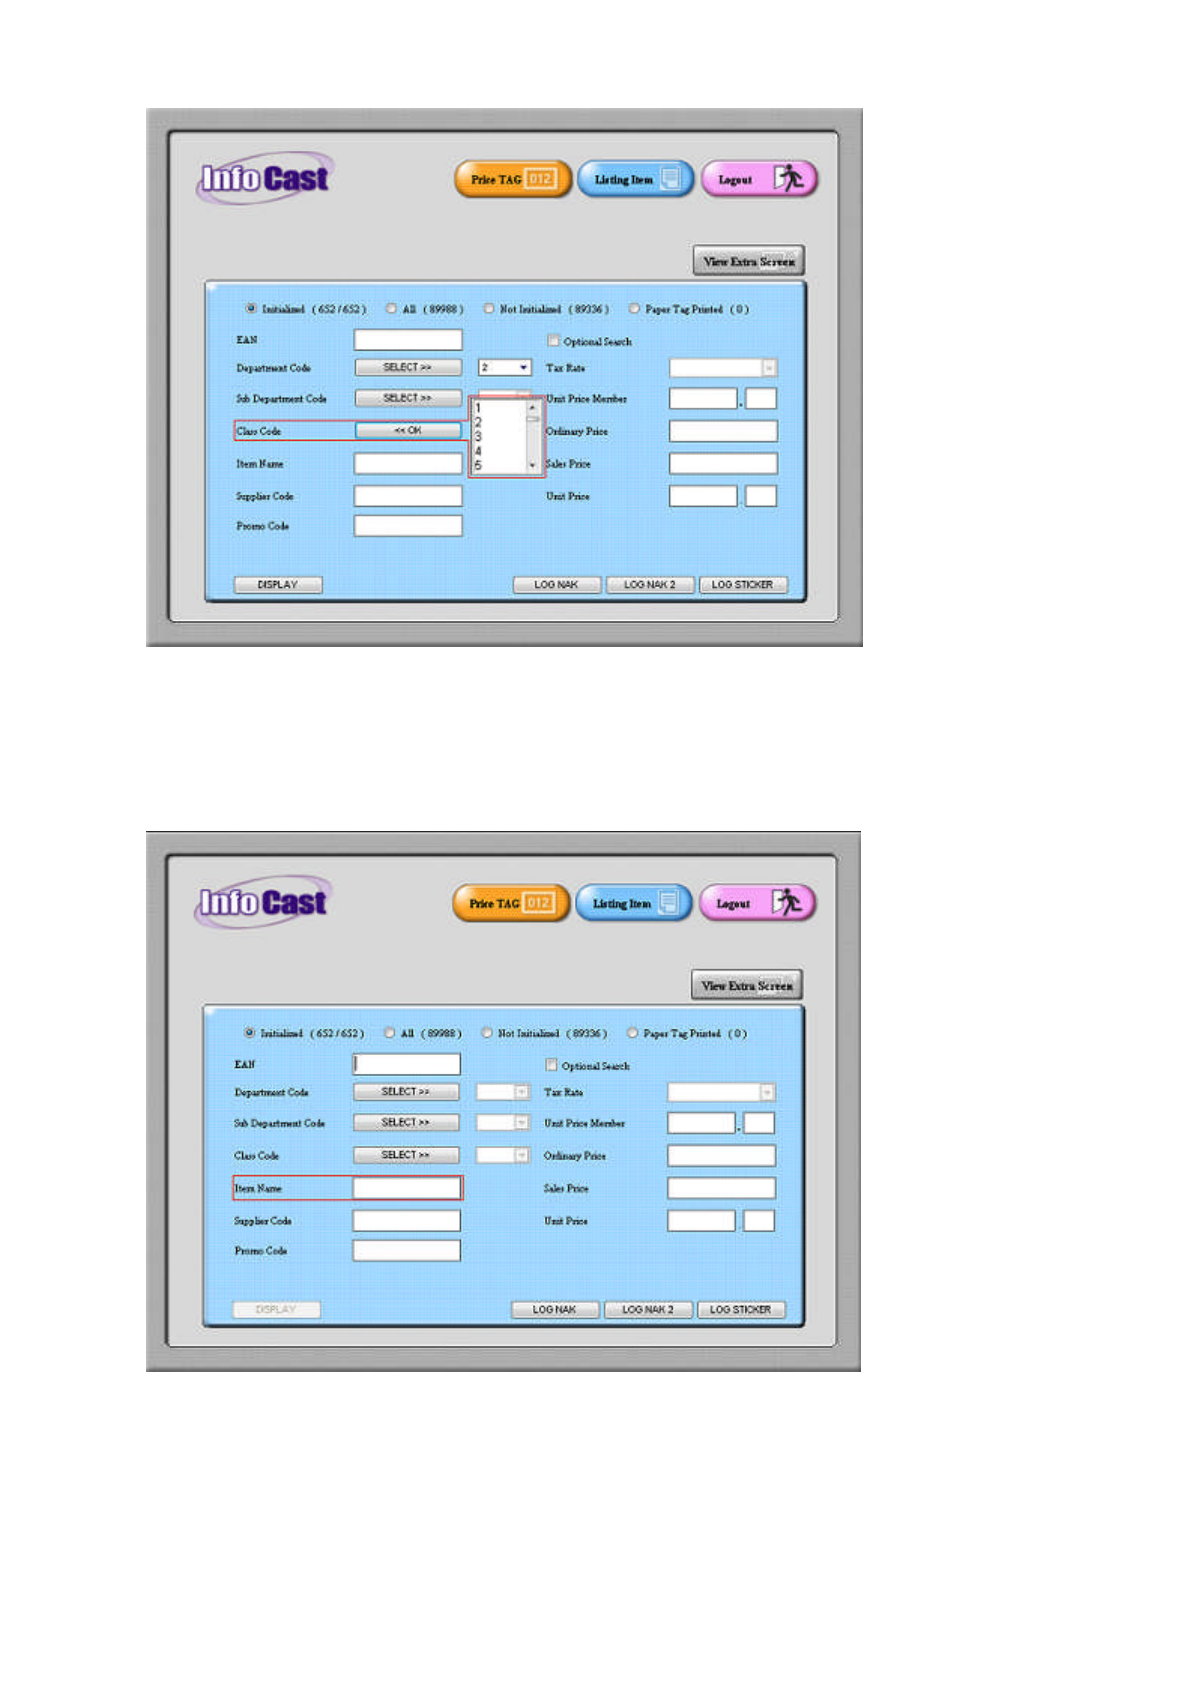
4.
Sub
-
Department Code
To search item by sub-department code
Press [SELECT] button to view available sub-department code
Select sub-department code and press [OK] button
5. Class Code
To search item by class code
Press [SELECT] button to view available class code
Select class code and press [OK] button
6. Item Name
To search item by a Item Name data
7. Supplier Code
To search item by a Supplier Code
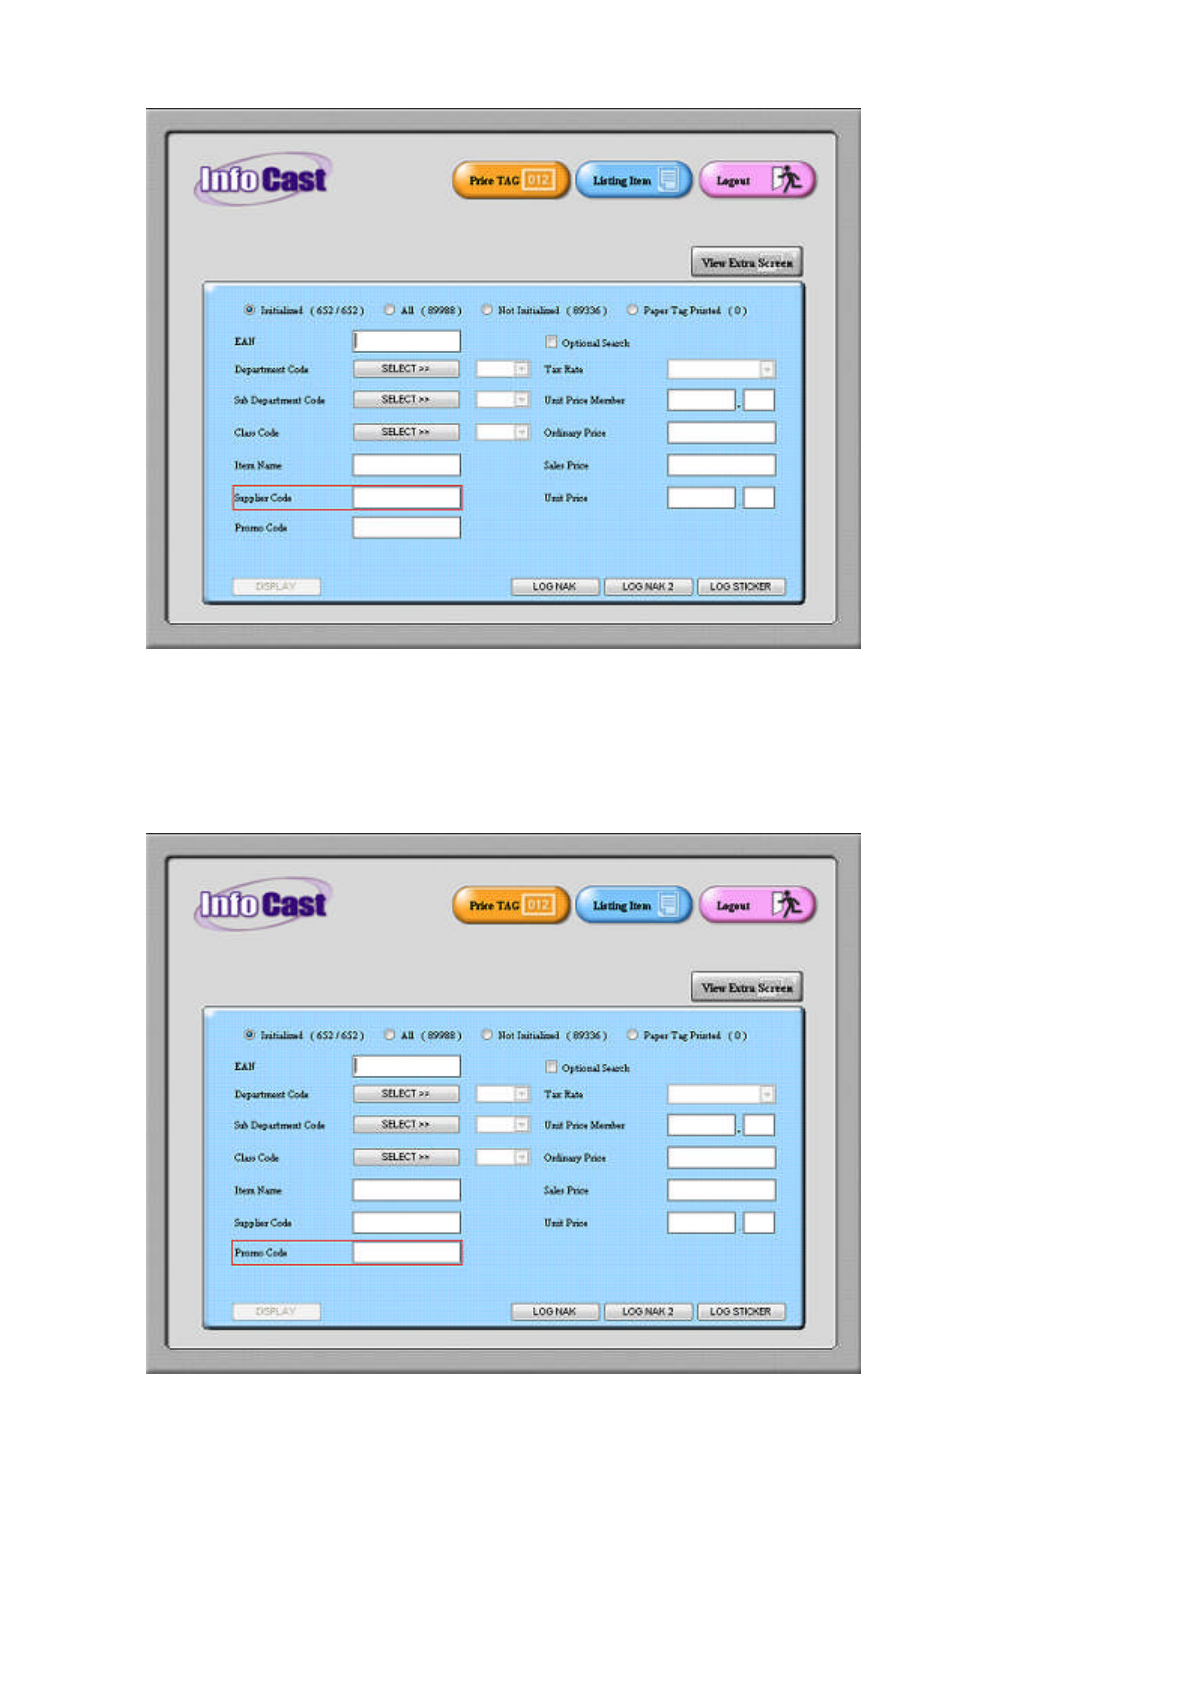
8. Promo Code
To search item by a Promotion Code
9. Optional Search
To enable/disable use of Optional Search options
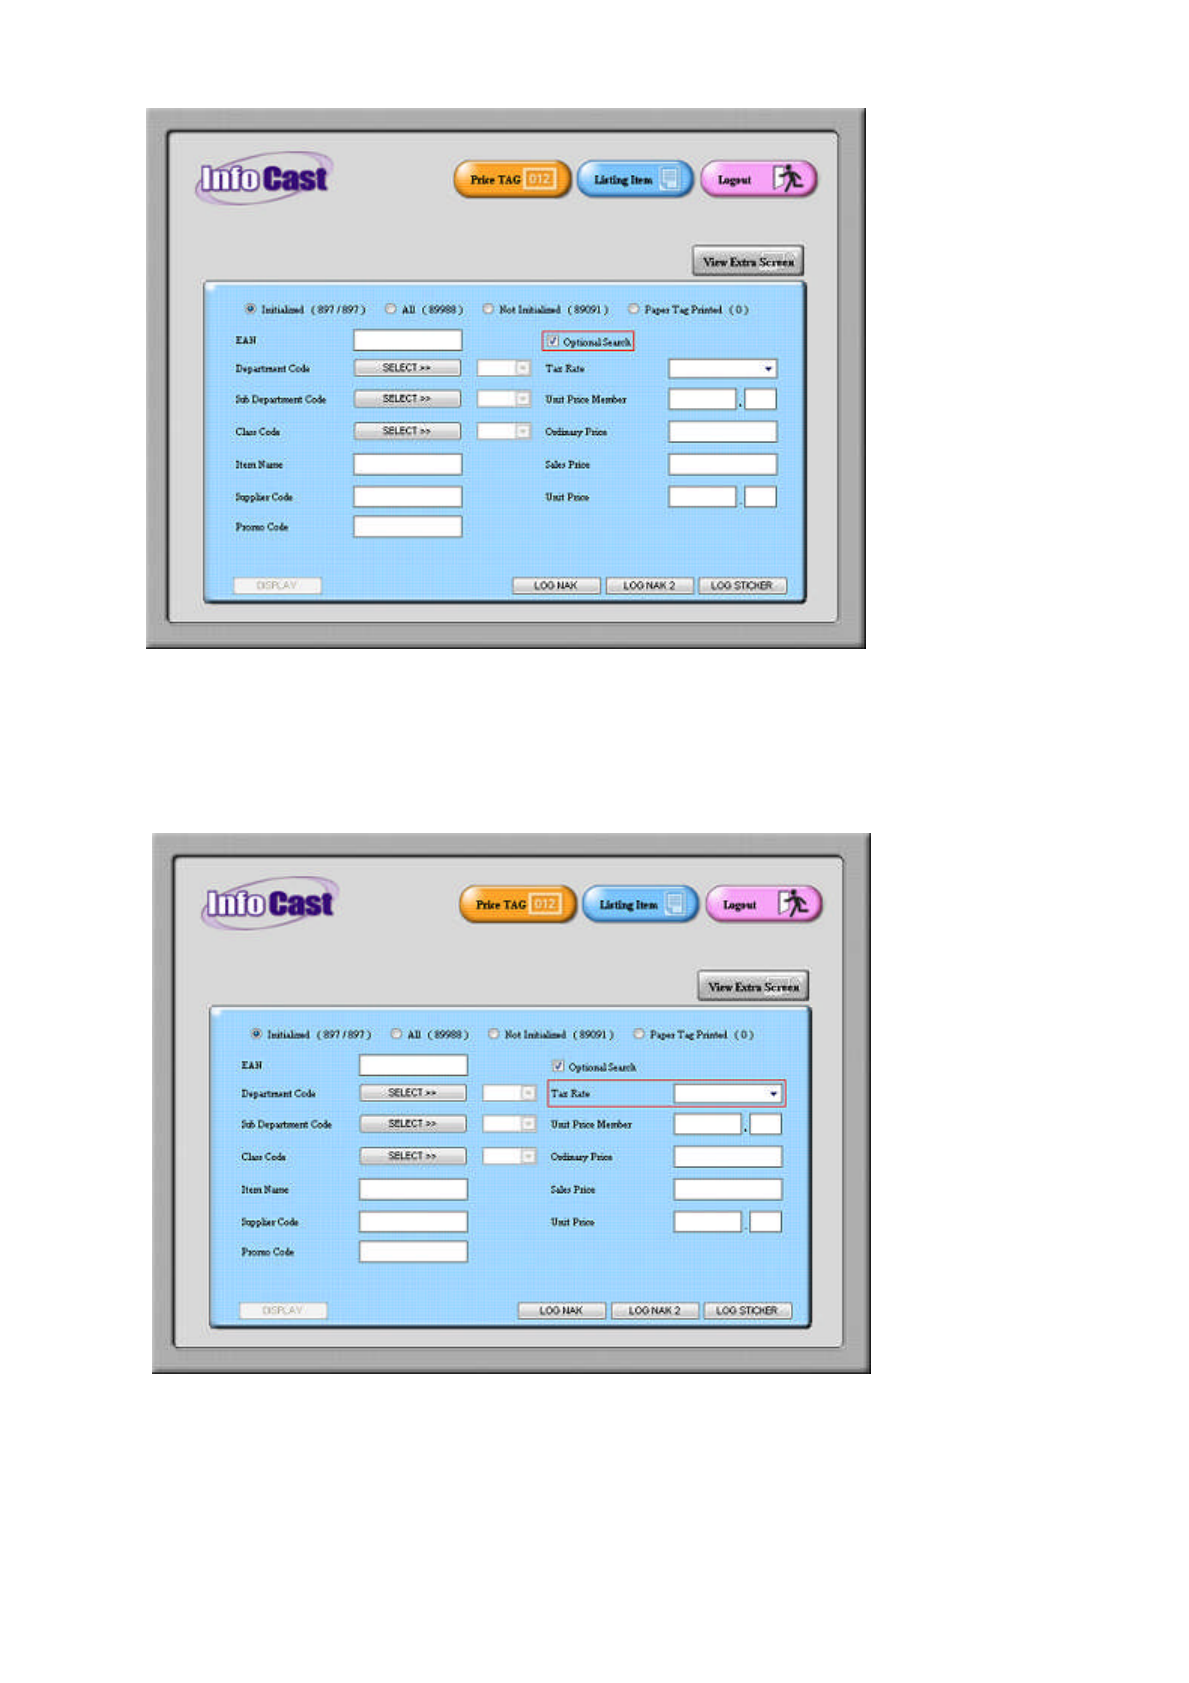
10. Tax Rate
To search item by a Tax Rate value
11. Unit Price Member
To search item by a Unit Price Member value
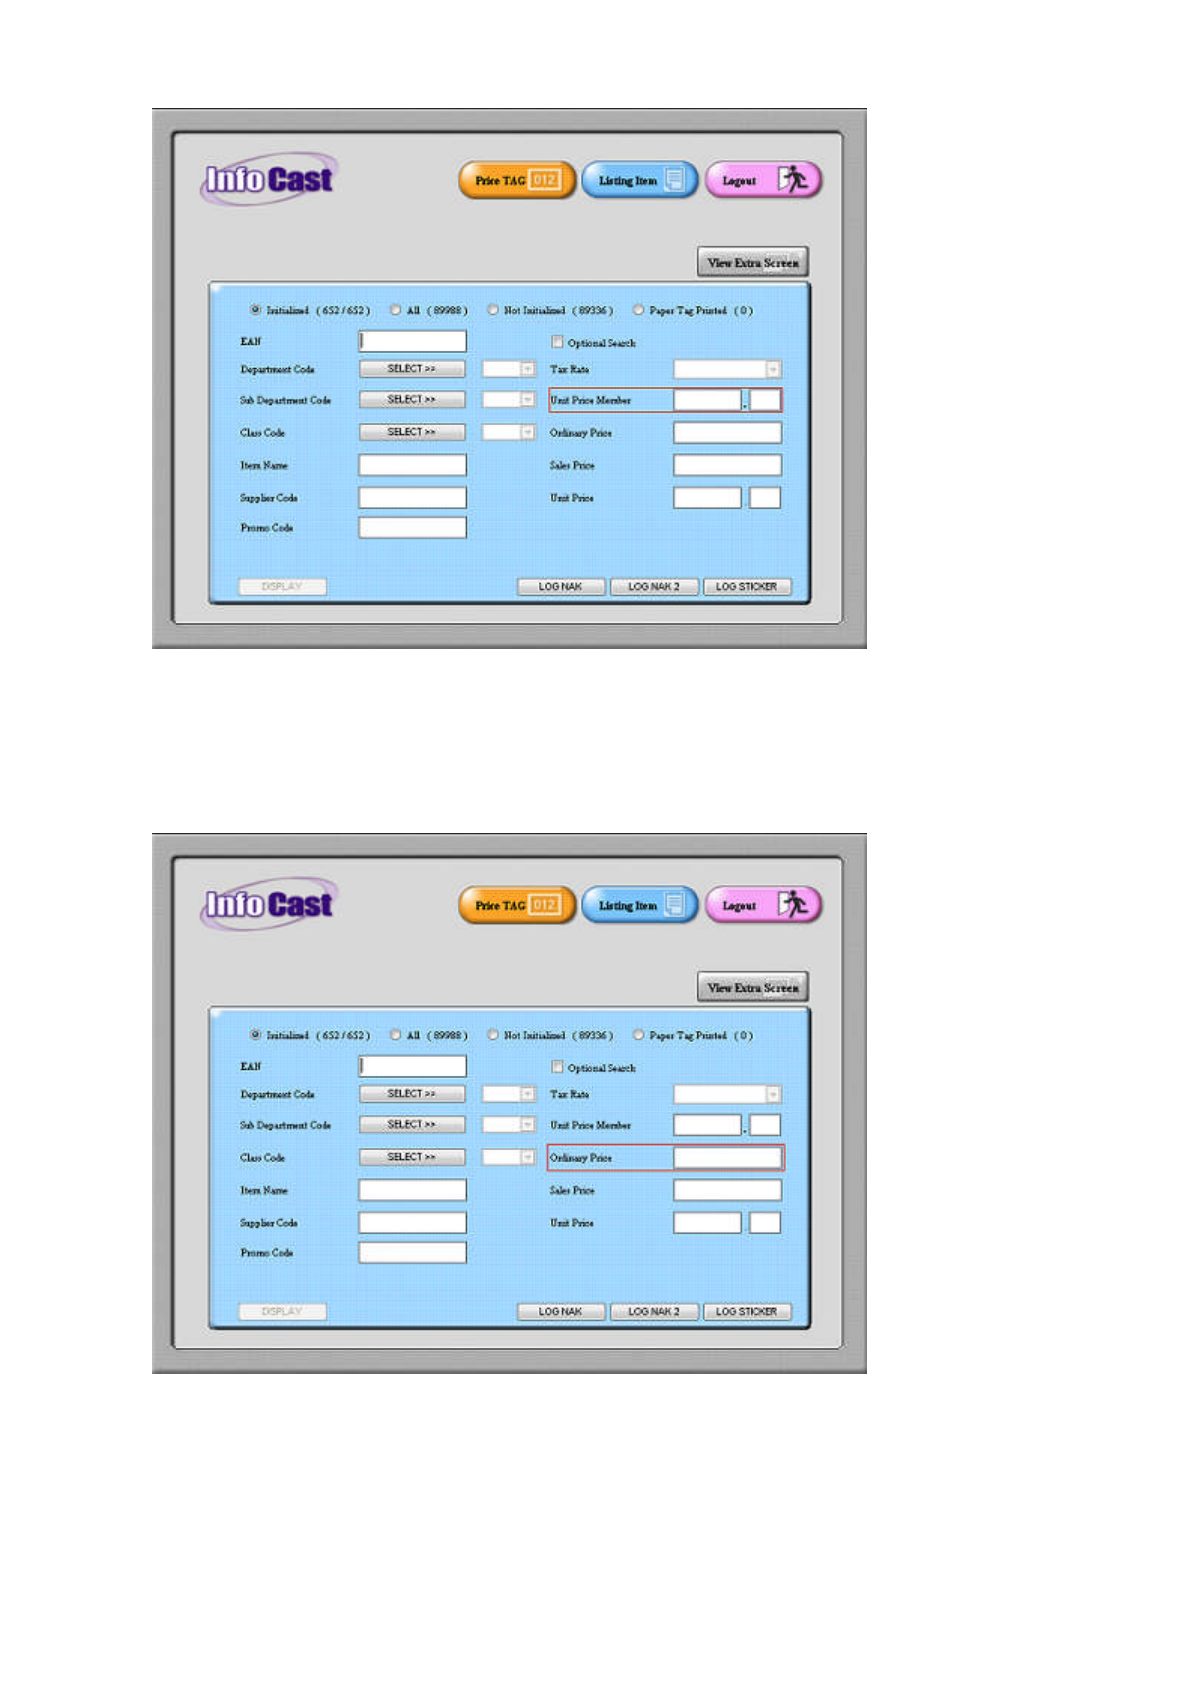
12. Ordinary Price
To search item by a Ordinary Price value
13. Sales Price
To search item by a Sales Price value
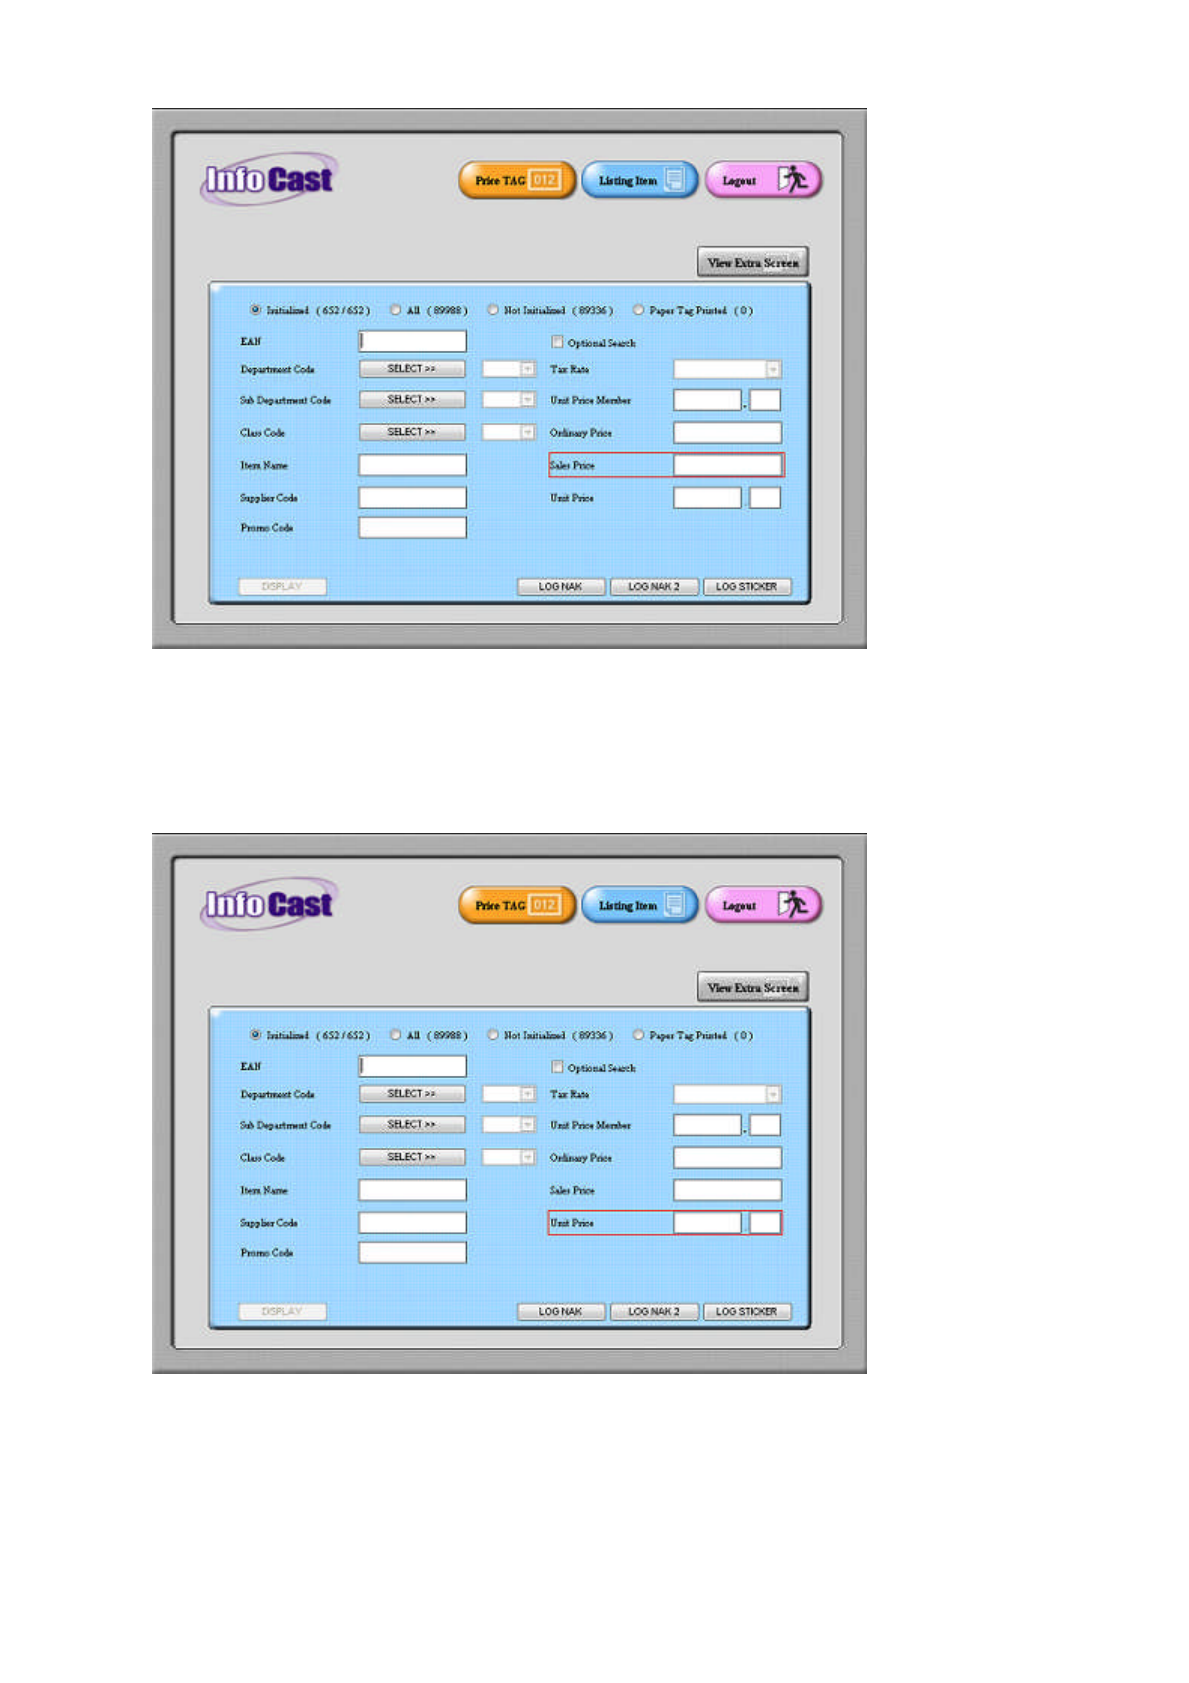
14. Unit Price
To search item by Unit Price value range
15. Display
To search and display according to entered search setting in above settings (see Search Item Display
screen)
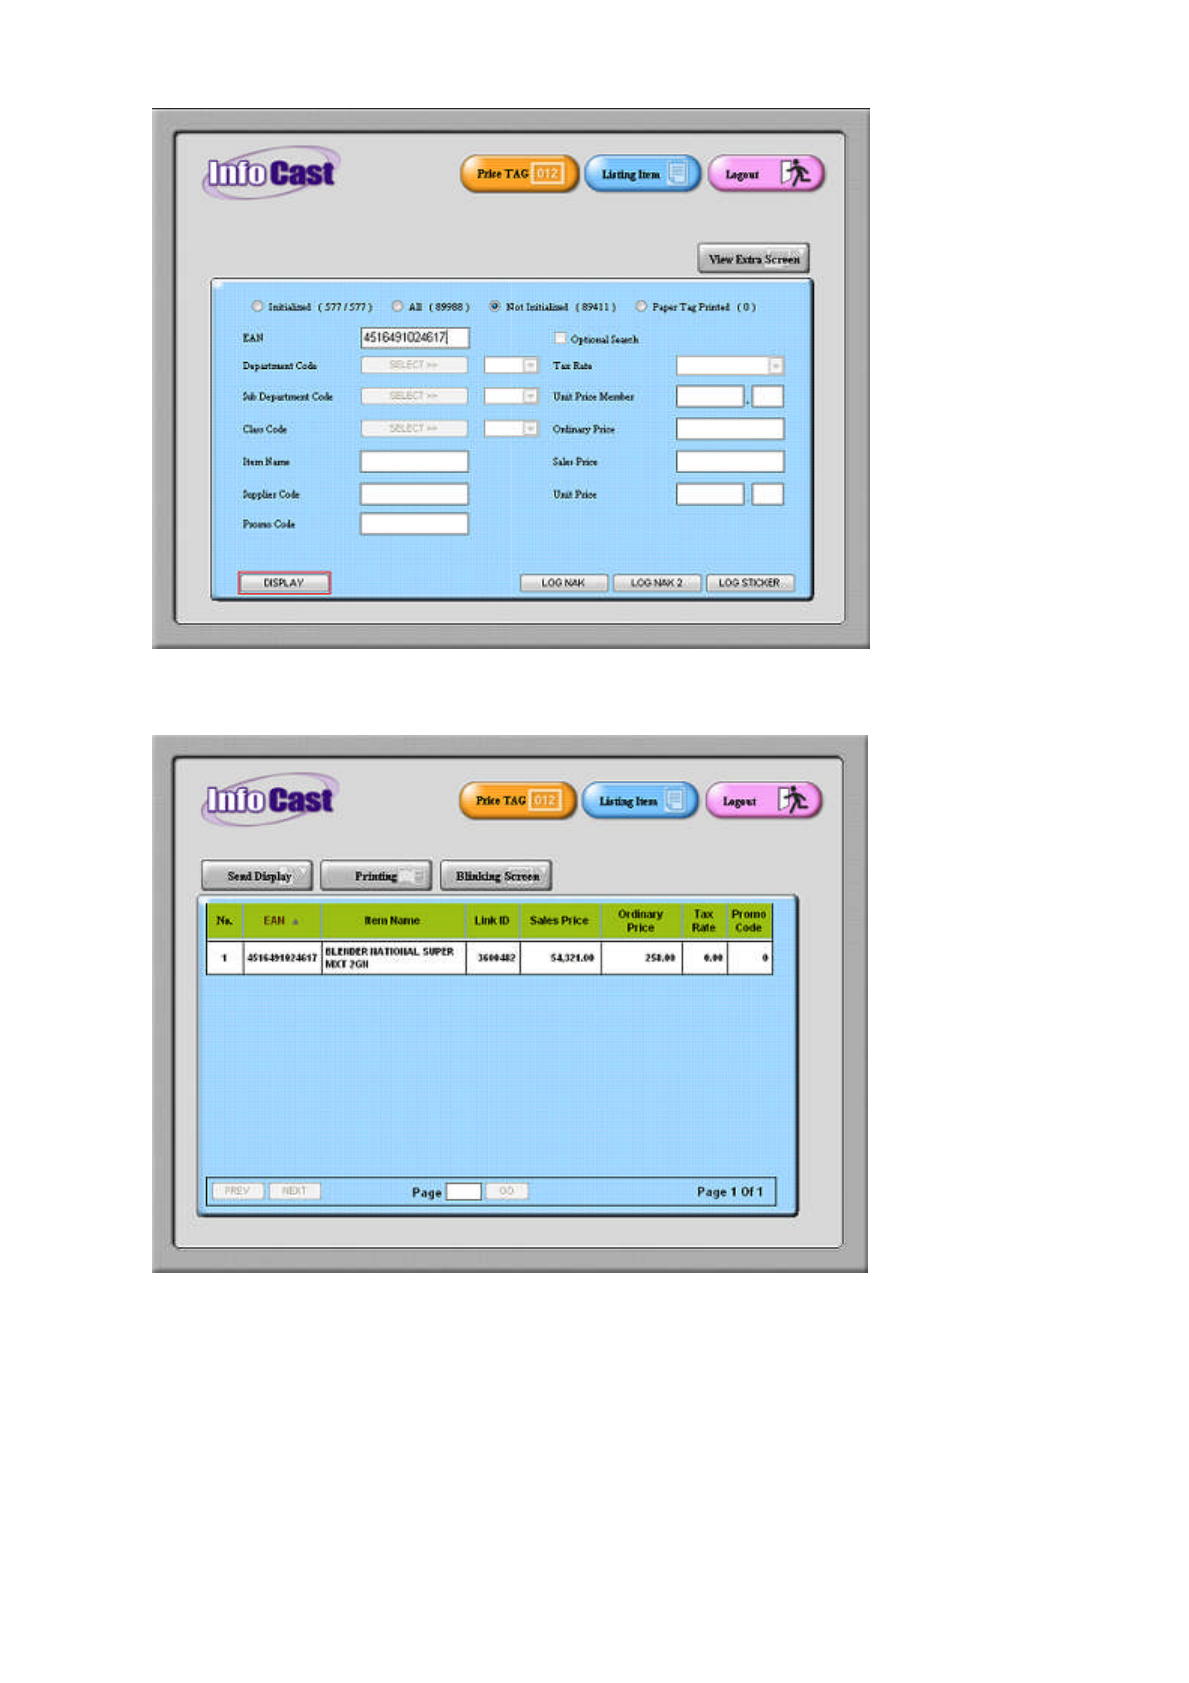
Press [DISPLAY] to go to Search Item Display screen
Note: Press [LISTING ITEM] button to exit Search Item Display screen
i) SEND DISPLAY
to send data to selected tag from the search list
Press [SEND DISPLAY] button to enter Send Display screen
To resend item data to tag, this function is useful when the tag is hang or display incomplete data
Press [BACK] button to exit Send Display screen and return to price tag main screen
a) [SEND 1ST W/O SYMBOL] button - to send the 1st screen numeric/digits data, without
symbol e.g. decimal point, Sales message and etc to selected tag
b) [SEND 1ST W/ SYMBOL] button - to send the 1st screen numeric/digits data, with symbol e.g.
decimal point, Sales message and etc to selected tag
c) [SEND 2ND SCREEN] button - to send the 2nd screen to selected tag
Note1: Check box select tag and item to be send display for updating tag display
Note2: Press [BACK] button to exit and return to Search Item Display screen
ii) Printing
Press [PRINTING] button to enter Printing screen
To print sticker or paper tag for the selected item
Press [BACK] button to exit Printing screen and return to price tag main screen
a) [PRINT] button - to print sticker or paper tag for selected item
b) [STICKER TYPE] selection - to select available sticker type for printing
Note1: Sticker type is required to be programmed in Sticker/Paper Tag Format Design in
advance
Note2: Check box select tag and item to be send display for updating tag display
Note3: Press button, to select data from available list
Note4: Press [BACK] button to exit and return to Search Item Display screen
iii) Blinking Screen
Press [BLINKING SCREEN] button to enter Blinking Screen mode screen
To set selected tag to blink tag displayed data
Press [BACK] button to exit Blinking Screen mode screen and return to price tag main screen
a) [START] button - to start blinking tag display
b) [STOP] button - to stop blinking tag display
c) [PAGE NUMBER] selection - to select page of tag to be displayed after stop blinking
operation.
Note1: Check box select tag and item to be send display for updating tag display
Note2: Press button, to select data from available list
Note3: Press [BACK] button to exit and return to Search Item Display screen
16.
LOG NAK
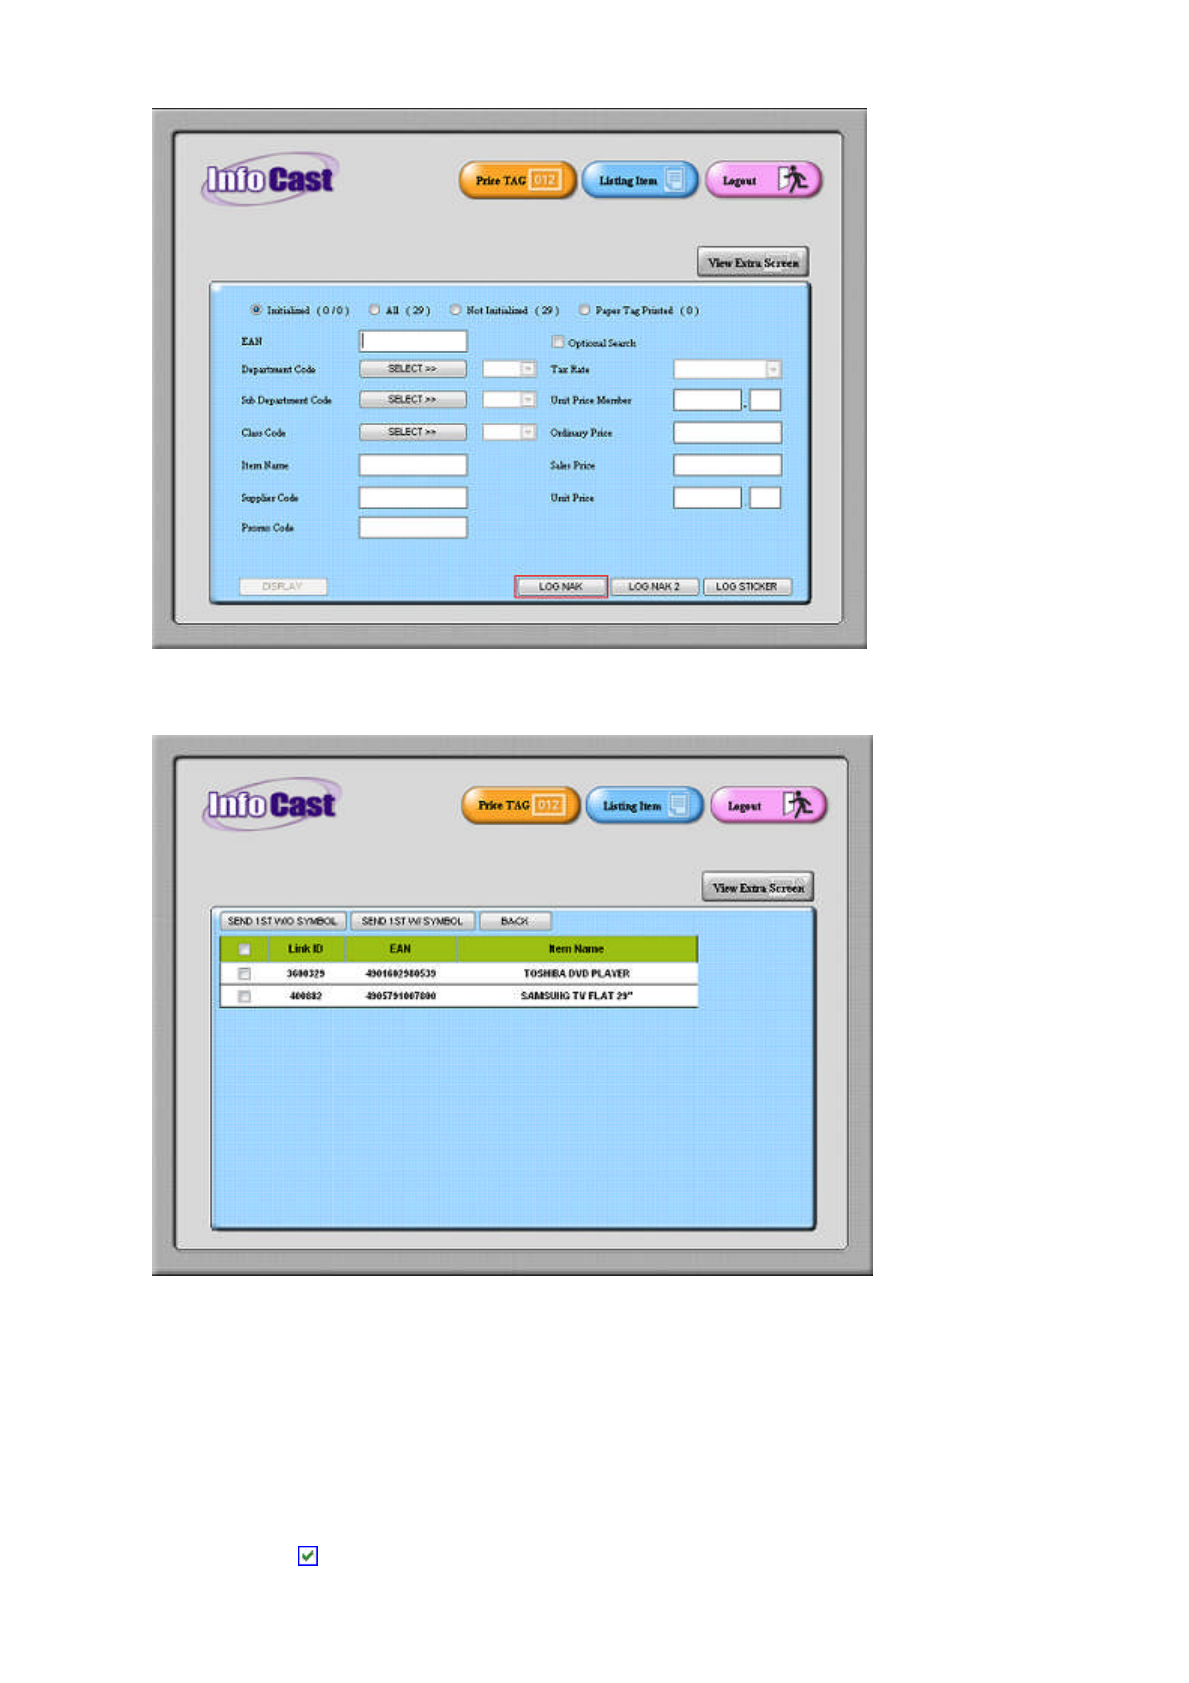
Press [LOG NAK] button to view list of tag with acknowledgment error for 1st screen of tag
When the Info base did not receive acknowledgment from the tag during updating, it will record the tag
info on the list
a) [SEND 1ST W/O SYMBOL] button - to send the 1st screen numeric/digits data, without
symbol e.g. decimal point, Sales message and etc to selected tag
b) [SEND 1ST W/ SYMBOL] button - to send the 1st screen numeric/digits data, with symbol e.g.
decimal point, Sales message and etc to selected tag
Note1:
Check box select tag and item to be send display for updating tag display
Note2:
Press
[BACK]
button to exit and return to Listing Item Screen
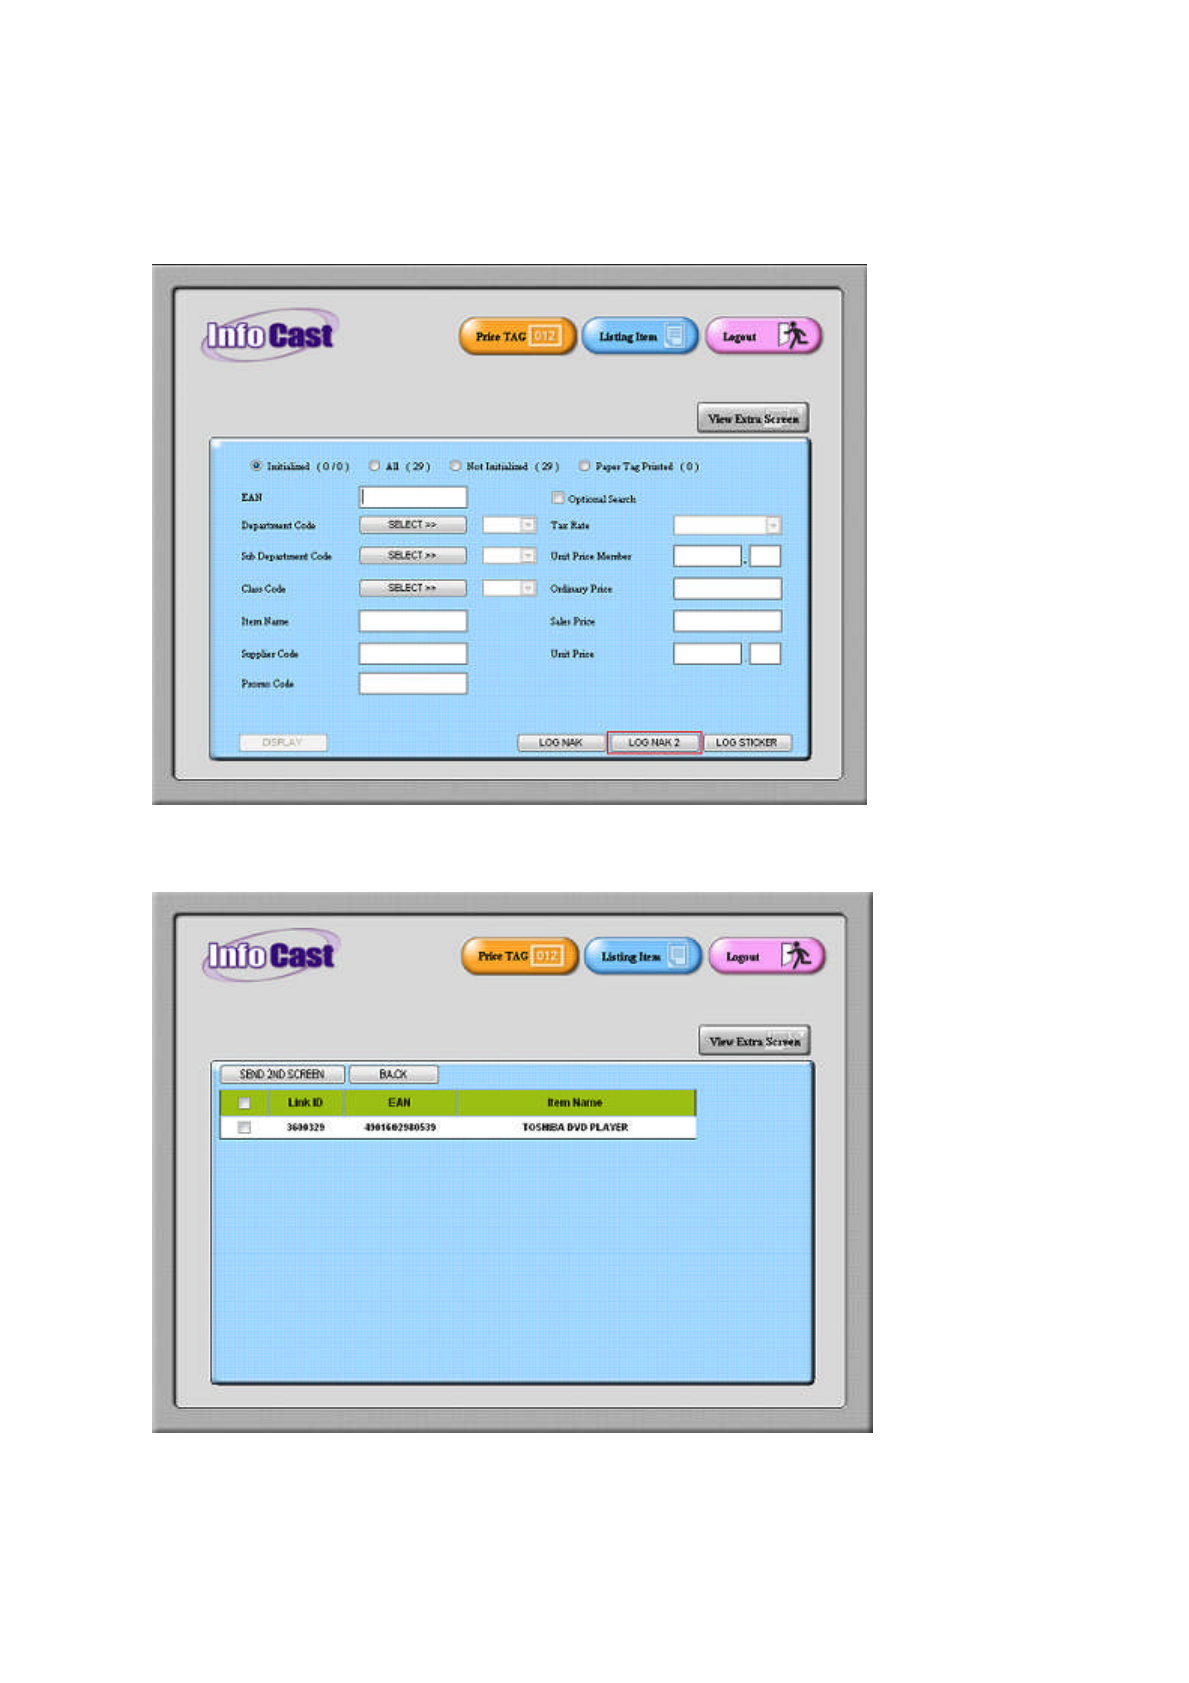
17. LOG NAK 2
Press [LOG NAK 2] button to view list of tag with acknowledgment error for 2nd screen of tag
When the Info base did not receive acknowledgment from the tag during updating, it will record the tag
info on the list
Press [SEND] button to send the 2nd screen display to selected tag
Note1: Check box select tag and item to be send display for updating tag display
Note2: Press [BACK] button to exit and return to Listing Item Screen
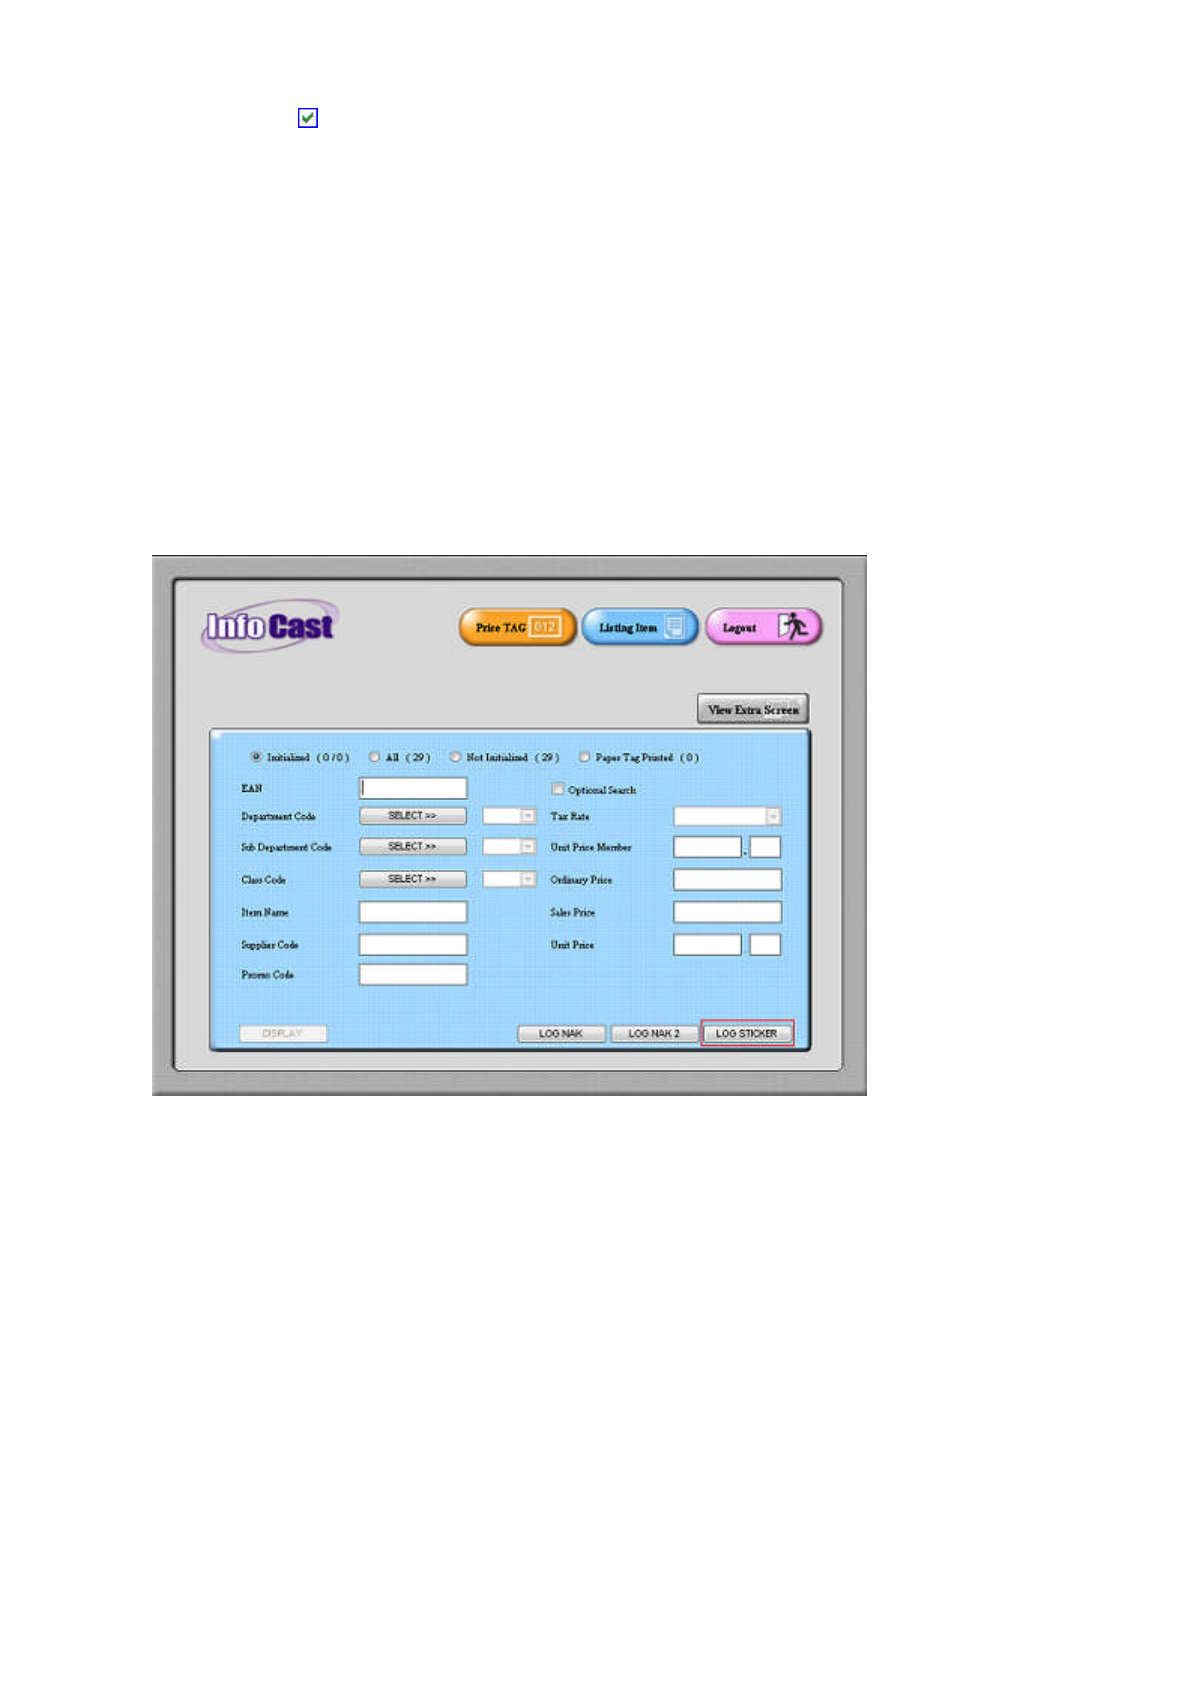
18. Log Sticker
To print sticker or paper tag for the selected item
Item data send to sticker log by Info System when required to print a new sticker, this apply when
sticker format data been updated
a) [PRINT] button - to print sticker or paper tag for selected item
b) [STICKER TYPE] selection - to select available sticker type for printing
Press [LOG STICKER] button to view list of sticker required for printing
Note1: Sticker type is required to be programmed in Sticker/Paper Tag Format Design in
advance
Note2: Check box select tag and item to be send display for updating tag display
Note3: Press button, to select data from available list
Note4: Press [BACK] button to exit and return to Listing Item screen
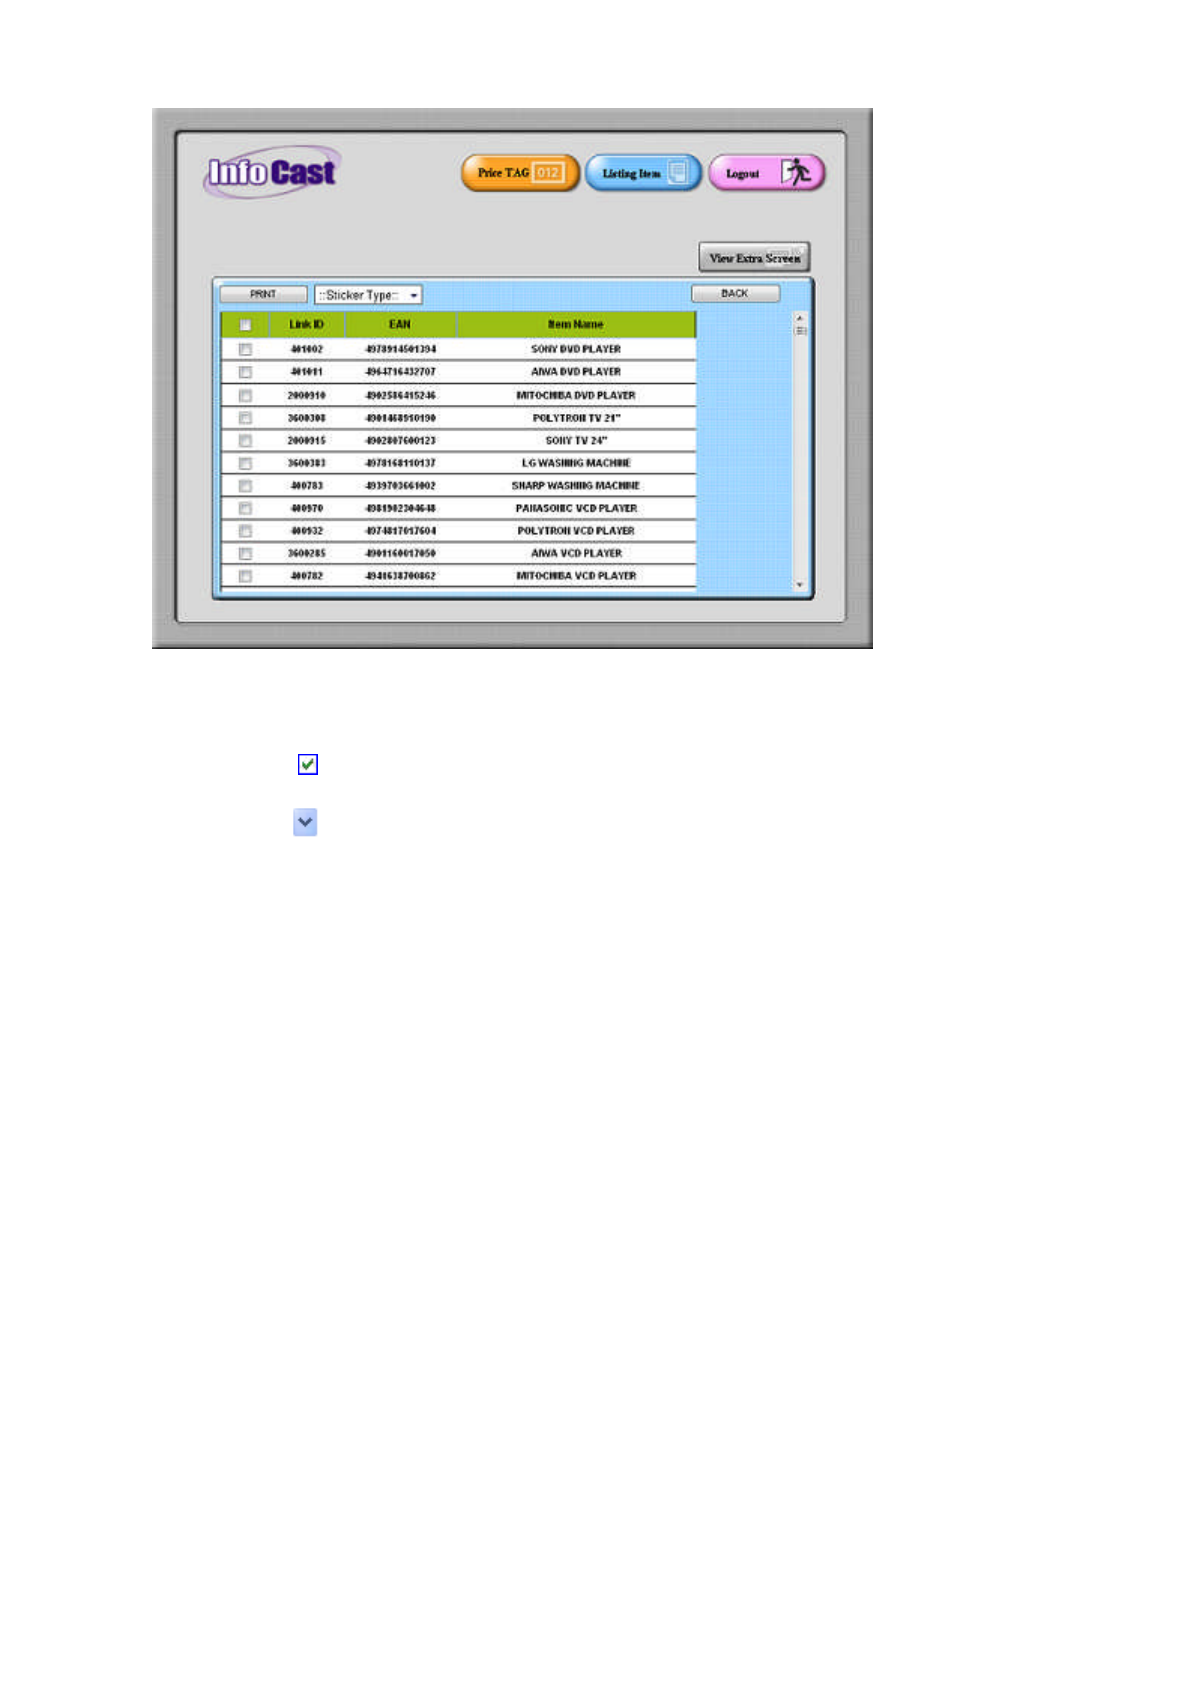
19. View Extra Screen
To set all tag displayed in selected screen mode
Press [VIEW EXTRA SCREEN] button to set tag displaying screen
a) [VIEW 2ND] button - to set tag to be display in 2nd Screen
b) [VIEW 1ST] button - to set tag to be display in 1st Screen
Note: Press [BACK] button to exit and return to Listing Item screen
Note1:
Press button, to select data from available list

Note2: Click box to enter desired data
Note3: Press [CLEAR] button to clear data retrieved or entered
Note3: press button, to exit from Maintenance screen, Price/Transaction
Maintenance screen.

MANUAL KEY IN BARCODE DATA
[Home] [Up]
Barcode data (EAN) can be manually key-
in using keyboard, but required to key in as bellow table. And depend on the number of digits entered, the system will
consider the barcode used as the barcode type and search data within a valid number configuration.
No.
Keyboard Entered Digits
Valid Number
Barcode Type
1.
13 digits
13 digits
EAN
-
13
2.
12 digits
0 + 12 digits / 12 digits
UPC
-
A
3.
11 digits
00 + 11 digits / 11 digits
UPC
-
A
4.
10 digits
00 + 10 digits + CD / 10 digits
UPC
-
A
5.
8 digits
If the first digit is Zero, cut first and last digit = 6 digits
UPC
-
E
If first digit is not Zero, use 8 digit = 8 digits
EAN
-
8
6.
7 digits
If the first digit is Zero, cut first digit = 6 digits
UPC
-
E
If the first digit is not Zero, cut last digit = 6 digits
UPC
-
E
7.
6 digits
6 digits
UPC
-
E