DM Technology DM-AV7 Portable Mulitmedia Player User Manual AV7 ENG 1116
DM Technology Co., Ltd. Portable Mulitmedia Player AV7 ENG 1116
Contents
- 1. USERS MANUAL 1
- 2. USERS MANUAL 2
- 3. USERS MANUAL 3
- 4. USERS MANUAL 4
USERS MANUAL 4

24
How to Install the Windows 98 USB Driver
Install the Windows 98 USB Driver
Window 98 users should first install the USB driver for the operating system.
Users of later versions of Windows do not need to install the USB driver, it will be automatically
recognized as a removable disk. Follow the instructions below to install the USB driver:
Insert the installation CD into your CD-ROM drive.
Use the USB cable that ships with the player to connect it to your PC.
The USB driver is included in the "WIN98_USB_Driver" folder of the Transcoder CD.
To install the USB driver
When the "Add New Hardware Wizard" appears
When the driver is not properly recognized on the first connection
1. When the "Add New Hardware Wizard" window appears, click on Next.
2. Select "Search for the Best Driver for This Device (Recommended)" and click Next.
3. Select "CD-ROM Drive" and click Next.
4. Identify the device that you want to locate a driver for and click on Next.
5. When you see the "Copying Files" dialog box, select Browse.
6. Select the "WIN98_USB_Driver" folder on the CD-ROM and click OK.
7. In the "Copying Files" dialog box, click OK.
8. Select Finish.
9. In Windows Explorer, a "removable disk" drive will have been created.
1. Select Start> Control Panel.
2. Select System from the Control Panel.
3. Select "Device Manager" and check for any incompletely installed USB devices.
4. Select USB Device from Other Devices and click on Properties.
5. Select "Reinstall Driver" at the bottom of the dialog box.
6. In the "Device Driver Update Wizard" dialog box, click on Next.
7. Check the "Search for the latest river (Recommended)" box and click on Next.
8. Select "CD-ROM Drive" and click Next.
9. Select "Updated Driver (recommended)" and click Next.
10. Make sure that the "device to search a driver for" is "DM Technology AV Player"
and select Next.
11. The installation is completed successfully.
1
2

25
ENG
er Installing and Using Transcoder
Installing and Using Transcoder
Using Environment
[PC requirements]
•Pentium III 1G at least
•Memory: 256MB at least
•Microsoft DirectX supported VGA
•Sound card-required
[OS]
•Microsoft Windows ME/Windows 2000/Windows XP
[Codec]
•Divx 5.1.1
Visit at the web site
http://download.divx.com/divx/DivX511.exe and download Divx codec for
installation.
•Aunified codec for running media files on a PC.
Aunified codec must be installed on the PC to run a file normally.
[Others]
•Microsoft DirectX 8.0 at least
•Microsoft Windows Media Player 9.0
Installing and Using Transcoder
26
Installing and Using Transcoder
Installation Guide
Transcoder software decodes files such as WMV, ASF, AVI, MPEG, MPG, WMA,
MPGA, VOB and DAT so that the files can be played.
Most files having the video formats, MPEG4-SP and DivX Ver 3.11, and audio
formats, 4.0, 5.03 SP and MPEG1 Layer3 (MP3), can be played without being
transformed.
Use a Transcoder for files that do not play,
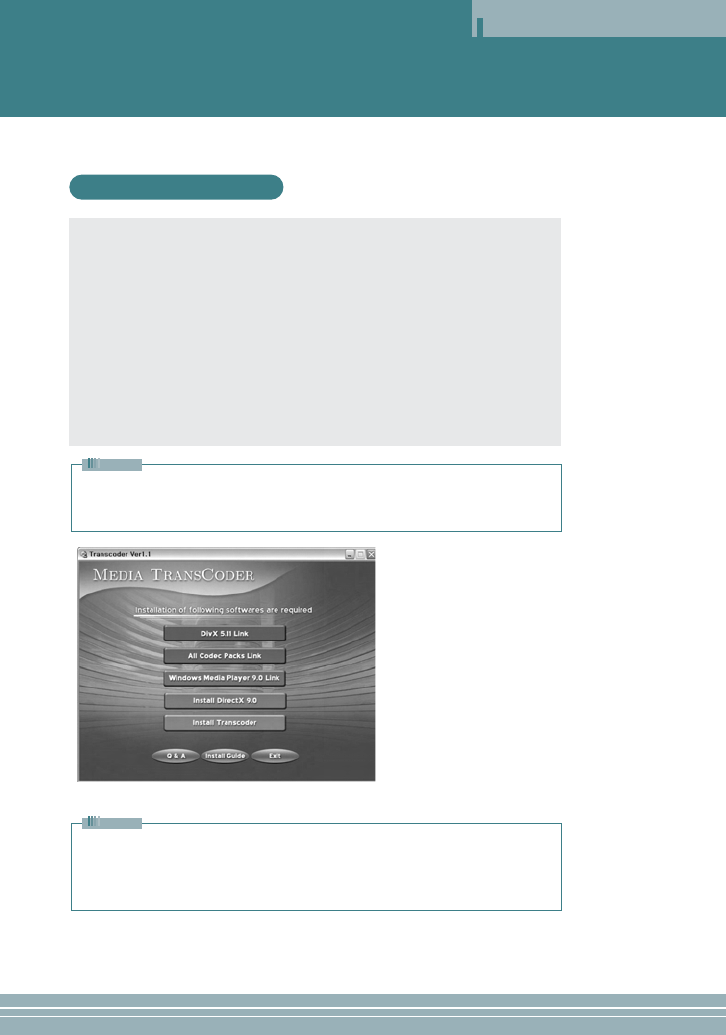
The following programs will be installed to your PC.
1. DivX 5.1.1 Bundle
2. All Codec Packs Link
3. Microsoft Windows Media Player 9.0
4. DirectX9.0
5. Transcoder
Insert the CD that came with the product into your PC to start the installation process.
You can download files from the Internet by using the enclosed CD.
The download time may differ according to the kind of Internet connection.
If you insert the CD into your PC, the following menu will appear.
Note
Make sure to select the icons sequentially starting from the top of the MENU window
in this order to install all five programs.
Refer to the Installation Guide and the Q&A at the bottom of the MENU for the
installation methods
Note
27
ENG
Installing and Using Transcoder
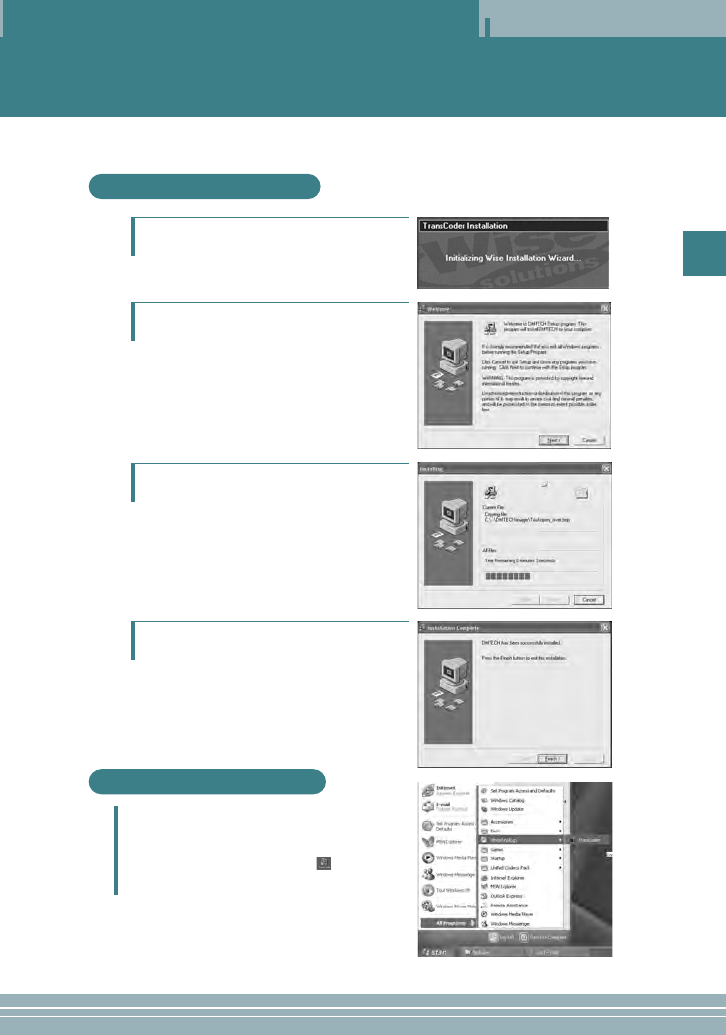
Installing Transcoder
Executing Transcoder
Insert the supplied installation CD and execute
"TransCoder.EXE".
1
Select "Next".
2
As shown in the figure right, the process of
program installation is displayed.
3
After installation is complete, select "Finish" to
end installation.
4
Select the menus at the right bottom of Windows
in the following sequence: "Start" → "Program
(P)" → "TRANSCODER" →"TRANSCODER".
Or double click "TRANSCODER( )" on the
Windows background screen.
28
Installing and Using Transcoder
Installing and Using Transcoder
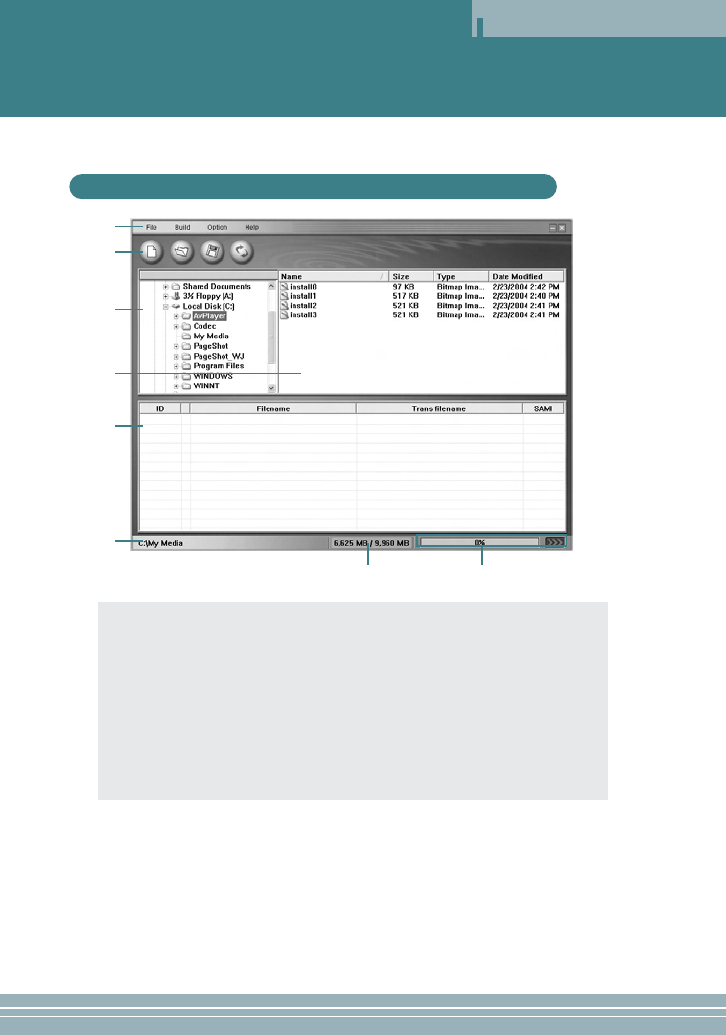
Configuration and Function of Transcoder Screen
ŒŒ
´´
ˇˇ
ˆˆ
ØØ
∏∏””
¨¨
ŒŒMenu
´´Function icon
ˇˇFile search window: This has the same function as Windows Explorer.
¨¨File list window: This has the same function as Windows Explorer.
ˆˆTranscoded files list window: The files to be transcoded are displayed.
ØØLocation where the transcoded files are saved: This displays the location where
the transcoded files are saved.
∏∏Capacitance of memory: This displays the capacitance of the location where the
transcoded files are saved.
””Display of transcoding progress: This displays the progress rate.
29
ENG
Installing and Using Transcoder
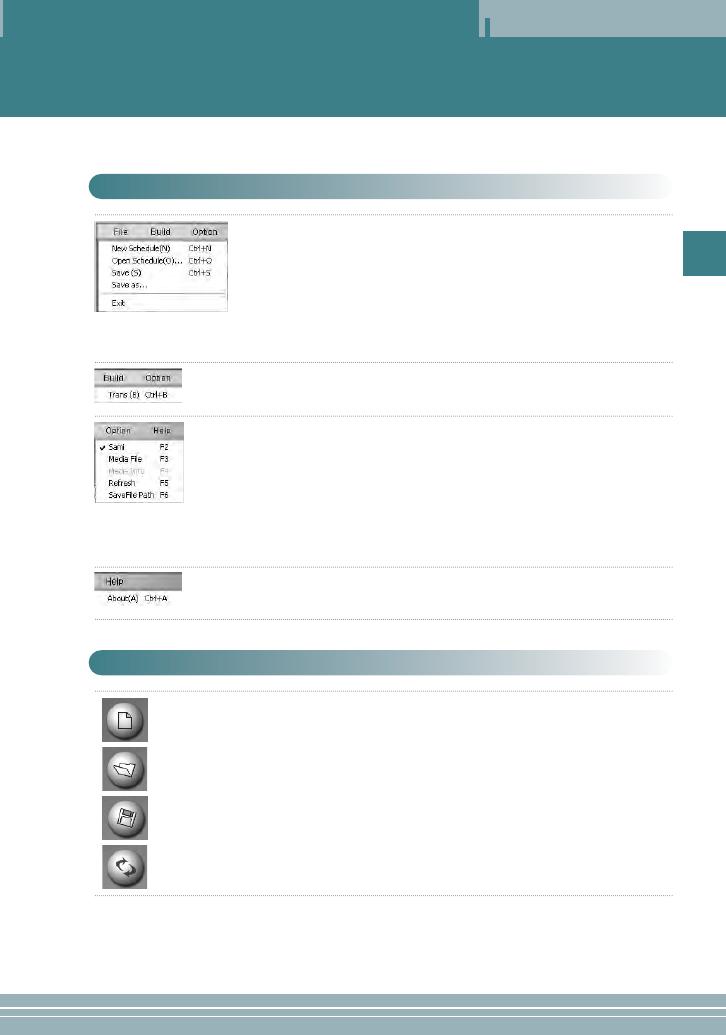
•File
-New Schedule: Calls a new file in the list of transcoded files.
-Open Schedule: Applies the saved *.dmt files in the list of
transcoded files.
-Save: Saves the contents of the operation which is under progress.
in the list of transcoded files.
-Save As: Saves as another name.
-Exit: Exits the program.
•Build
-Starts transcoding.
•Option
-Sami: If there is a caption file, whether to apply or not will be
determined.
-Media File: Only media files are applied in the list.
-Media Info: Displays the files which can play without change.
This is only available for Windows 2000.
-Refresh: Re-applies the file.
-SaveFile Path: Applies the path of a file to be transcoded.
•Help
-About: Guides product information and the whole web site.
Menu
-New schedule: Builds a new list of transcoded files.
-Open schedule: Calls a list of saved transcoded files.
-Save: Saves the contents of the list of transcoded files under operation.
-Start File Switching: Starts the schedule which is applied to the list of
transcoded files.
Tool Bar
New schedule
Open schedule
Save
Start File
Switching
30
Installing and Using Transcoder
Installing and Using Transcoder
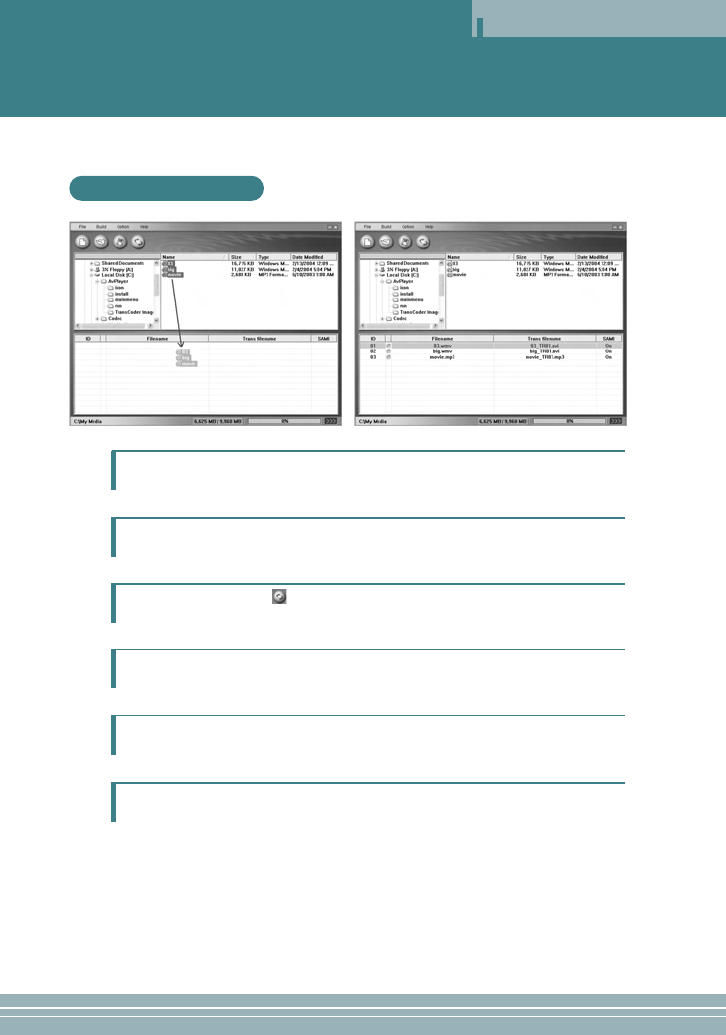
Transcoding files
Select the location where has a file to be transcoded in the File Search window.
1
Drag a file to be transcoded in the File List window and move it into the Transcoded Files
List window.
Select the "Transcoding ( )" function icon for execution.
2
3
The cursor in blue will be located on the file under transcoding and transcoding
will proceed.
4
After transcoding is complete, the transcoded file will be saved in the specified location.
The default folder is "C:\My Media".
5
The transcoded file can play by downloading it with a portable disc.
6

31
ENG
Installing and Using Transcoder
Note
•If Codec does not exist, the player will notice you through a message window. The message
window disappears three seconds later and an icon in red appears on the list.
•If the saving space is not enough, the player will notice you through a message window. The
message window disappears three seconds later and an icon in red appears on the list.
•If Caption does not exist, the player will operate without caption.
•DivX Codec can be installed only after the user downloads Freeware.
•Combined Codec can be installed only after the user downloads Freeware.
•If Inter Video Sound Codec has been installed, the player may not play normally.
•If there are any errors in the files to be converted, this may result in the file being corrupted.
•When the quality of an original file is not good, errors may occur in the transformed file.
Files that are interrupted when playing in Windows Media Player or do not have index information
may have poor quality.
•Refer to the INSTALLATION GUIDE and the Q&A on the CD for installation details and possible
problems.

32
Miscellaneous
Miscellaneous
Battery and Power
•You can use two AA-sized alkaline batteries or Ni-MH rechargeable ones only.
•Check the polarity (+ or -) of the battery before inserting it.
•Using a weak battery for an extended time can cause a player malfunction.
•When you turn on the power and the player does not operate with the status indicator blinking,
replace the battery as this may be due to an inadequate battery capacity.
•Make sure you check the rated voltage when you use an adapter to power on.
(DC3V, 0.5A)
•The useful life of the battery differs depending on the model.
Cautions on use
•There may be abnormality in a saved file when removing USB after the PC USB downloading
operation is complete. Remove it safely after making sure that the message "USB CONNECTED
TRANSFERRING FILES" disappears.
•Be careful that an AC adaptor is not connected to the AV IN jack.
•While playing a file in the external memory, do not remove the external memory forcedly.
•When connecting USB, the operation of this player will be limited.
•Do not remove a battery forcedly during playback or recording.
•It is recommended using a new battery or an adapter when you want to upgrade the player.

33
ENG
Miscellaneous
Troubleshooting
Symptom
The player is dead.
When connecting an A/V cable,
the playback screen of an
external component is not
displayed normally
Earphone volume is not output
normally.
An external memory (SD card) is
not recognized normally.
Adownloaded moving image file
does not play
Solution
1. Check a battery or AC adaptor is installed
2. Check the HOLD switch or LCD ON/OFF switch is turned on.
3. Press the POWER button.
Check an A/V cable is properly connected.
1. Check for the level of volume.
2. Check for the connection of the earphone. (If there is a dirt or
foreign material in the terminal, noise may occur.)
3. If the data of the file which is playing is damaged, noise may
occur or sound may be interrupted. Check with another file.
1. Check for the installation of an external memory.
2. Check for the WRITE PROTECT switch of an SD card.
3. This player supports only “FAT and FAT16” formats.
Play the moving image file after transcoding it through the
included TRANSCODER PROGRAM.
THIS DEVICE COMPLIES WITH PART 15 OF THE FCC RULES. OPERATION
IS SUBJECT TO THE FOLLOWING TWO CONDITIONS: (1) THIS DEVICE MAY
NOT CAUSE HARMFUL INTERFERENCE, AND (2) THIS DEVICE MUST
ACCEPT ANY INTERFERENCE RECEIVED, INCLUDING INTERFERENCE THAT
MAY CAUSE UNDESIRED OPERATION.
NOTE: THE MANUFACTURER IS NOT RESPONSIBLE FOR ANY
RADIO OR TV INTERFERENCE CAUSED BY UNAUTHORIZED
MODIFICATIONS TO THIS EQUIPMENT. SUCH MODIFICATIONS
COULD VOID THE USER'S AUTHORITY TO OPERATE THE EQUIPMENT.
NOTE: This equipment has been tested and found to comply with the
limits for a Class B digital device, pursuant to part 15 of the FCC
Rules. These limits are designed to provide reasonable protection
against harmful interference in a residential installation. This
equipment generates, uses and can radiate radio frequency energy
and, if not installed and used in accordance with the instructions, may
cause harmful interference to radio communications. However, there
is no guarantee that interference will not occur in a particular
installation. If this equipment does cause harmful interference to
radio or television reception, which can be determined by turning the
equipment off and on, the user is encouraged to try to correct the
interference by one or more of the following measures:
- Reorient or relocate the receiving antenna.
- Increase the separation between the equipment and receiver.
-Connect the equipment into an outlet on a circuit different from that
to which the receiver is connected.
-Consult the dealer or an experienced radio/TV technician for help