DM Technology DM-AV7 Portable Mulitmedia Player User Manual AV7 ENG 1116
DM Technology Co., Ltd. Portable Mulitmedia Player AV7 ENG 1116
Contents
- 1. USERS MANUAL 1
- 2. USERS MANUAL 2
- 3. USERS MANUAL 3
- 4. USERS MANUAL 4
USERS MANUAL 1

PORTABLE
MULTIMEDIA PLAYER
Owner’s Instructions
DM-AV7
Before using this product, please read the security instructions first and bear
them in mind when using the product.

Safety Instructions
Safety Instructions
2
Please read the safety instructions below before using the player.
• Do not overload the Mains outlet with too many power cords at any time . (It may cause the
generation of abnormal heat and/or fire.)
• Do not excessively bend the power cord or be squeezed by heavy objects. (It may cause fire.)
• Do not handle the power plug with wet hands. (It may cause electric shock.)
• Plug the player properly so that it can be stable. (If it is not properly plugged, it may cause fire.)
•Never disassemble or modify the player in any way.
•Do not let chemicals, such as benzene, thinner, and etc., come in contact with the player.
•Do not use the player near a magnetic material (magnet, and etc.).
•Do not let dirt or foreign materials go in the player.
•Avoid using the player in a place where has high temperature (40°… or higher) or low
temperature (5°… or lower), or has much moisture.
•Do not drop the player or give a shock.
•Keep the player away from a place where has severe vibration or a magnetic material.
•Interruption by electromagnetic wave may damage the player. Be sure to completely untie the
adaptor cable before using it.
•Avoid using the player near a direct ray of light or heat-generating device.
•Avoid using the player near a place where has much dirt or soot.
Warning
Caution
Notes when using an earphone
Traffic safety
•Do not use the earphone while riding a bicycle or driving a car or motorcycle. It is not only
dangerous, but also illegal depending on the region. If the earphone is used while walking on the
road, keeping its volume high on the crosswalk is very dangerous.
Protection for hearing ability
•Do not keep the earphone volume high. Most doctors point out that keeping the volume high for a
long time is very harmful to ears.
•If ears ring, turn down the volume or stop using the earphone.
Environmental information
•Separate packing materials, batteries, and/or old electronic products when disusing.
•Packing materials are classified into cardboard, polyethylene, and etc. Unnecessary packing
materials have not been used for this player.
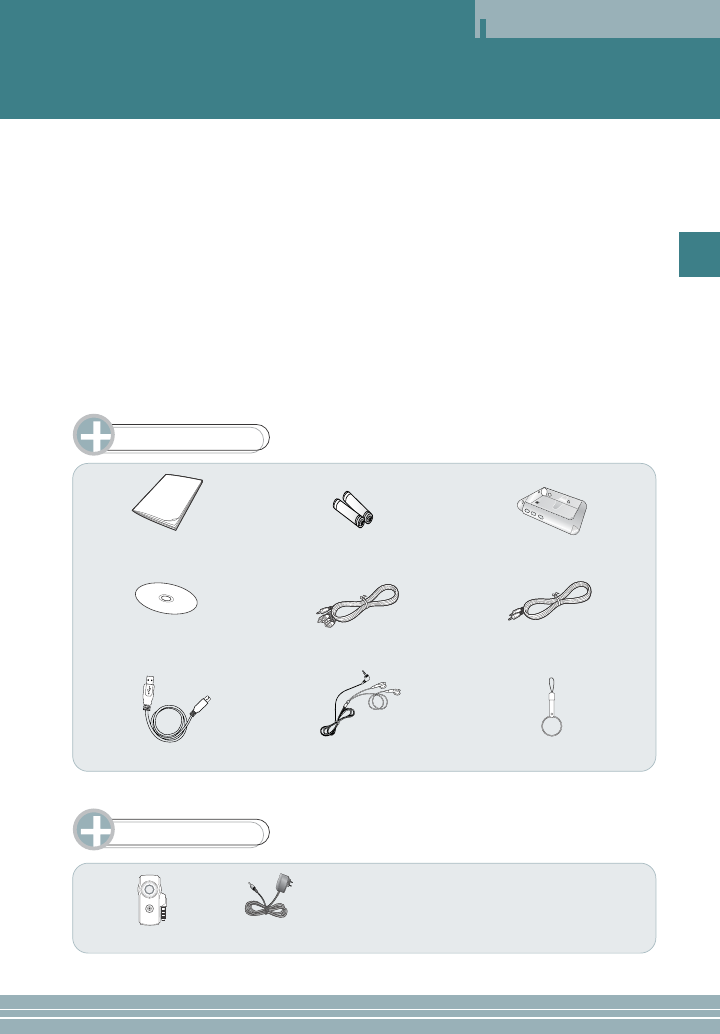
Table of Contents
Table of Contents
3
ENG
Safety Instructions...........................................2
Table of Contents ............................................3
Overview ........................................................ 4
Viewing an External Source ........................... 6
Viewing Video ................................................. 7
Viewing an Image ........................................... 9
Listening to the Music ................................... 11
Viewing Text Files..........................................14
Voice Record.................................................16
FM RADIO (Option).......................................18
Using a System Setup Menu ....................... 20
Connecting an External Component and USB
... 23
How to Install the Windows 98 USB Driver .. 24
Installing and Using a Transcoder ................ 25
Miscellaneous .............................................. 32
Specifications .............................................. 34
Accessories
Sold separately
Owner’s Instructions
Installation CD
(Transcoder program)
Video/Audio cables Audio cable
USB cable Earphone Hand strap
Carrying case
Camera
Battery
AC adaptor
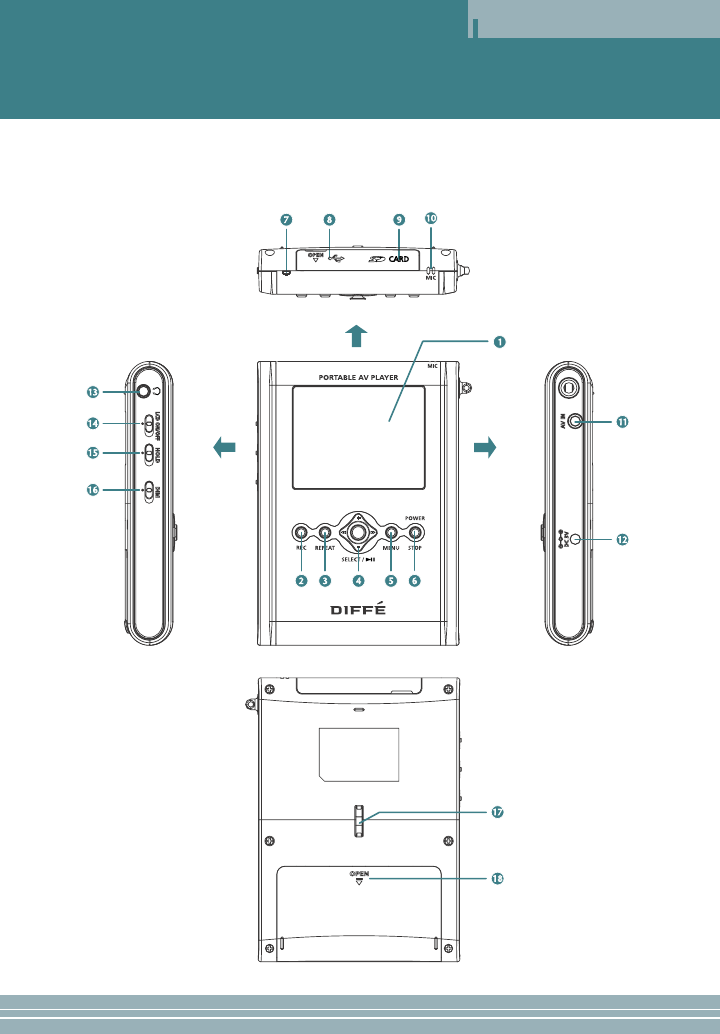
Description of each part
Overview
4

ENG
Overview
5
1LCD display
2REC button: Use to record an external input signal. Use to display operating time while
video playback and recording.
3REPEAT button: Use to repeat playback.
4button:
Press and hold down the JOG key left or right to move to the position you wish or use it to search or
skip.
Press and hold down the JOG key up or down to control the volume or use it to select a delay time
of the slide show.
Press the JOG key to select a menu or use it to play or pause.
5MENU button: Use to return to the menu screen.
6POWER/STOP button: Use to turn the player on/off or to stop playing.
From the menu, press the STOP button to display HELP.
7Status indicator: The indicator blinks to display the current status when the LCD lights are
off, the power is on or the battery is so weak that the player shuts down.
8USB Connection jack
9SD CARD insertion slot
10 MIC: Use to make a voice recording.
11 AV IN (external input) jack: Use to connect an external component.
12 DC IN (DC Power Input) port: Only use a rated voltage of DC 3V, 0.5A.
13 Headphone jack: Use to connect a headphone.
14 LCD ON/OFF switch: Use to turn on or off the LCD display.
15 HOLD switch: If the HOLD function is set, the player does not operate even in the entry of
another button during playback.
16 DIM button: Use to darken the screen in an attempt to prolong its life.
Use this during nighttime or when listening to the radio, a recording or MP3 music file.
17 30° tilt: Install hand strap circular stand into 30° slot.
18 Battery compartment: Use only two AA-sized Alkaline batteries or Ni-MH rechargeable ones.
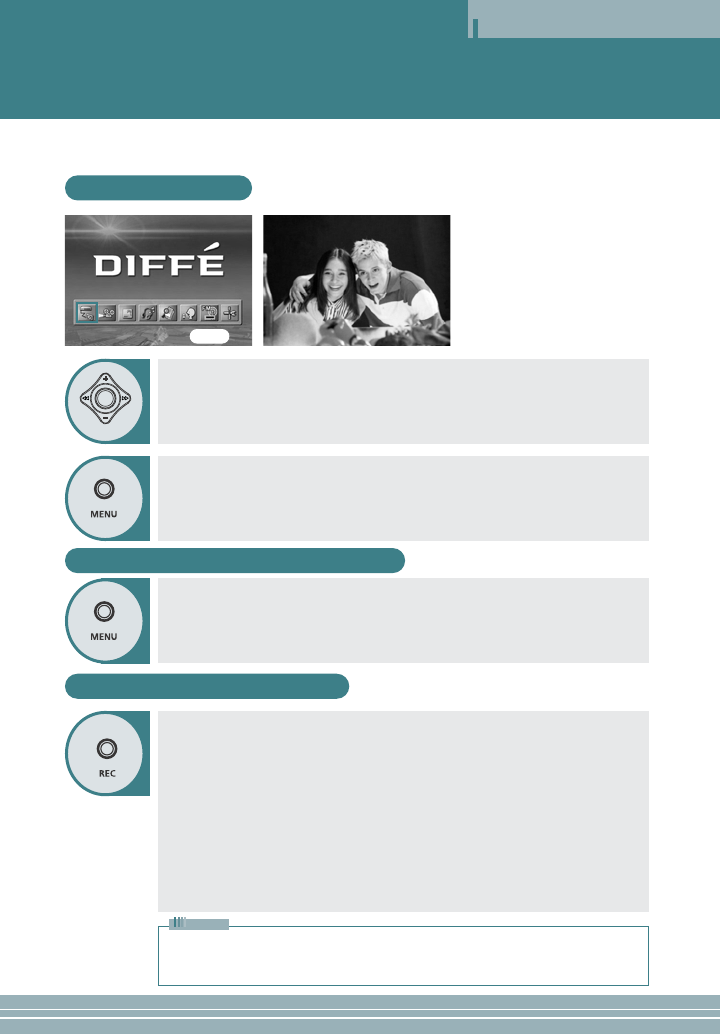
Viewing an External Source
Operation
INPUT MODE
Recording External Signals
Memory Settings & Screen Menu
6
This player allows you to view an external input signal.
For connection of an external component, see page 23.
After moving to "INPUT MODE" by using the JOG key, press the JOG key.
The external component that is being currently connected will play and the playback
screen will be displayed.
Press the MENU button to move to the menu screen.
The menu screen will be displayed.
You can set the screen brightness and the contrast, or configure the memory
settings for recording. Press and hold down the MENU button.
Awindow appears for configuring the screen brightness and contrast as well as the
memory settings. Use the JOG key to select and set an item and press the STOP
button. The window disappears and the settings are activating accordingly.
ŒŒ
Video Recording: Press the REC button once to start video recording.
Press the REC button again during video recording to set a recording time.
If the REC button is pressed during video recording, "TIME:000" appears in the recording
time section at the top of the screen. Move the JOG key to the left or right to set the
recording time in units of one minute and press the JOG key. The recordin continues for the
set time and automatically stops when the set time has lapsed. (The recording time can be
set up to 180 minutes.) If you press the REC button after setting the recording time during
video recording, the time setting is released. Press the STOP button to stop recording.
´´
MP3 Recording: Hold down the REC button to record MP3.
Press the STOP button to stop recording. (MP3 recording through an extended device is
available in MP3 mode.)
ˇˇ
JPEG Recording: Press the JOG key to save a JPEG image.
Press the STOP button to pause or to release the current image and operate the JOG key
to save the current image. Hold down the JOG key to consecutively recor images at an
interval of 1~1.5 seconds.
•Video recording and JPEG recording are only possible in external input mode.
•If Macrovision has been set, the Recording function does not operate.
The message "Macrovision detect cannot record” will be displayed.
Note
Option
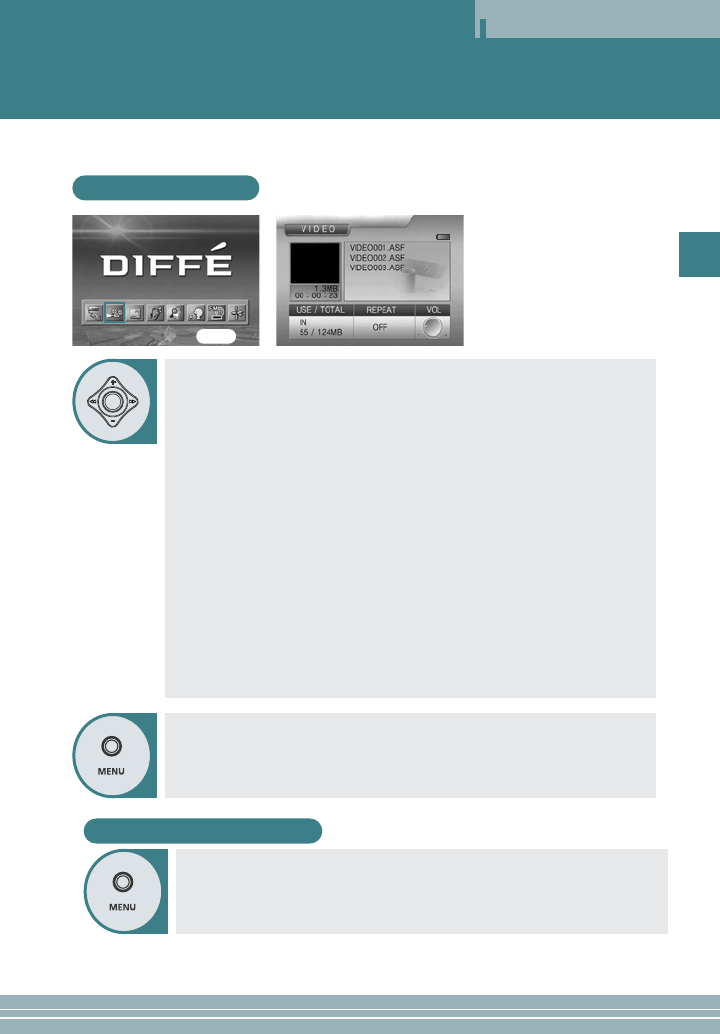
Viewing Video
Operation
VIDEO LIST
7
ENG
Screen Configuration
You can adjust the brightness and contrast of the screen while a movie is
playing. Press and hold down the MENU button to pause the current movie.
Awindow appears where you can adjust the screen brightness and contrast.
Adjust the configuration and press the STOP button for the window to disappear and
resume playing the movie.
Press the MENU button to move to the menu screen.
The menu screen will be displayed.
ŒŒAfter moving to "VIDEO LIST" by using the JOG key, press the JOG key for
selection.
Choose either built-in or external memory to display a list of video files on that
memory.
´´After moving to a desired video file by using the JOG key, press the JOG key
for playback.
-The selected video file will play.
-When the STOP button is pressed, playback will stop and the list of files will be
displayed.
-You can pause recording using the JOG key.
-If the JOG key is used short during playback, the previous file or next file will play.
-If the JOG key is used long (two seconds or longer) during playback, forward
playback or reverse playback will be available.
-When you select a file, two options are available: List Resume and File Resume.
For a resumed file, turn the JOG key slightly to the left to show the file from the
beginning.
Note:
•
If the message "N/A" appears during the operation of Fast Forward (FF) or Fast Reverse (FR),
it means the information on the FF or FR operation (Index) is not included in the file.
•
The Resume feature operates in all MP3, JPEG and Text Viewer modes.
• You can use the JOG key to select or play a file prior to the “
waiting
” operation of the player to
preview.
Option

Viewing Video
Operation
8
Repeat Section
ŒŒRepeats a section selected from the currently playing file.
´´Press the MENU button to select the start (point A).
ˇˇPress the MENU button again to select the end (point B). Section A-B will be
played repeatedly.
¨¨If you press the MENU button during the repeat section, the repeat section
is canceled.
GOTO
ŒŒPress and hold down the REPEAT button for more than 2 seconds to
display the window. where you can specify the location of the video display.
´´Use the JOG key to the left or right to move the cursor, and use the JOG key
up or down to set a start time.
ˇˇPress the JOG key to start playing from the specified point.
¨¨If the REC button is pressed while a video is running, both the current
running and remaining times are displayed (Off - Run time - Remaining
time).
Deleting a File
ŒŒWhen deleting a file from the list of files, select the file you want to delete by
using the JOG key and hold the key for at least two seconds. (When
selecting all the files in the folder, press and hold the REPEAT button for two
seconds or longer.)
´´When the STOP button is pressed, the selected files will be deleted.
ˇˇDeletion of the selected files can be cancelled in the same way as the
selection of files.
Caption
ŒŒWhen you store a caption file (extension *.smi) in the same folder and with
the same name as a video file you wish to play, the captions are displayed at
the bottom of the screen.
´´Press and hold down the JOG key to select a color and whether you want to
turn it on/off.
ON (BLUE)
→
MOD1 (YELLOW)
→
MOD2 (RED)
→
MOD3 (BLACK)
→
MOD4 (BLACK/WHITE)
→
OFF
Repeating Playback
Press the REPEAT button.
Whenever you press the REPEAT button, the repeat mode change in the order of
"OFF" →"ONE" →"ALL".
OFF: After the current file is played, the next file plays automatically.
ONE: Repeats the file which is currently playing.
ALL: Repeats all the video files in the current folder.