DREAMUS IFP180T MP3 Player User Manual users manual
IRIVER LIMITED MP3 Player users manual
DREAMUS >
users manual
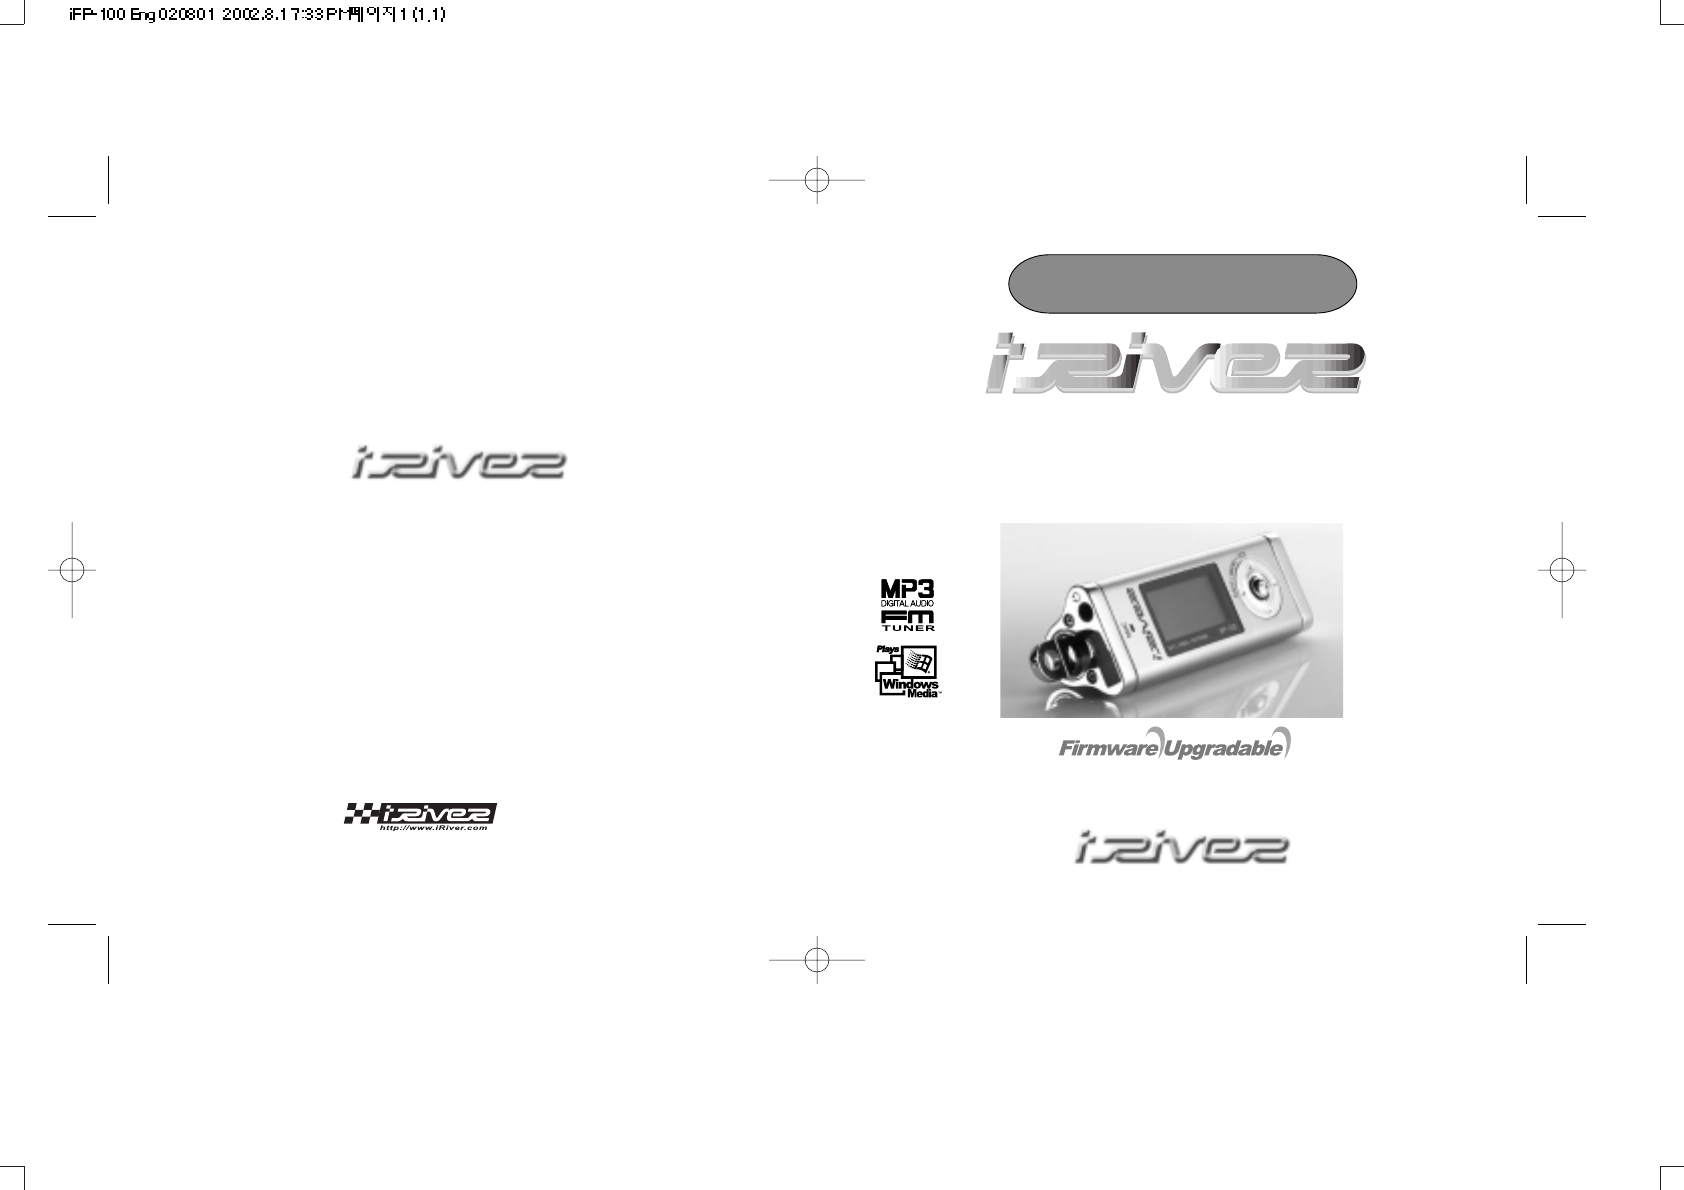
Model iFP-100
Instruction Manual
MP3 PLAYER / FM TUNER(Option)
Model iFP-100 Series
Limited
http://www.iRiver.com
Thank you for purchasing the product.
Please read this manual carefully before use.
THIS DEVICE COMPLIES WITH PART 15 OF THE FCC RULES. OPERATION IS
SUBJECT TO THE FOLLOWING TWO CONDITIONS: (1) THIS DEVICES MAY NOT
CAUSE HARMFUL INTERFERENCE, AND (2) THIS DEVICE MUST ACCEPT ANY
INTERFERENCE, RECEIVED, INCLUDING INTERFERENCE THAT MAY CAUSE
UNDERSIRED OPERATION.
Note : This equipment has been tested and found to comply with the
limits for a Class B digital device, pursuant to part 15 of the FCC Rules.
These limits are designed to provide reasonable protection against
harmful interference in a residential installation. This equipment
generates, uses and can radiate radio frequency energy and, if not
installed and used in accordance with the instructions, may cause
harmful interference to radio communications. However, there is no
guarantee that interference will not occur in a particular installation. If
this equipment does cause harmful interference to radio or television
reception, which can be determined by turning the equipment off and
on, the user is encouraged to try to correct the interference by one or
more of the following measures :
- Reorient or relocate the receiving antenna.
- Increase the separation between the equipment and receiver.
- Connect the equipment into an outlet on a circuit different from that
to which the receiver is connected.
- Consult the dealer or an experienced radio/TV technician for help.
NOTE: THE MANUFACTURER IS NOT RESPONSIBLE FOR ANY RADIO OR TV
INTERFERENCE CAUSED BY UNAUTHORIZED MODIFICATIONS TO THIS EQUIPMENT.
SUCH MODIFICATIONS COULD VOID THE USER'S AUTHORITY TO OPERATE THE
EQUIPMENT.
Introducing iRiver website
URL : http://www.iRiver.com
Provides information on our company, products, and contacting point for our
customers.
Unique feature of "Firmware (System software) Upgrade" keeps providing
premium disc readability and various optional add-on features, supporting new
CODEC to be introduced in the future.
Provides FAQ as well as Beginner's Guide
Set up customer registration to enable online customer service so that all
iRiver users receive the latest information, firmware upgrade, etc. via
newsletters.
iRiver Limited does not assume any responsibility for errors or omissions in
this document or make any commitment to update the information contained
herein.
iRiver is a registered trademark of iRiver Limited in the Republic of Korea and
/or other countries and is used under license. Microsoft Windows Media and
the windows Logo are trademarks or registered trademarks of Microsoft
Corporation in the United States and /or other countries. WinAmp and WinAmp
logo is registered trademark of NullSoft Inc.
All other brand and product names are trademarks of their respective
companies or organization. All other product names may be trademarks of the
companies with which they are associated.
1999-2002 iRiver Limited. All right reserved.
2
Unique Features of iFP-100
Unique Design :
Multi-Codec Player
: Supports MP3, WAV formats.
Firmware Upgrade
: Provides the latest updated features via firmware upgrade.
New formats such as AAC, MP3 Pro and Ogg Vorbis can be supported in the
future with a simple upgrade method. Player features such as add on,
modification, and continuous improvement of disc recognition are always
provided.
Graphic LCD supporting Multiple Languages
: iFP-100 Series comes with graphic LCD which can support multiple
languages, including: English, French, Spanish, German, Italian, other
alphabet-oriented fonts, Korean, Japanese(Katakana, Hirakgana, Kanji) and
others. Over 30 languages are supported.
FM Function
You can easily listen FM broadcast by using Auto Preset, Frequency Memory
and various function.
6 Equalizing Pattern : Normal, Rock, Jazz, Classic, U Bass, User EQ
Supporting of GUI(Graphic Equalizer Interface) MENU
3
5
Contents
1. CONTROLS
Front View, Side View 1...................................................................................
Side View 2, Up/Downside View......................................................................
LCD Window....................................................................................................
2. BASIC OPERATION
Listening to music............................................................................................
Playing FM Tuner............................................................................................
Recording FM..................................................................................................
Recording Voice..............................................................................................
3. Useful Features
Installing Software on PC................................................................................
Basic Operation...............................................................................................
Navigation........................................................................................................
Deleting Folder on the player...........................................................................
Mode................................................................................................................
Program Mode.................................................................................................
EQ Mode..........................................................................................................
Menu Controls.................................................................................................
Initializing/ Making new folder/Refresh............................................................
Download from the PC
Upload/ Listening MP3 on the PC...................................................................
Deleting files on the PC...................................................................................
4. Additional Information
Power Supply(Battery).....................................................................................
Trouble Shooting.............................................................................................
Precautions......................................................................................................
Accessories.....................................................................................................
Specification....................................................................................................
..
5
6
7
8~9
10~13
14
15~16
17~21
22~24
25~26
27
27~28
29~30
31
32~41
42
43~44
45~46
47
48
49
50
51
52
4
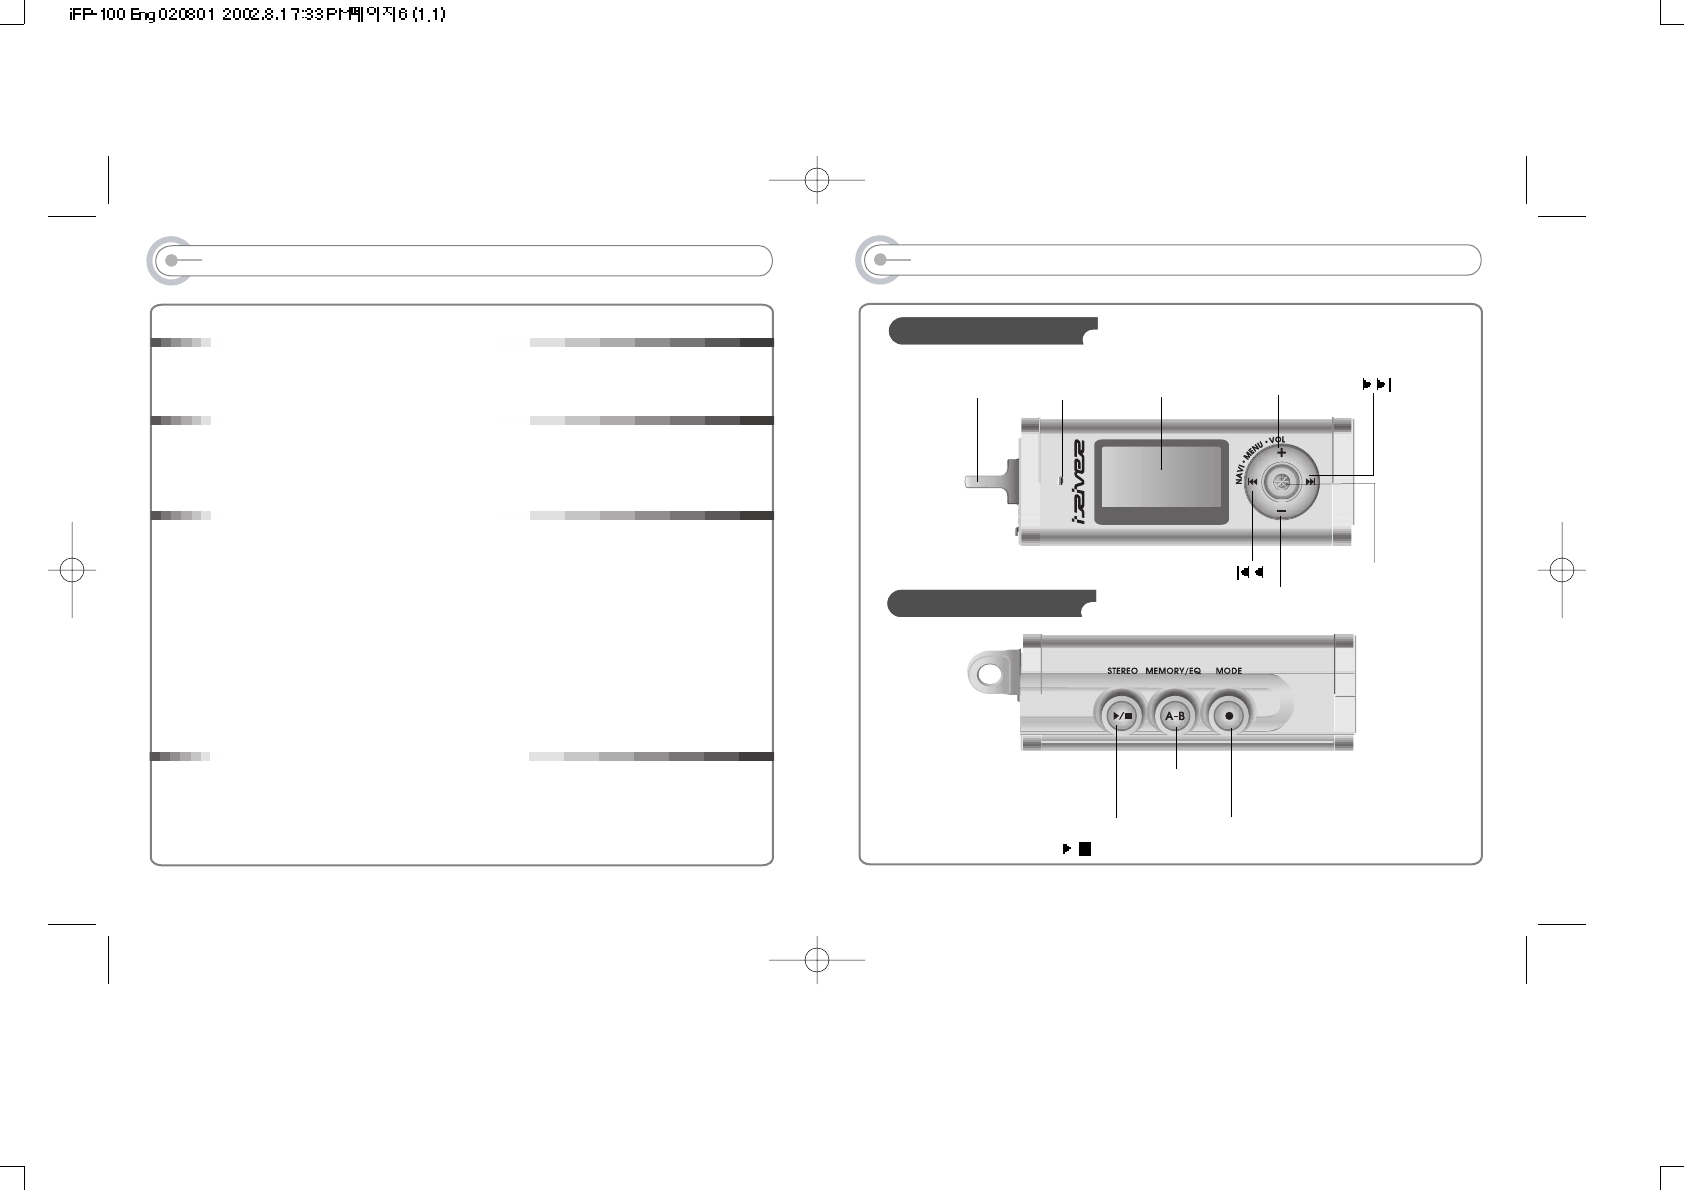
CONTROLS
FRONT VIEW
Volume -
Volume +
LCD Windows
Neck Strap
NAVI/MENU
SIDE VIEW 1
Mode/RECSTEREO
/(Play/Stop)
MEMORY/EQ
A-B
MIC
76
CONTROLS
SIDE VIEW 2
UP/DOWNSIDE VIEW
Battery Compartment
Earphone
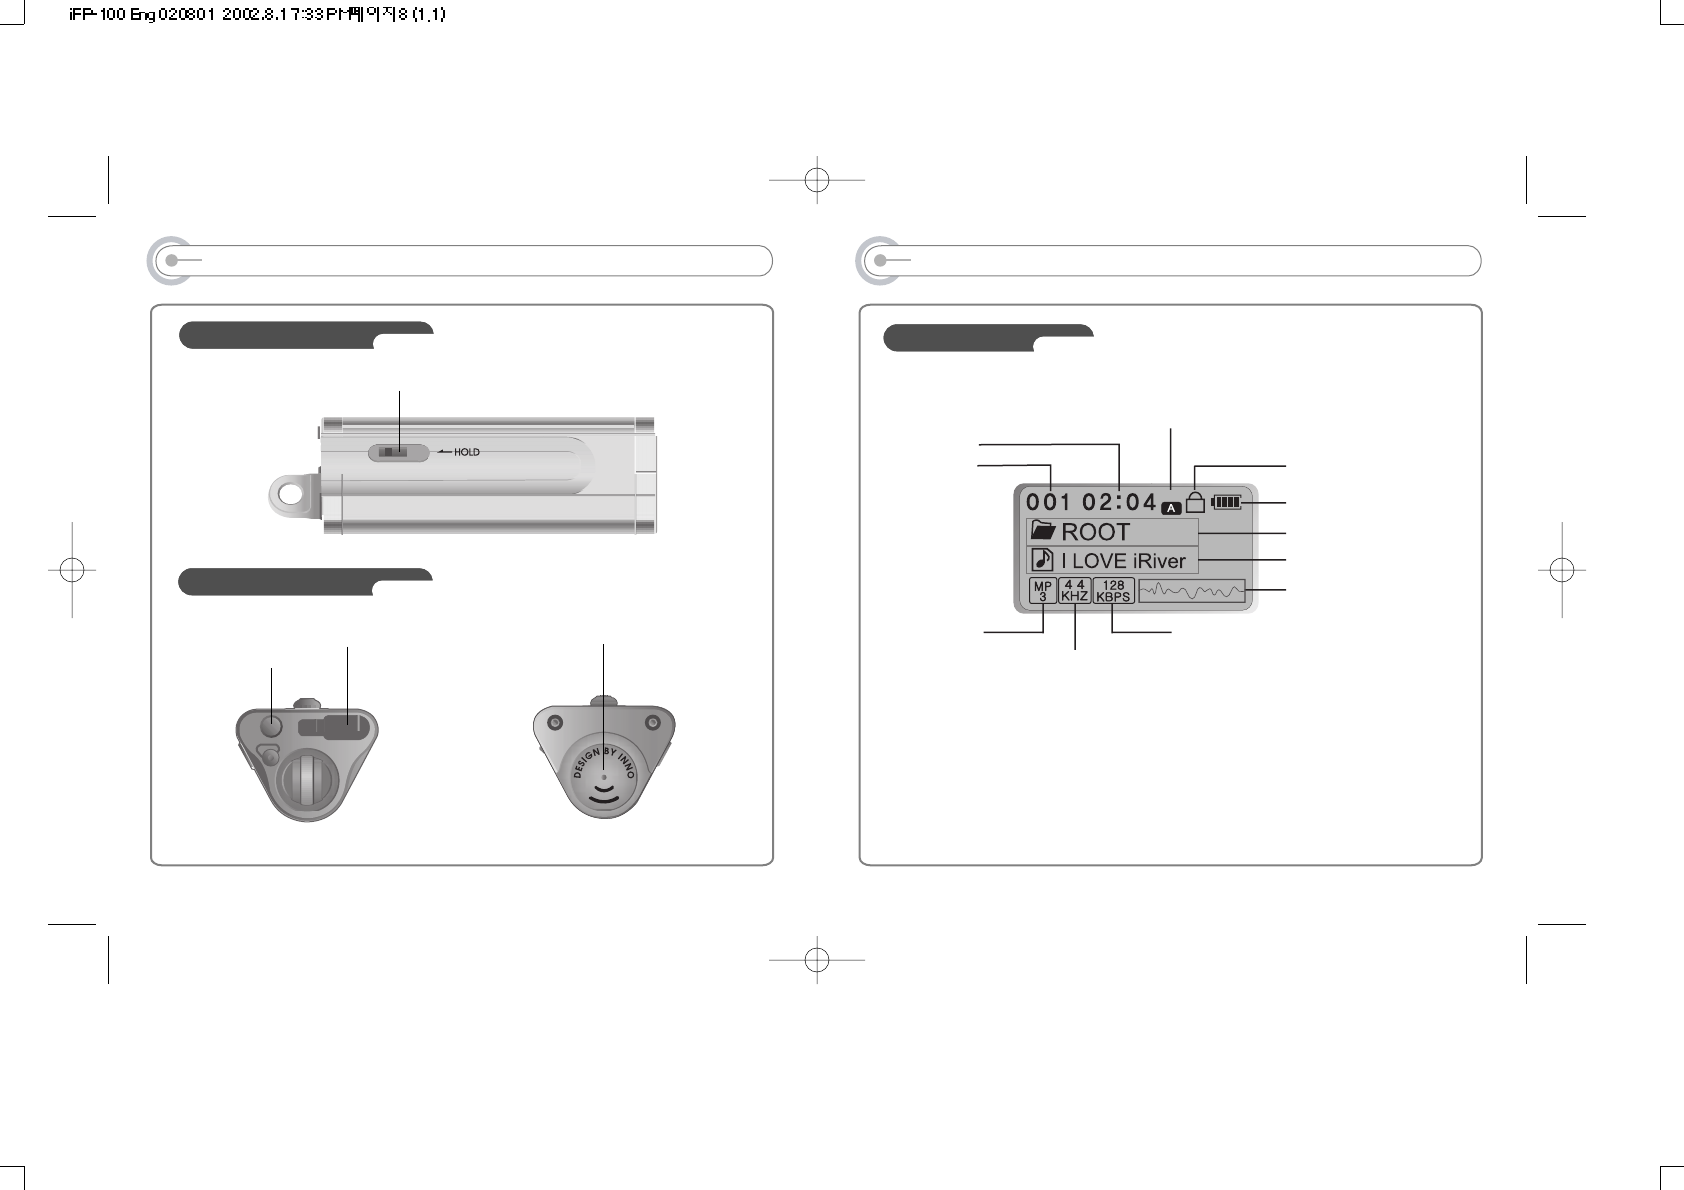
Hold
USB Connection Port
CONTROLS
LCD Window
SFL
TRACK
NUMBER
BIT RATE
PLAY TIME
PLAYBACK
MODE
BATTERY LEVEL
VOLUME
EQUALIZER
PROGRESSIVE BAR/
PROGRESSIVE/
FREE SPACE
FOLDER NAME
SAMPLE RATE
FILE FORMAT
SINGER/MUSIC NAME
HOLD
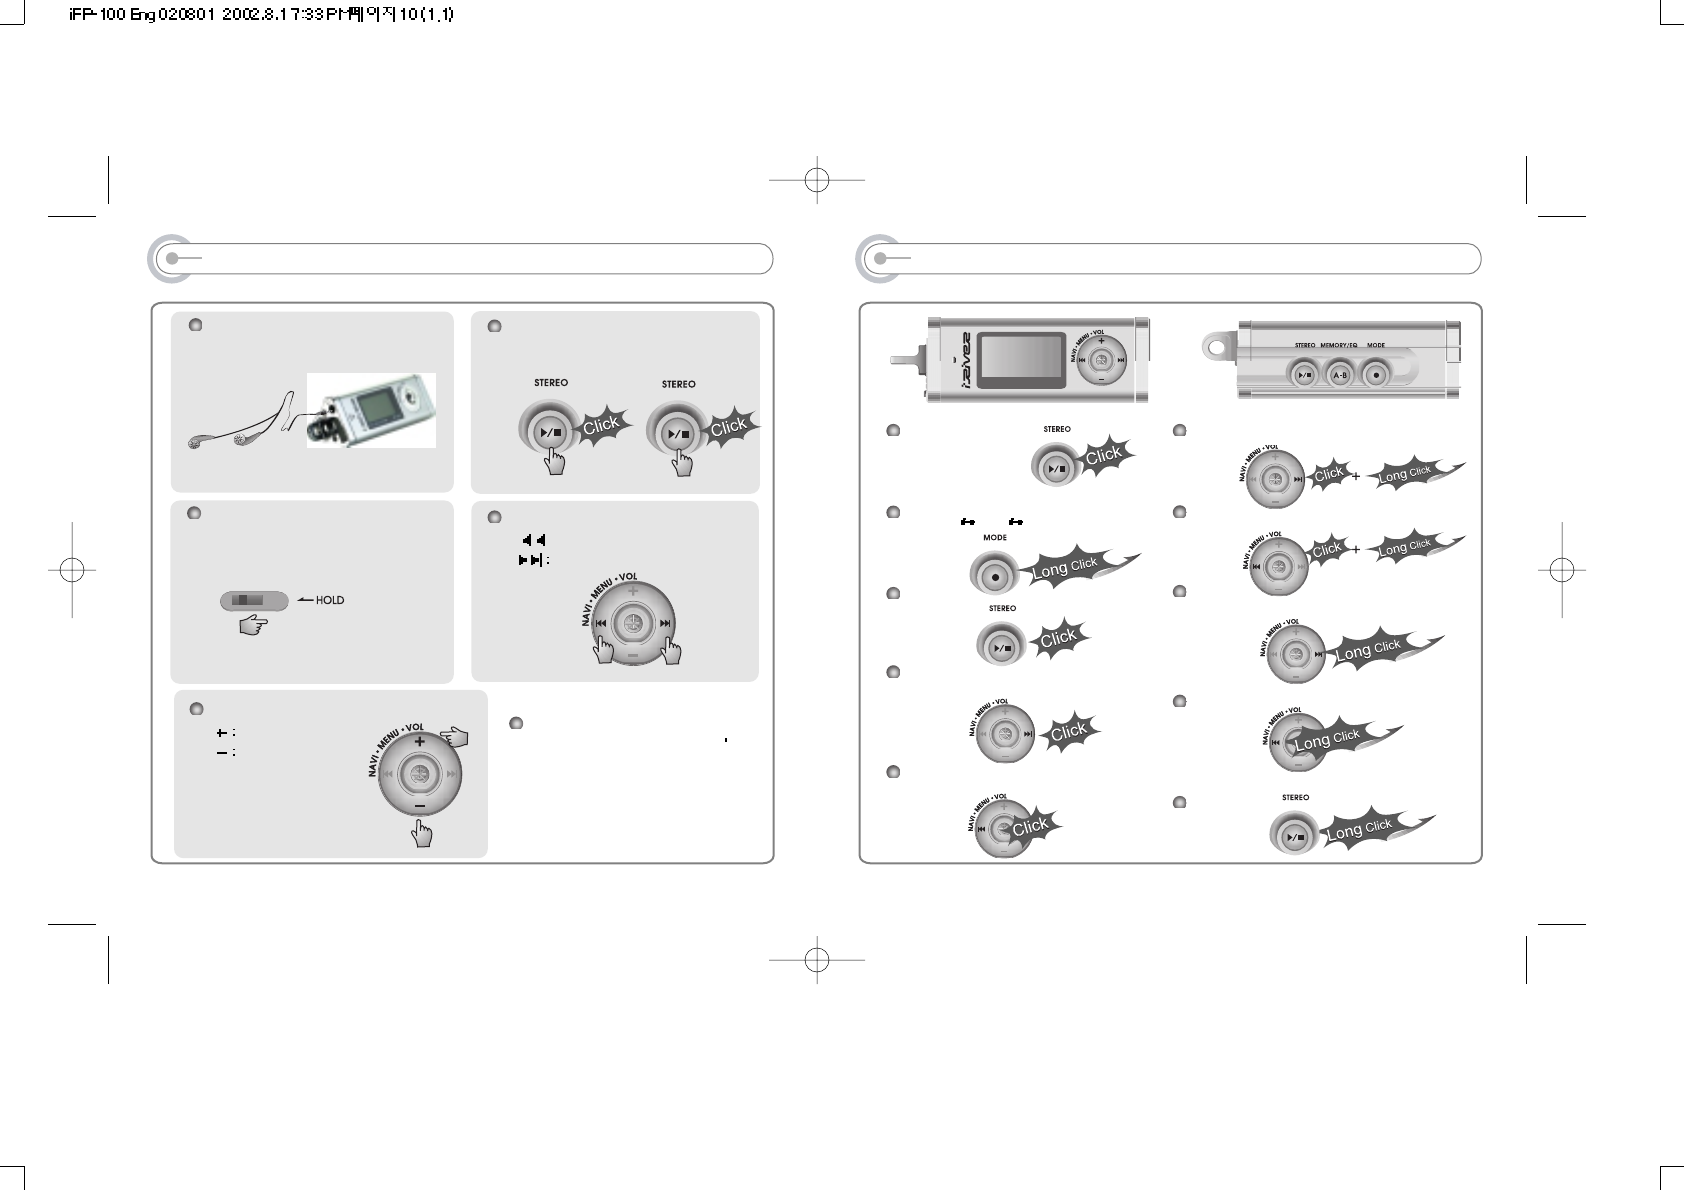
LISTENING TO MUSIC
To Play/Pause
To change source
(MP3 FM Voice recording)
To stop
To play next music
To play previous music
To play next folder
To play previous folder
To search fast advance the music.
To search fast reverse the music.
To turn off the player
9
LISTENING TO MUSIC
Put the HOLD switch to “OFF”.
Connect the earphones as below. Turn the power of the player on .
Press PLAY/MENU button to play.
To select music
I: To select previous music
To select next music
To adjust the volume
To increase volume
To decrease volume
Note
- With Hold switch on, you can t
manipulate the controls on the
player.
- When the player doesn’t operate
for about 3 minutes, the player
automatically turns off.
8
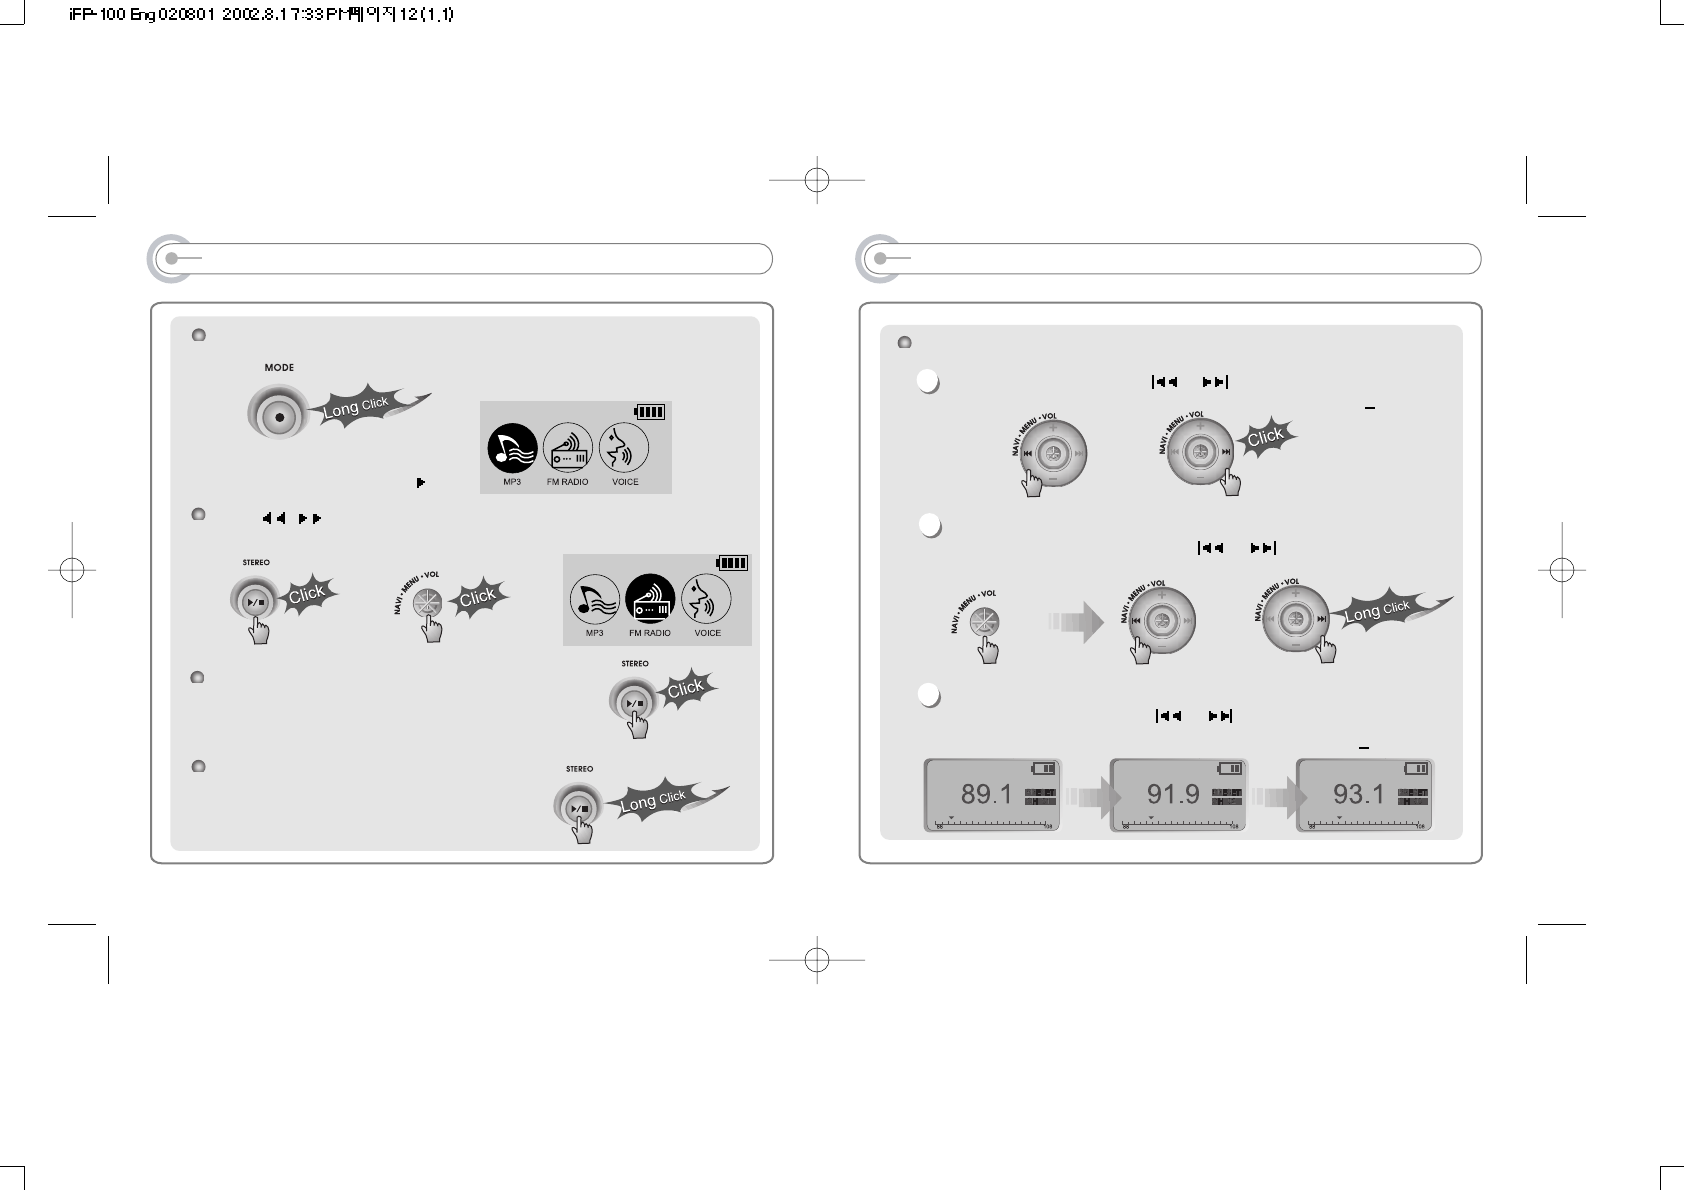
PLAYING FM TUNER
Selecting Frequency(FM 87.5MHz ~ 108MHz)
To change frequency, push the or shortly.
Auto Scan function: To select memorized channel, press the Navi/Menu
button and find the channel by pushing or .
PRESET Mode : To select memorized channel, press the Navi/Menu button
and find the channel by pushing or .
(ex : 87.5 87.6)
(ex : 89.1 91.9)
1
2
3
Example)
or
or
11
PLAYING FM TUNER
While Playing CD, Press MODE/REC button.
Function selection picture displays
on the LCD.
Push I, I button to select FM RADIO.
Press NAVI/MENU or PLAY/STOP button to confirm.
Press PLAY/STOP button to select Stereo/Mono.
Press PLAY/STOP button to turn the player off.
or
10
PLAYING FM TUNER
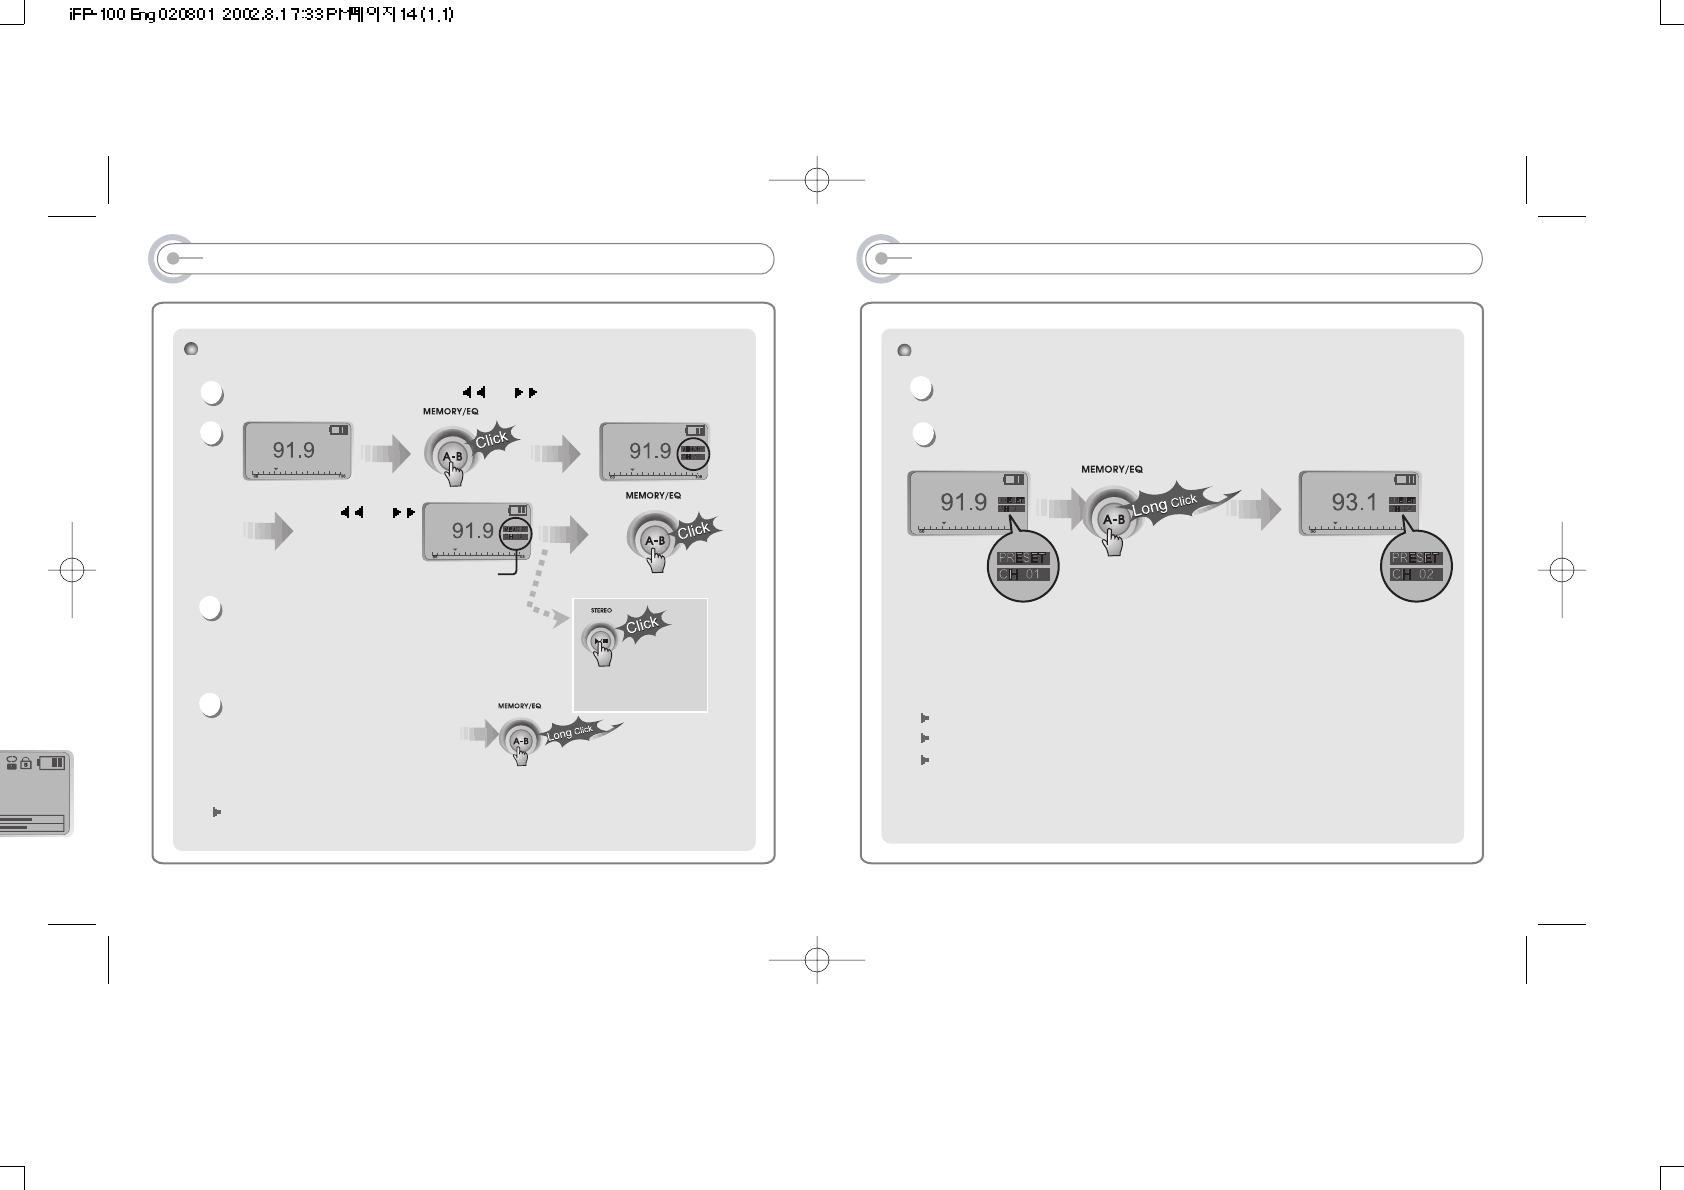
Memory delete function (Delete saved channels)
Select channel to be deleted at preset mode.
Push memory button for a long time.
- The next channel will appear when channel delete is completed.
Push memory button if you want to delete the next channel also.
1
2
FM Tuner receivability may differ in different areas.
While in Preset mode, auto scan and auto memory function are not available.
When player doesn't have any preset channels, EMPTY will be displayed at
preset mode then fade out.
13
PLAYING FM TUNER
Memory Function (Save channels)
Select the channel by pressing the I or I button.
Up to 20 channels can be memorized.
Auto memory function :
Automatically select channels
and save them in sequential
orders.(It only activates while the player is not in PRESET mode)
Note : Auto memory may not work within weak transmission areas.
Press I or I
and select the
desired channels.
1
3
4
2
Select CH02
Save complete
again
will exit
memory function
without saving.
12
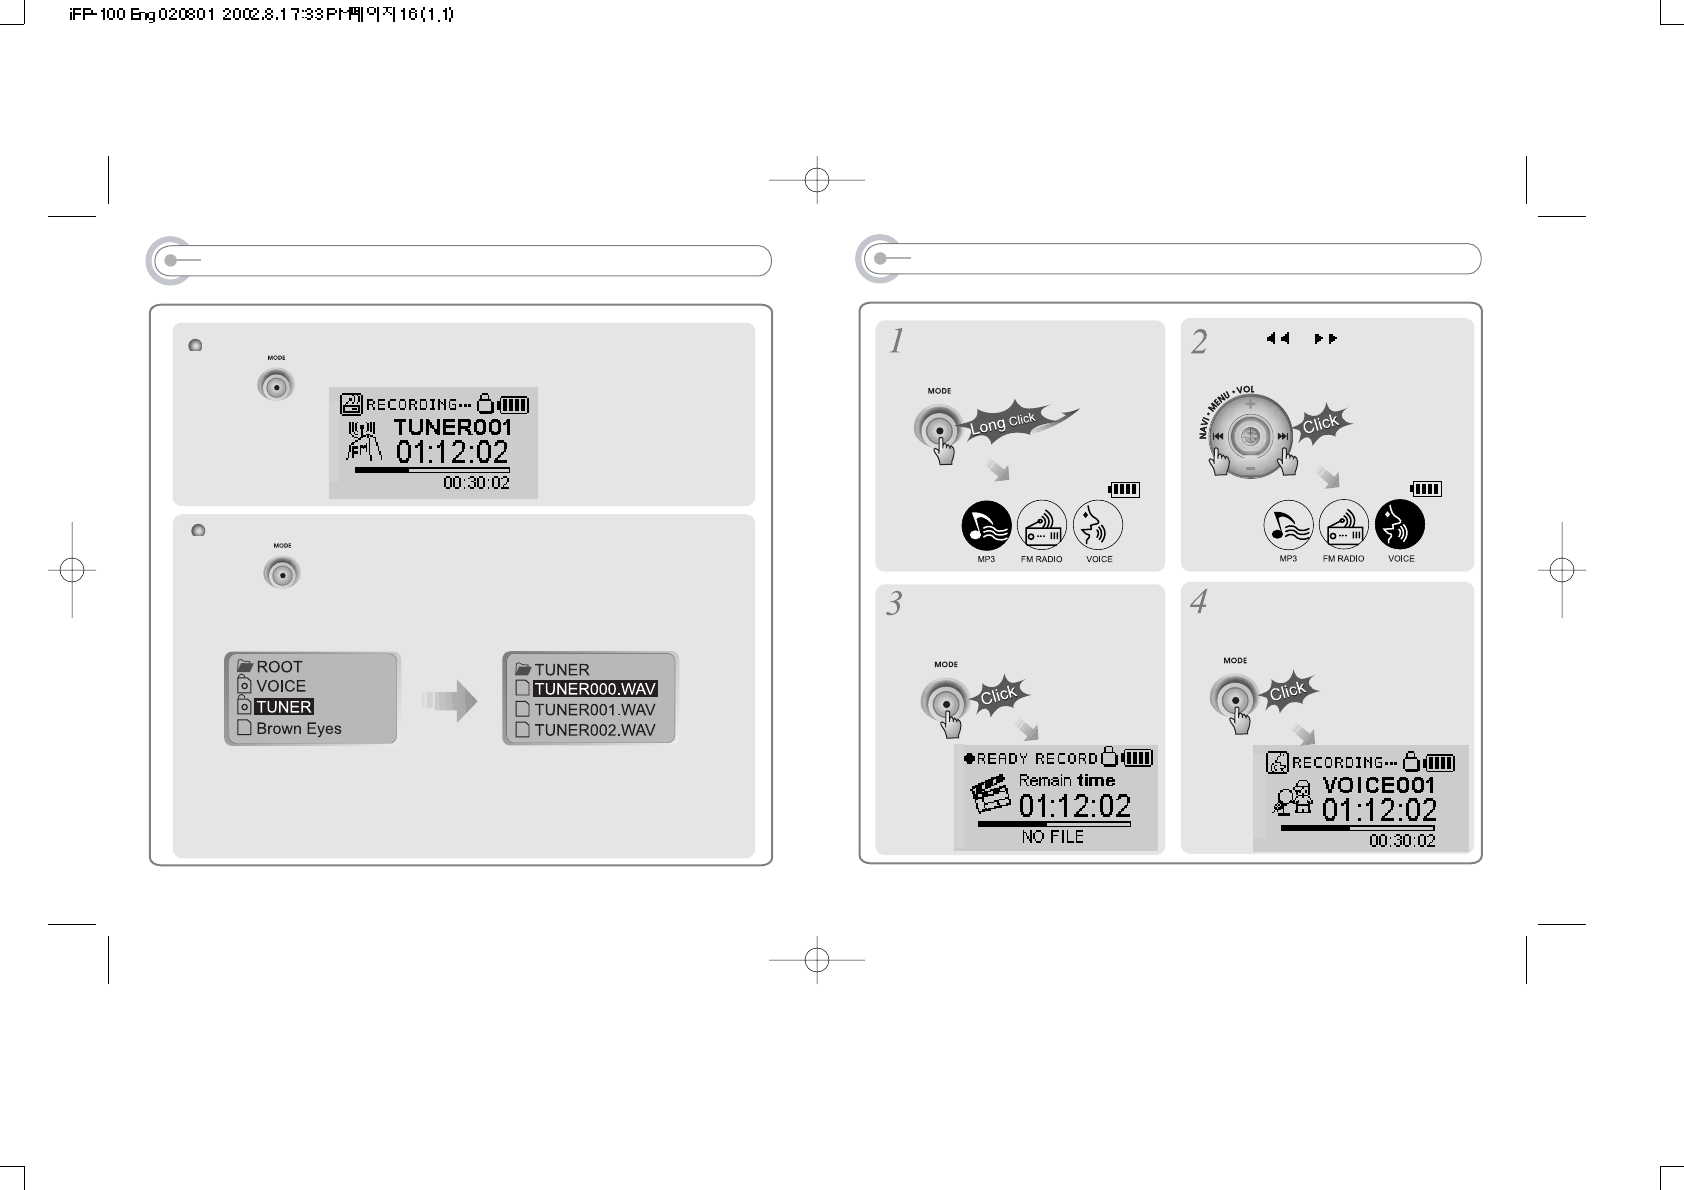
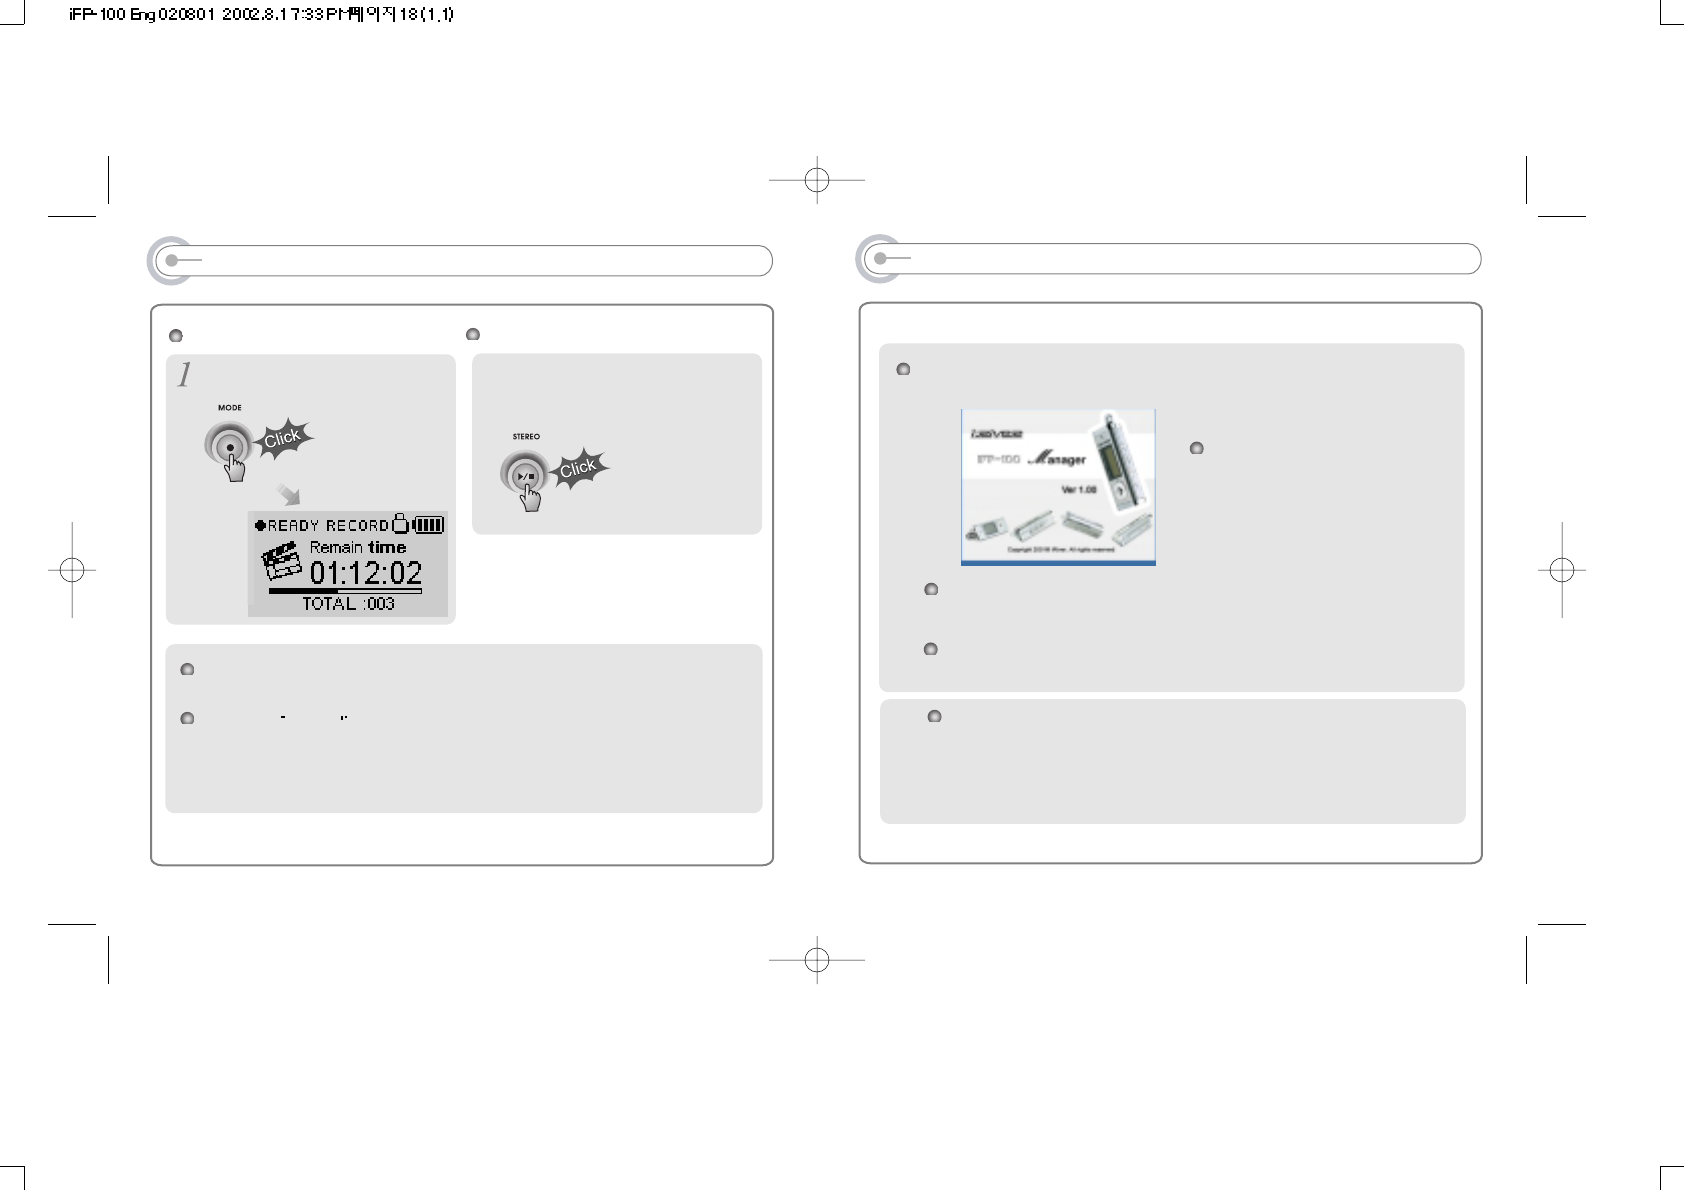
RECORDING VOICE
Press MODE/REC button for a long
time.
Press NAVI/MENU button(or
PLAY/STOP) once more to start
recording.
Press MODE/REC button once more.
Voice recording starts.
Press Ior Ibutton to Voice
mode.
15
RECORDING FM
To record FM
Press [MODE/REC] button during FM receiving.
To stop FM recording
Press [MODE/REC] button once more, recording is completed.
Recorded file is saved as form of TUNER001.WAV,
To play a recorded file
Select the MP3 at the initial window, then press PLAY/STOP button.
Note
Volume is not controlled during recording.
14
17
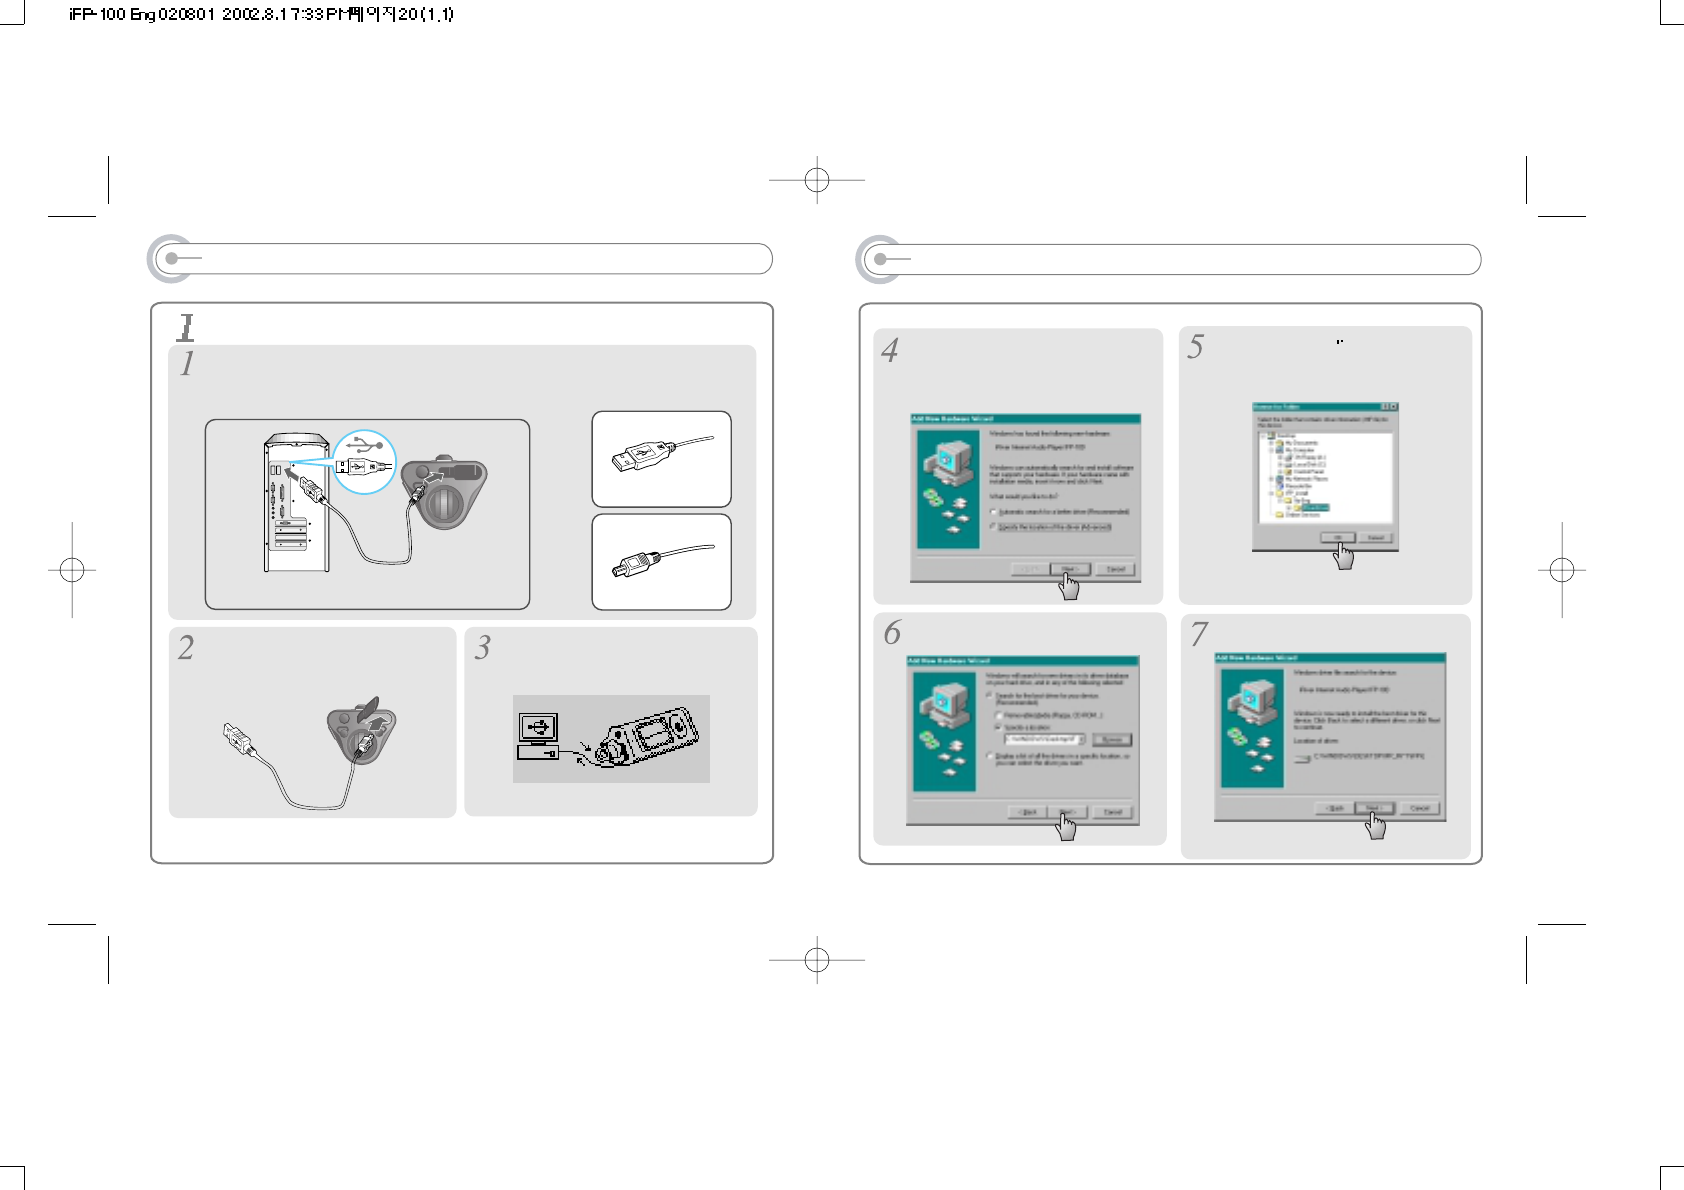
INSTALLING SOFTWARE ON PC
Insert the Installation CD into the CD-ROM drive. The following
picture appears when inserting the CD.
You can save MP3 files or other type of files on the PC or the Player by using
Manager Program.
You can upgrade the Operating System of the player by downloading from the
internet.(Log on to www.iriver.com or www.iriveramerica.com)
The installation CD includes
contents as follows.
- Device Driver
- Manager Program
System Requirements
- Pentium 133MHz or faster - CD-ROM drive
- USB port - 20MB free hard disc space
- Window 98 SE / ME / 2000 / XP
RECORDING VOICE
Recorded file is saved as form of VOICE001.WAV.
If displayed 00:00:00 on the LCD, the memory of the player is full.
To rec, delete files to make free space in the player.(Refer 26~27 Page)
To stop recording
Press MODE/REC button.
To play a recorded file
Press PLAY/STOP button.
16
19
INSTALLING SOFTWARE ON PC
The following picture appears when
connecting the USB cable.
Select the folder to Install.
Click “NEXT”.
Select “iRiverDriver folder to Install.
Click “OK”.
Click “NEXT”. Click “NEXT”.
18
INSTALLING SOFTWARE ON PC
Connect the USB cable(Provided) to the USB port of your computer.
Type “A” : USB port on the Panel of PC Type “B” : USB port of iFP-100
Connect the USB cable to match the direction.
Type “A”
Type “B”
USB port on the PC USB port on the IDP-100
USB cable
Type “A”
Type “B”
To install “New hardware”
Caution
After you stop playback of player, connect the USB cable to the player.
Turn on the iFP-100, remove the
protective cover of USB port, and
connect the USB cable.
“USB CONNECTED” will appear on the
LCD of the player.
21
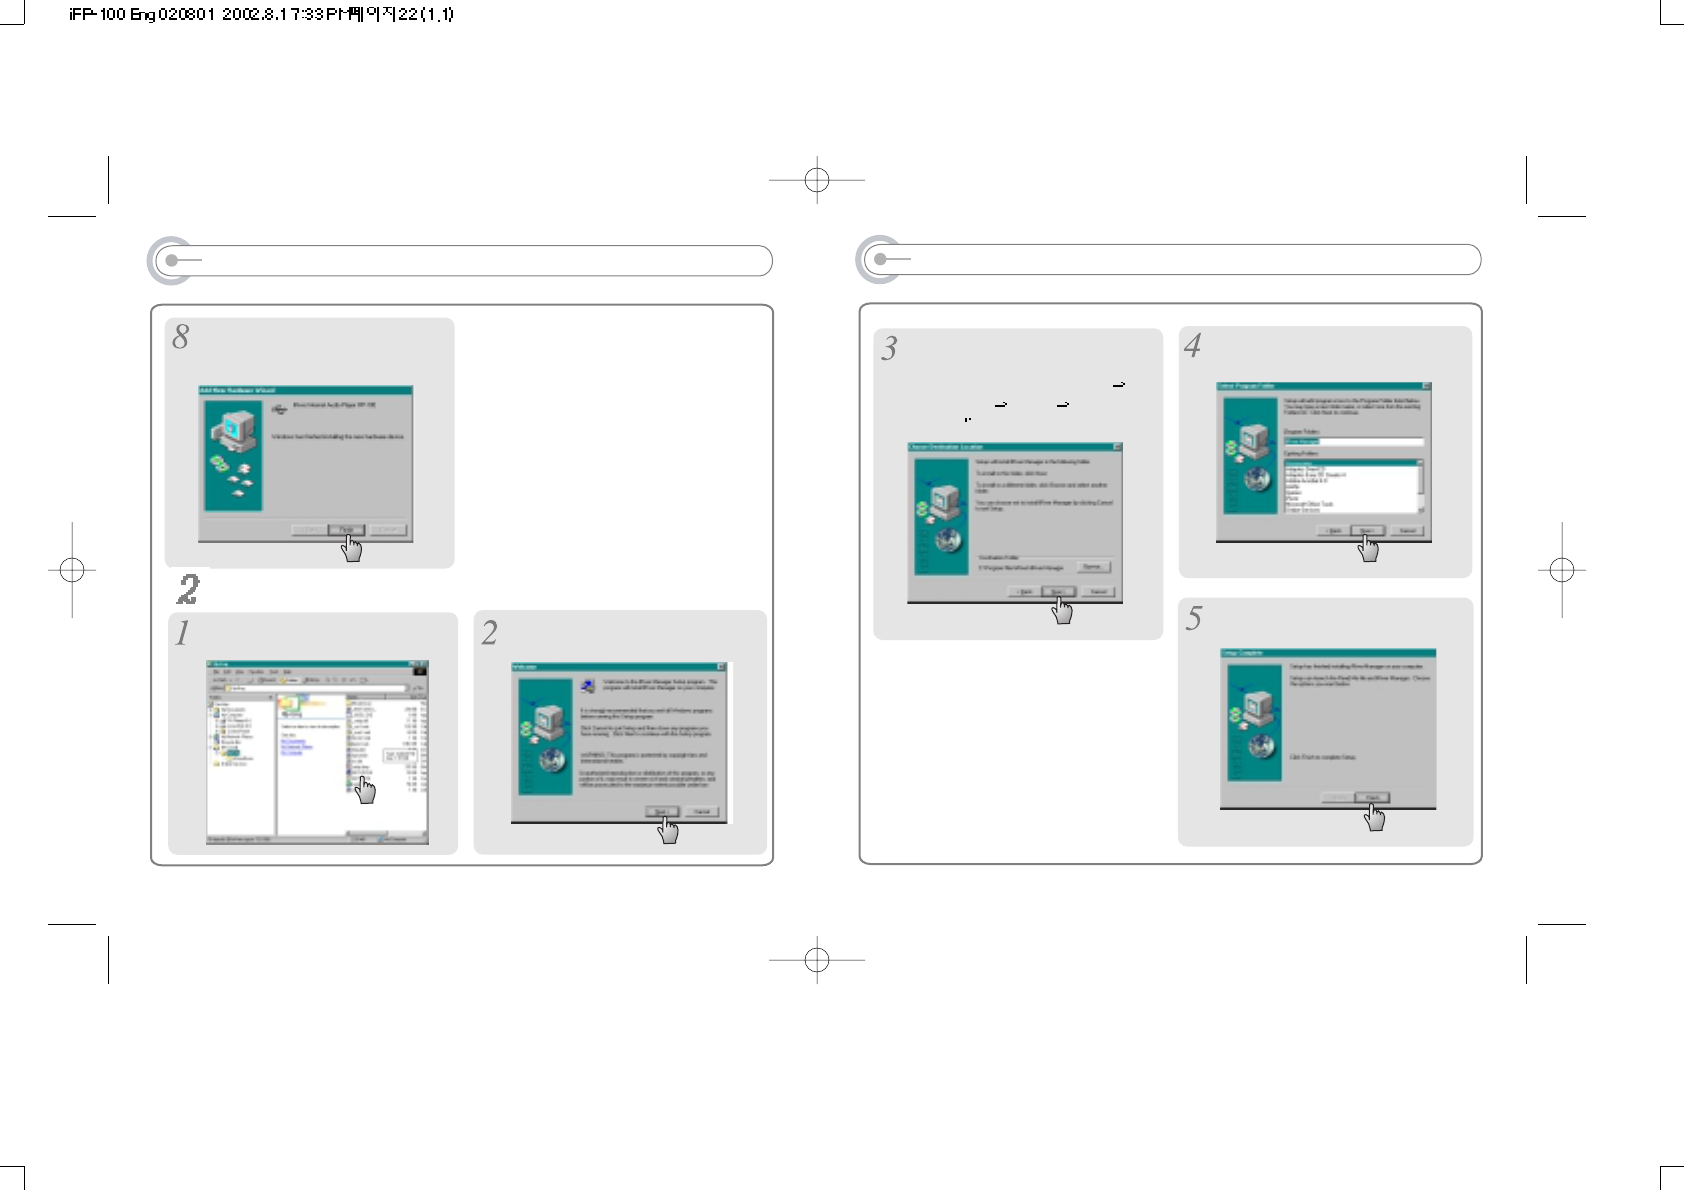
INSTALLING SOFTWARE ON PC
Select the folder to Install.
Click “NEXT”.
Generally assigned as “C Driver
Program File iRiver iRiver-
Manager
Click “NEXT”.
Click “Finish”
Complete the installation of “Manager”.
20
INSTALLING SOFTWARE ON PC
Click “Finish”
Complete the installation of “New
hardware”.
To install Manager program
Click “SETUP.EXE” in the ifp-Eng
folder to start the installation. Click “NEXT”.
BASIC OPERATION
NAVIGATION
Push NAVI/MENU button shortly and find the desired track by pushing
VOL + or VOL - button.
To select the track, please press Navi/Menu(or PLAY/STOP button) shortly.
To move to the upper folder, short click NAVI/MENU button.
If there is not upper folder, NAVIGATION stops.
Volume Control: Slide jog lever to the upward or
to the downward.
Changing FM Mode :
MP3 FM Changing :
BASIC OPERATION
(Refer p10)
2322
BASIC OPERATION
When using Navigation
1. LCD windows.
2. To select the previous music or station for MP3 or FM.
3. To increase or decrease volume
4. To select the next music or station for MP3 or FM.
5. To select NAVI/MENU function.
6. To start playback or pause for MP3, to select mode for FM or turn off
7. To select EQ mode, A-B repeat or to memory stations for FM automatically.
EQ : NORMAL ROCK JAZZ CLASSIC U BASS USER EQ
8. To select function, playback mode or recording/stop recording.
When using Menu
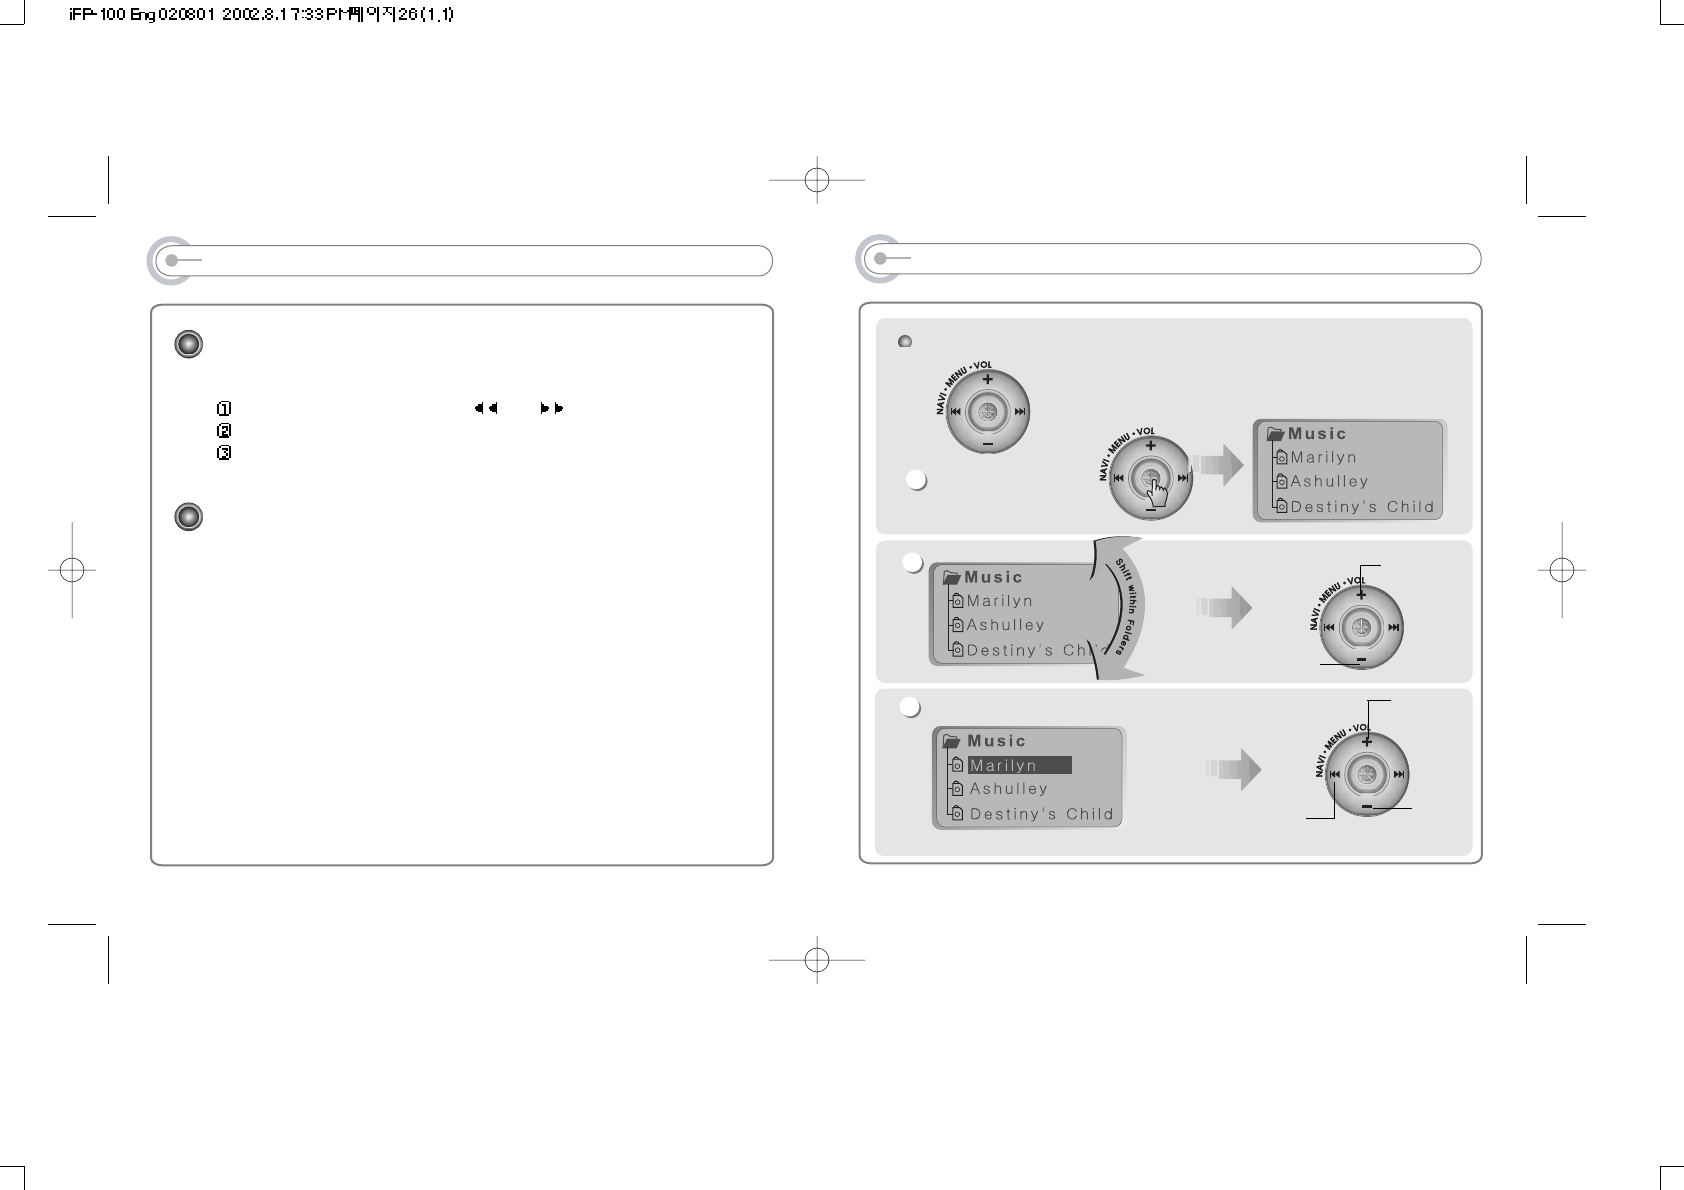
NAVIGATION
NAVIGATION is the function to search track.
You can find the desired song by pressing
NAVI/MENU button and using VOL +, VOL - buttons.
NAVI/MENU button
Shift to upper
folder
Shift to down folder
1
2
Select Folder or Shift to Upper Folder
3
Shift to Upper Folder
Select Folder
Select
Folder
25
BASIC OPERATION
MENU
Long press of NAVI/MENU will execute menu function.
Shifting between menus : Press I and I
Exit : Press VOL - button or long press NAVI/MENU button.
Select Function: press VOL - button.
MODE
While MP3 is playing, do a short click of MODE/REC to activate selected
modes.
Long click of MODE/REC button :
You can select function of MP3 or FM or voice recording and play mode is
selected when MP3 plays.
24
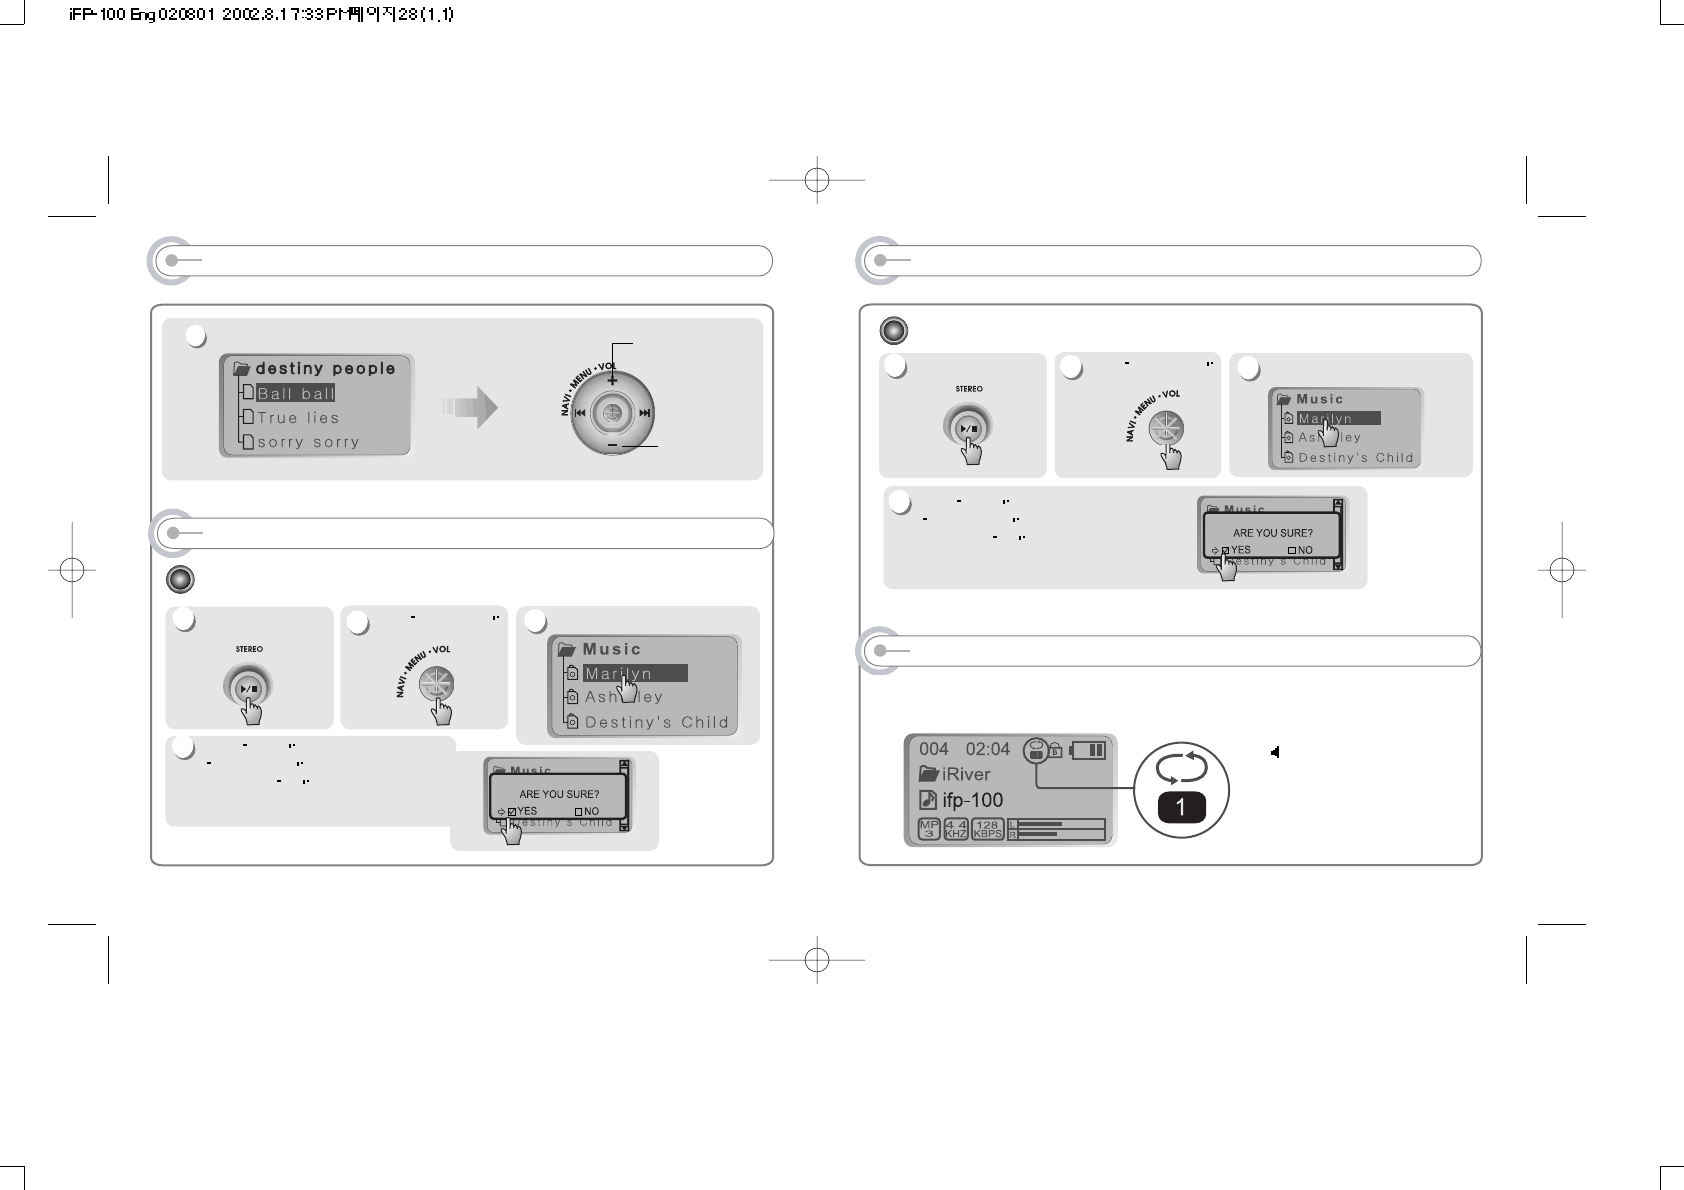
NAVIGATION DELETING FOLDER ON THE PLAYER
27
To delete folder
Stop playback. Select folder to delete.
Click MODE button.
are you sure? is displayed on the
LCD. Click yes to delete.
* Note : You can only delete blank folder. Delete folder after deleting files in the folder.
FILE DELETE
Click NAVI/MENU
button.
1
2
3
4
Select the track
4
Select the track
Select the track
Mode
You can enjoy various ways of playing by using playback mode.
Please refer to the function controls (page 25) for user-defined configuration.
When MODE/REC button is
pushed, icon in the playback
mode indicator is changed.
26
To delete files
Stop playback.
1
Click NAVI/MENU
button. Select files to delete.
Click MODE button.
are you sure? is displayed on the
LCD. Click yes to delete.
FILE DELETE
2
3
4
DELETING FILES ON THE PLAYER

MODE
Randomly play whole tracks in the disk repeatedly and stop.
Play a single track repeatedly.
Randomly play whole tracks in the folder repeatedly and stop.
Randomly play whole tracks in the folder repeatedly.
Randomly play whole tracks in the disk repeatedly.
INTRO
INTRO: Play beginning 10 seconds of each track in sequential
order.
INTRO HIGHLIGHT: Play 10 seconds from the spot 1 minute
played for each track in sequential order.
Above feature can be selected within Function Control.
Play a single track repeatedly.
Play whole tracks in the folder and stop.
Play whole tracks in the folder repeatedly.
Play whole tracks in the disk repeatedly.
28
REPEAT
SHUFFLE
PROGRAM MODE
Activating Program mode
01
02
03
Program mode: Play tracks in your favorite order.
Program mode is activated while in Stop Mode.
Repeat A-B is activated while in Play Mode.
At stop mode
Shift to Program mode
Use VOL +, VOL -, NAVI/MENU button to select the desired
track and press
Track number in
program list
Push VOL + or
VOL - lever to
select folder, then
press
MEMORY/REC button to save all files in the folder.
To delete programmed files, press MODE/REC
button after selecting file to be deleted. Then
program list is automatically changed.
01
02
03
Brown eyes
Yesterday
Burning Love
01
02
03
Brown eyes
Yesterday
Burning Love
Music name
29
PROGRAM MODE
Cancel Program Mode
While in Stop Mode
After programming, press to play the tracks in sequential order.
Program mode icon appears
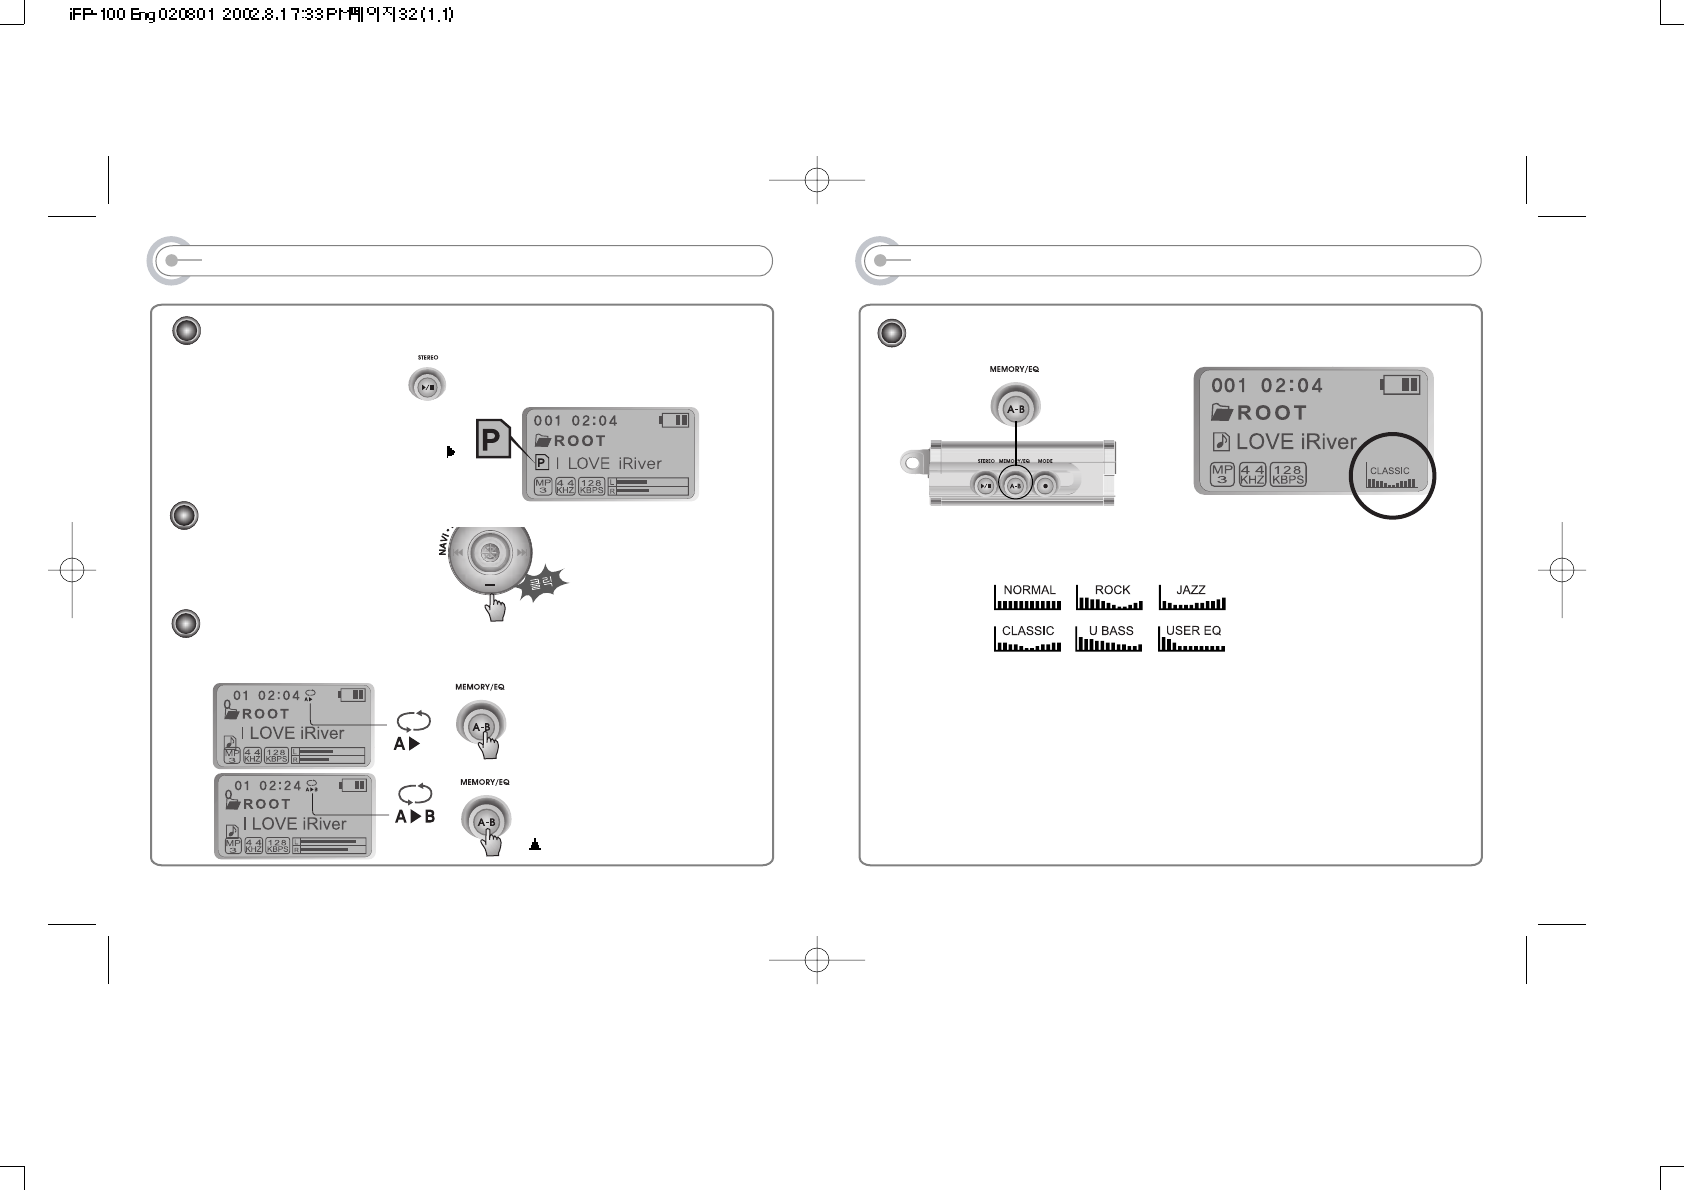
Interval Repeat
Play selected interval repeatedly
Program play
A-B interval will be repeated.
Press button once to select the
beginning <A> Point.
Press button again to select the
ending <B> Point.
30
EQ MODE
Long click of MEMORY/EQ button displays the current EQ.
Every time you click this button, the EQ mode shifts in sequential order.
Note: Please refer to the Function Control (Page 41) for configuring
User Defined EQ.
EQ MODE
31
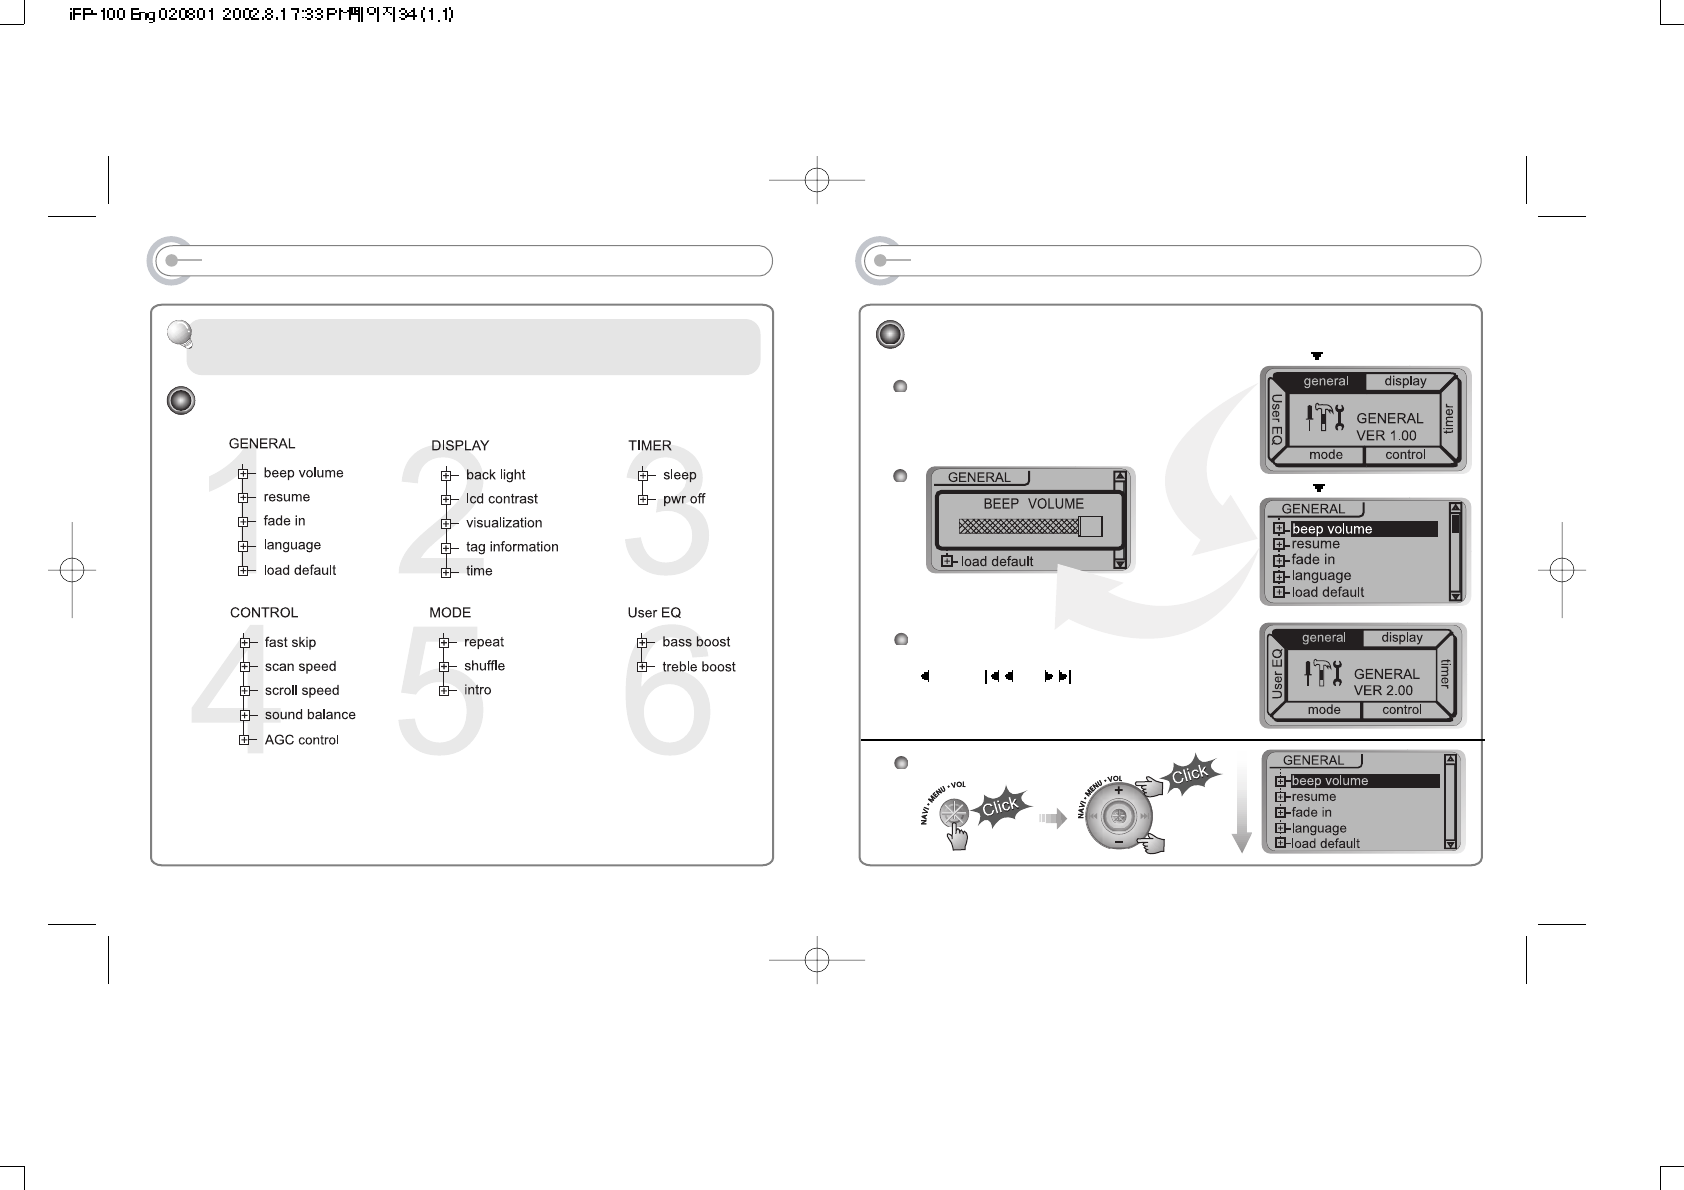
MENU
Menu Operation
MAIN MENU
SUB MENU
4
When you select the sub menu window, you can
set the user's preference to be displayed.
Pressing NAVI/MENU button will show
you the figures. It is composed of
6 main menus with submenus.
From Main Menu to Sub Menu
Shift between Menu
Press or button to move
between main menu and sub
menu.
33
MENU (FUNCTION CONTROLS)
Configuration
Function Control is subject to change with different firmware versions. Users
can configure their own settings.
32
MENU(GENERAL)
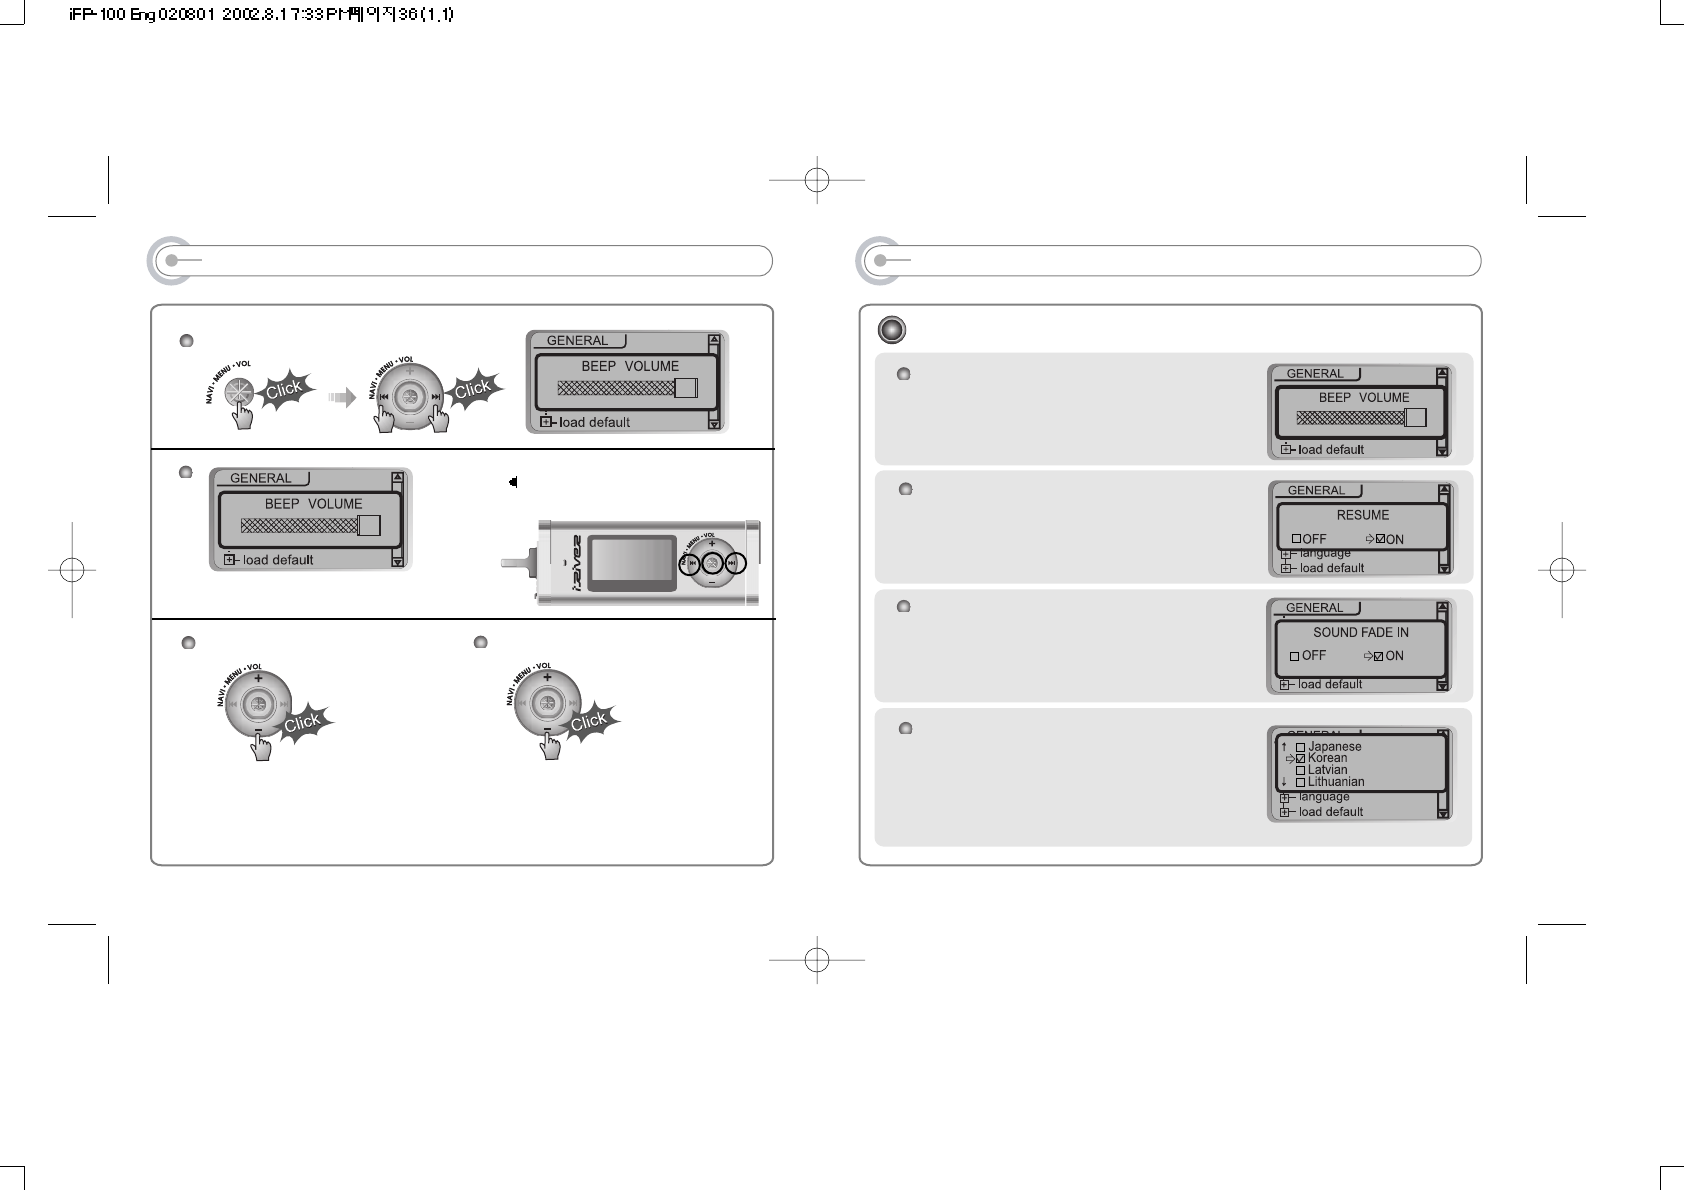
RESUME
: When activated, player returns to the same
settings after STOP or Power OFF.
FADE IN
: When activated, volume increases
gradually at playback mode to prevent
sudden loudness.
LANGUAGE(Supports 35 languages)
: When activated, displays proper fonts for
tracks and ID3 tag information (which differs
from PC operation system in different
language).
BEEP VOL
: Configure beep sound (ON/OFF) with volume
level.
4
GENERAL
35
MENU
Each control option is configured
by three buttons shown below.
Exit Sub Menu
4
4
Enter Sub Menu
Exit Function Control mode
34
MENU(DISPLAY)
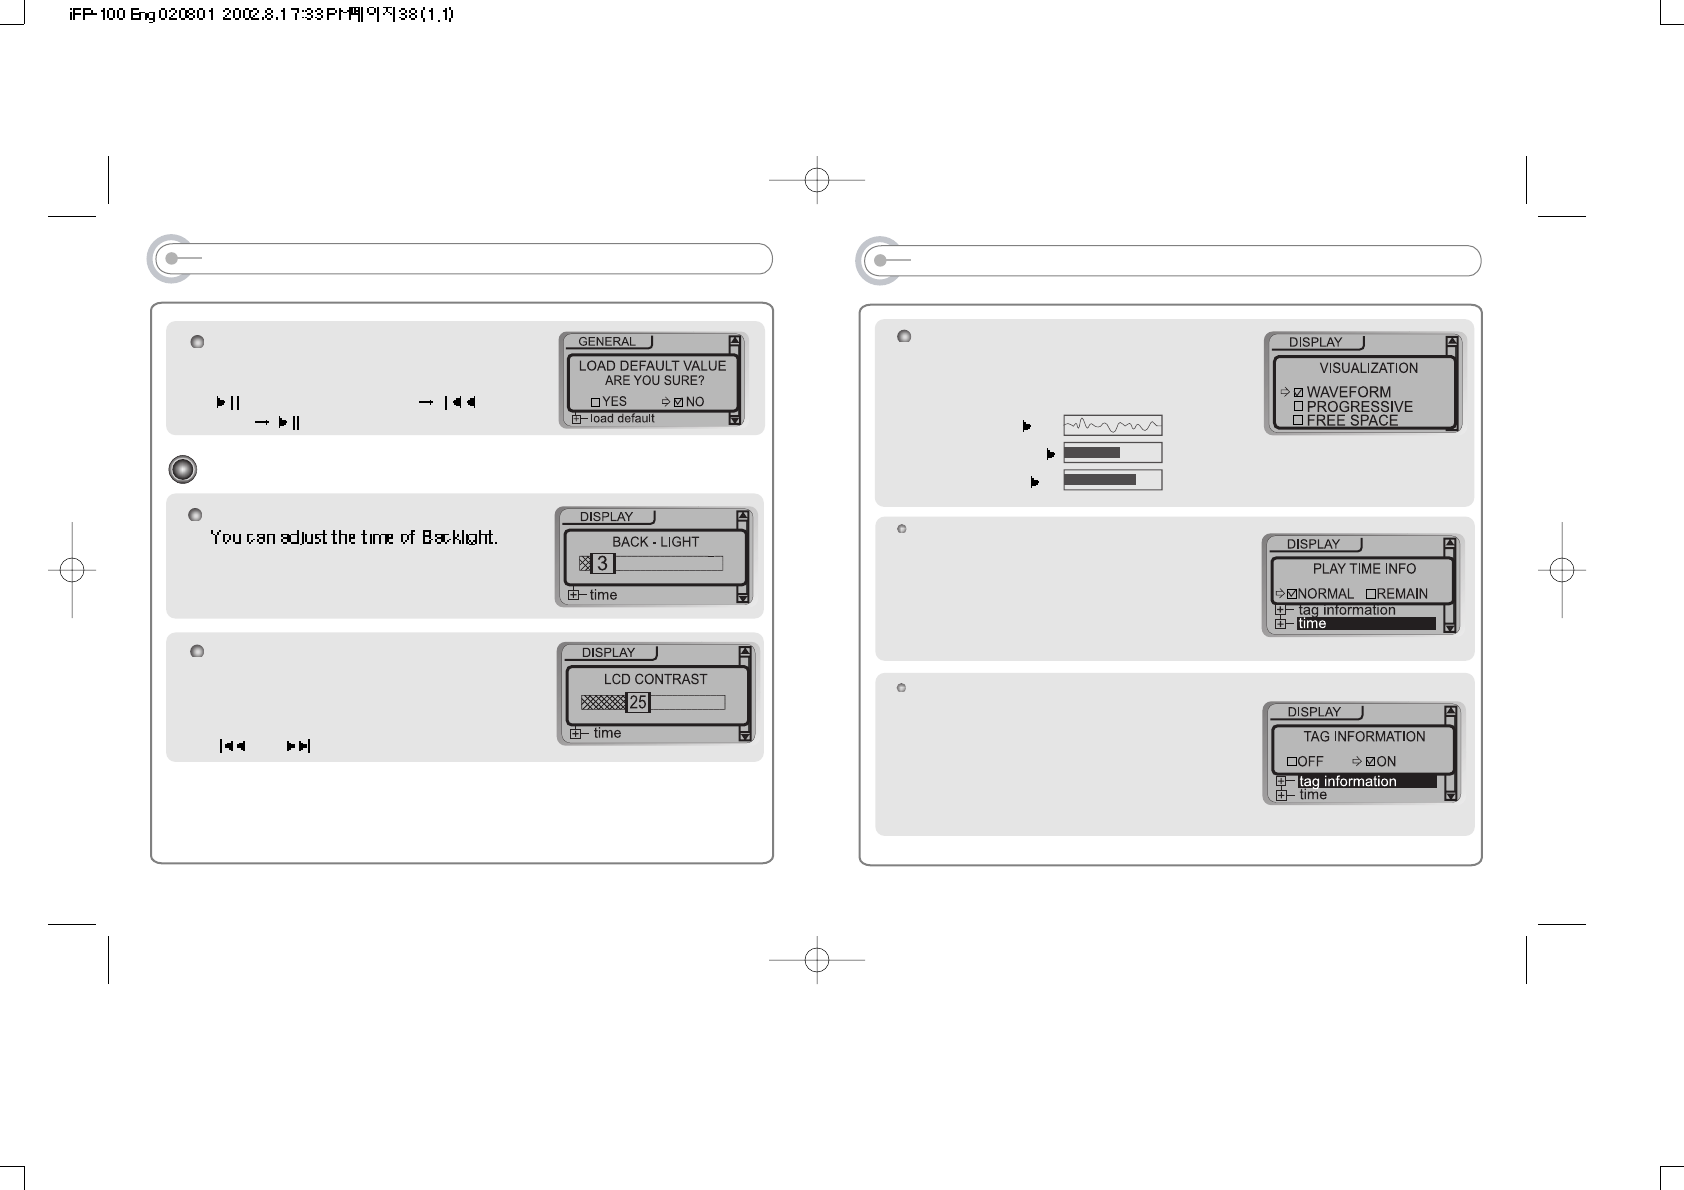
VISUALIZATION
: Visualize audio signal at play mode, elapsed
time of playing track or free space of memory.
WAVEFORM
PROGRESSIVE
FREE SPACE
37
TAG INFORMATION
ON : Displays track with ID3 tag
information.
OFF : Displays track with file name.
When set off the tag information, the track
is playing and the next track can be
displayed with ID3 tag information.
TIME
Normal : display elapsed time.
Remain : display remaining time.
Note : If the track format is VBR, the time
may not be accurate.
MENU(General & Display)
LOAD DEFAULT VALUE
: Initialize to original factory setting.
button operation order is as below.
(select default menu) (select
YES) (select YES : Initialization)
LCD CONTRAST
: Adjust LCD contrast.
Contrast can be adjusted by using
and buttons.
BACK LIGHT
Menu(Display)
36
MENU(CONTROL)
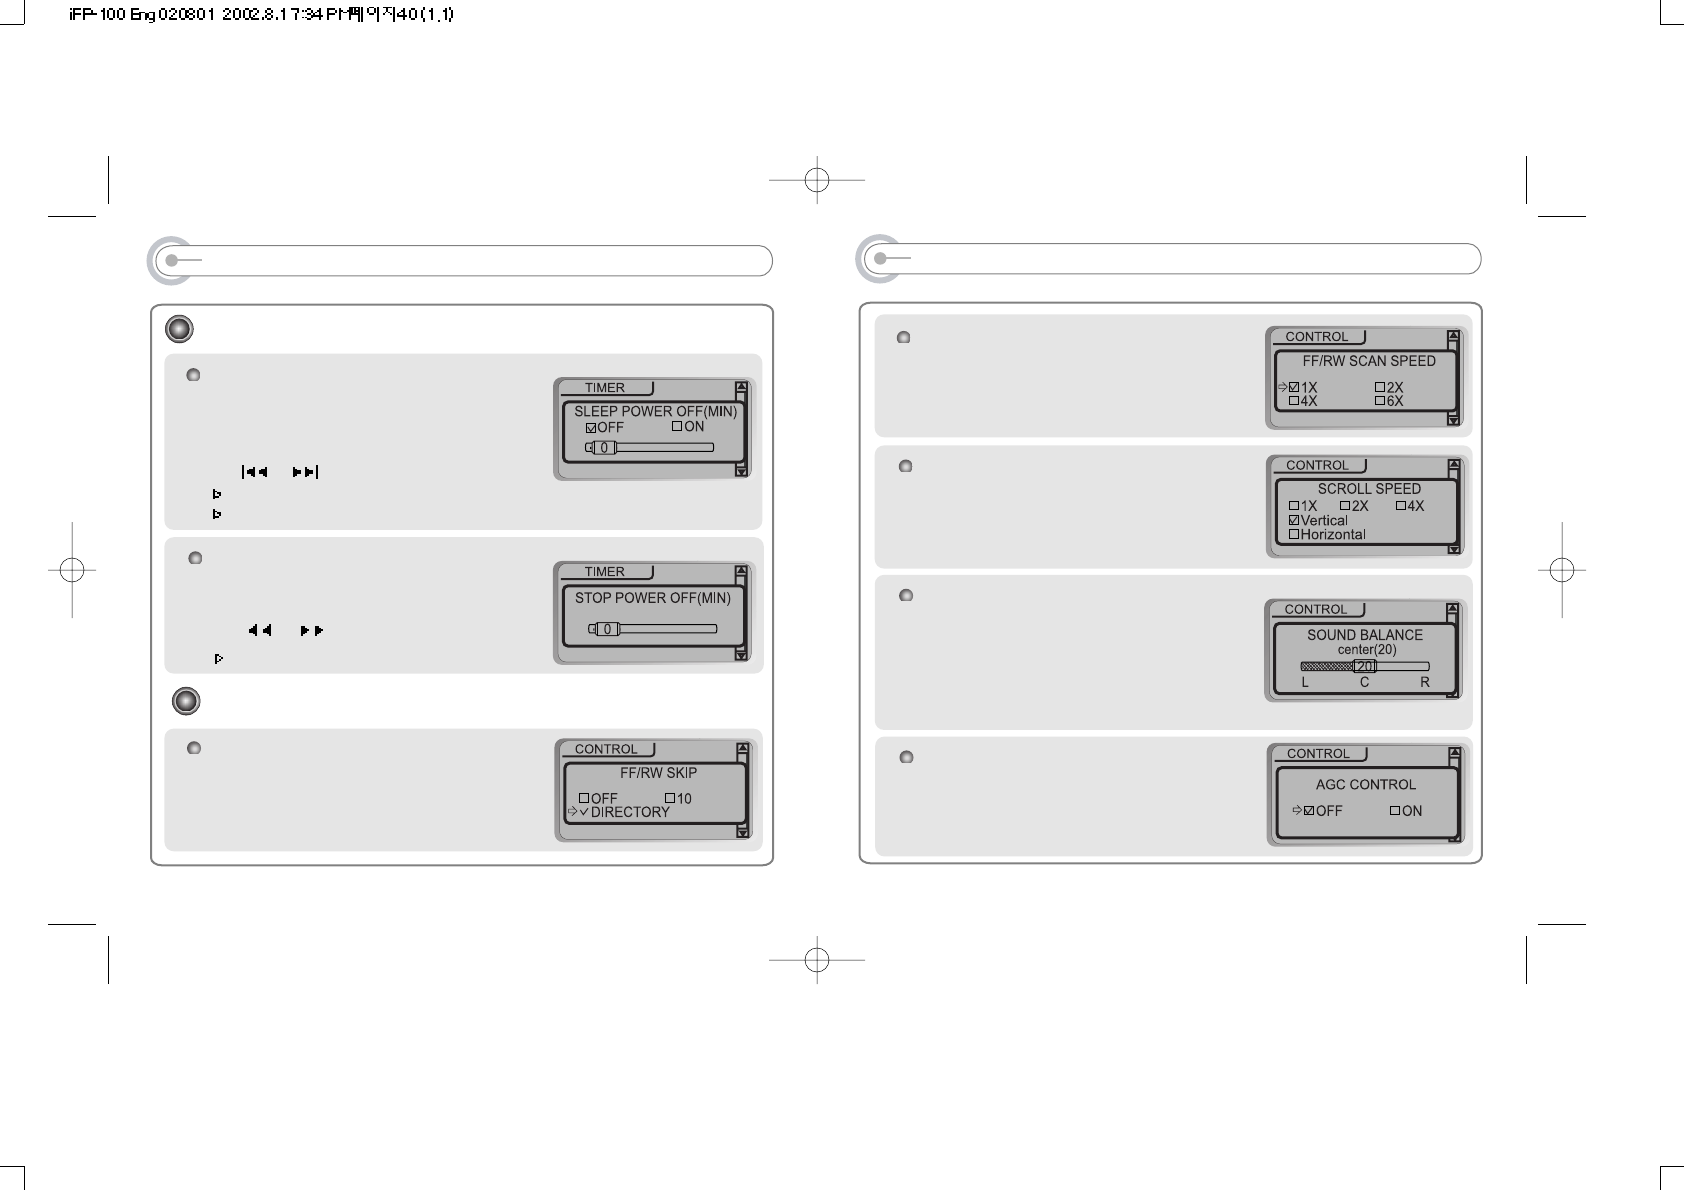
SOUND BALANCE
When the lever on the Sound Balance bar is moved
to L(Left, 0), the sound output will be in the left
earphone. When the lever on the Sound Balance
bar is moved to R(Right, 40) the sound output will
be in the right earphone. The default value is 20
and the sound output will be in the center.
39
SCROLL SPEED
Adjust scan speed by 1x/2x/4x
Vertical : The scroll goes from up to down
Horizontal : The scroll goes from the left to
the right.
SCAN SPEED
The fast scan speed can range from 1x/2x/
4x/6x. It is useful when studying a
language.
AGC CONTROL
ON : When recording voice, automatically
control recording level to record high quality
sound.
MENU(TIMER & CONTROL)
CONTROL
FAST SKIP
OFF : Skip does not activate.
10 : Playback previous or next 10th track.
Directory : Skip to previous or next directory.
38
STOP POWER OFF
: Automatically power off at stop mode.
(1 ~ 60 minutes)
Use I or I button to adjust time.
This function only works for MP3.
SLEEP POWER OFF
: Automatically power off after fixed time
(Time range can be set from 0 to 99 minutes
by minute)
Use or button to adjust time.
Available with both MP3 and FM Tuner
When the power is off, the sleep power off setting goes back to Zero setting.
TIMER(Set Auto Power Off)
MENU(USER EQ)
Menu (User EQ)
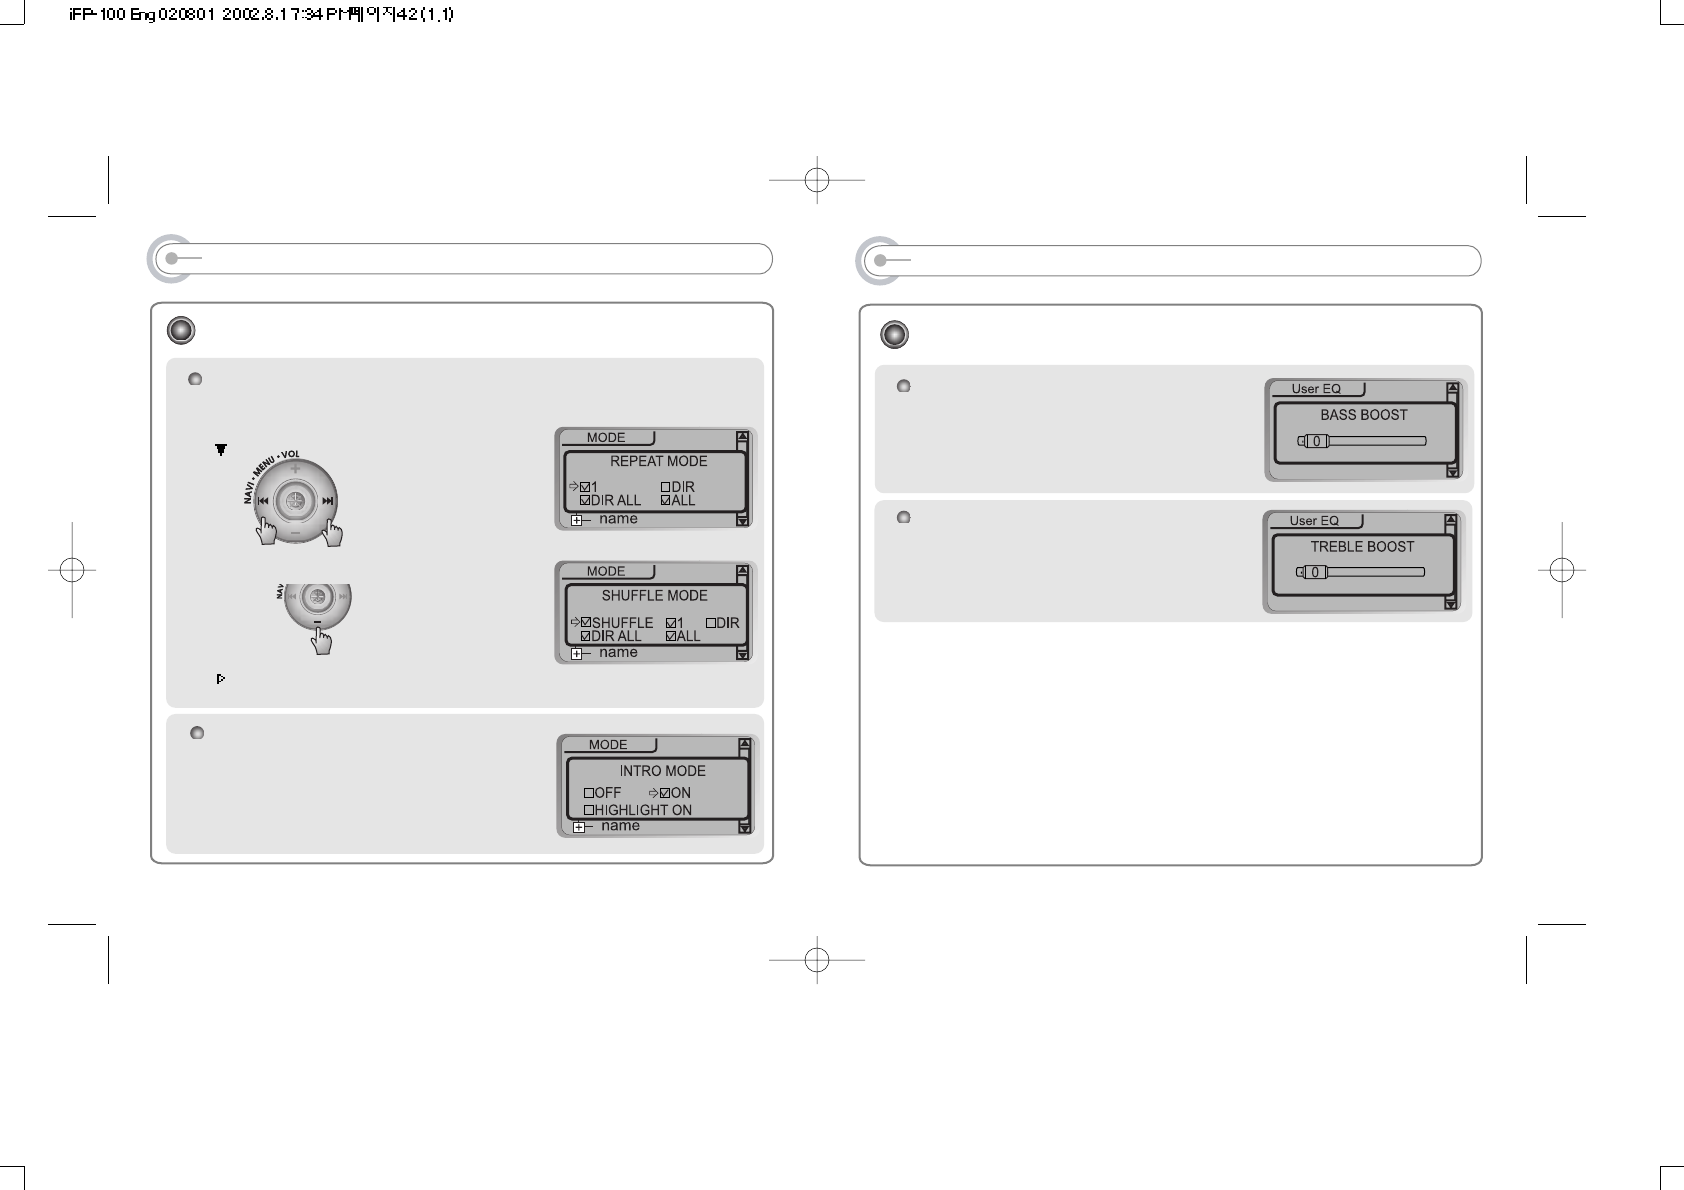
TREBLE BOOST
: Treble boost level is from o to 6dB.
BASS BOOST
: Bass Boost lever is from 0 to 24dB.
41
MENU(PLAYBACK MODE)
INTRO MODE
Intro: Play beginning 10 seconds of each
track.
Intro Highlight : play 10 seconds from the
spot 1 minute played for each track.
REPEAT MODE / SHUFFLE MODE (Page 27~28)
: Available with multiple section, selected modes are activated on mode
operation.
MODE
Pressing button to enter
ex
And button for selection.
Only the selected play mode will be applied when you press the MODE/REC
button(For details, please refer Page 24)
40
42
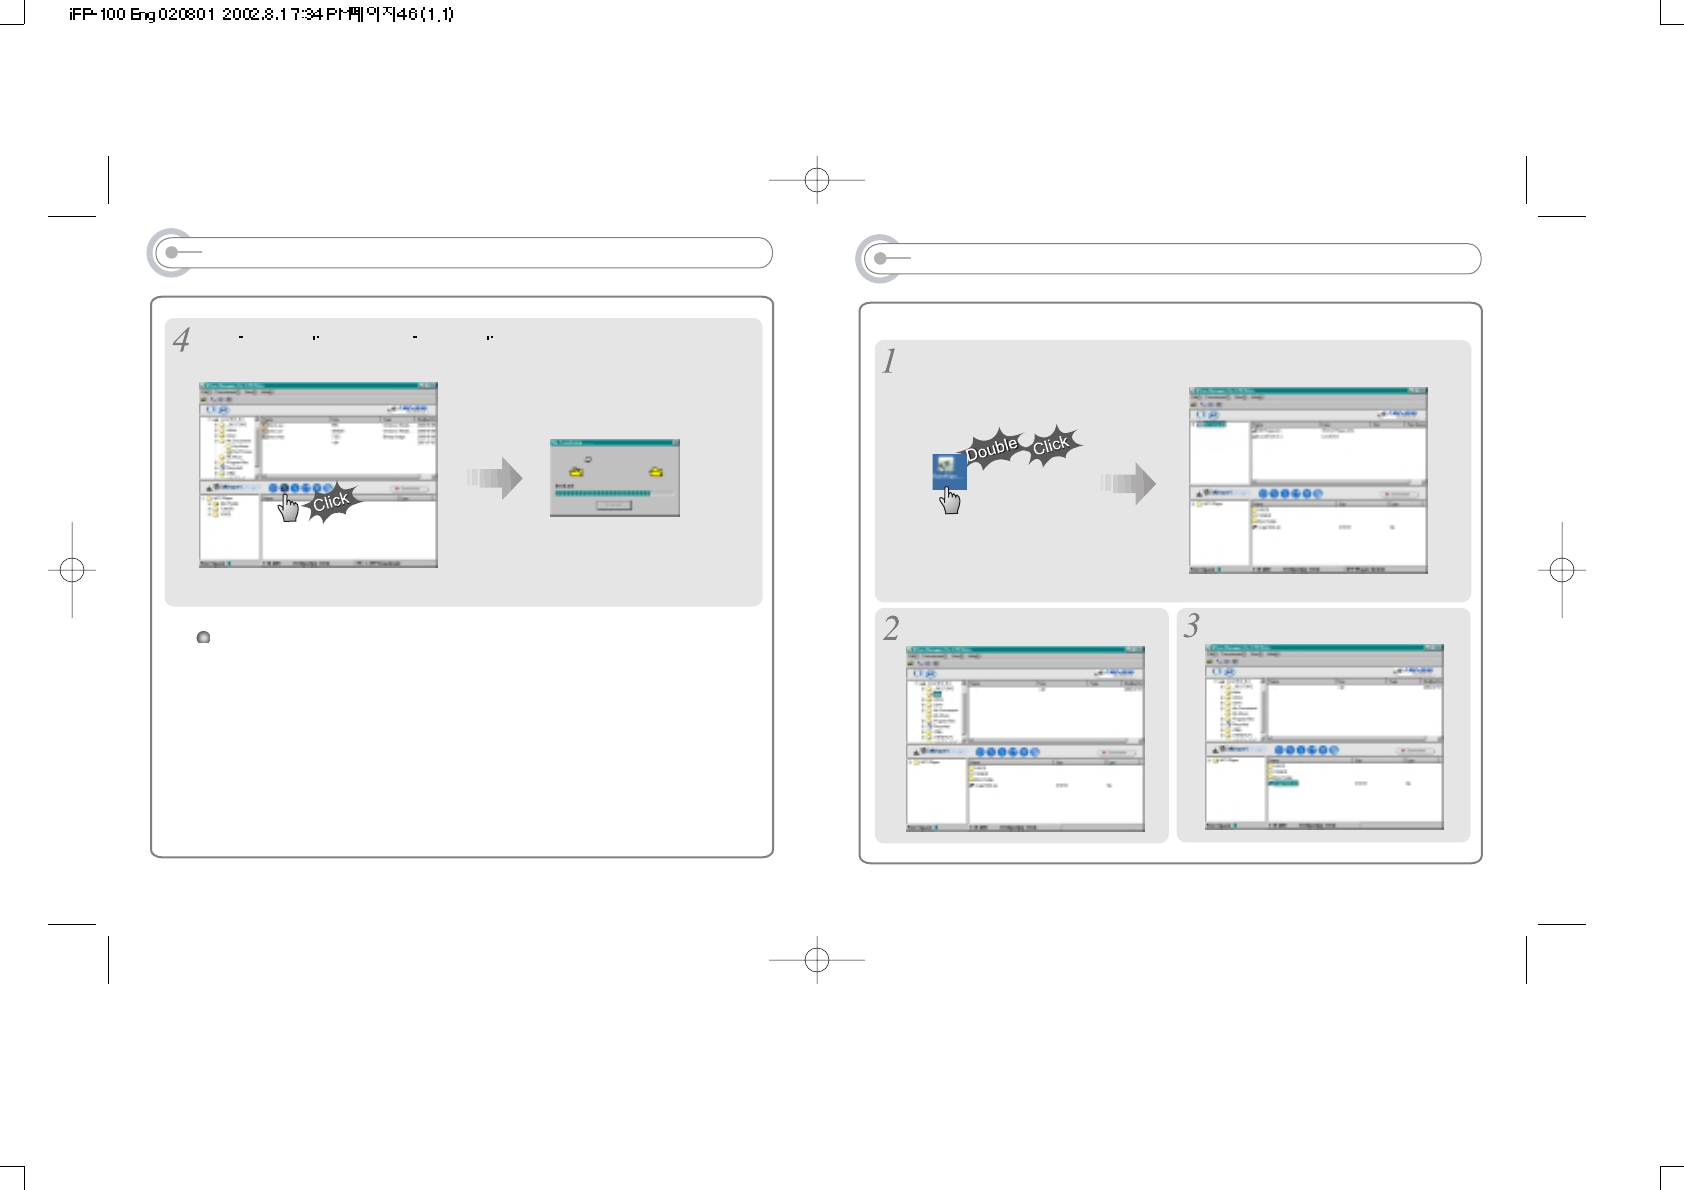
INITIALIZING/ MAKING NEW FOLDER/REFRESH
Double Click the Manager icon on
the PC windows to operate Manager
program.
Click format icon or select “format”
in
the file menu to format.
Click New Folder icon or select New
folder in the file menu to make new
folder.
DOWNLOADING FROM THE PC
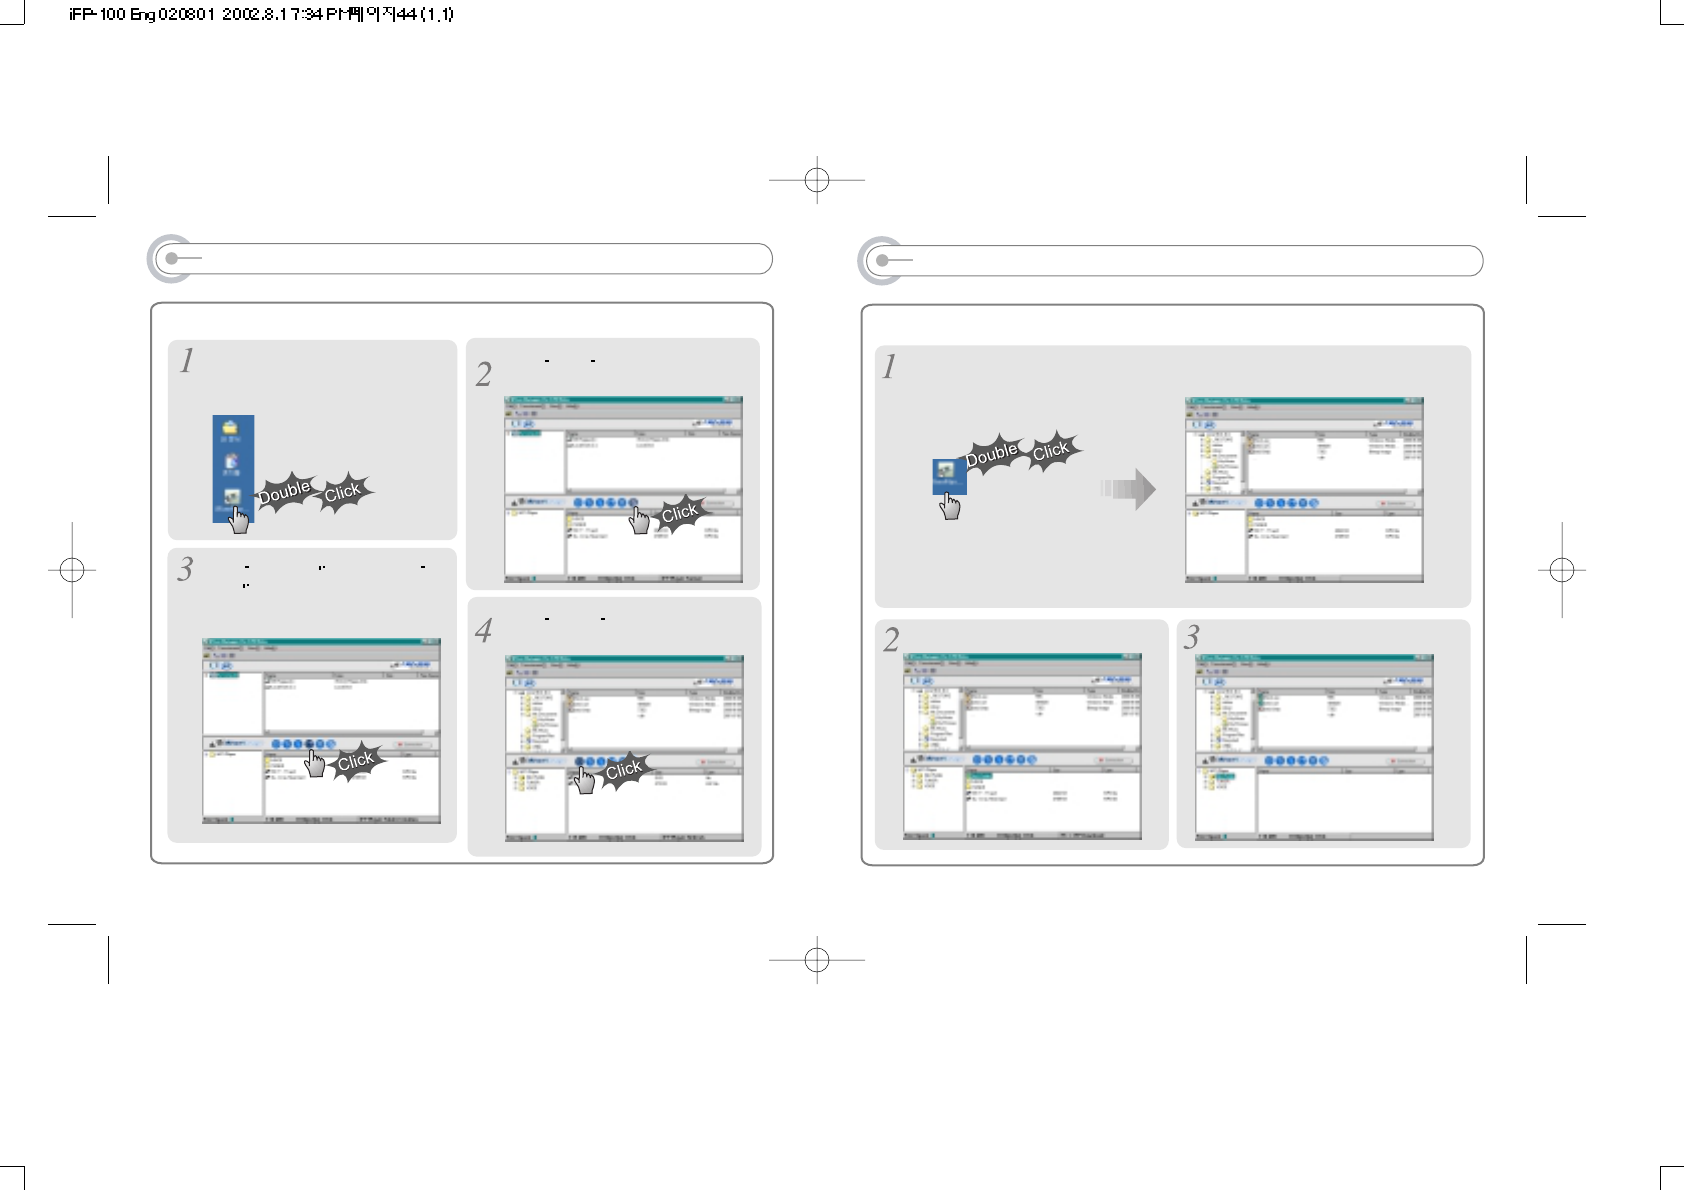
Activate Manager program after connecting USB cable between the player and PC.
Double Click the Manager
icon on the PC windows.
Select folder to saved in the PC. Select files in the player to save.
43
Click Refresh icon
to display contents
of the player.
DOWNLOADING FROM THE PC
Click Downpload icon or select Downpload in
the Transmission menu to download.
45
UPLOADING/ LISTENING MP3 ON THE PC
Activate Manager program after connecting USB cable between the player and PC.
Double Click the Manager
icon on the PC windows.
Select folder to be saved in the PC. Select files in the player to save.
44
You can not upload general music files from the player to the PC according to
license.
You can upload files made by the player.
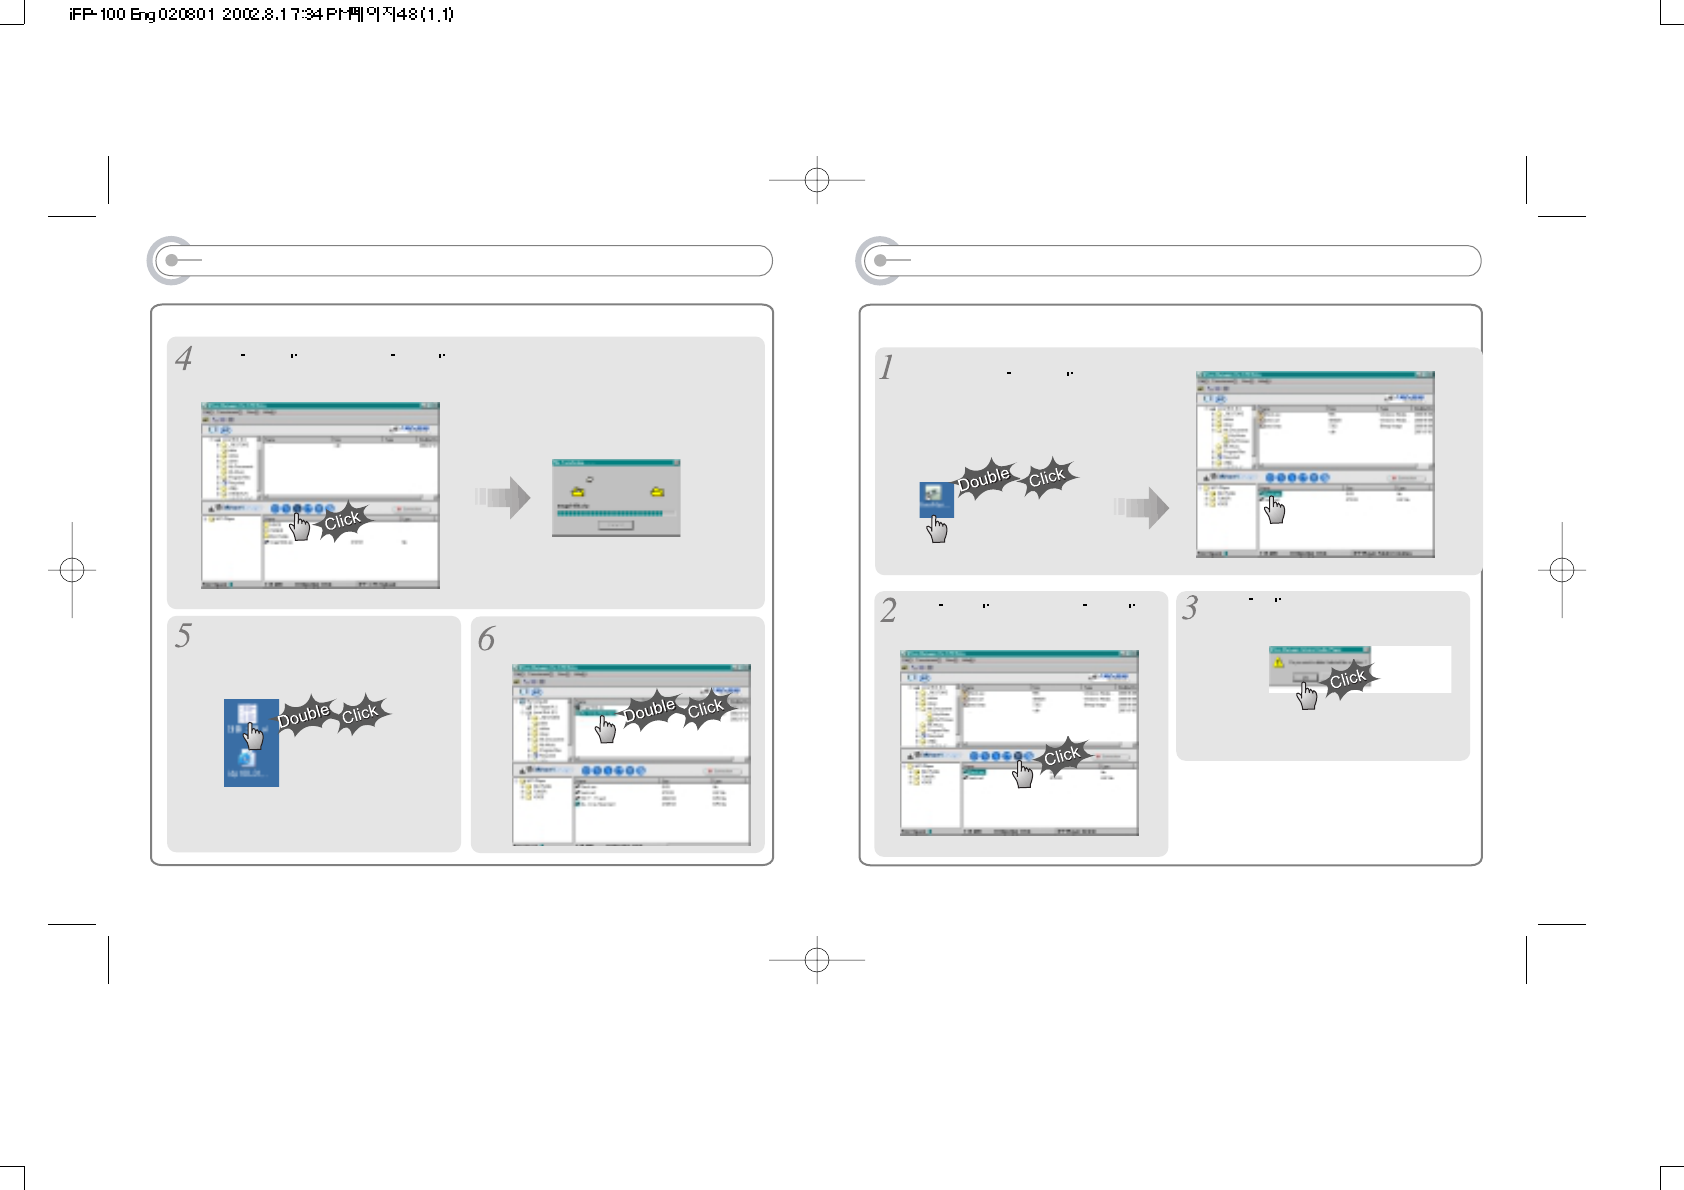
46
UPLOADING/ LISTENING MP3 ON THE PC
Click Upload icon or select Upload in the
Transmission menu to upload.
Double Click the “Window Searcher”
icon on the PC windows. Select files to play.
Double Click the desired file to play.
47
DELETING FILES ON THE PC
After starting the Manager program,
select files to delete.
Activate Manager program after connecting USB cable between the player and PC.
Note
You can also delete by clicking right button of
mouse after selecting files.
Click Delete icon or select Delete in
the File menu to delete.
Click yes .
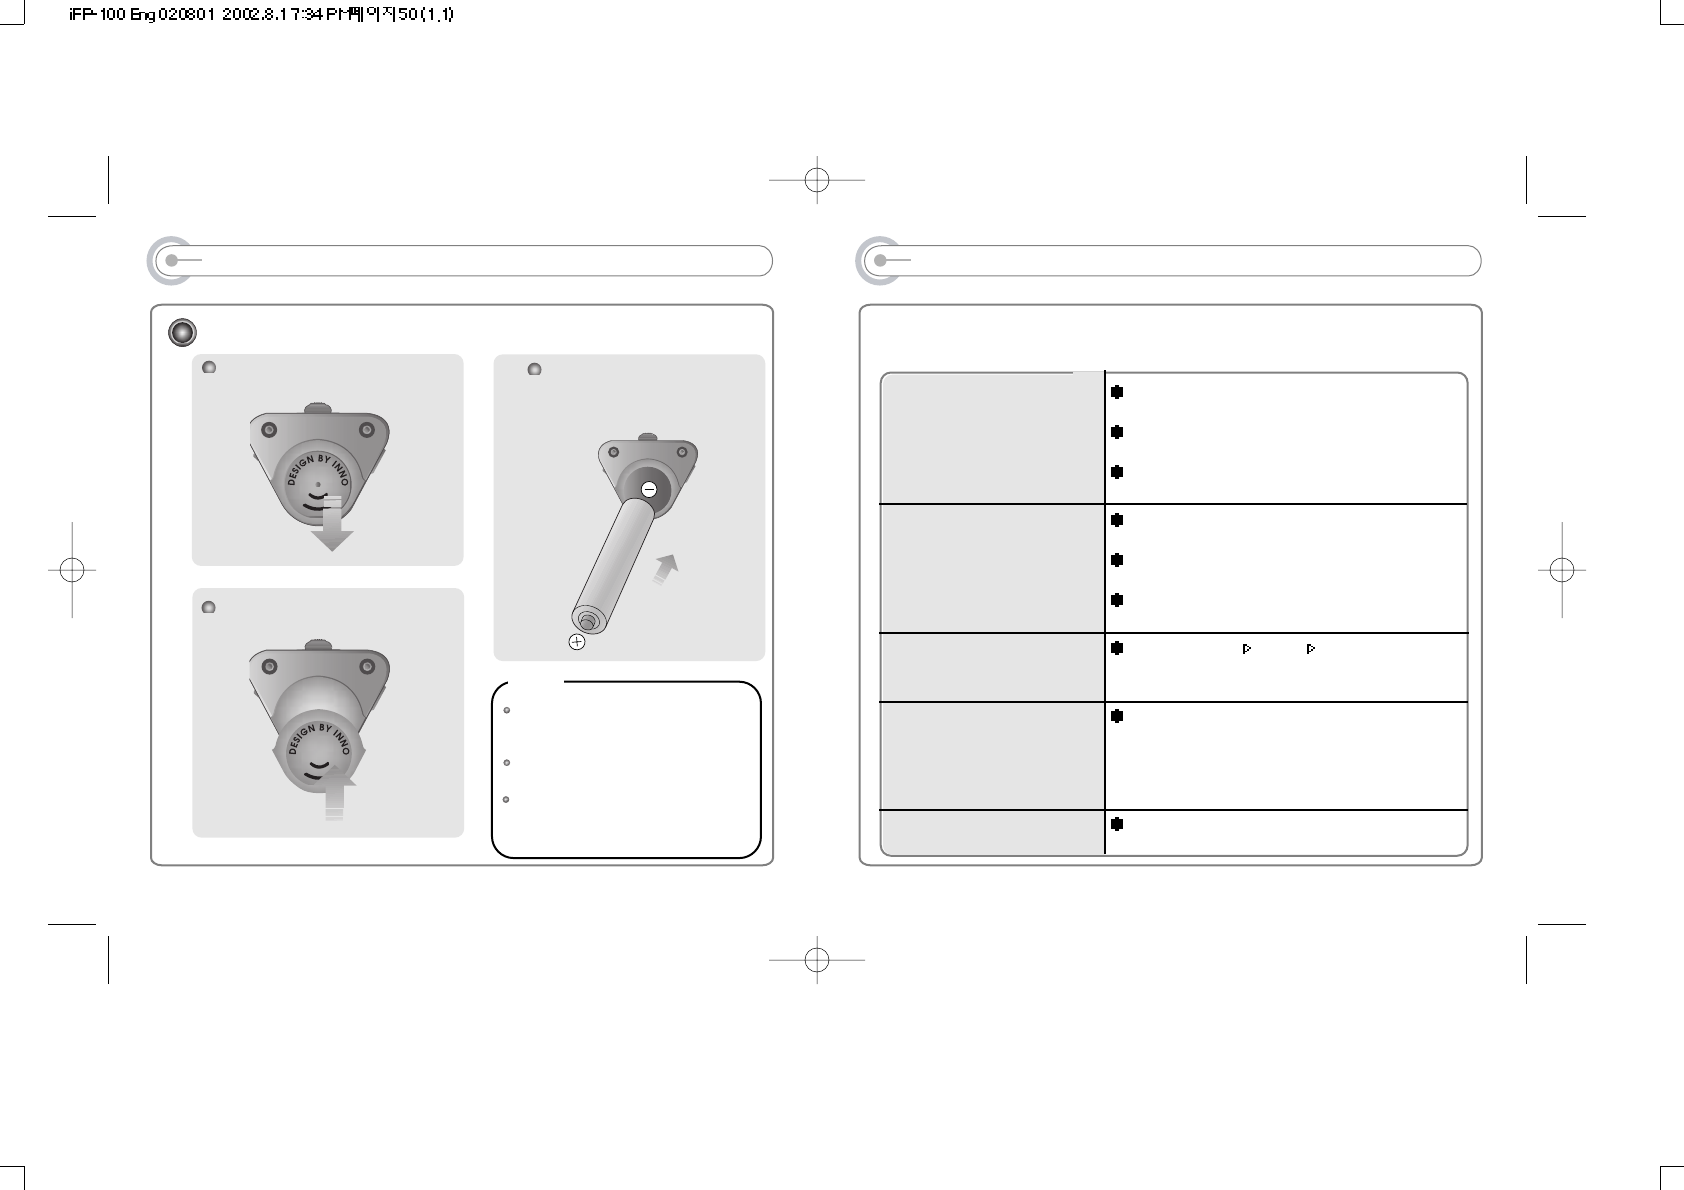
POWER SUPPLY(BATTERY)
Inserting a battery
Open the battery cover.
Close the battery cover.
Insert the batteries.
Be sure to match the + and - ends
of the batteries with the diagram
inside the battery compartment.
To avoid corrosion, remove the
batteries if the remote controller is not
to be used for a long time.
Remove dead batteries immediately to
avoid damage from corrosion.
When corrosion occurs, wipe dry
immediately with a dry cloth and insert
a new battery.
Note
48
TROUBLE SHOOTING
Should any problem persist after you have checked these symptoms, consult your
iRiver dealer.
No Power On
No Sound or noise is heard
Characters in LCD are
corrupted.
FM is not heard well.
Failed download of MP3 file
Check whether the batteries have been inserted in
proper polarity.
Check whether the HOLD switch in player or
remote is ON (Switch to OFF position)
Check whether the rechargeable batteries are not
charged.
Check whether VOLUME is set to "0". Connect the
earphones/remote plug firmly.
Check whether plug is dirty. Clean the plug with a
dry and soft cloth.
Corrupted MP3, WMA file may have a static noise
or sound cut off.
Check out Menu Display Language and
confirm whether the right language has been
selected.
Adjust the position of the player and earphone.
Turn off the power of other electric devices nearby
the player. If it does work, please move away the
player and work it from a distance.
Earphone does function as the antenna.
Check the condition of the battery or the USB
connection between your PC and the player.
49
PRECAUTIONS
Safety
Vibration experienced during walking or exercising will not affect the player. However,
dropping the player or dropping a heavy object on the player may result in damage or
sound distortion.
Avoid falling any liquid into the player.
If water or any other liquid enters the case, take this unit to an authorized service center
for inspection.
Do not leave the console in a location near heat sources, or in a place subject to direct
sunlight, excessive dust or sand, moisture, rain, mechanical shock, unleveled surface, or
in a car with its windows closed.
To avoid corrosion, remove the batteries if the remote controller is not to be used for a
long time.
On Headphones and Earphones
Road Safety
Do not use headphones/earphones while driving, cycling, or operating any motorized
vehicle. It may create a traffic hazard and is illegal in some areas. It can also be
potentially dangerous to play your headsets at high volume while walking, especially at
pedestrian crossings. You should exercise extreme caution or discontinue use in
potentially hazardous situations.
Preventing hearing damage
Avoid using headphones/earphones at high volume. Hearing experts advise against
continuously loud and extended play. If you experience a ringing in your ears, reduce
volume or discontinue use.
Consideration for others
Keep the volume at a moderate level. This will allow you to hear outside sound and to be
considerate to the people around you.
50
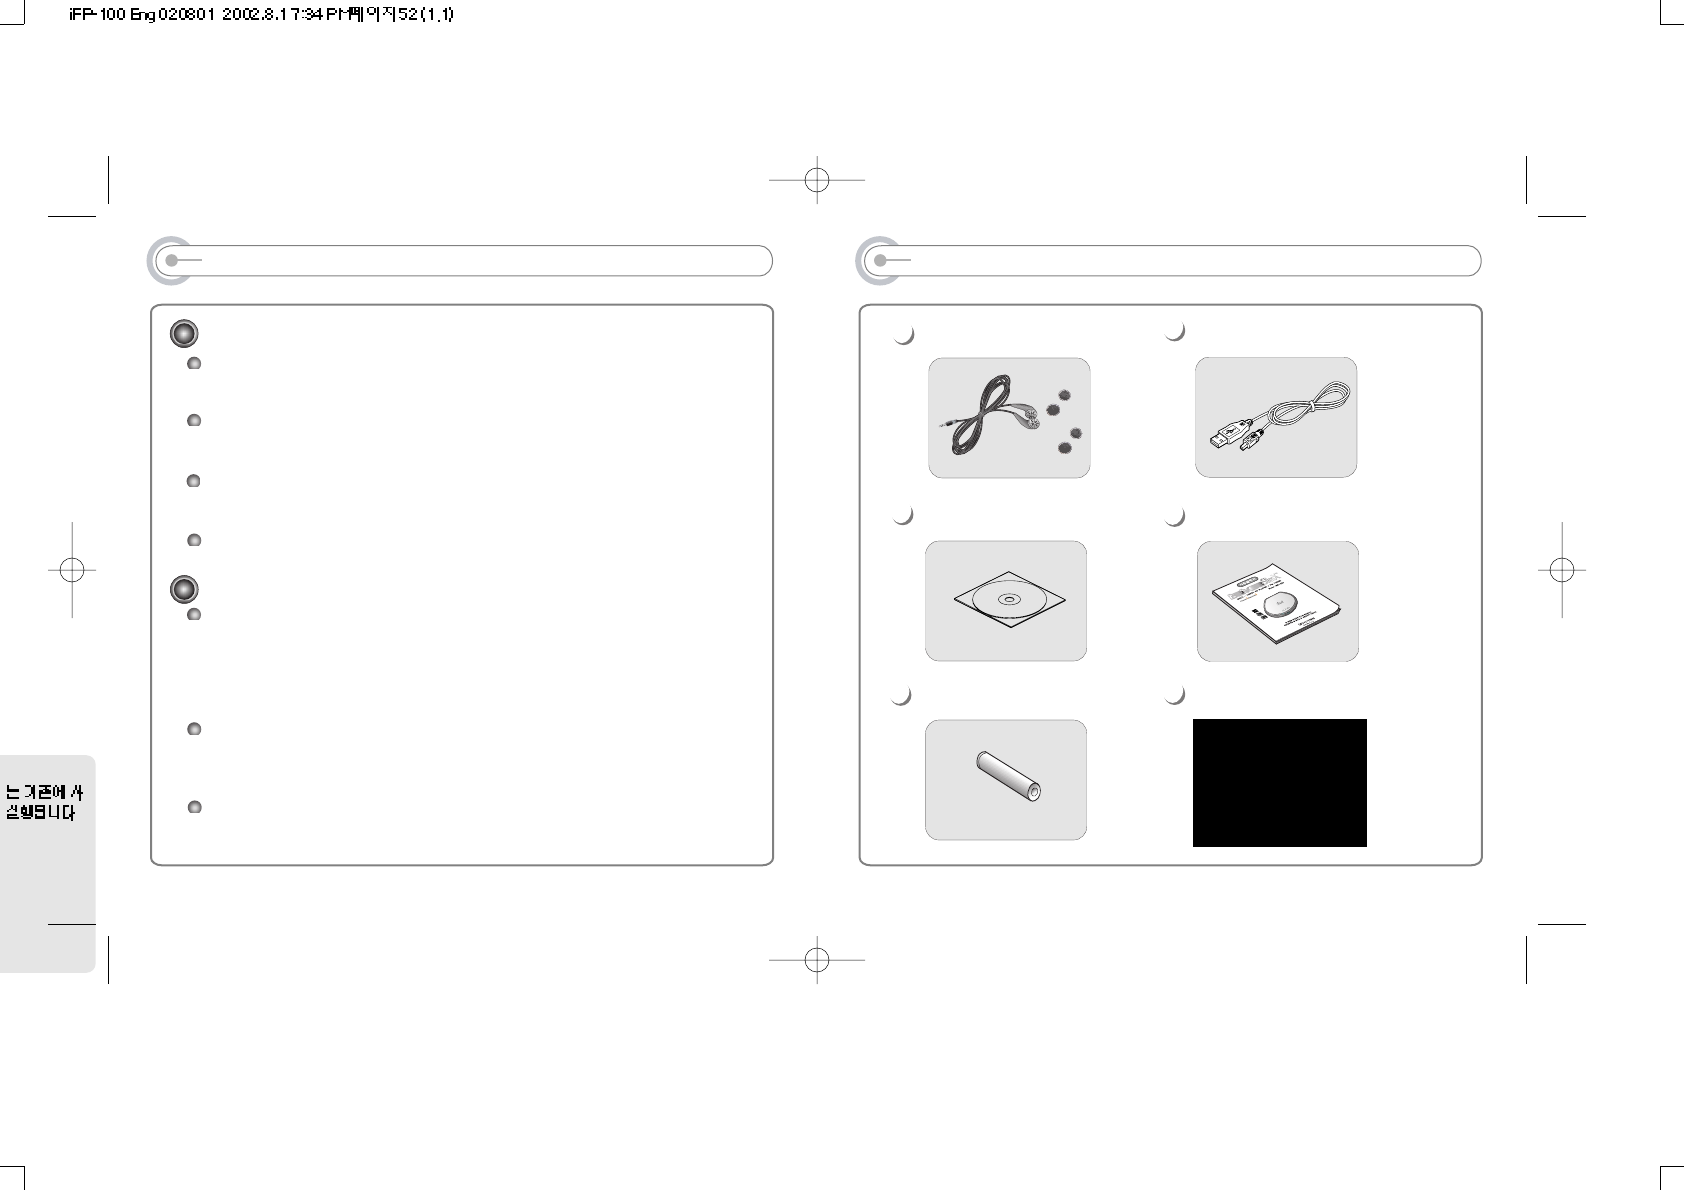
ACCESSORIES
Earphone/Earphone sponge USB cable
Necklace for carrying
User manual/Warranty card
Battery(AA type 1EA)
Installation CD
1
6
5
4
3
2
51
.
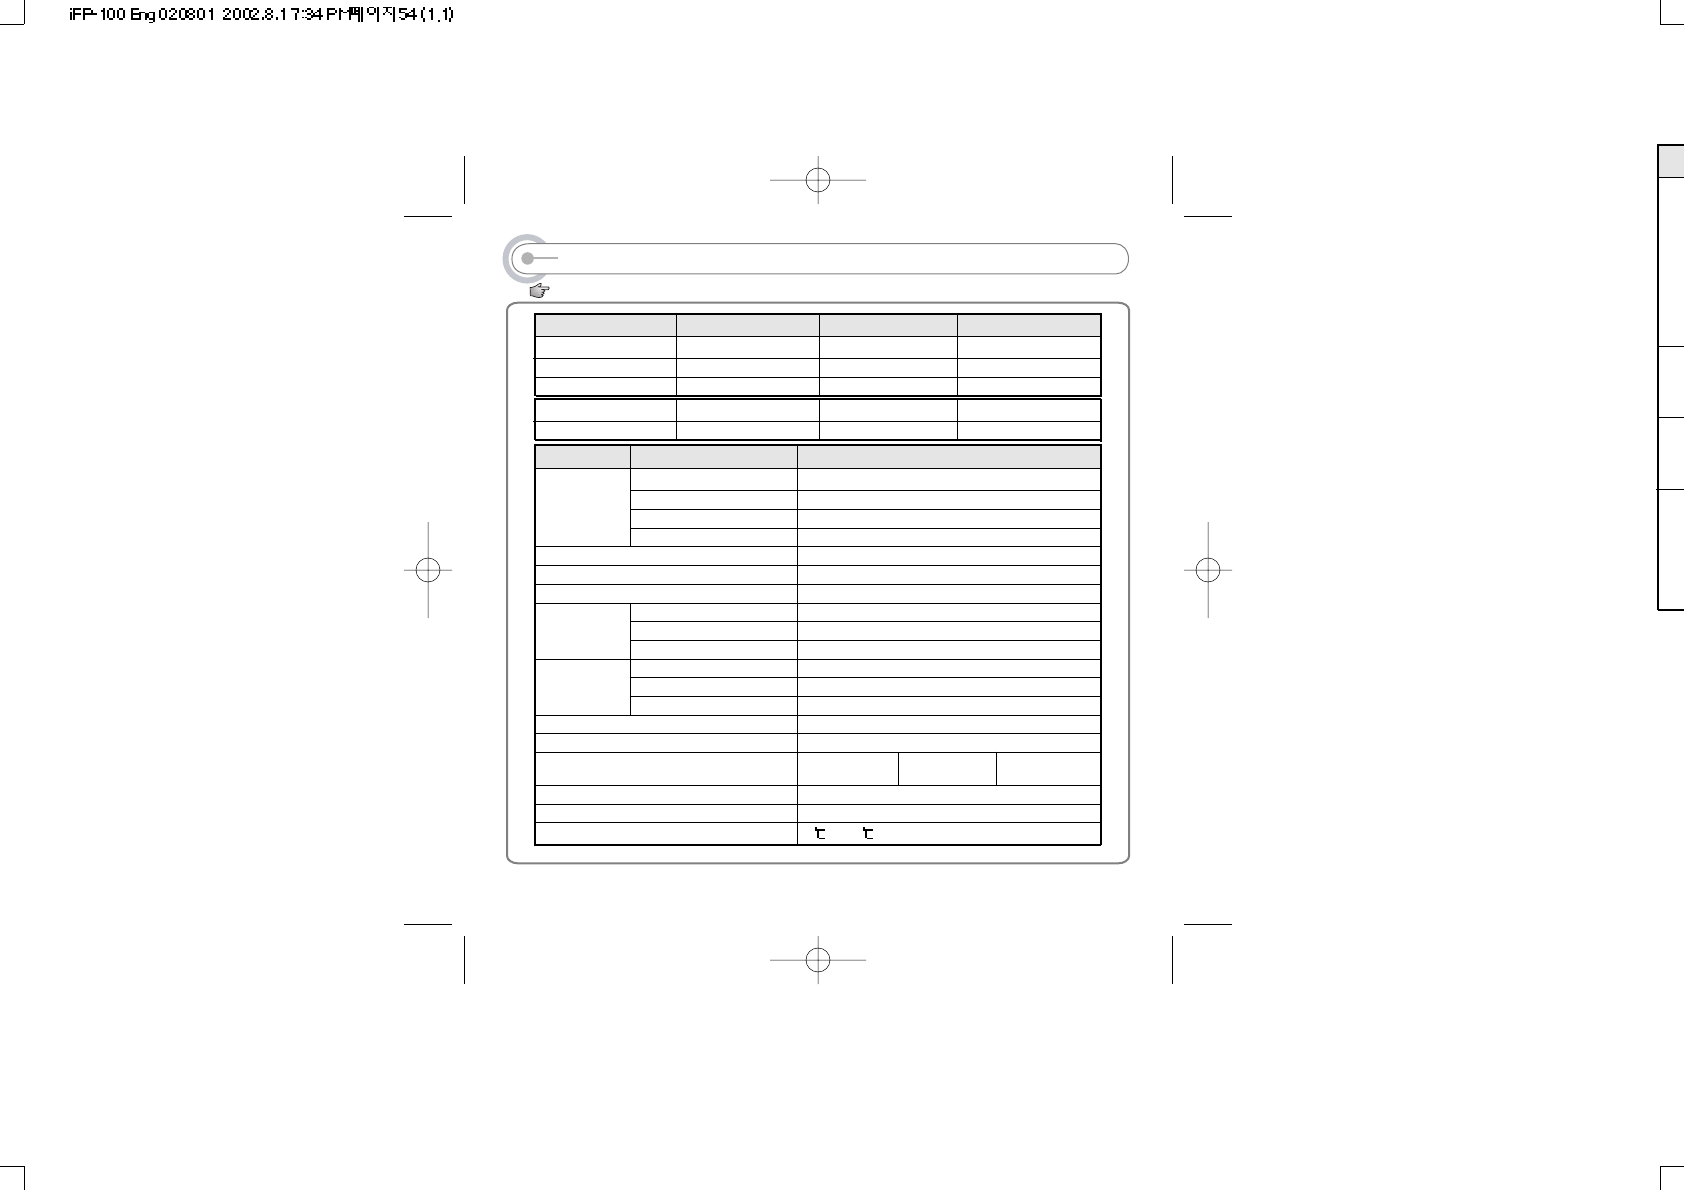
SPECIFICATION
Memory
Color
Color Code
FM Frequency range
Headphone Output
S/N ratio
Antenna
Frequency range
Headphone Output
S/N ratio
File Type
Bit Rate
Tag Info
FM TUNER
Audio
FILE
SUPPORT
87.5 MHz ~ 108 MHz
(L)10 mW + (R)10 mW (16 Ohm) max. Volume
60 dB
Headphone/Earphone-Cord Antenna
31 x 28.5 x 82 mm(95mm : With Ring for Necklace)
52 g (without battery)
1 AA size Alkaline battery
20 Hz ~ 20 KHz
(L)10 mW + (R)10 mW (16 Ohm) max. Volume
90 dB(MP3)
MPEG 1/2/2.5 Layer 3, WMA, ASF
8 Kbps ~ 320 Kbps
ID3 VI, ID3 V2 2.0, ID3 V2 3.0, ID 3 V2 4.0
Full Graphic 4 Line with Backlight
36 Language
Approx. 18 hours(128 kbps, MP3)
USB 1.1
0 ~ 40 )
Category ITEM Specifications
52
Distributing copies of MP3 tracks without permission is a violation of international copyright laws.
Dimension
Weight
Battery
LCD
Language
Voice Recording
Max. Playtime
USB
Operational Temperature
iFP-120 iFP-140
32 MB
Gun Metal
MA8288
64 MB
White Pearl
MA8287
128 MB
Bright Silver
MC9905
iFP-180
With FM Tuner
Without FM Tuner iFT-120T
iFT-120 iFT-140T
iFT-140 iFT-180T
iFT-180
Approx. 9:00 hrs
(32kbps, 128 MB)
Approx. 4:30 hrs
(32kbps, 64 MB)
Approx. 2:45 hrs
(32kbps, 32 MB)