DREAMUS IHP140 MP3 PLAYER User Manual USERS MANUAL 2
IRIVER LIMITED MP3 PLAYER USERS MANUAL 2
DREAMUS >
Contents
- 1. USERS MANUAL 1
- 2. USERS MANUAL 2
- 3. USERS MANUAL 3
USERS MANUAL 2
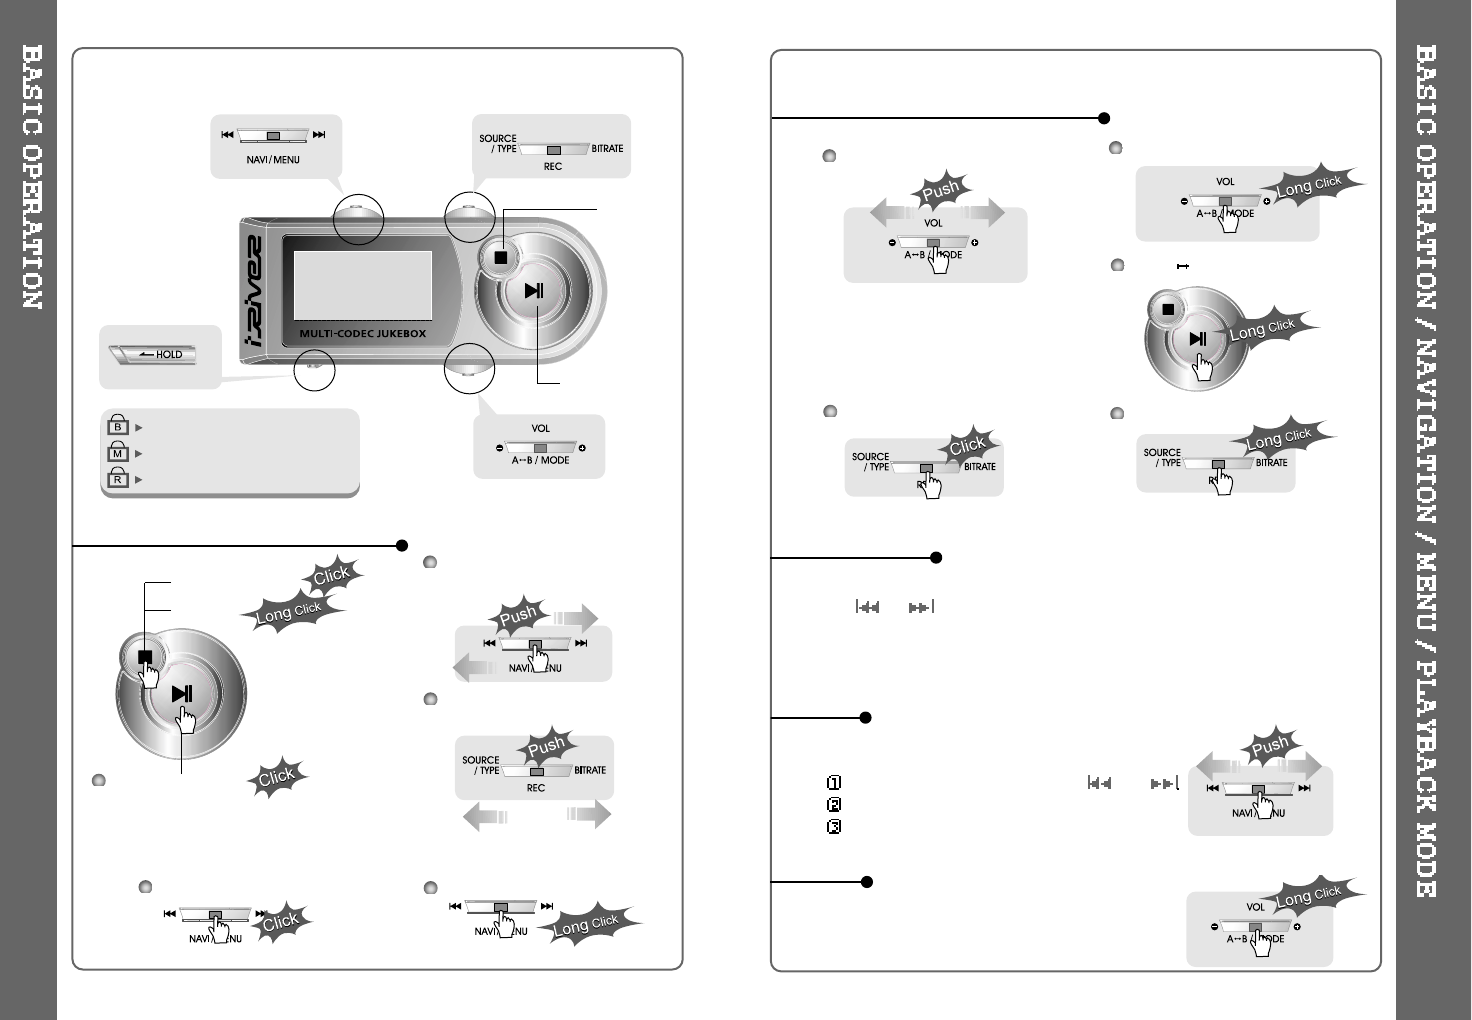
BASIC OPERATION FUNCTION
BASIC OPERATION FUNCTION
NAVIGATION
MENU
MODE
Main unit and Remote control both locked.
Only Main unit is locked.
Only Remote control is locked.
The remote control operates every function by using 5 buttons.
Menu Operation
PLAY / PAUSE
STOP
Turn on the player
Playback and Pause
Stop the playback
To listen to the previous track,
push the jog switch to the left.
Press the Navi/Menu jog lever with a short click and find the desired track by
pressing or . To play the track, press Navi/Menu with a short click.
To move to upper folder, click the STOP button or long click NAVI/MENU button.
If there is no upper folder, pressing the Stop button will exit the NAVIGATION mode.
Changing Mode
Long press of NAVI/MENU will enter the MENU.
Scrolling between menus : Press and
Select Function: press Navi/Menu button.
Exit: Press the stop button.
While an audio file is playing, press and hold
theA-B/MODEbuttontoactivateplayback
modes (Repeat, Shuffle, etc.).
18 19
To listen to the next track, push
the jog switch to the right.
Power Off
Navigation Operation
HDD FM Changing
Slide jog lever to the right to
increase volume or to the left
to decrease volume.
Volume Control
Tolistentothe
previous folder To listen to the
next folder
To change EQ/SRS Record Standby
Push the NAVI/MENU handle toward or to select a track
or folder to play.
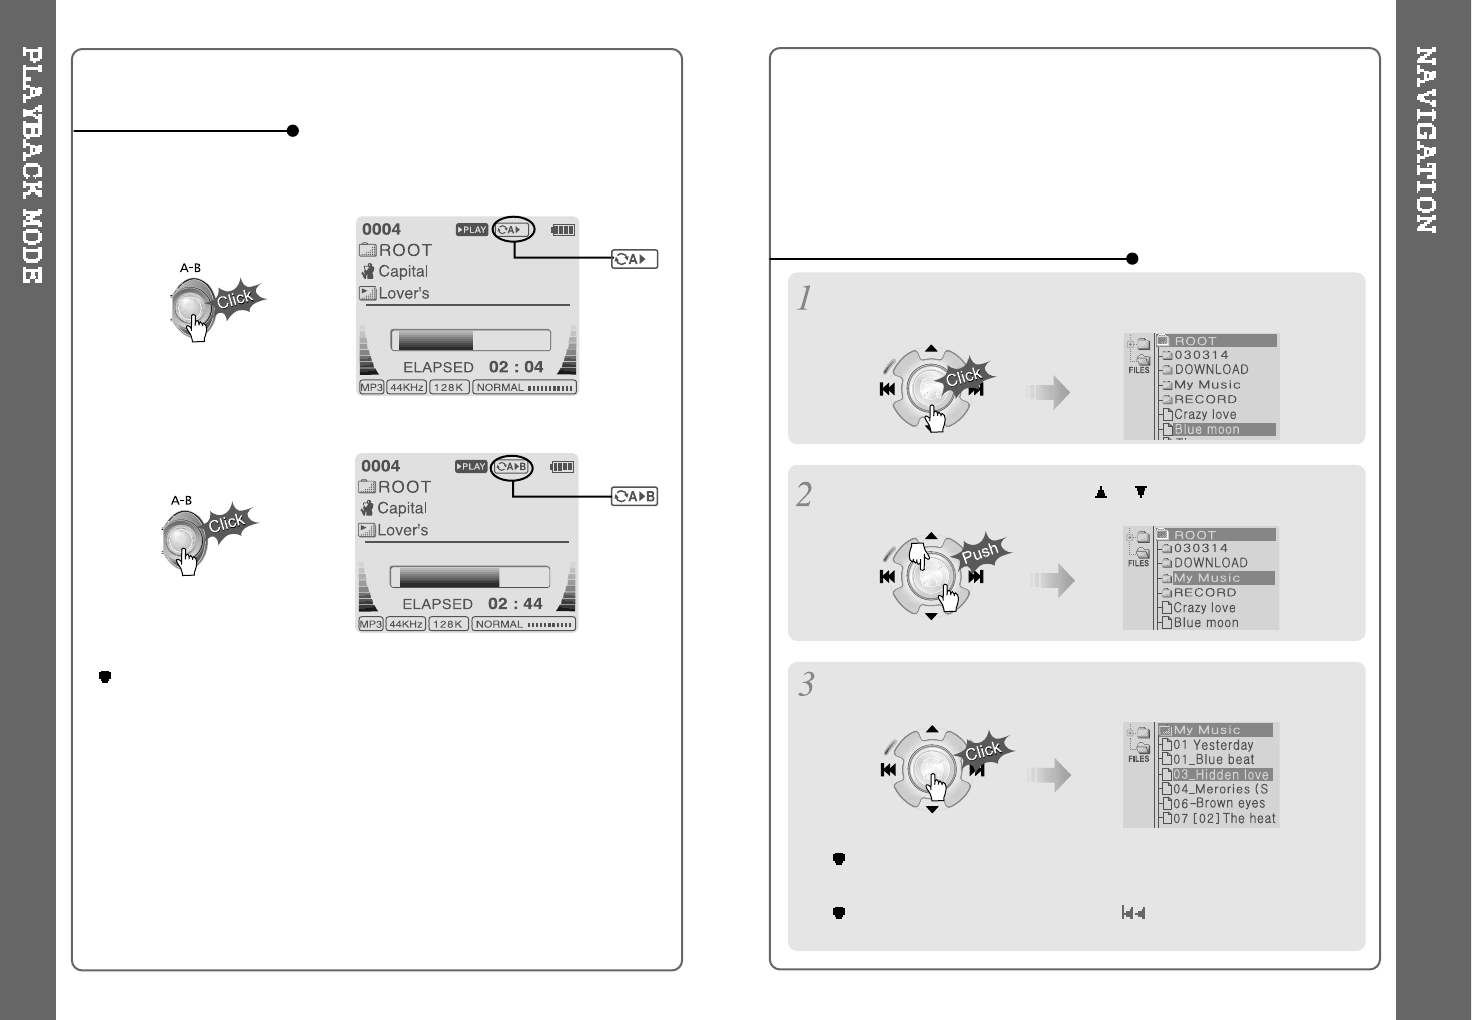
1. NAVIGATION USING FILE TREE
Press A-B button once to select
the beginning <A> Point.
A-B interval will be repeated.
Play selected interval repeatedly while playing.
INTERVAL REPEAT
Press A-B button again to
select the ending <B> Point.
In case the database file is damaged or deleted or DB SCAN OPTION is set
to “OFF”, the Navigation function will use the normal "File Tree" method of
searching. (Refer to page 24 for DB file information.)
Press the NAVI/MENU button to play the selected track or display the
contents of a folder.
Onceyouselectafolder,choosethesongyouwishtolistentoand
press the NAVI/MENU button.
Push the NAVI/MENU handle toward to go the upper folder or the
previous menu.
Press the NAVI/MENU button to display the list of audio tracks.
The current track will also be displayed.
Navigation mode is useful for quickly searching your files by using ID3 tag
information and file name.
20 21
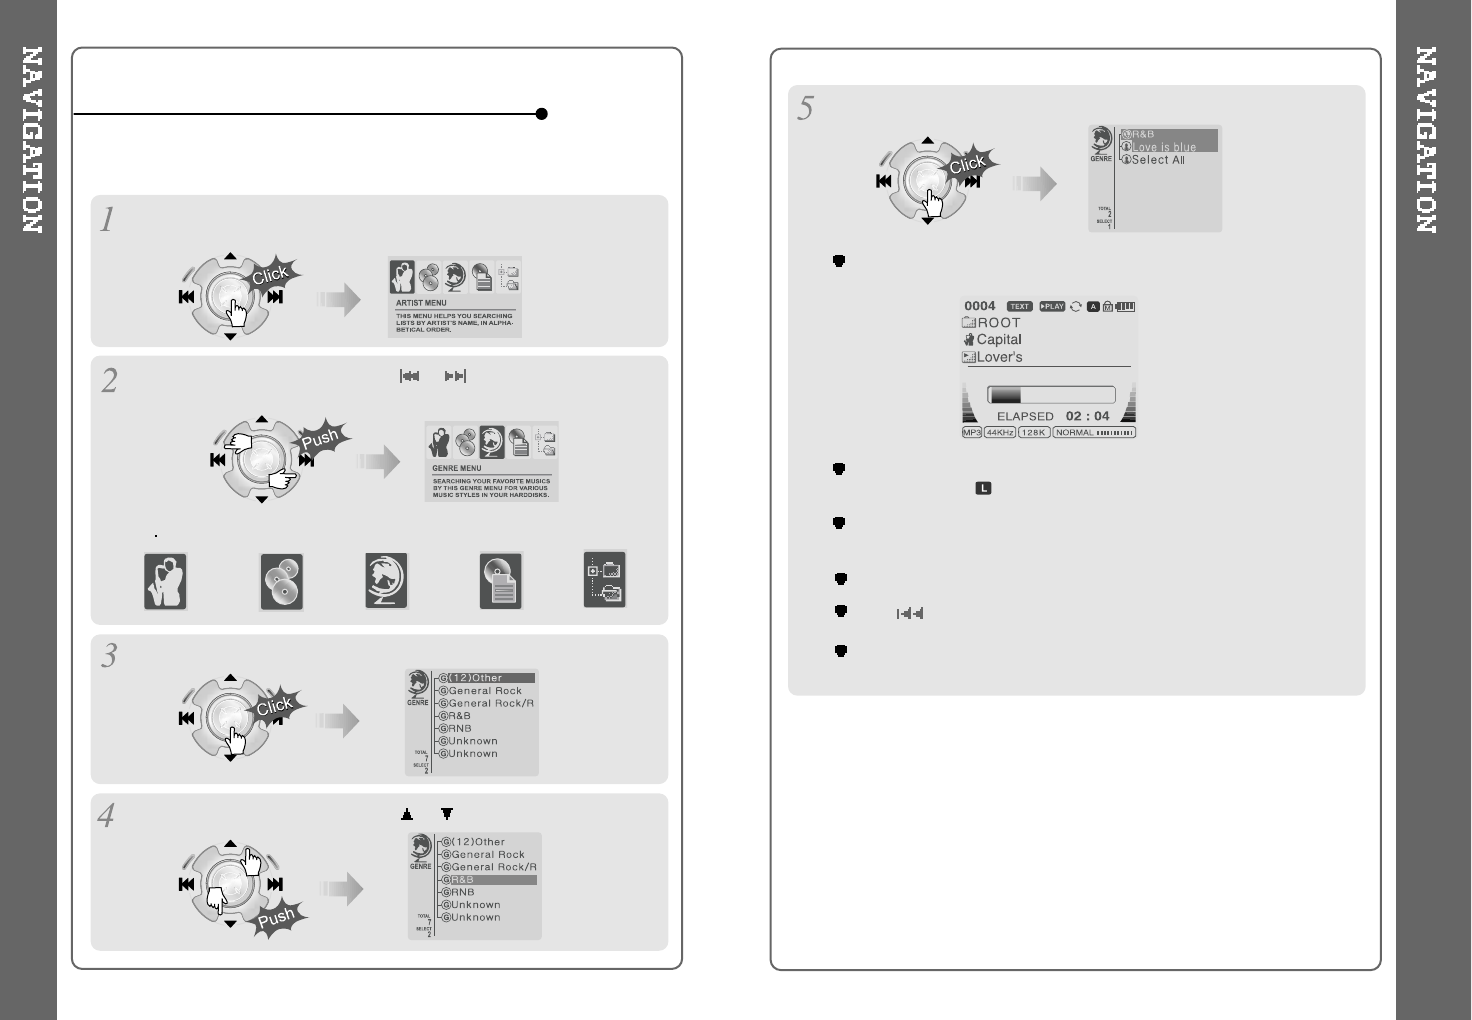
Press the NAVI/MENU button.
The function selection graphic displays on the LCD.
To search by
artist s name To search by
album’s name To search by
song title
To search by
genre menu To search by
files & folders
Press NAVI/MENU to display the details of the selected searching method.
Press the NAVI/MENU handle toward or to select searching condition.
Press the NAVI/MENU button to display the detail of the selected search
condition.
If the selected search condition does not have any details, playback of
matching tracks will begin immediately.
Repeat 4 ~ 5 steps to search for other tracks.
Push to go back the previous step.
When you select “Select All”, all tracks matching the selected condition
are played and " " (Indicating List Repeat Mode) is displayed.
To cancel List Repeat Mode, press Stop to stop playback and press
Stop again to cancel the List Repeat Mode.
In order to use the navigation by Artist/Album/Genre/ and Title, the DB
SCAN setting must be set to YES in the firmware menu, (refer to page 41).
2. NAVIGATION USING MUSIC INFORMATION
Push the NAVI/MENU handle toward or to select the searching
function.
22 23
Caution:DB navigation does not work when
The directory or file name is over 52 characters
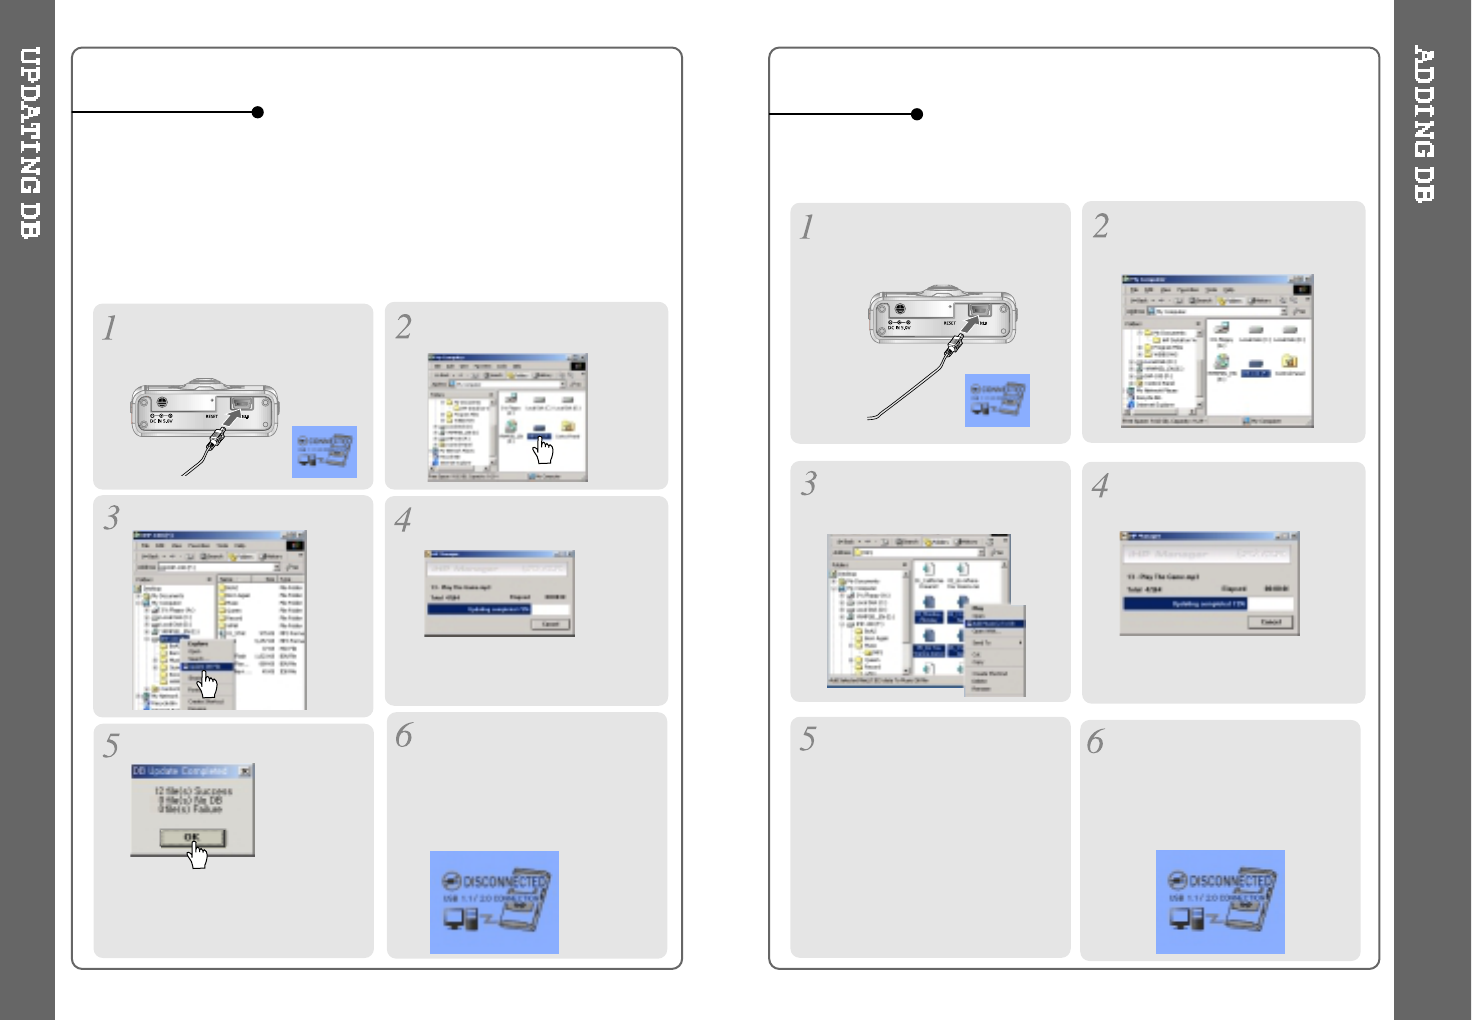
Open Windows Explorer and
select the iHP drive.
Connect the player to the host PC.
(Refer to “Connecting the iHP to the
Host PC”, page 10)
Right click on the iHP. Select “DB File update” to
activate DB File update.
TO UPDATE DB
If you are adding songs to the iHP and not deleting any files, you can save
time by adding the files to the DB instead of updating the entire DB file.
After activating the explorer on
the PC, select iHP driver.
Connect the player to the host PC.
(Refer to “Connecting the iHP to
the Host PC”, page 10)
Select “Add Music(s) to DB” to
activate this function.
ID3 Tag information of the
selected files are added to DB. In
case DB file is not, new DB file
(iRivNavi.iDB) is created.
TO ADD DB
After disconnecting the player
from the host PC, you can
search the added music by using
ID3 Tag. (Refer to
“Disconnecting the player from
the Host PC”, page 13.)
Click “OK”. After disconnecting the player
from the host PC, you can use
the Navigation function to
search for songs using ID3 Tag
information. (Refer to
“Disconnecting the player from
the Host PC”, page 13.)
Click the right button of mouse
after selecting MP3 files or
Folders to add to DB.
The DB is a DataBase of the songs on your iHP player. It indexes all the
Artist, Album, Genre, and Title information as found in the ID tags of your
MP3 files. It is important to perform the steps below after loading the iHP
player for the first time. This can also be used to re-create the DB file if it is
damaged or accidentally deleted. Any time songs are deleted from the player,
the DB must be updated to keep the Artist, Album, Genre, and Title lists
accurate. When new songs are added the DB must be updated or the songs
must be added to the DB using the instructions on the following page.
24 25
The DB update will take from three
to five minutes depending on the
number of songs loaded on the iHP.
26 27
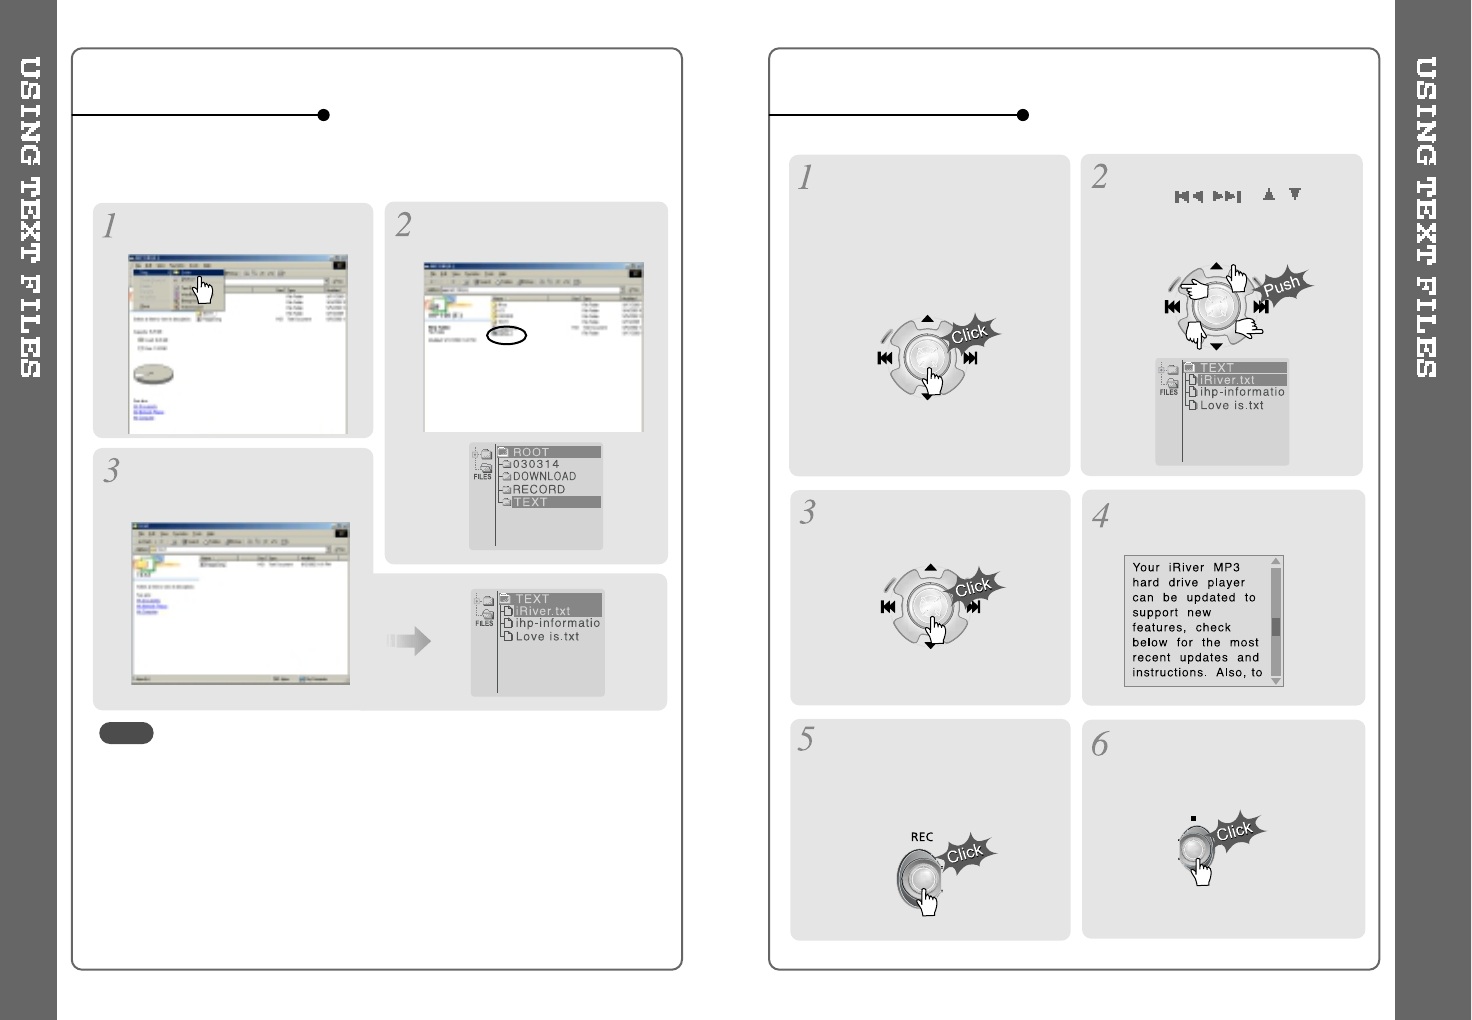
Make a new folder under ROOT
folder on the Windows Explorer.
Push the NAVI/MENU lever
toward ,or ,to
select the TEXT file under the
TEXT folder.
TO MAKE A TEXT FILE
Click the NAVI/MENU button. TEXT file is displayed on the
LCD.
Click the REC button to switch
the display to the current song
information. Click the REC button
again to return to the text file.
Click the STOP button to exit the
text file and return to the song
display screen.
TO READ A TEXT FILE
Click the NAVI/MENU button to
go to NAVI mode. Or select the
fifth icon, “To search by files &
folders” on the Navigation using
Music Information
You can read text files on your iHP player by creating a "TEXT" folder and
copying .TXT files into it.
- The screen can display 19 characters across and 8 lines.
- The text is not displayed on the remote.
- Text files can not be deleted directly from the player, it must be connected to
the PC and files deleted from Windows Explorer.
- The player can store 200 text files, and can read up to 240 Kbytes
per each text file.
Copy ***.txt files on the PC to the
player.
Type TEXT as a name of a new
folder on the Windows Explorer.
NOTE
28 29
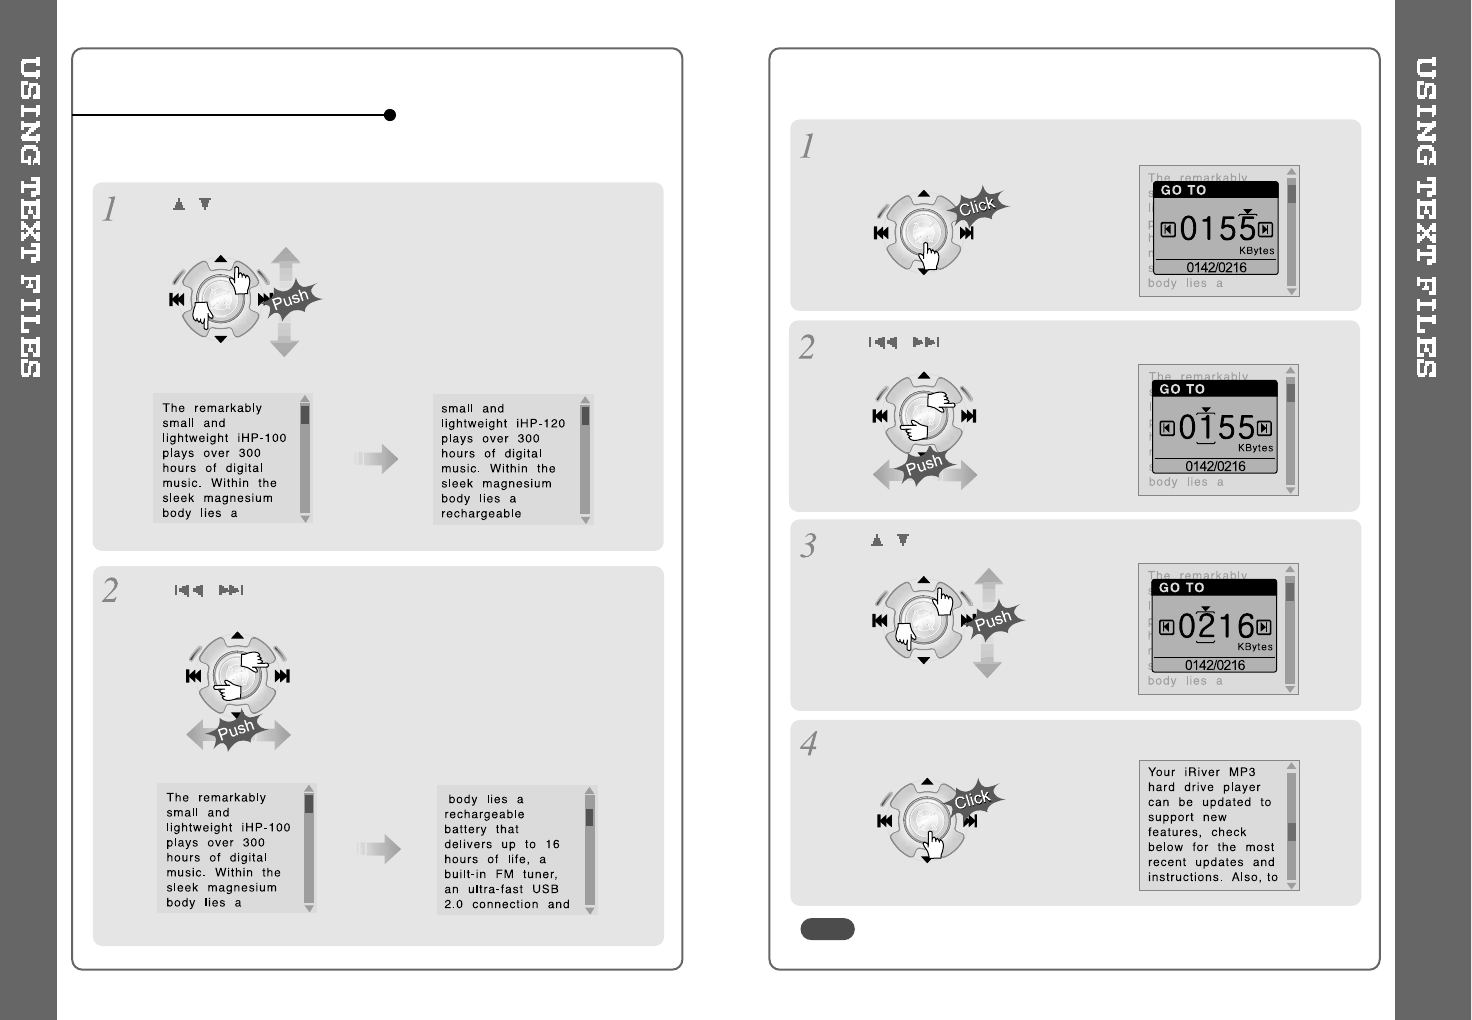
TO SEARCH THE TEXT FILES
Push ,levertomovetothenextlineduringreadingthetext.
The number displayed is the Kilobyte size and Kilobyte location
in the text file.
1. To Search a Text files generally
2. To go to specific position (Useful for large files.)
Push ,lever to move to the next page during reading the text.
Click the NAVI/MENU button to move the desired position of the text.
Push ,lever to select the desired Digit.
Push ,lever to select the desired numeral.
Click the NAVI/MENU button. The TEXT goes to the selected position.
NOTE
Push or
and select the
desired station to
save the station to.
Select CH02
Save complete
again
will exit the
memory function
without saving.
Select a station by pushing the
or
switch to the left or the right.
Note: The Auto Memory Function may not function well in weak transmission areas.
Press and hold the A-B/MODE button.
Press the NAVI/MENU button to exit the Preset mode.
Automatically select station and save them in sequential order.
While playing an Audio File, Press and hold the PLAY/PAUSE button.
The FM function picture displays on the LCD.
Push the
or
button to select FM frequency.
Press the STEREO/PLAY/PAUSE button to select Stereo/Mono.
To change frequency, push the or switch to the left or the right.
Auto Scan function: To select a station to store, press the NAVI/MENU button to
exit Preset mode and find a station by using or
.
or
or
OPERATING THE FM TUNER
SELECTING FREQUENCY
AUTO MEMORY FUNCTION (Save stations automatically)
MEMORY FUNCTION (Save stations manually)
PRESET Mode : To select a station saved in memory, press the NAVI/MENU button
to enter Preset mode. Select a stored station by using the or switch.
30 31
Up to 20 stations can be stored.
Exit Preset
Up to 20 stations will be stored in channels 1~20 automatically.
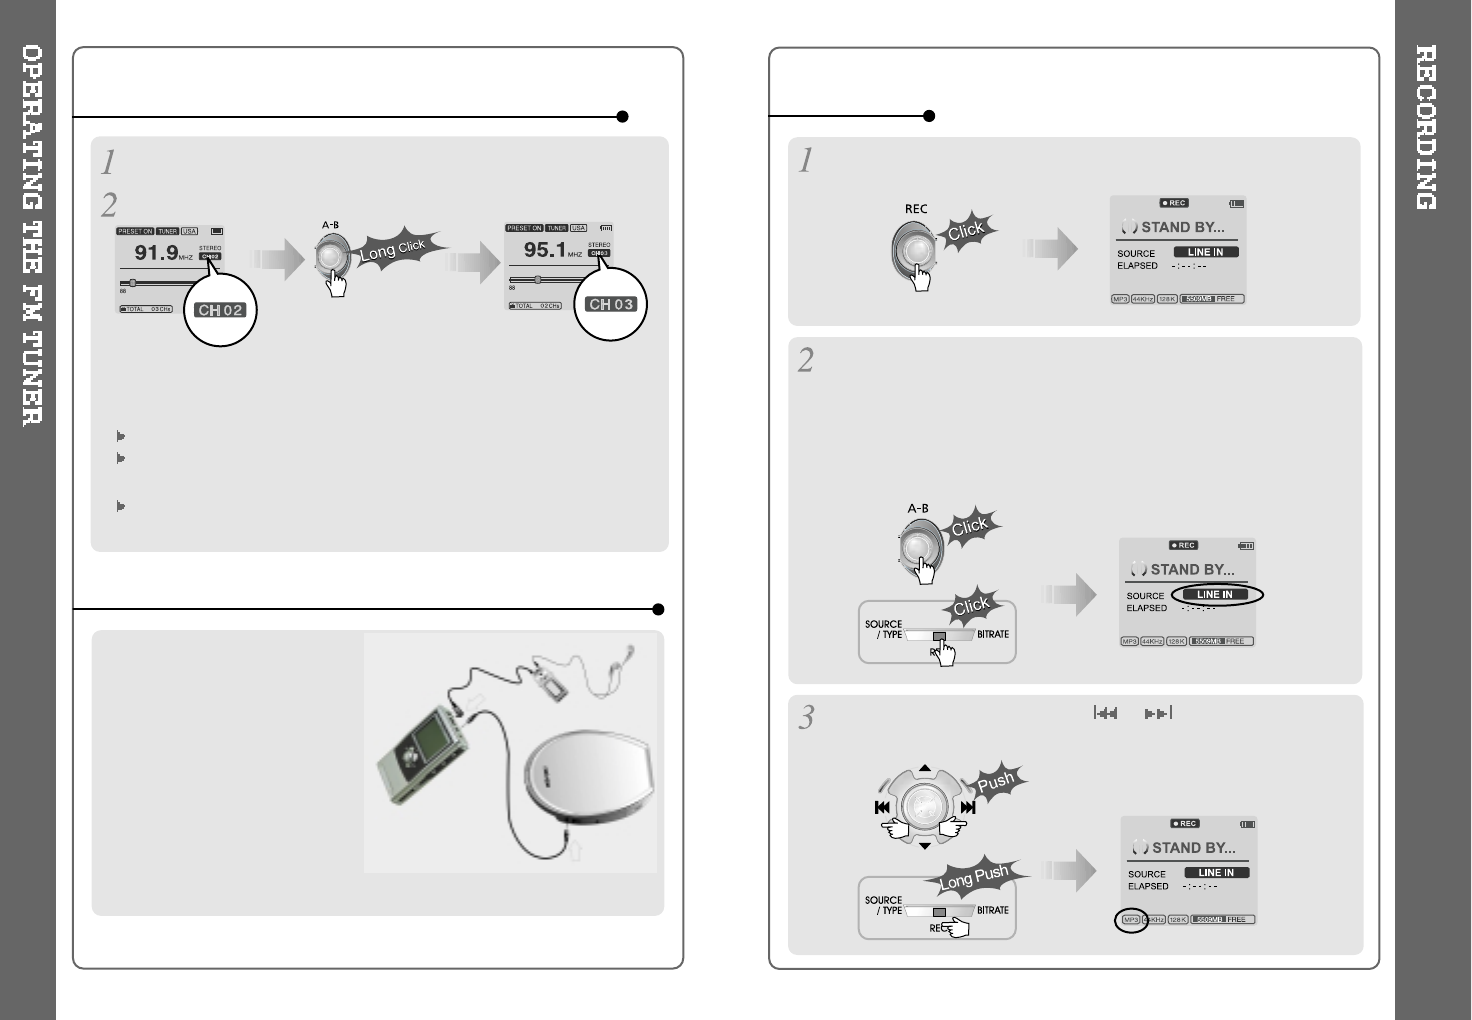
Select the channel to be deleted at preset mode.
Press and hold the memory button.
- The next channel will appear when channel deletion is completed.
Push the MEMORY button if you want to delete the next channel also.
FM Tuner reception may vary in different areas.
While in Preset mode, Auto Scan and Auto Memory functions are not
available.
When the player does not have any preset channels, EMPTY will be
blinking at preset mode.
MEMORY DELETE FUNCTION (Delete saved channels)
Connect the stereo cable to the LINE IN
jack on the iHP and to the LINE OUT or
Headphone jack of an external audio
device.
CONNECTING THE PLAYER TO EXTERNAL AUDIO SOURCE
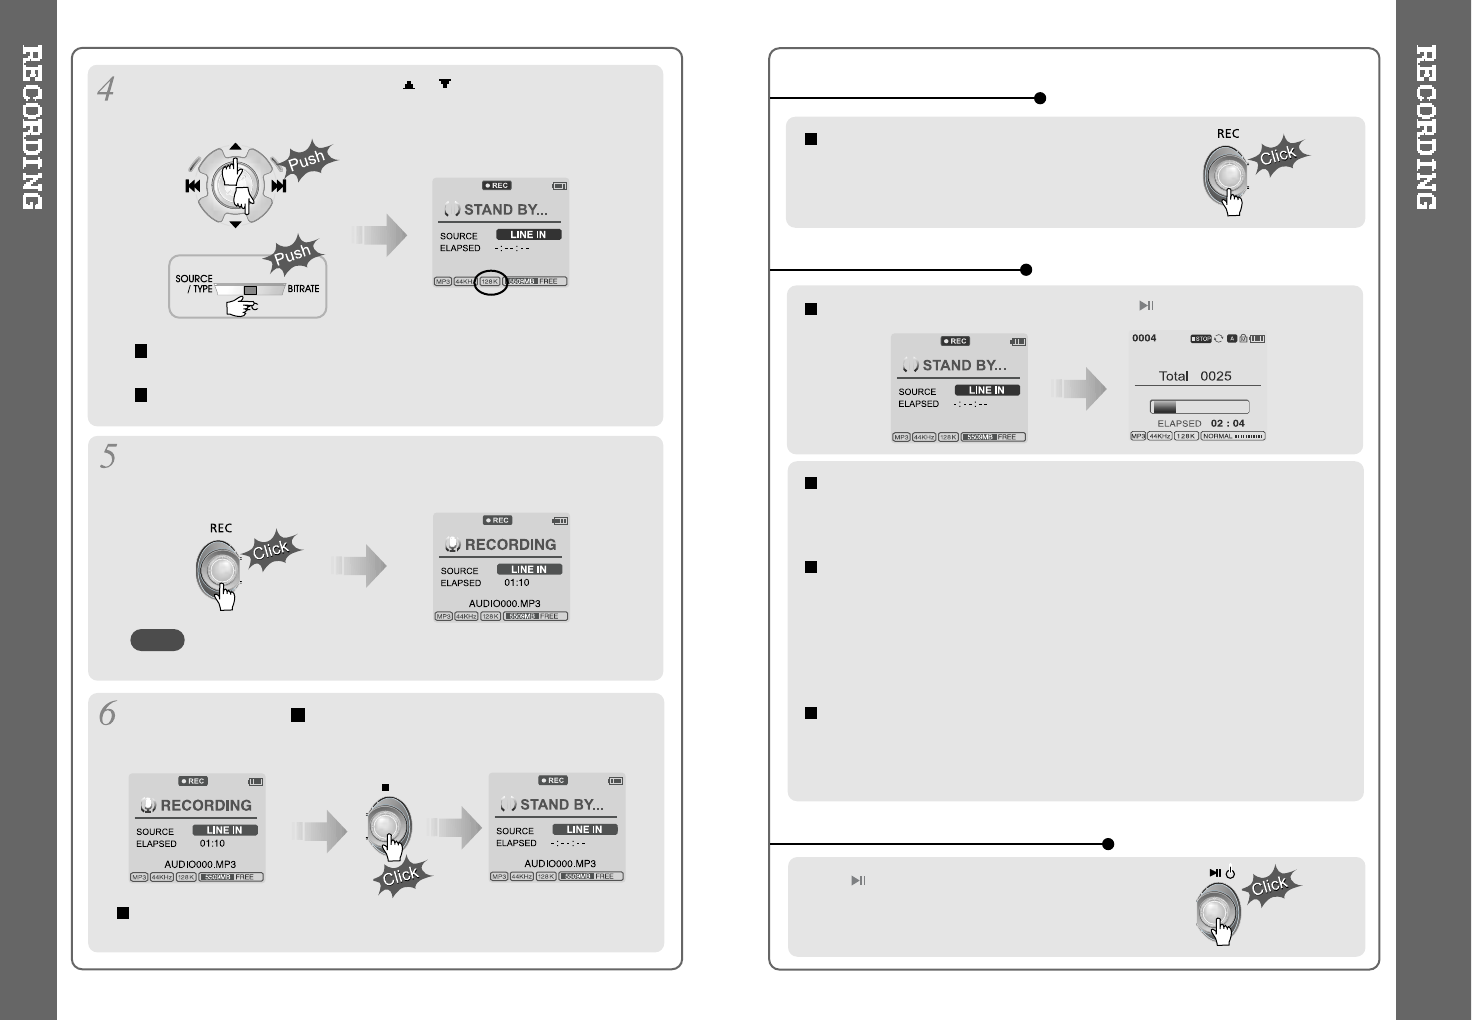
Press the REC button to activate recording standby mode.
Press A-B/MODE button or push the REC switch toward SOURCE/TYPE
to select the source to record
- To record voice with internal microphone : INT.MIC
- To record voice with the external microphone: EXT.MIC
- To record from an external audio device with an Optical Out: OPTICAL.
-TorecordfromanexternalaudiodevicewithastandardLineOutor
Headphone jack: LINE-IN
If the external audio device has
an Optical output, connect an
Optical cable to the Optical Out
jack on the external device and to
the Optical In jack on the iHP.
When recording by using the external microphone,
connect the external microphone to the Line-In jack.
32 33
RECORDING
Push the MENU/NAVI handle toward or ,or push the REC button
on the remote control toward SOURCE/TYPE to select FILE TYPE to
save.
Push the MENU/NAVI handle toward or ,or push the REC button on
the remote control toward BITRATE to select BITRATE TYPE to set
recording quality. This is only for MP3 file.
Push the REC button to start recording.
When recording from an external audio device, be sure to start the
playback on that device when recording on to the iHP.
Press the REC button to pause recording. And press the REC button
again to restart recording.
Volume level can not be controlled on the iHP while recording
from an external device.
While recording, press (STOP/PWR OFF) to stop recording and
switch to recording standby mode. Press the REC button again to
begin recording to a new file.
34 35
At recording standby mode, press and hold button to go previous
mode.
During recording, press REC button to pause
recording, press REC button again to start
recording.
TO STOP RECORDING
TO PLAY THE RECORDED FILE
Press button to play the recorded file at the
recording standby mode.
TO PAUSE RECORDING
When saving as WAV file, the Bitrate generally is 1411Kbps.
(44.1 KHz, 16Bit, Stereo)
When saving the optical signal with 48KHz as WAV file,
the Bitrate is 1536Kbps. (48 KHz, 16Bit, Stereo)
NOTE
Recorded files are stored in folders matching the source name from
where the audio was recorded.
- Line In/Optical In : ROOT\RECORD\AUDIO\AUDIOXXX.MP3(WAV)
- INT/EXT Mic : ROOT\RECORD\VOICE\VOICEXXX.MP3(WAV)
Recording is automatically stopped if:
- The iHP's memory is full.
- When the recorded MP3 file size is over 195MB
- When the recorded WAV file size is over 795MB
- The recorded time is longer than 5 hours.
- The battery is low.
- When sampling rate is changed during optical recording
Caution
Optical recording can sample at 44.1KHz or 48KHz. It is important to match the
recording sampling rate with the playback sampling rate of your optical output device.
Note, when the player is is Record Standby Mode, it will automatically shut off
according to the "STOP POWER OFF" setting (Refer to page 43).

When the A-B/MODE
button is pushed, the
playback mode
changes and an icon
indicating the mode is
displayed.
REPEAT
Play a single track repeatedly. Press or to play the previous or
next track.
Play all tracks in the folder and stop.
Play all tracks in the folder repeatedly.
Play all tracks in the player repeatedly.
Randomly play all tracks in the player and stop.
Play a single track repeatedly. Press or to switch to a new
random track.
Randomly play all tracks in the folder and stop. Press or to
switch to a new random folder.
Randomly play all tracks in the folder repeatedly.
Randomly play all tracks in the player repeatedly.
INTRO: Play beginning 10 seconds of each track in sequential order.
INTRO HIGHLIGHT: Plays 10 seconds from 1 minute into each track in
sequential order. You can set this function in the MENU function.
SHUFFLE
INTRO
The iHP has various playback modes.
Please refer to the function controls (see page 44 for details) for user-defined
configurations.
36 37
You can change the EQ to match your music style.
- Normal / Rock / Jazz / Classic / Ultra Bass / User EQ
-
SRS / TruBass / WOW (Preset) / WOW (User)
Whenever the REC button is pressed, EQ changes as the following order :
(Normal Rock Jazz Classic Ubass User EQ SRS
TruBass WOW(Preset) WOW(User))
You can set the EQ function by using Function Menu. Refer to page 44~45.
EQ/SRS
EQ
SRS
1) SRS Selection
-SRS( ) : SRS is activated.
- TruBass : TruBass is activated.
- WOW (Preset) : WOW (Preset) is
operated as a preset setting
organized by SRS +TruBass
+Focus function.
- WOW (User) : WOW (User) is operated as a setting of
SRS +TruBass +Focus adjusted in the SRS Settings on the menu by
user.
2) SRS Settings (The defaults is 5, 7, High, 60Hz)
-SRS( ) : SRS range can be set from 1 to 10.
- TruBass : TruBass range can be set from 1 to 10.
- Focus : The fineness of the sound can be selected. (Low, High)
- Boost : You can set the Bass according to the using earphones or
the Bass. (40, 60, 100, 150, 200, 250, 300, 400Hz)
SRS( ) is the trade mark of SRS Labs. Inc.
What is SRS( )?.....
SRS-WOW is simulated 3D surround sound developed by SRS Lab and
is composed by SRS, TruBass, Focus, and WOW.
- EQ (SRS Off) : SRS is deactivated and EQ set by user is operated.
(Normal, Rock, Jazz, Classic, UBass, User EQ)