DREAMUS N10 PORTABLE DIGITAL AUDIO PLAYER User Manual N10 01eng
IRIVER LIMITED PORTABLE DIGITAL AUDIO PLAYER N10 01eng
UserManual.wiki
>
DREAMUS
>
N10 User Manual
>
users manual 1
Contents
1.
users manual 1
2.
users manual 2
users manual 1
Navigation menu
Upload a User Manual
Namespaces
Wiki Guide
HTML
PDF
Info
Views
User Manual
Discussion / Help
Navigation


![2 Getting startedGetting startedLCD screen displayRecod mode [Before Recoding][After Recoding]11 Condition of Recoding2 Icon of Recoding3 Progress Bar4 File Number5 Elapsed Time6 Indicator Time7 Progress Bar for Recode8 Folder Name for Recode9 File Name for Recode](https://usermanual.wiki/DREAMUS/N10.users-manual-1/User-Guide-441854-Page-11.png)


![3 Using Basic FunctionsUsing Basic FunctionsSoftware installationPlease complete the steps in this section BEFORE ATTACHING YOUR PLAYER TO YOUR PC.Insert the Installation CD into theCD-ROM drive.Installation starts automatically.1Click [Next] after selecting the language install.2Using Basic FunctionsSoftware installationClick [Next] to Install iRiver Music Manager.3Select the folder to Install. Click [Next].4](https://usermanual.wiki/DREAMUS/N10.users-manual-1/User-Guide-441854-Page-15.png)
![Using Basic FunctionsSoftware installationUsing Basic FunctionsSoftware installationClick [Next] after confirming the installationfolder.5Click [Install] to begin the installation.6Installation is in progressing.Click [Finish] after the installation is completed.7](https://usermanual.wiki/DREAMUS/N10.users-manual-1/User-Guide-441854-Page-16.png)
![Using Basic FunctionsInstallation of New HardwareAfter installing iRiver Music Manager fromthe CD and connecting the player to your PC,[Found New Hardware] screen is displayed.1The computer will automatically search tofind your new hardware.2Using Basic FunctionsInstallation of New HardwareSelect [Install the software automatically(Recommended)] and click [Next].3If a [Hardware Installation] warning messageappears, click [Continue Anyway].(Windows XP)The iRiver software driver will not causeany damage to your computer.4](https://usermanual.wiki/DREAMUS/N10.users-manual-1/User-Guide-441854-Page-18.png)
![3 Using Basic FunctionsUsing Basic FunctionsInstallation of New HardwareThe installation will continue.5Click [Finish].Completed the installation of [New hardware].6Using Basic FunctionsInstallation of New HardwareInformation screen is displayed on the PC.New ardware is installed successfully and ready to use.7Windows 98SE,Windows ME,Windows 2000 OS do not need any other device driver installation.Install New Hardware after installing iRiver Music Manager program.](https://usermanual.wiki/DREAMUS/N10.users-manual-1/User-Guide-441854-Page-19.png)
![Select the [Safely Remove hardware] afterclicking the [Safe To Remove Hardware] byusing the right button of mouse.1Click the [Stop] after selecting the deviceto remove.2Click the [OK] after confirming thehardware to remove.3Click the [Close] after confirming the Safely RemoveHardware message. (In case of Windows XP)4If the player is disconnected inacculately, it may cause a malfunction or damagesto the player.Using Basic FunctionDetach the playerUsing Basic FunctionDetach the player](https://usermanual.wiki/DREAMUS/N10.users-manual-1/User-Guide-441854-Page-20.png)
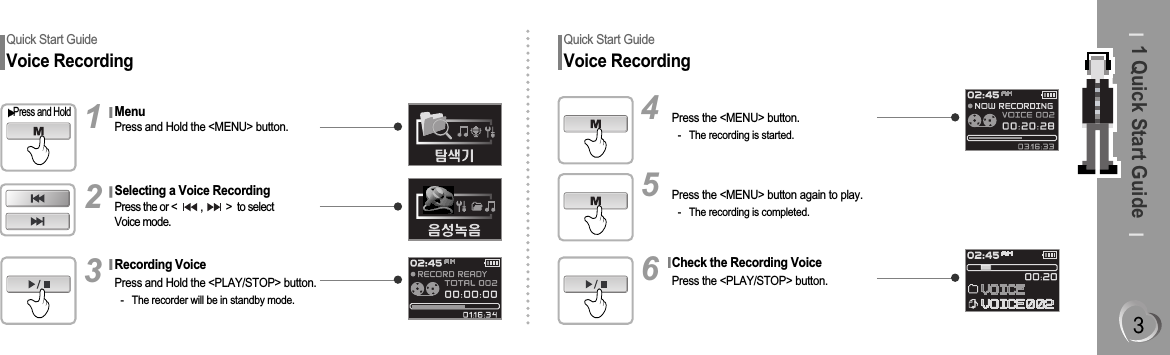
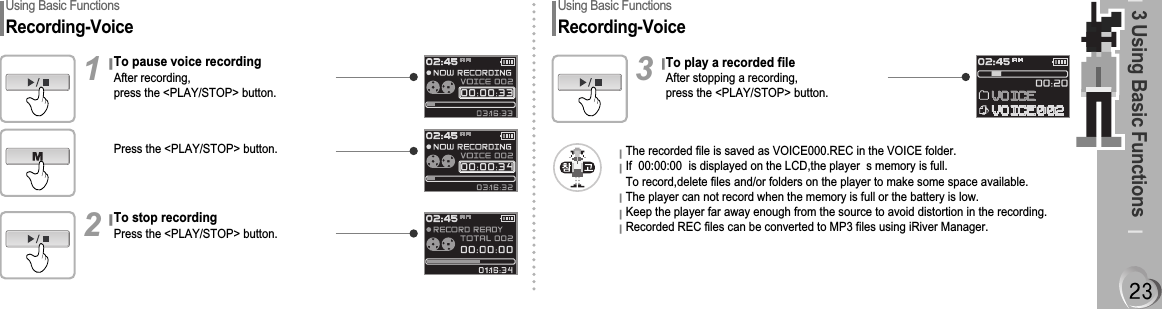
![Using Basic FunctionsMP3Press and Hold the <MENU> button.Press and Hold1Press the < / > button to select[MP3].2Press the <MENU or (PLAY/STOP)> button to play.3Using Basic FunctionsRecording-VoicePress and Hold the <MENU> button.Press and Hold1Press the < / > button to select[Recoding].2Press the <MENU or (PLAY/STOP)> button to recording displayed.3](https://usermanual.wiki/DREAMUS/N10.users-manual-1/User-Guide-441854-Page-22.png)
![Using Basic FunctionsMenu SetupPress and hold the <MENU> button andthe [Navigation] is displayed.Press and Hold1Press the < / > button.Select the [Menu] function.2Press the <MENU or (PLAY/STOP)> buttonand the [Menu] is displayed.3Using Basic FunctionsDelect - FileStop to player.1Press thde <MENU> button toselect [Navigation].Press thde <MENU> button again tonavigation displayed.2](https://usermanual.wiki/DREAMUS/N10.users-manual-1/User-Guide-441854-Page-24.png)
![3 Using Basic FunctionsUsing Basic FunctionsDelect - FileFile deletePress the < + / -> button.3Press the < / > button to select[YES].Press the <PLAY/STOP> button.5Press thde <MENU> button.- FILE DELETE ARE YOU SURE?4](https://usermanual.wiki/DREAMUS/N10.users-manual-1/User-Guide-441854-Page-25.png)
![Using Basic FunctionsDelect - FolderStop to player.1Press thde <MENU> button toselect [Navigation].Press thde <MENU> button again tonavigation displayed.2Using Basic FunctionsDelect - FolderFolder deletePress the < + / -> button.3Press the < / > button to select[YES].Press the <PLAY/STOP> button.5Press thde <MENU> button.- FOLDER DELETE ARE YOU SURE?4](https://usermanual.wiki/DREAMUS/N10.users-manual-1/User-Guide-441854-Page-26.png)