DREAMUS N10 PORTABLE DIGITAL AUDIO PLAYER User Manual N10 01eng
IRIVER LIMITED PORTABLE DIGITAL AUDIO PLAYER N10 01eng
DREAMUS >
Contents
- 1. users manual 1
- 2. users manual 2
users manual 1
I Quick Start Guide I
Power ON / OFF 2
Listening to music 2
Recording 3
Charging 4
Chapter
1
Quick Start Guide
Power ON / OFF
Quick Start Guide
Listening to music
Power ON
Press the <PLAY/STOP> button to
turn on the player.
Press and Hold
When stopped or in recording standby mode,the player automatically turns off according to the
setting of STOP POWER OFF on the MENU.
1
Selecting an Audio Track
: Plays previous track
: Plays next track
3
Volume control
: To increase
: To decrease
4
Listening to music
Press the <PLAY/STOP> button
to turn on the player.
2
Connecting product
Connect the earphones as shown
illustrations.
1
Power OFF
Press and Hold the <PLAY/STOP>
button.
2
Press the <PLAY/STOP> button
again to play.
1 Quick Start Guide
Quick Start Guide
Voice Recording
Press the <MENU> button.
- The recording is started.
4
Press the <MENU> button again to play.
- The recording is completed.
5
Check the Recording Voice
Press the <PLAY/STOP> button.
6
Quick Start Guide
Voice Recording
Menu
Press and Hold the <MENU> button.
Press and Hold
1
Recording Voice
Press and Hold the <PLAY/STOP> button.
- The recorder will be in standby mode.
3
Selecting a Voice Recording
Press the or < , > to select
Voice mode.
2
Quick Start Guide
Charging with USB cable
Connecting USB cable
Connect the USB cable (provided) to the USB port of your computer.
1
l
The player can be recharged even during power off.
l
Charge time: 3 hours (At full discharge)
I Getting started I
Welcome 6
Copyrights and Trademarks 6
Features of iFP-N10 7
Components 8
Locating the controls 8
LCD screen display 10
Chapter
2
Getting started
Welcome
Getting started
Copyrights and Trademarks
Thank you for purchasing this product.
The iFP-N10 comes complete with a long list of advanced features.
Please read this manual carefully to get the most out of your new player.
http://www.iRiver.com
You can obtain information about your product, look for updates and find Q/A s at our website.
Copyrights
iRiver Limited has all the rights of the patent, trademark, literary property and intellectual property related to this
manual. You may not reproduce any part of this manual unless authorized by iRiver Limited.
You can be punished by using any part of this manual illegally.
The software, audio and video which have an intellectual property are protected by copyright and international
laws. It is user s responsibilities when he/she reproduce or distribute the contents created by this product.
The companies, institutions, products, people and events used in examples are not real data. We don t have any
intension to be related with any companies, institutions, products, people and events through this manual and
should not draw inferences. Users are responsible for observing the copyrights and intellectual properties.
'1999~2004 iRiver Limited. All rights reserved.
Trademarks
Windows, Windows 98 SE, Windows ME, Windows 2000, Windows XP and Windows Media Player are the
registered trademarks of Microsoft Corp.

2 Getting started
Getting started
Features of iFP-N10
Multi-Codec Player
Supports MP3,WMA and ASF formats.
Firmware Upgrade
Provides the latest updated features via firmware upgrade.
Graphic LCD supporting Multiple Languages
Graphic LCD which can support multiple languages (40 languages).
6 Preset EQ
Normal, Rock, Jazz, Classic, U Bass, Metal
Xtreme EQ and Xtreme 3D
Customize your own EQ with Xtreme EQ and enhance bass and surround sound with Xtreme 3D.
GUI (Graphic User Interface)Menu System
Convenient neck strap
Supports USB 1.1
Simple Navigation
Simple navigation makes it easy to find any song.
Supports 8 levels of subfolders, 100 folders total and up to 500 files at one time
Voice Recording
Create your own playlists
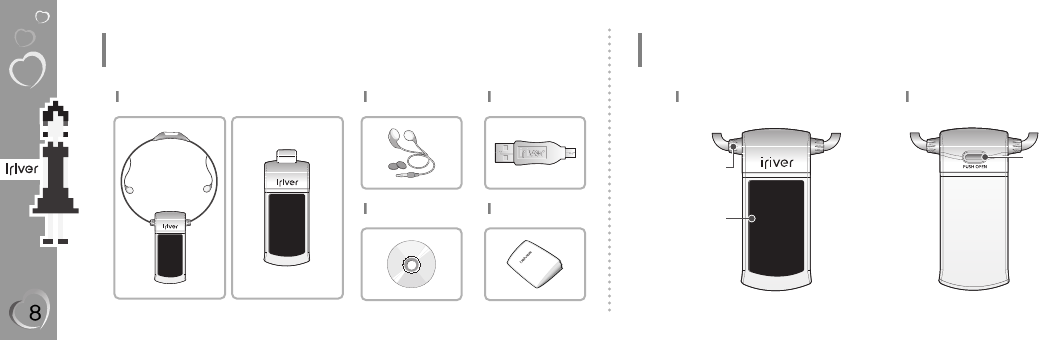
iFP-N10 Earphones and
Covers
Mini USB
Getting started
Components Accessories are subject to change without notice.
Movie Clip CD Manual/Warranty form
(Quick Start Guide)
Getting started
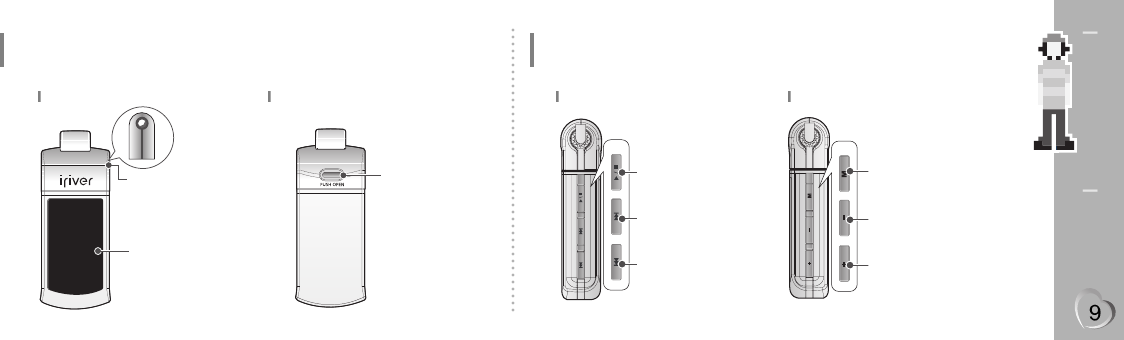
Locating the controls Your player may differ slightly from that shown in the illustrations.
Product View - top
1
Product View - bottom
2
LCD Display
Push open
button
2 Getting started
Getting started
Locating the controls Your player may differ slightly from that shown in the illustrations.
Product View - top
1
Product View - bottom
2
LCD Display
Earphones’Jack Push open
button
Getting started
Locating the controls Your player may differ slightly from that shown in the illustrations.
Product View - Left side
1
Product View - Right side
2
Play / Stop Button
Power ON / OFF
Button
Long : MENU Button
Short : MODE Button
Volume - Button
Down Button
Volume + Button
Up Button
Next Button /
Left Button
Previous Button /
Right Button
Getting started
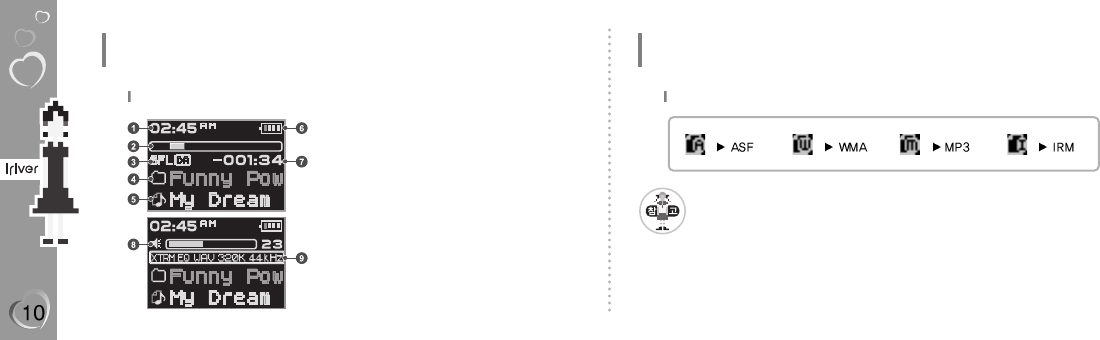
LCD screen display
Music mode
1
1 Time
2 Progress Bar
3 Play Mode
4 Folder Name
5 Song Title
6 Battery Indicator
7 Play time
8 Volume
9 EQ / File Format / Bit Rate /
Sampling Rate
Getting started
LCD screen display
IRM (iRiver Rights Management)
iRiver Rights Management is a digital music format.
Please visit our web site for details about this music format.
File Format
2 Getting started
Getting started
LCD screen display
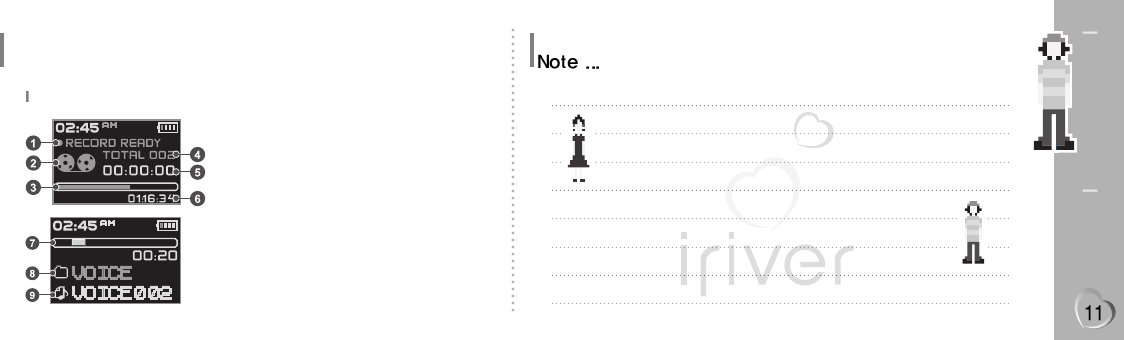
Recod mode [Before Recoding]
[After Recoding]
1
1 Condition of Recoding
2 Icon of Recoding
3 Progress Bar
4 File Number
5 Elapsed Time
6 Indicator Time
7 Progress Bar for Recode
8 Folder Name for Recode
9 File Name for Recode


I Using Basic Functions I
Software installation 14
Connecting to the PC 17
Installation of New Hardware 18
Detach the player 20
Basic Functions 21
Navigation 21
MP3 22
Recording-Voice 22
Menu Setup 24
Delect-File 24
Delect-Folder 26
Chapter
3
Using Basic Functions
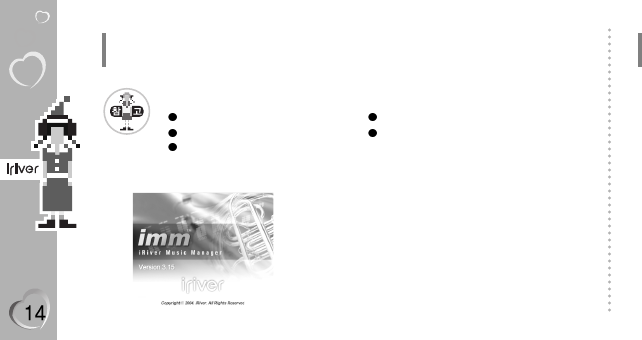
Software installation
Please complete the steps in this section BEFORE ATTACHING YOUR PLAYER TO YOUR PC.
Insert the Installation CD into the CD-ROM drive.
The following screen appears after inserting the CD.
- If the installation doesn’t automatically begin, execute the
"setup.exe"file in the installation CD.The installation program
will begin.
- The installation CD contains the following contents :
Device Driver
Manager Program
Manager Program for Mac
1
System Requirements (Windows)
Pentium133MHz or faster CD-ROM drive
USB Port 10MB free hard disk space
Window 98SE/ME/2000 /XP
Using Basic Functions
Software installation
Please complete the steps in this section BEFORE ATTACHING YOUR PLAYER TO YOUR PC.
- The player can store MP3 files or files of any type.
- You can upload files, other than music (MP3, WMA, ASF), to the PC using the
iRiver Music Manager Program.
- Download latest versions of drivers and iRiver Music Manager at www.iRiver.com
- Please be sure your login has Administrator privileges if using Windows 2000 or Windows XP.
3 Using Basic Functions
Using Basic Functions
Software installation
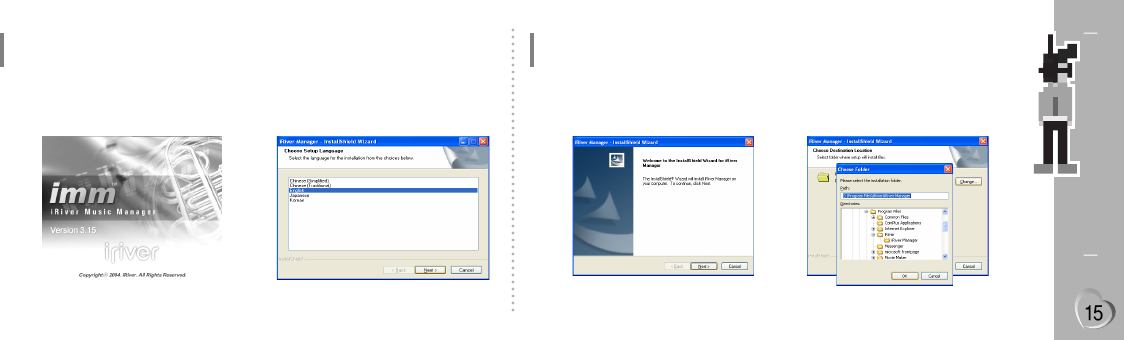
Please complete the steps in this section BEFORE ATTACHING YOUR PLAYER TO YOUR PC.
Insert the Installation CD into the
CD-ROM drive.
Installation starts automatically.
1
Click [Next] after selecting the language install.
2
Using Basic Functions
Software installation
Click [Next] to Install iRiver Music Manager.
3
Select the folder to Install.
Click [Next].
4
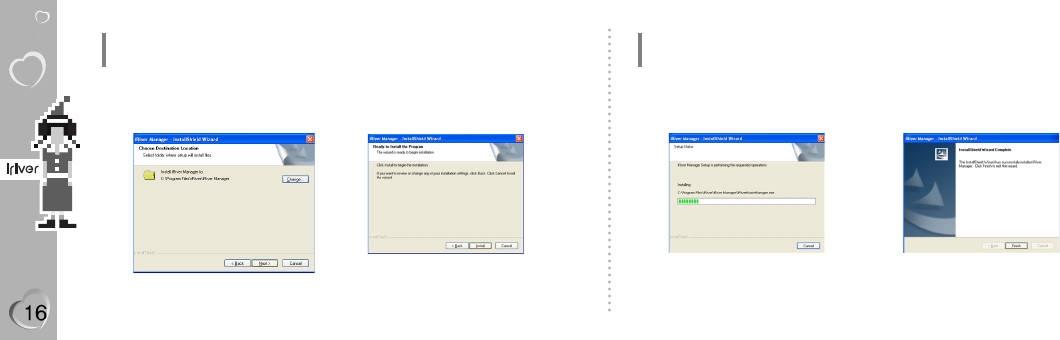
Using Basic Functions
Software installation
Using Basic Functions
Software installation
Click [Next] after confirming the installation
folder.
5
Click [Install] to begin the installation.
6
Installation is in progressing.
Click [Finish] after the installation is completed.
7
3 Using Basic Functions
Using Basic Functions
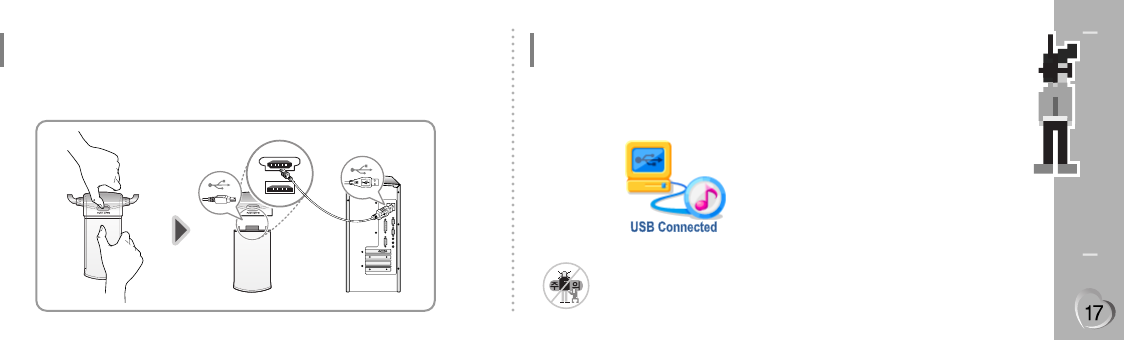
Connecting to the PC
Connect the USB cable (provided)to the USB port of your computer.
1
Using Basic Functions
Installation of New Hardware
USB CONNECTED will appear on the LCD screen of the player.
2
Connect the USB cable to the PC after playback stops to avoid errors.

Using Basic Functions
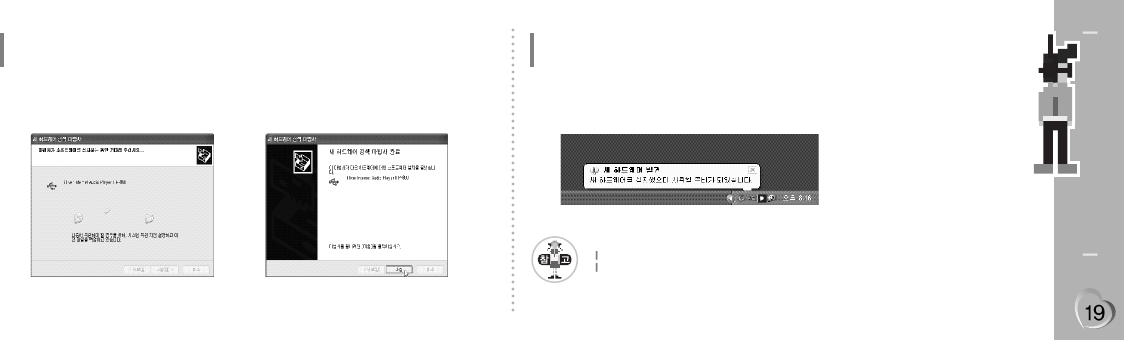
Installation of New Hardware
After installing iRiver Music Manager from
the CD and connecting the player to your PC,
[Found New Hardware] screen is displayed.
1
The computer will automatically search to
find your new hardware.
2
Using Basic Functions
Installation of New Hardware
Select [Install the software automatically
(Recommended)] and click [Next].
3
If a [Hardware Installation] warning message
appears, click [Continue Anyway].
(Windows XP)
The iRiver software driver will not cause
any damage to your computer.
4
3 Using Basic Functions
Using Basic Functions
Installation of New Hardware
The installation will continue.
5
Click [Finish].
Completed the installation of [New hardware].
6
Using Basic Functions
Installation of New Hardware
Information screen is displayed on the PC.
New ardware is installed successfully and ready to use.
7
Windows 98SE,Windows ME,Windows 2000 OS do not need any other device driver installation.
Install New Hardware after installing iRiver Music Manager program.
Select the [Safely Remove hardware] after
clicking the [Safe To Remove Hardware] by
using the right button of mouse.
1
Click the [Stop] after selecting the device
to remove.
2
Click the [OK] after confirming the
hardware to remove.
3
Click the [Close] after confirming the Safely Remove
Hardware message. (In case of Windows XP)
4
If the player is disconnected inacculately, it may cause a malfunction or damages
to the player.
Using Basic Function
Detach the player
Using Basic Function
Detach the player
3 Using Basic Functions
Using Basic Functions
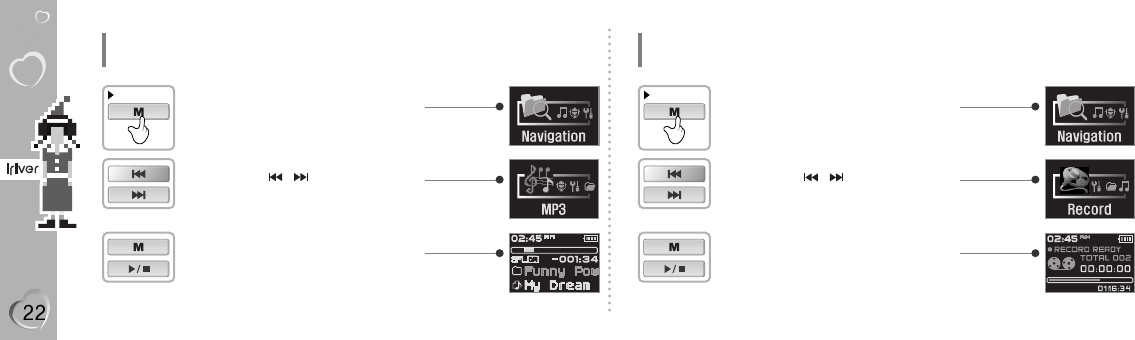
Basic Functions
Changing Functions
Press and Hold the <MENU> button.
Press and Hold
1
If a folder is selected press the < / >
button to enter the folder.
- Navigation MP3 Recode MENU
If a folder is selected press the <MENU>
button to enter the folder.
- Select MP3
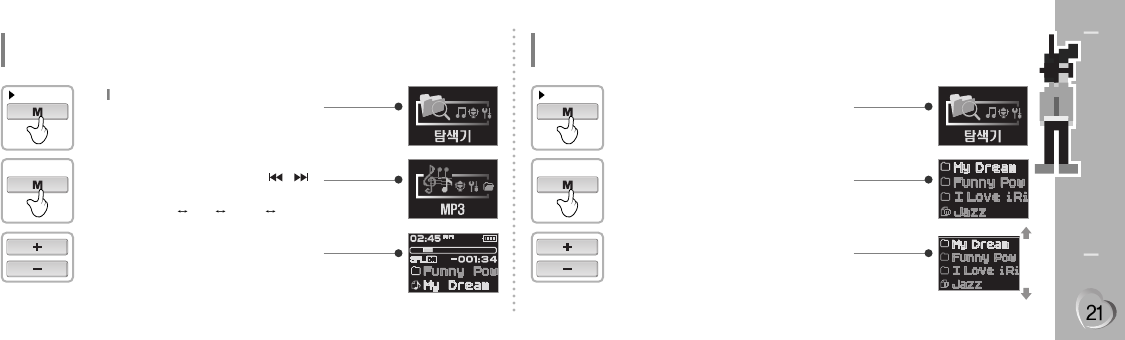
Using Basic Functions
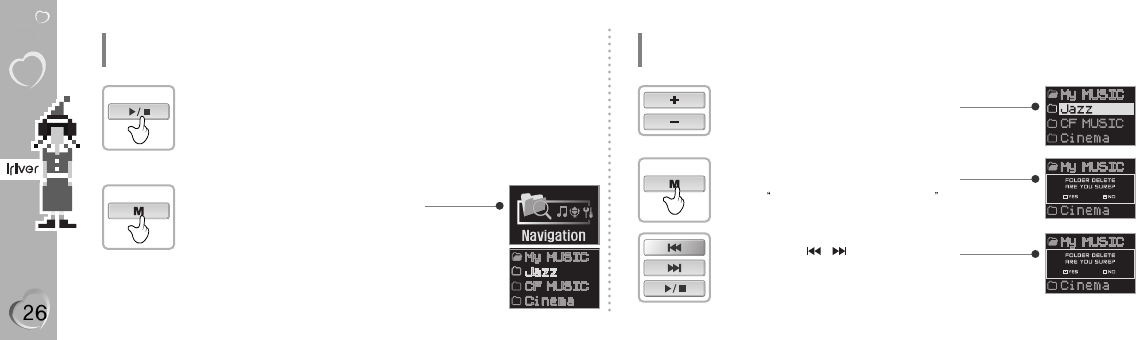
Navigation
Press and Hold the <MENU> button.
Press and Hold
1
Press the <MENU> button
again to navigation displayed.
2
If a folder is selected press the <+ / ->
button to enter the folder.
3
+
-
Using Basic Functions
MP3
Press and Hold the <MENU> button.
Press and Hold
1
Press the < / > button to select
[MP3].
2
Press the <MENU or (PLAY/STOP)> button
to play.
3
Using Basic Functions
Recording-Voice
Press and Hold the <MENU> button.
Press and Hold
1
Press the < / > button to select
[Recoding].
2
Press the <MENU or (PLAY/STOP)> button
to recording displayed.
3
3 Using Basic Functions
Using Basic Functions
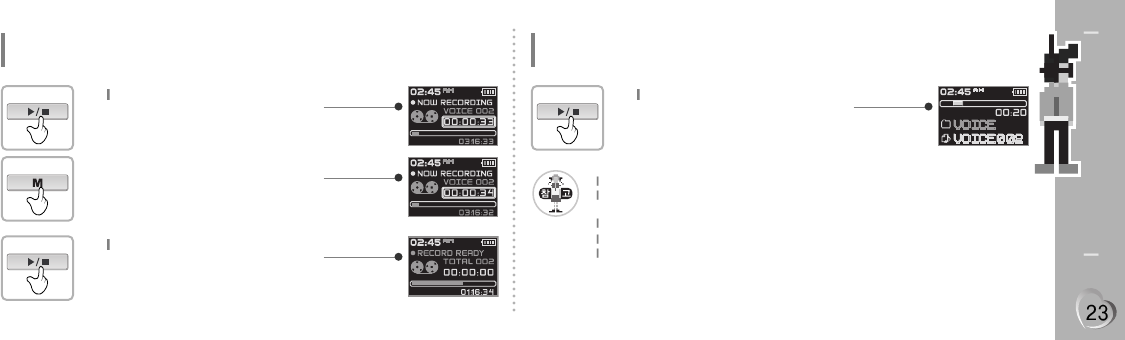
Recording-Voice
To pause voice recording
After recording,
press the <PLAY/STOP> button.
1
To stop recording
Press the <PLAY/STOP> button.
2
Press the <PLAY/STOP> button.
Using Basic Functions
Recording-Voice
To play a recorded file
After stopping a recording,
press the <PLAY/STOP> button.
3
The recorded file is saved as VOICE000.REC in the VOICE folder.
If 00:00:00 is displayed on the LCD,the player s memory is full.
To record,delete files and/or folders on the player to make some space available.
The player can not record when the memory is full or the battery is low.
Keep the player far away enough from the source to avoid distortion in the recording.
Recorded REC files can be converted to MP3 files using iRiver Manager.
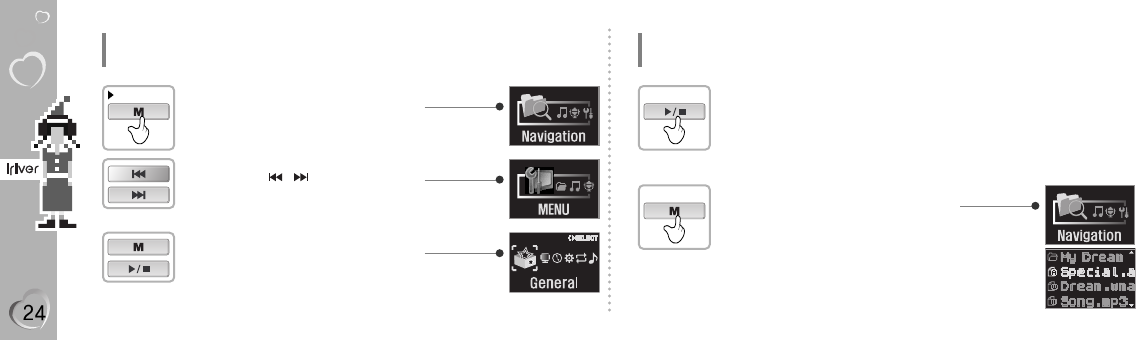
Using Basic Functions
Menu Setup
Press and hold the <MENU> button and
the [Navigation] is displayed.
Press and Hold
1
Press the < / > button.
Select the [Menu] function.
2
Press the <MENU or (PLAY/STOP)> button
and the [Menu] is displayed.
3
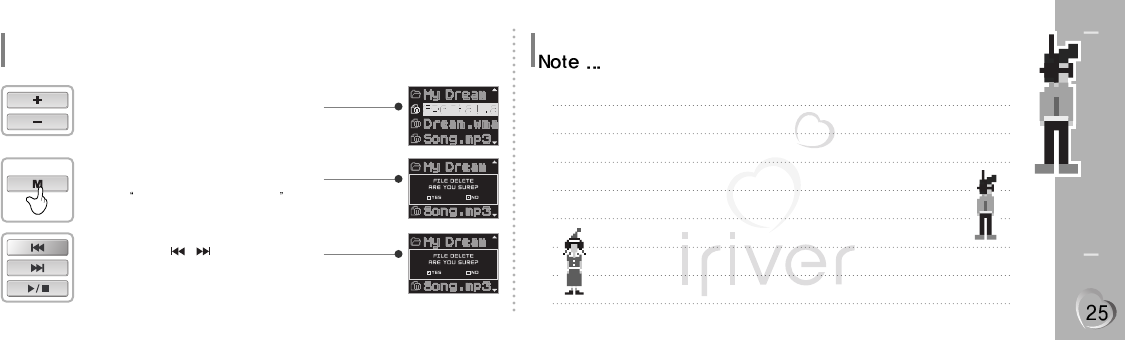
Using Basic Functions
Delect - File
Stop to player.
1
Press thde <MENU> button to
select [Navigation].
Press thde <MENU> button again to
navigation displayed.
2
3 Using Basic Functions
Using Basic Functions
Delect - File
File delete
Press the < + / -> button.
3
Press the < / > button to select
[YES].
Press the <PLAY/STOP> button.
5
Press thde <MENU> button.
- FILE DELETE ARE YOU SURE?
4
Using Basic Functions
Delect - Folder
Stop to player.
1
Press thde <MENU> button to
select [Navigation].
Press thde <MENU> button again to
navigation displayed.
2
Using Basic Functions
Delect - Folder
Folder delete
Press the < + / -> button.
3
Press the < / > button to select
[YES].
Press the <PLAY/STOP> button.
5
Press thde <MENU> button.
- FOLDER DELETE ARE YOU SURE?
4

I Detailed Operation I
Navigation mode 28
Play mode 29
Interval Repeat (A-B) 31
EQ 32
Program Mode 34
Chapter
4
Detailed Operation
Navigation mode
Navigate to locate tracks to play
Press and Hold the <PLAY/STOP>
button.
Press and Hold
1
Press the <MENU> button again to play.
A list of files on the disc will be displayed.
2
Select the Folder and File
Press the <+/-> button.
+ : Move the Up
- : Move the Down
3
+
-
Detailed Operation
Navigation mode
Select the Folder and File to play
Press the <PLAY/STOP> button.
Move to upper folder
Press the <PLAY/STOP> button.
4
I4 Detailed Operation I
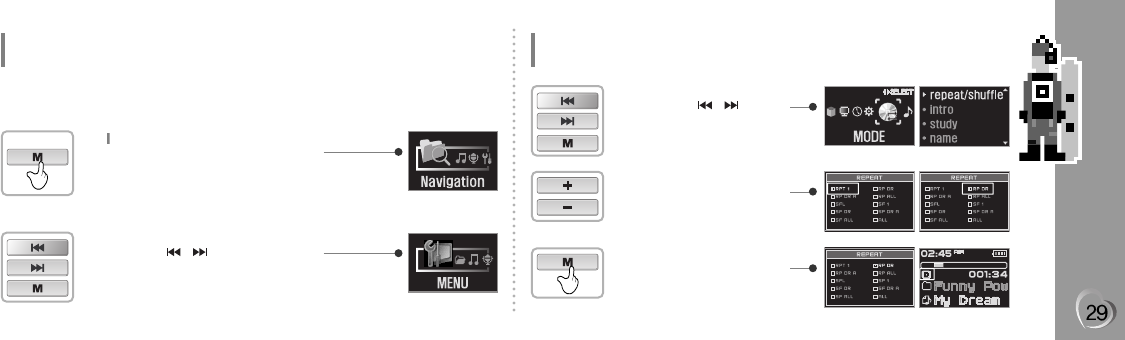
Change to the Play mode
Press the <MENU> button.
1
Select the MENU
Press the < / > button.
Press the <MENU> button.
2
Detailed Operation
Play mode
Detailed Operation
Play mode
Select the MODE
Press the < / > button.
Press the <MENU> button.
3
Press the <+/- > button.
Select <RP DR>
4
Press the <MENU> button.
5
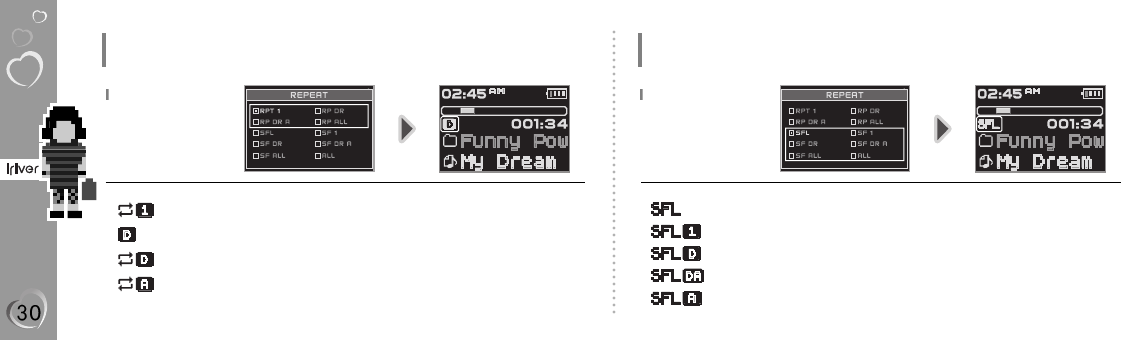
Detailed Operation
Play mode
REPEAT
: Plays a selected track repeatedly.
: Plays all tracks in the selected folder and stop.
: Plays all tracks in the selected folder repeatedly.
: Plays all tracks stored in the player repeatedly.
Detailed Operation
Play mode
SHUFFLE
: Randomly plays all tracks in the player and stop.
: Plays a single track repeatedly.
: Randomly plays all tracks in the selected folder and stop.
: Randomly plays all tracks in the selected folder repeatedly.
: Randomly plays all tracks stored in the player repeatedly.