DREAMUS PMP140 PORTABLE MULTIMEDIA PLAYER User Manual USERS MANUAL 2
IRIVER LIMITED PORTABLE MULTIMEDIA PLAYER USERS MANUAL 2
DREAMUS >
Contents
USERS MANUAL 2

18
2-2. LCD screen display Getting started
Music playback
File name
Artist
Folder Name(Title)
Hold indicator
(Machine/Remote control/Both)
Volume level
Battery indicator
Clock
Playback mode/status
Progressive Bar
Play time(Elapsed l Remain)
Level Meter
EQ mode
Bit Rate
Sampling Rate
File Format
1
1
2
2
3
3
4
4
5
5
6
6
7
7
8
8
9
9
10
10
11
11
12
12
Elapsed 01:47 i 03 :58
I Love iRiver
Singer...
Entertainment.MP3
1
1
4
4
8
8
2
2
3
3
5
56
67
7
9
9
10
10
11
11
12
12
13
13
14
14
15
15
17
2-2. LCD screen display Getting started
Function selection mode
Music : Playing music files.
Video : Playing video files.
Photo : Viewing photo files.
Radio : FM radio listening.
Record: Recording from the Mic(Int/Ext) or connected equipment
Setup: Customizing the function setting.
Browser : Searching folders/files
1
1
2
2
3
3
4
4
5
5
6
6
7
7
13
13
14
14
15
15

FM radio mode
Recording Mode
20
2-2. LCD screen display Getting started
101.7
101.7
MHz
STEREO
FM Tuner
CH 16
02:02
22
Stereo/Mono
Battery indicator
Hold
Clock
Volume level
Channel
Frequency Range
Total preset number
Region
Preset
on/off
Free space
RECORDING..
Bit rate
Record status
Battery indicator
Record File Name
Sample rate
Recording file format
Hold
Record elapsed time
Source
Clock
Volume level
Video playback
Photo view
19
2-2. LCD screen display Getting started
Elapsed 00:01:29 : 00:05:23
Battery indicatorHold
Elapsed time
Progress bar
Clock
Volume level
Total playing time
100%
o
0
Name!Name!: My iRiverMy iRiver.bmp
Type!Type!: 0
Size!Size!: 640 x 480
Byte!Byte!: 65 KB
Magnification of photo
Symmetry
Rotation angle
File information
File name
Playback
mode/status
22
2-3. Connecting and installation Getting started
Charging at the power off mode
Charging by using AC adapter
11
11
Use only the AC Power Adapter supplied with the player.
The AC operating voltage of this player is 100~240V, 50/60Hz.
Connect the AC adapter to the
player's DC IN 5.0V connector.
1
Connect the AC adapter plug to a
power socket.(AC adapter for this
player is 120~240V, 50/60Hz.)
If a power source is connected when
the player is turned off, a charging
indicator light will illuminate while the
player is charging.
2
Press the POWER button while
charging to start the player in
Function selection mode.
4
The light will turn off when
charging is complete.
3
"
When AC adapter is connected to player without rechargeable battery the
player will not operate.
21
2-3. Connecting and installation Getting started
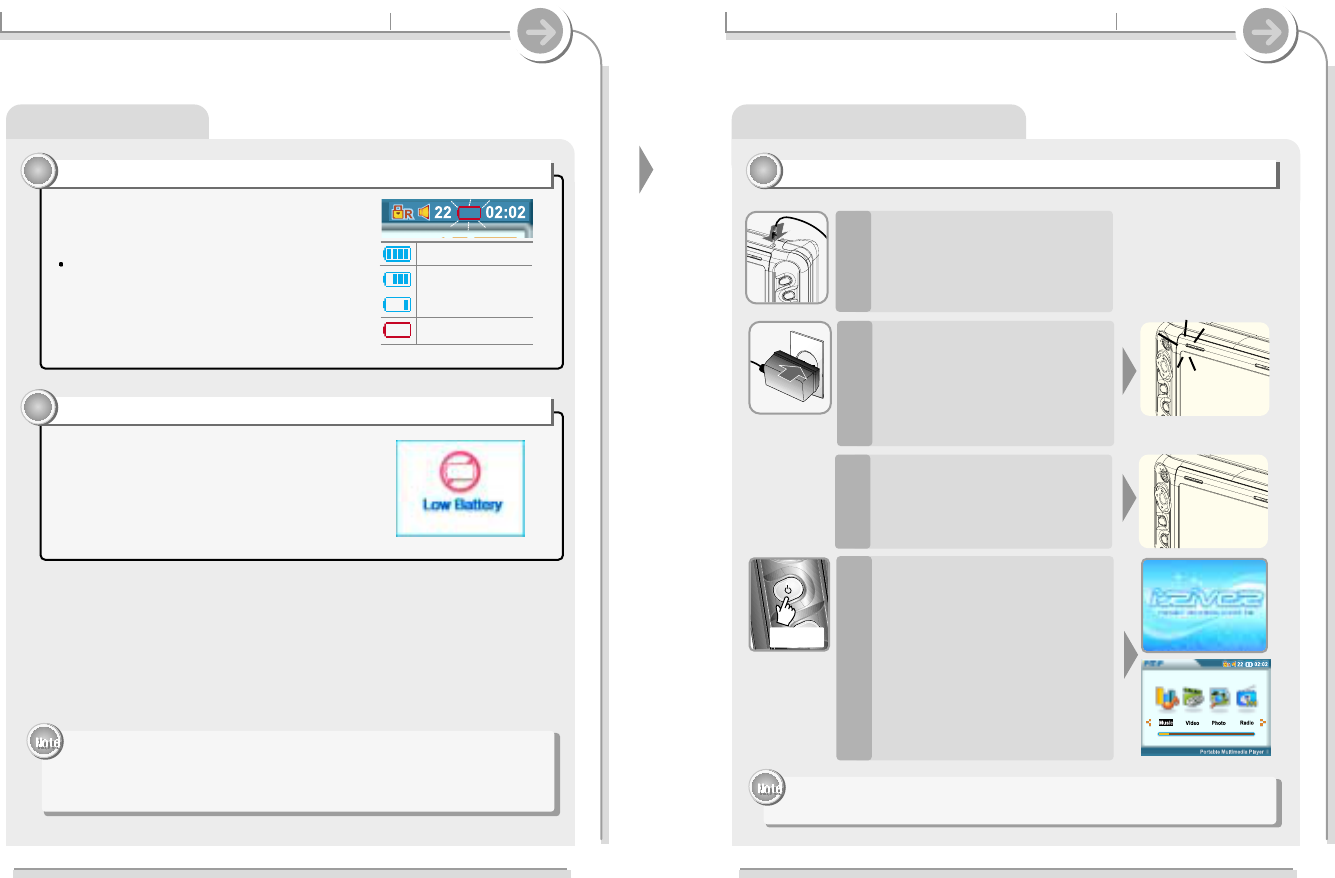
about battery indicator
If the battery is fully discharged, the red
battery icon is blinked in the system LCD.
The may not charge if you switch to playback
mode during USB charging.
If the battery is fully discharged...
11
11
If the battery is all worn out, the player turn
off after “Low Battery” is displayed on the
LCD.
If the battery is all worn out...
22
22
Fully charged
-
used
-
Fully discharged
"
If the player turn off because the battery is all worn out, please turn on the
player after connect the AC adapter and charge over the 20 second.
"
If the battery is detached while the player is operated by AC adapter, the
player is turn off for system protection.
24
2-3. Connecting and installation Getting started
Charging at power on mode
Charging by using AC adapter
11
11
"
The charging time : Approx. 2.5~3 hours (At full discharge)
"
The discharging(play) time : Approx. 4 hours (At video playback)
If the battery is fully discharged,
the red battery icon is blinked in
the system LCD.
1
Connect the AC adapter to the
player's DC IN 5.0V connector.
3
Connect the AC adapter plug to
a power socket. If a power
source is connected when the
player is turned off, a charging
indicator light will illuminate
while the player is charging.
4
The light will turn off when
charging is complete.
5
If the battery is all worn out,
turn offed the power after “Low
Battery” is displayed on the
LCD.
2
23
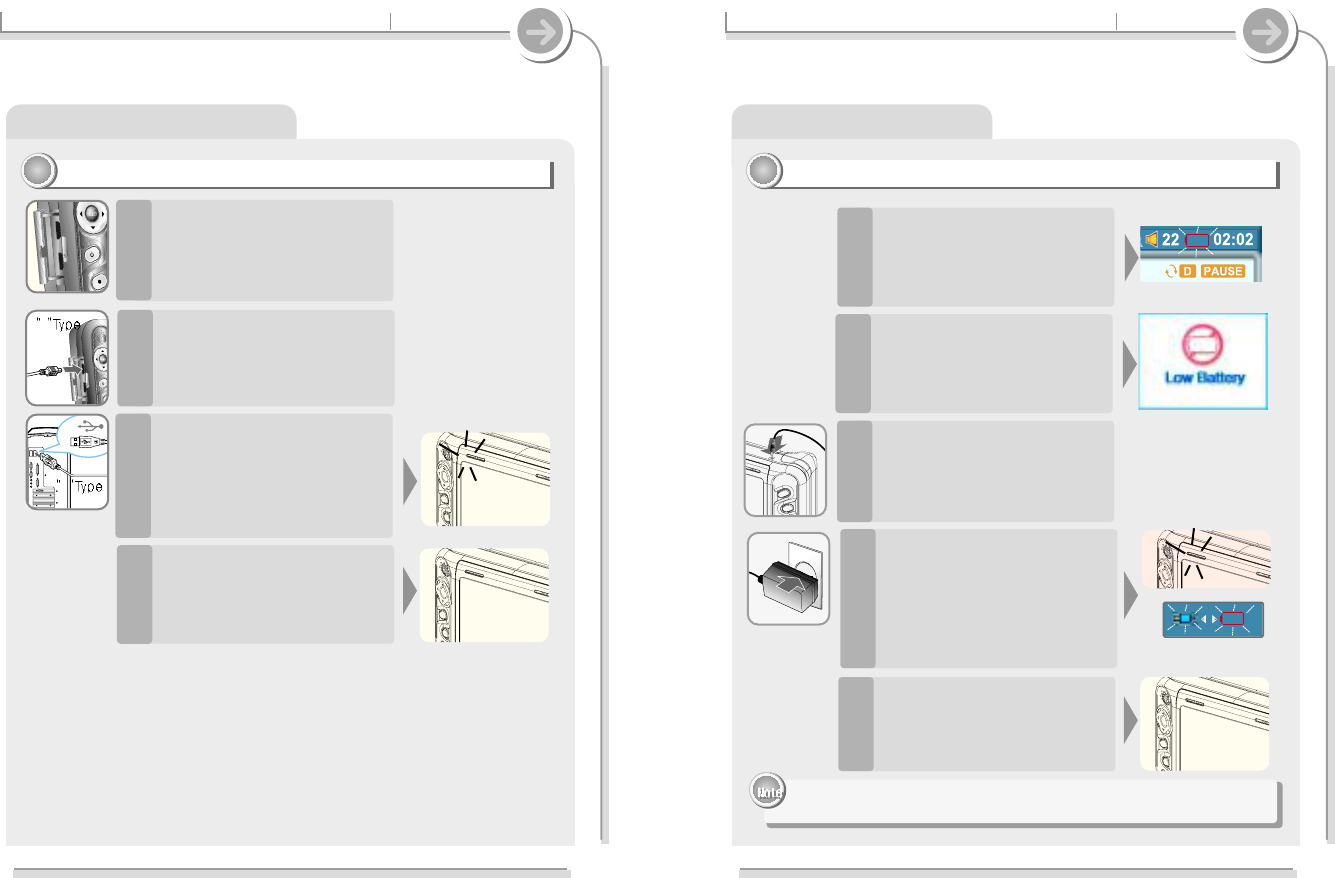
2-3. Connecting and installation Getting started
Charging at the power off mode
Charging by using USB cable
22
22
Push the USB lock to open the
protective cover.
1
Connect the USB cable to the
player ‘s USB Port.
2
The light will turn off when
charging is complete.
4
Connect the USB cable to the
PC’s USB port.
A charging indicator light will
illuminate while the player is
charging.
3
B
A
Connecting the remote control/earphones
26
2-3. Connecting and installation Getting started
1. Connect the remote control to the socket on the top of the player.
2. Connect the earphones jack to the earphone socket of the remote control.
25
2-3. Connecting and installation Getting started
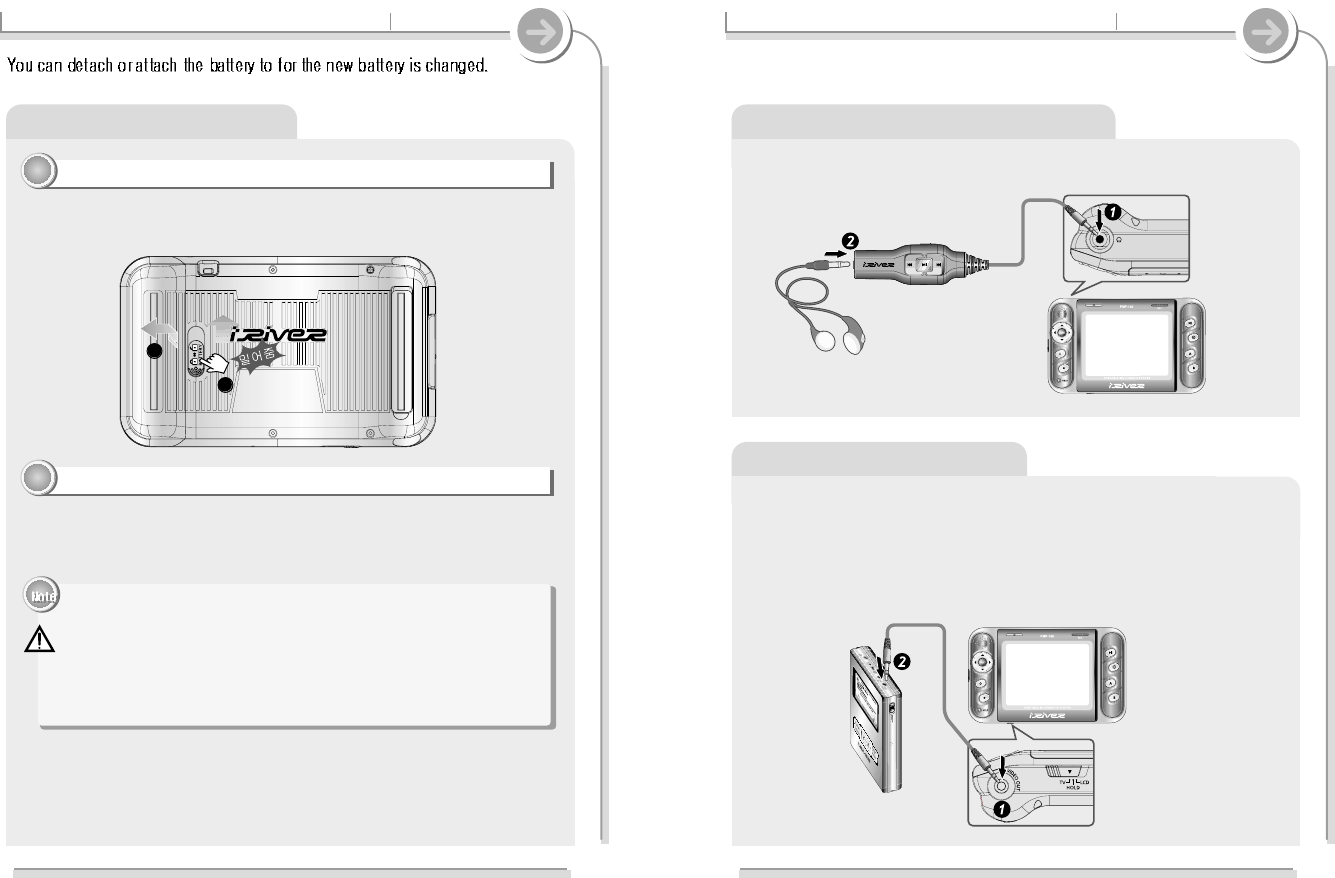
About the Rechargeable battery
Battery detach
11
11
Slide the battery onto the player until it locks into place.
Press the lock to release the battery and slide it out of the player.
Battery attach
22
22
"
Charge and store the battery at room temperature.
It may not charge properly in hot or cold temperature environments.
"
Do to attempt to disassemble the battery.
Do not expose the battery to open flame.
"
These activities could cause the battery to explode resulting in serious injury.
"
Do not contact the connectors of the battery to metal objects, or an electrical
shock may occur.
1
1
2
2
Connecting to audio equipment
Line-In : Connects external input devices for Line-In recording.
1. Connect the Line-Out or earphone socket of the external device to the
Line-In socket of the player with the Line In/Out cable.
2. Use the recording feature to record with the desired setting.
28
2-3. Connecting and installation Getting started
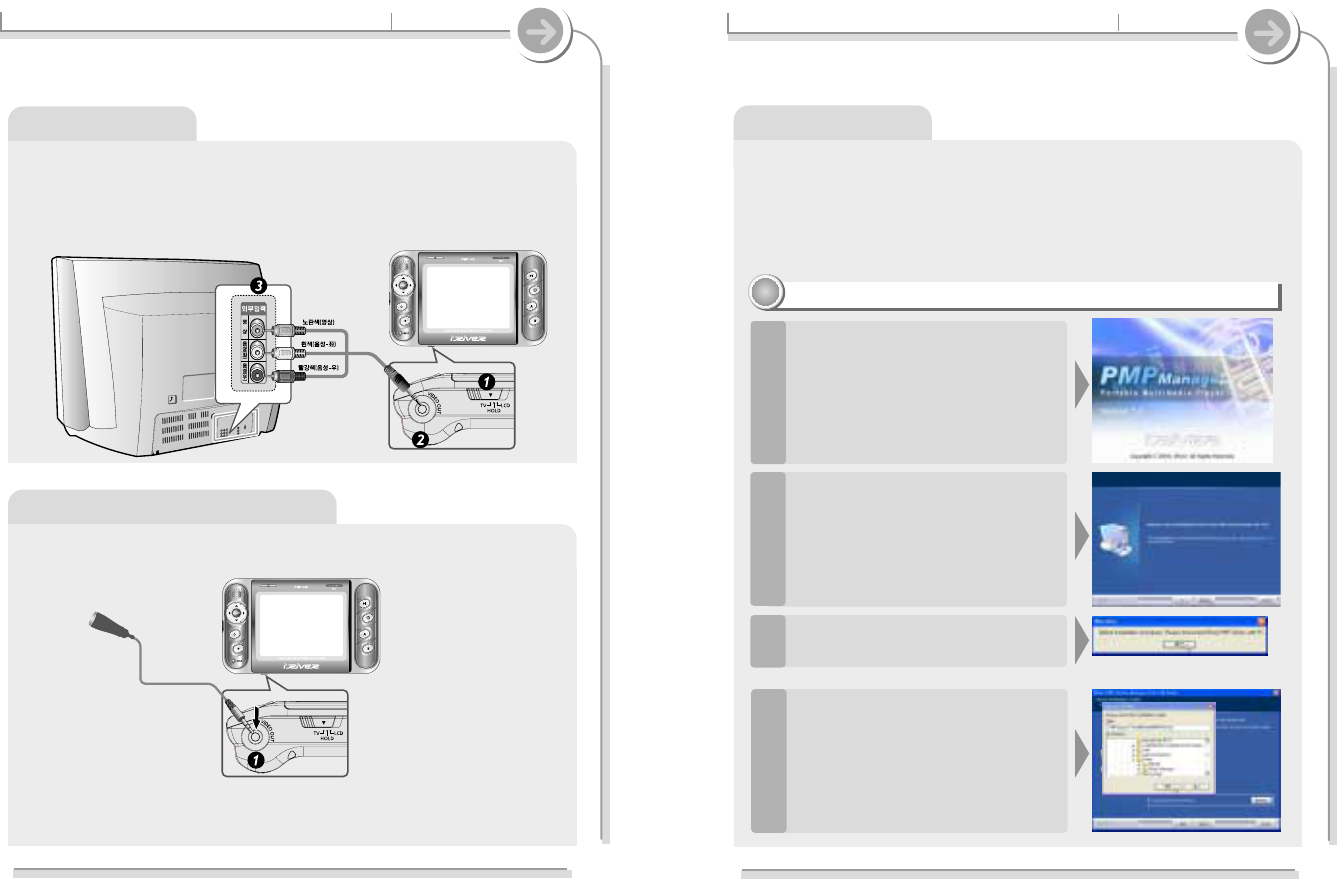
Operate the software
PMP Manager installation
11
11
Insert the Installation CD into the CD-
ROM drive.
The installation will start automatically.
1
Click “Next” to continue installation.
2
If the product is connected, disconnect
it from the PC and press the "OK"
3
Windows ME, Windows 2000 and Windows XP will recognize the PMP-100
as a USB drive automatically and you can use the player with out
installing PMP Manager.
For Windows 98 SE users, the PMP Manager must be installed for the
computer to recognize the player.
All users must install PMP Manager to use the Database function.
27
2-3. Connecting and installation Getting started
Connecting to external microphone
To use an external microphone for recording, connect the external
microphone cable to the Line-In/Video Out socket.
Connecting to a TV
1. Select TV from "TV/HOLD/LCD" switch.
2. Connect AV cable with player as shown on the diagram below.
3. Connect RCA jack to the TV as shown on the diagram below.
(Yellow - Video, White - Audio L.ch, Red - Audio R.ch)
Select the folder to Install.
Click “OK”.
4
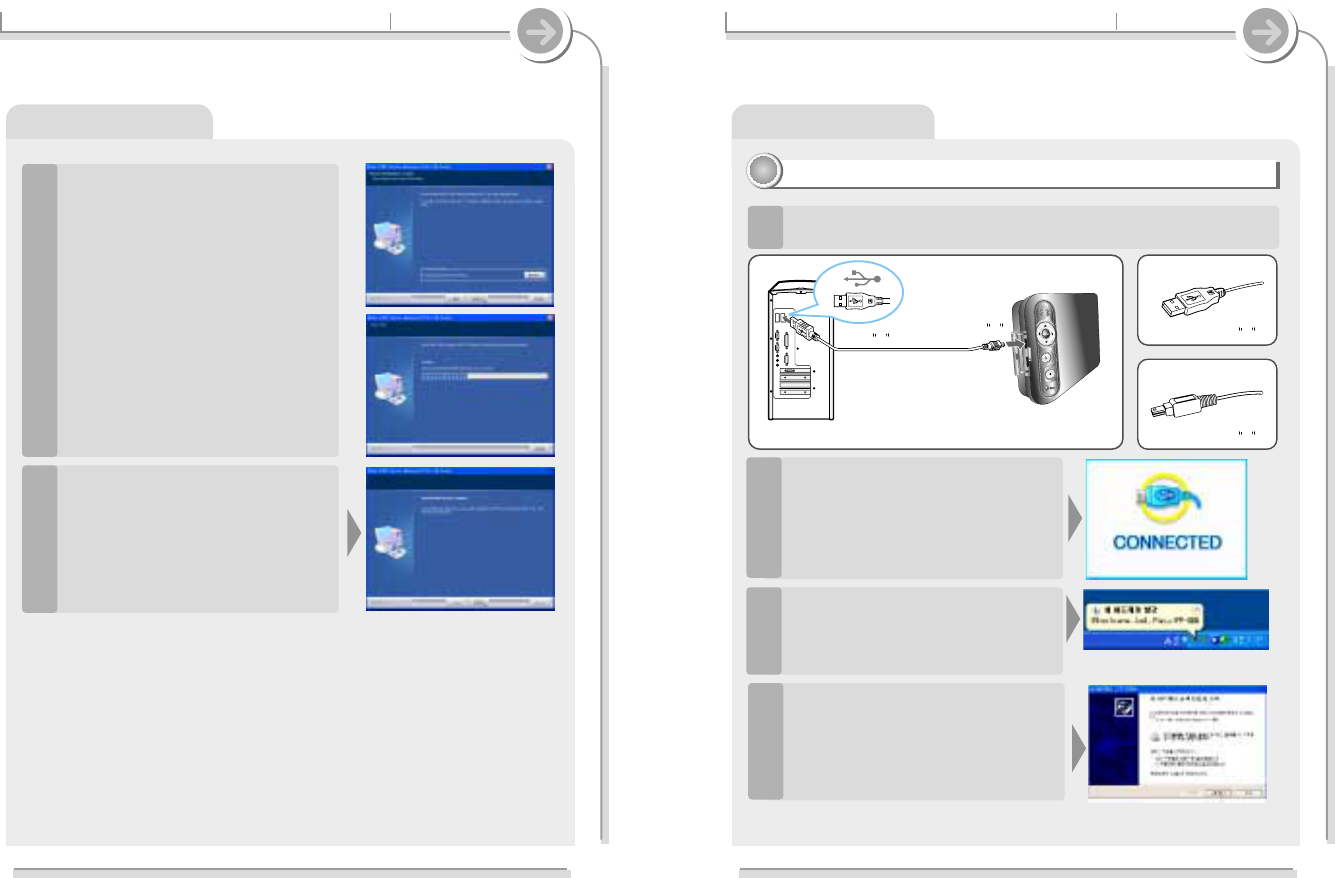
30
2-3. Connecting and installation Getting started
Operate the software
Connecting to a PC
22
22
Connect the USB cable (provided) to the USB port of your
1
Turn on the player, open the
protective cover of the USB port, and
connect the USB cable.
“CONNECTED” icon will appear on
the LCD screen of the player.
2
After installing iRiver Music Manager
from the CD and connecting the
player to your PC, "Found New
Hardware" screen is displayed.
3
Type AType B
USB port on the PC USB port on the player
(USB2.0/Device)
USB cable
Type A
Type B
29
2-3. Connecting and installation Getting started
Operate the software
Click “Next” after confirming the
installation folder.
The installation is in processing.
5
Click “Finish” after the installation is
completed.
6
Select “Install the software
automatically (Recommended)” and
4
Complete the driver installation after installing the PMP Manager software.
32
2-3. Connecting and installation Getting started
Operate the software
Installing the device driver manually (Windows98 SE only]
33
33
If the player is not recognized by the
PC, an "Add new hardware wizard"
window is opened. Click the "Next"
1
Click the "Search for the best device
driver (recommended)" and click the
"Next" button.
2
Click ‘the specify a location’ option
and click the "Browse" button.
3
Select the installation folder that
includes the iRiverH.inf file
(C:\Program Files\iRiver\PMP100\
drivers) and click the "OK" button.
4
31
2-3. Connecting and installation Getting started
Operate the software
If a "Hardware Installation" warning
message appears, click "Continue
Anyway". (Windows XP)
The iRiver software driver will not cause
any damage to your computer.
5
Complete the driver installation after installing the PMP Manager software.
Windows XP and Windows 2000 will
display a "Device Attached" icon.
Windows may ask to install a driver for the
PMP. Please follow the provided driver
installation guide on the following page.
6
Once installed, open Windows
Explorer and an additional drive
should be listed called “PMP-100”.
7

Operate the software
34
2-3. Connecting and installation Getting started
Operate the software
To copy/delete files/folders
44
44
The player will show up as a new
drive in Windows Explorer.
1
To copy files/folders
Click and Drag files from the PC to the
player.
2
To delete files/folders
To delete files or folders from the
player, select the files (folders) to be
deleted and press "Delete" on the
keyboard. Click “Yes” when asked to
confirm the delete.
3
"
"
When the player is attached to a computer for an extended
period of time, be sure to plug in the AC adapter.
Low batteries can prevent the proper functioning of the player.
33
2-3. Connecting and installation Getting started
When the folder is located, click the
"Next" button.
5
Click the "Next" button.
6
Click the "Finish" button to finish the
installation.
7

Turning on/off the player
Turning on the player
11
11
36
3-1. Basic operation Basic operation
Connect the remote control or
earphones.
1
Press the POWER button to turn
on the player.
3
The following icons are displayed to indicate HOLD status.
: The HOLD function is set in both the player and the remote controller.
: The HOLD function is set in the player.
: The HOLD function is set in the remote controller.
When stopped or in recording standby mode, the player automatically
turns off according to the setting of “STOP POWER OFF” on the
Setup.
2
Put the HOLD switch to LCD
35
2-3. Connecting and installation Getting started
Operate the software
Safely Removing the player from the PC
55
55
Click the “Safely removing device” icon in the PC tray.
1
Click “Stop iRiver PMP-100-Driver(X)” or “Safely Remove TOSHIBA
MK1 3GAL USB Disk Drive(X:)”. (Where X is the drive letter
assigned to the PMP)
2
Click the Confirm button in the hardware safe removal window
3
Disconnect the USB cable between
the player and host PC.
The following message is displayed in
the LCD screen.
4
"
"
The tray icon may be hidden in some Windows XP operating system settings.
Click the "Display hidden icon" to view the hidden icon.
"
"
Hardware safe removal may not be available while using some applications such
as Windows Explorer or Windows Media Player. Please close all applications
using the player before the hardware safe removal process.
"
"
In some Windows XP operation system settings, hardware safe removal is
temporarily unavailable due to some internal system communication.
Please wait and try again.
DISCONNECTING
DISCONNECTING