DVS Korea VXM2200 DVD Player with FM Transmitter User Manual Users manual 1
DVS Korea Co., Ltd. DVD Player with FM Transmitter Users manual 1
Contents
- 1. Users manual 1
- 2. Users manual 2
Users manual 1
PLAYBACK
2
Precaution
Precaution
The lighting flash with arrowhead symbol,
within an equilateral triangle, is intended to
alert the user to the presence of unisulated
dangerous voltage within the product's
enclosure that may be of sufficient
magnitude to constitute a risk of electric
shock to persons.
CAUTION: TO PREVENT THE RISK OF
ELECTRIC SHOCK DO NOT REMOVE
COVER (OR BACK). NO USER
SERVICEABLE PARTS INSIDE. REFER
SERVICING TO QUALIFIED SERVICE
PERSONNEL.
The exclamation point within an
equilateral triangle is intended to alert
the user to the presence of important
operating and maintenance
(servicing instructions in the literature
accompanying the appliance.
TO PREVENT FIRE OR SHOCK HAZARD, DO NOT EXPOSE THIS APPLIANCE TO RAIN OR MOISTURE.
WARNING
CAUTION
Use of controls or adjustments or performance of
procedures other than those wpecified here in may
result in hazardous radiation exposure.
The use of Optical instruments with this product will
increase eye hazard
CAUTION
This product satisfies FCC regulations when shielded
cables and connectors are used to connect the unit to
other equipment. To present electromagnetic interference
with electric appliances such as radios and televisions,
use shielded cables and connectors for connections.
N
ote
:
This equipment has been tested and found to comply with the limits for a
Class B digital device, pursuant to Part 15 of the FCC Rules. These limits are
designed to provide reasonable protection against harmful intrference in a
residential instailation. This equipment generates, uses and can radiate radio
frequency energy and, if not installed and used in accordance with the
instructions, may cause harmful interference to radio communications. However,
there is no guarantee that interference will not occur in a particular installation. If
this equipment does cause harmful interference to radio or television reception,
which can be determined by turing the equipment off and on, the user is
encouraged to try to correct the interference by one or more of the following
measures:
- Reorient or relocate the receiving antenna.
- Increase the separation between the equipment and receiver.
- Connect the equipment into an outlet on a circuit different from that to which
the receiver is connected.
- Consult the dealer or an experienced radio/TV technician for help.
CAUTION
This product contains a laser diode of higher class than 1. To ensure continued
safety, do not remove any covers or attempt Refer all servicing to qualified
personnel.
The following caution appears on rear of the unit.
CAUTION
VISIBLE AND INVISIBLE LASER RADIATION WHEN OPEN. AVOID
DIRECT EXPOSURE TO BEAM (WARNING LOCATION: INSIDE ON
LASER COVERSHIELD)
This product is in conformity with the EMC directive
and low-voltage directive.
This product incorporates copyright protection technology that is protected by method claims of certain U. S .Patents and other intellectual property
rights owned by Macrovision Corporation and other rights owners. Use of this copyright protection technology must be Authorized by Macrovision
Corporation, and is intended for home and other limited viewing uses only unless otherwise authorized by Macrovision corporation. Reverse engineering
or disassembly is prohibited.
Manufactured under license from Dolby Laboratories. "Dolby" and the double-D symbol are trademarks of Dolby Laboratories.
"DTS" and "DTS Digital Surround" are trademarks of Digital Theater Systems, Inc.
CAUTION
: LASER RADIATION WHEN OPEN.
AVOID EXPOSURE TO BEAM.
VORSICHT
: SICHTBARE UND UNSICHTBARE
LASERSTRAHLUNG. WENN
ABDECKUNG GE FFNET. NICHT
DEM STRAHL AUSETZEN.
ADVARSEL
: LASERSTR LING VED ÃÃ BNING UNDGÃ
UDSÆ TTEL SE FOR STRÃLING.
VARNING
: LASERSTRÃL NING NÃR DENNA DEL ÃR
ÖPPNAD BETRAKTA EJ STRÃLEN.
VARO!
: AVATTAESSA ALTISTUT LASERSÃTBL YLLE
ÃLÃ KATSO SÃTEESEN
IMPORTANT

3
Important Safety Instruction
Important Safety Instruction
- READ INSTRUCTIONS -
All the safety and
operating instructions should be read before the
product is operated.
- RETAIN INSTRUCTIONS -
The safety and
operating instructions should be retained for future
reference.
- HEED WARNINGS -
All warnings on the product
and in the operating instructions should be
adhered to.
- FOLLOW INSTRUCTIONS -
All operating and
use instructions should be followed.
- CLEANING -
Unplug this product from the wall
outlet before cleaning. The product should be
cleaned only with a polishing cloth or a soft dry
cloth. Never clean with furniture wax, benzene
secticides or other volatile liquids since they may
corrode the cabinet.
- ATTACHMENTS -
Do not use attachments not
recommended by the product manufacturer as
they may cause hazards.
- WATER AND MOISTURE -
Do not use this
product near water - for example, near a bathtub,
wash bowl, kitchen sink, or laundry tub; in a wet
basement; or near a swimming pool; and the like.
- ACCESSORIES -
Do not place this product on
an unstable cart, stand, tripod, bracket, or table.
The product may fall, causing serious injury to a
child or adult, and serious damage to the product.
Use only with a cart, stand, tripod, bracket, or table
recommended by the manufacturer, or sold with
the product. Any mounting of the product should
follow the manufacturer's instructions, and should
use a mounting accessory recommended by the
manufacturer.
- CART -
A product and cart
combination should be moved
with care. Quick stops,
excessive force, and uneven
surfaces may cause the
product and cart combination to
overturn.
- VENTILATION -
Slots and openings in the
cabinet are provided for ventilation and to ensure
reliable operation of the product and to protect it
from overheating, and these openings must not be
blocked or covered. The openings should never be
blocked by placing the product on a bed, sofa, rug,
or other similar surface. This product should not be
placed in a built-in installation such as a bookcase
or rack unless proper ventilation is provided or the
manufacturer's instructions have been adhered to.
- POWER SOURCES -
This product should be
operated only from the type of power source
indicated on the marking label. If you are not sure
of the type of power supply to your home, consult
your product dealer or local power company.
- LOCATION -
he appliance should be installed in
a stable location.
- NONUSE PERIODS -
The power cord of the
appliance should be unplugged from the outlet
when left unused for a long period of time.
- GROUNDING OR POLARIZATION
-
If this product is equipped with a polarized
alternating current line plug (a plug having one
blade wider than the other), it will fit into the
outlet only one way. This is a safety feature. If
you are unable to insert the plug fully into the
outlet, try reversing the plug. If the plug should
still fail to fit, contact your electrician to replace
your obsolete outlet. Do not defeat the safety
purpose of the polarized plug.
- If this product is equipped with a three-wire
grounding type plug, a plug having a third
(grounding) pin, it will only fit into a grounding
type power outlet. This is a safety feature. If you
are unable to insert the plug into the outlet,
contact your electrician to replace your obsolete
outlet. Do not defeat the safety purpose of the
grounding type plug.
- POWER-CORD PROTECTION -
Power-supply
cords should be routed so that they are not likely to
be walked on or pinched by items placed upon or
against them, paying particular attention to cords
at plugs, convenience receptacles, and the point
where they exit from the product.
- OUTDOOR ANTENNA GROUNDING -
If an
outside antenna or cable system is connected to
the product, be sure the antenna or cable system
is grounded so as to provide some protection
against voltage surges and built-up static charges.
Article 810 of the National Electrical Code,
ANSI/NFPA 70, provides information with regard to
proper grounding of the mast and supporting
structure, grounding of the lead-in wire to an
antenna discharge unit, size of grounding
conductors, location of antenna-discharge unit,
connection to grounding electrodes, and
requirements for the grounding electrode. See
Figure A.
- LIGHTNING -
For added protection for this
product during a lightning storm, or when it is left
unattended and unused for long periods of time,
unplug it from the wall outlet and disconnect the
antenna or cable system. This will prevent damage
to the product due to lightning and power-line
surges.
- POWER LINES -
An outside antenna system
should not be located in the vicinity of overhead
power lines or other electric light or power circuits,
or where it can fall into such power lines or circuits.
When installing an outside antenna system,
extreme care should be taken to keep from
touching such power lines or circuits as contact
with them might be fatal.
- OVERLOADING -
Do not overload wall outlets,
extension cords, or integral convenience
receptacles as this can result in a risk of fire or
electric shock.
- OBJECT AND LIQUID ENTRY -
Never push
objects of any kind into this product through
openings as they may touch dangerous voltage
points or short-out parts that could result in a fire or
electric shock. Never spill liquid of any kind on the
product.
- SERVICING -
Do not attempt to service this
product yourself as opening or removing covers
may expose you to dangerous voltage or other
hazards. Refer all servicing to qualified service
personnel.
- DAMAGE REQUIRING SERVICE -
Unplug this
product from the wall outlet and refer servicing to
qualified service personnel under the following
conditions:
- When the power-supply cord or plug is damaged.
- If liquid has been spilled, or objects have fallen
into the product.
- If the product has been exposed to rain or water.
- If the product does not operate normally by
following the operating instructions. Adjust only
those controls that are covered by the operating
instructions as an improper adjustment of other
controls may result in damage and will often
require extensive work by a qualified technician
to restore the product to its normal operation.
- If the product has been dropped or damaged in
any way.
- When the product exhibits a distinct change in
performance - this indicates a need for service.
- REPLACEMENT PARTS -
When replacement
parts are required, be sure the service technician
has used replacement parts specified by the
manufacturer or have the same characteristics as
the original part. Unauthorized substitutions may
result in fire, electric shock, or other hazards.
- SAFETY CHECK -
Upon completion of any
service or repairs to this product, ask the service
technician to perform safety checks to determine
that the product is in proper operating condition.
- WALL OR CEILING MOUNTING -
The product
should not be mounted to a wall or ceiling.
- HEAT -
The product should be situated away from
heat sources such as radiators, heat registers,
stoves, or other products (including amplifiers) that
produce heat.
Watch out for using Mobile DVD Player while driving
(Watching TV while driving are prohibited)
W
arning
4
Table of contents
Table of contents
Front Panel
Display
Rear Panel
Remote Control Unit
What's in the box
Preparing the Remote Control
Using the remote control
Compatible Discs
Before You Start
Caution on Handling Discs
5
7
7
8
9
Power Connection
Connecting to a TV
Connecting to a Car Audio System
Connecting External A/V Input
Connecting to a Dolby Digital
Connecting to Car Radio System
Connecting to
Component Video Input
Getting Started
16
17
19
18
20
21
22
Playing DVD Video disc
Playing MP3 discs
Playing Kodak CD and
JPEG file play
Fast Forward/Backward
Skip Forward/Backward
Slow Forward/Backward
Frame by Frame Playback
Basic Operation
23
25
26
27
28
27
28
OSD (On-Screen Display)
Selecting Audio Languages
Selecting Subtitles
Repeating a Title, Chapter, Track
Repeating a specific section (A-B)
Program Play
Zooming a Picture
Switching the Camera Angle
Direct Search (GO TO)
Advanced Operation
29
29
30
31
31
31
31
33
32
Basic Operations
General Setup
Audio Setup
Video Setup
Preference Setup
Password Setup
Using the Setup Menu
36
37
39
42
41
44
Specifications
Troubleshooting
Additional Information
45
46
11
12
14
13
Control & Display
Before You Start
Disc
Holding Discs
Cleaning Discs
5
C
autions on handling discs
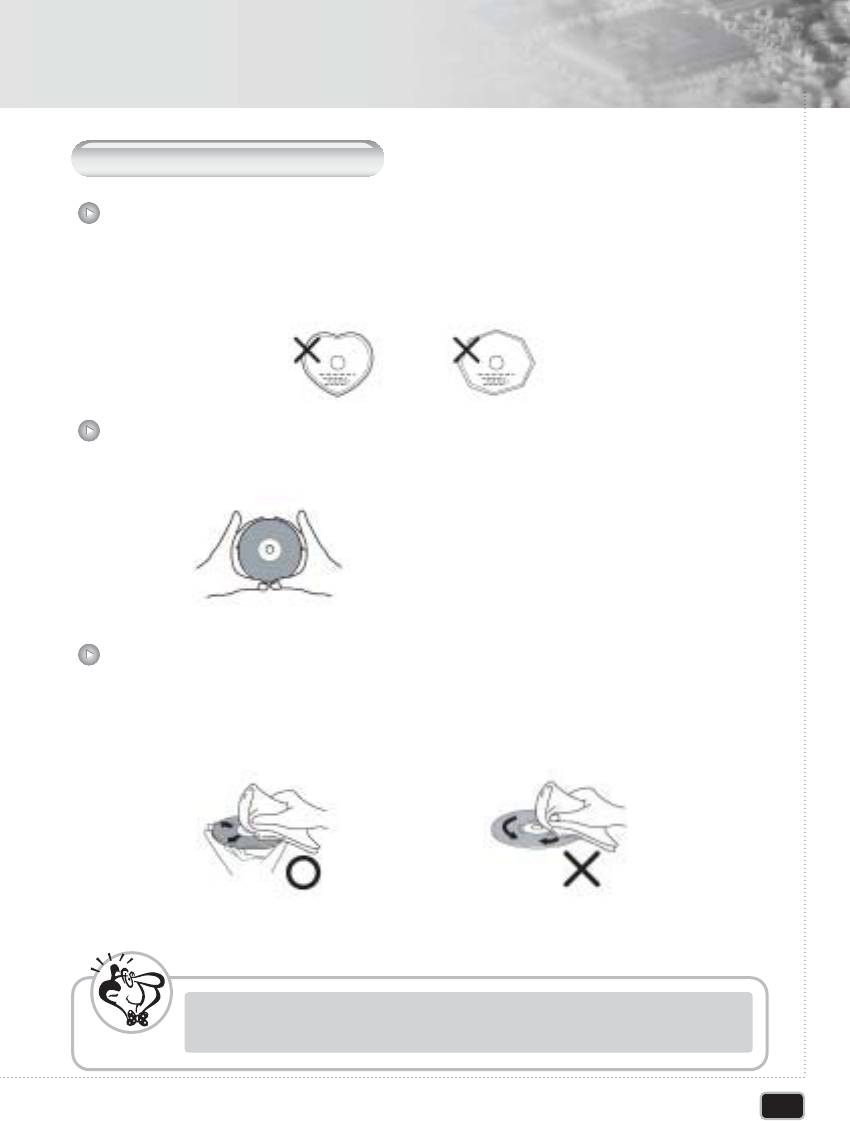
Only the discs including the mark shown on page 7 can be played on the DVD player.
Note, however, that discs with special shapes(heart-shaped discs, hexagonal discs,
irregular discs, etc.) cannot be played on the DVD player. Do not attempt to play such
discs, as they may damage the player.
Avoid touching the surface of discs when loading and unloading them.
- Fingerprints or dirt on the may lower sound and picture quality or cause breaks in
playback. Wipe off fingerprints or dirt
- Use a commercially available disc cleaning set or a soft cloth to wipe off fingerprints or dirt.
Be careful not to get fingerprints on the signal
surface (the side which shines in rainbow colors.)
Wipe gently from the middle outwards Do not wipe with a circular motion
- Do not use record spray or antistatic. Also do not use volatile chemicals such as
benzene or thinner
N
ote
Before you Start

6
Before You Start
Before You Start
- Do not get fingerprints, grease or dirt on discs.
- Be especially careful not to scratch discs when removing them from their cases.
- Do not bend discs.
- Do not heat discs.
- Do not enlarge the center hole.
- Do not write on the labeled (printed) side with a ball-point pen or pencil.
- Water droplets may from on the surface if the disc is moved suddenly from a cold place
to a warm one. Do not use hairdryer, etc., to dry the disc.
Cautions on handling discs
- Only load one disc at a time. Loading one disc on top of another may result in damage
or scratch the discs.
- Do not load cracked or warped discs or discs that have been fixed with adhesive, etc.
- Do not use discs on which the adhesive part of cellophane tape or glue used to attach
the label is exposed, or discs with traces of tape or labels that have been peeled, or
discs with traces of tape or label that have been peeled off. Such discs may get stuck
inside the player, resulting in damage
Caution on Loading Discs
7
Before You Start
Before You Start
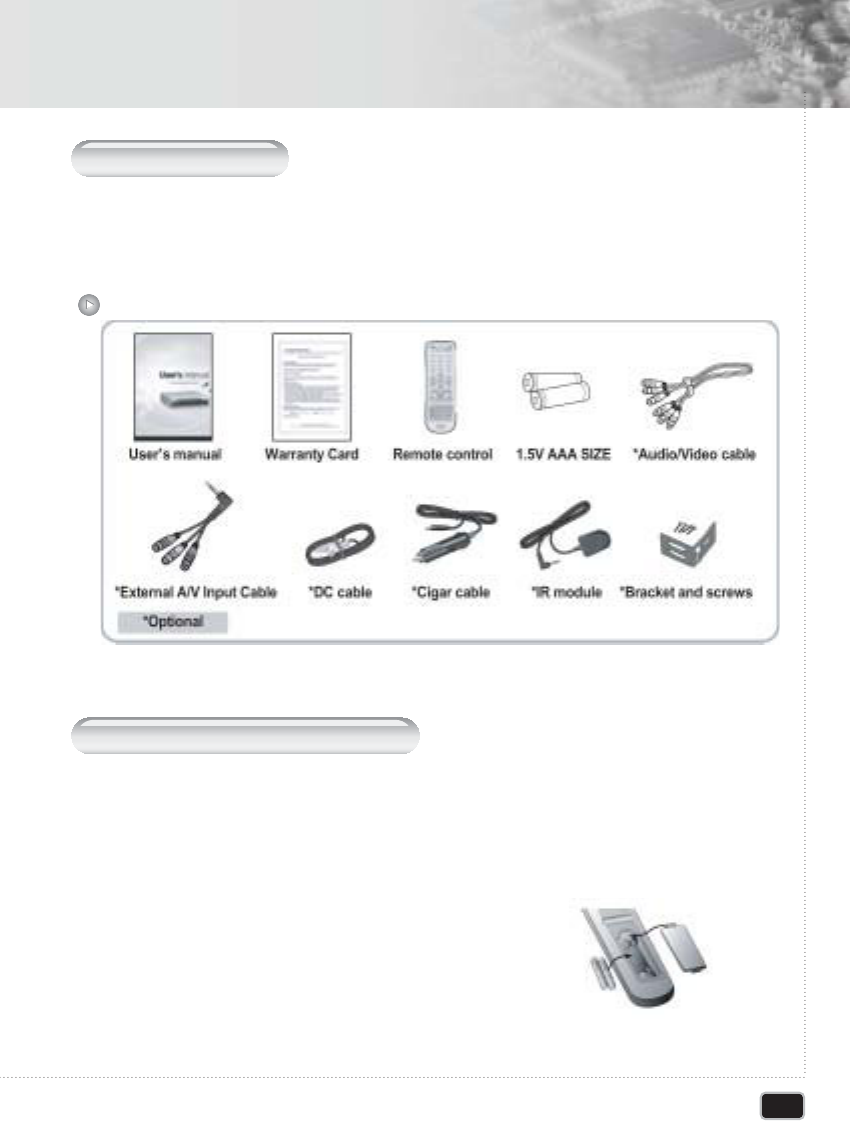
Thank you for buying this product. Please confirm that the following accessories are in
the box when you open it.
Insert the batteries into the remote controler so you can use it to operate the DVD player
Warning : DC cable must be connected to ACC power line
Open the battery cover.
Accessories
W
hat
'
s in the box
P
reparing the
R
emote
C
ontrol
11
Close the cover.
33
Insert batteries. (AAA size)
- Make sure to match the + and - on the batteries
to the marks inside the battery compartment.
22
W
arning
8
Before You Start
Before You Start
- Improper use of batteries may cause battery leakage and corrosion.
- To operate the remote control correctly, follow the instructions.
- Don't insert the batteries into the remote control in the wrong direction.
- Don't charge, heat, open, or short-circuit the batteries.
- Don't throw the batteries into fire.
- Don't leave dead or exhausted batteries in the remote control.
- Don't use different types of batteries together, or mix old and new batteries.
- If you do not use the remote control for a long period of time, remove the batteries to
avoid possible damage from battery corrosion.
- If the remote control does not function correctly or if the operating range becomes
reduced, replace all batteries with new ones.
- If battery leakage occurs, wipe the battery liquid from the battery compartment, then
insert new batteries.
- The batteries should last about one year with normal use.
- Direct the remote control at the remote sensor of the DVD player.
- Don't drop or give the remote control a shock.
- Don't leave the remote control near extremely hot or humid place.
- Don't spill water or put anything wet on the remote control.
- Don't open the remote control.
U
sing the remote control
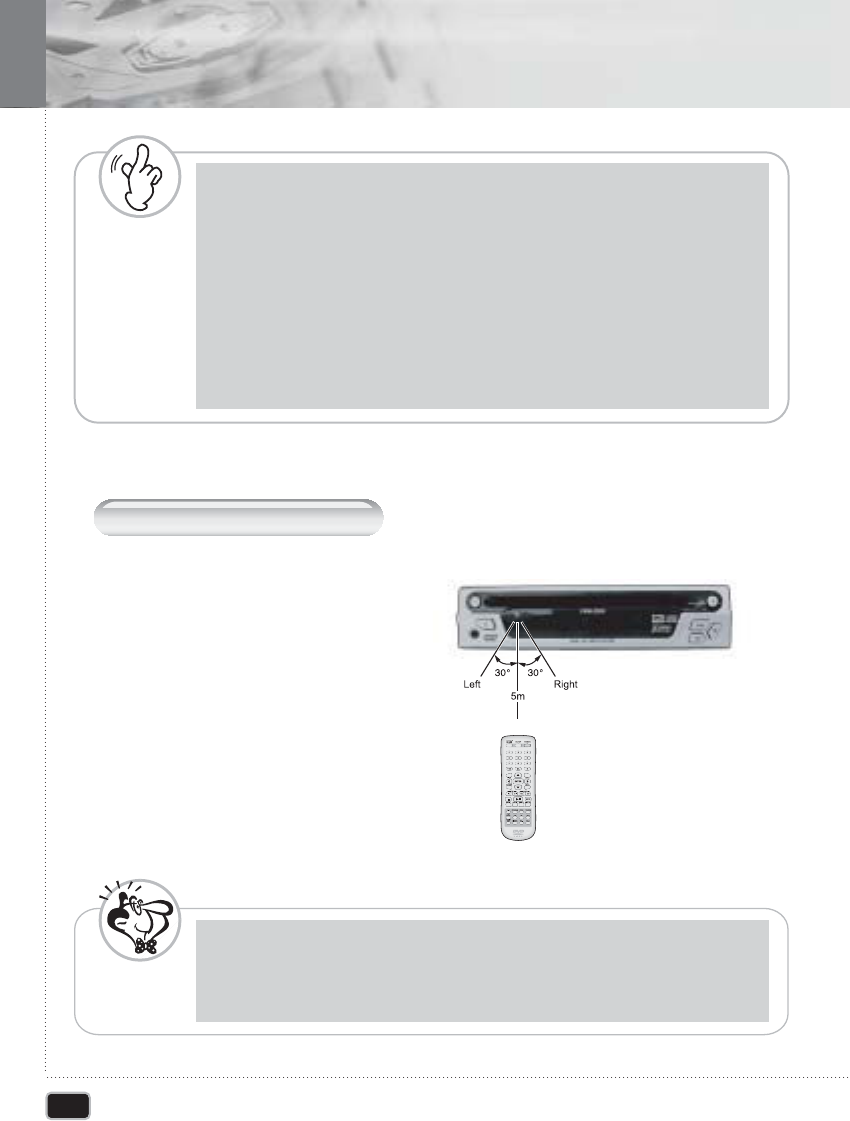
The effective operating range of the
remote control is 5~7m, and 30 left and
right degrees from the IR receiver.
N
ote
9
Before You Start
Before You Start
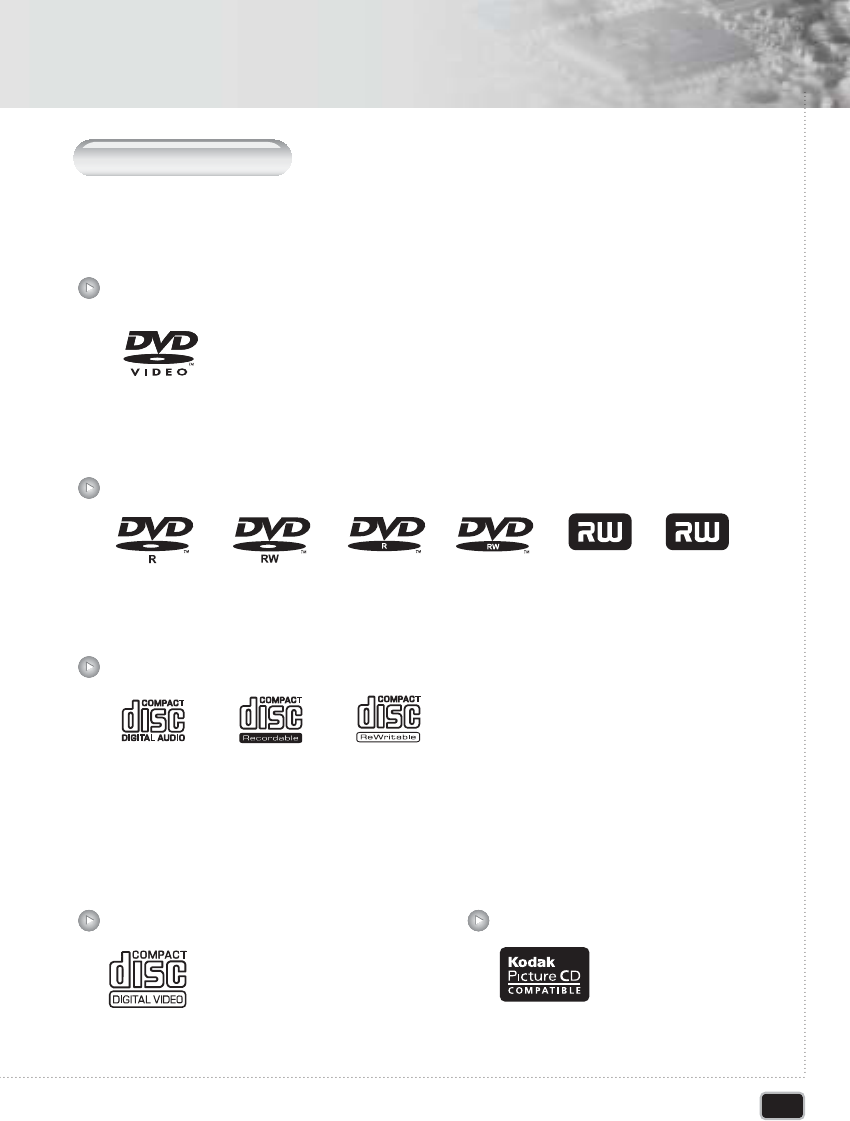
The types of discs listed on the table below can be used on the DVD player. The marks are
indicated on the disc labels or jackets.
- This unit can play DVD-R/ RW/ +R/ +RW discs recorded as DVD video format.
- 12cm or 8cm discs.
- Linear PCM digital audio
- CD-Audio, CD-R and CD-RW formatted CDs are divided into tracks.
(This unit can play CD-R and CD-RW discs recorded on CD Audio or
Video CD format, or with MP3 audio files)
- 12cm or 8cm discs.
- MPEG-1 digital audio.
- MPEG-1 digital video.
- Video CDs are divided into tracks.
- Picture 12cm discs
- Single sided or double sided discs.
- Single layer or dual layer discs.
- Dolby Digital, DTS, MPEG or Linear PCM digital audio.
- MPEG-2 digital video Discs are generally divided into one or more title.
Titles may be further subdivided into chapters.
Digital Video discs
DVD-R, DVD-RW, DVD+R, DVD+RW
DVD-R, DVD-RW, DVD+R, DVD+RW
Video CD Picture CD
C
ompatible
D
iscs
DVD+R
e
W
ritable
DVD+R

10
Before You Start
Before You Start
- The CD-ROM must be ISO 9660 compatible.
- Mono or stereo MPEG-1 Audio Layer 3 format, 32 or 44.1 or 48kHz fixed bit-rate.
Incompatible files will not play.
- Compatible with variable bit-rate (VBR) files.
- This player is compatible with multi-session discs.
- Audio encoded at 128Kbps should sound close to regular audio CD quality. Although
this player will play 48K to 320k bit-rate.
- MP3 tracks, the sound quality becomes. Noticeably worse at lower bit rates.
MP3 compatibility information
Your DVD player is designed and manufactured to respond to the region management
information that is recorded on a DVD disc.
All DVD Video discs carry a region mark on the case somewhere that indicates which
region of the world the disc is compatible with. Your DVD player also has a region mark,
which you can find on the rear panel. Discs from incompatible regions will not play in
this player. Discs marked ALL will play in any player.
Region code
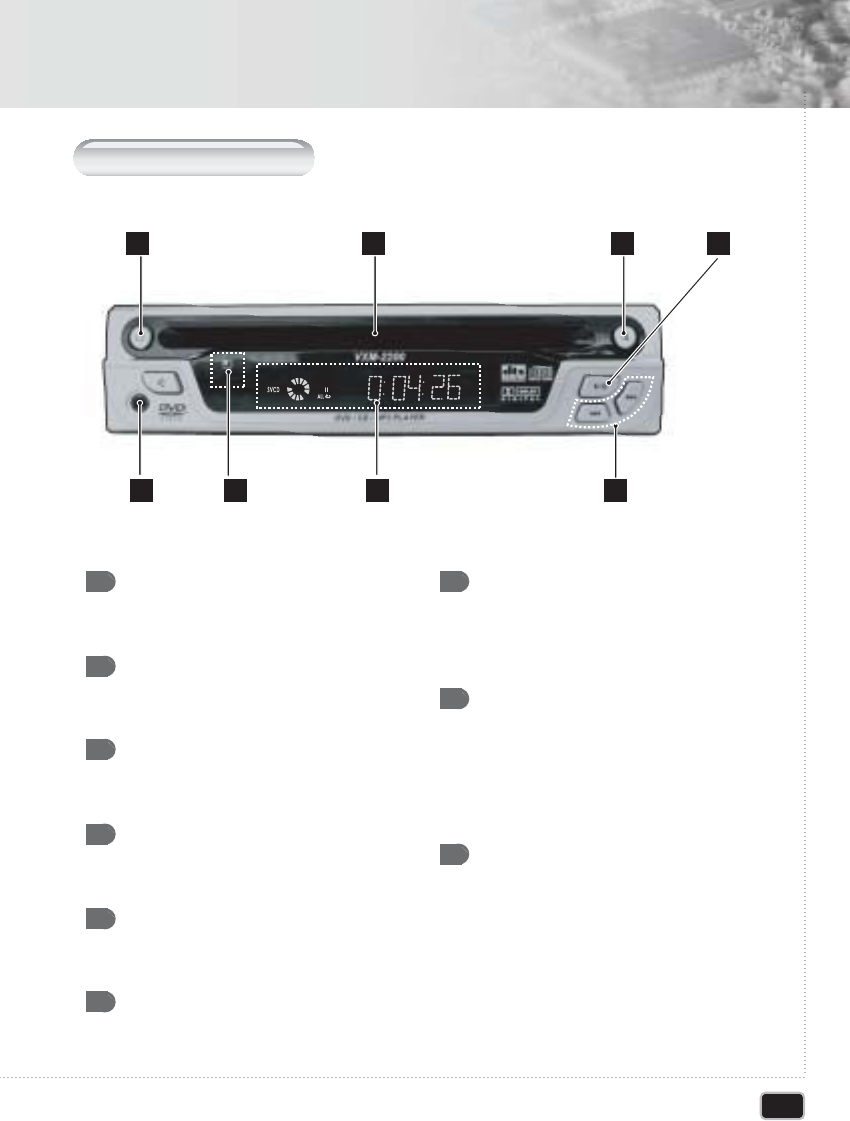
Front Panel Control
POWER
Turns the power on/off.
DISC IN / OUT HOLE
Discs are inserted and ejected here.
EJECT
Press EJECT to eject the discs.
PLAY/PAUSE
Starts disc play and pause
SKIP Forward/Reverse
Plays skip forward/reverse.
REMOTE SENSOR
Receives a IR signal from the
remote control
DISPLAY WINDOW
Display information about the current
state of the player and the disc.
(See next page.)
STEREO JACK FOR CAR
PACK / AV IN
Plug in car pack jack for stereo audio
output.
Plug in video and stereo audio input.
MUTE
Turns the audio outputs on/off.
1 7
8
9
2
3
4
5
6
11
Control & Display
Control & Display
1 2 3 4
568 7

12
Control & Display
Control & Display
D
isplay
DVD/SVCD/MP3/PBC
Illuminates the type of the disc loaded.
ROTATION
Rotates when the disc is spinning.
PLAY/PAUSE
Indicates the current operation mode.
Repeat/ALL
Indicates the current repeat play mode.
DTS
Indicates that the audio type of the disc
under play is DTS.
1
2
3
5
4
TIME
Indicates time information and displays
information about operation such as PLAY,
STOP, LOAD, NO DISC, etc.
Dolby
Indicates that the audio format of the disc
under play is Dolby digital.
6
7
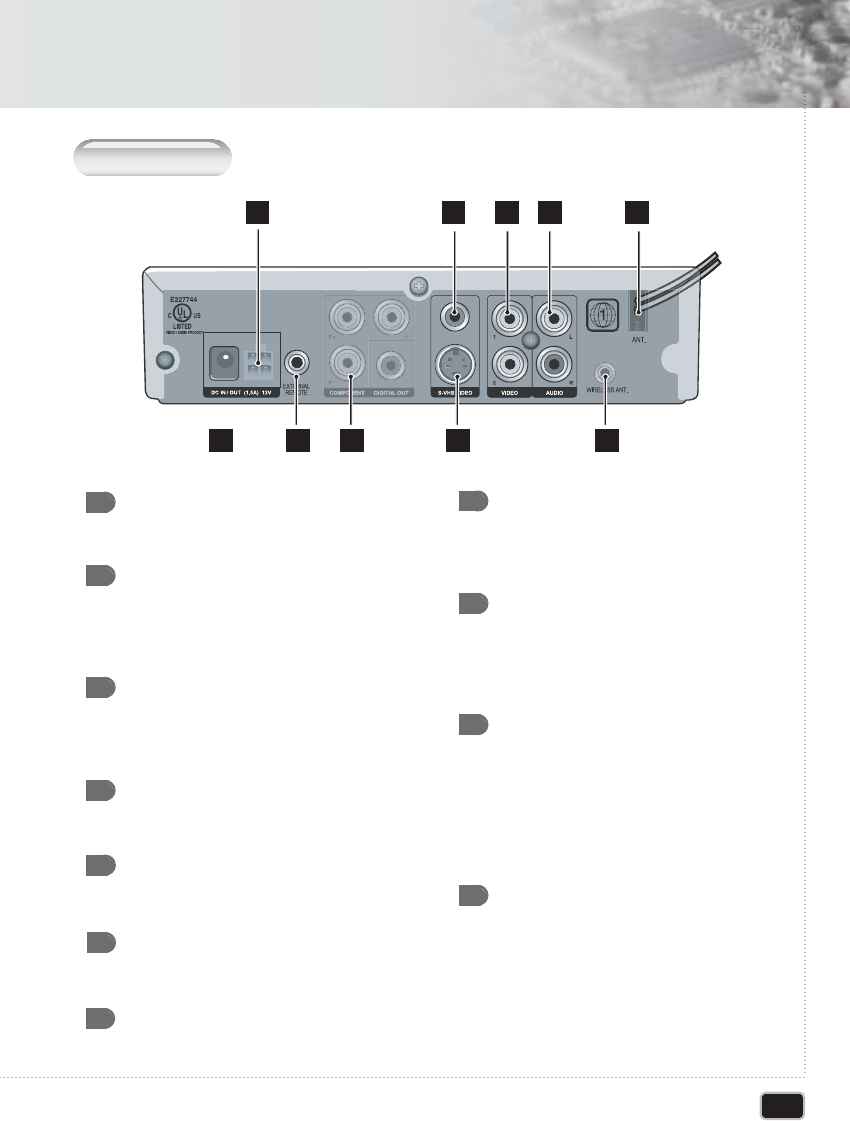
Rear Panel
DC INPUT
Use the cigar cable to connect the
cigar jack.
Use the AC adapter to connect the AC
Power. (optional)
EXTERNAL REMOTE
CONNECTOR
Use the External Remote Control to
Connect the Irmodule
DIGITAL AUDIO OUT (Coaxial)
Use coaxial digital cable to connect to
a compatible Dolby Digital receiver
VIDEO OUT
Use a video cable to connect one of
these jacks to the Video input on your TV.
DC INPUT
Use the DC cable to connect the
only 12V battery
1
2
3
4
5
AUDIO OUT (L/R)
Connect to the Audio input jacks of your
TV, audio/video receiver
6
S-VIDEO OUT
Use the S-VIDEO cable to connect this
jack to the S-VIDEO.
7
VGA CONNECTOR (VGA option)
Connect the VGA monitor to this connector.
In VGA mode you can see progressive
scan video.
8
COMPONENT VIDEO OUT
Connect the component video input of TV
system. It can out Y/Pb/Pr or RGB video
output. At this video mode progressive
scan is also possible.
9
ANTENNA CONNECTOR
(Wireless FM Transmitter model)
To connect antenna for internal wireless FM
transmitter. It can out DVD player's audio
signal to your car radio system. At this mode
not necessary to connect any wiring for DVD
player's audio signal
10
ANTENNA CABLE
(Wired FM Transmitter model)
To connect car radio's antenna and car radio
antenna input for use wired FM transmitter.
It can switching car antenna signal during
DVD player's operation, so radio noise will
decrease.
11
13
Control & Display
Control & Display
1 4 5 6
11
2 3 7
10
9
14
Control & Display
Control & Display
R
emote
C
ontrol
OPEN / CLOSE ( )
Ejects the disc
1
SETUP ( )
Use to set various functions according to
individual preference
2
POWER ( )
Turns on or off the DVD player.
3
NUMBER
Press the number button. Use the +10 button to
input numbers of 10 or over.
4
TITLE ( )
Use the TITLE button to display the title screen
included on DVD discs.
5
MENU ( )
Use the MENU button to display the menu screen
ncluded on a DVD discs.
6
RETURN ( )
Use the RETURN button to return to the previous
menu screen.
7
MUTE ( )
Turns on/off audio outputs.
8
ARROW BUTTONS( )
Use to move to the desired menu.
9
CL(CLEAR) ( )
Press this to clear numbers that you have input.
10
ENTER ( )
Selects menu items and begins disc play.
11
STOP ( )
Stop video playback in DVD video and video
CD mode.
12
PLAY/PAUSE ( )
Play or pause video and audio media.
13
STEP ( )
14
Play one frame at a time during
pause.
SKIP ( )
15
Select previous track, title, chapter,
and index or beginning of current track,
title, chapter, index.
Select next track, title, chapter, index.
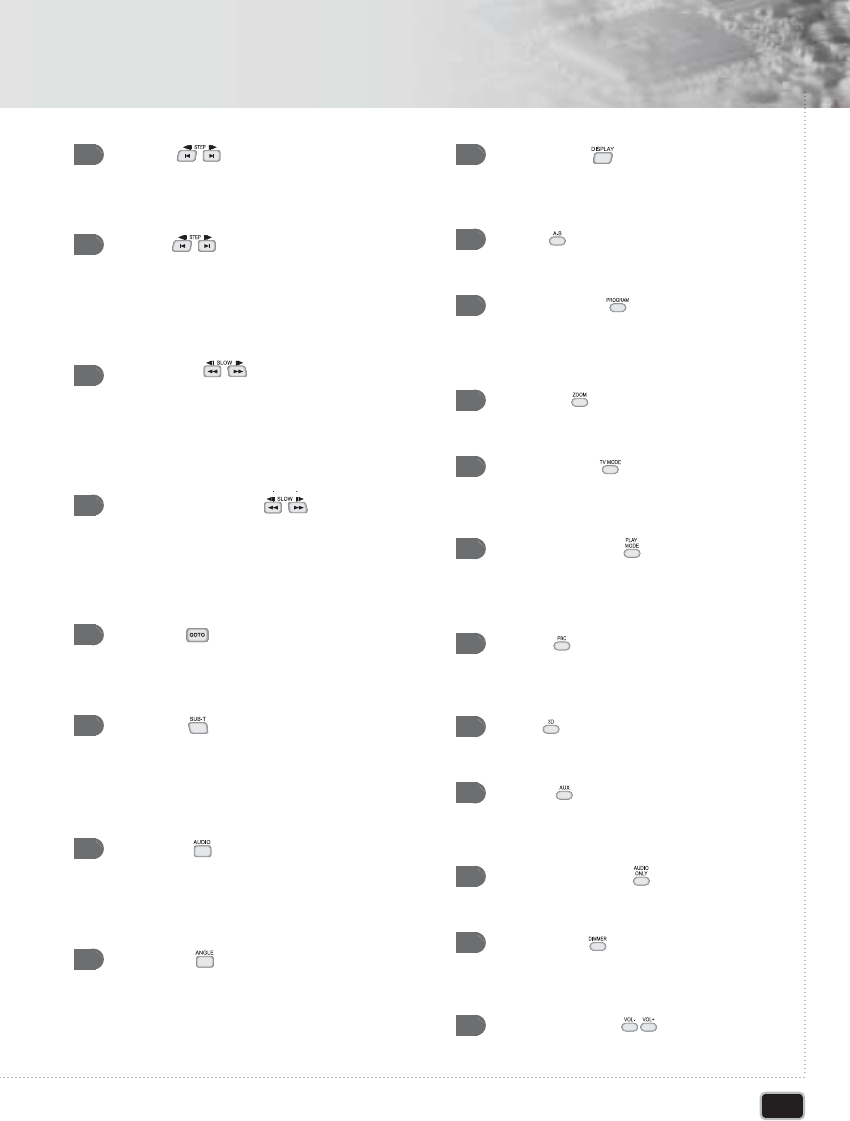
DISPLAY ( )
22
Shows the information about time,
play state.
A-B ( )
23
Repeating a specific section.
PROGRAM ( )
24
Programs the desired titles and tracks of
DVD and CD-DA.
ZOOM ( )
25
Press this to enlarge the image.
TV MODE ( )
26
Changes the NTSC/PAL/MULTI /VGA
(option) mode.
PLAY MODE ( )
27
Repeats part or all of a chapter, title,
track, or an entire disc
PBC ( )
28
Turn on and off the PBC function in
video CD mode
3D ( )
29
Virtual 3D Sound Control
AUX ( )
30
Changes the DVD mode and external
A/V input mode
AUDIO ONLY ( )
31
Turns off the screen for audio only mode
DIMMER ( )
32
Set the display brightness
(HALF, FULL, OFF).
VOL+/VOL - ( )
33
Increases and decreases the volume.
SEARCH ( )
16
Press for fast backward scanning during
playback.
Press for fast forward scanning during
playback.
SLOW MOTION ( )
17
Press for slow backward scanning during
pause.
Press for slow forward scanning during
pause
GOTO ( )
18
Used to go to the chapter, track or song
of the disc you want
SUB-T ( )
19
Changes the subtitle language to another
available language or sets OFF (if the disc
supports multiple subtitle languages).
AUDIO ( )
20
Changes the audio language to another
available language (if the disc supports
multiple audio languages).
ANGLE ( )
21
View with a different frame angle. (This
button is available only on multiple angle
DVDs.)
15
Control & Display
Control & Display
16
Getting Started
Getting Started
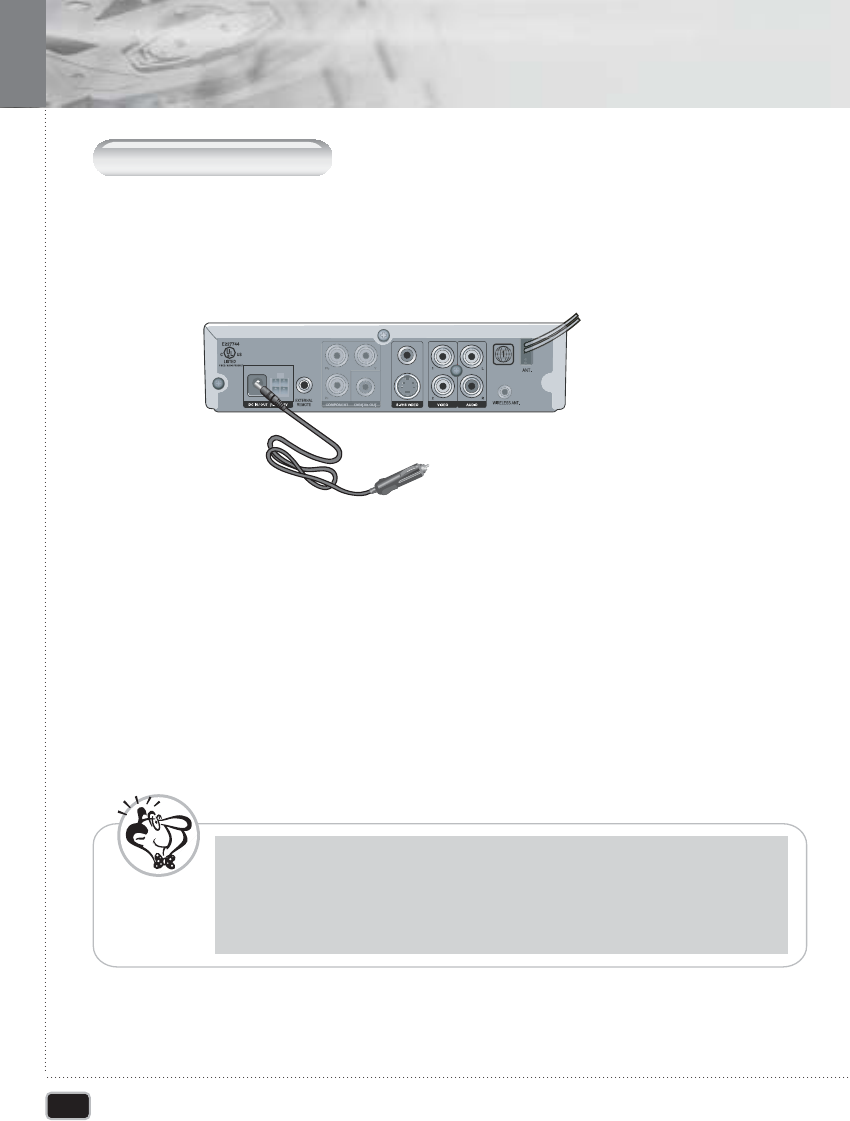
P
ower
C
onnections
When using the Cigar cable
- Make sure that input voltage is 12-24V
- Connect to DC INPUT using the include cigar cable.
To Cigar Jack
11
When connecting the DC power cable.
- DC cable - This is installation should be made by a qualified service person and
should confirm to all local codes.
- Connect the terminal of red cable to DC 12-24V, and the terminal of black cable to
ground.
22
When using the DVD player at home
- Connect to DC INPUT using the AC adapter.(optional)
33
- When you connect the DVD player to your TV, be sure to turn off the power and unplug
both units from the wall outlet before making any connections.
- Connect the DVD player to your TV directly. If you connect the DVD player to a VCR,
the playback picture will be distorted because DVD video discs are copy protected.
- Fuse Replacement Marking - Replace only with same type (3 A, 250 V) and
ratings of fuse. For continued protection against fire hazard.
N
ote
W
arning
- Do not set the Digital Audio Output of this DVD player to "SPDIF/PCM" unless you are
connecting the DIGITAL AUDIO jack of this DVD player to an AV decoder that has
Dolby Digital decoding function. High volume sound may damage your hearing as well
as speakers.
C
onnecting to a
TV
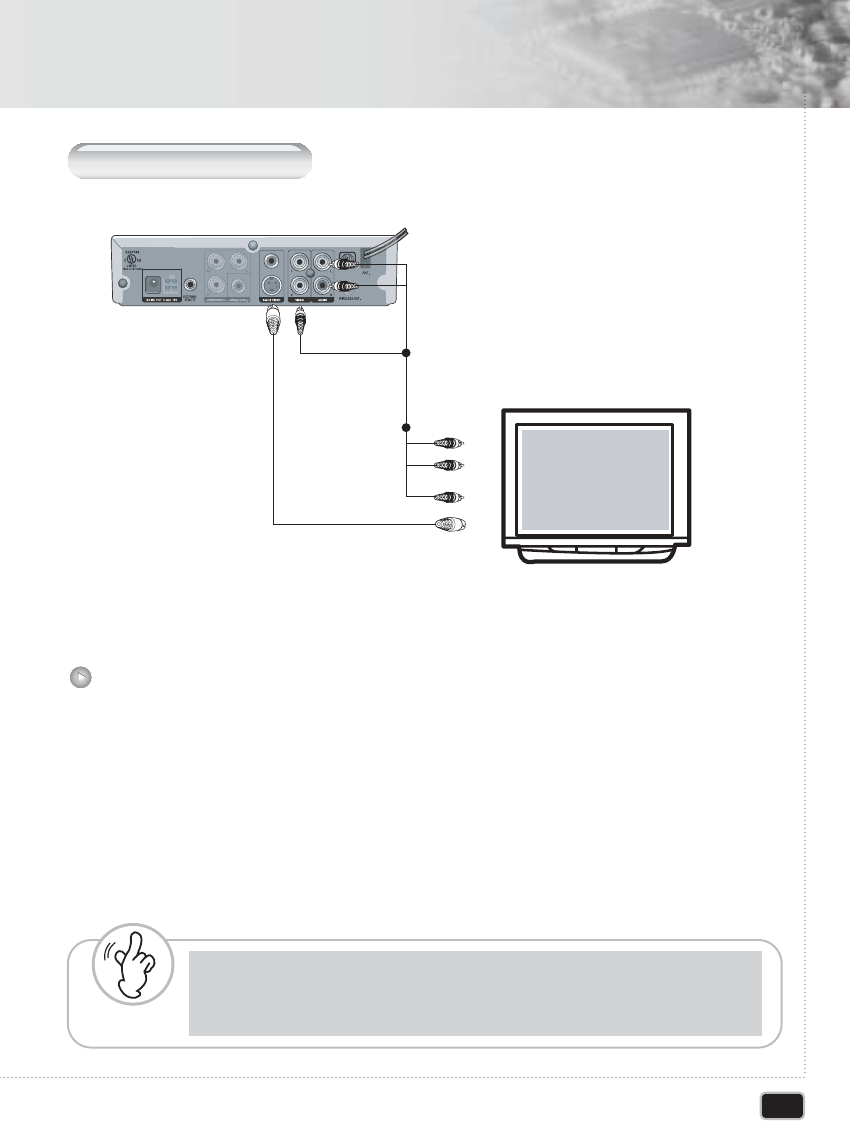
VConnect the AUDIO CABLES between the AUDIO OUT L and R jacks on the back of
your DVD player and the corresponding AUDIO INPUT jacks on your TV.
L (White)
Audio Output
Audio Input
Video Input
R (Red)
R
L
Video Output (Yellow)
S-Video Output
S-Video Input
11
Connect the VIDEO CABLE between the VIDEO OUT jack on the back of your DVD player
and the corresponding VIDEO INPUT jack on your TV. (if you have S-VIDEO jack on your
TV, connect to the S-VIDEO jack on your DVD player. You will watch a better picture.
22
Connect the DVD player to your TV.
17
Getting Started
Getting Started
18
Getting Started
Getting Started
C
onnecting to a
C
ar
A
udio
S
ystem
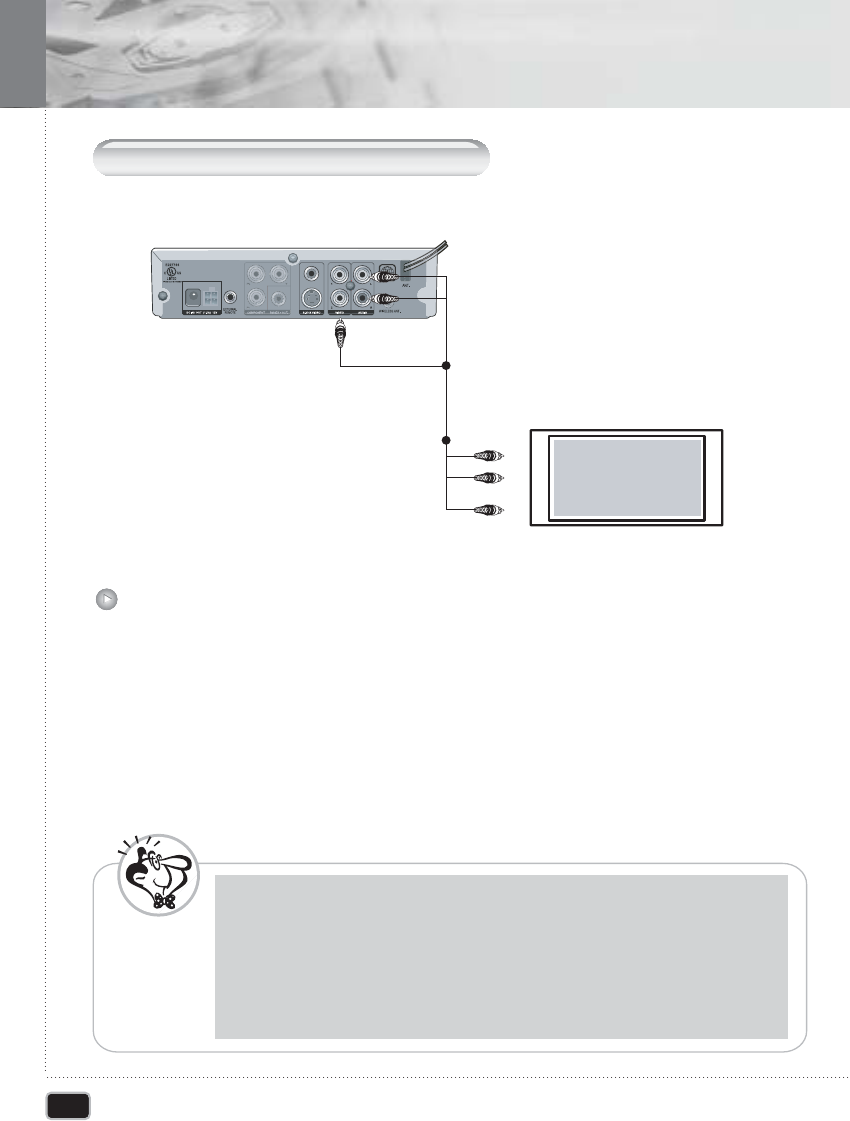
Connect the AUDIO CABLES between the AUDIO OUT L and R jacks on the back of
your DVD player and the corresponding AUDIO INPUT jacks on your audio system.
11
Connect the VIDEO CABLE between the VIDEO OUT jack on the back of your DVD
player and the corresponding VIDEO INPUT jack on your TV.
22
- When you connect the DVD player to other equipment, be sure to turn off the power and
unplug all of the equipment from the power source before making any connections.
- If you place the DVD player near a turner or radio, the radio broadcast sound might be
distorted. In this case, move the DVD player away from the tuner and radio.
- Be sure to adjust the receiver's volume to a moderate listening level. Otherwise, the
speakers may be damaged by a sudden high volume sound.
- Turn off the receiver before you connect or disconnect the DVD player's power cord.
If you leave the receiver power on the speakers may be damaged.
N
ote
Connecting to a Car Audio System.
L (White)
Audio Output
TV
Audio Input
Video Input
R (Red)
R
L
Video Output (Yellow)
19
Getting Started
Getting Started
C
onnecting
E
xternal
A/V I
nput
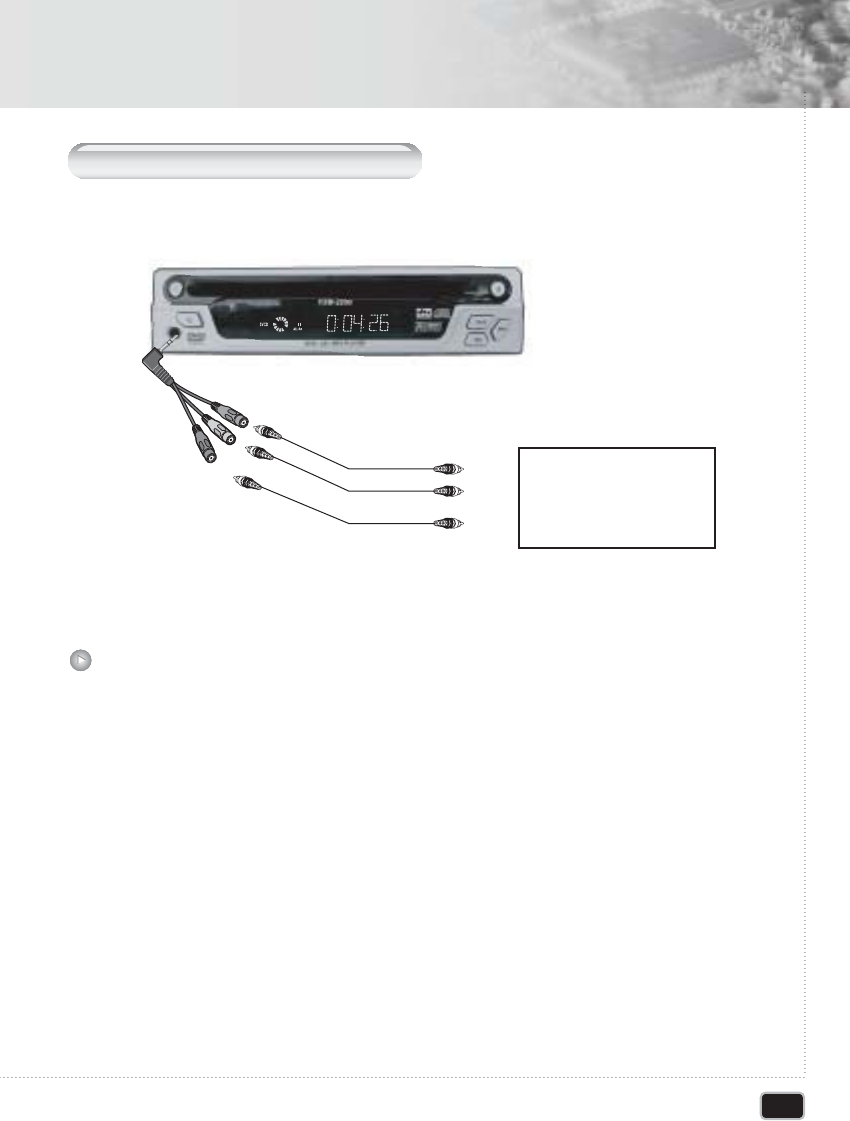
This function can connects your another A/V (Game machine, MD...) to monitor and
car audio system. Only connect A/V input cable to your DVD player's AUDIO OUT/AV
IN socket than DVD player changes to external A/V input mode. If A/V has only audio
signals cannot changes to external A/V input mode.
You can change the mode by remote controller's AUX key.
Caution : This function cannot operate in VGA mode (VGA option)
11
Connecting External A/V Input
Audio Output
Audio Input
External A/V Input Cable
Video Output
Video Input R
R
L
LExternal AV player
Game machine
MD player
CD player...
20
Getting Started
Getting Started
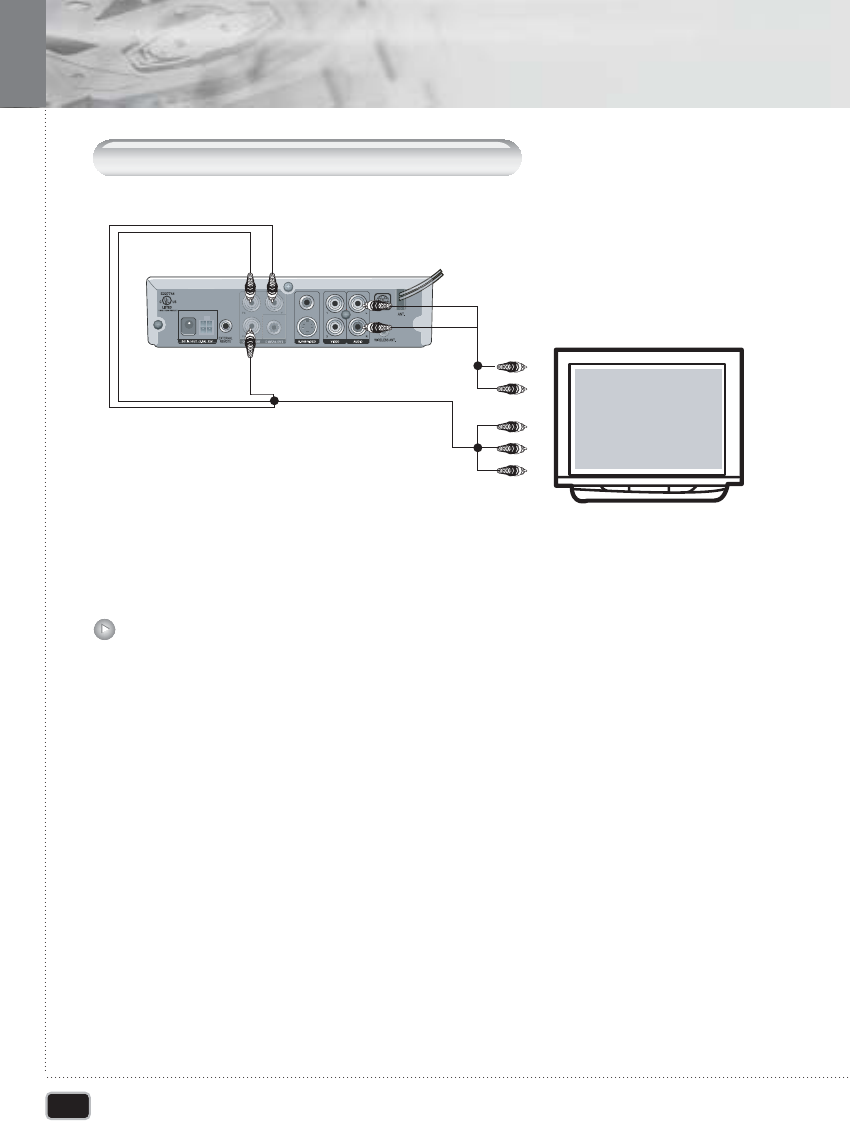
C
onnecting to a
D
olby
D
igital
S
ystem
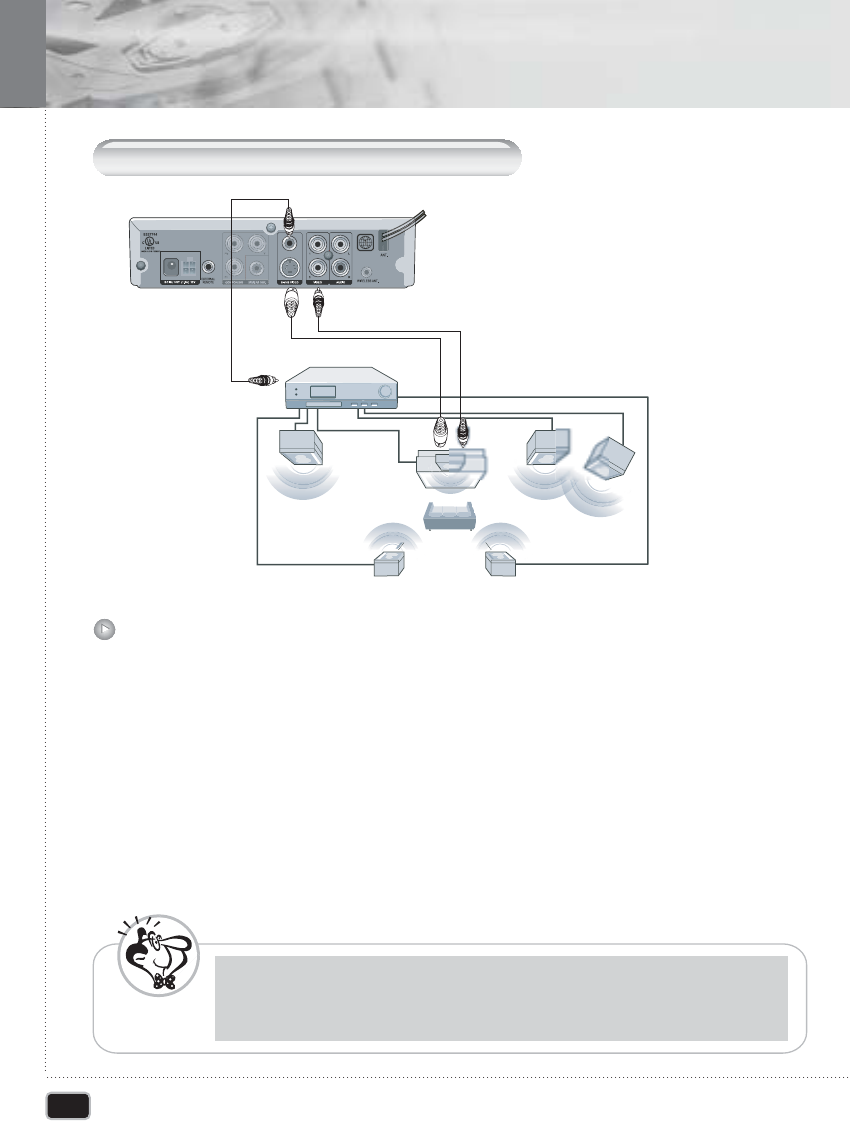
Dolby Digital is the surround sound technology used in theaters showing the latest movies,
and is now available to reproduce this realistic effect in the home. You can enjoy motion
picture and live concert DVD video discs with this dynamic realistic sound by connecting
the DVD player to a 6 channel receiver equipped with a Dolby Digital decoder or Dolby
Digital processor.
- When you connect the DVD player to other equipment, be sure to turn off the power and
unplug all of the equipment from the wall outlet before making any connections.
- Turn off the receiver before you connect or disconnect the DVD player's power cord.
If you leave the receiver power on, the speakers may be damaged.
N
ote
Dolby Digital
Connect the COAXIAL DIGITAL OUT (black) jack on the back of your DVD player
to the DIGITAL IN jack fo the Decoder or AV amplifier.
11
2. Page 17-18 for details on video connection to TV
22
Video Output
S-Video Output
Coaxial Cable
Coaxial Digital In
Dolby Digital Decoder
TV
Center
Speaker
Front
Speaker (R)
Front
Speaker (L) Sub Woofer
Rear Speaker
(Left surround) Rear Speaker
(Right surround)
Coaxial Digital Out
21
Getting Started
Getting Started
C
onnecting to
C
ar
R
adio
S
ystem
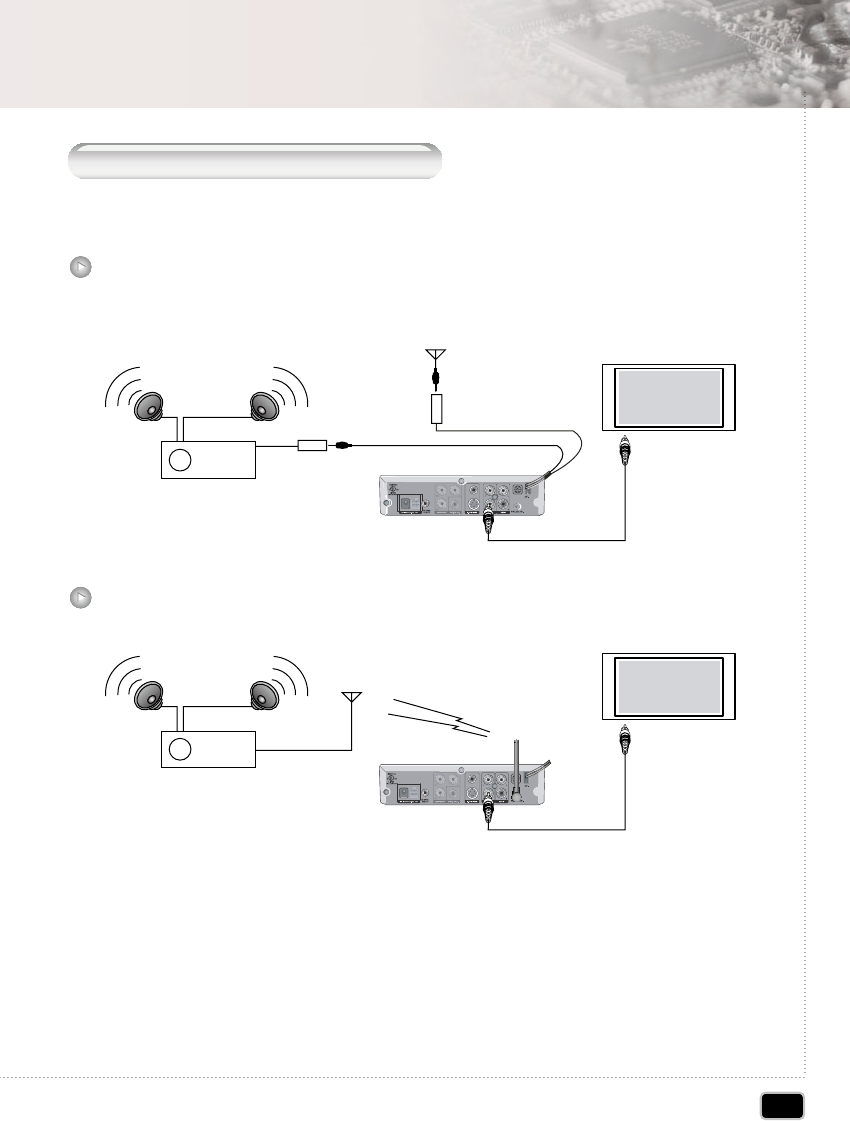
Connecting 2 wires to car antenna and car radio system each other.
For use internal FM transmitter any connecting will be required.
Wired FM transmitter model
TV
Video Signal
Audio Signal
Car Radio
Car Antenna
Just connect antenna to it's connector
Setting the FM transmitter frequency
SETUP => Audio Setup Page => FM Tx => Setting FM Frequency (Off, 88.1MHz ~ 88.9MHz)
CAUTION
- Some Frequency has any broadcasting signal.
- Audio signal has noise sometimes followed by moving position or electrical noise.
Sometimes wireless FM transmitter causes some noise according to setting position
of DVD player and environmental condition (high voltage wire or another radio frequency)
Wireless FM transmitter model
Audio Signal
TV
Video Signal
Car Radio
Car Antenna
22
Getting Started
Getting Started
C
onnecting to
C
omponent
V
ideo
I
nput
Some TV system has component video signal input terminal. DVD player can output
component video signal. At this mode progressive scan will possible.
Connect the component video (Y/Pb/Pr or RGB) cable to it's terminal and setting the
setup menu.
Connecting to Component Video Input
Setting the Component video output
SETUP => Video Setup Page => Component (select Off / YUV / RGB)
11
Setting the Progressive Scan (enable when YUV or RGB selected)
SETUP => Video Setup Page => TV Mode (select Interlace / P-SCAN)
22
Audio Output
Audio Input
Video Input
TV
Video Output
Component Cable
R (Red)
L(White)
L
Y
YPb
Pr
Pb
Pr
R
23
Basic Operation
Basic Operation
P
laying
DVD V
ideo
D
iscs
Ensure that your DVD player is connected correctly to the TV and audio system,
which are output components. Turn on the power of the TV and audio system.
Ensure that the local code of the DVD player is matched to that of the disc. If not
matched, your disc will not be played.
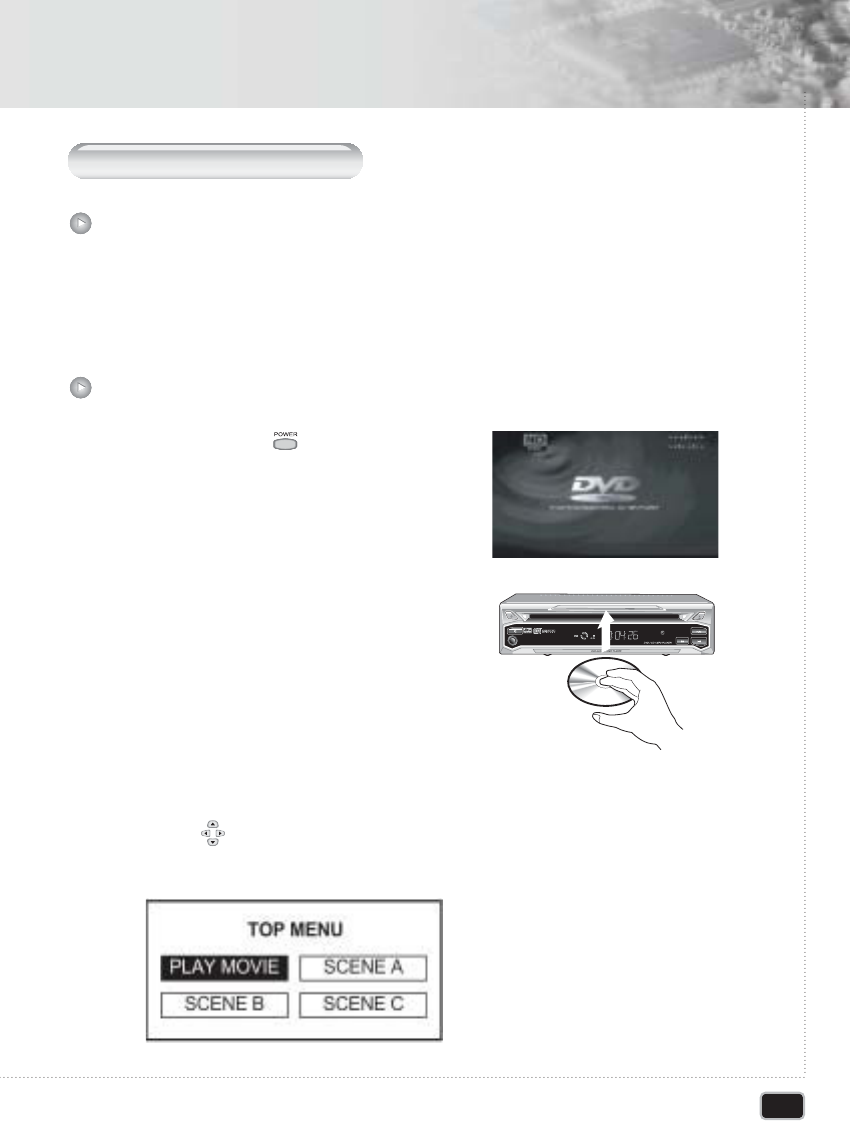
Before Playing Your DVD Disc
Press the POWER ( )button.
11
Insert the DVD disc. Ensure that the
labeled surface (not the surface where
data is recorded) is at the top when
placing it.
22
Your DVD disc will be automatically played depending on the current program mode.
1) The Disc menu is displayed on the screen. Select the desired menu using the
arrow ( )buttons or NUMBER buttons and press the ENTER button to play
your DVD disc.
33
To Play a DVD Disc
Some DVD discs contain menus. Sometimes these are displayed automatically when
you start playback; others only appear when you press MENU or Title remote control.
TITLE ( )button: Displays the top menu of a DVD disc
MENU ( )button: Displays a DVD disc menu-this varies with the disc and may be the
same as the top menu.
RETURN ( )button: Returns to the previously displayed menu screen.
Arrow( ) button: Move the cursor around the screen.
ENTER ( )button: Selects the current menu option.
Number button: Selects a numbered menu option
PLAY/PAUSE( ) : Starts playback or pause a disc that's playing
(press again to restart playback)
STOP( ): Stop playback
FR( ): Press for fast backward searching.
FF( ): Press for fast forward searching
PREV( ): Skip to the previous chapter.
NEXT( ): Skip to the next chapter.
24
Basic Operation
Basic Operation
- Don't move the DVD player during playback. During so may damage the disc and the
DVD player.
- When " " appears on the TV screen while a button is pressed, it means that this
function is not available on the disc you are playing.
- Depending on the DVD disc, some operations may be different or restricted. Refer to
the jacket or case of disc you are playing.
N
ote
Basic Playback Controls
Basic Disc Menu Controls
25
Basic Operation
Basic Operation
P
laying
MP3
discs
To Play a MP3 File
Insert the MP3 disc. Make sure that the disc's label is facing up.
11
MP3 menu screen is displayed
automatically depending on MP3 disc's
folder (directory) structure
22
Using the UP( ) or DOWN( ) button to find the desired folder
33
Press the ENTER( ) button to select.
The TV screen shows the file lists under
the folder.
44
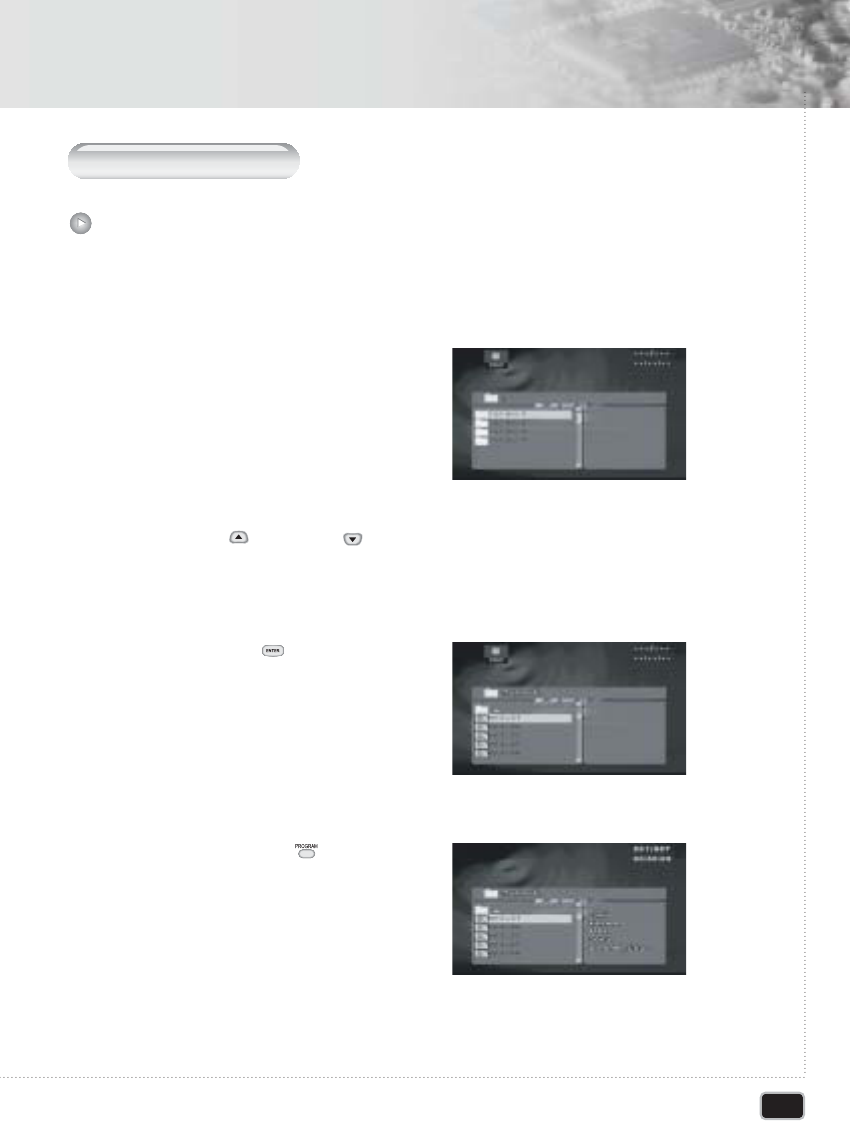
Press the PROGRAM ( ) button
repeatedly. Each time you pressed,
PROGRAM mode will be changed
repeatedly. (Folder a Filelist)
55
26
Basic Operation
Basic Operation
- The file name is only displayed in English.
- This DVD player is compatible with the "MPEG-1 Audio Layer 3" standard. It is not
compatible with such other standards as "MPEG-2 Audio Layer 3", "MPEG-2.5 Audio
Layer 3", MP1, MP2, etc.
- Do not play CD-R/RW discs containing any files other than music CD files, MP3 and
JPEG files.
- Programmed playback is not possible with MP3 discs.
- When writing MP3 files on CD-R/RW discs, select "ISO9660 level 1" as the writing
software format.
N
ote
P
laying
K
odak picture
CD
and
JPEG
file play
When a Kodak Picture CD is inserted, an automated slide show is launched. When a JPEG
file loaded, the table of contents is displayed on TV screen. 16 slideshow transition modes
are provided. Use the PROGRAM button to switch the slideshow transition mode.
Diagonal Wipe Right Top -> Diagonal Wipe Left Bottom -> Diagonal Wipe Right Bottom ->
Extend from Center H -> Extend from Center V -> Compress to Center H -> Compress to
Center V -> Window H -> Window V -> Wipe from Edge to Center -> Move in from Top -> None)
Each time the ZOOM button is pressed during playback, zoom 125 -> 150 -> 200 ->
50 -> 75 -> zoom off is selected repeatedly
- UP( ) button : Moving up the zooming picture
- DOWN( ) button : Moving down the zooming picture
- LEFT( ) button : Moving left the zooming picture
- RIGHT( ) button : Moving right the zooming picture
22
Select the picture
Select the picture, you want to see, by pressing the UP( ) or DOWN( ) button.
The selected item shows as small size picture on the right side of File Menu Screen.
11
Image rotation
There are 4 modes to rotate a picture: Left, Right, Invert, Mirror
- UP( ) button : invert
- DOWN( ) button :mirror
- LEFT( ) button :Turn left
- RIGHT( ) button :Turn right
22
27
Basic Operation
Basic Operation
F
ast
F
orward
/B
ackward
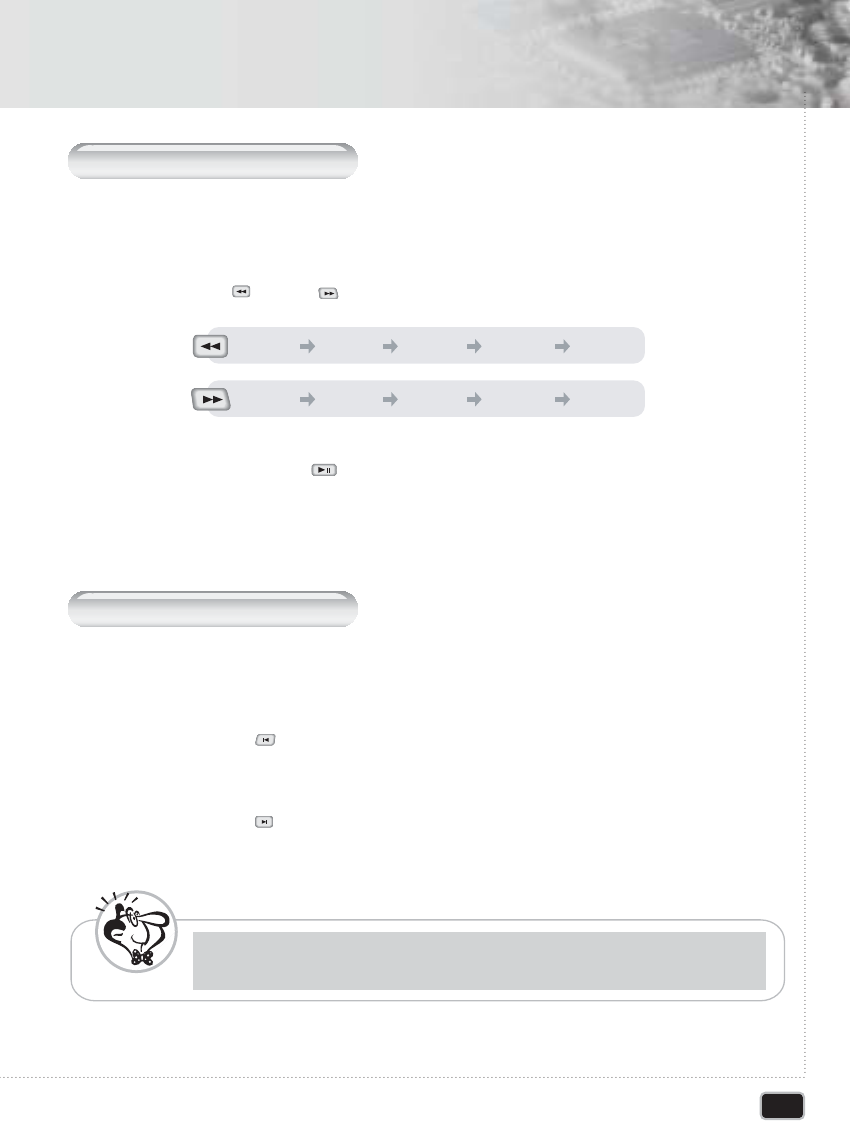
Use this function to play the DISC contents in fast forward or fast reverse. During searching,
audio will be muted (except CD-DA).
Press the FR ( ) or FF ( ) button during disc play.
11
Press the PLAY/PAUSE ( ) button to resume normal playback.
22
S
kip
F
orward
/B
ackward
Use this function to move to the net or previous chapter for DVD, track for VCD and CD-DA.
Press the PREV ( ) button to go to the previous chapter or track.
11
Press the NEXT ( ) button to go to the next chapter or track.
22
- This function will not operate if there is only one chapter per a disc.
N
ote
ඔඔG x 2 ඔඔG x 4 ඔඔG x 8 ඔඔG x 16 ඔඔG x 32
ඖඖG x 2 ඖඖG x 4 ඖඖG x 8 ඖඖG x 16 ඖඖG x 32
28
Basic Operaion
Basic Operation
S
low
F
orward
/B
ackward
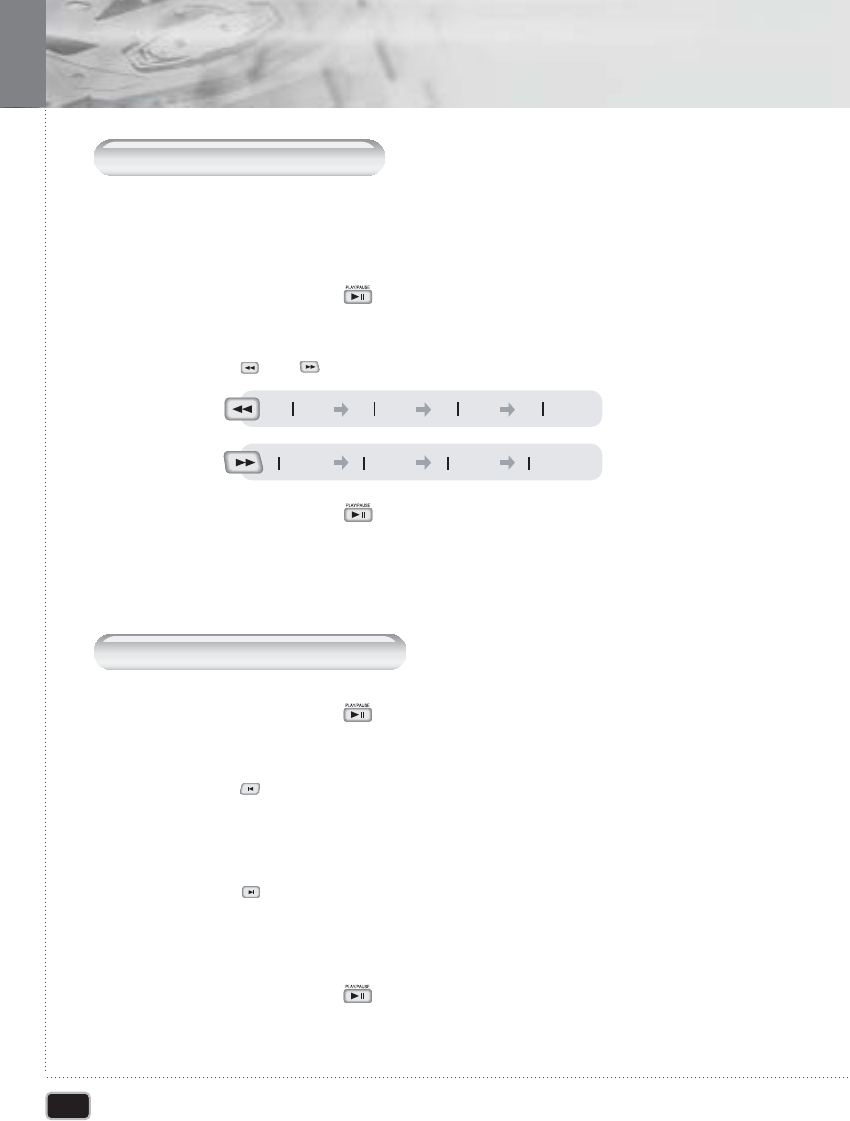
Use this function to play the DISC contents in slow forward or slow reverse. During
searching, audio will be muted.
Press the PLAY/PAUSE ( ) button during play mode.
11
Press the PLAY/PAUSE ( ) button to resume normal playback.
33
Press the ( ) or ( ) repeatedly.
22
F
rame
-
by
-F
rame
P
layback
Press the PLAY/PAUSE ( ) button during play mode.
11
Press the ( ) button repeatedly.
Each time you pressed, forward one frame is displayed at a time.
22
Press the ( ) button repeatedly.
Each time you pressed, backward one frame is displayed at a time.
33
Press the PLAY/PAUSE ( ) button to resume normal playback.
44
1/2 1/4 1/8 1/16
1/2 1/4 1/8 1/16
ඖඖඖඖ
ඖඖඖඖ
29
Advanced Operation
Advanced Operation
OSD (O
n
-
screen
D
isplay
)
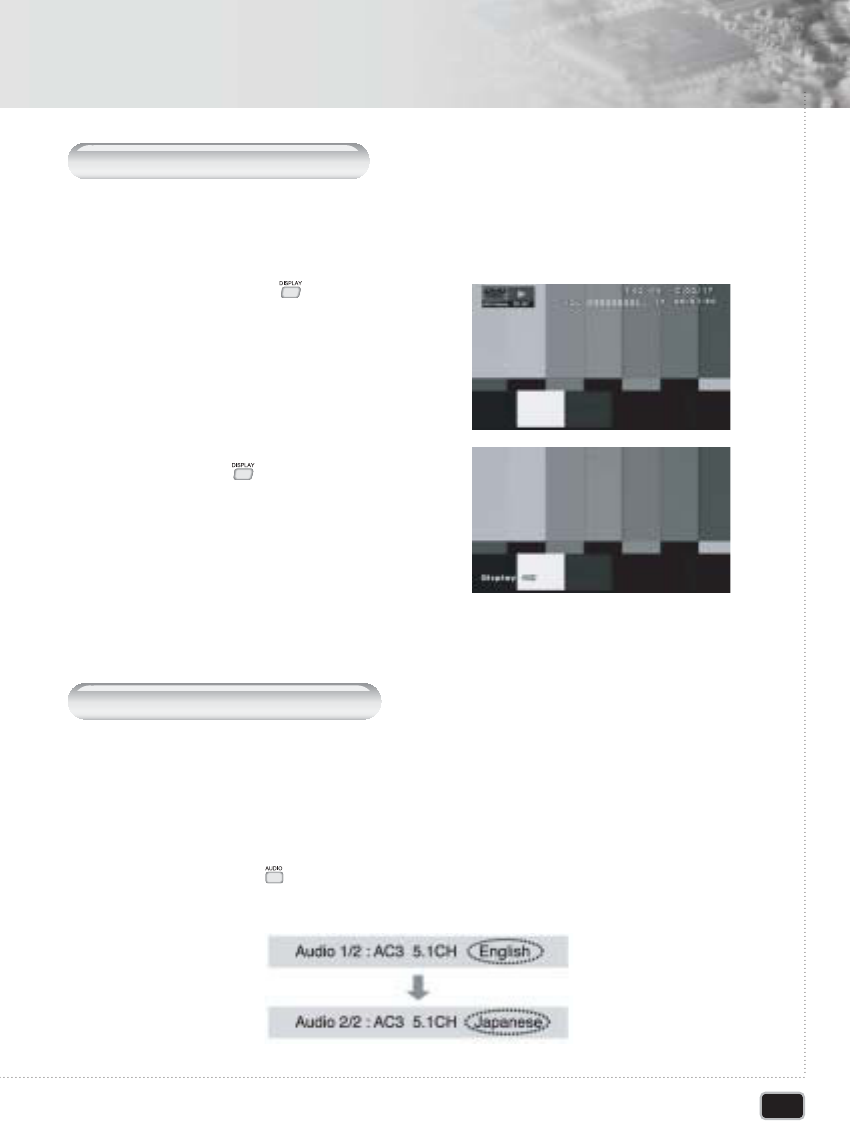
You can display the playback status on TV screen as following; Title, Chapter number,
Playing time, Disc.
Press the DISPLAY ( )button during
playback
- Disc, Chapter(DVD), Track(CD-DA),
Time information appears on screen.
11
To turn off the on-screen display, press
the DISPLAY ( )button
22
S
electing
A
udio
L
anguage
It is possible to change the audio soundtrack language to a different language from the one
selected at the initial settings. This operation works only with discs on which multiple audio
soundtrack languages are recorded. If the loaded disc supports multiple languages, you can
select the audio language.
Press the AUDIO button repeatedly during playback. Each time you pressed, the audio
language is changed
11
30
Advanced Operation
Advanced Operation
S
electing
S
ubtitles
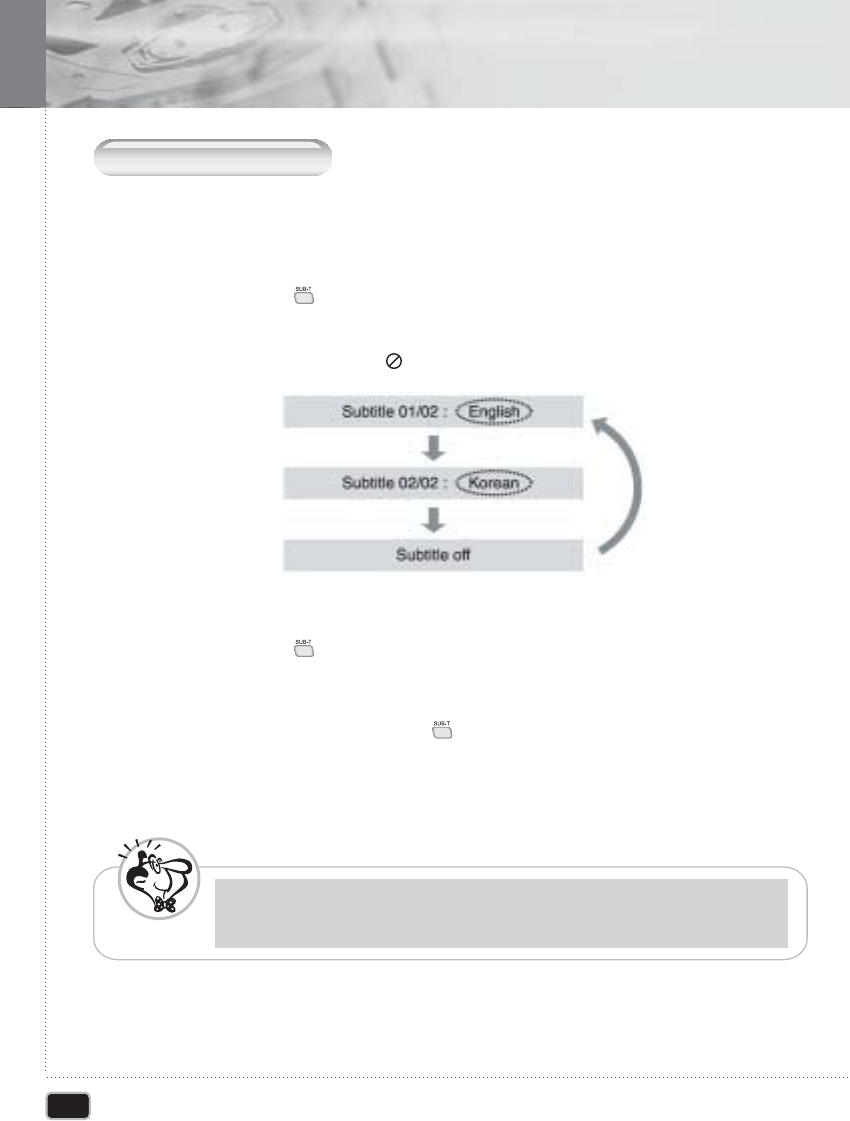
It is possible to change the subtitle language to a different language from the one selected
at the initial settings. This operation works only with discs on which multiple subtitle
languages are recorded.
Press the SUB-T ( )button during disc play.
The subtitle info banner appears.
The default is Subtitle off.
If no subtitle are recorded, the ( ) icon will appear.
11
Press the SUB-T ( )button repeatedly until the desired subtitle language is
displayed.
22
To turn subtitle off, press the SUB-T ( )button until Subtitle off is displayed.
33
This function is a disc dependent. There are some DVD discs that prevent selecting
subtitle even if it supports multiple subtitles. In this case, the subtitle should be selected
via disc menu.
N
ote