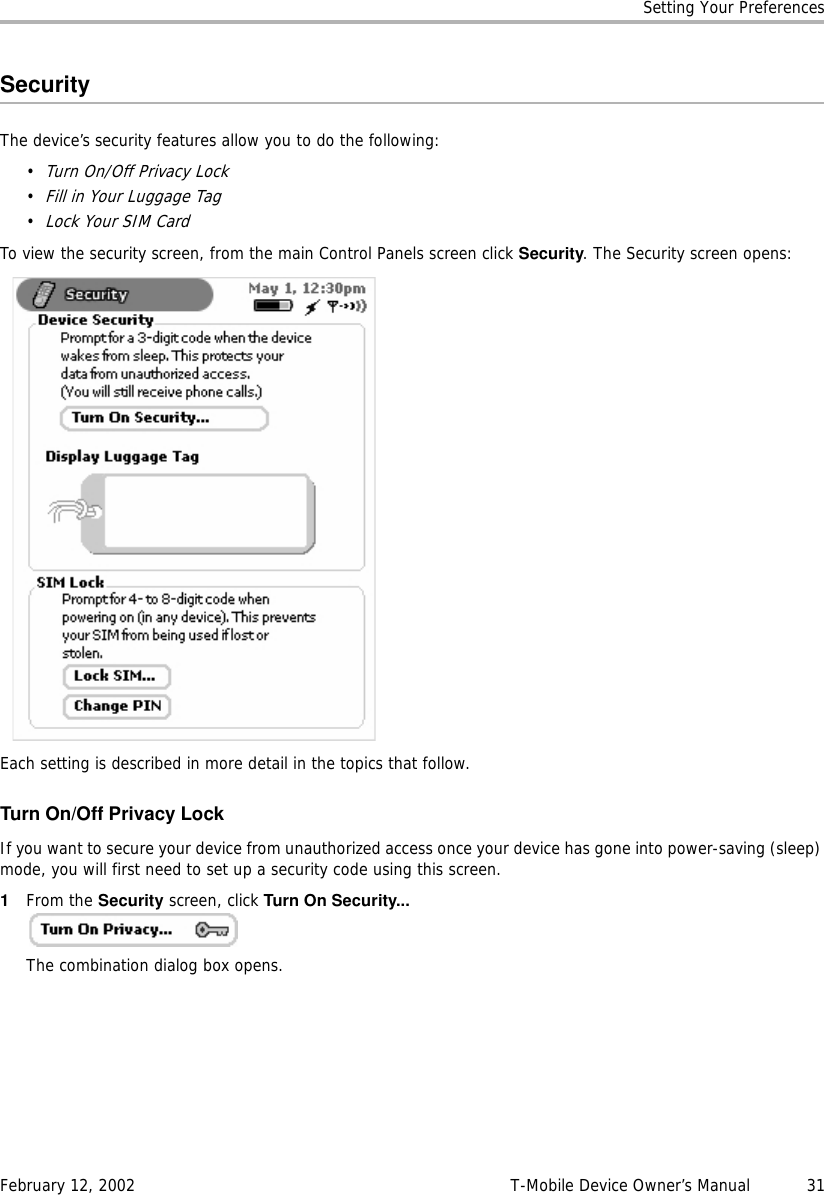
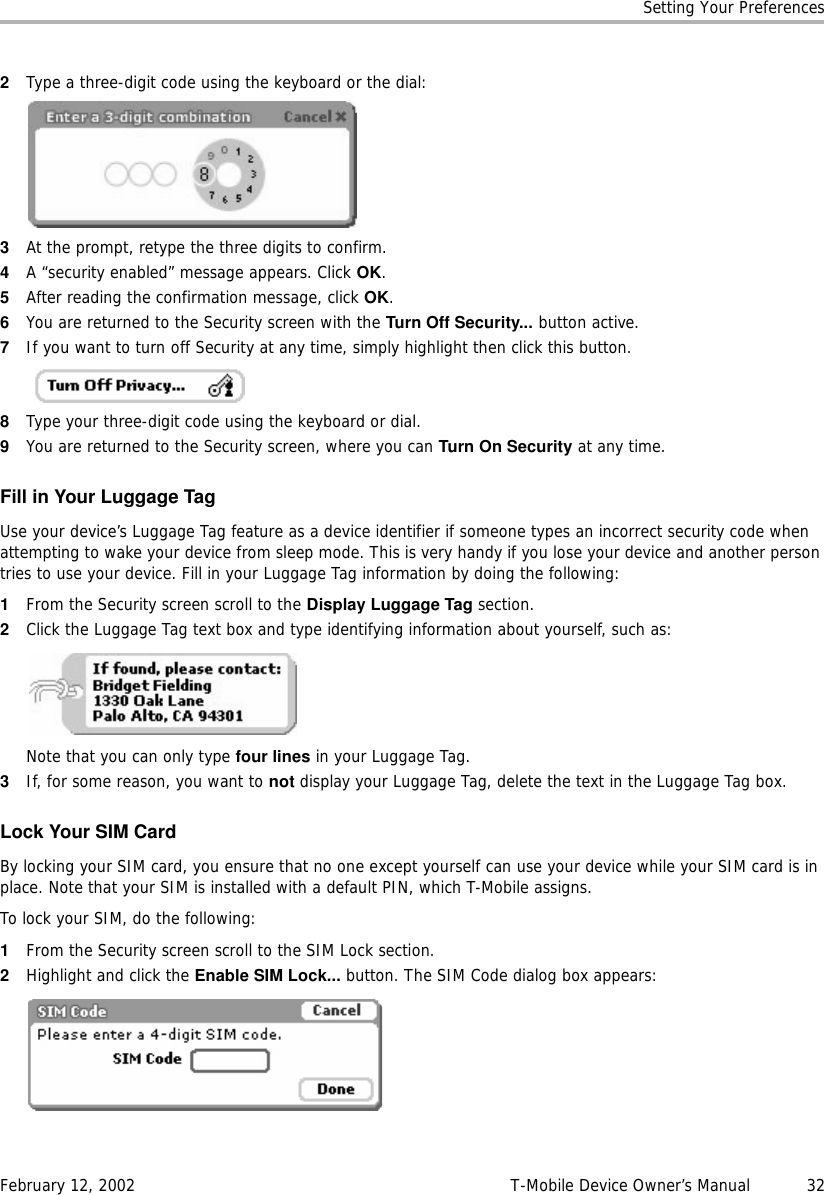
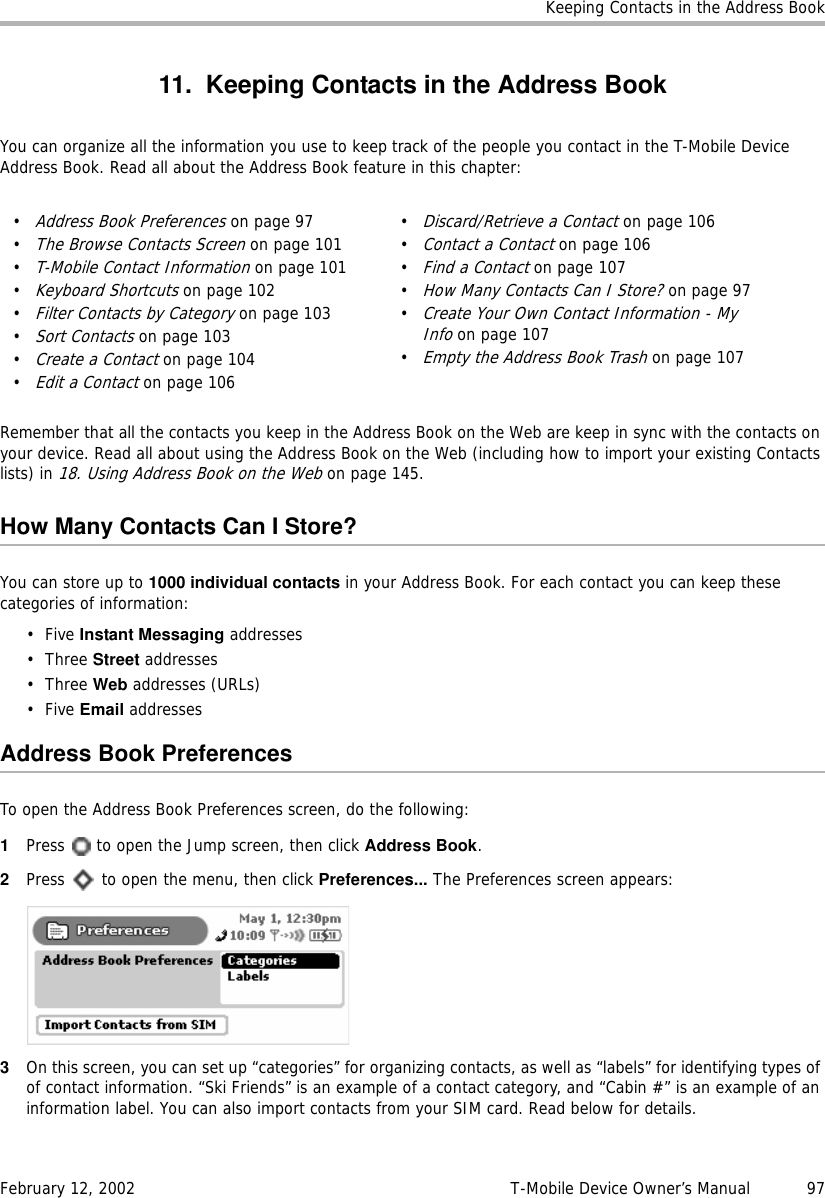
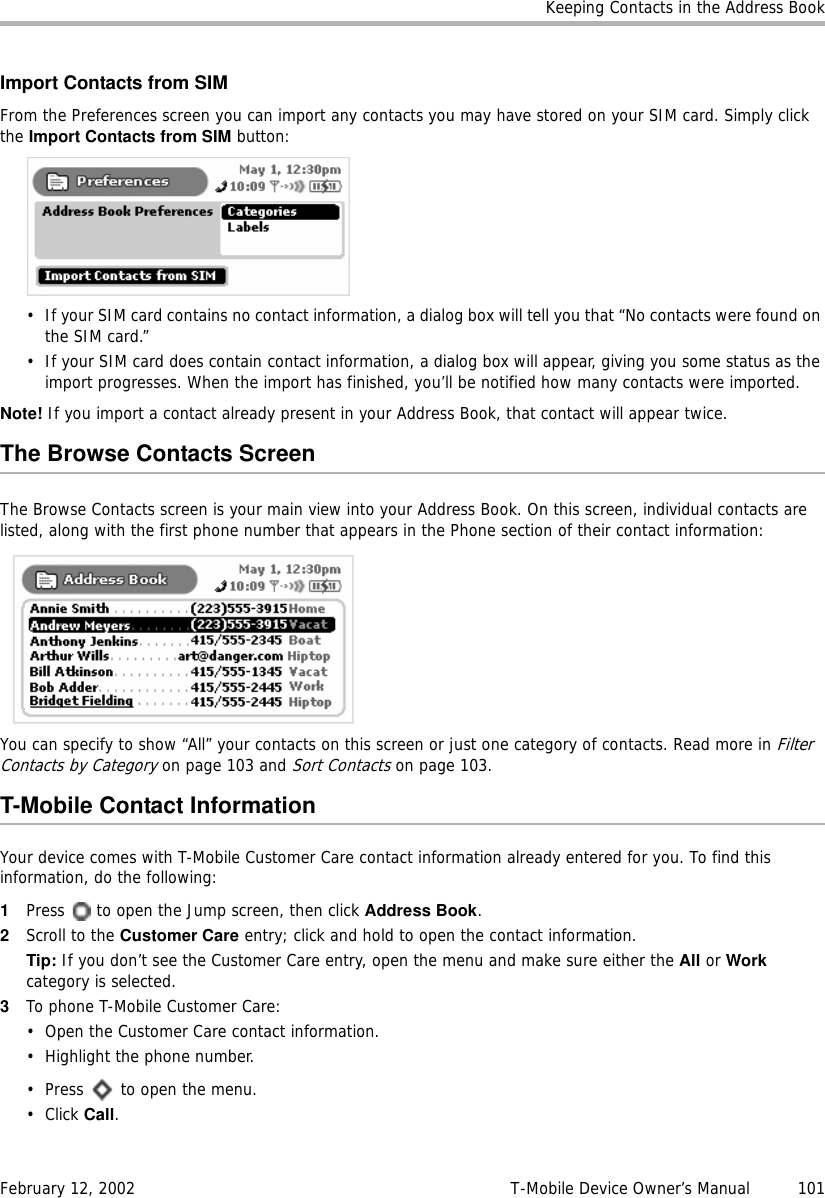
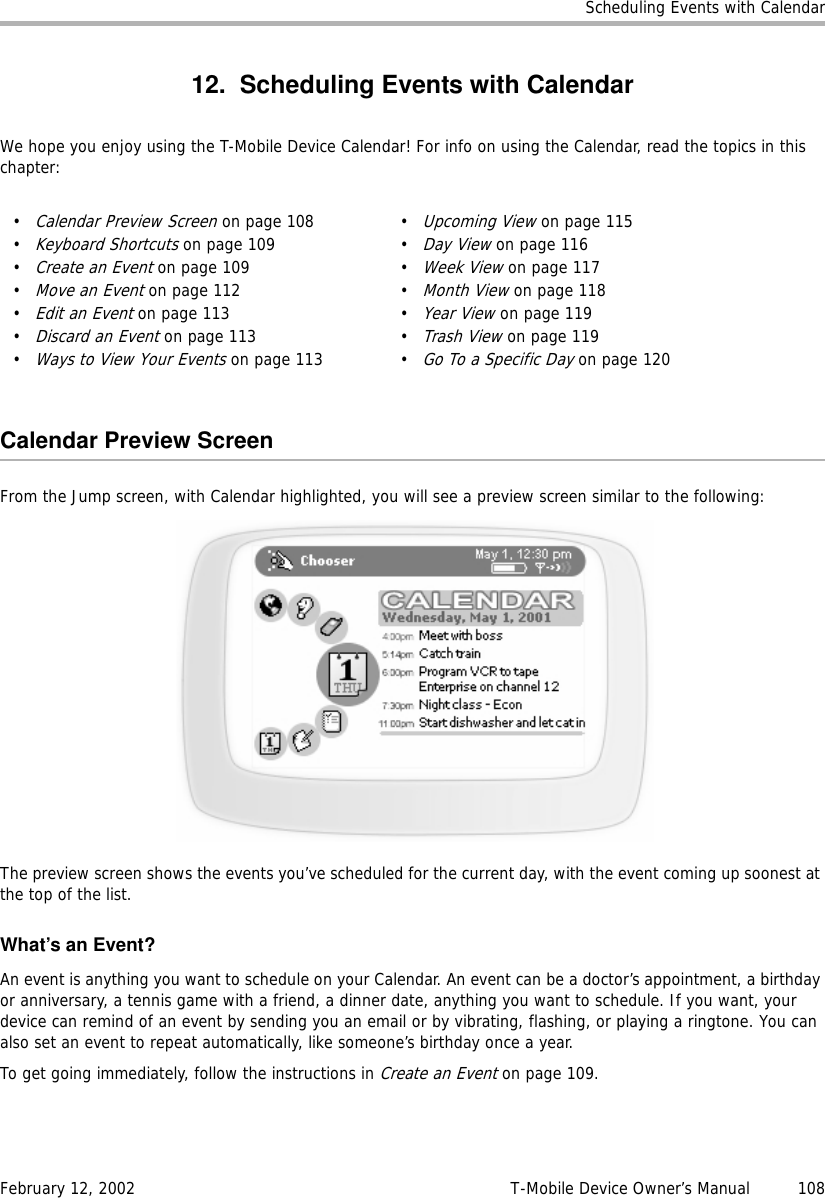
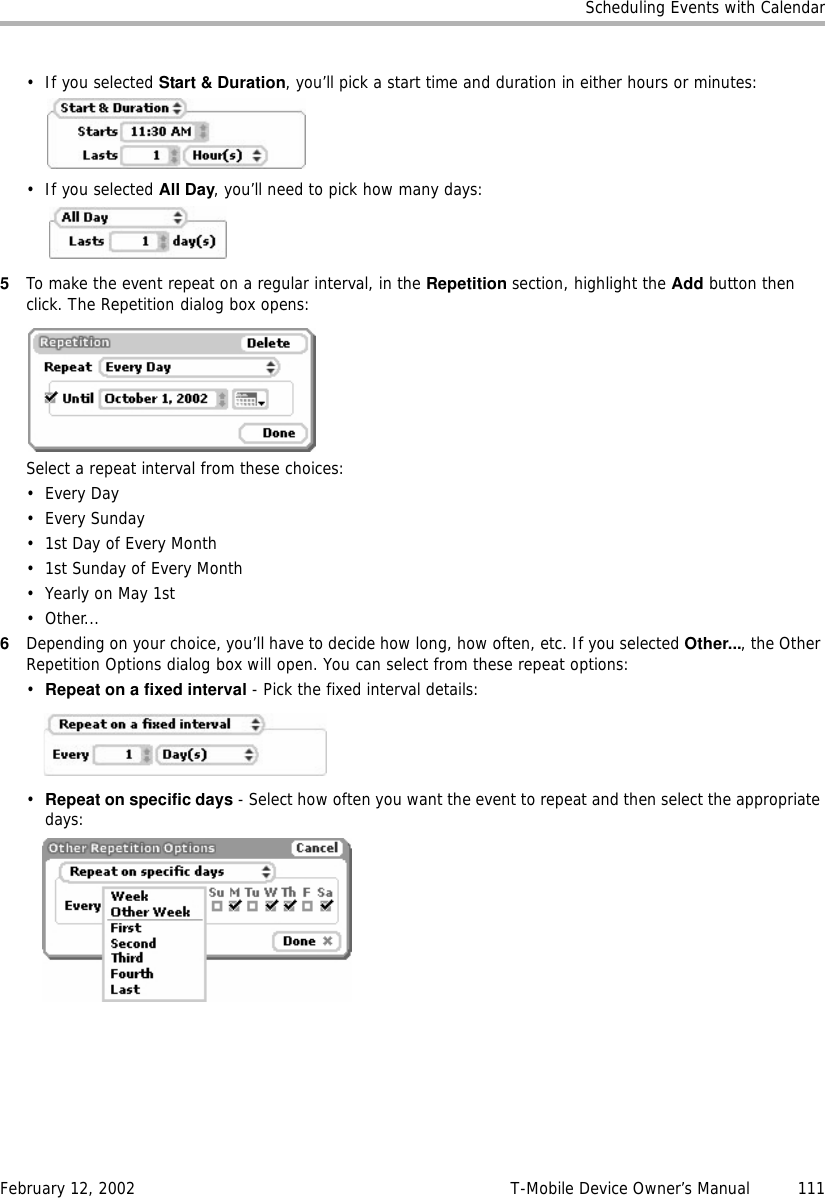
Danger FYMASMBD-01 PCS portable transeiver User Manual mod02
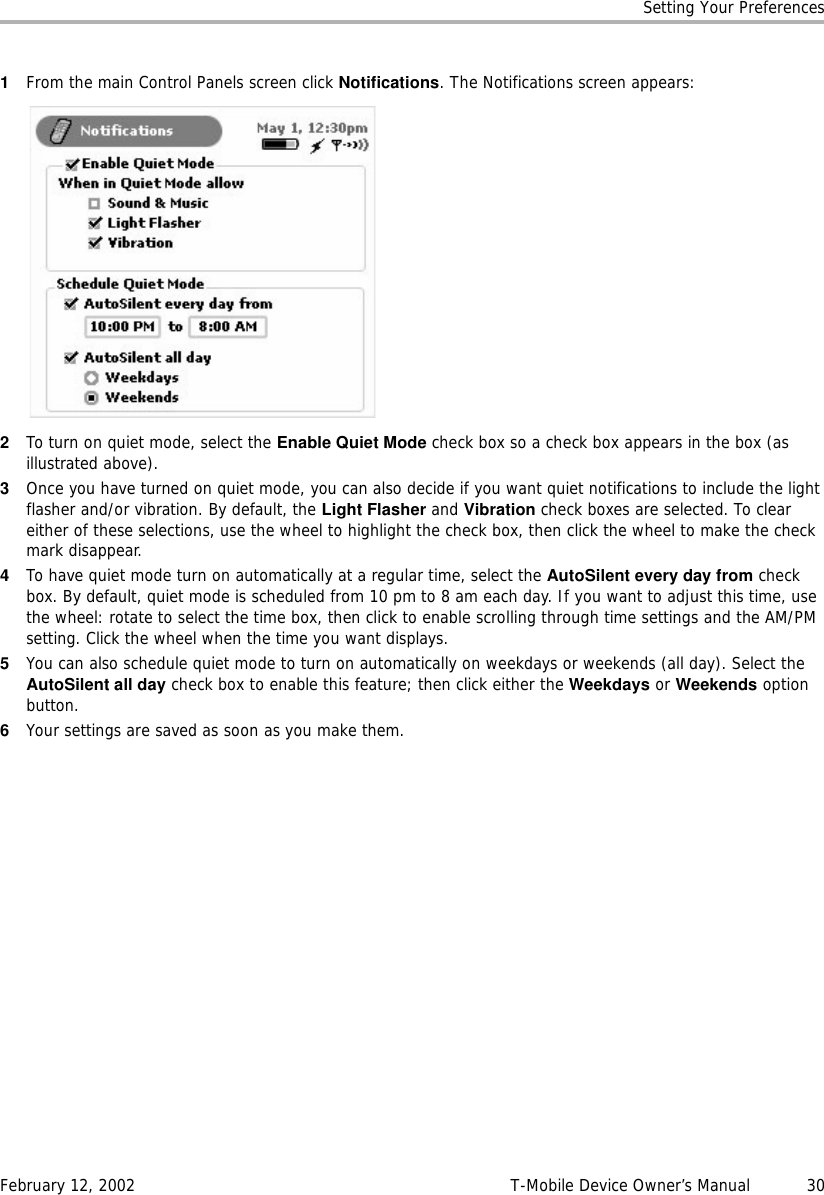
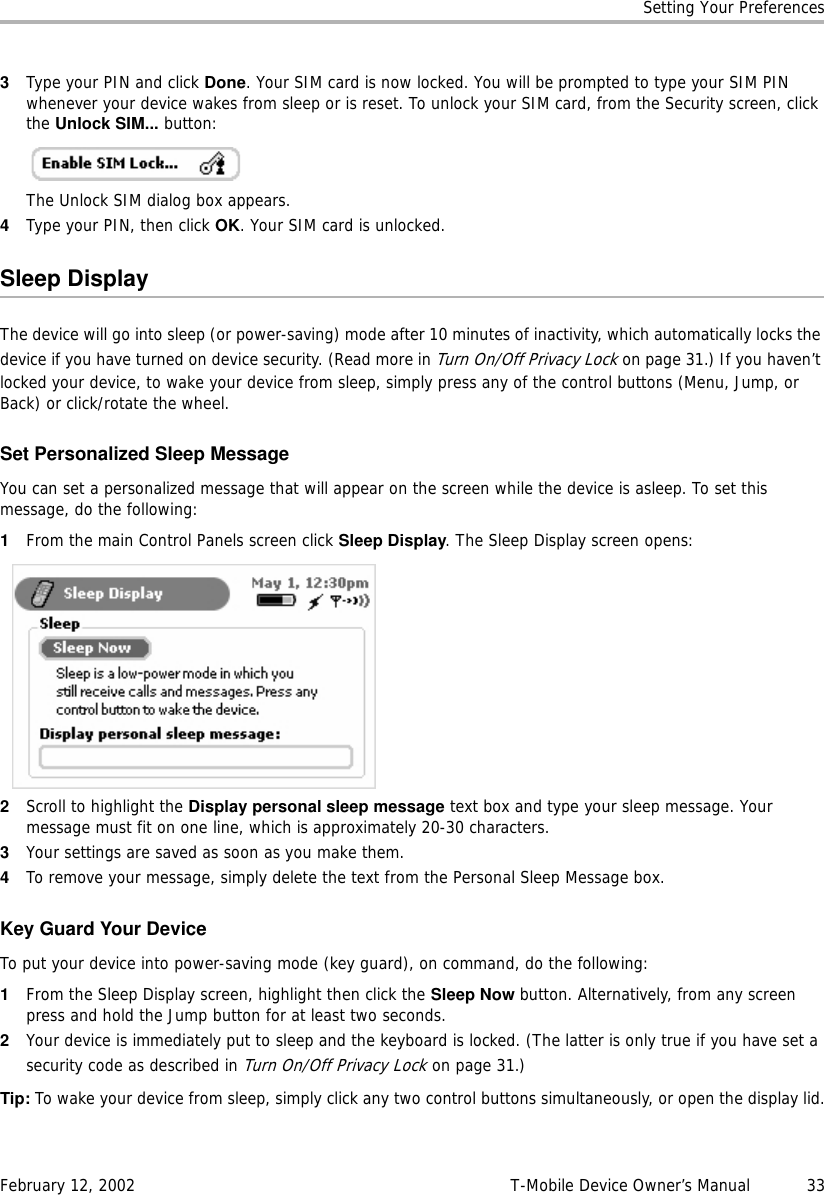
Danger, Inc. PCS portable transeiver mod02
UserManual.wiki
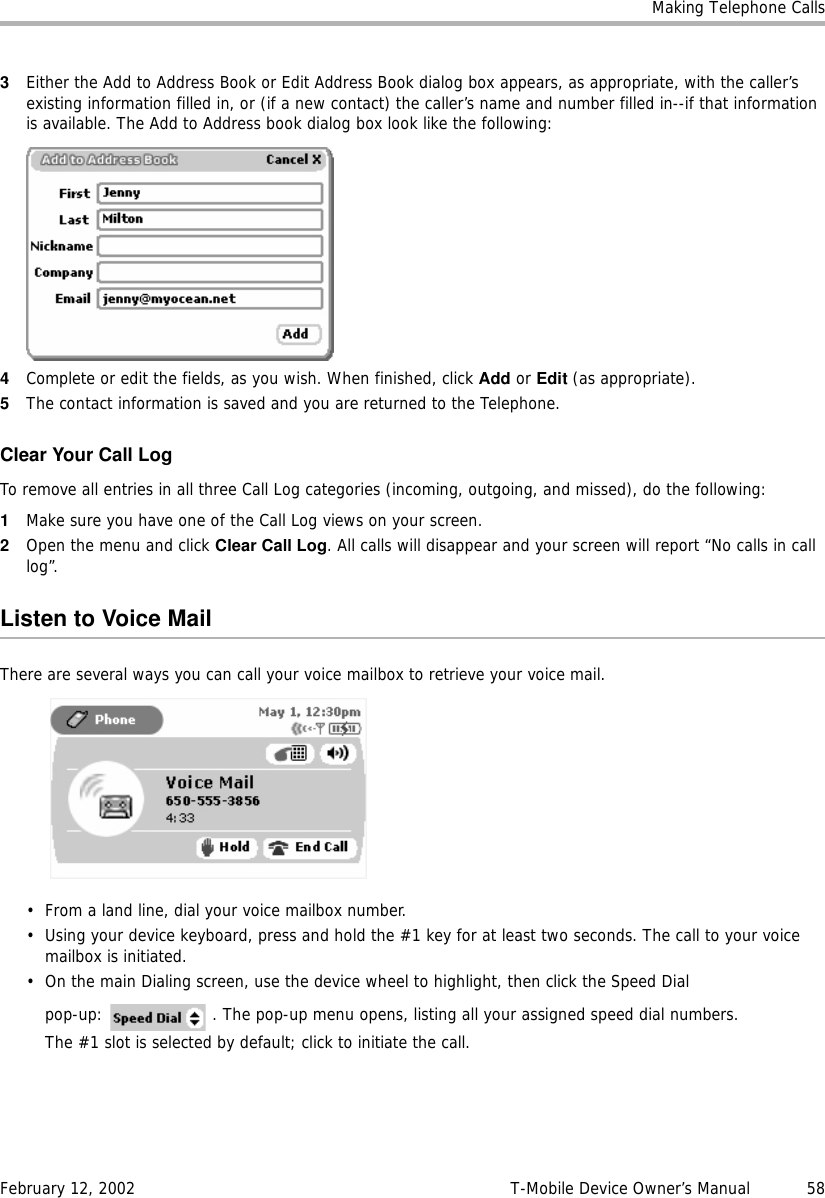
>
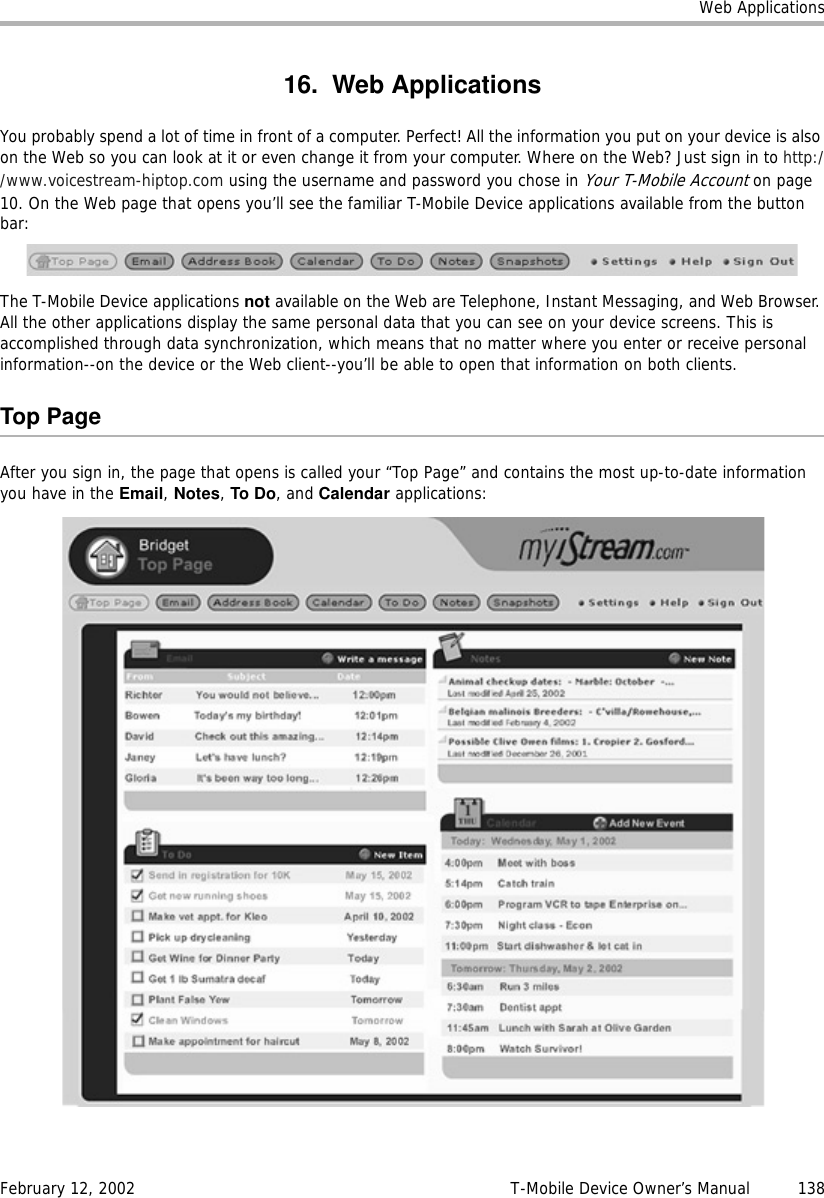
Danger
>
FYMASMBD 01 User Manual
Users Manual
Navigation menu
Upload a User Manual
Namespaces
Wiki Guide
HTML
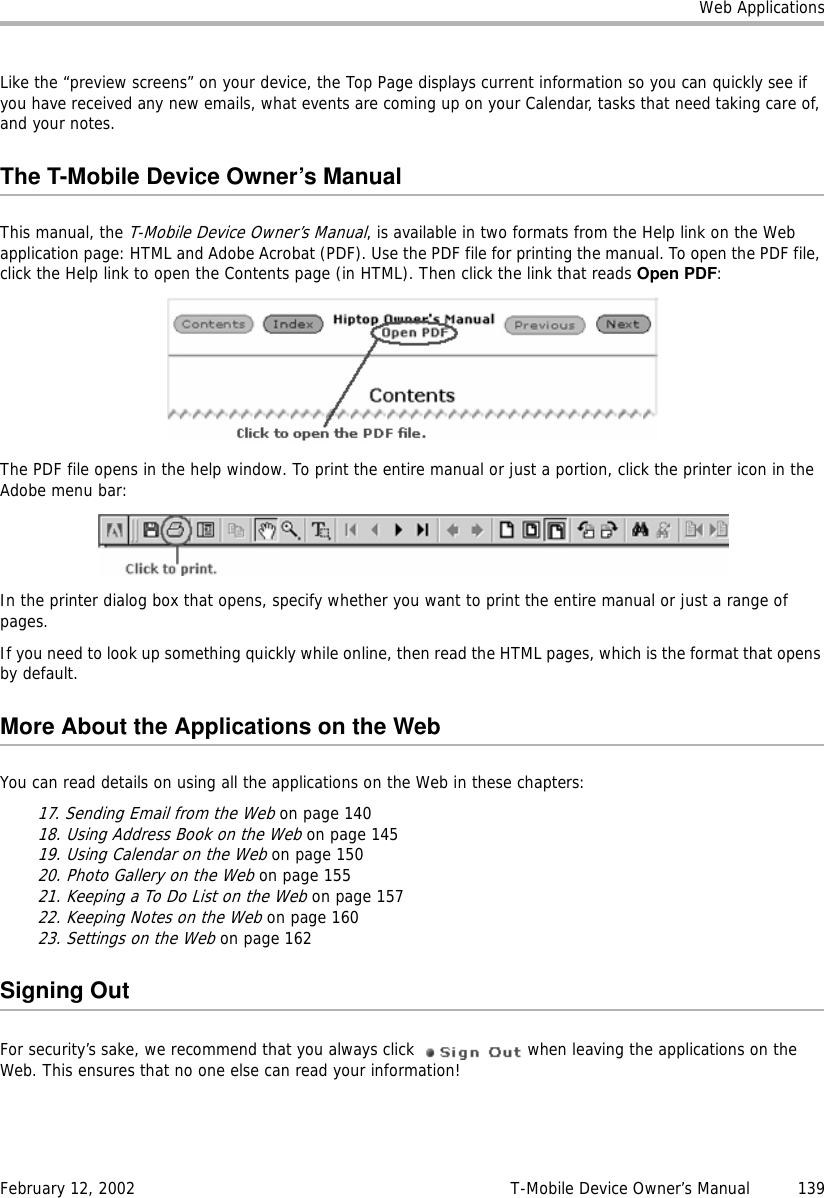
PDF
Info
Views
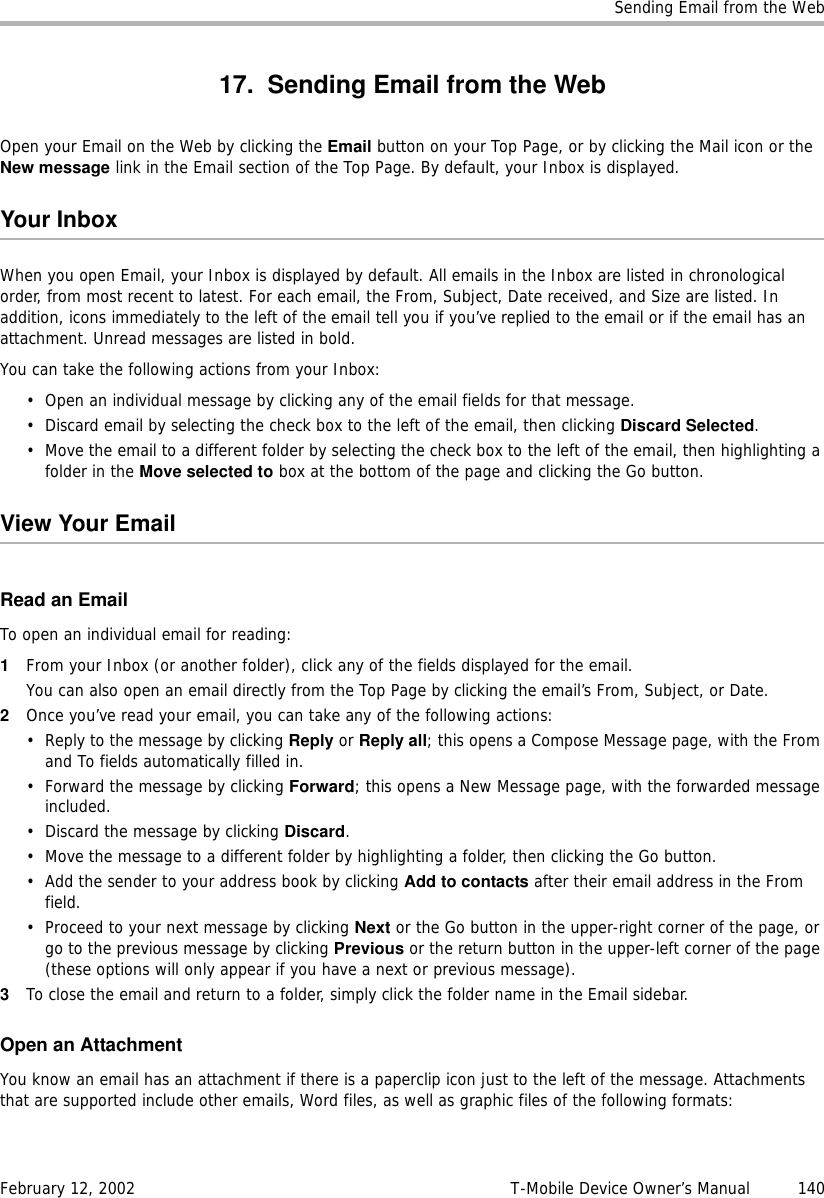
User Manual
Discussion / Help
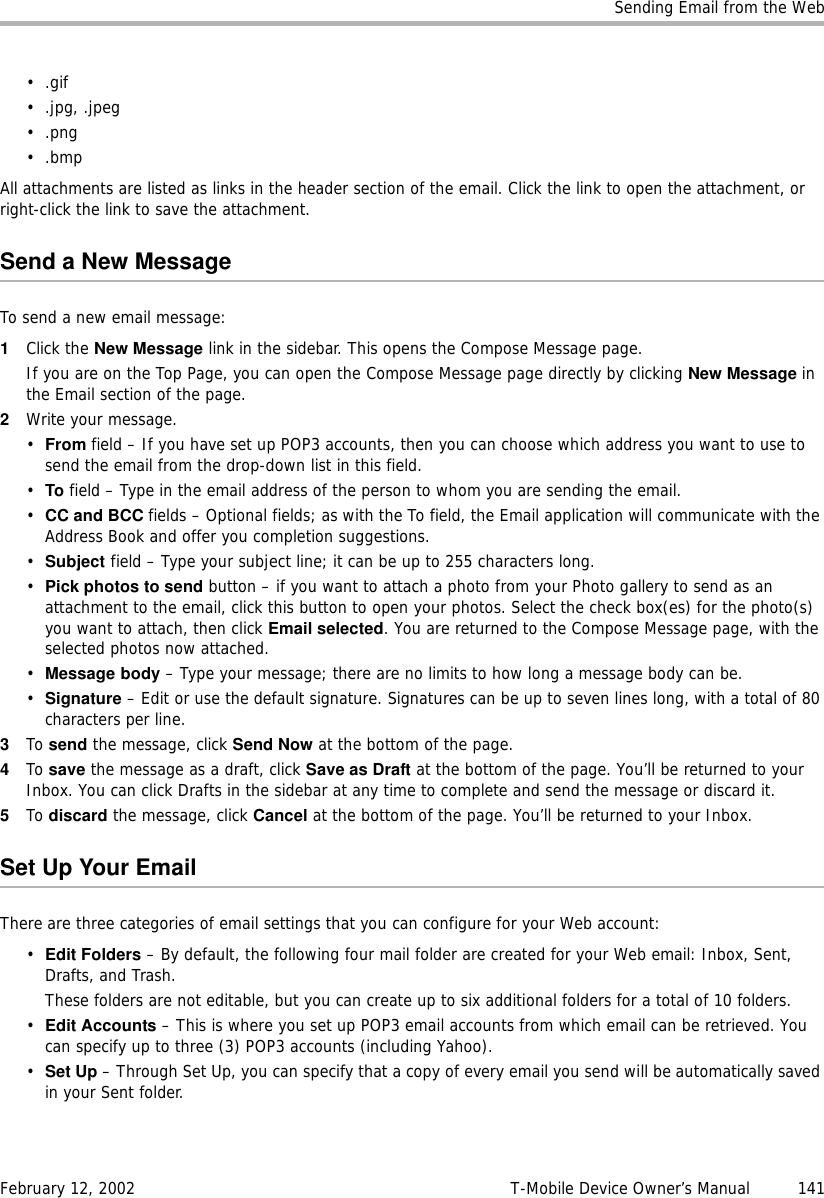
Navigation

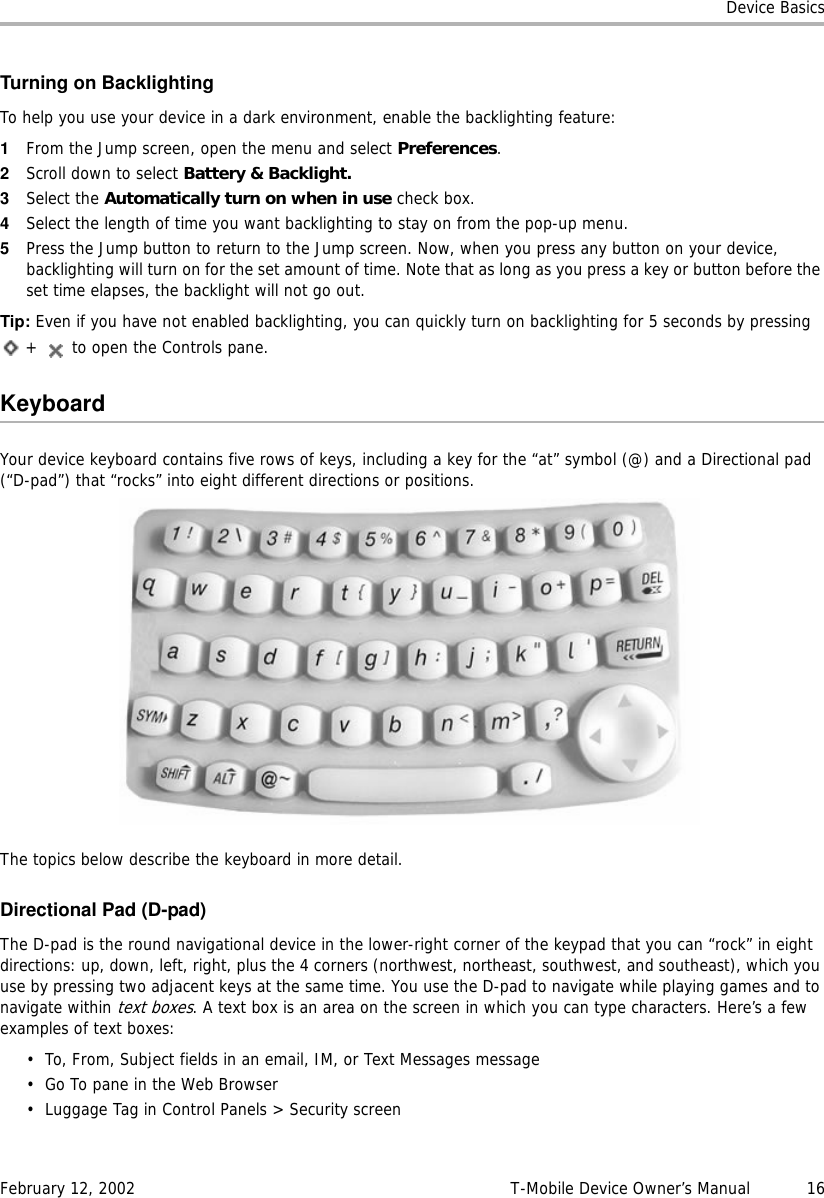

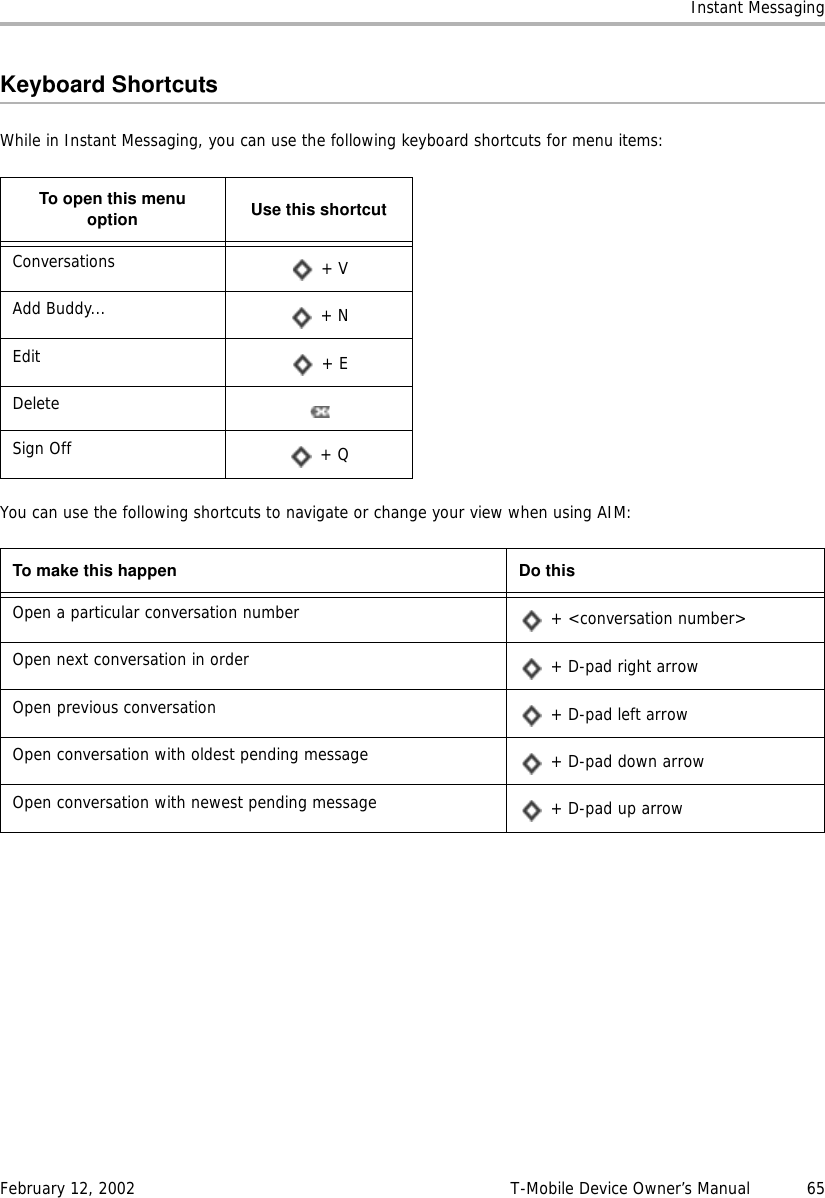
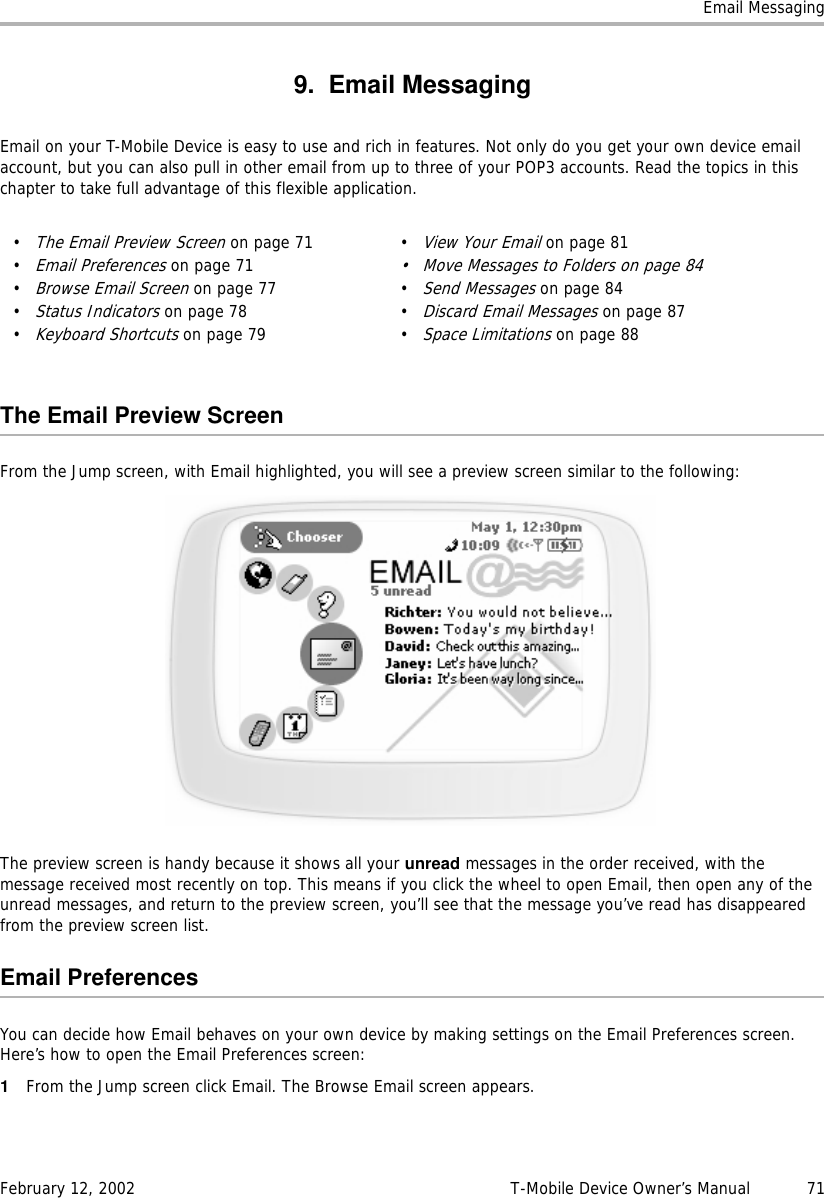
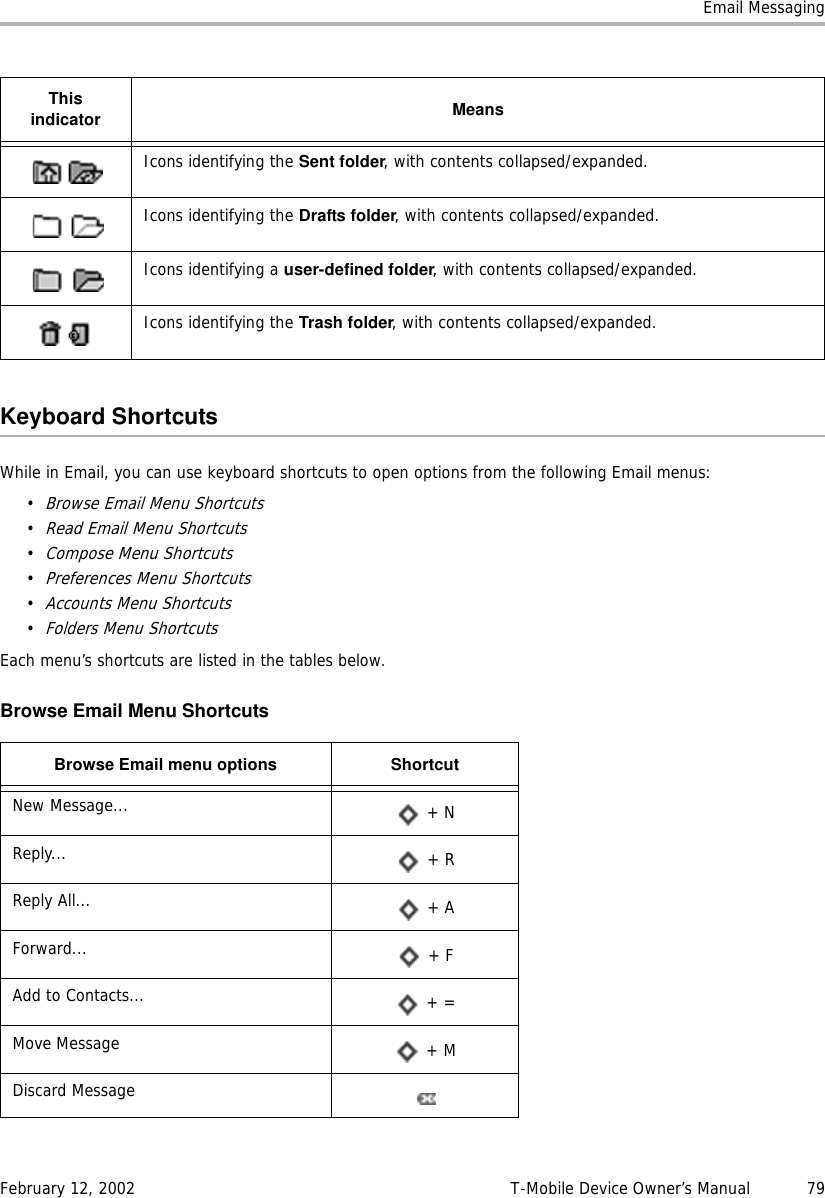
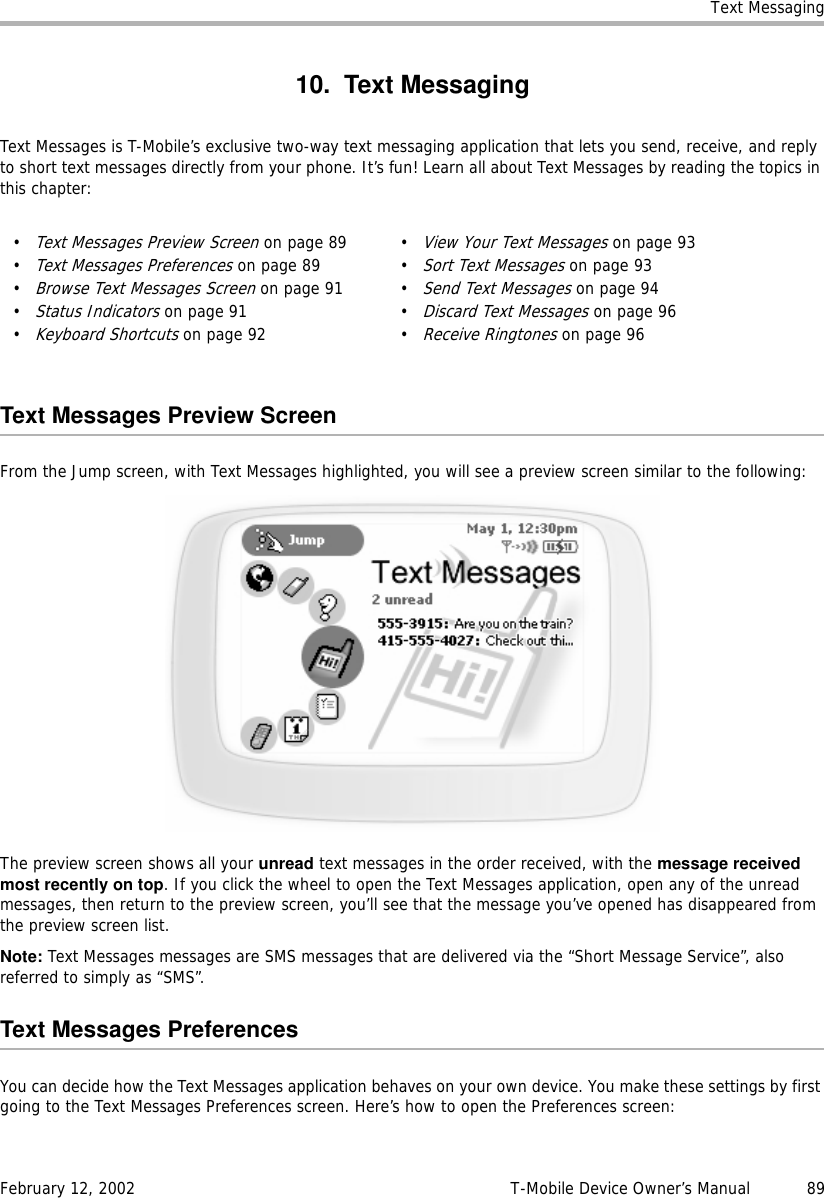
![Device BasicsFebruary 12, 2002 T-Mobile Device Owner’s Manual 21Typing TextMany of the T-Mobile Device applications have screens in which you type text, such as the Email Compose screen, the individual Preference screens, the Browser’s Go To pane, etc. You will primarily use the keyboard to type text, which is easy to use, but here are some hints to make typing and editing text easier:• Use the Directional Pad to navigate within a text box:- Press the up/down and left/right arrows to move in those directions among characters in a text box.- Press the corners of the D-pad (two adjacent arrows at the same time) to jump up/down one line and forward/backward a character. • To delete a character to the left of the cursor, press the DEL key [ ].• To delete a character to the right of the cursor, press SHIFT+ .• To delete all the characters in a text box, press ALT+SHIFT+ .• To lock the SHIFT key, press SHIFT twice. To unlock, press SHIFT once again.• To lock the ALT key, press ALT twice. To unlock, press ALT once again.](https://usermanual.wiki/Danger/FYMASMBD-01/User-Guide-236112-Page-21.png)

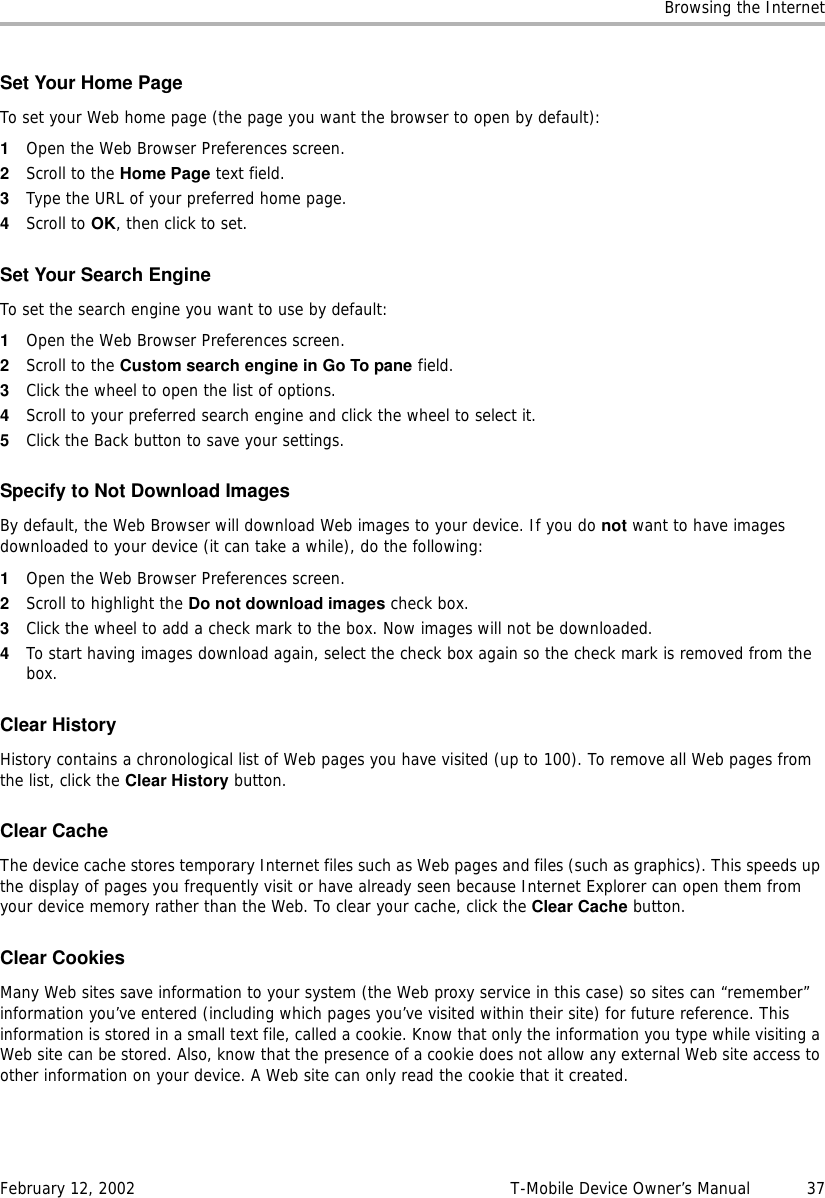
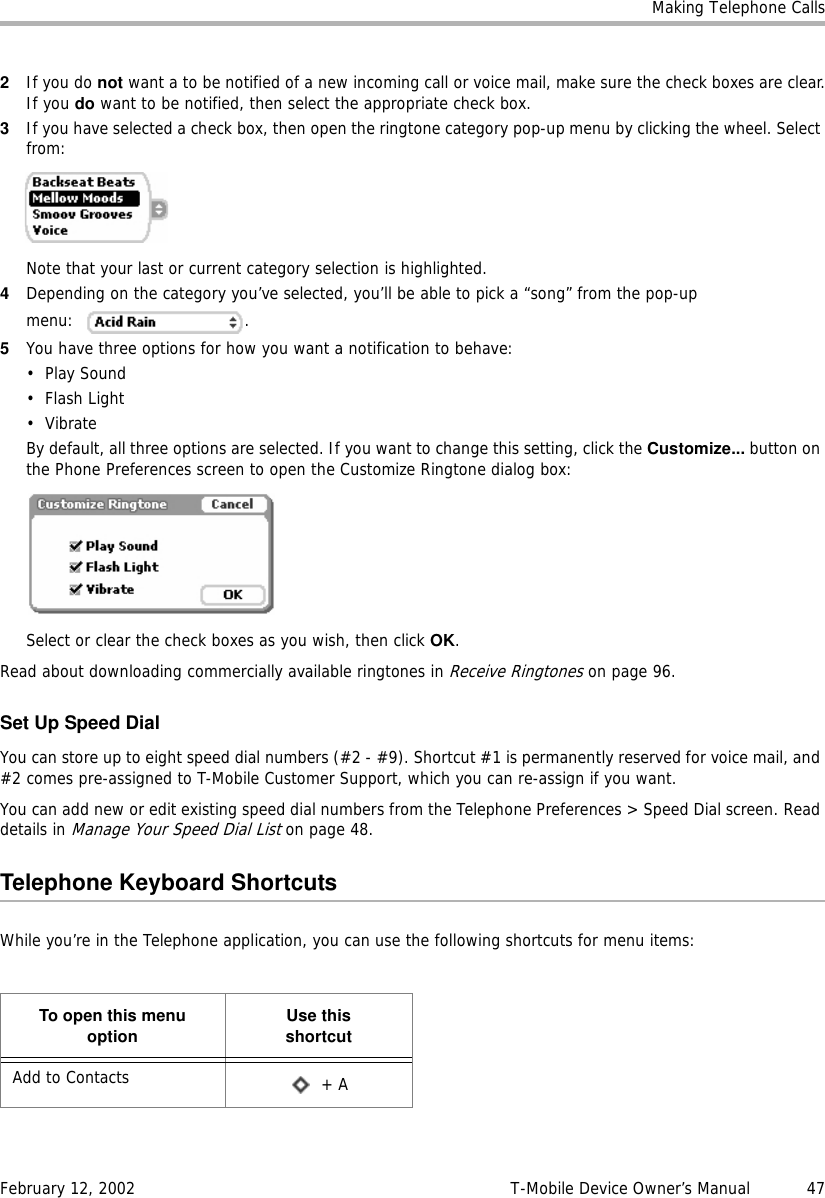
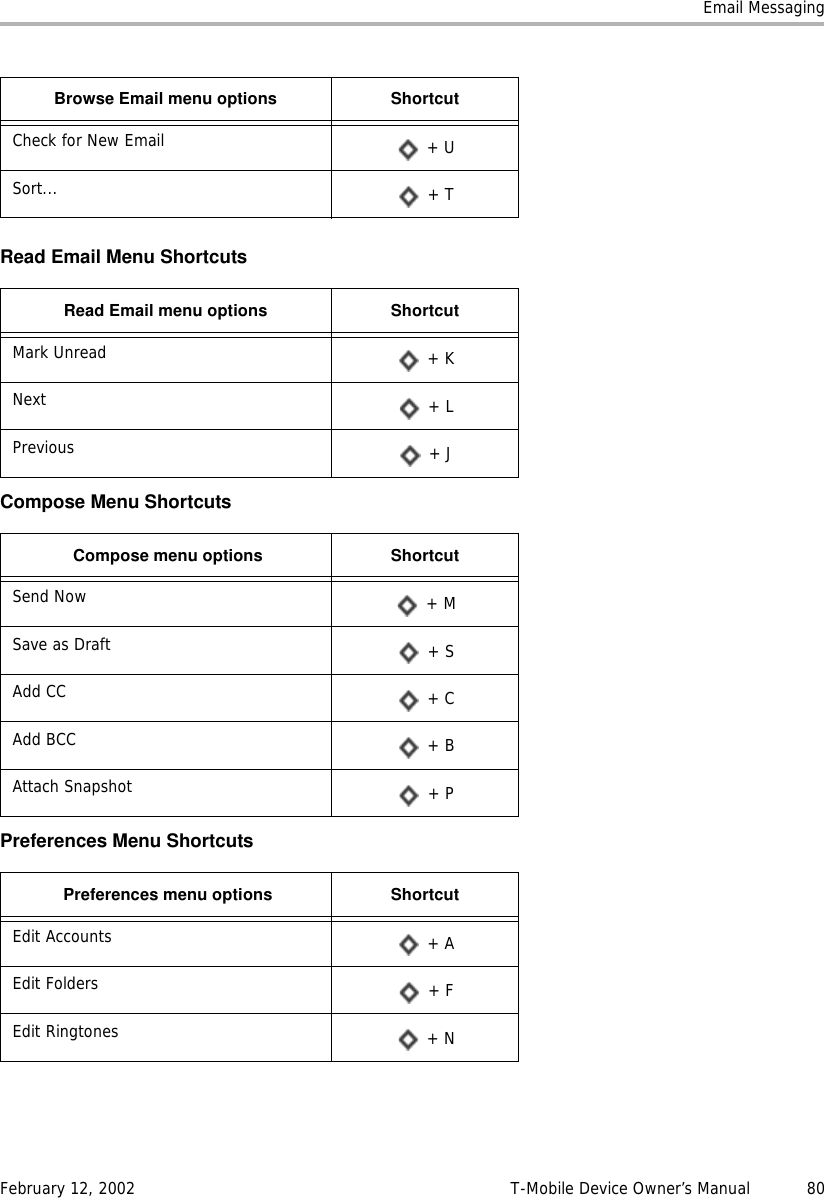
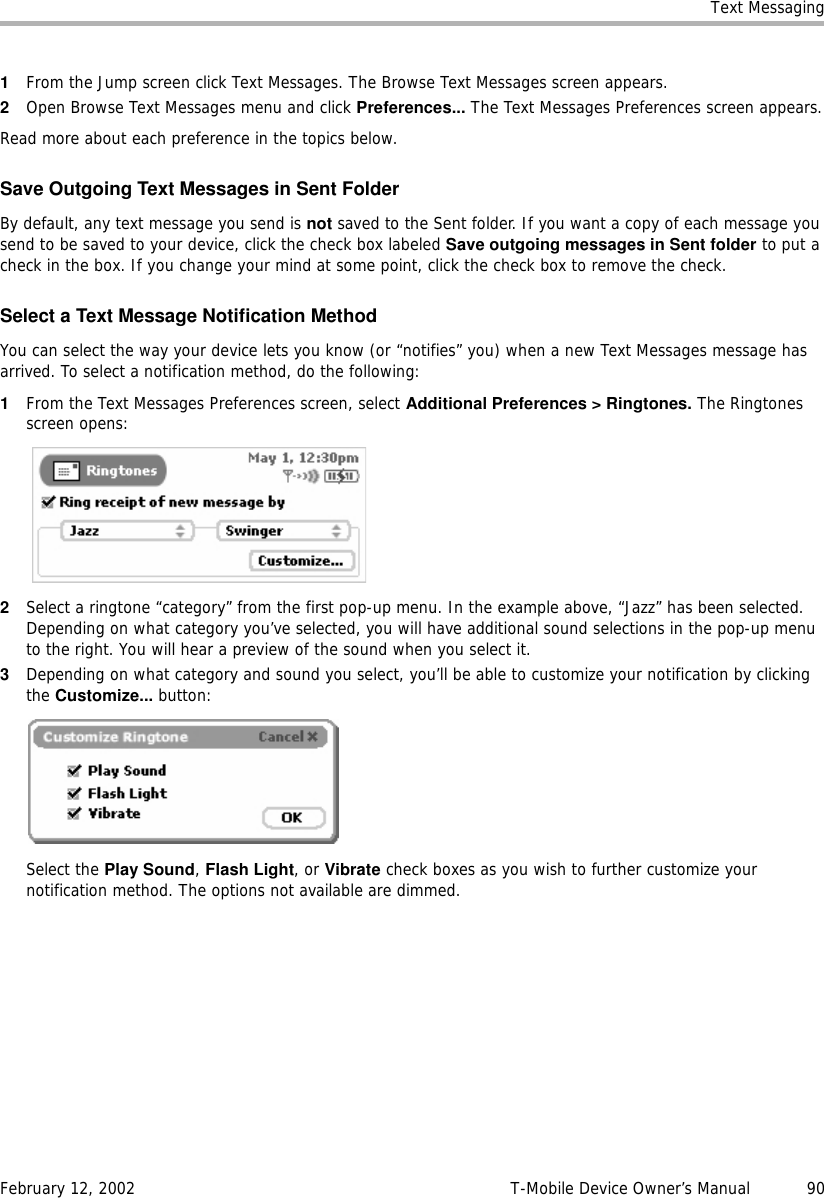
![Setting Your PreferencesFebruary 12, 2002 T-Mobile Device Owner’s Manual 27AutoTextTo help you type accurately, the AutoText screen includes rules that automatically correct common typing errors. You can add to or discard rules that are included by default. To open the AutoText screen, do the following:1From the Jump screen open the Control Panels, then click AutoText.2If you want the first letter in new sentences to be capitalized automatically, select the Capitalize newsentences check box to cause a check to appear in the box. Note that this check box is selected by default.3If you want the replacement rules listed on the screen to be in effect, click the AutoReplace check box to cause a check to appear in the box. Note that this check box is also checked by default.4To discard any of the replacement rules, rotate the wheel to highlight the rule, then open the menu and click Discard Rule [ ]. You are prompted to confirm that you really want to remove the rule. Click either Cancel or Discard.5To add a new replacement rule, open the menu and click Add Rule. The Replacement Rule dialog box opens:Type the word or phrase that you common misspell in the first text box, then type the correct spelling in the second box. For example: Click OK to save the replacement rule, or Discard if you don’t want to save it after all.6To return all AutoText settings to those set when you first received your device, open the menu and click Restore Defaults.Date & TimeThe device service knows the Coordinated Universal Time, or UTC. (Note that UTC is also known as Greenwich Mean Time, or GMT.) UTC reflects the mean solar time along the Earth's prime meridian. The prime meridian is arbitrarily based on the meridian that runs through the Greenwich Observatory outside of London, where the present system originated.To set your device time correctly, you must select your time zone:1From the Jump screen open the Control Panels, then click Date & Time.2From the Time Zone pop-up menu, highlight the time zone you want your device to reflect, then click.](https://usermanual.wiki/Danger/FYMASMBD-01/User-Guide-236112-Page-27.png)

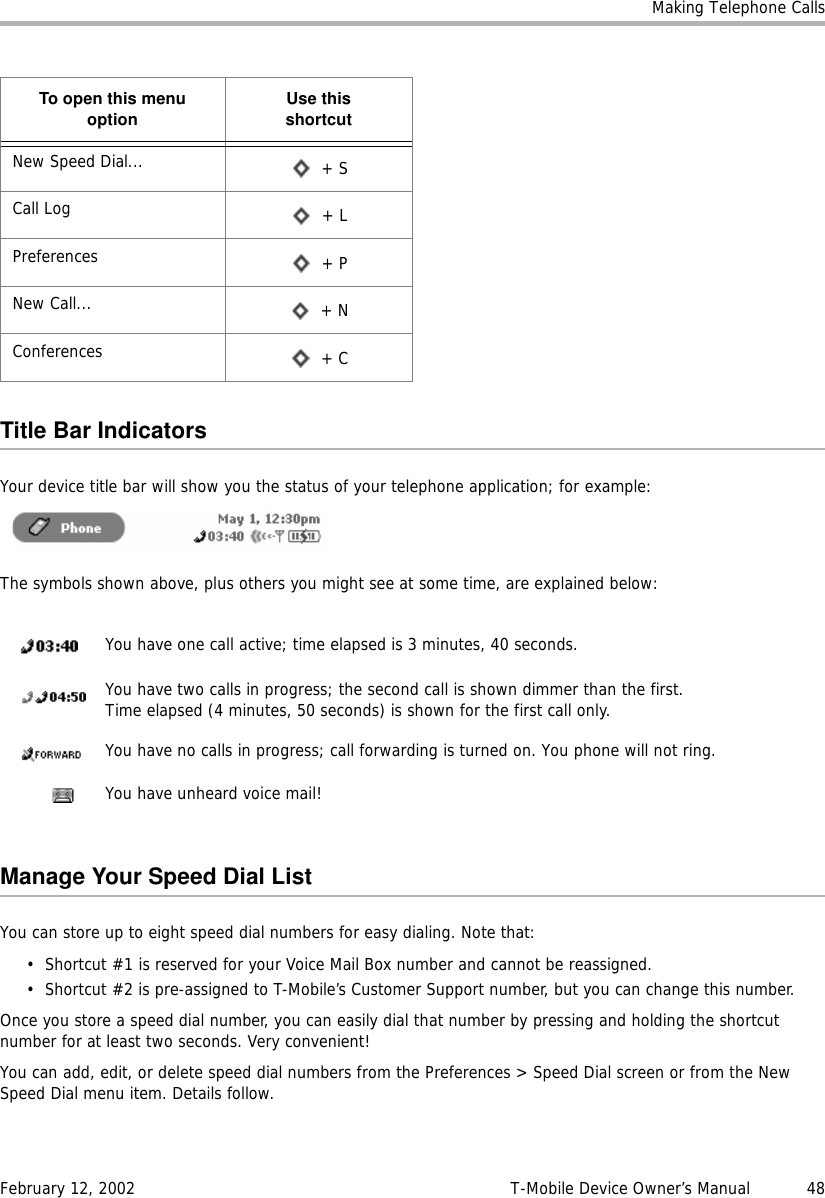
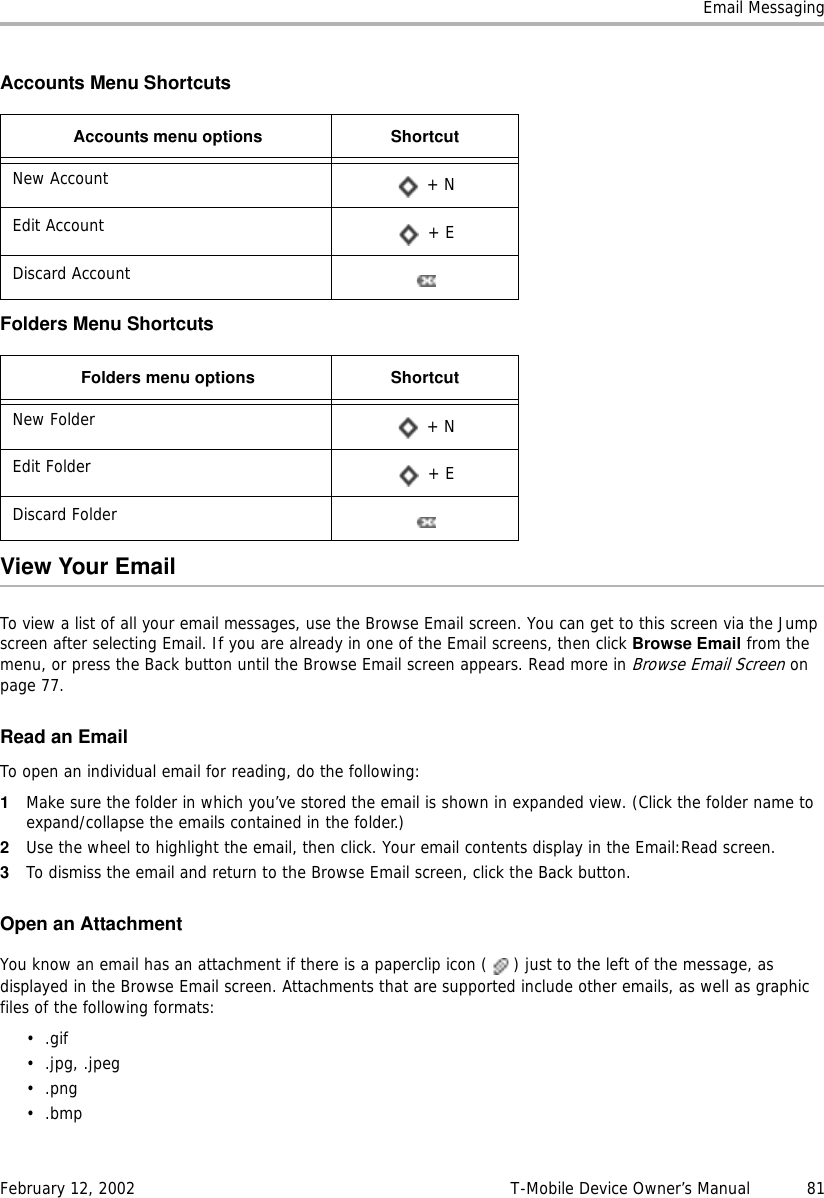
![Setting Your PreferencesFebruary 12, 2002 T-Mobile Device Owner’s Manual 292Scroll to highlight the application for which you want to create a jump shortcut, then click the wheel. The Key Assignment dialog box appears. In the illustration below, Address Book was highlighted when the Key Assignment dialog box was opened:3Press the key you want to use to jump to the application you’ve highlighted. The Key Mapping dialog box disappears and your shortcut is saved.4To use the Jump Shortcuts, from any screen at any time, press the Jump button [ ] plus the shortcut key to open that application.5To delete a shortcut key mapping, scroll the wheel to highlight the application, then press the Delete key.Keyboard & WheelYou can set how your keyboard and wheel respond to your touch:•Keyboard repeat delay - If you hold down a key long enough, it will start repeating in your text box. This setting determines how long you must hold down a key before it starts repeating.•Keyboard repeat rate - Once you’ve held down a key long enough so it starts repeating, this setting determines how fast the key repeats.•Wheel acceleration - Rotating the wheel up or down causes some pages to scroll up or down. This setting allows you to specify how fast you want the wheel to accelerate while scrolling.To set these preferences, do the following:1From the main Control Panels screen click Keyboard & Wheel.2You make the three settings described by using “sliders”. Scroll the wheel to highlight the slider you want adjust, then click to be able to move the slider. A selected slider looks like the following:3Rotate the wheel up to increase the setting; rotate the wheel down to decrease the setting. This means that to:• Increase the time you have to hold down a key before it starts to repeat, move the slider to the right.• Increase how fast keys are repeated, once they start repeating, move the slider to the right.• Increase how fast the wheel accelerates, move the slider to the right.4The settings are saved as soon as you make them.Quiet Mode and NotificationsIn some situations, you may want you device to be “quiet” when notifying you of new messages or phone calls. This is called “quiet mode”. You can also schedule regular times when you want your device to operate in quiet mode. To make these settings, do the following:](https://usermanual.wiki/Danger/FYMASMBD-01/User-Guide-236112-Page-29.png)
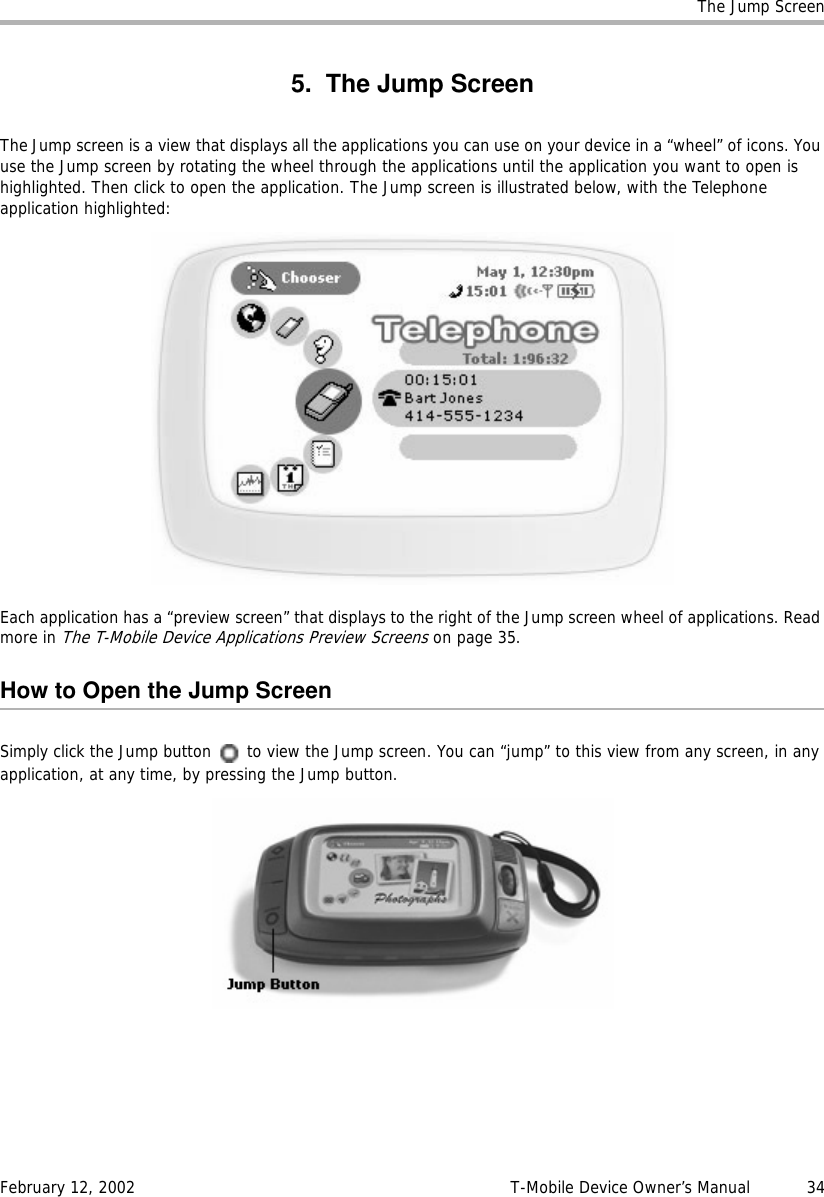
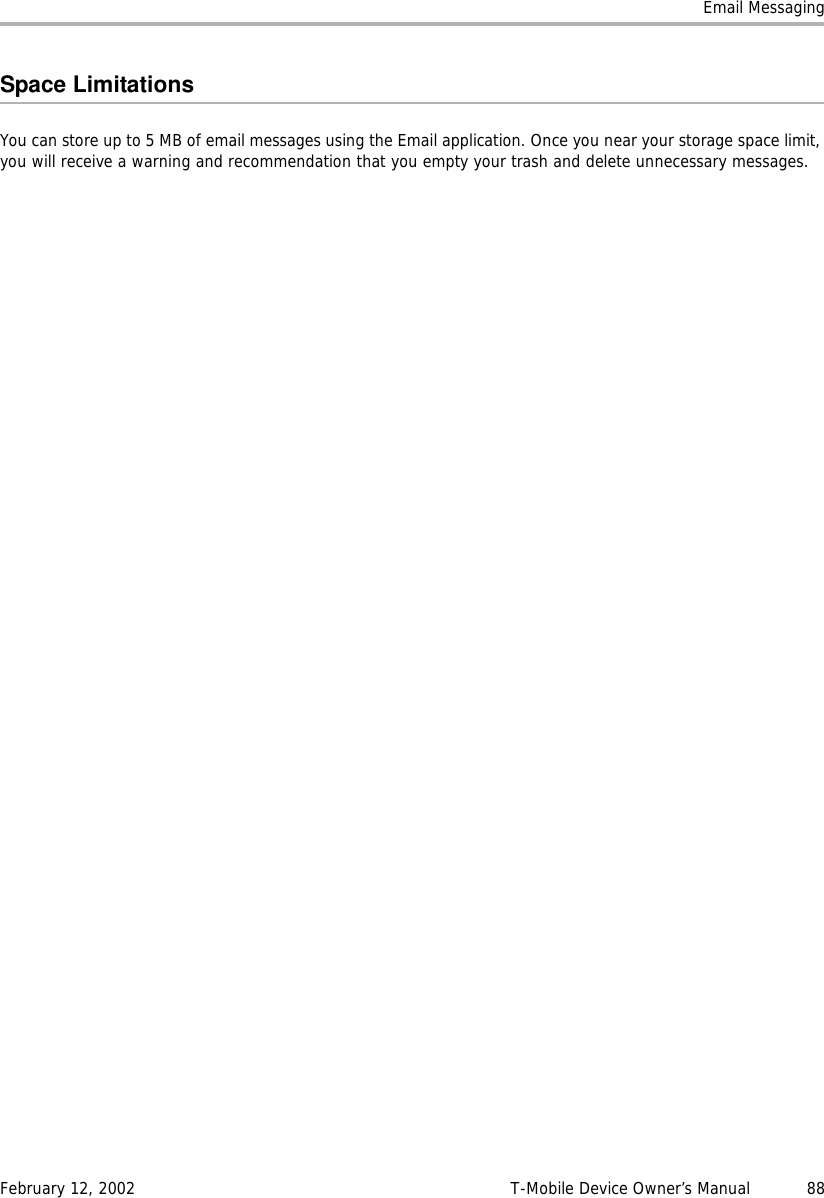
![The Jump ScreenFebruary 12, 2002 T-Mobile Device Owner’s Manual 35The T-Mobile Device Applications Preview ScreensAs you view the Jump screen and scroll through each application using the wheel, the preview screen applicable to that application highlighted displays to the right of the Jump screen wheel. Some preview screens contain application status information. For example, in the illustration of the Jump screen above, the Telephone preview screen shows the device owner that she has one voice mail message. Jump preview screens with timely user information are described in more detail in the following topics:•Telephone Preview Screen on page 44•Instant Messaging Preview Screen on page 59•The Email Preview Screen on page 71•Text Messages Preview Screen on page 89How to Select a T-Mobile Device Application1Press the Jump button to open the Jump screen.2Rotate the wheel to scroll through the applications. Stop when the application you want to use is highlighted.3Click the wheel to open the application.The Jump Screen MenuWhile on the Jump screen, press the Menu button to open the Jump screen menu:Here’s what you can do from this menu:•Controls [ ] - Opens the Controls pane. Read more in Controls Pane on page 26.•Preferences... - Opens the Preferences screen, from which you can make device-wide settings. Read more in 4. Setting Your Preferences on page 24.•Shortcuts... - Opens a series of help screens.•Key Guard - Puts your device into power-saving mode and locks the keys if you have set a Privacy Code. Read more in Turn On/Off Privacy Lock on page 31.](https://usermanual.wiki/Danger/FYMASMBD-01/User-Guide-236112-Page-35.png)
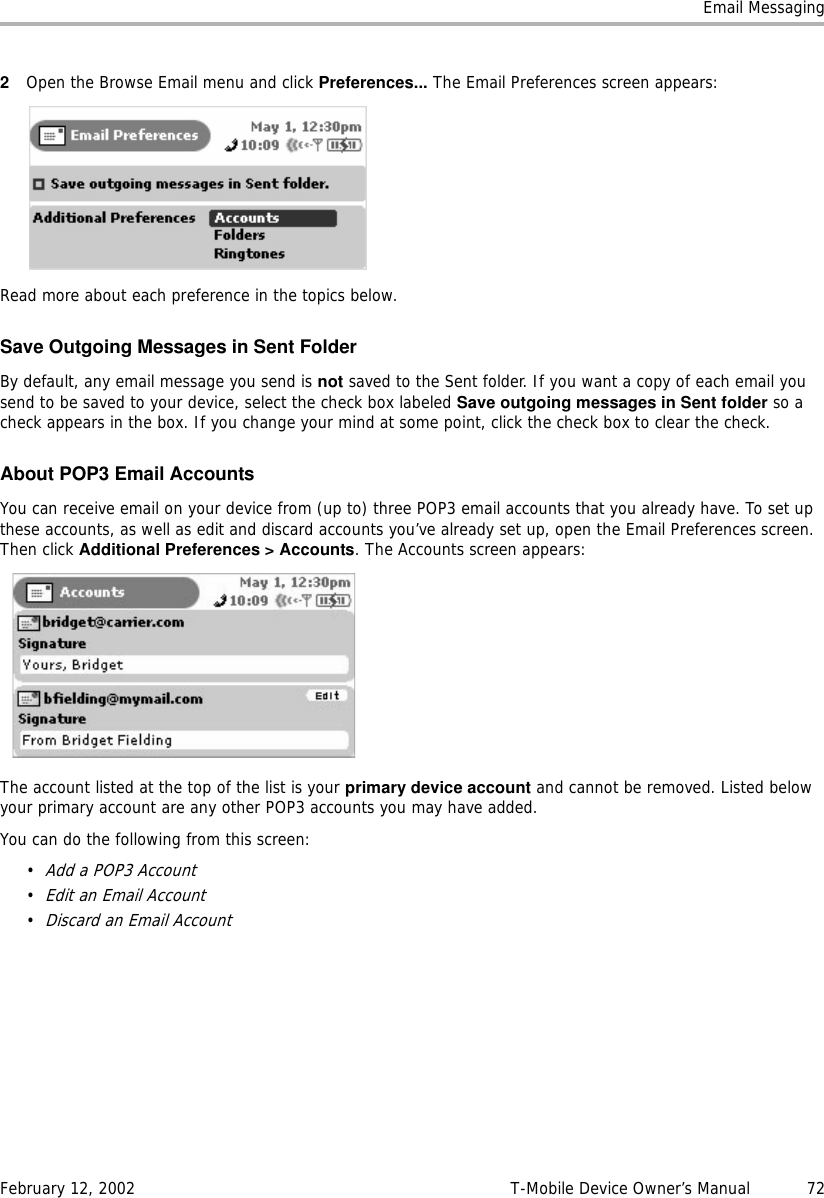
![Browsing the InternetFebruary 12, 2002 T-Mobile Device Owner’s Manual 41The Bookmarks screen looks like the following:Notice you can create folders to organize your bookmarks. You can “expand” or “collapse” the bookmarks contained within a given folder by highlighting the folder and clicking the wheel. Click to expand the list, click again to collapse the list.Read more about folders in Add/Edit/Delete Bookmark Folders on page 41. Add BookmarksTo add a bookmark to your list of bookmarks, do the following while in the Web Browser:1Open the Web page you want to bookmark.2Open the menu and click Add Bookmark... [+ A].3The Add Bookmark screen opens with the Name and URL fields filled in. Use the Folder pop-up menu to select the folder in which you want the bookmark to appear.4When finished, click OK. Your bookmark is added.Edit and Discard BookmarksYou can change the address (URL), name, or folder of an existing bookmark, or discard a bookmark by doing the following while in the Web Browser:1Open the Web Browser menu and click View Bookmarks [+ B). The Bookmarks screen opens.2Scroll to highlight the bookmark you wish to modify. 3Press the Menu button to open the Bookmarks menu, and then:•To edit a bookmark name, click Edit Bookmark to open the Edit Bookmark pane. Change the bookmark name, URL, or folder as you wish; then click OK.•To discard a bookmark, click Discard Bookmark. You will be asked to confirm your action before the bookmark is actually removed.Add/Edit/Delete Bookmark FoldersYou can organize your bookmarks into folders that you name. To add, edit, or delete a bookmark folder, do the following from the Web Browser:1Open the Web Browser menu and click View Bookmarks [+ B]. The Bookmarks screen opens. 2Scroll to highlight the folder you wish to modify. If you are adding a folder, don’t worry about what folder is highlighted.](https://usermanual.wiki/Danger/FYMASMBD-01/User-Guide-236112-Page-41.png)
![Browsing the InternetFebruary 12, 2002 T-Mobile Device Owner’s Manual 423Press the Menu button to open the Bookmarks Folders menu:•To edit a folder name, click Edit Folder to open the Edit folder pane. Change the folder name as you wish and click OK.•To discard a folder, click Discard Folder. You will be asked to confirm your action before the folder is discarded.•To add a folder, click New Folder... The New Folder pane appears. Type the new folder name and click OK.See Recently-Viewed Web PagesTo see a list of Web pages that you have visited recently, relative to the page you are currently viewing, use the Recent Pages screen: press and hold the Back button and the Recent Pages pane opens. Scroll to a page you wish to return to, and click. Notice that the page you are currently viewing is marked with a diamond and its listing is positioned relative to where you’ve been:By using Recent Pages, you can easily navigate forward and backward among pages you’ve visited.You can also open the Recent Pages pane by using the Web Browser menu:1Open the Web Browser menu and click Recent Pages. The Recent Pages pane opens.2The page you are viewing is marked with a bullet. Scroll to highlight the Web page you want to open, then click.View HistoryTo see a chronological list of Web pages you have visited (up to 100), open the History screen:1Open the Web Browser menu and click History [+ I]. The History screen opens:2To return to any of the pages listed, simply scroll to highlight the URL and click.](https://usermanual.wiki/Danger/FYMASMBD-01/User-Guide-236112-Page-42.png)

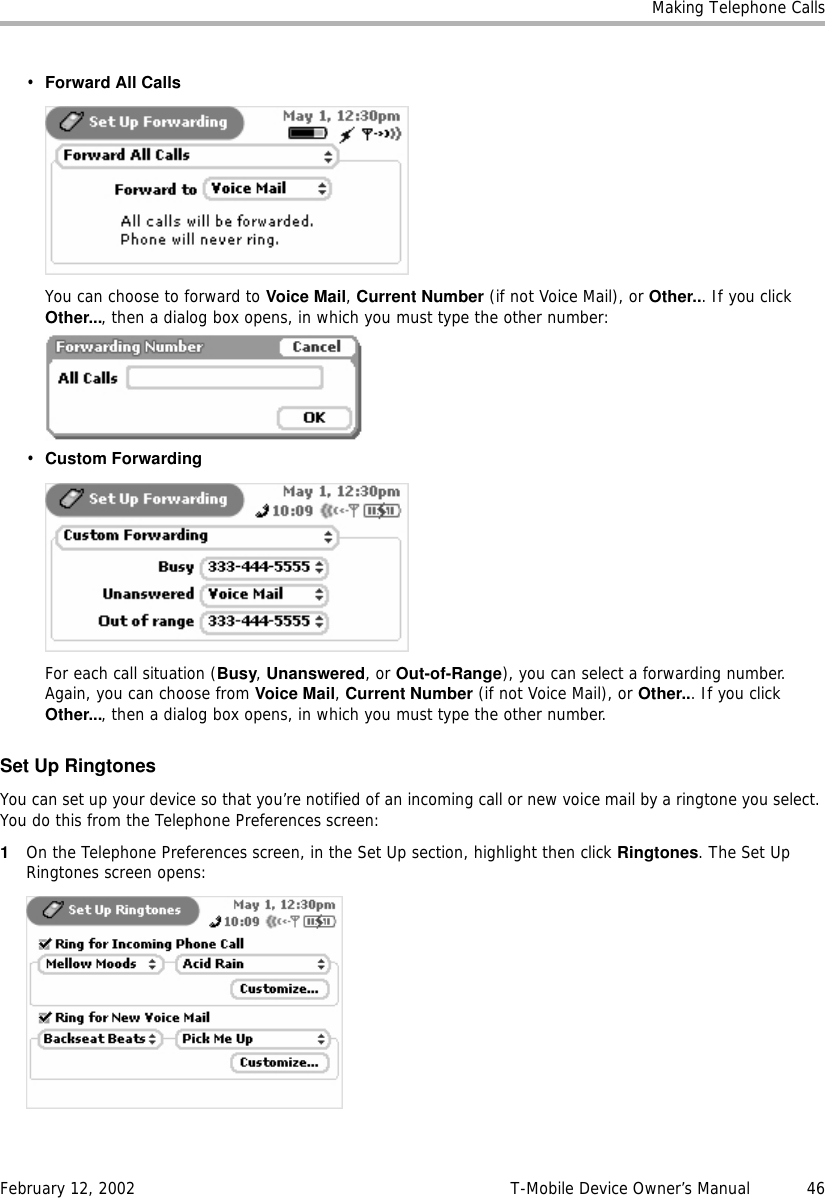
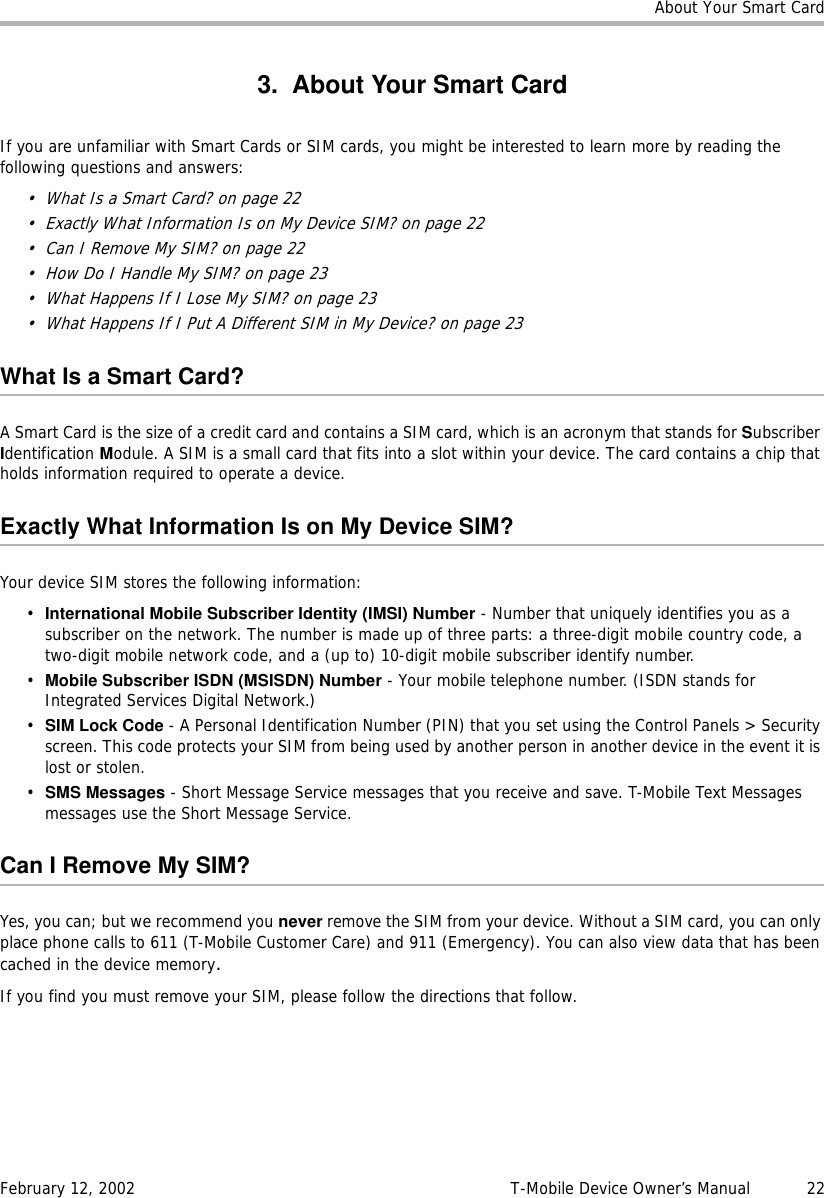
![Making Telephone CallsFebruary 12, 2002 T-Mobile Device Owner’s Manual 49Adding a Number to Your Speed Dial List1From the Jump screen click Telephone.2Open the menu and click New Speed Dial... [ +S]. The New Speed Dial Entry dialog box opens:3The next-available shortcut number is selected by default in the pop-up menu. You can use this number or any other number that isn’t already assigned.4Type the Name and Number of the contact.5Click Create. Your speed dial number is saved.Editing an Existing Speed Dial Number1Open the menu and click Preferences... [ +P]. The Phone Preferences screen appears:2In the Set Up section, highlight then click Speed Dial. The Set Up Speed Dial screen appears:3Use the wheel to highlight the entry you want to edit, then click. The Edit Speed Dial Entry screen appears. Make your change to the shortcut number, name, or phone number.4Click Done.](https://usermanual.wiki/Danger/FYMASMBD-01/User-Guide-236112-Page-49.png)
![Making Telephone CallsFebruary 12, 2002 T-Mobile Device Owner’s Manual 50Deleting an Existing Speed Dial Number1Open the menu and click Preferences... [ +P]. The Phone Preferences screen appears.2In the Set Up section, highlight then click Speed dial. The Set Up Speed dial screen appears.3use the wheel to highlight the entry you want to delete, then click. The Edit Speed Dial Entry screen appears.4Click Delete. The speed dial entry is gone.Headset or Handset?When making a telephone call, you can use the device as a handset or use the headset.•Handset - Make sure the display lid is in the closed position. Hold the phone as a receiver, speaking into the microphone located between the Menu and Jump buttons.•Headset - Plug your headset lead into your device headset/camera jack (see Parts of Your T-Mobile Device on page 13 for an illustration of location).Adjusting VolumeWhile you’re on an active call, you can adjust the speaker volume by using either of the following two methods:•Volume Button - Use the wheel to highlight the speaker volume button on the screen, then click. The volume pane opens:Use the wheel to adjust the volume up or down.•Control Keys - Hold the Menu button while scrolling the wheel. Scrolling up increases the volume; scrolling down decreases the volume.Place a CallThere are many ways you can “dial” a call with your device. This section describes all the methods. Pick the one that suits you:•Keyboard Dialing on page 51•Keypad Dialing on page 51•Redialing a Number on page 51•Speed Dialing on page 51•Dialing Recent Numbers on page 52•Dialing Using Letters on page 52•Dialing from the Call Log on page 52•Dialing from the Look Up Screen on page 52•Dialing from Contact Information on page 52](https://usermanual.wiki/Danger/FYMASMBD-01/User-Guide-236112-Page-50.png)
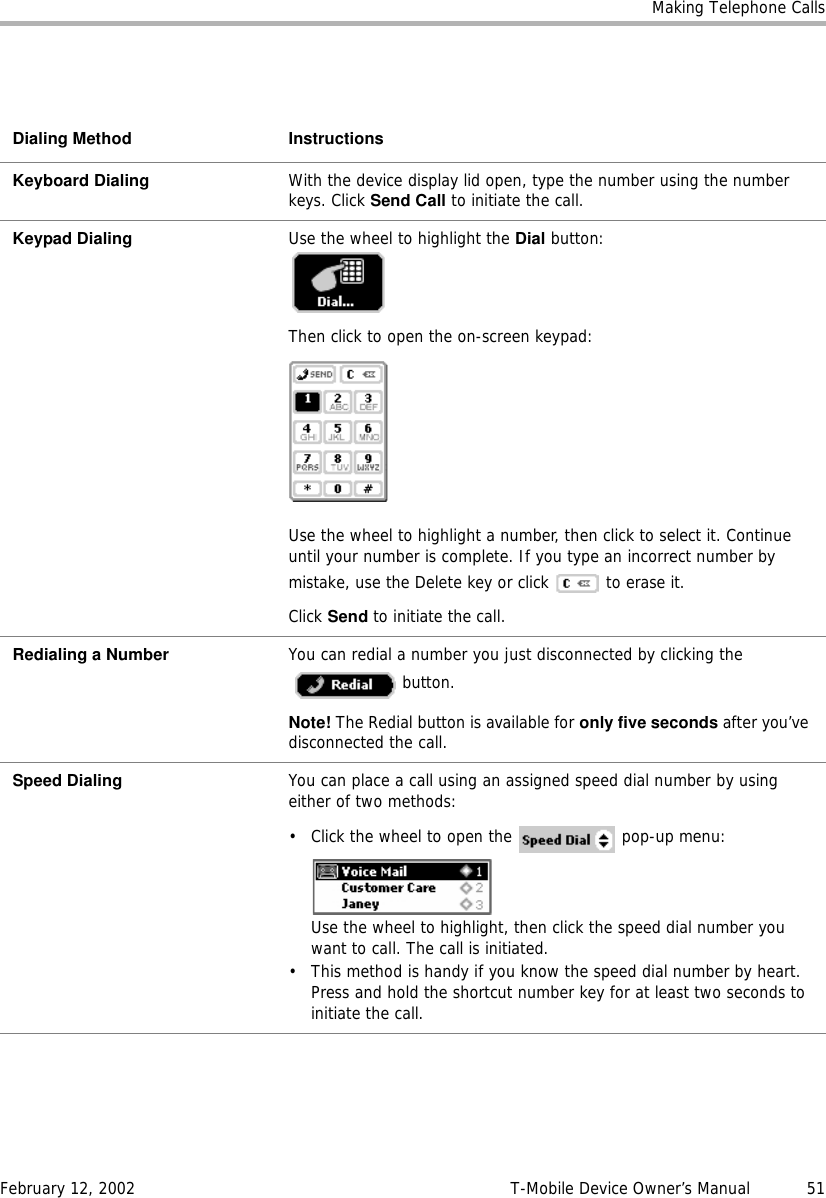
![Making Telephone CallsFebruary 12, 2002 T-Mobile Device Owner’s Manual 52Dialing Recent Numbers The Telephone application stores a list of the last 10 numbers you’ve called, received, or missed. Open this list by clicking the wheel to open the pop-up menu:Use the wheel to highlight, then click the number you want to call. The call is initiated.The symbols to the left of the name/number tell you the “category” of the recent call: - Incoming - Outgoing - MissedDialing Using Letters If you want to dial a phone number that appears as letters (such as 1-800-FLOWERS), you can use the keyboard’s alpha keys to type the number: The Telephone application will “interpret” the letters and send the numeric equivalent.Dialing from the Call Log The Call Log is described in detail inYour Call Log on page 56, but (in brief) here’s how to dial using the Call Log: • Open the menu and click Call Log [ +L]. • Use the wheel to highlight, then click the number you want to call. • The call is initiated.Dialing from the Look UpScreen You can open a “Look Up” view into your Address Book that just lists your contacts and phone numbers. To use this screen to dial a number:•Click the button.• An abbreviated Browse Contacts screen appears.• Use the wheel to scroll through your contacts until you find the phone number you want to call, then click.• The call is initiated and you return to the Telephone application screen.Dialing from ContactInformation You can call a contact stored in your Address Book directly from their contact information:• From the Jump screen click Address Book.• Open the information for the contact you want to call. • Use the wheel to highlight the phone number of interest.• Open the menu and click Call <number>. • You return to the Telephone application as the call is initiated.Dialing Method Instructions](https://usermanual.wiki/Danger/FYMASMBD-01/User-Guide-236112-Page-52.png)
![Making Telephone CallsFebruary 12, 2002 T-Mobile Device Owner’s Manual 53Features While on a CallWhile you’re on a call, you can:•Enter Additional Numbers•Put Your Call on Hold•Make a Second Call•Make a Conference CallEnter Additional NumbersSometimes after connecting to a phone number, you’ll need to enter additional numbers (such as menu item choices or your voice mailbox security code). You can enter these numbers by using either of these two methods:•Method 1 - Use the keyboard number keys. You do not have to type the dashes that separate portions of the phone number.•Method 2 - Click the button to open the on-screen keypad. Use the wheel to highlight then click the numbers or symbols you need to enter. Click the Back button to dismiss the keypad when finished.Put Your Call on HoldDuring an active call you can place your call on hold by clicking the button. The screen switches to the following view:To resume your call, click the button (it’s highlighted by default).Make a Second CallWhile on an active call, you can place a second call:1With your current call active, let the person you’re speaking to know you’re about to put them on hold.2Open the menu and click New Call [ +N]. The active call is placed on hold automatically.3Dial your second call number and click the button.](https://usermanual.wiki/Danger/FYMASMBD-01/User-Guide-236112-Page-53.png)
![Making Telephone CallsFebruary 12, 2002 T-Mobile Device Owner’s Manual 544Your first call still appears on your screen, in the lower panel:5To switch between callers, click the button, highlighted by default in the lower panel. After you click this button, the active caller is put on hold and they’re call is shown in the lower panel.6To end either call assuming it’s active, click End Call. To end the call on hold without resuming it, click End.Make a Conference CallYou can make a three-way conference call using your device. To do this, first you need to have two callers on your phone, one active and one on hold, as described in Make a Second Call on page 53. Then:1Open the menu and click Conference [ +C].2You and your two callers are now conferenced into the same “line”. Your screen appears like this:3You can end the conference by dropping the two calls individually by clicking the End button, or by clicking the button.](https://usermanual.wiki/Danger/FYMASMBD-01/User-Guide-236112-Page-54.png)
![Making Telephone CallsFebruary 12, 2002 T-Mobile Device Owner’s Manual 55Answer a CallWhen you receive a new incoming phone call, you will see a notification screen like the following:Since the Answer Phone button is highlighted by default, all you have to do is click the wheel to answer the call.To send the call directly to voice mail, highlight and click the ForwardtoVoiceMail button, or simply press the Back button.There are a couple of special cases you should know about:•If your device is asleep when a call comes in, the on-screen notification will include a message to press the Menu button to unlock the wheel. Then you can click the wheel to answer the phone.•If your device screen is locked when a call comes in, press the Menu button to unlock the wheel, then click the wheel to answer the call. Once you’re on the call, the phone screen will include a button that allows you to the device so you can use the Menu, Back, and Jump buttons.•If you are already in a call when another call comes in, the notification screen will include a button to Switch Calls. If you click this button, the first call will be put on hold. Alternatively, you can click the Forward to Voice Mail button [ ] to send the incoming call straight to voice mail.About Caller IDIf your caller does not have Caller ID blocked on their telephone account, then the incoming call notification screen will include the caller information. In addition, if you have the caller in your Address Book, the notification screen will be further personalized with the label on the phone number and an identity icon, if you have stored this information.For example, in the case that the caller does not have Caller ID blocked and you have the caller in your Address Book, you could get a notification screen that looks like the one in the illustration above for caller Gloria Grant.End a CallThere are a few ways you can end your telephone call:•If you are in the Telephone application, click the button.•If you are in an application other than Telephone, open the menu and click End Call.•Regardless of where you are, press the Menu and Jump buttons together.](https://usermanual.wiki/Danger/FYMASMBD-01/User-Guide-236112-Page-55.png)
![Making Telephone CallsFebruary 12, 2002 T-Mobile Device Owner’s Manual 56Your Call LogYour Call Log lists the calls that you have either:• received (“incoming”),• placed (“outgoing”), or• didn’t pick up (“missed”)The Log stores up to 10 calls in each of the three categories (Incoming, Outgoing, or Missed), for a total of 30 calls. When you reach the maximum limit in one of the categories, the oldest call is removed from the Log to make room for the new call. You can also clear your Log at any time (read more in Clear Your Call Log on page 58).Views of Your Call LogThe Log is convenient because you can view your calls by category if you want. Here’s how you can set your Log view:1Open the menu and click Call Log [ +L]. The Log opens in either the default view (All Calls), or in the view you last selected.2Open the Call Log menu and click the view you want to see:•Incoming•Outgoing• MissedIf you don’t have any calls in the category you selected, the screen will display the message “No calls in call log”. 3The view you select “sticks” until you change it from the menu. Note that your currently-selected view is indicated by a check mark in the menu:](https://usermanual.wiki/Danger/FYMASMBD-01/User-Guide-236112-Page-56.png)
![Making Telephone CallsFebruary 12, 2002 T-Mobile Device Owner’s Manual 57An example Call Log is shown below, with the view set to All Calls:Note the call category icons: - Incoming - Outgoing - MissedPlace a Call From the LogYou can use your Call Log to return or make calls. Here’s how:1View your Call Log by opening the main Dialing screen menu and clicking Call Log [ +L].2Use the wheel to highlight the number you want to call, then click. The context menu appears, with CallAgain selected by default.3Click the wheel to initiate the call.Add/Edit Speed Dial from the LogIf one of your Log entries is also on your Speed Dial list, you can easily edit this entry from the Log. If an entry in your Log is not on your Speed Dial list, you can easily add the number to your Speed Dial list from the Log:1View your Call Log by opening the Dialing screen menu and clicking Call Log [ +L]. The Call Log opens.2Use the wheel to highlight the number you want to call, then open the menu and click Add to Speed Dial... or Edit Speed Dial... (the appropriate entry will appear).3Either the Edit Speed Dial Entry or New Speed Dial Entry dialog box appears, as appropriate.4Type or edit the Shortcut, Name, and Number information.5Click Create to dismiss the dialog box and save the changes.Add Contact List from the LogIf one of your Log entries is also in your Address Book, you can easily edit this entry from the Log. If an entry in your Log is not in your Address Book, you can easily add that contact to your Address Book from the Log:1View your Call Log by opening the main Dialing screen menu and clicking Call Log [ +L].2Use the wheel to highlight the name/number you want to add or edit, then open the menu and click Add toContacts... or Edit Contact... (the appropriate entry will appear).](https://usermanual.wiki/Danger/FYMASMBD-01/User-Guide-236112-Page-57.png)
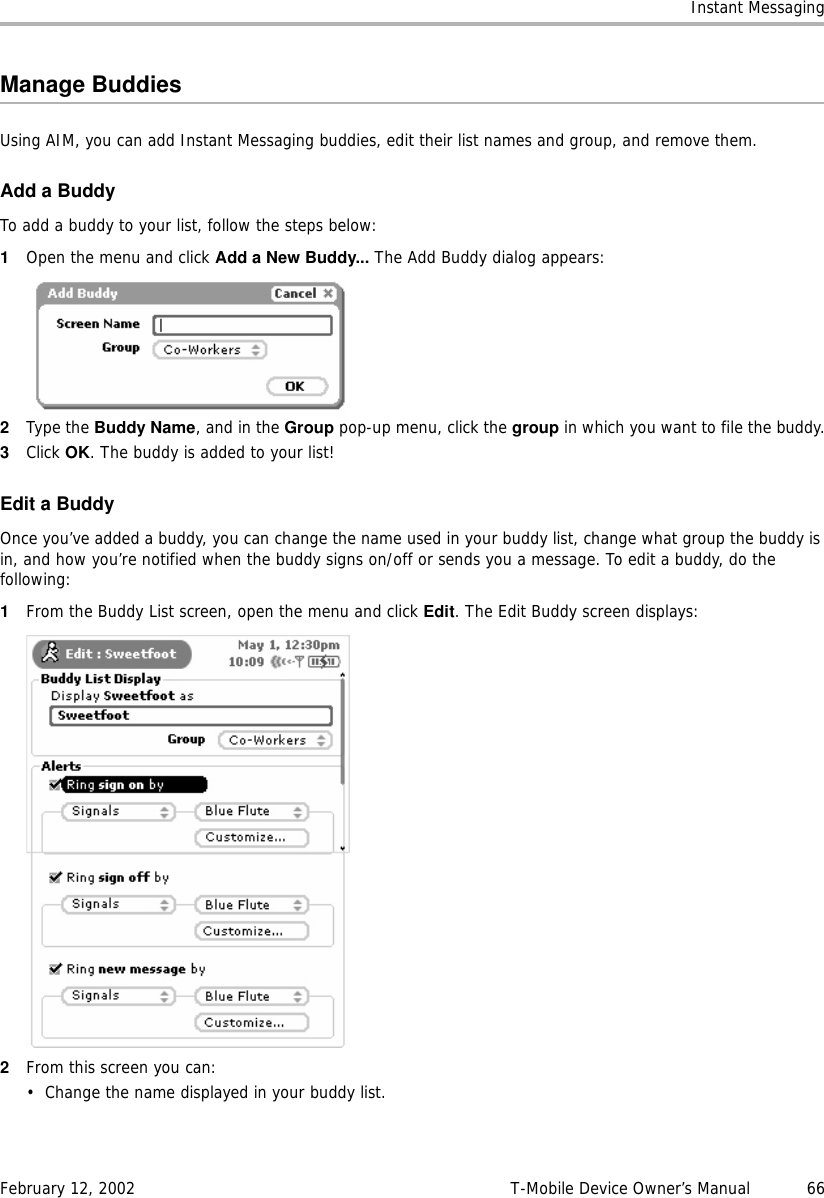
![Instant MessagingFebruary 12, 2002 T-Mobile Device Owner’s Manual 60Add a Screen NameBefore you can use AIM on your device, you must register an AOL Instant Messenger screen name with the service (instructions follow below). Every name you register will be added to the Sign On screen in a pop-up menu, like the one shown below:If you don’t already have an AOL or AIM account, no problem! The instructions below tell you how to get a new account too.Tip: You can only add one screen name at a time (just repeat the steps to add others). Here’s the steps:1Enter AOL Instant Messenger from the Jump screen. • If you’re not already signed on, click <New Account> from the Screen Name pop-up, then click the SignOn button.• If you’re already signed in, open the menu and click New Account [ + N].2The New Account dialog box opens:Click the Create New Screen Name button if you don’t have an AOL or AIM account; you’ll be taken to the new AIM Registration page via the device Web Browser.3Complete the online forms that appear on your screen. When you’re done, you’ll be returned to the AIM Sign On screen, with your new screen name showing as one of the options in the Screen Name pop-up menu.](https://usermanual.wiki/Danger/FYMASMBD-01/User-Guide-236112-Page-60.png)
![Instant MessagingFebruary 12, 2002 T-Mobile Device Owner’s Manual 61Sign OnOnce you have at least one screen named registered, you’re ready to sign on!1After you choose AOL Instant Messenger from the Jump screen, the Sign On screen appears:2All screen names that you can use to sign on are listed in the Screen Name pop-up menu. Tip: To get a screen name on the pop-up menu, you must first “register” that name with the AIM service, as described in Add a Screen Name on page 60.3To open the pop-up, highlight it using the wheel, then click:4Use the wheel to highlight the screen name you want to use to sign on, then click.5Type your password. If you want the device to remember your password, click the Save check box.6Click the Sign On button.7If you want to add a registered AOL screen name to the list, or remove a screen name, read Add a Screen Name on page 60 and Remove Existing Screen Name on page 62.Sign OffTo sign off from AIM at any time, open the menu and click Sign Off [ + Q].Switch Screen NamesYou can switch screen names at any time:1From any of the AIM screens, open the menu and click Sign Off. The Sign On screen appears.2From the Screen Name pop-up menu, highlight the screen name you want to use to sing on, then click.3Click Sign On.](https://usermanual.wiki/Danger/FYMASMBD-01/User-Guide-236112-Page-61.png)
![Instant MessagingFebruary 12, 2002 T-Mobile Device Owner’s Manual 62Remove Existing Screen NameYou can remove one or more names from your Screen Name pop-up menu. Note that if you do this, you will notbe deleting either your AIM or AOL account, you will just be “unregistering” that screen name from the IM application. You can always add the names back in later by using the Add Account by adding an account. It’s easy to remove a name:1Open the Screen Name pop-up menu and click Remove Name. This dialog appears:2Select the names you wish to remove (you can select more than one).3Click Remove. The names you’ve removed will now not appear on the Screen name pop-up menu.Tip! To put a removed screen name back on the Screen Names pop-up menu, follow the instructions in Add a Screen Name on page 60.Instant Messaging Preferences1From the Jump screen click AOL Instant Messenger.2Open the menu and click Preferences...[ + S]. The AIM Preferences screen appears:From this screen you can:•Set Up Knock-Knock on page 62•Enable AIM Sound on page 63Set Up Knock-KnockYou can set up AIM so that if someone not on your buddy list sends you an instant message, you will first see an alert asking you if you want to accept the message. To set this up, do the following:](https://usermanual.wiki/Danger/FYMASMBD-01/User-Guide-236112-Page-62.png)
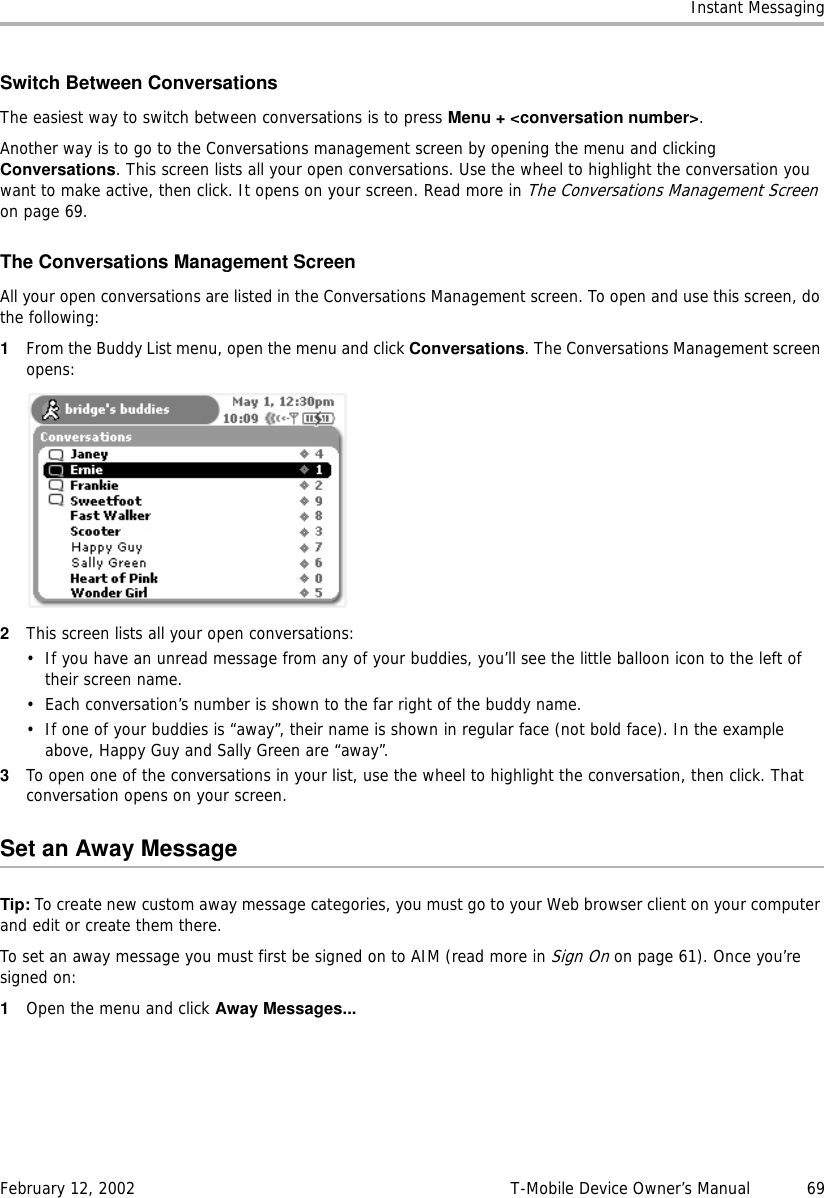
![Instant MessagingFebruary 12, 2002 T-Mobile Device Owner’s Manual 67• Change the group in which you’ve filed the buddy.• Set alerts (notifications) for when your buddy signs on, signs off, or sends you a new message.3After making your edits, click the Menu button to open the menu:• Click Discard to cancel all changes.• Click Save [ + S] to save your changes.Delete a BuddyTo delete a buddy from your list, do the following:1From the Buddy List screen, scroll to highlight the screen name of the buddy you wish to delete.2Open the menu and click Delete. A confirmation dialog opens.3If you’re sure you want to remove this buddy, click Delete. Otherwise, to cancel the action and keep the buddy on your list, press the Back button.Block/Unblock BuddiesIf you want to block messages from a particular buddy, you can easily do so:1On the Buddy List screen, use the wheel to highlight the name of the buddy you want to block.2Open the menu and click Block:3The buddy’s name still appears on your Buddy List, but now it’s in the Offline group and the “forbidden” icon appears to next to the buddy’s name: .4To unblock the buddy’s messages, highlight the buddy name and click Unblock from the menu. Their name moves under the group you had previously assigned to them and you will start receiving messages from this buddy again.ConversationsConversations are one-on-one chat sessions you have with your online buddies. With AIM, you can have up to 10 online conversations going at the same time. This section explains how to start and end conversations, as well as how to keep track of all the conversations you have going at one time!Start/End a ConversationTo send a message to one of your buddies, follow the instructions below.1You can open a conversation screen in either of two ways:](https://usermanual.wiki/Danger/FYMASMBD-01/User-Guide-236112-Page-67.png)
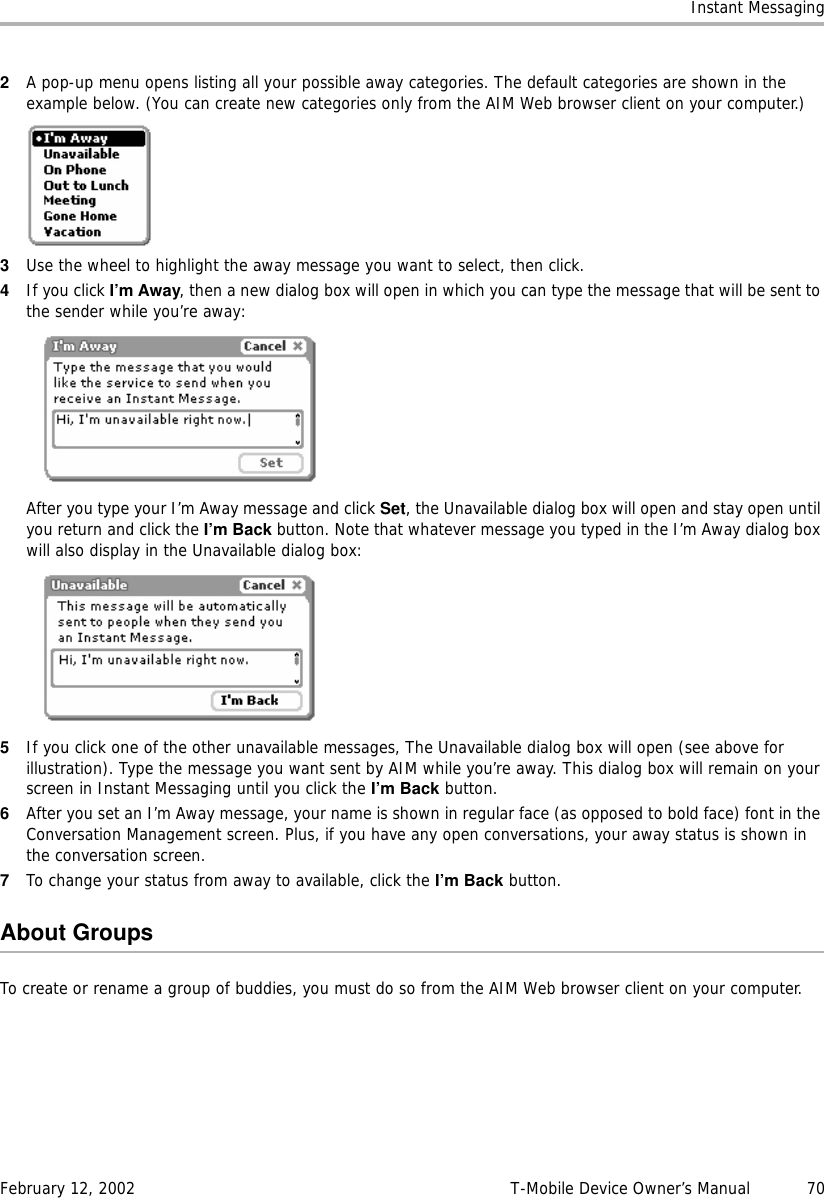
![Instant MessagingFebruary 12, 2002 T-Mobile Device Owner’s Manual 68• From the Buddy List screen, scroll to highlight the buddy with whom you want to message, then click the wheel. A conversation screen with this buddy opens.• Open the menu and click Send Message To... The New Instant Message dialog box opens:2In the Send to text box, type the screen name of the buddy you want to send a message to. You can also open the pop-up menu and click a buddy name (all your buddies are listed there).3Type your initial message, then click Send (or press Return) to send it. A conversation screen with this buddy opens with your initial message showing.4Use the lower pane to type your messages. Here’s an example of a conversation-in-progress:5To end a conversation, open the menu and click End Conversation. From any conversation screen menu you can also:• Return to the Conversations Management screen by clicking Conversations [ + V].• Return to your Buddy List view by clicking Buddy List.• Set an away message by clicking Away Messages...Conversation IndicatorsMost every screen you view within Instant Messaging, including the preview screen, contains balloon indicators, one for each active conversation (assuming you have at least one conversation going). The balloon indicates that you have an unread message from a buddy.In addition, each open conversation is numbered and usually displays to the far right of the buddy name in any of the lists. If you press the Menu button and the conversation number, that conversation will display on the screen and become active.](https://usermanual.wiki/Danger/FYMASMBD-01/User-Guide-236112-Page-68.png)
![Email MessagingFebruary 12, 2002 T-Mobile Device Owner’s Manual 73Add a POP3 AccountTo add a POP3 account do the following:1From the Jump screen click Email, then open the menu and click Preferences > Accounts.2From the Accounts screen, open the menu and click New Accounts [+ N]. The New Accounts screen opens:3Assuming you’re setting up this account for the purpose of having the email collected, simply leave the Stopcollecting email from account check box alone (unchecked). If, at some point in the future, you want the Email application to stop collecting email from the POP3 account, select the Stop collecting email fromaccount check box to put a check mark in the box. The account information is saved in case you want the application to start collecting email from that account later.4By default, email retrieved from a POP3 server to your device will remain on the POP3 server. If you want the email to be removed from the POP3 server as it’s collected and sent to your device, select the Removeretrieved email from server check box to make a check mark appear.5Complete all the Server information fields:•POP server - Obtain from the POP3 email service provider.•Port - If you’re unsure what to type here, leave the port at 110.•Mail Domain - The part of your email address that appears to the right of the @ sign. For example, if your email is grace@myserver.com, the Mail Domain is “myserver.com”.](https://usermanual.wiki/Danger/FYMASMBD-01/User-Guide-236112-Page-73.png)
![Email MessagingFebruary 12, 2002 T-Mobile Device Owner’s Manual 746Complete all the Account information fields:•Login - The name you use to log in to your POP3 account.•Password - The password you use for your POP3 account. You’re asked to verify this password by typing it again.•Name - Your name as you'd like it to appear on email sent through this account.•Reply To - The email address to which you'd like all replies to go.•Save Folder - Folder in which you would like all retrieved mail to be placed. You can create a folder specifically for this purpose; read Manage Email Folders on page 75 for instructions on creating email folders.7When you have completed all fields on the screen, press the Back button to open a dialog box from which you can Save the information, or Discard Changes. Before your account is completely set up, the validity of the POP3 email account will be checked. You’ll know the account has been set up when you see it listed on the Accounts screen.Edit an Email AccountTo edit a POP3 email account, do the following:1From the Email Preferences screen, select Additional Preferences > Accounts. The Accounts screen appears. From this screen you can change how the emails from all your accounts are signed. Note: You cannot edit your primary device email account (the account listed first in the Accounts screen) except to change the signature.2To edit other account information, select the Email account you wish to edit by clicking the button opposite the account name. Your account information appears.3Make edits as you wish, then click the Back button to open a dialog box from which you can Save or Discard Changes.Discard an Email AccountNote: You cannot discard your primary device email account (the account listed first in the Accounts screen).To delete any other POP3 email account, do the following:1From the Email Preferences screen, select Additional Preferences > Accounts. The Accounts screen appears.2Select the Email account you wish to delete by making sure the button opposite the account name is highlighted (shown in black). 3Open the menu and click Delete Account [].](https://usermanual.wiki/Danger/FYMASMBD-01/User-Guide-236112-Page-74.png)
![Email MessagingFebruary 12, 2002 T-Mobile Device Owner’s Manual 754A confirmation dialog box appears. Click OK to delete the account; press the Back button to cancel the deletion.Manage Email FoldersYou can create folders in which to store and organize your emails. (Read more in About Email Folders on page 82.) To add new email folders, as well as edit and discard existing email folders you may have already created, open the Email Preferences screen. Then select Additional Preferences > Folders. The Folders screen appears:All user-defined folders appear in the lower portion of the folder list. Create an Email FolderTo create a new folder do the following from the Folders screen:1Open the Folders menu and click New Folder [+ N]. The New Folder pane appears:2Type the name of your new folder, then click OK.Edit an Existing Email FolderNote: You cannot edit the Inbox, Sent, Drafts, or Trash folders’ names as they are “system” folders. To edit any other folder, do the following:1From the Email Preferences screen, select Additional Preferences > Folders. The Folders screen appears.](https://usermanual.wiki/Danger/FYMASMBD-01/User-Guide-236112-Page-75.png)
![Email MessagingFebruary 12, 2002 T-Mobile Device Owner’s Manual 762Highlight the folder you want to edit and click the wheel. Alternatively, you can open the Folders menu to click Edit Folder [+ E]. The Edit Folder pane appears with the text cursor in the Folder Name field, ready for editing:3Make your edit to the name, then click OK.Discard an Existing Email FolderNote: You cannot discard the Inbox, Sent, Drafts, or Trash folders as they are “system” folders. To discard any other folder, do the following:1From the Email Preferences screen, select Additional Preferences > Folders. The Folders screen appears.2Highlight the folder you want to discard.3Open the menu and click Discard Folder [].4A confirmation dialog box appears. Click Discard to confirm the deletion or press the Back button to cancel the deletion.Select Email NotificationsYou can select the way your device lets you know (or “notifies” you) when a new email has arrived. You will always receive a banner notification in the title bar:To select additional notification methods (sound, flasher, or vibration), do the following:](https://usermanual.wiki/Danger/FYMASMBD-01/User-Guide-236112-Page-76.png)
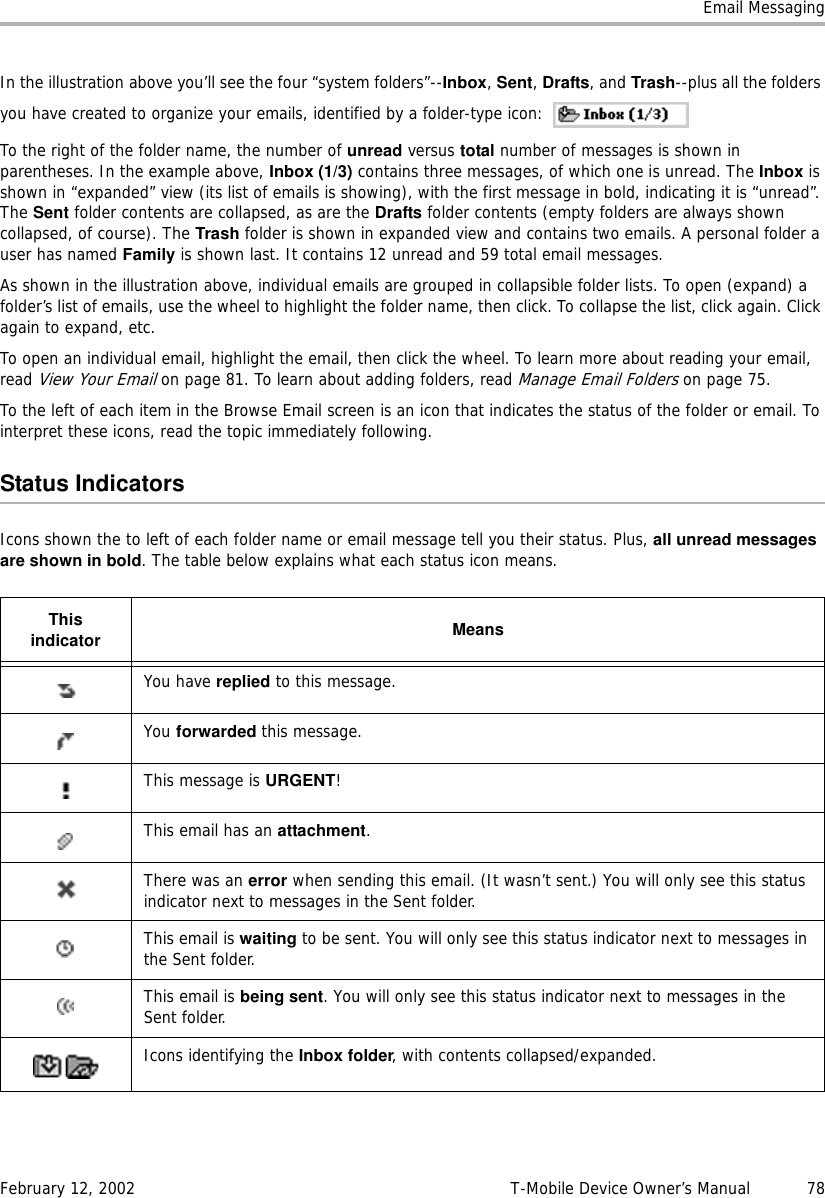
![Email MessagingFebruary 12, 2002 T-Mobile Device Owner’s Manual 82To open a graphic attachment, open the email, the use the wheel to scroll to the attachment link, then click.Open Hypertext Links in MessagesIf a hypertext link is embedded in an email message (including attached email addresses and Web site addresses), these links will appear at the bottom of the email message as a clickable button.Change the Status of an Email to UnreadNormally, when you have an unread email message, it is listed on the Email preview screen, and it is shown in bold on the Browse Email screen. Once you’ve read the message, it disappears from the preview screen and appears in regular type on the Browse Email screen. However, there may be times when you want to mark an unread message as read. To do this:1From the Browse Email screen, open the email message whose status you want to change to “read”.2Open the Email:Read menu and click Mark Unread [+ K].The message appears again on the preview screen and on the Browse Email screen in bold.About Email FoldersThe Email application uses four “system” folders--Inbox, Sent, Drafts, and Trash--shown in the illustration below:You cannot discard or modify the four system folders (Inbox, Sent, Drafts, Trash), but you can add any number of folders with names you define. To add new, edit, or discard existing user-defined email folders, you use the Email Preferences screen, as described in the following topics:•Manage Email Folders on page 75•Edit an Existing Email Folder on page 75•Discard an Existing Email Folder on page 76Here’s a little more information about each system folder:•Inbox - The Inbox folder is the default drop point for any new emails you receive. Note that you can specify that email from POP3 accounts be dropped into folders you create. (Read more in Manage Email Folders on page 75.)](https://usermanual.wiki/Danger/FYMASMBD-01/User-Guide-236112-Page-82.png)
![Email MessagingFebruary 12, 2002 T-Mobile Device Owner’s Manual 83•Sent - As you send an email message, the email is displayed in the Sent folder (expanded view), with its status just to the left. In the illustration above you’ll see the status indicators showing the top email is being sent ( ), the second is waiting to be sent ( ), and the third was not sent due to a delivery problem ( ).After a message has been sent, it disappears from the Sent folder, unless you specify in the Email Preferences screen that you want to Save outgoing messages in Sent folder. If you’ve set this preference, a copy of every email you compose and send will be saved in the Sent folder.•Drafts - If you start composing an email but want to pause in writing it or wait to send it, then you can save the email in the Drafts folder and later open it and continue. (Read more in Save an Email Message as a Draft on page 85)•Trash - Every message you discard from other folders is moved to the Trash folder. Discarded emails accumulate in the Trash until you explicitly use the menu option to Empty Trash. As long as an email stays in the Trash, however, you can restore it to another folder. (Read more in Discard Email Messages on page 87.)Sort Email MessagesWithin each folder you can decide how you want messages to be sorted:1Open the Browse Email screen and click Sort... [+ T]. The Sort Messages dialog box opens:By default, messages are sorted by date & time, with newer messages appearing at the top.2If you want to change this default sort behavior, you can choose from:•Date & Time - further specify sort order:- Newer messages at top- Newer messages at bottom•Subject - further specify sort order:- A .. Z- Z .. A•Sender/Recipient - further specify sort order:- A .. Z- Z .. A3When finished, click OK to save changes, or push the Back button to dismiss the window with no changes.](https://usermanual.wiki/Danger/FYMASMBD-01/User-Guide-236112-Page-83.png)
![Email MessagingFebruary 12, 2002 T-Mobile Device Owner’s Manual 84Move Messages to FoldersYou can move messages around within folders by doing the following:1From the Browse Email screen, expand the folder that holds the email you want to move.2Highlight the email you want to move and then open the Move Message to Folder pane. There are three ways to open this pane:• Use the wheel to highlight the email, then hold the wheel down. The Move Message to Folder pane appears.• Use the wheel to highlight the email. Press the Menu button to open the menu, then select MoveMessage.... The Move Message to Folder pane appears.• Use the wheel to highlight the email, then press + E. The Move Message to Folder pane appears:3All folders (except for the Drafts and Sent folders, and the folder the email currently is in) are shown in the list. Highlight the folder into which you want to move the message, then click.Send MessagesCompose a New MessageTo write a new email message you must first open the Compose screen:1Open the Browse Email screen and click New Message... [+ N]. The Compose screen opens:2Complete your message:•From field - If you have set up POP3 accounts, then you can choose what address you want to use to send the email. To open the pop-up menu with your addresses, highlight the From field and click the wheel.•To field - As you fill in the To field, the Email application will communicate with the Address Book and offer you completion suggestions (based on your existing Address Book contacts). The suggestions appear in a drop-down list. Scroll and click to select one of the address suggestions or type a new one. To create a new line so you can add more recipients, press the comma (,) key or press + RETURN.](https://usermanual.wiki/Danger/FYMASMBD-01/User-Guide-236112-Page-84.png)
![Email MessagingFebruary 12, 2002 T-Mobile Device Owner’s Manual 85•CC and BCC fields - Optional fields you can display by opening the Compose menu and clicking Add CC or Add BCC. You cannot show both BCC and CC fields; only one or the other. To create a new line so you can add more recipients, press the comma (,) key or press + RETURN.•Subject field - Type your subject line; there are no limits to how long a subject line can be. •Message body - Type your message body; there are no limits to how long a message body can be.•Signature - Edit or use the default message you set up in Preferences > Accounts > Signature.3To send your message, do one of the following:• Open the Compose menu and click Send Now.• Press + M.• Press the Back button; a dialog box appears asking you to select Discard, Save as Draft, or Send Now. Click Send Now.4To discard your message, either:• Open the Compose menu and click Discard.• Press the Back button; a dialog box appears asking you to select Discard, Save as Draft, or Send Now. Click Discard.Note about in-progress messages: If you are composing more than one message at a time, each in-progress message is listed in the Browse Email menu at the bottom of the list. To return to each compose screen, simply open the menu and click the message you want to view.Note about attachments: You cannot attach files to emails you compose on your device (except for photos), but you can forward emails with attachments. Read more in Open an Attachment on page 81 and Email Photos on page 124.Save an Email Message as a DraftIf you are composing an email message and want to save it so you can resume composing or sending at a later time, save your message in the drafts folder by doing one of the following:• Open the Compose menu and click Save as Draft.• Press + S.• Press the Back button; a dialog box appears asking you to select Discard, Save as Draft, or Send Now. Click Save as Draft.To re-open a draft message, from the Browse Email screen highlight the draft message you want to open and click. The message reopens in the Compose screen for editing. Note: If, after editing, you still want to keep the message as a draft, be sure to use one of the methods to Saveas Draft again--don’t discard the message or the it will be deleted, as in not saved to your Trash folder.Reply to an Email MessageTo reply to an email message, do the following:1From the Browse Email screen, highlight the email you want to reply to. Open the email if you wish by clicking the wheel.2From either the Email:Read or Browse Email screen, open the menu and click one of:•Reply... [+ R] to address your reply only to the individual who sent you the message.](https://usermanual.wiki/Danger/FYMASMBD-01/User-Guide-236112-Page-85.png)
![Email MessagingFebruary 12, 2002 T-Mobile Device Owner’s Manual 86•Reply All... [+ A] to address your reply to all individuals copied on the message.3The Reply screen opens with the To: field filled in according to the menu option you selected.Forward an Email MessageTo forward an email message to one or more addresses, do the following:1From the Browse Email screen, highlight the email you want to forward. Open the email if you wish by clicking the wheel.2From either the Email:Read or Browse Email screen, open the menu and click Forward... [+ F].3The Forward screen opens ready for you to address. The email, including any attachments, are appended to the end of the new message.Adding Email Senders to the Address BookIf you receive an email from an individual you would like to include as a contact in the Address Book, do the following:1From the Browse Email screen, highlight the email whose sender you want to add as a contact. Open the email if you wish by clicking the wheel.2From either the Email Read or Browse Email screen, open the menu and click Add to Contacts... [+ =].3The Add to Address Book dialog box pens with the new contact’s name and email address added:4Complete the information, then click Add.Read more about editing contact information in the Address Book application in 11. Keeping Contacts in the Address Book on page 97.Note! If you add an entry that is already listed as a contact in your Address Book, you will create a duplicate entry for that contact.Adding Email Recipients to the Address BookIf you compose an email and want to add any of the recipients to your Address Book, do this:1Compose a new email to the point where you at least have listed the recipients.2Save the email as a draft, or (if you’ve set up in Preferences to save outgoing messages to the Sent folder) send it.3Highlight the email (in either the Drafts or Sent folder). Don’t open it if it’s a draft.](https://usermanual.wiki/Danger/FYMASMBD-01/User-Guide-236112-Page-86.png)

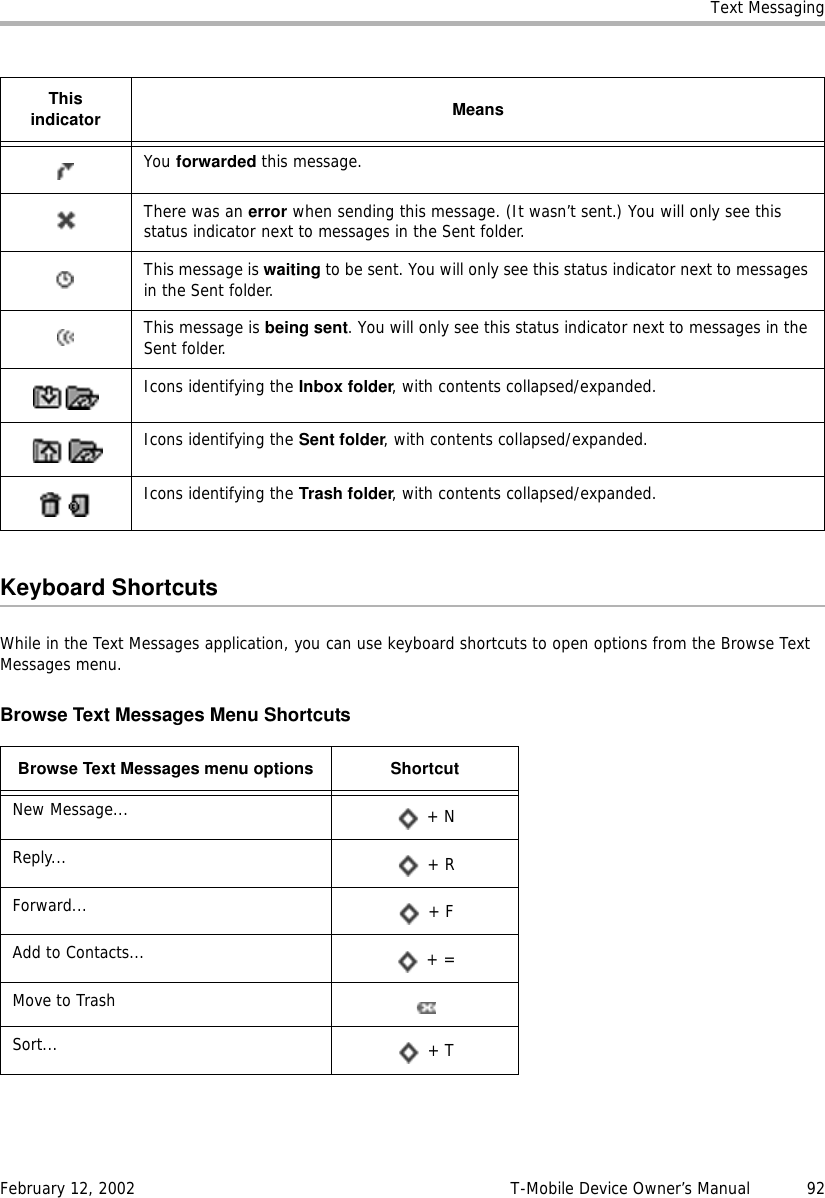
![Text MessagingFebruary 12, 2002 T-Mobile Device Owner’s Manual 93View Your Text MessagesTo view a list of all your text messages, open the Text Messages application from the Jump screen. The Browse Text Messages screen appears, listing all your messages.Read a Text MessageTo open an individual text message for reading, do the following:1Make sure the folder in which you’ve stored the message is shown in expanded view. (Click the folder name to expand/collapse the messages contained in the folder.) 2Use the wheel to highlight the message--a message preview shows in the lower half of the screen. To have the message fill your screen, then click the message. Your message contents display in the Read screen.3To dismiss the message and return to the Browse Text Messages screen, click the Back button.About Text Message FoldersText Messages uses three “system” folders--Inbox, Sent, and Trash.Here’s a little more information about each system folder:•Inbox - The Inbox folder is the default drop point for any new messages you receive. •Sent - As you send a text message, the message is displayed in the Sent folder (expanded view), with its status just to the left. Possible status indicators include: message is being sent ( ), message is waiting to be sent ( ), and message not sent due to a delivery problem ( ).After a message has been sent, it disappears from the Sent folder, unless you specify in the Text Messages Preferences screen that you want to Save outgoing messages in “Sent” folder. If you’ve set this preference, a copy of every message you compose and send will be saved in the Sent folder.•Trash - Every message you discard from other folders is moved to the Trash folder. Discarded messages accumulate in the Trash until you explicitly use the menu option to Empty Trash. As long as a message stays in the Trash, however, you can restore it to another folder. (Read more in Discard Text Messages on page 96.Sort Text MessagesBy default, the messages listed in the Browse Text Messages screen are organized with the newer messages at the top. To change the order in which your messages are displayed in the Browse Text Messages screen, do the following:1Open the Browse Text Messages menu and click Sort... [+ T]. The Sort Messages screen opens:2Click the sort option you prefer: newer messages at the top or the bottom of the lists.](https://usermanual.wiki/Danger/FYMASMBD-01/User-Guide-236112-Page-93.png)
![Text MessagingFebruary 12, 2002 T-Mobile Device Owner’s Manual 943Click OK.Send Text MessagesCompose a New Text MessageTo write a new text message you must first open the Compose screen:1Open the Browse Text Messages menu and click New Message... [+ N]. The Compose screen opens:2Complete your message:•To field - As you fill in the To field, the Text Messages application will communicate with the Address Book and offer you completion suggestions (based on your existing Address Book contacts). The suggestions appear in a drop-down list. Scroll and click to select one of the address suggestions or type a new one. •Message body - Type your message body; you can only type 160 characters. At the bottom of the screen you’ll see a counter that keeps track of how many characters you’ve typed. Some special characters on the keyboard cannot be used in a text message; these include brackets ([]), braces ({}), tildes (~), and carets (^). If you happen to type one of the “illegal” characters, no entry will be made in the message body. A sample message is shown below:3To send your message, do one of the following:• Open the Compose menu and click Send Now.• Press the Back button; a dialog box appears asking you to select Discard or Send Now. Click Send Now.4To discard your message, either:• Open the Compose menu and click Discard.• Press the Back button; a dialog box appears asking you to select Discard or Send Now. Click Discard.](https://usermanual.wiki/Danger/FYMASMBD-01/User-Guide-236112-Page-94.png)
![Text MessagingFebruary 12, 2002 T-Mobile Device Owner’s Manual 95Reply to a Text MessageTo reply to a text message, do the following:1From the Browse Text Messages screen, highlight the message you want to reply to. Open the message if you wish by clicking the wheel.2From either the Read or Browse Text Messages screen, open the menu and click Reply... [+ R].3The Reply screen opens with the To field filled in.Forward a Text MessageTo forward a text message to another individual, do the following:1From the Browse Text Messages screen, highlight the message you want to forward. Open the message if you wish by clicking the wheel.2From either the Read or Browse Text Messages screen, open the menu and click Forward... [+ F].3The Forward screen opens ready for you to address. The message is appended to the end of the new message.Adding Text Message Senders to the Address BookIf you receive a message from an individual you would like to include as a contact in your Address Book, do the following:1From the Browse Text Messages screen, highlight the message whose sender you want to add as a contact. Open the message if you wish by clicking the wheel.2From either the Read or Browse Text Messages screen, open the menu and click Add to Contacts... [+ =].3The New Contact screen opens with the new contact’s phone number added (as “unfiled”). At this point you can Save the new contact as is, add more contact information, or simply click the Back button to return to the Text Messages application without saving any of the new contact’s information.Read more about editing contact information in the Address Book application in 11. Keeping Contacts in the Address Book on page 97.Call Back Sender of a Text MessageTo use the Telephone application to call the sender of a text message, do the following:1From the Browse Text Messages screen, highlight the message from the person you wish to call back. Open the message if you wish.2Open the menu and click Call Back. You enter the Telephone application and your call is placed.](https://usermanual.wiki/Danger/FYMASMBD-01/User-Guide-236112-Page-95.png)
![Text MessagingFebruary 12, 2002 T-Mobile Device Owner’s Manual 96Discard Text MessagesTo discard a text message, do the following:1From the Browse Text Messages screen, highlight the message you want to discard. Open the message if you wish.2From either the Read or Browse Text Messages screen, open the menu and click Move to Trash.3The message is moved to the Trash folder.4To restore your discarded message, from the Browse Text Messages screen expand the contents of the Trash folder. Use the wheel to highlight the message you want to restore then open the menu and click Move toInbox.To empty all messages from the Trash, from the Browse Text Messages screen open the menu and click Empty Trash. The contents of your Trash folder are emptied (without asking you for confirmation).Receive RingtonesMany Web sites offer ringtones that you can download to a wireless device for a fee. If you purchase a ringtone, it is delivered to your wireless device using the Short Message Service. Your device can store up to 10 such ringtones. If you receive a text message with a ringtone attached, it will automatically be added to your ringtone library, which you can then select as a notification method.If you already have 10 custom ringtones in your device’s ringtone library, then before any additional ringtones you purchase will are saved to your device, you will be asked to discard one of your 10 saved ringtones: [add picture]](https://usermanual.wiki/Danger/FYMASMBD-01/User-Guide-236112-Page-96.png)
![Keeping Contacts in the Address BookFebruary 12, 2002 T-Mobile Device Owner’s Manual 98Create, Edit, and Delete CategoriesEach contact in your Address Book contacts is stored in a category. By default, your Address Book contains four categories:•Work•Family•Friends•NewYou can edit the names of these categories, delete them, and create new ones.To edit an existing category:1From the Address Book Preferences screen, click Categories. The Categories screen appears.2Use the wheel to highlight the category you wish to edit, then click. The Edit Category dialog box appears:3Edit the name as you wish, then click Done [ ] to save the change. To cancel your edit, click Cancel.To create a new category:1From the Address Book Preferences screen, click Categories. The Categories screen appears:2Press to open the menu, then click New Category [+ N]. The New Category dialog box appears:3Type the name of your new category. Remember, categories describe a group of contacts; for example, you might have a number of medical doctors you want to group into a category named “MDs”. 4Click Done [ ] to save the category. If you change your mind and don’t want to create the new category after all, click Cancel.](https://usermanual.wiki/Danger/FYMASMBD-01/User-Guide-236112-Page-98.png)
![Keeping Contacts in the Address BookFebruary 12, 2002 T-Mobile Device Owner’s Manual 995You will now be able to assign contacts to this new category, as well as use it to filter (sort) messages. Read more in Filter Contacts by Category on page 103.To delete a category:1From the Address Book Preferences screen, click Categories. The Categories screen appears.2Use the wheel to highlight the category you wish to delete.3Press to open the menu, then click Discard Category [].4A confirmation dialog appears, asking if you want to discard the category. Click Discard if you want to; otherwise, click Cancel.Create, Edit, and Delete LabelsAll pieces of information you store about an individual contact are described using “labels”. For example, in the screen below, in the Phone section, “Home” and “Vacation” are labels used to differentiate Gloria’s home phone number from the phone number she uses when on vacation.By default, the Address Book includes the following labels:•Home•Mobile•Personal• Vacation•WorkYou can edit the names of these labels, delete them, and create new ones.To edit an existing label:](https://usermanual.wiki/Danger/FYMASMBD-01/User-Guide-236112-Page-99.png)
![Keeping Contacts in the Address BookFebruary 12, 2002 T-Mobile Device Owner’s Manual 1001From the Address Book Preferences screen, click Labels. The Labels screen appears.2Use the wheel to highlight the label you wish to edit, then click. The Edit Label dialog box appears:3Edit the name as you wish, then click Done [ ] to save the change. To cancel your edit, click Cancel.To add a label:1From the Address Book Preferences screen, click Labels. The Labels screen appears, showing all existing labels:2Press to open the menu, then click New Label... [+ N]. The New Label dialog box appears:Type your new label name. Remember, labels describe bits of information about an individual contact; for example, you could create a label named “Social” to describe the email addresses your friends use for social-type email. Each friend could also have an email address labeled “Work”.3Click Done [ ] to save the label. If you change your mind and don’t want to create the new label after all, click Cancel.4You will now be able to assign contact information to this new label, as well as view it on the Browse Contacts screen describing the contact information displayed.To discard a label:1From the Address Book Preferences screen, click Labels. The Labels screen appears.2Use the wheel to highlight the label you wish to discard.3Press to open the menu, then click Discard Label [].4A confirmation dialog appears, asking if you’re sure you want to discard the label. Click Discard if you want to; otherwise, click Cancel to keep the label.](https://usermanual.wiki/Danger/FYMASMBD-01/User-Guide-236112-Page-100.png)

![Keeping Contacts in the Address BookFebruary 12, 2002 T-Mobile Device Owner’s Manual 103Filter Contacts by CategoryTo view only one category of contacts on the Browse Contacts screen, do the following:1From the Browse Contacts screen, press to open the menu.2Scroll through the menu items until you find the list of categories. Individual categories are listed after All. The category of contacts currently displaying on the Browse Contacts screen is indicated by a check mark:3Highlight the category you want to use to filter, then click. The Browse Contacts screen refreshes to show only the contacts in the category you selected.Sort ContactsOn the Browse Contacts screen, individual contacts can be sorted by:•First Name•Last NameIn addition, you can specify the sort order:•A to Z (ascending)• Z to A (descending)To specify your sort preference, do this:1From the Browse Contacts screen, press to open the menu, then click Sort... The Sort Options dialog box opens:2Highlight the Sort Options By field; click and hold the wheel to open the pop-up menu. Scroll to highlight either the Last Name or First Name option; click to select.3Highlight the Sort order field; again, hold the wheel down to open the pop-up menu. Then scroll to highlight either the AtoZ or the ZtoAorder; click to select.4Click Done [ ] when finished, or click Cancel to cancel any changes you’ve made to the sort options.](https://usermanual.wiki/Danger/FYMASMBD-01/User-Guide-236112-Page-103.png)
![Keeping Contacts in the Address BookFebruary 12, 2002 T-Mobile Device Owner’s Manual 104Create a ContactYou can add a contact to your Address Book by starting from scratch; or by duplicating an existing contact’s information, then editing it. Both methods are described below.Add a New Contact from Scratch1From the Browse Contacts screen, press to open the menu, then click New Contact... [+ N]. The New Contact, Identity screen opens:2The Identity screen holds basic contact information. Complete at least one of the fields, then click Done [ ]. The full contact screen appears:3From this screen you can edit the basic “identity” information (including the selection of an appropriate icon to represent your contact). From this screen you can also:• select the contact category (“Adventurers” in the example above)• add phone numbers• add email addresses](https://usermanual.wiki/Danger/FYMASMBD-01/User-Guide-236112-Page-104.png)
![Keeping Contacts in the Address BookFebruary 12, 2002 T-Mobile Device Owner’s Manual 105• add Web addresses (URLs)• add instant messaging screen names•add notesTo add information, use the wheel to highlight the appropriate button, and click. A screen opens in which you can add the information. For example, the following illustration is of the Phone Number screen:4Add contact information to each screen, then click Done [ ]. Continue through the Contacts screen until you have added all the information you wish. Note! Before you can save the contact information, you must have provided one of the following pieces of information:• First or Last name•Phone Number•Email address•Company name5To save all the pieces of information you’ve added to the contact screen, press to open the menu and click Save [].Tip: If you cannot select Save from the menu because it is dimmed, then you must return to the contact screen and add one of the required pieces of information listed above.Create a New Contact by Duplicating an Existing Contact1From the Browse Contacts screen, highlight the contact whose information you want to edit.2Press to open the menu, then click Duplicate Contact. A contact information screen opens with an exact copy of the highlighted contact’s information. Note! If you save this contact information, you will have two duplicate entries for this contact.3Edit the information for the new contact, then press to open the menu and click Save [].](https://usermanual.wiki/Danger/FYMASMBD-01/User-Guide-236112-Page-105.png)
![Keeping Contacts in the Address BookFebruary 12, 2002 T-Mobile Device Owner’s Manual 106Edit a ContactTo edit an existing contact:1From the Browse Contacts screen, highlight the contact’s name then click the wheel. The contact’s information appears for editing.2Edit information as you wish, then press to open the menu and click Save [].Discard/Retrieve a ContactTo remove an existing contact from your Address Book:1From the Browse Contacts screen, highlight the contact’s name.2Press to open the menu, then click Discard Contact [].3The contact is moved to the Trash without a verification prompt.To retrieve a discarded contact:1From the Browse Contacts screen, press to open the menu, then click Trash [+ T]. The contacts in the Trash appear.2Highlight the contact you wish to retrieve from the Trash.3Press to open the menu, then click Retrieve Contact [+ R]. The contact information is moved back to your Address Book in the category to which it was previously assigned.Contact a ContactUsing stored contact information, you can quickly communicate with a contact by phone, Text Messages, Email, or Instant Messaging:1From the Browse Contacts screen, highlight the name of the contact with whom you wish to communicate.2Click the wheel to open the contact information.3Scroll to highlight the phone number, email address, or IM address you wish to use.4Click and hold the wheel to open the pop-up menu. Highlight one of the following, then click:•Call - to switch to the Telephone and place a call to your contact•Edit - to edit the highlighted contact information•Send Email - to switch to Email and compose an email to that contact•Send Message - to switch to Instant Messaging and open a conversation with that contact•Discard - to remove the highlighted contact informationYou can also use menu items to perform these actions, assuming you have the relevant contact information highlighted.](https://usermanual.wiki/Danger/FYMASMBD-01/User-Guide-236112-Page-106.png)
![Keeping Contacts in the Address BookFebruary 12, 2002 T-Mobile Device Owner’s Manual 107Find a ContactIf you have a large number of contacts in your Address Book, you can easily search and find a specific contact by using the Match pane. The Match pane search is limited to the category of contacts you are currently viewing in the Browse Contacts screen. So, if you want to search your entire Address Book, make sure you have selected the All category from the menu. In the example below, the category being searched is Friends.1From the Browse Contacts screen (in any filtered view), press to open the menu, then click Match... The Match pane opens.2Start typing the first letter(s) of the contact you wish to find. The nearest match is highlighted:3Either continue typing the name to narrow the search, or scroll to find your contact.4Click the wheel to open the contact information.Create Your Own Contact Information - My InfoWhen you first received your device and went through the on-screen registration process, your name and phone number were stored in a special contact information screen called “My Info”. This entry in the Browse Contacts screen is underlined to make it easily identifiable: To add information to your own contact information:1From the Browse Contacts screen, press to open the menu, then click My Info [+ M]. Your contact information screen opens.2Make additions or edits as you wish, then press to open the menu and click Save [].Empty the Address Book TrashAll discarded contacts are moved to the Trash category. Since this information takes up storage space on your device, you should periodically remove items from Trash by doing the following:1From the Browse Contacts screen, press to open the menu and click Trash. The contacts in the Trash appear.2Press to open the menu, then click Empty Trash. All contacts in the Trash are permanently removed.](https://usermanual.wiki/Danger/FYMASMBD-01/User-Guide-236112-Page-107.png)
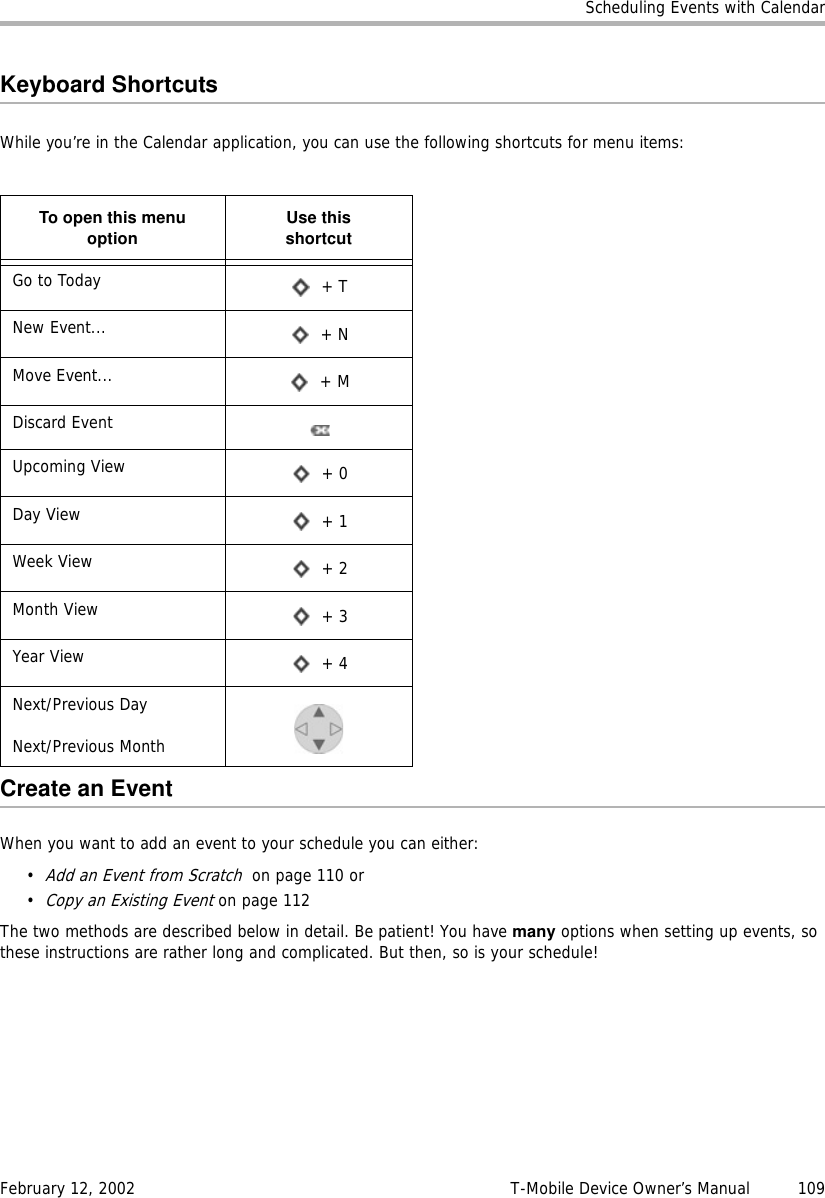
![Scheduling Events with CalendarFebruary 12, 2002 T-Mobile Device Owner’s Manual 110Add an Event from Scratch1Open the menu from any Calendar view, then click New Event [ + N]. The blank New Event screen looks like this:2Start by giving the Event a title. The shorter the title, the more likely it will display on some of the tighter views, like the Week view. If you don’t give it a title, the system will name it “Untitled”.3Pick the Date on which the event starts from the date picker . Click to open the picker, then rotate the wheel until the month you want is highlighted, then click. Rotate the wheel until the day you want is highlighted, then click again. Now pick the year by rotating the wheel until the year you want is highlighted, then click.You can also use the calendar date picker to select the event start date. Highlight the calendar icon then click. The current month appears:If you want a year ahead, rotate the wheel until you get to the year and month you want. Then click and rotate to highlight the day. Click again and your date is set in the Event Details screen.4Set the duration of the event in the Start & End section of the screen:Click Start & End to open the pop-up menu: Use the wheel to highlight the duration type you want, then click.• If you selected Start & End, you’ll have to pick a date range:](https://usermanual.wiki/Danger/FYMASMBD-01/User-Guide-236112-Page-110.png)
![Scheduling Events with CalendarFebruary 12, 2002 T-Mobile Device Owner’s Manual 1127To set a reminder for the event (and each time it repeats), in the Reminder section, highlight the Add button and click. The Reminder dialog box opens: You can set your reminder to happen a number of minute(s), hour(s), or day(s) before the event.You can be reminded by a device alert (sound and on-screen message), or email.8To can also add a note to your event. Simply click the Notes box and type. Your note can be any length.9Here’s an example of a filled-in event:Copy an Existing Event1From an Upcoming, Day, or Week view, highlight the event you want to duplicate, then click to open its Events Details screen.2Open the menu and click Duplicate Event. The screen appears to remain unchanged; however, you are really looking at a copy of the original event.3Make your edits on the Event Details screen to reflect the details of your new event.4When you’ve finished editing the screen, open the menu and click Save [].Move an EventIf you have an event that occurs within a one-day time frame and the time for that event changes, you can adjust its time from either the Day or Week view:1From the menu, click Today or Week.2Use the wheel to highlight the event you want to move, then open the menu and click Move Event.3Rotate the wheel to position the event at the new time.4Click the wheel to save the move.](https://usermanual.wiki/Danger/FYMASMBD-01/User-Guide-236112-Page-112.png)
![Scheduling Events with CalendarFebruary 12, 2002 T-Mobile Device Owner’s Manual 113Edit an Event1From an Upcoming, Day, or Week view, highlight the event you want to edit, then click to open its Events Details screen.2Make your edits on the Event Details screen as you wish. If you need to change a Repetition or Reminder, simply highlight the repetition or reminder line, and click to open the appropriate dialog box for editing.3When you’ve finished editing the details, open the menu and click Save [ ]. If you’ve changed a repetition item, you’ll be prompted to:• Change just this occurrence• Change the entire series• Change the series from here onSelect the appropriate action and click Save.Discard an EventTo remove an event completely, highlight it, then open the menu and click Discard Event [ ]. The event is moved to the Trash View.Ways to View Your EventsThe Calendar application offers a number of convenient ways to view all your scheduled events. To go to a particular view within Calendar, open the menu and click View... A menu appears, listing your view choices: Upcoming, Day, Week, Month, Year, or Trash.A check mark always appears next to the view currently on your screen:Notice that from anywhere in the Calendar application you can use the shortcuts shown above to switch views. For example, to switch from Upcoming to Month view, simply Press [ + 3].To read more about each view, follow the link in the first column of the table below.](https://usermanual.wiki/Danger/FYMASMBD-01/User-Guide-236112-Page-113.png)
![Scheduling Events with CalendarFebruary 12, 2002 T-Mobile Device Owner’s Manual 115Upcoming ViewThe Upcoming view shows you all your events scheduled for the next five days. To open the Upcoming Events view, from the Jump screen click Calendar, then open the menu and click Views... > Upcoming [ + 0].Upcoming View Features•In the Today section, you only see the events that have not expired, as of that minute.Year View A grid of the year, grouped by month, with the current month and day selected.Navigate between months by rotating the wheel, or by pressing the D-pad up/down arrows.Use the menu to Go to Today, Next Year, or Previous Year.Navigate within a month by first highlighting the month, then clicking the wheel. Now, with the month highlighted, you can move around days by rotating the wheel.Open a specific Day view by first highlighting the month, then clicking the wheel, then highlighting the day and clicking. From there you can edit an event’s details.View What you see in this view What you can do from this view](https://usermanual.wiki/Danger/FYMASMBD-01/User-Guide-236112-Page-115.png)
![Scheduling Events with CalendarFebruary 12, 2002 T-Mobile Device Owner’s Manual 116• To open an Event Detail screen, use the wheel to highlight the event title, then click. At this point you can edit the details if you want. To dismiss the screen and return to the view, click the Back button.• All-day events are shown with an event icon just to the left of the event name, like “Write Econ paper” in the example above.Upcoming View Navigation Tips• Use the wheel to scroll through the five days, backward and forward. You are constrained in your scrolling to the current day and four days forward.Day ViewThe Day view shows you all the events you have scheduled for the current day, listed down the screen, starting with the earliest event at the top.To open the Day view, from the Jump screen click Calendar, then open the menu and click Views ... > Day [ + 1].Day View Features• The full day will not display on your screen (not enough room), so the Day view always opens with the events occurring at the current time centered on the screen.• All-day events are shown at the top of the screen and will always stay in view, even when you scroll.• If one or more events have overlapping times, the events will appear adjacent to each other, like the “Night class - Econ” and “Write mom” events in the example above.• Hours of the day are listed down the left edge of the screen. PM hours are shown against a dark background; AM hours are shown against a light background.Day View Navigation Tips• Use the wheel to scroll up and down the day’s time slots.](https://usermanual.wiki/Danger/FYMASMBD-01/User-Guide-236112-Page-116.png)
![Scheduling Events with CalendarFebruary 12, 2002 T-Mobile Device Owner’s Manual 117• To go to the next or previous day’s view, instead of scrolling, you can always open the menu and click Next Day or Previous Day.• But if you do keep scrolling up or down, you will enter the previous or next day’s time slots, and beyond.Week ViewThe Week view shows you the events you’ve scheduled for the current week, with one exception: all-day events are not shown in this view. To open the Week view, from the Jump screen click Calendar, then open the menu and click Views... > Week[ + 2].Week View Features• The current day’s time slot lines are bold, like May 1 in the example above. • An event you’ve highlighted is shown with a black background.• Events in the past (“expired events”) are shown in blocks with a white background.• If you have overlapping events, they will appear adjacent to each other.• To open an Event Details screen, highlight the event, then click. View or edit the event details. To dismiss/save your edits to the Event Details screen, click the Back button.Week View Navigation Tips• Use the wheel to scroll up and down through the time slots; use the D-pad left/right arrows to advance back and forward through the days, even beyond the current week to the previous and next week. • You can always use the menu to go to Next Week or Previous Week.](https://usermanual.wiki/Danger/FYMASMBD-01/User-Guide-236112-Page-117.png)
![Scheduling Events with CalendarFebruary 12, 2002 T-Mobile Device Owner’s Manual 118Month ViewThe Month view is designed to give you a sense of where you are in the month (the current day is highlighted in black).To open the Month view, from the Jump screen click Calendar, then open the menu and click Views... > Month[ + 3].Month View Features• The current day block is shown highlighted in black.• If you have at least one event scheduled for a given day, that day contains a little square icon in the lower-right corner of the day block .• To drill down to an Event Details screen, highlight the day, then click to open the Day view. Make sure the event you want to open is highlighted, then click again. View or edit the event details. To dismiss the screen, click the Back button.Month View Navigation Tips• Use the wheel to scroll forward and backward through days.• To scroll backward and forward through months, use the D-pad up/down arrows.• You can always use the menu to go to Next Month or Previous Month.](https://usermanual.wiki/Danger/FYMASMBD-01/User-Guide-236112-Page-118.png)
![Scheduling Events with CalendarFebruary 12, 2002 T-Mobile Device Owner’s Manual 119Year ViewThe Year view opens to the current year and lets you look forward and backward across months in one glance. This view is handy if you need to plan an event that is at least a month ahead, such as your summer vacation!To open the Year view, from the Jump screen click Calendar, then open the menu and click Views... > Year [ + 4].Year View Features• The current month is shown highlighted in black.• The current day is shown in a white circle.• To drill down into a more focused view, first highlight the month you’re interested in, then click. Now you can rotate the wheel to highlight a specific day. Once you’ve highlighted the day you want, click. The Day view opens to your selected date. (From there you can view events.)Year View Navigation Tips• Use the wheel or D-pad up/down arrows to scroll from month to month.• To move forward and backward among years, open the menu and click either Next Year or PreviousYear.Trash ViewWhenever you Discard an Event by using the menu option or the DEL key [ ], your event is “saved” in the Trash, in case you want to retrieve it.To retrieve an event:1Open the menu and click Trash. The Trash view opens.2Use the wheel to highlight the event you want to retrieve. 3Open the menu and click Retrieve Event. The event returns to its original time slot.To empty the Calendar Trash:1Open the menu and click Trash. The Trash view opens.](https://usermanual.wiki/Danger/FYMASMBD-01/User-Guide-236112-Page-119.png)
![Scheduling Events with CalendarFebruary 12, 2002 T-Mobile Device Owner’s Manual 1202Open the menu and click Empty Trash. A message appears on the screen stating “The Trash is empty.”Go To a Specific DayRegardless of where you are in a particular view, you can always return to today by opening the menu and clicking Go to Today [ + T].](https://usermanual.wiki/Danger/FYMASMBD-01/User-Guide-236112-Page-120.png)
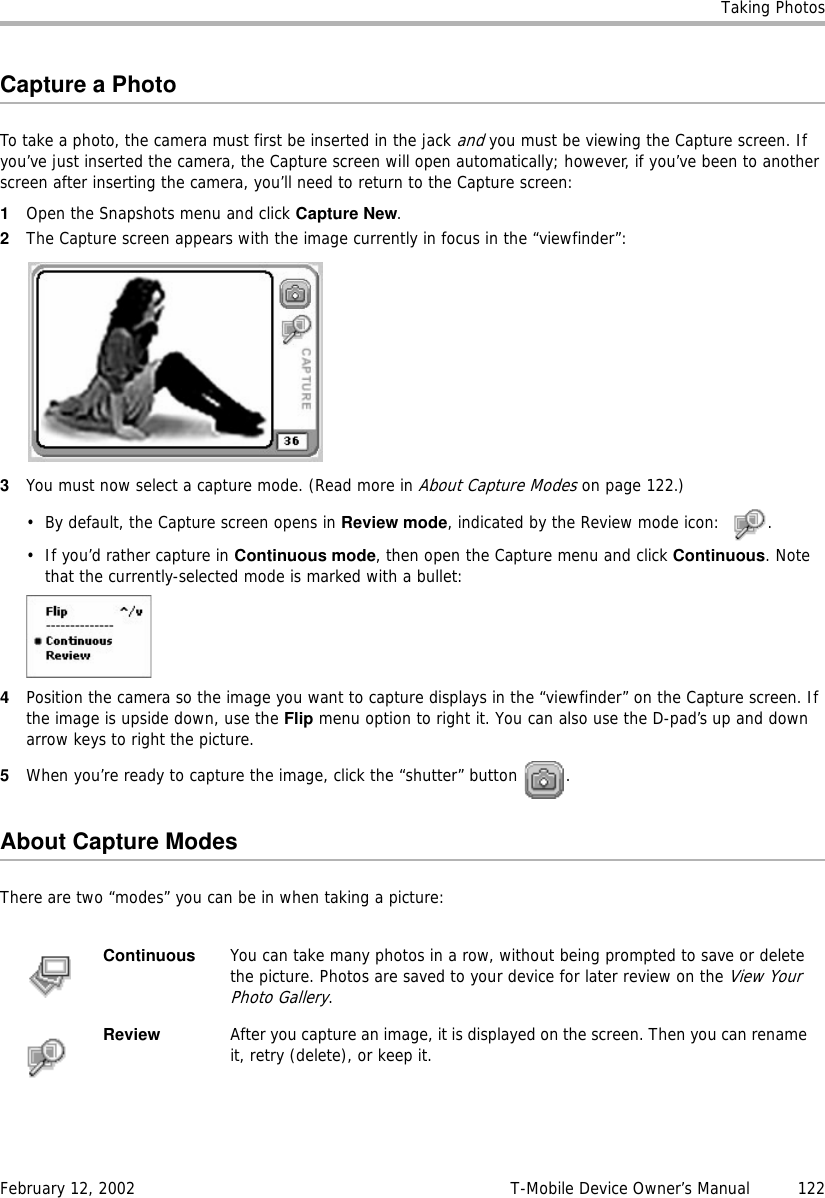
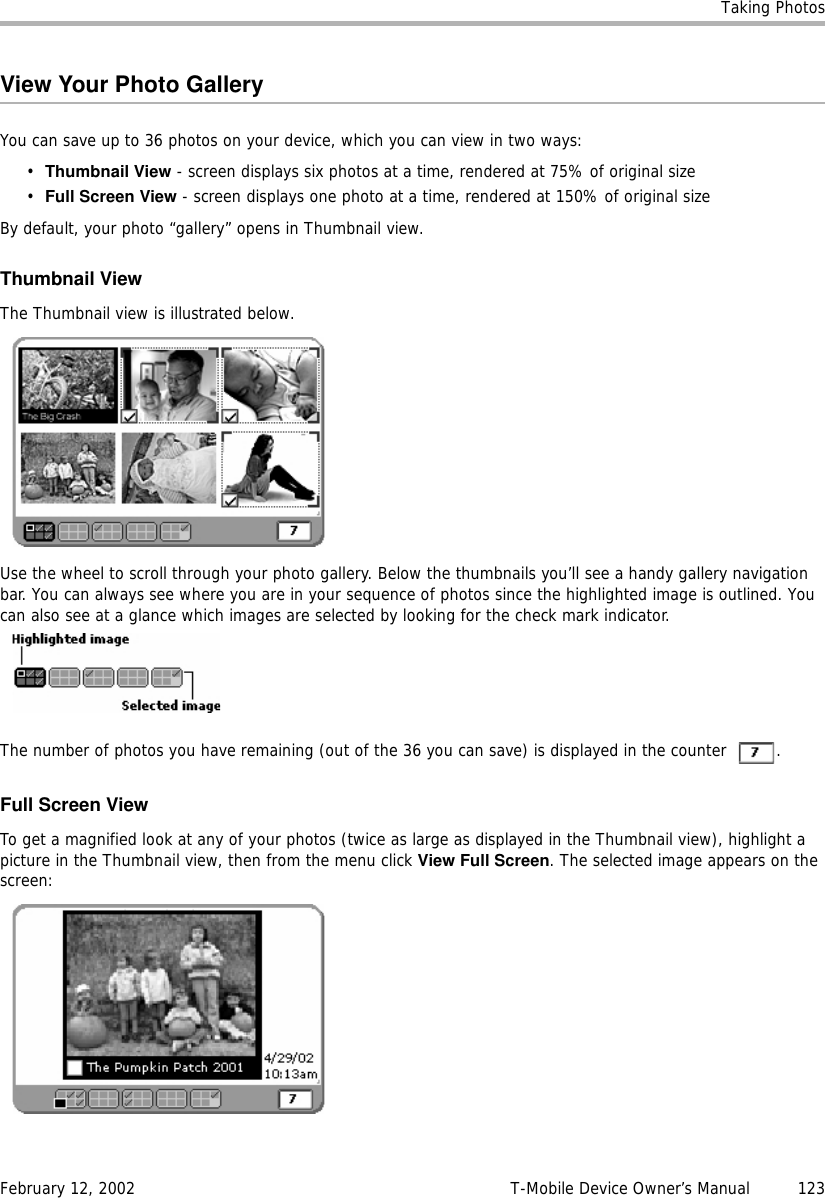
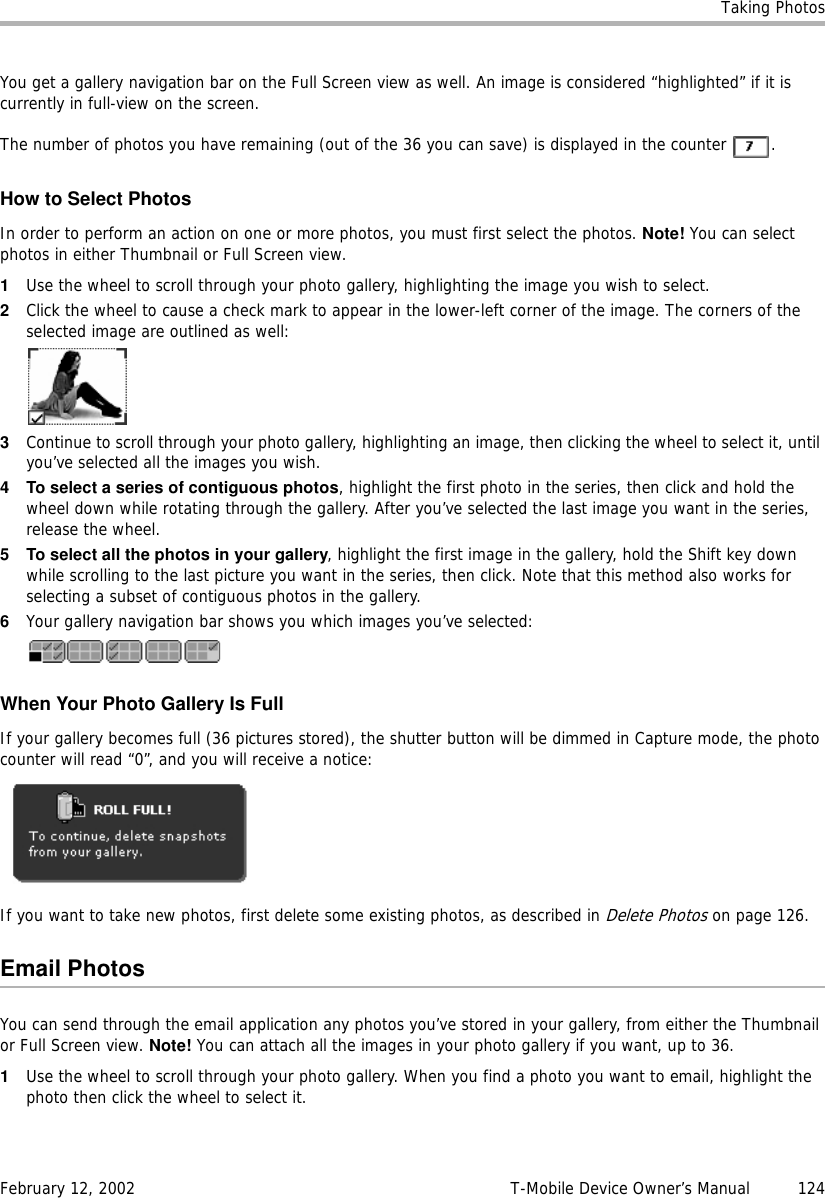

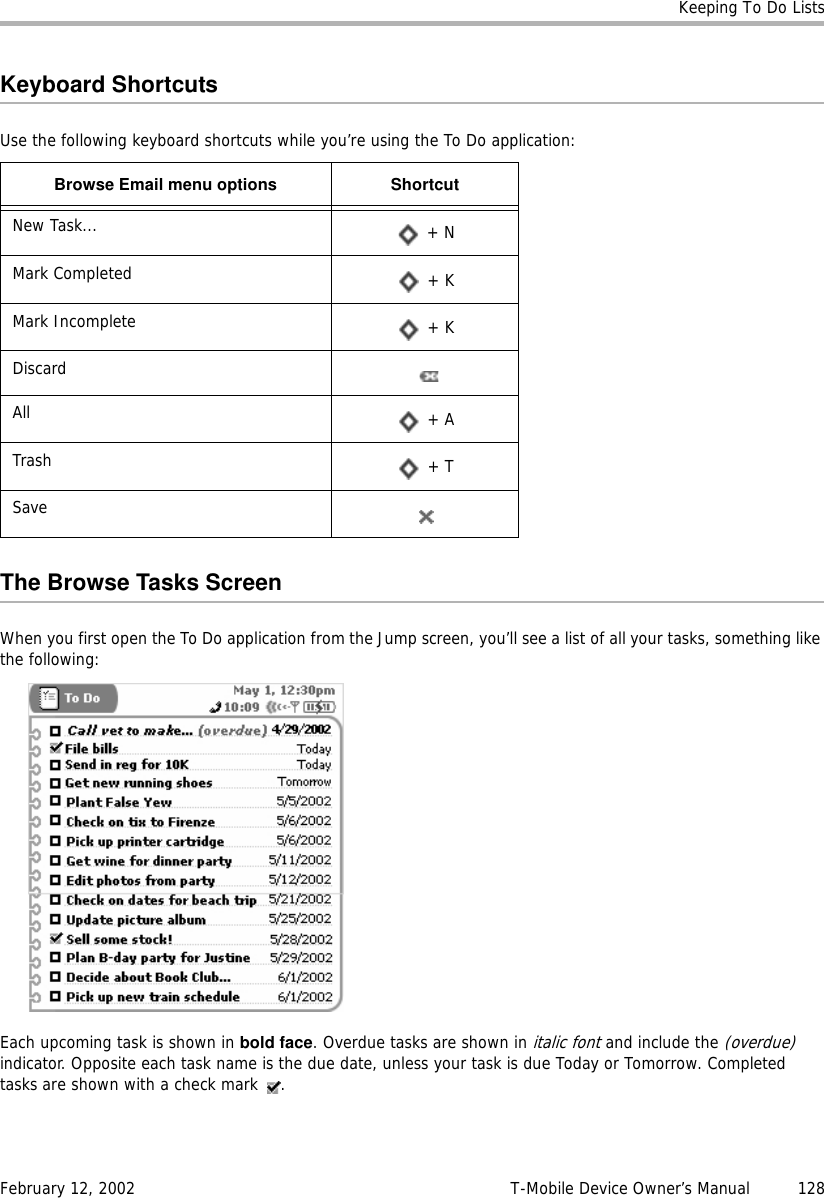
![Keeping To Do ListsFebruary 12, 2002 T-Mobile Device Owner’s Manual 129You can decide if you want to view overdue and upcoming tasks, or all tasks (listed by date). The list in the example above shows all tasks, including those completed. Read more in Show Tasks Filter on page 131.Task Details ScreenFor each task there is a details screen, which contains more information about the task than can fit in the Browse Tasks screen. The details screens are also editable, so when opened, you can change the details. To open a task’s details, on the Browse Tasks screen use the wheel to highlight a task, then click. The details screen opens. Here’s an example:Create a New TaskFollow these steps to create a new To Do task:1From the Jump screen, highlight To Do and click. The Browse Tasks screen opens.2Open the menu and click New Task [ + N]. A blank Task Details screen opens:3In the Task field, type a title for your task. Your title can be up to 40 characters long.4In the Due pop-up menu, select one of:• Never•Today• Tomorrow•Other...](https://usermanual.wiki/Danger/FYMASMBD-01/User-Guide-236112-Page-129.png)
![Keeping To Do ListsFebruary 12, 2002 T-Mobile Device Owner’s Manual 130If you select Other..., the Task Due Date dialog box opens:5Pick the Date on which the task is due from the date picker . Click to open the picker, then rotate the wheel until the month you want is highlighted, then click. Rotate the wheel until the day you want is highlighted, then click again. Now pick the year by rotating the wheel until the year you want is highlighted, then click.You can also use the calendar date picker to select task due date. Highlight the calendar icon then click. The current month appears:If you want a year ahead, rotate the wheel until you get to the year and month you want. Then click and rotate to highlight the day. Click again and your date is set in the Task Details screen.When finished selecting a Task Due Date, click Done. You are returned to the New Task screen.6To can also add a note to your event. Simply click the Notes box and type. Your note can be up to 255 characters (or a medium-sized paragraph).7To save your new task, click the Back button or open the menu and click Save. Your new task appears in your Browse Tasks screen.Edit a TaskYou can edit any of your tasks by opening the task’s detail screen:1From the Browse Tasks screen, use the wheel to highlight the task you want to edit, then click. The Task Details screen opens.2You can change any of the fields, just as if you were creating the task from scratch. Note that you can mark the task completed by selecting the Completed check box. You can also mark the task as incomplete by clearing the Completed check box.3You can discard the task altogether by opening the menu and clicking Discard []. Tip: Your task is not deleted permanently; it’s discarded, which means it’s been moved to the Trash.4When finished with your edits, open the menu and click Save, or press the Back button. If you decide you don’t want to save the edits you’ve just made to the task details, open the menu and click Revert [ + R].MarkaTaskCompleteIf you’ve completed a task, make sure to make it completed. That way you can choose to suppress these tasks from the Browse Tasks screen list of tasks (read more in Show Tasks Filter on page 131).To mark a task as completed, do this:](https://usermanual.wiki/Danger/FYMASMBD-01/User-Guide-236112-Page-130.png)
![Keeping To Do ListsFebruary 12, 2002 T-Mobile Device Owner’s Manual 1311In the Browse Tasks screen, use the wheel to highlight the task you want to mark completed.2Open the menu and click Mark Completed [ + K].3A check mark now appears in the box to the left of the task title.4If you change your mind about having completed a tasks, you can mark it as incomplete by highlighting the task, opening the menu, and clicking Mark Incomplete [ + K].Tip: You can also mark a task as completed/incomplete from the Task Details screen. Read more in Edit a Task on page 130.Show Tasks FilterYou can decide if you want the Browse Tasks screen to show:• just overdue and upcoming tasks• all tasks in date orderTo set this view preference:1Open the Browse Tasks menu and click Show... The Show Tasks dialog box opens:2Click the option you want for your view.3Click Done when finished.Task ViewsThere are two task “views”:• All tasks (using criteria you specified in Show Tasks Filter on page 131)• Trash (contains all tasks you’ve discarded)You select the view you want by opening the menu and clicking either:•All [ + A]or•Trash [ + T]Your currently-selected view is indicated by a check mark.Discard a TaskYou can discard a task from either the Browse Tasks screen, or the Event Details screen.](https://usermanual.wiki/Danger/FYMASMBD-01/User-Guide-236112-Page-131.png)
![Keeping To Do ListsFebruary 12, 2002 T-Mobile Device Owner’s Manual 132• From the Browse Tasks screen, use the wheel to highlight the task you want to discard, then open the menu and click Discard [].• From the Event Details, open the menu and click Discard []. Either way, the task is moved to the Trash, where you can retrieve until you empty the Trash.Empty the To Do TrashTo permanently remove all the tasks you’ve discarded:1From the Browse Tasks screen, open the menu and click Trash [ + T]. The Browse Trashed Tasks screen opens.2From this screen you can retrieve any task by highlighting it, opening the menu, and clicking Retrieve Task [ + R]. You can now see the task in the All view.3When you’re sure you want to permanently delete all the tasks in the Trash view, open the menu and click Empty Trash. The Trash empties.](https://usermanual.wiki/Danger/FYMASMBD-01/User-Guide-236112-Page-132.png)
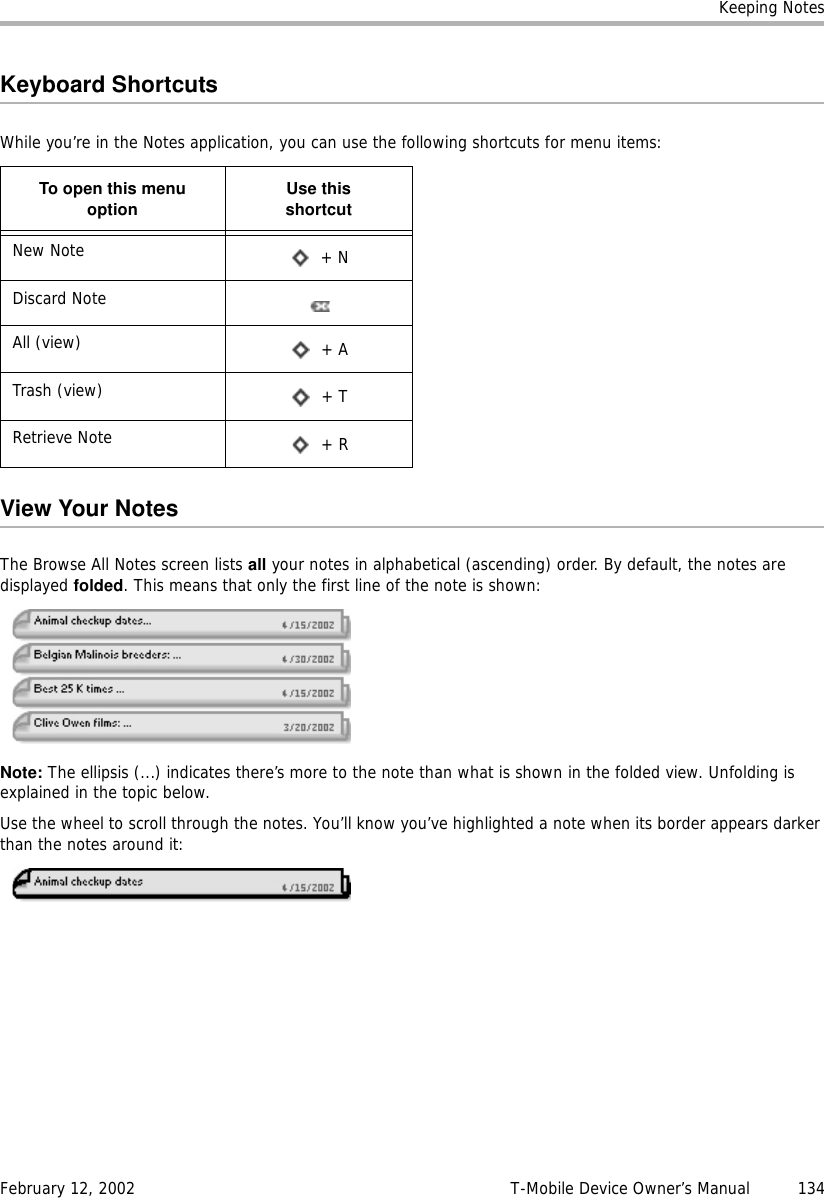
![Keeping NotesFebruary 12, 2002 T-Mobile Device Owner’s Manual 135Unfolding/Folding a Single NoteTo unfold a single note, do this:1Highlight the note then click the wheel. The note expands, showing the full text:2If your note is longer than the screen, use the wheel to scroll up/down the note contents. You can also use the D-pad arrows to navigate within the text.3To fold your note again, click the wheel. The note folds, showing only the first line:Unfolding/Folding All Your NotesTo unfold all your notes, do this:1Open the menu and click Unfold All. 2Use the wheel to scroll up/down through the list of notes. 3At any time, if you want to fold a notes’ contents, first highlight the note with the wheel, then click. The contents of the note collapse, but the note is still highlighted.4To re-fold all your notes, open the menu and click Fold All. All the notes’ contents collapse. The note that was highlighted when you folded all the notes remains highlighted.Add a NoteHere’s some note facts you need to know:•How many notes can I have? You can store 20 notes total, including the notes that you’ve discarded to the Trash. If you’ve run out of room, you may want to empty your Trash (read more in Manage Your Notes Trash on page 136).•How long can each note be? Each note can be 1000 characters at most; and that includes spaces and line returns. (To get a sense of how long this is, half a page in a paperback contains about 1000 characters.)To create a new note, follow these steps:1From the Browse All Notes screen, open the menu and click New Note [+ N].2A blank note screen opens. Type your note using the keyboard. (Read more in Typing Text on page 21.)3When you’re finished composing your note, save it by simply clicking the Back button . It’s added to your list in the Browse All Notes screen.](https://usermanual.wiki/Danger/FYMASMBD-01/User-Guide-236112-Page-135.png)
![Keeping NotesFebruary 12, 2002 T-Mobile Device Owner’s Manual 136Edit a NoteYou can always edit an existing, unfolded note.1Make sure you are viewing the note unfolded. If it’s folded, highlight the note with the wheel, then click to unfold it.2The text cursor will be positioned at the spot where you last were typing in the note. Use the D-pad to move within the text; use the keyboard to edit your note. (Read more in Typing Text on page 21.)3Your edits are saved as soon as you make them.Discard a NoteDiscarding a note means moving it to the Trash:1From the Browse All Notes screen, highlight the note you wish to discard. (It doesn’t matter if the note is folded or unfolded.)2Open the menu and click Discard Note [].3The note moves to the Trash, where you can later retrieve it or delete it for good.Manage Your Notes TrashAll your notes are displayed either in the Browse All Notes screen or the Browse Trashed Notes screen, shown below:To switch from viewing all your notes to just the notes in your Trash, open the menu and click Trash. The Browse Trashed Notes screen appears. From this screen you can either:•Retrieve a Note You’ve Previously Discarded, or•Empty Your Notes TrashRetrieve a Note You’ve Previously DiscardedAll notes that you have discarded are stored in the Trash, just in case you want to retrieve them later:1From the Browse All Notes screen, open the menu and click Trash [+ N]. The Browse Trashed Notes screen opens.2Use the wheel to highlight the note you want to retrieve.3Open the menu and click Retrieve Note [+ R].](https://usermanual.wiki/Danger/FYMASMBD-01/User-Guide-236112-Page-136.png)
![Keeping NotesFebruary 12, 2002 T-Mobile Device Owner’s Manual 1374The note now appears in the Browse All Notes screen.Empty Your Notes TrashRemember that you can store 20 notes, including the notes you’ve sent to the Trash. If you’re running out of available notes, empty your Trash:1From the Browse All Notes screen, open the menu and click Trash [+ N]. The Browse Trashed Notes screen opens.2Open the menu and click Empty Trash. The Browse Trashed Notes screen appears with the message “The Trash is empty.”](https://usermanual.wiki/Danger/FYMASMBD-01/User-Guide-236112-Page-137.png)