Danger FYMASMBD-01 PCS portable transeiver User Manual mod02
Danger, Inc. PCS portable transeiver mod02
Danger >
Users Manual
T-Mobile Device Owner’s Manual
Release 1.0
February 12, 2002
Copyright© Danger, Inc. 2000-2002 All rights reserved.
Confidential material of Danger, Inc., 124 University Avenue, Palo Alto, CA 94301
May not be duplicated or copied without the prior written consent of Danger, Inc.

FCC Compliance Statement
This device complies with Part 15 of the FCC Rules. Operation is subject to the following two conditions:
(1) this device may not cause harmful interference, and
(2) this device must accept any interference received, including interference that may cause undesired
operation.

Contents
February 12, 2002 T-Mobile Device Owner’s Manual 3
T-Mobile Device Owner’s Manual
Contents
FCC Compliance Statement . . . . . . . . . . . . . . . . . . . . . . . . . . . . . . . . . . . . . . . . . . . . . . . . . . . . 2
1.StartHere.........................................................................9
Thank You for Purchasing a T-Mobile Device! . . . . . . . . . . . . . . . . . . . . . . . . . . . . . . . . . . . . . . . 9
Your T-Mobile Account . . . . . . . . . . . . . . . . . . . . . . . . . . . . . . . . . . . . . . . . . . . . . . . . . . . . . . 10
Powering Your Device . . . . . . . . . . . . . . . . . . . . . . . . . . . . . . . . . . . . . . . . . . . . . . . . . . . . . . . 10
Using the Wrist Strap to Carry Your Device . . . . . . . . . . . . . . . . . . . . . . . . . . . . . . . . . . . . . . . . 12
T-Mobile Device User Documents . . . . . . . . . . . . . . . . . . . . . . . . . . . . . . . . . . . . . . . . . . . . . . 12
Using the Holster to Protect Your Device Screen . . . . . . . . . . . . . . . . . . . . . . . . . . . . . . . . . . . . 12
Use Your Device Safely . . . . . . . . . . . . . . . . . . . . . . . . . . . . . . . . . . . . . . . . . . . . . . . . . . . . . . 12
2.DeviceBasics.................................................................... 13
Parts of Your T-Mobile Device . . . . . . . . . . . . . . . . . . . . . . . . . . . . . . . . . . . . . . . . . . . . . . . . . 13
Device Display . . . . . . . . . . . . . . . . . . . . . . . . . . . . . . . . . . . . . . . . . . . . . . . . . . . . . . . . . . . . 13
Notifications . . . . . . . . . . . . . . . . . . . . . . . . . . . . . . . . . . . . . . . . . . . . . . . . . . . . . . . . . . . . . 15
Keyboard . . . . . . . . . . . . . . . . . . . . . . . . . . . . . . . . . . . . . . . . . . . . . . . . . . . . . . . . . . . . . . . 16
Control Buttons . . . . . . . . . . . . . . . . . . . . . . . . . . . . . . . . . . . . . . . . . . . . . . . . . . . . . . . . . . . 17
Wheel . . . . . . . . . . . . . . . . . . . . . . . . . . . . . . . . . . . . . . . . . . . . . . . . . . . . . . . . . . . . . . . . . . 19
Headset/Camera Jack . . . . . . . . . . . . . . . . . . . . . . . . . . . . . . . . . . . . . . . . . . . . . . . . . . . . . . . 19
Charging Outlet . . . . . . . . . . . . . . . . . . . . . . . . . . . . . . . . . . . . . . . . . . . . . . . . . . . . . . . . . . . 20
USB Mini-B Port . . . . . . . . . . . . . . . . . . . . . . . . . . . . . . . . . . . . . . . . . . . . . . . . . . . . . . . . . . . 20
Typing Text . . . . . . . . . . . . . . . . . . . . . . . . . . . . . . . . . . . . . . . . . . . . . . . . . . . . . . . . . . . . . . 21
3.AboutYourSmartCard ............................................................ 22
What Is a Smart Card? . . . . . . . . . . . . . . . . . . . . . . . . . . . . . . . . . . . . . . . . . . . . . . . . . . . . . . 22
Exactly What Information Is on My Device SIM? . . . . . . . . . . . . . . . . . . . . . . . . . . . . . . . . . . . . 22
Can I Remove My SIM? . . . . . . . . . . . . . . . . . . . . . . . . . . . . . . . . . . . . . . . . . . . . . . . . . . . . . 22
How Do I Handle My SIM? . . . . . . . . . . . . . . . . . . . . . . . . . . . . . . . . . . . . . . . . . . . . . . . . . . . 23
What Happens If I Lose My SIM? . . . . . . . . . . . . . . . . . . . . . . . . . . . . . . . . . . . . . . . . . . . . . . 23
What Happens If I Put A Different SIM in My Device? . . . . . . . . . . . . . . . . . . . . . . . . . . . . . . . . 23
4.SettingYourPreferences...........................................................24
Application-Wide Preferences . . . . . . . . . . . . . . . . . . . . . . . . . . . . . . . . . . . . . . . . . . . . . . . . . 24
Application-Specific Preferences . . . . . . . . . . . . . . . . . . . . . . . . . . . . . . . . . . . . . . . . . . . . . . . 25
Controls Pane . . . . . . . . . . . . . . . . . . . . . . . . . . . . . . . . . . . . . . . . . . . . . . . . . . . . . . . . . . . . 26
AutoText . . . . . . . . . . . . . . . . . . . . . . . . . . . . . . . . . . . . . . . . . . . . . . . . . . . . . . . . . . . . . . . . 27
Date & Time . . . . . . . . . . . . . . . . . . . . . . . . . . . . . . . . . . . . . . . . . . . . . . . . . . . . . . . . . . . . . 27
Jump Shortcuts . . . . . . . . . . . . . . . . . . . . . . . . . . . . . . . . . . . . . . . . . . . . . . . . . . . . . . . . . . . 28
Keyboard & Wheel . . . . . . . . . . . . . . . . . . . . . . . . . . . . . . . . . . . . . . . . . . . . . . . . . . . . . . . . . 29
Quiet Mode and Notifications . . . . . . . . . . . . . . . . . . . . . . . . . . . . . . . . . . . . . . . . . . . . . . . . . 29
Security . . . . . . . . . . . . . . . . . . . . . . . . . . . . . . . . . . . . . . . . . . . . . . . . . . . . . . . . . . . . . . . . 31
Sleep Display . . . . . . . . . . . . . . . . . . . . . . . . . . . . . . . . . . . . . . . . . . . . . . . . . . . . . . . . . . . . . 33

Contents
February 12, 2002 T-Mobile Device Owner’s Manual 4
5.TheJumpScreen ................................................................. 34
How to Open the Jump Screen . . . . . . . . . . . . . . . . . . . . . . . . . . . . . . . . . . . . . . . . . . . . . . . . 34
The T-Mobile Device Applications Preview Screens . . . . . . . . . . . . . . . . . . . . . . . . . . . . . . . . . . 35
How to Select a T-Mobile Device Application . . . . . . . . . . . . . . . . . . . . . . . . . . . . . . . . . . . . . . . 35
The Jump Screen Menu . . . . . . . . . . . . . . . . . . . . . . . . . . . . . . . . . . . . . . . . . . . . . . . . . . . . . 35
6.BrowsingtheInternet.............................................................. 36
Web Browser Preferences . . . . . . . . . . . . . . . . . . . . . . . . . . . . . . . . . . . . . . . . . . . . . . . . . . . . 36
Status Indicators . . . . . . . . . . . . . . . . . . . . . . . . . . . . . . . . . . . . . . . . . . . . . . . . . . . . . . . . . . 38
Keyboard Shortcuts . . . . . . . . . . . . . . . . . . . . . . . . . . . . . . . . . . . . . . . . . . . . . . . . . . . . . . . . 38
Navigation/View Shortcuts . . . . . . . . . . . . . . . . . . . . . . . . . . . . . . . . . . . . . . . . . . . . . . . . . . . 39
Go To a Web Page . . . . . . . . . . . . . . . . . . . . . . . . . . . . . . . . . . . . . . . . . . . . . . . . . . . . . . . . . 39
Go to Your Home Page . . . . . . . . . . . . . . . . . . . . . . . . . . . . . . . . . . . . . . . . . . . . . . . . . . . . . . 40
Search the Web . . . . . . . . . . . . . . . . . . . . . . . . . . . . . . . . . . . . . . . . . . . . . . . . . . . . . . . . . . . 40
Use Bookmarks . . . . . . . . . . . . . . . . . . . . . . . . . . . . . . . . . . . . . . . . . . . . . . . . . . . . . . . . . . . 40
See Recently-Viewed Web Pages . . . . . . . . . . . . . . . . . . . . . . . . . . . . . . . . . . . . . . . . . . . . . . . 42
View History . . . . . . . . . . . . . . . . . . . . . . . . . . . . . . . . . . . . . . . . . . . . . . . . . . . . . . . . . . . . . 42
Refresh a Web Page . . . . . . . . . . . . . . . . . . . . . . . . . . . . . . . . . . . . . . . . . . . . . . . . . . . . . . . . 43
Stop a Web Page from Loading . . . . . . . . . . . . . . . . . . . . . . . . . . . . . . . . . . . . . . . . . . . . . . . . 43
7.MakingTelephoneCalls............................................................44
Telephone Preview Screen . . . . . . . . . . . . . . . . . . . . . . . . . . . . . . . . . . . . . . . . . . . . . . . . . . . 44
Telephone Preferences . . . . . . . . . . . . . . . . . . . . . . . . . . . . . . . . . . . . . . . . . . . . . . . . . . . . . . 45
Telephone Keyboard Shortcuts . . . . . . . . . . . . . . . . . . . . . . . . . . . . . . . . . . . . . . . . . . . . . . . . 47
Title Bar Indicators . . . . . . . . . . . . . . . . . . . . . . . . . . . . . . . . . . . . . . . . . . . . . . . . . . . . . . . . 48
Manage Your Speed Dial List . . . . . . . . . . . . . . . . . . . . . . . . . . . . . . . . . . . . . . . . . . . . . . . . . . 48
Headset or Handset? . . . . . . . . . . . . . . . . . . . . . . . . . . . . . . . . . . . . . . . . . . . . . . . . . . . . . . . 50
Adjusting Volume . . . . . . . . . . . . . . . . . . . . . . . . . . . . . . . . . . . . . . . . . . . . . . . . . . . . . . . . . . 50
Place a Call . . . . . . . . . . . . . . . . . . . . . . . . . . . . . . . . . . . . . . . . . . . . . . . . . . . . . . . . . . . . . . 50
Features While on a Call . . . . . . . . . . . . . . . . . . . . . . . . . . . . . . . . . . . . . . . . . . . . . . . . . . . . . 53
Answer a Call . . . . . . . . . . . . . . . . . . . . . . . . . . . . . . . . . . . . . . . . . . . . . . . . . . . . . . . . . . . . 55
End a Call . . . . . . . . . . . . . . . . . . . . . . . . . . . . . . . . . . . . . . . . . . . . . . . . . . . . . . . . . . . . . . . 55
Your Call Log . . . . . . . . . . . . . . . . . . . . . . . . . . . . . . . . . . . . . . . . . . . . . . . . . . . . . . . . . . . . . 56
Listen to Voice Mail . . . . . . . . . . . . . . . . . . . . . . . . . . . . . . . . . . . . . . . . . . . . . . . . . . . . . . . . 58
8. Instant Messaging................................................................. 59
Instant Messaging Preview Screen . . . . . . . . . . . . . . . . . . . . . . . . . . . . . . . . . . . . . . . . . . . . . . 59
Add a Screen Name . . . . . . . . . . . . . . . . . . . . . . . . . . . . . . . . . . . . . . . . . . . . . . . . . . . . . . . . 60
Sign On . . . . . . . . . . . . . . . . . . . . . . . . . . . . . . . . . . . . . . . . . . . . . . . . . . . . . . . . . . . . . . . . 61
Sign Off . . . . . . . . . . . . . . . . . . . . . . . . . . . . . . . . . . . . . . . . . . . . . . . . . . . . . . . . . . . . . . . . 61
Switch Screen Names . . . . . . . . . . . . . . . . . . . . . . . . . . . . . . . . . . . . . . . . . . . . . . . . . . . . . . . 61
Remove Existing Screen Name . . . . . . . . . . . . . . . . . . . . . . . . . . . . . . . . . . . . . . . . . . . . . . . . 62
Instant Messaging Preferences . . . . . . . . . . . . . . . . . . . . . . . . . . . . . . . . . . . . . . . . . . . . . . . . 62
The Buddy List Screen . . . . . . . . . . . . . . . . . . . . . . . . . . . . . . . . . . . . . . . . . . . . . . . . . . . . . . 64
Keyboard Shortcuts . . . . . . . . . . . . . . . . . . . . . . . . . . . . . . . . . . . . . . . . . . . . . . . . . . . . . . . . 65
Manage Buddies . . . . . . . . . . . . . . . . . . . . . . . . . . . . . . . . . . . . . . . . . . . . . . . . . . . . . . . . . . 66
Conversations . . . . . . . . . . . . . . . . . . . . . . . . . . . . . . . . . . . . . . . . . . . . . . . . . . . . . . . . . . . . 67

Contents
February 12, 2002 T-Mobile Device Owner’s Manual 5
Set an Away Message . . . . . . . . . . . . . . . . . . . . . . . . . . . . . . . . . . . . . . . . . . . . . . . . . . . . . . . 69
About Groups . . . . . . . . . . . . . . . . . . . . . . . . . . . . . . . . . . . . . . . . . . . . . . . . . . . . . . . . . . . . 70
9. Email Messaging..................................................................71
The Email Preview Screen . . . . . . . . . . . . . . . . . . . . . . . . . . . . . . . . . . . . . . . . . . . . . . . . . . . . 71
Email Preferences . . . . . . . . . . . . . . . . . . . . . . . . . . . . . . . . . . . . . . . . . . . . . . . . . . . . . . . . . 71
Browse Email Screen . . . . . . . . . . . . . . . . . . . . . . . . . . . . . . . . . . . . . . . . . . . . . . . . . . . . . . . 77
Status Indicators . . . . . . . . . . . . . . . . . . . . . . . . . . . . . . . . . . . . . . . . . . . . . . . . . . . . . . . . . . 78
Keyboard Shortcuts . . . . . . . . . . . . . . . . . . . . . . . . . . . . . . . . . . . . . . . . . . . . . . . . . . . . . . . . 79
View Your Email . . . . . . . . . . . . . . . . . . . . . . . . . . . . . . . . . . . . . . . . . . . . . . . . . . . . . . . . . . . 81
Move Messages to Folders . . . . . . . . . . . . . . . . . . . . . . . . . . . . . . . . . . . . . . . . . . . . . . . . . . . 84
Send Messages . . . . . . . . . . . . . . . . . . . . . . . . . . . . . . . . . . . . . . . . . . . . . . . . . . . . . . . . . . . 84
Discard Email Messages . . . . . . . . . . . . . . . . . . . . . . . . . . . . . . . . . . . . . . . . . . . . . . . . . . . . . 87
Space Limitations . . . . . . . . . . . . . . . . . . . . . . . . . . . . . . . . . . . . . . . . . . . . . . . . . . . . . . . . . . 88
10. Text Messaging .................................................................. 89
Text Messages Preview Screen . . . . . . . . . . . . . . . . . . . . . . . . . . . . . . . . . . . . . . . . . . . . . . . . 89
Text Messages Preferences . . . . . . . . . . . . . . . . . . . . . . . . . . . . . . . . . . . . . . . . . . . . . . . . . . . 89
Browse Text Messages Screen . . . . . . . . . . . . . . . . . . . . . . . . . . . . . . . . . . . . . . . . . . . . . . . . . 91
Status Indicators . . . . . . . . . . . . . . . . . . . . . . . . . . . . . . . . . . . . . . . . . . . . . . . . . . . . . . . . . . 91
Keyboard Shortcuts . . . . . . . . . . . . . . . . . . . . . . . . . . . . . . . . . . . . . . . . . . . . . . . . . . . . . . . . 92
View Your Text Messages . . . . . . . . . . . . . . . . . . . . . . . . . . . . . . . . . . . . . . . . . . . . . . . . . . . . 93
Sort Text Messages . . . . . . . . . . . . . . . . . . . . . . . . . . . . . . . . . . . . . . . . . . . . . . . . . . . . . . . . 93
Send Text Messages . . . . . . . . . . . . . . . . . . . . . . . . . . . . . . . . . . . . . . . . . . . . . . . . . . . . . . . . 94
Call Back Sender of a Text Message . . . . . . . . . . . . . . . . . . . . . . . . . . . . . . . . . . . . . . . . . . . . . 95
Discard Text Messages . . . . . . . . . . . . . . . . . . . . . . . . . . . . . . . . . . . . . . . . . . . . . . . . . . . . . . 96
Receive Ringtones . . . . . . . . . . . . . . . . . . . . . . . . . . . . . . . . . . . . . . . . . . . . . . . . . . . . . . . . . 96
11.KeepingContactsintheAddressBook.............................................. 97
How Many Contacts Can I Store? . . . . . . . . . . . . . . . . . . . . . . . . . . . . . . . . . . . . . . . . . . . . . . 97
Address Book Preferences . . . . . . . . . . . . . . . . . . . . . . . . . . . . . . . . . . . . . . . . . . . . . . . . . . . . 97
The Browse Contacts Screen . . . . . . . . . . . . . . . . . . . . . . . . . . . . . . . . . . . . . . . . . . . . . . . . . 101
T-Mobile Contact Information . . . . . . . . . . . . . . . . . . . . . . . . . . . . . . . . . . . . . . . . . . . . . . . . 101
Keyboard Shortcuts . . . . . . . . . . . . . . . . . . . . . . . . . . . . . . . . . . . . . . . . . . . . . . . . . . . . . . . 102
Filter Contacts by Category . . . . . . . . . . . . . . . . . . . . . . . . . . . . . . . . . . . . . . . . . . . . . . . . . . 103
Sort Contacts . . . . . . . . . . . . . . . . . . . . . . . . . . . . . . . . . . . . . . . . . . . . . . . . . . . . . . . . . . . 103
Create a Contact . . . . . . . . . . . . . . . . . . . . . . . . . . . . . . . . . . . . . . . . . . . . . . . . . . . . . . . . . 104
Edit a Contact . . . . . . . . . . . . . . . . . . . . . . . . . . . . . . . . . . . . . . . . . . . . . . . . . . . . . . . . . . . 106
Discard/Retrieve a Contact . . . . . . . . . . . . . . . . . . . . . . . . . . . . . . . . . . . . . . . . . . . . . . . . . . 106
Contact a Contact . . . . . . . . . . . . . . . . . . . . . . . . . . . . . . . . . . . . . . . . . . . . . . . . . . . . . . . . 106
Find a Contact . . . . . . . . . . . . . . . . . . . . . . . . . . . . . . . . . . . . . . . . . . . . . . . . . . . . . . . . . . . 107
Create Your Own Contact Information - My Info . . . . . . . . . . . . . . . . . . . . . . . . . . . . . . . . . . . 107
Empty the Address Book Trash . . . . . . . . . . . . . . . . . . . . . . . . . . . . . . . . . . . . . . . . . . . . . . . 107
12.SchedulingEventswithCalendar..................................................108
Calendar Preview Screen . . . . . . . . . . . . . . . . . . . . . . . . . . . . . . . . . . . . . . . . . . . . . . . . . . . 108
Keyboard Shortcuts . . . . . . . . . . . . . . . . . . . . . . . . . . . . . . . . . . . . . . . . . . . . . . . . . . . . . . . 109

Contents
February 12, 2002 T-Mobile Device Owner’s Manual 6
Create an Event . . . . . . . . . . . . . . . . . . . . . . . . . . . . . . . . . . . . . . . . . . . . . . . . . . . . . . . . . . 109
Move an Event . . . . . . . . . . . . . . . . . . . . . . . . . . . . . . . . . . . . . . . . . . . . . . . . . . . . . . . . . . . 112
Edit an Event . . . . . . . . . . . . . . . . . . . . . . . . . . . . . . . . . . . . . . . . . . . . . . . . . . . . . . . . . . . . 113
Discard an Event . . . . . . . . . . . . . . . . . . . . . . . . . . . . . . . . . . . . . . . . . . . . . . . . . . . . . . . . . 113
Ways to View Your Events . . . . . . . . . . . . . . . . . . . . . . . . . . . . . . . . . . . . . . . . . . . . . . . . . . 113
Upcoming View . . . . . . . . . . . . . . . . . . . . . . . . . . . . . . . . . . . . . . . . . . . . . . . . . . . . . . . . . . 115
Day View . . . . . . . . . . . . . . . . . . . . . . . . . . . . . . . . . . . . . . . . . . . . . . . . . . . . . . . . . . . . . . 116
Week View . . . . . . . . . . . . . . . . . . . . . . . . . . . . . . . . . . . . . . . . . . . . . . . . . . . . . . . . . . . . . 117
Month View . . . . . . . . . . . . . . . . . . . . . . . . . . . . . . . . . . . . . . . . . . . . . . . . . . . . . . . . . . . . . 118
Year View . . . . . . . . . . . . . . . . . . . . . . . . . . . . . . . . . . . . . . . . . . . . . . . . . . . . . . . . . . . . . . 119
Trash View . . . . . . . . . . . . . . . . . . . . . . . . . . . . . . . . . . . . . . . . . . . . . . . . . . . . . . . . . . . . . 119
Go To a Specific Day . . . . . . . . . . . . . . . . . . . . . . . . . . . . . . . . . . . . . . . . . . . . . . . . . . . . . . 120
13.TakingPhotos.................................................................. 121
Snapshots Menu Shortcuts . . . . . . . . . . . . . . . . . . . . . . . . . . . . . . . . . . . . . . . . . . . . . . . . . . 121
Insert the Camera . . . . . . . . . . . . . . . . . . . . . . . . . . . . . . . . . . . . . . . . . . . . . . . . . . . . . . . . 121
Capture a Photo . . . . . . . . . . . . . . . . . . . . . . . . . . . . . . . . . . . . . . . . . . . . . . . . . . . . . . . . . 122
About Capture Modes . . . . . . . . . . . . . . . . . . . . . . . . . . . . . . . . . . . . . . . . . . . . . . . . . . . . . . 122
View Your Photo Gallery . . . . . . . . . . . . . . . . . . . . . . . . . . . . . . . . . . . . . . . . . . . . . . . . . . . . 123
Email Photos . . . . . . . . . . . . . . . . . . . . . . . . . . . . . . . . . . . . . . . . . . . . . . . . . . . . . . . . . . . . 124
Change the Name of a Photo . . . . . . . . . . . . . . . . . . . . . . . . . . . . . . . . . . . . . . . . . . . . . . . . 125
Sort Photos . . . . . . . . . . . . . . . . . . . . . . . . . . . . . . . . . . . . . . . . . . . . . . . . . . . . . . . . . . . . . 125
Delete Photos . . . . . . . . . . . . . . . . . . . . . . . . . . . . . . . . . . . . . . . . . . . . . . . . . . . . . . . . . . . 126
14.KeepingToDoLists............................................................. 127
To Do Preview Screen . . . . . . . . . . . . . . . . . . . . . . . . . . . . . . . . . . . . . . . . . . . . . . . . . . . . . 127
Keyboard Shortcuts . . . . . . . . . . . . . . . . . . . . . . . . . . . . . . . . . . . . . . . . . . . . . . . . . . . . . . . 128
The Browse Tasks Screen . . . . . . . . . . . . . . . . . . . . . . . . . . . . . . . . . . . . . . . . . . . . . . . . . . . 128
Task Details Screen . . . . . . . . . . . . . . . . . . . . . . . . . . . . . . . . . . . . . . . . . . . . . . . . . . . . . . . 129
Create a New Task . . . . . . . . . . . . . . . . . . . . . . . . . . . . . . . . . . . . . . . . . . . . . . . . . . . . . . . . 129
Edit a Task . . . . . . . . . . . . . . . . . . . . . . . . . . . . . . . . . . . . . . . . . . . . . . . . . . . . . . . . . . . . . 130
Mark a Task Complete . . . . . . . . . . . . . . . . . . . . . . . . . . . . . . . . . . . . . . . . . . . . . . . . . . . . . 130
Show Tasks Filter . . . . . . . . . . . . . . . . . . . . . . . . . . . . . . . . . . . . . . . . . . . . . . . . . . . . . . . . . 131
Task Views . . . . . . . . . . . . . . . . . . . . . . . . . . . . . . . . . . . . . . . . . . . . . . . . . . . . . . . . . . . . . 131
Discard a Task . . . . . . . . . . . . . . . . . . . . . . . . . . . . . . . . . . . . . . . . . . . . . . . . . . . . . . . . . . . 131
Empty the To Do Trash . . . . . . . . . . . . . . . . . . . . . . . . . . . . . . . . . . . . . . . . . . . . . . . . . . . . . 132
15.KeepingNotes.................................................................. 133
Notes Preview Screen . . . . . . . . . . . . . . . . . . . . . . . . . . . . . . . . . . . . . . . . . . . . . . . . . . . . . . 133
Keyboard Shortcuts . . . . . . . . . . . . . . . . . . . . . . . . . . . . . . . . . . . . . . . . . . . . . . . . . . . . . . . 134
View Your Notes . . . . . . . . . . . . . . . . . . . . . . . . . . . . . . . . . . . . . . . . . . . . . . . . . . . . . . . . . 134
Add a Note . . . . . . . . . . . . . . . . . . . . . . . . . . . . . . . . . . . . . . . . . . . . . . . . . . . . . . . . . . . . . 135
Edit a Note . . . . . . . . . . . . . . . . . . . . . . . . . . . . . . . . . . . . . . . . . . . . . . . . . . . . . . . . . . . . . 136
Discard a Note . . . . . . . . . . . . . . . . . . . . . . . . . . . . . . . . . . . . . . . . . . . . . . . . . . . . . . . . . . . 136
Manage Your Notes Trash . . . . . . . . . . . . . . . . . . . . . . . . . . . . . . . . . . . . . . . . . . . . . . . . . . . 136

Contents
February 12, 2002 T-Mobile Device Owner’s Manual 7
16.WebApplications...............................................................138
Top Page . . . . . . . . . . . . . . . . . . . . . . . . . . . . . . . . . . . . . . . . . . . . . . . . . . . . . . . . . . . . . . . 138
The T-Mobile Device Owner’s Manual . . . . . . . . . . . . . . . . . . . . . . . . . . . . . . . . . . . . . . . . . . . 139
More About the Applications on the Web . . . . . . . . . . . . . . . . . . . . . . . . . . . . . . . . . . . . . . . . 139
Signing Out . . . . . . . . . . . . . . . . . . . . . . . . . . . . . . . . . . . . . . . . . . . . . . . . . . . . . . . . . . . . . 139
17.SendingEmailfromtheWeb......................................................140
Your Inbox . . . . . . . . . . . . . . . . . . . . . . . . . . . . . . . . . . . . . . . . . . . . . . . . . . . . . . . . . . . . . 140
View Your Email . . . . . . . . . . . . . . . . . . . . . . . . . . . . . . . . . . . . . . . . . . . . . . . . . . . . . . . . . . 140
Send a New Message . . . . . . . . . . . . . . . . . . . . . . . . . . . . . . . . . . . . . . . . . . . . . . . . . . . . . . 141
Set Up Your Email . . . . . . . . . . . . . . . . . . . . . . . . . . . . . . . . . . . . . . . . . . . . . . . . . . . . . . . . 141
Collect Mail from POP3 Account . . . . . . . . . . . . . . . . . . . . . . . . . . . . . . . . . . . . . . . . . . . . . . . 143
Move Messages to Folders . . . . . . . . . . . . . . . . . . . . . . . . . . . . . . . . . . . . . . . . . . . . . . . . . . 143
Discard Email Messages . . . . . . . . . . . . . . . . . . . . . . . . . . . . . . . . . . . . . . . . . . . . . . . . . . . . 144
18.UsingAddressBookontheWeb .................................................. 145
Browse Contacts . . . . . . . . . . . . . . . . . . . . . . . . . . . . . . . . . . . . . . . . . . . . . . . . . . . . . . . . . 145
Address Book Preferences . . . . . . . . . . . . . . . . . . . . . . . . . . . . . . . . . . . . . . . . . . . . . . . . . . . 145
Add a Contact .................................................................. 147
Edit a Contact . . . . . . . . . . . . . . . . . . . . . . . . . . . . . . . . . . . . . . . . . . . . . . . . . . . . . . . . . . . 148
Discard/Retrieve a Contact . . . . . . . . . . . . . . . . . . . . . . . . . . . . . . . . . . . . . . . . . . . . . . . . . . 148
Import Contacts . . . . . . . . . . . . . . . . . . . . . . . . . . . . . . . . . . . . . . . . . . . . . . . . . . . . . . . . . . 149
Open and Edit My Info . . . . . . . . . . . . . . . . . . . . . . . . . . . . . . . . . . . . . . . . . . . . . . . . . . . . . 149
Communicate with a Contact . . . . . . . . . . . . . . . . . . . . . . . . . . . . . . . . . . . . . . . . . . . . . . . . 149
Empty the Trash . . . . . . . . . . . . . . . . . . . . . . . . . . . . . . . . . . . . . . . . . . . . . . . . . . . . . . . . . 149
19.UsingCalendarontheWeb.......................................................150
View Events . . . . . . . . . . . . . . . . . . . . . . . . . . . . . . . . . . . . . . . . . . . . . . . . . . . . . . . . . . . . 150
View an Event . . . . . . . . . . . . . . . . . . . . . . . . . . . . . . . . . . . . . . . . . . . . . . . . . . . . . . . . . . . 151
Add an Event . . . . . . . . . . . . . . . . . . . . . . . . . . . . . . . . . . . . . . . . . . . . . . . . . . . . . . . . . . . . 151
Edit an Event . . . . . . . . . . . . . . . . . . . . . . . . . . . . . . . . . . . . . . . . . . . . . . . . . . . . . . . . . . . . 152
Discard an Event . . . . . . . . . . . . . . . . . . . . . . . . . . . . . . . . . . . . . . . . . . . . . . . . . . . . . . . . . 153
Manage Your Trash . . . . . . . . . . . . . . . . . . . . . . . . . . . . . . . . . . . . . . . . . . . . . . . . . . . . . . . 153
Settings . . . . . . . . . . . . . . . . . . . . . . . . . . . . . . . . . . . . . . . . . . . . . . . . . . . . . . . . . . . . . . . 153
20.PhotoGalleryontheWeb ........................................................155
Browse Photos . . . . . . . . . . . . . . . . . . . . . . . . . . . . . . . . . . . . . . . . . . . . . . . . . . . . . . . . . . . 155
Sort Your Photos . . . . . . . . . . . . . . . . . . . . . . . . . . . . . . . . . . . . . . . . . . . . . . . . . . . . . . . . . 155
Rename Your Photos . . . . . . . . . . . . . . . . . . . . . . . . . . . . . . . . . . . . . . . . . . . . . . . . . . . . . . 155
Delete a Photo . . . . . . . . . . . . . . . . . . . . . . . . . . . . . . . . . . . . . . . . . . . . . . . . . . . . . . . . . . . 155
Photos and Email . . . . . . . . . . . . . . . . . . . . . . . . . . . . . . . . . . . . . . . . . . . . . . . . . . . . . . . . . 156
21.KeepingaToDoListontheWeb ..................................................157
About To Do Items . . . . . . . . . . . . . . . . . . . . . . . . . . . . . . . . . . . . . . . . . . . . . . . . . . . . . . . . 157
View Your Tasks . . . . . . . . . . . . . . . . . . . . . . . . . . . . . . . . . . . . . . . . . . . . . . . . . . . . . . . . . . 157
Add a New Task . . . . . . . . . . . . . . . . . . . . . . . . . . . . . . . . . . . . . . . . . . . . . . . . . . . . . . . . . . 157
Edit a Task . . . . . . . . . . . . . . . . . . . . . . . . . . . . . . . . . . . . . . . . . . . . . . . . . . . . . . . . . . . . . 158

Contents
February 12, 2002 T-Mobile Device Owner’s Manual 8
Mark a Task as Complete . . . . . . . . . . . . . . . . . . . . . . . . . . . . . . . . . . . . . . . . . . . . . . . . . . . 158
Discard a Task . . . . . . . . . . . . . . . . . . . . . . . . . . . . . . . . . . . . . . . . . . . . . . . . . . . . . . . . . . . 158
Discard Completed Tasks . . . . . . . . . . . . . . . . . . . . . . . . . . . . . . . . . . . . . . . . . . . . . . . . . . . 158
Manage Trash . . . . . . . . . . . . . . . . . . . . . . . . . . . . . . . . . . . . . . . . . . . . . . . . . . . . . . . . . . . 159
22.KeepingNotesontheWeb........................................................ 160
See All Notes . . . . . . . . . . . . . . . . . . . . . . . . . . . . . . . . . . . . . . . . . . . . . . . . . . . . . . . . . . . . 160
Add a Note . . . . . . . . . . . . . . . . . . . . . . . . . . . . . . . . . . . . . . . . . . . . . . . . . . . . . . . . . . . . . 160
Edit a Note . . . . . . . . . . . . . . . . . . . . . . . . . . . . . . . . . . . . . . . . . . . . . . . . . . . . . . . . . . . . . 160
Discard a Note . . . . . . . . . . . . . . . . . . . . . . . . . . . . . . . . . . . . . . . . . . . . . . . . . . . . . . . . . . . 160
Manage Your Trash . . . . . . . . . . . . . . . . . . . . . . . . . . . . . . . . . . . . . . . . . . . . . . . . . . . . . . . 161
23.SettingsontheWeb............................................................. 162
Your Account Information . . . . . . . . . . . . . . . . . . . . . . . . . . . . . . . . . . . . . . . . . . . . . . . . . . . 162
Your Device ID . . . . . . . . . . . . . . . . . . . . . . . . . . . . . . . . . . . . . . . . . . . . . . . . . . . . . . . . . . 162
Time Zone . . . . . . . . . . . . . . . . . . . . . . . . . . . . . . . . . . . . . . . . . . . . . . . . . . . . . . . . . . . . . . 162
Start Here
February 12, 2002 T-Mobile Device Owner’s Manual 9
1. Start Here
Thank You for Purchasing a T-Mobile Device!
Here’s what you’ll find in the box:
• T-Mobile Device
• Smart Card with SIM
• Power adapter
•Camera
• Headset
•USB B cable
•Wrist strap
• Carrying holster
• Quick Reference card
•Quick Start booklet
If you find that anything is missing, please contact T-Mobile Customer Care by calling 1-800-937-8997, or by
going to http://www.myistream.com and clicking the Customer Care link.
Before you can start using your device, you must set up your T-Mobile account and charge the battery. Read the
following topics to find out how.

Start Here
February 12, 2002 T-Mobile Device Owner’s Manual 10
Your T-Mobile Account
Before you can use your device, your T-Mobile account must be completely set up. Account setup involves the
following steps:
1 Obtain a telephone number.
When you purchased your device, a T-Mobile representative assigned you a telephone number, which is
stored on your device’s Subscriber Identification Module, or “SIM” for short. (Read more in
About Your Smart
Card
on page 22.) This step you’ve already completed.
2 Wait for account activation.
T-Mobile must activate your device on the network. This can take up to 48 hours after you purchase your
device. You will know your T-Mobile account is activated when you see a “Welcome to Registration” screen on
your device display.
3 Register a username and password.
After you see the “Welcome to Registration” screen on your device, follow the prompts to select a username
and password. You will use your phone number and this password to sign in and out of the Web version of
the applications, and you may occasionally be prompted to enter this information on the device as well.
When selecting a username and password, note the following:
-Usernames - Must start with an alphabetic character (A-Z), can include numbers, can include
underscores but no other punctuation, and must be two or more characters in length. If your preferred
username is already taken, the T-Mobile service will provide you with alternate suggestions. You can
either pick one of these or try another one of your choice. Note that usernames are not case-sensitive.
-Passwords - Must contain at least six characters and include both letters and numbers. You will be
asked to type your password twice for confirmation. Note that your password appears on the screen as
asterisks (*) to ensure privacy. Select a password that is not a word, is difficult to guess, but one that
you can remember. Passwords
are
case-sensitive. If you forget your password at some time in the
future, contact T-Mobile Customer Care at 1-800-937-8997.
Secret Question - You will also be asked to select a “secret question” and type the answer. Questions are
similar to these:
- What is your mother's maiden name?
- What is your favorite pet's name?
- What is the last name of your favorite teacher?
- What is your favorite movie?
If you ever forget your password, you will be asked to answer this question your password is “reset” by
Customer Care.
Powering Your Device
Your device comes with a built-in rechargeable lithium ion (Li-Ion) battery. Before you can begin using your
device you must charge the battery. Note that you cannot access or remove the battery from your device.
Read the following topics for more information about your device’s battery:
•
Charging Your Device’s Battery
•
Battery Charging Time
•
Use and Standby Times
•
Conserving Power
Start Here
February 12, 2002 T-Mobile Device Owner’s Manual 11
Charging Your Device’s Battery
To charge the battery, do the following:
1 Attach the power adapter to your device.
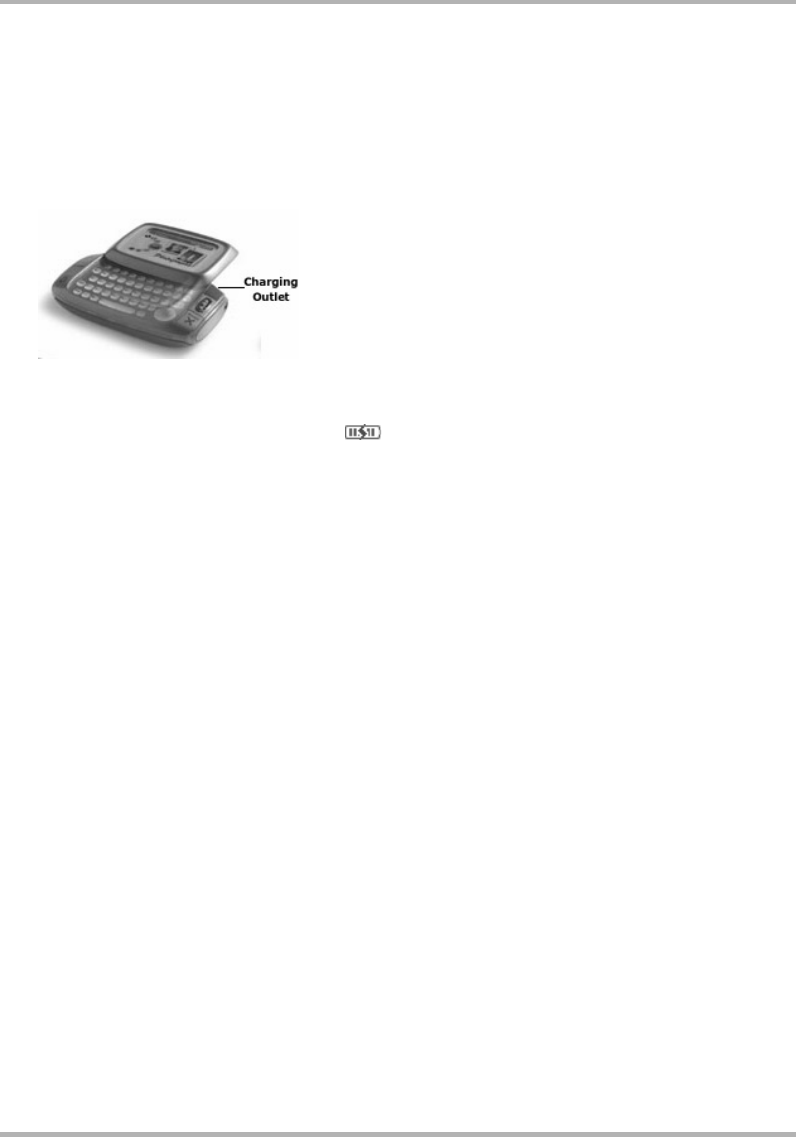
Locate the power adapter that came with your device. Insert the charger lead (the small round end of the
adapter) into your device’s charging outlet (the small round hold located at the top of your device) and plug
the adapter cord into a standard 120V AC electrical wall outlet.
2 Let the device charge for at least four (4) hours.
Rest the device in a safe place and let the batteries charge for at least four hours, or overnight. As the device
is charging, you will see a charge indicator ( ) blinking over the battery icon the upper-right corner of
the device display. When fully charged, the charge indicator will stop blinking. You’re ready to go!
Battery Charging Time
Initial charging time for your device’s lithium ion battery is approximately four hours. Recharging time is the
same, depending on how discharged the battery has become.
UseandStandbyTimes
With a fully-charged battery, you can use your device for one day. In power-saving (or sleep) mode, the battery
should last seven days. These times are approximate however; battery operation times vary according to how
you use your device, signal conditions, and other network settings made by T-Mobile.
Conserving Power
Your device has a power-saving feature that automatically reduces power to the device after 10 minutes of
inactivity. This is also referred to as “sleep mode”. In sleep mode your device will still receive messages and calls.
To wake the device, simply press any two control keys simultaneously or open the display lid.
If you have set a device security code, as described in
Turn On/Off Privacy Lock
on page 31, you will be
prompted to enter your three-digit security code before the device will “wake up”. This power-saving feature
conserves battery power, as well as provides security when used in conjunction with the device security feature.
Read more in
Sleep Display
on page 33.

Start Here
February 12, 2002 T-Mobile Device Owner’s Manual 12
Using the Wrist Strap to Carry Your Device
Use the wrist strap included in your box to carry your device safely. To attach the strap to your device, do the
following:
1Slip the thinnest end of the strap into the metal ring located at the top-right corner of the device, then open
this end into a loop.
2Take the opposite end of the strap (where your wrist fits) and pull it through the loop.
3Pull the strap to make the loop tight and secure.
4Use the strap to secure the device around your wrist.
T-Mobile Device User Documents
In addition to this Owner’s Manual, the device comes with two other documents. To open these in PDF format for
printing, click the links below:
• T-Mobile Device Quick Reference card
• T-Mobile Device Quick Start booklet
Using the Holster to Protect Your Device Screen
Use the holster included in your box to both protect the screen and carry your device securely. To use the
holster:
1Close the lid to your device and slip it into the open holster.
2Secure the holster to your belt or waistband using the holster clip.
Remember! The best way to protect the screen from scratches and other damage is to always carry the
device in the holster.
Use Your Device Safely
While using your device, please remember to follow the safety rules listed below. To turn off your device when
required, press and hold the keyboard On/Off Power key for four seconds. To turn off the radio, press the Jump
button, then press Menu and select Preferences. Scroll to the Turn Off Wireless button and select.
•Do not use your device while driving a vehicle. If you must use your device, pull off the road to
a safe spot first.
•Turn off your device while on an aircraft. Because wireless devices interfere with navigation
systems, FCC regulations prohibit use of your device in the air. Please follow airline rules and switch off
your device when directed.
•Turn off your device while in a hospital. Adhere to posted signs in hospitals, where an active
wireless device could interfere with hospital equipment and pacemakers.
•Turn off your device while at a fueling station or near blasting. Do not use wireless devices
near fuel or other chemicals. Follow posted restrictions at these sites.
•Use only approved device batteries and accessories. Please do not insert or connect
incompatible products to your device.
Device Basics
February 12, 2002 T-Mobile Device Owner’s Manual 13
2. Device Basics
Read the topics in this chapter to get a quick understanding of how your device operates:
Parts of Your T-Mobile Device
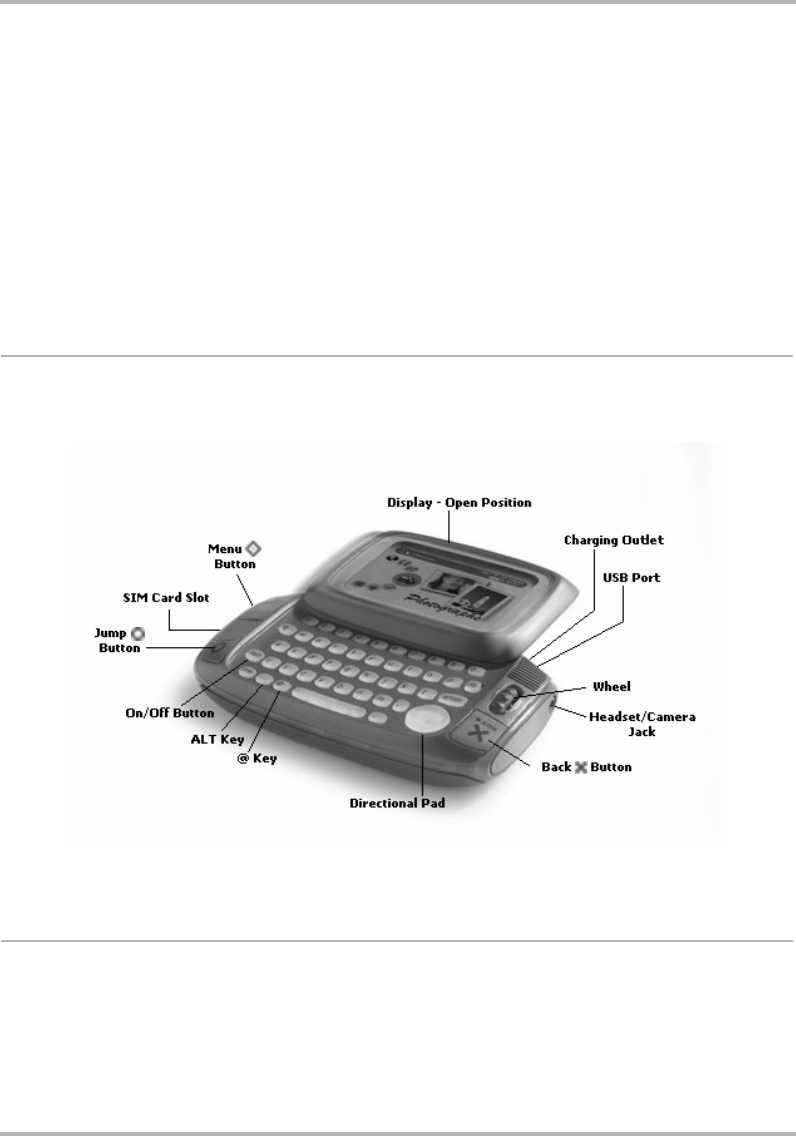
The illustration below identifies the basic elements of your hiptop.
Each element is described in more detail in the topics below.
Device Display
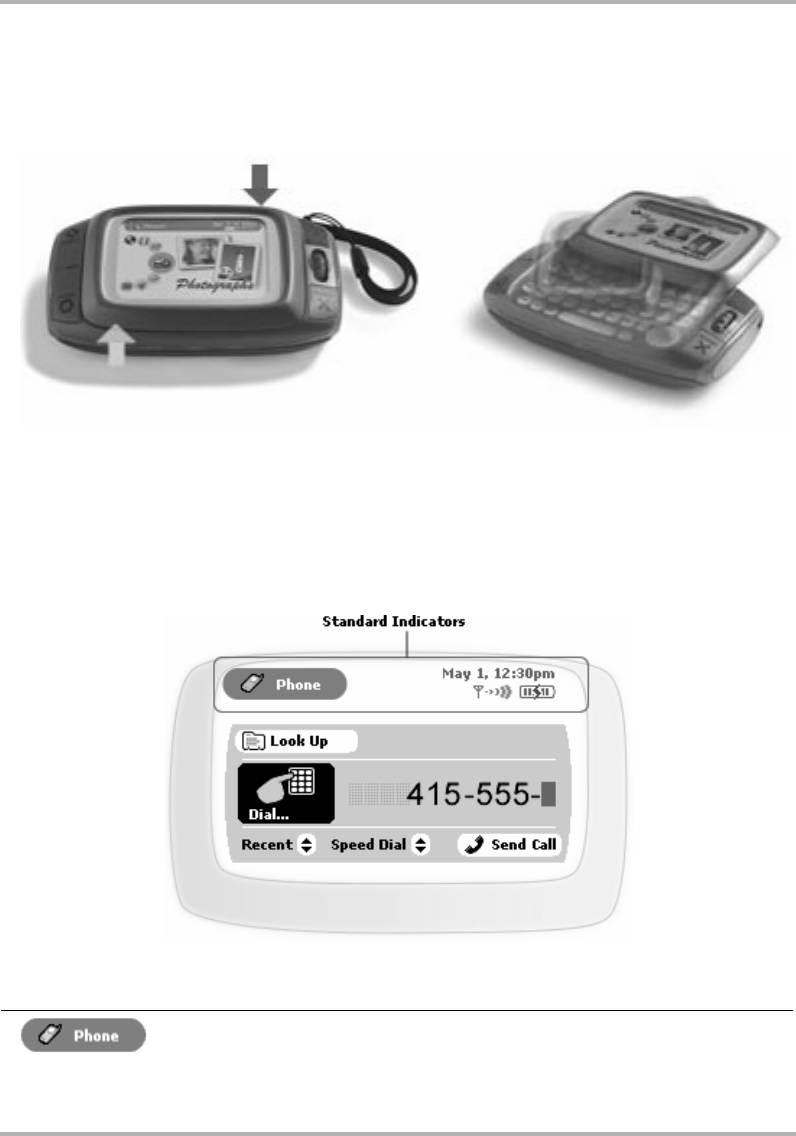
Your device comes with a swivel display lid that covers the keyboard in the closed position. Even when closed,
the LCD faces up and the control buttons are exposed, so you can use your device. When you open the display
lid (by rotating it clockwise), the display automatically rotates 180-degrees. Read more details below.
•
Parts of Your T-Mobile Device
on page 13
•
Device Display
on page 13
•
Keyboard
on page 16
•
Control Buttons
on page 17
•
Wheel
on page 19
•
Headset/Camera Jack
on page 19
•
Headset/Camera Jack
on page 19
•
Charging Outlet
on page 20
•
USB Mini-B Port
on page 20
•
Typing Text
on page 21
Device Basics
February 12, 2002 T-Mobile Device Owner’s Manual 14
Opening and Closing the Display Lid
1 To open the display lid, place your left thumb on the lower-left corner and your right forefinger on the
upper-right corner of the lid and gently push in a clockwise direction. The lid will spring smoothly into
position:
2 To close the display lid, reverse the motion to pivot the lid counter-clockwise and lock it into the closed
position.
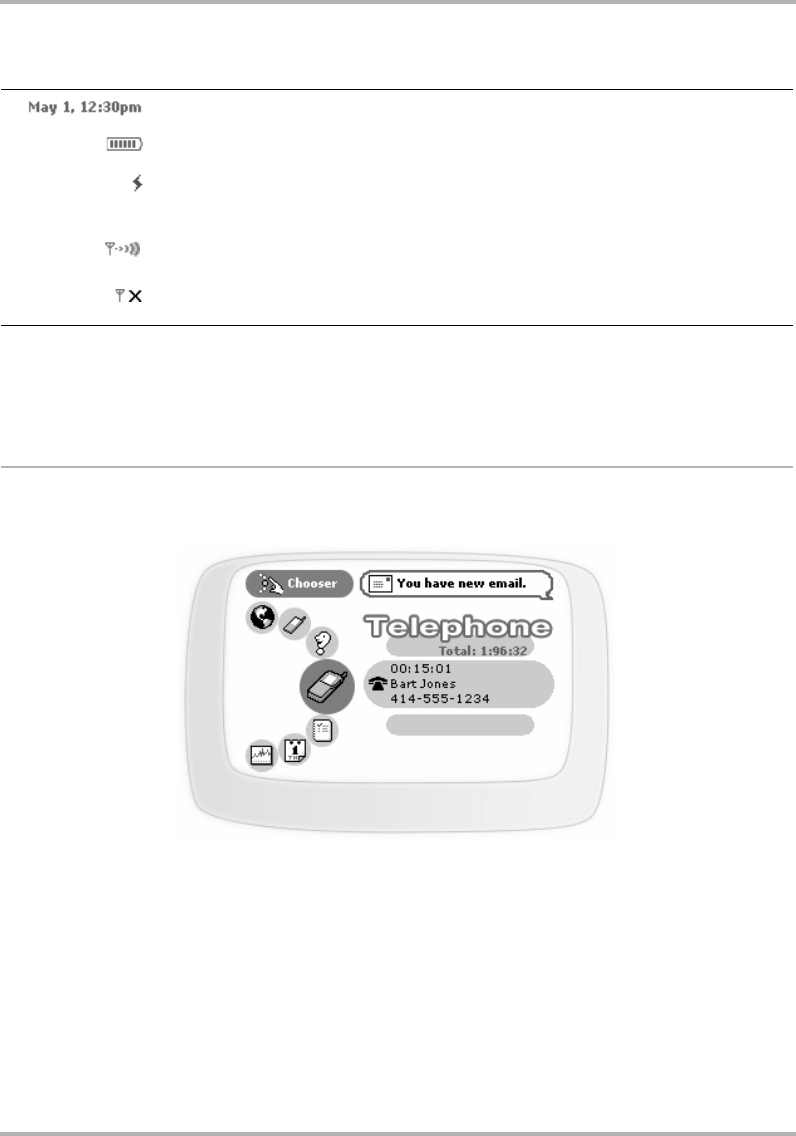
Standard Display Screen Indicators
The display screen is your view into the T-Mobile Device applications, so what you see on the screen depends on
what application you are using. However, there are some standard indicators that display on the screen at all
times. These indicators are located at the top of the screen and are circled in the example below.
Element Description
Device application identifier. Lets you know what application screen you are currently
viewing.
Device Basics
February 12, 2002 T-Mobile Device Owner’s Manual 15
You can read about other indicators and icons in
The Jump Screen
on page 34 and in the chapters describing
each application.
Notifications
When you receive a new email, SMS, IM, or voice mail message, the service will give you a visual notification in
the title bar, no matter what application you’re currently viewing. Here’s an example of a new email notification:
The notice will appear/disappear several times in case you miss it the first time.
You can also chose to be notified of new messages using ringtones (sounds, flasher, or vibration). Read more
about notifications in the following topics:
•
Quiet Mode and Notifications
on page 29
•
Set Up Ringtones
on page 46
•
Select Email Notifications
on page 76
Current date and time.
Battery charge indicator. The darker the battery icon, the more power in the battery.
Power adapter connectivity indicator. When your device is connected to the power
adapter, this lightning bolt icon displays over the battery indicator. If your battery is
charging, the lightning bolt flashes.
Radio signal strength indicator. The more signal bands showing, the stronger the
signal strength of the wireless connection at your current location.
No radio signal indicator. If you see this X next to the radio tower icon, it means you
have temporarily lost network connection.
Element Description
Device Basics
February 12, 2002 T-Mobile Device Owner’s Manual 16
Turning on Backlighting
To help you use your device in a dark environment, enable the backlighting feature:
1From the Jump screen, open the menu and select Preferences.
2Scroll down to select Battery & Backlight.
3Select the Automatically turn on when in use check box.
4Select the length of time you want backlighting to stay on from the pop-up menu.
5Press the Jump button to return to the Jump screen. Now, when you press any button on your device,
backlighting will turn on for the set amount of time. Note that as long as you press a key or button before the
set time elapses, the backlight will not go out.
Tip: Even if you have not enabled backlighting, you can quickly turn on backlighting for 5 seconds by pressing
+ to open the Controls pane.
Keyboard
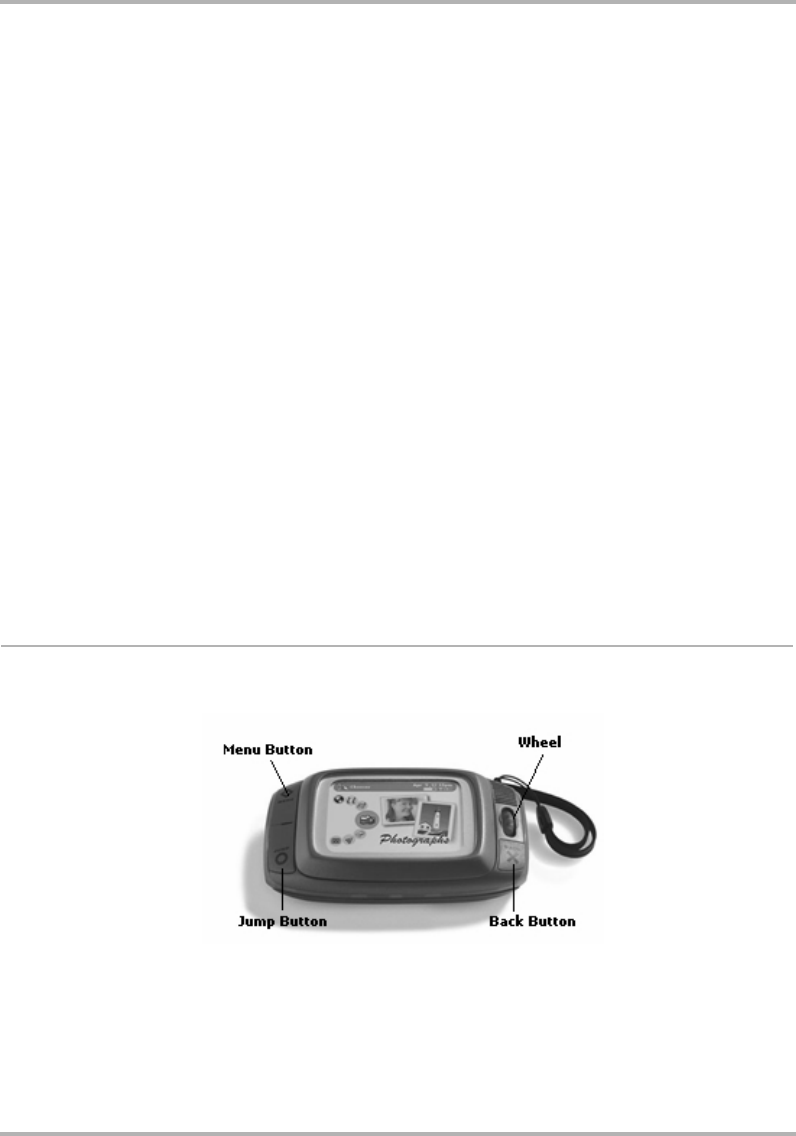
Your device keyboard contains five rows of keys, including a key for the “at” symbol (@) and a Directional pad
(“D-pad”) that “rocks” into eight different directions or positions.
The topics below describe the keyboard in more detail.
Directional Pad (D-pad)
The D-pad is the round navigational device in the lower-right corner of the keypad that you can “rock” in eight
directions: up, down, left, right, plus the 4 corners (northwest, northeast, southwest, and southeast), which you
use by pressing two adjacent keys at the same time. You use the D-pad to navigate while playing games and to
navigate within
text boxes
. A text box is an area on the screen in which you can type characters. Here’s a few
examples of text boxes:
• To, From, Subject fields in an email, IM, or Text Messages message
• Go To pane in the Web Browser
• Luggage Tag in Control Panels > Security screen
Device Basics
February 12, 2002 T-Mobile Device Owner’s Manual 17
Press the up/down and left/right arrows to move in those directions among characters in a text box. Press the
corners of the D-pad (two adjacent arrows at the same time) to jump up/down one line and forward/backward
a character. Read more in
Typing Text
on page 21.
ALT Key
You type special characters (shown in red on some of the keys) by first pressing the ALT key, then the key
showing the special character. For example, if you need to type a semicolon (;), you would first press the ALT
key, then the J key. (This action is also represented in the user documentation as ALT+J.)
•Lock the ALT key to type a series of special characters by pressing the key twice.
•Unlock the ALT key by pressing it once again.
Note! You can also lock the Shift key by pressing it twice. Unlock by pressing once again.
@Key
When you type an email address, you use the “at” symbol (@) to separate the username from the domain; for
example, username@domain.com. Use the @ key (located in the bottom row of keys) to insert the @ symbol in
an email address easily.
On/Off Button
Power off the device to conserve the maximum amount of power. While the power is off, your device will not
receive messages or phone calls. Incoming calls are forwarded to voice mail.
To power your device on and off, use the On/Off button. It is located just to the left of the “Z” key on the
keyboard.
Control Buttons
A T-Mobile Device comes with four main control buttons, which you can still use when the display lid is in the
closed position, as shown below:
Read more details about the control buttons in the topics below.
Device Basics
February 12, 2002 T-Mobile Device Owner’s Manual 18
Menu Button
The Menu button is located in the upper-left corner of the device and is marked by a diamond. When you see the
diamond on the device screen or in the documentation, this refers to the Menu button. Use the Menu button
to do the following:
• Press once to open a drop-down menu listing actions you can take from the current screen.
• Press again to close the drop-down menu.
• Press in combination with a shortcut key to perform an action. There are two types of shortcut keys:
-User-definable - Read more in
Jump Shortcuts
on page 28.
- System-defined - You’ll find the system-defined shortcuts listed in the menus to the right of a given
option. For example, in the Email application, the shortcut for composing a new message is +N.
About Context Menus - The options that appear in any given menu are dependent on what screen you are
viewing. These types of menus are often referred to as “context menus”. For example, if you are viewing the
main screen of the Email application, the menu will list options such as “New Message” and “Check for New
Email”. However, if you are viewing the main screen in the Address Book, the menu will list options such as “New
Contact”, “Sort...”, and “My Info”. So the items that appear depend on the “context” (or screen) you are in when
you open the menu.
Jump Button
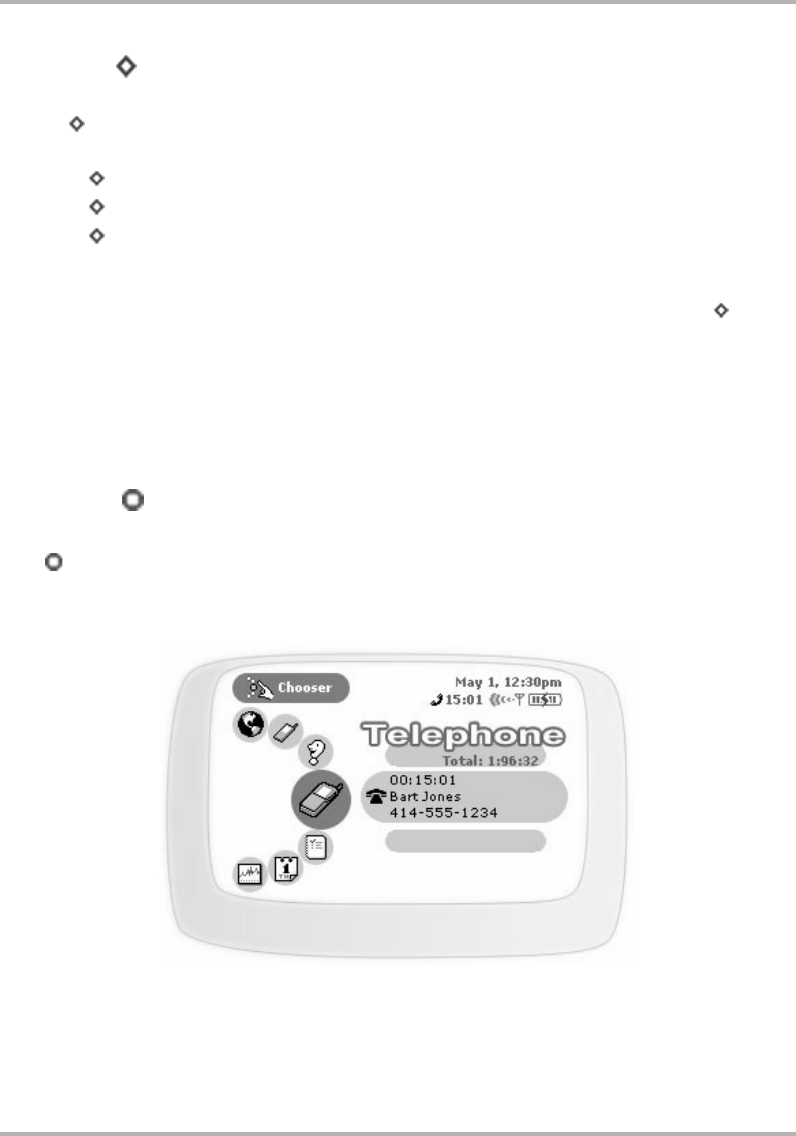
The Jump button is located in the lower-left corner of the device and is marked by a circle. When you see the
circle on the device screen or in the documentation, this refers to the Jump button. Use the Jump button to
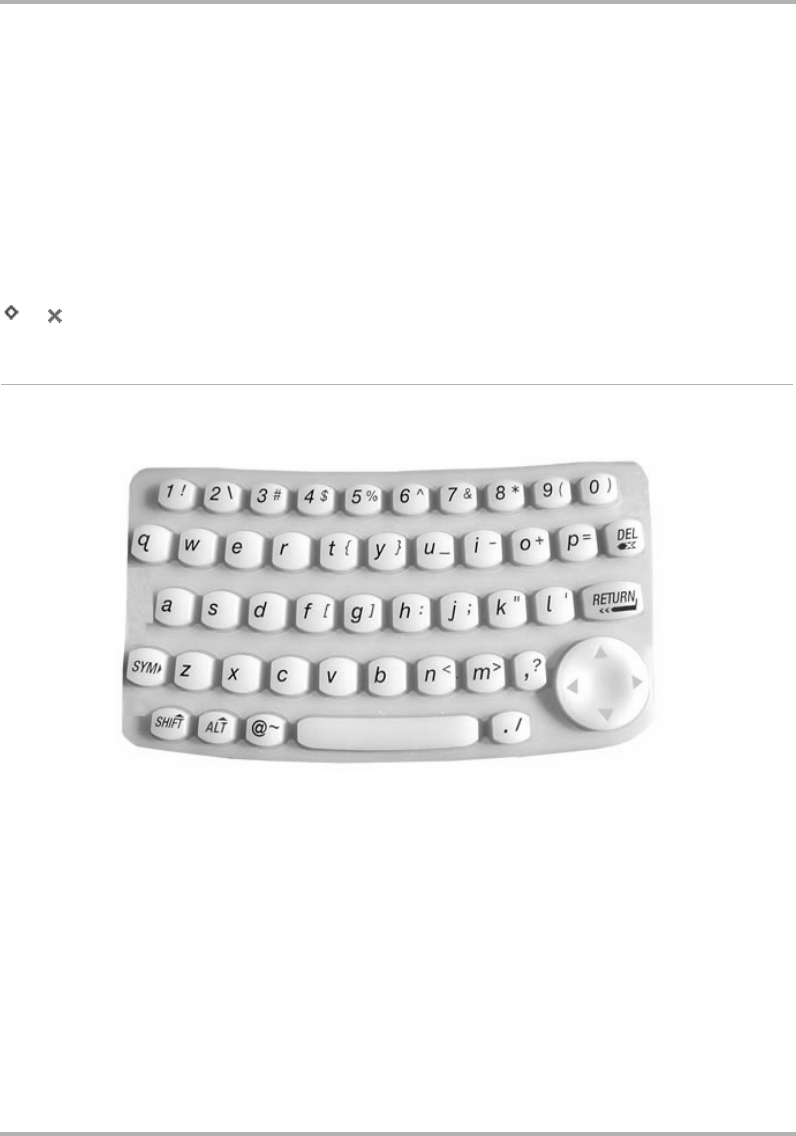
open the Jump screen. No matter where you are in the applications--what screen you are viewing--if you press
the Jump button, you’ll return to the Jump screen. In the example below, the Jump screen shows the Telephone
application highlighted:
To open the application you have highlighted from the Jump screen, click the wheel.
Read more in the
Wheel
on page 19 and
The Jump Screen
on page 34
.

Device Basics
February 12, 2002 T-Mobile Device Owner’s Manual 19
Back Button
The Back button is located in the lower-right corner of the device and is marked by a cross. When you see the
cross on the device screen or in the documentation, this refers to the Back button. Use the Back button to do
the following:
• Press once to go back to the screen you were previously viewing; press twice to go back two screens,
and so on.
• In a dialog box or on a screen, press once to save any changes you’ve made to the information. If
you’ve made changes within a dialog box, the dialog box closes as well.
• If a menu is open, press once to close it.
Wheel
The wheel is located in the upper-right corner of your device. You use it to highlight and click buttons or links on
the screen. Use your thumb to rotate the wheel away from you (up) or toward you (down), moving through
selections (“clickable” items). You can also click the wheel down. More specifically, here’s how you can use the
wheel:
•Rotate the wheel toward you to advance the current selection through all the “clickable” elements on a
screen and scroll down a Web page.
•Rotate the wheel away from you to reverse through all the “clickable” elements on a screen and to scroll
up a Web page.
•Click down on the wheel (as you would a mouse button) to select a highlighted item or open a pop-up
menu.
•Click and hold the wheel to open pop-up context menus.
Headset/Camera Jack
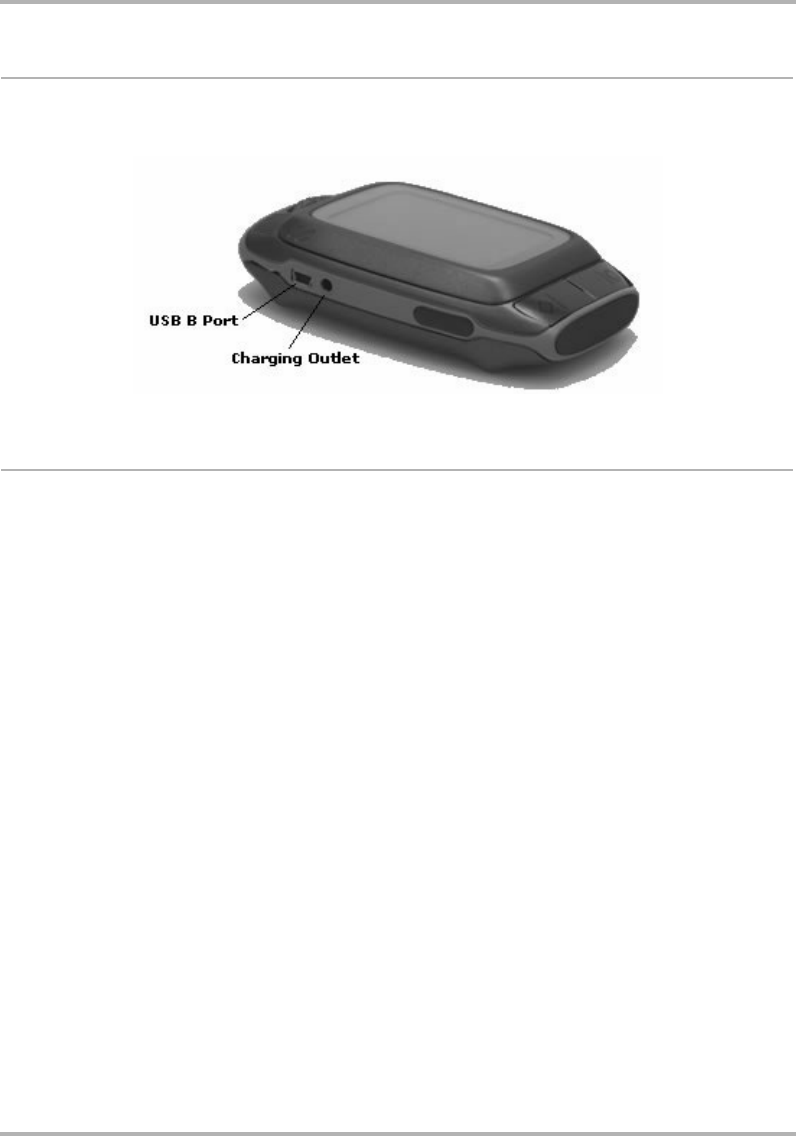
The jack where you insert your headset or camera is located on the right side of the device. See illustration in
Parts of Your T-Mobile Device
on page 13. Be sure to press the headset or camera lead in firmly to secure the
connection:
Device Basics
February 12, 2002 T-Mobile Device Owner’s Manual 20
Charging Outlet
The charging outlet is located at the top of your device, as shown in the illustration below. Read more in
Powering Your Device
on page 10.
USB Mini-B Port
The USB Mini-B port is located on the top of your device, as shown in the illustration above. Use the USB Mini-B
port with your USB cable to connect your device to a personal computer for restoring the device operating
system software. For details on using your USB Mini-B port for this purpose, please read
Troubleshooting
on
page 161.

Device Basics
February 12, 2002 T-Mobile Device Owner’s Manual 21
Typing Text
Many of the T-Mobile Device applications have screens in which you type text, such as the Email Compose
screen, the individual Preference screens, the Browser’s Go To pane, etc. You will primarily use the keyboard to
type text, which is easy to use, but here are some hints to make typing and editing text easier:
• Use the Directional Pad to navigate within a text box:
- Press the up/down and left/right arrows to move in those directions among characters in a text box.
- Press the corners of the D-pad (two adjacent arrows at the same time) to jump up/down one line and
forward/backward a character.
• To delete a character to the left of the cursor, press the DEL key [ ].
• To delete a character to the right of the cursor, press SHIFT+ .
• To delete all the characters in a text box, press ALT+SHIFT+ .
• To lock the SHIFT key, press SHIFT twice. To unlock, press SHIFT once again.
• To lock the ALT key, press ALT twice. To unlock, press ALT once again.

About Your Smart Card
February 12, 2002 T-Mobile Device Owner’s Manual 22
3. About Your Smart Card
If you are unfamiliar with Smart Cards or SIM cards, you might be interested to learn more by reading the
following questions and answers:
• What Is a Smart Card?
on page 22
• Exactly What Information Is on My Device SIM?
on page 22
• Can I Remove My SIM?
on page 22
• How Do I Handle My SIM?
on page 23
• What Happens If I Lose My SIM?
on page 23
• What Happens If I Put A Different SIM in My Device?
on page 23
What Is a Smart Card?
A Smart Card is the size of a credit card and contains a SIM card, which is an acronym that stands for Subscriber
Identification Module. A SIM is a small card that fits into a slot within your device. The card contains a chip that
holds information required to operate a device.
Exactly What Information Is on My Device SIM?
Your device SIM stores the following information:
•International Mobile Subscriber Identity (IMSI) Number - Number that uniquely identifies you as a
subscriber on the network. The number is made up of three parts: a three-digit mobile country code, a
two-digit mobile network code, and a (up to) 10-digit mobile subscriber identify number.
•Mobile Subscriber ISDN (MSISDN) Number - Your mobile telephone number. (ISDN stands for
Integrated Services Digital Network.)
•SIM Lock Code - A Personal Identification Number (PIN) that you set using the Control Panels > Security
screen. This code protects your SIM from being used by another person in another device in the event it is
lost or stolen.
•SMS Messages - Short Message Service messages that you receive and save. T-Mobile Text Messages
messages use the Short Message Service.
Can I Remove My SIM?
Yes, you can; but we recommend you never remove the SIM from your device. Without a SIM card, you can only
place phone calls to 611 (T-Mobile Customer Care) and 911 (Emergency). You can also view data that has been
cached in the device memory.
If you find you must remove your SIM, please follow the directions that follow.
About Your Smart Card
February 12, 2002 T-Mobile Device Owner’s Manual 23
To Remove Your SIM...
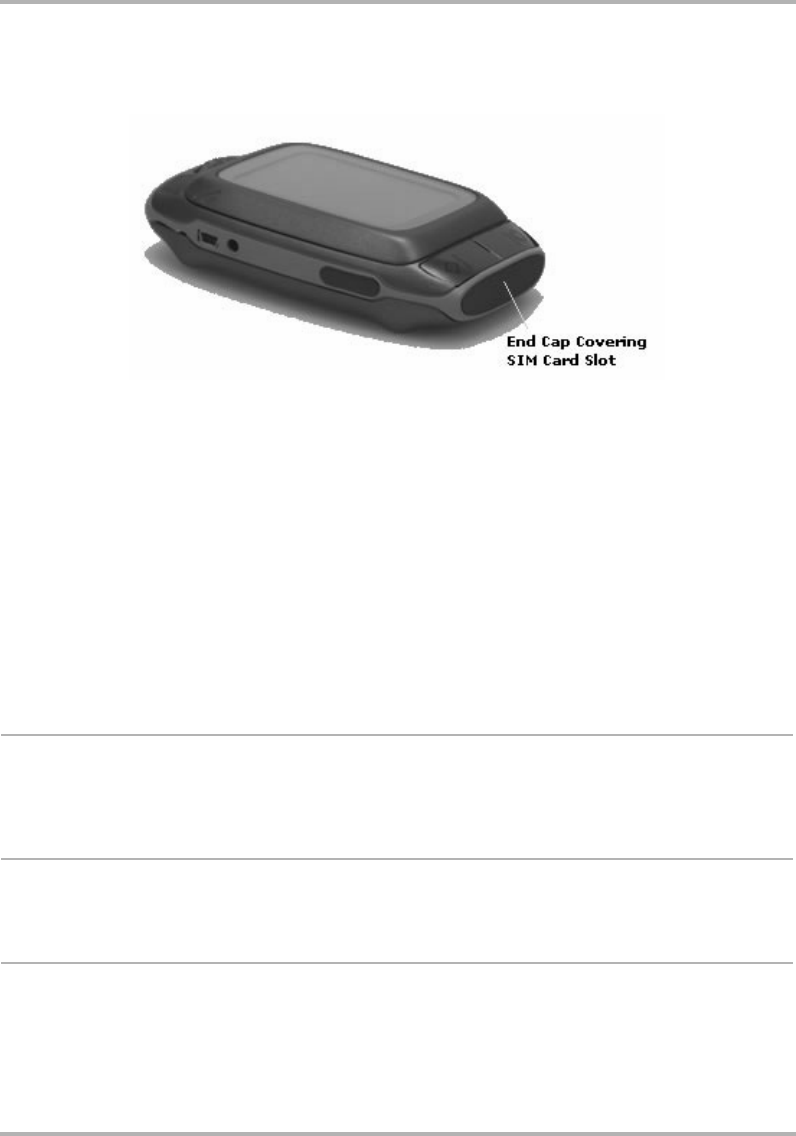
1Your SIM card fits into a slot on the left side of your device behind the end cap:
Remove the end cap using your fingernail or a coin.
2You will see the SIM card in its slot; press the end of the SIM in toward the device and release. The SIM
should spring gently out of its slot.
3Remove the SIM carefully. Be sure to read
How Do I Handle My SIM?
on page 23.
4Replace the end cap by pressing the prongs in slightly and inserting the cap. Make sure the cap is flush with
the case.
To Insert Your SIM...
1Remove the end cap covering the SIM slot.
2Press the SIM into its slot with the notch in the upper-right corner and the gold contacts facing down (away
from you). When you release the SIM make sure it is locked into position and it doesn’t spring out.
3Replace the end cap.
How Do I Handle My SIM?
Handle your SIM card very carefully since the card and gold contacts can be easily damaged by scratches or
bends. Be sure to keep SIM cards out of reach of small children.
What Happens If I Lose My SIM?
Call T-Mobile Customer Care at 1-800-937-8997.
What Happens If I Put A Different SIM in My Device?
We do not recommend you insert a different SIM into your device. If you do, your device will function but
you will not have access to your messages and you will not be able to use the telephone application.

Setting Your Preferences
February 12, 2002 T-Mobile Device Owner’s Manual 24
4. Setting Your Preferences
Your T-Mobile Device is designed so you can set up many of its features to suit your preferences:
•Specify application-wide preferences using the Preferences screens.
From the Jump screen, open the menu and click Preferences... to open these screens.
•Specify application-specific preferences using the application Preferences screens.
From the Jump screen, click any application (Web Browser, Instant Messaging, Email, etc.). Then open the
menu and click Preferences... to open these screens.
We recommend you step through the application-wide Preferences screens and the application-specific
Preferences screens to completely customize your device for your personal use. Use the tables below to guide
you through the screens. For more details on each screen, follow the links in the first column.
Application-Wide Preferences
Control Panel Screen Configurable Items and Options
Controls Pane
on page 26 • Image contrast/brightness slider bar
• Sound Effects slider bar
• Phone volume slider bar
• Enable Quiet Mode check box
•Radio on/off check box
• Sleep Now button
AutoText
on page 27 • Capitalize new sentences check box
• Auto replace check box and list of replacement rules you can
add to or delete from
Date & Time
on page 27 • Current date & time text fields
• Radio connection status
• Time Zone setting scroll box
Jump Shortcuts
on page 28 • User-definable list of keyboard shortcuts to application
screens. Jump shortcuts use the Jump button plus another
key. See
Keyboard & Wheel
on page 29 • Keyboard repeat delay slider
• Keyboard repeat rate slider
• Wheel acceleration slider

Setting Your Preferences
February 12, 2002 T-Mobile Device Owner’s Manual 25
Application-Specific Preferences
Quiet Mode and Notifications
on page
29 • Quiet Mode Enabled check box
-Sound & Music
- Light Flasher
-Vibration check boxes
• Schedule Quiet Mode options
- Auto Silent every day from.... time drop-down menus
- Auto Silent all day check box and options: Weekdays,
Weekends
Security
on page 31 • Set your three-digit security code
• Display Luggage Tag check box and information pane
• Lock your SIM card and change SIM code buttons
Sleep Display
on page 33 • Sleep Now button
• Display Personal Sleep Message check box and message field
Application Preference Screen Configurable Items and Options
Web Browser Preferences
on page 36 • Home page URL setting pane
• Custom search engine in Go To pane selection list. Select
from: Google, Yahoo, MSN, AltaVista, Excite.
• Do not download images check box
• Clear History, Clear Cache, Clear Cookies buttons
Instant Messaging Preferences
on page
62 • Display offline buddies in list check box
• Auto-connect to messaging server check box
• Default notifications check boxes and options
Email Preferences
on page 71 • Save outgoing messages in Sent folder check box
• Accounts set-up screen. Use menu to define New Account,
Edit Account, Discard Account. Accounts are POP3.
• Folders set-up screen. Use menu to create New Folder, Edit
Folder, Discard Folder.
• Notifications screen. Use to set notification of new email
through ringtone, user interface, or beeps. Pop-up menu
shows sound options. You can listen to a selected sound by
using the sound preview button. In addition to Sound, you can
select Buzzer or Flasher check boxes.
Control Panel Screen Configurable Items and Options
Setting Your Preferences
February 12, 2002 T-Mobile Device Owner’s Manual 26
Controls Pane
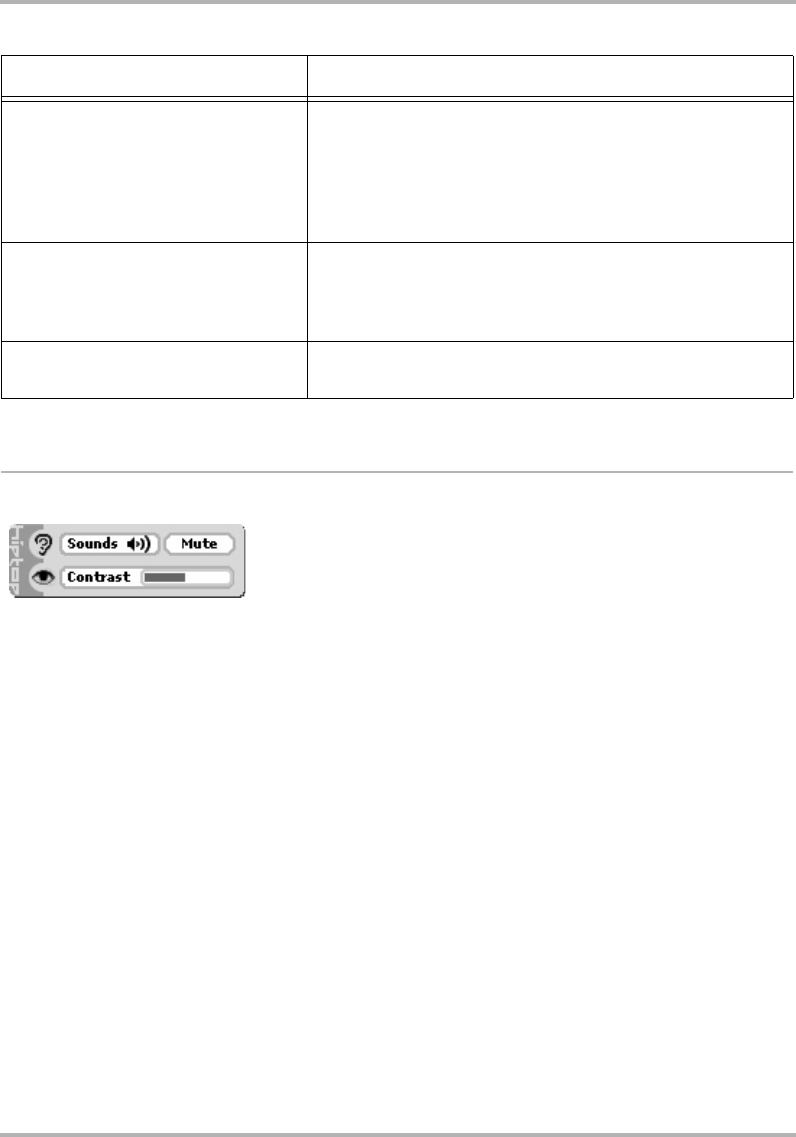
The Controls pane contains settings that you may want to open at any time, from any screen:
Open Controls
There are two ways you can open Controls:
•Method 1: Press the Menu and Back buttons together. The Controls pane opens. You can use this
method from any screen on any application at any time.
•Method 2: Press the Jump button to open the Jump screen. Press the Menu button to open the Jump
screen menu. Click Controls.
The Controls Pane
•Sounds volume slider - Adjust the volume of sound effects for new message notifications and games.
After highlighting and clicking the slider, rotate the wheel up to increase volume; rotate down to decrease
volume.
•Mute button - Quickly switch to quiet mode by clicking this button. Click again to “unmute”.
•Contrast slider - Adjust your screen image contrast to complement your current lighting environment.
Rotate the wheel to highlight the slider, then click to make it “editable”. Rotate the wheel up to increase
contrast, rotate down to decrease contrast.
Telephone Preferences
on page 45 • Call Forwarding set-up screen
• Total Call Time counter and Reset button
• Speed Dialing set-up screen
• Show My Phone Number screen
• Incoming Call Notification and Voice Mail Notification set-up
screens (same as Email notifications setup described above)
Address Book Preferences
on page 97 • Categories set-up screen. Use to create New Category, Edit
Category, or Discard Category.
• Labels set-up screen. Use to create New label, Edit Label, or
Discard Label.
Text Messages Preferences
on page 89 • Save outgoing messages in Sent folder check box
• Select a text message notification method
Application Preference Screen Configurable Items and Options
Setting Your Preferences
February 12, 2002 T-Mobile Device Owner’s Manual 27
AutoText
To help you type accurately, the AutoText screen includes rules that automatically correct common typing errors.
You can add to or discard rules that are included by default. To open the AutoText screen, do the following:
1From the Jump screen open the Control Panels, then click AutoText.
2If you want the first letter in new sentences to be capitalized automatically, select the Capitalize new
sentences check box to cause a check to appear in the box. Note that this check box is selected by default.
3If you want the replacement rules listed on the screen to be in effect, click the AutoReplace check box to
cause a check to appear in the box. Note that this check box is also checked by default.
4To discard any of the replacement rules, rotate the wheel to highlight the rule, then open the menu and click
Discard Rule [ ]. You are prompted to confirm that you really want to remove the rule. Click either
Cancel or Discard.
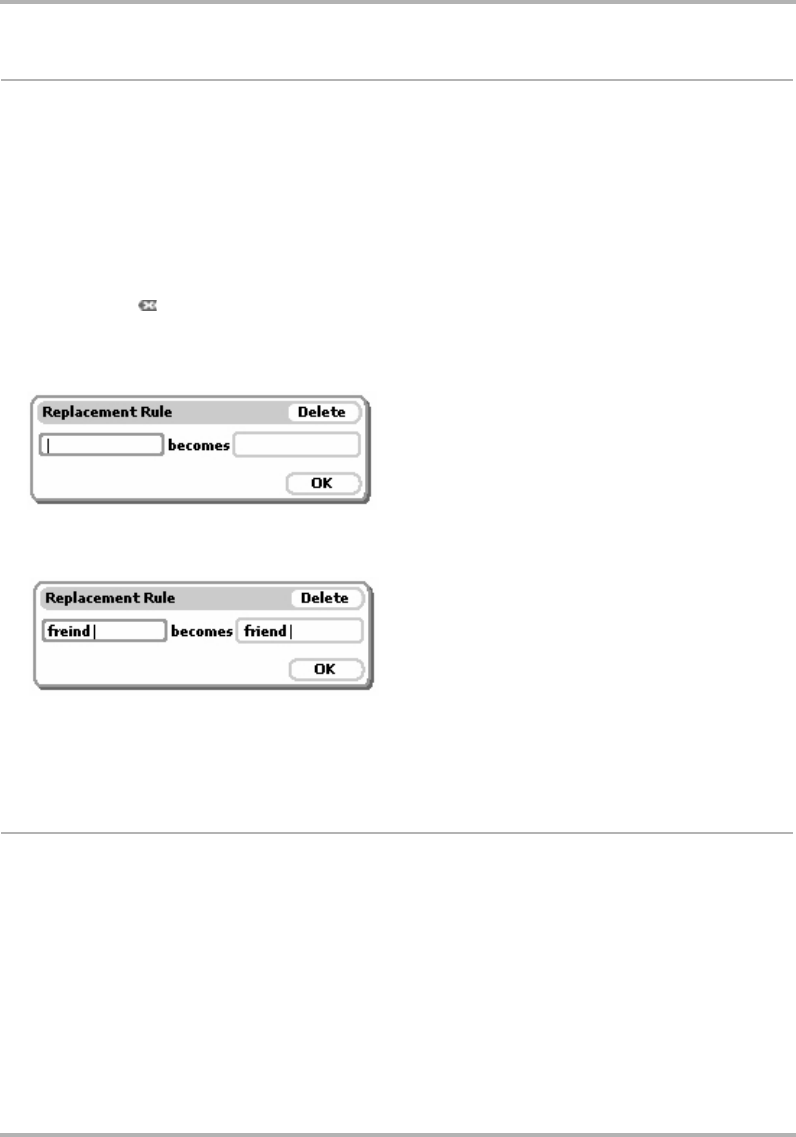
5To add a new replacement rule, open the menu and click Add Rule. The Replacement Rule dialog box
opens:
Type the word or phrase that you common misspell in the first text box, then type the correct spelling in the
second box. For example:
Click OK to save the replacement rule, or Discard if you don’t want to save it after all.
6To return all AutoText settings to those set when you first received your device, open the menu and click
Restore Defaults.
Date & Time
The device service knows the Coordinated Universal Time, or UTC. (Note that UTC is also known as Greenwich
Mean Time, or GMT.) UTC reflects the mean solar time along the Earth's prime meridian. The prime meridian is
arbitrarily based on the meridian that runs through the Greenwich Observatory outside of London, where the
present system originated.
To set your device time correctly, you must select your time zone:
1From the Jump screen open the Control Panels, then click Date & Time.
2From the Time Zone pop-up menu, highlight the time zone you want your device to reflect, then click.
Setting Your Preferences
February 12, 2002 T-Mobile Device Owner’s Manual 28
3If you are observing Daily Savings Time, select the I am currently observing Daylight Savings Time check
box.
4Once you leave the Date & Time screen, you settings are saved.
Override System Date & Time Settings
You can override the system-set date and time settings if you wish by doing the following:
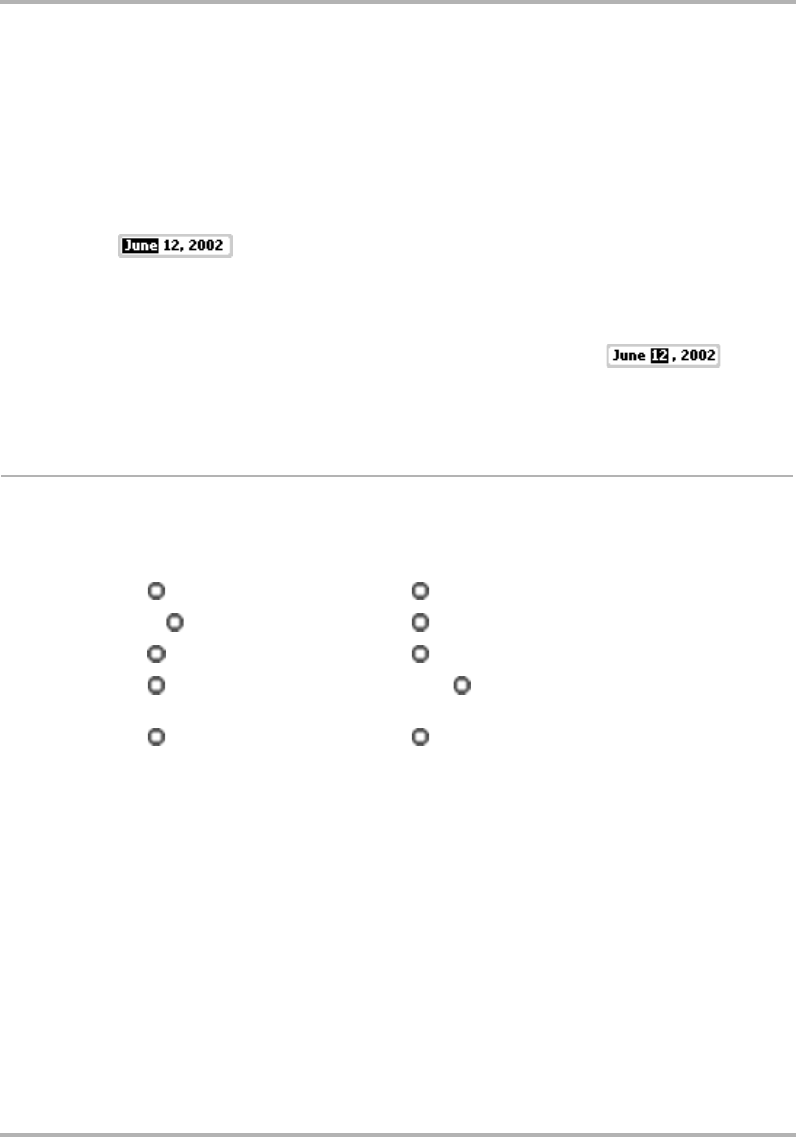
1Highlight either the date or time box then click the wheel to activate the selector. The first selectable field is
highlighted: .
2Scroll the wheel until you see:
• the correct month/day/year (for date), or
• hour/minutes/pm/am (for time).
3To select a value, click the wheel. The focus switches to the next selectable field: .
4Proceed until all fields are set as you wish.
5Press the Back button to save your settings.
Jump Shortcuts
You can always click the Jump button to return to the Jump screen, where you can then select one of the
applications. However, if you want to jump to a specific application quickly, you can set a shortcut key. Note that
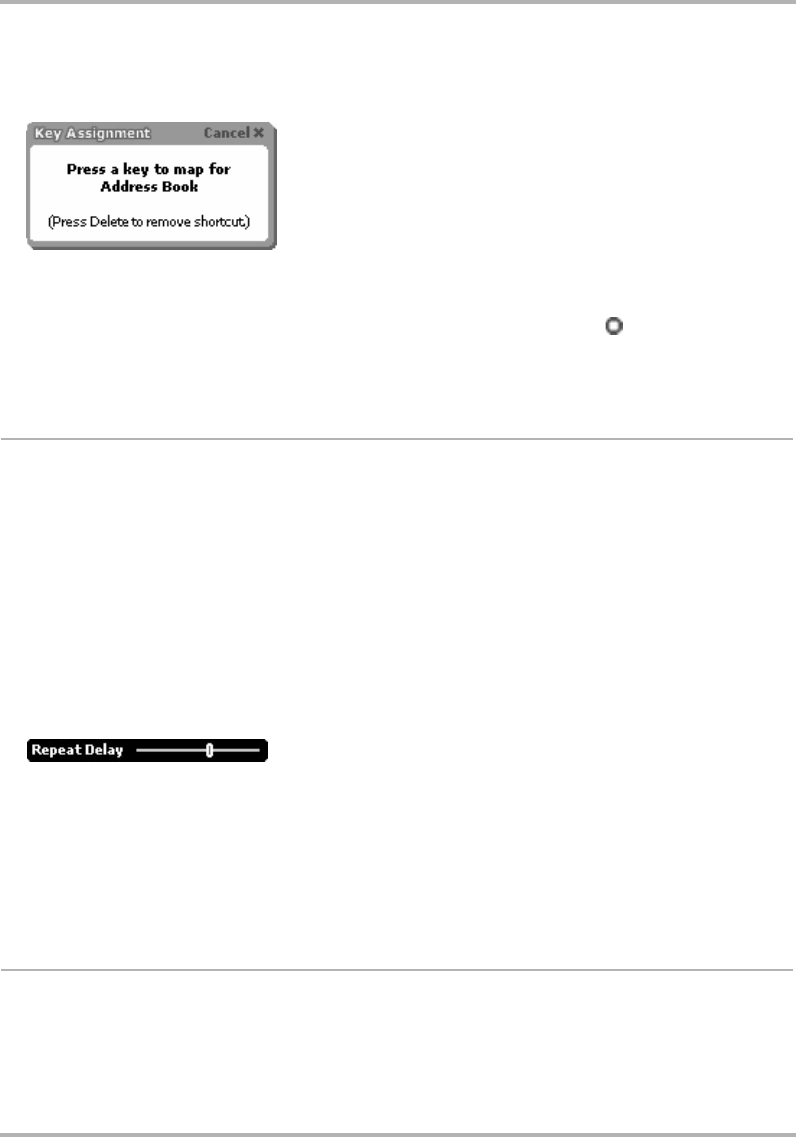
your device comes with the following shortcut keys pre-defined:
Change Preset Shortcuts
1From the main Control Panels screen click Jump Shortcuts.
Web Browser - + B Calendar - + C
Instant Messaging - + I To Do - + T
Email - + MNotes - + N
Phone - + P Text Messages (SMS) -
+ O
Address Book - + K Snapshots - + H
Setting Your Preferences
February 12, 2002 T-Mobile Device Owner’s Manual 29
2Scroll to highlight the application for which you want to create a jump shortcut, then click the wheel. The Key
Assignment dialog box appears. In the illustration below, Address Book was highlighted when the Key
Assignment dialog box was opened:
3Press the key you want to use to jump to the application you’ve highlighted. The Key Mapping dialog box
disappears and your shortcut is saved.
4To use the Jump Shortcuts, from any screen at any time, press the Jump button [ ] plus the shortcut key
to open that application.
5To delete a shortcut key mapping, scroll the wheel to highlight the application, then press the Delete key.
Keyboard & Wheel
You can set how your keyboard and wheel respond to your touch:
•Keyboard repeat delay - If you hold down a key long enough, it will start repeating in your text box. This
setting determines how long you must hold down a key before it starts repeating.
•Keyboard repeat rate - Once you’ve held down a key long enough so it starts repeating, this setting
determines how fast the key repeats.
•Wheel acceleration - Rotating the wheel up or down causes some pages to scroll up or down. This
setting allows you to specify how fast you want the wheel to accelerate while scrolling.
To set these preferences, do the following:
1From the main Control Panels screen click Keyboard & Wheel.
2You make the three settings described by using “sliders”. Scroll the wheel to highlight the slider you want
adjust, then click to be able to move the slider. A selected slider looks like the following:
3Rotate the wheel up to increase the setting; rotate the wheel down to decrease the setting. This means
that to:
• Increase the time you have to hold down a key before it starts to repeat, move the slider to the right.
• Increase how fast keys are repeated, once they start repeating, move the slider to the right.
• Increase how fast the wheel accelerates, move the slider to the right.
4The settings are saved as soon as you make them.
Quiet Mode and Notifications
In some situations, you may want you device to be “quiet” when notifying you of new messages or phone calls.
This is called “quiet mode”. You can also schedule regular times when you want your device to operate in quiet
mode. To make these settings, do the following:
Setting Your Preferences
February 12, 2002 T-Mobile Device Owner’s Manual 30
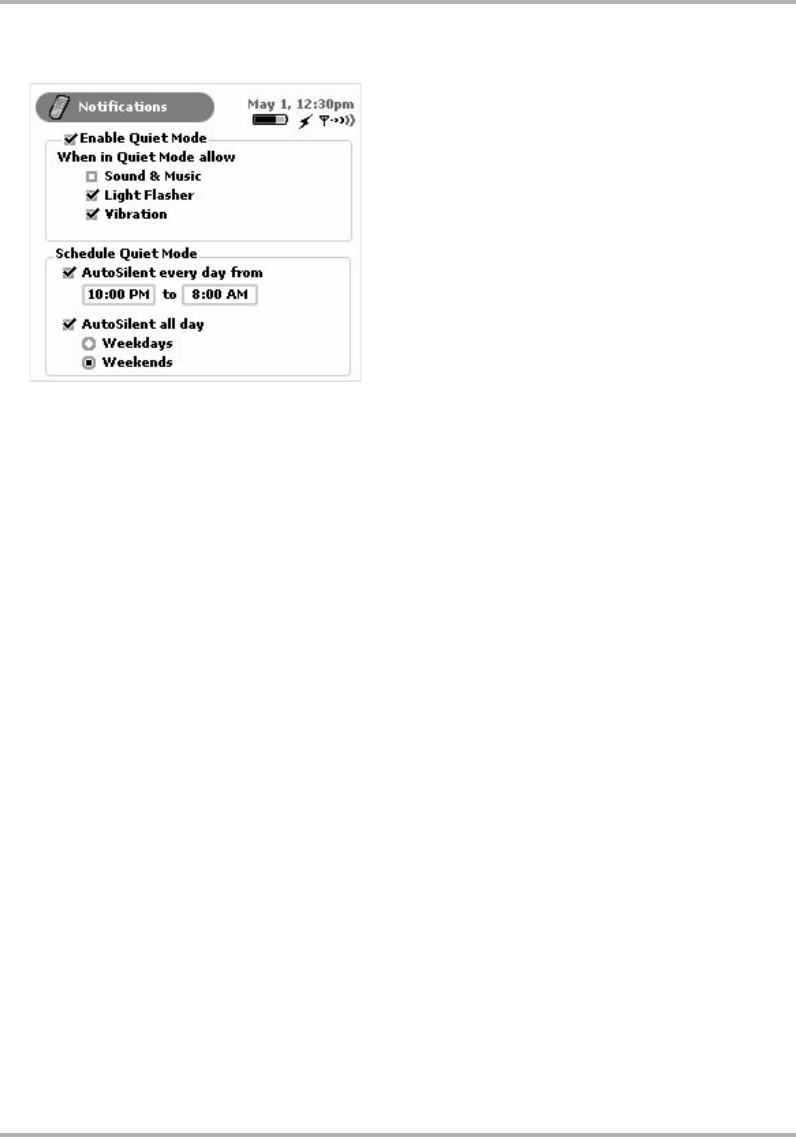
1From the main Control Panels screen click Notifications. The Notifications screen appears:
2To turn on quiet mode, select the Enable Quiet Mode check box so a check box appears in the box (as
illustrated above).
3Once you have turned on quiet mode, you can also decide if you want quiet notifications to include the light
flasher and/or vibration. By default, the Light Flasher and Vibration check boxes are selected. To clear
either of these selections, use the wheel to highlight the check box, then click the wheel to make the check
mark disappear.
4To have quiet mode turn on automatically at a regular time, select the AutoSilent every day from check
box. By default, quiet mode is scheduled from 10 pm to 8 am each day. If you want to adjust this time, use
the wheel: rotate to select the time box, then click to enable scrolling through time settings and the AM/PM
setting. Click the wheel when the time you want displays.
5You can also schedule quiet mode to turn on automatically on weekdays or weekends (all day). Select the
AutoSilent all day check box to enable this feature; then click either the Weekdays or Weekends option
button.
6Your settings are saved as soon as you make them.
Setting Your Preferences
February 12, 2002 T-Mobile Device Owner’s Manual 31
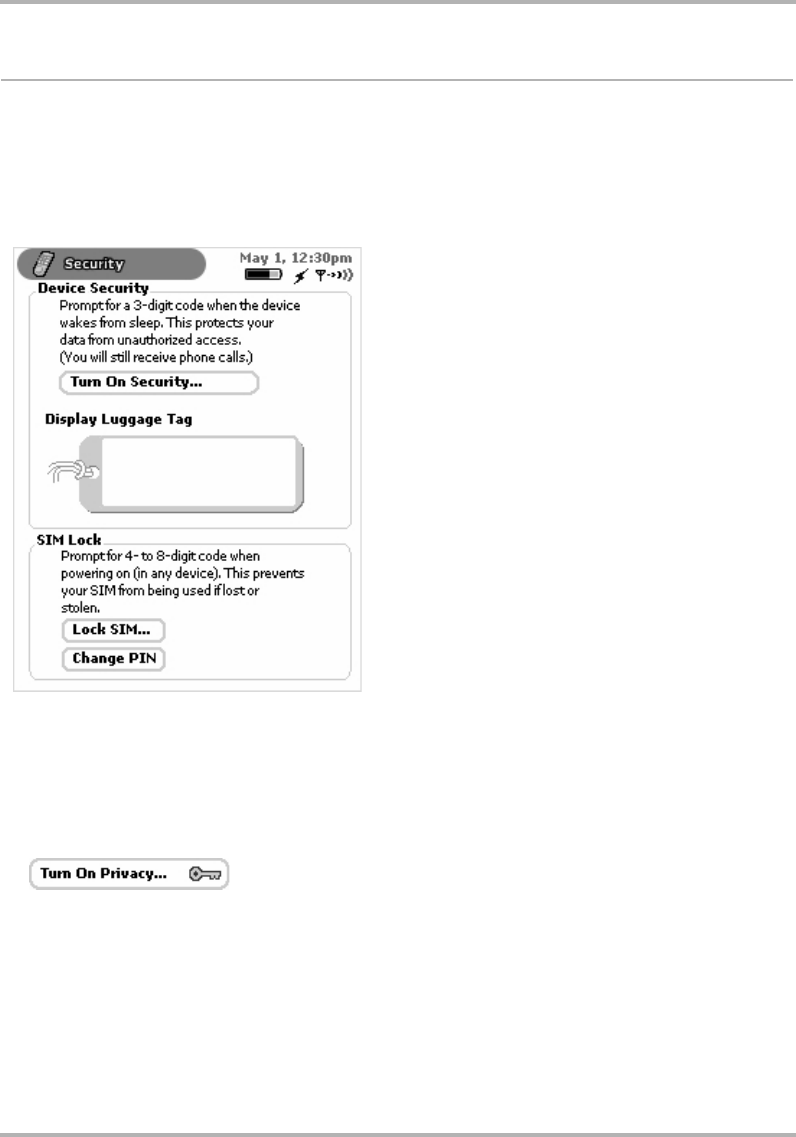
Security
The device’s security features allow you to do the following:
•
Turn On/Off Privacy Lock
•
Fill in Your Luggage Tag
•
Lock Your SIM Card
To view the security screen, from the main Control Panels screen click Security. The Security screen opens:
Each setting is described in more detail in the topics that follow.
Turn On/Off Privacy Lock
If you want to secure your device from unauthorized access once your device has gone into power-saving (sleep)
mode, you will first need to set up a security code using this screen.
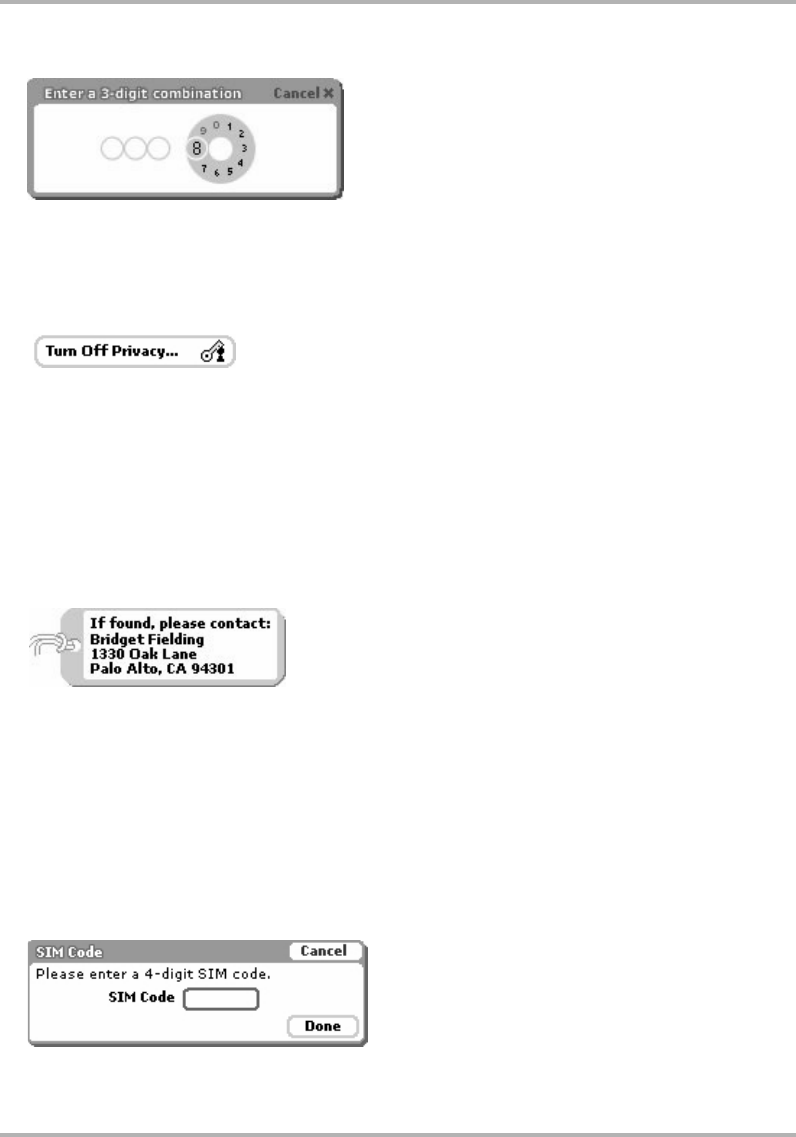
1From the Security screen, click Turn On Security...
The combination dialog box opens.
Setting Your Preferences
February 12, 2002 T-Mobile Device Owner’s Manual 32
2Type a three-digit code using the keyboard or the dial:
3At the prompt, retype the three digits to confirm.
4A “security enabled” message appears. Click OK.
5After reading the confirmation message, click OK.
6You are returned to the Security screen with the Turn Off Security... button active.
7If you want to turn off Security at any time, simply highlight then click this button.
8Type your three-digit code using the keyboard or dial.
9You are returned to the Security screen, where you can Turn On Security at any time.
Fill in Your Luggage Tag
Use your device’s Luggage Tag feature as a device identifier if someone types an incorrect security code when
attempting to wake your device from sleep mode. This is very handy if you lose your device and another person
tries to use your device. Fill in your Luggage Tag information by doing the following:
1From the Security screen scroll to the Display Luggage Tag section.
2Click the Luggage Tag text box and type identifying information about yourself, such as:
Note that you can only type four lines in your Luggage Tag.
3If, for some reason, you want to not display your Luggage Tag, delete the text in the Luggage Tag box.
Lock Your SIM Card
By locking your SIM card, you ensure that no one except yourself can use your device while your SIM card is in
place. Note that your SIM is installed with a default PIN, which T-Mobile assigns.
To lock your SIM, do the following:
1From the Security screen scroll to the SIM Lock section.
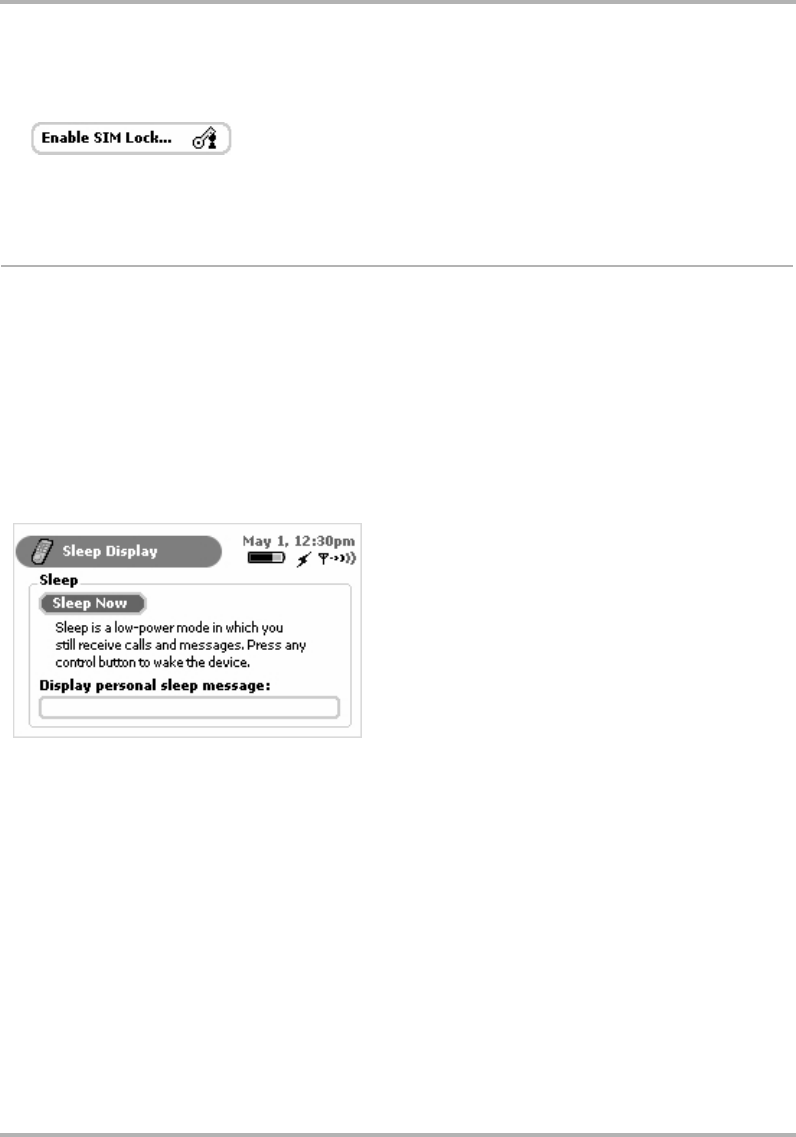
2Highlight and click the Enable SIM Lock... button. The SIM Code dialog box appears:
Setting Your Preferences
February 12, 2002 T-Mobile Device Owner’s Manual 33
3Type your PIN and click Done. Your SIM card is now locked. You will be prompted to type your SIM PIN
whenever your device wakes from sleep or is reset. To unlock your SIM card, from the Security screen, click
the Unlock SIM... button:
The Unlock SIM dialog box appears.
4Type your PIN, then click OK. Your SIM card is unlocked.
Sleep Display
The device will go into sleep (or power-saving) mode after 10 minutes of inactivity, which automatically locks the
device if you have turned on device security. (Read more in
Turn On/Off Privacy Lock
on page 31.) If you haven’t
locked your device, to wake your device from sleep, simply press any of the control buttons (Menu, Jump, or
Back) or click/rotate the wheel.
Set Personalized Sleep Message
You can set a personalized message that will appear on the screen while the device is asleep. To set this
message, do the following:
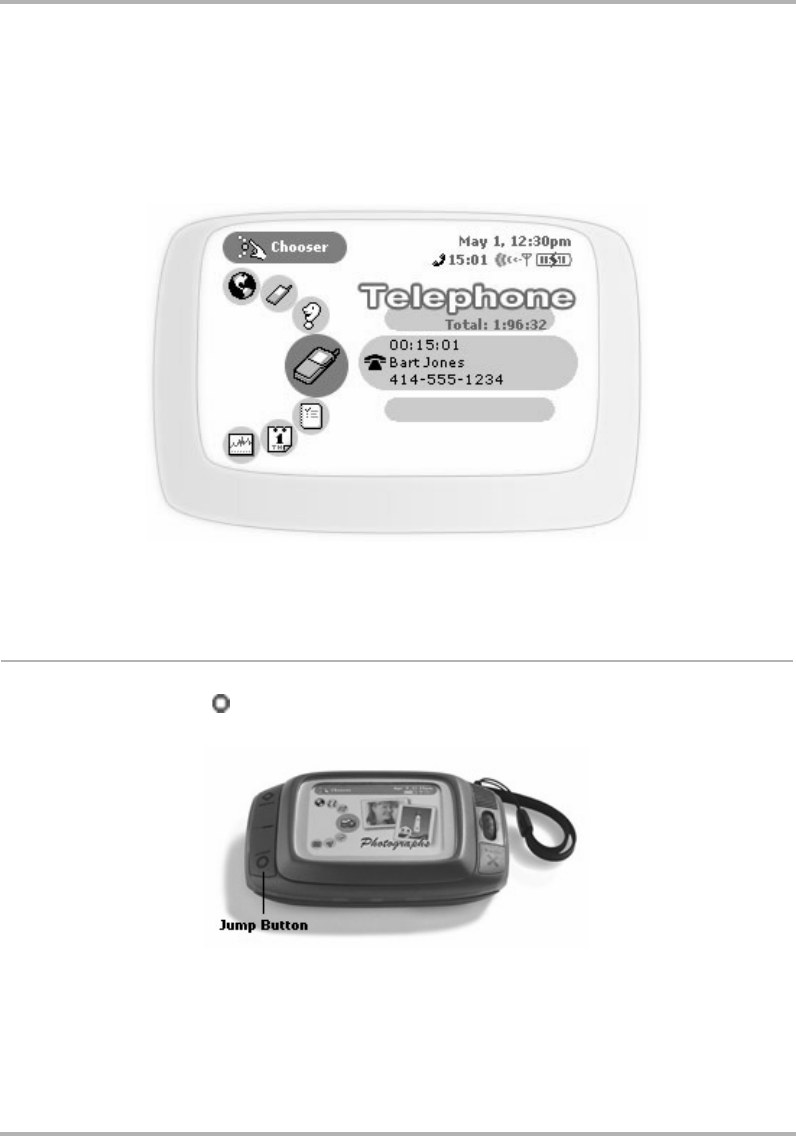
1From the main Control Panels screen click Sleep Display. The Sleep Display screen opens:
2Scroll to highlight the Display personal sleep message text box and type your sleep message. Your
message must fit on one line, which is approximately 20-30 characters.
3Your settings are saved as soon as you make them.
4To remove your message, simply delete the text from the Personal Sleep Message box.
Key Guard Your Device
To put your device into power-saving mode (key guard), on command, do the following:
1From the Sleep Display screen, highlight then click the Sleep Now button. Alternatively, from any screen
press and hold the Jump button for at least two seconds.
2Your device is immediately put to sleep and the keyboard is locked. (The latter is only true if you have set a
security code as described in
Turn On/Off Privacy Lock
on page 31.)
Tip: To wake your device from sleep, simply click any two control buttons simultaneously, or open the display lid.
The Jump Screen
February 12, 2002 T-Mobile Device Owner’s Manual 34
5. The Jump Screen
The Jump screen is a view that displays all the applications you can use on your device in a “wheel” of icons. You
use the Jump screen by rotating the wheel through the applications until the application you want to open is
highlighted. Then click to open the application. The Jump screen is illustrated below, with the Telephone
application highlighted:
Each application has a “preview screen” that displays to the right of the Jump screen wheel of applications. Read
more in
The T-Mobile Device Applications Preview Screens
on page 35.
How to Open the Jump Screen
Simply click the Jump button to view the Jump screen. You can “jump” to this view from any screen, in any
application, at any time, by pressing the Jump button.
The Jump Screen
February 12, 2002 T-Mobile Device Owner’s Manual 35
The T-Mobile Device Applications Preview Screens
As you view the Jump screen and scroll through each application using the wheel, the preview screen applicable
to that application highlighted displays to the right of the Jump screen wheel.
Some preview screens contain application status information. For example, in the illustration of the Jump screen
above, the Telephone preview screen shows the device owner that she has one voice mail message.
Jump preview screens with timely user information are described in more detail in the following topics:
•
Telephone Preview Screen
on page 44
•
Instant Messaging Preview Screen
on page 59
•
The Email Preview Screen
on page 71
•
Text Messages Preview Screen
on page 89
How to Select a T-Mobile Device Application
1Press the Jump button to open the Jump screen.
2Rotate the wheel to scroll through the applications. Stop when the application you want to use is highlighted.
3Click the wheel to open the application.
The Jump Screen Menu
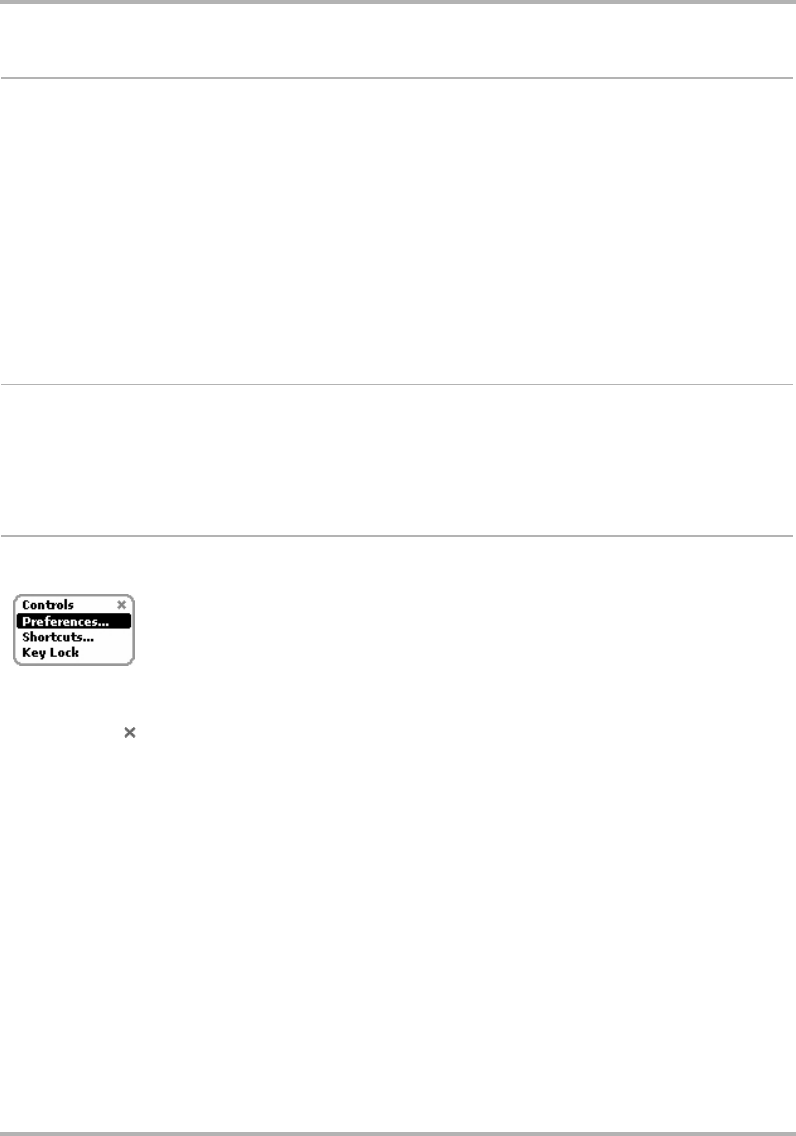
While on the Jump screen, press the Menu button to open the Jump screen menu:
Here’s what you can do from this menu:
•Controls [ ] - Opens the Controls pane. Read more in
Controls Pane
on page 26.
•Preferences... - Opens the Preferences screen, from which you can make device-wide settings. Read
more in
4. Setting Your Preferences
on page 24.
•Shortcuts... - Opens a series of help screens.
•Key Guard - Puts your device into power-saving mode and locks the keys if you have set a Privacy Code.
Read more in
Turn On/Off Privacy Lock
on page 31.
Browsing the Internet
February 12, 2002 T-Mobile Device Owner’s Manual 36
6. Browsing the Internet
Get away from it all and still browse the Internet! You’ll love the Web Browser application on your T-Mobile
Device. To learn how to take advantage of all your T-Mobile Device Browser features, read the topics in this
chapter:
Web Browser Preferences
To open the Web Browser Preferences screen:
1From the Jump screen click Web Browser.
2Open the menu and click Preferences...
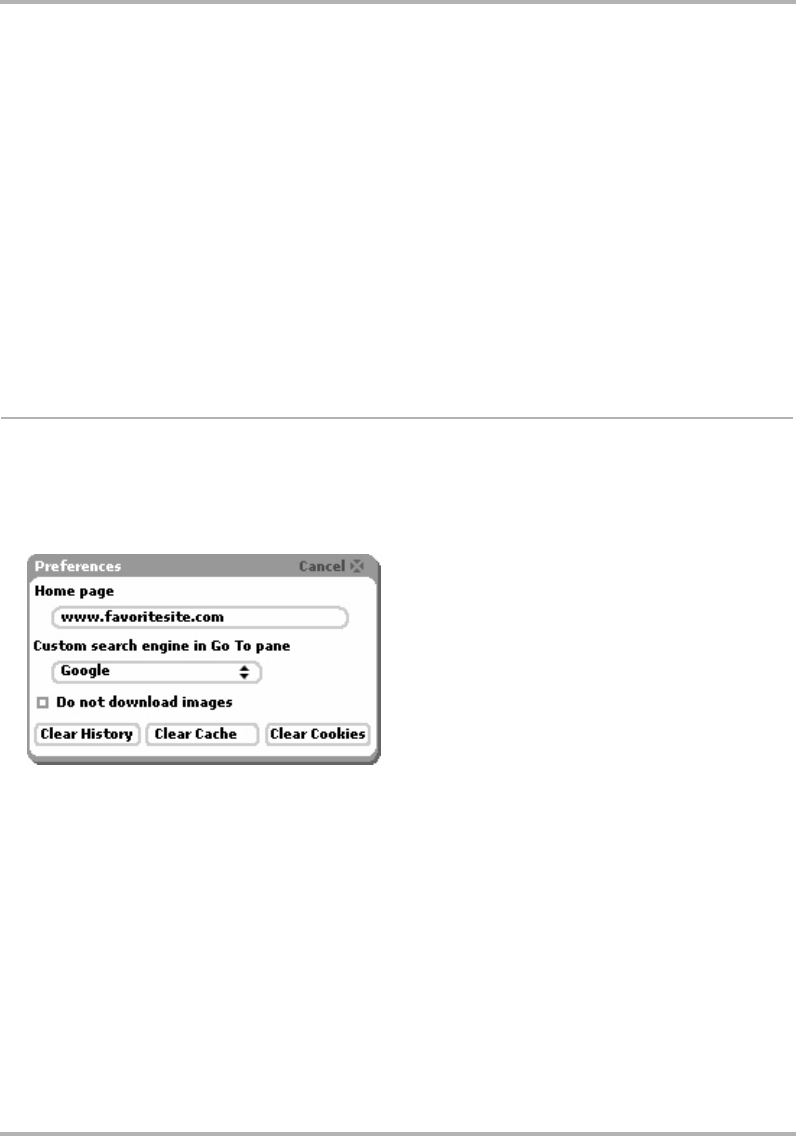
3The Preferences screen opens:
From this main Preferences screen you can:
•
Set Your Home Page
•
Set Your Search Engine
•
Specify to Not Download Images
•
Clear History
•
Clear Cache
•
Clear Cookies
•
Web Browser Preferences
on page 36
•
Status Indicators
on page 38
•
Keyboard Shortcuts
on page 38
•
Navigation/View Shortcuts
on page 39
•
Go To a Web Page
on page 39
•
Go to Your Home Page
on page 40
•
Search the Web
on page 40
•
Use Bookmarks
on page 40
•
See Recently-Viewed Web Pages
on page 42
•
View History
on page 42
•
Refresh a Web Page
on page 43
•
Stop a Web Page from Loading
on page 43

Browsing the Internet
February 12, 2002 T-Mobile Device Owner’s Manual 37
Set Your Home Page
To set your Web home page (the page you want the browser to open by default):
1Open the Web Browser Preferences screen.
2Scroll to the Home Page text field.
3Type the URL of your preferred home page.
4Scroll to OK, then click to set.
Set Your Search Engine
To set the search engine you want to use by default:
1Open the Web Browser Preferences screen.
2Scroll to the Custom search engine in Go To pane field.
3Click the wheel to open the list of options.
4Scroll to your preferred search engine and click the wheel to select it.
5Click the Back button to save your settings.
Specify to Not Download Images
By default, the Web Browser will download Web images to your device. If you do not want to have images
downloaded to your device (it can take a while), do the following:
1Open the Web Browser Preferences screen.
2Scroll to highlight the Do not download images check box.
3Click the wheel to add a check mark to the box. Now images will not be downloaded.
4To start having images download again, select the check box again so the check mark is removed from the
box.
Clear History
History contains a chronological list of Web pages you have visited (up to 100). To remove all Web pages from
the list, click the Clear History button.
Clear Cache
The device cache stores temporary Internet files such as Web pages and files (such as graphics). This speeds up
the display of pages you frequently visit or have already seen because Internet Explorer can open them from
your device memory rather than the Web. To clear your cache, click the Clear Cache button.
Clear Cookies
Many Web sites save information to your system (the Web proxy service in this case) so sites can “remember”
information you’ve entered (including which pages you’ve visited within their site) for future reference. This
information is stored in a small text file, called a cookie. Know that only the information you type while visiting a
Web site can be stored. Also, know that the presence of a cookie does not allow any external Web site access to
other information on your device. A Web site can only read the cookie that it created.
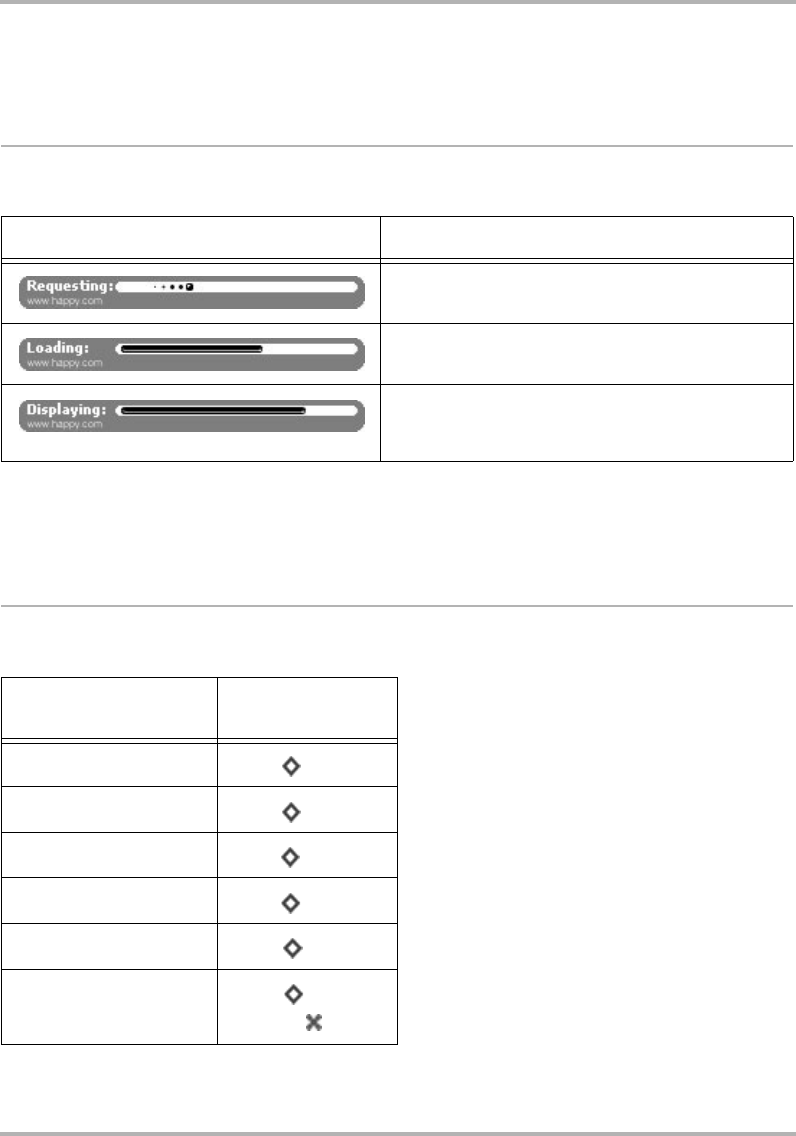
Browsing the Internet
February 12, 2002 T-Mobile Device Owner’s Manual 38
If you want to delete all the cookies stored for your account on the Web proxy service database, click the Clear
Cookies button.
Status Indicators
When a Web page is being loaded, you will see (at the bottom of your screen), the following status indicators:
If a Web page is longer than your display, you will see a vertical scroll bar along the right of your screen. Use the
wheel to scroll down the page, or use the shortcuts described in
Navigation/View Shortcuts
below.
Keyboard Shortcuts
While you’re in the Web Browser, you can use the following shortcuts for Menu items:
This indicator Means
The remote server is being contacted for the page you
requested.
The page you requested is being downloaded from the
remote server onto the service.
The page you requested is being displayed to the
device. You may not see this indicator if the Web page
displays quickly.
To open this menu
option Use this
shortcut
View Bookmarks + B
Add Bookmark... + A
Go To + O
Home Page + H
History + I
Stop Loading + .
or
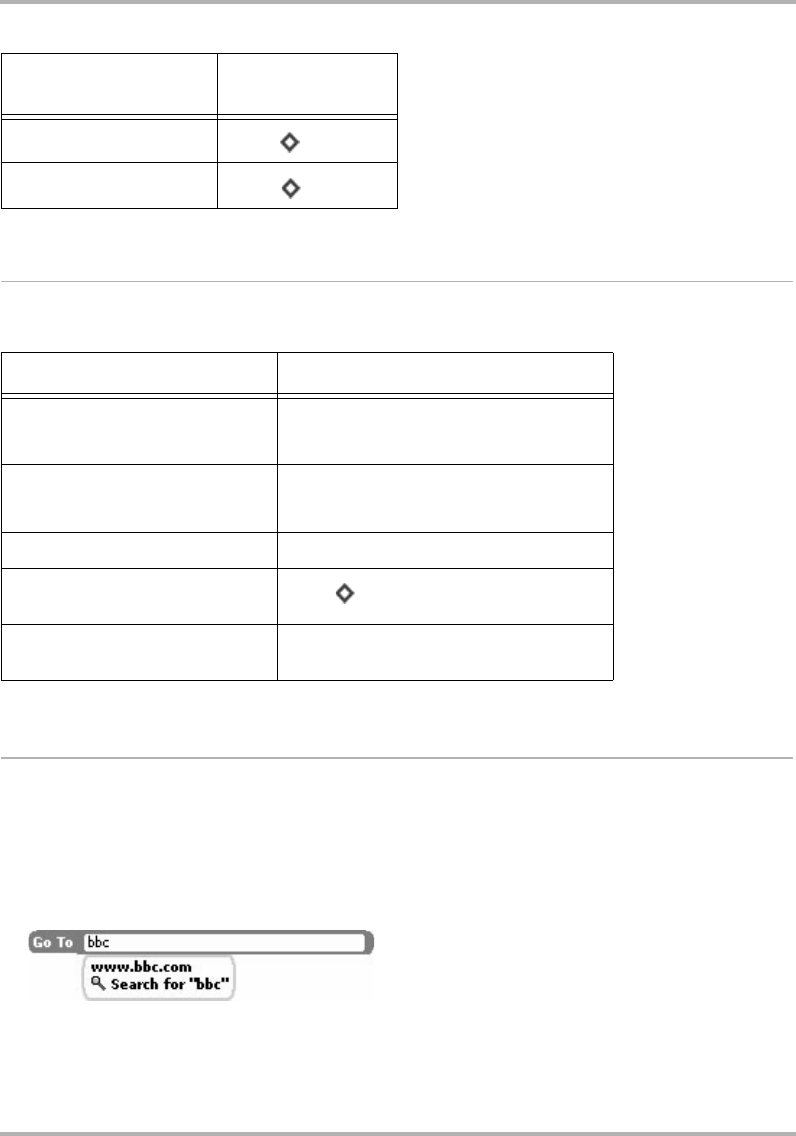
Browsing the Internet
February 12, 2002 T-Mobile Device Owner’s Manual 39
Navigation/View Shortcuts
You can use the following shortcuts to navigate or change your view when using the Web Browser:
Go To a Web Page
To open any Web page, first click Web Browser from the Jump screen, then:
1Start typing the address (URL) of the Web page you want to visit. The Go To pane opens automatically,
showing the address you are typing. Note! You do not need to type the “www.” or “.com” portion of the Web
address. You can also open the Go To pane from the Web Browser menu.
2Possible matches, based on what you’ve typed in this Go To pane previously, plus the Search pane appear
below the Go To text box:
Mail This URL + M
Refresh + R
To make this happen Do this
Scroll down a page Press down arrow on D-pad,
or
Rotate wheel toward you
Scroll up a page Press up key on D-pad,
or
Rotate wheel away from you
Open Recent Pages pane Press and hold the Back button
Toggle to full screen (hide status
indicators) Press + Shift + T
Go Back to previously-viewed Web
page Press the Back button
To open this menu
option Use this
shortcut
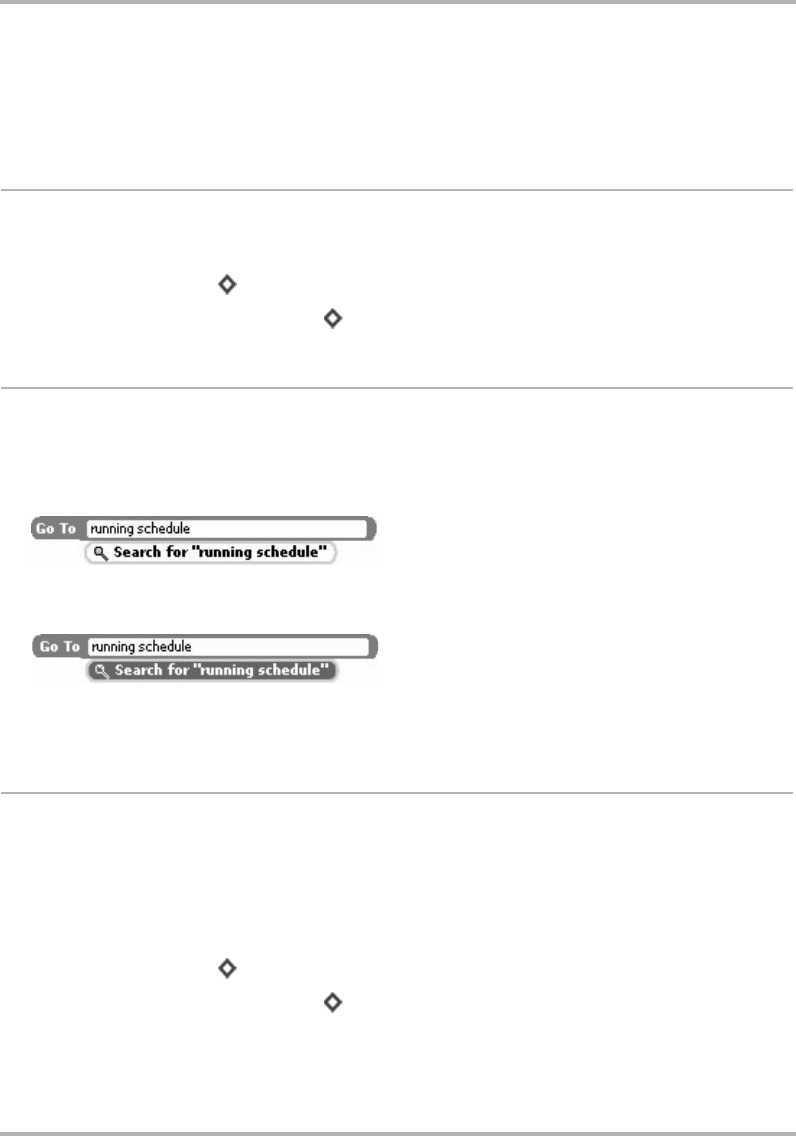
Browsing the Internet
February 12, 2002 T-Mobile Device Owner’s Manual 40
3Use the wheel to select a choice. If you click the wheel, you will be taken directly to the URL selected.
However, if you want to paste the URL in the Go To pane then edit it, hold the Shift key down while you click
the wheel. The URL is pasted in the Go To pane and you can edit the text.
4When ready, click the wheel to open the URL displayed in the Go To pane.
Go to Your Home Page
Your home page is set in the Web Browser Preferences screen as described in
Set Your Home Page
on page 37.
You can go to your home page in either of two ways while in the Web Browser:
• Press the Menu button ( ) to open the Web Browser menu. Scroll to highlight Home Page, then click.
• Use the keyboard shortcut by pressing + H.
Search the Web
To search the Web for keywords, first click Web Browser from the Jump screen, then:
1Start typing the word(s) you want to include in the search. The Go To pane opens automatically, showing the
word(s) you are typing.
2The Search pane appears directly below the word(s) you are typing:
When you are finished typing your search words, use the wheel to scroll down to highlight the Search pane
(the Search pane will appear as shown below), then click.
3Your Web search is then conducted by the search engine you have specified in
Set Your Search Engine
on
page 37. Your search results display. Scroll to the result you want to follow and click.
Use Bookmarks
A
bookmark
is a saved link to a Web page that has been added to a list of saved links. When you are looking at
a particular Web page and want the ability to get back to it later quickly, create a bookmark for it.
View Bookmarks
While in the Web Browser, you can see the bookmarks you have already set by doing either of the following:
• Press the Menu button ( ) to open the Web Browser menu. Scroll to click View Bookmarks, then click.
• Use the keyboard shortcut by pressing + B.
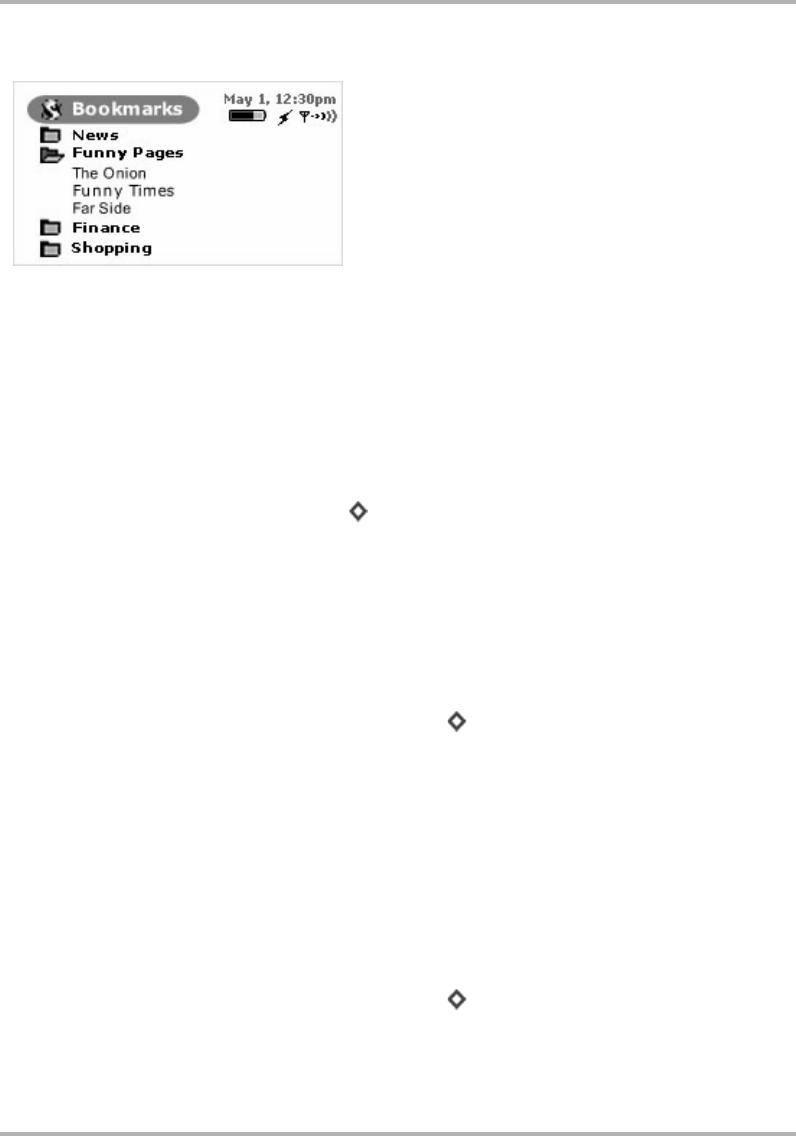
Browsing the Internet
February 12, 2002 T-Mobile Device Owner’s Manual 41
The Bookmarks screen looks like the following:
Notice you can create folders to organize your bookmarks. You can “expand” or “collapse” the bookmarks
contained within a given folder by highlighting the folder and clicking the wheel. Click to expand the list, click
again to collapse the list.
Read more about folders in
Add/Edit/Delete Bookmark Folders
on page 41.
Add Bookmarks
To add a bookmark to your list of bookmarks, do the following while in the Web Browser:
1Open the Web page you want to bookmark.
2Open the menu and click Add Bookmark... [+ A].
3The Add Bookmark screen opens with the Name and URL fields filled in. Use the Folder pop-up menu to
select the folder in which you want the bookmark to appear.
4When finished, click OK. Your bookmark is added.
Edit and Discard Bookmarks
You can change the address (URL), name, or folder of an existing bookmark, or discard a bookmark by doing the
following while in the Web Browser:
1Open the Web Browser menu and click View Bookmarks [+ B). The Bookmarks screen opens.
2Scroll to highlight the bookmark you wish to modify.
3Press the Menu button to open the Bookmarks menu, and then:
•To edit a bookmark name, click Edit Bookmark to open the Edit Bookmark pane. Change the bookmark
name, URL, or folder as you wish; then click OK.
•To discard a bookmark, click Discard Bookmark. You will be asked to confirm your action before the
bookmark is actually removed.
Add/Edit/Delete Bookmark Folders
You can organize your bookmarks into folders that you name. To add, edit, or delete a bookmark folder, do the
following from the Web Browser:
1Open the Web Browser menu and click View Bookmarks [+ B]. The Bookmarks screen opens.
2Scroll to highlight the folder you wish to modify. If you are adding a folder, don’t worry about what folder is
highlighted.
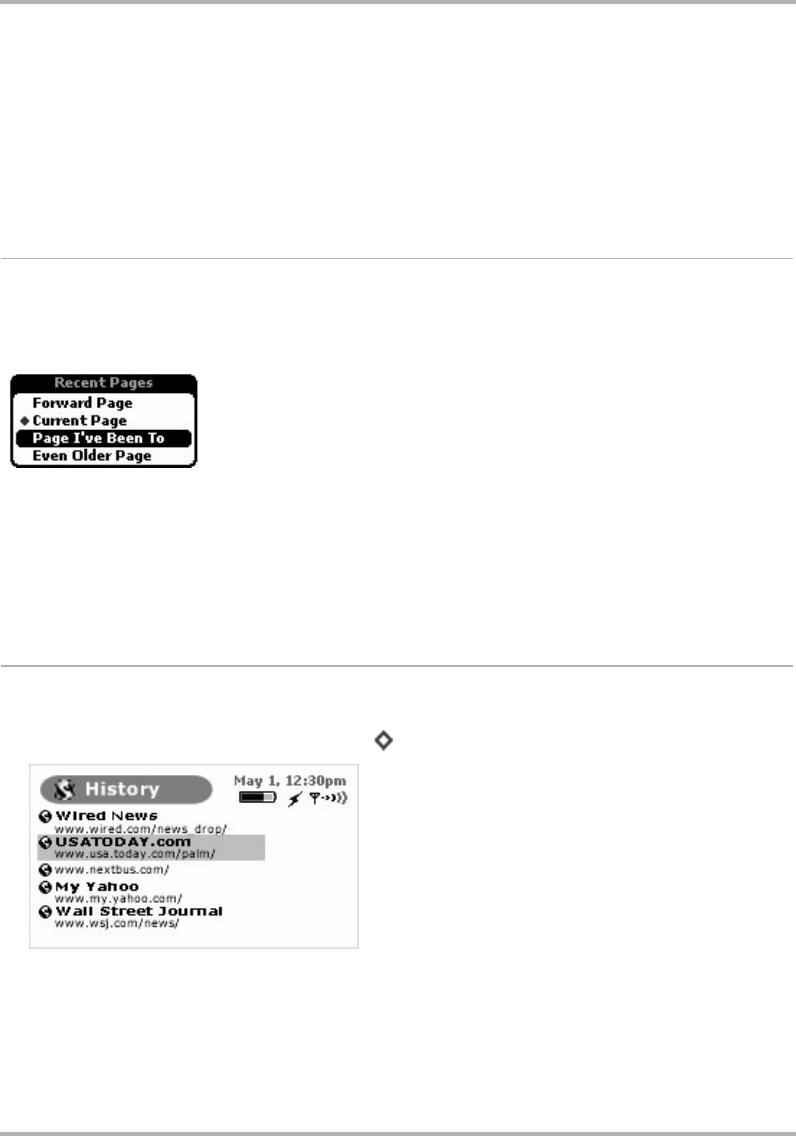
Browsing the Internet
February 12, 2002 T-Mobile Device Owner’s Manual 42
3Press the Menu button to open the Bookmarks Folders menu:
•To edit a folder name, click Edit Folder to open the Edit folder pane. Change the folder name as you
wish and click OK.
•To discard a folder, click Discard Folder. You will be asked to confirm your action before the folder is
discarded.
•To add a folder, click New Folder... The New Folder pane appears. Type the new folder name and click
OK.
See Recently-Viewed Web Pages
To see a list of Web pages that you have visited recently, relative to the page you are currently viewing, use the
Recent Pages screen: press and hold the Back button and the Recent Pages pane opens. Scroll to a page you
wish to return to, and click. Notice that the page you are currently viewing is marked with a diamond and its
listing is positioned relative to where you’ve been:
By using Recent Pages, you can easily navigate forward and backward among pages you’ve visited.
You can also open the Recent Pages pane by using the Web Browser menu:
1Open the Web Browser menu and click Recent Pages. The Recent Pages pane opens.
2The page you are viewing is marked with a bullet. Scroll to highlight the Web page you want to open, then
click.
View History
To see a chronological list of Web pages you have visited (up to 100), open the History screen:
1Open the Web Browser menu and click History [+ I]. The History screen opens:
2To return to any of the pages listed, simply scroll to highlight the URL and click.

Browsing the Internet
February 12, 2002 T-Mobile Device Owner’s Manual 43
Refresh a Web Page
You can refresh (reload from the originating server) the Web page you are currently viewing in either of two
ways:
• Press the Menu button ( ) to open the Web Browser menu. Scroll to highlight Refresh, then click.
• Use the keyboard shortcut by pressing + R.
Stop a Web Page from Loading
You can stop a Web page from loading in either of two ways:
• Press the Menu button ( ) to open the Web Browser menu. Scroll to highlight Stop Loading, then click.
• Use the keyboard shortcut by pressing + . (that’s a period).
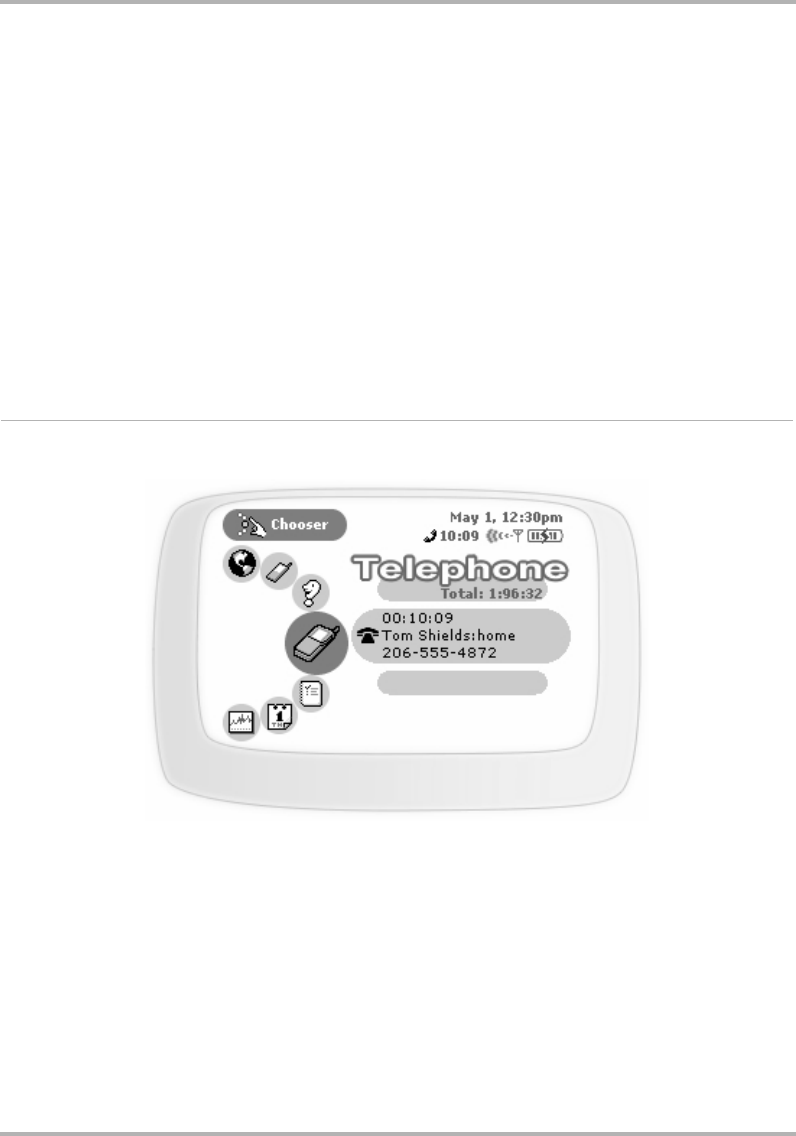
Making Telephone Calls
February 12, 2002 T-Mobile Device Owner’s Manual 44
7. Making Telephone Calls
Your hiptop’s Telephone application has many unique features that will make it easier than ever to stay
connected! Read the topics in this chapter to learn how to take advantage of all the application has to offer:
Telephone Preview Screen
From the Jump screen, with Telephone highlighted, you will see a preview screen similar to the following:
The preview screen lists your active calls (if you have any), the time elapsed in each active call, and the phone
number (assuming the caller doesn’t have Caller ID blocked). You can also see the total talk time elapsed since
you last reset the counter (read more in
Total Call Timer and Reset
on page 45).
•
Telephone Preview Screen
on page 44
•
Telephone Preferences
on page 45
•
Telephone Keyboard Shortcuts
on page 47
•
Title Bar Indicators
on page 48
•
Manage Your Speed Dial List
on page 48
•
Headset or Handset?
on page 50
•
Adjusting Volume
on page 50
•
Place a Call
on page 50
•
Features While on a Call
on page 53
•
Answer a Call
on page 55
•
End a Call
on page 55
•
Your Call Log
on page 56
•
Listen to Voice Mail
on page 58
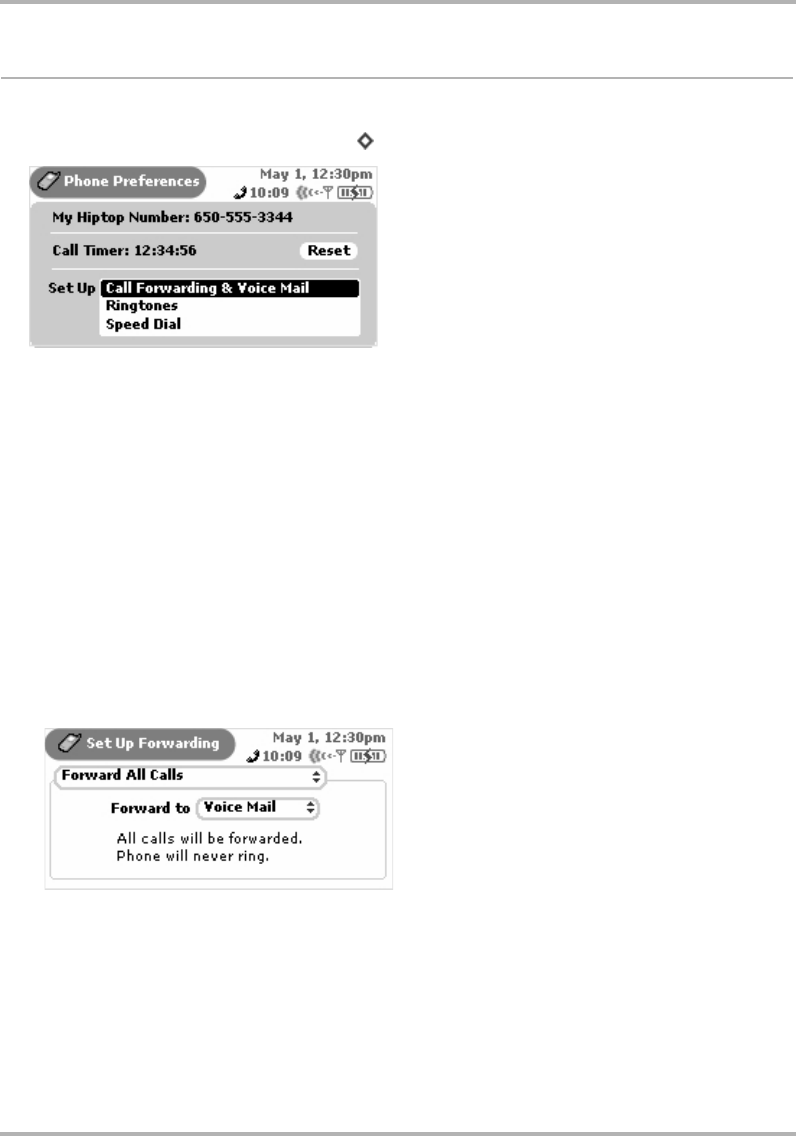
Making Telephone Calls
February 12, 2002 T-Mobile Device Owner’s Manual 45
Telephone Preferences
You can set a variety of things from your Telephone Preferences screen. Open the Telephone Preferences screen
by opening the menu and clicking Preferences... +P.
My Device Phone Number
Just in case you forget your device phone number, it’s shown on this screen.
Total Call Timer and Reset
If you are keeping track of your calling time and need to reset the time to zero, click the Reset button.
SetUpCallForwarding&VoiceMail
If you don’t want to answer your phone for some reason, and want the call to forward to another number (voice
mail or somewhere else), you set this up from the Telephone Preferences screen:
1On the Telephone Preferences screen, in the Set Up section, highlight then click Call Forwarding & Voice
Mail. The Set Up Forwarding screen opens.
2You have three forwarding options:
•Default Voice Mail Forwarding
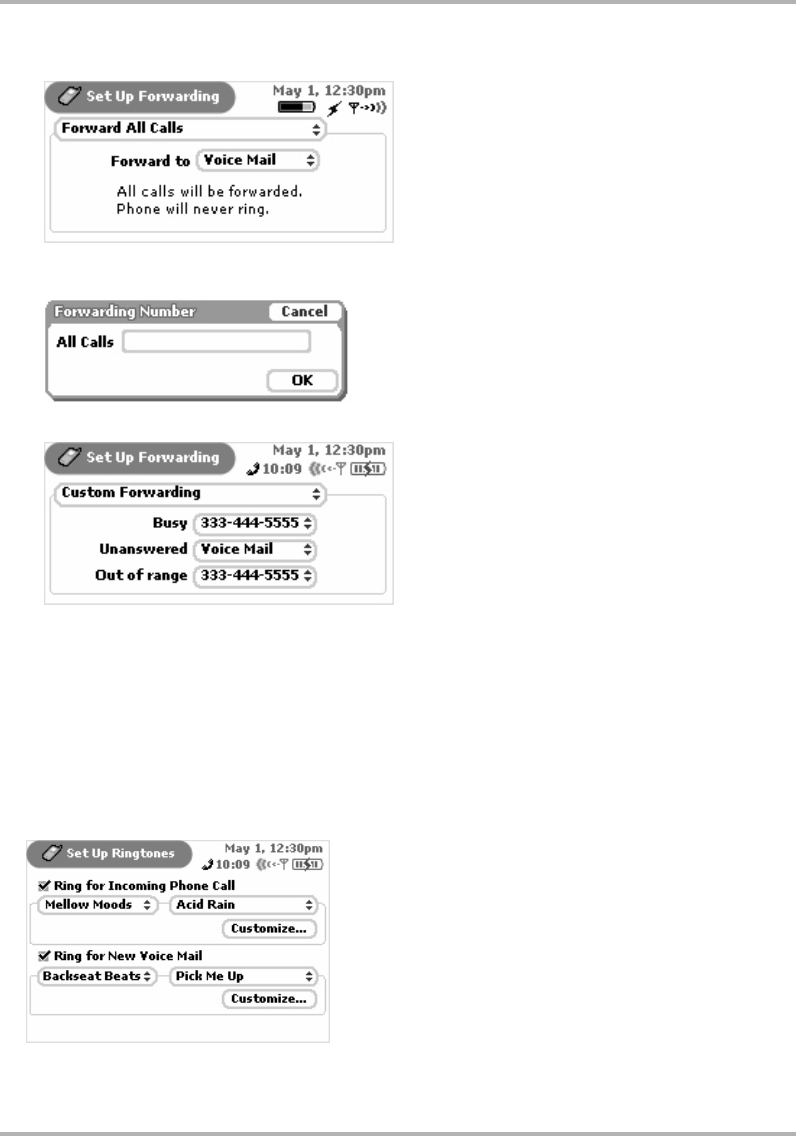
Making Telephone Calls
February 12, 2002 T-Mobile Device Owner’s Manual 46
•Forward All Calls
You can choose to forward to Voice Mail, Current Number (if not Voice Mail), or Other... If you click
Other..., then a dialog box opens, in which you must type the other number:
•Custom Forwarding
For each call situation (Busy, Unanswered, or Out-of-Range), you can select a forwarding number.
Again, you can choose from Voice Mail, Current Number (if not Voice Mail), or Other... If you click
Other..., then a dialog box opens, in which you must type the other number.
Set Up Ringtones
You can set up your device so that you’re notified of an incoming call or new voice mail by a ringtone you select.
You do this from the Telephone Preferences screen:
1On the Telephone Preferences screen, in the Set Up section, highlight then click Ringtones. The Set Up
Ringtones screen opens:
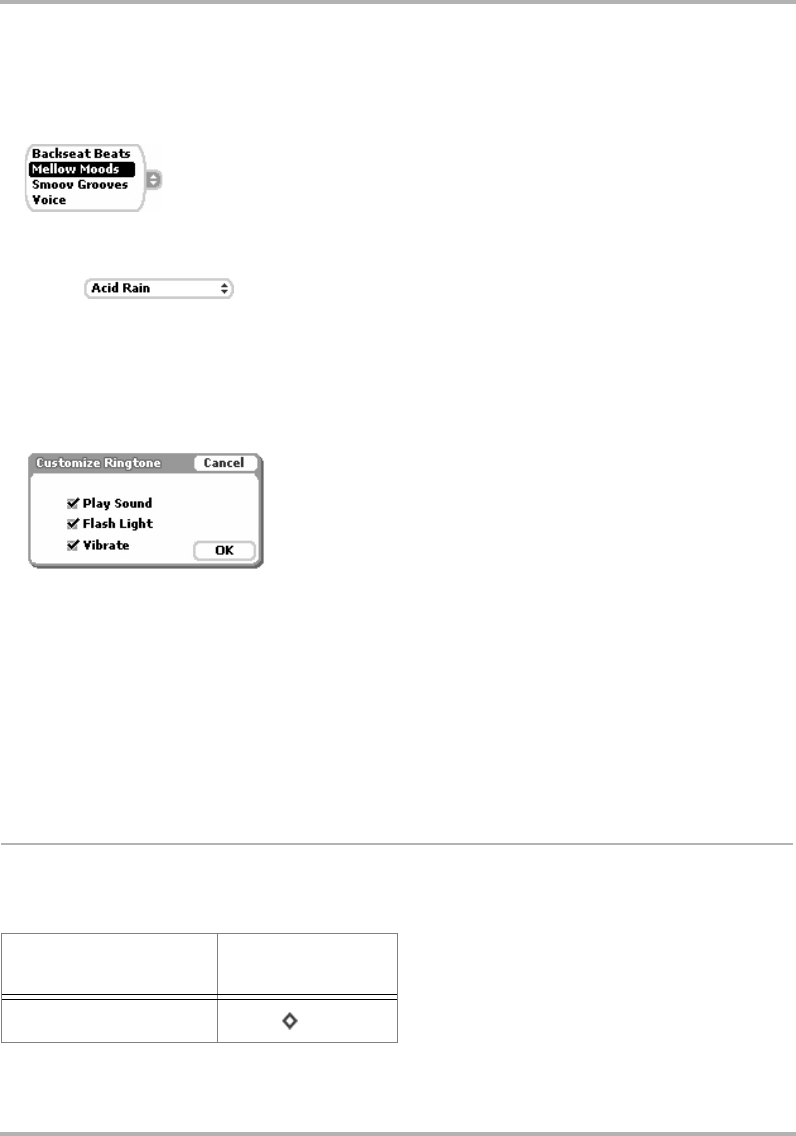
Making Telephone Calls
February 12, 2002 T-Mobile Device Owner’s Manual 47
2If you do not want a to be notified of a new incoming call or voice mail, make sure the check boxes are clear.
If you do want to be notified, then select the appropriate check box.
3If you have selected a check box, then open the ringtone category pop-up menu by clicking the wheel. Select
from:
Note that your last or current category selection is highlighted.
4Depending on the category you’ve selected, you’ll be able to pick a “song” from the pop-up
menu: .
5You have three options for how you want a notification to behave:
• Play Sound
•Flash Light
•Vibrate
By default, all three options are selected. If you want to change this setting, click the Customize... button on
the Phone Preferences screen to open the Customize Ringtone dialog box:
Select or clear the check boxes as you wish, then click OK.
Read about downloading commercially available ringtones in
Receive Ringtones
on page 96.
Set Up Speed Dial
You can store up to eight speed dial numbers (#2 - #9). Shortcut #1 is permanently reserved for voice mail, and
#2 comes pre-assigned to T-Mobile Customer Support, which you can re-assign if you want.
You can add new or edit existing speed dial numbers from the Telephone Preferences > Speed Dial screen. Read
details in
Manage Your Speed Dial List
on page 48.
Telephone Keyboard Shortcuts
While you’re in the Telephone application, you can use the following shortcuts for menu items:
To open this menu
option Use this
shortcut
Add to Contacts + A
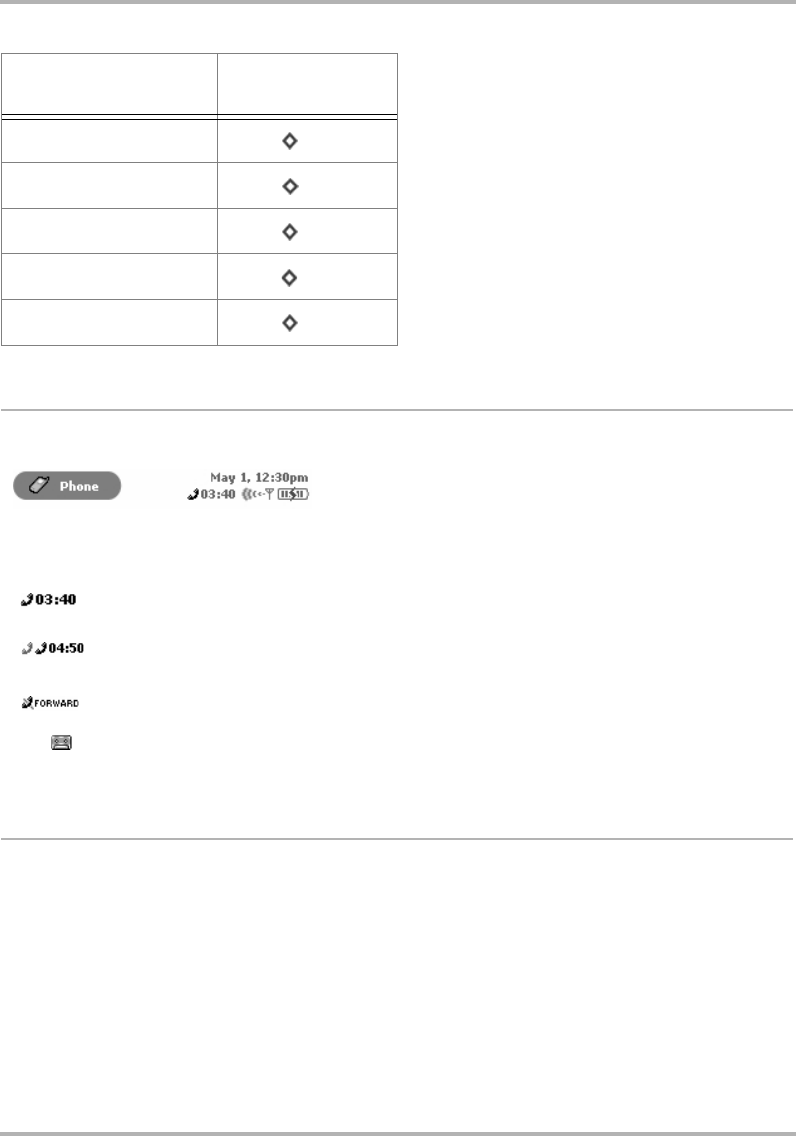
Making Telephone Calls
February 12, 2002 T-Mobile Device Owner’s Manual 48
Title Bar Indicators
Your device title bar will show you the status of your telephone application; for example:
The symbols shown above, plus others you might see at some time, are explained below:
Manage Your Speed Dial List
You can store up to eight speed dial numbers for easy dialing. Note that:
• Shortcut #1 is reserved for your Voice Mail Box number and cannot be reassigned.
• Shortcut #2 is pre-assigned to T-Mobile’s Customer Support number, but you can change this number.
Once you store a speed dial number, you can easily dial that number by pressing and holding the shortcut
number for at least two seconds. Very convenient!
You can add, edit, or delete speed dial numbers from the Preferences > Speed Dial screen or from the New
Speed Dial menu item. Details follow.
New Speed Dial... + S
Call Log + L
Preferences + P
New Call... + N
Conferences + C
You have one call active; time elapsed is 3 minutes, 40 seconds.
You have two calls in progress; the second call is shown dimmer than the first.
Time elapsed (4 minutes, 50 seconds) is shown for the first call only.
You have no calls in progress; call forwarding is turned on. You phone will not ring.
You have unheard voice mail!
To open this menu
option Use this
shortcut
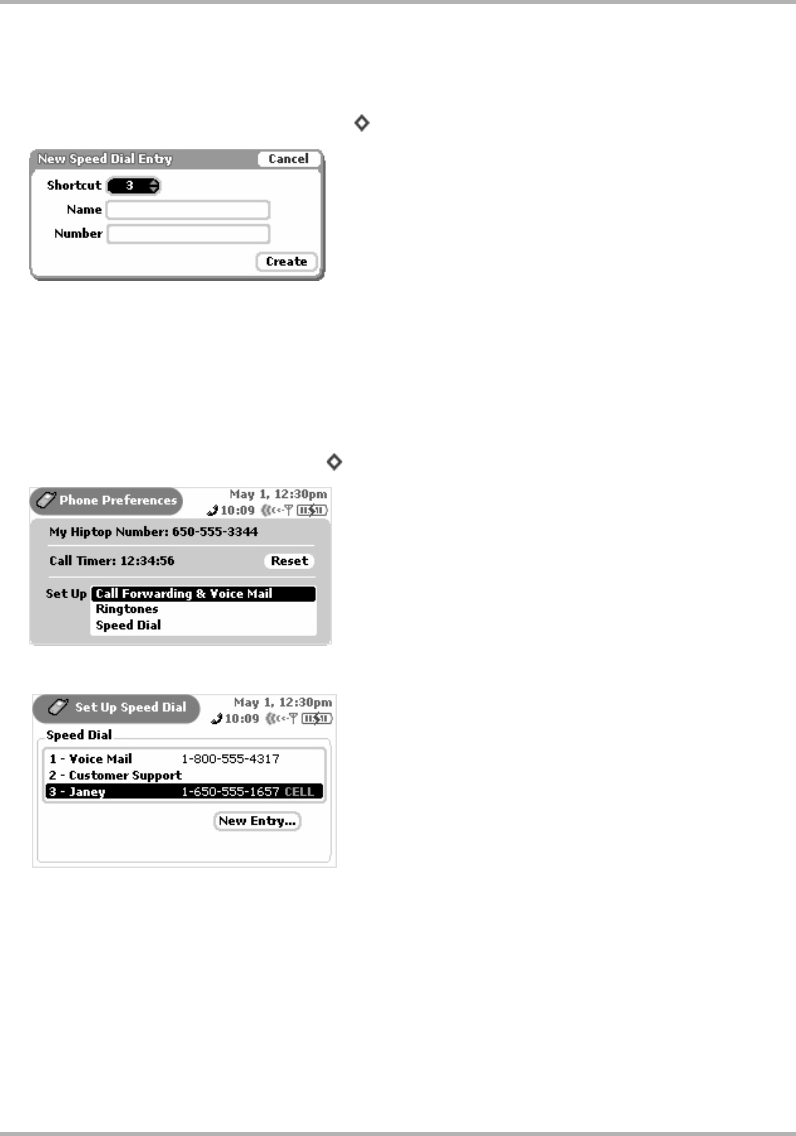
Making Telephone Calls
February 12, 2002 T-Mobile Device Owner’s Manual 49
Adding a Number to Your Speed Dial List
1From the Jump screen click Telephone.
2Open the menu and click New Speed Dial... [ +S]. The New Speed Dial Entry dialog box opens:
3The next-available shortcut number is selected by default in the pop-up menu. You can use this number or
any other number that isn’t already assigned.
4Type the Name and Number of the contact.
5Click Create. Your speed dial number is saved.
Editing an Existing Speed Dial Number
1Open the menu and click Preferences... [ +P]. The Phone Preferences screen appears:
2In the Set Up section, highlight then click Speed Dial. The Set Up Speed Dial screen appears:
3Use the wheel to highlight the entry you want to edit, then click. The Edit Speed Dial Entry screen appears.
Make your change to the shortcut number, name, or phone number.
4Click Done.
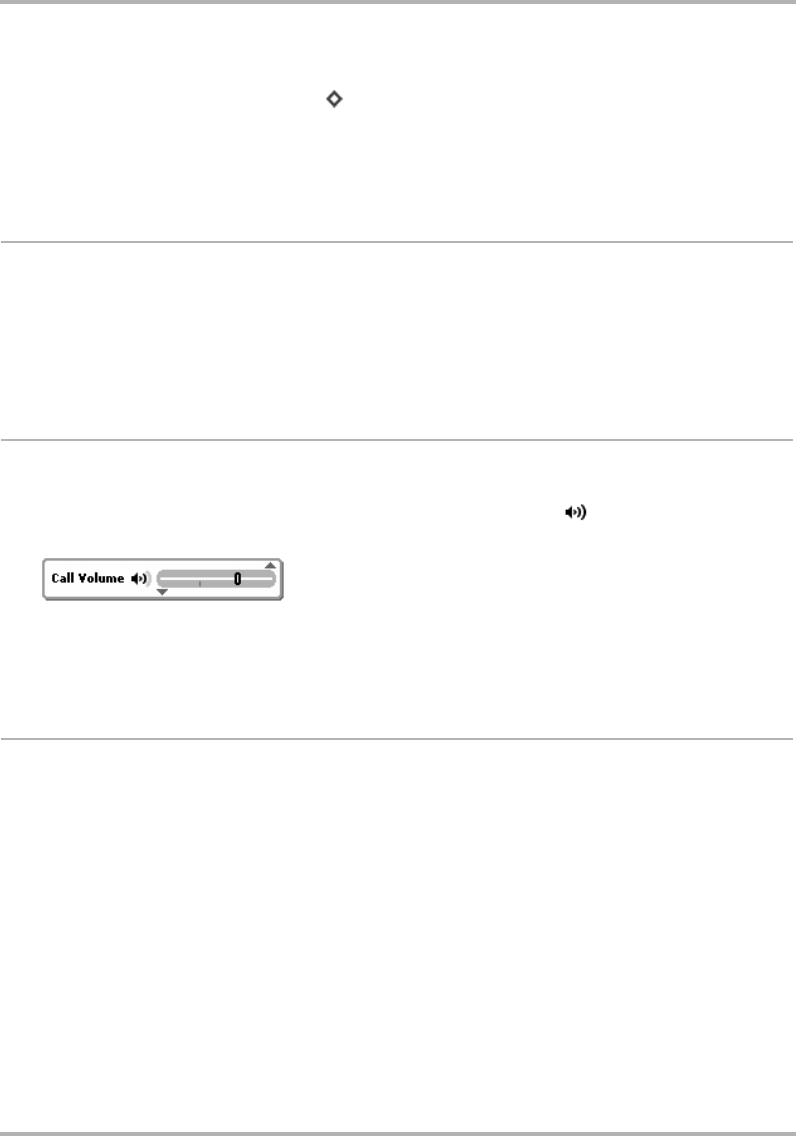
Making Telephone Calls
February 12, 2002 T-Mobile Device Owner’s Manual 50
Deleting an Existing Speed Dial Number
1Open the menu and click Preferences... [ +P]. The Phone Preferences screen appears.
2In the Set Up section, highlight then click Speed dial. The Set Up Speed dial screen appears.
3use the wheel to highlight the entry you want to delete, then click. The Edit Speed Dial Entry screen appears.
4Click Delete. The speed dial entry is gone.
Headset or Handset?
When making a telephone call, you can use the device as a handset or use the headset.
•Handset - Make sure the display lid is in the closed position. Hold the phone as a receiver, speaking into
the microphone located between the Menu and Jump buttons.
•Headset - Plug your headset lead into your device headset/camera jack (see
Parts of Your T-Mobile Device
on page 13 for an illustration of location).
Adjusting Volume
While you’re on an active call, you can adjust the speaker volume by using either of the following two methods:
•Volume Button - Use the wheel to highlight the speaker volume button on the screen, then click.
The volume pane opens:
Use the wheel to adjust the volume up or down.
•Control Keys - Hold the Menu button while scrolling the wheel. Scrolling up increases the volume;
scrolling down decreases the volume.
Place a Call
There are many ways you can “dial” a call with your device. This section describes all the methods. Pick the one
that suits you:
•Keyboard Dialing on page 51
•Keypad Dialing on page 51
•Redialing a Number on page 51
•Speed Dialing on page 51
•Dialing Recent Numbers on page 52
•Dialing Using Letters on page 52
•Dialing from the Call Log on page 52
•Dialing from the Look Up Screen on page 52
•Dialing from Contact Information on page 52
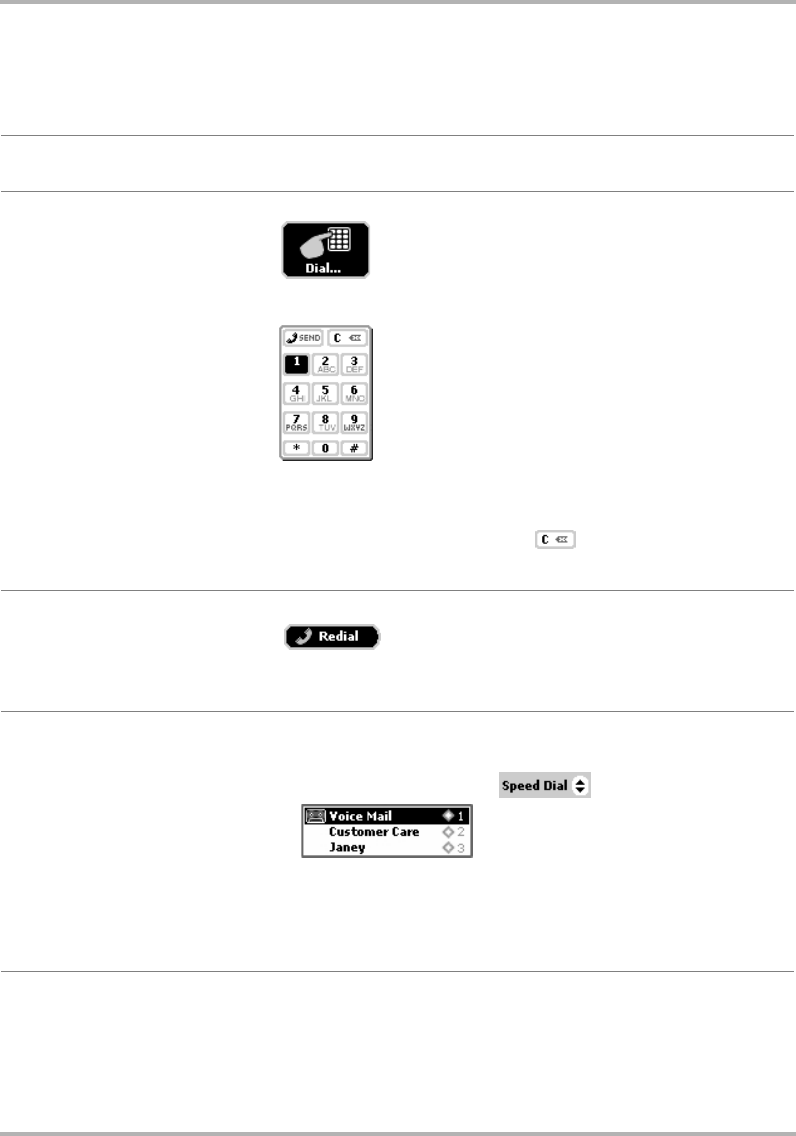
Making Telephone Calls
February 12, 2002 T-Mobile Device Owner’s Manual 51
Dialing Method Instructions
Keyboard Dialing With the device display lid open, type the number using the number
keys. Click Send Call to initiate the call.
Keypad Dialing Use the wheel to highlight the Dial button:
Then click to open the on-screen keypad:
Use the wheel to highlight a number, then click to select it. Continue
until your number is complete. If you type an incorrect number by
mistake, use the Delete key or click to erase it.
Click Send to initiate the call.
Redialing a Number You can redial a number you just disconnected by clicking the
button.
Note! The Redial button is available for only five seconds after you’ve
disconnected the call.
Speed Dialing You can place a call using an assigned speed dial number by using
either of two methods:
• Click the wheel to open the pop-up menu:
Use the wheel to highlight, then click the speed dial number you
want to call. The call is initiated.
• This method is handy if you know the speed dial number by heart.
Press and hold the shortcut number key for at least two seconds to
initiate the call.
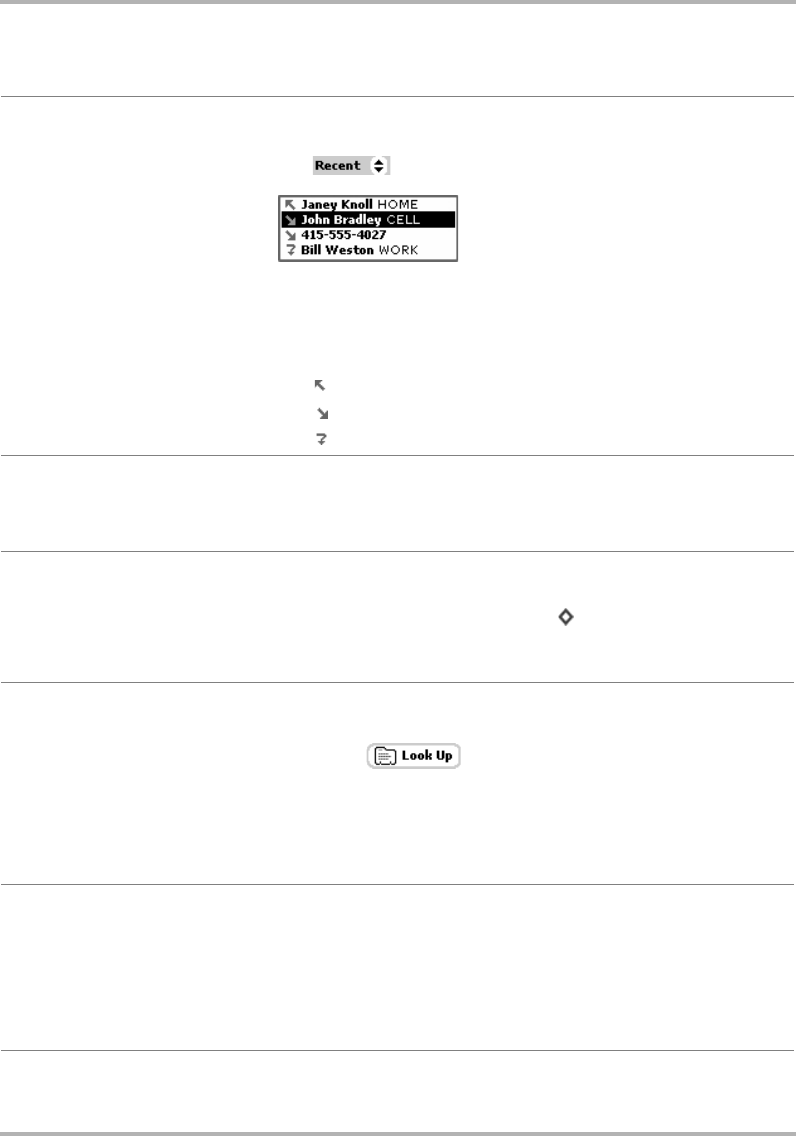
Making Telephone Calls
February 12, 2002 T-Mobile Device Owner’s Manual 52
Dialing Recent Numbers The Telephone application stores a list of the last 10 numbers you’ve
called, received, or missed. Open this list by clicking the wheel to open
the pop-up menu:
Use the wheel to highlight, then click the number you want to call. The
call is initiated.
The symbols to the left of the name/number tell you the “category” of
the recent call:
- Incoming
- Outgoing
- Missed
Dialing Using Letters If you want to dial a phone number that appears as letters (such as 1-
800-FLOWERS), you can use the keyboard’s alpha keys to type the
number: The Telephone application will “interpret” the letters and send
the numeric equivalent.
Dialing from the Call Log The Call Log is described in detail in
Your Call Log
on page 56, but (in
brief) here’s how to dial using the Call Log:
• Open the menu and click Call Log [ +L].
• Use the wheel to highlight, then click the number you want to call.
• The call is initiated.
Dialing from the Look Up
Screen You can open a “Look Up” view into your Address Book that just lists
your contacts and phone numbers. To use this screen to dial a number:
•Click the button.
• An abbreviated Browse Contacts screen appears.
• Use the wheel to scroll through your contacts until you find the
phone number you want to call, then click.
• The call is initiated and you return to the Telephone application
screen.
Dialing from Contact
Information You can call a contact stored in your Address Book directly from their
contact information:
• From the Jump screen click Address Book.
• Open the information for the contact you want to call.
• Use the wheel to highlight the phone number of interest.
• Open the menu and click Call <number>.
• You return to the Telephone application as the call is initiated.
Dialing Method Instructions
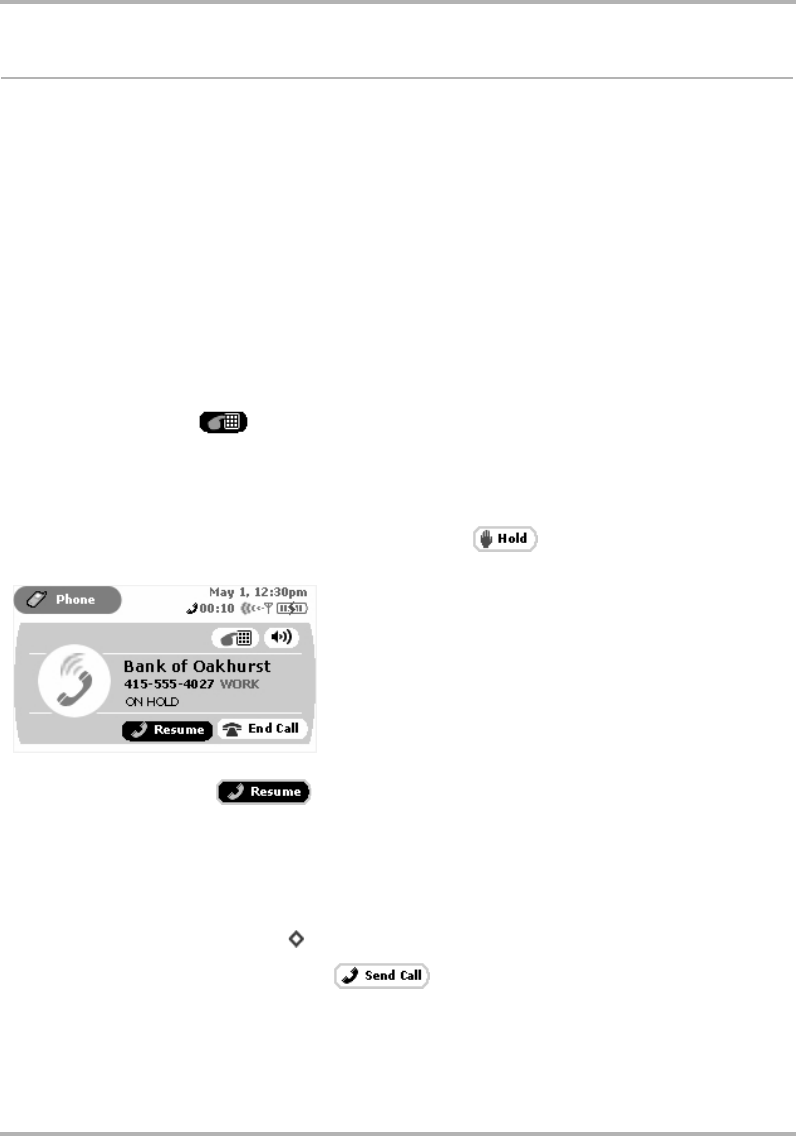
Making Telephone Calls
February 12, 2002 T-Mobile Device Owner’s Manual 53
Features While on a Call
While you’re on a call, you can:
•
Enter Additional Numbers
•
Put Your Call on Hold
•
Make a Second Call
•
Make a Conference Call
Enter Additional Numbers
Sometimes after connecting to a phone number, you’ll need to enter additional numbers (such as menu item
choices or your voice mailbox security code). You can enter these numbers by using either of these two
methods:
•Method 1 - Use the keyboard number keys. You do not have to type the dashes that separate portions of
the phone number.
•Method 2 - Click the button to open the on-screen keypad. Use the wheel to highlight then click
the numbers or symbols you need to enter. Click the Back button to dismiss the keypad when finished.
Put Your Call on Hold
During an active call you can place your call on hold by clicking the button. The screen switches to the
following view:
To resume your call, click the button (it’s highlighted by default).
Make a Second Call
While on an active call, you can place a second call:
1With your current call active, let the person you’re speaking to know you’re about to put them on hold.
2Open the menu and click New Call [ +N]. The active call is placed on hold automatically.
3Dial your second call number and click the button.
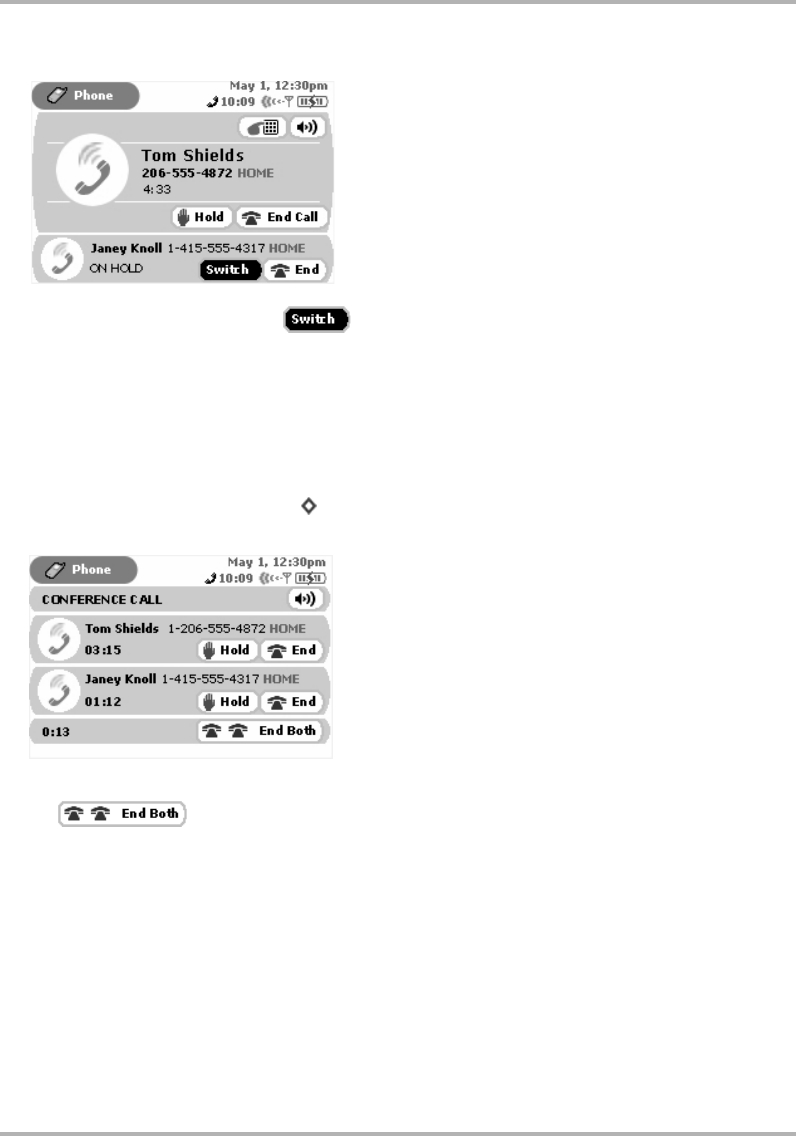
Making Telephone Calls
February 12, 2002 T-Mobile Device Owner’s Manual 54
4Your first call still appears on your screen, in the lower panel:
5To switch between callers, click the button, highlighted by default in the lower panel. After you
click this button, the active caller is put on hold and they’re call is shown in the lower panel.
6To end either call assuming it’s active, click End Call. To end the call on hold without resuming it, click End.
Make a Conference Call
You can make a three-way conference call using your device. To do this, first you need to have two callers on
your phone, one active and one on hold, as described in
Make a Second Call
on page 53. Then:
1Open the menu and click Conference [ +C].
2You and your two callers are now conferenced into the same “line”. Your screen appears like this:
3You can end the conference by dropping the two calls individually by clicking the End button, or by clicking
the button.
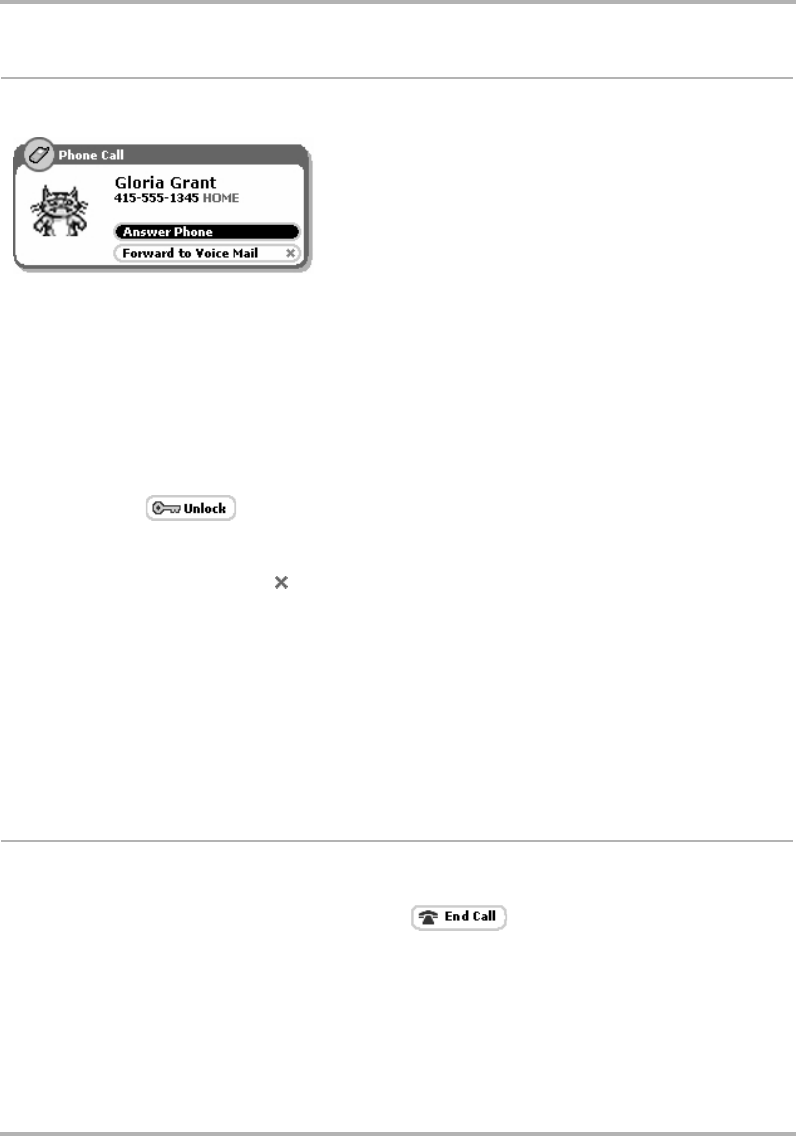
Making Telephone Calls
February 12, 2002 T-Mobile Device Owner’s Manual 55
Answer a Call
When you receive a new incoming phone call, you will see a notification screen like the following:
Since the Answer Phone button is highlighted by default, all you have to do is click the wheel to answer the call.
To send the call directly to voice mail, highlight and click the ForwardtoVoiceMail button, or simply press
the Back button.
There are a couple of special cases you should know about:
•If your device is asleep when a call comes in, the on-screen notification will include a message to press
the Menu button to unlock the wheel. Then you can click the wheel to answer the phone.
•If your device screen is locked when a call comes in, press the Menu button to unlock the wheel, then
click the wheel to answer the call. Once you’re on the call, the phone screen will include a button that
allows you to the device so you can use the Menu, Back, and Jump buttons.
•If you are already in a call when another call comes in, the notification screen will include a button to
Switch Calls. If you click this button, the first call will be put on hold. Alternatively, you can click the
Forward to Voice Mail button [ ] to send the incoming call straight to voice mail.
About Caller ID
If your caller does not have Caller ID blocked on their telephone account, then the incoming call notification
screen will include the caller information. In addition, if you have the caller in your Address Book, the notification
screen will be further personalized with the label on the phone number and an identity icon, if you have stored
this information.
For example, in the case that the caller does not have Caller ID blocked and you have the caller in your Address
Book, you could get a notification screen that looks like the one in the illustration above for caller Gloria Grant.
End a Call
There are a few ways you can end your telephone call:
•If you are in the Telephone application, click the button.
•If you are in an application other than Telephone, open the menu and click End Call.
•Regardless of where you are, press the Menu and Jump buttons together.
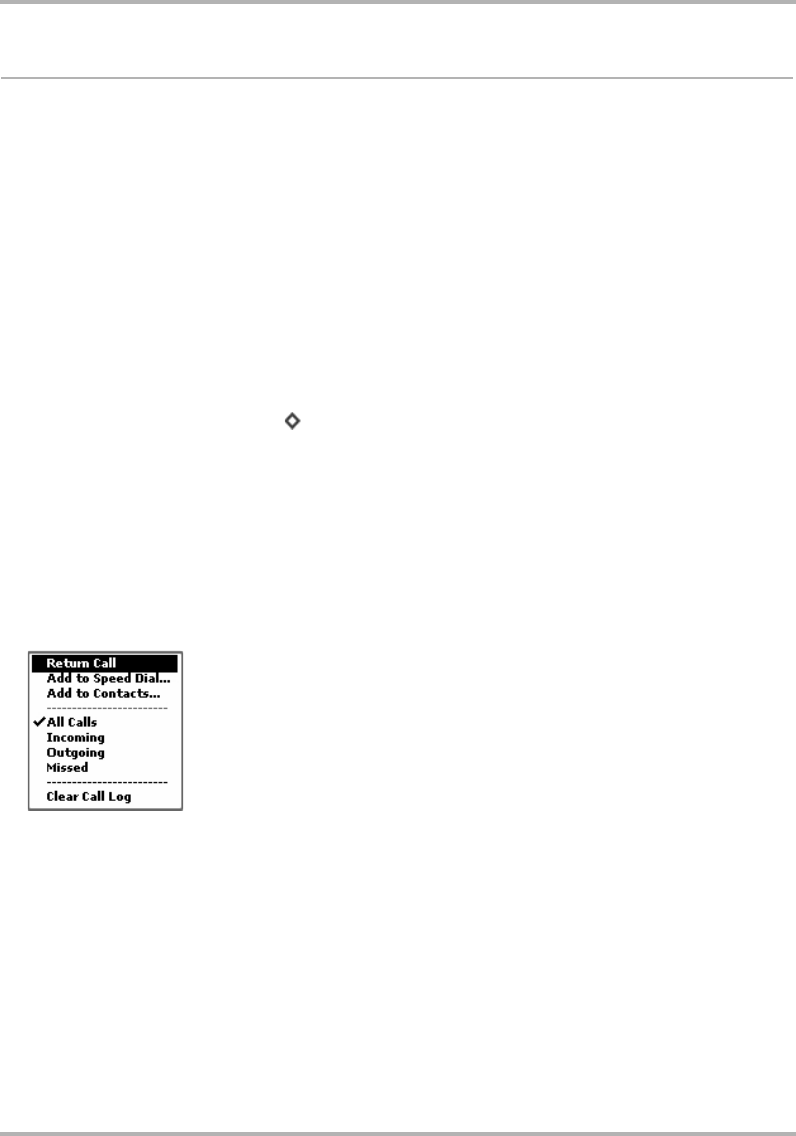
Making Telephone Calls
February 12, 2002 T-Mobile Device Owner’s Manual 56
Your Call Log
Your Call Log lists the calls that you have either:
• received (“incoming”),
• placed (“outgoing”), or
• didn’t pick up (“missed”)
The Log stores up to 10 calls in each of the three categories (Incoming, Outgoing, or Missed), for a total of 30
calls. When you reach the maximum limit in one of the categories, the oldest call is removed from the Log to
make room for the new call. You can also clear your Log at any time (read more in
Clear Your Call Log
on page
58).
Views of Your Call Log
The Log is convenient because you can view your calls by category if you want. Here’s how you can set your Log
view:
1Open the menu and click Call Log [ +L]. The Log opens in either the default view (All Calls), or in the
view you last selected.
2Open the Call Log menu and click the view you want to see:
•Incoming
•Outgoing
• Missed
If you don’t have any calls in the category you selected, the screen will display the message “No calls in call
log”.
3The view you select “sticks” until you change it from the menu. Note that your currently-selected view is
indicated by a check mark in the menu:
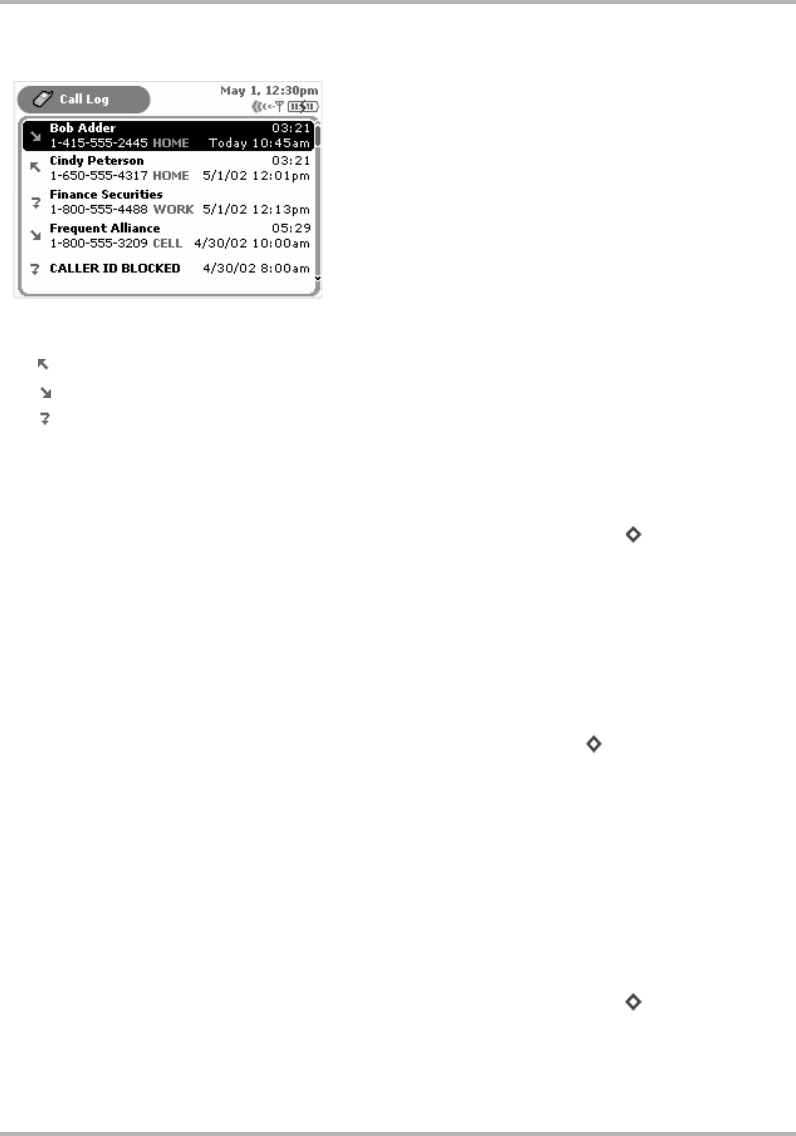
Making Telephone Calls
February 12, 2002 T-Mobile Device Owner’s Manual 57
An example Call Log is shown below, with the view set to All Calls:
Note the call category icons:
- Incoming
- Outgoing
- Missed
Place a Call From the Log
You can use your Call Log to return or make calls. Here’s how:
1View your Call Log by opening the main Dialing screen menu and clicking Call Log [ +L].
2Use the wheel to highlight the number you want to call, then click. The context menu appears, with Call
Again selected by default.
3Click the wheel to initiate the call.
Add/Edit Speed Dial from the Log
If one of your Log entries is also on your Speed Dial list, you can easily edit this entry from the Log. If an entry
in your Log is not on your Speed Dial list, you can easily add the number to your Speed Dial list from the Log:
1View your Call Log by opening the Dialing screen menu and clicking Call Log [ +L]. The Call Log opens.
2Use the wheel to highlight the number you want to call, then open the menu and click Add to Speed Dial...
or Edit Speed Dial... (the appropriate entry will appear).
3Either the Edit Speed Dial Entry or New Speed Dial Entry dialog box appears, as appropriate.
4Type or edit the Shortcut, Name, and Number information.
5Click Create to dismiss the dialog box and save the changes.
Add Contact List from the Log
If one of your Log entries is also in your Address Book, you can easily edit this entry from the Log. If an entry in
your Log is not in your Address Book, you can easily add that contact to your Address Book from the Log:
1View your Call Log by opening the main Dialing screen menu and clicking Call Log [ +L].
2Use the wheel to highlight the name/number you want to add or edit, then open the menu and click Add to
Contacts... or Edit Contact... (the appropriate entry will appear).
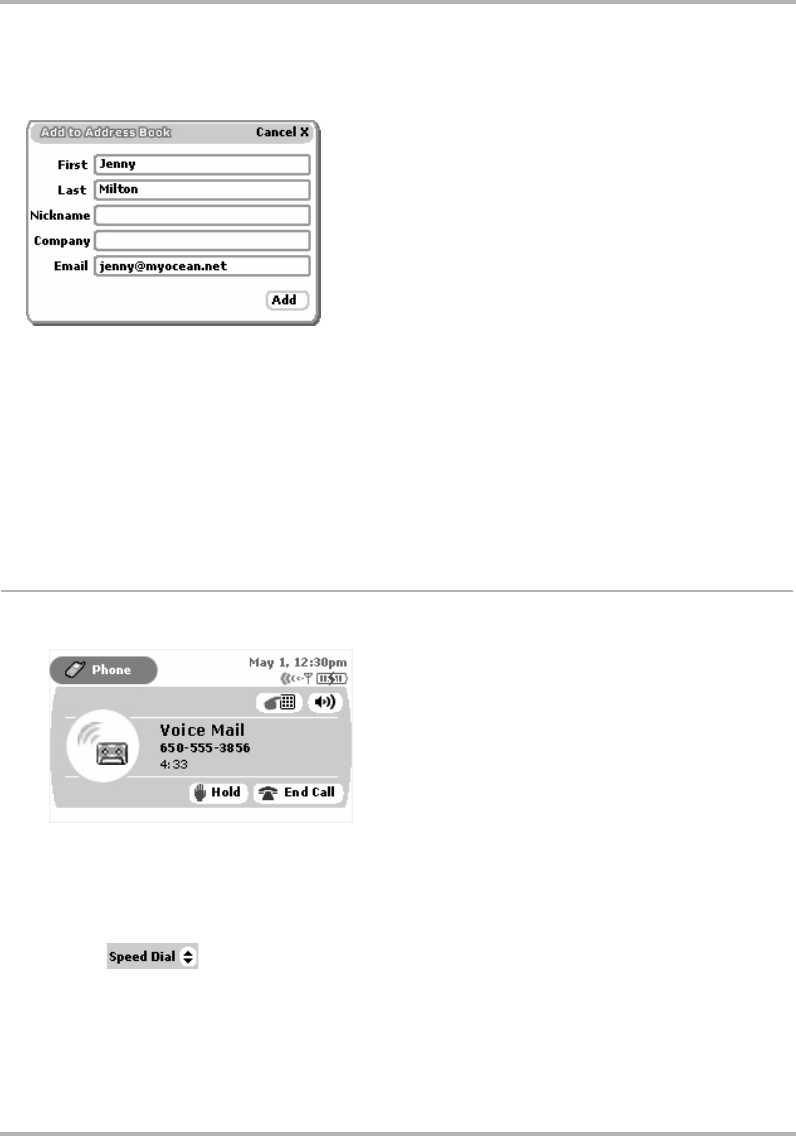
Making Telephone Calls
February 12, 2002 T-Mobile Device Owner’s Manual 58
3Either the Add to Address Book or Edit Address Book dialog box appears, as appropriate, with the caller’s
existing information filled in, or (if a new contact) the caller’s name and number filled in--if that information
is available. The Add to Address book dialog box look like the following:
4Complete or edit the fields, as you wish. When finished, click Add or Edit (as appropriate).
5The contact information is saved and you are returned to the Telephone.
Clear Your Call Log
To remove all entries in all three Call Log categories (incoming, outgoing, and missed), do the following:
1Make sure you have one of the Call Log views on your screen.
2Open the menu and click Clear Call Log. All calls will disappear and your screen will report “No calls in call
log”.
Listen to Voice Mail
There are several ways you can call your voice mailbox to retrieve your voice mail.
• From a land line, dial your voice mailbox number.
• Using your device keyboard, press and hold the #1 key for at least two seconds. The call to your voice
mailbox is initiated.
• On the main Dialing screen, use the device wheel to highlight, then click the Speed Dial
pop-up: . The pop-up menu opens, listing all your assigned speed dial numbers.
The #1 slot is selected by default; click to initiate the call.
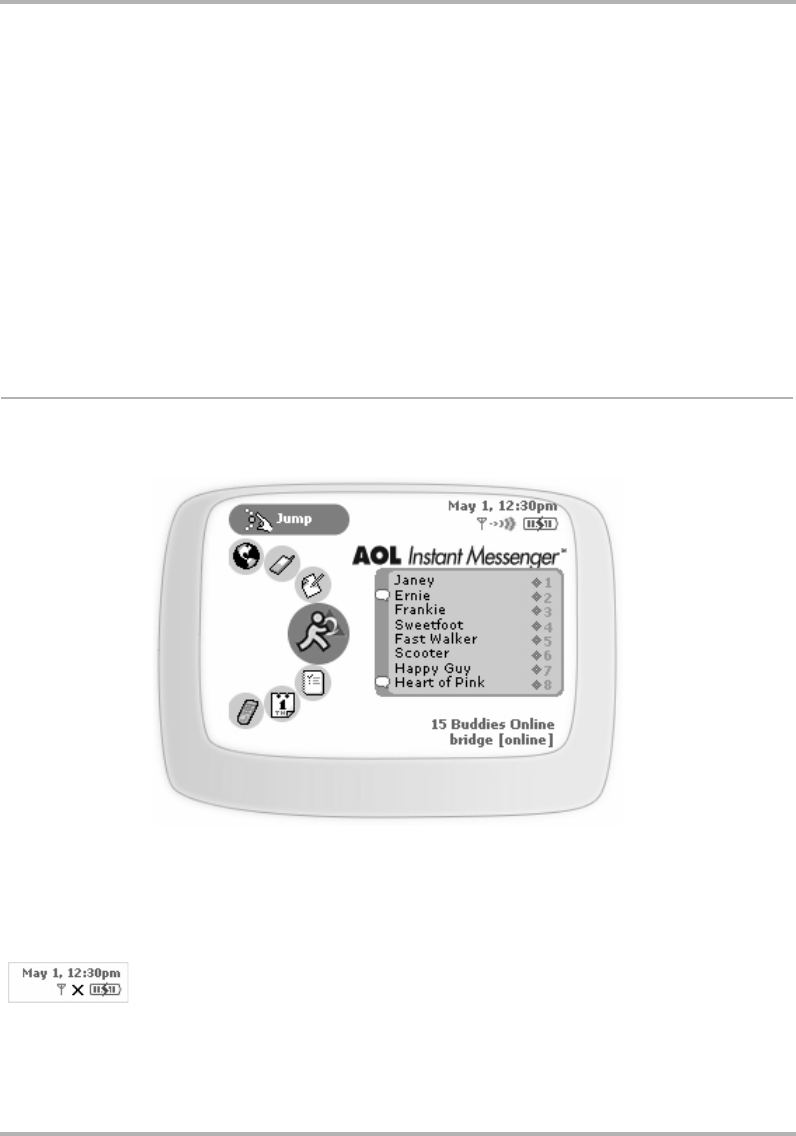
Instant Messaging
February 12, 2002 T-Mobile Device Owner’s Manual 59
8. Instant Messaging
What could be more fun than sending instant messages while you’re on the go? Not much! Read all about how
to use your T-Mobile Device’s AOL Instant Messenger application in this chapter:
Instant Messaging Preview Screen
From the Jump screen, with AOL Instant Messenger highlighted, you will see a preview screen similar to the
following:
The preview screen lists all your active conversations along with the buddy screen name and the conversation
number. The screen also tells you how many of your buddies are online at the time and the screen name you’re
currently using.
Tip: If you are out-of-network and therefore unable to connect to Instant Messaging, you will see an X in the
radio signal area of the notifications bar:
•
Instant Messaging Preview Screen
on page 59
•
Add a Screen Name
on page 60
•
Sign On
on page 61
•Sign Off
on page 61
•
Switch Screen Names
on page 61
•
Instant Messaging Preferences
on page 62
• The Buddy List Screen
on page 64
•
Keyboard Shortcuts
on page 65
•
Manage Buddies
on page 66
•
Conversations
on page 67
•
Set an Away Message
on page 69
•
About Groups
on page 70
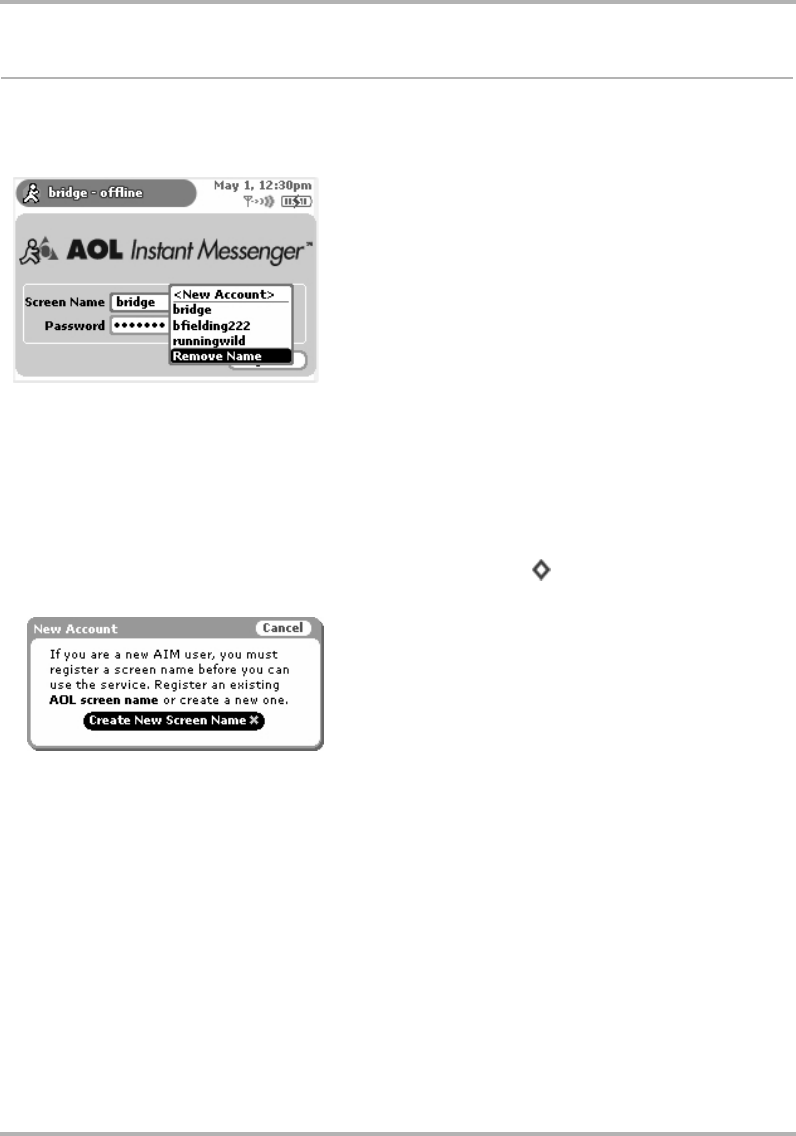
Instant Messaging
February 12, 2002 T-Mobile Device Owner’s Manual 60
Add a Screen Name
Before you can use AIM on your device, you must register an AOL Instant Messenger screen name with the
service (instructions follow below). Every name you register will be added to the Sign On screen in a pop-up
menu, like the one shown below:
If you don’t already have an AOL or AIM account, no problem! The instructions below tell you how to get a
new account too.
Tip: You can only add one screen name at a time (just repeat the steps to add others). Here’s the steps:
1Enter AOL Instant Messenger from the Jump screen.
• If you’re not already signed on, click <New Account> from the Screen Name pop-up, then click the Sign
On button.
• If you’re already signed in, open the menu and click New Account [ + N].
2The New Account dialog box opens:
Click the Create New Screen Name button if you don’t have an AOL or AIM account; you’ll be taken to the
new AIM Registration page via the device Web Browser.
3Complete the online forms that appear on your screen. When you’re done, you’ll be returned to the AIM Sign
On screen, with your new screen name showing as one of the options in the Screen Name pop-up menu.
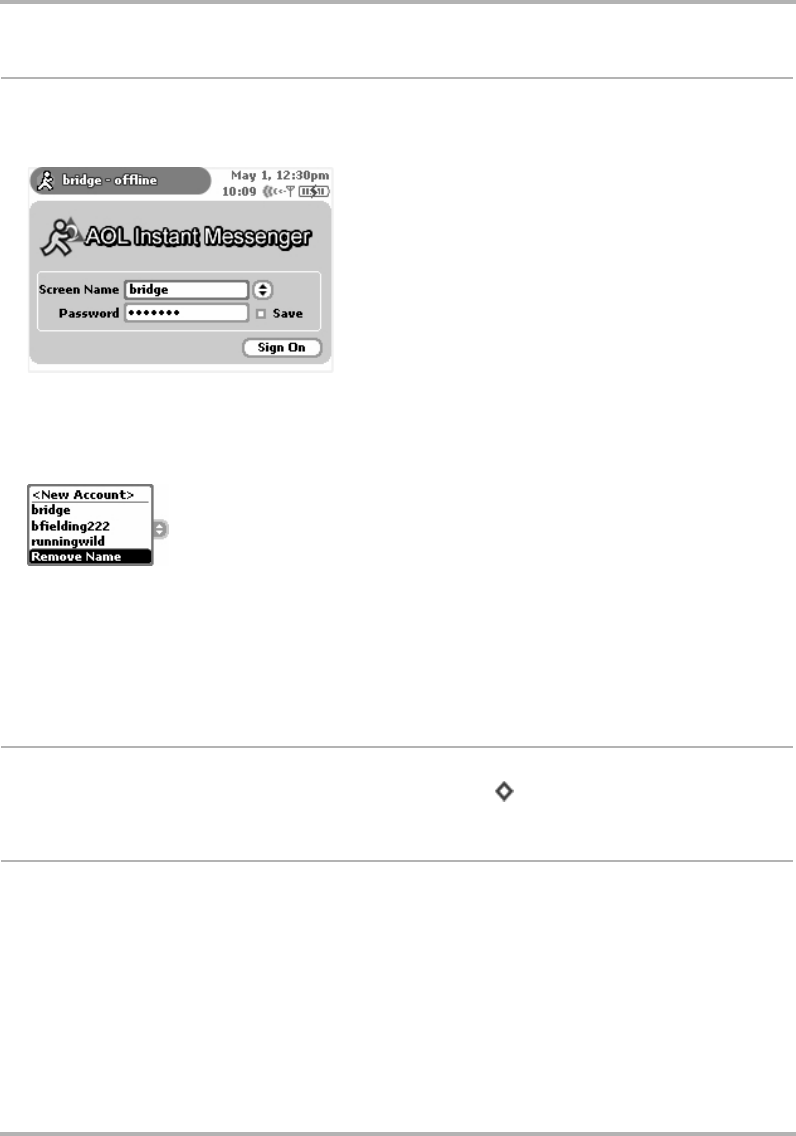
Instant Messaging
February 12, 2002 T-Mobile Device Owner’s Manual 61
Sign On
Once you have at least one screen named registered, you’re ready to sign on!
1After you choose AOL Instant Messenger from the Jump screen, the Sign On screen appears:
2All screen names that you can use to sign on are listed in the Screen Name pop-up menu. Tip: To get a
screen name on the pop-up menu, you must first “register” that name with the AIM service, as described in
Add a Screen Name
on page 60.
3To open the pop-up, highlight it using the wheel, then click:
4Use the wheel to highlight the screen name you want to use to sign on, then click.
5Type your password. If you want the device to remember your password, click the Save check box.
6Click the Sign On button.
7If you want to add a registered AOL screen name to the list, or remove a screen name, read
Add a Screen
Name
on page 60 and
Remove Existing Screen Name
on page 62.
Sign Off
To sign off from AIM at any time, open the menu and click Sign Off [ + Q].
Switch Screen Names
You can switch screen names at any time:
1From any of the AIM screens, open the menu and click Sign Off. The Sign On screen appears.
2From the Screen Name pop-up menu, highlight the screen name you want to use to sing on, then click.
3Click Sign On.
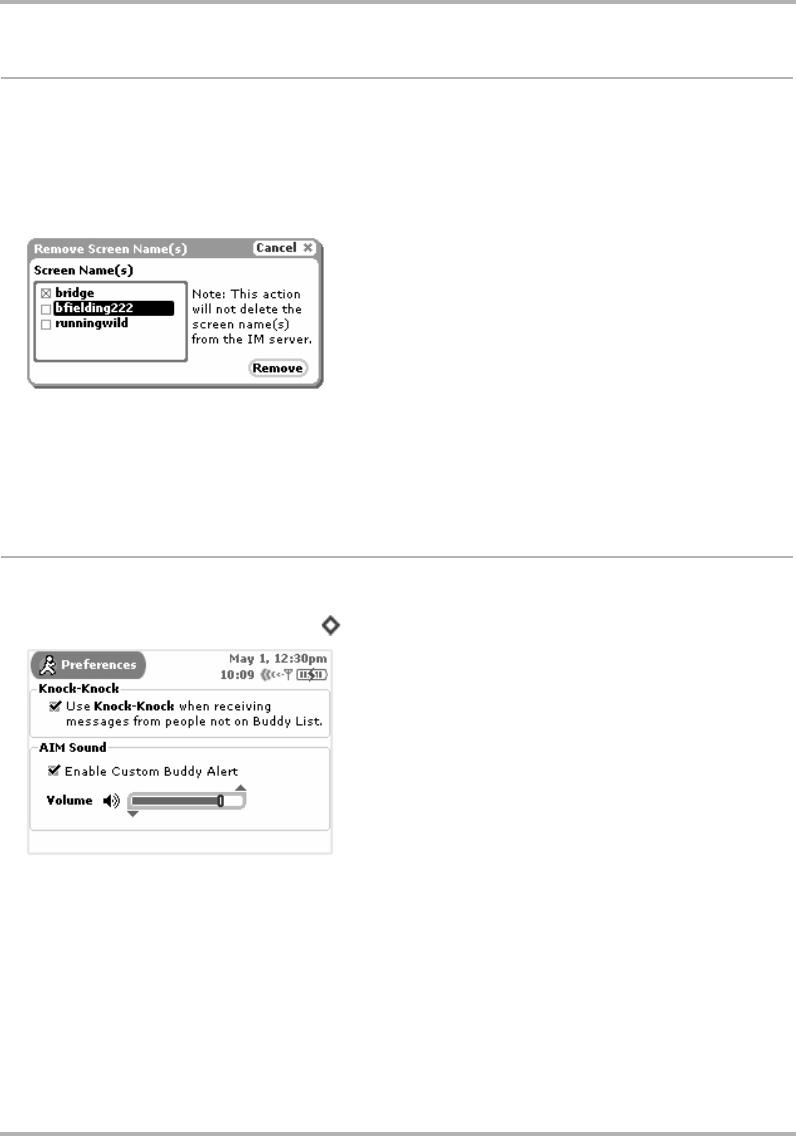
Instant Messaging
February 12, 2002 T-Mobile Device Owner’s Manual 62
Remove Existing Screen Name
You can remove one or more names from your Screen Name pop-up menu. Note that if you do this, you will not
be deleting either your AIM or AOL account, you will just be “unregistering” that screen name from the IM
application. You can always add the names back in later by using the Add Account by adding an account.
It’s easy to remove a name:
1Open the Screen Name pop-up menu and click Remove Name. This dialog appears:
2Select the names you wish to remove (you can select more than one).
3Click Remove. The names you’ve removed will now not appear on the Screen name pop-up menu.
Tip! To put a removed screen name back on the Screen Names pop-up menu, follow the instructions in
Add a
Screen Name
on page 60.
Instant Messaging Preferences
1From the Jump screen click AOL Instant Messenger.
2Open the menu and click Preferences...[ + S]. The AIM Preferences screen appears:
From this screen you can:
•
Set Up Knock-Knock
on page 62
•
Enable AIM Sound
on page 63
Set Up Knock-Knock
You can set up AIM so that if someone not on your buddy list sends you an instant message, you will first see an
alert asking you if you want to accept the message. To set this up, do the following:
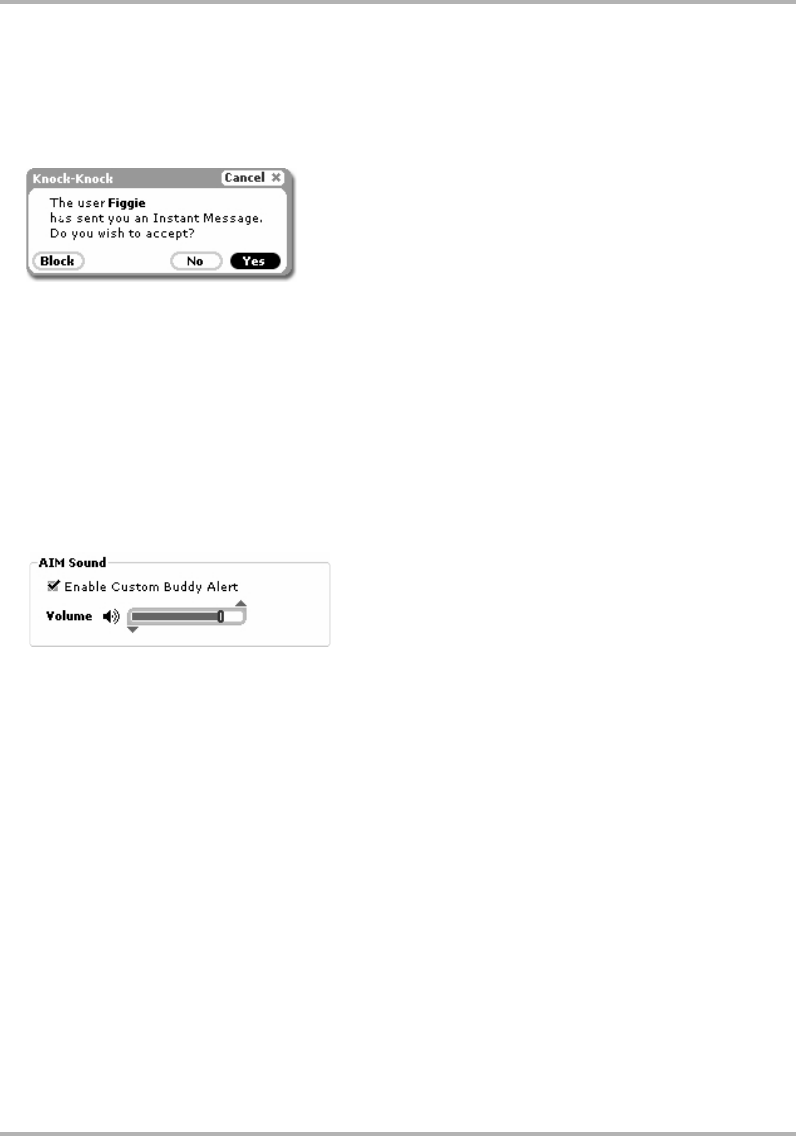
Instant Messaging
February 12, 2002 T-Mobile Device Owner’s Manual 63
1Open the AIM Preferences screen.
2The Knock-Knock section is at the top of the screen. Note that Knock-Knock is turned on by default! If you
want to turn Knock-Knock off, clear the check box by clicking it with the wheel.
3With Knock-Knock turned on, when you receive a message from someone not on your buddy list, you’ll get
an alert like the following:
4Choose from the following courses of action:
•Block - The sender of the AIM will be blocked from sending you any messages. (Read more in
Block/
Unblock Buddies
on page 67.)
•No - You will not even see the message from the non-buddy sender.
•Yes - You will see the message from the sender.
Enable AIM Sound
In order for Custom Buddy Alerts to work (read more in
Edit a Buddy
on page 66), you must enable these alerts
from the Preferences screen:
1Open the AIM Preferences screen from the IM menu and look at the AIM Sound section of the screen:
2Select the check box to enable Customer Buddy Alert. (To disable Custom Buddy Alert, click the check box to
clear it.)
3Assuming you’ve selected the check box, adjust the sound volume for these alerts using the slider bar:
• Use the wheel to highlight the slider bar.
• Click to make the bar “adjustable”.
• Rotate the wheel up to increase and down to decrease the volume.
4Your changes are saved as soon as you make them.
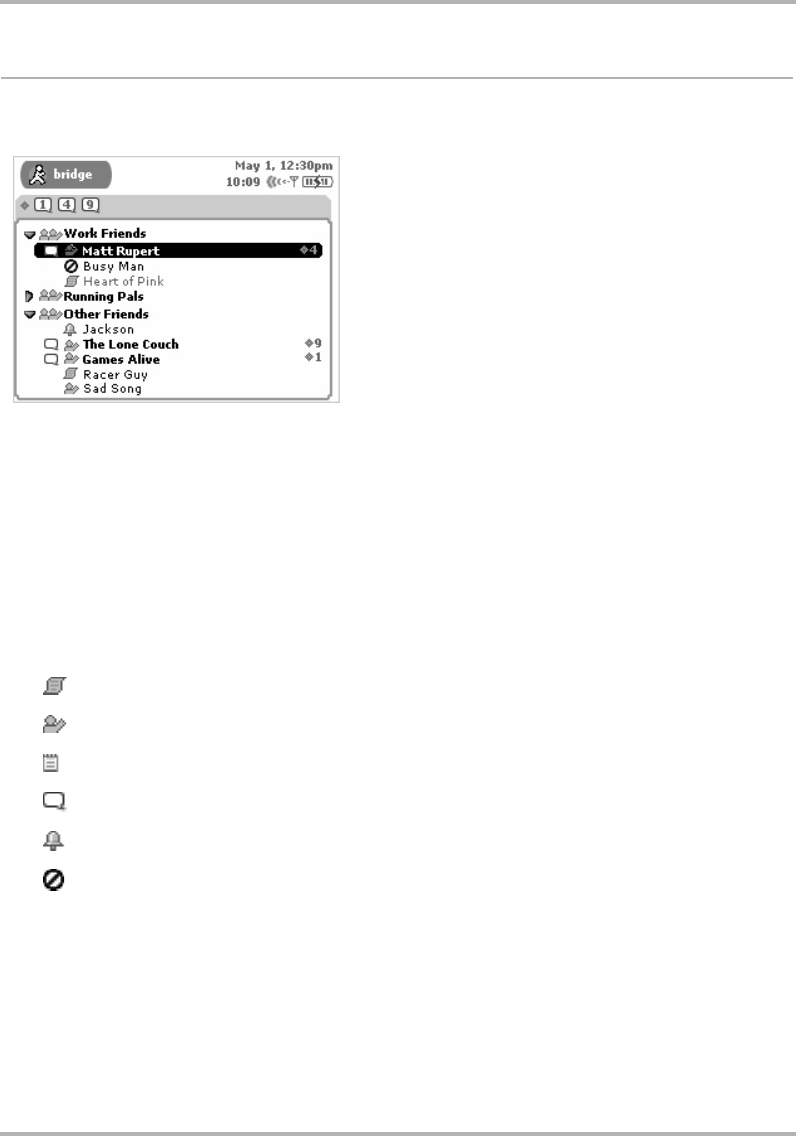
Instant Messaging
February 12, 2002 T-Mobile Device Owner’s Manual 64
The Buddy List Screen
The Buddy List screen is your main view into Instant Messaging. The screen shows a grouped listing of all your
buddies:
At the very top of the screen in the title bar you’ll see your screen name. Below your name, all your open
conversations are symbolized by little balloons, with the conversation number in the balloon. If you have a new
message in one of the conversations, the little balloon will blink.
Next, all the groups you have created are listed and marked with a folder icon, with the buddies in collapsible
lists.
• To open (expand) a group’s list, use the wheel to highlight the group name, then click. The little arrow icon
“opens”.
• To collapse the list, click again: the buddy names disappear and the arrow icon “closes”.
With the group contents expanded, to the far left of each buddy screen name you’ll see their open conversation
number (if you have a conversation open with them), and to the left there is an availability/status icon:
if offline
if online and available
if away
if you have a new message from them
if you’ve set a Custom Buddy Alert for them
if you have blocked this so-called “buddy”
Buddies who are “away” are shown in regular face font; buddies who are available are shown in bold face font.
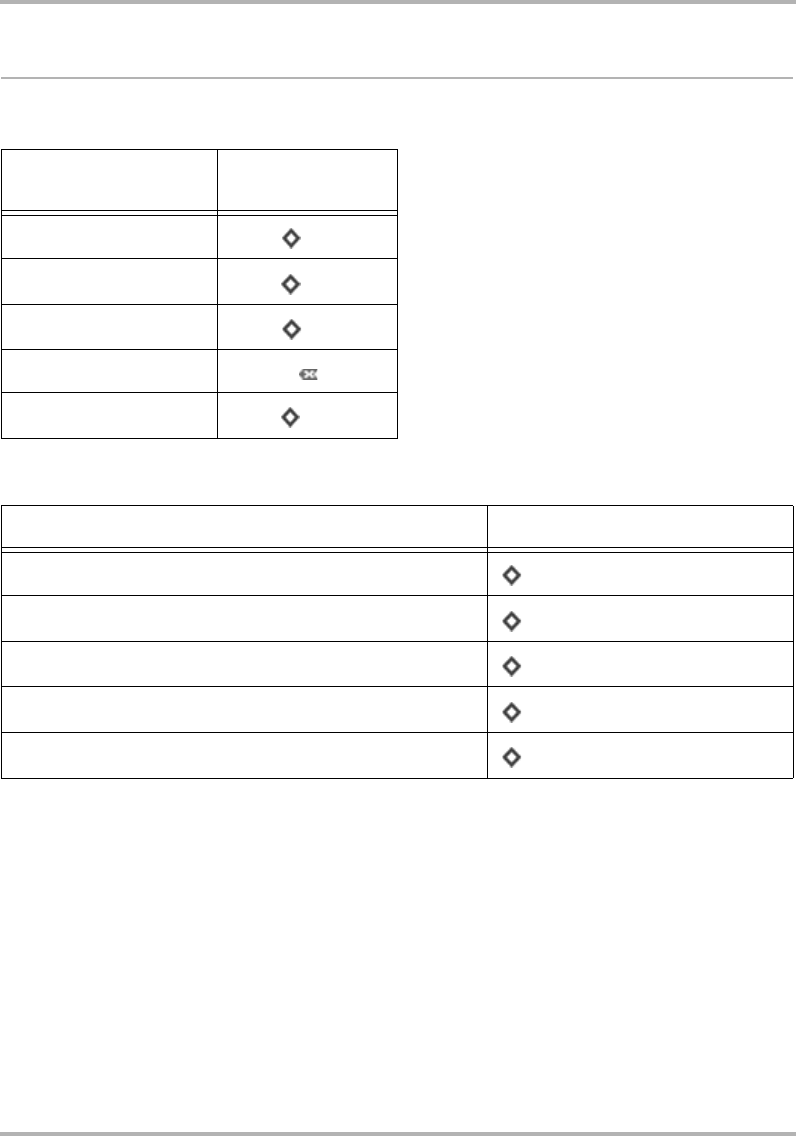
Instant Messaging
February 12, 2002 T-Mobile Device Owner’s Manual 65
Keyboard Shortcuts
While in Instant Messaging, you can use the following keyboard shortcuts for menu items:
You can use the following shortcuts to navigate or change your view when using AIM:
To open this menu
option Use this shortcut
Conversations + V
Add Buddy... + N
Edit + E
Delete
Sign Off + Q
To make this happen Do this
Open a particular conversation number + <conversation number>
Open next conversation in order + D-pad right arrow
Open previous conversation + D-pad left arrow
Open conversation with oldest pending message + D-pad down arrow
Open conversation with newest pending message + D-pad up arrow
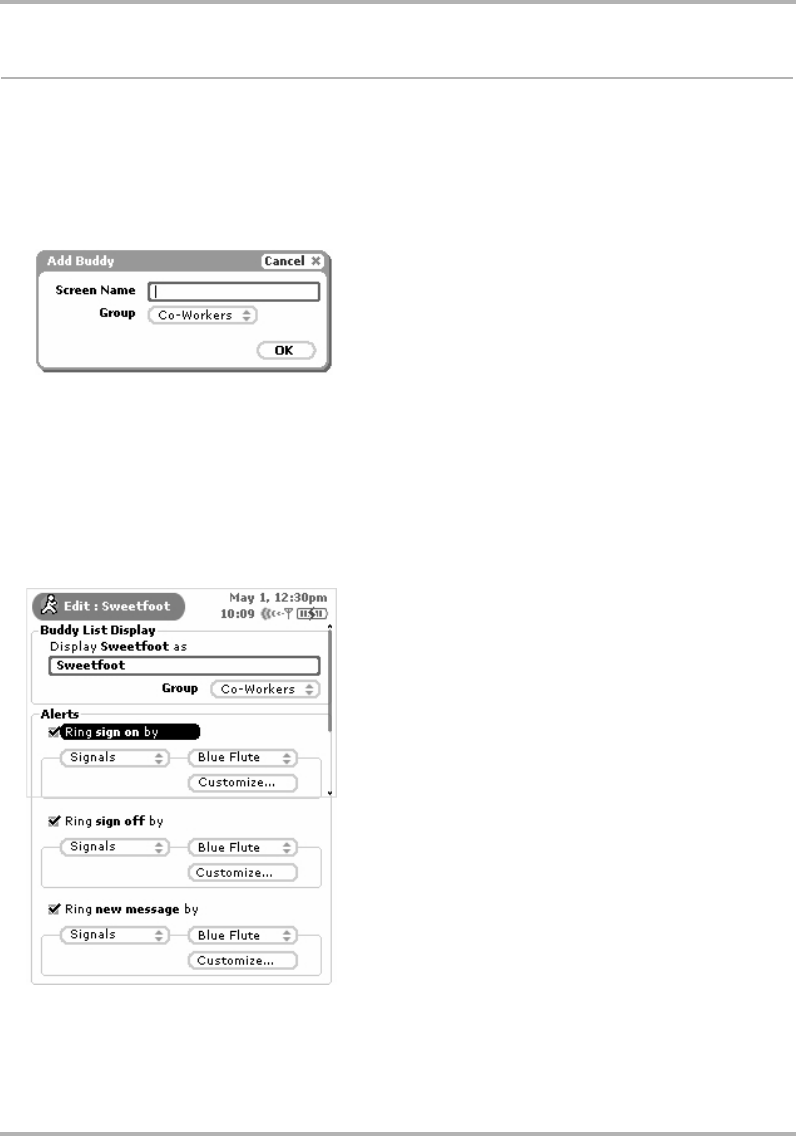
Instant Messaging
February 12, 2002 T-Mobile Device Owner’s Manual 66
Manage Buddies
Using AIM, you can add Instant Messaging buddies, edit their list names and group, and remove them.
Add a Buddy
To add a buddy to your list, follow the steps below:
1Open the menu and click Add a New Buddy... The Add Buddy dialog appears:
2Type the Buddy Name, and in the Group pop-up menu, click the group in which you want to file the buddy.
3Click OK. The buddy is added to your list!
Edit a Buddy
Once you’ve added a buddy, you can change the name used in your buddy list, change what group the buddy is
in, and how you’re notified when the buddy signs on/off or sends you a message. To edit a buddy, do the
following:
1From the Buddy List screen, open the menu and click Edit. The Edit Buddy screen displays:
2From this screen you can:
• Change the name displayed in your buddy list.
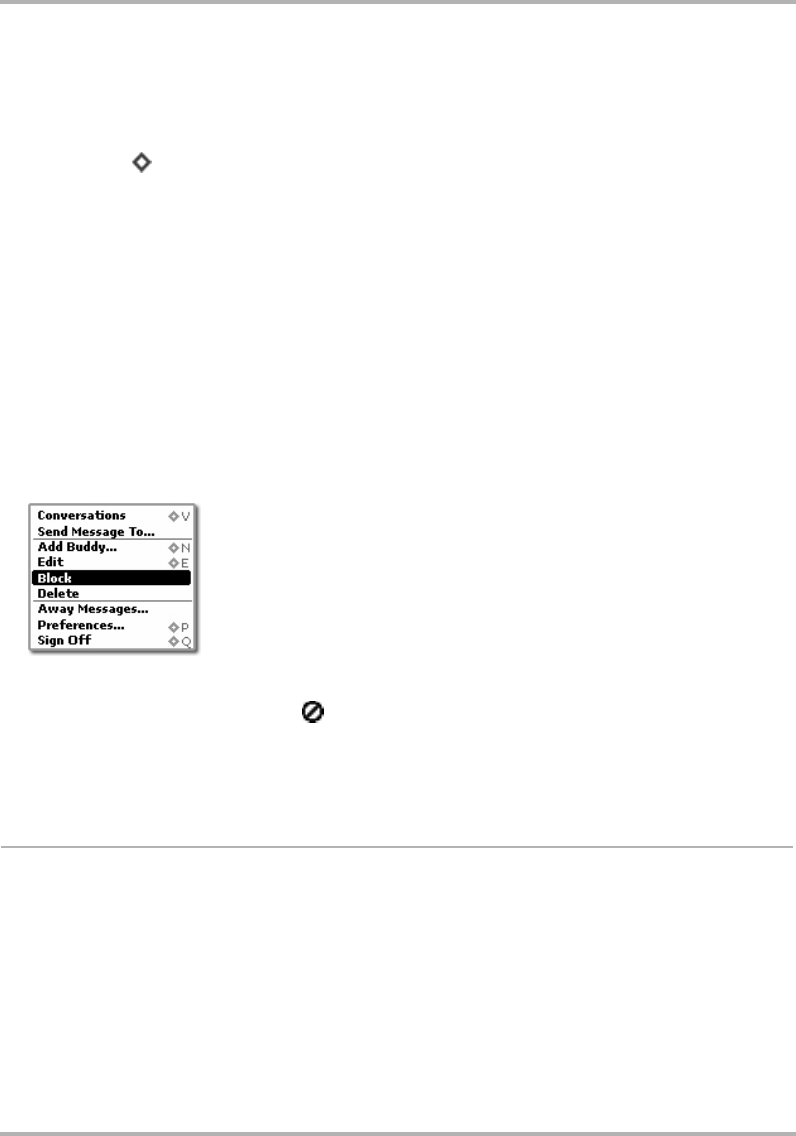
Instant Messaging
February 12, 2002 T-Mobile Device Owner’s Manual 67
• Change the group in which you’ve filed the buddy.
• Set alerts (notifications) for when your buddy signs on, signs off, or sends you a new message.
3After making your edits, click the Menu button to open the menu:
• Click Discard to cancel all changes.
• Click Save [ + S] to save your changes.
Delete a Buddy
To delete a buddy from your list, do the following:
1From the Buddy List screen, scroll to highlight the screen name of the buddy you wish to delete.
2Open the menu and click Delete. A confirmation dialog opens.
3If you’re sure you want to remove this buddy, click Delete. Otherwise, to cancel the action and keep the
buddy on your list, press the Back button.
Block/Unblock Buddies
If you want to block messages from a particular buddy, you can easily do so:
1On the Buddy List screen, use the wheel to highlight the name of the buddy you want to block.
2Open the menu and click Block:
3The buddy’s name still appears on your Buddy List, but now it’s in the Offline group and the “forbidden” icon
appears to next to the buddy’s name: .
4To unblock the buddy’s messages, highlight the buddy name and click Unblock from the menu. Their name
moves under the group you had previously assigned to them and you will start receiving messages from this
buddy again.
Conversations
Conversations are one-on-one chat sessions you have with your online buddies. With AIM, you can have up to 10
online conversations going at the same time. This section explains how to start and end conversations, as well as
how to keep track of all the conversations you have going at one time!
Start/End a Conversation
To send a message to one of your buddies, follow the instructions below.
1You can open a conversation screen in either of two ways:
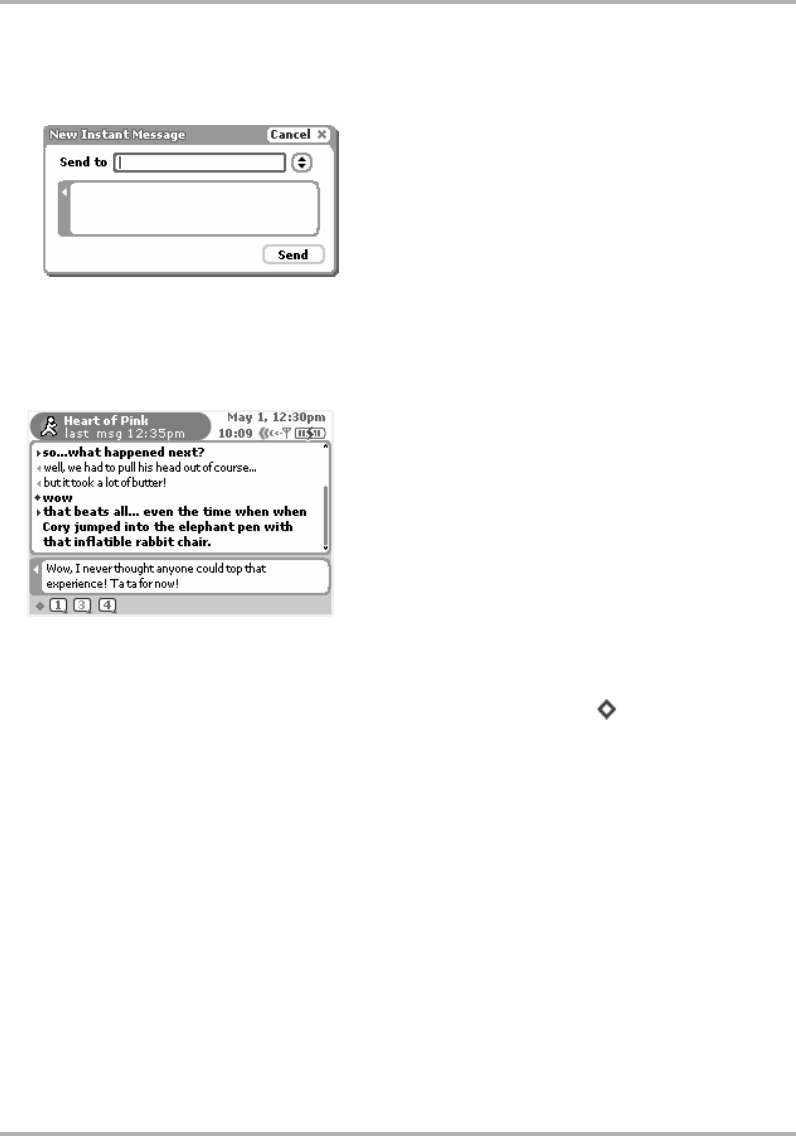
Instant Messaging
February 12, 2002 T-Mobile Device Owner’s Manual 68
• From the Buddy List screen, scroll to highlight the buddy with whom you want to message, then click the
wheel. A conversation screen with this buddy opens.
• Open the menu and click Send Message To... The New Instant Message dialog box opens:
2In the Send to text box, type the screen name of the buddy you want to send a message to. You can also
open the pop-up menu and click a buddy name (all your buddies are listed there).
3Type your initial message, then click Send (or press Return) to send it. A conversation screen with this
buddy opens with your initial message showing.
4Use the lower pane to type your messages. Here’s an example of a conversation-in-progress:
5To end a conversation, open the menu and click End Conversation.
From any conversation screen menu you can also:
• Return to the Conversations Management screen by clicking Conversations [ + V].
• Return to your Buddy List view by clicking Buddy List.
• Set an away message by clicking Away Messages...
Conversation Indicators
Most every screen you view within Instant Messaging, including the preview screen, contains balloon indicators,
one for each active conversation (assuming you have at least one conversation going). The balloon indicates
that you have an unread message from a buddy.
In addition, each open conversation is numbered and usually displays to the far right of the buddy name in any
of the lists. If you press the Menu button and the conversation number, that conversation will display on the
screen and become active.
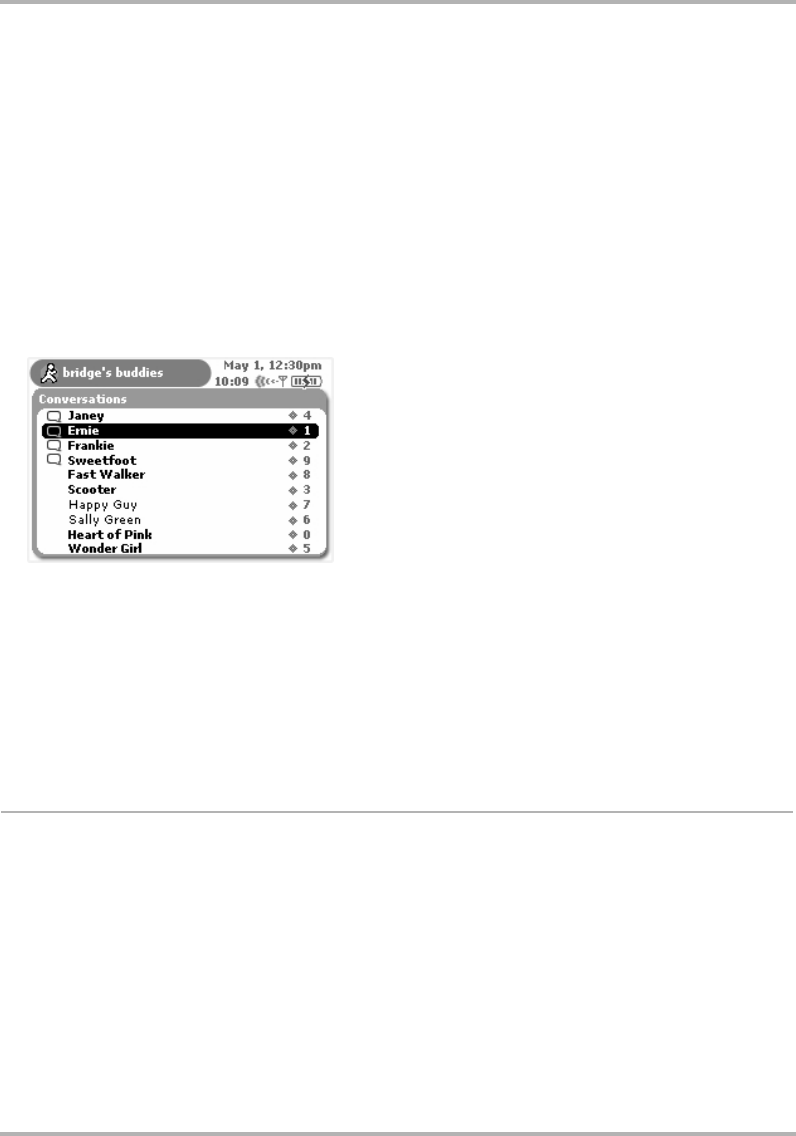
Instant Messaging
February 12, 2002 T-Mobile Device Owner’s Manual 69
Switch Between Conversations
The easiest way to switch between conversations is to press Menu + <conversation number>.
Another way is to go to the Conversations management screen by opening the menu and clicking
Conversations. This screen lists all your open conversations. Use the wheel to highlight the conversation you
want to make active, then click. It opens on your screen. Read more in
The Conversations Management Screen
on page 69.
The Conversations Management Screen
All your open conversations are listed in the Conversations Management screen. To open and use this screen, do
the following:
1From the Buddy List menu, open the menu and click Conversations. The Conversations Management screen
opens:
2This screen lists all your open conversations:
• If you have an unread message from any of your buddies, you’ll see the little balloon icon to the left of
their screen name.
• Each conversation’s number is shown to the far right of the buddy name.
• If one of your buddies is “away”, their name is shown in regular face (not bold face). In the example
above, Happy Guy and Sally Green are “away”.
3To open one of the conversations in your list, use the wheel to highlight the conversation, then click. That
conversation opens on your screen.
Set an Away Message
Tip: To create new custom away message categories, you must go to your Web browser client on your computer
and edit or create them there.
To set an away message you must first be signed on to AIM (read more in
Sign On
on page 61). Once you’re
signed on:
1Open the menu and click Away Messages...
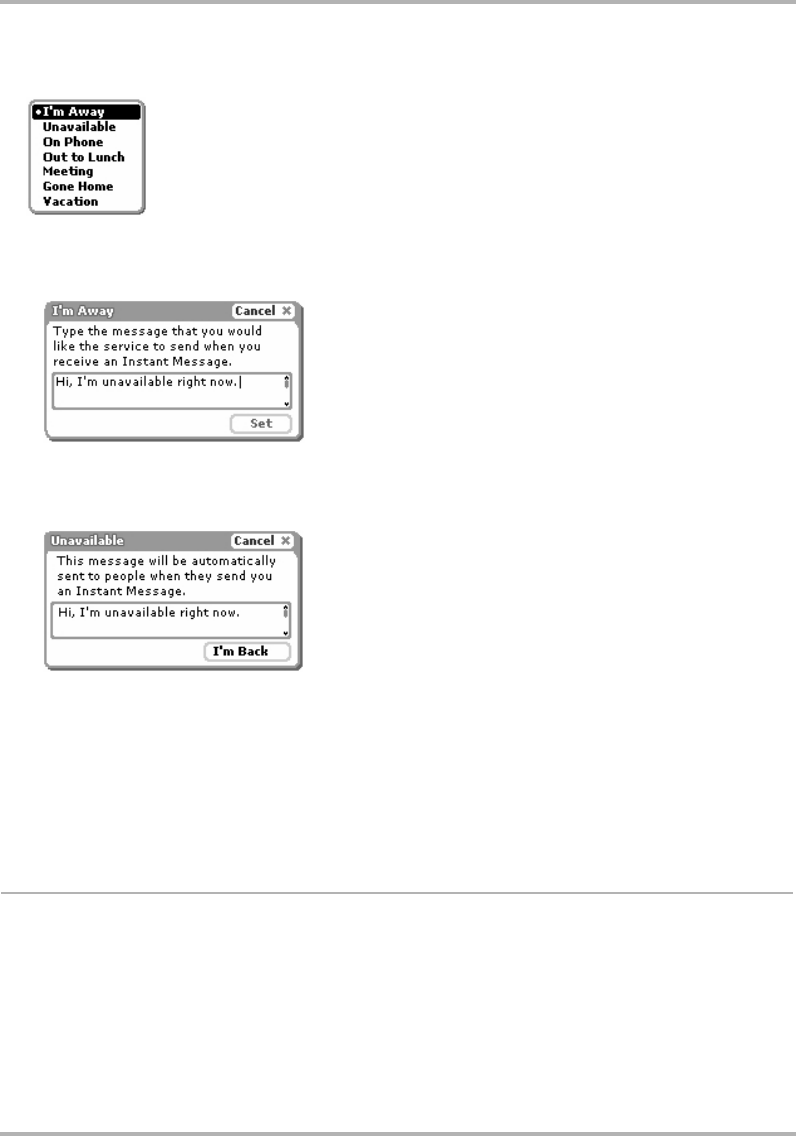
Instant Messaging
February 12, 2002 T-Mobile Device Owner’s Manual 70
2A pop-up menu opens listing all your possible away categories. The default categories are shown in the
example below. (You can create new categories only from the AIM Web browser client on your computer.)
3Use the wheel to highlight the away message you want to select, then click.
4If you click I’m Away, then a new dialog box will open in which you can type the message that will be sent to
the sender while you’re away:
After you type your I’m Away message and click Set, the Unavailable dialog box will open and stay open until
you return and click the I’m Back button. Note that whatever message you typed in the I’m Away dialog box
will also display in the Unavailable dialog box:
5If you click one of the other unavailable messages, The Unavailable dialog box will open (see above for
illustration). Type the message you want sent by AIM while you’re away. This dialog box will remain on your
screen in Instant Messaging until you click the I’m Back button.
6After you set an I’m Away message, your name is shown in regular face (as opposed to bold face) font in the
Conversation Management screen. Plus, if you have any open conversations, your away status is shown in
the conversation screen.
7To change your status from away to available, click the I’m Back button.
About Groups
To create or rename a group of buddies, you must do so from the AIM Web browser client on your computer.
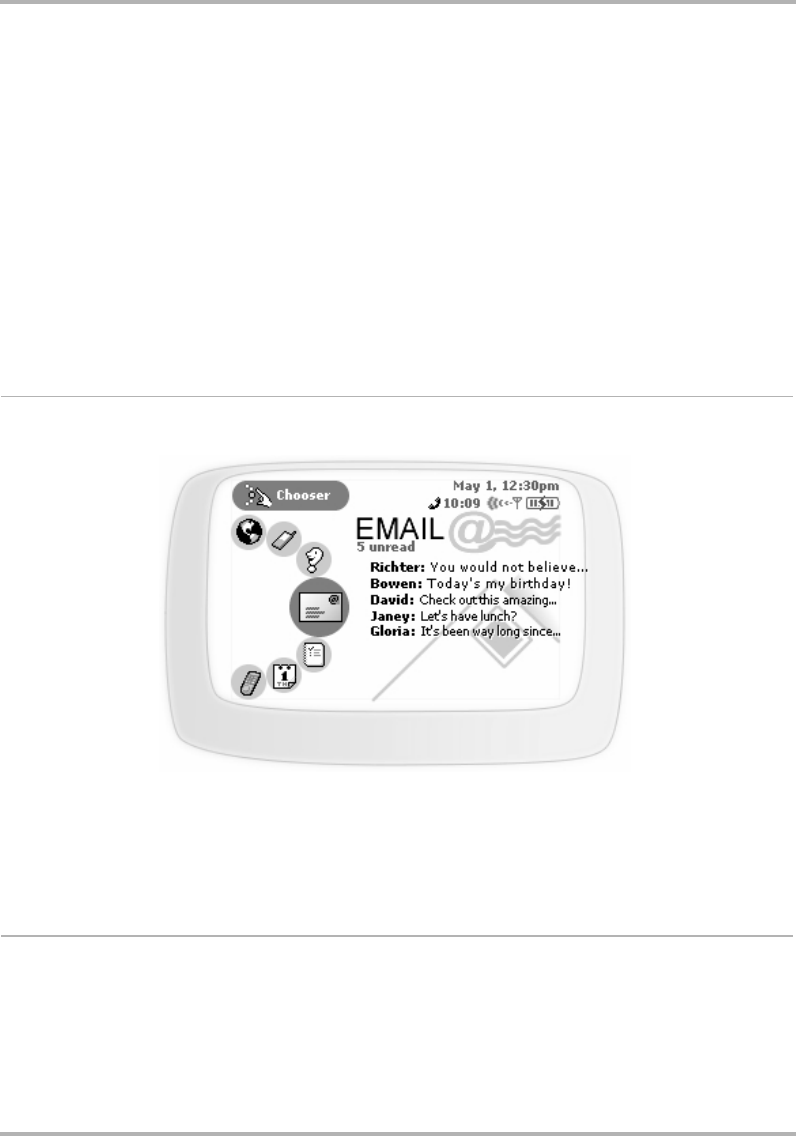
Email Messaging
February 12, 2002 T-Mobile Device Owner’s Manual 71
9. Email Messaging
Email on your T-Mobile Device is easy to use and rich in features. Not only do you get your own device email
account, but you can also pull in other email from up to three of your POP3 accounts. Read the topics in this
chapter to take full advantage of this flexible application.
The Email Preview Screen
From the Jump screen, with Email highlighted, you will see a preview screen similar to the following:
The preview screen is handy because it shows all your unread messages in the order received, with the
message received most recently on top. This means if you click the wheel to open Email, then open any of the
unread messages, and return to the preview screen, you’ll see that the message you’ve read has disappeared
from the preview screen list.
Email Preferences
You can decide how Email behaves on your own device by making settings on the Email Preferences screen.
Here’s how to open the Email Preferences screen:
1From the Jump screen click Email. The Browse Email screen appears.
•
The Email Preview Screen
on page 71
•
Email Preferences
on page 71
•
Browse Email Screen
on page 77
•
Status Indicators
on page 78
•
Keyboard Shortcuts
on page 79
•
View Your Email
on page 81
• Move Messages to Folders
on page 84
•
Send Messages
on page 84
•
Discard Email Messages
on page 87
•
Space Limitations
on page 88
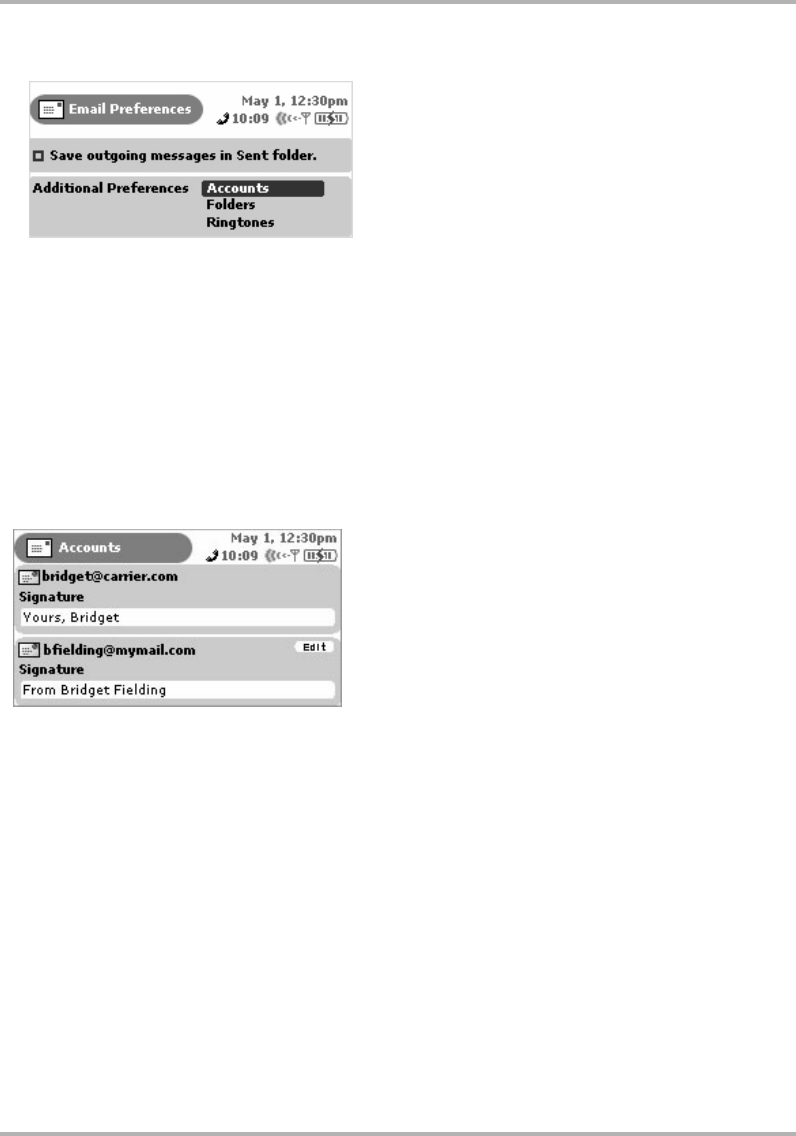
Email Messaging
February 12, 2002 T-Mobile Device Owner’s Manual 72
2Open the Browse Email menu and click Preferences... The Email Preferences screen appears:
Read more about each preference in the topics below.
Save Outgoing Messages in Sent Folder
By default, any email message you send is not saved to the Sent folder. If you want a copy of each email you
send to be saved to your device, select the check box labeled Save outgoing messages in Sent folder so a
check appears in the box. If you change your mind at some point, click the check box to clear the check.
About POP3 Email Accounts
You can receive email on your device from (up to) three POP3 email accounts that you already have. To set up
these accounts, as well as edit and discard accounts you’ve already set up, open the Email Preferences screen.
Then click Additional Preferences > Accounts. The Accounts screen appears:
The account listed at the top of the list is your primary device account and cannot be removed. Listed below
your primary account are any other POP3 accounts you may have added.
You can do the following from this screen:
•
Add a POP3 Account
•
Edit an Email Account
•
Discard an Email Account
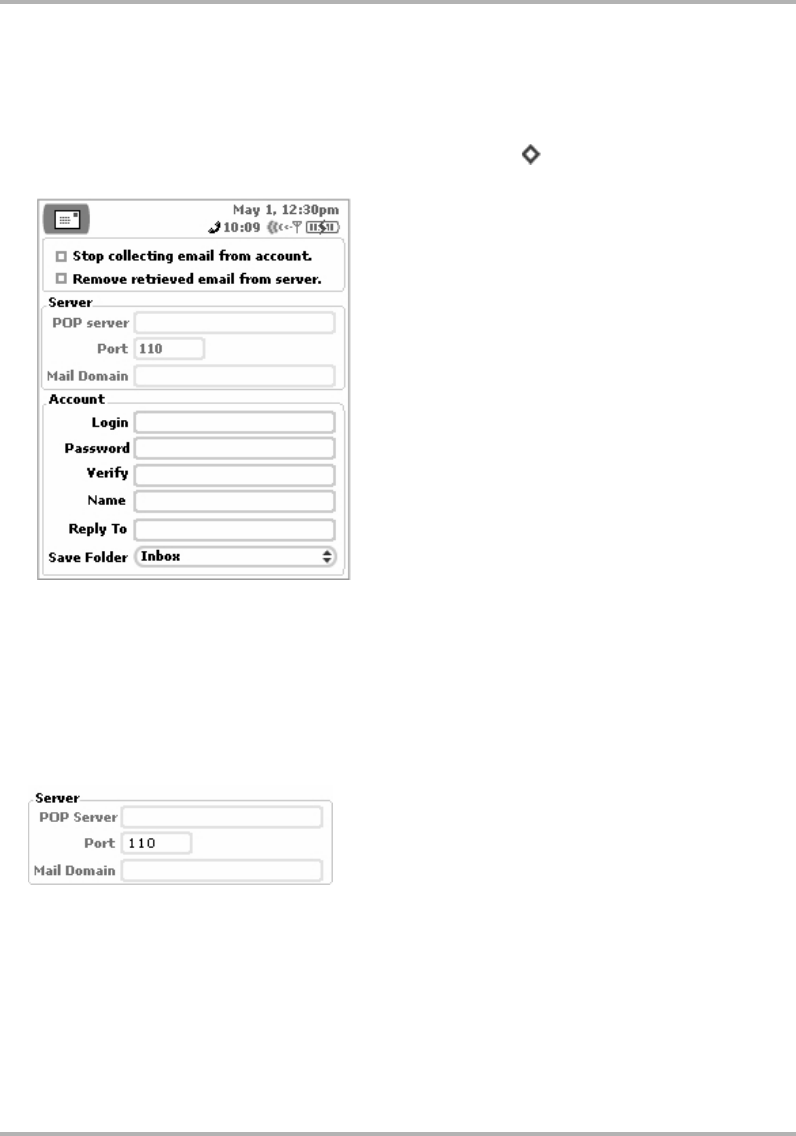
Email Messaging
February 12, 2002 T-Mobile Device Owner’s Manual 73
Add a POP3 Account
To add a POP3 account do the following:
1From the Jump screen click Email, then open the menu and click Preferences > Accounts.
2From the Accounts screen, open the menu and click New Accounts [+ N]. The New Accounts screen
opens:
3Assuming you’re setting up this account for the purpose of having the email collected, simply leave the Stop
collecting email from account check box alone (unchecked). If, at some point in the future, you want the
Email application to stop collecting email from the POP3 account, select the Stop collecting email from
account check box to put a check mark in the box. The account information is saved in case you want the
application to start collecting email from that account later.
4By default, email retrieved from a POP3 server to your device will remain on the POP3 server. If you want the
email to be removed from the POP3 server as it’s collected and sent to your device, select the Remove
retrieved email from server check box to make a check mark appear.
5Complete all the Server information fields:
•POP server - Obtain from the POP3 email service provider.
•Port - If you’re unsure what to type here, leave the port at 110.
•Mail Domain - The part of your email address that appears to the right of the @ sign. For example, if your
email is grace@myserver.com, the Mail Domain is “myserver.com”.
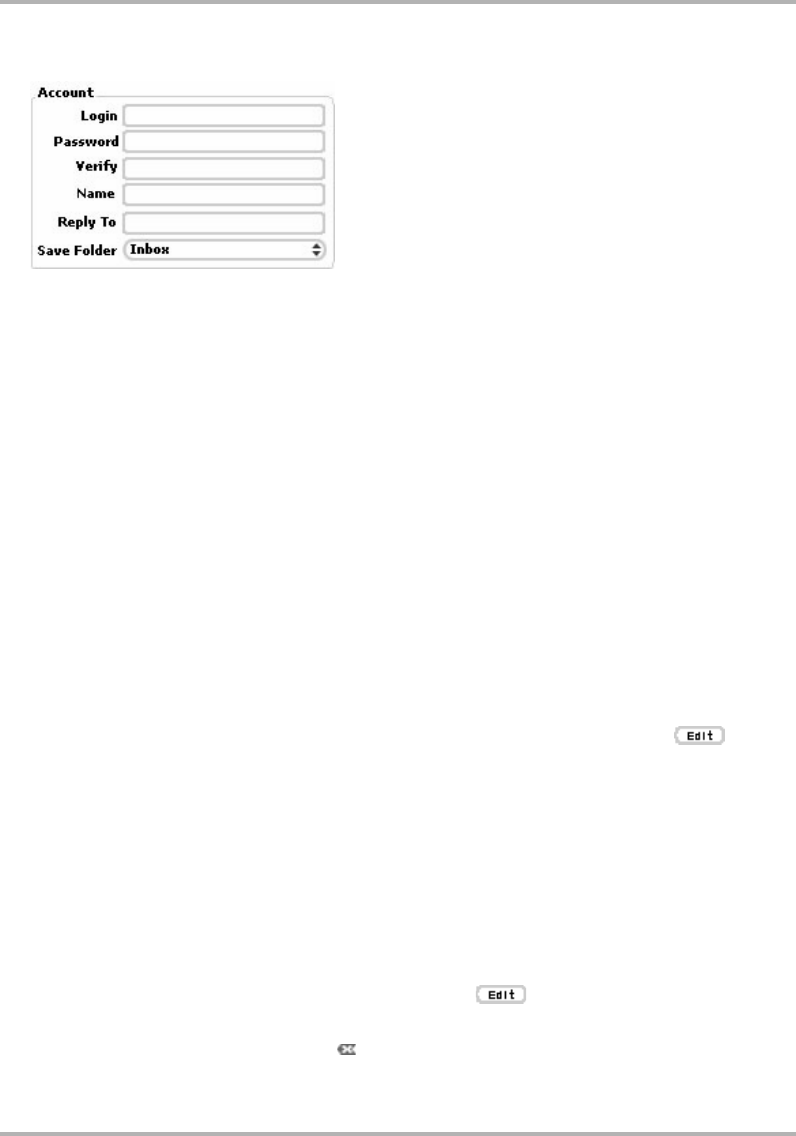
Email Messaging
February 12, 2002 T-Mobile Device Owner’s Manual 74
6Complete all the Account information fields:
•Login - The name you use to log in to your POP3 account.
•Password - The password you use for your POP3 account. You’re asked to verify this password by typing
it again.
•Name - Your name as you'd like it to appear on email sent through this account.
•Reply To - The email address to which you'd like all replies to go.
•Save Folder - Folder in which you would like all retrieved mail to be placed. You can create a folder
specifically for this purpose; read
Manage Email Folders
on page 75 for instructions on creating email
folders.
7When you have completed all fields on the screen, press the Back button to open a dialog box from which
you can Save the information, or Discard Changes. Before your account is completely set up, the validity of
the POP3 email account will be checked. You’ll know the account has been set up when you see it listed on
the Accounts screen.
Edit an Email Account
To edit a POP3 email account, do the following:
1From the Email Preferences screen, select Additional Preferences > Accounts. The Accounts screen
appears. From this screen you can change how the emails from all your accounts are signed. Note: You
cannot edit your primary device email account (the account listed first in the Accounts screen)
except
to
change the signature.
2To edit other account information, select the Email account you wish to edit by clicking the button
opposite the account name. Your account information appears.
3Make edits as you wish, then click the Back button to open a dialog box from which you can Save or Discard
Changes.
Discard an Email Account
Note: You cannot discard your primary device email account (the account listed first in the Accounts screen).
To delete any other POP3 email account, do the following:
1From the Email Preferences screen, select Additional Preferences > Accounts. The Accounts screen
appears.
2Select the Email account you wish to delete by making sure the button opposite the account name is
highlighted (shown in black).
3Open the menu and click Delete Account [].
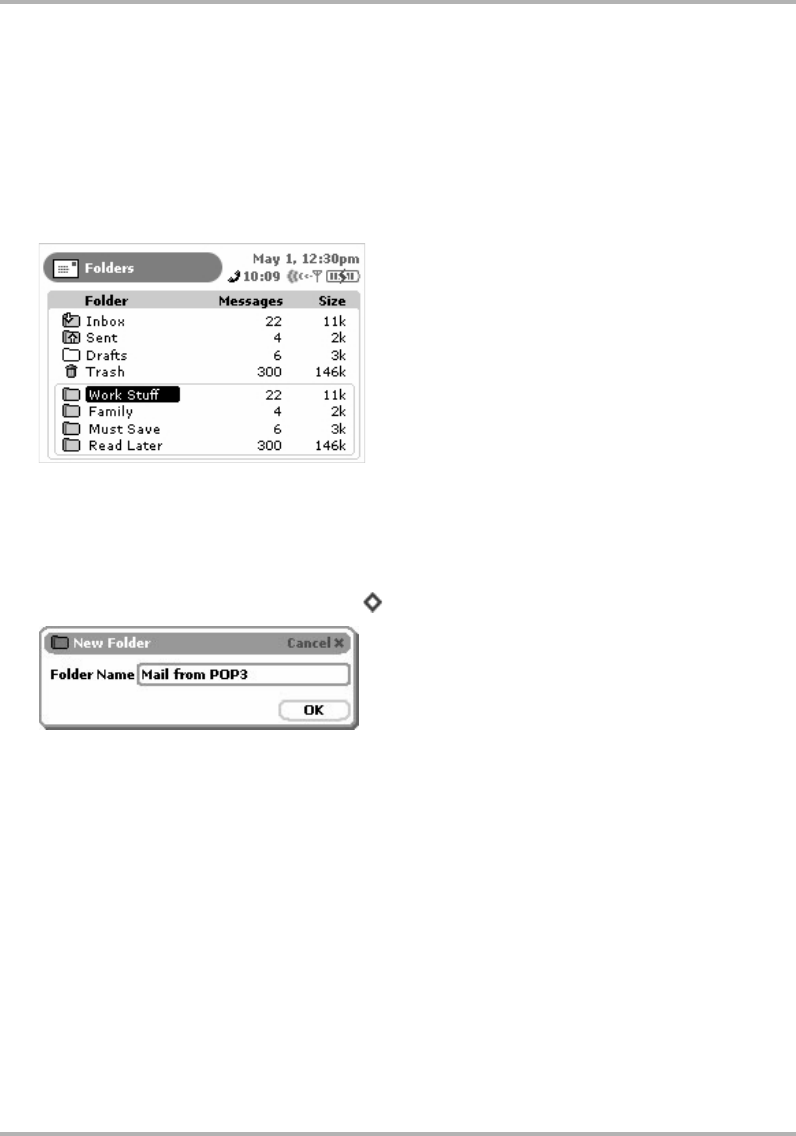
Email Messaging
February 12, 2002 T-Mobile Device Owner’s Manual 75
4A confirmation dialog box appears. Click OK to delete the account; press the Back button to cancel the
deletion.
Manage Email Folders
You can create folders in which to store and organize your emails. (Read more in
About Email Folders
on page
82.) To add new email folders, as well as edit and discard existing email folders you may have already created,
open the Email Preferences screen. Then select Additional Preferences > Folders. The Folders screen
appears:
All user-defined folders appear in the lower portion of the folder list.
Create an Email Folder
To create a new folder do the following from the Folders screen:
1Open the Folders menu and click New Folder [+ N]. The New Folder pane appears:
2Type the name of your new folder, then click OK.
Edit an Existing Email Folder
Note: You cannot edit the Inbox, Sent, Drafts, or Trash folders’ names as they are “system” folders.
To edit any other folder, do the following:
1From the Email Preferences screen, select Additional Preferences > Folders. The Folders screen appears.
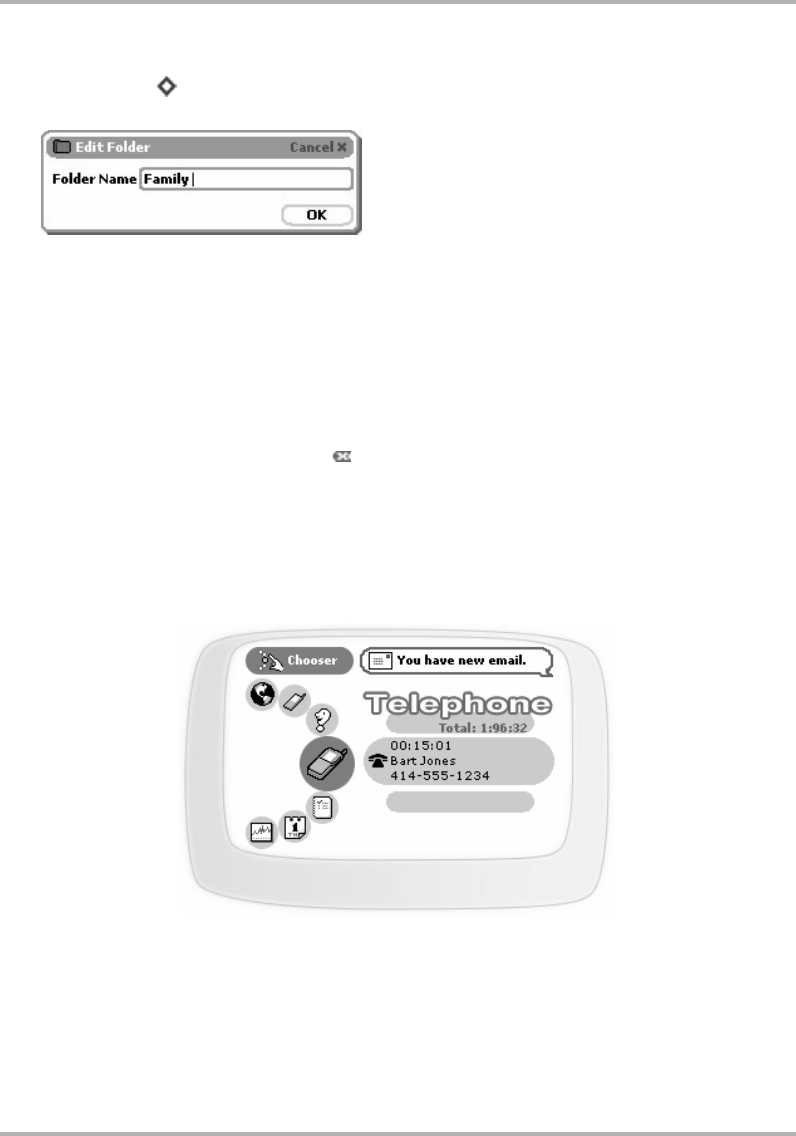
Email Messaging
February 12, 2002 T-Mobile Device Owner’s Manual 76
2Highlight the folder you want to edit and click the wheel. Alternatively, you can open the Folders menu to
click Edit Folder [+ E]. The Edit Folder pane appears with the text cursor in the Folder Name field, ready
for editing:
3Make your edit to the name, then click OK.
Discard an Existing Email Folder
Note: You cannot discard the Inbox, Sent, Drafts, or Trash folders as they are “system” folders.
To discard any other folder, do the following:
1From the Email Preferences screen, select Additional Preferences > Folders. The Folders screen appears.
2Highlight the folder you want to discard.
3Open the menu and click Discard Folder [].
4A confirmation dialog box appears. Click Discard to confirm the deletion or press the Back button to cancel
the deletion.
Select Email Notifications
You can select the way your device lets you know (or “notifies” you) when a new email has arrived. You will
always receive a banner notification in the title bar:
To select additional notification methods (sound, flasher, or vibration), do the following:
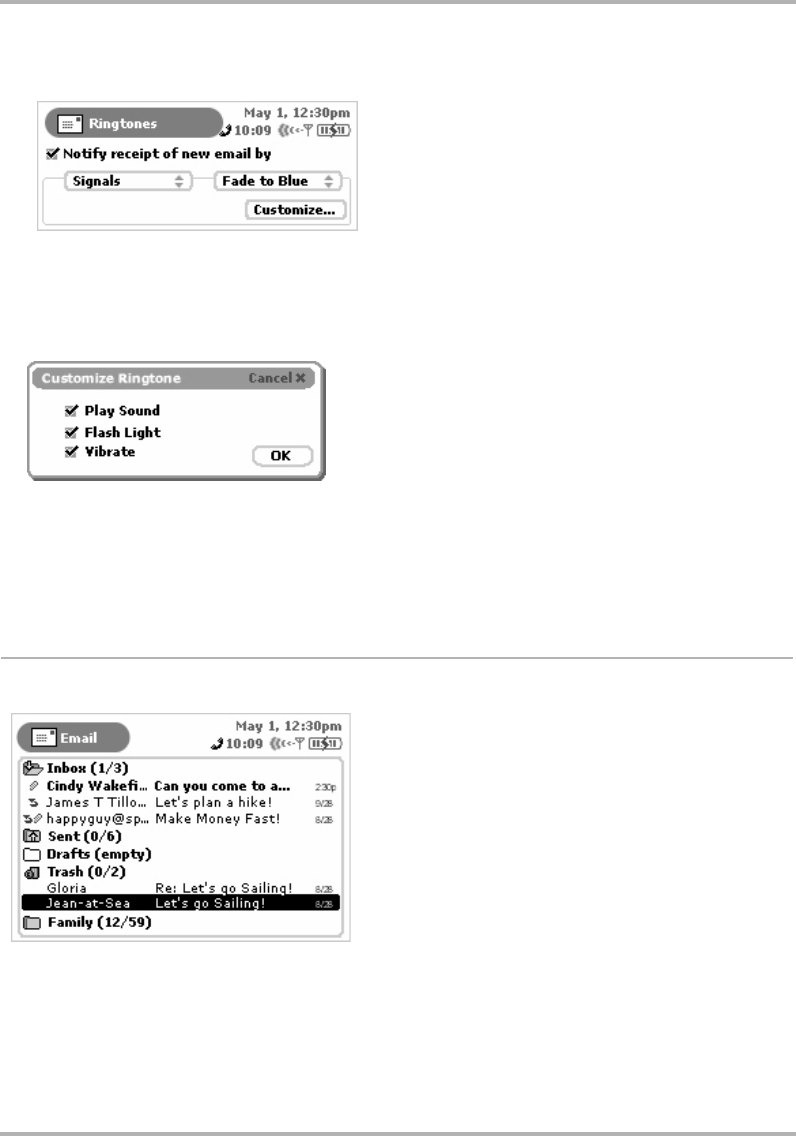
Email Messaging
February 12, 2002 T-Mobile Device Owner’s Manual 77
1From the Email Preferences screen, select Additional Preferences > Ringtones. The Ringtones screen
opens:
2Select a notification “category” from the first pop-up menu. In the example above, “Signals” has been
selected. Depending on what category you’ve selected, you will have additional sound selections in the pop-
up menu to the right. You will hear a preview of the sound when you click it.
3Depending on what category and sound you select, you’ll be able to customize your notification by clicking
the Customize... button. The Customize Ringtone dialog box appears:
4Select the Play Sound, Flash Light, or Vibrate check boxes as you wish to further customize your notification
method. The options not available (given your ringtone category choice) are dimmed. Click OK when finished
to dismiss the Customize Ringtone dialog box and return to the Ringtones screen.
5Click the Back button when you’re finished with your settings. You’re prompted to Save or Discard
Changes. You’ll return to the Email Preferences screen.
Browse Email Screen
The Browse Email screen is your main view into the Email application:
The Browse Email screen lists all your emails, grouped into folders, ordered by date. (Read more about ordering
your lists in
Sort Email Messages
on page 83.)
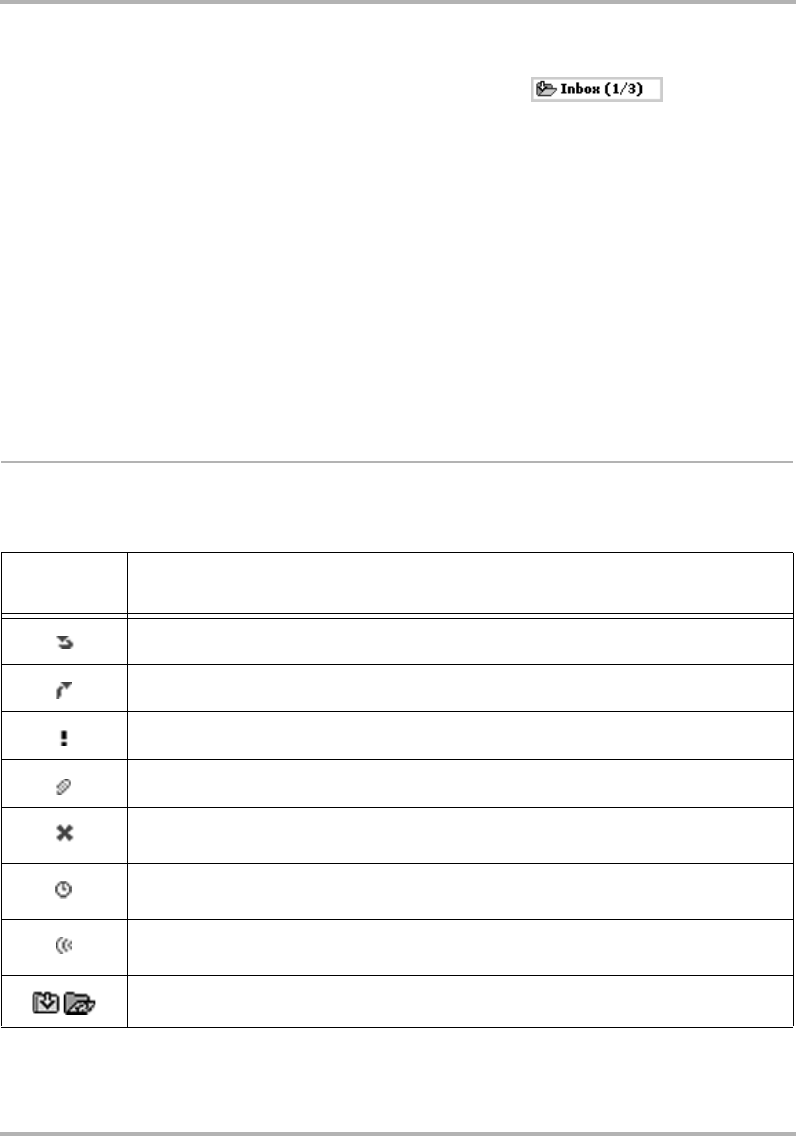
Email Messaging
February 12, 2002 T-Mobile Device Owner’s Manual 78
In the illustration above you’ll see the four “system folders”--Inbox, Sent, Drafts, and Trash--plus all the folders
you have created to organize your emails, identified by a folder-type icon:
To the right of the folder name, the number of unread versus total number of messages is shown in
parentheses. In the example above, Inbox (1/3) contains three messages, of which one is unread. The Inbox is
shown in “expanded” view (its list of emails is showing), with the first message in bold, indicating it is “unread”.
The Sent folder contents are collapsed, as are the Drafts folder contents (empty folders are always shown
collapsed, of course). The Trash folder is shown in expanded view and contains two emails. A personal folder a
user has named Family is shown last. It contains 12 unread and 59 total email messages.
As shown in the illustration above, individual emails are grouped in collapsible folder lists. To open (expand) a
folder’s list of emails, use the wheel to highlight the folder name, then click. To collapse the list, click again. Click
again to expand, etc.
To open an individual email, highlight the email, then click the wheel. To learn more about reading your email,
read
View Your Email
on page 81. To learn about adding folders, read
Manage Email Folders
on page 75.
To the left of each item in the Browse Email screen is an icon that indicates the status of the folder or email. To
interpret these icons, read the topic immediately following.
Status Indicators
Icons shown the to left of each folder name or email message tell you their status. Plus, all unread messages
are shown in bold. The table below explains what each status icon means.
This
indicator Means
You have replied to this message.
You forwarded this message.
This message is URGENT!
This email has an attachment.
There was an error when sending this email. (It wasn’t sent.) You will only see this status
indicator next to messages in the Sent folder.
This email is waiting to be sent. You will only see this status indicator next to messages in
the Sent folder.
This email is being sent. You will only see this status indicator next to messages in the
Sent folder.
Icons identifying the Inbox folder, with contents collapsed/expanded.
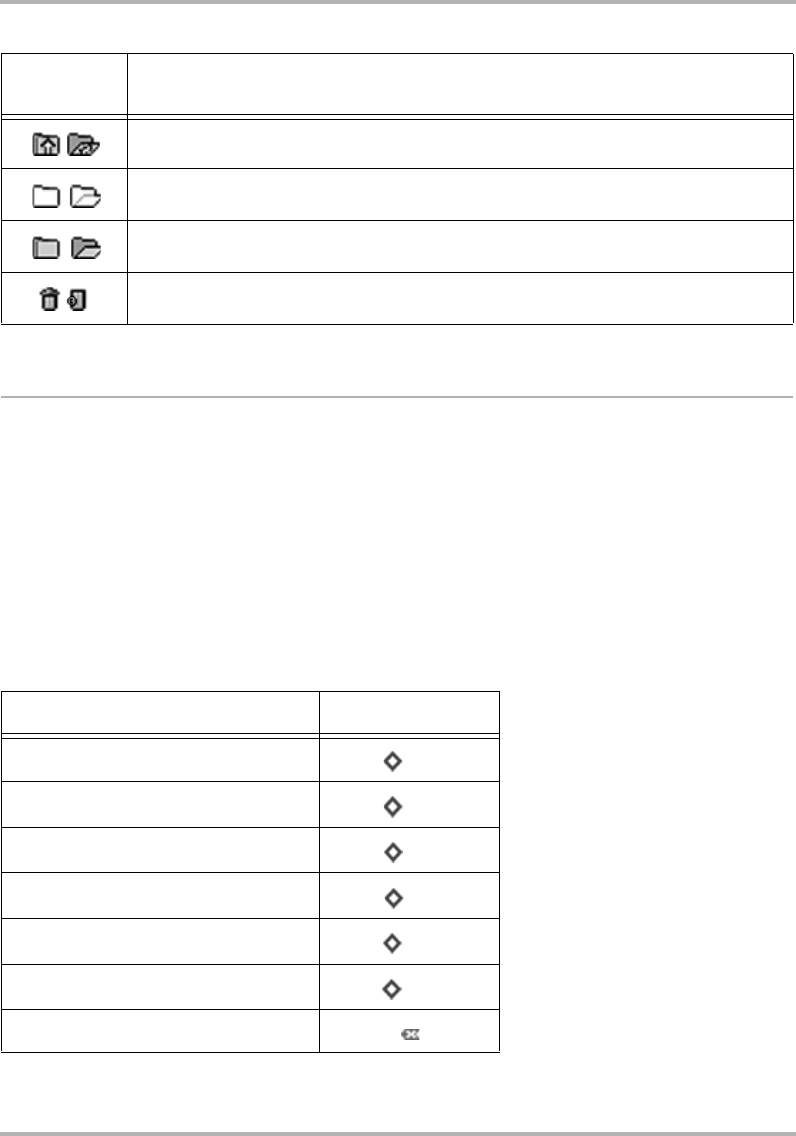
Email Messaging
February 12, 2002 T-Mobile Device Owner’s Manual 79
Keyboard Shortcuts
While in Email, you can use keyboard shortcuts to open options from the following Email menus:
•
Browse Email Menu Shortcuts
•
Read Email Menu Shortcuts
•
Compose Menu Shortcuts
•
Preferences Menu Shortcuts
•
Accounts Menu Shortcuts
•
Folders Menu Shortcuts
Each menu’s shortcuts are listed in the tables below.
Browse Email Menu Shortcuts
Icons identifying the Sent folder, with contents collapsed/expanded.
Icons identifying the Drafts folder, with contents collapsed/expanded.
Icons identifying a user-defined folder, with contents collapsed/expanded.
Icons identifying the Trash folder, with contents collapsed/expanded.
Browse Email menu options Shortcut
New Message... + N
Reply... + R
Reply All... + A
Forward... + F
Add to Contacts... + =
Move Message + M
Discard Message
This
indicator Means
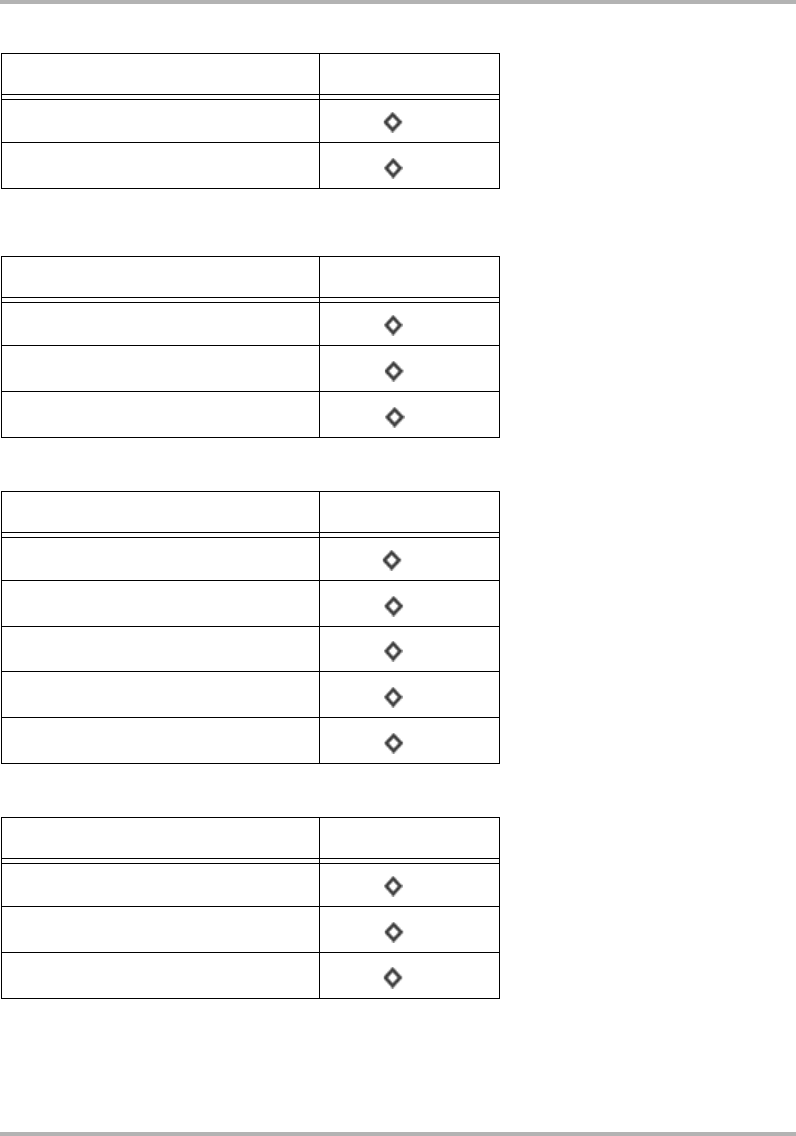
Email Messaging
February 12, 2002 T-Mobile Device Owner’s Manual 80
Read Email Menu Shortcuts
Compose Menu Shortcuts
Preferences Menu Shortcuts
Check for New Email + U
Sort... + T
Read Email menu options Shortcut
Mark Unread + K
Next + L
Previous + J
Compose menu options Shortcut
Send Now + M
Save as Draft + S
Add CC + C
Add BCC + B
Attach Snapshot + P
Preferences menu options Shortcut
Edit Accounts + A
Edit Folders + F
Edit Ringtones + N
Browse Email menu options Shortcut
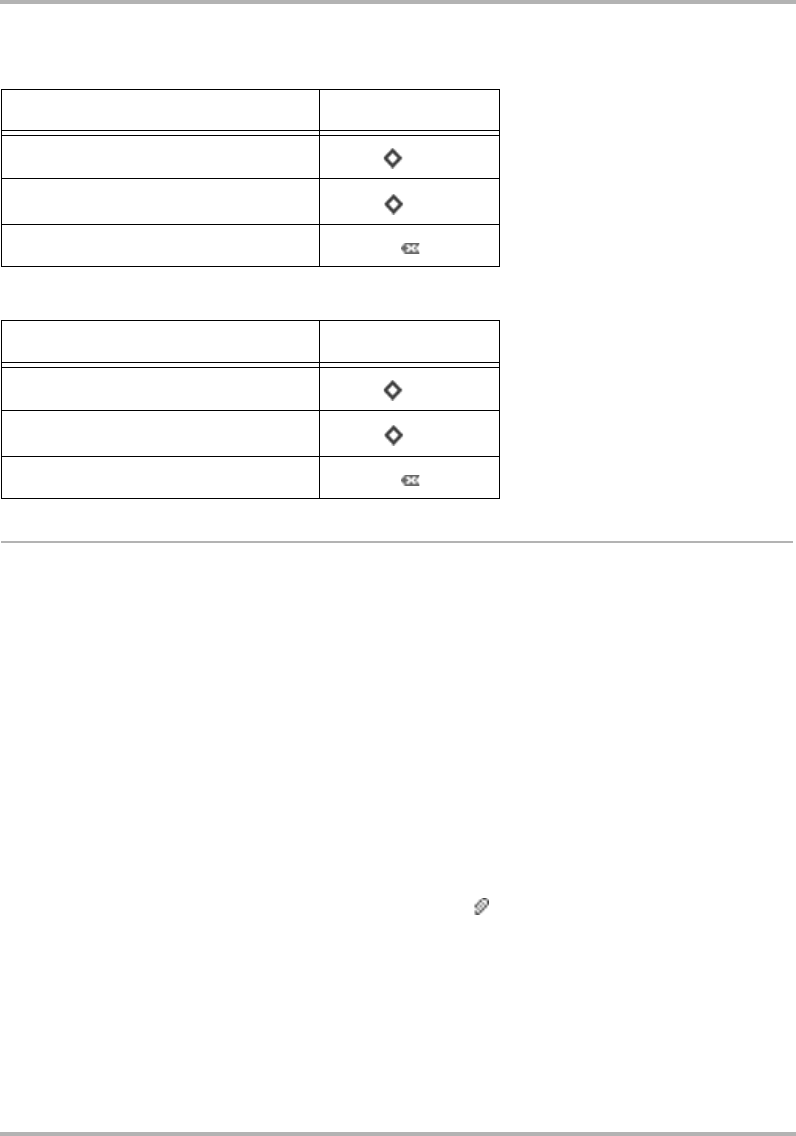
Email Messaging
February 12, 2002 T-Mobile Device Owner’s Manual 81
Accounts Menu Shortcuts
Folders Menu Shortcuts
View Your Email
To view a list of all your email messages, use the Browse Email screen. You can get to this screen via the Jump
screen after selecting Email. If you are already in one of the Email screens, then click Browse Email from the
menu, or press the Back button until the Browse Email screen appears. Read more in
Browse Email Screen
on
page 77.
Read an Email
To open an individual email for reading, do the following:
1Make sure the folder in which you’ve stored the email is shown in expanded view. (Click the folder name to
expand/collapse the emails contained in the folder.)
2Use the wheel to highlight the email, then click. Your email contents display in the Email:Read screen.
3To dismiss the email and return to the Browse Email screen, click the Back button.
Open an Attachment
You know an email has an attachment if there is a paperclip icon ( ) just to the left of the message, as
displayed in the Browse Email screen. Attachments that are supported include other emails, as well as graphic
files of the following formats:
•.gif
• .jpg, .jpeg
•.png
•.bmp
Accounts menu options Shortcut
New Account + N
Edit Account + E
Discard Account
Folders menu options Shortcut
New Folder + N
Edit Folder + E
Discard Folder
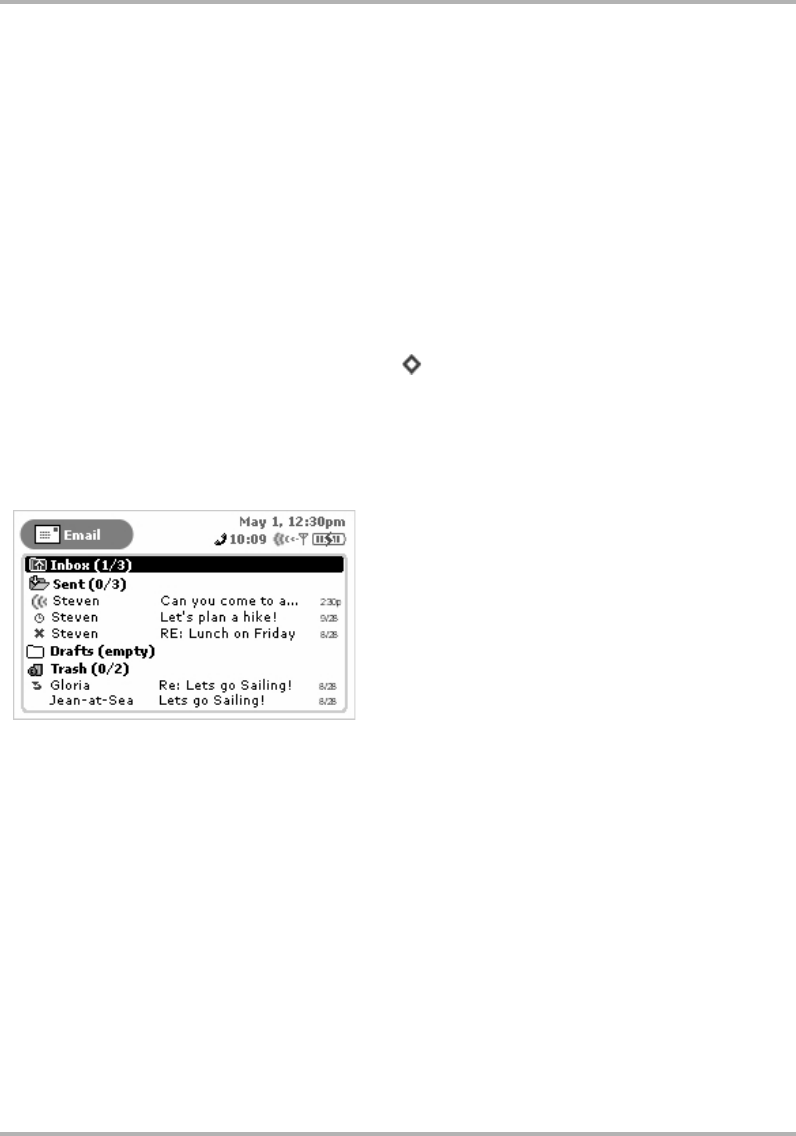
Email Messaging
February 12, 2002 T-Mobile Device Owner’s Manual 82
To open a graphic attachment, open the email, the use the wheel to scroll to the attachment link, then click.
Open Hypertext Links in Messages
If a hypertext link is embedded in an email message (including attached email addresses and Web site
addresses), these links will appear at the bottom of the email message as a clickable button.
Change the Status of an Email to Unread
Normally, when you have an unread email message, it is listed on the Email preview screen, and it is shown in
bold on the Browse Email screen. Once you’ve read the message, it disappears from the preview screen and
appears in regular type on the Browse Email screen. However, there may be times when you want to mark an
unread message as read. To do this:
1From the Browse Email screen, open the email message whose status you want to change to “read”.
2Open the Email:Read menu and click Mark Unread [+ K].The message appears again on the preview
screen and on the Browse Email screen in bold.
About Email Folders
The Email application uses four “system” folders--Inbox, Sent, Drafts, and Trash--shown in the illustration
below:
You cannot discard or modify the four system folders (Inbox, Sent, Drafts, Trash), but you can add any number
of folders with names you define. To add new, edit, or discard existing user-defined email folders, you use the
Email Preferences screen, as described in the following topics:
•
Manage Email Folders
on page 75
•
Edit an Existing Email Folder
on page 75
•
Discard an Existing Email Folder
on page 76
Here’s a little more information about each system folder:
•Inbox - The Inbox folder is the default drop point for any new emails you receive. Note that you can
specify that email from POP3 accounts be dropped into folders you create. (Read more in
Manage Email
Folders
on page 75.)
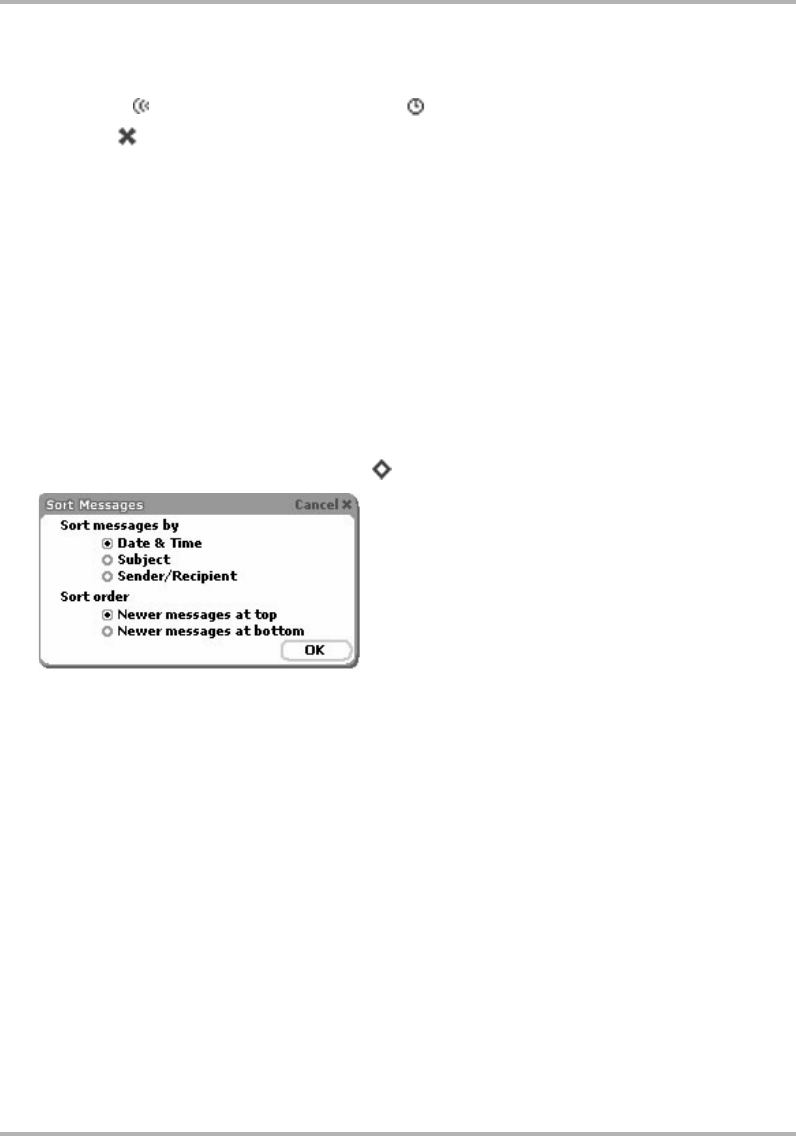
Email Messaging
February 12, 2002 T-Mobile Device Owner’s Manual 83
•Sent - As you send an email message, the email is displayed in the Sent folder (expanded view), with its
status just to the left. In the illustration above you’ll see the status indicators showing the top email is
being sent ( ), the second is waiting to be sent ( ), and the third was not sent due to a delivery
problem ( ).
After a message has been sent, it disappears from the Sent folder, unless you specify in the Email
Preferences screen that you want to Save outgoing messages in Sent folder. If you’ve set this
preference, a copy of every email you compose and send will be saved in the Sent folder.
•Drafts - If you start composing an email but want to pause in writing it or wait to send it, then you can
save the email in the Drafts folder and later open it and continue. (Read more in
Save an Email Message as
a Draft
on page 85)
•Trash - Every message you discard from other folders is moved to the Trash folder. Discarded emails
accumulate in the Trash until you explicitly use the menu option to Empty Trash. As long as an email
stays in the Trash, however, you can restore it to another folder. (Read more in
Discard Email Messages
on
page 87.)
Sort Email Messages
Within each folder you can decide how you want messages to be sorted:
1Open the Browse Email screen and click Sort... [+ T]. The Sort Messages dialog box opens:
By default, messages are sorted by date & time, with newer messages appearing at the top.
2If you want to change this default sort behavior, you can choose from:
•Date & Time - further specify sort order:
- Newer messages at top
- Newer messages at bottom
•Subject - further specify sort order:
- A .. Z
- Z .. A
•Sender/Recipient - further specify sort order:
- A .. Z
- Z .. A
3When finished, click OK to save changes, or push the Back button to dismiss the window with no changes.
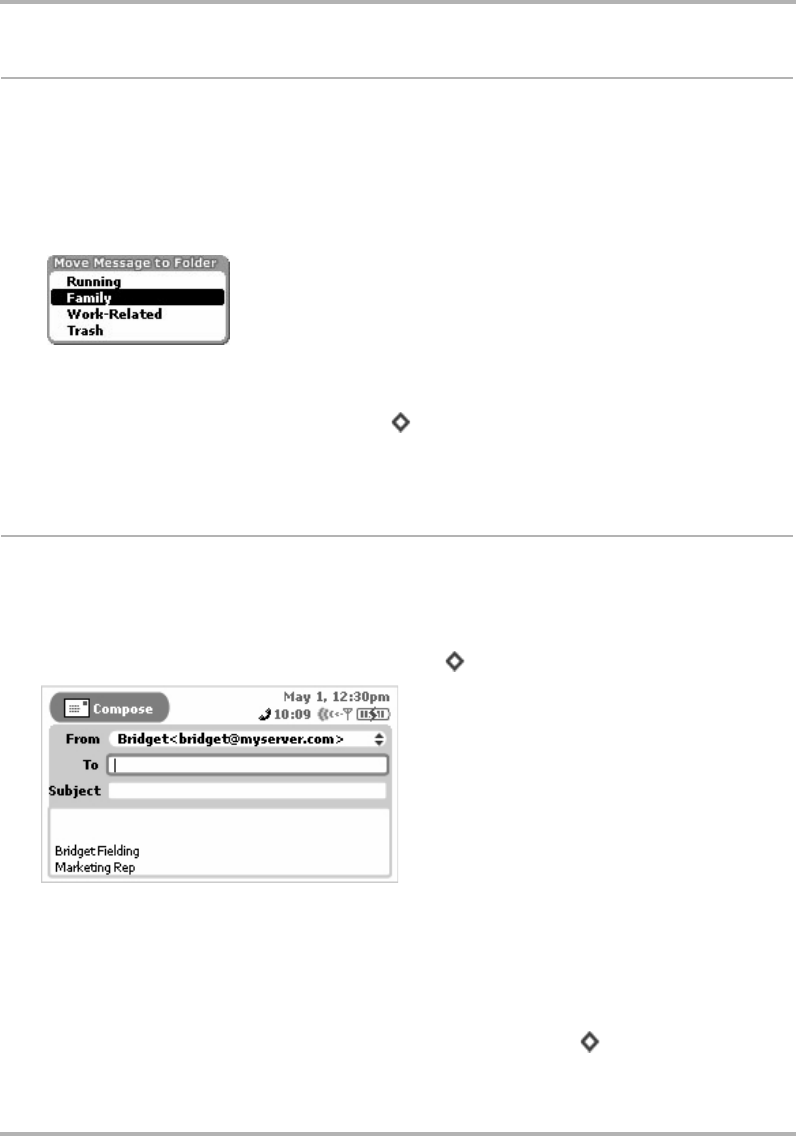
Email Messaging
February 12, 2002 T-Mobile Device Owner’s Manual 84
Move Messages to Folders
You can move messages around within folders by doing the following:
1From the Browse Email screen, expand the folder that holds the email you want to move.
2Highlight the email you want to move and then open the Move Message to Folder pane. There are three
ways to open this pane:
• Use the wheel to highlight the email, then hold the wheel down. The Move Message to Folder pane
appears.
• Use the wheel to highlight the email. Press the Menu button to open the menu, then select Move
Message.... The Move Message to Folder pane appears.
• Use the wheel to highlight the email, then press + E. The Move Message to Folder pane appears:
3All folders (
except
for the Drafts and Sent folders, and the folder the email currently is in) are shown in the
list. Highlight the folder into which you want to move the message, then click.
Send Messages
Compose a New Message
To write a new email message you must first open the Compose screen:
1Open the Browse Email screen and click New Message... [+ N]. The Compose screen opens:
2Complete your message:
•From field - If you have set up POP3 accounts, then you can choose what address you want to use to send
the email. To open the pop-up menu with your addresses, highlight the From field and click the wheel.
•To field - As you fill in the To field, the Email application will communicate with the Address Book and offer
you completion suggestions (based on your existing Address Book contacts). The suggestions appear in a
drop-down list. Scroll and click to select one of the address suggestions or type a new one. To create a
new line so you can add more recipients, press the comma (,) key or press + RETURN.

Email Messaging
February 12, 2002 T-Mobile Device Owner’s Manual 85
•CC and BCC fields - Optional fields you can display by opening the Compose menu and clicking Add CC
or Add BCC. You cannot show both BCC and CC fields; only one or the other. To create a new line so you
can add more recipients, press the comma (,) key or press + RETURN.
•Subject field - Type your subject line; there are no limits to how long a subject line can be.
•Message body - Type your message body; there are no limits to how long a message body can be.
•Signature - Edit or use the default message you set up in Preferences > Accounts > Signature.
3To send your message, do one of the following:
• Open the Compose menu and click Send Now.
• Press + M.
• Press the Back button; a dialog box appears asking you to select Discard, Save as Draft, or Send Now.
Click Send Now.
4To discard your message, either:
• Open the Compose menu and click Discard.
• Press the Back button; a dialog box appears asking you to select Discard, Save as Draft, or Send Now.
Click Discard.
Note about in-progress messages: If you are composing more than one message at a time, each in-progress
message is listed in the Browse Email menu at the bottom of the list. To return to each compose screen, simply
open the menu and click the message you want to view.
Note about attachments: You cannot attach files to emails you compose on your device (except for photos),
but you can forward emails with attachments. Read more in
Open an Attachment
on page 81 and
Email Photos
on page 124.
Save an Email Message as a Draft
If you are composing an email message and want to save it so you can resume composing or sending at a later
time, save your message in the drafts folder by doing one of the following:
• Open the Compose menu and click Save as Draft.
• Press + S.
• Press the Back button; a dialog box appears asking you to select Discard, Save as Draft, or Send Now.
Click Save as Draft.
To re-open a draft message, from the Browse Email screen highlight the draft message you want to open and
click. The message reopens in the Compose screen for editing.
Note: If, after editing, you still want to keep the message as a draft, be sure to use one of the methods to Save
as Draft again--don’t discard the message or the it will be deleted, as in not saved to your Trash folder.
Reply to an Email Message
To reply to an email message, do the following:
1From the Browse Email screen, highlight the email you want to reply to. Open the email if you wish by
clicking the wheel.
2From either the Email:Read or Browse Email screen, open the menu and click one of:
•Reply... [+ R] to address your reply only to the individual who sent you the message.
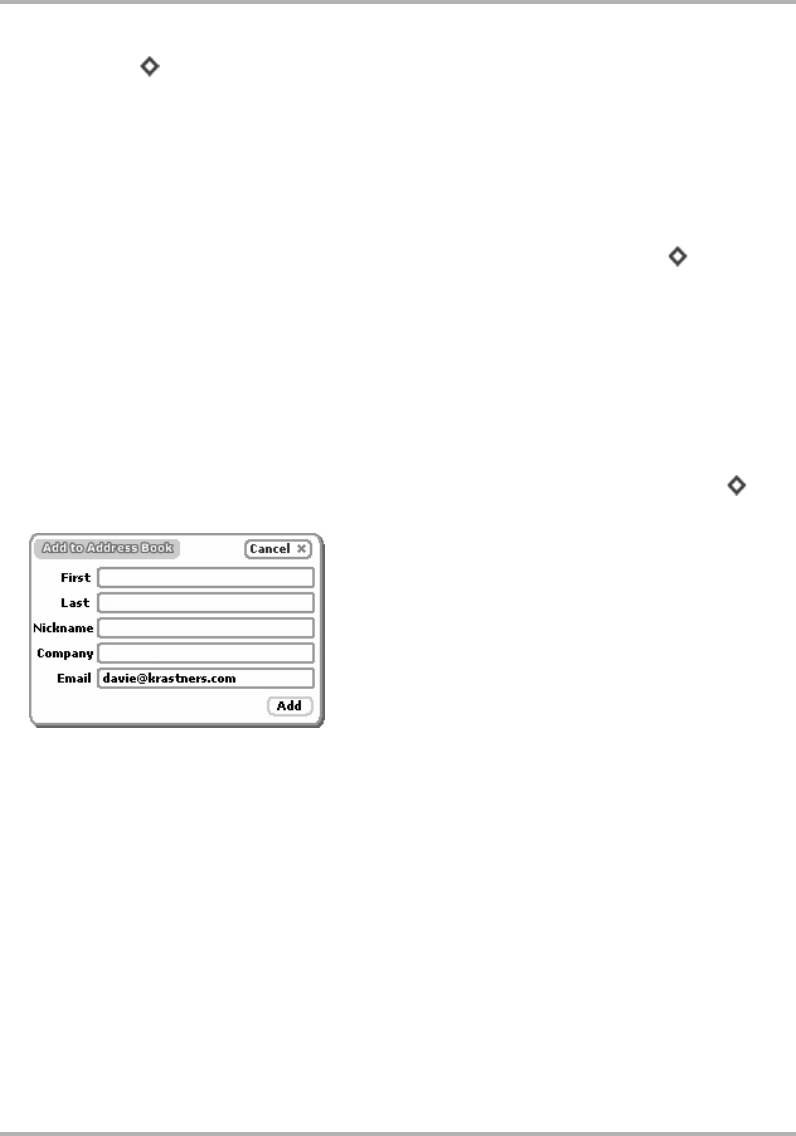
Email Messaging
February 12, 2002 T-Mobile Device Owner’s Manual 86
•Reply All... [+ A] to address your reply to all individuals copied on the message.
3The Reply screen opens with the To: field filled in according to the menu option you selected.
Forward an Email Message
To forward an email message to one or more addresses, do the following:
1From the Browse Email screen, highlight the email you want to forward. Open the email if you wish by
clicking the wheel.
2From either the Email:Read or Browse Email screen, open the menu and click Forward... [+ F].
3The Forward screen opens ready for you to address. The email, including any attachments, are appended to
the end of the new message.
Adding Email Senders to the Address Book
If you receive an email from an individual you would like to include as a contact in the Address Book, do the
following:
1From the Browse Email screen, highlight the email whose sender you want to add as a contact. Open the
email if you wish by clicking the wheel.
2From either the Email Read or Browse Email screen, open the menu and click Add to Contacts... [+ =].
3The Add to Address Book dialog box pens with the new contact’s name and email address added:
4Complete the information, then click Add.
Read more about editing contact information in the Address Book application in
11. Keeping Contacts in the
Address Book
on page 97.
Note! If you add an entry that is already listed as a contact in your Address Book, you will create a duplicate
entry for that contact.
Adding Email Recipients to the Address Book
If you compose an email and want to add any of the recipients to your Address Book, do this:
1Compose a new email to the point where you at least have listed the recipients.
2Save the email as a draft, or (if you’ve set up in Preferences to save outgoing messages to the Sent folder)
send it.
3Highlight the email (in either the Drafts or Sent folder). Don’t open it if it’s a draft.
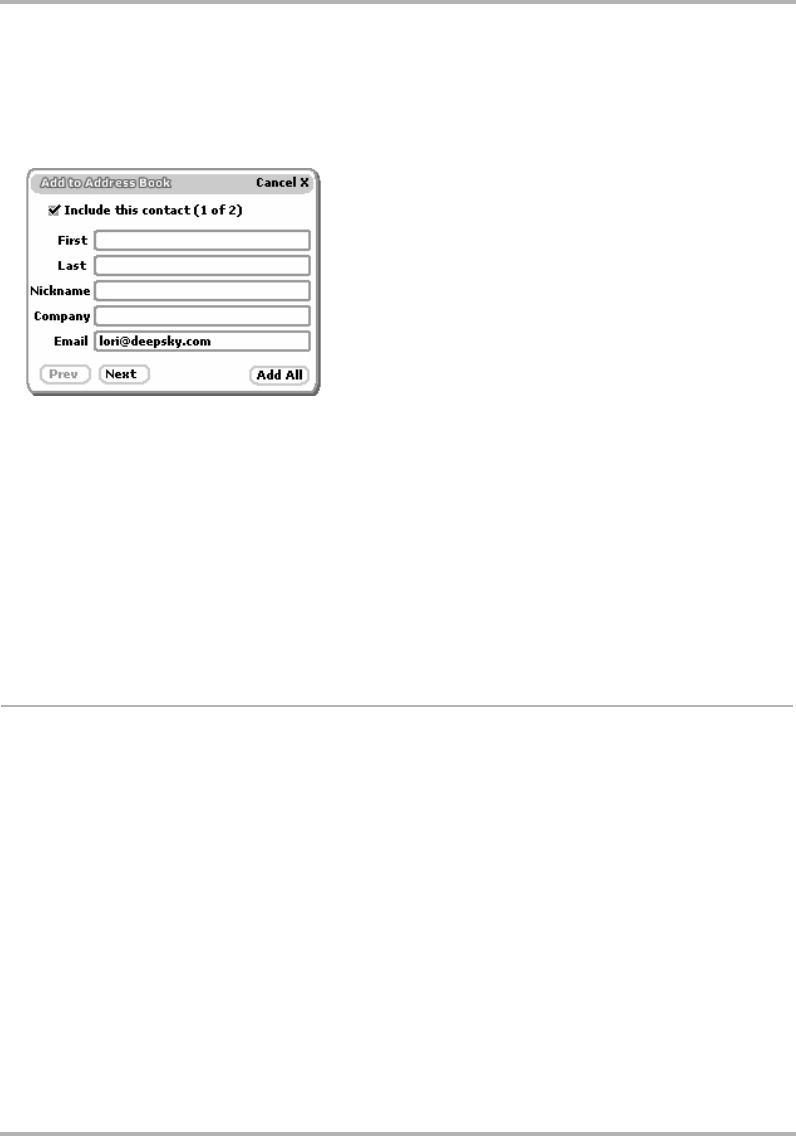
Email Messaging
February 12, 2002 T-Mobile Device Owner’s Manual 87
4Open the menu and click Add to Contacts... The Add to Address Book dialog box opens.
5 If you have only one email recipient, the dialog box shown in
Adding Email Senders to the Address Book
on page 86 appears. Complete the information you want to include in the contact information, then click
Add.
6 If you have more than one email recipient, this dialog box appears:
• If you want the first email recipient (lori@deepsky.com in the example above) added to your Address
Book, select the Include this contact check box (it is selected by default), complete the contact
information you want to include, and click Next. The next recipient’s blank contact information appears.
• Continue through recipients until you reach the final recipient. If there are any recipients you do not want
to include, clear the Includethiscontact check box.
• When you’ve progressed through the screens for all recipients, click Add All to add all the selected
recipients to your Address Book.
7If you want to provide more complete information for the added recipient(s), go to the Address Book
application to edit the contact information. Read more in
Edit a Contact
on page 106.
Note! If you add an entry that is already listed as a contact in your Address Book, you will create a duplicate
entry for that contact.
Discard Email Messages
To delete an email message, do the following:
1From the Browse Email screen, highlight the email you want to discard. Open the email if you wish by clicking
the wheel.
2From either the Email Read or Browse Email screen, open the menu and click Discard Message.
3The message is moved to the Trash folder.
4To restore your discarded message, from the Browse Email screen expand the contents of the Trash folder.
Use the wheel to highlight the email you want to restore then hold the wheel down. The Move Message to
Folder pane appears.
5Highlight the folder to which you want to restore the email and click.
To empty all messages from the Trash, from the Browse Email screen open the menu and click Empty Trash.
The contents of your Trash folder are emptied (without asking you for confirmation).

Email Messaging
February 12, 2002 T-Mobile Device Owner’s Manual 88
Space Limitations
You can store up to 5 MB of email messages using the Email application. Once you near your storage space limit,
you will receive a warning and recommendation that you empty your trash and delete unnecessary messages.
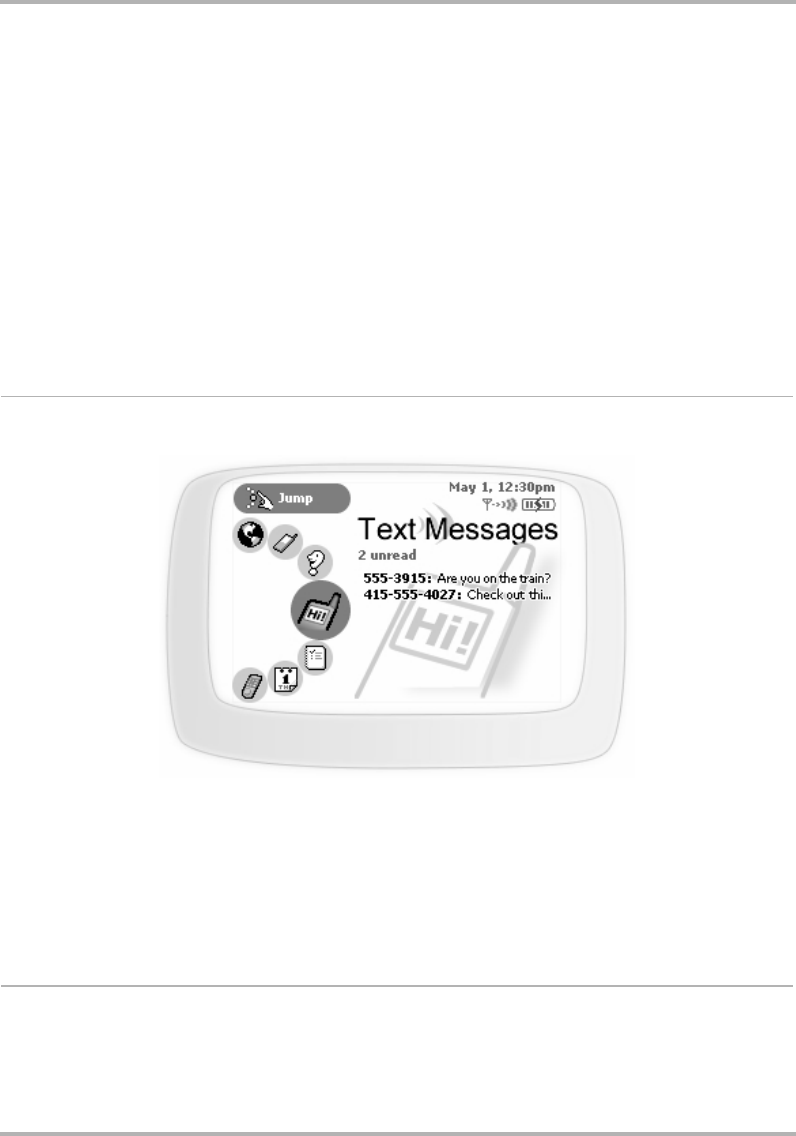
Text Messaging
February 12, 2002 T-Mobile Device Owner’s Manual 89
10. Text Messaging
Text Messages is T-Mobile’s exclusive two-way text messaging application that lets you send, receive, and reply
to short text messages directly from your phone. It’s fun! Learn all about Text Messages by reading the topics in
this chapter:
Text Messages Preview Screen
From the Jump screen, with Text Messages highlighted, you will see a preview screen similar to the following:
The preview screen shows all your unread text messages in the order received, with the message received
most recently on top. If you click the wheel to open the Text Messages application, open any of the unread
messages, then return to the preview screen, you’ll see that the message you’ve opened has disappeared from
the preview screen list.
Note: Text Messages messages are SMS messages that are delivered via the “Short Message Service”, also
referred to simply as “SMS”.
Text Messages Preferences
You can decide how the Text Messages application behaves on your own device. You make these settings by first
going to the Text Messages Preferences screen. Here’s how to open the Preferences screen:
•
Text Messages Preview Screen
on page 89
•
Text Messages Preferences
on page 89
•
Browse Text Messages Screen
on page 91
•
Status Indicators
on page 91
•
Keyboard Shortcuts
on page 92
•
View Your Text Messages
on page 93
•
Sort Text Messages
on page 93
•
Send Text Messages
on page 94
•
Discard Text Messages
on page 96
•
Receive Ringtones
on page 96
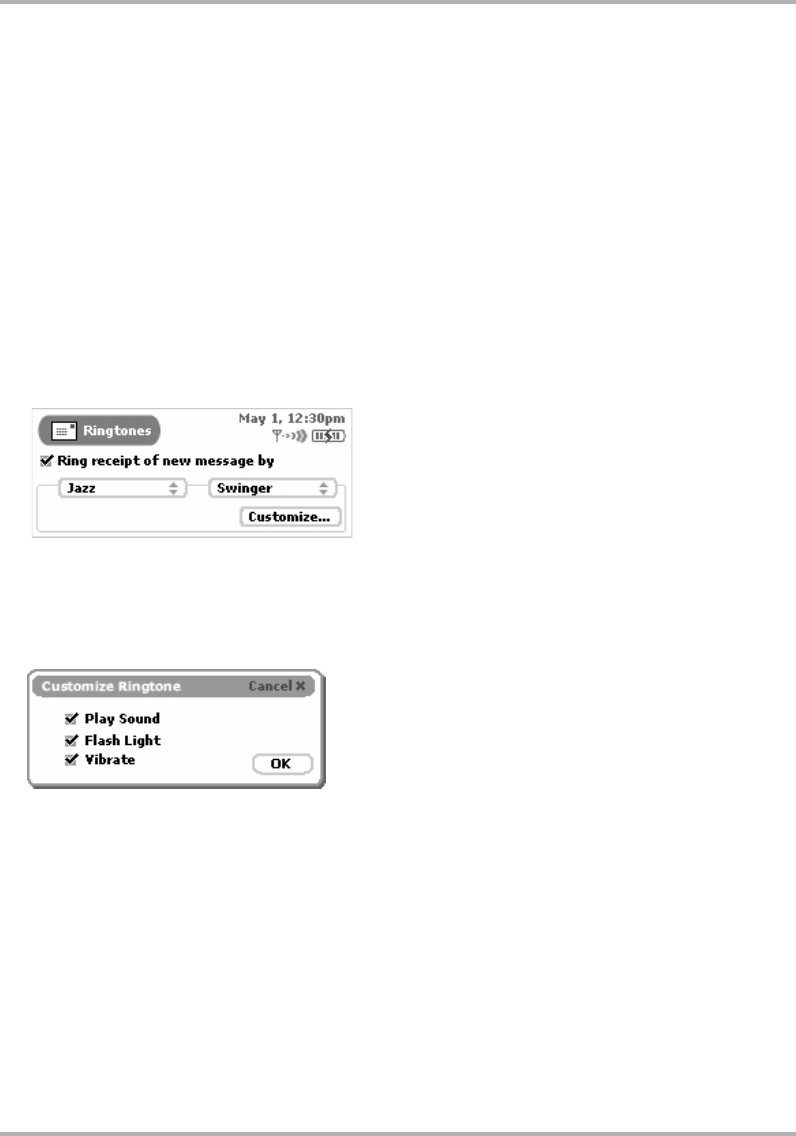
Text Messaging
February 12, 2002 T-Mobile Device Owner’s Manual 90
1From the Jump screen click Text Messages. The Browse Text Messages screen appears.
2Open Browse Text Messages menu and click Preferences... The Text Messages Preferences screen appears.
Read more about each preference in the topics below.
Save Outgoing Text Messages in Sent Folder
By default, any text message you send is not saved to the Sent folder. If you want a copy of each message you
send to be saved to your device, click the check box labeled Save outgoing messages in Sent folder to put a
check in the box. If you change your mind at some point, click the check box to remove the check.
Select a Text Message Notification Method
You can select the way your device lets you know (or “notifies” you) when a new Text Messages message has
arrived. To select a notification method, do the following:
1From the Text Messages Preferences screen, select Additional Preferences > Ringtones. The Ringtones
screen opens:
2Select a ringtone “category” from the first pop-up menu. In the example above, “Jazz” has been selected.
Depending on what category you’ve selected, you will have additional sound selections in the pop-up menu
to the right. You will hear a preview of the sound when you select it.
3Depending on what category and sound you select, you’ll be able to customize your notification by clicking
the Customize... button:
Select the Play Sound, Flash Light, or Vibrate check boxes as you wish to further customize your
notification method. The options not available are dimmed.
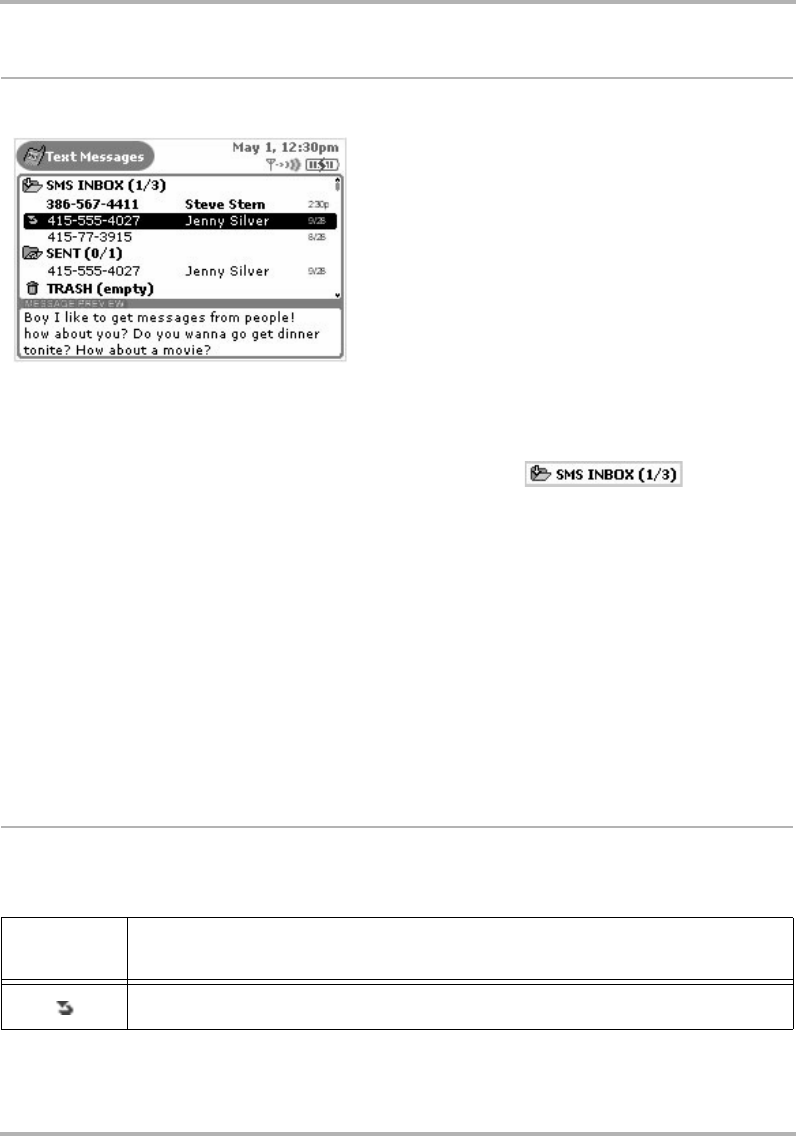
Text Messaging
February 12, 2002 T-Mobile Device Owner’s Manual 91
Browse Text Messages Screen
The Browse Text Messages screen is your main view into the Text Messages application:
The Browse Text Messages screen lists all your text messages, grouped into folders, ordered by date. (Read
more about ordering your lists in
Sort Text Messages
on page 93.)
In the illustration above you’ll see the three “system folders”--Inbox, Sent, and Trash--plus all the folders you
have created to organize your messages, identified by a folder-type icon:
To the right of the folder name, the number of unread versus total number of messages is shown in
parentheses. In the example above, Inbox (1/3) contains three messages, of which one is unread. The Inbox is
shown in “expanded” view (its list of messages is showing), with the first message in bold, indicating it is
“unread”. The Sent folder contents are expanded, showing one read message. The Trash folder is empty and
collapsed (empty folders are always shown collapsed, of course).
As shown in the illustration above, individual messages are grouped in collapsible folder lists. To open (expand)
a folder’s list of messages, use the wheel to highlight the folder name, then click. To collapse the list, click again.
Click again to expand, etc.
To open an individual message, highlight the message and click the wheel. To learn more about reading your
message, read
View Your Text Messages
on page 93.
To the left of each item in the Browse Text Messages screen is an icon that indicates the status of the folder or
message. To interpret these icons, read the topic immediately following.
Status Indicators
Icons shown the to left of each folder name or text message tell you their status. Plus, all unread messages
are shown in bold. The table below explains what each status icon means.
This
indicator Means
You have replied to this message.
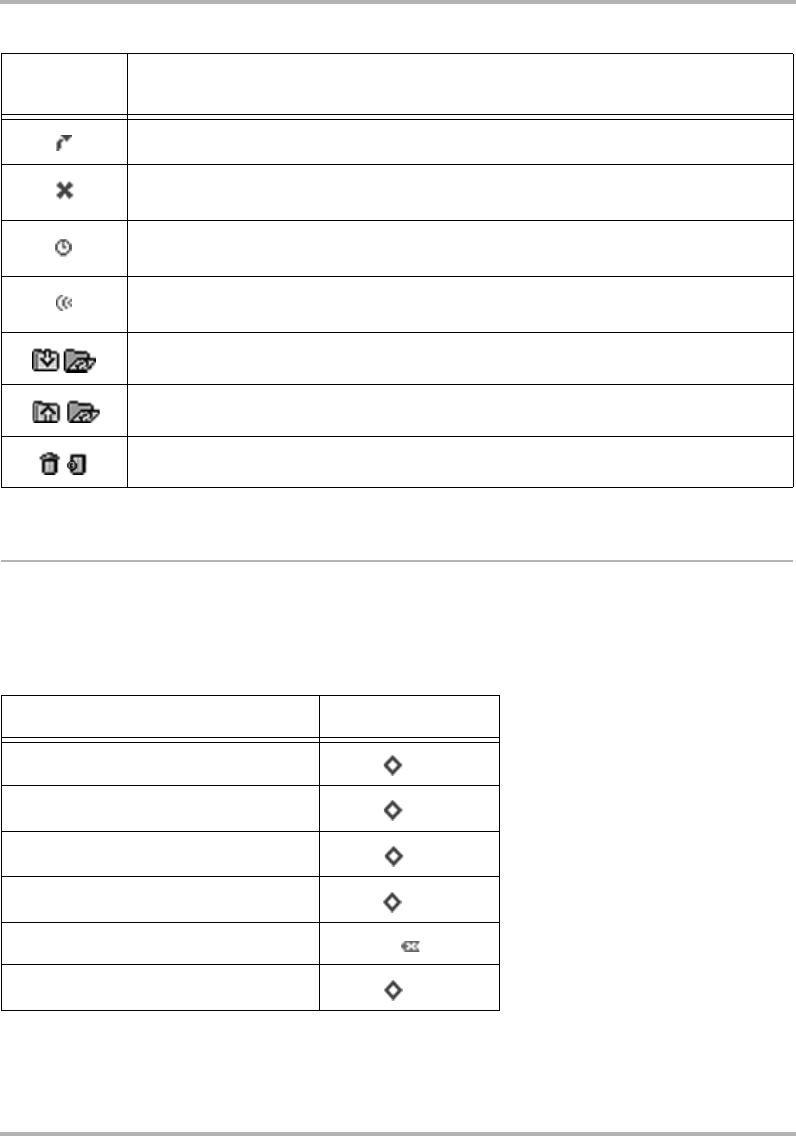
Text Messaging
February 12, 2002 T-Mobile Device Owner’s Manual 92
Keyboard Shortcuts
While in the Text Messages application, you can use keyboard shortcuts to open options from the Browse Text
Messages menu.
Browse Text Messages Menu Shortcuts
You forwarded this message.
There was an error when sending this message. (It wasn’t sent.) You will only see this
status indicator next to messages in the Sent folder.
This message is waiting to be sent. You will only see this status indicator next to messages
in the Sent folder.
This message is being sent. You will only see this status indicator next to messages in the
Sent folder.
Icons identifying the Inbox folder, with contents collapsed/expanded.
Icons identifying the Sent folder, with contents collapsed/expanded.
Icons identifying the Trash folder, with contents collapsed/expanded.
Browse Text Messages menu options Shortcut
New Message... + N
Reply... + R
Forward... + F
Add to Contacts... + =
Move to Trash
Sort... + T
This
indicator Means
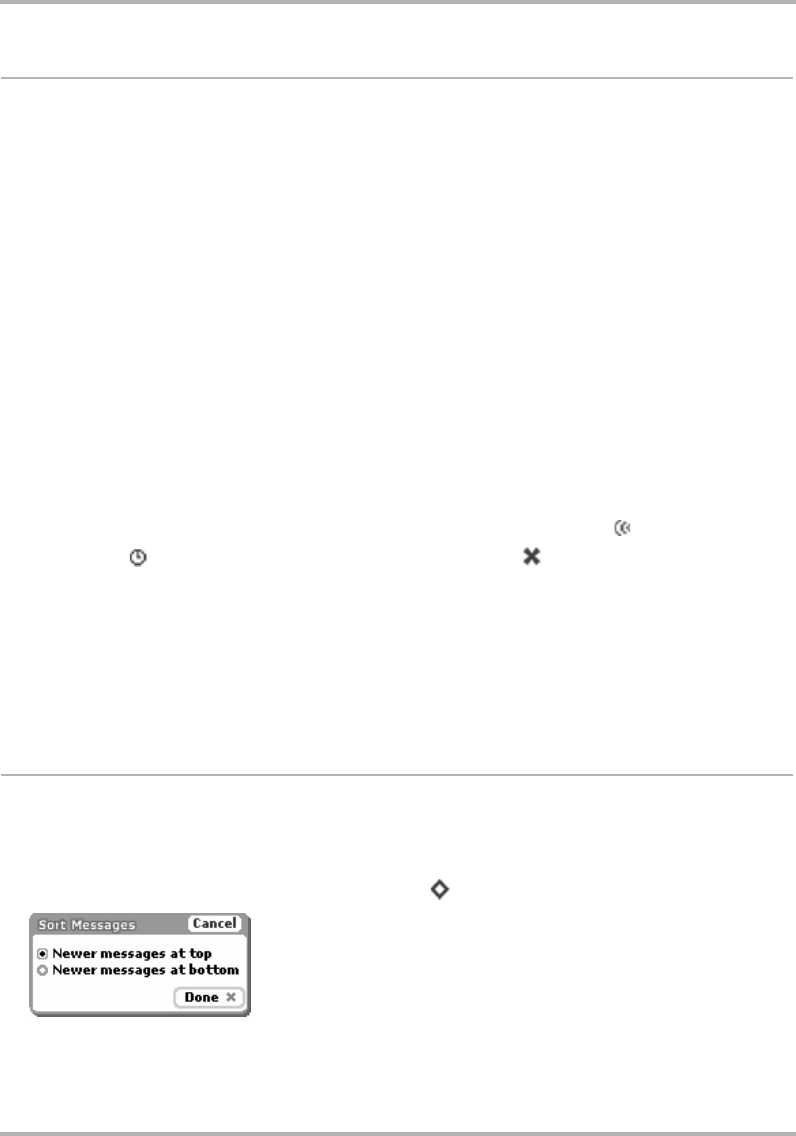
Text Messaging
February 12, 2002 T-Mobile Device Owner’s Manual 93
View Your Text Messages
To view a list of all your text messages, open the Text Messages application from the Jump screen. The Browse
Text Messages screen appears, listing all your messages.
Read a Text Message
To open an individual text message for reading, do the following:
1Make sure the folder in which you’ve stored the message is shown in expanded view. (Click the folder name
to expand/collapse the messages contained in the folder.)
2Use the wheel to highlight the message--a message preview shows in the lower half of the screen. To have
the message fill your screen, then click the message. Your message contents display in the Read screen.
3To dismiss the message and return to the Browse Text Messages screen, click the Back button.
About Text Message Folders
Text Messages uses three “system” folders--Inbox, Sent, and Trash.
Here’s a little more information about each system folder:
•Inbox - The Inbox folder is the default drop point for any new messages you receive.
•Sent - As you send a text message, the message is displayed in the Sent folder (expanded view), with its
status just to the left. Possible status indicators include: message is being sent ( ), message is waiting
to be sent ( ), and message not sent due to a delivery problem ( ).
After a message has been sent, it disappears from the Sent folder, unless you specify in the Text Messages
Preferences screen that you want to Save outgoing messages in “Sent” folder. If you’ve set this
preference, a copy of every message you compose and send will be saved in the Sent folder.
•Trash - Every message you discard from other folders is moved to the Trash folder. Discarded messages
accumulate in the Trash until you explicitly use the menu option to Empty Trash. As long as a message
stays in the Trash, however, you can restore it to another folder. (Read more in
Discard Text Messages
on
page 96.
Sort Text Messages
By default, the messages listed in the Browse Text Messages screen are organized with the newer messages at
the top. To change the order in which your messages are displayed in the Browse Text Messages screen, do the
following:
1Open the Browse Text Messages menu and click Sort... [+ T]. The Sort Messages screen opens:
2Click the sort option you prefer: newer messages at the top or the bottom of the lists.
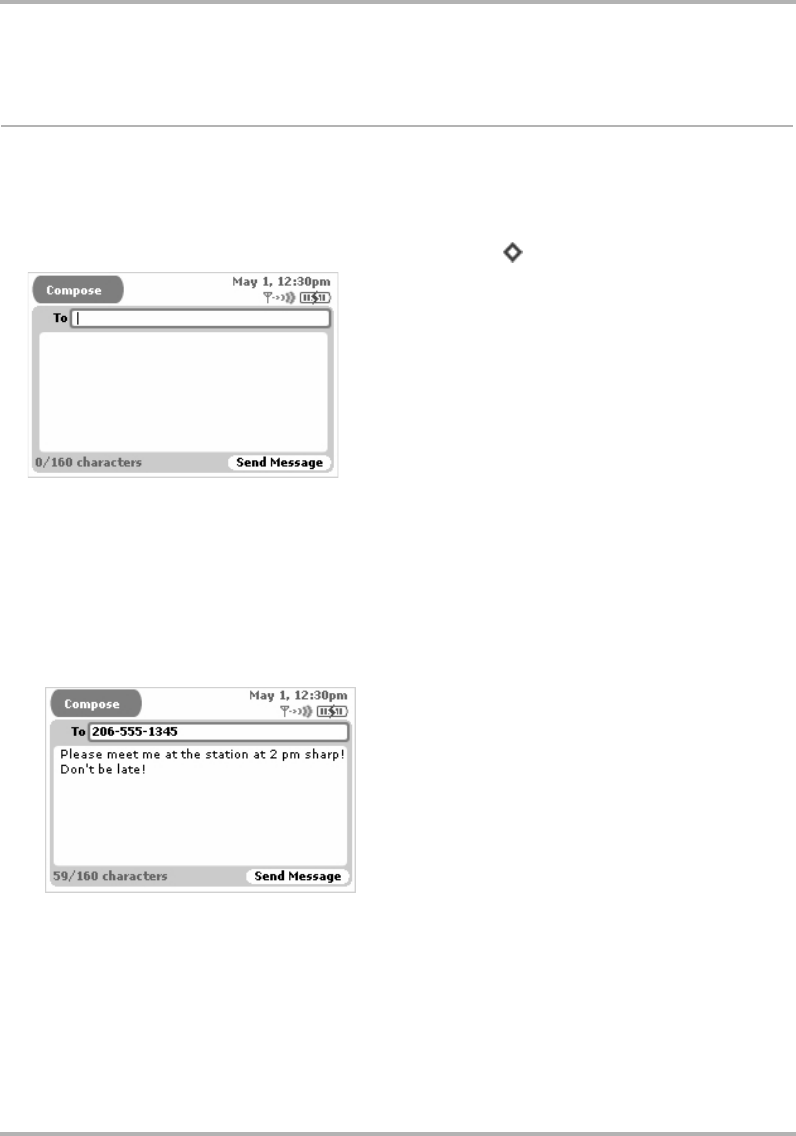
Text Messaging
February 12, 2002 T-Mobile Device Owner’s Manual 94
3Click OK.
Send Text Messages
Compose a New Text Message
To write a new text message you must first open the Compose screen:
1Open the Browse Text Messages menu and click New Message... [+ N]. The Compose screen opens:
2Complete your message:
•To field - As you fill in the To field, the Text Messages application will communicate with the Address Book
and offer you completion suggestions (based on your existing Address Book contacts). The suggestions
appear in a drop-down list. Scroll and click to select one of the address suggestions or type a new one.
•Message body - Type your message body; you can only type 160 characters. At the bottom of the screen
you’ll see a counter that keeps track of how many characters you’ve typed. Some special characters on the
keyboard cannot be used in a text message; these include brackets ([]), braces ({}), tildes (~), and carets
(^). If you happen to type one of the “illegal” characters, no entry will be made in the message body. A
sample message is shown below:
3To send your message, do one of the following:
• Open the Compose menu and click Send Now.
• Press the Back button; a dialog box appears asking you to select Discard or Send Now. Click Send Now.
4To discard your message, either:
• Open the Compose menu and click Discard.
• Press the Back button; a dialog box appears asking you to select Discard or Send Now. Click Discard.

Text Messaging
February 12, 2002 T-Mobile Device Owner’s Manual 95
Reply to a Text Message
To reply to a text message, do the following:
1From the Browse Text Messages screen, highlight the message you want to reply to. Open the message if
you wish by clicking the wheel.
2From either the Read or Browse Text Messages screen, open the menu and click Reply... [+ R].
3The Reply screen opens with the To field filled in.
Forward a Text Message
To forward a text message to another individual, do the following:
1From the Browse Text Messages screen, highlight the message you want to forward. Open the message if
you wish by clicking the wheel.
2From either the Read or Browse Text Messages screen, open the menu and click Forward... [+ F].
3The Forward screen opens ready for you to address. The message is appended to the end of the new
message.
Adding Text Message Senders to the Address Book
If you receive a message from an individual you would like to include as a contact in your Address Book, do the
following:
1From the Browse Text Messages screen, highlight the message whose sender you want to add as a contact.
Open the message if you wish by clicking the wheel.
2From either the Read or Browse Text Messages screen, open the menu and click Add to Contacts...
[+ =].
3The New Contact screen opens with the new contact’s phone number added (as “unfiled”). At this point you
can Save the new contact as is, add more contact information, or simply click the Back button to return to
the Text Messages application without saving any of the new contact’s information.
Read more about editing contact information in the Address Book application in
11. Keeping Contacts in the
Address Book
on page 97.
Call Back Sender of a Text Message
To use the Telephone application to call the sender of a text message, do the following:
1From the Browse Text Messages screen, highlight the message from the person you wish to call back. Open
the message if you wish.
2Open the menu and click Call Back. You enter the Telephone application and your call is placed.

Text Messaging
February 12, 2002 T-Mobile Device Owner’s Manual 96
Discard Text Messages
To discard a text message, do the following:
1From the Browse Text Messages screen, highlight the message you want to discard. Open the message if you
wish.
2From either the Read or Browse Text Messages screen, open the menu and click Move to Trash.
3The message is moved to the Trash folder.
4To restore your discarded message, from the Browse Text Messages screen expand the contents of the Trash
folder. Use the wheel to highlight the message you want to restore then open the menu and click Move to
Inbox.
To empty all messages from the Trash, from the Browse Text Messages screen open the menu and click
Empty Trash. The contents of your Trash folder are emptied (without asking you for confirmation).
Receive Ringtones
Many Web sites offer ringtones that you can download to a wireless device for a fee. If you purchase a ringtone,
it is delivered to your wireless device using the Short Message Service. Your device can store up to 10 such
ringtones. If you receive a text message with a ringtone attached, it will automatically be added to your ringtone
library, which you can then select as a notification method.
If you already have 10 custom ringtones in your device’s ringtone library, then before any additional ringtones
you purchase will are saved to your device, you will be asked to discard one of your 10 saved ringtones: [add
picture]
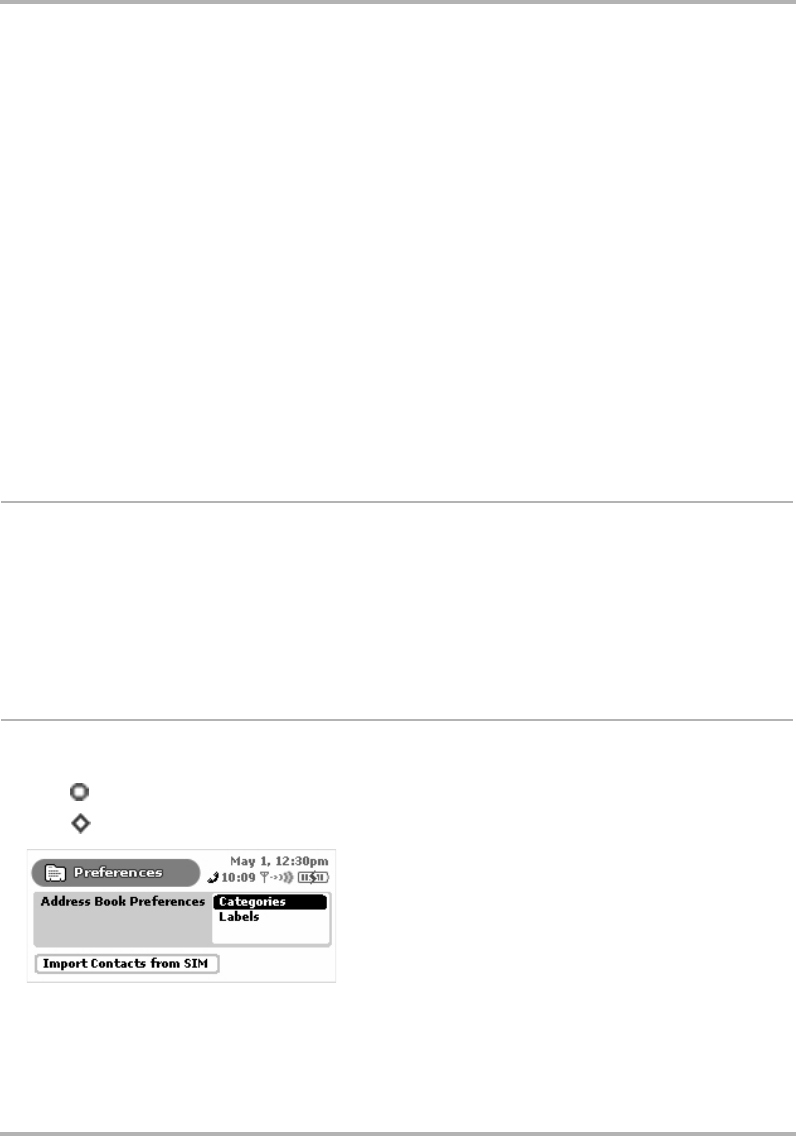
Keeping Contacts in the Address Book
February 12, 2002 T-Mobile Device Owner’s Manual 97
11. Keeping Contacts in the Address Book
You can organize all the information you use to keep track of the people you contact in the T-Mobile Device
Address Book. Read all about the Address Book feature in this chapter:
Remember that all the contacts you keep in the Address Book on the Web are keep in sync with the contacts on
your device. Read all about using the Address Book on the Web (including how to import your existing Contacts
lists) in
18. Using Address Book on the Web
on page 145.
How Many Contacts Can I Store?
You can store up to 1000 individual contacts in your Address Book. For each contact you can keep these
categories of information:
•Five Instant Messaging addresses
• Three Street addresses
• Three Web addresses (URLs)
•Five Email addresses
Address Book Preferences
To open the Address Book Preferences screen, do the following:
1Press to open the Jump screen, then click Address Book.
2Press to open the menu, then click Preferences... The Preferences screen appears:
3On this screen, you can set up “categories” for organizing contacts, as well as “labels” for identifying types of
of contact information. “Ski Friends” is an example of a contact category, and “Cabin #” is an example of an
information label. You can also import contacts from your SIM card. Read below for details.
•
Address Book Preferences
on page 97
•
The Browse Contacts Screen
on page 101
•
T-Mobile Contact Information
on page 101
•
Keyboard Shortcuts
on page 102
•
Filter Contacts by Category
on page 103
•
Sort Contacts
on page 103
•
Create a Contact
on page 104
•
Edit a Contact
on page 106
•
Discard/Retrieve a Contact
on page 106
•
Contact a Contact
on page 106
•
Find a Contact
on page 107
•
How Many Contacts Can I Store?
on page 97
•
Create Your Own Contact Information - My
Info
on page 107
•
Empty the Address Book Trash
on page 107
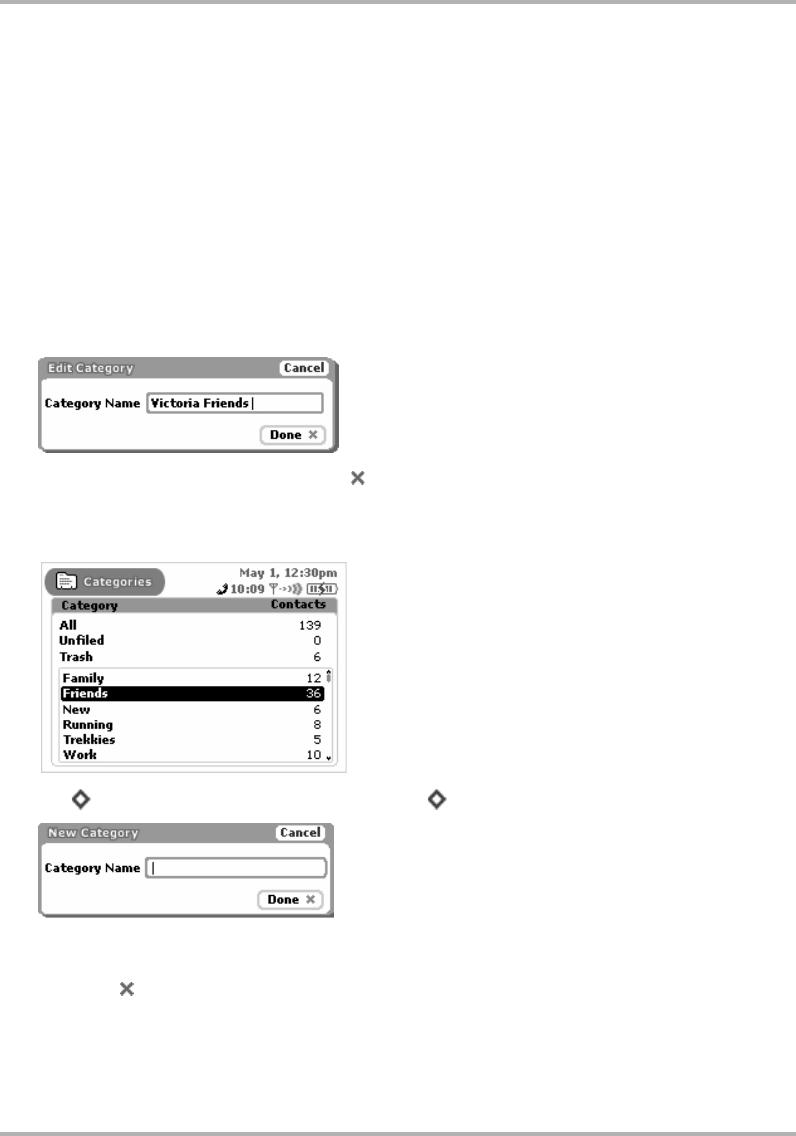
Keeping Contacts in the Address Book
February 12, 2002 T-Mobile Device Owner’s Manual 98
Create, Edit, and Delete Categories
Each contact in your Address Book contacts is stored in a category. By default, your Address Book contains four
categories:
•Work
•Family
•Friends
•New
You can edit the names of these categories, delete them, and create new ones.
To edit an existing category:
1From the Address Book Preferences screen, click Categories. The Categories screen appears.
2Use the wheel to highlight the category you wish to edit, then click. The Edit Category dialog box appears:
3Edit the name as you wish, then click Done [ ] to save the change. To cancel your edit, click Cancel.
To create a new category:
1From the Address Book Preferences screen, click Categories. The Categories screen appears:
2Press to open the menu, then click New Category [+ N]. The New Category dialog box appears:
3Type the name of your new category. Remember, categories describe a group of contacts; for example, you
might have a number of medical doctors you want to group into a category named “MDs”.
4Click Done [ ] to save the category. If you change your mind and don’t want to create the new category
after all, click Cancel.
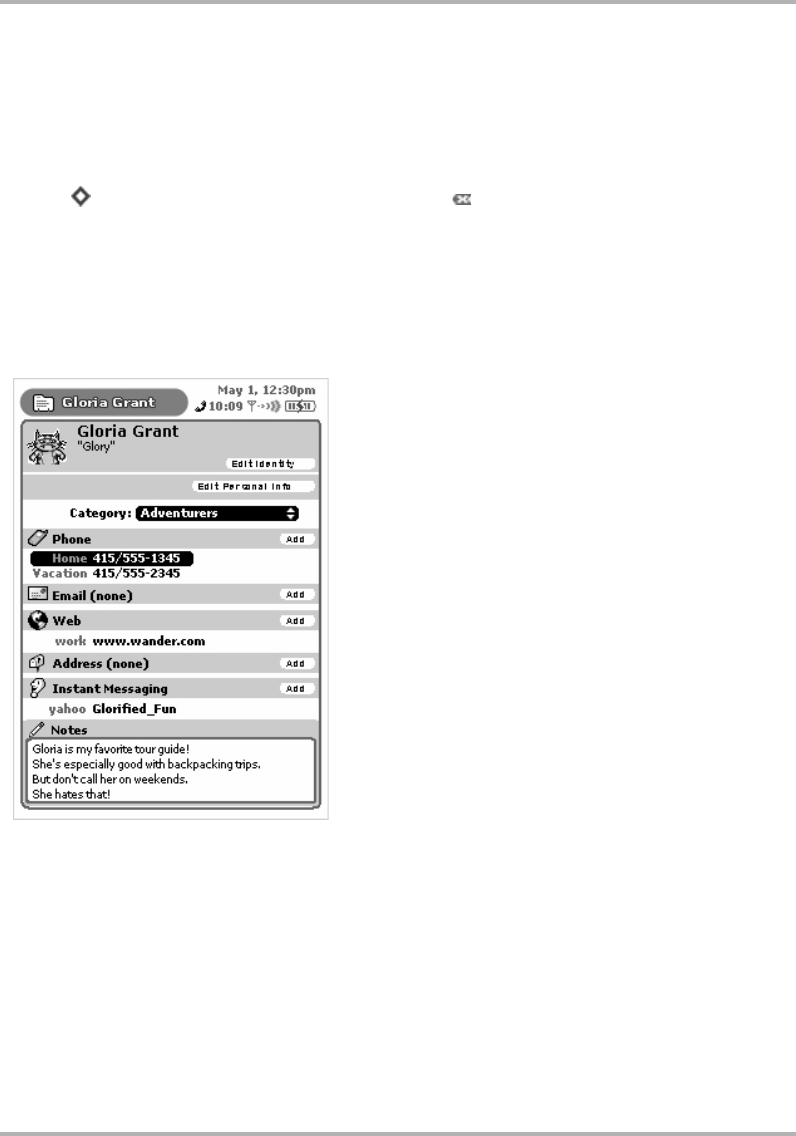
Keeping Contacts in the Address Book
February 12, 2002 T-Mobile Device Owner’s Manual 99
5You will now be able to assign contacts to this new category, as well as use it to filter (sort) messages. Read
more in
Filter Contacts by Category
on page 103.
To delete a category:
1From the Address Book Preferences screen, click Categories. The Categories screen appears.
2Use the wheel to highlight the category you wish to delete.
3Press to open the menu, then click Discard Category [].
4A confirmation dialog appears, asking if you want to discard the category. Click Discard if you want to;
otherwise, click Cancel.
Create, Edit, and Delete Labels
All pieces of information you store about an individual contact are described using “labels”. For example, in the
screen below, in the Phone section, “Home” and “Vacation” are labels used to differentiate Gloria’s home phone
number from the phone number she uses when on vacation.
By default, the Address Book includes the following labels:
•Home
•Mobile
•Personal
• Vacation
•Work
You can edit the names of these labels, delete them, and create new ones.
To edit an existing label:
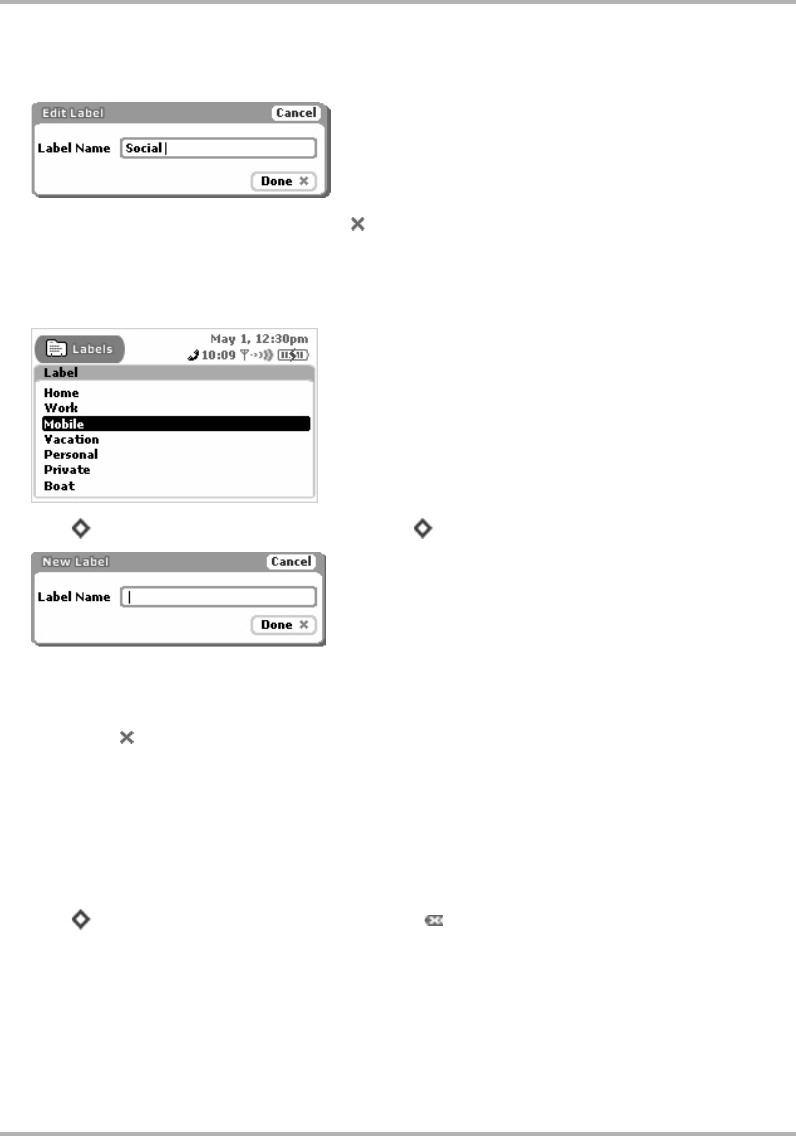
Keeping Contacts in the Address Book
February 12, 2002 T-Mobile Device Owner’s Manual 100
1From the Address Book Preferences screen, click Labels. The Labels screen appears.
2Use the wheel to highlight the label you wish to edit, then click. The Edit Label dialog box appears:
3Edit the name as you wish, then click Done [ ] to save the change. To cancel your edit, click Cancel.
To add a label:
1From the Address Book Preferences screen, click Labels. The Labels screen appears, showing all existing
labels:
2Press to open the menu, then click New Label... [+ N]. The New Label dialog box appears:
Type your new label name. Remember, labels describe bits of information about an individual contact; for
example, you could create a label named “Social” to describe the email addresses your friends use for social-
type email. Each friend could also have an email address labeled “Work”.
3Click Done [ ] to save the label. If you change your mind and don’t want to create the new label after all,
click Cancel.
4You will now be able to assign contact information to this new label, as well as view it on the Browse
Contacts screen describing the contact information displayed.
To discard a label:
1From the Address Book Preferences screen, click Labels. The Labels screen appears.
2Use the wheel to highlight the label you wish to discard.
3Press to open the menu, then click Discard Label [].
4A confirmation dialog appears, asking if you’re sure you want to discard the label. Click Discard if you want
to; otherwise, click Cancel to keep the label.
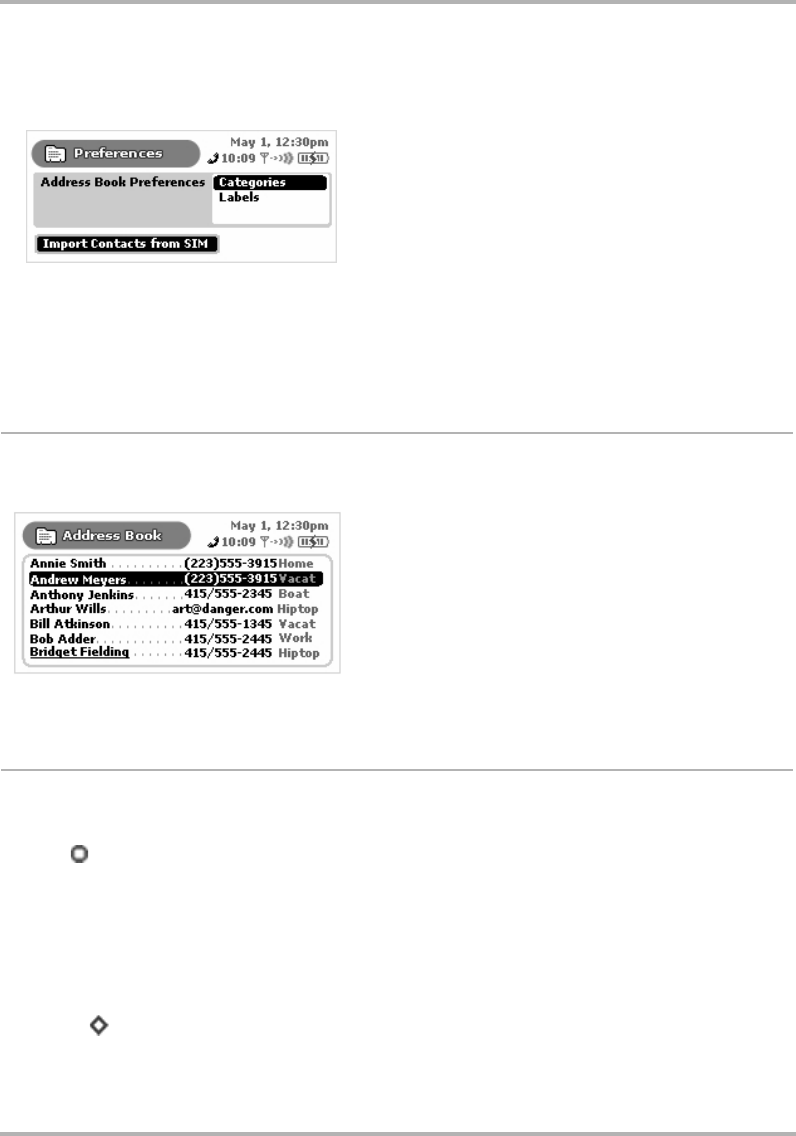
Keeping Contacts in the Address Book
February 12, 2002 T-Mobile Device Owner’s Manual 101
Import Contacts from SIM
From the Preferences screen you can import any contacts you may have stored on your SIM card. Simply click
the Import Contacts from SIM button:
• If your SIM card contains no contact information, a dialog box will tell you that “No contacts were found on
the SIM card.”
• If your SIM card does contain contact information, a dialog box will appear, giving you some status as the
import progresses. When the import has finished, you’ll be notified how many contacts were imported.
Note! If you import a contact already present in your Address Book, that contact will appear twice.
The Browse Contacts Screen
The Browse Contacts screen is your main view into your Address Book. On this screen, individual contacts are
listed, along with the first phone number that appears in the Phone section of their contact information:
You can specify to show “All” your contacts on this screen or just one category of contacts. Read more in
Filter
Contacts by Category
on page 103 and
Sort Contacts
on page 103.
T-Mobile Contact Information
Your device comes with T-Mobile Customer Care contact information already entered for you. To find this
information, do the following:
1Press to open the Jump screen, then click Address Book.
2Scroll to the Customer Care entry; click and hold to open the contact information.
Tip: If you don’t see the Customer Care entry, open the menu and make sure either the All or Work
category is selected.
3To phone T-Mobile Customer Care:
• Open the Customer Care contact information.
• Highlight the phone number.
• Press to open the menu.
• Click Call.
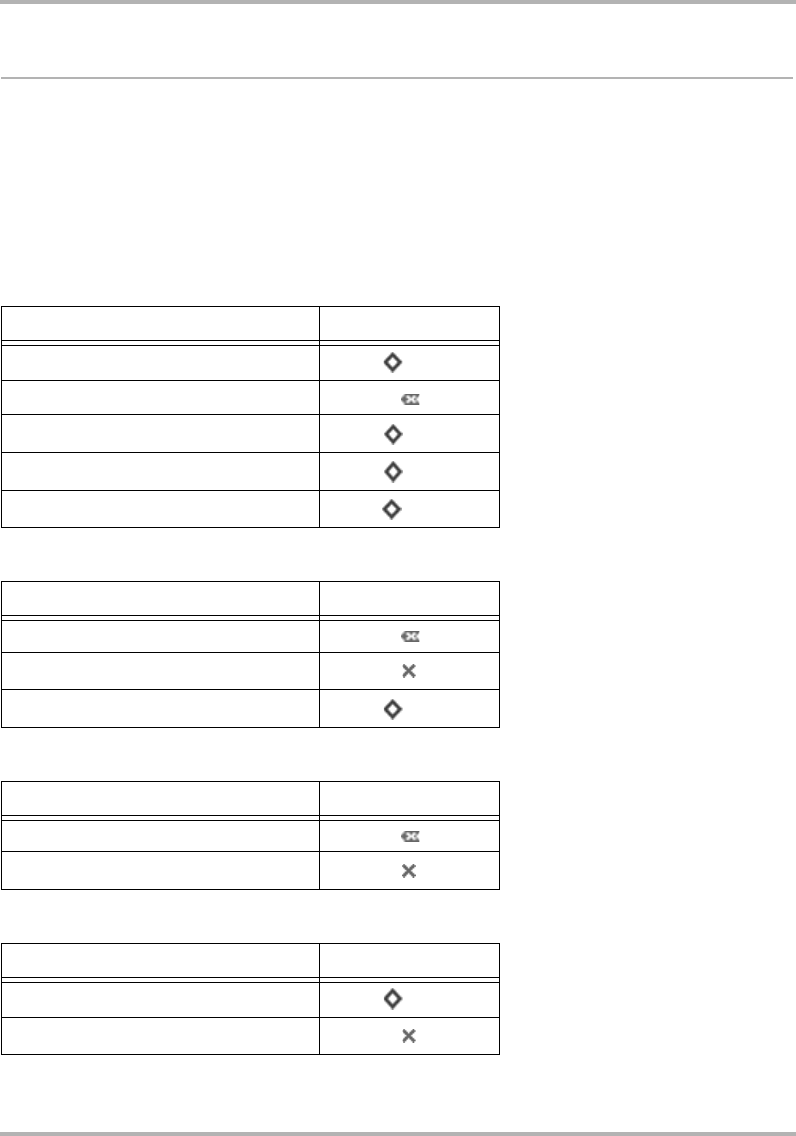
Keeping Contacts in the Address Book
February 12, 2002 T-Mobile Device Owner’s Manual 102
Keyboard Shortcuts
While in the Address Book application, you can use the keyboard shortcuts shown in the tables below to open
options from the following menus:
•
Browse Contacts Menu Shortcuts
•
Contact Info Menu Shortcuts
•
New Contact Menu Shortcuts
•
Trash Menu Shortcuts
Browse Contacts Menu Shortcuts
Contact Info Menu Shortcuts
New Contact Menu Shortcuts
Trash Menu Shortcuts
Browse Contacts Menu Items Shortcut
New Contact... + N
Discard Contact
All + A
Trash + T
My Info + M
Contact Info Menu Items Shortcut
Discard Contact
Save
Revert + R
New Contact Menu Items Shortcut
Discard Contact
Save
Trash Menu Items Shortcut
Retrieve Contact + R
Save
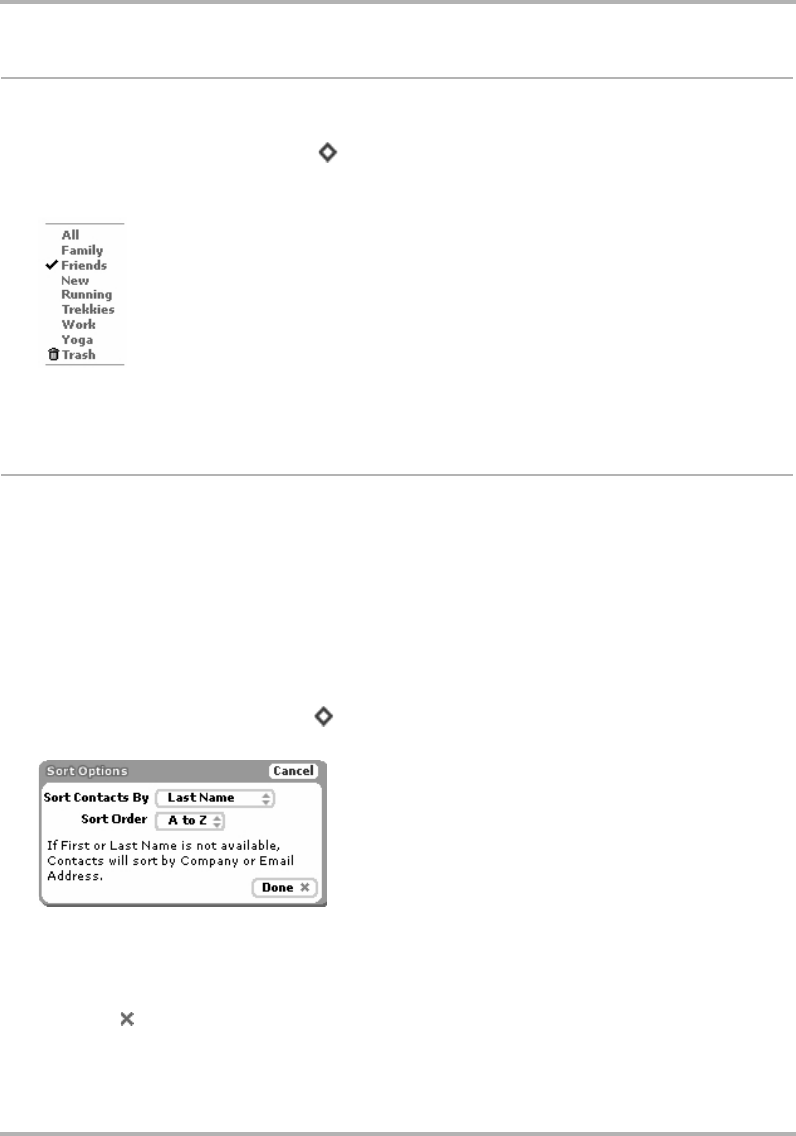
Keeping Contacts in the Address Book
February 12, 2002 T-Mobile Device Owner’s Manual 103
Filter Contacts by Category
To view only one category of contacts on the Browse Contacts screen, do the following:
1From the Browse Contacts screen, press to open the menu.
2Scroll through the menu items until you find the list of categories. Individual categories are listed after All.
The category of contacts currently displaying on the Browse Contacts screen is indicated by a check mark:
3Highlight the category you want to use to filter, then click. The Browse Contacts screen refreshes to show
only the contacts in the category you selected.
Sort Contacts
On the Browse Contacts screen, individual contacts can be sorted by:
•First Name
•Last Name
In addition, you can specify the sort order:
•A to Z (ascending)
• Z to A (descending)
To specify your sort preference, do this:
1From the Browse Contacts screen, press to open the menu, then click Sort... The Sort Options dialog box
opens:
2Highlight the Sort Options By field; click and hold the wheel to open the pop-up menu. Scroll to highlight
either the Last Name or First Name option; click to select.
3Highlight the Sort order field; again, hold the wheel down to open the pop-up menu. Then scroll to highlight
either the AtoZ or the ZtoAorder; click to select.
4Click Done [ ] when finished, or click Cancel to cancel any changes you’ve made to the sort options.
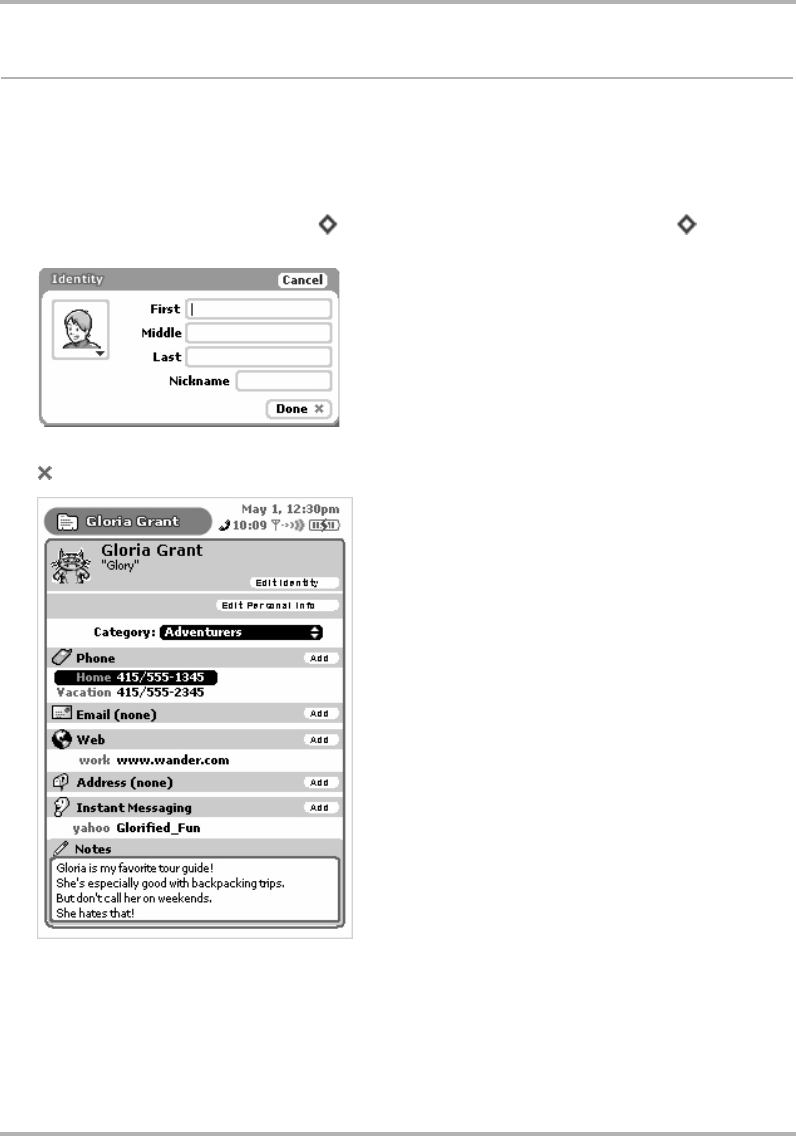
Keeping Contacts in the Address Book
February 12, 2002 T-Mobile Device Owner’s Manual 104
Create a Contact
You can add a contact to your Address Book by starting from scratch; or by duplicating an existing contact’s
information, then editing it. Both methods are described below.
Add a New Contact from Scratch
1From the Browse Contacts screen, press to open the menu, then click New Contact... [+ N]. The
New Contact, Identity screen opens:
2The Identity screen holds basic contact information. Complete at least one of the fields, then click Done
[ ]. The full contact screen appears:
3From this screen you can edit the basic “identity” information (including the selection of an appropriate icon
to represent your contact). From this screen you can also:
• select the contact category (“Adventurers” in the example above)
• add phone numbers
• add email addresses
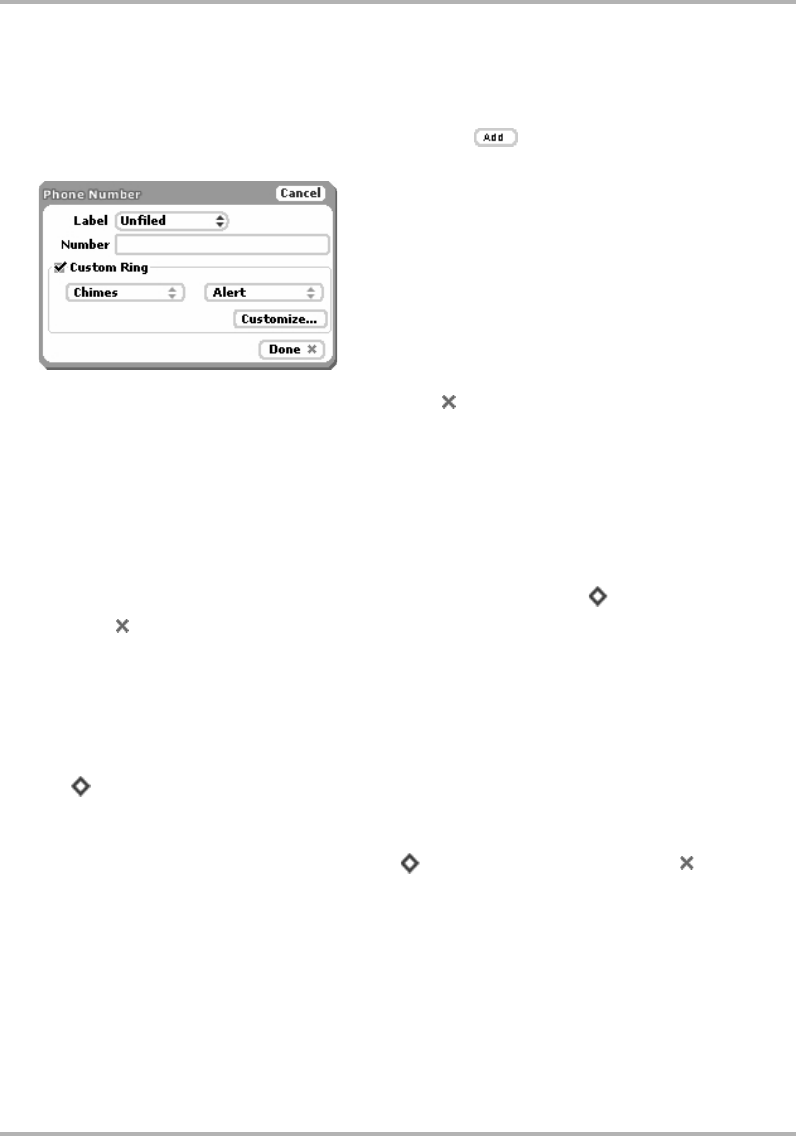
Keeping Contacts in the Address Book
February 12, 2002 T-Mobile Device Owner’s Manual 105
• add Web addresses (URLs)
• add instant messaging screen names
•add notes
To add information, use the wheel to highlight the appropriate button, and click. A screen opens in
which you can add the information. For example, the following illustration is of the Phone Number screen:
4Add contact information to each screen, then click Done [ ]. Continue through the Contacts screen until
you have added all the information you wish.
Note! Before you can save the contact information, you must have provided one of the following pieces of
information:
• First or Last name
•Phone Number
•Email address
•Company name
5To save all the pieces of information you’ve added to the contact screen, press to open the menu and
click Save [].
Tip: If you cannot select Save from the menu because it is dimmed, then you must return to the contact
screen and add one of the required pieces of information listed above.
Create a New Contact by Duplicating an Existing Contact
1From the Browse Contacts screen, highlight the contact whose information you want to edit.
2Press to open the menu, then click Duplicate Contact. A contact information screen opens with an
exact copy of the highlighted contact’s information.
Note! If you save this contact information, you will have two duplicate entries for this contact.
3Edit the information for the new contact, then press to open the menu and click Save [].

Keeping Contacts in the Address Book
February 12, 2002 T-Mobile Device Owner’s Manual 106
Edit a Contact
To edit an existing contact:
1From the Browse Contacts screen, highlight the contact’s name then click the wheel. The contact’s
information appears for editing.
2Edit information as you wish, then press to open the menu and click Save [].
Discard/Retrieve a Contact
To remove an existing contact from your Address Book:
1From the Browse Contacts screen, highlight the contact’s name.
2Press to open the menu, then click Discard Contact [].
3The contact is moved to the Trash without a verification prompt.
To retrieve a discarded contact:
1From the Browse Contacts screen, press to open the menu, then click Trash [+ T]. The contacts in
the Trash appear.
2Highlight the contact you wish to retrieve from the Trash.
3Press to open the menu, then click Retrieve Contact [+ R]. The contact information is moved back
to your Address Book in the category to which it was previously assigned.
Contact a Contact
Using stored contact information, you can quickly communicate with a contact by phone, Text Messages, Email,
or Instant Messaging:
1From the Browse Contacts screen, highlight the name of the contact with whom you wish to communicate.
2Click the wheel to open the contact information.
3Scroll to highlight the phone number, email address, or IM address you wish to use.
4Click and hold the wheel to open the pop-up menu. Highlight one of the following, then click:
•Call - to switch to the Telephone and place a call to your contact
•Edit - to edit the highlighted contact information
•Send Email - to switch to Email and compose an email to that contact
•Send Message - to switch to Instant Messaging and open a conversation with that contact
•Discard - to remove the highlighted contact information
You can also use menu items to perform these actions, assuming you have the relevant contact information
highlighted.
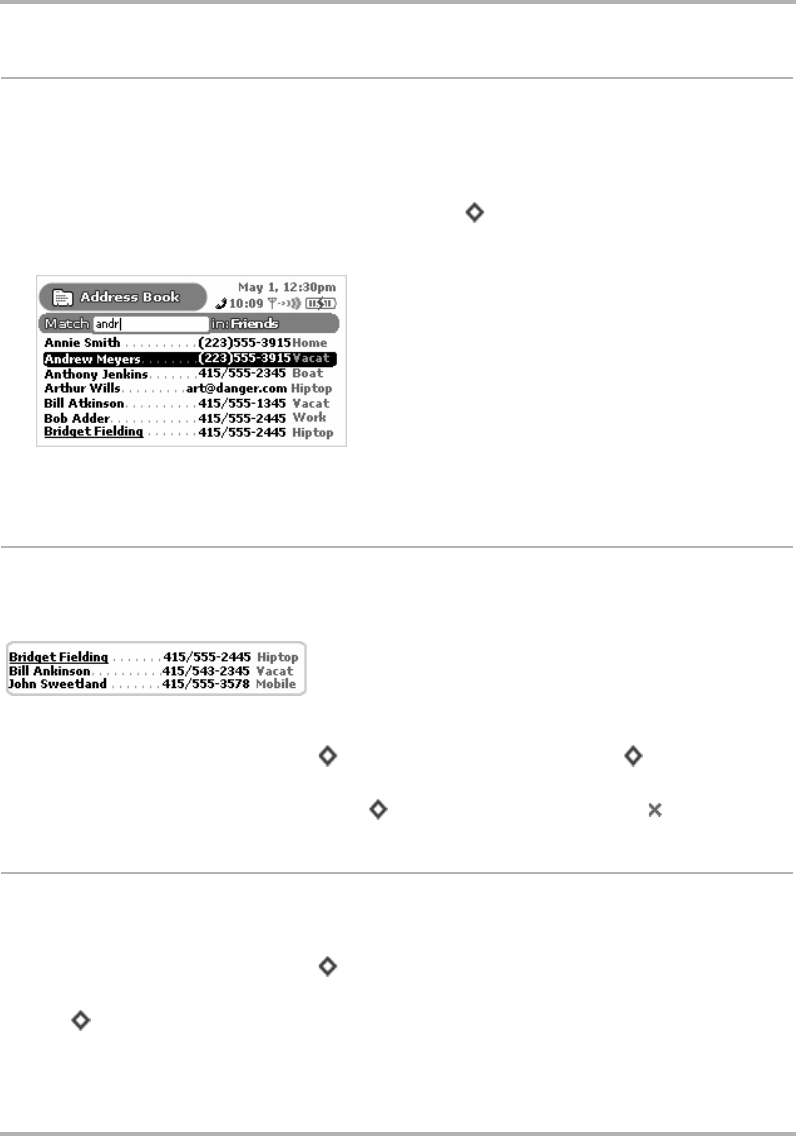
Keeping Contacts in the Address Book
February 12, 2002 T-Mobile Device Owner’s Manual 107
Find a Contact
If you have a large number of contacts in your Address Book, you can easily search and find a specific contact by
using the Match pane. The Match pane search is limited to the category of contacts you are currently viewing in
the Browse Contacts screen. So, if you want to search your entire Address Book, make sure you have selected
the All category from the menu. In the example below, the category being searched is Friends.
1From the Browse Contacts screen (in any filtered view), press to open the menu, then click Match... The
Match pane opens.
2Start typing the first letter(s) of the contact you wish to find. The nearest match is highlighted:
3Either continue typing the name to narrow the search, or scroll to find your contact.
4Click the wheel to open the contact information.
Create Your Own Contact Information - My Info
When you first received your device and went through the on-screen registration process, your name and phone
number were stored in a special contact information screen called “My Info”. This entry in the Browse Contacts
screen is underlined to make it easily identifiable:
To add information to your own contact information:
1From the Browse Contacts screen, press to open the menu, then click My Info [+ M]. Your contact
information screen opens.
2Make additions or edits as you wish, then press to open the menu and click Save [].
Empty the Address Book Trash
All discarded contacts are moved to the Trash category. Since this information takes up storage space on your
device, you should periodically remove items from Trash by doing the following:
1From the Browse Contacts screen, press to open the menu and click Trash. The contacts in the Trash
appear.
2Press to open the menu, then click Empty Trash. All contacts in the Trash are permanently removed.
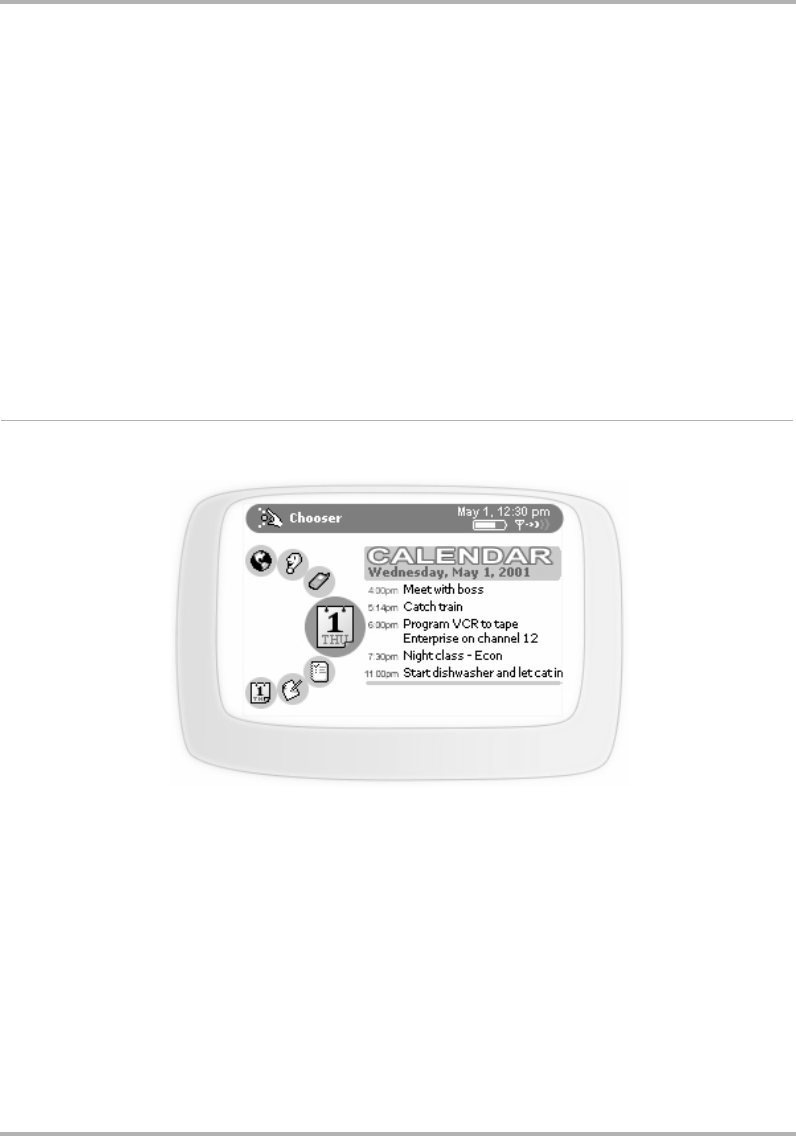
Scheduling Events with Calendar
February 12, 2002 T-Mobile Device Owner’s Manual 108
12. Scheduling Events with Calendar
We hope you enjoy using the T-Mobile Device Calendar! For info on using the Calendar, read the topics in this
chapter:
Calendar Preview Screen
From the Jump screen, with Calendar highlighted, you will see a preview screen similar to the following:
The preview screen shows the events you’ve scheduled for the current day, with the event coming up soonest at
the top of the list.
What’s an Event?
An event is anything you want to schedule on your Calendar. An event can be a doctor’s appointment, a birthday
or anniversary, a tennis game with a friend, a dinner date, anything you want to schedule. If you want, your
device can remind of an event by sending you an email or by vibrating, flashing, or playing a ringtone. You can
also set an event to repeat automatically, like someone’s birthday once a year.
To get going immediately, follow the instructions in
Create an Event
on page 109.
•
Calendar Preview Screen
on page 108
•
Keyboard Shortcuts
on page 109
•
Create an Event
on page 109
•
Move an Event
on page 112
•
Edit an Event
on page 113
•
Discard an Event
on page 113
•
Ways to View Your Events
on page 113
•
Upcoming View
on page 115
•
Day View
on page 116
•
Week View
on page 117
•
Month View
on page 118
•
Year View
on page 119
•
Trash View
on page 119
•
Go To a Specific Day
on page 120
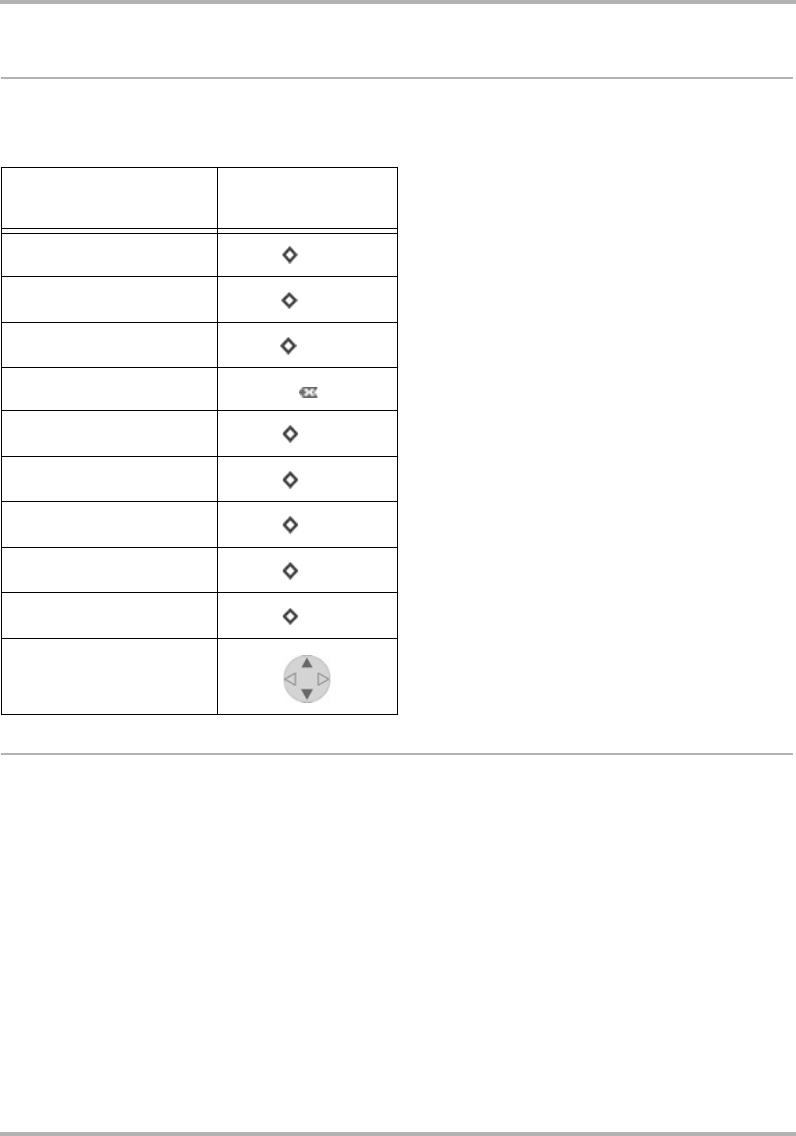
Scheduling Events with Calendar
February 12, 2002 T-Mobile Device Owner’s Manual 109
Keyboard Shortcuts
While you’re in the Calendar application, you can use the following shortcuts for menu items:
Create an Event
When you want to add an event to your schedule you can either:
•
Add an Event from Scratch
on page 110 or
•
Copy an Existing Event
on page 112
The two methods are described below in detail. Be patient! You have many options when setting up events, so
these instructions are rather long and complicated. But then, so is your schedule!
To open this menu
option Use this
shortcut
Go to Today + T
New Event... + N
Move Event... + M
Discard Event
Upcoming View + 0
Day View + 1
Week View + 2
Month View + 3
Year View + 4
Next/Previous Day
Next/Previous Month
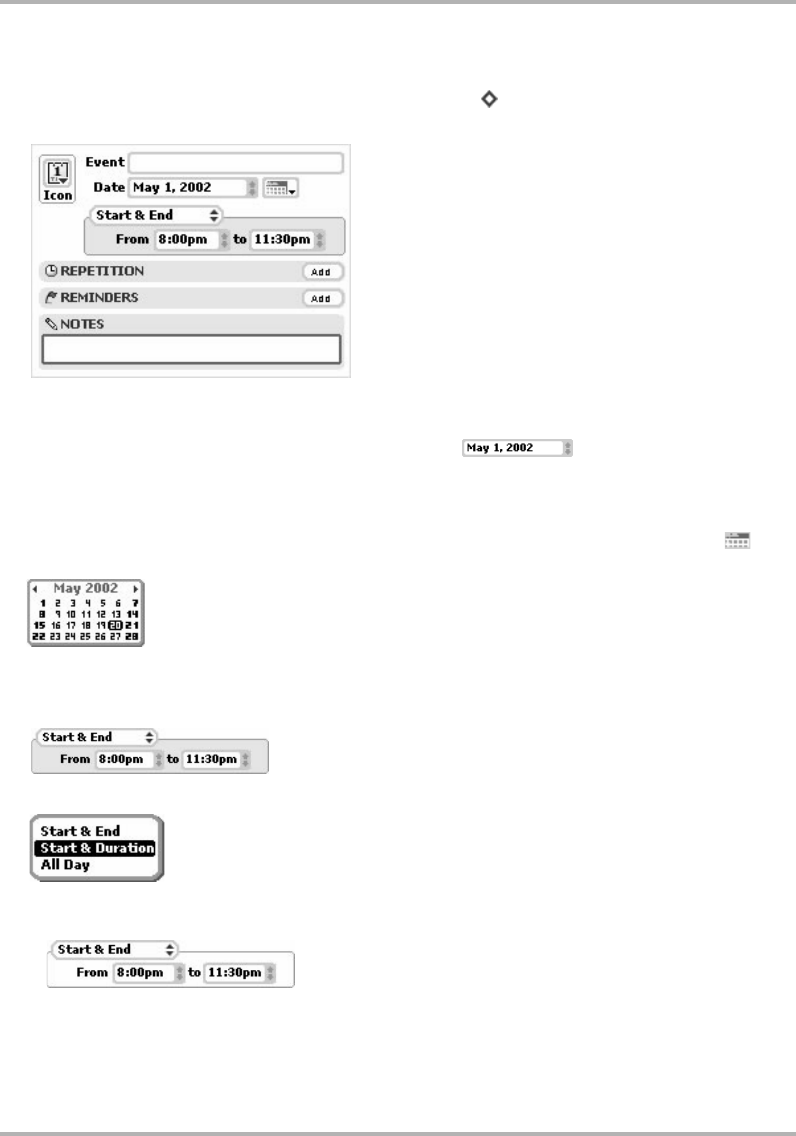
Scheduling Events with Calendar
February 12, 2002 T-Mobile Device Owner’s Manual 110
Add an Event from Scratch
1Open the menu from any Calendar view, then click New Event [ + N]. The blank New Event screen looks
like this:
2Start by giving the Event a title. The shorter the title, the more likely it will display on some of the tighter
views, like the Week view. If you don’t give it a title, the system will name it “Untitled”.
3Pick the Date on which the event starts from the date picker . Click to open the picker, then
rotate the wheel until the month you want is highlighted, then click. Rotate the wheel until the day you want
is highlighted, then click again. Now pick the year by rotating the wheel until the year you want is
highlighted, then click.
You can also use the calendar date picker to select the event start date. Highlight the calendar icon then
click. The current month appears:
If you want a year ahead, rotate the wheel until you get to the year and month you want. Then click and
rotate to highlight the day. Click again and your date is set in the Event Details screen.
4Set the duration of the event in the Start & End section of the screen:
Click Start & End to open the pop-up menu:
Use the wheel to highlight the duration type you want, then click.
• If you selected Start & End, you’ll have to pick a date range:
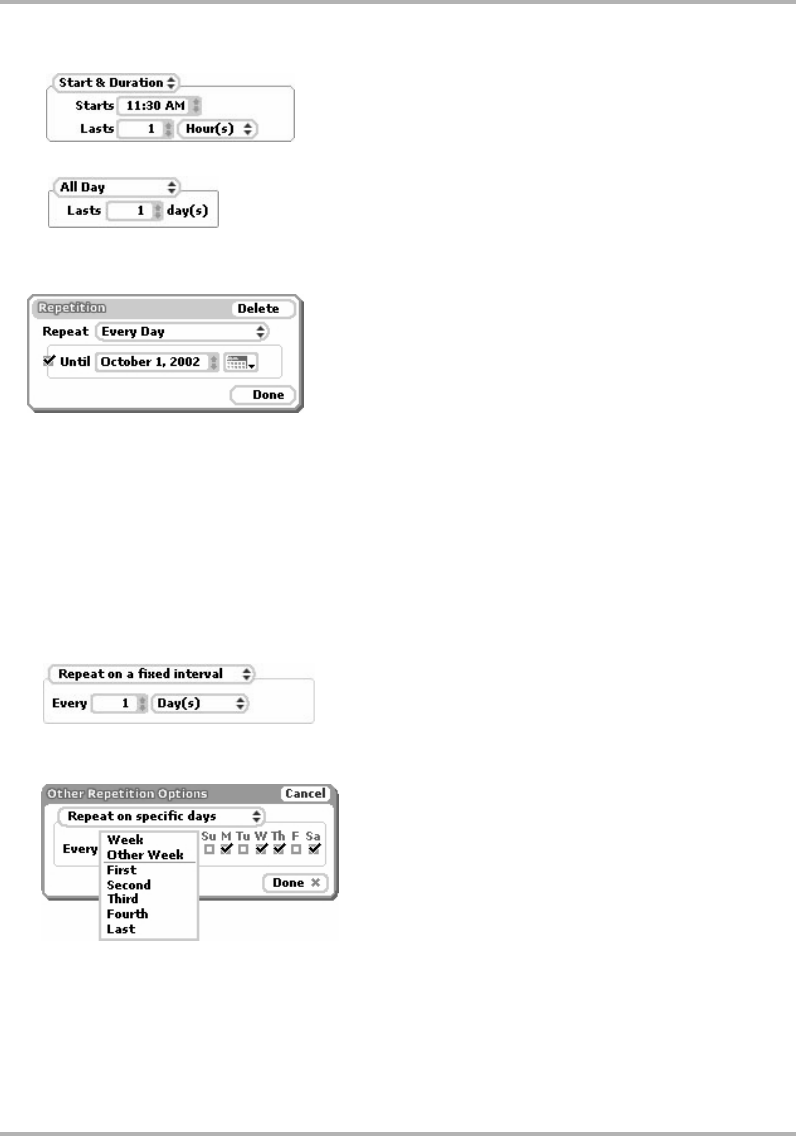
Scheduling Events with Calendar
February 12, 2002 T-Mobile Device Owner’s Manual 111
• If you selected Start & Duration, you’ll pick a start time and duration in either hours or minutes:
• If you selected All Day, you’ll need to pick how many days:
5To make the event repeat on a regular interval, in the Repetition section, highlight the Add button then
click. The Repetition dialog box opens:
Select a repeat interval from these choices:
•Every Day
• Every Sunday
• 1st Day of Every Month
• 1st Sunday of Every Month
•Yearly on May 1st
•Other...
6Depending on your choice, you’ll have to decide how long, how often, etc. If you selected Other..., the Other
Repetition Options dialog box will open. You can select from these repeat options:
•Repeat on a fixed interval - Pick the fixed interval details:
•Repeat on specific days - Select how often you want the event to repeat and then select the appropriate
days:
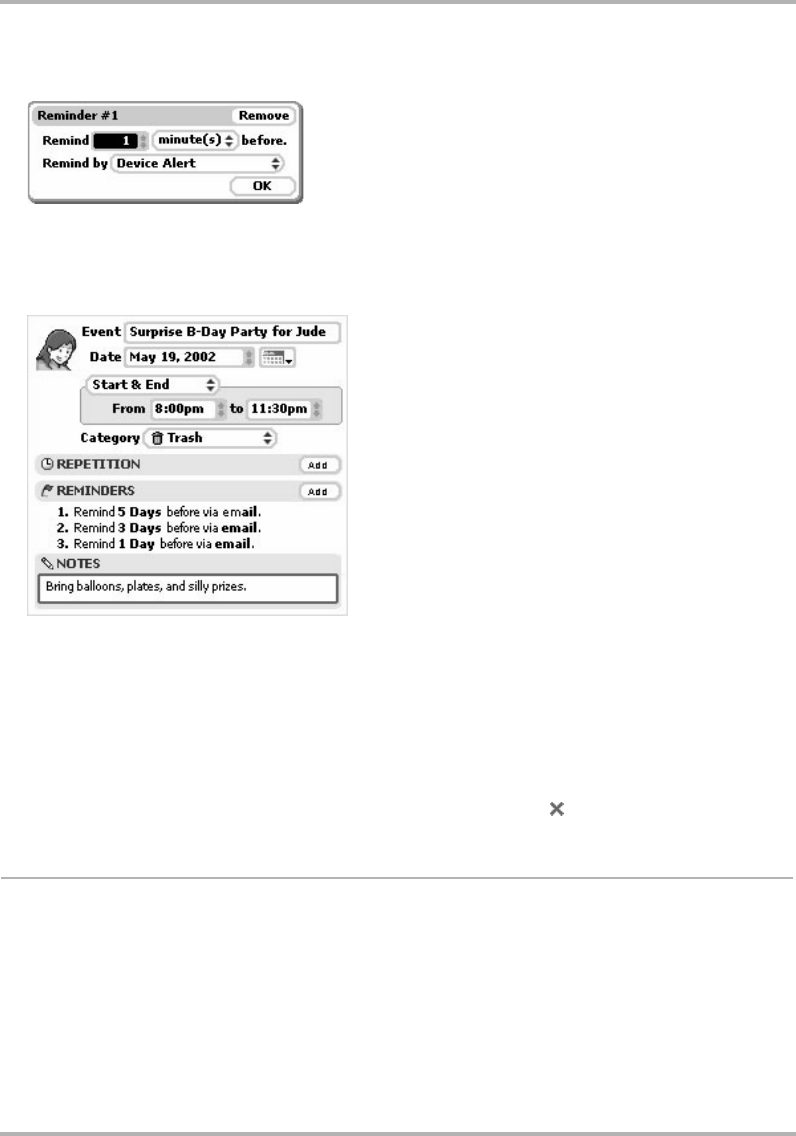
Scheduling Events with Calendar
February 12, 2002 T-Mobile Device Owner’s Manual 112
7To set a reminder for the event (and each time it repeats), in the Reminder section, highlight the Add
button and click. The Reminder dialog box opens:
You can set your reminder to happen a number of minute(s), hour(s), or day(s) before the event.
You can be reminded by a device alert (sound and on-screen message), or email.
8To can also add a note to your event. Simply click the Notes box and type. Your note can be any length.
9Here’s an example of a filled-in event:
Copy an Existing Event
1From an Upcoming, Day, or Week view, highlight the event you want to duplicate, then click to open its
Events Details screen.
2Open the menu and click Duplicate Event. The screen appears to remain unchanged; however, you are
really looking at a copy of the original event.
3Make your edits on the Event Details screen to reflect the details of your new event.
4When you’ve finished editing the screen, open the menu and click Save [].
Move an Event
If you have an event that occurs within a one-day time frame and the time for that event changes, you can
adjust its time from either the Day or Week view:
1From the menu, click Today or Week.
2Use the wheel to highlight the event you want to move, then open the menu and click Move Event.
3Rotate the wheel to position the event at the new time.
4Click the wheel to save the move.
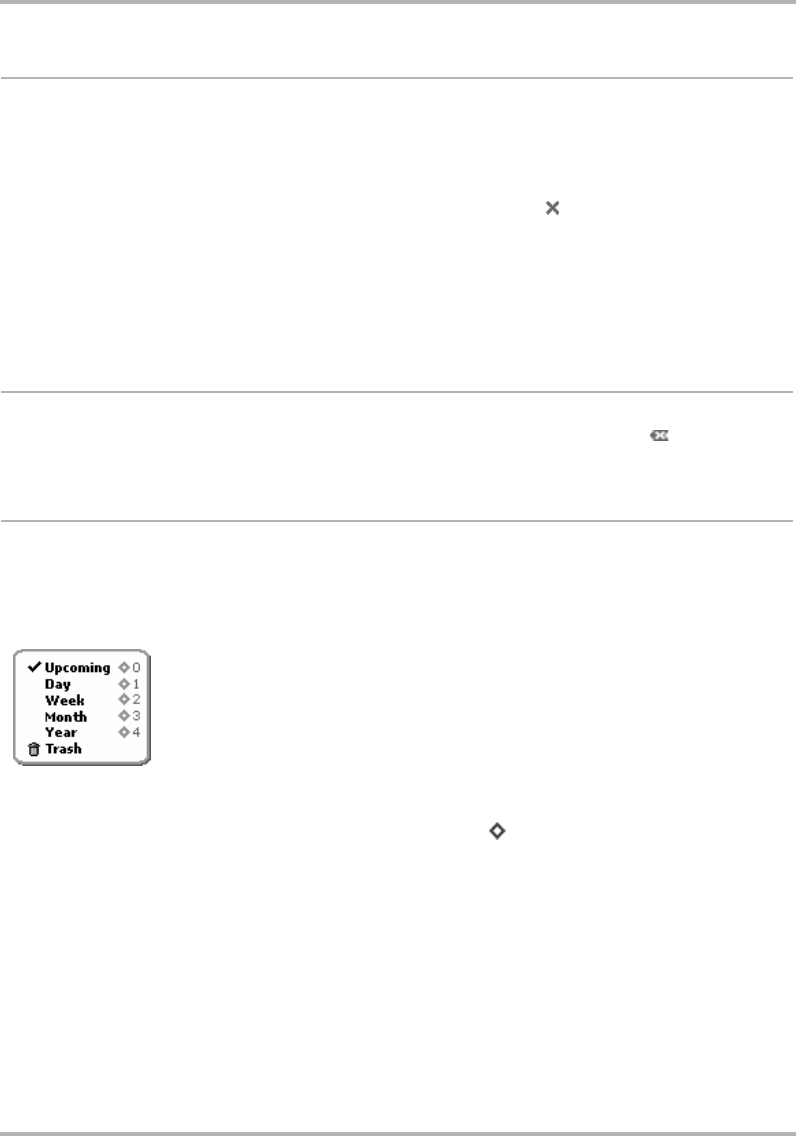
Scheduling Events with Calendar
February 12, 2002 T-Mobile Device Owner’s Manual 113
Edit an Event
1From an Upcoming, Day, or Week view, highlight the event you want to edit, then click to open its Events
Details screen.
2Make your edits on the Event Details screen as you wish. If you need to change a Repetition or Reminder,
simply highlight the repetition or reminder line, and click to open the appropriate dialog box for editing.
3When you’ve finished editing the details, open the menu and click Save [ ]. If you’ve changed a repetition
item, you’ll be prompted to:
• Change just this occurrence
• Change the entire series
• Change the series from here on
Select the appropriate action and click Save.
Discard an Event
To remove an event completely, highlight it, then open the menu and click Discard Event [ ]. The event is
moved to the Trash View.
Ways to View Your Events
The Calendar application offers a number of convenient ways to view all your scheduled events. To go to a
particular view within Calendar, open the menu and click View... A menu appears, listing your view choices:
Upcoming, Day, Week, Month, Year, or Trash.
A check mark always appears next to the view currently on your screen:
Notice that from anywhere in the Calendar application you can use the shortcuts shown above to switch views.
For example, to switch from Upcoming to Month view, simply Press [ + 3].
To read more about each view, follow the link in the first column of the table below.

Scheduling Events with Calendar
February 12, 2002 T-Mobile Device Owner’s Manual 114
View What you see in this view What you can do from this view
Upcoming View A list of all scheduled events
for the next five days. Navigate up/down the list by rotating the wheel up
or down, or by pressing the D-pad up/down arrows.
Edit an event’s details by highlighting the event, then
clicking the wheel.
Day View A list of all scheduled events
(past and future), organized by
day. One-hour time slots are
shown down the left side of
the screen.
Events are shown in shaded
boxes, with their titles and
time span (as space allows).
Navigate up/down the list by rotating the wheel, or
by pressing the D-pad up/down arrows.
Use the menu to Go to Today, Next Day, or
Previous Day.
Edit an event’s details by highlighting the event, then
clicking the wheel.
Week View A table showing the current
week. The days of the week,
starting with Sunday, are
shown as column headings
and one-hour time slots are
shown down the left side of
the screen.
Events are grey boxes,
sometimes containing a partial
title (depending on space).
Navigate up/down the list by rotating the wheel, or
by pressing the D-pad up/down arrows.
Navigate among days in the week by pressing the D-
pad left/right arrows. You can scroll to previous or
future weeks by continuing to use the arrow keys.
Use the menu to Go to Today, Next Week, or
Previous Week.
Edit an event’s details by highlighting the event, then
clicking the wheel.
Month View A table showing the current
month, with the current day
highlighted.
Navigate between days by rotating the wheel.
Navigate between months by pressing the D-pad
left/right arrows.
Use the menu to Go to Today, Next Month, or
Previous Month.
Edit an event’s details by highlighting the event, then
clicking the wheel. The Day view appears. Click the
wheel again to edit the event’s details.
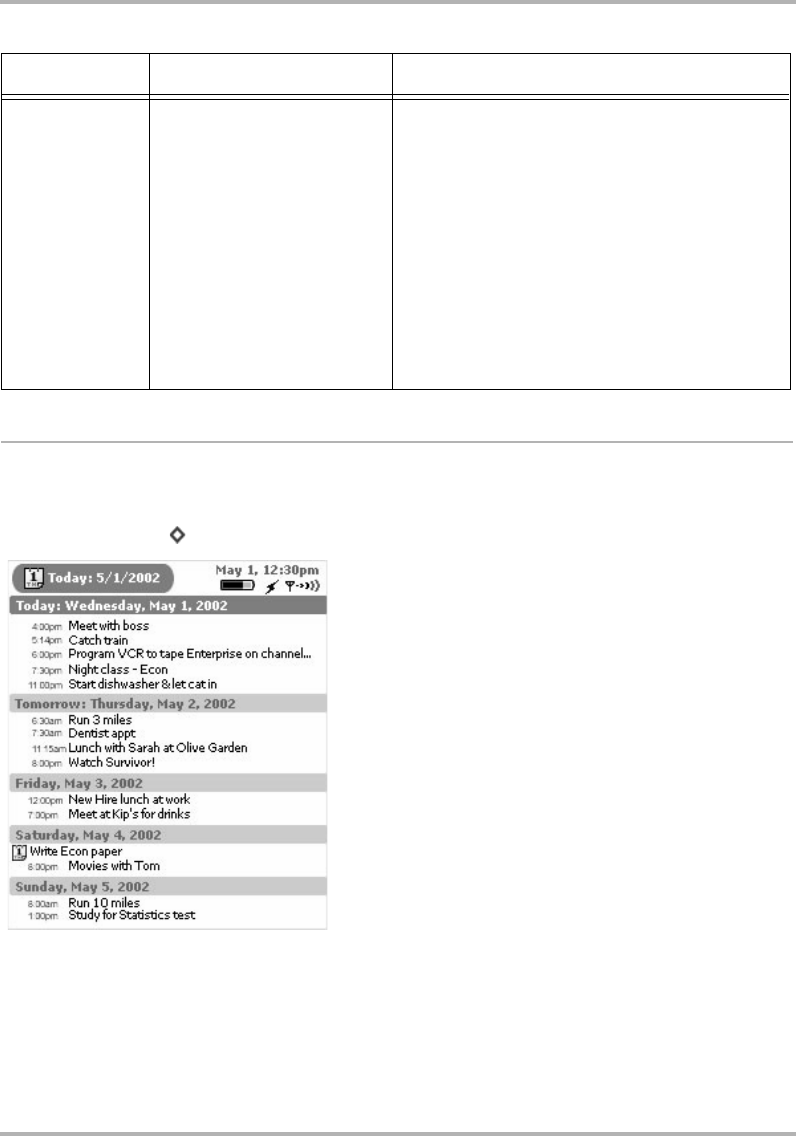
Scheduling Events with Calendar
February 12, 2002 T-Mobile Device Owner’s Manual 115
Upcoming View
The Upcoming view shows you all your events scheduled for the next five days.
To open the Upcoming Events view, from the Jump screen click Calendar, then open the menu and click
Views... > Upcoming [ + 0].
Upcoming View Features
•In the Today section, you only see the events that have not expired, as of that minute.
Year View A grid of the year, grouped by
month, with the current month
and day selected.
Navigate between months by rotating the wheel, or
by pressing the D-pad up/down arrows.
Use the menu to Go to Today, Next Year, or
Previous Year.
Navigate within a month by first highlighting the
month, then clicking the wheel. Now, with the month
highlighted, you can move around days by rotating
the wheel.
Open a specific Day view by first highlighting the
month, then clicking the wheel, then highlighting the
day and clicking. From there you can edit an event’s
details.
View What you see in this view What you can do from this view
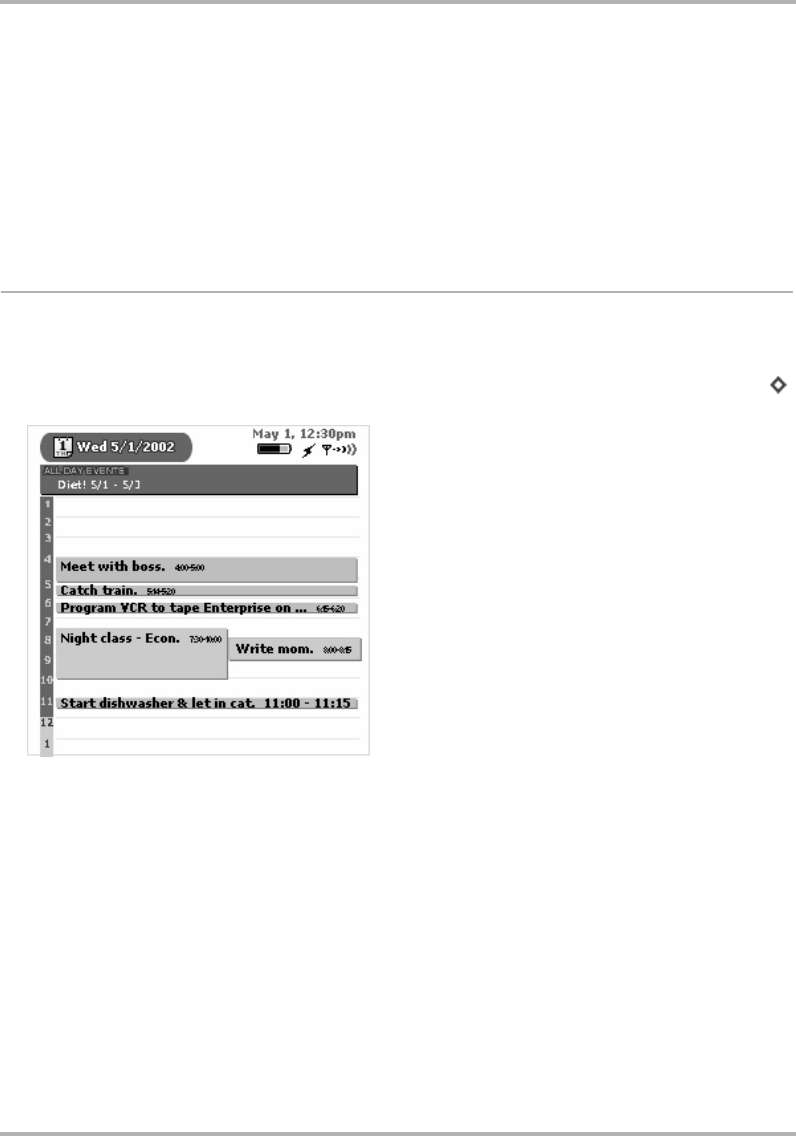
Scheduling Events with Calendar
February 12, 2002 T-Mobile Device Owner’s Manual 116
• To open an Event Detail screen, use the wheel to highlight the event title, then click. At this point you can
edit the details if you want. To dismiss the screen and return to the view, click the Back button.
• All-day events are shown with an event icon just to the left of the event name, like “Write Econ paper” in
the example above.
Upcoming View Navigation Tips
• Use the wheel to scroll through the five days, backward and forward. You are constrained in your scrolling
to the current day and four days forward.
Day View
The Day view shows you all the events you have scheduled for the current day, listed down the screen, starting
with the earliest event at the top.
To open the Day view, from the Jump screen click Calendar, then open the menu and click Views ... > Day [
+ 1].
Day View Features
• The full day will not display on your screen (not enough room), so the Day view always opens with the
events occurring at the current time centered on the screen.
• All-day events are shown at the top of the screen and will always stay in view, even when you scroll.
• If one or more events have overlapping times, the events will appear adjacent to each other, like the
“Night class - Econ” and “Write mom” events in the example above.
• Hours of the day are listed down the left edge of the screen. PM hours are shown against a dark
background; AM hours are shown against a light background.
Day View Navigation Tips
• Use the wheel to scroll up and down the day’s time slots.
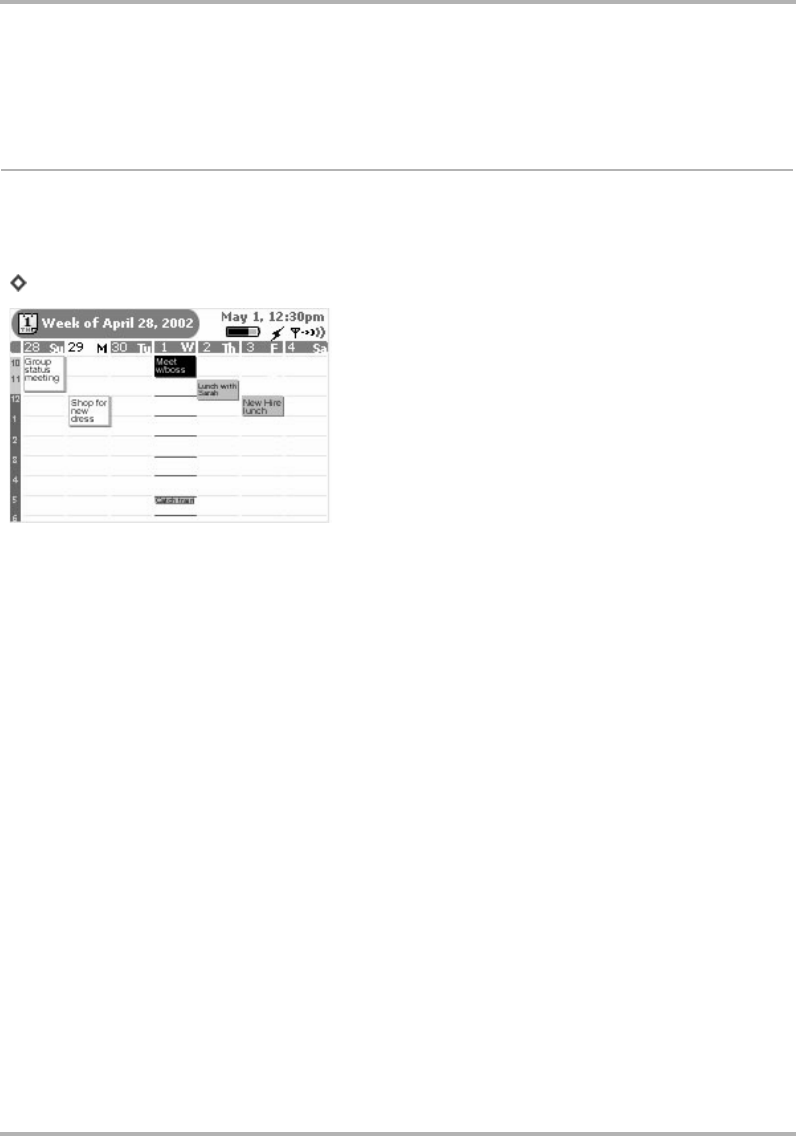
Scheduling Events with Calendar
February 12, 2002 T-Mobile Device Owner’s Manual 117
• To go to the next or previous day’s view, instead of scrolling, you can always open the menu and click
Next Day or Previous Day.
• But if you do keep scrolling up or down, you will enter the previous or next day’s time slots, and beyond.
Week View
The Week view shows you the events you’ve scheduled for the current week, with one exception: all-day events
are not shown in this view.
To open the Week view, from the Jump screen click Calendar, then open the menu and click Views... > Week
[ + 2].
Week View Features
• The current day’s time slot lines are bold, like May 1 in the example above.
• An event you’ve highlighted is shown with a black background.
• Events in the past (“expired events”) are shown in blocks with a white background.
• If you have overlapping events, they will appear adjacent to each other.
• To open an Event Details screen, highlight the event, then click. View or edit the event details. To dismiss/
save your edits to the Event Details screen, click the Back button.
Week View Navigation Tips
• Use the wheel to scroll up and down through the time slots; use the D-pad left/right arrows to advance
back and forward through the days, even beyond the current week to the previous and next week.
• You can always use the menu to go to Next Week or Previous Week.
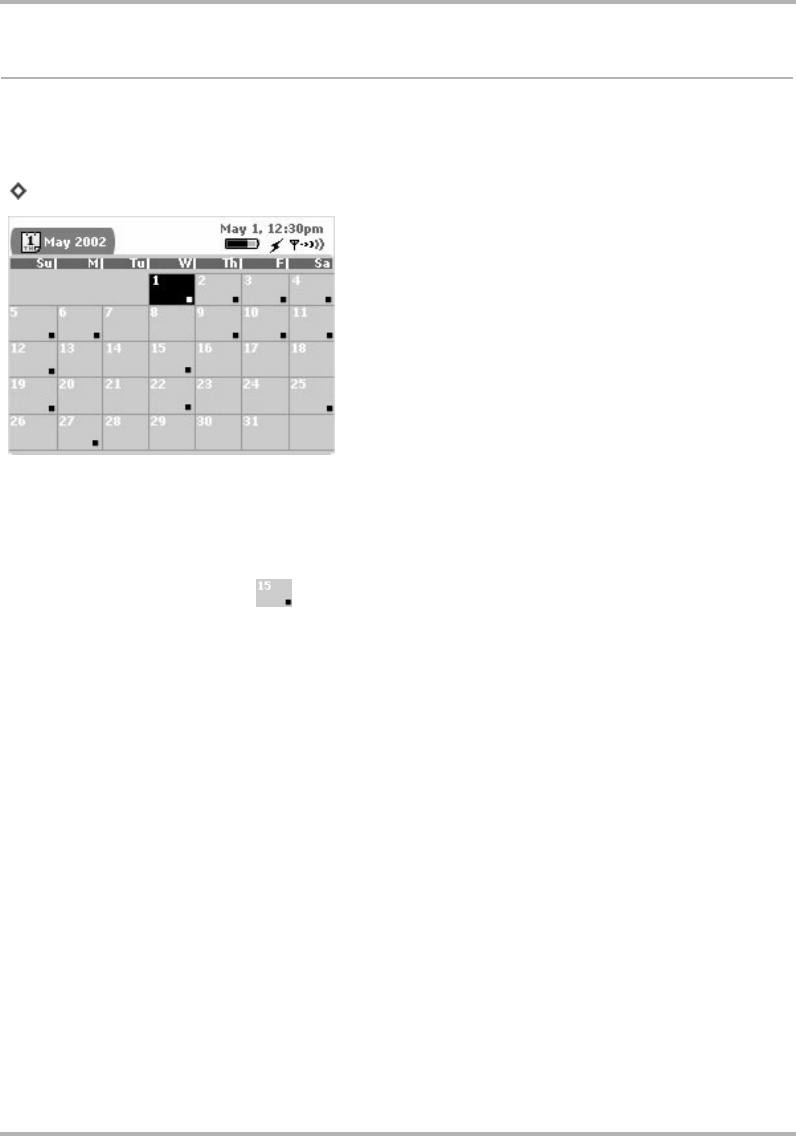
Scheduling Events with Calendar
February 12, 2002 T-Mobile Device Owner’s Manual 118
Month View
The Month view is designed to give you a sense of where you are in the month (the current day is highlighted in
black).
To open the Month view, from the Jump screen click Calendar, then open the menu and click Views... > Month
[ + 3].
Month View Features
• The current day block is shown highlighted in black.
• If you have at least one event scheduled for a given day, that day contains a little square icon in the lower-
right corner of the day block .
• To drill down to an Event Details screen, highlight the day, then click to open the Day view. Make sure the
event you want to open is highlighted, then click again. View or edit the event details. To dismiss the
screen, click the Back button.
Month View Navigation Tips
• Use the wheel to scroll forward and backward through days.
• To scroll backward and forward through months, use the D-pad up/down arrows.
• You can always use the menu to go to Next Month or Previous Month.
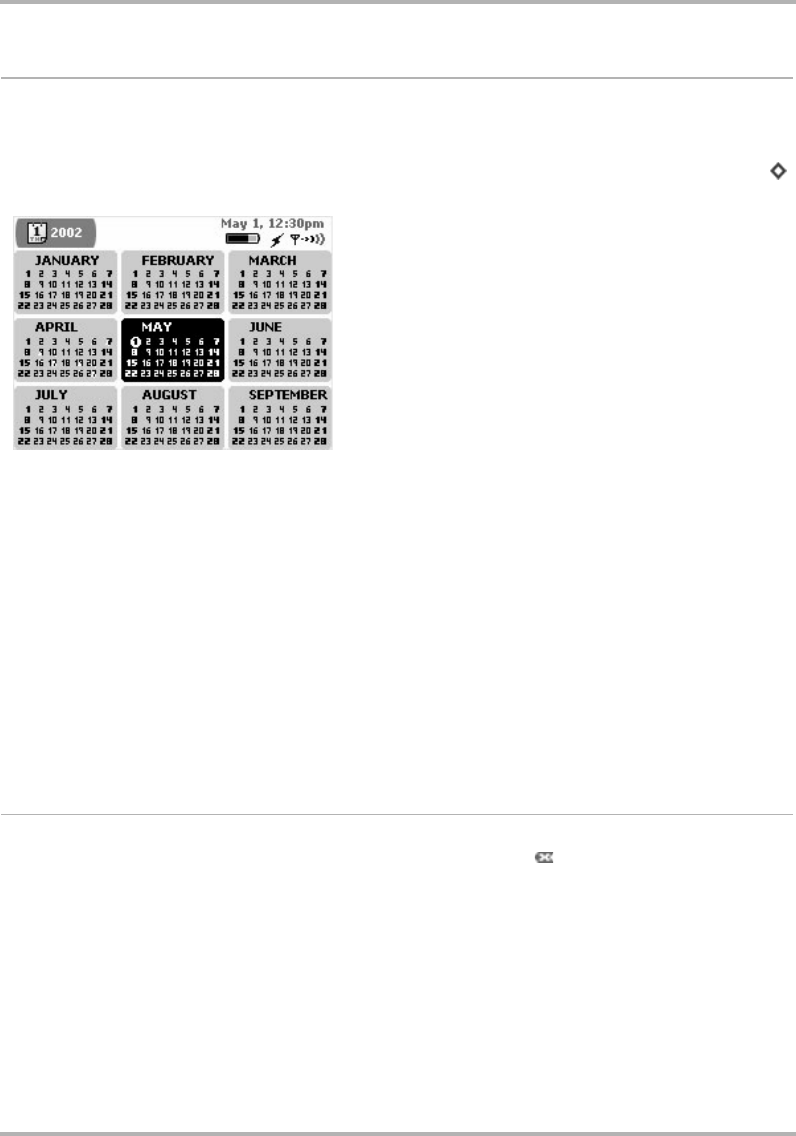
Scheduling Events with Calendar
February 12, 2002 T-Mobile Device Owner’s Manual 119
Year View
The Year view opens to the current year and lets you look forward and backward across months in one glance.
This view is handy if you need to plan an event that is at least a month ahead, such as your summer vacation!
To open the Year view, from the Jump screen click Calendar, then open the menu and click Views... > Year [
+ 4].
Year View Features
• The current month is shown highlighted in black.
• The current day is shown in a white circle.
• To drill down into a more focused view, first highlight the month you’re interested in, then click. Now you
can rotate the wheel to highlight a specific day. Once you’ve highlighted the day you want, click. The Day
view opens to your selected date. (From there you can view events.)
Year View Navigation Tips
• Use the wheel or D-pad up/down arrows to scroll from month to month.
• To move forward and backward among years, open the menu and click either Next Year or Previous
Year.
Trash View
Whenever you Discard an Event by using the menu option or the DEL key [ ], your event is “saved” in the
Trash, in case you want to retrieve it.
To retrieve an event:
1Open the menu and click Trash. The Trash view opens.
2Use the wheel to highlight the event you want to retrieve.
3Open the menu and click Retrieve Event. The event returns to its original time slot.
To empty the Calendar Trash:
1Open the menu and click Trash. The Trash view opens.

Scheduling Events with Calendar
February 12, 2002 T-Mobile Device Owner’s Manual 120
2Open the menu and click Empty Trash. A message appears on the screen stating “The Trash is empty.”
Go To a Specific Day
Regardless of where you are in a particular view, you can always return to today by opening the menu and
clicking Go to Today [ + T].
Taking Photos
February 12, 2002 T-Mobile Device Owner’s Manual 121
13. Taking Photos
Smile! You’re always ready to document a fun time with the T-Mobile Device Snapshots application. What’s more,
you can instantly involve family or friends by sending them the photo via email. You can save up to 36 pictures
for viewing either on your device or the Web.
Just put the camera into the headset jack and you’re ready to start taking photos! Find out exactly how to use
your device’s camera by reading the topics in this chapter:
•
Snapshots Menu Shortcuts
on page 121
•
Insert the Camera
on page 121
•
Capture a Photo
on page 122
•
About Capture Modes
on page 122
•
View Your Photo Gallery
on page 123
•
Full Screen View
on page 123
•
Email Photos
on page 124
Snapshots Menu Shortcuts
You can use the following keyboard shortcuts for performing actions from the Snapshots menu:
Insert the Camera
Your device comes with a Treva camera in the box. Here’s how to attach the camera to your device:
1Before you can insert the camera into your device, you must expose the “lead”, which is protected by a
plastic case. You can tell which end is the case because it has a hook for attaching to a key chain or cord. To
remove the case, hold the camera with both hands (one hand on each end) and rotate the case 90 degrees,
then pull to expose the lead. Insert the lead firmly into the device headset/camera jack (see
Parts of Your T-
Mobile Device
on page 13 for a picture showing the location of the jack).
2As soon as you insert the camera into the jack, your device will display the Capture screen. If you’re ready to
take a photo now, follow the instructions in
About Capture Modes
on page 122.
Snapshots Menu Options Shortcut
Sort... + A
Delete
Email Marked
Flip
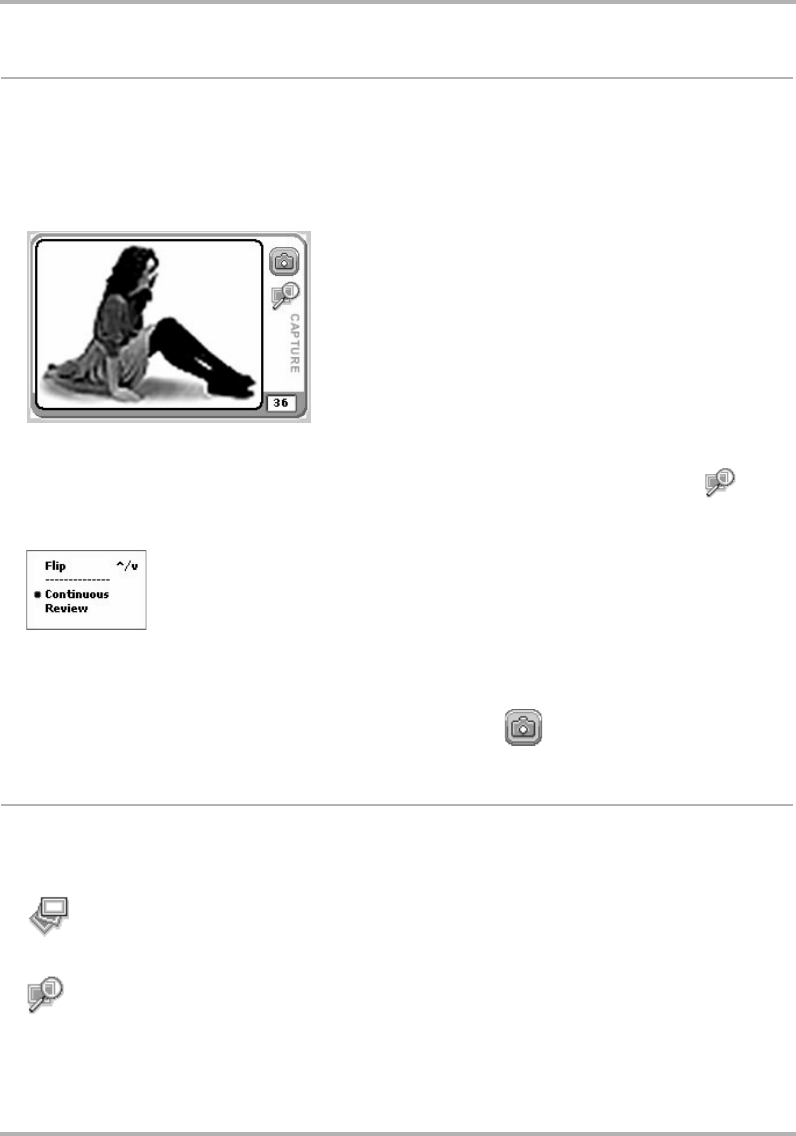
Taking Photos
February 12, 2002 T-Mobile Device Owner’s Manual 122
Capture a Photo
To take a photo, the camera must first be inserted in the jack
and
you must be viewing the Capture screen. If
you’ve just inserted the camera, the Capture screen will open automatically; however, if you’ve been to another
screen after inserting the camera, you’ll need to return to the Capture screen:
1Open the Snapshots menu and click Capture New.
2The Capture screen appears with the image currently in focus in the “viewfinder”:
3You must now select a capture mode. (Read more in
About Capture Modes
on page 122.)
• By default, the Capture screen opens in Review mode, indicated by the Review mode icon: .
• If you’d rather capture in Continuous mode, then open the Capture menu and click Continuous. Note
that the currently-selected mode is marked with a bullet:
4Position the camera so the image you want to capture displays in the “viewfinder” on the Capture screen. If
the image is upside down, use the Flip menu option to right it. You can also use the D-pad’s up and down
arrow keys to right the picture.
5When you’re ready to capture the image, click the “shutter” button .
About Capture Modes
There are two “modes” you can be in when taking a picture:
Continuous You can take many photos in a row, without being prompted to save or delete
the picture. Photos are saved to your device for later review on the
View Your
Photo Gallery
.
Review After you capture an image, it is displayed on the screen. Then you can rename
it, retry (delete), or keep it.
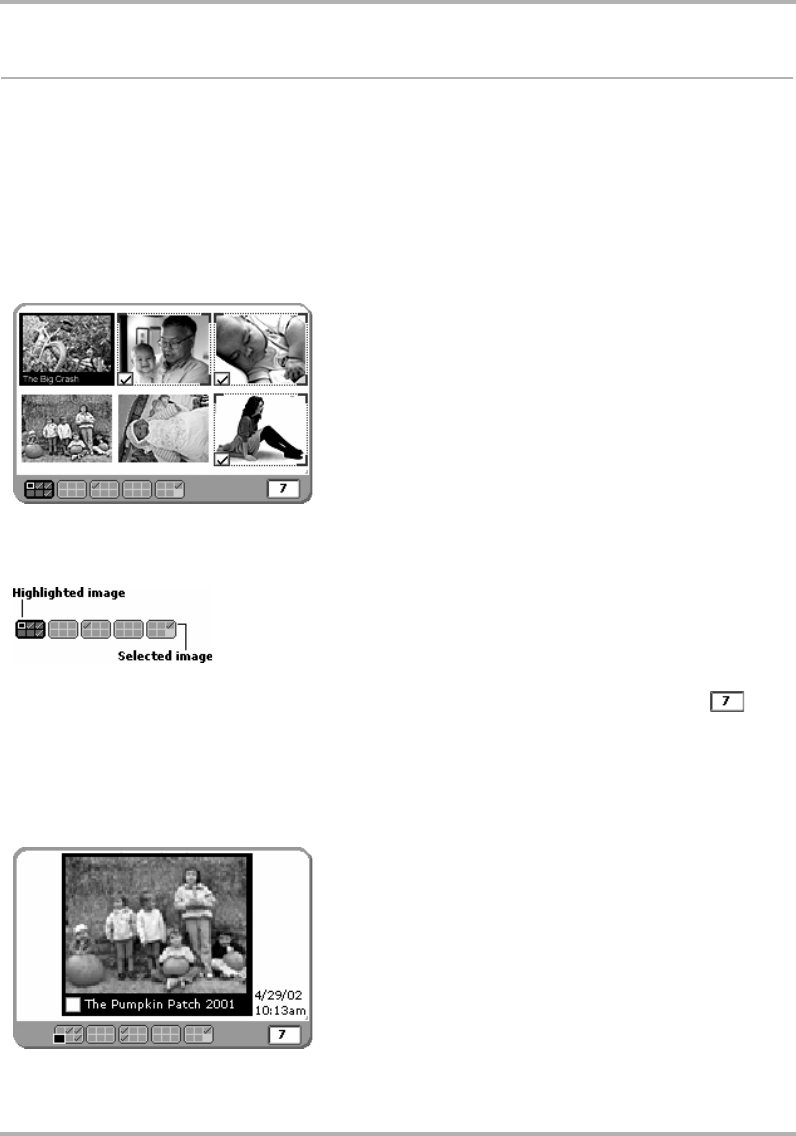
Taking Photos
February 12, 2002 T-Mobile Device Owner’s Manual 123
View Your Photo Gallery
You can save up to 36 photos on your device, which you can view in two ways:
•Thumbnail View - screen displays six photos at a time, rendered at 75% of original size
•Full Screen View - screen displays one photo at a time, rendered at 150% of original size
By default, your photo “gallery” opens in Thumbnail view.
Thumbnail View
The Thumbnail view is illustrated below.
Use the wheel to scroll through your photo gallery. Below the thumbnails you’ll see a handy gallery navigation
bar. You can always see where you are in your sequence of photos since the highlighted image is outlined. You
can also see at a glance which images are selected by looking for the check mark indicator.
The number of photos you have remaining (out of the 36 you can save) is displayed in the counter .
Full Screen View
To get a magnified look at any of your photos (twice as large as displayed in the Thumbnail view), highlight a
picture in the Thumbnail view, then from the menu click View Full Screen. The selected image appears on the
screen:
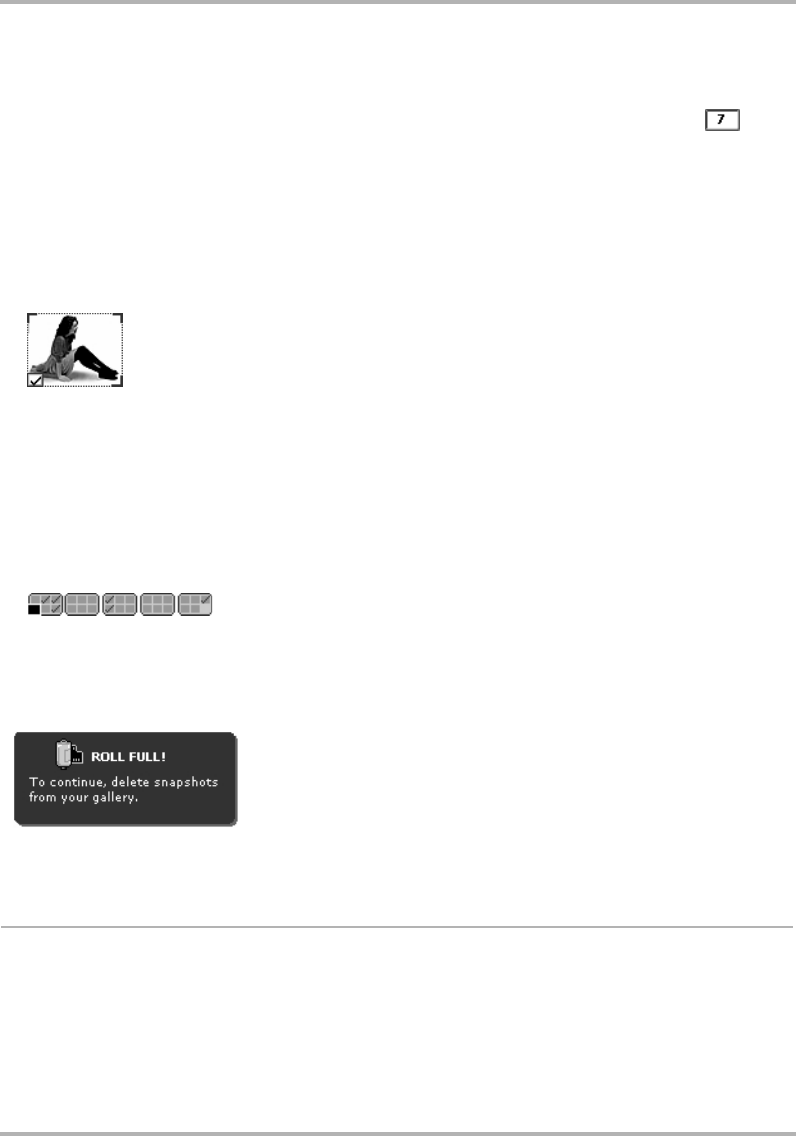
Taking Photos
February 12, 2002 T-Mobile Device Owner’s Manual 124
You get a gallery navigation bar on the Full Screen view as well. An image is considered “highlighted” if it is
currently in full-view on the screen.
The number of photos you have remaining (out of the 36 you can save) is displayed in the counter .
How to Select Photos
In order to perform an action on one or more photos, you must first select the photos. Note! You can select
photos in either Thumbnail or Full Screen view.
1Use the wheel to scroll through your photo gallery, highlighting the image you wish to select.
2Click the wheel to cause a check mark to appear in the lower-left corner of the image. The corners of the
selected image are outlined as well:
3Continue to scroll through your photo gallery, highlighting an image, then clicking the wheel to select it, until
you’ve selected all the images you wish.
4 To select a series of contiguous photos, highlight the first photo in the series, then click and hold the
wheel down while rotating through the gallery. After you’ve selected the last image you want in the series,
release the wheel.
5 To select all the photos in your gallery, highlight the first image in the gallery, hold the Shift key down
while scrolling to the last picture you want in the series, then click. Note that this method also works for
selecting a subset of contiguous photos in the gallery.
6Your gallery navigation bar shows you which images you’ve selected:
When Your Photo Gallery Is Full
If your gallery becomes full (36 pictures stored), the shutter button will be dimmed in Capture mode, the photo
counter will read “0”, and you will receive a notice:
If you want to take new photos, first delete some existing photos, as described in
Delete Photos
on page 126.
Email Photos
You can send through the email application any photos you’ve stored in your gallery, from either the Thumbnail
or Full Screen view. Note! You can attach all the images in your photo gallery if you want, up to 36.
1Use the wheel to scroll through your photo gallery. When you find a photo you want to email, highlight the
photo then click the wheel to select it.
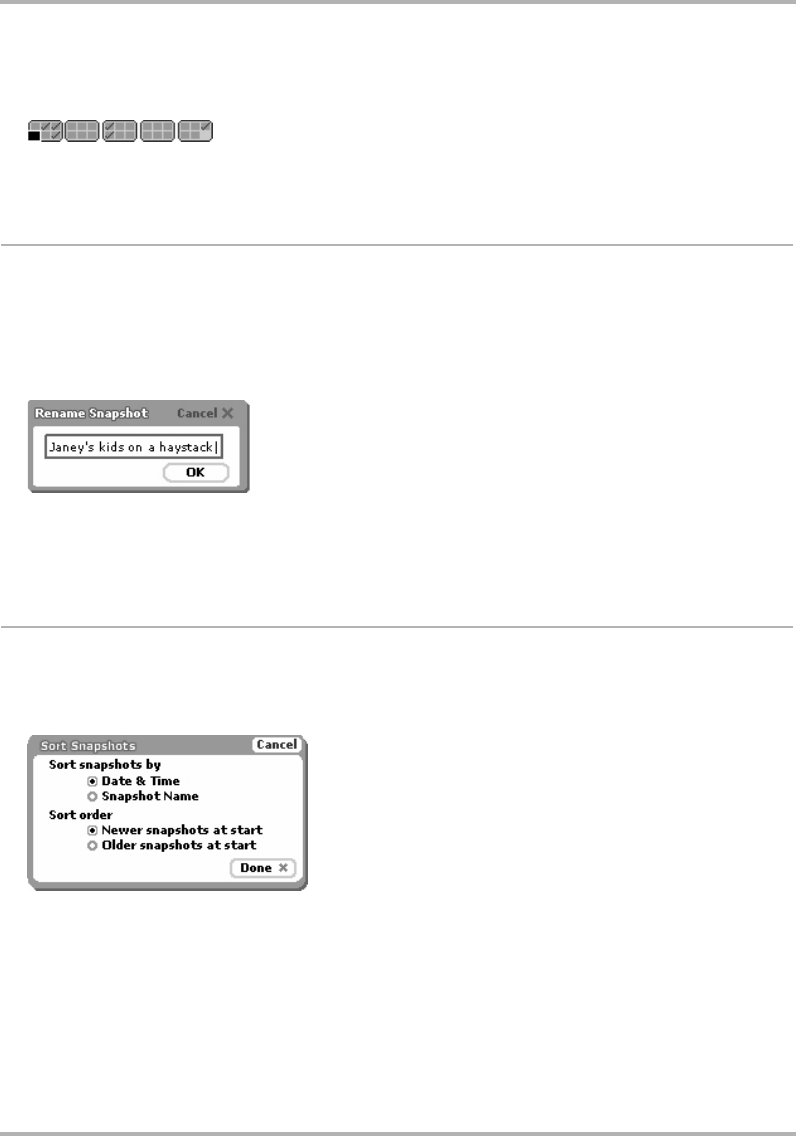
Taking Photos
February 12, 2002 T-Mobile Device Owner’s Manual 125
2Continue to select photos until you’ve selected all the images you want to send.
3Review the gallery navigation bar at the bottom of the screen to make sure you’ve selected only the images
you want to attach to your email message:
4Open the menu and click Email Marked. A new email compose screen will appear, with your photos shown
as attachments.
Change the Name of a Photo
You can always re-name photos you’ve stored in your gallery, from either the Thumbnail or Full Screen view.
Note! A photo name can be no longer than 32 characters.
1Use the wheel to highlight the image you want to rename.
2Click the wheel to select it.
3From the menu, click Rename... The Rename Photo dialog box opens:
4The text cursor is located at the end of the current name. Delete the old name and type your new image
name as you like.
5Click OK to save the change and dismiss the dialog box.
Sort Photos
You can sort the order in which your photos appear in your photo gallery, from either the Thumbnail or Full
Screen view.
1Open the menu and click Sort... The Sort Photos dialog box opens:
By default, your photos are sorted by date & time, with the newest photos at the beginning of the gallery.
2If you want to change this default sort behavior, you can choose from:
•Date & Time - further specify sort order:
- Newer photos at start
- Older photos at start
•Photo Name - further specify sort order:

Taking Photos
February 12, 2002 T-Mobile Device Owner’s Manual 126
- A .. Z
- Z .. A
3When finished, click OK to save changes, or push the Back button to dismiss the dialog box with no changes.
Delete Photos
You can always delete photos you’ve stored in your gallery, from either the Thumbnail or Full Screen view.
1Use the wheel to select the image you want to delete.
2Click the wheel to select it.
3Open the menu and click Delete... A confirmation dialog box appears.
4Click OK to delete the image from your gallery.
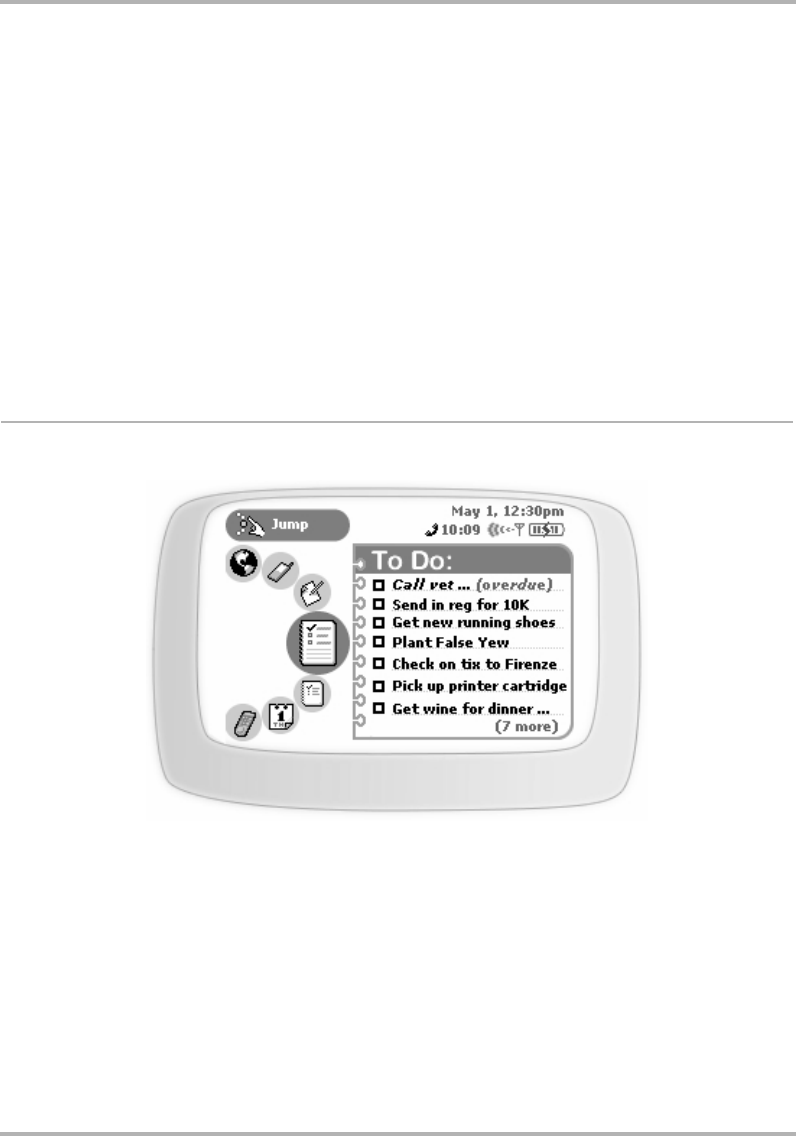
Keeping To Do Lists
February 12, 2002 T-Mobile Device Owner’s Manual 127
14. Keeping To Do Lists
Make sure you never forget another thing to do! Keep yourself organized with the T-Mobile Device To Do
application. Get started now by reading the topics in this chapter:
To Do Preview Screen
From the Jump screen, with To Do highlighted, you’ll see a screen similar to the following:
The preview screen lists seven of your tasks. If you have more tasks, a note at the bottom of the screen tells you
how many more. You can store a total of 50 tasks, including the tasks that you’ve discarded to the Trash.
•
To Do Preview Screen
on page 127
•
Keyboard Shortcuts
on page 128
•
The Browse Tasks Screen
on page 128
•
Task Details Screen
on page 129
•
Create a New Task
on page 129
•
Edit a Task
on page 130
•
Mark a Task Complete
on page 130
•
Show Tasks Filter
on page 131
•
Task Views
on page 131
•
Discard a Task
on page 131
•
Empty the To Do Trash
on page 132
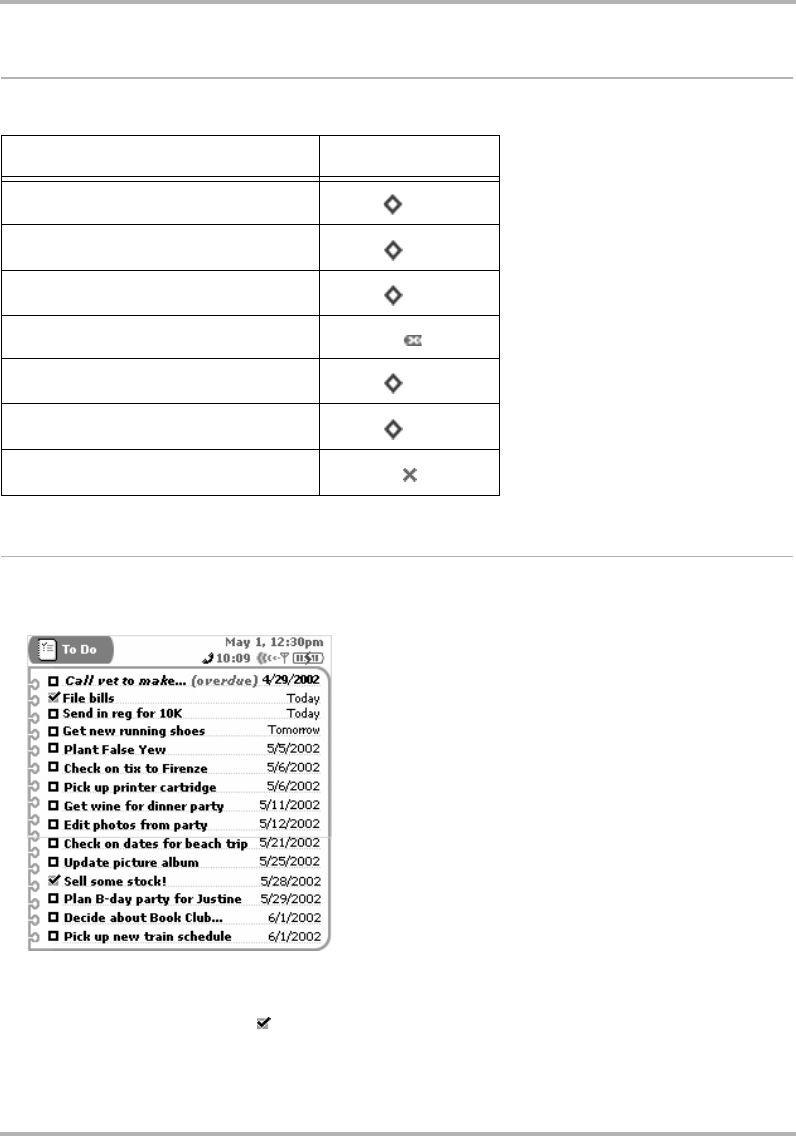
Keeping To Do Lists
February 12, 2002 T-Mobile Device Owner’s Manual 128
Keyboard Shortcuts
Use the following keyboard shortcuts while you’re using the To Do application:
The Browse Tasks Screen
When you first open the To Do application from the Jump screen, you’ll see a list of all your tasks, something like
the following:
Each upcoming task is shown in bold face. Overdue tasks are shown in
italic font
and include the
(overdue)
indicator. Opposite each task name is the due date, unless your task is due Today or Tomorrow. Completed
tasks are shown with a check mark .
Browse Email menu options Shortcut
New Task... + N
Mark Completed + K
Mark Incomplete + K
Discard
All + A
Trash + T
Save
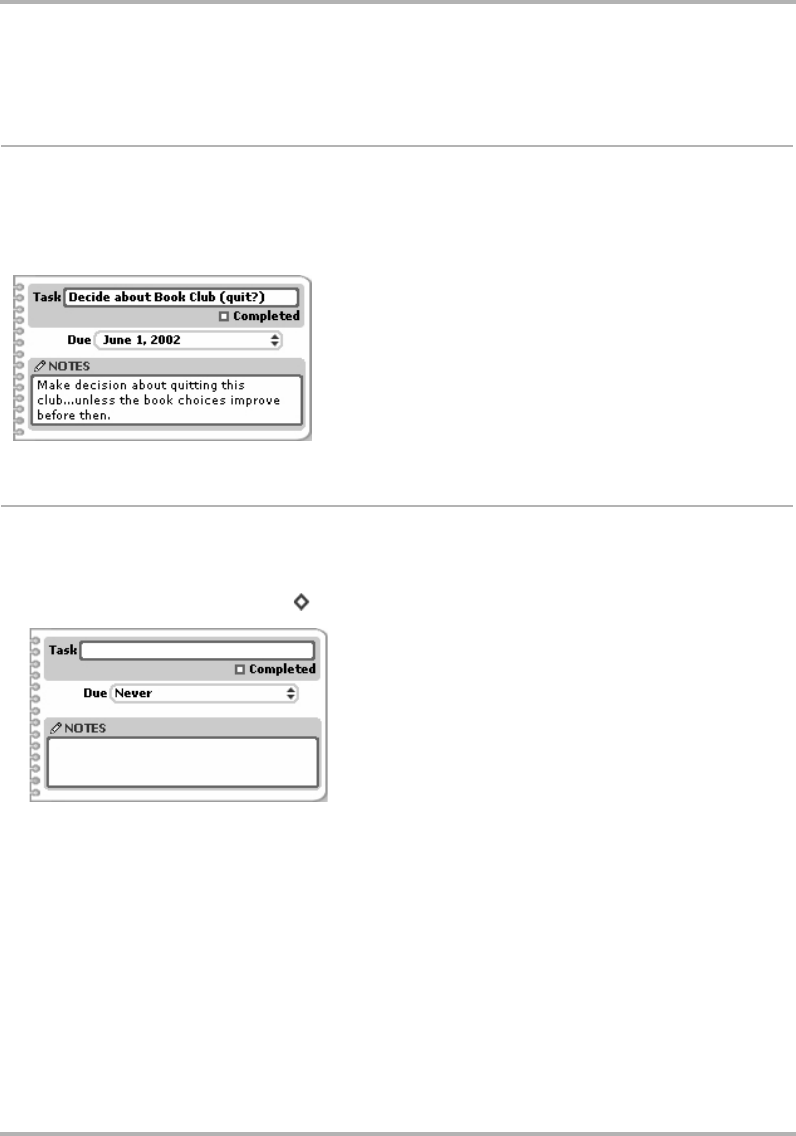
Keeping To Do Lists
February 12, 2002 T-Mobile Device Owner’s Manual 129
You can decide if you want to view overdue and upcoming tasks, or all tasks (listed by date). The list in the
example above shows all tasks, including those completed. Read more in
Show Tasks Filter
on page 131.
Task Details Screen
For each task there is a details screen, which contains more information about the task than can fit in the Browse
Tasks screen. The details screens are also editable, so when opened, you can change the details.
To open a task’s details, on the Browse Tasks screen use the wheel to highlight a task, then click. The details
screen opens. Here’s an example:
Create a New Task
Follow these steps to create a new To Do task:
1From the Jump screen, highlight To Do and click. The Browse Tasks screen opens.
2Open the menu and click New Task [ + N]. A blank Task Details screen opens:
3In the Task field, type a title for your task. Your title can be up to 40 characters long.
4In the Due pop-up menu, select one of:
• Never
•Today
• Tomorrow
•Other...
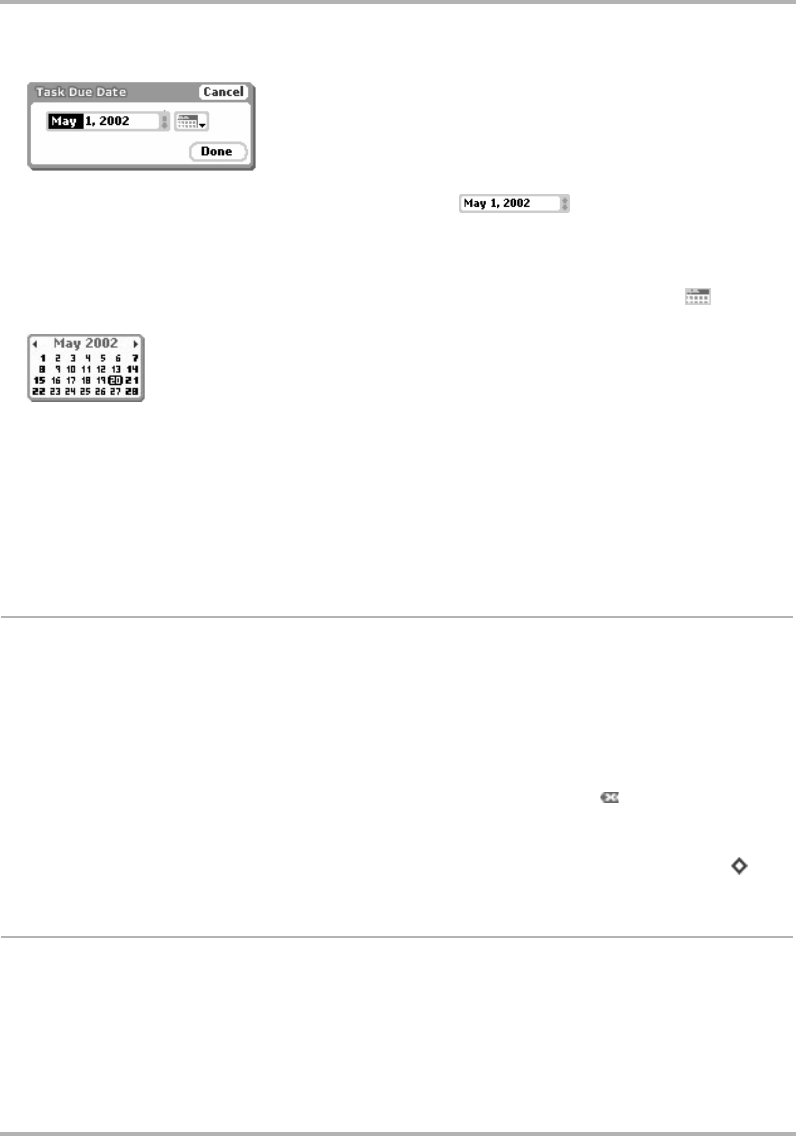
Keeping To Do Lists
February 12, 2002 T-Mobile Device Owner’s Manual 130
If you select Other..., the Task Due Date dialog box opens:
5Pick the Date on which the task is due from the date picker . Click to open the picker, then
rotate the wheel until the month you want is highlighted, then click. Rotate the wheel until the day you want
is highlighted, then click again. Now pick the year by rotating the wheel until the year you want is
highlighted, then click.
You can also use the calendar date picker to select task due date. Highlight the calendar icon then click.
The current month appears:
If you want a year ahead, rotate the wheel until you get to the year and month you want. Then click and
rotate to highlight the day. Click again and your date is set in the Task Details screen.
When finished selecting a Task Due Date, click Done. You are returned to the New Task screen.
6To can also add a note to your event. Simply click the Notes box and type. Your note can be up to 255
characters (or a medium-sized paragraph).
7To save your new task, click the Back button or open the menu and click Save. Your new task appears in
your Browse Tasks screen.
Edit a Task
You can edit any of your tasks by opening the task’s detail screen:
1From the Browse Tasks screen, use the wheel to highlight the task you want to edit, then click. The Task
Details screen opens.
2You can change any of the fields, just as if you were creating the task from scratch. Note that you can mark
the task completed by selecting the Completed check box. You can also mark the task as incomplete by
clearing the Completed check box.
3You can discard the task altogether by opening the menu and clicking Discard []. Tip: Your task is not
deleted permanently; it’s discarded, which means it’s been moved to the Trash.
4When finished with your edits, open the menu and click Save, or press the Back button. If you decide you
don’t want to save the edits you’ve just made to the task details, open the menu and click Revert [ + R].
MarkaTaskComplete
If you’ve completed a task, make sure to make it completed. That way you can choose to suppress these tasks
from the Browse Tasks screen list of tasks (read more in
Show Tasks Filter
on page 131).
To mark a task as completed, do this:
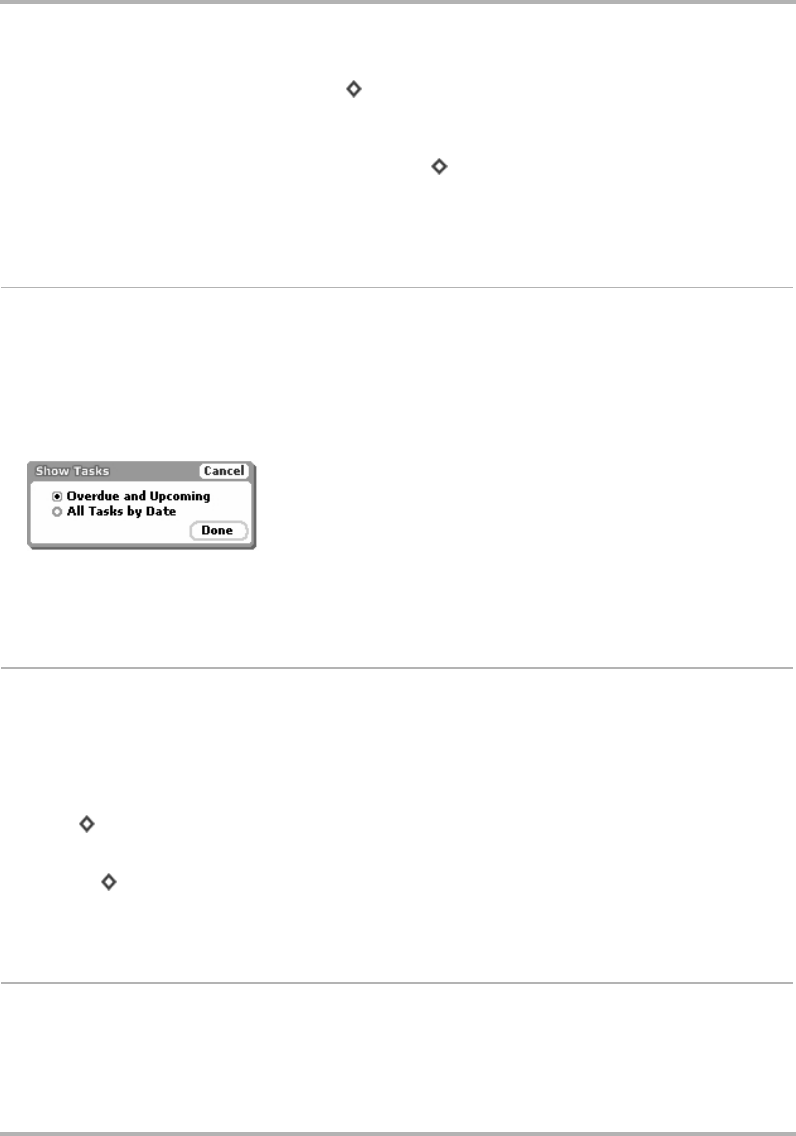
Keeping To Do Lists
February 12, 2002 T-Mobile Device Owner’s Manual 131
1In the Browse Tasks screen, use the wheel to highlight the task you want to mark completed.
2Open the menu and click Mark Completed [ + K].
3A check mark now appears in the box to the left of the task title.
4If you change your mind about having completed a tasks, you can mark it as incomplete by highlighting the
task, opening the menu, and clicking Mark Incomplete [ + K].
Tip: You can also mark a task as completed/incomplete from the Task Details screen. Read more in
Edit a Task
on page 130.
Show Tasks Filter
You can decide if you want the Browse Tasks screen to show:
• just overdue and upcoming tasks
• all tasks in date order
To set this view preference:
1Open the Browse Tasks menu and click Show... The Show Tasks dialog box opens:
2Click the option you want for your view.
3Click Done when finished.
Task Views
There are two task “views”:
• All tasks (using criteria you specified in
Show Tasks Filter
on page 131)
• Trash (contains all tasks you’ve discarded)
You select the view you want by opening the menu and clicking either:
•All [ + A]
or
•Trash [ + T]
Your currently-selected view is indicated by a check mark.
Discard a Task
You can discard a task from either the Browse Tasks screen, or the Event Details screen.

Keeping To Do Lists
February 12, 2002 T-Mobile Device Owner’s Manual 132
• From the Browse Tasks screen, use the wheel to highlight the task you want to discard, then open the
menu and click Discard [].
• From the Event Details, open the menu and click Discard [].
Either way, the task is moved to the Trash, where you can retrieve until you empty the Trash.
Empty the To Do Trash
To permanently remove all the tasks you’ve discarded:
1From the Browse Tasks screen, open the menu and click Trash [ + T]. The Browse Trashed Tasks screen
opens.
2From this screen you can retrieve any task by highlighting it, opening the menu, and clicking Retrieve Task
[ + R]. You can now see the task in the All view.
3When you’re sure you want to permanently delete all the tasks in the Trash view, open the menu and click
Empty Trash. The Trash empties.
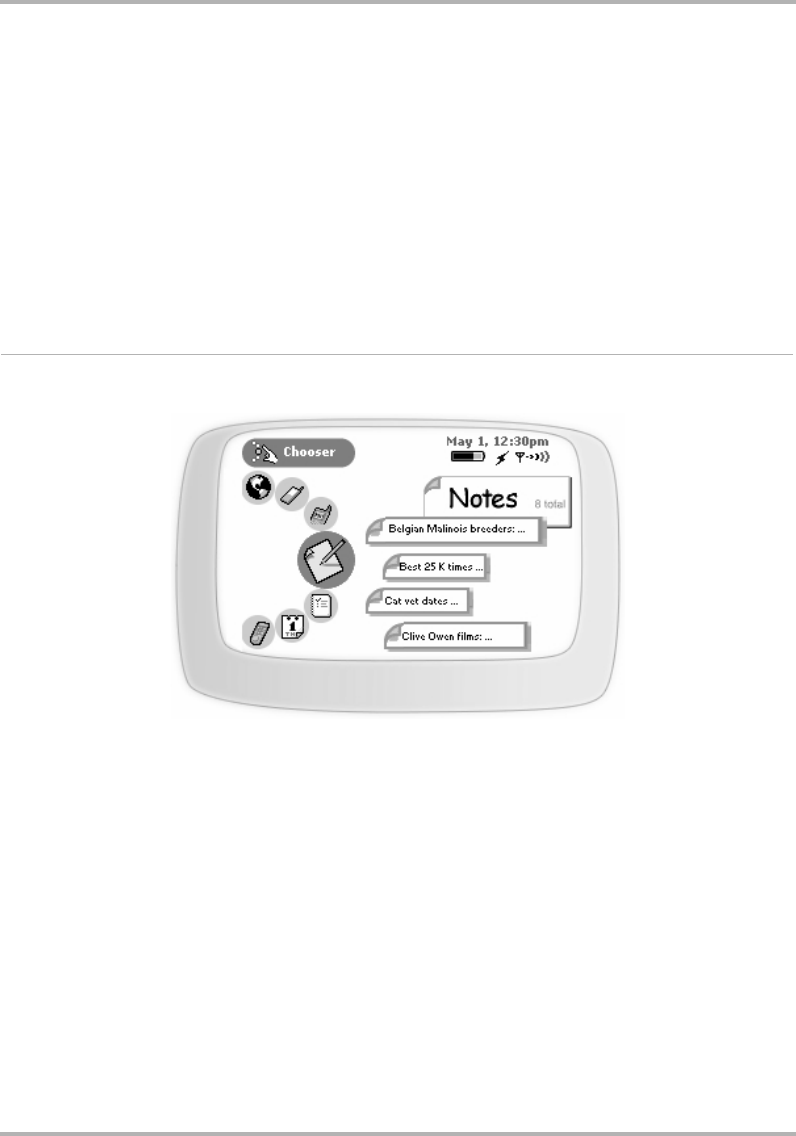
Keeping Notes
February 12, 2002 T-Mobile Device Owner’s Manual 133
15. Keeping Notes
Save all kinds of important information with the T-Mobile Device Notes application. Check your notes on either
your device or the applications on the Web. To learn about Notes, read the topics in this chapter:
Notes Preview Screen
From the Jump screen, with Notes highlighted, you’ll see a screen similar to the following:
The preview screen lists the first four of your notes, as they appear in alphabetical order. The total number of
notes you have is also shown (eight total in the example above). You can create and save up to 20 notes, which
includes the notes that you’ve discarded in the Trash.
•
Notes Preview Screen
on page 133
•
Keyboard Shortcuts
on page 134
•
View Your Notes
on page 134
•
Add a Note
on page 135
•
Edit a Note
on page 136
•
Discard a Note
on page 136
•
Manage Your Notes Trash
on page 136
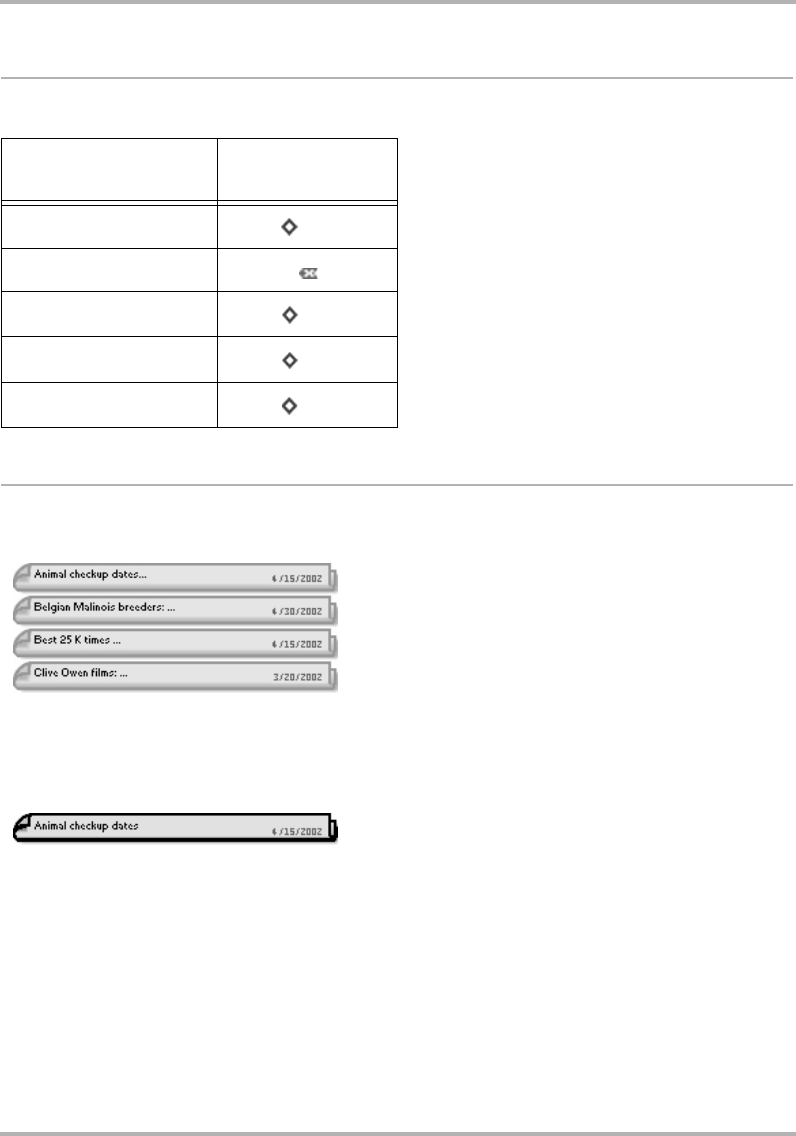
Keeping Notes
February 12, 2002 T-Mobile Device Owner’s Manual 134
Keyboard Shortcuts
While you’re in the Notes application, you can use the following shortcuts for menu items:
View Your Notes
The Browse All Notes screen lists all your notes in alphabetical (ascending) order. By default, the notes are
displayed folded. This means that only the first line of the note is shown:
Note: The ellipsis (...) indicates there’s more to the note than what is shown in the folded view. Unfolding is
explained in the topic below.
Use the wheel to scroll through the notes. You’ll know you’ve highlighted a note when its border appears darker
than the notes around it:
To open this menu
option Use this
shortcut
New Note + N
Discard Note
All (view) + A
Trash (view) + T
Retrieve Note + R
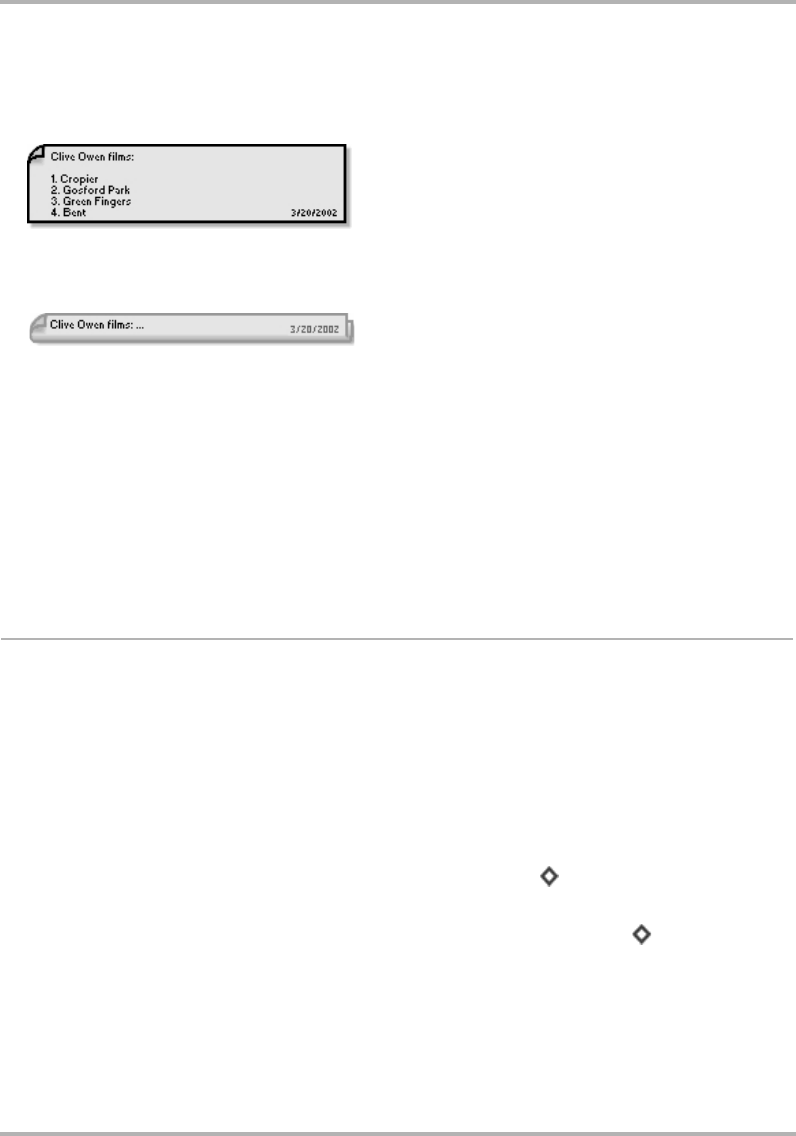
Keeping Notes
February 12, 2002 T-Mobile Device Owner’s Manual 135
Unfolding/Folding a Single Note
To unfold a single note, do this:
1Highlight the note then click the wheel. The note expands, showing the full text:
2If your note is longer than the screen, use the wheel to scroll up/down the note contents. You can also use
the D-pad arrows to navigate within the text.
3To fold your note again, click the wheel. The note folds, showing only the first line:
Unfolding/Folding All Your Notes
To unfold all your notes, do this:
1Open the menu and click Unfold All.
2Use the wheel to scroll up/down through the list of notes.
3At any time, if you want to fold a notes’ contents, first highlight the note with the wheel, then click. The
contents of the note collapse, but the note is still highlighted.
4To re-fold all your notes, open the menu and click Fold All. All the notes’ contents collapse. The note that
was highlighted when you folded all the notes remains highlighted.
Add a Note
Here’s some note facts you need to know:
•How many notes can I have? You can store 20 notes total, including the notes that you’ve discarded to
the Trash. If you’ve run out of room, you may want to empty your Trash (read more in
Manage Your Notes
Trash
on page 136).
•How long can each note be? Each note can be 1000 characters at most; and that includes spaces and
line returns. (To get a sense of how long this is, half a page in a paperback contains about 1000
characters.)
To create a new note, follow these steps:
1From the Browse All Notes screen, open the menu and click New Note [+ N].
2A blank note screen opens. Type your note using the keyboard. (Read more in
Typing Text
on page 21.)
3When you’re finished composing your note, save it by simply clicking the Back button . It’s added to your
list in the Browse All Notes screen.
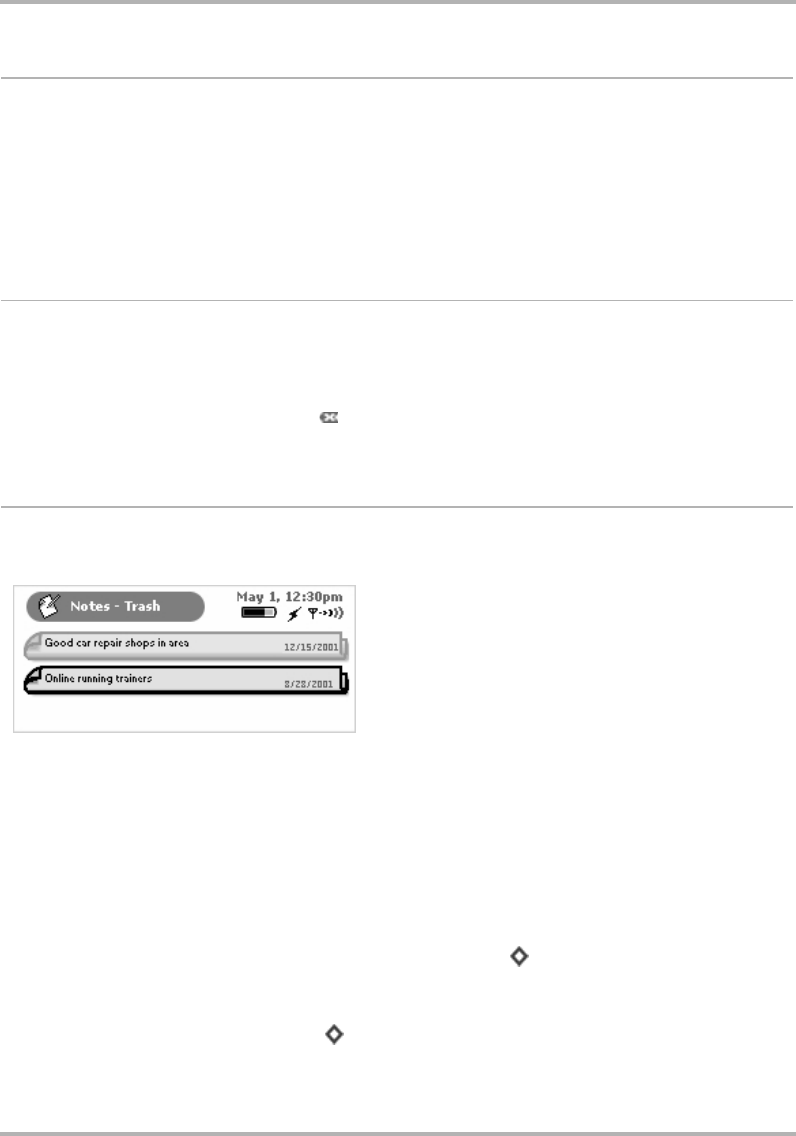
Keeping Notes
February 12, 2002 T-Mobile Device Owner’s Manual 136
Edit a Note
You can always edit an existing, unfolded note.
1Make sure you are viewing the note unfolded. If it’s folded, highlight the note with the wheel, then click to
unfold it.
2The text cursor will be positioned at the spot where you last were typing in the note. Use the D-pad to move
within the text; use the keyboard to edit your note. (Read more in
Typing Text
on page 21.)
3Your edits are saved as soon as you make them.
Discard a Note
Discarding a note means moving it to the Trash:
1From the Browse All Notes screen, highlight the note you wish to discard. (It doesn’t matter if the note is
folded or unfolded.)
2Open the menu and click Discard Note [].
3The note moves to the Trash, where you can later retrieve it or delete it for good.
Manage Your Notes Trash
All your notes are displayed either in the Browse All Notes screen or the Browse Trashed Notes screen, shown
below:
To switch from viewing all your notes to just the notes in your Trash, open the menu and click Trash. The
Browse Trashed Notes screen appears. From this screen you can either:
•
Retrieve a Note You’ve Previously Discarded
, or
•
Empty Your Notes Trash
Retrieve a Note You’ve Previously Discarded
All notes that you have discarded are stored in the Trash, just in case you want to retrieve them later:
1From the Browse All Notes screen, open the menu and click Trash [+ N]. The Browse Trashed Notes
screen opens.
2Use the wheel to highlight the note you want to retrieve.
3Open the menu and click Retrieve Note [+ R].

Keeping Notes
February 12, 2002 T-Mobile Device Owner’s Manual 137
4The note now appears in the Browse All Notes screen.
Empty Your Notes Trash
Remember that you can store 20 notes, including the notes you’ve sent to the Trash. If you’re running out of
available notes, empty your Trash:
1From the Browse All Notes screen, open the menu and click Trash [+ N]. The Browse Trashed Notes
screen opens.
2Open the menu and click Empty Trash. The Browse Trashed Notes screen appears with the message “The
Trash is empty.”
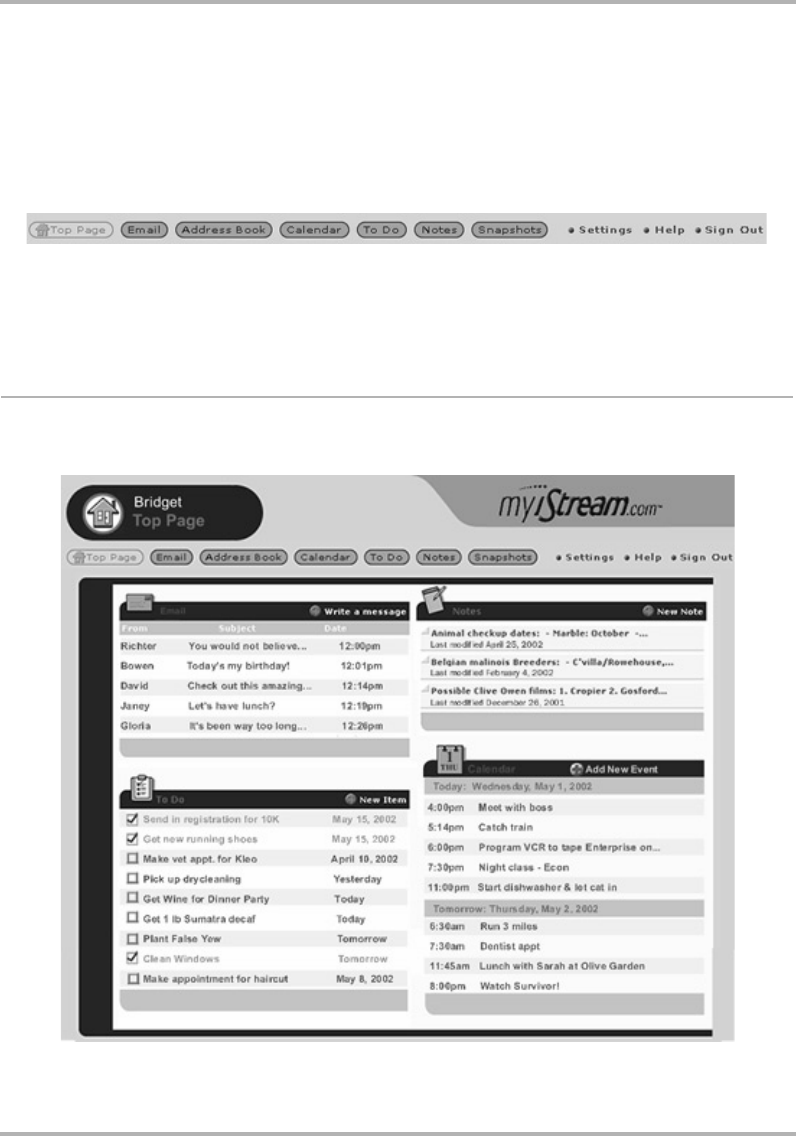
Web Applications
February 12, 2002 T-Mobile Device Owner’s Manual 138
16. Web Applications
You probably spend a lot of time in front of a computer. Perfect! All the information you put on your device is also
on the Web so you can look at it or even change it from your computer. Where on the Web? Just sign in to http:/
/www.voicestream-hiptop.com using the username and password you chose in
Your T-Mobile Account
on page
10. On the Web page that opens you’ll see the familiar T-Mobile Device applications available from the button
bar:
The T-Mobile Device applications not available on the Web are Telephone, Instant Messaging, and Web Browser.
All the other applications display the same personal data that you can see on your device screens. This is
accomplished through data synchronization, which means that no matter where you enter or receive personal
information--on the device or the Web client--you’ll be able to open that information on both clients.
Top Page
After you sign in, the page that opens is called your “Top Page” and contains the most up-to-date information
you have in the Email, Notes, To Do, and Calendar applications:
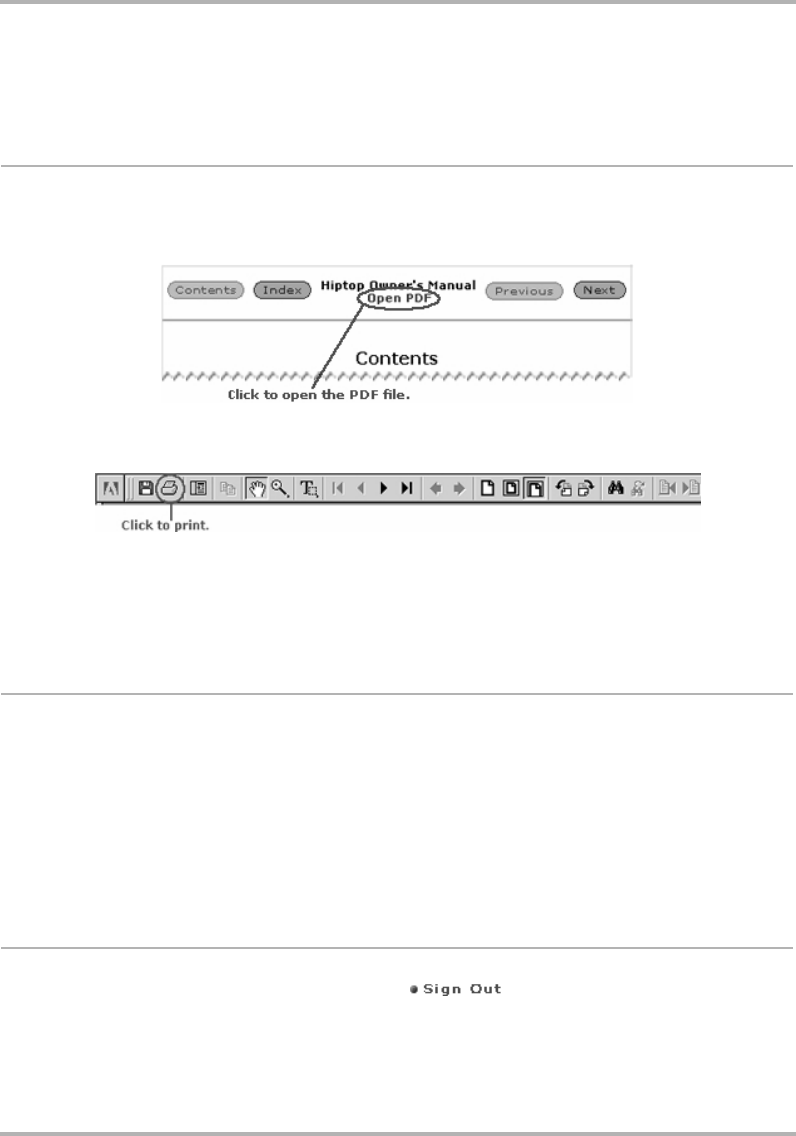
Web Applications
February 12, 2002 T-Mobile Device Owner’s Manual 139
Like the “preview screens” on your device, the Top Page displays current information so you can quickly see if
you have received any new emails, what events are coming up on your Calendar, tasks that need taking care of,
and your notes.
The T-Mobile Device Owner’s Manual
This manual, the
T-Mobile Device Owner’s Manual
, is available in two formats from the Help link on the Web
application page: HTML and Adobe Acrobat (PDF). Use the PDF file for printing the manual. To open the PDF file,
click the Help link to open the Contents page (in HTML). Then click the link that reads Open PDF:
The PDF file opens in the help window. To print the entire manual or just a portion, click the printer icon in the
Adobe menu bar:
In the printer dialog box that opens, specify whether you want to print the entire manual or just a range of
pages.
If you need to look up something quickly while online, then read the HTML pages, which is the format that opens
by default.
More About the Applications on the Web
You can read details on using all the applications on the Web in these chapters:
17. Sending Email from the Web
on page 140
18. Using Address Book on the Web
on page 145
19. Using Calendar on the Web
on page 150
20. Photo Gallery on the Web
on page 155
21. Keeping a To Do List on the Web
on page 157
22. Keeping Notes on the Web
on page 160
23. Settings on the Web
on page 162
Signing Out
For security’s sake, we recommend that you always click when leaving the applications on the
Web. This ensures that no one else can read your information!

Sending Email from the Web
February 12, 2002 T-Mobile Device Owner’s Manual 140
17. Sending Email from the Web
Open your Email on the Web by clicking the Email button on your Top Page, or by clicking the Mail icon or the
New message link in the Email section of the Top Page. By default, your Inbox is displayed.
Your Inbox
When you open Email, your Inbox is displayed by default. All emails in the Inbox are listed in chronological
order, from most recent to latest. For each email, the From, Subject, Date received, and Size are listed. In
addition, icons immediately to the left of the email tell you if you’ve replied to the email or if the email has an
attachment. Unread messages are listed in bold.
You can take the following actions from your Inbox:
• Open an individual message by clicking any of the email fields for that message.
• Discard email by selecting the check box to the left of the email, then clicking Discard Selected.
• Move the email to a different folder by selecting the check box to the left of the email, then highlighting a
folder in the Move selected to box at the bottom of the page and clicking the Go button.
View Your Email
Read an Email
To open an individual email for reading:
1From your Inbox (or another folder), click any of the fields displayed for the email.
You can also open an email directly from the Top Page by clicking the email’s From, Subject, or Date.
2Once you’ve read your email, you can take any of the following actions:
• Reply to the message by clicking Reply or Reply all; this opens a Compose Message page, with the From
and To fields automatically filled in.
• Forward the message by clicking Forward; this opens a New Message page, with the forwarded message
included.
• Discard the message by clicking Discard.
• Move the message to a different folder by highlighting a folder, then clicking the Go button.
• Add the sender to your address book by clicking Add to contacts after their email address in the From
field.
• Proceed to your next message by clicking Next or the Go button in the upper-right corner of the page, or
go to the previous message by clicking Previous or the return button in the upper-left corner of the page
(these options will only appear if you have a next or previous message).
3To close the email and return to a folder, simply click the folder name in the Email sidebar.
Open an Attachment
You know an email has an attachment if there is a paperclip icon just to the left of the message. Attachments
that are supported include other emails, Word files, as well as graphic files of the following formats:

Sending Email from the Web
February 12, 2002 T-Mobile Device Owner’s Manual 141
•.gif
• .jpg, .jpeg
•.png
•.bmp
All attachments are listed as links in the header section of the email. Click the link to open the attachment, or
right-click the link to save the attachment.
Send a New Message
To send a new email message:
1Click the New Message link in the sidebar. This opens the Compose Message page.
If you are on the Top Page, you can open the Compose Message page directly by clicking New Message in
the Email section of the page.
2Write your message.
•From field – If you have set up POP3 accounts, then you can choose which address you want to use to
send the email from the drop-down list in this field.
•To field – Type in the email address of the person to whom you are sending the email.
•CC and BCC fields – Optional fields; as with the To field, the Email application will communicate with the
Address Book and offer you completion suggestions.
•Subject field – Type your subject line; it can be up to 255 characters long.
•Pick photos to send button – if you want to attach a photo from your Photo gallery to send as an
attachment to the email, click this button to open your photos. Select the check box(es) for the photo(s)
you want to attach, then click Email selected. You are returned to the Compose Message page, with the
selected photos now attached.
•Message body – Type your message; there are no limits to how long a message body can be.
•Signature – Edit or use the default signature. Signatures can be up to seven lines long, with a total of 80
characters per line.
3To send the message, click Send Now at the bottom of the page.
4To save the message as a draft, click Save as Draft at the bottom of the page. You’ll be returned to your
Inbox. You can click Drafts in the sidebar at any time to complete and send the message or discard it.
5To discard the message, click Cancel at the bottom of the page. You’ll be returned to your Inbox.
Set Up Your Email
There are three categories of email settings that you can configure for your Web account:
•Edit Folders – By default, the following four mail folder are created for your Web email: Inbox, Sent,
Drafts, and Trash.
These folders are not editable, but you can create up to six additional folders for a total of 10 folders.
•Edit Accounts – This is where you set up POP3 email accounts from which email can be retrieved. You
can specify up to three (3) POP3 accounts (including Yahoo).
•Set Up – Through Set Up, you can specify that a copy of every email you send will be automatically saved
in your Sent folder.

Sending Email from the Web
February 12, 2002 T-Mobile Device Owner’s Manual 142
Edit Folders
Toaddanemailfolder:
1Click Edit Folders in the Email sidebar. This opens the Folders page, where all current folders are listed,
along with the number of messages in each folder and the folder size in bytes.
2To add a new folder, click Add another folder in the lower-right corner of the page. In the box provided,
type the name of the new folder. Be sure and read the guidelines for folder names listed on the page (spaces
and underscores are allowed, but punctuation is not).
3Click Add Folder. You’re returned to the Folders page, where the folder you just created is now added to
your list of folders.
To edit an existing email folder:
1Open the Folders page by clicking Edit Folders in the Email sidebar.
2The names of editable folders are displayed in editable text boxes. Make whatever changes you wish to the
folder names, then click Save Changes. To discard your edits, click Cancel.
To discard an email folder:
1Open the Folders page by clicking Edit Folders in the Email sidebar.
2Click Discard opposite the folder you want to delete. A warning page appears, informing you that all emails
in the folder will be deleted along with the folder.
3To complete the discard, click Discard the Folder. You are returned to the Folders page; the discarded
folder no longer appears.
If you decide to keep the folder and the messages, click Don’t Discard.
Edit Accounts
To add a POP3 account:
1Click Edit Accounts in the Email sidebar. This opens the Accounts page.
2Click Add a new POP3 account in the lower-right corner of the page.
3In the page that opens, enter your email address in the boxes provided, the click the Continue button in the
lower-right corner of the page.
4Fill in your email password.
5Fill in the email server information:
• POP server – obtain from the POP3 email service provider.
• Port – leave as 110 unless you know it is different.
6If you want the email to be removed from the POP3 server as it’s collected and sent to your device, click the
Remove retrieved email from server check box to make a check mark appear. By default, email retrieved
from a POP3 server will remain on the POP3 server.
7Select the folder you want mail from this server to be delivered to; Inbox is selected by default.
8When the form is complete, click Continue.
9Complete the signature and name information.
• Name – your name as you want it to appear on mail sent through this account.
• Reply-to – the address to which replies will be sent.
• Signature – your name as it will appear on replies to emails received from this account.
10 Click Continue when the form is complete. The Account Summary page will be displayed.

Sending Email from the Web
February 12, 2002 T-Mobile Device Owner’s Manual 143
11 Review the Server, Identity, and Collecting account information and make any corrections required.
12 Click Save. Before your account is completely set up, the validity of the POP3 email account will be checked.
• If the account has been added successfully, you’ll be returned to the Accounts page, and the new POP3
account will be listed.
• If there is a problem with the account information you provided, you’ll receive an error message. Click Edit
this account to try to fix the error or to delete the account.
To edit a POP3 email account:
1Click Edit Accounts in the Email sidebar. This opens the Accounts page.
2Click Edit this Account opposite the account you want to edit. Your account information appears in an
editable form.
3Make edits as you wish, then click Save.
To delete a mail account:
1Click Edit Accounts in the Email sidebar. This opens the Accounts page.
2Click Edit this Account opposite the account you want to discard. Your account information appears in an
editable form.
3Click Discard at the bottom of the page.
Set Up
To control automatic saving of sent emails:
1Click Set Up in the Email sidebar. This opens the Set Up page.
2Select the Save copies of outgoing mail check box, then click Save Changes.
If you decide you don’t want copies saved any longer, simply clear the check box, then click Save Changes.
Note that you also always have the option of saving a copy from the Compose Message page before you send an
email.
Collect Mail from POP3 Account
To collect mail from any POP3 mail accounts you have set up:
1Click Collect POP Mail in the Email sidebar.
2Email from your POP3 accounts is automatically collected and filed in the folder specified in the account setup
information.
Move Messages to Folders
You can move messages around within folders by doing the following:
1Open the folder the email is currently in, then highlight the email.
2Open the Move selected to list box in the lower-right corner. All folders (
except
for the Drafts and Sent
folders, and the folder the email currently is in) are shown in the list.
3Highlight the folder into which you want to move the message. Then click the Go button.

Sending Email from the Web
February 12, 2002 T-Mobile Device Owner’s Manual 144
Discard Email Messages
To discard an email message:
1Open the folder where the email is located, then highlight the email you want to discard. Open the email if
you wish.
2Click Discard Message. The message is moved to the Trash folder.
3To retrieve your discarded message, click Trash in the Email sidebar. Highlight the email you want to
retrieve, then either:
• Click Retrieve Selected; this will move the message back to your Inbox.
• Highlight a folder from the Move selected to box, then click the Go button. This will move the message
back to the selected folder.
To empty all messages from a particular folder, select the folder in the sidebar, then click Empty Folder at
the bottom of the page.
To empty all messages from the Trash, click Trash in the Email sidebar, then click Empty Trash. You’ll be
asked to confirm your action since the messages will be permanently deleted. Click OK to proceed, or click
Cancel to return to the Trash folder.

Using Address Book on the Web
February 12, 2002 T-Mobile Device Owner’s Manual 145
18. Using Address Book on the Web
Your Web Address Book is always synchronized with the Address Book on your device. You can store up to 1,000
individual contacts in your Address Book; for each contact, you can store:
• Five (5) Instant Messaging addresses
• Three (3) Street addresses
• Three (3) Web addresses (URLs)
• Five (5) Email addresses
Browse Contacts
Open your Address Book on the Web by clicking the Address Book button on your Top Page. By default, the
Browse Contacts view is displayed; all contacts are listed on the right side of the page in alphabetical order, with
their phone numbers and email addresses.
Sort Contacts
You can choose to sort your contacts in ascending (A to Z) or descending (Z to A) order by last name. Simply
click the red arrow at the top of the Last (name) column. This arrow acts as a toggle switch; if it is pointing up,
it means the list is sorted in ascending order, and clicking it will cause the list to be resorted in descending order.
The arrow will then be displayed pointing down. Clicking it again would resort the list in ascending order.
Filter Contacts
You can also specify to show “All” your contacts on this page or just one category of contacts.
1Highlight a category from the View Category list box.
2Click the Go button to the right of the box. The page will refresh, and only contacts that are assigned to that
category will be displayed.
Address Book Preferences
Create, Edit, and Delete Categories
All your Address Book contacts are stored in categories. By default, your Address Book contains four categories:
•Business
•Family
•Friends
•New
You can edit the names of these categories and create new ones.

Using Address Book on the Web
February 12, 2002 T-Mobile Device Owner’s Manual 146
To create a new category:
1In the Address Book sidebar, click Preferences; the Preferences page appears. The page has three links
across the top: Categories, Labels, and Delete all Contacts. Categories is selected by default.
2In the blank box at the bottom of the list of categories, type the name of your new category, and select a
color (if you do not wish to use the assigned color). Remember, categories describe a group of contacts; for
example, you might have a number of medical doctors you want to group into a category named “MDs”.
3Click the Add new category link to add the category. The page refreshes, and your new category is included
in the list in alphabetical order. A new blank box is added at the bottom in case you want to add another
category.
4When you’re through adding categories, click Save Changes at the bottom of the page. If you change your
mind and don’t want to create the new category, click Undo Changes at the bottom of the page.
5You will now be able to assign contacts to this new category, as well as use it to filter (sort) messages.
To edit an existing category:
1In the Address Book sidebar, click Preferences; the Preferences page appears, with Categories selected by
default.
2All categories appear in editable text boxes; edit the category you want to change, then click Save Changes
at the bottom of the page.To cancel your edit, click Undo Changes.
To delete a category:
1In the Address Book sidebar, click Preferences; the Preferences page appears, with Categories selected by
default.
2Click Discard category to the right of the category you want to delete. The category is deleted; any contacts
assigned to the category are moved to the Unfiled category.
Create, Edit, and Delete Labels
All pieces of information you store about an individual contact are described using “labels”. For example, you
might have two phone numbers for a contact, one of which is labeled “Home” and the other “Work”. By default,
the Address Book includes the following labels:
•Hiptop
•Home
•Mobile
•Personal
• Vacation
•Work
You can edit the names of these labels and create new ones. The maximum number of labels is 10.
To add a label:
1In the Address Book sidebar, click Preferences; the Preferences page appears.
2Click the Labels link at the top of the page; this opens the Labels page.
3In the blank box at the bottom of the list of labels, type the name of your new label.
4Click the Add new label link. The page refreshes, and your new label is included in the list in alphabetical
order. A new blank box is added in case you want to add another label.
5When you’re through adding labels, click Save Changes at the bottom of the page. If you change your mind
and don’t want to create the new label(s), click Undo Changes at the bottom of the page.

Using Address Book on the Web
February 12, 2002 T-Mobile Device Owner’s Manual 147
6After saving, you will be able to assign contact information to this new label, as well as view it on the Browse
Contacts page describing the contact information displayed.
To edit an existing label:
1In the Address Book sidebar, click Preferences; the Preferences page appears.
2Click the Labels tab at the top of the page; this opens the Labels page.
3Edit the label as you wish, then click Save Changes. To cancel your edit, click Undo Changes or click the
Cancel button.
To delete a label:
1In the Address Book sidebar, click Preferences; the Preferences page appears.
2Click the Labels tab at the top of the page; this opens the Labels page.
3Click Discard label to the right of the label you want to delete. The label’s text box is cleared.
4Click Save Changes to commit your deletion, or click Undo Changes if you decide you want to keep the
label after all.
Add a Contact
You can add a contact to your Address Book by starting from scratch, or by duplicating an existing contact’s
information, then editing it. Both methods are described below.
Add a New Contact from Scratch
1On the Address Book sidebar, click New Contact. The New Contact page opens, with the Quickview
information form displayed. Note that you cannot select any of the other information links at the top of the
New Contact page until the Quickview form has been completed and saved to add the contact.
2The Quickview form is divided into the following sections:
• Name – includes the contact’s name, employment information, Danger ID, and the category of the contact
•Phone Numbers
• Addresses
• Internet – includes email, URL, and IM information
You can fill in as much of the information as you wish, including multiple addresses, phone numbers, and
Internet addresses. You must, however, add at least a first name, last name, company name, email address,
or phone number to establish a contact.
3When you’ve completed the form, click Save at the bottom of the page. The page will refresh, and the new
contact information will be displayed.
4If you wish to add any other information to the contact, click Browse Contacts in the sidebar, highlight the
contact’s name in the list displayed, then click Edit at the bottom of the page.
Create a New Contact by Duplicating an Existing Contact
1From the Browse Contacts page, highlight the contact whose information you want to edit. The contact’s
information will be displayed on the right side of the page.
2Click Copy at the bottom of the page. An editable form of the highlighted contact’s information will appear
labeled
Contact Name (copy)
.
3Edit the information to create your new contact, then click Save.

Using Address Book on the Web
February 12, 2002 T-Mobile Device Owner’s Manual 148
Note: If you save this contact information without making any change, you will have duplicate entries for this
contact.
Edit a Contact
To edit an existing contact, do the following:
1From the Browse Contacts page, click the contact’s name. The contact’s information displays.
2Click Edit at the bottom of the page. The contact’s Basic Info is displayed in an editable form. There is also a
text box where you can add a note about the contact.
3Edit information as you wish. You can edit the other types of information by clicking one of the tabs at the
top of the page:
•Icon
•Phone
•Address
• Internet
Note that you do not have to save your changes when you move from one type of information to another. If
you want to discard your edits on a form, click Undo Changes to reset the form with the original
information.
4Click Save when you’ve made all your changes, or click Cancel to discard your changes and return to your
last Browse Contacts view.
Discard/Retrieve a Contact
To remove an existing contact from your Address Book:
1From the Browse Contacts page, click the contact’s name. The contact’s information displays.
2Click Discard at the bottom of the page.The contact is moved to the Trash without a verification prompt.
3You can also remove a contact from the Browse Contacts page by selecting the check box for the contact,
then clicking Discard Selected at the bottom of the page.
To retrieve a discarded contact:
1Click Trash in the sidebar. The list of discarded contacts displays.
2Select the check box to the left of the contact you wish to retrieve from the Trash.
3From the drop-down list at the bottom of the page, click the category you want to move the contact to, then
click the Go button. The contact is restored, and assigned to the selected category.
To remove all contacts:
1Click Preferences in the sidebar, then click Delete All Contacts at the top of the page.
2You will be asked to confirm your deletion and warned that proceeding will permanently delete all contacts
from your Address Book; they will not be moved to Trash. To continue, click Delete All at the bottom of the
page. If you change your mind, make another selection from the sidebar or from Preferences.

Using Address Book on the Web
February 12, 2002 T-Mobile Device Owner’s Manual 149
Import Contacts
You can import contact information from other programs into your Address Book. Note that you must first save
that contact information in the form of a flat, tab-delimited file.
1Click Import in the sidebar. The Import page opens. This page includes step-by-step instructions for
completing the import process.
2Complete the form as instructed on the page, then click Import Now.
Open and Edit My Info
1To open your own contact information, click My Info in the Address Book sidebar. Your own contact
information will be displayed in non-editable form on the right side of the page.
2To edit this information, click Edit at the bottom of the page. You can then modify your information just as
you would another contact’s, with the exception that My Info cannot be deleted.
3Click Save when you’ve completed your edits.
Communicate with a Contact
Using stored contact information, you can quickly communicate with a contact by Email:
1From the Browse Contacts page, click the email address of the contact with whom you wish to communicate.
The Email application opens, with the New Message page displayed. The To field is automatically filled in
with the contact’s Email address.
2Complete the message form, then click Send Now. You can also choose to save a draft of the message, or to
discard the message.
3Once you take action on the message, your Email Inbox opens. You are not returned to the Address Book.
Empty the Trash
All discarded contacts are moved to the Trash category. You should periodically remove items from Trash by
doing the following:
1From the Browse Contacts page, click Trash in the sidebar. The contacts in the Trash appear.
2Click Empty Trash at the bottom of the page. You’ll be asked to confirm your action since the contacts will
be permanently deleted. Click OK to proceed, or click Cancel to return to the Trash.

Using Calendar on the Web
February 12, 2002 T-Mobile Device Owner’s Manual 150
19. Using Calendar on the Web
Open your Calendar on the Web by clicking the Calendar button on your Top Page. By default, the Day View is
displayed, with the current day displayed.
Your Web calendar is always synchronized with the calendar on your hiptop device.
View Events
You can view your events in Day, Week, or Month view. Each is described below.
Week View
In the Week view, you see all event for a single selected week. For each event, you see:
• title of the event
• start time of the event
•event duration
If the current day falls in the week being viewed, it’s highlighted to make it easy to identify.
From within the Week view, you can move around your calendar as follows:
• back one week by clicking the next button at the top of the page
• forward one week by clicking previous button at the top of the page
• to a specific day in the current or next month by selecting the day in the month calendars displayed in the
sidebar
• to the Day view for a specific day in the week currently being viewed by clicking the day at the top of the
Week view
• to the current day by either clicking the day in the month calendar in the sidebar (the current day is
highlighted) or by clicking the Go button opposite the month / day / year box at the bottom of the sidebar
Day View
In the Day view, you can see all events for a single selected day. For each event, you see:
• title of the event
•event’s icon
• start time of the event
•event duration
From within the Day view, you can move around your calendar as follows:
• back one day by clicking the next arrow at the top of the view
• forward one day by clicking the previous arrow at the top of the view
• to the current day by either clicking the day in the month calendar in the sidebar (the current day is
highlighted) or by clicking the Go button opposite the month / day / year box at the bottom of the sidebar.

Using Calendar on the Web
February 12, 2002 T-Mobile Device Owner’s Manual 151
At the bottom of the Day view, all tasks you’ve entered in the To Do application that are due on the displayed
day (but not yet completed) will be listed. You can open the Task Information page by clicking the task name.
On that page, you can mark a task as completed by selecting the Task is complete check box.
Month View
In the Month view, you can see all events for a single selected month. For each event, you see:
• title of the event
•event duration
In addition, any To Do tasks that are due (but not yet completed) for the current month are displayed in the day
on which they are due.
From within the Month view, you can move around your calendar as follows:
• back one month by clicking the next arrow at the top of the view
• forward month day by clicking the previous arrow at the top of the view
• to the Day view for a specific day in the previous, next, or current month by clicking the date in the Month
view or in the month calendars displayed in the sidebar.
• to the current day by either clicking the day in the month calendar in the sidebar (the current day is
highlighted) or by clicking the Go button opposite the month / day / year box at the bottom of the sidebar.
When you are viewing the month that contains the current day, it’s highlighted to make it easily identified
View an Event
You can select and view an event’s details from any of the views by clicking the event name. This opens the
event details page, where the following information is displayed:
•event date
•start time
•stop time
•description
If you want to edit the event, click the Edit this event link to open the event in an editable form.
Add an Event
To add an event to your Calendar:
1From the Calendar sidebar, click New event. This opens the New Event page.
2In the Title box, type in a short, descriptive name for the event.
3In the Date box, select the date for the event.
4In the Time section, set the duration of the event. If you select This event has a start and end time, you’ll
have to select a start time and specify how long the event lasts in hours and minutes.
5In the Notes box, type any comments you want to make about the event. This is optional.
6In the Icon section, select an icon to represent the event.

Using Calendar on the Web
February 12, 2002 T-Mobile Device Owner’s Manual 152
7In the Reminder section, specify whether or not you want to be reminded when the event is going to occur,
and specify a method of reminding.
8To make the event repeat on a regular interval, in the Repetition section, select a repeat interval from these
choices:
• Just this once (i.e., no repetition; this is selected by default).
•Every day.
•Every day of the week (where day of the week equals the day of the week on which the event is first
scheduled to occur; e.g., Every Saturday).
•Every month on the nn (where nn is the date of the first occurrence of the event; e.g., Every month on
the 21st).
•Every month on the day of month (where day of month equals the specific day in the month when the
event first occurs; e.g., Every month on the 21st).
• Every year on date (where date equals the date of the first occurrence of the event; e.g., Every year on
May 21.
If you want additional reminder options, click More repetition options. You will then have the following
options:
• Just this once (i.e., no repetition; this is selected by default).
•Every n day(s).
• Every S M T W T F S (select one or more days of the week)
•Every n month(s) on the day of month (where day of month equals the specific day in the month when
the event first occurs; e.g., Every 2 months on the 21st).
•Every n month(s) on the nth day of the week of the month (where day of the week equals the day of the
week on which the event is first scheduled to occur; e.g., Every 3 months on the 1st Monday of the month.
•Every n year(s) on Month Day (e.g., Every 1 year on April 15).
9Specify a date on which the event will stop repeating.
10 Click Save.
To add an all-day event:
1From the Calendar sidebar, click New all-day event. This opens the New Event page.
2Type a title to identify your event.
3Select the date on which the event begins; then select the number of days it will last.
4Type a note if you wish.
5Select an icon to represent the event.
6In the Reminder section, specify whether or not you want to be reminded when the event is going to occur,
and specify a method of reminding.
7To make the event repeat on a regular interval, in the Repetition section, select a repeat interval. The
choices are the same as for events that do not last all day.
8Specify a date on which the event will stop repeating.
9Click Save.
Edit an Event
To edit an event:
1Open the event details page by clicking the event name from any of the calendar views.

Using Calendar on the Web
February 12, 2002 T-Mobile Device Owner’s Manual 153
2Click Edit. This opens the event in an editable form.
3Make your changes to the event.
If you are editing a repeating event, you will have the option of specifying which event(s) in the series will be
edited.
•Update just this occurrence – Changes will be made just for the currently selected occurrence of the
event.
•All occurrences –- All occurrences of this event (including earlier occurrences) will be changed.
•Occurrences from now on – All future occurrences of this event, including the current one, will be
changed.
4When you done with your edits, click Save.
Discard an Event
To discard an event from your calendar:
1Highlight the event from any of your calendar views, then click Edit.
2Click Discard at the bottom of the page. The event will be moved to the Trash.
Manage Your Trash
Once an event in the Trash, you can delete it (completely remove it from the system) or retrieve it (move it back
into your calendar).
1To open your Trash, click Trash in the Calendar sidebar. All discarded events are displayed on the right side
of the page.
2To remove the events from your system completely, click the Empty Trash button at the bottom of the
page. You’ll be asked to confirm your action since the events will be permanently deleted. Click OK to
proceed, or click Cancel to return to the Trash.
3To retrieve an event, select the check box on the left side of the event, then click Retrieve Selected. The
event will be removed from the list in the Trash; a message at the top of the page confirms the retrieval.
Settings
Through Settings you can define default settings for new events.
1Click Settings in the Calendar sidebar.
2Select one of the following options:
• Use duration when creating and editing events: if selected, new events will automatically have duration
selected.
•Use end time
3Default event duration: set the default event duration by selecting hours and minutes from the drop-down
boxes.
4Day view grid size: set the increment in which time is displayed in the day view by selecting a value from the
drop-down list.
5Starting view: determine the view in which your calendar will open when selected from the Top Page.

Using Calendar on the Web
February 12, 2002 T-Mobile Device Owner’s Manual 154
6Day view start time: set the time at which the day view will start unless there are earlier events scheduled.
7Day view end time: set the time at which the day view will end unless there are later events scheduled.

Photo Gallery on the Web
February 12, 2002 T-Mobile Device Owner’s Manual 155
20. Photo Gallery on the Web
Browse Photos
Open your photos on the Web by clicking the Snapshots button on your Top Page. By default, the Browse Photos
view is displayed; all photos are listed on the right side of the page in chronological order. The default order is
the newest (most recent) photos at the top.
Sort Your Photos
You can easily resort your photos by selecting a different sort order from the Sort drop-down list.
1Open the Sort drop down list.
2Select your sort order; you can choose from:
• Newest First
•Oldest First
•Alphabetical
3Click the Go button.
4If you want your photos to be displayed in this order the next time you open them, click Save Changes.
Otherwise, the order will revert to the default order or the most recently saved order the next time you open
Snapshots.
Rename Your Photos
When you take a photo, it is saved as a color .jpg with a default name. Since the default names are non-
intelligible (e.g, Photo_5.jpg), you may want to change the name to something more descriptive. Photo names
are displayed in editable text boxes; to change a name:
1Click in the photo name text box to make it editable.
2Type the new name. Keep in mind that names can be no longer than 32 characters.
3Click Save Changes.
DeleteaPhoto
Warning! Unlike other Web applications, there is no Trash for photos. You do not have the option of discarding
a photo from your photo gallery, then later retrieving it.
To delete one or more photos:
1Select the check box to the left of the photo(s) you want to delete. Click Select All if you want to delete all
your photos.
2Click Delete Selected. You will be asked to confirm your deletion.
3Click OK to continue with the deletion, or click Cancel to return to your photos.

Photo Gallery on the Web
February 12, 2002 T-Mobile Device Owner’s Manual 156
Photos and Email
Attach Photo(s) to an Email
You can easily attach photos to your emails. There are two ways to do this:
From the Browse photos page:
1Select the check box to the left of the photo(s) you want to attach to your email.
2Click the Email Selected button at the bottom of the page. This opens the Compose Email page, with the
selected photos already attached.
3Write your email, then send it.
From the Email Compose page:
1Click the Pick photos to send button; this opens the photos thumbnail page.
2Select the photo(s) you want to attach, then click Email Selected. The images will be attached, and you will
be returned to your Compose Email page. Note that if you make any changes to the photos (e.g., change
sort order or photo names), those changes will be automatically saved.
3If you decide to attach additional photos, click Pick more photos to send, and repeat the process.

Keeping a To Do List on the Web
February 12, 2002 T-Mobile Device Owner’s Manual 157
21. Keeping a To Do List on the Web
About To Do Items
Every task in your To Do list has the following “attributes”:
•Title - a short description of your task (up to 40 characters)
•Due Date - the date the task is due (note that tasks can’t be due at a particular time during the day)
•Notes - information in addition to the title, up to 255 characters (which is the size of a medium paragraph)
•Completion Status - Complete or Incomplete
•DueDateStatus - Past Due, Due Today, or Upcoming
How Many Tasks Can I Store?
You can store up to 50 tasks at one time, including the tasks you’ve moved to the Trash. By clicking the Discard
Completed Tasks button at the bottom of any of the To Do list pages, you can choose to discard all completed
tasks.
View Your Tasks
Your Top Page shows all your tasks that are both “upcoming” and “not completed”.
To view your tasks, click the To Do button at the top of your Top Page, or click the To Do icon in the To Do
section of the Top Page. For each item, completion status (complete or incomplete), title, and due date (if
applicable) are displayed.
View Incomplete Tasks
By default, See Incomplete Tasks is selected in the To Do sidebar. All incomplete To Do items are listed on the
right side of the page, sorted as follows:
•Overdue tasks appear at the top of the list in red.
•Due Today tasks are listed in the order you entered them in blue.
•Upcoming tasks are listed in chronological order below overdue tasks in light blue.
View All Tasks
To view all tasks, including completed tasks, click See All Tasks in the To Do sidebar. All tasks – overdue,
finished, and incomplete – are listed together in chronological order.
Add a New Task
To add a new task:
1In the To Do sidebar, click New Task, or click New Task in the To Do section of the Top Page. This opens
the Basic Information page.

Keeping a To Do List on the Web
February 12, 2002 T-Mobile Device Owner’s Manual 158
2Fill in the form with the information describing the task.
•Task Name: can be up to 40 characters long
•Due by: specify a specific date by typing in a month, day, and year (today’s date is filled in by default).
The task will also appear on your Calendar on the assigned date.
•Notes: add a note if you wish, up to 255 characters long
3Click Save.
Edit a Task
To edit a task:
1On the See Incomplete Tasks or See All Tasks page, select the task you want to edit by clicking the title of
the task. The Task Information opens. Click the Edit button to open the Task Information in an editable
form.
2Make your changes to the task’s Basic Information, Notes, or Repetition sections. When finished, click the
Save button. If you decide to discard your changes, click Cancel.
Mark a Task as Complete
To change the status of a task to complete:
1On the See Incomplete Tasks or See All Tasks page, select the check box to the left of the task you want to
mark as complete.
2Click the Mark Selected as Completed button.
3Click Save at the bottom of the page.
Note: You can also mark a task as completed by opening the Task Information page for editing and selecting the
Task is complete check box, then saving the change.
Discard a Task
To discard a task:
1On the See Incomplete Tasks or See All Tasks page, select the check box on the left side of the task you
want to discard. You can select as many tasks as you wish.
2Click Discard Selected at the bottom of the list of tasks. All selected tasks will be moved to Trash; a
message at the top of the page confirms your action.
Discard Completed Tasks
You can easily remove all completed tasks by clicking Discard Completed Tasks at the bottom of the See
Upcoming Tasks or See All Tasks page. The completed tasks are moved to the Trash.

Keeping a To Do List on the Web
February 12, 2002 T-Mobile Device Owner’s Manual 159
Manage Trash
You can have a total of 50 tasks in the system at one time, including the items in Trash. This means you’ll want
to periodically empty your Trash, or you’ll be left with no space for new tasks. Once a task is in the Trash, you
can discard it (completely remove it from the system) or retrieve it (move it back into your list of tasks).
1To open your Trash, click Trash in the sidebar on the To Do page. All discarded tasks are displayed on the
right side of the page in descending order of due date.
2To remove the tasks from your system completely, click the Empty Trash button at the bottom of the page.
You’ll be asked to confirm your action since the tasks will be permanently deleted. Click OK to proceed, or
click Cancel to return to the Trash.
3To retrieve a task, select the check box on the left side of the task, then click Retrieve Selected at the
bottom of the page. The task will be removed from the list in the Trash; a message at the top of the page
confirms the retrieval.
Keeping Notes on the Web
February 12, 2002 T-Mobile Device Owner’s Manual 160
22. Keeping Notes on the Web
Open your Notes on the Web by clicking the Notes button on your Top Page, or by clicking the Notes icon or the
New Note link in the Notes section of the Top Page. By default, the See All Notes view is displayed.
See All Notes
The See All Notes page lists all your current notes on the right side of the page in alphabetical order. On the left
side you see the sidebar, which includes links for New Note, See All Notes (the current selection), and Trash.
Add a Note
To add a note:
1In the Notes sidebar, click New Note. This opens the New Note page.
If you are on the Top Page, you can open the New Note page directly by clicking in the Notes
section of the page.
2When the New Note page is opened, your cursor is automatically placed in a text box; type your note. It can
be up to 1,000 characters long (including returns and spaces); this is about as many words as fit in half a
page of text in a paperback. Any email addresses in the note will be links to the Email application's compose
page; URLs in the note will be displayed as active links.
3When you finish your note, click . If you decide not to keep the note, click to return to
the See All Notes page.
4After clicking Save, you are returned to the See ALl Notes page, with the note you just created added to the
list on the right.
Edit a Note
To edit a note:
1On the See All Notes page, click Edit in the lower right corner of the note you want to edit. The note opens
in an editable text box.
2Make your changes to the note, then click Save Changes. If you decide to discard your changes, click
.
3After clicking Save Changes, you are returned to the See All Notes page. The note you just edited will
appear with your changes, and the modified time will be updated to reflect the date and time you saved the
edited note.
Discard a Note
To discard a note:

Keeping Notes on the Web
February 12, 2002 T-Mobile Device Owner’s Manual 161
1On the See All Notes page, select the check box on the left side of the note you want to remove. You can
select as many notes as you want.
2Click Discard Selected at the bottom of the list of notes. All selected notes will be moved to Trash; a
message at the top of the page confirms the discard.
Manage Your Trash
You can have a total of 20 notes in the system at one time, including the notes in Trash. This means you’ll want
to periodically empty your Trash, or you’ll be left with no space for new notes. Once a note is in the Trash, you
can delete it (completely remove it from the system) or retrieve it (move it back into your list of notes).
1To open your Trash, click Trash in the Notes sidebar. All discarded notes are displayed on the right side of
the page in alphabetical order.
2To remove the notes from your system completely, click the Empty Trash button at the bottom of the page.
You’ll be asked to confirm your action since the messages will be permanently deleted. Click OK to proceed,
or click Cancel to return to the Trash.
3To retrieve a note, select the check box on the left side of the note, then click Retrieve Selected at the
bottom of the page. The note will be removed from the list of notes in Trash; a message at the top of the
page confirms the retrieval. The modification date and time are not updated since the note itself has not
been modified.

Settings on the Web
February 12, 2002 T-Mobile Device Owner’s Manual 162
23. Settings on the Web
To open your Web settings, select Settings from the top menu bar.
Your Account Information
Your account information includes the following:
• current password
• full name (name that appears at the close of your email messages)
To change any of these settings, simply fill in the appropriate boxes, then click Save.
Your Device ID
To find out your device’s Device ID, open this page. You may need this number if you need to contact Customer
Care.
Time Zone
To view your current Time Zone settings, click Time Zone in the Settings sidebar. Your current home time zone,
the time and date, and the Daylight Saving Time status is displayed.
To change your home time zone for your hiptop Web service:
1Select the option button opposite one of the time zone options.
2Make a selection from the drop-down list box for that option
3Click Save.
Note that changing your device time zone has no effect on your Web time zone setting.

Index
February 12, 2002 T-Mobile Device Owner’s Manual 163
T-Mobile Device Owner’s Manual
Index
Symbols
.bmp files
attach to email,81
.gif files
attach to email,81
.jpg files
attach to email,81
.png files
attach to email,81
@ key, use,17
A
acceleration
setting for wheel,29
accessories (included with purchase),9
account (T-Mobile)
setting up,10
account information
settings for Web applications,162
Add Bookmark, Browser menu item
keyboard shortcut,38
Add to Address Book dialog box,86
Add to Contacts..., Browse Text Messages menu
item,95
Add to Contacts..., Email menu item,86
adding
Address Book category,98
Address Book label,100
Address Book label on Web,146
AIM buddy,66
AIM screen names,60
bookmark,41
bookmark folder,41
Calendar event,109
email recipients to Address Book,86
email sender to Address Book,86
note,135
note on the Web application,160
POP3 account,73
text message sender to Address Book,95
Address Book application
adding a category,98
adding a label,100
default categories,98
default labels,99
discarding a category,99
discarding a label,100
editing a category,98
editing a label,99
editing existing category,98
filtering contacts,103
importing contacts from SIM,101
labels,99
My Info,107
preferences screen,97
sorting contacts,103
storage maximums,97
Address Book Web application
accessing,145
adding a contact,147
communicating with contacts,149
creating categories,146
creating labels,146
default categories,145
discarding a label,147
discarding categories,146
discarding contacts,148
editing a label,147
editing categories,146
editing contacts,148
editing labels,147
editing My Info,149
filtering contacts,145
removing all contacts,148
sorting contacts,145
AIM adding a friend to your Buddy List,66
adding screen names,60
blocking a buddy,67
buddy availability icons,64
Buddy List screen,64
Conversation Management screen,69
custom buddy alerts,67
deleting a buddy,67
editing a buddy,66
enabling sound for alerts,63
ending a conversation,68
groups,70
keyboard shortcuts,65
knock-knock setup,62

Index
February 12, 2002 T-Mobile Device Owner’s Manual 164
limit to number of open conversations,67
new message alert,64
preferences,62
preview screen,59
removing screen names,62
setting away messages,69
signing off,61
signing on,61
starting a conversation,67
switching screen names,61
switching to a conversation,69
unblocking a buddy,67
alertscustomizing for individual buddies,67
setting for email,76
setting for text messages,90
setting up for AIM,63
when receiving new AIM message,64
Alt key
locking,17
unlocking,17
answering the phone,55
application
selecting,35
application preview screens
about,35
ascending order
sorting contacts in,103
assigning
keys for application shortcuts,29
Speed Dial numbers,47
attaching the lanyard,12
attachments to email
opening,81
opening on the Web,140
photos,124
status indicator,78
supported,81
AutoText
creating rules,27
discarding rules,27
availability icons,64
away messages,69
B
Back button
using,19
backlighting
turning on/off,16
balloon indicators,68
battery
charge indicator,15
charging,10
charging time,11
conserving power,11
use & standby times,11
BCC field, Compose screen,85
blocking
an AIM buddy,67
bookmarks
adding,41
definition,40
discarding,41
editing,41
viewing existing,40
brightness, screen
adjusting,26
Browse All Notes screen,134
Browse Contacts screen
about,101
menu shortcuts,102
Browse Email screen
about,77
menu shortcuts,79128
Browse Email, Email menu item,81
Browse Tasks screen, To Do application,128
Browse Text Messages screen
menu shortcuts,92
Browse Trashed Notes screen, Notes application,
136
buddies
adding,66
blocking,67
deleting,67
editing,66
unblocking,67
buddy availability icons,64
Buddy List screen,64
C
Calendar application
copying an existing event,112
creating an event,109
discarding an event,113
editing an event,113

Index
February 12, 2002 T-Mobile Device Owner’s Manual 165
emptying Trash,119
event definition,108
going to a specific day,120
keyboard shortcuts,109
moving an event,112
preview screen,108
retrieving an event from Trash,119
setting an event reminder,112
setting an event to repeat,111
using the date picker,110
view shortcuts,113
views, about,113
Calendar Web application
adding an all-day event,152
creating an event,151
discarding an event,153
editing an event,152
emptying Trash,153
retrieving an event from Trash,153
setting an event reminder,152
setting day view grid size,153
setting day view start and end times,153
setting default event duration,153
setting default view,153
viewing an event,151
views, about,150
call back sender of text message,95
call forwarding
setting up,45
Call Log
about,56
clearing,58
views,56
call timer, Telephone application
viewing and resetting,45
Caller ID, about,55
calling a phone number,50
calling two parties,53
camera jack,19
camera, inserting in device,121
capitalize new sentences, AutoText feature,27
capture modes
about,122
carrying your device,12
categories (Address Book)
creating,98
creating on the Web,146
discarding,99
discarding on the Web,146
editing existing,98
editing on the Web,146
filtering by,103
CC field, Compose screen,85
charging outlet
illustration,20
using,11
charging your device,10
clearing your Call Log,58
codesetting for device,31
completing a task,130
Compose screen
menu shortcuts,80
composing
new email message,84
new text message,94
conference calling, with Telephone application,54
Contact Info screen
menu shortcuts,102
contact information
dialing from information,52
minimum required to create a contact,105
contacting an Address Book contact,106
contacts
communicating with on Web application,149
discarding on Web,148
removing all contacts on the Web,148
contacts (Address Book)
adding email recipient,86
adding email sender,86
adding on the Web,147
adding text message sender,95
browsing a list,101
communicating with,106
creating,104
discarding,106
editing,106
editing on Web,148
finding,107
number you can store,97
retrieve,106
searching for,107
sorting,103
contacts (T-Mobile)
T-Mobile Customer Care,101

Index
February 12, 2002 T-Mobile Device Owner’s Manual 166
context menus
about,18
continuous capture mode,122
contrast, screen
adjusting,26
control buttons
about,17
Back button,19
illustration,17
Jump button,18
Menu button,18
wheel,19
Controls pane
illustration,26
image contrast slider bar,26
mute button,26
opening,26
sound volume slider bar,26
Conversation Management screen,69
conversations
ending an AIM,68
how many you can have open,67
indicators,68
starting an AIM,67
switching to a particular AIM session,69
counter, number of photos remaining,123
creating
Address Book category,98
Address Book contact,104
Address Book label,100
Address Book label on Web,146
an event,109
email folders,75
new note,135
new To Do task,129
custom buddy alerts,67
custom ringtones,96
Customer Care number & Web site, T-Mobile,9
D
date & time
indicator,15
settings,27
date picker, using,110
Day Calendar view
details,116
summary,114
daylight savings time
set on device,27
default
Address Book categories,98
Address Book labels,99
deleting
AIM buddy,67
email message,87
entries in Call Log,58
photo,126
POP3 account,74
Speed Dial number,50
text,21
text message,96
descending order
sorting contacts in,103
device applications on the Web,138
device email account,72
Device ID
viewing through settings for Web applications,
162
device phone number, where to find,45
diagram of parts of device,13
dialing
from contact information,52
from Telephone Look Up screen,52
recent numbers,52
using letters,52
with keyboard,51
with keypad,51
dialog boxes
Add to Address Book,86
directional pad
about,16
using,17
Discard Category, Address Book menu option,99
Discard Label, Address Book menu option,100
Discard Message, Browse Text Messages menu
item,96
Discard Message, Email menu item,87
Discard Note keyboard shortcut,134
discarding
a Calendar event,113
a note,136
a note on the Web,160
Address Book category,99

Index
February 12, 2002 T-Mobile Device Owner’s Manual 167
Address Book contact,106
Address Book contact on Web,148
Address Book label,100
Address Book label on the Web,147
bookmark folder,41
email folder,76
Email message,85
text message,94
To Do task,131
Web Browser bookmark,41
display icons,14
display lid, opening and closing,14
displaying your Luggage Tag,32
documents
how to download latest user docs,12
D-pad
about,16
using,17
draft, saving email as,85
Drafts folder
about,83
icon,79
due date, setting for a To Do task,130
E
Edit Category dialog box,98
Edit Folder pane,76
Edit Folder, Email menu option,76
editing
Address Book category,98
Address Book contact,106
Address Book contact on Web,148
Address Book label,99
Address Book label on the Web,147
Address Book label on Web,147
AIM buddy,66
bookmark,41
bookmark folder,41
Calendar event,113
email folder,75
existing Speed Dial number,49
Identity information,104
note,136
note on the Web,160
POP3 accounts,74
To Do task details,130
ellipsis
meaning in a folded note,134
Email application
adding email recipients to contacts,86
adding email sender to contacts,86
deleting an in-progress message,87
discarding an in-progress message,85
Drafts folder icon,79
emptying Trash,87
forwarding email message,86
Inbox folder icon,78
opening hypertext links,82
Preferences screen,71
preview screen,71
reading an email message,81
replying to a message,85
saving an email as draft,85
saving outgoing messages,72
sending a message,85
Sent folder,72
Sent folder icon,79
setting alerts,76
setting ringtones,76
setting up POP3 accounts,72
sorting messages,83
space limitations,88
status indicators,78
Trash folder icon,79
user-defined folder icon,79
email folders
about,82
creating,75
discarding,76
editing,75
setting preferences,75
system folders,77
email messages
accessing in progress messages,85
attaching a photo on the Web,156
composing,84
deleting,87
discarding,85
discarding on the Web,144
forwarding,86
moving to another folder,84
replying,85
sending message,85
sorting,83
Email Preferences screen
menu shortcuts,80
email signature

Index
February 12, 2002 T-Mobile Device Owner’s Manual 168
creating or editing,74
email status
changing to unread,82
Email Web application
about your Inbox,140
accessing,140
automatically saving copies of sent mail,143
collecting mail from POP3 accounts,143
discarding an email,144
editing folders,142
editing POP3 accounts,142
moving messages to folders,143
opening an attachment,140
reading an email,140
sending an email,141
settings,141
emailing photos,124
empty all messages in Email Trash,87
empty all messages in Text Messages Trash,96
Empty Trash, Address Book menu option,107
Empty Trash, Browse Text Messages menu item,
96
Empty Trash, Email menu item,87
emptying
Address Book Trash,107
Calendar Trash,119
Notes Trash,137
To Do Trash,132
enabling quiet mode,26
ending
AIM conversation,68
phone call,55
error sending email
status indicator,78
eventcopying to create new,112
creating,109
creating on the Web,151
definition,108
discarding,113
discarding on the Web,153
editing,113
editing on the Web,152
moving from one time to another,112
retrieving a discarded event on the Web,153
setting an event reminder on the Web,152
viewing on the Web,151
F
favorite Web page
saving,40
filtering contacts in the Address Book,103
finding an Address Book contact,107
Flip menu option, Snapshots application,122
flipping a captured image,122
folder,84
moving messages on the Web,143
Folder Name field, Edit Folder pane,76
Folders (email) screen
menu shortcuts,81
folders, bookmarks
adding,41
discard,41
editing,41
Forward..., Browse Text Messages menu item,95
Forward..., Email menu item,86
forwarded
email status indicator,78
forwarding
email message,86
text message,95
forwarding calls, setup,45
From field, Compose screen,84
full photo gallery, what to do!,124
full screen view
toggling in browser,39
Full Screen view, photo gallery,123
G
gallery
photo views,123
selecting all photos,124
what to do when photo gallery is full,124
Go To, Browser menu item
keyboard shortcut,38
graphic files
.bmp attachments,81
.gif attachments,81
.jpg attachments,81
.png attachments,81
groups, in AIM,70

Index
February 12, 2002 T-Mobile Device Owner’s Manual 169
H
handling a SIM,23
handset
using as Telephone,50
headset
jack,19
using with Telephone,50
History, Browser menu item
keyboard shortcut,38
hold, putting a call on,53
holster
how to use,12
home page
opening in browser,40
set for Browser,37
Home Page, Browser menu item
keyboard shortcut,38
hypertext links
open in email,82
I
iconsbuddy availability in AIM,64
Drafts folder,79
Inbox folder,78
incoming call,57
missed call,57
outgoing call,57
Sent folder,79
Trash folder,79
user-defined folder,79
Identity screen
editing,104
illegal characters, in Text Messages messages,94
illustration
keyboard,16
IM buddies
adding,66
blocking,67
deleting,67
editing,66
unblocking,67
image contrast slider bar,26
images
maximum device can store,123
importing contacts from SIM card,101
IMSI number,22
Inbox
on the Web,140
Inbox folder
about,82
icon,78
included accessories, in box with device,9
incoming call icon,57
indicators
AIM conversations,68
battery charge,15
current date & time,15
network connection lost,15
out-of-network,59
power adapter connection,15
radio signal strength,15
service identifier,14
standard display,14
Telephone application status,48
inserting a SIM,23
inserting the camera in your device,121
Instant Messaging application
adding a friend to Buddy List,66
adding screen names,60
away messages,69
blocking a buddy,67
buddy availability icons,64
Buddy List screen,64
Conversation Management screen,69
custom buddy alerts,67
deleting a buddy,67
editing a buddy,66
enabling sound,63
ending an AIM conversation,68
groups,70
Offline group,67
preferences,62
preview screen,59
removing screen names,62
setting up knock-knock,62
signing off,61
signing on,61
starting an AIM conversation,67
switching AIM conversations,69
switching screen names,61
unblocking a buddy,67
Instant Messaging Service
keyboard shortcuts,65

Index
February 12, 2002 T-Mobile Device Owner’s Manual 170
J
jackscamera,19
headset,19
Jump button
location,34
use,18
Jump screen
about,34
about preview screens,35
opening,34
selecting an application,35
Jump screen menu,35
Jump shortcuts, setting,28
K
Key Assignment dialog box,29
keyboard
@ key,17
dialing,51
illustration,16
repeat delay,29
repeat rate,29
symbols defined,16
keyboard & wheel settings,29
keyboard shortcuts
Add Bookmark,38
AIM,65
back in browser,39
Calendar application,109
Go To pane,38
History,38
Home Page,38
in Telephone application,47
in Web Browser application,38
Instant Messaging application,65
Notes menu items,134
Refresh,38
scrolling in Web pages,39
Stop Loading,38
To Do application,128
View Bookmarks,38
keypad dialing,51
knock-knock, setting up,62
L
labels
creating in Address Book,100
discarding Address Book labels,100
discarding Address Book labels on Web,147
editing Address Book,99
editing Address Book label on Web,147
labels (Address Book)
about,99
creating on the Web,146
default,99
edit on the Web,147
lanyard, attaching,12
library of custom ringtones,96
light flasher notification, setting,29
limitslength of a note,135
number of image attachments to email,124
number of notes you can store,135
number of To Do tasks you can store,127
open conversations in AIM,67
To Do task notes,130
To Do task title,129
links in email,82
list of tasks in To Do application,128
locking
Alt key,17
device,31
shift key,17
SIM card,32
Login field, Accounts screen,74
Look Up screen, in Telephone application,52
lost SIM
what to do,23
Luggage Tag
filling in,32
M
Mail Domain field, Accounts screen,73
managing your Speed Dial list,48
Mark Unread, Email Read menu item,82
Match pane,107
Menu button
using,18
menu shortcuts
Browse Contacts screen,102
Browse Email screen,79128

Index
February 12, 2002 T-Mobile Device Owner’s Manual 171
Browse Text Messages screen,92
Compose screen,80
Contact Info screen,102
Email Preferences screen,80
Folders (email) screen,81
New Contact screen,102
POP3 accounts screen,81
Read Email screen,80
Snapshots application,121
menus
Jump screen,35
message
move to another folder,84
message body
Compose screen,85
Text Messages Compose screen,94
messages
sorting,83
minimum info required to create a contact,105
missed call icon,57
modes
capturing images,122
Month Calendar view
details,118
summary,114
Move Message to Folder pane,84
Move Message..., Email menu item,84
moving email messages,84
MSISDN number,22
mute button,26
My Info,107
editing on the Web,149
N
Name field, Accounts screen,74
network connection lost indicator,15
New Account dialog box,60
new AIM message alert,64
New Category dialog box,98
New Category, Address Book menu option,98
New Contact screen
menu shortcuts,102
New Folder, Email menu option,75
New Message..., Browse Text Messages menu
item,94
New Message..., Email menu item,84
New Note keyboard shortcut,134
Notes application
adding a new note,135
discarding a note,136
editing an existing note,136
emptying the Trash,137
folding/unfolding notes,135
keyboard shortcuts to menu items,134
length limit,135
managing the Trash,136
number limit,135
retrieving a note from Trash,136
views,134
Notes Web application
accessing,160
adding a new note,160
discarding a note,160
editing a note,160
emptying the trash,161
retrieving a note,161
notifications
set for text messages,90
setting for email,76
number of Address Book contacts you can store,
97
numbers
IMSI,22
MSISDN,22
O
off, turning device off,12
Offline group, AIM,67
on/off button,17
opening
a Web page,39
an email attachment on the Web,140
Controls pane,26
Email message,81
Jump screen menu,35
text message,93
the Jump screen,34
opening/closing display lid,14
outgoing call icon,57
out-of-network indicator,59

Index
February 12, 2002 T-Mobile Device Owner’s Manual 172
P
password
changing for Web access,162
Password field, Accounts screen,74
password, selecting,10
PDF file of Owner’s Manual,139
Personal Sleep Message
message length limit,33
personalizing your sleep display,33
phone call
adjusting volume,50
ending,55
phone number, for your device,45
phoning, placing a call,50
photos
capturing,122
counter,123
deleting,126
deleting on the Web,155
maximum device can store,123
remaining,123
renaming,125
renaming on the Web,155
selecting,124
selecting all,124
sorting,125
sorting on the Web,155
PIN for SIM card,32
placing telephone calls
placing a call,50
placing a second call,53
POP server field, Accounts screen,73
POP3 accounts
collecting mail from,143
deleting,74
editing,74
setting up,72
POP3 accounts screen
menu shortcuts,81
POP3 email accounts
adding to Email Web application,142
Port field, Accounts screen,73
portsUSB Mini-B,20
power adapter
attaching to device,11
connection indicator,15
powering the device on/off,17
power-saving mode,33
waking,11
preferences,24
Address Book application,97
device-wide,24
Email application,71
Instant Messaging application,62
Telephone application,45
Web Browser application,36
preview screens
about,35
AIM,59
Calendar application,108
Email application,71
Notes application,133
Telephone application,44
To Do,127
primary device account,72
privacy lock, setting,31
putting a call on hold,53
Q
Quiet Mode
enabling,29
schedule for regular times,30
quiet mode
button,26
R
radio signal strength indicator,15
Read Email screen
menu shortcuts,80
reading a text message,93
reading an email message,81
on the Web,140
recent numbers
Telephone application,52
recipient (of email)
add to Address Book,86
redialing,51
redialing a number
Telephone application,51
Refresh, Browser menu item
keyboard shortcut,38

Index
February 12, 2002 T-Mobile Device Owner’s Manual 173
refreshing a Web page,38
Registration screen,10
Reminder dialog box,112
reminder for an event, setting,112
removing
AIM screen names,62
removing a SIM,22
renaming a photo,125
repeat rate, keyboard,29
repeating events, setting,111
Repetition dialog box,111
replied to
email status indicator,78
Reply All..., Email menu item,86
Reply To field, Accounts screen,74
Reply..., Browse Text Messages menu item,95
Reply..., Email menu item,85
replying to a text message,95
replying to an email,85
resetting your telephone call timer,45
resuming a call,53
Retrieve Contact, Address Book menu option,106
Retrieve Note keyboard shortcut,134
retrieving
a trashed note on the Web,161
To Do task from Trash,132
retrieving a Calendar event from Trash,119
retrieving a trashed note,136
retrieving an Address Book contact,106
review capture mode,122
ringtones
download from Web site,96
setting for email,76
setting up,46
S
safety, while using device,12
Save Folder field, Accounts screen,74
saving an email as draft,85
saving outgoing email messages,72
saving outgoing text messages,90
scheduling Quiet Mode,30
screen
backlighting,16
protecting from damage,12
screen image
control,26
screen names
adding,60
removing,62
switching,61
scrolling
Web page,38
search engine
set for Browser,37
searching the Web,40
second call, placing in Telephone application,53
securing your device with a code,31
security,31
turn on/off for device,31
security code, device,31
selecting all photos in gallery,124
selecting an application from the Jump screen,35
selecting photos,124
selecting series of contiguous photos,124
selecting username and password,10
Send Now, Email Compose menu item,85
Send Now, Text Messages Compose menu item,94
sender (of email)
add to Address Book,86
sender (of text message)
add to Address Book,95
sending
email message,85
email messages on the Web,141
text message,94
sending email
status indicator,78
Sent folder,7290
about,83
icon,79
service identifier,14

Index
February 12, 2002 T-Mobile Device Owner’s Manual 174
setting daylight savings time,27
setting up
call forwarding,45
date & time on your device,27
jump shortcuts to applications,28
keyboard repeat delay,29
ringtones,46
speed dialing,47
time zones,27
voice mail,45
shift key
lock,17
unlock,17
shortcuts
changing views in Calendar,113
in Telephone application,47
key mapping to open the applications,29
to applications,28
showing To Do tasks, setting,131
shutter button,122
signal strength indicator,15
signature, email,74
signing off
from AIM,61
signing on
to AIM,61
SIM about swapping,23
general information,22
handling,23
information saved on,22
inserting,23
lost! what to do,23
removing,22
what you can do on device without a SIM,22
SIM card
importing contacts from,101
lock/unlock,32
SIM Lock Code
where stored,22
SIM PIN,32
sleepputting device to sleep on command,33
waking the device from sleep,33
sleep display
personalize with message,33
sleep mode
about,11
Smart Card
about,22
Snapshots application
attaching to email,124
capturing a photo,122
changing an image name,125
deleting an image,126
flipping an image,122
gallery,123
maximum images device can store,123
menu shortcuts,121
selecting images,124
shutter button,122
sorting images in your gallery,125
what to do when gallery is full,124
Snapshots Web application
accessing,155
attaching to email,156
deleting photos,155
renaming photos,155
sorting photos,155
Sort By..., Address Book menu option,103
Sort Messages dialog box,83
Sort Messages..., Email menu item,83
sorting contacts in the Address Book,103
sorting email messages,83
sorting photos,125
sound
enabling for AIM alerts,63
setting up ringtones in Telephone application,
46
turning off for device,26
volume adjustment slider bar,26
space limitations
number of email messages,88
number of To Do tasks,127
specific day, opening in Calendar,120
specify application-specific preferences,24
Speed Dial list
about,48
assigning numbers,47
managing,48
Speed Dial number
editing,49
Speed dialing, using to call,51
standby battery time,11

Index
February 12, 2002 T-Mobile Device Owner’s Manual 175
starting an AIM conversation,67
status
changing email to unread,82
changing To Do task to completed/incom-
plete,130
status indicators
attachment to email,78
email,78
error sending email,78
forwarded email,78
on Web pages,38
replied to email,78
sending email,78
Text Messages,91
urgent email,78
waiting to send email,78
Stop Loading, Browser menu item
keyboard shortcut,38
Subject field, Compose screen,85
swapping SIMs,23
switching
conversations in AIM,69
screen names in AIM,61
system email folders,77
system text (Text Messages) folders,91
T
task creating a new task on the Web,157
creating new,129
discarding,131
discarding completed tasks on the Web,158
discarding on the Web,158
editing on the Web,158
emptying Trash on the Web,159
marking as complete/incomplete,130
marking as complete/incomplete on the Web,
158
notes (To Do) size limit,130
retrieving a discarded task on the Web,159
title (To Do) size limit,129
viewing all on the Web,157
viewing details,129
views in To Do application,131
Task Details screen, To Do application
about,129
adding a note,130
editing,130
tasksincomplete, viewing on the Web,157
Telephone application,52
adjusting volume in active call,50
alpha key mapping,52
answering calls,55
Call Log,56
Caller ID,55
clearing Call Log,58
conference calling,54
deleting a Speed Dial number,50
editing an existing Speed Dial number,49
ending a call,55
holding a call,53
keyboard shortcuts,47
placing a call,50
preferences,45
preview screen,44
resetting your call timer,45
resuming a call,53
setting up ringtones,46
Speed Dial setup,47
title bar indicators,48
using device as handset,50
using headset,50
voice mail,58
text tips when typing,21
text (Text Messages) folders, system,91
text application
calling a sender back on the phone,95
text message
composing,94
deleting,96
discarding,94
forwarding,95
replying,95
sending message,94
Text Message Inbox folder
about,93
Text Message Sent folder
about,93
Text Message Trash folder
about,93
text messages
where stored,22
Text Messages application,96
add text message sender to contacts,95
calling a sender back on the phone,95

Index
February 12, 2002 T-Mobile Device Owner’s Manual 176
emptying Trash,96
forwarding a message,95
illegal characters in messages,94
message folders,93
reading a text message,93
replying to a message,95
saving outgoing message,90
sending a message,94
Sent folder,90
setting alerts,90
status indicators,91
Thumbnail view, photo gallery,123
Time Zone
settings for Web applications,162
T-Mobile
account setup,10
Customer Care number,9
Customer Care Web site,9
T-Mobile Device Owner’s Manual
about,139
printing,139
To Do application
adding a note to task details,130
Browse Tasks screen,128
creating a new task,129
discarding a task,131
editing a task,130
emptying the Trash,132
keyboard shortcuts,128
limit on number of tasks,127
limit to task notes,130
limit to task title,129
marking a task as complete/incomplete,130
preview screen,127
retrieving trashed task,132
setting a due date,130
setting which tasks display,131
Task Details screen,129
task views,131
using the date picker,130
To Do Web application
accessing,157
adding a new task,157
all tasks, viewing,157
description of To Do items,157
discarding a task,158
discarding completed tasks,158
editing a task,158
emptying Trash,159
marking a task as complete/incomplete,158
retrieving a discarded task,159
viewing incomplete tasks,157
To field
Email Compose screen,84
Text Messages Compose screen,94
Top Page, about,138
TrashAddress Book application,107
emptying Calendar Web Trash,153
emptying contents, Notes Web application,
161
emptying Notes Trash on the Web,159
Notes application,136
Trash (Email) folder
empty all contents,87
Trash (Text Messages) folder
empty all contents,96
Trash (To Do), emptying,132
Trash Calendar view
details,119
Trash folder
about,83
icon,79
Treva camera,121
turning off
the device,12
turning the device on/off,17
typing text tips,21
U
unavailable
setting an AIM away message,70
unblocking
an AIM buddy,67
unfolding/folding
all notes,135
single note,135
unlocking
Alt key,17
shift key,17
your SIM card,32
unmute button,26
unread emails
listed on preview screen,71
unread text messages
listed on preview screen,89
Upcoming Calendar view

Index
February 12, 2002 T-Mobile Device Owner’s Manual 177
details,115
summary,114
urgent, email status indicator,78
USB Mini-B port,20
user documents
how to download latest,12
user-defined folder icon,79
username, selecting,10
using headset with Telephone application,50
V
vibration
setting as a notification in Telephone applica-
tion,47
setting as device notification,29
View Bookmarks, Browser menu item
keyboard shortcut,38
viewing all your Notes,134
viewsCall Log,56
Day, details,116
Day, summary,114
Month, details,118
Month, summary,114
setting in To Do application,131
Trash, details,119
Upcoming, details,115
Upcoming, summary,114
Week, details,117
Week, summary,114
Year, details,119
Year, summary,115
views in Calendar application
about,113
views in Calendar Web application
about,150
Day view,150
Month view,151
Week view,150
views of photo gallery,123
voice mail
calling,58
setting up,45
Speed Dial number,48
volume
adjusting,26
adjusting when on the phone,50
W
waiting to send email
status indicator,78
waking device from power-saving mode,11
Web accessing device applications,138
searching,40
setting your home page,37
setting your search engine,37
Web Browser preferences,36
Web page
opening,39
status indicators,38
Web pages
scrolling,38
Web settings
account information,162
Device ID,162
Time Zone,162
Week Calendar view
details,117
summary,114
wheel
setting acceleration,29
using,19
Y
Year Calendar view
details,119
summary,115