Datel Design and Development XB0197 Wireless Controller User Manual
Datel Design & Development, Inc. Wireless Controller
user manual

TurboFire® EVO™
For Xbox 360
User Guide
V1.0
Index
1. Thank you for Choosing TurboFire EVO
2. Carton Contents
3. Important Information
4. Controller Overview
5. Combat Command LCD Display Overview
6. Inserting Batteries
7. Attaching a Rechargeable Battery Pack
7.1. Recharging a Rechargeable Battery Pack
8. Syncing the Controller
9. Adjusting the Level of Brightness
10. Entering and Exiting the TurboFire EVO Menu
11. Activating Features
12. Pre-installed Features
12.1. Sniper
12.1.1. Configuring Sniper
12.2. Remap
12.2.1. Configuring Remap
12.3. Rapid Fire
12.3.1. Choosing Which Buttons are Assigned Rapid Fire
12.3.2. Setting Rapid Fire Speed
12.4. Low Recoil
12.4.1. Configuring Low Recoil
13. EVO Customizer PC software
14. Compatibility Warranty
15. FCC Rules, Part 15
16. Customers in Canada
17. Technical Support and Customer Service
1
1. Thank you for Choosing TurboFire EVO™
TurboFire® EVO™ further builds on the already impressive spec of the best-selling third party
wireless controllers TurboFire® and TurboFire® 2. The TurboFire® EVO™ includes a 1.7”
Combat Command LCD Display, enabling you to select from and configure a range of in built
enhancement features.
Advanced features are available with just a few button presses, these features include Combo
Sequences, Sniper Mode, Rapid Fire, Low Recoil, Button Remapping, Y-Axis Reverse, Analogue
Sensitivity, Left Handed Mode and Auto Fire.
The TurboFire® EVO™ is capable of storing four features at one time. Connecting the
TurboFire® EVO™ to a USB port on any internet enabled PC allows you update and change the
pre-installed features. Once you have made your selections, you can choose to either configure
the features via your computer or using the Combat Command LCD Display.
In addition to its unique programmability, TurboFire® EVO™ features an integrated headset
port for Xbox® Live™ play. Its precision engineered design is built to withstand aggressive fast -
paced game play! The design team have even thought to reposition the feature buttons to the
back of the controller, a more comfortable position minimising finger fatigue in extended
gameplay. Datel has also listened to requests from users of the original TurboFire® controllers
and TurboFire® EVO™ provides the option to use a rechargeable battery pack.
2. Carton Contents
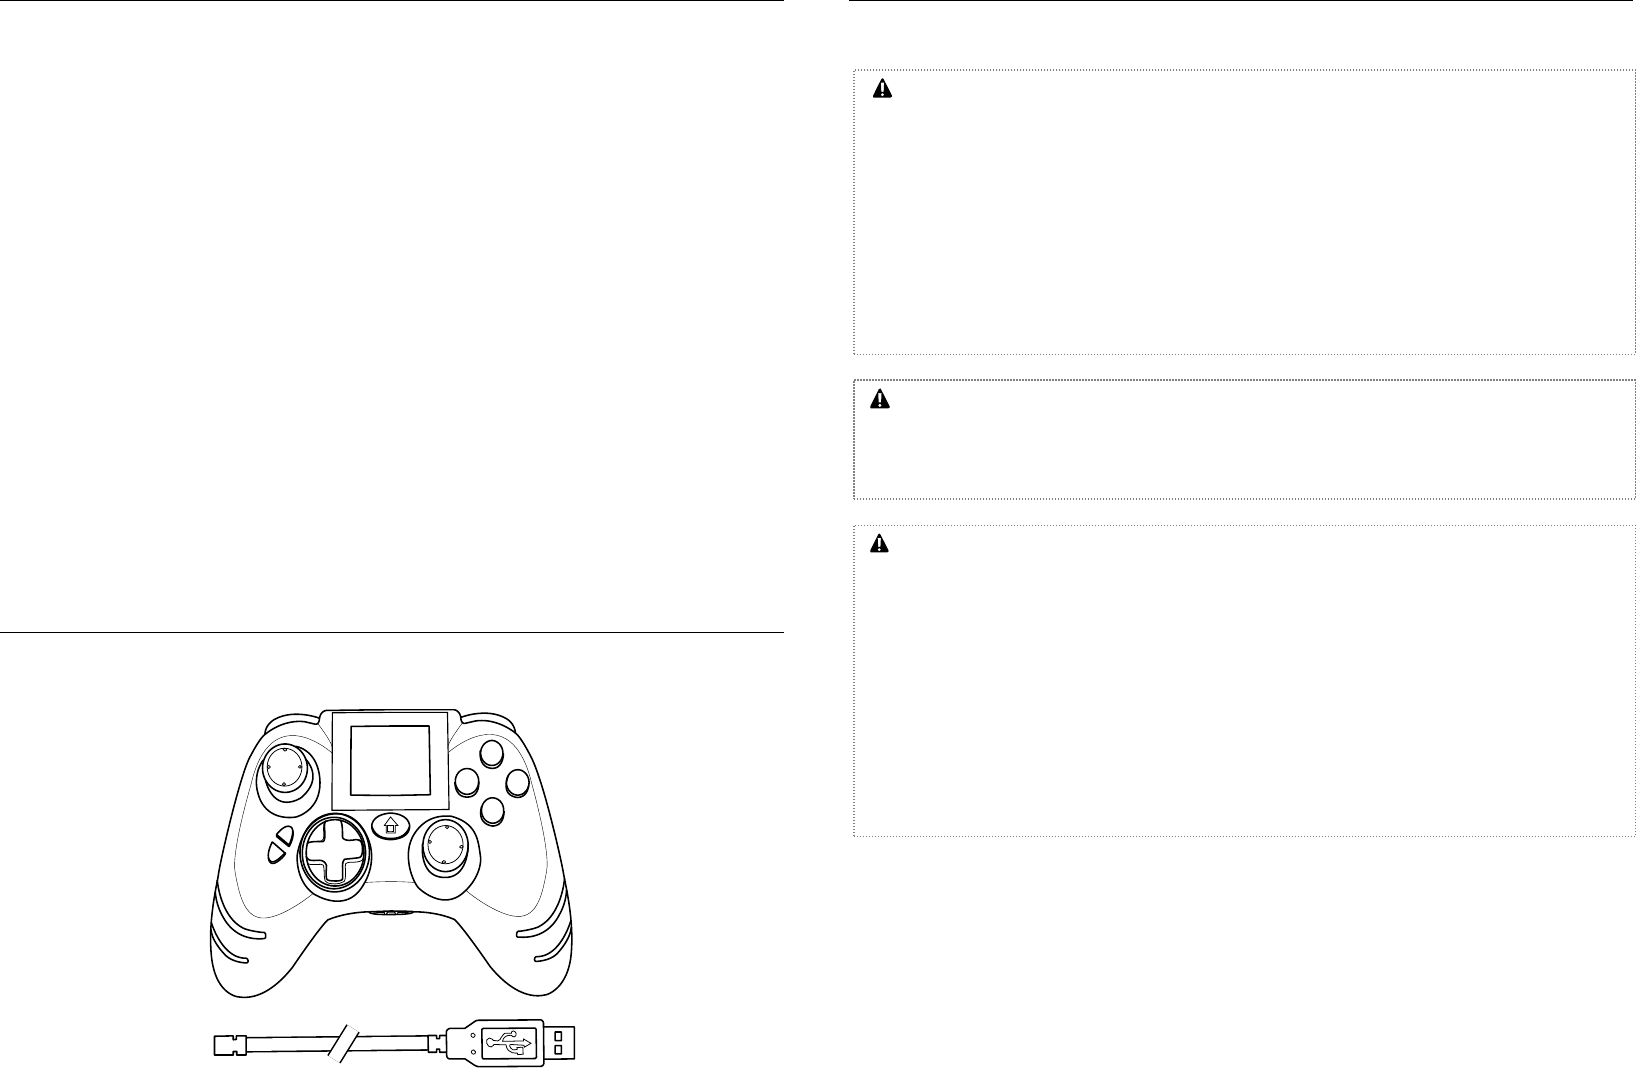
Please verify that your carton contains the following:
1 x TurboFire EVO
1 x USB Cable
3. Important Information
Please ensure that you carefully read the following important information before continuing:
Important Battery Precautions
Please ensure that you follow these recommendations to avoid causing damage to batteries
or the product:
• Do not mix standard and rechargeable batteries.
• Never mix new and used batteries with different charge levels.
• Ensure that batteries are fitted in accordance to the guide shown on the inside of the
battery moulding.
• Do not leave flat batteries in the product.
• Avoid mixing batteries of different types or brands.
• Ensure that batteries are removed from the product for long periods of non-use.
• Do not use batteries which appear to be damaged.
• When disposing of batteries follow appropriate local guidelines and regulations.
Taking Regular Breaks
The TurboFire EVO controller has been designed to be as ergonomic as possible but as with
any gaming peripheral you are advised to take regular breaks during your gaming session
especially if any discomfort occurs.
Safety Information
• Batteries (battery pack or batteries installed) shall not be exposed to excessive heat such
as sunshine, fire or the like.
• Never try to dismantle the product yourself, or push objects of any kind into the products,
as this may cause short circuits which could result in a fire or electric shock.
• None of the components can be replaced or repaired by users.
• Avoid exposing your product to rain, moisture or other liquids to protect against damage
to the product or injury to you.
• Keep all products, cords, and cables away from operating machinery.
• Dispose of the product according to local standards and regulations.
• Do not expose the product to temperatures in excess of 40oC or below -10oC.
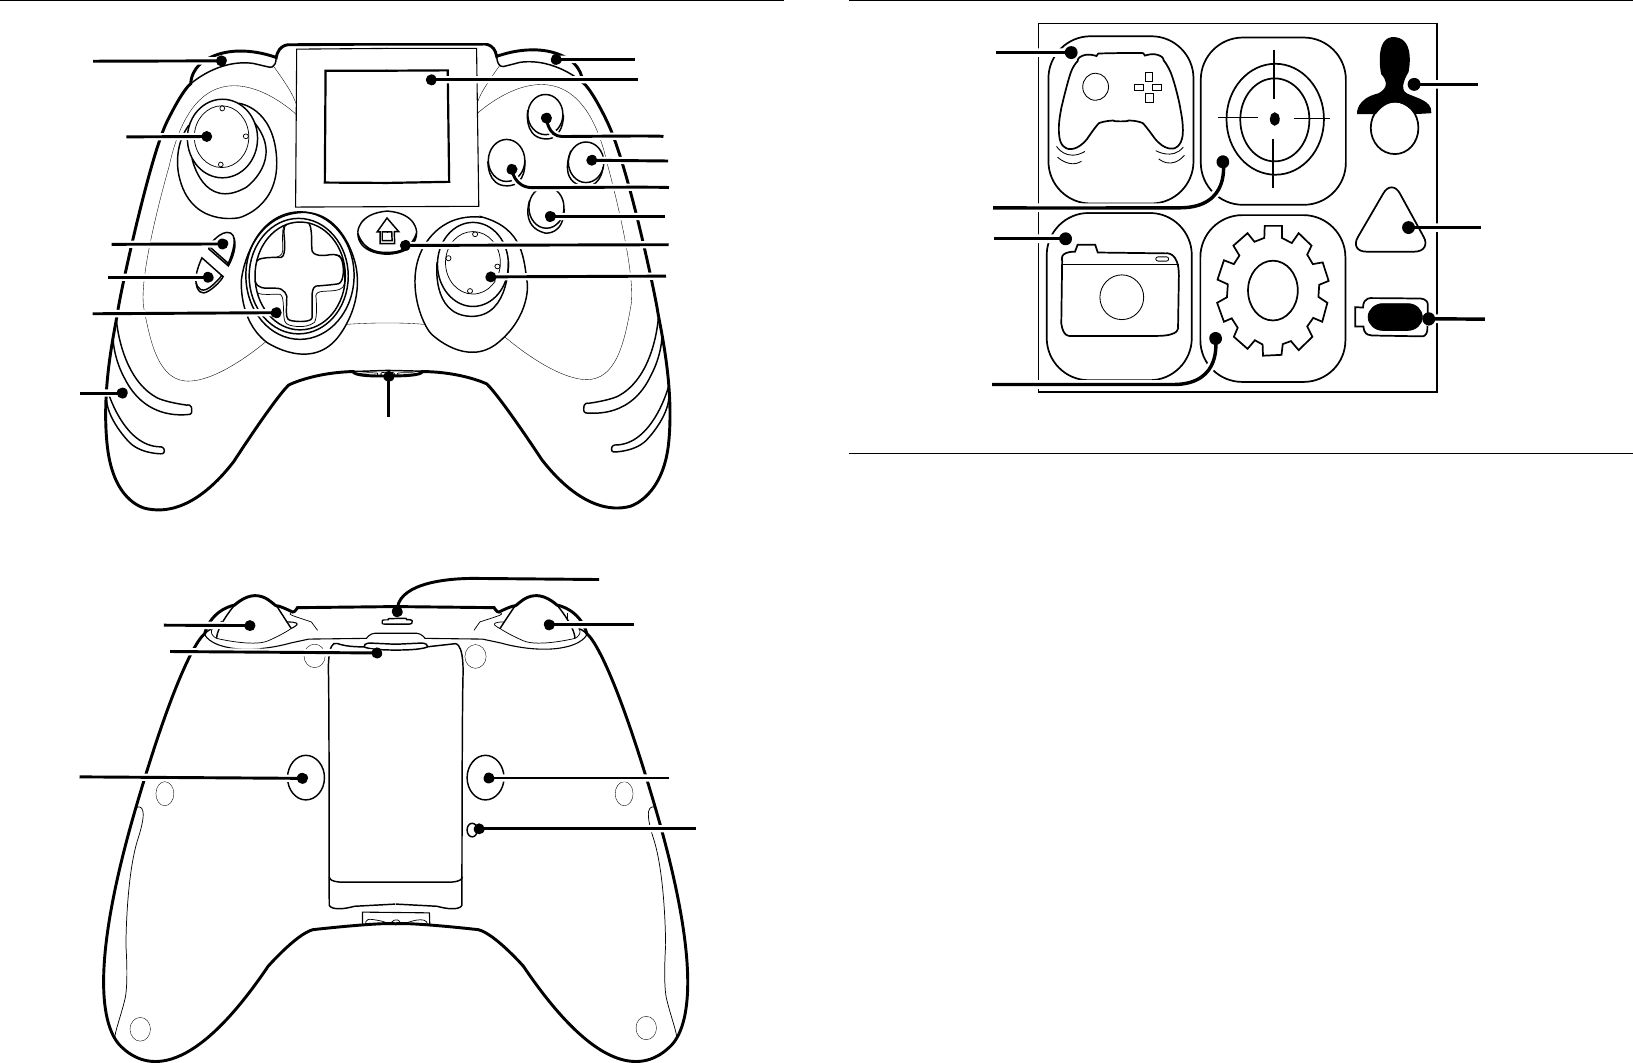
4. Controller Overview
5. Combat Command LCD Display Overview
6. Inserting Batteries
Before inserting batteries, please refer to the ‘Important Battery Precautions’ information
beneath section ‘3’.The TurboFire EVO can be powered using regular cell AA batteries or using
a rechargeable battery pack as described in the next section. In order to insert regular cell AA
batteries in to the battery compartment, please follow these steps:
Step 1:
Whilst pressing and holding the Battery Compartment Button remove the battery
compartment from the rear of the controller.
Step 2:
Insert 2 x regular cell AA batteries, ensuring that you orientate them as shown on the inside of
battery moulding.
Step 3:
Re-attach the battery compartment to the controller ensuring that it latches correctly.
Important Information
The TurboFire EVO does not support the usage of rechargeable AA batteries. For advice on the
usage of a rechargeable battery pack, please refer to the next section.
RT Button LT Button
F2 Button
Sync
Button
Battery Compartment
Button
RB Button
Combat Command
LCD Display
Y Button
B Button
X Button
A Button
Home Button
Right Analogue
Stick
LB Button
Left Analogue
Stick
Start Button
Back Button
Direction
Buttons
Feature
Indicator
Lights Headset Connection
F1 Button
USB Connection
1
Player Number
Indicator
Feature Slot 2
Feature Slot 3
Feature Slot 1
Feature Slot 4
Battery Status
Indicator
!Notificat ion
Indicator
7. Attaching a Rechargeable Battery Pack
The TurboFire EVO supports the usage of a rechargeable battery pack (not supplied). A
rechargeable battery pack is used in place of the battery compartment and is usually a sealed
unit. Rechargeable battery packs are manufactured by a number of first and third party
manufacturers. In order to attach a rechargeable battery pack, please follow these steps:
Step 1:
Whilst pressing and holding the Battery Compartment Button remove the battery
compartment from the rear of the controller.
Step 2:
Attach the rechargeable battery pack ensuring that it latches correctly.
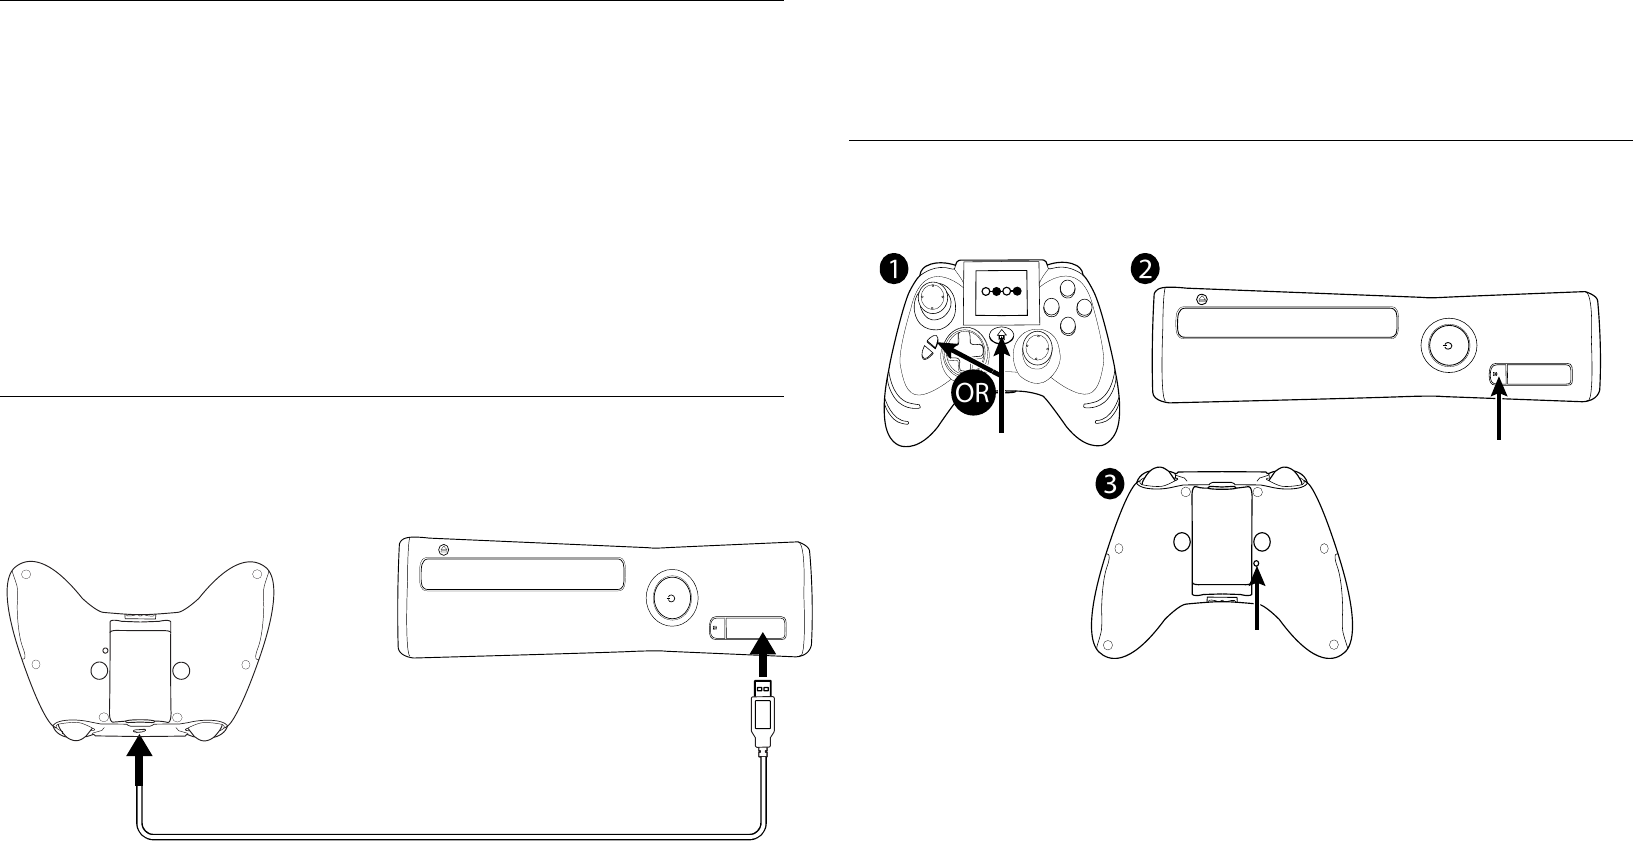
7.1. Recharging a Rechargeable Battery Pack
The TurboFire EVO allows the recharging of a rechargeable battery pack using the USB
connection on the TurboFire EVO and the USB cable (supplied). In order to recharge a
rechargeable battery pack, please follow these steps:
Step 1:
Connect the larger end of the USB Cable (supplied) into any free USB port on your Xbox 360.
Step 2:
Connect the mini USB end of the USB Cable to the USB Connection located on the top of the
TurboFire EVO.
Other Charging Information
The TurboFire EVO does not support the usage or charging of rechargeable AA batteries. Please
refer to the information provided with your rechargeable battery pack for approximate
charging times.
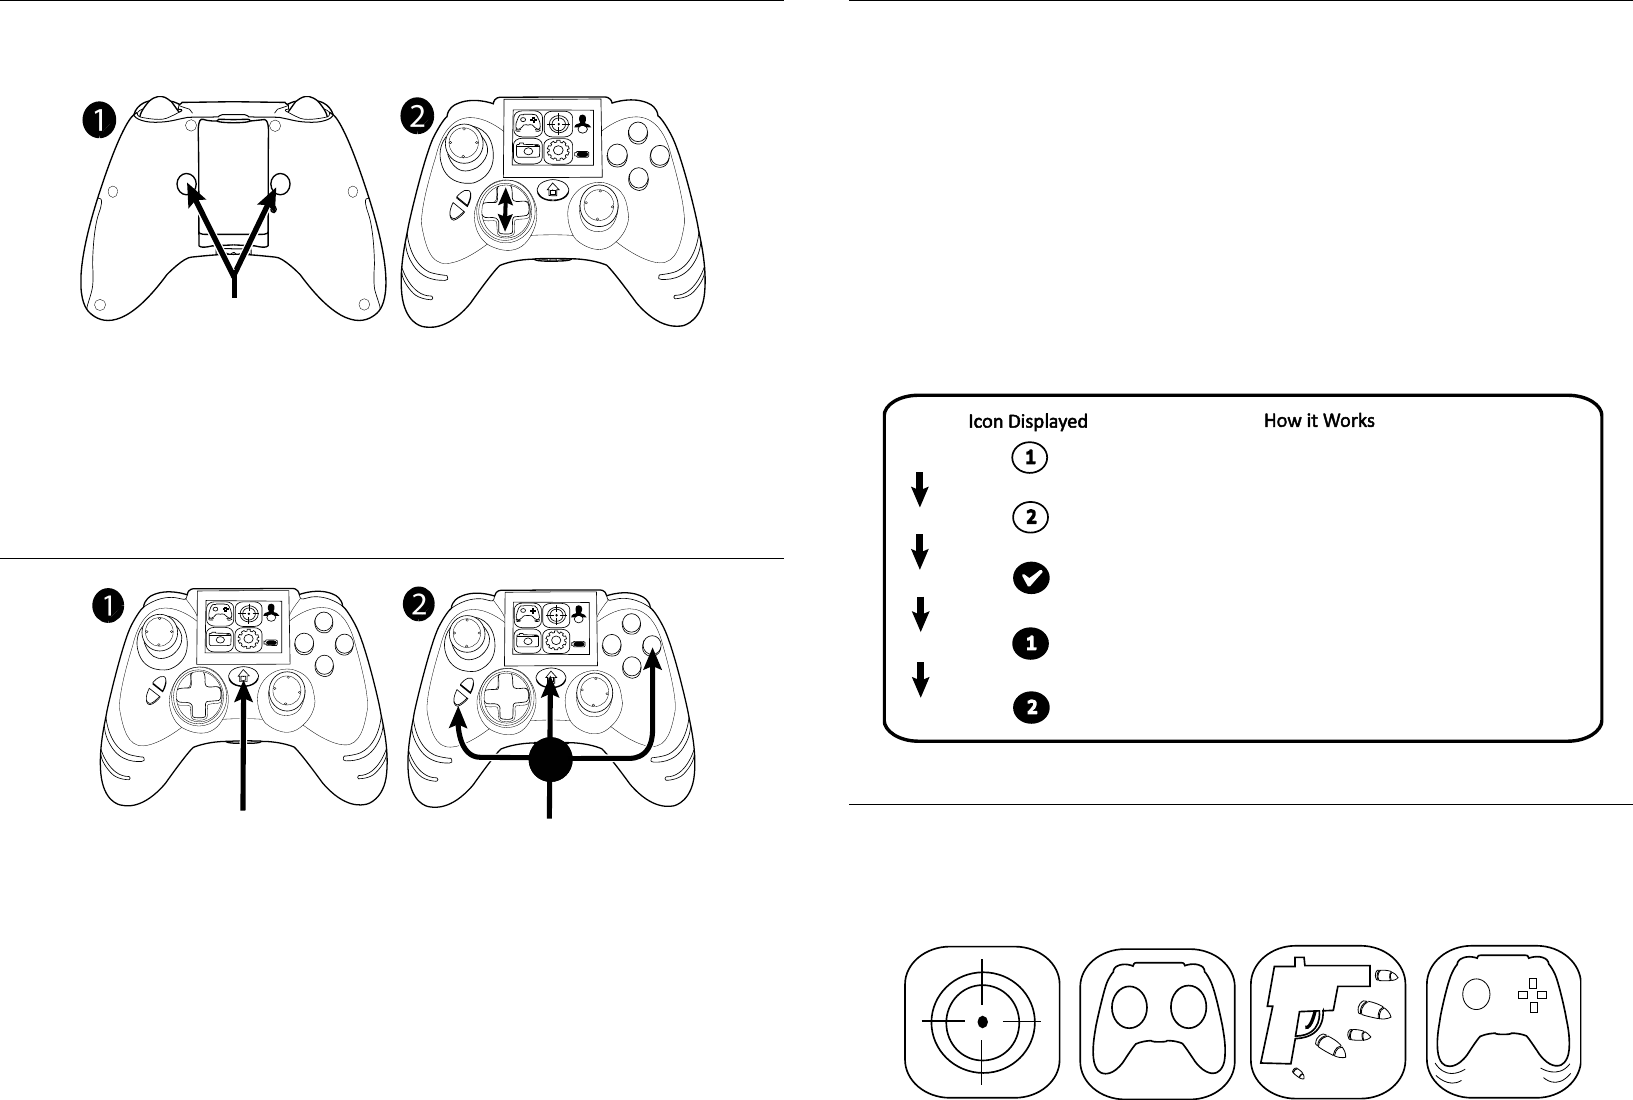
8. Syncing the Controller
Before you can use the TurboFire EVO for the first time you need to sync it with your Xbox 360.
To do this, please follow these steps:
Step 1:
Ensuring the Xbox 360 is powered on. Press and hold the Home button or Start button to
power the controller so you are shown four connected circles on the Combat Command LCD
Display indicating that the controller is not synced with a console.
Step 2:
Press the Sync button on your Xbox 360. The actual position of the sync button may differ from
the illustration.
Step 3:
Press and hold the Sync button on the TurboFire EVO for a number of seconds. After a few
seconds the TurboFire EVO and the Xbox 360 will automatically be synchronized. A player
number will be assigned to the TurboFire EVO and displayed by Player Number Indicator on the
Combat Command LCD Display.
9. Adjusting the Level of Brightness
The Combat Command LCD Display can be set to the preferred level of brightness. In order to
adjust the level of brightness, please follow these steps:
Step 1:
Press and hold the F1 and F2 Buttons
Step 2:
Whilst continuing to press and hold the F1 and F2 buttons increase and decrease the level of
brightness by moving the direction buttons up and down as shown.
10. Entering and Exiting the TurboFire EVO Menu
Step 1:
Each time you wish to access the TurboFire EVO Menu you need to short tap the Home button
on the TurboFire EVO controller. Access the usual Xbox guides when pressing and holding the
Home button for over a second.
Step 2:
Whilst you are within the TurboFire EVO menu the TurboFire EVO buttons and controls will
only allow you to control the TurboFire EVO menu. In order to exit the TurboFire EVO Menu
and regain control of your console, you need to tap the Home button, Back button or B button.
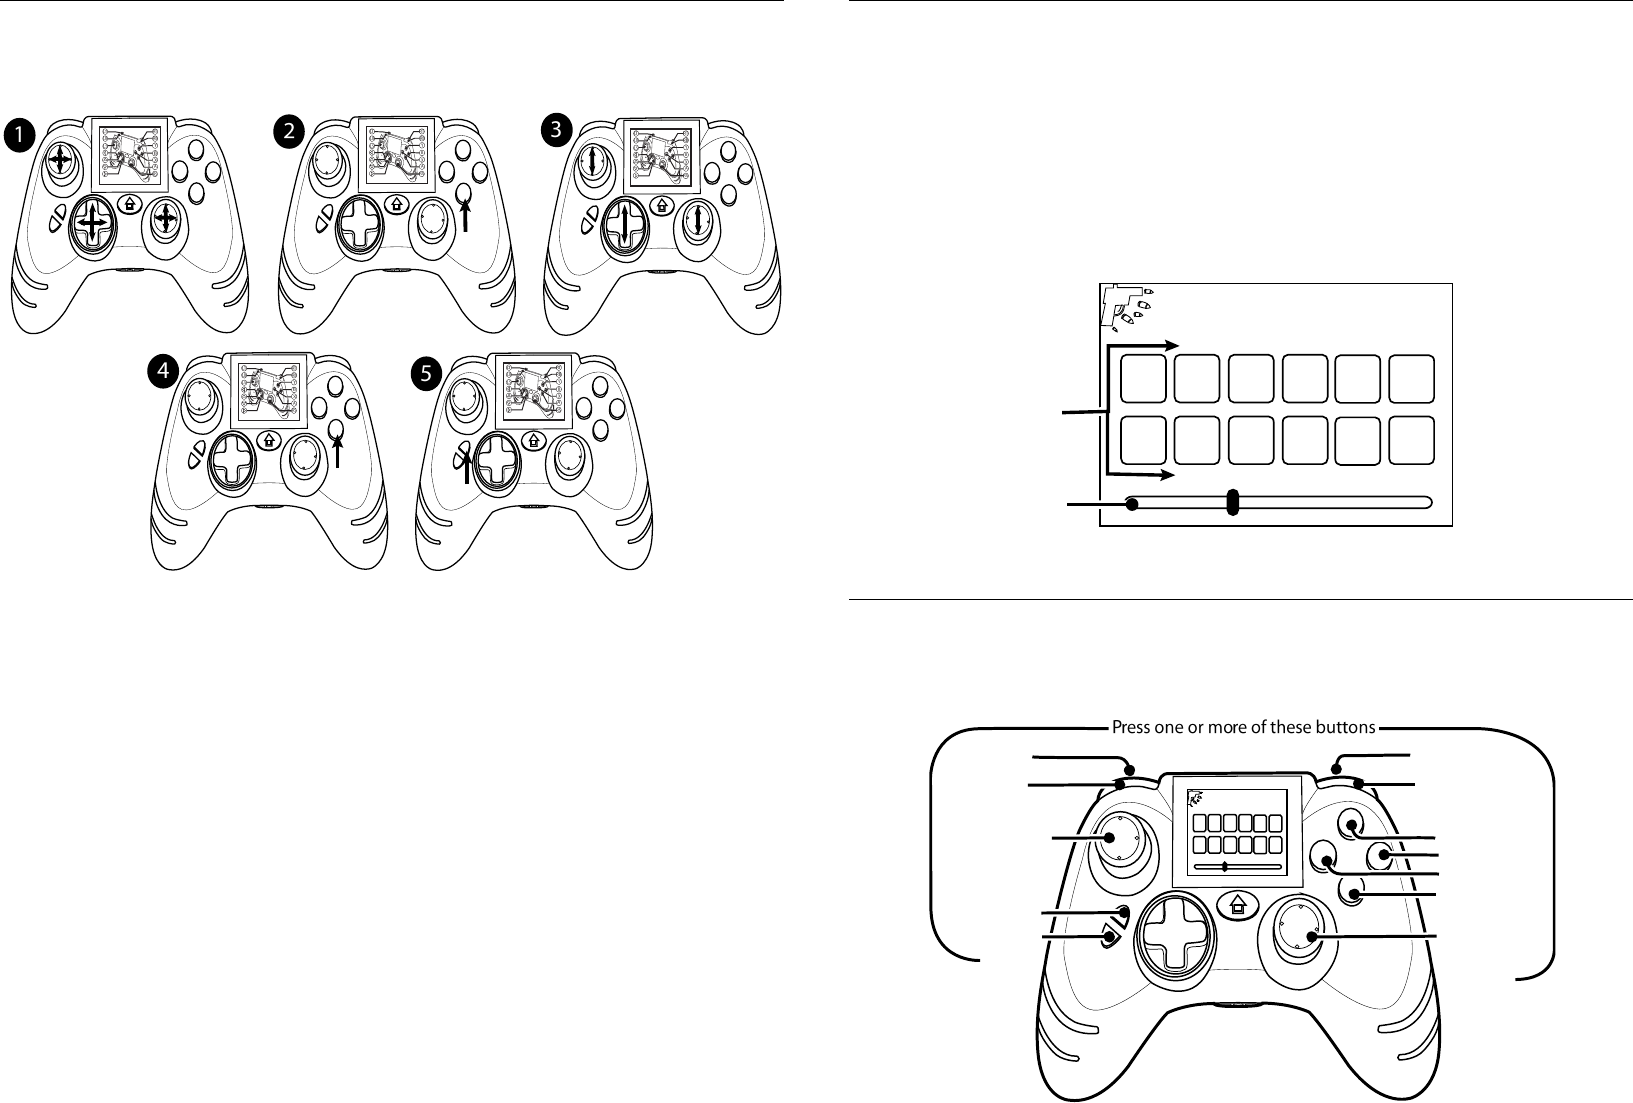
11. Activating Features
It is possible to set each of the features to activate in one of five ways. You can choose to
activate and deactivate a feature by pressing the F1 or F2 button. You can choose to activate a
feature when you are pressing and holding the F1 or F2 button. Alternatively you can choose to
have a feature set to always on, meaning that you do not need to press any button to activate
the feature. When activating features you can use multiple instances of some features such as
Rapid Fire and Sniper.
When you have entered the TurboFire EVO menu as detailed in the previous section, using the
Left Analog Stick or the Direction buttons enables you can scroll between the four features.
With the feature which you wish to activate highlighted, using the X button on the TurboFire
EVO you can toggle the highlighted feature between the five different activation modes. Each
of the activation modes is indicated by an icon being added to the highlighted feature as
follows:
12. Pre-installed Features
The TurboFire EVO is preinstalled with the features Sniper, Remap, Rapid Fire and Low recoil.
Each of the pre-installed features is easily identifiable by the following feature images:
1
11
OR
Tap X Activate and deactivate by pressing the F1 butt on
Tap X
Activate when you are pressing and holding the F1 butt on
Tap X
Activate and deactivate by pressing the F2 butt on
Always on
Tap X
Tap X Activate when you are pressing and holding the F2 butt on
<
AB
Sniper Mode Remap Rapid Fire Low Recoil
12.1. Sniper
The TurboFire EVO controller is equipped with a unique programmable Sniper Mode feature
which allows for you to slow down the movement of either analogue stick. In slowing down the
movement of either analogue stick allows for more precise movements, which is an advantage
when playing in a sniper situation which requires accurate aiming.
After entering the TurboFire EVO Menu as detailed under section ‘10’, using the A button select
the Sniper feature image to enter the Sniper configuration screen. If you would like to return to
the TurboFire EVO Menu at any time press the Back button.
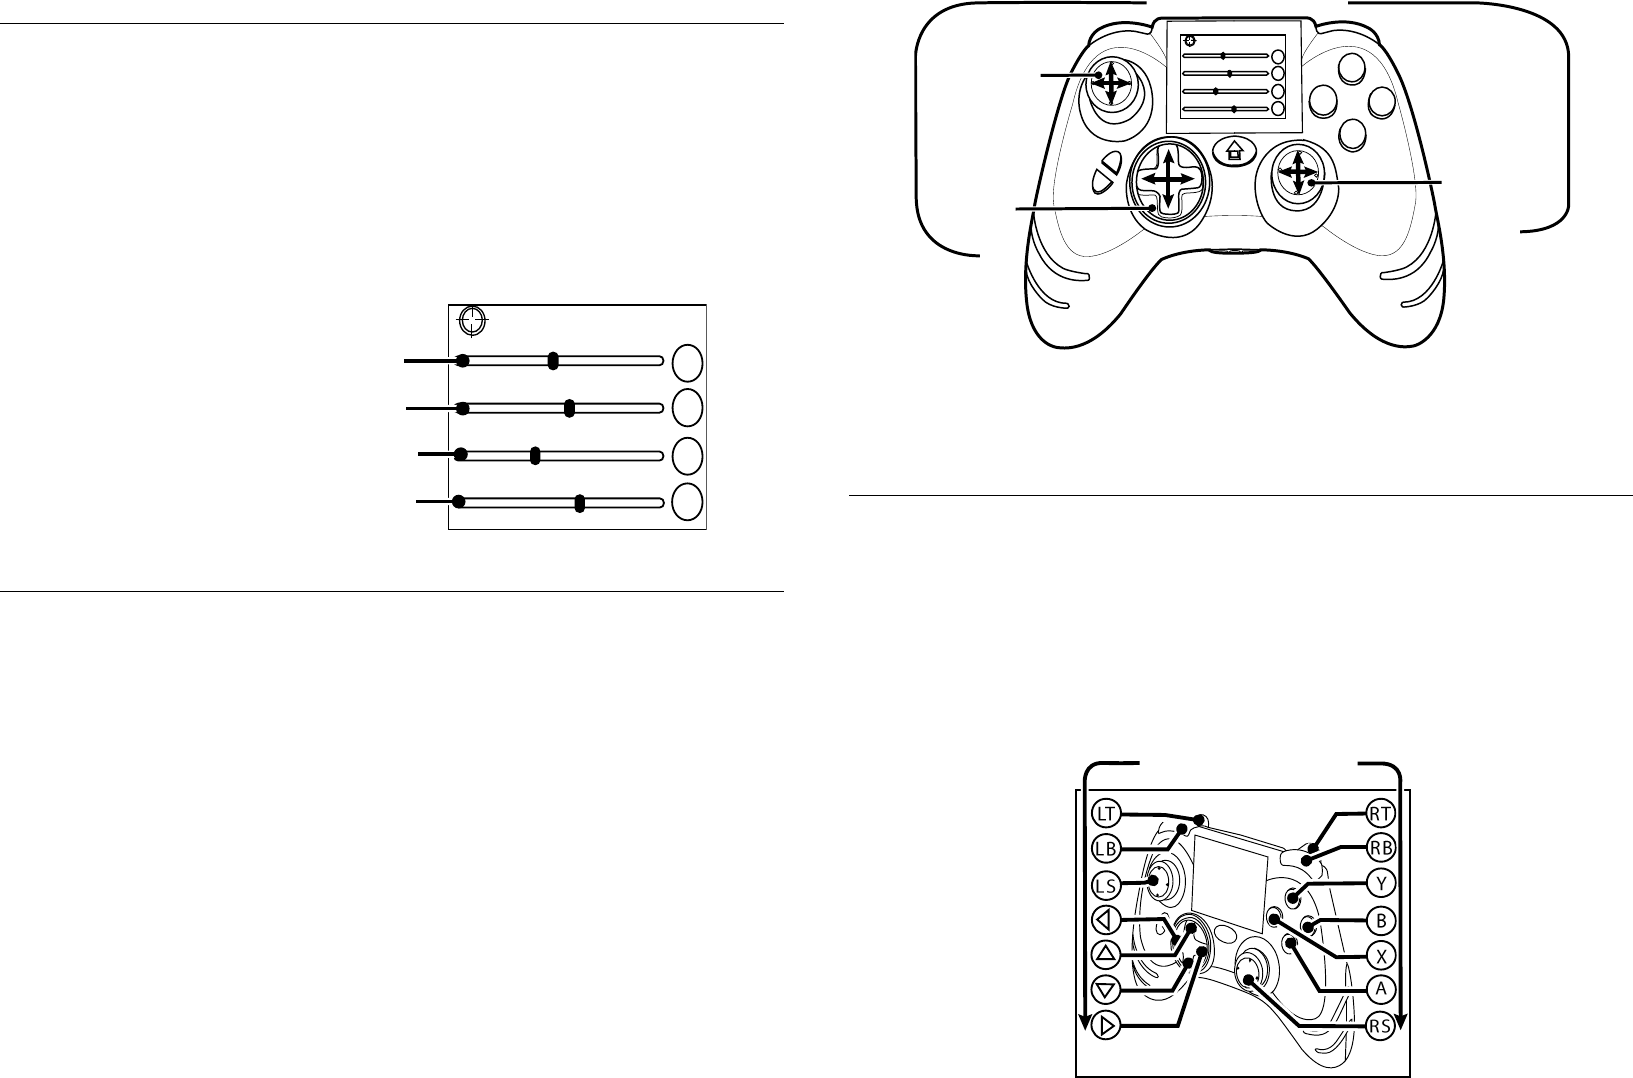
12.1.1. Configuring Sniper
When configuring Sniper you are increasing or decreasing the speed of the analogue sticks by
adjusting the y-axis and x-axis slider bars for each analogue sticks. The y-axis is up and down
movement, the x-axis is left and right movement. The centre of a slider bar represents the
normal speed of the axis. When moving a slider bar to the left you are slowing down the x-axis
or y-axis. When moving a slider to the right you are speeding up the x-axis or y-axis.
In order to adjust each of the slider bars you need to scroll up or down to highlight the slider
bar which you would like to adjust. Whilst highlighting the chosen slider bar move each of the
sliders left or right. You can use any of the buttons shown in the following illustration:
Once you are happy with your configuration press the Start button to save the configuration. As
detailed under section ‘11’ you can now activate the feature with your chosen configuration.
12.2. Remap
Button remapping gives you the ultimate control over the TurboFire EVO layout by allowing you
to choose which buttons should be pressed to activate each control.
After entering the TurboFire EVO Menu as detailed under section ‘10’, using the A button select
the Remap image to enter the Remap configuration screen. If you would to return to the
TurboFire EVO Menu at any time press the Back button. As shown in the following illustration,
the Remap configuration screen displays which buttons are assigned to each of the controls.
SNIPER
LX
LY
RX
RY
X-Axis Left Analogue Stick Slider Bar
Y-Axis Left Analogue Stick Slider Bar
X-Axis Right Analogue Stick Slider Bar
Y-Axis Right Analogue Stick Slider Bar
Use one of these controls
Left Analogue
Stick
Direction
Buttons
Right Analogue
Stick
SNIPER
LX
LY
RX
RY
Programmable Buttons
12.2.1. Configuring Remap
In order to program which buttons should be pressed to activate each control, please follow
these steps:
Step 1:
Scroll up, down, left or right to highlight the button which you would like to remap.
Step 2:
Select the highlighted button using the A button.
Step 3:
Scroll up or down until you are shown the button which you would like to assign to the control.
Step 4:
Press the A button to confirm.
Step 5:
Repeat the same steps to remap any other buttons. Once you are happy with your
configuration press the Start button to save the configuration. As detailed under section ‘11’
you can now activate the feature with your chosen configuration.
12.3. Rapid Fire
The unique programmable Rapid Fire feature can boost your firepower in any Xbox 360 game.
The Rapid Fire can be set to operate at different speeds and can be assigned to wide range of
buttons.
After entering the TurboFire EVO Menu as detailed under section ‘10’, using the A button select
the Rapid Fire image to enter the Rapid Fire configuration screen. If you would to return to the
TurboFire EVO Menu at any time press the Back button. As shown the Rapid Fire configuration
screen displays the buttons which are assigned Rapid Fire and a Rapid Fire speed slider bar
which enables you to adjust the rate of fire.
12.3.1. Choosing Which Buttons are Assigned Rapid Fire
In order for you to get the most out of the Rapid Fire feature you can choose exactly which
button or buttons it is assigned to. To program which buttons will use Rapid Fire press any of
the buttons shown in the following illustration.
RAPID FIRE
A B
xY
LB
RB
LS
RS RT
LT
Buttons Assigned
Rapid Fire
Rapid Fire Speed
Slider Bar
START
BACK
RB Button
Y Button
B Button
X Button
A Button
Right Analogue
Stick Click
LB Button
Left Analogue
Stick Click
LT Button RT Button
Start Button
Back Button
RAPID FIRE
A B
xY
LB
RB
LS
RS RT
LT START
BACK
In order to assign Rapid Fire to the Start button and Back button without exiting the Rapid Fire
configuration screen. You need to press and hold the F1 or F2 button before pressing the Start
button and Back button.
When making your selections, as shown button icons are displayed by the Rapid Fire
configuration screen confirming the buttons which will be assigned Rapid Fire.
Having chosen the buttons which you would to assign Rapid Fire you can now save the
configuration by pressing the ‘Start’ button. Alternatively you can set the Rapid Fire speed as
detailed in the next section. If you would you like to continue without changing the Rapid Fire
speed, as detailed under section ‘11’ you can now enable the feature with chosen buttons.
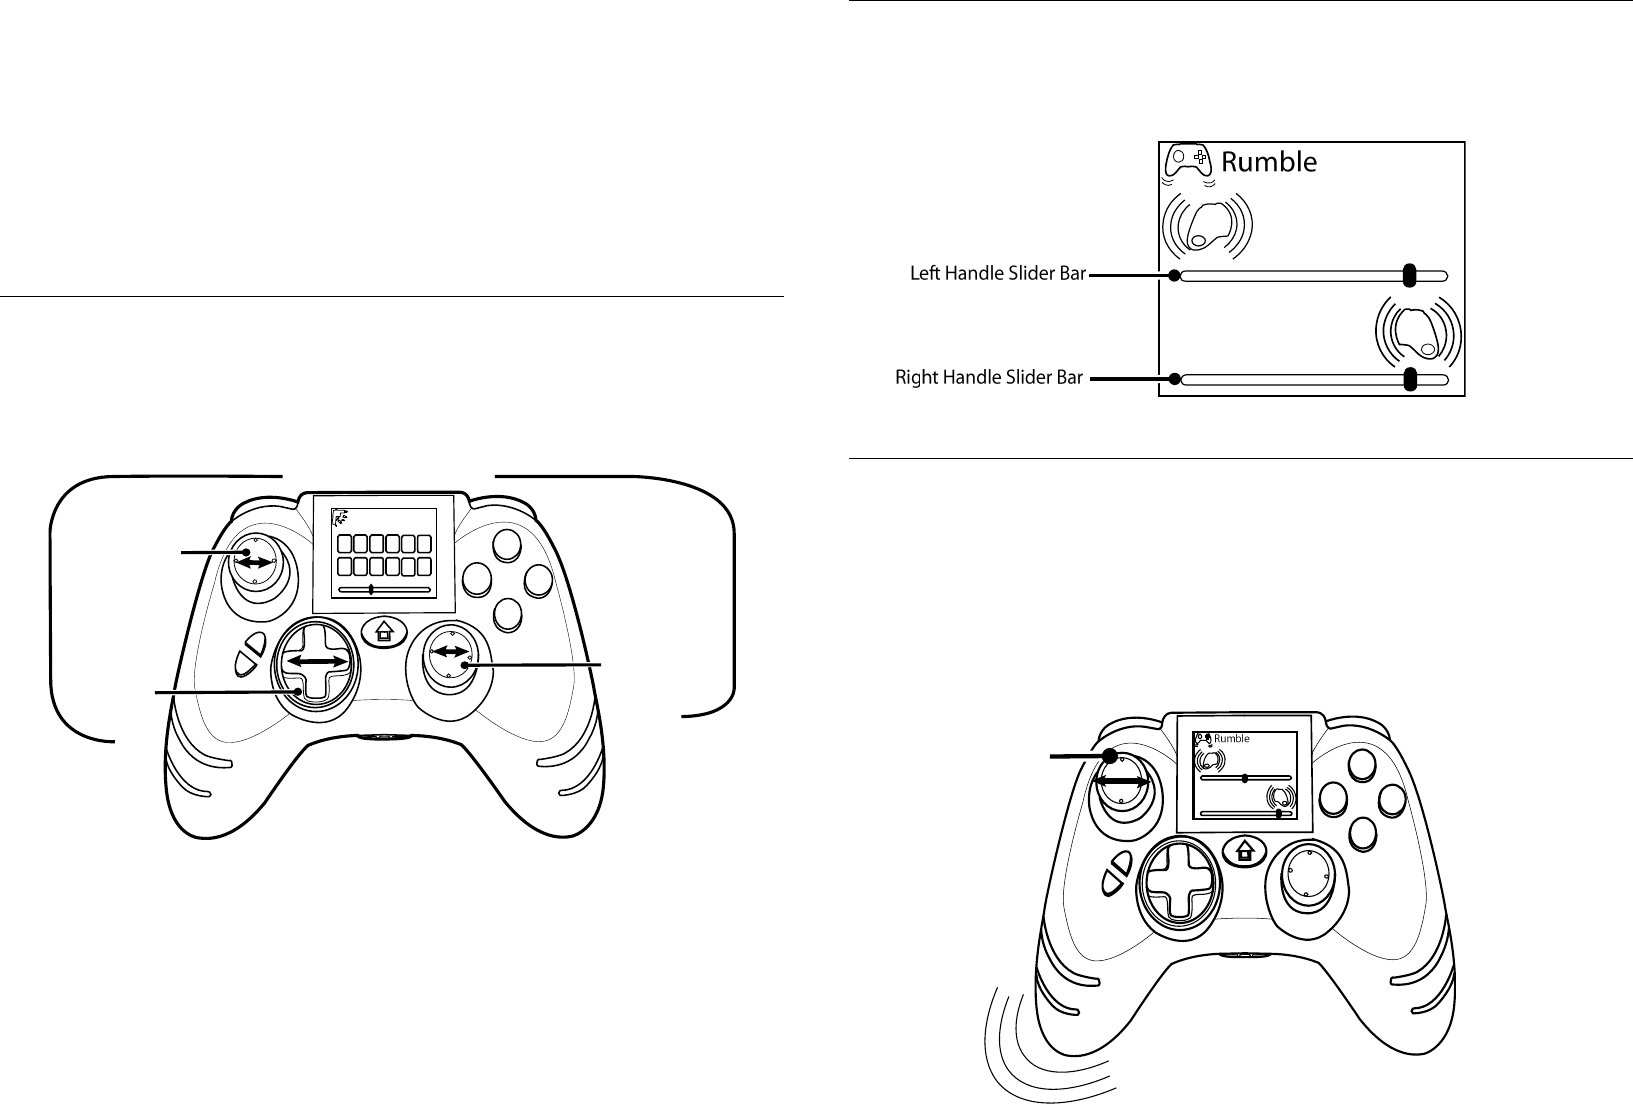
12.3.2. Setting Rapid Fire Speed
Having chosen the buttons which you would like to assign Rapid Fire, you can choose the speed
which Rapid Fire will operate. In order to set the speed of Rapid Fire you need to move the
Rapid Fire slider bar either to the left to decrease or to the right to increase. You can use any of
the buttons shown in the following illustration:
Once you are happy with the configuration save the configuration by pressing the ‘Start’
button. As detailed under section ‘11’ you can now enable the feature with chosen buttons and
set speed.
12.4. Low Recoil
The Low Recoil feature allows you to set the level of rumble which you feel during gaming. The
rumble configuration screen allows you can adjust the level of rumble which you feel on either
handle of the pad as shown in the follow illustration:
12.4.1. Configuring Low Recoil
In order for you to configure the level of rumble which you feel on either handle of the pad.
You need to adjust the Left Handle Slider Bar and the Right Handle Slider Bar, when making
adjustments to either slider bar the actual level of rumble is felt though the handles. To do this,
please follow these steps:
Left Handle Slider Bar
Moving the Left Analogue stick left and right will adjust the Left Handle Slider Bar, as shown in
the following illustration:
Use one of these controls
Left Analogue
Stick
Direction
Buttons
Right Analogue
Stick
RAPID FIRE
A B
xY
LB
RB
LS
RS RT
LT START
BACK
Left Analogue
Stick
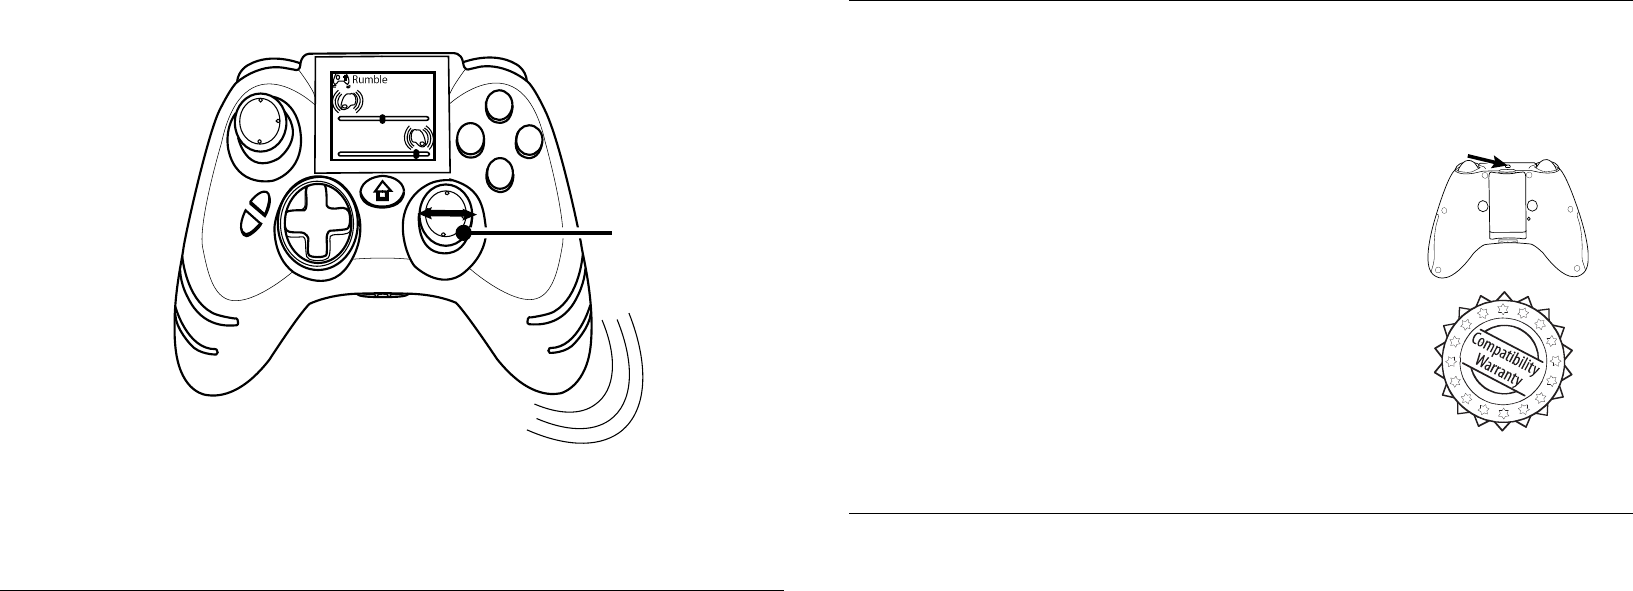
Right Handle Slider Bar
Moving the Right Analogue stick left and right will adjust the Right Handle Slider Bar, as shown
in the following illustration:
Once you are happy with your configuration press the Start button to save the configuration. As
detailed under section ‘11’ you can now activate the feature with your chosen configuration.
13. EVO Customizer PC software
The EVO Customizer is a free downloadable PC application which allows you to download and
configure the TurboFire EVO Features. The EVO Customizer is downloadable complete with
instructions from Datel’s website, www.codejunkies.com.
Using the EVO Customizer and the USB Cable (supplied), you can choose from a host of
downloadable features including Combo Sequences, Y-Axis Reverse, Analogue Sensitivity, Left
Handed Mode, Auto Fire and Custom Image. You can also download the pre-installed features
Sniper, Remap, Rapid Fire and Low recoil.
As explained in this user guide for the pre-installed features, you can configure features using
the Combat Command LCD Display. In addition to this it is possible to configure each of the
available features using the EVO Customizer.
This fantastic feature gives you the ultimate freedom to customize the TurboFire EVO for how
you want to play and best of all it is completely free.
14. Compatibility Warranty
Because this TurboFire EVO controller has a unique online software update feature, Datel
warrants that this controller will always be compatible with your Xbox 360 console and any
Dashboard updates. In the unlikely case that a future software update from Microsoft causes
the TurboFire EVO controller to stop working, Datel offer two easy solutions:
1. The TurboFire EVO controller includes a USB connection. If
your controller is no longer recognized after a Microsoft
system update, you can simply connect your controller to
any PC via USB and download the controller software
update from Datel’s website, www.codejunkies.com
2. If you do not have access to a computer, you can send your
TurboFire EVO controller to Datel Customer Service at no
charge and we will update your controller and send it back
to you.
15. FCC Rules, Part 15
This equipment has been tested and found to comply with the limits for a class B digital device,
pursuant to Part 15 of the FCC rules. These limits are designed to provide reasonable protection
against harmful interference in a residential installation. This equipment generates, uses and
can radiate radio frequency energy and, if not installed and used in accordance with the
instructions, may cause harmful interference to radio communications. However, there is no
guarantee that interference will not occur in a particular installation. If this equipment does
cause harmful interference to radio or television reception, which can be determined by
turning the equipment off and on, the user is encouraged to try to correct the interference by
one or more of the following measures:
• Reorient or relocate the receiving antenna.
• Increase the separation between the equipment and receiver.
• Connect the equipment to an outlet on a circuit different from that to which the
receiver is connected.
• Consult the dealer or an experienced radio/TV technician for help.
Right Analogue
Stick
1

This device must accept any interference received, including interference that may
cause undesired operation.
Changes or modifications not expressly approved by the party responsible for compliance could
void the user’s authority to operate the equipment.
Responsible Party:
Datel Design & Development Inc,
33 North Garden Avenue,
Suite 900,
Clearwater,
FL 33755
United States of America
Tel. 727-431-0650
16. Customers in Canada
IC warning statement:
This Class B digital apparatus complies with Canadian ICES-003.
This device complies with RSS 210 of Industry Canada (IC).
Operation of this device is subject to the following two conditions: (1) this device may not
cause interference, and (2) this device must accept any interference, including interference
that may cause undesired operation of the device.
RF warning statement:
The device has been evaluated to meet general RF exposure requirement. The device can be
used in portable exposure conditions without restriction.
17. Technical Support and Customer Service
Before contacting Datel’s customer service department, please ensure that you have read
through and understood the information in this manual.
Please ensure that you have information on when and where you purchased this product to
hand.
Datel Customer Service USA
ATTN: Customer Services, Datel Design & Development Inc
33 North Garden Avenue, Suite 900, Clearwater, FL 33755
UNITED STATES
Email: support@dateldesign.com
Knowledgebase: http://www.datelcustomerservice.com
Web: http://us.codejunkies.com
TouchSense® Technology Licensed from Immersion Corporation. Protected by one or more of
the following patents.
U.S. Patents: 5831408, 5844392, 5857986, 5907487, 5959613, 6020875, 6088017, 6104158, 6219032, 6246390,
6252583, 6271833, 6275213, 6278439, 6343349, 6400352, 6411276, 6424333, 6715045, 6801008, 7131073, 7199790,
7209117, 7299321, 7327348, 7345672, and 7502011.
© 2011 Datel Design & Development Inc. TurboFire is a registered trademark of Datel
Design and Development Inc. EVO is a trademark of Datel Design and Development Inc.
TurboFire EVO for Xbox 360 is a 100% unofficial product and is NOT sponsored, endorsed or approved by MICROSOFT,
nor any games developer or publisher. Xbox 360 and Xbox Live are registered trademarks or trademarks of MICROSOFT
in the United States and/or other countries.
LeprésentappareilestconformeauxCNRd'IndustrieCanadaapplicablesauxappareilsradio
exemptsdelicence.L'exploitationestautoriséeauxdeuxconditionssuivantes:(1)l'appareil
nedoitpasproduiredebrouillage,et(2)l'utilisateurdel'appareildoitacceptertout
brouillageradioélectriquesubi,mêmesilebrouillageestsusceptibled'encompromettrele
fonctionnement.
This device complies with Part 15 of the FCC rules.
Operation is subject to the following two conditions:
This device may not cause harmful interference.