Dayton GICONT Bike Computer User Manual 11 228000 PP
Dayton Industrial Co., Ltd. Bike Computer 11 228000 PP
UserManual.wiki
>
Dayton
>
GICONT User Manual
User Manual
Navigation menu
Upload a User Manual
Namespaces
Wiki Guide
HTML
PDF
Info
Views
User Manual
Discussion / Help
Navigation
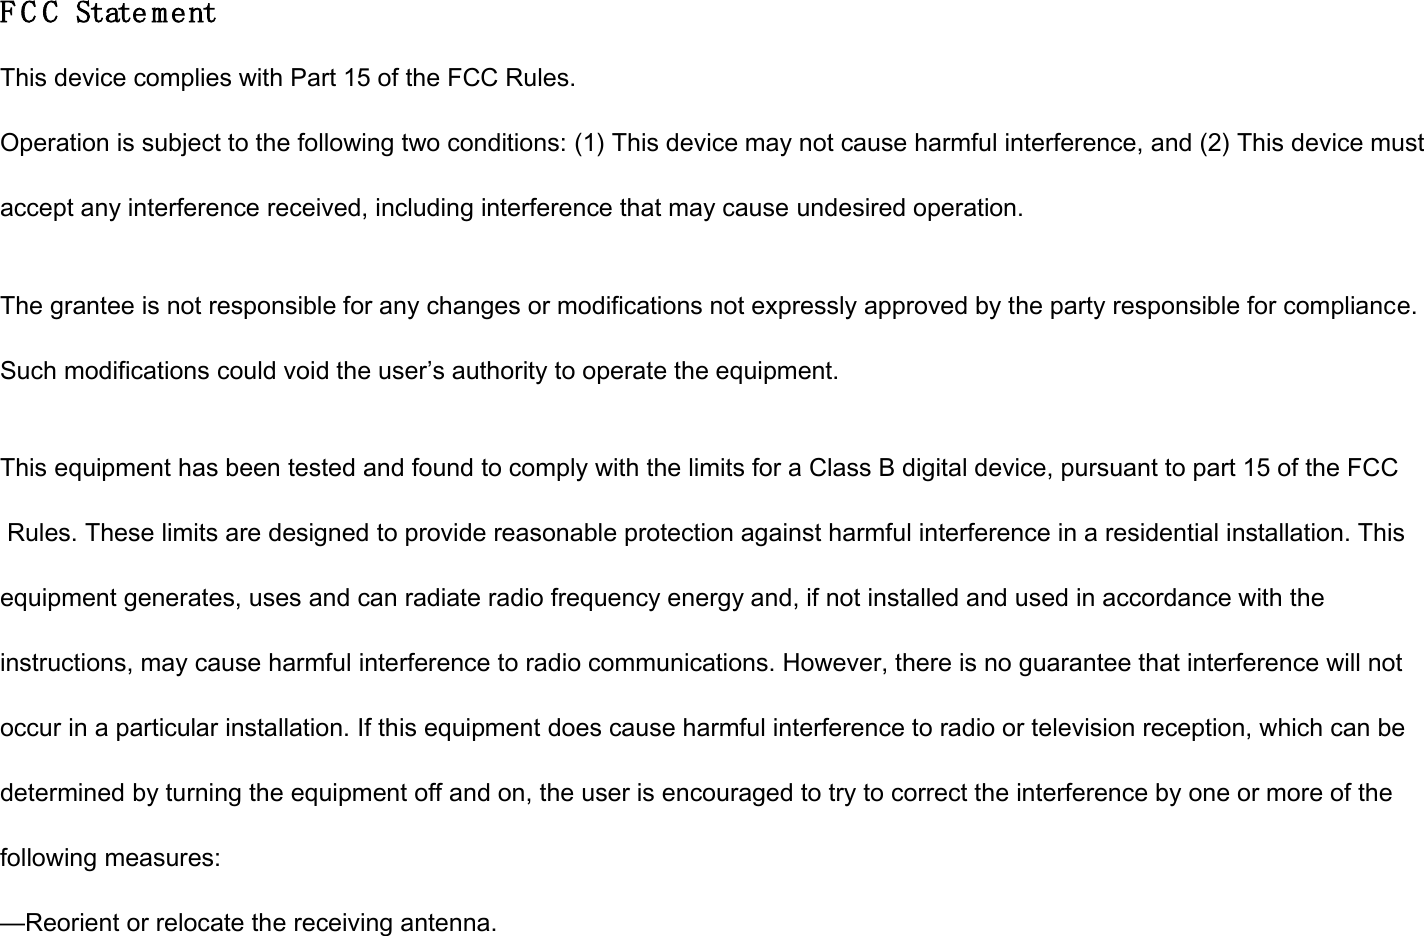
![orPress and release L keyX 4LPress and release S keyRR L5mm12345678 9101112131415161. Ave/Max Speed 2. Current Speed3. Backlight Setup4. Heart Rate5. Cadence6. Incoming Call7. Low Battery8. Phone Mode9. Bluetooth10. Bike Selection11. Speed Comparison12. Service Reminder13. Units14. Function15. Alarm16. Function ValueEN ⹚✮㛧⤎㘩怆⮅㗝怆⺍傳ℰ宥⮁⾪巚㕗⛅当㕗㝌䔜㘥䤡⼘䔜㘥䤡㈲㜡㨈哄䉀彍❲忰㋐怆⺍㮻彪ῄⅢ㎷慹⌼ἴ⊆僤无撆⊆僤㕗‣SC 1. ⹚✮/㛧⤎㘩怆2.⍚㘩怆⺍3.傳ℰ娔⮁4.⾪巚㕟5.⛅弰㕟6.Ὥ曢桖䤡7.⼘曢桖䤡8.㈲㩆㨈9.喴劤10.庱䨕恟㒮11.怆⺍㮻廪12.ῄ棱㎷慹13.▕ἴ14.⊆僤15.欎揿16.⊆僤㕟‣TC1. Durchschnitts-/Maximalgeschwindigkeit 2. Aktuelle Geschwindigkeit 3. Beleuchtungseinstellungen 4. Herzfrequenz 5. Kadenz 6. Ankommender Anruf 7. Energiestand niedrig 8. Telefonmodus 9. Bluetooth 10. Fahrradauswahl 11. Geschwindigkeitsvergleich 12. Serviceerinnerung 13. Einheiten 14. Funktion 15. Alarm 16. FunktionswertDE1. Velocidad media y máxima 2. Velocidad actual3. Configuración de la retroiluminación4. Frecuencia cardíaca5. Cadencia6. Llamada entrante7. Batería con carga baja8. Modo Teléfono9. Bluetooth10. Selección de bicicleta11. Comparación de velocidad12. Recordatorio para servicio13. Unidades14. Función15. Alarma16. Valor de funciónES1. Vitesse moy/max 2. Vitesse actuelle3. Configuration rétroéclairage4. Rythme cardiaque5. Cadence6. Appel entrant7. Batterie faible8. Mode téléphone9. Bluetooth10. Sélection de vélo11. Comparaison de vitesse12. Rappel service13. Unités14. Fonction15. Alarme16. Valeurs fonctionsFR1. /ਈপச২ 2. ਠभச২3. ংॵॡছॖॺਝ4. ੱ༭ਯ5. న৹6. ାਦ7. ਗ਼भଋৣ8. ਗ਼ਵঔشॻ9. Bluetooth10. ঽૡ৭උ11. ச২ૻຎ12. १شঅ५भउੴैच13. ঘॽॵॺ14. ਃચ15. ॔ছش16. ਃચகJPૡ̎ফоܖѦୃࢢܖѦؒԂࢇઝ۶ࢽ֑ܹৼࢇыݛܹݦࢷؑਫ਼չٕ࣐ࢷֻҖٴՔઆݛࢷʠ۴ܖѦٸˬ۰ٸݛߊսЯࡢ̛МߊԆ̛МʅKR 1. Gem./max. snelheid2. Huidige snelheid3. Instelling achtergrondverlichting4. Hartslag5. Ritme6. Binnenkomende oproep7. Batterijvermogen laag8. Telefoonmodus9. Bluetooth10. Fietsselectie11. Snelheidsvergelijking12. Serviceherinnering13. Eenheden14. Functie15. Alarm16. FunctiewaardeNL 3UĊGNRĞüĞUHGQLDPDNV\PDOQD3UĊGNRĞüDNWXDOQD8VWDZLHQLDSRGĞZLHWOHQLD7ĊWQR5. Kadencja3RáąF]HQLHSU]\FKRG]ąFH5R]áDGRZDQDEDWHULD8. Tryb telefonu9. Bluetooth10. Wybór roweru3RUyZQDQLHSUĊGNRĞFL3U]\SRPQLHQLHRXVáXG]H13. Jednostki14. Funkcja15. Alarm:DUWRĞüIXQNFMLPLSR R RRR RLInstallation & Quick StartInstallationGeneral Operation & DisplayFunctionUnit & PartsESTCDESCENFRੂीथ॥থআগشॱش॑उઞःपऩॊधऌमؚ॥থআগشॱشभഫએभ6य़ش॑खؚਝঔشॻपোॉऽघ؛/य़ش॑खथওॽগش॑ৣपखऽघ؛5य़ش॑खथওॽগش॔ॖॸ॑৭උखऽघ؛ৎਝ/य़ش॑खथभৎૄ॑৭උखऽघ؛5य़ش॑खथৎਝपखऽघ؛/य़ش॑खथਠभৎ॑৭උखऽघ؛5य़ش॑खथীਝपखऽघ؛/य़ش॑खथਠभী॑৭උखऽघ؛5य़ش॑खथીവखऽघ؛॔ছشਝ/य़ش॑खथ॔ছشभड़থड़ই॑৭උखऽघ؛5य़ش॑खथ॔ছشभৎਝपखऽघ؛/य़ش॑खथ॔ছشभৎ॑৭උखऽघ؛5य़ش॑खथ॔ছشभীਝपखऽघ؛/य़ش॑खथ॔ছشभী॑৭උखऽघ؛5य़ش॑खथીവखऽघ؛ংॖॡਝ/य़ش॑खथঽૡभ॑৭උखऽघ؛5य़ش॑खथॖشঝ१ॖ६ਝपखऽघ؛/य़ش॑खؚহपউটॢছऔोथःॊभॖشঝ१ॖ६भण॑৭උखऽघ؛ਫखःॖشঝ१ॖ६ऋંऔोथःॊৃ়ؚ5य़ش॑खथીവखऽघ؛ਫखःॖشঝ१ॖ६ऋંऔोथःऩःৃ়ؚ/य़ش॑खथᐈभਗఢએपਤाऽघ؛5य़ش॑खथਈੂभᐈपखऽघ؛/य़ش॑खथਈੂभᐈ॑৭උखऽघ؛5य़ش॑खथઃभᐈपखऽघ؛घसथभᐈऋ৭උऔोञैؚ5य़ش॑खथીവखऽघ؛ਜ਼ध2'2भਝ/य़ش॑खथওشॺঝਜ਼NPNJऽञमॖথঌজ॔ঝਜ਼PLOE॑৭උखऽघ؛5य़ش॑खथ2'2ਝपखऽघ؛/य़ش॑खथਈੂभᐈ॑৭උखऽघ؛5य़ش॑खथઃभᐈपखऽघ؛घसथभᐈऋ৭උऔोञैؚ5य़ش॑खथીവखऽघ؛ਙશध৬भਝ/य़ش॑खथ੬ਙਙ॑৭උखऽघ؛5य़ش॑खथ৬ਝपखऽघ؛/य़ش॑खथਈੂभᐈ॑৭උखऽघ؛5य़ش॑खथઃभᐈपखऽघ؛घसथभᐈऋ৭උऔोञैؚ5य़ش॑खथીവखऽघ؛ঔشॻਝ/य़ش॑खथ७থ१شਗ਼ਵ॔क़ॺঔشॻ॑৭උखऽघ؛5य़ش॑खथঌ॔জথॢঔشॻपखऽघ؛৭උखञॹংॖ५ऋঌ॔জথॢऔोञैؚ/य़ش॑खथ॔क़ॺ॑৭උखؚ5य़ش॑खथਝওॽগش॑ીവखऽघ؛ਗ਼ਵঔشॻਝपणःथम$33ਝুದ॑ओ༮ऎटऔः৯पਝঔشॻपमःॊधऌؚংॵॡছॖॺध१شঅ५भउੴैच॑ਝखऽघ؛When using the computer for the first time, press the S key on the back of the computer to enter setup mode. Press the L key to move down the menu. Press the R key to select a menu item. 1. Time Setup: Press the L key to select 12/24 hour time format. Press the R key to move to hour setup. Press the L key to select the current hour. Press the R key to move to minute setup. Press the L key to select the current minute. Press the R key to exit. 2. Alarm Setup: Press the L key to select alarm on/off. Press the R key to move to alarm hour setup. Press the L key to select the alarm hour. Press the R key to move to alarm minute setup. Press the L key to select the alarm minute. Press the R key to exit. 3. Bike Setup: Press the L key to select bike 1/2. Press the R key to move to wheel size setup. Press the L key select one of the ten preprogrammed wheel sizes. If the correct wheel size is listed, press the R key to exit. If the correct wheel size is not listed, press the L key to advance to the four digit circumference screen. Press the R key to move to the first digit. Press the L key to select the first digit. Press the R key to advance to the next digit. After all digits are selected, press the R key to exit. 4. Unit & ODO Setup : Press the L key to select metric (km/kg) or imperial (mi/lb) units. Press the R key to ODO setup. Press the L key to select the first digit. Press the R key to advance to the next digit. After all digits are selected, press the R key to exit. 5. Gender & Weight Setup:Press the L key to select male/female. Press the R key to weight setup. Press the L key to select the first digit. Press the R key to advance to the next digit. After all digits are selected, press the R key to exit. 6. Mode Setup: Press the L key to select Sensor/Phone/Out mode. Press the R key to move to pairing mode. Once the selected device is paired, press the L key to select OUT and press the R key to exit the setup menu. (See APP setup procedure for phone mode settings) * Set up backlight and service reminder when entering the setup mode the second time. Lorsque vous utilisez l'ordinateur pour la première fois, appuyez sur la touche S à l'arrière de l'ordinateur pour accéder au mode configuration. Appuyez sur la touche L pour vous déplacer vers le bas dans les menus. Appuyez sur la touche R pour sélectionner un élément de menu. 1. Configuration de l'heure: Appuyez sur la touche L pour sélectionner le format 12/24 heures. Appuyez sur la touche R pour vous déplacer vers la configuration de l'heure. Appuyez sur la touche L pour sélectionner l'heure actuelle. Appuyez sur la touche R pour vous déplacer vers la configuration des minutes. Appuyez sur la touche L pour sélectionner la minute actuelle. Appuyez sur la touche R pour quitter. 2. Configuration de l'alarme: Appuyez sur la touche L pour activer/désactiver l'alarme. Appuyez sur la touche R pour vous déplacer vers la configuration de l'heure de l'alarme. Appuyez sur la touche L pour sélectionner l'heure de l'alarme. Appuyez sur la touche R pour vous déplacer vers la configuration des minutes de l'alarme. Appuyez sur la touche L pour sélectionner la minute de l'alarme. Appuyez sur la touche R pour quitter. 3. Configuration du vélo: Appuyez sur la touche L pour sélectionner le vélo 1/2. Appuyez sur la touche R pour vous déplacer vers la configuration de la taille des roues. Appuyez sur la touche L pour sélectionner une des dix tailles de roues préprogrammées. Si la bonne taille de roue est répertoriée, appuyez sur la touche R pour quitter. Si la bonne taille de roue n'est pas répertoriée, appuyez sur la touche L pour aller à l'écran de saisie de circonférence à quatre chiffres. Appuyez sur la touche R pour vous déplacer vers le premier chiffre. Appuyez sur la touche L pour sélectionner le premier chiffre. Appuyez sur la touche R pour vous déplacer vers le chiffre suivant. Une fois tous les chiffres sélectionnés, appuyez sur la touche R pour quitter. 4. Configuration des unités et ODO: Appuyez sur la touche L pour sélectionner les unités métriques (km/kg) ou impériales (mi/lb). Appuyez sur la touche R pour la configuration ODO. Appuyez sur la touche L pour sélectionner le premier chiffre. Appuyez sur la touche R pour vous déplacer vers le chiffre suivant. Une fois tous les chiffres sélectionnés, appuyez sur la touche R pour quitter. 5. Configuration du sexe et du poids: Appuyez sur la touche L pour choisir entre homme/femme. Appuyez sur la touche R pour la configuration du poids. Appuyez sur la touche L pour sélectionner le premier chiffre. Appuyez sur la touche R pour vous déplacer vers le chiffre suivant. Une fois tous les chiffres sélectionnés, appuyez sur la touche R pour quitter. 6. Configuration du mode: Appuyez sur la touche L pour sélectionner le mode Capteur/Téléphone/Quitter. Appuyez sur la touche R pour vous déplacer vers le mode d'appariement. Une fois l'appareil sélectionné apparié, appuyez sur la touche L pour sélectionner OUT et appuyez sur la touche OUT pour quitter le menu de configuration. (voir procédure de configuration de l'application pour les réglages du mode téléphone)* Configurez le rétroéclairage et le rappel de service lors de l'accès au mode configuration pour la deuxième fois. 䬓ᷧ㬈ὦ䔏䟨塏㗝Ə㋰⍲䟨塏Ḣ㜡傳杉6攕忂⅌宥⮁㨈Ə㋰⍲/攕Ɲ忰㋐ƞ㋰⍲5攕Ɲ䡕宋Ə⹝忂⅌ᷲᷧḑ宥⮁忰桠˛㗝旛宥⮁Ɲ/攕忰㋐㗝∝Ə5攕忂⅌⯶㗝Ɲ⇭撆宥⮁˛无撆宥⮁Ɲ/攕忰㋐2))21Ə勌21Ə5攕忂⅌⯶㗝Ɲ⇭撆宥⮁˛彍❲宥⮁Ɲ/攕忰㋐⌼彍RUƏ5攕忂⅌Ⅼ⻡享录⽫忰桠ㇽ凑堳彺⅌录⽫˛⌼ἴ两憳䧲宥⮁Ɲ/攕忰㋐⅓∝.P.J勘∝0/EƏḍᾄ⭳ㇷ〢憳䧲宥⮁˛『−檻憴宥⮁Ɲ/攕忰㋐䔞『0$/(⥚『)(0$/(Əḍᾄ⭳ㇷἺ憴宥⮁˛㨈宥⮁Ɲ/攕忰㋐ἇㄆ♏6(1625㈲㜡3+21(䦢⻧287㨈Ə5攕忂⅌Ợᷧ㨈⌠愴Ə⭳ㇷ⌠愴⏵㋰⍲/攕凚287忰桠5攕䡕宋䦢⻧˛㈲㜡㨈宥⮁寞⎩俪$33宥⮁㴨䧲䬓ṳ㬈忂⅌宥⮁㨈㗝Ə⢅⊇傳ℰ宥⮁᷵憳䧲ῄⅢ㎷慹宥⮁˛JPWenn Sie den Computer zum ersten Mal benutzen, rufen Sie den Einstellungsmodus mit der S-Taste an der Rückseite des Gerätes auf. Mit der L-Taste bewegen Sie sich im Menü nach unten. Mit der R-Taste wählen Sie einen Menüeintrag aus. 1. Zeiteinstellung: Wählen Sie mit der L-Taste zwischen 12- und 24-Stunden-Format. Wechseln Sie mit der R-Taste zur Stundeneinstellung. Wählen Sie die Stunde mit der L-Taste. Wechseln Sie mit der R-Taste zur Minuteneinstellung. Wählen Sie die Minute mit der L-Taste. Drücken Sie die R-Taste zum Verlassen. 2. Alarmeinstellungen: Mit der L-Taste schalten Sie den Alarm ein und aus. Wechseln Sie mit der R-Taste zur Alarm-Stundeneinstellung. Wählen Sie die Alarm-Stunde mit der L-Taste. Wechseln Sie mit der R-Taste zur Alarm-Minuteneinstellung. Wählen Sie die Alarm-Minute mit der L-Taste. Drücken Sie die R-Taste zum Verlassen. 3. Fahrrad einstellen: Mit der L-Taste schalten Sie zwischen Fahrrad 1 und 2 um. Wechseln Sie mit der R-Taste zur Radgrößeneinstellung. Wählen Sie mit der L-Taste unter 10 vorprogrammierten Radgrößen. Wenn die richtige Radgröße angezeigt wird, drücken Sie die R-Taste zum Beenden. Sollte die richtige Radgröße nicht aufgelistet werden, wechseln Sie mit der L-Taste zum Bildschirm, in dem Sie den vierstelligen Radumfang eingeben. Wechseln Sie mit der R-Taste zur ersten Ziffer. Wählen Sie die erste Ziffer mit der L-Taste. Wechseln Sie mit der R-Taste zur nächsten Ziffer. Wenn alle Ziffern eingegeben wurden, drücken Sie die R-Taste zum Beenden. 4. Einheiten und Tageskilometerzähler (ODO) einstellen: Schalten Sie mit der L-Taste zwischen metrischen (km/kg) und englischen (mi/lb) Einheiten um. Wechseln Sie mit der R-Taste zur Tageskilometerzähler-Einstellung (ODO). Wählen Sie die erste Ziffer mit der L-Taste. Wechseln Sie mit der R-Taste zur nächsten Ziffer. Wenn alle Ziffern eingegeben wurden, drücken Sie die R-Taste zum Beenden. 5. Geschlecht und Gewicht einstellen: Schalten Sie mit der L-Taste zwischen männlich und weiblich um. Wechseln Sie mit der R-Taste zur Gewichtseinstellung. Wählen Sie die erste Ziffer mit der L-Taste. Wechseln Sie mit der R-Taste zur nächsten Ziffer. Wenn alle Ziffern eingegeben wurden, drücken Sie die R-Taste zum Beenden. 6. Modus einstellen: Wählen Sie mit der L-Taste zwischen den Modi Sensor, Telefon und Ausgabe. Wechseln Sie mit der R-Taste in den Kopplungsmodus. Nachdem das gewünschte Gerät gekoppelt wurde, wählen Sie Ausgabe (OUT) mit der L-Taste, anschließend verlassen Sie die Einstellungen mit der R-Taste.(Hinweise zu Telefonmoduseinstellungen finden Sie bei den App-Einstellungen.) * Stellen Sie Beleuchtung und Serviceerinnerung ein, wenn Sie zum zweiten Mal in den Einstellungsmodus wechseln. Cuando utilice el computador por primera vez, presione el botón S situado en la parte posterior de dicho computador para entrar en el modo de configuración. Presione el botón L para recorrer el menú hacia abajo. Presione el botón R para seleccionar un elemento de menú. 1. Configuración de la hora: presione el botón L para seleccionar el formato de 12 o 24 horas. Presione el botón R para pasar a la configuración de las horas. Presione el botón L para seleccionar la hora actual. Presione el botón R para pasar a la configuración de los minutos. Presione el botón L para seleccionar el minuto actual. Presione el botón R para salir. 2. Configuración de alarmas: presione el botón L para activar y desactivar la alarma. Presione el botón R para pasar a la configuración de la hora de la alarma. Presione el botón L para seleccionar la hora de la alarma. Presione el botón R para pasar a la configuración de los minutos de la alarma. Presione el botón L para seleccionar el minuto de la alarma. Presione el botón R para salir. 3. Configuración de la bicicleta: presione el botón L para seleccionar la bicicleta 1 o 2. Presione el botón R para pasar a la configuración del tamaño de la rueda. Presione el botón L para seleccionar uno de los diez tamaños de rueda preprogramados. Si el tamaño de rueda correcto se encuentra en la lista, presione el botón R para salir. Si el tamaño de rueda correcto no se encuentra en la lista, presione el botón L para avanzar a la pantalla de circunferencia de cuatro dígitos. Presione el botón R para pasar al primer dígito. Presione el botón L para seleccionar el primer dígito. Presione el botón R para avanzar al siguiente dígito. Una vez seleccionados todos los dígitos, presione el botón R para salir. 4. Configuración de las unidades y del odómetro: presione el botón L para seleccionar unidades métricas (km/kg) o imperiales (mi/lb). Presione el botón R para la configuración del odómetro. Presione el botón L para seleccionar el primer dígito. Presione el botón R para avanzar al siguiente dígito. Una vez seleccionados todos los dígitos, presione el botón R para salir. 5. Configuración del sexo y el peso: presione el botón L para seleccionar hombre o mujer. Presione el botón R para la configuración del peso. Presione el botón L para seleccionar el primer dígito. Presione el botón R para avanzar al siguiente dígito. Una vez seleccionados todos los dígitos, presione el botón R para salir. 6. Modo de configuración: presione el botón L para seleccionar el modo Sensor, Teléfono o Salida. Presione el botón R para pasar al modo de asociación. Cuando el dispositivo seleccionado esté asociado, presione el botón L para seleccionar OUT (SALIDA) y presione el botón R para salir del menú de configuración. (Consulte el procedimiento de configuración de la aplicación para obtener información acerca de la configuración del modo Teléfono) * Configure la retroiluminación y el recordatorio para servicio cuando entre en el modo de configuración la segunda vez. EL Als u de computer voor de eerste keer gebruikt, drukt u op de S-toets op de achterkant van de computer om naar de instellingsmodus te gaan. Druk op de R-toets om een menu-item te selecteren. 1. Tijdinstelling: druk op de L-toets om 12/24-uurs notatie te selecteren. Druk op de R-toets om naar de uurinstellingen te gaan. Druk op de L-toets om het huidige uur te selecteren. Druk op de R-toets om naar de minuteninstelling te gaan. Druk op de L-toets om de huidige minuut te selecteren. Druk op de R-toets om af te sluiten. 2. Alarminstelling: druk op de L-toets om het alarm aan/uit te zetten. Druk op de R-toets om naar de instelling van het uur voor het alarm te gaan. Druk op de L-toets om het uur voor het alarm in/uit te schakelen. Druk op de R-toets om naar de instelling voor de minuut voor het alarm te gaan. Druk op de L-toets om de minuut voor het alarm in te stellen. Druk op de R-toets om af te sluiten. 3. Fietsinstelling: druk op de L-toets om fiets 1/2 te selecteren. Druk op de R-toets om naar de instelling voor de wielgrootte te gaan. Druk op de L-toets om een van de tien vooraf geprogrammeerde wielgrootten te selecteren. Als de juiste wielgrootte wordt weergegeven, drukt u de op de R-toets om af te sluiten. Als de juiste wielgrootte niet wordt weergegeven, drukt u op de L-toets om verder te gaan naar het scherm voor de viercijferige omtrek. Druk op de R-toets om naar het eerste cijfer te gaan. Druk op de L-toets om het eerste cijfer te selecteren. Druk op de R-toets om naar het volgende cijfer te gaan. Nadat alle cijfers zijn geselecteerd, drukt u op de R-toets om af te sluiten. 4. Eenheids- & ODO-instelling: druk op de L-toets om metrische (km/kg) of Engelse (mi/lb) eenheden te selecteren. Druk op de R-toets om naar de ODO-instelling te gaan. Druk op de L-toets om het eerste cijfer te selecteren. Druk op de R-toets om naar het volgende cijfer te gaan. Nadat alle cijfers zijn geselecteerd, drukt u op de R-toets om af te sluiten. 5. Instelling geslacht & gewicht: druk op de L-toets om mannelijk/vrouwelijk te selecteren. Druk op de R-toets om naar de gewichtinstelling te gaan. Druk op de L-toets om het eerste cijfer te selecteren. Druk op de R-toets om naar het volgende cijfer te gaan. Nadat alle cijfers zijn geselecteerd, drukt u op de R-toets om af te sluiten. 6.Modusinstelling: Druk op de L-toets om de modus Sensor/Telefoon/Uit te selecteren. Druk op de R-toets om naar de koppelmodus te gaan.Zodra het geselecteerde apparaat is gekoppeld, drukt u op de L-toets om OUT te selecteren en druk op de R-toets om het instellingsmenu af te sluiten. (Zie APP-instellingsprocedure voor telefoonmodusinstellingen) * Stel de achtergrondverlichting en de serviceherinnering in wanneer u de tweede keer naar de instelmodus gaat.PL Przy pierwszym użyciu komputera, naciśnij przycisk S z tyłu komputera, aby przejść do trybu ustawień. Naciśnij przycisk L, aby przewinąć menu w dół. Naciśnij przycisk R, aby wybrać pozycję menu. 1. Ustawienia czasu: Naciśnij przycisk L, aby wybrać 12/24 format czasu. Naciśnij przycisk R, aby przejść do ustawień godziny. Naciśnij przycisk L, aby wybrać bieżącą godzinę. Naciśnij przycisk R, aby przejść do ustawień minut. Naciśnij przycisk L, aby wybrać bieżącą minutę. Naciśnij przycisk R w celu wyjścia. 2. Ustawienia alarmu: Naciśnij przycisk L, aby wybrać włączenie/wyłączenie alarmu. Naciśnij przycisk R, aby przejść do ustawień alarmu. Naciśnij przycisk L, aby wybrać godzinę alarmu. Naciśnij przycisk R, aby przejść do ustawień minut. Naciśnij przycisk L, aby wybrać minutę alarmu. Naciśnij przycisk R w celu wyjścia. 3. Ustawienia roweru: Naciśnij przycisk L, aby wybrać rower 1/2. Naciśnij przycisk R, aby przejść do ustawień rozmiaru koła. Naciśnij przycisk L, aby wybrać jeden ze wstępnie zaprogramowanych rozmiarów koła. Jeśli na liście znajduje się prawidłowy rozmiar koła, naciśnij przycisk R w celu wyjścia. Jeśli na liście nie ma prawidłowego rozmiaru koła, naciśnij przycisk L, aby przejść do czterocyfrowego ekranu obwodu. Naciśnij przycisk R, aby przejść do pierwszej cyfry. Naciśnij przycisk L, aby wybrać pierwszą cyfrę. Naciśnij przycisk R, aby przejść do następnej cyfry. Po wybraniu wszystkich cyfr, naciśnij przycisk R w celu wyjścia. 4. Ustawienia jednostki i ODO: Naciśnij przycisk L, aby wybrać jednostki metryczne (km/kg) lub brytyjskie (mile/funty). Naciśnij przycisk R, aby przejść do ustawień ODO. Naciśnij przycisk L, aby wybrać pierwszą cyfrę. Naciśnij przycisk R, aby przejść do następnej cyfry. Po wybraniu cyfr, naciśnij przycisk R w celu wyjścia. 5. Ustawienia płci i wagi: Naciśnij przycisk L, aby wybrać mężczyznę/kobietę. Naciśnij przycisk R, aby przejść do ustawień wagi. Naciśnij przycisk L, aby wybrać pierwszą cyfrę. Naciśnij przycisk R, aby przejść do następnej cyfry. Po wybraniu wszystkich cyfr, naciśnij przycisk R w celu wyjścia. 6. Ustawienie trybu: Naciśnij przycisk L, aby wybrać tryb Czujnik/Telefon/Wyjście. Naciśnij przycisk R, aby przejść do trybu parowania. Po sparowaniu wybranego urządzenia, naciśnij przycisk L, aby wybrać WYJŚCIE i naciśnij przycisk R, aby wyjść z menu ustawień. (Informacje o ustawieniach trybu telefonu, sprawdź w procedurze ustawień APLIKACJI) * Po drugim przejściu do trybu ustawień należy ustawić podświetlenie i przypomnienie o usłudze. KR ৷ଈਫ਼ձঈࡸیࡈଜЕˁࡉ৷ଈਫ਼ҏִࢂ6ੁձЀԜ۶ࢽֻҖԻҚ߭ʄТЬ/ੁձЀԜ֩Ѝ߅ԎԻࢇѰଢТЬ5ੁձЀԜ֩Ѝତּࡶ۴ଢТЬݤɾ۶ࢽ/ੁձЀԜݤɾݥࡶ۴ଢТЬ5ੁձЀԜݤɾ۶ࢽࡳԻࢇѰଢТЬ/ੁձЀԜୃࢢݤɾࡶ۴ଢТЬ5ੁձЀԜٗ۶ࢽࡳԻࢇѰଢТЬ/ੁձЀԜୃएٗࡶ۴ଢТЬ5ੁձЀԜࣗՎଢТЬߊԆ۶ࢽ/ੁձЀԜߊԆ̛̛ձ۴ଢТЬ5ੁձЀԜߊԆݤɾ۶ࢽࡳԻࢇѰଢТЬ/ੁձЀԜߊԆݤɾࡶ۴ଢТЬ5ੁձЀԜߊԆٗ۶ࢽࡳԻࢇѰଢТЬ/ੁձЀԜߊԆٗࡶ۴ଢТЬ5ੁձЀԜࣗՎଢТЬࢷʠ۶ࢽ/ੁձЀԜࢷʠձ۴ଢТЬ5ੁձЀԜ̛۶ࢽࡳԻࢇѰଢТЬ/ੁձЀԜԻ̐Ԏѹɼए̛ࣸଜΟձ۴ଢТЬࠠհ̛ɼּԼ߾ݤѸִ5ੁձЀԜࣗՎଢТЬࠠհੁɼּԼ߾ݤѸए߉ࡳִ/ੁձЀԜտܹ҂ԦִࡳԻφ߭ʄТЬ5ੁձЀԜءधտܹԻࢇѰଢТЬ/ੁձЀԜءधտܹձ۴ଢТЬ5ੁձЀԜЬࡸտܹԻφ߭ʄТЬֻҘտܹձ۴ଞ୯5ੁձЀԜࣗՎଢТЬЯࡢ2'2۶ࢽ/ੁձЀԜਫ਼ئNPNJӖЕଔઝئPLOEࡶ۴ଢТЬ5ੁձЀԜ2'2۶ࢽࡳԻҚ߭ʄТЬ/ੁձЀԜءधտܹձ۴ଢТЬ5ੁձЀԜЬࡸտܹԻφ߭ʄТЬֻҘտܹձ۴ଞ୯5ੁձЀԜࣗՎଢТЬ۽طׁהʯ۶ࢽ/ੁձЀԜΧ۽ࠆ۽ࡶ۴ଢТЬ5ੁձЀԜׁהʯ۶ࢽࡳԻҚ߭ʄТЬ/ੁձЀԜءधտܹձ۴ଢТЬ5ੁձЀԜЬࡸտܹԻφ߭ʄТЬֻҘտܹձ۴ଞ୯5ੁձЀԜࣗՎଢТЬֻҖ۴/ੁձЀԜ܁۰ࢷࣗՎֻҖձ۴ଢТЬ5ੁձЀԜ߭րֻҖԻࢇѰଢТЬ۴ଞࢠɼ߭րѸִ/ੁձЀԜ287ձ۴ଜˈ5ੁձЀԜ۶ࢽ֩ЍձࣗՎଢТЬࢷֻҖ۶ࢽࡵ$33۶ࢸ८ձॳ࣏ଜݫݤࠝѿءधԻ۶ࢽֻҖ߾Қ߭ɼִؒԂࢇઝ۰ٸݛߊսࡶ۶ࢽଢТЬPress and release S keysPress and release L keyLL 2Press & hold L key for 2sPress and release R keyRPress & hold R key for 2sR21. Set Hour FormatL R RSet AlarmR2. Set AlarmL R RSet Wheel SizeR1 23. Set Wheel SizeL R RR2Set UnitR4. Set Unit & ODO 5. Set Gender & Weight L LR R RRSet PairR6. Set PairLLLPair SensorR䕝䬓ᷧ㬈ὦ䔏䢣塏㘩Ə㋰⢺䢣塏Ḣ㩆傳杉6㋰捜敲⦲⟡㜓娔⮁Ə㋰/捜媦㕛恟柬Ə㋰5捜䢡婴ḍ怙⅌ᷲᷧῲ娔⮁▕ἴㇽ柬䛕Ɲ娔⮁㘩揿Ɲ㋰/捜恟㒮㘩㘩∝Ə㋰5捜䢡婴ḍᾄ⭳ㇷ⯶㘩⇭揿娔⮁˛娔⮁欎揿Ɲ㋰/捜恟㒮2))旃21敲Ə㋰5捜䢡婴Ə勌恟㒮21Əᾄ⭳ㇷ⯶㘩⇭揿娔⮁˛娔⮁弑⽸Ɲ㋰/捜恟㒮%,.(▕庱%,.(▕庱Ə㋰5捜䢡婴ḍᾄ恟㒮ⅎ⻡䨕⸟䔏弑⽸ㇽ凑堳弟⅌弑⽸两敞˛娔⮁▕ἴ憳䧲Ɲ㋰/捜恟㒮⅓∝.0ㇽ勘∝0Ə㋰5捜䢡婴ḍᾄ⭳ㇷ两憳䧲娔⮁˛娔⮁『∌檻憴Ɲ㋰/捜恟㒮0$/(䔞『)(0$/(⥚『Ə㋰5捜䢡婴ḍᾄ⭳ㇷ檻憴娔⮁˛娔⮁愴⯴Ɲ㋰/捜恟㒮6(1625ㄆㆰ♏3+21(㈲㩆287曉敲㨈Ə㋰5捜䢡婴怙堳愴⯴㨈ㇽ287曉敲˛㈲㩆㨈娔⮁媲⎪俪$33娔⮁㴨䧲䬓ṳ㬈怙⅌娔⮁㨈㘩Ə⢅⊇傳ℰ娔⮁凮憳䧲䶔㎷慹娔⮁˛Ride Sync AppRStart SettingFRONT BACKP/N# 11-228000 file rc’d on 23th Jan.,2015 File name : 11-228000 Giant_Continuum SYNC_3+ Revised Picture made by King’sSize: Before Fold : 210 x 396 mm , After Fold: 105 x 66mm Paper : 70 gsm woodfreeColor : 1C + 1CFinishing: 6-Folding](https://usermanual.wiki/Dayton/GICONT/User-Guide-2531690-Page-1.png)