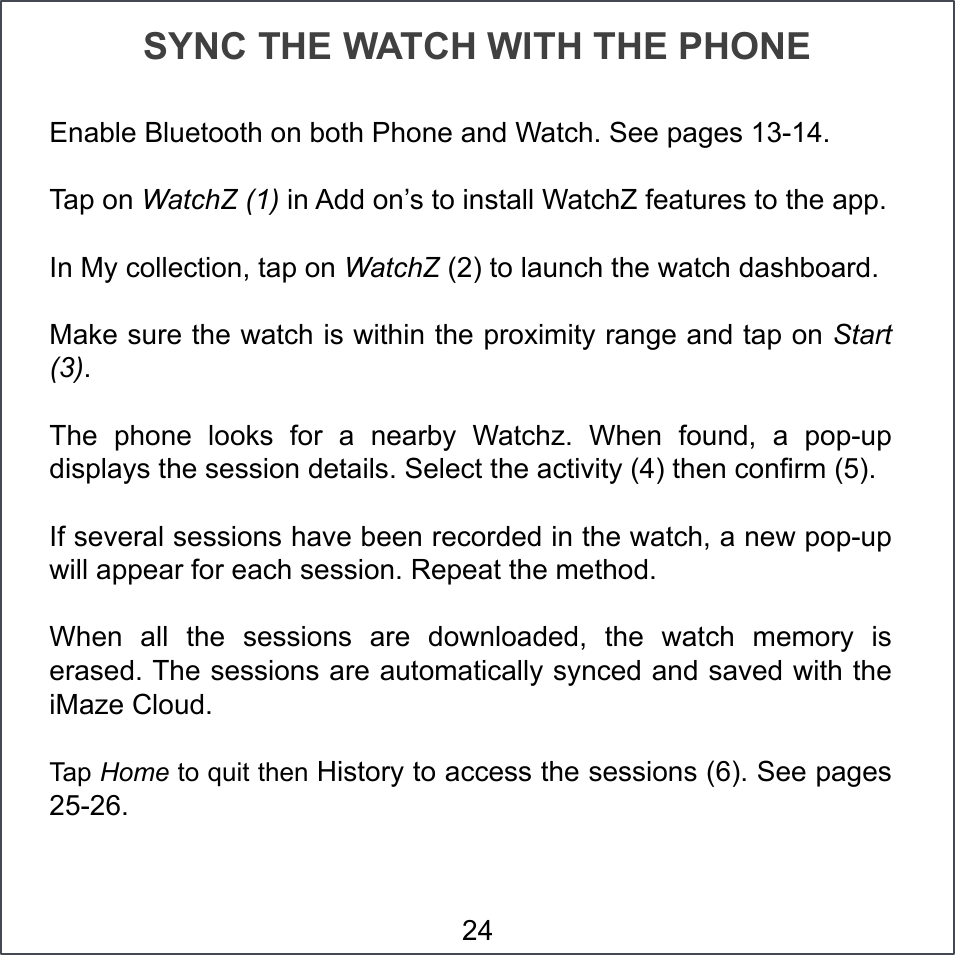
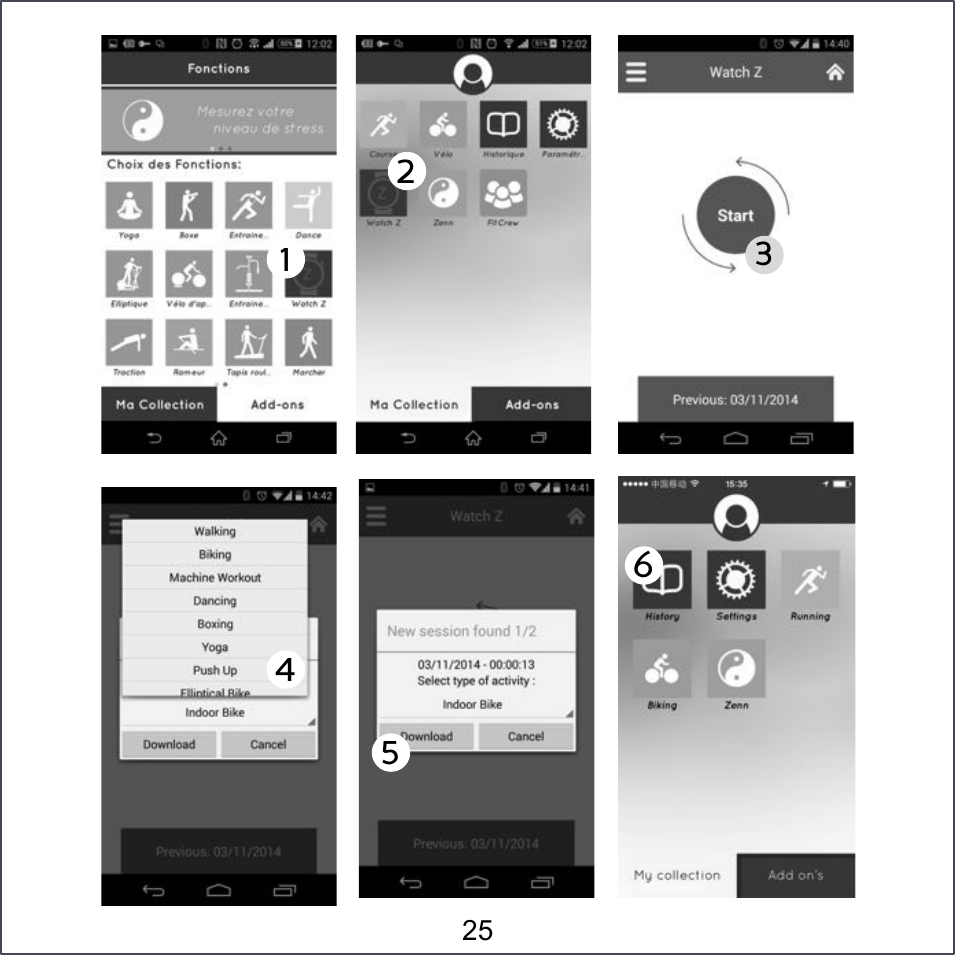
Dayton MW3 BLE Watch User Manual
Dayton Industrial Co., Ltd. BLE Watch
UserManual.wiki
>
Dayton
>
MW3 User Manual
User Manual
Navigation menu
Upload a User Manual
Namespaces
Wiki Guide
HTML
PDF
Info
Views
User Manual
Discussion / Help
Navigation


![0:00 17 =P7#VUV(M#Q3#7QMP#E/H)R#<-)**#UV<#4=A5#+/#H;*19,.#V9,-E#E/H)#4&56##Q3# VUV(M# E/H)R# <-)**# ,3H# 2/9H# =7V(7Y=7N<# 4=&5# J/-# [# *)B*#4'56#72)#*B-))3#H;*19,.*##=P7#VUV(M#03C9#)3+)-;3?#;3+/#V9,-E#*)>3?#E/H)6#=F;+B2#NSYN]]#+2)#V9,-E#W.#1-)**;3?#=P7YUQTZ7#4=[5#/-#=7V(7Y=7N<#4=&56#<-)**#UV<#4=A5#+/#D,9;H,+)#4A56#=)+#2/0-#01#/-#H/F3#W.#1-)**;3?#=7V(7Y=7N<#4&5#/-#=P7YUQTZ7#4=[56#<-)**#UV<#4=A5#+/#D,9;H,+)#4L56#=)+#M;30+)R#0*;3?#+2)#*,E)#E)+2/H6#ALARM 1!3!4! 0n 07:00 HOUR ALARM ALARM 2! SET](https://usermanual.wiki/Dayton/MW3/User-Guide-2473622-Page-19.png)
![18 ^QP_#Q3#7QMP#Y#7(VQSQST#Y#=<PPO#E/H)*R#<-)**#^QP_#4=L5#+/#B.B9)#H,+,#/3#+2)#A-H#H;*19,.#9;3)6##19:10:35 SAT 25.10 O,+)#VD)-,?)#Z),-+#(,+)#4W1E5#7/+,9#7-,;3;3?#CE)#4!!`!!5#a0--)3+#U,1#CE)#4!!`!!5##a0--)3+#=1))H#4bEY2#cE;Y2d#/-#E;3YGE#cE;3YE;d5#a0--)3+#W;G)#B,H)3B)#4(<M5#;J#1,;-)H#F;+2#8;G)#=ea#*)3*/-#/-##a0--)3+#<,B)#4=<M5#;J#1,;-)H#F;+2#J//+#1/H#VD)-,?)#=1))H#4bEY2#cE;Y2d#/-#E;3YGE#cE;3YE;d5#O;*+,3B)#4bE#/-#E;5#890)+//+2#*+,+0*#4NSYN]]5#](https://usermanual.wiki/Dayton/MW3/User-Guide-2473622-Page-20.png)

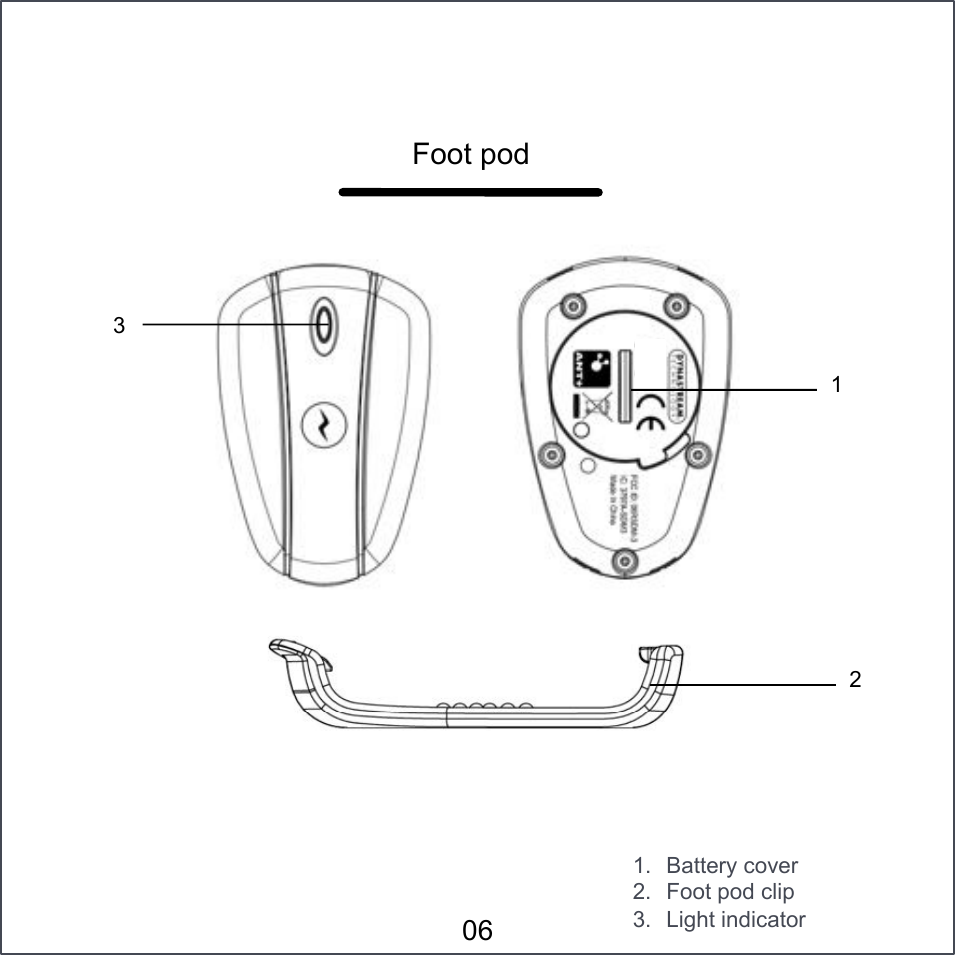
![CONNECT THE FOOT POD The Foot pod automatically detects, measures, and wirelessly transmits your speed and distance in real time to the watch. The foot pod reacts to motion. To turn it on, shake it several times until the red light blinks 3 times. Turn it on before connecting / pairing. Before using, the Foot pod must be paired with the watch. This is only necessary when you connect the foot pod for the first time. <VQ(QST#7ZP#]NN7#<NO#In SETTING mode, Press LAP (S3) to display PAIR NEWDEV (1). Then press START/STOP (S1) to search for devices around. The foot pod icon appears and is flashing during search. When the Foot pod is detected, the screen displays PR SPD DEV (3). Confirm pairing by pressing START/STOP (S1). It displays SPD OK when the foot pod is paired. Press MODE (S2) to exit. 1!2!PAIR NEWDEV PR SEARCH… 3!SPD DEV PR SPD OK 32](https://usermanual.wiki/Dayton/MW3/User-Guide-2473622-Page-34.png)
![aNSSPa7#7ZP#]NN7#<NO#Once paired, the foot pod is automatically connected to the watch when entering in TRAINING or SPEED modes (1). The foot pod icon blinks then displays when the device is connected. If the foot pod doesn’t connect: 1) Make sure that you turned it on. The Light indicator must flash 3 times. 2) Keep the foot pod within the proximity range. 3) Launch device searching manually by pressing LAP (S3). The foot pod icon will flash during search (2). TRAINING 1!SPEED 2!33](https://usermanual.wiki/Dayton/MW3/User-Guide-2473622-Page-35.png)
![1!2!3!4!6!5!7!8!LIMITS 126 Lo LIMIT 9!HI LIMIT 144 In the watch, go to SETTING mode then press LAP (S3) to display LIMITS (7). Press START/STOP (S1) to display HR Zone Min [LO LIMIT] (8). Press LAP (S3) to HR Zone Max [HI LIMIT] (9). 35](https://usermanual.wiki/Dayton/MW3/User-Guide-2473622-Page-37.png)
![STATS WATCH STATS MODE Put the watch in STATS mode (1) by pressing on MODE (S2). <-)**#UV<#4=A5#+/#B.B9)#H;I)-)3+#*+,+*#/J#+2)#9,+)*+#-)B/-H)H#/-#B0--)3+#*)**;/36##38 VD)-,?)#Z),-+#(,+)#4W1E5#Z),-+#(,+)#M,i#4W1E5#7;E)#;3#g/3)#4E;35#7;E)#;3#9/F)-#h/3)#4E;35#7;E)#;3#2;?2)-#h/3)#4E;35#7/+,9#a,9/-;)*#W0-3)H#4bB,95#7/+,9#],+#W0-3)H#4?5#890)+//+2#*+,+0*#4NSYN]]5#](https://usermanual.wiki/Dayton/MW3/User-Guide-2473622-Page-40.png)
![WATCH LAP-DATA MODE 39 LAP-DATA Put the watch in LAP-DATA mode (1) by pressing on MODE (S2). <-)**# UV<# 4=A5# +/# B.B9)# 9,1# H,+,# /J# +2)# 9,+)*+# -)B/-H)H# /-# B0--)3+# *)**;/36# ]/-#),B2#U,1R#+2)#F,+B2#H;*19,.*`#9,1#CE)R#,D)-,?)#2),-+#-,+)#+2)3#,D)-,?)#*1))H6#"#$%&'()U,1#7;E)##U&#VD)-,?)#Z),-+#(,+)#U&#4W1E5#VD)-,?)#=1))H#U&#4bEY2#cE;Y2d#/-#E;3YGE#cE;3YE;d5#"#$)*)+,-.)*/)U,1#7;E)##U&#VD)-,?)#Z),-+#(,+)#U&#VD)-,?)#=1))H#U'#"#$)0)+,-.)0/)U,1#7;E)##US#VD)-,?)#Z),-+#(,+)#US#VD)-,?)#=1))H#US#](https://usermanual.wiki/Dayton/MW3/User-Guide-2473622-Page-41.png)