Dayton NEOSSYNC Bluetooth (BLE) and ANT+ Bicycle Computer User Manual
Dayton Industrial Co., Ltd. Bluetooth (BLE) and ANT+ Bicycle Computer
Dayton >
User Manual
X5
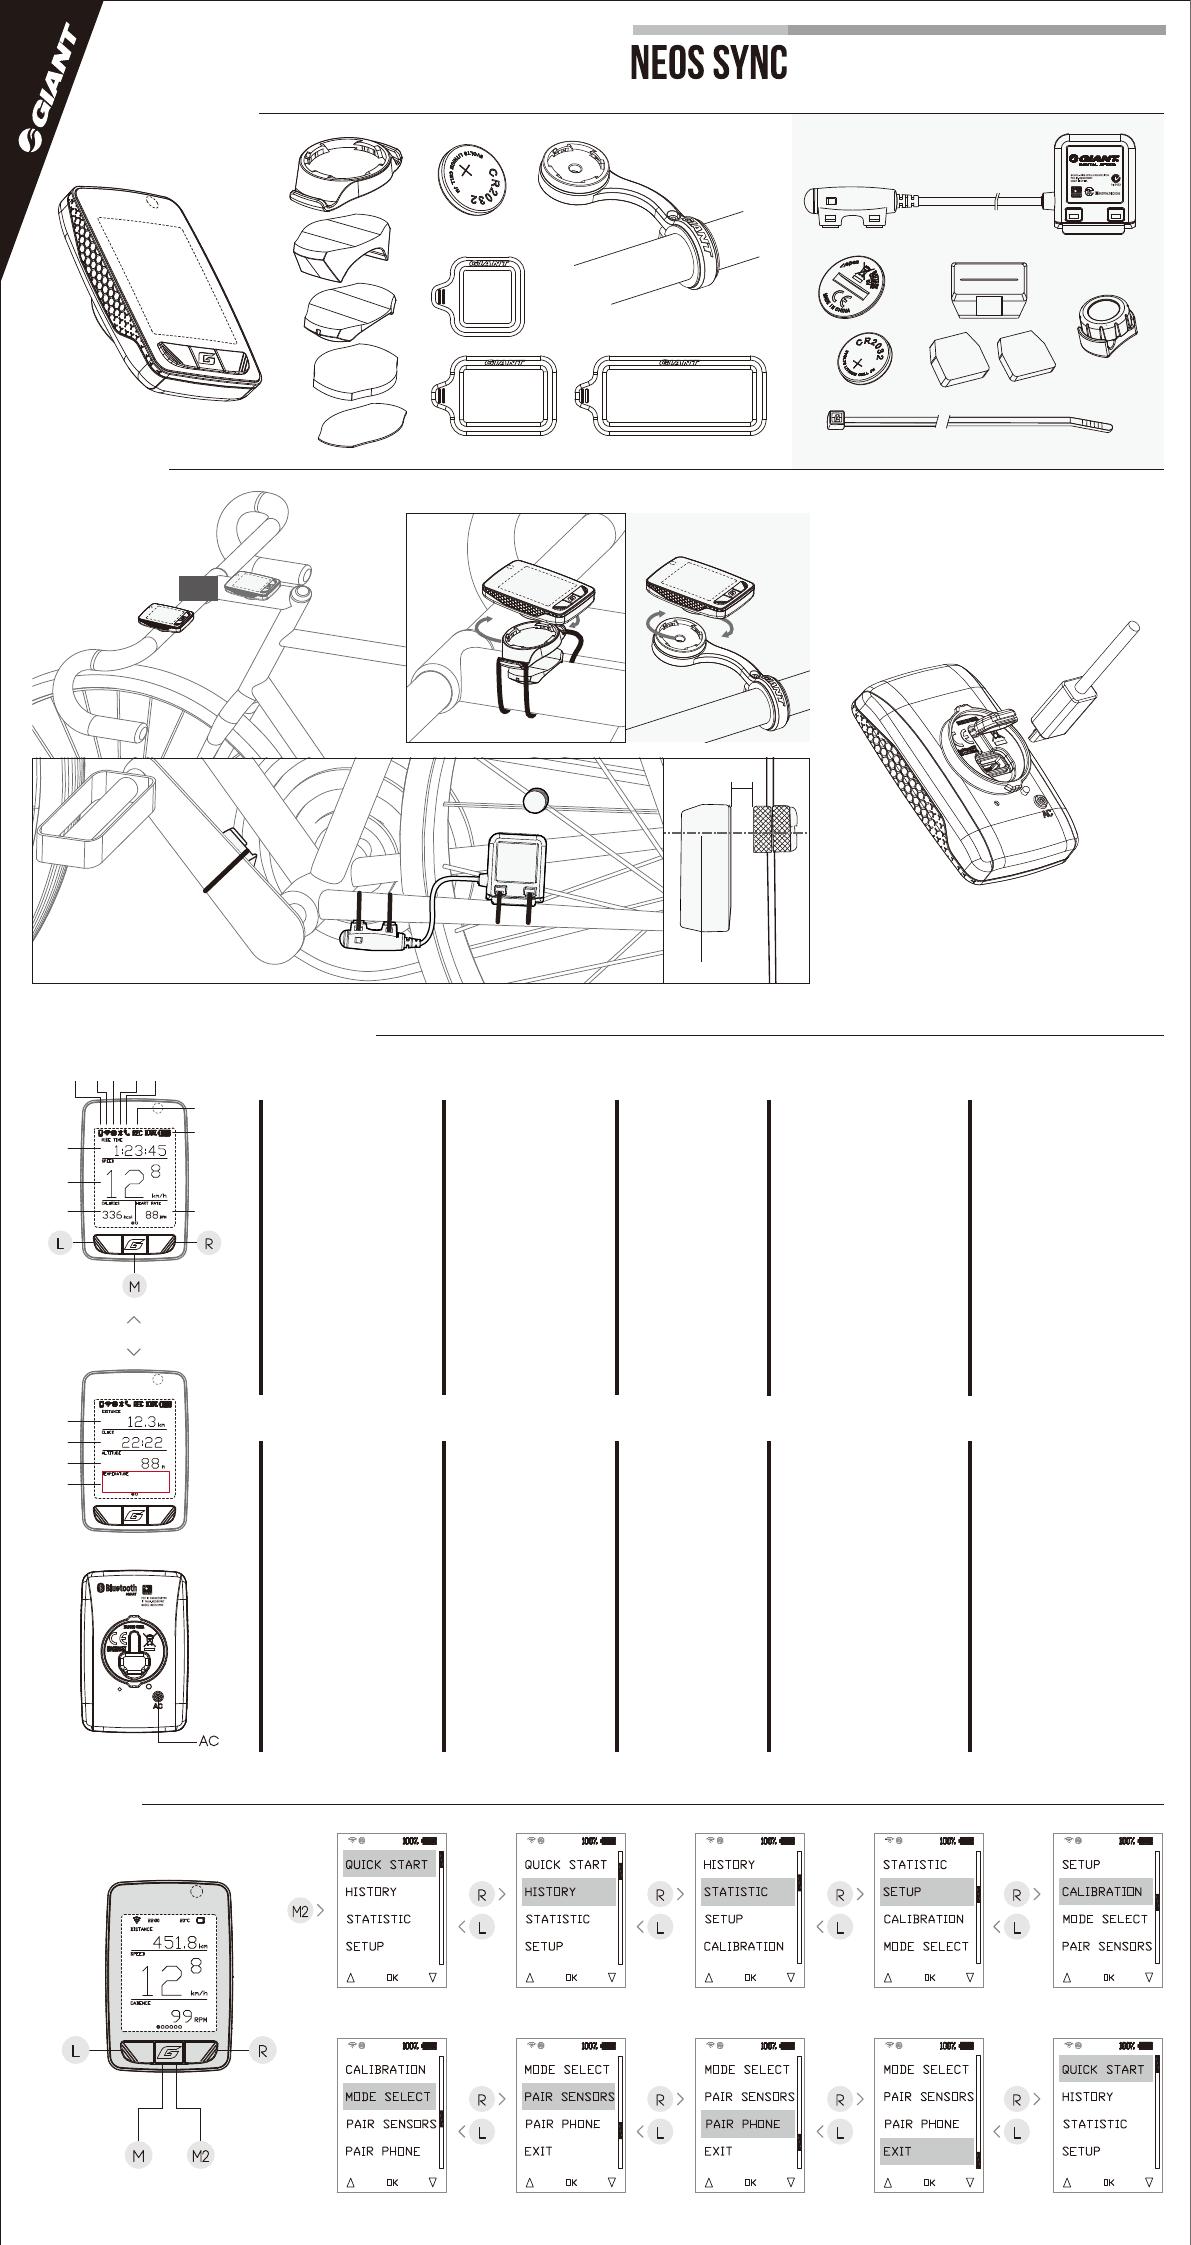
Installation
General Operation & Display
Function
Select Select
L or R
OK
R
M
M2
L
R
AC
M
L
Press and
release R key
Press and
release M key
Press & hold
M key for 2s
Press and
release L key
R
L
R
L
R
L
R
L
R
L
R
L
R
L
R
L
Installation & Quick Start
Unit & Parts
or
1.
2.
3.
4.
5.
6.
7.
8.
9.
10.
11.
12.
13.
14.
15.
EN SC TC JP
5mm
9
1
2
3 4
10 11 12 13
14
15
5
6
7
8
FOR 410000048 ONLY
M2
Ride Time
Current Speed
Cadence
Heart Rate
Distance
Clock
Altitude
Temperature
Phone mode
Wireless sensor detector
Bike Selection
Bluetooth
Incoming Call
In recording
Battery power indicator
1.
2.
3.
4.
5.
6.
7.
8.
9.
10.
11.
12.
13.
14.
15.
骑行时间
实时速度
回转数
心跳数
距离
时钟
海拔高度
温度
手机模式
无线传感器探头
车型选择
蓝牙
来电显示
记录中
电量显示
1.
2.
3.
4.
5.
6.
7.
8.
9.
10.
11.
12.
13.
14.
15.
騎乘時間
即時速度
回轉數
心跳數
距離
時間
海拔高度
溫度
手機模式
無線感應符號
車種選擇
藍芽
來電顯示
記錄中
電量顯示
1.
2.
3.
4.
5.
6.
7.
8.
9.
10.
11.
12.
13.
14.
15.
走行時間
現在の速度
ケイデンス
心拍数
距離
現在時刻
高度
温度
フォンモード
ワイヤレスセンサー検出表示
バイク選択
Bluetooth
着信
記録中
電池残量表示
ES 1.
2.
3.
4.
5.
6.
7.
8.
9.
10.
11.
12.
13.
14.
15.
Tiempo de marcha
Velocidad actual
Cadencia
Frecuencia cardíaca
Distancia
Reloj
Altitud
Temperatura
Modo de teléfono
Detector de sensor inalámbrico
Selección de bicicleta
Bluetooth
Llamada entrante
Grabando
Indicador de carga de batería
1.
2.
3.
4.
5.
6.
7.
8.
9.
10.
11.
12.
13.
14.
15.
Durée à vélo
Vitesse actuelle
Cadence
Rythme cardiaque
Distance
Horloge
Altitude
Température
Mode téléphone
Détecteur sans fil
Sélection de vélo
Bluetooth
Appel entrant
Enregistrement en cours
Voyant de niveau
de batterie
1.
2.
3.
4.
5.
6.
7.
8.
9.
10.
11.
12.
13.
14.
15.
Fahrmodus
Aktuelle
Geschwindigkeit
Kadenz
Herzfrequenz
Strecke
Uhr
Höhe
Temperatur
Telefonmodus
Kabelloser Sensor
Fahrradauswahl
Bluetooth
Ankommender Anruf
Aufzeichnung
Akkubetriebsanzeige
1.
2.
3.
4.
5.
6.
7.
8.
9.
10.
11.
12.
13.
14.
15.
주행 시간
현재 속도
케이던스
맥박수
거리
시계
고도
온도
전화 모드
무선 센서 감지기
자전거 선택
블루투스
수신 전화
기록 중
배터리 전원 표시기
1.
2.
3.
4.
5.
6.
7.
8.
9.
10.
11.
12.
13.
14.
15.
Fietstijd
Huidige snelheid
Ritme
Hartslag
Afstand
Klok
Hoogte
Temperatuur
Telefoonmodus
Draadloze sensor detector
Fietsselectie
Bluetooth
Binnenkomende oproep
In opname
Vermogensindicator batterij
1.
2.
3.
4.
5.
6.
7.
8.
9.
10.
11.
12.
13.
14.
15.
Czas jazdy
Prędkość aktualna
Kadencja
Tętno
Odległość
Zegar
Wysokość
Temperatura
Tryb Telefonu
Wskaźnik czujnika
Wybór roweru
Bluetooth
Połączenie przychodzące
Podczas nagrywania
Wskaźnik zasilania
bateryjnego
DEFR KR NL PL
M
6. Set BPM 7. Set Pair
M R R
L
M
Ride Sync
App
L
30S Time out,
or finish pairing
or press any key
1. Set Unit 2. Set Date
MM M
Set
Hour Format
M
R
L
3. Set Hour Format
M M
Set Wheel Size
M
R
L
R
L
M M
5. Gender & Weight4. Set Wheel Size
M
Set BPM
M
M
R
L
Press and
release R key
Press and
release L key
M
M2
Press and
release M key
Press & hold
M key for 2s
or
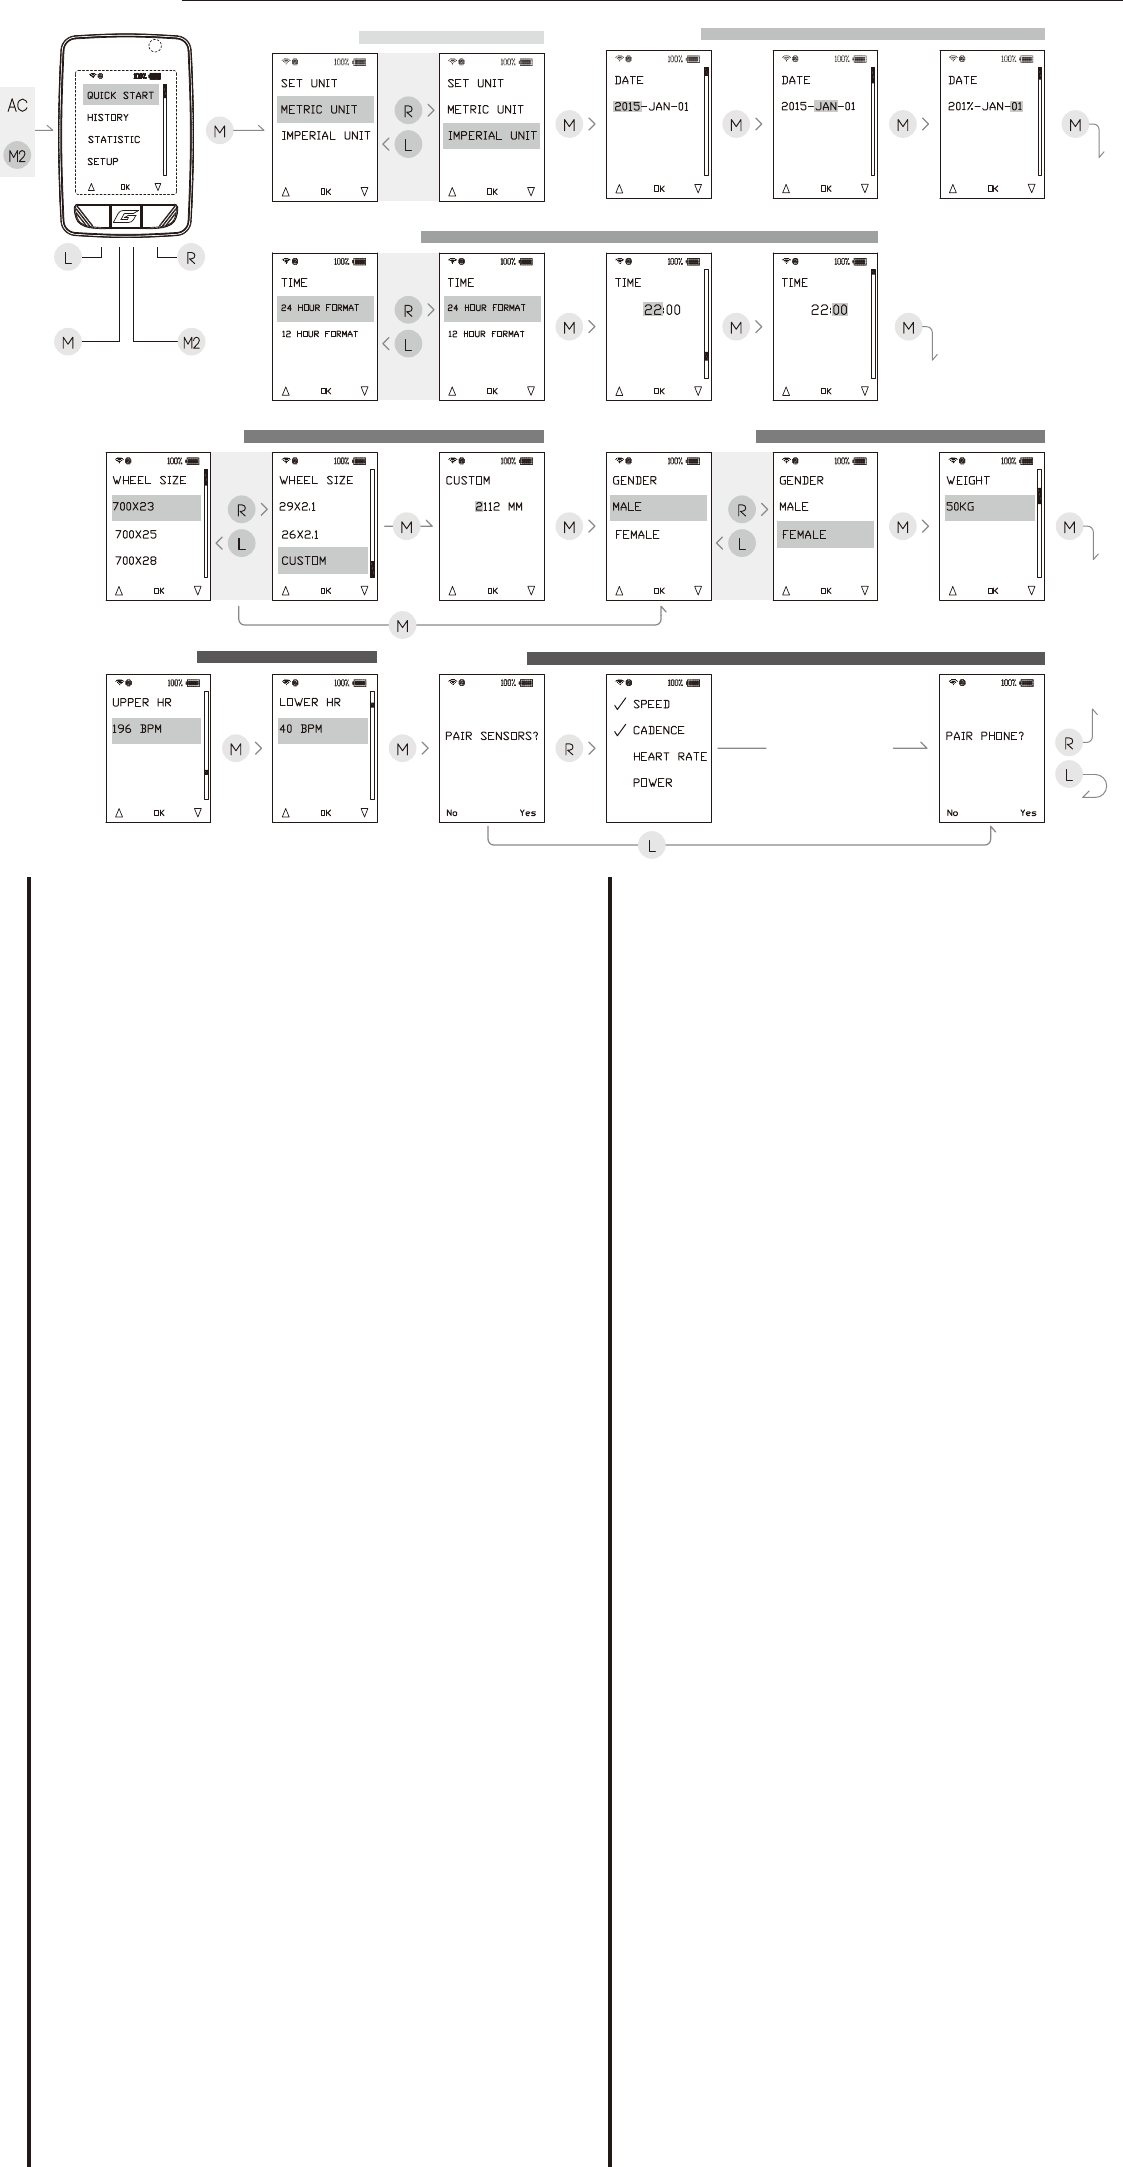
Start Setting
ES
TC
DE
SC
EN
FR
初めてストップウォッチを使用する前に、ストップウォッチの裏面にある AC ボタンを長押しし、簡易設
定メニューに入ってください。 「L」または「R」キーを押して選択し、「M」キーを押して選択を確定し
ます。
1. 計測単位の設定: 「L」または「R」キーを押してメートルまたはマイル単位を選択し、「M」キーを押
して選択を確定します。2. 日付の設定: 「L」または「R」キーを押して年を選択し、「M」キーを押して
選択を確定します。 この操作を繰り返し、月と日を設定します。3. 時刻形式の設定: 「L」または「R」キ
ーを押して 24 時間表示または 12 時間表示を選択し、「M」キーを押して選択を確定します。 この操作を
繰り返し、時間と分を設定します。4. ホイール外径の設定: 「L」または「R」キーを押して 10 通りの選
択肢からホイール外径を選択するか、手動で入力します (「カスタム」オプション)。
5. 性別と体重の設定: 「L」または「R」キーを押して男性または女性を選択し、「M」キーを押して選択
を確定します。 この操作を繰り返し、体重を設定します。6. 心拍通知の設定: 「L」または「R」キーを
押して心拍の上限を選択し、「M」キーを押して選択を確定します。 この操作を繰り返し、下限を設定し
ます。7. デバイスのペアリング方法: センサーペアリングモードに入り、R (はい) キーを押し、デバイス
をペアリングします。 L (いいえ) キーを押すか、デバイスのペアリング後に 30 秒待つと、モバイルペア
リングモードに入ります。 モバイルをペアリングする場合、R (はい) キーを押してデバイスをペアリング
します。あるいは、L (いいえ) キーを押して終了し、メニューに戻ります。
M」キーを押し、ペダリングページに入ります。(モバイルペアリングモードについては APP 設定プロセ
スをご覧ください。)
* 「M」キーを長押しし、メニュー機能に入ります。
* 操作マニュアルは Web サイト (http://www.giant-bicycles.com/en-in/) でダウンロードしてください。
Before using the computer for the first time, press and hold the AC button on the back side of the computer to enter
the fast setup menu. Follow the steps below in order. Press the "L" or "R" key to select a value. Press the "M" key
to confirm a selection.
1. Unit of Measure: Press the "L" or "R" key to select either metric or imperial units. Press the "M" key to confirm
selection. 2. Date: Press the "L" or "R" key to select year. Press the "M" key to confirm selection. Repeat steps to
set up month and day. 3. Time Format: Press the "L" or "R" key to select either 12 or 24 hour format. Press the
"M" key to confirm selection. Repeat steps to set up hour and minute. 4. Tire Size: Press the "L" or "R" key to
select tire size from the 10 uilt-in options. Press the "M" key to confirm selection. To enter a tire size other than
those built-in, select Custom and press the "M" key. Press the "L" or "R" key to select tire circumference (in
millimeters). Press the "M" key to confirm selection.
5. Gender & Weight: Press the "L" or "R" key to select either male or female. Press the "M" key to confirm
selection. Repeat steps to set up weight. 6. Heart Rate Limits: Press the "L" or "R" key to select upper heartrate
limit. Press the "M" key to confirm selection. Repeat steps to set up lower heartrate limit. 7. Pair Sensors & Phone:
If no sensors are to be paired, press the "L" key (No) to enter mobile pairing mode. To pair computer with sensors,
press the "R" key (Yes) to enter sensor pairing mode. Wait 30 seconds after the computer is paired to enter mobile
pairing mode. To pair computer with phone, press the "R" (Yes) key to enter mobile pairing mode, or press the "L"
(No) key to enter "Menu Exit". Menu Exit: Press the "M" key to enter the pedaling page. (See APP setup process for
mobile pairing mode)
*Press and hold the "M" key to enter setup menu.
*Please download the operation manual at web site: http://www.giant-bicycles.com/en-in/
Avant d'utiliser votre compteur pour la première fois, appuyez sur le bouton AC à l'arrière du chronomètre et
maintenez-le enfoncé pour accéder au menu de configuration rapide. Appuyez sur «L» ou «R» pour sélectionner, et
sur «M» pour confirmer votre sélection.
1. Configurer l'unité de mesure: Appuyez sur «L» ou «R» pour choisir entre unité métrique ou impériale, et sur «M
» pour confirmer votre sélection. 2. Configurer la date: Appuyez sur «L» ou «R» pour sélectionner l'année, et sur «
M» pour confirmer votre sélection. Faites la même chose pour le mois et le jour. 3. Régler le format d'heure:
Appuyez sur «L» ou «R» pour sélectionner le format 24 ou 12heures, et sur «M» pour confirmer votre sélection.
Faites la même chose pour régler l'heure et la minute. 4. Configuration du diamètre de la roue : Appuyez sur «L» ou
«R» pour sélectionner le diamètre de roue souhaité parmi les 10 options intégrées, ou saisissez-le manuellement
(option «Personnalisé»). 5. Régler le sexe et le poids : Appuyez sur «L» ou «R» pour sélectionner homme ou
femme, et sur «M» pour confirmer votre sélection. Faites la même chose pour régler votre poids. 6. Régler le rappel
de rythme cardiaque: Appuyez sur «L» ou «R» pour sélectionner la limite supérieure de votre rythme cardiaque, et
sur «M» pour confirmer votre sélection. Faites la même chose pour régler la limite inférieure. 7. Pour appairer votre
appareil: Entrez en mode d'appairrage du capteur avant d'appuyer sur R (OUI) pour appairer votre appareil. Appuyez
sur L (NON) ou attendez 30 secondes après l'appairrage de l'appareil pour que l'appareil mobile entre en mode
appairage. Si l'appairage mobile est nécessaire, appuyez sur R (OUI) pour appairer votre appareil, ou sur L (NON)
pour quitter le menu.
Appuyez sur «M» pour accéder à la page Pédalage (voir le processus de configuration de l'application mobile pour
le mode d'appariement).
*Appuyez sur «M» et maintenez la touche enfoncée pour entrer dans les fonctions du menu.
* Veuillez télécharger le mode d'emploi sur le site Web: http://www.giant-bicycles.com/en-in/
首次使用码表时,按压码表主机背面AC键进入快速设定,L&R键:选择键,M键:确认键。
1.设定单位:按L or R键选择公制/英制,按M键确认。2.设定日期:按L or R键选择年分,按M键确认,依序完
成月/日设定。3.设定时制:按L or R键选择24/12小时制,按M键确认并依序完成小时:分钟设定。4.设定轮径
:按L or R键选择内建10种常用轮径或自行输入轮径(Custom)。5.设定性别&体重:按L or R键选择MALE男性
/FEMALE女性,按M键确认并依序完成体重设定。6.设定心率提醒:按L or R键调整心率提醒数值上限,按M键
确认,再依序完成心率提醒数值下限。7.设定配对:进入感应器模式配对后,按R(YES)键进行装置配对,按
L(NO)键或装置配对完成后30秒则进入手机模式配对,如有手机配对需求,按R( YES)键依序进行配对或按L(NO)
键离开则进MENU(选单)EXIT-按M键后进入骑乘页面。 (手机模式配对请参考APP设定流程)
*长按L键则进入Menu选单*详细说明书下载:http://www.giant-bicycles.com/en-in/
JP
Bitte drücken und halten Sie vor erstmaliger Benutzung der Stoppuhr die AC-Taste an der Rückseite der Stoppuhr
zum Aufrufen des Schnelleinrichtungsmenüs. Drücken Sie zur Auswahl die Taste „L“ oder „R“, drücken Sie zur
Bestätigung Ihrer Auswahl die „M“-Taste.
1. Einheit einstellen: Drücken Sie zur Auswahl des metrischen oder imperialen Maßsystems die Taste „L“ oder „R“,
drücken Sie zur Bestätigung Ihrer Auswahl die „M“-Taste. 2. Datum einstellen: Drücken Sie zur Auswahl des Jahres
die Taste „L“ oder „R“, drücken Sie zur Bestätigung Ihrer Auswahl die „M“-Taste. Gehen Sie zur Festlegung von
Monat und Tag ebenso vor. 3. Zeitformat einstellen: Drücken Sie zur Auswahl des 24- oder 12-Stunden-Formats die
Taste „L“ oder „R“, drücken Sie zur Bestätigung Ihrer Auswahl die „M“-Taste. Gehen Sie zur Festlegung von Stunde
und Minute ebenso vor.
4. Reifendurchmesser festlegen: Drücken Sie zur Auswahl des gewünschten Reifendurchmessers aus 10
voreingestellten Optionen die Taste „L“ oder „R“ oder geben Sie ihn manuell ein („Anpassen“-Option). 5. Geschlecht
und Gewicht einstellen: Drücken Sie zur Auswahl von Männlich oder Weiblich die Taste „L“ oder „R“, drücken Sie zur
Bestätigung Ihrer Auswahl die „M“-Taste. Gehen Sie zur Festlegung Ihres Gewichts ebenso vor. 6. Herzfrequenzhin-
weis festlegen: Drücken Sie zur Auswahl der Obergrenze der Herzfrequenz die Taste „L“ oder „R“, drücken Sie zur
Bestätigung Ihrer Auswahl die „M“-Taste. Gehen Sie zur Festlegung der Untergrenze ebenso vor. 7. So koppeln Sie
Ihr Gerät: Rufen Sie den Sensorkopplungsmodus auf, bevor Sie die „R“-Taste (Ja) zum Koppeln Ihres Gerätes
drücken. Drücken Sie die „L“-Taste (Nein) oder warten Sie nach Kopplung des Gerätes zum Aufrufen des mobilen
Kopplungsmodus 30 Sekunden. Falls eine mobile Kopplung erforderlich ist, drücken Sie die „R“-Taste (Ja) zum
Koppeln Ihres Gerätes bzw. die „L“-Taste (Nein) zum Verlassen des Menüs. Drücken Sie die „M“-Taste zum Aufrufen
der Pedaltrittseite. (Hinweise zum mobilen Kopplungsmodus finden Sie unter App-Einrichtung).
* Drücken und halten Sie die „M“-Taste zum Aufrufen der Menüfunktion.
* Bitte laden Sie die Bedienungsanleitung von der Webseite herunter: http://www.giant-bicycles.com/en-in/
Antes de utilizar el cronómetro por primera vez, presione sin soltar el botón AC situado en la parte posterior de dicho
cronómetro para entrar en el menú de configuración rápida. Presione los botones "L" o "R" para realizar la selección
y el botón "M" para confirmarla.
1. Configurar la unidad de medición: presione los botones "L" o "R" para seleccionar unidades métricas o imperiales
y el botón "M" para confirmar la selección. 2. Configurar la fecha: presione los botones "L" o "R" para seleccionar el
año y el botón "M" para confirmar la selección. Haga lo mismo para configurar el mes y el día. 3. Configurar el
formato de hora: presione los botones "L" o "R" para seleccionar el formato de hora de 24 o 12 horas y el botón "M"
para confirmar la selección. Haga lo mismo para configurar la hora y los minutos. 4. Configurar el diámetro de la
rueda: presione los botones "L" o "R" para seleccionar el diámetro de rueda entre las 10 opciones disponibles o
escríbalo manualmente (opción "Personalizada"). 5. Configurar el sexo y el peso: presione los botones "L" o "R" para
seleccionar Hombre o Mujer y el botón "M" para confirmar la selección. Haga lo mismo para configurar el peso. 6.
Configurar el aviso de frecuencia cardíaca: presione los botones "L" o "R" para seleccionar el límite superior de la
frecuencia cardíaca y el botón "M" para confirmar la selección. Haga lo mismo para configurar el límite inferior. 7.
Para asociar el dispositivo: entre en el modo de asociación del sensor antes de presionar el botón R (SÍ) para asociar
el dispositivo. Presione el botón L (NO) o espere 30 segundos después de que el dispositivo se asocie para entrar en
el modo de asociación móvil. Si la asociación móvil es necesaria, presione el botón R (SÍ) para asociar el dispositivo o
el botón L (NO) para salir al MENÚ SALIR.
Presione el botón "M" para entrar en la página de pedaleo. (Consulte el proceso de configuración de la aplicación
para el modo de asociación móvil.)
*Presione sin soltar el botón "M" para entrar en la función Menú.
* Descargue el manual de funcionamiento en el sitio Web: http://www.giant-bicycles.com/en-in/
EL Houd, voordat u uw stopwatch voor het eerst gebruikt, de AC-knop op de achterkant van de stopwatch ingedrukt
om naar het snelle instellingsmenu te gaan. Druk op de knop "L" of "R" om te selecteren en op de knop "M" om
uw selectie te bevestigen.
1. Maateenheid instellen: druk op de knop "L" of "R" om de metrische of Britse eenheid te selecteren en op de
knop "M" om uw selectie te bevestigen. 2. Klok instellen: druk op de knop "L" of "R" om het jaar te selecteren en
op de knop "M" om uw selectie te bevestigen. Doe hetzelfde om de maand en dag in te stellen. 3. Tijdnotatie
instellen: druk op de knop "L" of "R" om de 24- of 12-uursnotatie te selecteren en op de knop "M" om uw
selectie te bevestigen. Doe hetzelfde om het uur en de minuten in te stellen. 4. Wieldiameter instellen: druk op
de knop "L" of "R" om de gewenste wieldiamter te selecteren van de 10 geïntegreerde opties of voer het
handmatig in (de optie "Aanpassen"). 5. Geslacht en gewicht instellen: druk op de knop "L" of "R" om Mannelijk
of Vrouwelijk te selecteren en op de knop "M" om uw selectie te bevestigen. Doe hetzelfde om uw gewicht in te
stellen. 6. De herinnering voor hartfrequentie instellen: druk op de knop "L" of "R" om de bovengrens van uw
hartfrequentie te selecteren en op de knop "M" om uw selectie te bevestigen. Doe hetzelfde om de ondergrens in
te stellen. 7. Uw apparaat koppelen: voer de koppelingsmodus voor de sensor in voordat u op de knop "R" (JA)
drukt om uw apparaat te koppelen. Druk op de knop "L" (NEE) of wacht 30 seconden na het koppelen van het
apparaat om de mobiele koppelingsmodus te openen. Als mobiel koppelen nodig is, drukt u op de knop "R" (JA)
om uw apparaat te koppelen of op de knop "L" (NEE) om naar MENU AFSLUITEN af te sluiten.
Druk op de knop "m" om naar de trappagina te gaan. (Zie de APP-instellingsprocedure voor mobiele
koppelingsmodus.)
*Houd de knop "M" ingedrukt om de Menufunctie te openen.
* Download de bedieningshandleiding op de website: http://www.giant-bicycles.com/en-in/
PL Przed pierwszym użyciem licznika, naciśnij i przytrzymaj przycisk AC z tyłu licznika, aby przejść do menu
szybkiego ustawienia. Postępuj zgodnie z krokami podanymi poniżej. Naciśnij przycisk "L" lub "R" w celu
wyboru wartości i przycisk "M" w celu potwierdzenia wyboru.
1. Ustawienie jednostki miary: Naciśnij przycisk "L" lub "R" w celu wyboru jednostki metrycznej lub
anglosaskiej i naciśnij przycisk "M" w celu potwierdzenia wyboru. 2. Ustawienie daty: Naciśnij przycisk "L" lub
"R" w celu wyboru roku i przycisk "M" w celu potwierdzenia wyboru. Zrób to samo w celu ustawienia miesiąca i
dnia. 3. Ustawienie formatu czasu: Naciśnij przycisk "L" lub "R" w celu wyboru formatu 12 lub 24 godzinnego i
przycisk "M" w celu potwierdzenia wyboru. Zrób to samo w celu ustawienia godziny i minuty. 4. Ustawienie
rozmiaru koła: Naciśnij przycisk "L" lub "R" w celu wyboru jednego z 10 predefiniowanych rozmiarów lub
wprowadź go ręcznie (opcja "Custom").
5. Ustawienie płci i wagi: Naciśnij przycisk "L" lub "R" w celu wyboru mężczyzna lub kobieta i przycisk "M" w
celu potwierdzenia wyboru. Zrób to samo w celu ustawienia wagi. 6. Ustawienie alarmu limitu tętna: Naciśnij
przycisk "L" lub "R" w celu wyboru górnego limitu tętna i przycisk "M" w celu potwierdzenia wyboru. Zrób to
samo w celu ustawienia dolnego limitu tętna. 7. W celu wykonania parowania z czujnikami i telefonem: Jeśli nie
ma urządzeń do sparowania, naciśnik przycisk "L" (Nie). By przejść do trybu parowania licznika z czujnikami,
naciśnij przycisk R (TAK). Zaczekaj 30 sekund po sparowaniu urządzenia z czujnikami w celu przejścia do trybu
parowania urządzenia mobilnego. Jeśli parowanie urządzenia mobilnego jest wymagane, naciśnij przycisk R
(TAK) w celu wykonania parowania urządzenia lub przycisk L (NIE); jeśli nie ma takiej potrzeby; aby przejść do
Menu Wyjście (Menu Exit).
Naciśnij przycisk "M", aby przejść na stronę pedałowania.(Sprawdź proces konfiguracji APLIKACJI dla trybu
parowania urządzenia mobilnego)
*Naciśnij i przytrzymaj przycisk "M", aby przejść do funkcji Menu.
* Pobierz instrukcję obsługi na stronie internetowej: http://www.giant-bicycles.com
KR 스톱워치를 처음 사용하기에 앞서 스톱워치 뒷면의 AC 버튼을 길게 눌러 빠른 설정 메뉴로 들어가십시오.
"L" 또는 "R" 키를 눌러 선택한 후 "M" 키를 눌러 선택을 확인하십시오.
1. 측정 단위 설정: "L" 또는 "R" 키를 눌러 미터법 단위 또는 야드파운드법 단위를 선택한 후 "M" 키를
눌러 선택을 확인합니다. 2. 날짜 설정: "L" 또는 "R" 키를 눌러 연도를 선택한 후 "M" 키를 눌러 선택을
확인합니다. 월(month)/일(date)에 대해서도 동일한 방법으로 설정합니다. 3. 시간 형식 설정: "L" 또는 "R"
키를 눌러 24시간 또는 12시간 형식을 선택한 후 "M" 키를 눌러 선택을 확인합니다. 시간과 분에 대해서도
동일한 방법으로 설정합니다. 4. 휠 직경 설정: "L" 또는 "R" 키를 눌러 내장된 10개의 옵션 중에서 원하는
휠 직경을 선택하거나, 수동으로 입력합니다 ("사용자 지정" 옵션). 5. 성별 및 체중 설정: "L" 또는 "R" 키를
눌러 남성 또는 여성을 선택한 후 "M" 키를 눌러 선택을 확인합니다. 체중에 대해서도 동일한 방법으로
설정합니다. 6. 심박수 알림 설정: "L" 또는 "R" 키를 눌러 심박수 상한을 선택한 후 "M" 키를 눌러 선택을
확인합니다. 심박수 하한에 대해서도 동일한 방법으로 설정합니다. 7. 장치 페어링: 센서 페어링 모드로
들어가서 R(예) 키를 눌러 장치를 페어링합니다. L(아니요) 키를 누르거나 장치가 페어링된 후 30초를
기다리면 모바일 페어링 모드로 들어갑니다. 모바일 페어링이 필요한 경우, R(예) 키를 눌러 장치를
페어링하거나 L(아니요) 키를 눌러 메뉴 종료로 나가십시오.
"M" 키를 눌러 페달링 페이지로 들어가십시오 (모바일 페어링 모드에 대한 내용은 앱 설정 과정을
참조하십시오).
*"M" 키를 길계 눌러 메뉴 기능으로 들어가십시오.
* 다음 웹 사이트에서 사용 설명서를 다운로드하십시오. http://www.giant-bicycles.com/en-in/
首次使用碼表時,按壓碼表主機背面AC鍵進入快速設定,L&R鍵:選擇鍵,M鍵:確認鍵。
1.設定單位:按L or R鍵選擇公制/英制,按M鍵確認。2.設定日期:按L or R鍵選擇年分,按M鍵確認,依序
完成月/日設定。3.設定時制:按L or R鍵選擇24/12小時制,按M鍵確認並依序完成小時:分鐘 設定。4.設定
輪徑:按L or R鍵選擇內建10種常用輪徑或自行輸入輪徑(Custom)。5.設定性別&體重:按L or R鍵選擇
MALE男性/FEMALE女性,按M鍵確認並依序完成體重設定。6.設定心率提醒:按L or R鍵調整心率提醒數值
上限,按M鍵確認,再依序 完成心率提醒數值下限。7.設定配對:進入感應器模式配對後,按R(YES)鍵進行
裝置配對,按L(NO)鍵或裝置配對完成後30秒則進入手機模式配對,如有手機配對需求,按R(YES)鍵依序進行
配對或按L(NO)鍵離開則進入MENU(選單)EXIT-按M鍵後進入騎乘頁面。(手機模式配對請參考APP設定流程)
*長按M鍵則進入Menu選單*詳細說明書下載:http://www.giant-bicycles.com/en-in/
RL
M2
AC
FCC ID: O4GNEOSSYNC
FCC STATEMENT
This device complies with Part 15 of the FCC Rules.
Operation is subject to the following two conditions: (1) This device may not cause harmful
interference, and (2) This device must accept any interference received, including interference
that may cause undesired operation.
The grantee is not responsible for any changes or modifications not expressly approved by the
party responsible for compliance. Such modifications could void the user’s authority to operate
the equipment.
NOTE: This equipment has been tested and found to comply with the limits for a Class B digital
device, pursuant to part 15 of the FCC Rules. These limits are designed to provide reasonable
protection against harmful interference in a residential installation. This equipment generates,
uses and can radiate radio frequency energy and, if not installed and used in accordance with
the instructions, may cause harmful interference to radio communications. However, there is no
guarantee that interference will not occur in a particular installation. If this equipment does
cause harmful interference to radio or television reception, which can be determined by turning
the equipment off and on, the user is encouraged to try to correct the interference by one or
more of the following measures:
—Reorient or relocate the receiving antenna.
—Increase the separation between the equipment and receiver.
—Connect the equipment into an outlet on a circuit different from that to which the receiver is
connected.
—Consult the dealer or an experienced radio/TV technician for help.
IC:7666A-NEOSSYNC
IC Statement
This device complies with Industry Canada licence-exempt RSS standard(s). Operation is
subject to the following two conditions: (1) this device may not cause interference, and (2) this
device must accept any interference, including interference that may cause undesired operation
of the device.
CAN ICES-3(B)/NMB-3(B)
Le présent appareil est conforme aux CNR d'Industrie Canada applicables aux appareils radio
exempts de licence. L'exploitation est autorisée aux deux conditions suivantes:
(1) il ne doit pas produire de brouillage et
(2) l’ utilisateur du dispositif doit étre prêt à accepter tout brouillage radioélectrique reçu, même
si ce brouillage est susceptible de compromettre le fomctionnement du dispositif.
CAN ICES-3(B)/NMB-3(B)
The device meets the exemption from the routine evaluation limits in section 2.5 of RSS 102
and compliance with RSS-102 RF exposure, users can obtain Canadian information on RF
exposure and compliance.
Le dispositif rencontre l'exemption des limites courantes d'évaluation dans la section 2.5 de
RSS 102 et la conformité à l'exposition de RSS-102 rf, utilisateurs peut obtenir l'information
canadienne sur l'exposition et la conformité de rf.
This transmitter must not be co-located or operating in conjunction with any other antenna or
transmitter. This equipment should be installed and operated with a minimum distance of 20
millimeters between the radiator and your body.
Cet émetteur ne doit pas être Co-placé ou ne fonctionnant en même temps qu'aucune autre
antenne ou émetteur. Cet équipement devrait être installé et actionné avec une distance
minimum de 20 millimètres entre le radiateur et votre corps.