Dell 7260WY Model 7260HMW Wireless Network Adapter User Manual 88395x 01LA MNL OSG DX0Q EFGS 05 14 2013
Dell Inc. Model 7260HMW Wireless Network Adapter 88395x 01LA MNL OSG DX0Q EFGS 05 14 2013
Dell >
Contents
- 1. User Manual (DX0Q).pdf
- 2. User Manual (Statements).pdf
- 3. User Manual (ZX0Q).pdf
User Manual (DX0Q).pdf

Quick-Start Guide
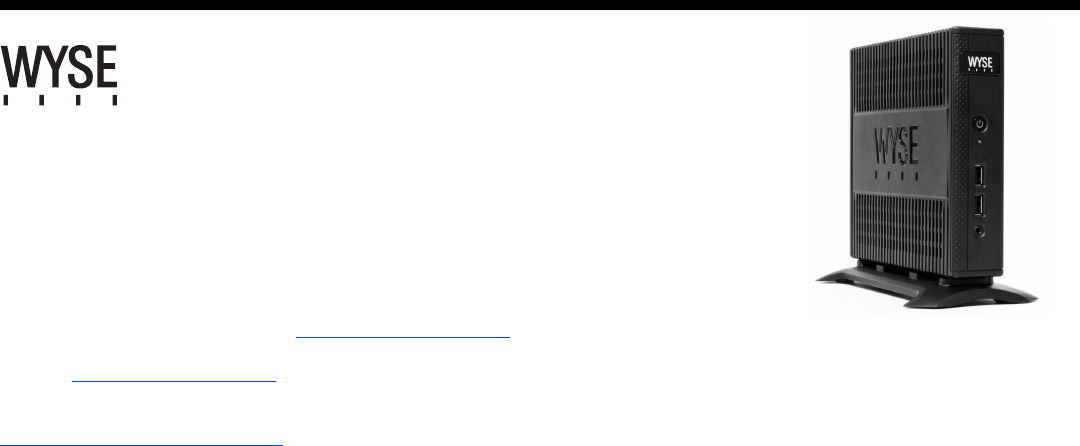
Wyse® D Class Cloud Clients, Model Dx0Q
Products: D00Q (cloud PC), D50Q, D90Q7, D90Q7p, D90Q8, D90Q8x (thin clients)
See accompanying documents in the shipping carton for License Agreement and Warranty information.
To find the latest Quick-Start Guide, go to http://www.wyse.com/manuals and click on the name of your cloud client.
Important: A printed copy of the Wyse Technology End User License Agreement is included in the shipping box and provided for your reference only. The
license at http://www.wyse.com/license as of the purchase date is the controlling licensing agreement. By copying, using, or installing the software or the
product, you agree to be bound by those terms.
Important: If you use Wyse Device Manager Server software for managing your Wyse cloud clients, download the latest version to ensure compatibility at
http://support.wyse.com/selfservice.html.
Caution: Improper connection, mounting, or use of this product could result in component failure or undesired interference. Read Safety Guidelines
before setting up and operating the cloud client.

2
D00Q, D50Q, D90Q7, D90Q7p, D90Q8, D90Q8x
[1] Not all USB devices are supported; check with Wyse or your Wyse representative to find out if a particular device is supported on your cloud client.
[2] Warning: Listening to audio at high volume levels for extended durations can damage your hearing.
[3] Wireless option not available in all localities.
[4] For details on supported monitor combinations, go to the Wyse Knowledge Base at http://www.wyse.com/kb and search for solution 22991.
Components
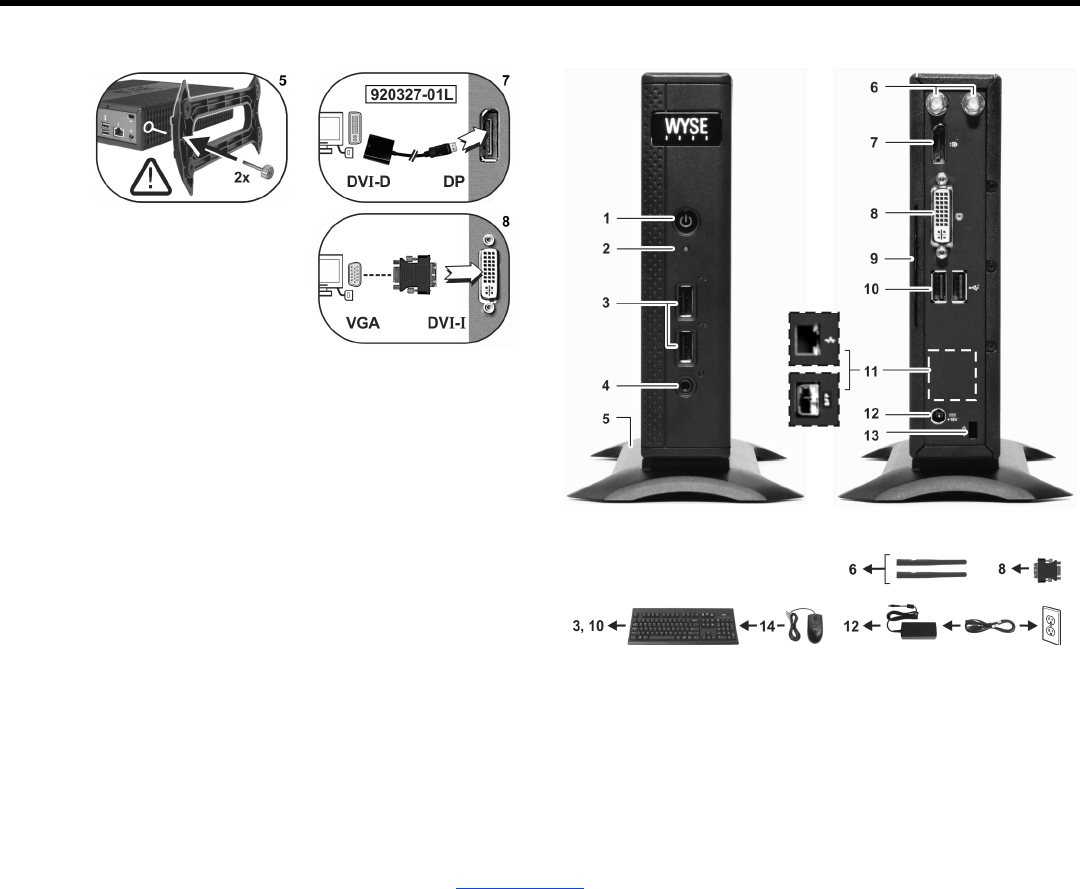
1Power on/off button/light
2Activity light
3USB 2.0 port (2)[1]
4Combination audio/microphone jack[2]
5Vertical stand
6Wireless antenna port (2) (optional)[3]
7DisplayPort connector[4]
8DVI-I port (1x DVI-D or 1x VGA)[4]
9Product information tab
10 USB 2.0 port (2)[1]
11 Network port, 10/100/1000 Base-T
(or) SFP/Mini-GBIC slot
12 +19V Power adapter input
13 Lock receptacle
14 PS/2-type mouse port located on keyboard
Components may vary based on model and location.

3
Setting Up Your Cloud Client
Read Safety Guidelines before setting up and operating the cloud client.
Refer to the figures and proceed as follows:
1. Place the cloud client on a desk, or use a Wyse-approved mounting
accessory kit. Make sure that the monitor and the cloud client are
turned off and disconnected from AC power.
2. Make all desired connections (video display and keyboard with mouse
are required). Connection to a 10/100/1000 Base-T Ethernet network
is required unless an optional WiFi network adapter is used for
wireless connection to a network. For connection to Fiber SFP, make
sure to unlock the SFP module (ordered/shipped separately)
completely before plugging it into the SFP/Mini-GBIC slot, and then
flip the latch to lock the module in place. Additional connections of
peripheral devices may be made to the other ports.
3. Connect the power adapter to the cloud client power input before
connecting to a 100-240V AC, 50-60 Hz electrical outlet, and then
press the power button to apply power. When the initialization
sequence is complete, the amber activity light changes to green.
Default User Names and Passwords
(Case Sensitive)
* For administrators, log off User desktop while holding down the Shift key until the logon box
appears.
Windows- and Linux-Based Thin Client - After turning on, the thin client initially goes
through several boot sequence procedures before the operating system loads. Information
about setting up your server environment is available in the thin client’s documentation.
Cloud PC - WSM software is required; no operating system is installed, and therefore no
default user name and password are defined. Information about setting up your server
environment is available in the WSM documentation.
Safety Guidelines
Improper connection, mounting, or use of this product could result in
component failure or undesired interference. Read the following
guidelines before setting up and operating the device.
Setup
•Do not connect to AC power until all other connections (including the
power adapter) are made. Connecting or disconnecting components or
equipment on the back panel when the device is receiving AC power
can cause power surges and damage the device.
•Do not force a connector into its socket. If any undue resistance is
encountered, ensure that the connector is correctly oriented to the
receptacle.
•For wireless usage and requirements, refer to the regulatory notices in
the device’s documentation.
Venting and Care
•Mount the device only as shown or in accordance with the instructions
provided with Wyse-approved mounting accessory kits. Improper
orientation could restrict airflow of heat from the device and damage it.
•Allow sufficient space around the device for ventilation; do not place the
device in any enclosure that restricts airflow around the device; do not
place any objects on the device or block the vent outlets.
For environmental operating specifications, locate your product and
download the Fact Sheet using the Cloud clients tab at:
http://www.wyse.com/products
Wyse® Enhanced
SUSE Linux Enterprise
Microsoft® Windows® Embedded
Standard 2009* / 7*
Administrator
User Name admin administrator
Password admin Wyse#123
User
User Name thinuser user
Password thinuser Wyse#123
Power Sources
•For regulatory compliance use only the power adapter that comes with
your device or a Wyse-approved equivalent. For proper replacement
compare the labels on both device and power adapter to ensure that
their voltages match.
Warning: Use of any other power adapter may damage your
device or the power adapter. The damage caused by an improper power
adapter is not covered by warranty.
•Accidental loss of power can damage device. Avoid connecting it to any
power outlet which can be accidentally switched off. Do not hard reset
the device by holding down the power button during normal operation.
•When turning off the device, be sure to perform a complete shutdown
(via the user interface or a light press on the power button). Do not
disconnect the AC power cord, DC power cord, or shut off power at a
circuit breaker (including power strips), etc., to turn off the device.
•Surge protectors for electrical devices are recommended in areas of
lightning. However, when lightning is occurring, your equipment should
be properly shut down and unplugged from AC power until the storm
has passed.
•Be very careful to not interrupt power while the device is downloading a
software update.
Battery
The device contains an internal button cell battery replaceable by Wyse or
one of our Authorized Service Centers. For service, visit
http://www.wyse.com/support/authorized-service-centers.
Warning: There is a risk of explosion if the battery is replaced by an
incorrect type. Always dispose of used batteries according to the
instructions accompanying the battery.
Warning: Perchlorate Materials - Special Handling May Be Required
under California Code of Regulations, title 22. (Only required within the
U.S.A.)
Need more information?
Wyse Reference Guides - User, Administrator, and related
documentation is available at:
http://www.wyse.com/manuals
Wyse-Approved Mounting Accessory Kits - Information about
approved mounting accessory kit options is available at:
http://www.wyse.com/products/accessories/mounting-options
Wyse Service and Support - Latest software images are available at:
http://www.wyse.com/downloads
Wyse Device Manager - Information about Wyse remote management
software is available at:
http://www.wyse.com/products/software/management/WDM
Wyse WSM - Information about Wyse WSM software is available at:
http://www.wyse.com/products/software/cloud/WSM
Wyse and the Environment - Information about Wyse compliance with
RoHS and with the Waste Electrical and Electronic Equipment (WEEE) is
available at:
http://www.wyse.com/green
Wyse and E-Recycling - Information about recycling unwanted Wyse
product within the United States is available at:
http://www.wyse.com/erecycling
Wyse Warranty Registration* - Register your product at:
http://www.wyse.com/registration
*The standard warranty is three years from the date of purchase.

4
Notes

©2013 Wyse Technology L.L.C. All rights reserved. This product and/or associated software are
protected by copyright international treaties, and various patents, including the following U.S.
patents: 6,836,885 and 5,918,039.
88395x-01L Rev. A
May 2013
Printed in U.S.A.
Wyse Technology L.L.C.
3471 North First Street
San Jose, CA 95134-1801 U.S.A.
Printed on 50% post-consumer recycled paper