Dell XPS Rxxx 6341dbk1 User Manual To The 85c5a56f E396 46a1 91db 11f10efb31e0
User Manual: Dell XPS Rxxx to the manual
Open the PDF directly: View PDF ![]() .
.
Page Count: 60
- Welcome
- Contents
- Preparing Your Computer System for Use the First Time
- Customizing the Windows Desktop
- Using and Installing Software
- Using Computer Hardware
- Frequently Asked Questions
- General Questions
- Program Diskette Maker Questions
- Why do I need to make the diskettes listed in the Program Diskette Maker?
- How do I stop the Program Diskette Maker from appearing when I turn on my computer system?
- Can I make these diskettes later?
- Does the Program Diskette Maker back up all the software on my computer?
- How many diskettes do I need? What type of diskettes should I use?
- Software Questions
- Hardware Questions
- The formatted capacity of my hard-disk drive seems to be smaller than what I ordered. Where is th...
- Why do I have a line (or two lines) across my monitor?
- My monitor flickers or shakes all the time. What can I do?
- My monitor is flashing different colors when I change screens. How do I fix it?
- Where can I find drivers for my monitor?
- I have installed telephony software, but the sound doesn’t work. What can I do?
- Getting Help
- Index

®
ZZZGHOOFRP
'HOO'LPHQVLRQ ;365[[[6\VWHPV
6(783*8,'(

____________________
Information in this document is subject to change without notice.
© 1998 Dell Computer Corporation. All rights reserved.
Reproduction in any manner whatsoever without the written permission of Dell Computer Corporation is strictly forbidden.
Trademarks used in this text:
Dell
, the
DELL
logo, and
Dell Dimension
are registered trademarks and
DellWare
is a registered service
mark of Dell Computer Corporation;
MS-DOS
,
Microsoft
,
Windows
, and
Windows NT
are registered trademarks of Microsoft
Corporation.
Other trademarks and trade names may be used in this document to refer to either the entities claiming the marks and names or their
products. Dell Computer Corporation disclaims any proprietary interest in trademarks and trade names other than its own.
October 1998 P/N 6341D A01
v
:HOFRPH
This guide is intended for anyone who is setting up or starting to use a Dell Dimension
XPS R
xxx
computer system. Both first-time and experienced computer users should
complete Chapter 1 to properly configure a system for operation. The remaining chap-
ters describe procedures for using software and hardware.
6DIHW\,QVWUXFWLRQV
Safety instructions for setting up and using your system are given throughout this
guide. The
Reference and Troubleshooting Guide
provides detailed safety information.
$EEUHYLDWLRQV$FURQ\PVDQG7HUPV
Abbreviations, acronyms, and computer terms are identified or defined as they are
used in this guide. For a complete listing, refer to the Glossary in the
Online Guide
.
1RWDWLRQDO&RQYHQWLRQV
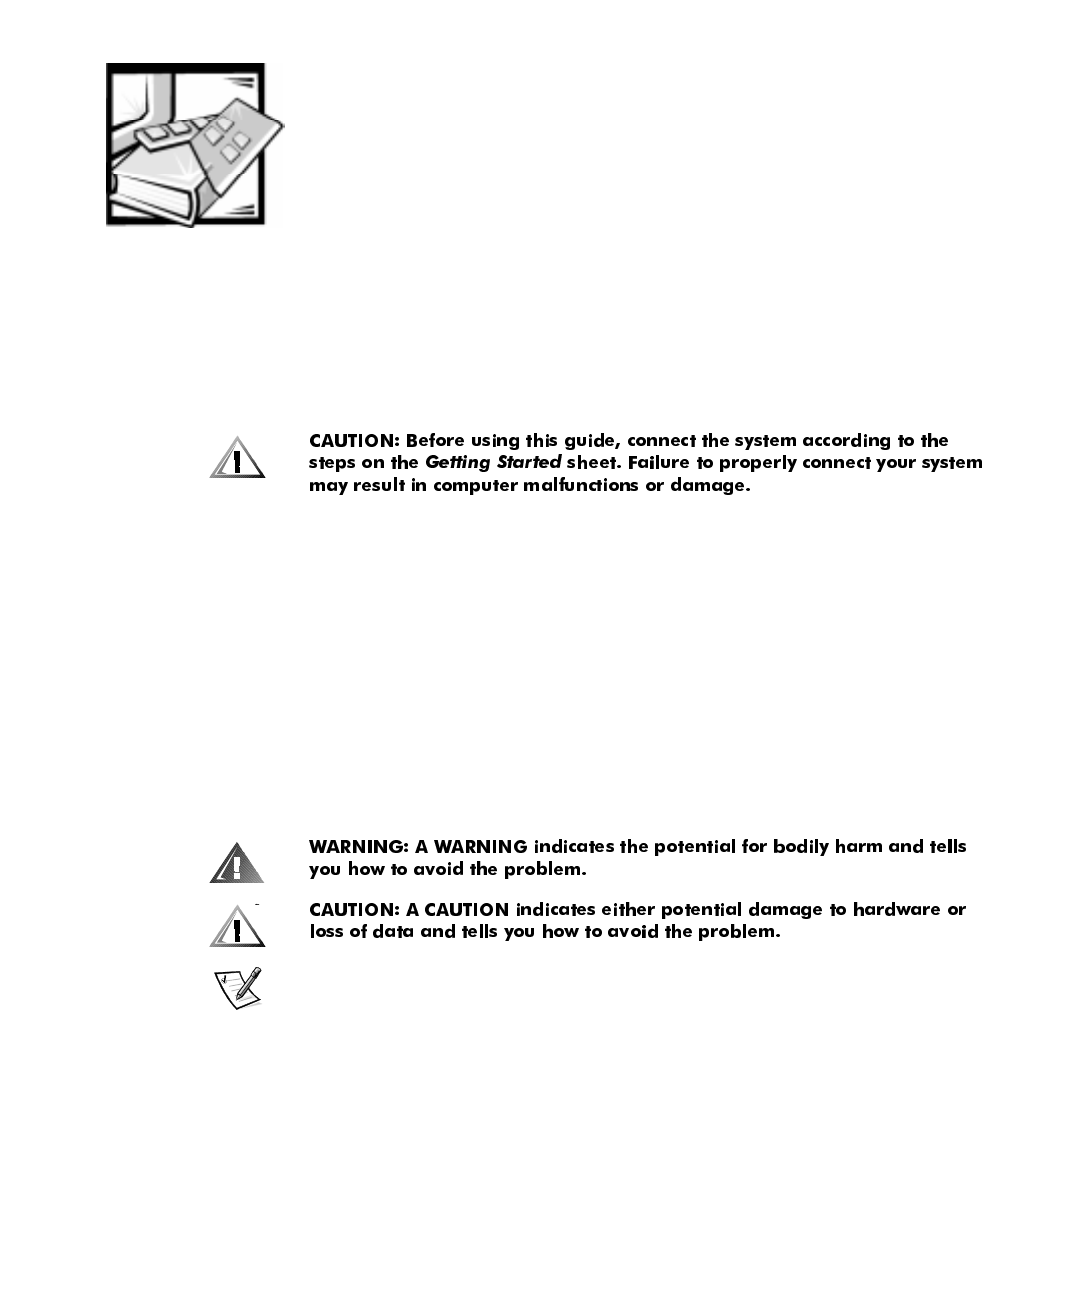
NOTE: A NOTE conveys important information that helps you make better use of your
computer system.
,I<RX1HHG+HOS
If you need help while using this guide, refer to Chapter 5, “Frequently Asked Ques-
tions.” For detailed troubleshooting procedures, refer to the
Reference and
Troubleshooting Guide
.
vi
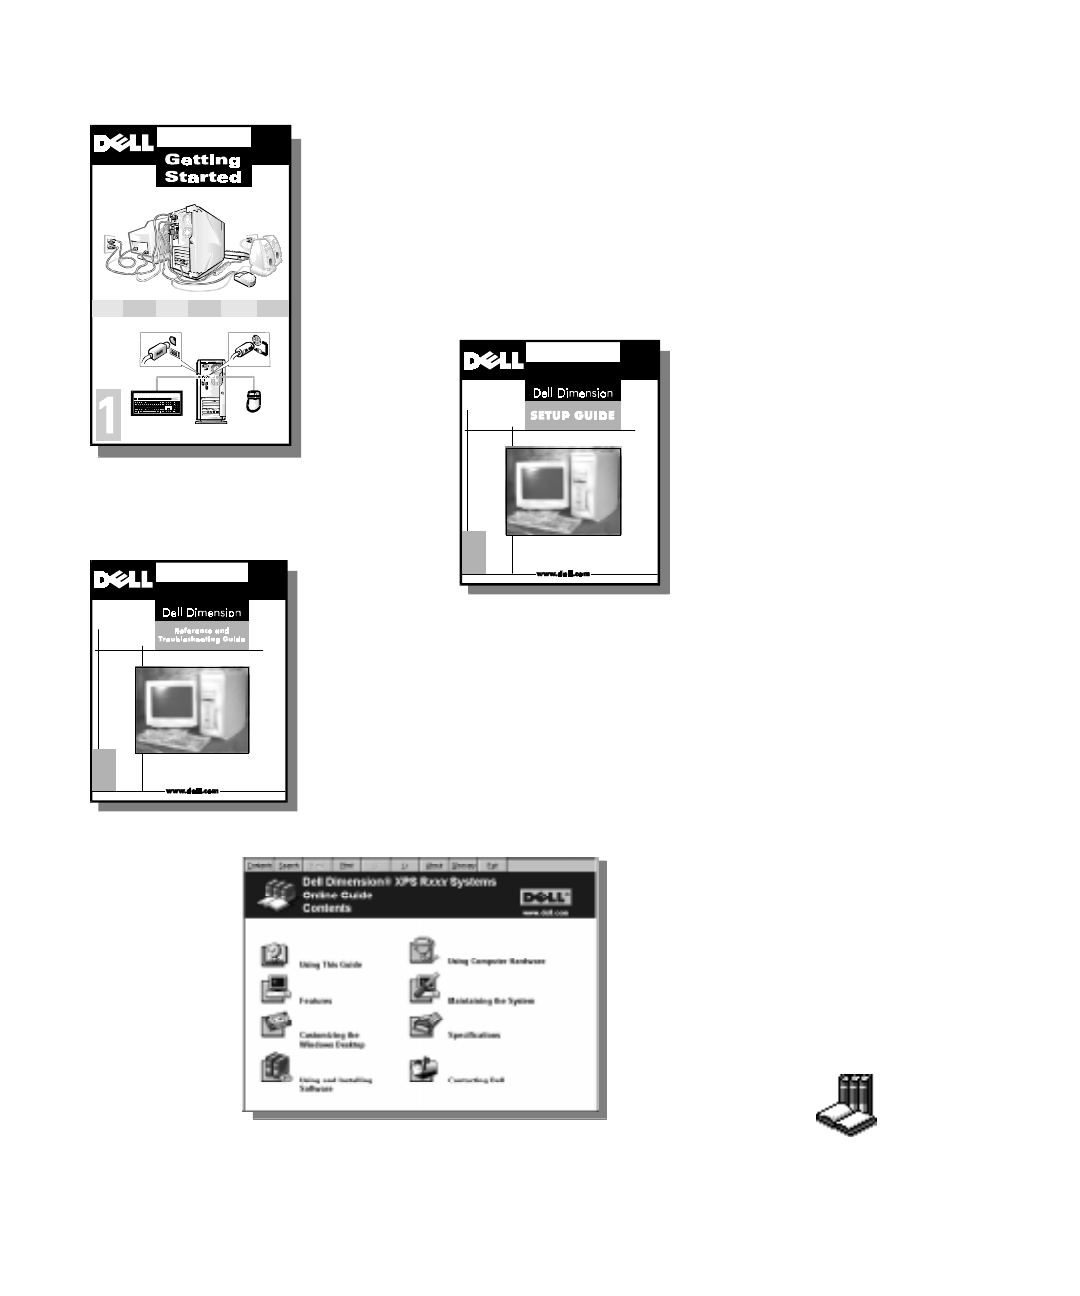
The
Getting Started
sheet provides
step-by-step instructions for connect-
ing your computer system. Start with
this document.
The
Setup Guide
explains how to
prepare your system for operation.
It also describes how to use soft-
ware and hardware.
,QIRUPDWLRQ5HVRXUFHV
The
Reference and Troubleshooting
Guide
provides maintenance informa-
tion, instructions on installing upgrades
like memory, and troubleshooting
procedures for solving common
problems.
The
Online Guide
replicates important
information from both the
Setup Guide
and
Reference and Troubleshooting Guide
.
It is provided for those who prefer online
documents to printed ones.
To open the guide,
click the Start button,
point to Programs—>Dell Accessories,
and click Online Guide.

vii
&RQWHQWV
&KDSWHU 3UHSDULQJ<RXU&RPSXWHU6\VWHPIRU8VHWKH
)LUVW7LPH
Setting Up Windows 98 . . . . . . . . . . . . . . . . . . . . . . . . . . . . . . . . . . . . . . . . . . . . . 1-1
Completing Dell Setup in Windows 98 . . . . . . . . . . . . . . . . . . . . . . . . . . . . . . . . . . 1-4
Making Program Diskette Sets . . . . . . . . . . . . . . . . . . . . . . . . . . . . . . . . . . . . . . . . 1-5
Setting Up Windows NT . . . . . . . . . . . . . . . . . . . . . . . . . . . . . . . . . . . . . . . . . . . . . 1-6
Creating a Windows NT Emergency Repair Diskette. . . . . . . . . . . . . . . . . . . . 1-8
&KDSWHU &XVWRPL]LQJWKH:LQGRZV'HVNWRS
Using the Welcome to Windows 98 Screen. . . . . . . . . . . . . . . . . . . . . . . . . . . . . . 2-1
Major Features of the Windows Desktop . . . . . . . . . . . . . . . . . . . . . . . . . . . . . . . . 2-2
Working Within Program Windows. . . . . . . . . . . . . . . . . . . . . . . . . . . . . . . . . . . . . 2-4
Control Panel. . . . . . . . . . . . . . . . . . . . . . . . . . . . . . . . . . . . . . . . . . . . . . . . . . . . . . 2-5
Setting Up Display Properties . . . . . . . . . . . . . . . . . . . . . . . . . . . . . . . . . . . . . . . . . 2-6
Changing the Wallpaper. . . . . . . . . . . . . . . . . . . . . . . . . . . . . . . . . . . . . . . . . . 2-6
Changing the Screen Saver . . . . . . . . . . . . . . . . . . . . . . . . . . . . . . . . . . . . . . . 2-7
Changing Desktop Themes . . . . . . . . . . . . . . . . . . . . . . . . . . . . . . . . . . . . . . . 2-8
Web View. . . . . . . . . . . . . . . . . . . . . . . . . . . . . . . . . . . . . . . . . . . . . . . . . . . . . 2-9
Shortcuts. . . . . . . . . . . . . . . . . . . . . . . . . . . . . . . . . . . . . . . . . . . . . . . . . . . . . . . . . 2-9
Creating a Shortcut on the Windows Desktop. . . . . . . . . . . . . . . . . . . . . . . . 2-10
Arranging and Positioning Shortcuts . . . . . . . . . . . . . . . . . . . . . . . . . . . . . . . 2-10
Using Windows Help. . . . . . . . . . . . . . . . . . . . . . . . . . . . . . . . . . . . . . . . . . . . . . . 2-11
&KDSWHU 8VLQJDQG,QVWDOOLQJ6RIWZDUH
Accessing Programs . . . . . . . . . . . . . . . . . . . . . . . . . . . . . . . . . . . . . . . . . . . . . . . . 3-1
Basic File Management. . . . . . . . . . . . . . . . . . . . . . . . . . . . . . . . . . . . . . . . . . . . . . 3-1
My Computer. . . . . . . . . . . . . . . . . . . . . . . . . . . . . . . . . . . . . . . . . . . . . . . . . . 3-1
Windows Explorer . . . . . . . . . . . . . . . . . . . . . . . . . . . . . . . . . . . . . . . . . . . . . . 3-2
Finding Files . . . . . . . . . . . . . . . . . . . . . . . . . . . . . . . . . . . . . . . . . . . . . . . . . . . 3-3

viii
Copying Files . . . . . . . . . . . . . . . . . . . . . . . . . . . . . . . . . . . . . . . . . . . . . . . . . . 3-4
Moving Files. . . . . . . . . . . . . . . . . . . . . . . . . . . . . . . . . . . . . . . . . . . . . . . . . . . 3-4
Renaming Files . . . . . . . . . . . . . . . . . . . . . . . . . . . . . . . . . . . . . . . . . . . . . . . . 3-4
Deleting Files. . . . . . . . . . . . . . . . . . . . . . . . . . . . . . . . . . . . . . . . . . . . . . . . . . 3-5
Retrieving a Deleted File From the Recycle Bin. . . . . . . . . . . . . . . . . . . . 3-5
Emptying the Recycle Bin. . . . . . . . . . . . . . . . . . . . . . . . . . . . . . . . . . . . . 3-5
Shutting Down Your Computer. . . . . . . . . . . . . . . . . . . . . . . . . . . . . . . . . . . . . . . . 3-6
Installing and Configuring Additional Software . . . . . . . . . . . . . . . . . . . . . . . . . . . . 3-6
Temporarily Disabling Windows 98 Virus-Scanning Programs . . . . . . . . . . . . 3-7
Removing Software . . . . . . . . . . . . . . . . . . . . . . . . . . . . . . . . . . . . . . . . . . . . . . . . 3-7
Device Drivers. . . . . . . . . . . . . . . . . . . . . . . . . . . . . . . . . . . . . . . . . . . . . . . . . . . . . 3-7
Backing Up Files . . . . . . . . . . . . . . . . . . . . . . . . . . . . . . . . . . . . . . . . . . . . . . . . . . . 3-8
&KDSWHU 8VLQJ&RPSXWHU+DUGZDUH
Video Display. . . . . . . . . . . . . . . . . . . . . . . . . . . . . . . . . . . . . . . . . . . . . . . . . . . . . . 4-1
Changing the Display Resolution in Windows 98 . . . . . . . . . . . . . . . . . . . . . . 4-1
Changing the Refresh Rate in Windows 98. . . . . . . . . . . . . . . . . . . . . . . . . . . 4-3
Changing the Display Resolution in Windows NT . . . . . . . . . . . . . . . . . . . . . . 4-4
Changing the Refresh Frequency in Windows NT. . . . . . . . . . . . . . . . . . . . . . 4-5
Keyboard. . . . . . . . . . . . . . . . . . . . . . . . . . . . . . . . . . . . . . . . . . . . . . . . . . . . . . . . . 4-5
Mouse. . . . . . . . . . . . . . . . . . . . . . . . . . . . . . . . . . . . . . . . . . . . . . . . . . . . . . . . . . . 4-7
CD-ROM and DVD-ROM Drives . . . . . . . . . . . . . . . . . . . . . . . . . . . . . . . . . . . . . . . 4-8
Speakers . . . . . . . . . . . . . . . . . . . . . . . . . . . . . . . . . . . . . . . . . . . . . . . . . . . . . . . . . 4-9
Microphone. . . . . . . . . . . . . . . . . . . . . . . . . . . . . . . . . . . . . . . . . . . . . . . . . . . . . . . 4-9
Adding a Printer. . . . . . . . . . . . . . . . . . . . . . . . . . . . . . . . . . . . . . . . . . . . . . . . . . . . 4-9
Using Plug and Play Devices. . . . . . . . . . . . . . . . . . . . . . . . . . . . . . . . . . . . . . . . . 4-10
System Upgrades . . . . . . . . . . . . . . . . . . . . . . . . . . . . . . . . . . . . . . . . . . . . . . . . . 4-11
&KDSWHU )UHTXHQWO\$VNHG4XHVWLRQV
General Questions . . . . . . . . . . . . . . . . . . . . . . . . . . . . . . . . . . . . . . . . . . . . . . . . . 5-1
Program Diskette Maker Questions . . . . . . . . . . . . . . . . . . . . . . . . . . . . . . . . . . . . 5-2
Software Questions . . . . . . . . . . . . . . . . . . . . . . . . . . . . . . . . . . . . . . . . . . . . . . . . 5-2
Hardware Questions. . . . . . . . . . . . . . . . . . . . . . . . . . . . . . . . . . . . . . . . . . . . . . . . 5-3
Getting Help . . . . . . . . . . . . . . . . . . . . . . . . . . . . . . . . . . . . . . . . . . . . . . . . . . . . . . 5-5
,QGH[
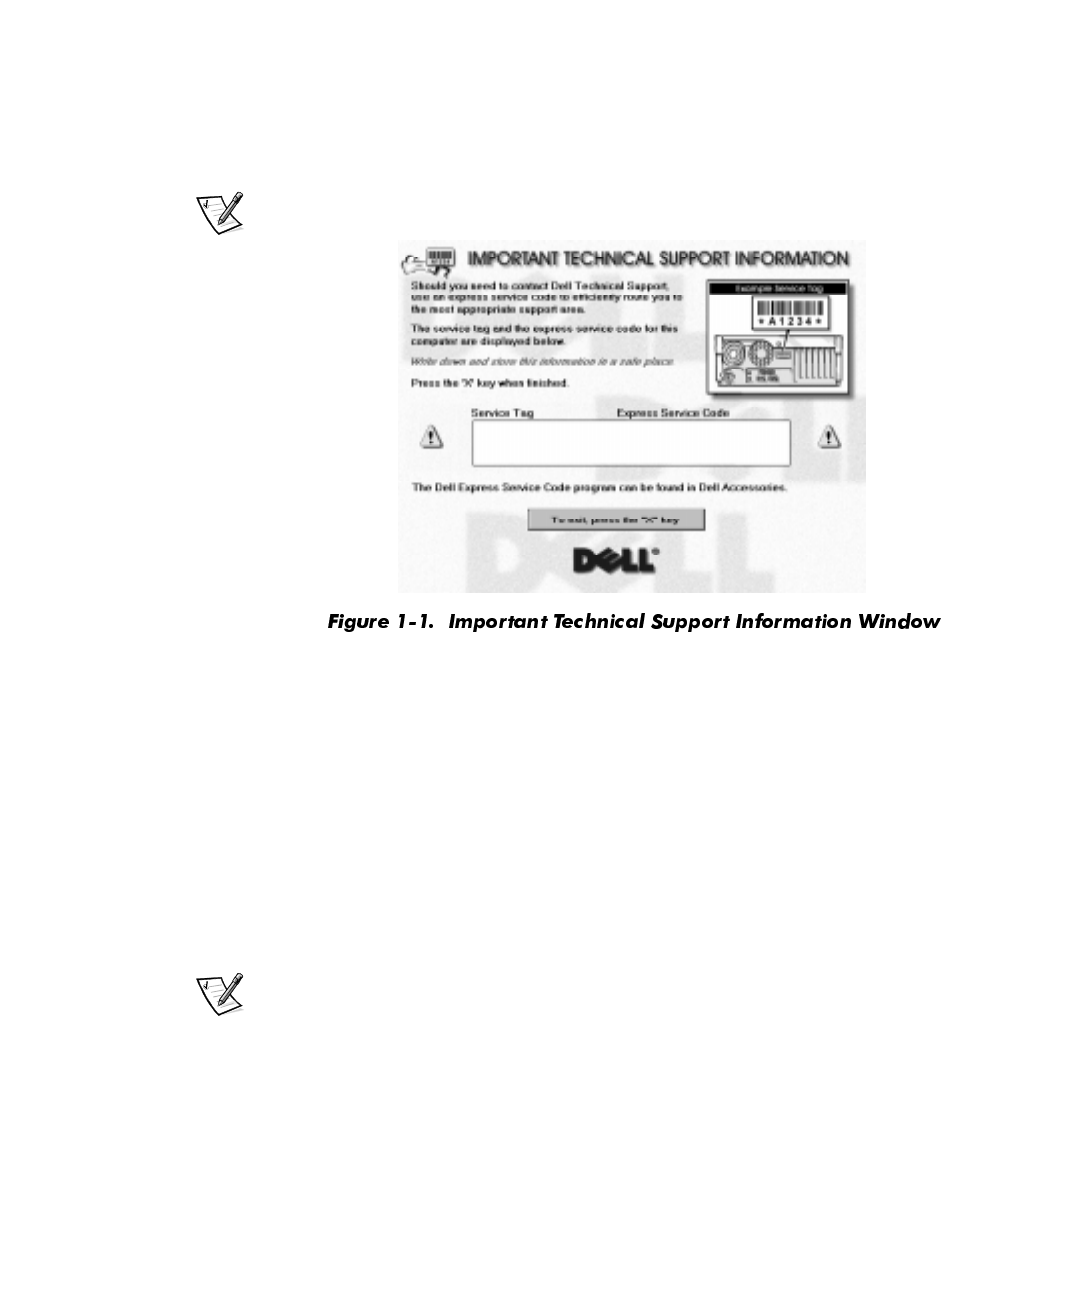
)LJXUHV Figure 1-1. Important Technical Support Information Window . . . . . . . . . . . . . . 1-2
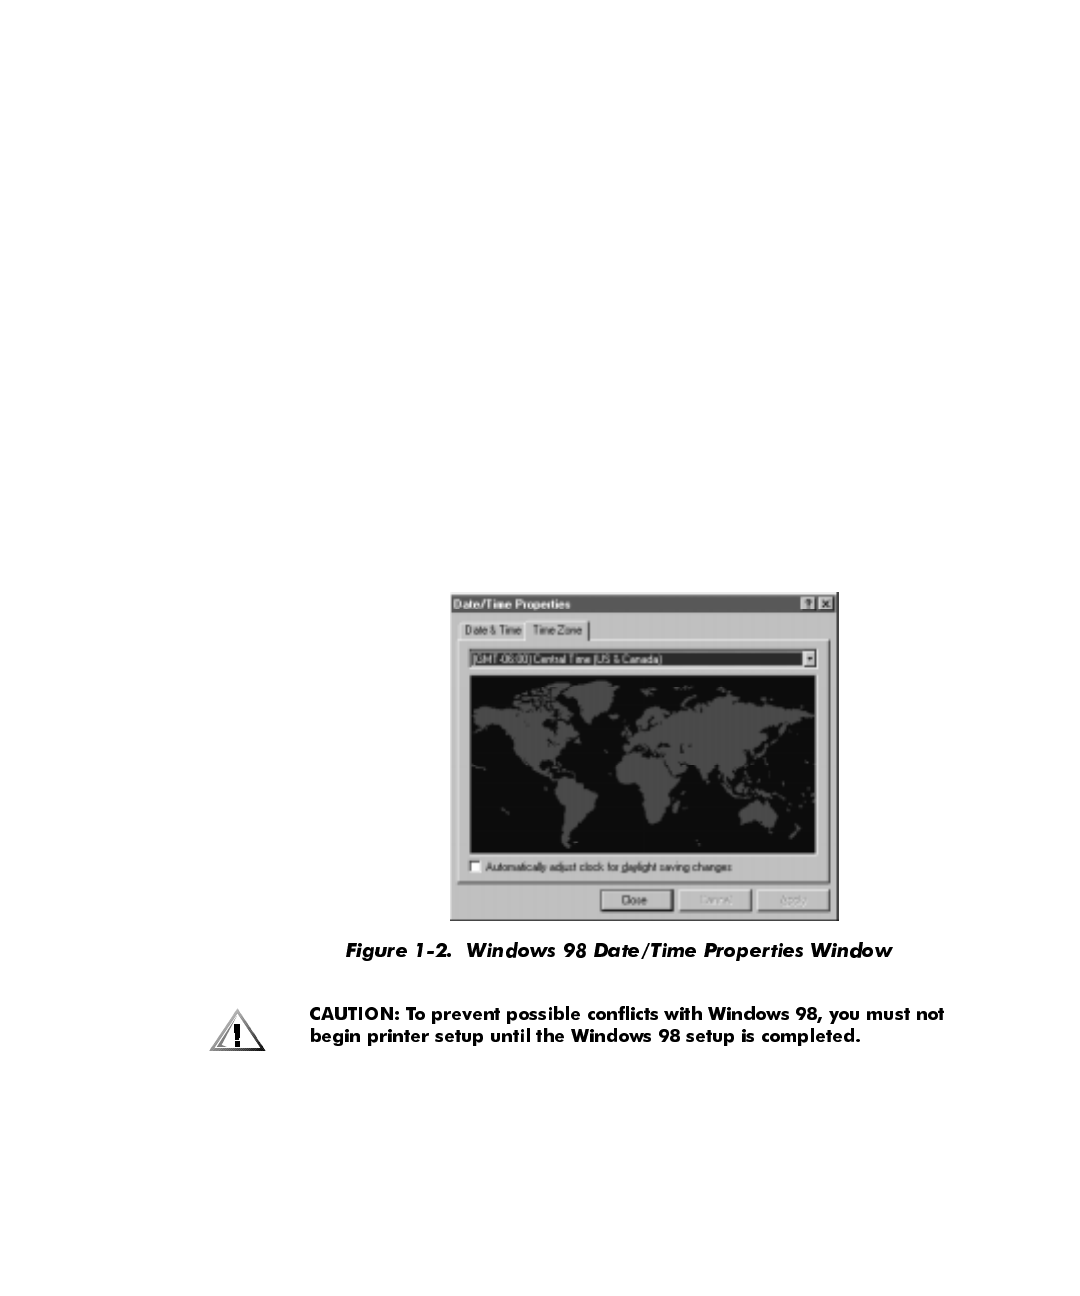
Figure 1-2. Windows 98 Date/Time Properties Window. . . . . . . . . . . . . . . . . . . 1-3
Figure 1-3. Dell Setup Icon . . . . . . . . . . . . . . . . . . . . . . . . . . . . . . . . . . . . . . . . . 1-4
Figure 2-1. Windows Desktop. . . . . . . . . . . . . . . . . . . . . . . . . . . . . . . . . . . . . . . 2-2
Figure 2-2. Start Button Menu. . . . . . . . . . . . . . . . . . . . . . . . . . . . . . . . . . . . . . . 2-3

ix
Figure 2-3. Windows Title Bar . . . . . . . . . . . . . . . . . . . . . . . . . . . . . . . . . . . . . . . 2-4
Figure 2-4. Taskbar and Program Buttons . . . . . . . . . . . . . . . . . . . . . . . . . . . . . . 2-5
Figure 2-5. Control Panel Window. . . . . . . . . . . . . . . . . . . . . . . . . . . . . . . . . . . . 2-5
Figure 2-6. Background Tab of the Display Properties Window . . . . . . . . . . . . . 2-6
Figure 2-7. Screen Saver Tab of the Display Properties Window . . . . . . . . . . . . 2-7
Figure 2-8. Desktop Themes Window. . . . . . . . . . . . . . . . . . . . . . . . . . . . . . . . . 2-9
Figure 2-9. Contents Tab of Windows Help. . . . . . . . . . . . . . . . . . . . . . . . . . . . 2-11
Figure 3-1. My Computer Window . . . . . . . . . . . . . . . . . . . . . . . . . . . . . . . . . . . 3-2
Figure 3-2. Windows Explorer . . . . . . . . . . . . . . . . . . . . . . . . . . . . . . . . . . . . . . . 3-3
Figure 3-3. Find: All Files Window . . . . . . . . . . . . . . . . . . . . . . . . . . . . . . . . . . . . 3-3
Figure 3-4. Shut Down Windows Window . . . . . . . . . . . . . . . . . . . . . . . . . . . . . 3-6
Figure 4-1. Windows 98 Display Properties Window . . . . . . . . . . . . . . . . . . . . . 4-2
Figure 4-2. Windows 98 Advanced Display Properties Window . . . . . . . . . . . . . 4-3
Figure 4-3. Windows NT Display Properties Window . . . . . . . . . . . . . . . . . . . . . 4-4
Figure 4-4. Typical Keyboard . . . . . . . . . . . . . . . . . . . . . . . . . . . . . . . . . . . . . . . . 4-6
Figure 4-5. Microsoft IntelliMouse. . . . . . . . . . . . . . . . . . . . . . . . . . . . . . . . . . . . 4-7
Figure 4-6. Properly Inserting a Disc . . . . . . . . . . . . . . . . . . . . . . . . . . . . . . . . . . 4-8
7DEOHV Table 2-1. Major Features of the Windows Desktop . . . . . . . . . . . . . . . . . . . . . 2-2
Table 2-2. Start Menu Options . . . . . . . . . . . . . . . . . . . . . . . . . . . . . . . . . . . . . . 2-3
Table 2-3. Background Tab Features . . . . . . . . . . . . . . . . . . . . . . . . . . . . . . . . . 2-7
Table 2-4. Screen-Saver Tab Features . . . . . . . . . . . . . . . . . . . . . . . . . . . . . . . . 2-8
Table 4-1. Windows Logo Key Combinations. . . . . . . . . . . . . . . . . . . . . . . . . . . 4-6

x
Preparing Your Computer System for Use the First Time 1-1
&+$37(5
3UHSDULQJ<RXU&RPSXWHU6\VWHP
IRU8VHWKH)LUVW7LPH
After you connect your computer system according to the steps on the
Getting Started
sheet, you need to prepare it for use the first time you start it. Your Dell Dimension®
XPS R
xxx
system has been shipped with either the Microsoft® Windows® 98 or
Microsoft Windows NT® operating system already installed. Perform the steps in the
setup procedure corresponding to your operating system so the software functions
properly on your Dell® system.
6HWWLQJ8S:LQGRZV
Initial setup of Windows 98 takes about 15 minutes. The setup process is customized
according to which computer components you have.
To complete the initial setup of Windows 98 on your Dell system, follow these steps:
1. Turn on your system.
The Dell Software License window appears. By typing y, you are agreeing to
read the software license agreement that came with your system.
1-2 Dell Dimension XPS R
xxx
Systems Setup Guide
2. Type y to continue.
The Important Technical Support Information window appears (see Figure 1-1)
and displays your Express Service Code. The Express Service Code helps expe-
dite Dell technical support. Record the code and store it in a safe place.
NOTE: Dell’s Express Service Code may not be available in all countries.
3. Type x to continue.
4. When the Complete the Dell Setup window appears, read the message that
appears in the window and then press any key to continue the setup process.
Your system restarts automatically.
5. When the Regional Settings window appears, select the regional setting for
your location and then click Next>.
This setting tells Windows 98 how to display numbers, dates, time, and currency.
6. In the Keyboard Layout window, accept the default (highlighted) keyboard from
the list and then click Next>.
NOTE: If you are located outside of the U.S., click the keyboard for your location.
7. In the User Information window, type your name and, if applicable, company
name. Then click Next>.
The Name field must be completed; the Company Name field is optional.
8. Read the license agreement, click I accept the Agreement, and then click Next>.
If you do not accept the agreement, you cannot access Windows 98. After you
accept the license agreement, the Product Key window appears.
Preparing Your Computer System for Use the First Time 1-3
9. Find the Product Key on the Certificate of Authenticity on the front cover of the
Getting Started/Microsoft Windows 98
document, enter the Product Key in the
fields provided, and then click Next>.
10. When the Start Wizard window appears, click Finish.
11. If the Enter Network Password window appears, enter a user name and password.
This window appears only when your system has a network card. When the Set
Windows Password window appears, reenter the password.
Depending on your system’s configuration, windows may appear listing which
items Windows 98 is setting up.
12. If the Enter Windows Password window appears, enter your user name and, if
applicable, your password. Then click OK.
The Username field must be completed; the Password field is optional.
Depending on your system’s configuration, windows may appear listing which
items Windows 98 is setting up.
13. In the Date/Time Properties window (see Figure 1-2), click the down arrow and
select the appropriate time zone for your location from the drop-down list. Click
Apply, and then click OK.
14. In the Add Printer Wizard window, click Cancel.
Windows 98 finalizes your setup.
1-4 Dell Dimension XPS R
xxx
Systems Setup Guide
15. If the IntelliMouse Productivity Tips window is open on the Windows desktop,
read the window’s contents. Click the Show Tips at Windows Startup box to
uncheck it, and then close the window by clicking the X in the upper-right corner.
16. If you are in the U.S. and ordered a Dell-installed modem with your system, a
screen appears that prompts you to set up your Internet access. Follow the
instructions that appear on the screen.
NOTE: Make sure you connected the telephone line(s) to the system as illus-
trated on the
Getting Started
sheet that came with your system.
If you have a network card or if you are located outside of the U.S., proceed to
the next step.
17. When the Welcome to Windows 98 screen appears, click the X in the upper-
right corner of the screen.
The Welcome to Windows 98 screen is described in Chapter 2, “Customizing
the Windows Desktop.”
18. Click anywhere inside the Welcome to Your New Dell Computer window to
view a brief multimedia presentation. When the presentation ends, close the
window by clicking the X in the upper-right corner.
&RPSOHWLQJ'HOO6HWXSLQ:LQGRZV
After you set up Windows 98, run the Dell Setup program so that your Dell-installed
software, including virus protection, works properly on your operating system. To
complete this setup, follow these steps:
1. Double-click the Dell Setup icon (see Figure 1-3) on the Windows desktop.
The Dell Setup program runs. When it finishes, a dialog box instructs you to
restart the computer.
NOTE: After the system restarts, the Dell Setup icon no longer appears.
2. Click Yes.
Windows 98 restarts automatically.
Preparing Your Computer System for Use the First Time 1-5
6HWWLQJ8S:LQGRZV17
If you are on a local area network (LAN), check with your network administrator
before
setting up Windows NT for information relevant to the setup process, such as the
computer name, the administrator password, and required network protocols. Also
attach the network cable (if applicable) and connect any devices you want to use with
your system.
Initial setup of Windows NT takes about 30 minutes. To configure Windows NT for
your system, follow these steps:
1. Turn on your system and any attached devices.
The Dell Software License window appears. By typing y, you are agreeing to
read the software license agreement that came with your system.
2. Type y to continue.
3. The Important Technical Support Information window appears and displays
your Express Service Code. The Express Service Code helps expedite Dell tech-
nical support. Record the code and store it in a safe place.
NOTE: Dell’s Express Service Code may not be available in all countries.
4. Type x to continue.
The setup program examines your computer’s hardware and copies to your hard-
disk drive the files needed to run Windows NT. After several minutes, the system
reboots and the Microsoft software license agreement appears.
5. Read the license agreement, and then click the I Agree button.
You must accept the agreement to proceed with the setup of Windows NT.
6. In the Windows NT Setup window, click Next> to continue.
7. Type your name and organization (up to 50 characters each) and click Next>.
8. In the Registration window, enter your 20-digit product ID number and click
Next>.
The number is located on the Certificate of Authenticity on the front cover of the
Microsoft Windows NT Workstation
manual.
9. In the Administrator Account window, type your administrator password (up to
14 characters) in the Password field and in the Confirm Password field. Then
click Next>.

1-6 Dell Dimension XPS R
xxx
Systems Setup Guide
10. In the Windows NT Setup window, Click Next>.
If your system has a network card, it is automatically detected and the required
files are copied to your hard-disk drive. Go to step 11.
If your system does not have a network card, go to step 14.
11. When prompted for information about network connections, click the Do Not
Connect This Computer to a Network at This Time radio button.
Setup configures your files to run Windows NT, and the appropriate files are then
copied to your hard-disk drive.
NOTE: You can add or update network hardware or software after completing this
setup procedure by double-clicking the Network icon in the Control Panel and
providing the necessary information.
12. Click Next>.
The Computer Name window appears and prompts you to enter the name of
your computer.
13. Type the unique name used to identify your computer on a network (up to
15 characters) and click Next>.
14. If you have a modem installed, the Install New Modem window appears. Con-
tinue with step 15.
If you do not have a modem installed, click Cancel and proceed to step 20.
15. Click Next> to let Windows NT detect any installed modem.
Dell recommends that you let Windows NT detect your modem. However, you
can click the Don’t Detect My Modem; I Will Select From a List radio button,
and then manually select a modem.
16. Click Next> to continue the modem setup, or click Change... to select a different
modem.
Windows NT then installs the modem drivers and prompts you for information
about your current location.
17. Select the appropriate country from the drop-down list box. Provide your area
(city) code and any telephone number required to access an outside line. Specify
whether you are using tone or pulse dialing. Then click Next>.
If you do not provide an area (city) code, the Dialing Properties dialog box
appears and prompts you to enter a code.
18. When a message tells you that the modem setup was successful, click Finish.
19. Verify the settings in the Modem Properties window; then click Close.

Preparing Your Computer System for Use the First Time 1-7
20. The Setup program continues configuration and file installation.
If you receive a message warning you that your system is running low on registry
quota or virtual memory, click OK. Dell adjusted the registry so that you should
not exceed the memory threshold.
A dialog box appears and states that Windows NT has been installed.
21. Remove any diskettes and CDs from your computer’s drives.
22. Reboot your computer by clicking the Restart Computer button.
23. When prompted to select an operating system, use the up- or down-arrow key
to highlight Windows NT Workstation Version 4.00 (default setting) or
Windows NT Workstation Version 4.00 (VGA Mode). Then press <Enter>.
If no action is taken within 30 seconds, the default setting is selected
automatically.
24. When prompted, press <Ctrl><Alt><Del> to log on to Windows NT.
25. At the Logon Information window, type the administrator password you entered
in step 9 and click OK.
&UHDWLQJD:LQGRZV17(PHUJHQF\5HSDLU'LVNHWWH
The emergency repair diskette saves your original configuration and can be used to
restore your system to its initial setup state if files become corrupted. It should not be
used as a backup tool.
To create the emergency repair diskette, follow these steps:
1. Click the Start button, point to Programs, and click the Dell Accessories folder.
2. Click the Create Repair Disk icon.
3. In the Repair Disk Utility window, click Create Repair Disk.
4. Label a diskette ”Emergency Repair Disk,“ insert it into the diskette drive, and
click OK.
The diskette is formatted and the configuration files are copied to it.
5. When the Repair Disk Utility window reappears, click Exit.
6. Remove the diskette from your diskette drive, and store it in a safe place.
7. Click the Start button, point to Programs—>Dell Accessories, and then click
Program Disk Maker.
8. Create backup diskettes for your Dell-installed software (refer to “Making Pro-
gram Diskette Sets” found earlier in this chapter).

1-8 Dell Dimension XPS R
xxx
Systems Setup Guide
&RQJUDWXODWLRQV
<RXUV\VWHPLVVHWXSDQGUHDG\WRXVH
:KDW·V1H[W"
Chapter 2 orients you to the Windows desktop. It also tells you how to change your
wallpaper and screen saver, create shortcuts, and position icons.
Chapter 3 describes how to access, install, and remove software. It also covers basic
file management, such as finding, copying, deleting, and renaming files.
Chapter 4 provides basic information and tips on using your computer hardware. Also
included are general instructions for adding a printer.
Chapter 5 offers answers to commonly asked questions about your computer system.
2QOLQH*XLGH
For your convenience, the information provided in Chapters 2 through 5 of this
Setup
Guide
is available online. The
Online Guide
can be a handy reference tool as you work
on your desktop. It allows you to search for information in multiple ways and to quickly
link to related topics.
To open the guide, click the Start button, point to Programs—>Dell Accessories, and
click Online Guide.

Preparing Your Computer System for Use the First Time 1-9

1-10 Dell Dimension XPS R
xxx
Systems Setup Guide
Customizing the Windows Desktop 2-1
&+$37(5
&XVWRPL]LQJWKH:LQGRZV'HVNWRS
This chapter describes the main features of the Windows desktop and explains how
to customize the operating system for your use. It also tells you how to get help while
using Windows.
8VLQJWKH:HOFRPHWR:LQGRZV6FUHHQ
The Welcome to Windows 98 screen enables you to learn about and configure some
additional features of your operating system. It contains the following options:
Register Now — Registers your copy of Windows 98 with Microsoft.
NOTE: To register your copy of Windows 98, you need to be connected to the
Internet.
Discover Windows 98 — Provides information about basic computer essentials,
features of Windows 98, and Windows 98 resources. For a tutorial of Windows
98, select the Windows 98 Overview option.
Maintain Your Computer — Configures your system for regular automated sys-
tem maintenance. Newer versions of device drivers and other software should be
downloaded from www.dell.com.
NOTE: Dell provides support for your system as it was configured by Dell.
When you place the cursor over an option, information about that option is displayed
to the right of Contents. Click an option or click Begin to access the Register Now
window. To bypass the Welcome to Windows 98 screen, click the X in the upper-
right corner of the screen.
The Welcome to Windows 98 screen appears each time you start the computer sys-
tem. To change this default, uncheck the Show this window each time Windows 98
starts option. If you uncheck this option and later want to access the Welcome to
Windows 98 screen, click the Start button, point to Programs—>Accessories—>
System Tools, and click Welcome to Windows.
2-2 Dell Dimension XPS R
xxx
Systems Setup Guide
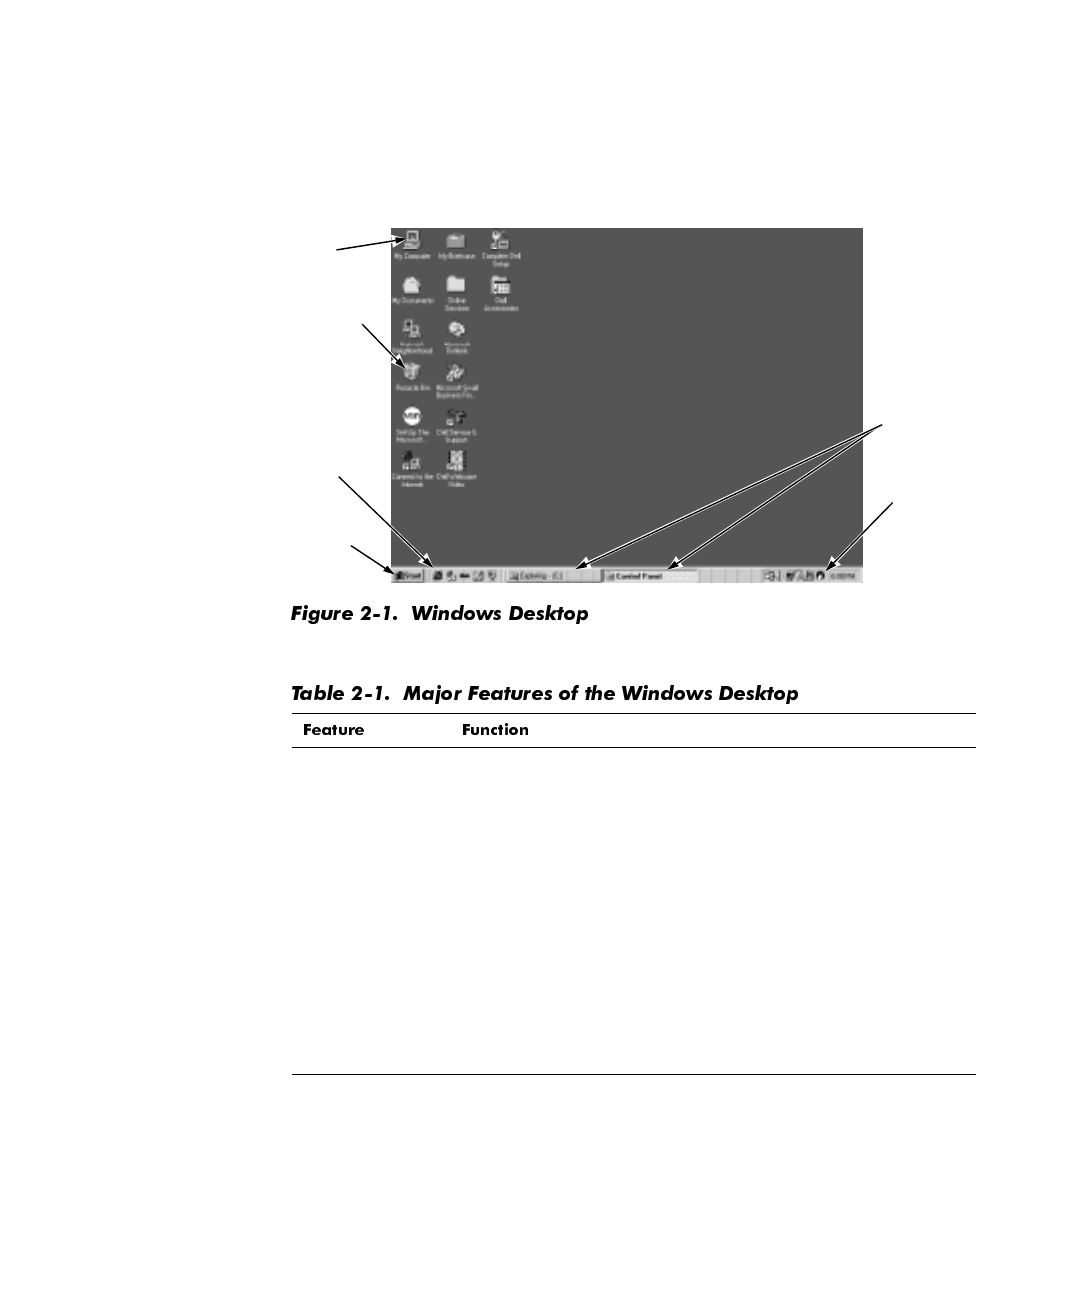
0DMRU)HDWXUHVRIWKH:LQGRZV'HVNWRS
Although your system may vary slightly depending on its hardware and software
configuration, the Windows desktop has many standard features (see Figure 2-1).
Table 2-1 describes these features.
Taskbar The area at the bottom of the screen is called the
taskbar
.
When you open a program, a button appears on the taskbar.
The taskbar contains the Start button on the left and a clock on
the right. You may also see other icons on the taskbar, depend-
ing on your system’s software and hardware features.
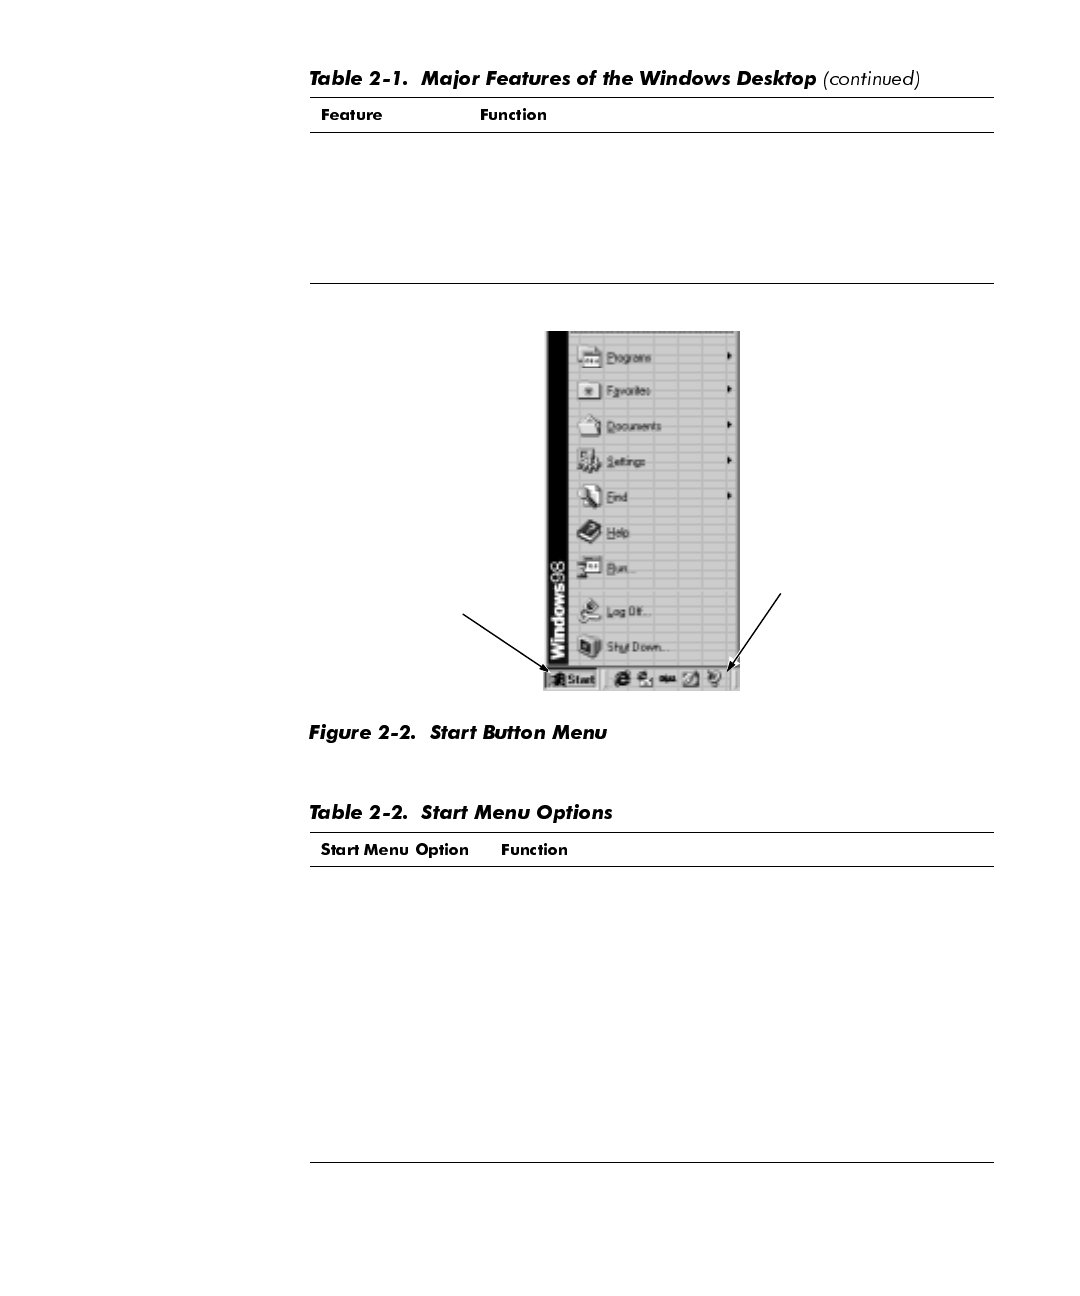
Start Button The Start button provides access to the contents of your
computer. Click the Start button to display a menu containing
the system’s main program and program group icons (see Fig-
ure 2-2). Refer to Table 2-2 for descriptions of the Start menu
options.
My Computer Double-click this icon to display the contents of your computer.
Icons appear for any installed drives, as well as the Control
Panel, printers, and so on. Refer to “My Computer” in
Chapter 3 for more information.
taskbar
program
buttons
My
Computer
icon
Recycle
Bin icon
Internet
Explorer
icon
Start
button
Customizing the Windows Desktop 2-3
Recycle Bin When you delete a file from your system, it moves to the
Recycle Bin, where it can later be retrieved. To permanently
remove files, empty the Recycle Bin as explained in “Deleting
Files” in Chapter 3.
Internet
Explorer Click this icon to launch Internet Explorer and access the
Internet.
Programs Displays a list of installed programs you can start.
Favorites Displays a list of favorite Web content and sites.
Documents Displays a list of most-recently opened documents.
Settings Displays a list of user-configurable system components.
Find Displays a menu to help you find files, folders, or computers
to which you are connected. Refer to “Finding Files” in
Chapter 3 for more information.
Help Opens the help system that provides instructions for using
Windows. Refer to “Using Windows Help” found later in
this chapter for more information.
Start
button taskbar
2-4 Dell Dimension XPS R
xxx
Systems Setup Guide
For more information on the Windows desktop, refer to the Microsoft documentation
that accompanied your system.
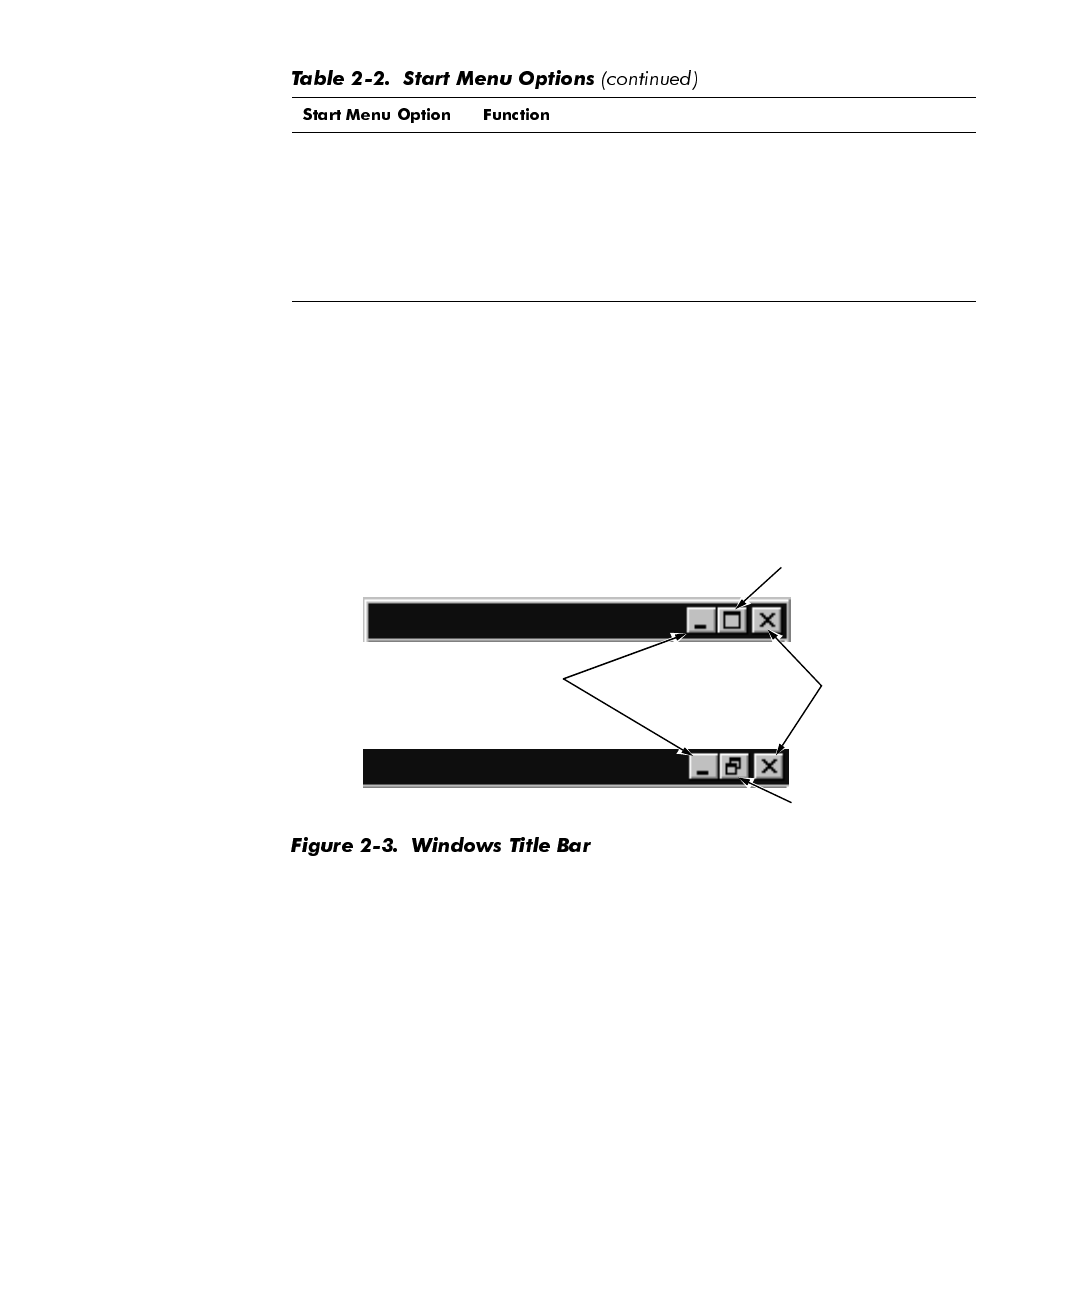
:RUNLQJ:LWKLQ3URJUDP:LQGRZV
Each program and document has a
title bar
at the top of the window that displays the
title of the window. The title bar includes three small icons on the right side (see
Figure 2-3).
Click the minimize button to close the window but leave the program running (click
the program’s button on the taskbar to restore the window). Click the maximize but-
ton to size the window to the screen, and click the resize button to return the window
to its original size. Click the close button to close the document or program.
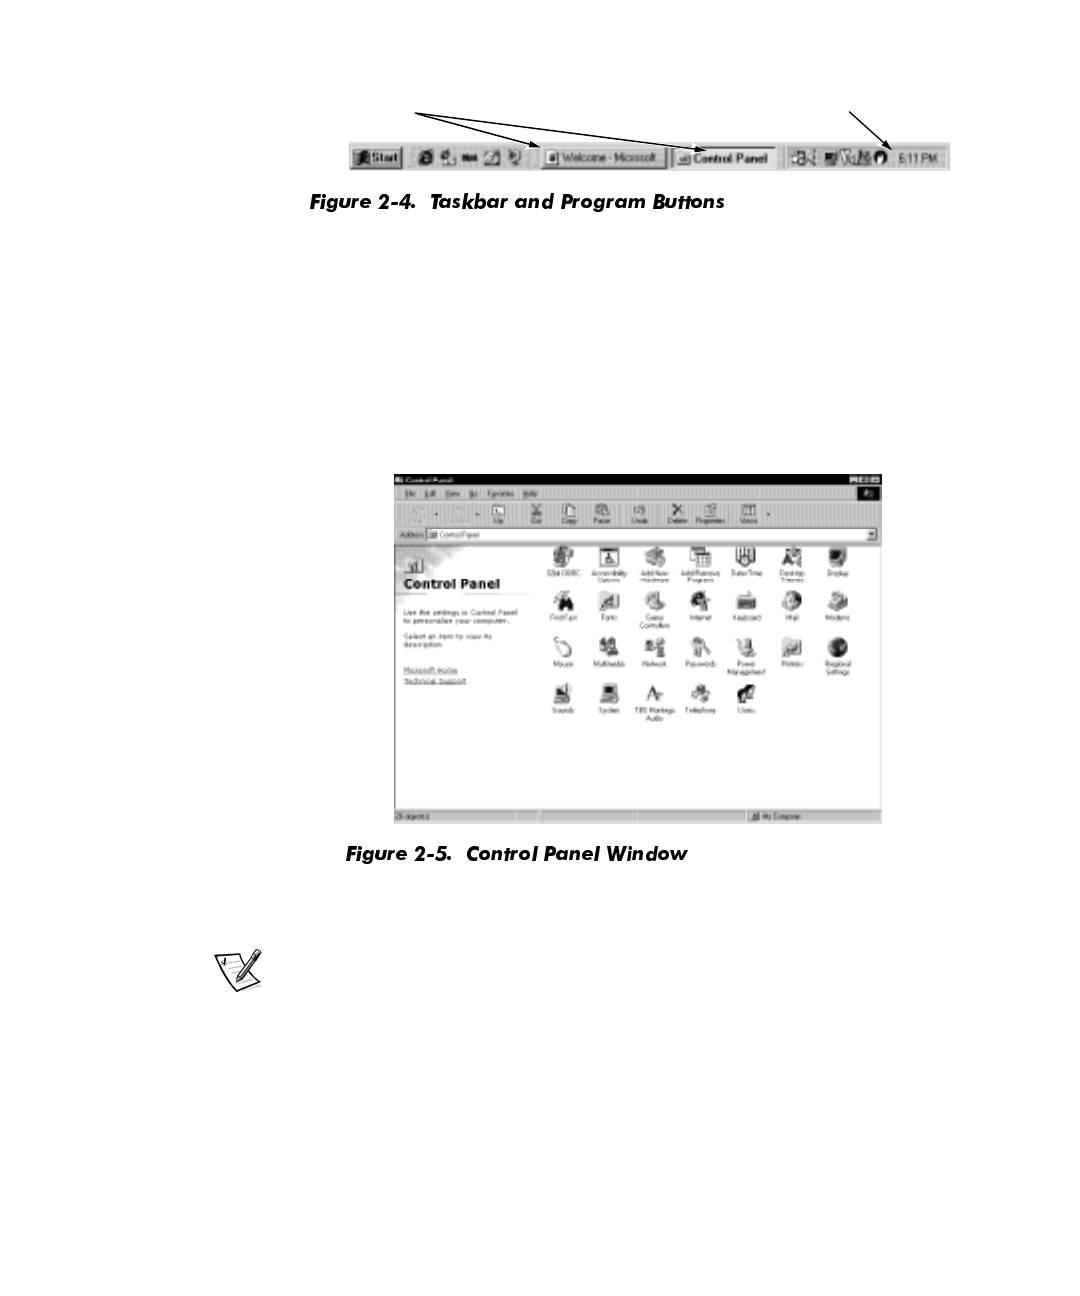
Each time you open a program, a button for that program appears on the taskbar (see
Figure 2-4). You can click the buttons to toggle between open programs.
Run... Displays a window for starting a program or file with an
MS-DOS® command.
Log Off... Logs off the current user so that a new user can log on.
Shut Down... Displays a window with options for shutting down your com-
puter system, restarting it, restarting in DOS mode, or enter-
ing standby mode.
minimize button close button
maximize button
resize button
Customizing the Windows Desktop 2-5
&RQWURO3DQHO
The Control Panel contains many of the tools used to change how Windows looks
and works. To access the Control Panel, follow these steps:
1. Click the Start button, point to Settings, and then click Control Panel (see
Figure 2-5).
A window containing system setup icons appears.
Typical icons include Display, Keyboard, Mouse, and Printers.
NOTE: The icons in the Control Panel vary depending on the hardware and soft-
ware configuration of your computer system. Click an icon to see a short
description of its settings.
2. Double-click an icon to see the settings that you can change for that item.
program
buttons taskbar
2-6 Dell Dimension XPS R
xxx
Systems Setup Guide
6HWWLQJ8S'LVSOD\3URSHUWLHV
The Display Properties window contains controls for customizing the way Windows
looks on your system. For example, you can change your desktop’s
wallpaper
(back-
ground) and screen saver. To access display settings, follow these steps:
1. Click the Start button, point to Settings, and click Control Panel.
2. Double-click the Display icon.
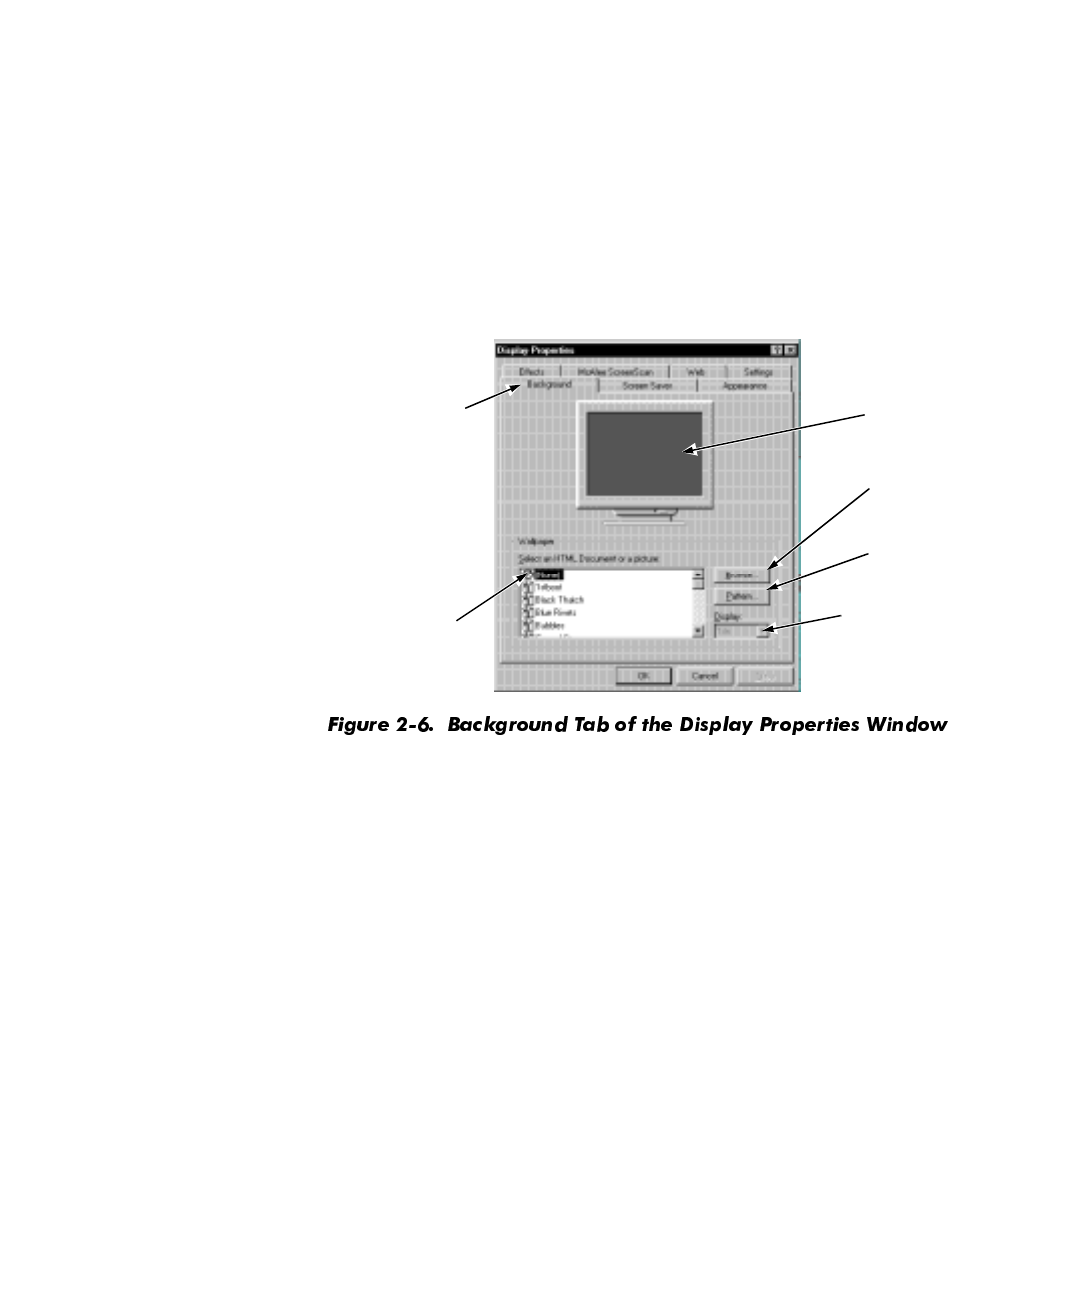
The Display Properties window opens with the Background tab selected by
default (see Figure 2-6).
&KDQJLQJWKH:DOOSDSHU
The
wallpaper
(background appearance of the Windows desktop) is changed on the
Background tab of the Display Properties window. Table 2-3 describes the various
parts of this tab. After you make any changes, click OK to apply (activate) them.
preview
window
Background tab
Wallpaper list
Pattern
button
Display
pull-down
menu
Browse
button
Customizing the Windows Desktop 2-7
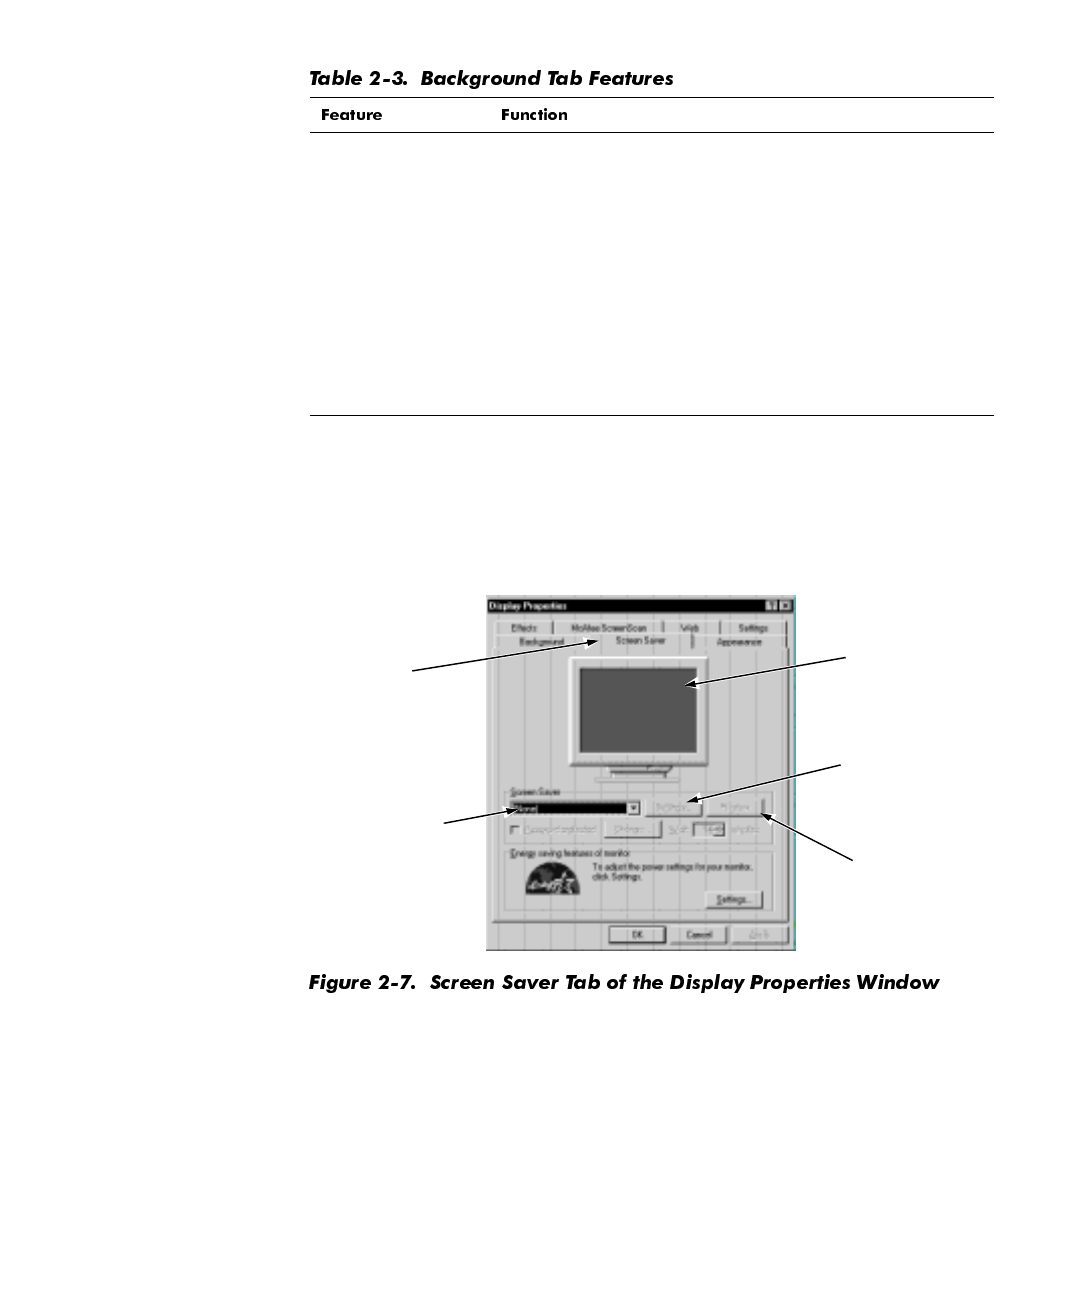
&KDQJLQJWKH6FUHHQ6DYHU
Screen savers
are programs that prevent a static image from damaging the monitor.
They start automatically after a user-defined period of inactivity. To change your sys-
tem’s screen saver, click the Screen Saver tab in the Display Properties window
(see Figure 2-7).
Table 2-4 describes the various parts of the Screen Saver tab. After you make any
changes, click OK to apply them.
Preview window Displays the current wallpaper or pattern.
Wallpaper list Click the name of the wallpaper you want to display, or click
(None) if you prefer not to use a wallpaper image. Click the
Browse button to use images in a directory you specify.
Pattern button Click the Pattern button to display a list of patterns for your
desktop, or click (None) if you prefer not to use a pattern.
This option is not available if the Tile option has been applied
to a wallpaper selection.
Display pull-down
menu Click Tile to tile a wallpaper image across the entire screen,
or click Center to place a single copy of the image in the
center of the screen.
Screen Saver
pull-down menu
preview
window
Screen
Saver tab
Settings
button
Preview
button

2-8 Dell Dimension XPS R
xxx
Systems Setup Guide
T
NOTE: Depending on your monitor, you may also have fields for other display controls,
such as energy-saving features. For more information, refer to the documentation that
came with your monitor.
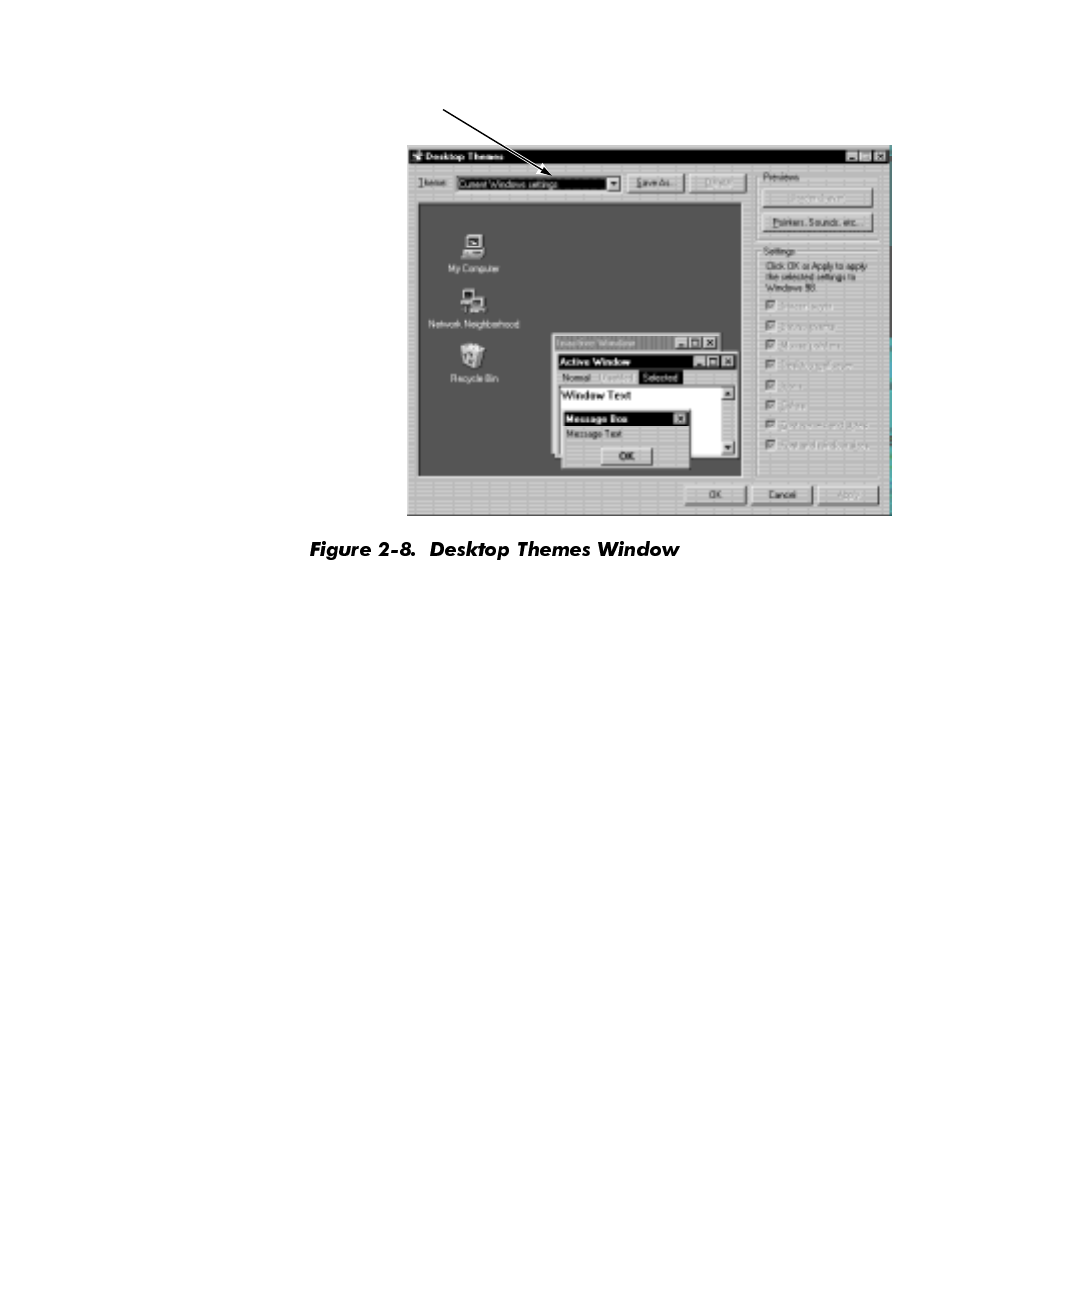
&KDQJLQJ'HVNWRS7KHPHV
You can change the way your desktop looks and add sound effects by using
desktop
themes
. To change desktop themes, follow these steps:
1. Click the Start button, point to Settings, and click Control Panel.
2. Double-click the Desktop Themes icon.
The Desktop Themes window opens (see Figure 2-8).
3. Select a theme from the Theme pull-down menu and click OK.
Preview window Displays the current screen saver.
Screen Saver
pull-down menu Choose a screen saver from the pull-down menu, or click
(None) if you prefer not to activate a screen saver.
Settings button Click this button to change various features of the screen
saver.
Preview button Click this button to run the currently selected screen saver.
Customizing the Windows Desktop 2-9
:HE9LHZ
Windows 98 adds Web environment features to the standard Windows interface,
such as the ability to single-click an icon, file, or folder to open it.
To disable this Web View, right-click on the desktop, point to Active Desktop, and
then uncheck View as Web Page (click the item if it is checked). Or click the Start but-
ton, point to Settings, click Active Desktop, and then uncheck View as Web Page.
To reactivate Web View, right-click on the desktop, point to Active Desktop, and then
click View as Web Page. Or click the Start button, point to Settings, click Active
Desktop, and then click View as Web Page.
To change the view of folders, click the Start button, point to Settings, and then click
Folder Options. Select the General tab, click the option you want (Web style, Clas-
sic style, or Custom), and click OK.
6KRUWFXWV
Shortcuts
are icons that provide quick access to frequently used programs, files, fold-
ers, and drives. By double-clicking a shortcut, you can open its corresponding folder or
file without having to find it first. Shortcuts do not change the location of files; if you
delete a shortcut, the original file is not affected.
Theme
pull-down menu

2-10 Dell Dimension XPS R
xxx
Systems Setup Guide
&UHDWLQJD6KRUWFXWRQWKH:LQGRZV'HVNWRS
To create a shortcut, follow these steps:
1. Open the My Computer window or Windows Explorer.
To open the My Computer window, double-click the My Computer icon on the
Windows desktop.
To open Windows Explorer, right-click the Start button and then click Explore.
2. Find the item for which you want a shortcut.
3. Using your right mouse button, click the object and drag it to the Windows desk-
top. Then release the right mouse button.
A menu appears next to your cursor.
4. Click Create Shortcut(s) Here.
An icon appears on your desktop that you can double-click at any time to activate
the shortcut.
$UUDQJLQJDQG3RVLWLRQLQJ6KRUWFXWV
To individually move shortcuts, point your mouse cursor at the icon, click it, and drag it
to the desired location.
To arrange all of your shortcut icons at once, follow these steps:
1. Move your mouse cursor to an empty spot on the Windows desktop, and click
the right mouse button.
2. From the pop-up menu, point to Arrange Icons.
3. Click the option for the icon arrangement you prefer.
The icons are automatically arranged.
Customizing the Windows Desktop 2-11
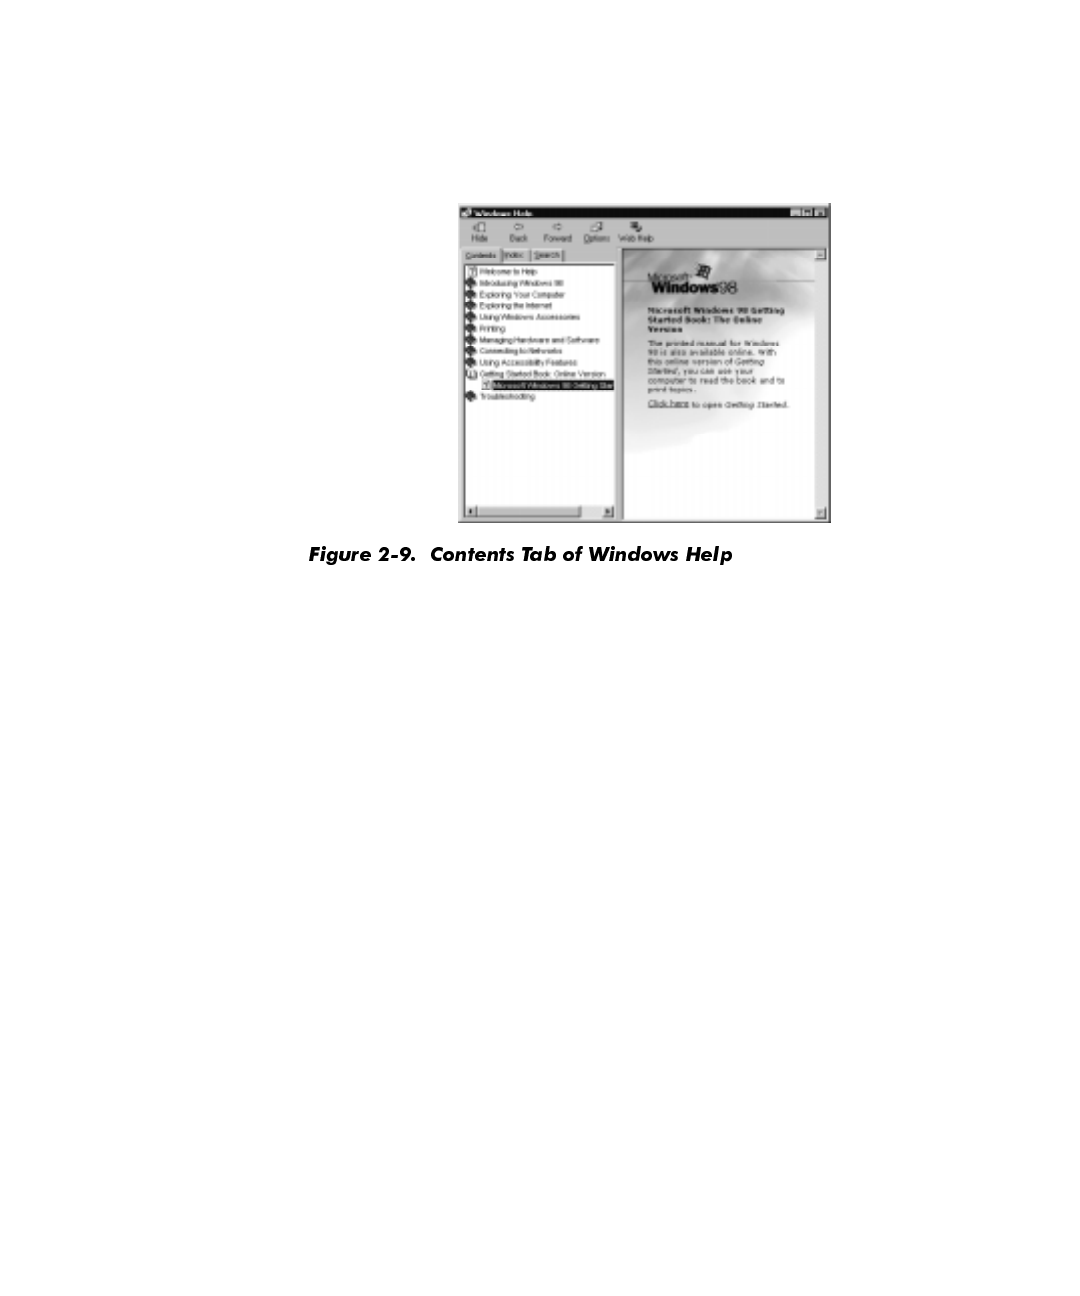
8VLQJ:LQGRZV+HOS
An extensive help system is built into your Microsoft operating system. To access
Help, click the Start button and then click Help. The Windows Help window appears
(see Figure 2-9).
The Contents tab lists help topics by subject, the Index tab lists topics alphabetically,
and the Search tab lets you search for topics based on words you provide.
The Windows help system can help orient you to Windows 98 operations. On the
Contents tab, click Getting Started Book: Online Version and then click Microsoft
Windows 98 Getting Started Book: The Online Version. Click the underlined words
indicated in the right pane to open the
Getting Started Book
. On the Contents tab,
click If You’re New to Windows or If You’ve Used Windows Before as appropriate.
For more information on using Windows Help, refer to Microsoft Windows documen-
tation that came with your system.

2-12 Dell Dimension XPS R
xxx
Systems Setup Guide

Using and Installing Software 3-1
&+$37(5
8VLQJDQG,QVWDOOLQJ6RIWZDUH
This chapter provides information about using Windows 98 and Windows NT to per-
form basic tasks, such as starting programs, managing files, and properly shutting
down your computer system. It also discusses adding and removing software pack-
ages and loading device drivers.
$FFHVVLQJ3URJUDPV
To access your programs, follow these steps:
1. Click the Start button, and then point to Programs.
In the Programs menu, a folder icon appears next to program groups with
multiple programs.
2. Click the program you want to start.
%DVLF)LOH0DQDJHPHQW
Windows 98 and Windows NT provide file management and browsing capabilities
with Windows Explorer and My Computer.
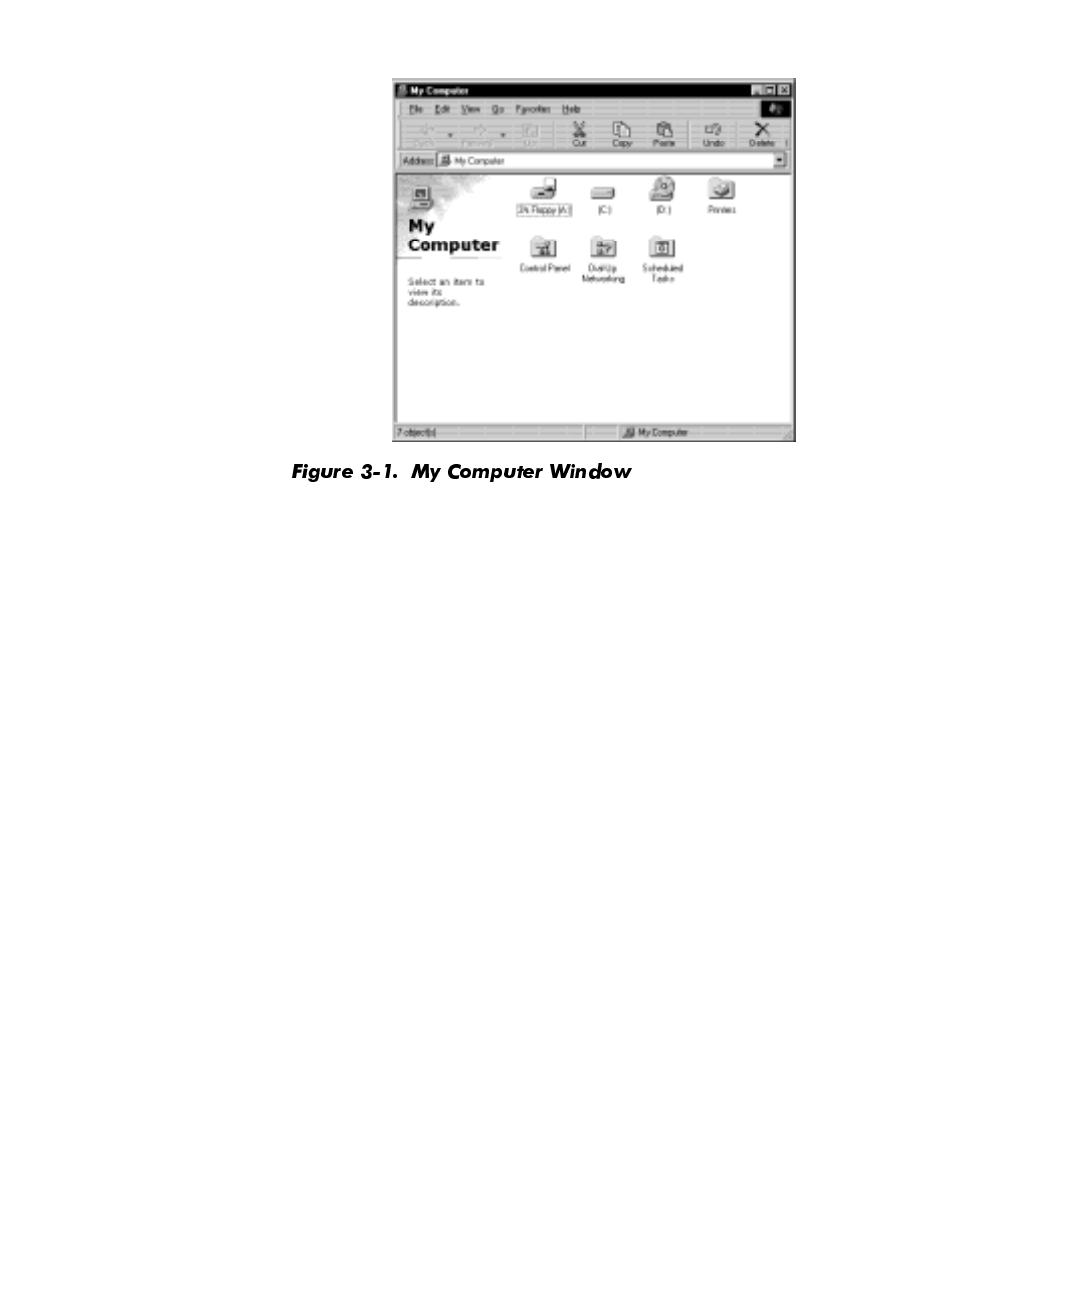
0\&RPSXWHU
My Computer contains various icons that represent the contents of your computer.
Icons appear for any installed drives, as well as the Control Panel and printers. To
open the My Computer window (see Figure 3-1), double-click the My Computer icon
on the Windows desktop.
3-2 Dell Dimension XPS R
xxx
Systems Setup Guide
To view the contents of any drive or folder, double-click its icon. As shown in
Figure 3-1, for Windows 98 your hard-disk drive has the drive letter C assigned. If you
have Windows NT, your hard-disk drive is partitioned into two logical drives. Each logi-
cal drive appears as a separate drive letter (C and D).
For more information on My Computer, refer to the Microsoft documentation that
came with your system.
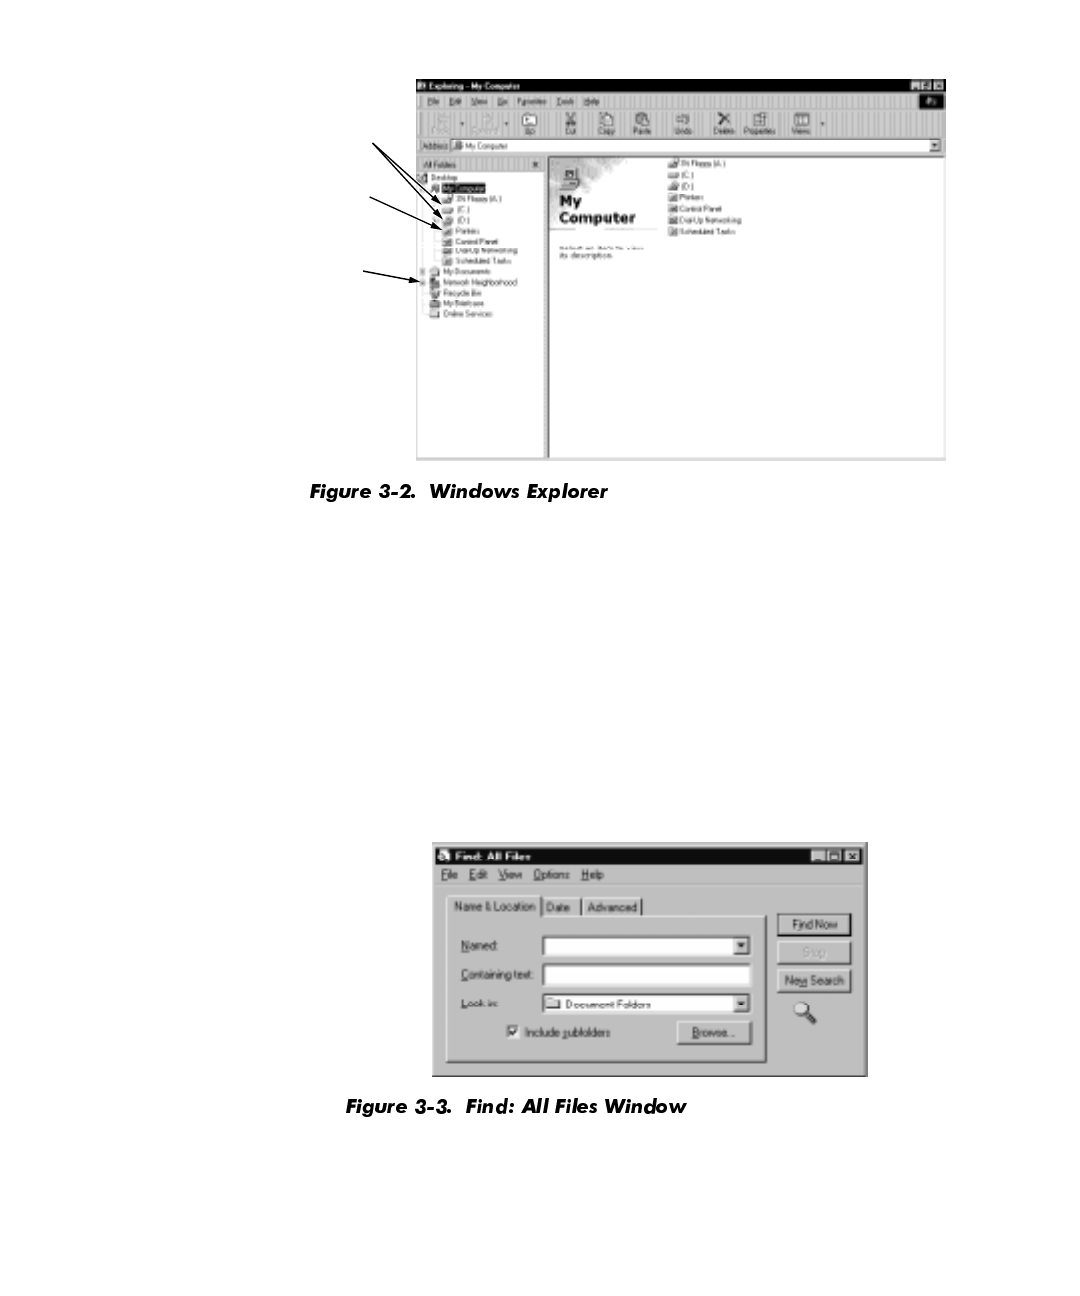
:LQGRZV([SORUHU
Windows Explorer displays the contents of your computer as an ordered list, or
tree
(see Figure 3-2). You can use this program to locate files on any drive or folder in your
computer.
To open Windows Explorer, click the Start button, point to Programs, and then click
Windows Explorer. Or right-click the Start button and then click Explore.
Using and Installing Software 3-3
The left side of the window shows drives and folders, and the right side lists the files
in the drive or folder selected. A plus (+) icon to the left of a drive or folder indicates
the presence of additional folders. Click the plus icon to expand the view one level. To
collapse the view, click the minus (–) icon to the left of a drive or folder.
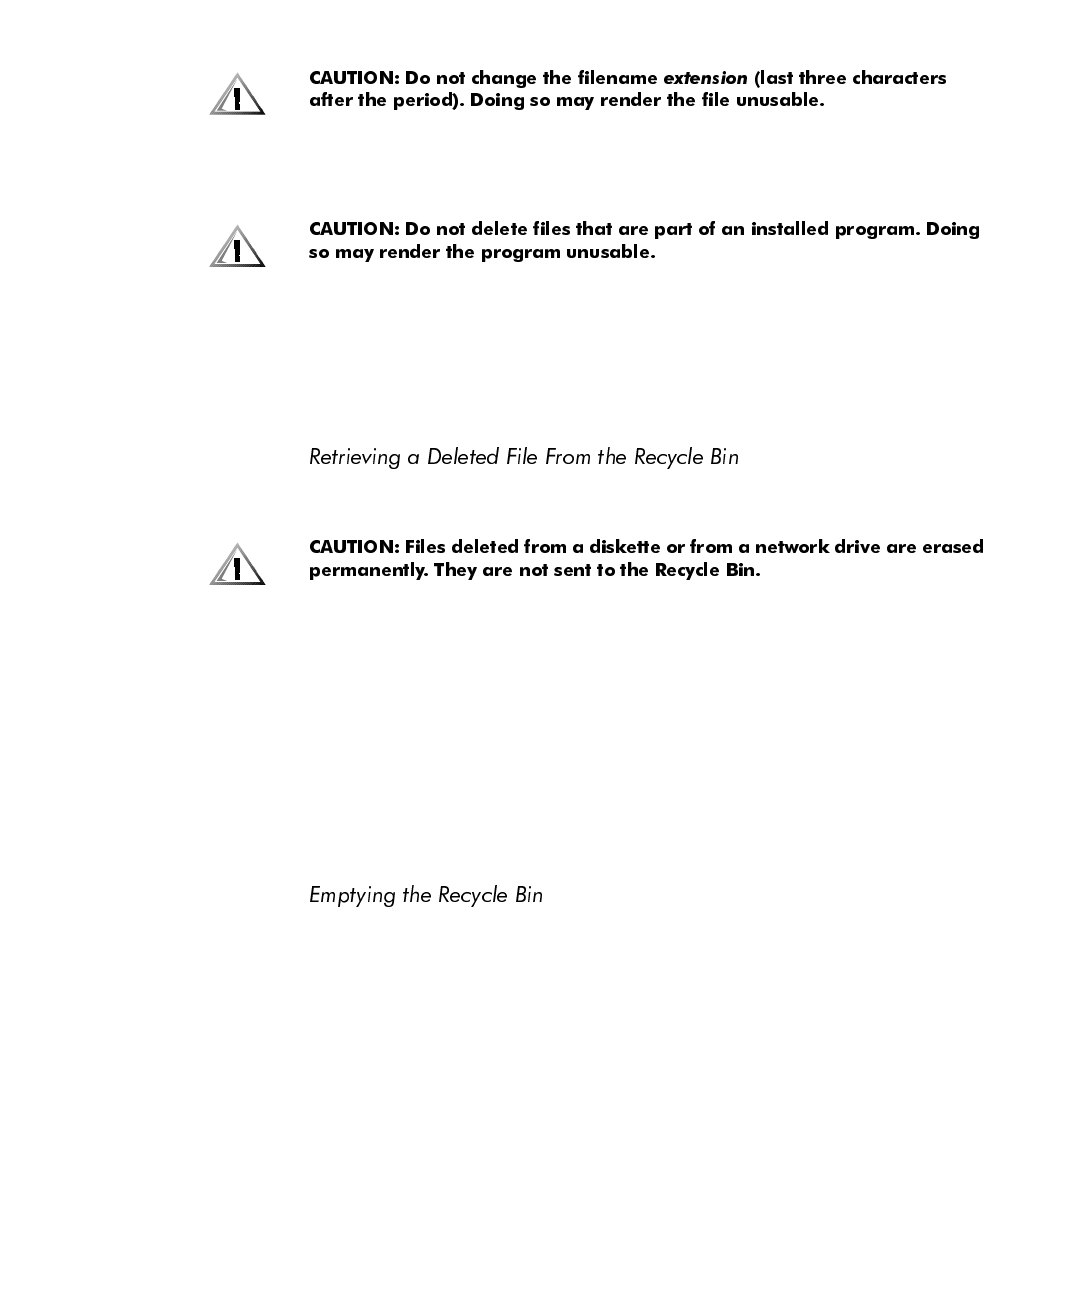
)LQGLQJ)LOHV
To locate a particular file or folder, follow these steps:
1. Click the Start button, point to Find, and then click Files or Folders.
The Find: All Files window opens with the Name & Location tab selected and
the cursor in the Named: field (see Figure 3-3).
plus
icon
drive
icons
folder
icon
3-4 Dell Dimension XPS R
xxx
Systems Setup Guide
2. Type the name of the file or folder you want to find.
3. Specify where you want Windows to search by clicking the arrow next to the
Look in: field.
NOTE: If you leave the default setting (C:), Windows searches the entire hard-disk
drive (or drive C partition).
4. Click the Find Now button to begin the search.
Windows lists any files meeting your search criteria below the Find: All Files
window.
&RS\LQJ)LOHV
To place a copy of a file in a new location, follow these steps:
1. U s e Windows Explorer or My Computer to locate the file you want to copy.
2. Click the file to select it.
3. Click the Edit menu, and then click Copy.
4. Open the folder where you want to copy the file.
5. Click the Edit menu, and then click Paste.
0RYLQJ)LOHV
To move a file to a new location, follow these steps:
1. U s e Windows Explorer or My Computer to locate the file you want to move.
2. Click the file to select it.
3. Click the Edit menu, and then click Cut.
4. Open the folder where you want to move the file.
5. Click the Edit menu, and then click Paste.
5HQDPLQJ)LOHV
To change the name of a file, follow these steps:
1. U s e Windows Explorer or My Computer to locate the file you want to rename.
2. Click the file to select it.
3. Click the File menu, and then click Rename.
Using and Installing Software 3-5
4. Type the new filename and press <Enter>.
'HOHWLQJ)LOHV
To delete a file, follow these steps:
1. U s e Windows Explorer or My Computer to locate the file you want to delete.
2. Click the file to select it.
3. Click the File menu, and then click Delete.
When you delete a file, it moves to the Recycle Bin. It is not removed from the sys-
tem until you empty the Recycle Bin.
If you delete a file in error and need to retrieve it from the Recycle Bin, follow these
steps:
1. Double-click the Recycle Bin icon located on the Windows desktop.
The Recycle Bin window opens and lists all deleted files, their previous locations,
and the date you deleted them.
2. Click the file you want to restore.
3. Click the File menu, and then click Restore.
The file disappears from the Recycle Bin and is restored to its original location.
Deleted files sent to the Recycle Bin still use space on the computer’s hard-disk drive.
To free up disk space, periodically empty the Recycle Bin by following these steps:
1. Double-click the Recycle Bin icon located on the Windows desktop.
The Recycle Bin window opens and lists all deleted files, their previous locations,
and the date you deleted them.
2. Click the File menu, and then click Empty Recycle Bin.
3. When a confirmation dialog box appears, click Yes to delete the file(s).
All files disappear from the Recycle Bin and are removed from the system.
3-6 Dell Dimension XPS R
xxx
Systems Setup Guide
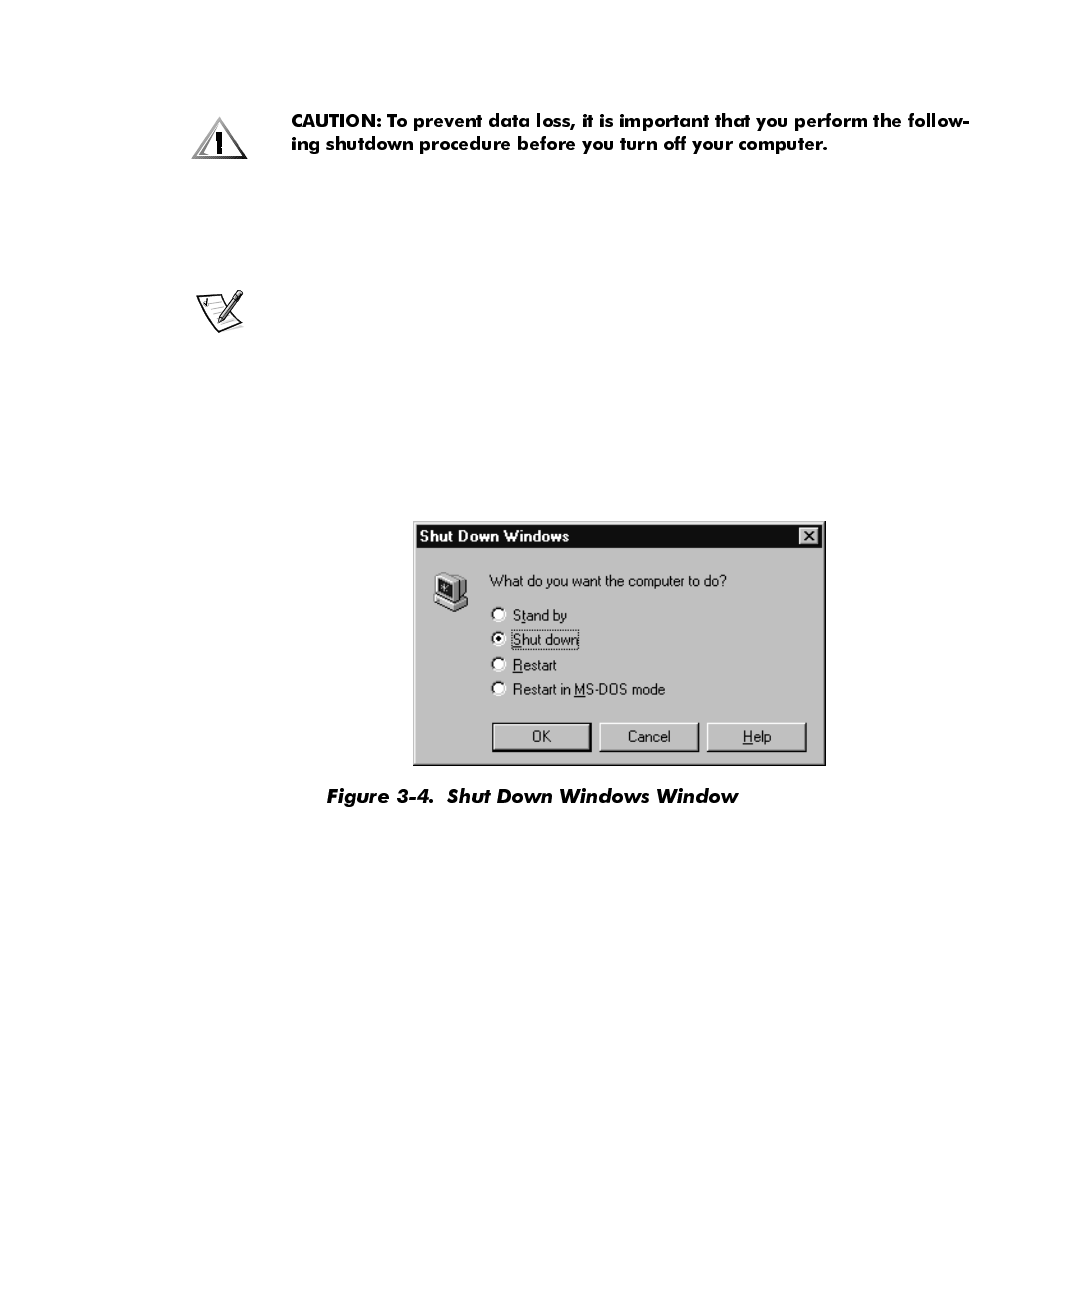
6KXWWLQJ'RZQ<RXU&RPSXWHU
To shut down your computer, follow these steps:
1. Save and exit any application programs and files you have open.
2. Click the Start button, and then click Shut Down.
NOTES: When you shut down your computer for the first time, Windows 98
defaults to standby mode. For information about standby mode, refer to “Using
Windows 98 Power Management Features” in Chapter 5 of the
Reference and
Troubleshooting Guide
.
By clicking Shut down, you ensure that data is saved and the system shuts
down completely.
3. In the Shut Down Windows window (see Figure 3-4), click Shut down and then
click OK.
,QVWDOOLQJDQG&RQILJXULQJ$GGLWLRQDO
6RIWZDUH
If you are unsure whether Dell installed a particular software package you ordered,
you can quickly check by clicking the Start button, pointing to Programs, and scan-
ning the programs listed in the Programs menu. If the program is listed, it has already
been installed and you do not need to reinstall it from the diskettes or CDs you
received with your system. Store the diskettes and CDs in a safe place.
Before installing any new software, check the program’s specifications to ensure that
it was designed to run on your computer’s installed hardware and software. For
example, many software packages list the microprocessor, minimum memory config-
uration, and hard-disk drive space required for proper operation. They also list the
operating system versions that are compatible with the software.
Using and Installing Software 3-7
To install or configure new software on your computer, follow the manufacturer’s
instructions. If it fails to install or run properly, contact the software manufacturer for
technical support.
NOTE: DellWare
®
products are supported by the item's manufacturer. To receive
product support information, call 1-800-753-7201.
7HPSRUDULO\'LVDEOLQJ:LQGRZV9LUXV6FDQQLQJ
3URJUDPV
When you install commercially available software, you may be prompted to tempo-
rarily disable any virus-scanning program running on your system. To temporarily
disable virus protection, follow these steps.
1. Locate the virus-scanning program icon on the Windows desktop.
2. Right-click the mouse over the icon and click Disable.
3. Install the software package according to the manufacturer’s instructions.
4. Right-click the mouse on the virus-scanning program icon and click Enable.
5. Run the virus-scanning program to check for viruses.
5HPRYLQJ6RIWZDUH
To remove a program from your computer, follow these steps.
1. Click the Start button, point to Settings, and then click Control Panel.
2. In the Control Panel, double-click Add/Remove Programs.
3. Select the program you want to delete from the programs listed, and click the
Add/Remove… button.
4. Follow the instructions and prompts to delete all installed components.
5. When finished, click OK.
'HYLFH'ULYHUV
Device drivers
are programs that run in the background to enable your computer to
communicate with installed and connected devices. For example, many of the pro-
gram diskettes you made in Chapter 1 contain device drivers (such as audio drivers).
3-8 Dell Dimension XPS R
xxx
Systems Setup Guide
All of the devices installed by Dell already have the appropriate drivers installed. If you
add devices, such as a printer, they may require additional drivers to work properly.
Contact the device manufacturer if the necessary drivers are not provided on a dis-
kette or CD.
If you are using Windows 98, new hardware may be detected automatically during
the system restart. If Windows 98 detects new hardware, a New Hardware Found
window appears, and you are prompted for information about the device so that
Windows 98 can identify and load the appropriate drivers. You must then restart the
system for the configuration information to take effect.
If you are using Windows NT, each device driver must be loaded manually. Refer to
the documentation that came with the device for driver installation instructions.
%DFNLQJ8S)LOHV
It is important to make backups (copies) of all your data files. Data files are the files
(documents, graphics, records, and so on) you create with your programs.
NOTE: No backups need be made for software packages or for your operating system.
You made your Dell-installed software backups when you created program diskettes
in Chapter 1, and an operating system CD and boot diskette came with your system.
Additionally, any software you purchase comes with diskettes or CDs.
Refer to the ”Maintaining the System“ section of the
Online Guide
or “Preserving
Data” in Chapter 1 of the
Reference and Troubleshooting Guide
for more information
on backing up data files.
Using Computer Hardware 4-1
&+$37(5
8VLQJ&RPSXWHU+DUGZDUH
This chapter provides information and tips on using your computer
hardware
(physical
parts of a computer system). It also includes general instructions for adding a printer.
Many of the computer devices you might want to use or connect come with their
own instructions and/or software. You should follow the device manufacturer’s
instructions when connecting and using these devices.
9LGHR'LVSOD\
The video display system consists of the video card in the computer and the monitor
connected to it. They work together to produce the picture you see on your screen. To
display a program at a specific
resolution
(maximum number of pixels that can be dis-
played), both the video card and monitor must support it and the necessary video
drivers must be installed.
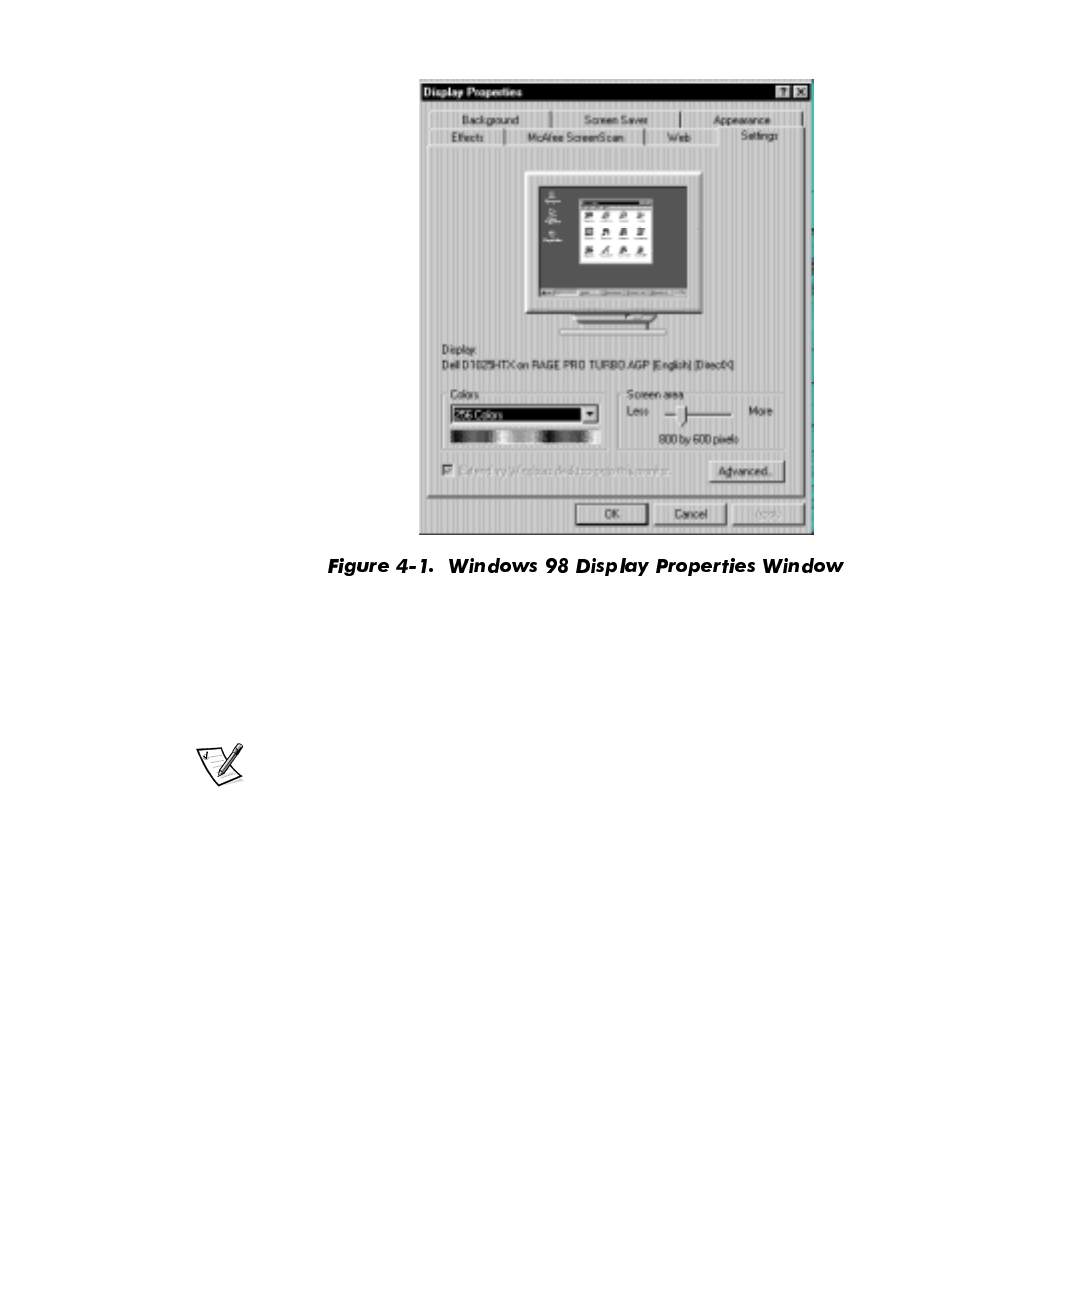
&KDQJLQJWKH'LVSOD\5HVROXWLRQLQ:LQGRZV
Refer to the static sticker shipped on your monitor or the monitor documentation for
the recommended resolution. To set the display resolution, follow these steps:
1. Click the Start button, point to Settings, and then click Control Panel.
2. Double-click the Display icon, and then click the Settings tab (see Figure 4-1).
4-2 Dell Dimension XPS R
xxx
Systems Setup Guide
3. Point the mouse cursor at the slidebar in the Screen area. Then click and hold
down the left mouse button.
4. Move the slidebar to the left to decrease the resolution or to the right to increase
the resolution.
NOTE: As the resolution increases, icons and text appear smaller on the screen.
5. Click Apply.
A dialog box informs you that the process may take 15 seconds and that the
screen may flicker while the resolution is changed.
6. Click OK and then Yes to accept the new setting.
For more information on monitor adjustments, refer to the documentation that came
with your monitor.

Using Computer Hardware 4-3
&KDQJLQJWKH5HIUHVK5DWHLQ:LQGRZV
The
refresh rate
is the rate at which the monitor redraws the video image on the
monitor screen. The higher the refresh rate, the less video flicker can be seen by the
human eye. If the video image appears to flicker (typically at a refresh rate of 60 hertz
[Hz]), select a higher supported refresh rate by following these steps:
1. Click the Start button, point to Settings, and then click Control Panel.
2. Double-click the Display icon, and then click the Settings tab.
3. Click the Advanced... button.
4. Click the Adapter tab, locate the Refresh rate section, and click the pull-down
menu (see Figure 4-2).
5. Click the desired refresh rate.
Adapter default sets the monitor to 60 Hz. Optimal sets the monitor to the
highest refresh rate possible according to the resolution selected. This setting is
controlled by the horizontal (scan line) frequency range of the monitor.
6. Click Apply.
7. Read the instructions that appear in the dialog box, and then click OK to continue.
8. Read the new instructions that appear, and click Yes to accept the new setting.
For more information on monitor adjustments, refer to the documentation that came
with your monitor.
4-4 Dell Dimension XPS R
xxx
Systems Setup Guide
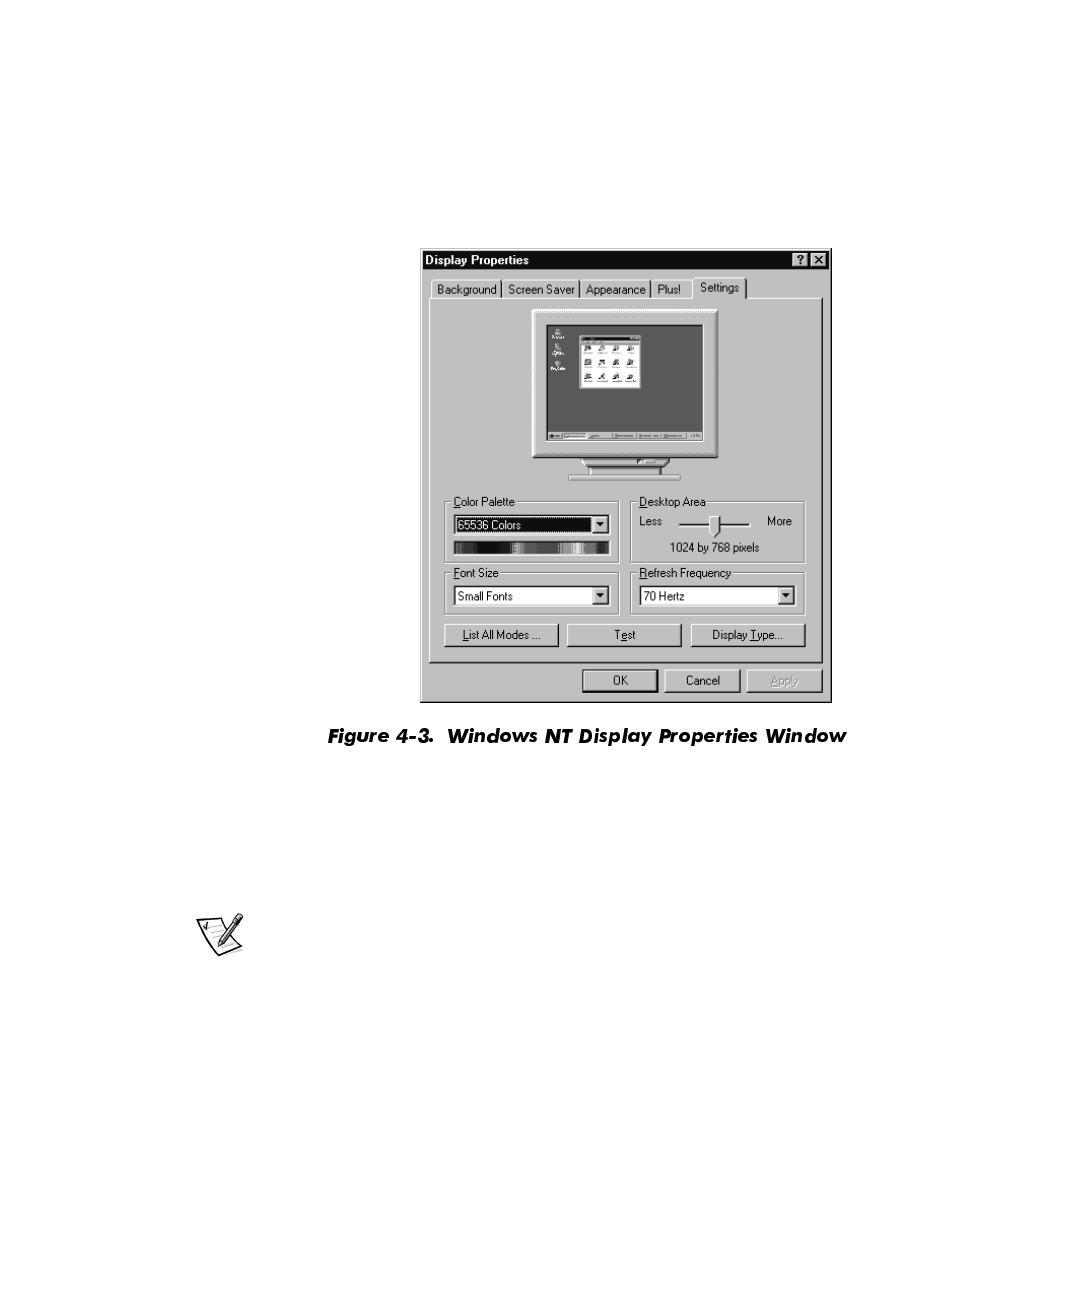
&KDQJLQJWKH'LVSOD\5HVROXWLRQLQ:LQGRZV17
Refer to the static sticker shipped on your monitor or the monitor documentation for
the recommended resolution. To set the display resolution, follow these steps:
1. Click the Start button, point to Settings, and then click Control Panel.
2. Double-click the Display icon, and then click the Settings tab (see Figure 4-3).
3. Point the mouse cursor at the slidebar in the Desktop Area. Then click and hold
down the left mouse button.
4. Move the slidebar to the left to decrease the resolution or to the right to increase
the resolution.
NOTE: As the resolution increases, icons and text appear smaller on the screen.
5. Click the Test button.
6. Read the instructions that appear, and then click OK.
7. If you see a test bitmap pattern, click Yes and go to step 9. Otherwise, click No
and go to step 8.
8. Read the message, and click OK. Select a different display resolution, and then
repeat steps 3 through 7.

Using Computer Hardware 4-5
9. Click the Apply button to change the settings.
10. Click Cancel or OK to exit the Display Properties window.
&KDQJLQJWKH5HIUHVK)UHTXHQF\LQ:LQGRZV17
The higher the refresh frequency, the less video flicker can be seen by the human
eye. If the video image appears to flicker (typically at a refresh rate of 60 Hz), select a
higher supported refresh frequency by following these steps:
1. Double-click the My Computer icon, and then double-click the Control Panel
icon.
2. Double-click the Display icon, and then click the Settings tab (see Figure 4-3).
3. Click the pull-down menu in the Refresh Frequency area.
4. Click the desired refresh frequency.
5. Click the Test button.
6. Read the instructions that appear, and then click OK.
7. If you see a test bitmap pattern, click Yes and proceed to step 9. Otherwise, click
No and go to step 8.
8. Read the message, and click OK. Select a different refresh frequency, and then
repeat steps 3 through 7.
9. Click the Apply button to change the refresh frequency.
10. Click Cancel or OK to exit the Display Properties window.
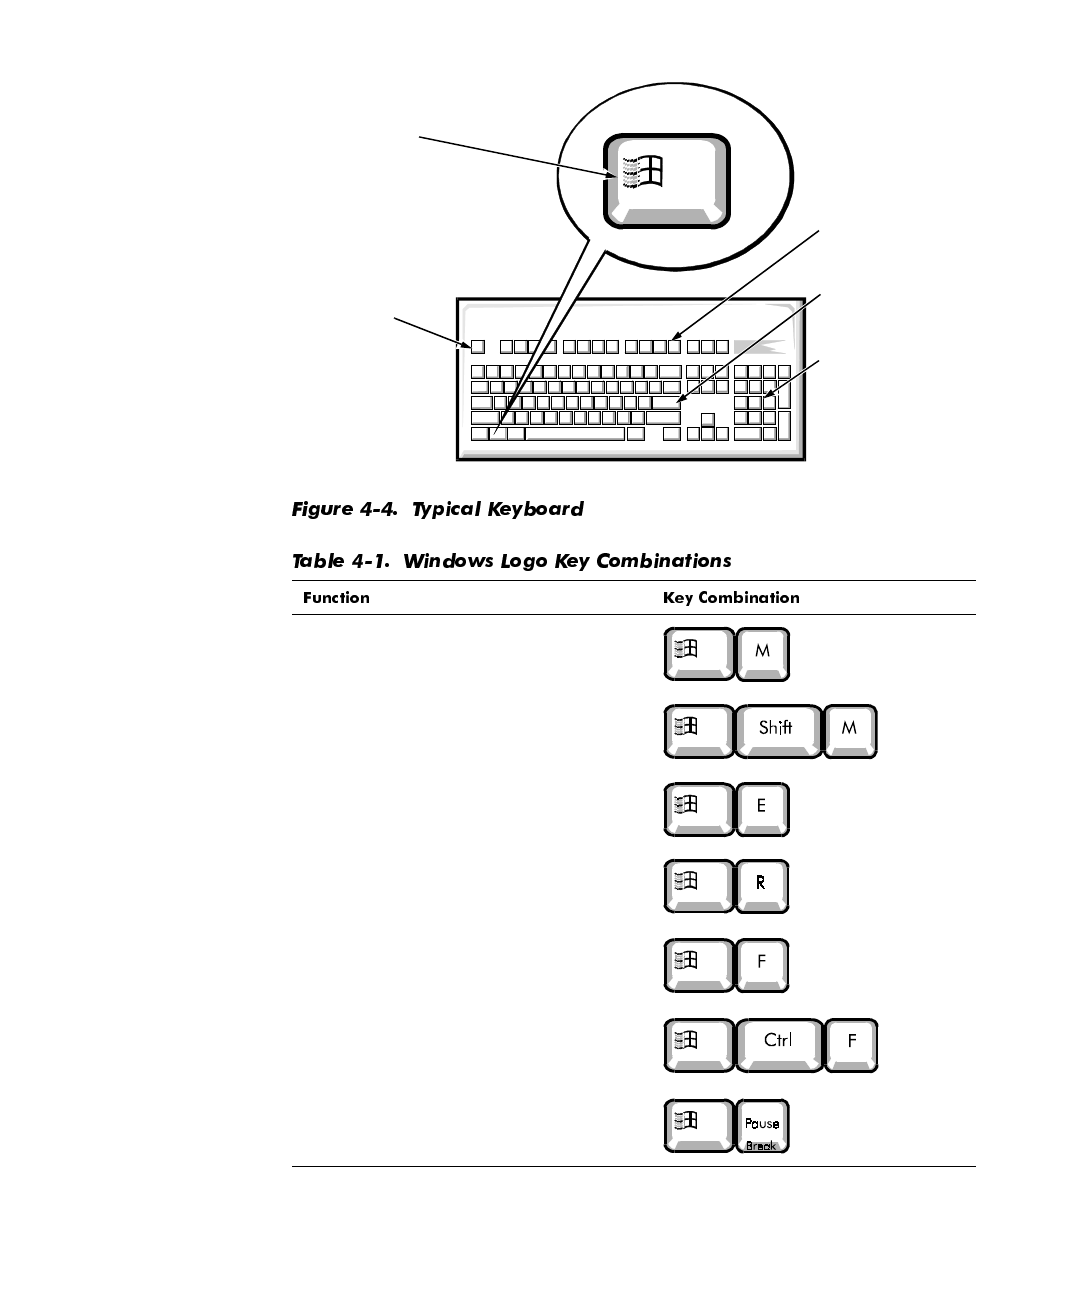
.H\ERDUG
The keyboard that came with your Dell computer probably looks similar to the one
shown in Figure 4-4.
One of the special keys on your keyboard is the Windows logo key. When pressed, it
displays the Start menu. The Windows logo key may also be pressed simultaneously
with other keys to perform the functions listed in Table 4-1.
4-6 Dell Dimension XPS R
xxx
Systems Setup Guide
Minimizes all open windows
Maximizes all windows
Opens Windows Explorer
Opens the Run window
Opens the Find: All Files window
Opens the Find Computer window (if you
are connected to a network)
Opens the System Properties window
Windows
logo key
numeric
keypad
function
keys
Esc
key Enter
key
Using Computer Hardware 4-7
To adjust keyboard operation, such as the character repeat rate, double-click the
Keyboard icon in the Control Panel (refer to “Control Panel” in Chapter 2).
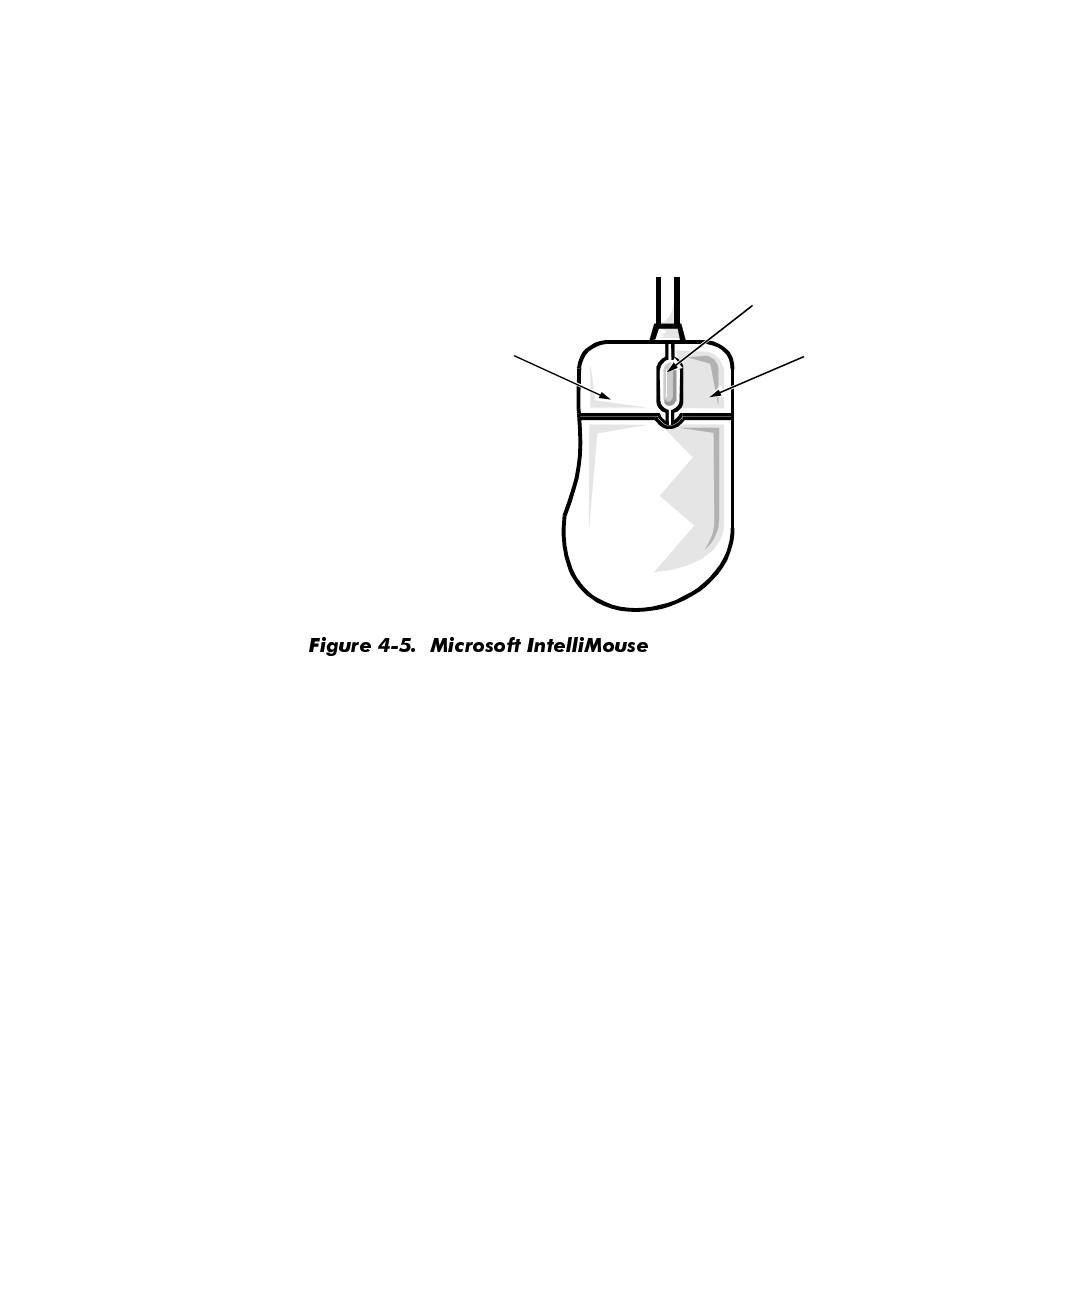
0RXVH
The mouse that came with your Dell computer probably looks similar to the one
shown in Figure 4-5.
The mouse’s left button is typically used to select options from menus, activate but-
tons, and highlight text in various programs. The right button frequently activates
menus with shortcuts for performing various tasks. If you have a Microsoft
IntelliMouse (see Figure 4-5), it includes a wheel that you can rotate forward and back
or press like a button to perform a number of operations.
The following software is required for using the IntelliMouse wheel:
Windows 98 or Windows NT Workstation
IntelliPoint 2.
x
Application programs that support the wheel; for example, Microsoft Office or
Internet Explorer
The application programs being used determine how the wheel works. If you do not
have all the necessary software, the IntelliMouse functions as a standard two-button
mouse.
To adjust mouse operation, such as the pointer speed and right/left-handed button
configuration, double-click the Mouse icon in the Control Panel (refer to “Control
Panel” in Chapter 2). For more information, refer to the mouse documentation that
came with your system.
left button right button
wheel
4-8 Dell Dimension XPS R
xxx
Systems Setup Guide
&'520DQG'9'520'ULYHV
Your Dell computer came with either a CD-ROM or DVD-ROM drive. Both drives read
audio CDs and a variety of other CD formats. The DVD-ROM drive also plays digital
versatile discs (DVDs).
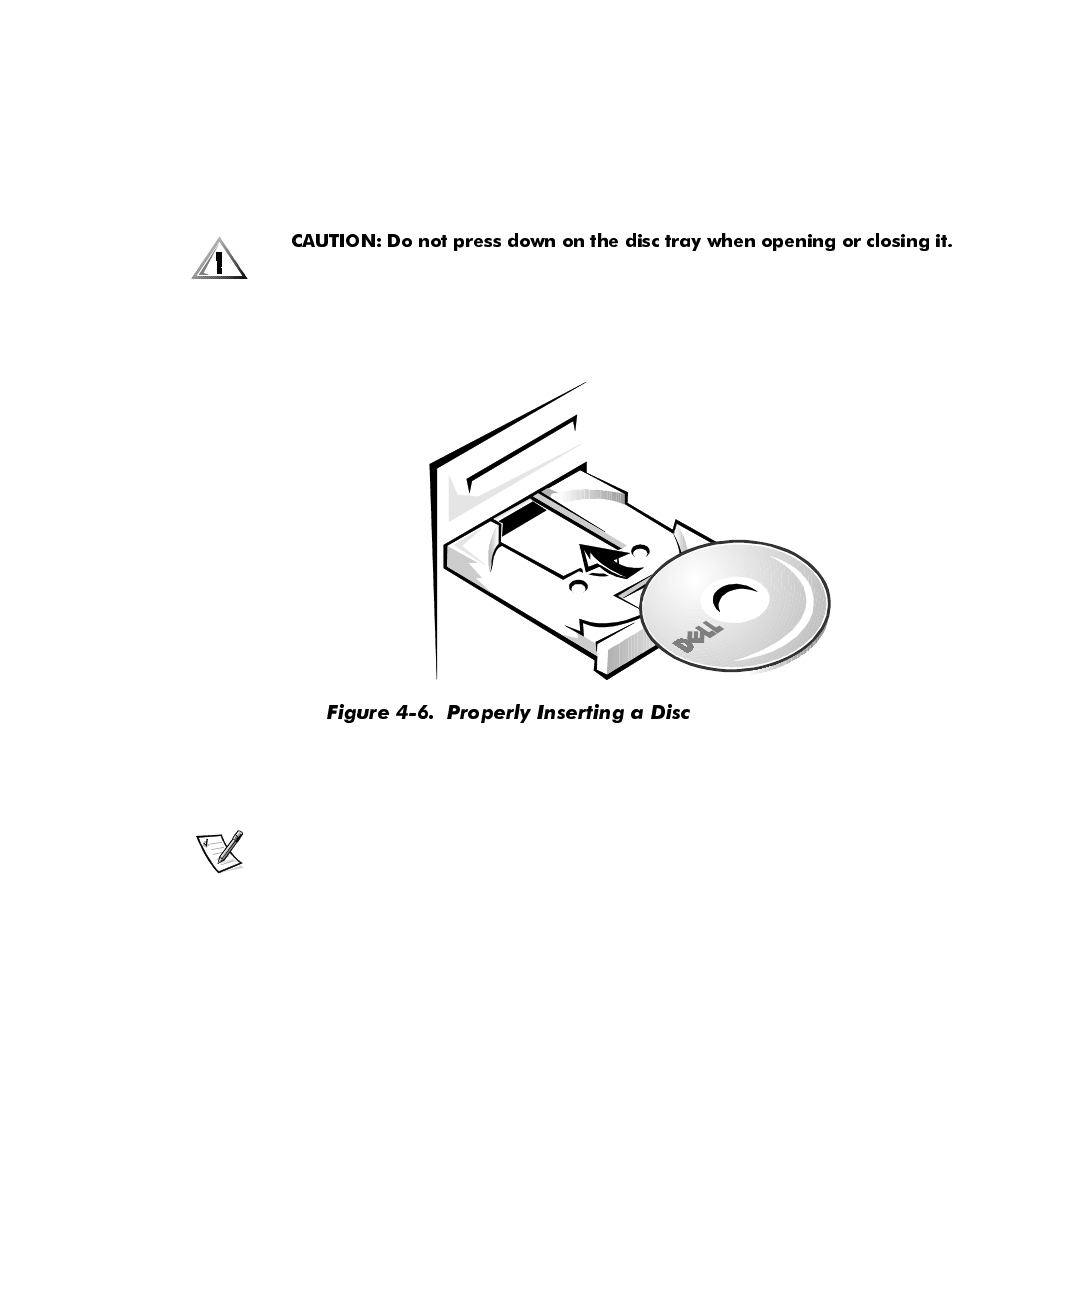
To use a disc in the drive, follow these steps.
1. Press the open/close button on the front of the drive to open the disc tray.
2. Place the disc in the center of the disc tray with the label side facing up (see
Figure 4-6).
.
3. Close the tray by pressing the open/close button or by lightly pressing the front
edge of the tray (the tray will automatically close).
NOTE: High-speed CD-ROM drives spin the CD at a very high rotational speed
and may be noisy. If a CD has printing on only half of the disk, or if there is a
slight imbalance in the CD, the imbalance is greatly magnified by the high speed
and the noise is louder. This effect is inherent in the high-speed technology and
does not indicate a problem with the drive.
When using a CD-ROM or DVD-ROM drive, follow these guidelines:
Never use damaged, broken, or deformed discs.
Do not press the open/close button while the computer is accessing a disc.
Keep the disc tray closed when not using the drive.
For more information on using your drive, refer to the drive documentation that came
with your system.
Using Computer Hardware 4-9
6SHDNHUV
If you ordered speakers with your system, connect them as illustrated on the
Getting
Started
sheet that came with your system. Also refer to the documentation that came
with the speakers.
Subwoofer frequencies are nondirectional. Therefore the subwoofer does not need to
be placed in a particular relationship to the satellite speakers. Dell recommends that
you place the subwoofer on the floor under a desk.
NOTE: Avoid placing speakers or a subwoofer near the monitor. The magnetic field
they generate may degrade the picture.
To adjust the volume of the speakers, use the volume knob on the front of the
speaker. To adjust the volume of the signal being produced by the computer, click the
yellow speaker icon at the bottom right of your screen. A small window appears with
a slidebar. Click and hold the slidebar; then move it up to increase the volume or down
to decrease the volume.
When you adjust the volume knob on some Universal Serial Bus (USB) speakers, a
window pops up on your screen that provides various audio controls. For information
on using this interface, refer to the documentation that came with the speakers.
0LFURSKRQH
If your system came with a microphone, connect it as illustrated on the
Getting
Started
sheet that came with your system. Experiment with microphone placement
to achieve optimal recording levels.
$GGLQJD3ULQWHU
Most printers come with specific instructions for connection and installation of neces-
sary software and drivers. Follow the instructions that came with your printer. If
instructions are not available, follow these general steps:
1. Turn off the computer and any attached devices.
2. Connect the printer cables.
Connect the data cable between the printer and the appropriate port on your
computer. The parallel port with the printer icon is LPT1, and is the most com-
monly used printer port. The serial port, marked with “I/O,” is the COM port. If
you are unable to determine which port to use, contact the printer manufacturer.
Connect the power cable to an electrical outlet.

4-10 Dell Dimension XPS R
xxx
Systems Setup Guide
3. Turn on the printer, and then turn on the computer system.
4. If the printer is automatically detected by Windows, follow the instructions that
appear.
If the printer is not automatically detected during operating system start-up, pro-
ceed to step 5.
5. Double-click the My Computer icon on the Windows desktop.
6. Double-click the Printers folder, and then double-click the Add Printer icon.
7. In the Printer Wizard dialog box, click either the My Computer option or the
Network Printer Server option and then click Next>.
8. Click the port that you want to use.
Choose the computer port to which you connected the printer. Verify that the
port you chose is not already assigned to another device. If necessary, add a port
or configure a port by using the buttons in the Printer Wizard dialog box.
9. Select the printer manufacturer and model from the list provided. If your printer is
not listed and the printer drivers are on a diskette or CD, click Have Disk... and
insert the diskette into drive A or the CD into the CD-ROM drive.
10. Provide the printer name (up to 31 characters) and click Next>.
11. Indicate whether the printer will be shared with other network users by clicking
either the Shared or Not shared option.
If the printer will be shared, the Connect to Printer dialog box appears. Continue
to step 12.
If the printer will not be shared, go to step 14.
12. Select your printer from the list provided or type the printer name. Then click OK.
13. Select all the operating systems (from the list provided) required to print to the
shared printer.
14. Click Next> to continue.
15. Select Yes or No to indicate whether you want to print a test page. Then click
Finish.
8VLQJ3OXJDQG3OD\'HYLFHV
Plug and Play is an industry-standard specification that enables you to add to your
computer certain devices, which, after you restart your computer system, are auto-
matically detected and configured for use with your system. A Plug and Play device
requires an operating system that has Plug and Play technology implemented, such as
Windows 98. Examples of Plug and Play devices are a mouse, joystick, and USB
speakers. To ensure that a device is Plug and Play-compatible, refer to the manufac-
turer’s documentation that came with the device.

Using Computer Hardware 4-11
To install a Plug and Play device on a system running Windows 98, follow these steps:
1. Save and exit any application programs and files you have open.
2. Shut down Windows 98 as instructed in “Shutting Down Your Computer” in
Chapter 3.
3. Turn off the computer system.
4. Connect the device to the computer according to the manufacturer’s instructions.
5. Turn on the computer system.
When Windows 98 starts, a New Hardware Found window appears, indicating
that the device has been detected and configured.
NOTE: To install and configure a non-Plug and Play device for use with Windows 98,
click the Start button, point to Settings, and click Control Panel. Double-click the
Add New Hardware icon, and follow the instructions displayed.
6\VWHP8SJUDGHV
You can purchase various upgrades for your computer, including memory, hard-disk
drives, printers, and so on. Refer to “Available Upgrades” in Chapter 1 of the
Refer-
ence and Troubleshooting Guide
for information on upgrading your system.

4-12 Dell Dimension XPS R
xxx
Systems Setup Guide

Frequently Asked Questions 5-1
&+$37(5
)UHTXHQWO\$VNHG4XHVWLRQV
Many common questions about your Dell computer are answered in this chapter. For
troubleshooting tips and diagnostic tools, refer to the
Reference and Troubleshooting
Guide
. If you do not find a solution, refer to the “Contacting Dell” section of the
Online Guide
.
*HQHUDO4XHVWLRQV
+RZGR,DFFHVVWKH2QOLQH*XLGHIRULQIRUPDWLRQDERXW
P\V\VWHP"
To open the
guide, click the Start button, point to Programs—>Dell Accessories, and
then click Online Guide.
:KHUHFDQ,ILQGWKHVSHFLILFDWLRQVIRUP\V\VWHP")RUP\
LQVWDOOHGGHYLFHV"
System specifications are provided in the “Specifications” section of the
Online
Guide
and in Appendix A, “Technical Specifications,” of the
Reference and Trouble-
shooting Guide
. Specifications for installed devices can be found in the device
manufacturer’s documentation that came with your system. Specifications also are
available from Dell’s World Wide Web site at www.dell.com.
+RZFDQ,ILQGLQIRUPDWLRQUHODWHGWRP\V\VWHPRQWKH
'HOO:HEVLWH"
From Dell’s World Wide Web home page (www.dell.com), click the Support icon.
Everything you need to know about your system is presented in the support area.
When prompted on any page, enter your service tag (or, if you have one, your Express
Service Code) and click Submit to see information specific to your system. If you
don’t have your service tag or Express Service Code available, you can also select
support information by system.

5-2 Dell Dimension XPS R
xxx
Systems Setup Guide
3URJUDP'LVNHWWH0DNHU4XHVWLRQV
:K\GR,QHHGWRPDNHWKHGLVNHWWHVOLVWHGLQWKH
3URJUDP'LVNHWWH0DNHU"
The Program Diskette Maker enables you to create backup diskettes of essential
device driver files and tools installed on the computer’s hard-disk drive. These dis-
kettes will be required if you ever need to restore your software.
+RZGR,VWRSWKH3URJUDP'LVNHWWH0DNHUIURP
DSSHDULQJZKHQ,WXUQRQP\FRPSXWHUV\VWHP"
To disable the Program Diskette Maker, click the Disable this message button on the
Program Diskettes screen. When the Warning window appears, click OK.
&DQ,PDNHWKHVHGLVNHWWHVODWHU"
It is important to make them as soon as possible. To access the Program Diskette
Maker from the Windows desktop, click the Start button, point to Programs—>Dell
Accessories, and click Dell Diskmaker.
'RHVWKH3URJUDP'LVNHWWH0DNHUEDFNXSDOOWKH
VRIWZDUHRQP\FRPSXWHU"
The Program Diskette Maker only backs up Dell-specific device drivers and tools.
+RZPDQ\GLVNHWWHVGR,QHHG":KDWW\SHRIGLVNHWWHV
VKRXOG,XVH"
The number of diskettes needed varies depending on your system configuration. To
determine the total number required, add the number of diskettes listed below each
software item on the Program Diskette Maker screen.
Use blank, 1.44-megabyte (MB), high-density diskettes to make these backups.
NOTE: You cannot create backup diskettes on a tape or Zip drive.
6RIWZDUH4XHVWLRQV
,VWKHUHDQHZ%,26RUQHZHUGULYHUVDYDLODEOHIRUP\
V\VWHP"6KRXOG,XSGDWH"
Basic input/output system (BIOS) and driver updates are available from Dell’s File
Library; they are released to either fix problems or add features. Do not update the
BIOS or a driver unless you are advised to do so by a Dell technician or you are experi-
encing problems with your hardware configuration. Always read the release notes

Frequently Asked Questions 5-3
included with the update thoroughly before making a decision to upgrade the BIOS or
a driver.
:KHUHLVWKHID[SURJUDPLQ:LQGRZV"
Microsoft does not support a native fax program with the Windows 98 operating sys-
tem. However, some application programs, such as Microsoft Office 98 Small
Business Edition, include fax software.
:K\DP,KDYLQJSUREOHPVLQVWDOOLQJ061RQP\V\VWHP
UXQQLQJ0LFURVRIW:LQGRZV17"
The Microsoft Network (MSN) cannot be installed on the Microsoft Windows NT
operating system.
:LOOP\V\VWHPFRUUHFWO\KDQGOHWKH<HDUSUREOHP"
Your computer is set to automatically correct the date after 1/1/2000 occurs. It will
then continue to keep and update dates correctly. For more information about
Year 2000 issues, refer to the Research and Development section of the Dell Web site
(www.dell.com).
+DUGZDUH4XHVWLRQV
7KHIRUPDWWHGFDSDFLW\RIP\KDUGGLVNGULYHVHHPVWR
EHVPDOOHUWKDQZKDW,RUGHUHG:KHUHLVWKHPLVVLQJ
VSDFH"
The operating system reports drive capacity assuming that 1 MB equals
1,048,576 bytes. This calculation is technically correct.
Drive manufacturers compute the size differently. They consider 1 MB to equal
1,000,000 bytes. This difference can cause confusion! If the drive is advertised as
4.3 gigabytes (GB) (4,300,000,000 bytes), the operating system sees it as approxi-
mately 4.1 GB (4,300,000,000 / 1,048,576 / 1000 = 4.100799560547).
:K\GR,KDYHDOLQHRUWZROLQHVDFURVVP\PRQLWRU"
Trinitron monitors use aperture grill technology, which is analogous to a vertical grat-
ing. A horizontal wire (one for smaller monitors, two for larger monitors) is strung
across the aperture grill to prevent image distortion.
The line that you are seeing is the shadow cast by the horizontal wire(s). Although the
shadow can be distracting, it is usually not very noticeable, and Trinitron monitors are
noted for their exceptional brightness and image sharpness.

5-4 Dell Dimension XPS R
xxx
Systems Setup Guide
0\PRQLWRUIOLFNHUVRUVKDNHVDOOWKHWLPH:KDWFDQ,GR"
Many things can cause the monitor to flicker; they are all simple to fix and do not
require hardware replacement.
First, turn the monitor off and then back on. You may also press the degauss button if
your monitor has one (refer to the documentation that came with your monitor) to get
rid of any magnetic field that may have developed during normal monitor operation.
Next, try moving the monitor to the other end of the desk to get rid of the flicker. Also
try separating the monitor from sources of electrical interference (such as speakers,
power cables, fluorescent lights, or something in the wall or on the other side of the
wall).
Finally, increase the refresh frequency if both the monitor and video controller support
a higher rate at the chosen resolution. For instructions, refer to “Changing the Refresh
Rate in Windows 98” or “Changing the Refresh Frequency in Windows NT” in
Chapter 4.
0\PRQLWRULVIODVKLQJGLIIHUHQWFRORUVZKHQ,FKDQJH
VFUHHQV+RZGR,IL[LW"
If your monitor is flashing different colors when you change screens, follow these
steps:
1. Click the Start button, point to Settings, and then click Control Panel.
2. In the Control Panel, double-click the Display icon. Then click the Settings tab.
3. Change the Color palette to High Color (16 bit) or True Color (32 bit). Then
click OK.
4. In the Compatibility Warning window, click the Apply the settings without
restarting? radio button, and then click OK.
5. When prompted, click OK to adjust the display.
6. When prompted, click Yes to accept the changes.
:KHUHFDQ,ILQGGULYHUVIRUP\PRQLWRU"
Monitors do not require drivers; video cards require drivers. Use the video drivers pro-
vided with the video card. Newer drivers may also be available from the Dell Web site
(www.dell.com).
,KDYHLQVWDOOHGWHOHSKRQ\VRIWZDUHEXWWKHVRXQG
GRHVQ·WZRUN:KDWFDQ,GR"
Modems with telephony support have sound capability independent of your com-
puter’s audio. You must have a microphone plugged into the connector on the modem.

Frequently Asked Questions 5-5
*HWWLQJ+HOS
Dell provides a number of tools to help you if you don’t understand a procedure
described in this guide or if your system does not perform as expected. For informa-
tion on these help tools, see Chapter 8, “Getting Help,” in the
Reference and
Troubleshooting Guide
or the “Contacting Dell” section of the
Online Guide
.
If you need help with hardware or software that was not Dell-installed, contact the
manufacturer of that item. For DellWare items, call 1-800-753-7201 to receive product
support information.

5-6 Dell Dimension XPS R
xxx
Systems Setup Guide

Index 1
,QGH[
$
assistance, 5-4
%
backing up files, 3-8
backing up programs, 1-5
&
cautions, v
CD-ROM drives, 4-8
Control Panel, 2-5
'
desktop
arranging shortcuts, 2-10
creating shortcuts, 2-10
features, 2-2
My Computer, 3-1
Start button, 2-2
desktop theme, changing, 2-8
diagnosing problems, 5-1
display properties
refresh rate, Windows 98, 4-3
refresh rate, Windows NT, 4-5
resolution, Windows 98, 4-1
resolution, Windows NT, 4-4
screen saver, 2-7
wallpaper, 2-6
drivers, 3-7
DVD-ROM drives, 4-8
)
files
backing up, 3-8
copying, 3-4
deleting, 3-5
finding, 3-3
moving, 3-4
renaming, 3-4
fixing problems, 5-4
frequently asked questions
general, 5-1
hardware, 5-3
Program Diskette Maker, 5-2
software, 5-2
*
getting help, 5-4

2 Dell Dimension XPS R
xxx
Systems Setup Guide
+
hardware
CD-ROM drives, 4-8
DVD-ROM drives, 4-8
frequently asked questions, 5-2
keyboard, 4-5
microphone, 4-9
mouse, 4-5
Plug and Play devices, 4-10
printer, 4-9
speakers, 4-9
video display, 4-1
help
obtaining, 5-4
within Windows, 2-11
,
icons.
See
shortcuts
.
keyboard, 4-5
0
mouse, 4-5
My Computer icon, 3-1
1
notational conventions, v
notes, v
3
Plug and Play devices, 4-10
printer, adding, 4-9
program diskette sets, 1-5
programs
accessing, 3-1
adding, 3-6
backing up, 1-5
My Computer, 3-1
removing, 3-7
Windows Explorer, 3-2
5
refresh rate, changing
Windows 98, 4-3
Windows NT, 4-5
resolution, changing
Windows 98, 4-1
Windows NT, 4-4
6
screen saver, 2-7
service, 5-4
setup
completing Dell setup, 1-4
display properties, 2-6
printer, 4-9
program diskette sets, 1-5
shortcuts, 2-9
Windows 98, 1-1
Windows NT, 1-6
shortcuts
arranging, 2-10
setup, 2-9
shutting down, 3-6
software
drivers, 3-7
frequently asked questions, 5-2
installing, 3-6
removing, 3-7
speakers, 4-9
Start button, 2-2
support, 5-4

Index 3
7
technical assistance, 5-4
turning off system, 3-6
9
video display
about, 4-1
changing refresh rate in Windows 98,
4-3
changing refresh rate in Windows NT,
4-5
changing resolution in Windows 98,
4-1
changing resolution in Windows NT,
4-4
virus-scanning programs, temporarily
disabling, 3-7
:
wallpaper, customizing, 2-6
warnings, v
Windows 98
accessing programs, 3-1
backing up files, 3-8
completing Dell setup, 1-4
copying files, 3-4
deleting files, 3-5
drivers, 3-7
file management, 3-1
finding files, 3-3
Windows 98
(continued)
help, 2-11
installing software, 3-6
moving files, 3-4
program diskette sets, 1-5
removing software, 3-7
renaming files, 3-4
setting refresh rate, 4-3
setting resolution, 4-1
setting up, 1-1
shutting down, 3-6
Windows logo key, 4-6
Windows desktop
features, 2-2
My Computer, 3-1
Start button, 2-2
Windows Explorer, 3-2
Windows Help, 2-11
Windows NT
accessing programs, 3-1
backing up files, 3-8
copying files, 3-4
deleting files, 3-5
drivers, 3-7
emergency repair diskette, 1-8
file management, 3-1
finding files, 3-3
help, 2-11
installing software, 3-6
moving files, 3-4
program diskette sets, 1-5
removing software, 3-7
renaming files, 3-4
setting refresh rate, 4-5
setting resolution, 4-4
setting up, 1-6
shutting down, 3-6

4 Dell Dimension XPS R
xxx
Systems Setup Guide
