Delonghi Dedica Cappuccino Ec 860 M Instruction Manual
Delonghi-En-5713216881-Owner-S-Manual delonghi-en-5713216881-owner-s-manual
2015-04-28
: Delonghi Delonghi-Dedica-Cappuccino-Ec-860-M-Instruction-Manual-715683 delonghi-dedica-cappuccino-ec-860-m-instruction-manual-715683 delonghi pdf
Open the PDF directly: View PDF ![]() .
.
Page Count: 11

6
When using electrical appliances, basic safety precautions should always be followed, including the following:
• Readallinstructions.
• Donottouchhotsurfaces.Usehandlesandknobs.
• Toprotectagainstre,electricalshockandpersonalinjury,donotimmersecord,plugorapplianceinwaterorother
liquid.
• Neverallowtheappliancetobeusedbychildren.
• Unplugfromtheoutletwhennotinuseandbeforecleaning.Allowtocoolbeforettingortakingoparts,and
beforecleaningtheappliance.
• Donotoperatewithadamagedcordorplug,oraftertheappliancemalfunctions,orhasbeendamagedinany
manner.Returntheappliancetothenearestauthorizedservicefacilityforexamination,repairoradjustment.
• Theuseofaccessoryattachmentsorsparepartsnotrecommendedbytheappliancemanufacturermayresultin
re,electricalshockorpersonalinjury.
• Donotuseoutdoors.
• Donotletthecordhangovertheedgeofthetableorcounter,ortouchhotsurfaces.
• Donotplaceonornearahotgasorelectricalburner,orinaheatedoven.
• Plugcordintothewalloutlet.Todisconnect,turnanycontrolto“o”,thenremoveplugfromwalloutlet.
• Donotusetheapplianceforotherthantheintendeduse.Thisapplianceistobeutilizedfordomesticuseonly.Any
otheruseistobeconsideredimproperand,therefore,dangerous.
WARNING: To reduce the risk of fire or electric shock, do not remove the cover. Don’t at-
tempt to repair or modify the machine, doing so will void the warranty. Repair should be
done by authorized service personnel only!
SAVE THESE INSTRUCTIONS
This producT is for household use only
SHORT CORD INSTRUCTIONS
- Ashortpowercordisprovidedtoreducerisksresultingfrombecomingentangledinortrippingoveralonger
cord.
- Longer,detachablepowersupplycordsorextensioncordsareavailableandmaybeusedifcareisexercisedin
theiruse.
- Ifanextensioncordisused,themarkedelectricalratingshouldbeatleastasgreatastheelectricalratingofthe
appliance.Iftheapplianceisprovidedwith3-wire,groundingtypecord,theextensionshouldbeaGROUNDING
TYPE3-WIRECORD.Thelongercordshouldbearrangedsothatitwillnotdrapeoverthecounter-toportabletop
whereitcanbepulledonbychildrenortrippedover.
- Yourproductisequippedwithapolarizedalternatingcurrentlineplug(aplughavingonebladewiderthanthe
other).Thisplugwilltintothepoweroutletonlyoneway.Thisisasafetyfeature.Ifyouareunabletoinsertthe
plugfullyintotheoutlet,tryreversingtheplug.Iftheplugshouldstillfailtot,contactyourelectriciantoreplace
yourobsoleteoutlet.Donotdefeatthesafetypurposeofthepolarizedplug.
IMPORTANT SAFEGUARDS
7
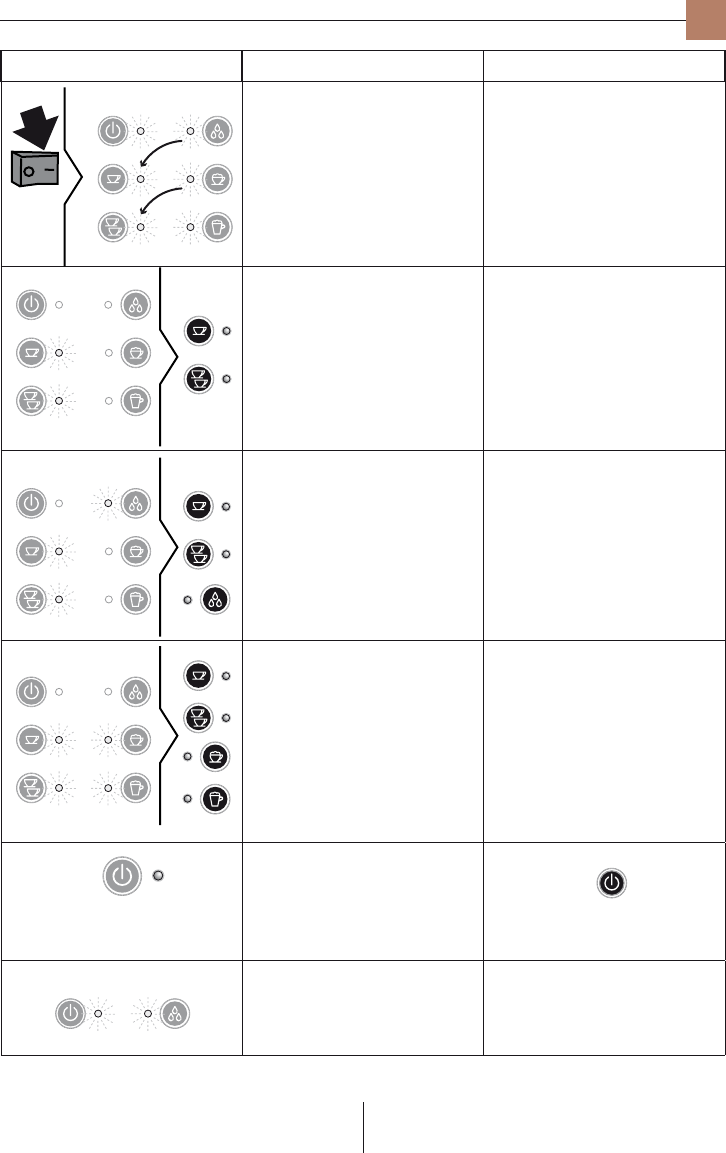
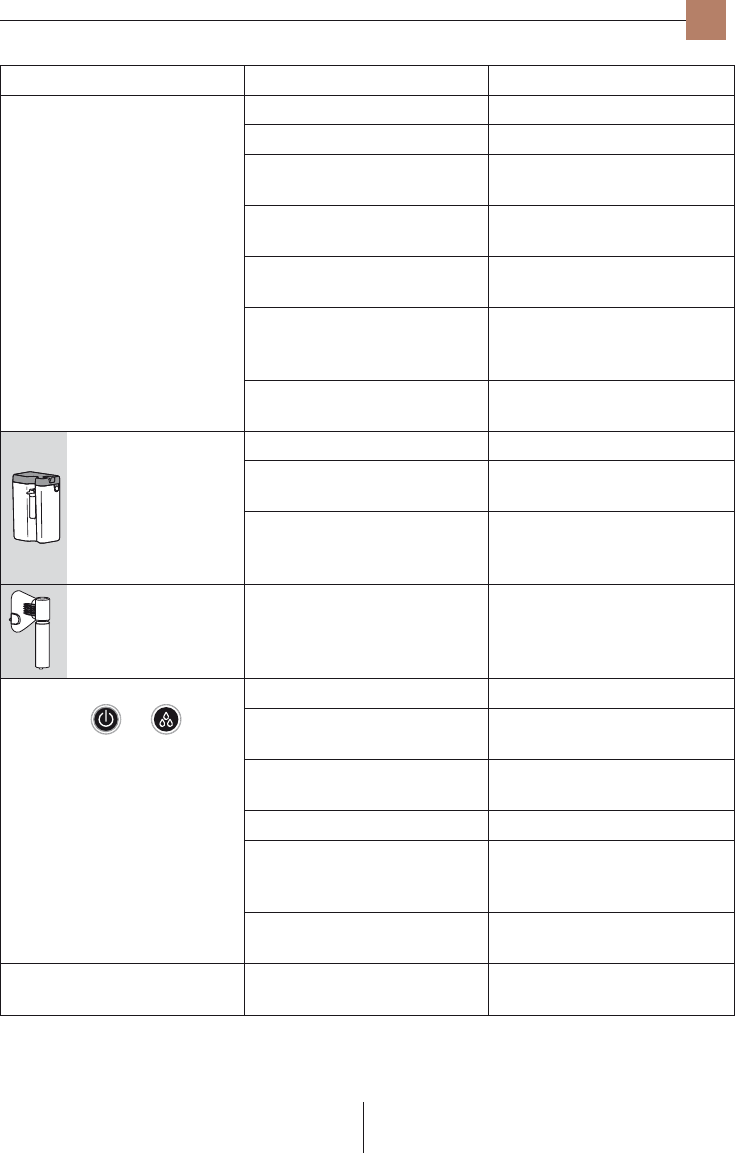
Functioning lights en
Lights Operation Meaning of lights
TurnonfromgeneralON/OFFswitch,at
thebackoftheappliance.
Theapplianceperformsaself-test,
signalled by the sequential ashing of
lights.
Theapplianceison:noaccessoryis
connectedtocouplingA2.
Theapplianceisheatinguptomake
coee:whenthe1or2cuplightsstop
ashing, the appliance has reached the
idealtemperaturetodelivercoee.
Theapplianceison:thehotwaterspout
D7isconnectedtocouplingA2.
Theapplianceisheatinguptomake
coeeortodeliverhotwater:whenthe
1or2cuplightsandthehotwaterspout
light stop ashing, the appliance has
reachedtheidealtemperaturetodeliver
coeeorhotwater.
Theapplianceison:themilkcontainerC
isconnectedtocouplingA2.
Theapplianceisheatinguptomake
coee,cappuccinoorlattemacchiato:
whenthe1or2cuplights,the
cappuccinoandlattemacchiatolights
stop ashing, the appliance has reached
idealtemperaturetodelivercoeeor
cappuccinoorlattemacchiato.
Theappliancehasbeenunusedfor75
minutesfortheON/STAND-BYbutton
hasbeenpressed.
TheapplianceisinSTAND-BY:toswitchit
backon,pressthe button.
Thetimeintervalbeforestand-byis
adjustable:seesection“AdjustStand-by
interval”.
Thewatertankisemptyortheappliance
cannotdeliver.
Seesection“Troubleshooting.”(page
15).

8
Instructions for use
Readtheseinstructionscarefullybeforeusingthe appliance.
Failure to respect these instructions may result in personal
injuryordamagetotheappliance.
Themanufacturerisnotliablefordamageasaresultoffailure
tocomplywiththeseuserinstructions.
Please note:
Keeptheseinstructions.Iftheapplianceshouldbetransferred
tootherpersons,theseinstructionsmustaccompanyit.
Checking the appliance
Afterthepackaginghasbeenremoved,checktheintegrityof
theapplianceandthepresenceofallaccessories.Donotuse
the appliance if it is visibly damaged. Contact the Customer
Experience.
Installing the appliance
Attention!
Thefollowingsafetymeasuresmustbecompliedwithwhen
installing the appliance:
• Theappliancecouldbedamagedbywaterinltration.
Donotpositiontheappliancenearwaterfaucetsorsinks.
• Theappliancecouldbedamagedifthewateritcontains
freezes.
Do not install the appliance in a room where the
temperaturecanfallbelowfreezingpoint.
• Positionthepowersupplycableinawaythatitcannotbe
damagedbysharpedgesorbycontactwithhotsurfaces
(e.g.electricstoves,cookingsurfaces,orgasburners).
Connecting the appliance
Attention!
Make sure that the electric mains voltage corresponds with
thatindicatedonthedataplateonthebaseoftheappliance.
Insertthepowersupplycableconnectorinthesocketonthe
backoftheappliance(g.1);theninsertthepluginthepower
outlet.Checkthatthemainspowersupplyvoltagecorresponds
tothevalueindicatedontheratingplateonthebottomofthe
appliance.Ifthepowersocketdoesnotmatchtheplugonthe
appliance,havethesocketreplacedwithasuitabletypebya
qualiedprofessional.
Description of appliance
(page3-A )
A1. Cupholder/Warmingplate
A2. Waterspout/milkcontainercoupling
A3. GeneralON/OFFswitch
A4. Powersupplycablesocket
A5. Boileroutlet/Infusionassembly
A6. Watertankseat
A7. Watertanklid
A8. Watertankwithseatforwaterlter
A9. Waterrellindicator
A10.Driptray
A11.Indicatorfordriptraymaximumwaterlevel
A12.Cuptray
A13.Slidingtrayforlongcoee/lattemacchiatoglass
A14.Cupwarmerbutton
Description of control panel (B)
(page3-B)
B1. ON/Stand-byButton
B2. ON/Stand-byLight
B3. 1cupbutton
B4. 1cup/“temperatureOK”light
B5. 2cupsbutton
B6. 2cups/“temperatureOK”light
B7. Hotwaterbutton
B8. Hotwaterlight
B9. Hotmilk/cappuccinobutton
B10.Hotmilk/cappuccino/“temperatureOK”light
B11.Hotmilk/lattemacchiatobutton
B12.Hotmilk/lattemacchiato/“temperatureOK”light
Milk container description
(page2-C)
C1. Milkfrotherlidwithfrothregulator
C2. CLEANbutton
C3. MilkSpoutTube
C4. Milkintaketube
C5. Milkcontainer
Description of accessories
(page2-D)
D1. Filter-holdercup
D2. 1coeecremalter
D3. 2coeecremalter
D4. ESEpodcremalter
D5. Powersupplycable(removable)
D6. Tamper/dispensermeasure
Description en
D7. Removablewater/steamspout
D8. Reactivestriptodetectwaterhardness
(Totalhardnesstest)
D9. Descaler
D10.Watersoftenerlter
9
Instructions for use
programmingmenu,pressbutton again.
Setting the temperature
Tomodifythetemperature(low,medium,high)ofthewater
usedtomakethecoee,proceedasfollows:
1. Accesstheprogrammingmenu;
2. Keepbutton presseduntilthelightsrelativetothe
wantedtemperatureturn-on(seechartbelow).
3. Whenthelightsrelativetothewantedtemperatureturn-
on,releasethebutton.
4. Press toturntheapplianceo(stand-by).
Adjust Stand-by
Themachineispre-settoswitchtostand-byafter75minutes
of non-use. This time interval can be modied so that the
appliance switches o after 15 minutes or after 3 hours.
Proceedasfollows:
1. Accesstheprogrammingmenu;
2. Keepthe buttonpresseduntilthelightsrelativeto
thedesiredstand-byintervalturn-on(seechartbelow).
3. Whenthelightsrelativetothewantedstand-byinterval
turn-on,releasethebutton.
4. Press toturntheapplianceo(stand-by).
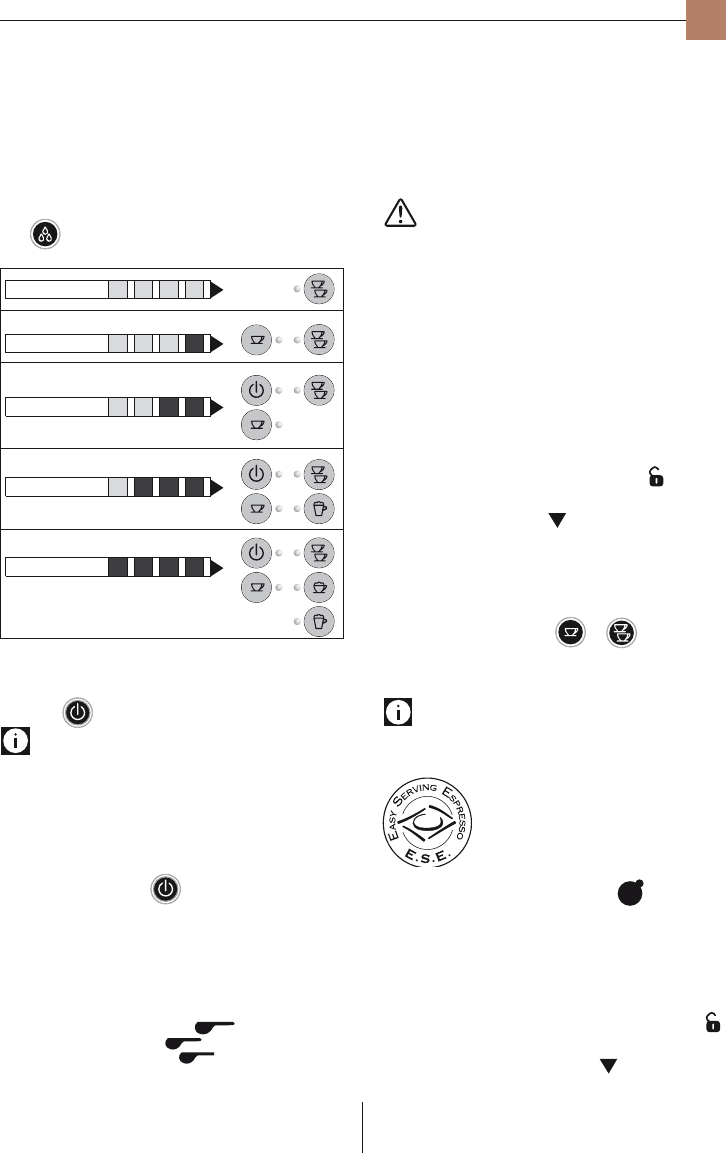
“Setting temperature” and “Adjust Stand-by” chart
Temperature Correspondinglights Stand-byafter
Low 15minutes
Medium 75minutes
High 3hours
Set the water hardness
Thelightssignalingthe needtodescale theappliance,after
a pre-set period of operation depends on the hardness of the
water.Itispossibletoprogramthemachineaccordingtothe
actualwaterhardnessinuseinthearea,thusmakingdescaling
lessfrequent.Proceedasfollows:
1. Remove the provided reactive strip “TOTAL HARDNESS
TEST”fromitspackaging.
en
Activation of the water lter and lling of the water
tank
• Removethe lterfromthe packagingand rinseit with
about17OZ/0.5Lofrunningwater(g.2).
• Turn thecalendar disc(see g.3)until thefollowing 2
monthsofusearedisplayed.
Please note
thelter hasa two monthdurationif the appliance is used
normally, whereas if the machine remains unused with the
lterinstalled,ithasamaximum3monthduration.
• Removethewatertankandllitwithfreshwater(donot
exceedtheMAXline)(g.4).
• Completelydipthelterinthewater,tiltingittoenable
airbubblestocomeout(g.5).
• Insertthelterintheappropriateseat(g.6),pressdown
andclosethetankwiththelid.
• Placethetankbackintothemachine(Ensurethewater
levelisnotovertheMAXline)(g.7).
Thelterisnowactivatedandthemachinecanbeused.
Appliance rst use
• Turn the appliance on by pressing the I/O main switch
A3 at rear in pos. I: the appliance performs a self-test,
signalledbythesequentialashingofthelights.
•
Oncetheself-testiscompleted,the“hotwaterspout”light
B8asheswhiletheothersturn-o:theappliancesignals
itisnecessarytoinsertthehotwaterspout(g.8).
• Placeacontainerunderneath thespoutwith minimum
capacityof100ml(g.9).
• Pressthe“hotwater”button :deliverystartsand
interruptsautomatically.
• The coee and water spout lights ash to indicate the
applianceisreachingtemperature:whenthelightsstop
ashing and remain permanently on, the appliance is
readyforuse.
Please note: upon rst use
• Iflights and ash, press the button
again.
• Upon rst use, it is necessary to make 4-5 coees or
4-5 cappuccinos before the machine gives a satisfying
results.
Settings of the programming menu
To access the programming menu, ensure the appliance is
in stand-by, simultaneously press buttons and
until the ON/Stand-by (B2) light ashes: the appliance is in
programmingmode.Setthemachineaswanted;toexitthe
10
Instructions for use
2. Completely dip the strip into a glass of water for one
second.
3. Remove the strip from the water and shake it slightly.
After about one minute 1, 2, 3 or 4 red squares form,
dependingonthehardnessofthewater(4redsquares=
veryhardwater).
4. Accesstheprogrammingmenu.
5. Onceobtainedtheresultofthestrip,keepthe“hotwater”
button pressed until the lights turn-on, as in
following table:
5. Whenthelightsrelativetothedetectedwaterhardness
turn-on,releasethebutton.
6. Press buttontoturntheapplianceo(stand-by).
Please note:
If the water lter is correctly used, set the machine on to a
lowerhardnesslevelcomparedtothatdetectedbythereactive
strip.
ON/OFF and stand-by
Whenthemainswitchisinpos.I,turntheapplianceonando
(stand-by)bypressingthe button.
The appliance automatically turns o (stand-by) after 75
minutes of non-use: to change the non-use time, refer to
paragraph“Adjuststand-by”.
How to prepare espresso using ground coee
• Insertthelterforgroundcoee(D2orD3)inthelter-
holder(g.10).Usethelter ifwantingtomake
onecoeeorthelter ifwantingtomake2
coees.
• To prepare one coee, ll the lter with one level
measuringspoon of groundcoee,about 0.24oz./7 gr
(g. 11). If you wish to prepare two cups of coee, ll
the lter with two less-than-level measuring spoons
ofgroundcoee(about0.48oz./7+7gr.).Fillthelter
a little at a time to prevent the ground coee from
overowing.
Attention:
For correct use, before lling the lter with ground coee
alwaysmakesurethereisnoresidualcoeefromtheprevious
infusioninthelter.
• Distribute the ground coee evenly and press it lightly
using the coee tamper (g. 12). Pressing the ground
coee is very important to obtain a good espresso. If
excessivelypressed,thecoeewillslowlyleakanditwill
bestronger.Whereas,ifslightlypressed,thecoeewill
comeouttooquicklyandwillbelight.
• Removeanyexcesscoeefromtherimofthelter-holder
and attach it to the machine: for correct attachment,
alignthelter-holderhandletosymbol OPEN (g.
13),attachthelter-holderandturnhandletotheright,
until aligned to position CLOSE(g.14).
• Position the cup or cups under the lter-holder spouts
(g.15).Itisadvisedtoheatthecupsbeforemakingthe
coee,rinsingthemwithhotwater.
• Ensure the lights relative to the coee buttons are on,
pressthecoeebuttons( or ): the appliance
proceedsandinterruptsautomatically.
How to prepare espresso using pods
Please note:
use pods that comply with the ESE Standard: this will be
indicatedonthepackagingbythefollowingmark.
The ESE Standard is a system accepted by
leadingcoeepodmanufacturersandallows
espresso coee to be made simply and
withoutmess.
• Insertthelterforpodscoee(D4 )inthelter-
holder(g.10).
• Insert the pod, centering it as close as possible on the
lter(g.16).Alwaysfollowtheinstructionsofthepod
packforcorrectpositioningofthepodinthelter.
• Attach the lter-holder to the machine: for correct
attachment,alignthelter-holderhandletosymbol
OPEN(g.13),attachthelter-holderandturnhandleto
the right, until aligned to position CLOSE(g.14).
en
11
Instructions for use
• Position the cup under the lter-holder spouts. It is
advisedtoheatthecupbeforemakingthecoee,rinsing
itwithhotwater.
• Ensure the lights relative to the coee buttons are on,
pressthecoeebutton : the appliance proceeds
andinterruptsautomatically.
Please note:
• While the machine is preparing the coee, it can be
stoppedatanytime by pressingthe previouslypressed
coeebutton.
•
Oncedeliveryiscompleted,ifyouwouldliketotoincrease
the amount of coee inside the cup, keep the previously
pressedcoeebuttonpressed(within3seconds)ofdelivery.
• Turn the handle from right to left to release the lter-
holder.
Scalding hazard!
To avoid sprays, never release the lter-holder while the
machineisdeliveringandwaitafewsecondsafterdelivery.
Program the amount of coee in the cup
The machine has been set by default to deliver standard
amountsofcoee.Ifyouwouldliketoamendtoamendthese
quantities, proceed as follows:
1.
Placeacupunderthecoeespout.
2. Keep the button to be programmed ( or )
pressed.Themachinestartsdeliveringcoee.
3. Assoonasthewantedamountofcoeeincupisreached,
releasethebutton:deliverystops.
The machine is now re-programmed according to the new
amount.
Warmer cup (g. 32)
Thewarmercupcanbeswitchedonbypushingthe but-
ton:leavethecupsontheapplianceaslongastheyarewarm.
Thisisusefultohavewarmercoee.
Important!
When the appliance turns to low power function or stand-by
thecupwarmerisstillonuntilyoudon’tpressthebuttonto
switchito.Payattentionnottotouchitasitishot.
How to prepare milk-based drinks
Toavoidmilkwithpoorfrothorlargebubbles,alwayscleanthe
lidofthemilkandthehotwaternozzleasdescribedinthe“cle-
aningthemilkcontainer”atpage13.
1. Removethelid(g.17);
2. Fillthemilkcontainerwithsucientamountofmilk,not
exceedingthemaximumof0.5l(g.18).Rememberthat
everynotchonthesideofthecontainercorrespondsto
100mlofmilk.
Please note!
• For a more dense and homogenous froth, It is
recommendedtouseskimmilkatrefrigeratortemperature
(about41°F/5°C).
3. Makesurethemilkintaketubeiscorrectlyinsertedinthe
bottomofthemilkcontainerlid(g.19).
4. Placethelidonthemilkcontainer.
5. Removethehotwaterspoutfromthenozzlebypushing
thebutton(g.20).
6. Attachbyinsertingthecontainertothenozzle(g.21).
7. Set-upthemachinetomakecoee(see“howtoprepare
espresso”pg.10).
8. Place the cup for cappuccino or the glass for Latte
Macchiato under the coee spout and adjust the milk
spout(g.22).Ifusingtallcupsorglasses,repositionthe
cup-holder,asshowning.23).
9. Vary the froth regulator depending on the amount of
froth wantedandtypeofmilkused(g.24).
To prepare the Cappuccino: press button .
To prepare the latte macchiato: press button .
9. After having delivered the frothed milk, the machine
automaticallypreparesthecoee.
Please note!
• Forahottercappuccino,itisadvisedtopresstheCLEAN
button to heattheductsofthemilkfrotherdevice(see
successiveparagraph).
• To prepare the cappuccino or the latte macchiato, the
appliance performs 2 deliveries: rst the milk and
subsequentlythecoee.Ifyouwouldliketointerruptthe
deliveryinprogress,pressthepreviouslypressedbutton.
• Once delivery is completed, if wanting to increase the
amountofmilkorcoeeinsidethecup,keepthebutton
(within a few seconds) relative to the preparation in
progresspressed.
• Donotleavethemilkcontaineroutoftherefrigeratorfor
toolong:thehigherthemilktemperature(41°F/5°Cis
ideal),thepoorerthequalityofthefroth.
Cleaning the milk frother device using the CLEAN button
After every use of the milk functions, perform cleaning to
eliminatethemilkresiduesasfollows:
1. Leavethemilkcontainerinsertedinthemachine(itisnot
necessarytoemptythemilkcontainer);
en
12
2. Placeacuporothercontainerunderthemilkspouttube.
3. Keepthe“CLEAN”button (g.25) pressed:lights
and
ash. When the lights stop ashing and the
appliancegoesbacktoreadyforuse,releasethe“CLEAN”
button: the steam cleans the circuits inside the milk
frother.
Program the amount of coee and milk in the cup for
cappuccino or milk
Themachinehasbeensetbydefaulttodeliverstandardamounts
ofcoeeandmilk.Ifyouwouldliketoamendthesequantities,
proceed as follows:
1. Placeacupunderthecoeespoutsandthemilkspout
tube.
2. Pressthebuttonrelativetothepreparationwithmilkto
beprogrammedandkeepitpressed.Afterafewseconds,
themachinestartsdeliveringthemilk.
3. Oncetherequiredquantityofmilkhasbeendeliveredinto
thecup,releasethebutton;milkdeliverystops.
4. Program the amount of coee into the cup as for the
amountofmilk.
5. Programming is conrmed by the lights ashing for 3
seconds.
The machine is now re-programmed according to the new
amountsofmilkandcoee.
Preparing the hot water and steam
Scalding hazard!
Do not leave the machine unattended when delivering hot
water.Thespoutheatsupduringdelivery,therefore,onlythe
blackpartmustbeheld.
Delivering hot water
1. Checkthehotwaterspoutiscorrectlyattached(g.8).
2. Placeacupunderthespout(asnearaspossibletoavoid
sprays).
3. Pressthe button(B7):therelativelightashesand
theappliancestartshotwaterdelivery.
4. Themachineautomaticallystopsdelivery.
Please note!
• Tomanuallyinterruptthehotwaterdelivery,press
buttonagain.
Programming the amount of water automatically
delivered
Ifyouwouldliketoamendtheamountofwatersetbydefault,
proceed as follows:
1. Placeacupunderthewaterspout.
2. Keepthe buttonpressed.
3. Whenthehotwaterinthecupreachestherequiredlevel,
release the button. Programming is conrmed by the
lightsashingforthreeseconds.
The machine is now re-programmed according to the new
amount.
Delivering steam
1. Checkthehotwaterspoutiscorrectlyattached(g.8).
2. Fillacontainerwiththeliquidtobeheated/frothedand
immersethewater/steamspoutintotheliquid.
3. Presstwicethe button(B7):therelativelightashes
andtheappliancestartssteamdelivery.
4. When the required temperature is obtained, interrupt
steamdeliverybypressingthebuttonagain.(Youshould
notdischargesteamformorethan3minutesatatime).
Important!
Always stop steam delivery before extracting the container
containingtheliquidtoavoidburnsfromsplashes.
Cleaning the water spout after use
Alwayscleanthespoutafterusetoavoidthebuild-upofmilk
residuesandpreventthespoutfromclogging.
1. Placeacontainerunderthecappuccinomakerandpress
the buttontodeliveralittlewater(g.3).
Stop the ow of water by pressing the button
again.
2. Wait a few minutes for the cappuccino maker to cool
down,thenextractthehotwaterspout.
3. Checktheholeisnotblocked.Ifnecessary,cleanwitha
pin.
4. Washallpartsofthecappuccinomakerthoroughlywitha
spongeandwarmwater.
5. Reinsertthewaterspout.
Cleaning
Attention!
• Do not use solvents, abrasive detergents or alcohol to
cleanthemachine.
• Only the milk container (D) can be washed in the dish
washer.Nootherpartoftheappliancecanbewashedin
thedishwasher.
•
Do not use metal objects to remove coee deposits or
foulingastheymightscratchthemetalorplasticsurfaces.
en
Instructions for use
13
Cleaning the drip tray
Attention!
Thedriptrayisequippedwithaoatingwaterlevelindicator
(red) (A11). As soon as this indicator starts protruding from
thecuptray,emptythetrayandcleanit,otherwisethewater
mayoverowanddamagethemachine,andthesurrounding
work-top.
1. Removethedriptray(g.26).
2. R
emove the cup tray, dispose of the water (g. 27) and
cleanthetrayusingacloth:thenre-assemblethedriptray.
3. Re-insertthedriptray.
Cleaning the coee lters
Regularlycleanthecoeeltersrinsingthemunderrunning
water.Checkthattheholesarenotblocked.Iftheyare,clean
themusingapin(g.28).
Cleaning the boiler outlet
Rinsetheboileroutletevery200coeesdelivered,bydelivering
0.5l of water from the boiler outlet (place a cup under the
boileroutletandthenpresseitherthe1or2cupcoeebutton
todeliveracoeewithoutusingcoeepowder).
Cleaning the milk container
Clean the milk container after each milk preparation, as
described below:
1. Extractthelid.
2. Removethemilkspouttubeandtheintaketube(g.29).
3. Removethefrothregulatorbybypullingitout(g.30).
4. Carefullycleanallcomponentsusinghotwaterandamild
detergent. All components can be washed in the
dishwasher by positioning them on the upper rack
of the dishwasher. Pay particular attentionthat milk
residuesdonotremaininsidetheholesandinthegroove
onthenarrowpartofthefrothregulator.
5. Alsocheckthattheintaketubeandthemilkspouttube
arenotobstructedbymilkresidues.
6. Re-assemblethefrothregulator,themilkspouttubeand
themilkintaketube.
7. Placethelidonthemilkcontainer.
Replacing the lter
Aftertwomonthsofduration(seecalendar),oriftheapplianceis
notusedfor3weeks,replacethelterasdescribedinparagraph
“Activationofthesoftenerlterandllingofthetank”(page9).
Descaling
Descale the machine when the light ashes on the
controlpanel.Proceedasfollows:
1. Removethewaterlter.Fillthetankwiththedescaling
solution obtained by diluting the descaler with water as
indicatedonthedescalerpack.
2. Insertthehotwaterspout(g.8).
3. Placeonecontainerundertheboileroutletandoneunder
thehotwaterspout(g.31)andensurethedriptrayis
emptyandcorrectlyinserted.
4. Simultaneouslypressthe and
buttons
: light
turns on (if the hot water spout has not been
inserted,thelightashes).
5. Press the button. Descaling is signaled by the
LED that alternate in sequence.The descaling program
automatically performs a series of deliveries from the
boileroutletandfromthehotwaterspoutatintervals,to
removethelimescalefrominsidethecoeemachine.
6. Oncethedescalingsolutionisterminated,thelight
turnsontoindicaterinsingisnecessary.
7. Toeliminatethesolutionandlimescaleresidues,rinsethe
tankandllitwithfreshwater(withoutdescaler);empty
thecontainersandplacethemundertheboileroutletand
hotwaterspout.
8. Pressthe button:rinsingstartsandallLEDsashin
sequence.
9. Rinsingstopswhenthetankisempty:rinseandrellthe
tank.
10. Light turns on: press the relative button: delivery
startsandinterruptsautomatically.
Theapplianceisnowreadyforuse.
Repairstothecoeemachinerelativetolimescaleproblems
are not covered by the warranty if the descaling procedure
describedaboveisnotperformedonaregularbasis.
en
Instructions for use

14
Troubleshooting
Problem Possible causes Solution
Thedevicewillnotswitchon Thepowersupplycableisnotinserted
correctly
Checkthatthepowersupplycable
connector is fully inserted in the
appropriatesocketonthebackofthe
device;thencheckthattheplugis
correctly connected to the power outlet
Espressocoeedoesnotowout Nowaterinthetank Fillthewatertank
Theholesinthelter-holderareblocked Cleantheholesinthelter-holderspouts
Theespressoboileroutletisblocked Cleanasindicatedinthe“Cleaningthe
boileroutlet”paragraph(page13)
Espressocoeedripsfromtheedgesof
thelter-holderinsteadofthroughthe
holes
Thelter-holderisnotcorrectlyinserted
or is dirty
Attachthelter-holdercorrectlyand
handle to the right until aligned to the
CLOSEposition
Theespressoboilergaskethaslost
elasticity or it is dirty
Havetheespressoboilergasketreplaced
ataservicecenter
Theholesinthelter-holderspoutare
blocked
Cleantheholesinthelterholderspouts
Thelter-holderdoesnothookontothe
device
Toomuchcoeewaspouredinthelter Usethemeasureprovidedandmakesure
tousethecorrectlterforthetypeof
preparationdesired.
Loudpumpnoise Thewatertankisempty Fillthetank
Thetankisinsertedincorrectlyandthe
valveonthebottomisnotopen
Pressthetanklightlytoopenthevalveon
thebottom
Thecoeecreamisclear(itowsquickly
fromthespout)
Thegroundcoeehasnotbeen
sucientlypressed
Increasepressingofthegroundcoee
Notenoughgroundcoee Increasetheamountofgroundcoee
Thecoeeisnotgroundnelyenough Onlyusecoeegroundspecicallyfor
espressocoeemachines
Incorrecttypeofgroundcoee Changethequalityofthegroundcoee
Aftercoeedelivery,thecoeelterre-
mainsattachedtotheboileroutlet
Insertthelter-holderagain,then
removeit.
After the coee has been prepared, the
podorcoeepowderremainsattachedto
the boiler outlet
Re-insertthelter-holder,delivercoee,
removethelter-holder.
15
Troubleshooting en
Problem Possible causes Solution
Thecoeecreamisdark(itowsslowly
fromthespout)
Thegroundcoeeistootightlypressed Pressthecoeeless
Largeamountofgroundcoee Decreasetheamountofgroundcoee
Theespressoboileroutletisblocked
Performcleaningasindicatedinthesection
“cleaningtheboileroutlet”(page13)
Thelterisblocked Performcleaningasindicatedininthe
section“cleaningthelter”(page13)
Thecoeeistoonelyground Onlyusecoeegroundspecicallyfor
espressocoeemachines
Thegroundcoeeistooneorisdamp Onlyusecoeegroundspecicallyfor
espressocoeemachinesanditmustnot
betoodamp
Incorrecttypeofgroundcoee Changethequalityofthegroundcoee
powder
Themilkdoesnotfrothwhen
makingacappuccino
Themilkisnotcoldenough A
lwaysusemilkatrefrigeratortemperature
Thecursorofthemilkfrotherlidisnotin
correct position
Ensurethecursorisinthefrothposition
Themilkcontainerlidisdirty Cleanthemilklidasdescribedinthe
section“Cleaningthemilkcontainer”
(page13)
Themilkcontainslarge
bubbles and there is little
froth.
Thespoutisdirty. Cleanasdescribedinthesection
“Cleaningthespoutafteruse”.
Themachinedoesnotdeliveranydrink
and the lights and ash for
afewseconds.
Nowaterinthetank Fillthewatertank
Thetankisinsertedincorrectlyandthe
valveonthebottomisnotopen
Pressthetanklightlytoopenthevalveon
thebottom
Incorrectlyinstalledwaterlter Activatethelterbyfollowingthe
indicated procedure
Thegroundcoeeistootightlypressed Pressthecoeeless
Theespressoboileroutletisblocked Performcleaningasindicatedinthe
section“cleaningtheboileroutlet”
(page13)
Thelterisblocked Performcleaningasindicatedinthe
section“cleaningthecoeelters”
Themachinedoesnotworkandalllights
ash
Immediatelydisconnecttheappliance
andcontactanauthorizedservicecenter

16
Limited warranty
This warranty applies to all products with De’Longhi or Kenwood brand names.
What does the warranty cover?
Wewarranteachappliancetobefreefromdefectsinmaterialandworkmanship.Ourobligationunderthiswarrantyislimitedto
repairatourfactoryorauthorizedservicecenterofanydefectivepartsorpartthereof,otherthanpartsdamagedintransit.Inthe
eventofaproductsreplacementorreturn,theunitmustbereturnedtransportationprepaid.Therepairedornewmodelwillbe
returnedatthecompanyexpense.
Thiswarrantyshallapplyonlyiftheapplianceisusedinaccordancewiththefactorydirections,whichaccompanyit,andonan
Alternatingcurrent(AC)circuit.
How long does the coverage last?
Thiswarrantyrunsforoneyear(1)fromthepurchasedatefoundonyourreceiptandappliesonlytotheoriginalpurchaserforuse.
What is not covered by the warranty?
Thewarrantydoesnotcoverdefectsordamageoftheappliance,whichresultfromrepairsoralterationstotheapplianceoutside
ourfactoryorauthorizedservicecenters,norshallitapplytoanyappliance,whichhasbeensubjecttoabuse,misuse,negligenceor
accidents.Also,consequentialandincidentaldamageresultingfromtheuseofthisproductorarisingoutofanybreachofcontractor
breachofthiswarrantyarenotrecoverableunderthiswarranty.Somestatesdonotallowtheexclusionorlimitationofincidentalor
consequentialdamage,sotheabovelimitationmaynotapplytoyou.
How do you get service?
Ifrepairsbecomenecessary,seecontactinformationbelow:
U.S. Residents: Pleasecontactourtollfreehotlineat1-800-322-3848orlogontoourwebsiteatwww.delonghi.com
Residents of Canada: Pleasecontactourtollfreehotlineat1-888-335-6644orlogontoourwebsiteatwww.delonghi.com
Residents of Mexico: Pleasecontactourtollfreenumber01-800-711-8805forassistanceorlogontoourwebsiteat
www.delonghi.com
Theabovewarrantyisinlieuofallotherexpresswarrantiesandrepresentations.Allimpliedwarrantiesarelimitedtotheapplicable
warrantyperiodsetforthabove.ThislimitationdoesnotapplyifyouenterintoanextendedwarrantywithDe’Longhi.Somestates/
countriesdonotallowlimitationsonhowlonganimpliedwarrantylasts,sotheaboveexclusionsmaynotapplytoyou.De’Longhi
doesnotauthorizeanyotherpersonorcompanytoassumeforitanyliabilityinconnectionwiththesaleoruseofitsappliance.
How does country law apply?
Thiswarrantygivesyouspeciclegalrights,andyoumayalsohaveotherrights,whichvaryfromstatetostate/countrytocountry.
