Delta Electronics E804WAG Dual-Band Wireless A+G Router User Manual P74743 F6D3230 4 AG man 12 04 indd
Delta Networks, Inc. Dual-Band Wireless A+G Router P74743 F6D3230 4 AG man 12 04 indd
Contents
Users manual 4
Using the Web-Based Advanced User Interface
41
section
1
2
3
4
5
6
7
8
9
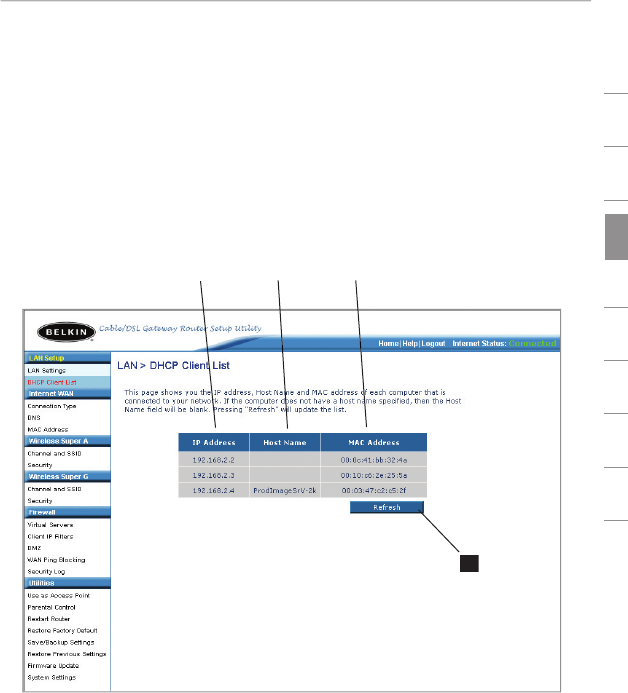
Viewing the DHCP Client List Page
You can view a list of the computers (known as clients), which are
connected to your network. You are able to view the IP address
(1)
of
the computer, the host name
(2)
(if the computer has been assigned
one), and the MAC address
(3)
of the computer’s network interface
card (NIC). Pressing the “Refresh”
(
4
)
button will update the list. If
there have been any changes, the list will be updated.
(1)
(2)
(3)
(4)

42
Using the Web-Based Advanced User Interface
Using the Web-Based Advanced User Interface
Configuring the Wireless Network Settings
Your Belkin A+G Router is equipped with two wireless access points,
one 802.11g and one 802.11a. Both access points run simultaneously (at
the same time). Each has its own unique settings that can be adjusted
independent of each other. This means that each will have its own SSID,
Mode, Security, and Advanced settings. The
following
sections will tell
you about making changes to these settings and more.
Disabling Wireless
In some cases, you may not want your wireless network ON. To
disable the radio, place a check mark next to “Disable Super A Radio”
or “Disable Super G Radio” then click “Apply Changes”. Keep in mind
that the Super A and Super G settings are on separate pages.
Changing the Wireless Channel
There are a number of operating channels you can choose from with
both 802.11g and 802.11a. Each have different numbered channels,
but both work the same way. The channel can be changed if needed.
If there are other wireless networks operating in your area, your
network should be set to operate on a channel that is different than
the other wireless networks.
Using the Web-Based Advanced User Interface
43
section
1
2
3
4
5
6
7
8
9
Changing the Channel
For best performance, your Router should use a channel that is at
least five channels away from the other wireless networks in the area.
For instance, if another network is operating on channel 11, then set
your network to channel 6 or below. To change the channel, select the
channel from the drop-down list. Click “Apply Changes”. The change
is immediate. Keep in mind that Super A and Super G settings are on
different pages.
44
Using the Web-Based Advanced User Interface
Using the Web-Based Advanced User Interface
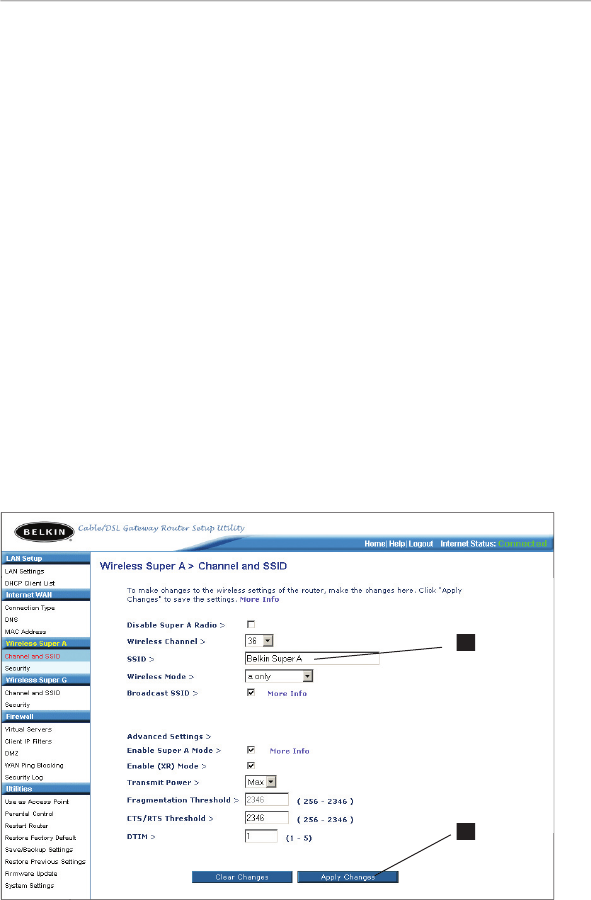
Changing the Wireless Network Name (SSID)
To identify your wireless network, a name called the SSID (Service
Set Identifier) is used. The SSID is your network name. The default
network name of the Routers access points are as follows:
802.11g AP: Belkin_Super_G
802.11a AP: Belkin_Super_A
You can change these to anything you choose, or you can leave them
unchanged. Keep in mind, if you decide to change your wireless
network name, and there are other wireless networks operating
in your area, your network name needs to be different from other
wireless networks that may be operating in your area. To change the
SSID, type in the SSID that you want to use in the SSID field
(1)
and
click “Apply Changes”
(2)
. The change is immediate. If you make a
change to the SSID, your wireless-equipped computers may also need
to be reconfigured to connect to your new network name. Refer to the
documentation of your wireless network adapter for information on
making this change.
(1)
(2)

Using the Web-Based Advanced User Interface
45
section
1
2
3
4
5
6
7
8
9
Using the Broadcast SSID Feature
Note:
This advanced feature should be employed by advanced users
only. For security, you can choose not to broadcast your network’s
SSID. Doing so will keep your network name hidden from computers
that are scanning for the presence of wireless networks. To turn off
the broadcast of the SSID, remove the check mark from the box next
to “Broadcast SSID”, and then click “Apply Changes”. The change is
immediate. Each computer now needs to be set to connect to your
specific SSID; an SSID of “ANY” will no longer be accepted. Refer to
the documentation of your wireless network adapter for information
on making this change.
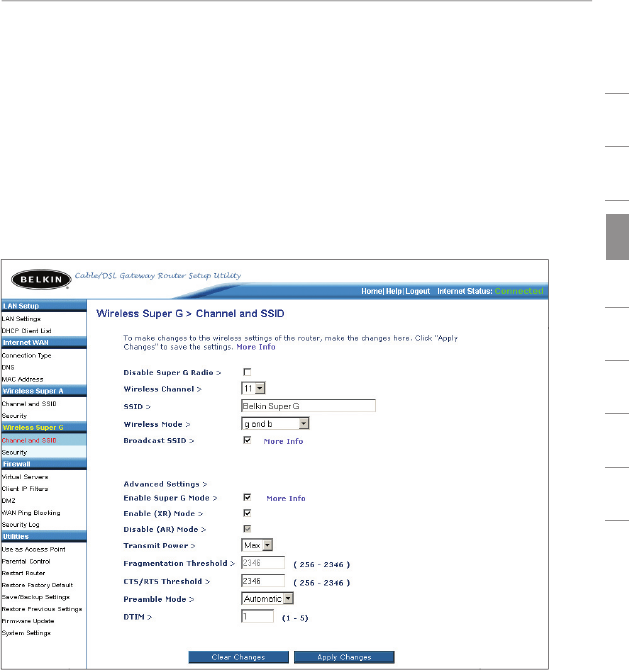
Super G Wireless Mode
The Super G wireless mode of the Router is shipped from the factory
in the “g and b” mode, meaning it will seamlessly interoperate with
802.11b and 802.11g devices. Setting the Router’s wireless mode
to b only will allow only 802.11b devices to connect to the network.
Setting the wireless mode to “Auto 108Mbps” will allow the Router
to jump into the 108Mbps mode when possible. In this mode the
Router constantly monitors the radio waves looking for interference
or other networks. If neither of these is detected, the Router will jump
into 108Mbps mode and remain there unless interference or another
network is detected. “108Mbps only” mode will lock the Router into
the 108Mbps mode. This mode is only recommended if there are
absolutely no other 802.11g networks or interference in the space
where you are operating your network. Interference can greatly and
adversely affect the performance of the Router when locked into
108Mbps mode. To change the wireless mode, select the mode you
want from the drop-down menu and click “Apply Changes”.
Super Mode
Enabling Super mode will allow you to take advantage of the dynamic
108Mbps capability, real-time hardware data compression, dynamic
transmit optimization and standards-compliant bursting. Setting the
wireless mode to “Auto 108Mbps” and enabling Super mode will
allow the Router to jump into Super mode when possible. The Router
constantly monitors the radio waves looking for interference or other
networks. If neither of these is detected, the Router will jump into
Super mode and remain there unless interference or another network
is detected. The Super mode is turned OFF at the factory. To enable
Super mode, check the check box and click “Apply Changes”.

46
Using the Web-Based Advanced User Interface
Using the Web-Based Advanced User Interface
Super A Wireless Mode
The Super A wireless mode of the Router is shipped from the factory
in the “a only” mode, meaning it will seamlessly interoperate with
standard 802.11a devices. Setting the wireless mode to “Auto
108Mbps” will allow the Router to jump into the 108Mbps mode when
possible. In this mode, the Router constantly monitors the radio
waves looking for interference or other networks. If neither of these
are detected, the Router will jump into 108Mbps mode and remain
there unless interference or another network is detected. “108Mbps
only” mode will lock the Router into the 108Mbps mode. This mode is
only recommended if there are absolutely no other 802.11a networks
or interference in the space where you are operating your network.
Interference can greatly and adversely affect the performance of the
Router when locked into 108Mbps mode. To change the wireless
mode, select the mode you want from the drop-down menu and click
“Apply Changes”.
Enable XR Mode
XR mode allows for extension of the operating range of the Router.
By allowing devices to connect at lower than 1Mbps rates when the
signal is weak (when the device is far from the Router), the connection
can be maintained at much greater distances than normal. The Router
ships from the factory with the XR mode ON. Unchecking the check
box and clicking “Apply Changes” will disable the XR mode.
Disable AR Mode
AR mode, or Adaptive Radio mode, works only when the Router is
in “Auto 108Mbps” wireless mode. AR uses a method by which the
Router constantly monitors the radio waves looking for interference
or other networks. If neither of these are detected, the Router will
jump into 108Mbps mode and remain there unless interference or
another network is detected. “108Mbps only” mode will lock the
Router into the 108Mbps mode. Disabling the AR mode is generally
not recommended unless there are absolutely no other networks
or interference in the space where you are operating your network.
Interference can greatly and adversely affect the performance of
the Router in 108Mbps mode. AR mode is turned on at the factory.
Checking the check box and clicking “Apply Changes” will disable the
AR mode.
Transmit Power
The Super A+G technology used in your Router has great capabilities
to reach farther than standard 802.11g or 802.11a technology. In
some cases, the coverage area of the Router may exceed the area
that you intend to cover. If so, you can reduce the power output of

Using the Web-Based Advanced User Interface
47
section
1
2
3
4
5
6
7
8
9
the Router, effectively reducing the coverage area. If you are in a
small space such as an apartment, you can reduce the coverage area
to eliminate the possibility of neighbors using your network or the
possibility of your network interfering with a neighboring network.
The Transmit Power setting has been set to “Max” (Maximum) at
the factory. To change the Transmit Power setting, select the power
setting you want from the drop-down menu and click
“Apply Changes”.
Changing the Wireless Security Settings
Your Router is equipped with the latest security standard called
WPA (Wi-Fi
®
Protected Access). It also supports the legacy security
standard called WEP (Wired Equivalent Privacy). Also included is
802.1x authentication using a server. By default, wireless security
is disabled. To enable security, you will need to determine which
standard you want to use. To access the security settings, click
“Security” under each wireless (Super G and Super A) heading. Please
note, security for Super A and Super G are separate. The security
settings can be set the same or differently depending on what you
want. To fully secure your wireless network, you will need to secure
both the Super A and the Super G network.

48
Using the Web-Based Advanced User Interface
Using the Web-Based Advanced User Interface
Setting WPA-PSK (No Server) Security
Note:
To use WPA security, your clients must be capable of
supporting WPA. If you are not sure, contact the manufacturer of your
wireless card.
WPA-PSK uses what is known as a pre-shared key (PSK) as the
security key. A pre-shared key is basically a password that is between
eight and 40 characters long. It can be a combination of letters,
numbers, or characters. Each client uses the same key to access
the network. Typically this is the model that will be used in a home
environment. It is recommended by the Wi-Fi Alliance that your key be
at least 20 characters long and use a mixture of letters, numbers, and
special characters (such as !,”,(,)). Try to make it easy to remember,
like “tH15is@600d9@ssW0rD” (thisisagoodpassword).
Note:
These directions work for both Super A and Super G security.
1.
From the “Security Mode” drop-down menu, select “WPA-PSK
(no server)”.
2.
For “Encryption Technique”, select TKIP or AES. This setting will
have to be identical on the clients that you set up.
3.
Enter your pre-shared key. This can be from eight to 40
characters and can be letters, numbers, or symbols. This same
key must be used on all of the clients that you set up.
4.
Click “Apply Changes” to finish. You must now set all clients to
match these settings.
Using the Web-Based Advanced User Interface
49
section
1
2
3
4
5
6
7
8
9
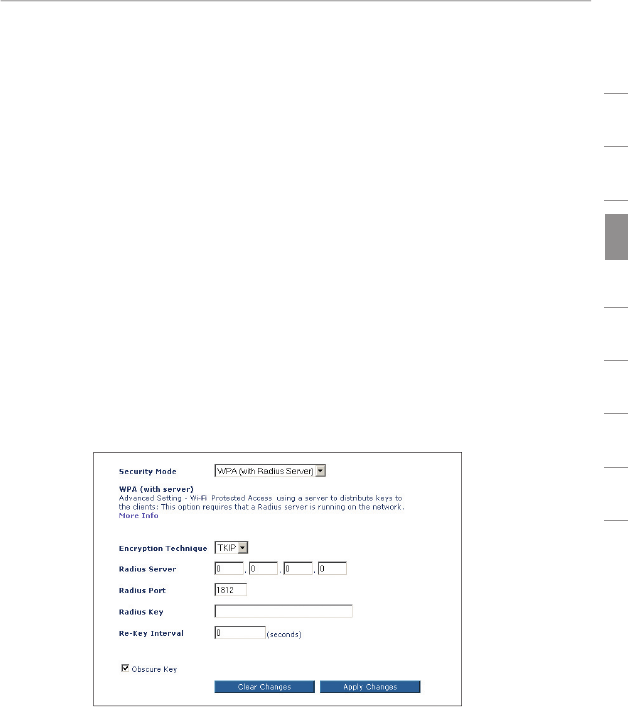
Setting WPA (with server) Security
If your network uses a radius server to distribute keys to the clients,
use this setting.
1.
From the “Security Mode” drop-down menu, select “WPA
(with server)”.
2.
For “Encryption Technique”, select TKIP or AES. This setting will
have to be identical on the clients that you set up.
3.
Enter the IP address of the radius server into the “Radius
Server” fields.
4.
Enter the radius key into the “Radius Key” field.
5.
Enter the key interval. Key interval is how often the keys are
distributed (in packets).
6.
Click “Apply Changes” to finish. You must now set all clients to
match these settings.
50
Using the Web-Based Advanced User Interface
Using the Web-Based Advanced User Interface
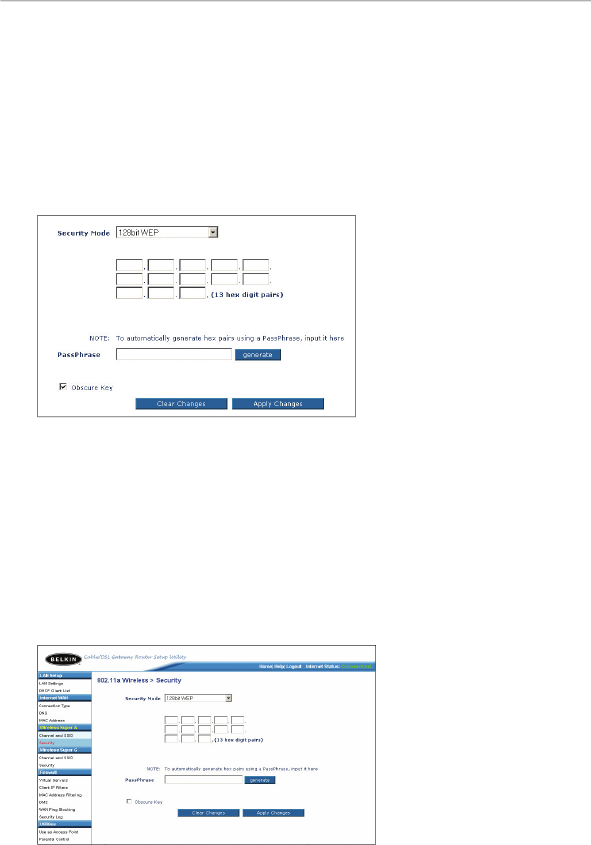
Setting WEP Encryption (64-bit, 128-bit)
Note to Mac users:
The passphrase option will not operate with
Apple
®
AirPort
®
. To configure encryption for your Mac computer, set the
encryption using the manual method described in the next section.
1.
Select “128-bit WEP” or “64-bit WEP” from the drop-down menu.
2.
After selecting your WEP encryption mode, you can enter your
WEP key manually by typing in the hex WEP key manually, or
you can type in a passphrase in the “Passphrase” field and
click “Generate” to create a WEP key from the passphrase.
Click “Apply Changes” to finish. You must now set all of your
clients to match these settings. Note on passphrases: The
passphrase generation technique works with all Belkin wireless
clients. It is not guaranteed to work with other brands of wireless
clients. If you are using a mix of Belkin and other products, it is
recommended that you use a hex key. For more information on
hex keys, see page 51 in this User Manual.
3.
Encryption in the Router is now set. Each of your computers on
your wireless network will now need to be configured with the
same passphrase. Refer to the documentation of your wireless
network adapter for information on making this change.
Using the Web-Based Advanced User Interface
51
section
1
2
3
4
5
6
7
8
9
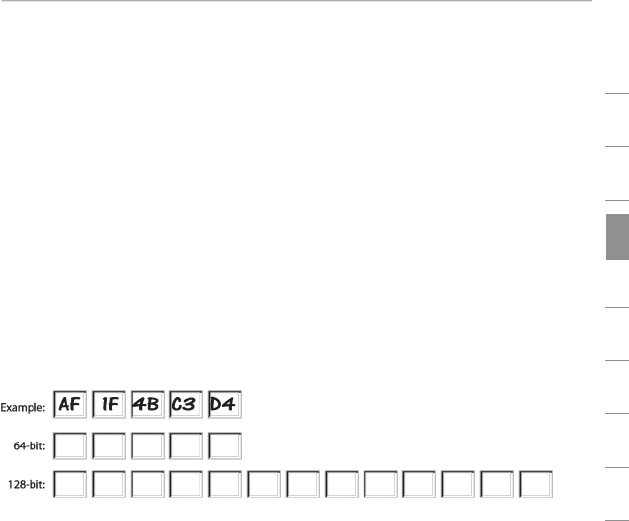
Using a Hexadecimal Key for WEP Encryption
A hexadecimal key is a mixture of numbers and letters from A–F and
0–9. 64-bit keys are five two-digit numbers. 128-bit keys are 13
two-digit numbers. 64-bit keys are five two-digit numbers.
For instance:
AF 0F 4B C3 D4
= 64-bit key
C3 03 0F AF 0F 4B B2 C3 D4 4B C3 D4 E7
= 128-bit key
In the boxes below, make up your key by writing in two characters
between A–F and 0–9. You will use this key to program the encryption
settings on your Router and your wireless computers.
Note to Mac users:
Original Apple AirPort products support 64-bit
encryption only. Apple AirPort 2 products can support 64-bit or
128-bit encryption. Apple AirPort Extreme uses up to 128-bit
encryption. Please check your product to see which version you are
using. If you cannot configure your network with 128-bit encryption,
try 64-bit encryption.
52
Using the Web-Based Advanced User Interface
Using the Web-Based Advanced User Interface
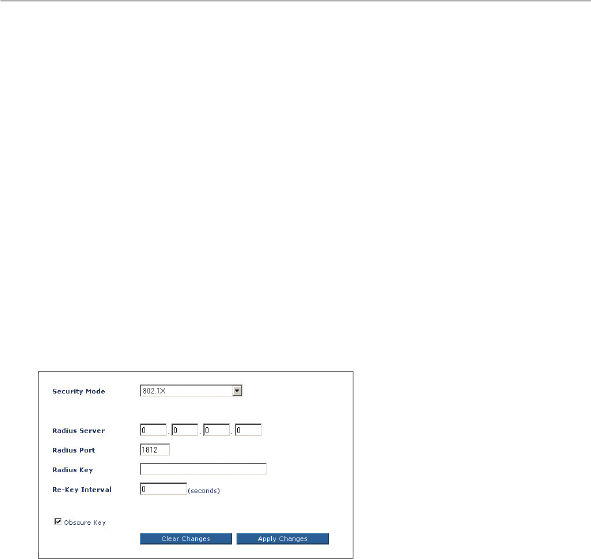
Using 802.1x Authentication
1.
From the “Security Mode” drop-down menu, select “802.1x”.
2.
Enter the IP address of the radius server into the “Radius
Server” fields.
3.
Enter the port that the radius server is listening on.
4.
Enter the radius key into the “Radius Key” field.
5.
Enter the re-key interval. Re-key interval is how often the keys
are distributed (in seconds).
6.
Click “Apply Changes” to finish. You must now set all clients to
match these settings.

Using the Web-Based Advanced User Interface
53
section
1
2
3
4
5
6
7
8
9
Using the Access Point Mode
Note:
This advanced feature should be employed by advanced
users only. The Router can be configured to work as a wireless
network access point. Using this mode will defeat the NAT IP sharing
feature and DHCP server. In AP mode, the Router will need to be
configured with an IP address that is in the same subnet as the
rest of the network that you will bridge to. The default IP address
is 192.168.2.254 and subnet mask is 255.255.255.0. These can be
customized for your needs.
1.
Enable the AP mode my selecting “Enable” in the “Use as Access
Point only” page. When you select this option, you will be able to
change the IP settings.
2.
Set your IP settings to match your network. Click
“Apply Changes”.
3.
Connect a cable from the WAN port on the Router to your
existing network.
The Router is now acting as an A+G access point. To access
the Router’s Advanced User Interface again, type the IP address
you specified into your browser’s navigation bar. You can set the
encryption settings, MAC address filtering, SSID, and
channel normally.
54
Using the Web-Based Advanced User Interface
Using the Web-Based Advanced User Interface
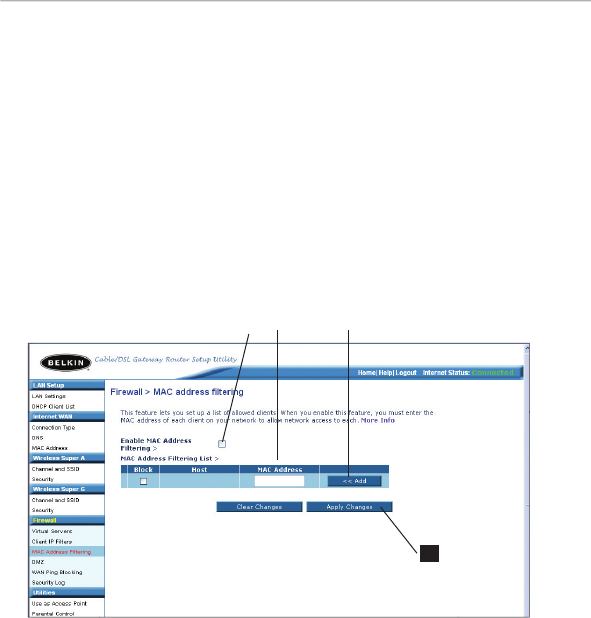
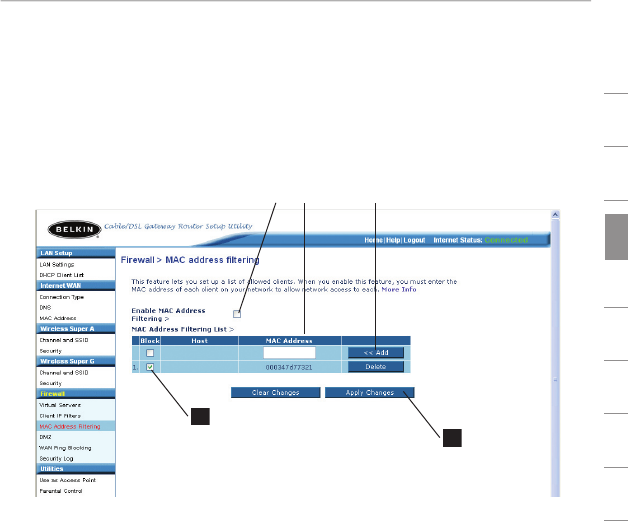
Setting MAC Address Filtering
The MAC address filter is a powerful security feature that allows you
to specify which computers are allowed on the wireless network.
Note:
This list applies only to wireless computers. This list can
be configured so any computer attempting to access the wireless
network that is not specified in the filter list will be denied access.
When you enable this feature, you must enter the MAC address of
each client (computer) to which you want to allow network access.
The “Block” feature lets you turn on and off access to the network
easily for any computer without having to add and remove the
computer’s MAC address from the list.
Setting up an Allow Access List
1.
Check the “Enable MAC Address Filtering” box
(1)
to begin
setting up a list of computers allowed to connect to the
wireless network.
2.
N
ext, in the “MAC
Address” field that is blank
(2)
, type in the
MAC address of the wireless computer you want to be able to
access the wireless network, then click “<<Add”
(3)
.
3.
Continue to do this until all of the computers you want to add
have been entered.
4.
Click “Apply Changes”
(4
)
to finish.
(1)
(2)
(4)
(3)
Using the Web-Based Advanced User Interface
55
section
1
2
3
4
5
6
7
8
9
Setting up a Block Access List
The “Block” list lets you specify computers that you DO NOT want
to access the network. Any computer in the list will not be allowed
access to the wireless network. All others will.
1.
Check the “Enable MAC Address
Filtering
” box
(1)
to begin
setting up a list of computers to be denied access to the
wireless network.
2.
Next, in the “MAC Address” field that is blank
(2)
, type in the
MAC address of the wireless computer you want to block access
to the wireless network, then click “<<Add”
(
3
)
.
3.
Continue to do this until all of the computers you want to deny
access to have been entered.
4.
Check the “Block” box
(4)
next to the MAC address you would
like blocked from the network.
5.
Click “Apply Changes”
(5)
to finish.
(1)
(2)
(4)
(3)
(5)