Delta Electronics F5D72304 Wireless G Router User Manual P74688 F5D7230 4 1223 indd
Delta Networks, Inc. Wireless G Router P74688 F5D7230 4 1223 indd
Contents
Users Manual 6
95
Recommended Web Browser Settings
95
section
2
1
3
4
5
6
7
8
9
10
11
In most cases, you will not need to make any changes to your web
browser’s settings. If you are having trouble accessing the Internet or
the advanced web-based user interface, then change your browser’s
settings to the recommended settings in this section.
Internet Explorer 4.0 or Higher
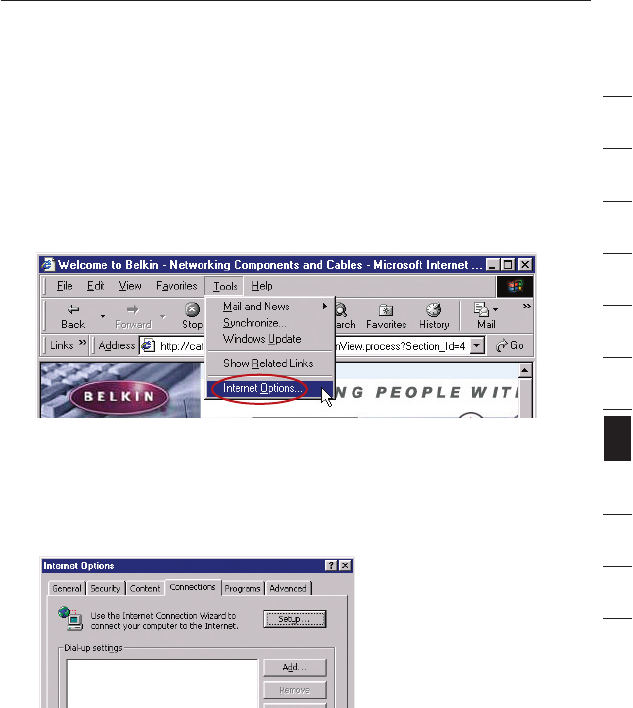
1. Start your web browser. Select “Tools” then “Internet Options”.
2. In the “Internet Options” screen, there are three selections:
“Never dial a connection”, “Dial whenever a network connection
is not present”, and “Always dial my default connection”. If you
can make a selection, select “Never dial a connection”. If you
cannot make a selection, go to the next step.
3. Under the “Internet Options” screen, click on “Connections” and
select “LAN Settings…”.
9796
9796
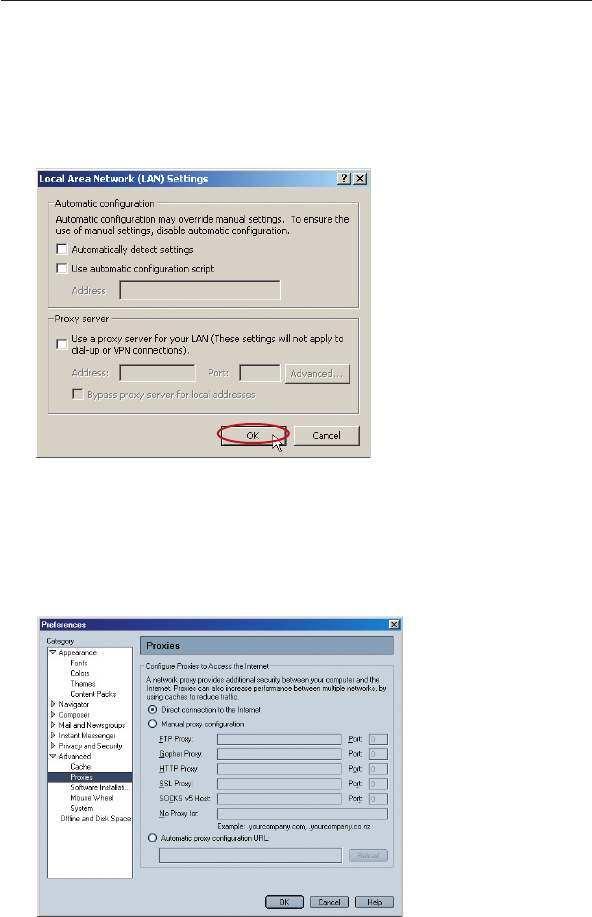
4. Make sure there are no check marks next to any of the displayed
options: “Automatically detect settings”, “Use automatic
configuration script”, and “Use a proxy server”. Click “OK”. Then
click “OK” again in the “Internet Options” page.
Netscape Navigator 4.0 or Higher
1. Start Netscape. Click on “Edit” then “Preferences”.
2. In the “Preferences” window, click on “Advanced” then select
“Proxies”. In the “Proxies” window, select “Direct connection to
the Internet”.
Recommended Web Browser Settings

97
Using your Router with AOL Broadband
97
section
2
1
3
4
5
6
7
8
9
10
11
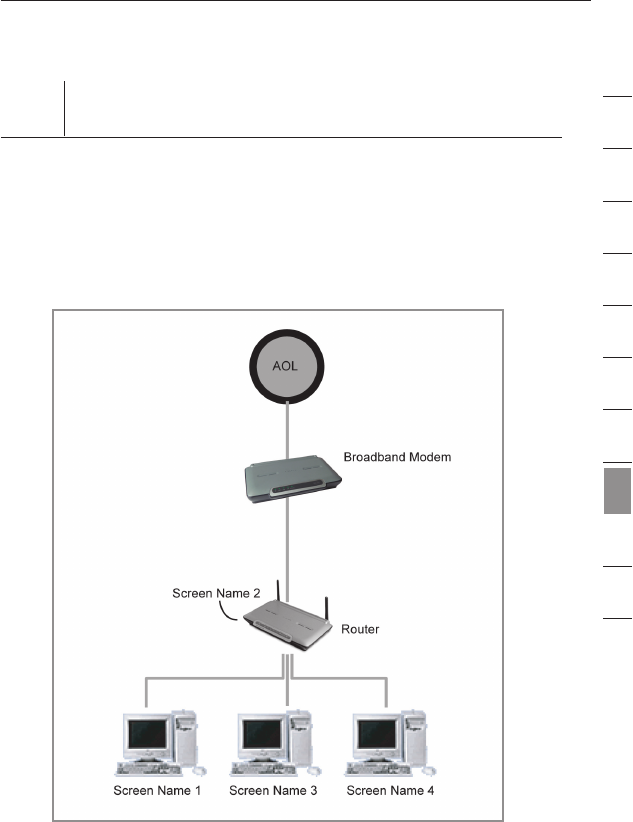
How to set up your network to operate with AOL® for Broadband
and your new Belkin Router
There are two types of AOL connections available—either AOL DSL
or AOL Cable. A third service is called AOL BYOA (Bring Your Own
Access). This is used along with an existing broadband connection,
supplied by your Internet Service Provider (ISP). If you have AOL
DSL, please refer to “Directions for AOL DSL Users” below for setup
instructions. If you have either AOL Cable or the AOL BYOA service,
please go to the “Directions for AOL Cable Users” section of this
guide, on page 104.
Directions for AOL DSL Users
STEP 1: Create AOL screen names for the Router and for each
computer that will be using your AOL service.
STEP 2: Configure the Router for AOL for Broadband.
STEP 3: Configure your computers with the new AOL screen names
you just created.
Step 1 Creating new AOL screen names
Note: Your AOL connections must be set to operate on the TCP/IP
standard. If you have designated another protocol, reset them to
TCP/IP before proceeding.
1. If your Router is currently connected to the network, remove
it from the network and connect it directly to your broadband
modem. Then, log on to AOL as you normally do.
2. Log on to your AOL master account.
9998
Using your Router with AOL Broadband
9998
Using your Router with AOL Broadband
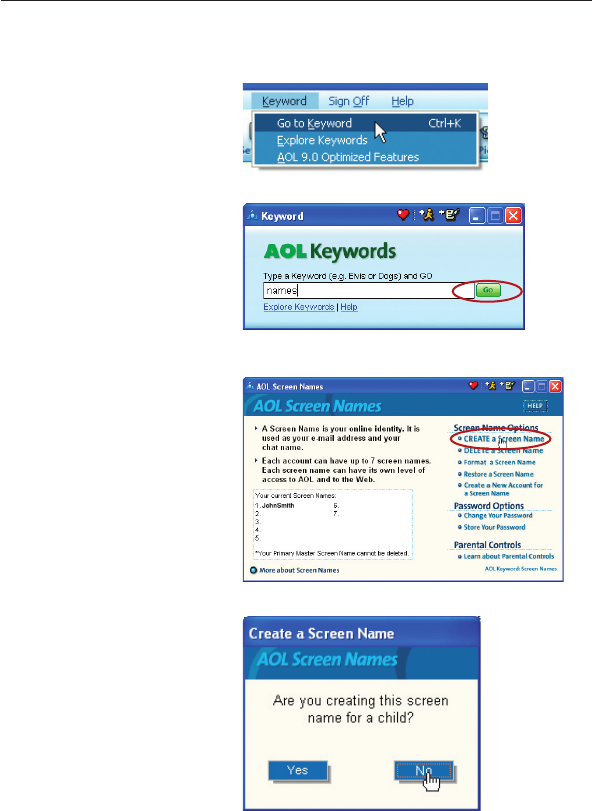
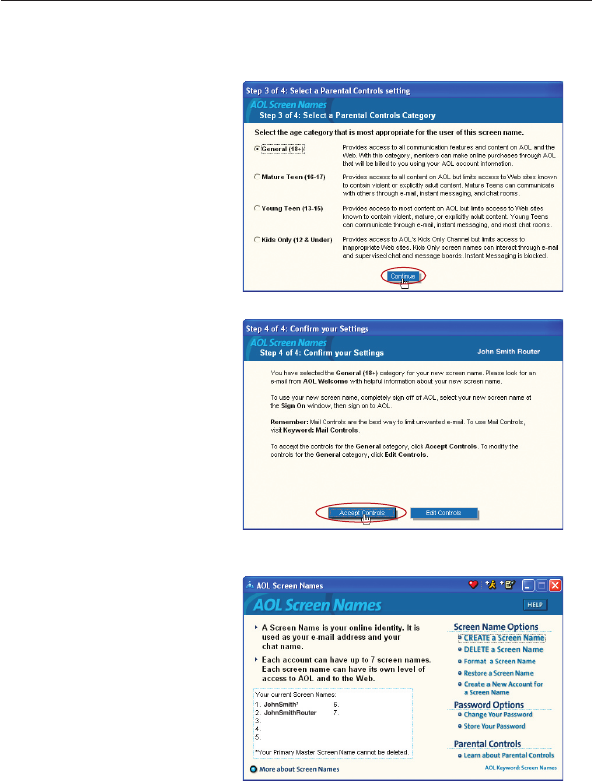
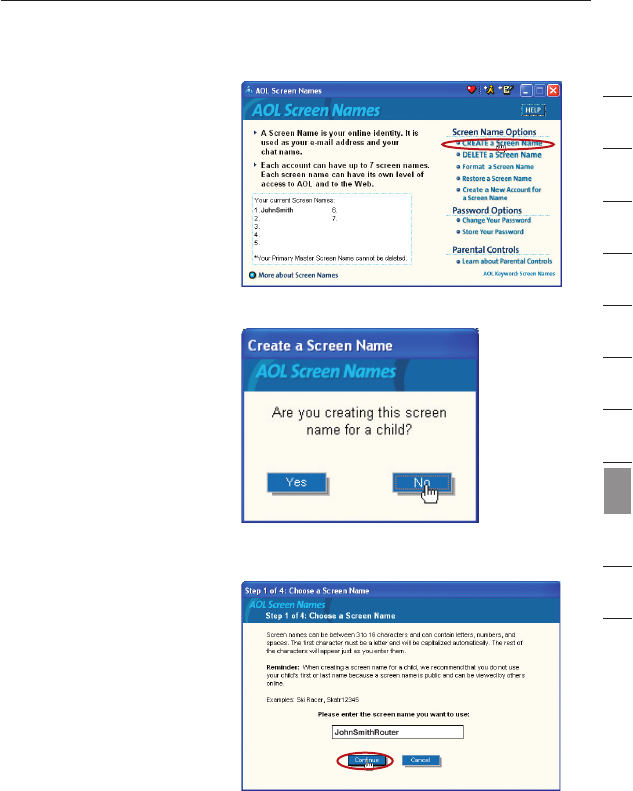
3. Perform a keyword
search on “names” by
clicking “Keyword”, and
then “Go to Keyword”.
4. In the “Keyword”
window, type in
“names” then
click “Go”.
5. You will see the
“AOL Screen Names”
window. Click “CREATE
a Screen Name”.
6. A window will appear
that asks whether
the screen name is
for a child. If you are
creating the screen
name for the Router,
click “Yes” or “No” (it
doesn’t matter which
you select). If you
are creating a screen
name for an additional
computer, select the
appropriate answer.
99
Using your Router with AOL Broadband
99
section
2
1
3
4
5
6
7
8
9
10
11
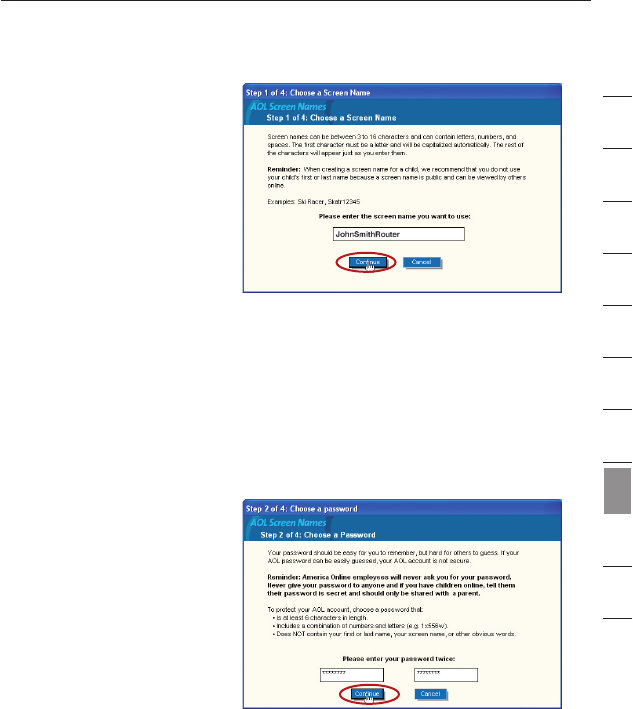
7. The “Choose a Screen
Name” window will
appear. Type in a
screen name, and
click “Continue”. If
this screen name is for
the Router, the name
you choose should be
something like your
master screen name
followed by the word
Router. For instance
“JohnSmithRouter”.
If the screen name is
for a computer, type in
the screen name of the
computer for which you
are creating this screen
name. Click “Continue”.
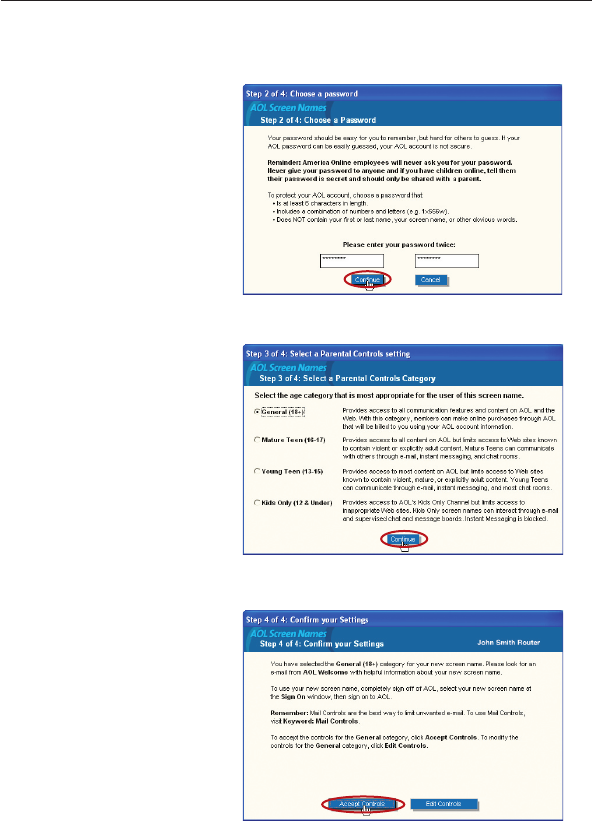
8. The “Choose a
password” screen
will appear. Enter the
password for this
screen name twice, and
click “Continue”.
101100
Using your Router with AOL Broadband
101100
Using your Router with AOL Broadband
9. The “Select a Parental
Controls setting”
window will appear. If
this screen name is for
the Router, choose any
one of the settings (it
doesn’t matter which).
If this screen name is
for a computer, choose
the desired setting and
click “Continue”.
10. The “Confirm your
Settings” window will
appear. Select “Accept
Controls”.
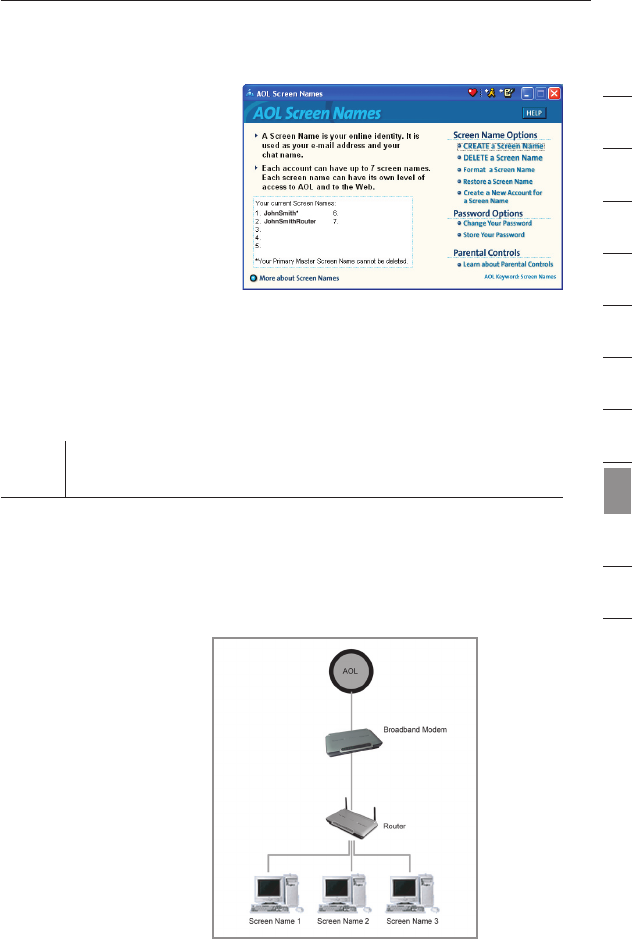
11. The “AOL Screen
Names” window
appears. This window
will include all the
screen names you have
created to this point.
12. Repeat steps 1-11
to add an additional
screen name for each
computer that will be
using AOL and that will
be connected to the
Router. When you are
finished adding screen
names, go to Step 2.
101
Using your Router with AOL Broadband
101
section
2
1
3
4
5
6
7
8
9
10
11
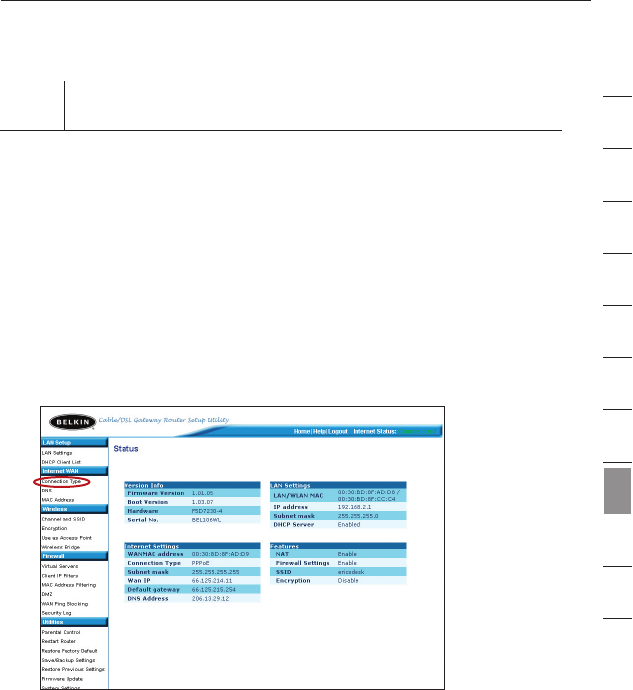
Step 2 Configuring the Router
Follow this step only if you use AOL DSL. This procedure is for Belkin
Router models F5D5231-4, F5D6231-4, F5D7230-4, and F5D7231-4.
1. Connect your Router to your network per the instructions in your
User Manual.
2. Open your Web browser.
3. In the address bar of your browser, type http://192.168.2.1 and
click “Go”. You will be directed to the Router’s home page. Click
on “Connection Type” in the left-hand column under “Internet
WAN” heading.
4. You will see the Router’s login page. Leave the password field
blank and click “Submit”.
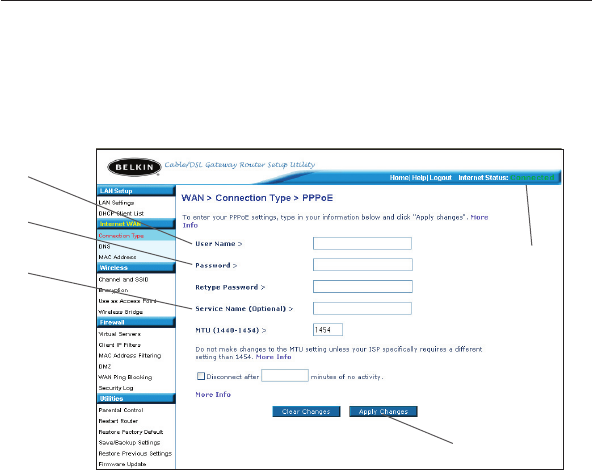
5. You will now see the “Connection Type” page. Select “PPPoE”
and click “Next”. You will now see the PPPoE setup page.
6. In the “User Name” field, type in the screen name that you
created for your Router (1).
103102
Using your Router with AOL Broadband
103102
Using your Router with AOL Broadband
7. In the password fields, type in the password you created for the
Router’s screen name (2).
8. Leave the “Service Name” field blank (3). Do not change the
MTU setting.
9. Click on “Apply Changes” (4).
10. Click on the Home link at the top of the screen. The Internet
Status indicator should read “Connected” (5).
11. Go to Step 3.
(1)
(2)
(3)
(4)
(5)
103
Using your Router with AOL Broadband
103
section
2
1
3
4
5
6
7
8
9
10
11
Step 3 Configure your computers with the AOL screen names
you just created
This step consists of installing the AOL software on each computer
and configuring it to use one of the screen names you created in
Step 1. Remember that each computer MUST use a different screen
name. For help installing and configuring the AOL software, contact
AOL’s technical support department.
Network Configuration

105104
Using your Router with AOL Broadband
105104
Using your Router with AOL Broadband
AOL Cable or AOL BYOA (Bring Your Own Access)
Users Directions
AOL Cable users need to follow these directions. If you have AOL
DSL, go to the “Directions for AOL DSL” section beginning on
page 97.
AOL Cable Users STEP 1:
Create AOL screen names for each computer that will be using
your AOL service.
AOL DSL Users STEP 2:
Configure your computers with the new AOL screen names you
just created.
AOL Cable or AOL BYOA Users
Step 1 Creating new AOL screen names
Note: Your AOL connections must be set to operate on the TCP/IP
standard. If you have designated another protocol, reset them to
TCP/IP before proceeding.
1. Connect the Router to the network per the instructions in your
User Manual. Once the Router is installed properly, go to the
next step.
2. Log on to your AOL master account.
3. Perform a keyword
search on “names” by
clicking “Keyword”, and
then “Go to Keyword”.
4. In the “Keyword”
window, type in
“names” then
click “Go”.
105
Using your Router with AOL Broadband
105
section
2
1
3
4
5
6
7
8
9
10
11
5. You should see the
“AOL Screen Names”
window. Click “CREATE
a Screen Name”.
6. A window will appear
that asks whether the
screen name is for a
child. Click “Yes” or
“No” to answer.
7. The “Choose a Screen
Name” window will
appear. Type in the
screen name of the
computer for which you
are creating this screen
name. Click “Continue”.
107106
Using your Router with AOL Broadband
107106
Using your Router with AOL Broadband
8. The “Choose a
password” screen
will appear. Enter the
password for this
screen name twice, and
click “Continue”.
9. The “Select a Parental
Controls setting”
window will appear.
Choose the appropriate
setting for this screen
name. Click “Continue”.
10. The “Confirm your
Settings” window will
appear. Select
“Accept Controls”.
107
Using your Router with AOL Broadband
107
section
2
1
3
4
5
6
7
8
9
10
11
11. The “AOL Screen
Names” window
appears. This window
will include all the
accounts you have
created to this point.
12. Repeat steps 1-11 for
each computer that
will be using AOL and
that will be connected
to your Belkin Router.
When you are finished
adding screen names,
go to Step 2.
Step 2 Configure your computers with the new AOL screen names
you just created
This step consists of installing the AOL software on each computer
and configuring it to use one of the screen names you created in
Step 1. Remember that each computer MUST use a different screen
name. For help installing and configuring the AOL software, contact
AOL’s technical support department.
Network Configuration

109108
Troubleshooting
109108
Troubleshooting
Problem:
Installation CD does not automatically start
Solution:
If the CD-ROM does not start the Easy Install Wizard automatically,
it could be that the computer is running other applications that are
interfering with the CD drive.
1. If the Easy Install Wizard screen does not appear within 15-20
seconds, open up your CD-ROM drive by double clicking on the
“My Computer” icon that is located on your desktop.
2. Next, double-click on the CD-ROM drive that the Easy Installation
CD has been placed in to start the installation.
3. Easy Install should start within a few seconds If, instead, a window
appears showing the files on the CD, double-click on the icon
labeled “EasyInstall.exe”.
4. If the Easy Install Wizard is still does not start, reference the
section titled “Manually Configuring Network Settings” (page 89 of
this manual for alternative setup method).

109
Troubleshooting
109
section
2
1
3
4
5
6
7
8
9
10
11
Problem:
Easy Install cannot find my Router
Solution:
If the Easy Install Wizard is not able to find the Router during the
installation process please check the following items:
1. If the Easy Install Wizard is not able to find the Router during
the installation process, there may be 3rd party firewall software
installed on the computer attempting to access the Internet.
Examples of third party firewall software are ZoneAlarm,
BlackICE PC Protection, McAfee Personal Firewall, and Norton
Personal Firewall.
If you do have firewall software installed on your computer,
please make sure that you properly configure it. You can
determine if the firewall software is preventing Internet access
by temporarily turning it off. If, while the firewall is disabled,
Internet access works properly, you will need to change the
firewall settings to function properly when it is turned on.
Please refer to the instructions provided by the publisher of your
firewall software for instructions on configuring the firewall to
allow Internet access.
2. Unplug power to the Router for 10 seconds, and then plug the
power back into the router. Ensure that the router’s Power light
is on; it should be solid green. If not, check to make sure that
the AC adapter is connected to the router and plugged into a
wall outlet.
3. Ensure that you have a cable (use the cable included with the
router) connected between (1) the network (Ethernet) port on the
back of the computer and (2) one of the LAN ports, labeled “1”
through “4”, on the back of the router.
Note: the computer should NOT be connected to the port
labeled “Internet/WAN” on the back of the router.
4. Try shutting down and restarting your computer, then re-running
the Easy Install.
If the Easy Install Wizard is still unable to find the Router,
reference the section titled “Manually Configuring Network
Settings” for installation steps.

111110
Troubleshooting
111110
Troubleshooting
Problem:
Easy Install cannot connect my Router to the Internet
Solution:
If the Easy Install Wizard is not able to connect the Router to the
Internet, please check the following items:
1. Use the troubleshooting suggestions within the Easy
Install Wizard. If the troubleshooting screen does not open
automatically, click on the “Troubleshoot” button in the lower
right-hand corner of the Easy Install Wizard window.
2. If your ISP requires a user name and password, make sure that
you have typed in your user name and password correctly. Some
user names require that the ISP’s domain may be at the end of
the name. Example: “myname@myisp.com”. The “@myisp.com”
part of the user name may need to be typed as well as your
user name.
If you continue to have no Internet connection, reference the
section titled “Manually Configuring Network Settings” (page 87
of this manual for alternative setup method).
Problem:
• The Easy Install Wizard completed installation, but my web
browser doesn’t work
• I am unable to connect to the Internet. The Routers “WAN” light
on my Router is off, and the “Connected” light is blinking
Solution:
If you cannot connect to the Internet, and the “WAN” light is off,
and the “Connected” light is blinking, the problem may be that your
modem and router are not connected properly.
1. Make sure the network cable between the modem and the
Router is connected. We strongly recommend using the cable
that was supplied with your Cable or DSL modem for this
purpose. The cable should be connected at one end to the
Router’s “Internet/WAN” port, and at the other end to the
network port on your modem.

111
Troubleshooting
111
section
2
1
3
4
5
6
7
8
9
10
11
2. Unplug the Cable or DSL modem from its power source for 3
minutes. After 3 minutes plug the modem back into its power
source. This may force the modem to properly recognize
the router.
3. Unplug the power to your Router, wait 10 seconds, and then
reconnect the power. This will cause the router to re-attempt
communication with the modem.
If the “WAN” light on the Router is not lit after completing these
steps, please contact Belkin Technical Support.
4. Try shutting down and restarting your computer.
Problem:
• The Easy Install Wizard completed installation, but my web
browser doesn’t work
• I am unable to connect to the Internet. The Routers “WAN” light
on my Router is on, and the “Connected” light is blinking
Solution:
If you cannot connect to the Internet, the “WAN” light is on, and
the “Connected” light is blinking, the problem may be that your
connection type may not match the ISP’s connection.
• If you have a “static IP address” connection, your ISP must
assign you the IP address, subnet mask, and gateway address.
Please refer to the section entitled “Alternate Setup Method” for
details on changing this setting.
• If you have a “PPPoE” connection, your ISP will assign you a
user name and password and sometimes a service name. Make
sure the Router connection type is configured to PPPoE and the
settings are entered properly. Please refer to your Router’s User
Guide section entitled “Alternate Setup Method” for details on
changing this setting.

113112
Troubleshooting
113112
Troubleshooting
• You may need to configure your Router to meet the specific
requirements of your ISP. To search our Knowledge Base for
ISP-specific issues, go to: http://web.belkin.com/support and
type in “ISP”
If you are still unable to access the Internet after verifying these
settings, please contact Belkin Technical Support.
Problem:
• The Easy Install Wizard completed, but my web browser
doesn’t work
• I am unable to connect to the Internet. The “WAN” light on my
router is blinking, and the “Connected” light is solid
Solution:
If the “WAN” light is blinking, and the “Connected” light is solid,
but you are unable to access the Internet, there may be 3rd party
firewall software installed on the computer attempting to access the
Internet. Examples of third party firewall software are ZoneAlarm,
BlackICE PC Protection, McAfee Personal Firewall, and Norton
Personal Firewall.
If you do have firewall software installed on your computer, please
make sure that you properly configure it. You can determine if
the firewall software is preventing Internet access by temporarily
turning it off. If, while the firewall is disabled, Internet access works
properly, you will need to change the firewall settings to function
properly when it is turned on.
Please refer to the instructions provided by the publisher of your
firewall software for instructions on configuring the firewall to allow
Internet access.
If you are still unable to access the Internet after disabling any
Firewall software, please contact Belkin Technical Support.
113
Troubleshooting
113
section
2
1
3
4
5
6
7
8
9
10
11
Problem:
I can’t connect to the Internet wirelessly
Solution:
If you are unable to connect to the Internet from a wireless
computer, please check the following items:
1. Look at the lights on your Router. If you’re using a Belkin
Router, the lights should be as follows:
• The “Power” light should be on.
• The “Connected” light should be on, and not blinking.
• The “WAN” light should be either on or blinking.
2. Open your wireless utility software by clicking on the icon in the
system tray at the bottom right-hand corner of the screen. If
you’re using a Belkin wireless card, the tray icon should look like
this (the icon may be red or green):
3. The exact window that opens will vary depending on the model
of wireless card you have; however, any of the utilities should
have a list of “Available Networks” – those wireless networks it
can connect to.
Does the name of your wireless network appear in the results?
Yes, my network name is listed – go to the troubleshooting solution
titled “ I can’t connect to the Internet wirelessly, but my network
name is listed”
No, my network name is not listed - go to the troubleshooting solution
titled “ I can’t connect to the Internet wirelessly, and my network
name is not listed”

115114
Troubleshooting
115114
Troubleshooting
Problem:
I can’t connect to the Internet wirelessly, but my network name
is listed
Solution:
If the name of your network is listed in the “Available Networks” list,
please follow the steps below to connect wirelessly:
1. Click on the correct network name in the “Available
Networks” list.
2. If the network has security (encryption) enabled, you will need to
enter the network key. For more information regarding security,
see the page entitled: Setting up wireless security
3. Within a few seconds, the tray icon in the lower left-hand
corner of your screen should turn green, indication a successful
connection to the network.
Problem:
I can’t connect to the Internet wirelessly, and my network name is
not listed
Solution
If the correct network name is not listed under “Available
Networks” in the wireless utility, please attempt the following
troubleshooting steps:
1. Temporarily move computer, if possible, five to ten feet from
the Router. Close the wireless utility, and re-open it. If the
correct network name now appears under “Available Networks”,
you may have a range or interference problem. Please see the
suggestions discussed in the section titled “Placement of your
Wireless Networking Hardware” of this user manual.

115
Troubleshooting
115
section
2
1
3
4
5
6
7
8
9
10
11
2. Using a computer that is connected to the Router via a network
cable (as opposed to wirelessly), ensure that “Broadcast SSID”
is enabled. This setting is found on the Router’s wireless
“Channel and SSID” configuration page.
If you are still unable to access the Internet after completing
these steps, please contact Belkin Technical Support.
Problem:
My wireless network performance is inconsistent
Data transfer is sometimes slow
Signal strength is poor
Difficulty establishing and/or maintaining a Virtual Private Network
(VPN) connection
Solution:
Wireless Technology is radio-based, which means connectivity
and the throughput performance between devices decreases when
the distance between devices increases. Other factors that will
cause signal degradation (metal is generally the worst culprit) are
obstructions such as walls and metal appliances. As a result, the
typical indoor range of your wireless devices will be between 100
to 200 feet. Note also that connection speed may decrease as you
move further from the Router or Access Point.
In order to determine if wireless issues are related to range, we
suggest temporarily moving the computer, if possible, five to ten
feet from the router.
Changing the wireless channel - Depending on local wireless
traffic and interference, switching the wireless channel of your
network can improve performance and reliability. The default
channel the router is shipped with is channel 11, you may choose
from several other channels depending on your region; see page
45 - “changing the wireless channel” for instructions on how to
choose other channels.
Limiting the wireless transmit rate - Limiting the wireless
transmit rate can help improve the maximum wireless range, and
connection stability. Most wireless cards have the ability to limit
the transmission rate. To change this property, go to the Windows
Control Panel, open the Network Connections and double-click on

117116
Troubleshooting
117116
Troubleshooting
your wireless card’s connection. In the properties dialog, select
the configure button on the General tab (Windows 98 users will have
to select the wireless card in the list box and then click properties),
then choose the advanced tab and select the Rate property.
Wireless client cards are usually set to automatically adjust the
wireless transmit rate for you, but doing so can cause periodic
disconnects when the wireless signal is too weak; as a rule, slower
transmission rates are more stable. Experiment with different
connection rates until you find the best one for your environment;
note that all available transmission rates should be acceptable
for browsing the Internet. For more assistance, see your wireless
card’s user manual.
Problem:
How do I extend the range of my wireless network
Solution:
Belkin recommends using one of the following products to extend
wireless network coverage throughout large homes or offices:
• Wireless Access Point: A wireless access point can effectively
double the coverage area of your wireless network. An Access
Point is typically placed in the area not currently covered by
your wireless router, and connected to the router using either an
Ethernet cable, or through your home’s power lines using two
Powerline Ethernet Adapters.
• For 802.11g (54g) wireless networks, Belkin offers a Wireless
Range Extender/Access Point that can be connected wirelessly
to a Belkin 802.11g Wireless Router, without requiring an
Ethernet cable or Powerline Ethernet Adapters.
These Belkin products are available at your local retailer, or can be
ordered from Belkin directly.
For network/range extension information, please visit: www.belkin.
com/networking to find out more about:
802.11g Wireless Range Extender/Access Point (F5D7130)
Powerline Ethernet Adapter (F5D4070)
Powerline USB Adapter (F5D4050)

117
Troubleshooting
117
section
2
1
3
4
5
6
7
8
9
10
11
Problem:
I am having difficulty setting up Wired Equivalent Privacy (WEP)
security on a Belkin Router or Belkin Access Point
Solution
1. Log into your Wireless Router or Access Point.
Open your web browser and type in IP address of the Wireless
Router or Access Point. (The Router default is 192.168.2.1, the
802.11g Access Point is 192.168.2.254 ). Log into your router by
clicking on the “Login” button in the top right-hand corner of the
screen. You will be asked to enter your password. If you never set
a password, leave the password field blank and click “Submit”.
Click the “Wireless” tab on the left of your screen. Select
the “Encryption” or “Security” tab to get to the security
settings page.
2. Select “128-bit WEP” from the drop-down menu.
3. After selecting your WEP encryption mode, you can type in
your hex WEP key manually, or you can type in a passphrase
in the “Passphrase” field and click “Generate” to create a WEP
key from the passphrase. Click “Apply Changes” to finish. You
must now set all of your clients to match these settings. A hex
(hexadecimal) key is a mixture of numbers and letters from A-F
and 0-9. For 128-bit WEP, you need to enter 26 hex keys.
For example:
C3030FAF4BB2C3D44BC3D4E7E4 = 128-bit key
4. Click “Apply Changes” to finish. Encryption in the Wireless
Router is now set. Each of your computers on your wireless
network will now need to be configured with the same
security settings.
WARNING: If you are configuring the Wireless Router or Access
Point from a computer with a wireless client, you will need to ensure
that security is turned on for this wireless client. If this is not done,
you will lose your wireless connection.
Note to Mac users: Original Apple Airport® products support 64-
bit encryption only. Apple Airport 2 products can support 64-bit or
128-bit encryption. Please check your Apple Airport product to see
which version you are using. If you cannot configure your network
with 128-bit encryption, try 64-bit encryption.

119118
Troubleshooting
119118
Troubleshooting
Problem:
I am having difficulty setting up Wired Equivalent Privacy (WEP)
security on a Belkin client card
Solution:
The client card must use the same key as the Wireless Router or
Access Point. For instance, if your Wireless Router or Access Point
uses the key 00112233445566778899AABBCC, then the client card
must be set to the exact same key.
1. Double-click the Signal Indicator icon to bring up the Wireless
Network screen. The Advanced button will allow you to view and
configure more options of your card.
2. The “Advanced” button will allow you to view and configure more
options of the card.
3. Once the advanced button is clicked the Belkin Wireless LAN
Utility will appear. This Utility will allow you to manage all the
advanced features of the Belkin wireless card.
4. Under the “Wireless Network Properties” tab, select a
network name from the “Available networks” list and click the
“Properties” button
5. Under “Data Encryption” select “WEP”
6. Ensure the check box “The key is provided for me automatically”
at the bottom is unchecked. If you are using this computer to
connect to a corporate network, please consult your network
administrator if this box needs to be checked.
7. Type you WEP key in the “Network key’ box.
Important: A WEP key is a mixture of numbers and letters from
A-F and 0-9. For 128-bit WEP, you need to enter 26 keys. This
Network key needs to match the key you assign to your Wireless
Router or Access Point.
For example:
C3030FAF4BB2C3D44BC3D4E7E4 = 128-bit key
8. Click “OK”, and then “Apply” to save the settings.
For non-Belkin wireless client cards please consult the manufacturer
for that wireless client card’s user manual

119
Troubleshooting
119
section
2
1
3
4
5
6
7
8
9
10
11
Problem:
Do Belkin products support WPA?
Solution
Note: To use WPA security, all your clients must be upgraded
to drivers and software that support it. At the time of this FAQ
publication, a security patch download is available, for free,
from Microsoft. This patch works only with the Windows XP
operating system.
Download the patch here:
http://www.microsoft.com/downloads/details.
aspx?FamilyID=009d8425-ce2b-47a4-abec-274845dc9e91&displayl
ang=en
You also need to download the latest driver for your Belkin Wireless
802.11g Desktop or Notebook Network Card from the Belkin
support site. Other operating systems are not supported at this
time. Microsoft’s patch only supports devices with WPA-enabled
drivers such as Belkin 802.11g products
Download the latest driver at http://web.belkin.com/support
for the following products:
F5D7000, F5D7001, F5D7010, F5D7011, F5D7230-4,
F5D7231-4, F5D7130

121120
Troubleshooting
121120
Troubleshooting
Problem:
I am having difficulty setting up Wi-Fi Protected Access (WPA)
security on a Belkin Wireless Router or Belkin Access Point for a
home network.
Solution:
1. From the “Security Mode” drop-down menu, select “WPA-PSK
(no server)”.
2. For Encryption Technique, select “TKIP” or “AES”. This setting
will have to be identical on the clients that you set up.
3. Enter your pre-shared key. This can be from 8 to 63 characters
and can be letters, numbers, or symbols or spaces. This same
key must be used on all of the clients that you set up. For
example, your PSK might be something like: “Smith family
network key”.
4. Click “Apply Changes” to finish. You must now set all clients to
match these settings.

121
Troubleshooting
121
section
2
1
3
4
5
6
7
8
9
10
11
Problem:
I am having difficulty setting up Wi-Fi Protected Access (WPA)
security on a Belkin Wireless Router or Belkin Access Point for
a business.
Solution:
If your network uses a radius server to distribute keys to the clients,
use this setting. This is typically used in a business environment.
1. From the “Security Mode” drop-down menu, select “WPA
(with server)”
2. For Encryption Technique, select “TKIP” or “AES”. This setting
will have to be identical on the clients that you set up.
3. Enter the IP address of the radius server into the “Radius
Server” fields.
4. Enter the radius key into the “Radius Key” field
5. Enter the key interval. Key interval is how often the keys are
distributed (in packets).
6. Click “Apply Changes” to finish. You must now set all clients to
match these settings.

123122
Troubleshooting
123122
Troubleshooting
Problem:
I am having difficulty setting up Wi-Fi Protected Access (WPA)
security on a wireless Belkin client card for a home network.
Solution:
Clients must use the same key that the Wireless Router or Access
Point uses. For instance if the key is “Smith Family Network Key” in
the Wireless Router or Access point, the clients must also use that
same key.
Double-click the Signal Indicator icon to bring up the Wireless
Network screen. The Advanced button will allow you to view and
configure more options of your card.
The “Advanced” button will allow you to view and configure more
options of the card.
Once the advanced button is clicked the Belkin Wireless LAN Utility
will appear. This Utility will allow you to manage all the advanced
features of the Belkin wireless card.
Under the “Wireless Network Properties” tab, select a network name
from the “Available networks” list and click the “Properties” button
Under “Network Authentication” select “WPA-PSK (no server)
Type your WPA key in the “Network key” box
Important: WPA-PSK is a mixture of numbers and letters from A-
Z and 0-9. For WPA-PSK you can enter 8 to 63 characters. This
Network key needs to match the key you assign to your Wireless
Router or Access Point.
Click “OK, then “Apply” to save the settings

123
Troubleshooting
123
section
2
1
3
4
5
6
7
8
9
10
11
Problem:
I am having difficulty setting up Wi-Fi Protected Access (WPA)
security on a Belkin wireless client card for a business.
Solution:
Double-click the Signal Indicator icon to bring up the Wireless
Network screen. The Advanced button will allow you to view and
configure more options of your card.
The “Advanced” button will allow you to view and configure more
options of the card.
Once the advanced button is clicked the Belkin Wireless LAN Utility
will appear. This Utility will allow you to manage all the advanced
features of the Belkin wireless card.
Under the “Wireless Network Properties” tab, select a network
name from the “Available networks” list and click the
“Properties” button
Under “Network Authentication” select WPA
In the “ Authentication” tab, select the settings that are indicated by
your network administrator.
Click “OK, then “Apply” to save the settings

125124
Troubleshooting
125124
Troubleshooting
Problem:
I am having difficulty setting up Wi-Fi Protected Access (WPA)
security on a non-Belkin client card for a home network.
Solution:
For non-Belkin WPA Wireless Desktop and Wireless Notebook
Network Cards that are not equipped with WPA-enabled software, a
file from Microsoft called “Windows XP Support Patch for Wireless
Protected Access” is available for free download:
www.microsoft.com/downloads/details.aspx?FamilyID=009d8425-
ce2b-47a4-abcc-2748dc9e91diplaylang=en
Note: The file that Microsoft has made available works only with
Windows XP. Other operating systems are not supported at this
time. You also need to ensure that the wireless card manufacturer
supports WPA and that you have downloaded and installed the
latest driver from their support site.
Supported Operating Systems:
• Windows XP Professional
• Windows XP Home Edition
Enabling WPA-PSK (no server)
1. Under Windows XP, click “Start > Control Panel > Network
Connections”.
2. Right-click on “Wireless Networks” tab will display the following
screen. Ensure the “Use Windows to configure my wireless
network settings” check box is checked.
3. Under the Wireless Networks tab, click the “Configure” button,
and you will see the following screen.
4. For a home or small business user, select “WPA-PSK” under
“Network Administration”.
Note: Select WPA (with radius server) if you are using this
computer to connect to a corporate network that supports an
authentication server such as a radius server, please consult
your network administrator for further information.

125
Troubleshooting
125
section
2
1
3
4
5
6
7
8
9
10
11
5. Select “TKIP” or “AES” under “Date Encryption”. This setting will
have to be identical to the Wireless Router or Access Point that
you set up.
6. Type in your encryption key in the “Network Key” box.
Important: Enter your Pre-Shared key. This can be from 8 to 63
characters and can be letters, numbers, or symbols. This same
key must be used on all of the clients that you set up.
7. Click “OK” to apply settings.

127126
Troubleshooting
127126
Troubleshooting
What’s the difference between 802.11b, 802.11g and 802.11a?
Currently there are three levels of wireless networking standards,
which transmit data at very different maximum speeds. Each is
based on the designation 802.11x, so named by the IEEE, the
board that is responsible for certifying networking standards. The
most common wireless networking standard, 802.11b, transmits
information at 11Mbps; 802.11a and 802.11g work at 54Mbps. See
the following chart for more detailed information.
Wireless Comparison
Wireless
Technology
802.11b 802.11g 802.11a
Speed 11Mbps 54Mbps 54Mbps
Frequency Common
household
devices such as
cordless phones
and microwave
ovens. May
interfere with
the 2.4GHz
unlicensed band
Common
household
devices such as
cordless phones
and microwave
ovens. May
interfere with
the 2.4GHz
unlicensed band
5GHz -
uncrowded band
Compatibility Compatible with
802.11g
Compatible with
802.11b
Incompatible
with 802.11b or
802.11g
Range Depends on
interference -
typically 50-300
ft. indoors
Depends on
interference -
typically 50–300
ft. indoors
Less interference
- range is
typically 50-100
feet
Adoption Mature - widely
adopted
Expected to
continue to grow
in popularity
Slow adoption
for consumers -
more popular in
business
Price Inexpensive More expensive Most expensive