Deltanode Solutions DDL001 Low Power Indoor Cellular Remote Unit User Manual 9570S1 2
Deltanode Solutions AB Low Power Indoor Cellular Remote Unit 9570S1 2
User Manual
Bird Technologies Manual 7-9570-1-1(Rough Draft) 08/19/16 Page 1
8625 Industrial Parkway, Angola, NY 14006 Tel: 716-549-4700 Fax: 716-549-4772 sales@birdrf.com www.bird-technologies.com
Installation and Operation Manual for
the DDL Series Remote Radio Head
Model Numbers DDL100/DDL200/DDL300/DDL400
Manual Part Number
7-9570-1-1 (Rough Draft)
WARNING: This is NOT a consumer device. It is designed for installation by
FCC Licensees and Qualified Installers. You must have an FCC license or
express consent of an FCC Licensee to operate this device. You must regis-
ter Class B signal boosters (as defined in 47 CFR 90.219) online at
www.fcc.gov/signal-boosters/registration. Unauthorized use may result in sig-
nificant forfeiture penalties, including penalties in excess of $100,000 for each
continuing violation.

Bird Technologies Manual 7-9570-1-1(Rough Draft) 08/19/16 Page 2
Warranty
This warranty applies for one year from shipping date.
TX RX Systems Inc. warrants its products to be free from defect in material and workmanship at the time of shipment.
Our obligation under warranty is limited to replacement or repair, at our option, of any such products that shall have
been defective at the time of manufacture. TX RX Systems Inc. reserves the right to replace with merchandise of
equal performance although not identical in every way to that originally sold. TX RX Systems Inc. is not liable for dam-
age caused by lightning or other natural disasters. No product will be accepted for repair or replacement without our
prior written approval. The purchaser must prepay all shipping charges on returned products. TX RX Systems Inc.
shall in no event be liable for consequential damages, installation costs or expense of any nature resulting from the
purchase or use of products, whether or not they are used in accordance with instructions. This warranty is in lieu of all
other warranties, either expressed or implied, including any implied warranty or merchantability of fitness. No repre-
sentative is authorized to assume for TX RX Systems Inc. any other liability or warranty than set forth above in con-
nection with our products or services.
TERMS AND CONDITIONS OF SALE
PRICES AND TERMS:
Prices are FOB seller’s plant in Angola, NY domestic packaging only, and are subject to change without notice. Fed-
eral, State and local sales or excise taxes are not included in prices. When Net 30 terms are applicable, payment is
due within 30 days of invoice date. All orders are subject to a $100.00 net minimum.
QUOTATIONS:
Only written quotations are valid.
ACCEPTANCE OF ORDERS:
Acceptance of orders is valid only when so acknowledged in writing by the seller.
SHIPPING:
Unless otherwise agreed at the time the order is placed, seller reserves the right to make partial shipments for which
payment shall be made in accordance with seller’s stated terms. Shipments are made with transportation charges col-
lect unless otherwise specified by the buyer. Seller’s best judgement will be used in routing, except that buyer’s routing
is used where practicable. The seller is not responsible for selection of most economical or timeliest routing.
CLAIMS:
All claims for damage or loss in transit must be made promptly by the buyer against the carrier. All claims for shortages
must be made within 30 days after date of shipment of material from the seller’s plant.
SPECIFICATION CHANGES OR MODIFICATIONS:
All designs and specifications of seller’s products are subject to change without notice provided the changes or modifi-
cations do not affect performance.
RETURN MATERIAL:
Product or material may be returned for credit only after written authorization from the seller, as to which seller shall
have sole discretion. In the event of such authorization, credit given shall not exceed 80 percent of the original pur-
chase. In no case will Seller authorize return of material more than 90 days after shipment from Seller’s plant. Credit
for returned material is issued by the Seller only to the original purchaser.
ORDER CANCELLATION OR ALTERATION:
Cancellation or alteration of acknowledged orders by the buyer will be accepted only on terms that protect the seller
against loss.
NON WARRANTY REPAIRS AND RETURN WORK:
Consult seller’s plant for pricing. Buyer must prepay all transportation charges to seller’s plant. Standard shipping pol-
icy set forth above shall apply with respect to return shipment from TX RX Systems Inc. to buyer.
DISCLAIMER
Product part numbering in photographs and drawings is accurate at time of printing. Part number labels on TX RX
products supersede part numbers given within this manual. Information is subject to change without notice.
Bird Technologies
Bird Technologies Manual 7-9570-1-1(Rough Draft) 08/19/16 Page 3
Symbols Commonly Used
NOTE
VIDEO
WARNING !!!
CAUTION or ATTENTION
Important Information
Training Video Available
Heavy Lifting
High Voltage
Hot Surface
ESD Electrostatic Discharge
Electrial Shock Hazard
Safety Glasses Required
Manual Part Number 7-9570
Copyright © 2016 Bird Technologies
First Printing: August 2016
Version Number Version Date
1.0 08/10/16
1.1 08/19/16
Bird Technologies Manual 7-9570-1-1(Rough Draft) 08/19/16 Page 4
Table of Contents
Overview .............................................................................................................. 7
Unpacking............................................................................................................ 8
Remote Unit ......................................................................................................... 8
Installation ........................................................................................................... 8
Location ............................................................................................................ 8
Mounting ............................................................................................................ 8
Connections ....................................................................................................... 8
RF Exposure (Exposition RF) ......................................................................... 10
Functional Block Diagram ............................................................................... 10
Operation ........................................................................................................... 11
Web Based GUI Interface ................................................................................. 12
Master Unit......................................................................................................... 14
Master Frame Unit ............................................................................................ 15
BUI (Base Station Interface Module)................................................................. 15
Functional Description..................................................................................... 16
LED Behavior.................................................................................................. 17
POI Module (Point of Interconnect Module) ...................................................... 18
FOI Module (Fiber Optic Interface Module)....................................................... 18
Functional Description..................................................................................... 18
Central Gateway Computer.............................................................................. 19
Figures and Tables
Figure 1: Typical Fiber DAS System ................................................................... 7
Figure 2: Front view of the DDL Remote Radio Head ......................................... 9
Figure 3: Chassis mounting dimensions ............................................................ 10
Figure 4: DDL functional block diagram............................................................. 11
Figure 5: DDL system layout screen.................................................................. 13
Figure 6: Typical overview screen ..................................................................... 13
Figure 7: RF Status drop-down menu selection................................................. 14
Figure 8: RF Config drop-down menu selection ................................................ 15
Figure 9: Typical master unit.............................................................................. 16
Figure 10: BIU module ....................................................................................... 17
Figure 11: POI module ....................................................................................... 18
Figure 12: FOI module ....................................................................................... 19
Table 1: Operating Bands..................................................................................... 8
Table 2: DDL Specifications ................................................................................. 9
Table 3: DDL front panel LED behavior.............................................................. 12
Bird Technologies Manual 7-9570-1-1(Rough Draft) 08/19/16 Page 5
For Class A or Class B Unintentional Radiators
This equipment has been tested and found to comply with the limits for a Class A or Class B digital device, pursuant to
Part 15 of the FCC rules. These limits are designed to provide reasonable protection against harmful interference when
the equipment is operated in a commercial environment. This equipment generates, uses, and can radiate radio fre-
quency energy and, if not installed and used in accordance with the instruction manual, may cause harmful interference
to radio communications. Operation of this equipment in a residential area is likely to cause harmful interference in
which the user will be required to correct the interference at his own expense.
Pour Classe-A ou Classe-B Radiateurs Involontaires
Cet équipement a été testé et jugé conforme avec les limites de la Classe-A ou Classe-B des appareils numériques,
suivants à la Partie 15 des règlements de la FCC. Ces limites sont conçues pour fournir une protection raisonnable
contre les interférences dangereuses lorsque l'équipement est utilisé dans un environnement commercial. Cet équipe-
ment génère, utilise et peut émettre des fréquences radio et, s'il n'est pas installé et utilisé conformément aux instruc-
tions du manuel, ceci peut causer des interférences dangereuses aux communications radio. Le fonctionnement de cet
équipement dans une zone résidentielle est susceptible de causer des interférences mauvaises dans lequel l'utilisateur
sera tenu pour responsable de corriger l'interférence à sa propre discrétion.
WARNING: Changes or modifications which are not expressly approved by Bird Technologies
could void the user’s authority to operate the equipment.
AVERTISSEMENT: Les changements ou modifications qui ne sont pas approuvés par Bird
Technologies pourrait annuler l'autorité de l'utilisateur de faire fonctionner l'équipement.
ATTENTION: This device complies with Part 15 of the FCC rules. Operation is subject to the following two
conditions: (1) this device may not cause harmful interference and (2) this device must accept any interfer-
ence received, including interference that may cause undesired operation.
ATTENTION: Cet appareil est conforme à la Partie 15 des règlements de la FCC. L'opération doit se con-
former aux deux conditions suivantes: (1) cet appareil ne peut causer d'interférences nuisibles et (2) cet
appareil doit accepter toute interférence reçue, y compris les interférences qui peuvent provoquer un fonc-
tionnement indésirable.

Bird Technologies Manual 7-9570-1-1(Rough Draft) 08/19/16 Page 6
Bird Technologies Manual 7-9570-1-1(Rough Draft) 08/19/16 Page 7
OVERVIEW
This manual details the Installation and Operation
of the Bird Technologies Remote Radio Head Sys-
tem models DDL100/DDL200/DDL300/DDL400.
The system is designed to distribute wireless ser-
vice for voice and data to/from a Master Unit
located at the BTS site and to/from the Remote
Radio Heads (Remote Units) which are indoor
mounted throughout the coverage area.
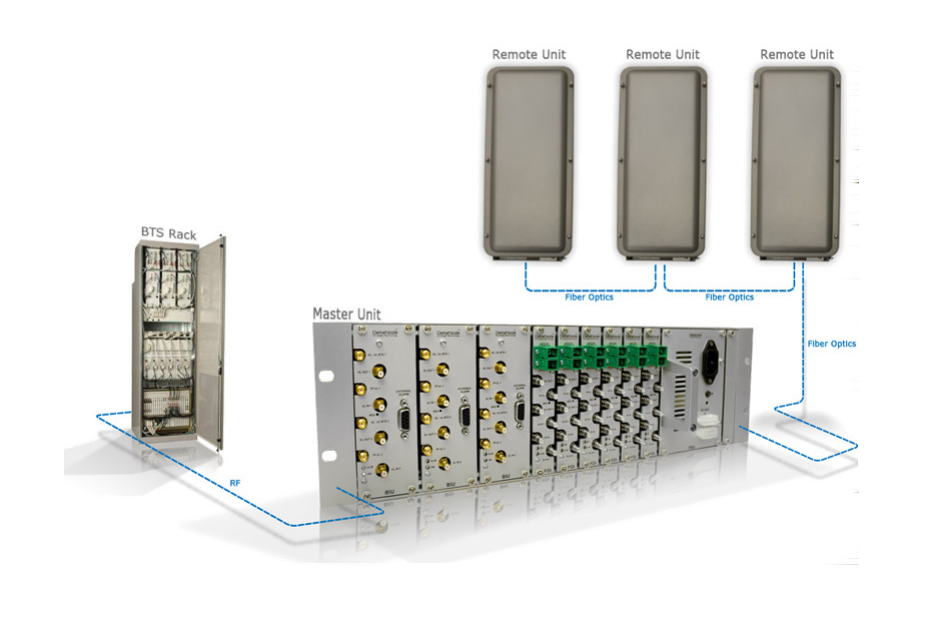
Figure 1 shows an overall layout of a typical instal-
lation. The DDL Remote Unit transmits into a dis-
tributed antenna system (DAS) for downlink output
signals and a fiber optic cable for uplink output sig-
nals. The DDL Remote Unit is designed as the
peripheral part of the overall DAS network/system
and performs as a downlink transmitter and an
uplink receiver. A Fiber DAS uses fiber optic cables
to distribute RF signals from a base station to
remotely located antenna when coaxial cable
losses would be to high or it is impractical to install
coaxial cables. Fiber DAS can be used indoors to
cover large buildings where outside penetration of
RF signals is insufficient. It can also be used to
provide coverage in areas such as road tunnels,
rail tunnels, airports, metro lines, etc.
The system uses a common optical cable for its
signal paths (uplink and downlink) between the
remote units and master unit. Either WDM or
CDWM is used as the optical transmission tech-
nique. In addition, the fiber optic cable carries an
optical sub carrier which allows control signals to
pass between the maser unit and the remote units.
The system is managed by a central gateway com-
puter (CGW) that is the overall interface point for
system management functions. The CGW com-
puter is connected to the master unit and has rout-
ing, firewall functionality, alarm logging, and access
control for the complete DAS system. The remote
unit has a WEB based GUI interface that is
accessed via the CGW computer.
The Bird Technologies Fiber-DAS system consists
of two major parts including a Master Unit (MU)
which functions as the head-end and at least one
or more Remote Units which function as remote-
ends. Connection between the customers BTS and
the Master Unit (or head-end) is through coaxial
cable while the connection between the Master
Unit and Remote Units is through fiber optic cable.
Figure 1: Typical Fiber DAS system.

Bird Technologies Manual 7-9570-1-1(Rough Draft) 08/19/16 Page 8
UNPACKING
Each major component of the Fiber DAS system is
individually packaged and shipped via motor freight
or UPS. It is important to report any visible damage
to the carrier immediately. It is the customer's
responsibility to file damage claims with the carrier
within a short period of time after delivery (1 to 5
days).
REMOTE UNIT
The DDL Remote Unit is a high performing wide-
band remote radio head equipped with linear vari-
able gain amplifiers supporting 4 operating bands
as listed in Table 1. The lightweight, convection
cooled IP42 chassis ensures high performance in
any indoor environment. The DDL Remote Unit is
designed for indoor mounting only. One chassis
can house from one to four different operating
bands. Product model numbers reflect the number
of installed bands. DDL100 has 1 band, DDL200
has 2 bands, DDL300 has 3 bands, and DDL400
has 4 bands installed. Labels are placed on the
front panel next to the DAS RF connectors to des-
ignate the operating bands used and where to
make the proper antenna line connections. The
Remote Unit is shown in Figure 2 and specifica-
tions are listed in Table 2.
INSTALLATION
The following sub-sections of the manual discuss
general considerations for installing the Remote
Unit. All work should be performed by qualified per-
sonnel and in accordance with local codes.
Location
The layout of the antenna distribution system will
be the prime factor in determining the mounting
location of this unit. However, safety and service-
ability are also key considerations. The unit should
be located where it can not be tampered with by
the general public, yet is easily accessible to ser-
vice personnel. Also, consider the weight of the
unit and the possibility for injury if it should become
detached from its mounting for any reason.
The unit needs to be installed such that there can
be unobstructed air flow around the back of the
chassis. Insure that the heat sink fins are unob-
structed. The various subassemblies within the
equipment cabinet will stay warm during normal
operation so in the interest of equipment longevity,
avoid installation locations that carry hot exhaust
air or are continually hot.
Mounting
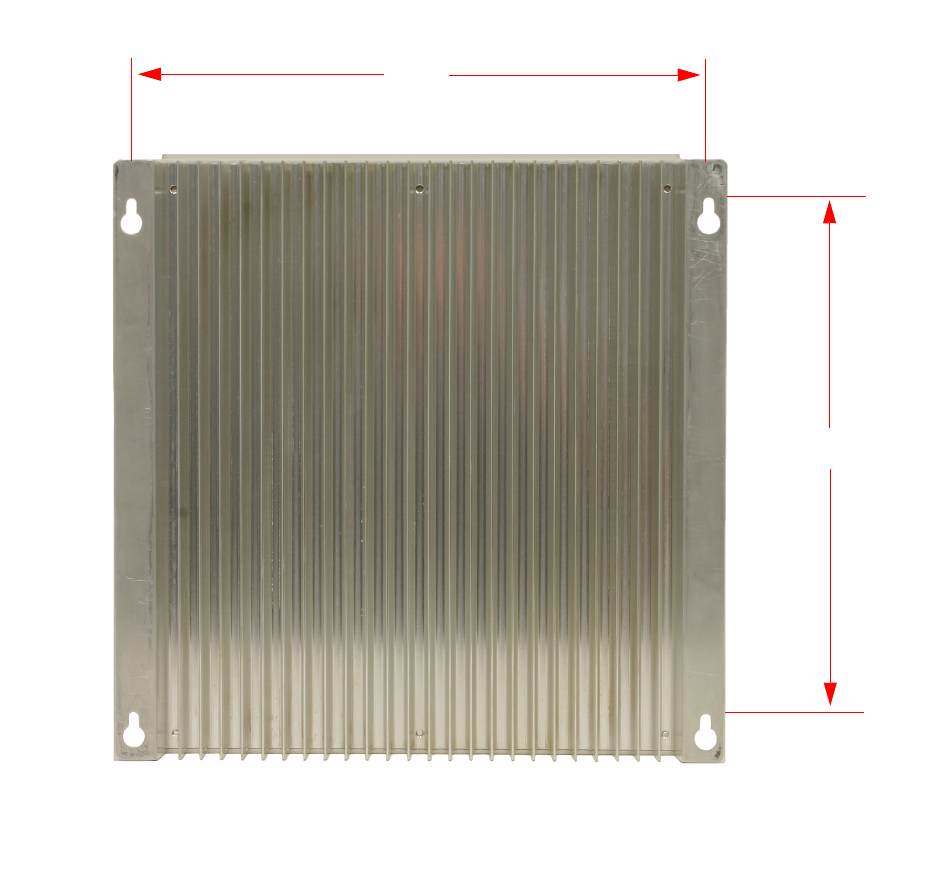
Figure 3 shows the mounting hole layout for the
chassis. Mount the cabinet using 3/16” (5 MM)
diameter steel bolts (not supplied). We recommend
flat washers on both ends and a lock washer under
the nut. Nut and bolt mounting is preferred to the
use of lag bolts. Use backer blocks where neces-
sary to spread the force over a larger area. In
areas of known seismic activity, additional devices
such as tether lines may be necessary.
Because Bird Technologies cannot anticipate all of
the possible mounting locations and the structure
types where these devices will be located, we rec-
ommend consulting local building inspectors, engi-
neering consultants or architects for advice on how
to properly mount objects of this type, size and
weight in your particular situation. It is the custom-
ers responsibility to make sure that these devices
are mounted safely and in compliance with building
codes.
Connections
All RF cabling connections to the booster should
be made and checked for correctness prior to pow-
ering up the system. N(f) bulkhead connectors are
Band Uplink (MHz) Downlink (MHz) Pout (DL)
dBm/Composite
700 (LTE) 698 - 716
776 - 787 728 - 756 23
850 (CELL) 824 - 849 869 - 894 23
1900 (PCS) 1850 - 1915 1930 - 1995 23
2100 (AWS) 1710 - 1780 2110 - 2180 23
Table 1: Operating Bands.
Bird Technologies Manual 7-9570-1-1(Rough Draft) 08/19/16 Page 9
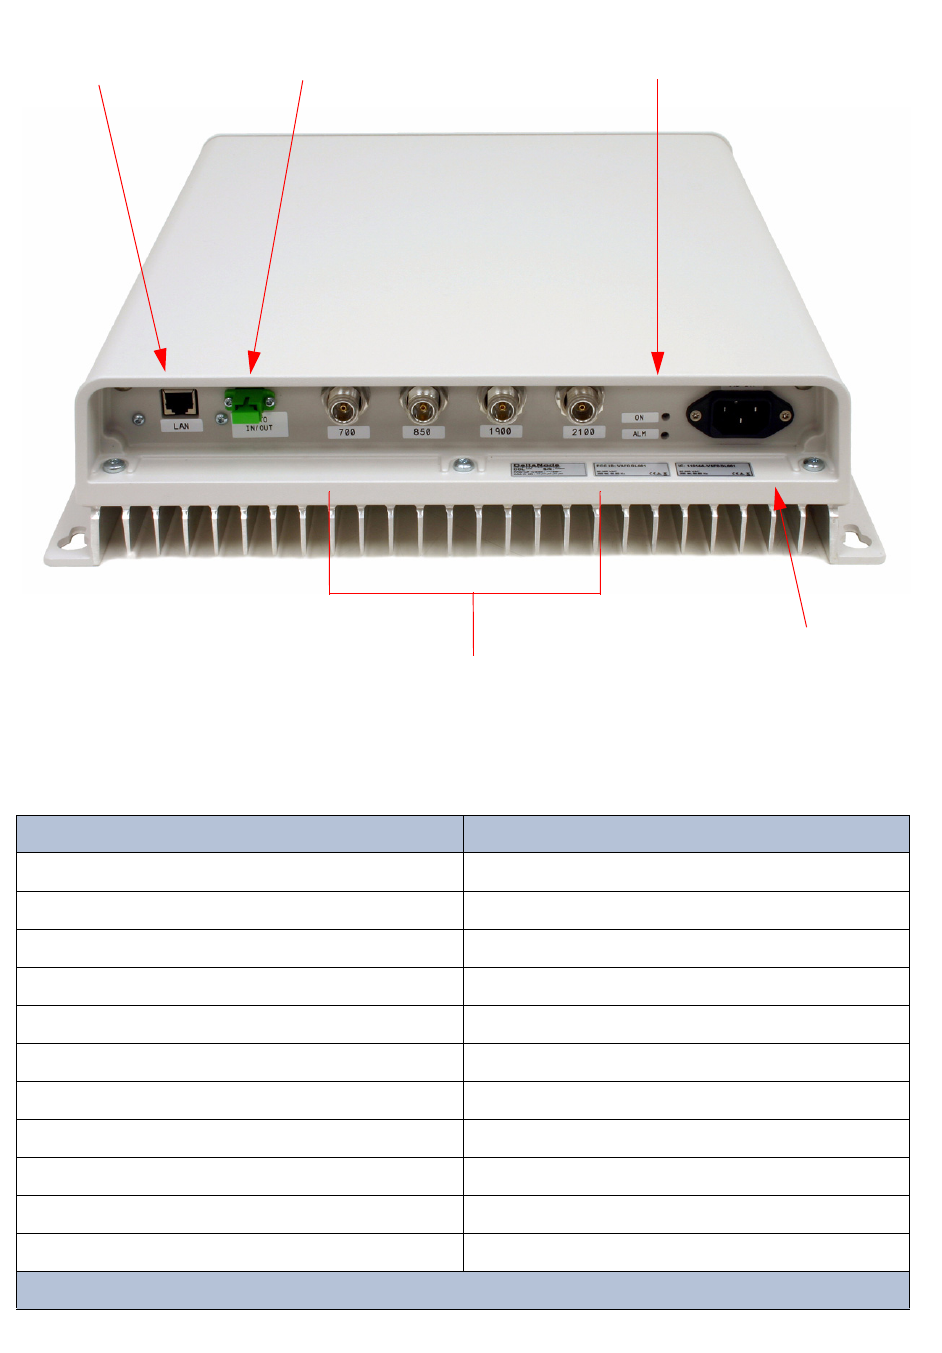
LAN
Port
Fiber Optic link
to Master Unit
Power On and
Alarm indicators
AC Cord
connects here
DAS RF Ports
Figure 2: Front view of the DDL Remote Radio Head.
Specification Value
Noise Figure 4.5 dB
Delay Excluding Optical Fiber < 0.5
Power Requirement 90 - 264 VAC
Operating Temperature Range -20 to +50
DFB Laser Output Wavelength 1270 - 1610 nm
Optical Output Power 3 mW
Maximum Optical Input Power 10 mW
Optical Return Loss <-40 dB
Casing IP42
Dimensions (WxDxH) 15” x 3.6” x 15”
Weight 26.4 lbs.
Table 2: DDL Specifications.
Bird Technologies Manual 7-9570-1-1(Rough Draft) 08/19/16 Page 10
available at the front of the unit for connection to
the system antennas. Make sure the correct
branches of the antenna system are connected to
the correct front panel connectors or the system
will not work properly. Using high quality connec-
tors with gold center pins is advised.
RF EXPOSURE
To comply with FCC RF exposure compliance
requirements, a separation distance of at least 20
cm must be maintained between the DAS antenna
of this device and all persons. This device must not
be co-located or operating in conjunction with any
other antenna or transmitter.
EXPOSITION RF
Pour conformer aux exigences d'exposition de
FCC RF, une distance de séparation d'au moins 20
cm doit être maintenue entre les DAS antenne de
cet appareil et toutes les personnes. Cet appareil
ne doit pas être co-localisé ou exploités en con-
jonction avec toute autre antenne ou transmetteur.
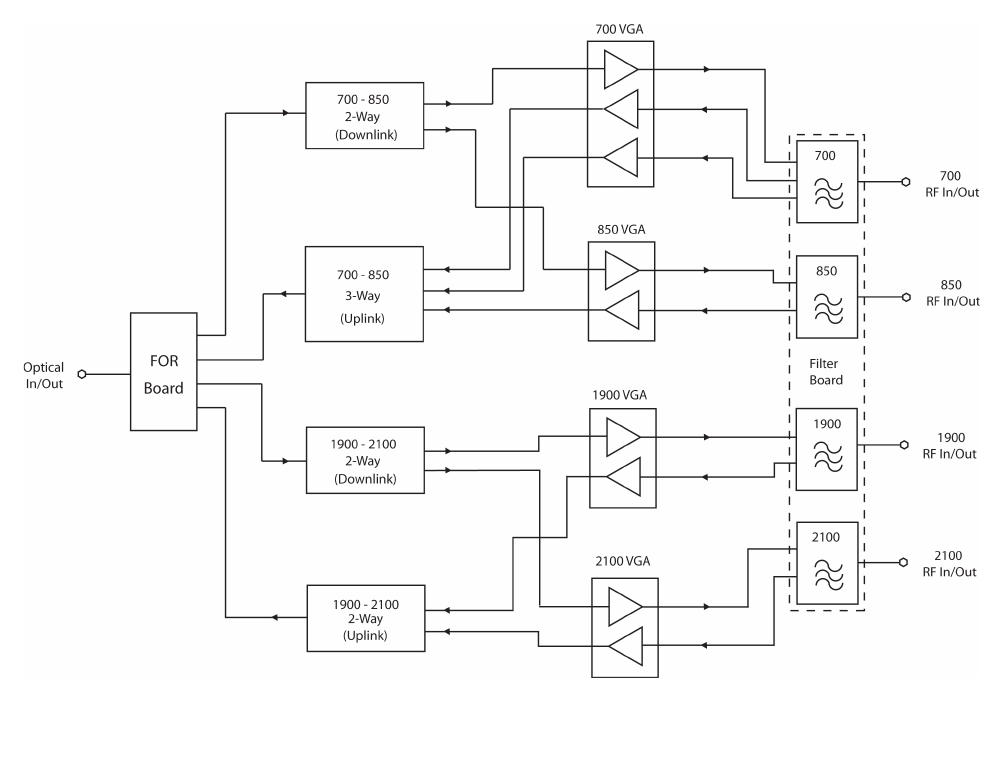
FUNCTIONAL BLOCK DIAGRAM
Signal flow through the DDL Remote Unit is illus-
trated with the functional block diagram shown in
Figure 4. This diagram shows the DDL400 model
which has four operating bands. The DDL100
through DDL300 models are similar but have less
operating bands and therefore fewer boards and
assemblies mounted in the chassis.
14 “
12 10/16”
Figure 3: Chassis mounting dimensions.
Bird Technologies Manual 7-9570-1-1(Rough Draft) 08/19/16 Page 11
RF downlink and uplink signals are found at the
four individual RF ports (N-type connector) shown
on the right side of the drawing. These are RF sig-
nals traveling to and from the users handheld units
via the DAS antennas. Uplink signals from the
handhelds are passed through the filter assembly
and are fed into the uplink side of the respective
VGA board. The signals are amplified by the VGA
board and combined as needed, with uplink signals
from other operating bands, using the 2-ways or 3-
way. After the signals are combined they are fed to
the input of the FOR board for conversion to optical
signals and sent to the master unit.
Downlink signals going to the handhelds enter the
DLL Remote Unit as optical signals from the mas-
ter unit at the FOR board. The FOR board converts
the optical signals into RF signals and outputs
them to the downlink 2-ways. The 2-ways split the
signals and apply them to the downlink amplifiers
on the VGA boards. The signals are amplified by
the VGA board, passed to the filter board, and out-
put through the RF connectors to the DAS antenna
elements.
OPERATION
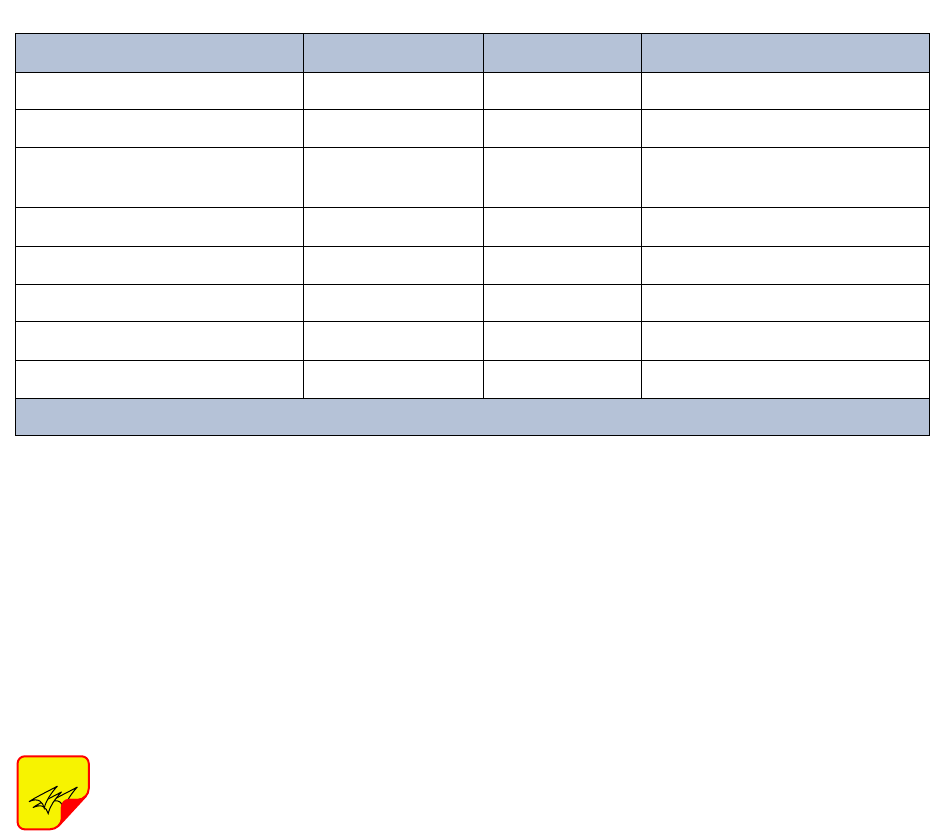
Power is applied to the unit by plugging in the AC
power cord. There is no power on/off switch so the
unit will begin to boot-up immediately. The status of
the unit is indicated by the ON and ALM front panel
LED’s. Refer to Table 3 for a detailed explanation
of the LED behavior.
The remote unit is software directed so control of
the unit is accomplished via a web based GUI
interface. The GUI interface is handled by the cen-
tral gateway computer connected to the master
unit. For convenience, access to the GUI interface
can be gained using the front panel LAN port on
the remote unit. However using this method for
interfacing is slower due to the speed of the optical
Figure 4: DDL Functional block diagram.
Bird Technologies Manual 7-9570-1-1(Rough Draft) 08/19/16 Page 12
sub carrier that links the remote unit to the master
unit.
Users have the ability to set the following parame-
ters in the remote unit via the web based GUI appli-
cation:
- Gain Values (UL & DL)
- ALC threshold (UL & DL)
- UL Test tone
Users cannot adjust/align any fre-
quency response, linearity response
or detector calibration levels.
The remote unit has a built in ALC (Automatic Level
Control) with preset levels, to make sure that the
linearity or spectral spreading does not exceed the
regulatory limits. The ALC threshold is a setable
value that defines what output power is allowed
from the remote unit. If an inserted signal plus the
set gain in the remote unit exceeds the set ALC
threshold the remote unit will automatically reduce
the gain so that the output signal level always
matches the set ALC threshold. The device cannot
end up in saturation due to the ALC feature. Satu-
ration or over-modulation is even prevented for
pulsed signal inputs. There are also configurable
signal threshold parameters in the remaining com-
ponents of the DAS system located in the master
unit.
UL Test Tone is a help feature tool used only when
commissioning the DAS network.
DL ALC threshold for the remote unit is 23 dBm
and cannot be exceeded.
WEB BASED GUI INTERFACE
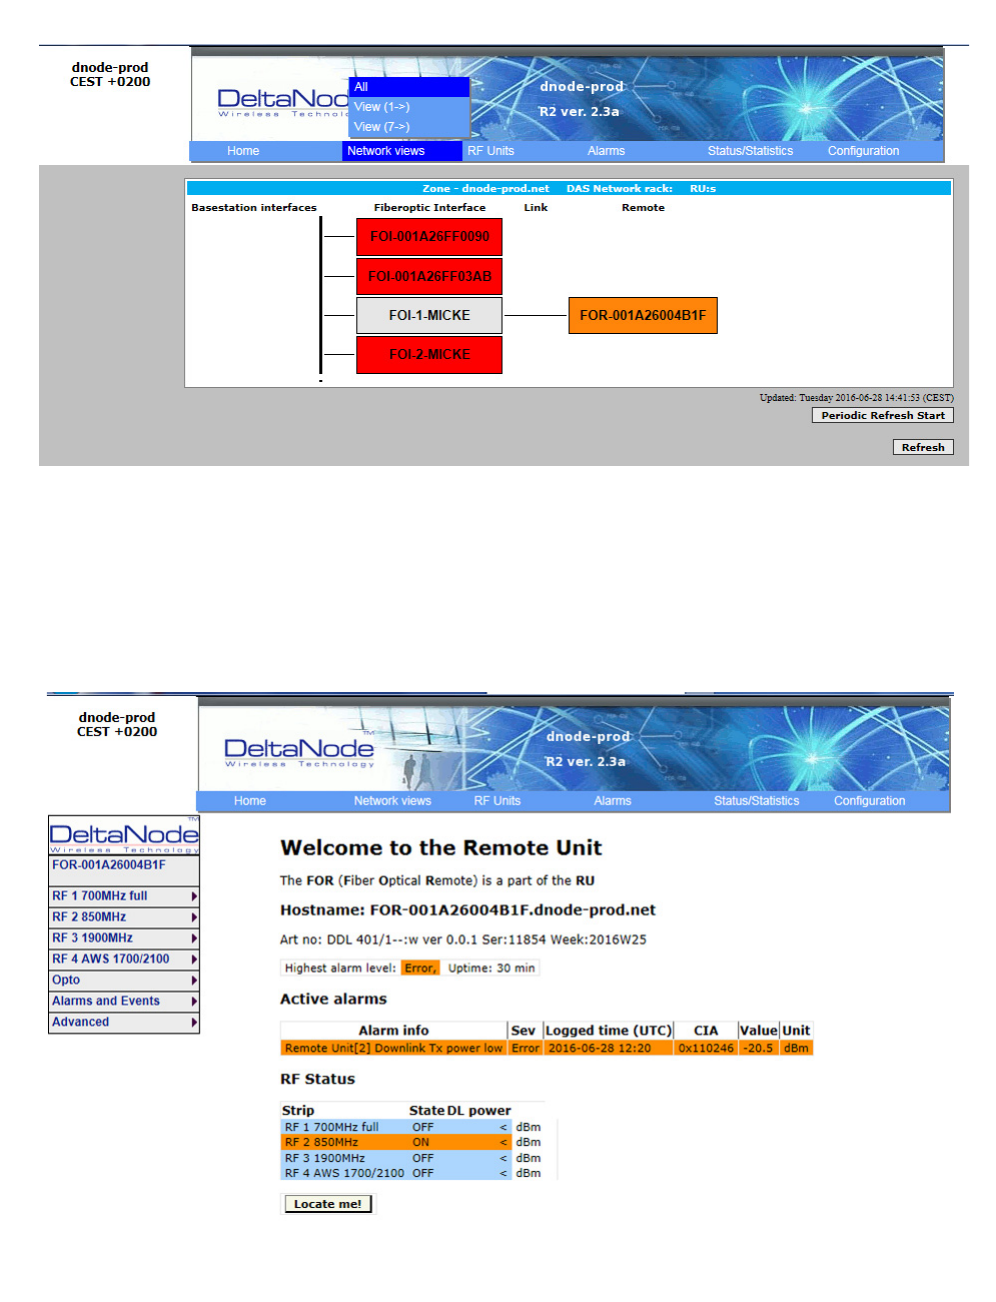
When first connecting to the remote unit via the
web based GUI interface a system layout screen
will be presented as shown in Figure 5. The
screen will show all of the addressable boards con-
nected into the system. Master unit boards are
shown under the column titled Fiber optic Interface
and remote unit boards are shown under the col-
umn titled Remote. In this example there are four
FOI (Fiber Optic Interface) boards installed in the
master unit and one FOR (Fiber Optic Remote)
board installed in a remote unit. Sub carrier links
between the boards are shown as lines on the
screen display. To ease location and identification
each box shown presents the user defined system
name for the individual boards. Clicking on any of
the boxes will call up the GUI Interface screen for
that particular board.
Using the mouse to click on the FOR board shown
in the example will call up an overview screen for
that particular board as shown in Figure 6. This
screen provides a convenient summary of the
boards active alarms and RF status. A description
of any alarm events are listed as well as when the
alarm occurred. The RF status for all RF bands
built into the remote unit, in this example there are
4 bands.
NOTE
State On LED Alarm LED Note
Booting 2 Hz Off Normal Boot
Booting standalone mode 2 Hz 2 Hz Not attached to rack
Booting read of MAC address
failed 2 Hz On Error
Starting 0.1 Hz 90% 0.1 Hz 90% Kernal startup
Operation 0.5 Hz 10% Off Normal operation
Operation 0.5 Hz 10% 1 Hz 10% Minor alarm state
Operation 0.5 Hz 10% 2 Hz 25% Major alarm state
Operation 0.5 Hz 10% On Critical alarm state
Table 3: DDL front panel LED behavior.
Bird Technologies Manual 7-9570-1-1(Rough Draft) 08/19/16 Page 13
Figure 6: Typical overview screen. FOR board shown as an example.
Figure 5: DDL system layout screen.
Bird Technologies Manual 7-9570-1-1(Rough Draft) 08/19/16 Page 14
At the bottom of the page is a button labeled
“Locate Me”. When this button is clicked the remote
units ON LED, located on the font panel, will blink
rapidly for about 1 minute. This is a convenience
feature that helps to physically identify units in a
large installation.
On the right side of the overview screen area is
group of drop-down style menu items which allow
for detailed interaction with the board. Each band
(referred to as an RF Strip) that is found on the
board will have a menu item. In addition there are
menu items for Opto, Alarms, and Advanced. The
Opto selection allows the user to set the gain and
check the status of the optical link between the
remote unit and the master unit. Alarms provides a
listing of all current alarms and provides access to
an alarm log file which can hold up to 95 current
and past alarm events. The Advanced selection
allows the user to adjust network settings as well
as verify things like IP addresses and MAC
addresses.
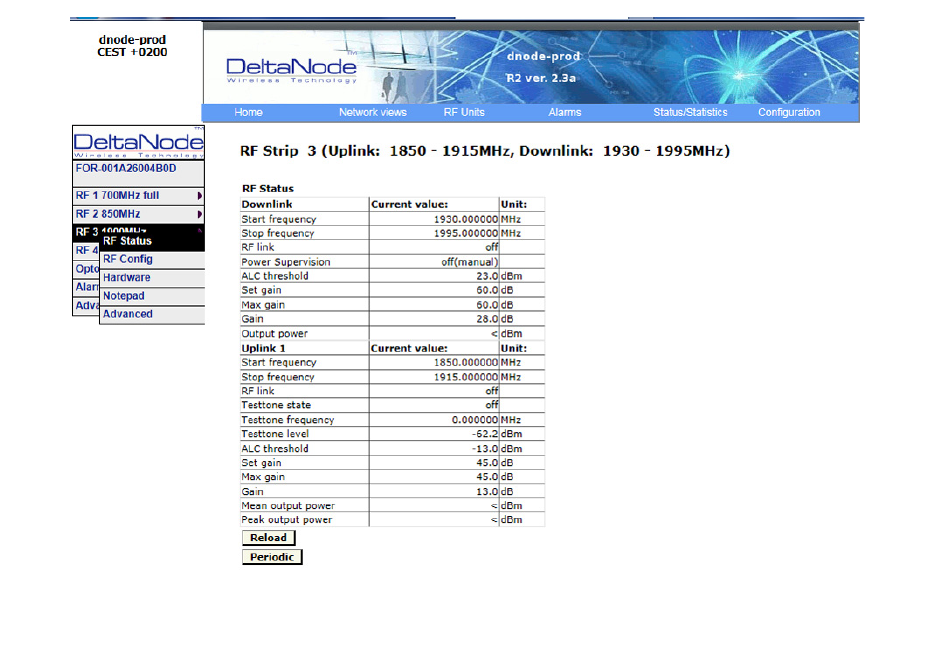
When an RF Strip is selected for interaction a drop-
down list will be presented as shown in Figure 7. In
this example the RF Status menu item has been
selected and RF status information is presented on
the screen. This screen presents the current status
of all uplink and downlink signal paths in the band.
In this example there is a downlink and 1 uplink
path. The values presented are a static snap shot
taken at the time the screen was presented. To
update the information press the reload button at
the bottom of the screen. In addition, for conve-
nience the periodic button can be pressed which
will update the screen automatically at a periodic
rate.
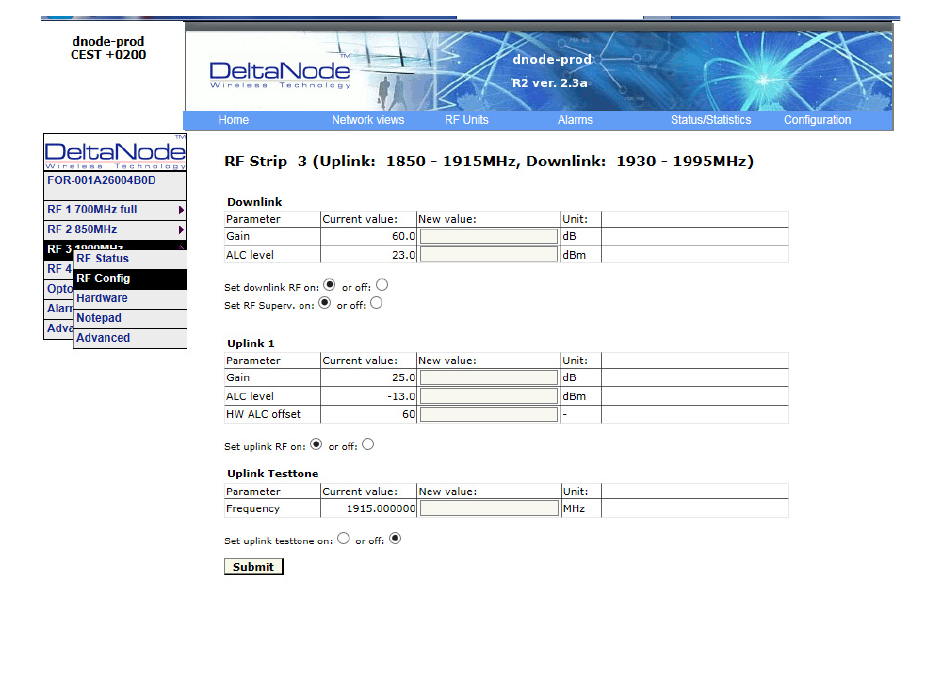
When the RF Config menu item is selected a page
showing user configurable parameters is presented
as shown in Figure 8. User configurable parame-
ters include uplink and downlink gain value, uplink
and downlink ALC threshold setting, and turning
on/off an uplink test tone. Changes are made by
clicking on the radio buttons and entering new val-
ues into the highlighted boxes. To initiate changes
press the Submit button at the bottom of the
screen.
MASTER UNIT
The Master Unit consists of a 19 inch frame rack
(called a Master Frame Unit) with signal processing
Figure 7: RF Status drop-down menu selection.
Bird Technologies Manual 7-9570-1-1(Rough Draft) 08/19/16 Page 15
modules that are inserted into the rack frame
depending on the specific system design. Gener-
ally all Master Units will contain a master frame
unit, a power supply, at least one Base Station
Interface Unit (BIU), an RF splitter/combiner unit
called the Point of Interconnect (POI) and a mini-
mum of one Fiber Optic Interface card (FOI). A
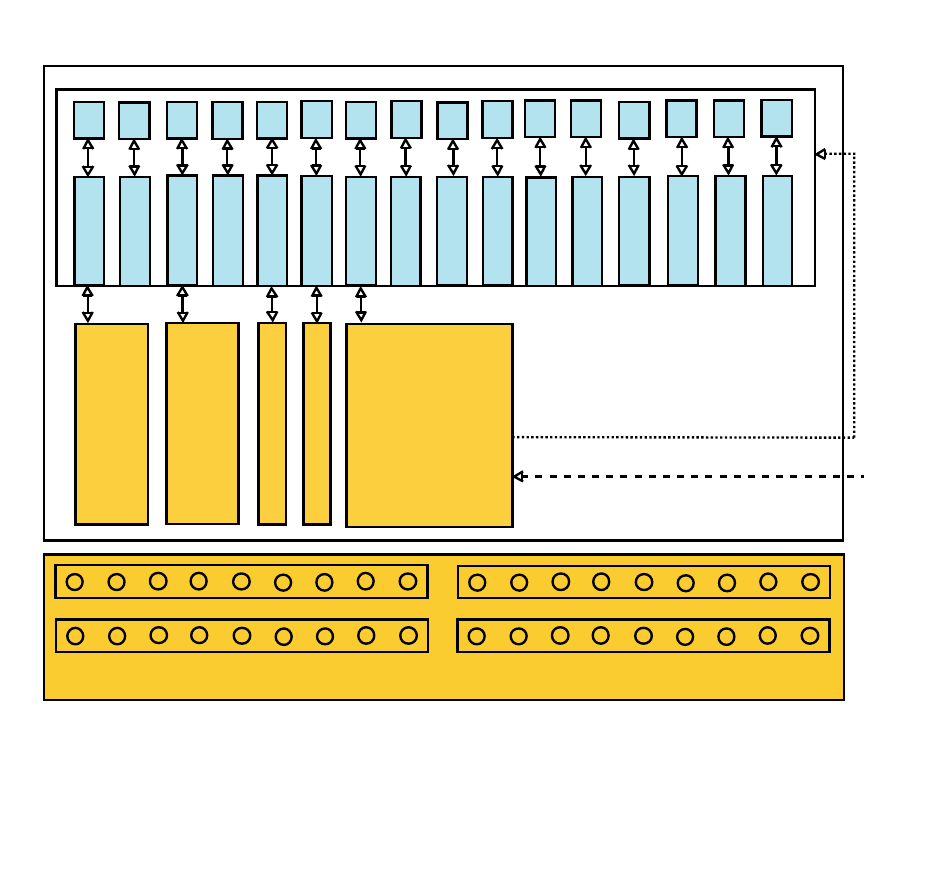
block diagram of the typical Master Unit is shown in
Figure 9.
The Master Frame Unit
The master frame unit houses some of the mod-
ules in a master unit including the power supply
modules, fiber optic interface modules, and base
station interface modules. Modules can be placed
anywhere in the master frame unit and any combi-
nation of modules can be mixed. There are 16 slot
positions for modules in the master frame. Each
type of module placed into the master frame uses a
different amount of slot positions. Power supply
modules use 4 slot positions, BIU’s use 2 slot posi-
tions, and FOI’s use one slot position. In very large
systems multiple master frame units can be used
to house a multitude of modules as required. In the
example shown in figure 1 the Master Frame Unit
contains 3 BIU’s, 6 FOI’s, and a power supply mod-
ule.
Each master frame in a system needs to be pow-
ered by a power supply module. The backplane in
the master frame will distribute the supply voltage
to all of the modules in the frame. The frame has
two molex plugs for accepting power from a power
supply module. Two dual plugs allow a primary and
redundant power supply to be connected to the
master frame. This connection scheme will ensure
operation even if one supply should fail. The frame
also contains a pair of fans used to ventilate the
modules housed in the frame. These are quality
fans with a high MTBF.
A power supply module that is connected to a mas-
ter frame does not necessarily have to be housed
in the frame. Quite often a system will have more
than one power supply module which will be placed
together in one frame for easy access.
BUI Module (Base Station Interface Module)
The BIU is the interface between the operator's
base station and the Fiber-DAS system. This mod-
Figure 8: RF Config drop-down menu selection.
Bird Technologies Manual 7-9570-1-1(Rough Draft) 08/19/16 Page 16
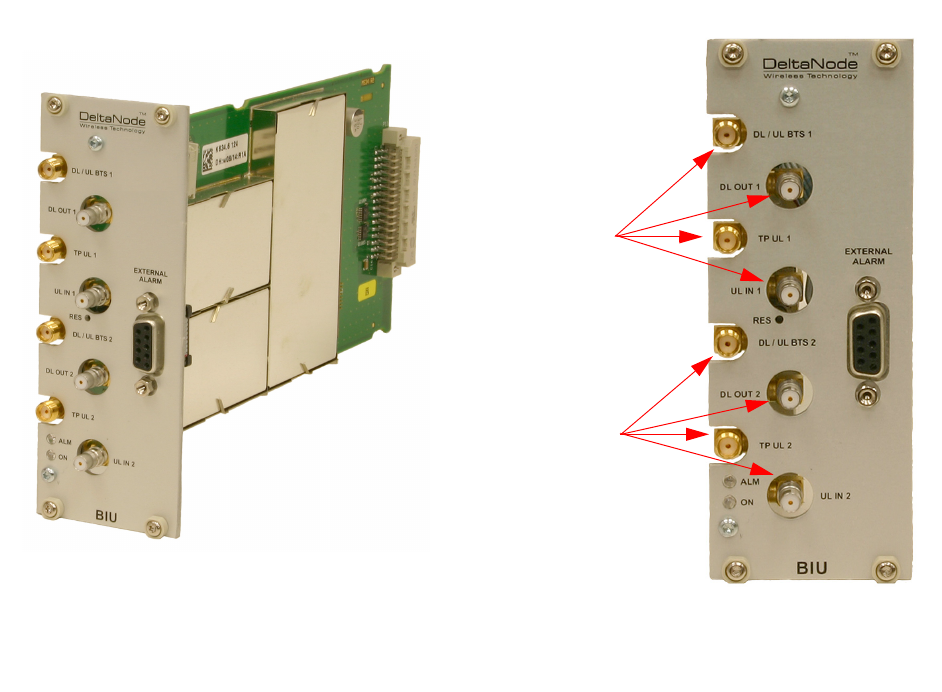
ule has several RF connectors on the front panel
and contains either duplex filters and combined DL/
UL ports or separate uplink/downlink paths which
can be chosen for connection to the base station
depending on system requirements. In most cases
the duplexed version with a combined DL/UL port
is used. Refer to Figure 10.
FUNCTIONAL DESCRIPTION
In the duplexed version there are UL test connec-
tors present (SMA) that can be used to monitor the
signal out from the BIU. The version without duplex
filters has the test connectors replaced by UL con-
nectors and the normally combined DL/UL connec-
tors are replaced by DL only connectors.
There are two separate RF channels and associ-
ated RF ports in a BIU (channel 1 and channel 2).
Each channel contains a downlink and an uplink
path. The two RF paths in the BIU cannot have dif-
ferent frequency bands. As an example a GSM 900
BIU will have two GSM 900 paths. If you wanted an
1800 path in the system it would require adding a
second BIU module to the master frame unit. Note:
BIU Modules need to be ordered for the specific
frequency bands that they will serve.
The BIU has four QMA type (female) ports that are
normally used to connect it to the Point of Intercon-
nect (POI) Module. There are two uplink (input)
ports and two downlink (output) ports. The isolation
between DL1 and DL2 as well as between UL1 and
Slot 1
Slot 2
Slot 3
Slot 4
Slot 5
Slot 6
Slot 7
Slot 8
Slot 9
Slot 10
Slot 11
Slot 12
Slot 13
Slot 14
Slot 15
Slot 16
LAN
LAN
LAN
LAN
LAN
LAN
LAN
LAN
LAN
LAN
LAN
LAN
LAN
LAN
LAN
LAN
BIU
Module
BIU
Module
FOI Module
Power
Supply
Module
FOI Module
DC Out
AC In 120
VAC
(Back plane)
Master Frame Unit
POI Module
Figure 9: Typical Master Unit. In this example 2 BIU’s, 2 FOI’s and a Power Supply are each plugged
into the backplane of a master frame unit. A single POI is not plugged into the backplane but is
installed into the rack as part of the Master Unit.
Bird Technologies Manual 7-9570-1-1(Rough Draft) 08/19/16 Page 17
UL2 is > 50 dB. The ports that interface to the Base
Station are SMA type (female). RF patch cables
are used to patch the BIU ports to the customers
Base Station and the POI Module.
Each downlink signal path in the module contains
attenuation and filtering. One of the attenuation
stages is adjustable and is used to adjust the sig-
nal strength to proper levels before feeding the sig-
nals into the POI module. In the uplink direction
there is also filtering and attenuation as well as an
amplifier stage. The adjustable attenuation stage is
used to adjust the signal and the noise level into
the base station uplink.
All connections necessary are made from the front
of the BIU module itself. The maximum recom-
mended input power to the BIU is 30 dBm. The
module has high power alarms which activate at
input signal levels > 30 dBm and low power alarms
which activate at signal levels < 10 dBm. Signals
with an input power higher than the recommended
maximum can cause permanent damage to the
module. It is therefore recommended that when-
ever connecting to high power base stations the
customer place an inline attenuator between the
base station and BIU module to ensure that the
input power to the BIU can never exceed the speci-
fied maximum.
There is also an alarm port (DB9 connector) on the
BIU module which in the future can be used to con-
nect external alarms. This connector is currently
not in use.
LED BEHAVIOR
The unit has two LEDs located on the front panel.
One is the power on LED (green) and the other is
the alarm LED (red). Both LEDs can indicate a
number of states by different flashing behaviors.
Refer to table 3. In an alarm state the web interface
should be used to check the actual condition of the
BIU module. The front panel alarm LED is
designed to give a quick indication that an alarm
condition exists and is also useful for locating an
alarming BIU module when you are dealing with a
rack that contains several BIU modules in it.
Channel 1
Ports
Channel 2
Ports
Figure 10: BIU Module. Front plate close-up also shown.
Bird Technologies Manual 7-9570-1-1(Rough Draft) 08/19/16 Page 18
POI Module (Point of Interconnect Module)
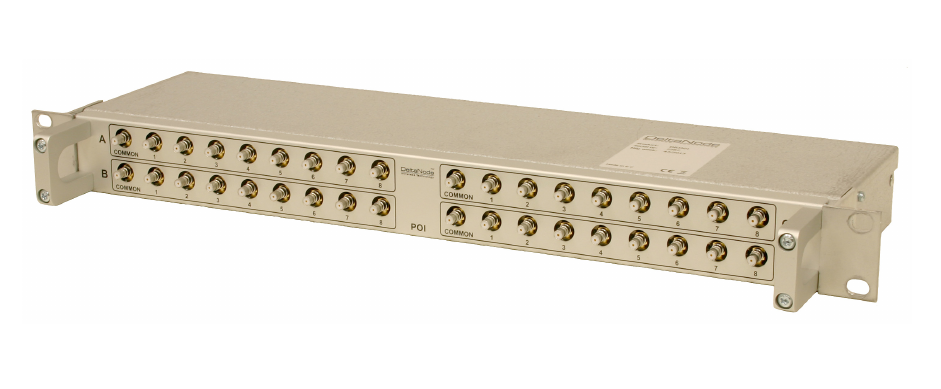
The POI module contains four independent 1-to-8
splitter/combiners. The module is used in the Fiber
DAS system to tie together signals between BIU
modules and FOI modules in a multi-band or multi-
operator system. Each of the 4 independent split-
ter/combiners has a COMMON port and 8 in/out
ports (labeled 1-8). If you are using it as a com-
biner then you should connect the signals you want
to combine to the ports 1-8 and you will receive the
sum of the signals (minus insertion loss) on the
COMMON port. Using it as a splitter then you
should connect the signal you want to split/distrib-
ute to the common port. Each of the 8 output ports
will then output the signal with equal signal
strength at each port (minus insertion loss).
The POI module is a stand alone module designed
to use 1 RU of rack space as shown in Figure 11.
The module is not designed to plug into the master
frame unit so it can be installed anywhere in the
rack that is convenient for the customer. It is typi-
cally installed just below the master frame unit in
most installations. This keeps the interconnect
cables (QMA style connectors) reasonably short.
The four independent splitter/combiner assemblies
that make up the POI module are labeled as A
through D.
FOI Module (Fiber Optic Interface Module)
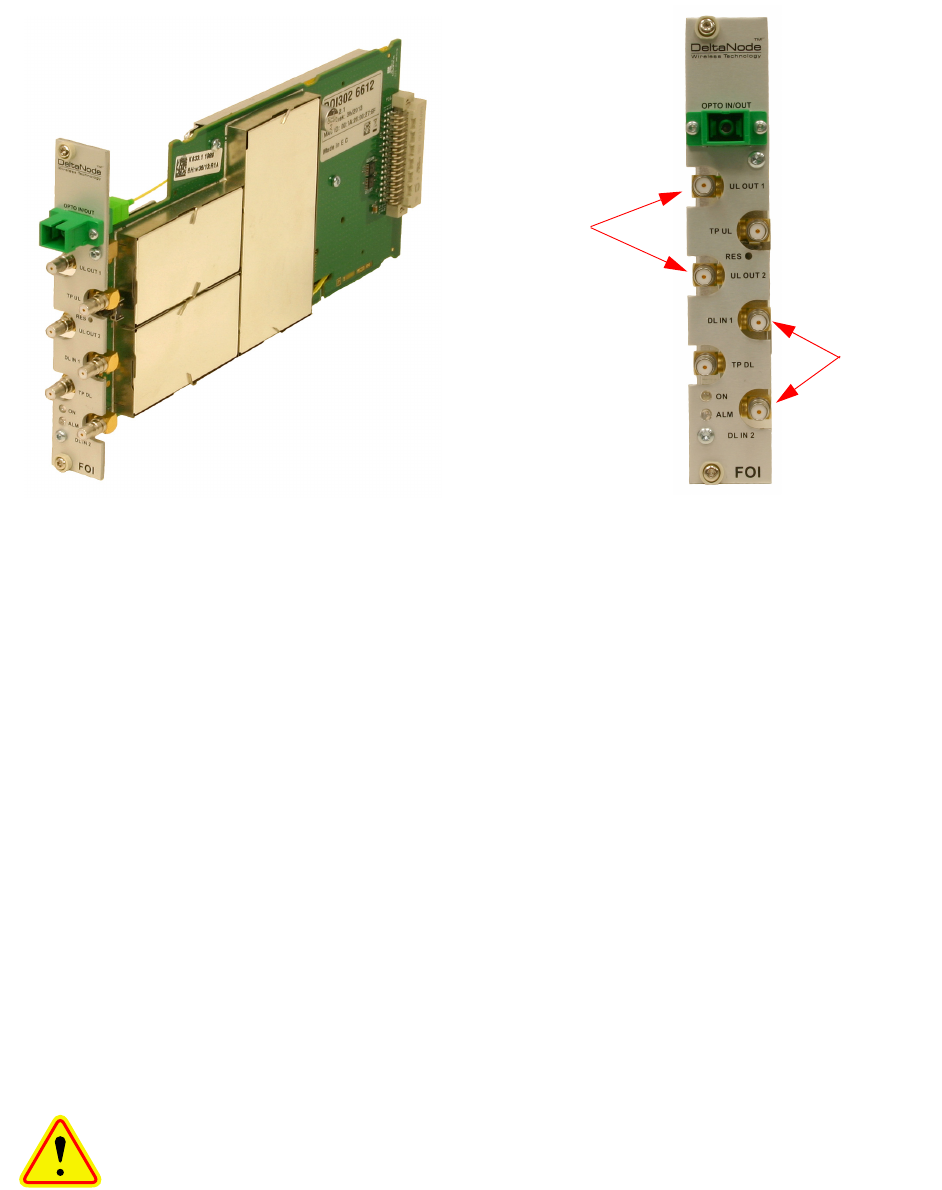
The FOI module is responsible for converting RF
signals in the downlink direction (from the base sta-
tion) into optical signals that can be transmitted on
a fiber cable to the remote unit. It is also responsi-
ble for receiving optical signals in the uplink direc-
tion from the Remote Unit and converting them
back into RF signals which can be passed along to
the base station. The FOI module is shown in Fig-
ure 12.
The fiber-optic interface can either be a single fiber
interface (with WDM) or a dual fiber interface with
separate RX and TX connectors. The type of FOI
is ordered as needed when the Master Unit is
specified. Each FOI can serve up to 4 Remote
Units on a single fiber cable. The Remote Units
must have different optical wavelengths in the
uplinks to avoid interference. They can however,
share the same optical wavelength in the downlink.
FUNCTIONAL DESCRIPTION
The FOI is powered from the master frame back-
plane and communicates via Ethernet with the
other modules in the Master Unit. The FOI contains
several adjustable attenuators which can be used
to compensate for losses that occur before the FOI
(e.g. in the POI) and for losses that occur on the
fiber in the uplink. There are two sets of RF ports
on the FOI that can be used to connect signals
from two different strips in the POI. The FOI has a
dual fiber interface style with separate uplink and
downlink fiber optic connections.
There are two attenuators that can be set in the DL
path, this allows for balancing the input signals
from two different signal sources so that they can
share the dynamics of the laser properly. The RF
drive levels are measured and accessible in the
web interface so that they can be checked. In the
future alarm levels may be added to these test
points.
This interface is designed to work with SC-APC
connectors (7° angled physical connector) and sin-
Figure 11: POI Module.
Bird Technologies Manual 7-9570-1-1(Rough Draft) 08/19/16 Page 19
gle mode fibers only. All connectors between the
master unit and the remote unit should be of
angled type, otherwise problems with reflections
will arise which may cause severe problems in the
system.
The FOI has a nominal gain of 35 dB. The laser
transmitter should see a maximum composite
power in of approximately 0 dBm. This means that
for 0 dB attenuation in the DL direction a maximum
input of -35 dBm composite power is recom-
mended (when attenuators are set to 0 dBm). If the
DL attenuator is set to a higher value the maximum
recommended input is adjusted accordingly. The
output power of the laser is calibrated to 3000 µW.
This can be used to check the loss over fiber in the
remote because the remote reports the received
optical levels. The loss may be different in the UL
compared to the DL because of different wave-
lengths on the laser.
Safety and care for fibers
The laser is a Class 3b laser that
produces invisible infra-red coherent
light. Avoid looking into connected
fibers and receptacles. Not safe to
view with optical instruments. Always
put the protection caps on unused
fibers and receptacles.
Every time a fiber is disconnected and re-con-
nected care should be taken to avoid dust to settle
on the connector or in the receptacle. Clean with a
dry fiber cleaning tool before reconnecting the fiber
at all times. A single speck of dust can impact the
transmission severely. Do not touch the fiber ends
with your fingers. That will leave grease on the con-
nectors and may cause severe problems.
CENTRAL GATEWAY COMPUTER
The central gateway computer (CGW) is the overall
interface point for system management functions.
The CGW computer is connected to the master
unit and has routing, firewall functionality, alarm
logging, and access control for the complete DAS
system. Two types of CGW’s are used, either the
Remote Gateway Unit (RGW) or the Base Station
Gateway Unit (BGW). The RGW is a smaller com-
pact embedded solution while the BGW is a full
featured Linux server that can be set up in many
different ways. The gateway computer will assign
IP addresses to all the subunits in the master unit
and also for remote units when they are connected
to the system. This will create a protected sub-net
for the DAS system itself that should not be con-
nected directly to a LAN. Connections to a LAN
should only be made via the gateway computer.
2 DL
Paths
2 UL
Paths
Figure 12: FOI Module. Front plate close-up also shown.

Bird Technologies Manual 7-9570-1-1(Rough Draft) 08/19/16 Page 20
8625 Industrial Parkway, Angola, NY 14006 Tel: 716-549-4700 Fax: 716-549-4772 sales@birdrf.com www.bird-technologies.com