DewertOkin CU170 Control Unit User Manual 1
DewertOkin GmbH Control Unit 1
user manual

Quick Reference Guide to RF1058 / CU170
03.04.2017 Id-No. 84625(c) 1 / 12
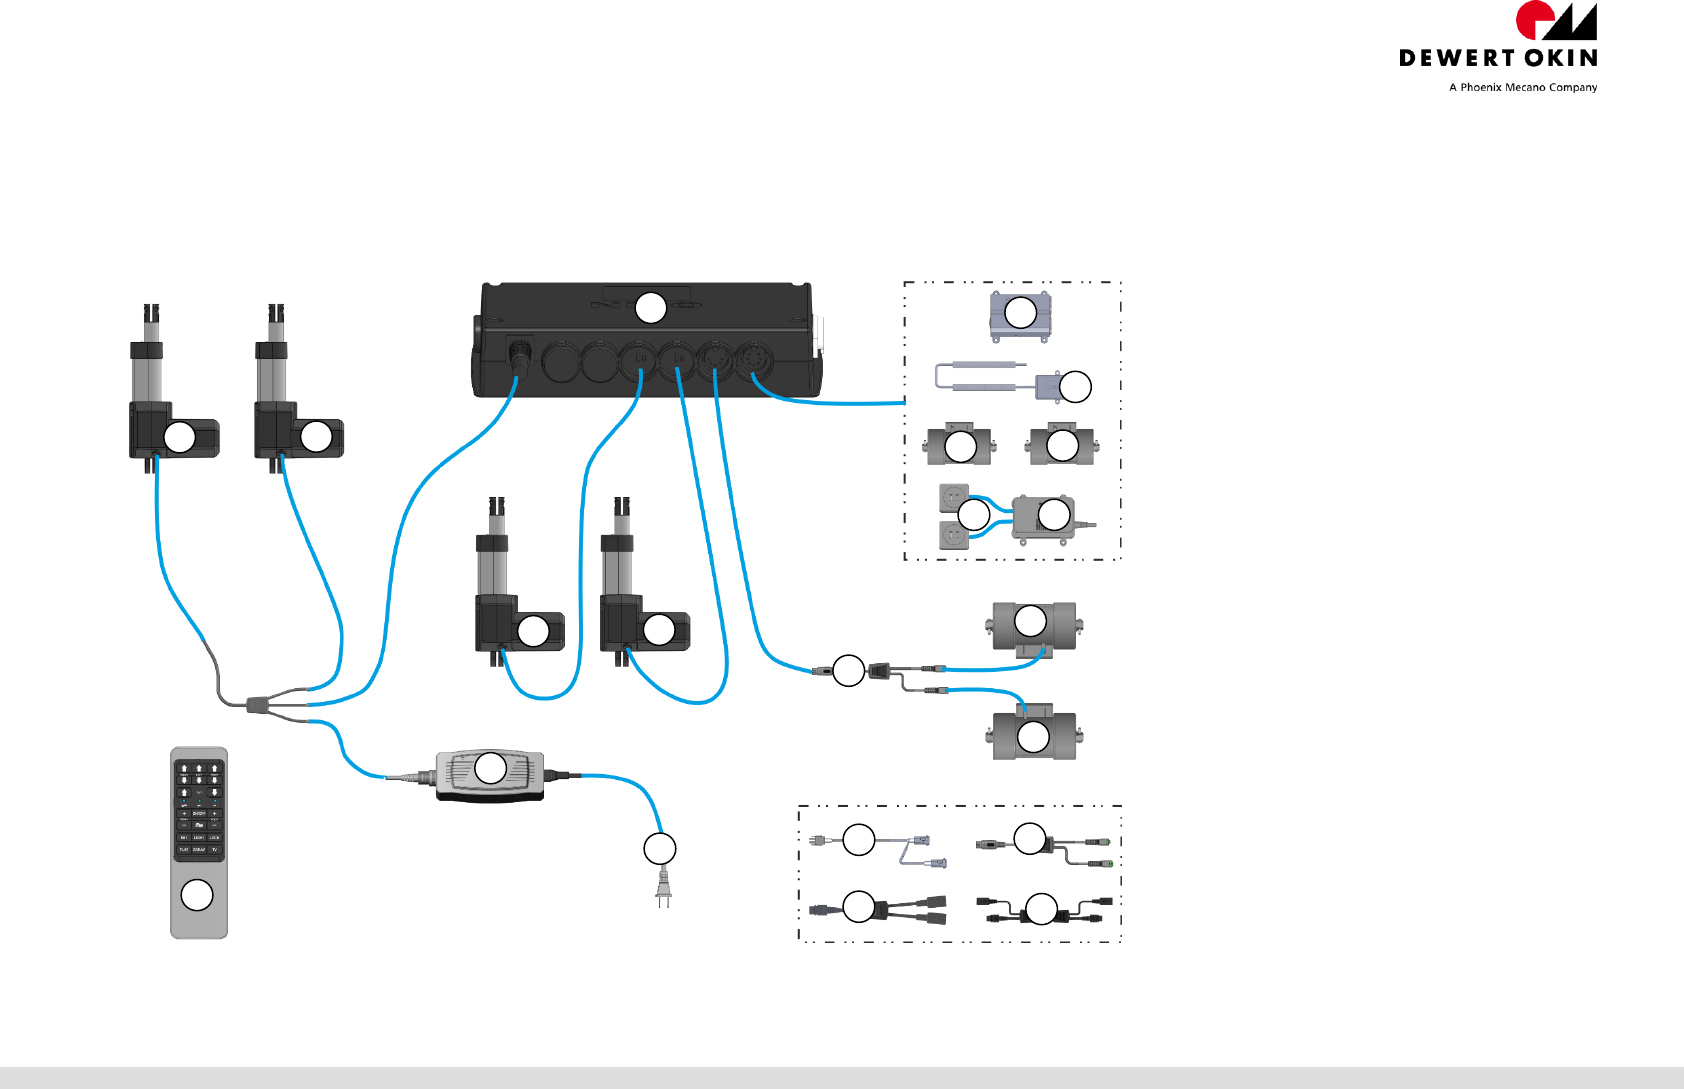
System overview
Notice! Electrical components should be connected or disconnected only when the power supply cord is unplugged.
Notice! There is a delay after the supply voltage is applied before the device actually turns on. Wait at least 2 seconds before commissioning.
Components that can be connected:
1. CU170
2. RF1058
3. M1: e.g. DELTADRIVE DS2
4. M2: e.g. DELTADRIVE DZ
5. M3: e.g. DELTADRIVE DZ
6. M4: e.g. DELTADRIVE DZ
7. POWER SUPPLY PD12
8. Power cord US Version
9. Massage motor
10. Junction cable (for 4 massage motors)
11. Optional: POWER DOWN BOX
12. Optional: LED-Set with POWER BOX
13. Optional: Massage motor
14. Optional: USB SOCKET
15. Optional: USB CHARGER
16. Optional: Junction cable
17. Optional: Adapter cable
18. Optional: Junction cable
19. Optional: Synchronous cable
optional
optional
7
1
8
6
5
9
2
3
12
13
4
10
11
16
14
9
13
15
17
18
19

Quick Reference Guide to RF1058 / CU170
03.04.2017 Id-No. 84625(c) 2 / 12
CU170
Connections and functions
1. Connection for (POWER SUPPLY PD12, M1 and M2)
2. Connection socket for M3
3. Connection socket for M4
4. Connection socket for Massage motor
5. Multi-function port for optional accessories
6. Reset button / Pairing button / Pairing LED
Technical specifications
Rated voltage
Current consumption
Mode of operation
Protection class
Protection degree
Length x width x height
Transport / storage temperature
Operation temperature
Relative humidity
Air pressure
Altitude
24-29V DC
max. 6.00A
Duty Cycle 2min ON / 18min OFF
III
IP20
186mm x 120mm x 38mm
from -20°C to +50°C
from +10°C to +40°C
from 30% to 75%
from 800hPa to 1060hPa
< 2000m
1
2
3
4
5
6
Quick Reference Guide to RF1058 / CU170
03.04.2017 Id-No. 84625(c) 3 / 12
RF1058
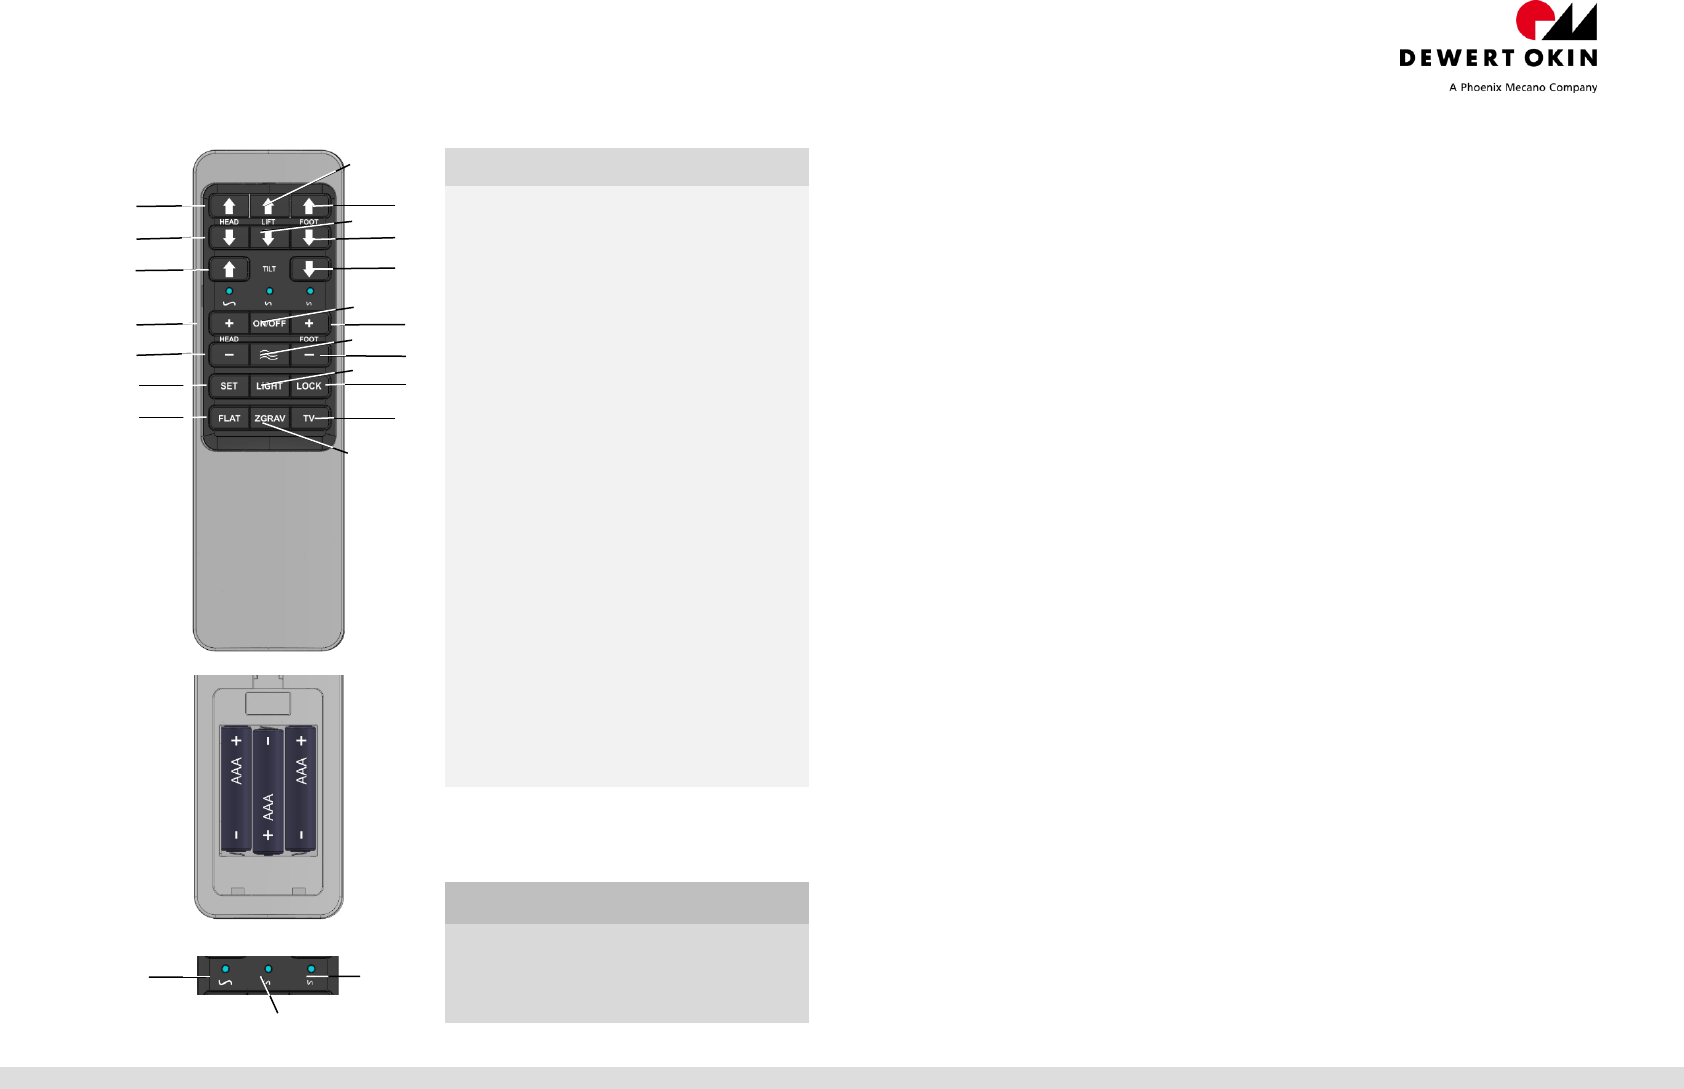
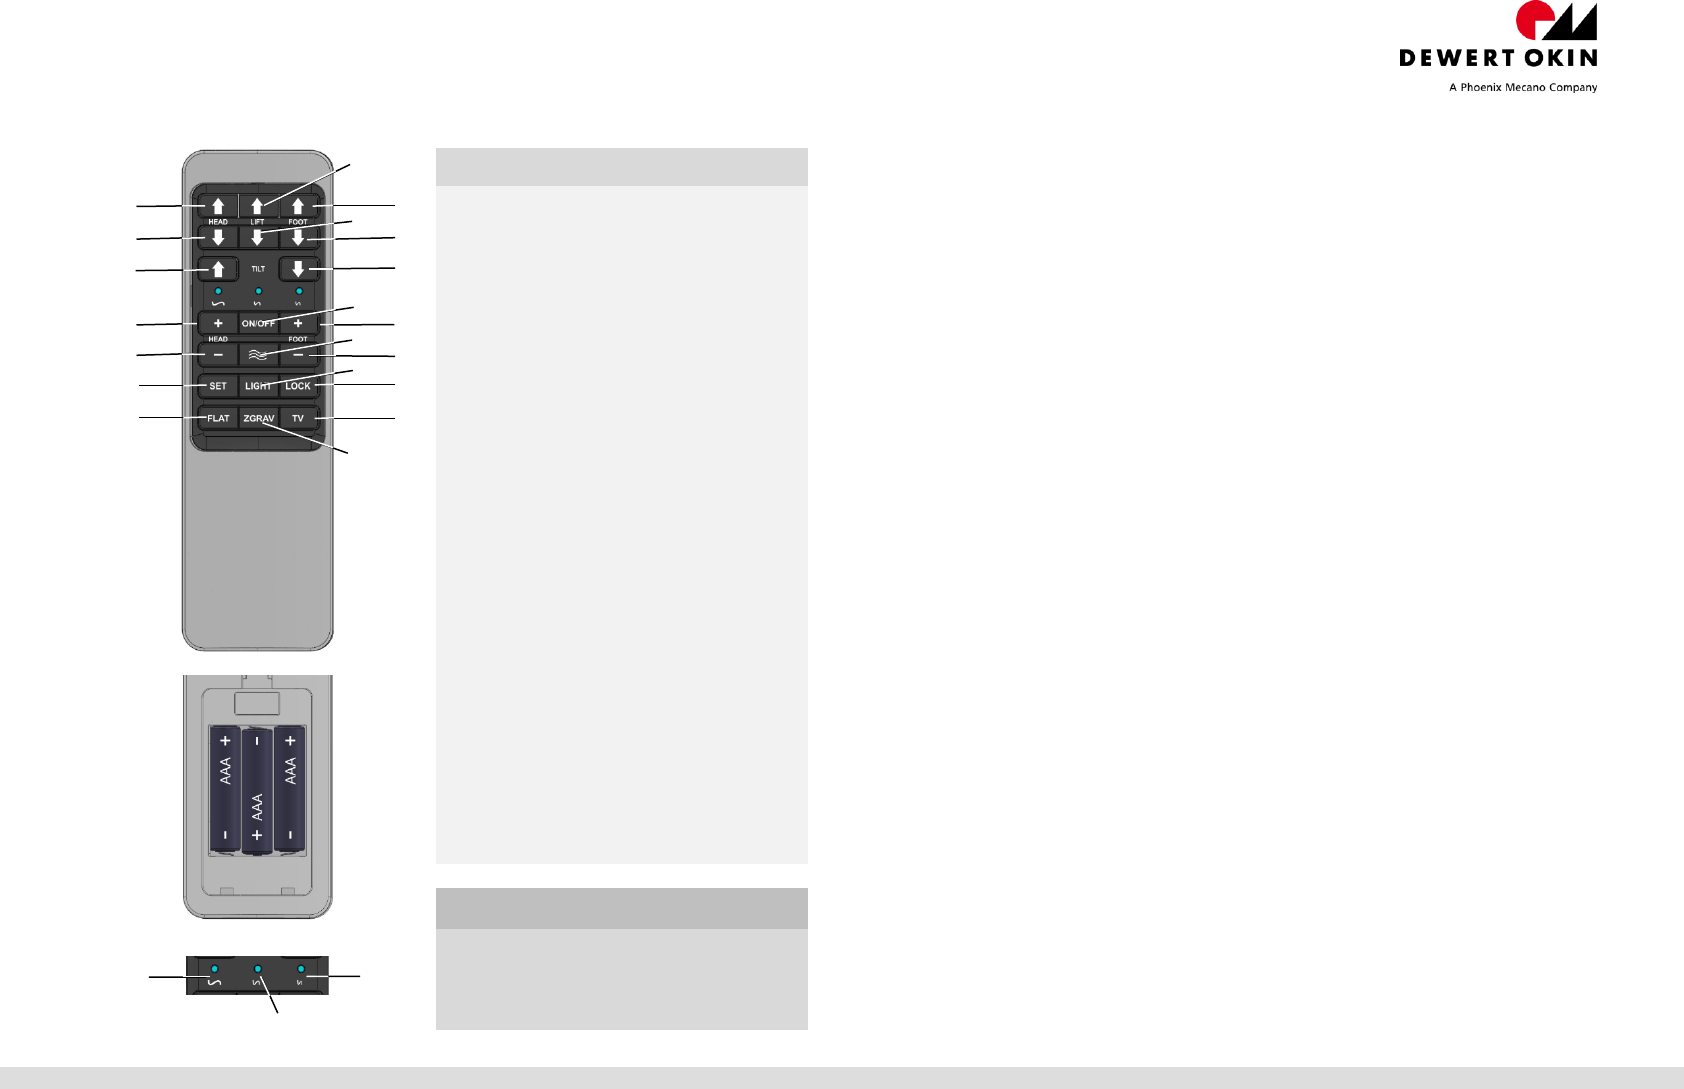
Button Function
Acknowledgement: The floor lighting will blink twice and a "peep" tone will
sound to signal the successful completion of the step.
1. Teach-in for the RF1058 or app
To start using the RF1058 with a Bluetooth® device, the wireless link with the
CU170 must first be established.
In order to use a Bluetooth® device (a smart phone or tablet) with your system,
you will first need to download and install the "OKIN" app for your device.
a. Automatic teach-in
Insert the power plug into a power outlet. The CU170 will be in pairing mode
for 120sec which is divided as follows: During the first 60sec, an RF1058
can be discovered (the teach-in). During the next 60sec, a Bluetooth®
device can be discovered.
The floor lighting and the blue LED are illuminated during this teach-in phase
for the RF1058.
RF1058: Simultaneously press buttons 1 and 19.
A successful pairing will be acknowledged.
The floor lighting will switch off after the teach-in process for the RF1058 is
finished. The blue LED for pairing with a Bluetooth® device starts flashing.
The blue LED switches off when the Bluetooth® pairing process has timed
out or when the device has connected successfully. A successful pairing will
be acknowledged.
If, during the RF1058 teach-in process, you press any button on an already
paired RF1058, then it switches to the Bluetooth® teach-in mode.
If the RF1058 or a Bluetooth® device is discovered during the pairing phase,
then this pairing mode is automatically ended. The floor lighting and the
blue LED switch off.
Repeat the automatic teach-in process. First, remove the plug from the
power supply. Then wait 60sec and insert the plug back into the power
supply. You can now start the new teach-in process.
When operating a system in parallel, you must execute the teach-in
processes for the CU170s sequentially. First, connect the CU170 to the
power supply. Then execute the teach-in process for the first RF1058 or
Bluetooth® device. Then execute the teach-in for the second device.
Note! Only commission one system at a time. Never configure multiple
systems simultaneously
1 Drive M1 up (head)
2 Drive M3 up (lift)
3 Drive M2 up (foot)
4 Drive M1 down (head)
5 Drive M3 down (lift)
6 Drive M2 down (foot)
7 Drive M4 up (tilt)
9 Drive M4 down (tilt)
10 Head massage higher level
11 Massage on/off
12 Foot massage higher level
13 Head massage lower level
14 Massage wave
15 Foot massage lower level
16 Set memory
17 Under Bed Light on/off
18 Child safety lock on/off
19 Position Flat
20 Memory position Zero G
21 Memory position TV
1 + 19 Pairing System 1
3 + 19 Pairing System 2
13 + 15 Press + Release
16 + 19 Press + Hold
16 + 19 Reset memory position
LED Massage function
a slow
b medium
c fast
12
15
18
11
1
4
7
10
13
16
2
20
3
6
9
5
14
17
19
21
a
c
b

Quick Reference Guide to RF1058 / CU170
03.04.2017 Id-No. 84625(c) 4 / 12
b. Manuel teach-in
The system must be connected to the power supply.
Quickly press the Reset/Pairing button twice on the CU170 (button 6).
The floor lighting and the green pairing LED will illuminate. The CU170 is
now in pairing mode for 120 seconds, which is divided as follows: During
the first 60 seconds, an RF1058 can be discovered (the teach-in). During
the next 60 seconds, a Bluetooth® device can be discovered.
The floor lighting and the blue LED are illuminated during this teach-in
phase for the RF1058.
RF1058: Simultaneously press buttons 1 and 19.
A successful pairing will be acknowledged.
The floor lighting will switch off after the teach-in process for the RF1058
is finished. The blue LED for pairing with a Bluetooth® device starts
flashing.
The blue LED switches off when the Bluetooth® pairing process has timed
out or when the device has connected successfully. A successful pairing
will be acknowledged.
If, during the RF1058's teach-in process, you press any button on an
already paired RF1058, then it switches to the Bluetooth® teach-in mode.
If the RF1058 or a Bluetooth® device is discovered during the pairing
phase, then this pairing mode is automatically ended. The floor lighting
and the blue LED switch off.
When operating a system in parallel, you must execute the teach-in
processes for the CU170s sequentially. First, connect the CU170 to the
power supply. Then execute the teach-in process for the first RF1058 or
Bluetooth® device. Then execute the teach-in for the second device.
Note! Only commission one system at a time. Never configure multiple
systems simultaneously.
2. Locking or enabling the RF1058
Press and hold button 18 for about three seconds: this will either enable or
lock the RF1058.
A successful pairing will be acknowledged.
3. Adjusting the intensity of the massage
To turn the massage function (head and foot end) on or off, press
button 11 on the RF1058.
If the massage function is turned off, it can be activated by pressing
button 10, 12, 13 or 15.
If the massage function is turned on, it can be deactivated, starting
from the lowest intensity, by pressing button 13 or 15.
The massage intensity is changed through 4 steps each time one of
the buttons 10, 12, 13 or 15 is pressed.
Press the WAVE button 14 to switch between the three interval levels.
This is then indicated by the LEDs above the massage function on the
RF1058.
4. Execute a reference movement
The referencing must be execute in the following scenarios:
The initial commissioning
A change in hardware
After the battery-powered electrical reset function has been
execute.
The CU170 has a positional feedback feature. A referencing
movement must first be carried out before this feature can function
properly. Press and hold the reset/pairing button (6) on the CU170
until the end position has been reached.
A successful pairing will be acknowledged.
5. Saving the memory positions
You can save two different memory positions on the buttons "ZGRAV
/ TV" as follows:
Move to the desired position using buttons 1 to 9.
Press and hold button 16 (SET) for one second.
Within three seconds, press button 20 (ZGRAV) or button 21 (TV)
in order to save the position, this is confirmed by a "beep" signal.
The desired position is now saved on buttons 20 or 21.
You can overwrite the saved memory position at any time by repeating
this process.

Quick Reference Guide to RF1058 / CU170
03.04.2017 Id-No. 84625(c) 5 / 12
6. Switching to automatic movements and factory settings
The buttons FLAT, ZGRAV and TV can be used for various saved
positions. Press the respective button briefly (press and release) to move
to that position. The button does not need to be held down.
Proceed as follows to establish communications:
Activate
Press buttons 13 and 15 for about five seconds simultaneously, the
Press + Release mode is activated.
A successful pairing will be acknowledged.
Deactivate (factory default)
Press buttons 16 and 19 for about five seconds simultaneously, the
Press + Release mode is deactivated. The Press + Hold mode is
activated. The memory positions of ZGRAV and TV are reset to
factory default.
A successful pairing will be acknowledged.
7. Moving two systems in parallel using a sync cable
CAUTION! Only connect the electrical components when the power
supply is switched off.
Two operating systems can be connected to each other using a sync
cable at the multi-function port. In this way, they can be run
simultaneously.
Press the Reset/Pairing button on the CU170 (button 6) to move
both systems to their end positions.
Disconnect the power plug on both systems from the power socket.
Connect both systems by connecting the proper synchronous cable to
the multi-function port.
Insert the mains plug from both systems into the power socket.
Parallel operations are possible as soon as both systems are
connected to the power supply.
Both programmed RF remotes can be used to move the systems.
8. Moving two systems in parallel using remote radio signals
CAUTION! Only connect the electrical components when the power
supply is switched off.
Two systems can be moved and operated simultaneously (parallel
mode) using one RF1058.
Press the Reset/Pairing button on the CU170 (button 6) to move
both systems to their end positions.
Execute the teach-in process first for system 1 (button 1 +19) and
then for system 2 (button 3 +19). Note that the teach-in processes
are always sequential. The teach-in should never be carried out on
two systems at the same time.
The teach-in cannot be execute for a second RF1058 in this mode.
9. Cleaning and care
This system was designed so that it would be easy to clean.
Be sure to unplug the power cord of the power socket before you
begin cleaning it!
Use a dry antistatic cloth to clean the system
Be sure that you do not damage the connecting cables during the
cleaning.
10. Disposal
The system consists of electronic components, cables and metal and
plastic parts. You should observe all corresponding national and
regional environmental regulations when disposing of the system.
The disposal of the end product is regulated in Germany by Elektro-G,
internationally by the EU Directive 2011/65/EC (RoHS), or by any
applicable national laws and regulations. (The end product is not
regulated by the EU Directive 2012/19/EC (WEEE)).
This system should not be disposed of
with normal household waste!

Quick Reference Guide to RF1058 / CU170
03.04.2017 Id-No. 84625(c) 6 / 12
FCC WARNING
This device complies Part 15 of the FCC Rules. Operation is subject to the following
two conditions:
(1) this device may not cause harmful interference, and
(2) this device must accept any interference received, including interference that may
cause undesired operation.
Section 15.21 Information to user
Changes or modifications not expressly approved by the party responsible for
compliance could void the user's authority to operate the equipment.
NOTE: This equipment has been tested and found to comply with the limits for a Class
B digital device, pursuant to part 15 of the FCC Rules. These limits are designed to
provide reasonable protection against harmful interference in a residential installation.
This equipment generates, uses and can radiate radio frequency energy and, if not
installed and used in accordance with the instructions, may cause harmful interference
to radio communications. However, there is no guarantee that interference will not
occur in a particular installation. If this equipment does cause harmful interference to
radio or television reception, which can be determined by turning the equipment off and
on, the user is encouraged to try to correct the interference by one or more of the
following measures:
Reorient or relocate the receiving antenna.
Increase the separation between the equipment and receiver.
Connect the equipment into an outlet on a circuit different from that to which
the receiver is connected.
Consult the dealer or an experienced radio/ TV technician for help.
IC WARNING
This device complies with Industry Canada licence-exempt RSS standard(s).
Operation is subject to the following two conditions:
(1) this device may not cause interference, and
(2) this device must accept any interference, including interference that my cause
undesired operation of the device.
Le présent appareil est conforme aux CNR d’Industrie Canada applicables aux
appareils radio exempts de licence. Lexploitation est autorisée aux deux conditions
suivantes:
(1) l’appareil ne diot pas produire de brouillage, et
(2) l’utilisateur de lappareil diot accepter tout bouillage radioélectrique subi, méme si
le brouillage est susceptible d’en compromettre le fonctionnement.
DewertOkin GmbH
Weststraße 1
32278 Kirchlengern
Germany
Phone: +49 (0)5223/979-0
Fax: +49 (0)5223/75182
http://www.dewertokin.de
Info@dewertokin.de
Kurzanleitung RF1058 / CU170
03.04.2017 Id-Nr. 84625(c) 7 / 12
Systemübersicht
Achtung! Sie dürfen elektrische Komponenten nur bei gezogenem Netzstecker anschließen oder trennen.
Achtung! Nach dem Herstellen der Spannungsversorgung schaltet das Gerät verzögert ein. Warten Sie vor der Inbetriebnahme min. 2 Sekunden.
Anschließbare Komponenten
1. CU170
2. RF1058
3. M1: z.B. DELTADRIVE DS2
4. M2: z.B. DELTADRIVE DZ
5. M3: z.B. DELTADRIVE DZ
6. M4: z.B. DELTADRIVE DZ
7. POWER SUPPLY PD12
8. Netzzuleitung US Version
9. Massagemotor
10. Verteilerkabel (2x Massagemotor)
11. Optional: POWER DOWN BOX
12. Optional: LED-Set mit POWER BOX
13. Optional: Massagemotor
14. Optional: USB SOCKET
15. Optional: USB CHARGER
16. Optional: Verteilerkabel
17. Optional: Adapterkabel
18. Optional: Verteilerkabel
19. Optional: Synchronkabel
optional
optional
7
1
8
6
5
9
2
3
12
13
4
10
11
16
14
9
13
15
17
18
19

Kurzanleitung RF1058 / CU170
03.04.2017 Id-Nr. 84625(c) 8 / 12
CU170
Anschlüsse und Funktionen
1. Anschluss für (POWER SUPPLY PD12, M1 und M2)
2. Anschlussbuchse für M3
3. Anschlussbuchse für M4
4. Anschlussbuchse für Massagemotor
5. Multifunktions Port für optionales Zubehör
6. Reset-Taste / Pairing-Taste (Pairing LED)
Technische Daten
Eingangsspannung
Stromaufnahme
Betriebsart
Schutzklasse
Schutzart
Länge x Breite x Höhe
Transport-/Lagertemperatur
Betriebstemperatur
Relative Luftfeuchte
Luftdruck
Höhe
24-29V DC
max. 6.00A
Aussetzbetrieb AB 2 min. / 18 min.
III
IP20
186mm x 120mm x 38mm
von -20°C bis +50°C
von +10°C bis +40°C
von 30% bis 75%
von 800hPa bis 1060hPa
< 2000m
1
2
3
4
5
6
Kurzanleitung RF1058 / CU170
03.04.2017 Id-Nr. 84625(c) 9 / 12
Handsender RF1058
Taste Funktion
Quittierung: Ein erfolgreicher Abschluss des jeweiligen Vorgangs wird durch
2x blinken der UBB und ein „Piep“ Signal. signalisiert.
1. Handsender/App anlernen
Zur Inbetriebnahme des RF1058 und eines Bluetooth® Gerät muss die Funk-
kommunikation mit der CU170 aufgebaut werden.
Für das Verfahren Ihres Systems mit einem Bluetooth® Gerät (z.B: Smartphone
/ Tablet), laden Sie die „OKIN“ App von der entsprechenden Plattform herunter
und installieren diese auf Ihrem Gerät.
a. Automatisch anlernen
Stecken Sie den Stecker der Spannungsversorgung in die Steckdose. Die
CU170 befindet sich für 120sec im Pairing Modus, der teilt sich wie folgt auf:
In den ersten 60sec kann ein RF1058 angelernt werden, in den zweiten
60sec ein Bluetooth® Gerät.
Während der Anlernphase des RF1058 leuchten die UBB und die blaue LED.
RF1058: Betätigen Sie gleichzeitig die Tasten 1 + 19.
Ein erfolgreicher Abschluss wird quittiert.
Nach Beendigung des Anlernvorgangs für den RF1058 erlischt die UBB. Die
blaue LED zum Anlernen eines Bluetooth® Gerätes beginnt zu blinken.
Ist das Anlernen für Bluetooth® Geräte abgelaufen oder ein Gerät ver-
bunden, erlischt die blaue LED. Ein erfolgreicher Abschluss wird quittiert.
Drücken Sie während der Anlernphase für den RF1058 an einem bereits
angemeldeten RF1058 eine beliebige Taste, wird auf den Bluetooth®
Anlernmodus gewechselt.
Sind der RF1058 bzw. ein Bluetooth® Gerät innerhalb der Pairing Phase
angelernt, wird der Pairing Modus automatisch beendet. Die UBB und die
blaue LED werden ausgeschaltet.
Wiederholung vom automatischen Anlernen: Zuerst ziehen Sie den Stecker
von der Spannungsversorgung, warten Sie 60sec, und stecken Sie an-
schließend den Stecker wieder in die Spannungsversorgung. Sie können
jetzt mit dem neuen Anlernvorgang beginnen.
Bei einem System mit Parallelbetrieb müssen die CU170 nacheinander ange-
lernt werden. 1.te CU170 an die Spannungsversorgung anschließen und den
1.ten RF1058 / Bluetooth® Gerät anlernen, anschließen das 2.te System
genauso anlernen.
Achtung! Nehmen Sie immer nur ein System, nie mehrere Systeme gleich-
zeitig in Betrieb.
1 Antrieb M1 auf (Kopf)
2 Antrieb M3 auf (Lift)
3 Antrieb M2 auf (Fuß)
4 Antrieb M1 ab (Kopf)
5 Antrieb M3 ab (Lift)
6 Antrieb M2 ab (Fuß)
7 Antrieb M4 auf (Tilt)
9 Antrieb M4 ab (Tilt)
10 Massageintensität + (Kopf)
11 Massage ein/aus
12 Massageintensität + (Fuß)
13 Massageintensität - (Kopf)
14 Massage WAVE wechseln
15 Massageintensität - (Fuß)
16 Memoryspeichertaste (SET)
17 Unterbettbeleuchtung ein/aus
18 Kindersicherung ein/aus
19 Position (Flat)
20 Memoryposition (Zero G)
21 Memoryposition (TV)
1 + 19 Pairing System 1
3 + 19 Pairing System 2
13 + 15 Press + Release
16 + 19 Press + Hold
16 + 19 Werkseinstellung zurückstellen
LED Massagefunktion
a langsam
b mittel
c schnell
12
15
18
11
1
4
7
10
13
16
2
20
3
6
9
5
14
17
19
21
a
c
b

Kurzanleitung RF1058 / CU170
03.04.2017 Id-Nr. 84625(c) 10 / 12
b. Manuell einlernen.
Das System muss an die Spannungsversorgung angeschlossen sein.
Betätigen Sie 2x kurz hintereinander die Reset / Pairing-Taste 6 an der
CU170, die UBB und die Pairing LED (grün) leuchten. Die CU170
befindet sich für 120sec im Pairing Modus, der teilt sich wie folgt auf: In
den ersten 60sec kann ein RF1058 angelernt werden, in den zweiten
60sec ein Bluetooth® Gerät.
Während des Anlernen des RF1058 leuchten die UBB und die blaue
LED.
RF1058: Betätigen Sie gleichzeitig die Tasten 1 + 19.
Ein erfolgreicher Abschluss wird quittiert.
Nach Beendigung des Anlernvorgangs für den RF1058 erlischt die
UBB. Die blaue LED zum Anlernen eines Bluetooth® Gerätes beginnt
zu blinken.
Ist das Anlernen für Bluetooth® Geräte abgelaufen oder ein Gerät ver-
bunden, erlischt die blaue LED. Ein erfolgreicher Abschluss wird
quittiert.
Drücken Sie während der Anlernphase für den RF1058 an einem
bereits angemeldeten RF1058 eine beliebige Taste, wird auf den
Bluetooth® Anlernmodus gewechselt.
Sind der RF1058 bzw. ein Bluetooth® Gerät innerhalb der Pairing Phase
angelernt, wird der Pairing Modus automatisch beendet. Die UBB und
die blaue LED werden ausgeschaltet.
Bei einem System mit Parallelbetrieb müssen die CU170 nacheinander
angelernt werden. 1.te CU170 an die Spannungsversorgung an-
schließen und den 1.ten RF1058 / Bluetooth® Gerät anlernen,
anschließend das 2.te System genauso anlernen.
Achtung! Nehmen Sie immer nur ein System, nie mehrere Systeme
gleichzeitig in Betrieb.
2. Handsender RF1058 sperren bzw. freigeben
Durch betätigen der Taste 18 (ca. 3 sec halten) wird der RF1058 gesperrt
bzw. freigegeben.
Ein erfolgreicher Abschluss wird quittiert.
3. Einstellen der Massageintensität
Zum Ein- oder Ausschalten der Massage (Kopf und Fußseite) betätigen
Sie die Taste 11 auf dem RF1058.
Bei ausgeschalteter Massage kann diese mit der Taste 10, Taste 12,
Taste 13 oder Taste 15 eingeschaltet werden.
Bei eingeschalteter Massage kann diese mit der Taste 13 oder Taste 15,
von der kleinsten Intensität ausgehend, ausgeschaltet werden.
Die Massageinternsität wird 4 stufig bei jedem Tastendruck auf die
Tasten 10, 12, 13 oder 15 geändert.
Durch betätigen der WAVE-Taste 14 kann 3 stufig zwischen den
verschiedenen Periodendauern gewechselt werden, diese werden durch
die LED’s ober-halb der Massagefunktion im RF1058 angezeigt.
4. Referenzfahrt durchführen
Es muss eine Referenzfahrt durchführt werden bei,
Erstinbetriebnahme
Hardwareänderung
Durchführung der elektrischen Rückstellfunktion mit Batteriespannung
Die CU170 verfügt über eine Positionsrückmeldung, damit diese
reibungslos funktioniert muss zuerst eine Referenzfahrt durchgeführt
werden. Betätigen Sie die Reset / Pairing-Taste 6 an der CU170 bis die
Endposition angefahren ist.
Ein erfolgreicher Abschluss wird quittiert.
5. Memorypositionen speichern
Sie können 2 verschiedene Memorypositionen auf den Tasten „ZGRAV /
TV“ wie folgt speichern:
Fahren Sie die gewünschten Positionen mit den Tasten 1 bis 9 an.
Betätigen Sie für 1 sec die Taste 16 (SET).
Betätigen Sie innerhalb von 3 sec die Taste 20 (ZGRAV) oder Taste 21
(TV) zum Speichern der Position. Ein erfolgreicher Abschuss wird
quittiert.
Die gewünschte Position ist jetzt auf den Tasten 20 oder 21
gespeichert.
Sie können eine gespeicherte Memoryposition durch Wiederholen des
Vorgangs jederzeit überschreiben.

Kurzanleitung RF1058 / CU170
03.04.2017 Id-Nr. 84625(c) 11 / 12
6. Umstellen auf automatisches Fahren und Werkseinstellung
Sie können mit den Tasten „FLAT, ZGRAV und TV“ verschiedene,
gespeicherte Positionen durch kurzes drücken (Press und Release)
anfahren. Die Taste muss dafür nicht festgehalten werden.
Hierzu verfahren Sie wie folgt:
Aktivierung
Drücken Sie gleichzeitig für ca. 5sec die Taste 13 und Taste 15 der
Press + Release Modus ist aktiviert. Ein erfolgreicher Abschuss wird
quittiert.
Deaktivierung (Werkseinstellung)
Drücken Sie gleichzeitig für ca. 5sec die Taste 16 und Taste 19
der Press + Release Modus ist deaktiviert. Der Press + Hold
Modus wird aktiviert. Die Memorypositionen von ZGRAV und TV
werden auf Werkseinstellung zurückgestellt. Ein erfolgreicher
Abschuss wird quittiert.
7. Parallelfahrt von zwei Systemen mit Synchronkabel
Achtung! Schließen Sie elektrische Komponenten nur im spannungs-
freien Zustand an.
Zwei in Betrieb genommene Systeme können über den Multifunktions-port
durch Verwendung eines Synchronkabels miteinander verbunden und
gleichzeitig verfahren werden.
Fahren Sie mit der Reset / Pairing-Taste 6 der CU170 beide Systeme
in die Endposition (untere Endlage der Antriebe).
Entfernen Sie die Netzstecker beider Systemen aus der Steckdose.
Verbinden Sie beide Systeme mit dem entsprechenden Synchron-kabel
am Multifunktionsport.
Stecken Sie die Netzstecker beider Systeme in die Steckdose. Ein
Parallelbetrieb ist möglich, wenn beide Systeme an der Spannungs-
versorgung angeschlossen sind.
Das Verfahren der Systeme funktioniert mit beiden angelernten
Handsendern.
8. Parallelfahrt von zwei Systemen mit Funk
Achtung! Schließen Sie elektrische Komponenten nur im spannungs-
freien Zustand an.
Zwei Systeme können im Parallelfahrmodus mit einem RF1058 gleich-
zeitig verfahren und bedient werden.
Fahren Sie mit der Reset / Pairing-Taste 6 der CU170 beide
Systeme in die Endposition (untere Endlage der Antriebe).
Lernen Sie zuerst System 1 (Taste 1 + 19) an und anschließend
System 2 (Taste 3 + 19). Beachten Sie, das immer nur ein System
nach dem anderen angelernt wird und nicht 2 Systeme zur gleichen
Zeit.
In diesem Modus kann kein 2ter. RF1058 angelernt werden.

Kurzanleitung RF1058 / CU170
03.04.2017 Id-Nr. 84625(c) 12 / 12
9. Pflege und Reinigung
Das System wurde so entworfen, dass dieses einfach zu reinigen ist.
Ziehen Sie vor Beginn der Reinigung den Netzstecker der
Spannungsversorgung aus der Steckdose!
Reinigen Sie das System mit einem trockenen antistatischen Tuch.
Achten Sie darauf, bei der Reinigung die Anschlussleitungen nicht zu
beschädigen.
10. Entsorgung
Das System enthält Elektronikbauteile, Kabel, Metalle, Kunststoffe usw.
Das System ist gemäß den geltenden Umweltvorschriften des jeweiligen
Landes zu entsorgen.
Die Entsorgung des Produkts unterliegt in Deutschland dem Elektro-G,
international der EU-Richtlinie 2011/65/EU (RoHS) oder den jeweiligen
nationalen Gesetzgebungen. (Das Produkt unterliegt nicht der EU-Richtlinie
2012/19/EU (WEEE)).
Das System darf nicht in den Hausmüll gelangen!
DewertOkin GmbH
Weststraße 1
32278 Kirchlengern
Tel: +49 (0)5223/979-0
Fax: +49 (0)5223/75182
http://www.dewertokin.de
Info@dewertokin.de