Diasonic Technology Co DDR3KR Digital Voice Recorder User Manual
Diasonic Technology Co Ltd Digital Voice Recorder
User Manual
User's Manual
Thank you for choosing our DIGITAL VOICE RECODER&AUDIO
PLAYER of DIASONIC TECHNOLOGY Co. LTD. Before use, read
through the User's Manual carefully, then, enjoy the player
appropriately and safely. While using, we advise you to keep this
user's manual to avoid possible technical difficulties.
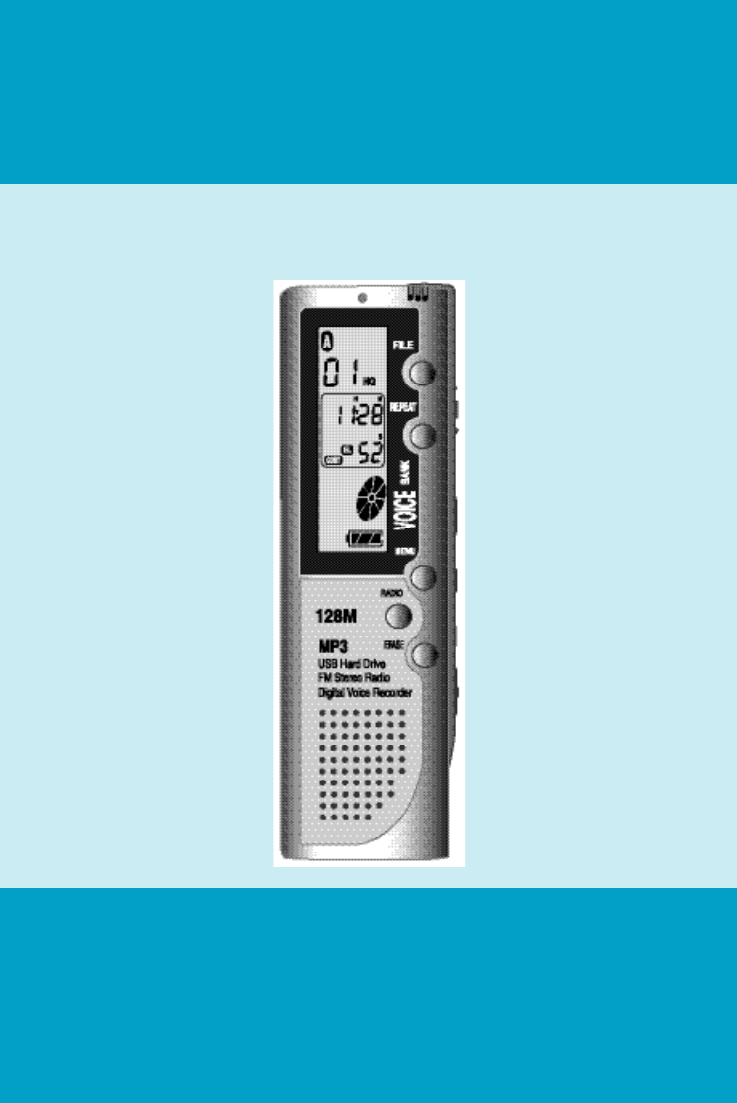
DIGITAL VOICE RECORDER & AUDIO PLAYER
MODEL : D D R - 3 0 3 2 / D D R - 3 0 6 4 / D D R - 3 1 2 8
D D R - 3 0 3 2 R / D D R - 3 0 6 4 R / D D R - 3 1 2 8 R
3000영문 2002.8.23 5:26 PM 페이지1 (1,1)

COPYRIGHT
●Copyright ⓒ2001, DIASONIC TECHNOLOGY CO. LTD. All rights
reserved.
No part of this User's Manual may be reproduced, translated or used
for profits. It is against copyright law to violate these rules. The
content of this User's Guide is produced under the greatest care of
our company. To improve the quality and function of the product, the
content of manual can be modified without any notice in advance. Our
company does not take any responsibility for the loss or damage by
the modification of the manual.
●MP3 files should not be used for the purpose of commercial use or
service other than personnel use. It is in conflict with the domestic
copyright law in case of below.
●It is prohibited to copy recorded matter other than the purpose of
personnel enjoyment by law.
YER
3000영문 2002.8.23 5:26 PM 페이지2 (1,1)
INFORMATION TO THE USER
This equipment has been tested and found to comply with the limits for a Class B
digital device, pursuant to part 15 of the FCC Rules. These limits are designed to
provide reasonable protection against harmful interference in a residential installation.
This equipment generates, uses and can radiate radio frequency energy and, if not
installed and used in accordance with the instructions, may cause harmful
interference to radio communications. However, there is no guarantee that
interference will not occur in a particular installation. If this equipment does cause
harmful interference to radio or television reception, which can be determined by
turning the equipment off and on, the user is encouraged to try to correct the
interference by one more of the following measures:
-. Reorient or relocate the receiving antenna.
-. Increase the separation between the equipment and receiver.
-. Connect the equipment into an outlet on a circuit different from that to which
the receiver is connected.
-. Consult the dealer or an experienced radio/TV technician for help.
WARNING
Changes or modifications not expressly approved by the manufacturer
could void the user’s authority to operate the equipment.
This device complies with Part 15 of the FCC Rules. Operation is subject to the
following two conditions: (1) this device may not cause harmful interference, and
(2) this device must accept any interference received, including interference that
may cause undesired operations.

CONTENTS
1. DDR-3000/R SERIES
1) Suggestions for Users ・・・・・・・・・・・・・・・・・ 1
2) About DDR-3000/R SERIES ・・・・・・・・・・・・・・・ 2
3) Functions and Features ・・・・・・・・・・・・・・・・・ 3
4) Names of Each Part/ LCD Screen ・・・・・・・・・・・・ 5
5) How to Use Battery and Components of Package ・・・・・ 6
6) Basic Directions for Use・・・・・・・・・・・・・・・・・ 8
7) How to Use Buttons ・・・・・・・・・・・・・・・・・・ 9
8) How to Set Menu in VOICE/MP3/FM Part ・・・・・・・・・12
9) Operation of Playback Dial ・・・・・・・・・・・・・・・13
10) How to Record and to Set Up Mode・・・・・・・・・・・・15
11) Various Methods for Playback ・・・・・・・・・・・・・・17
12) Deleting and Controlling Data
・・・・・・・・・・・・・・・
19
13) ALARM/PLAY, TIMER/REC ・・・・・・・・・・・・・・・20
14) How to Connect with External Appliances ・・・・・・・・・24
15) Signal-Receiving Function ・・・・・・・・・・・・・・・・26
2. DVR-Explorer / Mail Manager
1) What is DVR-Explorer? ・・・・・・・・・・・・・・・・・27
2)
Connecting DDR-3000/R SERIES and setting up DVR-Explorer
・・28
3) Composition of DVR-Explorer ・・・・・・・・・・・・・・30
4) Spectrum screen and sound effect ・・・・・・・・・・・・33
5) Transferring MP3・・・・・・・・・・・・・・・・・・・・34
6) Sending DVF files to computer ・・・・・・・・・・・・・・35
7) Deleting MP3 and DVF files ・・・・・・・・・・・・・・・37
8) Resetting flash memory ・・・・・・・・・・・・・・・・・38
9) Managing files by using DVR-Explorer ・・・・・・・・・・39
10) Mail Manager ・・・・・・・・・・・・・・・・・・・・・40
3. Standard of Manufactures ・・・・・・・・・・・・・・43
4. Warranty Card of the Product ・・・・・・・・・・・・・46
3000영문 2002.8.23 5:26 PM 페이지3 (1,1)

-1-
Suggestions for users
●Do not drop or shock the device. It can cause technical trouble.
●Please try to avoid such places.
- The place of high temperature(above 60℃)
- Direct rays of sunlight or right next to a heating apparatus
- Inside of tightly-shut car(especially in summers)
- Humid places(bathrooms)
●Overpressure can cause damage on liquid crystal display(LCD), and
it can also provoke malfunction because of its own features.
●If you put credit cards or commuter passes next to speakers, it will
change the magnetic attraction so that you cannot use your cards
any more.
●DIASONIC TECHNOLOGY Co. cannot be held responsible for any
kind of damage by the use of this product or reparation for injury by a
third party [or individuals].
●DIASONIC TECHNOLOGY Co. does not have any responsibility for
the loss of data in a memory except the one that happens while
repairing and mending technical faults of the product.
●Users should not repair, remodel or take the product apart by
themselves.
●Do not use the device on such places where the use of electrical
machines is prohibited.
●While operating one function of the product, do not try other functions.
●Applying heat to the body of the product or to batteries is
inappropriate.
●While using the product, do not adhere main device closely to the part
for insertion of support appliances.
●If a customer or a third party [or individuals] uses the device in an
inappropriate way, or if main device get shocked, data in a memory
can be changed or lost without warning.
Save important data in other ways.
3000영문 2002.8.23 5:26 PM 페이지4 (1,1)

-2-
About DDR-3000/R SERIES
DDR-3000/R SERIES is the recording and playback device with high
quality of sound and with intensive and excellent technology of
DIASONIC TECHNOLOGY. It provides customers various ways to
record (SHQ/HQ/SP/Timer Recorder Function) and to play
(ALARM/PLAY / speakers playback/ earphone playback/ real time
playback), and you can also enjoy MP3 files, which are digital
compression music files, in various ways. DDR-3000/R SERIES is the
portable digital audio device for next generation with function of
receiving and recording FM radio signals and broadcast.
●Polished, Sophisticated, Extremely Small Size & Solid Exterior
DDR-3000/R SERIES adopted the function of SAMPLING with high
quality of sound such as SHQ/HQ/SP so that it supports high quality-
voice recording and playback technology. We guarantee that
additional MP3 technology satisfies consumers' demands.
●Extension of Additional MP3/HD Function
Voice recorder together with various function of MP3 player
(equalizer/repeat function) can correspond to the advantage of MP3
players, and you can enjoy portable data-storage system or portable
hard disk-storage system.
●FM Radio Broadcast-Receiving & recording(optional function)
You can enjoy both receiving and recording FM radio signals and
broadcast and real time FM recording.
●BACKLIGHT
Even at night, JOG button will help users set menu easily so that they
can see and check the display of LCD of DARK-BLUE colors with
attached BACKLIGHT on the back.
3000영문 2002.8.23 5:26 PM 페이지5 (1,1)

●Additional DVR-EXPLORER / MAIL MANAGER
DDR-3000/R SERIES is the player, which is convenient when
transmitting recorded data, and MP3 files from one PC to another, and
which helps regenerating, managing saved data and sending data
through e-mail.
●ALARM/PLAY, TIMER/REC, SETTING UP TIMER
DDR-3000/R SERIES sets up timer or alarm to record or play
messages or songs at any time, and it helps recording or playback be
processed smoothly.
●USB INTERFACE: supports quick uploading and downloading.
●Display of time on LCD screen
●Saved calendars up to year of 2099
●Thin & slim design for portable and convenient use
●Hidden high quality-microphone inside of the device
●Total 396 messages with 4 separate files (99 messages in each file)
●ARS (Automatic Recording System): prevents unnecessary recording
when there is no sound or voice so that maximizes the time of
recording (A/B/OFF).
●KEY HOLD FUNCTION: prevents accidental operation when not in
use.
●REC MODE: for appropriate quality, time and purpose (SHQ/HQ/SP)
●RECORD DATE FUNCTION: shows time, date, and year of
recording.
●REMAIN FUNCTION: shows remain time for recording and playback.
Functions and Features
-3-
3000영문 2002.8.23 5:26 PM 페이지6 (1,1)

-4-
●TIMER RECORDER FUNCTION: can receive and record radio
broadcast automatically -daily, weekly or monthly.
●ALARM PLAY FUNCTION: can play messages automatically at
requested time after setting time and date.
●Repeat & A-B Repeat function: can play as long as you want to, and
you choose the intervals between two part that you want to listen.
●AUTO OFF FUNCTION: turns off power automatically after one
minute with no other work or operation.
●SEARCH PLAY FUNCTION: searches(forward, backward) the part
that you want to listen fast and easily.
●MONITOR FUNCTION: you can listen to the contents with
earphones while recording.
●H/D(32M/64M/128M) FUNCTION: can substitute for portable hard
disks.
●Digital output Volume control(30 levels)
●Various equalizer modes(normal, rock, jazz, classic, pop)
●Various repeat function (NORMAL/INTERVAL REPEAT/1
TRACK/ALL TRACK/RANDOM)
●On/off function of backlight on LCD (dark-blue)
●Downloading MP3 files / playback with various modes.
●Simultaneous recording function: can receive and record radio
broadcast (TIMER/REC): optional.
3000영문 2002.8.23 5:26 PM 페이지7 (1,1)
-5-
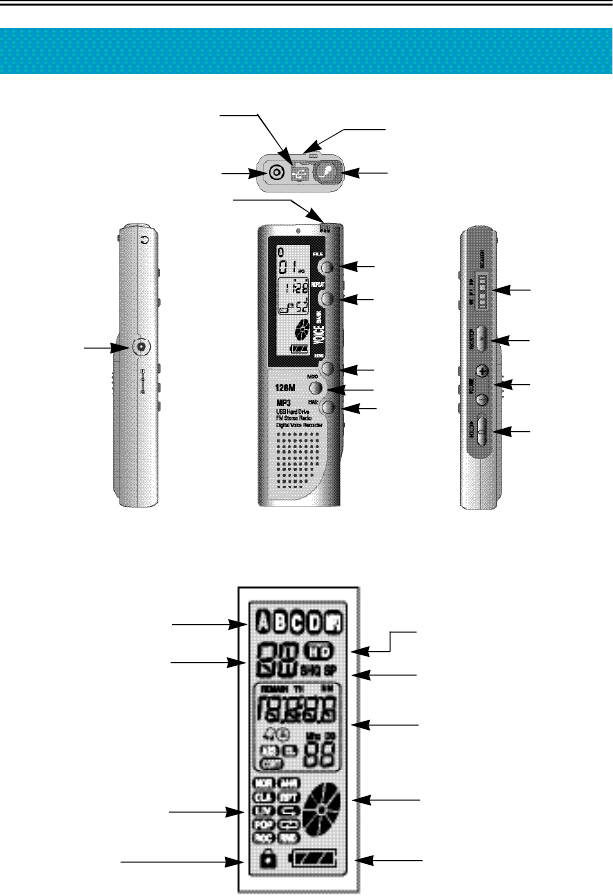
Names of Each Part/ LCD Indicator
D.C JACK
REPEAT
MENU
RADIO
ERASE
FILE
FF/PLAY/REW
REC/STOP
VOL+/VOL-
C-MIC
Ext C-MIC.JACK
NECK STRAP
USB JACK
USE OF PORTABLE
SAVING DEVICE
REC MODE
FILE
EARPHONE JACK
HOLD ON/OFF
REC TIME/PLAY TIME/
Mhz/ARS/EL/CONT/TIMER/
VOLUME/TIME
REC/PLAY/USB DISK
BATTERY
MESSAGE NO.
REPEAT/EQ
HOLD
3000영문 2002.8.23 5:26 PM 페이지8 (1,1)
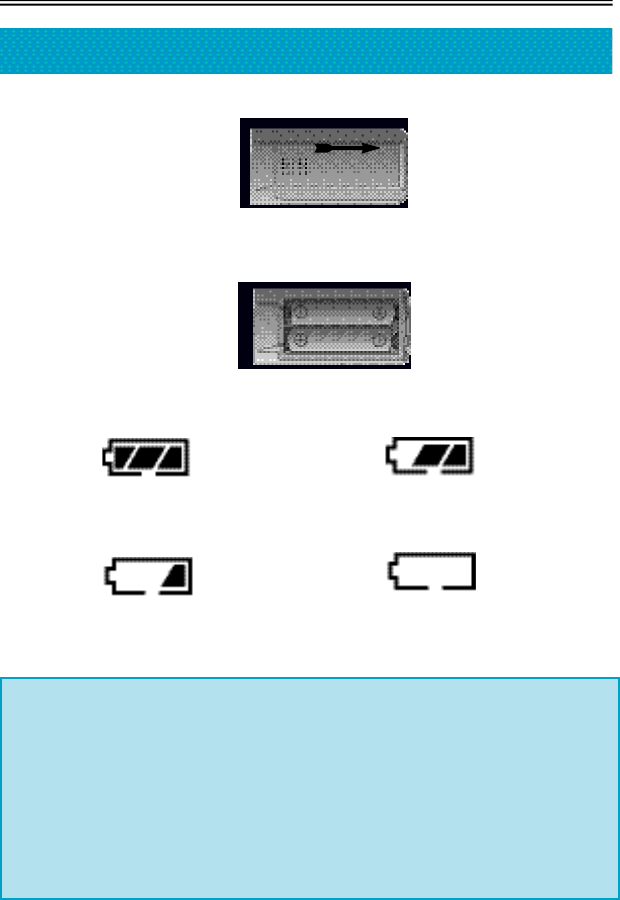
1. Open the cover of battery.
2. Put two LR 03 batteries in accordance with (+) (-) of inside of the
device, and put the cover back on.
Battery: LR 03 or similar batteries of same kind (size "AAA" or UM-4)
3. Check the extra lifetime of battery by pressing PLAY/STOP button or
REC button.
Enough power Battery has consumed
slight amount of power.
Battery has consumed Battery needs to be changed.
plenty of power.
-6-
Use of Battery and Components of Package
열림
※Caution
If LCD screen does not work even with new batteries, check polarity
of batteries immediately.
In the case that LCD screen does not work in spite of appropriate
setting of polarity, remove the batteries and ask for repair.
※Note
If you leave batteries unused in the device for a long time, it would be
wasted.
3000영문 2002.8.23 5:26 PM 페이지9 (1,1)

4. Lifetime of Battery
5. Suggestions when using batteries
●Do not mix and use different kinds of batteries at the same time.
●Remove batteries when you do not use the device for a long time.
●If you use charging battery, read the direction of a battery or a
charger carefully before use.
6. Components of Package
SETERO EARPHONE , TELEPHONE ADAPTOR , INSTALL CD
LINE/IN CABLE , USB CABLE , EXTERNAL MIC, BATTERY , NECK
STRAP , AC ADAPTOR (OPTION), TX 2000(OPTION) ,
REMOCON(OPTION)
-7-
Battery in use Recording
Playback through earphone
(Level of Volume: Medium)
Alkaline Battery
Size "AAA" LR-03
About 15 hr. About 9 hr. About 15 hr.
Playback through speaker
(Level of Volume: Medium)
3000영문 2002.8.23 5:26 PM 페이지10 (1,1)
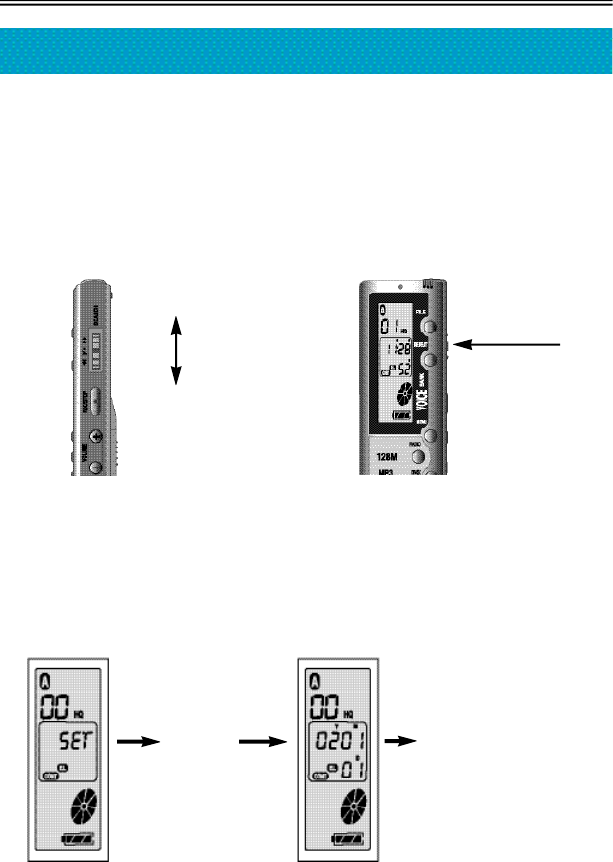
●Power ON/OFF
After pressing Playback or REC button for 1 second, power is on as
soon as LCD screen displays as the picture shows below.
If no button gets any order in 1 minute, player turns off power
automatically.
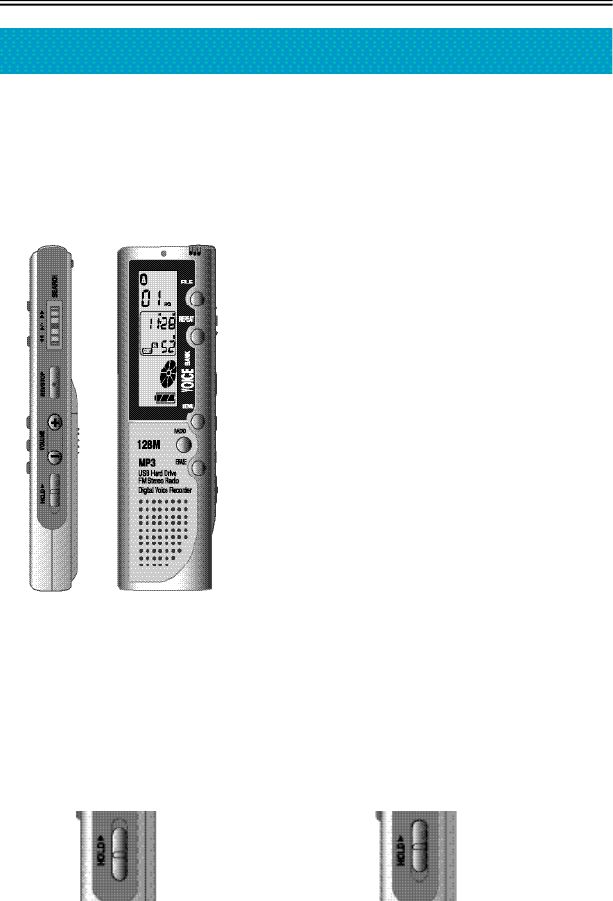
●How to Use HOLD Switch
If HOLD switch is fixed upward, any switch button does not work
except DISPLAY switch.
Fix HOLD switch upward if you want to keep recording and not to work
with the player for a while.
Before use, check the HOLD switch is fixed downward, and then, turn
on the power.
HOLD HOLD ON
OFF You can not use other switches.
-8-
Basic Directions for Use
※We recommend you to set time right after
purchasing DDR-3000/R and inserting
supplied batteries.
If you do not set time, you cannot enjoy
various functions such as ALARM/PLAY,
TIMER/REC and etc.
(Go to Page 14 on User's Manual to see
how to set up SET mode)
3000영문 2002.8.23 5:26 PM 페이지11 (1,1)
-9-
How to Use Buttons
●VOICE FILE SECTION(A/B/C/D)
Key Action: —means short press, and ——means long
press(more than 1 second).
BUTTON
▶/■
▶▶
◀◀
●/■
M E N U
V O L +
V O L–
R E P E A T
E R A S E
F I L E
R A D I O
WHEN PLAYER IS RECORDING
Check the memory capacity
X
Start recording on next index
X
X
X
Stop recording
Stop recording
X
Turn up the volume in
case of motoring
Turn down the volume in
case of motoring
X
X
X
X
X
X
X
WHEN PLAYER IS NOT WORKING
Start playing current index
Start scanning and playing
from current index
Forward to next index
Automatic conversion to search index
Conversion to previous index
Automatic conversion to
search index
Start recording after conversion
to +index
Start recording after conversion
to +index
Set menu
Turn up the volume
Turn down the volume
X
X
Erase indexes of all files
Delete indexes of all files
Erase files
Change of sections-A/B/C/D/MP3/HD
Receive FM radio signals
WHEN PLAYER IS PLAYING
Stop playing index
Stop playing index
Start playing next index
Current index search &
consecutive search
Stop playing current index
Stop playing current index
X
Turn up the volume
Turn down the volume
Repetitive playback of
current index
A-B repeat & playback
current index
X
X
X
X
X
KEY ACTION
—
——
—
——
—
——
—
——
—
——
—
——( 5 s e c )
+ FILE
Note) Instant recording function: For your convenience, after pressing REC
button for 2 seconds, it turns on power and starts recording at the
same time even when power is off.
Playing previous index in case less than
5 seconds, Playing the first part of
playing index in case over 5 seconds
Playing from the beginning after
searching current index contrariwise
and return to the beginning
3000영문 2002.8.23 5:26 PM 페이지12 (1,1)
-10-
●FM RADIO SECTION(RADIO KEY)
BUTTON
▶/■
▶▶
◀◀
●/■
M E N U
V O L +
V O L–
R E P E A T
E R A S E
F I L E
R A D I O
WHEN RECEIVING FM SIGNALS
Start to create and set channels
for each FM station
Select channel memory(01~10) and
frequency
Select channel memory(01~10)and
frequency
Start to record FM radio broadcast
Set menu
Change to FM memory channel mode
and release
Turn up the volume
Turn down the volume
X
X
X
Stop receiving FM signals
WHEN RECORDING FM RADIO BROADCAST
X
X
Increase +index
Stop recording FM radio broadcast and
start receiving FM signals
X
X
Turn up the volume
Turn down the volume
X
X
X
X
KEY ACTION
—
—
—
—
——
Note) Earphone works as an antenna.
The longer line of earphone, the more clear quality of sound.
3000영문 2002.8.23 5:26 PM 페이지13 (1,1)
-11-
●MP3 FILE SECTION(MP3)
BUTTON
▶/■
▶▶
◀◀
●/■
M E N U
V O L +
V O L–
R E P E A T
E R A S E
F I L E
R A D I O
WHEN PLAYER IS NOT WORKING
Start playing current track
Start scanning/playing from current track
Conversion to next track
Automatic conversion to search track
Conversion to previous track
Automatic conversion to search track
Start recording +index after changing A FIEL
Start recording +index after changing A FIEL
Set menu
Turn up the volume
Turn down the volume
X
X
Delete current track
Delete tracks of MP3 files
Change of sections-
A / B / C / D / M P 3 / H D
Receive FM radio signals
WHEN PLAYER IS PLAYING
Stop playing track
Stop playing track
Start playing the next track
Current track search & consecutive
track search
Playing previous track in case less than 5 seconds,
Playing the first track in case over 5 seconds
Playing from the beginning after searching current
track contrariwise and return to the beginning
Stop playing current track
Stop playing current track
Perform equalizer
Turn up the volume
Turn down the volume
Repetitive playback of current
track(NOR/RND/ONE/ALL)
A-B repeat & playback current track
X
X
X
X
KEY ACTION
ㅡ
ㅡㅡ
ㅡ
ㅡㅡ
ㅡ
ㅡㅡ
ㅡ
ㅡㅡ
ㅡ
ㅡㅡ
ㅡ
ㅡㅡ(5sec)
Note) WMA files can only be applied to DDR-3064/DDR-3064R/DDR-
3128/DDR 3128R MODEL
3000영문 2002.8.23 5:26 PM 페이지14 (1,1)
-12-
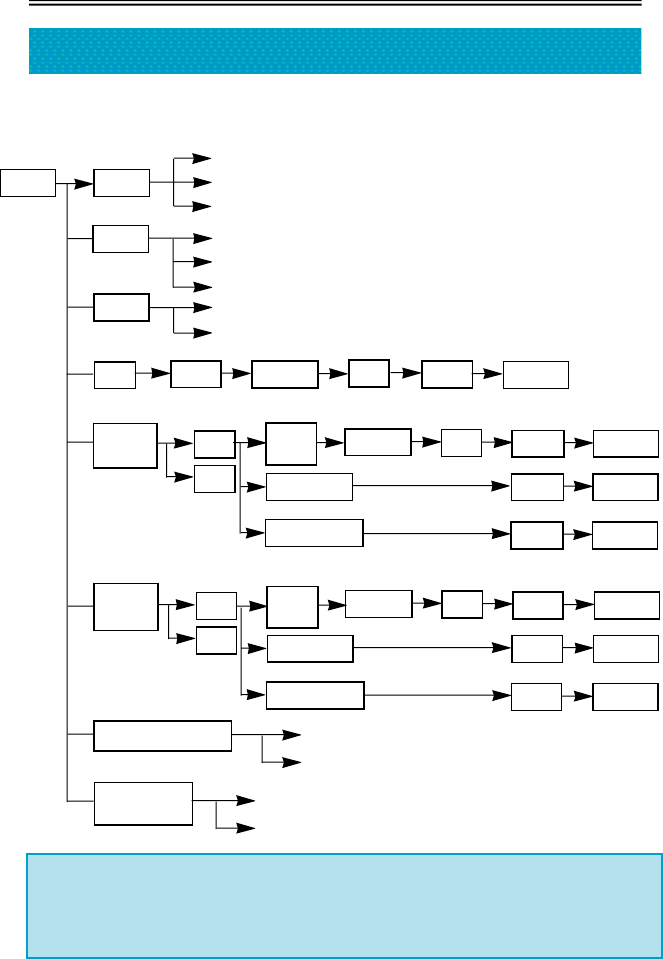
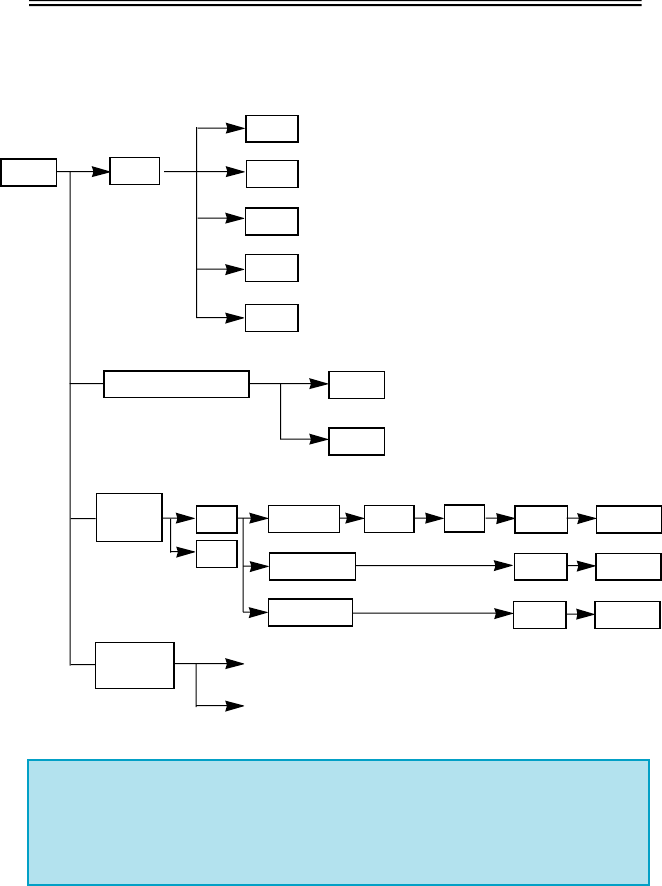
How to set Menu in VOICE/MP3/FM Part
1. Map of menu-Voice section
MENU M O D E
S H Q
H Q
S P
O N
O F F
A
B
O F F
※When pressing menu button, choose MODE. Then LCD screen shows
you contents of MODE. After you choose the part that you want by
moving PLAYBACK button upward and downward, then press the
button and save it in memory.
REM(REMAIN)
NOR(NORMAL)
A R S
C O N T
S E T Y E A R M O N T H D A Y H O U R M I N U T E
A R M
( A L A R M ) O N
O F F
D A T
( D A T E ) M O N T H D A Y H O U R M I N U T E
S U N ~ S A T H O U R M I N U T E
D L Y ( D A I L Y ) H O U R M I N U T E
TMR
(TIMER) M O N T H D A Y H O U R M I N U T E
S U N ~ S A T H O U R M I N U T E
H O U R M I N U T E
EL(BACK LIGHT) O N
O F F
D S P
( D I S P L A Y )
O N
O F F
D A T
( D A T E )
D L Y ( D A I L Y )
3000영문 2002.8.23 5:26 PM 페이지15 (1,1)
-13-
2. Map of Menu-MP3 Part
※When pressing MENU button, choose EQ. Then LCD screen shows
you contents of EQ . After you choose the section that you want by
moving PLAYBACK button upward and downward, then press the
button and save it in memory.
REM(REMAIN)
NOR(NORMAL)
ARM
(ALARM) D A T ( D A T E ) M O N T H D A Y H O U R M I N U T E
S U N ~ S A T H O U R M I N U T E
D L Y ( D A I L Y ) H O U R M I N U T E
EL(BACK LIGHT)
EQ
NOR
CLA
LIV
POP
ROC
ON
O F F
D S P
( D I S P L A Y )
MENU
ON
O F F
3000영문 2002.8.23 5:26 PM 페이지16 (1,1)
-14-
Operation of Playback Dial
Move Playback dial upward and downward, (2) press it in one way (you
can press it in two ways)Handle the dial correctly as User's Guide reads.
When setting menu, (1)move the button up and down(when it is moving
up and down, playback dial does not work), and (2) press it. Then the
section of menu is set.
(1) Move the button up and down (2) Press it in one way as you want.
●Before you start recording, you need to set date, time first.
①Press MENU button. It will show you "MODE" sign.
②Move PLAYBACK dial up and down, and choose SET mode, then
press PLAYBACK dial. Number of year will flash. Choose each
number of year and press PLAYBACK dial. Do it in the same way to
set month, day and time.
SET DATE MODE
③If you finish setting time and date, press MENU button, and go back
to first stage.
Press
PLAYBACK dial
Move PLAYBACK dial
up and down, and
choose each number
to set date, and press
PLAYBACK dial.
FF (+INDEX)
REW (-INDEX)
PLAY/STOP
3000영문 2002.8.23 5:26 PM 페이지17 (1,1)

-15-
How to Record and to Set Up Mode
●How to record
You can record up to 99 messages in each four A, B, C and D files.
①Press the button for each file, and select one on which you want to
record.(Choose one among A/B/C/D)
②Prepare a microphone and let it face the source of sound, and press
REC/STOP button for 1 second. As soon as the recording process
begins, LCD screen will display the number, mark and time of
recording, and red-color light will flash
③If you want to stop recording, press REC/STOP button again.
※It is impossible to stop recording in 5 seconds after you press
REC/STOP button. It does not stop even if you press STOP button.
Be careful.
※When you press REC/STOP button, the content of recording will be
saved as the latest number so that you don't have to find unrecorded
part as you did with tape before.
※Don't forget to change batteries into new ones if you want to record
for a long time.
※Check the rest amount of power of batteries before you start
recording.
※Caution
For successful recording, conduct mock recording as a pretest.
If batteries are used up while recording, LCD will notice you with
"BAT(low battery)" sign, and power will be turned off automatically.
Then, change batteries.
●How to Set REC Mode
If you press MENU button when player is not working, MODE will
appear on screen.If you want to change one of SHQ/HQ/SP to
another, move PLAYBACK dial up and down, and press the dial
again. You can enjoy the highest quality of sound by setting the
recording mode as SHQ.
3000영문 2002.8.23 5:26 PM 페이지18 (1,1)

-16-
●How to Set ARS
When you press MENU button and select ARS while player is not
working, ARS is on, and it stop automatically when there is no sound
so that you can save and minimize recording time. While ARS is in
action, A-mode performs ARS PAUSE. When A-mode is off, the
record process is performed with current index one after another.
While ARS is in action, B-mode performs ARS PAUSE. When A-
mode is off, the record process is performed with next index one after
another.
●How to Check Remaining Recording Time
In MENU, you can set the list of playback or recording in the order of
playing time. The list of playing will appear in the order of amount of
playback or remaining time during playback, and the list of recording
will appear in the same order while recording.
●Recording Monitor Function
If you connect an earphone with a player, you can monitor the
content or sound during the recording process. Adjusting volume of a
player cannot control volume of recording.
●Separating Files While Recording
As for user's demand, files can be separated from each file.
By pressing FF/KEY, you can record in the next index continuously
so that you can easily distinguish from one index after another.
※Caution
-. Do not take out batteries during the process. Details of recording can
be erased or be worked irregularly. You must take out them after you
check the device stops working completely.
-. If there are no more available numbers to save details of recording,
you cannot record any more. If available amount of time that you can
use for recording is filled up, it says "FULL" and lets you know
immediately.
Before recording, please check the available space, file or time that
the player can offer, and erase unnecessary parts. (See No. 10 to
learn how to erase recorded details)
-. You cannot record as the route of MP3 or H/D. When the recording
process once starts, the previous recording convert into A FILE of
VOICE part, and then the process begins. (MP3 is only available for
playback)
3000영문 2002.8.23 5:26 PM 페이지19 (1,1)

-17-
Various Methods for Playback
●How to Play Voice Part
①Choose the message that you want to listen.
②Choose one file among A, B, C and D, and select the file with FILE button.
③By moving PLAYBACK dial up and down, select the number of the
m e s s a g e .
④It starts to play after pressing PLAYBACK dial.
⑤Adjust the volume with DIGITAL VOLUME button.
⑥Since it is super-mini speaker, you should be careful to listen to the
messages in quiet places.
⑦If you are interrupted by noise, use an earphone.
⑧If you want to stop the player, press REC/STOP button.
※If batteries are used up completely, LCD will let you know it with "BAT
(low battery)", and power will be turned off automatically after warning.
Then, change batteries and start the player again. At first stage, you
can listen to every message in the recorder from the first to the last one
by pressing PLAYBACK button. If you want to listen to just one of
messages and stop, press MENU button when the player does not
work. And then if MODE appears on screen, choose "OFF" by
selecting "CONT" with PLAYBACK dial.
●Playback of MP3
①Convert to MP3 by using FILE button.
②If you do not have any downloaded songs through USB, "MP3" sign will
be on your LCD screen.
③MP3 music files can be played by PLAYBACK dial after downloading
through USB.
●Backward and Forward Playback While Playing
You can check both next and previous messages by moving PLAYBACK
dial upward and downward while it plays one message.
To keep pressing PLAYBACK dial can bring messages forward or
backward fast. (SEARCH function)
3000영문 2002.8.23 5:26 PM 페이지20 (1,1)

●Search & Play
If you press PLAYBACK dial for 2 seconds, the recorder will play its
every message for just 10 seconds orderly.
While the recorder is scan-playing, if you press PLAYBACK dial one
more time, you can hear the message of the number you chose.
As for playback of MP3, its Search & Play function also works.
●Repetitive Playback of VOICE files
By pressing REPEAT button while playing, LCD screen will let you see
"RPT", And that is going to make one message repeat forever unless
you stop it by pressing REPEAT button one more time.
●Repetitive Playback of MP3 Files
If you press REPEAT button when the device plays, you can choose one
of various kinds of repeat mode (NORMAL/1 TRACK/ALL
TRACK/RANDOM).
NORMAL: Playback of all songs and stop
1 TRACK (RPT): repetitive playback of one song
ALL TRACK: Repetitive playback of all songs
RANDOM: Playback of all songs by random choice
●A↔B Repeat Playback
"A↔B" sign shows up when you press REPEAT button for more than 1
second whenever you want to repeat the playback.
If you press REPEAT button again, "A↔B" sign shows up, and the part
that you choose starts playing repetitively.
By pressing REPEAT button again, it stops playing.
※You cannot choose more than 2 messages subsequently with REPEAT
playback.
※MP3 files can be played by the way of A↔B repeat playback.
●Various Equalizer Function
If you play MP3 music files, Equalizer Function will help the player play
different genres-NORMAL, ROCK, JAZZ, CLASSIC, POP and etc.
Select one of MP3 files and choose Equalizer function as your menu by
moving the button back and forth.
-18-
3000영문 2002.8.23 5:26 PM 페이지21 (1,1)

-19-
Deleting and Controlling Data
※Deleting massages is only possible when the player stops it's work
completely.
●Deleting Messages One by One
①Choose one message that you want to erase.
Select the message by moving FILE button and PLAYBACK dial.
②Push ERASE button for 1 second, and LCD will display "ERS". The
recorder plays the message to make you sure.
While "ERASE" is flickering on LCD screen, the message is erased
completely, Once message is deleted, numbers of messages on
LCD are shifted for each message.
※While "ERASE" sign is blinking, if you press other buttons, Delete
function is cancelled.
※Caution: You can never restore deleted messages.
●Deleting All Files and Messages
①Select the file that you want to delete.
②To press ERASE button and FILE button together for 1 second
erases selected file and "FL.ER" sign.
All files are deleted by pressing ERASE button again.
●VOICE FILES/ ALL ERASE
①"AL.ER" sign appears by pushing ERASE button for 5 seconds.
If you push ERASE button again when "AL.ER" sign disappears,
recorded messages on files are all deleted.
②ALL ERASE deletes not MP3, H/D files but A/B/C/D files among
VOICE files
③MP3 DELETE can erase not only a single music file but also all MP3
files, and H/D DELETE can be removed through USB.
※Caution
If you used up all of memory of hard disk, it is impossible to save
recorded or MP3 files. Please clear off useless files before use.
3000영문 2002.8.23 5:26 PM 페이지22 (1,1)

-20-
TIMER/REC & ALARM/PLAY Function
※For TIMER/REC, SET mode and time need to be fixed.
①If you press MENU buttons, "MODE" appears on LCD.
Set “TMR(Timer)” by moving and pushing PLAYBACK dial.
②Delete "ON" by shifting PLAYBACK dial and set PLAYBACK dial.
③DAT(DATE) flickers.
④Each number for year (Y), month (M) and day (D) will flicker one by
one by pressing PLAYBACK dial so that select numbers by moving
the button. Press PLAYBACK dial and fix the number.
⑤"STRT(START)" sign will appear on LCD, and then specific time for
TIMER/REC will flicker. Press PLAYBACK dial in the same way of 4.
⑥"END" sign is on LCD now, and end time for TIMER/REC will flicker.
Then, do it in the same way of 5.
⑦Finally, if you press MENU button again, a small picture of watch
will be on LCD screen.
●In case that you want to record weekly (at same time)
①Let TMR(TIMER) be on LCD screen in order (1~2).
②Move PLAYBACK dial upward and downward, and select day.
SUN…Sunday, MON…Monday, TUE…Tuesday, WED…Wednesday,
THU…Thursday, FRI…Friday, SAT…Saturday
③Set up the time you want to record with PLAYBACK dial
④Complete to set time of TIMER/REC in order (6~7)
●In case that you want to record at the same time everyday
①Let TMR(TIMER) be on LCD screen in order (1~2).
②Move PLAYBACK dial upward and downward, and select
DLY(DAILY).
③Set up the time you want to record with PLAYBACK dial
④Complete to set time of TIMER/REC in order (6~7)
3000영문 2002.8.23 5:26 PM 페이지23 (1,1)

-21-
●Cancel of TIMER/REC
①Change "ON" to "OFF" in the second step of TIMER/REC (Cancel)
●Stop during TIMER/REC
①Press REC button
※Caution
-. Only one item of TIMER/REC is possible -one for each VOICE
files/FM radio
-. Before you start TIMER/REC, check amount of possible time.
If time for recording takes longer than available time, TIMER/REC is
impossible.
However, if you set the schedule every week or everyday for
TIMER/REC, it is possible to set TIMER/REC mode even though
recording time is shorter than available amount of time for recording.
-. If selected files are filled with 99 recorded messages already, and
memory is full, TIMER/REC cannot operate its function
appropriately.
-. TIMER/REC should be set for less than 24 hours.
-. If the start time of recording is before 23: 59, and the ending time is
later than 00: 00, the ending time is set as the next day.
-. If TIMER/REC starts its process while ALARM/PLAY function is
working, press the stop button and start TIMER/REC function again.
-. If TIMER/REC starts to record a message while other function is on
except recording, press stop button and start TIMER/REC function
again.
If TIMER/REC function starts its work when the player is already
recording something else, recording process keeps working, and
TIMER/REC function stops.
3000영문 2002.8.23 5:26 PM 페이지24 (1,1)

-22-
●How to Set ALARM/PLAY Function
ALARM/PLAY is the function which automatically starts the message
that you selected before.
①Bring the message that you want to play with ALARM/PLAY function
on LCD screen.(See No. 1 of How to Play to know specifically)
②By moving PLAYBACK dial up and down, bring "ARM(ALARM)" sign
on screen and set the function. (By moving MENU button, "MODE"
sign will show up)
③When "On" and "OFF" signs flicker together on screen, choose "ON"
and set up "ON".
④Then, "DAT(DATE)" sign shows up.
⑤When "Y(year)", "M(month)", "D(date)" appear on screen in order,
select numbers and press PLAYBACK dial.
⑥Do it in same way to set time when "TIME" sign appear on screen.
⑦By pressing MENU button, alarm sign, " " will be in sight on LCD
screen.
⑧Play the selected message when time has come.
When the player stops playing, it stops its whole function
automatically and go back to the beginning part of the message.
★If you want to listen to the message again, press PLAYBACK dial.
●If you want to play the same message at the same time once
in every week
①Follow the same steps and procedures of 1~3 on setting
ALARM/PLAY function, and set ARM(ARAM) up "ON".
②By moving PLAYBACK dial up and down, select days of the week.
SUN…Sunday, MON…Monday, TUE…Tuesday, WED…Wednesday,
THU…Thursday, FRI…Friday, SAT…Saturday
③Set days of the week you want with PLAYBACK dial.
④Set up ALARM/PLAY time in the same way with the step 7~8 of
setting ALARM/PLAY function.
3000영문 2002.8.23 5:26 PM 페이지25 (1,1)

●If you want to play messages at the same time everyday
①Set ARM(ARAM) up "ON" in the same way with step 1~3 of setting
ALARM/PLAY function.
②By moving PLAYBACK dial up and down, select "DLY(DAILY)" and
set up
③Set up the time you want to record with PLAYBACK dial.
④Set up ALARM/PLAY time in the same way with the step 7~8 of
setting ALARM/PLAY function.
●When You Want to Cancel ALARM/PLAY function
①If you want to cancel, select "OFF" in the third procedure of setting
ALRM/PLAY function.
※Caution
-. ALARM setting up or REC/RECORD is available only one time.
-. If ALARM/PLAY and TIMER/REC function get orders to start at the
same time together, LCD shows "RESET", and ALARM/PLAY
function will not work appropriately.
-. If requested time of ALARM/PLAY has come during the normal
recording process, ALARM/PLAY function would start to work after
all the normal recording process is completed.
-. When requested time of ALARM/PLAY functions has come while the
player is in MENU mode, MENU mode disappears, and
ALARM/PLAY starts the process.
-. If you delete the message which is supposed to start playing
accordance with ALARM/PLAY function, the set up of alarm function
becomes unavailable.
-. If requested time has come while you are deleting the message, the
message will be played while the deleting process stops working.
-. If you set up the schedule to play once in every day or every week,
the order is not cancelled even after you stop ALARM/PLAY
function.
-23-
3000영문 2002.8.23 5:26 PM 페이지26 (1,1)
●How to Connect with External Microphone
-. Put the plug of a microphone into the external microphone terminal of
the player.
※When the external mike is connected with the microphone terminal
of the player, internal microphone does not work.
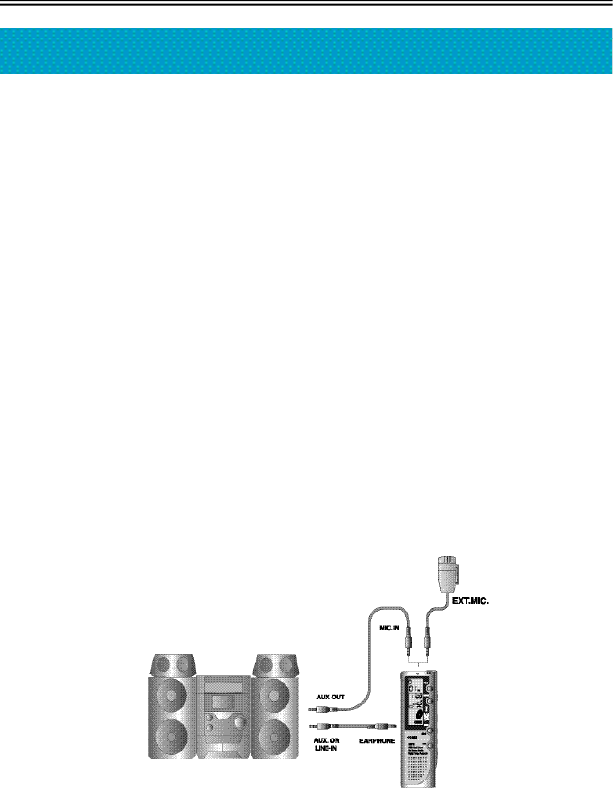
●Connection with external appliances
The message that you recorded with DDR-3000/R SERIES through
audio cable and telephone adaptor(for either portable or domestic use)
can also be recorded with other external appliances such as cassette
players or MD. And recording of the messages of wireless or domestic
telephones is possible through this player.
●How to Connect with Record Players
①When you want to record in VOICE RECORDER through external
appliances: Connect audio cable with the earphone terminal of
stereo components and with the microphone terminal of VOICE
RECORDER together.
②When you want to record in external appliances through VOICE
RECORDER: Connect audio cable with the microphone terminal of
external appliances and with the earphone terminal of VOICE
RECORDER together.
How to Connect with Stereo Components
※Caution
★When you connect to external appliances, turn off the power and
start the connection operation.
★When you connect to external appliances, read through the its
manual and understand it fully before you start to use and operate
them.
-24-
How to Connect with External Appliances
3000영문 2002.8.23 5:26 PM 페이지27 (1,1)
●Recording from external appliances
When you record certain messages from external appliances, turn
down the volume of the appliance, and then connect audio cable with it
and start to record. When recording, set up the volume of the appliance
as medium level, and try not to change it during the recording process.
●When you record through external appliances
Start operating external appliances with VOICE RECORDER at the
same time. (Starting time of players is all different from each other.
Check and understand working and operation of appliances.
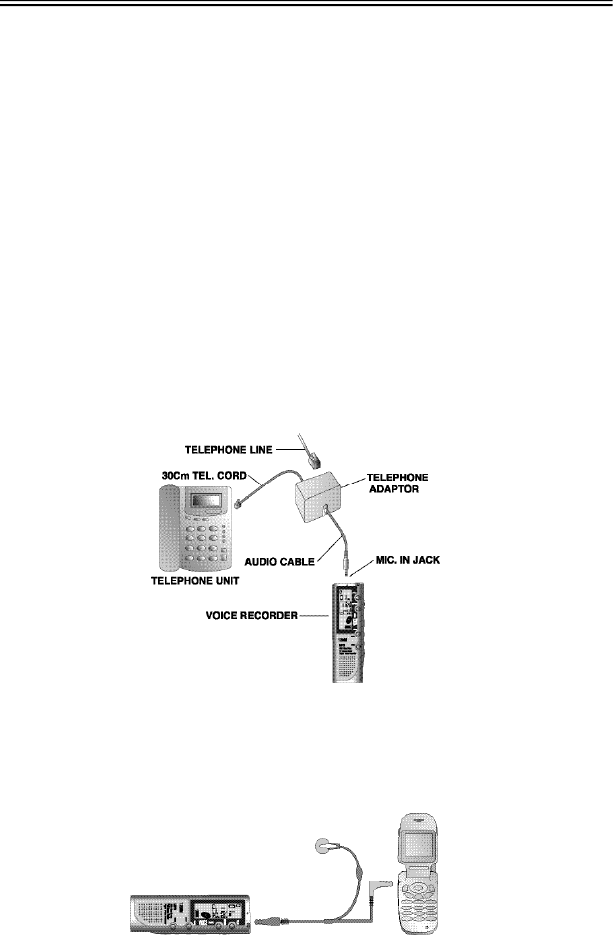
●How to Record the Conversation over Telephone
Connect audio cable to the microphone connector of VOICE
RECORDER and to the distributor of a component equipment. Connect
telephone cable of component equipment to the distributor. Attach a
cord, which connects the receiver and telephone, to the distributor.
Connect one side of telephone wire to main body of telephone. If you
press REC button of VOICE RECORDER, you can record conversation
over the telephone.
The method of recording conversation of telephone
●How to Record Conversation over Cellular Phone
Connect the cord of cellular phone to the microphone connector of
VOICE RECORDER and to the earphone jack of cellular phone. By the
earphone connected with wire of cellular phone, the conversation is
recorded.
The method to record cellular phone conversation
-25-
3000영문 2002.8.23 5:26 PM 페이지28 (1,1)

-26-
FM Signal-Receiving Function
※Note: This function is available only for the models those have the
function of radio. If you want high quality of sound when you
listen to FM radio, use earphones. Insert the antenna into
earphone jack if you want to use speakers.
※AUTO SEEK is convenient function when you listen to the radio.
If you press FF or REW button for 0. 5 seconds, it stops automatically at
the radio station that the player can receive signals. Sometimes AUTO
SEEK functions cannot TUNE to the stations accurately. In this case,
control minutely with REW or FF button.
●How to Set Radio Channels(Stations)
①Select Radio Mode by pressing RADIO button.
②LCD will show you frequency. Select the station that you want by
FF/REW button.
●How to Save Radio Stations
①Press RADIO button, and select RADIO mode.
②LCD will show you frequency. Select the station that you want by
FF/REW button.
③If you press PLAY button, "01" sign will flash on the screen where "FM"
sign appears. Then, choose the channel that you want to save(1~10) by
FF/REW button, and press PLAY button for one second. "FM" sign
shows up as the channel is saved. In the same way, you can save up to
10 channels.
※Confirming saved channels
If you press MENU button for 1 second, saved channels and signals will
show up. Then, confirm savings with FF/REW buttons. Again, press
MENU button for 1 second and choose signals and stations that you
want to save.
●How to Record Radio Broadcast
①Select the radio station that you want to record following the step 1~2 of
"How to Save Radio Stations".
②Press REC button and start recording. In this case, the recorded
message is saved in the index and VOICE files. If you stop playing MP3
and choose radio mode, the message is recorded in A file of new index.
③You cannot check the condition of message while recording. After stop
recording, you can see the condition in VOICE part.
※If you want to check the condition of recorded message, see 11. of "How
to Play in VOICE mode"
3000영문 2002.8.23 5:26 PM 페이지29 (1,1)

-27-
What is DVR-Explorer?
DVR-Explorer is a managing program for DDR-3000/R SERIES which
transfer or plays MP3 files from computer to DDR-3000/R SERIES, it
manages recorded voice or FM radio file (DVF) from DDR-3000/R
SERIES and has following features.
●Transferring(upload/download) file to DDR-3000/R SERIES -
MP3,DVF and normal data file
●Similar structure to Window Explorer for file managing
●Plays MP3, MP2, WAV, Audio CD, playlist
●DVF/WAV two way convert
●Convenient transfer of file using transfer list
●Various spectrum, equalizer, effect support
●Convenient instruction manual
Minimum System Requirement for DVR-Explorer
●Pentium 200MHz
●64MB Memory
●20MB Empty Hard Disk Space
●256bit Color
●Window 98/ME/2000/XP(NT Not Supported)
●USB Port
●CD-ROM Drive
●Sound Card, Speaker or Headphone
3000영문 2002.8.23 5:26 PM 페이지30 (1,1)
(1) Insert DDR-3000/R SERIES setup CD to CD-ROM drive and it will
rum automatically. If Auto-run doesn't work execute setup file "CD-
ROM:\setup.exe" or "CD-ROM:\DVR-Explorer \setup.exe". Setup will
progress automatically, once setup is completed DVR-Explorer will
be registered to "DIASONIC" in start program.
(2) Using USB Cable connect USB port terminal from DDR-3000/R
SERIES to USB port at PC. Then, "New Hardware detected" will
execute and end automatically when using Window 2000. Now
complete setup of USB drive and install DVR-Explorer .
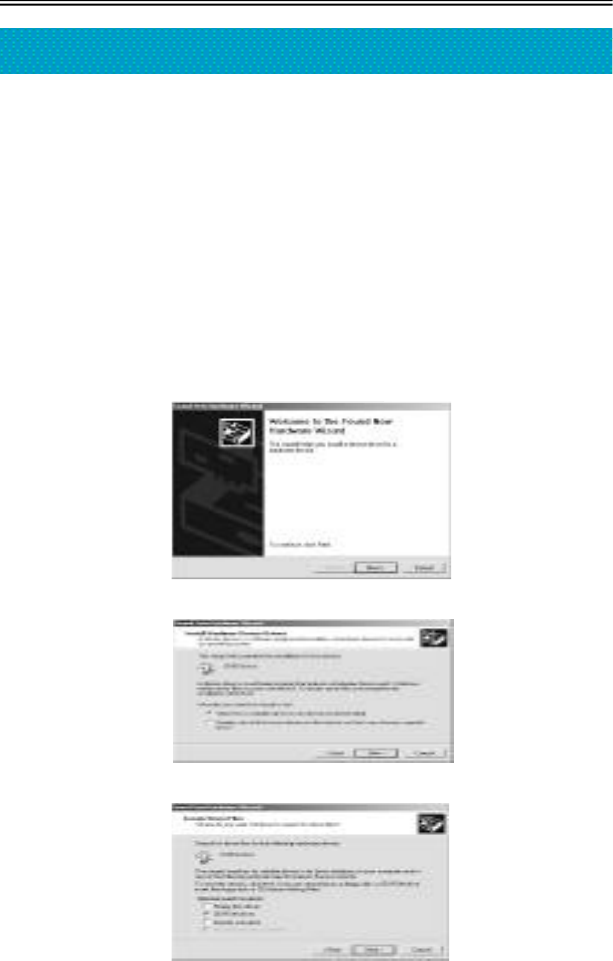
(3)
Connect DDR-3000/R SERIES and PC using USB port cable. ‘New
Hardware Detected’ will run automatically, new click on ‘NEXT’ button.
(4) Select 'Search suitable drive for device' and click on ' NEXT ' button.
(5) Select CD ROM drive and click on ' NEXT ' button.
-28-
Connecting DDR-3000/R SERIES and setting up DVR-Explorer
3000영문 2002.8.23 5:26 PM 페이지31 (1,1)
-29-
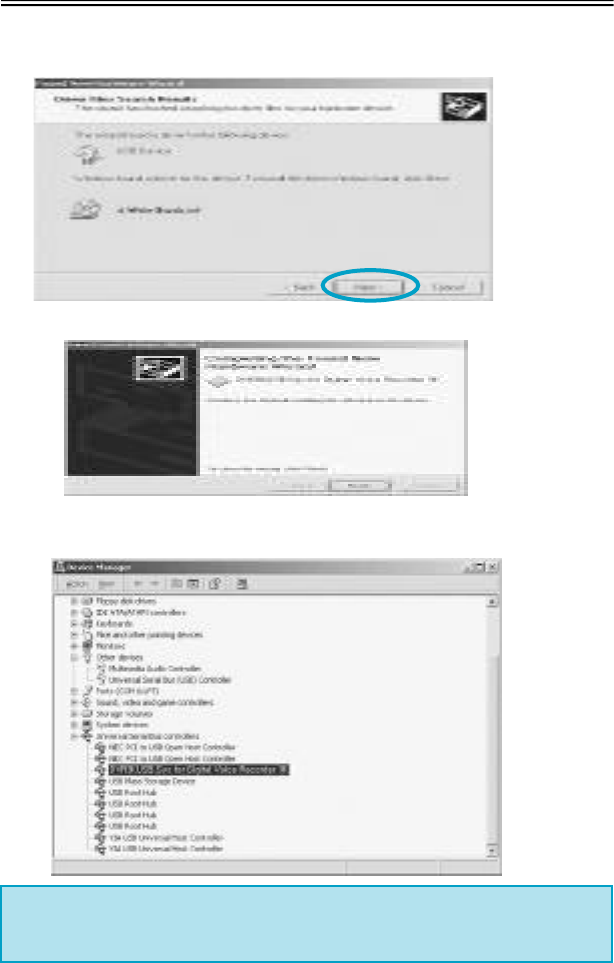
(6) Searched USB driver file and click on ' NEXT ' button.
(7) Click on ' NEXT ' button to finish wizard.
(8) Once USB drive setup is completed, check for setup progress from
device manager at My Computer.
※If DDR-3000/R SERIES is not found once DVR-Explorer is
performed. Check for USB device on PC, and for proper
connection of Cable.
3000영문 2002.8.23 5:26 PM 페이지32 (1,1)
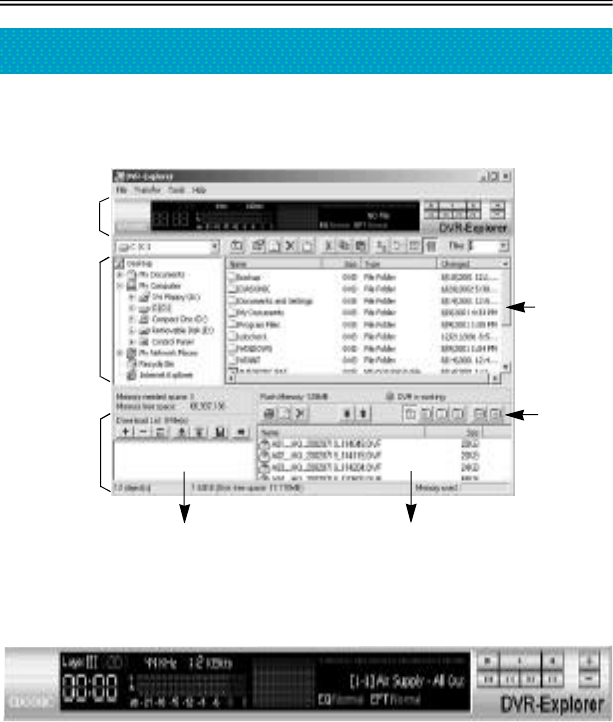
Figure of DVR-Explorer
(1) Paying MP3, WAV, CD and DVF
Double click on MP3, WAV, Audio CD Track and DVF file on file control
window or use drag and drop to playlist for instant play. Also, you can
select file then press play. Through LCD window progress of music and
title scrolls right to left, and you can see two kind of magnificence
spectrum window.
Play and stop files through control panel on the right side of the screen.
Adjust volume by using +,- button. Click on red position bar to move the
position of current playing music.
-30-
Composition of DVR-Explorer
File
Manage
Window
Play
Manage
Window
Flash
Memory
Manage
Window
Folder
Manage
Window
Transfer list
Manage Window
File
Manage
Window
Flash Memory
Manage Window
3000영문 2002.8.23 5:26 PM 페이지33 (1,1)
-31-
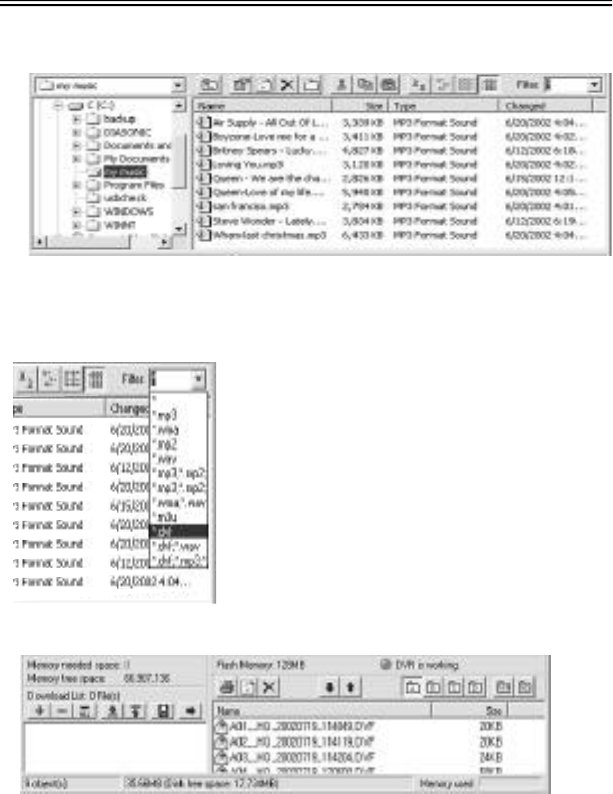
(2) Managing DVF file and MP3 file
File managing part of DVR-Explorer is very similar to Window Explorer.
Left part of the window shows the hard disk and CD-ROM drive
installed in system with it's inside folders. Right part of the window
shows various files inside folders.
(3) Flash Memory Managing of DDR-3000/R SERIES
Very low section of DVR-Explorer is a part which manages flash
memory installed in DDR-3000/R SERIES and transferring list. If DDR-
3000/R SERIES is properly connected it will show red light lamp with a
phrase saying 'DVR is Working' just like picture at the top. The MP3
files which the user stores in flash memory of DDR-3000/R SERIES
will appear on low right window and file size and left over space of
memory will be marked with graphic screen.
Basic setting is to show all the files on the
screen, but you can select DVF files or other
various files by using filter function on the
upper right corner.
Also, transferring and copying of the files can
be used in the same way as explorer.
Using this file managing function separation
and keeping of DVF files in other folders are
possible.
3000영문 2002.8.23 5:26 PM 페이지34 (1,1)
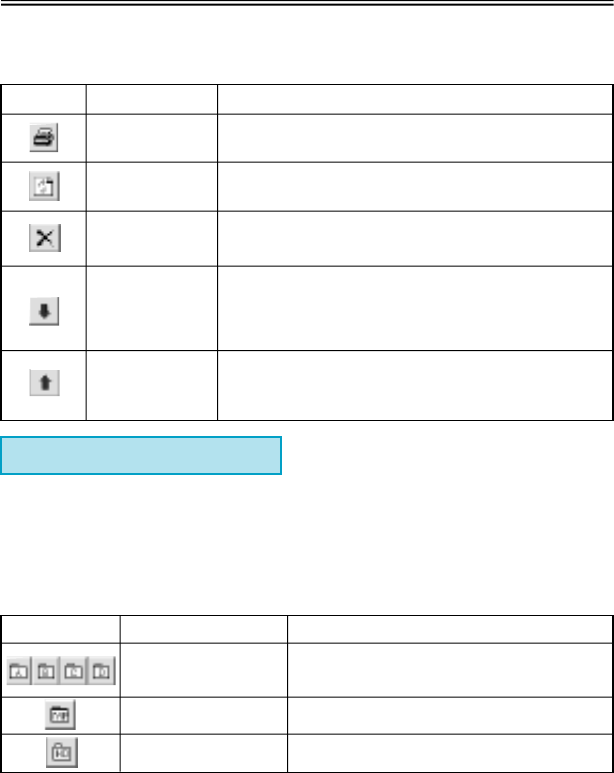
(4) Buttons
※Can't upload MP3 files.
Just like managing folder in computer, memory of DDR-3000/R SERIES
is divided into 6 folder and can be played by each folder.
Album select buttons.
Particular information
Prints file list in flash memory.
Re-reads the information on flash screen.
Choose the file stored in flash memory,
then press this button to delete the file.
Choose the files to be move to flash memory for file
manage window, then click this button to transfer
(download) selected file to flash memory.
It is used to move file to computer from
flash memory.
-32-
Button
Function
print
reload
delete
Transfer to flash
memory
Transfer to
computer
Button
Function
Select voice folder
Select MP3 folder
Select HD folder
Particular information
Used only in voice record mode
Save/create DVF files
Used in MP3 mode
Used in HD mode(portable HD)
3000영문 2002.8.23 5:26 PM 페이지35 (1,1)
-33-
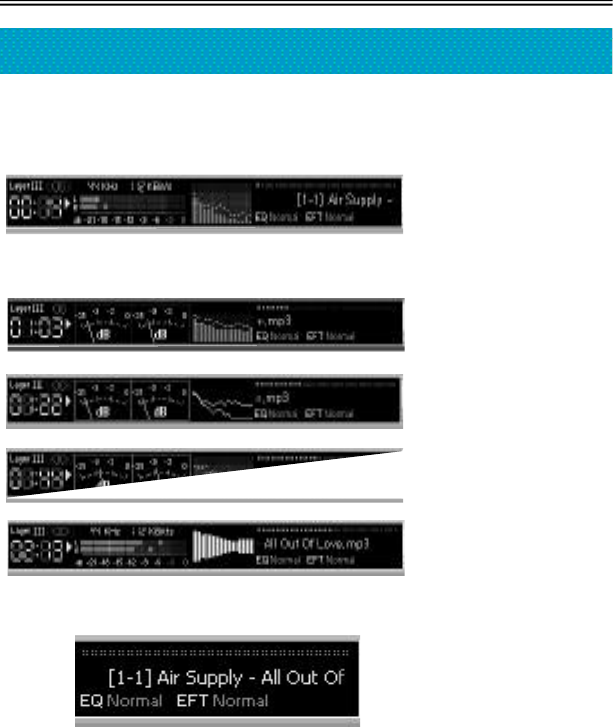
Spectrum screen and sound effect
DVR-Explorer shows fascinating spectrum screen. Basic setting is same
as picture at bottom but, screen changes in various ways by clicking left
button of mouse. ☜Spectrum screen of
DVR-Explorer 1
This changing spectrum screen can be used by users taste. Following
pictures are example of some features.
☜Spectrum screen of
DVR-Explorer 2
☜Spectrum screen of
DVR-Explorer 3
☜Spectrum screen of
DVR-Explorer 4
☜Spectrum screen of
DVR-Explorer 5
Other than this spectrum screen, various equalizer and sound effect can
be use to listen to music more wealthy and powerfully.
The equalizer freesets supported by DVR-Explorer are normal, rock,
pop, jazz, classic, and vocal, by clicking left button of mouse on red light
freeset configuration change them in order. Also, DVR-Explorer has
many kind of effect.Supported effects are normal, room reverb, big
room, hall reverb, stage reverb, stadium reverb, cathedral1, cathedral2,
air duct reverb, metallic reverb, simple reverb, alien 1, alien 2, bass
boost, mega bass boost, simple echo, distance echo, long echo, alpia
echo, double echo, strange FB1, and strange FB2. By using this effect
can experience various sound.
3000영문 2002.8.23 5:26 PM 페이지36 (1,1)
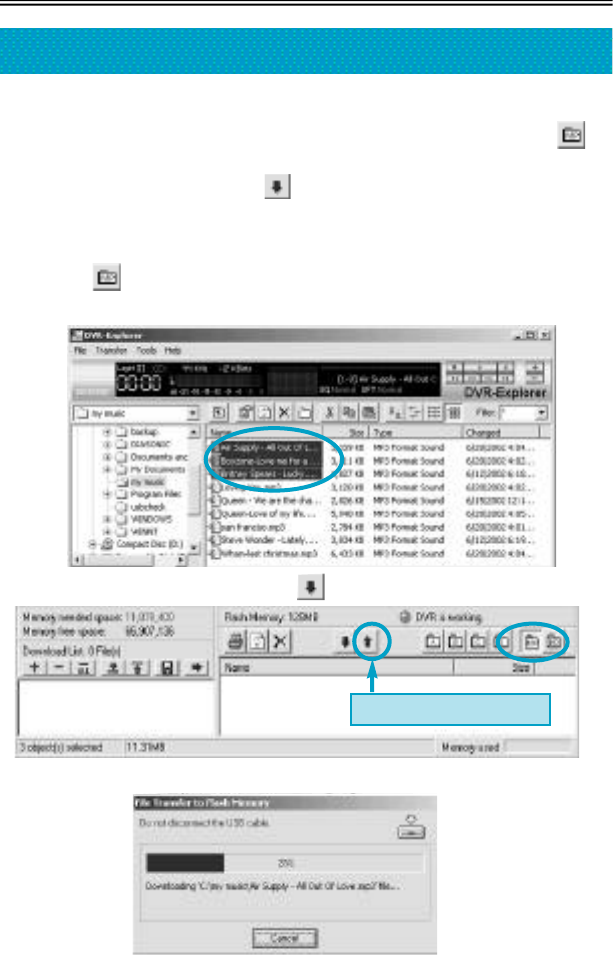
It's very simple to transfer MP3 file to DDR-3000/R SERIES. Mentioned
up at top, select MP3 files from file manage window and choose on
folder manage window. Then, drag and drop files to flash memory
manage window. Also, click icon from flash memory managing
section for same reaction.
Transferring MP3file as following.
①Select from folder manage window, Select MP3 file from file
manage window.
②Click 'downlod to flash memory' .
③Selected MP3files are being downlod to flash memory of DDR-300/R
SERIES.
-34-
Transferring MP3
transfer flash memory
3000영문 2002.8.23 5:26 PM 페이지37 (1,1)
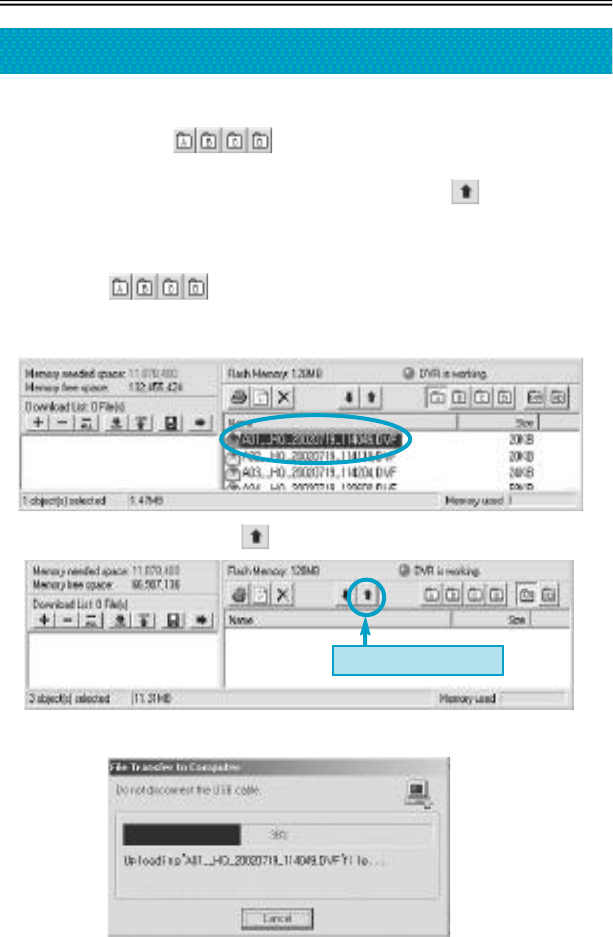
It's very simple to send DVF files from DDR-3000/R SERIES to a
computer. Choose from previously mentioned folder
manage window, and select DVF files from flash memory manage
window. Then, click 'upload to computer' icon from flash memory
manage section.
Receiving DVF files to computer.
①Choose from folder manage window, and select DVF
files that you will sent to a computer from flash memory manage
window.
②
Click 'upload to computer' .
③Selected DVF file being transfer to computer.
-35-
Sending DVF files to computer
upload to computer
3000영문 2002.8.23 5:26 PM 페이지38 (1,1)
●The way to transfer DVF file to DDR-3000/R SERIES is choose
from album managing section then, select icon.
Rest of procedure is same as transferring MP3 file to DDR-3000/R
SERIES.
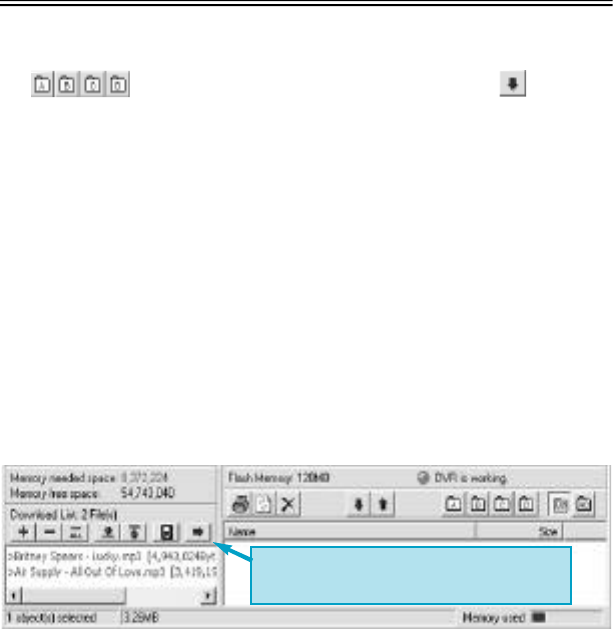
Through steps like 34), 35). You can easily transfer DVF or MP3 files in
flash memory. Once the transfer is over, status bar at low part of DVR-
Explorer shows size of the transferred file and use of memory.
+To transfer file at once use button or drag and drop to keep files in
transfer list. It's convenient to send files from lot a different folders and
manage files by making play list.
Transferring files from transfer list is shown below.
-36-
Transfer all the files in transfer list to
flash memory.
3000영문 2002.8.23 5:26 PM 페이지39 (1,1)
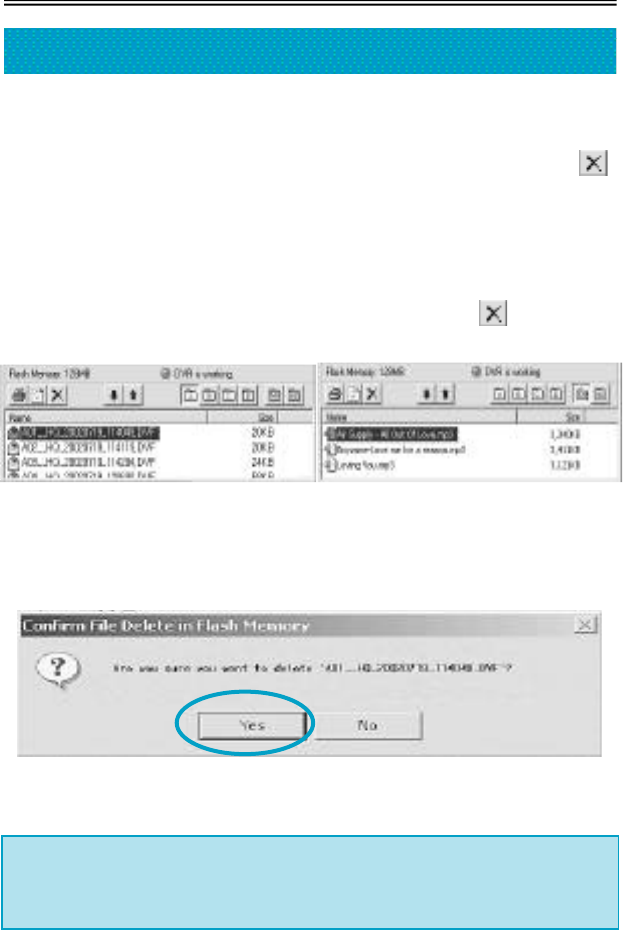
Deleting MP3 or DVF files stored in flash memory of DDR-3000/R
SERIES is same as deleting files in explorer. Select one of the stored file
from flash memory by clicking left mouse button, then press 'delete'
button from tools at flash memory manage section.
Through following steps, you can delete MP3 and DVF files from flash
memory.
①Select file to be deleted, then from click on 'delete' button from
tools.
DVF file MP3 file
②Confirming of deleting file. Choose yes to delete file.
③Now file will be deleted from flash memory of DDR-3000/R SERIES.
※From flash memory managing display, pop-up menu will appear by
clicking right button of the mouse. Deleting and transferring is
possible from this menu.
-37-
Deleting MP3 and DVF files
3000영문 2002.8.23 5:26 PM 페이지40 (1,1)
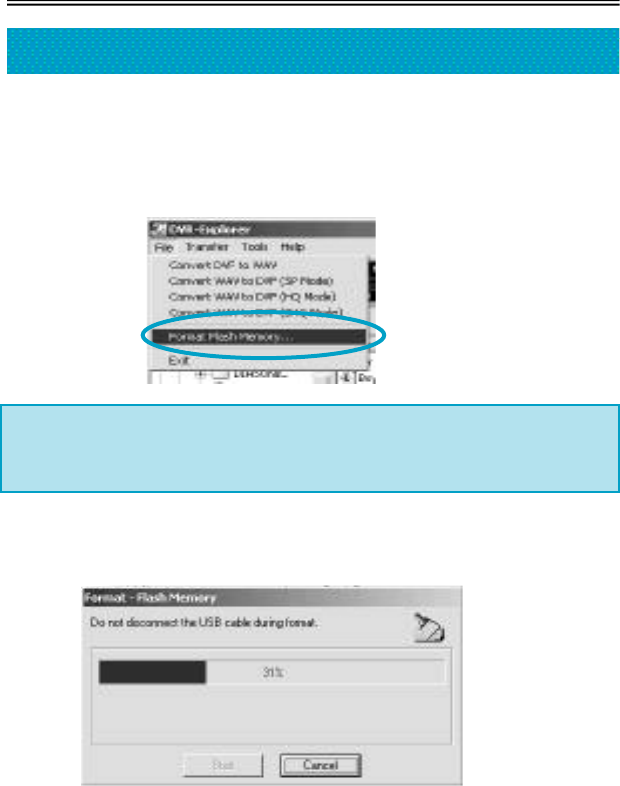
Just like formatting hard disk on computer flash memory used in DDR-
3000/R SERIES can be reset (format). All the data from flash memory
will be lost when formatted.
①Select 'file - format flash memory' a menu from DVR-Explorer.
※From flash memory managing window click on right button of the
mouse for pop-up menu. Flash memory can be deleted from this
menu.
②When format window appears press 'start' to start formatting.
-38-
Resetting flash memory
3000영문 2002.8.23 5:26 PM 페이지41 (1,1)
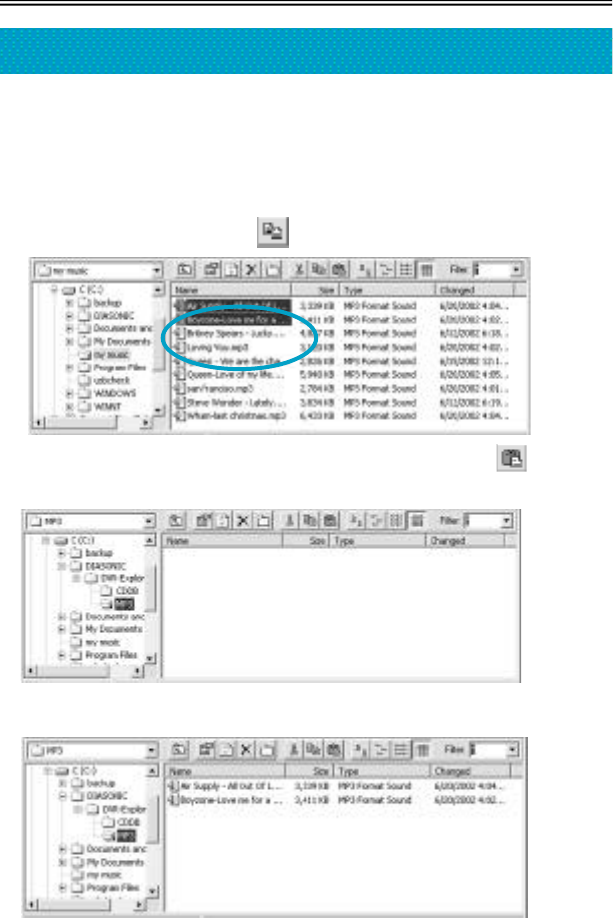
It's easy to manage MP3 and DVF files by using DVR-Explorer. Make
folder at a position you want, copy and save frequently listened MP3
and DVF files. And, useless MP3 and DVF files can be easily deleted by
using delete button.
①Select file, then click 'copy' from tool menu.
②Move to a folder desire to copy files to, then use 'paste' from tool
menu.
③Files are copied and saved at designated folder.
-39-
Managing files by using DVR-Explorer
3000영문 2002.8.23 5:26 PM 페이지42 (1,1)
Special Features
●Play/Record DVF file
●Voice mail function: auto appending at mail program
●Creates self play function : voice file+player
●Edit DVF file : delete front and rear, middle insert record function
●16various voice effect
Mail Manager send and receive voice mail through e-mail or network
without typing or writing letters. To send voice mail by mail manager use
DVF file recorded from DDR-3000/R SERIES, or simply press record
and send recorded voice without any difficulties, and If recorded DVF file
from mail manager is sent to DDR-3000/R SERIES, it can be played
through DDR-3000/R SERIES.
Mail Manager supports mail program like exchange, internet mail,
outlook, outlook express, and Netscape, with use of drag and drop
sending voice mail through other mail program and network program is
possible. One of the special function about mail manager is that it
creates tiny size combined voice data and player in executable file
(.exe), voice mail can be sent even receiver don't have mail manager.
Also, changing original voice through use of various voice effects like
reverb, echo, robot voice, helium voice makes interesting voice mail.
-40-
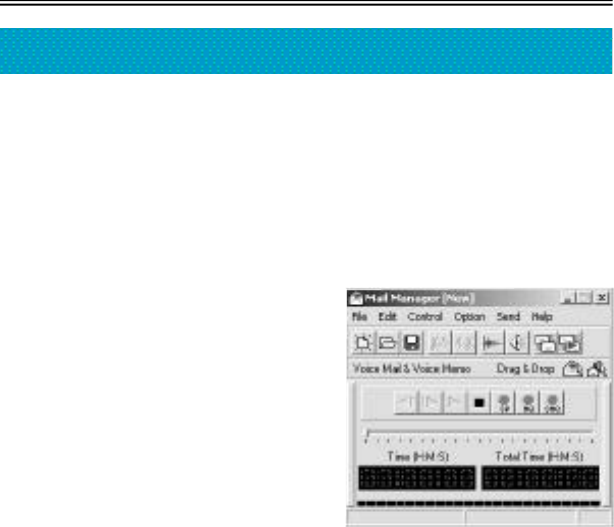
Mail Manager
Mail Manager is a program that plays
self created voice file DVF from DDR-
3000/R SERIES. It can send voice mail
or record and keep conference
meeting and lectures.
3000영문 2002.8.23 5:26 PM 페이지43 (1,1)
1) Voice Recorder
Has Voice mail, Voice memo function, record and play of
compressed feature of high sound quality DVF file.
●Play
●Pause/Stop
●Record (Half way insertion record possible)
●Move forward
●Move Backward
2) Convenient use method
Auto-append of voice mail to mail
program.
●Press 'record'button
●Say the message
●Press 'Stop' button
●Finally press 'send' button and
mail window with voice mail attached will apppear.
Proper volume level is required for record and play. Adjust wave
volume from [control volume] of window to set play volume, and
adjust [option]→[ p r o p e r t i e s ]→[record] from volume adjust window
select [microphone] for microphone record volume.
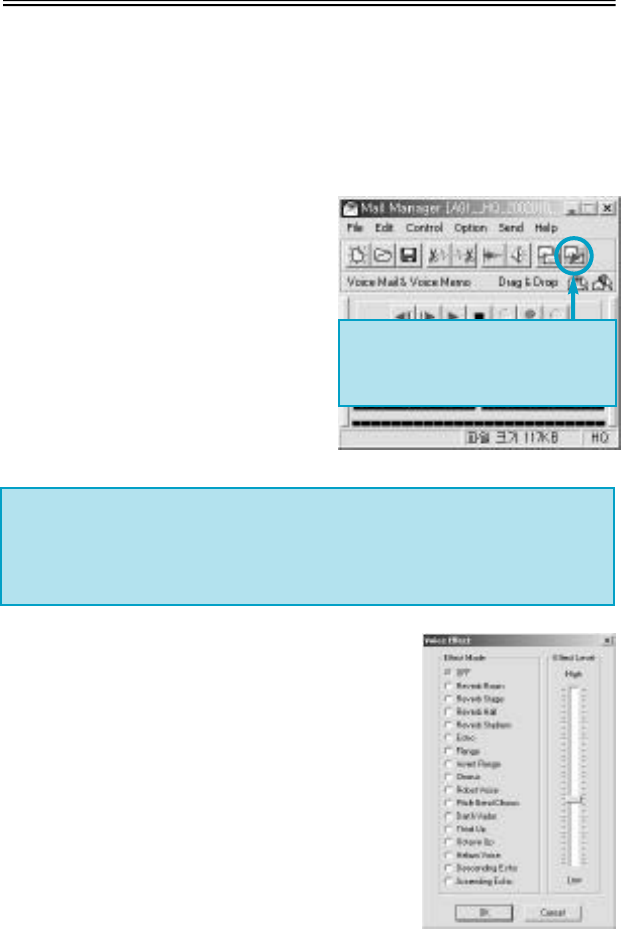
3) Production of self play function
●Creates little size of executable file
combined with voice file and player.
●If self player formed mail is sent receiver
can listen to it even without mail manager.
●From 'save as' save in 'voice mail+player'
from and it will create self player with
executable file(.exe)
4) 16Digital voice effect
Change recorded voice to various voices.
16Digital voice effect
-41-
Sending: voice file+player(EXE)
(In case, the receiver doesn't
have MailManager)
3000영문 2002.8.23 5:26 PM 페이지44 (1,1)
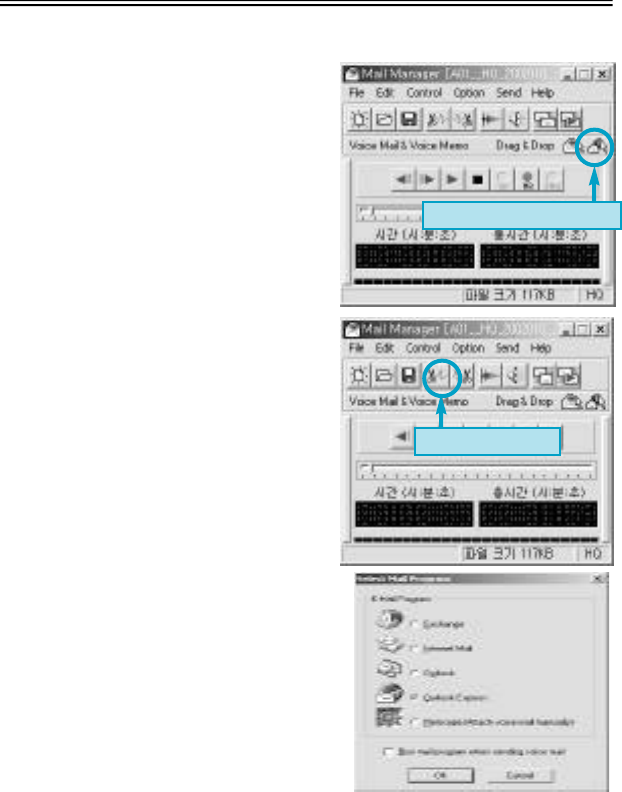
5) Drag and Drop
If use drag and drop function of mail
manager attaching voice mail to other
mail program or network emulator not
supported by mail manager will be
possible. Press left button of mouse on
drag and drop To add voice mail to
other program. Now, Use two drag and
drop icon, choose between voice
file+player.
6) Simple edit function
Deleting of front By simple edit function
deleting of front and rear part of
recorded massages are possible, and
after recording if mis-record is found,
delete the mis-part and just record that
part again.
●delete front part of current position
●delete rear part of current position
7) Supported mail program
●Exchange
●Internet mail
●Outlook
●Outlook express
●
Netscape(manual attack of voice mail)
-42-
Voice file+player(.exe)
Deleting of front
8) Shorten Keys
Support of shorten keys, control of mail manager is possible while
using other program.
●F2 : Play
●F3 : Rewind
●F4 : Fast Forward
●F5 : (Pause/Stop)
3000영문 2002.8.23 5:26 PM 페이지45 (1,1)
SHQ(14.8Kbps) / HQ(8Kbps) / SP(6.4Kbps)
A/B/C/D
Total 396 messages with 4 separate files(99 messages in each file)
Automatic Recording System(A-Saving in one index after another, B-Saving in next index)
No
World Standard FM /Japanese FM
No
76.8or77.6MHz / 88or88.8MHz
Combination of wire and microphone
Hidden Flash Memory
60db (62db input 1Khz , speaker output 50mW : 32Kbps)
1.5%±0.2 (62db input 1Khz , speaker output 50mW : 32Kbps)
300Hz~4.0Khz(-6db)
Maximum 80mW (Speaker8ohm)
Repeat one message & A-B repeat function
Playback of one or every message in files
Playback of every message for 10 seconds
Search for convenient and easy files or messages
No Radio 60db at 1mv 98.1MHz
No Radio
0.8%(max) at 1mv 98.1MHz ?f=22.5KHz
350Hz±30Hz,3KHz±0.25KHz
(100Hz~10KHz,60dbuV)
No Radio Max 80mW(speaker 8ohm)
World Standards: 87.5 ~ 108MHz
Japanese Standards: 76 ~ 90MHz
32Kbps~320Kbps(MPEG 1/2 LAYER 3)
85db up (1KHz input 0db)
0.3%±0.05 (1KHz input 0db)
20Hz~20Khz
Maximum5mW (16ohm)
EQ: NORMAL, ROCK, POP, CLASSIC, LIVE
Playback of each track for 10 seconds
-43-
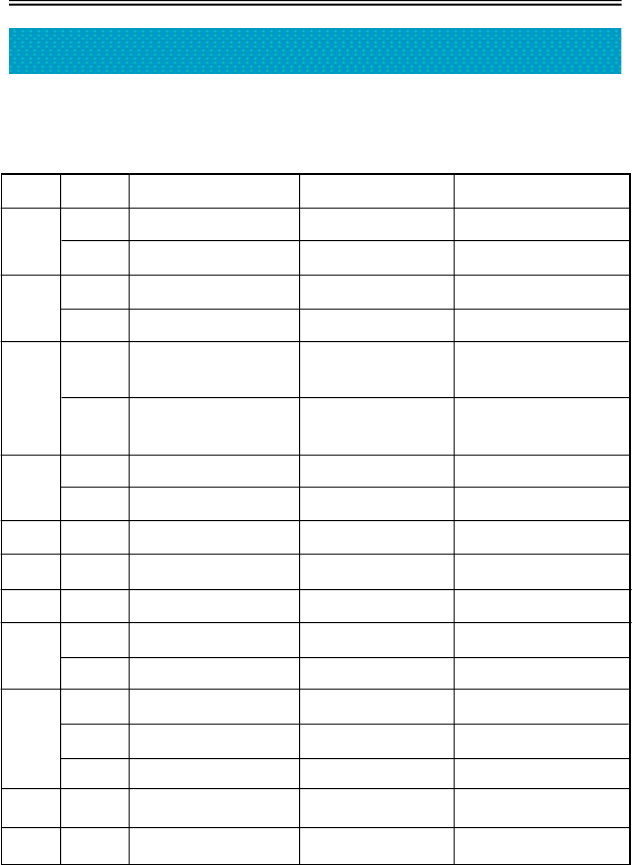
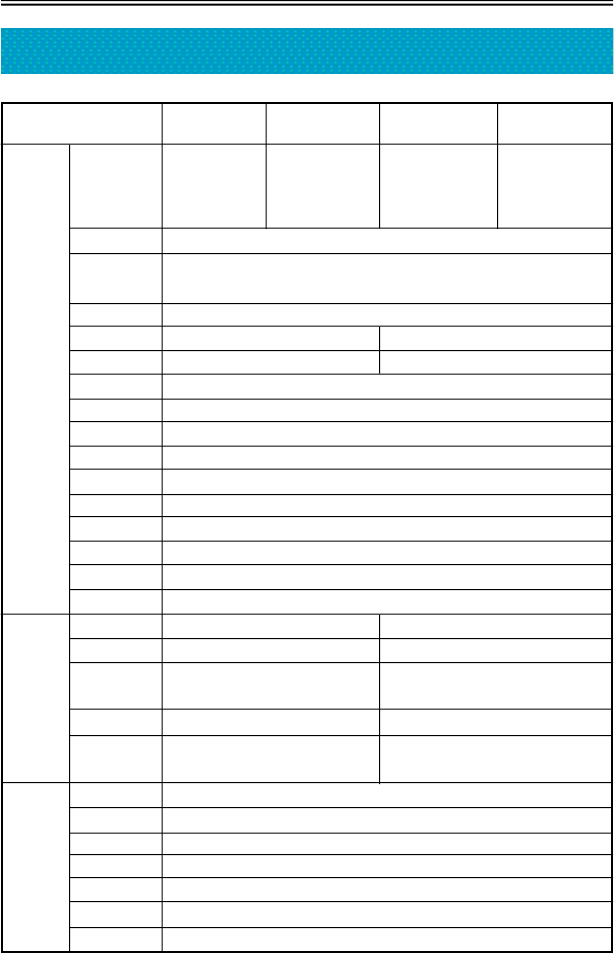
GENERAL SPECIFICATIONS (DDR-3000/R)
MODEL DDR-3064 DDR-3128 DDR-3064R DDR-3128R
VOICE
RECORD
SHQ: 590min SHQ:1180min SHQ:590min SHQ:1180min
HQ :1080min HQ :2160min HQ:1080min HQ :2160min
SP :1355min SP :2710min SP :1355min SP :2710min
FM
radio
(stereo)
MP3
No Radio
No Radio
Recording
time
Recording mode
File
Auto recording
cording FM radio
Wireless mike
External mike
Recording medium
Signal vs noise rate
Distortion
Frequency respond
Output
Repeat
Continuous play
Search play
search
Signal vs noise rate
Distortion
Frequency respond
Output
Frequency range
Bit rate
Signal vs noise rate
Distortion
Frequency respond
earphone
Play mode
Search play
3000영문 2002.8.23 5:26 PM 페이지46 (1,1)

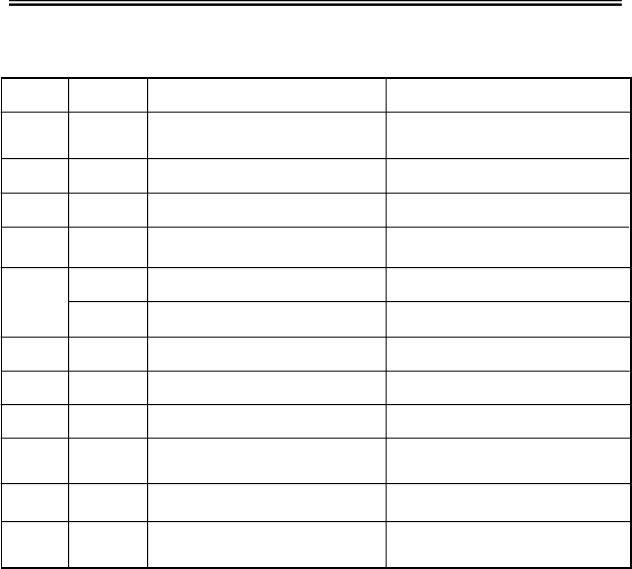
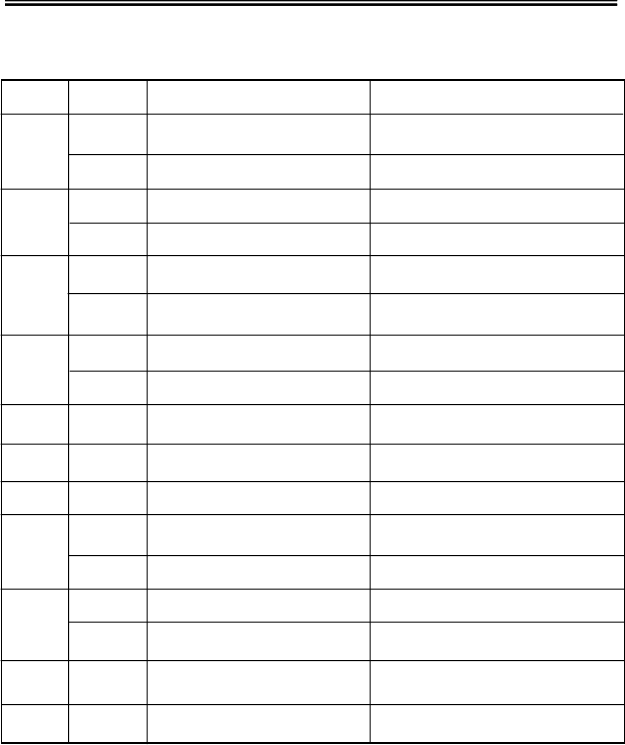
-44-
Easy to find convenient and easy tracks
Playback of one track or all tracks & optional playback
USB 1.1
Hard disk space of more than CPU 200MHz, RAM 64Mb and 20MB
windows98 , windows2000 , windows ME , windows XP
Sound Bluster 16
More than 640X480
∮3.5 plug-in power microphone(mini plug/stereo) IMP less than3KΩ
∮3.5 earphone(mini plug/stereo) IMP less than 16Ω
HOLE : ∮2.75, Dia : ∮0.65
Mini jack (PC : A TYPE)
∮23(IMP 8Ω)
80mw(Maximum Sound)
Digital Sound(30 Levels)
BLUE
32M/64M/128M
Nand Flash Memory(32M/64M/128M)
Sign of Recording LED(Red)
A/B/C/D/MP3/HD
01~99 voice Indexes and 01~99 MP3 Tracks
SHQ/HQ/SP
NOR ,ROC ,POP ,CLA, LIV. Etc. (5 kinds of equalizer)
0h00m00s
A-B REPEAT / ONE REPEAT / NORMAL REPEAT / ALL REPEAT
DC3V/200mA(CE,CUL,T,FCC)
FF, PLAY, REW, MENU, FILE, REC/STOP,
RADIO, ERASE, VOLUME, REPEAT, HOLD
DC 3V , LR03 , Alkaline Battery x2EA('AAA" size or UM-4)
About 15 hrs. with medium level of volume through earphones
About 15 hrs. with medium level of volume through earphones
About 9 hrs. with medium level of volume through speaker
About 12 hrs. with medium level of volume through earphones
About 8 hrs. with medium level of volume through speaker
Connecting cable with external appliances (1)/ Installation CD (1)/Adaptor to
record the telephone conversation (1)/Stereo Earphone (1)/External
microphone (1)/Batteries (2)/USB cable (1)/Manual (1)/Neck strap(1)
Remote Control (Function/PLAY/FF/REW/REC)
99.8×31×14.1
MP3
LCD
(TN)
Volume
EL/ BACK LIGHT
Hard disk storage
Memory
LED
PC
interface
In/out
put
division
Speaker
Adopter
Function key
Power
Battery
period
Accessories
Remote controller
size
Search
Repeat
Network
System requirement
OS
Sound card
Display
External mike
Earphone
DC JACK
USB
Diameter
Output
File
Message
Mode
Equalizer
remain/count
Repeat
Play MP3
Play VOICE
Play VOICE
Receiving radio
Receiving radio
3000영문 2002.8.23 5:26 PM 페이지47 (1,1)

If you have trouble with the product, stop using the device immediately
and ask for help and inquire A/S from the store or DIASONIC
TECHNOLOGY Co, Ltd.
Representative: 82-31-474-0852
We guarantee you free repairs as User's Manual describes.
If you find out the break down and defect of device, come and visit the
store or our company with this warranty card, and ask for help.
The warranty card, which omits the date, year of purchasing and the
name of the store, is not unavailable for our A/S service. Please check
the information on your card and if the information is not on the card,
ask the store for the record. This warranty card is not to be reissued.
Please be careful.
<Free Repair Provisions >
1. This product has been passed strict quality test.
2. If some trouble comes up at any time during the warranty period, we
provide free repair service as long as the product is in the condition
that User's Manual describes.
3. Even it is on warranty period, we do not provide free service under
these conditions:
1) If you do not have the warranty card
2) If there are no record of the date of the purchasing, the name of the
store and customer. When customer change the information
intentionally.
3) If the player gets damage by the customer's carelessness or
mistake.
4) Damage and defect by customer who fixed and reconstructed the
device.
-45-
Inquiry of A/S
Warranty Card(provisions)
3000영문 2002.8.23 5:26 PM 페이지48 (1,1)
- 46 -
5) When the player gets trouble caused by natural disaster such as fire,
pollution, earthquake, flood and etc.
6) If liquid from batteries causes defect on the player.
7) When batteries are used up and needs to be changed.
4. This warranty card is only valid for service in Korea.
(Suggestion for Mailing and Shipping)
When you mail or post this product, please read these suggestions first.
1. When the player is on warranty period, enclose this warranty card with
the product.
2. Please wrap the device with shock-absorbing materials and put it in the
box to avoid damage during the delivering process.
3. The cost of mailing and wrapping is customer's responsibility.
4. To prevent the loss of the product, please use the registered mailing
system.
3000영문 2002.8.23 5:26 PM 페이지49 (1,1)
WARRANTY CARD
Name of a Good: VOICE RECORDER
MODEL : DDR-3000/R
The Term of Guarantee: 1 Year
Date of Purchase: . . .
●Whenever our products get out of order, please do not hesitate to call
DIASONIC TECHNOLOGY CO., LTD and to ask for help.
●The provisions of compensation for exchanges, repair, rebate, terms
of possesion and etc. are based on the standard of compensation of
"Law of Consumer-Protection".
●If you have any questions to ask about the product and for more
information, please contact DIASONIC TECHNOLOGY CO., LTD.
DIASONIC TECHNOLOGY CO., LTD
●#321-43, Suksu-Dong, Manan-Gu, Anyang-City,Gyeonggi-Do, Korea
●TEL : +82-31-474-0852~5
FAX : +82-31-474-0856
Homepage : http://www.diasonic.com
This Warranty card is valid only in Korea, and you should keep this card
well for guaranteed repairs.
PURCHASER
SELLER
Name
Address
Telephone
Name
Address
Telephone
3000영문 2002.8.23 5:26 PM 페이지50 (1,1)