Diasonic Technology Co DHD1000 HDD MP3 User Manual
Diasonic Technology Co Ltd HDD MP3 Users Manual
Contents
- 1. Users Manual
- 2. Revised user manual
Users Manual

User Manual
Hard Disk-type MP3 Player
DHD-1000
Thank you for purchasing Hard disk-type MP3 Player of
DIASONIC Technology.
- Please read this manual before using the product.

2
Thank you for purchasing DIASONIC DHD-1000.
Please read this manual before using the product.
In case a breakdown occurs, contact the service center at (82)-31-4740852.
Notes:
● Do not repair, disassemble, or remodel the product.
● Incorrect use of the product by the user or a third party or static electricity or electric shock
loaded on the product may cause loss or change of the data saved in the product during
repair services or replacement of the battery.
We recommend you to write down important information on paper.
● DIASONIC Technology is not responsible for damage caused by change or loss of the data
in the product.
● Do not heat up or short the main body or the battery.
● Do not put the battery on a hot item or disassemble the battery in a high-temperature place.
Toxic contents of the battery may harm user’s eyes or skin.
● In case the contents of the battery leaks and is exposed to the user, wash the exposed body
part with clean water and see the doctor.
● Do not soak the device in water or leave it in a humid place.
● Contents of the user manual are subject to change without prior notice for performance
improvement.
Copyrights
● DIASONIC Technology has all copyrights of this user manual.
● Reproduction, distribution, and commercial use of a part of or the entire user manual without
prior consent of DIASONIC Technology are strictly prohibited by laws.
● All information contained in this manual has been carefully studied and written and is subject
to change without prior notice for functional and performance improvement. DIASONIC
Technology will not take any responsibility for matters arising due to differences between the
product and information contained user manual.
● Use of MP3 files is prohibited for other than personal purposes like commercial or service
purposes. Servicing MP3 files or providing MP3 files for commercial purposes will be
against the copyright law of Korea.
● Reproduction of files is prohibited for other than personal purposes by law.
This device has been developed for home users and passed the
electromagnetic interference test. This device can be used in residential areas
and other places.
MIC User Notice for Level B Device
(
IT Device for Home Users
)
Preface

3
Warning
● When the LCD is broken, do not touch liquid from the LCD.
If your eyes have contacted the liquid, wash your eyes with clean water and
see the doctor.
● Before charging the product, please thoroughly read the user manual.
● Before using the product, please thoroughly read the user manual.
Earphone-related Warning
For Traffic Safety
● Do not wear earphones while riding bicycle or motor cycle or driving a car.
It may cause dangerous situation and can be illegal in some countries.
Listening to music at a loud volume while crossing the road is especially
dangerous.
For Protection of Hearing Ability
● Do not use earphones at a loud volume.
Doctors say listening to music at a loud volume for a long time is harmful for
your hearing ability.
● When you hear echo sound in your ears while using earphones, immediately
lower the volume or stop using the earphones.
Safety Notes
4

5
6 …………………………………… Operational Notes
8 …………………………………… Functions and Features
9 …………………………………… Parts and Components
12 …………………………………… Basic Operation
14 …………………………………… Button Manipulation
18 …………………………………… FM Radio Reception
19 …………………………………… Mode Menu
22 …………………………………… Main Menu
29 …………………………………… Recording
30 …………………………………… Connecting External Devices
31 …………………………………… Installing Drivers and Uninstalling Devices
33 …………………………………… Connecting to the PC
34 …………………………………… Management of Folder and File
36 …………………………………… Firmware Upgrade
37 …………………………………… Troubleshooting
38 …………………………………… Specification
TTS, Media SYNC
Table of Contents

6
General Operational Notes
Do not leave the device
under direct sun rays or
near a heating device.
This product is equipped
with Li-polymer battery
and the product may
explode when exposed to
heat.
Do not leave the device in a
humid, dusty place such as
a bathroom.
Touch the power plug
only with dry hands.
(Otherwise, an electric
shock may occur.)
Disconnect the power plug
during thunder and lightning.
(Otherwise, a fire may
occur.)
Do not repair,
disassemble, or
remodel the product.
In this case, the product
will not be subject to
free repair services.
Do not forcefully bend the
power cord or put a heavy
item on the power cord.
Keep the device away
from a place with
severe vibration or a
strong magnet.
(Music-playing might be
interfered.)
Incorrect use of the device
by the user or a third-party,
or static electricity and
electric shock loaded to the
device may cause change or
loss of the data during repair
or replacement of the
battery.
When over-heating is
suspected during
charging, remove the
device from the charger.
Leaving the device in
the charger for a long
time can cause
overheating that will
result in fire.
Do not drop the device or
give strong shock to the
device. Otherwise, a
breakdown may occur.
Operational Notes

7
Do not put excessive load on LCD. Otherwise, the LCD may be damaged or display
defects may occur.
Do not put an item with liquid contents such as cups, cosmetic bottles, or medicines
on the player. (Otherwise, a breakdown may occur.)
Do not spray water in each part of the player when cleaning the player. Use dry
cloth when cleaning the player.
Chemicals and detergent will damage and discolor the surface of the player. Never
use these agents.
Do not use the player in a place where use of electronic devices is banned.
Do not use the player while driving.
Do not connect several power plugs to the same outlet.
For safety, use the adapter provided with the player.
Notes on Using HDD
Sudden disconnection of the player from the PC while the HDD of the player is
operating may cause malfunctioning of the HDD or data loss. Please check that the
HDD is not running before disconnecting the player from the PC.
Notes on Using Host Function
Keep the player away
from objects with a
strong magnetic field
like magnets.
Otherwise, the HDD
may malfunction or data
loss may occur..
When disconnecting the
player from the PC, use
“Safely Remove
Hardware” or “Remove
or Eject Hardware”
function.
We recommend users
to back up important
data. DIASONIC
Technology will not be
responsible for data
loss during repair
services
Shocks given to the player
while the player is being
connected to the PC or the
reading the HDD can
severely damage the HDD.
Free repair service may be
provided depending on the
damage degree.

8
● Excellent sound quality
Provides the best sound quality with 10mW of high output, less than 0.1% of distortion rate, and -90dB
of minimum noise.
● 1.8” color LCD supporting 65,000 colors
● USB host function to copy data without passing through the PC
Supports USB Host function to transmit data from other USB devices and back up data saved in the
digital camera or portable storage.
● Supporting UMS-type USB 2.0 and USB 1.1
Connects to the PC without installation of special driver.
Supports USB 2.0 interface and 480Mbps of the maximum rate.
Perfectly compatible with USB 1.1.
● High-capacity HDD
Supports high-capacity HDD so that the user can save large-sized data, photos, documents, and music
files.
● Media SYNC function (with lyrics)
MP3 player displaying lyrics
When an LRC file with lyrics is played, the lyrics are also displayed.
● Image and text viewer
The user can view images and text on the player.
The user can receive data from the digital camera through USB Host function and view received images
and photos on the player.
The user can view any text file such as lyrics or novels on the player in any place at any time.
● 3D sound
High-quality magnificent sound effect thanks to SRS WOW effects
SRS and TruBass feature that is to complement middle and low tones are provided so that the player
can provide the best-quality sound.
● FM radio
Convenient features – automatic FM radio channel selection, FM radio recording, and frequency
memory.
The user can listen to FM radio at the best quality thanks to the advanced setting features in any place
at any time.
● Voice recording and direct encoding
The player is equipped with high-performance microphone and provides bitrate-adjusting feature so that
the user can record the voice at the best quality.
The user can also encode data saved in an external device into an MP3 file through the line-in cable.
With SYNC, the user can encode each title.
● Supporting various formats
The player supports not only MP3 format but also other formats – WMA and OGG.
● Bookmark and WINAMP play list
The user can produce and edit his/her own play list with Bookmark function.
The user can quickly replay songs contained in the play list edited in WINAMP (M3U).
● USB charging
The user only needs to connect the USB port for charging.
● Wireless/Wired Remote Controller
The user can control the player with wired/wireless remote controllers in any lace.
● Various features
Various features are supported – Repeat, Adjust Playing Speed, Intro, Multi-language, and ID3 Tag.
Supports Repeat, Equalizer, Firmware Upgrade features.
Functions and Features

9
Main Body
Wire Remote Controller IR Remote Controller
Play Stop A↔B Menu
VOL + VOL – FF REW
HDD Charge LED
Earphone jack (for
wire remote
controller) DC
5.0V port
Hold Switch MIC
REC SRS Line-in
jack.
USB 2.0 Port USB 1.1 Host Port
Parts and Components

10
Package Components
MP3 Player
Infrared Remote
Controller
Wire Remote
Controller
USB 2.0 Cable
USB 1.1 Host Cable
Line-in Cable
AC Adapter
Stereo Earphone
Installation CD
User Manual
Neck Strap

11
LCD
● MP3 Player
● Record
● FM
● LED
Charging
HDD Active
Battery status Playing status
HDD operation status icon
Repeat Replaying order
Repeat ID3Tag
Number of folders
Number of files
Title Playing Time
EQ Bitrate Sampling Rate
SRS Sleep Level Mater Volume
Icon
List: Next songs
Recording status
Recorded file
Recording time
Recording bitrate
Recoding
Sampling Frequency
Progress bar
Preset Channel FM Frequency
Stereo Volume

12
1. Turning On/Off Power
Press Play button for a second to turn on the power. After the power is turned on, press Stop
button for a while to turn off the power.
After power is supplied from an [eternal power source (USB or adapter)], the charging status
will be indicated by the LED. Then, press Play button to enter into Charging mode. If
charging is being made, the battery level symbol will blink.
Press Play button again to enter into normal operation status.
2. Lock Switch
When the lock switch is on (or on the right side), the switch will not function.
3. Main Menu
Press Menu button for a while, and select the main menu by pressing VOL+, VOL-, FF, and
REW buttons. After selecting the menu, press Play button. To cancel menu selection, press
Menu button, and to exist Mode menu, press Stop button.
4. Adjusting Volume
The user can adjust the volume by pressing VOL+ or VOL- button, and continuously adjust the
volume by pressing each button for one second or more.
5. Repeat
While playing a song, shortly press A↔B button. Then, the starting point (A) will be defined,
and Repeat icon (A↔) will blink on the LCD. Press A↔B again to define the ending point (B).
Repeat icon (A↔B) will be displayed on the LCD. The user can turn off Repeat function by
pressing A↔B button again.
6. Adjusting Playing Speed
7. Selecting SRS
The user can select SRS by pressing SRS button while a song is played in Music Box, Search
Play, or Record (Encode or Voice Record) mode.
Play List Music Box Search Play FM Radio Text Record USB Data User Folder
* Volume levels are from 0 to 30.
* When the player is turned on, the volume level will be at 10.
Basic Operation
13
8. Setting Bookmark
To bookmark an MP3 or WMA file, press SRS button shortly in Stop mode. Bookmark
function is available only in Music Box mode.
9. Recording
Recorded file will be saved under different folders depending on the mode when the user
presses Recording button. If the user connects line-in cable while recording voice, voice will
be recorded till the user presses Stop button.
While the line-in cable is connected, the user cannot enter into FM mode. Although the user
disconnects the cable during line-in recording, line-in recording will not stop.
The player provides a monitoring function with which the user can listen to the recorded
contents through the earphone while recording voice. The memory space (Total time :
Remaining time) will be displayed in %.
* Encode
- When the line-in cable is connected to the player, line-in recording will be automatically made
and the recorded file will be saved under Encode folder.
- The user can record radio broadcasting by pressing REC button while listening to radio, and
the recorded file will be saved in Encode mode.
* Voice Encode
When the user records voice without a line-in cable connected, the recording will be made by
the built-in microphone and the recorded file will be saved under Voice folder.
The recorded file can be replayed under Voice folder in Record mode, and maximum 1,000
files can be recorded and saved.
10. Host Function
The user can copy data from an external device to the player with Host function.
Connect the USB 1.1 host port to the external device through the USB host cable.
The data saved in the external device will be displayed.

14
● Music Box Mode
Button Key
Function When Stopped While Playing
Short Plays the current track. Pauses playing the current track.
Play/Pause
Long Plays the previous part.
(Intro scan)
Plays the previous part.
(Intro scan)
Short Goes to the lower folder. Plays the next track.
FF
Long Automatically goes to the next-
lower folder. Fast-forward the current track.
Short Goes to the upper folder.
After 5 seconds: Plays the track from the
beginning.
Before 5 seconds: plays the previous track.
REW
Long Automatically goes to next-upper
folder. Rewinds the current track.
Short Enters into Mode menu. Starts navigation.
Menu
Long Enters into Main menu. Enters into Main menu.
Short Converts to the previous track. Increase the volume.
Volume +
Long Automatically converts to the
previous track. Automatically increases the volume.
Short Converts to the next track. Lowers the volume.
Volume -
Long Automatically converts to the next
track. Automatically lowers the volume.
Short × Activate/Deactivate Repeat function.
A↔B
Long × Adjusts the playing speed.
SRS Short Change SRS. Change SRS.
REC Long Starts recording. ×
Short × Stops playing the current track.
Stop
Long Turns off the power. Stops playing and turns off the power.
Button Manipulation

15
● FM Radio Mode
Button Key
Function Frequency Mode Preset Mode Preset Mode
Short Adjusts the FM frequency. Converts to the next
preset channel. Increases the channel.
FF
Long Automatically seeks FM
channels (+).
Automatically increases
the channel. -
Short Adjusts the FM frequency. Converts to the previous
channel. Lowers the channels.
REW
Long Automatically seeks FM
channels (-).
Automatically lower the
channel. -
Short Increases the volume. Increases the volume. Increases the volume.
Volume+
Long Automatically increases
the volume.
Automatically increases
the volume.
Automatically
increases the volume.
Short Reduces the volume. Reduces the volume. Reduces the volume.
Volume-
Long Automatically reduces the
volume.
Automatically reduces
the volume.
Automatically reduces
the volume.
Short Enters into Preset menu. Saves the frequency. ×
SRS Long Enters into Preset mode. × Calls the frequency.
A↔B
Automatically searches
frequencies and preset the
searched frequency.
× ×
REC Long Starts recording. Starts recording. Starts recording.
Stop Long Turns off the power. Turns off the power. Turns off the power.

16
● Record Mode
Button Key
Function When Stopped While Playing During Recording
Short Starts to play the current
file.
Stops playing the current
track. (Pause) ×
Play/Pause
Long Plays the previous part.
(Intro scan)
Plays the previous part.
(Intro scan) ×
Short Converts to the lower folder.Converts to and plays the
next file. ×
FF
Long Automatically converts to
the lower folder.
Fast-forward the current
track. ×
Short Converts to the upper
folder.
After 5 seconds: Plays the track
from the beginning.
Before 5 seconds: Converts to
and plays the previous file.
×
REW
Long Automatically converts to
the upper folder. Rewinds the current track. ×
Short Enters into in Mode menu. Starts navigation. ×
Menu
Long Enters into in Main menu. × ×
Short Converts to the previous
file. Increases the volume. Increases the
volume.
Volume +
Long Automatically converts to
the previous file.
Automatically increases
the volume.
Automatically
increases the
volume.
Short Converts to the next file. Reduces the volume. Reduces the
volume.
Volume -
Long Automatically converts to
the next file.
Automatically reduces the
volume.
Automatically
reduces the
volume.
Short × Activates/Deactivates
Repeat function. ×
A↔B
Long × Sets the playing speed. ×
SRS Short - Changes SRS. ×
Short - × REC Pause
REC
Long Starts recording. × ×
Short ×
Stops playing the current
track. Stops recording.
Stop
Long Turns off the power. Stops and turns off the
power.
Saves and turns off
the power.

17
● Search Play
Button Key
Function Upon File Selection
Play/Pause Short Starts to play the current track.
FF Short Searches the next character string.
REW Short
Searches the previous character
string.
Short Enters into Mode menu.
Menu
Long -
Volume + Short Goes to the previous track.
Volume - Short Goes to the next track.
REC Long -
Stop Long Turns off the power.

18
● Turn on the power, and select RM Radio from Mode menu.
● Auto Seek is a very useful function for listening to FM radio.
Press FF/REW button for a few seconds. Then the channel
will be automatically tuned in. The user can manually tune in
the channel by shortly pressing FF/REW buttons.
(When using Auto Seek function in an area with low signal
reception, the user needs to manually tune in the channel by
pressing FF/REW buttons. The user can set the environment
to listen to the radio – Mute, Mono, or Stereo function.)
● Saving Channels
Select the broadcasting channel to listen to by
pressing FF/REW buttons, and shortly press
SRS button. Then, the channel will be preset,
and “Channel 01” message will be displayed.
At this time, press FF/REW button and select
the channel number (1 ~ 20). Then, press
SRS button again to save the channel.
(The user can check the channels by pressing
SRS button for a few seconds in Frequency
mode. Then, Frequency mode will be
changed into Preset mode, and all channels
and frequencies will be displayed. By pressing FF/REW buttons, the user can search all
channels.)
● Recording
The user can record radio by simply pressing REC button while listening to FM radio.
The recorded file will be named ENC001 and saved under Encode folder in Record mode.
According to the recording order, the index will be saved.
* Notes
Noise might be included in recording in a place with low reception or when recording is made
indoors. When this happens, move to another place with better reception.
The earphone line functions as an antenna. We recommend users to unfold the line as long
as possible for best reception.
FM Radio Reception

19
Press Menu button to enter into Mode menu. Mode menu is for replaying music and
includes following sub menus. The user can select sub menus by pressing +, –, REW,
and FF buttons.
Mode Menu
Play List Music Box Search Record User Folder User Data FM Text
PLAY LIST
The user can create his/her own play list with the bookmark and
M3U files. The user can save maximum 100 songs in the
bookmark.
M3U files support maximum 100 songs with each M3U file
saving 50 songs.
Play List created by bookmark (* .BMK)
Play list edited in WINAMP (* .M3U)
The user can edit the bookmark file on the device and M3U files
in WINAMP.
* Creating M3U File
1. Run WINAMP program.
2. Open the music file.
3. Save the list.
4. Define the M3U file path.
5. Saving is completed.
MUSIC BOX
All MP3, WMA, OGG, and WAV files in the HDD will be played.
The player can support maximum 1,000 folders and 5,000
titles.
Mode Menu

20
SEARCH
The user can quickly and easily find the song that he/she wants
using Search function.
RECORD
* Encode
The user can replay files recorded by Line-in feature or during
user’s listening to the FM radio.
* Voice Record
The user can replay files recorded with the microphone.
USB FOLDER
The user can open photos and pictures saved as image file format
– JPG, JPEG, or BMP.
USB DATA
The user can replay files copied from external devices using Host
function.
FM
Auto Seek function is very useful for listening to FM radio. When
user presses FF/REW key for a second, the channel will be
automatically tuned in. In an area with low signal reception, the
user may be required to manually tune in the channel using
FF/REW keys.
* Saving Channels
Select the frequency of the channel using FF/REW buttons and shortly press SRS button.
Then, the selected frequency will be preset, and “Channel 01” message will be displayed. At
this time, select the channel number (1 ~ 20) and press SRS button to save the selected
frequency. (To check the channel numbers, press SRS button for a few seconds in
Frequency mode. Then, the mode will be changed into Preset mode, and the saved channels
and frequencies will be displayed. At this time, the user can search any channel by pressing
FF/REW buttons.)
* Recording
The user can record the radio by pressing REC button while listening to FM radio. The
recorded file will be named ENC001 and saved under Encode folder in Record mode.
According to the recording order, the file index will be saved.

21
Notes
( Noise might be included in recording a place with low reception or when recording is
made indoors.
When this happens, move to another place with better reception.
( The earphone line functions as an antenna. We recommend users to unfold the line
as long as possible for best reception.
TEXT
The user can open text data saved under Text folder.

22
MAIN MENU
SYSTEM
DISPLAY
REPEAT
SOUND
SRS
AUTO PLAY
POWER OFF TIME
FAST Charge
AUTO SCAN LEVEL
FM BAND MODE
SYNCHRONOUS
VOICE
ENCODE
SLEEP TIME
INTRO TIME
LANGUAGE
BACKLIGHT TIME
LCD CONTRAST
ID3 TAG
PLAY TIME
SYSTEM
LYRICS
JPEG
PLAY MODE
EQUALIZER
USER EQ
NORMAL
WOW EFFECT
SRS EFFECT
TRUBASS EFFECT
RESUME
DEFAULT
SRS LEVEL
TRUBASS LEVEL
PLAY DATA MODE
SCROLL SPEED
FOCUS LEVEL
DEFAULT VOLUME
Main Mode
DELETE DELETE ON
DELETE FOLDER
23
1.
AUTO PLAY ON, OFF
The user can set automatic playing of the selected file.
POWER OFF TIME
1 MINUTE, 3 MINUTES, 5 MINUTES, ALWAYS ON
The user can set the player to be automatically turned after
a certain time of player’s not functioning.
FAST CHARGE ON, OFF
The user can set to rapidly charge the battery using the adapter.
ON: Three hours of rapid charging using the adapter
OFF: Four hours of normal charging using the adapter
AUTO SCAN LEVEL LOW, MID, HIGH
The user can set the FM sensitivity level.
FM BAND MODE WORLD, JAPAN, EUROPE
SYSTEM
- When the Ac adapter and the USB are connected to the player, the player will be
automatically charged.
- While the battery is being charged by the AC adapter, the green LED is on, and after charging
is completed, the green LED will be turned off.
- If the user turns off the player while the AC adopter is connected to the player, the player will
enter into Charging mode (with the corresponding LED turned on.)
Normal
Charging
Rapid
Charging USB Charging
4 hours 3 hours 4 hours
※ When the player is set to be charged through the USB in Main menu, the player will not be
connected to the PC but will be only charged.

24
World: 87.5 ~ 108MHz, 100KHz Step
Japan: 76.0 ~ 108MHz, 100KHz Step
Europe: 87.5 ~ 108MHz, 50KHz Step
SYNCHRONOUS ON, OFF
On: The start and the end of the song are automatically detected,
and separate files are created for each track.
Off: The user can define the start and the end of the track.
VOICE 32 Kbps, 48 Kbps, 64 Kbps, 96 Kbps, 128 Kbps
The user can set the sound quality for voice recording:
32Kbps, 48Kbps, 64Kbps, 96Kbps, or 128Kbps
ENCODE 32 Kbps, 48 Kbps, 64 Kbps, 96, Kbps 128 Kbps
The user can set the sound quality for line-in recording and FM
recording:
64Kbps, 96Kbps, 128Kbps, 256Kbps, or 320Kbps
SLEEP TIME OFF, 15 ~ 120
The player will be turned off after a certain time preset by the user:
Off and nine steps every 15 minutes from 15 minutes to 120 minutes
INTRO TIME 5, 10, 15
The user can decide to play only the beginning part of the track:
5, 10, or 15 seconds.
The track will be played only for the time preset by the user.
RESUME ON, OFF
On: Playing of the track will be resumed from the point where
playing stopped previously.
Off: The track will be played from the beginning.

25
DEFAULT NO, YES
If the user activates Default (by selecting Yes), the setting of
the player will be reset into default setting made in the factory.
2.
LANGUAGE KOREAN, ENGLISH, JAPANESE, CHINESE
The player supports Korean, Japanese, (traditional) Chinese, and
(simplified) Chinese.
* Notes
- ID3 Tag, file names, folder names, and text are decided by the
OS in which they are created.
- For example, files created in a Korean-version OS, the file
names will be properly displayed in proper Korean setting only.
BACK LIGHT TIME 0 ~ 10
The user can set the backlight time from 0 to 10 seconds.
SCROLL SPEED X1, X2, X4, X 8, X16
The user can set the scroll speed on the LCD - X1, X2, X4, X8,
or X16.
LCD CONTRAST 0 ~ 10
The user can adjust the LCD contrast from 0 to 10.
ID3 TAG ON, OFF
On: The singer, the title, and the album title of the MP3 file will be
displayed.
If there is no ID3 tag information, only the file name will be
displayed.
Off: Only the file name will be displayed.
DISPLAY

26
PLAY TIME NORMAL, REVERSE
Normal: The played time of the track will be displayed.
Reverse: The remaining time of the track will be displayed.
SYSTEM
The user can set to display system information:
Firmware version, HDD space, used space, and number of
saved files.
LYRICS ON, OFF
When there is an LCR file names same as the title of the song currently
played, the lyrics will be displayed on the LCD.
On: To displays lyrics
Off: Not to display lyrics
※ If there is no LCR file, lyrics will not be displayed although
Lyrics function is on. For more information about
creating an LRC file, see the corresponding part in the
manual.
JPEG ON, OFF
On: To display JPG and JPEG files under User folder on the
initial screen
Off: To use the default initial screen design
TEXT NORMAL, REVERSE
Normal: To display dark characters on the bright background
Reverse: To display bright characters on the dark background
3.
PLAY MODE NORMAL, REPEAT, SHUFFLE
NORMAL: To play all tracks in order once
REPEAT: To repeat the current track
SHUFFLE: To continuously play all tracks in a random order
REPEAT

27
PLAY DATA MODE ALL FILE, ONE FILE, ALL FOLDER,
ONE FOLDER
ALL FILE: To set all files
ONE FILE: To set on file
ALL FOLDER: To set all folders
ONE FOLDER: To set one folder
4.
EQUALIZER NORMAL, CLASSIC, ROCK, JAZZ,
U-BASS, USER EQ
The user can select a suitable equalizer for the current track.
USER EQ
The user can set the equalizer by himself/herself.
SRS LEVEL 1 ~ 10 LEVEL
The user can set SRS effect from 1 to 10.
TRUBASS LEVEL 1 ~ 10 LEVEL
To user can set TruBass effect from 1 to 10.
FOCAS LEVEL LOW, HIGH
Te user can select the FOCAS effect – Low or High.
SOUND

28
DEFAULT VOLUME 20 ~ 30 LEVEL
When the user turns on the player, the user can set the volume
level.
When the user sets high volume, loud sound may do harm to
user’s hearing ability. We recommend the user to set a proper
level of volume sound.
5.
SRS Normal, WOW, SRS, TruBass
With the SRW Wow function, the user can enjoy music to the
maximum. .
SRS WOW ※Effects
SRS WOW is the most widely used 3D sound technology developed by SRS Institute in the USA. SRS
WOW technology realizes 3D sound effect only with two speakers as if using multi-channel speakers.
This technology consists of SRS for surround effect, TruBass to complement low-tone sound, and Focus
to increase the clarity of sound. The user can select the sub features to get the best sound effect.
6.
DELETE ON
The user can delete voice, line-in, and FM radio recording files and related folders.
SRS
DELETE

29
This player supports three kinds of recording – recording with the built-in microphone,
recording from an external device through Line-in port, and FM radio recording.
①Recording with the built-in microphone: Press REC button shortly in any mode except FM, Text, or
Search mode. Then, the player will automatically enter into Voice mode and start to record voice
next to the final recording file.
②Recording from an external device through Line-in port: Connect the line-in cable to the output port
of an external device and the line-in input port of the player. Then, press REC button for a while in
any mode except FM, Text, or Search mode. Then, the player will automatically enter into Line In
Record mode and start recording next to the final recording file.
③ FM radio recording: The user can record FM radio broadcasting by pressing Recording
button while listening to FM radio.
● Recording Monitoring
The user can listen to the recorded contents by connecting the earphones while recording.
● Checking Remaining Recording Time
The remaining memory space is displayed during recording for the user’s reference..
<Caution>
- Recording is made only there is available space for recording (32KB).
After the available space is used up, “Memory Full” message will be displayed.
- The user can record maximum 2, 000 files.
※Notes
- About Memory Full
“Total” displayed on the LCD of the player while the player is on shows the capacity of the
memory, and “Used” shows the used space in the memory.
Recording

30
● Connecting External Devices
When the line-in cable is connected, the player will automatically enter into Record mode and
opens Encode folder.
The user can copy the voice files recorded with the audio cable to external devices such as
cassette tapes and MDs.
● Connecting to an audio device
① When recording to the player from an external source
Connect the audio cable to Line In Input port of the player.
② When recording to an external source from the player
Connect the audio cable to the earphone port of the player and the microphone port or an
input port the external device.
※Notes
- When connecting the player to an external device, turn off the device first.
- Please read the manual of the external device before connecting the player to an external
device.
- The player does not internally provide power for the external microphone. Therefore, the
user cannot record voice by connecting an external microphone to Line-in port.
● When recording to the player from an external device
When recording from an external device, lower the volume of the source device and connect the
cable to the player before starting recording.
● When recording to an external device from the player
Start recording as soon as turning on the player.
(However, this timing may differ depending on each device. Therefore, we recommend users to
make tests before starting recording.)
When recording, set the volume the player at the mid level and do not change the volume level
during recording.
Connecting External Devices

31
The player provides USB mass storage function so that the player itself can function as
a single hard drive. The user can connect the player to the PC in which Windows ME,
2000, or XP, not Windows 98, is installed by plug-and-play method without installing
special software.
Installing Driver
⑴For Windows ME, 2000, or XP
When connecting the player to the PC through the USB cable, “Detect New Hardware”
message will be displayed and the driver will be automatically connected.
* Click on [My PC], and check if the player is detected as a portable disk.
* After the USB driver is normally installed, click on Manager and Device Manager tab. Then,
check if the player is displayed as a large-capacity USB storage.
(In Windows ME, “?” may be displayed, which is not an error.)
Installing Drivers and Uninstalling
Di
32
⑵Disconnecting the Cable from the USB Port
Before removing the player, disconnect the cable first.
Otherwise, the data may be lost or broken.
① Close all files.
When a file or folder is open, the device will not be properly removed from the PC.
② Click on the icon displayed on the lower-right part of the screen. Then, the toolbar shown
below will appear. Delete the device.
③ Click on the toolbar. Then, the following window will appear.
④ When a toolbar shown below appears, physically disconnect the player from the PC.
33
The player provides USB mass storage function so that the player itself can function as
a single hard drive. The user can connect the player to the PC in which Windows ME,
2000, or XP, not Windows 98, is installed by plug-and-play method without installing
special software.
Connecting to the PC
If the user connects the USB cable while the device is off or being charged, the device will
function by USB power and software connection will be automatically made. (While recording
with the device, the user cannot connect the device to the PC.)
If the user’s PC uses Windows 98, the user will need to install a separate driver.
Disconnecting from the PC
Before removing the player, disconnect the cable first. Otherwise, the data may be lost or
broken.
①Close all files and click on icon( ) at the lower-right part of the screen. (If there is a file or
folder open, the device will not be properly removed from the PC.) Then, the following toolbar
will be created:
②Click on the tool bar. Then, the following window will appear. Delete the device.
③When the following toolbar is displayed, physically disconnect the player from the PC.
※If the PC supports only USB 1.1, a message that says that the device cannot be removed
may be displayed. When this happens, check the HDD is not operating and disconnect the
USB cable.
Supporting FAT32 File System
Connecting to the PC
34
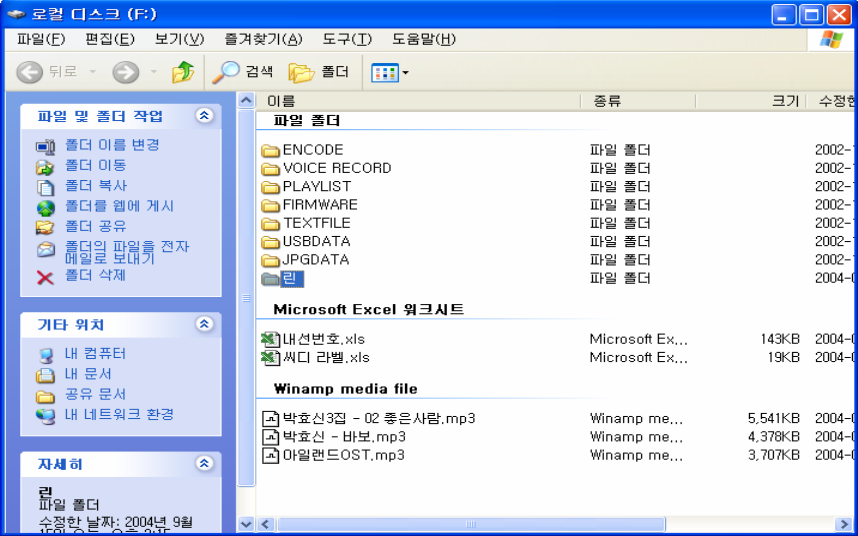
⑴When the user connects the player to the PC for the first time, the following window will
appear in which Encode, Voice Record, Play List, Firmware, Text File, USB Data, and JPG
Data folders are included.
⑵The user can save not only MP3 music files but other data files, and read, write, and delete
them on the player just as in the hard disk of the computer.
Management of Folders and Files
35
⑶No separate folder will be created when the player is connected to the PC in Music Box
mode. The user can create folders on the PC as shown below and check them on the player
in Music mode.
* The user can check music folders and files in the folder in Music Box mode.

36
Receiving Firmware File
Connecting to the PC
Firmware File Set Drive
Copying Firmware Folder
Remove from PC
Set On
Upgrading
Rebooting
Upgrading Completed
Firmware Upgrade

37
Troubleshooting
When a breakdown is suspected, please check the following:
Trouble Things to Check Measures
Check if the hold switch is in On position. Move the hold switch to Off position.
The power is off. Connect the adapter and check if the
Player functions.
Check if the battery is charged. Charge
the battery, if necessary.
Check if the volume level is 0. Increase the volume. (VOL 20 is
recommended.)
Check if there is a playable file saved in
the player. Copy a playable file from the PC.
Check if the file as been damaged. Copy the file again from the PC.
The sound is off or
noise is generated.
Copy the corresponding file to the PC, and
check if the file is normally played in the
PC.
This problem might occur when the bitrate
is too low.
Check if the adapter is correctly connected
to the outlet. Correctly connect the adapter to the outlet.
Check if the suitable input power is
supplied.
Connect the adapter to an outlet with
designated voltage.
The AC adapter
does not function.
Check if DC port is correctly connected. Correctly connect the DC port to the outlet.
Check the file to be played and O/S where
ID3 Tag data was created.
Set Multi-language submenu in Main
menu.
Check if Lyrics menu is on in Main menu. Set Lyrics menu on in Main menu.
Characters are not
normally displayed
on the LCD. The
lyrics are not
displayed.
Check if there is an LCR file with same
name as the file to be played under the
same folder.
Copy the same-named LCR file to the
same folder.
The noise is
detected when the
user listens to the
radio, and it is
difficult to tune in
the channel.
FM radio reception is difficult in frequency-
shadow areas such as buildings, subways,
moving vehicles.
The player and the earphones function as
an antenna. Adjust directions of the
player and the earphones to better receive
signals.
Automatic connection is not made in
Windows 98 OS.
Check the OS. If the OS is Windows 98,
install Windows 98 driver.
Automatic
connection is not
made to the PC. Check if the USB cable is correctly
connected to the player.
Correctly connect the USB cable to the
player.
Check if the cable is correctly connected to
the USB 1.1 host port.
Correctly connect the cable to the USB 1.1
host port.
Connection is not
established with an
external USB
device.
Check if the external USB device is a UMS
type.
If the connection is not automatically
established when the device is physically
connected to the PC, the host function
cannot be used for the device.
The shorter the track time, the shorter the playing time.
The higher the sampling frequency and the bitrate of the track, the shorter the playing
time.
The playing time is
different from
described from the
manual. The more key manipulations and the shorter the LCD backlight time, the shorter the
playing time.

38
Specifications
Part Item Specification
Capacity 2GB
Size 1 inch
HDD Disk
File System FAT32
Frequency Range 20Hz ~ 20KHz
Earphone Output 10mW(L) + 10mW(R): 16Ω, Maximum volume
Signal to Noise Raito 90db (1KHz input 0db at USE LPF 30KHz)
Frequency Respond ±2dB
Distortion 0.1%±0.05 (1KHz input 0db)
Number of Files Maximum 5000EA (MP3 + WMA)
Audio
Channel Stereo
MP3 Bitrate 64 Kbps, 96 Kbps, 128 Kbps, 256Kbps, 320 Kbps
Recording
Voice Bitrate 32 Kbps, 48 Kbps, 64 Kbps, 96 Kbps, 128Kbps
World 87.5 ~ 108.0MHz Step 100KHz
Japan 76.0 ~ 108.0MHz Step 100KHz
Europe 87.5 ~ 108.0MHz Step 50KHz
Earphone Output 10mW(L) + 10mW(R): 16Ω, Maximum volume
Signal to Noise Raito 55dB at 1mV
FM Radio
Reception Type Earphone Code Antenna
Communication Built-in USB 2.0, USB 1.1(USB Mass Storage)
System Specification CPU 200MHz, RAM 64MB, 20MB or Higher Capacity of Hard Disk
O/S Windows98SE, Windows2000, Windows ME, Windows XP
Sound Card Compatible with Sound Blaster 16
Display 640X480 or higher resolution
PC
Interface
USB Jack USB 'B' Type Plug
File Format MPEG 1/2 LAYER 3, WMA, OGG, WAV
MP3 Bitrate 8Kbps ~ 320Kbps
WMA Bitrate 5Kbps ~ 192Kbps
OGG Bitrate 32Kbps ~ 500Kbps
File
Support
Tag ID3 Tag V1, ID3 Tag V2 2.0, ID3 Tag V2 3.0
LCD Resolution 1.8 inch Color LCD
Playing
Time MP3 Playing Approximately 12 hours
AC Adapter DC 5V 1.5A
Power
Battery 3.7V LI-Polymer
AC Adapter Approximately 180 minutes for rapid charging or 240 minutes for
normal charging
Charging
Time USB Approximately 240 minutes
Dimensions
Weight
LCD 1.8 inch CSTN LCD
Operating Temperature 5°C ~ 35°C
General
Supported Languages Korean, English, Japanese, Chinese (Traditional/Simplified)

39
Repair Service
● When a breakdown occurs, stop using the product and contact the sales agency or the service center of
DIASONIC Technology at 82-031-474-0852 for repair services.
Warranty (Service Policy)
● Free repair services will be provided in compliance with the free repair policy of DIASONIC Technology.
If a breakdown occurs during the warranty period, bring the product with the warranty card to the sales
agency or the service center of DIASONIC Technology.
Free repair service will be provided only when the purchase date and the name of the sales agency
appear on the warranty card.
Please check all information is written when purchasing the product from the sale agency.
The warranty card is not reissuable so we recommend you keep it safely.
<Free Repair Policy>
1. This product has passed strict quality control and inspection.
2. Breakdowns occurring under normal operating conditions described in the user manual within the
warranty period will be subject to free repair services:
3. For the following cases, some service fees will be charged:
1) When the customer fails to submit the warranty card
2) When information is missing in the warranty card – purchase date or the name of the sales
agency
3) When the product is damaged or broken down due to user’s mishandling
4) When the product is damaged or broken down due to user’s repair or remodeling
5) When the product is damaged or broken down due to fires, pollution, earthquakes, and other
natural disasters
6) When the product is damaged or broken down due to leakage of the battery
7) When the consumable parts such as a battery need to be replaced
4. This warranty card is only valid for service in Korea.
(This warranty card is only valid for service in Korea.)
(Request When Mailing)
Please beware of the following when sending a mail:
1. Please enclose the warranty card with the product when mailing during the warranty period.
2. Please wrap in shock-absorbing materials and put the product in a box to prevent damage during
transportation.
Mailing fees and wrapping fees should be born by customers.
3. To prevent loss, please send the product for repair services by registered mail.

40
Product Warranty
Warranty Card
Product: HDD MP3 Player
Model: DHD-1000
Warranty Period: One Year
Purchase Date: ______ ________, _________
Name
Address
Purchaser
Telephone
Name
Address
Seller
Telephone
● Please contact the sales agency of DIASONIC Technology Co., Ltd. for breakdown of the
product.
● Exchange, (charged or free) repair services, refund, and part-keeping periods comply with
regulations of customer protection.
● For questions or more information about the product, contact DIASONIC Technology Co.,
Ltd.
DIASONIC Technology Co., Ltd.
● Address: 321-43, Seoksu-dong, Manan-gu, Anyang-si, Gyeonggi-do (430-806), South Korea
● Telephone Number
- Representative Number: 82-31-474-0852
Website: http: //www.diasonic.com
The warranty card is only valid in Korea. Please keep this card for free repair services.
&TTS, Media SYNC