Diasonic Technology Co DMP200EN MP3 Player User Manual DMP 200English 1th
Diasonic Technology Co Ltd MP3 Player DMP 200English 1th
User Manual
DIASONIC
Thank you for your purchasing the DIASONIC MP3 player! If you use DIASONIC MP3 player
for the first time, please read this manual carefully before use.
MODEL
DMP-200EN
User’s Manual
WARRANTY CARD INCLUDED

Thank you for purchasing the DIASONIC MP3 player.
Please read this manual carefully before use.
When the device is broken or has a problem, please contact us or a dealer.
Caution:
● Never attempt to repair, disassemble or modify the device by yourself.
● If a user or others misuse the device, or if the device is exposed to an electrical
shock, you may find any change or loss of the saved data when it is repaired or battery
is changed
You better do memo for the important items on memo pad, note book or PC.
● Please be precautious that we do not take any responsibility for any changes or
losses of data.
● Do not drop the device into water or put it in a humid place.
● This manual may be changed for the improvement of performance without notice.
Precaution on copyright
● You are cautioned that MP3 files created by MP3 conversion function can not be
used for commercial use or service other than personal use. If you do not follow
this, you may break the copyright.
● Copy for commercial use other than personal use is prohibited by law
Notice
Introduction
Please be cautious not to lose this manual which is essentially needed for
using the device. You are cautioned that this manual can not be delivered
again.
Caution for safety
Alarm
● Please keep the battery out of reach of small children as it is dangerous for them. If a child
accidentally swallows the battery, seek medical advice immediately.
● Do not short, disassemble, apply heat or pressure and put the battery into a fire. It may cause
leakage, heat emission, breakage, a fire, etc.
● If the battery leaks and fluid gets into your eyes, wipe out it with water and seek medical
treatment immediately. If you do not this, it can cause injury or loss of eyesight.
● When LCD is broken, do not touch the leaked fluid. If the fluid gets into your eyes or comes
into contact with your skin, wipe out it with clean water and seek medical treatment immediately.
● When you drive a bicycle, automobile or motorcycle, do not use earphone.
It is very dangerous and you may break the law according to the area.
● Do not turn up the sound volume too high.
If your ears are exposed to high sound level for a long time, it may cause ear problems.
● When ringing in your ear happens, lower the volume or stop using.
● You must use Alkaline battery (1.5V, LR03, AAA Size or UM-4). If you use rechargeable one, it
may cause malfunction or severe noise which make your hearing damaged.
● Please read this manual through before use.

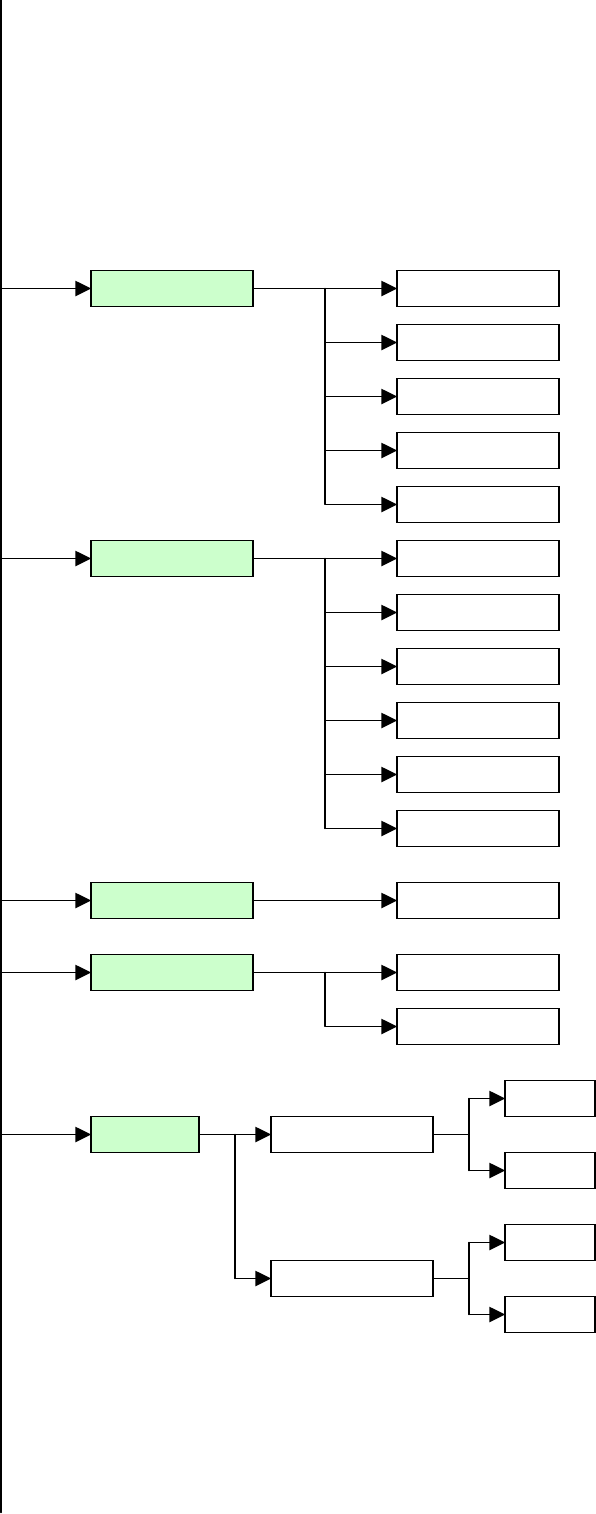
Caution ……………………………………………………………
MP3 Player
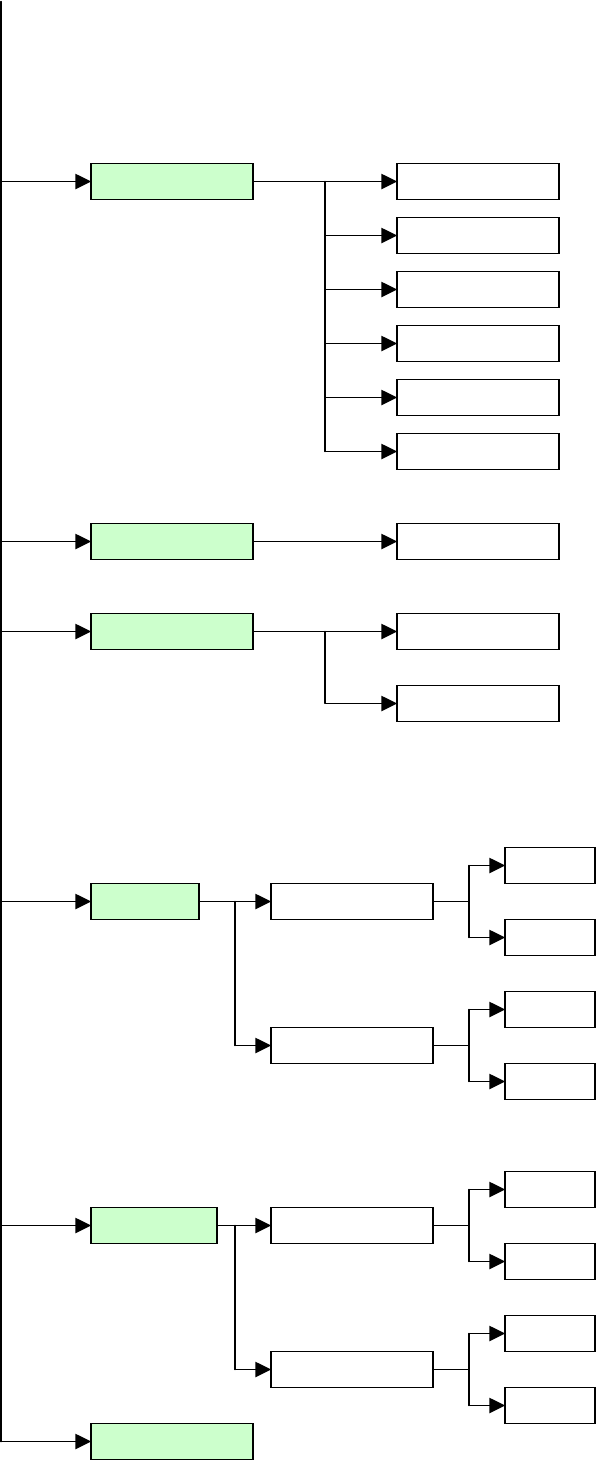
1. Function and feature
2. Part name and LCD display
3. Battery use and its package contents
4. How to use
5. How to use button
6. How to control menu dial
7. Table of the menu in stop mode of audio and record mode
8. Description of items of each mode
9. How to connect the device to external devices
10. FM radio receiving function
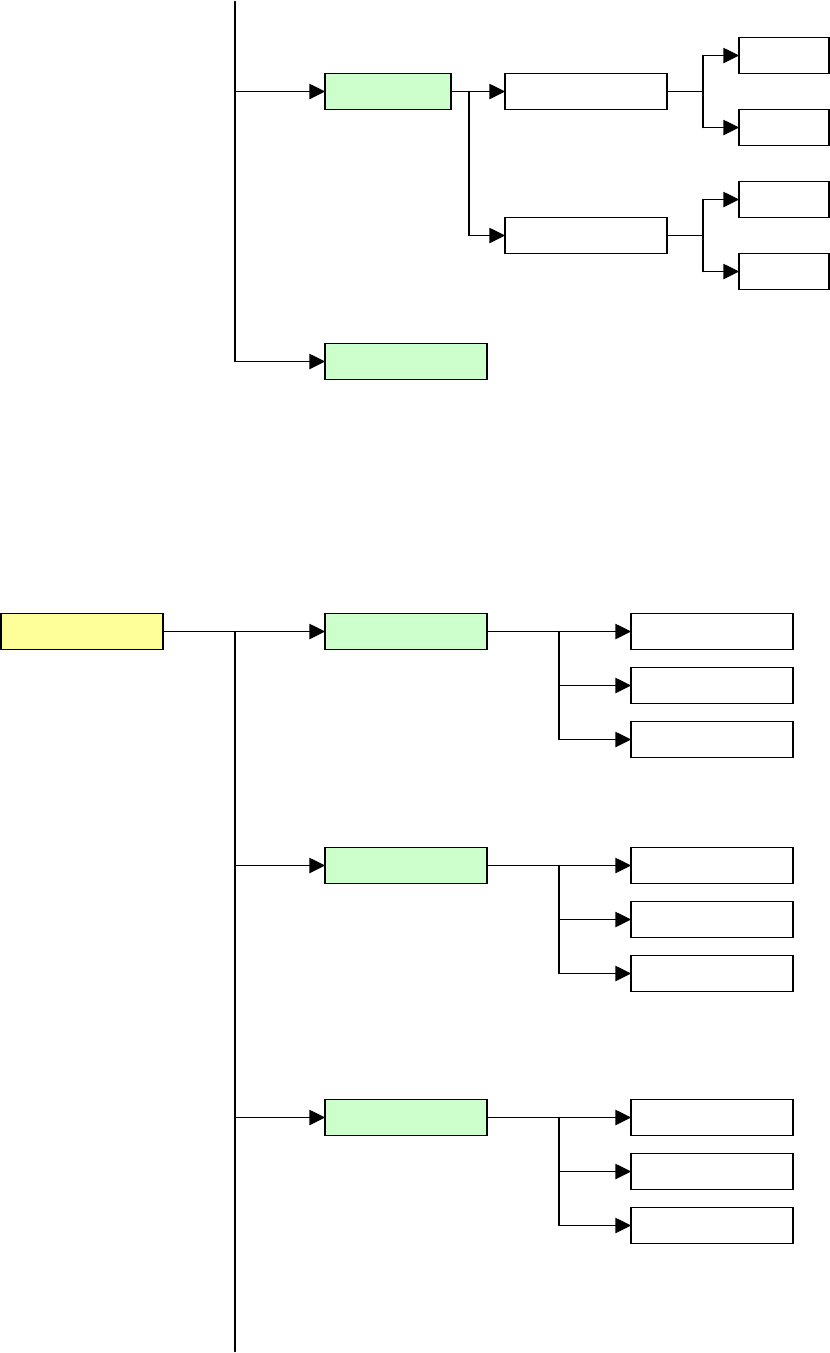
DIASONIC MP3 ExplorerⅡ
1. What is DIASONIC MP3 Explorer Ⅱ?
2. How to install DIASONIC MP3 Explorer Ⅱ
3. How to install USB DRIVER
4. Configuration of DIASONIC MP3 Explorer Ⅱ
5. MP3 file sending
6. Sending DMP file through PC
7. Erasing MP3 file and DMP file
9. How to upgrade Firmware
Dimension
Warranty card
Index

● Do not drop or apply a strong impact. It may cause a
malfunction.
● Be cautious not to put the device near magnetic card like cash
card, transportation pass, etc, as it may cause the malfunction of
the cards.
● Do not put it into the back pocket. LCD may be damaged.
● Escape from sunlight. Avoid from a heater or a hot place.
● Please use smooth cloth other than liquid solvent (thinner,
benzene, etc.) or wet cloth for removing dust.
● Do not apply strong pressure on LCD as it made of glass, The
LCD may be damaged.
● Do not control the key with a solid material or strong power.
The key may be damaged.
Caution

● As DIASONIC MP3 player is the high performance mobile digital audio player, it
plays MP3 and WMA(64Kbps or more), which are compressed digital music files, into
various modes, and it is the multi-functional mobile digital audio player of the next
generation, allowing high quality voice recording and recording through an external
device.
● Sophisticated and luxurious ultra compact design and secured exterior
Escaped from the current design, sophisticated ultra compact design and adopting
front aluminum case make it more luxurious and mobile.
● High sound quality MP3 PLAYER
It is equipped with all the merits of MP3 by adopting various function of MP3 player
and has superior sound quality that gives you rich and delicate feeling.
● Direct encoded recording function
As it adopt various function of voice recorder into those of MP3 player, voice
recording and direct MP3 encoded recording through an external device are available,
and it can be used as a mobile data saving device, a mobile hard disk.
● Bit rate setting
You can use memory efficiently, as recording sound quality can be controlled by
setting bit rate of voice recording or line in recording according to the time and the
place.
● Speed control function
As you can control the playing speed, you may use it even for linguistic study.
● LCD monitor of multi-language support graphic and back-light function
As it adopt graphic LCD supporting Korean, English, Chinese, Japanese, European
languages, special characters, etc, you can easily see the name of the song and playing
time, and as dark blue back-light of back side of the LCD makes you check LCD display
and set menu with buttons even at night.
● Adopting USB interface function which easily connects it to PC.
● Hold function that prohibits misoperation.
● Repeat play function(normal, 1 track, all, random, block repeat)
● Play/pause/intro play, stop/power off, record
● Next track/former track/fast forward/fast rewind
● Volume up/down(digital volume: 30steps)
● Saving/management for each folder(audio folder, record folder)
Function and feature
● Various equalizer mode(normal, classic, live, pop, rock)
● Auto power off function
● Control time of back-light on, scroll speed control function
● File deleting function(one, all)
● Firmware upgrade
As you can upgrade the function of the device with firmware download function, you
can enjoy the latest function. (Refer to chapter 9 of DIASONIC MP3 Explorer)
● Software: DIASONIC MP3 Explorer Ⅱ
(File transmission, playing MP3/WAV/DMP and voice mail)
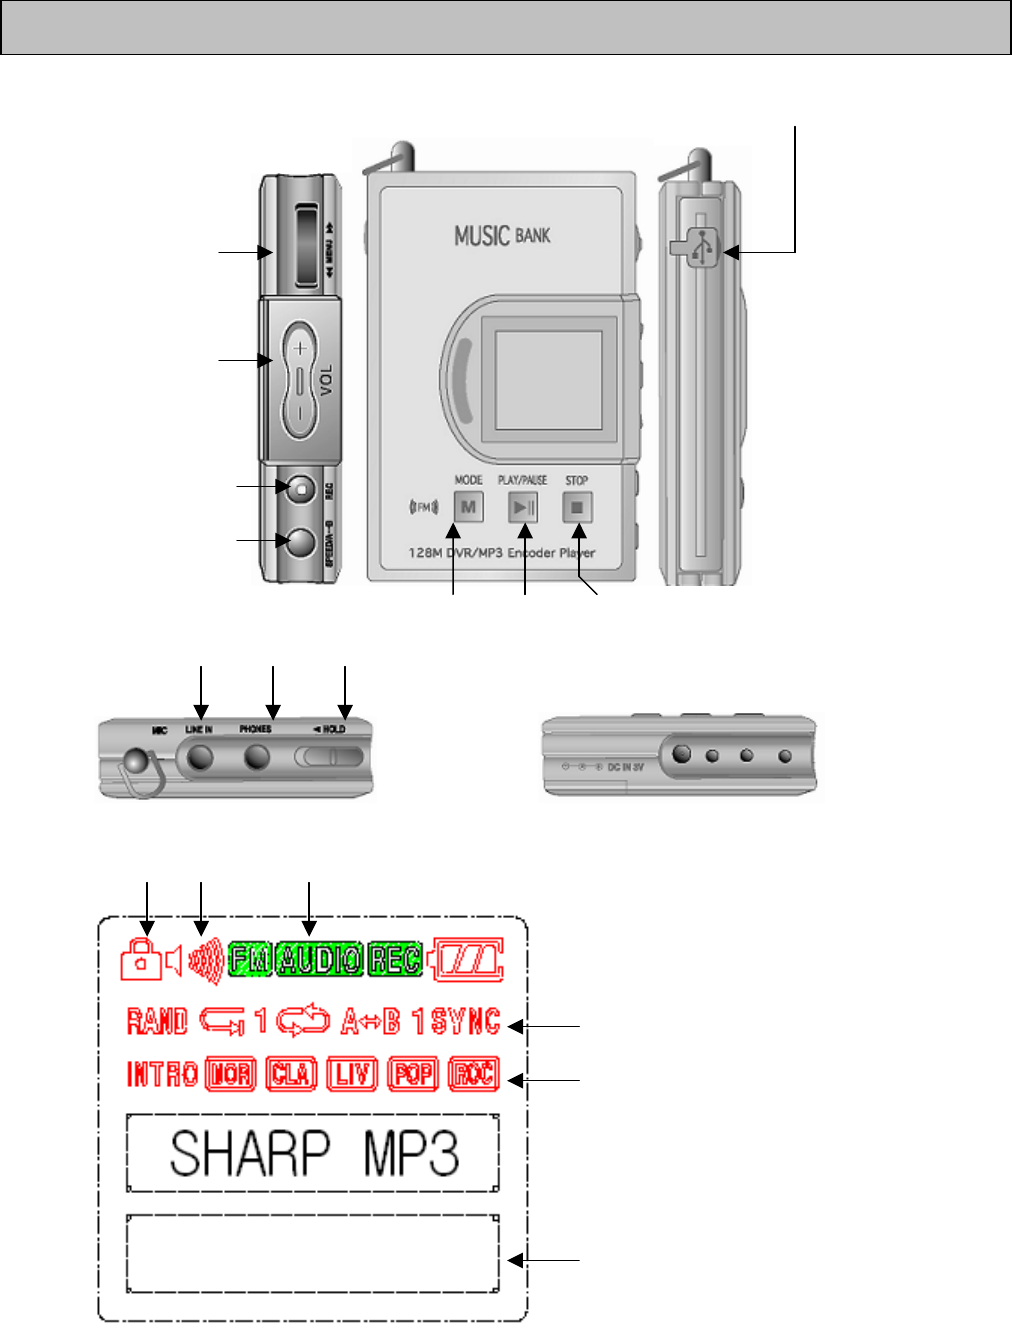
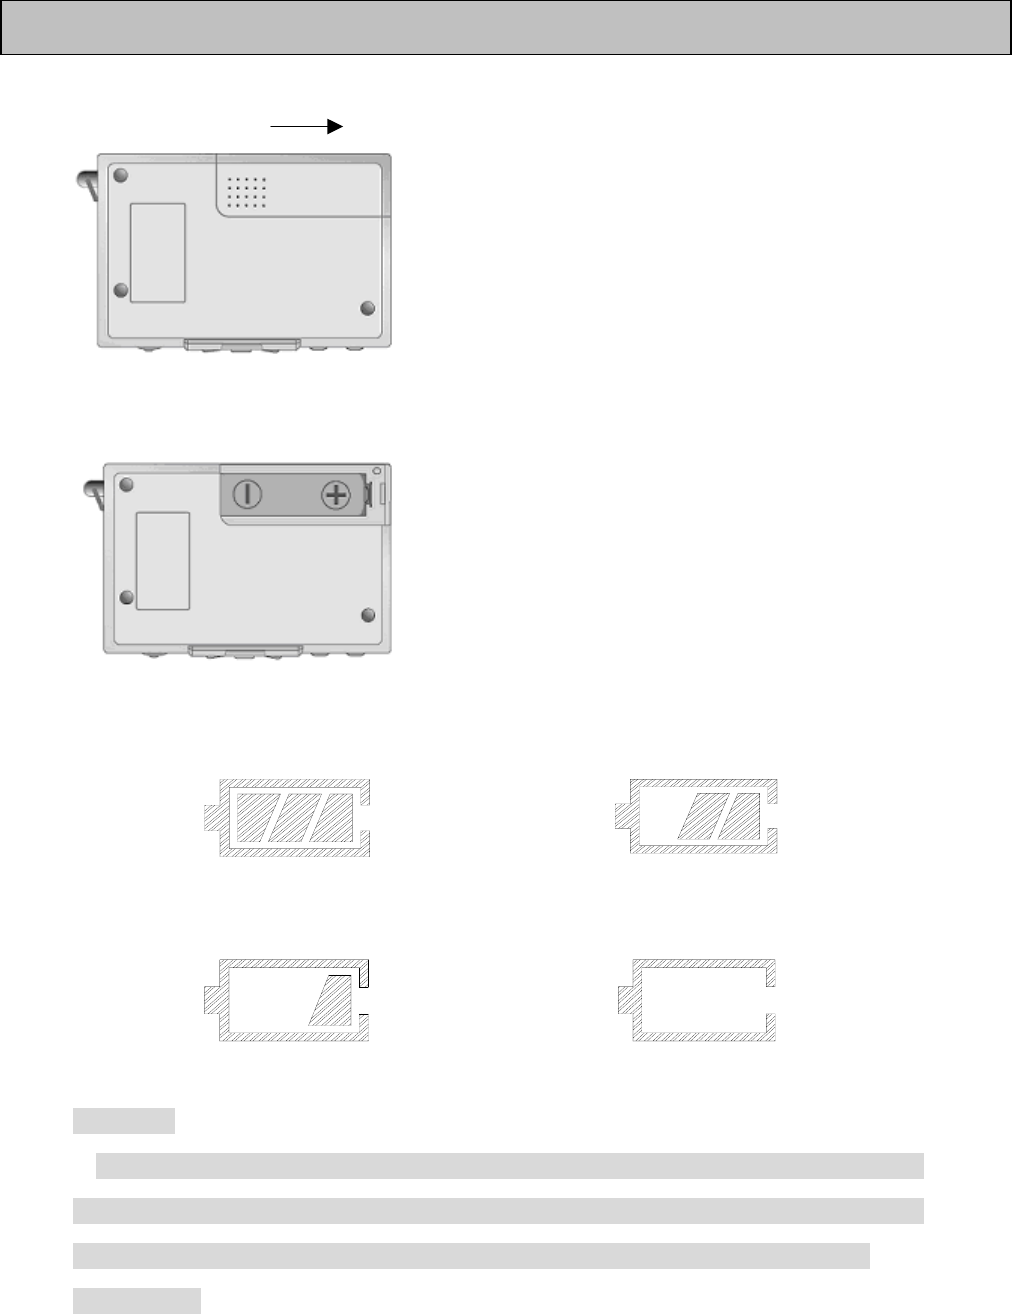
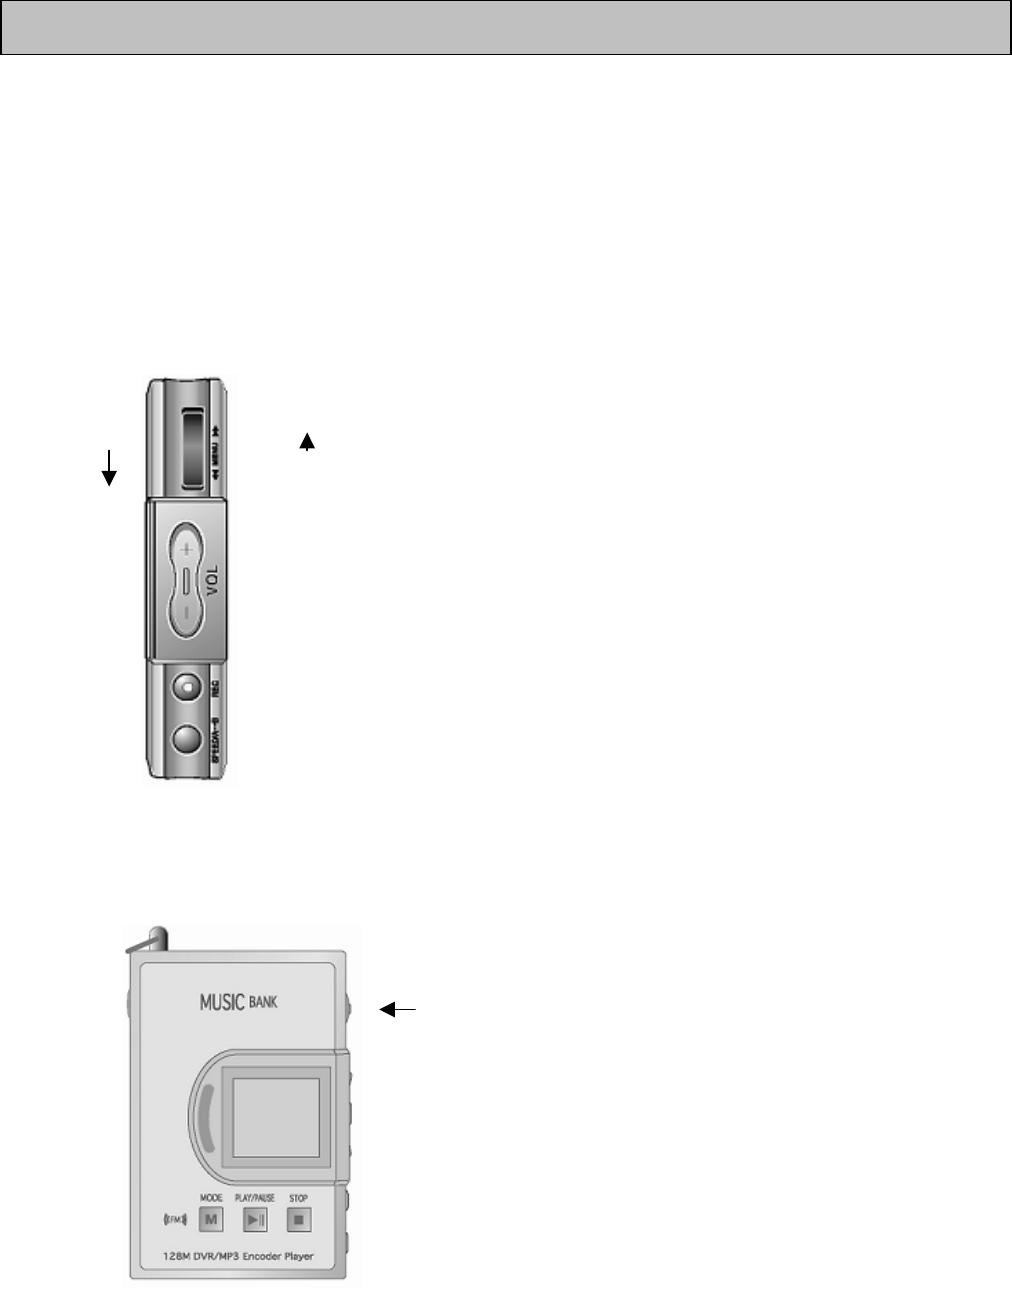
1) Part name USB JACK
Menu
REW/MENU/FF
Volume control
VOL+/VOL-
REC
Play speed control
Mode Play/pause Stop
External device Earphone Lock up
2) LCD display
Lock up Volume Mode(RADIO/AUDIO/RECORDER)
Battery level
Repeat
EQ
REC, Playtime/Volume/Menu set mode
Part name and LCD display
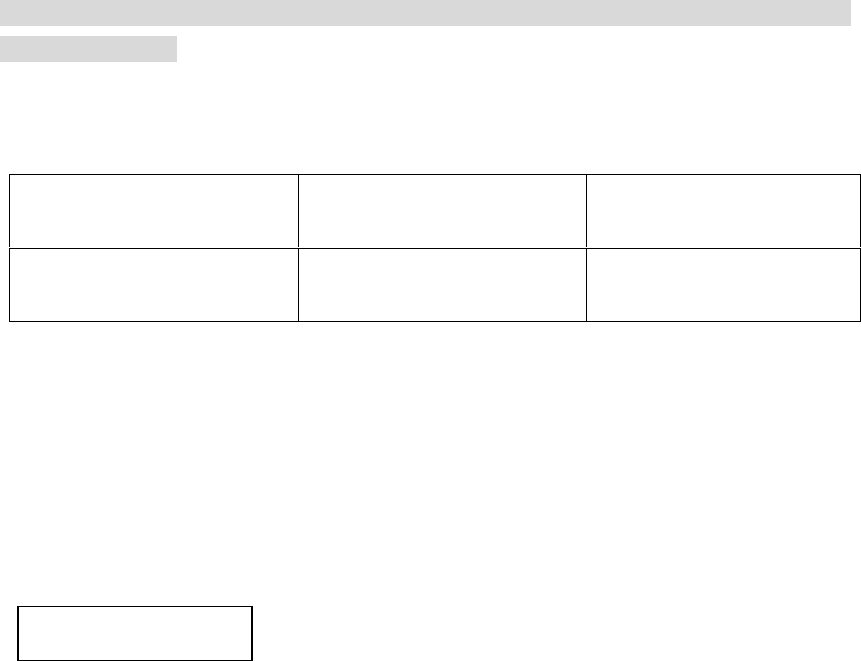
1. Open battery cover.
Open
2. Load 1 ea of LR 03 type battery according to the guide of (+) (-) and close the cover.
[Battery: LR 03 or compatible one (Size”AAA” or UM-4)]
3. After turning on power by pushing play/pause button for a few seconds, check the
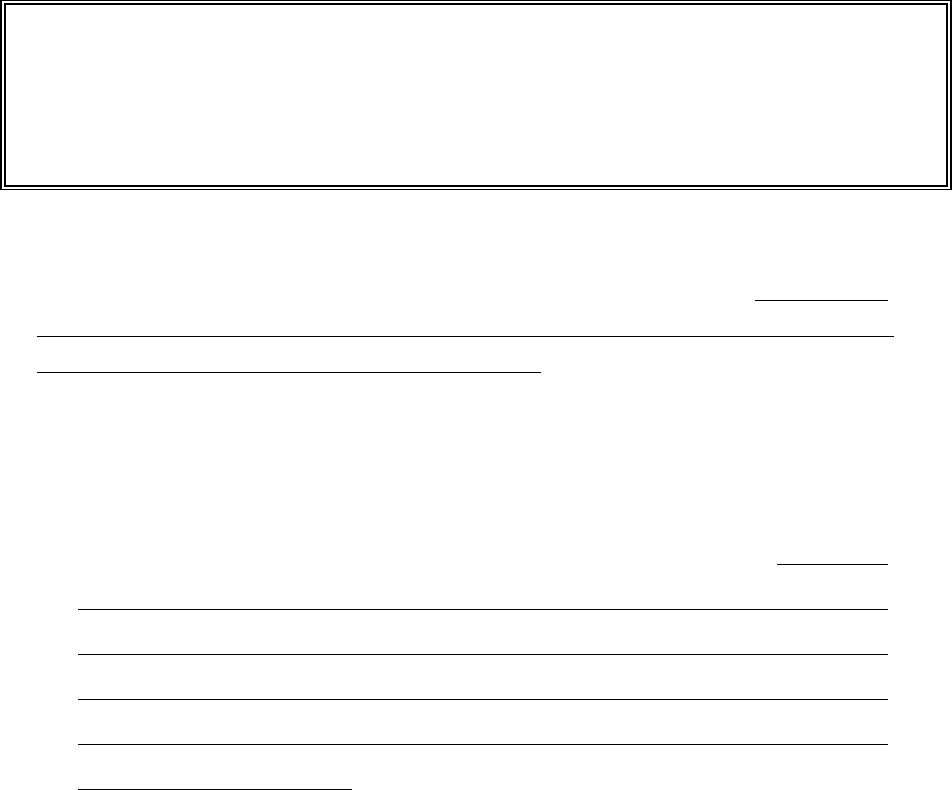
battery level.
Battery level is high. Battery level is in middle.
Battery level is low. It is time to replace the battery.
※ Caution
If LCD display does not show the battery level though you loaded a new battery, please
check the polarity of the battery. If it still does not show the battery level when you
loaded the battery properly, remove the battery immediately and apply for service.
※ Reference
Battery use and its package contents
If you keep the device in a place for a long period loading the battery in it, the battery
may be consumed.
4. Duration of battery
5. Caution for battery
● When you do not use the device for a long time, as there may be a leakage, so,
please store it after removing the battery.
● You must use alkaline battery. The device has no recharging function and you
must refrain from using rechargeable battery.
1. Stereo earphone
2. Line in cable
3. USB Cable
4. Install CD
5. User’s manual
6. Battery (1ea)
7. Neck strap
8. Adaptor (3V 180 mA)
Using battery Play through earphone
(Vol.: middle )
Recording
(Record mode:32Kbps)
Alkaline battery
Size “AAA” LR03 About 7hours About 7hours
Accessories

● How to turn on/off power
When you push play/pause button for more than 1
second, power is turned on. Then, pushing play/pause
button for more than 1 second, power is turned off. If you
do not any control after turning on power, power is
automatically turned off.
● How to use hold switch
When hold switch is set to hold on, switch control won’t be done. When you do not use
the device or want to keep the current status, please set the switch to hold on.
Before use, check hold switch is set to hold off, turn on power and use it.
Hold off Hold on
Switch control won’t be done.
※ If you turn on power when the hold key is set to hold on, LCD displays “Hold on” and
then power is off, so, turn on power after setting the key to hold off.
● Conversion of mode
The device has audio, record and FM radio mode. In pause mode, you can select
How to use

each mode with mode button
● Play, pause and stop
If you want to play in pause mode, push play/pause button, and if you push
play/pause button in play mode, play is paused.
If you push play/pause button at this moment, pause is cancelled and play starts again
from then on.
If you push stop button in play mode, it stops at the starting portion of the file being
played.
● Erase
If you want to erase only the file displayed on LCD, push menu button in pause mode
to display menu on LCD, select erase by using FF or REW button and select “ ERS ONE
“, yes, then the file is erased.
● Selecting file and moving
If you push FF button or REW button in pause mode, you can select the next track
and previous track, if you keep pushing the button, you can select them quickly. When
you push FF button in play mode, the next track is played, and if you keep pushing the
button, the counter of the current track proceeds quickly. If you push REW button, when
it is played within 5 seconds, former track is played. If you keep pushing the button, it
rewinds quickly to the start of the current track.
● Volume control
Control the volume by pushing VOLUME + and VOLUME button. If you keep pushing
them, it is continuously controlled.
※ When you erase all the files in audio mode or record mode, select ERS ALL by
pushing FF button or REW button in erase menu, select yes and then push menu button.
● Intro play
This function is to check quickly what kinds of songs or voice files are in
memory by playing front portion for just about 10 seconds. If you push
play/pause button in play mode for more than 1 second, LCD displays “Intro” icon,
and the front portion of all the tracks is played. If you want to keep the current
track played in intro play mode, undo the intro play by pushing play/pause
button.
● Block repeat
The device has the function which makes you set a block and hear it. If you push
SPEED/A↔B button more than 1 second in play mode, A spot, which is the start point
of the block repeat, is set and block repeat icon( A↔B ) starts flashing. And if you
push SPEED/A↔B button when the ending section of block repeat is played, B spot,
which is the end of the block repeat, is set and block repeat icon( A↔B ) is also set
up, then block repeat starts. To undo the block repeat function, push SPEED/A↔B
button again.
● Play speed control
The device has the function which makes you control play speed to normal, fast or
slow.
If you push SPEED/A↔B button on play mode, LCD displays the current mode
( Normal Spd, Fast Spd, Slow Spd ) once and then the set mode is played.
Speed mode being set is not changed unless the mode is changed.
● Record function
Recording in audio mode as well as record mode is available. There are two methods
to record; first is to record with the built in microphone, second is to record the output
※ Volume can be controlled with the range of 0~30 steps
※ Volume can be controlled when earphone is plugged, and when you plug out earphone,
the device automatically sense “earphone plugged out” and volume is automatically
returned to 20 level.

signal from the external device through line in cable. If the line in cable is not plugged
to the set, the built in microphone is automatically selected on recording, and if the line
in cable is plugged to the set, line in is automatically selected on recording. Recording
starts by pushing REC button in stop position. To stop the recording, push stop button,
then MP3 file is made in audio mode and DMP file in record mode.
● PC Connection
When you download file by connecting the device to PC through USB cable, LCD
displays “USB Connection “and the device comes into PC connection mode. When
the device is connected to PC, play is not available, so you must detach the PC
connecting cable from the device for play.
Without battery, connection with PC is available by connecting USB jack. When you
plug out USB jack, power is turned off, so turn on power and use the device.
※ As though high quality sound recording in audio mode is possible, but uploading the
file through PC connection is prohibited by Copyright.
※ Uploading the file, which is recorded in record mode, through PC connection is legal.
※ Ref.: If pont size on LCD is too big to show properly, set the basic pont size of OS of PC
to 96 DPI or normal size. The pont size shown on the device is depending on the basic pont
size of OS of PC.
● Audio mode (Short means pushing shortly and long more than 1 second)
Button Key
operatio
n
On stop In play mode In record mode
MODE SHORT Converted to REC
Mode Remain Time Remain Time
SHORT Current track play
starts PAUSE -
PALY/PAUSE
LONG Current track play
starts INTRO play -
SHORT - Stop play Stop recording
STOP LONG Power off Stop play Stop recording
MENU SHORT Menu display Menu display -
SHORT Move to next track Move to next track &
play
Index increased
only when more
than 5 seconds
FF
LONG Moving to next
track auto increase FF current track -
SHORT Move to previous
track
When after 5 Sec, to
first of track, When
before 5 Sec, move to
previous track
-
REW
LONG Moving to previous
track auto decrease F REW current track -
SHORT Volume up Volume up Volume up
VOLUME+ LONG Auto volume up Auto volume up Auto volume up
SHORT Volume down Volume down Volume down
VOLUME- LONG Auto volume down Auto volume down Auto volume down
REC SHORT Start recording - Pause recording
SHORT - Play speed mode
control -
SPEED/A↔B
LONG - Set & undo block
repeat -
How to use button
※ Ref.: Volume can be controlled only when earphone is plugged.
● Record mode (Short means pushing shortly and long more than 1 second)
※ Ref.: Volume can be controlled only when earphone is plugged.
Button Key
operation
On stop In play mode In record mode
MODE SHORT Convert to FM MODE Remain Time Remain Time
SHORT
Current track play
starts
PAUSE -
PALY/PAUS
E
LONG
Current track play
starts
INTRO play -
SHORT - Stop play Stop recording
STOP
LONG Power off Stop play Stop recording
MENU SHORT Menu display Menu display -
SHORT Move to next track
Move to next track &
play
Index increased only
when more than 5
seconds FF
LONG
Moving to next track
auto increase
FF current track -
SHORT
Move to previous
track
When after 5 Sec, to
first of track, When
before 5 Sec, move to
previous track
-
REW
LONG
Moving to previous
track auto decrease
F REW current track -
SHORT Volume up Volume up Volume up
VOLUME+
LONG Auto volume up Auto volume up Auto volume up
SHORT Volume down Volume down Volume down
VOLUME-
LONG Auto volume down Auto volume down Auto volume down
REC SHORT Start recording - Pause recording
SHORT - Play speed mode control -
SPEED/A↔B
LONG - Set & undo block repeat -
● FM radio mode
※ Ref: Volume can be controlled only when earphone is plugged.
※ When station is set, if no any key operation, it is automatically undone.
※ Earphone play a role as an antenna. The longer the earphone line the better the
receive sensitivity.
Button Key
operation
FREQUENCY MODE PRESET MODE STATION mode
MODE SHORT Convert to AUDIO
MODE
Convert to AUDIO
MODE -
SHORT STATION set up - Station set up PALY/PAU
SE LONG STATION set up - -
SHORT - - Undo set up
STOP LONG Power off Power off Power off
MENU SHORT PRESET mode FREQ. mode -
SHORT FM FREQ. fine
increasing control
Convert to next
PRESET
CH.
CHANNEL UP
FF
LONG FM
AUTO SEEK + Auto Channel Up -
SHORT FM FREQ. fine
decreasing control
Convert to previous
PRESET
CH.
CHANNEL DOWN
REW
LONG FM
AUTO SEEK - Auto Channel Down -
SHORT Volume up Volume up Volume up
VOLUME+ LONG Auto volume up Auto volume up Auto volume up
SHORT Volume down Volume down Volume down
VOLUME- LONG Auto volume down Auto volume down Auto volume down
REC SHORT Start recording Start recording -
SHORT - - - SPEED/A↔
B LONG - - -
Menu dial moves (1) up and down, and 2 kinds of control are available by pushing it like
(2).
Please control it according to the guide as below;
For searching menu, etc, follow (1), and then (2) for the next control.
Thus, the relevant menu is set.
(1) Move it up and down.
FF (+TRACK)
REW (-TRACK)
(2) Push it.
Menu selection
How to control menu dial
①
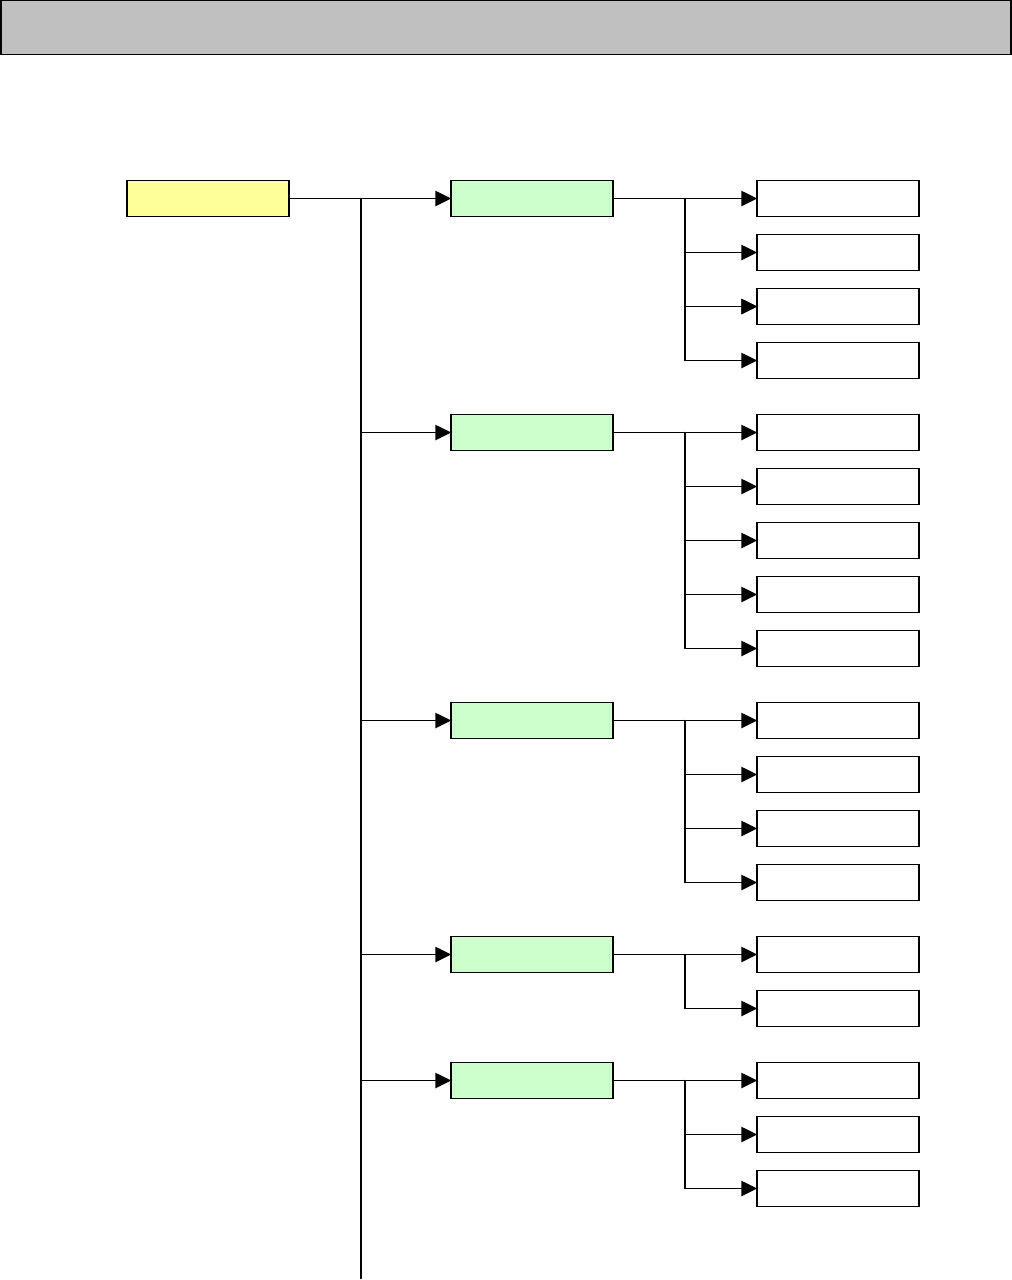
Menu table on stop position in audio mode
Menu table on stop position in audio and record mode
REPEAT 1. NORMAL : : MENU : :
2. ONE
3. ALL
4. RANDOM
EQ 1. NORMAL
2. CLASSIC
3. LIVE
4. POP
5. ROCK
SCROLL 1. 1.0 Sec
2. 0.7 Sec
3. 0.5 Sec
4. 0.3 Sec
ID3 TAG 1. OFF
2. ON
SYNC 1. SYNC OFF
2. 1 SYNC
3. SYNC ON
BITRATE 1. 64 Kbps
2. 96 Kbps
3. 128 Kbps
4. 192 Kbps
5. 224 Kbps
BACKLIT 1. OFF
2. 1 Sec
3. 2 Sec
4. 3 Sec
5. 4 Sec
6. 5 Sec
LCD CONT. CONT.: 0~20
ERASE 1. ERS ONE
NO
2. ERS ALL
YES
NO
YES
LED CTL 1. OFF
2. ON
②
Menu table on stop position in record mode
FORMAT Format
NO
Low format
YES
NO
YES
EXIT
REPEAT 1. NORMAL : : MENU : :
2. ONE
3. ALL
SYNC 1. SYNC OFF
2. 1 SYNC
3. SYNC ON
BITRATE 1. 16 Kbps
2. 32 Kbps
3. 56 Kbps
BACKLIT 1. OFF
2. 1 Sec
3. 2 Sec
4. 3 Sec
5. 4 Sec
6. 5 Sec
LCD CONT. CONT.: 0~20
ERASE 1. ERS ONE
NO
2. ERS ALL
YES
NO
YES
FORMAT Format
NO
Low format
YES
NO
YES
EXIT
LED CTL 1. OFF
2. ON
◈ Main menu items of audio mode
For each menu selection and set up, use menu button, and for main menu move, move
for sub menu selection and set up after selecting main menu, use FF and REW button.
☞ Ref.: LCD display on selecting menu
<Main menu of each item > < Sub menu of each item >
1) REPEAT: To set repeat play of file
1. NORMAL: Play all the files in order and stop
2. ONE: Repeat play only selected file
3. ALL: Play all the files continuously in order
4. RANDOM: Play all the files continuously in random order
2) EQ
As it is the mode that equalizer can be selected, user can select wanted mode (1.
NORMAL, 2. CLASSIC, 3. LIVE, 4. POP, 5. ROCK).
3) SCROLL
Display of file information on LCD can be set to 4 steps from 1SEC ~ 0.3SEC.
(speed: 1 SEC < 0.7 SEC < 0.5 SEC < 0.3 SEC)
Description of items of each mode
REPEAT EQ SCROLL ID3 TAG SYNC BITRATE BACKLIT
LCD CONT. LED CTL ERASE FORMAT EXIT
: : M E N U : :
R E P E A T
: : M E N U : :
1. NORMAL
4) ID3 TAG: To set up the method to display the information of the song on LCD.
1. OFF: To display the information of the song only as file name format
2. ON: To display the information of the song as ID3 TAG information when the
song having tag information is played
5) SYNC: To set up recording method on external data input recording
1. SYNC OFF: To record all the songs, which are being inputted from external source
until pushing stop button from the start of external data input, as 1 file
2. 1 SYNC: To record only the first song being input from external source and then stop
3. SYNC ON: To record and automatically classify all the songs being input from external
source to each file
6) BITRATE
1. As it is the function to control bit rate of recorded file for each use If you set the bit
rate low, recording time increases, but sound quality is down, and If you set the bit rate
high, recording time decreases, but sound quality is up. The set up in audio mode is 5
steps in range of 64Kbps ~ 224Kbps.
7) BACKLIT (BACK LIGHT): To set up back light on/off duration
1. OFF: Back light off even during key operation
2. 1 Sec: 1 SEC of Back light on during key operation
3. 2 Sec: 2 SEC of Back light on during key operation
4. 3 Sec: 3 SEC of Back light on during key operation
5. 4 Sec: 4 SEC of Back light on during key operation
6. 5 Sec: 5 SEC of Back light on during key operation
8) LCD CONT. (LCD CONTRAST)
1. As it is the function to control contrast of icon, control by 1 step in range of 01 ~ 20
is possible. (It is set to 10 steps on ex-factory)
9) LED CTL (LED CONTROL): ON/OFF of LED (flashing light in various colors) in
play or record mode
1. OFF: LED OFF
2. ON: LED ON
10) ERASE: To erase files stored in memory
1. ERS ONE: To erase only 1 song shown on LCD before menu display
2. ERS ALL: To erase all the files of selected mode
11) FORMAT: To format the memory stored in the set
1. FORMAT: To reset memory fast
2. LOW FORMAT: To format memory while checking memory block for a longer
time

12) EXIT: To exit from menu
◈ Main menu items of record mode
For each menu selection and set up, use menu button, and for main menu move, move
for sub menu selection and set up after selecting main menu, use FF and REW button.
☞ Ref: LCD display on selecting menu
<Main menu of each item > < Sub menu of each item >
1) REPEAT: To set repeat play of file
1. NORMAL: Play all the files in order and stop
2. ONE: Repeat play only selected file
3. ALL: Play all the files continuously in order
2) SYNC: To set up recording method on external data input recording
1. SYNC OFF: To record all the songs, which are being inputted from external source
until pushing stop button from the start of external data input, as 1 file
2. 1 SYNC: To record only the first song being input from external source and then stop
3. SYNC ON: To record and automatically classify all the songs being input
3) BITRATE
1. As it is the function to control bit rate of recorded file for each use If you set the bit
rate low, recording time increases, but sound quality is down, and If you set the bit rate
high, recording time decreases, but sound quality is up. The set up in record mode is 3
REPEAT SYNC BITRATE BACKLIT LCD CONT. LED CTL
ERASE FORMAT EXIT
: : M E N U : :
B A C K L I T
: : M E N U : :
3. 3 Sec
steps, 16Kbps/32Kbps/ 56Kbps.
4) BACKLIT (BACK LIGHT): To set up back light on/off duration
1. OFF: Back light off even during key operation
2. 1 Sec: 1 SEC of Back light on during key operation
3. 2 Sec: 2 SEC of Back light on during key operation
4. 3 Sec: 3 SEC of Back light on during key operation
5. 4 Sec: 4 SEC of Back light on during key operation
6. 5 Sec: 5 SEC of Back light on during key operation
5) LCD CONT. (LCD CONTRAST)
1. As it is the function to control contrast of icon, control by 1 step in range of 01 ~ 20
is possible. (It is set to 10 steps on ex-factory)
6) LED CTL (LED CONTROL): ON/OFF of LED (flashing light in various colors) in play or
record mode
1. OFF : LED OFF
2. ON : LED ON
7) ERASE: To erase files stored in memory
1. To erase only 1 song shown on LCD before menu display
2. ERS ALL: To erase all the files of selected mode
8) FORMAT: To format the memory stored in the set
1. FORMAT: To format memory fast
2. LOW FORMAT: To format memory while checking memory block for a longer
time
9) EXIT: To exit from menu
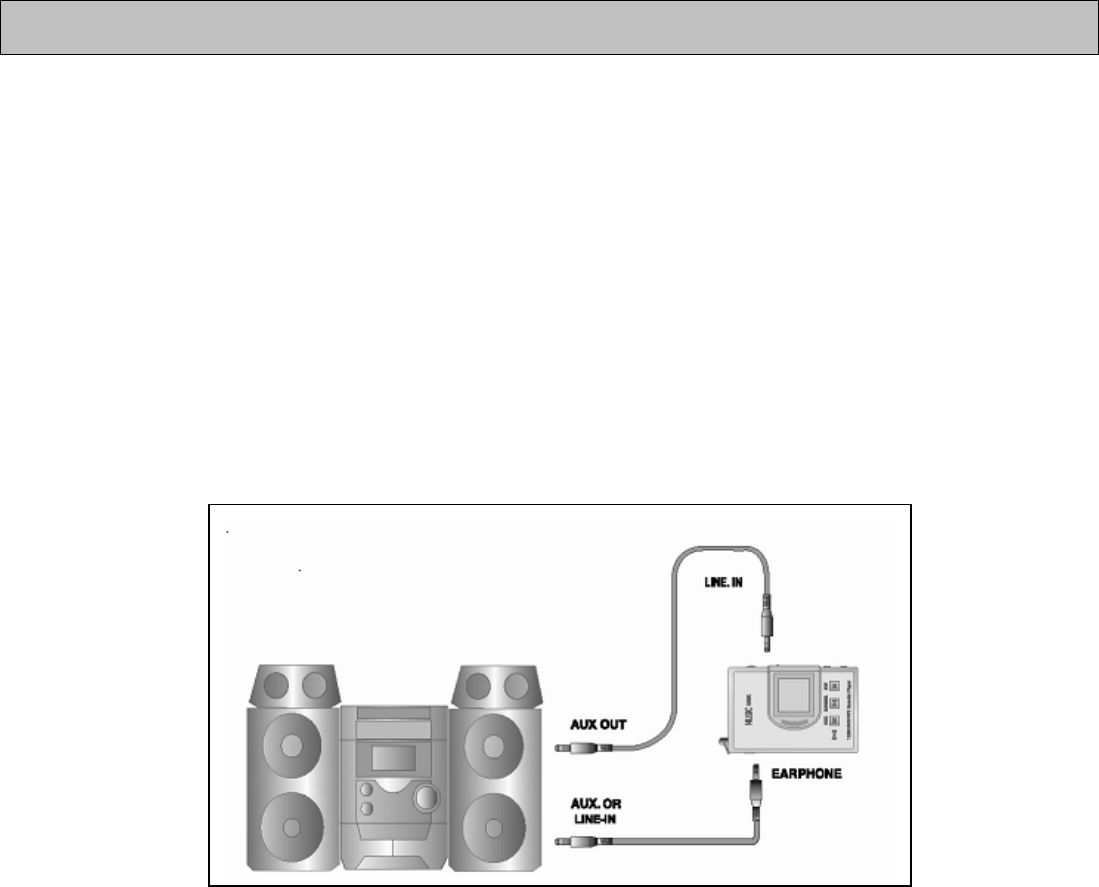
● Connecting to external device
Using audio cable you can record voice record stored in the device to a cassette,
MD, etc.
● How to connect to audio
① In case of recording from external device to the device;
Plug in the audio cable to line in input terminal of the device.
② In case of recording from the device to external device;
Plug in the audio cable to line in input terminal of the device and mic or input terminal
of external device.
How to connect to audio
※ Caution
★ In case of connecting to external device, please turn off power before hand.
★ Please read through this manual carefully before connecting to external device.
● In case of recording from external device
In case of recording from external device, please turn down volume and then, record
How to connect the device to external device
by connecting audio cable to the device.
On recording, set the volume in middle and do not change it.
● In case of recording to external device
Start recording of external device and playing the device simultaneously.
(As this timing is depending on the kinds of each device, do pretest for the operation
of device.)

* Having AUTO SEEK function, it is easy to control the device.
After selecting radio, if you push FF KEY or REW KEY for about 1 second, it stops at
receivable channel.
When you use AUTO SEEK function, correct tuning may not be done, when you use
fine tuning with REW or FF KEY.
● Radio tuning method
① By pushing mode button, select radio mode.
② LCD displays frequency. Select wanted frequency with FF/REW KEY.
● Channel storing method
① By pushing mode button, select radio mode.
② LCD displays frequency. Select wanted frequency with FF/REW KEY.
③ If you push play/pause button, channel 01 shown on frequency is out, when select
wanted channel (01-10) with FF/REW KEY and push play button, selected channel is
stored to channel 01 and frequency is displayed.
You can store up to CH10 with the same manner.
☞ Checking stored channel
If you push menu button in frequency mode, it changes to preset mode, and channel
and frequency that are stored are displayed, when you select the stored channel with
FF/REW KEY. If you push menu button again in frequency mode, it changes to preset
mode and you can select frequency.
● How to record radio broadcast
Select the wanted channel with the same manner of ①~② of radio channel set up
method.
Record it by pushing REC button. The message recorded at this time is stored to
the next of the latest file recorded in audio mode.
You can not check the data of the file being recorded, but after stop in audio
mode.
FM radio receiving function

DIASONIC MP3 ExplorerⅡ send MP3 file of PC to the device or play MP3 file and is
the manager program for DIASONIC MP3 player that manages recorded file (DMP) in
the device. It has the features as below;
● To download/upload files to MP3 player - MP3, DMP and normal data files
● The same file managing function having the same structure with window search.
● To play MP3, WAV, DMP file
● WAV -> DMP mutual conversion
● DMP -> MP3 mutual conversion
● Mail sending function
● Easy Firmware upgrade function
● Convenient using method
System requirement for DIASONIC MP3 ExplorerⅡ is as follow;
● Pentium 200MHz or more, IBM compatible
● 128MB memory or more
● 100MB or more of hard disk space
● 256bit color or more
● Win 98/ME/2000/XP(NT is not supported)
● USB port support
● CD-ROM drive
● Sound card, speaker or headphone
What is DIASONIC MP3 ExplorerⅡ?
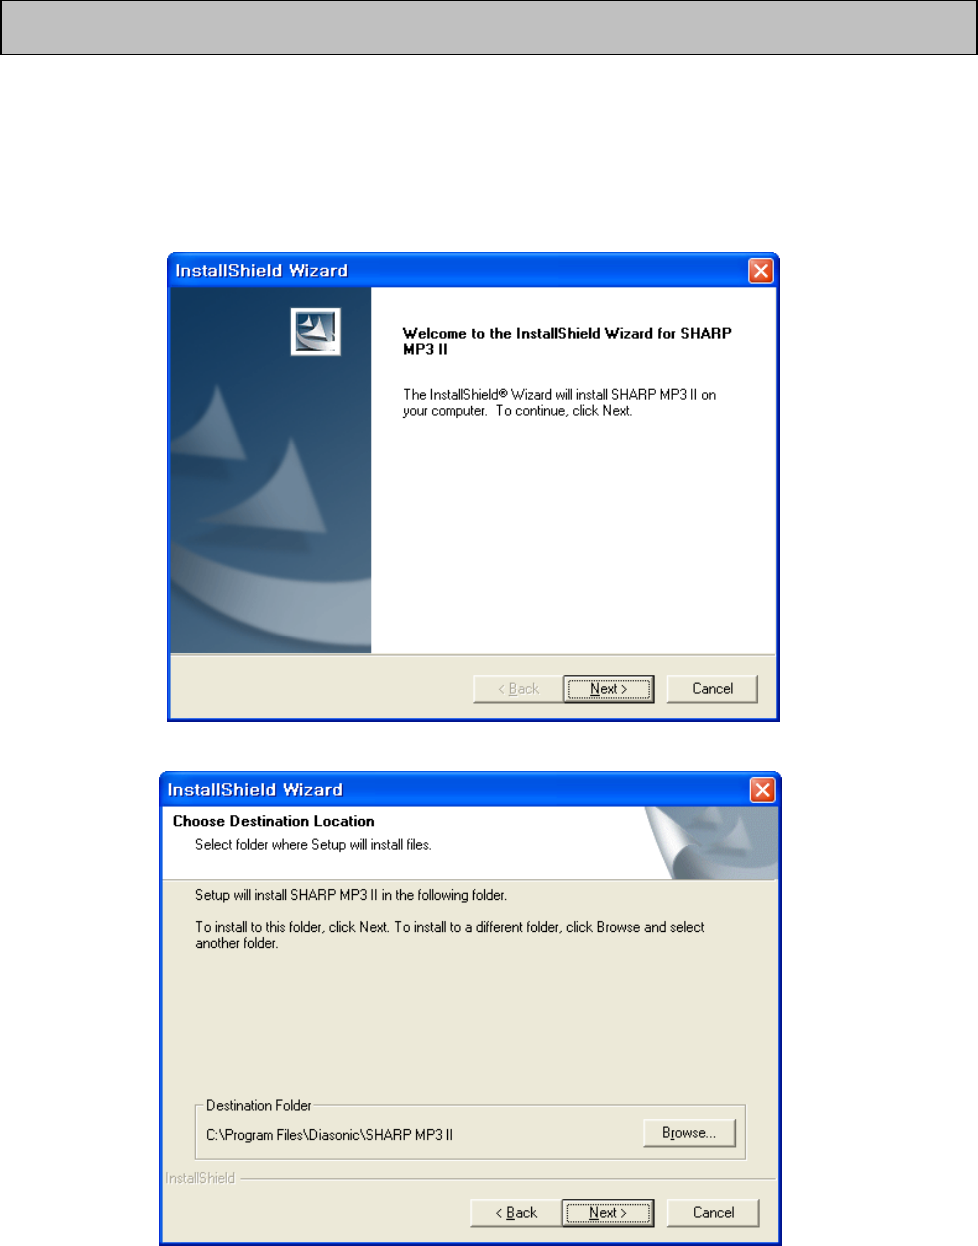
1. If you load install CD into CD-ROM drive, install program is automatically
executed. If not, please execute the execute file, “CD-ROM:₩Setup.exe”. Install is
automatically executed and if you just click in order as shown in the pictures as below,
install is completed.
○
1
②
○
3
How to install DIASONIC MP3 ExplorerⅡ
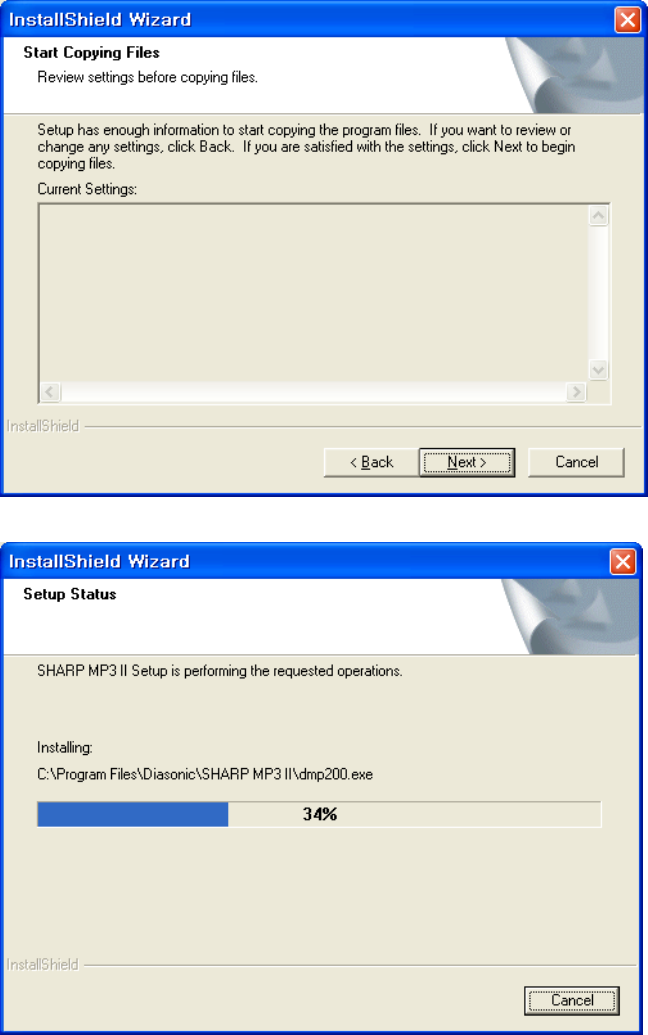
○
4
○
5
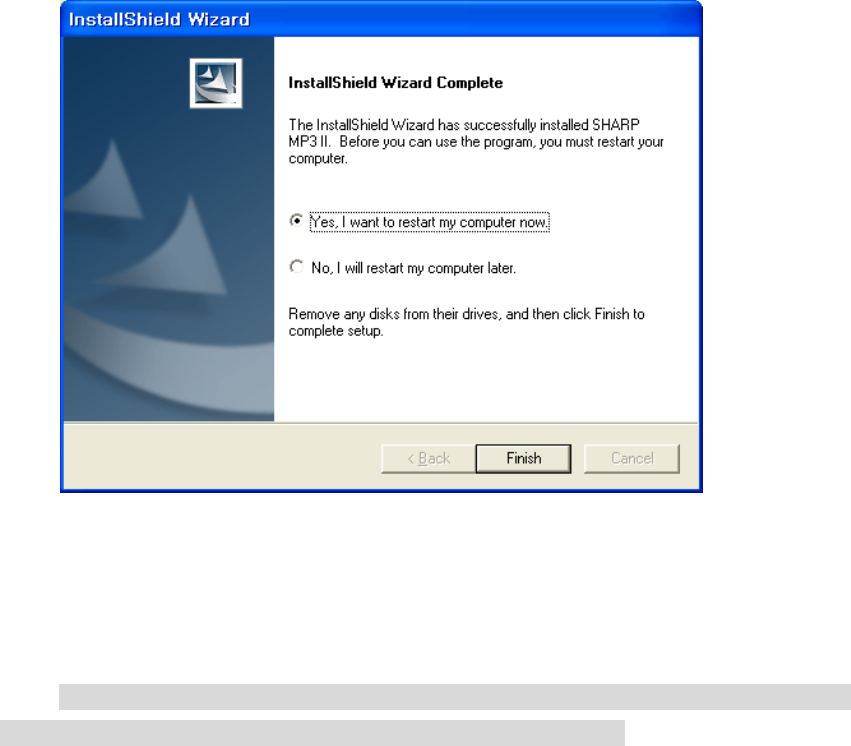
○
6 If you click [Finish] and restart PC, install is completed.
☞ To erase DIASONIC MP3 Ⅱ, you can do it by selecting [Start]-[Settings]-
[Control Panel]-[Add/Remove Programs]- [DIASONIC MP3 Ⅱ].
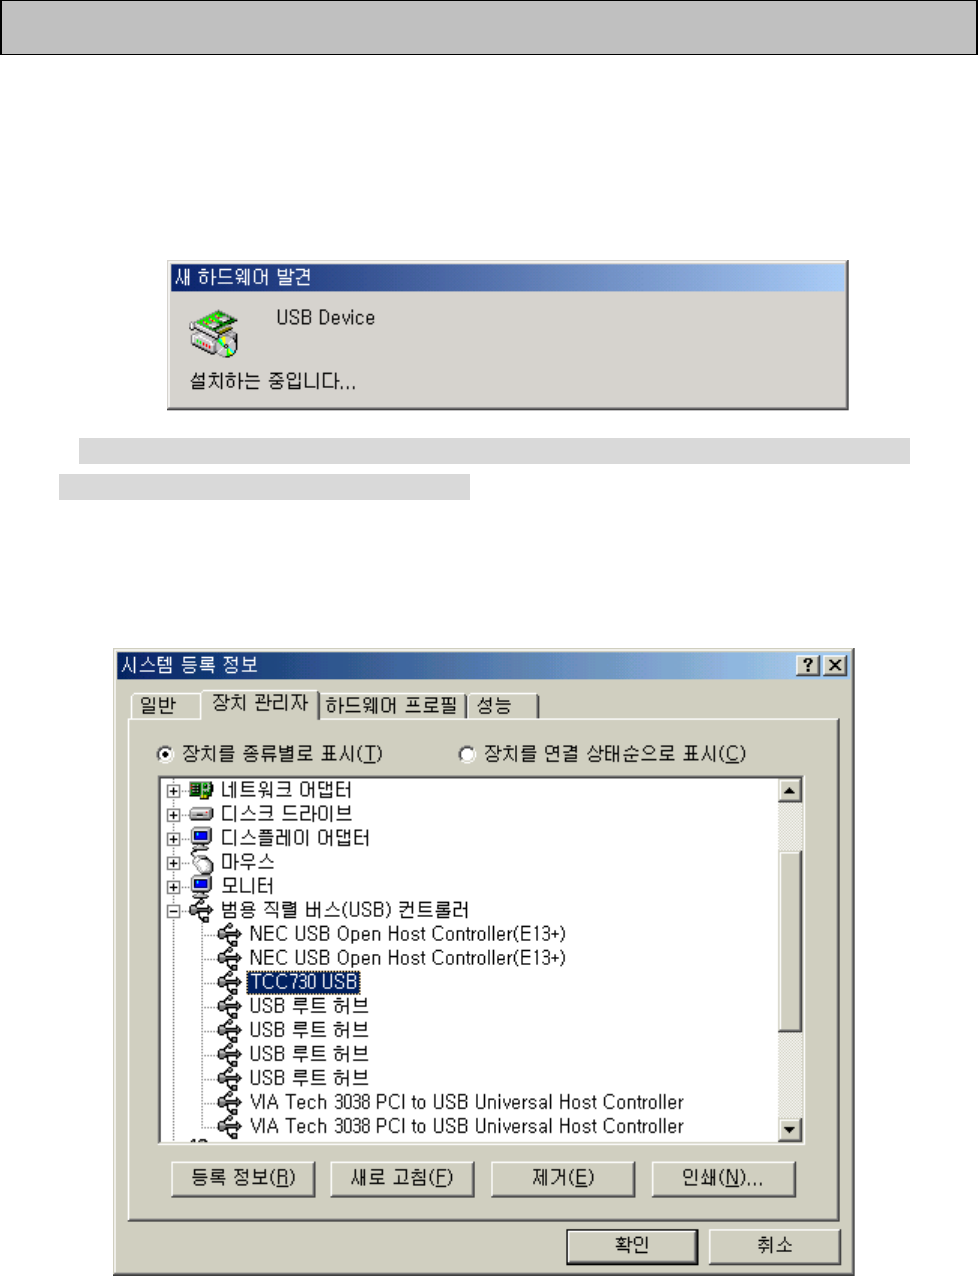
1. If you connect MP3 PLAYER to PC using USB cable enclosed with the set after
completion of program install, picture as below is shown and USB driver is
automatically installed.
☞ If USB driver is once installed through the procedure above, you need not install it
next time as it is automatically recognized.
2. You can check installed status in Device Manager of My Computer after
completion of USB driver install
HOW TO INSTALL USB DRIVER
① ② ③ ④ ⑤ ⑥ ⑦ ⑧
⑨⑩
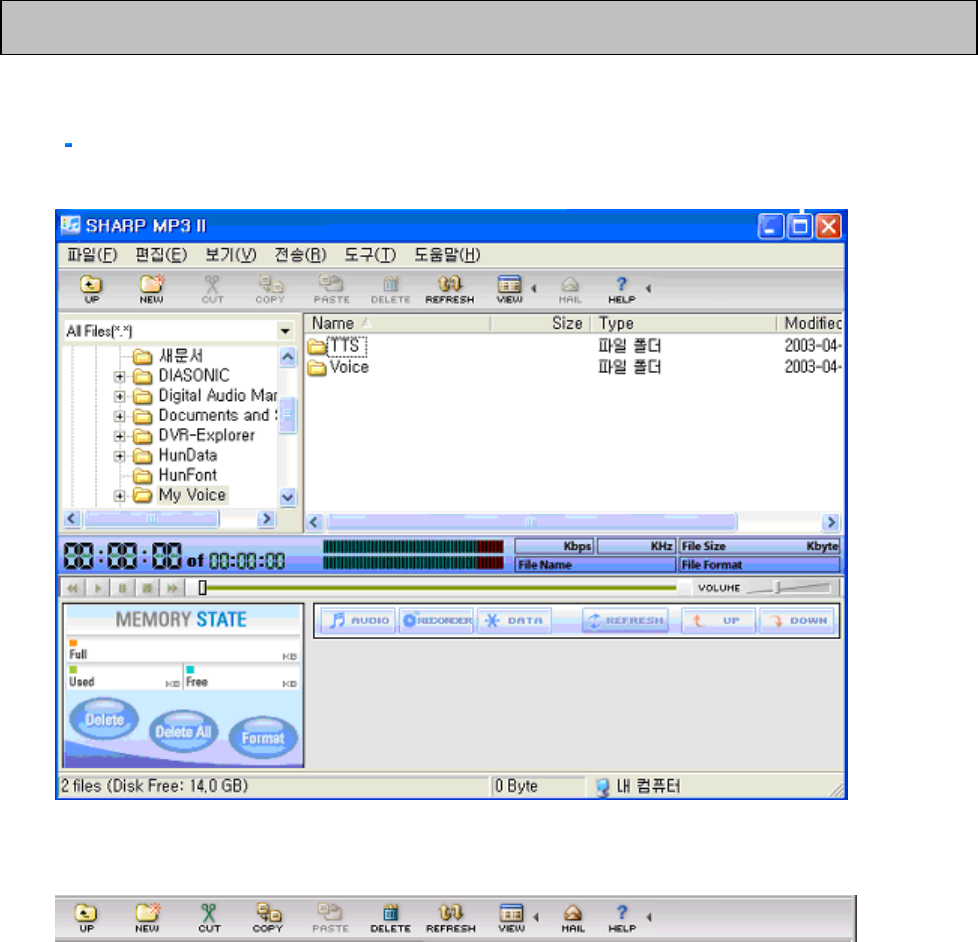
Screen of DIASONIC MP3 Ⅱ
1) Description for basic function
① To go back to the latest executing position on Search Screen
② To make a new folder (Working directory) on Search File Screen
③ To cut and store a folder or a file into Clip Board
④ To copy and store a folder or a file into Clip Board
⑤ To paste a folder or a file copied or cut by user to designated position
⑥ To delete a folder or a file. A folder or a file deleted move to Recycle Bin.
⑦ To rearrange the contents of Search Screen
Configuration of DIASONICMP3ExplorerⅡ

① ②
⑧⑨
⑧ To change a folder or a file displayed on Search Screen to Big Icon, Small Icon and
Detail View
⑨ To send a file or other file of record mode being attached to e-mail
○
10 To display Help Dialogue Box for the main menu of DIASONIC MP3 II
2) Description for play
① To display play time/recording time of selected file
② To display information of selected file
③ To move fast to previous portion of the file currently being played. It moves 1/10
of the length of the file per a click.
④ To play the selected file
⑤ To pause the file currently being played
⑥ To stop the file currently being played
⑦ To move fast to next portion of the file currently being played. It moves 1/10 of
the length of the file per a click.
⑧ Playing position is displayed as a bar. If you move cursor to a position and click,
the bar moves to the position. You can play as you move a position with mouse.
⑨ Volume control button
3) Description for file converting function
① Conversion A (*.WAV -> *.DMP)
It converts *.WAV format file to *.DMP format file.
Select a file to be converted and push file converting button in file menu, then, the
selected file is converted to *.DMP format file and stored in the current folder.
② Conversion B (*.DMP -> *.MP3)
It converts *.DMP format file to *.MP3 format file.
Select a file to be converted and push file converting button in file menu, then, the
selected file is converted to *.MP3 format file and stored in the current folder.
☞ As due to compression loss, 2 times or more of conversion lower the sharpness of
③ ④ ⑤ ⑥ ⑦
①
⑧ ⑨ ⑩
○
11 ○
12
original sound, please escape from frequent conversion, and if it inescapable, you better
store original file.
4) Description of other management screen
① Define the file to be displayed.
② Computer information and the contents of the folder are displayed.
③ File management screen: It shows computer information and the sub contents of the
folder.
④ It shows the full size of memory of MP3 player.
⑤ It shows the size of memory of MP3 player currently being used.
⑥ It shows the size of memory available in MP3 player.
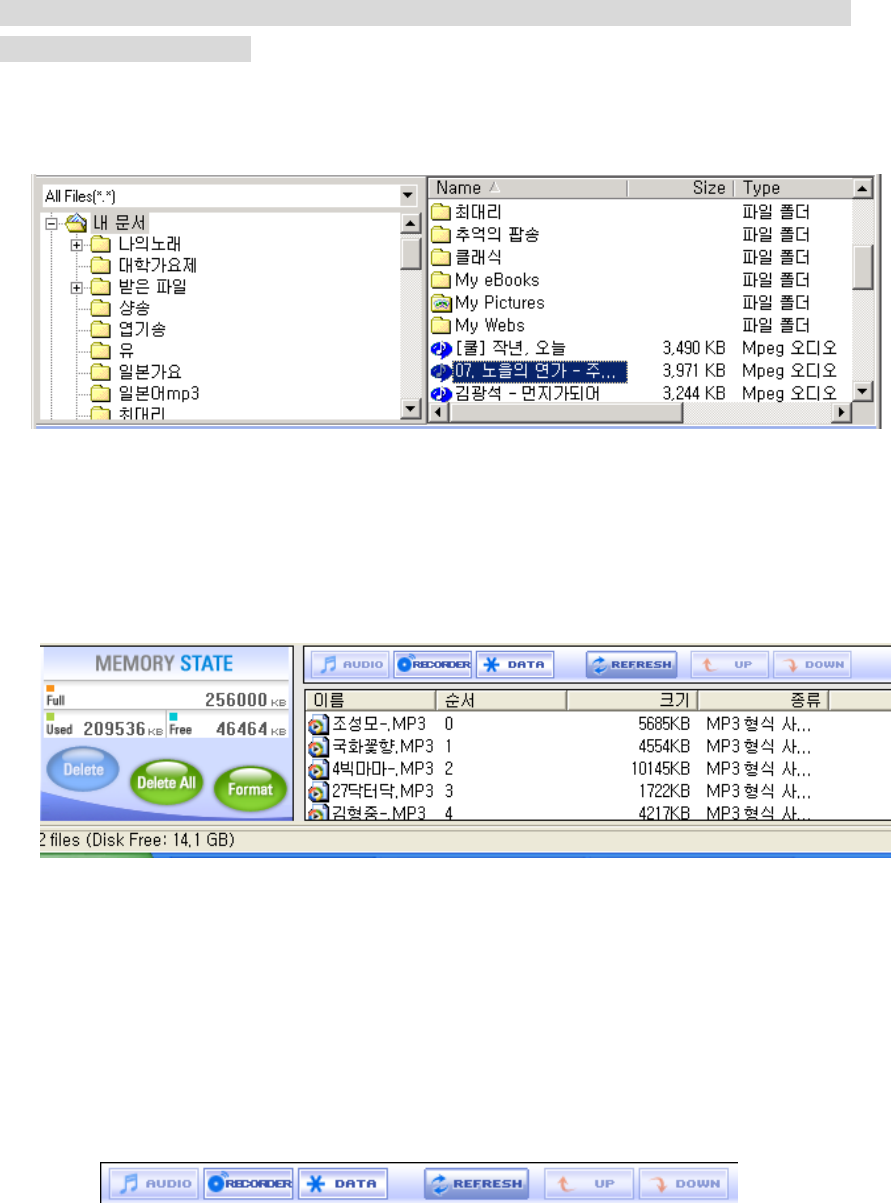
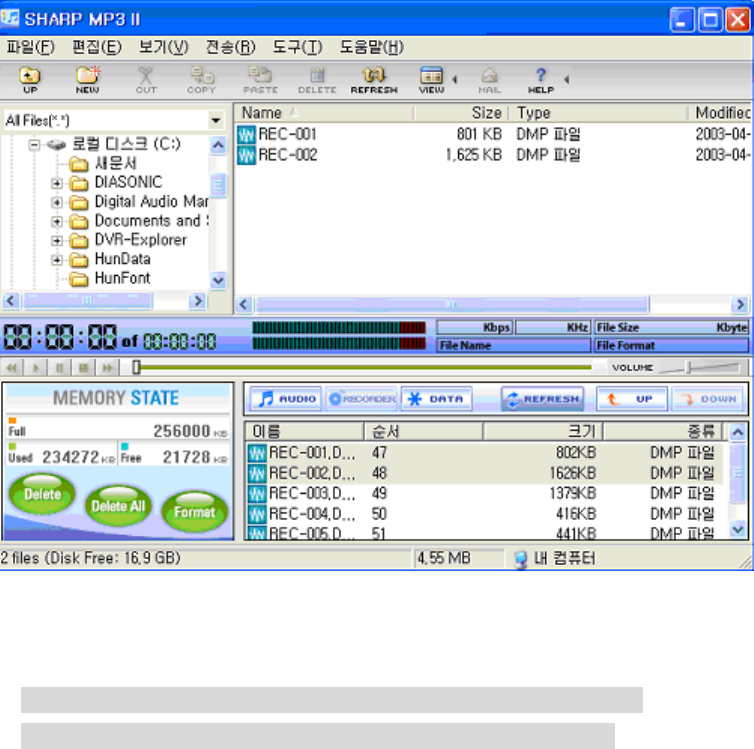
⑦ Flash memory management screen: It shows the files stored in the selected
folder (audio, recorder, data) including name, order, file size and type.
③
②

⑧ Folder management screen: It shows the contents (*.MP3) stored in audio mode
of MP3 player.
⑨ Folder management screen: It shows the contents (*.DMP) stored in record mode
of MP3 player.
⑩ Folder management screen: It shows the general data stored in MP3 player.
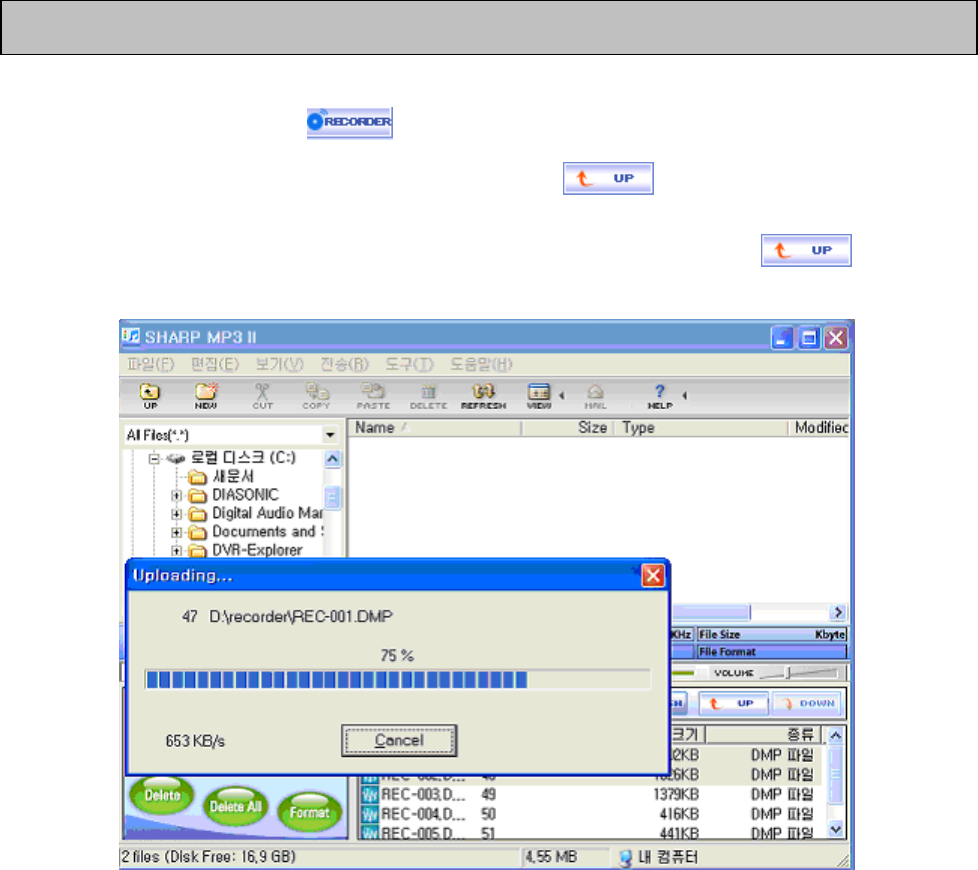
⑪ It moves *.DMP stored in MP3 player to PC (upload).
⑫ It moves files stored in PC to MP3 player (upload).
☞ MP3 file shall not be uploaded in accordance with Copyright.
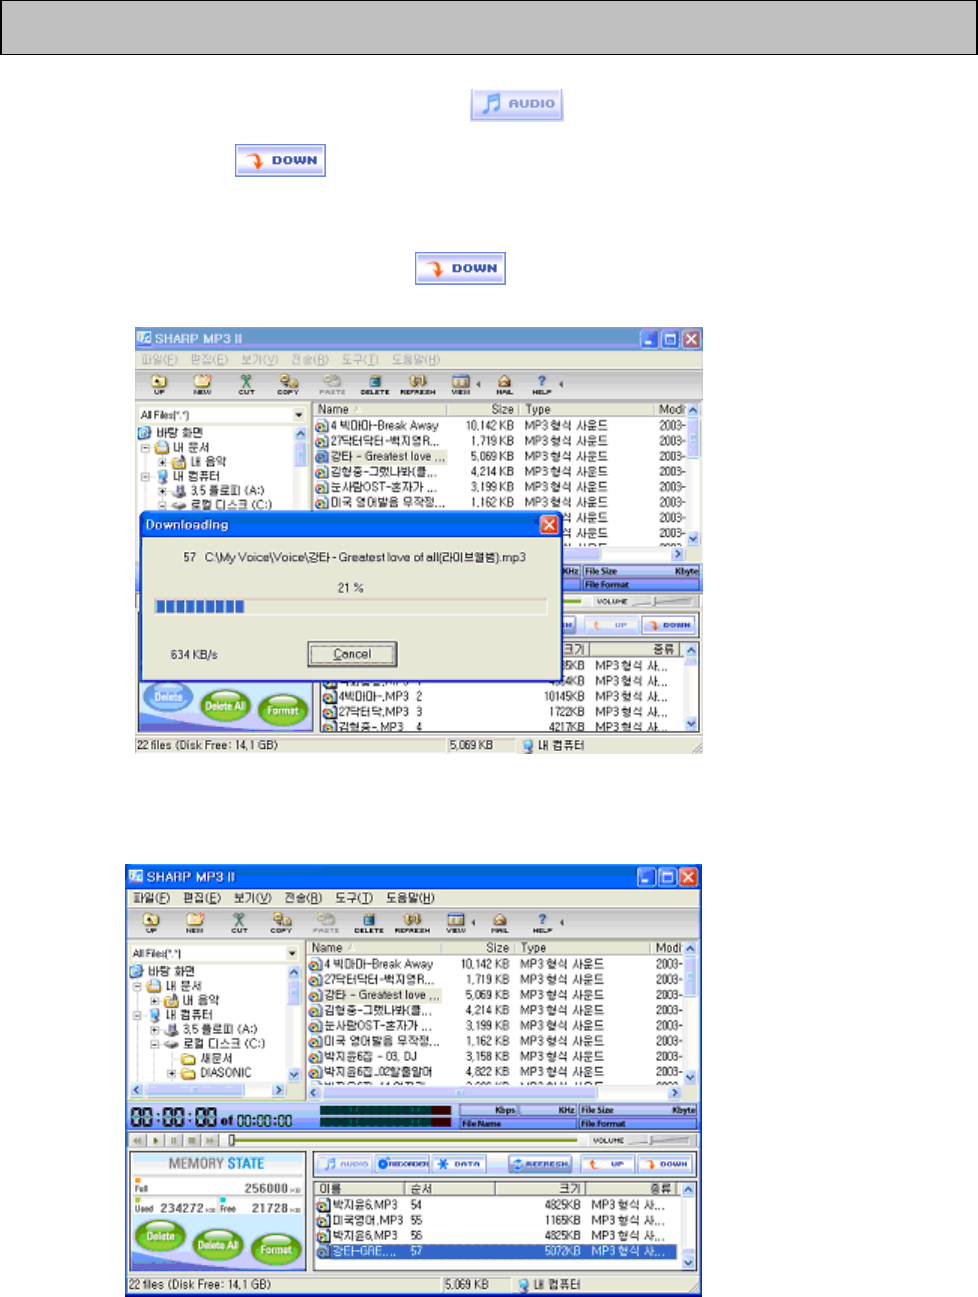
It is very simple. Select MP3 file and then in file management window above.
After that, click icon in flash memory management window and then it is
completed as below;
1. Select MP3 file to be sent and icon, the file is sent to flash memory as
below;
2. When sending is completed, sent file is displayed on flash memory management
window.
Sending MP3 file

☞ Only *.MP3 and *.WMA file can be sent to music folder of MP3 player and
*.DMP to voice folder. And various files with various kinds of extender can be stored in
data folder.
☞ Caution: Do not disconnect USB cable during sending file.
It is very simple. Select in folder management window above, DMP file to be
sent in flash memory management window and click icon in flash memory
management window, then it is completed.
1. Select DMP file in flash memory management window and click icon,
then the file is sent to designated directory of file management window.
2. When sending is completed, sent file is displayed on file management window.
Sending DMP file through PC
☞ MP3 file shall not be uploaded in accordance with Copyright.
☞ Caution: Do not disconnect USB cable during sending file.
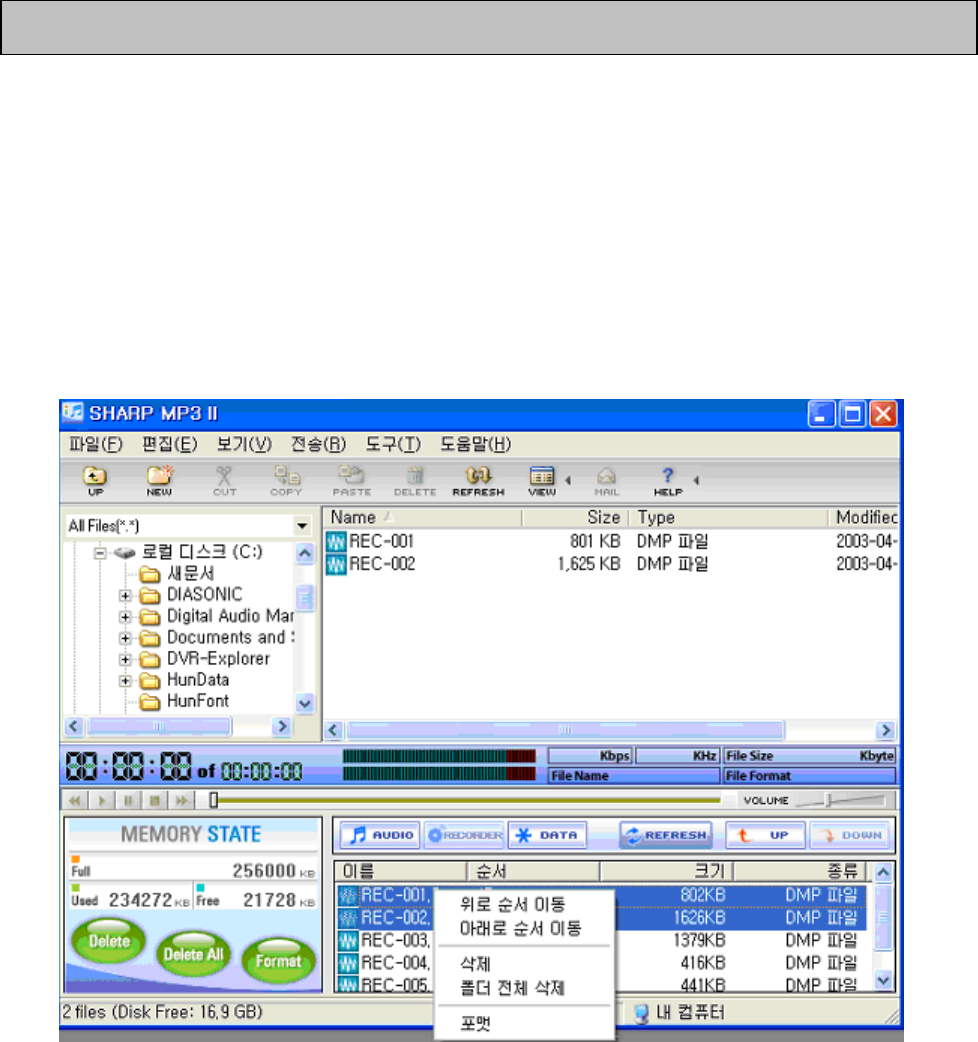
The method to erase MP3 file and DMP file stored in flash memory of MP3 player is the
same with the one of erasing method in the searcher. Select one or more file stored
flash memory with the left button of mouse and click, when if you select to erase the
file, the file is erased from flash memory management window and the file stored flash
memory is erased.
1. If you select the file to be erased and push the right button of mouse, then it is
displayed as below;
Erasing MP3 file and DMP file
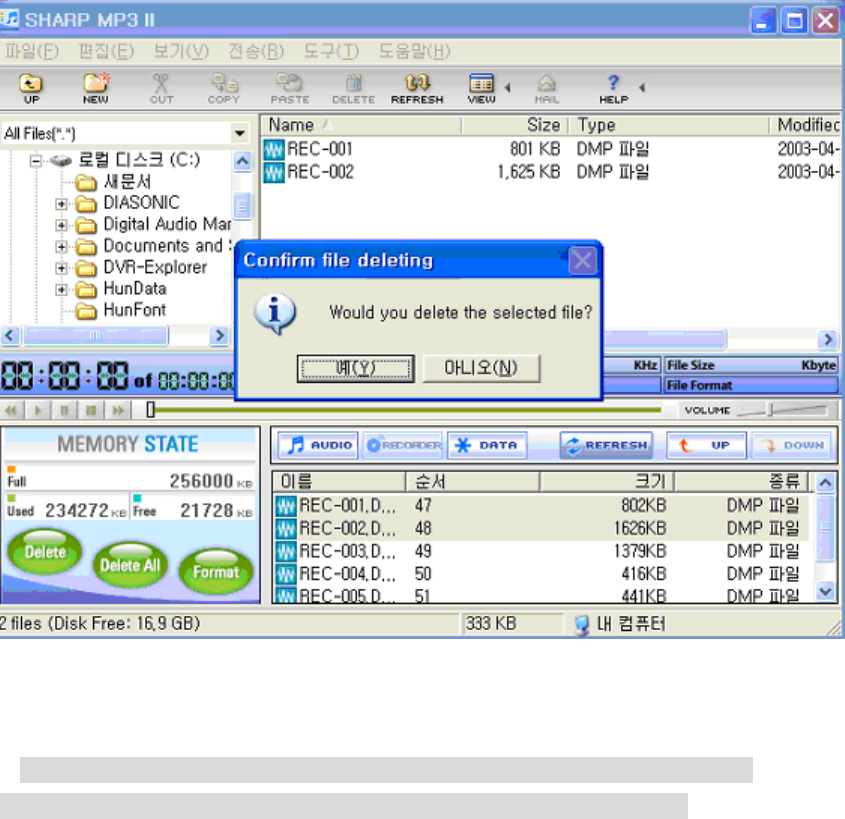
2. Confirmation for the erase is checked again. To erase the file, click ‘Yes’.
3. After for a while, the file selected from flash memory is erased
☞ Caution) 1. Deleted file can not be recovered. Be careful for the deletion.
2. Caution: Do not disconnect USB cable during sending file.
As like hard disk formatting, flash memory used in the device is also formatted. If you
do format flash memory, all the data stored in memory disappears.
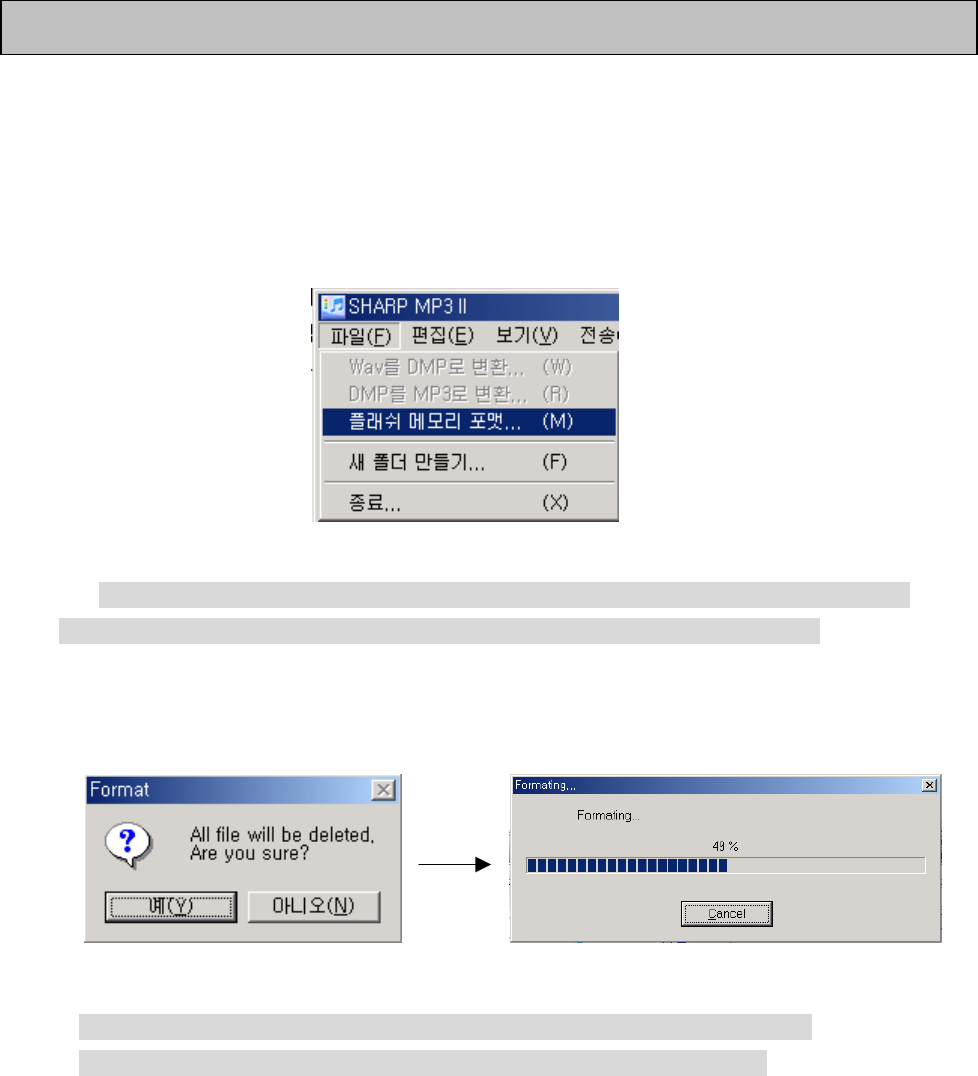
1.Select [file] – [flash memory format] in the menu of DIASONIC MP3 Ⅱ.
☞ Select vacant space in flash memory management screen and click the right
button of mouse, then popup menu appears. You can do format in the menu too.
2. Format box appears as below and when you click ‘Yes’, format starts.
☞ Caution) 1. Deleted file can not be recovered. Be careful for the deletion.
2. Caution: Do not disconnect USB cable during sending file.
Flash memory format
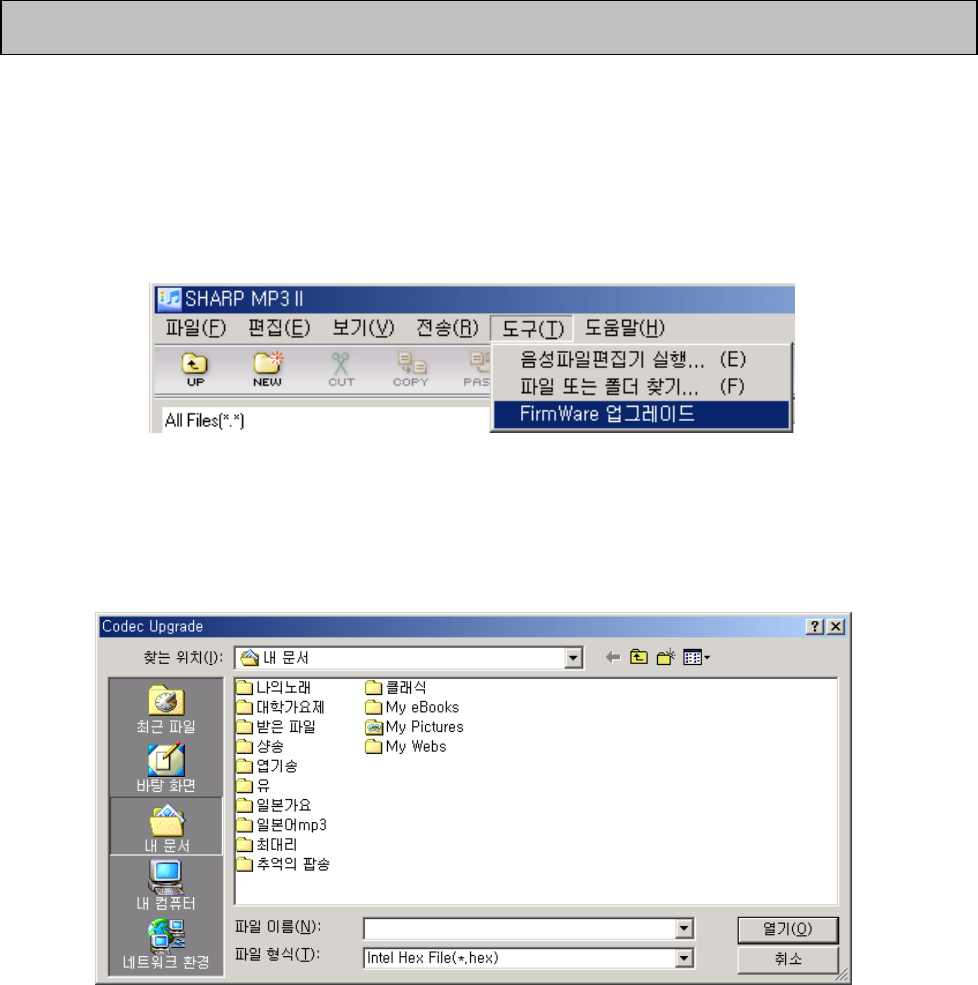
It is simple to upgrade FirmWare.
Upgrade order is as below;
1. Select [tool] – [FirmWare Upgrade] in the menu of DIASONIC MP3 Ⅱ.
2. When the window as below shows, define pass of the relevant FirmWare Upgrade
File(*.hex) and click [open].
3. When you click [open] button, the window as below displayed and FirmWare
FirmWare Upgrade
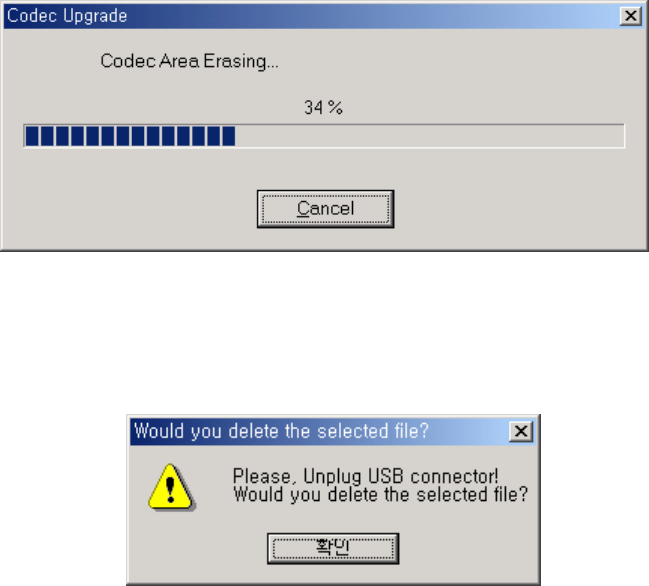
Upgrade proceeds.
4. When FirmWare Upgrade is completed, the dialogue box as below appears. Click
‘Yes’, disconnect USB cable and restart the device, then upgrade is completed.

Classification Item Specification
Model name SMP-200EN
MPEG
1/2/2.5
layers
32 ~ 320 Kbps Play file format
WMA 64 ~ 192 Kbps
Media 128M or 256M
File Q’TY 256ea (MP3 + WMA)
Channel Stereo
Frequency response 20Hz ~ 20KHz
Distortion 0.3 ± 0.05 (1KHz 0dB input)
Signal to noise ratio 80dB (1KHz 0dB input at use LPF
30KHz)
Earphone output 5mW (L) + 5mW(R): 16Ω Max.
volume
Download speed Max. 4Mbps (500Kbyte)
EQ Normal, Classic, Live, POP, Rock
Searching play (Intro function) Play 10 SEC per each track
Repeat play 1 song play, all song play, all song
repeat play, block repeat play,
random play
MP3
Play speed Fast (115%), normal (100%), slow
(80%)
Recording method Built in Mic or stereo line in cable
File Q’ty 256EA
CD SYNC. Function (when use
line in)
SYNC, 1 SYNC, SYNC off (normal)
Audio mode Max. 260min. (64Kbps), 70 Max.
min. (224Kbps)
Recording
Time 128M
Record mode Max. 1060min. (16Kbps), 300 Max.
min. (56Kbps)
Specification

Audio mode Max. 520min. (64Kbps), 140 Max.
min. (224Kbps)
256M
Record mode Max. 2120min. (16Kbps), 600 Max.
min. (56Kbps)
Audio
mode
44.1 KHz sampling 64Kbps ~
224Kbps
Record
mode
16 KHz sampling
16Kbps/32Kbps/56Kbps
Sound quality
FM radio
mode
16 KHz 56Kbps
Frequency range International standard 87.5 ~ 108
MHz
Earphone output 5mW (L) + 5mW(R): 16Ω Max.
volume
Signal to noise ratio 55dB at 1mV 98.1MHz
FM radio
(stereo)
Receiving type Earphone cord antenna
Panel FSTN, 0.45T (total 1.5m/m Max)
Resolution 80 X 16 2 line with icon
Back light Blue
LCD
Language Korean, English, Japanese, Chinese,
etc
Communication USB V 1.1
CUP 200Mhz or more, RAM 64M or
more
20M or more of hard disk space
available
System configuration
CD-ROM drive, USB port (1 type)
Sound card Sound blaster 16 compatible
Earphone Φ5.5 earphone stereo IMP less than
16Ω
Display Resolution 640 x 480 or more
PC interface
OS Win 98/98SE/2000/ME/XP

Classification Item Specification
FirmWare
upgrade
USB port Support
LR03 Alkaline battery 1EA (“AAA” size or UM-4) Power supply Power: 1.5V
DC adaptor (DC 3V 200mA)
MP3 play 7Hours (128Kbps, middle volume)
Battery
duration
Volume Digital volume (30 steps)
LED 2 color LED X 3EA
Mode, play/pause, stop, menu, FF, hold Key spec.
REW, volume+/-, record, play speed/block repeat
Accessories External device connecting cable (1EA)/install CD
(1EA)/neck strap (1EA)/stereo earphone (1EA)/battery
(1EA)/USB cable (1EA)/manual 1EA
Dimension 44.4 (W)X 68 (H) X 12.9 (D) mm
General items
Weight (g) excluding battery

When there is a malfunction of the device during use
Please contact a dealer or Diasonic.
Phone: 82-31-474-0852 / Fax: 82-31-474-0856 / E-mail: diasonic@diasonic.com
● You can have free service repair in accordance with the rule as below,
When there is a malfunction of the device during use within validity, please apply for
repair service to the service center or the dealer with this warranty card.
If purchasing date, the name of the dealer, etc, are missed on the warranty card, it is
not valid. You must check the contents and when there are missed items, ask the dealer
for that.
This card is not delivered again, so please keep it carefully.
<Rules on free A/S service>
1. The device is made under the strict quality control and test procedure.
2. When malfunction of the device happens as though you use it properly within
validity, the dealer or the manufacturer provides you free A/S service.
3. The cases below are charged even in validity;
1) No warranty card
2) When purchasing date, the name of the dealer, etc, are missed on
the card or the contents are corrected randomly
3) For any damage arising from misuse
4) For any damage arising from repair or modification done by user
5) For any damage arising from a fire, environmental pollution, earthquake,
storm and flood and other natural disaster.
6) For any damage arising from battery leakage
7) When battery is exhausted and battery exchange is needed
4. This warranty card is valid within Korea
A/S
Warranty Card (rule)
(Caution on shipping)
When shipping, please care the items below;
1. If warranty card is within the validity, please envelop it into the product box.
2. Please do care to protect the product from any damage arising from shipping
by wrapping the product with shock-absorbing material. Postage, wrapping cost, etc,
are on customer.
3. To prohibit loss, please use registered mail.

WARRANTY CARD
Product name: MP3 PLAYER
MODEL: DMP-200EN
Validity: 1year
Purchasing date:
● For any malfunction of the device, please contact a dealer or Diasonic.
● Compensation rule for exchange, repair (charge/free), refund and
part exchange is in accordance with that of the Consumer Protection
Law.
DIASONIC Co., Ltd.
● Address: 321-43, Seoksoo-dong, Manan-gu, Anyang-si, Kyeonggi-do
● Contact:
- Phone: 82-31-474-0852
- Fax: 82-31-474-0852
- E-MAIL: diasonic@diasonic.com
Homepage : http://www.diasonic.com
This warranty card is valid within Korea and as it is essentially needed
for repair service, please keep it properly.
Name
Address
Purchaser
Phone
Name
Address
Dealer
Phone