Diasonic Technology Co PDVR1000 POCKET VIDEO RECORDER User Manual PDVR 1000 Manual
Diasonic Technology Co Ltd POCKET VIDEO RECORDER PDVR 1000 Manual
User Manual
User Manual
Model: PDVR-1000
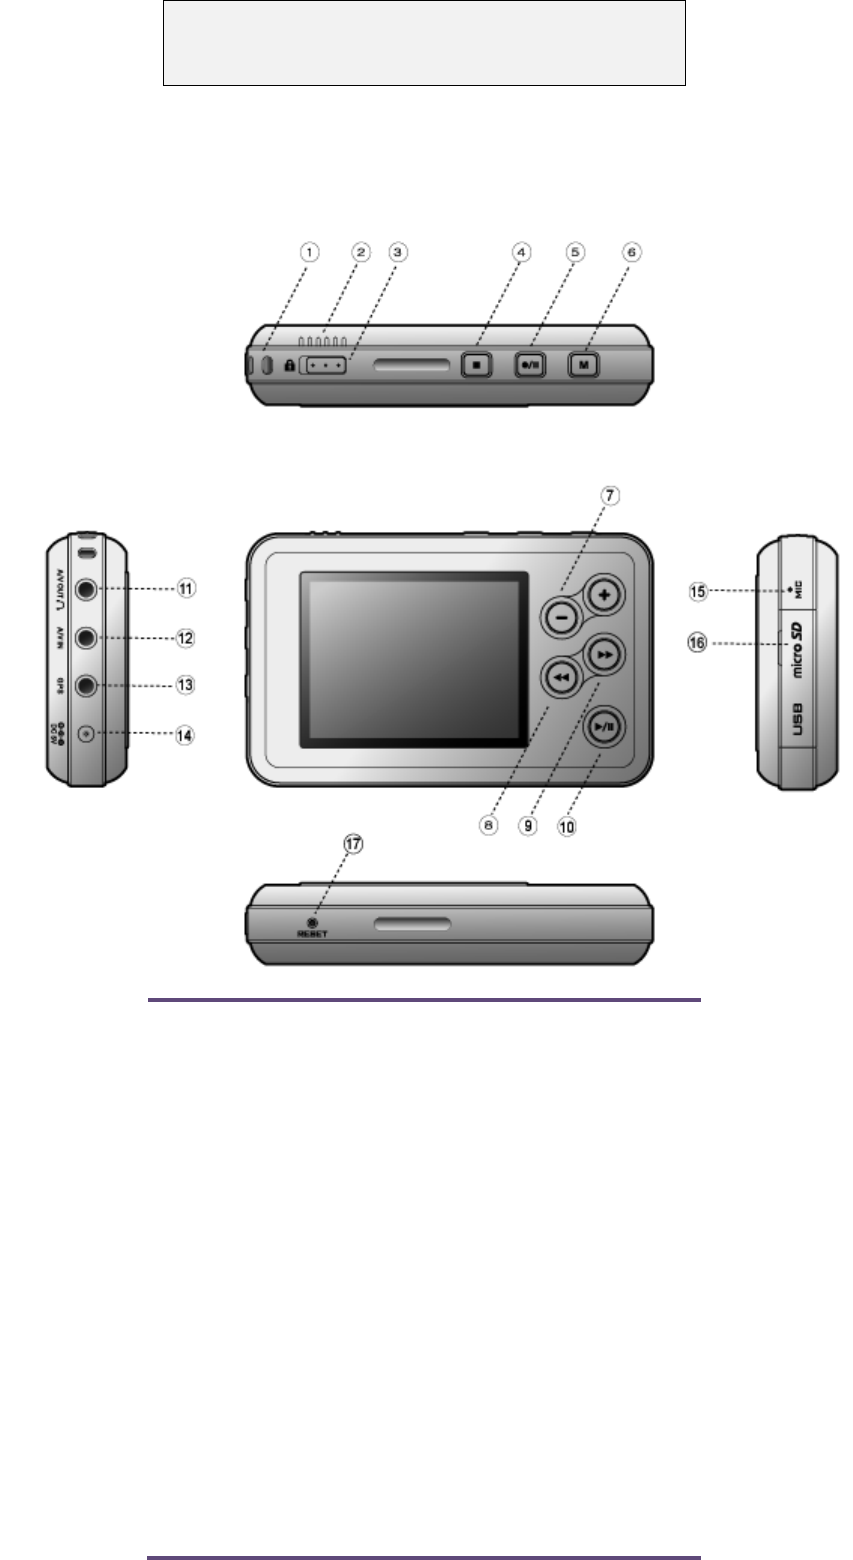
1. Name of each part
① Neck Strap Holder
② Built-in Microphone
③ Hold Key
④ Stop/ESC
⑤ Rec./Pause
⑥ Menu in the recording modes
⑦ Volume down
⑧ Volume up
⑨ RW
⑩ FF
⑪ Play/Stop
⑫ A/V Out
⑬ A/V In
⑭ Remote Controller
⑮ DC Jack
16 micro SD card slot/USB jack
17 Reset
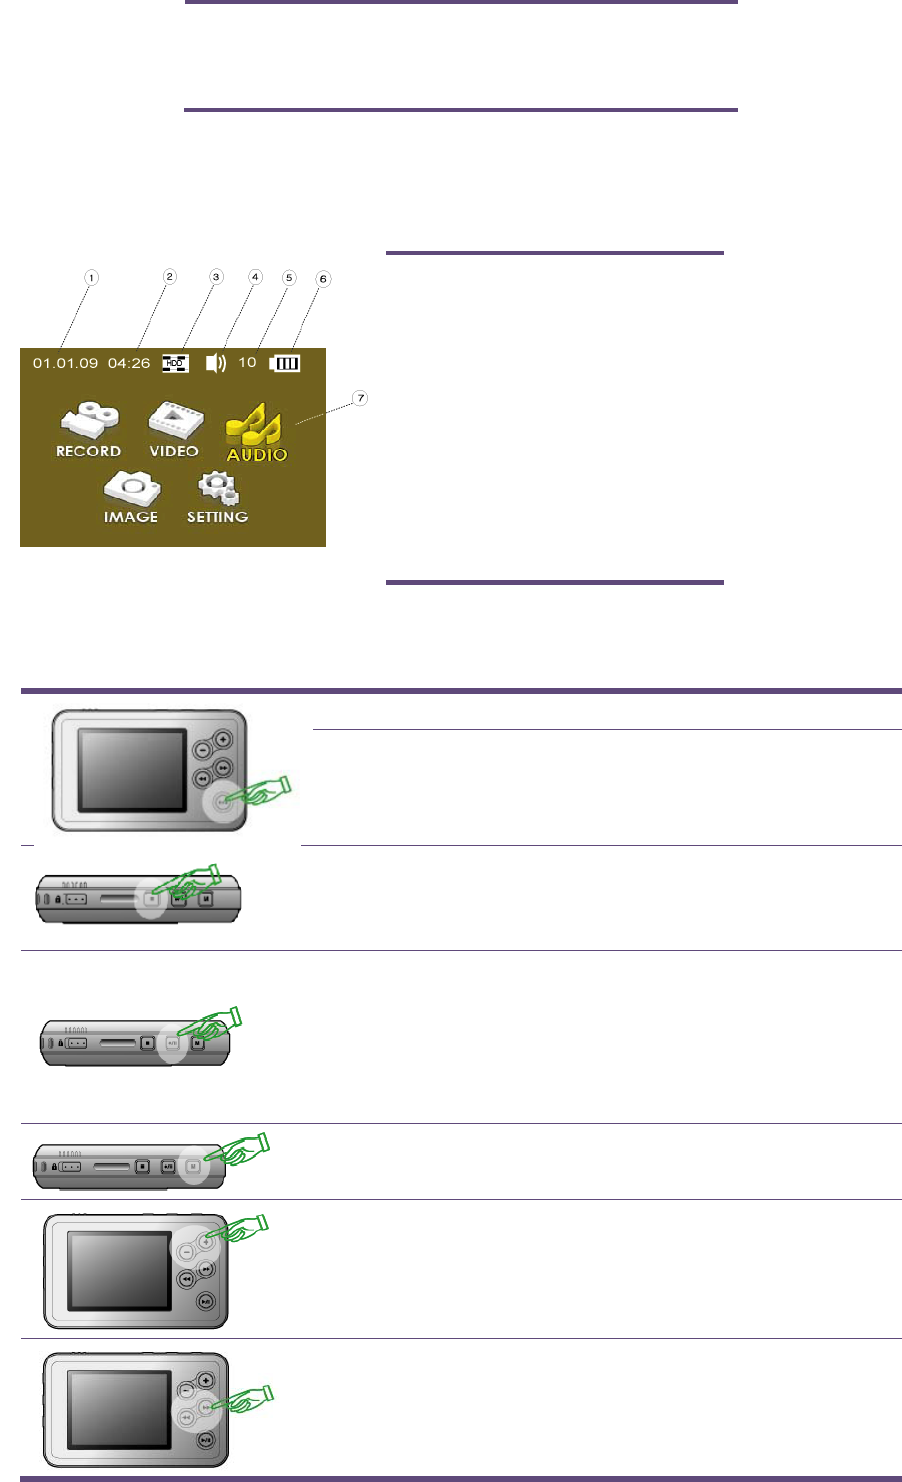
2. LCD
① Date
② Time
③ Current Memory Storage
④ Speaker On/Off
⑤ Volume Level
⑥ Battery Status
⑦ Current selected menu
3. Quick operation of each button
Long Key Short Key
- Power On/Off
- Play/Pause in Playing a file.
- Enter/Select in Menu & file
list
- LCD Off - Stop playing or recording.
- Escape out of a current
menu.
- Preview in connecting
camera
- Start/Pause recording video
or audio in connecting
camera
- Enter into submenu list
- Move to upper or lower
menu or file.
- Volume Up or Down in
playing a file.
- Move to upper or lower
directory.
- FF or RW in playing
- Change a setting value.
☞ Long key: Hold a key for 2-3 seconds / Short Key: Hold a key for 1 second
4. Structure of Main Menu
RECORD VIDEO AUDIO IMAGE SETTING
1) RECORD
- Record an input signal (Video & Audio) from the connected camera.
- The file recorded in this mode is stored at the Video Folder.
2) VIDEO
- A recorded video file(s) is stored in the Video folder and the file(s) is played back in this menu.
3) AUDIO
- A recorded audio only file(s) is stored in the Audio folder and the file(s) is played back in
this mode.
4) IMAGE
- An image file(s) taken by Snap Shot function is stored in the Image folder and the file(s) is
checked in this mode.
5) SETTING
- Use can set up most of a setting value related to the system menu here.
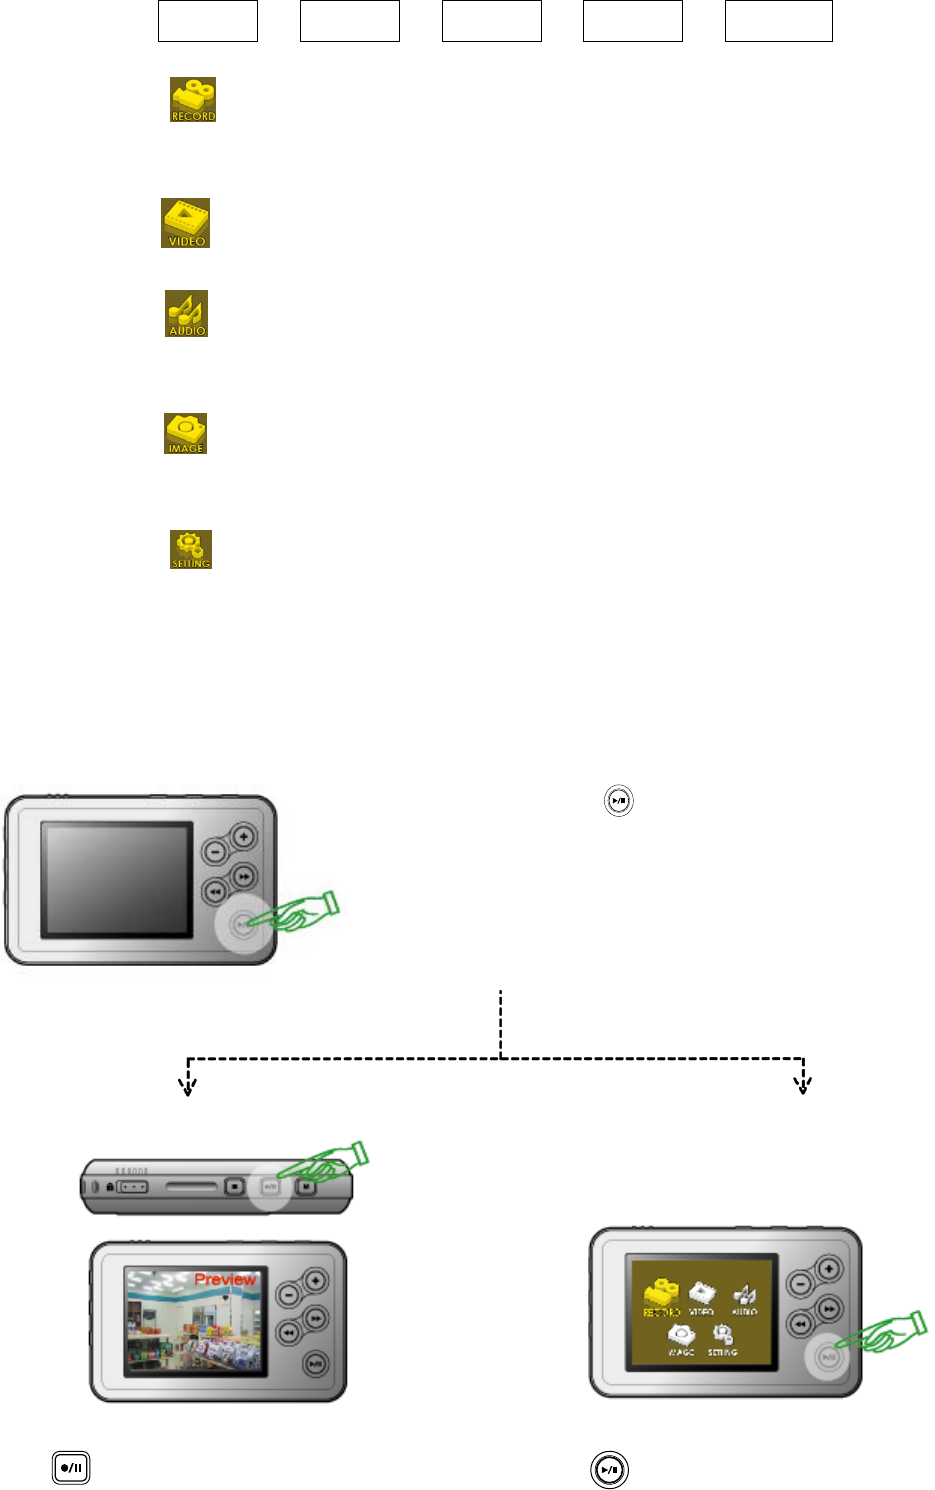
5. Quick Operation of main functions
1) Video Recording(Video or Video + Voice)
Turn it on by pressing
Preview
Press to start recording. If so, Live image from
Preview
Press to start recording. Live image from a
a camera is shown on the LCD with "Preview" in red
on the right of the LCD before recording.
camera is shown on the LCD with "Preview" in red
on the right of the LCD before recording.
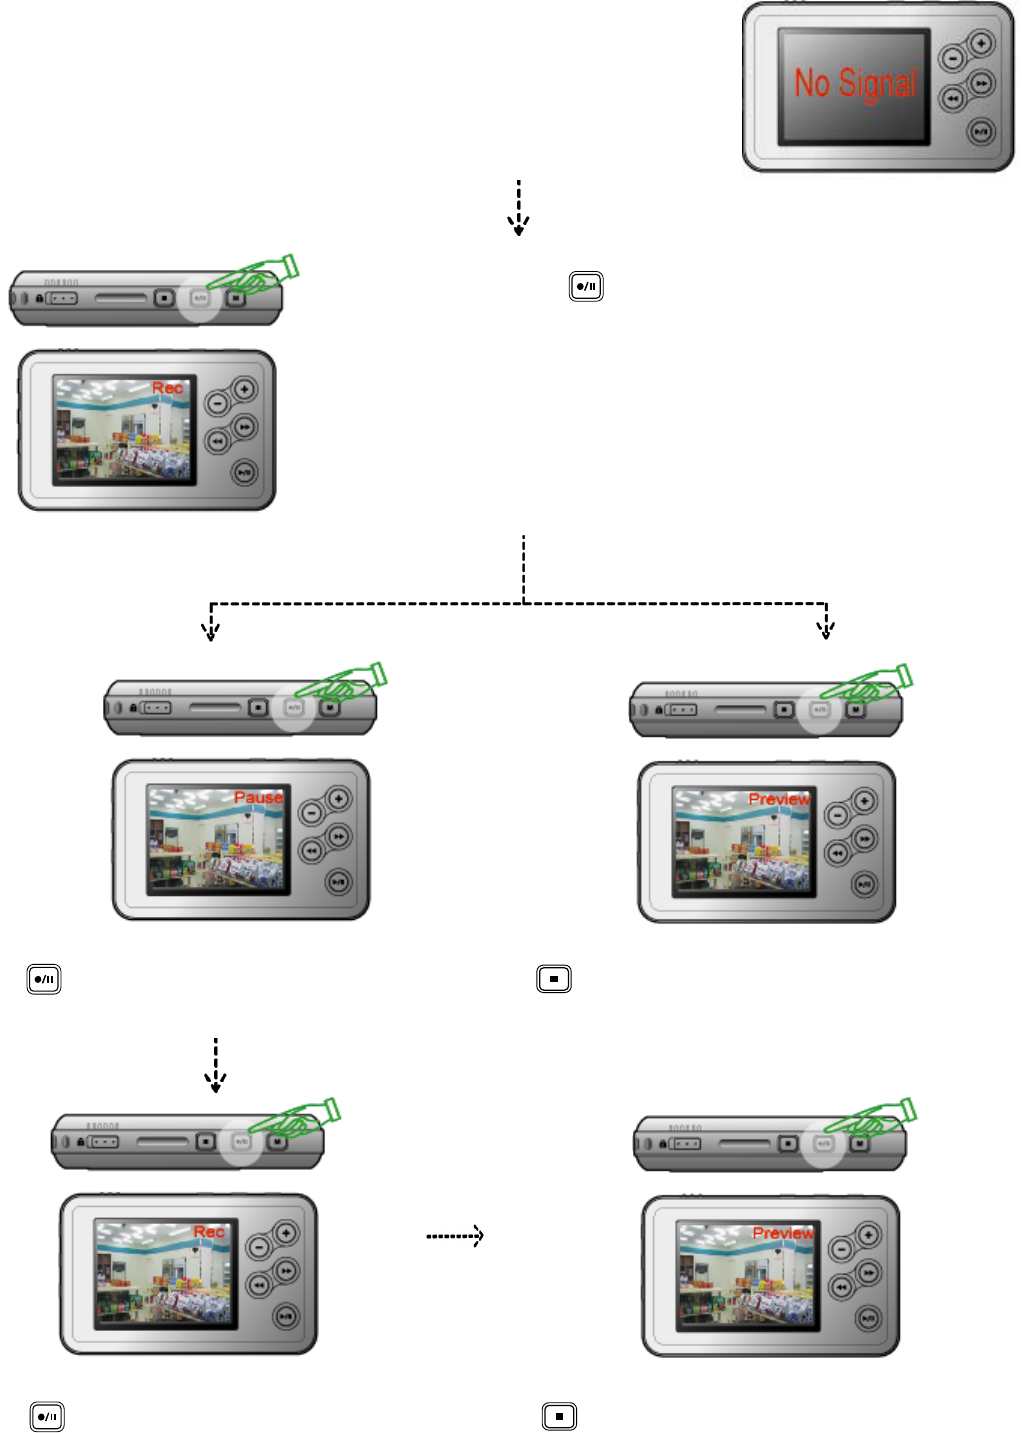
☞If a camera is not connected or connected in loose, "No Signal" will be
displayed in blinking several times instead of a image and then goes back
to main menu display.
Recording
Recording starts when is pressed once again with
"Rec" in red on the right of the LCD.
Pause
If is pressed once again, recording is in pause
with Pause in red on the LCD.
Stop Recording
If is pressed the recording is in stop and then turn
it to the preview display.
Re-start recording
If is pressed once again, recording is started
again.
Stop Recording
If is pressed the recording is in stop and then turn
it to the preview display.
☞ Making a new file while recoding
If pressing or while recording, the recording file is separated with a new file name.
The recording file is stored in “Video Folder”
☞ Changing a setup value
While recording, Recording time & Microphone sensitivity are changeable by pressing without
stopping the recording.
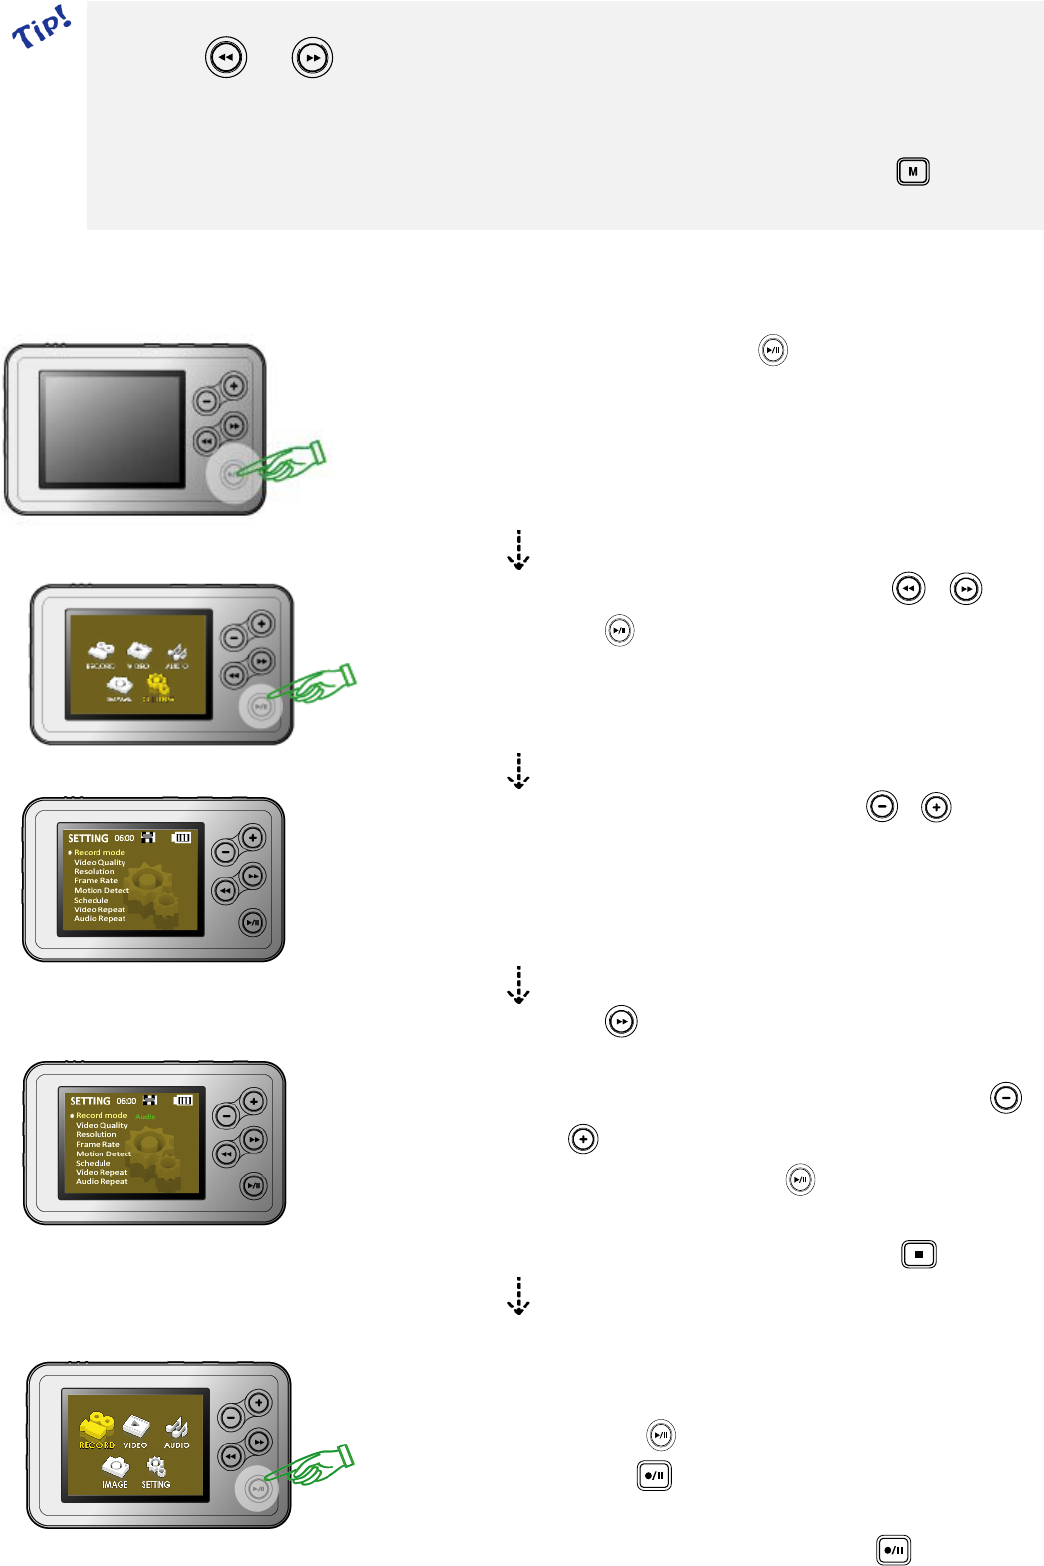
2) Audio Recording(Voice)
Turn it on by pressing
Move to “Setting” Menu by pressing or .
Press to enter into a recording mode setting for
Voice only.
Go to “Record mode” by pressing or .
Press to enter into submenu
list(Video+Audio/Video/Audio).
Change the list of mode to “Audio” by pressing
or .
Select “Audio” by pressing , if so, “Audio” is
disappeared.
Get out of the setting list by pressing .
Recording 1.
In the main menu display,
- “RECORD”
- Press ->monitoring.
- Press to start recording and press it again
for pause.
- Re-start recording by pressing .
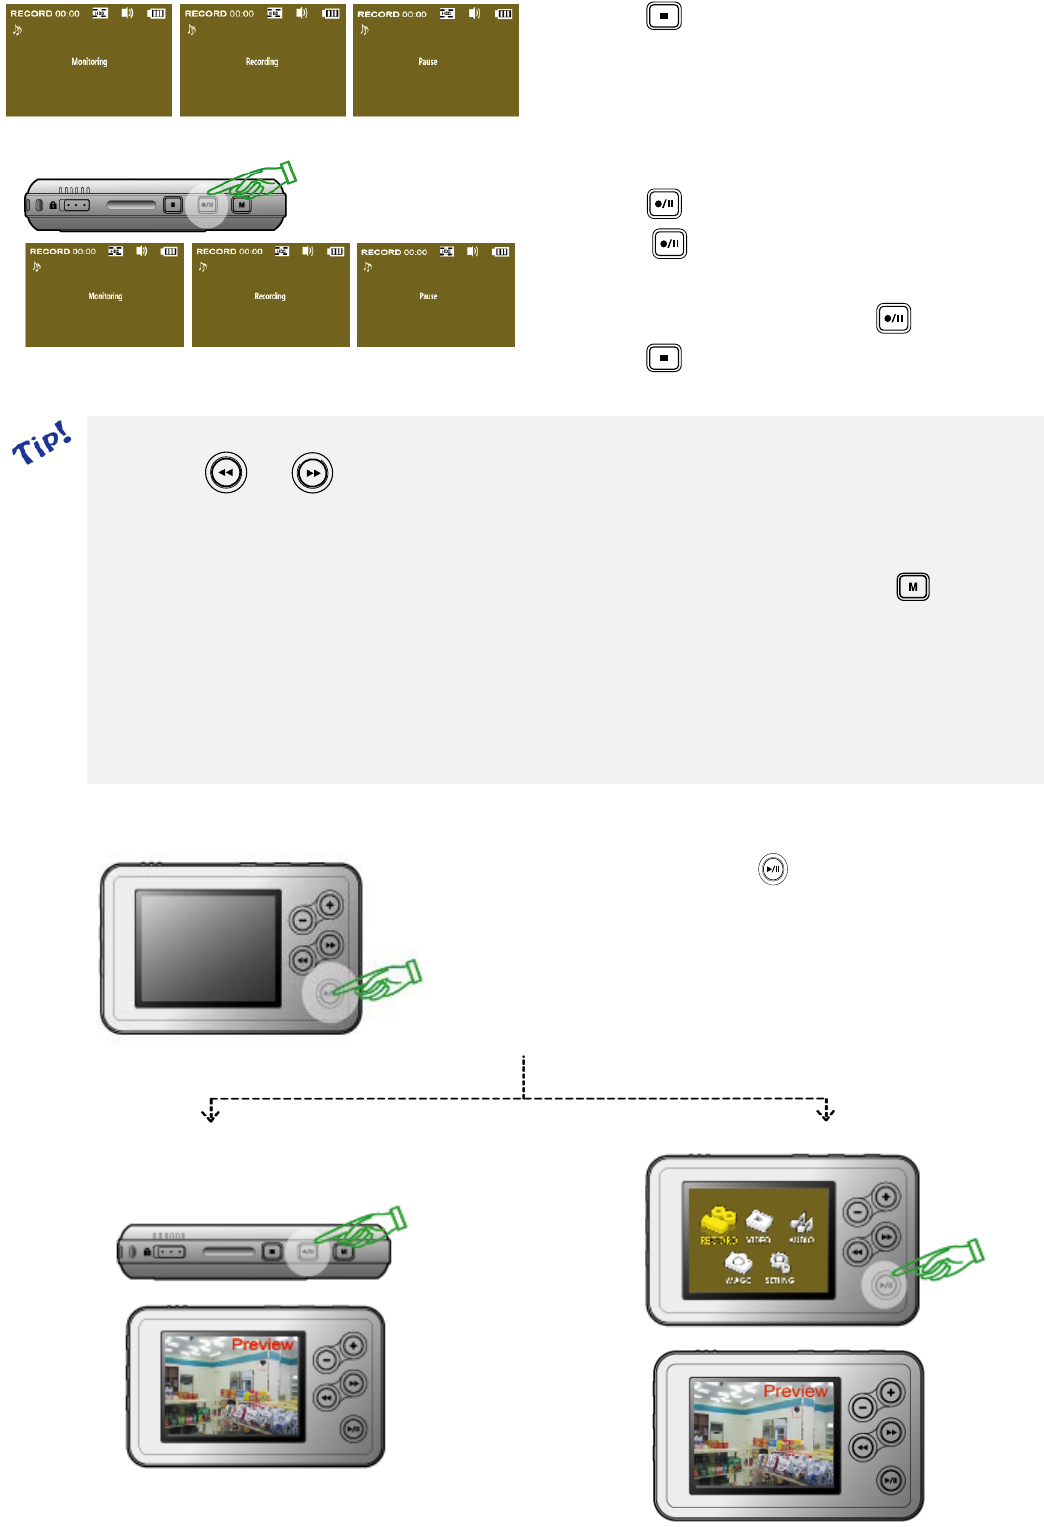
- Press to stop recording.
Recording 2.
By Rec. Button
- Press to enter into the monitoring.
- Press once again to start recording and
press it again for pause.
- Re-start recording by pressing .
- Press to stop recording.
☞ Making a new file while recoding
If pressing or while recording, the recording file is separated with a new file name.
The recording file is stored in “AUDIO”
☞ Changing a setup value
While recording, Recording time & Microphone sensitivity are changeable by pressing without
stopping the recording.
- Recording Time: No(Default)/5/10/20/30/50mins.
- Microphone Sensitivity: High/Middle(default)/Low
3) Snap Photo Shot
Turn it on by pressing
Preview Preview
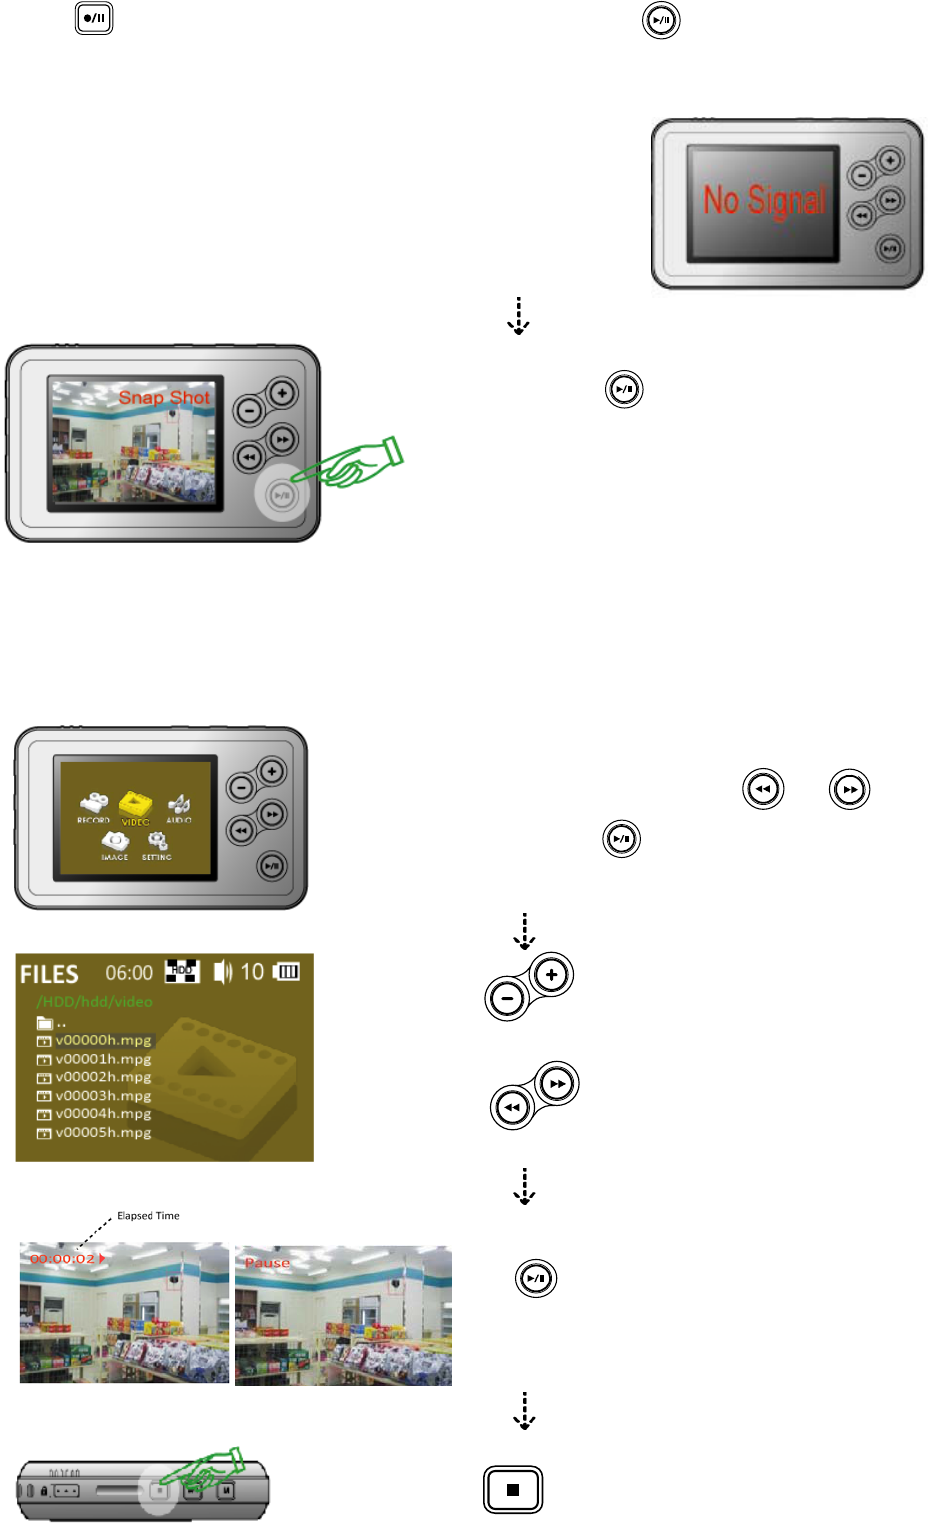
Press to preview before taking a photo.
If so, Live image from a camera is shown on the LCD
with "Preview" in red on the right of the LCD.
Press to preview at the RECORD Mode.
Live image from a camera is shown on the LCD
with "Preview" in red on the right of the LCD.
☞If a camera is not connected or connected in loose,
"No Signal" will be displayed in blinking several times
instead of a image and then goes back to main menu
display.
Taking a photo shot
Press to take a shot.
The photo is stored to “IMAGE Mode”
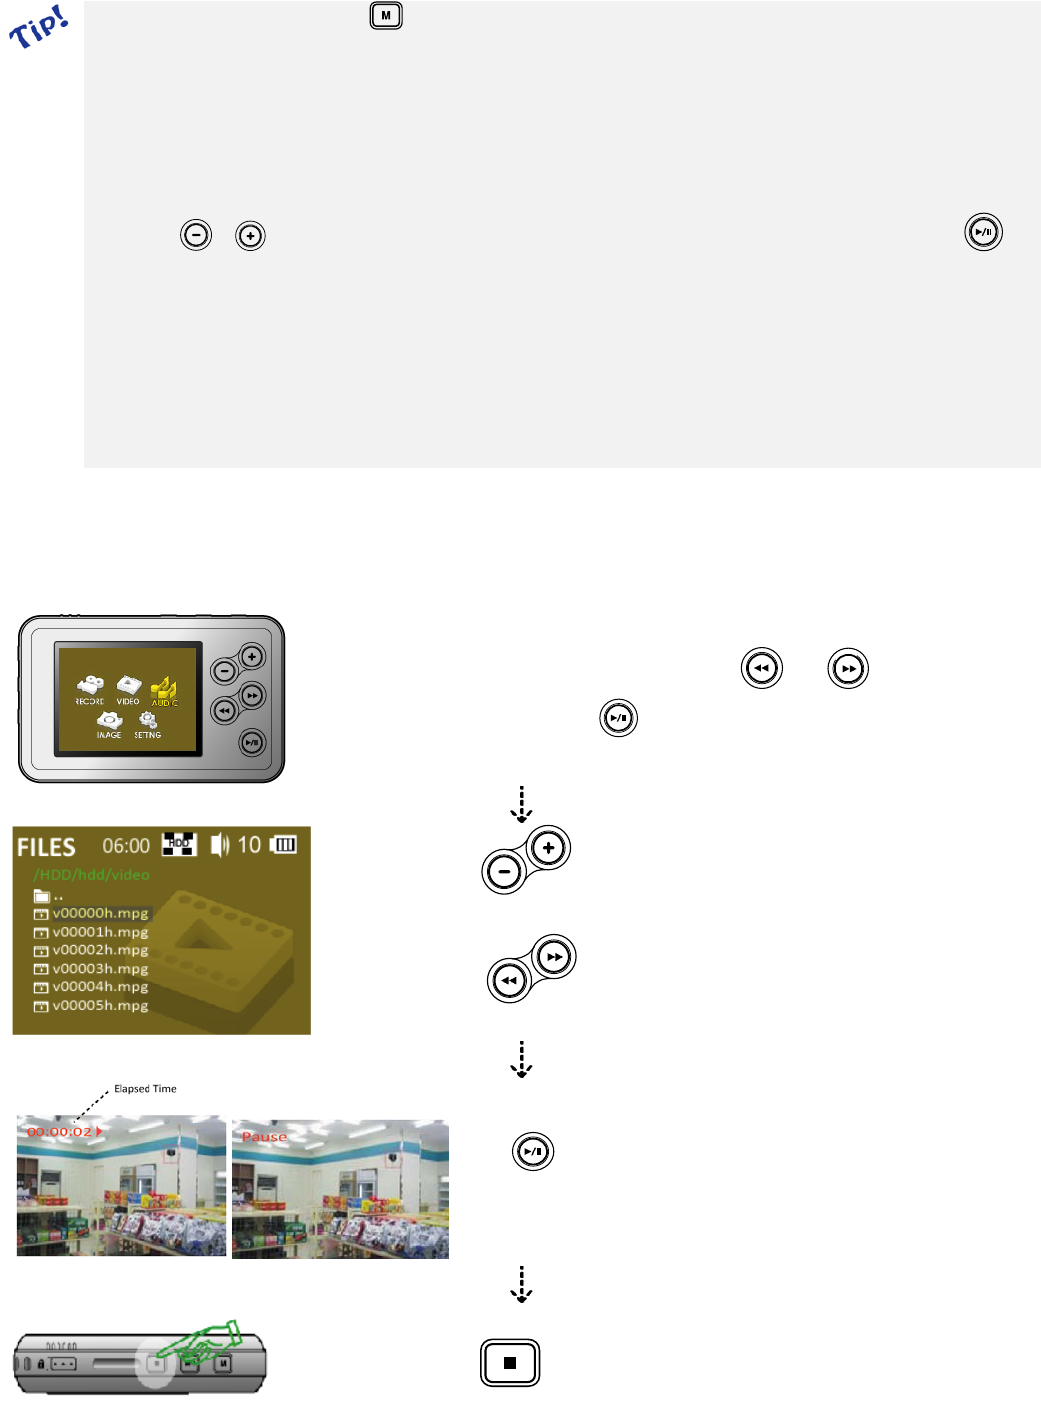
4) VIDEO
The file(s) recorded in Video+Audio or Video is stored and play back at this mode.
- Move to “VIDEO” by or .
- Press to enter into file list.
Move up or down on the file list
to select a file.
Play a selected file back or Pause.
Stop and then go to the main menu.
☞ On the file list, if pressing with short key, submenu(Playback/File Delete/File Protect/File
Information) is appeared.
- Playback: Play a selected file back.
- File Delete: Delete a selected file.(No, One, All)
- File Protect: The file with File Protect won’t be deleted.(Off, On)
- File Information: File name, size, Time, Protect status are displayed.
With or , user can move up and down on the menu list and then select a menu by .
☞ While playing a file back, user can set up the volume, Repeat, Play speed and TV Out.
- Volume: 1-30
- Repeat: No/One/All/Radom
- Play Speed: X1, 2, 4, 8, 1/2, 1/4, 1/8
- TV Out: LCD, TV
5) AUDIO
A recorded audio only file(s) is stored in the Audio folder and the file(s) is played back in this mode.
- Move to “AUDIO” by or .
- Press to enter into file list.
Move up or down on the file list
to select a file.
Play a selected file back or Pause.
Stop and then go to the main menu.
Model: PDVR-1000
ANSI C63.4: 2003
THIS DEVICE COMPLIES WITH PART 15 OF THE FCC RULES.
OPERATION IS SUBJECT TO THE FOLLOWING TWO CONDITIONS.
1) THIS DEVICE MAY NOT CAUSE HARMFUL INTERFERENCE, AND
2) THIS DEVICE MUST ACCEPT ANY INTERFERENCE RECEIVED, INCLUDING INTERFERENCE THAT MAY
CAUSE UNDESIRED OPERATION.
Notice: Any changes or modifications not expressly approved by the
party responsible for compliance could void the user’s authority
to operate the equipment.
NOTE: This equipment has been tested and found to comply with the limits for a Class B digital device,
pursuant to part 15 of the FCC Rules. These limits are designed to provide reasonable protection
against harmful interference in a residential installation. This equipment generates, uses and can
radiate radio frequency energy and, if not installed and used in accordance with the instructions, may
cause harmful interference to radio communications. However, there is no guarantee that interference
will not occur in a particular installation. If this equipment does cause harmful interference to
radio or television reception, which can be determined by turning the equipment off and on, the user is
encouraged to try to correct the interference by one or more of the following measures:
- Reorient or relocate the receiving antenna.
- Increase the separation between the equipment and receiver.
-Connect the equipment into an outlet on a circuit different from that to which the receiver is
connected.
-Consult the dealer or an experienced radio/TV technician for help.