Digi CCIMX6UL ConnectCore for i.MX6UL User Manual manual instructions
Digi International Inc ConnectCore for i.MX6UL manual instructions
UserManual.wiki
>
Digi
>
CCIMX6UL User Manual
manual_instructions
Navigation menu
Upload a User Manual
Namespaces
Wiki Guide
HTML
PDF
Info
Views
User Manual
Discussion / Help
Navigation


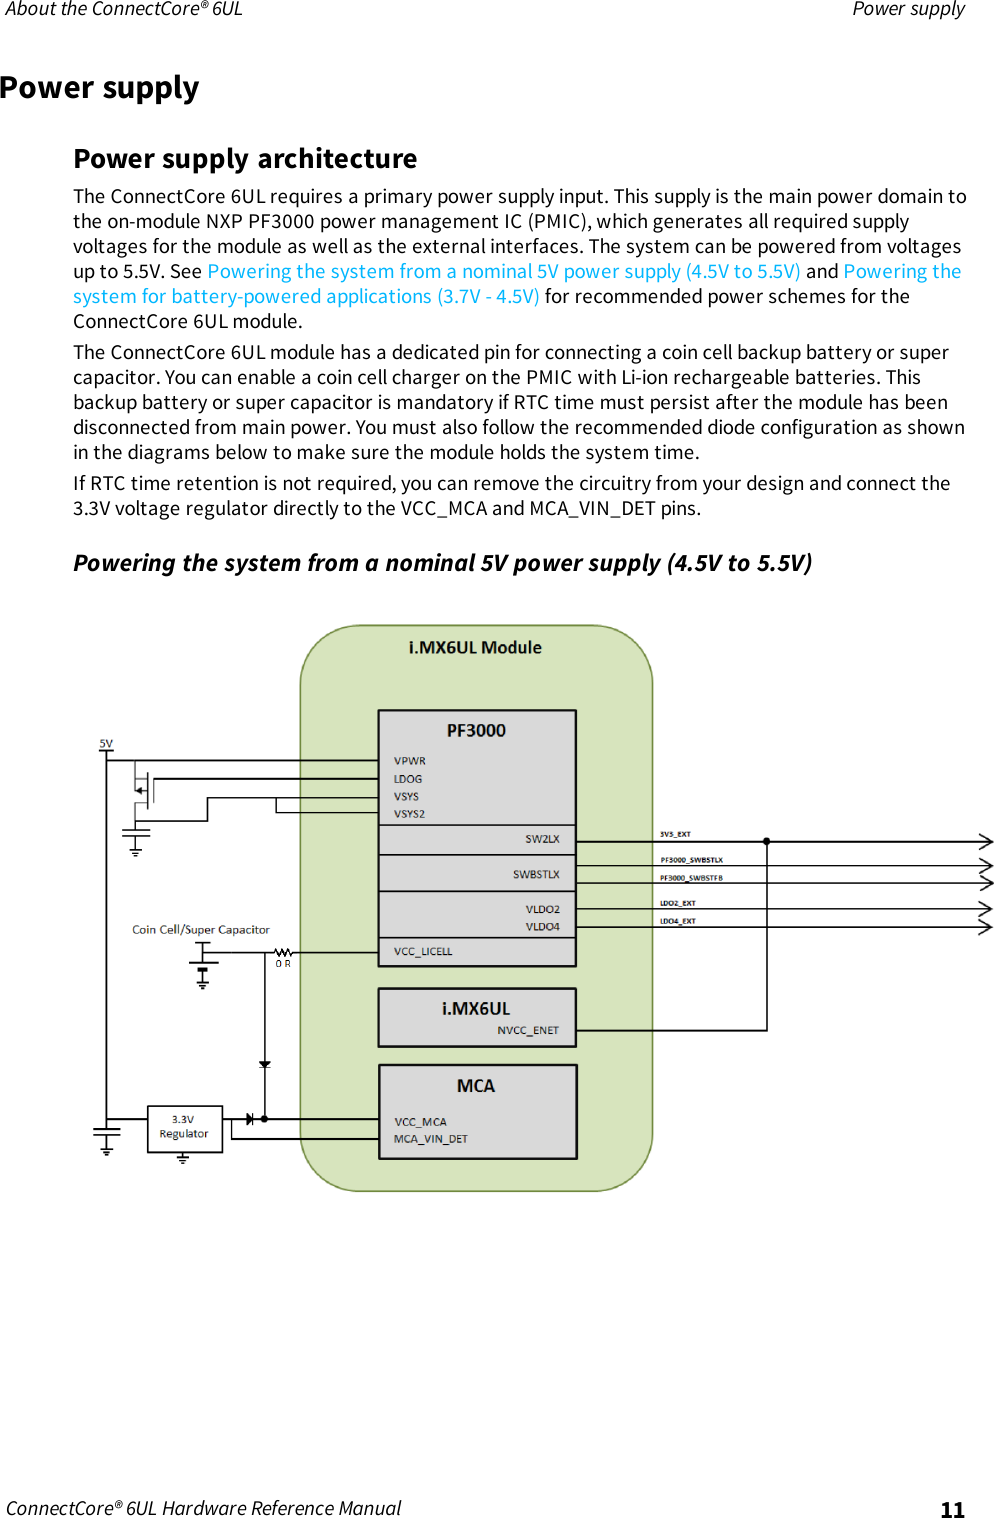
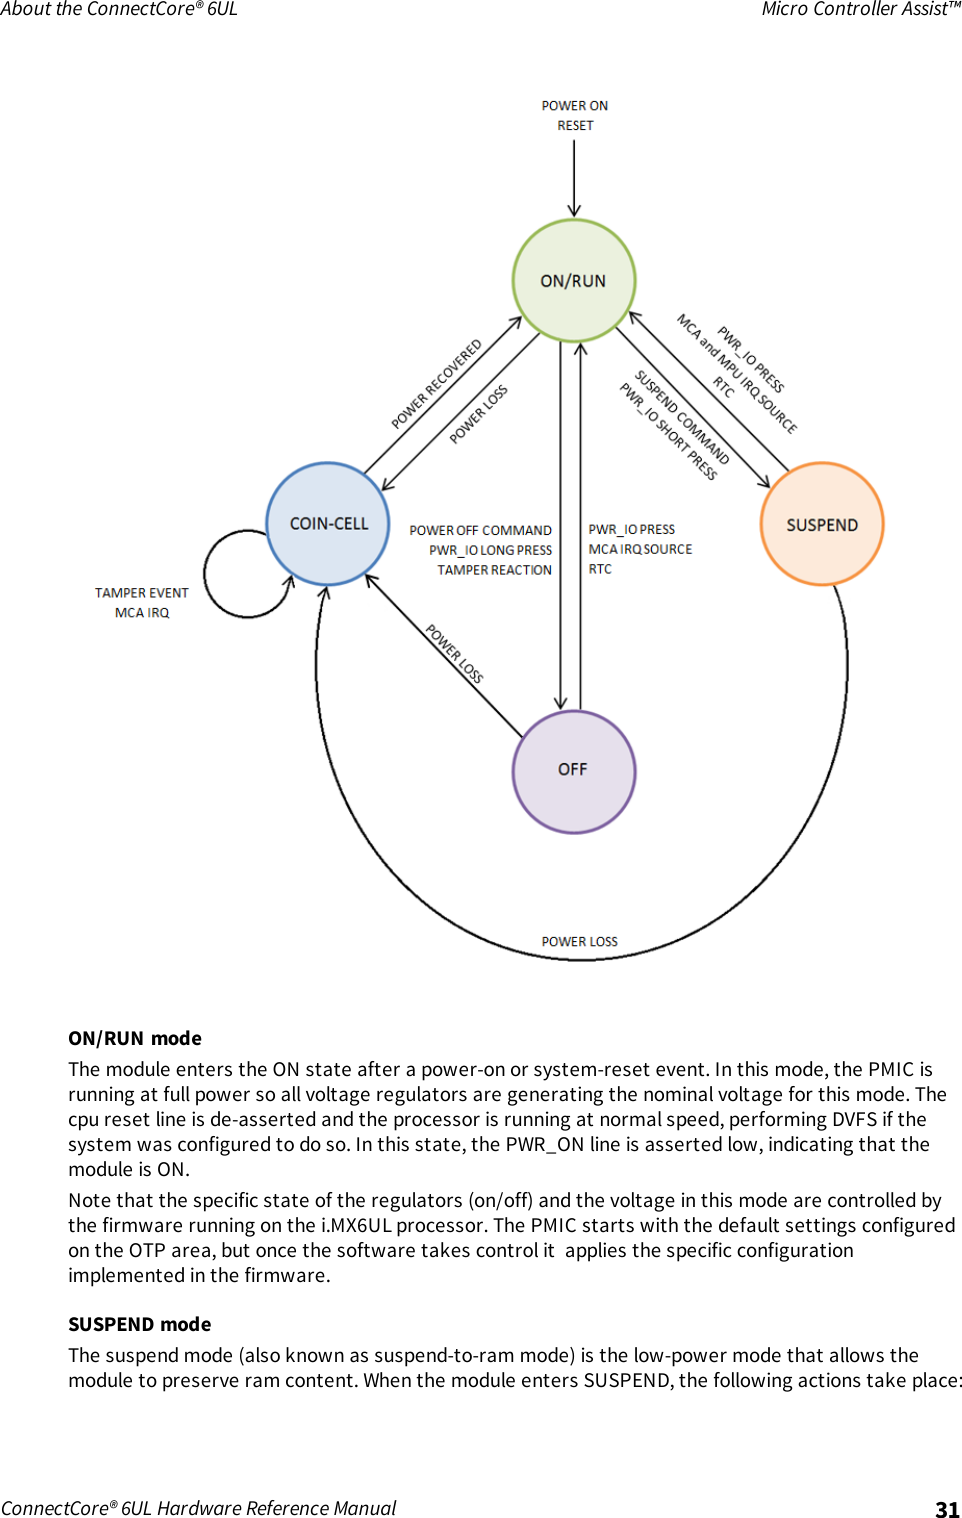
![About the ConnectCore® 6UL BootstrapConnectCore® 6UL Hardware Reference Manual 15The following time diagram shows the power-up sequence.BootstrapThe ConnectCore 6UL module can be configured to boot from different devices and interfaces asdetermined by the Boot ROM. The configuration of the booting process of the CPU is done through:nBOOT_MODE register, which selects the boot mode of the processor.neFUSEs and/or GPIOs, which determine the boot configuration.Four boot modes are available on the i.MX6UL processor. Selection between them is done throughBOOT_MODE[1:0] bits. The bits are externally configurable on two processor IOs, whose values arelatched during boot-up:BOOT_MODE [1:0] Boot type00 Boot from fuses01 Serial downloader10 Internal boot11 ReservedBOOT_MODE[0] and BOOT_MODE[1] are available on dedicated LGA pads on the module. However, onthe castellated pads only BOOT_MODE[1] is available.Note BOOT_MODE[0] is set to 0 internally on the module through a 100K pull-down resistor. Thismeans that in applications using only the castellated pads of the module, the only boot modesavailable are Boot from fuses and Internal boot. However, once Uboot is running, you can select adifferent boot mode (like serial downloader).Boot from fusesBoot from fuses is the recommended boot mode for production purposes. When this boot mode isselected, you must configure several parameters in order to select and configure the boot device of](https://usermanual.wiki/Digi/CCIMX6UL/User-Guide-3421985-Page-15.png)
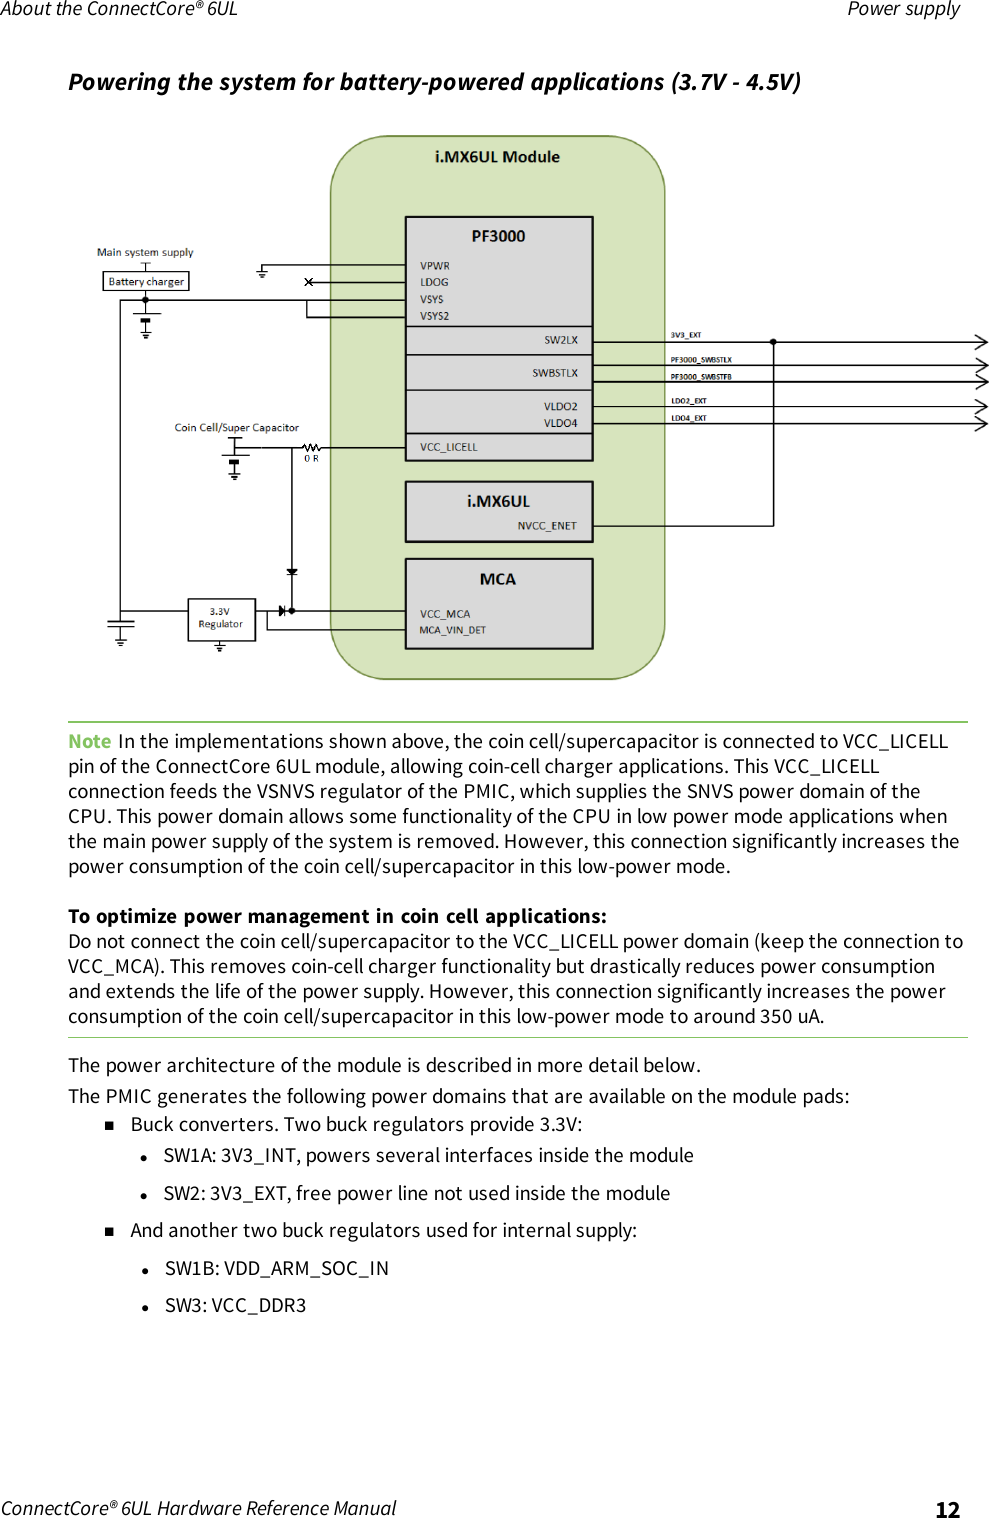
![About the ConnectCore® 6UL Internal bootConnectCore® 6UL Hardware Reference Manual 16the system. These parameters are configured through fuses, which are burned in order to set theirvalues. This means that the configuration is irreversible.BOOT_CFG1 selects the boot device through BOOT_CFG1[7:4] bits:BOOT_CFG1[7:4] Boot device0000 NOR/OneNAND (EIM)0001 QSPI0011 Serial ROM (SPI)010x SD/eSD/SDXC011x MMC/eMMC1xxx Raw NANDThere are many other registers that configure the different boot devices. For a complete descriptionof the booting configuration, refer to the NXP i.MX 6UltraLite Applications Processor ReferenceManual (Chapter 8: System Boot).Internal bootInternal boot is the recommended boot mode for development purposes. When this boot mode isselected, the selection and configuration of the booting process is done through the same registersused when booting from fuses. However, this time the values of some registers are overridden usingmultiple GPIOs, which are latched during power-up.The following configuration is done internally in the ConnectCore 6UL module in order to enablebooting from the NAND memory:Bootstrap configuration Corresponding GPIO Default configurationBOOT_CFG2[1] LCD_DATA9 100K pull-downBOOT_CFG2[2] LCD_DATA10 100K pull-downBOOT_CFG2[3] LCD_DATA11 100K pull-upBOOT_CFG2[4] LCD_DATA12 100K pull-downBOOT_CFG2[5] LCD_DATA13 100K pull-upBOOT_CFG2[6] LCD_DATA14 100K pull-downBOOT_CFG2[7] LCD_DATA15 100K pull-downYou must also set up BOOT_CFG1[7:0] register when booting from the internal on-module NAND whenInternal boot mode is selected. It must be configured externally (outside the module) as shown in thefollowing table:](https://usermanual.wiki/Digi/CCIMX6UL/User-Guide-3421985-Page-16.png)
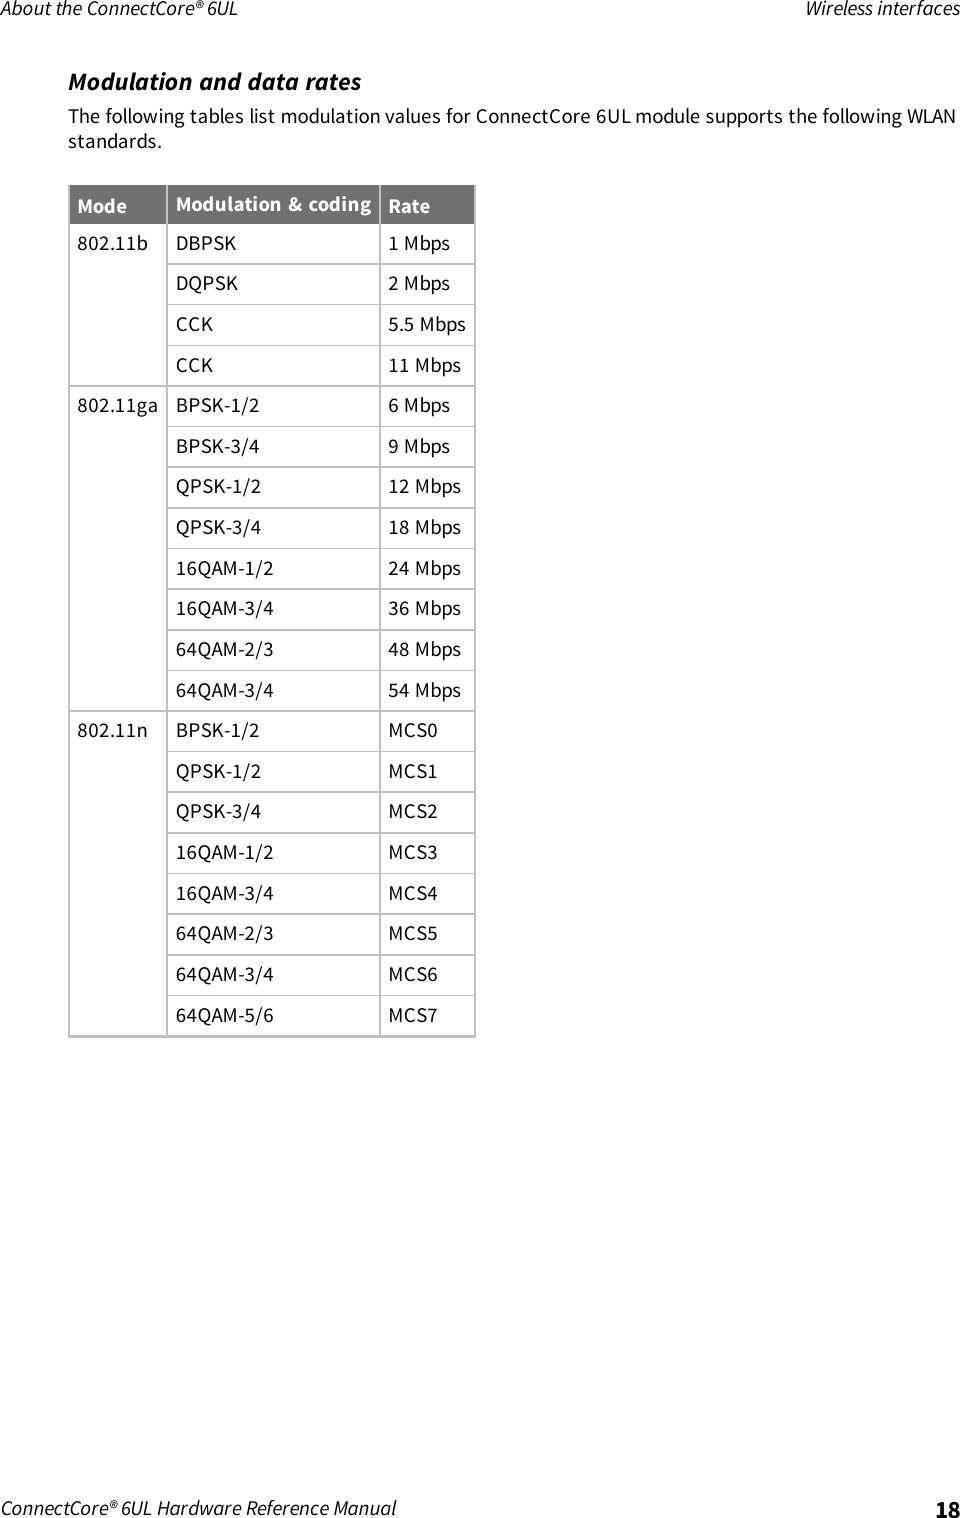
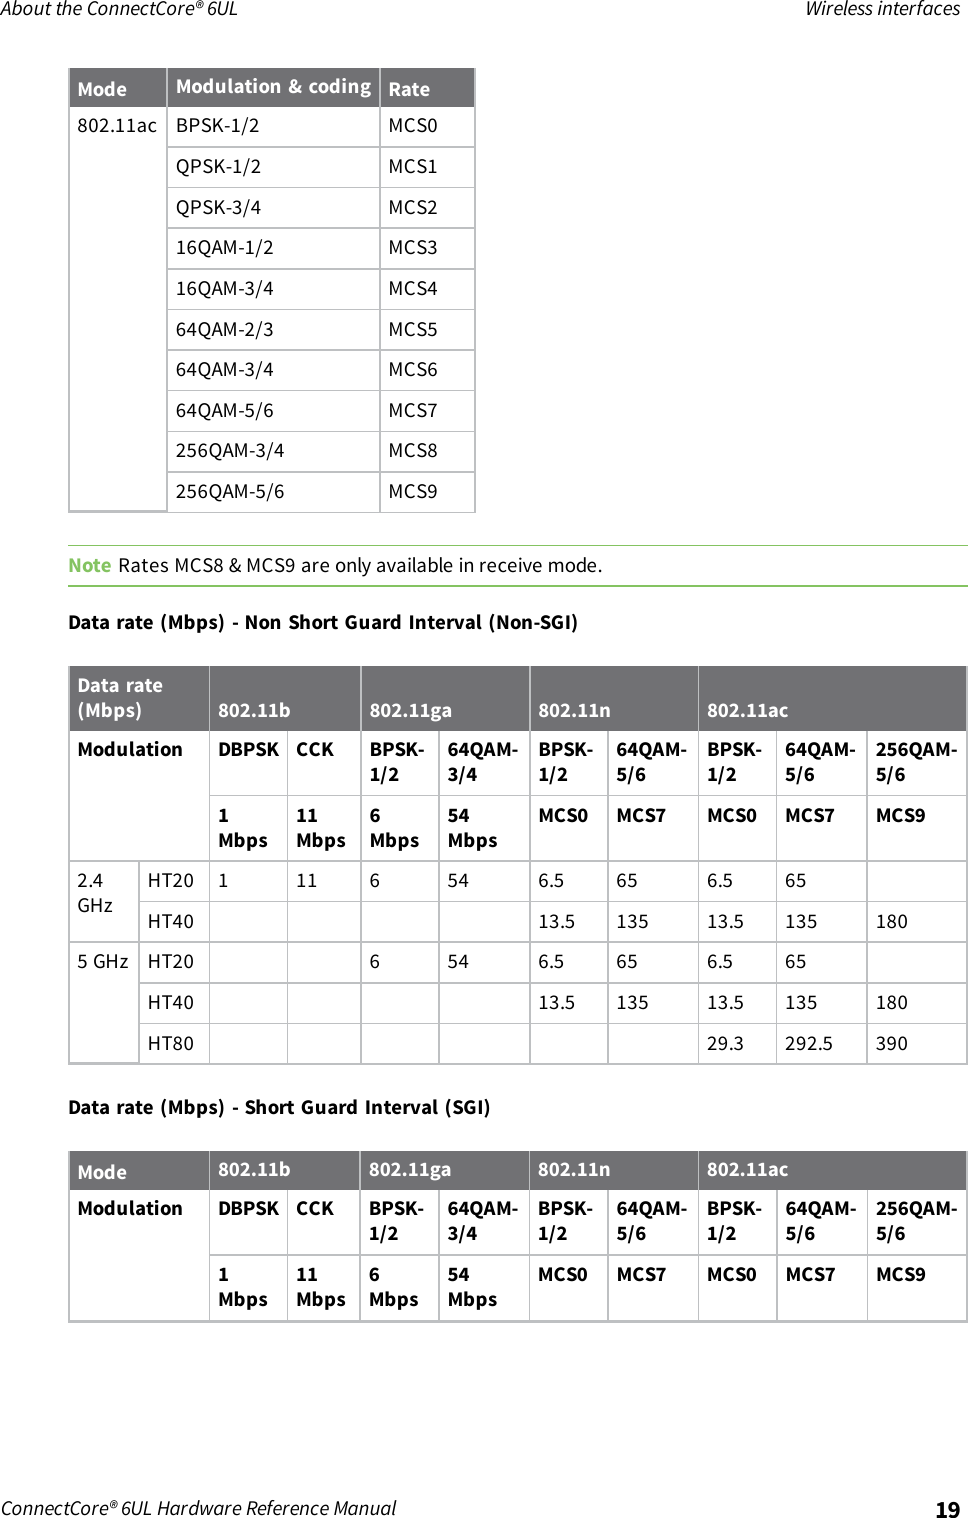
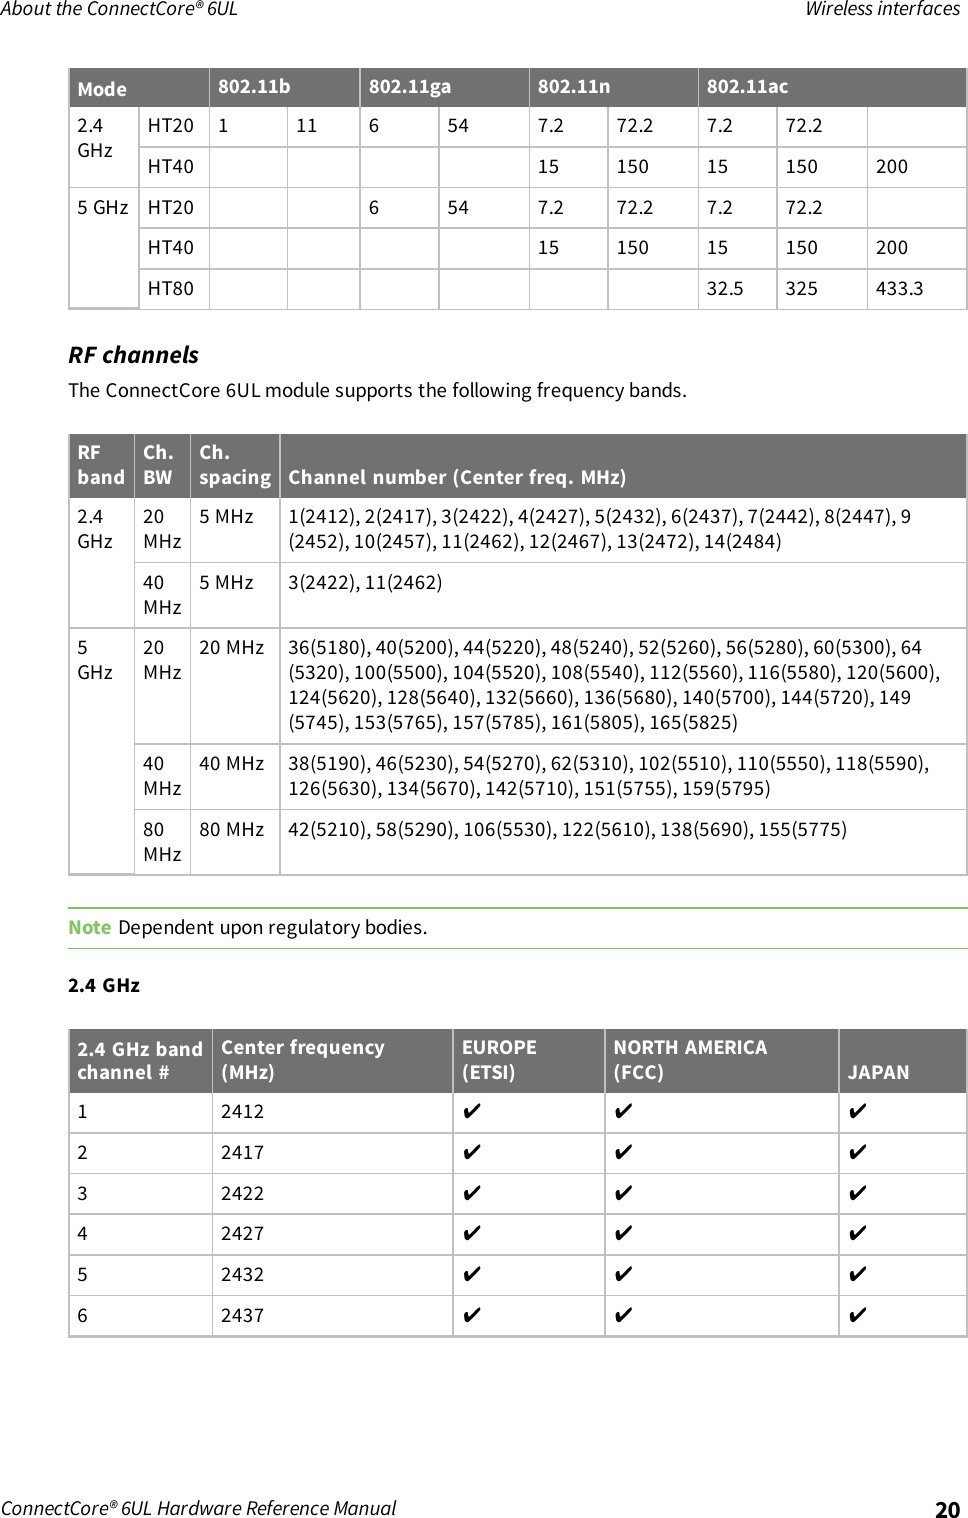
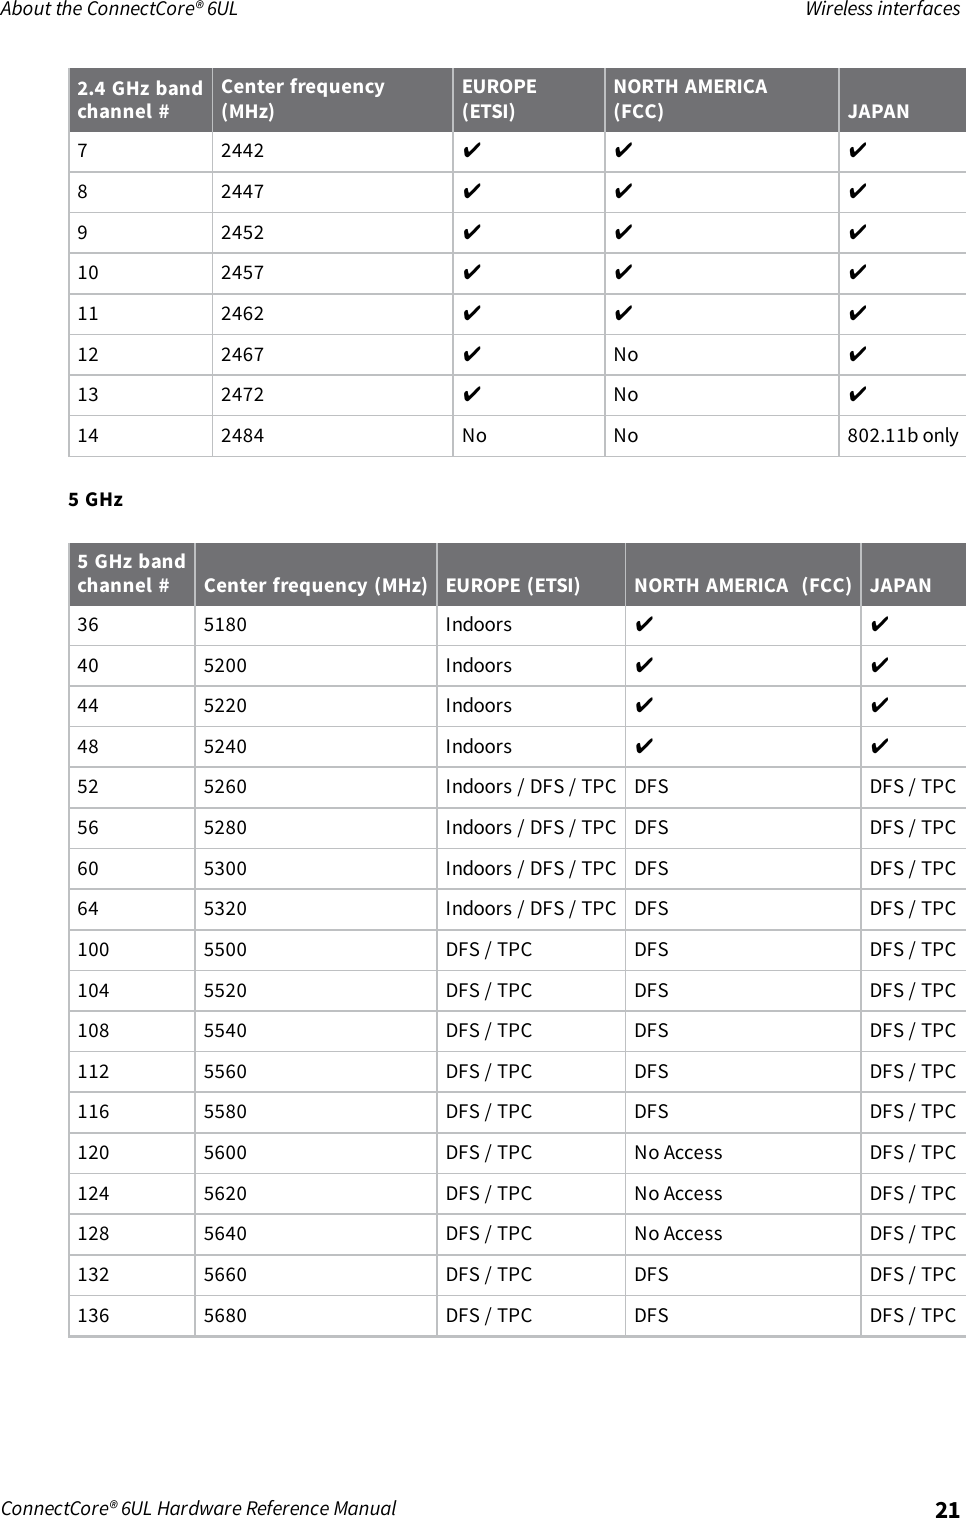
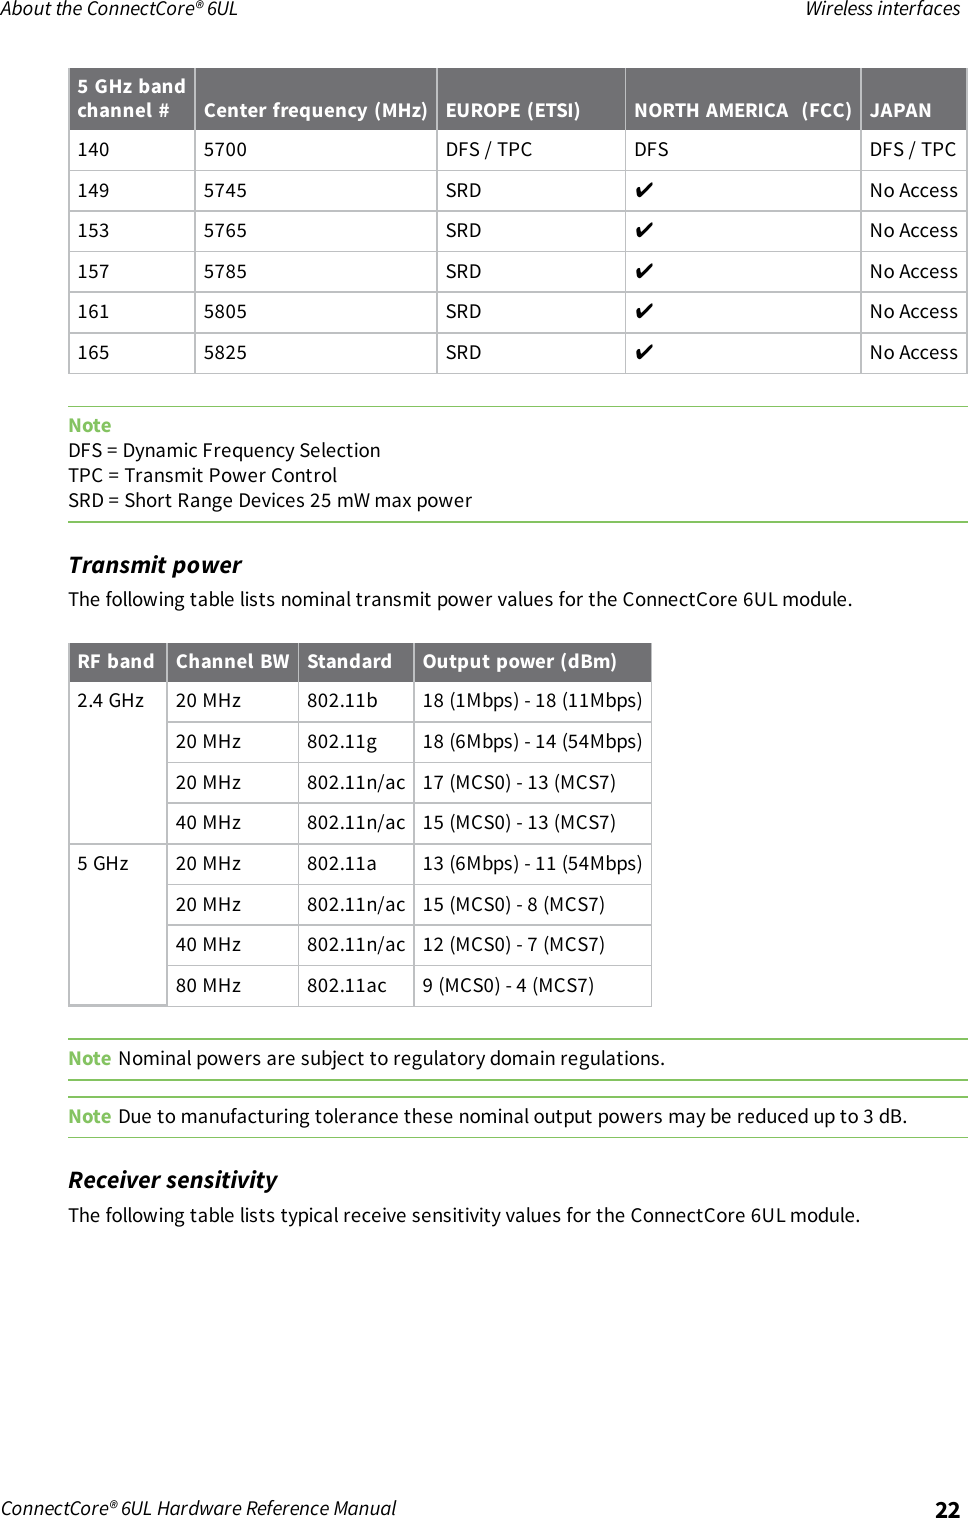
![About the ConnectCore® 6UL Serial downloaderConnectCore® 6UL Hardware Reference Manual 17Bootstrap configuration Corresponding GPIO ConfigurationBOOT_CFG1[0] LCD_DATA0 0BOOT_CFG1[1] LCD_DATA1 0BOOT_CFG1[2] LCD_DATA2 0BOOT_CFG1[3] LCD_DATA3 0BOOT_CFG1[4] LCD_DATA4 1BOOT_CFG1[5] LCD_DATA5 0BOOT_CFG1[6] LCD_DATA6 0BOOT_CFG1[7] LCD_DATA7 1Digi recommends you use 10K pull-up and pull-down resistors to configure each line.The BOOT_CFG1 and BOOT_CFG2 register lines are not dedicated lines of the CPU. This means thatthe values of these lines are latched during the power-up, but have a different functionality once thesystem is up and running. In this case, these lines belong to the LCD interface. In order to protect thevalue of these registers while the system is booting, Digi recommends you use a protection circuitryas shown in sheet 3 of 7, "Boot selection," of the ConnectCore 6UL reference designs. SeeConnectCore 6UL design files.Serial downloaderYou can use the serial downloader boot mode for device recovery. The serial downloader allows you todownload a program image to the chip through a USB or UART serial connection. When any of thestandard boot modes is selected but the booting process doesn’t succeed (for instance due to wrongbooting device or corrupted images) the CPU automatically jumps to the serial downloader bootmode.Wireless interfacesThe ConnectCore 6UL system-on-module combines a wireless local area network (WLAN) andBluetooth (BT) dual solution to support IEEE802.11 a/b/g/n/ac WLAN standards and BT 4.2 enablingseamless integration of WLAN/BT and Low Energy technology. Digi also offers a non-wireless variant ofthe ConnectCore 6UL module.The following sections include specifications for the wireless interfaces available on the ConnectCore6UL module.WLAN 802.11a/b/g/n/acThe 2.4 GHz band on the ConnectCore 6UL module supports 20/40 MHz bandwidths, and the 5 GHzband supports 20/40/80 MHz bandwidths.The following sections specify the performance of the WLAN IEEE 802.11a/b/g/n/ac interface on theConnectCore 6UL module.](https://usermanual.wiki/Digi/CCIMX6UL/User-Guide-3421985-Page-17.png)