Digi Cm Users Manual
Digi CM digi-cm-console-terminal-server
Digi CM to the manual 3b02eb4f-9a53-4d4c-a9e8-ed8f8a04af71
2015-02-04
: Digi Digi-Digi-Cm-Users-Manual-513499 digi-digi-cm-users-manual-513499 digi pdf
Open the PDF directly: View PDF ![]() .
.
Page Count: 158 [warning: Documents this large are best viewed by clicking the View PDF Link!]
- Introduction
- Digi CM Model Support
- Feature Overview
- Feature Summary
- User Groups
- Root and Admin Usernames and Passwords
- Adding Port Administrators and Users
- Ways to Configure the Digi CM
- Ways of Accessing the Digi CM: Overview
- Web Interface Access Menu
- Port Access Menu
- Direct Port Access
- Custom Menus
- Port Escape Menu
- Saving and Applying Changes
- Automatic Device Recognition
- Getting Started
- Installing and Configuring PC Cards
- System and Port Logging
- Configuring Ports
- Alerts and Notifications
- User Administration
- Configuring Security and Authentication
- Custom and Default Menus
- Microsoft SAC Support
- Rackable Systems Management Card
- Configuring Remote Dial-In Access
- Power Controller
- Port Clustering
- System Administration
- Command Line Interface
- Configuration Menu
- Accessing the Configuration Menu
- Configuring SSH
- Adding, Editing, and Removing Users
- Adding and Configuring a PC Card
- Host Mode Configuration
- Port Parameters
- Port Access Menu
- System Logging
- Configuring SNMP
- Configuring SMTP
- Network IP Filtering
- Port IP Filtering
- Sniff Sessions
- Authentication
- Dial-in Modem Access
- Dial-in Terminal Server Access
- Clustering
- Firmware Upgrade
- Restoring Factory Defaults
- Setting Date and Time
- Accessing the Boot Loader Program
- Hardware Information
- Certifications

90000301_E
Digi CM
User Guide

Digi International Inc. 2004.
Digi, Digi International, the Digi logo, the Digi Connectware, the Making Device
Networking Easy logo, Digi One, and RealPort are trademarks or registered
trademarks of Digi International, Inc. in the United States and other countries
worldwide. All other trademarks are the property of their respective owners.
Microsoft Windows Server 2003 is a trademark of Microsoft Corporation.

4

Contents 5
Chapter 1 Introduction
Digi CM Model Support ....................................................................................9
Feature Overview.............................................................................................9
Feature Summary.............................................................................................9
User Groups...................................................................................................11
Root and Admin Usernames and Passwords.................................................11
Adding Port Administrators and Users ...........................................................11
Ways to Configure the Digi CM......................................................................11
Ways of Accessing the Digi CM: Overview ....................................................13
Web Interface Access Menu ..........................................................................13
Port Access Menu ..........................................................................................15
Direct Port Access..........................................................................................15
Custom Menus...............................................................................................16
Port Escape Menu..........................................................................................16
Saving and Applying Changes .......................................................................19
Automatic Device Recognition .......................................................................19
Chapter 2 Getting Started
Introduction.....................................................................................................21
Assigning IP Settings from the Console Port .................................................21
Configuring HTTP and HTTPS.......................................................................22
Configuring for SSH .......................................................................................23
Adding, Editing, and Removing Users............................................................25
Chapter 3 Installing and Configuring PC Cards
Introduction.....................................................................................................27
Compatible PC Cards.....................................................................................27
Adding a Compact-flash Card ........................................................................27
Adding a Network Card ..................................................................................28
Adding a Wireless LAN Card..........................................................................29
Adding a Serial Modem..................................................................................30
Chapter 4 System and Port Logging
Introduction.....................................................................................................33
Enabling Log Storage Location ......................................................................33
Configuring System Logging ..........................................................................36
Configure Port Logging ..................................................................................38
Chapter 5 Configuring Ports
Introduction.....................................................................................................41
Enabling and Disabling the Ports...................................................................41
Resetting Ports...............................................................................................42
Port Title.........................................................................................................42
Contents
6 Contents
Configuring Automatic Device Recognition....................................................42
Apply all Ports Settings ..................................................................................44
Host Mode Configuration................................................................................44
Configuring Host Mode...................................................................................47
Supported Protocols.......................................................................................48
Serial Port Parameters...................................................................................49
Chapter 6 Alerts and Notifications
Introduction.....................................................................................................51
Configuring SMTP Alerts................................................................................52
SNMP Information..........................................................................................52
Traps ..............................................................................................................53
Configuring SNMP..........................................................................................54
Managing the SNMP Protocol........................................................................55
Configuring Port Event Handling....................................................................56
Config Alerts for Automatic Device Recognition (ADR)..................................58
Chapter 7 User Administration
Administering Users .......................................................................................59
Chapter 8 Configuring Security and Authentication
Introduction.....................................................................................................61
Configuring Network IP Filtering.....................................................................61
Configuring User Access Control ...................................................................64
Authentication.................................................................................................67
Configuring Authentication Methods for Port Access.....................................67
Configuring Authentication for the Web Server..............................................68
Chapter 9 Custom and Default Menus
Introduction.....................................................................................................69
Making Custom Menus...................................................................................69
Default Menu..................................................................................................72
Chapter 10 Microsoft SAC Support
About Digi CM Support for Microsoft Windows Server 2003 .........................75
Set Up Overview ............................................................................................76
Setting Up the Windows Server 2003 Port.....................................................76
Setting Up the Digi CM for SAC Support........................................................76
Accessing the Windows Server 2003 Console Port from the Digi CM GUI....78
Chapter 11 Rackable Systems Management Card
Introduction.....................................................................................................81
Set up.............................................................................................................81
Chapter 12 Configuring Remote Dial-In Access
Introduction.....................................................................................................85
Configuring For Dial-In Modem Access..........................................................85
Adding a PC Modem ......................................................................................88
Configuring For Dial-In Terminal Server Access............................................88
Contents 7
Chapter 13 Power Controller
Introduction.....................................................................................................91
Installing Power Controller .............................................................................92
Configuring Power Controller .........................................................................92
Setting Alarms and Thresholds ......................................................................94
Outlet Configuration .......................................................................................95
User Access for Power Controller ..................................................................96
Power Controller Management.......................................................................98
Cascading Multiple Digi RPM Units..............................................................100
Chapter 14 Port Clustering
Introduction...................................................................................................103
Configuring Port Clustering ..........................................................................104
Chapter 15 System Administration
Introduction...................................................................................................111
Upgrading the Firmware...............................................................................111
Configuration Management..........................................................................112
Automatically Upgrading the Digi CM Firmware or
Configuration using TFTP ............................................................................112
Resetting Factory Defaults...........................................................................114
Setting Date and Time..................................................................................116
Configuring a Host Name.............................................................................116
Chapter 16 Command Line Interface
Introduction...................................................................................................117
Linux Commands .........................................................................................117
Important File Locations...............................................................................118
Example Scripts ...........................................................................................120
User Administration......................................................................................122
Chapter 17 Configuration Menu
Accessing the Configuration Menu...............................................................123
Configuring SSH...........................................................................................123
Adding, Editing, and Removing Users..........................................................124
Adding and Configuring a PC Card..............................................................124
Host Mode Configuration..............................................................................125
Port Parameters ...........................................................................................126
Port Access Menu ........................................................................................126
System Logging............................................................................................127
Configuring SNMP........................................................................................128
Configuring SMTP........................................................................................128
Network IP Filtering......................................................................................129
Port IP Filtering.............................................................................................129
Sniff Sessions...............................................................................................130
Authentication...............................................................................................132
8 Contents
Dial-in Modem Access..................................................................................133
Dial-in Terminal Server Access....................................................................134
Clustering .....................................................................................................135
Firmware Upgrade........................................................................................136
Restoring Factory Defaults...........................................................................137
Setting Date and Time..................................................................................137
Accessing the Boot Loader Program............................................................137
Chapter 18 Hardware Information
Introduction...................................................................................................141
Hardware Specifications...............................................................................141
LED Indicators..............................................................................................143
About Serial Port Cabling.............................................................................143
Serial Port Pinouts........................................................................................143
Cable Adapters.............................................................................................144
Ethernet Pinouts...........................................................................................148
Rack Mounting Installation ...........................................................................149
Chapter 19 Certifications
Safety ...........................................................................................................151
Emissions.....................................................................................................153
Immunity.......................................................................................................153
Solaris Ready...............................................................................................153
Index .................................................................................................................155

Chapter 1 9
Introduction
Digi CM Model Support
This manual offers information on Digi CM 8-port, 16-port, 32-port, and 48-port
models.
Feature Overview
With Digi CM, administrators can securely monitor and control servers,
routers, switches, and other network devices from anywhere on the corporate
TCP/IP network, over the Internet, or through dial-up modem connections,
even when the server is unavailable through the network.
Digi CM employs SSHv2 encryption, to keep server access passwords safe
from hackers, and supports all popular SSH clients, as well as secure access
from any Java-enabled browser. It is the first console server to provide a
secure graphical user interface for easy out-of-band management of Microsoft
Windows Server 2003 systems. It connects to serial console ports using
standard CAT5 cables, eliminating the hassles of custom cabling. In addition,
the Digi CM offers a PCMCIA card slot, for adding dialup modems or wireless
network cards. Flash memory cards can be used to save port logs and backup
configuration files.
Digi CM is available in 8-, 16-, 32- and 48-port models, in a 1U rack-mount
form factor.
Feature Summary
Chapter 1 Introduction
Category Feature
Security
• SSH v2 server and client
•SSL
•IP Filtering
Authentication
• TACACS+
•RADIUS
•LDAP
• Kerberos
• User access per port
• Local user database

Feature Summary
10 Chapter 1
Management
• Command line
• WEB --HTTP/HTTPS
•SNMP
• Custom applications
• Port Triggers and Alerts
• Multi level menus
• Auto-discovery
• Integrated power management and control
• Automatic Device Recognition
Data Capture
• Local port logging
• External logging (syslog, NFS, secure
NFS, PC card)
Port Access
• Telnet/SSH with custom menu
• Reverse Telnet/SSH
• HTTP/HTTPS
•Raw TCP
• Port escape menu
PC Card Support
• CompactFlash memory card
• Wireless LAN adapter (802.11b)
• Ethernet LAN adapter
• PSTN/CDMA modem card
See http://cm.digi.com for more information.
Other Features
• Solaris Ready
• Multiple users per port
• Flash upgrade able
• SSH sessions simultaneously on all ports
• Secure Clustering - Single IP for multiple
Digi CM devices
• IP addresses per port
• Automated TFTP firmware and
configuration update upon boot
• RSA SecurID® support using RADIUS
Category Feature
Introduction
Chapter 1 11
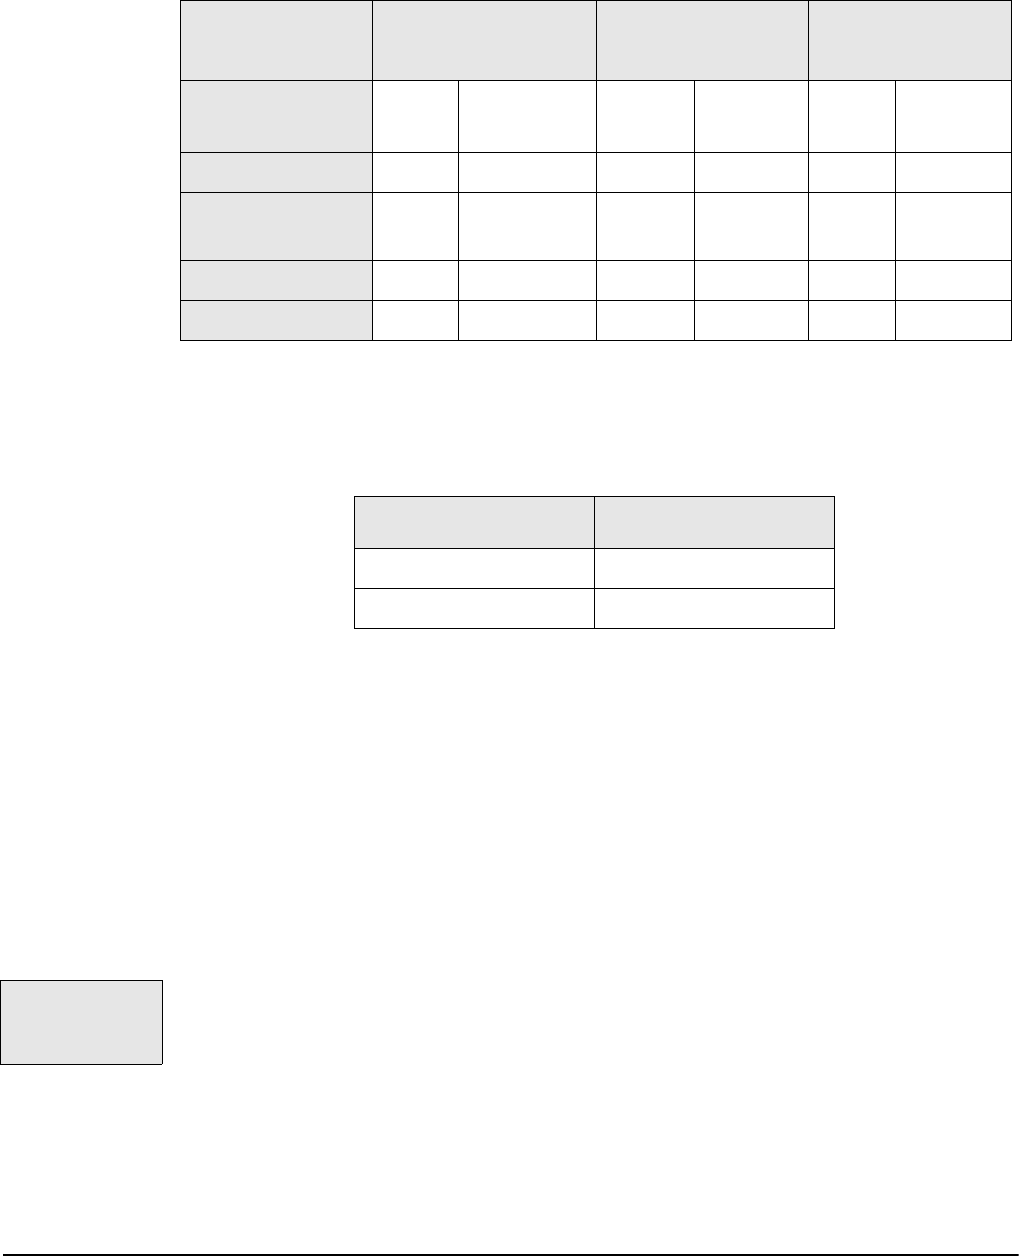
User Groups
The Digi CM comes with built-in user groups, defined by access levels. The
following table lists user groups, their access rights, and default user names.
Root and Admin Usernames and Passwords
The Digi CM comes with two default users; root and system admin.
The user names of the Digi CM are case sensitive.
Adding Port Administrators and Users
The system administrator and root user can add port administrators and
additional users easily with the web interface by choosing System
administration > User administration > Add user.
Ways to Configure the Digi CM
This section discusses the three ways to configure the Digi CM using the web
interface, configuration menu, or command line interface.
Web Interface
The web interface provides an easy way to configure the Digi CM. The root
user and system administrator can configure all features through the web. Port
administrators can configure ports, including port clustering, but cannot modify
system settings. No other users can use the web interface for configuration.
To access the web interface, enter the Digi CM IP address or host name in a
browser’s URL window. The following page is displayed after login.
Group Access Privileges Configuration
Privileges Defaults
----------- Ports Command
Line Ports System Login Password
Root yes yes yes yes root dbps
System Admin yes yes
(read only) yes yes admin admin
Port Admin yes no yes no - -
User yes no no no - -
User Name Default Password
root dbps
admin admin
The Digi CM web
interface features
HTTPS for secure
access.

Ways to Configure the Digi CM
12 Chapter 1
Configuration Menu
The root user and system administrator have full access to the configuration
menu from a Telnet or SSH session or a serial connection through the console
port. Functionality is similar to the web interface, with the exception of custom
menus, which can be created only from the web interface. The configuration
menu is presented to system administrators automatically. Root users access
the menu by entering the command configmenu. Port administrators can
access this menu but can modify serial port configuration only. No other users
can access this menu.
Command Line Interface
The command line interface can be accessed from a Telnet or SSH session or
from the console port. The root user always has access to this interface. The
Introduction
Chapter 1 13
system administrator can be granted read-only permission as well. No other
users can access the command line interface.
Ways of Accessing the Digi CM: Overview
There are four ways to access the ports on the Digi CM:
• Web Interface
• Port Access Menu
• Direct Port Access
• Custom Menus
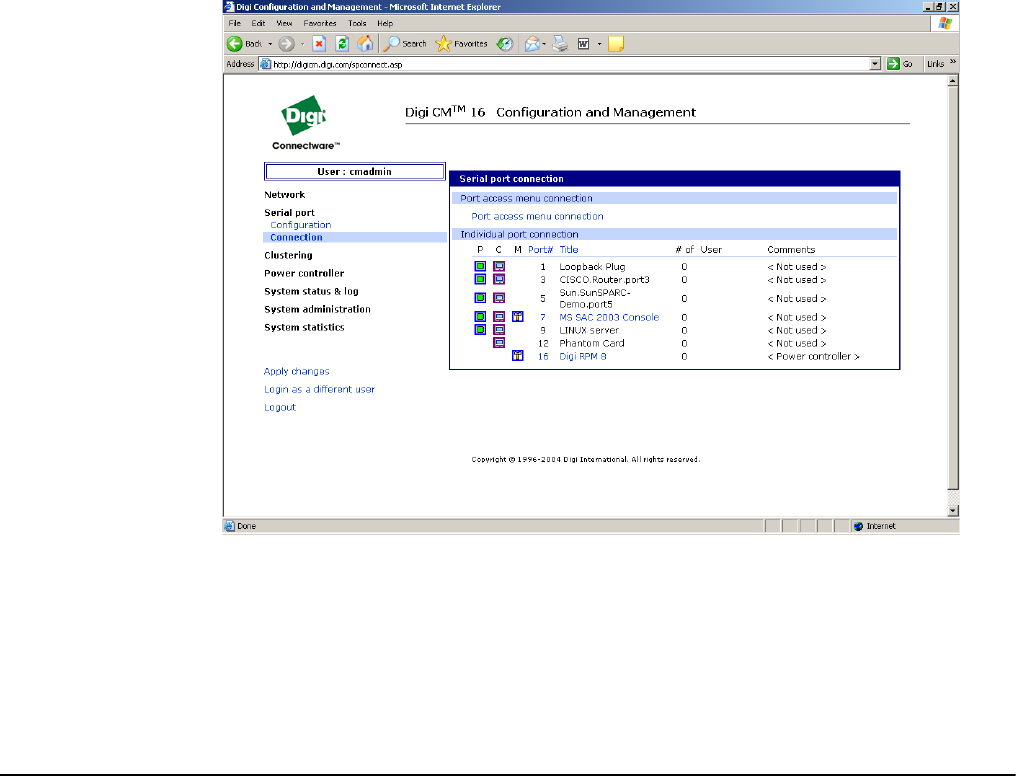
Web Interface Access Menu
The web interface menu provides easy and convenient access to ports. All
users can access the menu by entering the Digi CM IP address or host name
in a web browser’s URL window. You will only be able to see the ports that you
are allowed to access.
To access a port from the web interface, do the following:
1. Access the web interface.
2. Click Serial port > Connection.
The P (Power) column allows you to control power of the attached devices, if a
Remote Power Management unit is attached and you have appropriate rights.
The M (Manage) column offers web based management for Windows Server
2003, Remote Power Management units or Rackable Systems Management
Card.
The “# of User” column shows how many users are actually connected to the
port and the username of the read/write user.
Web Interface Access Menu
14 Chapter 1
If you are conducting a special task through the console port, like BIOS
upgrade and should not be interrupted, you can notify other users by entering
a comment upon connect. This comment is shown here.
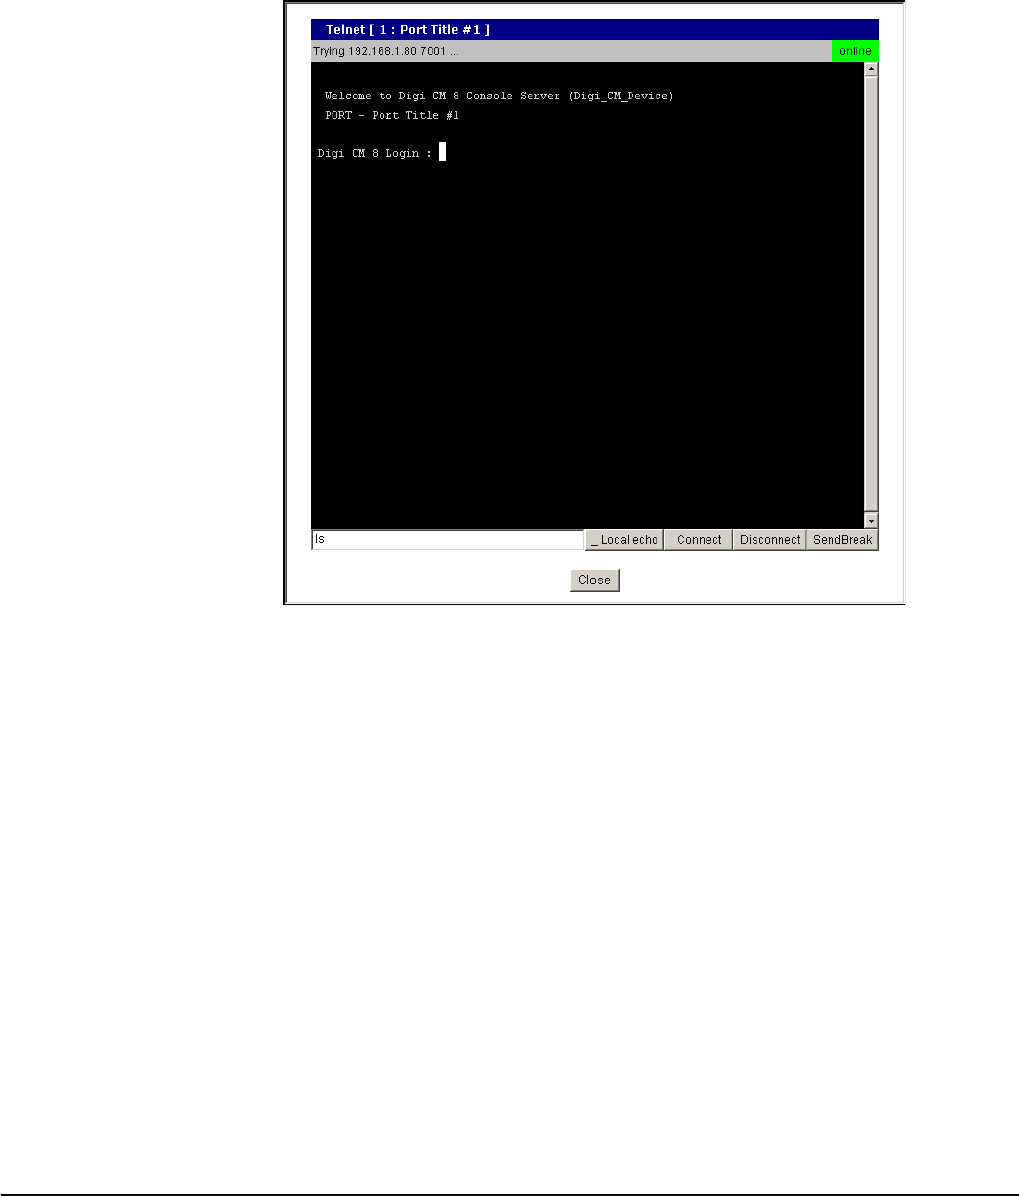
3. Select a port by clicking the icon in the C (Console) column.
A Java applet or Telnet window opens with a login prompt.
The web interface can also be configured to call a local Telnet or SSH
application, see "Configuring Host Mode" on page 47.
Introduction
Chapter 1 15
Port Access Menu
The Port Access Menu provides access to ports. It is accessible to all users
through the web interface, Telnet and SSH sessions, and remote modem
access. The information that follows shows you how to access this menu.
Direct Port Access
You can connect directly to a properly configured port through a Telnet or SSH
session. Configuration requirements include setting the Host Mode to Console
Server Mode and the Protocol to either Telnet or SSH. Ports, by default are set
to Console Server Mode and Telnet. Use the following information to make a
Telnet or SSH connection to a port:
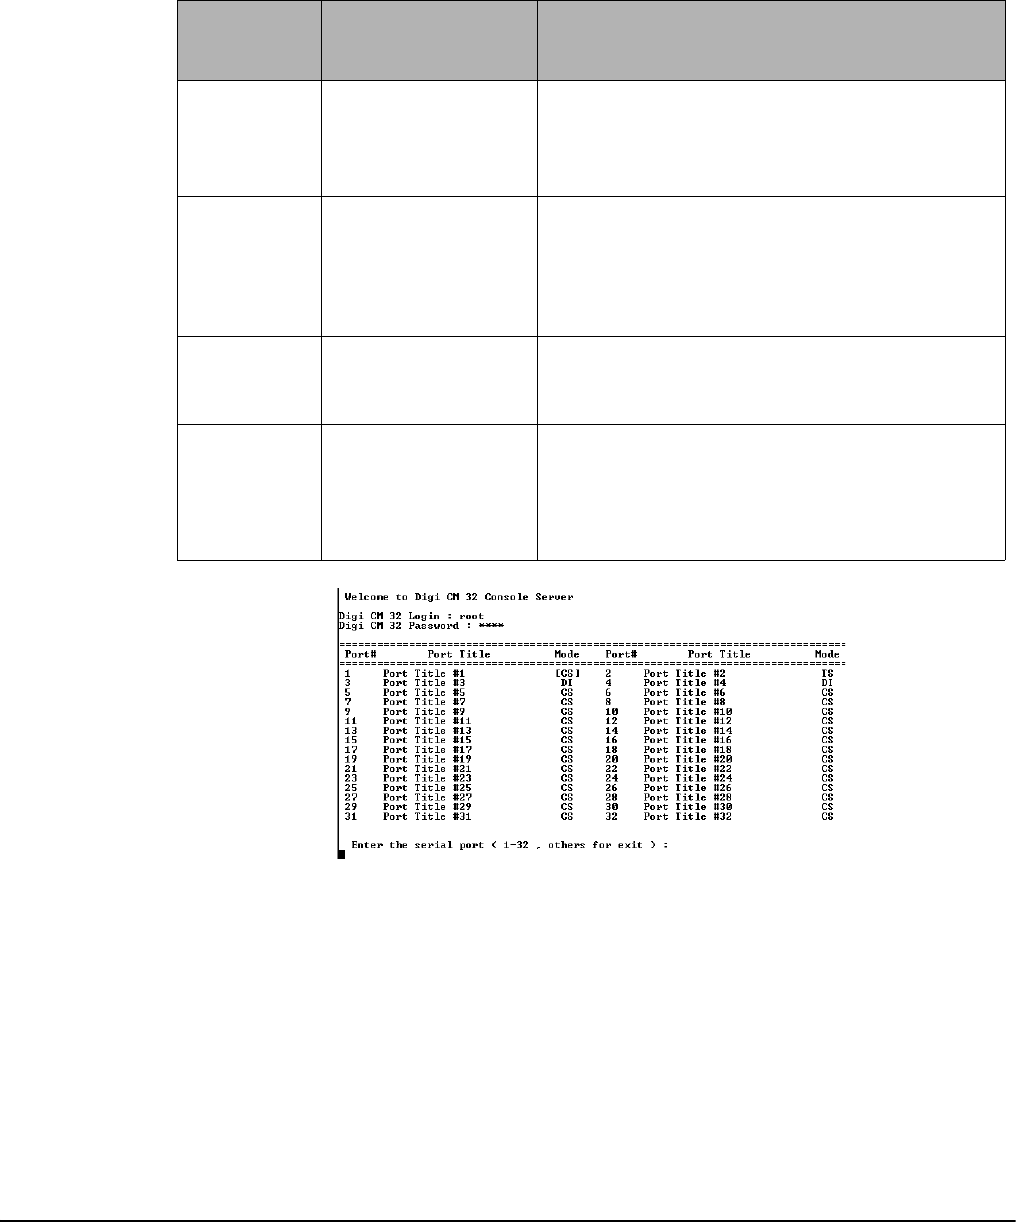
Access
Type Permissions Procedure
Web interface Any user can use
this method.
1. Access the web interface
2. Choose Serial port > Connection > Port access
menu connection
3. Log in
Telnet/SSH Any user can use
this method.
1. Telnet to the Digi CM specifying its IP address
and port 7000. (7000 is the default socket port for
both Telnet and SSH) Example:
telnet 192.168.15.7 7000
2. Log in
Command
line Root From the command line, issue the
portaccessmenu command. Example:
portaccessmenu
Telnet/SSH Any user
TCP port 23/22
Example: telnet digicm.digi.com
If user’s shell is configured to "Port access
menu", please refer to "Administering Users" on
page 59.

Custom Menus
16 Chapter 1
Note: The example assumes that the Listening TCP port is 7003, the default for port 3.
Custom Menus
Custom menus are created by either root or the system administrator to limit
your access to specific ports. For more information, see "Making Custom
Menus" on page 69.
Port Escape Menu
Port escape is the ability to escape from a port without disconnecting. Port
escape is available in main sessions as well as sniff sessions. Every
connection method accommodates port escape. You configure the escape
sequence per port. Follow the procedure to configure the port escape
sequence.
1. Serial Port > Configuration > Select the port number or All.
2. Host mode configuration > Port escape sequence - enter a letter for the Port
escape sequence. The default is <ctrl> z.
3. Click Save to flash and continue with other configurations or click Save & apply
for the changes to take effect.
Type Command Syntax Example: Connection to Port 3
Telnet
telnet ip-address tcp-port
where ip-address is the Digi CM’s IP address
and tcp-port is the Listening TCP port for a
port
telnet 192.168.15.7 7003
(7000 is the default socket port for both
Telnet and SSH)
SSH
ssh user-name@ ip-address tcp-port
where user-name is a user’s name,
ip-address is the Digi CM’s IP address and
tcp-port is the Listening TCP port for a port
ssh user-name:”p=port-number”@ip-address
or
ssh user-name:”t=port-title”@ip-address
ssh admin@ 192.168.15.7 -p 7003
(7000 is the default socket port for both
Telnet and SSH)
ssh sunadmin:”p=25”@Digi12
ssh ciscoadmin:”t=Cisco-main”@Digi12
WEB
http://ip-address/connect.asp?t=port-title
http://ip-address/connect.asp?p=port-
number
where ip-address is the Digi CM
IP address or NDS name, port-number is the
number of the serial port and port title is the
name of the port as assigned in serial port,
port title.
http://digicm.digi.com/
connect.asp?t=CISCO.Router.port3
(the port name is case sensitive)
Introduction
Chapter 1 17
The port escape menu is automatically started if there is one active session to
the port established and a second user tries to connect.
To open a sniff session:
1. Click Serial port > Connection.
2. Select the port you want to access.
3. Log in with your user name and password.
Port Escape Menu
18 Chapter 1
4. Enter the letter of the port escape sequence.
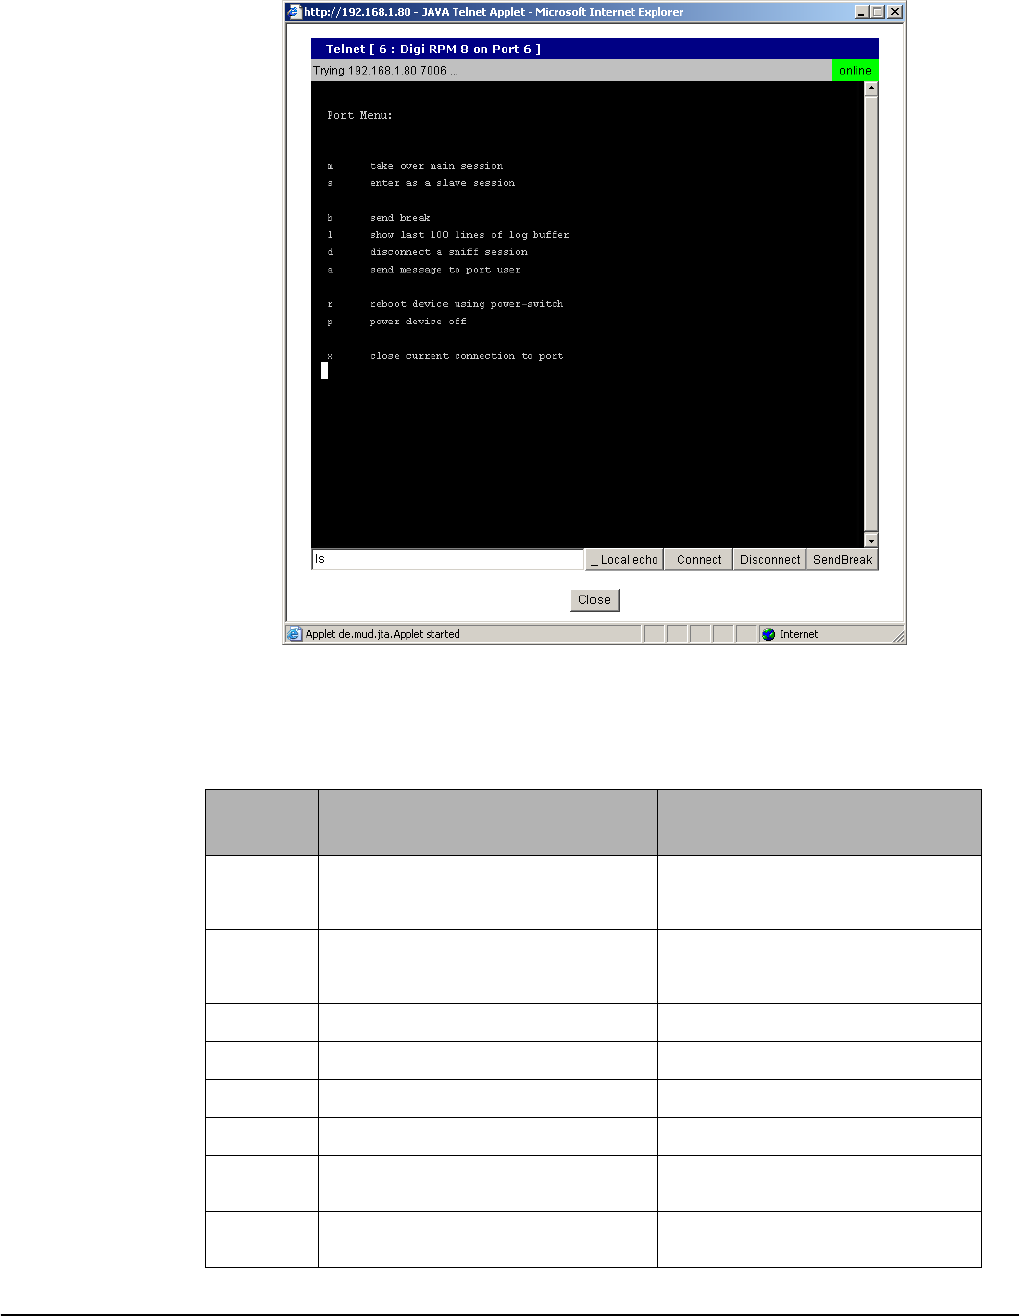
The following table describes the fields and the operations for the port escape
feature. You will only see the fields allowed for your permissions.
Description of Fields
Escape
Sequence
Ctrl+ Description of Action Occurrence
mtake over main session (read/write) only presented to users with read/
write access upon entering a
session
senter as a slave session (read only) only presented to users with read/
write access upon entering a
session
bsend break not functional for sniff users
lshow last 100 lines of log buffer must enable logging for this option
ddisconnect a sniff session only functional to admin
asend message to port user(s) not available to sniff users
rreboot device using power-switch only if power management is
available on this port
ppower device on/off (show only on or off) only if power
management is available on this port

Introduction
Chapter 1 19
Saving and Applying Changes
In the web interface, you can save and apply configuration changes in two
ways. With the one-step method, you choose “Save & apply” and changes are
saved and applied (take effect) immediately. With the two-step method, you
choose “Save to flash,” which immediately saves changes but the changes do
not take effect until you choose Apply changes. The following topics describe
how to do each of these operations.
One Step: Save and Apply Changes
To save and apply changes immediately, choose the Save & apply button.
Two-Step: Save to Flash and then Apply Changes
To save multiple changes but apply changes once, do the following:
Choose the Save to flash button.
When you finish changing the configuration, choose the Apply changes link
which is located on the left navigation menu (or the Save & apply button at the
bottom of the page.)
Automatic Device Recognition
This feature allows the Digi CM to automatically detect and recognize attached
devices. The Digi CM sends down a probe string, “Enter”, by default then
analyzes the response. It then displays the detected OS, device and port
number like:
CISCO.Router.port3
Sun.nemo.port5
To enable Automatic Device Recognition:
1. Serial Port > Configuration > Select the port number or All.
2. Port title
Automatic Detection - Enable
Use detected port title - Enable
Probe String - \x0D (means <Enter>)
Device detection method - Active
Detection initiation - periodically
Detection delay - every 5 minutes
3. Click Save & apply.
For more details about Automatic Device Recognition please refer to chapter
4, Configuring Ports.
xclose current connection to port closes the current connection
Escape
Sequence
Ctrl+ Description of Action Occurrence

Automatic Device Recognition
20 Chapter 1
Port 3 shows a real world example of a detected device.
Automatic Device Recognition also monitors each of the configured serial
ports. This allows you to receive an e-mail or SNMP trap if there is a change in
the expected response from the device connected to the serial port. If the
device goes down or is disconnected for any reason, you are notified.
For configuration of this alarm feature please refer to chapter 4, Configuring
Ports.
Getting Started
Chapter 2 21
Introduction
This chapter covers basic configuration topics. Included is information on
assigning IP settings, enabling secure access with the web interface,
accessing the unit through SSH, and adding or removing users.
Note: Initial setup is described in the Quick Start Guide included with the product
packaging. A copy of this document is also available online at http://cm.digi.com.
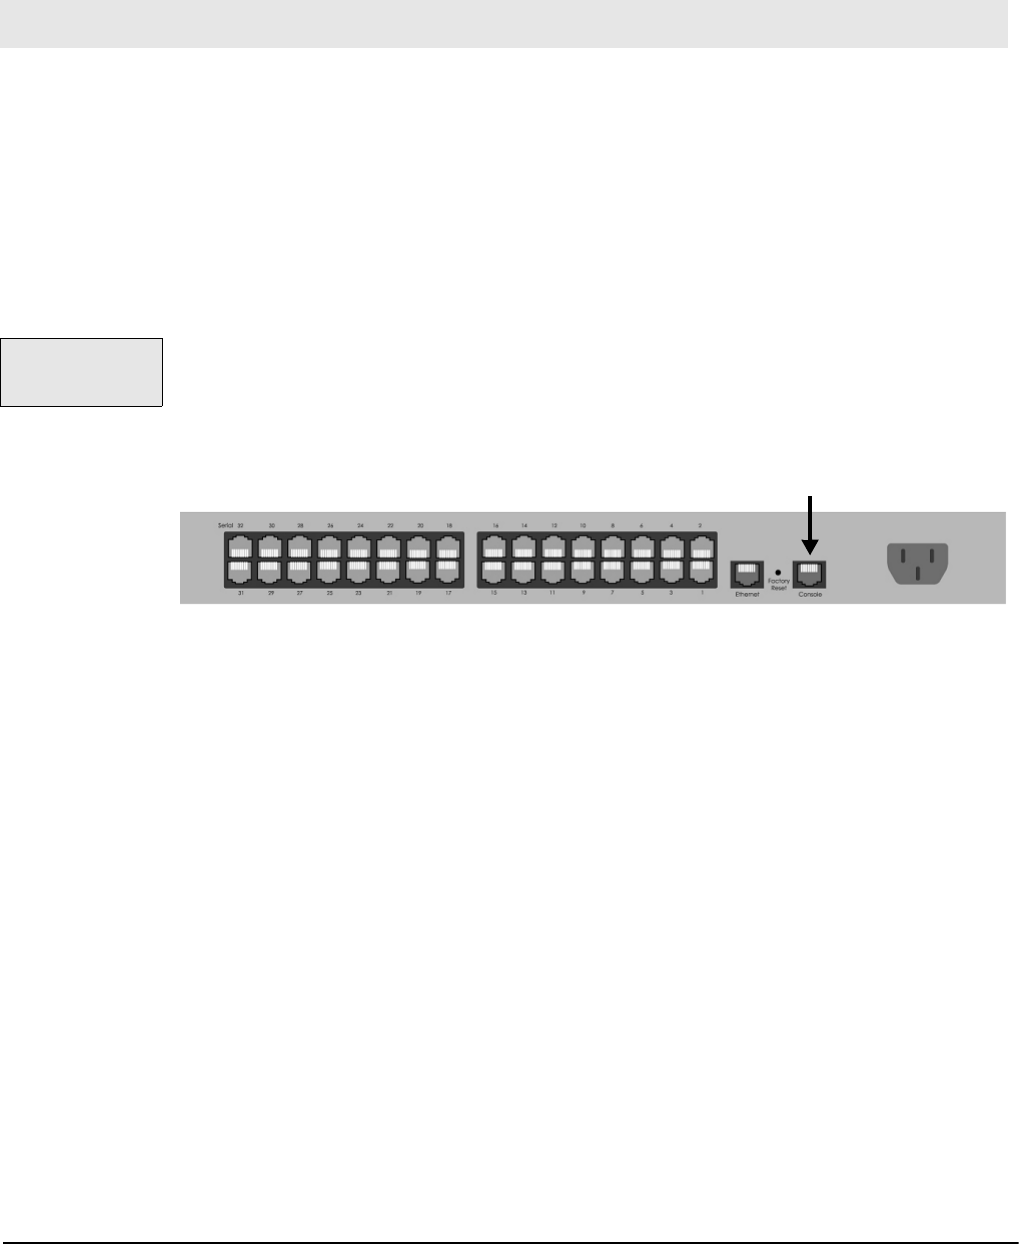
Assigning IP Settings from the Console Port
The following steps use the console port to assign IP settings.
1. Connect the console port on the rear panel of the Digi CM to a serial port
on a workstation using the Ethernet console cable and the appropriate Digi
console adapter packaged with the Digi CM. The arrow in the following
graphic points to the console port.
2. Configure a terminal emulation program, such as HyperTerminal, using the
following settings:
• bps=9600
• data bits=8
• parity=none
•stop bits=1
• flow control=none.
3. Establish a connection to the console port and press Enter to get a
command prompt.
Chapter 2 Getting Started
The default IP
address is
192.168.161.5.
console port
CM 32 back panel show
n
Configuring HTTP and HTTPS
22 Chapter 2
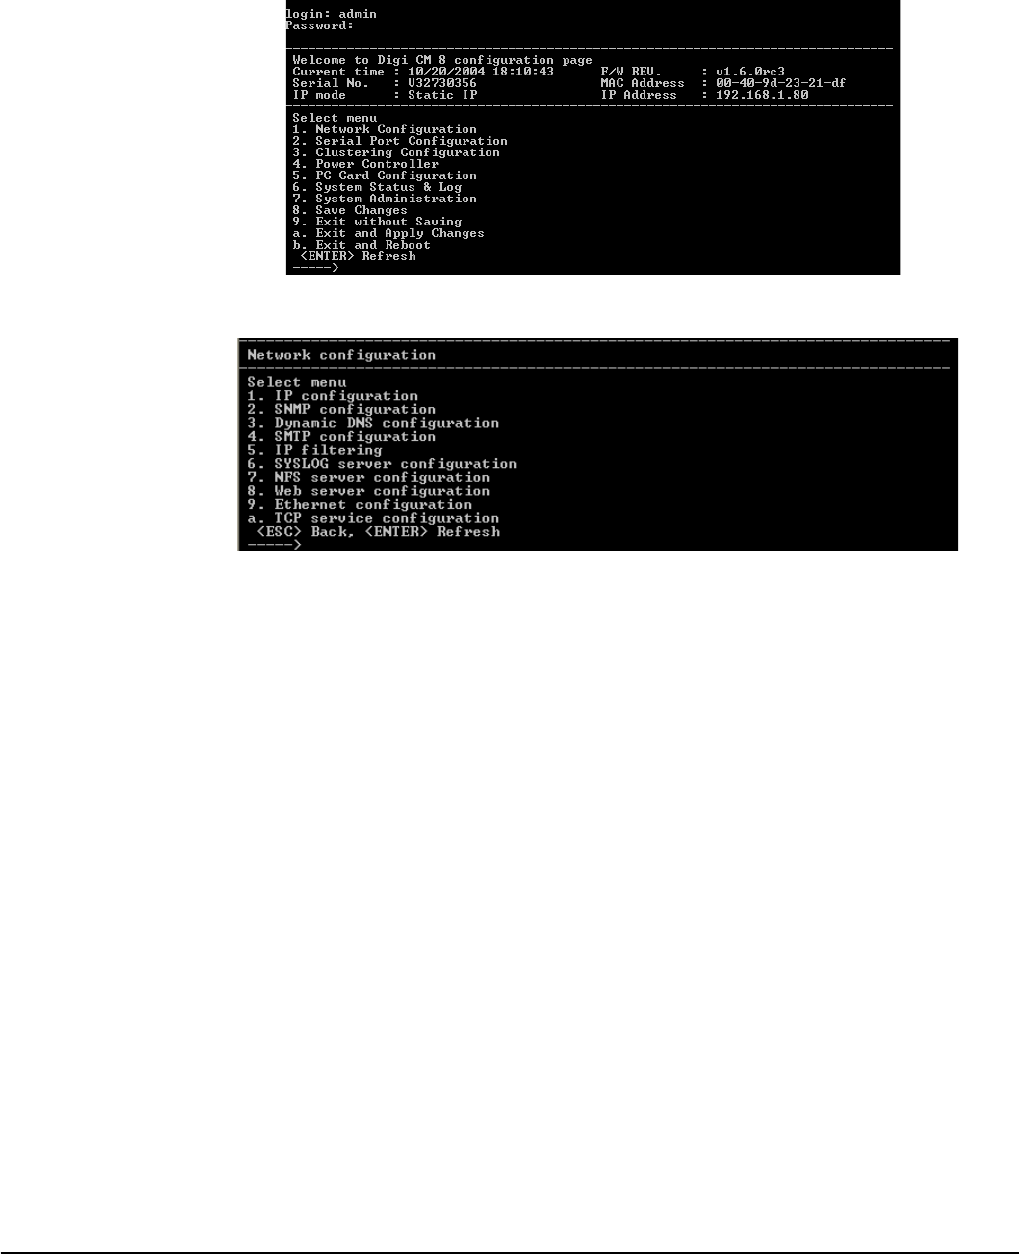
4. At the login prompt, log in as admin. The default password for admin is
admin.
The Configuration menu appears.
5. Enter the number for Network configuration.
6. Enter the number for IP configuration.
7. Enter the appropriate parameters for the IP settings.
8. Press ESC when done to return to the main configuration menu.
9. Enter the number to exit and apply changes.
Changes are saved and applied immediately. There is no need to reboot.
Configuring HTTP and HTTPS
By default HTTP and HTTPS are enabled on the Digi CM device. To modify
these settings, do the following:
1. Enter the IP address for the Digi CM in a web browser’s URL.
2. Under the left navigation bar, Network > Web server configuration
3. Select Enabled or Disabled.
4. Set the desired refresh rate for statistics, connection, and power control
data. The default value is 10 seconds.
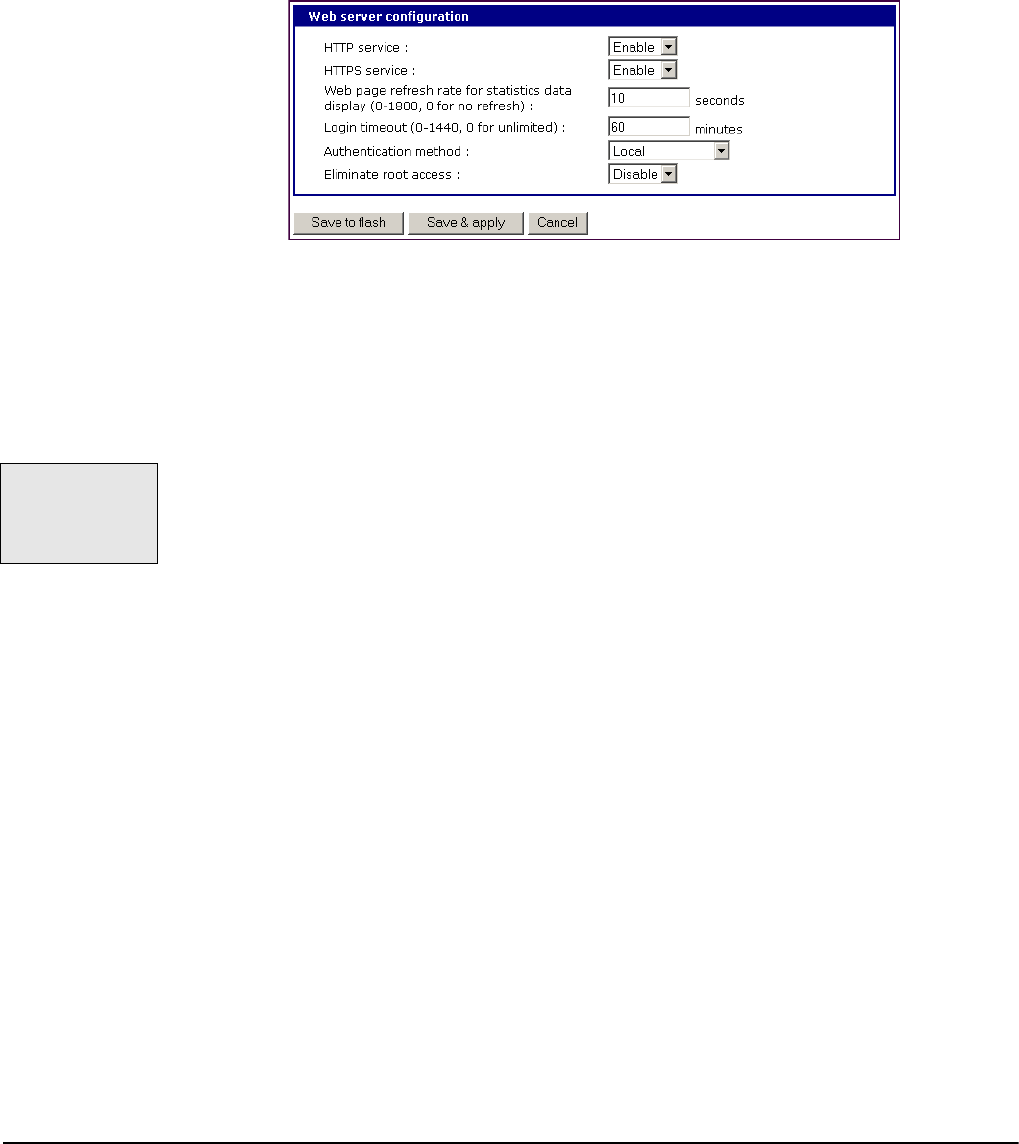
Getting Started
Chapter 2 23
5. Select an authentication method for accessing the web interface. The
default is local.
6. To save and apply changes, click Save & apply.
Configuring for SSH
Accessing the Digi CM’s command line via SSH is enabled by default
(TCP port 22).
Options
The Port Access Menu and individual ports can be configured for SSH.
Configuring the Port Access Menu for SSH
1. Access the web interface.
2. Log in as root, admin, or a member of the port administration group. The
default password for root is dbps, and the default password for admin is
admin.
3. Under Serial port > Configuration > Port access menu configuration.
The Port access configuration menu appears.
The Digi CM
supports Blowfish
and 3DES
encryption
methods for SSH.

Configuring for SSH
24 Chapter 2
4. Select SSH as the Port access menu protocol.
5. Click Save & apply.
Configuring a Port for SSH
1. Access the web interface.
2. Log in as root, admin, or a member of the port administration group. The
default password for root is dbps, and the default password for admin is
admin.
3. Under Serial port > Configuration.
4. Select All or one individual port you want to configure for SSH.
5. Click Host mode configuration.
6. Specify SSH as the Protocol as shown in the following screenshot.
Getting Started
Chapter 2 25
7. Click Save & apply.
Adding, Editing, and Removing Users
The root user and system administrator can add, remove, or edit users from
the web interface.
Procedure
1. Access the web interface.
2. Log in as root or admin. The default password for root is dbps, and the
default password for admin is admin.
Adding, Editing, and Removing Users
26 Chapter 2
3. Under the System administration heading click Users administration.
4. Select Add, Edit, Remove or click the username to edit a user.
•Add: Assign a user name, user group, password, and shell.
•Edit: Change user group, password, or their shell
•Remove: Remove a user from the system
5. Click Save & apply.
Note: The root and admin users cannot be removed from the system.
About Shell Options
The shell program selection determines the interface you see when
establishing a Telnet or SSH session or connecting via the console port with
the Digi CM.
User Group Shell Program Options
root command line
system admin command line, configuration menu, port access menu, custom
menus
port admin configuration menu, port access menu, custom menus
user port access menu, custom menus
Installing and Configuring PC Cards
Chapter 3 27
Introduction
This chapter includes information on adding and configuring PC cards for the
Digi CM. PC card devices that can be added to the Digi CM include a serial
modem, compact-flash card, wireless LAN card, and a network LAN card.
Compatible PC Cards
All compact-flash cards work with the Digi CM, but not all serial modem,
wireless LAN, or regular LAN cards do. To see a list of compatible cards that
have been tested with the Digi CM, visit the Digi support site at
http://cm.digi.com.
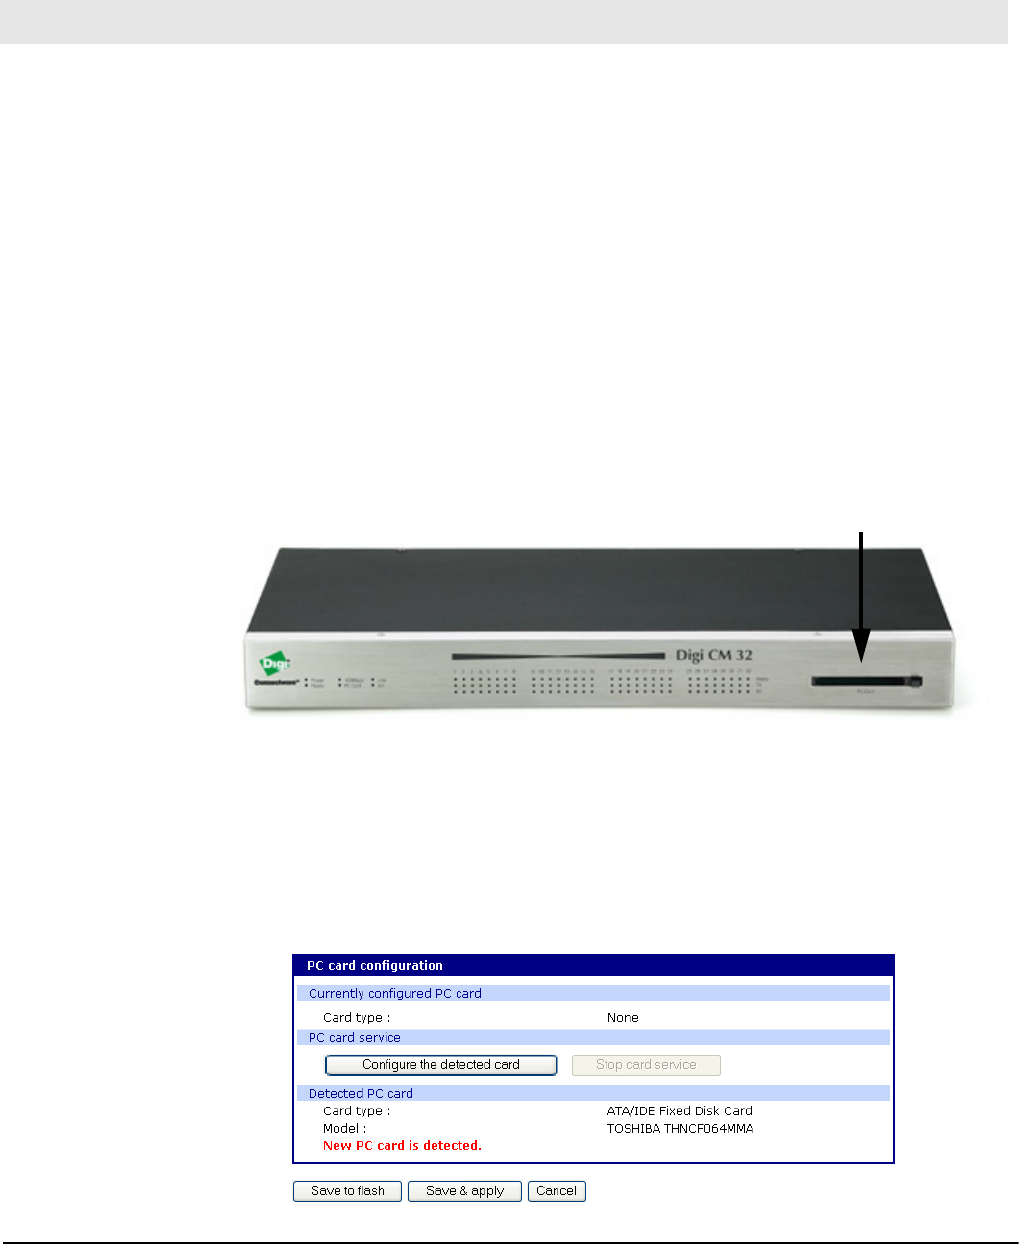
Adding a Compact-flash Card
A PC card slot is located on the front panel of the Digi CM. The arrow in the
following graphic indicates the PC card slot.
To install and configure the compact-flash card on the Digi CM, do the following.
1. Insert the card into the PC card slot.
2. Access the web interface.
3. Under the PC card heading click Configuration.
Chapter 3 Installing and Configuring PC Cards
PC card slot
Digi CM 32 show
n

Adding a Network Card
28 Chapter 3
4. Click Configure the detected card.
The following fields appear on the configuration page.
— ATA/IDE Fixed Disk Card configuration
Total data size to be used - Enter the amount of memory you want to assign to
the compact-flash card for configuration files.
Delete all files in ATA/IDE Fixed Disk Card - Select the Delete button to clear the
compact-flash card of all files.
Format ATA/IDE Fixed Disk Card. - The options are EXT2 or FAT formats.
Select the format option and then select the Format button.
— Automatic Backup/Restore Configuration
Automatically backup configuration - Choose Yes to enable and No to disable
automatic backup.
Restore previously saved configuration - Click Restore to import the previously
saved configuration.
Restore currently saved configuration - Click Restore to import the most
recently saved configuration.
5. Enter the appropriate parameters on the configuration page.
6. Click Save to flash or Save & apply.
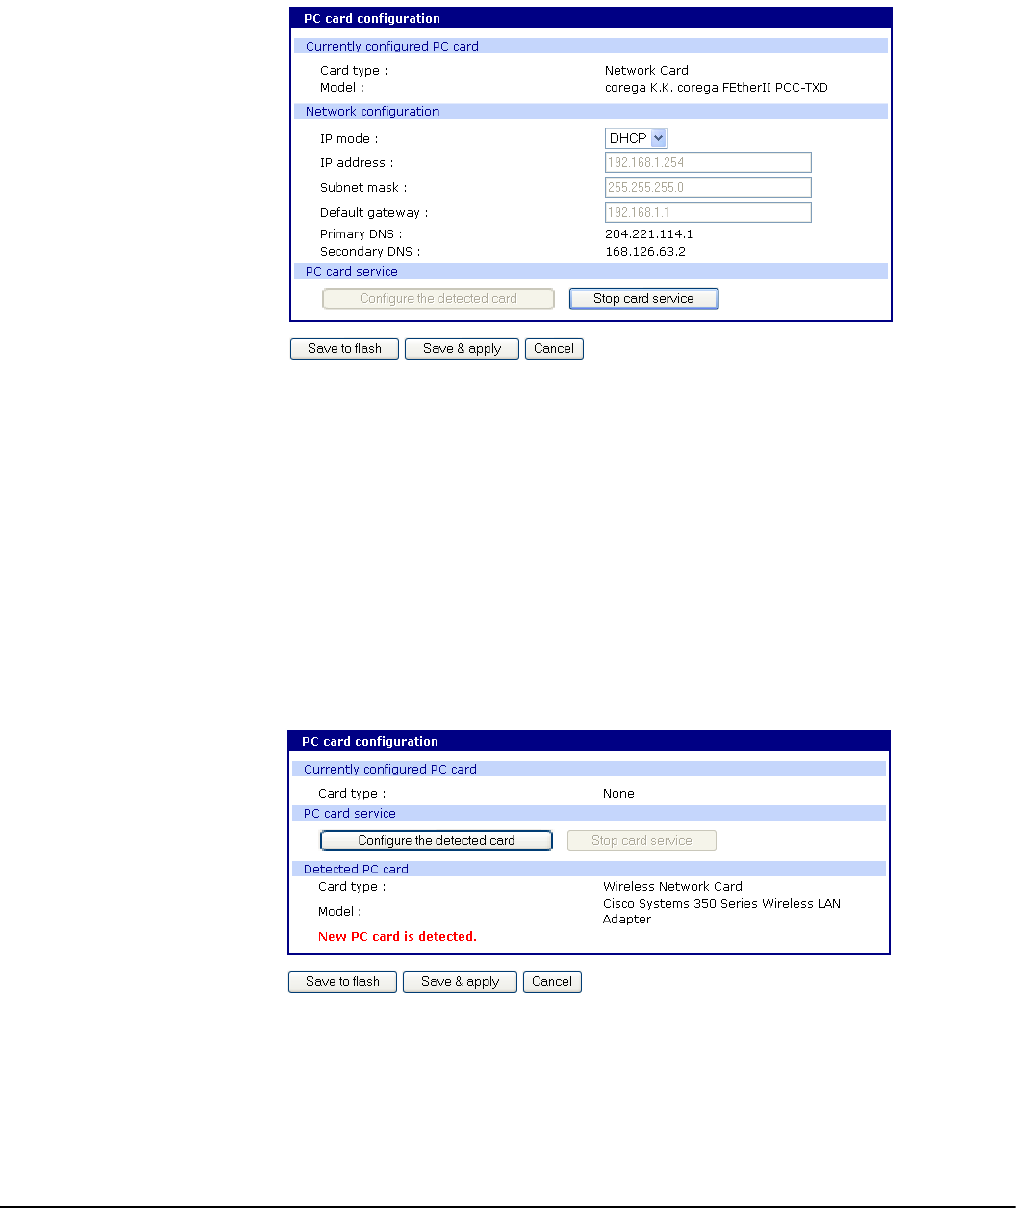
Adding a Network Card
To install and configure a network card on the Digi CM, do the following.
1. Insert the card into the PC slot.
2. Access the web interface.
3. Under the PC card heading, click Configuration.
Note: The card is automatically discovered and a configuration menu is displayed.
Always select the
Stop card
service button
and Save & apply
before removing
the PC card.
Installing and Configuring PC Cards
Chapter 3 29
4. Enter the appropriate parameters in the configuration menu.
5. Click Save & apply.
Note: If DHCP is active the IP address will appear after the configuration is saved and
applied.
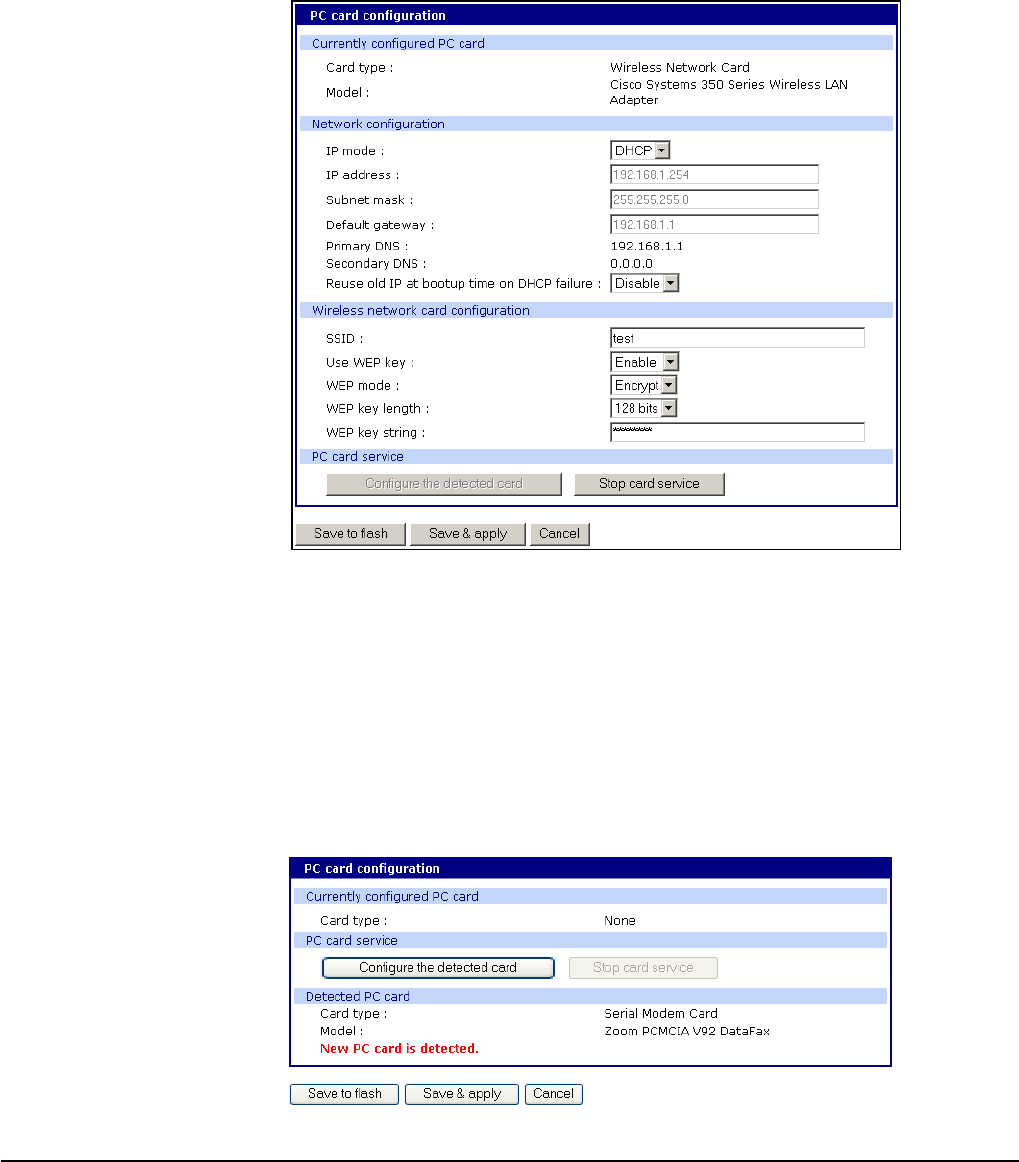
Adding a Wireless LAN Card
To install and configure a wireless LAN card on the Digi CM, do the following.
1. Insert the card into the PC slot.
2. Access the web interface.
3. Under the PC card heading, click Configuration.
Note: The card is automatically discovered and a configuration menu is displayed.
4. Click Configure the detected card.
5. Enter the appropriate parameters in the configuration menu.
WEP is the acronym for Wired Equivalent Privacy and is a security protocol
for wireless LANs using encryption to protect data transfers. If you are
unsure of the settings for the wireless card, see your network administrator.
Adding a Serial Modem
30 Chapter 3
SSID - Set Service Identifier and is the name of the wireless LAN network
Use WEP key - Enable or disable the WEP key
WEP mode - Encrypted or unencrypted
WEP key length - The options are 40 or 128 bits if the WEP key is enabled
WEP key string - Refer to the wireless network administrator for the
wireless encryption key string
6. Click Save to flash.
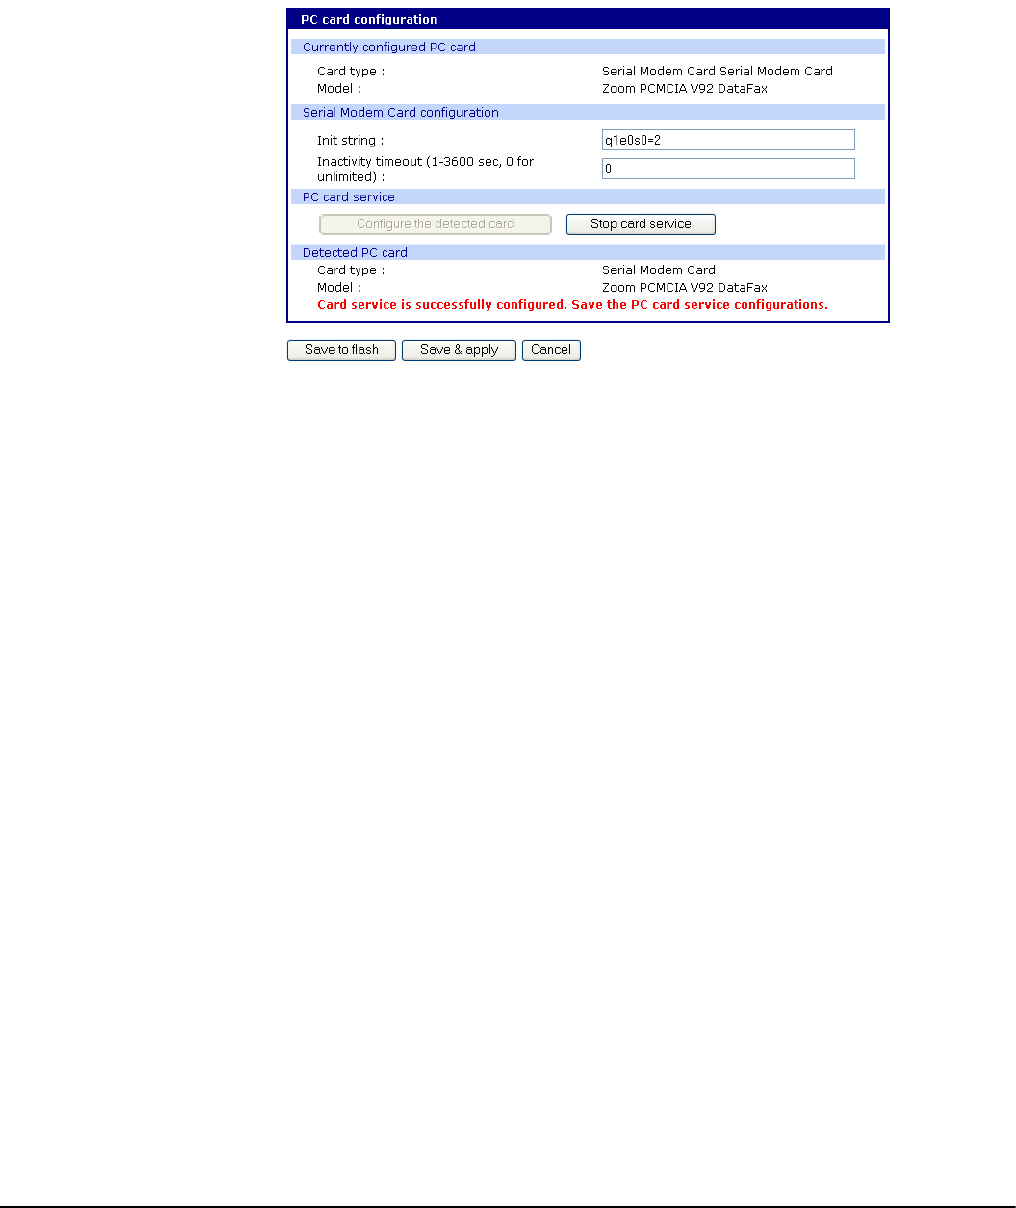
Adding a Serial Modem
The modem must first be inserted and installed on your system before it can
be used. To configure the modem do the following:
1. Access the web interface.
2. From the menu click Configuration under the PC card heading.
Note: The card is automatically discovered and a configuration menu is displayed.
Installing and Configuring PC Cards
Chapter 3 31
3. Click Configure the detected card.
4. Edit any appropriate parameters and Click Save & apply.

Adding a Serial Modem
32 Chapter 3

Chapter 5 33
System and Port Logging
Introduction
The Digi CM provides four options for saving system and port logs. The
options are: a syslog server, NFS server, compact-flash card, and the Digi CM
memory. When memory is selected as the storage location, log files are saved
to volatile memory, meaning files are lost when the power is turned off. To use
a syslog server, an NFS server, or a compact-flash card, you must first enable
the devices and enter the required information. Compact-flash cards must be
installed before they can be enabled and configured for logging purposes.
System logs track events such as logins, authentication failures, system
configuration changes, and more. Port logs on the other hand document the
data flow through the serial ports. Locations for viewing the system and port
logs is outlined in this chapter.
Enabling Log Storage Location
Enable NFS Server
Log data can also be saved to an NFS server, but the NFS server must be
configured with read and write privileges. To use an NFS server, you must
specify the NFS server’s IP address and its mounting path. Encrypted NFS is
using a SSH connection to tunnel all data. To enable the NFS server for port or
system logging, do the following:
1. Access the web interface.
2. Under the Network heading, Click NFS server configuration.
NFS service - Enabled or disabled.
Primary NFS server name -IP address of NFS server or DNS name
Mounting path on primary NFS server - directory to primary NFS server
Primary NFS timeout - Interval in seconds before timeout (5-3600)
Primary NFS mount retrying interval - Interval in second between attempts to
connect (5-3600)
Enable/Disable encrypted primary NFS server - IF server supports encrypted
NFS server
Encrypted primary NFS server user - User name of server
Encrypted primary NFS server password - password
Secondary NFS service - Enabled or Disabled
Secondary NFS server name - Name of server
Mounting path on secondary NFS server - Directory to server
Secondary NFS timeout (sec, 5-3600) - Timeout in seconds
Secondary NFS mount retrying interval (sec, 5-3600) - Retry interval in seconds
Chapter 5 System and Port Logging

Enabling Log Storage Location
34 Chapter 5
Enable/Disable encrypted secondary NFS server - If secondary server supports
encrypted NFS server
Encrypted secondary NFS server user - User name
Encrypted secondary NFS server password - Password
Confirm secondary NFS server password - Repeat password
3. Choose Enabled.
4. Enter the IP address of the primary and secondary (if applicable) NFS
server and the mounting path of each.
5. Click Save & apply.
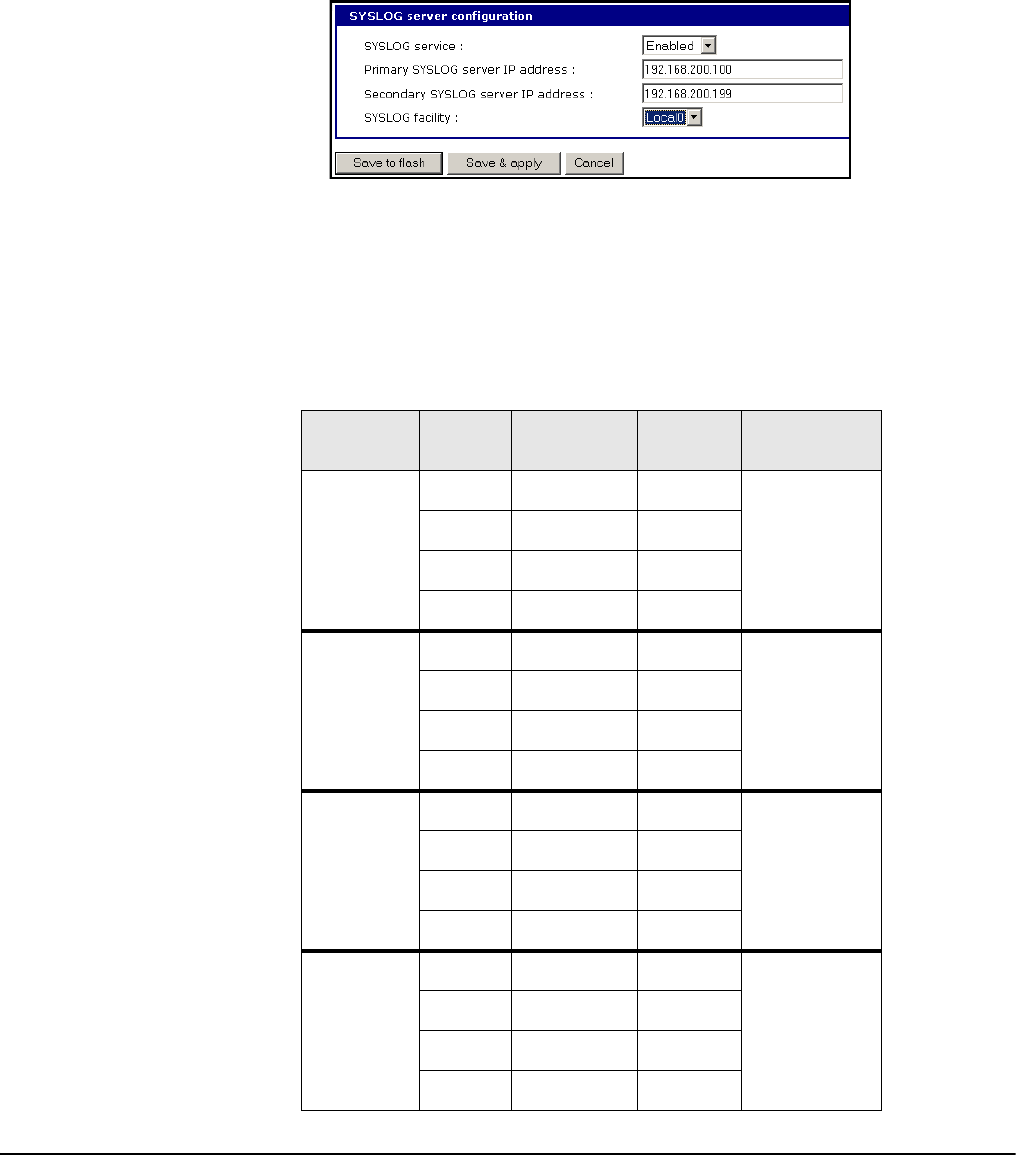
Enable SYSLOG Server
To enable the Digi CM for system or port logging on a syslog server, do the
following:
1. Access the web interface.
2. Under the Network heading, click SYSLOG server configuration.
3. Choose Enable.
System and Port Logging
Chapter 5 35
4. Enter the IP address of the primary and secondary (if applicable) syslog
server and select the syslog facility from the drop down menu.
5. Click Save & apply.
Enable A Compact-flash Card
The compact-flash card must be installed and configured on the Digi CM
before it can be used for system logging or storing Digi CM configuration
information. When storing log files to an external flash card, the size of the
available storage is dependent on both the size of the card and the port counts
of the Digi CM used. The maximum settings for log file sizes are listed in the
following table. See also Adding a Compact-flash Card on page 27.
Total Flash
Card Size Digi CM System Log Port Log
(per port) Total Memory
Used
32
8 4.6 3.1M
29M
16 4.6 1.53M
32 4.6 762K
48 4.6 500K
64
8 9.2 6.2M
58M
16 9.2 3.1M
32 9.2 1.53M
48 9.2 1.02M
128
8 18.4 12.3M
118M
16 18.4 6.2M
32 18.4 3.1M
48 18.4 2.0M
256
8 36.8 24.6M
236M
16 36.8 12.3M
32 36.8 6.2M
48 36.8 4.1M

Configuring System Logging
36 Chapter 5
Enable Digi CM Memory
The Digi CM memory is already enabled for port logging and only needs to be
configured for system or port logging. When storing log files to the Digi CM
local memory, a total of 3.5M is available. The amount of memory per serial
port is dependent on the port count of the Digi CM used. The log file sizes are
shown in the following table are maximum settings. See also Configuring
System Logging on page 36.
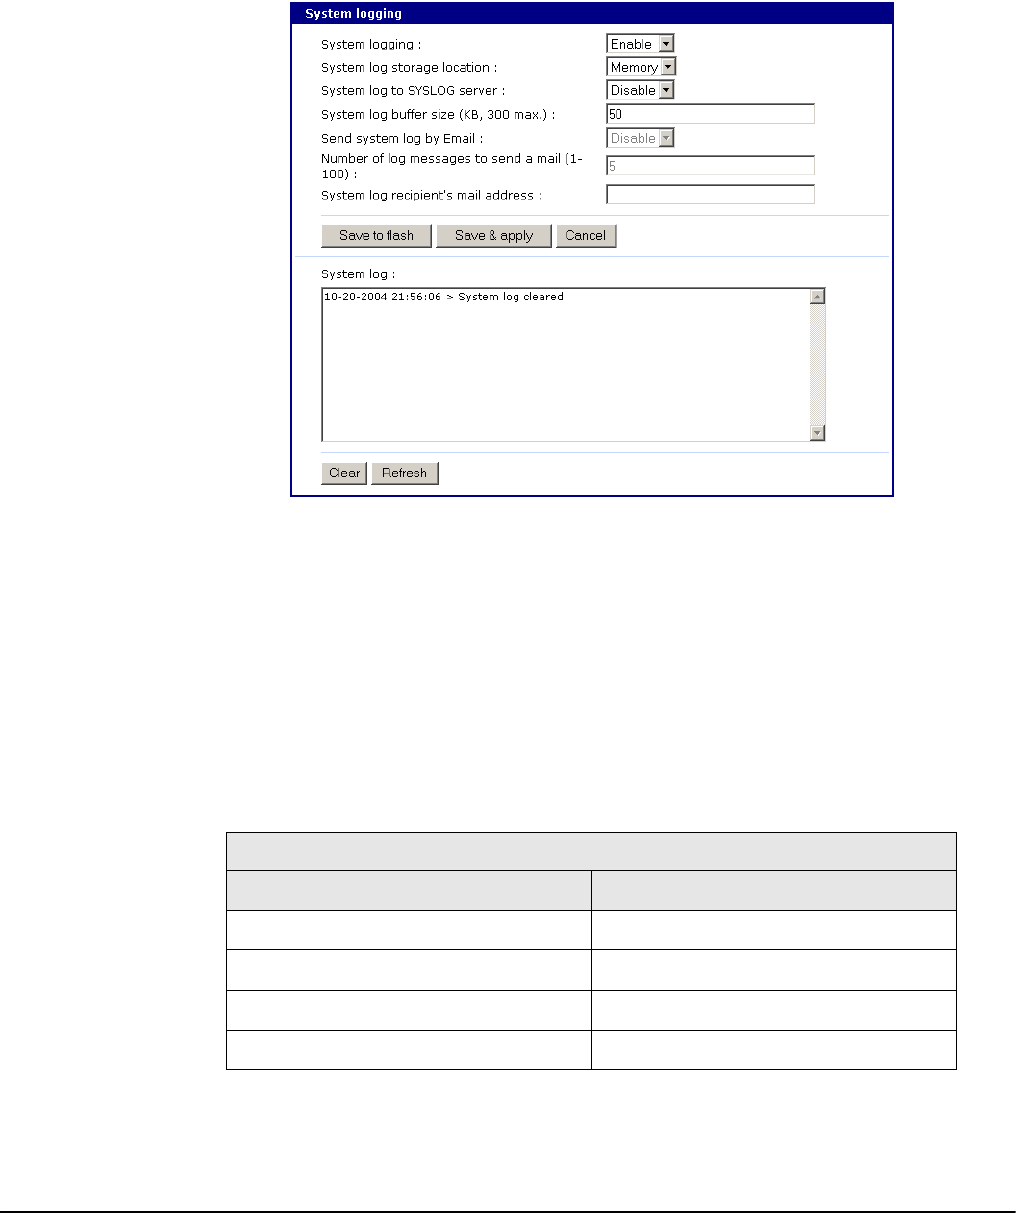
Configuring System Logging
To configure the Digi CM for system logging, do the following:
1. Access the web interface.
2. Under System status & log, click System logging.
3. Choose Enabled for System logging and the log buffer size.
4. From the System log storage location, choose the location you want from
the drop down menu. The choices available are dependent on what you
have enabled and/or installed. The Digi CM memory choice is always
available.
System logging - Enable or Disable
System log storage location - Memory or NFS server
System log to SYSLOG server - Enable to store system logs to a SYSLOG
server
System log buffer size (KB, 300 max) - Log buffer size in KB
Send system log by Email - Enable or Disable
Number of log messages to send a mail (1-100) - Number of messages
Digi CM System Log Port Log
(per port) Total Memory Used
8
300K
400K
3.5M
16 200K
32 100K
48 66K
System and Port Logging
Chapter 5 37
System log recipient’s mail address - Email address for log recipient
5. Choose to enable or disable email alerts and the number of log messages
to send. The default value is 5 seconds for the delay in log email
messages.
6. Enter the contact email address.
7. Click Save & apply.
Viewing System Logs
The system logs can be viewed from the web interface on the System logging
page or from the location where they have been saved. The following table
lists the file locations of the system logs.
System Logfile
Log Storage File Location
Digi memory /tmp/logs
Compact-flash card /mnt/flash/logs
Syslog server must be viewed on the syslog server
NFS server /mnt/nfs/logs

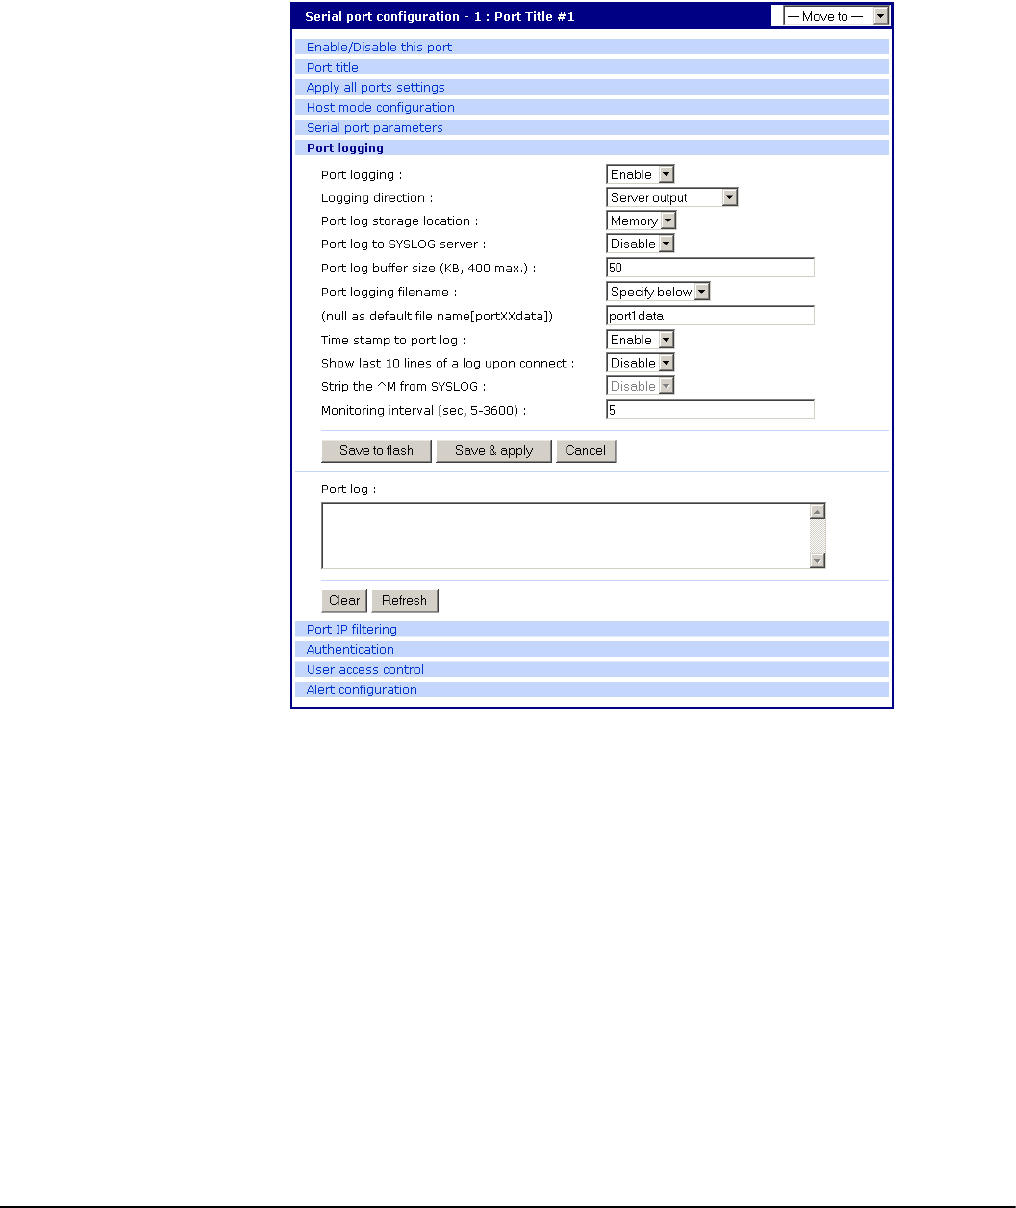
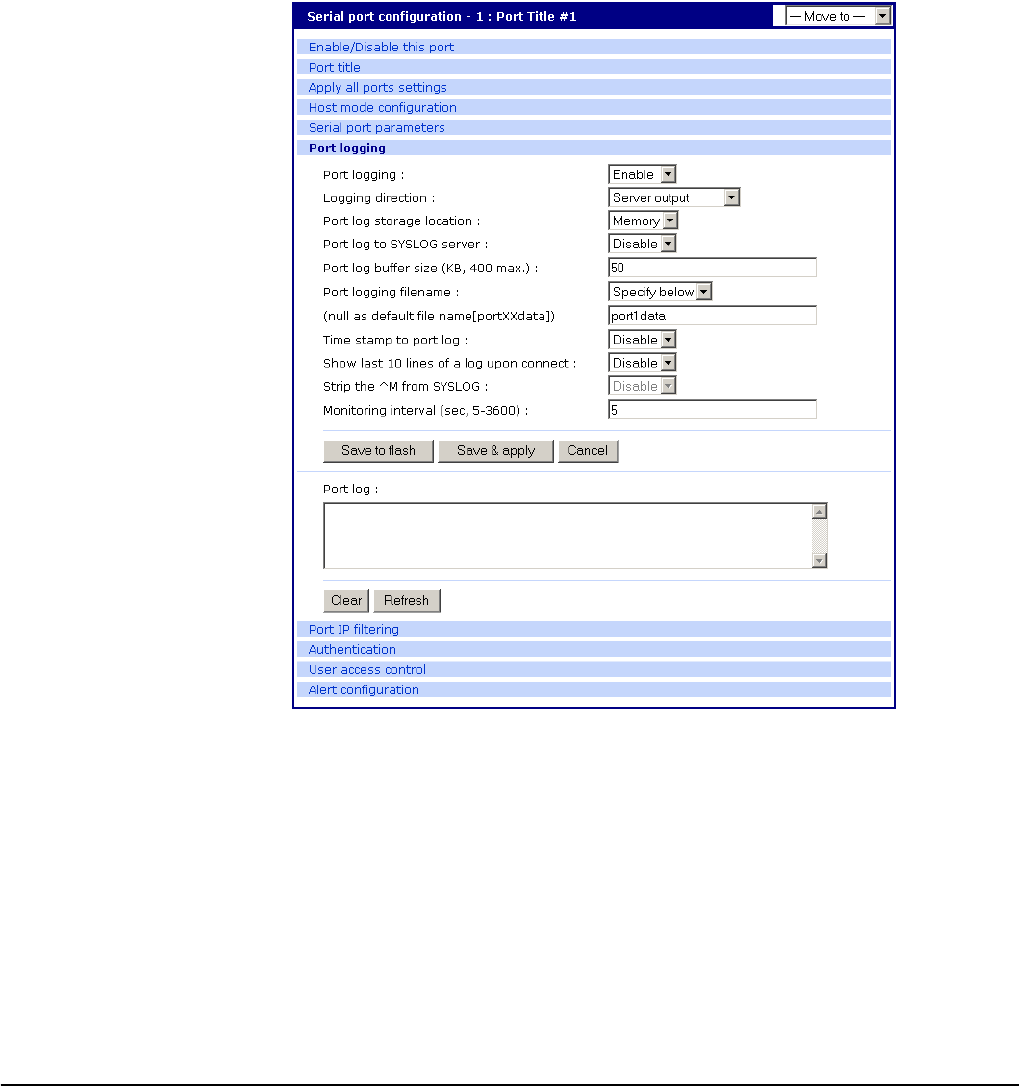
Configure Port Logging
38 Chapter 5
Configure Port Logging
If a serial port is configured for console server mode, the port logging feature
can be enabled. Port logging allows you to save serial data to the memory of
the Digi CM, a compact-flash card, a syslog server, or to an NFS server. If the
memory is used for port logging, all data will be cleared when the system’s
power is turned off.
You can also define alarm keywords for each serial port and send email alerts
or SNMP traps to enable unattended serial data monitoring. The following
steps configure a serial port for port logging in console server mode.
1. Access the web interface.
2. Under the Serial port heading, Click Configuration.
3. Choose All or the Individual port and then Port logging.
4. Configure the settings:
Logging direction - Specify what to log. Options are: Server – only server
output, User – only user output, Both with/without arrows – server and user
output with/without directional arrows. Default: server output.
Security advice: When logging user output passwords will be saved into
the log file!
Port log to SYSLOG server - Enable to store port logs to a SYSLOG server
Port logging filename - Options are to specify your own or use the port title
for the port log filename
Show last 10 lines of a log upon connect -Show previous last 10 lines of log
when connecting to this port
Strip the ^M from SYSLOG -For logging to a SYSLOG server, strip out all ^M
Monitoring interval -The frequency in seconds to update the port log

Configure Port Logging
40 Chapter 5
Viewing Port Logs
The port logs can be viewed from the web interface on the Port logging page
or from the location where they have been saved. The following table lists the
file locations of the system logs.
To view the port logs on the NFS server for port number 5, enter the following
command:
more /mnt/nfs/port5data
Partial logfiles can also be viewed on the web interface by going to Serial port
> Configuration > select a port you want to view > Port logging.
Port Logfile
Log Storage File Location
Digi memory /tmp/port#data
Compact-flash card /mnt/flash/port#data
Syslog server must be viewed from the syslog server
NFS server /mnt/nfs/port#data
Chapter 4 41
Configuring Ports
Introduction
This chapter provides information on configuring serial ports. Key port
configuration attributes include whether or not the port is enabled or disabled,
the host mode, which defines a type of communication between the port and a
remote host, the protocol, authentication, user access restrictions, and serial
communication attributes.
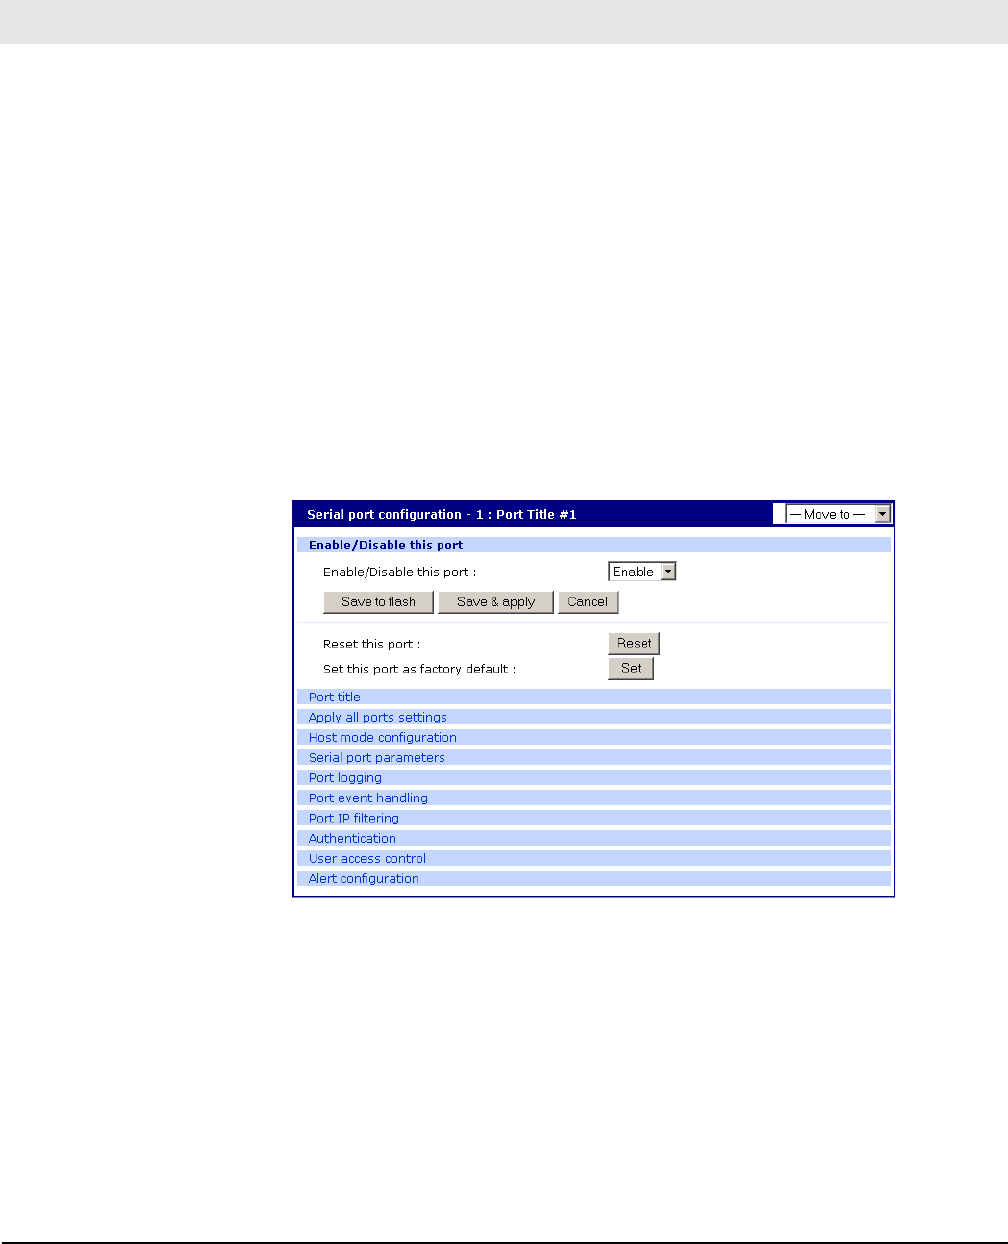
Enabling and Disabling the Ports
All serial ports may be enabled or disabled individually or as a group from the
web interface.
1. Click Serial port > Configuration > Port number or all
2. Select Enable or Disable from the drop down menu.
3. Click Save to flash and continue with other configurations or click Save & apply.
Chapter 4 Configuring Ports

Resetting Ports
42 Chapter 4
Resetting Ports
The Digi CM allows you to restart all processes associated with a port and to
disconnect all sessions.
To reset an individual port:
1. Click Serial port > Configuration > Port number.
2. Click Reset this port: Reset.
Reset individual port settings
Individual ports can be reverted to factory defaults.
1. Click Serial port > Configuration > Port number.
2. Click Set this port as factory default: Set.
Port Title
The Digi CM offers multiple ways to configure the port title; both manually and
automatically. The default is set to “Port Title # xx” with xx being the port-
number.
Automatic Device Recognition allows the Digi CM to evaluate the attached
devices and populate the port title. Additionally the Digi CM can generate a
SNMP trap or send an e-mail in case the response of the device changes or it
stops responding.
If Active detect is selected, a configurable probe string (carriage return =0x0d
by default) is sent to the console port and the response is saved to a file at
/var/run/systemrep_raw.portxx with xx being the port number.
This file is parsed using a script /tmp/cnf/active_detect and the operating
system and device name are written to files: /var/run/HostnamePortxx and
/var/run/OSPortxx.
The commands to parse the system response are user customizable, so if you
have a device that is not recognized immediately by the Digi CM, he can add a
rule to the file.
If Passive detect is selected, no probe string is sent to the attached device but
the port buffer is analyzed.
The script /tmp/cnf/passive_detect is executed and the results are saved to
files: /var/run/HostnamePortxx and /var/run/OSPortxx.
After editing the scripts as either active_detect or passive_detect, save them to
flash using the saveconf command so they are not lost after a reboot.
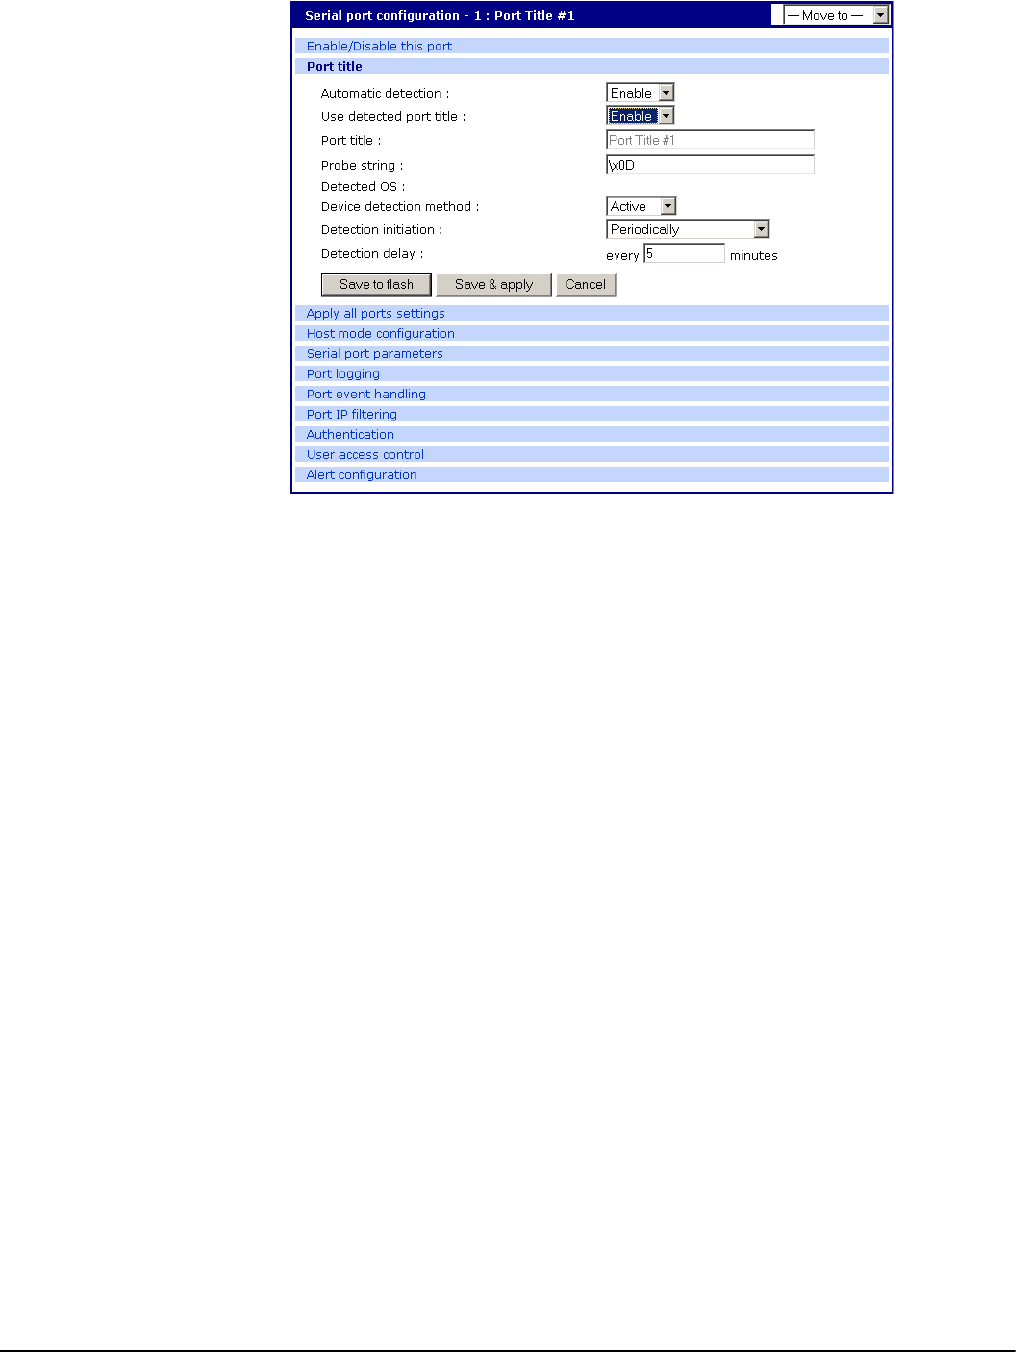
Configuring Automatic Device Recognition
Configure a serial port for Automatic Device Recognition.
1. Access the web interface.
2. Under the Serial Port heading, Click Configuration.
3. Choose All or an Individual port > Serial port parameters.
4. Edit the fields as they apply to your configuration.
Configuring Ports
Chapter 4 43
Automatic detection - Enable or disable automatic detection of devices
Use detected port title - Enable if you want the Digi CM to automatically use the
results of the detection mechanism to populate the port title. Disable if you
want the default port title. If you choose Disable, you can still use the alarm
feature.
Port title - Manually entered or automatically populated title of the port.
The Digi CM allows access to a port by using only the number of the port title,
making it unnecessary to know the serial port number.
The default is set to “Port Title xx” with xx being the port number.
Probe string - The probe string is an ASCII string that is sent to the device.
Special characters are coded in hexadecimal values like:
CR \x0d
LF \x0a
ESC \x1B
Examples are:
Parse string output
root\x0d\x0a root<CR><LF>
\x1Btest\x0d <ESC>test<CR>
\x1B test\x0d <ESC><Space>test<CR>
\x1b\x20test\x0D <ESC><Space>test<CR>
\x1B\x20\x74\x65\x73\x74\x0d <ESC><Space>test<CR>
Detected OS - Displays the result of the Active or Passive detection process.
Device detection method - If Active is selected a probe string is periodically sent
to the device and the response is analyzed. If Passive is selected, the port
Apply all Ports Settings
44 Chapter 4
logging is parsed to determine the device name and the OS.
Detection initiation - Active only if automatic detection is Enabled. Periodically or
If new device is detected are the choices in the drop down menu. If
Periodically is selected, the probe string is sent once every n minutes to the
device while no connection is active to the serial port. When If new device is
detected is selected, the probe string is only sent if a change on the DSR
signal on the serial port is detected. Normally a device will activate the DSR
signal if the serial port becomes active.
Detection delay - The delay before the first active detect process is started and
between active detections.
5. Click Save & apply.
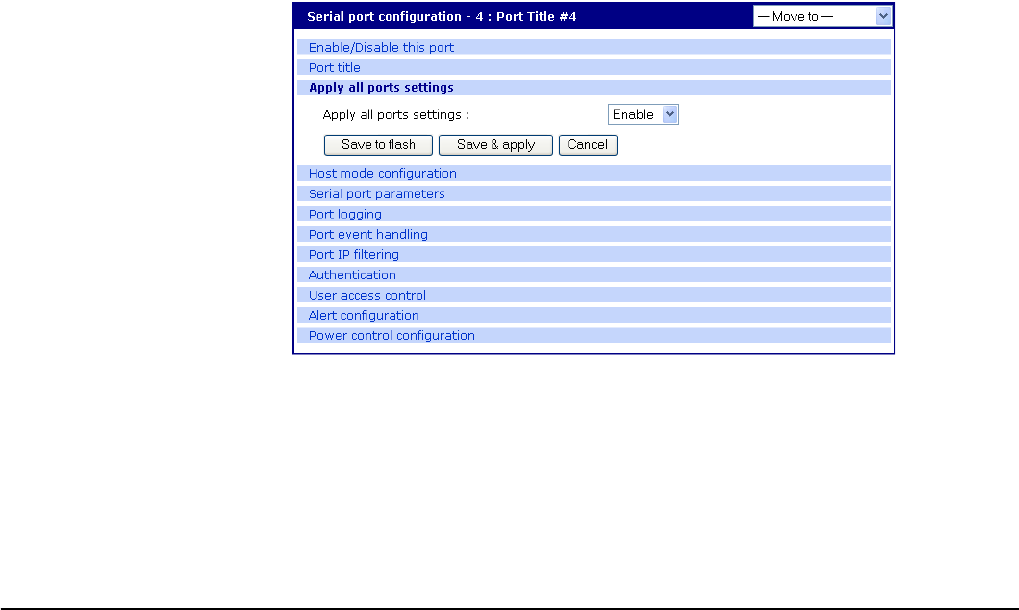
Apply all Ports Settings
The Digi CM supports managing all ports simultaneously. If changes are made
to the page “all ports”, they are automatically applied to all ports. You can
choose to exclude ports from this feature.
To enable/disable this feature for a port:
1. Access the web interface.
2. Under the Serial Port heading, click Configuration.
3. Choose an individual port > Host mode configuration.
4. Select Enable or Disable from the drop down menu.
5. Click Save to flash and continue with other configurations or click Save & apply.
Note: When changing a parameter for all ports, all settings of the complete page are
applied to all ports.
Host Mode Configuration
The Digi CM provides four modes of communication between serial devices
and remote hosts. Console server, terminal server, dial-in modem, and dial-in
terminal server. These are described in the following sections.
Console Server Mode
Configuring a serial port as a console server creates a TCP socket on the Digi
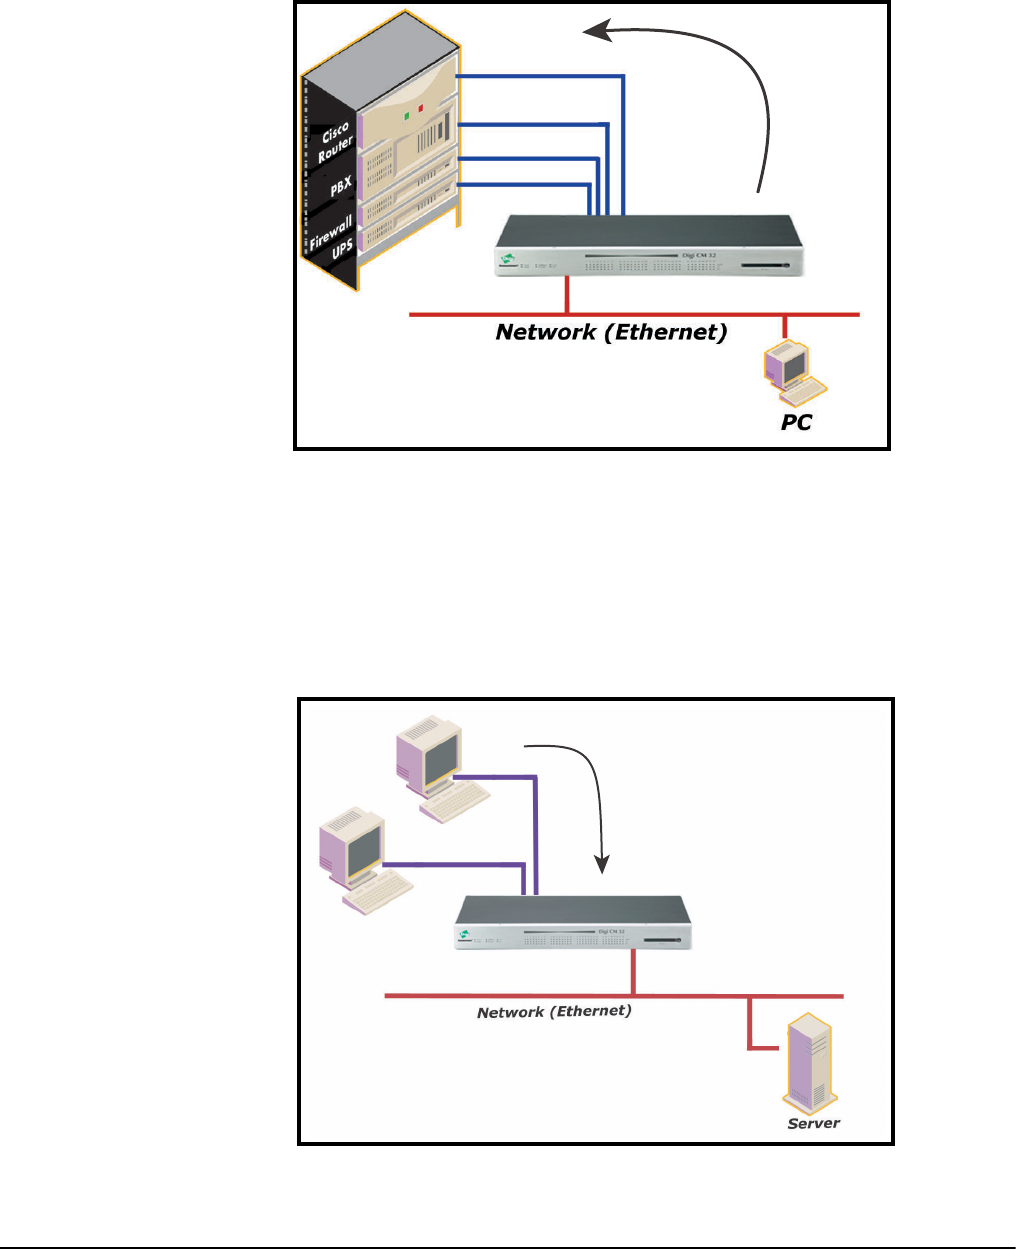
Configuring Ports
Chapter 4 45
CM that listens for a Telnet or SSH client connection. When you connect to the
TCP socket, you have access to the device attached to the serial port as
though the device were connected directly to the network. RawTCP is also
supported with the Console Server Mode.
Terminal Server Mode
In terminal server mode, the Digi CM serial port is configured to wait for data from
the device connected to the port. If data is detected, the Digi CM starts a TCP
session as a Telnet or SSH client to a pre-defined server. The server must be
defined by you before the port can be configured for a Telnet or SSH client. This
mode is used when you want to access servers on the network from a serial
terminal. RawTCP is also supported with the Terminal Server Mode.
serial
Connection request
terminals
serial
Connection request
Host Mode Configuration
46 Chapter 4
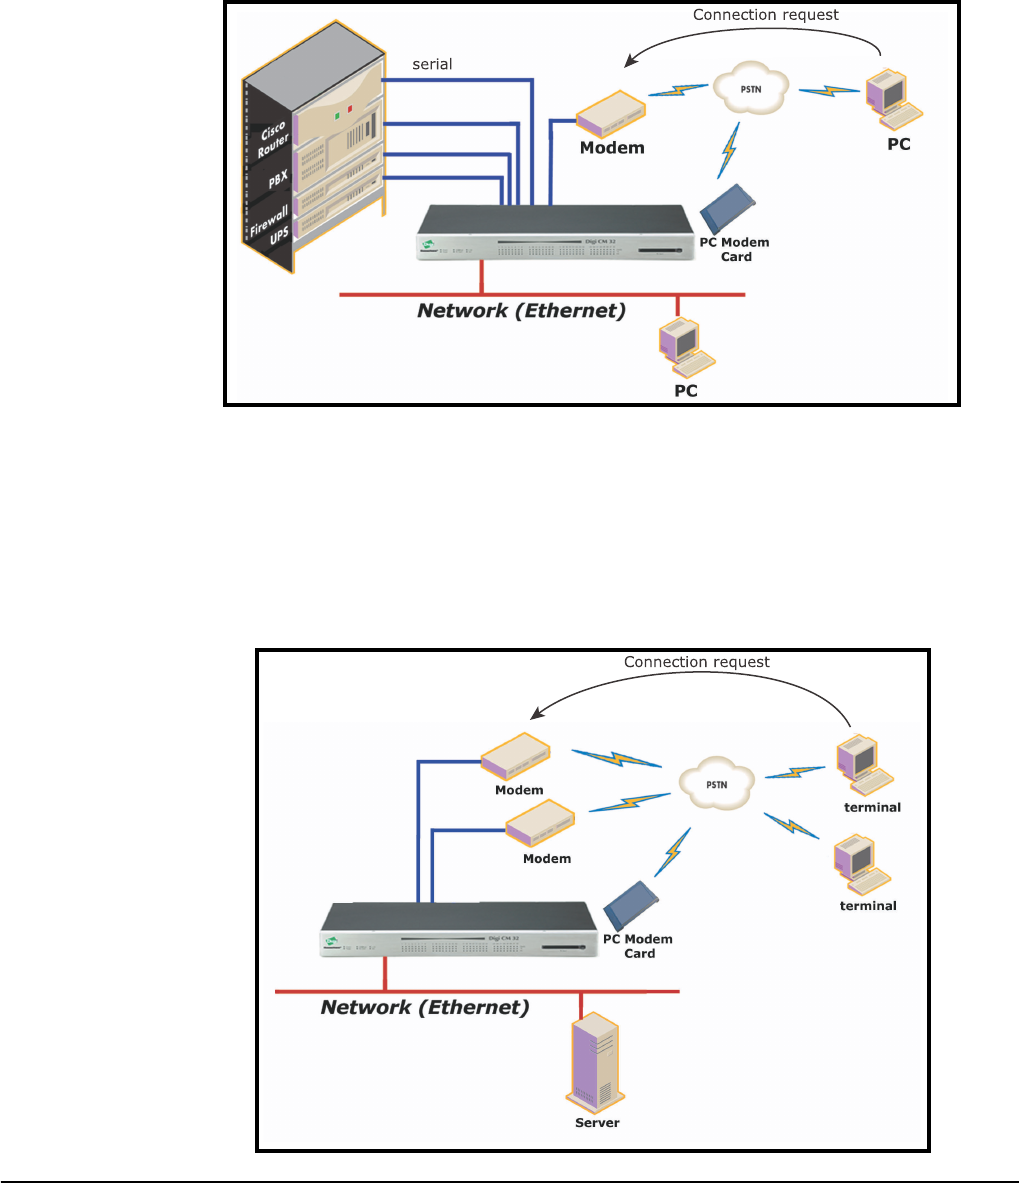
Dial-In Modem Mode
In this mode, the Digi CM assumes an external modem is attached to the serial
port and is waiting for a dial-in connection from a remote site. When a user
dials-in using a terminal application, the Digi CM accepts the connection and
displays the appropriate prompt or menu for you that logged in. Example: User
’root’ would see the command line interface (CLI), whereas the user ’admin’
would see the config menu or CLI depending on the shell for that user.
Dial-In Terminal Server
Dial-in terminal server mode is a combination of the terminal server mode and
the dial-in modem mode. In the dial-in terminal server mode, the Digi CM
assumes the serial port is connected to an external modem and is waiting for a
dial-in connection from a remote site. When you dial-in using terminal
applications, the Digi CM accepts the connection as a Telnet or SSH client to a
pre-defined server. This mode is most frequently used when you want to use
modems to access servers on a network.
Configuring Ports
Chapter 4 47
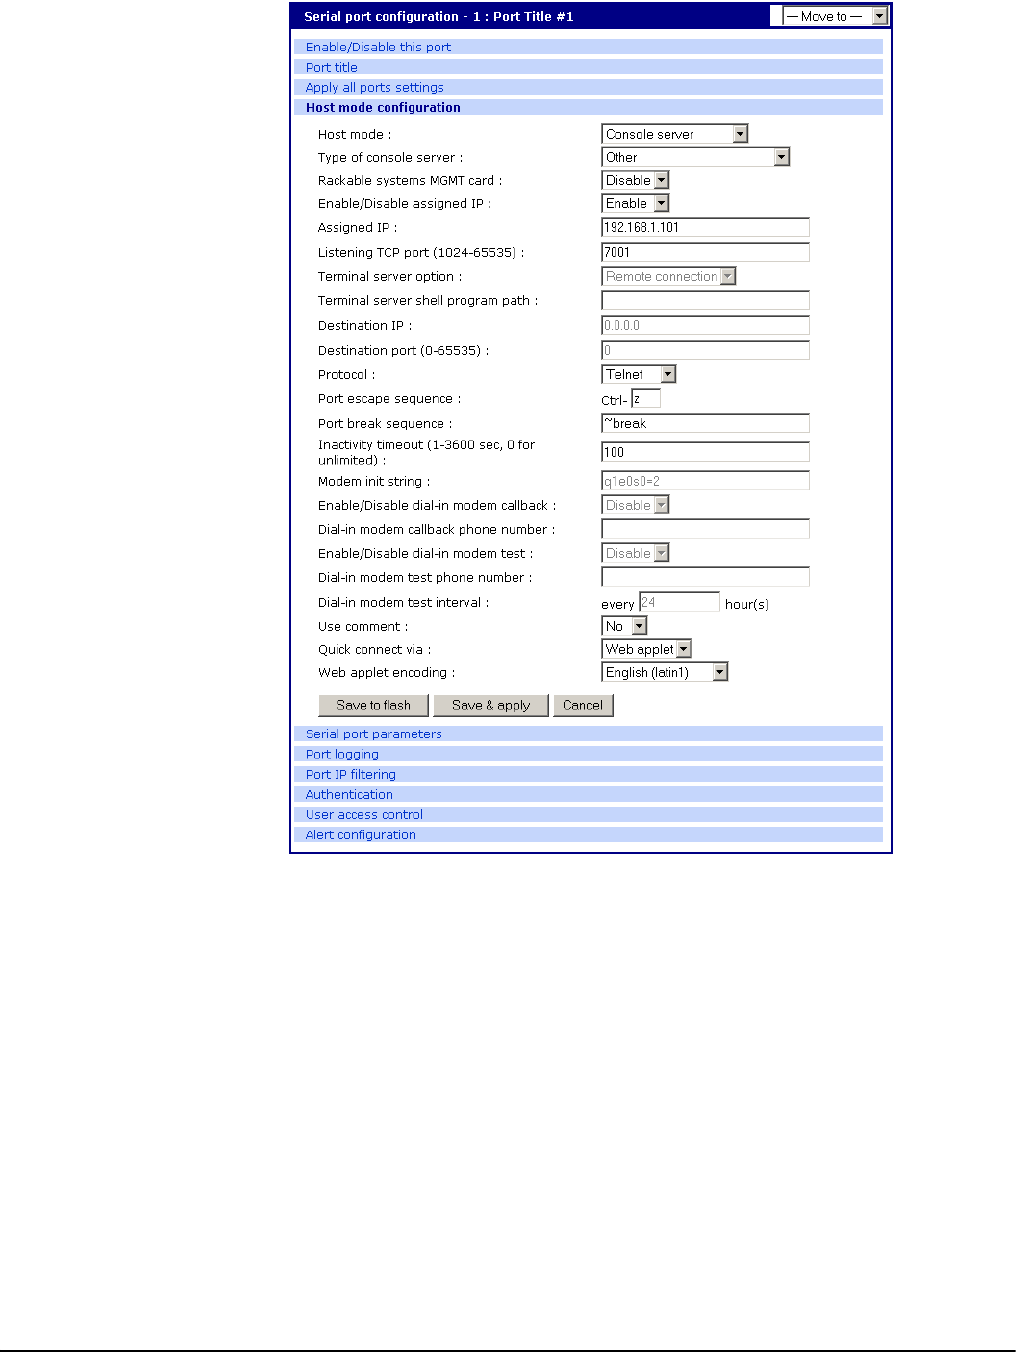
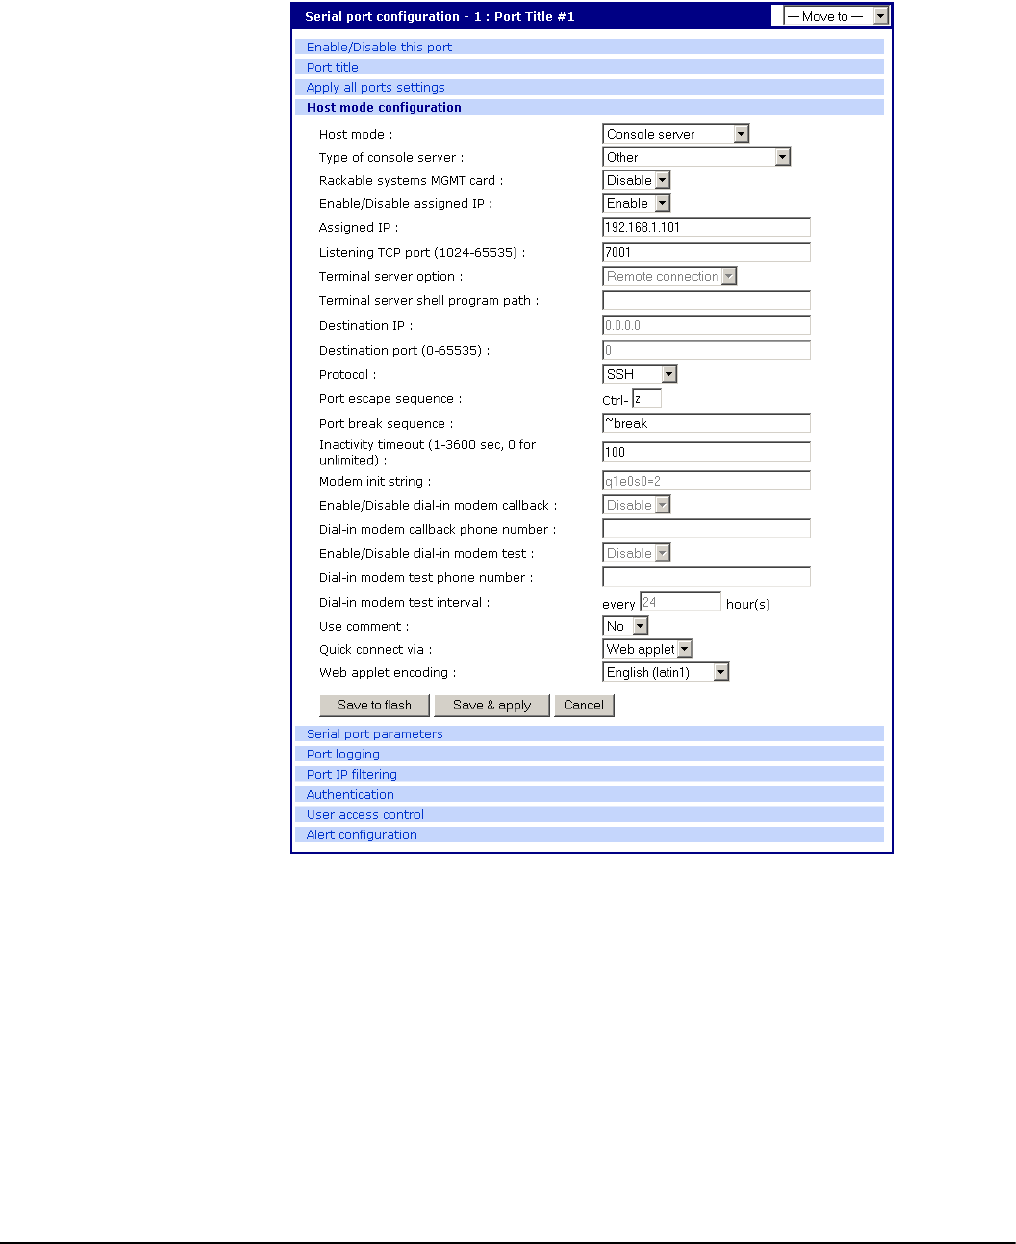
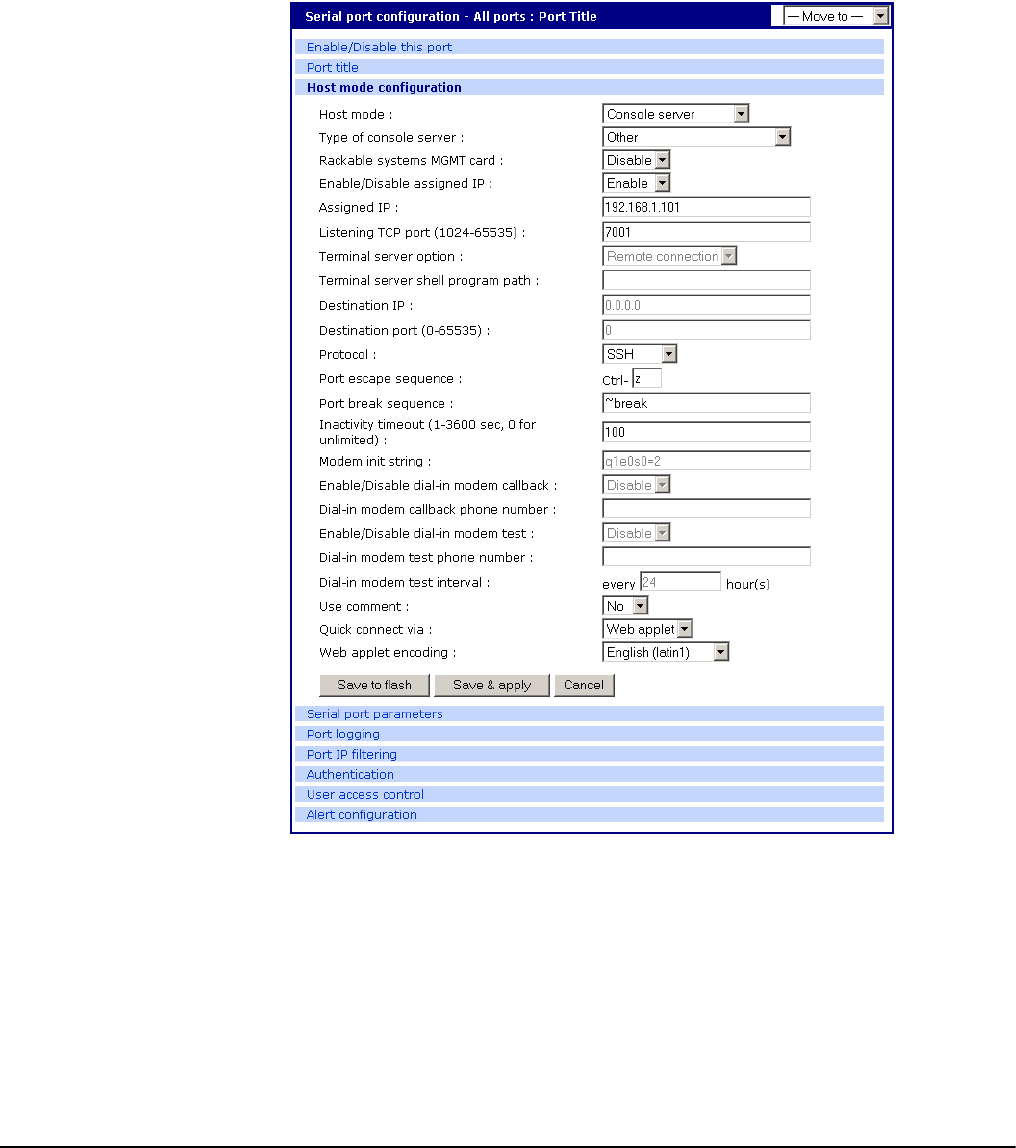
Configuring Host Mode
To configure a serial port for host mode, enter the values in the applicable
fields. To access the Host mode configuration screen, do the following:
1. Access the web interface.
2. Under the Serial Port heading, click Configuration.
3. Choose All or an Individual port > Host mode configuration.
4. Fill in the highlighted fields as they apply to your configuration.
Host mode - The options are console server mode, terminal server mode,
dial-in modem mode, and dial-in terminal server mode.
Type of console server - The options are MS SAC console -English or
Japanese which you use to provide a graphic user interface to the
Windows Server 2003 Special Administration Console (see "Microsoft SAC
Support" on page 75) and Other, which you use in all other cases.
Rackable Systems Mgmt Card - Enable to use Rackable’s Management card.
Enable/Disable assigned IP - Determines whether an IP address will be

Supported Protocols
48 Chapter 4
assigned to the port. The default is Enable.
Assigned IP - Also known as alternate IP, this field assigns an IP address to
the port, enabling you to Telnet directly to the serial port using an IP
address (without having to specify a TCP port).
Listening TCP port - This is the TCP port you will specify when connecting
directly to the port using Telnet or SSH.
Terminal server option - The Terminal server option allows you to define the
functionality of this port if a terminal is connected. The Remote connection
establishes a Telnet/SSH connection to the destination IP. The Shell
program launches an application on the Digi CM (specified in Terminal
Shell program path.)
Terminal server shell program path - Path to specified shell program. Used in
Terminal Server mode.
Destination IP - Used in terminal server mode, this is the IP address of the
system that you will be automatically connected to when you access the
port.
Destination port - Used in terminal server mode, this is the TCP port that will
be used when the port you accessed is automatically connected to a
system on the network.
Protocol - The options are SSH, RawTCP, and Telnet.
Port escape sequence - The letter to initiate port escape.
Port break sequence - The sequence of characters that sends a break
character to a device.
Inactivity timeout - The timeout length ranges from 1 to 3600 seconds. 0
means that there is no timeout.
Modem init string - Use the default string or enter your own string.
Enable/Disable dial-in modem callback - Enable to use the callback option.
Dial-in modem callback phone number - Specify the callback number to use.
Enable/Disable dial-in modem test - Enable periodic modem test. See
"Configuring For Dial-In Modem Access" on page 85 for details.
Dial-in modem test phone number - Specify test number to use.
Dial-in modem test interval - Specify in hours the interval to test the modem.
Use comment - Determines whether a port user is prompted to add a
comment each time the port is accessed.
Quick connect via - Determines method for connecting to a port when in
console server mode. Available with Telnet/SSH.
Web applet encoding - Supported languages for Java terminal.
5. Click Save & apply.
Supported Protocols
.In configuring a serial port, you have three protocol options. The three
protocols available are: RawTCP, SSH, and Telnet. Choose SSH as the
protocol when logging in from an SSH client program to access a port. Choose
RawTCP when connecting directly to a TCP socket. Choose Telnet when
logging in from a Telnet client program and accessing the ports. Use the Host
The Digi CM
supports three
protocol options:
SSH, Raw TCP, and
Telnet.
Configuring Ports
Chapter 4 49
mode configuration page in the web interface to select the correct protocol.
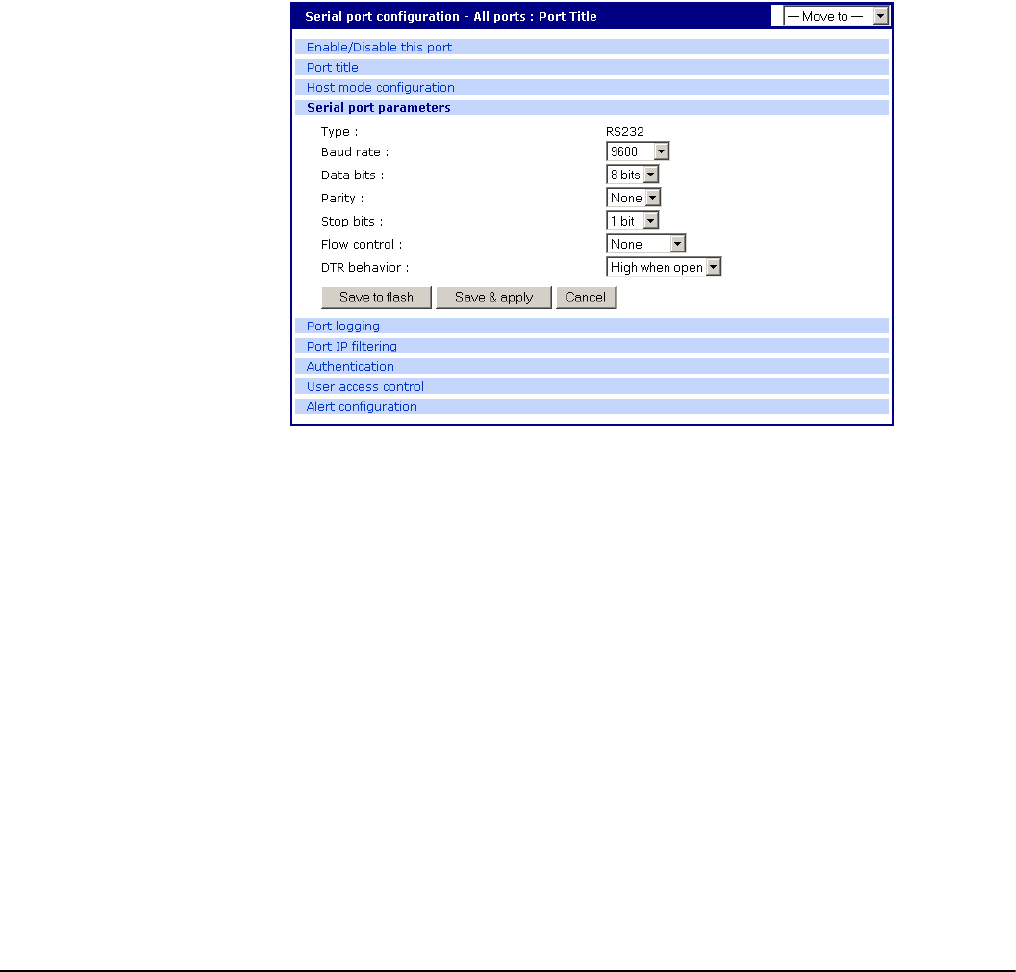
Serial Port Parameters
In attaching a serial device to a Digi CM serial port, the port parameters must
match. The serial ports by default are enabled, meaning you have full access
to the port. To configure the port parameters for the Digi CM, do the following:
1. Access the web interface.
2. Under the Serial Port heading, Click Configuration.
3. Choose All or an Individual port > Serial port parameters.
4. Fill in the serial port parameters. The following are the defaults: bps=9600,
data bits=8, parity=none, stop bits=1, flow control=none, and DTR
behavior=High when open.
5. Click Save & apply
DTR Behavior
DTR can be set on the serial port to one of three settings: always high, always
low, or High when open. Setting the DTR to High when open keeps the DTR
high if a TCP connection is established. The DTR setting cannot be set by you
when the host mode is configured for dial-in modem or dial-in terminal server
mode.
Inter-character Timeout
This setting is only available when the host mode protocol is set for RawTCP.
The parameter sets the time value for the Digi CM to transfer data stored in the
buffer. The Digi CM transfers data when the buffer is full using the TCP/IP
protocol. However, if it is not full, the Digi CM will also transfer data dependent
on the timeout value selected.

Serial Port Parameters
50 Chapter 4
Alerts and Notifications
Chapter 5 51
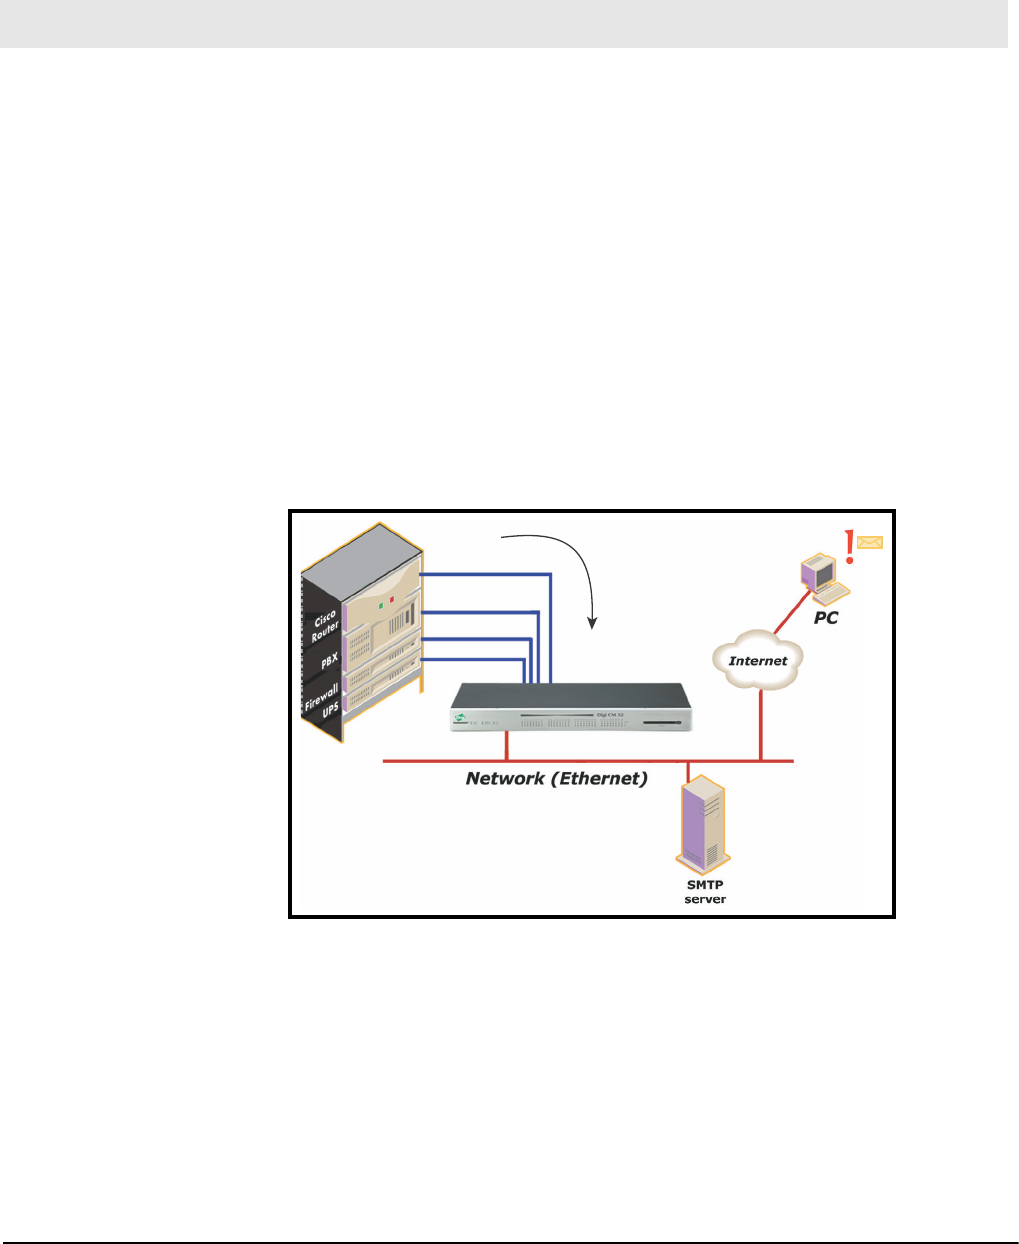
Introduction
The Digi CM can be configured for system alerts and notifications. It sends
email messages when the number of system log messages reaches a certain
value or when an alarm message is detected in the serial port data. The Digi
CM uses SMTP (Simple Mail Transfer Protocol) for sending the notifications.
To use SMTP, the system administrator must configure a valid SMTP server
for sending the emails. The Digi CM supports three types of SMTP servers:
SMTP server without authentication, SMTP server with authentication, and
POP before SMTP.
The Digi CM also supports SNMP (Simple Network Management Protocol), a
protocol used to manage a network and monitor devices on a network. System
and port alerts can also be sent using SNMP traps. The Digi CM supports both
versions 1 and 2 of the SNMP protocol. The main function of SNMP on the
Digi CM is to allow a system administrator to query remote devices for
information.
Chapter 5 Alerts and Notifications
serial
PANIC
PANIC
Configuring SMTP Alerts
52 Chapter 5
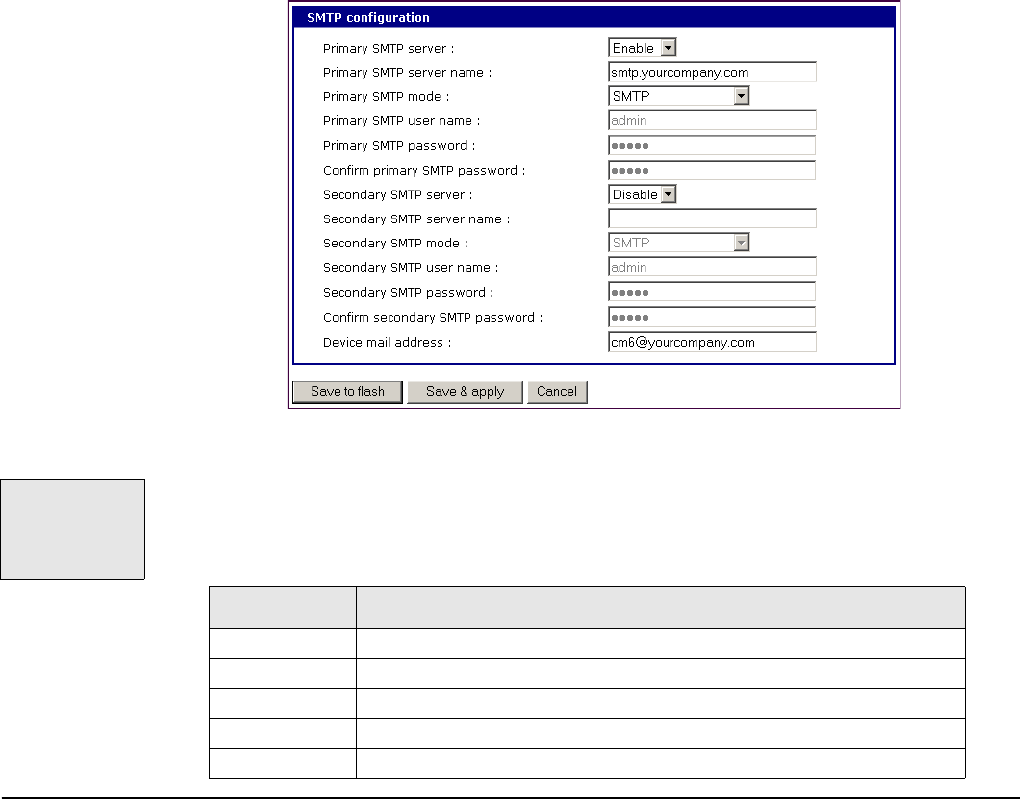
Configuring SMTP Alerts
Most SMTP servers check the sender’s email address with the host domain
name to verify the address as authentic. Consequently, when assigning an
email address for the device email address, any arbitrary username with the
registered hostname may be used. An example is username@company.com.
To configure the Digi CM for SMTP alerts, the following parameters are required:
SMTP server - Use either the hostname or the IP address.
Device mail address - Specify the sender’s email address for the log and
alarm delivery.
SMTP mode - Specify the type of SMTP server to use.
Username and password - These fields are required for POP before SMTP
and SMTP with authentication servers.
To configure SMTP alerts on the Digi CM, do the following:
1. Access the web interface.
2. Under the Network heading, choose SMTP configuration.
3. Fill in the required fields. SMTP with authentication and POP before SMTP
require usernames and passwords.
4. Click Save & apply.
SNMP Information
Applications such as NMS (Network Management System) or an SNMP
browser can exchange information with the Digi CM and control actions to the
unit. The protocol functions defined for SNMP includes GET, SET, GET-Next,
GET-Bulk, and TRAP. Below are the definitions of the protocol functions found
in SNMP. Authentication, power on, and link up traps are supported.
.
The Digi CM
supports SNMP
authentication,
power on, and
link up traps.
Protocol Function
GET Queries a device for more information
SET Makes changes to a device’s state
GET-Next After an initial GET query, goes to the next value
GET-Bulk Retrieves tables of information and security functions
TRAP Notifies a system administrator of a significant event

Alerts and Notifications
Chapter 5 53
Traps
There are additional traps that can be set at the port level. The following table
shows where the trap is under Serial port > Configuration on the web
interface, trap name, configure options, and the trap functions. The MIBs for
login traps can be found at http://ftp.digi.com/support/utilities/digicm/
Trap Location Trap Name Function
Port access menu Port login trap
Notify about any login
action to the port
access menu
(succeed and fail)
Alert configuration Port login trap
Notify about login to
this specific port
(succeed and fail)
(only available if host
mode is set to
"Console server")
Alert configuration Device
connection trap
Notify about a change
of the DTR signal line
(only available if host
mode is set to
"Console server")
Alert configuration Active detection
trap
Notify about changes
in the device’s
response to the probe
string (see also
"Automatic Device
Recognition" on page
19, only available if
host mode is set to
"Console server")
Alert configuration Dial-in modem
test trap
Notify about modem
test (succeed and fail)
(only available if host
mode is set to "Dial-in
modem")
Port event handling Keyword
notification trap
Notify about the
occurrence of a
keyword in the port
log
(only available if host
mode is set to
"Console server")

Configuring SNMP
54 Chapter 5
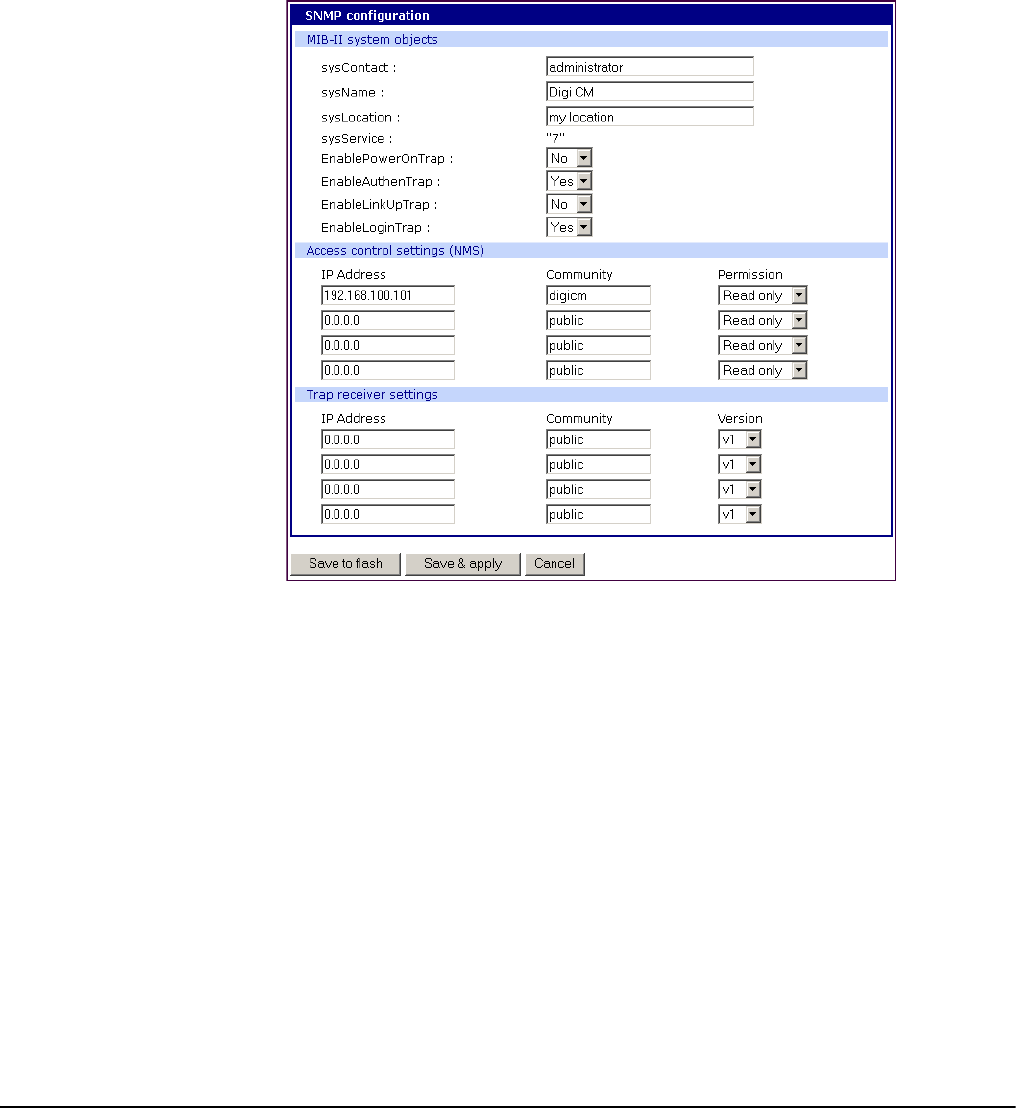
Configuring SNMP
To configure the Digi CM for SNMP do the following:
1. Access the Digi CM web interface.
2. Under the Network heading, choose SNMP configuration.
3. Fill in information for the MIB-II system objects section and choose Yes
under EnableAuthenTrap. The fields are described in the following section:
sysContact - Identity of the contact person managing the MIB-II system.
sysName - The name identifying the system. By convention, this is the fully
qualified domain name of the Digi CM unit. An example is:
DigiCM@companyname.com.
sysLocation. - The physical location of the unit such as Room 264 or
Engineering Lab.
sysService (Read only). - A series of values, separated by commas,
indicating the set of services the system provides. By default the Digi CM
only supports Application (7) service level.
EnablePowerOnTrap. - Determines whether the SNMP agent generates a
trap each time the Digi CM is started.
EnableAuthenTrap. - Indicates whether the SNMP agent process is permitted
to generate authentication failure traps.
EnableLinkUpTrap. - Determines whether the SNMP agent generates a trap
each time the network connection comes up.
EnableLoginTrap - Determines whether the SNMP agent generates a trap for
each login.
Note: Trap values override all other configuration information, meaning all other
authentication failure traps can be disabled with this setting.
4. Enter Access control settings based on the following field descriptions:
IP Address - Defines what applications can access the Digi CM SNMP agent
to exchange information and control actions. If no IP addresses are listed,
any application can access the SNMP agent.
Community - The options are public or private.
Permissions - The options are Read only or Read/Write.
Alerts and Notifications
Chapter 5 55
5. Enter Trap receiver settings based on the following field descriptions:
IP Address - Enter the IP address of the device receiving the trap alerts.
Community - The options are public or private.
Version - Choose the SNMP version, either version 1 or version 2c.
6. Click Save & apply.
Managing the SNMP Protocol
The Digi CM SNMP protocol can be managed using an NMS or SNMP
browser. However, before the NMS or SNMP browser can access the data,
the Access control settings must list the IP address of the host from which the
browser is executed. See the preceding graphic for details.
Configuring Port Event Handling
56 Chapter 5
Configuring Port Event Handling
Once an SMTP or SNMP server has been configured, it can be used to send
port-related alerts and notifications. The following describes how to configure a
port for port event handling.
1. Access the web interface.
2. Choose Serial port > Configuration.
3. Choose a port to configure and then Port logging.
4. Select Enable.
5. Choose Save & apply.
6. Choose Port event handling.
The following page appears.
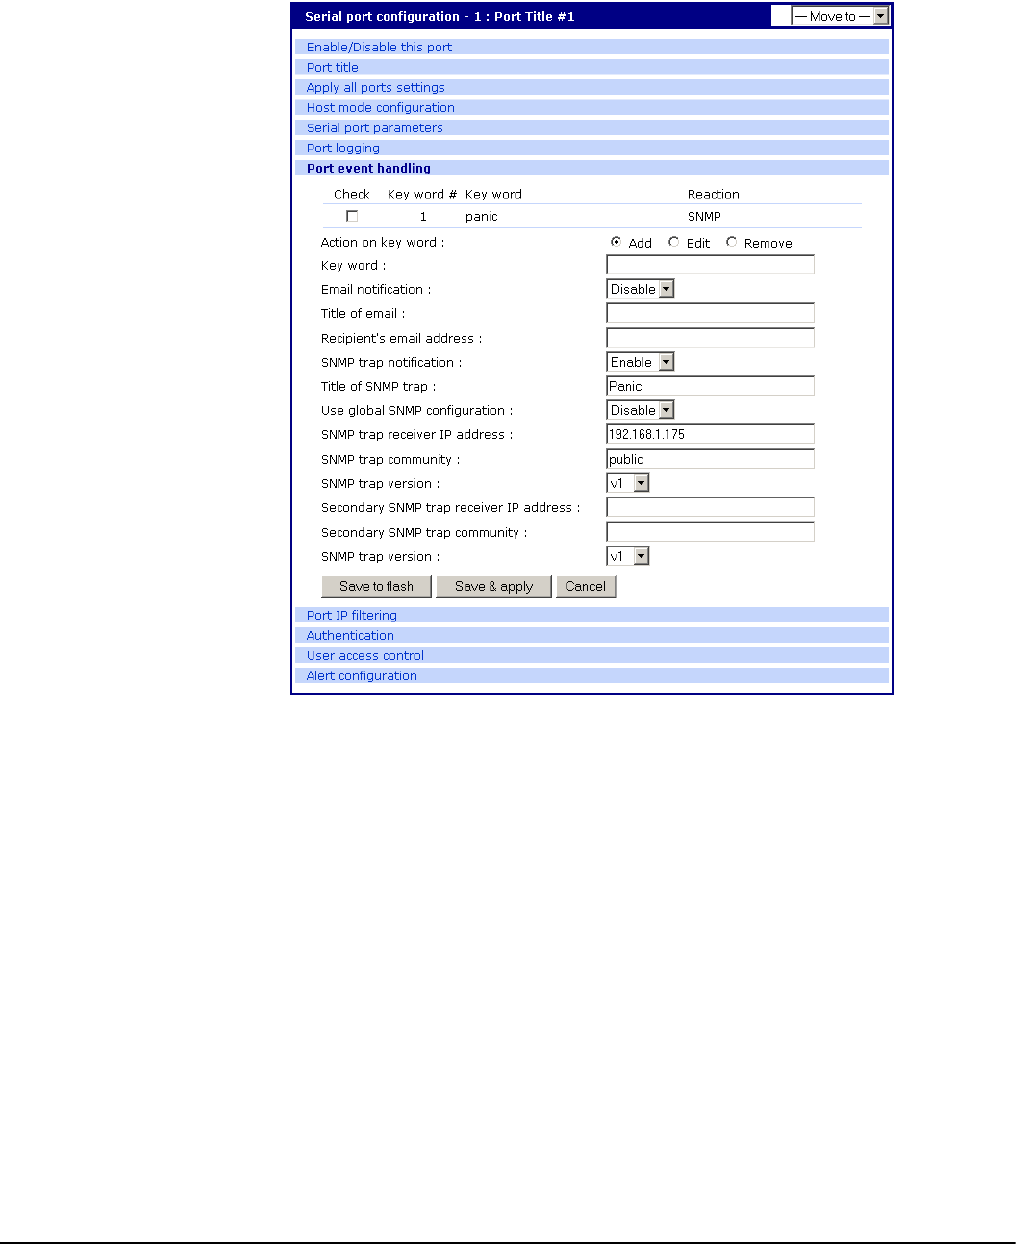
Alerts and Notifications
Chapter 5 57
7. Select an action and enter the keyword for the port event handling.
8. Enable Email notification.
Note: It is assumed that SMTP is configured first. If not, see "Configuring SMTP Alerts"
on page 52.
9. Enter the title of the Email (subject line).
10.Enter the Email recipient’s address.
11. Enable SNMP trap notification.
12.Enter the title of the trap.
13.Choose either to use the global SNMP settings by enabling "Use global
SNMP configuration" or specify special settings for this port.
14.Enter the IP address of the trap receiver.
15.Enter the SNMP community
16.Select the version.
17.Complete configuration and then choose Save & apply.
Note: Key word is any text string that will trigger an alert when it traverses the serial port.
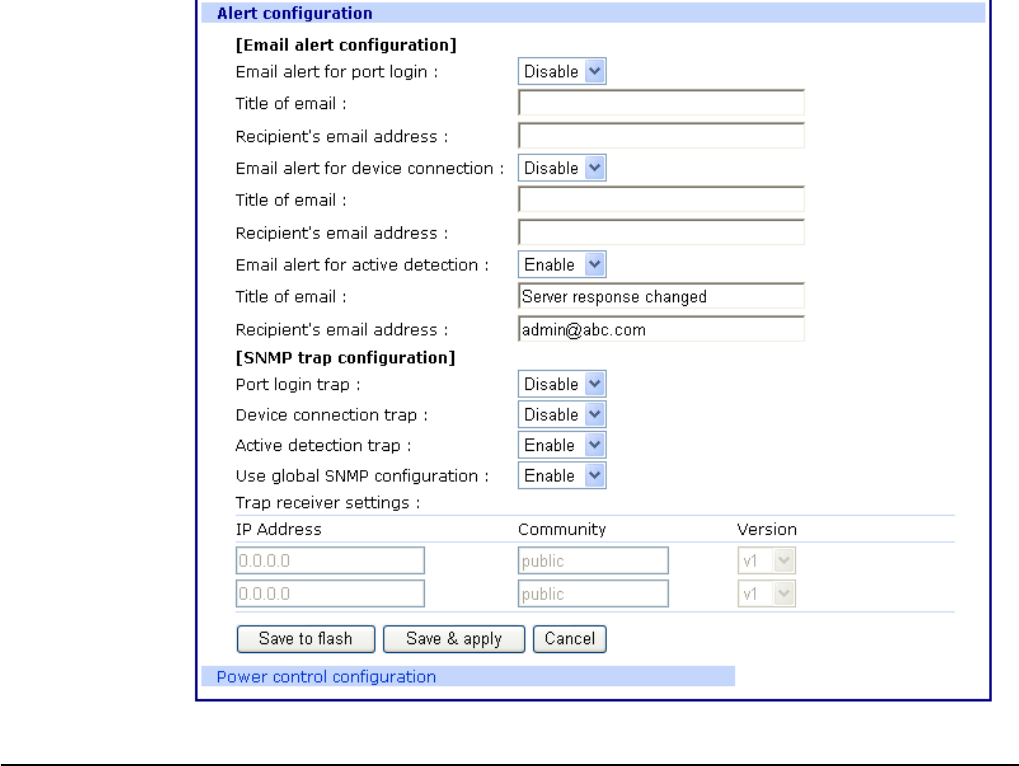
Config Alerts for Automatic Device Recognition (ADR)
58 Chapter 5
Config Alerts for Automatic Device Recognition (ADR)
Before configuring the alerts for Automatic Device Recognition, be sure you
have configured the port for ADR as described in "Configuring Automatic
Device Recognition" on page 42.
1. Access the web interface.
2. Under the Serial Port heading, Click Configuration.
3. Choose All or an Individual port > Alert Configuration.
4. Follow the Email Alert steps to configure the email alert or follow the SMTP
Notification to configure SMTP.
5. Complete configuration and choose Save & apply.
Email Alert SMTP Notification
Enable "Email Alert for active
detection"
Enter the Title of email
Enter Name and email address
where the email should be sent.
Enable "Active detection trap"
Configure the trap receiver by one of the
following two ways:
Enter "Use global SNMP configuration"
OR
Enter the IP address of the trap receiver,
the SNMP trap community and select the
version
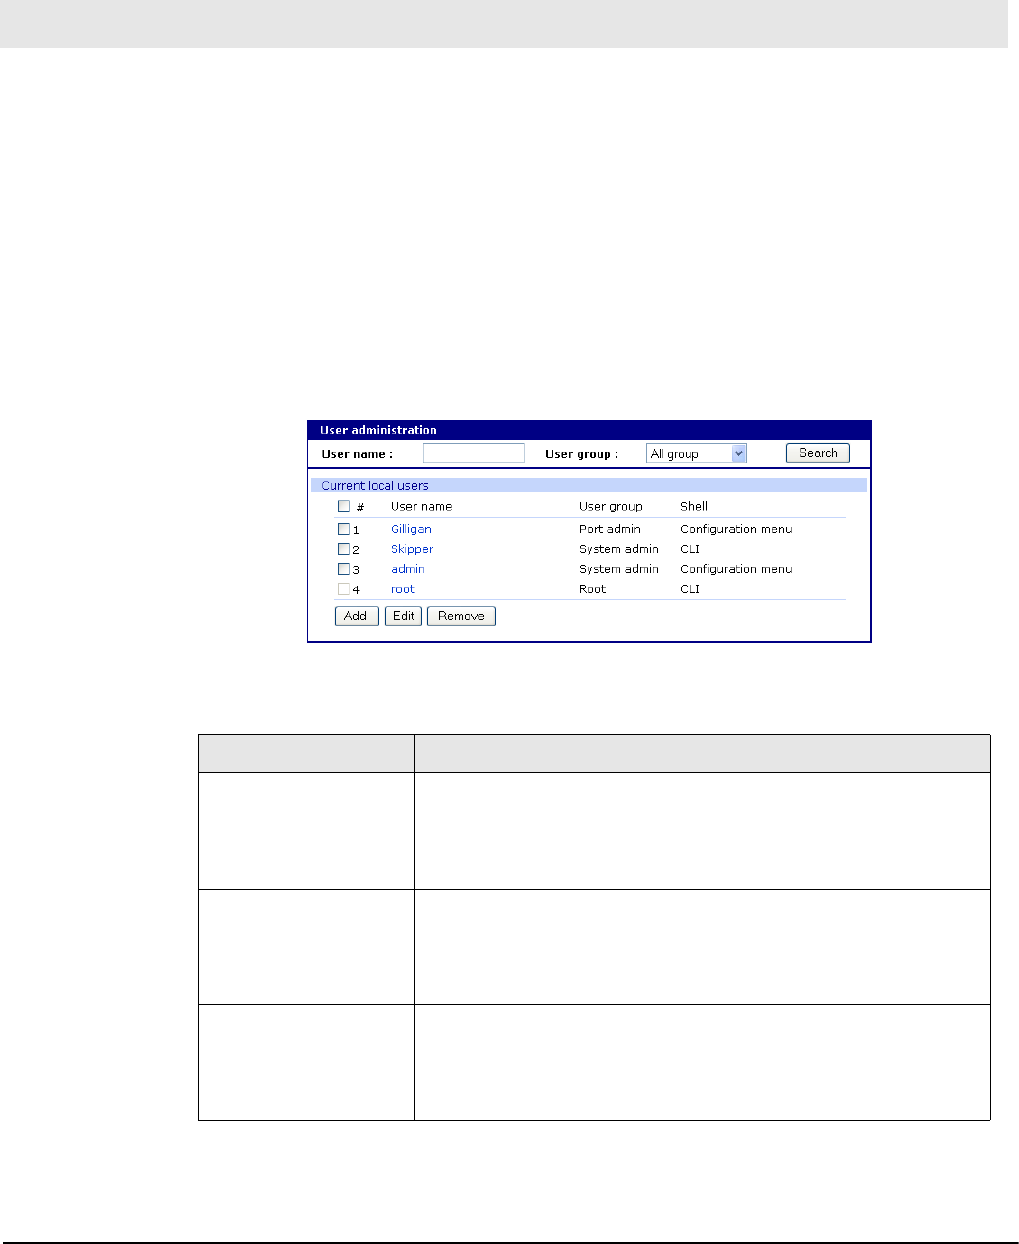
User Administration
Chapter 6 59
Administering Users
Required Privileges
Only root and admin can administer users. The root user has unlimited
administration privileges. Admin can view and change all attributes except
those that belong to the root user.
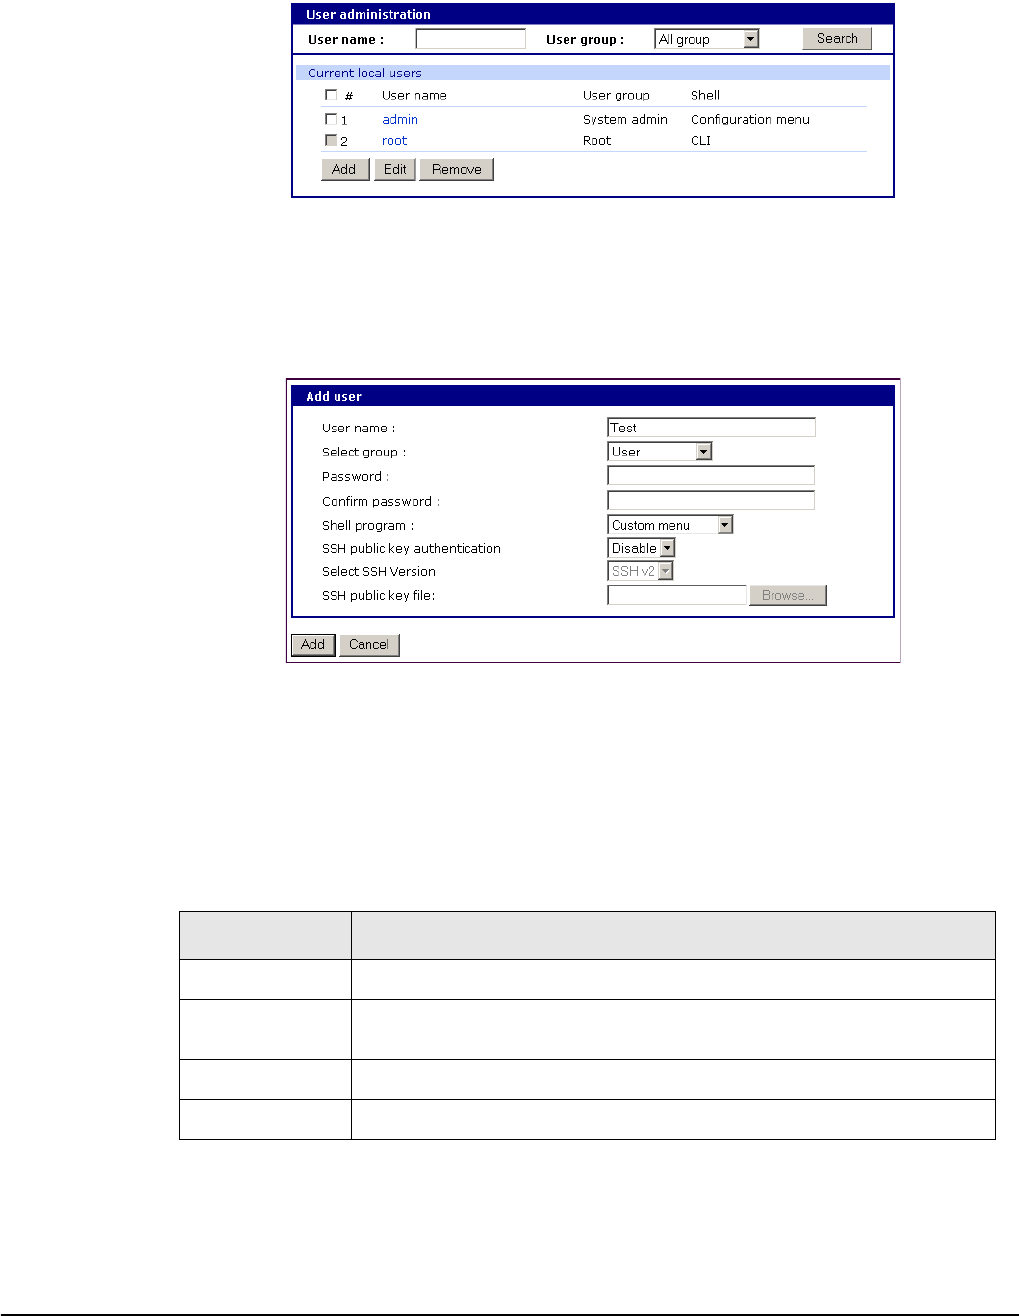
Procedure
1. Access the web interface.
2. Under System administration, choose Users administration.
The following screen appears.
Note: The username on the Digi CM is case sensitive.
3. Do one of the following:
Chapter 6 User Administration
To... Do the Following...
Add a user
A. Click Add.
B. Fill in the attribute fields. See the table that follows for
information on attribute fields.
C. Click Add.
Edit a user
A. Click on the username.
B. Fill in the attribute fields. See the table that follows for
information on attribute fields.
C. Click Submit.
Remove a user
A. Check the box that corresponds to the user you want to
remove.
B. Click Remove.
C. Choose OK at the prompt.
Administering Users
60 Chapter 6
4. Click Apply changes.
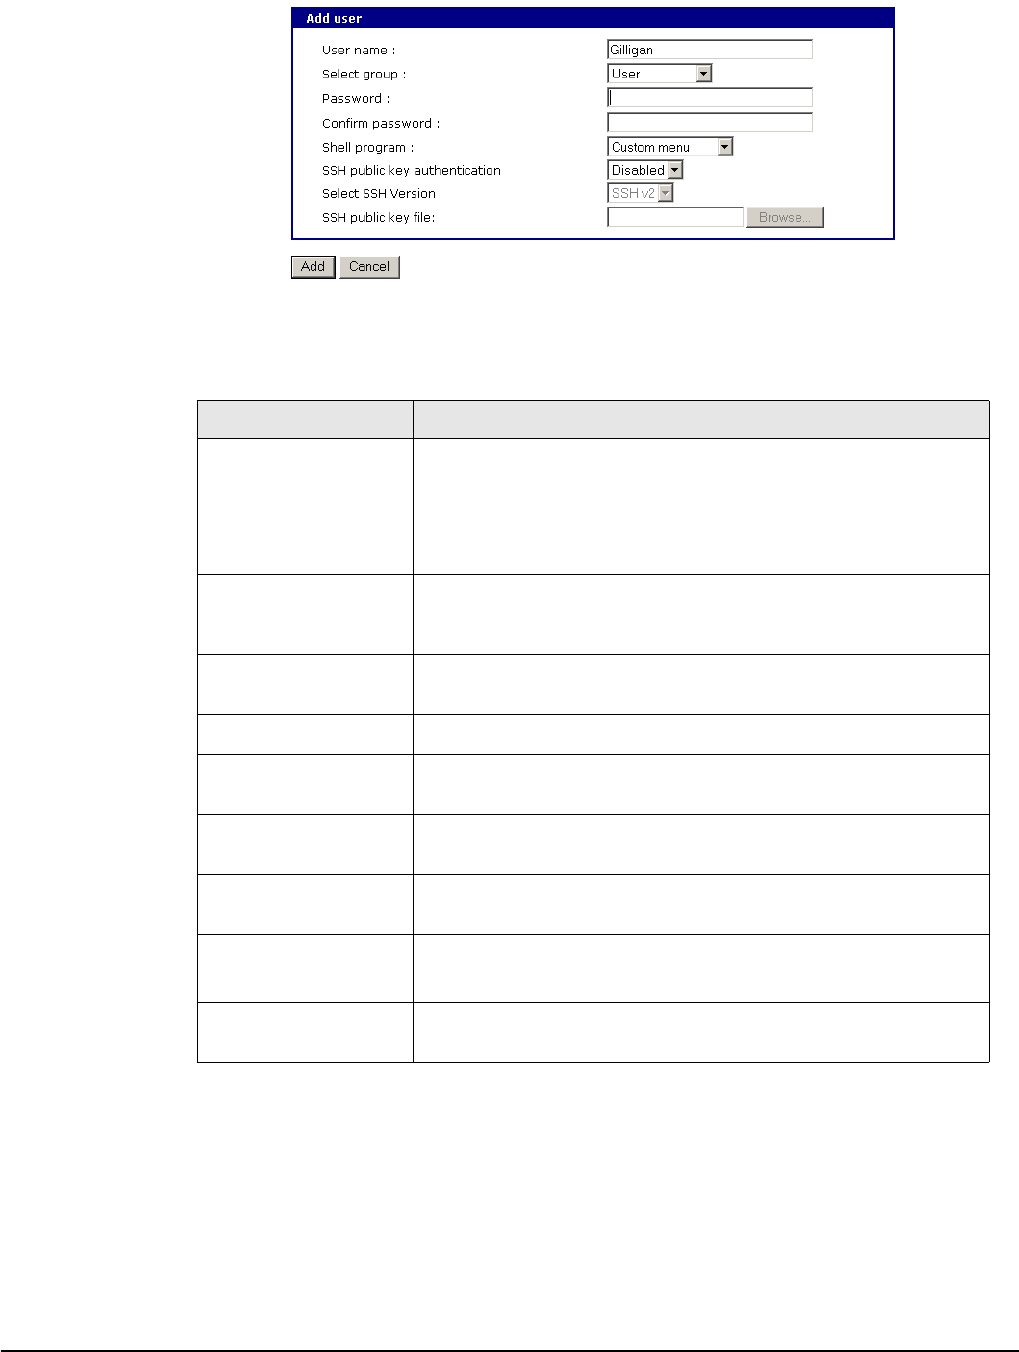
User Fields
Field Description
User name
Name for the user, which must be between 3 and 29
characters and cannot include colons (:), less than or greater
than signs (< >), ampersand (&), spaces, or quotation marks.
The at sign @ and period . are acceptable.
The username on the Digi CM is case sensitive.
Select group Group to which the user is assigned. Groups include Root,
System Admin, Port Admin and User. See "User Groups" on
page 11 for more information
Password Password to assign to the user. This must conform to the
rules stipulated above for a user name.
Confirm password Confirms the password.
Shell program Interface presented to the user when he/she logs on to the
system from a Telnet or SSH connection.
SSH public key
authentication Alternative method of identifying yourself to a login server.
More secure than just a password.
SSH public key to
use Current public file key or create a new public file key
Select new SSH
public key version SSH1 only supports one type of key
SSH2 supports both RSA and DSA key types
Select new SSH
public key file Location for the SSH public key file
Configuring Security and Authentication
Chapter 7 61
f
Introduction
The Digi CM provides several ways to control access to the network and the
devices on the network. One method is through IP filtering, which allows or
prevents users with specific IP addresses from accessing devices or serial
ports on the network. IP filtering can be permitted or restricted for all ports
globally or on a per port basis. Another access control method involves
restricting or permitting specific users. Users can be easily added or removed
from either a restricted or permitted users list. Sniff session access, which
allows multiple users to access a single port, is also discussed.
The Digi CM provides for various authentication methods. They are: Local,
RADIUS, TACACS+, LDAP, and Kerberos. Authentication may be configured
where a secondary method is attempted if the primary method fails.
Configuring Network IP Filtering
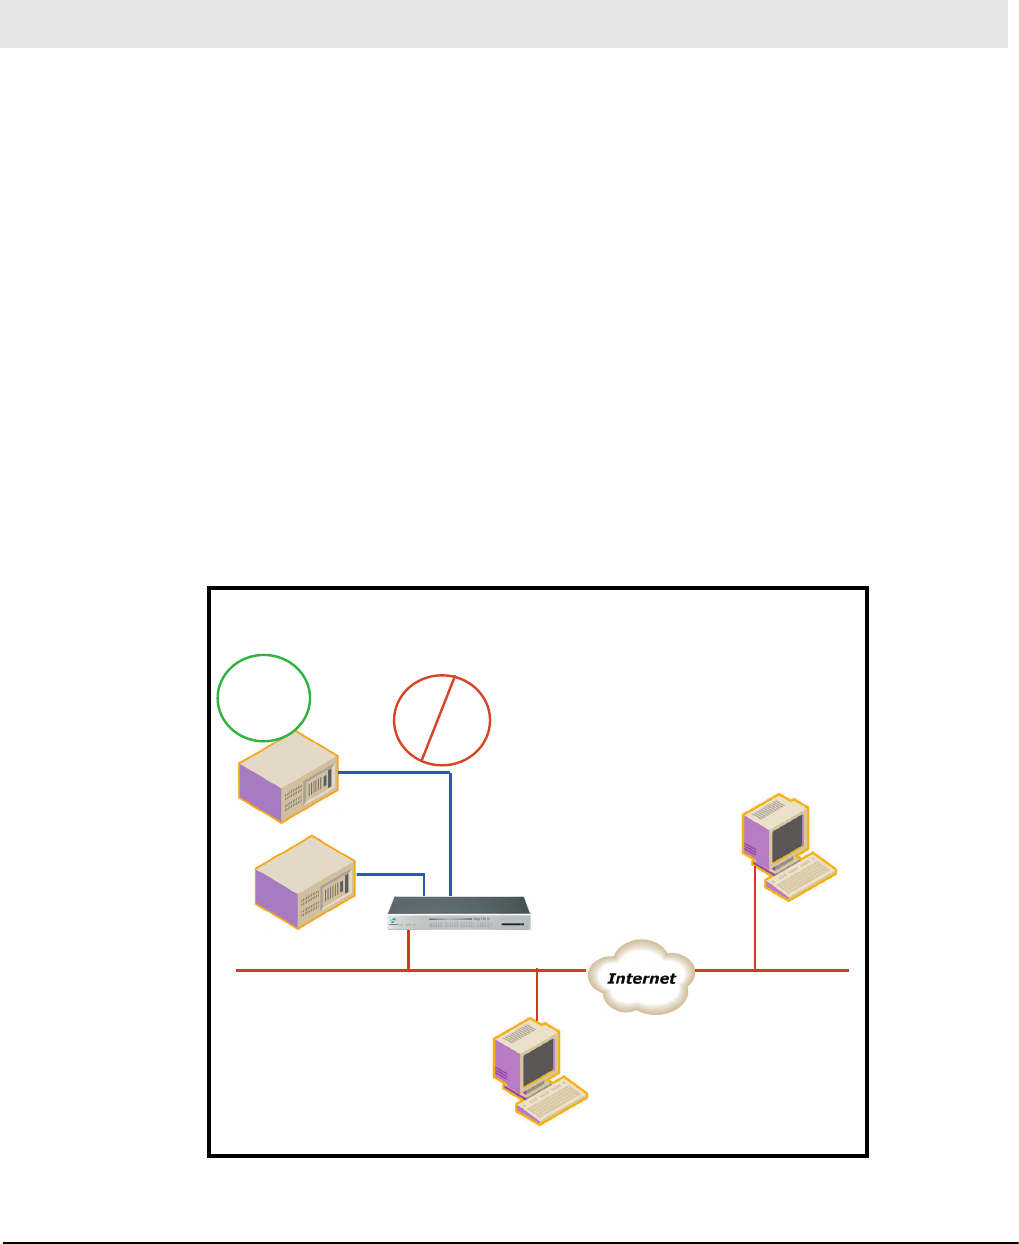
The Digi CM offers built-in firewall functionality to limit TCP/IP traffic to and
from certain networks, TCP ports and interfaces. The functionality
implemented is based on the Linux tool IPtables.
Chapter 7 Configuring Security and Authentication
serial
192.168.1.108
Filter IP: 192.168.1.0
Filter Mask: 255.255.255.0
192.168.5.10
192.168.5.10
192.168.1.108
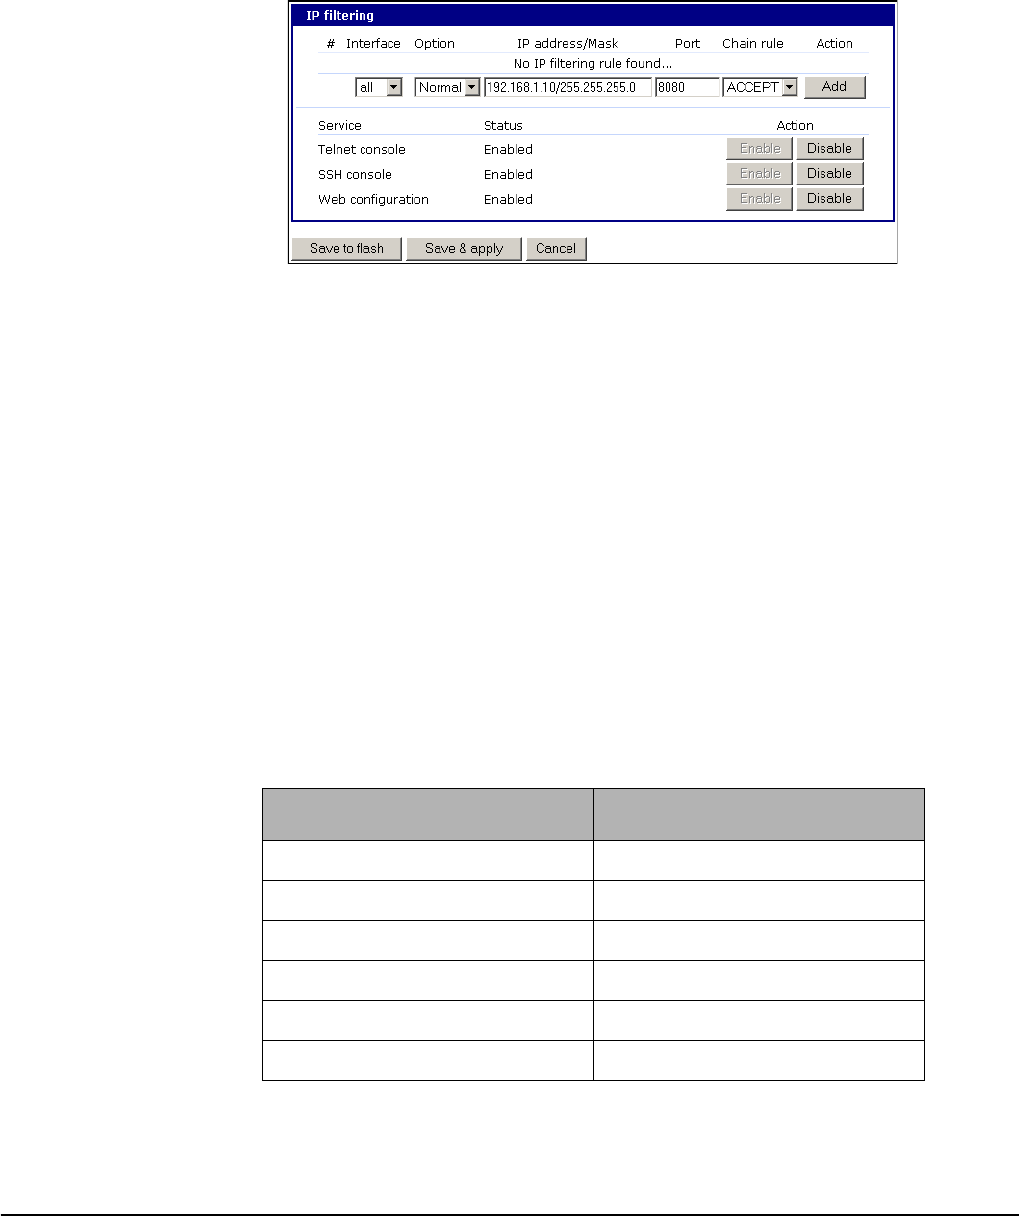
Configuring Network IP Filtering
62 Chapter 7
It is also possible to enable or disable specific services of the Digi CM:
Telnet console (TCP/IP port 23)
SSH console (TCP/IP port 22)
Web configuration (TCP/IP port 80)
Interface - The interface is the name of the network interface via which a packet
is received. It can be one of these three values:
eth0 : the default Ethernet interface of the Digi CM
eth1 : the secondary interface added by using a PC card or wireless card
all : both interfaces
Option - The Option determines that this rule will be applied to the IP address/
Mask specified or to its inverse -meaning the rule will be applied to all except
those specified.
Normal : applied to the hosts included
Invert : applied to the hosts excluded
IP address/Mask - The IP address/Mask specifies the host range by entering
base host IP address followed by “/” and subnet mask. The host range can be
one of the following scenarios by changing the value:
• Only one host of a specific IP address
• Hosts on a specific subnet
•Any host
Port - A TCP/IP Port on the Digi CM that other hosts try to access. The port can
be specified using a single value or a range of ports in the form of: port1:port2,
where port1 defines the lowest port and port2 the highest port.
Specified host range Input format
Any host 0.0.0.0/0.0.0.0
192.168.1.120 192.168.1.120/255.255.255.255
192.168.1.1 ~ 192.168.1.254 192.168.1.0/255.255.255.0
192.168.0.1 ~ 192.168.255.254 192.168.0.0/255.255.0.0
192.168.1.1 ~ 192.168.1.126 192.168.1.0/255.255.255.128
192.168.1.129 ~ 192.168.1.254 192.168.1.128/255.255.255.128
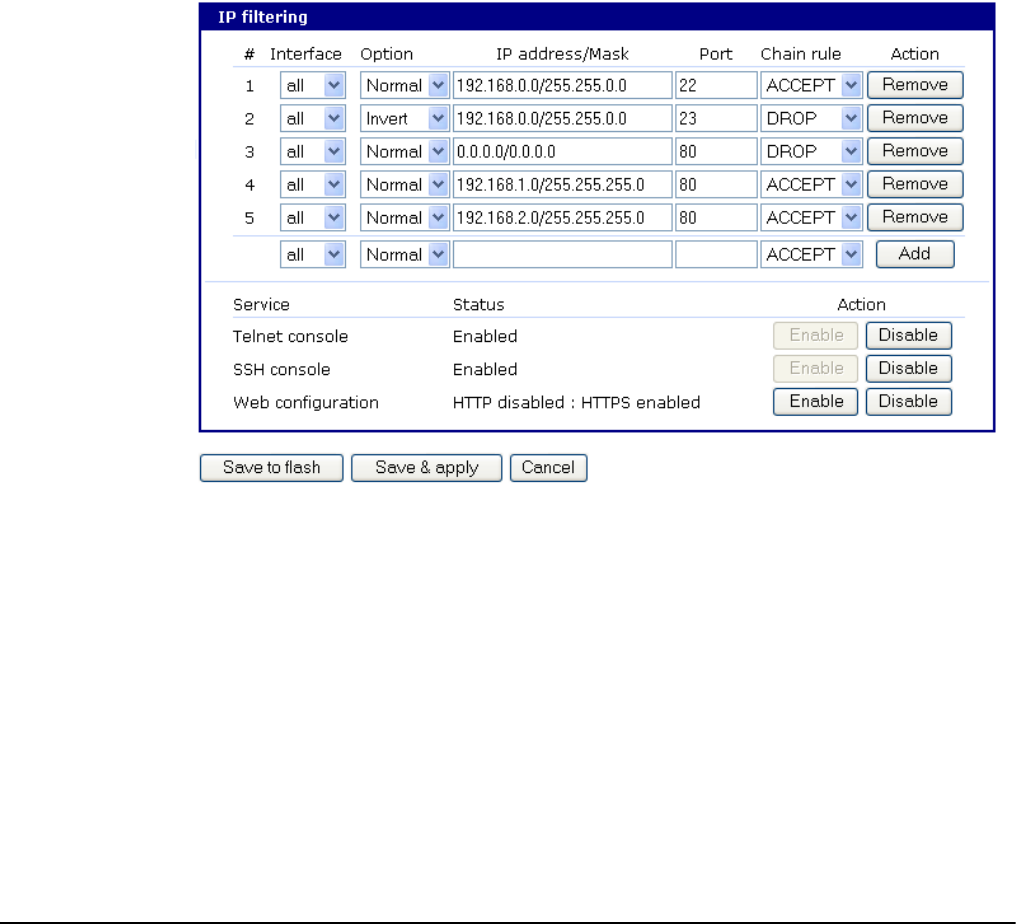
Configuring Security and Authentication
Chapter 7 63
Chain rule - The Chain rule determines whether access from the hosts is
allowed or not. It can be one of these two values:
ACCEPT : access allowed
DROP : access not allowed
A user can add a new IP filtering rule by entering the values for the parameters
and clicking the Add button on the right hand side of the table. A user can
remove a rule by using the Remove button. After having finished editing the
table be sure to save the settings to flash using the Save to flash button or to
save and apply them using the Save & apply button. Be aware that the changes
need to be applied before becoming active.
This screen shot shows 5 IP rules that have been established.
Rule #1 defines SSH access to the Digi CM (port 22). The Normal option
specifies that the rule applies to all addresses listed. The rule says to Accept
traffic from these addresses for Port 22.
Rule #2 defines Telnet access to the Digi CM (port23). The Invert option
specifies that the rule applies to all addresses except those listed. The rule
says to Drop traffic from all addresses not listed.
Rule #s 3, 4,and 5 define access to the Digi CM using HTTP (port 80).
However, rule 3 blocks all traffic, rule 4 allows access from IP address
192.168.1.0. and rule 5 allows access from IP address 192.168.2.0.
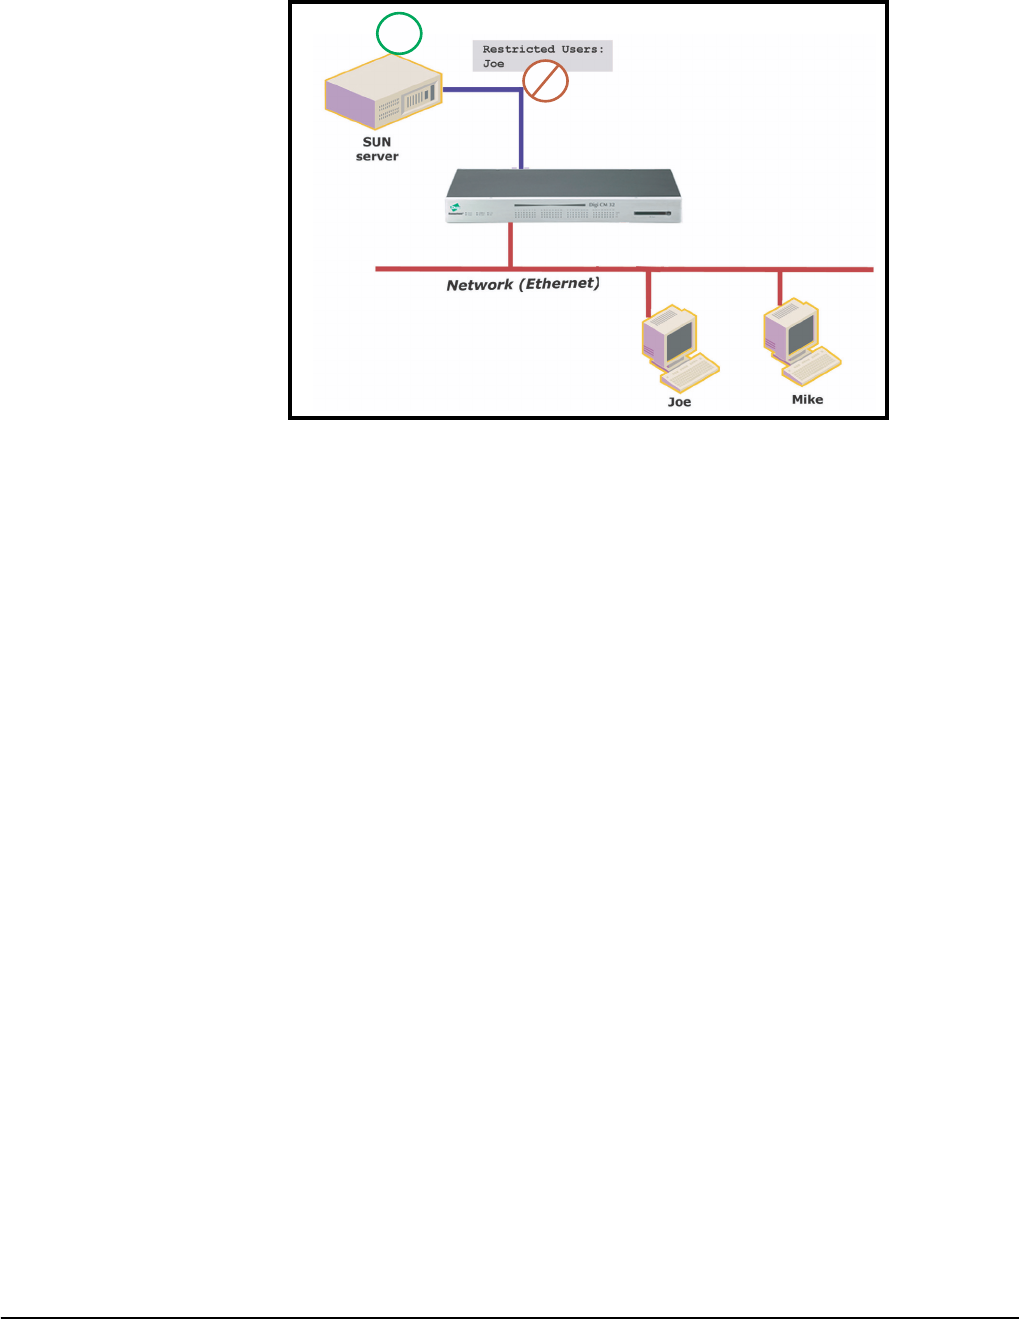
Configuring User Access Control
64 Chapter 7
Configuring User Access Control
Another method to control access to the serial ports on the Digi CM is through
the User Access Control configuration. This configuration can be done on a
per port basis or globally by selecting the All Ports option. It is not necessary to
have users added to the system to assign rights. However, for the permissions
or restrictions to be enforced, the username must match exactly or the
application will not recognize any misspellings and is also case-sensitive. If
you want to add users, click on "System administration > Users
administration". For more details how to add users refer to "Administering
Users" on page 59.
Note: Users do not need to be authenticated locally; they can be users on any
configured authentication server.
An administrator can choose either one of two strategies to assign rights to a port:
• allowing “everyone” access to a port and then restricting access to certain
users or
• specifying every user that has right to a port.
If <<everyone>> is checked, all users configured locally or that are using a
remote authentication mechanism like LDAP or Kerberos have access to this
port. If <<everyone>> is not checked, everyone allowed to access this port
needs to be listed.
When entering usernames for access permission or restrictions, the username
must be entered exactly as the username found on the remote authentication
server or configured locally. The username is case sensitive.
In the following example, there are three users configured on a Digi CM: Jeff,
Tim and Paul.
If you want to give Tim and Paul read/write access and power access to this
port, you could either
JOE
MIKE
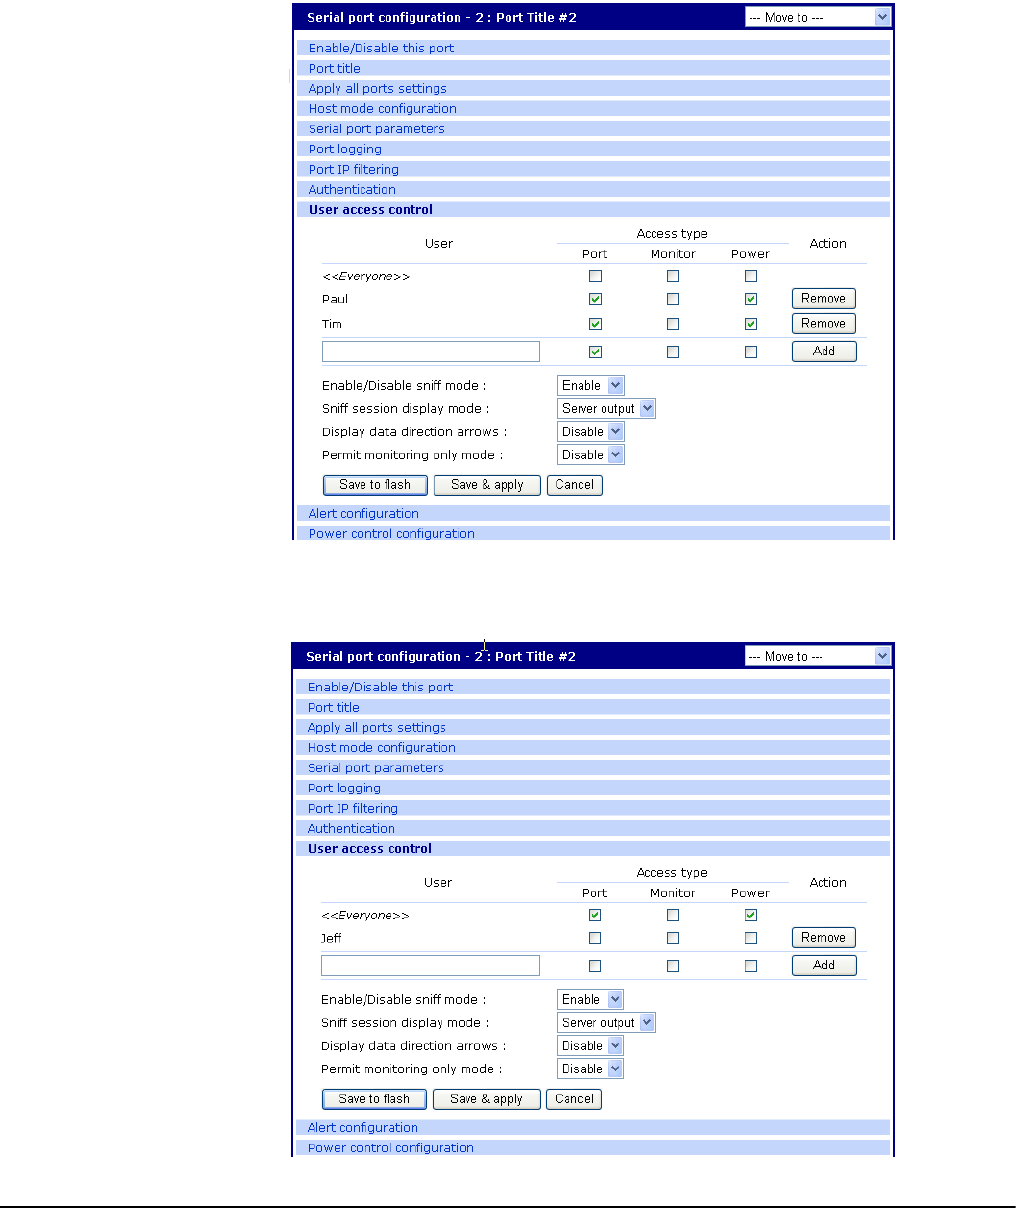
Configuring Security and Authentication
Chapter 7 65
• grant rights to Paul and Tim,
Note: The usernames and passwords on the Digi CM are case sensitive.
• or restrict rights to Jeff
Note: The usernames and passwords on the Digi CM are case sensitive.
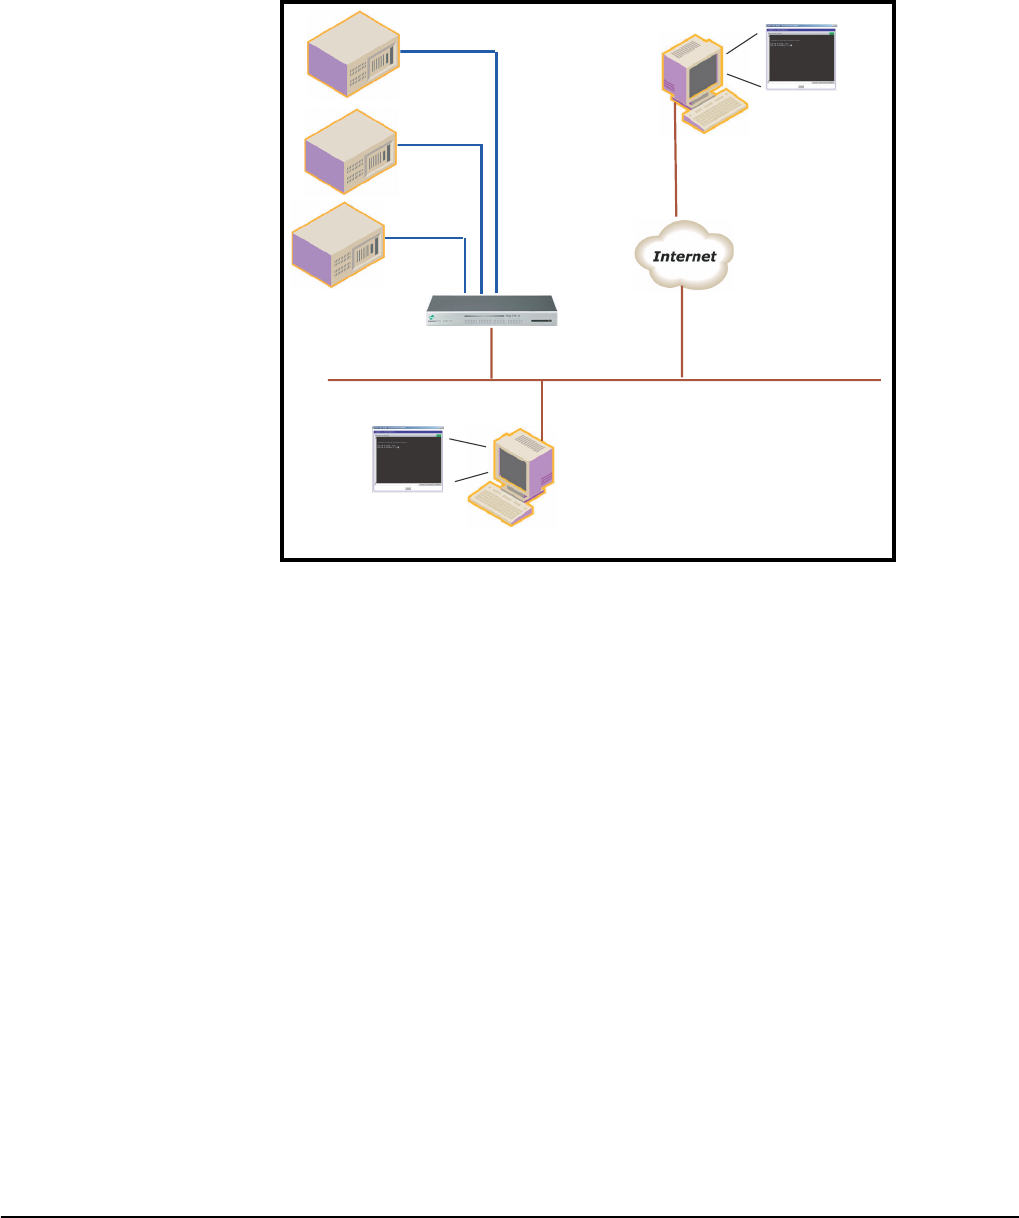
Configuring User Access Control
66 Chapter 7
Sniff Session
A sniff session enables multiple users to access a single serial port for viewing
the data stream. Anyone that is registered for a sniff session can access a
specific serial port even if someone else is using the port. The Digi CM
supports multiple concurrent sniff sessions.
There are four options for a Sniff Session mode, disabled, input, output, and
both. You can configure the sniff session modes on a per-port basis from the
Serial port configuration page.
Enable/Disable sniff mode
• Disabled -The sniff mode is disabled and no one can enter a sniff
session after the first person is logged on.
• Enabled - - Allows everyone with access the following options while in
sniff mode:
Sniff session display mode
• server output - View all data to a serial port from a remote connection
• user input - View all data from a serial port to a remote connection
• both - See all data transmitted or received through a serial port
Display data direction arrows
• Enable/Disable - displays arrows to indicate direction of data to or from
the server. When accessing the port as a second user the global "Port
escape menu" will be displayed. See "Port Escape Menu" on page 16.
log in
port 3
log in
port 3
Network (Ethernet)
serial
Sniff Session
Main Session
Port 3
(Read only access)
(
Read/write access
)
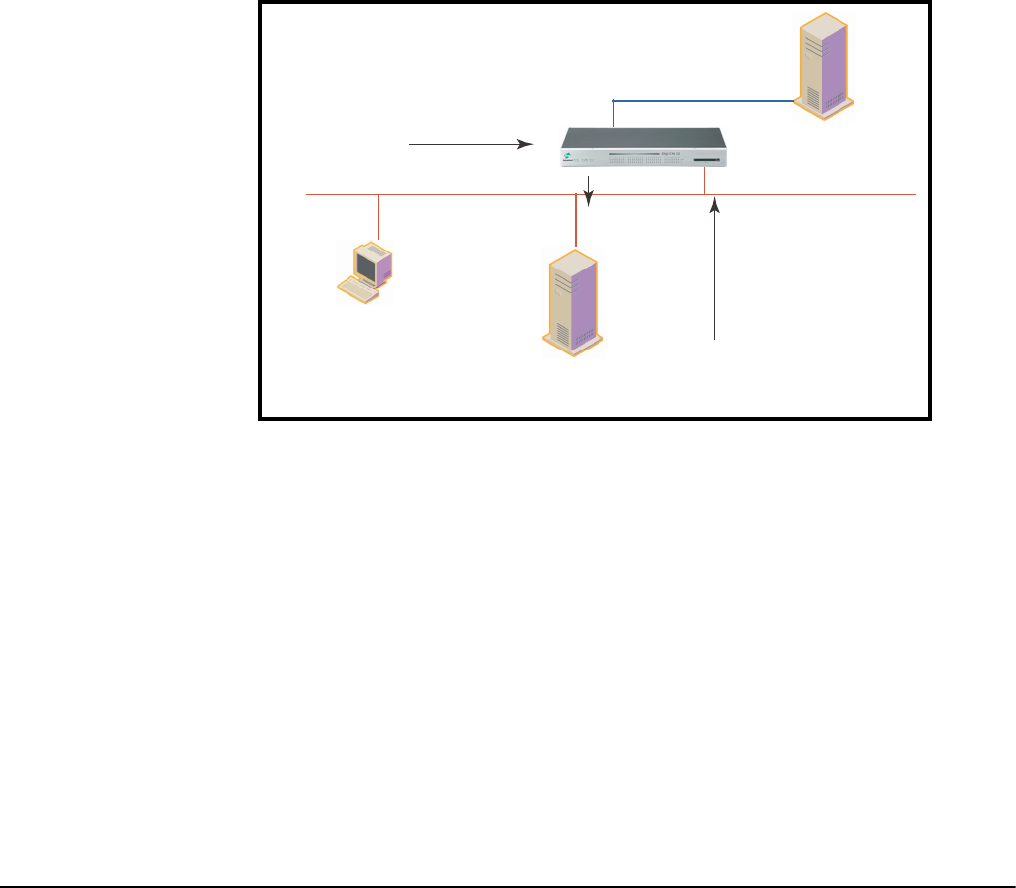
Configuring Security and Authentication
Chapter 7 67
Permit monitor only mode
• Enable: A user with “Monitor" permissions can only connect to the port
in read only mode any time.
• Disable: A user with “Monitor" permissions can connect if a read/write
user has a connection to the port. A read only session is automatically
disconnected if the main user (read/write session) disconnects from the
port.
Authentication
The Digi CM supports multiple methods of user authentication. The following
methods are supported: Local, TACACS+, RADIUS, LDAP, and Kerberos. The
type of authentication protocol you use is dependent on your environment.
Configuring Authentication Methods for Port Access
You can choose between having a single authentication method, such as
RADIUS, or an authentication method where a Local authentication service is
used in addition to the RADIUS, LDAP, TACACS+ server, or Kerberos. These
options are listed when you configure the Digi CM for authentication. To
configure a Digi CM for authentication, do the following:
1. Access the web interface.
2. Under the Serial port heading, choose Configuration.
3. Choose All or an Individual port > Authentication.
4. From the drop down menu, choose an authentication method. A
configuration screen for that particular authentication method is displayed.
The following figure displays the parameters for setting up a RADIUS
PC
Connection request
Authentication
server
Serve
r
1.
2. Query
User ID
3. Accept
User ID
4. Access granted
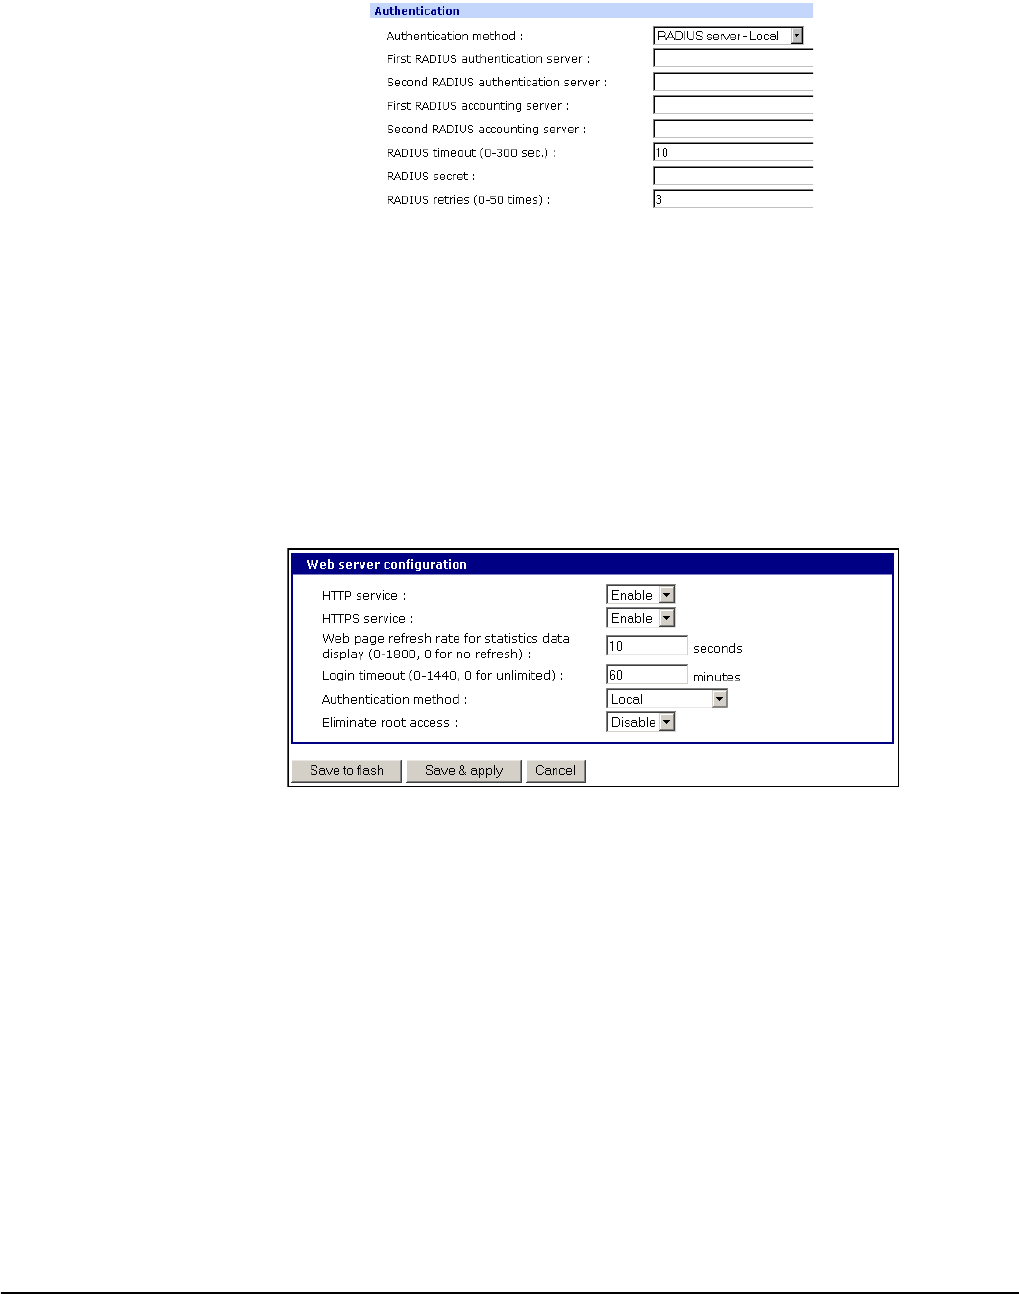
Configuring Authentication for the Web Server
68 Chapter 7
server as the primary authentication server and Local authentication if the
primary authentication method fails.
Note: Remote authentication to Port access menu can be obtained from Serial port >
Configuration > Port access Menu
5. Fill in the appropriate fields.
6. Choose Save & apply changes.
Configuring Authentication for the Web Server
1. Access the web interface.
2. Choose Network > Web server configuration.
The following screen appears.
3. Choose an authentication method and then Save & apply.
When using remote authentication for the web server, such as Radius,
TACACS+, LDAP or Kerberos, you must also be added to the local
database. The user password must be different from local authentication
or it will do local authentication instead of remote. See "Administering
Users" on page 59 for details.
Once your password is approved by the authentication server, the Digi CM
uses the local permission rights to provide proper access privileges for you
to ports and the configuration.
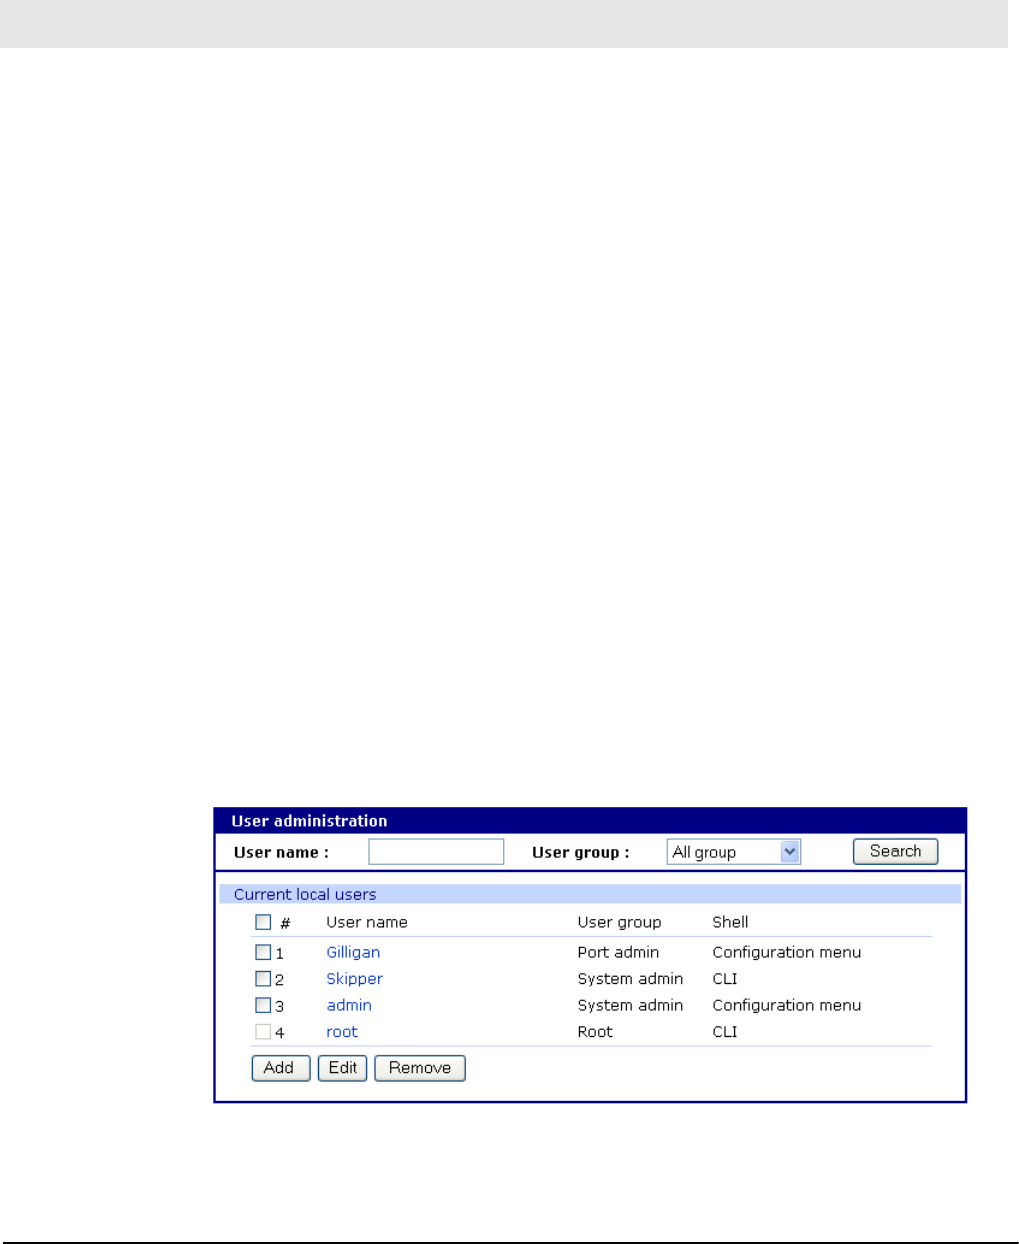
Custom and Default Menus
Chapter 8 69
Introduction
The Digi CM has several default menus for easy configuration and access by
different users. Depending on access privileges, the menus available are the
Web Interface, Configuration Menu, and Port Access Menu. A Custom Menu
feature for creating menus is also available through the web interface.
The Custom Menu feature enables system administrators to create menus for
specific users; in other words, system administrators can create a customized
interface to selected ports. Custom menus can only be configured via the web
however, they can only be accessed via the shell (command line).
Making Custom Menus
Before making custom menus, plan the kind of menus and menu items you
want available to your users. A good plan would include the following:
1. Add users to the system.
2. Create a menu name with sort and display features.
3. Add menu items and submenus to the new menu.
4. Assign users to the menus.
Adding Users
You cannot assign users to a menu until you have added users to the system.
To add users, do the following:
1. Access the web interface.
2. System administration > Users administration > Add
Chapter 8 Custom and Default Menus
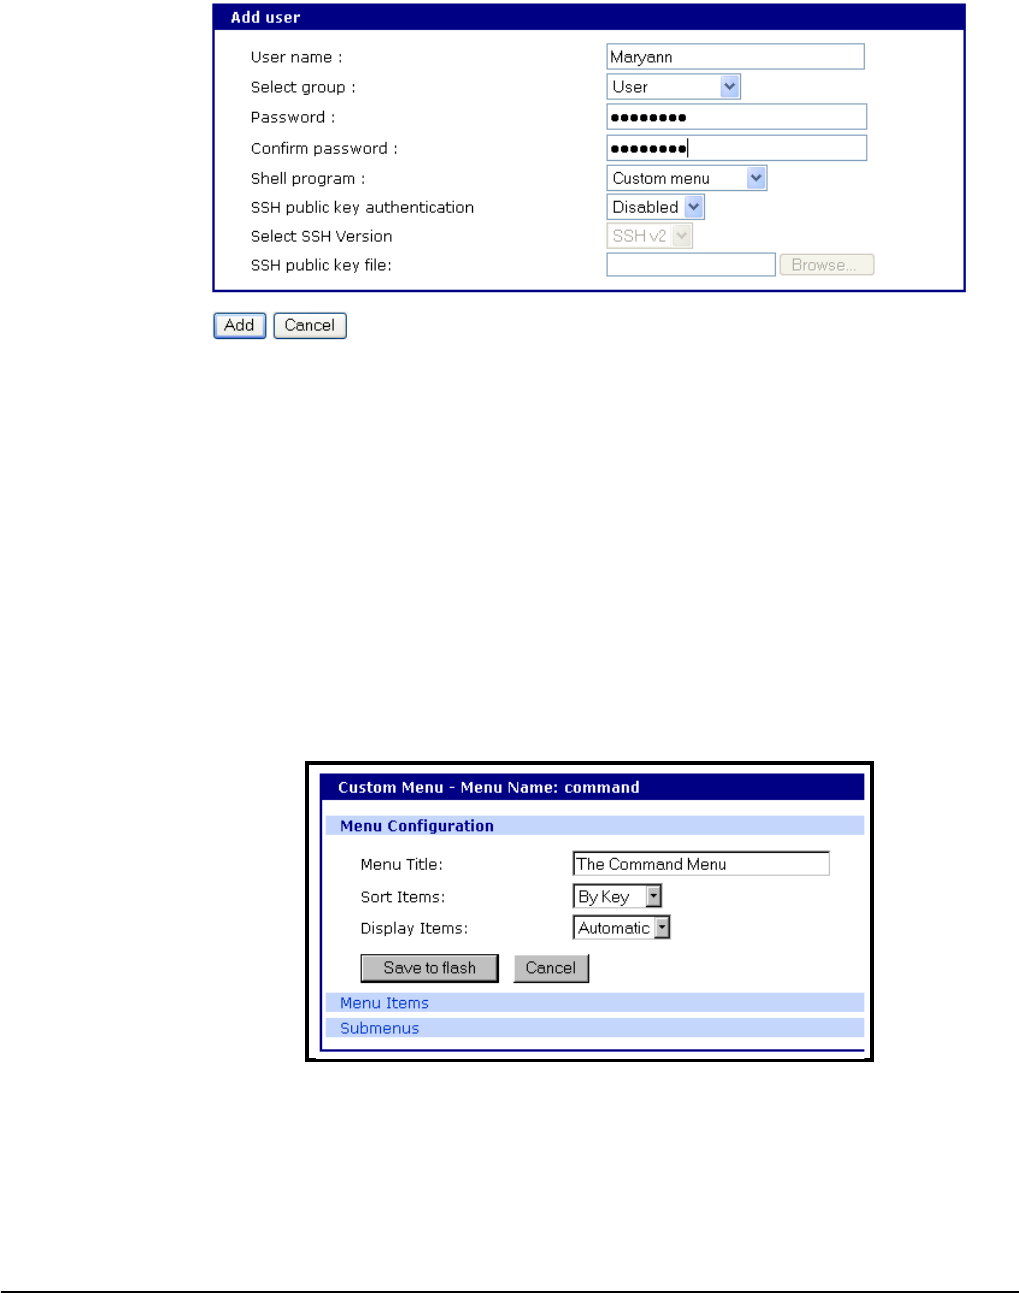
Making Custom Menus
70 Chapter 8
3. Enter the User name and User group from the drop down menu.Select
Custom menu from the drop down menu for the Shell program.
4. Click Add to add the user.
5. Continue to add users as needed.
Note: You do not need to Save to flash or Apply changes to add users.
Creating Menu Names
To make a custom menu, do the following:
1. Access the web interface.
2. Custom Menu > Configuration.
3. Enter the Menu Name to assign and click the Add Menu button.
The menu is added.
4. Click the hyperlink to the menu you just created.
5. From the drop down menu, select the way to Sort and Display items.
6. Click Save & apply.
7. Repeat as required to create additional menus.
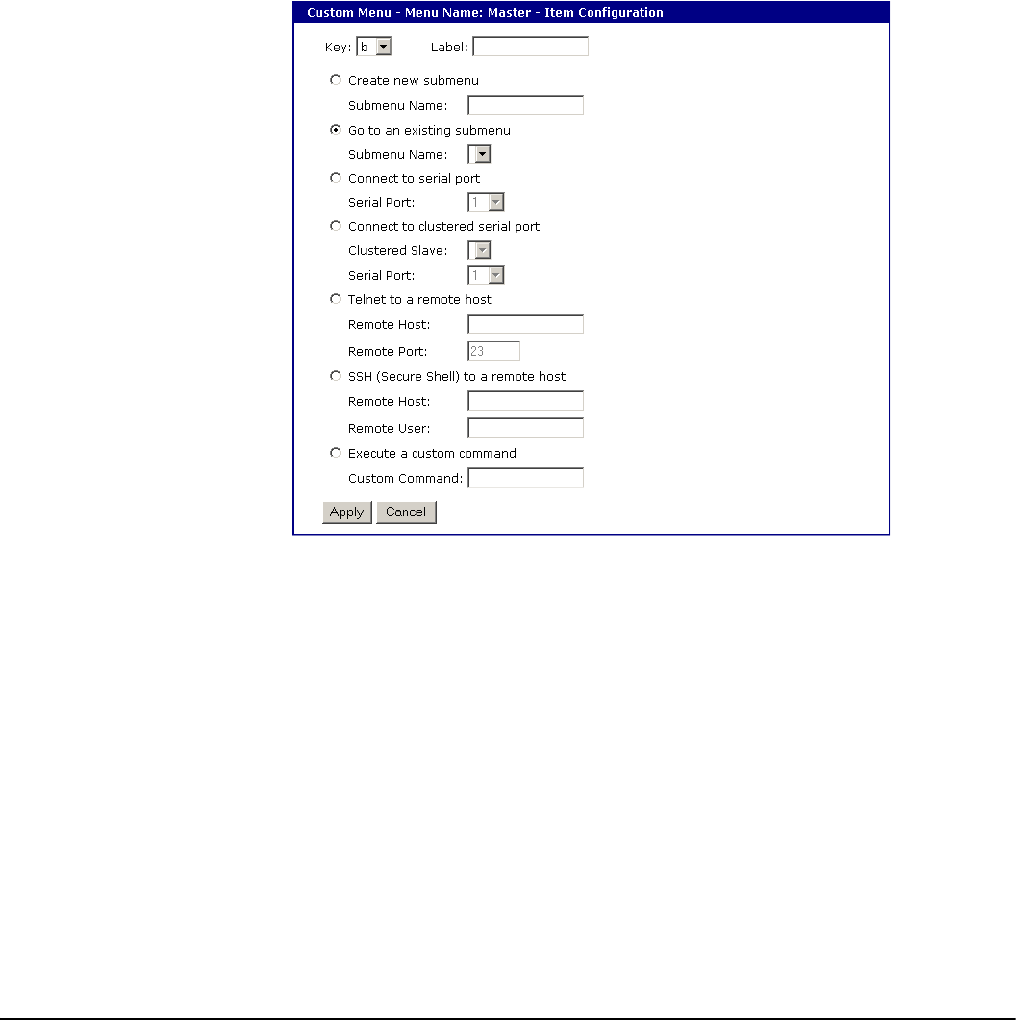
Custom and Default Menus
Chapter 8 71
Adding Menu Items
Once you have defined a menu name and added users, you can then add
menu items. To add menu items, do the following:
1. Custom Menu > Configuration > Menu Name hyperlink for the menu you
want to configure.
2. Choose Menu Items > Add Item.
The following screen appears.
3. Fill in the desired parameters. The parameters are:
Key - Assign any letter or number except a value already used by another
menu item.
Label - Assign a label or name for the menu item.
Create new submenu - Assign a name for a new submenu that this menu item
will be assigned or linked to.
Go to existing submenu - Choose an existing submenu from the drop down
menu that this menu item will be assigned or linked to.
Connect to serial port - Connects you to a specified port.
Connect to clustered serial port - Connects you to a clustered port.
Telnet to a remote host - Enter a remote host’s IP address or hostname.
SSH (Secure Shell) to a remote host - Enter the hostname or IP address of a
remote host and the remote username.
Execute a custom command - Enter a customized command that is any valid
command on the command line with acceptable user privileges.
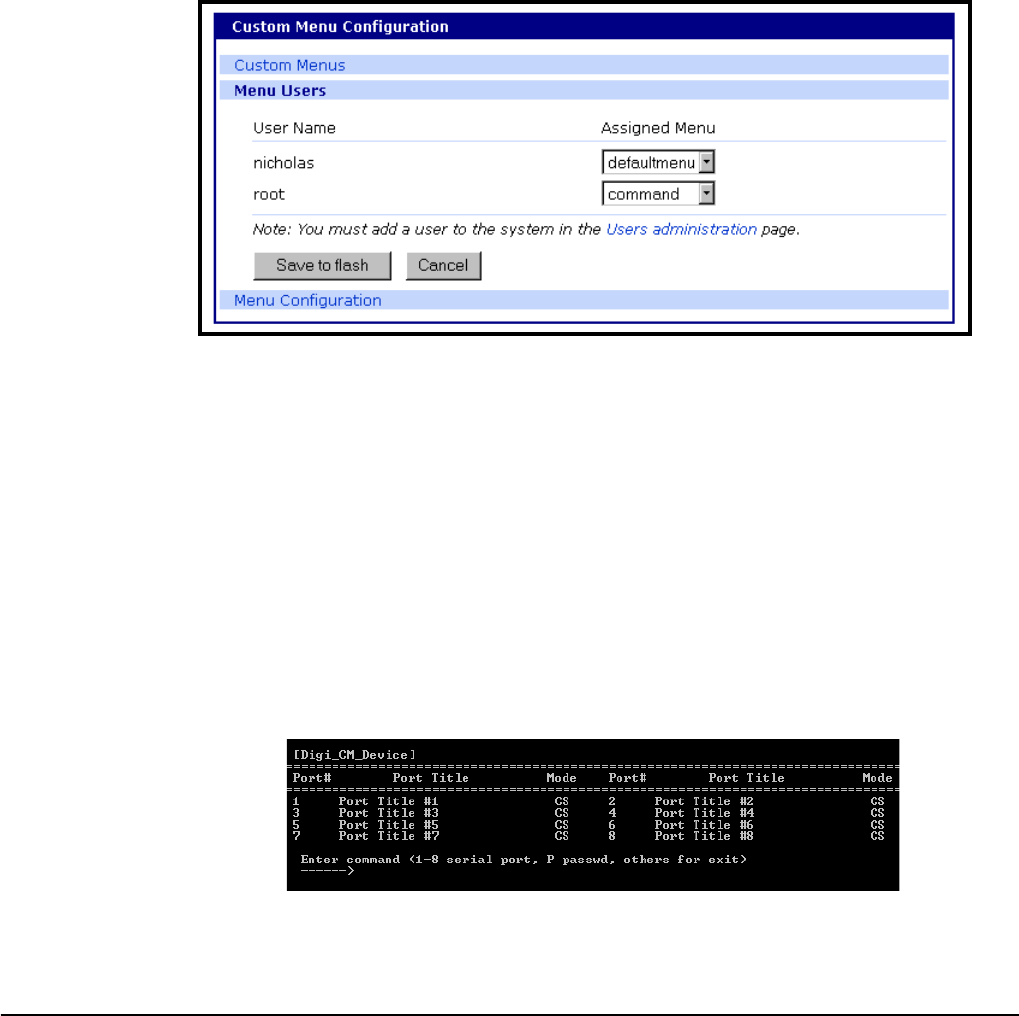
Default Menu
72 Chapter 8
4. Choose Apply.
5. Repeat this procedure to add more menu items.
Note: To add or configure submenus, select the Submenus hyperlink on the Menu
Configuration page.
Assigning Users to a Menu
Once a menu has been created, users can be assigned to the menu by doing
the following:
1. Access the web interface.
2. Configuration > Custom Menu > Menu Users.
A list of available users is displayed.
3. Choose a menu for a user by selecting a menu from the drop down
Assigned Menu list.
4. Choose Save & apply.
Default Menu
Port Access Menu
The PortAccess menu is a flat (one level) menu showing all ports, port titles
and the mode of each port.
Using the PortAccess menu you have a complete overview of all ports and can
initiate a connection to any of them.
When you choose to connect to a specific port, you are prompted again for the
username and password.

Custom and Default Menus
Chapter 8 73
There are multiple ways to access the PortAccess menu:
• Assigned IP address (see "Configuring Host Mode" on page 47)
• TCP/IP port 7000
• TCP/IP port 22 or 23 if the “Shell program” is set to “port access menu” for
this specific user (see chapter "Administering Users" on page 59)
• By calling “portaccessmenu” from the command line
The PortAccess menu allows simple access to each port.
By typing the number of the port to connect to, the Digi CM initiates a
connection to this port using the appropriate protocol (Telnet of SSH).
You can also change your own password by using the “P” Key.
If the Digi CM is configured to be the master in a master-slave scenario, the
“S” key will bring up a list of all slaves. Selecting a slave will then spawn a
connection to the Port Access Menu of the slave.
When using a Digi CM 48 not all ports can be displayed on one screen. Ports
33-48 can be viewed after hitting the <Enter> key.

Default Menu
74 Chapter 8
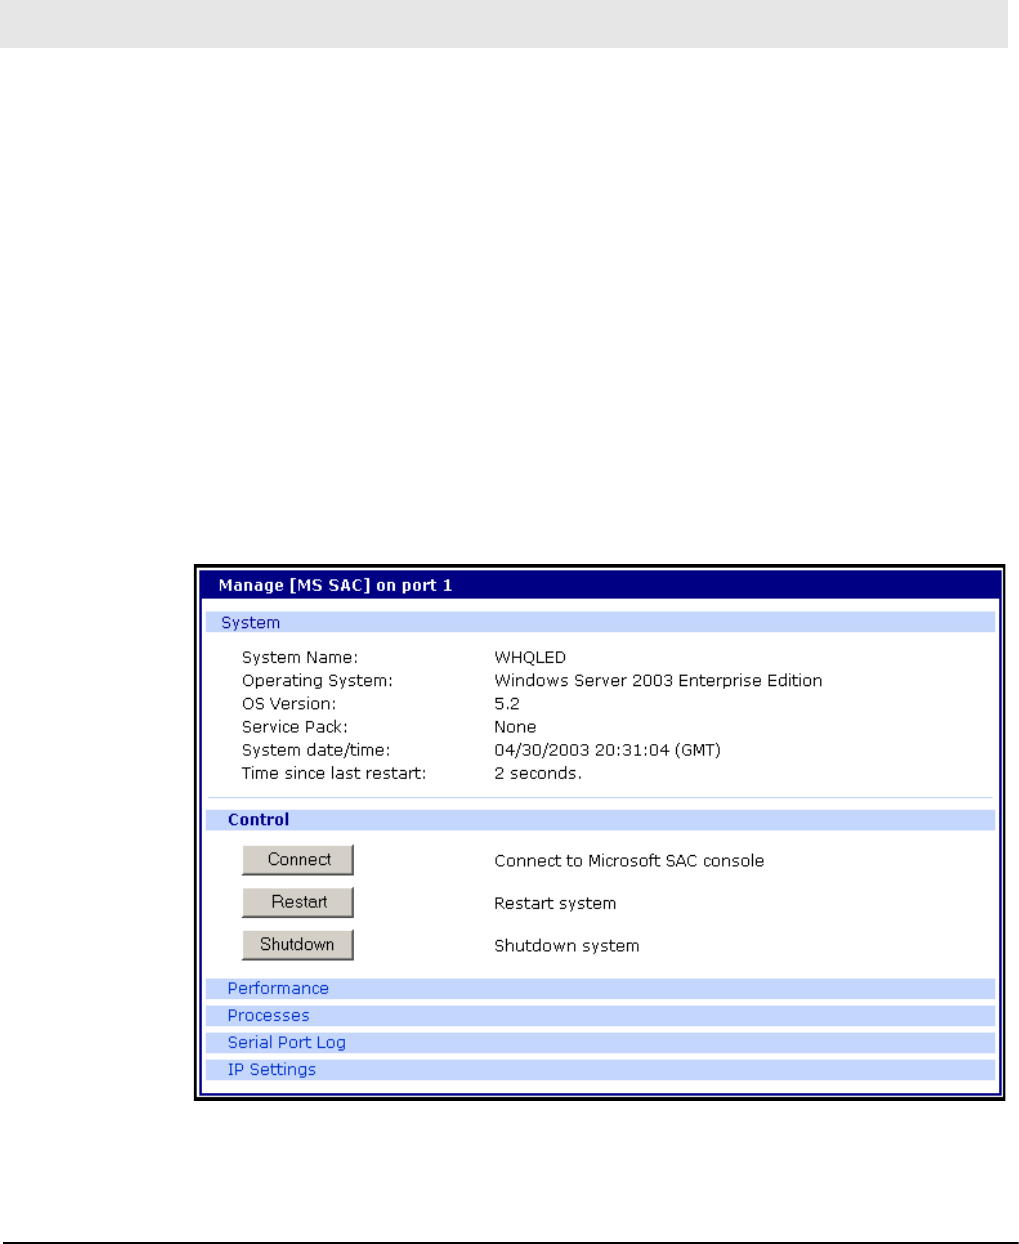
Microsoft SAC Support
Chapter 9 75
About Digi CM Support for Microsoft Windows Server 2003
The Digi CM provides a browser-based user interface to Microsoft’s text-based
Special Administration Console (SAC), an integral part of Windows Server
2003 Emergency Management Services (EMS). Both the English and
Japanese versions of SAC are now supported. When a server running
Windows Server 2003 is connected to a Digi CM serial port, key SAC
functions--normally accessed from the command line--are available from a
graphical user interface (GUI). SAC features accessible from this interface
include:
• Reset and shutdown
• Show performance values like memory utilization
• Show and configure IP settings per interface
• Show the process list and kill processes
Note: While the EMS port is available at all times using Telnet or SSH, the special GUI is
available only while SAC is active.
Chapter 9 Microsoft SAC Support

Set Up Overview
76 Chapter 9
Set Up Overview
Set up for Digi CM SAC support is a three-step process:
1. Set up the Windows Server 2003 for SAC support. To do this, ensure that
the COM port used for console traffic is properly set up. This includes
designating a COM port for console communication and setting the port
speed (baud) appropriately. For further information please refer to Setting
Up the Windows Server 2003 Port below.
2. Cable the console port on the Windows Server 2003 to a Digi CM port. See
the cabling information in Chapter 17.
3. Set up the Digi CM for SAC support. See "Setting Up the Digi CM for SAC
Support" on page 76.
Setting Up the Windows Server 2003 Port
1. Sign on to the Windows Server 2003 as the administrator.
2. Access the command line.
3. Use the bootcfg command to redirect console traffic to the correct COM
port. The following is the command syntax and an example. See the
Microsoft documentation for additional information on the SAC feature.
Command Syntax
bootcfg /ems on /port com# /id # /baud 115200
where com# is the COM port to which console traffic will be redirected, # is the
is the number of the boot entry, and the port speed is set to the
Digi - recommended rate (although you can use any rate supported by
Windows Server 2003).
Command Example
In this example, console output is redirected to COM 2, the boot entry is
specified as 1, and the port speed set to 115200.
bootcfg /ems on /port com2 /id 1 /baud 115200
Setting Up the Digi CM for SAC Support
To set up a serial port to provide access to the Windows Server 2003 console
port, do the following:
1. Access the web interface.
2. Choose Serial port > Configuration.
3. Choose a port.
4. Choose Host mode configuration.
The Host mode configuration page appears.
5. Set the Host mode to Console server and the Type of console server to MS
SAC -English (or Japanese) console as shown in the following figure.
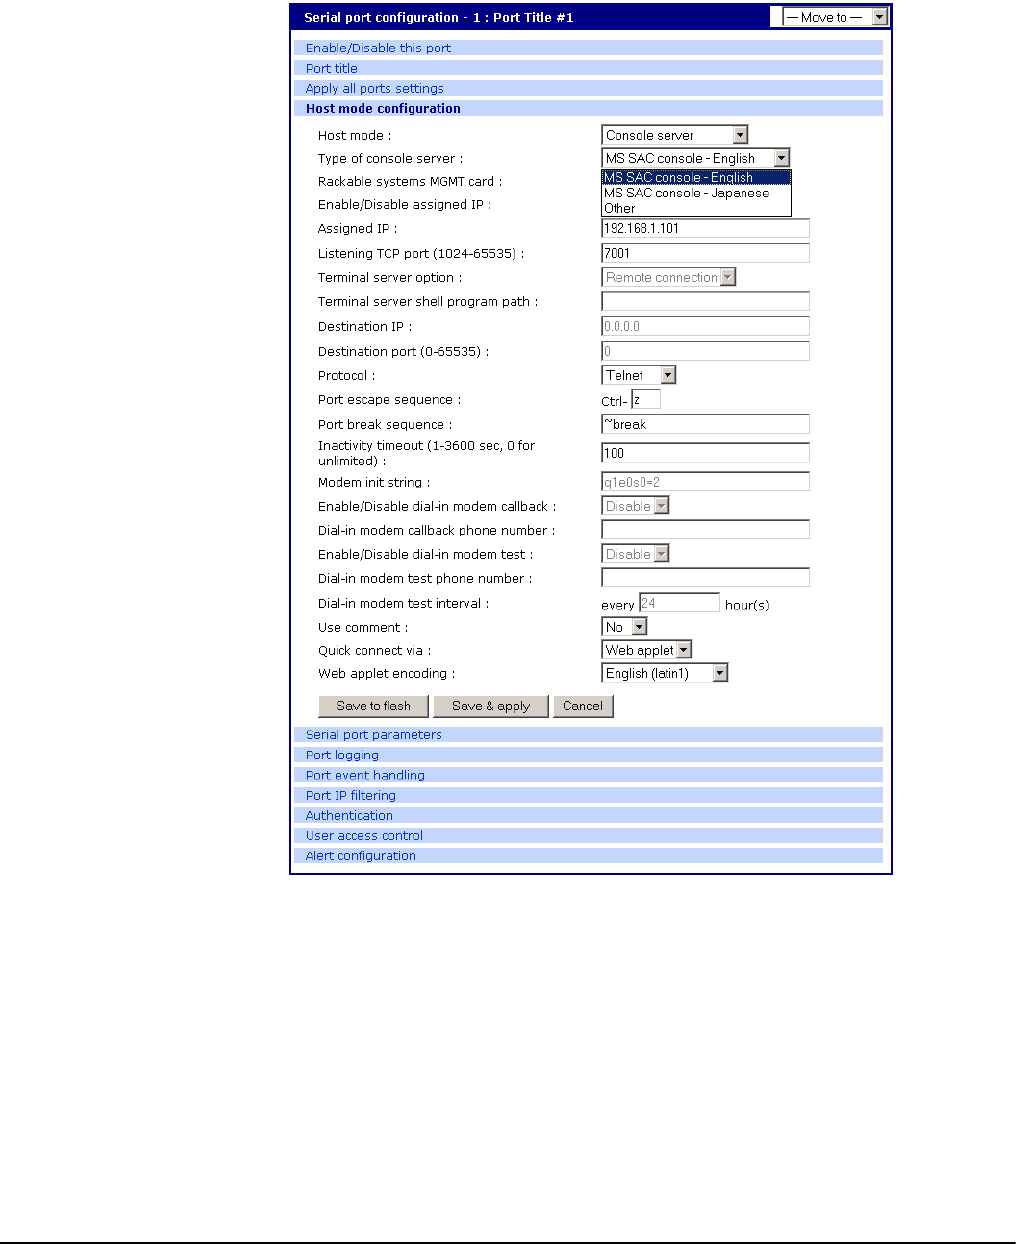
Microsoft SAC Support
Chapter 9 77
6. Set other fields as appropriate.
7. Click Save & apply.
8. Configure serial port communication settings, by doing the following:
a. Choose Serial port parameters from the menu.
b. Adjust settings as required. This includes ensuring that the Baud rate
matches the setting on the Windows Server 2003 serial port and Flow
control is set to None. Ignore the DTR behavior field.
c. Click Save & apply.
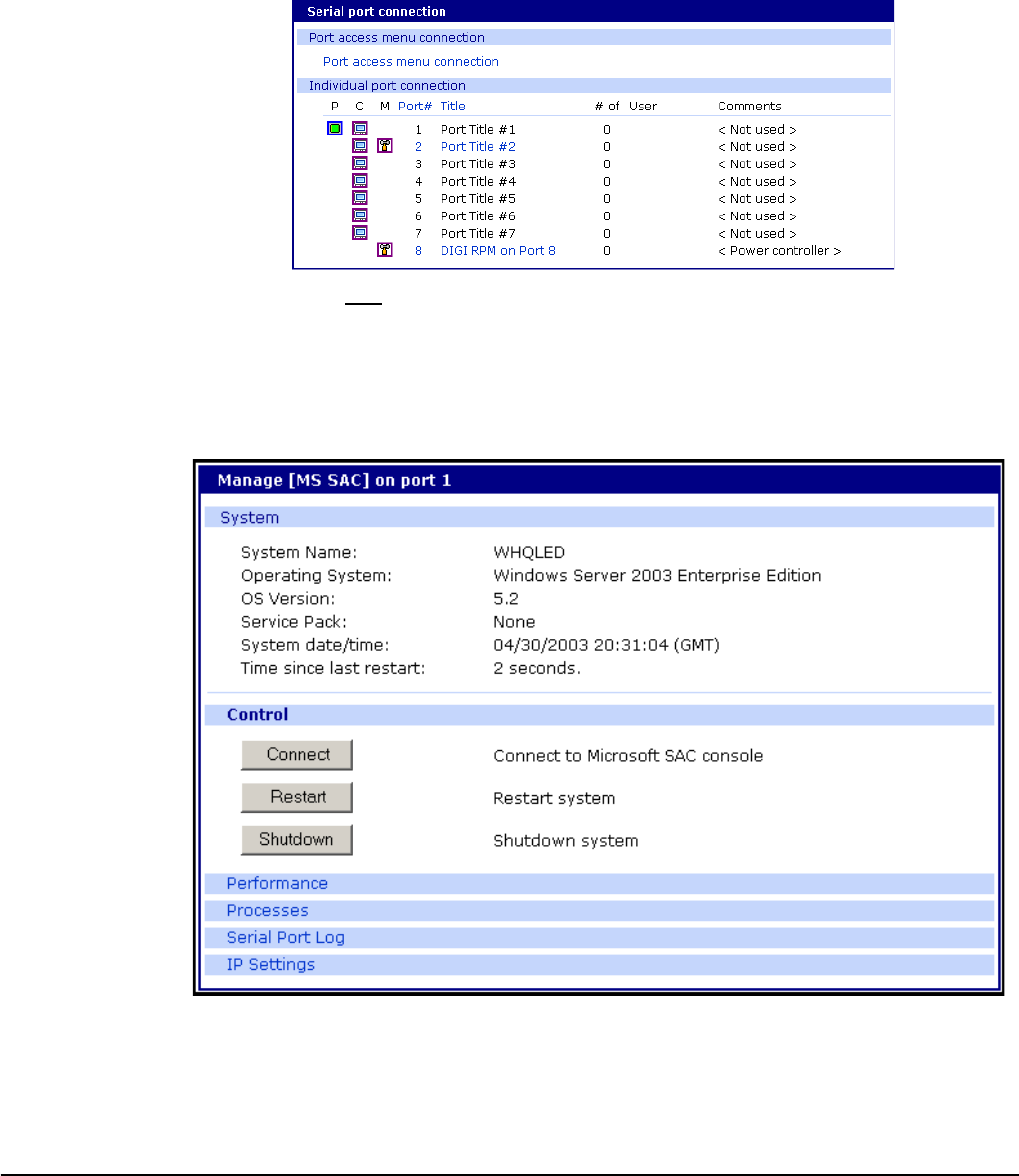
Accessing the Windows Server 2003 Console Port from the Digi CM GUI
78 Chapter 9
Accessing the Windows Server 2003 Console Port from the Digi CM GUI
To access the Windows Server 2003 console port, do the following:
1. Access the web interface.
2. Choose Serial port > Connection.
A screen similar to the following appears.
3. Click on the title of the port to which the Windows Server 2003 console port
is connected.
Note: If support for "Windows Server 2003" and "Rackable Systems Management Card"
is selected a menu will appear and you must choose between the two functions.
A screen similar to the following appears.
4. Use the Digi CM GUI to perform SAC functions. The following table
describes attributes of the controls on the GUI.

Microsoft SAC Support
Chapter 9 79
Field Description
Connect Connects to the SAC console port via the command line interface.
Restart Reboots the Microsoft Server 2003.
Shutdown Shuts down the Microsoft Server 2003.
Caution! This switches off the server and you can no longer access it
remotely.
Performance Provides access to Microsoft Server 2003 status information.
Process Provides access to the process list, which allows you to view and kill
active processes.
Serial Port
Log Provides access to port logging information.
IP Settings Provides access to IP settings, enabling you to verify and change settings.

Accessing the Windows Server 2003 Console Port from the Digi CM GUI
80 Chapter 9

Rackable Systems Management Card
Chapter 10 81
Introduction
Rackable Systems manufactures a management card that is built into some of
their servers. It interfaces between the Digi CM and the server’s serial port. In
normal mode, it allows transparent communication between the Digi CM and
the server. After detecting an escape sequence, it allows you to control
functions from the server independently of the main processor. The contollable
functions are listed below:
• Switching power on or off
• Rebooting
• Turning the status LED on or off
• Programming the LCD panel
• Reading the temperature from inside the server
• Setting the power on delay
The Digi CM offers a graphical web based user interface to manage the
Rackable Systems Management Card.
Set up
Set up of the Digi CM to support the Rackable Systems Management Card
To set up the serial port to provide access to the Rackable Systems
Management console, do the following:
1. Access the Digi CM’s web interface.
2. Under the Serial Port heading choose Configuration.
3. Choose a port.
4. Choose Host mode configuration.
The Host mode configuration page appears.
5. Set the Host mode to Console server.
6. Set the “Rackable Systems Mgmt Card” support to Enable.
7. Click Save & apply.
Configure serial port communication settings:
1. Choose Serial port parameters from the menu.
2. Adjust the settings as required. The defaults for the Rackable Systems
Management Card are identical to these of the Digi CM:
Baud rate 9600
Data bits 8
Parity None
Stop bits 1
Flow control None
DTR behavior High when open
Chapter 10 Rackable Systems Management Card

Set up
82 Chapter 10
3. Click Save & apply.
Assign a port name:
1. Choose port title from the menu.
2. Enter a port title.
3. Click Save & apply.
Accessing the Rackable Systems Management Card from the Digi CM user interface
1. Access the Digi CM’s web interface.
2. Under the Serial Port heading choose Connection.
A screen similar to the following appears.
3. Click on the icon in the M (Manage) column or on the title of the port to
which the Rackable Server is connected.
A screen similar to the following appears.
4. Use the Digi CM user interface to perform Rackable Systems Management
Card functions. The following describes attributes of the user interface controls.
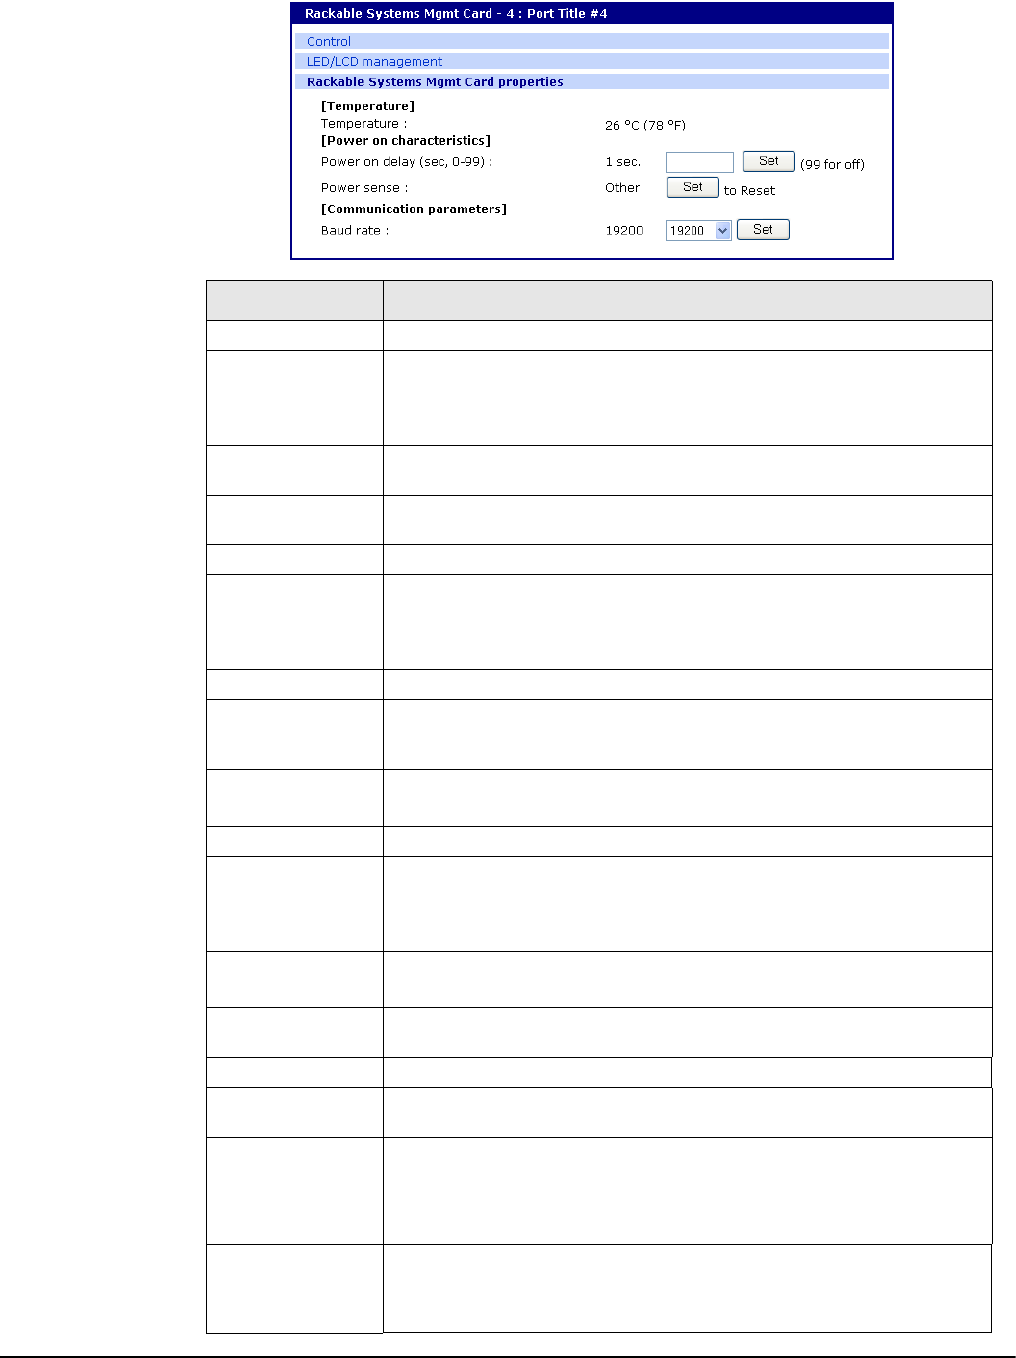
Rackable Systems Management Card
Chapter 10 83
.
Field Description
Control
Power status
The first column shows the current state.
Three buttons are available to initiate an action to either, power
on, power off or restart the server. Dependant on the current sta-
tus Power on or Power off is disabled.
Reboot Reboot the Rackable Server by sending a 500ms reset signal to
the server.
Connect Spawn the Java Telnet applet or the local Telnet/SSH application
to connect directly to the port.
LED Mgmt
LED
Management
To control the LED in the front of the Rackable Server.
The first columns shows the current status of the LED. Three but-
tons are available to select the activity of the status LED: turn on,
turn off and blinking. Either of these buttons is disabled.
LCD Mgmt
Currently
displayed
message
Shows the message that is currently displayed on the LCD dis-
play.
Erase This function clears the LCD display.
The saved message stays saved to flash.
Save Save currently displayed message to flash memory.
Show saved
LCD message
upon startup
The first columns shows the current status: Yes or No.
This parameter defines which message is displayed upon startup
of the server, either the saved message or the standard: “Rack-
able Systems Phantom Vx.xx”.
Contrast Set a contrast for the LCD panel.
The default is 50, the range is 0 – 100.
Phantom
Properties
Temperature
Indicates current temperature inside the Rackable Systems Server.
Power delay Time in seconds before the server starts up after applying power
(0-98 seconds, 99 means no power on delay).
Power sense
The power sense option toggles between sensing server power
on the reset header or on the J7 connector. Most applications will
use the “Reset” option. This option should be set before shipping
from Rackable Systems, but may need to be reset if somehow
changed after shipping.
Communication
settings
Baud Rate
Configure the baud rate used to communicate with the Rackable
Systems Management Card. For this change to become effective
reset or power-cycle the Management card, and be sure to
switch the port settings in the Digi CM port settings.

Set up
84 Chapter 10
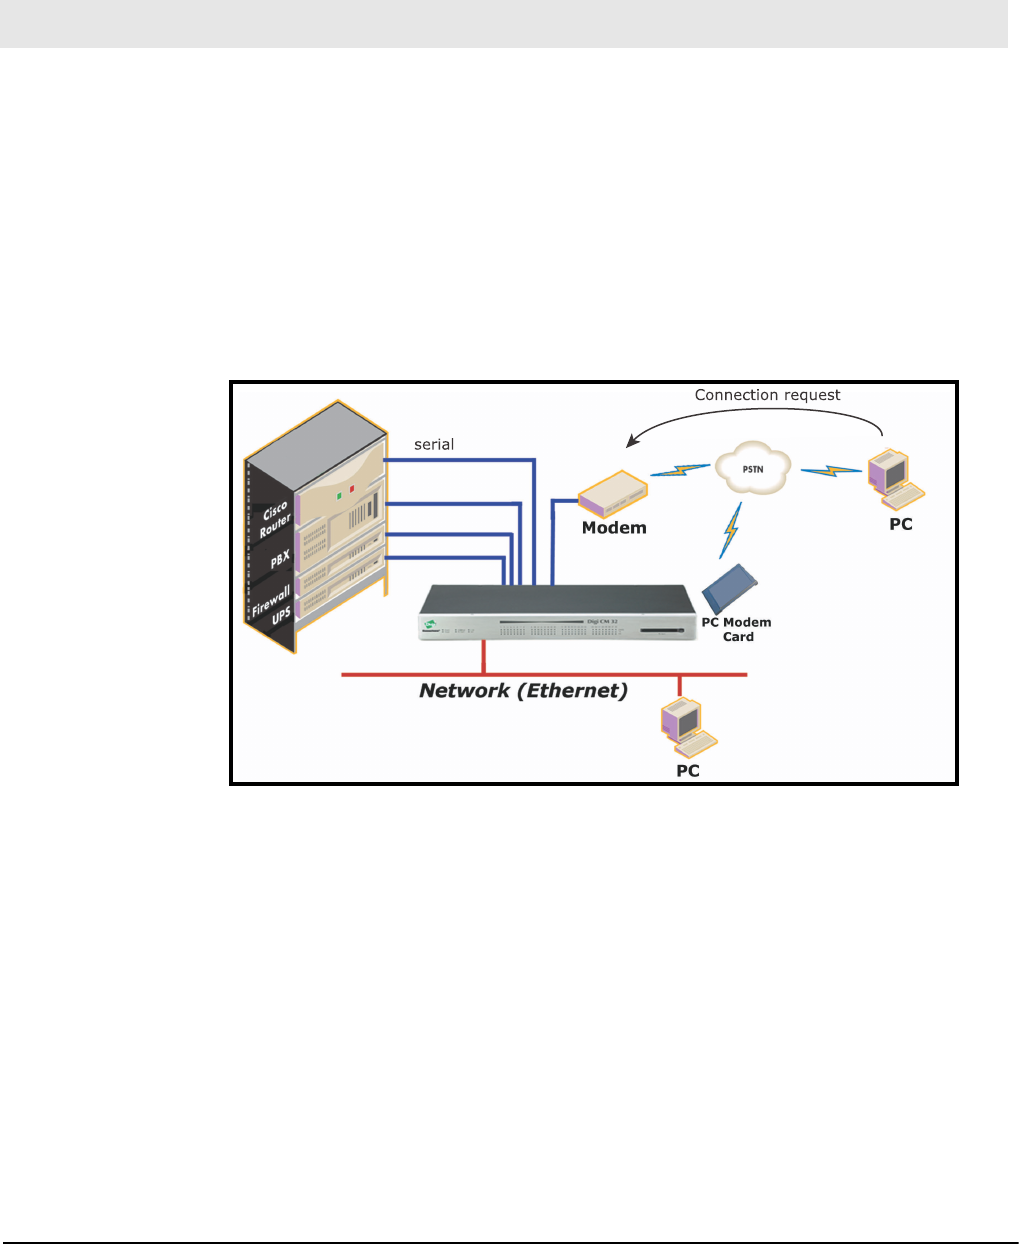
Configuring Remote Dial-In Access
Chapter 11 85
Introduction
The Digi CM supports dial-in connections from remote sites for out-of-band
access. In this configuration, the Digi CM has serial ports configured for
external modems and waits for dial-in connections from remote sites. If you
dial-in using a terminal application, the Digi CM accepts the connection and
displays a menu of available serials ports. In a dial-in terminal server mode,
the Digi CM makes a TCP connection with either a Telnet or SSH client to a
pre-defined server. RawTCP is also an option for dial-in users.
For more information on the different types of Host mode configuration, see
"Host Mode Configuration" on page 44.
Configuring For Dial-In Modem Access
To configure a serial port for a dial-in modem, enter the values for these fields:
Host mode, Modem init string, and Inactivity timeout. To access the Host mode
configuration screen, do the following:
1. Access the web interface.
2. Under the Serial port heading, choose Configuration.
3. Choose a specific port under Individual port configuration and then choose
Host mode configuration.
4. Select Dial-in modem for the Host mode in the drop down menu.
5. Fill in the appropriate fields as they apply to your configuration.
Chapter 11 Configuring Remote Dial-In Access
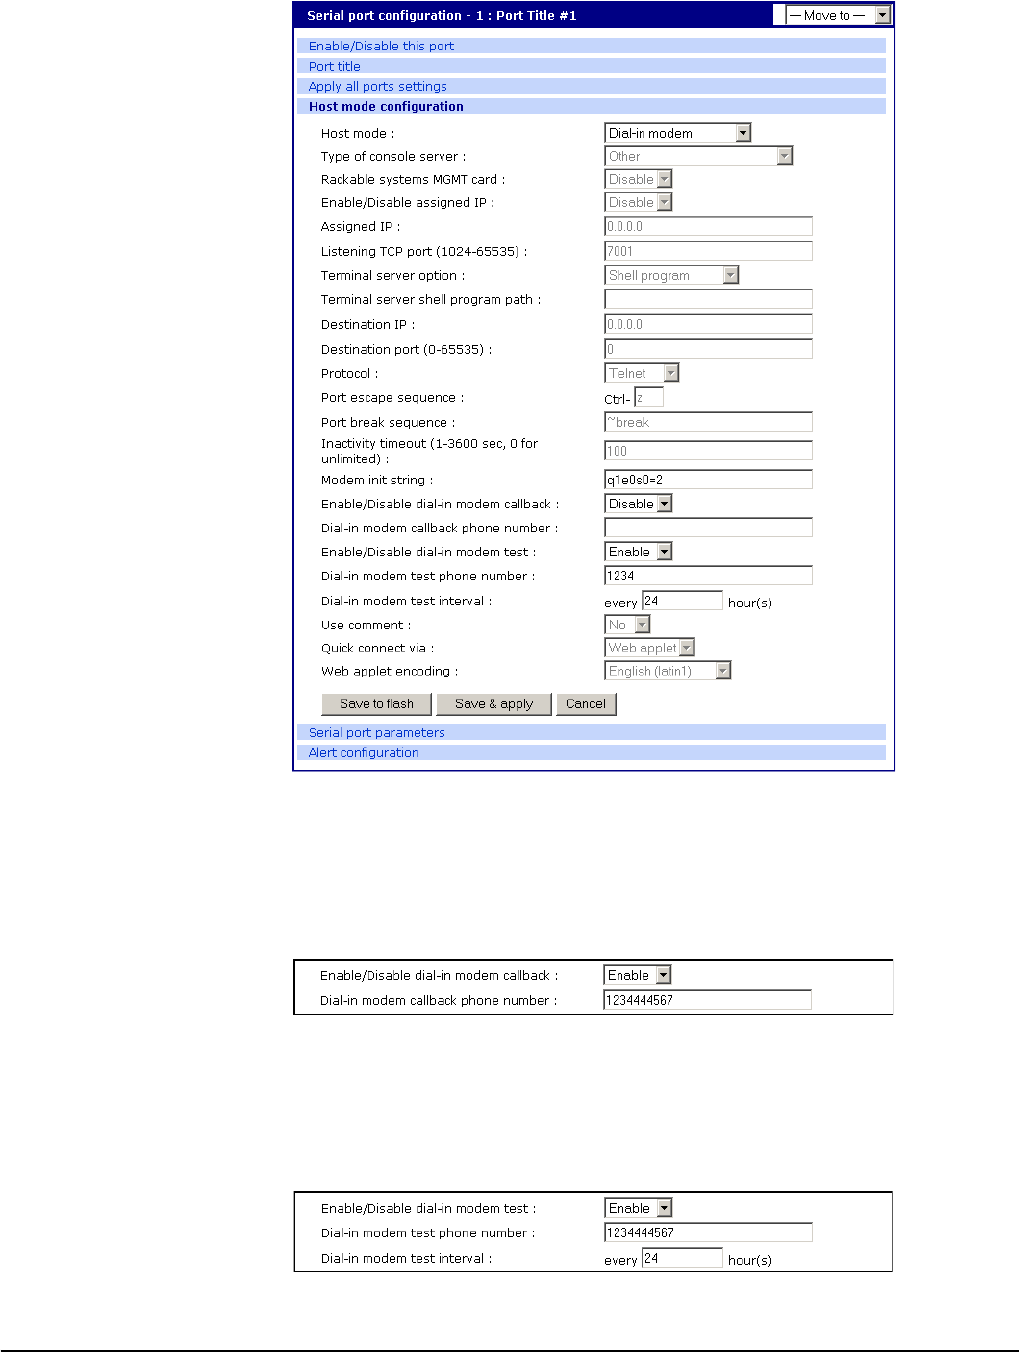
Configuring For Dial-In Modem Access
86 Chapter 11
Modem init string - The default modem init string is q1e0s0=2. The init string
sets the modem to quiet mode, echo off, and Auto Answer on two rings.
The modem init string is used for initializing an external modem attached to
a Digi CM serial port. See your modem user manual for more information.
Callback - For security reasons, the callback feature can be activated.
If callback is enabled, the Digi CM does not accept any incoming calls.
After the incoming call is rejected, a callback is initiated to the phone num-
ber configured in the “Dial-in modem callback phone number”.
Modem test - To ensure the proper functionality of the modem, the Digi CM
has the ability to test the modem connection in a configurable interval.
The modem test allows you to specify a phone number and an interval.

Configuring Remote Dial-In Access
Chapter 11 87
After the system has booted, the interval has elapsed, and the modem is
not in use, the specified dial number is called. The modem trains and
receives a login prompt from the other side (normally another Digi CM).
If the login-in prompt (login: ) is detected the line is disconnected again and
the modem test is considered successful.
Two ports can call each other using this modem test procedure.
Please be aware that the tests will fail if the other modem is in use.
There are multiple ways to review the information about the mode test:
• syslog in the Digi CM itself:
07-16-2004 12:45:01 > Port #16 - Modem Test started. Calling to 1234444567.
07-16-2004 12:45:22 > Modem connected through Port #15
07-16-2004 12:45:22 > Port #16 - Modem Test succeeded
In this example a modem connected to port 16 is calling another
modem connected to port 15.
Any errors occurring are captured in the syslog file as well.
• e-mail based notification
The Alert configuration dialog of the port configuration, contains multiple
settings:
The title of the e-mail and the address can be configured.
To be able to configure e-mail notifications, a primary SMTP server has
to be configured under Network > SMTP configuration.
• SNMP configuration
It is also possible to receive notifications using SNMP traps.
When using SNMP traps the global settings for IP address, Community
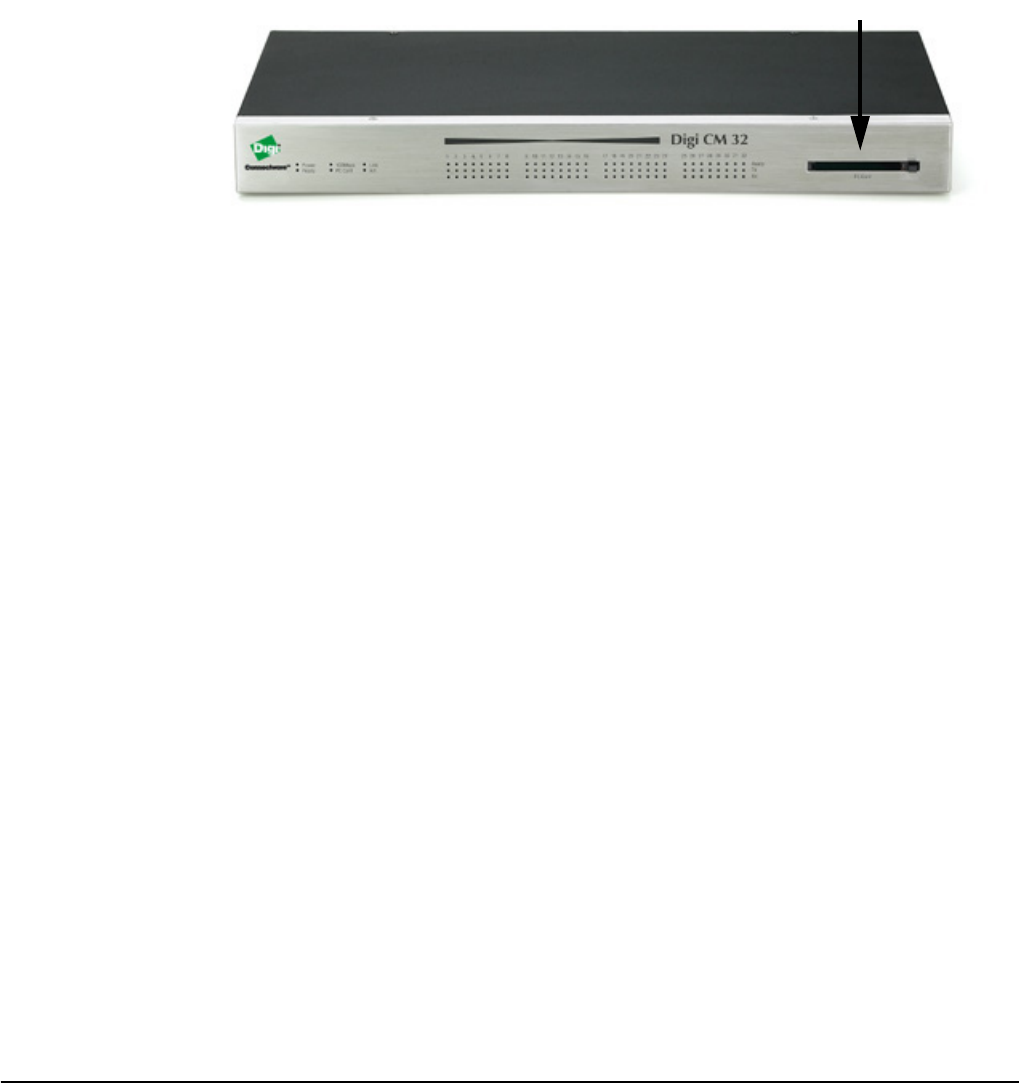
Adding a PC Modem
88 Chapter 11
and Version can be used, or specified separately.
The Trap MIB can be downloaded from support.digi.com (select your
product and go to Diagnostics, Utilities and MIBs).
6. Click Save & apply.
Adding a PC Modem
A PC card slot is provided on the front panel of the Digi CM. The graphic below
has an arrow indicating the PC card slot.
To install and configure the PC modem on the Digi CM, do the following.
1. Insert the card into the PC slot.
2. Access the web interface.
3. From the menu, choose Configuration under the PC card heading.
4. Choose Discover a new card.
The Digi CM searches for a PC card and displays a configuration menu.
5. Enter the appropriate parameters in the configuration menu.
6. Click Save & apply.
Configuring For Dial-In Terminal Server Access
The host mode Dial-In Terminal Server is identical to the host mode Terminal
Server but allows you to configure a modem init string. In this mode an
incoming modem connection is automatically connected to an IP address.
To configure a serial port for a dial-in terminal server access, enter the values
for these fields: Host mode, Destination IP, Base Port, Protocol, Inactivity
timeout, and Modem init string. To access the Host mode configuration
screen, do the following:
1. Access the web interface.
2. Under the Serial port heading, choose Configuration.
3. Choose a specific port under Individual port configuration and then choose
Host mode configuration.
PC card slot
Digi CM 32 shown
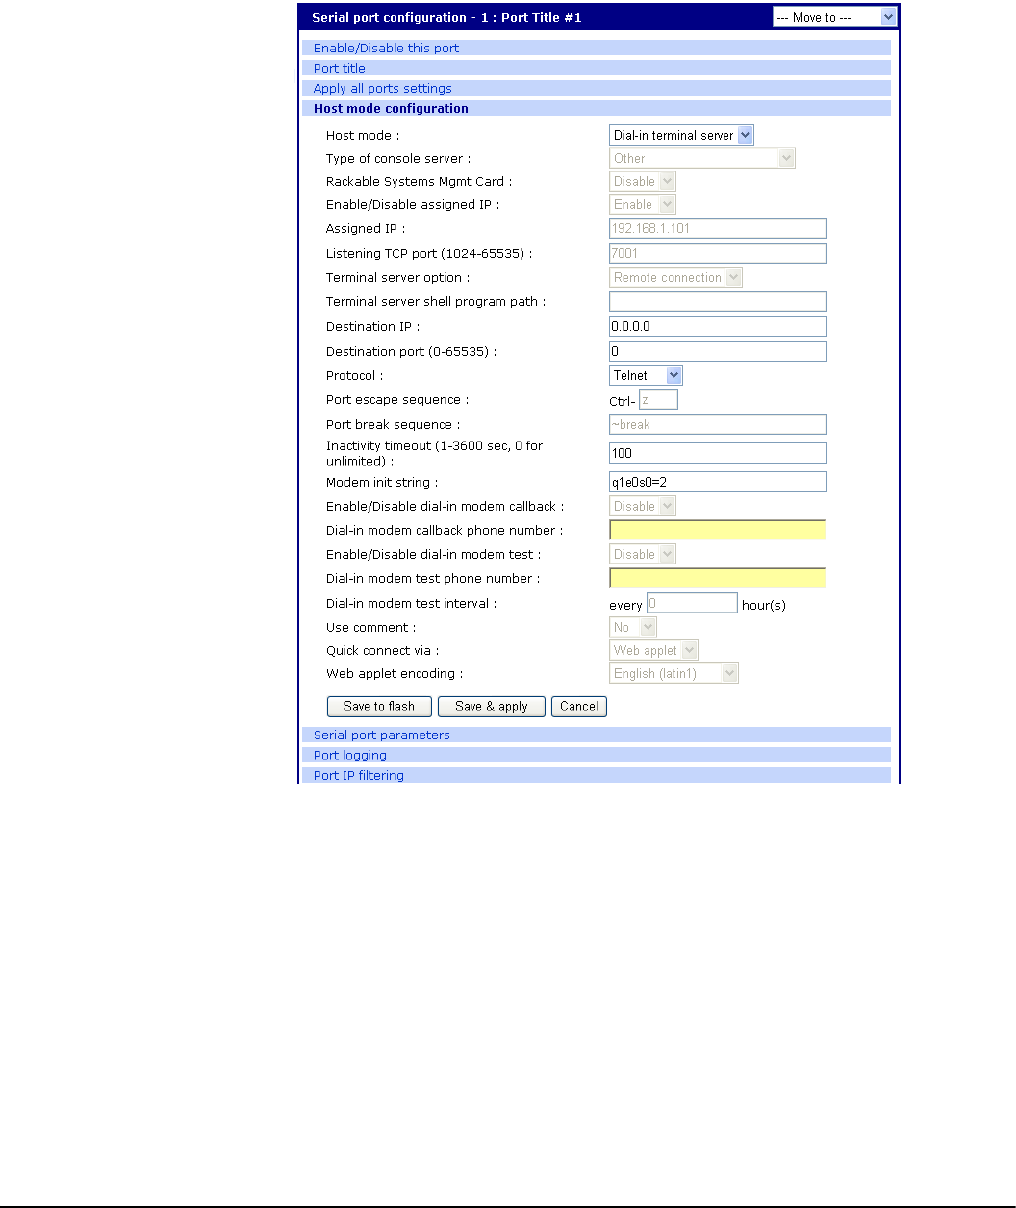
Configuring Remote Dial-In Access
Chapter 11 89
4. Select Dial-in terminal server for the Host mode from the drop down menu.
5. Fill in the appropriate fields as they apply to your configuration.
Destination IP - The IP address of the system that you will be automatically
connected to when you access the port.
Destination port -´ The TCP port that will be used when the port you
accessed is automatically connected to a system on the network.
Protocol - The protocol that will be used to establish the connection to
Destination IP: port. The options are SSH, RawTCP, and Telnet.
Inactivity timeout - The timeout length ranges from 1 to 3600 seconds; 0 is
unlimited timeout.
Modem init string - Use the default string or enter your own string.
6. Click Save & apply.

Configuring For Dial-In Terminal Server Access
90 Chapter 11
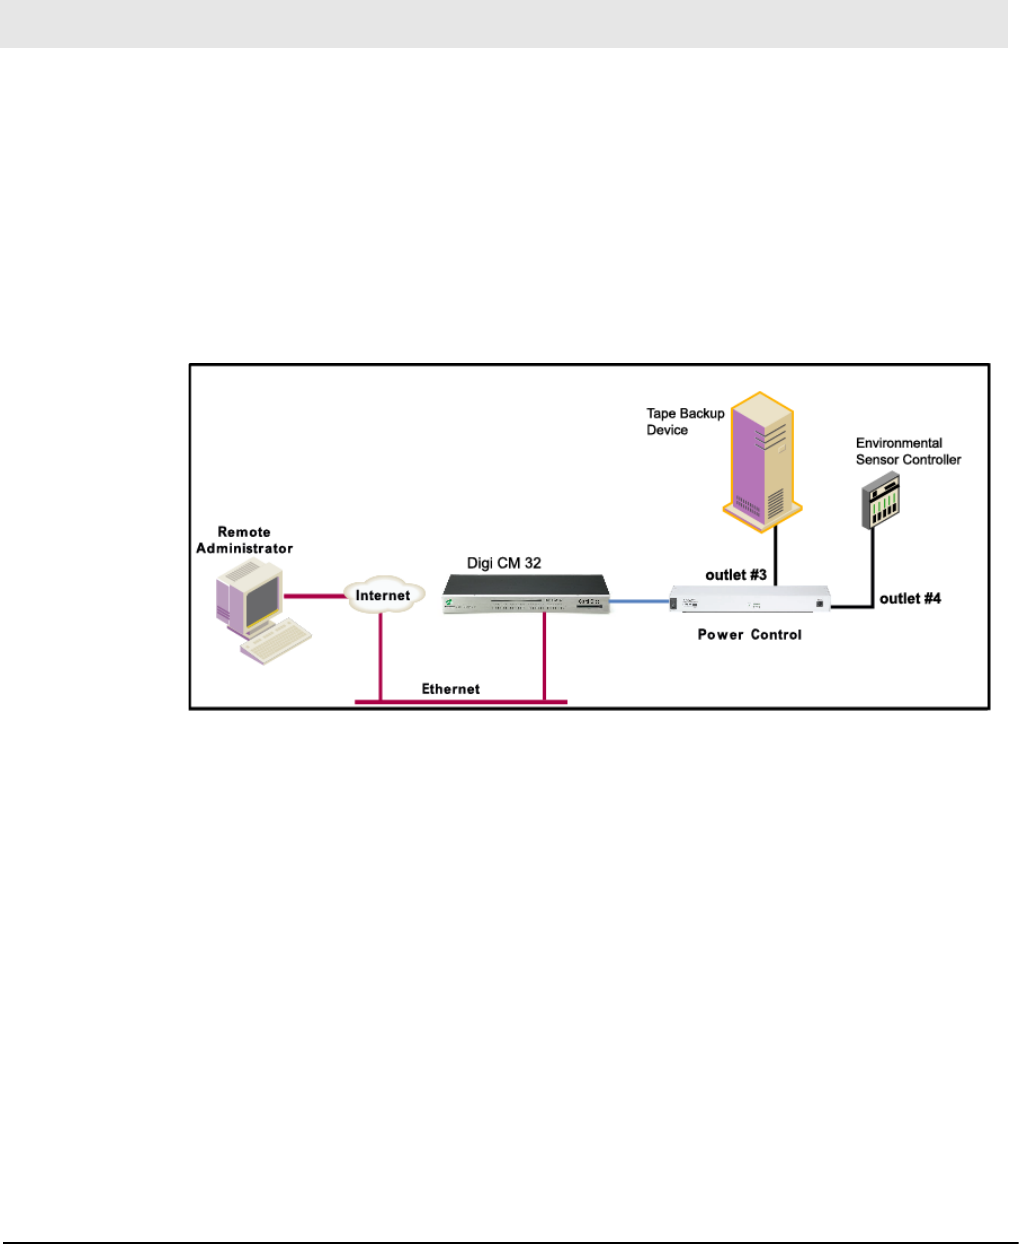
Power Controller
Chapter 12 91
Introduction
The Power Controller feature allows the administrators of the Digi CM to use
console management to control power functions. Power control consists of
three basic functions: on, off, and reboot (power cycle). There are two typical
scenarios when using a power controller. The simplest scenario is a non-serial
device connected to a power controller (for example, an environmental sensor
controller or a tape backup device). The power controller is configured and
accessed through the Digi CM.
This illustration shows the a power controller configured through the Digi CM
for non-serial devices.
The second scenario is a serial device (such as a router or server) managed
through a port on the Digi CM with its power supply mapped through the power
control feature. After configuration is complete, you need only reference the
console management port on the Digi CM to also manage power. The Power
Controller feature handles the relationship of a specific outlet to a serial device
as if the power supply was also connected to the same port as the serial
device. In other words, you don’t need to see the physical connection or
remember which outlet controls a specific serial device after configuration - the
Digi CM does that for you.
Chapter 12 Power Controller

Installing Power Controller
92 Chapter 12
The following illustration shows a Sun server configured through a serial port
connection on the Digi CM 32.
Installing Power Controller
To connect the Digi RPM power controller to the Digi CM use the straight-thru
cable provided with the Digi RPM unit. Plug one side into the “Console” port of
the Digi RPM and the other into any port of the Digi CM. If you plan to connect
multiple power controllers, set up all of them as described before proceeding.
For details on how to configure the Digi RPM for cascading refer to "Cascading
Multiple Digi RPM Units" on page 100.
If you are using any other manufacturer of power controllers, please refer to
"About Serial Port Cabling" on page 143 for more information.
Before proceeding, plug the power controller into an appropriate power source
and turn it on.
Note: The DIP switches on the Digi RPM are used for cascading. Make sure that the dip
switches of the first unit are set to off. For more information about cascading refer
to "Cascading Multiple Digi RPM Units" on page 100.
Configuring Power Controller
Only system administrators can add a power controller although authorized
users may reconfigure outlets or serial ports.
Configure the serial port parameters to match the power controller
1. Log in to the Digi CM (username root, password dbps).
2. Click Serial port > Configuration.
3. Select the port number of the serial port you want to connect to the power
controller.
4. Select the Serial port parameters:
Baud rate 9600
Data bits 8
Parity None
Stop bits 1
Flow control None
DTR behavior High when open
5. Click Save & apply.
6. Continue by adding the power controller.

Power Controller
Chapter 12 93
Add the power controller
1. Log in to the Digi CM (username root, password dbps).
2. Click Power Controller > Configuration.
3. Select the port number of the serial port you want have connected to the
power controller(s), the manufacturer of the power controller, and the
number of units to be cascaded (1 means that one unit will be connected
(no cascading)).
Note: The number of cascaded units cannot be changed later, so make sure you have
all power controllers connected before proceeding.
The default title is the manufacturer brand and the port number it is
connected to. You have the ability to change this title in step 5 if needed.
4. Click Add controller.
5. After the controller is detected automatically, you can correct the number of
ports if necessary or edit the port title.
6. Click Save & apply.
7. Continue by setting the alarms and tresholds.
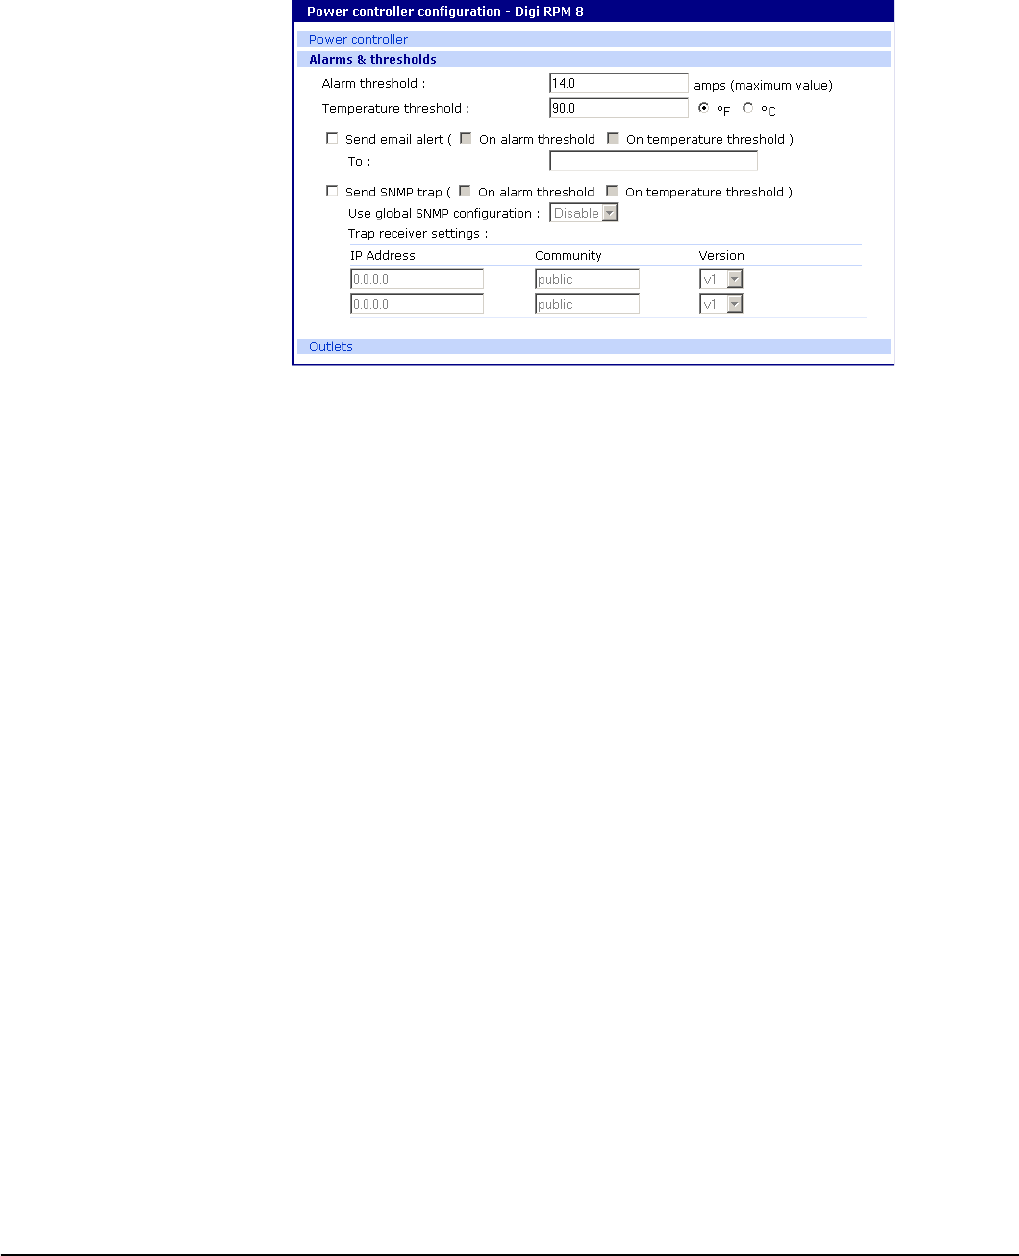
Setting Alarms and Thresholds
94 Chapter 12
Setting Alarms and Thresholds
Power Controller allows administrators to set an alert via E-mail notification or
an SNMP trap when environmental conditions exceed specifications.
1. Under Power Controller click Alarms & thresholds.
2. Enter the appropriate parameters. Select the condition(s) for an alert and
enter the information for the alert (E-mail or SNMP trap or select both).
Note: If multiple power management units are cascaded, the alarm threshold is set for
the sum of all outlets.
Note: To set up an E-mail alert it is assumed that the mail server has already been set
up. If not, go to "Configuring SMTP Alerts" on page 52. If the SMTP server is not
set up, the E-mail option will not be available.
3. Click Save & apply
4. Continue by configuring the outlets.

Power Controller
Chapter 12 95
Outlet Configuration
The following procedure allows you to setup the power supplied to your device
from the power controller.
1. From Power controller, click Outlets.
2. Click the outlet number to configure.
3. Select the serial port number that controls the device connected to the Digi
CM (if any). If the port number has a title, it will appear.
Note: If you want to add a title or change the existing title, go to Serial port >
Configuration and select the port number that you want to add or change the title.
Enter the title and click Save & apply. Go back to Power Controller > Configuration
> Title > Outlets and select the outlet you are configuring to continue.
4. If you are not selecting a serial port number, you can modify a user’s
access on this screen. Enter the User Access Control parameters - see
"User Access for Power Controller" on page 96.
5. Click Save to flash and repeat steps 2- 4 for each outlet you want to
configure.
6. Click Save & apply.
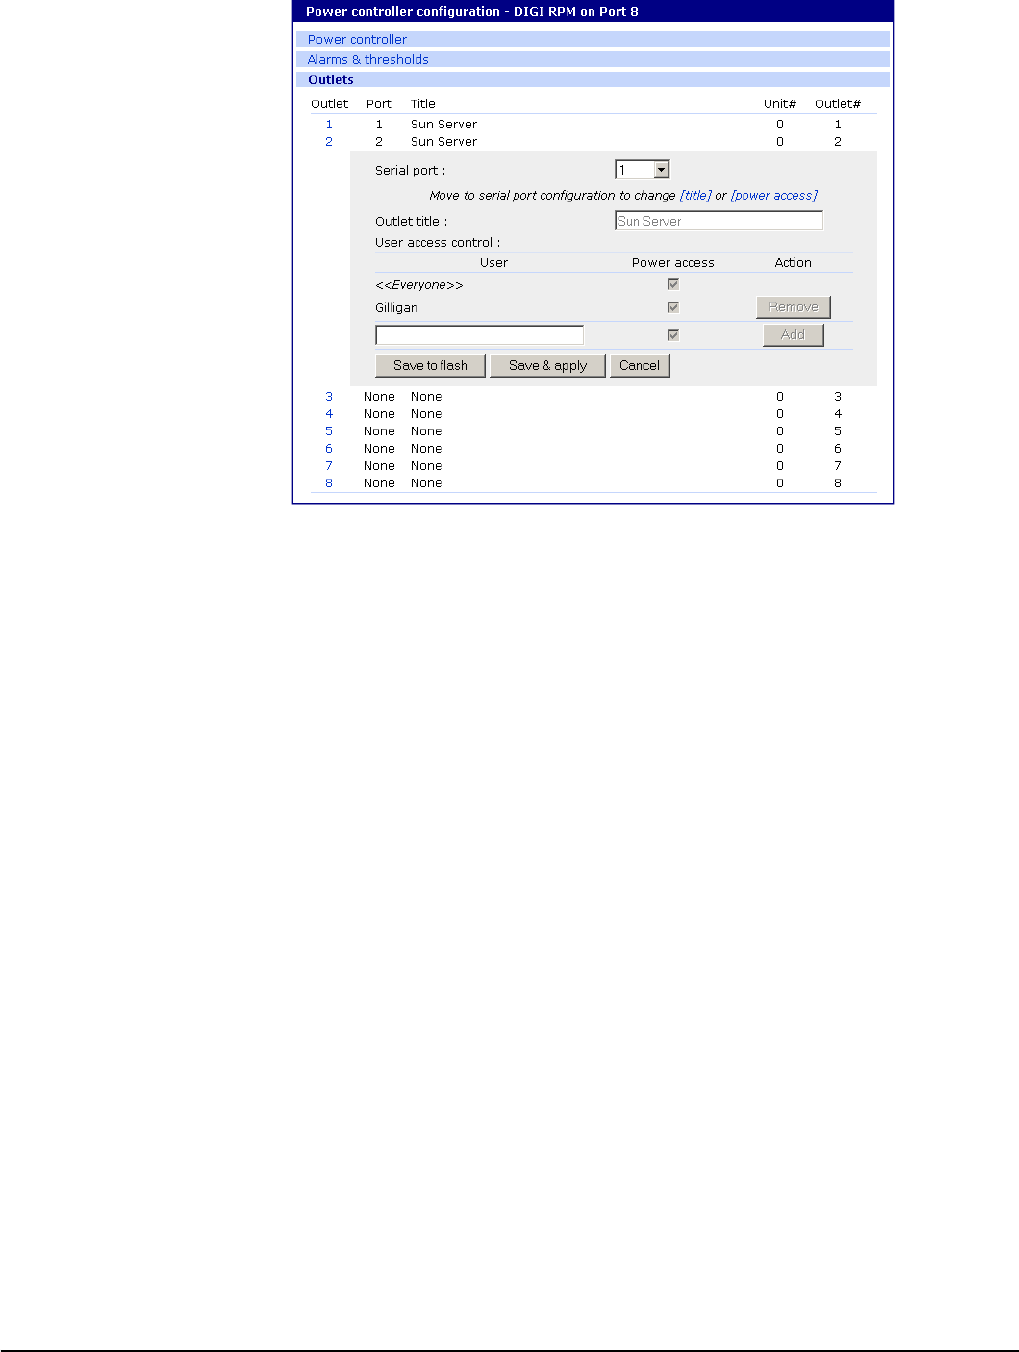
User Access for Power Controller
96 Chapter 12
Note: The screen above shows that serial port one on the Digi CM is connected to a Sun
Server that is supplied power from outlets 1 and 2 on the power controller. In the
example above, Gilligan has access to the power outlets.
7. To select the parameters for the User Access Control, click the User Access
link. You may grant specific users permission to access an outlet or restrict
access for specific users from an outlet. For more information see "User
Access for Power Controller" on page 96.
User Access for Power Controller
The Digi CM can be configured to allow all users or specific users access to
the power controller feature as well as restricting specific users to the power
controller feature. User Access is configured on an outlet by outlet basis.
Note: User Access to a serial device that is connected to the power controller in
configured under Serial Port > Configuration > Port # > User Access
Configuring to Allow Specific Users Access
To configure the Digi CM for specific users, you must deselect
<<Everyone’s>> access and add the specific user and access as in the
following steps.
1. Log in to the Digi CM (username root, password dbps)
2. Click Power Controller > Configuration > Outlets > Select the outlet # to
configure.
3. Select the port to configure to the outlet. If it is a non-serial device select
None.
4. Edit the outlet title. If there is a serial port, the port title will appear and
cannot be edited from this screen.
5. Click Save & apply.
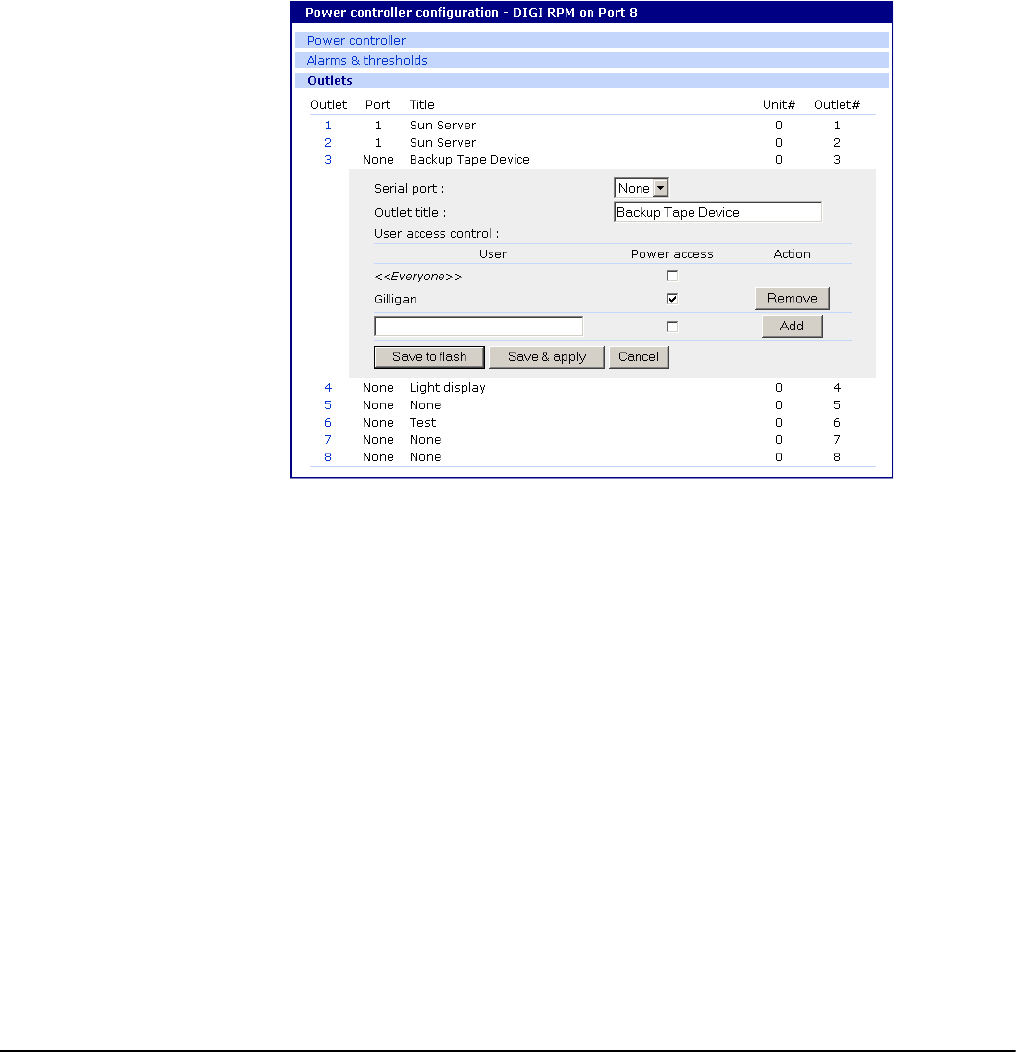
Power Controller
Chapter 12 97
6. Under Everyone uncheck the Access type and click Save to flash.
7. Enter the user that will have access and check the Access type.
Note: Port is access to the port. Monitor is access to sniff. Power is access to the power
management.
8. Click Save to flash. Repeat steps 7 and 8 for additional users.
9. Click Save & apply after all users have been entered.
Note: The screen above shows outlets 1 & 2 control power to the Sun Server configured
on port 1 of the Digi CM. Outlets 3 and 4 are not serial devices. Gilligan has been
designated the specific user to control outlet # 3.
Configuring to Restrict Specific Users
To restrict specific users, you must select access for << Everyone>> and add
the restricted user by deselecting his or her access.
1. Log in to the Digi CM (username root, password dbps)
2. Click Power Controller > Configuration > Outlets > Select the outlet # to
configure.
3. Select the port to configure to the outlet. If it is a non-serial device select
None.
4. Edit the outlet title. If there is a serial port, the port title will appear and
cannot be edited from this screen.
5. Click Save & apply.
6. Check Everyone and click Save to flash.
7. Enter the username that will NOT have access, uncheck the Access types
that are restricted, and click Add.
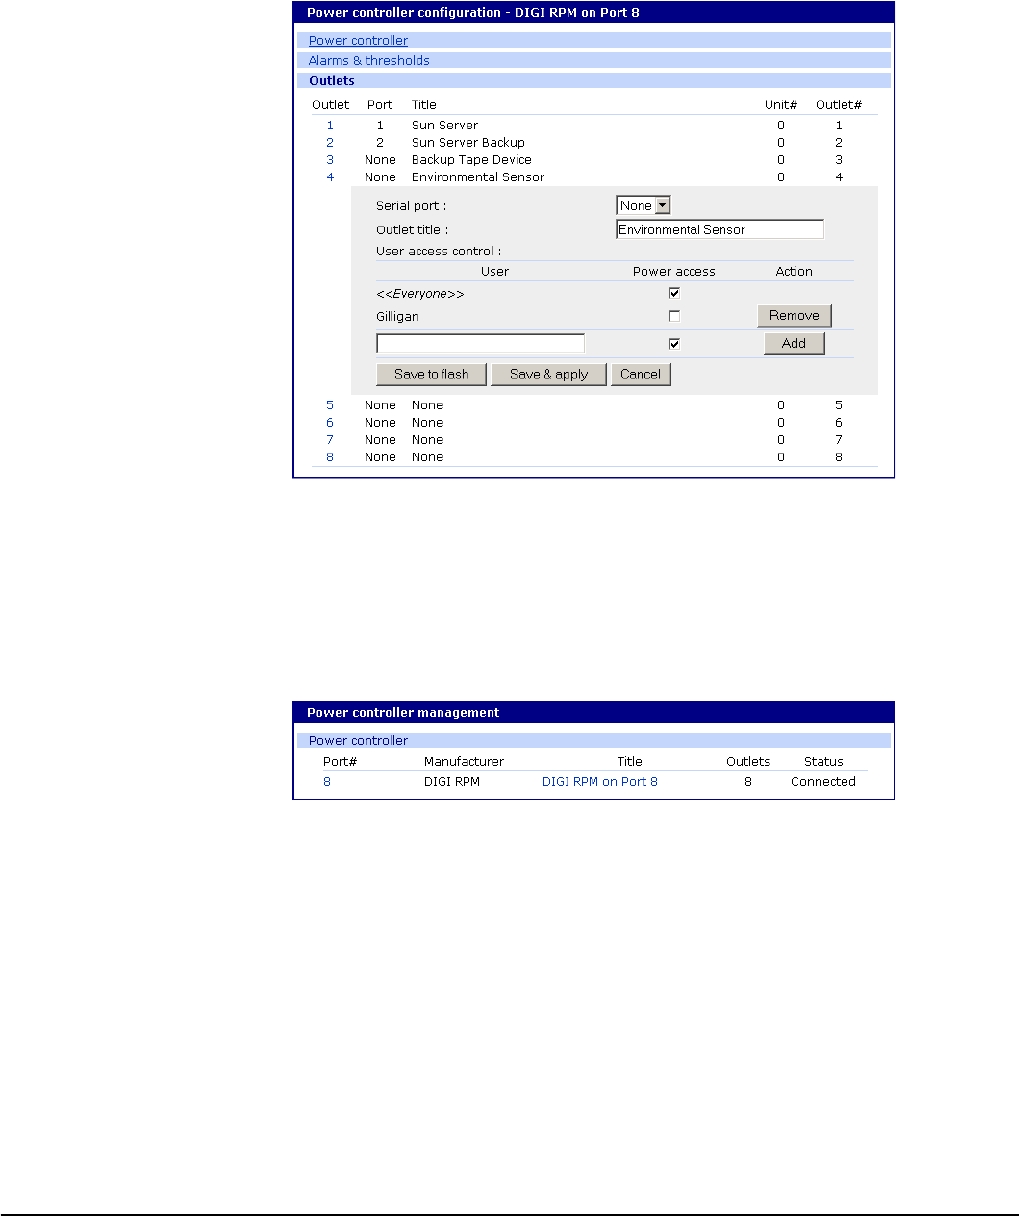
Power Controller Management
98 Chapter 12
Note: Port is access to the port. Monitor is access to sniff. Power is access to the power
management.
8. Click Save to flash and repeat steps 7 and 8 for additional users.
9. When all users have been added Click Save & apply.
Note: Gilligan does not have access to Outlet # 4.
Power Controller Management
The Power Controller Management option allows you to change outlet settings
or get a quick update of the power controller status.
1. Under Power Control click Management.
The Power controller management screen gives a quick view of all the power
controllers and the current status of the connection. The Port # and
Manufacturer fields are a link to the specific power controller statistic page
which displays information for the power controller. If the status is
‘Disconnected’ the links are inactive.
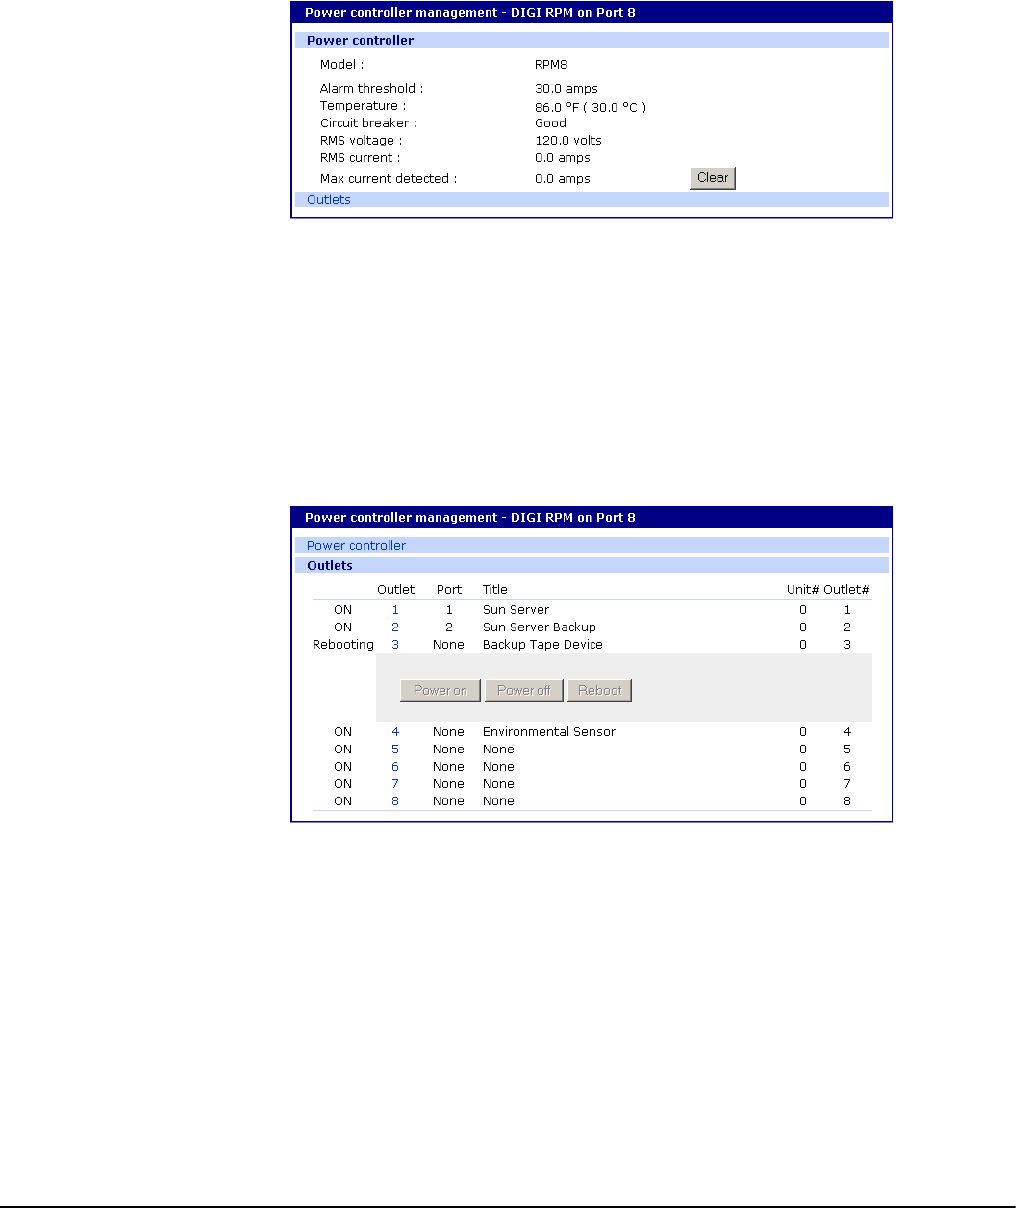
Power Controller
Chapter 12 99
2. Click either the Port # or the power controller title.
The Power controller statistics screen appears to show the Alarm threshold,
Current temp, Circuit breaker condition, RMS voltage, RMS current, and Max
current detected.
The Clear button will reset the Max current detected to 0.0 amps. From this
screen click Outlets.
3. Select the outlet number that you would like to manage.
Note: The screen below shows that all the outlets are powered On and outlet 3 is
Rebooting, therefore the Backup Tape Device is power cycling.
4. Click
Power on
,
Power off
, or
Reboot
depending on what you want the outlet to do.
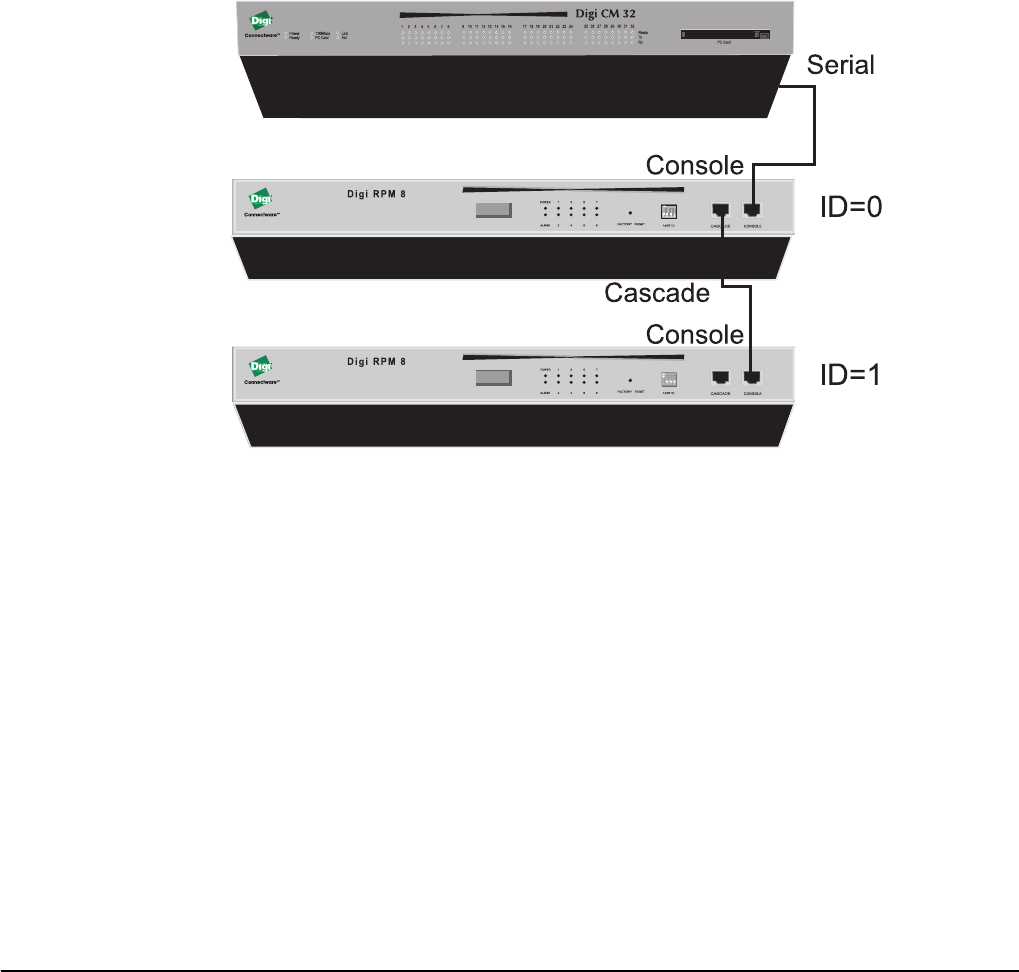
Cascading Multiple Digi RPM Units
100 Chapter 12
Cascading Multiple Digi RPM Units
The Digi RPM power controllers can be cascaded when used with the Digi
CM.
The DIP switches on the front panel of the Digi RPM allow configuring unique
identities (ID) to the Digi RPMs so they can be identified. In a cascaded
environment each unit has to be configured to a unique ID.
To cascade the Digi RPM connect a serial port of the Digi CM to the Console
Port of the first Digi RPM using a straight-thru cable. Connect the “Cascade”
Port of the first Digi RPM to the “Console” Port of the second.
Following an example of two cascaded Digi RPMs connected to a Digi CM.
Please note that the ID for the first unit is set to 0 and for the second unit it is
set to 1.
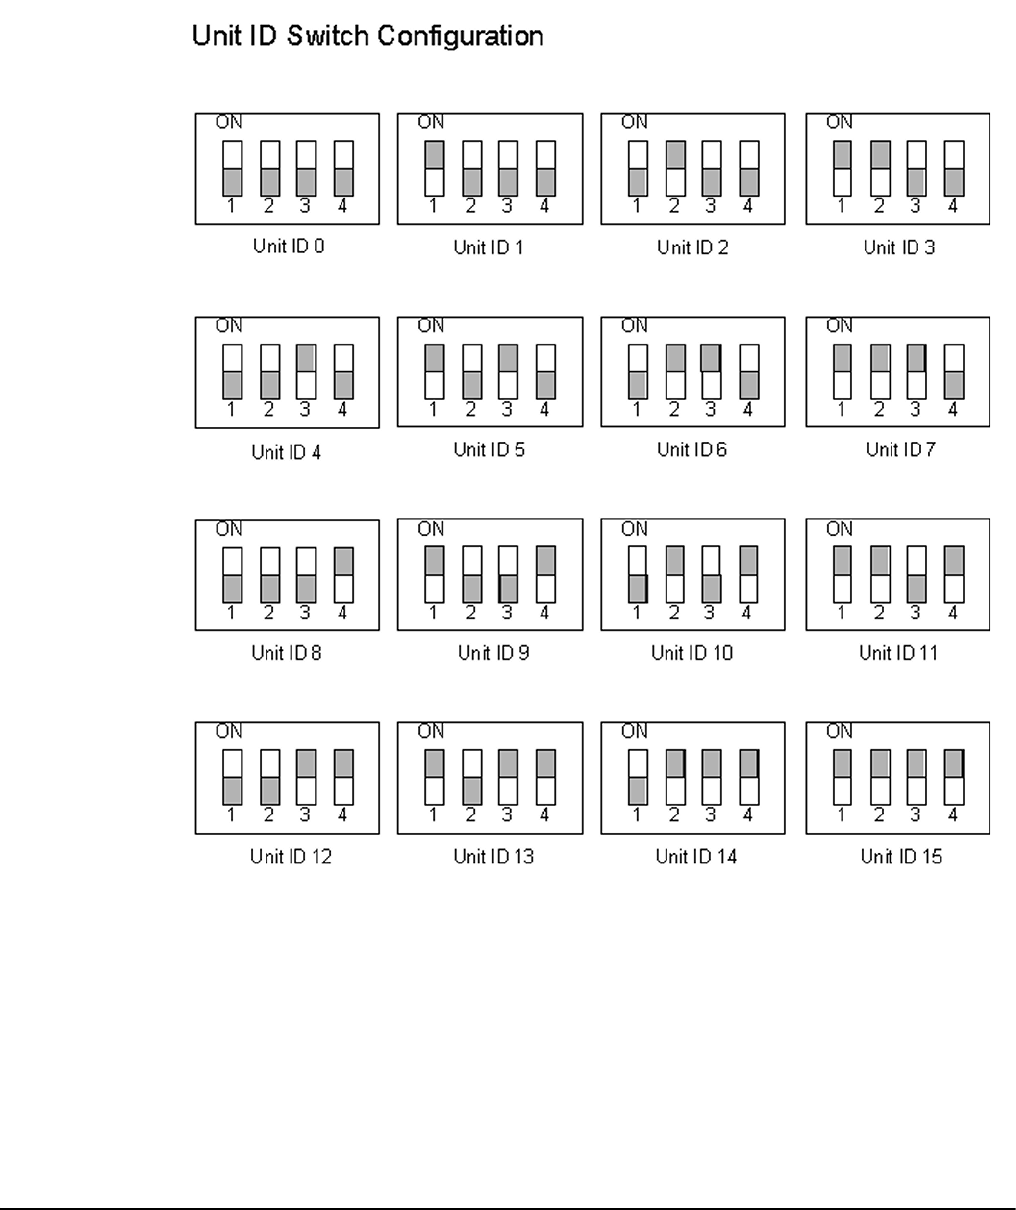
Power Controller
Chapter 12 101
The next table shows all possible IDs that can be configured on the Digi RPM.

Cascading Multiple Digi RPM Units
102 Chapter 12
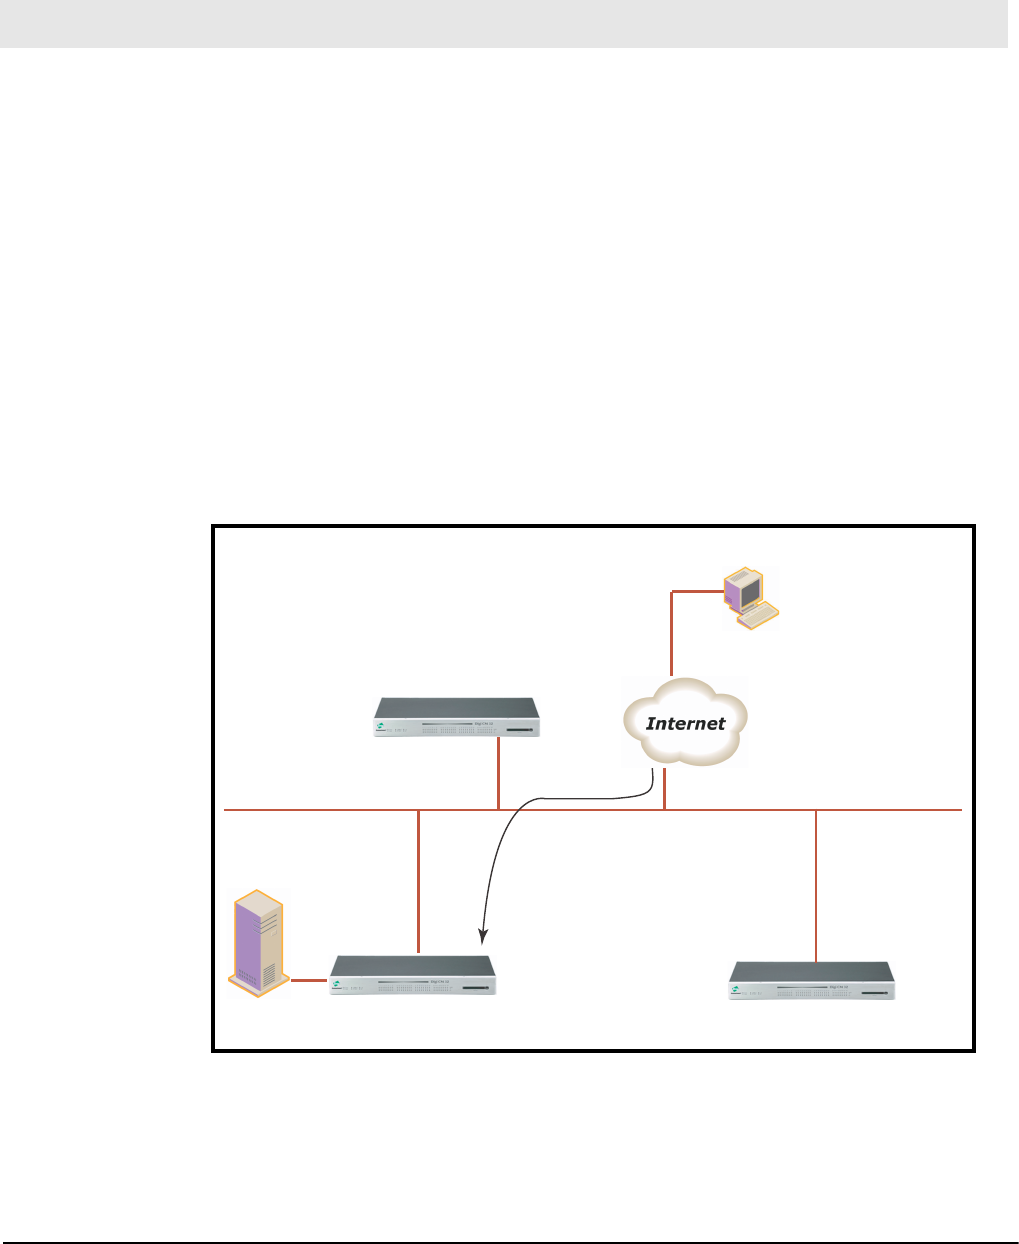
Port Clustering
Chapter 13 103
Introduction
Port clustering is the ability to manage many serial ports on one or multiple
slave devices from one master device using a single IP address. For instance,
the Digi CM can manage up to 16 slave devices or a maximum 816 serial ports
with one Master device. Ports can be configured either collectively or
individually depending on user preference. Each master and slave device is
configured separately; they cannot be configured from one master console.
A secondary IP address can be specified to put all slaves on a private network.
The secondary IP option can be found under Network –> IP configuration.
To set up the Digi CM for port clustering you will need to:
• Configure all Digi CM serial ports
• Assign one Digi CM as the master clustering device; all other Digi CMs
default to slave devices.
• Import slave configuration to the Digi CM master device
Chapter 13 Port Clustering
Slave 2
192.168.1.103
Slave 1
192.168.1.102
IP 211.112.67.34
Master
Ports 7000-7031 - Local
8000-8031 - Slave 1
9000-9031 - Slave 2
Remote PC
Telnet 211.112.67.34 8005
Port 5
Server
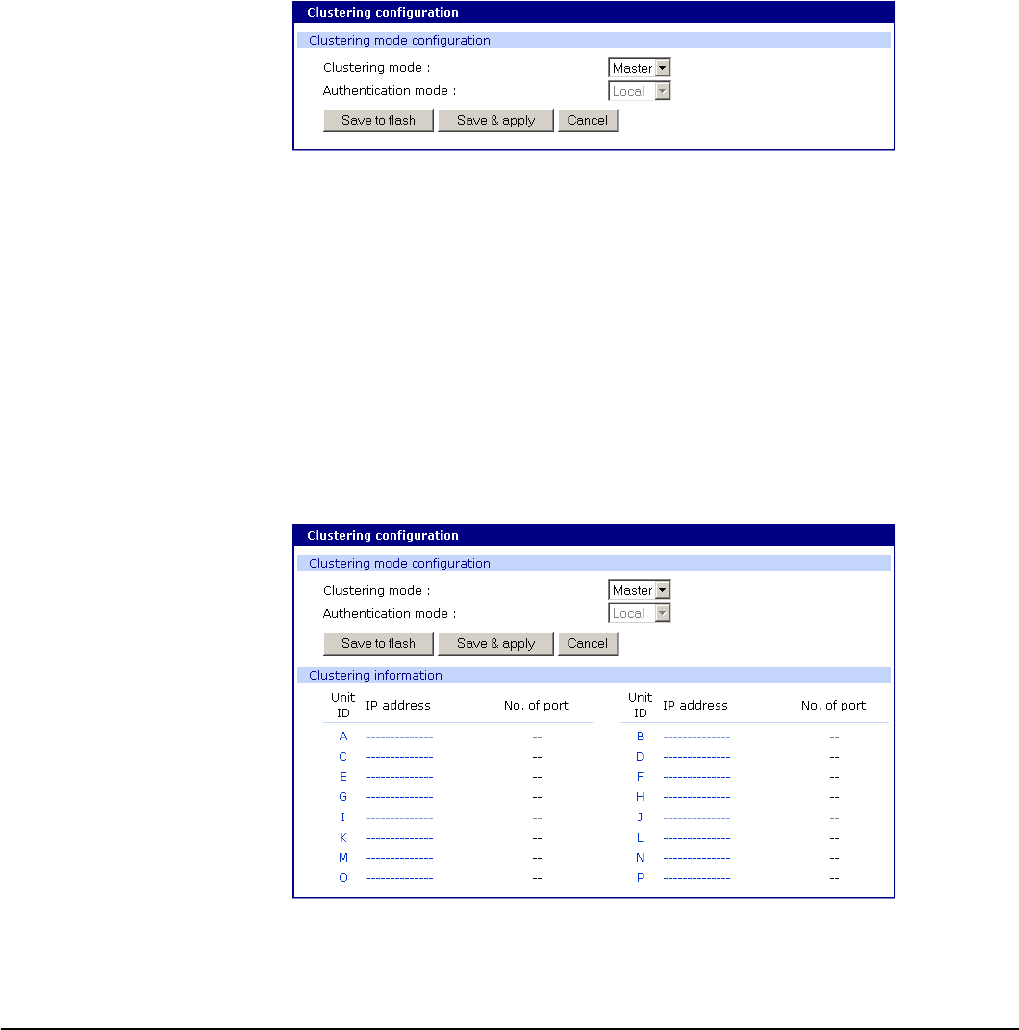
Configuring Port Clustering
104 Chapter 13
Configuring Port Clustering
Assigning Master Clustering Mode
To assign a Digi CM as the master cluster device, do the following:
1. Access the Digi CM through the web interface. This Digi CM needs to be
the unit you want as the Master.
2. Under the Clustering heading, choose Configuration.
3. Choose Master from the drop down menu.
Subsequent units will be configured in Slave mode by default.
4. Choose Save & apply.
Configuring Slave Ports on the Master Unit with Auto Config
Ports on slave units are automatically enabled and set to the Telnet protocol. If
you want to disable some or all of the ports or you want to use a different
protocol, make these changes to the slave units before you autoconfigure the
slave ports on the master unit.
To configure the slave serial ports on the master unit, do the following:
1. Access the Digi CM through the web interface.
2. Under the Clustering heading, choose Configuration.
3. Select the hyperlinked letter under Unit ID or the dashed line under IP
address.
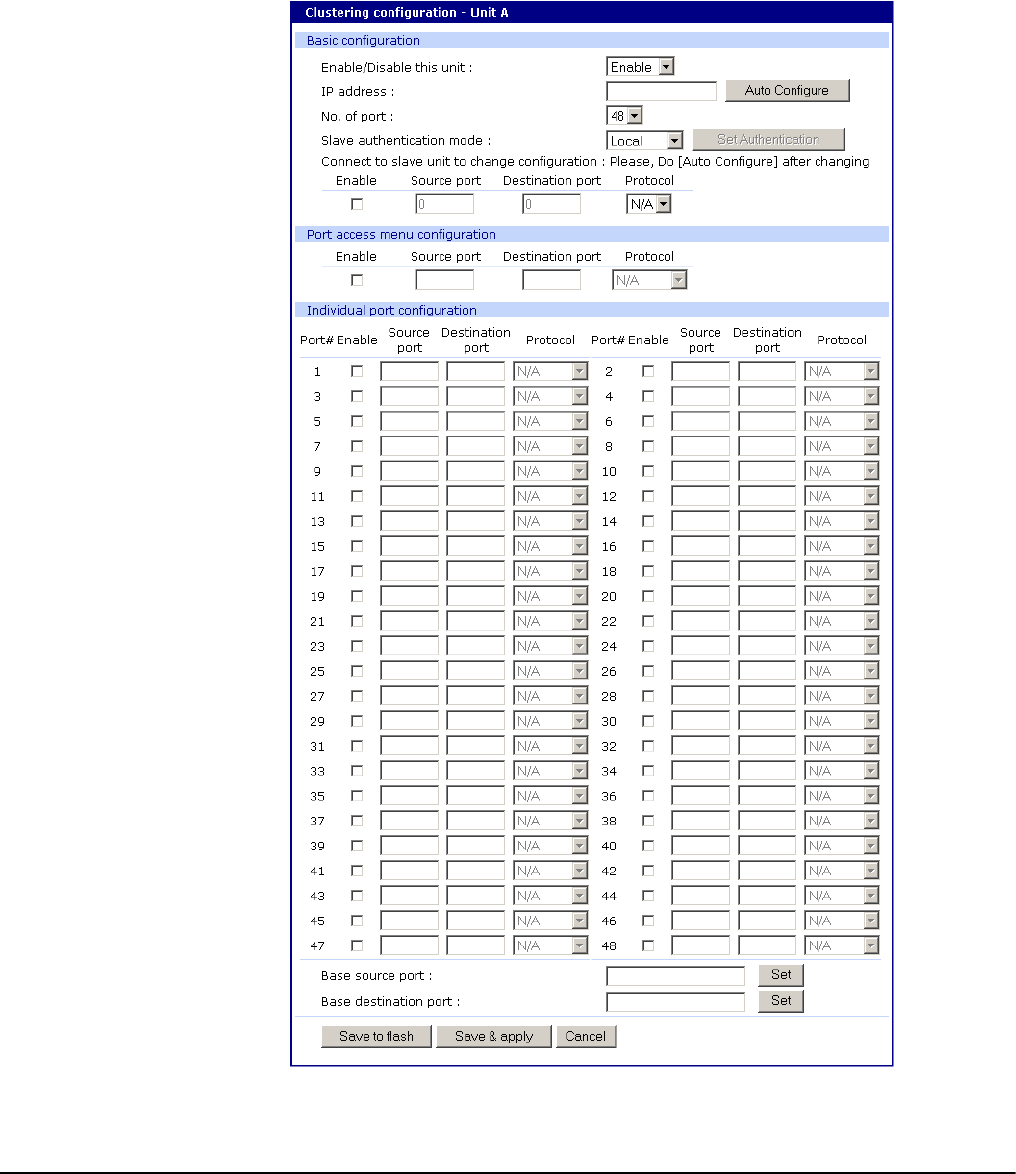
Port Clustering
Chapter 13 105
4. Select Enable from the Enable/Disable this unit drop down menu.
A new configuration screen appears.
5. Enter the IP address of the slave unit in the IP address field.
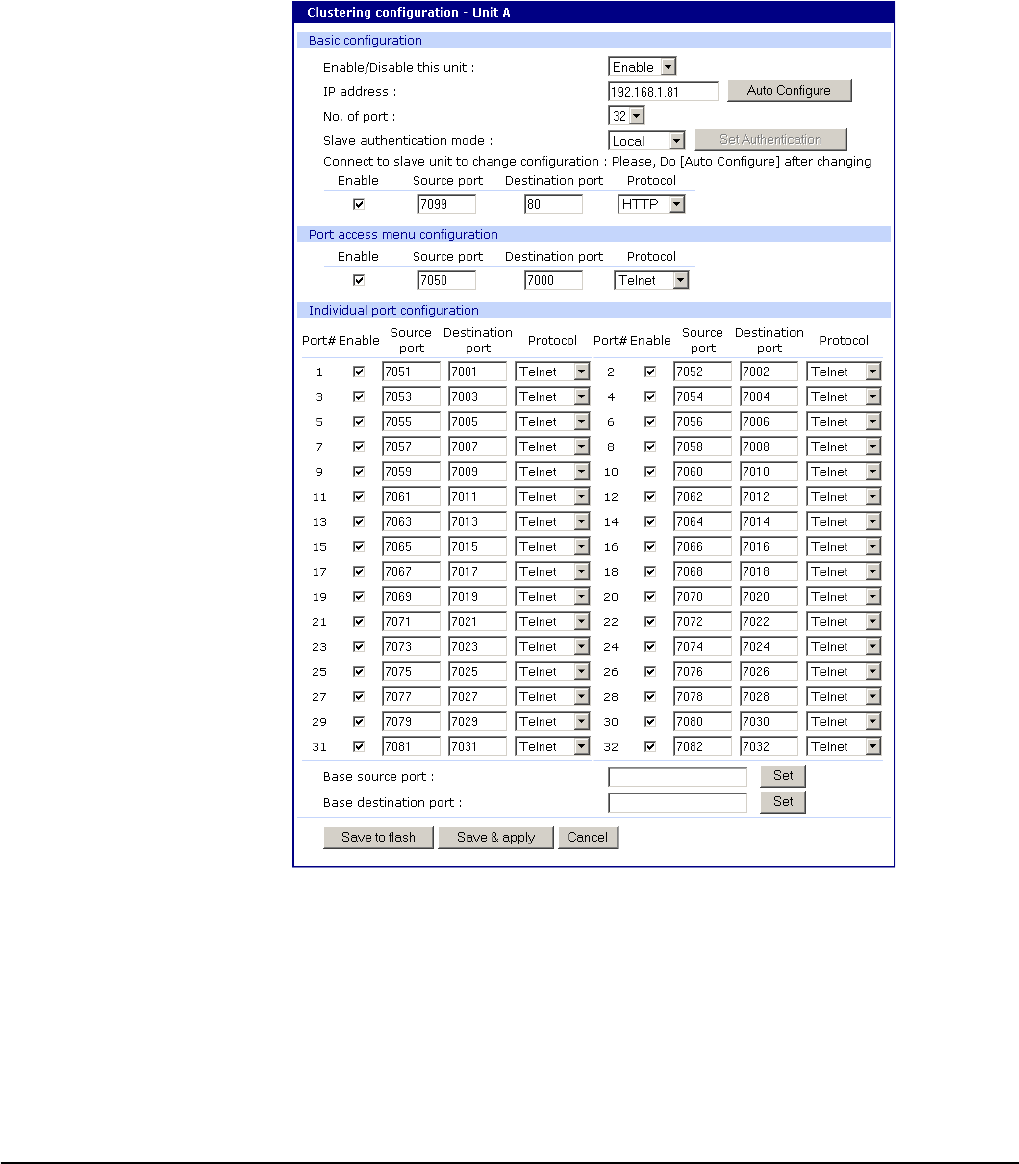
Configuring Port Clustering
106 Chapter 13
6. Select the Auto Config button and the Master Digi CM automatically imports
the configuration of the Slave serial ports to the Master Digi CM.
The following figure displays serial port configuration imported from a slave
unit.
Note: When changing the protocol or authentication on the slave make sure to re-run
"auto config" on the master.
7. Choose Save & apply.
Note: If Auto Config fails, Clear your cache (delete temporary Internet files) under Tools
> Internet Options on the tool bar.
Configuring Slave Ports on the Master Unit Manually
If you do not use Auto Config you may set the port numbers to any range of
numbers.
1. Enter the IP address that you wish to configure.
2. Select Enable from the drop down menu and enter the number of ports.
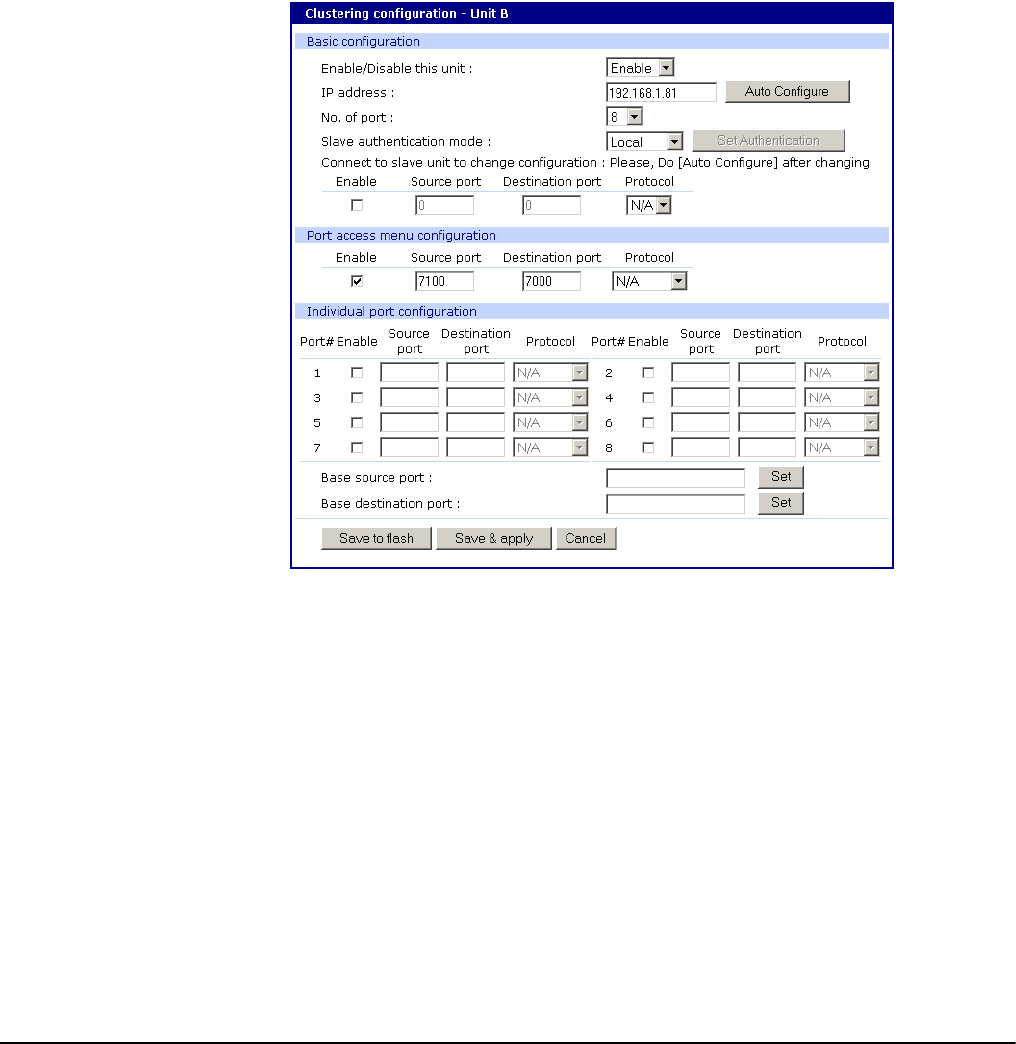
Port Clustering
Chapter 13 107
3. Enter the Port access menu Source port number (the port number to
access the device.)
4. Enter the Port access menu Destination port number (the physical port
number on the Slave unit for the Port access menu.)
5. Select a protocol if appropriate.
6. Click Save to flash.
7. Enable all the ports you wish to use.
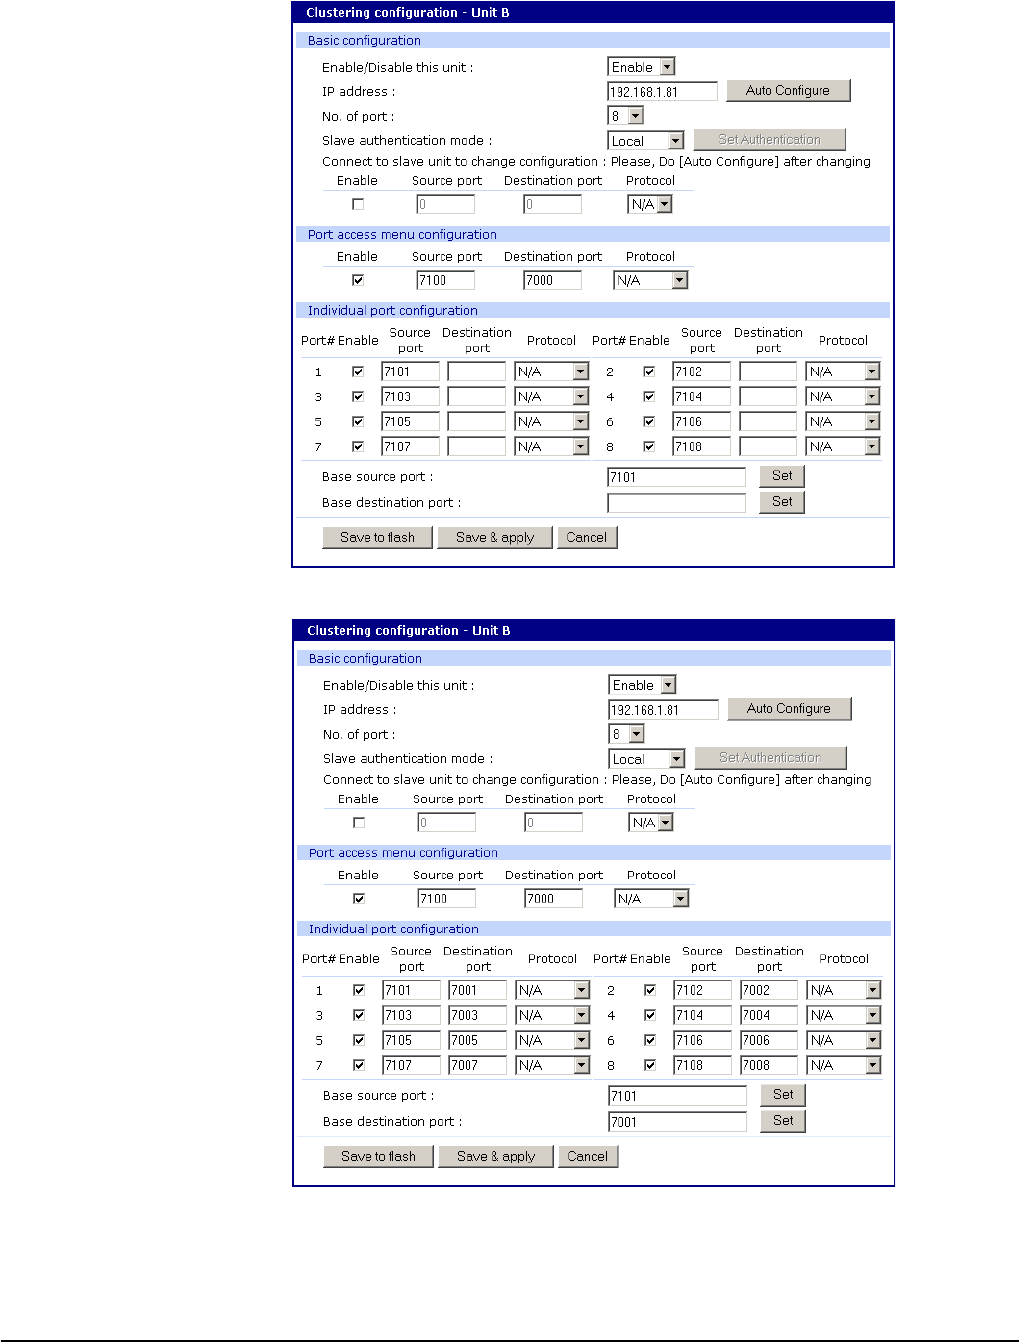
Configuring Port Clustering
108 Chapter 13
8. Enter the Base source port number to start the numbering and click Set.
9. Enter the Base destination port number and click Set.
Note: The Source ports and Destination ports can be understood as the Destination port
number is the actual physical port number on the Slave unit and the Source port
number is the extension number of the Slave unit to the Master unit. In other
words, the Master device port number 7051 = Slave port device number 7001.
10.Click Save & apply.

Port Clustering
Chapter 13 109
Clustering Parameters
Below is a list and brief description of clustering parameters:
Slave authentication mode - To specify if your database is controlled by the
master unit, or locally by the slaves themselves.
Connect to slave unit to change configuration - A quick access method to
connect to the slave.
Enable - This shows whether the port is enabled or disabled. All ports are
enabled by default.
Source port - This is the port number that you would access to get to the
slave on the master unit. The first slave port defaults to 7050 for the port
access menu and the port numbers increase according to the number of
ports on the CM.
Destination port - The destination port is the corresponding port number on
the slave unit. On a 32-port slave unit, the destination port numbers range
from 7001 to 7032.
Protocol - The four options are N/A (not available), SSH, Telnet, and
RawTCP.
Base source port -If you choose not to use AutoConfig, you can set these
ports manually. Base source port is the first port number on a master unit.
By default the base source port on the master unit is 7001. The base
source ports extend the master’s ports via the slave ports. For example,
starting the base source port number with 7051 results in a 32-port unit
being numbered from 7051 to 7082. Port number 7050 is the port access
menu of the slave. If you configure the device manually, the port access
menu must also be configured separately.
Base destination port - The physical port numbers of the slave device.
Note: However, you can change the base source port number to another number and
the rest of the ports on the unit will be sequentially numbered from the base
source port.
Accessing the Cluster Ports
You can connect to the slave port using the web, Telnet or SSH client. You
can access the port access menu or custom menu of each slave device or
connect directly to each slave port.
— Web Access
1. Click Clustering > Connection > Port number.
2. Log in to the port
3. Enter the port escape sequence (listed on page)
—Telnet
1. Telnet to the IP and the port number of the device.
telnet 143.191.3.9 7051

Configuring Port Clustering
110 Chapter 13
2. Login and enter your password
root
dbps
3. Enter the port escape sequence (listed on page).
—SSH
1. Click on the port with SSH protocol
2. Login
3. Enter the port escape sequence (listed on the page)
Depending on your access rights you can sniff (read only) or monitor (read/
write), or manage power of the ports.
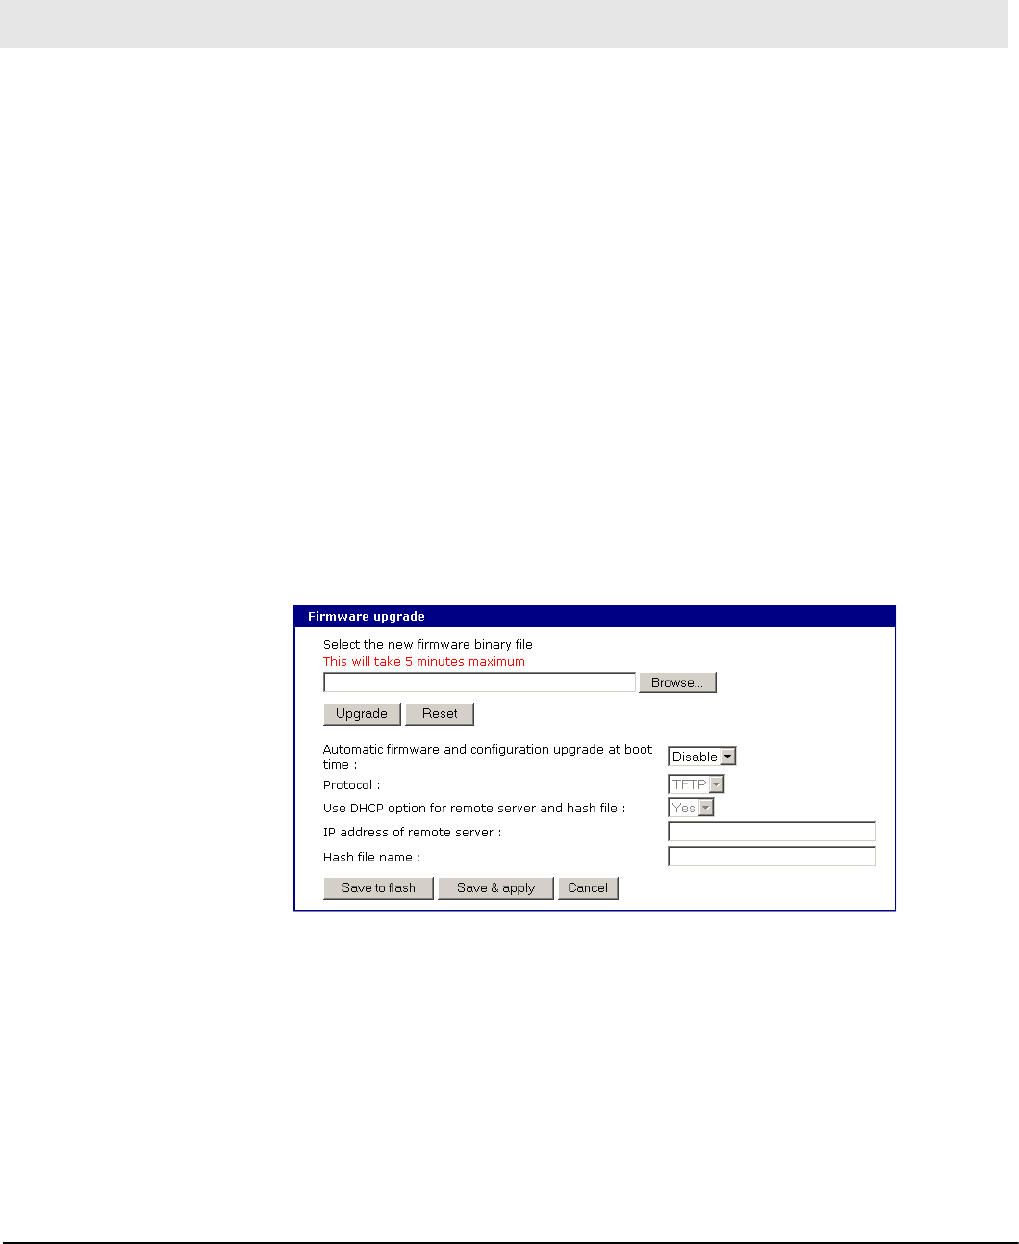
System Administration
Chapter 14 111
Introduction
This chapter describes how to perform tasks performed either by root or the
system administrator. These tasks fall under the general heading of system
administration and include firmware upgrades, resetting the unit to defaults,
and disaster recovery procedures.
Upgrading the Firmware
Web Interface
The web interface allows you to download the latest firmware version to a
Digi CM . The latest firmware can be found at: http://cm.digi.com. Do the
following to upgrade the firmware:
1. Access the web interface.
2. Under the System administration heading, choose Firmware upgrade.
3. Choose the Browse button and locate the firmware download.
4. Choose Upgrade. The Digi CM will automatically reboot when the upgrade is
complete.
Note: Do not powercycle the unit for five minutes after the firmware upgrade is
completed, as the unit is writing the firmware to flash!
Chapter 14 System Administration
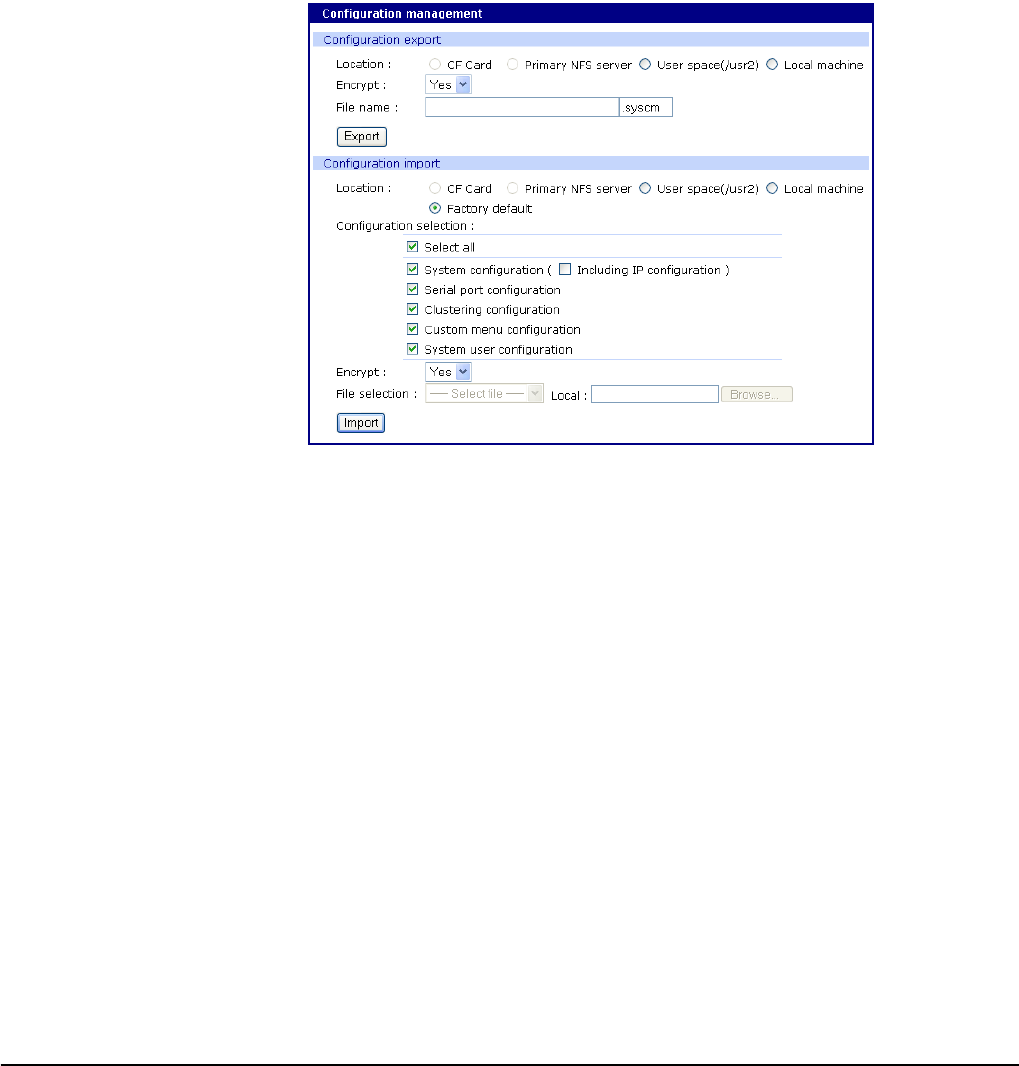
Configuration Management
112 Chapter 14
Configuration Management
Configuration management allows you to save all or parts of your
configuration. The Digi CM saves all configurations when the Save & apply
button is used or the Apply changes link is used. These configurations are
saved to the local CM in /tmp/cnf directory by default. Manage these
configurations by exporting the files to your location of choice.
1. Click System administration > Configuration management. The
Configuration management screen appears.
2. Under Configuration Export, select the file locations that you wish to save
enter a name and click Export.
Automatically Upgrading the Digi CM Firmware or Configuration using TFTP
The Digi CM supports upgrading the firmware, configuration, or any other files
in the file system using a TFTP-based mechanism.
During boot, the Digi CM can verify a “hash” file and determine if it needs to
download upgrades from the TFTP server.
There are multiple ways to configure the TFTP upgrade function.
DHCP
The DHCP server can automatically assign a TFTP upgrade server and file to
the Digi CM during boot. The options implemented are:
(66) TFTP server address
(67) TFTP filename (this is the filename of the hash file)
To enable DHCP firmware upgrade:
1. Click System administration > Firmware upgrade.
2. Set “Automatic firmware and configuration upgrade at boot time” to Enable.
3. Set “Use DHCP option for remote server and hash file” to Yes.
4. Click Save & apply.
The next time the Digi CM reboots, it will analyze the hash file and upgrade the
firmware, configuration, or other files if required.

System Administration
Chapter 14 113
Directly configure the TFTP server and the name of the “hash” file
To configure the IP address of the TFTP server and the filename of the hash
file on the Digi CM follow the steps below:
1. Click System administration > Firmware upgrade.
2. Set “Automatic firmware and configuration upgrade at boot time” to Enable.
3. Set “Use DHCP option for remote server and hash file” to No.
4. Configure the “IP address of remote server “.
5. Configure the “Hash file name".
6. Click Save & apply.
The next time the Digi CM reboots, it will analyze the hash file and upgrade the
firmware, configuration, or other files if required.
If you have trouble with the TFTP upgrade process, please verify that the hash
file and the other files are accessible using TFTP.
The structure of the hash file
The hash file is an ASCII configuration file with one line per entry. Each entry
defines one upgrade action.
There are 3 actions defined:
1 upgrade firmware
2 upgrade configuration
3 upgrade any file
The action is the first entry in the line and it also defines the syntax of the line.
Syntax for action 1: firmware upgrade
1,<image name>,<model name>,<version>
<image name> specifying the path and the filename of the firmware on the
TFTP server
<model name> specifying the product name especially the port count e.g.
DigiCM48, DigiCM32, DigiCM16 or DigiCM8
This allows you to have one hash file for different models.
<version> the version number of the firmware
The Digi CM will download the firmware if the version number of the
running firmware is different than the firmware version in the hash file
(the current firmware version is saved in file /tmp/cnf/version).
Note: Make sure the firmware version in the hash file matches the firmware version on
the FTP directory, otherwise you will start a continuous upgrade process.
Example: 1,cm48.img,DigiCM48,v1.6.0
After the firmware was upgraded the Digi CM boots again.

Resetting Factory Defaults
114 Chapter 14
Syntax for action 2: configuration upgrade
2,<image name>,<model name>,<version>
<image name> specifying the path and the filename of the configuration file
on the TFTP server
<model name> specifying the product name especially the port count e.g.
DigiCM48, DigiCM32, DigiCM16 or DigiCM8
This allows you to have one hash file for different models.
<version> the version number of the firmware
The Digi CM will download the configuration if the version in the hash
file is different from the version saved in the file /tmp/cnf/.cnfversion.
This file does not exist until you do the first automatic configuration
upgrade. It is also deleted if the unit is reset to factory defaults.
If the /tmp/cnf/.cnfversion file does not exist, no download will occur.
The file /tmp/cnf/.cnfversion is a hidden file.
Example: 2,config.tar.gz,DigiCM48,v1.6.0
After the firmware configuration is upgraded the Digi CM boots again.
A sample hash file can be downloaded from: http://cm.digi.com.
Syntax for action 3: file upgrade
3,<file name>,<options>,<destination>
<file name> specifying the path and the filename of the file on the TFTP server
<options> - F : forced copy (override existing file)
- X : uncompress
- Z : unzip
- U : default option for file uploading
<destination> directory on the Digi CM to place the file
These files are downloaded every time the Digi CM boots and there is
no reboot after downloading.
Example: 3,snmpd.conf,FU,/tmp/cnf
The file snmpd.conf is copied from the TFTP server and placed into
/tmp/cnf. The file is used as is and the previous version is overwritten.
Resetting Factory Defaults
There are two ways to reset the unit to the factory defaults. The quickest and
simplest method is to push and hold the hardware factory default reset button
until the Ready light on the front panel goes out. The reset button is located on
the back panel of the unit next to the Ethernet port. The arrow points to the
reset button’s location.
Factory reset button
Digi CM 32 shown
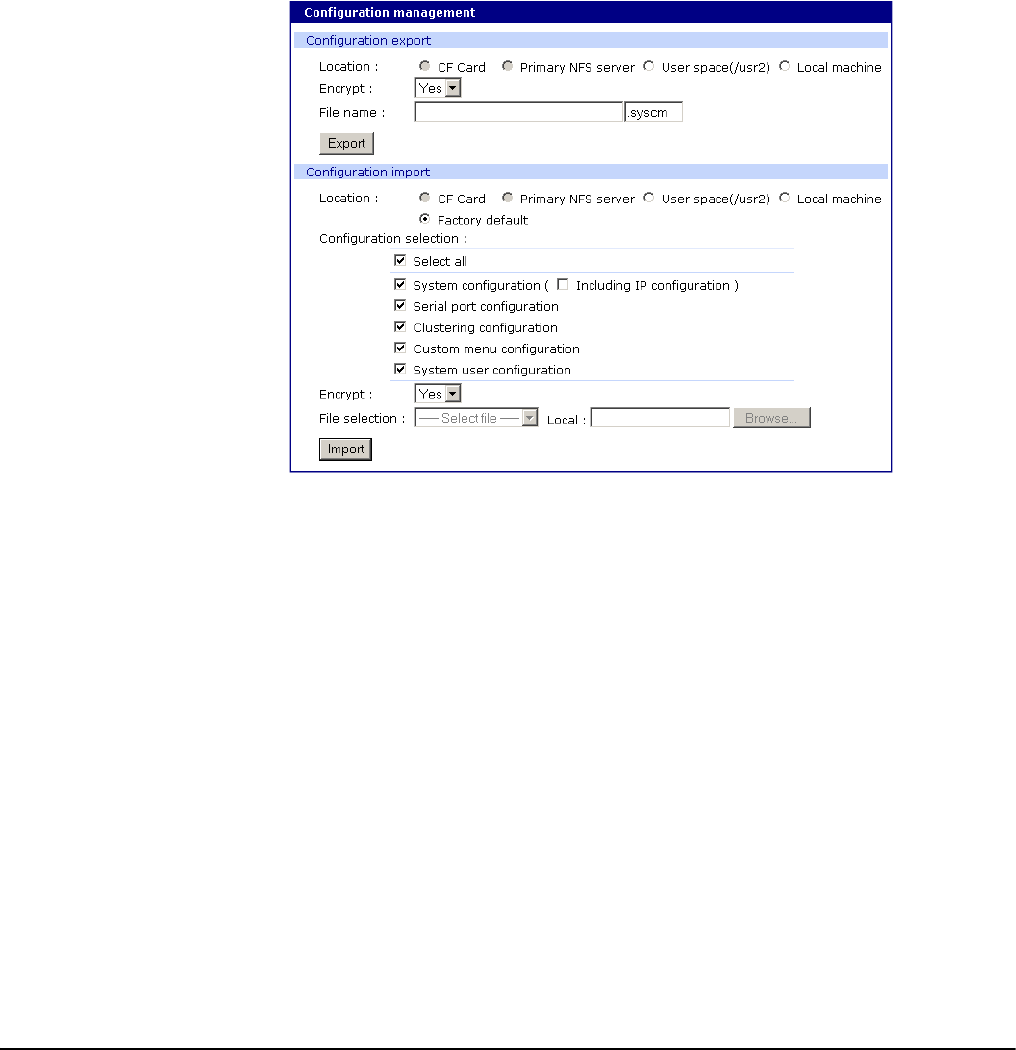
System Administration
Chapter 14 115
The alternative method to reset the unit is through the web interface. The web
interface provides the option of retaining the IP settings. To use the web
interface to reset the Digi CM, do the following:
1. Access the web interface.
2. System administration > Configuration management
3. Under Configuration import select Factory default.
.
4. Select the Configuration factory default options you want to restore from
the checklist.
5. Click Import. The Digi CM will automatically reboot.
The following are the default values when the Digi CM is reset to the factory
defaults.
• Static IP Address: 192.168.161.5
• Port Access Menu IP Address: 192.168.1.100
• Port Access Menu TCP Port Number: 7000
• Serial Port IP Address: 192.168.1.101-
• Serial Port TCP Port Number: 7001-
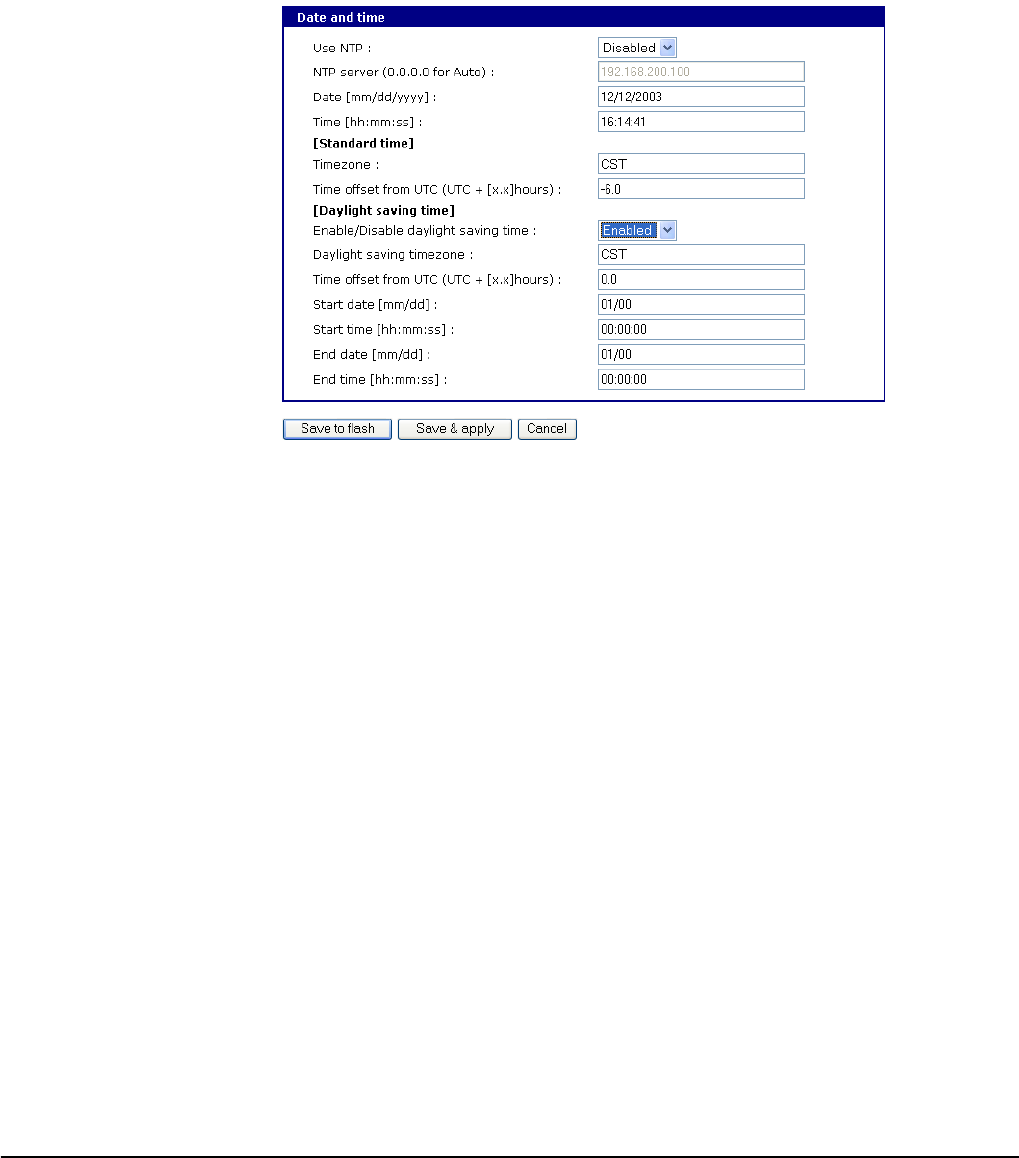
Setting Date and Time
116 Chapter 14
Setting Date and Time
The Digi CM provides two options for keeping system time. The first is by
using an NTP server and the other is through an internal battery backup. To
configure the Digi CM for date and time, do the following:
1. Access the web interface.
2. System administration > Date and time.
3. To use an NTP server, choose Enable, the NTP server’s IP address, the
Time offset, and the Date and Time fields.
or
To use the internal battery, fill in the Date and Time fields only.
Note: If you change your time zone, you must go back and reconfigure your time for the
time zone change to be effective.
4. Choose Save & apply.
Configuring a Host Name
The system administrator can assign a Host name to the Digi CM. This is often
helpful for administration purposes to locate a specific Digi CM on the network.
To assign the Digi CM a device name, do the following:
1. Access the web interface.
2. System administration > Device name.
3. Enter the name you want to assign the Digi CM.
4. Choose Save & apply.

Command Line Interface
Chapter 15 117
Introduction
The Digi CM runs the embedded Hard Hat Linux operating system. The
command line interface for configuration purposes is accessible only by the
root user. The system administrator has read only privileges from the
command line. By default the root user is connected to the CLI (command line
interface) when accessing the Digi CM through Telnet or SSH. To gain access
to the command prompt, the root user uses the username root and the root
password. The default root password is dbps.
This chapter includes the Linux commands available on the embedded Linux
operating system and the location of files useful to the root user for
administrative purposes.
Note: The root user should be aware that deleting or corrupting files may prevent the
Digi CM from booting properly. Before editing any files, be sure to back up your
configuration files.
Linux Commands
The purpose of this section is to list the various Linux commands available on
the Digi CM. This is simply a listing of commands and does not detail what the
commands do or give their particular parameters. If you need more
information, see the man pages on a Linux system.
Two commands that are very important for saving and applying changes to the
configuration files are:
•saveconf: The saveconf command saves the configuration files to
flash memory.
•applyconf: The applyconf command immediately applies the
configuration changes.
The configuration files are located in /tmp/cnf directory.
Two system utility menus that are important for accessing and configuring the
Digi CM and the serial ports are the portaccessmenu and configmenu.
•portaccessmenu: This menu allows the user to access the serial
ports on a Digi CM.
•configmenu: This menu enables the system administrator to configure
the Digi CM. It has essentially the same functionality as the web
interface for configuring a unit with the exception of the ability to create
custom menus.
•portreset #: This command allows the user to reset a specific port. It
restarts all processes associated with the port.
Chapter 15 Command Line Interface

Important File Locations
118 Chapter 15
Important File Locations
The Digi CM has several files that are important for administrative use. Below
is a brief listing of some files that the root user or system administrator might
desire to either monitor or edit.
Default Script
The default script file is executed whenever the Digi CM is booted. The file is
/usr/rc.user and can be modified with the vi editor. The modified script
becomes effective when the system is rebooted.
Booting Sequence
When the Digi CM boots, it decompresses the /cnf/cnf.tar.gz file to /tmp/cnf/*
and unmounts the /cnf file. If the configuration files are modified in the /tmp/cnf
file and the configuration is saved to flash (saveconf), the unit mounts the /cnf
file and compresses the /tmp/cnf/* to /cnf/cnf.tar.gz.
Shell and Shell Utilities
sh ash bash echo sed
env false grep more which
pwd
File and Disk Utilities
ls cp mv rm mkdir
rmdir ln mknod chmod touch
sync gunzip gzip zcat tar
dd df du find cat
vi tail mkdosfs mke2fs e2fsck
fsck mount umount scp
System Utilities
date free hostname sleep stty
uname reset insmod rmmod lsmod
modprobe kill killall ps half
shutdown poweroff reboot telnet init
useradd userdel usermod whoami who
id su
Network Utilities
ifconfig iptables route telnet ftp
ssh ping

Command Line Interface
Chapter 15 119
Config Files
All config files are in /tmp/cnf and /tmp/cnf subdirectories. The following table
lists the filenames and a brief description.
File Name Description
active_detect Active auto detection of serial devices
chap-secrets Chap authentication information when using “PPPoE”
client.pem Web certificate
./cluster/cluster.conf Cluster “Master” port information
./cluster/unit#.conf Cluster “Slave” port information
.cnfversion Version of current configuration. Used for TFTP
update only
dhcpd.opt DHCPD information
./digi/digi.cnf Auto Backup configuration via the PC Flash Card
stored automatically
ez-ipupdate.conf “Dynamic DNS” information for IP assigning
group User group information
host.cnf Host name look up order
hosts Host name table
interfaces Basic loopback (lo) and ethernet interface (eth0)
information (IP, gateway, etc)
krb5.conf Kerberos information
./keywords Keywords for alert configuration
./menu All custom menu information, .xml files
pap-secrets PAP auth via PPPoE
passive.detect Passive auto detection of serial devices
passwd User password file
./power/power.cnf Power management configuration
pppoe.conf Config file for PPPoE
redirect.cnf Basic port and portaccessmenu config information
resolv.conf DNS information
server.pem Private key for SSH with key certification information
shadow Secure password file

Example Scripts
120 Chapter 15
User Storage Space
The Digi CM comes with 1 megabyte of user storage space. This storage
space can be used to store custom scripts. The location is /usr2. Custom
scripts such as simple commands, are simply dropped into /usr2. If a file
needs to be edited, copy the file into usr2/rc.usr, kill the process, then restart
the process from the new file. Scripts from the user storage may be created to
run during boot after the network is up. The following are some examples of
various ways to create a script stored in the user storage space.
• Saving IP tables options permanently
• Changing radius socket ports
• Limiting root access to the console on Digi CM products
• Sending a break
Example Scripts
Example Script: Saving IP tables options permanently
Add the following command in the '/usr2/rc.user' script file just above "exit
0". Disabling Telnet is just shown as one example.
1. Create a new script file '/usr2/run.user' which includes the commands you
want.
iptables -A INPUT -p tcp --dport 23 -j DROP
2. Run the following command to make the script executable
chmod 755 /usr2/run.user
3. Add the following command in the '/usr2/rc.user' script, just above "exit 0"
ln -s /usr2/run.user /etc/rc.d/rc2.d/S60runuser
4. Reboot
reboot
Note: If you factory default the unit, the ’/usr2/rc.user’ script file is moved to ’/usr2/
rc.user.old#’ and the default rc.user file will be restored.
Example Script: Changing radius socket ports
The radius client obtains the radius socket ports to use via the
'/etc/services' file. The client only looks up the lines starting with 'radius'
and 'radacct'.
snmpd.conf SNMP information
./.ssh Directory for SSH information
system.cnf Basic network config information (IP, gateway, etc)
timezone Time zone configuration
./.usracctl Directory containing user access control information
version Firmware version
File Name Description

Command Line Interface
Chapter 15 121
1. Modify the /etc/services file as follows. Change lines starting with ’radius’
and ’radacct’ to the socket numbers you wish. For example:
radius 1645/tcp
radius 1645/ucp
radacct 1646/tcp
radacct 1646/ucp
2. After editing /etc/services copy it to /usr2
cp /etc/services /usr2
3. Edit /usr2/rc.user and add the following line just above "exit 0":
cp -a /usr2/services /etc/services
4. Reboot
reboot
Note: If you factory default the unit, the ’/usr2/rc.user’ script file is moved to ’/usr2/
rc.user.old#’ and the default rc.user file will be restored.
Example Script: Limiting root access to the console on Digi CM products (for SSH only)
This prevents root access from any means except physically logging in on
the Digi CM console.
1. Modify ’/etc/inetd.conf’ and append -f /usr2/sshd_config to the sshd line.
cp /etc/inetd.conf /usr2/inetd.conf
2. Edit ’/etc/ssh/sshd_config’. Change "PermitRootLogin" to no.
cp /etc/ssh/sshd_config /usr2
3. Add the following commands in the ’/usr2/rc.user’ script. Add these
commands just above "exit 0":
cp -a /usr2/inetd.conf /etc/inetd.conf
while killall inetd 2>/dev/null;
do sleep 5;
done
/usr/sbin/inetd
4. Reboot
reboot
Note: If you factory default the unit, the ’/usr2/rc.user’ script file is moved to ’/usr2/
rc.user.old#’ and the default rc.user file will be restored.
Example Script: Sending a break from an existing session with the Digi CM
From a Telnet session - If the Telnet was initiated from a UNIX command line
Telnet client. Issuing the Telnet escape sequence ’^]’ (control-
right_square_bracket) will take you to the ’telnet>’ prompt.
telnet>send brk
Note: Other Telnet clients often have a "send break" option.
From an ssh session - Type the [tilde-break] which is the default ssh break
characters.
~break
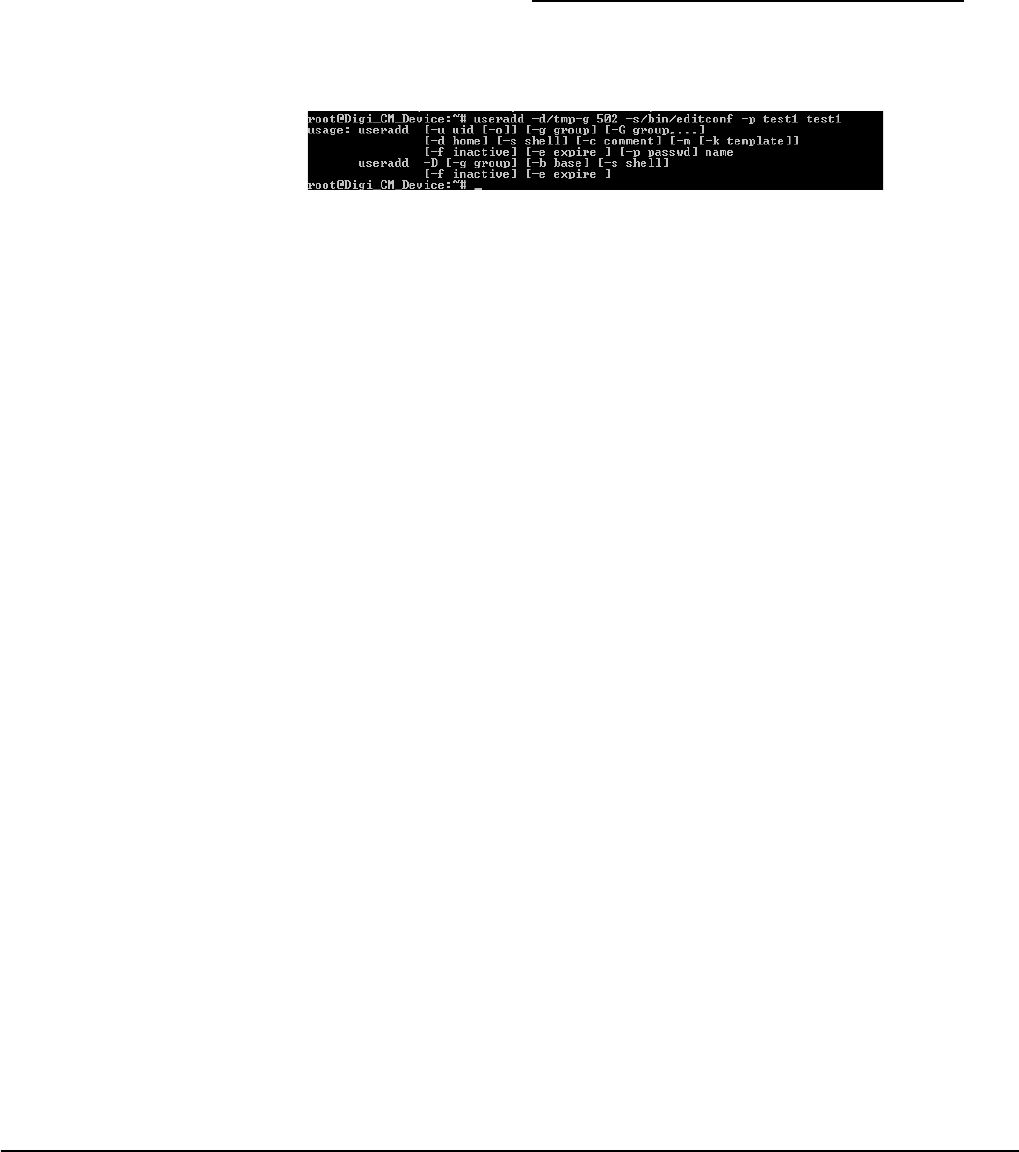
User Administration
122 Chapter 15
The ssh break can changed from the Web UI or config menu under
Serial ports > Configuration > Host mode configuration > SSH break sequence
Additional binaries or applications can be added to /usr2 such as:
• crontab
•netstat
•fuser
To download these utilities go to: http://ftp.digi.com/support/utilities/digicm/
User Administration
Add, edit or delete users with the Digi CM command line interface.
• Add user
Example:
useradd -d /tmp [-g groupid ] [-s shellprogram ] [username]
groupid = Options are: Sys admin, Port admin, or Standard User.
500 = Sys admin
501 = Port admin
502 = Standard User
These are the three types of groups supported by the Digi CM. You
must use one of these.
shellprogram = Options are: CLI (Command Line Interface), Config menu,
Port access menu, or Custom menu.
/bin/bash = CLI
/bin/editconf = Configuration menu
/bin/vts.master = Port access menu
/bin/menu = Custom menu
These are the four types of shells supported by the Digi CM. You must
use one of these four.
• passwd [username]
• saveconf
• applyconf
• Modify user
Example:
usermod -d /tmp [-g groupid] [-s shellprogram] [username]
Syntax is the same as it is for useradd mentioned above.
• saveconf
• applyconf
• Delete user
Example:
userdel[username]
• saveconf
• applyconf
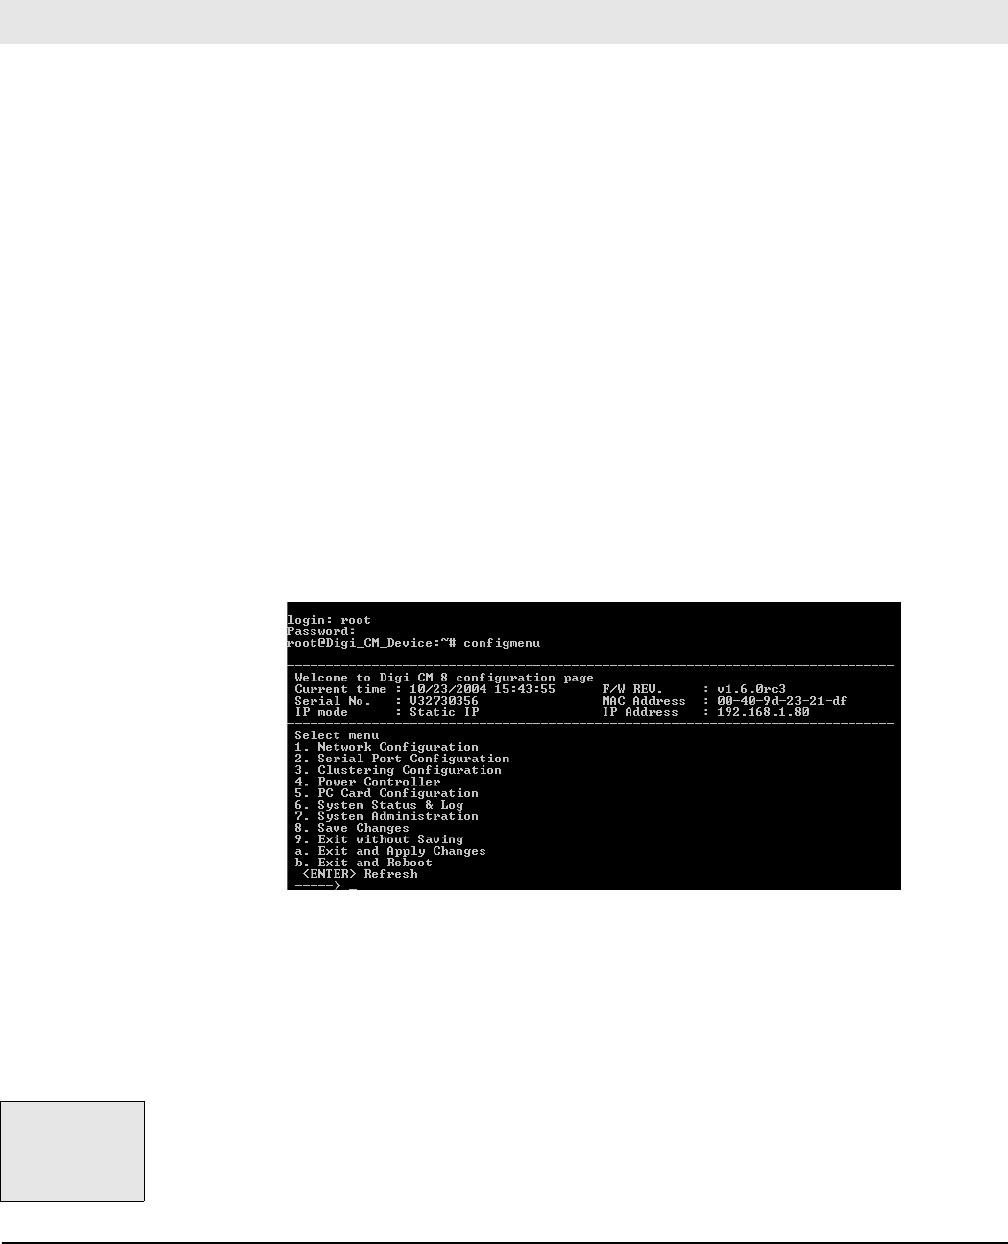
Chapter 16 123
Configuration Menu
The configuration menu presents the same functionality in configuring the Digi
CM as does the web interface, excluding the creation of custom menus. The
configuration menu is navigated by using the number representing the menu
item and the ESC key to return to earlier menus. Telnet to the Digi CM, log in
(username root, password dbps) and enter configmenu to start any
configuration. If you log in as admin, the configuration menu will automatically
appear.
Accessing the Configuration Menu
The configuration menu is available through a Telnet or SSH session to the
root user, system administrator, or port administrator. (Port administrator can
only change serial port parameters.) The configuration menu enables the
authorized users to configure the Digi CM with the same functionality as is
available with the web interface. The only functionality missing from the
configuration menu is the ability to create custom menus.
The root user, by default, is connected from a Telnet session to the Linux
command line. In order to access the configuration menu, the root user enters
configmenu at the command prompt. The configuration menu follows the
layout of the web interface.
Choices for the configuration menu are made by selecting the number of a
menu item. The ESC key allows you to move back a menu each time it is
selected. Sometimes only one menu item is presented; however, that single
menu item has two or more options that have to be configured.
Configuring SSH
1. Choose Serial Port Configuration and then an individual port number or 0
(zero) for all ports.
2. Choose Host mode configuration > Protocol > SSH.
Chapter 16 Configuration Menu
The Save
changes option
saves changes to
flash memory
only.

Adding, Editing, and Removing Users
124 Chapter 16
3. Use the ESC key to return to the main configuration menu.
4. Choose Exit and apply changes.
Adding, Editing, and Removing Users
1. Choose System administration > User administration and then choose an
operation to perform (Add, Remove, or Edit)
2. Configure the user as required.
3. Use the ESC key to return to the main configuration menu.
4. Choose Exit and apply changes.
Adding and Configuring a PC Card
To add a modem card, compact-flash card, wireless LAN card, or a network
card to the Digi CM using the configuration menu, do the following:
1. Access the configuration menu.
2. Choose PC Card configuration
Choose Exit and
apply changes
when you have
made all your
changes.

Configuration Menu
Chapter 16 125
3. Configure the card by choosing Change card configuration.
Note: The system searches for the card and displays information on the product model
number and type of card.
4. Use the ESC key to back out to the main configuration menu.
5. Choose Save Changes.
Host Mode Configuration
1. Access the configuration menu.
2. Choose Serial Port Configuration > an individual port number or 0 (zero) for
all ports > Host Mode Configuration.
3. Enter the desired parameters for each menu item.
4. Use the ESC key when all parameters are entered to return to the main menu.
5. Choose Save changes.
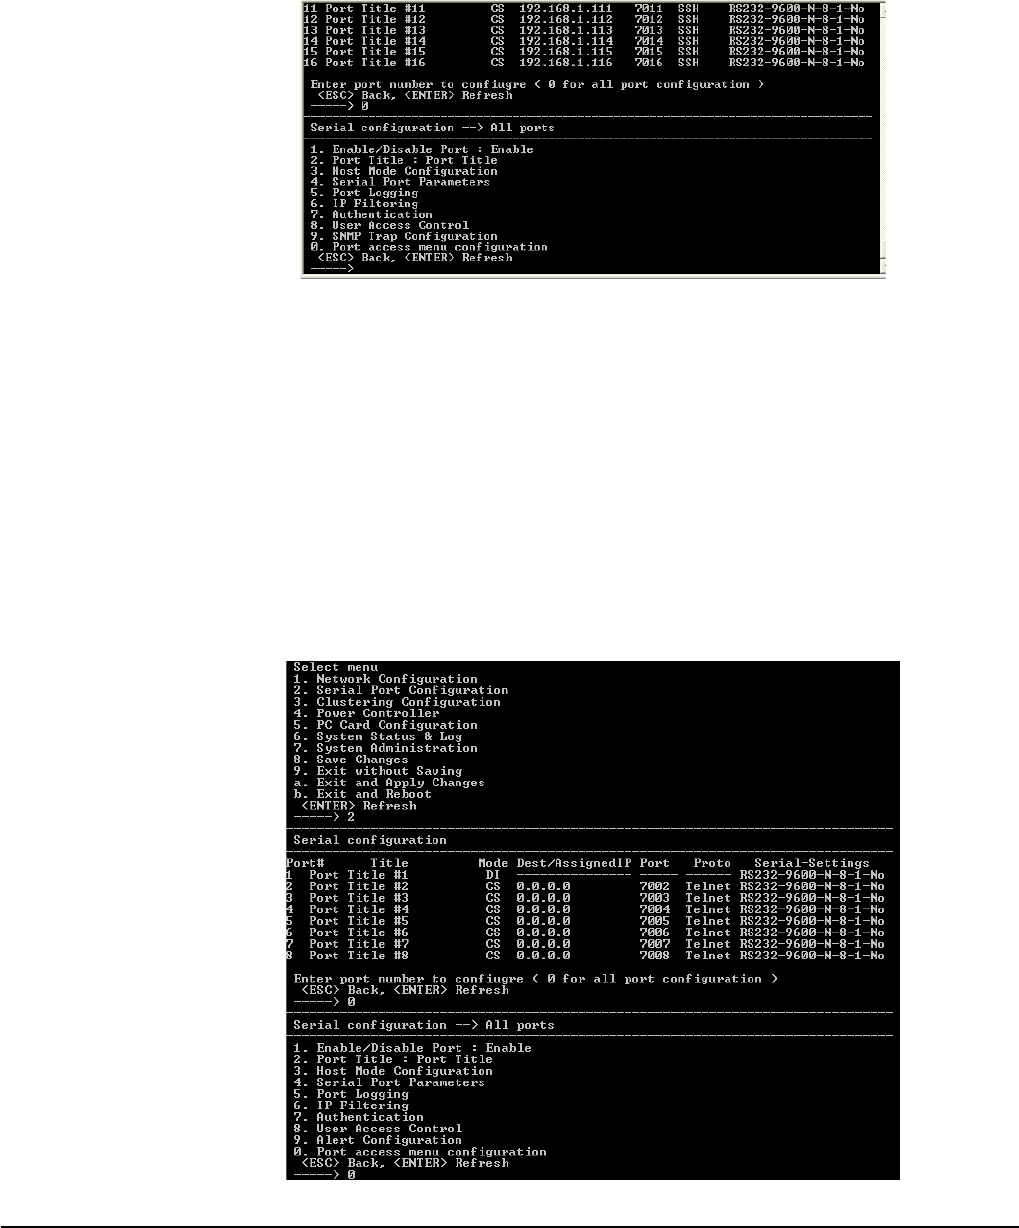
Port Parameters
126 Chapter 16
Port Parameters
1. Access the configuration menu.
2. Choose Serial Port Configuration > an individual port number or 0 (zero) for
all ports.
3. Enter the desired parameters for each menu item.
4. Use the ESC key when all parameters are entered to return to the main menu.
5. Choose Save changes.
Port Access Menu
Another default menu is the Port Access Menu, which is available to all users.
1. Access Configuration menu
2. Select Serial Port Configuration.
3. Select 0 for all ports.
4. Select Port access menu configuration.
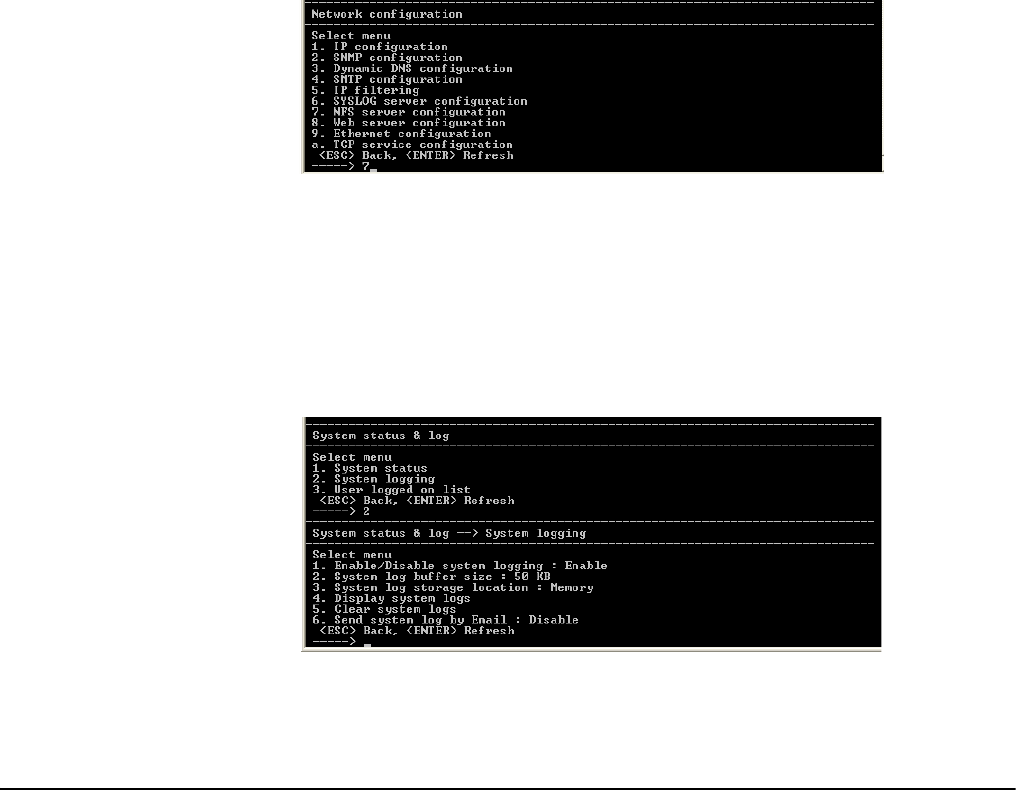
Configuration Menu
Chapter 16 127
You can access this menu through a Telnet or SSH session using the IP
address of the Digi CM followed by the port number 7000 as in the following
example:
telnet 192.168.100.200 7000
By default root is connected to the command line interface and the preceding
option allows the root user access to the port access menu.
System Logging
System logging is a two part process. First, the device being used to record
the system logs must be configured. Secondly, system logging must be
configured for the system under System status and log. System logs can be
saved to the Digi CM system memory (there is no need to configure the
memory), a compact-flash card, an NFS server, or a SYSLOG server.
Configure the System Log Device
To configure the compact-flash card for system logging, see "Adding a
Compact-flash Card" on page 27. Adding a Compact-flash Card For an NFS or
SYSLOG server, do the following:
1. Access the configuration menu.
2. Choose Network configuration > NFS or SYSLOG server configuration.
3. Disable or enable the server.
4. Use the ESC key when all parameters are entered to return to the main menu.
5. Choose Save changes.
Configure System Logging
1. Access the configuration menu.
2. Choose System Status & log > System logging.
3. Enter the desired parameters for the menu items.
4. Use the ESC key when all parameters are entered to return to the main
menu.
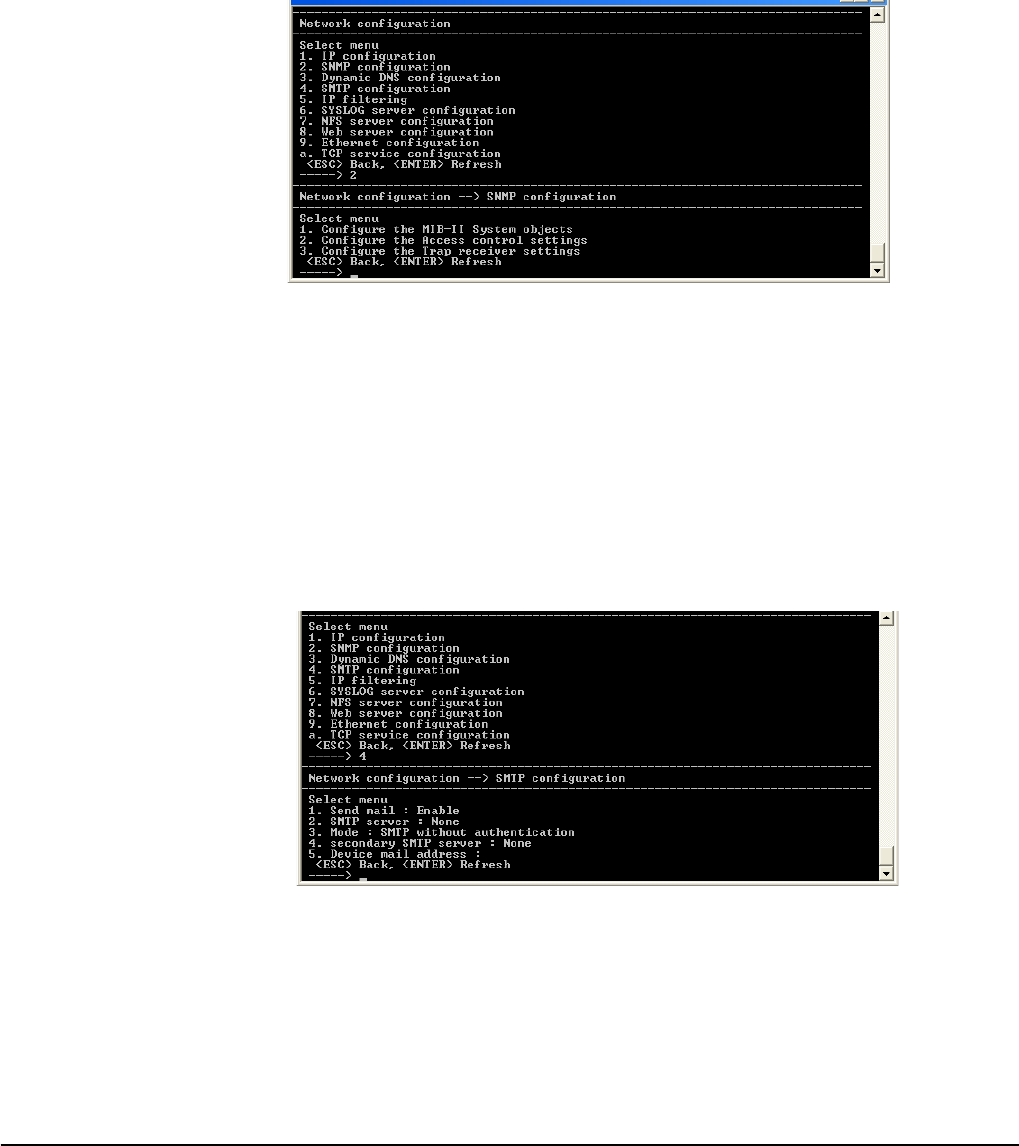
Configuring SNMP
128 Chapter 16
5. Choose Save changes.
Configuring SNMP
To configure SNMP from the configuration menu, do the following:
1. Access the configuration menu.
2. Choose Network Configuration > SNMP configuration.
3. Enter the desired parameters for the menu items.
4. Use the ESC key when all parameters are entered to return to the main
menu.
5. Choose Save changes.
Configuring SMTP
To configure SMTP from the configuration menu, do the following:
1. Access the configuration menu.
2. Choose Network configuration > SMTP configuration.
3. Enter the desired parameters for the menu items.
4. Use the ESC key when all parameters are entered to return to the main
menu.
5. Choose Save changes.
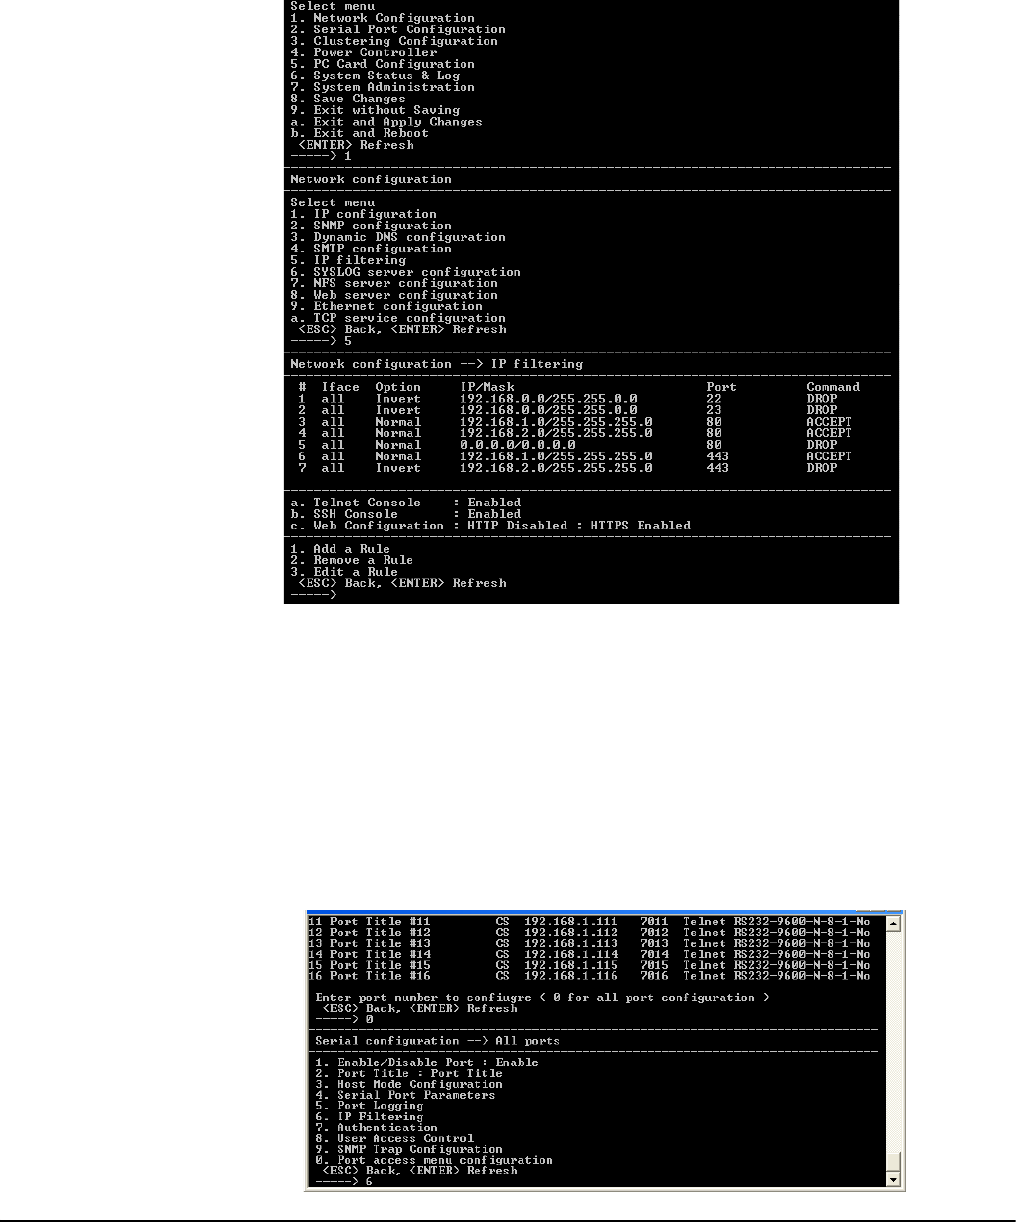
Configuration Menu
Chapter 16 129
Network IP Filtering
To configure the Digi CM for Network IP filtering, do the following:
1. Access the configuration menu.
2. Choose Network configuration > IP filtering.
s
3. Choose a menu item and enter the desired parameters for the menu items.
4. Use the ESC key to return to the main menu.
5. Choose Save changes.
Port IP Filtering
To configure the Digi CM for Port IP filtering, do the following:
1. Access the configuration menu.
2. Choose Serial port configuration.
3. Choose an individual port number or 0 (zero) for all ports > IP filtering.
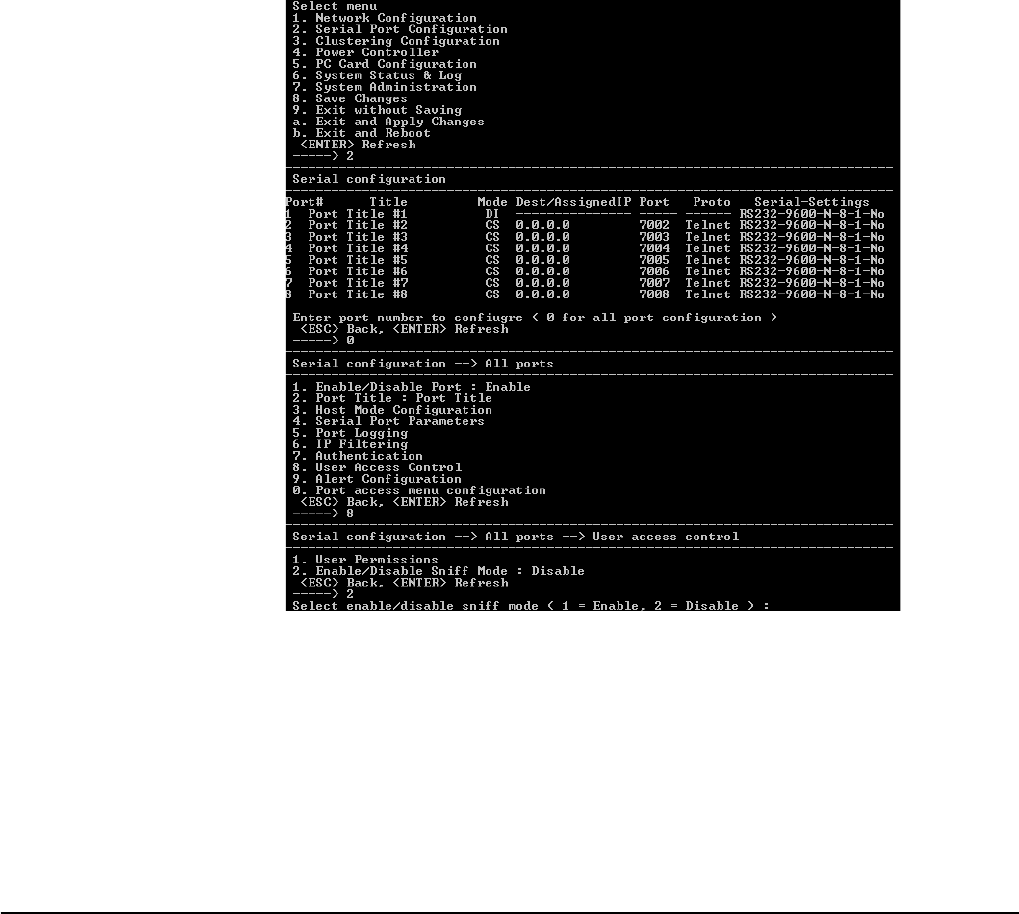
Sniff Sessions
130 Chapter 16
4. Choose a menu item and enter the desired parameters for the menu items.
5. Use the ESC key when all parameters are entered to return to the main
menu.
6. Choose Save changes.
Sniff Sessions
To configure a port or all ports for sniff users, do the following:
1. Access the configuration menu.
2. Choose Serial port configuration.
3. Choose an individual port number or 0 (zero) for all ports > User access
control.
4. Choose User Access Control.
5. Choose Enable/Disable Sniff Mode.
6. Choose a menu item and enter the desired parameters.
7. Use the ESC key when all parameters are entered to return to the main
menu.
8. Choose Save changes.
For information on entering a sniff session, see the next section, "Viewing A
Sniff Session" on page 131.
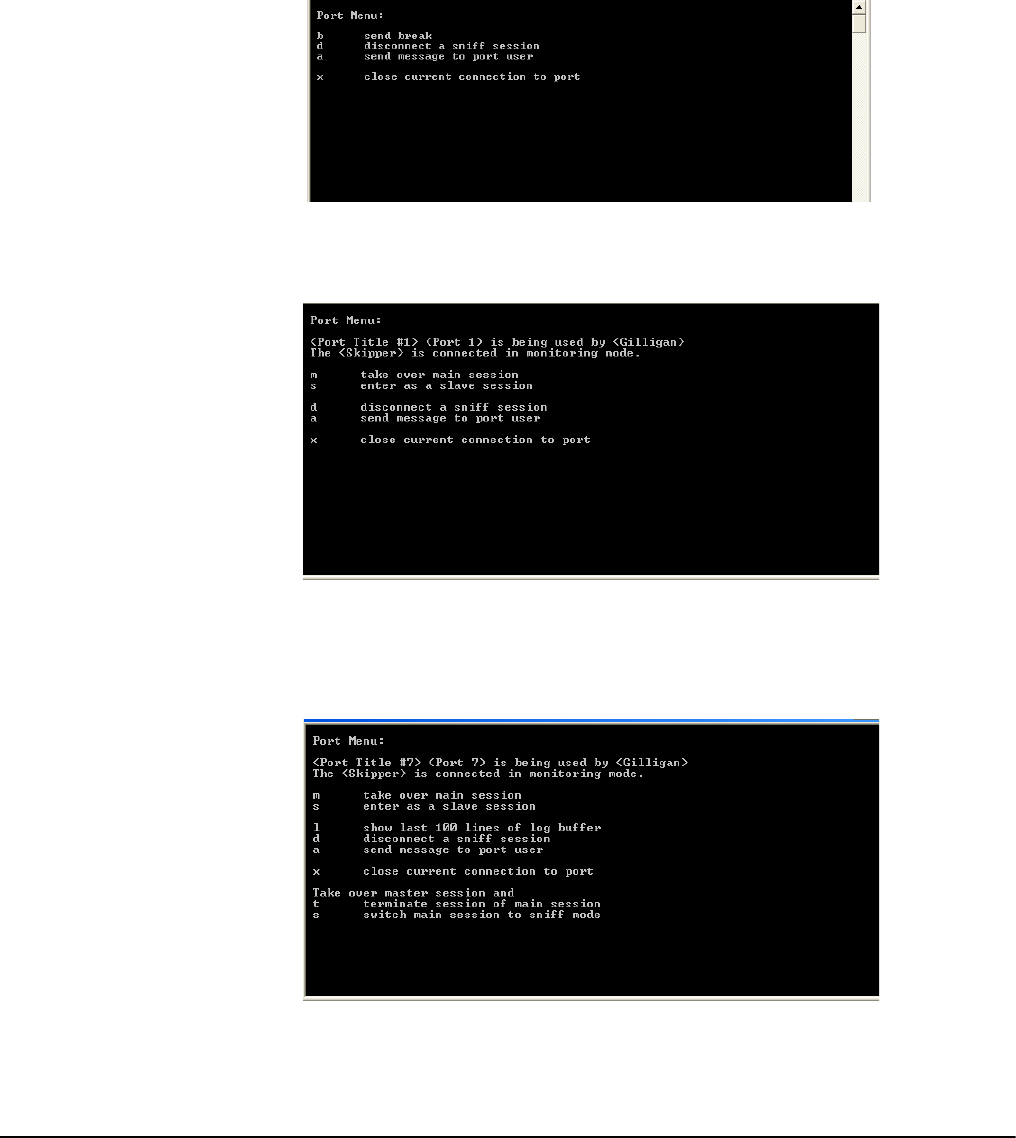
Configuration Menu
Chapter 16 131
Viewing A Sniff Session
A sniff user enters a sniff session by starting a Telnet session on a specified
port. In the following example, a sniff user telnets to port 7 of a Digi CM. From
the command prompt enter the following command:
telnet 192.168.100.42 7007
1. Log in and enter your password
2. Enter the port escape sequence.
When sniff users login to a port from a Telnet session, a sniff session menu is
displayed with your permitted options. The first user (with port access rights) to
login to the port is in the main session.
The next user (with port access rights) to enter the port will be given the option
to take over the main session. This user is given the option to take over the
main session by either terminating the first user or switching the first user to
sniff (read only).

Authentication
132 Chapter 16
Field Descriptions for Sniff Sessions
Authentication
1. Access the configuration menu.
2. Choose Serial port configuration.
3. Choose an individual port number or 0 (zero) for all ports > Authentication.
4. Choose Authentication type.
Escape
Sequence
Ctrl+ Description of Action Occurrence
mtake over main session (read/write) only presented to users with
read/write access upon entering
a session
senter as a slave session (read only) only presented to users with
read/write access upon entering
a session
bsend break not functional for sniff users
lshow last 100 lines of log buffer must enable logging for this
option
ddisconnect a sniff session only functional to admin
asend message to port user(s) not available to sniff users
rreboot device using power-switch only if power management is
available on this port
ppower device on/off (show only on or off) only if
power management is available
on this port
xclose current connection to port closes the sniff session
connection
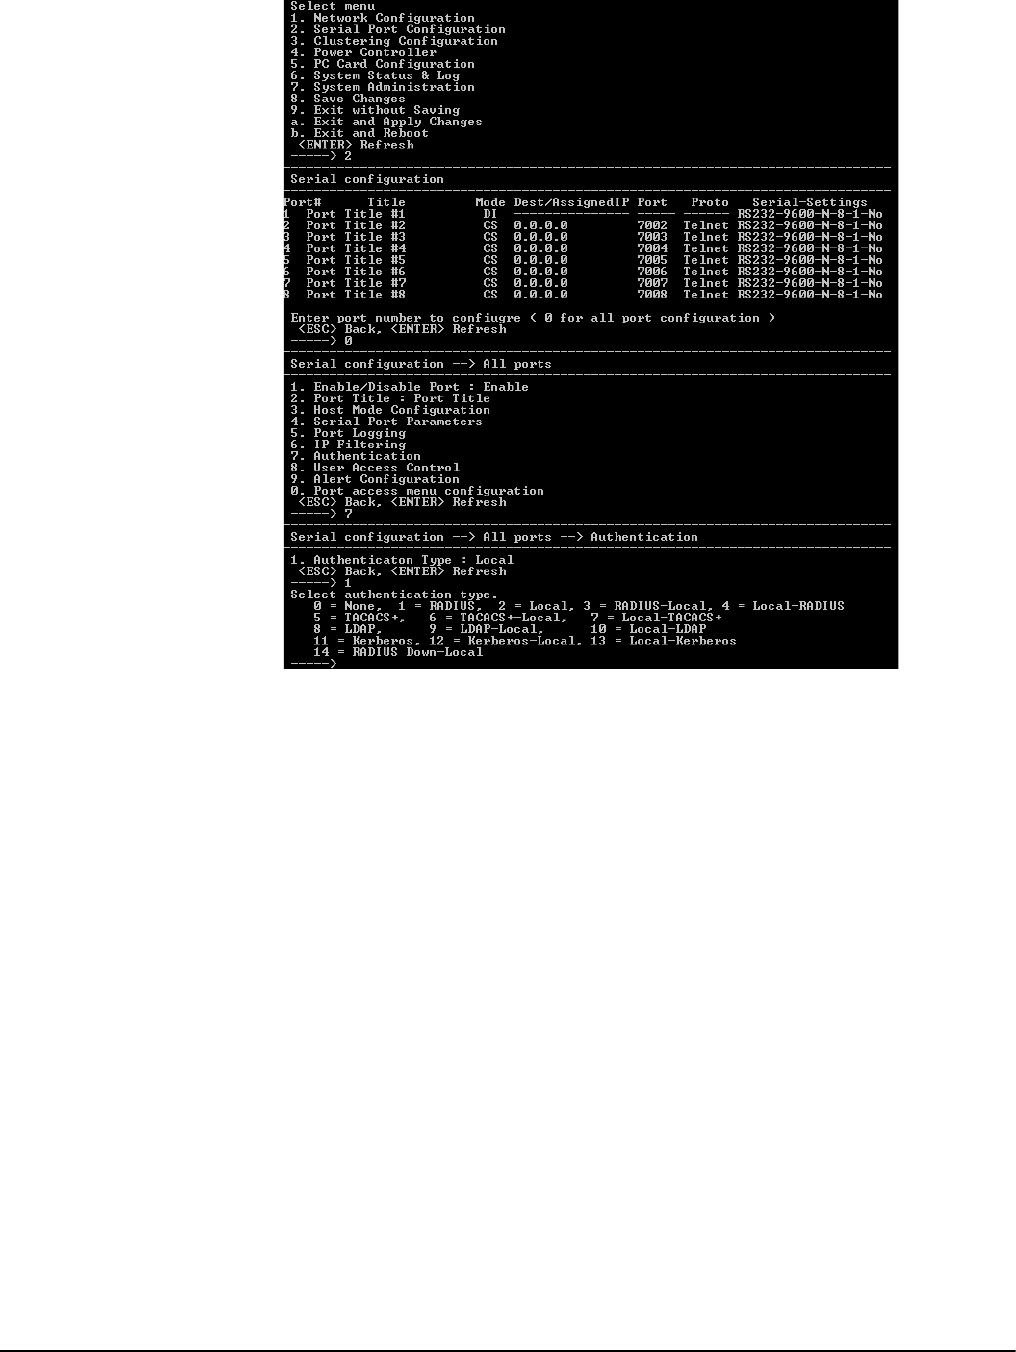
Configuration Menu
Chapter 16 133
5. Use the ESC key to return to the main menu.
6. Choose Save changes.
Dial-in Modem Access
Individual serial ports on the Digi CM can be configured for dial-in modem
access. To use dial-in modem mode, an external modem is first attached to a
serial port and then the serial port is configured for dial-in modem access. In
the illustration below, port 7 is configured for a dial-in modem.
To configure a serial port for a dial-in modem, do the following:
1. Access the configuration menu.
2. Choose Serial Port Configuration.
3. Choose an individual port number and then Host Mode Configuration.
4. Select Host mode and then Dial-in modem.
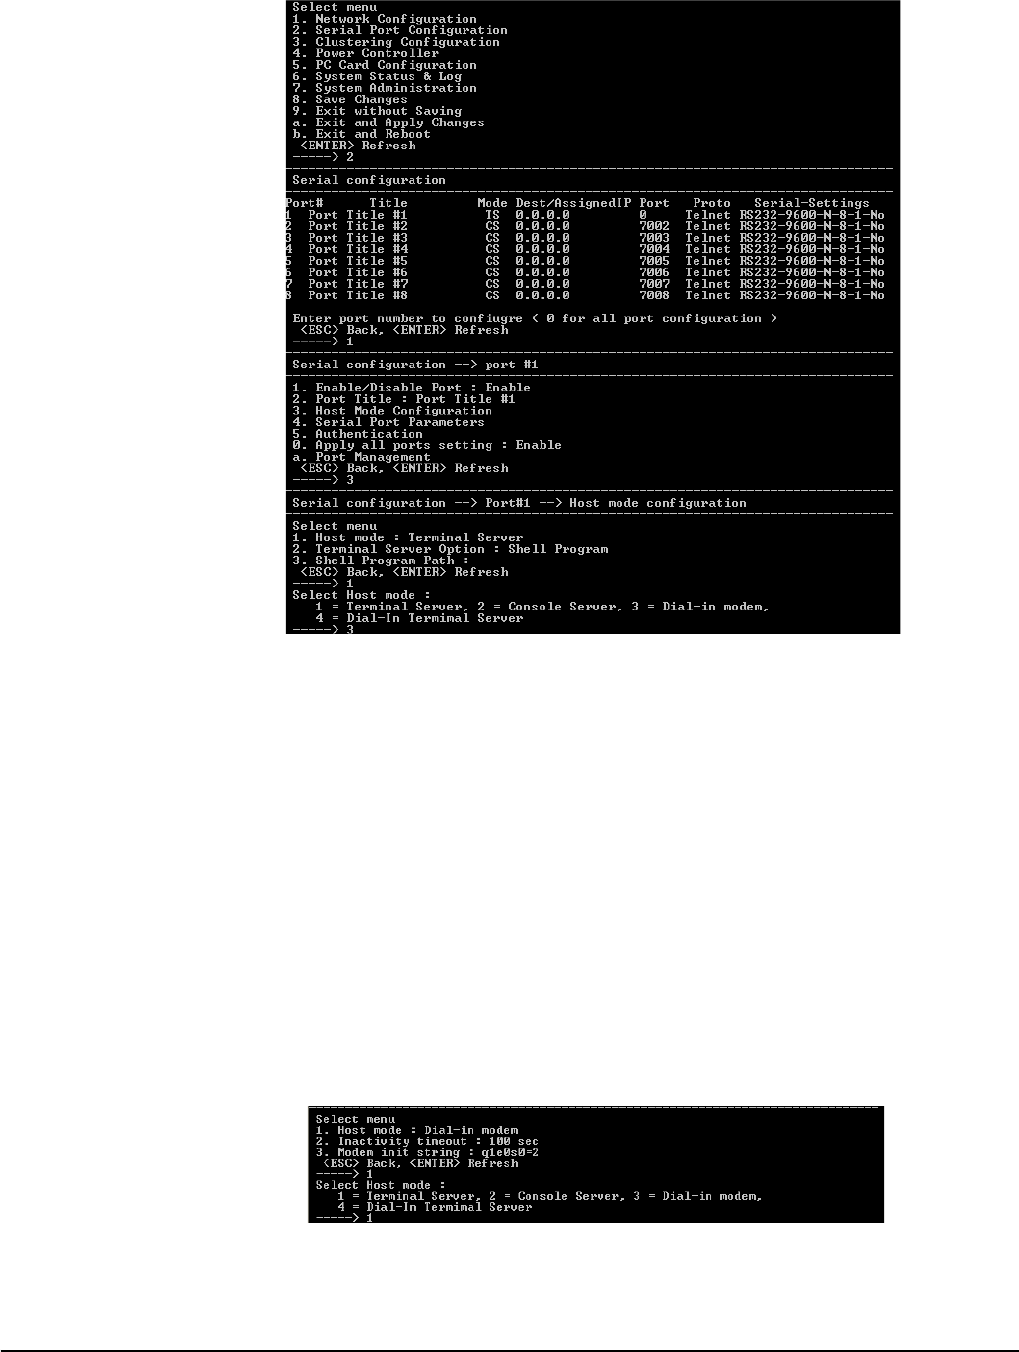
Dial-in Terminal Server Access
134 Chapter 16
5. Use the ESC key to return to the main menu.
6. Choose Save changes.
Dial-in Terminal Server Access
Individual serial ports on the Digi CM can be configured for a dial-in terminal
server access. To use dial-in terminal server access, an external modem is
first attached to a serial port on the Digi CM and then the serial port is
configured for dial-in terminal server mode. In the illustration below, port 7 is
configured for dial-in terminal server mode.
In terminal server mode, you are connected directly to a server.
To configure a serial port for a dial-in terminal server, do the following:
1. Access the configuration menu.
2. Choose Serial port configuration.
3. Choose an individual port number and then Host Mode Configuration.
4. Choose Dial-in Terminal Server and configure the other configuration
parameters.

Configuration Menu
Chapter 16 135
5. Use the ESC key to return to the main menu.
6. Choose Save changes.
Clustering
By default clustered slave devices are configured using the Telnet protocol and
port parameters of the following: bps=9600, data bits=8, parity=none, stop
bits=1, flow control=none. When the master device autoconfigures a slave
device, it simply imports the information from the slave unit. If you want other
protocols or other port parameters, you should configure your slave unit first
with those parameters before autoconfiguring.
Before you start this configuration procedure, the slave units should already be
configured unless you want them set to the default values. To set up the Digi
CM for clustering, do the following:
1. Access the configuration menu.
2. Choose Clustering configuration > Unit position.
3. Assign the unit as the master device.
A new screen is displayed.
4. Enter the number 1 for the first slave unit.
5. Choose Enable/Disable unit clustering > Enable.
6. Enter the values for Slave Unit IP, No. of ports, and Port configuration.
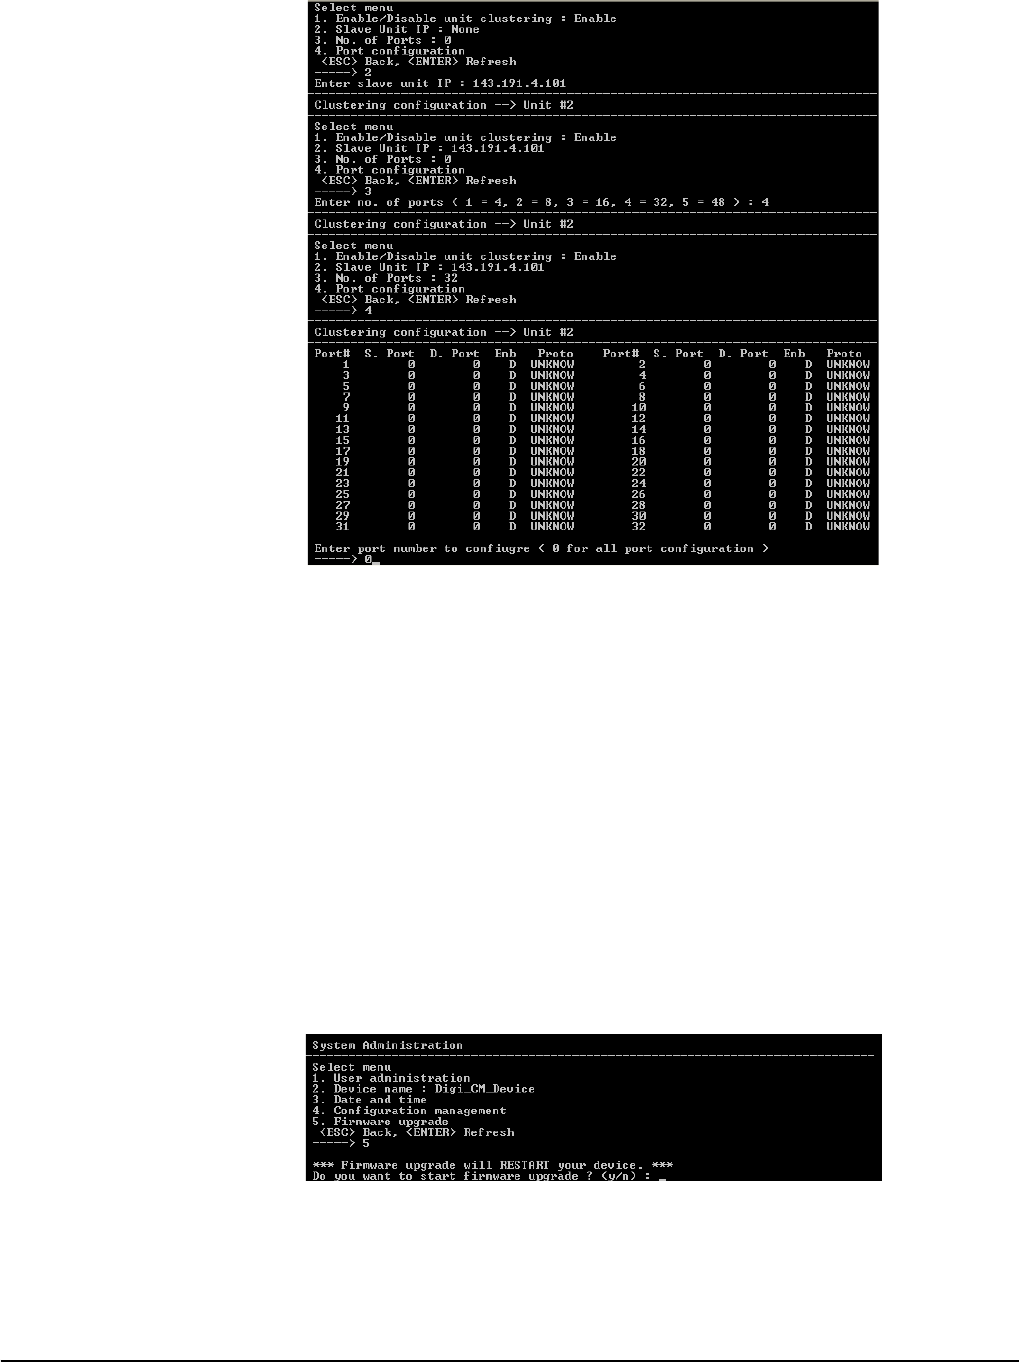
Firmware Upgrade
136 Chapter 16
7. Select the port number to configure or 0 for all ports.
8. Select Enable configuration
9. Select Auto Configuration
10.Choose Exit and apply changes.
Firmware Upgrade
Before upgrading firmware from the configuration menu you should have:
• Downloaded the firmware to a system on the same subnet
• Set up a terminal emulation program that supports Zmodem transfer
protocol
To upgrade the firmware with the configuration menu, do the following:
1. Access the configuration menu.
2. Choose System administration.
3. Choose Firmware upgrade. Enter y for Yes when asked if you want to
upgrade the firmware.
If the firmware upgrade is successful, the Digi CM will reboot automatically. If a
Firmware upgrade failed! Warning appears, do not reboot the unit but repeat
the upgrade process.
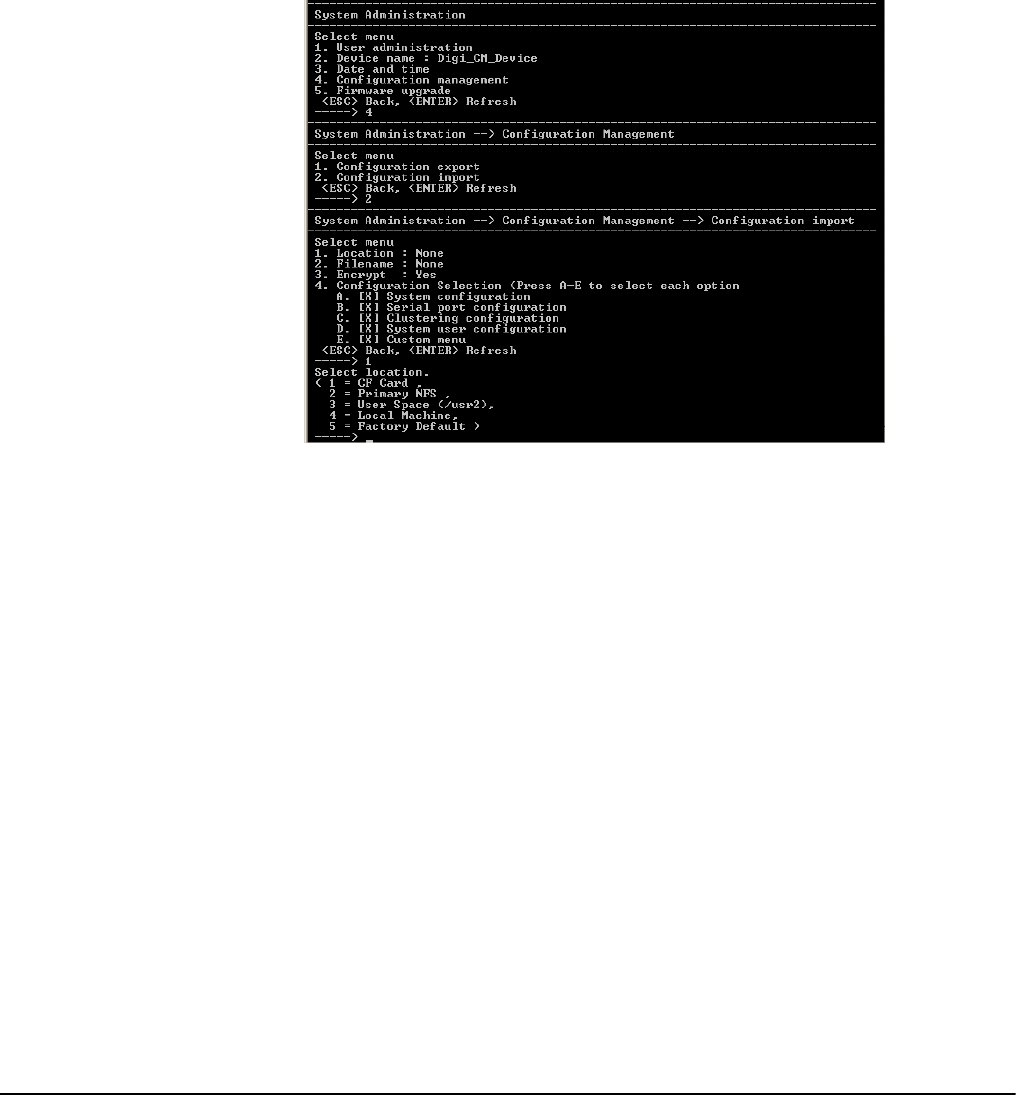
Configuration Menu
Chapter 16 137
Restoring Factory Defaults
You have two choices to restore the unit to its factory defaults. The options are
restoring all factory defaults or restoring all factory defaults except IP settings.
To restore your unit to the factory defaults, do the following:
1. Access the configuration menu.
2. Choose System administration.
3. Select Configuration import.
4. Select Location
5. Select Factory Default.
The system will restore factory defaults, and the unit will automatically reboot.
Note: Use System Administration to save your configuration in case you need to reload
it later or onto another system. See "Adding and Configuring a PC Card" on page
124 for more information.
Setting Date and Time
Date and time on the Digi CM can either be kept internally or by an NTP
server. To set the parameters for date and time on the Digi CM, do the
following:
1. Access the configuration menu.
2. Choose System administration.
3. Choose Date and Time.
4. Enter the desired parameters.
5. Choose Save changes.
Accessing the Boot Loader Program
The Boot Loader program can be accessed during the boot process. The main
function of the program is to provide a backup means for restoring the
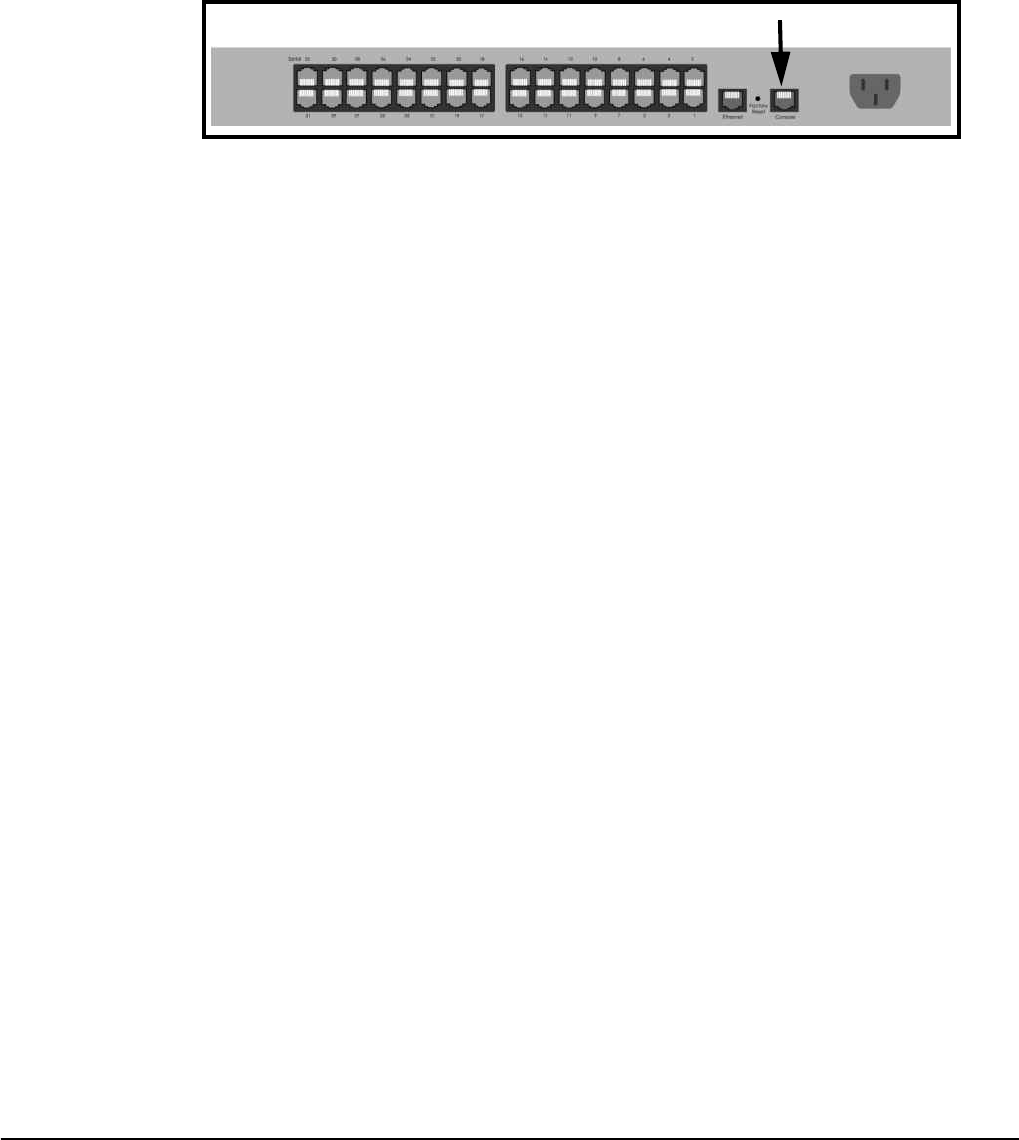
Accessing the Boot Loader Program
138 Chapter 16
firmware if the Digi CM will no longer boot. It also provides a hardware testing
module that detects and tests hardware components on the unit.
To access the Boot Loader program, do the following:
1. Connect the Ethernet cable from the console port on the rear panel of the
Digi CM to a serial port on a workstation. Use the Ethernet cable packaged
with the Digi CM and attach the DB-9 adapter. The arrow in the following
graphic points to the Console Port.
2. Set up a terminal emulation program, such as HyperTerminal, using the
following port parameters: bps=9600, data bits=8, parity=none, stop bits=1,
and flow control=none.
3. Turn the power on to the unit.
4. Press ESC within 3 seconds of booting the unit to get Boot Loader menu.
Hardware Test Menu
The Boot Loader program provides a hardware test for detecting and testing
hardware components on the Digi CM. From the Boot Loader menu, choose
the number 3 to access the Hardware test. Options for several components
appear.
Disaster Recovery
The Digi CM provides a disaster recovery procedure in the event the
configuration data is destroyed or corrupted. The Digi CM automatically
restores a corrupted configuration file system to the factory default settings.
However, if the Digi CM fails to boot in spite of being reset to the factory default
settings, the firmware can be restored by using the Boot Loader program.
To restore the Digi CM to the factory default configuration settings, you will
need to use a TFTP or BOOTP server. To use the Boot Loader program to
flash new firmware, do the following:
1. Connect the console port on the rear panel of the Digi CM to a serial port
on a workstation. Use an Ethernet cable with a DB-9 adapter.
2. Set up a terminal emulation program such as HyperTerminal. Use the
following port parameters: bps=9600, data bits=8, parity=none, stop bits=1,
flow control=none
3. Reboot or power on the Digi CM.
4. Press the ESC key within three seconds of applying power to the device.
The following screen appears.
Console Port
back of Digi CM 32 show
n
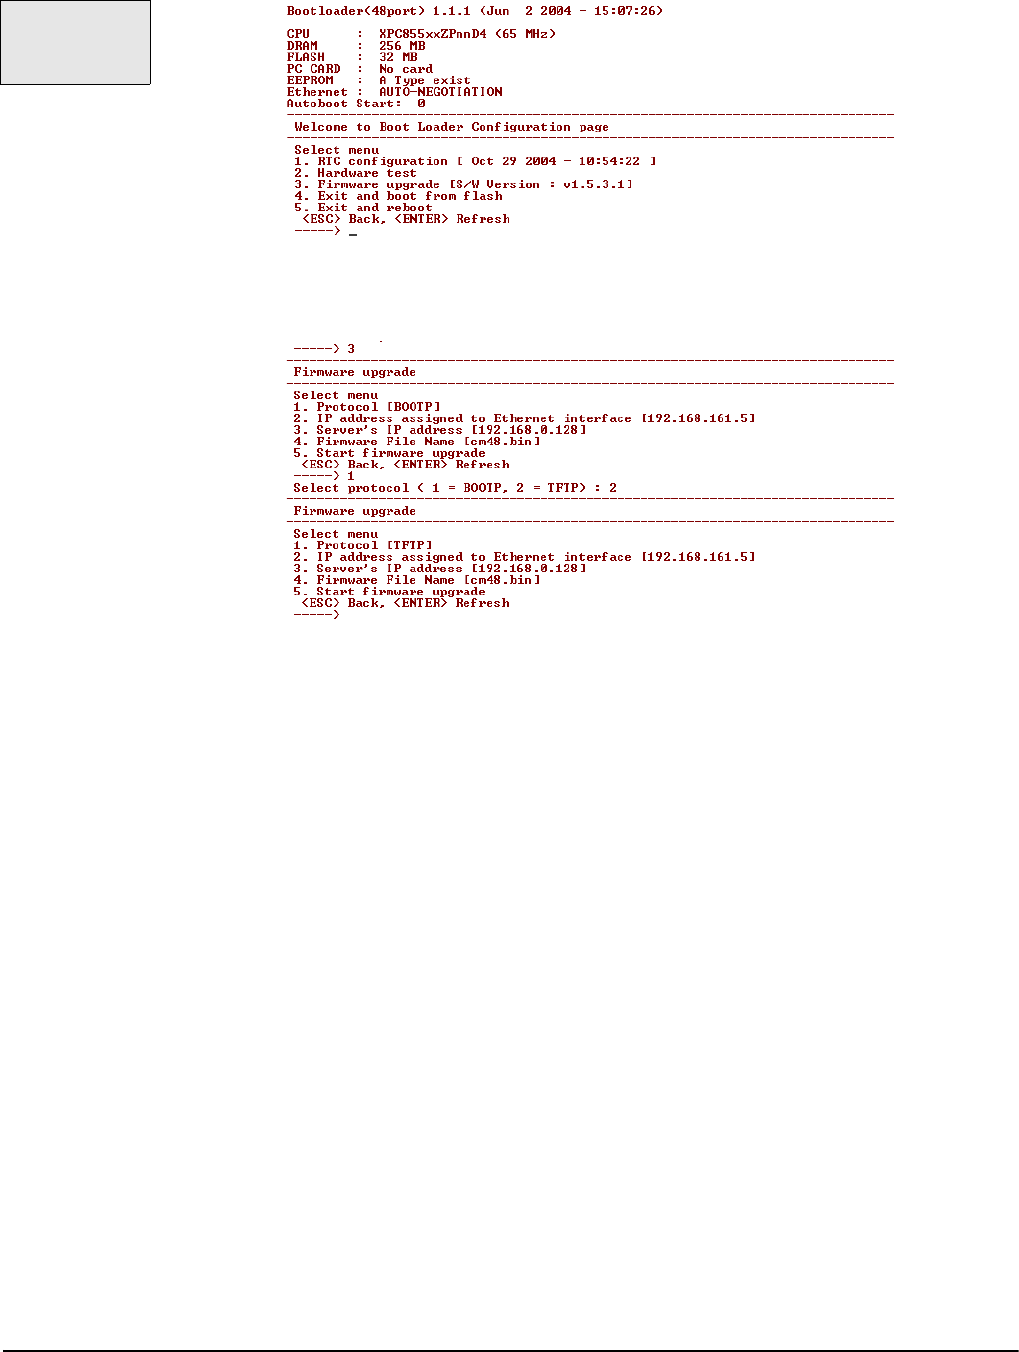
Configuration Menu
Chapter 16 139
5. Choose Firmware upgrade by entering 3.
The following screen appears.
6. Enter the information for the first menu items.
• Protocol: The choices are BOOTP or TFTP
• IP address assigned: Enter the IP address of the Digi CM
• Server’s IP address: The IP address of the BOOTP or TFTP server
• Firmware File Name: The filename for the firmware
Note: Use the ESC key to back up to earlier menu screens.
7. Choose Start firmware upgrade.
The firmware upgrade will take several minutes to process.
This will factory default the unit.
8. When the upgrade process is complete, choose ESC to return to the main
menu.
9. Choose Exit and boot from flash.
Use the ESC key
to return to an
earlier menu
screen.

Accessing the Boot Loader Program
140 Chapter 16
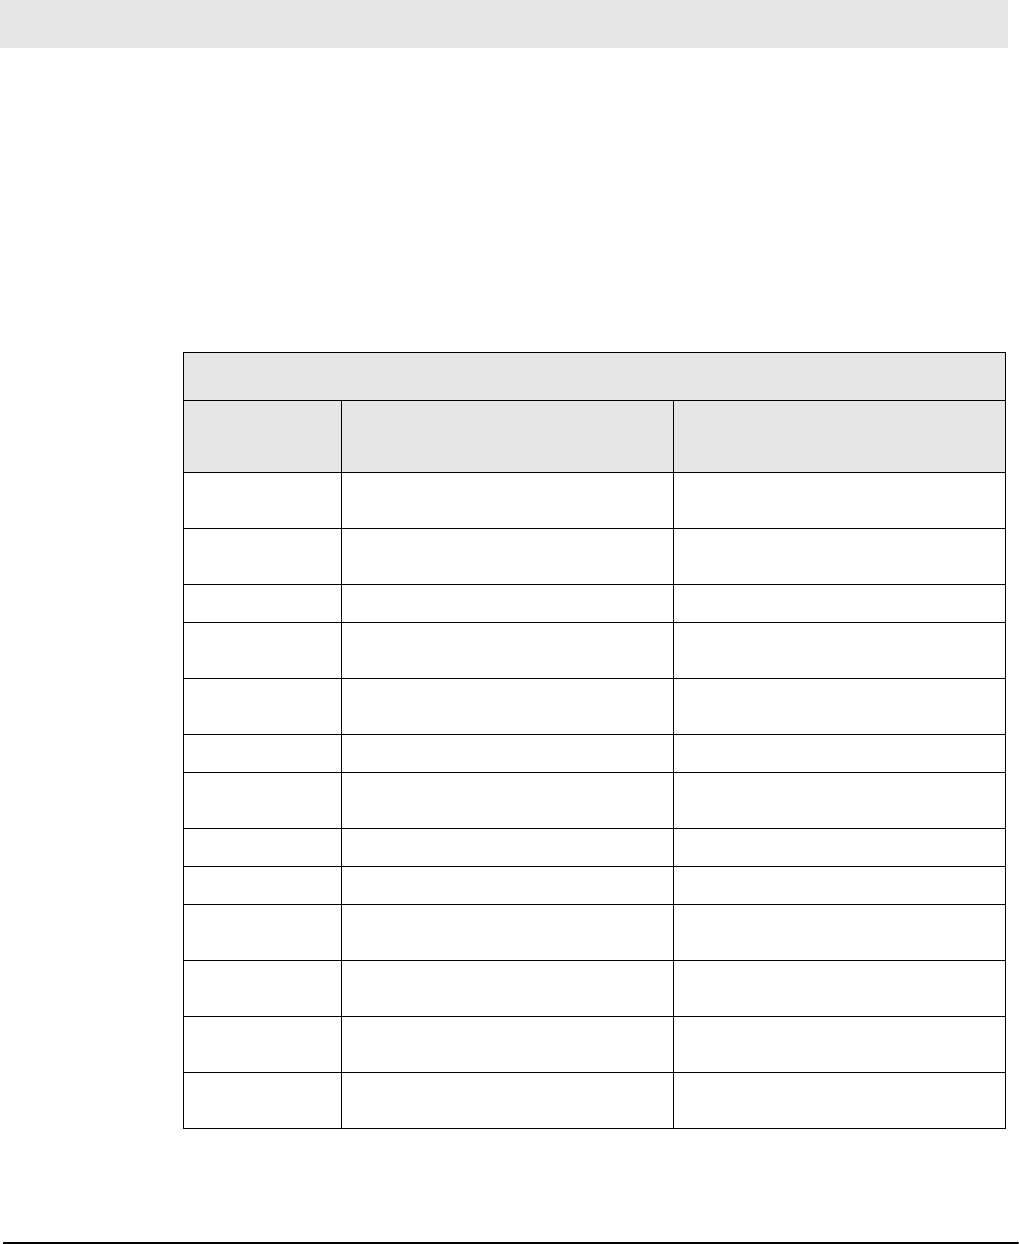
Hardware Information
Chapter 17 141
Introduction
This chapter provides information on Digi CM hardware. Among the topics
covered are the hardware specifications, LED descriptions, pinouts for the
Ethernet cable, pinouts for the cable adapters, and rack mounting
specifications.
Hardware Specifications
Digi CM 48
Chapter 17 Hardware Information
Hardware Specifications
Attribute Value
AC Powered Value
DC Powered
Operating tem-
perature 40°F to 120°F (5°C to 50°C) 40°F to 120°F (5°C to 50°C)
Storage tem-
perature -20°F to 140°F (-29°C to 60°C) -20°F to 140°F (-29°C to 60°C)
Humidity 10% to 90% non-condensing 10% to 90% non-condensing
Power supply Internal, 100 -240VAC, 50/60 Hz,
1.2A (max) Internal, 36 - 72 Vdc, 1.2A (max)
Power con-
sumption 0.37A /120VAC, 45W (typical), 150W
(max) 0.4A /48Vdc, 19W (typical), 40W
(max)
Fuse (internal) FUSE (Type L) AC250V, 2A Fuse (Type L) 250V, 5A
Operating sys-
tem Linux Hard Hat embedded Linux Hard Hat embedded
SDRAM 256 megabytes 256 megabytes
Flash memory 16 megabytes 16 megabytes
Dimensions:
unpackaged 17.5” x 10.0” x 1.75”
(44.5 x 25.4 x 4.5 cm) 17.5” x 10.0” x 1.75”
(44.5 x 25.4 x 4.5 cm)
Dimensions:
packaged 20.375” x 15.25” x 4.75 (517.5 mm
387.3 mm x 120.6 mm) 20.375” x 15.25” x 4.75 (517.5 mm
387.3 mm x 120.6 mm)
Weight:
unpackaged 6.5 lbs (2.95 kg) 6.7 lbs (3.05 kg)
Weight: pack-
aged 9.95 lbs (4.51 kg) 10.2 lbs (4.61 kg)

Hardware Specifications
142 Chapter 17
Digi CM 16 and Digi CM 32
Digi CM 8 AC Powered
Attribute AC Powered
Value DC Powered
Value
Operating tem-
perature 40°F to 120°F (5°C to 50°C) 40°F to 120°F (5°C to 50°C)
Storage temper-
ature -20°F to 140°F (-29°C to 60°C) -20°F to 140°F (-29°C to 60°C)
Humidity 10% to 90% non-condensing 10% to 90% non-condensing
Power supply Internal, 100 -240VAC, 50/60 Hz,
1.2A (max) Internal, 36 - 72 Vdc, 1.2A (max)
Power consump-
tion 0.1A /120VAC (type), 12W (typical),
40W (max)
0.25A /48Vdc, 12W (typical),
40W (max)
Fuse (internal) FUSE (Type L) AC250V, 2A
Operating sys-
tem Linux Hard Hat embedded Linux Hard Hat embedded
SDRAM 64 megabytes 64 megabytes
Flash memory 8 megabytes 8 megabytes
Dimensions:
unpackaged 17” x 8.5” x 1.75” (431.8 cm x 215.9
cm x 44.5 cm) 17” x 8.5” x 1.75” (431.8 cm x 215.9
cm x 44.5 cm)
Dimensions:
packaged 20.375” x 15.25” x 4.75 (517.5 cm
387.3 cm x 120.6 cm) 20.375” x 15.25” x 4.75 (517.5 cm
387.3 cm x 120.6 cm)
Weight: unpack-
aged 5.8 lbs (2.63 kilograms) 5.8 lbs (2.63 kilograms)
Weight: pack-
aged 8.6 lbs (3.9 kilograms) 8.6 lbs (3.9 kilograms)
Attribute Value
Operating temperature 40°F to 120°F (5°C to 50°C)
Storage temperature -20°F to 140°F (-29°C to 60°C)
Humidity 10% to 90% non-condensing
Power supply External, 100 - 240VAC, 50/60 Hz, 1.0A (max)
Power consumption AC input: 0.05A /120VAC, 6W (typical), 12W (max)
DC input: 0.8A/5VAC, 4.5 W (typical), 8W (max)
Operating system Linux Hard Hat embedded
SDRAM 64 megabytes
Flash memory 8 megabytes
Dimensions 9.5” x 6.25” x 1.25” (241.3 cm 158.75 x 31.75 cm )
Weight 2.5 lbs (1.13 kilograms)
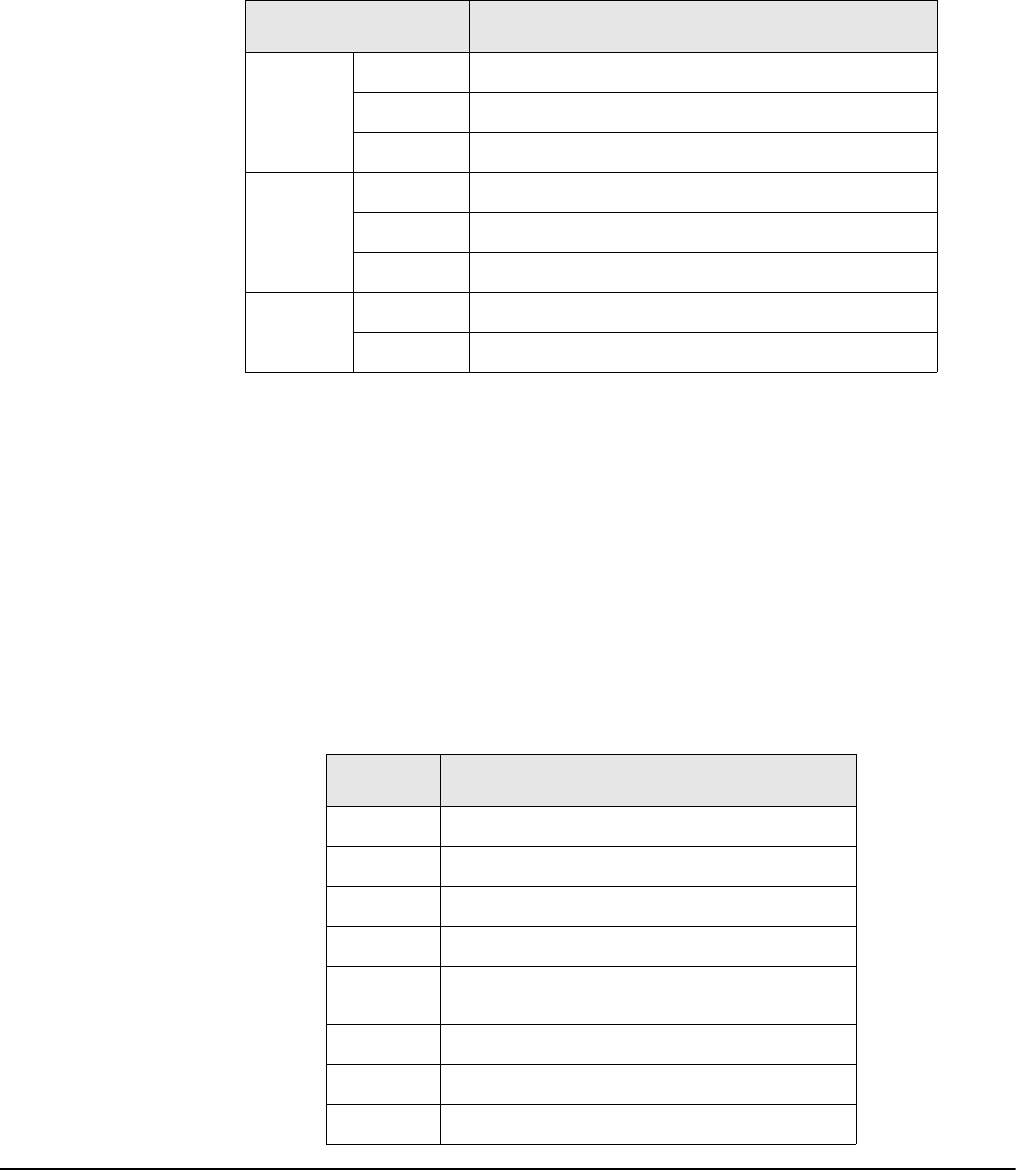
Hardware Information
Chapter 17 143
LED Indicators
Use the LED indicators to confirm your attachment to the network and that the
Digi CM is able to send and receive data.
*Not available on the Digi CM 48
About Serial Port Cabling
The Digi CM simplifies cabling. The RJ-45 8-pin configuration matches all
SUN and Cisco RJ-45 console port configurations, enabling CAT 5 cabling
without pinout concerns. Three DB-25 and one DB-9 adapters come in the
package. A DB-25 male, a DB-25 female, and a DB-9 adapter support console
management applications. A DB-25 male adapter provides a modem
connection. See the cable adapter information that follows later in this chapter.
Note: The cable length restrictions common to RS-232 cables apply to the Digi CM
serial cable as well.
Serial Port Pinouts
The Digi CM uses an RJ-45 connector for serial ports. Pin assignments are
listed in the following table.
LED Function
System
Power On when power is supplied
Ready On when system is ready to run
PC On when a PC device is running
Ethernet
100Mbps On when 100Base-TX connection is detected
LINK On when connected to an Ethernet network
Act Blinks when there is activity on the Ethernet port
Serial
port*
In use On when the serial port is ready to run
Rx/Tx Blinks when there is traffic on the serial port
Pin Description
1CTS
2DSR
3RxD
4GND
5DCD Note: Inbound signal can also be
used as a second ground.
6TxD
7DTR
8RTS
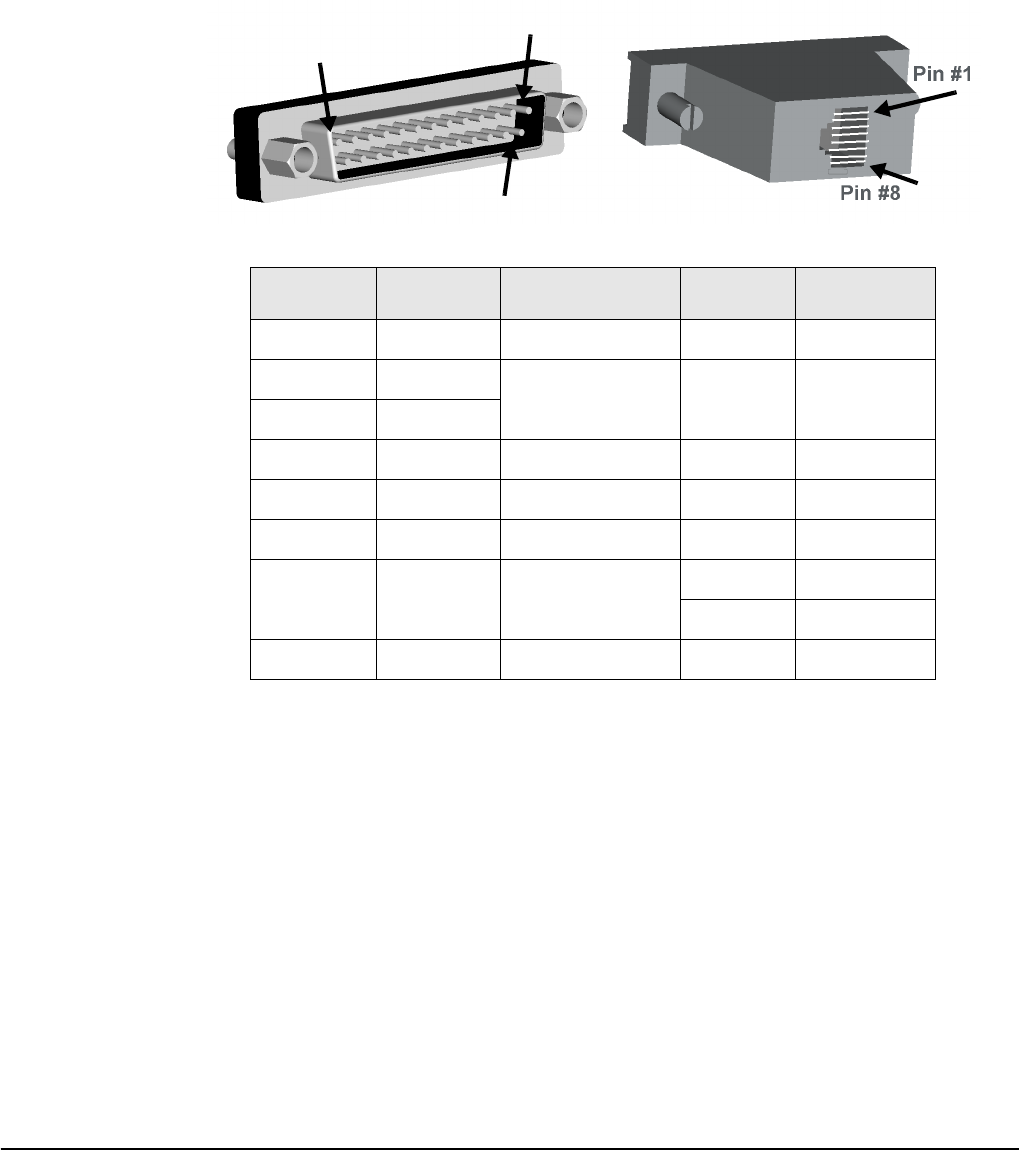
Cable Adapters
144 Chapter 17
Cable Adapters
The Digi CM comes with four cable adapters. The following illustrations show
cable adapter pin outs. Additional adapters can be purchased from Digi in
quantities of 8.
DB-25 Male Console Adapter
(Digi 8-pack reorder P/N 76000672)
DB-25 Male to RJ-45 Connector Pin Assignments
RJ-45 Signal DB-25M Signal
1 CTS Connected to 4 RTS
2DSR Connected to 20 DTR
5 DCD
3 RxD Connected to 2 TxD
4 GND Connected to 7 GND
6 TxD Connected to 3 RxD
7 DTR Connected to 6 DCD
8DSR
8 RTS Connected to 5 CTS
Pin #1 Pin #13
Pin #25
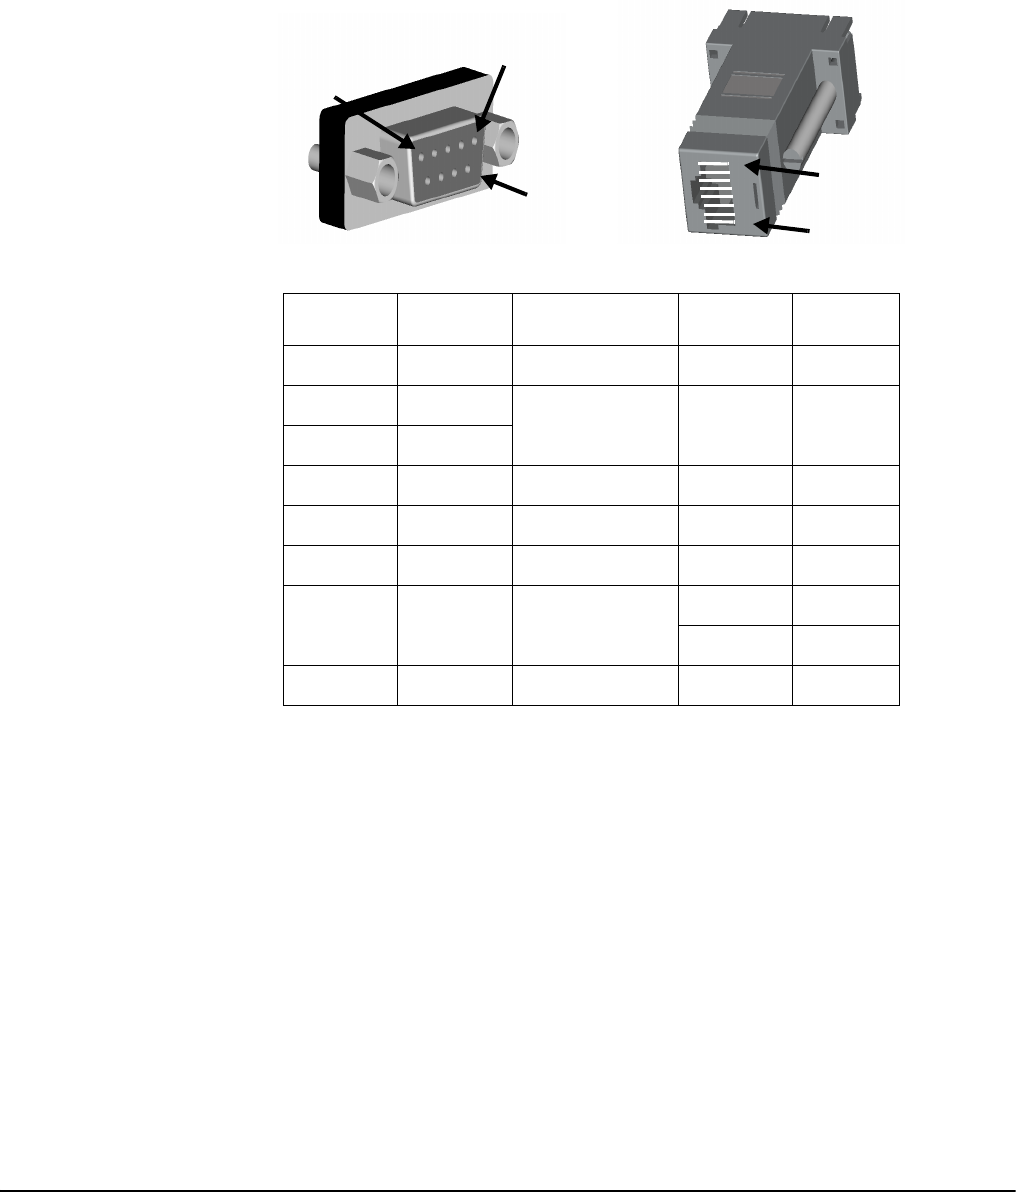
Hardware Information
Chapter 17 145
DB-9 Female Console Adapter
(Digi 8-pack reorder P/N 76000671)
DB-9 Female to RJ-45 Pin Assignments
RJ-45 Signal DB-9F Signal
1 CTS Connected to 7 RTS
2DSR Connected to 4 DTR
5 DCD
3 RxD Connected to 3 TxD
4 GND Connected to 5 GND
6 TxD Connected to 2 RxD
7 DTR Connected to 1 DCD
6DSR
8 RTS Connected to 8 CTS
Pin #5 Pin #1
Pin #6
Pin #1
Pin #8
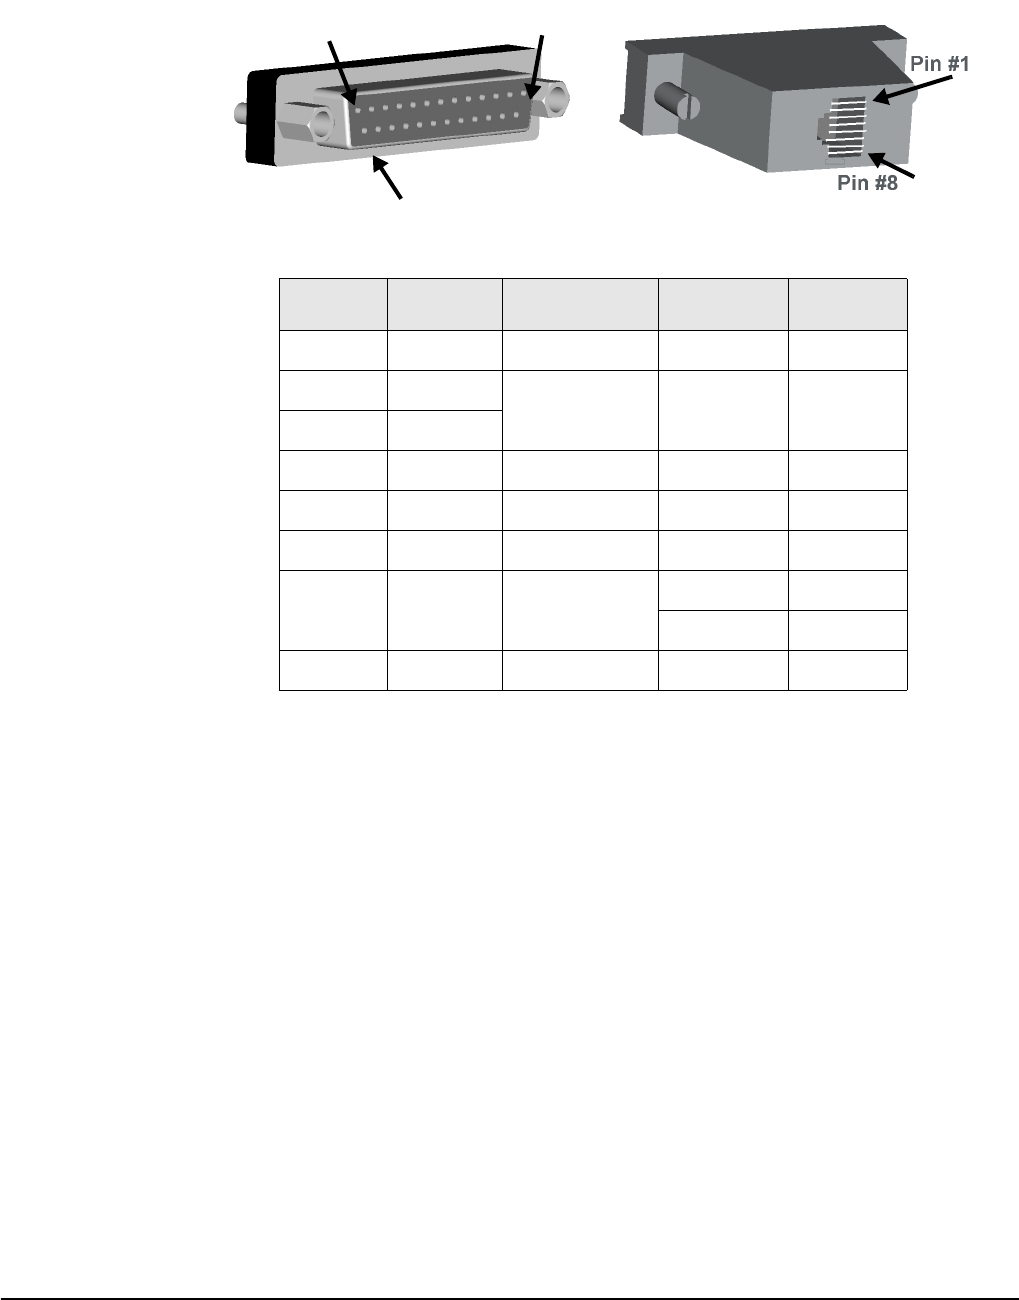
Cable Adapters
146 Chapter 17
DB-25 Female Console Adapter
(Digi 8-pack reorder P/N 76000673)
DB-25 Female to RJ-45 Pin Assignments
RJ-45 Signal DB-25M Signal
1 CTS Connected to 4 RTS
2DSR
Connected to 20 DTR
5 DCD
3 RxD Connected to 2 TxD
4 GND Connected to 7 GND
6 TxD Connected to 3 RxD
7 DTR Connected to 6 DCD
8DSR
8 RTS Connected to 5 CTS
Pin#13 Pin #1
Pin#25
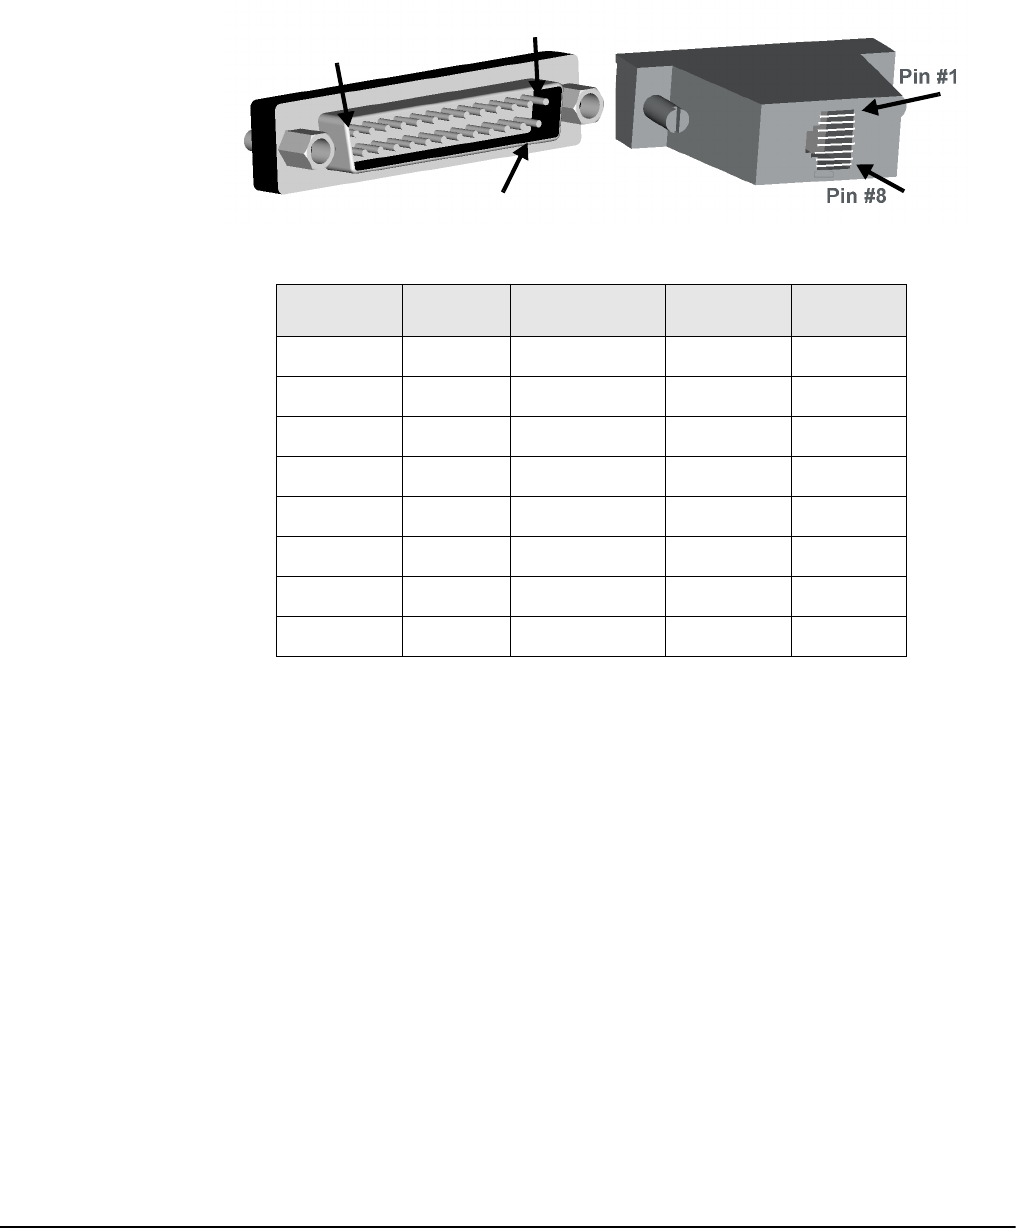
Hardware Information
Chapter 17 147
DB-25 Male Modem Adapter (Digi 8-pack reorder P/N 76000670)
DB-25 Male Modem to RJ-45 Pin Assignment
RJ-45 Signal DB-25M Signal
1 CTS Connected to 5 CTS
2 DSR Connected to 6 DSR
3 RxD Connected to 3 RxD
4 GND Connected to 7 GND
5 DCD Connected to 8 DCD
6 TxD Connected to 2 TxD
7 DTR Connected to 20 DTR
8 RTS Connected to 4 RTS
Pin #1
Pin #13
Pin #25
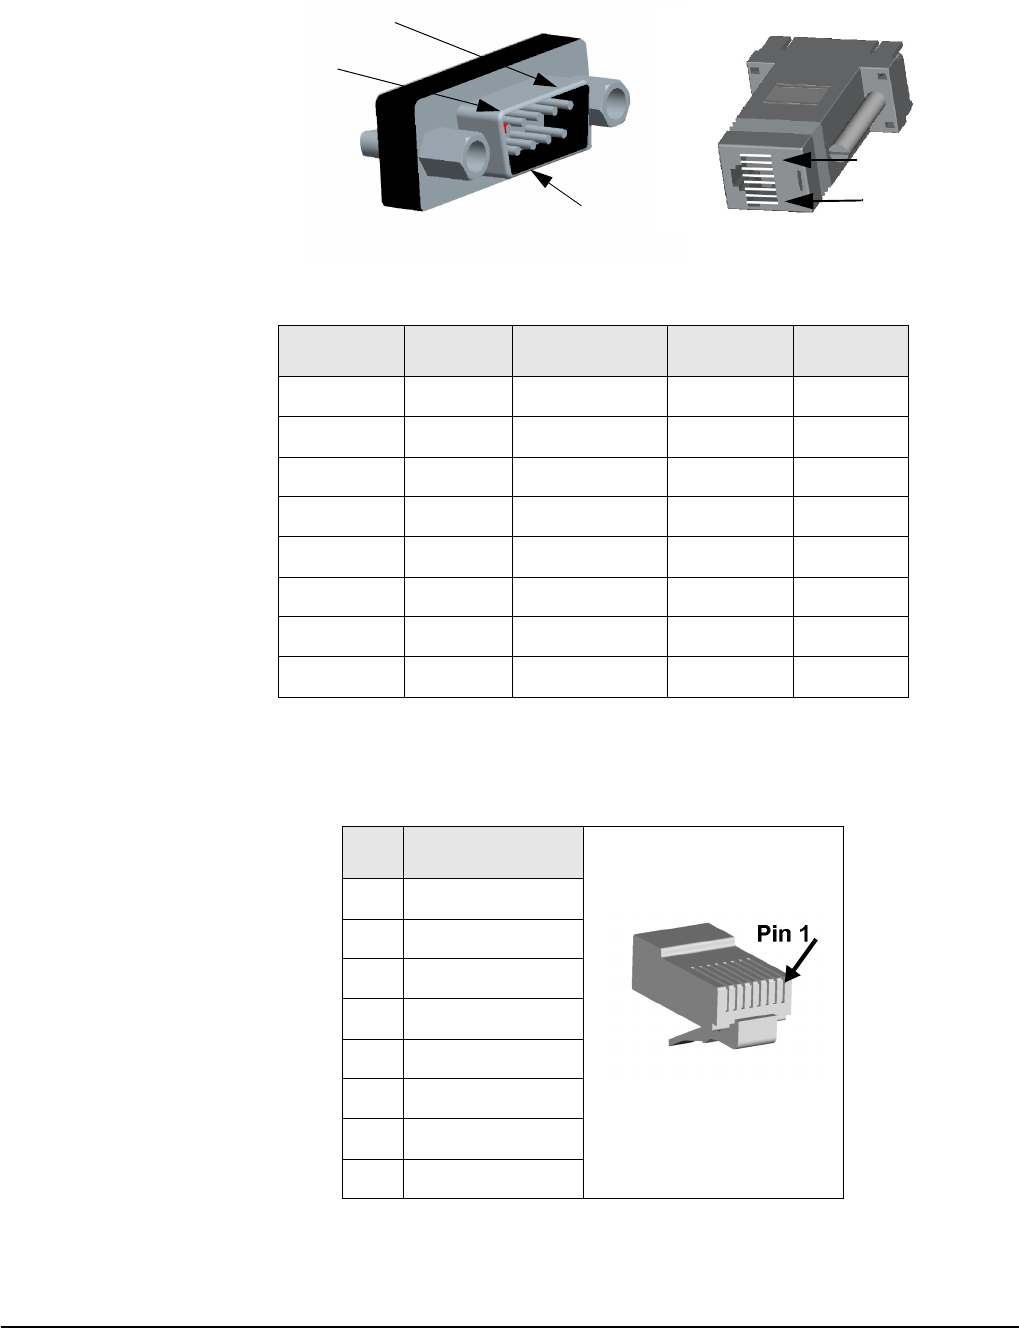
Ethernet Pinouts
148 Chapter 17
DB-9 Male Modem Adapter (Digi 8-pack reorder P/N 76000702)
(Available but not included)
DB-9 Male Modem to RJ-45 Pin Assignment
Ethernet Pinouts
The Digi CM uses a standard Ethernet connector, that is a shielded and
compliant with AT&T 258 specifications.
RJ-45 Signal DB-9M Signal
1 CTS Connected to 8 CTS
2 DSR Connected to 6 DSR
3 RxD Connected to 2 RxD
4 GND Connected to 5 GND
5 DCD Connected to 1 DCD
6 TxD Connected to 3 TxD
7 DTR Connected to 4 DTR
8 RTS Connected to 7 RTS
Pin #1
Pin #8
Pin #5
Pin #1
Pin #6
Pin Description
1Tx+
2Tx-
3Rx+
4NC
5NC
6Rx-
7NC
8NC

Hardware Information
Chapter 17 149
Rack Mounting Installation
1. Attach enclosed bracket ears to rack as shown in illustration.
2. Follow safety precautions when placing Digi CM on rack.
Rack Mounting Safety Precautions
• Distribute weight evenly in the rack to avoid overloading.
• Ensure proper ventilation with at least 12 inches (30 centimeters) of
clearance on all sides.
• Check equipment nameplate ratings before connecting to the supply circuit
to avoid overloads which may damage over-current protection devices and
supply wiring.
• Maintain reliable earthing for rack-mounting equipment, especially for
supply connections.
• Install equipment in Restricted Access Areas only (dedicated equipment
rooms/closets) in accordance with Articles 110-16, 110-17, and 110-18 of
the National Electrical Code, ANSI/NFPA 70.
• Connect equipment to a DC supply source (reliably earthed) that is
electrically isolated from the AC source.
• Directly connect the equipment chassis to the DC supply system-grounding
electrode conductor or a bonding jumper from a grounding terminal bar (or
bus) that is connected to the DC supply system grounding electrode
conductor.
• Contain equipment that has a connection between the grounded conductor
of the same DC supply circuit, the grounding conductor, and also the point
of grounding of the DC system in the same immediate area. Do not ground
the equipment elsewhere.
Rack shown in illustration is
not included with Digi CM.

Rack Mounting Installation
150 Chapter 17
• Locate the DC supply source within the same premises as the equipment.
• Route away and secure all DC input wiring from sharp edges to prevent
chaffing as well as provide strain relief.
• Provide a readily accessible disconnect device and protective device a
fixed wiring for a DC power supply suitable for the specified rated voltage
and current. Disconnect and protective devices to be rated 2A Amps
maximum.

Certifications
Chapter 18 151
Safety
• US: UL1950
• Canada: CSA 22.2 No. 60950
• Europe: EN60950 (CB Scheme Report)
Working Inside the Digi CM
NOTICE: Do not attempt to service the Digi CM yourself, except when
following the instructions from Digi Technical Support personnel. In such a
case, first perform the following actions:
• Turn off the Digi CM.
• Ground yourself by touching an unpainted metal surface at the back of the
equipment before touching anything inside your equipment.
Replacing the Battery
A coin-cell battery maintains date and time information. If you have to
repeatedly reset time and date information after turning on your Digi CM,
replace the battery.
CAUTION: A new battery can explode if it is incorrectly installed. Replace the
3 Volt CR2032 battery only with the same or equivalent type recommended by
the battery manufacturer. Discard used batteries according to the battery
manufacturer’s instructions.
Rack Mounting Installation Considerations
For a rack setup with forced air, the device can run 0-55° C with no extra
space above or below the device (default design of the Digi CM Rack provides
1/16” = 2mm between devices).
For a rack setup with no forced air, make sure that the air in-between devices
does not get warmer than 55°C by the following measures:
• Providing space between the devices, or
• controlling the ambient temperature on the rack.
• Distribute weight evenly in the rack to avoid overloading.
• Check equipment nameplate ratings before connecting to the supply circuit
to avoid overloads which may damage over-current protection devices and
supply wiring.
• Maintain reliable earthing for rack-mounting equipment, especially for
supply connections.
Chapter 18 Certifications

Safety
152 Chapter 18
Environmental Considerations and Cautions
The following is a list of environmental considerations that will ensure safe and
efficient operation of your Digi CM:
• Do not position the Digi CM near high-powered radio transmitters or
electrical equipment, such as electrical motors or air conditioners.
Interference from electrical equipment can cause intermittent failures.
• Avoid exceeding the maximum cabling distances discussed in the online
cable guide.
• Do not install the Digi CM in areas where condensation, water, or other
liquids may be present. These may cause safety hazards and equipment
failure.
For DC powered equipment:
• Install equipment in Restricted Access Areas only (dedicated equipment
rooms/closets) in accordance with Articles 110-16, 110-17, and 110-18 of
the National Electrical Code, ANSI/NFPA 70.
• Connect equipment to a DC supply source (reliably earthed) that is
electrically isolated from the AC source.
• Directly connect the equipment chassis to the DC supply systemgrounding
electrode conductor or a bonding jumper from a grounding terminal bar (or
bus) that is connected to the DC supply system grounding electrode
conductor.
• Contain equipment that has a connection between the grounded conductor
of the same DC supply circuit, the grounding conductor, and also the point
of grounding of the DC system in the same immediate area. Do not ground
the equipment elsewhere.
• Locate the DC supply source within the same premises as the equipment.
• Route away and secure all DC input wiring from sharp edges to prevent
chaffing as well as provide strain relief.
• Provide a readily accessible disconnect device and protective device a
fixed wiring for a DC power supply suitable for the specified rated voltage
and current. Disconnect and protective devices to be rated 2A Amps
maximum.
Note: The Digi CM is intended to connect to networking devices. Do not attempt con-
necting to a telephone line.
Safety Instructions
CAUTION: Do not operate your Digi CM with the cover removed.
• To avoid shorting out your Digi CM when disconnecting the network cable,
first unplug the cable from the equipment and then from the network jack.
When reconnecting a network cable to the equipment, first plug the cable
into the network jack and then into the equipment.
• To help prevent electric shock, plug the Digi CM into a properly grounded
power source. The cable is equipped with 3-prong plug to help ensure
proper grounding. Do not use adapter plugs or remove the grounding

Certifications
Chapter 18 153
prong from the cable. If you have to use an extension cable, use a 3-wire
cable with properly grounded plugs.
• To help protect the Digi CM from transients in electrical power, use a surge
suppressor, line conditioner, or uninterruptible power supply.
• Be sure that nothing rests on Digi CM cables and that the cables are not
located where they can be stepped on or tripped over.
• Do not spill food or liquids on your Digi CM. If it gets wet, contact Digi
Technical Support.
• Do not push objects into the openings of your Digi CM. Doing so can cause
fire or electric shock by shorting out interior components.
• Keep your Digi CM away from heat sources and do not block cooling vents.
Emissions
• US: FCC part 15, Class A
• Canada: ICES 003 Class A
• Europe: EN55022
• Japan: VCCI
• Australia: AS3548
Immunity
Europe: EN55024:1998
EN61000-3-2: 2000
EN61000-3-3: 1998
Solaris Ready All Digi CM products are Solaris Ready certified. This certification identifies
these products have met the stringent testing requirements for system
compatibility, interoperability, ease-of-installation, functionality, and network
interoperability as defined and controlled by Sun Microsystems.

Solaris Ready
154 Chapter 18

Index 155
3DES 23
A
accessing a port
web interface 13
administration See system administration
alerts and notifications
for Power Controller 94
overview 51
port event handling 56
SMTP alerts 52
SNMP information 52
traps 53
apply all ports settings 44
applyconf 117
assigning IP settings 21
authentication 67
configuration menu 132
configuring 67
local 67
automatic device recognition 19
configuring 42
B
Blowfish 23
Boot Loader program 137
accessing 138
boot sequence 118
C
cable adapters 144
callback 86
Cascading multiple Digi RPM units 100
certifications
Emissions 153
Immunity 153
Safety 151
Solaris Ready 153
command line interface 12
example scripts 120
important file locations 118
Linux commands 117
user administration 122
compact-flash card
adding 27
configuring 28
formatting the card 28
configmenu 12, 117
configuration management 112
configuration menu 12
description 12
using 26
configuring automatic device recognition 42
configuring host mode 47
configuring system logging 36
console server mode 44
custom menus 16, 69
D
date and time
configuration menu 137
setting 116
default menu
port access menu 72
default password 11
defaults See factory defaults
device name
configuring 116
device recognition
configuring 42
dial-in modem
configuring access 85, 92, 133
mode 46
dial-in terminal server 46
configuring access 88
configuring access (configuration menu) 134
Digi CM
access methods 13
adding and configuring PC cards 27
alerts and notifications 51
certifications 151
command-line interface 117
configuration menu interface 123
configuration methods 11
configuring ports 41
feature overview 9
hardware information 141
log files for 33
menus 69
port clustering 103
power controller 91
remote dial-in access 85
security and authentication 61
Special Administration Console (SAC)
support 75
system administration 59
web interface for 11
Digi RPM
Index
156 Index
cascading multiple units 100
direct port access 15
disaster recovery 138
DTR settings 49
E
emissions certifications 153
EMS support 75
enabling system logging 33
encryption
SSH 23
wireless LAN 29
F
factory defaults
reset button 114
resetting 114
restoring (configuration menu) 137
values 115
firmware
automatically upgrading 112
upgrade (configuration menu) 136
upgrading 111
H
hardware specifications 141
hardware test menu 138
host mode
configuration 44
configuring (configuration menu) 125
host name configuration 116
hostname 11
HTTPS 22
HyperTerminal 21
I
immunity certifications 153
inter-character timeout 49
IP filtering
configuring network 61
examples 63
network (configuration menu) 129
port (configuration menu) 129
IP settings 21
L
LDAP 67
LED Indicators 143
Linux
commands 117
default script 118
file and disk utilities 118
Hard Hat 117
network utilities 118
shell utilities 118
system utilities 118
M
menus
adding menu items 71
assigning users 72
creating menu names 70
creating submenu 71
port access menu 126
using the configuration menu 123
Microsoft Server 2003 SAC support 75
modem
adding 88
modem init string 86
modem test 86
N
network card
adding 28
NTP server 116
P
password 11
PC card
adding and configuring (configuration
menu) 124
PC cards
compact-flash 27
compatible cards 27
installing and configuring 27
network 28
serial modem 30
wireless LAN 29
port
apply all settings 44
reset 42
port access menu 15, 126
port clustering
assigning master unit 104
autoconfigure 104
configuration menu 135
configuring slave ports 104, 106
Port Escape Menu 16
port logging 38
enabling 33
port parameters 21
configuration menu 126
port title 42
portaccessmenu 117
portreset # 117
Power Controller
overview 91
power controller
alarms and thresholds 94
configuring 92
installing 92
managing 98
user access to 96
protocols 48
157 Index
RawTCP 48
Telnet 48
R
Rackable Systems MGMT Card 81
set up 81
RADIUS 67
resetting ports 42
S
SAC support 75
safety certifications 151
saveconf 117
saving and applying changes 18
serial modem
adding 30
serial port parameters 49
serial port pinouts 143
SMTP
alerts 52
configuring 128
sniff session
configuration menu 130
viewing 131
SNMP 52
configuring 53, 128
configuring (configuration menu) 128
managing the SNMP protocol 55
Solaris Ready 153
SSH 15
accessing a port 23
configuring (configuration menu) 123
encryption methods 23
SYSLOG server
enabling 34
system administration
configuration management 112
date and time 116
firmware upgrades 111
host name configuration 116
resetting factory defaults 114
user administration 59
system logging 126
configuration menu 126
configuring device (configuration menu) 127
system logs 37
T
TACACS+ 67
Telnet 15
terminal server mode 45
TFTP 112
traps 53
U
user access control
to Power Controller 96
to serial ports 64
user groups 11
user storage space 120
username 11
users
adding 69
adding, editing, and removing 25, 59
admin username and default password 11
administration 59
root username and default password 11, 117
system admin 11
W
web interface menu 13
WEP 29
wireless LAN card 29
PN:(1P)
E
90000301
