Digigram ES8MIC Ethernet Audio Distributor User Manual ES8in 8out
Digigram Ethernet Audio Distributor ES8in 8out
Digigram >
User Manual

Digigram
Networking Your Sound
ES8in
ES8mic
ES8out
USER’SMANUAL
MANUEL UTILISATEUR
EtherSound ES8in, ES8mic & ES8out
Ethernet Audio Bridges
network ca
modificatio
Alimentation
rdial de connecter
u
ire les risques de feu ou de choc,
, mise en place
ment correct et de
une installation dans des endroits très
iquement avec un chiffon doux et sec.
n sec.
areil a été endommagé quelle qu'en
Important Safety Information
read carefully before using this equipment!
Follow these instructions and keep them in a safe place! Keep in mind that damages due to failure to
observe the instructions contained in this manual are not covered by warranty.
Instructions importantes de sécurité
lire soigneusement avant d'utiliser l'équipement!
Lisez et suivez ces instructions. Conservez les pour consultation ultérieure! Les dommages dus au
non-respect des instructions contenues dans ce manuel ne sont pas couverts par la garantie.
Wichtige Sicherheitshinweise
vor Inbetriebnahme des Gerätes sorgfältig lesen!
Befolgen Sie die Anweisungen und bewahren Sie sie für spätere Fragen auf! Bei Schäden, die durch
Nichtbeachten dieser Bedienungsanleitung verursacht werden, erlischt der Garantieanspruch!
Throughout this manual,
the lightning bolt triangle is
used to alert the user to the
risk of electric shock.
The exclamation point
triangle is used to alert the
user to important operating
or maintenance instructions.
Do Not Open the Cabinet
There are no user-serviceable
components inside this product.
Opening the cabinet may present a shock hazard,
and any modification to the product will void
your warranty. If it is necessary to open the device
for maintenance or advanced configuration
purposes, this is to be done by qualified personnel
only after disconnecting the power cord and
bles!
Power supply
The device is to be connected only to a
power supply as specified in this
manual and marked on the equipment. This
equipment must be earthed!
ma
Do not block any of the ventilation openings!
Humidity
To reduce the risk of fire or shock, do not expose
this device to rain or moisture. Do not place
objects filled with liquid on this device.
Installation Location
To ensure proper operation and to avoid safety
hazards, the device must be installed in a 19“ rack
mount chassis. If this is not possible, place it on a
firm and level surface. Avoid installation in
extremely hot or cold locations, or in an area that
is exposed to direct sunlight or heating
equipment. Avoid moist or humid locations.
Cleaning
Clean only with a soft, dry cloth. If necessary,
after disconnecting the unit’s cables, wipe it with a
soft cloth dampened with mild soapy water, then
with a fresh cloth with clean water. Wipe dry
immediately with a dry cloth. NEVER use
benzene, aerosol cleaners, thinner, alcohol or any
other volatile cleaning agent. Do not use abrasive
cleaners, which may damage the finish of metal or
other parts.
Refer all servicing to qualified service
personnel.
Servicing is required when the apparatus has been
damaged in any way, such as power supply cord
or plug is damaged, liquid has been spilled, the
apparatus has been exposed to rain or moisture,
does not operate normally, or has been dropped.
Moving the device
Before moving the unit, be certain to disconnect
any cables that connect with other components.
Ne pas ouvrir l'appareil
L'ouverture du coffret peut produire
un risque de choc électrique, et toute
n du produit annule votre garantie. S'il
est nécessaire d'ouvrir l'appareil pour l'entretien
ou la configuration avancée, cela doit être fait par
du personnel qualifié, après avoir débranché le
cordon d'alimentation et les câbles réseaux !
Il est primo
l'appareil à une alimentation
électrique telle que spécifiée dans ce
tilisateur et sur le matériel même.
Cet équipement doit être raccordé à la terre !
N'obstruer aucune ouverture de ventilation !
nuel d´
Humidité
Afin de rédu
n'exposez pas cet appareil à la pluie ou l'humidité.
Ne placez pas d´objet contenant un liquide sur
l'appareil.
Installation
Afin d'assurer le fonctionne
minimiser les risques potentiels liés à la sécurité,
l'appareil doit être installé dans une baie de
montage de type 19 pouces. Si cela ne vous est
pas possible, placez le sur une surface solide et
plane.
Evitez
chauds ou très froids ainsi que dans des lieux
exposés directement au soleil. Evitez les lieux
présentant un excès d'humidité.
Nettoyage
Nettoyez un
Si nécessaire, après avoir débranché le cordon
d´alimentation, essuyez-le avec un chiffon doux
humidifié avec de l´eau savonneuse puis rincez le
á l´aide d un chiffon propre et d´eau claire.
Séchez-le immédiatement avec un chiffo
N'utilisez JAMAIS d´essence, de nettoyants en
aérosols, d´alcool ou tout autre agent nettoyant
volatile. N'utilisez pas de produits nettoyants
abrasifs qui pourraient endommager les finitions
métalliques ou d´autres pièces.
Réparation
Lorsque l'app
soit la cause ou qu'il ne fonctionne pas
normalement, toute réparation doit être effectuée
par du personnel qualifié. Avant de transporter
l´unité, assurez-vous d´avoir bien déconnecté le
cordon d'alimentation ainsi que tous les câbles la
reliant à d´autres appareils.
Gerät nicht öffnen
Öffnen des Geräts kann eine
Gefährdung durch Stromschlag und
Erlöschen der Garantie zur Folge haben.
Reparaturarbeiten und Änderungen der
Hardwarekonfiguration dürfen nur von
qualifiziertem Personal nach entfernen der Strom-
und Netzwerkkabel durchgeführt werden.
Stromversorgung
Das Gerät darf nur mit der in dieser
Bedienungsanleitung und auf dem
Gerät angegebenen Stromversorgung
betrieben werden. Erdung ist zu gewährleisten!
Belüftungsschlitze nicht verdecken!
Wasser und Feuchtigkeit
Um Brand- oder Stromschlagrisiken zu
vermeiden, darf das Gerät nicht mit Feuchtigkeit
in Berührung kommen.
Aufbau des Geräts
Um den einwandfreien Betrieb zu gewährleisten
und Sicherheitsrisiken zu vermeiden, muss das
Gerät in einem 19-Zoll Baugruppenrahmen
montiert werden. Nur wenn dies nicht möglich
ist, stellen Sie das Gerät auf einen festen,
waagerechten Untergrund. Meiden Sie Standorten
in den Nähe von Wärme- oder
Feuchtigkeitsquellen sowie direkte
Sonneneinstrahlung.
Reinigen des Geräts
Säubern Sie das Gerät nur mit einem weichen,
trockenen Tuch. Bei Bedarf verwenden Sie ein mit
mildem Seifenwasser befeuchtetes Tuch, nachdem
Sie die Netzanschlusskabel aus der Steckdose
gezogen haben, anschliessend ein weiches, mit
klarem Wasser befeuchtetes Tuch. Trocken Sie
das Gerät sofort im Anschluss. Keinesfalls Benzol,
Verdünner oder sonstige starke Lösungsmittel
oder Scheuerreiniger verwenden, da hierdurch
das Gehäuse beschädigt werden könnte.
Lassen Sie etwaige Reparaturen nur von
qualifizierten Fachleuten durchführen!
Sollten das Netzkabel oder der Netzstecker
beschädigt sein, oder sollte das Gerät selbst
beschädigt worden sein (z. B. durch Eindringen
von Feuchtigkeit durch Fall auf den Boden), oder
sollte es nicht ordnungsgemäss funktionieren oder
eine deutliche Funktionsabweichung aufweisen,
so ist es von qualifizierten Fachleuten zu
reparieren.

D i g i g r a m
INFORMATION FOR THE USER
..........................................................................................................4
C
Co
Fi
Table of Contents
Overview
.....................................................................................................................................................................4
Contents of this package
................................................................................................................................4
The ES8in/ES8mic and ES8out front panels
......................................................................................5
The ES8in/ES8mic and ES8out rear panels
.......................................................................................6
XLR models.............................................................................................................................................................6
Terminal block models .........................................................................................................................................6
INSTALLATION
....................................................................................................................................................8
Before mounting dev ces in a rack…
Internal settings (ES8in/ES8mic only)
i
......................................................................................................8
...............................................................................................................8
onnecting your EtherSound device
.....................................................................................................8
Power ........................................................................................................................................................................8
Network ...................................................................................................................................................................8
Example 1: point-to-point transmission of eight audio channels......................................................... 8
Example 2: adding more devices................................................................................................................. 9
Example 3: more complex architectures................................................................................................... 9
nnecting a computer to manage the EtherSound network.................................................................... 9
Audio .........................................................................................................................................................................9
GPIO..........................................................................................................................................................................9
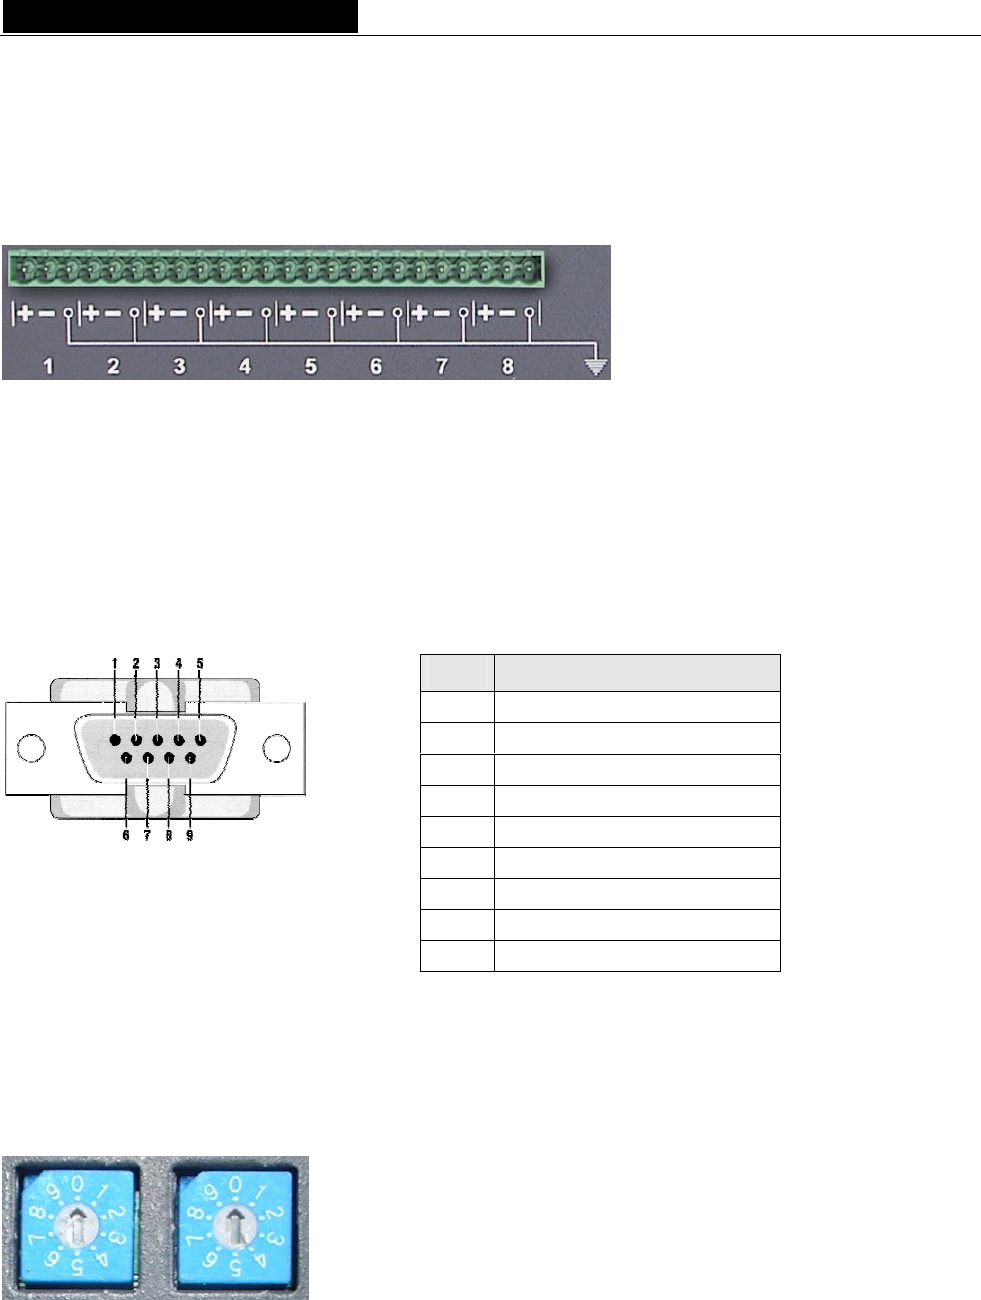
Serial port (RS232 on DB9) ............................................................................................................................ 10
Setting the EtherSound channels
Manual set-up ..................................................................................................................................................... 10
.......................................................................................................... 10
ES8mic & ES8micCL management ............................................................................................................... 11
Remote set-up by means of configuration software .................................................................................. 11
rmware update
.............................................................................................................................................. 11
2

EtherSound ES8in, ES8mic & ES8out
Ethernet Audio Bridges
r
SPECIFICATIONS
..............................................................................................................................................12
Configuration
.......................................................................................................................................................12
Parameters
............................................................................................................................................................12
Inputs/Outputs
....................................................................................................................................................12
ES8micCL special features..........................................................................................................................12
Connectivity
..........................................................................................................................................................13
Audio specifications
.........................................................................................................................................13
Synchronization
..................................................................................................................................................13
Appendix A: GPIO description
........................................................................................................14
General Purpose Inputs (GPIs)
................................................................................................................14
GPI #1....................................................................................................................................................................14
GPI #2....................................................................................................................................................................14
GPI #3 & GPI #4 ................................................................................................................................................14
GPI optocoupler specifications..........................................................................................................................15
General Purpose Outputs (GPOs)
.........................................................................................................15
GPO relay specifications.....................................................................................................................................15
Appendix B: Setting the internal jumpers
........................................................................16
Jumper locations on the main board
....................................................................................................16
Sampling frequency.............................................................................................................................................17
Input impedance and nominal input level.....................................................................................................18
Appendix C: Glossary
.................................................................................................................................19
Copyright 2004 Digigram. All rights reserved.
No portion of this manual may be reproduced without prior written consent from Digigram. The copyright protection claimed here includes
photocopying, translation and/or reformatting of the information contained in this manual.
While every effort has been made to ensure accuracy, Digigram is not responsible for errors and omissions, and reserves the right to make improvements
or changes in the products and programs described without notice.
Digigram, EtherSound, ES8in, ES8mic, and ES8out are registered trademarks or trademarks of Digigram S.A. Other trademarks are p operty of their
respective holders.
EtherSound technology is protected by international patents and patent applications, including, but not limited to, the following: WO 03/023759, FR 2 829
655, US 2003/0050989
3

D i g i g r a m
Thank you for purchasing Digigram EtherSound ES8in/ES8mic/ES8out!
EtherSound ES8in, ES8mic, and ES8out by Digigram incorporate our patented EtherSound audio networking
technology. They offer the easiest and most affordable way to install and distribute up to 64 channels of
audio between up to 65 534 devices using standard Ethernet switches and cabling.
ES8in/ES8mic insert eight analog audio channels into an EtherSound network with ES8mic adding the
flexibility to connect up to eight microphones instead of the line inputs, while ES8out extracts eight analog
audio channels for playback. All three feature GPIOs and RS232 for bi-directional control and take
advantage of EtherSound's simple, nearly instant set-up.
EtherSound ES8in, ES8mic, and ES8out allow audio distribution going well beyond the possibilities of analog
audio installations and their physically defined signal paths. Routing can be adapted remotely to the
changing needs of the audio installation.
INFORMATION FOR THE USER
This equipment has been tested and found to comply with the limits for a CLASS B digital device, pursuant to Part 15 of the FCC
Rules and with the following European and international Standards for:
Electrical safety: Electromagnetic Compatibility:
Europe : EN60950, 3rd edition
European Directive 73/23/CEE “Low Voltage Directive“
International: IEC 60950, 3rd edition
Europe: EN55022:1998 + A1:2000, Class B / EN55024 : 1998 + A1:2001
European Directive 89/336/CEE on electromagnetic compatibility
International: CISPR22:1997 + A1:2000 CLASS B
United states: FCC rules-Part 15 Class B ( digital device )
In order to guarantee compliance with the above standards in an installation, the following must be done:
· the provided cables must not be modified.
· additional cables used must have their respective shield connected to each extremity.
Operation is subject to the following two conditions: (1) This device may not cause harmful interference, and (2) This device must
accept any interference received, including interference that may cause undesired operation.
If this equipment does cause harmful interference to radio or television reception, which can be determined by turning the equipment
off and on, the user is encouraged to try to correct the interference by one or more of the following measures:
* reorient or relocate the receiving antenna
* increase the separation between the equipment and the receiver
* connect the equipment into an outlet on a circuit different from that of the receiver
* consult the dealer or an experienced audio television technician.
Note: Connecting this device to peripheral devices that do not comply with CLASS B requirements or using an unshielded peripheral data
cable could also result in harmful interference to radio or television reception. The user is cautioned that any changes or modifications
not expressly approved by the party responsible for compliance could void the user’s authority to operate this equipment. To ensure
that the use of this product does not contribute to interference, it is necessary to use shielded I/O cables.
OVERVIEW
Contents of this package
* one ES8in, one ES8mic or one ES8out 1U rack device,
* power cord,
* terminal block counterpart connectors (TB versions only),
* the user's manual at hand
* a CD-Rom with configuration software,
4
EtherSound ES8in, ES8mic & ES8out
Ethernet Audio Bridges
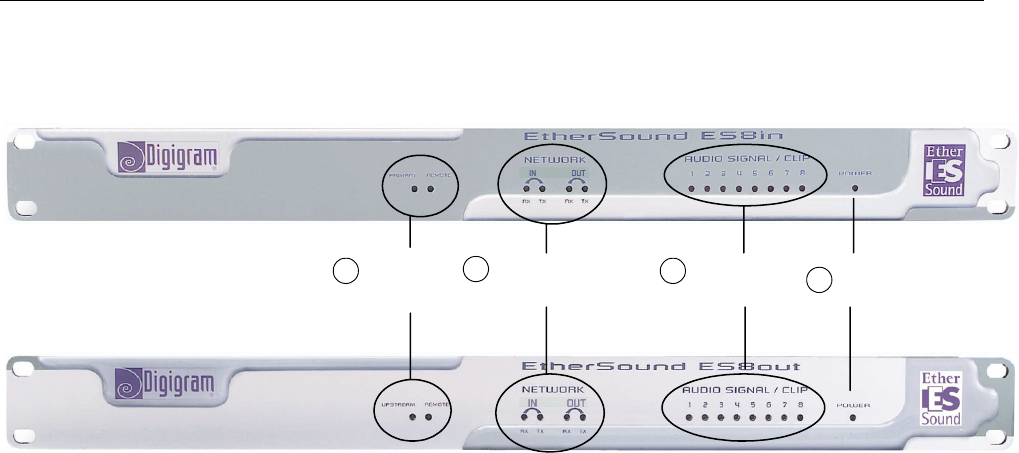
The ES8in/ES8mic and ES8out front panels
Audio metering
group Power
Network status
group
Device status
group
1234
1. Device status group (two orange LEDs):
on ES8in/ES8mic
The first LED is called “Primary”. It shines when ES8in/ES8mic is the first Master device in the EtherSound
network, thus the Primary Master of the EtherSound network (see chapter on EtherSound for more details on
the Primary Master concept)
on ES8out
The first LED is called “Upstream”. It indicates that an EtherSound stream is correctly received on the “IN”
(“FROM”) port of ES8out; in normal operation mode it constantly emits light, unless the connections to the
network have not been properly established.
on all ES8 devices
The second LED is labeled “Remote” on all devices: It is lightened when the EtherSound channel configuration
is done remotely and not by the rotary switches on the rear panels.
2. Network status group
These four green LEDs indicate an activity on the two Ethernet ports (“IN” (“FROM”) and “OUT” (“TO”)); RX
flashing means that data are received while TX flashing means that data are transmitted. As the audio in the
EtherSound stream is unidirectional (from the “IN” (“FROM”) port to the “OUT” (“TO”) port), the RX of “IN”
(“FROM”) and the TX of “OUT” (“TO”) will flash most of the time during normal operation. The TX of “IN”
(“FROM”) and the RX of “OUT” (“TO”) will flash more rarely as they only concern control data (which is bi-
directional on the EtherSound network).
3. Audio metering group
These eight bi-color LEDs exemplify the level of the analog signals passing into the eight channels of the
device. They change from green to red at 6 dB before clipping (i.e. “-6 dBfs”).
4. Power
This LED simply shows that the device is up and running!
5
D i g i g r a m
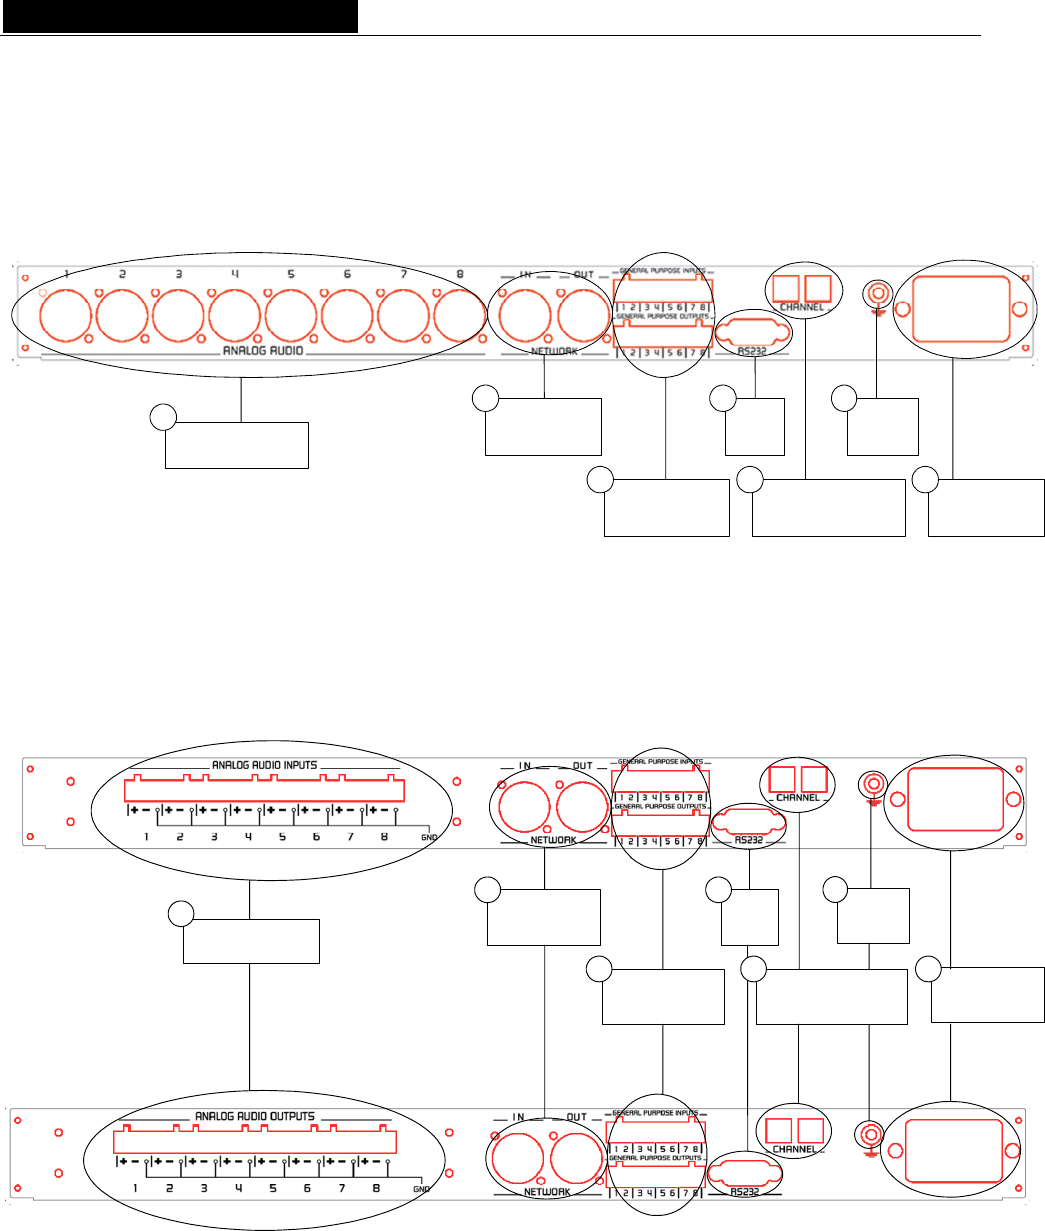
The ES8in/ES8mic and ES8out rear panels
XLR models
Audio connectors
1Network
connectors
2
GPIO
connectors
3
EtherSound channel
positionning
5
Serial
port
4
Ground
6
Power supply
7
Terminal block models
Power supply
Ground
Audio connectors
1Network
connectors
2
GPIO
connectors
3
Serial
port
4
7
6
EtherSound channel
positioning
5
6

EtherSound ES8in, ES8mic & ES8out
Ethernet Audio Bridges
1. Audio connectors
On ES8out XLR, eight male XLR-3 connectors are used to output eight balanced analog line level
signals; on ES8in XLR, eight female XLR-3 connectors are used to input eight balanced analog line
level signals, on ES8mic the input signals can be either microphone or line level. As the distinction
between in/out using female/male convention is not possible with Terminal Block models, the
serigraphy recalls whether these are inputs or outputs. Counterparts are supplied to facilitate the use
of the terminal blocks but you may buy different models at your convenience through your usual
electric parts reseller.
2. Network connectors
These two NeutrikTM EtherConTM RJ45 connectors allow of a steady and reliable connection to the
EtherSound network. The “IN” (“FROM”) port receives the EtherSound stream (from devices located
“upstream”) while the “OUT” (“TO”) port forwards it to the next devices (located “downstream”); see
EtherSound chapter for more details on upstream/downstream concepts.
3. GPIO connectors
These terminal blocks allow setup of external control and monitoring devices through configurable
and protected General Purpose Inputs and Outputs. See dedicated GPIO chapter for details.
Note: The GPIO ports are managed by configuration software only.
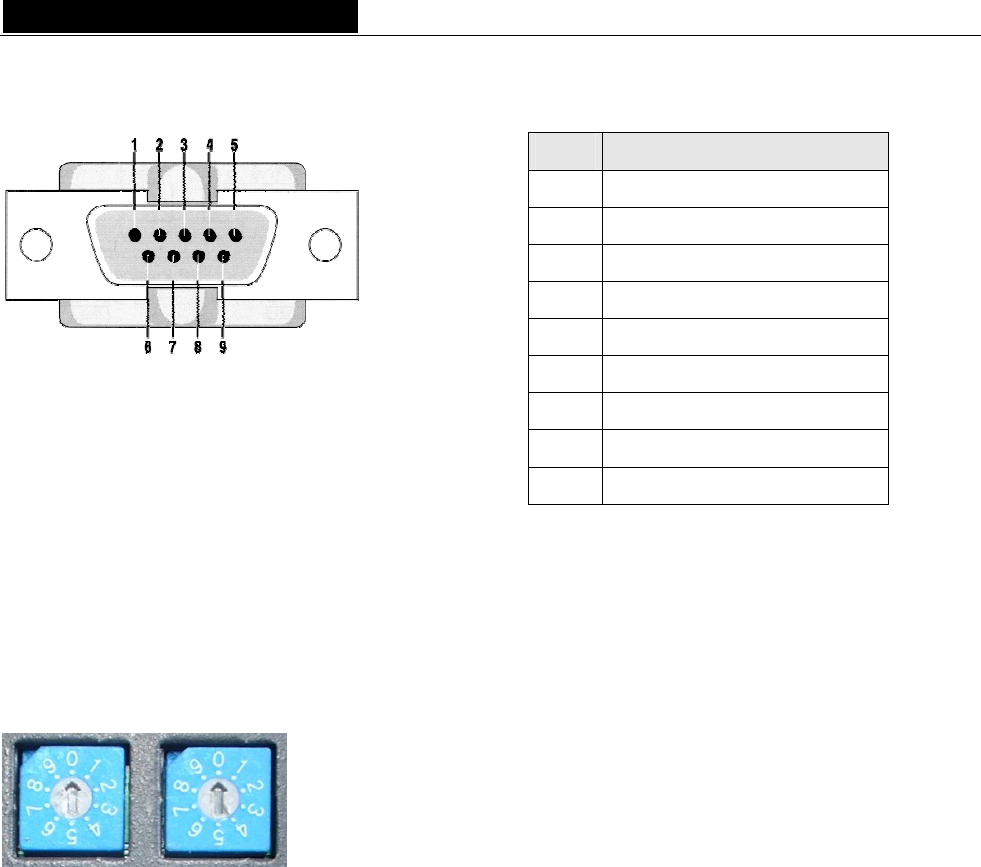
4. Serial port
RS232 interface on DB9.
Note: The RS232 serial port management requires specific software.
5. EtherSound channel positioning
These two decimal rotary switches determine whether the assignment of the EtherSound channels to
the analog inputs or outputs of ES8 is done locally or remotely through software control.
6. Ground
Connect this ground bolt to the chassis of the mounting rack for a better grounding of the electronics,
thus ensuring immunity to electromagnetic interference.
7. Power supply
Power plug MUST be earthed properly.
7
D i g i g r a m
INSTALLATION
Note: To use your ES8 devices outside of fixed installations, they must be mounted on slide rails inside the rack to
insure correct support and prevent damages during transport and handling.
Before mounting devices in a rack…
Internal settings (ES8in/ES8mic only)
On ES8in, impedance and the nominal level of entry, as well as the sampling rate can be configured using
internal jumpers.
On ES8mic, only the sampling rate is configurable.
The default values are:
- Nominal input level: +4 dBu
- Impedance: 22.2kΩ
- Sampling frequency: 48 kHz.
In case you need to change the default settings, please refer to appendix B of this manual.
Note: These operations require opening of the cabinet and shall be done by qualified personnel only.
Connecting your EtherSound device
It is recommended to establish all connections before powering up the device.
Power
Before plugging the power cord, make sure that:
• the power cord is not damaged
• the AC outlet used is properly earthed.
Just like any other audio system, power the individual devices up following the audio path and power down
in the opposite direction.
Do not allow anything to rest on the power cable. Keep the power cable away from where people could trip
over it.
Network
The cable type most commonly used today is CAT5e. For more detailed information, please refer to the
chapter “Ethernet cables” in this manual.
The network connections are established via two NeutrikTM EtherConTM RJ45 receptacles.
Connection is very easy: use the base labeled “IN” (“FROM”) to input the EtherSound stream,
the base labeled “OUT” (“TO”) to send the EtherSound stream to other devices.
The NeutrikTM EtherConTM RJ45 provide secure connection through a latching system. To
disconnect the cable from the device, press the latch, then withdraw the cable while
maintaining the latch pushed.
If you use ES8in/ES8mic as the Primary Master, the “IN” (“FROM”) port may be connected directly to a
control computer for system configuration with a crossover cable; if connection is established via a switch,
standard cables are to be used.
Example 1: point-to-point transmission of eight audio channels
This application is very easy with EtherSound ES8in/ES8mic and ES8out.
8
EtherSound ES8in, ES8mic & ES8out
Ethernet Audio Bridges
Connect a standard Ethernet cable between an ES8in/ES8mic “OUT” (“TO”) port to the “IN” (“FROM”) port of
an ES8out device. Select the ES8in/ES8mic and ES8out channels accordingly (see “Setting the EtherSound
channels” chapter).
Example 2: adding more devices
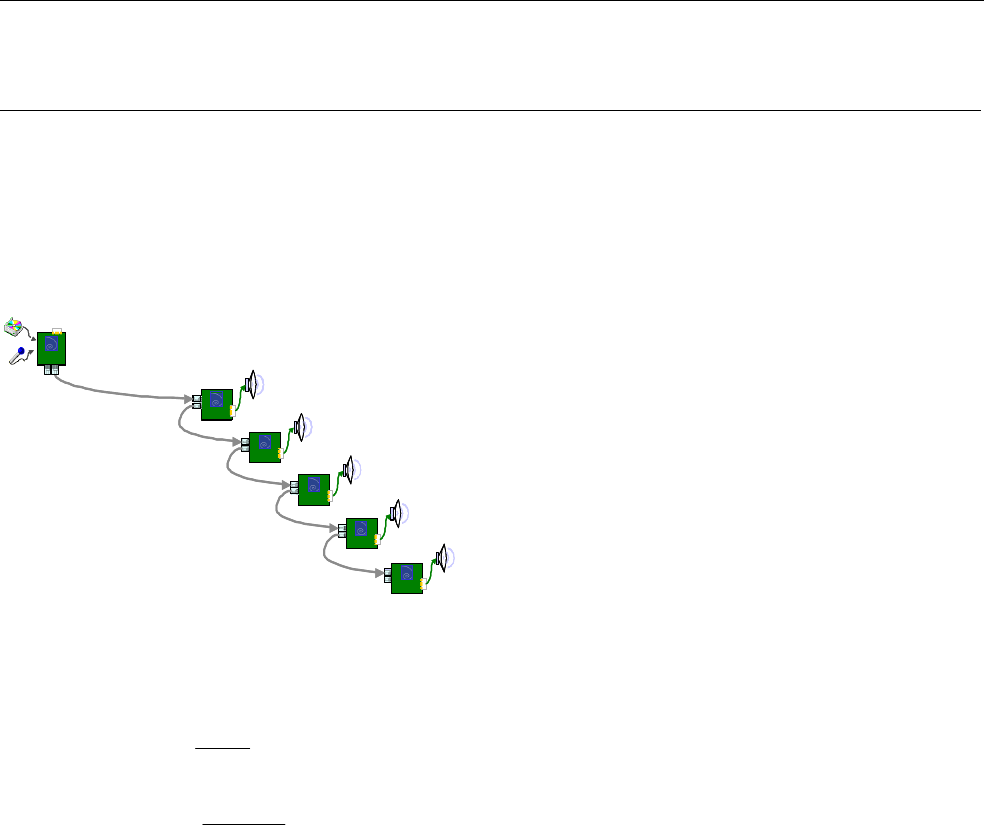
You can easily insert further ES8 devices to build a simple daisy chain. There are only two rules to follow:
1. The first device in the chain is necessarily the Primary Master, typically an ES8in/ES8mic.
2. Install the devices in the chain starting from the Primary Master; connect its “OUT” (“TO”) port to the
“IN” (“FROM”) port of the next device, connect its “OUT” (“TO”) port to the “IN” (“FROM”) port of
the following device, and so on.
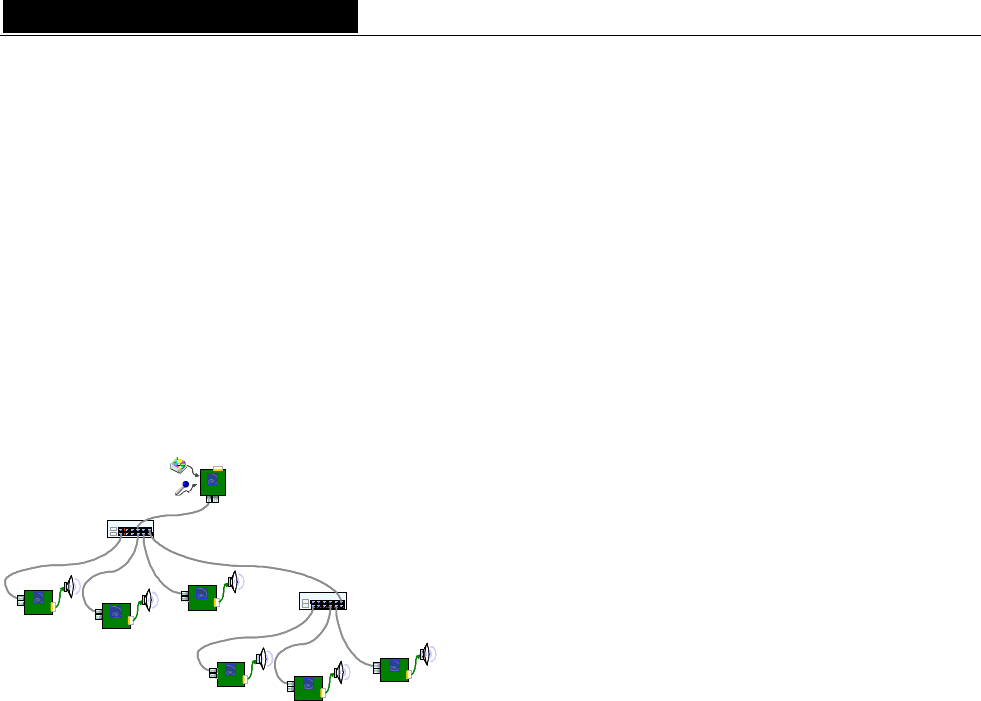
Example 3: more complex architectures
System topology may be daisy chain, star, or a combination of both. The first device in a network, such as an
EtherSound ES8in/ES8mic, provides the master clock for the entire network.
Connect the one device's “OUT” (“TO”) port to the “IN” (“FROM”) port of the following device (EtherSound
ES8in/ES8mic for inserting additional channels or EtherSound ES8out for extracting existing channels).
Repeat this step for each device in the network. The maximum distance between two devices is 100 meters
(328 feet). Intermediate switches or fiber optic links may be used to considerably increase this distance.
All EtherSound devices “downstream” from an audio source can play the corresponding network channel.
Connecting a computer to manage the EtherSound network
To connect a PC directly to ES8in/ES8mic, it must be equipped with a network card. Use a
crossover Ethernet cable to connect the network card to the “IN” (“FROM”) port of the
Primary Master.
You can also access the Primary Master through a conventional Ethernet network; in this case, use a standard
Ethernet cable (e. g. connected to a switch)
Audio
Depending on the ES8 model purchased, balanced inputs and outputs are available either on eight XLRs or on
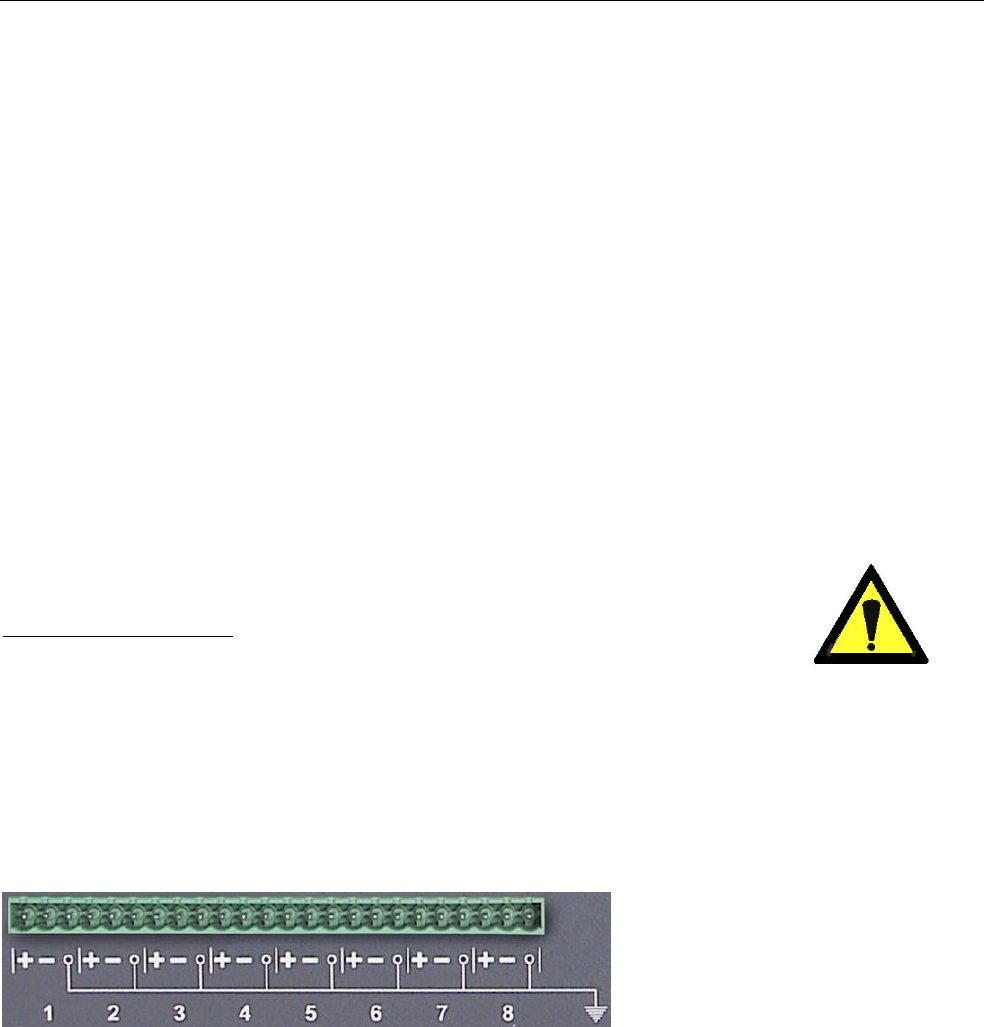
a terminal block on the rear panel. The pinout used on the XLRs is standard: pin 1 carries the signal ground,
pin 2 carries the positive signal (“hot”, +) and pin 3 carries the negative signal (“cold”, -).
The pinout of the terminal block is depicted beneath the strip:
These balanced connections are
compatible with unbalanced audio
sources and destinations: just wire
both cold pin and ground pin on ES8
to the ground of the unbalanced signal,
and the ES8 hot pin to the signal.
By default, ES8in/ES8mic nominal input level is set to +4 dBu; for details, see Appendix B.
By default, ES8out nominal output level is +4 dBu. The value can be adjusted for each channel through
management software and stored in the ES8out device.
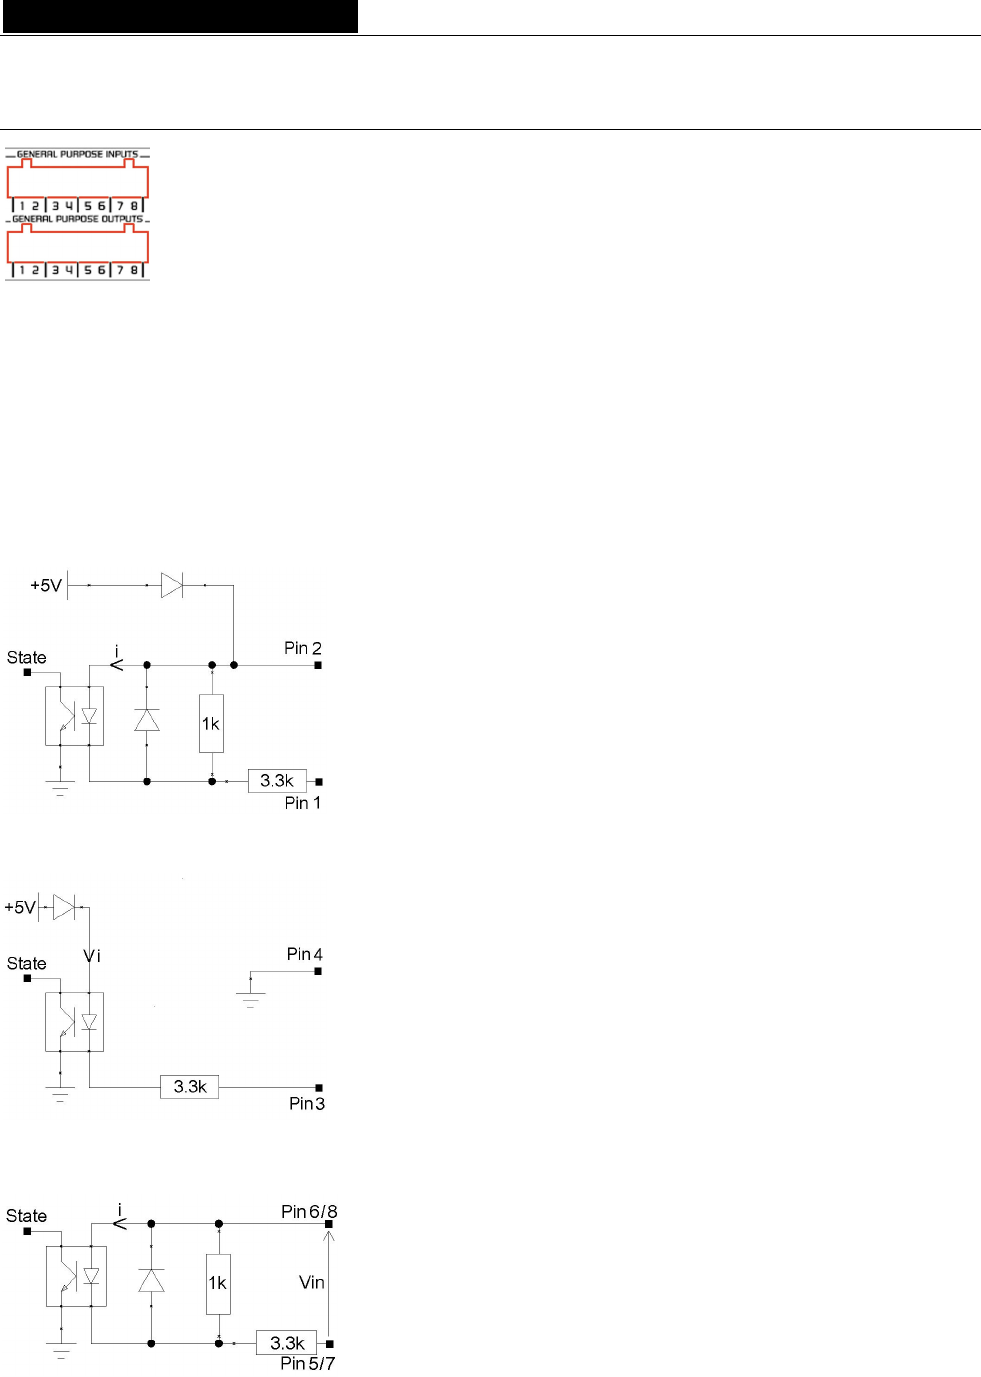
GPIO
ES8in/ES8mic and ES8out are shipped with four GPIs and four GPOs on terminal blocks, counterparts are
supplied. For details see Appendix A.
9
D i g i g r a m
Serial port (RS232 on DB9)
ES8in/ES8mic and ES8out dispose of a serial RS232 DB9 male port on the rear panel. Use this port to connect
any compatible device. For pinout allocation details, please refer to the figure and table above.
Note: The RS232 serial port requires specific software.
Setting the EtherSound channels
These two decimal rotary switches on the rear panel determine whether the
assignment of the EtherSound channels to the analog inputs or outputs of
ES8 is done locally or remotely by software control. The rotary switch on
the left is the “tens” position and the rotary switch on the right is the “ones”
position. Channels 1 to 64 are reserved for manual set-up, 0 and the
channels from 65 on set the device to remote configuration mode.
Manual set-up
To manually set the EtherSound channels to be used by the device, configure the number of the EtherSound
channel to be assigned to the first analog input or output using a small screwdriver (e. g. if you choose
channel no. 24 to be the first EtherSound channel, set the left switch to “2”, the right one to “4”). The other
channels will then be assigned subsequently (e. g. second channel = 25, third channel = 26 and so on…).
Pin # Description
1 not connected
2 RxD (received data)
3 TxD (transmitted data)
4 not connected
5 signal ground
6 not connected
7 RTS (request to send)
8 CTS (clear to send)
9 not connected
10

EtherSound ES8in, ES8mic & ES8out
Ethernet Audio Bridges
ES8mic & ES8micCL management
The ES8mic & ES8micCL management requires connection to a PC and Digigram's EScontrol software. For
further information, please refer to the EScontrol online help.
Remote set-up by means of configuration software
To prepare the device for remote control mode, set the rotary switches manually to either zero or to any
number between 65 and 99. Use of the configuration software allows for advanced channel allocation; for
software details, please refer to the online help file.
ES8in/ES8mic is shipped with a CD-ROM containing it’s the driver and EScontrol, the Digigram configuration
software. Insert the CD into a computer connected to an EtherSound network. Install the EtherSound driver
first. A window lists the instructions to follow to achieve this step.
Next, launch EScontrol setup.exe. An InstallShield Wizard will guide you through the installation process.
(Note: This operation is only necessary if software control is needed).
ES8in/ES8mic and ES8out may also be managed through configuration software edited by Digigram
development partners.
To uninstall the software go to Add/remove programs in the Windows Control Panel.
Firmware update
Digigram may decide in the context of further development to provide firmware updates for existing devices.
In this case, please refer to the respective documentation provided with the firmware upgrade tool.
11

D i g i g r a m
SPECIFICATIONS
Configuration
Size 1U 19“ rack: 43.9 x 482.6 x 297.1 mm
Power supply 100 – 240 VAC, 47-400 Hz
switching-mode, automatic voltage detection
WARNING: Do not open the power supply module. It contains hazardous
voltages. There are no user-serviceable parts inside
Temperature/humidity
(non-condensing):
Operating:
Storage:
0 °C – 50 °C / 0% - 95%
-5 °C – 70 °C / 0% - 95%
Power consumption 0.29 A
Net weight ∼3,4 kg (∼7.5 lbs)
Parameters
Selection of audio channels Manually by rotary switches or by Windows 2000/XP compatible software
EtherSound System
Configuration Software
Software application allowing the detection of the EtherSound network,
remote channel assignment, control of the GPIOs
Inputs/Outputs
EtherSound ES8in EtherSound ES8mic EtherSound ES8out
Analog audio
8 balanced analog mono
line inputs
8 balanced analog mono
line/mic inputs
with switchable
48 V phantom power
8 servo-balanced∗ analog
mono line outputs
Impedance 22.2 kΩ 22.2 kΩ <100 Ω
Nominal level +4 dBu or -10 dBV
(switchable)
-62, -44, -26, -8, +4 dBu
(software selectable)
+4 dBu
(software adjustable)
Maximum level +22 dBu or +10 dBu
(switchable)
line: +22 dBu
mic: +10 dBu
(software selectable)
+22 dBu
(software adjustable)
Analog output gain
from –72 to 0 dB
(software adjustable)
ES8micCL special features
Programmable noise-gate threshold -52 dB, -42 dB, -32 dB
Programmable compressor/limiter threshold From –26 dB to 0 dB
Programmable compressor ratio 1, 1.5, 1.8, 2, 3, 4
Programmable compressor/limiter gain From 0 to 16 dB
∗
Electronically servo-balanced outputs provide automatic level adjustment to accommodate either balanced or unbalanced lines
12

EtherSound ES8in, ES8mic & ES8out
Ethernet Audio Bridges
Limiter ratio 15:1
Compressor/limiter release time 150 ms
Connectivity
EtherSound ES8in EtherSound ES8mic EtherSound ES8out
Analog audio 8 XLR-3 female or 24-point terminal block 8 XLR-3 male or
24-point terminal block
EtherSound 2 EtherCon female RJ45 compatible (connections “IN”/“OUT”)
GPIO 4 optocoupled inputs and 4 relay outputs on 8-point terminal blocks
Serial port 1 RS232 on DB9
Audio specifications
EtherSound ES8in EtherSound ES8mic EtherSound ES8out
Sampling frequency 48 kHz or 44.1 kHz 48 kHz or 44.1 kHz 48 kHz or 44.1 kHz
A/D and D/A converter
resolution
24 bits 24 bits 24 bits
Frequency response at 48
kH
20 Hz – 20 kHz: ± 0.2
dB
20 Hz – 20 kHz: ± 0.2
dB
20 Hz – 20 kHz: ± 0.2
dB
Dynamic range
60 dBfs with Fs=48 kHz
(20 Hz/20 kHz,
unweighted)
>102 dB >96 dB at G=36 dB >104 dB
Distortion and noise
(THD+N) at 1 kHz
(–1 dBfs with Fs=48 kHz)
<-94 dB (0.002%) <-92 dB (0.0025%) <-93 dB (0.002%)
Phase difference between
channels: 20 Hz/20 kHz
0.5°/2° 0.5°/2° 0.5°/2°
Crosstalk:
at 1 kHz
at 15 kHz
(–1 dBfs with Fs=48 kHz)
<-115 dB
<-110 dB
<-120 dB
<-102 dB
at G=36 dB
<-115 dB
<-110 dB
Synchronization
Clock source Either internal
(if first EtherSound device in a network) or
external, locked on EtherSound upstream
External, locked on
EtherSound upstream
13
D i g i g r a m
APPENDIX A: GPIO DESCRIPTION
ES8in/ES8mic and ES8out feature four optocoupled GPIs and four relay GPOs. GPIs allow
sending commands to the EtherSound configuration software, GPOs can be used by the
EtherSound configuration software for remote control of external devices.
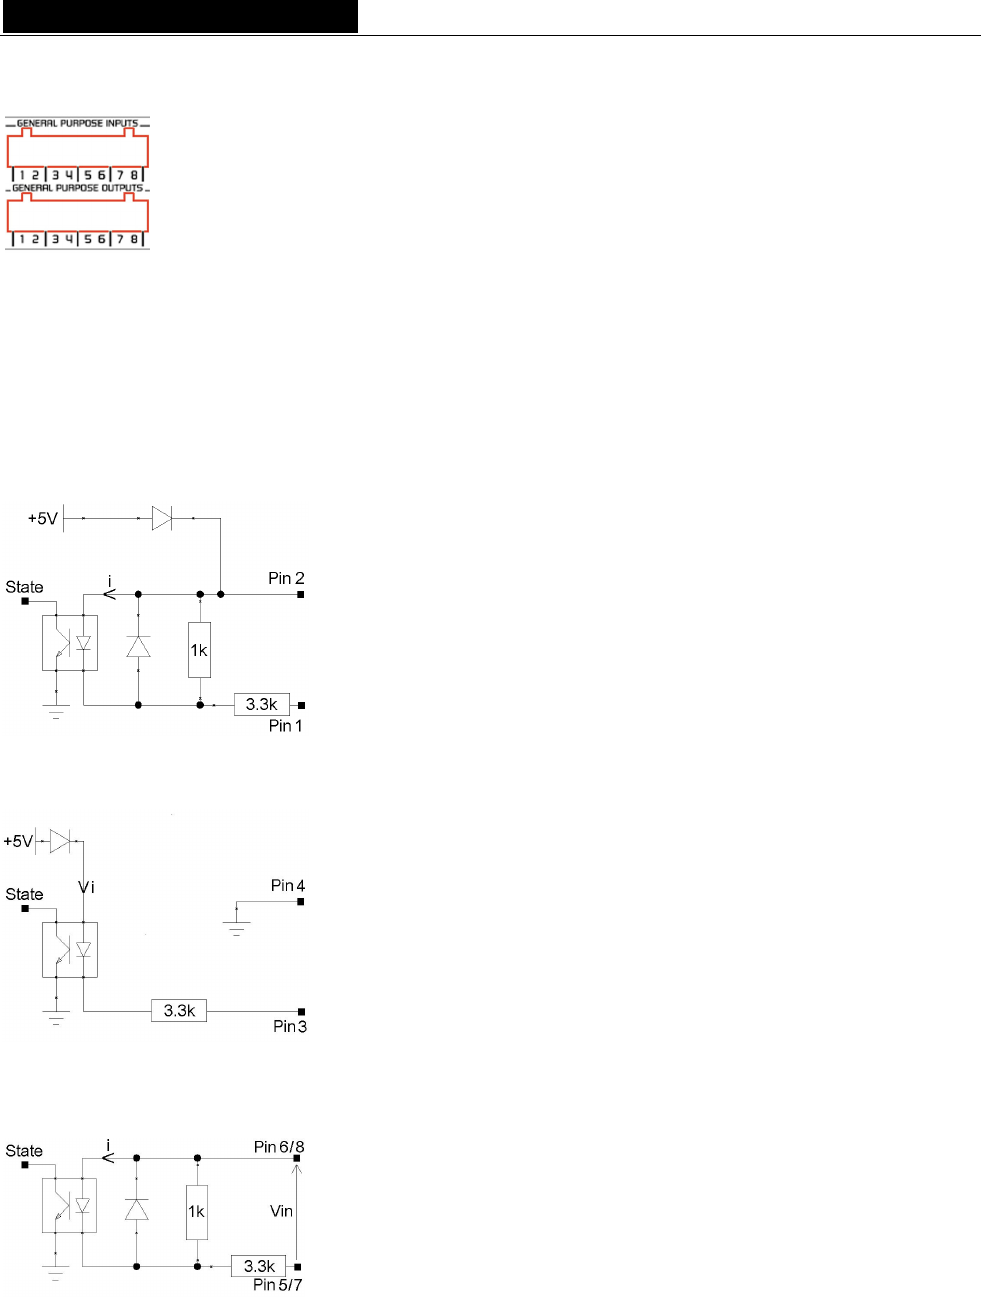
The GPIO pins are labeled 1 through 8 on the rear panel as illustrated.
General Purpose Inputs (GPIs)
Schematic diagrams show the particular design for each GPI. The GPI status can be either “1” or “0”. It is read
“0” as soon as the system connected to the GPI creates the current labeled “i” on the scheme. Otherwise it is
read “1”. Different GPI designs allow for multiple ways to establish this current, thus offering utmost flexibility
in system configuration to best meet your needs.
Note: Pin 2 delivering +5 V electric potential and pin 4 being connected to ground may also be used in the
configuration of other GPIs.
GPI #1
GPI #1 uses pins 1 & 2
Pin 2 delivers +5 V electric potential. This pin may serve as a source to
create a current flow for GPI #3 and GPI #4.
Switching the GPI state to 0:
Pin 1 is to be connected to ground to establish the “i” current, typically by
connecting it to pin 4.
GPI #2
GPI #2 uses pins 3 & 4
Switching the GPI state to 0:
Pin 3 is to be connected to ground to establish the “i” current, typically by
connecting it to pin 4.
GPI #3 & GPI #4
GPI #3 uses pins 5 & 6, GPI #4 uses pins 7 & 8.
Switching the GPI state to 0:
A current flow is to be established from pin 6 to pin 5 (GPI #3) or from pin
8 to pin 7 (GPI #4).
14

EtherSound ES8in, ES8mic & ES8out
Ethernet Audio Bridges
GPI optocoupler specifications
Minimum current imin to switch GPI 0,5 mA
Maximum current imax supported 50 mA
i calculation rule (GPI #3 & #4) i (mA) = 3,3
1,2 - Vin
Maximum voltage Vin supported 50 Vdc
Maximum reverse voltage Vin supported 6 V
General Purpose Outputs (GPOs)
The ES8 GPOs are relay outputs. They feature two pins each and are all configured the same way. Pins 1 & 2
belong to GPO #1, 3 & 4 to GPO #2, 5 & 6 to GPO #3, and 7 & 8 to GPO #4.
It responds to commands of configuration and management software sent via the Primary Master. If set to “1”,
the GPO closes the related relay. If set to “0”, the GPO opens the related relay.
GPO relay specifications
Maximum power switching capability 10 W
Maximum switching current 500 mAdc
Maximum carrying current 1 Adc
Maximum switching voltage 100 Vdc
Typical life expectancy (switching max power) 106 operations
15

D i g i g r a m
APPENDIX B: SETTING THE INTERNAL JUMPERS
These settings shall be executed by qualified personnel only!
Tools Required
• a #1 Pozidriv screwdriver
• an ESD-preventive wrist strap
• a small flat blade screwdriver
Electrostatic discharge (ESD) can damage several components on the board. To avoid such
damage in handling the board, take the following precautions:
Bring the device and everything that contacts it to ground potential by providing a
conductive surface and discharge paths. As a minimum, observe these precautions:
• Disconnect all power and signal sources.
• Place the device on a grounded conductive work surface.
• Ground yourself via a grounding wrist strap or by holding a grounded object.
• Ground any tools that will contact the device.
• Unscrew the eight flat-head Pozidriv screws (four on top-side,
four on bottom-side) counterclockwise and open the cabinet.
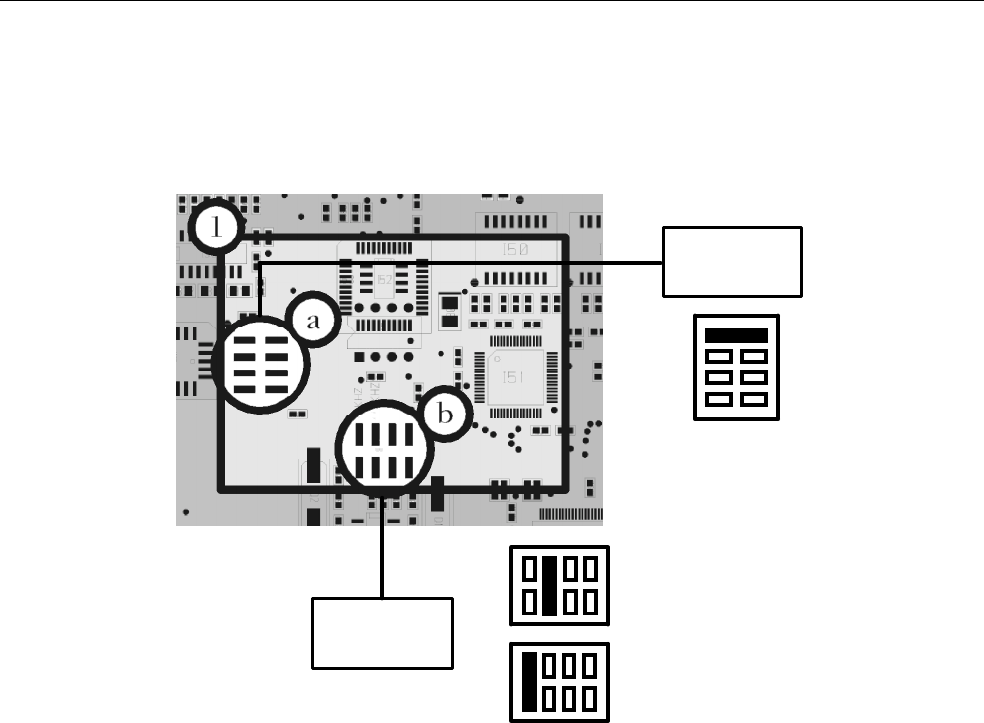
Jumper locations on the main board
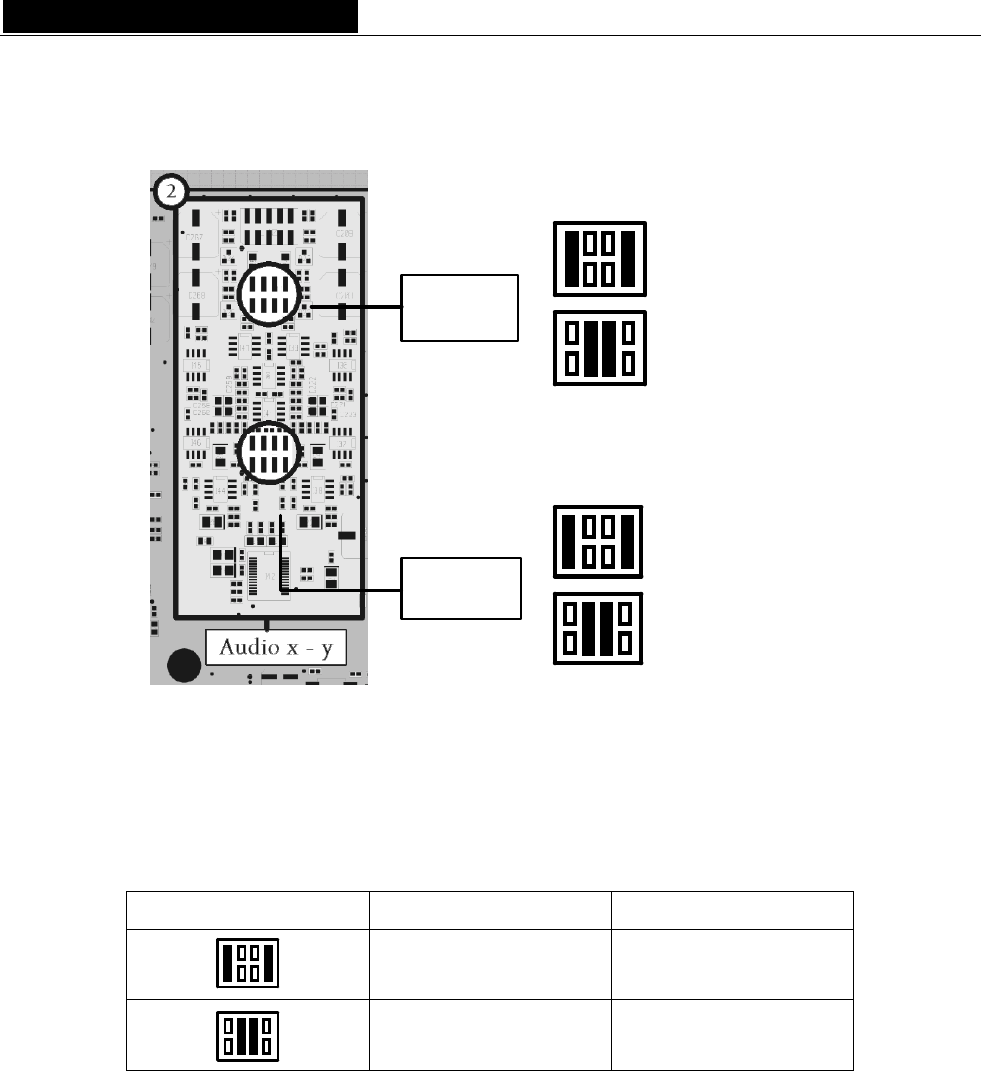
The figure above shows the locations of the different jumpers on the main board.
Area 1 explains the sampling frequency setting, area 2 illustrates the input settings for the audio channels;
every setting applies to one pair of balanced mono inputs. Please use the above overview to locate the pair
you'd like to modify. For the jumper settings in detail, please refer to the following close-ups:
to receive either –10 dBV (“Consumer” nominal level) or +4 dBu (“Professional” nominal level) analog signals.
Default setting is +4 dBu for all inputs.
16
EtherSound ES8in, ES8mic & ES8out
Ethernet Audio Bridges
The impedance of each pair of ES8in inputs can be configured to 600 Ω or 22.2kΩ. Default setting is
+22.2kΩ for all inputs.
Sampling frequency
Operating
mode
Sampling
frequency
(ES8in/mic only)
44.1 kHz
48 kHz
Normal
use
Section a shows the default setting for normal operating mode; this setting MUST NOT be modified. This
jumper area is reserved for servicing purposes.
Section b allows for modification of the ES8in/ES8mic sampling frequency. The default value is preset to
48 kHz. It can be set to 44.1 kHz. Note that this setting is effective only if the ES8in/ES8mic is the Primary
Master of the EtherSound network, as the Primary Master is the device providing the clock for the entire
network. In case ES8in/ES8mic acts as “common” Master device, the sampling frequency is determined by the
incoming EtherSound stream (synchronized on the Primary Master clock). Modifications on devices other
than the Primary Master will be ignored.
Acting as a slave device in EtherSound networks, ES8out does not feature sampling frequency jumpers.
17
D i g i g r a m
Input impedance and nominal input level
Input
impedance
(ES8in only)
Nominal
input level
(ES8in only)
600 Ohms
22.2 kOhms
+4 dBu
-10 dBV
(approx. -8 dBu)
The settings described above relate to ES8in only, since they affect nominal input level and input impedance.
Having located the pair to modify in the overview picture, set the jumpers according to the above illustrations
to match the requirements of your system.
Input levels
Jumper position Nominal input Maximum input
+4 dBu +22 dBu
-10 dBV (∼ -8 dBu) +10 dBu
18
EtherSound ES8in, ES8mic & ES8out
Ethernet Audio Bridges
APPENDIX C: GLOSSARY
AUDIO CHANNEL
An audio channel is a single mono audio signal. By extension, an audio channel is one of the 64 slots of an
EtherSound frame, i.e. a signal sampled at 48 kHz with a 24-bit resolution.
DAISY CHAIN
The daisy chain is a network topology where all devices are linked “serially”.
ES
ES
ES
ES
ES
SLAV E 5
SLAV E 4
SLAVE 3
SLAVE 2
SLAV E 1
ES
PRI MAR Y
MA ST ER
ES
ES
ES
ES
ES
ES
ES
ES
ES
ES
SLAV E 5
SLAV E 4
SLAVE 3
SLAVE 2
SLAV E 1
ES
PRI MAR Y
MA ST ER
ES
PRI MAR Y
MA ST ER
ES
ES
PRI MAR Y
MA ST ER
dBV, dBu
Two different units expressing the voltage level using logarithms:
V
VU
dBVLU1
)(
log20)( 10
=
V
VU
dBuLU775.0
)(
log20)( 10
=
dBu is widely used in the pro audio world, whereas dBV is generally associated with consumer electronics
products. To fast and simply convert dBV to dBu, you may use LU(dBu) ∼ L
U(dBV) +2 to obtain an
approximate equivalent.
FRAME
A frame is a set of characters that are transmitted as an entity according to a defined format. The frame follows
a coding procedure at the physical level before emission. The EtherSound frame is fully compliant to the
Ethernet IEEE 802.3 standard.
GPIO
General Purpose Inputs Outputs. Each ES8 device has four GPIs and four GPOs. GPOs can be fully
configured to remotely control external devices. GPIs can be used to receive commands from external devices.
MASTER
A Master is a device contributing audio channels into the EtherSound network. It is located downstream from
the Primary Master.
A Master answers to the status requests and commands of the Primary Master. See also Primary Master.
19
D i g i g r a m
PRIMARY MASTER
The first EtherSound device in the network is called the Primary Master. As well as being a source of audio
for the network, the Primary Master provides the commands and the clock for audio channel synchronization.
The Primary Master may also serve as the link between the EtherSound network and configuration software
running on an external computer, connected to its Ethernet IN/FROM port.
SLAVE
An EtherSound device that receives the EtherSound stream and restores standard audio is called a Slave.
A slave answers to the status requests and commands of the Primary Master.
STAR
Star is a network topology where all devices are connected to a same unit (a switch in the following picture)
that is handling all the communications.
Switch 1
ES
ES
ES
Swit ch 2
ES
ES
ES
SLAV E 5
SLAV E 4
SLAV E 3
SLAV E 2
SLA V E 1
SLAV E 6
ES
PRI MAR Y
MA ST ER
Switch 1Switch 1
ESES
ESES
ESES
Swit ch 2Swit ch 2
ESES
ESES
ESES
SLAV E 5
SLAV E 4
SLAV E 3
SLAV E 2
SLA V E 1
SLAV E 6
ES
PRI MAR Y
MA ST ER
ES
PRI MAR Y
MA ST ER
ESES
PRI MAR Y
MA ST ER
SWITCH
Device to connect two segments of a Local Area Network. Seeking greater filtering and forwarding speeds,
efforts were made to decrease the amount of time required to determine whether a packet should be filtered or
forwarded (‘latency’) by only examining the address information contained at the start of the Ethernet frame.
The term ‘Ethernet Switch’ now is used for multiple-port-devices, which are able to filter and forward packets
at nearly the speed of Ethernet (‘wire speed’) regardless of the technique.
20

EtherSound ES8in, ES8mic & ES8out
Ethernet Audio Bridges
Your notes:
21

EtherSound ES8in, ES8mic & ES8out
Ethernet Audio Bridges
Table des Matières
INFORMATION IMPORTANTE
......................................................................................................... 24
Presentation
........................................................................................................................................................ 24
Contenu
................................................................................................................................................................... 24
Faces avant de ES8in/ES8mic et ES8out
........................................................................................... 25
Faces arrière de ES8in/ES8mic et ES8out
....................................................................................... 26
Versions XLR........................................................................................................................................................ 26
Versions à bornier............................................................................................................................................... 26
INSTALLATION
................................................................................................................................................. 28
Avant de monter les appareils dans une baie
................................................................................ 28
Paramétrages internes (ES8in/ES8mic uniquement).................................................................................28
Connexion de votre rack EtherSound
................................................................................................ 28
Alimentation ......................................................................................................................................................... 28
Réseau ................................................................................................................................................................... 29
Exemple 1 : transmission point à point de huit canaux audio ..........................................................29
Exemple 2 : avec quelques canaux supplémentaires ..........................................................................29
Exemple 3: architectures plus complexes ...............................................................................................29
Connexion d'un ordinateur pour la gestion d'un réseau EtherSound.................................................... 29
Audio ...................................................................................................................................................................... 30
GPIO (entrées/sorties Tout Ou Rien) ............................................................................................................. 30
Port série (RS232 sur DB9) ............................................................................................................................. 30
Réglage des canaux EtherSound
............................................................................................................ 30
Réglage manuel................................................................................................................................................... 31
Gestion d'ES8mic et d'ES8micCL.................................................................................................................... 31
Réglage à distance au moyen du logiciel de configuration....................................................................... 31
Mise à jour du micrologiciel
....................................................................................................................... 31

EtherSound ES8in, ES8mic & ES8out
Passerelles Audio Ethernet
,
SPECIFICATIONS
..............................................................................................................................................32
Configuration
.......................................................................................................................................................32
Paramètres
............................................................................................................................................................32
Entrées/sorties
.....................................................................................................................................................32
ES8micCL : Caractéristiques particulières...............................................................................................33
Connectivité
..........................................................................................................................................................33
Caractéristiques audio
...................................................................................................................................33
Synchronisation
..................................................................................................................................................33
Annexe A : Connecteurs GPIO (Tout Ou Rien)
............................................................33
General Purpose Inputs (GPIs)
................................................................................................................34
GPI n°1...................................................................................................................................................................34
GPI n°2...................................................................................................................................................................34
GPIs n°3 & n°4....................................................................................................................................................34
Caractéristiques des optocoupleurs des GPIs...............................................................................................34
General Purpose Outputs (GPOs)
.........................................................................................................35
Caractéristiques des relais des GPOs .............................................................................................................35
Annexe b : Parametrage des cavaliers internes
.........................................................36
Localisation des cavaliers sur la carte principale
.........................................................................36
Fréquence d'échantillonnage.............................................................................................................................37
Niveau d’entrée nominal et impédance d'entrée........................................................................................38
Annexe C : Glossaire
...................................................................................................................................39
Copyright 2004 Digigram. Tous droits réservés.
Aucune partie de ce manuel ne peut être reproduite sans l’accord préalable de Digigram. Cette réserve inclut la photocopie, la traduction et/ou la remise
en forme de l’information contenue dans ce manuel.
Digigram ne peut être tenu responsable pour toute erreur ou omission et se réserve le droit d’apporter des modifications et des améliorations sans
préavis.
Digigram, EtherSound, ES8in, ES8mic et ES8out sont des marques déposées ou des marques commerciales de Digigram S.A.. Toutes les autres marques
sont la propriété des sociétés respectives.
La technologie EtherSound est protégée par des brevets et des demandes de brevet internationaux, y compris, mais pas limitée à :
WO 03/023759, FR 2 829 655 USA 2003/0050989
23

D i g i g r a m
Vous venez d’acquérir Digigram EtherSound ES8in/ES8out et nous vous
en félicitons !
EtherSound ES8in/ES8mic et ES8out par Digigram sont basés sur EtherSound, notre technologie breveté
d’audio sur réseau. Ils permettent de réaliser facilement et économiquement des réseaux de distribution
audio numériques comportant jusqu'à 64 canaux audio, en utilisant des composants Ethernet standard
(câbles et commutateurs).
ES8in/ES8mic transforme jusqu'à huit signaux audio analogiques en autant de canaux EtherSound, avec
ES8mic supportant les nivaux d’entrée micro ou ligne, tandis que ES8out extrait jusqu'à huit canaux
numériques du réseau et les transforme en autant de signaux audio analogiques. Les trois appareils sont
équipés d'entrées/sorties Tout Ou Rien et d'une interface RS232, et bénéficient de la configuration simple et
instantanée d'un réseau EtherSound.
EtherSound ES8in/ES8mic et ES8out permettent la distribution audio avec une flexibilité dépassant de loin
les possibilités des installations audio analogiques et de leurs chemins définis physiquement. Le routage peut
être effectué à distance pour s'adapter aux besoins changeants de l'installation.
INFORMATION IMPORTANTE
Cet appareil a été testé et est conforme aux normes suivantes :
Sécurité électrique: Compatibilité électromagnétique:
Europe : EN60950, 3rd edition
European Directive 73/23/CEE “Low Voltage Directive”
International: IEC 60950, 3rd edition
Europe: EN55022:1998 + A1:2000, Class B / EN55024 : 1998 + A1:2001
European Directive 89/336/CEE on electromagnetic compatibility
International: CISPR22:1997 + A1:2000 CLASS B
United states: FCC rules-Part 15 Class B
Pour assurer une conformité aux standards énumérés ci-dessus, les règles suivantes doivent être observées :
- le câble fourni ne doit pas être modifié.
- les câbles additionnels utilisés doivent avoir leur blindage respectif relié à chaque extrémité.
PRESENTATION
Contenu
Dans l'emballage ES8 vous disposez:
* d'un appareil ES8in, ES8mic ou ES8out au format rack 1U 19 pouces,
* d'un cordon d'alimentation,
* de prises pour borniers (versions TB uniquement),
* de ce manuel d’utilisateur,
* d’un CDROM qui contient le logiciel de configuration.
24

EtherSound ES8in, ES8mic & ES8out
Passerelles Audio Ethernet
Faces avant de ES8in/ES8mic et ES8out
Présence et/ou
saturation du signal Alimentation
Activité
réseau
Statut de
l'appareil
1234
1. Statut de l'appareil (deux diodes électroluminescentes oranges):
sur ES8in/ES8mic
La première diode s'appelle “Primary”. Elle s'allume quand ES8in/ES8mic est le premier “Master” dans le
réseau EtherSound, donc le “Primary Master” du réseau EtherSound (voir le chapitre sur EtherSound pour
plus de détails sur le concept de “Primary Master”).
sur ES8out
La première diode s'appelle “Upstream”. Elle indique qu'un flux EtherSound est correctement reçu sur le
port “IN” (“FROM”) d'ES8out; en mode normal d'opération elle est constamment allumée, sauf si les
raccordements réseau n'ont pas été établis correctement.
sur ES8in/ES8mic et ES8out
La deuxième diode s'appelle “Remote” sur les trois appareils : elle s’allume quand la configuration des
canaux EtherSound est exécutée à distance et non pas par les roues codeuses de la face arrière.
2. Activité réseau
Ces quatre diodes vertes indiquent une activité sur les deux ports Ethernet (“IN” (“FROM”) et “OUT”
(“TO”)); RX clignotant signale que des données sont reçues tandis que TX clignotant signale que des
données sont transmises. Comme les canaux audio dans le flux EtherSound sont unidirectionnels (du port
“IN” (“FROM”) au port “OUT” (“TO”)), la diode RX de “IN” (“FROM”) et la diode TX de “OUT” (“TO”)
clignoteront la plupart du temps en fonctionnement normal. Le TX de “IN” (“FROM”) et le RX de “OUT”
(“TO”) clignoteront plus rarement, car ils concernent seulement les donnés de contrôle (qui sont bi-
directionnelles sur le réseau EtherSound).
3. Présence et/ou saturation du signal
Ces huit diodes bicolores témoignent de la présence et/ou de la saturation des signaux analogiques passant
dans les huit canaux de l'appareil. Elles passent de vert à rouge 6 dB avant la saturation (c.à.d. quand le
signal atteint “- 6 dBfs”).
4. Alimentation
Cette diode montre simplement que l'appareil est en service !
25
D i g i g r a m
Faces arrière de ES8in/ES8mic et ES8out
Versions XLR
Connecteurs audio
1Connecteurs
réseau
2
Connecteurs
GPIO
3
Sélecteur des canaux
EtherSound
5
Port
série
4
Mise à la
masse
6
Alimentation
7
Versions à bornier
Alimentation
Mise à la
masse
Connecteurs audio
1Connecteurs
réseau
2
Connecteurs
GPIO
3
Port
série
4
7
6
Sélecteur des canaux
EtherSound
5
26

EtherSound ES8in, ES8mic & ES8out
Passerelles Audio Ethernet
1. Connecteurs audio
Sur ES8out XLR, huit connecteurs XLR-3 mâles sont utilisés pour restituer huit signaux analogiques
symétriques; sur ES8in XLR, huit connecteurs XLR-3 femelles sont utilisés pour insérer huit signaux
analogiques symétriques ; sur ES8mic, ces signaux peuvent être au niveau micro ou ligne. Comme la
distinction entrées/sorties basée sur la convention male/femelle n'est pas possible avec les versions à
bornier, la sérigraphie rappelle s'il s'agit d'entrées ou de sorties. Des prises réciproques sont fournies
afin de faciliter l'utilisation des borniers, mais vous pouvez acheter d'autres modèles à votre
convenance chez votre revendeur habituel de composants électriques.
2. Connecteurs réseau
Ces deux connecteurs NeutrikTM EtherConTM RJ45 permettent un raccordement fiable au réseau
EtherSound. Le port “IN” (“FROM”) reçoit le flux EtherSound (en provenance des appareils localisés
“en amont”) tandis que le port “OUT” (“TO”) l'envoie aux appareils suivants (localisés “en aval”); voir
le chapitre EtherSound pour plus de détails sur les concepts d'amont (“upstream”) et d'aval
(“downstream”).
3. Connecteurs GPIO (Tout Ou Rien)
Ces borniers permettent l'installation de dispositifs externes de contrôle par des entrées/sorties Tout
Ou Rien configurables et protégées. Voir le chapitre consacré aux entrées/sorties Tout Ou Rien pour
plus de détails.
Note : les ports Tout Ou Rien sont utilisables uniquement via le logiciel de configuration.
4. Port série
Interface RS232 sur DB9.
Note : Un logiciel spécifique est requis pour utiliser le port RS232.
5. Sélecteur des canaux EtherSound
Ces deux roues codeuses décimales déterminent si l'attribution des canaux EtherSound aux entrées ou
aux sorties d'ES8 est faite localement ou à distance par logiciel de configuration.
6. Mise à la masse
Connectez cette vis de masse au châssis de la baie de montage pour une meilleure mise à la masse de
l'électronique, assurant ainsi une bonne immunité aux interférences électromagnétiques.
7. Alimentation
La prise de courant DOIT être mise à la terre correctement.
27
D i g i g r a m
INSTALLATION
Attention : pour tout transport des ES8 montés dans un rack, il est nécessaire d’utiliser des glissières pour un
maintien correct des unités dans leur rack.
Avant de monter les appareils dans une baie
Paramétrages internes (ES8in/ES8mic uniquement)
Sur ES8in, l'impédance et le niveau nominal d'entrée, ainsi que la fréquence d'échantillonnage peuvent être
configurés à l'aide de cavaliers internes.
Sur ES8mic, seule la fréquence d'échantillonnage est configurable.
Les valeurs par défaut sont :
- Niveau d’entrée nominal : +4 dBu
- Impédance : 22.2kΩ
- Fréquence d'échantillonnage : 48 kHz.
Si vous souhaitez modifier ces valeurs, veuillez vous référer à l'annexe B de ce manuel.
Note : ces opérations requièrent l'ouverture du coffret et doivent être effectuées par du personnel qualifié uniquement.
Connexion de votre rack EtherSound
Il est recommandé d'établir tous les raccordements avant de mettre l'appareil sous tension.
Alimentation
Avant de brancher le cordon d'alimentation, assurez-vous que:
• le cordon d'alimentation n'est pas endommagé
• la prise de courant utilisée est convenablement mise à la terre.
Comme dans tout autre système audio, il est recommandé de mettre sous tension les différents appareils selon
l'ordre défini par le chemin du signal audio et de les mettre hors tension dans l'ordre inverse.
Ne rien laisser reposer sur le cordon d'alimentation. Tenez le cordon d'alimentation à l'écart de zones de
passage.
28

EtherSound ES8in, ES8mic & ES8out
Passerelles Audio Ethernet
Réseau
Le type de câble plus couramment utilisé de nos jours est le CAT5e. Pour plus d'information, veuillez vous
reporter au chapitre “Câbles Ethernet”.
Les connexions réseau sont réalisées via deux embases NeutrikTM EtherConTM RJ45. La
connexion est très simple : utilisez l'embase marquée “IN” (“FROM”) pour entrer le flux
EtherSound, l'embase marquée “OUT” (“TO”) pour envoyer le flux EtherSound vers d'autres
dispositifs.
Les NeutrikTM EtherConTM RJ45 permettent une connexion sure grâce à un système de verrouillage. Pour
déconnecter le câble du dispositif, appuyer sur le cliquet et tirer simultanément le câble.
Si vous utilisez un ES8in/ES8mic en tant que “Primary Master”, le port “IN” (“FROM”) peut être raccordé
directement à un ordinateur de contrôle pour configurer le système EtherSound à l'aide d'un câble réseau
croisé; si la connexion est établie à travers d'un commutateur, un câble droit doit être utilisé.
Exemple 1 : transmission point à point de huit canaux audio
Cette application est très simple avec EtherSound ES8in/ES8mic et ES8out.
Connectez un câble Ethernet standard entre le port “OUT” (“TO”) d'un ES8in/ES8mic et le port “IN”
(“FROM”) d'un ES8out. Mettez en concordance les canaux EtherSound sur les deux appareils (voir chapitre
“Réglage des canaux EtherSound”).
Exemple 2 : avec quelques canaux supplémentaires
Vous pouvez facilement insérer d'autres ES8 pour créer une chaîne simple. Il y a seulement deux règles à
suivre:
1. Le premier dispositif dans la chaîne est nécessairement le “Primary Master”, typiquement un
ES8in/ES8mic.
2. Positionnez les appareils dans la chaîne à partir du “Primary Master”; reliez son port “OUT” (“TO”) au
port “IN” (“FROM”) de l'appareil suivant, reliez le port “OUT” (“TO”) de ce dernier au port “IN”
(“FROM”) de l'appareil suivant, et ainsi de suite.
Exemple 3: architectures plus complexes
La topologie du système peut être en série (daisy chain), en étoile, ou une combinaison des deux. Le premier
dispositif dans un réseau, tel qu'un EtherSoundES8in/ES8mic, fournit l'horloge maître pour le réseau entier.
Connecter le port “OUT” (“TO”) avec le port “IN” (“FROM”) de l’équipement EtherSound suivant (EtherSound
ES8in/ES8mic pour créer des canaux supplémentaires ou EtherSound ES8out pour extraire les canaux
existants).
Répéter cette étape autant de fois que nécessaire. La distance maximale entre deux équipements est de 100 m.
Des commutateurs interconnectés ou des fibres optiques peuvent considérablement augmenter cette distance.
Tout équipement EtherSound “en aval” d’une source audio peut restituer le canal EtherSound correspondant.
Connexion d'un ordinateur pour la gestion d'un réseau EtherSound
Pour connecter un PC directement à un ES8in/ES8mic, ce PC doit être équipé d'une carte
réseau. Utiliser un câble Ethernet croisé pour relier la carte réseau au port “IN” (“FROM”) du
“Primary Master”.
Vous pouvez aussi accéder au “Primary Master” à travers un réseau Ethernet conventionnel;
dans ce cas, utilisez un câble Ethernet standard (par exemple, connecté à un commutateur).
29
D i g i g r a m
Audio
En fonction du modèle ES8 acquis, les entrées/sorties symétriques sont disponibles soit sur huit XLR, soit sur
un bornier. Le brochage utilisé sur les XLR est standard: le point 1 est connecté à la masse, le point 2 au signal
positif (“point chaud”), et le point 3 au signal négatif (“point froid”).
Le brochage du bornier est décrit sur la face arrière:
Ces entrées/sorties symétriques
peuvent être utilisées avec des sources
et destinations audio asymétriques. il
suffit de raccorder le point froid et la
masse de l'ES8 à la masse du signal
asymétrique, et de relier le point chaud
au signal.
Par défaut, le niveau nominal d'entrée d'un ES8in/ES8mic est de +4 dBu;
Par défaut, le niveau nominal de sortie d'un ES8out est de +4 dBu. Cette valeur peut être ajustée pour chaque
canal par le logiciel de configuration et être mémorisée dans l'ES8out.
GPIO (entrées/sorties Tout Ou Rien)
ES8in/ES8mic et ES8out sont livrés avec quatre GPIs et quatre GPOs sur prises borniers dont les contre-
parties sont fournies. Voir annexe A pour plus de détails.
Port série (RS232 sur DB9)
ES8in/ES8mic et ES8out disposent d'un port série RS232 sur DB9 mâle sur le panneau arrière. Utilisez ce port
pour relier tout dispositif compatible. Pour le brochage détaillé, veuillez vous référer au dessin et au tableau
ci-dessus.
Note : Un logiciel spécifique est requis pour utiliser le port RS232.
Réglage des canaux EtherSound
Ces deux roues codeuses décimales de la face arrière déterminent si
l'attribution des canaux EtherSound aux entrées ou aux sorties d'ES8 est
faite localement ou à distance par logiciel de configuration. La roue
codeuse de gauche permet d'indiquer la dizaine du canal EtherSound à
sélectionner. La roue codeuse de droite indique l'unité. Les canaux 1 à 64
sont réservés pour la configuration manuelle, 0 et les canaux de 65 à 99
règlent l'appareil en mode configuration à distance.
Point Description
1 non connecté
2 RxD (received data)
3 TxD (transmitted data)
4 non connecté
5 masse des signaux
6 non connecté
7 RTS (request to send)
8 CTS (clear to send)
9 non connecté
30

EtherSound ES8in, ES8mic & ES8out
Passerelles Audio Ethernet
Réglage manuel
Pour régler manuellement les canaux EtherSound à utiliser, fixer le numéro du canal EtherSound à affecter à
la première entrée ou sortie analogique à l'aide d'un petit tournevis.
Exemple : pour choisir le canal 24 comme premier canal EtherSound, placez la roue codeuse de gauche sur 2 et
celle de droite sur 4.
Les autres canaux seront alors affectés en séquence. (dans notre exemple: deuxième canal = 25, troisième canal =
26 etc…).
Gestion d'ES8mic et d'ES8micCL
La gestion du préampli micro de l'ES8mic et du compresseur-limiteur de l'ES8micCL exige le raccordement à
un PC et au logiciel d'EScontrol de Digigram. Pour plus d'informations, veuillez vous référer à l'aide en ligne
d'EScontrol.
Réglage à distance au moyen du logiciel de configuration
Pour préparer le dispositif pour le mode de télécommande, régler les roues codeuses manuellement sur soit
zéro, soit tout nombre compris entre 65 et 99. L'utilisation du logiciel de configuration apporte plus de
souplesse dans l'attribution des canaux; pour plus de détails sur le logiciel, veuillez vous référer à son aide en
ligne.
ES8in/ES8mic est livré avec un CD-ROM contenant le pilote EtherSound et le logiciel de configuration de
Digigram, EScontrol. Pour procéder à l' installation, il est indispensable d’ajouter d'abord le pilote EtherSound
à votre système. Une fenêtre affiche les instructions que vous devez suivre pour réaliser cette étape.
Ensuite, lancez setup.exe sur un ordinateur relié à un réseau EtherSound. Un assistant InstallShield vous
guidera lors de la procédure d'installation.
(Note : Cette opération n’est nécessaire que dans le cas où vous ayez besoin de contrôle par logiciel)
ES8in/ES8mic et ES8out peuvent également être contrôlés par un logiciel de configuration édité par des
partenaires de développement de Digigram.
Aller dans Ajout/Suppression de programmes dans le panneau de configuration pour désinstaller le logiciel.
Mise à jour du micrologiciel
Digigram peut être amené à publier des mises à jour du microcode embarqué. Il peut alors être nécessaire de
mettre à jour vos appareils. Dans ce cas, veuillez vous référer à la documentation respective livrée avec l'outil
de mise à jour du micrologiciels.
31
D i g i g r a m
SPECIFICATIONS
Configuration
Dimensions 1U 19“ rack: 43.9 x 482.6 x 297.1 mm
Alimentation 100 – 240 VAC, 47-63 Hz
alimentation à découpage, détection automatique de tension
AVERTISSEMENT: Ne pas ouvrir le bloc d'alimentation. Tensions dangereuses
à l'intérieur. Ne contient aucune pièce que l'utilisateur puisse réparer
Température/humidité
(sans condensation)
En fonctionnement
Stockage :
0 °C – 50 °C / 0% - 95%
-5 °C – 70 °C / 0% - 95%
Consommation 0.29 A
Poids net ∼3,4 kg (∼7.5 lbs)
Paramètres
Sélection des canaux audio Manuellement par roues codeuses ou par logiciel compatible
Windows 2000/XP
Logiciel de configuration
EtherSound
Application permettant la détection du réseau EtherSound, l'attribution à
distance de canaux, la commande des entrées/sorties Tout Ou Rien (GPIO)
Entrées/sorties
EtherSound ES8in EtherSound ES8mic EtherSound ES8out
Audio analogique
8 entrées analogiques ligne
symétriques mono
8 entrées analogiques
ligne/micro symétriques
mono avec alimentation
fantôme 48 V commutable
8 sorties analogiques ligne
mono à symétrie flottante∗
Impédance 22.2 kΩ 22.2 kΩ <100 Ω
Niveau nominal +4 dBu ou -10 dBV
(réglable)
-62, -44, -26, -8, +4 dBu
(ajustable par logiciel)
+4 dBu
(ajustable par logiciel)
Niveau maximum +22 dBu ou +10 dBu
(réglable)
réglable par logiciel
line: +22 dBu
mic: +10 dBu
+22 dBu
(ajustable par logiciel)
Gain de sortie
analogique
de –72 à 0 dB
(ajustable par logiciel)
∗
Les sorties à symétrie flottante électronique permettent de traiter indifféremment les signaux symétriques ou asymétriques sans perte de niveau.
mono avec gains de sortie analogiques et numériques programmables
32

EtherSound ES8in, ES8mic & ES8out
Passerelles Audio Ethernet
ES8micCL : Caractéristiques particulières
Seuil programmable d'expansion-compression -52 dB, -42 dB, -32 dB
Seuil programmable d'expansion-compression de –26 dB à 0 dB
Ratio programmable de compression 1, 1.5, 1.8, 2, 3, 4
Gain programmable de compression-limitation de 0 à 16 dB
Ratio du limiteur 15:1
Temps de relâchement compresseur/limiteur 150 ms
Connectivité
EtherSound ES8in EtherSound ES8mic EtherSound ES8out
Audio analogique 8 XLR-3 femelles ou bornier 24 points 8 XLR-3 mâles
ou bornier 24 points
EtherSound 2 EtherCon femelle RJ45 compatible (connexions “IN”/“OUT”)
GPIO (entrées/sorties
Tout Ou Rien) 4 entrées optocouplées et 4 sorties relais sur borniers 8 points
Port série 1 RS232 sur DB9
Caractéristiques audio
EtherSound ES8in EtherSound ES8mic EtherSound ES8out
Fréquence
d'échantillonnage
48 kHz ou 44.1 kHz 48 kHz ou 44.1 kHz 48 kHz ou 44.1 kHz
Résolution des CAN/CNA 24 bits 24 bits 24 bits
Bande passante à 48 kHz 20 Hz – 20 kHz: ± 0.2 dB 20 Hz – 20 kHz: ± 0.2 dB 20 Hz – 20 kHz: ± 0.2 dB
Dynamique –60 dBfs avec
Fs=48 kHz (20 Hz/20 kHz,
non-pondérée)
>102 dB >96 dB à G=36 dB >104 dB
Distorsion + bruit à 1 kHz
(-1 dBfs avec Fs=48 kHz)
<-94 dB (0.002%) <-92 dB (0.0025%) <-93 dB (0.002%)
Différence de phases entre
canaux: 20 Hz/20 kHz
0.5°/2° 0.5°/2° 0.5°/2°
Diaphonie:
à 1 kHz
à 15 kHz
(0 dBfs avec Fs=48 kHz)
<-115 dB
<-110 dB
<-120 dB
<-102 dB
à G=36 dB
<-115 dB
<-110 dB
Synchronisation
Source d'horloge Interne
(si premier équipement EtherSound dans un réseau)
ou externe, verrouillée sur le flux EtherSound amont
Externe, verrouillée sur le
flux EtherSound amont
ANNEXE A : CONNECTEURS GPIO (TOUT OU RIEN)
33
D i g i g r a m
ES8in/ES8mic et ES8out possèdent quatre GPIs optocouplés et quatre relais GPOs. Les
GPIs permettent d'envoyer des commandes au logiciel de configuration EtherSound, les
GPOs peuvent être utilisés par le logiciel de configuration EtherSound pour la
télécommande de dispositifs externes.
Les bornes des GPIOs sont marquées 1 à 8 sur le panneau arrière comme illustré.
General Purpose Inputs (GPIs)
Les schémas suivants décrivent la conception de chaque GPI. Le statut d'un GPI peut être soit à “1”, soit à “0” .
Il est lu à “0” dès que le système relié au GPI crée le courant marqué “i” sur le schéma. Sinon, le GPI est lu à
“1”. Les différentes conceptions des GPIs permettent d'établir ce courant de manières multiples, offrant une
grande flexibilité dans la configuration du système afin de satisfaire au mieux vos besoins.
Note: La borne 2 délivrant un potentiel électrique de +5 V et la borne 4 étant mise à la masse, elles peuvent
également être employées dans la configuration d'autres GPIs.
GPI n°1
Le GPI n°1 utilise les bornes 1 & 2
La borne 2 délivre un potentiel électrique de +5 V. Cette borne peut servir de
source pour créer un courant pour les GPI n°3 et GPI n°4.
Commutation du GPI à l'état 0:
Il suffit de relier la borne 1 à la masse pour établir le courant “i”, par exemple
en la reliant à la borne 4.
GPI n°2
Le GPI n°2 utilise les bornes 3 & 4
Commutation du GPI à l'état 0:
Il suffit de relier la borne 3 à la masse pour établir le courant “i”, par exemple
en la reliant à la borne 4.
GPIs n°3 & n°4
Le GPI n°3 utilise les bornes 5 & 6, le GPI n°4 utilise les bornes 7 & 8
Commutation du GPI à l'état 0:
Un courant électrique doit être établi de la borne 6 à la borne 5 (GPI n°3) ou de
la borne 8 à la borne 7 (GPI n°4).
Caractéristiques des optocoupleurs des GPIs
34

EtherSound ES8in, ES8mic & ES8out
Passerelles Audio Ethernet
Courant minimum imin de commutation 0,5 mA
Courant maximum imax supporté 50 mA
Règle de calcul de i pour les GPIs n°3 et n°4 i (mA) = 3,3
1,2 - Vin
Tension maximale Vin supportée 50 Vdc
Tension inverse maximale Vin supportée 6 V
General Purpose Outputs (GPOs)
Les GPOs des ES8 sont des sorties relais. Ils comportent deux bornes chacun et sont tous configurés de la
même manière. Les bornes 1 & 2 appartiennent au GPO n°1, 3 & 4 au GPO n°2, 5 & 6 au GPO n°3, et 7 & 8
au GPO n°4.
Il répond aux commandes du logiciel de configuration EtherSound envoyés par le Primary Master. S'il est écrit
à “1”, le GPO ferme le relais associé. S'il est écrit à “0”, le GPO ouvre le relais associé.
Caractéristiques des relais des GPOs
Puissance maximale commutable 10 W
Courant maximum commutable 500 mAdc
Courant traversant maximum 1 Adc
Tension maximale commutable 100 Vdc
Durée de vie type
(en commutant la puissance maximale)
106 opérations
35
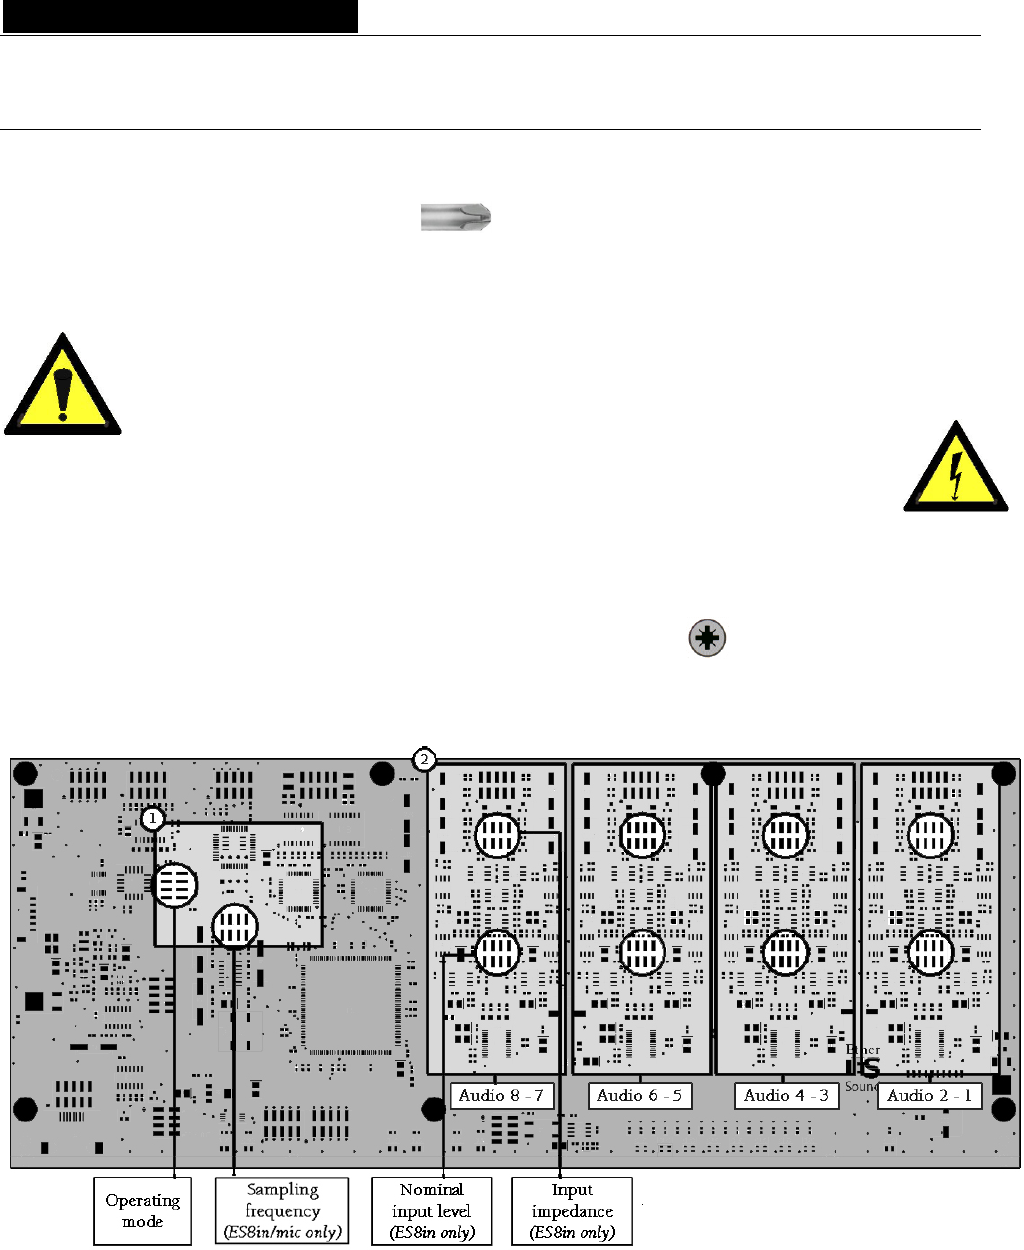
D i g i g r a m
ANNEXE B : PARAMETRAGE DES CAVALIERS INTERNES
Ces paramétrages doivent être effectués uniquement par du personnel qualifié !
Outils requis:
• un tournevis Pozidriv n°1
• un bracelet antistatique
• un petit tournevis plat
Une décharge électrostatique (ESD) peut endommager plusieurs composants sur la carte. Pour
éviter de tels dommages en manipulant la carte, prenez les précautions suivantes:
Mettez le dispositif et tout ce qui entre en contact avec lui au potentiel de masse en présentant
une surface conductrice et des chemins de décharge. Au minimum, observez ces
précautions:
• Débranchez toutes les sources d'alimentation et de signal.
• Placez l'équipement sur une surface de travail conductrice mise à la masse.
• Mettez-vous au potentiel de masse à l'aide d'un bracelet antistatique ou en tenant un objet
mis à la masse.
• Mettez à la masse tous les outils qui entreront en contact avec l'équipement.
• Dévissez les huit vis à tête Pozidriv (quatre sur le dessus,
quatre sur le dessous) dans le sens contraire des aiguilles
d'une montre et ouvrez le coffret.
Localisation des cavaliers sur la carte principale
La figure ci-dessus montre les emplacements des différents cavaliers sur la carte principale.
36
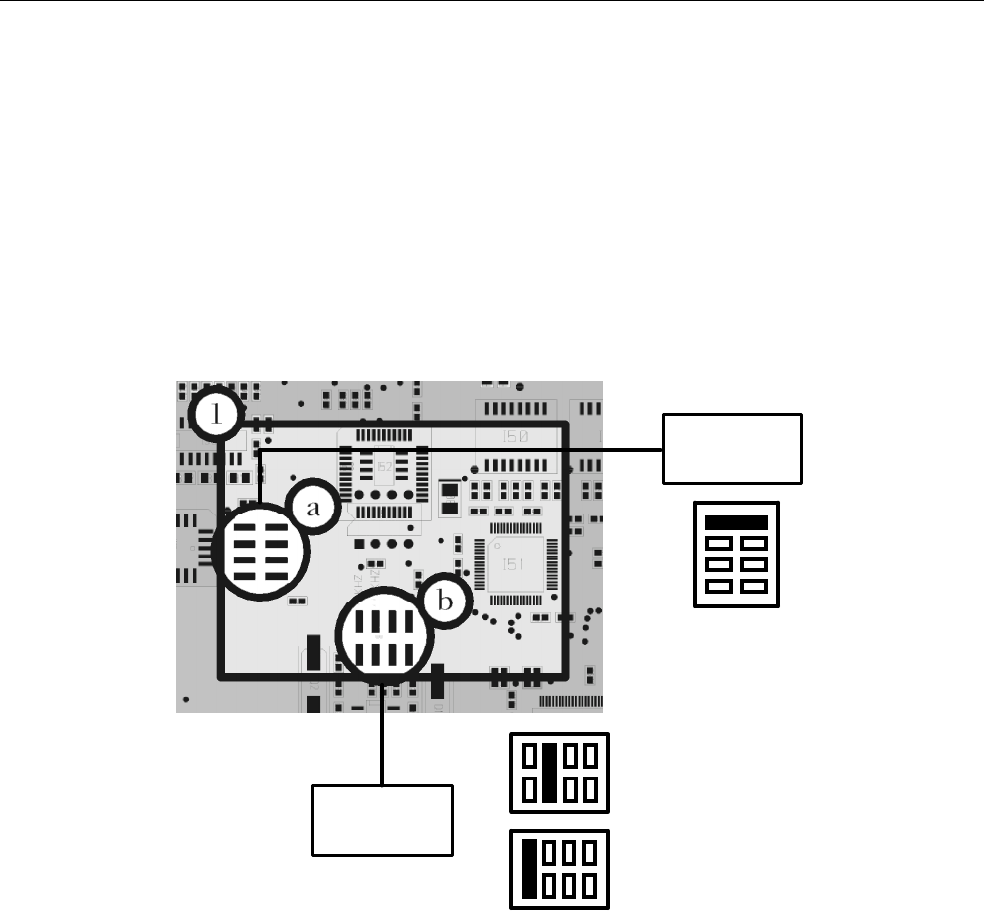
EtherSound ES8in, ES8mic & ES8out
Passerelles Audio Ethernet
Le secteur 1 explique le réglage de la fréquence d'échantillonnage, le secteur 2 illustre les réglages des entrées
analogiques; chaque réglage s'applique à une paire d'entrées mono symétriques. Veuillez vous reporter à la
vue d'ensemble ci-dessus pour localiser la paire que vous souhaitez modifier. Pour le réglage détaillé des
cavaliers, veuillez vous référer aux gros-plans suivants:
pour recevoir des signaux analogiques de type –10 dBV (niveau nominal dit “Consumer”) ou de type +4 dBu
(niveau nominal professionnel). Le réglage par défaut est +4 dBu pour toutes les entrées.
L'impédance de chaque paire d'entrée d'un ES8in/ES8mic peut être configurée à 600 Ω ou à 22.2kΩ. Le
réglage par défaut est +22.2kΩ pour toutes les entrées.
Fréquence d'échantillonnage
Operating
mode
Sampling
frequency
(ES8in/mic only)
44.1 kHz
48 kHz
Normal
use
Le secteur a montre la position par défaut pour le mode normal de fonctionnement; ce réglage NE DOIT PAS
être modifié. Cette zone de cavaliers est réservée aux opérations de maintenance.
La section b permet la sélection de la fréquence d'échantillonnage d'ES8in/ES8mic. La valeur par défaut est
réglée sur 48 kHz. Elle peut être ajustée à 44.1 kHz. Notez que ce réglage est effectif seulement si
l'ES8in/ES8mic est le Primary Master du réseau EtherSound, car le Primary Master est l'équipement fournissant
l'horloge pour le réseau entier. Au cas où ES8in/ES8mic agirait en tant que “simple” Master, la fréquence
d'échantillonnage est déterminée par le flux EtherSound entrant (synchronisé sur l'horloge du Primary
Master). Des modifications sur des dispositifs autres que le Primary Master seront ignorées.
En tant que Slave dans les réseaux EtherSound, ES8out ne comporte pas de cavaliers de sélection de fréquence
d'échantillonnage.
37
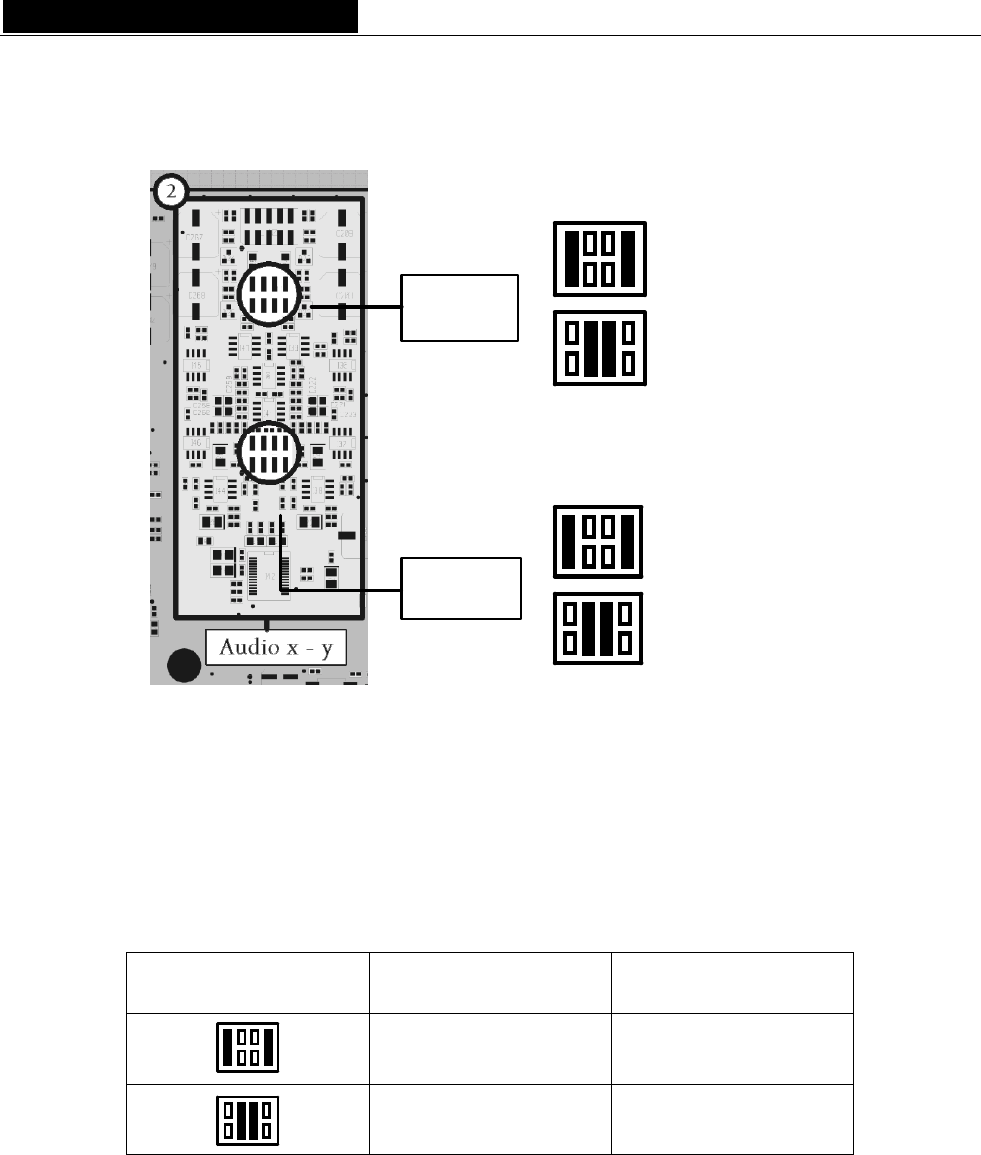
D i g i g r a m
Niveau d’entrée nominal et impédance d'entrée
Input
impedance
(ES8in only)
Nominal
input level
(ES8in only)
600 Ohms
22.2 kOhms
+4 dBu
-10 dBV
(approx. -8 dBu)
Les réglages décrits ci-dessus concernent ES8in uniquement, puisqu'ils affectent l'impédance d'entrée et le
niveau nominal d'entrée. Après avoir localisé la paire à modifier dans la vue d'ensemble, placez les cavaliers
selon les illustrations ci-dessus pour obtenir les paramétrages adaptés à votre système.
Niveaux d’entrée
Position des cavaliers Niveau d’entrée
nominal
Niveau maximum
d'entrée
+4 dBu +22 dBu
-10 dBV (∼ -8 dBu) +10 dBu
38
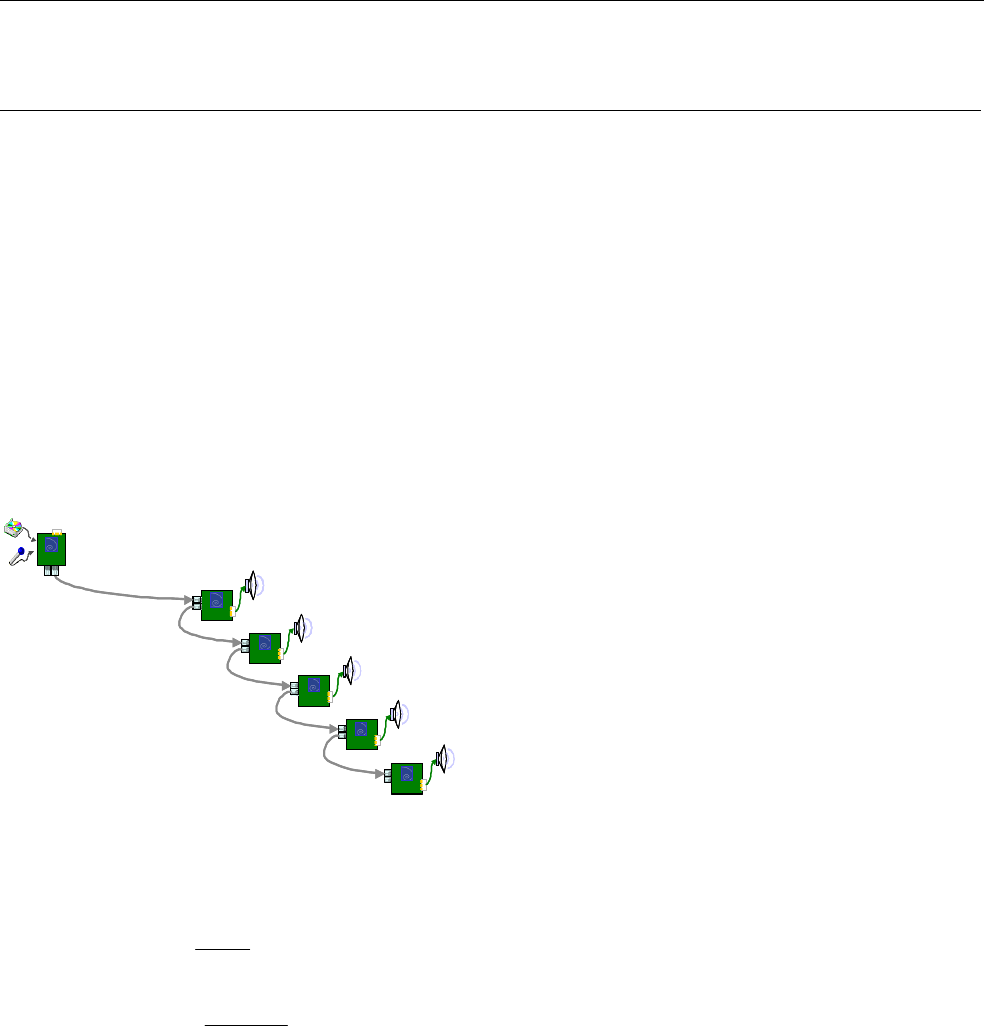
EtherSound ES8in, ES8mic & ES8out
Passerelles Audio Ethernet
ANNEXE C : GLOSSAIRE
CANAL AUDIO (AUDIO CHANNEL)
Un canal audio est un signal audio mono simple. Par extension, un canal audio est un des 64 emplacements
de la trame EtherSound, c.à.d. un signal échantillonné à 48 kHz avec une résolution de 24 bits.
COMMUTATEUR (SWITCH)
Elément d'interconnexion de deux segments de réseaux locaux. En recherchant de plus grandes vitesses de
filtrage et de transmission, des efforts ont été faits pour réduire le temps requis pour déterminer si un paquet
doit être filtré ou expédié ('latence') en examinant seulement l'information d'adresse au début de la trame
Ethernet. Le terme “commutateur Ethernet” est maintenant employé pour les appareils à ports multiples qui
peuvent filtrer et transmettre des paquets quasiment à la vitesse de l'Ethernet (“vitesse du câble”)
indépendamment de la technique utilisée.
DAISY CHAIN (branchement en série)
Se dit d'une topologie de réseau où tous les équipements sont reliés en série.
ES
ES
ES
ES
ES
SLAV E 5
SLAV E 4
SLAVE 3
SLAVE 2
SLAV E 1
ES
PRI MAR Y
MA ST ER
ES
ES
ES
ES
ES
ES
ES
ES
ES
ES
SLAV E 5
SLAV E 4
SLAVE 3
SLAVE 2
SLAV E 1
ES
PRI MAR Y
MA ST ER
ES
PRI MAR Y
MA ST ER
ES
ES
PRI MAR Y
MA ST ER
dBV, dBu
Deux unités différentes exprimant un niveau de tension en utilisant des logarithmes:
V
VU
dBVLU1
)(
log20)( 10
=
V
VU
dBuLU775.0
)(
log20)( 10
=
Le dBu est largement répandu dans le monde audio pro, tandis que le dBV est généralement associé aux
produits électroniques grand public. Pour convertir rapidement et simplement le dBV en dBu, vous pouvez
employer l'approximation suivante LU(dBu) ∼ LU(dBV) +2 pour obtenir un équivalent.
GPIO (entrées/sorties Tout Ou Rien)
General Purpose Inputs Outputs. ES8in/ES8mic et ES8out possèdent quatre GPIs et quatre GPOs chacun. Les
GPOs peuvent être configurés pour commander à distance des dispositifs externes. Les GPIs peuvent être
utilisés pour recevoir des commandes de dispositifs externes.
39
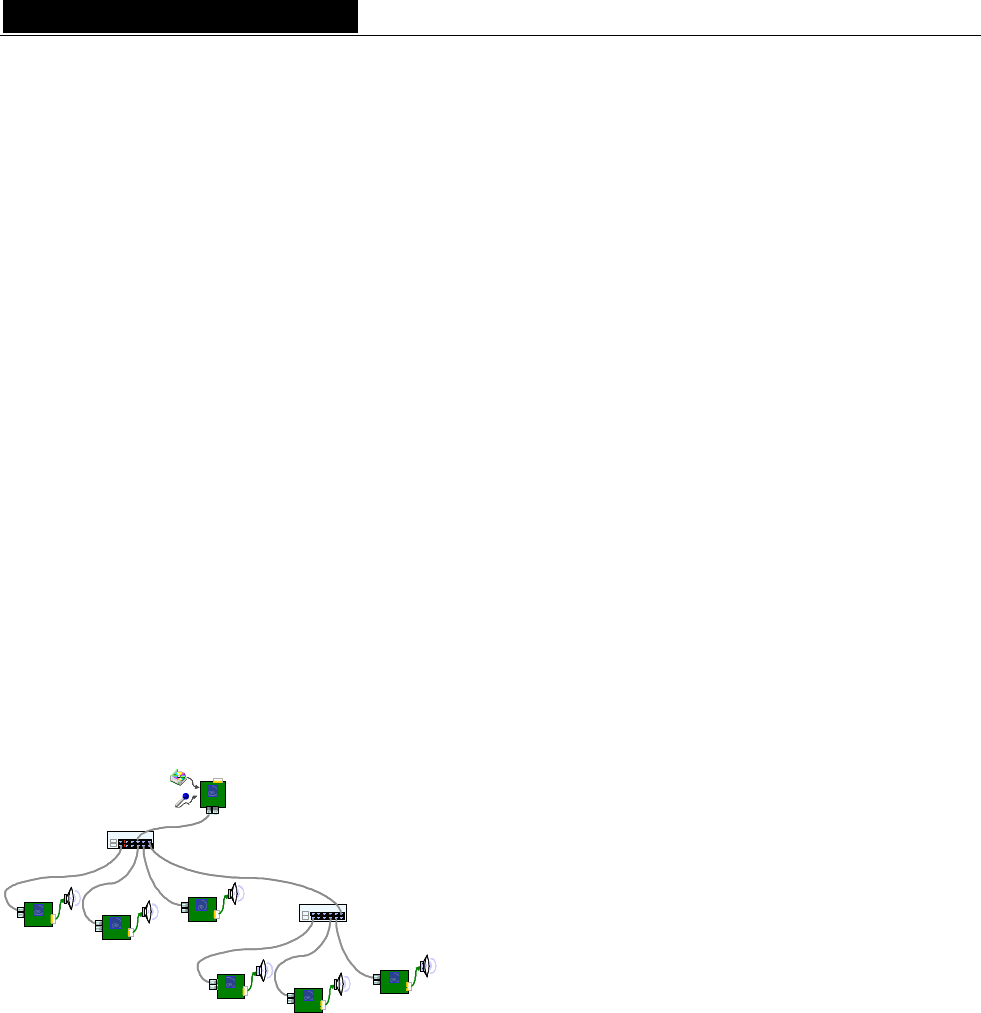
D i g i g r a m
MASTER
Un Master est un dispositif ajoutant des canaux audio dans un réseau EtherSound. Il est situé en aval du
Primary Master.
Un Master répond aux requêtes de statut et aux commandes du Primary Master. Voir aussi Primary Master
PRIMARY MASTER
Le premier dispositif dans un réseau EtherSound est appelé le “Primary Master”, typiquement un
ES8in/ES8mic. Tout en pouvant être une source audio pour le réseau, le Primary Master envoie les
commandes et fournit l'horloge maître pour la synchronisation des canaux audio.
En tant que Primary Master, il peut également servir de lien entre le réseau EtherSound et le logiciel de
configuration sur un ordinateur externe relié au port Ethernet IN/FROM.
SLAVE
Un équipement EtherSound qui reçoit le flux EtherSound et restitue de l'audio standard est dit de type Slave.
Un Slave répond aux requêtes de statut et aux commandes du Primary Master.
SSI
Synchronous Serial Interface: interface série synchrone, manière la plus courante d'envoyer à ou de recevoir des
données d'un CNA/CAN audio standard.
STAR (étoile)
L'étoile est une topologie de réseau où tous les dispositifs sont reliés à une même unité (un commutateur dans
l'image suivante) qui gère toutes les communications.
Switch 1
ES
ES
ES
Swit ch 2
ES
ES
ES
SLAV E 5
SLAV E 4
SLAV E 3
SLAV E 2
SLA V E 1
SLAV E 6
ES
PRI MAR Y
MA ST ER
Switch 1Switch 1
ESES
ESES
ESES
Swit ch 2Swit ch 2
ESES
ESES
ESES
SLAV E 5
SLAV E 4
SLAV E 3
SLAV E 2
SLA V E 1
SLAV E 6
ES
PRI MAR Y
MA ST ER
ES
PRI MAR Y
MA ST ER
ESES
PRI MAR Y
MA ST ER
40

Digigram
Digigram (www.digigram.com) digital audio solutions are
key to the success of public address and pro sound installations, as
well as broadcast and media production companies worldwide.We
develop innovative networked audio devices, computer sound cards,
and audio management software.
Digigram Powered solutions are installed in thousands of radio
and television stations; corporate and commercial sound
installations; and audio recording and video post-production facilities
around the globe.
Customers are served from three regional business units:
Digigram SA (Digigram Headquarters, Montbonnot, France),
Digigram Inc. (Arlington, VA USA) and Digigram Asia (Singapore).
Digigram is publicly traded on the Paris stock exchange (Code ISIN:
FR00000 35784).
www.digigram.com
Digigram SA
(Serving Europe, Africa, Middle East, Latin America)
Parc de Pré Milliet 38330 Montbonnot-FRANCE
Tel: +33 (0)4 76 52 55 01 • Fax: +33 (0)4 76 52 53 07
E-mail: sales@digigram.com
Digigram Inc.
(Serving North America)
2101 Wilson Boulevard, Suite 1004,
Arlington,VA 22201-USA
Tel: +1 703 875 9100 • Fax: +1 703 875 9161
E-mail: input@digigram.com
Digigram Asia Pte Ltd.
(Serving Asia and Australia/Oceania)
350 Orchard Road - #19-07 Shaw House Singapore
238868-SINGAPORE
Tel: +65 6291 2234 • Fax: +65 6291 3433
E-mail: info_asia@digigram.com
Networking Your Sound
Digigram, the Digigram logo, ESnet, EtherSound, and the EtherSound logo are trademarks or registered trademarks of Digigram S.A. Other trademarks are property of their respective holders. Contents copyright © March 2004 by Digigram S.A.
While every effort has been made to ensure accuracy, Digigram is not responsible for errors and omissions, and reserves the right to make improvements or changes in the products and programsdescribed without notice.