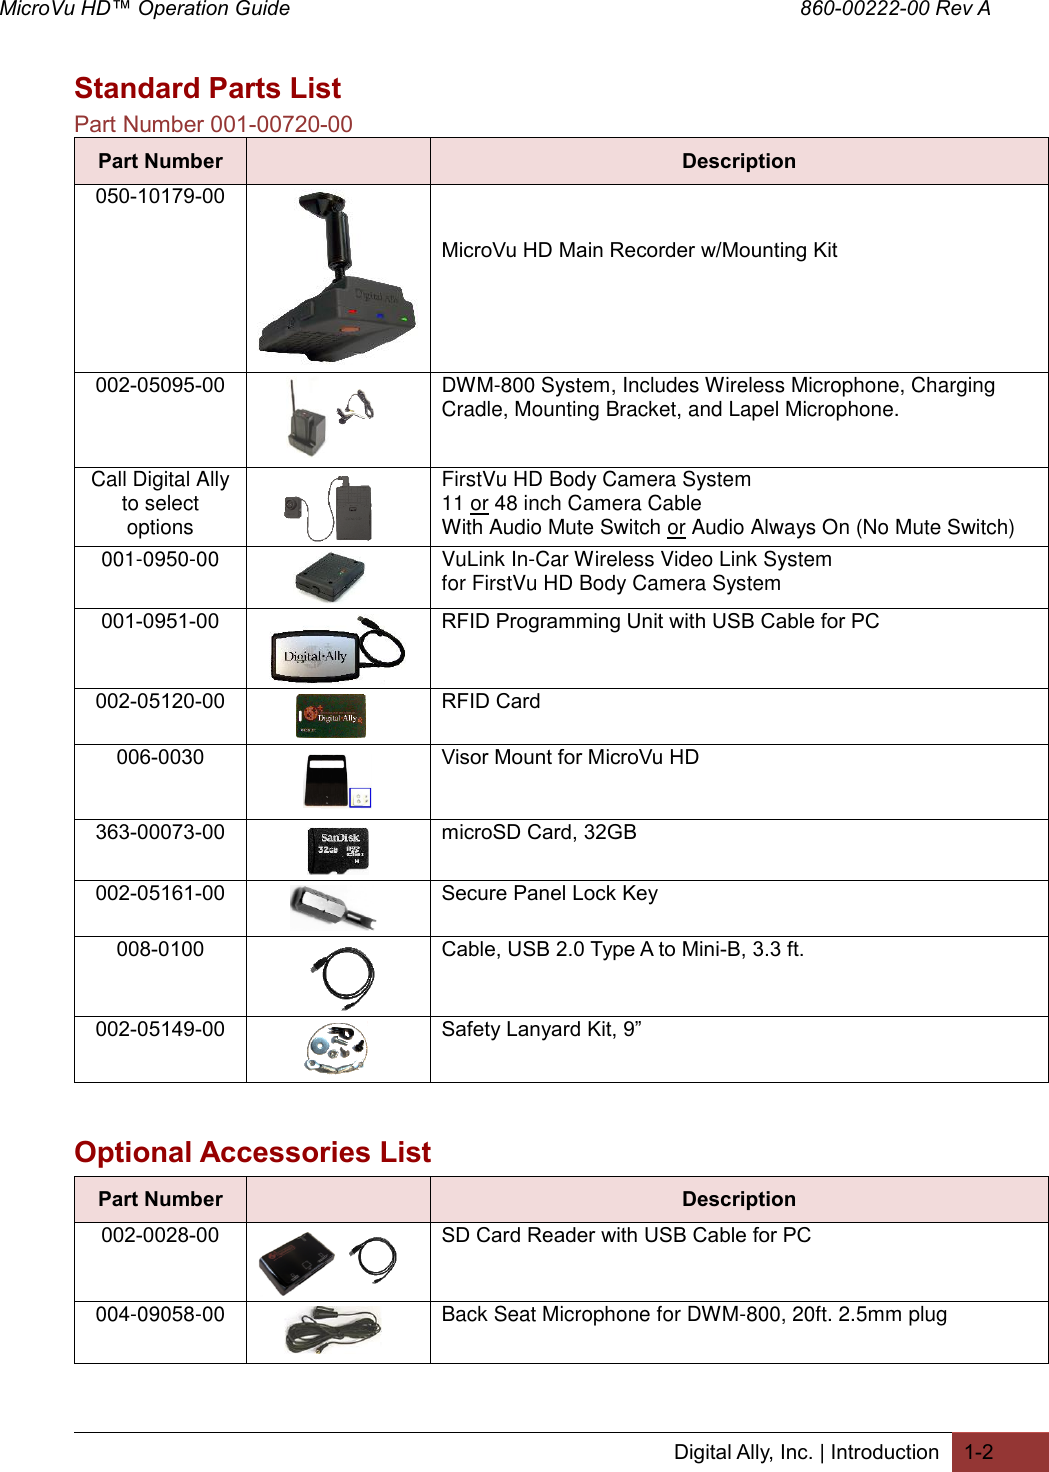
Digital Ally MICROVU RFID tag reader User Manual FirstVu
Digital Ally, Inc. RFID tag reader FirstVu
UserManual.wiki
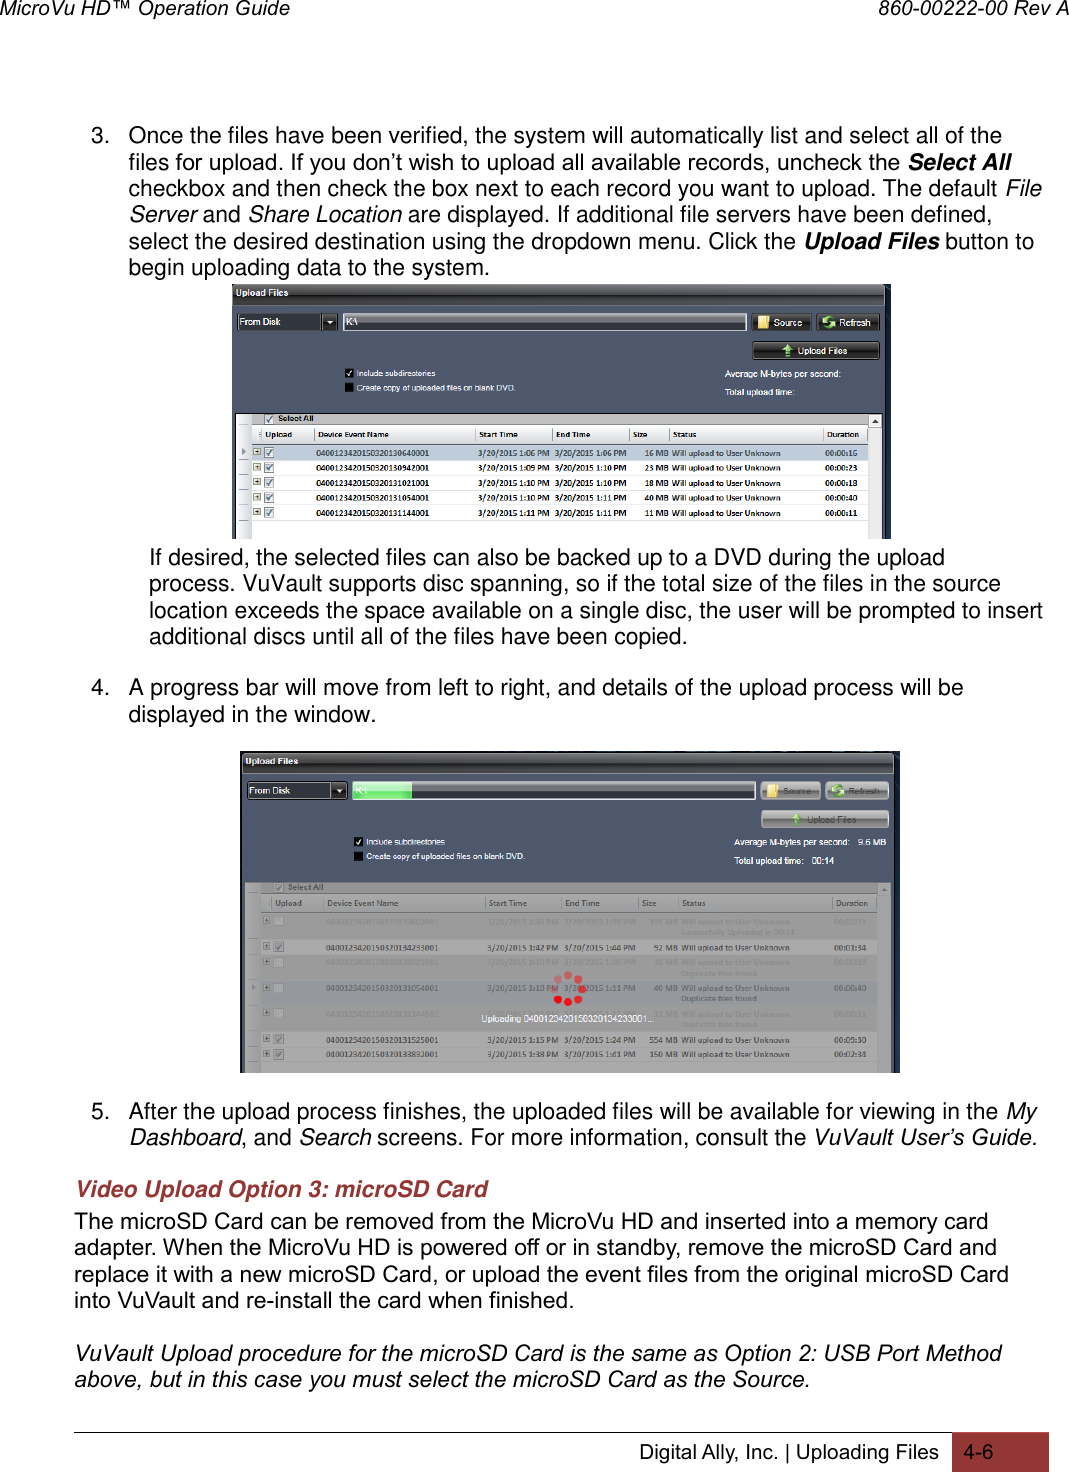
>
Digital Ally
>
MICROVU User Manual
User Manual
Navigation menu
Upload a User Manual
Namespaces
Wiki Guide
HTML
PDF
Info
Views
User Manual
Discussion / Help
Navigation
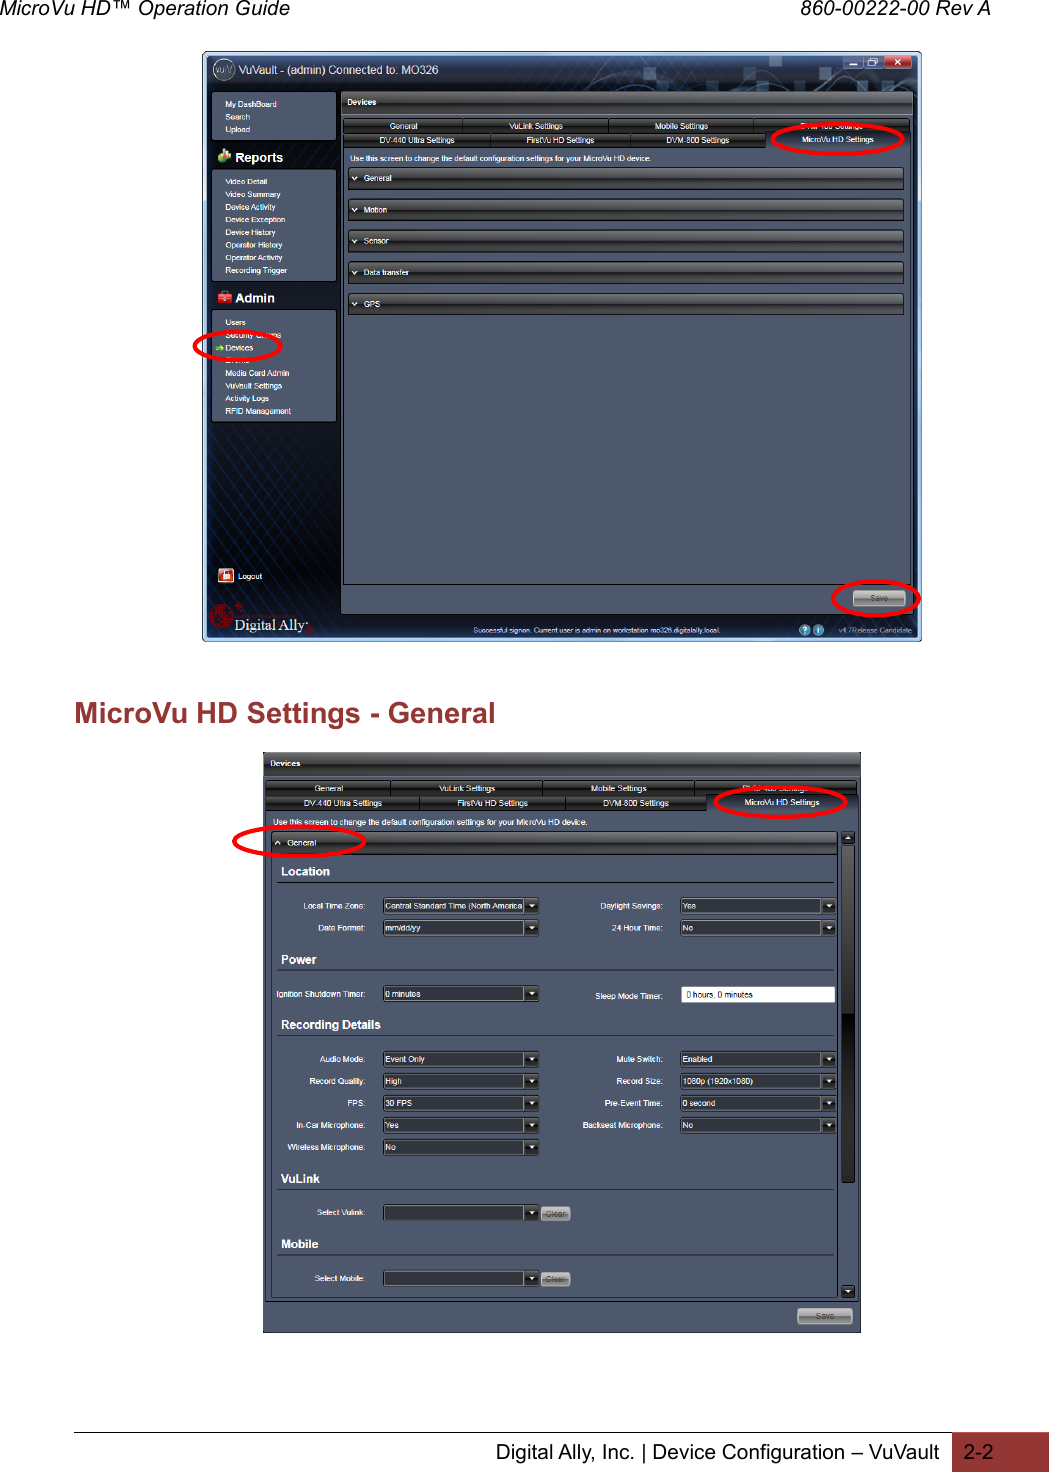
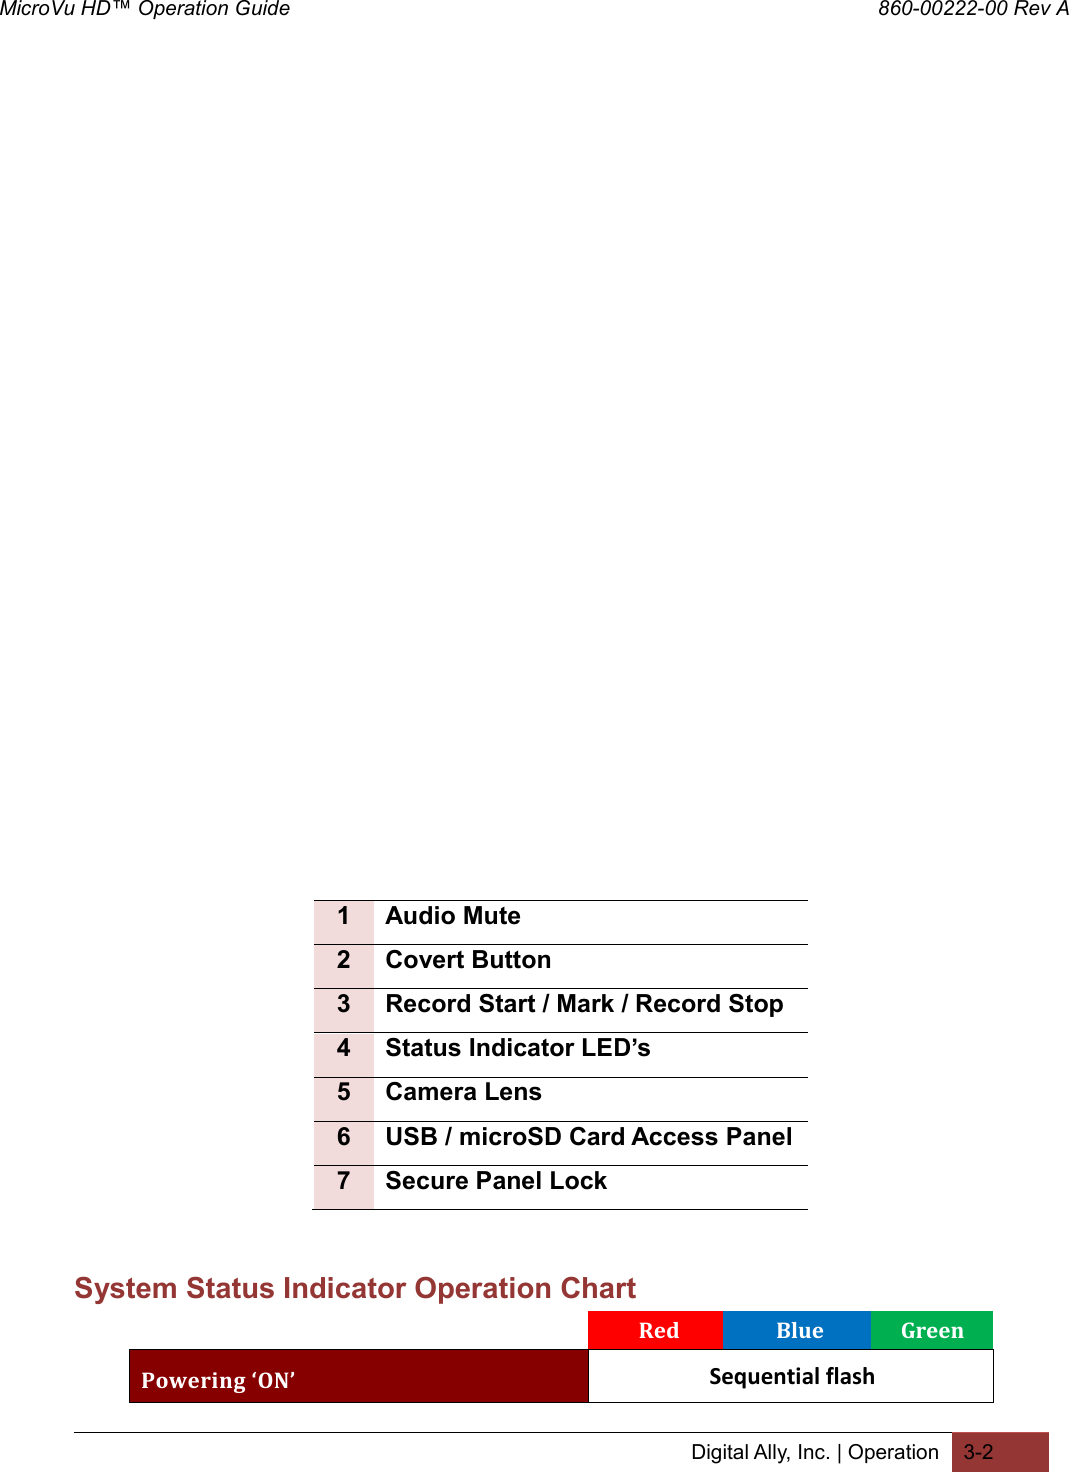
![MicroVu HD™ Operation Guide 860-00222-00 Rev A Digital Ally, Inc. | Device Configuration – VuVault 2-3 Location Below are the configuration items for localization which are provided to address Date/Time settings and display formats. Local Time Zone The local time zone is used to adjust the device when synchronizing to the Greenwich Mean Time. During device configuration, the local time from the PC real time clock will be used, and Central Standard Time is set by default. The date and time is set by the factory prior to shipment. However, you must also enter the correct UTC offset when configuring the device so that the time zone can be set properly. For example, USA Central Standard Time =UTC -6. If using VuVault™, the date & time are automatically synced to your computer during activation. PST = Pacific Standard Time (UTC - 8 hours) MST = Mountain Standard Time (UTC - 7 hours) CST = Central Standard Time (UTC - 6 hours) EST = Eastern Standard Time (UTC - 5 hours) AST = Atlantic Standard Time (UTC - 4 hours) ALST = Alaskan Standard Time (UTC - 9 hours) HST = Hawaiian Standard Time (UTC - 10 hours) Daylight Saving When set to Yes, Daylight Saving setting time will be automatically adjusted for the configured Local Time Zone. If this is disabled, time will not be adjusted for Daylight Saving. Settings: No, Yes [default] Date Format The date format displayed on the event recordings is selected through this setting. Settings: mm/dd/yy [default]; yy/mm/dd; dd/mm/yy 24 Hour Time This time format allows the device to be configured in a 12-hour format or a 24-hour format. Settings: No [default], Yes Power Power to the MicroVu HD is controlled through your vehicle’s ignition. There are no manual controls for powering the unit on and off. When ignition is switched on, the boot-up process will begin. The driver-facing status indicators will flash in sequence until boot-up is complete. When the Blue LED is lit steadily the unit is in Standby and is ready for use. The Power operation is configurable and specifies how the MicroVu HD will operate when the vehicle ignition is turned to the ON or OFF positions. Two parameters control the power operation in order as follows: Ignition Shutdown Timer The Ignition Shutdown Timer specifies the amount of time the MicroVu HD remains fully powered when the vehicle ignition goes from ON to OFF. Settings: 0 to 50 minutes, 1 hr, 2 hrs, 4 hrs, 8 hrs, 12 hrs, 24 hrs, and Unlimited [default = 1 hour]](https://usermanual.wiki/Digital-Ally/MICROVU/User-Guide-2594693-Page-8.png)
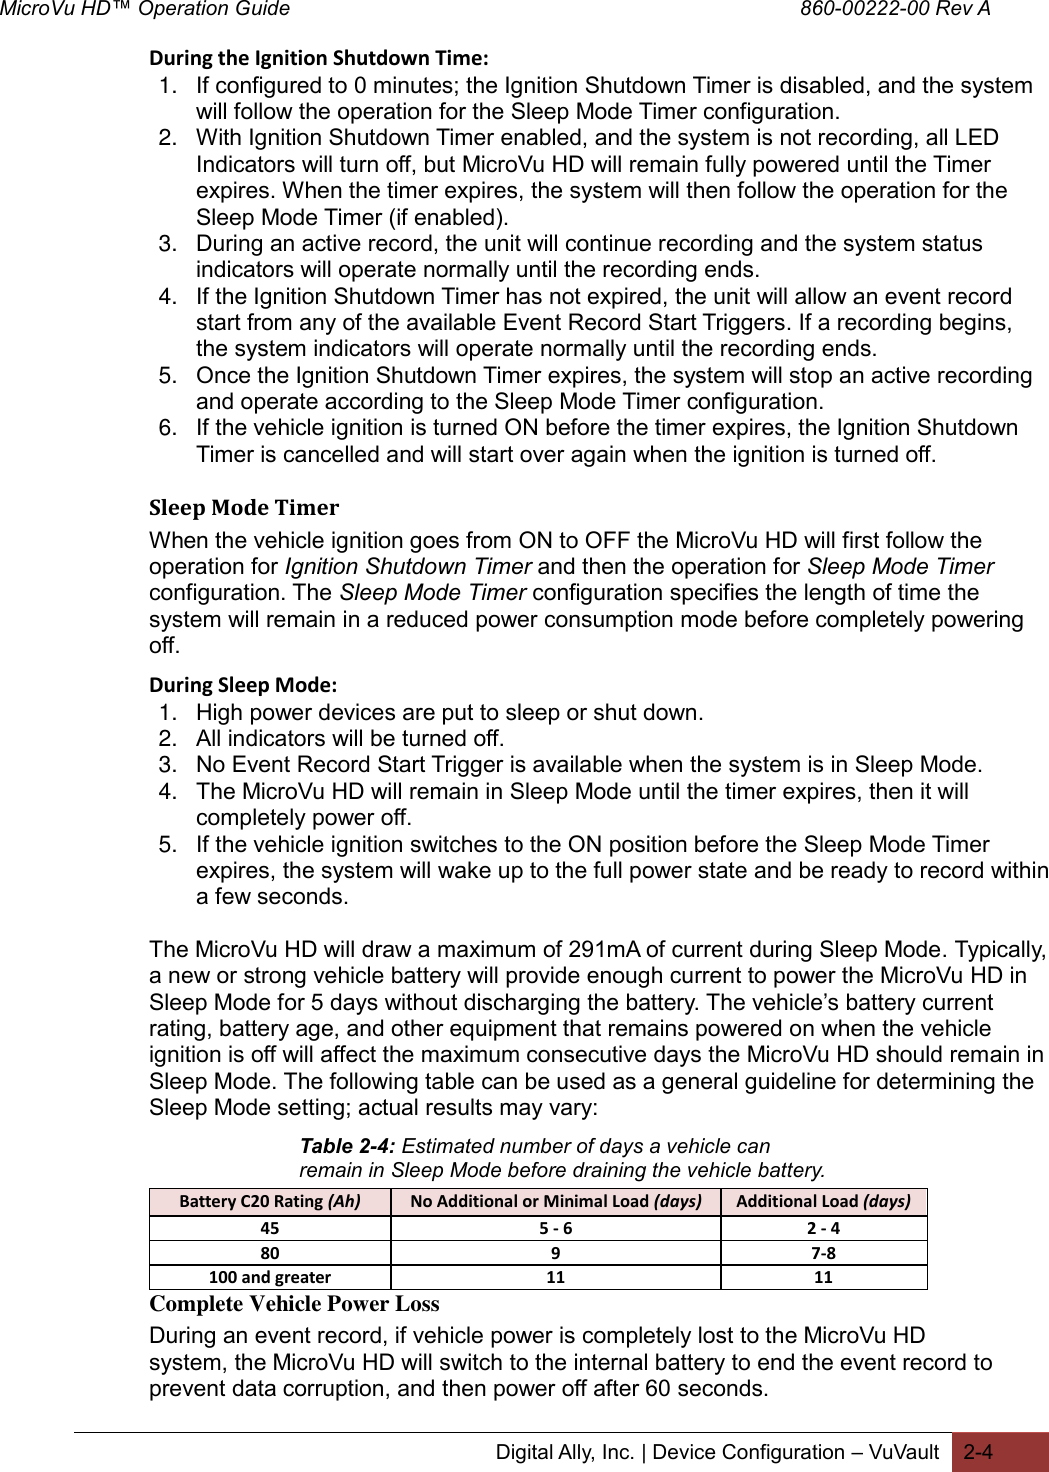
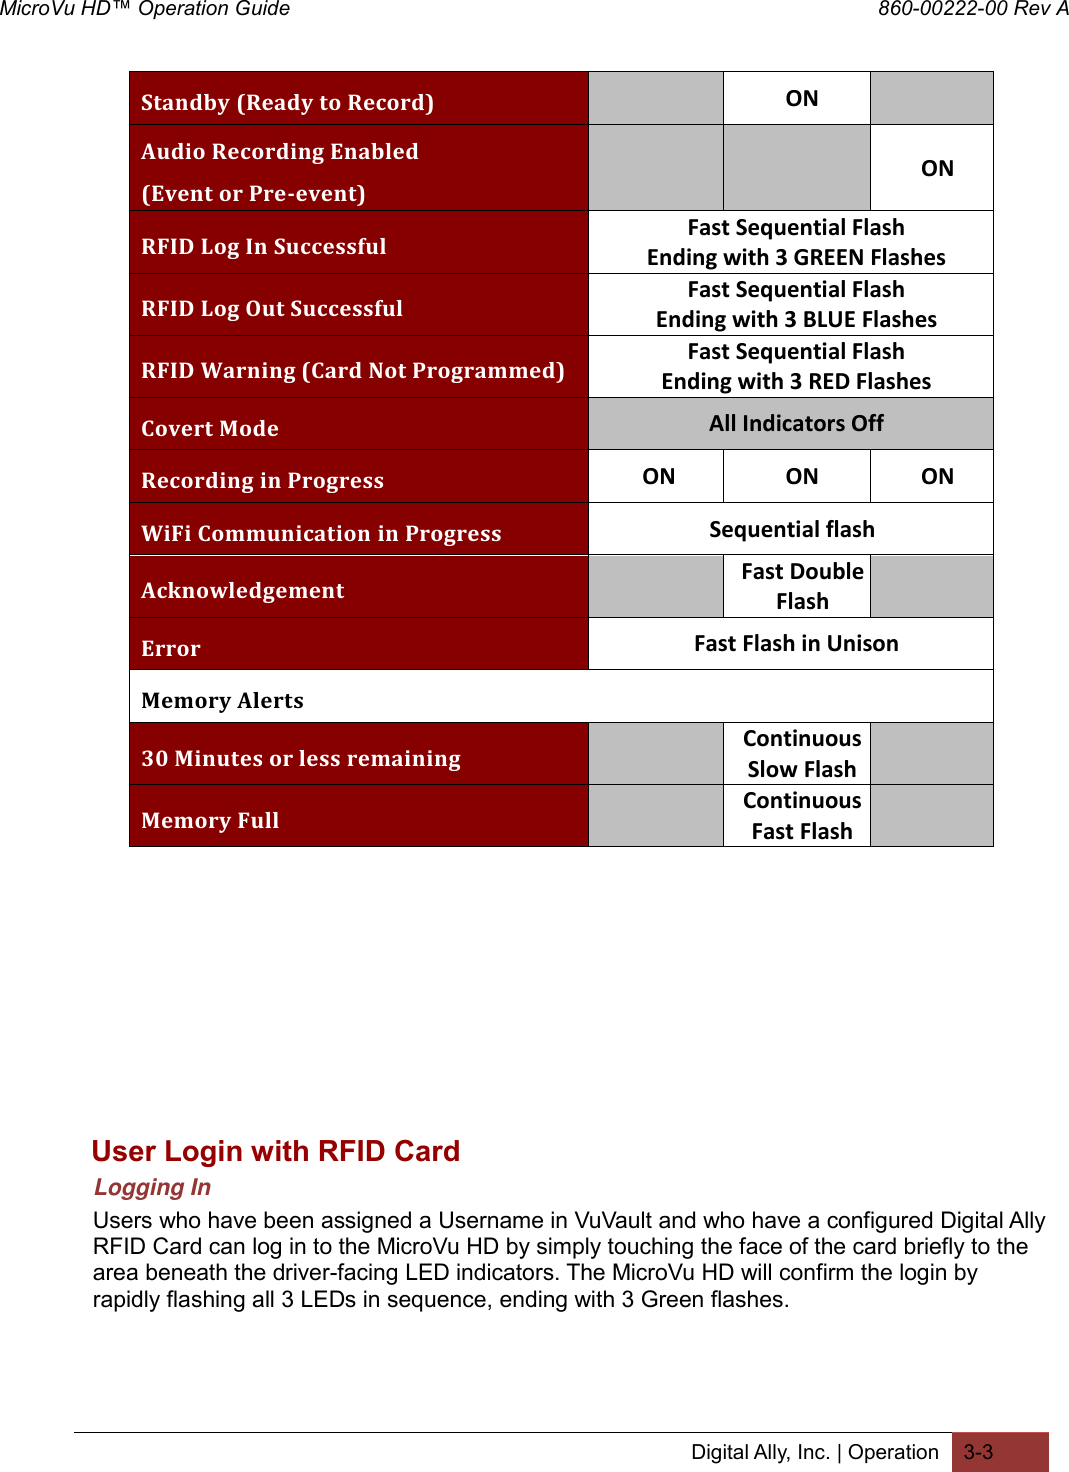
![MicroVu HD™ Operation Guide 860-00222-00 Rev A Digital Ally, Inc. | Device Configuration – VuVault 2-5 If the MicroVu HD is not recording when vehicle power is completely lost, the MicroVu HD automatically make a 60 second recording using the internal backup battery, then power down completely. Recording Details Audio Mode The Audio Mode determines how audio will be recorded to your device. Disabled: No audio will be recorded. Enabled (w/o Pre-Event): Audio is recorded during the event but not recorded during pre-event. Enabled: Audio is recorded during the recorded event and during the configured pre-event time. Settings: Disabled, Enabled (w/o Pre-Event) [default], Enabled Mute Switch Enables use of the Mute Switch on the device. This setting is not available if Audio Mode is set to Disabled. Settings: Enabled [default], Disabled Record Quality The Record Quality parameter allows the video compression bit rate to be adjusted. Digital video is compressed by taking out data that remains constant from each frame, and only storing data that actually changes. This allows videos with still backgrounds to be much smaller than they would be if the background had to be present in every single frame. The bit rate is the number of bits that can be used in one second of video. The higher the record quality, the higher the bit rate and the size of the event files. The default setting is “high” for a good mix between video qualities and upload time, but can be lowered or raised to adjust quality and storage space. Record Size Record Quality Standard Medium High Super High 1080p (1920x1080) 2 Mbps 4 Mbps 8 Mbps 12 Mbps 720p (1280x720) 1 Mbps 2 Mbps 4 Mbps 8 Mbps VGA (640x480) 0.5 Mbps 1 Mbps 2 Mbps 4 Mbps Record Size Allows you to select the video resolution for your MicroVu HD video recordings. The higher the setting, the better the video quality, and the larger the size of the event files. Settings: VGA (640x480), 720p (1280x720), 1080p (1920x1080) [default] FPS (Frames Per Second) This parameter sets the number of frames per second the MicroVu HD will record. The higher the setting, the better the video quality, and the larger the size of the event files. Settings: 5, 10, 15, 30fps [default] Pre-Event Time The Pre-Event Time option allows you to set the amount of time for the pre-event buffer. The MicroVu HD will buffer the last 0-60 seconds of audio and Table 2-5: Video Quality Guide (Mbps = Megabits per Second)](https://usermanual.wiki/Digital-Ally/MICROVU/User-Guide-2594693-Page-10.png)
![MicroVu HD™ Operation Guide 860-00222-00 Rev A Digital Ally, Inc. | Device Configuration – VuVault 2-6 video so it can be recorded during a record event. If set for 0 seconds, pre-event function will be disabled. Settings: 0, 6, 12, 18, 24, 30, 60 seconds [default = 0 seconds] In-Car Microphone Enables the MicroVu HD to record from the In-Car Microphone. Settings: Yes [default], No Backseat Microphone Enables the MicroVu HD to record from the Backseat Microphone. Settings: Yes, No [default] Wireless Microphone Enables the MicroVu HD to record from the Wireless Microphone. Settings: Yes, No [default] VuLink Select VuLink Assign a VuLink™ device serial number for use with your MicroVu HD. A VuLink™ wireless link is required (see the “VuLink Operation and Installation Guide”, or call Digital Ally Inc. Technical Support for more information). VuVault GO Select VuVault GO Assign a VuVault GO SSID for use with your MicroVu HD from the list of VuVault GO devices as configured in VuVault in the VuVault GO Settings tab. Motion Accelerometer Accelerometer Collision The MicroVu HD has an accelerometer built-in which can be used to trigger an Event Record when the set G-Force levels indicate that a collision has occurred. Use this setting to configure the threshold for this trigger. This trigger can be disabled by setting the Accelerometer Collision level to zero. Vehicle Speed Use GPS for Speed The MicroVu HD will detect vehicle speed using the built-in GPS system. Settings: Yes [default], No](https://usermanual.wiki/Digital-Ally/MICROVU/User-Guide-2594693-Page-11.png)
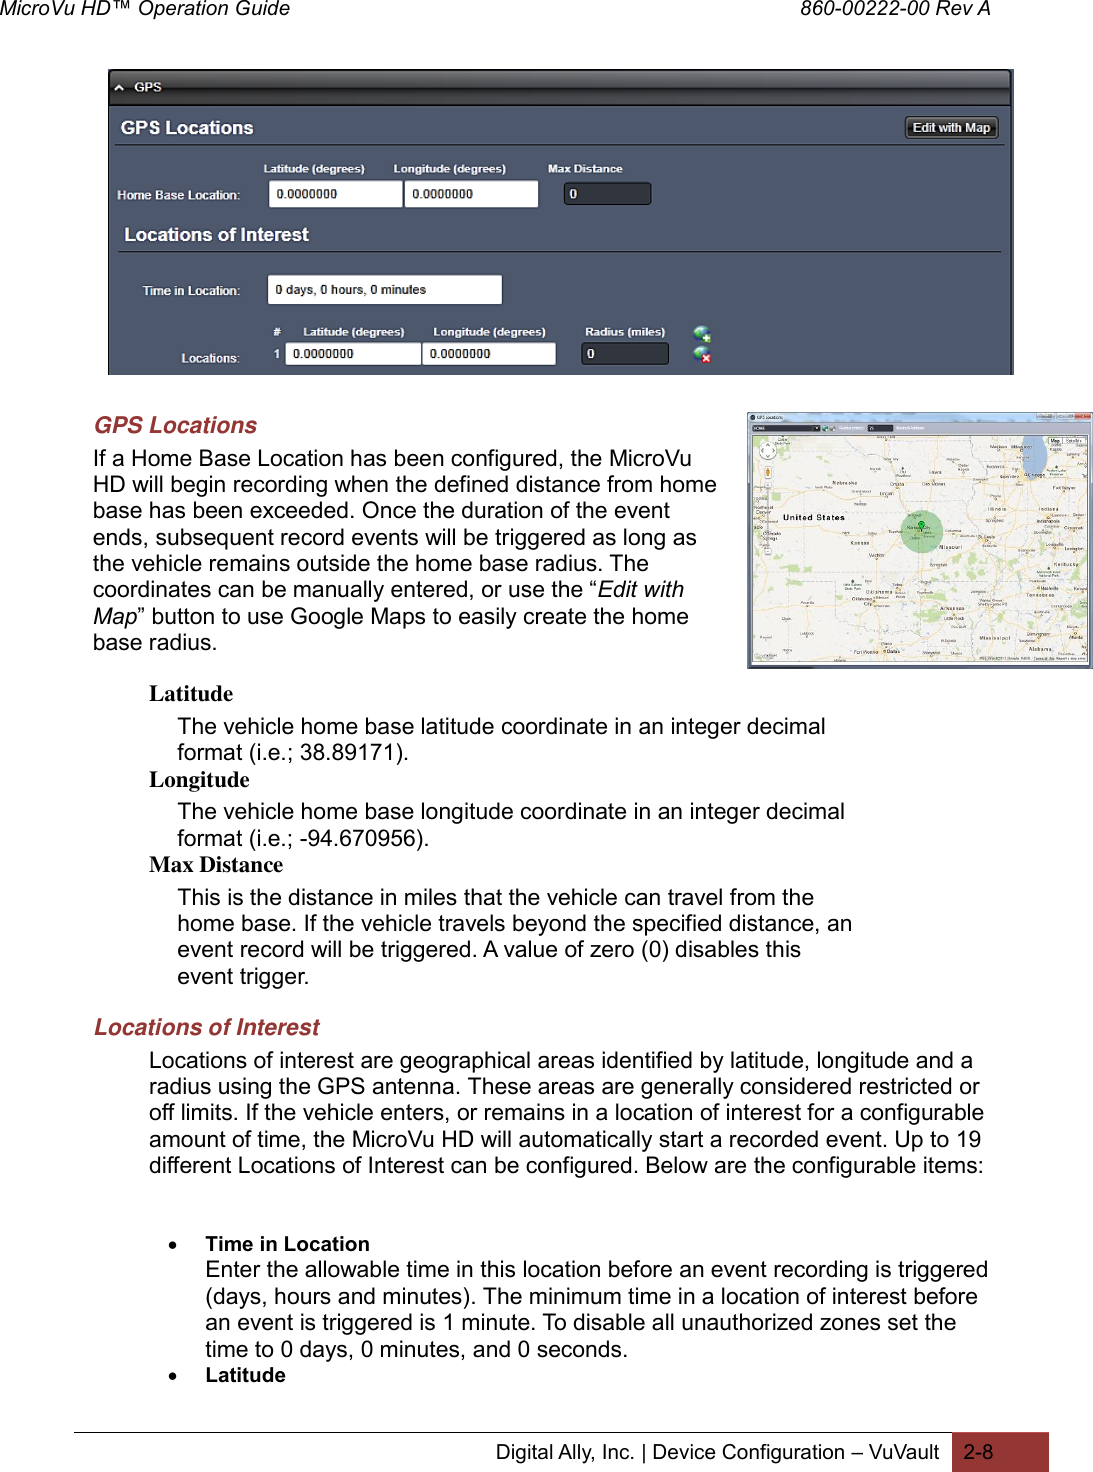
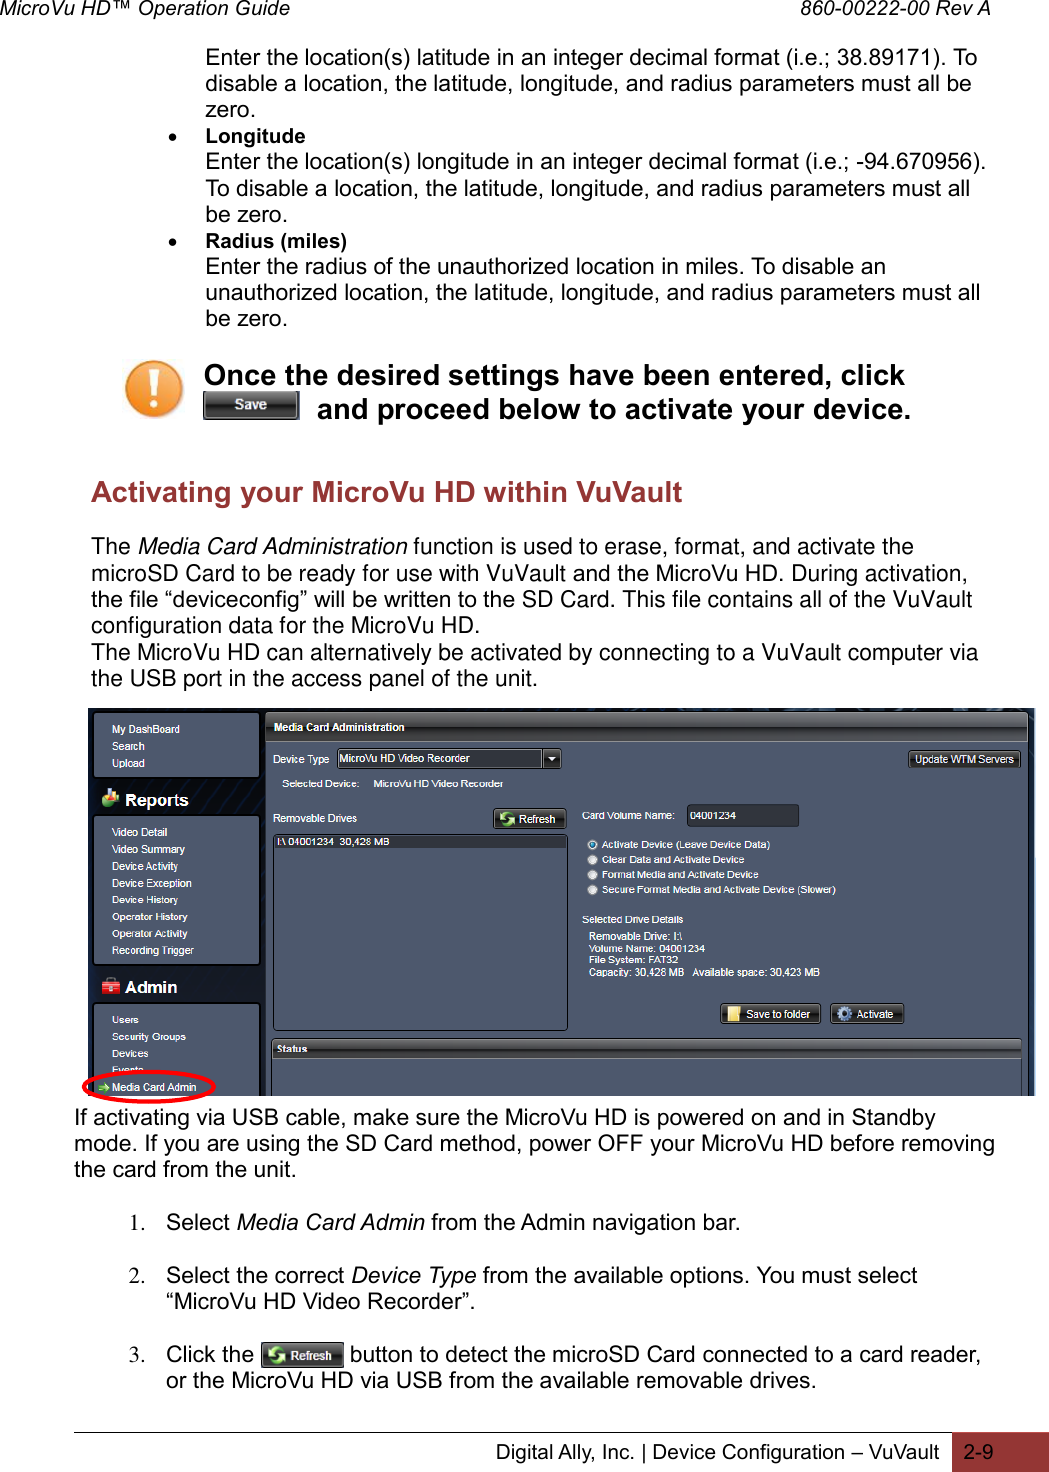
![MicroVu HD™ Operation Guide 860-00222-00 Rev A Digital Ally, Inc. | Device Configuration – VuVault 2-7 Vehicle Speed Limit This parameter sets the threshold for excessive speed. When the Vehicle Speed Trigger Source is enabled and the speed exceeds the value of this parameter, an Event Record will be triggered. Settings: 1-199 mph [default = 75] Sensors Input Sensors The MicroVu HD main cable allows external connection to the vehicle triggers. The input sensors can be connected to various devices to trigger an event recording, or to only register the device activity in the metadata. Use the Edit button to name the sensor to match the wiring configuration and to select whether the sensor will be used as an Event Trigger or Sensor Only. Data Transfer Network Wtm Settings Use this parameter to select the Wireless Access Point(s) that your MicroVu HD will use to communicate with the network. The Wireless Access Points must be configured in the VuVault Settings / Wtm Server page. While powered on and in Standby Mode, the MicroVu HD will attempt to find a WAP and wirelessly transfer data every 2 minutes. GPS The GPS information displays the route traveled during the course of a recording on an interactive map. It includes path traveled, current position of the vehicle during playback, location and details of the starting and stopping points and any marks in the video. It can also display the heading and any unauthorized zones that are setup. Below are configuration items which can be enabled for a GPS location to trigger an Event Record.](https://usermanual.wiki/Digital-Ally/MICROVU/User-Guide-2594693-Page-12.png)