Digital Ally MICROVU RFID tag reader User Manual FirstVu
Digital Ally, Inc. RFID tag reader FirstVu
User Manual
Copyright © 2015 Digital Ally, Inc. All Rights Reserved. This publication may not be reproduced, stored in a retrieval system,
or transmitted in whole or part in any form or by any means electronic, mechanical, recording, photocopying, or in any other
manner without the prior written approval of Digital Ally, Inc.
Operation Guide
Compact HD Law Enforcement In-Car Video System
860-00222-00 Rev A
April 2015

MicroVu HD™ Operation Guide 860-00222-00 Rev A
© 2015 Digital Ally, Inc.
T a b l e o f C o n t e n t s
SECTION - 1 INTRODUCTION ............................................................................................................................1-1
MICROVU HD™ FEATURES .................................................................................................................................1-1
SOFTWARE UPDATES ............................................................................................................................................1-1
STANDARD PARTS LIST ........................................................................................................................................1-2
OPTIONAL ACCESSORIES LIST ..............................................................................................................................1-2
SECTION - 2 DEVICE CONFIGURATION – VUVAULT ..................................................................................2-1
DEFAULT CONFIGURATION ...................................................................................................................................2-1
USING VUVAULT TO ACTIVATE YOUR MICROVU HD ...........................................................................................2-1
MICROVU HD SETTINGS - GENERAL ...................................................................................................................2-2
Location ........................................................................................................................................................2-3
Power ...........................................................................................................................................................2-3
Recording Details .........................................................................................................................................2-5
VuLink ..........................................................................................................................................................2-6
VuVault GO ...................................................................................................................................................2-6
MOTION ...............................................................................................................................................................2-6
Accelerometer ...............................................................................................................................................2-6
Vehicle Speed ................................................................................................................................................2-6
SENSORS ..............................................................................................................................................................2-7
Input Sensors ................................................................................................................................................2-7
DATA TRANSFER ...................................................................................................................................................2-7
Network ........................................................................................................................................................2-7
GPS......................................................................................................................................................................2-7
GPS Locations ..............................................................................................................................................2-8
Locations of Interest .....................................................................................................................................2-8
ACTIVATING YOUR MICROVU HD WITHIN VUVAULT ...........................................................................................2-9
UPDATING THE CONFIGURATION USING WIFI .....................................................................................................2-10
SECTION - 3 OPERATION .................................................................................................................................. 3-11
MICROVU HD FEATURES ................................................................................................................................... 3-11
SYSTEM STATUS INDICATOR OPERATION CHART ..................................................................................................3-2
USER LOGIN WITH RFID CARD ............................................................................................................................3-3
Logging In ....................................................................................................................................................3-3
Logging Out .................................................................................................................................................3-4
Error when Logging In .................................................................................................................................3-4
VIDEO RECORDING...............................................................................................................................................3-4
Start a Manual Recording ............................................................................................................................3-4
Stop Recording .............................................................................................................................................3-4
MEMORY ALERT ...................................................................................................................................................3-4
MARKING EVENTS ...............................................................................................................................................3-4
AUDIO RECORDING ..............................................................................................................................................3-4
SECTION - 4 UPLOADING FILES .......................................................................................................................4-4
UPLOADING FILES DIRECTLY TO A COMPUTER USING A USB CABLE ....................................................................4-7
UPLOADING FILES USING VUVAULT.....................................................................................................................4-4
Option 1: Wi-Fi ............................................................................................................................................4-4
Option 2: USB Port method .........................................................................................................................4-5
Option 3: microSD Card ..............................................................................................................................4-6
SECTION - 5 VIDEO PLAYBACK AND MANAGEMENT ................................................................................4-7
USING VUVAULT..................................................................................................................................................5-7
USING THE DIGITAL ALLY VIEWER .......................................................................................................................5-7
Toolbar Controls...........................................................................................................................................5-8
MicroVu HD™ Operation Guide 860-00222-00 Rev A
© 2015 Digital Ally, Inc.
Playback Controls ........................................................................................................................................5-8
Playback Slider bar ......................................................................................................................................5-9
View Selection and Options ..........................................................................................................................5-9
SECTION - 6 SUPPORT & TROUBLESHOOTING ...........................................................................................6-1
FIRMWARE UPDATES ............................................................................................................................................6-1
Firmware Update Instructions .....................................................................................................................6-1
PERFORMING A RESET ..........................................................................................................................................6-2
PRODUCT REPAIR .................................................................................................................................................6-2
SECTION - 7 WARRANTY INFORMATION ......................................................................................................7-1
SECTION - 8 CONTACT INFORMATION ..........................................................................................................8-1
SECTION - 9 REGULATORY ................................................................................................................................9-2

MicroVu HD™ Operation Guide 860-00222-00 Rev A
Digital Ally, Inc. | Introduction
1-1
Section - 1 Introduction
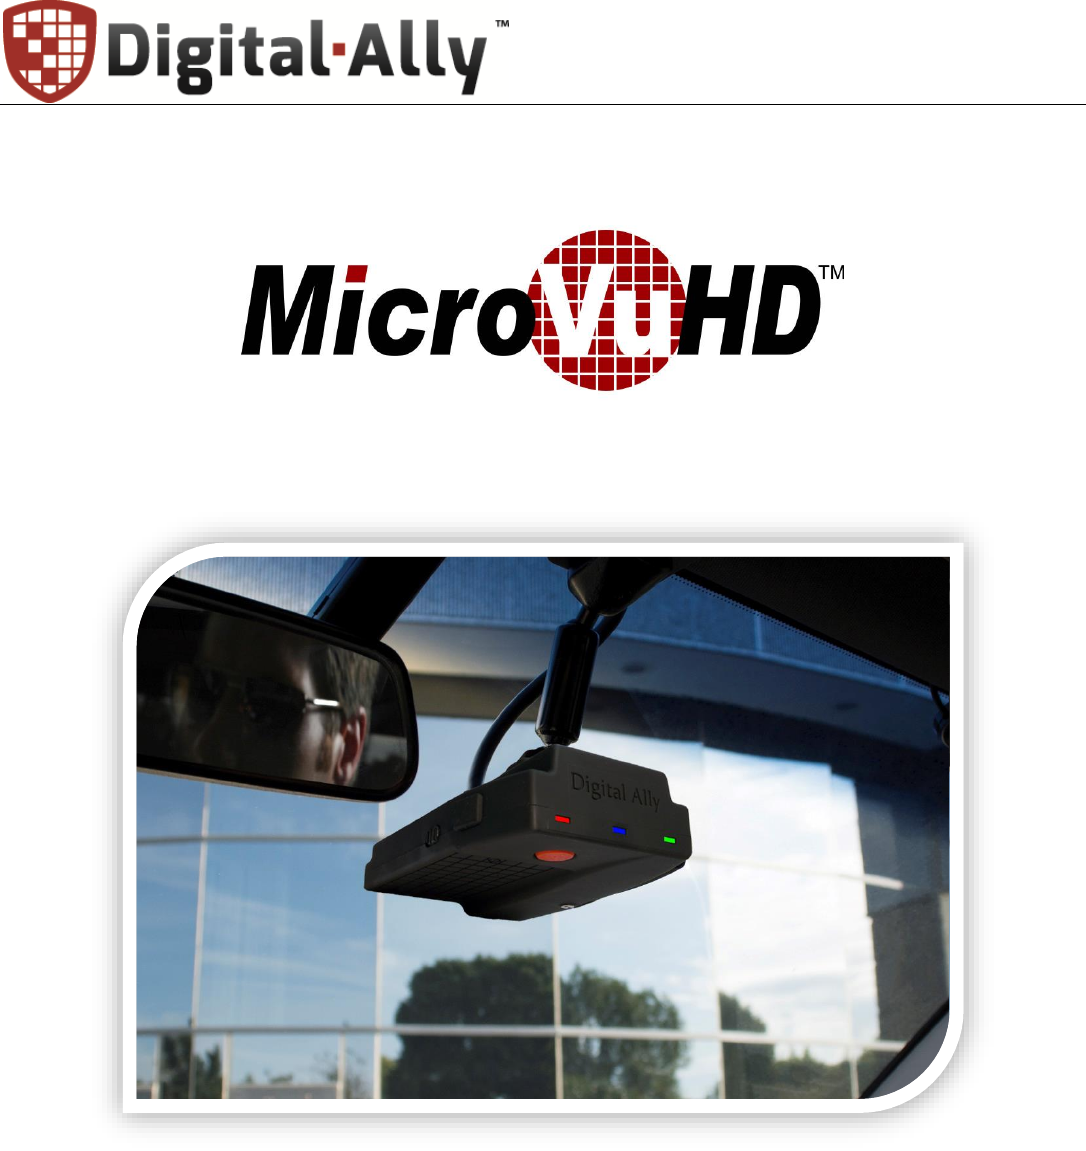
The MicroVu HD is an extremely compact law enforcement in-car digital video event recording system.
MicroVu HD provides up to1080p High-Definition video recording and a powerful array of features to
capture video and audio evidence while also collecting useful information such as a date/time stamp,
location, and more.
The MicroVu HD is designed for incredibly easy and unobtrusive use, from its initial installation to
unprecedented automatic login & recording capabilities.
This Operation Guide is designed to get you up and running quickly. For integration within the VuVault™
back office software, please refer to Section 2. For integration with Digital Ally’s VuLink™ in-car wireless
link, please consult the “VuLink Operation and Installation Guide.”
MicroVu HD™ Features
Entire system is only 4” long, 3” wide and 1” high.
RFID Login option to instantly log in.
One-button Record Start/Mark/Record Stop.
Patented VuLink capability: Flip on your lights, siren, etc. to automatically trigger
recordings on the MicroVu HD & simultaneously start a FirstVu HD Officer-worn
video system.
Internal G-Force sensor to automatically trigger recordings & capture data in case
of a crash or impact.
Recordings can be started with the 2.4GHz DWM-800 wireless microphone,
VuVault GO mobile app or a FirstVu HD body cam using the VuLink wireless in-car
video link from up to 200 feet away.
VuVault GO mobile App compatibility: Add incident notes & tag events, play video
recordings, display a live view, monitor remaining data storage space, and more.
High Quality 1080p or 720p Video – H.264 codec - up to 30 frames per second.
Enhanced low-light recording capability plus Wide Dynamic Range (WDR) video
capture, which provides dual –exposure (one dark, one light) blended together to
retain detail in both light and dark segments.
Encoded videos may easily be viewed on standard PC video player software or
VuVault GO enabled mobile device.
Saves Metadata along with Video.
Up to 60 Seconds Pre-Event Record – Capture events before pressing record.
Instant Record ON while in Standby Mode.
User can insert a ‘Mark’ during a recording which records to Metadata.
Covert Mode Button on the unit turns off all LED indicators.
Secure 32GB of event record memory.
Software upgradeable by microSD Card or via PC-USB cable connection.
Integrated GPS with back-office interactive mapping.
Wireless data transfer.
Live streaming capability.
Software Updates
Log on to www.digitalallyinc.com/tech-support.php and register for an account to be an
authorized user. By registering you will be able to download all the latest Product Guides,
Firmware/Software updates and will be notified of future upgrades.
MicroVu HD™ Operation Guide 860-00222-00 Rev A
Digital Ally, Inc. | Introduction
1-2
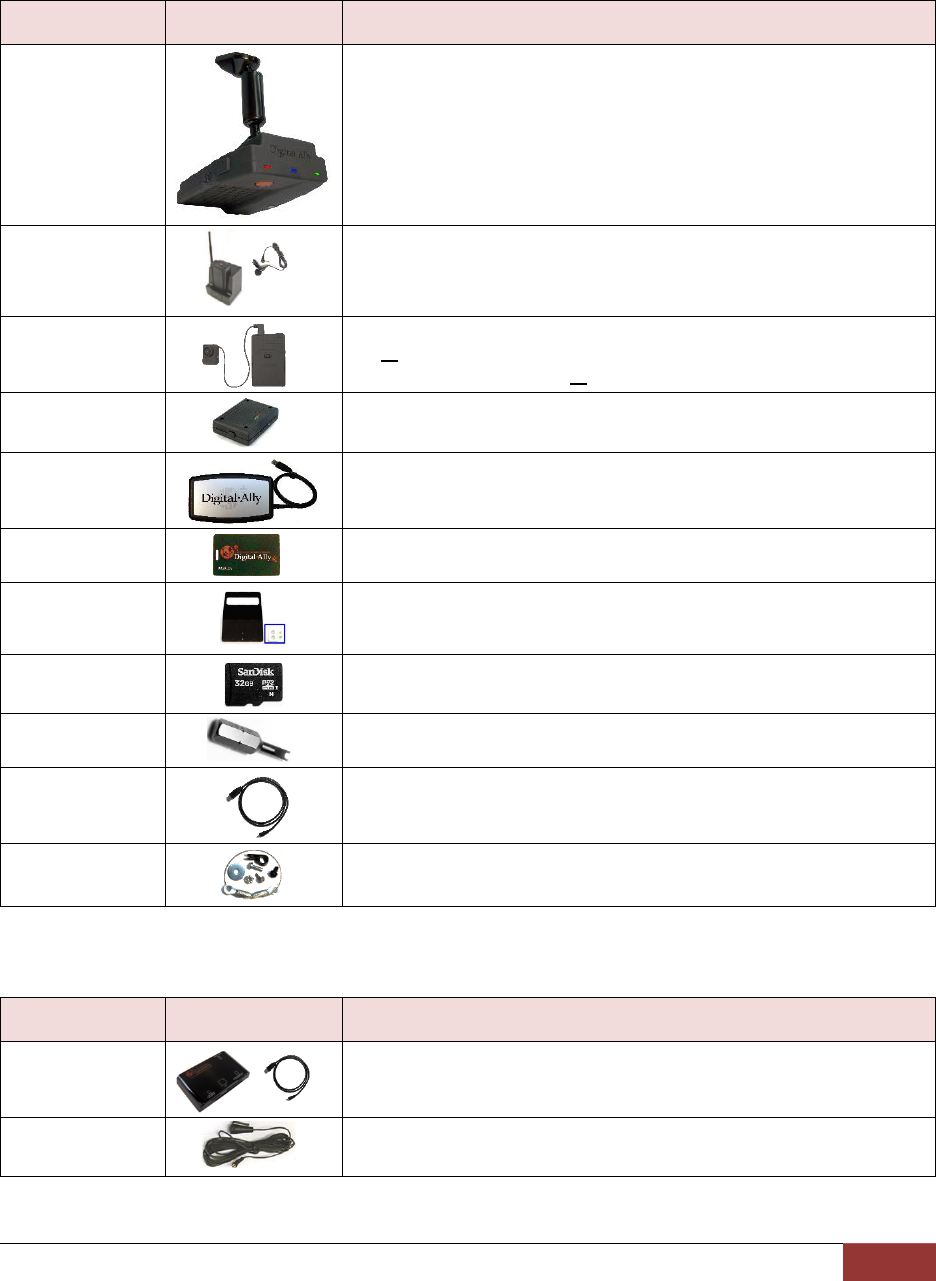
Standard Parts List
Part Number 001-00720-00
Optional Accessories List
Part Number
Description
050-10179-00
MicroVu HD Main Recorder w/Mounting Kit
002-05095-00
DWM-800 System, Includes Wireless Microphone, Charging
Cradle, Mounting Bracket, and Lapel Microphone.
Call Digital Ally
to select
options
FirstVu HD Body Camera System
11 or 48 inch Camera Cable
With Audio Mute Switch or Audio Always On (No Mute Switch)
001-0950-00
VuLink In-Car Wireless Video Link System
for FirstVu HD Body Camera System
001-0951-00
RFID Programming Unit with USB Cable for PC
002-05120-00
RFID Card
006-0030
Visor Mount for MicroVu HD
363-00073-00
microSD Card, 32GB
002-05161-00
Secure Panel Lock Key
008-0100
Cable, USB 2.0 Type A to Mini-B, 3.3 ft.
002-05149-00
Safety Lanyard Kit, 9”
Part Number
Description
002-0028-00
SD Card Reader with USB Cable for PC
004-09058-00
Back Seat Microphone for DWM-800, 20ft. 2.5mm plug
MicroVu HD™ Operation Guide 860-00222-00 Rev A
Digital Ally, Inc. | Device Configuration – VuVault
2-1
Section - 2 Device Configuration – VuVault
The MicroVU HD contains a default configuration and can be used immediately. For full
functionality it must be reconfigured by activating the device using Digital Ally’s VuVault™
back-office software.
Default Configuration
If the unit has never been activated, it will use the following default settings:
Central Standard Time (UTC-6)
Date format: Month/Day/Year
Time format:12-hour
Daylight Saving enabled
1920x1080p record size/high record quality
30 frames per second
Pre-Event disabled
Pre-Event Audio disabled
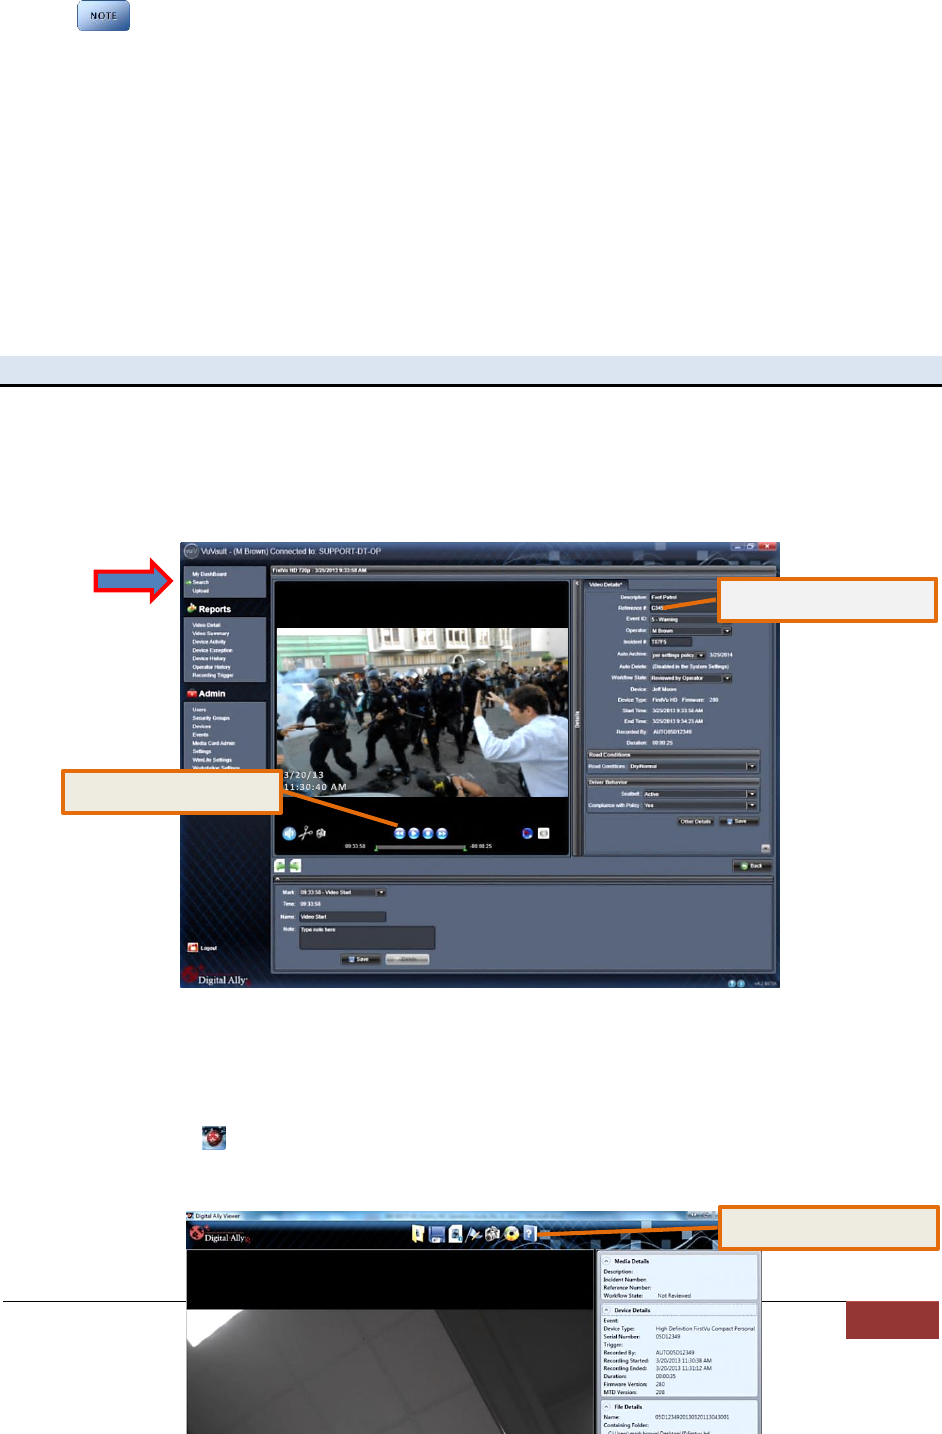
Using VuVault to Activate your MicroVu HD
You must be running VuVault Version 4.7 (minimum) to configure and
activate a MicroVu HD device.
VuVault is used to manage MicroVu HD settings as well as activate your device for use
within the system.
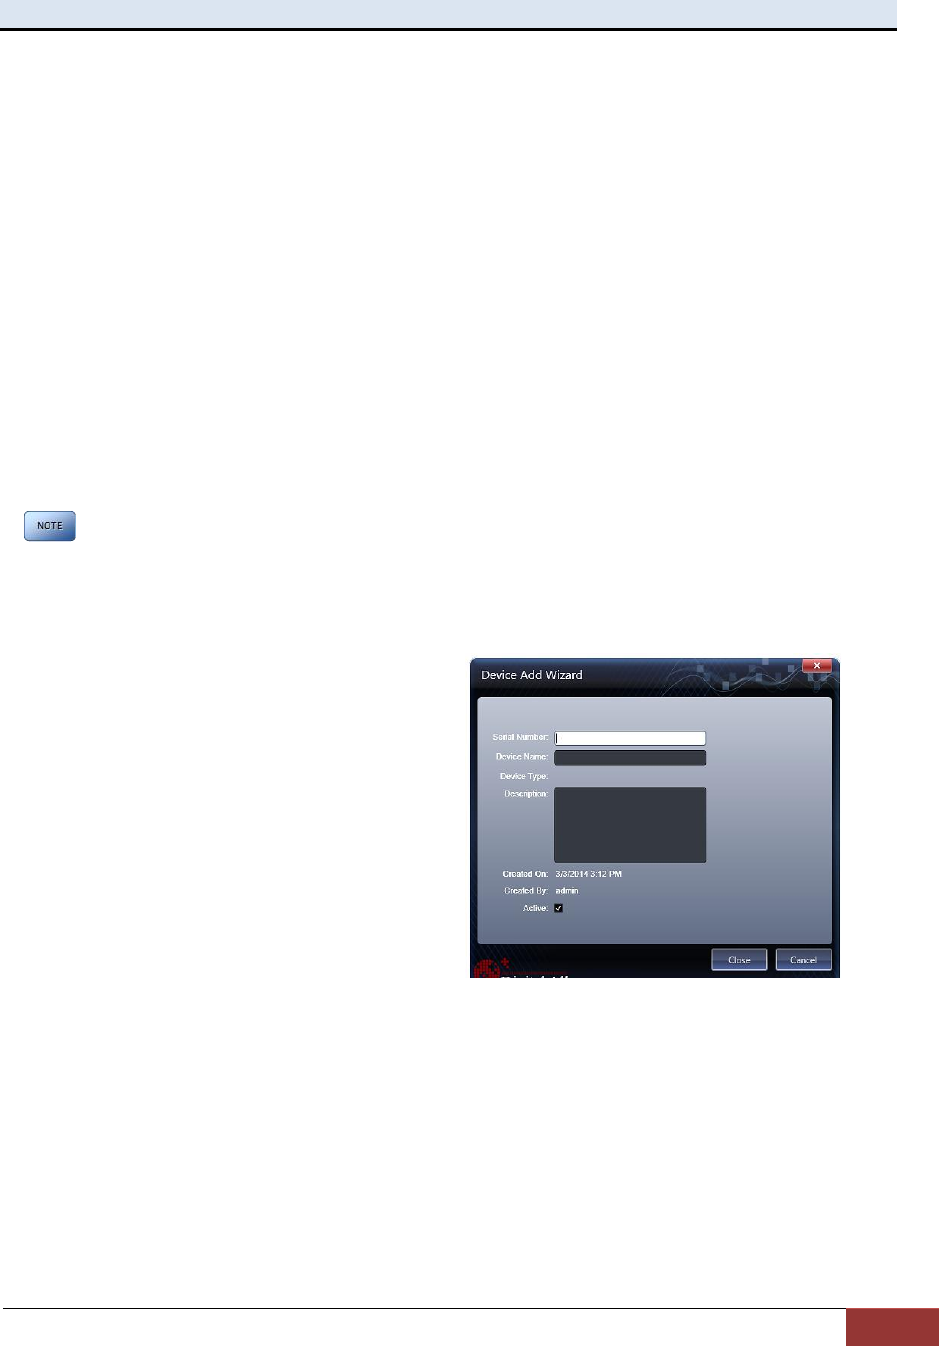
Before you can configure your MicroVu HD
for use within VuVault, the serial number
must be added into the system. Select
Admin>Devices>Advanced>Add Device
to add your device into VuVault.
Enter your device serial number and assign
it a name within the system. When done,
select Close, then Save.
For more information consult the VuVault
Administrator’s Guide “Adding Devices”
section.
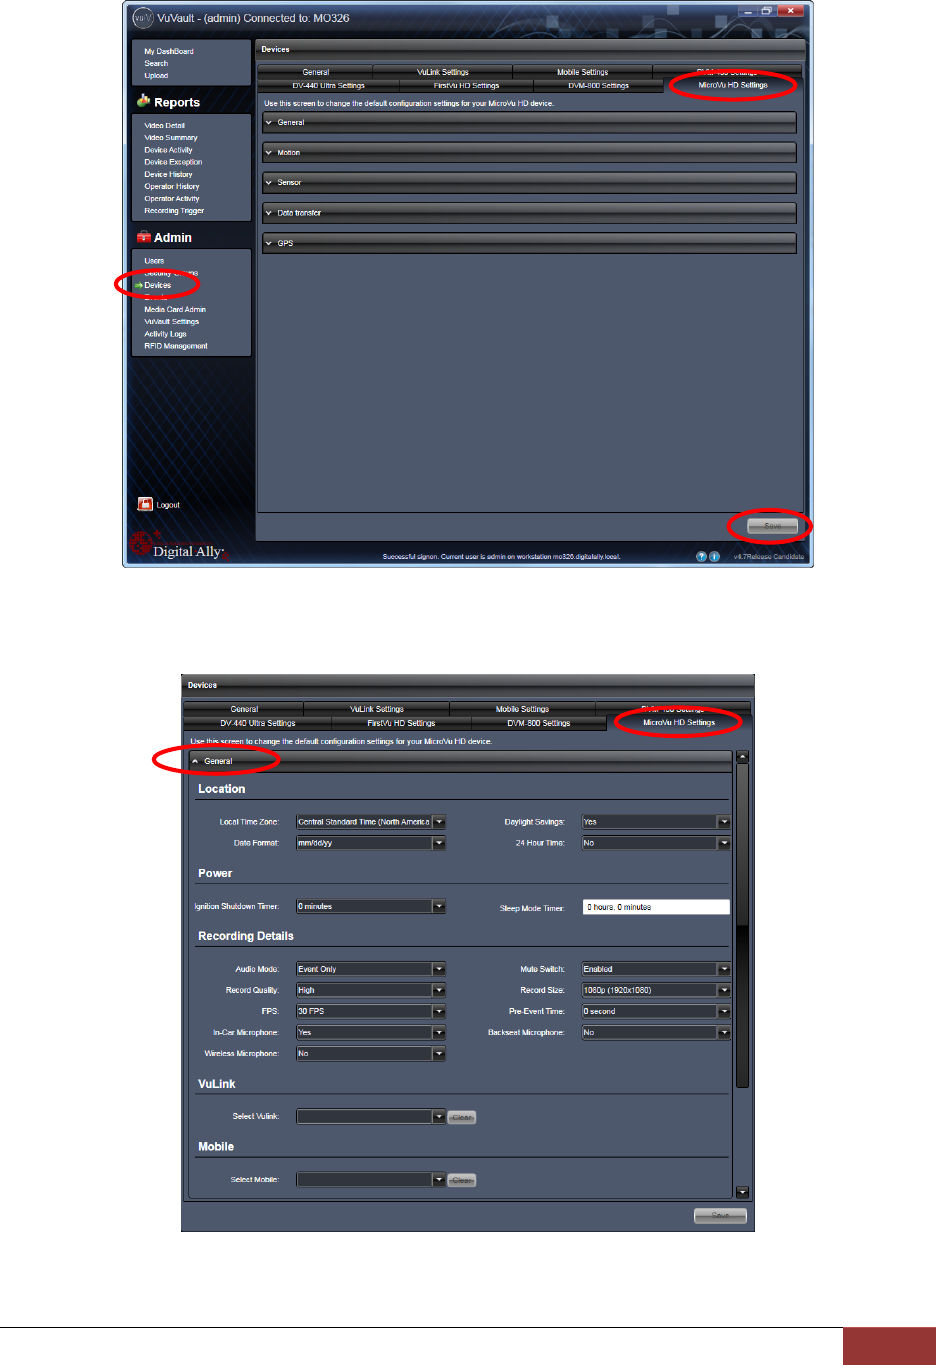
A configuration field will be available in the Admin>Devices tab within VuVault once a
valid MicroVu HD serial number has been added into the system. These global settings
will define how all users will interface with the MicroVu HD.
To create a unique configuration for a specific MicroVu HD device, select
Admin>Devices>Advanced, find the specific MicroVu HD serial number, and click
Settings. Choices made in this area will apply to this device only.
Click on each sub-heading to reveal the available configuration options. When done,
press Save.
MicroVu HD™ Operation Guide 860-00222-00 Rev A
Digital Ally, Inc. | Device Configuration – VuVault
2-2
MicroVu HD Settings - General

MicroVu HD™ Operation Guide 860-00222-00 Rev A
Digital Ally, Inc. | Device Configuration – VuVault
2-3
Location
Below are the configuration items for localization which are provided to address
Date/Time settings and display formats.
Local Time Zone
The local time zone is used to adjust the device when synchronizing to the
Greenwich Mean Time. During device configuration, the local time from the PC
real time clock will be used, and Central Standard Time is set by default.
The date and time is set by the factory prior to shipment. However, you must
also enter the correct UTC offset when configuring the device so that the time
zone can be set properly. For example, USA Central Standard Time =UTC -6.
If using VuVault™, the date & time are automatically synced to your computer
during activation.
PST = Pacific Standard Time (UTC - 8 hours)
MST = Mountain Standard Time (UTC - 7 hours)
CST = Central Standard Time (UTC - 6 hours)
EST = Eastern Standard Time (UTC - 5 hours)
AST = Atlantic Standard Time (UTC - 4 hours)
ALST = Alaskan Standard Time (UTC - 9 hours)
HST = Hawaiian Standard Time (UTC - 10 hours)
Daylight Saving
When set to Yes, Daylight Saving setting time will be automatically adjusted for
the configured Local Time Zone. If this is disabled, time will not be adjusted for
Daylight Saving.
Settings: No, Yes [default]
Date Format
The date format displayed on the event recordings is selected through this
setting.
Settings: mm/dd/yy [default]; yy/mm/dd; dd/mm/yy
24 Hour Time
This time format allows the device to be configured in a 12-hour format or a
24-hour format.
Settings: No [default], Yes
Power
Power to the MicroVu HD is controlled through your vehicle’s ignition. There are no
manual controls for powering the unit on and off. When ignition is switched on, the boot-
up process will begin. The driver-facing status indicators will flash in sequence until boot-
up is complete. When the Blue LED is lit steadily the unit is in Standby and is ready for
use.
The Power operation is configurable and specifies how the MicroVu HD will operate when
the vehicle ignition is turned to the ON or OFF positions. Two parameters control the
power operation in order as follows:
Ignition Shutdown Timer
The Ignition Shutdown Timer specifies the amount of time the MicroVu HD remains
fully powered when the vehicle ignition goes from ON to OFF.
Settings: 0 to 50 minutes, 1 hr, 2 hrs, 4 hrs, 8 hrs, 12 hrs, 24 hrs, and Unlimited [default = 1 hour]

MicroVu HD™ Operation Guide 860-00222-00 Rev A
Digital Ally, Inc. | Device Configuration – VuVault
2-4
During the Ignition Shutdown Time:
1. If configured to 0 minutes; the Ignition Shutdown Timer is disabled, and the system
will follow the operation for the Sleep Mode Timer configuration.
2. With Ignition Shutdown Timer enabled, and the system is not recording, all LED
Indicators will turn off, but MicroVu HD will remain fully powered until the Timer
expires. When the timer expires, the system will then follow the operation for the
Sleep Mode Timer (if enabled).
3. During an active record, the unit will continue recording and the system status
indicators will operate normally until the recording ends.
4. If the Ignition Shutdown Timer has not expired, the unit will allow an event record
start from any of the available Event Record Start Triggers. If a recording begins,
the system indicators will operate normally until the recording ends.
5. Once the Ignition Shutdown Timer expires, the system will stop an active recording
and operate according to the Sleep Mode Timer configuration.
6. If the vehicle ignition is turned ON before the timer expires, the Ignition Shutdown
Timer is cancelled and will start over again when the ignition is turned off.
Sleep Mode Timer
When the vehicle ignition goes from ON to OFF the MicroVu HD will first follow the
operation for Ignition Shutdown Timer and then the operation for Sleep Mode Timer
configuration. The Sleep Mode Timer configuration specifies the length of time the
system will remain in a reduced power consumption mode before completely powering
off.
During Sleep Mode:
1. High power devices are put to sleep or shut down.
2. All indicators will be turned off.
3. No Event Record Start Trigger is available when the system is in Sleep Mode.
4. The MicroVu HD will remain in Sleep Mode until the timer expires, then it will
completely power off.
5. If the vehicle ignition switches to the ON position before the Sleep Mode Timer
expires, the system will wake up to the full power state and be ready to record within
a few seconds.
The MicroVu HD will draw a maximum of 291mA of current during Sleep Mode. Typically,
a new or strong vehicle battery will provide enough current to power the MicroVu HD in
Sleep Mode for 5 days without discharging the battery. The vehicle’s battery current
rating, battery age, and other equipment that remains powered on when the vehicle
ignition is off will affect the maximum consecutive days the MicroVu HD should remain in
Sleep Mode. The following table can be used as a general guideline for determining the
Sleep Mode setting; actual results may vary:
Complete Vehicle Power Loss
During an event record, if vehicle power is completely lost to the MicroVu HD
system, the MicroVu HD will switch to the internal battery to end the event record to
prevent data corruption, and then power off after 60 seconds.
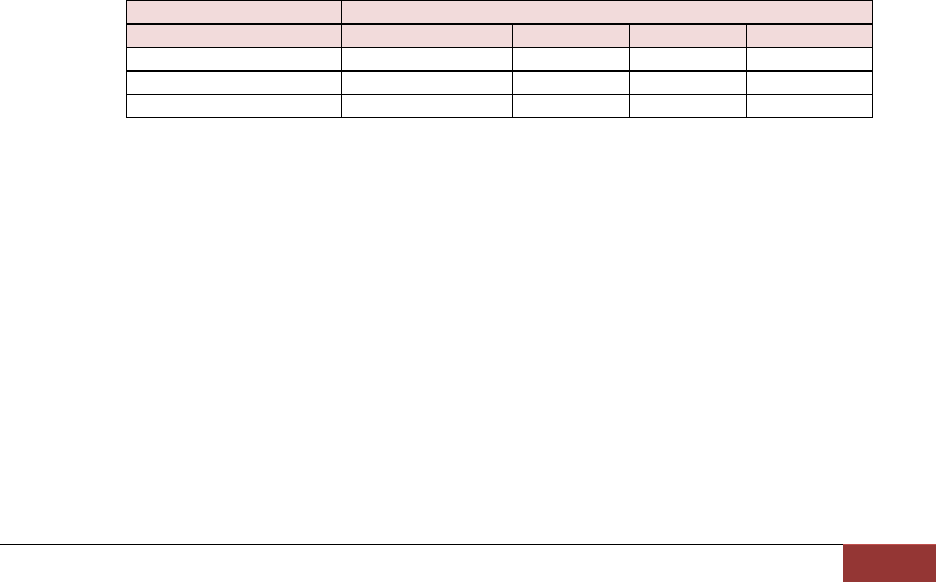
Battery C20 Rating (Ah)
No Additional or Minimal Load (days)
Additional Load (days)
45
5 - 6
2 - 4
80
9
7-8
100 and greater
11
11
Table 2-4: Estimated number of days a vehicle can
remain in Sleep Mode before draining the vehicle battery.
MicroVu HD™ Operation Guide 860-00222-00 Rev A
Digital Ally, Inc. | Device Configuration – VuVault
2-5
If the MicroVu HD is not recording when vehicle power is completely lost, the
MicroVu HD automatically make a 60 second recording using the internal backup
battery, then power down completely.
Recording Details
Audio Mode
The Audio Mode determines how audio will be recorded to your device.
Disabled: No audio will be recorded.
Enabled (w/o Pre-Event): Audio is recorded during the event but not
recorded during pre-event.
Enabled: Audio is recorded during the recorded event and during the
configured pre-event time.
Settings: Disabled, Enabled (w/o Pre-Event) [default], Enabled
Mute Switch
Enables use of the Mute Switch on the device. This setting is not available if
Audio Mode is set to Disabled.
Settings: Enabled [default], Disabled
Record Quality
The Record Quality parameter allows the video compression bit rate to be
adjusted. Digital video is compressed by taking out data that remains constant
from each frame, and only storing data that actually changes. This allows
videos with still backgrounds to be much smaller than they would be if the
background had to be present in every single frame.
The bit rate is the number of bits that can be used in one second of video. The
higher the record quality, the higher the bit rate and the size of the event files.
The default setting is “high” for a good mix between video qualities and upload
time, but can be lowered or raised to adjust quality and storage space.
Record Size
Record Quality
Standard
Medium
High
Super High
1080p (1920x1080)
2 Mbps
4 Mbps
8 Mbps
12 Mbps
720p (1280x720)
1 Mbps
2 Mbps
4 Mbps
8 Mbps
VGA (640x480)
0.5 Mbps
1 Mbps
2 Mbps
4 Mbps
Record Size
Allows you to select the video resolution for your MicroVu HD video
recordings. The higher the setting, the better the video quality, and the larger
the size of the event files.
Settings: VGA (640x480), 720p (1280x720), 1080p (1920x1080) [default]
FPS (Frames Per Second)
This parameter sets the number of frames per second the MicroVu HD will
record. The higher the setting, the better the video quality, and the larger the
size of the event files.
Settings: 5, 10, 15, 30fps [default]
Pre-Event Time
The Pre-Event Time option allows you to set the amount of time for the pre-
event buffer. The MicroVu HD will buffer the last 0-60 seconds of audio and
Table 2-5: Video Quality Guide (Mbps = Megabits per Second)
MicroVu HD™ Operation Guide 860-00222-00 Rev A
Digital Ally, Inc. | Device Configuration – VuVault
2-6
video so it can be recorded during a record event. If set for 0 seconds, pre-
event function will be disabled.
Settings: 0, 6, 12, 18, 24, 30, 60 seconds [default = 0 seconds]
In-Car Microphone
Enables the MicroVu HD to record from the In-Car Microphone.
Settings: Yes [default], No
Backseat Microphone
Enables the MicroVu HD to record from the Backseat Microphone.
Settings: Yes, No [default]
Wireless Microphone
Enables the MicroVu HD to record from the Wireless Microphone.
Settings: Yes, No [default]
VuLink
Select VuLink
Assign a VuLink™ device serial number for use with your MicroVu HD. A
VuLink™ wireless link is required (see the “VuLink Operation and Installation
Guide”, or call Digital Ally Inc. Technical Support for more information).
VuVault GO
Select VuVault GO
Assign a VuVault GO SSID for use with your MicroVu HD from the list of
VuVault GO devices as configured in VuVault in the VuVault GO Settings tab.
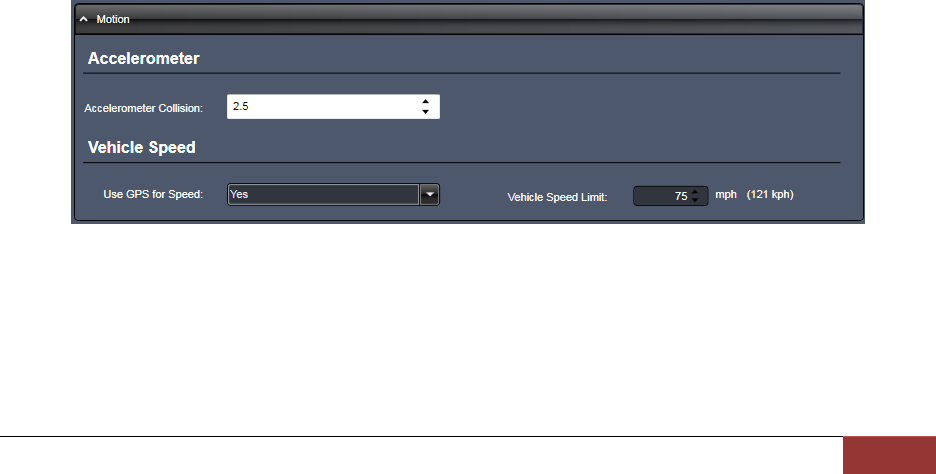
Motion
Accelerometer
Accelerometer Collision
The MicroVu HD has an accelerometer built-in which can be used to trigger an
Event Record when the set G-Force levels indicate that a collision has
occurred. Use this setting to configure the threshold for this trigger. This trigger
can be disabled by setting the Accelerometer Collision level to zero.
Vehicle Speed
Use GPS for Speed
The MicroVu HD will detect vehicle speed using the built-in GPS system.
Settings: Yes [default], No
MicroVu HD™ Operation Guide 860-00222-00 Rev A
Digital Ally, Inc. | Device Configuration – VuVault
2-7
Vehicle Speed Limit
This parameter sets the threshold for excessive speed. When the Vehicle
Speed Trigger Source is enabled and the speed exceeds the value of this
parameter, an Event Record will be triggered.
Settings: 1-199 mph [default = 75]
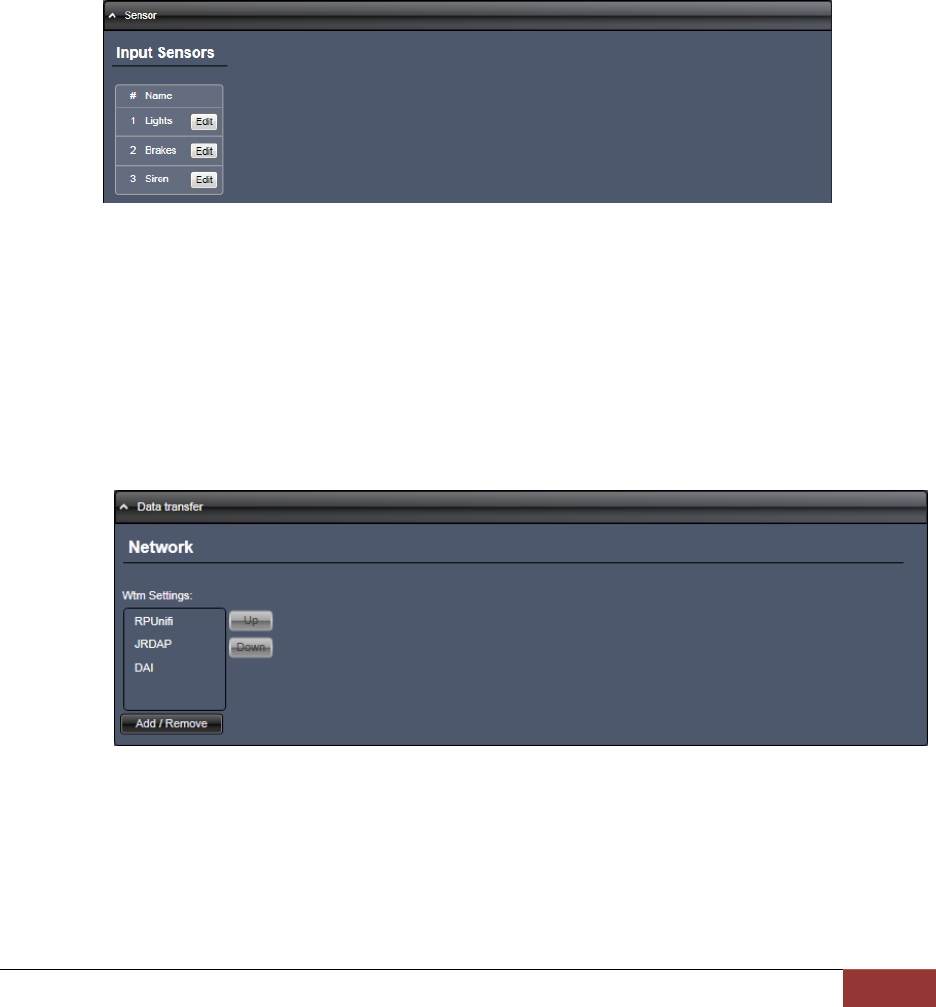
Sensors
Input Sensors
The MicroVu HD main cable allows external connection to the vehicle triggers. The input
sensors can be connected to various devices to trigger an event recording, or to only
register the device activity in the metadata.
Use the Edit button to name the sensor to match the wiring configuration and to select
whether the sensor will be used as an Event Trigger or Sensor Only.
Data Transfer
Network
Wtm Settings
Use this parameter to select the Wireless Access Point(s) that your MicroVu
HD will use to communicate with the network. The Wireless Access Points
must be configured in the VuVault Settings / Wtm Server page. While powered
on and in Standby Mode, the MicroVu HD will attempt to find a WAP and
wirelessly transfer data every 2 minutes.
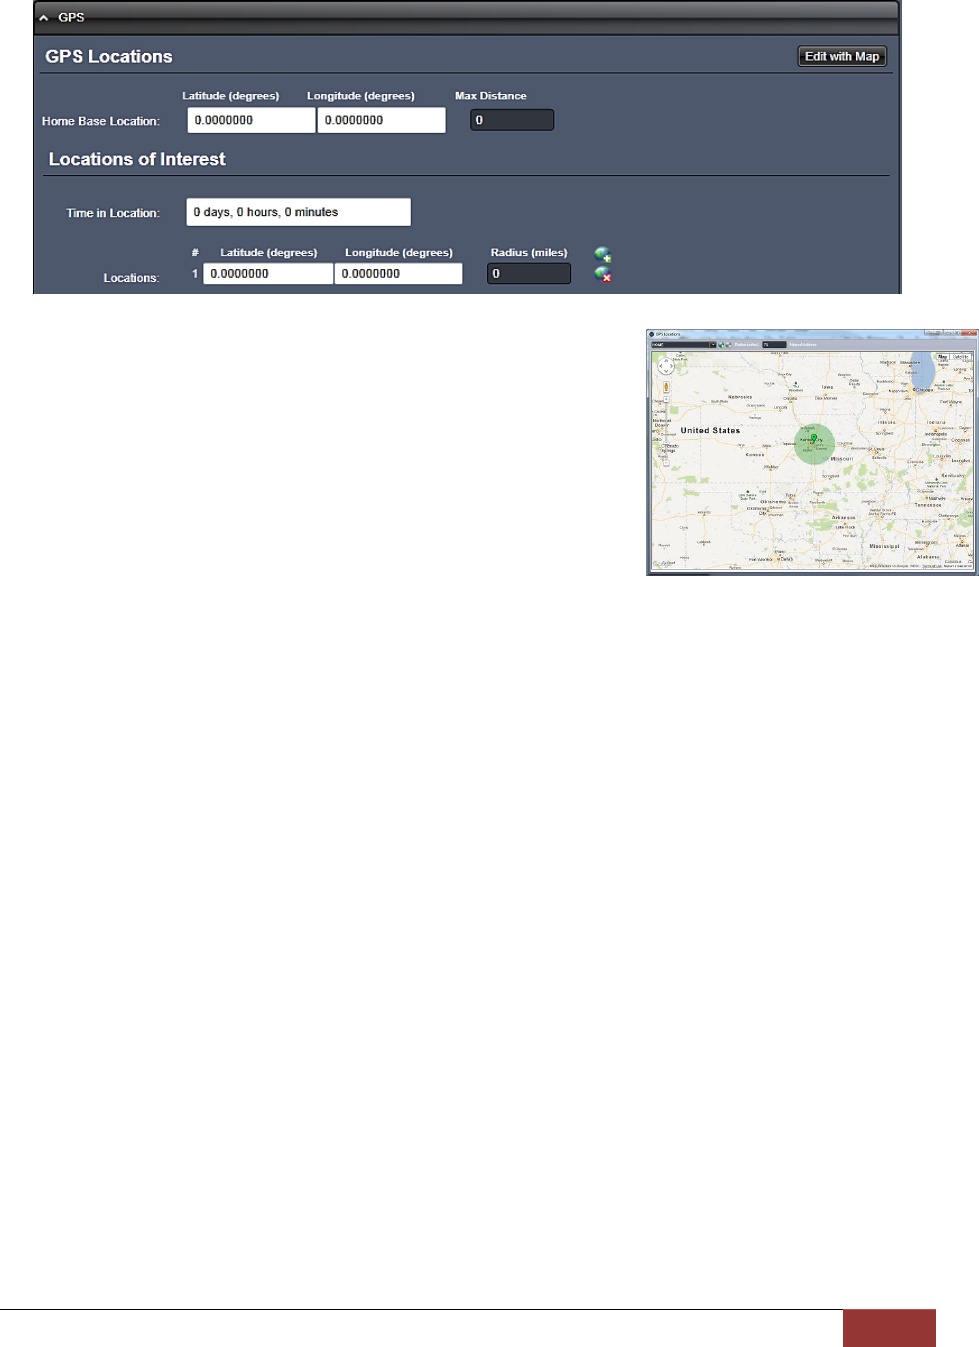
GPS
The GPS information displays the route traveled during the course of a recording on an
interactive map. It includes path traveled, current position of the vehicle during playback,
location and details of the starting and stopping points and any marks in the video. It can
also display the heading and any unauthorized zones that are setup. Below are
configuration items which can be enabled for a GPS location to trigger an Event Record.
MicroVu HD™ Operation Guide 860-00222-00 Rev A
Digital Ally, Inc. | Device Configuration – VuVault
2-8
GPS Locations
If a Home Base Location has been configured, the MicroVu
HD will begin recording when the defined distance from home
base has been exceeded. Once the duration of the event
ends, subsequent record events will be triggered as long as
the vehicle remains outside the home base radius. The
coordinates can be manually entered, or use the “Edit with
Map” button to use Google Maps to easily create the home
base radius.
Latitude
The vehicle home base latitude coordinate in an integer decimal
format (i.e.; 38.89171).
Longitude
The vehicle home base longitude coordinate in an integer decimal
format (i.e.; -94.670956).
Max Distance
This is the distance in miles that the vehicle can travel from the
home base. If the vehicle travels beyond the specified distance, an
event record will be triggered. A value of zero (0) disables this
event trigger.
Locations of Interest
Locations of interest are geographical areas identified by latitude, longitude and a
radius using the GPS antenna. These areas are generally considered restricted or
off limits. If the vehicle enters, or remains in a location of interest for a configurable
amount of time, the MicroVu HD will automatically start a recorded event. Up to 19
different Locations of Interest can be configured. Below are the configurable items:
Time in Location
Enter the allowable time in this location before an event recording is triggered
(days, hours and minutes). The minimum time in a location of interest before
an event is triggered is 1 minute. To disable all unauthorized zones set the
time to 0 days, 0 minutes, and 0 seconds.
Latitude
MicroVu HD™ Operation Guide 860-00222-00 Rev A
Digital Ally, Inc. | Device Configuration – VuVault
2-9
Enter the location(s) latitude in an integer decimal format (i.e.; 38.89171). To
disable a location, the latitude, longitude, and radius parameters must all be
zero.
Longitude
Enter the location(s) longitude in an integer decimal format (i.e.; -94.670956).
To disable a location, the latitude, longitude, and radius parameters must all
be zero.
Radius (miles)
Enter the radius of the unauthorized location in miles. To disable an
unauthorized location, the latitude, longitude, and radius parameters must all
be zero.
Once the desired settings have been entered, click
and proceed below to activate your device.
Activating your MicroVu HD within VuVault
The Media Card Administration function is used to erase, format, and activate the
microSD Card to be ready for use with VuVault and the MicroVu HD. During activation,
the file “deviceconfig” will be written to the SD Card. This file contains all of the VuVault
configuration data for the MicroVu HD.
The MicroVu HD can alternatively be activated by connecting to a VuVault computer via
the USB port in the access panel of the unit.
If activating via USB cable, make sure the MicroVu HD is powered on and in Standby
mode. If you are using the SD Card method, power OFF your MicroVu HD before removing
the card from the unit.
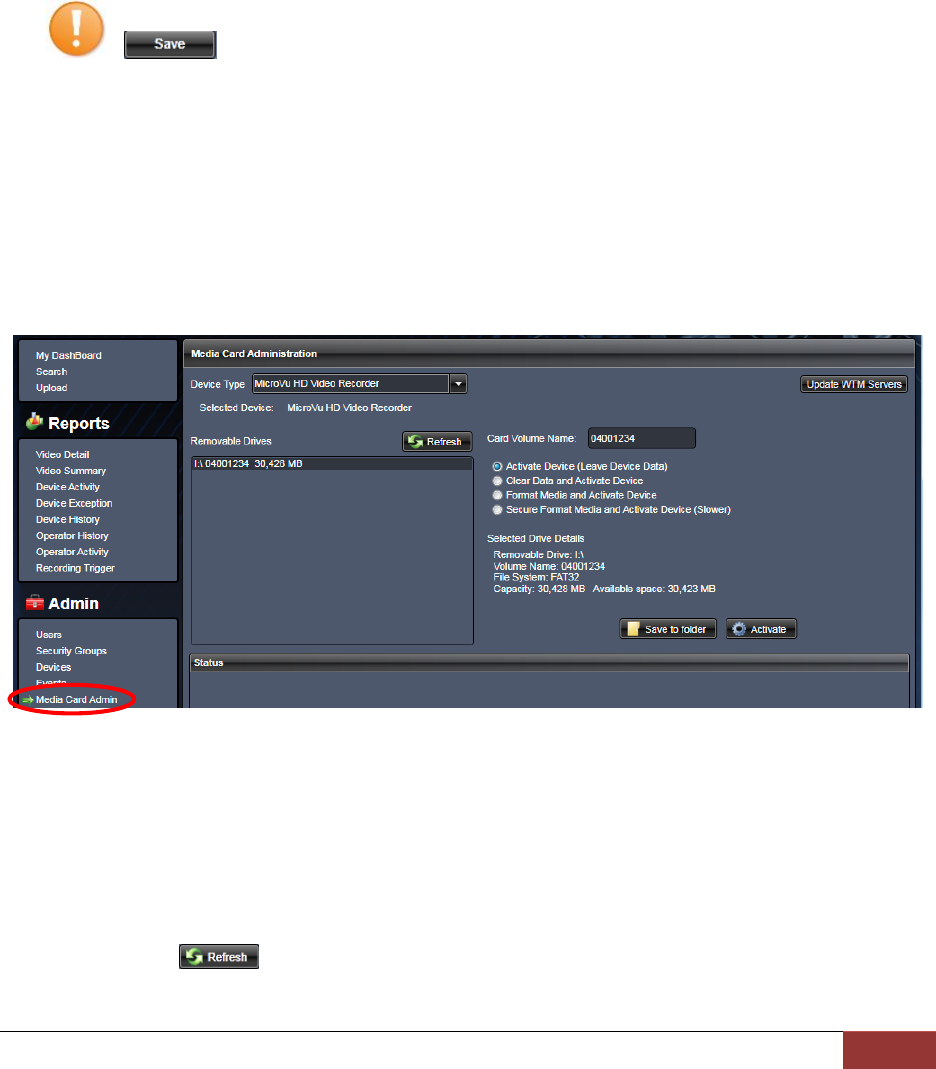
1. Select Media Card Admin from the Admin navigation bar.
2. Select the correct Device Type from the available options. You must select
“MicroVu HD Video Recorder”.
3. Click the button to detect the microSD Card connected to a card reader,
or the MicroVu HD via USB from the available removable drives.

MicroVu HD™ Operation Guide 860-00222-00 Rev A
Digital Ally, Inc. | Device Configuration – VuVault
2-10
4. Select the drive letter assigned to the MicroVu HD or SD Card.
5. Note the Card Volume Name field. If there is a current volume name, it will show
up automatically. If not, it will default to the serial number of the MicroVu HD. This
can be changed according to customer preference to whatever is deemed most
appropriate.
6. Choose from one of four options to activate the device:
Activate Device (Leave Data Intact) – this option activates the MicroVu HD
by writing the “deviceconfig” file to the microSD Card. No existing video events
located on the microSD Card are altered.
Clear Data and Activate Device – this option erases any data on the
microSD Card and activates it for use with the MicroVu HD.
Format Media and Activate Device – this option erases any data on the
microSD Card, formats the card (quick format), and activates it for use with the
MicroVu HD.
Secure Format Media and Activate Device (Slower) – this option overwrites
data on the microSD Card with zeroes for a secure erase, formats the card,
and activates it for use with the MicroVu HD.
Always ensure that all important data has been uploaded to the system before deleting it from
the MicroVu HD.
7. Click the Activate button. The Status field will indicate when the process has
completed.
VuVault will create a file named “deviceconfig” and place into the root folder of the
MicroVu HD (or microSD Card).
8. Your MicroVu HD will reboot when the USB cable is removed from the unit. If
activating by microSD Card, the new configuration will load when the MicroVu HD
has finished rebooting.
The MicroVu HD is now activated and ready for use. For more information consult the
VuVault Administrator’s Guide Media Card Administration section.
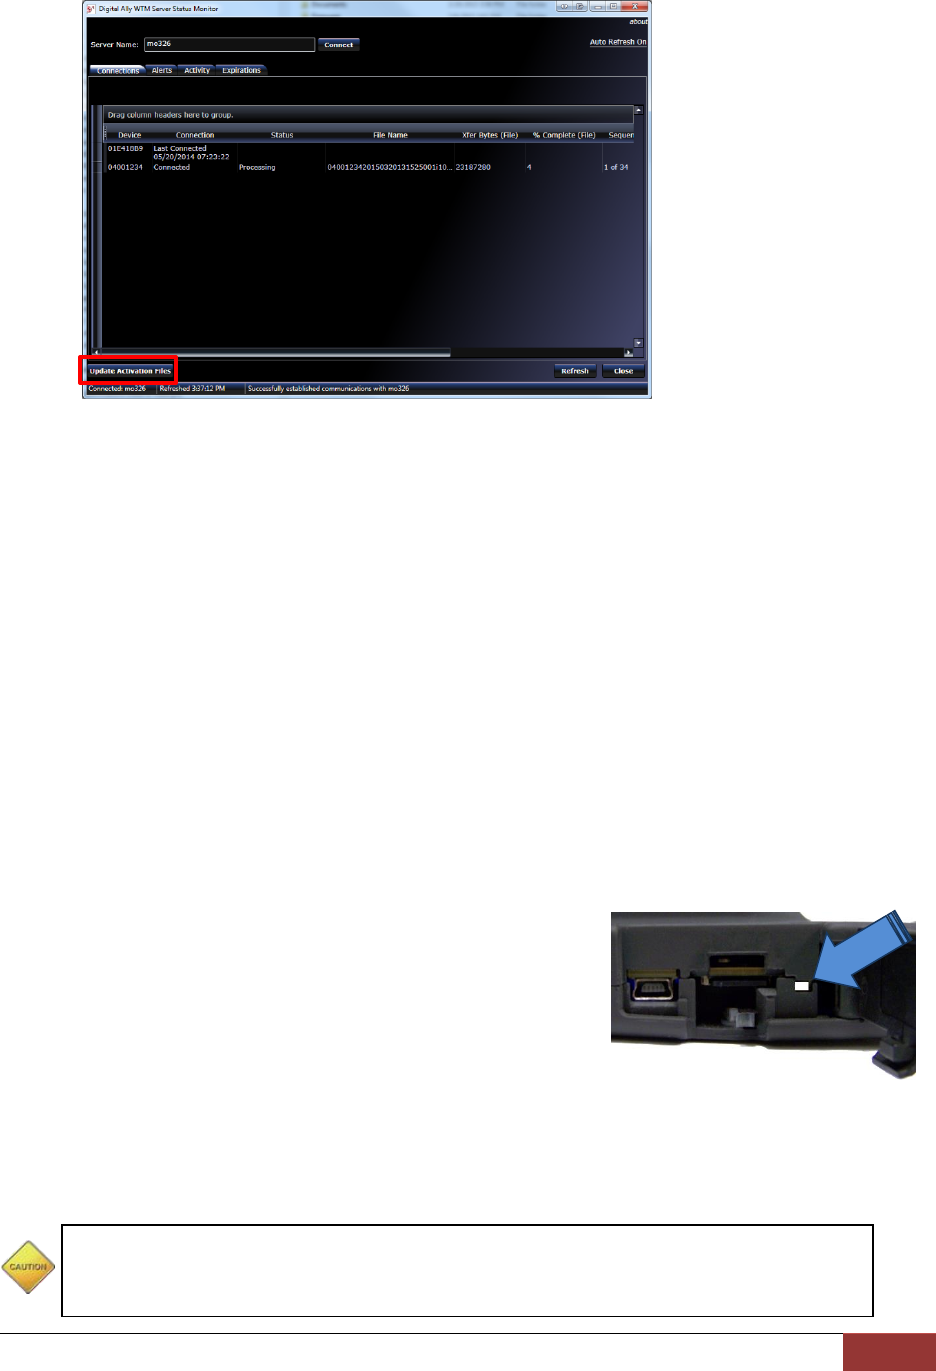
Updating the Configuration using Wifi
To be able to wirelessly update the configuration, your MicroVu HD must be configured for
wireless file transfer operation and have already successfully uploaded videos to the
VuVault server. Consult the VuVault Wireless Server Setup Guide for more information.
1. After making your configuration selections in VuVault, click .
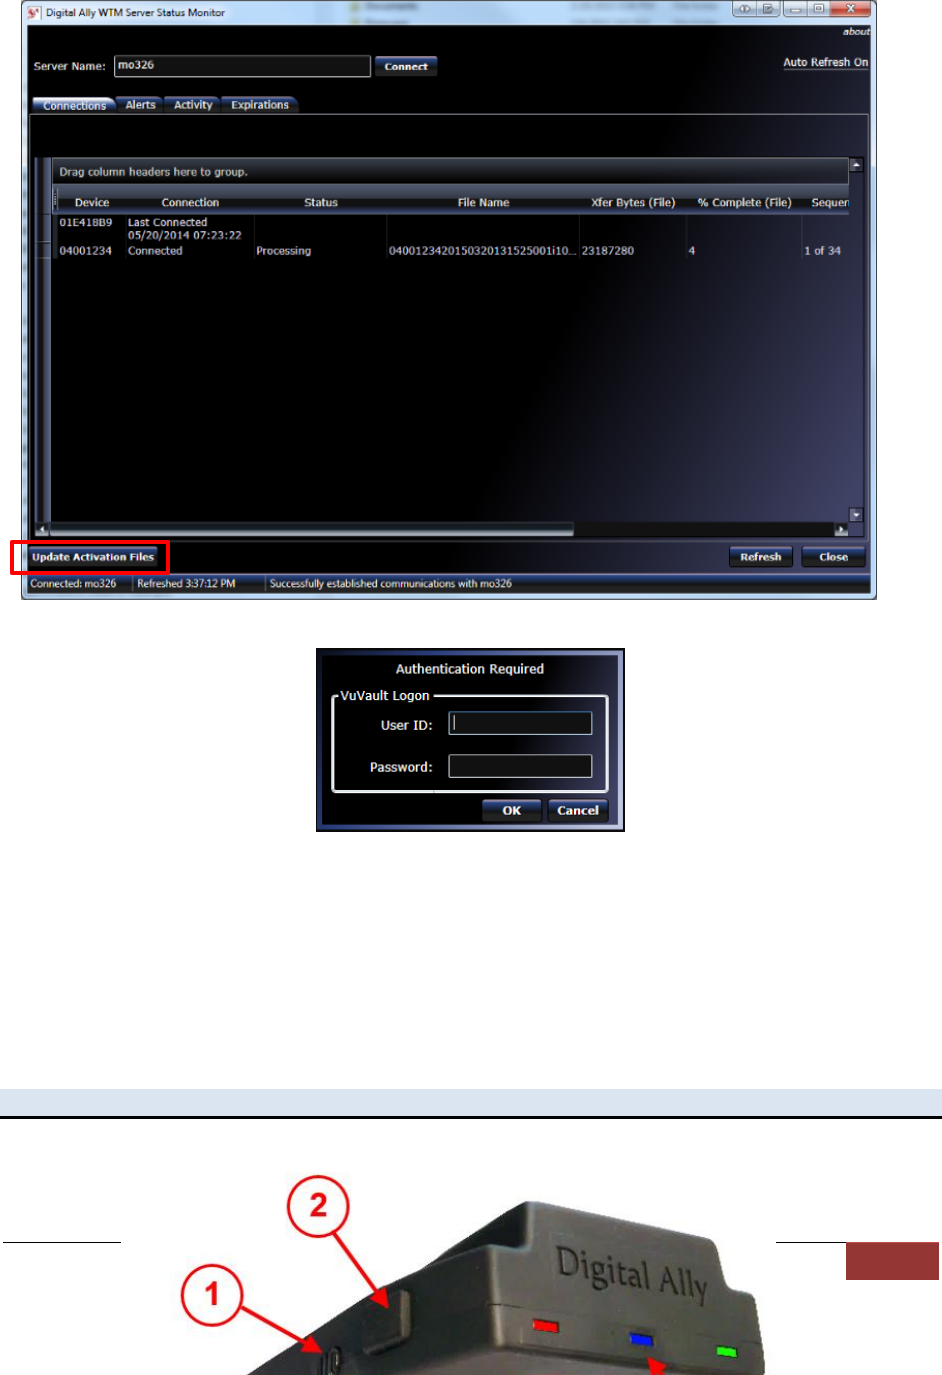
MicroVu HD™ Operation Guide 860-00222-00 Rev A
Digital Ally, Inc. | Operation
3-11
2. Open the Digital Ally WTM Server Status Monitor software (Start Menu > Programs
> Digital Ally > WTM Status Monitor).
3. Click the Update Activation Files button.
4. Enter the VuVault User ID and Password, then click OK.
5. The ‘deviceconfig’ file will be automatically extracted from VuVault and wirelessly
transferred to the MicroVu HD the next time it connects to the Wireless Access
Point. The MicroVu HD will first upload any existing videos, then transfer the
configuration.
6. The new configuration will take effect almost immediately after the file is transferred
and the Wifi session ends.
Section - 3 Operation
MicroVu HD Features

MicroVu HD™ Operation Guide 860-00222-00 Rev A
Digital Ally, Inc. | Operation
3-2
System Status Indicator Operation Chart
Red
Blue
Green
Powering ‘ON’
Sequential flash
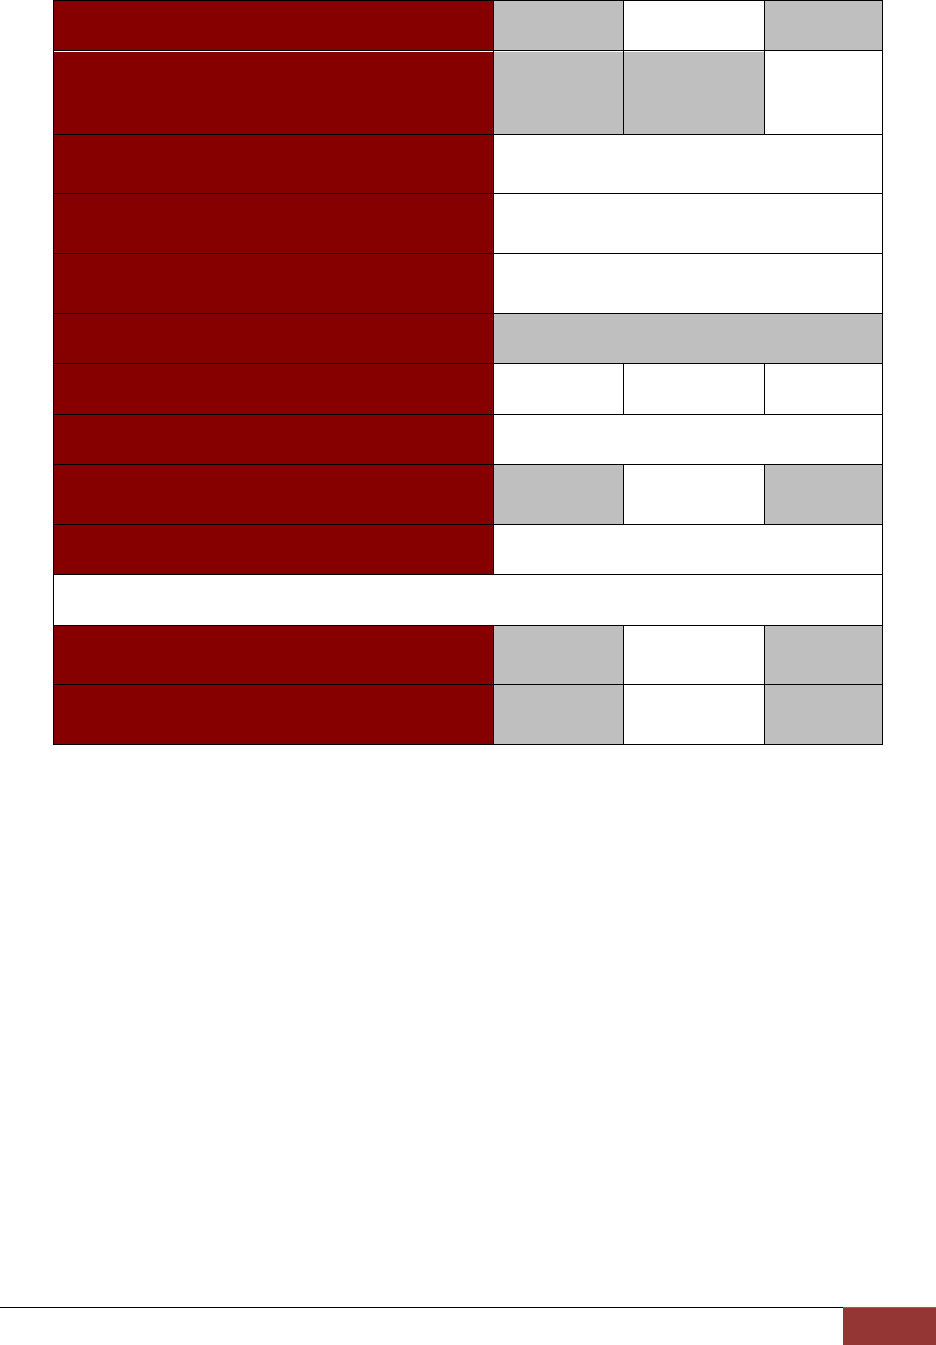
1
Audio Mute
2
Covert Button
3
Record Start / Mark / Record Stop
4
Status Indicator LED’s
5
Camera Lens
6
USB / microSD Card Access Panel
7
Secure Panel Lock
MicroVu HD™ Operation Guide 860-00222-00 Rev A
Digital Ally, Inc. | Operation
3-3
Standby (Ready to Record)
ON
Audio Recording Enabled
(Event or Pre-event)
ON
RFID Log In Successful
Fast Sequential Flash
Ending with 3 GREEN Flashes
RFID Log Out Successful
Fast Sequential Flash
Ending with 3 BLUE Flashes
RFID Warning (Card Not Programmed)
Fast Sequential Flash
Ending with 3 RED Flashes
Covert Mode
All Indicators Off
Recording in Progress
ON
ON
ON
WiFi Communication in Progress
Sequential flash
Acknowledgement
Fast Double
Flash
Error
Fast Flash in Unison
Memory Alerts
30 Minutes or less remaining
Continuous
Slow Flash
Memory Full
Continuous
Fast Flash
User Login with RFID Card
Logging In
Users who have been assigned a Username in VuVault and who have a configured Digital Ally
RFID Card can log in to the MicroVu HD by simply touching the face of the card briefly to the
area beneath the driver-facing LED indicators. The MicroVu HD will confirm the login by
rapidly flashing all 3 LEDs in sequence, ending with 3 Green flashes.

MicroVu HD™ Operation Guide 860-00222-00 Rev A
Digital Ally, Inc. | Uploading Files
4-4
Logging Out
The User will remain logged in to the MicroVu HD until the same user logs out by swiping their
card again. The MicroVu HD will confirm the logout by rapidly flashing all 3 LEDs in sequence,
ending with 3 Blue flashes.
The user will be automatically Logged Out when the vehicle ignition is turned off.
Error when Logging In
If a Login attempt is made using a RFID Card that has not been properly programmed for use
with the MicroVu HD, the LEDs will rapidly flash in sequence and end with 3 Red flashes.
Video Recording
Start a Manual Recording
Once the MicroVu HD is powered on and in Standby Mode, press and release the Record
Button at any time. The Red LED status indicators on the front and back MicroVu HD will
be lit continuously during the recording. If Pre-Event has been enabled through the device
configuration, the unit will automatically include up to 60 seconds of video and audio prior
to the event record trigger.
Stop Recording
Press and hold the Record Button for a minimum of 1 second to stop an active recording.
Memory Alert
The Blue status indicator will begin flashing slowly when the memory only has about 30
minutes of recording time remaining. If the memory is completely full, the Blue LED will flash
rapidly.
Marking Events
Once a recording has been initiated, markers can be placed in the recording to indicate when
important events take place. This is done by momentarily pressing the Record button, being
careful to not hold the button long enough to stop the recording. Additional marks can be
placed at any time during the recording.
Audio Recording
The MicroVU HD contains a built-in microphone. Audio can be muted or activated by changing
the position of the mute switch. Audio is active when the switch is in the green position Green
is showing). Audio is muted when the switch is in the opposite position. The audio mode must
also be enabled within the device configuration. The Mute Switch can be disabled by the
administrator in the MicroVu HD configutation settings.
Section - 4 Uploading Files
Uploading Files using VuVault
Video Upload Option 1: Wi-Fi
A properly configured MicroVu HD provides automated file transfer via 802.11n through your
wireless access point and network. After successfully uploading recorded events, the MicroVu
MicroVu HD™ Operation Guide 860-00222-00 Rev A
Digital Ally, Inc. | Uploading Files
4-5
HD will automatically delete the files from its memory. The driver-facing LED indicators will
flash in sequence while the MicroVu HD is actively transferring video files to your computer.
A VuVault Wireless Server must be configured to use the wireless transfer feature (see Method A:
Wireless Server Installation in the “VuVault Wireless Server Setup Guide” for setup instructions).
Video Upload Option 2: USB Port method
To upload video files from the MicroVu HD, plug the supplied USB cable into the VuVault
computers USB port and insert the other end of the cable into the MicroVu HD USB port.
Make sure your device is powered on.
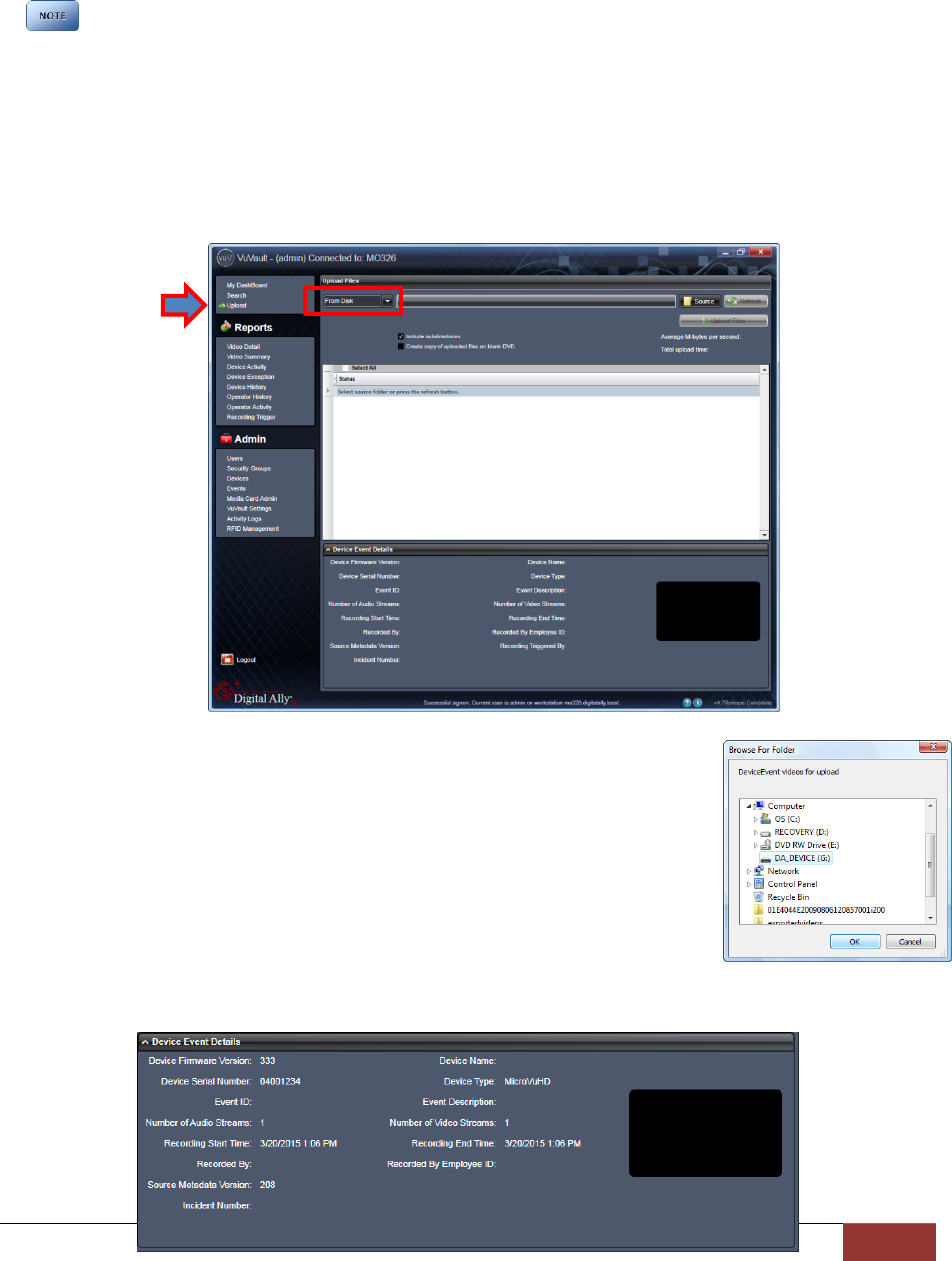
1. Select Upload from the Main navigation bar and select From Disk.
2. Click the Source button. A dialogue box will appear allowing you to
select the location of your MicroVu HD.
The system will verify the files to be uploaded. If event files are
being uploaded from a device that is not recognized by the system,
the user will be prompted to add them with the built-in Add Device
Wizard by clicking on Define Device in the lower right-hand corner
of the Device Event Details pane. Please refer to the VuVault
User’s Guide Add Device Wizard section for further details.
MicroVu HD™ Operation Guide 860-00222-00 Rev A
Digital Ally, Inc. | Uploading Files
4-6
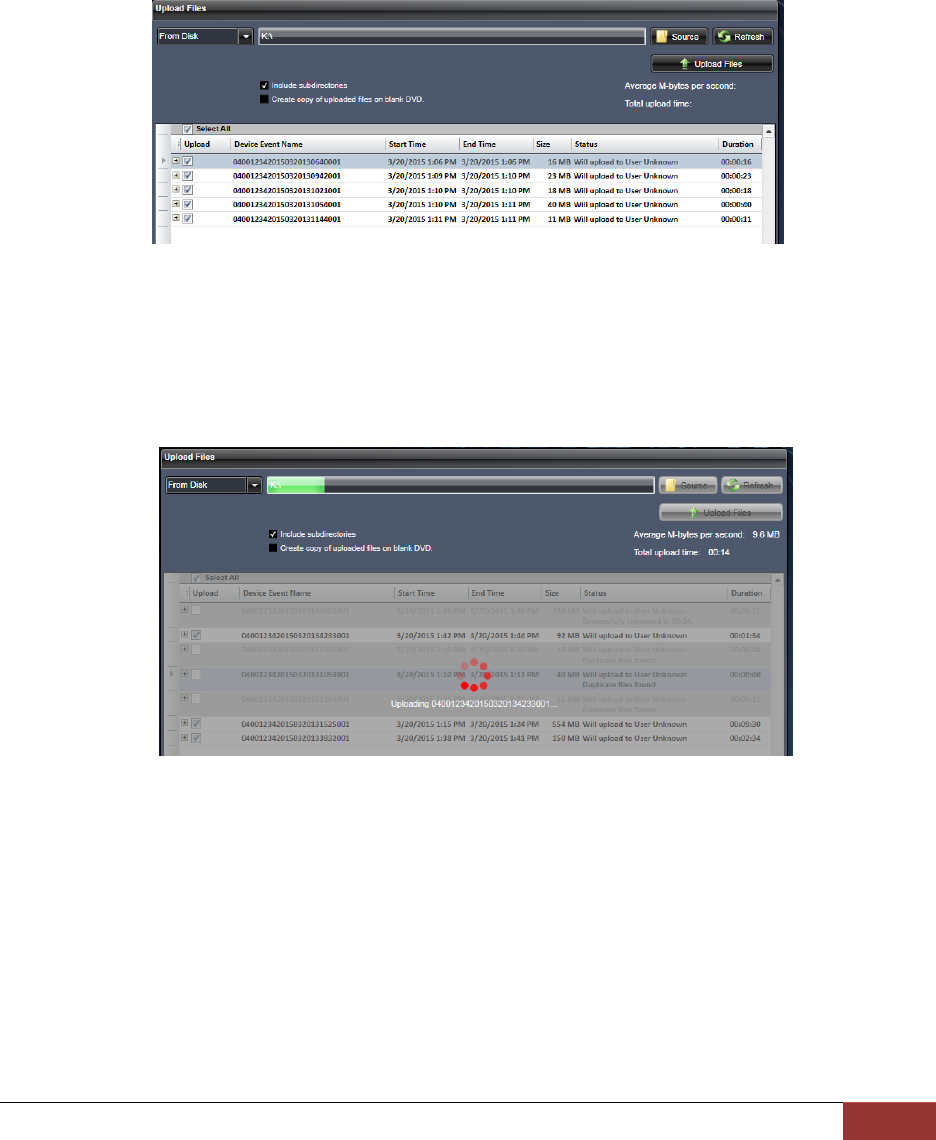
3. Once the files have been verified, the system will automatically list and select all of the
files for upload. If you don’t wish to upload all available records, uncheck the Select All
checkbox and then check the box next to each record you want to upload. The default File
Server and Share Location are displayed. If additional file servers have been defined,
select the desired destination using the dropdown menu. Click the Upload Files button to
begin uploading data to the system.
If desired, the selected files can also be backed up to a DVD during the upload
process. VuVault supports disc spanning, so if the total size of the files in the source
location exceeds the space available on a single disc, the user will be prompted to insert
additional discs until all of the files have been copied.
4. A progress bar will move from left to right, and details of the upload process will be
displayed in the window.
5. After the upload process finishes, the uploaded files will be available for viewing in the My
Dashboard, and Search screens. For more information, consult the VuVault User’s Guide.
Video Upload Option 3: microSD Card
The microSD Card can be removed from the MicroVu HD and inserted into a memory card
adapter. When the MicroVu HD is powered off or in standby, remove the microSD Card and
replace it with a new microSD Card, or upload the event files from the original microSD Card
into VuVault and re-install the card when finished.
VuVault Upload procedure for the microSD Card is the same as Option 2: USB Port Method
above, but in this case you must select the microSD Card as the Source.
MicroVu HD™ Operation Guide 860-00222-00 Rev A
Digital Ally, Inc. | Video Playback and Management
5-7
Do not remove the microSD Card while the MicroVu HD is recording. This will result in corrupted,
unusable video files. Please consult the VuVault User’s Guide for upload instructions. If the
MicroVu HD is powered on, All 3 LED’s will flash rapidly when the microSD Card is removed.
Uploading Files directly to a Computer using a USB Cable
Using the supplied USB cable, connect your MicroVu HD to a computer using the USB port
behind the access panel. Turn the vehicle ignition on to power up the unit. After the boot-up
process has completed the MicroVu HD will appear on the computer as a removable storage
drive. Double click on the drive and the video file folders will be listed. You may then drag and
drop the files to your PC or open a selected folder to play back the .avi files using Windows
Media Player.
Section - 5 Video Playback and Management
Using VuVault
VuVault is Digital Ally’s robust back-office video management solution. The VuVault media
player can be opened by double-clicking on a video entry in My Dashboard or Search
screens, or by selecting Play from the right-click menu. For more information about using
the VuVault player, please consult the VuVault User’s Guide.
Using the Digital Ally Viewer
The Digital Ally Viewer is a user-friendly software package to allow basic playback of video,
audio, and metadata files, as well as many advanced features. The Digital Ally Viewer installer
is located on your product DVD. Once installed, open the program by double clicking on the
Digital Ally Viewer icon, or by selecting the program from the Start Menu>Programs>Digital
Ally>Digital Ally Viewer. Once opened, the program will prompt you to navigate to your video
storage location and select a video.
Toolbar Controls
Playback Controls
Media Details

MicroVu HD™ Operation Guide 860-00222-00 Rev A
Digital Ally, Inc. | Video Playback and Management
5-8
Toolbar Controls
Browse Media: Browse and select event files (.mtd) to playback.
Save Media: Save changes or segment a video event. Segmenting the video allows
you to create a new video without altering the original video.
Media Details: Displays the details of the media file and allows adding additional
information.
Edit Marks: Add/Edit Marks or Notes to the video event.
Image Capture: Save a snapshot of a frame of video.
Burn to CD/DVD: Create a data disc or movie DVD of the video event using this
wizard. Simply follow the on-screen prompts to back up your recorded event.
Help: Displays help information and software version.
Playback Controls
Previous Mark: Click to skip to the Previous Mark.
Rewind: Click and hold to rewind.
Play/ Pause: Click to begin playback or pause video.
Fast Forward: Click and hold to Fast Forward.
Next Mark: Click to skip to Next Mark.
Start Over / Repeat: Click to Restart video from the beginning or Repeat playback.
Playback Speed Control: Adjust the Playback Speed (4x, 2x, 1x, 1/2x, 1/4x).
Playback Controls
Media Details
MicroVu HD™ Operation Guide 860-00222-00 Rev A
Digital Ally, Inc. | Video Playback and Management
5-9
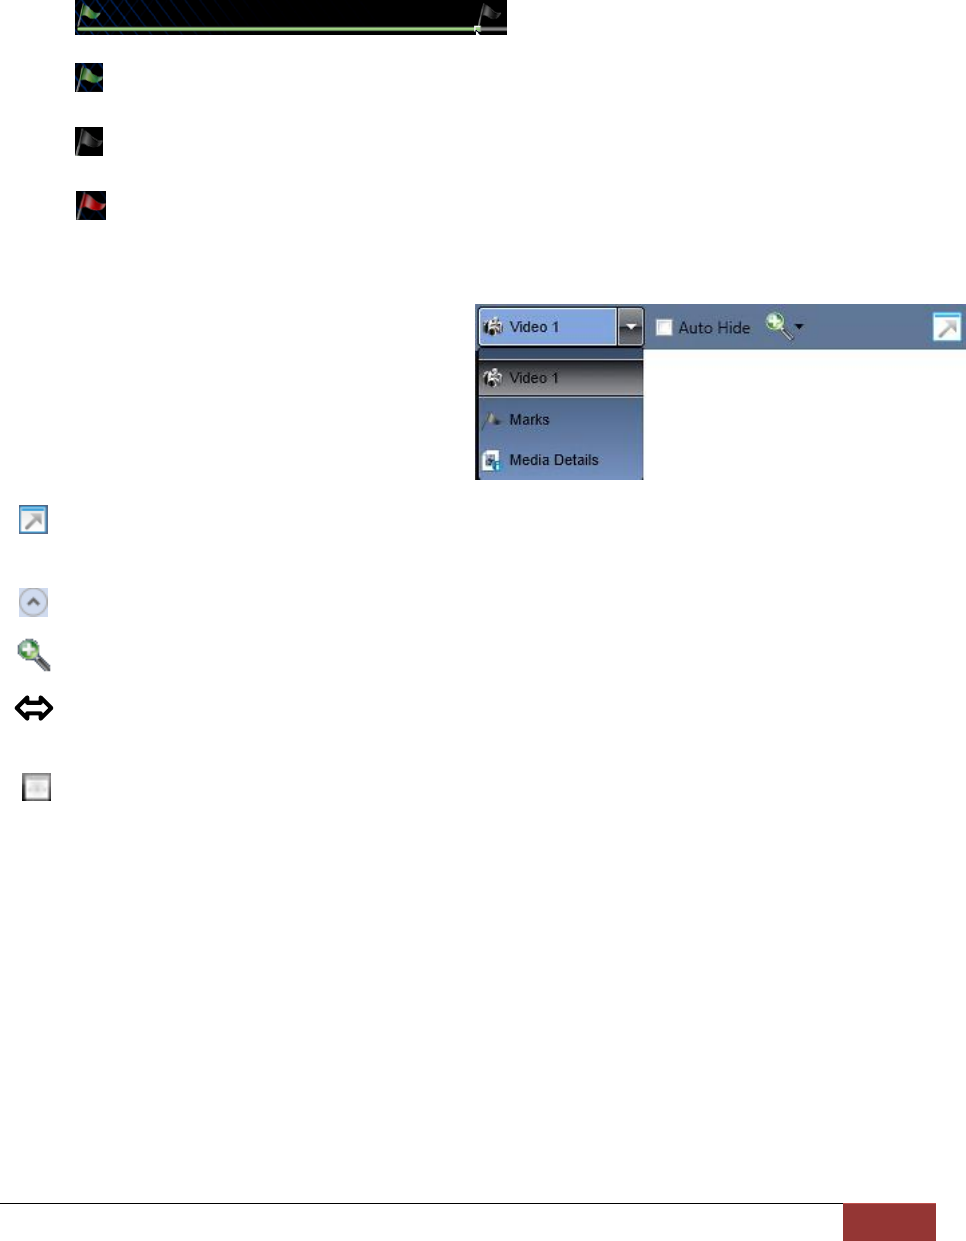
Playback Slider bar
The Playback Slider bar allows you to move forward or backward in the video event very
quickly by dragging the slider.
Beginning of Video Flag: The Green Flag indicates the Beginning of the video
event.
Start of Recording Flag: The Black Flag indicates the Start of video recording and
any added Marks.
End of Video Flag: The Red Flag indicates the End of the video event.
View Selection and Options
The View Selection drop down box allows
you to select the information that is displayed
in each window such as Video 1, Marks, and
Media Details. Point the mouse to the top of
each window to display the following drop
down bar. Then point on the window heading
to display the View Selection drop down box.
Full Screen View: Click on the Full Screen icon or Double Click in the window to
display full screen.
Auto Hide Window: Click this icon box to display or hide the view selection options.
Video Zoom Window: The video display window can be resized by using the slider bar.
Window Size Adjustment: You may increase or decrease the size of each field by
hovering your mouse on the vertical divider between the two display windows.
Select Screen Layout: Select this button located on the bottom of the screen next to the
playback controls to customize your view from a list of preset layouts.

MicroVu HD™ Operation Guide 860-00222-00 Rev A
Digital Ally, Inc. | Support & Troubleshooting
6-1
Section - 6 Support & Troubleshooting
Firmware Updates
Log on to www.digitalallyinc.com/tech-support.php and register for an Account to be an
Authorized User. By registering you will be able to download all the latest firmware/software
updates and will be notified of future updates.
Firmware Update Instructions
The MicroVu HD requires a specific filename to perform a firmware update. The filename for
the MicroVu HD firmware is ‘firmware.r’. If the firmware file is not found, the MicroVu HD will not
perform the update. The firmware is available from the Digital Ally Technical Support web site
mentioned above. Place the firmware file in your computer desktop.
Manual Method
1. The MicroVu HD should be powered on and in STANDBY (only the solid BLUE status
indicator) before proceeding.
2. Open the external SD card slot access door on the MicroVu HD and remove the
microSD Card. Place it in a card reader connected to your computer.
3. Copy the “firmware.r” image file from your computer to the microSD Card. The filename
must not be changed from “firmware.r”.
4. Using the removable media features of the computer system, safely remove the SD
card from the computer.
CAUTION: BEFORE PROCEEDING PLEASE NOTE THE FOLLOWING, ONCE THE
EXTERNAL CARD HAS BEEN INSTALLED, DO NOT REMOVE POWER TO THE
MICROVU HD AND DO NOT REMOVE THE microSD Card UNTIL THE PROCESS
IS COMPLETE AS NOTED IN THE FOLLOWING INSTRUCTIONS.
5. Open the microSD Card slot access door on the MicroVu HD.
6. Install the microSD Card into the microSD Card slot of the MicroVu HD.
7. The MicroVu HD will begin performing the firmware update.
8. The MicroVu HD driver-facing LED indicators will flash in sequence during the firmware
update process. Once the mirror goes back to Standby condition (solid Blue status
indicator) the MicroVu HD has been updated and is ready. The firmware file will be
automatically removed from the microSD Card.
Wireless Method
7. Your MicroVu HD must be configured for wireless file transfer operation and already be
successfully uploading videos to the VuVault back office. Consult the VuVault Wireless
Server Setup Guide for more information.
8. Open the Digital Ally WTM Server Status Monitor software
(Start menu>Programs>Digital Ally>WTM Status Monitor).
9. Copy the “firmware.r” file into the MicroVu HD Updates folder. This folder will be located
in a subfolder in the WTM folder that receives uploaded video files. Place the file in the
Working>Updates>MicroVuHD folder.
MicroVu HD™ Operation Guide 860-00222-00 Rev A
Digital Ally, Inc. | Support & Troubleshooting
6-2
10. Click the Update Activation Files button.
11. The firmware file will be wirelessly transferred to the MicroVu HD the next time it
connects to the wireless access point. The new firmware will automatically install
without the need to reboot the MicroVu HD.
SD Card Maintenance
It is recommended that the microSD Cards be periodically defragmented or formatted. The
frequency is dependent on usage, with a recommendation of every 2 to 3 months for typical
usage. With high usage, more frequent maintenance may be required.
Formatting Requirements
MicroSD Cards used in the MicroVu HD should be formatted as a FAT32 file system with
allocation block size of 64k bytes.
SD Card Requirements
The MicroVu HD supports 8GB, 16GB, 32GB, Minimum Class 10, commercial grade microSD
Cards purchased from Digital Ally.
Performing a Reset
Open the access panel and use a small device such as a
paper clip or eye-glass screwdriver to press the recessed
reset button that is located to the right of the microSD Card.
Reference the illustration for the reset button location.
Product Repair
The MicroVu HD should be returned to Digital Ally Inc. for service. The warranty may be voided
if the device is opened by any unauthorized individual. Please contact Digital Ally to obtain an
authorized Return Materials Authorization (RMA). It is helpful and will expedite the process if
you have your unit’s serial number available at the time of your call.
All In-Warranty and Out-of-Warranty service must be performed by Digital Ally,
Inc. There are no user serviceable parts inside of the MicroVu HD. Any user
serviceable items can be purchased directly through Digital Ally.

MicroVu HD™ Operation Guide 860-00222-00 Rev A
Digital Ally, Inc. | Warranty Information
7-1
Section - 7 Warranty Information
STANDARD LIMITED WARRANTY
MicroVu HD Compact HD Law Enforcement In-Car Video System
We warranty that our Compact HD Video System, Model MicroVu HD, will be free from defects in
workmanship and material for a period of 24 months from the date of purchase by the original purchaser.
If any defect is discovered through normal and proper use of the unit during this period, the defect will be
repaired or the unit will be replaced at our factory or at one of our authorized service centers at no cost to
the purchaser. The purchaser must return the defective unit to the factory or one of our authorized service
centers, freight prepaid. We will pay for shipping charges for the return of the unit.
This warranty applies only to defects in a unit’s internal electronic components and circuitry, and is void
as to units that have been opened without prior authorization, have experienced unauthorized repairs, or
have had unauthorized modifications. This warranty does not cover the following:
Normal wear and tear on the unit such as batteries, frayed cables or wires, broken
connectors, or scratched or broken cases.
Damage caused by operator abuse or neglect.
Damage caused by incorrect use of the unit, carelessness, unauthorized alterations to the
unit, improper storage of the unit or unauthorized service, installation or repairs made to the
unit.
Damage caused by fire, flood, lightning, vandalism, collision, acts of God, or other
events beyond the reasonable control of Digital Ally, Inc. or the purchaser.
Damage to external parts of the unit such as buttons, wires, and cables, etc.
Damage from use of the unit in hostile operating environments.
We reserve the right to charge for repairs to a unit during the warranty period made necessary because of
any of the foregoing causes at our standard rates for repair of units not under warranty.
The purchaser assumes all risk of use from its purchase and use of the unit. Harmful personal contact
with a unit might occur in the event of violent maneuvers, collisions, or similar circumstances, even if the
unit was properly installed and used. We are not responsible for, and we specifically disclaim any liability
for injury caused by a unit in such circumstances.
Extended Warranty Plan: Any and all Warranties must be purchased prior to the expiration of any previous
warranties. These must be purchased directly from Digital Ally, Inc. for a period no less than one year and
not to exceed three years.
THIS WARRANTY IS GIVEN IN LIEU OF ALL OTHER WARRANTIES. THERE ARE NO WARRANTIES THAT
EXTEND BEYOND THIS STATEMENT. ALL IMPLIED WARRANTIES ARE DISCLAIMED, INCLUDING, WITHOUT
LIMITATION, WARRANTIES OF MERCHANTABILITY, NON-INFRINGEMENT, FITNESS FOR A PARTICULAR
PURPOSE, AND WARRANTIES IMPLIED FROM A COURSE OF DEALING, COURSE OF PERFORMANCE OR
USAGE OF TRADE. THE PURCHASER’S SOLE AND EXCLUSIVE REMEDY FOR A WARRANTY CLAIM WILL
BE THE REPAIR OR REPLACEMENT OF A UNIT.

MicroVu HD™ Operation Guide 860-00222-00 Rev A
Section - 8 Contact Information
9705 Loiret Blvd
Lenexa, KS 66219
Website:
www.digitalallyinc.com
Support E-Mail:
support@digitalallyinc.com
Sales E-Mail:
sales@digitalallyinc.com
Phone:
913-814-7774
Fax:
913-814-7775
Sales / Support Toll Free:
1-800-440-4947

MicroVu HD™ Operation Guide 860-00222-00 Rev A
Section - 9 Regulatory
This device complies with Part 15 of the FCC Rules. Operation is subject to the following two
conditions: (1) This device may not cause harmful interference, and (2) This device must accept
any interference received, including interference that may cause undesired operation.
This equipment has been tested and found to comply with the limits for a Class B digital device,
pursuant to part 15 of the FCC Rules. These limits are designed to provide reasonable
protection against harmful interference in a residential installation. This equipment generates
uses and can radiate radio frequency energy and, if not installed and used in accordance with
the instructions, may cause harmful interference to radio communications. However, there is
no guarantee that interference will not occur in a particular installation. If this equipment does
cause harmful interference to radio or television reception, which can be determined by turning
the equipment off and on, the user is encouraged to try to correct the interference by one or
more of the following measures:
Reorient or relocate the receiving antenna.
Increase the separation between the user equipment and MicroVu HD.
Connect the user equipment into an outlet on a circuit different from that to which the
MicroVu HD is connected.
Contact Digital Ally technical support.
This equipment complies with the FCC RF radiation exposure limits set forth for an uncontrolled
environment. This equipment should be installed and operated with a minimum distance of 20
cm between the radiator and any part of your body.
This device complies with Industry Canada license-exempt RSS standard(s). Operation is
subject to the following two conditions: (1) this device may not cause interference, and (2) this
device must accept any interference, including interference that may cause undesired operation
of the device.
Le présent appareil est conforme aux CNR d'Industrie Canada applicables aux appareils radio
exempts de licence. L'exploitation est autorisée aux deux conditions suivantes : (1) l'appareil ne
doit pas produire de brouillage, et (2) l'utilisateur de l'appareil doit accepter tout brouillage
radioélectrique subi, même si le brouillage est susceptible d'en compromettre le
fonctionnement.
The CE Mark is a European marking of conformity indicating that a product complies with the
essential requirements of the applicable European laws or Directives with respect to safety,
health, environment, and consumer protection.
Changes or modifications not expressly approved by Digital Ally, Inc. could void the user’s
authority to operate the equipment.