Digital Device DPD-4200AK 42 inch Plasma Display Monitor User Manual
Digital Device Inc. 42 inch Plasma Display Monitor
User Manual
User’s Manual
PLASMA
P
PL
LA
AS
SM
MA
A
DISP
PLAY Monitor
D
DI
IS
SPL
LA
AY
Y
M
Mo
on
ni
it
to
or
r
MODEL : DPD-4200AK
It’s the creative world of plasma display
WARNING
RISK OF ELECTRICAL
SHOCK, DO NOT OPEN
CAUTION : TO REDUCE THE RISK OF ELECTRICAL SHOCK, DO NOT
REMOVE COVER(OR BACK). NO USER SERVICEABLE PARTS INSIDE.
REFER SERVICING TO QUALIFIED SERVICE PERSONNEL.
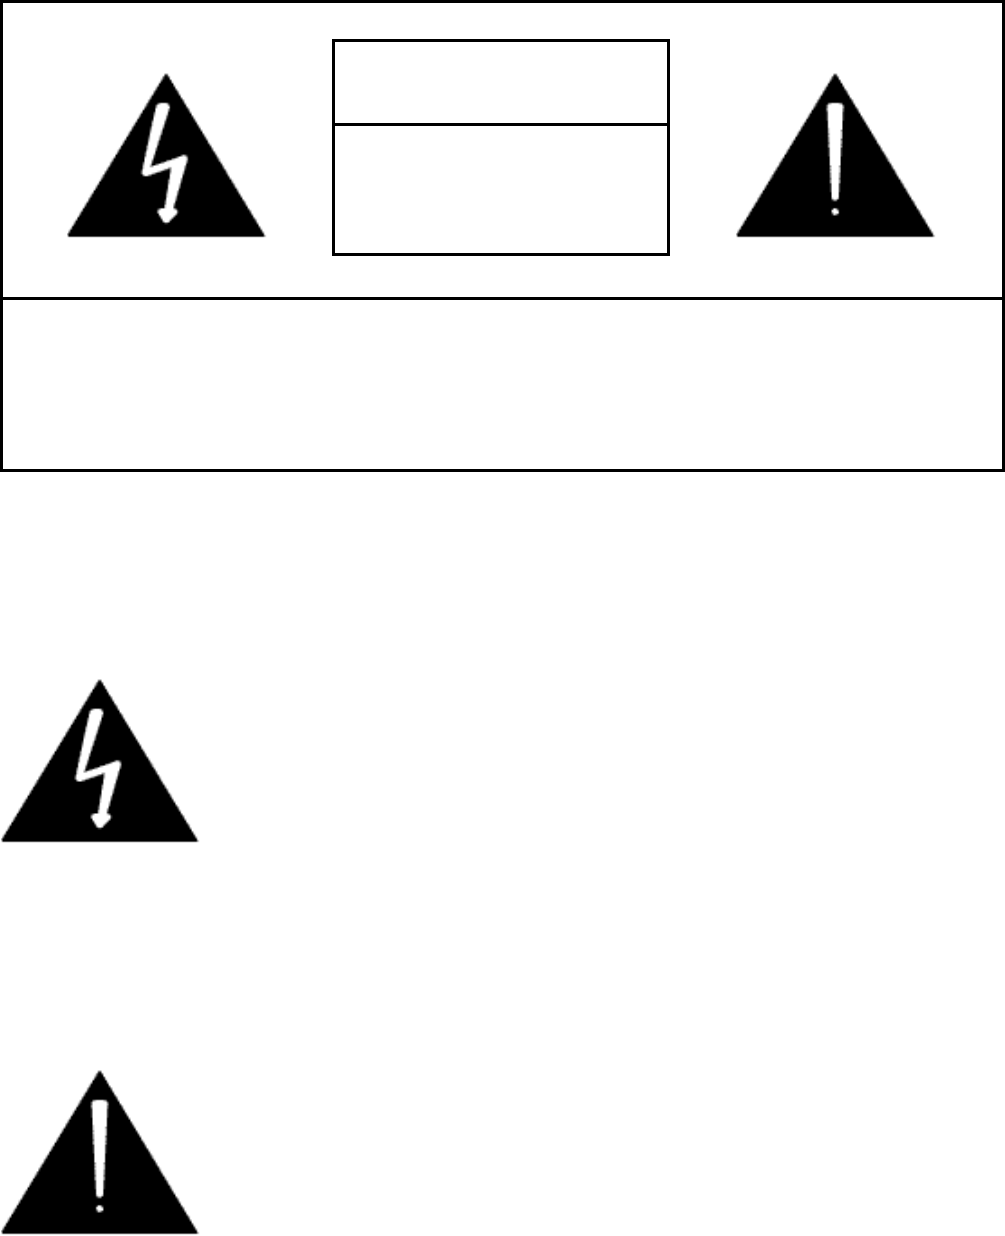
The lightning flash with the arrowhead symbol, within an
equilateral triangle, is intended to alert the user to the
presence of uninsulated "dangerous voltage" within the
product's enclosure that may be of sufficient magnitude
to constitute an electric shock to persons.
The exclamation point within an equilateral triangle is
intended to alert the user to the presence of important
operating and maintenance (servicing) instructions in
the literature accompanying the appliance.
- -
2

Manual Contents
Manual Contents
Manual Contents 3
Features and Package Contents - Features 4
- Packages Contents 4
I/O Definitions 5
Front and Rear Controls - Front 6
- Rear Controls 6
Remote Control - Remote Control Basic 7
- Remote Control Details 8
Basic Operation - AV Input/Ouput Terminal 10
- TV 10
- Video 10
- S-VHS 11
- SCART 11
- Monitor Out Connection 12
- Component Video 12
- PC 13
- External Speaker & Headphone Connection 13
TV Channel Memory - Auto Channel Memory 14
- Manual Channel Memory 15
Picture - Picture Adjustment 16
- Picture Size Adjustment 17
- Picture Adjustment in PC Mode 18
- Picture Size Adjustment in PC Mode 19
Audio - Audio Mode Setting 20
- Audio Adjustment 21
Picture in Picture - Picture in Picture Mode Setting 22
- Watching Picture in Picture 23
Video Signal Format - Video Signal Format Setting 24
Color Temperature - Color Temperature Setting 25
Specifications 26
Troubleshooting 27
- -
3

Features and Package
Features
- 42" Diagonal Viewing Area
- Menu driven On Screen Display (OSD) for Brightness and Contrast, Sharpness, Hue and
Saturation , NTSC/PAL, Channel, PIP(Picture in Picture), Aspect Ratio, Input Source, Audio, Audio
Adjust, Language, Color Temperature
- Cable TV ready
- IR Remote control for all functions
- Built-in Television Tuner
- Zoom Feature (up to 500%)
- Freeze Picture Feature
- Rotate Picture Feature
- Headphone output (only sub sound)
- Speaker output : Left, Right, Center, Surround-L, Surround-R, Sub-Woofer
- Selectable Aspect Ratio (16:9, 4:3, User Adjusting Mode)
- PIP (Picture in Picture) Function
- Multiple Mounting Options : Wall mount or Stand
- Monitor Composite Video Output
- Large Viewing Angle (160 °)
- Seven (7) Possible Video Sources : 1 PC
2 External RCA A/V Inputs
1 S-VHS Input
1 SCART Input
1 Component Video Input
1 TV
Package Contents
- 42" Plasma TV
- User's Manual
- Full function Remote Control
- A set of three AAA Batteries for Remote Control
- AV Cord
- AC Power Cord
- -
4

I/O Definitions
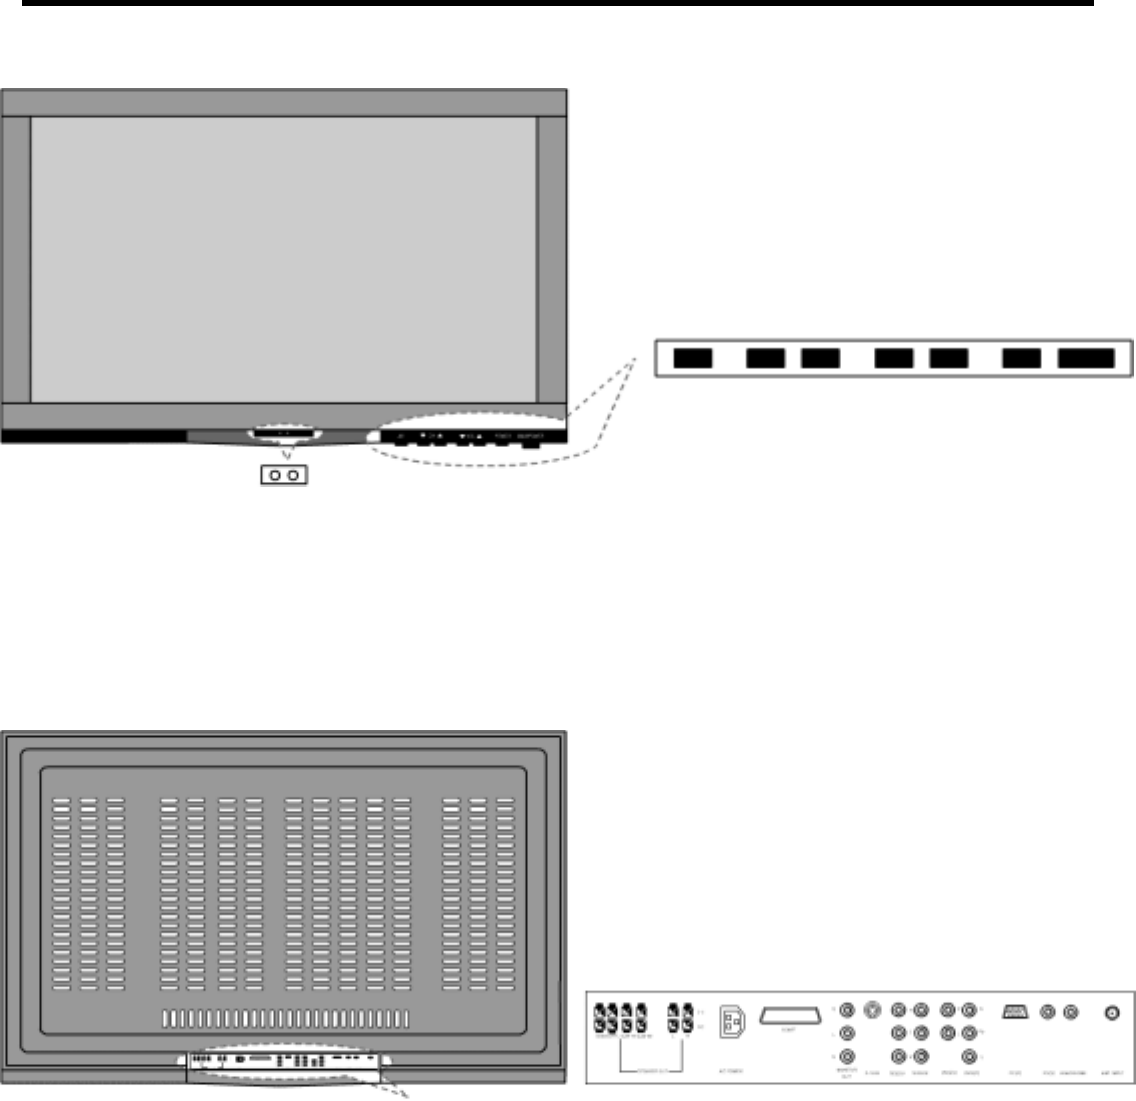
Front Panel Controls
- Main Power ON/OFF
- Power ON/OFF
- Channel UP
- Channel DOWN
- Volume UP
- Volume DOWN
- AV
Rear Unit I/O's
- AC Power Input
- F-Type (NTSC) or Din-Type (PAL) Connector for Antenna Input
- Monitor Composite Video Output
- Monitor Line Level Audio Output
- S-VHS Input
- Composite Video Input (2)
- Line Level Audio Input (2)
- SCART Input/Output
- DVD Component Video Input
- DVD Line Level Audio Input
- PC D-sub Connector Input
- PC Headphone Audio Input
- Headphone Audio Output
- Speaker Output : Left, Right, Center, Surround-L, Surround-R, Sub-woofer
- -
5
Front and Rear Controls
Front
AV CH Down/Up Vol Down/Up Power /Main Power
LED / Remote Control Receiver
Rear Controls
AV Input/Output Terminal
The recessed AV input/output terminals allow the user to have the option of using the mounting stand
or wall mounting the 42" Plasma Television. The television itself is only 95mm wide.
- -
6
Remote Control
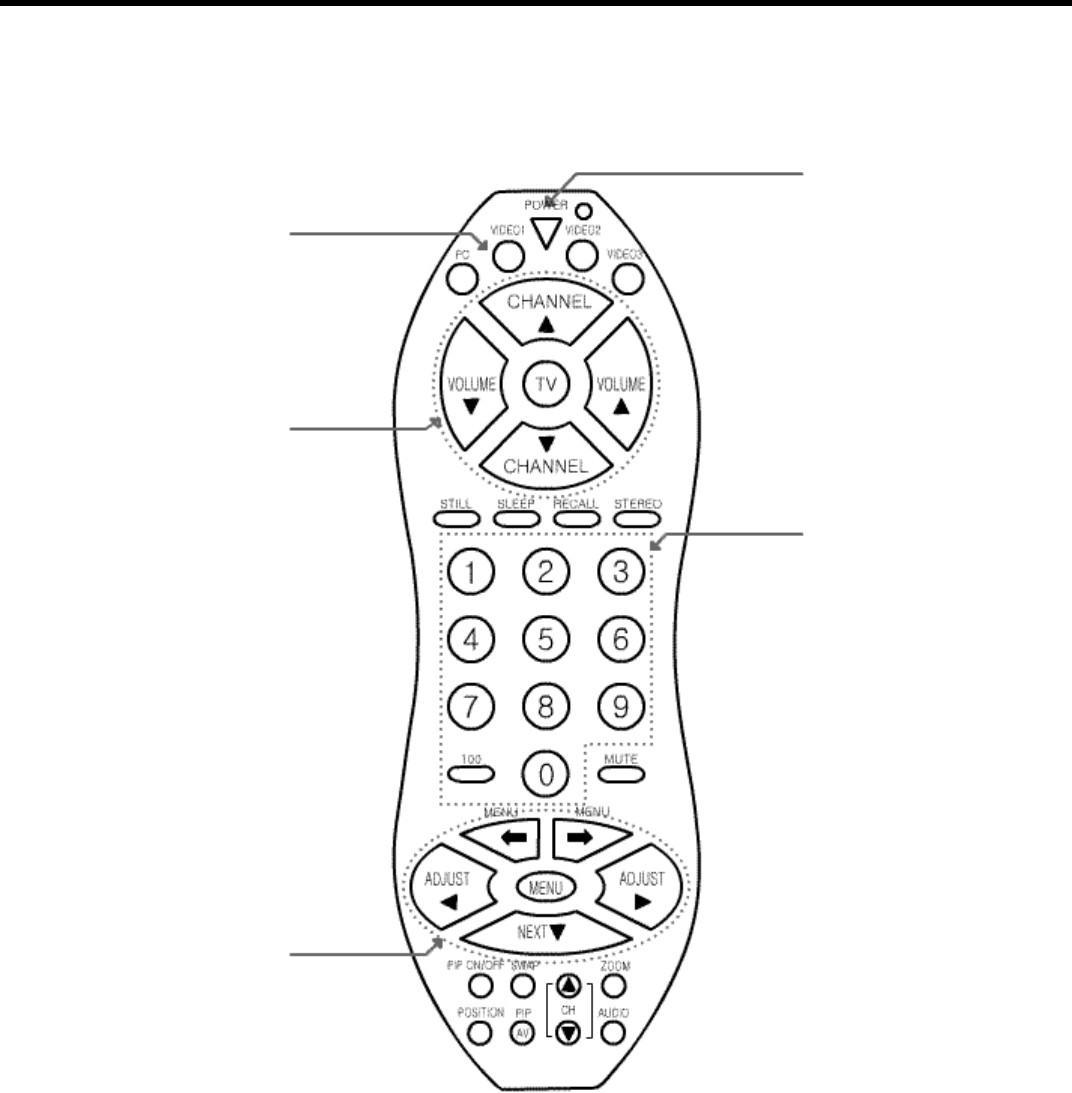
Remote Control Basic
POWER
Pressing this button
turns the television
ON and OFF.
AV Buttons
( PC / VIDEO1 / VIDEO2 /
VIDEO3 / TV )
Use this button for signal
selection.
CH/VOL BUTTONS
These buttons are used
to adjust the channel
selected and the volume
level.
Number Buttons
Used to enter
channels selected.
Menu Button
The center button is used
to pull up the menu
screen. The surrounding
buttons are used to make
adjustments to the menu
item selected. (ex.
Picture, Sound and PIP
adjustments)
- -
7
Remote Control
Remote Control Details
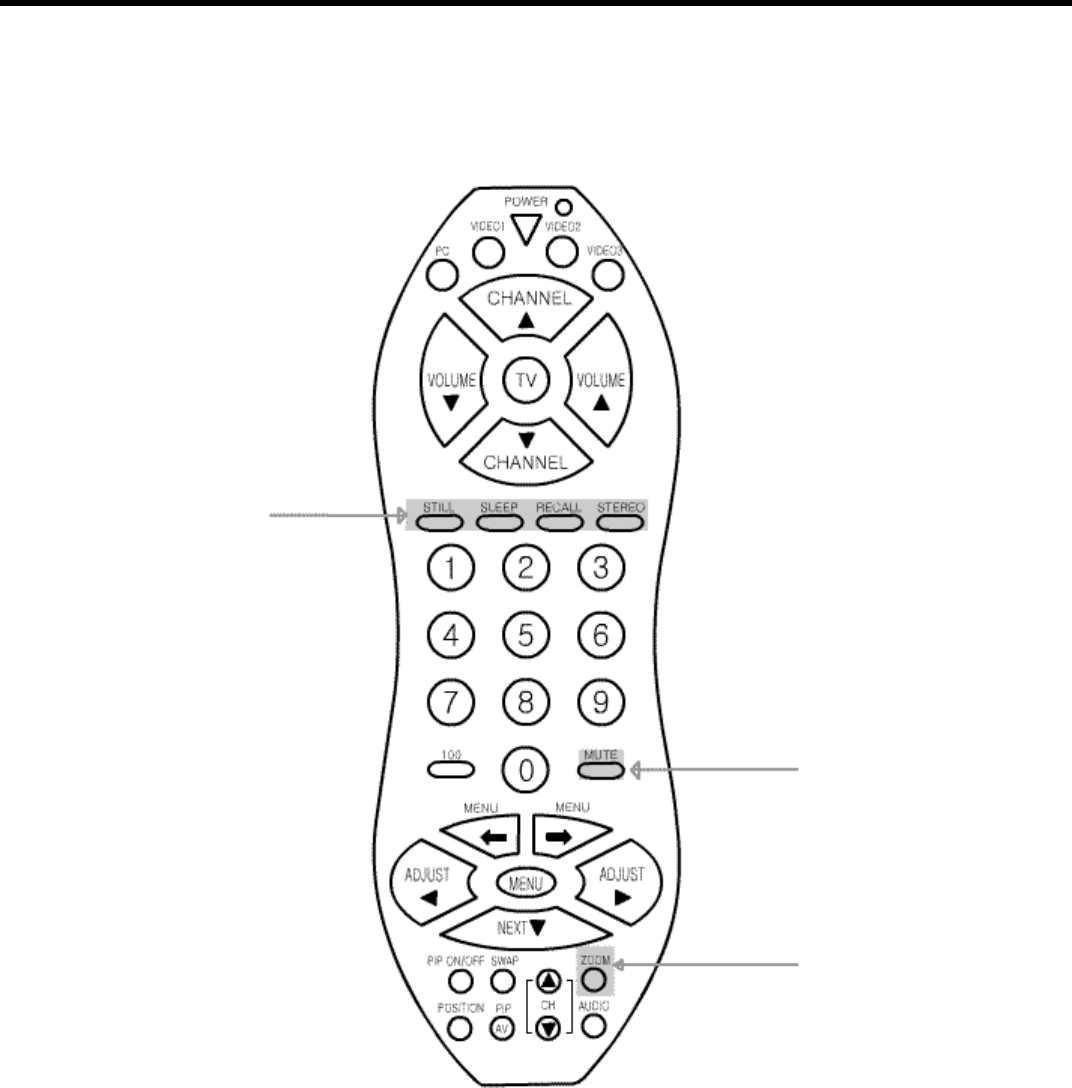
STILL
Pressing this button will
stop/freeze the picture.
SLEEP
This button allows the
user to set the sleep
timer.
RECALL
This button will allow the
user to view the setting
status.
STEREO
Allows MONO, STEREO or
SAP mode selection.
MUTE
This button mutes
the televisions
ZOOM
Pressing the up and
down buttons allows
the user to zoom in
or out the picture.
- -
8
Remote Control
PIP ON/OFF
Pressing this button
toggles picture in picture
on and off.
SWAP
This button allows the
user to swap the picture in
picture for picture on the
main screen.
CH ▲/▼
Pressing this button up
or down allows channel
selection of the picture
in picture.
POS
This button switches the
screen location of the
picture in picture viewing
screen. There are four
possible screen locations
for the picture in picture.
PIP AV
This button switches
the mode selection of
the picture in picture
viewing screen.
AUDIO
This button switches the
Speaker Out of picture in
picture Mode.
- -
9
Basic Operation
1. AV Input/Output Terminal
2. TV
1. Connect as the shown drawing.
2. Power on.
3. Press the [TV] button.
3. VIDEO
1. Connect as the shown drawing.
2. Power on.
3. Press the [VIDEO1] or [VIDEO2] button.
- -
10
Basic Operation
4. S-VHS
1. Connect as the shown drawing.
2. Power on.
3. Press the [VIDEO1] button.
<Caution> Audio input must be connected with [Video1].
In the case when all input sources of S-VHS and Video1 Port are occupied, S-VHS input Sources display
preceding to Video1 Port.
5. SCART Connection
1. Connect as the shown drawing.
2. Power on.
3. Press the [VIDEO2] button.
<Caution> In the case when all input sources of SCART and Video2 Port are occupied, SCART input Sources display
preceding to Video2 Port.
- -
11
Basic Operation
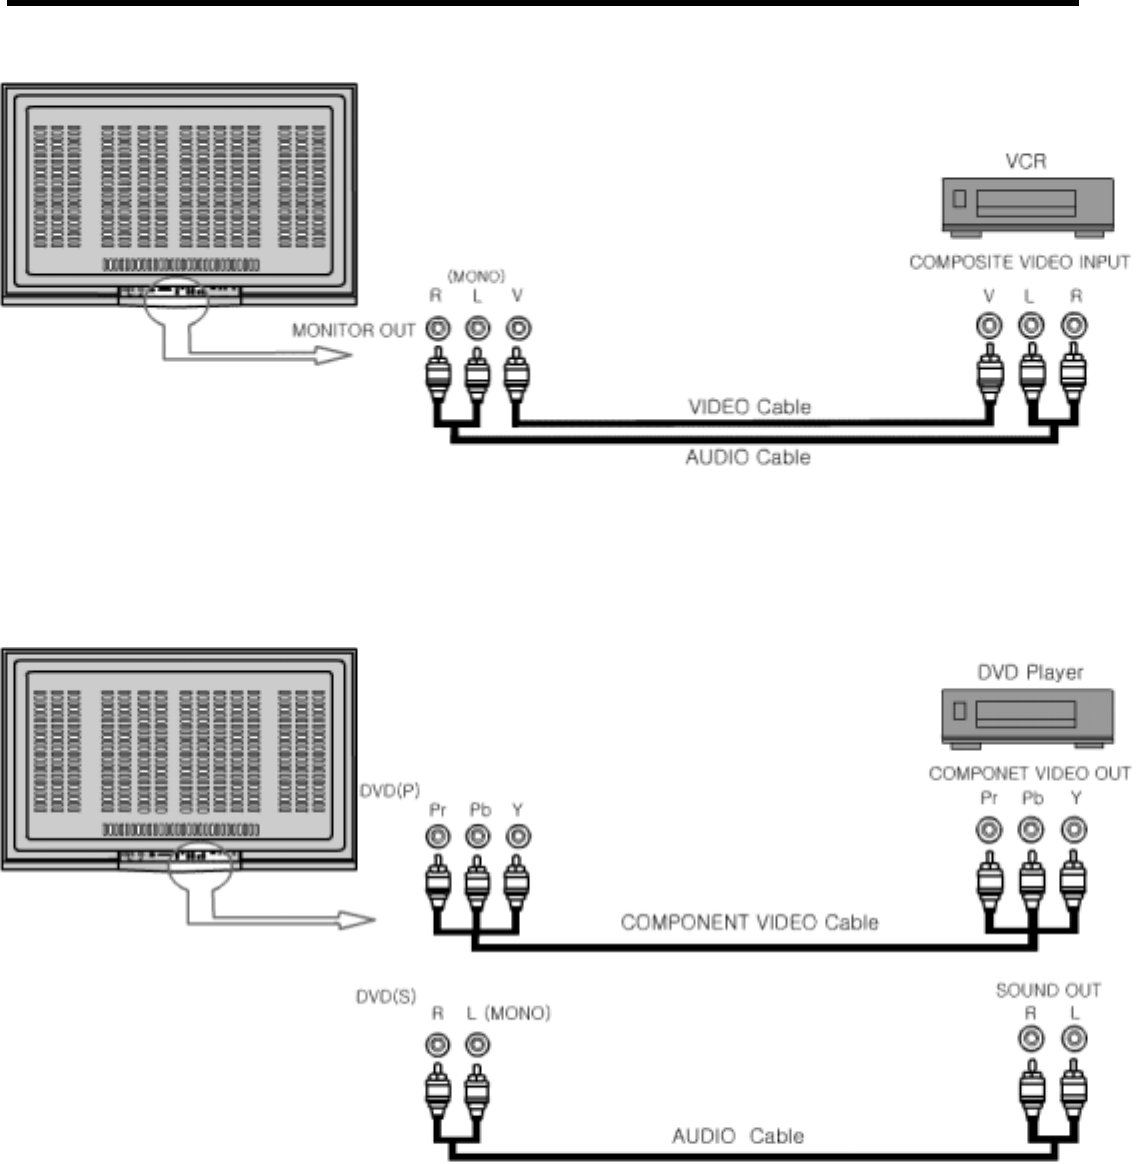
6. MONITOR OUT Connection
<Caution> Monitor out is only applied to [TV], [VIDEO1], [VIDEO2].
7. COMPONENT Video (ex. DVD, DTV Set-top Box)
1. Connect as the shown drawing.
2. Power on.
3. Press the [VIDEO3] button.
- -
12
Basic Operation
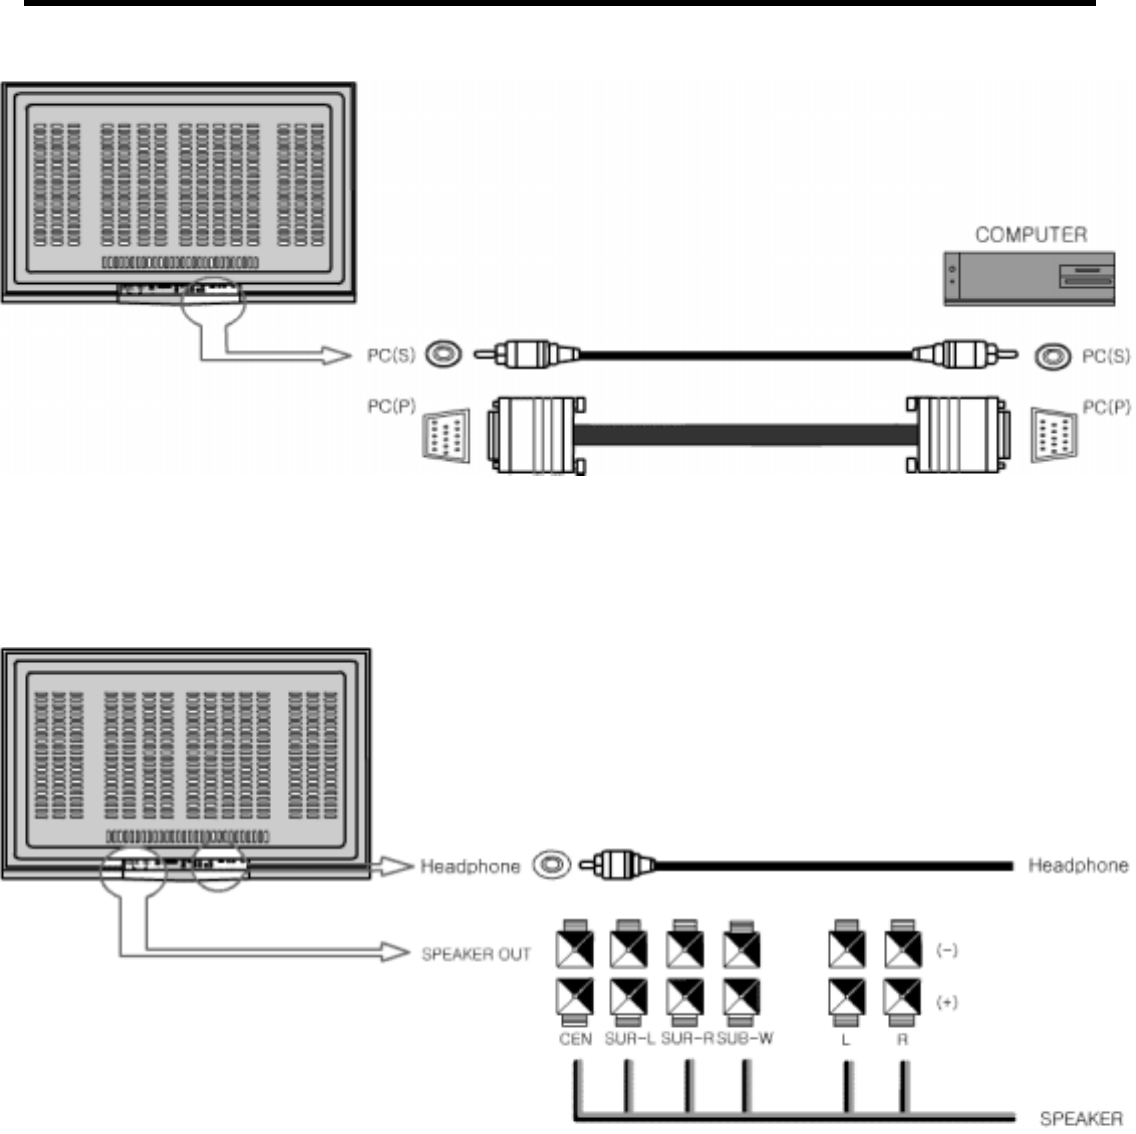
8. PC
1. Connect as the shown drawing.
2. Power on.
3. Press the [PC] button.
9. External Speaker & Headphone Connection
1. Power Off.
2. Connect as the shown drawing.
3. Power on.
4. Adjusting Audio setting.
<Caution> Headphone outputs Sub-Signal Sounds.
- -
13
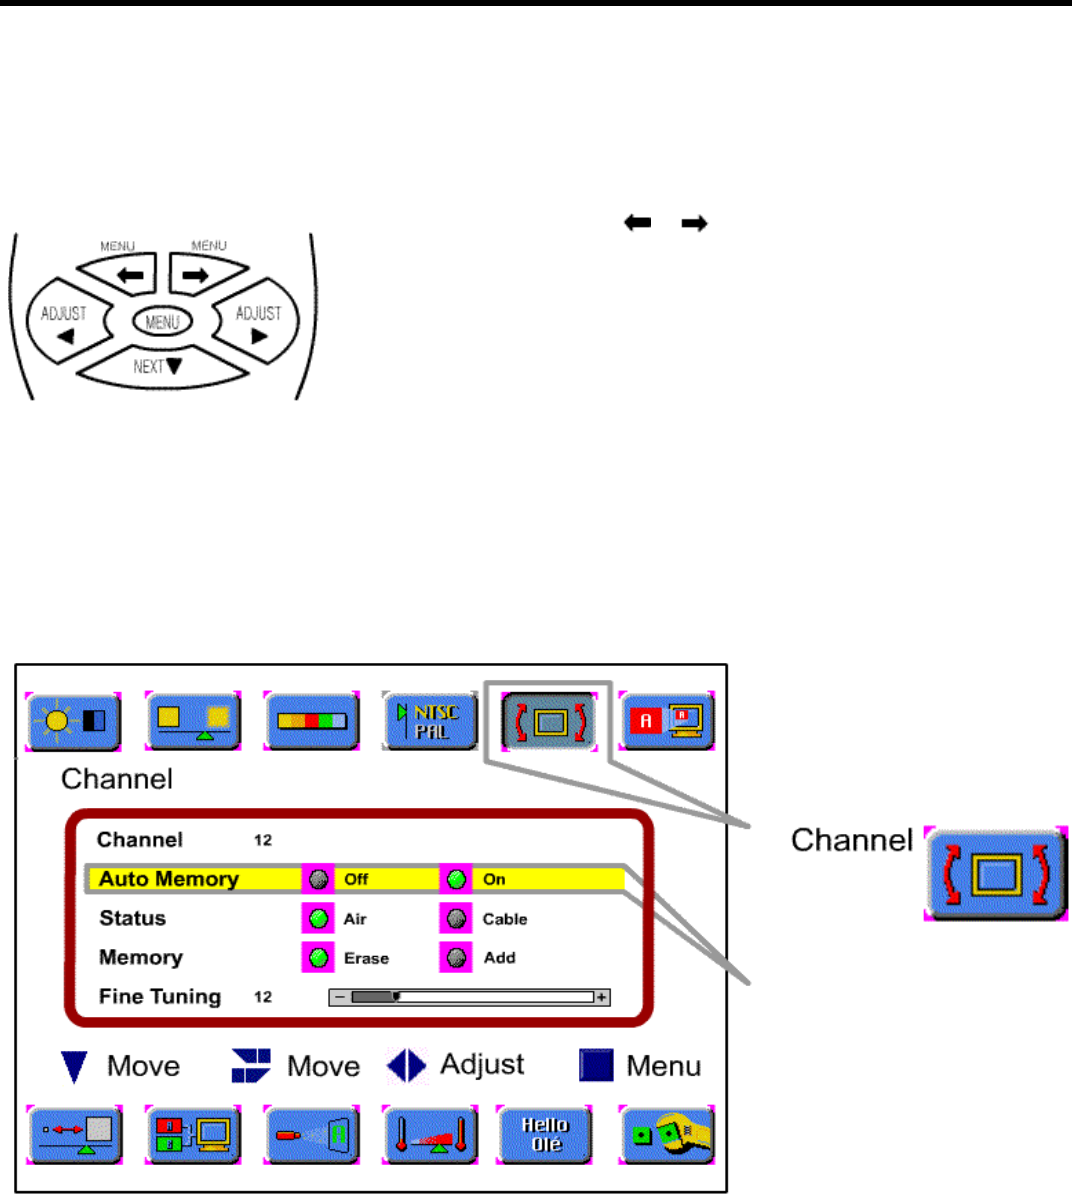
TV Channel Memory
Auto Channel Memory
Follow these steps for setting the Channel Memory automatically:
c Press the [MENU] button.
d Select [Channel] by the [ ]/[ ] buttons.
e Select [Status] by pressing the [NEXT] button.
f Select TV signal input mode by pressing the [ADJUST] button.
g Select [Auto Channel] by pressing the [NEXT] button.
h Select [ON] by pressing the [ADJUST] buttons.
i Press the [MENU] button to stop the auto channel memory.
※ Highlighted choice will be in green.
Auto Memory
When Auto memory is on,
it will scan CH 2~69 on the
Air setting and CH 1~125
on the Cable setting.
- -
14
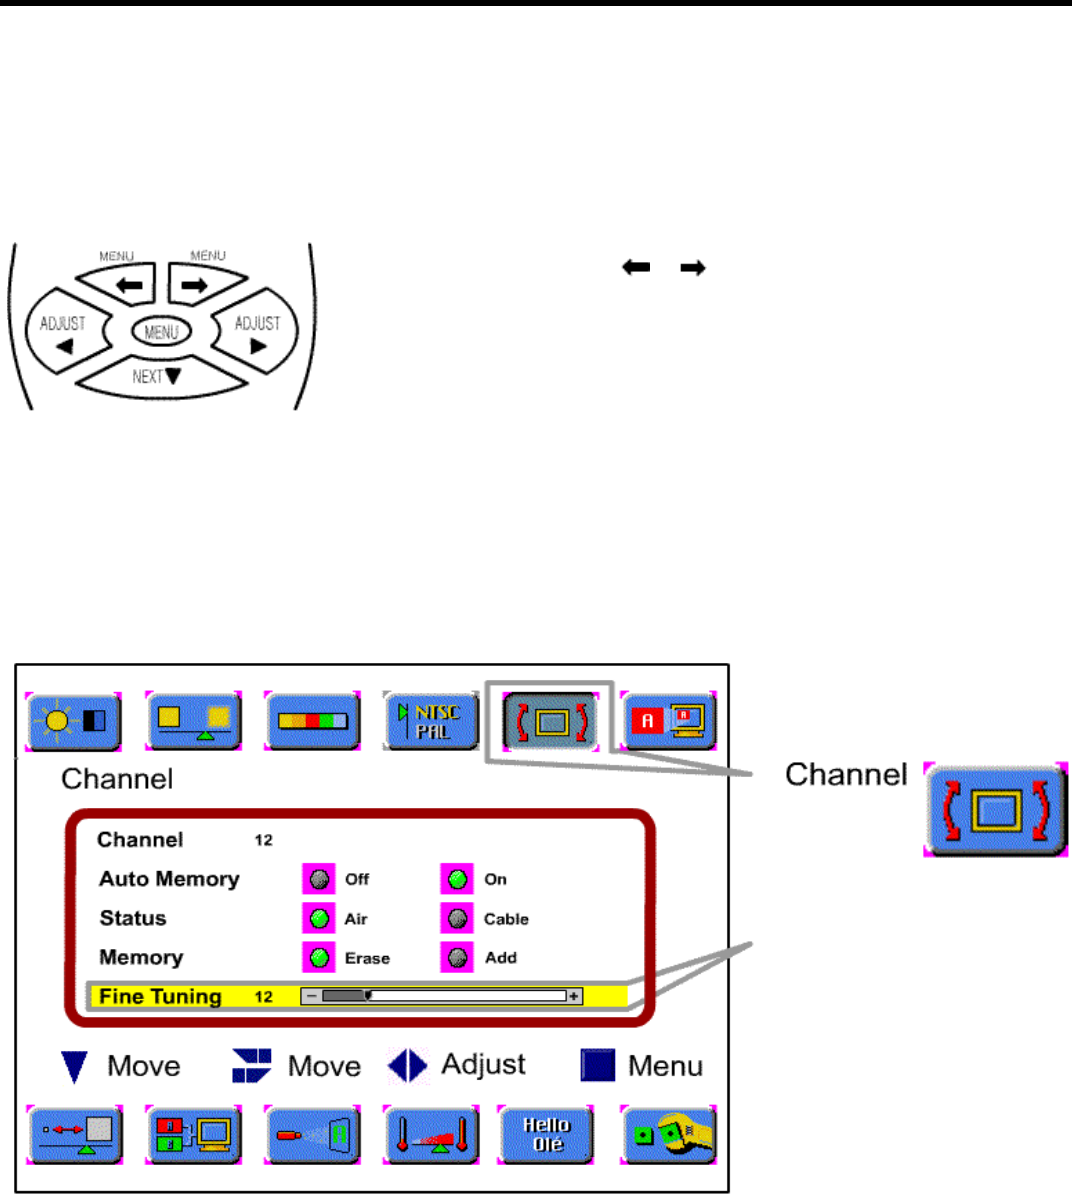
TV Channel Memory
Manual Channel Memory
Follow these steps to manually set the Channel Memory :
c Select the channel by pressing the number button(s).
d Press the [MENU] button.
e Select [Channel] by the [ ]/[ ] buttons.
f Select [Fine Tuning] mode by using the [NEXT] button.
g Press the [ADJUST] button for the tuning adjustment.
h Select [Memory] by using the [NEXT] button.
i Select [Erase] or [Add] by pressing the [ADJUST] buttons.
j Press the [MENU] button to exit the Channel Memory setting.
※ Highlighted choice will be in green.
Fine Tuning
The [ADJUST] button on
the remote control will
move the slide adjustment
of the fine tuning bar
positively or negatively.
- -
15
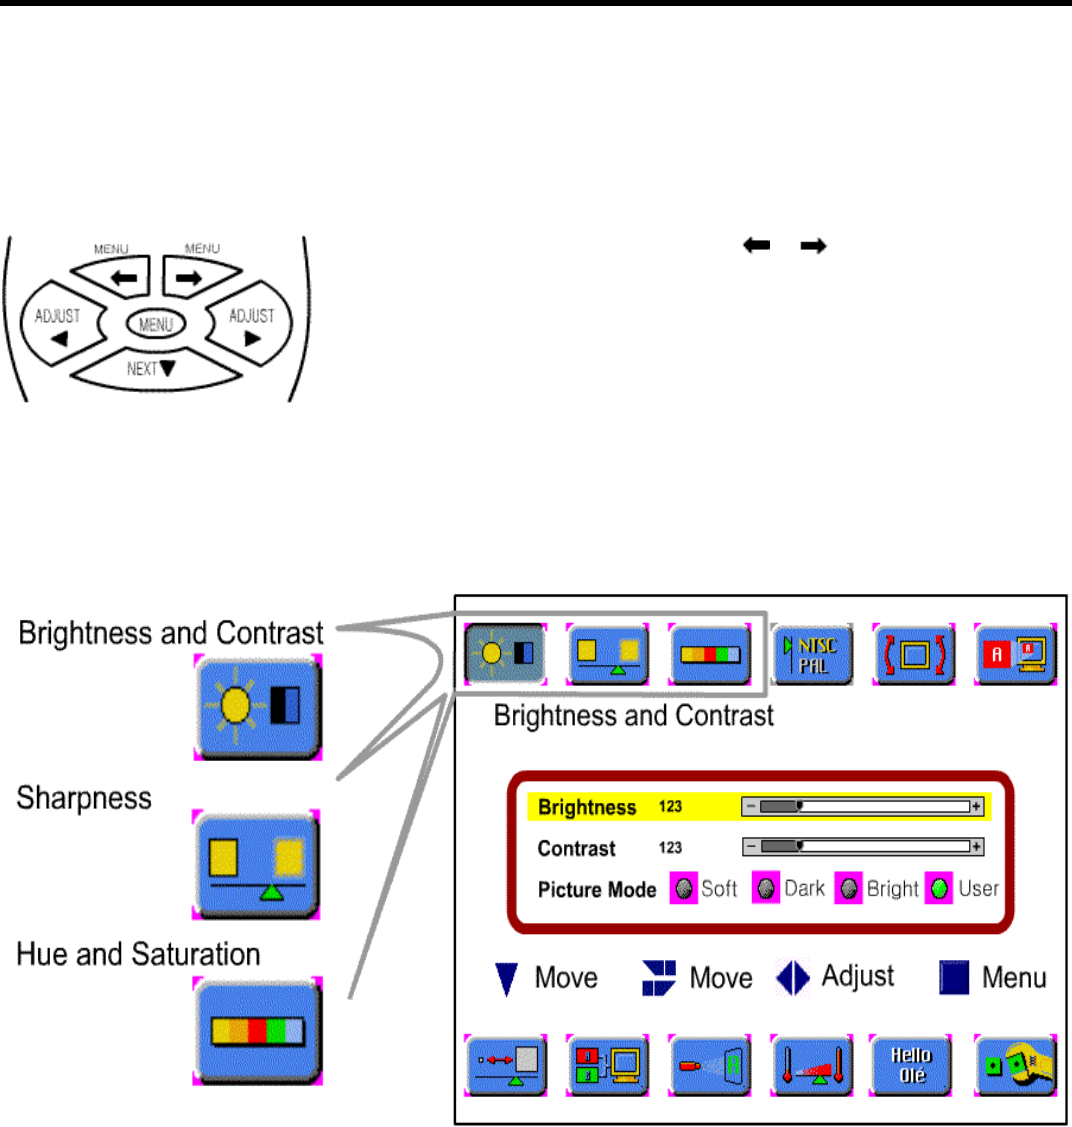
Picture
Picture Adjustment
Follow these steps to adjust the picture :
c Press the [MENU] button.
d Select the desired Mode by using the [ ]/[ ] buttons.
e Move to the desired Mode by pressing the [NEXT] button.
f Press the [ADJUST] button for adjusting the picture
g Press the [MENU] button to exit the adjustment menu.
※ Highlighted choice will be in green.
- -
16
Picture
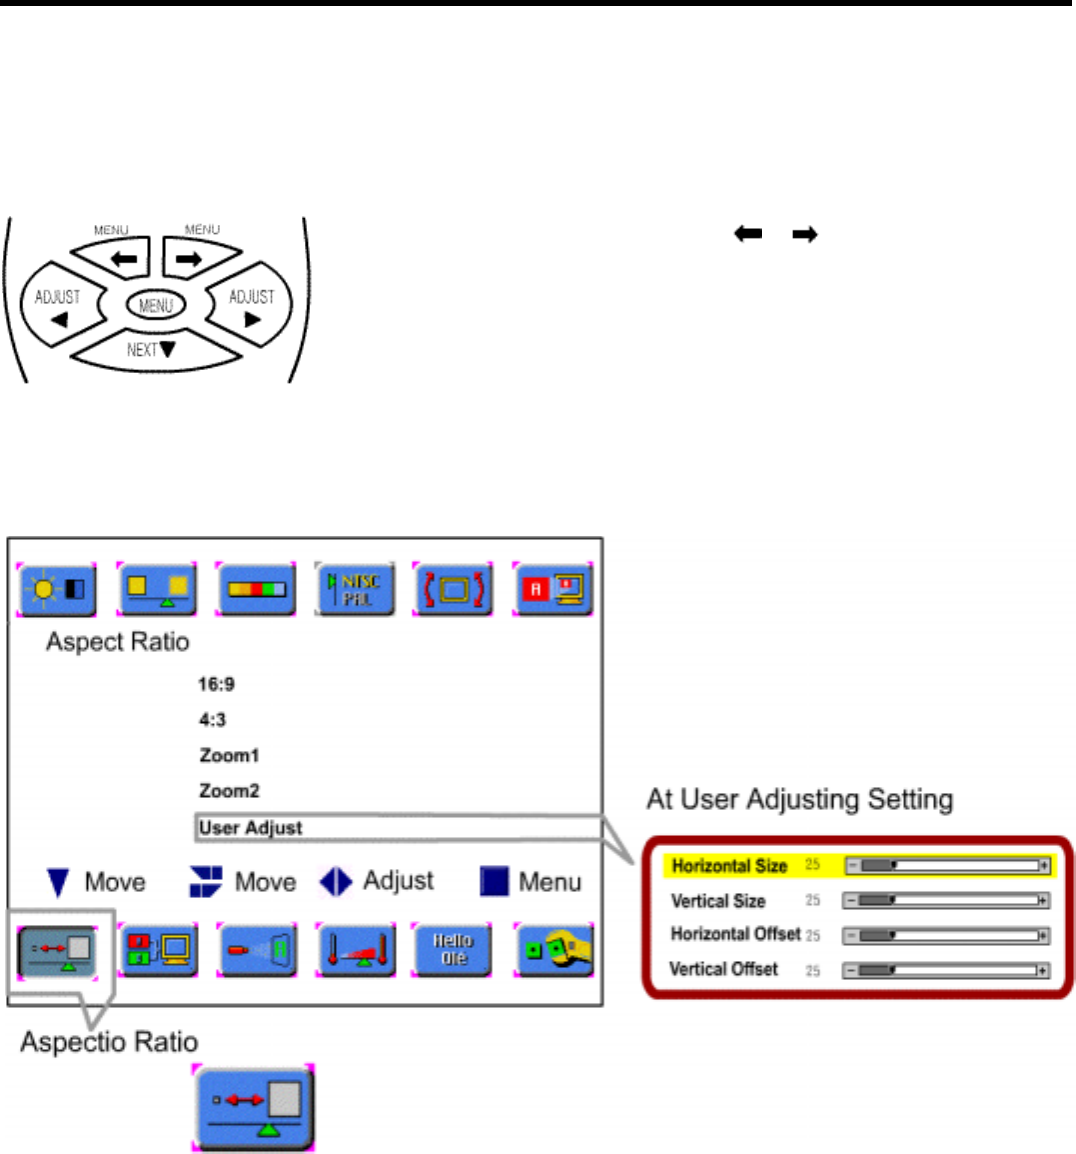
Picture Size Adjustment
Follow these steps to adjust the picture size :
c Press the [MENU] button.
d Select the Aspect Ratio by using the [ ]/[ ] buttons.
e Move to the desired Mode by pressing the [NEXT] button.
f Press the [ADJUST] button to adjust the picture size ratio.
g Press the [MENU] button to exit Picture Size Adjustment.
※ Highlighted choice will be in green.
[ZOOM + ] / [ZOOM - ] Button
: Using the [ZOOM] button on the remote controller, you can expand the picture size 0 up to 500%.
- -
17
Picture
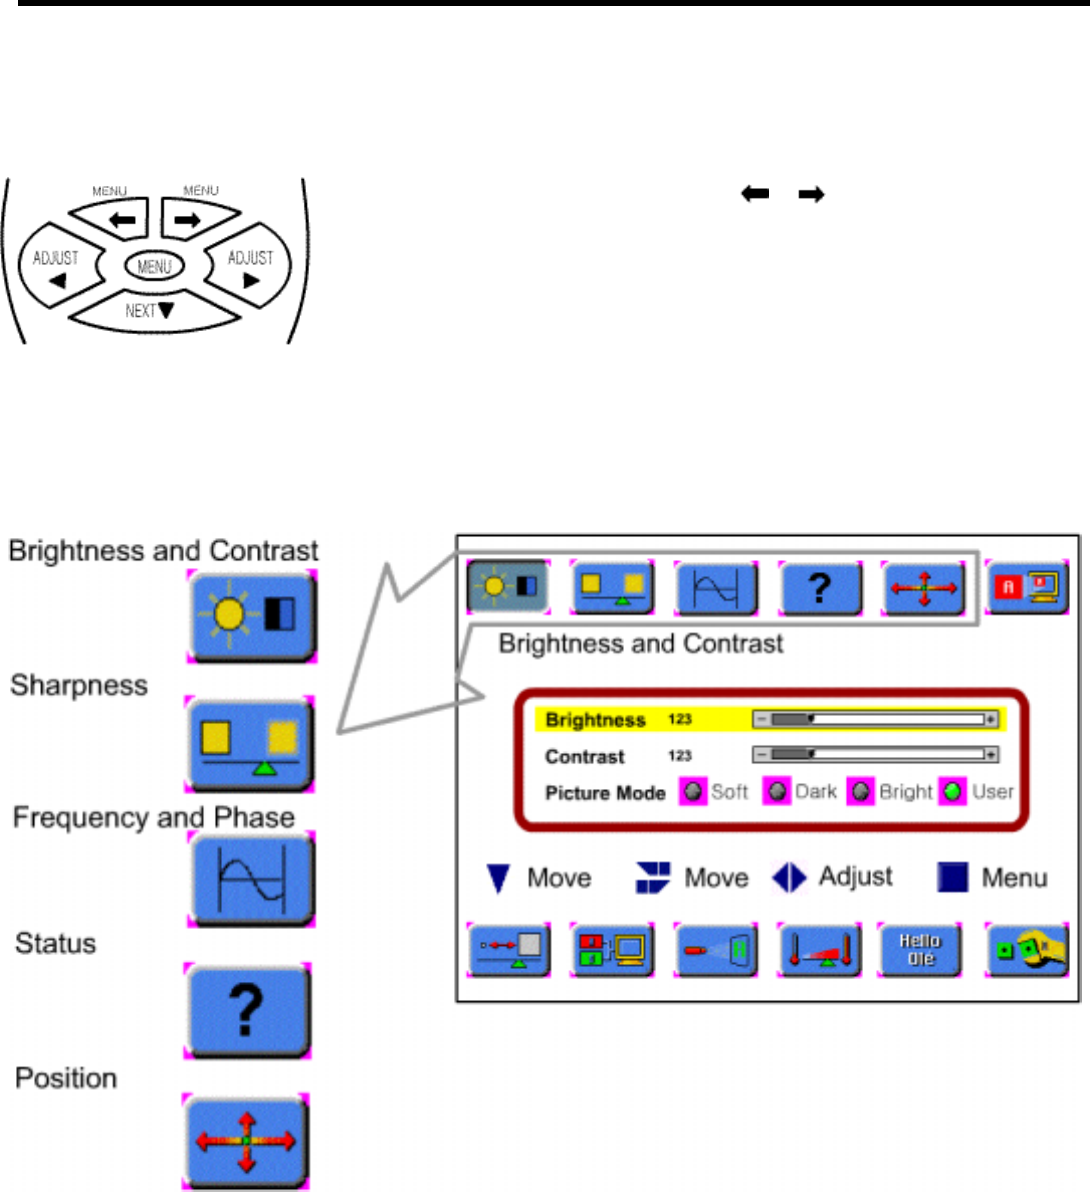
Picture Adjustment in PC Mode
Follow these steps to adjust the picture in PC Mode :
c Press the [MENU] button.
d Select the desired Mode by using the [ ]/[ ] buttons.
e Move to the desired Mode by pressing the [NEXT] button.
f Press the [ADJUST] button for adjusting the picture in PC Mode
g Press the [MENU] button to exit the adjustment menu.
※ Highlighted choice will be in green.
- -
18
Picture
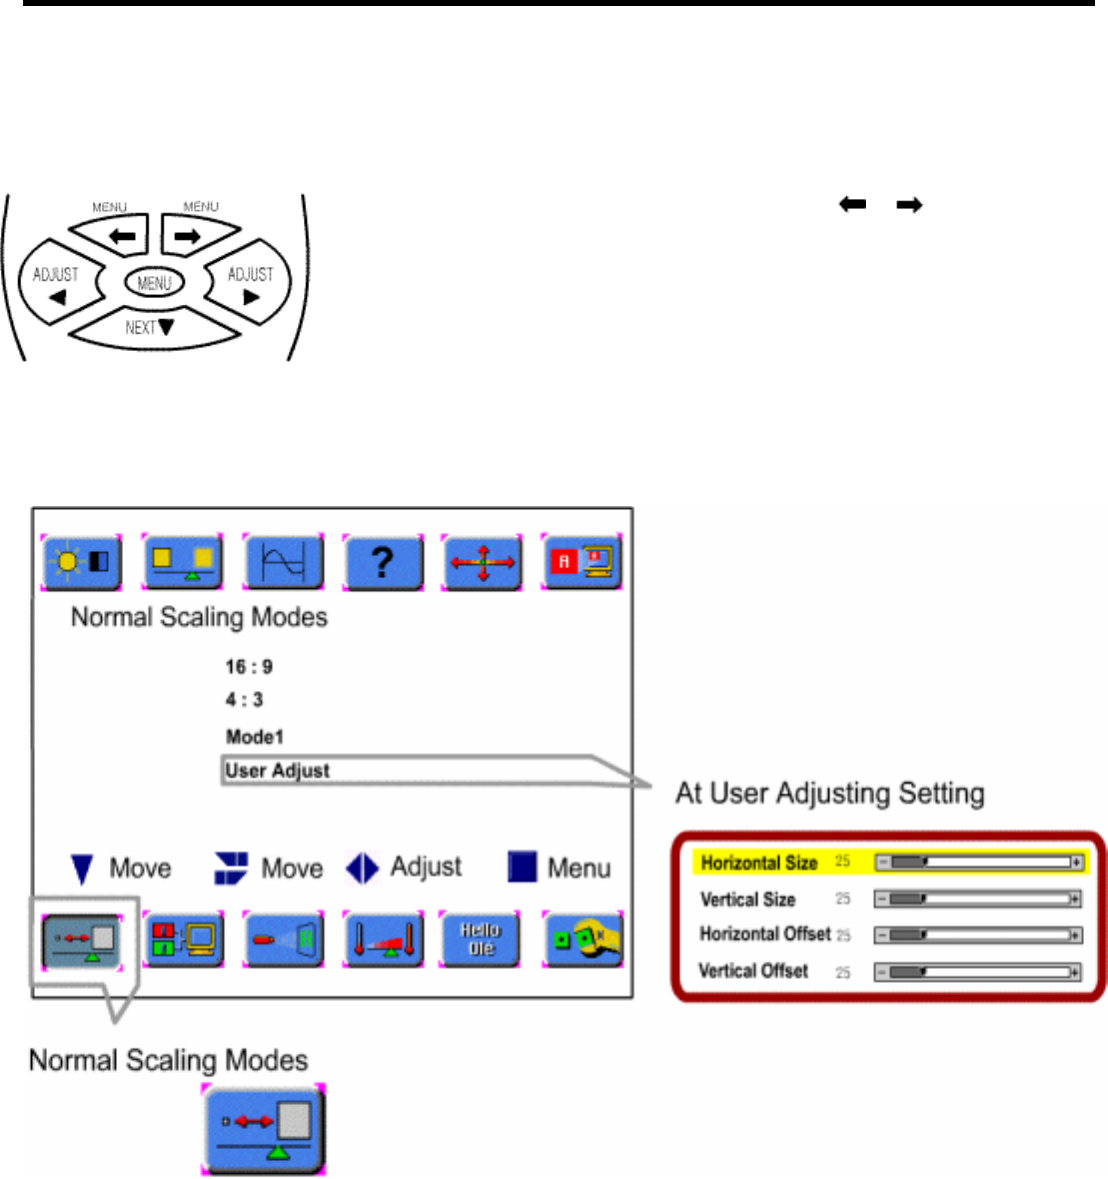
Picture Size Adjustment in PC Mode
Follow these steps for setting the Picture Size Adjustment of PC Mode.
c Press the [MENU] button.
d Select the Normal Scaling Modes by using the [ ]/[ ] uttons.
e Move to the desired mode by pressing the [NEXT] button.
f Press the [ADJUST] button to select the proper mode.
g Press the [MENU] button to exit the adjustment menu.
※ Highlighted choice will be in green.
[ZOOM + ] / [ZOOM - ] Button
: Using the [ZOOM] button on the remote controller, you can expand the picture size 0 up to 500%.
- -
19
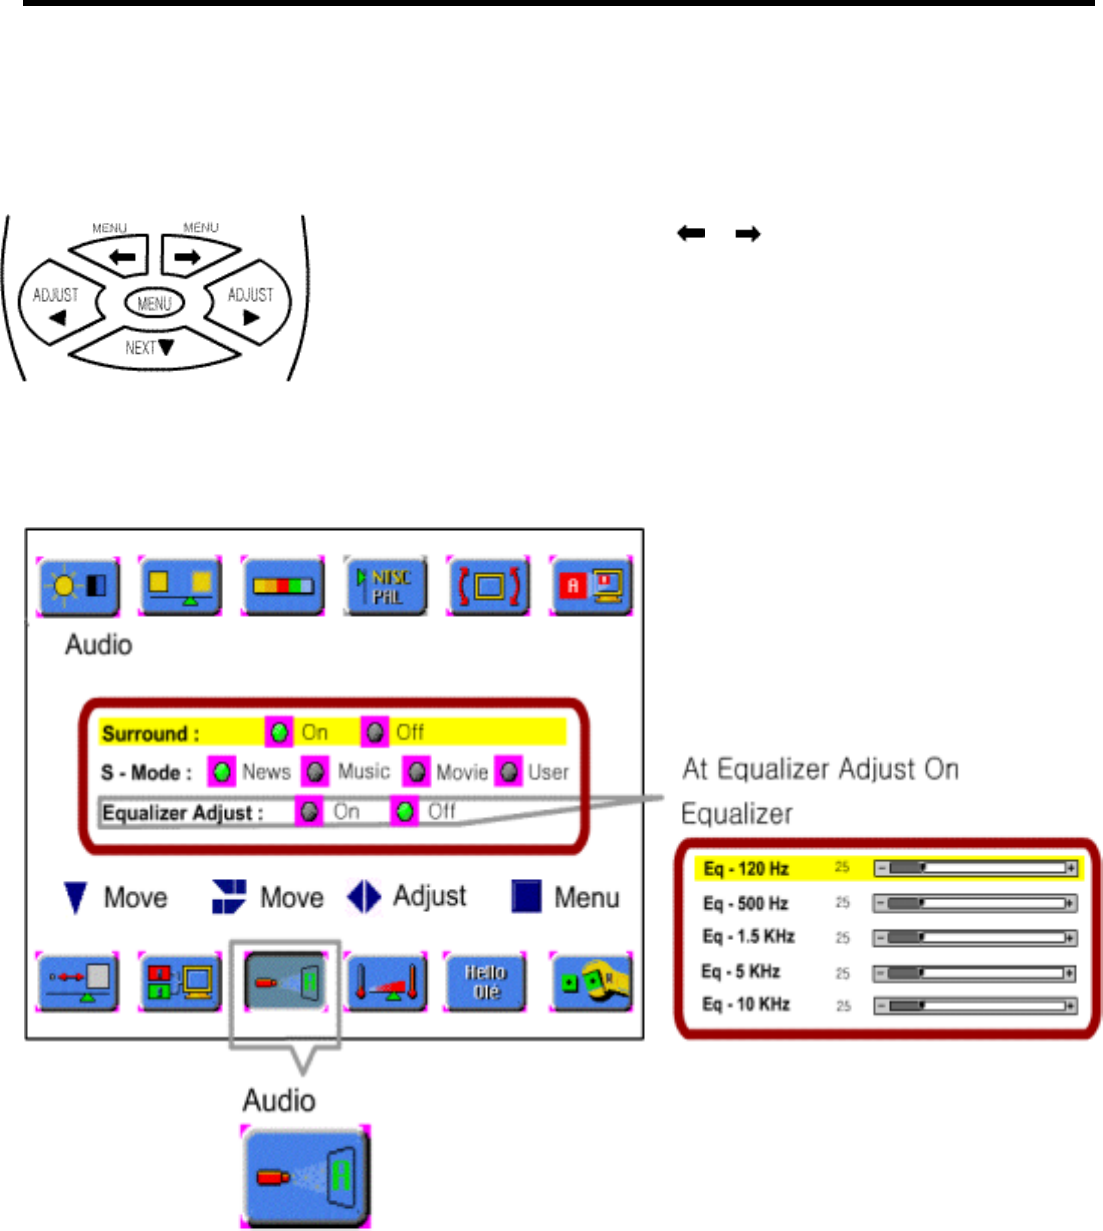
Audio
Audio Mode Setting
Follow these steps for setting Sound Mode :
c Press the [MENU] button.
d Select the Audio by using the [ ]/[ ] buttons.
e Move to the desired Mode by pressing the [NEXT] button.
f Press the [ADJUST] button to make the adjustment for Sound
g Press the [MENU] button to exit the adjustment menu.
※ Highlighted choice will be in green.
- -
20
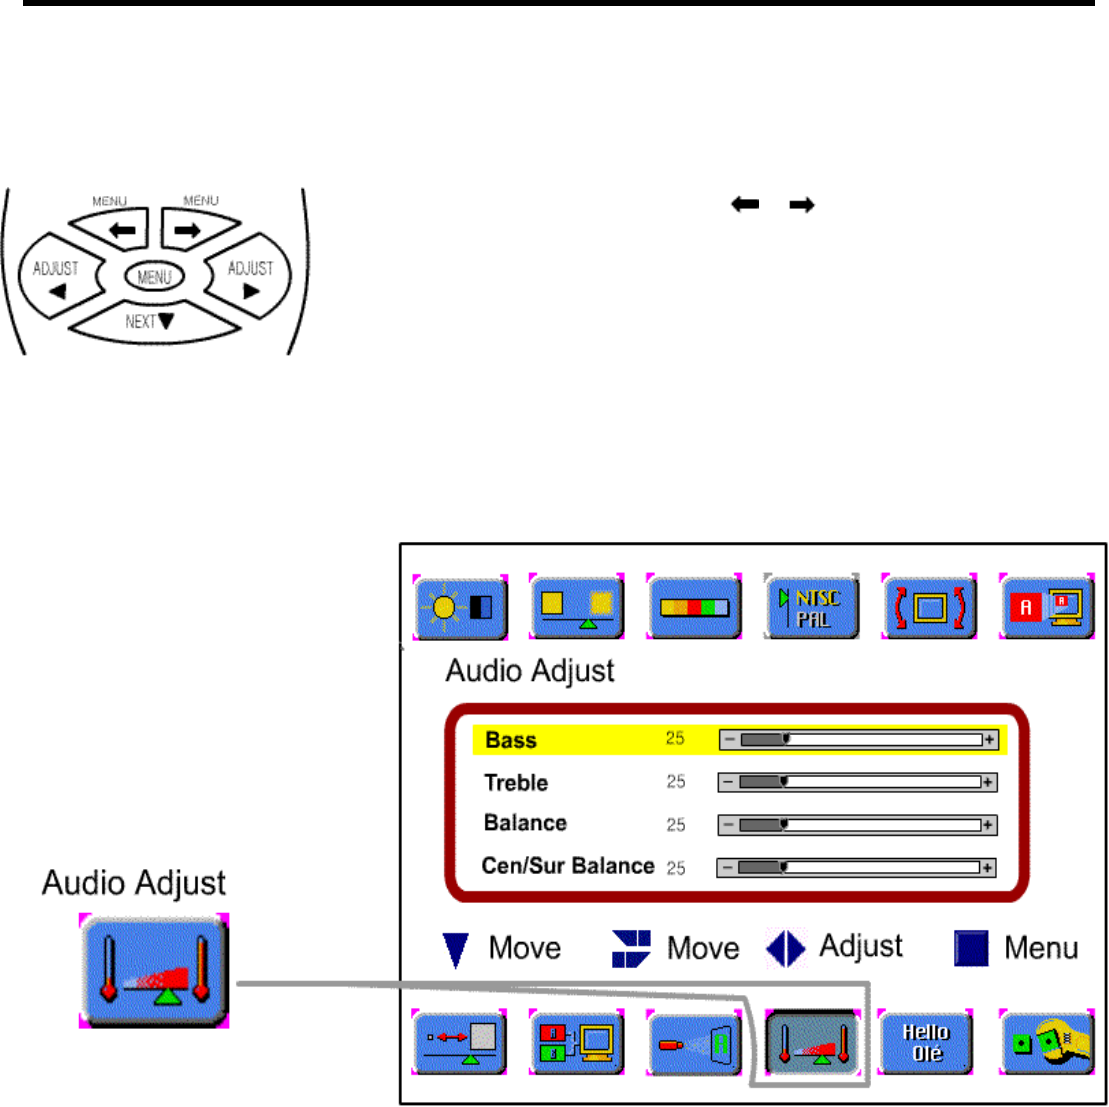
Audio
Audio Adjustment
Follow these steps to adjust the Sound :
c Press the MENU button.
d Select the Audio Adjust by using the [ ]/[ ] buttons.
e Move to the desired Mode by pressing the [NEXT] button.
f Press the [ADJUST] button to make the adjustment for Sound
g Press the [MENU] button to exit the adjustment menu.
※ Highlighted choice will be in green.
BASS : Changes the level of low frequency sound.
TREBLE : Changes the level of high frequency sound
BALANCE : Changes the balance of the left and right channels.
Cen/Sur BALANCE : Changes the balance of the center and surround channels.
- -
21
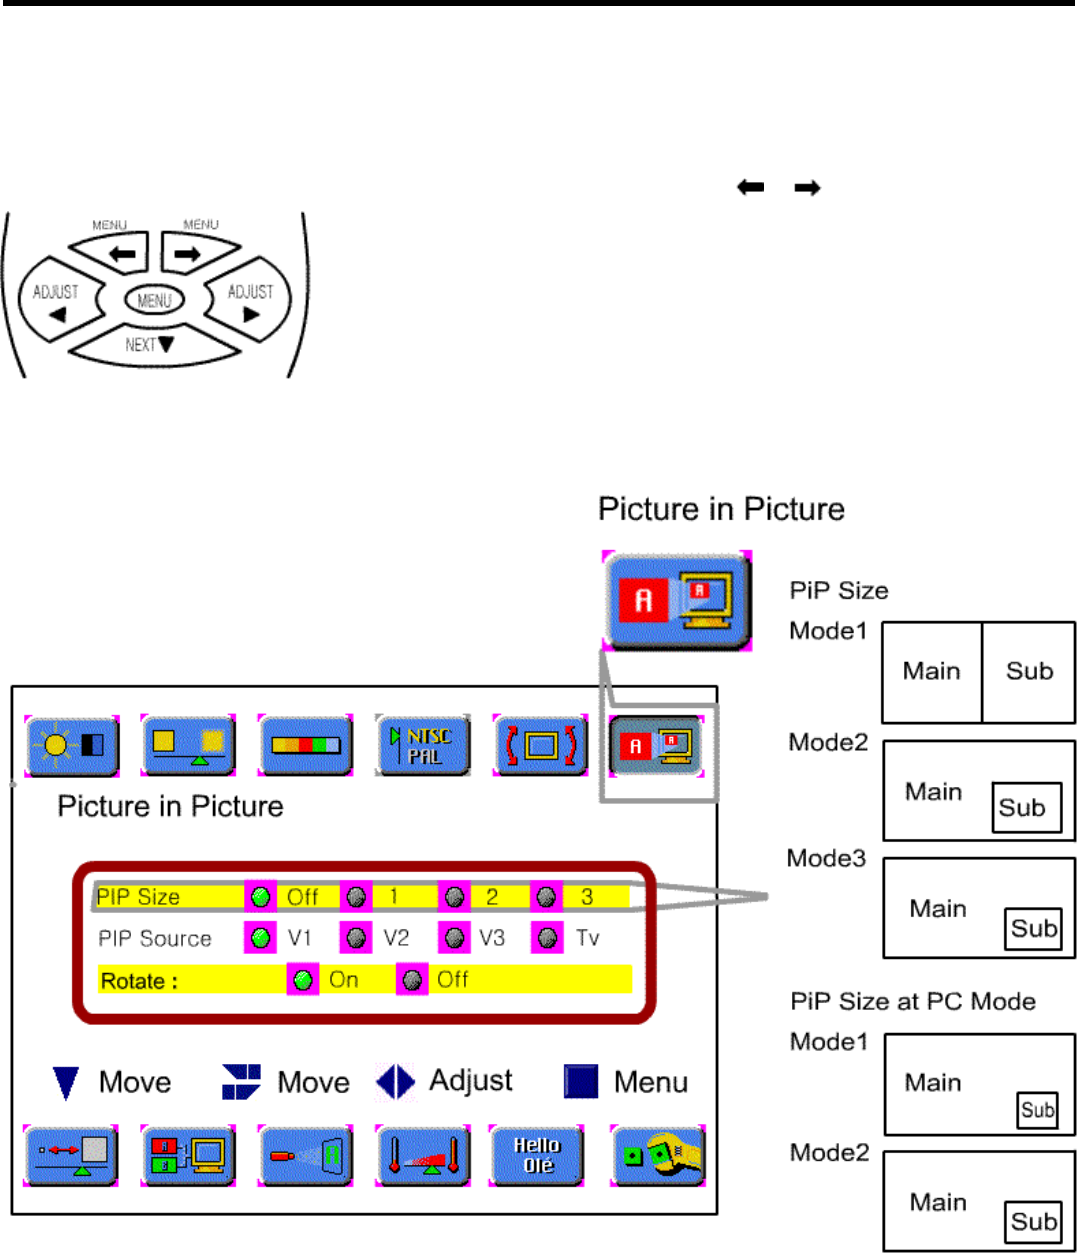
Picture in Picture
Picture in Picture Mode Setting
Follow these steps below to set Picture in Picture mode :
c Press the [MENU] button.
d Select Picture in Picture by using the [ ]/[ ] button.
e Select PIP size mode by pressing the [NEXT] button.
f Move to desired mode by pressing the [ADJUST] button.
g Select PIP Source Mode by pressing the [NEXT] button.
h Select PIP Source by pressing the ADJUST button.
i Press the [MENU] button to exit the adjustment menu.
※ Hi
g
hli
g
hted choice will be in
g
reen.
- -
22
Picture in Picture
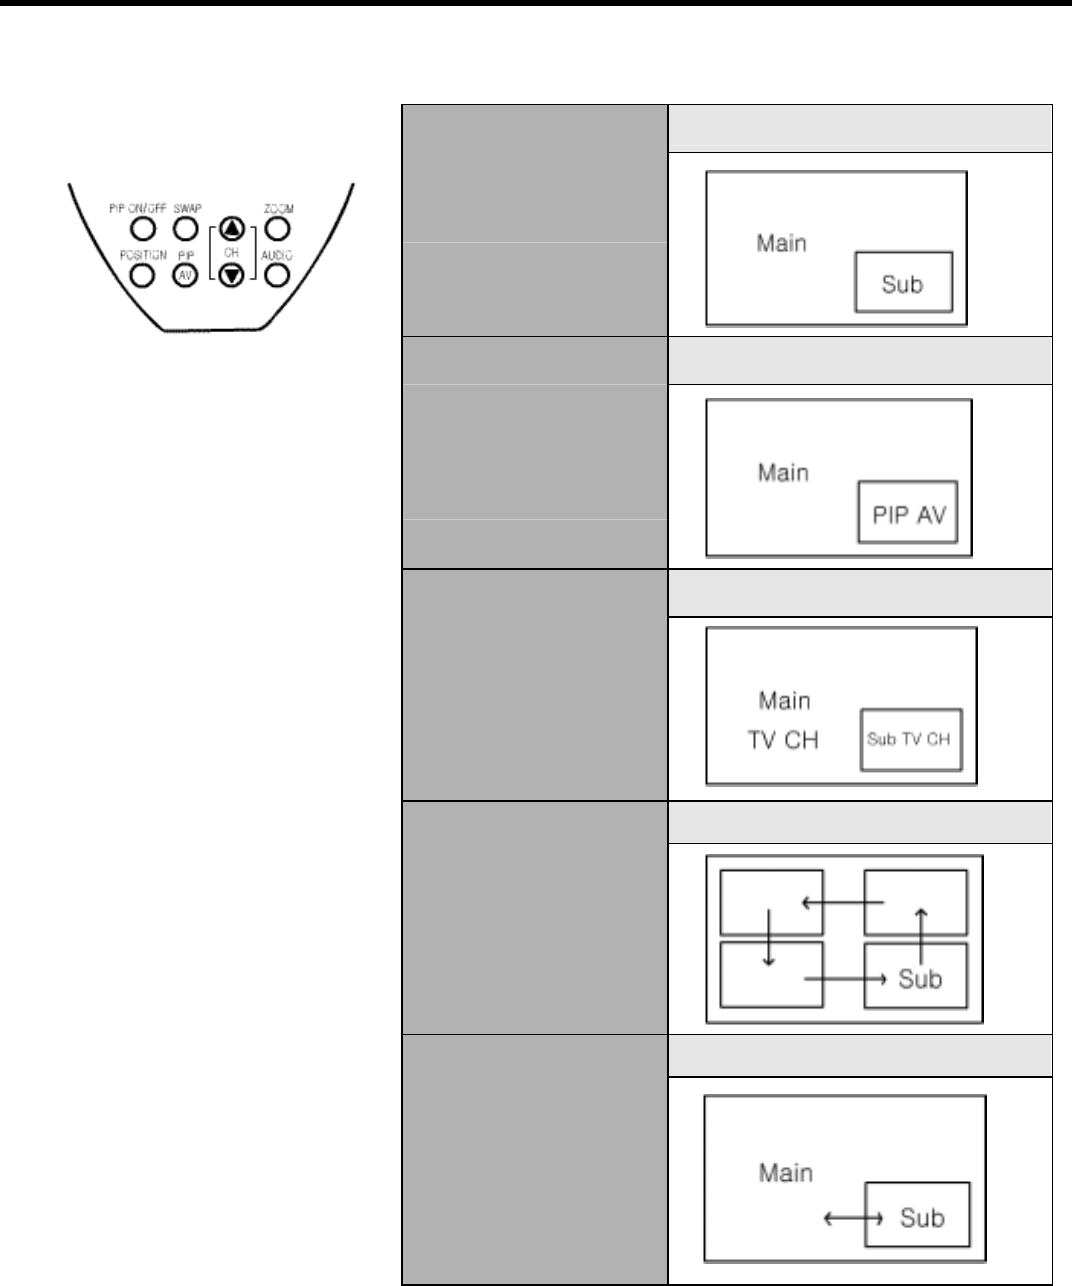
Watching Picture in Picture
Press the [PIP ON/OFF] button.
Watching PIP
Press the [PIP AV] button.
Changing
the Sub Picture to
AV
Press the [▲ CH ▼] button.
Changing the Sub
Picture Channel
Press the [POS] button.
Changing the Sub
Picture Position
Press the [SWAP] button.
PIP at PC Mode
PC signal can be seen on the
main picture but not on the sub
picture. AT 800×600 mode, you
can optimize PIP.
Swa
pp
ing Main for
Sub picture
- -
23
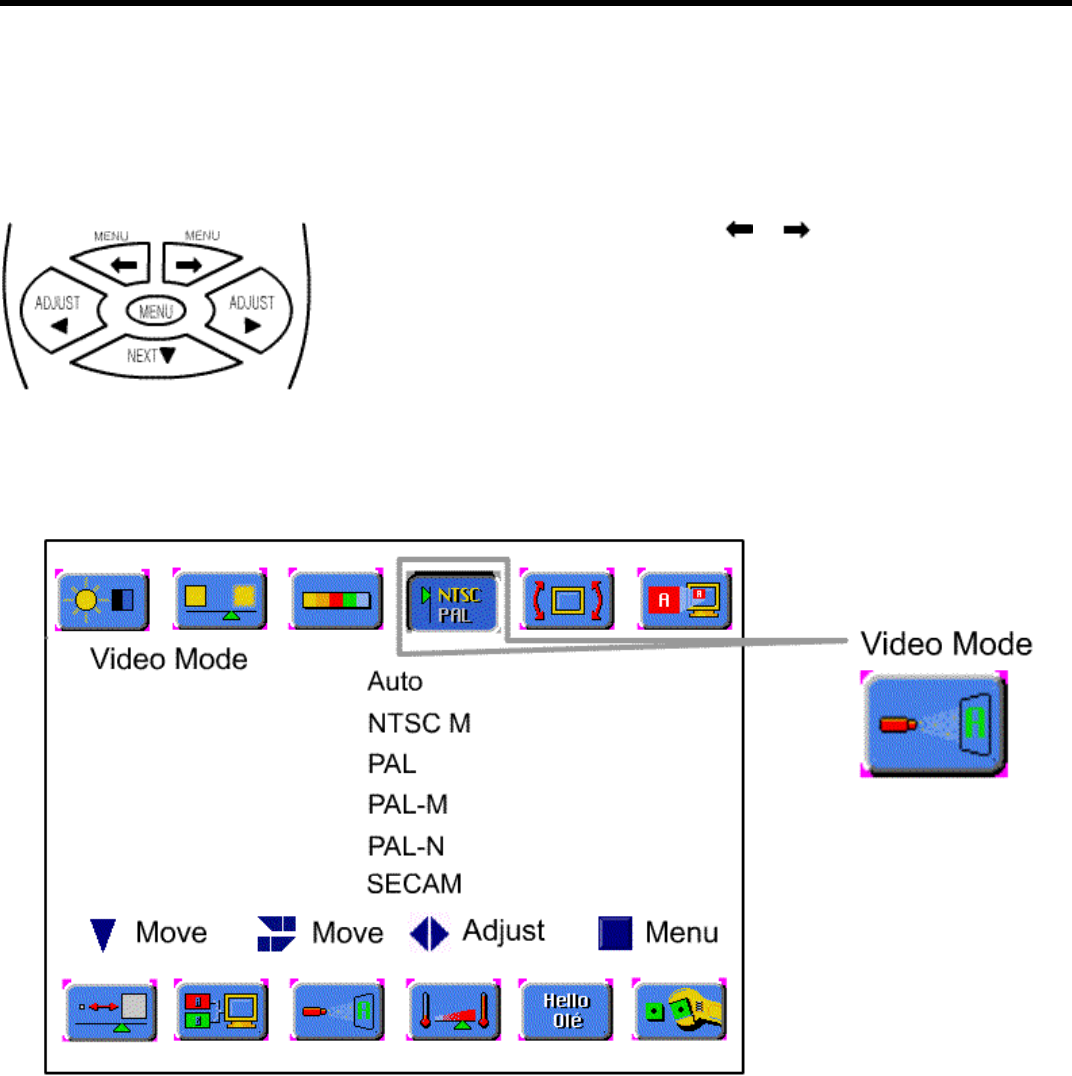
Video Signal Format
Video Signal Format Setting
Follow these steps for setting the Video Signal Format.
c Press the [MENU] button.
d Select the Video Mode by using the [ ]/[ ] buttons.
e Move to the desired system by pressing the [NEXT] button.
f Press the [ADJUST] button to select the desired system.
g Press the [MENU] button to exit the adjustment menu.
※ Highlighted choice will be in green.
Auto : The video signals are automatically detected and the format is set accordingly.
NTSC M : This is the standard format used mainly in the United States and Korea.
PAL : This is the standard format used mainly in the United Kingdom and Germany.
PAL-M : This is the standard format used mainly in Brazil.
PAL-N : This is the standard format used mainly in Argentina.
SECAM : This is the standard format used mainly in France and Russia.
- -
24
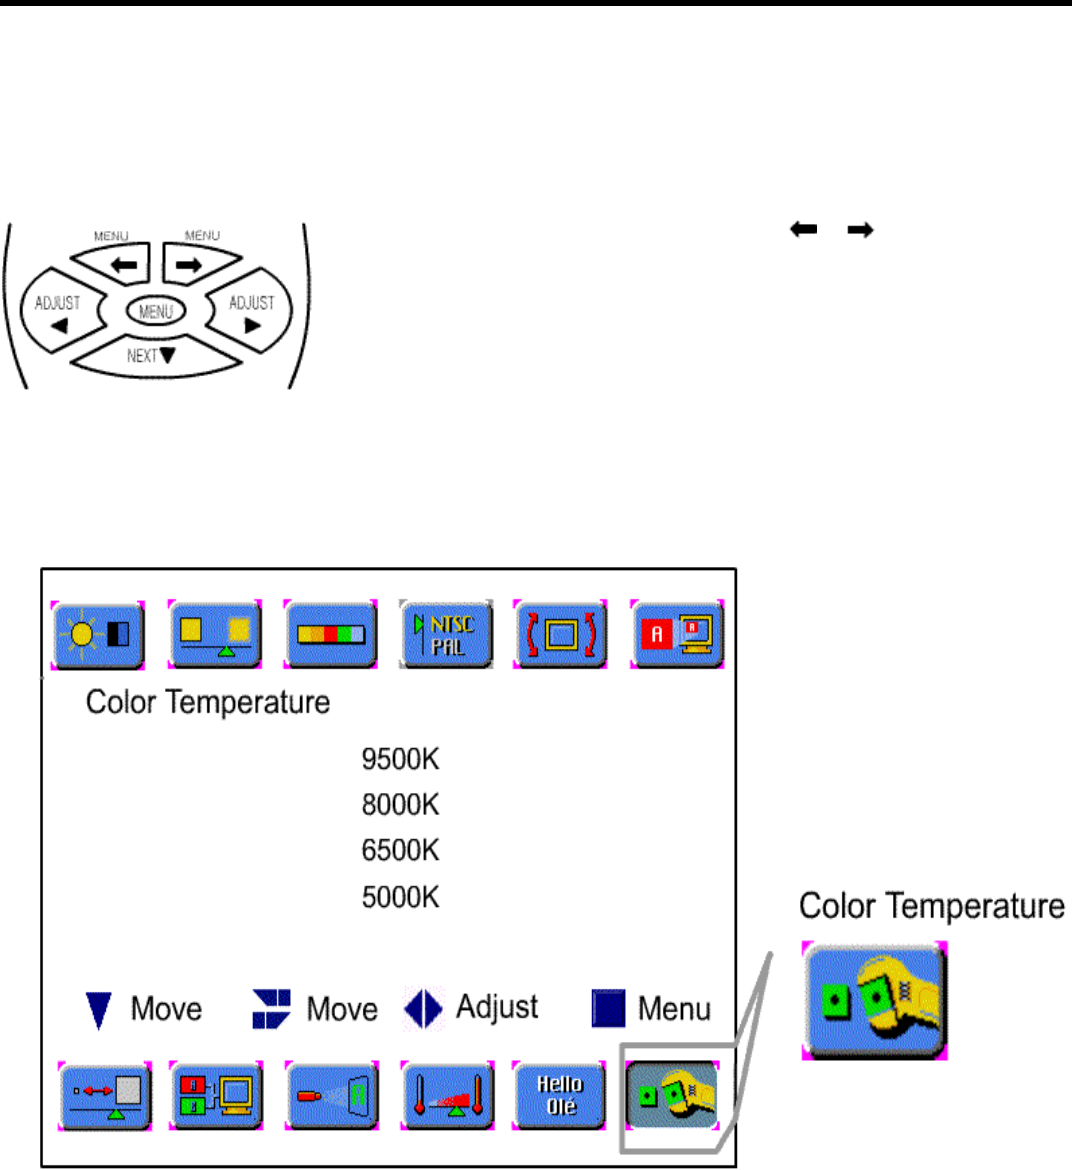
Color Temperature
Color Temperature Setting
Follow these steps for setting the Color Temperature.
c Press the [MENU] button.
d Select the Color Temperature by using the [ ]/[ ] buttons.
e Move to the desired mode by pressing the [NEXT] button.
f Press the [ADJUST] button to select the desired mode.
g Press the [MENU] button to exit the adjustment menu.
※ Hi
g
hli
g
hted choice will be in
g
reen.
Color Temperature : The higher temperature the coolest image looks like.
The lower temperature the warmest image looks like.
- -
25

Specifications
Power Source AC100V~240V, 50/60㎐
Power Consumption < 350W (Typical)
Display Panel Screen Size 921 mm (H) × 518 mm (V) <42" diagonal>
Number of Pixels 853(Horizontal) × 480 (Vertical)
Brightness 550 cd/m2
Contrast Ratio 700:1
Displayable Colors 16,770,000 Colors
Viewing Angle Over 160 degrees
Display Mode Input Signal TV, Video, S-VHS, Component, PC
RF Input System NTSC(F-Type) or PAL(DIN-Type)
Video Input System NTSC, PAL, SECAM
Input/Output Input PC (P), PC(S)
Video1(V, L, R)/S-VHS
Video2 (V, L, R)/SCART
Video3 [Component (Y, Pb, Pr), Sound (L, R)]
RF IN (NTSC F-TYPE, PAL DIN-TYPE)
Output Monitor Out (V, L, R)/ SCART
Speaker Out (L,R,Center,Surround L/R,Sub-W), Headphone
Weight Without Stand 33 Kg
Dimensions Without Stand 1080 mm (W) × 670mm (H) ×99.5 mm (D)
Operation Condition Temperature 0° C ~ 40° C
Humidity 20% ~ 80%
Storage Temperature -25° C ~ 60° C
- -
26

Troubleshooting
Symptom Cause Possible Solution
No Power Power to the TV is not Check source of power to the TV.
plugged in.
Unit will not respond to Sensor is blocked. Clear path for sensors.
remote control Batteries in remote control Clean sensor lens.
are weak. Replace batteries.
No signal is displayed Video source incorrect. Check video source connection.
Make sure TV is set to correct video
source.
Picture scrolls or is Antenna type or location Change antenna.
fuzzy Try antenna in different location.
- -
27

FCC Compliance Statements
NOTE : This equipment has been tested and found to comply with the limits for a Class B
digital device, pursuant to part 15 of the FCC Rules.
These limits are designed to provide reasonable protection against harmful interference
in a residential installation.
This equipment generates ,uses and can radiate radio frequency energy and ,if not
installed and used in accordance with the instruction , may cause harmful interference
to radio communication. However , there is no guarantee that interference will not occur
in a particular installation.
If this equipment dose harmful interference to radio or television reception, which
can be determined by turning the equipment off and on. The user is encouraged
to try to correct the interference by one or more of the following measures :
-- Reorient or relocate the receiving antenna
-- Increase the separation between the equipment and receiver.
-- Connect the equipment into an outlet on a circuit different from that to
which the receiver is connected.
-- Consult the dealer or an experienced radio / TV technician for help.
Warning :
Your are cautioned that any change or modifications to the equipment
not expressly approved
by the party responsible for compliance could void your authority to
operate such equipment.
NOTE : This unit was tested with shielded cables on the peripheral device .
Shield cables must be used with the unit to insure compliance.
- -
28