Digital Device DPU-4270 Plasma Display Monitor User Manual
Digital Device Inc. Plasma Display Monitor
UserManual.wiki
>
Digital Device
>
DPU 4270 User Manual
Users Manual
Navigation menu
Upload a User Manual
Namespaces
Wiki Guide
HTML
PDF
Info
Views
User Manual
Discussion / Help
Navigation

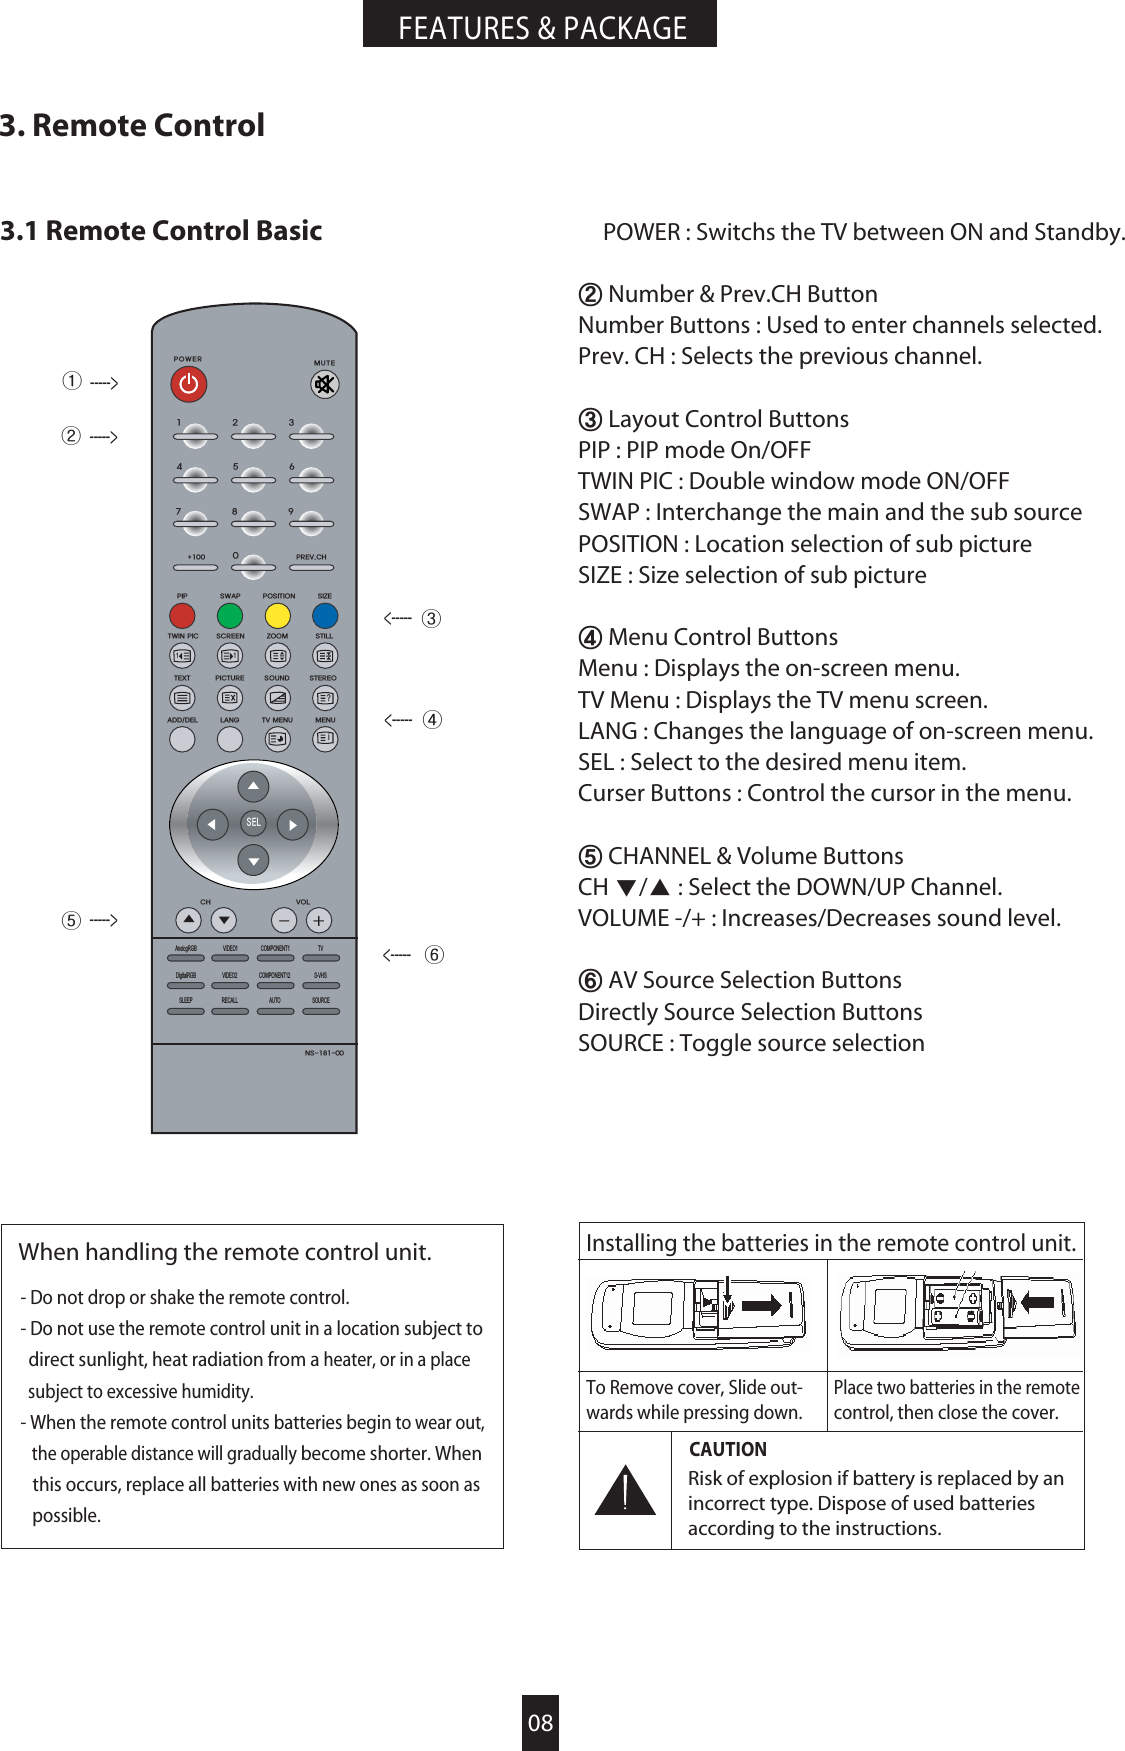
![09REMOTE CONTROL3. Remote Control3.1 Remote Control Basic ཿTEXT : Selects TELETEXT mode.See the page 24 in which the teletext function buttonis explained in detail.ྀADD/DEL:Memories or Deletes the selected channel.ཱྀSLEEP : Sets the sleep timer.ྂRECALL : Displays the setting status of PDP.ྃAUTO : Optimizes the picture at Componentand RGB mode.྄MUTE : Switches the sound on or off.྅Screen Control ButtonsSCREEN : Adjusts the size of the screen.(16:9, 4:3 etc.)ZOOM : Enlarges or reduces the picture size.STILL : Still the picture.PICTURE : Selects the picture mode selection.(User-Soft-Dark-Bright)྆Sound Control ButtonsSOUND : Selects the sound mode. (User- Movie-Music-News)STEREO : Selects the MONO, STEREO or SAPmode at TV.3.2 Wired Remote ControlྙConnect as the drawing shown.ྚPower on.[Note] IR Remote Controller is not included inthe product package.CAUTIONIR Remote Jack is not sound jack.Do not connect with any sound source̡̠̥----->----->----->----->̦----->̧32:(5 087(AnalogRGB VIDEO1 COMPONENT1 TVDigitalRGB VIDEO2 COMPONENT12 S-VHS6(/11?i 35(9&+3,36:$3326,7,216,=(7:,13,&6&5((1=22067,//7(;73,&785(6281'67(5(2$'''(//$1*790(180(18&+ 92/16SLEEP RECALL AUTO SOURCE11?i7:,13,&6&5((1=22067,//7(;73,&785(6281'67(5(2$'''(//$1*790(180(18IR Rmote Remote control̢ ̣̤͑͑͑͜͞](https://usermanual.wiki/Digital-Device/DPU-4270/User-Guide-559275-Page-9.png)
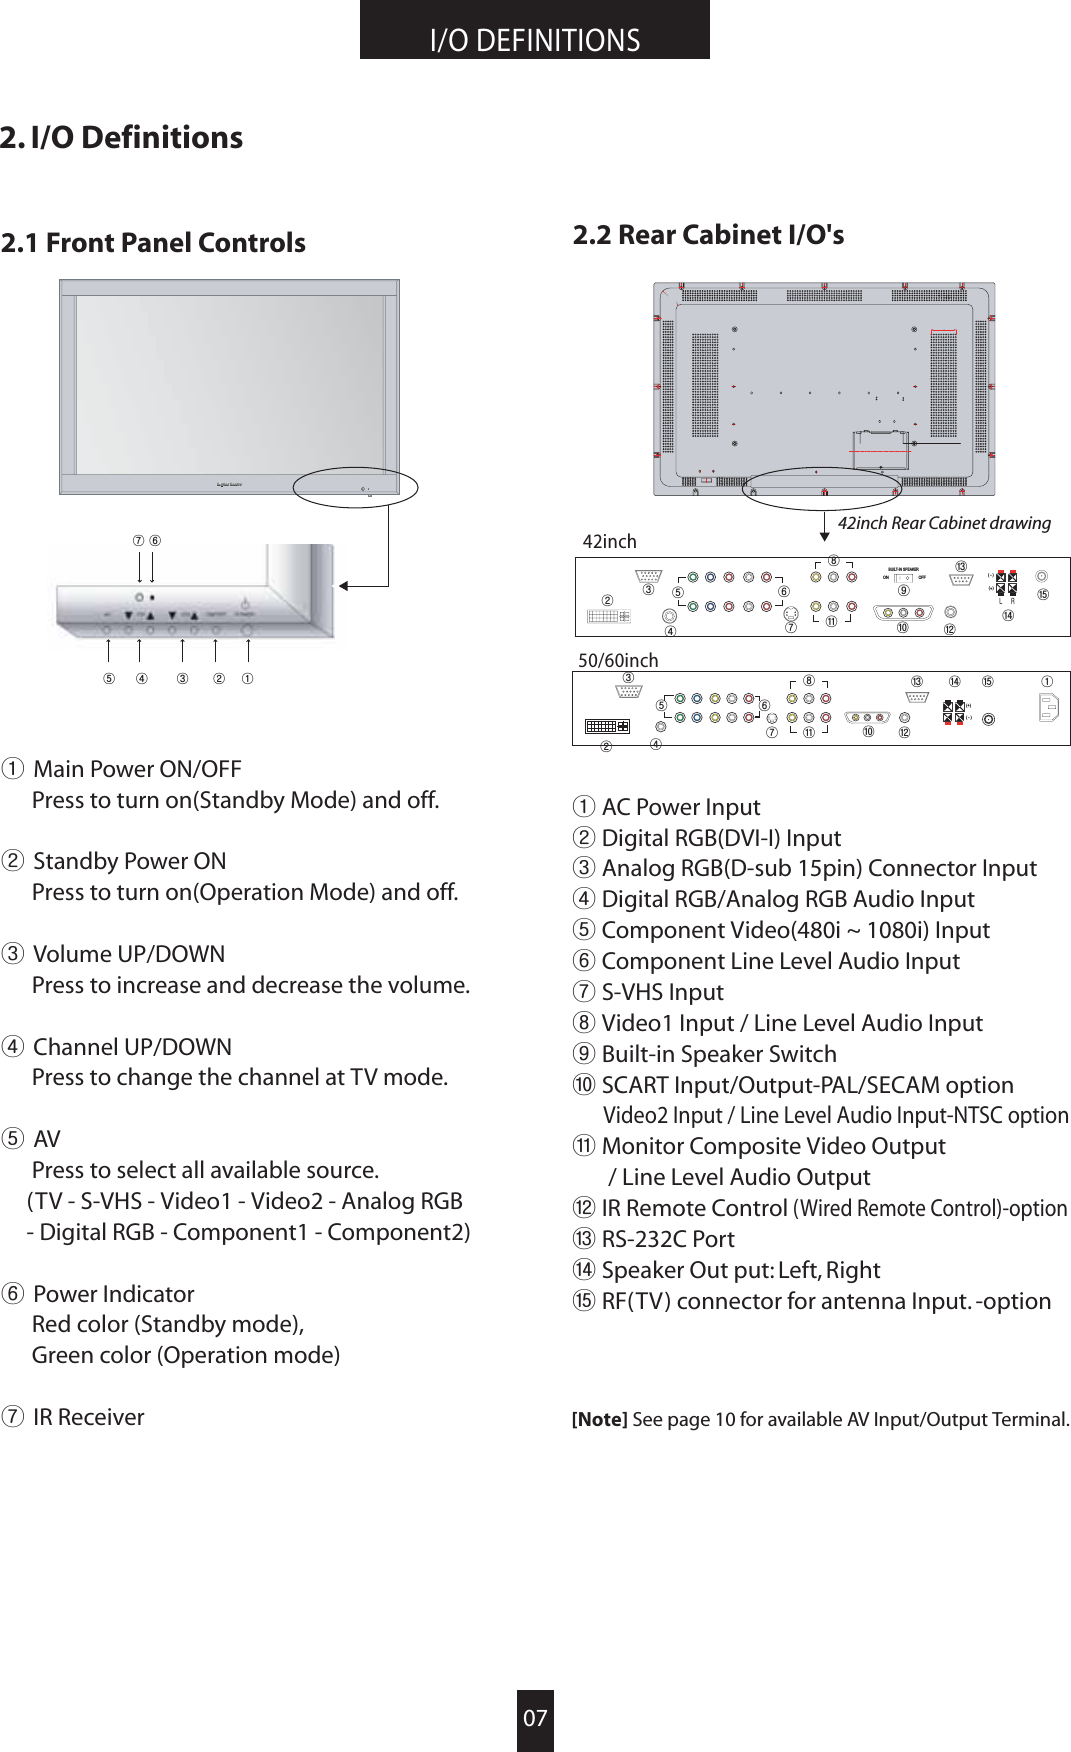
![11INSTALLATION4. Installation4.2.3) Video1/2ྙConnect as the drawing shown.ྚPower on.ྛPress the [VIDEO1]/[VIDEO2] button.- When connecting the TV to externalequipment, match the jack colors (Video=yellow, Audio Left = white, and Audio Right =red).- To avoid picture noise (interference), leave anadequate distance between the External VideoEquipment and TV.- Use the ISM Method of Panel Function Menuto avoid having a fixed image remain on thescreen for a long time. Typically a frozen stillpicture from a VCR. If the LetterBox pictureformat is used, the fixed image may remainvisible on the screen.4.2.4) S-VHSྙConnect as the drawing shown.ྚPower on.ྛPress the [S-VHS] button.[Caution]Audio input must be connected with [Video1].[Note]S-VHS cable is not included in the product package.4.2.5) SCART connection̺Connect as the drawing shown.̻Power on.̼Press the [VIDEO2] button.[Caution]1. Do not use Scart and video2 port simultaneously.2. Connected devices will not display properly in caseboth Scart and Video 2 ports are connected.3. Mode switching between Scart-RGB and Scart-Composite is done automatically.[Note] SCART cable is not included in theproduct package.S-VHS OUTPUTVCRRLVRLAUDIO Cable(MONO)VIDEO1S-VHS CableS-VHSSCART I/O SCART I/OVCRSCART CableRLVVIDEO2VIDEO1RLVVideo CableAudio Cable(MONO)COMPOSITE VIDEO OUTVCRYXX` XYYWYXYYWXX`At the Video/TV At the CableSCART PIN DescriptionPin12345678910NameAORAIRAOLAGNDBGNDAILBSWITCHG GNDCLKOUTDescriptionAudio Out RightAudio In RightAudio Out Left + MonoAudio GroundRGB Ble GroundAudio Left + MonoRGB Blue InAudio/RGB Switch/16:9RGB Green GroundPin11121314151617181920NameGDATAR GNDDATAGNDRBLNKVGNDBLNKGNDVOUTVINDescriptionRGB Green InRGB Red GroundData GroundRGB Red InComposite Video GroundBlanking Signal GroundComposite Video OutComposite Video In21 SHIELD Ground/shield(Chassis)](https://usermanual.wiki/Digital-Device/DPU-4270/User-Guide-559275-Page-11.png)
![12INSTALLATION4. Installation4.2.6) Analog RGBྙConnect as the drawing shown.ྚPower on.ྛPress the [ANALOG RGB] button.4.2.7) Digital RGB̺Connect as the drawing shown.̻Power on.̼Press the [DIGITAL RGB] button.G* The table below shows all of the display modes that are supported.CautionThere is only one Stereo Phone Jack forAnalog RGB and Digital RGB. Only one Soundsource is available at the same time.[Note] DVI jack not support HDMI.DVI Cable and Phone Cable is not includedin the product package.RGB(P)COMPUTERRGB(S)RGB(P)RGB(S)DVI(S) DVI(S)COMPUTERRGB(S) RGB(S)DVI(P) DVI(P)DVI(S) DVI(S)̺̺̺̺̺̺̺̺̺̺̺̺̺̺̺̺̺̺̺̺̺̺̺̺̺̺̺̺̺̺̺̺̺̺̺̺̺̺̺̺̺̺640x350640x440720x400640x480800x6001024x7681152x8641280x9601280x10248585856072758556607275857537.937.937.931.537.937.543.335.137.948.146.953.780posnegnegnegnegnegnegposposposposposposnegposposnegnegnegnegposposposposposposStandardStandardStandardInd standardStandartStandardStandardGuidelineGuidlineStandardStandardStandardStandard60707585906070756075607548.456.56068.767.56085.96480negnegposposposposposposposnegnegposposposposposposposGuidelineStandardStandardStandardStandardStandardStandardStandardStandardRGBDVIResolution(Pixel)VertRefresh(Hz)H Freq(KHz)H SyncPolarityV SyncPolarity CommentRGBDVIResolution(Pixel)VertRefresh(Hz)H Freq(KHz)H SyncPolarityV SyncPolarity Comment](https://usermanual.wiki/Digital-Device/DPU-4270/User-Guide-559275-Page-12.png)
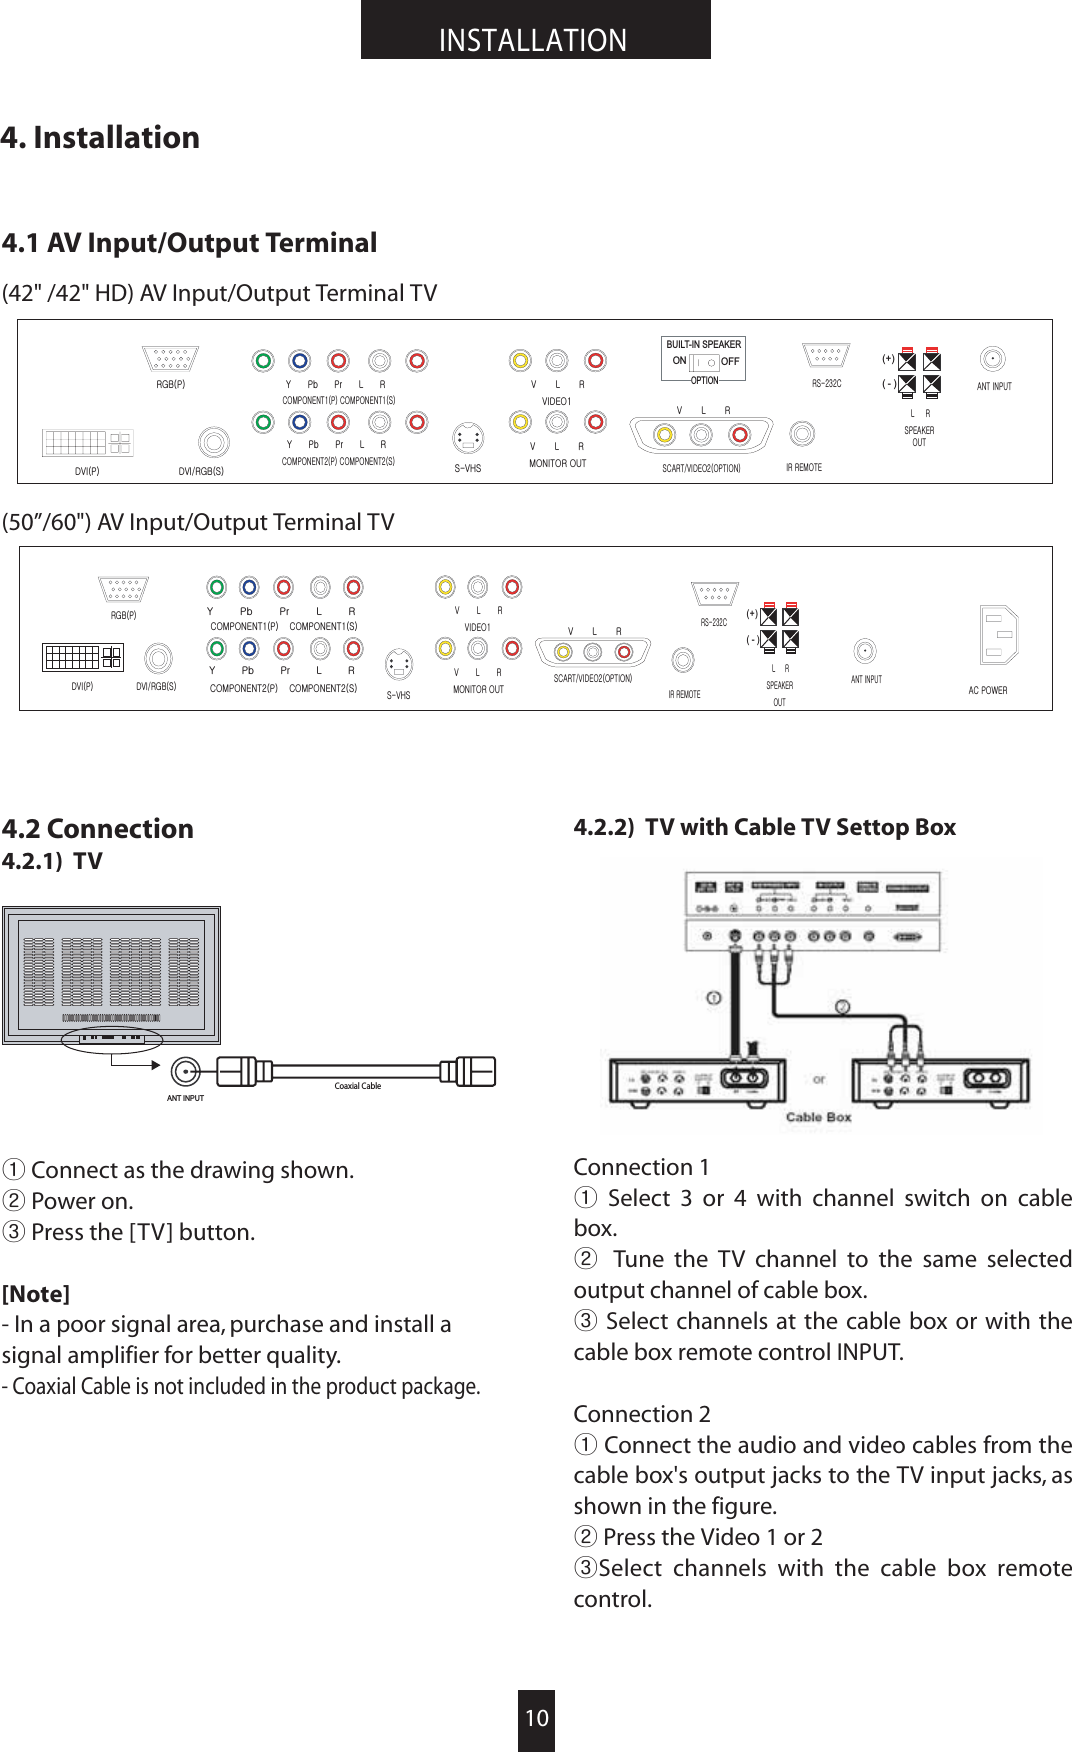
![13INSTALLATION4. Installation4.2.8) COMPONENT 1/2 Video̺Connect as the drawing shown.̻Power on.̼Press the [COMPONENT1]/[COMPONENT2]button.4.2.9) MONITOR output̺Connect as the drawing shown.̻Power on.[CAUTION]Monitor output can view [TV]/[VIDEO1]/[VIDEO2].4.2.10) Speaker outྙPower off.ྚConnect as the drawing shown.ྛPower on.ྜAdjusting audio setting.GVIDEO CableCOMPOSITE VIDEO INPUTVCRPr Pb YComponent Video Cable(MONO)COMPONENT VIDEO OUTInterlaced DVD, Progressive DVD, Settop BoxComponent 1Component 2RLRLAudio Cable(MONO)SOUND OUTComponent 1 Sound InputComponent 1 Sound InputPr Pb YSPEAKER OUT(-)(+)LRSPEAKERMonitor OutRL V(MONO)AUDIO CableVL R](https://usermanual.wiki/Digital-Device/DPU-4270/User-Guide-559275-Page-13.png)
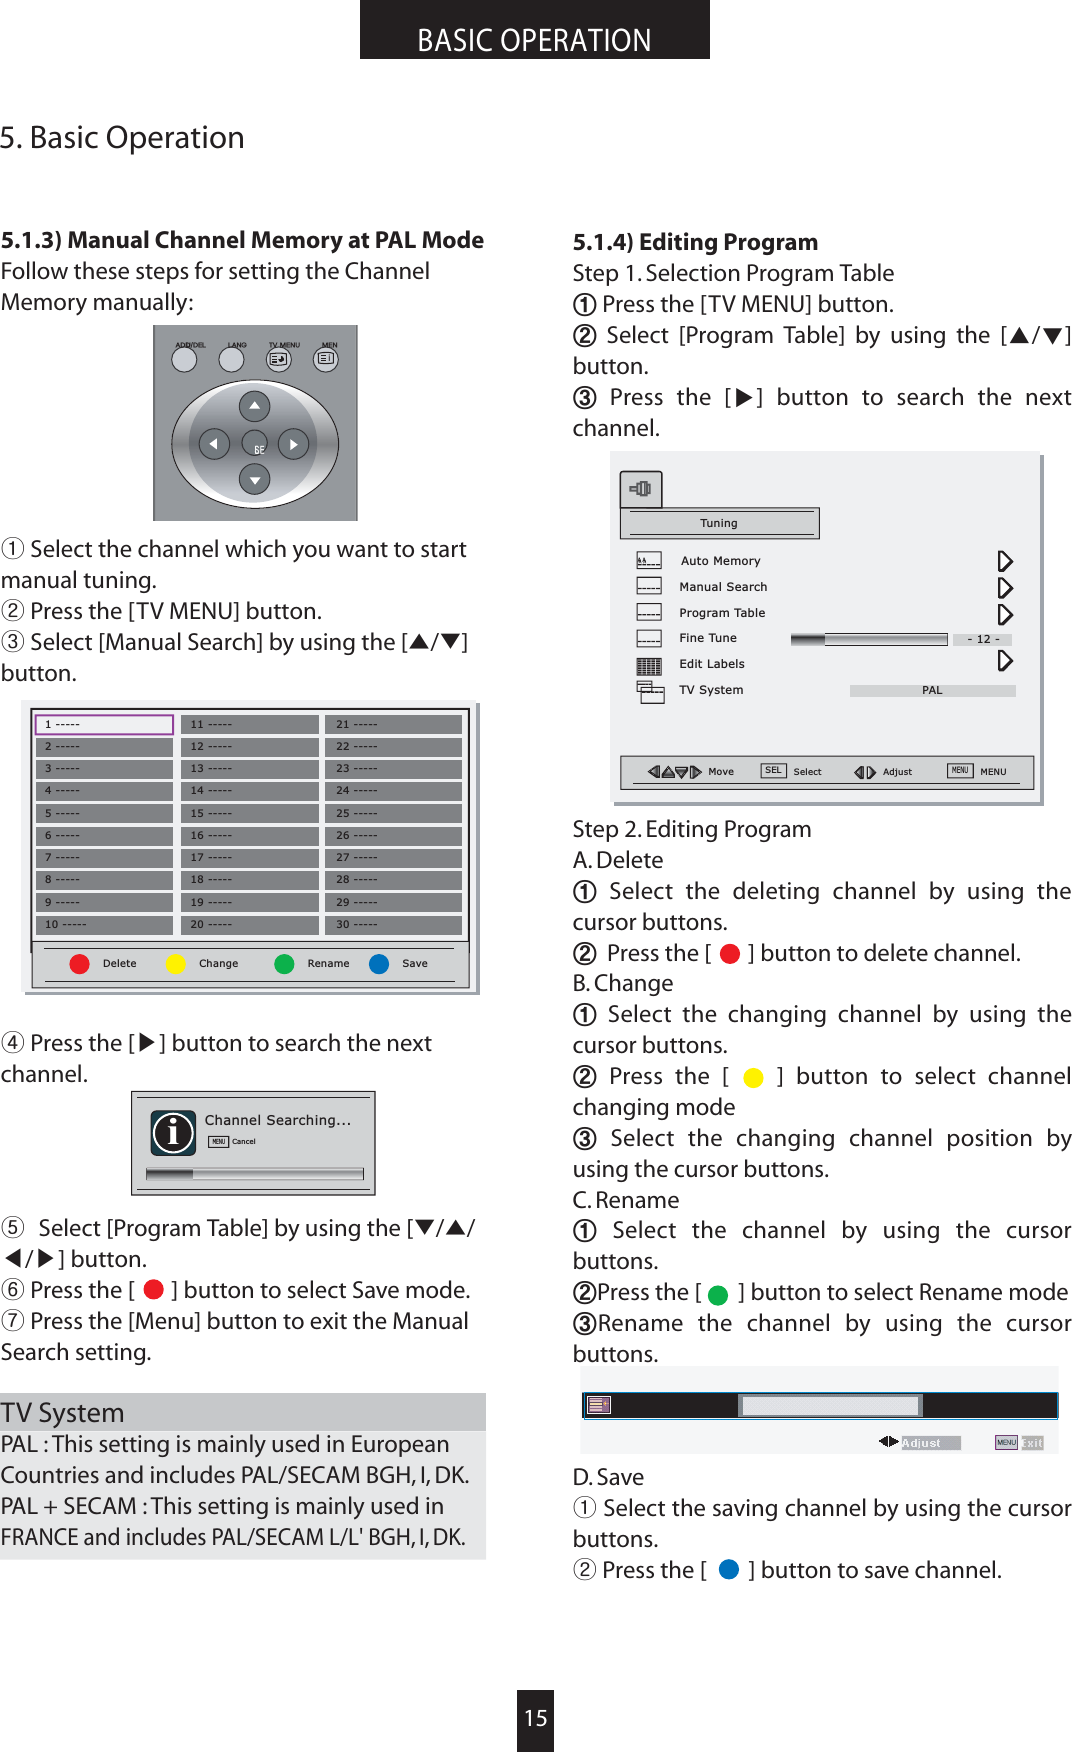
![14BASIC OPERATION5. Basic Operation5.1.2) Manual Channel Memory at NTSCFollow these steps for setting the ChannelMemory manually:ྙSelect the channel by pressing the numberbutton(s).ྚGPress the [TV MENU] button.ྛSelect [Auto Fine Tune] by using the [¤/¦]button.̽Select [Off] by using the [ඔ/ඖ] button.ྜྷSelect [Fine Tune] by using the [̵/̷] button.ྞPress the [ඔ/ඖ] button for the tuningadjustment.ྟSelect [Channel] by using the [̵/̷] button.ྠSelect [Add] or [Remove] by pressing the [ඔ/ඖ] button.ྡPress the [Menu] button to exit the ChannelMemory setting.If the [Auto Fine Tune] mode would be set [On],[Fine Tune] mode should not be adjusted.[Note] HRC and IRC are two special NTSC cablestandards in the US.5.1 TV Channel Memory5.1.1) Auto Channel MemoryFollow these steps for setting the ChannelMemory automatically:ྙPress the [TV MENU] button.ྚSelect [Source] by using the [̵/̷] button.ྛSelect TV signal input mode by pressing the[ඔ/ඖ] button.ྜSelect [Auto Memory] by using the [̵/̷]button.ྜྷPress the [ඖ] button to start the channelsearch.If you want to stop auto memory, press the[MENU] button. Only the channels searched upto that time are memorized.6(/i$'''(//$1*790(180(18TuningAuto MemoryAAAAChannelEdit LabelsAuto Fine TuneFine TuneSourceRegionMoveAdd Remove-12-Select AdjustSEL MENUMENUCancelMENUOff OnAirUSAiChannel Searching...](https://usermanual.wiki/Digital-Device/DPU-4270/User-Guide-559275-Page-14.png)
![16BASIC OPERATION5. Basic Operation5.2 Picture Control5.2.1) At Full Screen ModeFollow these steps to adjust the Picture at FullScreen Mode:ྙPress the [MENU] button.ྚPSelect the [Picture] mode by using the [ඔ/ඖ] button.ྛMove the desired mode by using the [̵/̷]button.ྜPress the [ඔඖ] button for a adjusting thepicture.ྜྷPress the [MENU] button to exit theadjustment menu.5.2.2) At PIP or Twin Screen ModeFollow these steps to adjust the Picture at PIP orTwin Screen ModeྙSelect the adjusting picture's layer by using [̵/̷] button.ྚPress the [MENU] button.ྛMove the desired mode by using the [̵/̷]button.ྜPress the [ඔ/ඖ] button for a adjusting thepicture.ྜྷPress the [MENU] button to exit theadjustment menuConventional FunctionPicture ModePress the [PICTURE] button or Selection [PictureMode] at MENU.You can select the desire mode. (Soft, Bright,Dark, User)[Note] If the Picutre Mode would not be setUser, Brightness and Contrast should not beadjusted.Calibration ModeCorrects the picture balance at Component 1/2.You can select the desire preset.TV, Video 1/2S-VHS, SRGB Component 1/2 Analog RGB Digital RGBPicture ModeBrightnessContrastSharpnessColorTiintPhaseFrequency̺̺̺̺̺̺TT̺̺̺̺̺̺̺̺̺̺̺̺TT̺̺̺̺̺̺TTTT* Picture menu aredifferent to eachinput sourcemode. You can seethe difference atright chart.6(/i$'''(//$1*790(180(18Move Select AdjustSEL MENUMENUPictureBrightnessContrastSharpnessColorTint-12--12--12--12--12-Picture Modesoft](https://usermanual.wiki/Digital-Device/DPU-4270/User-Guide-559275-Page-16.png)
![17BASIC OPERATION5. Basic Operation5.3 Screen5.3.1) At Full Screen ModeFollow these steps below to set Screen Menu:ྙPress the [MENU] button.ྚSelect the desired mode using the [ඔ/ඖ]/[̵/̷] button.ྛPress the [̵/̷] button to select the desiredmenu.ྜPress the [ඔ/ඖ] button to adjust the desiredmenu.ྜྷPress the [MENU] button to exit theadjustment menu.5.3.2) At PIP or Twin Screen ModeFollow these steps to adjust the Picture at PIP orTwin Screen ModeྙSelect the adjusting picture's layer by using [̵/̷] button.ྚPress the [MENU] button.ྛMove the desired mode by using the [̵/̷]button.ྜPress the [ඔ/ඖ] button for a adjusting thepicture.ྜྷPress the [MENU] button to exit theadjustment menu.Conventional FunctionImage SizeThis function allows to adjust the aspect ratio ofthe screen, Press the [SCREEN] button orSelection [Image Size] at MENU.PIP SizeThis function allows to adjust the size of the pipscreen, Press the [SIZE] button or Selection [PIPSize] at MENUPIP PositionThis function allows to adjust the size of the pipposition, Press the [POSITION] button orSelection [PIP Position] at MENUZoomThis function allows to enlarge or reduce thepicture size, Press the [ZOOM] button orSelection [Zoom] at MENU.Press the [Curser]/[SEL] buttons to adjust thezoom ratio or position.Zoom menuMove menu6(/i$'''(//$1*790(180(18Move Select AdjustSEL MENUMENUPictureImage SizeH positionV positionFreeze WindowZoomColor Tempfill alloff on5500K 6500K 7500K 8500K+-12--12-Screen](https://usermanual.wiki/Digital-Device/DPU-4270/User-Guide-559275-Page-17.png)
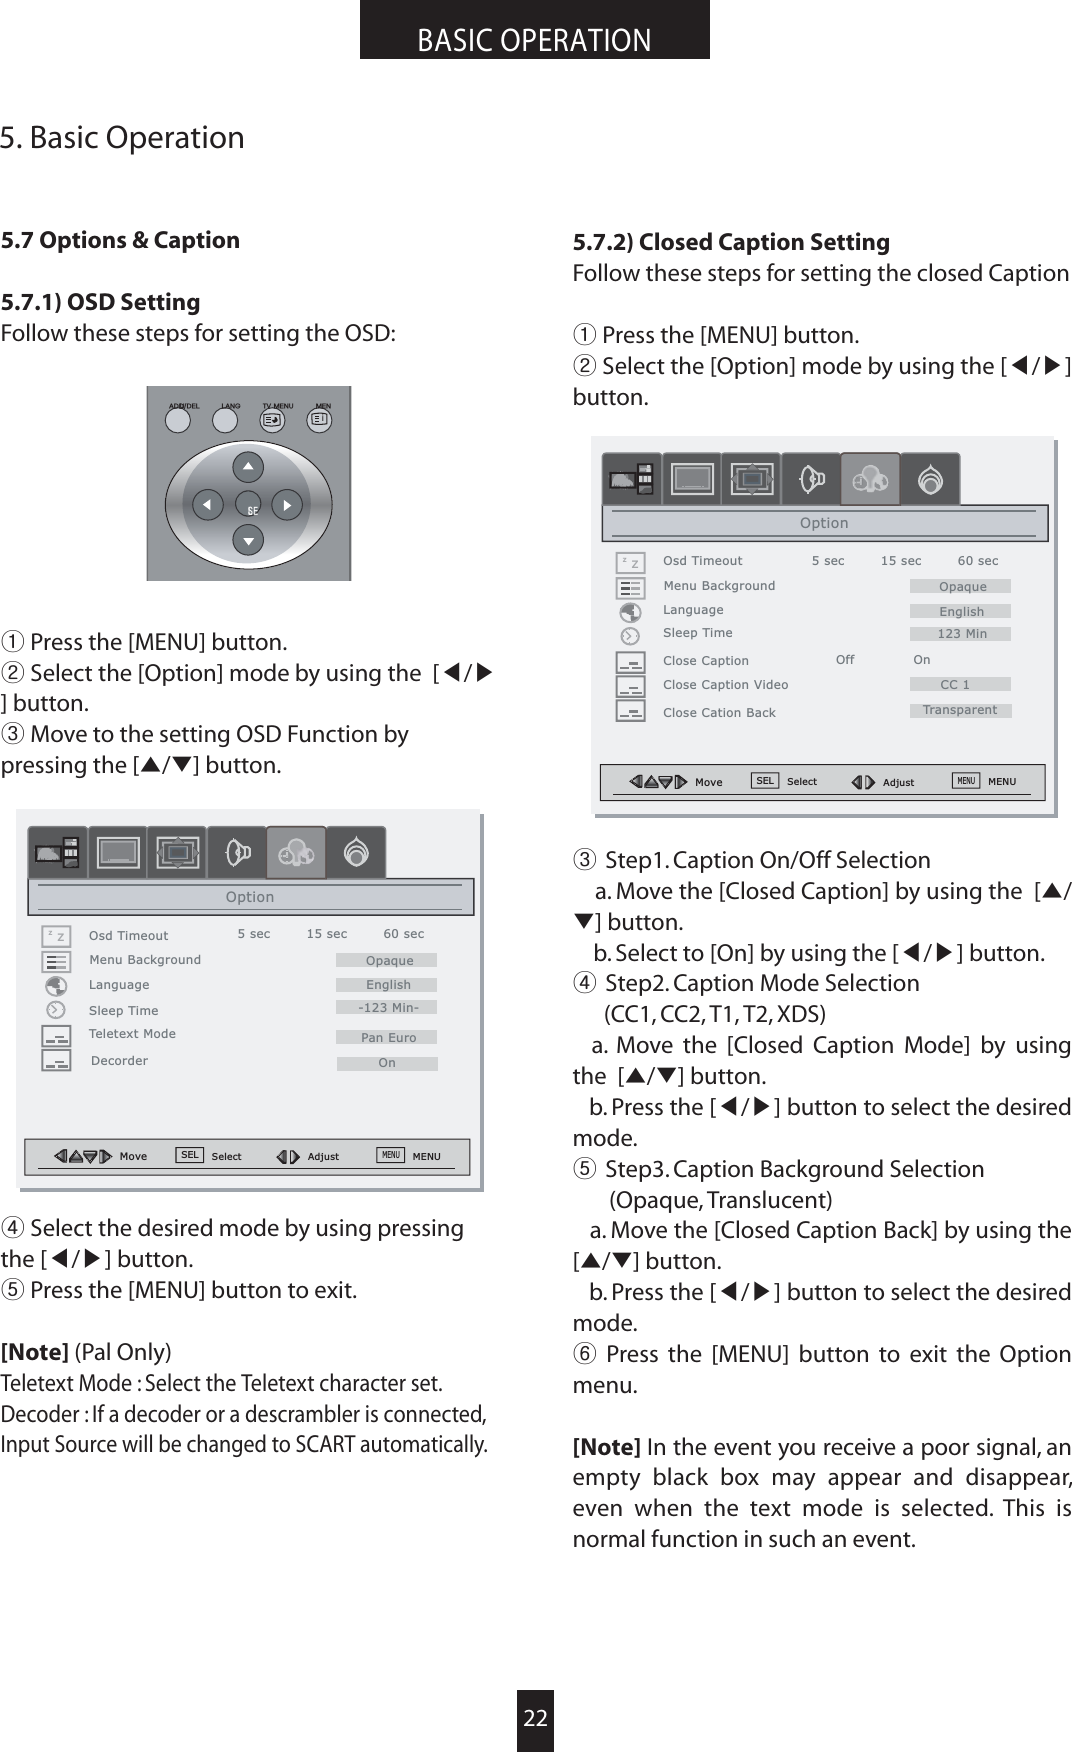
![18BASIC OPERATION5. Basic Operation5.4 Sound Control5.4.1) Sound ControlFollow these steps to adjust the Sound:ྙPress the [MENU] button.ྚSelect the [Audio] mode by using the [ඔ/ඖ]button.ྛMove the desired mode by using the [̵/̷]button.ྜPress the [ඔ/ඖ] button for a adjusting thepicture.ྜྷPress the [MENU] button to exit theadjustment menu.Bass: Changes the level of low frequency sound.Treble: Changes the level of high frequency sound.Balance: Changes the balabce of the left and rightchannels.5.4.2) At Equalizer modeFollow these steps to adjust the Equalizer Mode:ྙSelect the User mode by using the [ඔ/ඖ]button.ྚPress the [̵/̷] button to select the desiredmenu.ྛPress the [ඔ/ඖ] button to adjust the desiredmenu.ྜPress the [MENU] button to exit.*Note : When the change sound mode, off theBass and Treble values. If the Sound modewould not be set User, Equalizer should not beadjusted.Conventional FunctionSound ModePress the [SOUND] button or Selection [SoundMode] at MENUYou can select the desire mode. (User, News,Movie, Music)6(/i$'''(//$1*790(180(18Move Select AdjustSEL MENUMENUPictureVolumeMuteSound ModeBassTre bleBalance-12--12--12--12-AudioOff OnSound Mode120Hz500Hz1.5kHz-12--12--12-User5kHz-12-10kHz-12-Sound ModeUserAdjust MENUMENU](https://usermanual.wiki/Digital-Device/DPU-4270/User-Guide-559275-Page-18.png)
![19BASIC OPERATION5. Basic Operation5.5 Setting5.5.1) SettingFollow these steps to adjust the Setting:ྙPress the [ MENU].ྚSelect the desired mode by using the [ඔ/ඖ]/[̵/̷] button.ྛPress the [̵/̷] button to select the desiredmenu.ྜPress the [ඔ/ඖ] button to adjust thedesired menu.ྜྷPress the [MENU] button to exit.Tuning( TV mode Only): See the 14 ~ 15 page.Contents Blocking (NTSC system only):This menu automatically locks out programsthat are deemed inappropriate for children. Seethe 25 page.5.5.2) Input SourceSelect desire Input Source by using the [ඔ/ඖ]/[̵/̷] button:5.5.3) Panel FunctionSelect desire Panel function by using the [ඔ/ඖ]/[̵/̷] button.Gamma : Select desire gamma mode. (Mode1,Mode2, Mode3, mode4) Please use followfunctions to prevent image sticking.ISM (Image Sticking Minimization mode): When the fixed patterns are displayed for along time, the brightness will be reducedgradually.Pixel Shift : This function scrolls the screenautomatically.Inverse Image : This function inverts the screen.6(/i$'''(//$1*790(180(18Move Select AdjustSEL MENUMENUPictureTuningInput SourceContent BlockingPanelSettingMove Select AdjustSEL MENUMENUPictureGammaISMPixel ShiftInverse ImagePanelMove Select AdjustSEL MENUMENUPictureInput SourceAnalog RGBDigital RGBTVS-VHSVideo1Video2Component1Component2AAMode1OffOffOff](https://usermanual.wiki/Digital-Device/DPU-4270/User-Guide-559275-Page-19.png)
![20BASIC OPERATION5. Basic Operation5.6 Layout Control5.6.1) SettingFollow these steps below to set Screen LayoutMenu:ྙPress the [ MENU].ྚMove to the Layout by using the [ඔ/ඖ]button.ྛMove to desired mode by pressing the [̵/̷] button.ྜPress the [ඖ] button to select the desiredmode.5.6.2) Layer DescriptionFull ScreenYou can view full screen by select this menuPIPYou can view large and small screen at the sametime by select this menuTwin ScreenYou can view 1:1 screen at the same time by5.6.3) PIP and Twin Screen ControlSelect desire Input Source by using the [ඔ/ඖ]/[̵/̷] button:Input Source SelectionྙSelect the changing picture's layer by using [̵/̷] button.ྚSelect the Source by using the SourceSelection Buttons.Selecting Speaker outSelect the changing picture's layer by using [ඔ/ඖ button.Swaping the sourcePress the [SWAP] button.Possible PIP ModeThis Chart describe possible PIP or Twin PICmode.6(/i$'''(//$1*790(180(18Move Select AdjustSEL MENUMENULayoutFull ScreenPIPTwin ScreenPicture2Picture1TV Video1 Video2 S-video Component1 Component2 AnalogRGB Digital RGBTVVideo1Video2S-VideoComponent1Component2Analog RGBDigital RGB](https://usermanual.wiki/Digital-Device/DPU-4270/User-Guide-559275-Page-20.png)
![21BASIC OPERATION5. Basic Operation5.6.3) PIP ModesWatching PIP ScreenPress the [PIP ON/OFF] button.Selecting PictureSelect the Picture1/Picture2 by pressing [̵/̷]buttons.Changing the sizePress the [SIZE] button and Adjust by pressing [ඔඖ] button.Change the screen2 positionPress the [POSITON] button and Adjust bypressing [ඔඖ] button.Twin PICPress the [Twin PIC] button.SwappingPress the [SWAP] button.Picture2Picture1Picture2Picture1Picture2Picture1Picture2Picture1Picture2 Picture1Picture1 Picture2](https://usermanual.wiki/Digital-Device/DPU-4270/User-Guide-559275-Page-21.png)
![23BASIC OPERATION5. Basic Operation5.8 Teletext (PAL Only)5.8.1) Teletext FeatureMost television channels provide writteninformation services via teletext. Informationprovided includes:---> Television programme times---> News bulletins and weather forecasts---> Sports results---> Travel informationThis information is divided into numberedpages (see diagram).Teletext information is often divided betweenseveral pages displayed in sequence, which canbe accessed by:---> Entering the page number---> Selecting a title in a list---> Selecting a coloured heading(FASTEXT system)You can display Teletext information at any timeon your television. For Teletext information tobe displayed correctly, channel reception mustbe stable; otherwise:---> Information may be missing---> Some pages may not be displayed.5.8.2) Displaying the Teletext InformationྙPress the [ ] button to enter the Teletext mode.ྚTo exit from the Teletext display, Press the [ ]button again.5.8.3) Selecting a Text PagesྙUsing the Number Buttons.Enter the three-digit page number given in thecontent by pressing the corresponding Numberbuttons. : The selected Page number appears atthe top of the screen and page appears after ashort time.ྚGFASTTEXT SystemIf the FASTEXT system is used by thebroadcasting company, the different topicscovered on a Teletext page are color-codedand can be selected by pressing the colouredbuttons on the remote control.Press the coloured button corresponding to thetopic that you wish to select; the available topicsare given on the status line.ྛDisplay the Previous or Next page.ྜGSub-page can scrolled by using the[ ]/[ ] buttons.ྜྷTo exit from the Teletext display, Press the[ ] button.Part ContentA Selected page number.B Broadcasting channel identity.C Current page number or search indications.D Date and time.EText.F Status information./ FASTEXT information.1111?i3,36:$3326,7,216,=(7:,13,&6&5((1=22067,//7(;73,&785(6281'67(5(2$'''(//$1*790(180(18](https://usermanual.wiki/Digital-Device/DPU-4270/User-Guide-559275-Page-23.png)
![24BASIC OPERATION5. Basic Operation5.8.4) Selecting Display OptionsIndex Page[ ]ྙYou can switch directly to the programmedpreview or the overview page of the station youare currently viewing by pressing the INDEXbutton.Page Hold [ ]ྙSome Teletext pages contain moreinformation than can be displayedsimultaneously and are therefore sub-dividedinto a series of two or more pages.ྚThe first sub-page of a series of four sub-pages will, for example, be indicated by a 1/4displayed on the top right hand side of the textpage.ྛThese sub-pages are automatically rotated,each page being displayed for a set time beforebeing replaced by the next page. If you need toread a certain page for longer than is allowed, orretain a particular sub page, then the HOLDbutton should be pressed. The HOLD symbolwill be displayed on the top left hand sideinstead of the page number and pageacquisition will be stopped.ྜNormal operation is restored by pressing theHOLD button again or by entering a new pagenumber.Subcode[ ]ྙFor Teletext information that is longer thanone page, it may take some time for theautomatically changing of sub-pages to reachthe sub-page you require. It is possible,however, to enter the sub-page you require andcontinue watching a normal TV program untilthe correct sub-page has been reached.ྚPress SUBCODE button.ྛEnter the desired sub-page number.ྜWhen the requested sub-page is reached, themain page number will be superimposed on thenormal TV picture.ྜྷPress the Teletext button to display the storedsub-page.Reveal [ ]ྙSome Teletext pages play a role in concealingpart of the display in, for example, a quiz pagewith concealed answers.ྚThe REVEL button release the concealed textas long as the Reveal button is not pressedagain.Size[ ]ྙBy pressing the SIZE button , either the tophalf or the buttom half or the bottom half of theText display can be expanded.ྚPress the Size button once and the top half ofthe display expanded.ྛPress again and the bottom half is expanded.ྜPress again and the display return to normalsize characters.Cancel[ ]ྙThe CANCEL button suppress the Text displayand restores the normal TV picture while thereceiver remains in the Teletext mode.ྚThis function allows you to request Teletextpages and alter Teletext controls withoutinterrupting a TV program.ྛIf a new page is requested while Teletext iscancelled, the page header is displayed in a boxon the screen for 5 seconds.i?11?i3,36:$3326,7,216,=(7:,13,&6&5((1=22067,//7(;73,&785(6281'67(5(2$'''(//$1*790(180(18](https://usermanual.wiki/Digital-Device/DPU-4270/User-Guide-559275-Page-24.png)
![25BASIC OPERATION5. Basic Operation5.9 Contents Blocking(V-Chip): NTSC Only5.9.1) Contents BlockingFollow these steps for setting the ContentsBlocking:ྙPress the [MENU] button.ྚSelect the [Setting] mode by using the [ඔVඖ] button.ྛMove the [Content Blocking] mode by usingthe [̵V̷] button.ྜSelect the [Content Blocking] mode bypressing the [ඖ] button.ྜྷStep1. Input Password.ྞStep2. Setting the Movie Blocking Grade.ྟStep3. Setting the TV Blocking Grade.ྠPress the [MENU] button to exit the ContentBlocking Controls.5.9.2) Input PasswordA. InputYou have to input the password for the settingthe Contents Blocking Function.ྙMove the [Enter] mode by using the [̵V̷]button.ྚSelect the [Enter] mode by pressing the [ඖ]button.ྛInput the Password by using the cursorbuttons.ඔVඖ: Move the position of password number.̵V̷ ]: Increase or Decrease number.ྜPress the [SEL] button to enter the sub menu.B. ChangeྙMove the [Change] mode by using the [̵V̷]button.ྚSelect the [Change] mode by pressing the [ඖ] button.ྛChange the Password by using the cursorbuttons.ྜPress the [SEL] button to change password.C. ClearResetting the password to default number.Default password is 000000.ྙMove the [Clear] mode by using the [̵V̷]button.ྚSelect the [Clear] mode by pressing the [ඖ]button.Move Select AdjustSEL MENUMENUPictureInput SourceContent BlockingPanelSettingMove Select AdjustSEL MENUMENUpasswordenterchangeclear1234567890000000 OKAAAA6(/i$'''(//$1*790(180(18](https://usermanual.wiki/Digital-Device/DPU-4270/User-Guide-559275-Page-25.png)
![Move Select AdjustSEL MENUMENUMove Select AdjustSEL MENUMENU26BASIC OPERATION5. Basic Operation5.9.3) Movie BlockingྙGInput the password.ྚGPress the [Menu] button to exit the[Password] Mode.ྛSelect the Movie blocking mode by the using[ඔVඖ] button.ྜSet the Movie Blocking categories by usingthe cursor buttons.G̵V̷G: Move the desired blocking category.[SEL] : Lock or Unlock the category.ྜྷPress the [Menu] button to exit the [Movieblocking] Mode.[Note] Contents Blocking is automatically blockcertain categories that are "more restrictive". Forexample, if you select G category, all categorieswill automatically be blocked.MPAA(Motion Picture Association of America)Guide Line.5.9.4 ) TV BlockingྙInput the password.ྚGPress the [Menu] button to exitthe [Password] Mode.ྛSelect the [TV blocking] mode by the using[ඔVඖ]button.ྜSet the TV blocking categories by using thecursor buttons.[ඔVඖ]̵V̷G: Move the desired blocking category.SEL : Lock or Unlock the category.ྜྷPress the [Menu] button to exit the [TVblocking] Mode.Category DescriptonGGeneral audience. (on restrictions)PG Parental guidance suggestedPG-13 Parents strongly cautionedRRestricted.NC-17 No children under age 17XAdult only.NR Not ratedTV Guide Line Additional OptionY: Young Children FV: Fantasy violenceY7: Children 7 and over D: Sexually Suggestive DialogG: General audience L: Adult LanguagePG: Parental guidance S: Sexual situation14: Viewers 14 and over V: ViolenceMA: Mature audienceGmovie blocking1234567890GGGGPGPGGGGGGGGGtv blocking1234567890GGGGGGGGGGGGGGGGGGGGGGGGGGGGGGGGGGGGGGGGGGGGGGGGGG](https://usermanual.wiki/Digital-Device/DPU-4270/User-Guide-559275-Page-26.png)